Mobile Appliance PNX-5 Protable Navigation with Bluetooth User Manual 20080508 PND 1
Mobile Appliance, Inc. Protable Navigation with Bluetooth 20080508 PND 1
Contents
- 1. User manual 1 of 2
- 2. User manual 2 of 2
User manual 1 of 2
2
page Preface
001
3
page
Preface
Contents
001
Preface
001 Contents ................................................................................2
002 Warning Message
003 Before Use
004 How to read this manual
Common
101 Name and Function of each Component
102 Turning power ON/OFF
103 Placing on/off the cradle
104 Inserting/removing the SD card
105 Connect iPod
106 Using outside the vehicle
107 Map screen of current location (not during
route guide)
108 Using in portrait mode
109 Change map scale
110 Change map display method
111 Control AV source on current map screen
112 Map screen of current location (during route
guide)
113 Guide near guide point (during route guide)
114 Map screen displaying desired location
115 Display Top menu
116 Tour rout and drive route
Where
201 Display Search menu
202 Search various locations
203 Search location by address
204 Address input selection screen details
205 Address information input screen details
206 Start route guide setting the searched
location as Final Destination
207 Start route guide setting the searched
location as Intermediate Destination
208 Check the searched location on map
209 Add searched location to Favorites
210 Search point of interest
211 Search location by point of interest type
212 Search from Favorites
213 Check Favorite location on map
214 Edit Favorite location information
215 Delete Favorites
216 Search from previously visited destination
217 Edit previously visited destination
218 Search by coordinates
219 Search from map
220 Search for rent-a-car return
221 Go home
222 Change/Add home
Route
301 Display Route menu
302 Set round trip tour
303 View tour route
304 Display destination information
305 Check destination on the map
306 Individually delete destination
307 Change the order of destinations
308 Delete tour route
309 Add all destination to Favorites
310 Display entire drive route on map
311 Display drive route details
312 Select to set the drive route search condition
313 Set drive route type
314 Set average speed
315 Display route guide menu
316 Avoid traffic jam
317 Skip next destination
318 Display next destination information
319 Search alternate route
320 Cancel route guide
321 Drive in demo mode
A/V
401 Display Source menu
402 Display SD card's top category
403 Control while playing music in SD card
404 Select by title and play
405 Select by album title and play
406 Select by artist name and play
407 Play from Playlist
408 Select by composer and play
409 Select by genre and play
410 View still images
411 View video
412 Control while playing video
413 Display iPod's top category
414 Play audiobook
415 Play podcast
416 Display iPod video library
417 Play video on iPod
418 Control while playing video with iPod
419 Play music in Bluetooth device
420 Play DVD
421 Control while playing DVD
422 Disc control buttons
423 View digital TV
424 Control digital TV
425 Scan and preset digital TV channels
426 Tune digital TV from program list
427 Tune digital TV from preset list
428 Tune digital TV by channel seek
429 View digital TV program guide
430 Tune digital TV by channel number
431 Display digital TV text information

4
page Preface 5
page
Preface
001
Tool
501 Display Tools menu
502 Set GPS
503 View GPS satellite information
504 Reset reception
505 Display travel information
506 Display TMC information
507 Select TMC Station to receive
508 Display Bluetooth menu
509 Display Bluetooth setup menu
510 Set general Bluetooth settings
511 Naming Bluetooth device
512 Set passkey to Bluetooth device
513 Set SMS
514 Set hands free
515 Set auto answer
516 Set inquiry mode
517 Display connection history
518 Make call from phonebook
519 Make a call from call history
520 Make a call by dialing
521 Adjust receiver volume during conversation
522 Display SMS menu
523 Send short message
524 Manually download unread short messages
525 Read received message
526 Read sent message
527 Receive buddy message
528 Send buddy message
529 Delete buddy message
Setup
601 Display Setup menu
602 Display system setup menu
603 Set volume
604 Set various functions
605 Adjust touch position
606 Set rear view camera
607 Set language
608 Set voice volume
609 Set landscape/portrait mode
610 Set demo mode
611 Display version information
612 Set the map display method
613 Display AV setup menu
614 Set equalizer
615 Set image quality
616 Select video source device
617 Display device information
618 Set iPod
Appendix
701 General Information
702 Remote Controller
703 Removing the Built-in Battery to Dispose
704 Limited warranty and after service
705 Troubleshooting
706 Specifications

6
page Preface 7
page
Preface
002
002
Warning Message
For safe usage please observe the following !!!
READ THIS MANUAL FIRST
Read this manual carefully before starting to
operate the Kenwood Car Navigation System and
follow the manual's instructions. Kenwood are
not liable for problems or accidents resulting from
failure to observe the instructions in this manual.
OBSERVE LOCAL TRAFFIC SIGNS AND
REGULATIONS
Always observe the local traffic signs and
regulations whilst driving and check them against
the system's instructions.
Due to frequent changes in local signs and
regulations, the traffic sign and regulation data on
the Map DVD-ROM may be outdated.
Furthermore the Map DVD-ROM cannot reckon
with certain conditions such as traffic density at
certain times of the day, (temporary) road closures
due to construction work, weather conditions
or special events taking place. Therefore always
obey the local traffic signs and regulations rather
than the system's instructions. Failure to do so
may place you in illegal, unsafe or dangerous
situations.
DRIVE SAFELY
Before following the system's guidance
instructions, such as changes in direction, always
check first whether it is safe to do so given the
current traffic conditions. Then follow the given
instructions, but make sure you do so in a safe
manner.
VOLUME LEVEL
Keep the system's volume at a low enough level
to be able to hear outside noises whilst driving.
If you can no longer hear outside noises, you
may be unable to react adequately to the traffic
situation. This may cause accidents.
NEVER DISASSEMBLE OR ALTER
Never try to disassemble or alter the navigation
equipment. Any attempt to do so may cause
accidents, fire or electric shock.
SMALL ARTICLES
Keep small articles (like screws or batteries)
out of the reach of children. If any such object
is accidentally swallowed, consult a doctor
immediately.
Information in this document is subject to change
without notice.
IMPORTANT SAFETY INSTRUCTIONS
2 CAUTION
Read this page carefully to ensure safe
operation.
Read Instructions – All the safety and
operating instructions should be read before
the product is operated.
Retain Instructions – The safety and
operating instructions should be retained for
future reference.
Heed Warnings – All warnings on the product
and in the operating instructions should be
adhered to.
Follow Instructions – All operating and use
instructions should be followed.
2 WARNING
• Do not use headphones during riding/driving
a vehicle or walking.
Otherwise, a traffic accident may result. Never
use headphones when you ride a bicycle or
driving an automobile or motorbike. If this unit
is used during walking, the ambient sounds will
be cut and you may have difficulties in hearing
various warning sounds.
• Do not operate this unit during riding or
driving a vehicle.
Do not operate this unit when you drive or ride
an automobile, motorbike or bicycle.
Otherwise, a traffic accident may result. Be
sure to stop the vehicle in a safe place before
operating this unit.
• Do not stare at the display screen during
riding or driving a vehicle.
Otherwise, a traffic accident may result.
• Always use the designated AC adapter.
(KSUFB05000100W1UV-1)
Otherwise, a fire or electric shock may result.
• Always plug the AC adapter into an outlet
supplying the specified voltage.
Otherwise, a fire or electric shock may result.
Precautions:
• Do not insert or drop a metallic object or an easily
flammable object inside this unit through an
opening. Otherwise, a fire hazard or battery leak
may result.
• When connecting ancillary equipment to this unit,
read the instruction for the equipment, switch this
unit off and connect the equipment as instructed.
Also be sure to use the specified cord for the
connection. Inappropriate connection, use of a
nonspecified cord or extension of the cord may
cause heat generation and a burn or other injuries.
Do not use or place the product in the
following locations:
• A place with high humidity, such as in a bathroom
or shower room. Also do not use this unit in a
place subject to water splashes. Otherwise, a fire
hazard or battery leak may result.
• Do not approach this unit to heating equipment
(a stove, iron, etc.). Otherwise, a fire hazard or
battery leak may result.
• Do not place this unit in a place subject to soot
or vapor, for example in a kitchen or near an
air humidifier, or in a place subject to excessive
humidity or dust. Otherwise, a fire hazard or
battery leak may result.
• Do not leave this unit in a place where the
temperature may rise abnormally high, for
example in a closed automobile or under direct
sunlight. Otherwise, this unit or its parts may
deteriorate or a fire hazard or battery leak may
result.
• Do not use this unit in aircraft, airport, hospitals
and any other locations where there are
restrictions on the use of electronic devices.

8
page Preface 9
page
Preface
002
Notes on AC adapter
• Do not plug or unplug the AC adapter with a wet
hand. Otherwise, an electric shock may result.
• In case a thunder begins to rumble, do not touch
the AC adapter or the power plug.
Otherwise, an electric shock may result.
• Clean the power plug and AC adapter plug
periodically. If dirt is attached on these plugs,
deterioration of insulation due to moisture may
result in a fire or electric shock. To clean the power
plug, unplug it from the power outlet and wipe
dirty with a dry cloth.
• In case of an abnormality with this unit, unplug
the AC adapter. In case of water or a foreign object
penetrates inside this unit or it produces smoke,
abnormal odour or noise, immediately switch
off this unit and unplug the AC adapter from the
power outlet.
Continuing the use of the equipment may result in
a fire or electric shock. After the smoke, abnormal
odour or noise disappears, consult your dealer or a
Kenwood service agent for servicing.
• If you drop the AC adapter or this unit, unplug the
AC adapter. If equipment is dropped or the cover
or case is damaged, switch off this unit, unplug
the AC adapter from the power outlet. Continuing
the use of the equipment may result in a fire or
electric shock.
• While using the AC adapter, it may become
hot. Do not cover or wrap the AC adapter with
cloth or leave it in the carry case while using it.
Doing so will result in fire due to excessive heat
accumulating in the adapter.
• Do not open the case of or modify the AC adapter
or this unit. These incorporate high voltage parts
inside and opening or modifying them may result
in a fire or electric shock.
Notes on using through headphones:
• Do not start listening with too high a volume.
Otherwise, sudden output of a highvolume sound
may cause hearing failure, etc.
• Do not listen to the audio with an extremely high
volume for long hours. Otherwise, your hearing
ability may be damaged.
• Read the instruction manual of your headphones
for details.
Handling
• Do not apply an excessive force to the display
part. Otherwise, it may be damaged.
• Avoid storing this unit in a bag together with a
hard object. Otherwise, this unit may be damaged
when the bag is pushed.
• Do not expose this unit to an insecticide or other
volatile substance or bring this unit in extended
contact with a rubber or vinyl material. Otherwise,
discoloration or peeling of the surface finish may
result.
• Do not put this unit in a pocket of trousers.
Otherwise, it may be damaged due to a strong
impact when you sit down, etc.
• Protect this unit against sweat and moisture.
Do not use this unit by putting it in a breast
pocket for long hours in the summer or during
exercise. Otherwise, penetration of moisture or
sweat may cause malfunction or failure.
Operating conditions
• Operational temperature range : -20°C – 70°C
(without condensation)
• Battery chargeable temperature range : 0°C – 45°C
Notes on navigation system
• The unit is designed to provide you with route
suggestions. It does not reflect road closures
or road conditions, traffic congestion, weather
conditions, or other factors that may affect safety
or timing while driving.
• Use the unit only as a navigational aid. Do not
attempt to use the unit for any purpose requiring
precise measurement of direction, distance,
location, or topography.
• GPS may not operated properly under some
circumstances such as moving through the tunnel,
moving between high-rise buildings, and high-rise
trees.
Notes on the built-in battery
• For the replacement of the built-in battery, contact
your dealer.
• The battery built into this unit discharges
spontaneously even when this unit is not used.
This means that the built-in battery may be
exhausted completely when this unit is left
unused for a long period. If this happens, recharge
the battery before using this unit.
• The battery recharging time is variable depending
on the condition of the battery and ambient
temperature.
• The available playback time reduces when this
unit is used under low temperatures.
• The built-in battery can be recharged for about
500 times. (This is a reference value and is not
guaranteed.)
• The built-in battery is a consumable part, and
the available playback time reduces gradually
after repeated use. If the available playback
time becomes very short even after the battery
has been recharged fully, the battery may be
degraded; replace it with new one.
• Kenwood will not assume any liabilities for the
alteration or loss of data caused due to complete
discharging of the built-in battery.
• The built-in battery is a lithium ion battery.
It is free from the memory effect of Ni-Cd and
nickel-hydrogen batteries, with which the capacity
decreases if the battery is charged or discharged
incompletely for several times.
The built-in battery therefore accepts additional
charging before it has exhausted completely.
• Do not put, store or leave your product in or near
a heat source, in a high temperature location, in
strong direct sunlight in a microwave oven or in
a pressurized container, and do not expose it to
temperatures over 60°C.
• Failure to follow these guidelines may cause the
Lithium-Ion battery to leak acid, become hot,
explode or ignite and cause injury and/or damage.
• Do not pierce, open or disassemble the battery.
• If the battery leaks and you come into contact
with the leaked fluids, rinse thoroughly with water
and seek medical attention immediately.
• Dispose of the battery according to the law of the
country to dispose of.
2 Caution on installation
• Make sure to ground the unit to a negative 12V
DC power supply.
• Do not install the unit in a spot exposed to direct
sunlight or excessive heat or humidity. Also avoid
places with too much dust or the possibility of
water splashing.
• Do not use your own screws. Use only the screws
provided. If you use the wrong screws, you could
damage the unit.
• If the fuse blows, first make sure the wires aren’t
touching to cause a short circuit, then replace the
old fuse with one with the same rating.
• Do not press hard on the panel surface when
installing the unit to the vehicle. Otherwise scars,
damage, or failure may result.
• Reception may drop if there are metal objects near
the Bluetooth antenna.
• Comply with local regulations when installing
the unit. Installing an object or material on the
windshield or side or rear windows is prohibited
depending on countries and areas. Kenwood
bears no responsibility for any fines, penalties or
damage that may be incurred by disregarding this
notice.
10
page Preface 11
page
Preface
003
003
Before Use
Start the car engine before use
This mobile navigation system can be used when
the ignition key is turned to ON or ACC. However,
to preserve the battery, it should be used with
the engine running whenever possible. Using the
navigation system for a long time with the engine
switched off can cause the battery to run down.
Operating whilst driving
The GPS voice navigation system displays the
switches disabled during driving in fainter colors.
These switches stop functioning and no message
is displayed.
Precautions for handling precision machines
Be careful of the surrounding temperature. Using
the mobile navigation system at extremely high
or low temperatures can lead to malfunction or
damage.
Also note that the unit can be damaged by strong
vibration or by metal objects or water getting
inside.
It is recommended that the battery be charged
using the supplied AC adapter for 8 hours before
using the system.
Global Positioning System
The Global Positioning System (GPS) is a satellite-
based system that provides location and timing
information around the globe. GPS is operated
and controlled under the sole responsibility
of the Government of the United States of
America which is responsible for its availability
and accuracy. Any changes in GPS availability
and accuracy, or in environmental conditions,
may impact the operation of your PNX-7/PNX-
5. Kenwood cannot accept any liability for the
availability and accuracy of GPS.
Use with Care
Use of PNX-7/PNX-5 for navigation still means that
you need to drive with due care and attention.
Aircraft and Hospitals
Use of devices with an antenna is prohibited on
most aircraft, in many hospitals and in many other
locations. PNX-7/PNX-5 must not be used in these
environments.
Storage and maintenance of SD card
Before storage:
• Be sure to put the SD card in the case before
storing it.
• Do not leave the SD card in a place with
extremely high temperature (under direct
sunlight, etc.) or extremely high humidity.
When the SD card gets dirty.
• Wipe lightly with a soft cloth, etc.
• Do not use lacquer thinner, benzine or alcohol.
Other cautions:
• Do not open or modify the SD card.
• Do not peel off the label from the SD card.
• Do not attach a label or sticker on the SD card.
• Do not touch the metallic terminals on the
backside with a finger or metallic object.
Note on disposal/transfer of SD card:
The “Format” and “Delete” functions of this unit
or a PC simply change the file management
information and do not erase the data in the
SD card completely. Before disposing of or
transferring the SD card, it is recommended to
destroy it physically or erase the internal data
completely using commercially available PC data
erasing software.
It is the user’s responsibility to manage the data in
the SD card properly.
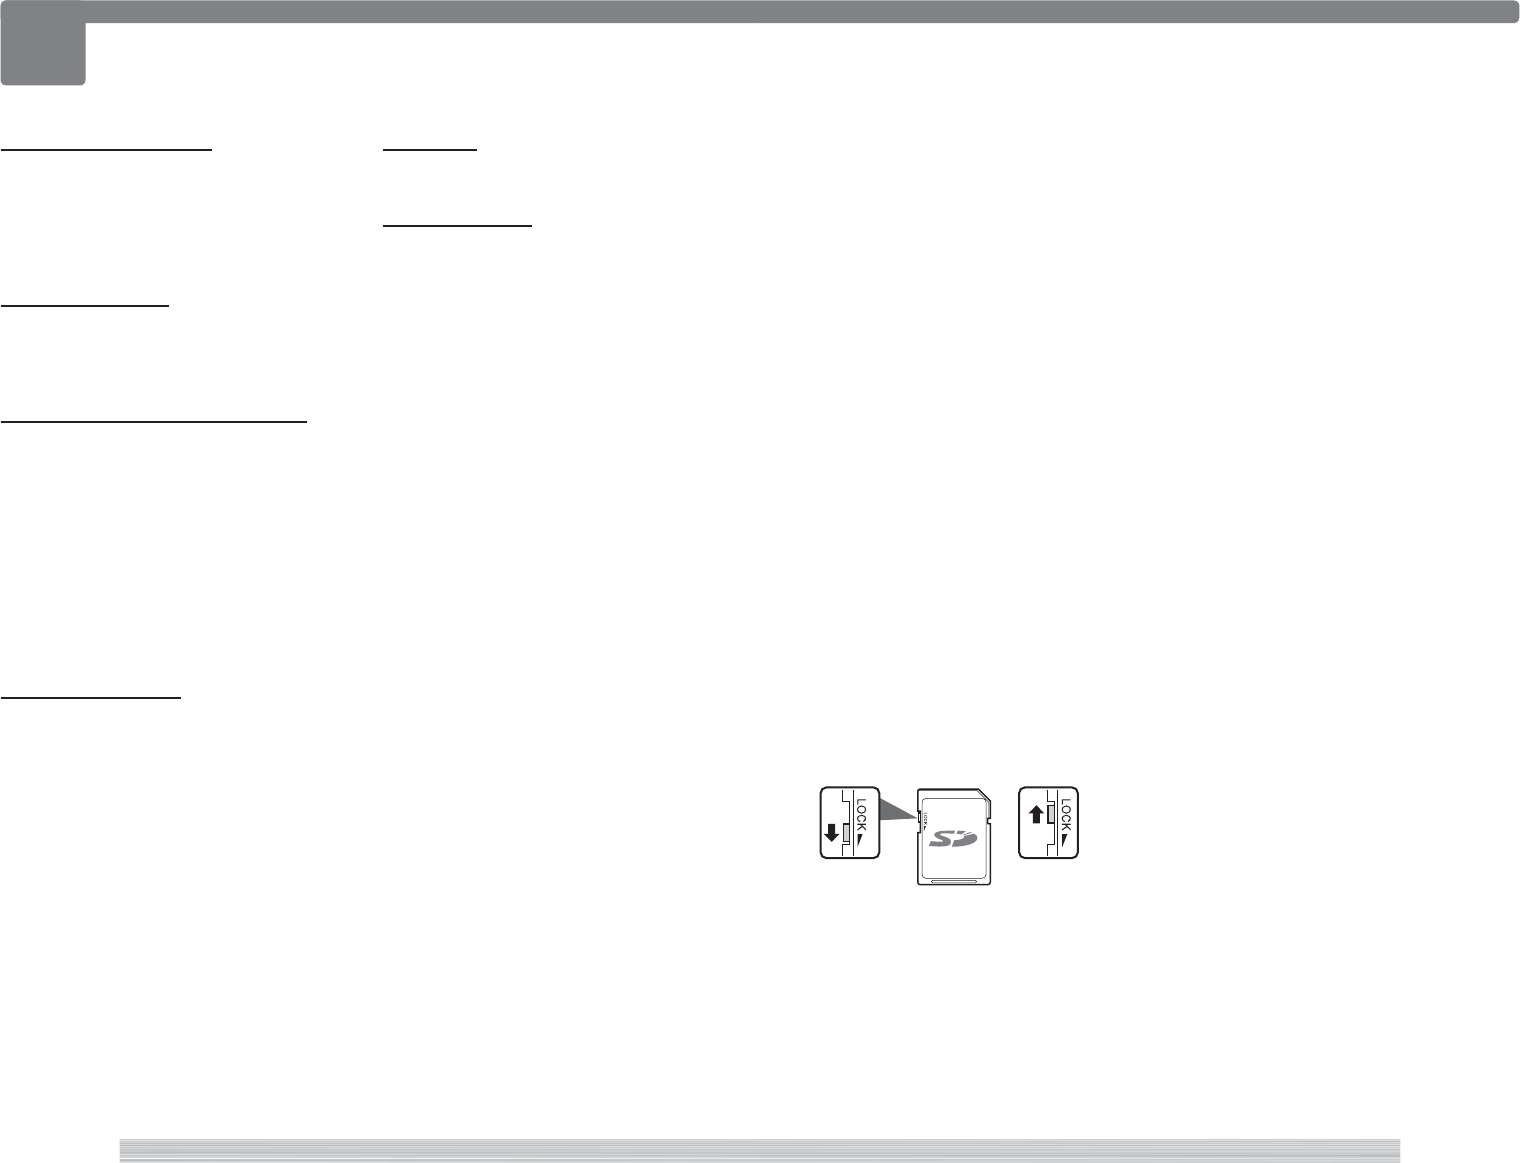
SD card (LOCK switch):
The SD card has a switch for protecting the card
against data write. Set the switch to the LOCK
position to protect the data in the card. Set the
switch to the unlock position before recording,
transferring, editing or erasing the data.
12
page Preface 13
page
Preface
004
004
How to read this manual
note
• The screens and examples are created for explanatory purpose. The screen may be different from the actual
screen and the examples may not be actually possible.
• The "TITLE TEXT" of the screens in this manual are the name of the actual screens.
The notations used in this manual are described below.
84
page Where
219
Preparation
Have the Search menu displayed.
115 201
Operation
1
Select [From Map].
2
Scroll the map and place the cursor
on the desired location.
Complete
note
• If [From Map] does not appear in
1
, select [ ].
• You can also set the searched location as the destination or add it to Favorites.
See 206 to set the searched location as the Final destination (Short tour) or see 207 to set as Destination
(Round trip tour) or Intermediate destination (Short tour).
Or, see 209 to add to Favorites.
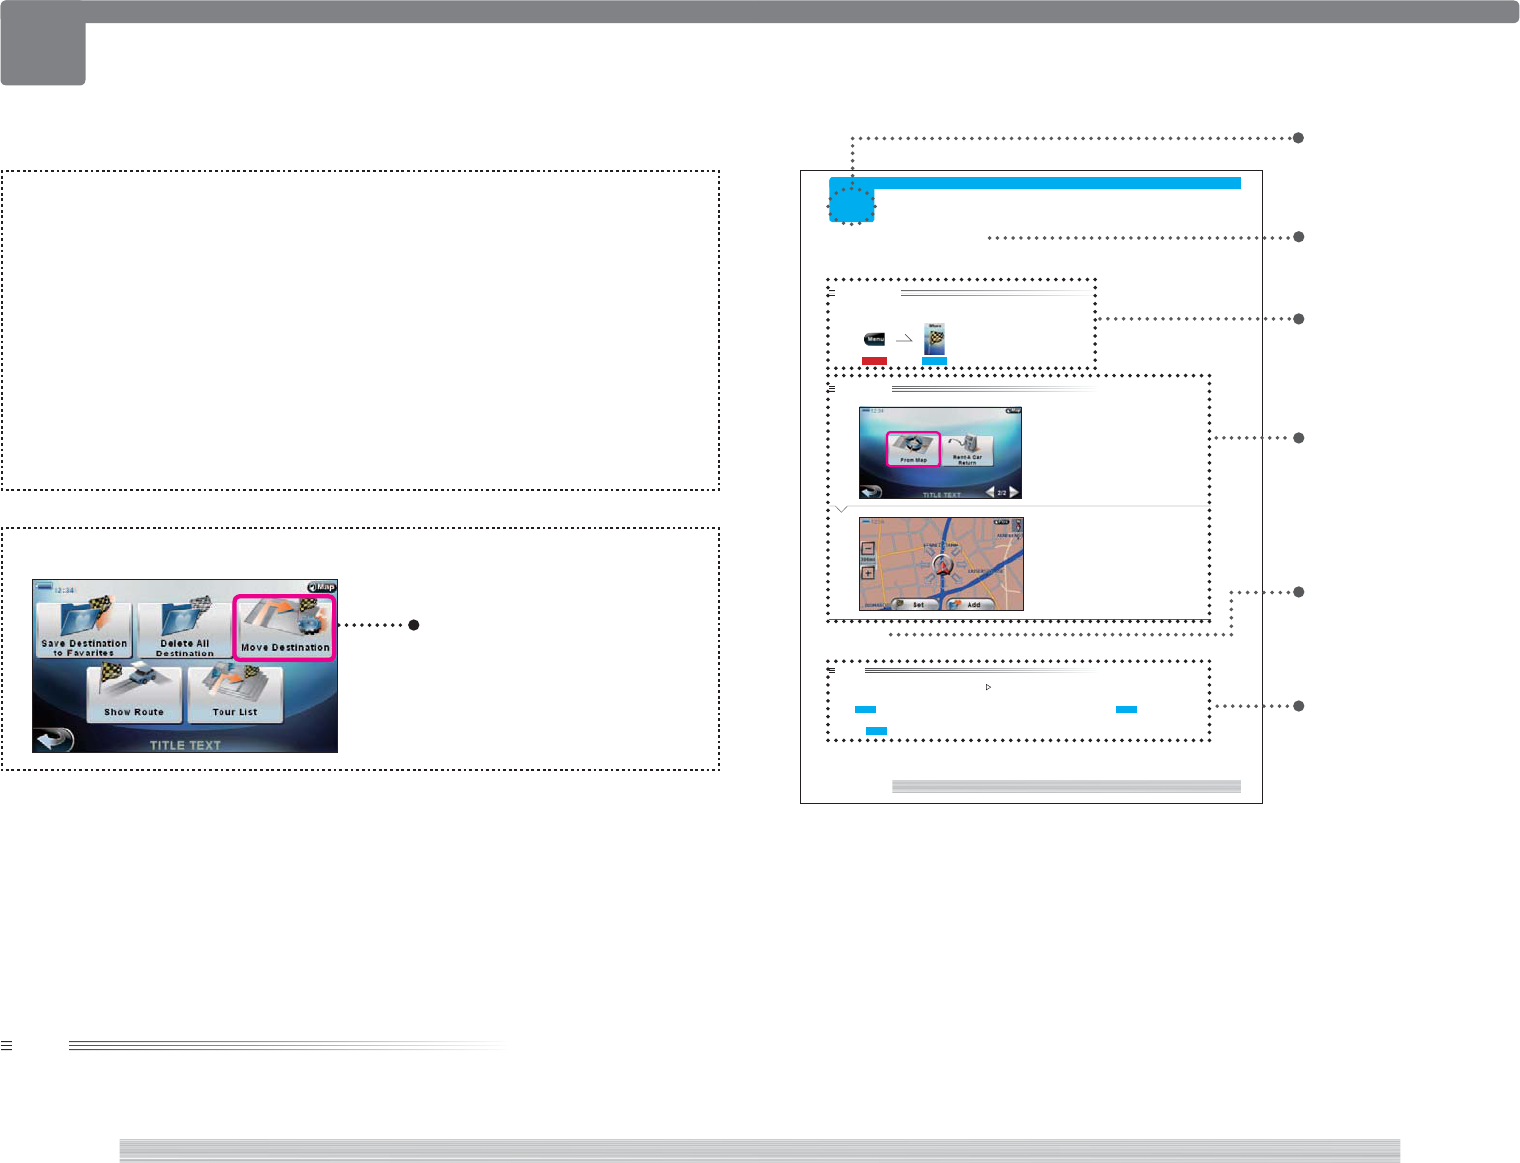
Search from map
Searching for destination from a map. Leading sentence
Short description of the
function.
Item No.
All references in this manual are
made with this item number.
Preparation
Operation that must be
performed before starting the
described operation.
Complete/Next Page
Next Page
Continues on next page.
Complete
Operation is complete.
Precautions
caution
Describes the precautions you
should take when performing
the operation.
note
Provides supplementary
description and restrictions.
Organization of this manual
This is a reference manual describing all functions and operations of the PORTABLE
NAVIGATION SYSTEM PNX-7/PNX-5 (hereafter referred to as this unit) and is organized
according to the functions of this unit.
0×× : Describes the precautions concerning this unit.
1×× : Describes the entire unit.
2×× : Describes the Search menu finding out the location to set as the destination.
3×× : Describes the Route menu editing the tour route.
4×× : Describes the Source menu switching the source to play.
5×× : Describes the Tool menu setting and operating useful functions.
6×× : Describes the Setting menu setting system and AV.
7×× : Describes the related reference materials.
Touch Panel Operation
Touch this button.
Indicated as "Select [XX]" in this
manual.
Operation
Describes the operation.
14
page Common
101
15
page
Common
101
2
8
1
7
6
5
3
4
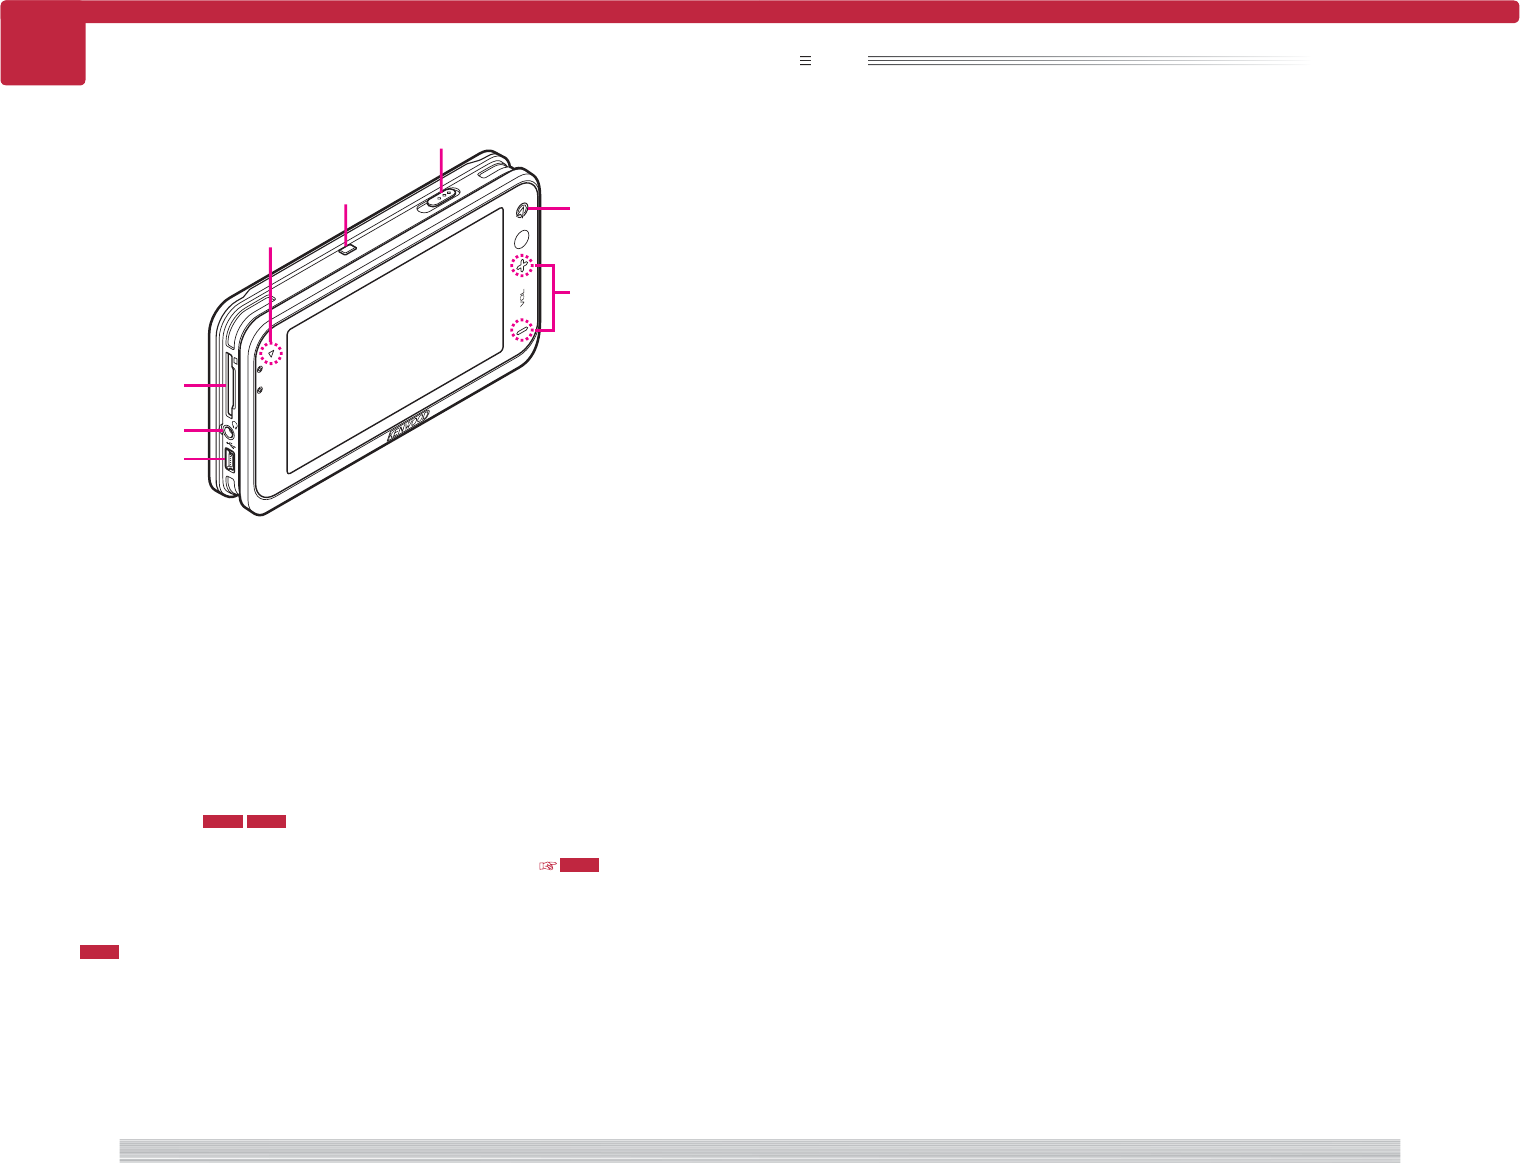
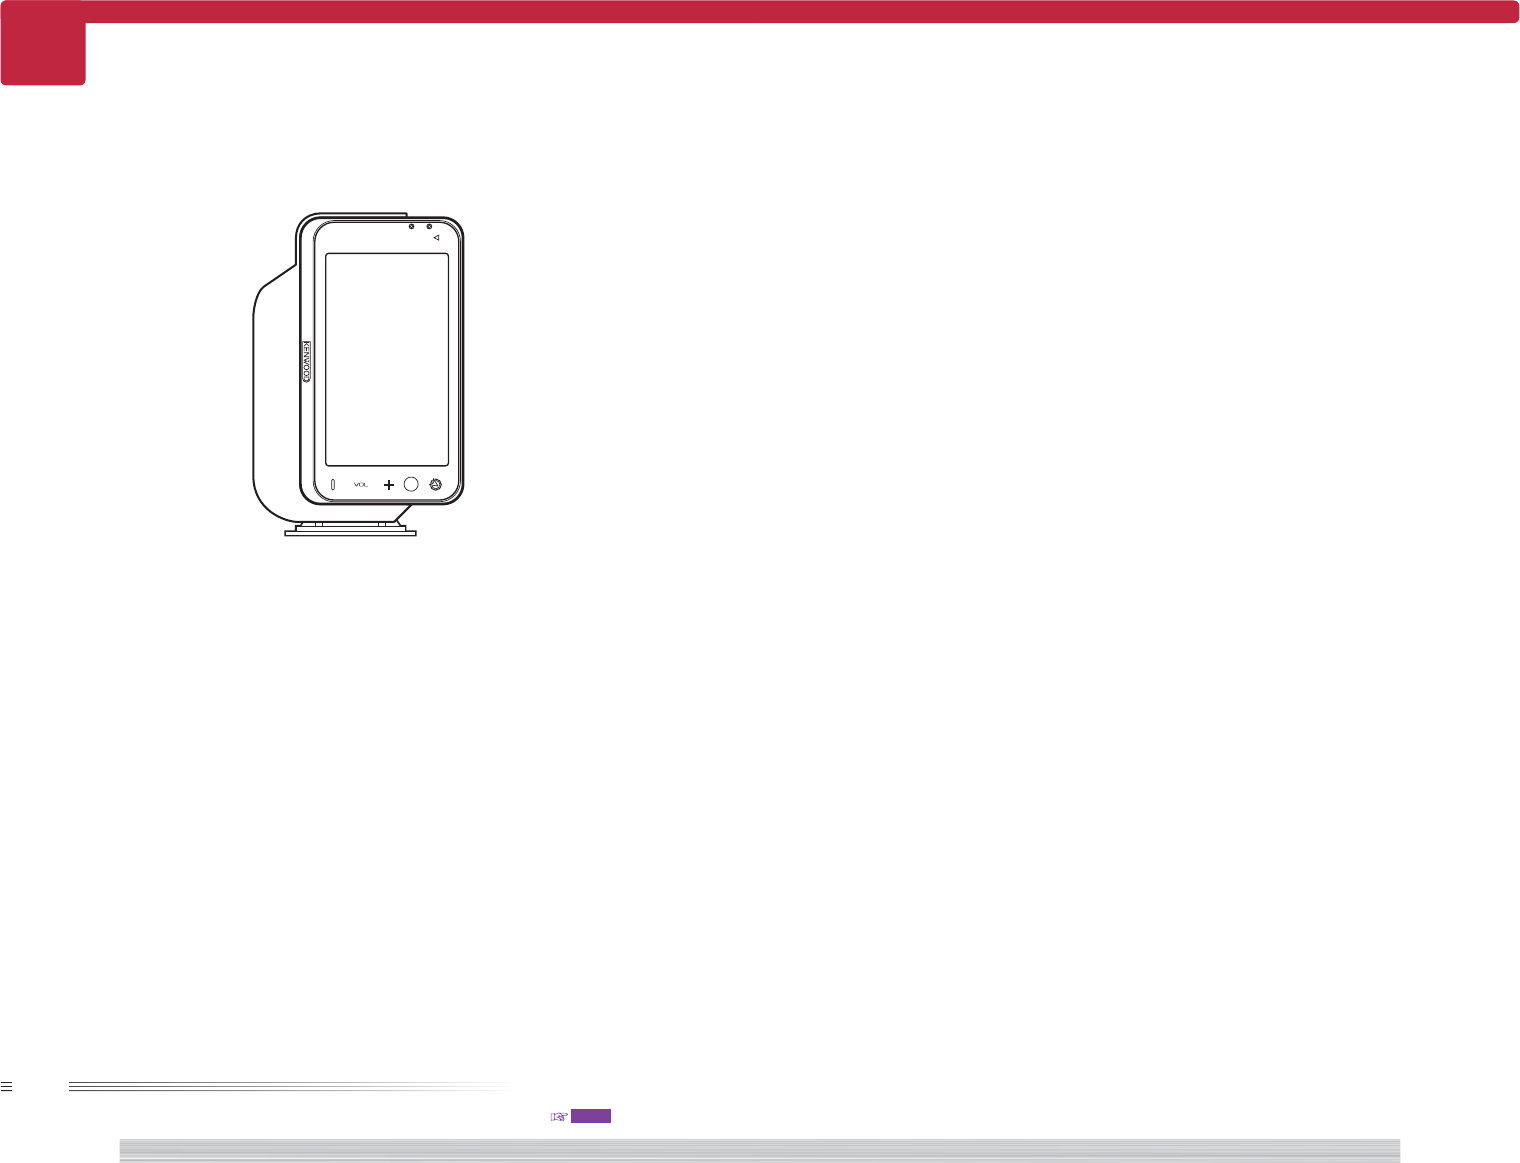
Name and Function of each Component
1 Power lamp
Lights red when the power is on and
goes off during standby and when the
power is off. Lights orange while charging
regardless of the power status.
2 Power switch
Turns On/Off the power of this device.
Also locks the keys and touch panel.
3 Position key
The current map screen 107 112 is
displayed when pressed while any other
screen is displayed.
You can listen to the last voice guide once
more by pressing when receiving route
guide while displaying the current map
screen 112 .
Press for at least 2 seconds to erase the
screen. Press any key or touch the screen
to redisplay the screen.
4 + key / – key
Press to adjust the volume of the built-in
speaker and headphone.
Keep pressing to continuously change the
volume.
5 USB terminal
Connect to a PC.
6 Headphone terminal
Connect to a headphone.
7 SD card slot
Insert an SD card. 104
8 Reset button
Press to reset all settings of this device.
note
• Volume adjustment with the +key/–key also affects the hands free unit receiver volume and car audio
playback volume.

16
page Common 17
page
Common
102
102
Turning power ON/OFF
■ Turning ON the power
Slide the power switch to the left (POWER) and
release.
The power of this device turns ON.
This device has a resume function which dis-
plays the last displayed screen when the power
is turned on.
■ Entering standby mode
Slide the power switch to the left (POWER) and
release while this device is in normal mode.
The screen goes blank and standby mode is
entered.
The power lamp remains lit.
■ Turning OFF the power
Slide the power switch to the left (POWER),
hold for approximately 2 seconds and then
release while this device is in normal mode or
standby mode.
The screen goes blank and the power of this
device turns OFF.
The power lamp turns off.
■ Locking
Slide the power switch to the right (HOLD).
This device is locked and all key and touch
screen operations are disabled. Slide the power
switch to the left to unlock.
caution
• Unplug the cigarette lighter plug when you turn off the ignition in order to prevent the battery from
running out.
note
• This unit goes into standby mode when all of the following conditions are satisfied.
– There is no external power.
– Battery save mode is on. 604
– AV source is not playing.
– No operation is performed for a prescribed interval.
18
page Common 19
page
Common
103
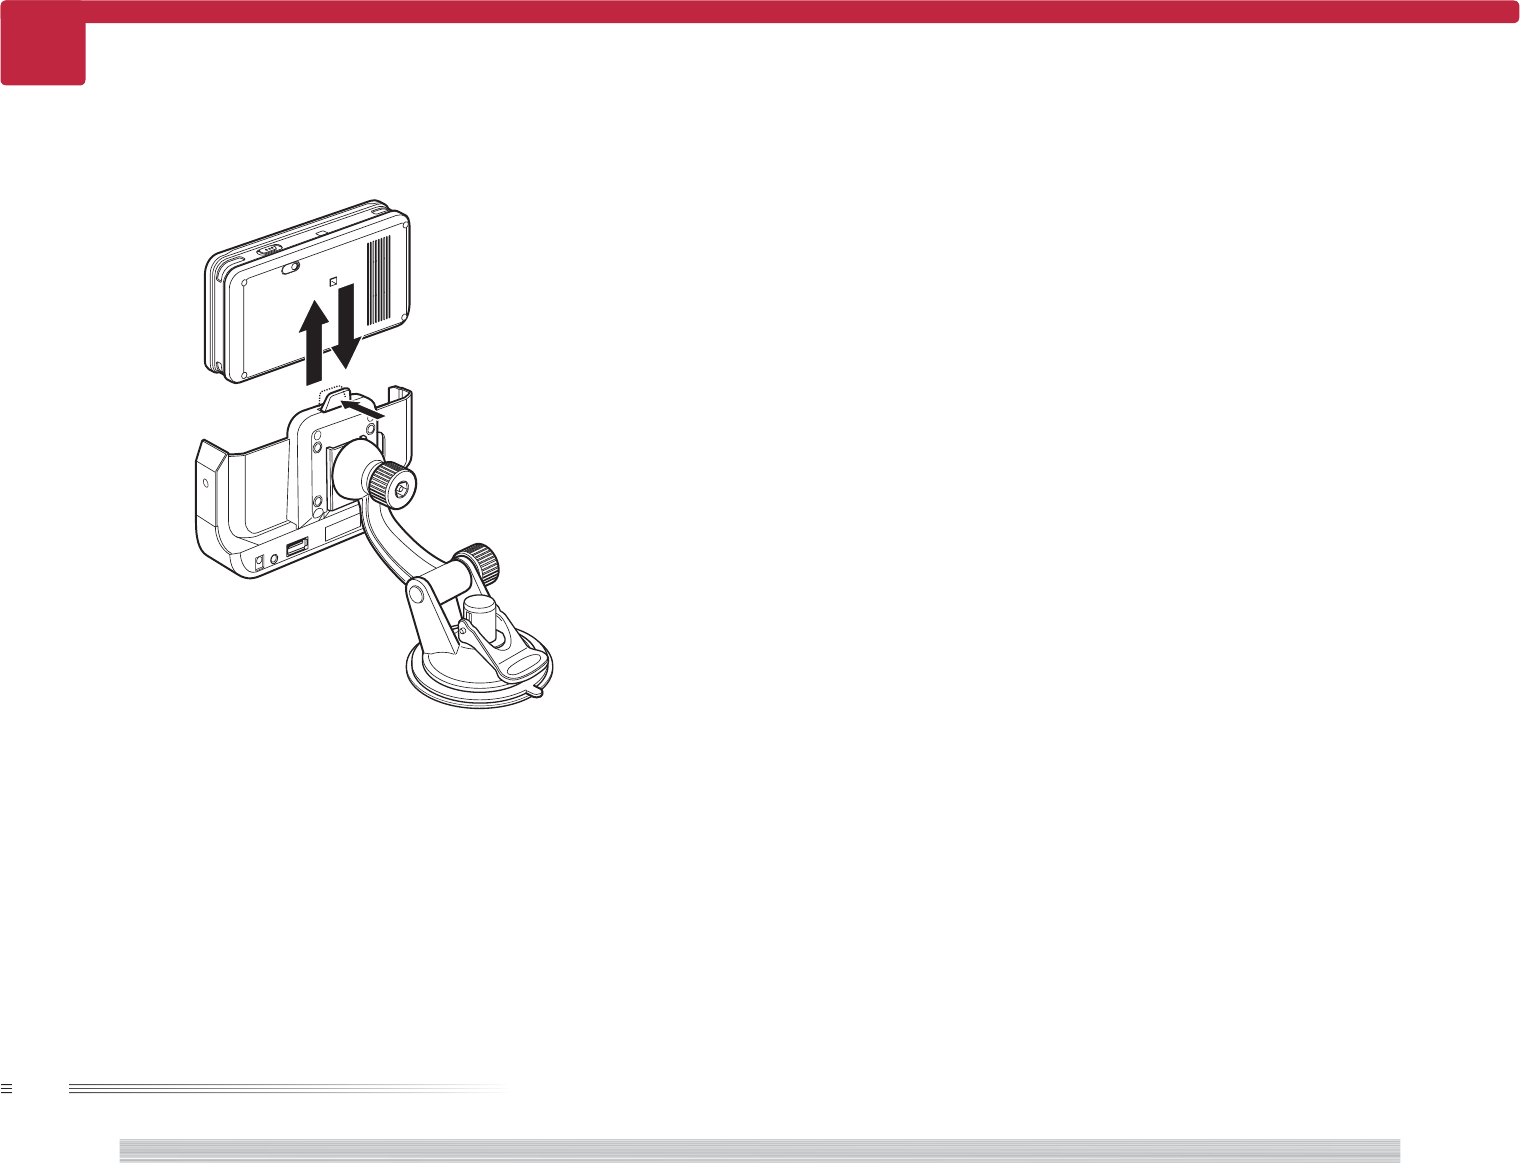
103
Placing on/off the cradle
You can use external power and source such as iPod by placing this device in the accessory
cradle.
note
• A B cradle option is necessary in order to play external video source such as DVD player.
20
page Common 21
page
Common
104
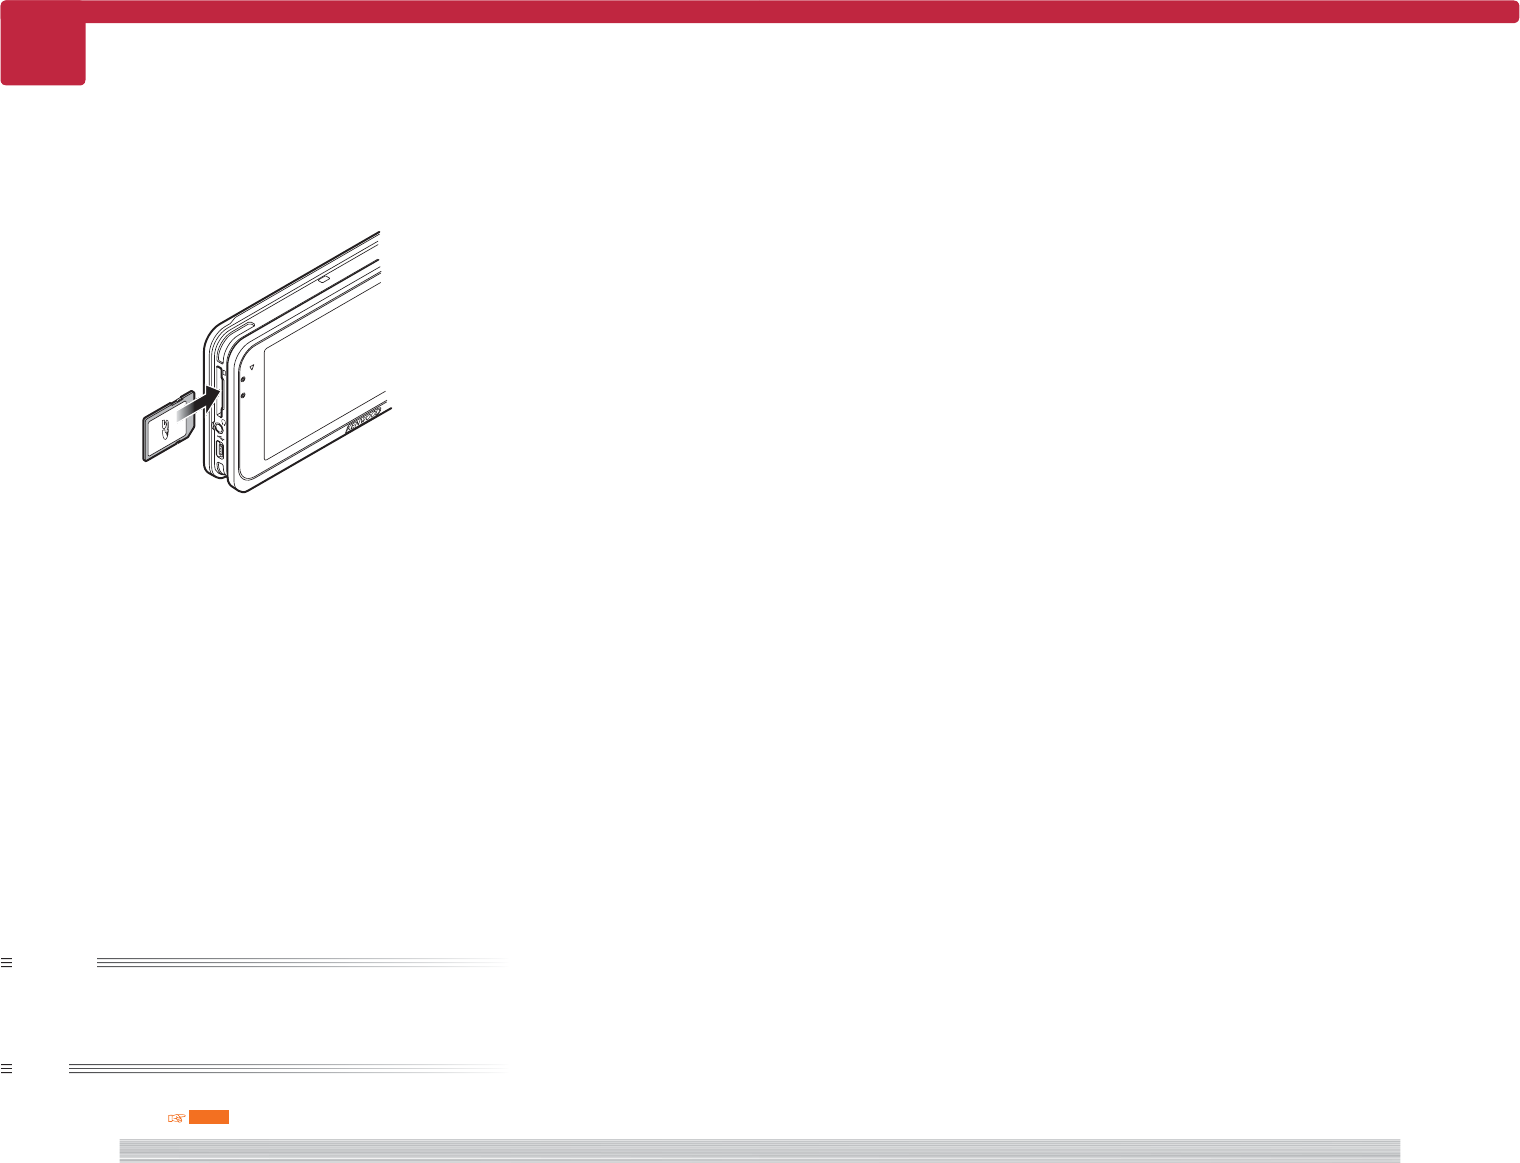
104
Inserting/removing the SD card
Match the orientation of the SD card with the diagram and insert.
Hold the end of the SD card and pull out to remove.
caution
• Insert firmly until it stops. However, do not exert excessive force when inserting. Otherwise, you may
damage the SD card or the unit itself.
note
• When you insert an SD card, a message to confirm playback appears. Select [YES] to display the top category
screen of the SD card. 402
22
page Common 23
page
Common
105
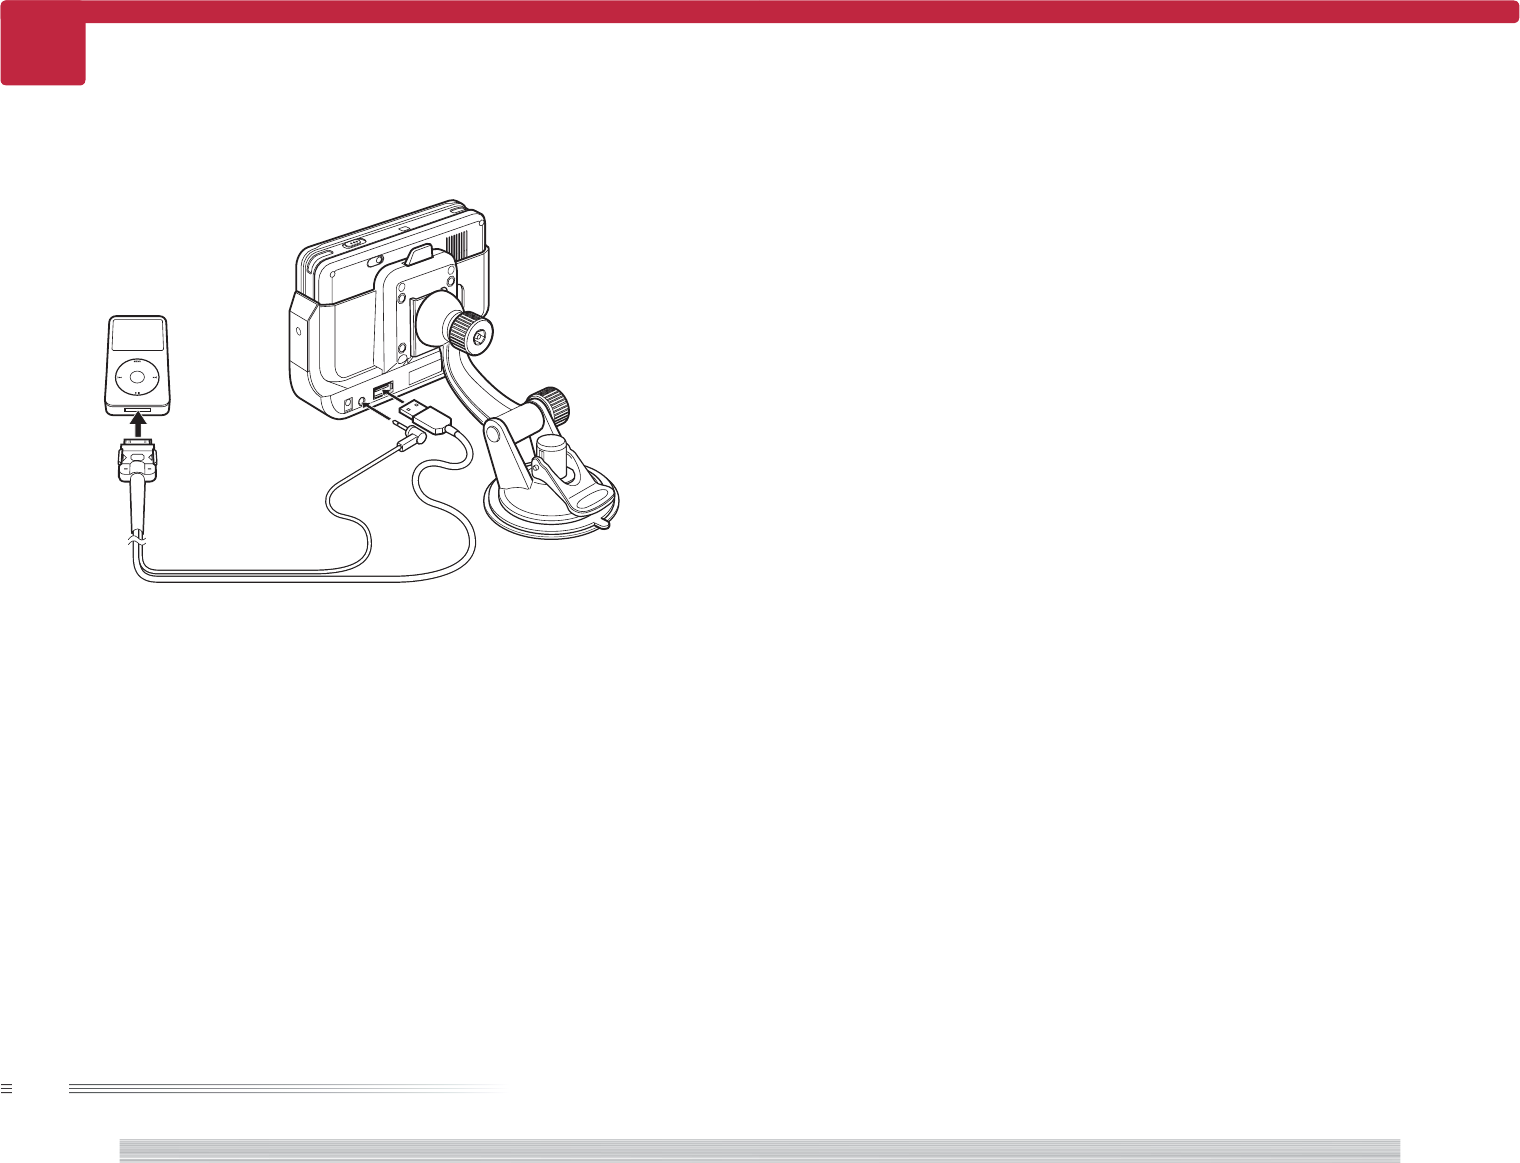
105
Connect iPod
note
• An optional iPod connection cable (KCA-iP300V) is necessary to connect an iPod.

24
page Common 25
page
Common
106
106
Using outside the vehicle
caution
• This unit contains software and map database necessary for the operation of this unit.
Do not change or delete those files or folders.
note
• When connected to a PC, this unit functions as an USB Mass Storage Class auxiliary storage.
■ Using at home
• Connect this unit to the outlet using an AC adapter and USB cable
• Connect a headphone (appropriate commercial product) to this unit
■ Connecting to a PC
• Connect this unit to a computer using an USB cable
caution
• Use the enclosed AC adaptor (KSUFB05000100W1UV-1) for this unit. To prevent a fire or electric shock
hazard, do not use an AC adapter other than the one specified.
• The power of this unit will not be completely cut off from the wall outlet when the power switch is
turned off. Install the equipment so that the wall outlet is easily accessible and, in case of emergency,
immediately unplug the power cord from the wall outlet.
note
• The provided AC adapter is designed for use in Europe. When using the unit in a country outside Europe,
please prepare a AC adapter matching the AC adapter standard of the country.
• The unit is equipped with a built-in rechargeable battery so that it can be used without connecting the AC
adapter. However, the built-in battery has not been fully charged at the time of purchase, so it should be fully
recharged with one of the AC adapters. Recharging completes in about • hours.
26
page Common 27
page
Common
107
107
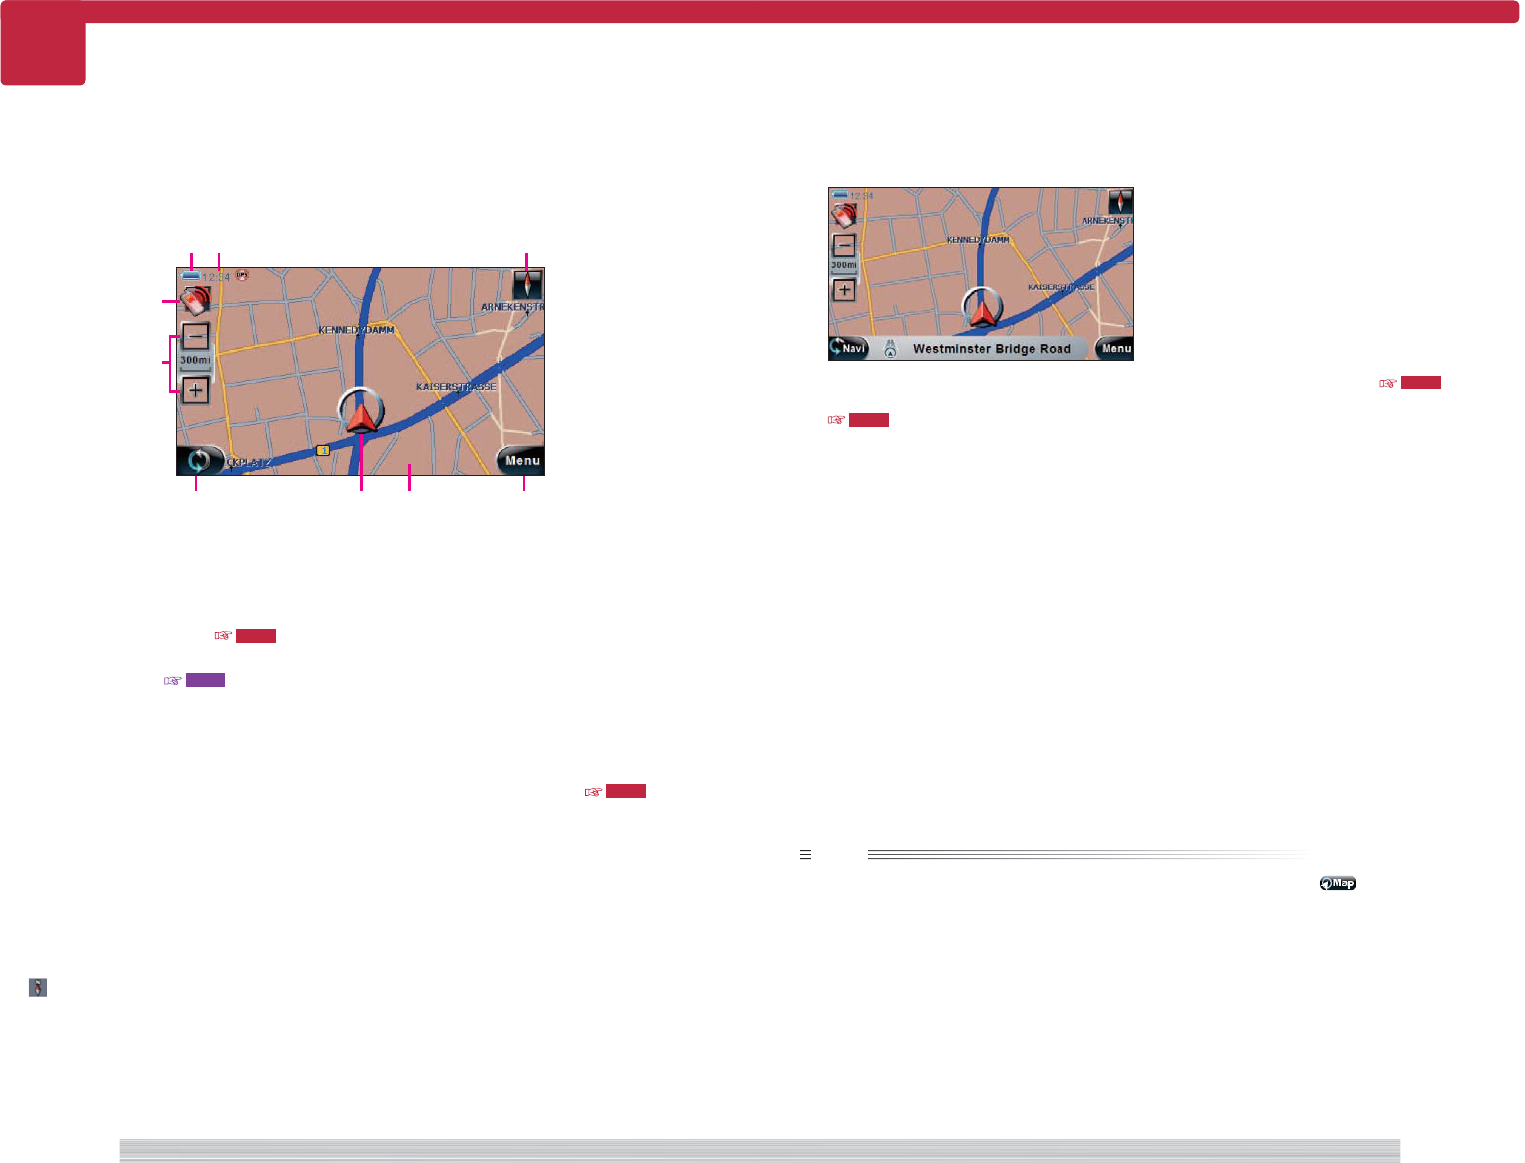
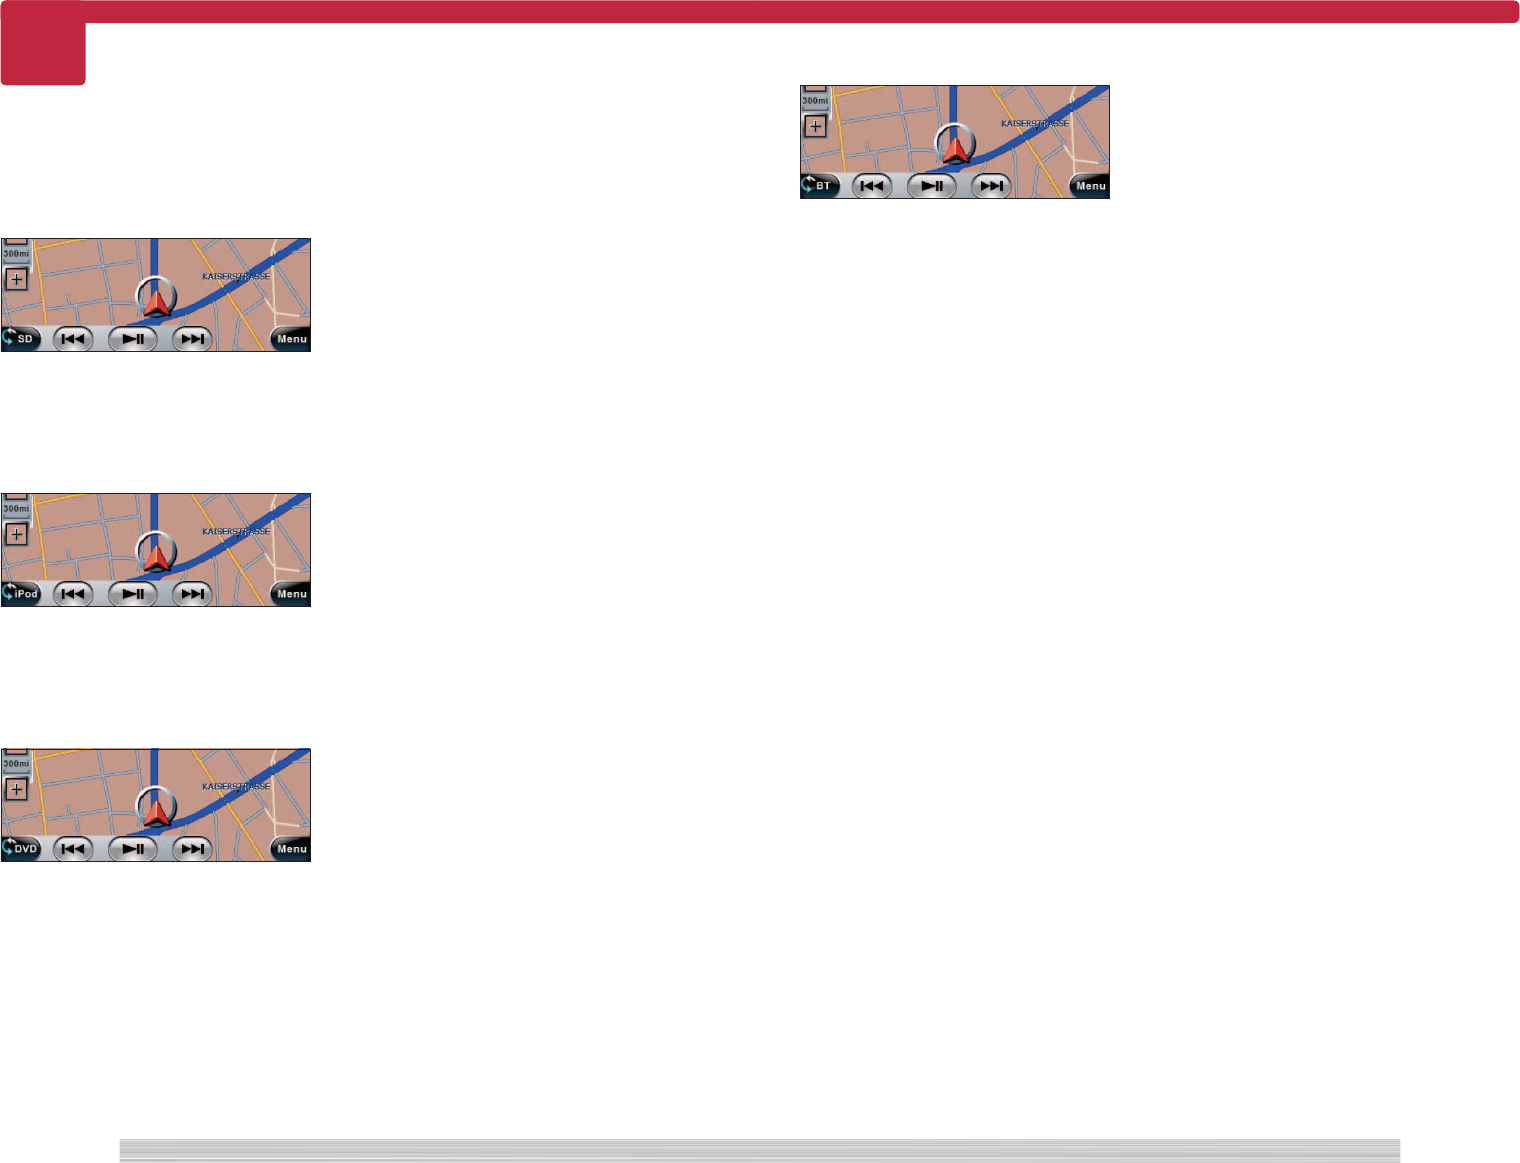
Map screen of current location (not during route guide)
1 Remaining battery
Displays the remaining battery.
2 Clock
Displays the current time. 110
Select to switch between 12 hour clock
and 24 hour clock. 604
3 Compass button
Switches the map orientation.
Switches between north up and heading
up each time you select.
7 : 3D heading up
Displays the map (3D) so that the
direction of travel is at the top of
screen.
7 : 2D heading up
Displays the map (2D) so that the
direction of travel is at the top of
screen.
: 2D north up
Displays the map (2D) so that north on
the map is at the top of screen.
4 Bluetooth button
Displayed when a cell phone's hands free
set is connected by Bluetooth.
7 : The call screen appears when this
button is selected while the phone is
ready to make a call.
7 : The dial palette screen appears when
this button is selected while the phone
is busy.
5 Zoom button
Zooms in/out the map. 109
[–] : Shows a wider area map.
[+] : Shows a more map details.
The map around the current location (current location screen) is displayed when this device is
turned ON.
note
• When the current map screen is not displayed, press the Position key or select of each screen.
• The source name is not displayed when the source is Standby. Also, the external source connected to AV-in is
not displayed.
• [×] is displayed when the radio signal from the GPS satellite cannot be received. The current location is not
displayed correctly under this condition.
• When the map direction is heading up, the vehicle symbol is displayed lower than the center of the screen.
When the map direction is North up, the vehicle symbol is displayed at the center of the screen.
• Orient this device vertically when the map direction is heading up to display more of the map in the traveling
direction for greater convenience.
• When you turn on the PNX-7/PNX-5, you must wait while the system acquires satellite signals. This process
could take up to several minutes. Make sure your vehicle is outdoors in an open area away from tall buildings
and trees for fastest acquisition.
6 AV quick control button
The button display changes in the order of
[OFF] = [NAV] = Current AV source name
= [OFF] each time you select the button.
Switch to [NAV] to display the name of the
street you are traveling.
Switch to the current AV source name to
display the AV quick control mode button.
111
7 Vehicle symbol
Displays the current position.
8 Map
Displays the map around the current
location.
Touch the map to switch to scroll map
screen. Touch once more to scroll the map
so that it is centered around the touched
location.
Keep on touching the map to scroll the
map in the touched direction. Release to
stop scrolling.
9 Menu button
Displays the Top Menu. 115
Current map screen (not during route guide)
<NM0000>
<NT1000a>
12 3
876
4
5
9
28
page Common 29
page
Common
108
108
Using in portrait mode
This unit can be used in portrait mode.
When this unit is used in portrait mode, more map is displayed in the traveling direction during
route guide (Super Front Wide). Also, you can display more titles in list display when selecting music.
note
• Set the Display mode to Portrait or Auto to display the screen supporting portrait mode. 609
30
page Common 31
page
Common
109
109
Change map scale
You can change the scale of the map displayed on the current map screen or scroll the map
screen as necessary.
note
• Available scales are 500km (300 miles) to 50m (50 yards) for 2D display and 500m (1/4 miles) to 50m (50yards)
for 3D display.
See 612 for information on switching between 2D display and 3D display and switching scale.
• Keep touching [+] or [-] to continuously change the scale.
• The scales of the scroll map screen and current map screen are independent. For example, even if you
change the scale to 50m in the scroll map screen, the map is displayed in the original scale when you return
to the current map screen.

32
page Common 33
page
Common
110
110
Change map display method
The map in the current map screen can be displayed north up (2D), heading up (2D), or heading
up (3D).
note
• When the map direction is heading up, the vehicle symbol is displayed lower than the center of the screen.
When the map direction is north up, the vehicle symbol is displayed at the center of the screen.
• Orient this device vertically when the map direction is heading up to display more of the map in the traveling
direction for greater convenience.
• 2D/3D display can be set from 612 also.
<NorthUp(2D)>
<HeadingUp(2D)>
<HeadingUp(3D)>
Displays the map so that north on the map is at the
top of screen (fixed to 2D).
The map can be viewed in the same manner as road
map.
Displays the map (2D) so that the direction of travel is
at the top of screen.
This is convenient when viewing the map while
driving.
The map is displayed as seen from the air (fixed to
heading up).
34
page Common 35
page
Common
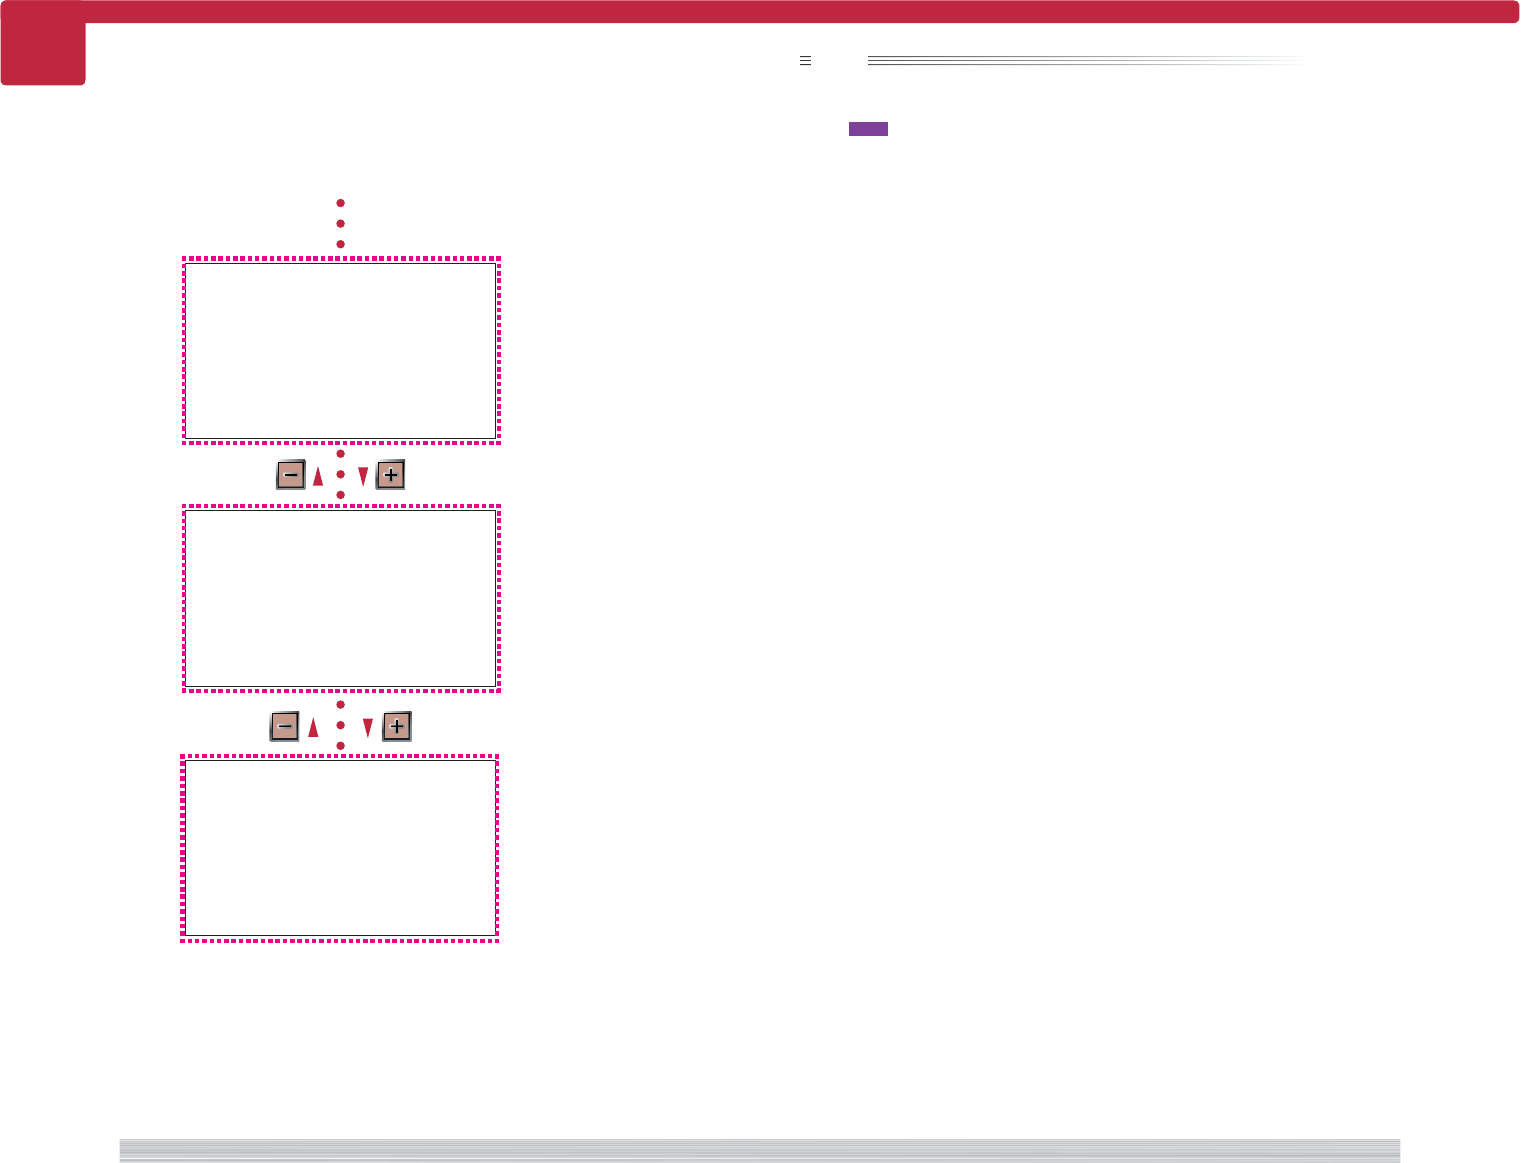
111 Control AV source on current map screen
111
When you select the AV quick control button to switch to the current AV source name, the AV
quick control buttons appear at the bottom of the screen. These buttons can be used to control
the current AV source while displaying the map.
■ Using SD card
1 Select to display the playback status (3 or 8).
2 Select to play from the beginning of the music or
the previous content.
3 Select to play or pause.
4 Select to play the next content.
■ Playing iPod
1 Select to play from the previous chapter.
2 Select to play or pause.
3 Select to play from the next chapter.
■ Playing DVD
1 Select to play from the previous music.
2 Select to play or pause.
3 Select to play from next music.
■ Using Bluetooth
1 Select to display the playback status (3 or 8).
2 Select to play from the beginning of the music or
the previous file.
3 Select to play or pause.
4 Select to play the next file.
<NT2000>
<NT2100>
<NT2200>
<NT2500>
36
page Common 37
page
Common
112
112
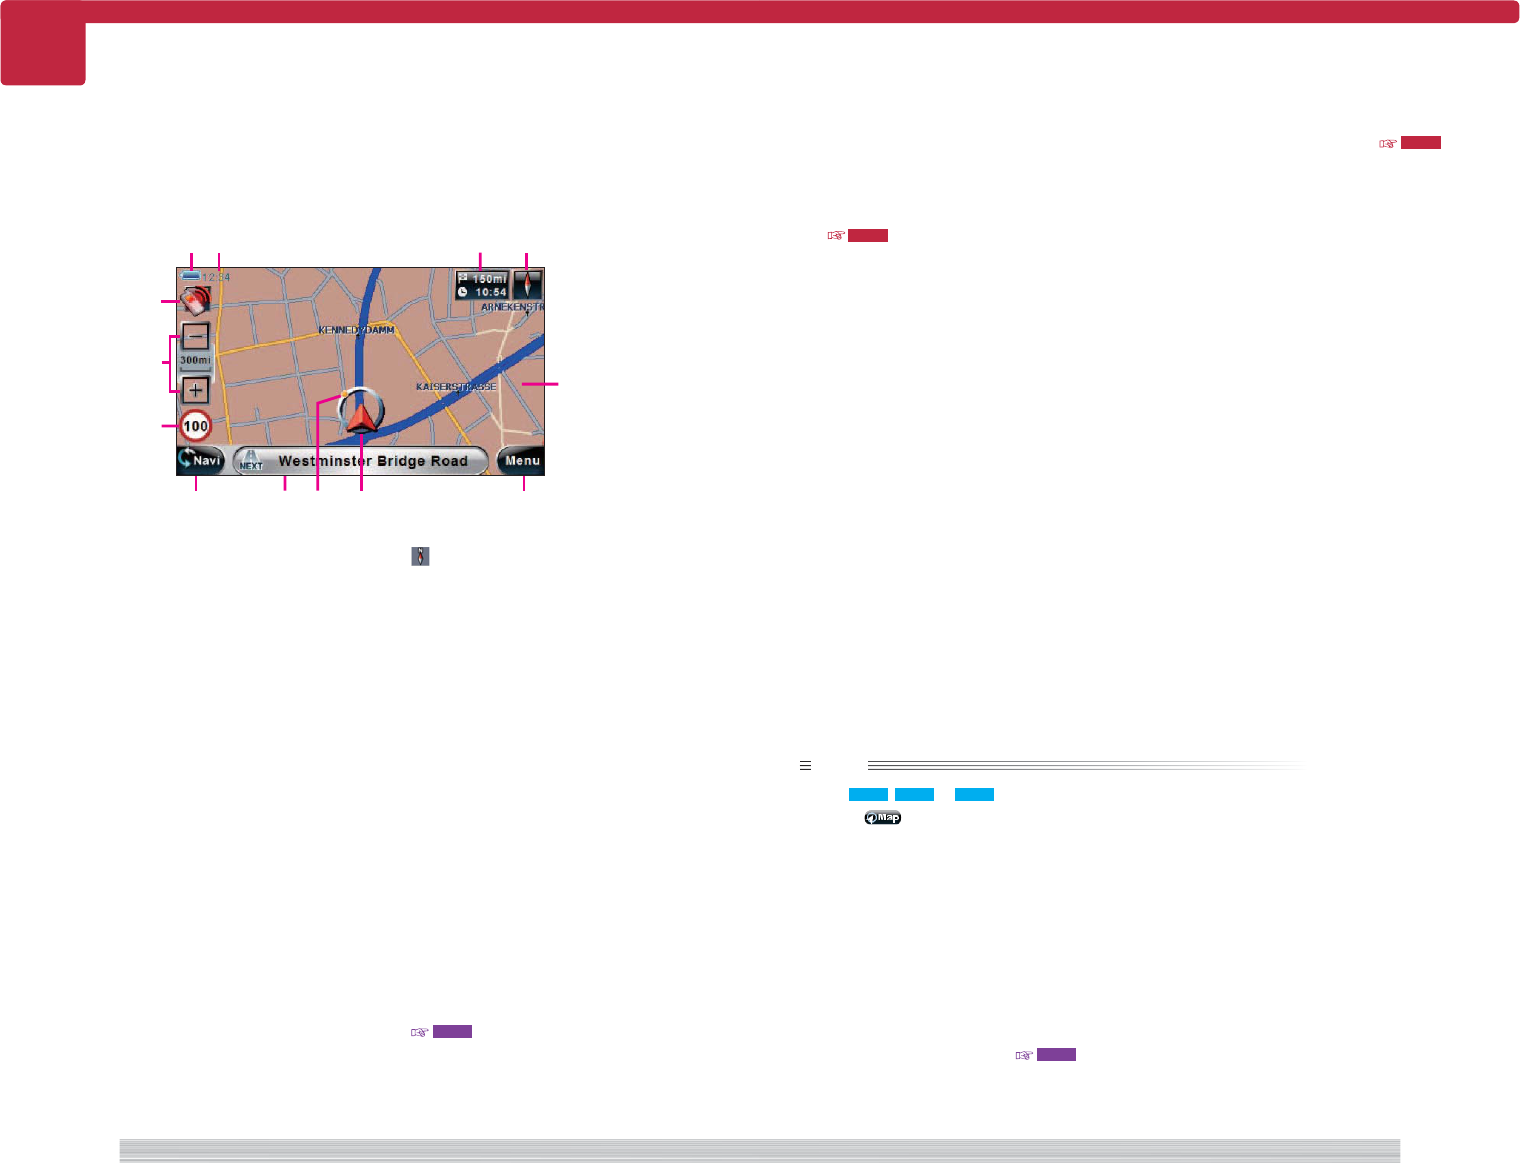
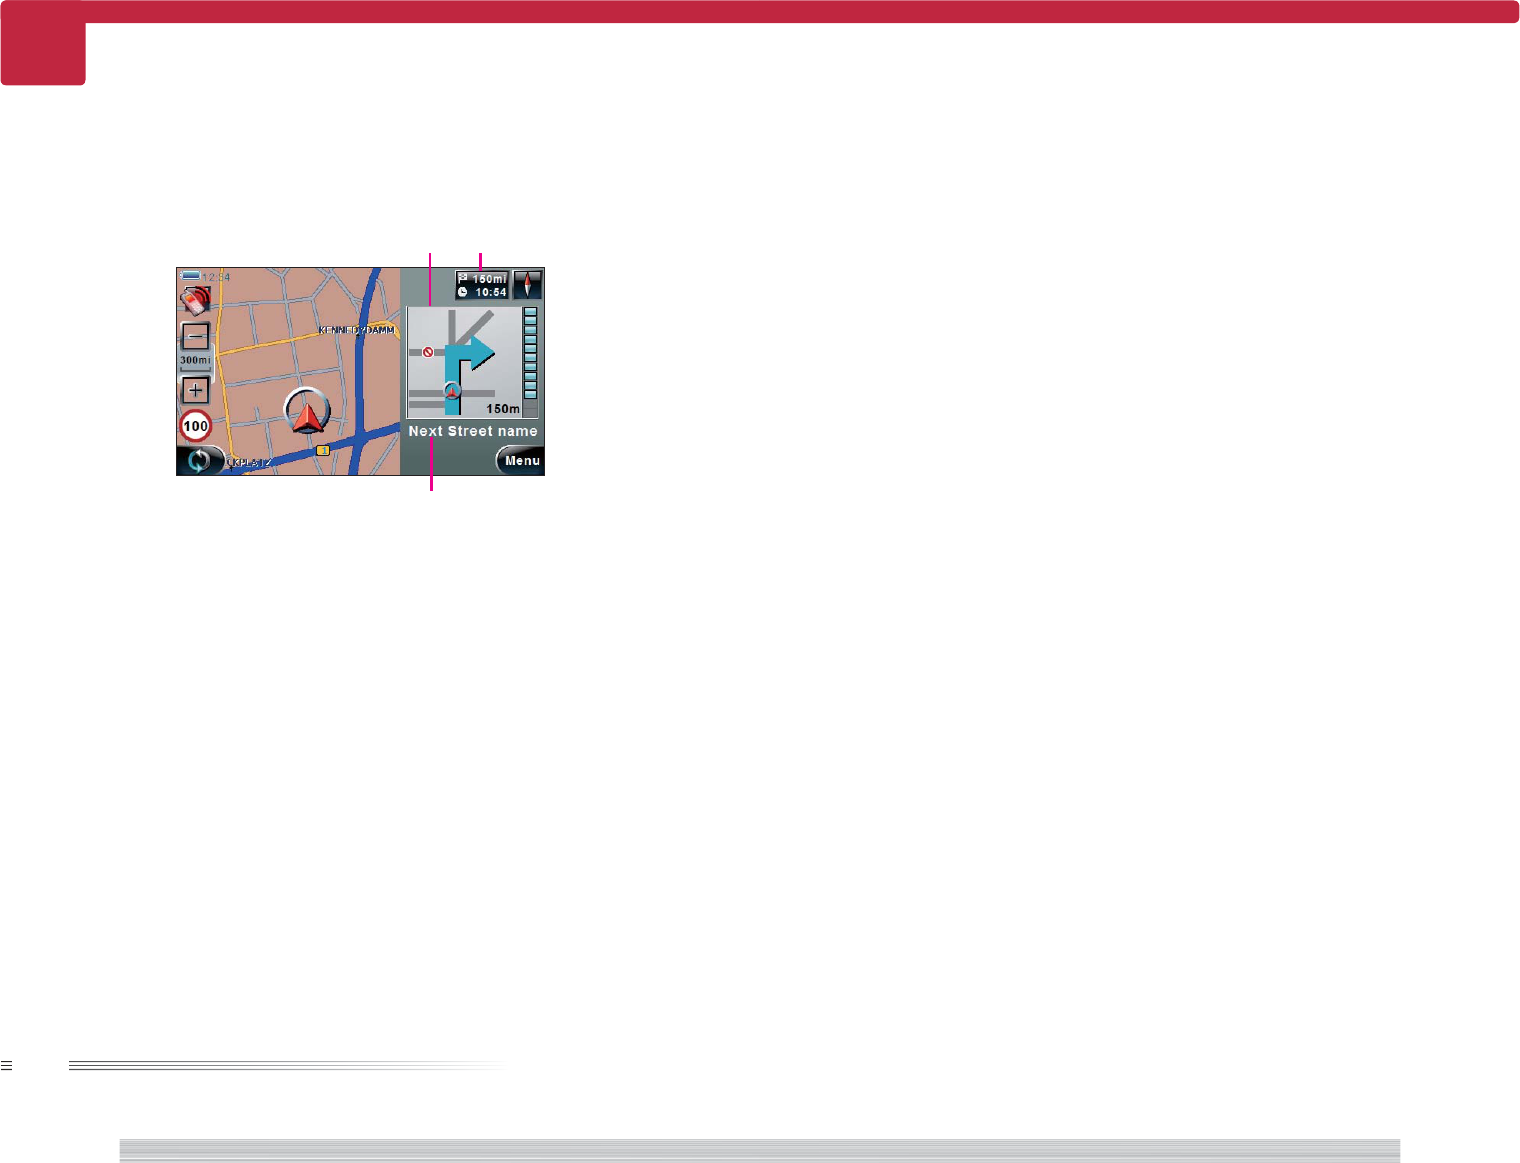
Map screen of current location (during route guide)
1 Remaining battery
Displays the remaining battery.
2 Clock
Displays the current time.
3 Destination information button
Displays the distance to the destination,
expected arrival time, and duration.
Switches between expected arrival time
and duration each time you press.
4 Compass button
Switches the map orientation.
Switches between north up and heading
up each time you select.
7 : 3D heading up
Displays the map (3D) so that the
direction of travel is at the top of
screen.
7 : 2D heading up
Displays the map (2D) so that the
direction of travel is at the top of
screen.
: 2D north up
Displays the map (2D) so that north on
the map is at the top of screen.
5 Bluetooth button
Displayed when a cell phone's hands free
set is connected by Bluetooth.
7 : The call screen appears when this
button is selected while the phone is
ready to make a call.
7 : The disconnect screen appears when
selected while the phone is busy.
6 Zoom button
Zooms in/out the map.
[–] : Shows a wider area map.
[+] : Shows a more map details.
7 Speed limit information
Displays the speed limit of the street you
are traveling.
You can turn off the speed limit display.
612
note
• See 207 , 208 or 302 for information on how to start the route guide.
• Select on each screen of this device to return to the above current map screen.
• The source name is not displayed when all sources are off. Also, the external source connected to AV-in is not
displayed.
• The speed limit information and road information are not displayed if the information cannot be obtained.
• x is displayed when the radio signal from the GPS satellite cannot be received. The current location is not
displayed correctly under this condition.
• When the map direction is heading up, the vehicle symbol is displayed lower than the center of the screen.
When the map direction is North up, the vehicle symbol is displayed at the center of the screen.
• Orient this device vertically when the map direction is heading up to display more of the map in the traveling
direction for greater convenience.
• If the current traveling speed exceeds the speed limit, the speed limit information flashes as a warning.
You can turn off this warning. 612
• When you turn on the PNX-7/PNX-5, you must wait while the system acquires satellite signals. This process
could take up to several minutes. Make sure your vehicle is outdoors in an open area away from tall buildings
and trees for fastest acquisition.
8 AV quick control button
The button display changes in the order of
[OFF] = [NAV] = Current AV source name
= [OFF] each time you select the button.
Switch to [NAV] to display road
information.
Switch to the current AV source name to
display the AV quick control mode button.
111
9 Road information
Displays the name of the road you are
traveling.
Select to display the name of the road you
will travel next.
0 Destination Direction Finder
Shows the approximate direction of the
destination.
- Vehicle symbol
Displays the current position.
= Menu button
Displays the Top Menu. 115
~ Map
Displays the map around the current
location.
Touch the map to switch to scroll map
screen. Touch once more to scroll the map
so that it is centered around the touched
location.
Keep on touching the map to switch to
scroll map screen and scroll the map in
the touched direction. Release to stop
scrolling.
The current map screen is displayed as follows during route guide (current map screen).
Current map screen (during route guide)
<NM2000>
1234
~
=-098
7
6
5
38
page Common 39
page
Common
113 Guide near guide point (during route guide)
113
When you approach a guide point, the voice guide is output and an enlarged intersection view
is displayed.
When you pass the guide point, the enlarged intersection view disappears.
note
• The distance for displaying the enlarged intersection view depends on the guide point.
• Press the Position key to listen to the last voice guide one more.
1 Enlarged intersection view
Displays an enlarged view of the passing
intersection.
Touch the screen to erase the enlarged
intersection view.
2 Distance display
Displays the distance to the guide point
as a bar.
3 Next road information
The name of the road you are going to
travel next is displayed.
Enlarged intersection view
<NM2100>
12
3
40
page Common 41
page
Common
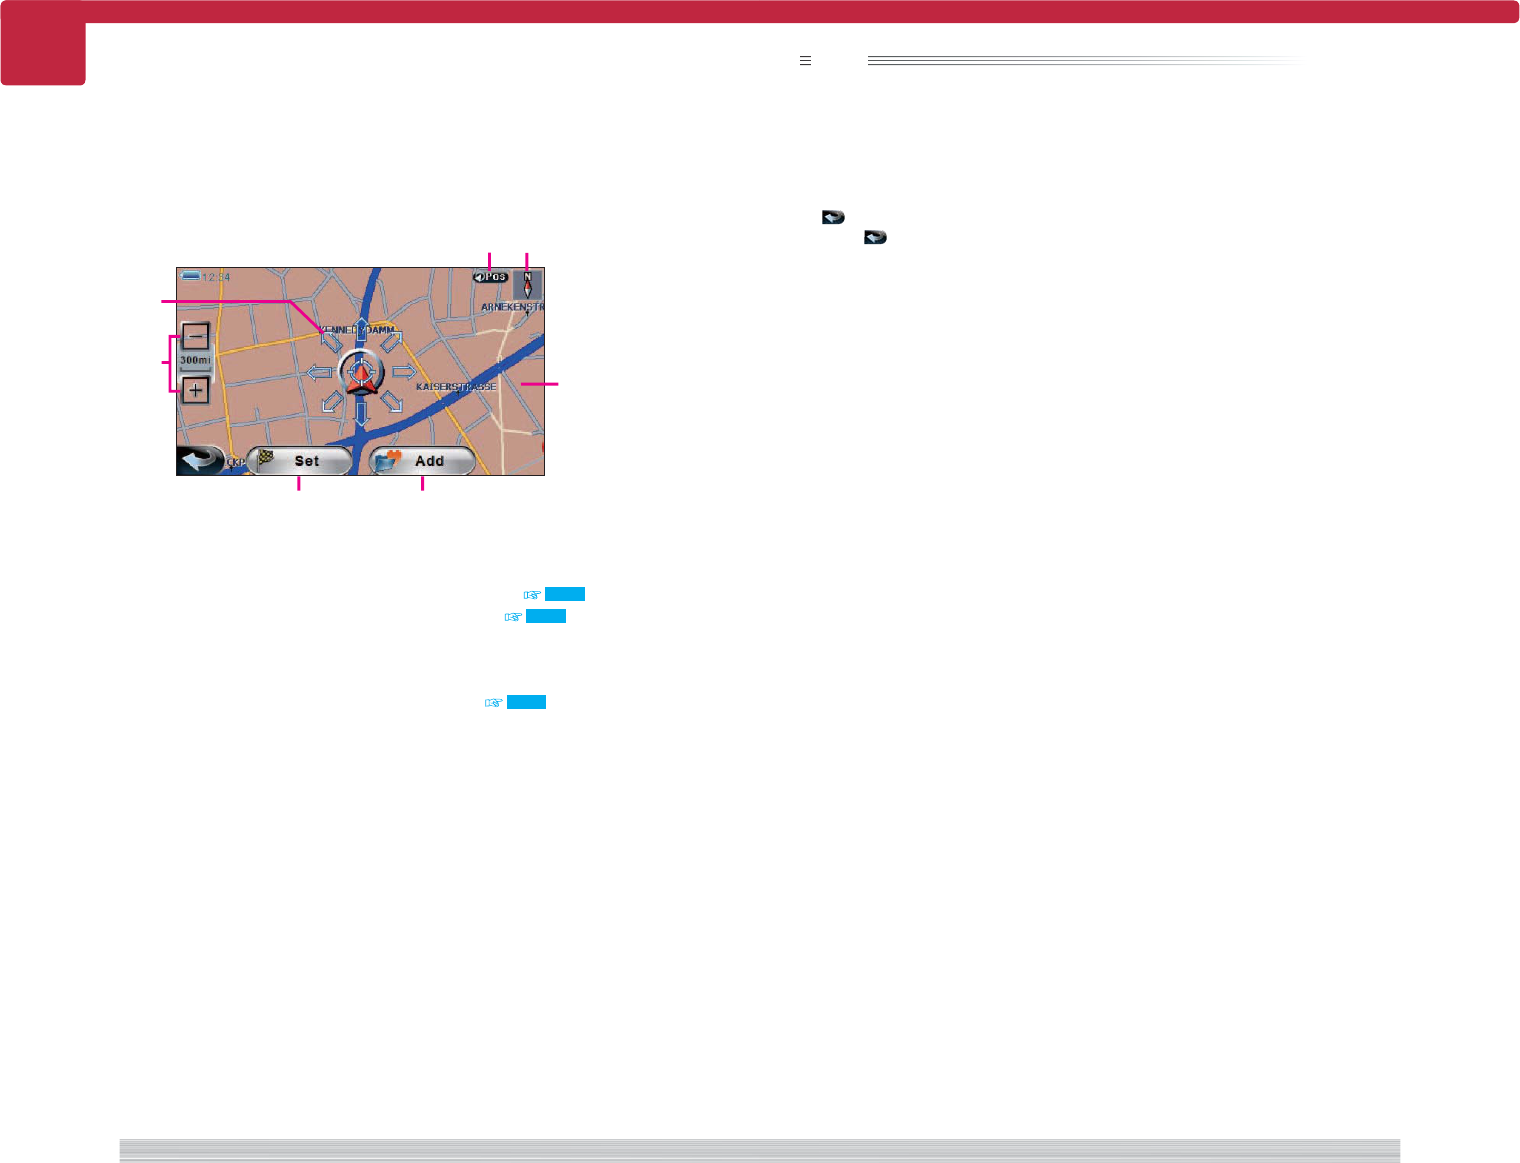
Map screen displaying desired location
114
114
note
• In the scroll map screen, the map is fixed to north up (2D) and cannot be changed.
• The scales of the scroll map screen and current map screen are independent. For example, even if you
change the scale to 50m in the scroll map screen, the map is displayed in the original scale when you return
to the current map screen.
• A confirmation message is displayed when you select [Add]. Select [YES] to add the position indicated by the
cursor to Favorites and erase the message.
• is displayed when you search for a location and display the scroll map screen with [Show in Map].
Select to return to the original screen (screen where you selected [Show in Map]).
Touch the map on the current map screen to switch to the scroll map screen and scroll the map
to display the desired location.
1 [Pos]
Select to return to the current map screen.
2 Compass
Select to display the north direction.
3 Cursor
Indicates the position to be controlled.
The cursor is always displayed at the center
of the screen.
4 Zoom button
Zooms in/out the map.
[+] : Shows a more map details.
[–] : Shows a wider area map.
5 [Set]
Sets the position indicated by the cursor
as destination ( 206 ) or intermediate
destination ( 207 ).
6 [Add]
Add the position indicated by the cursor to
Favorites. 209
7 Map
Touch the map to switch to display the
map so that the touched location is at the
center.
Keep on touching the map to scroll the
map. Release to stop scrolling.
Scroll map screen
<NM4000>
12
7
65
3
4
42
page Common 43
page
Common
115
115
Operation
1
Select [MENU].
The Top Menu is displayed.
Complete
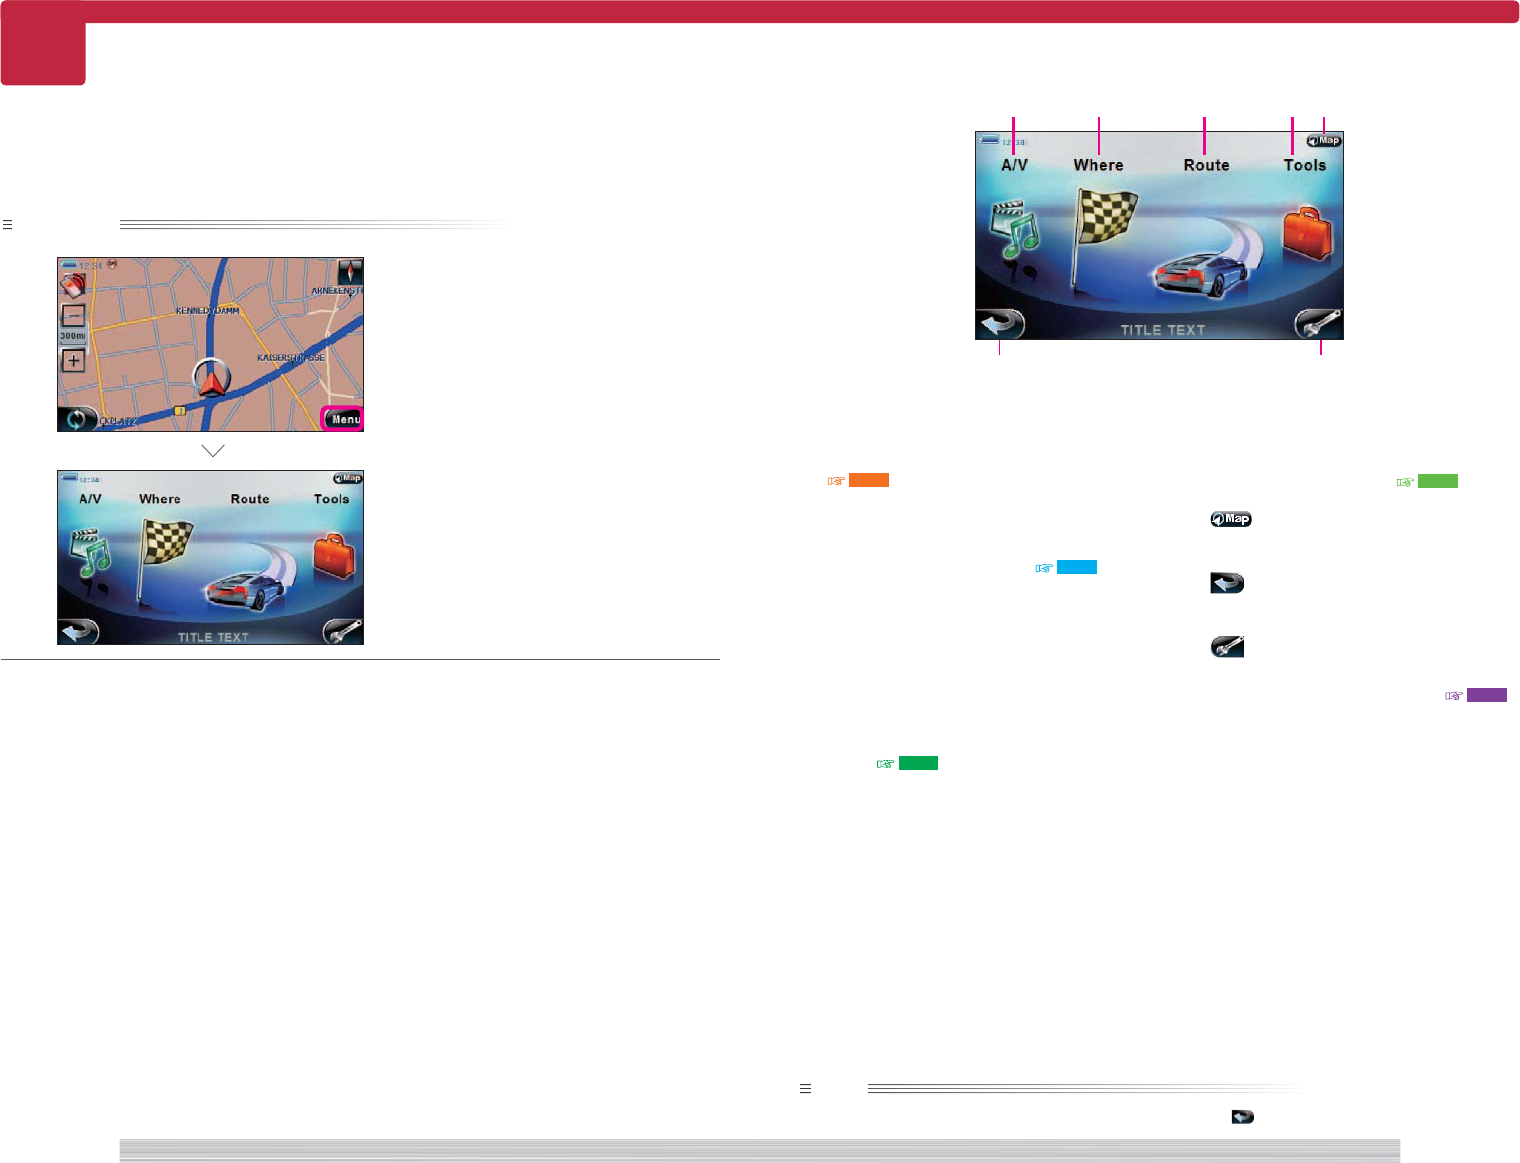
Display Top menu
Many of the operation of this device can be performed from the Top menu.
1 [A/V]
Displays the Source menu to switch AV
source and perform various operation.
401
2 [Where]
Displays the Search menu to search
location by various method. 201
You can set the searched location as
the Final destination or Intermediate
destination of the Short tour route.
You can also add them to Favorites and
save them.
3 [Route]
Displays the Route menu to edit the tour
route. 301
Destination of the Round trip tour route is
also set from the route menu.
4 [Tools]
Displays the Tool menu to set and
manipulate Bluetooth devices and display
GPS satellite information. 501
5
Select to return to the current map screen.
6
Select to return to the current map screen.
7
Displays the Setup menu to set the map
display method and this device. 601
note
• When the top menu is displayed with the remote control, select to return to the last displayed screen.
Top Menu
<TOP0000>
<TOP0000>
<NM0000>
12345
76

44
page Common 45
page
Common
116 Tour rout and drive route
116
■ What is a tour?
A tour route starts from the current location, passes through several intermediate destinations,
and arrives at the final destination.
A tour route consists of 0 or more intermediate destinations and one or more final destinations.
■ Setting a tour route
A relatively short distance tour such as stopping over at Heathrow Airport to pick up John,
passing through Tower of London (intermediate destination) and Buckingham Palace and
bringing him home is referred to as Short Tour.
In the above example, London International Airport, Tower of London, and Buckingham Palace
are intermediate destinations and home is the final destination.
On the other hand, a relatively long distance tour starting from home in London, stopping at
University of Paris to pick up Michelle, and attending a conference at the University of Naples is
referred to as a Round trip tour.
In the above example, University of Paris and University of Naples are destinations.
On this device, the method of setting up a tour route is different between Short tour and Round
trip tour.
÷ Setting a Short tour route
To set a Short tour route, search the location with the method described below 202 and set
that location as the intermediate destination or final destination.
÷ Round trip tour
Select [Plan Tour] from the Route Menu to start setting the Round trip tour route 302 , search
location by various method 202 , and set as destination.
■ Editing the tour route
You can also edit an already created tour route by changing the order of intermediate
destinations and adding or deleting intermediate destinations.
■ Searching for drive route
Searching the route to drive along the tour route is referred to as route search and the searched
route is referred to as the drive route.
In the case of short tour, drive route search is started automatically when you set the final
destination. Also, when you set intermediate destinations, select [Calc Route] on each screen to
start.
In this case, the drive route along the entire trip from the current location (start location) to the
final destination is searched.
In the case of round trip tour, select [Calc Route] on each screen to search the drive route
from the current location (start location) to the destination (Destination 1). When you reach
Destination 1, the drive route from Destination 1 to Destination 2 is searched.
■ Setting the drive route search condition
You can set the restrictions (left/right turns, toll roads/express ways) when searching the drive
route.
You can also select the drive route type (give priority to distance or travel time).
46
page Where
201
47
page
Where
201
Operation
1
Select [Where].
The Search menu appears.
Complete
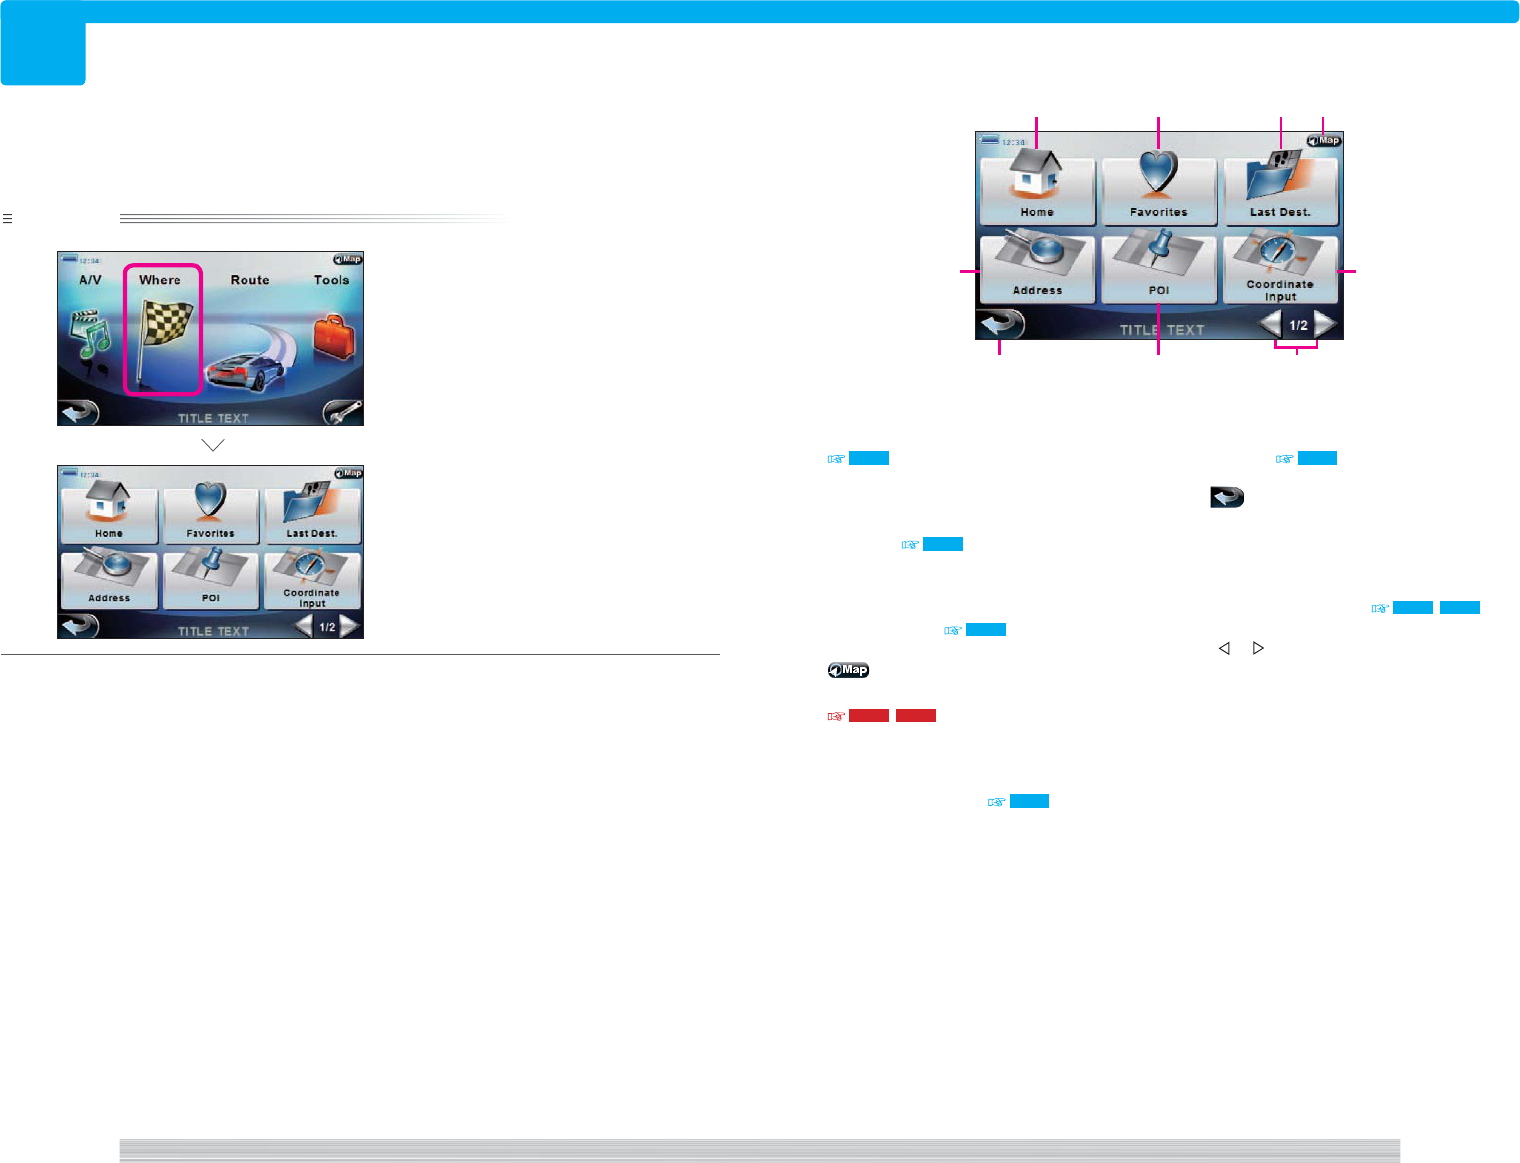
Displaying the Search menu from the Top menu to search the destination.
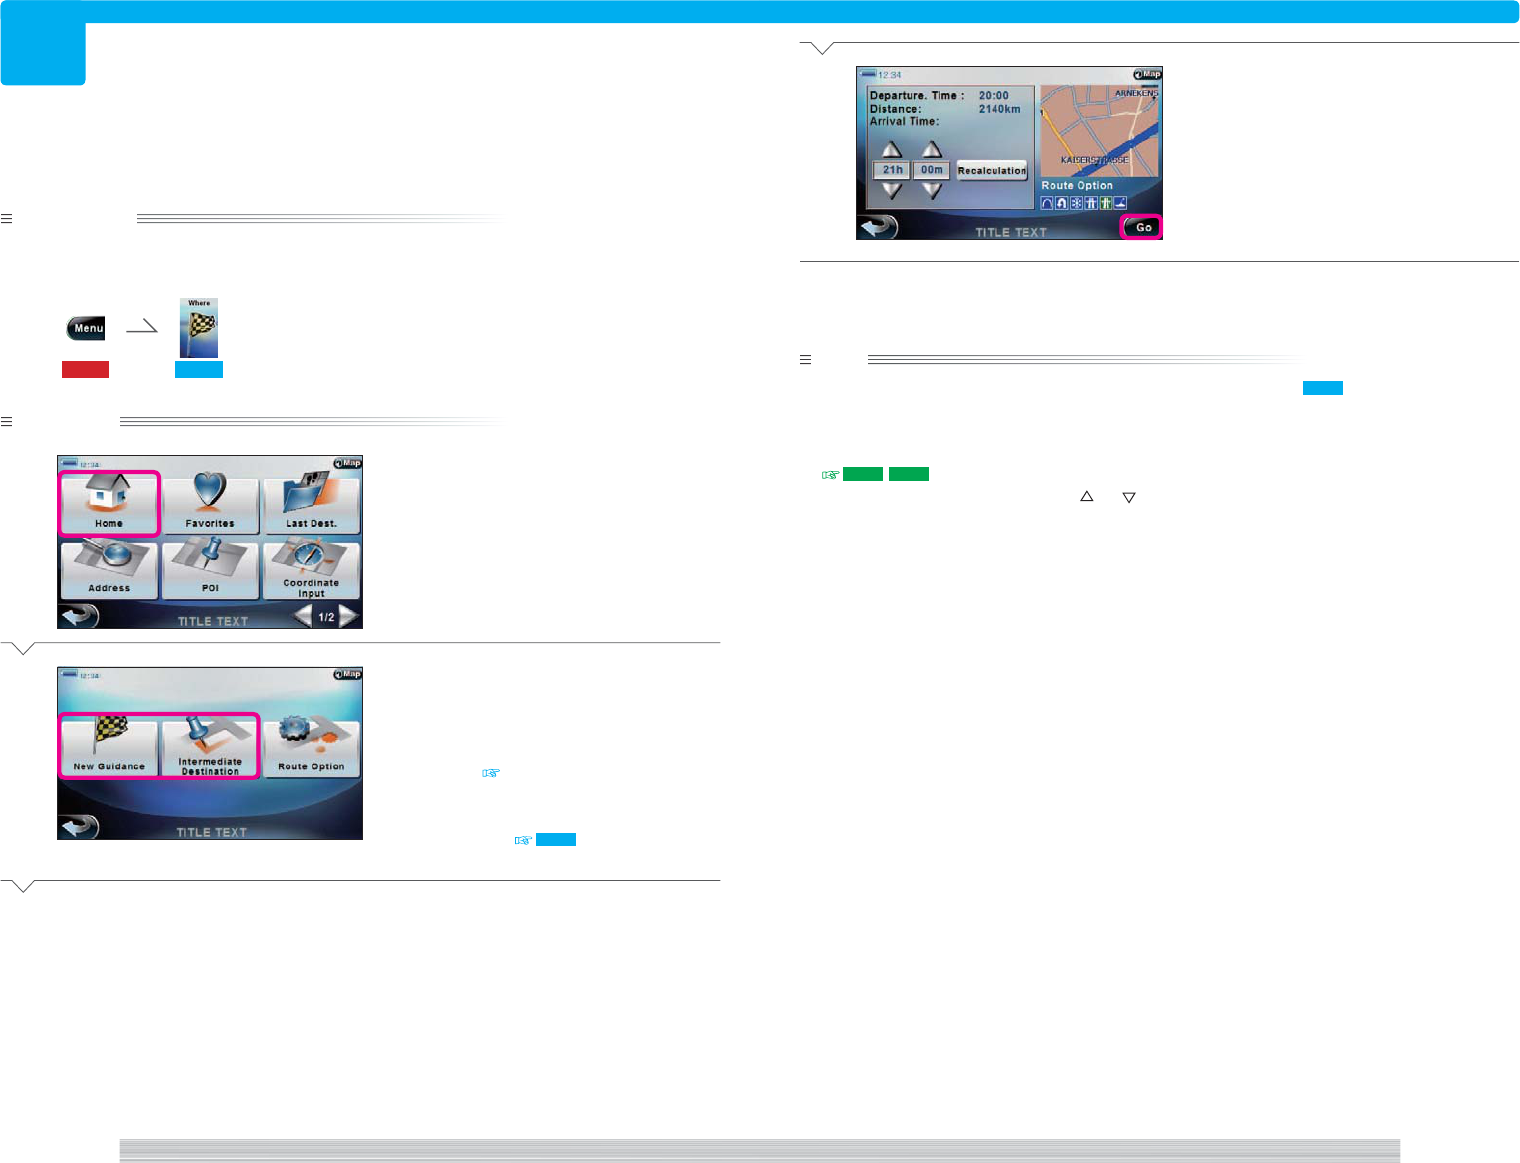
1 [Home]
Select to add home as destination.
222
2 [Favorites]
Select to search the destination from
Favorites. 212
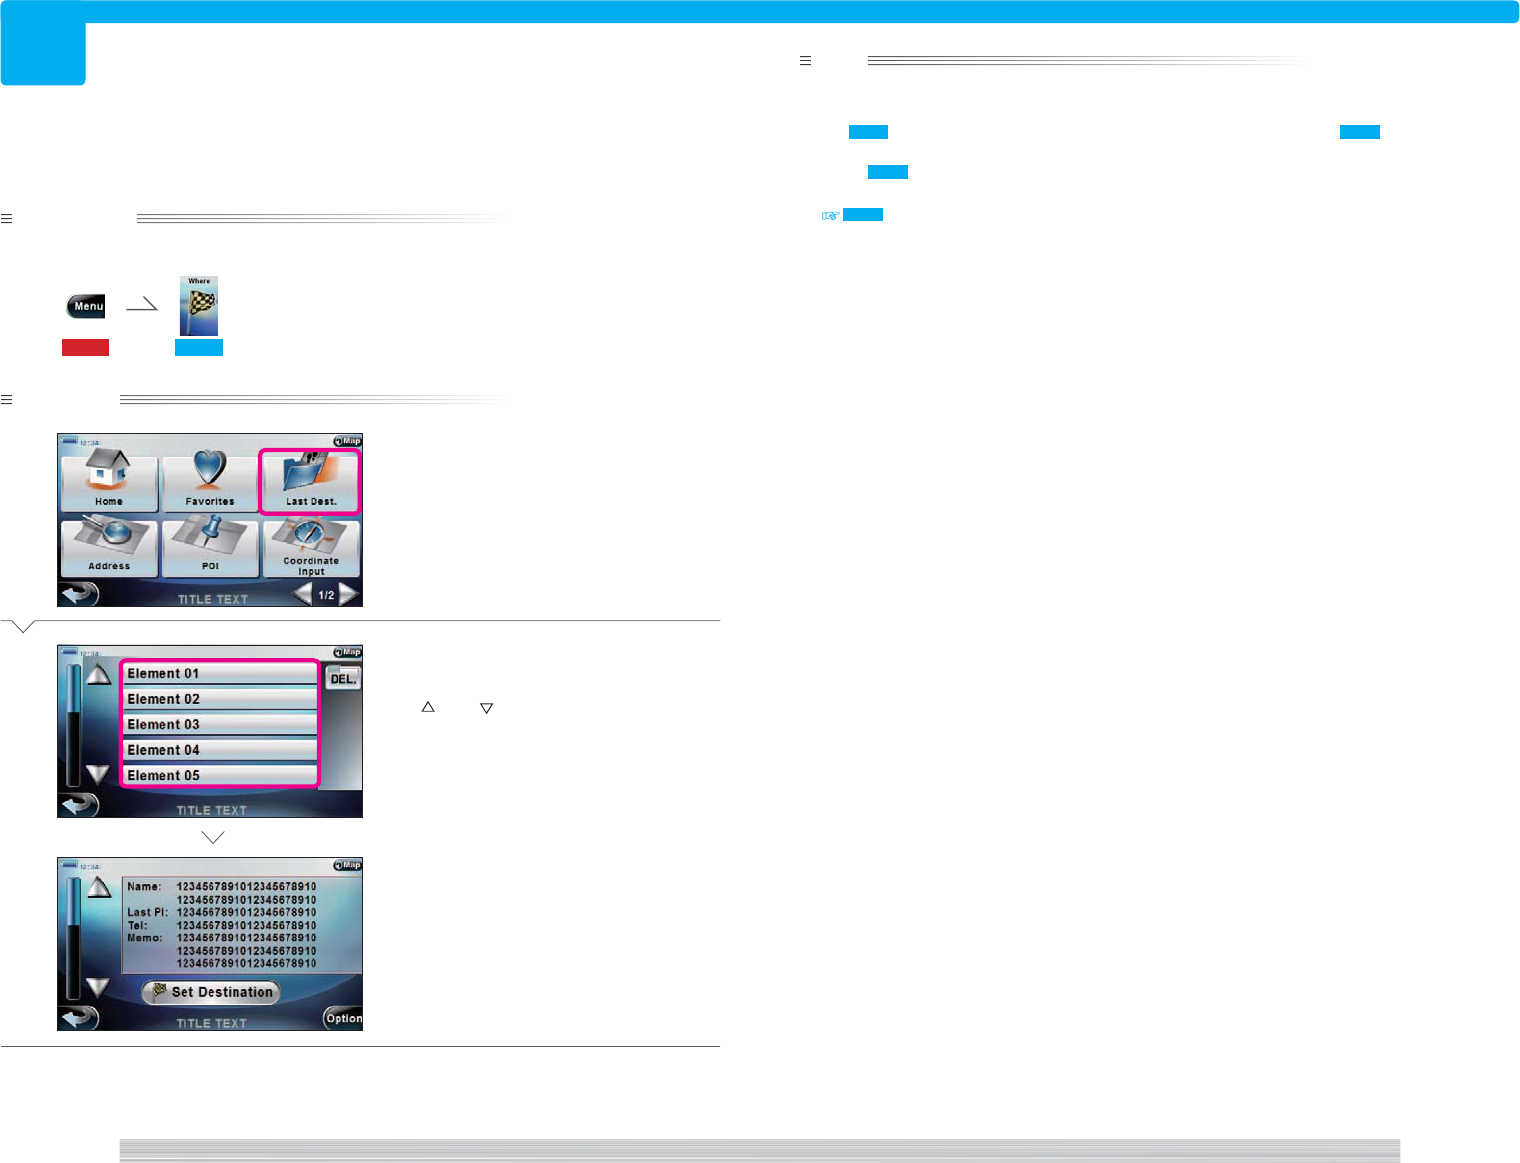
3 [Last Dest.]
Select to search the destination from a list
of destinations. 216
4
Select to return to the current map screen.
107 , 113
5 [Coordinate Input]
Select to search the destination by
entering coordinates. 218
6 [Address]
Select to search the destination from
address. 203
7
Select to return to the Top menu.
8 [POI]
Select to search the destination from the
point of interest type. 210 , 211
9 [
] [
]
Select to turn the Search menu page.
<TOP0000>
Search menu (1/2)
<NW0000a>
<NW0000a>
1
7 8 9
2 3 4
5
6
Display Search menu
48
page Where 49
page
Where
101
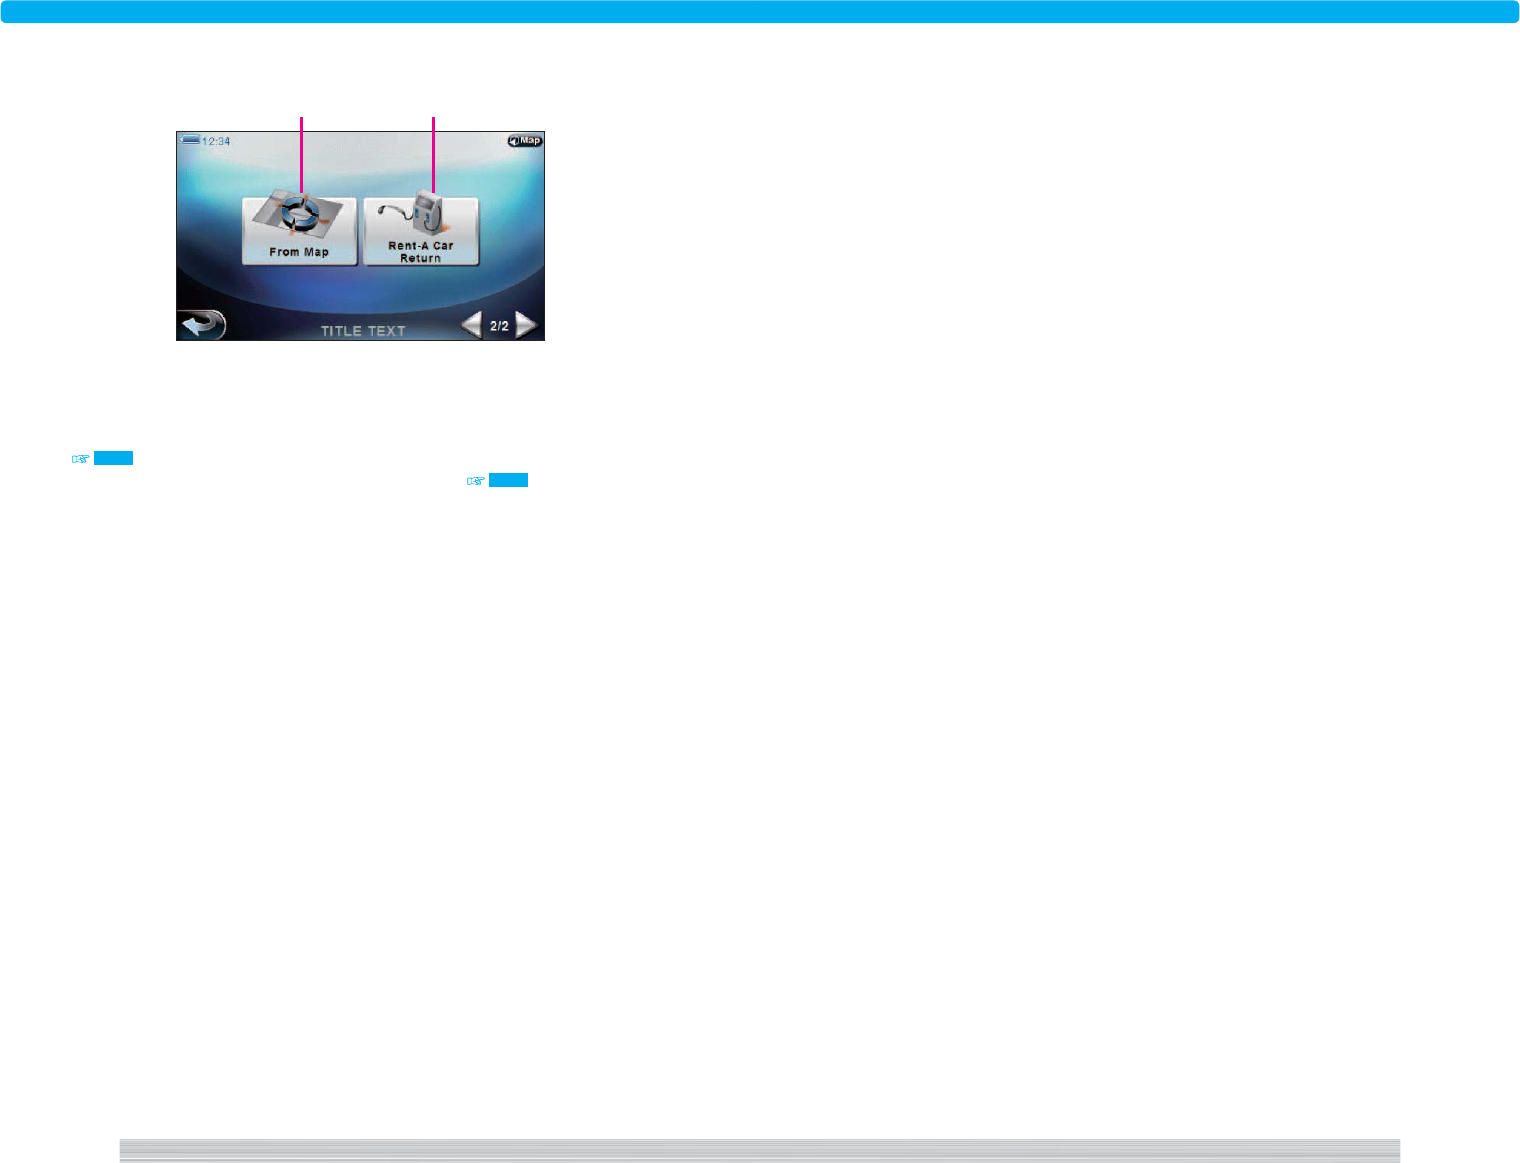
7 [From Map]
Select to search the destination from the
map. 219
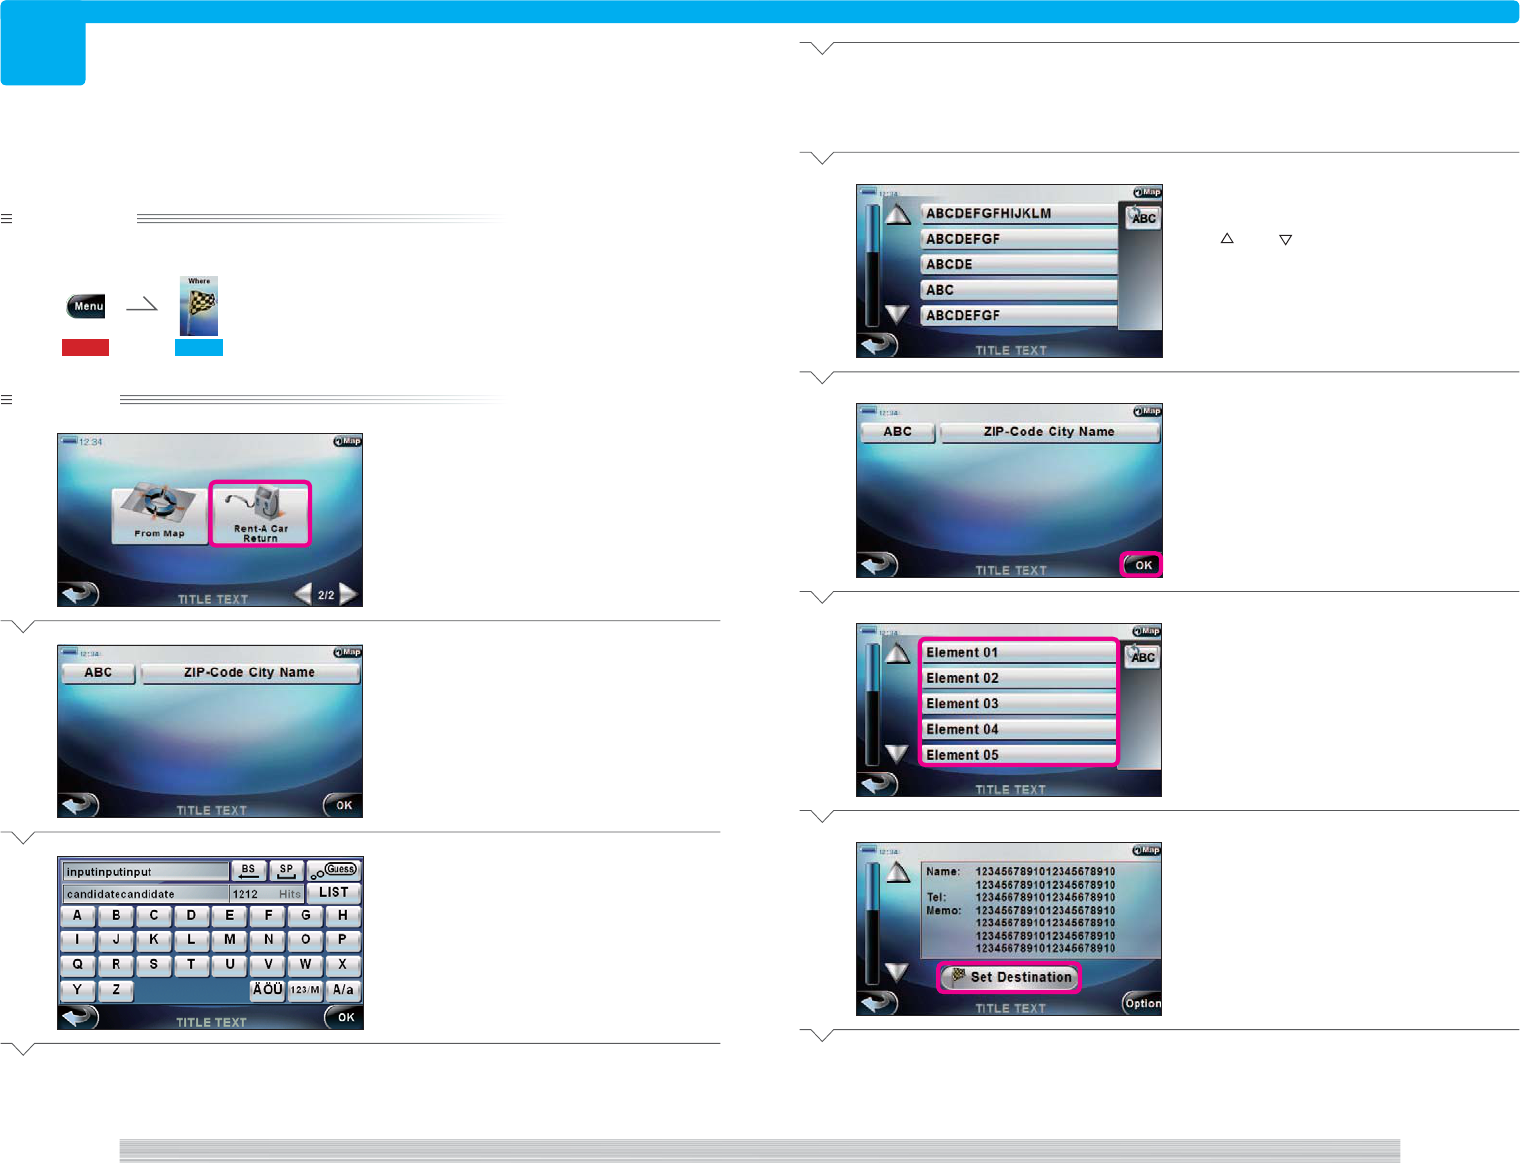
8 [Rent-A-Car Return]
Select to search for a place to return rent-
a-car and a drive route passing by a gas
station. 220
Search menu (2/2)
<NW0000b>
7 8

50
page Where 51
page
Where
202
202
You can search locations from the database by the following six methods (Location search).
− Address 203
− Facility type 210 , 211
− Coordinates 218
− Favorites 212
− Home 221
− Past final destinations (Last Destinations) 216
You can also search by scrolling the map. 219
Also, if you are using a rent-a-car, you can easily search for return location and fueling location.
220
The searched location can be set as the intermediate destination or final destination of a Short
tour or the destination of a Round trip tour. You can also add it to Favorites.
note
• In order to search a location from Favorites, you must add it to Favorites first. 209
• See 222 for information on adding home.
Search various locations

52
page Where 53
page
Where
203
203
Preparation
Have the Search menu displayed.
115 201
Operation
1
Select [Address].
2
Select the button of the item to enter.
3
Enter the address information.
Next Page
Search location by address
Searching destination from address (Address Search).
4
To enter another address
information, select [OK] and repeat
from
2
.
Select [LIST] when the number of hits
becomes reasonable.
5
Select the button of the desired
location.
Use [ ] and [ ] to scroll the list.
Complete
note
• Go to 206 to set the searched location as the Final destination (Short tour) or go to 207 to set as
Destination (Round trip tour) or Intermediate destination (Short tour).
Or, go to 209 to add to Favorites.
• See 204 for the details of the address input selection screen in
2
.
• See 205 for the details of the address information input screen in
3
.
• You can narrow down the candidates by entering as much address information as possible ins
2
and
3
.
• A list may be displayed instead of address information input screen in
3
.
• The current sort order is shown on the right of the list with buttons in
5
. Select these buttons to change the
sort order of the list as Alphabetical = Distance = Sort off.
<NW0000a>
<NW1000>
<NW1100a>
<NW1110>
<NW1000>
54
page Where 55
page
Where
204
204
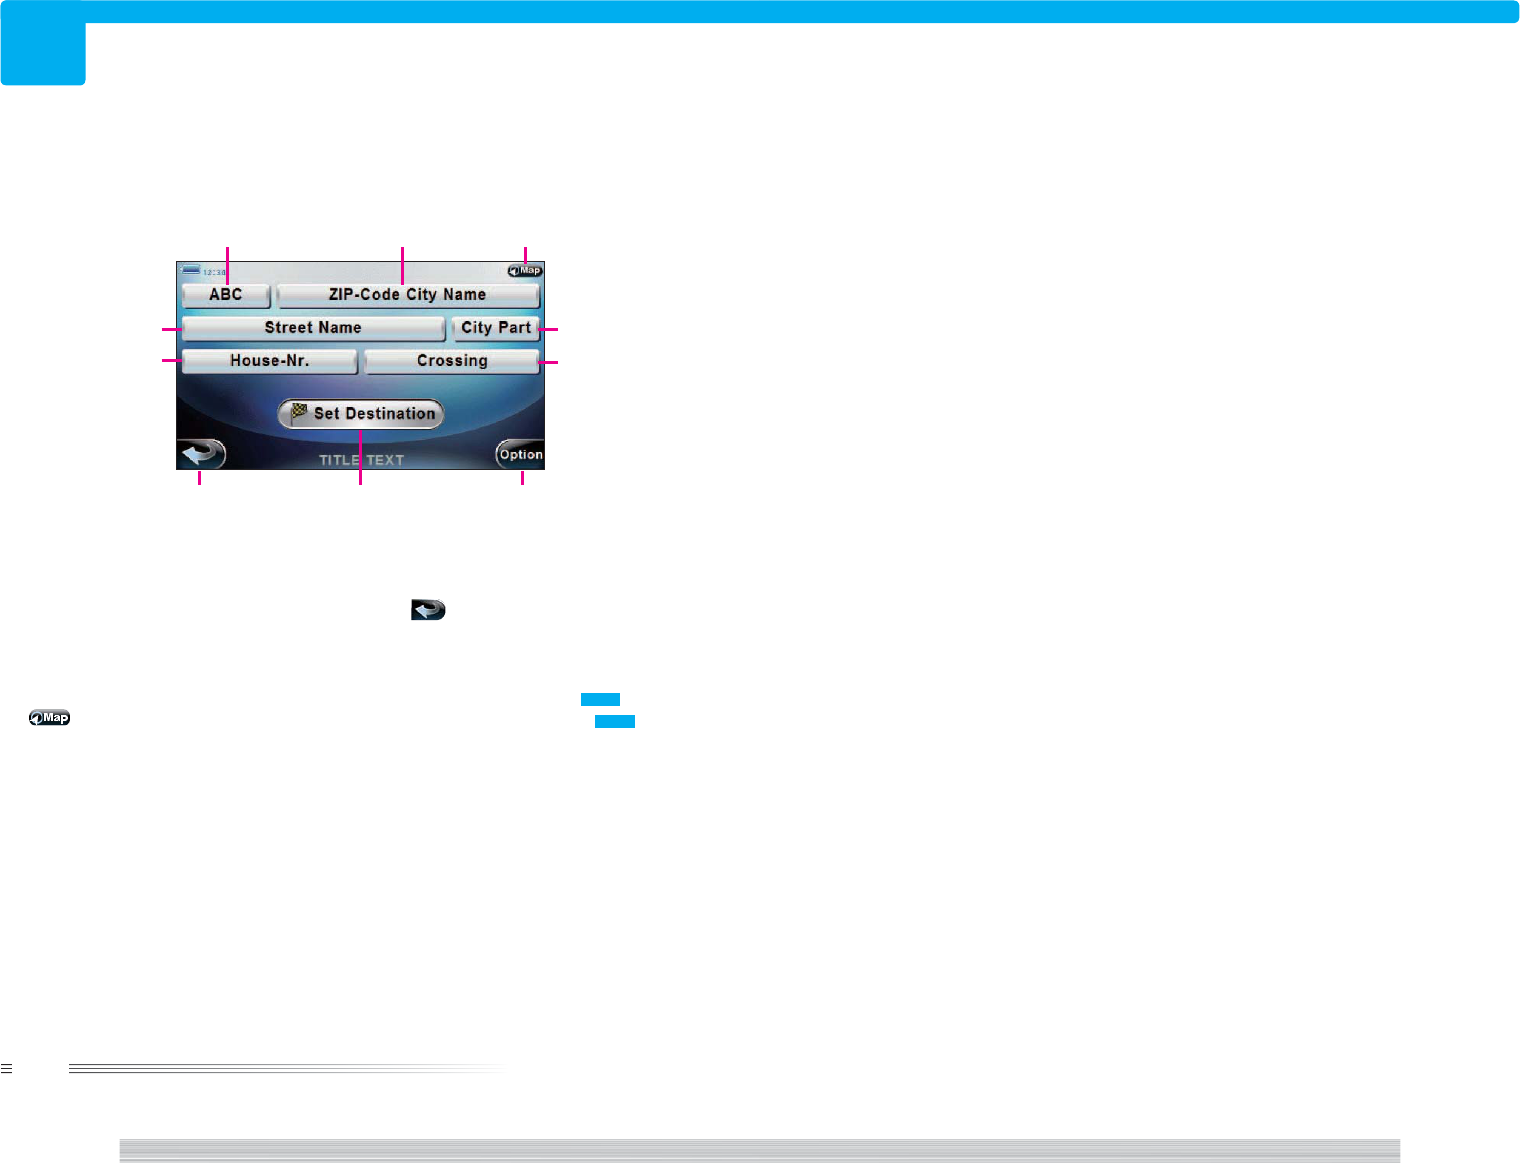
Address input selection screen details
The address input selection screen appears when you select [Address] from the Search menu.
On this screen, select the type of address information to enter to search for location.
1 [ABC]
Enter the country (Example: “UK”), and
prefecture.
2 [ZIP-Code City Name]
Enter a Zip code (Example: “CB21TN”) or a
city (Example: “Cambridge”).
3
Select to return to the current map screen.
4 [City Part]
Enter the area name.
5 [Crossing]
Enter the intersecting street name.
6 [Street Name]
Enter the street (Example: “Trinity Lane”).
7 [House-Nr.]
Enter the house number (Example: 1677).
8
Select to return to the Search menu.
9 [Set Destination]
Set as Final Destination 206 or
Intermediate Destination 207 .
0 [Option]
Add to Favorites.
You can also display the map of the
searched location.
Address input selection screen
<NW1000>
note
• House number may be displayed as range (Example: 1601 to 1699).
If there is no corresponding number, switch to list display and select from range.
1
0
4
8
5
9
6
7
2 3
56
page Where 57
page
Where
205
205
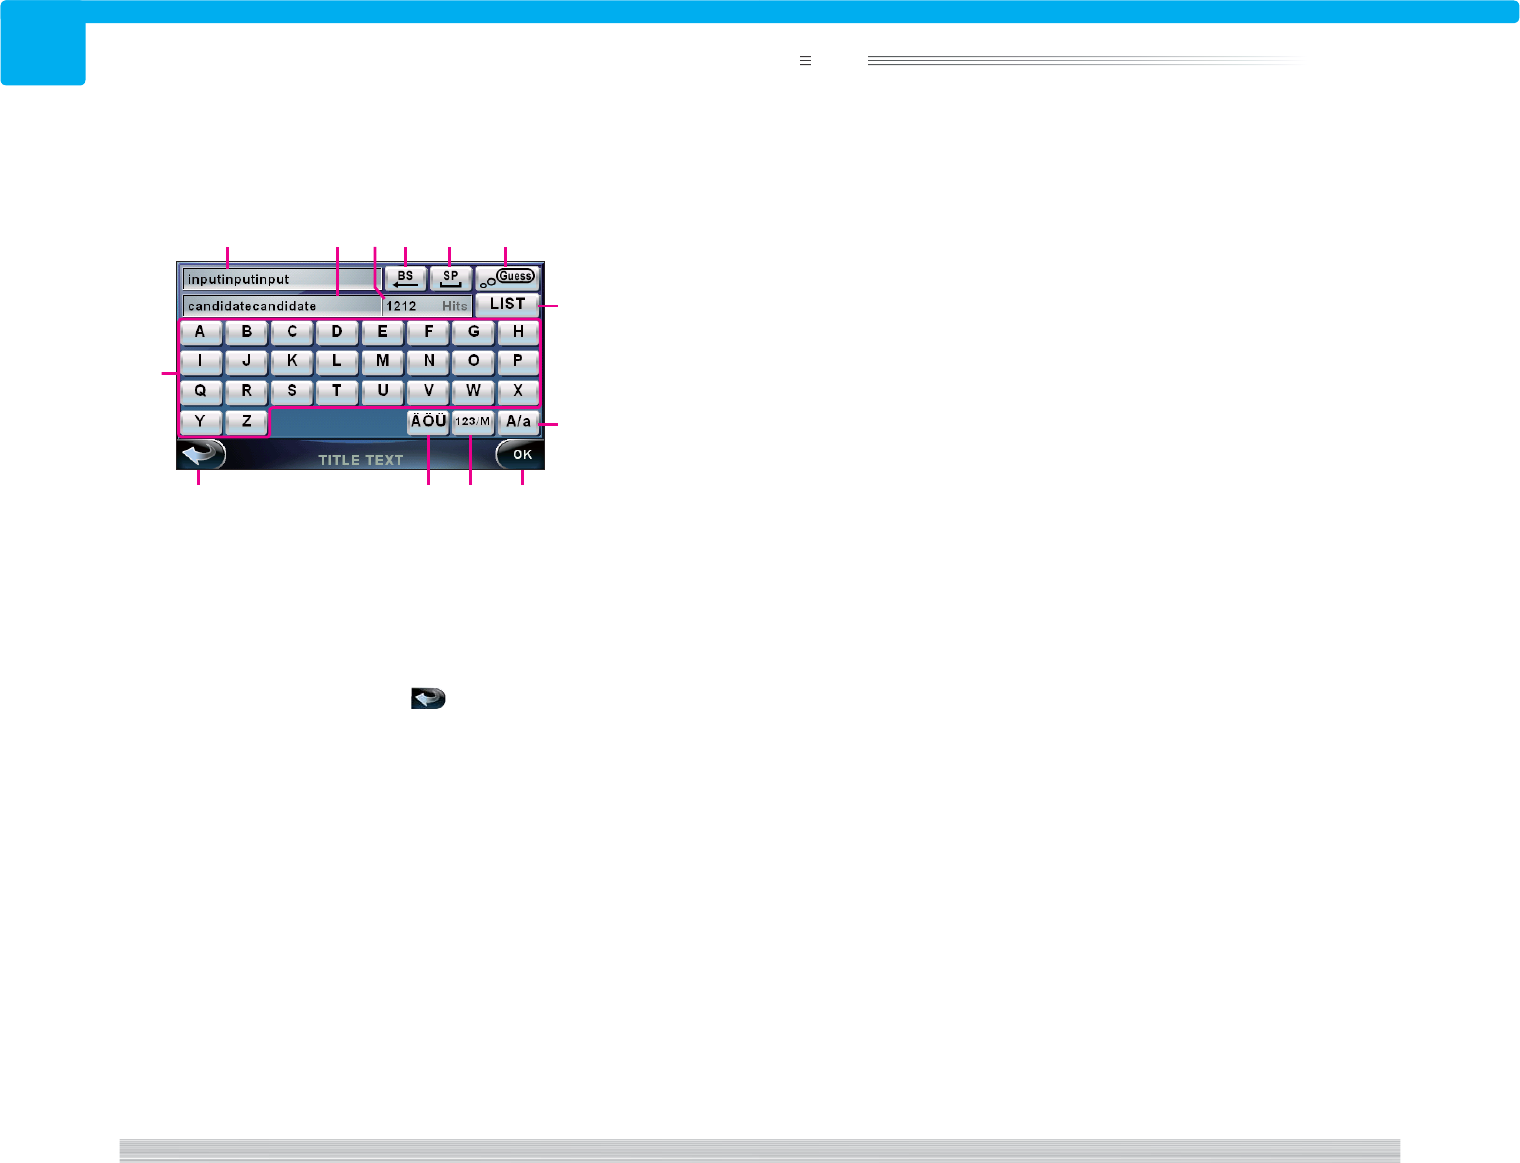
Address information input screen details
The address information input selection screen appears when you select the button of the item
to enter on the address input selection screen.
Enter the address information with characters on this screen.
note
• Fuzzy search can only be turned on/off with [Guess] during City Name input.
1 Input
Select to enter the item selected in the
address input selection screen.
2 Candidate
Select to display the candidates starting
with the entered letter.
3 Hits
Select to display the number of database
hits.
4 [BS]
Select to delete the previously entered
letter.
5 [SP]
Select to enter a space.
6 [Guess]
Select to turn On/Off fuzzy search for City
Name input.
7 [LIST]
Select to display a list of locations found in
the database.
8 [A/a]
Select to switch between uppercase and
lowercase.
9 Keyboard
Enter characters.
0
Select to cancel entering and return to the
Search menu.
- [ÄÖÜ]
Select to display the accented character
keyboard.
= [123/M]
Select to switch between numeric
keyboard and alphabetic keyboard.
~ [OK]
Select to return to the Search menu.
Address information input screen
<NW1100a>
16
~
7
0
4
8
-
5
=
9
23
58
page Where 59
page
Where
206
206
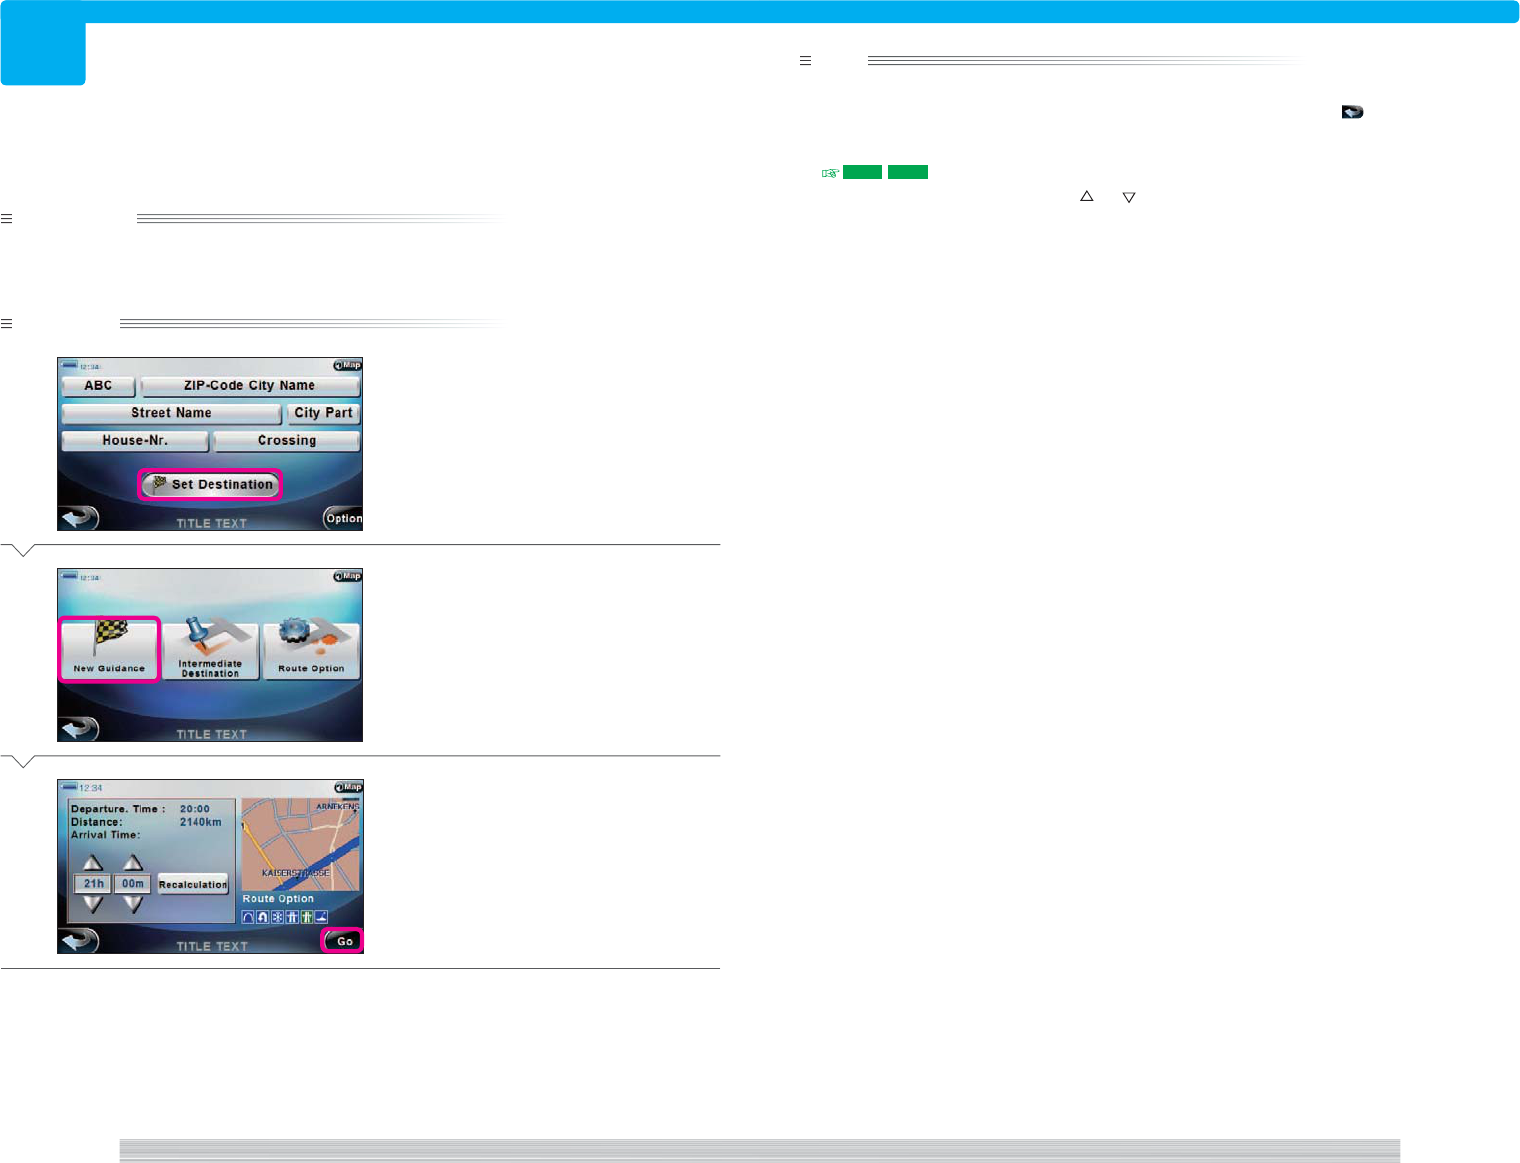
Preparation
Have the location to set as destination searched.
Operation
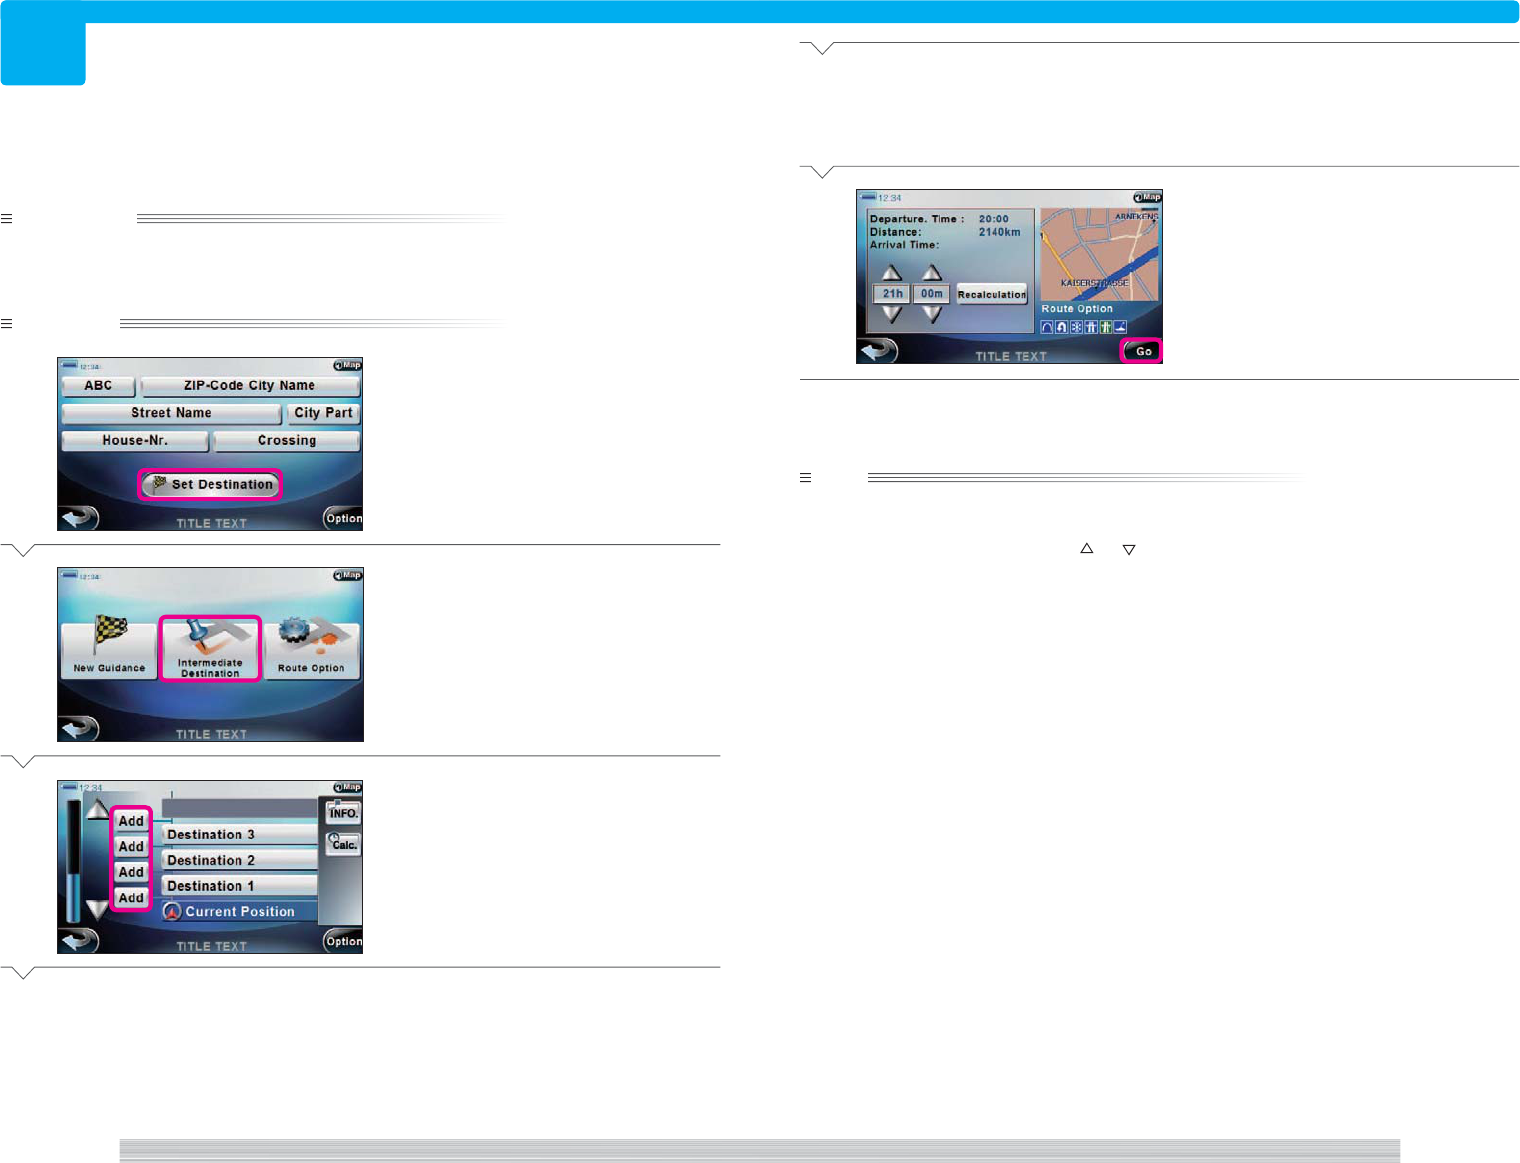
1
Select [Set Destination].
2
Select [New Guidance].
A tour route is created and set as destination.
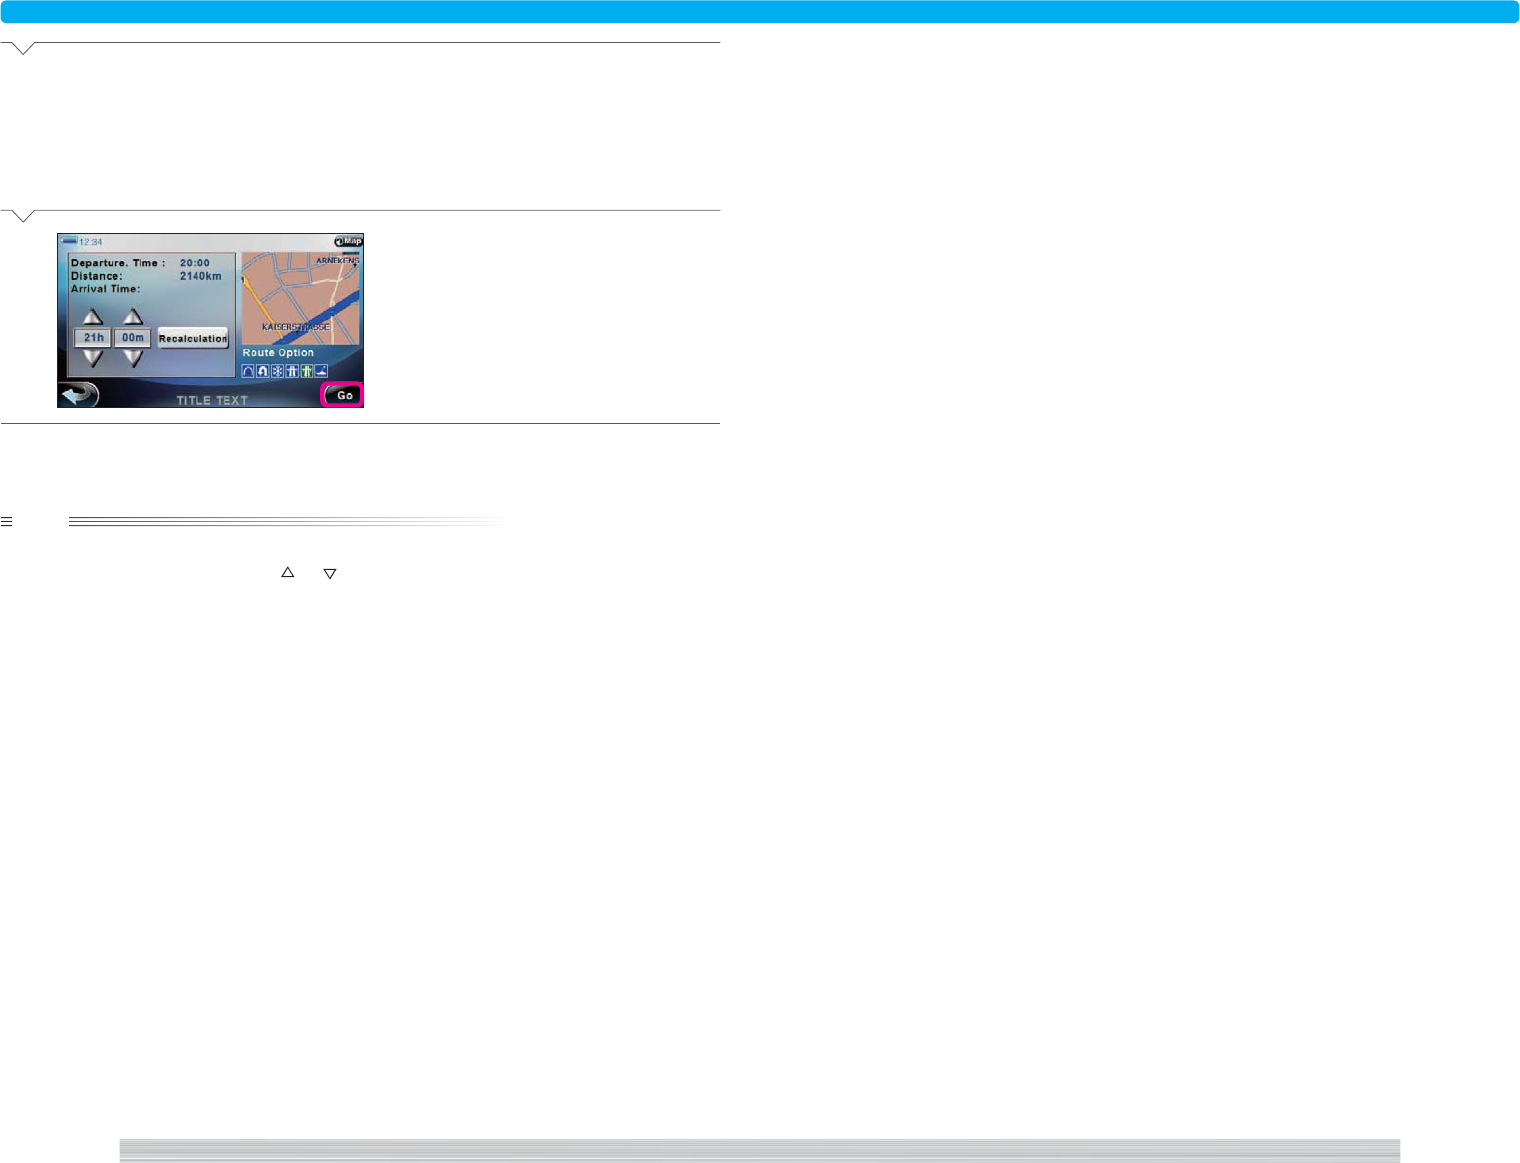
3
Select [Go] to start route guide.
Returns you to the current map screen and
displays the drive route appears.
Complete
Start route guide setting the searched location as Final
Destination
Setting the searched location as the Final destination of Short tour.
note
• To set the short tour, first set the Final destination.
• To add an intermediate destination without starting route guide, repeat selecting until the Search menu
appears.
• You can set the drive route search condition by selecting [Route Option] in
2
.
312 , 313
• Set the desired arrival time by selecting [ ] or [ ] in
3
and select [Recalculation] to recalculate and display
the start time.
• The screen in
1
is for address search, but you can also select [Set Destination] in the search screen for other
locations to display the screen in
2
and set the searched location as the destination.
<NW1300>
<NW1310a>
<NW1000>
60
page Where 61
page
Where
207
207
Preparation
Have the location to set as Intermediate Destination searched.
Operation
1
Select [Set Destination].
2
Select [Intermediate Destination].
3
Select [Add] for the destination to
add.
Next Page
Start route guide setting the searched location as
Intermediate Destination
Setting the searched location as the Intermediate destination of Short tour.
4
Select [Calc.].
The drive route is searched based on the cur-
rent tour route.
5
Select [Go] to start route guide.
This returns you to the current map screen
and displays the drive route on the map.
Complete
note
• The screen in
1
is for address search, but you can also select [Set Destination] in the search screen for other
locations to display the screen in
2
and set the searched location as the destination.
• Set the desired arrival time by selecting [ ] or [ ] in
5
and select [Recalculation] to recalculate and display
the start time.
<NR1000a>
<NW1300>
<NW1310a>
<NW1000>

62
page Where 63
page
Where
208
208
Preparation
Have the location to add to Favorites searched.
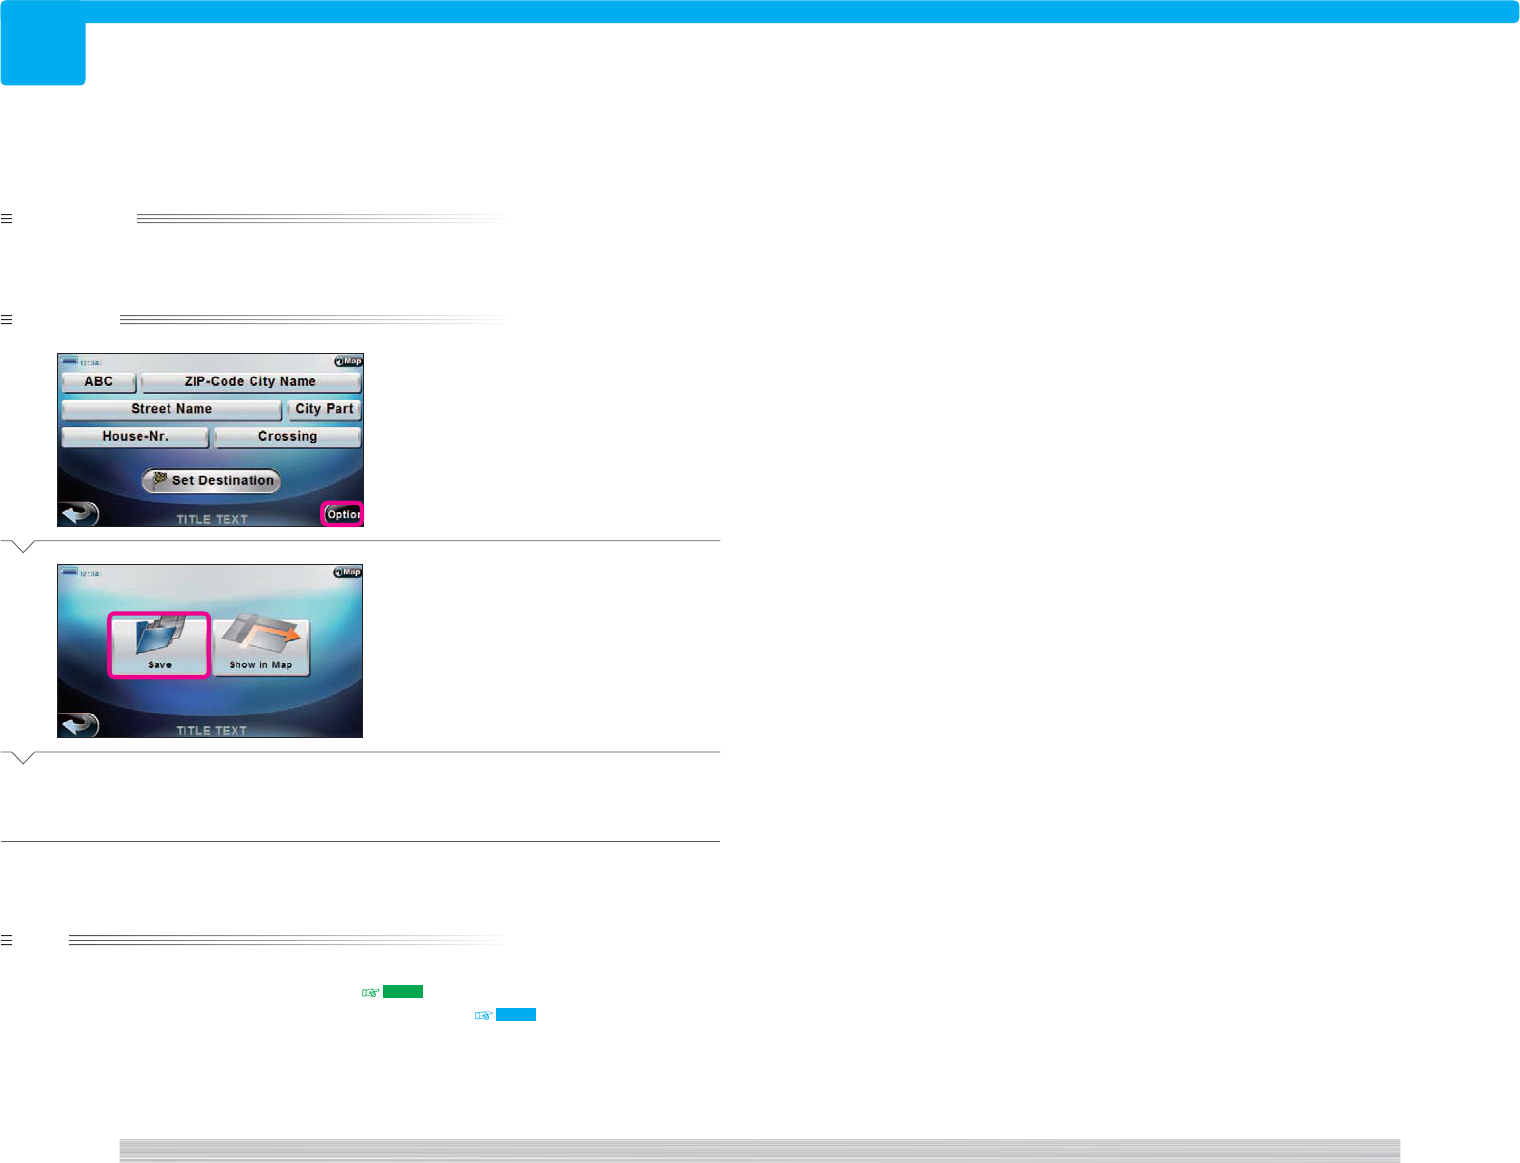
Operation
1
Select [Option].
2
Select [Show in Map].
The Scroll map screen appears.
Complete
Check the searched location on map
Displaying the searched location on the scroll map screen.
note
• Select [Set] in
2
to set the location displayed on the map as destination. 206 , 207
• Select [Add] in
2
to add the location displayed on the map to Favorites. 209
<NW1200>
<NW1000>
<NM1000>
64
page Where 65
page
Where
209
209
Preparation
Have the location to add to Favorites searched.
Operation
1
Select [Option].
2
Select [Save].
A confirmation message is displayed.
3
Select [YES].
Complete
note
• You can add up to 50 locations to Favorites.
• You can also add tour route destinations to Favorites. 309
• Select [Show in Map] in
2
to display the searched location on the map. 208
Add searched location to Favorites
Adding the searched location to Favorites.
<NW1200>
<NW1000>
66
page Where 67
page
Where
210
210
Preparation
Have the Search menu displayed.
115 201
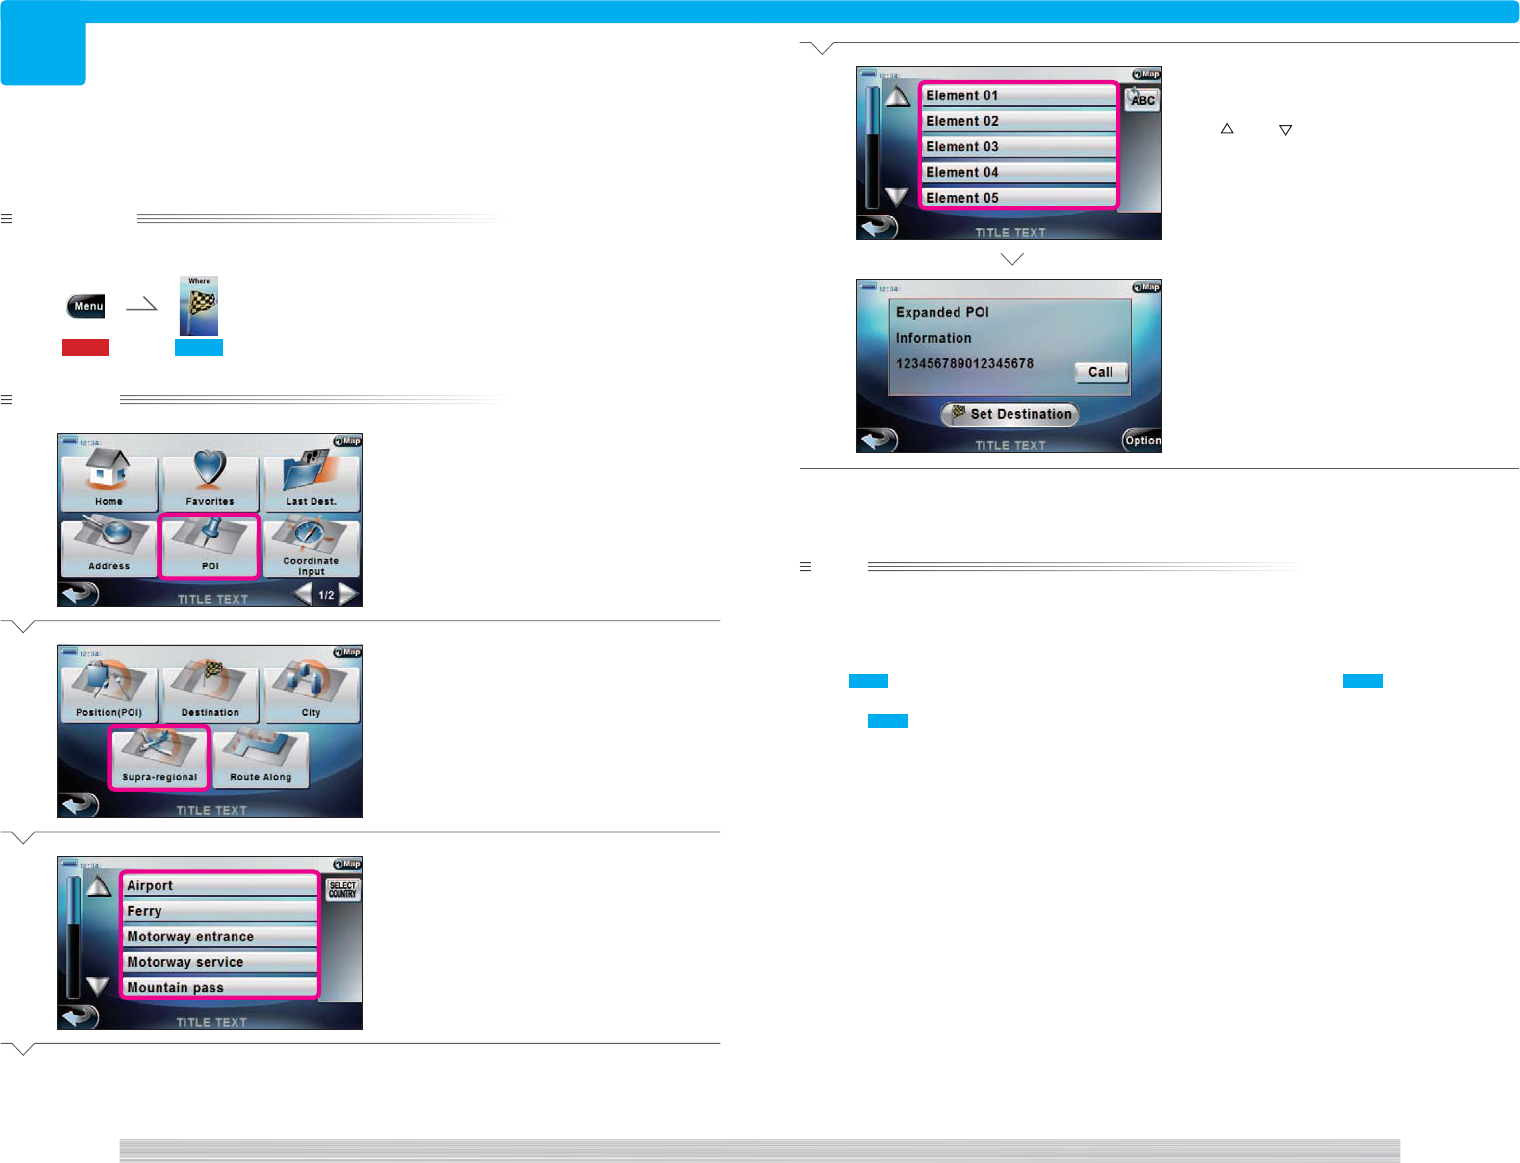
Operation
1
Select [POI].
2
Select [Supra-regional].
3
Select the category button of the
point of interest.
Next Page
Search point of interest
Searching for the location in facilities related to traffic.
4
Select the button of the point of
interest.
Use [ ] and [ ] to scroll the list.
The POI information screen appears.
Complete
note
• The current sort order is shown on the right of the list with buttons in
4
. Select these buttons to change the
sort order of the list as Alphabetical = Distance = Sort off.
• If a cell phone is connected, you can select [Call] in
4
to call the searched location.
• You can also set the searched location as the destination or add it to Favorites.
See 206 to set the searched location as the Final destination (Short tour) or see 207 to set as Destination
(Round trip tour) or Intermediate destination (Short tour).
Or, see 209 to add to Favorites.
<NW0000a>
<NW2000>
<NW2300a>
<NW2111>
<NW2112>
68
page Where 69
page
Where
211
211
Preparation
Have the Search menu displayed.
115 201
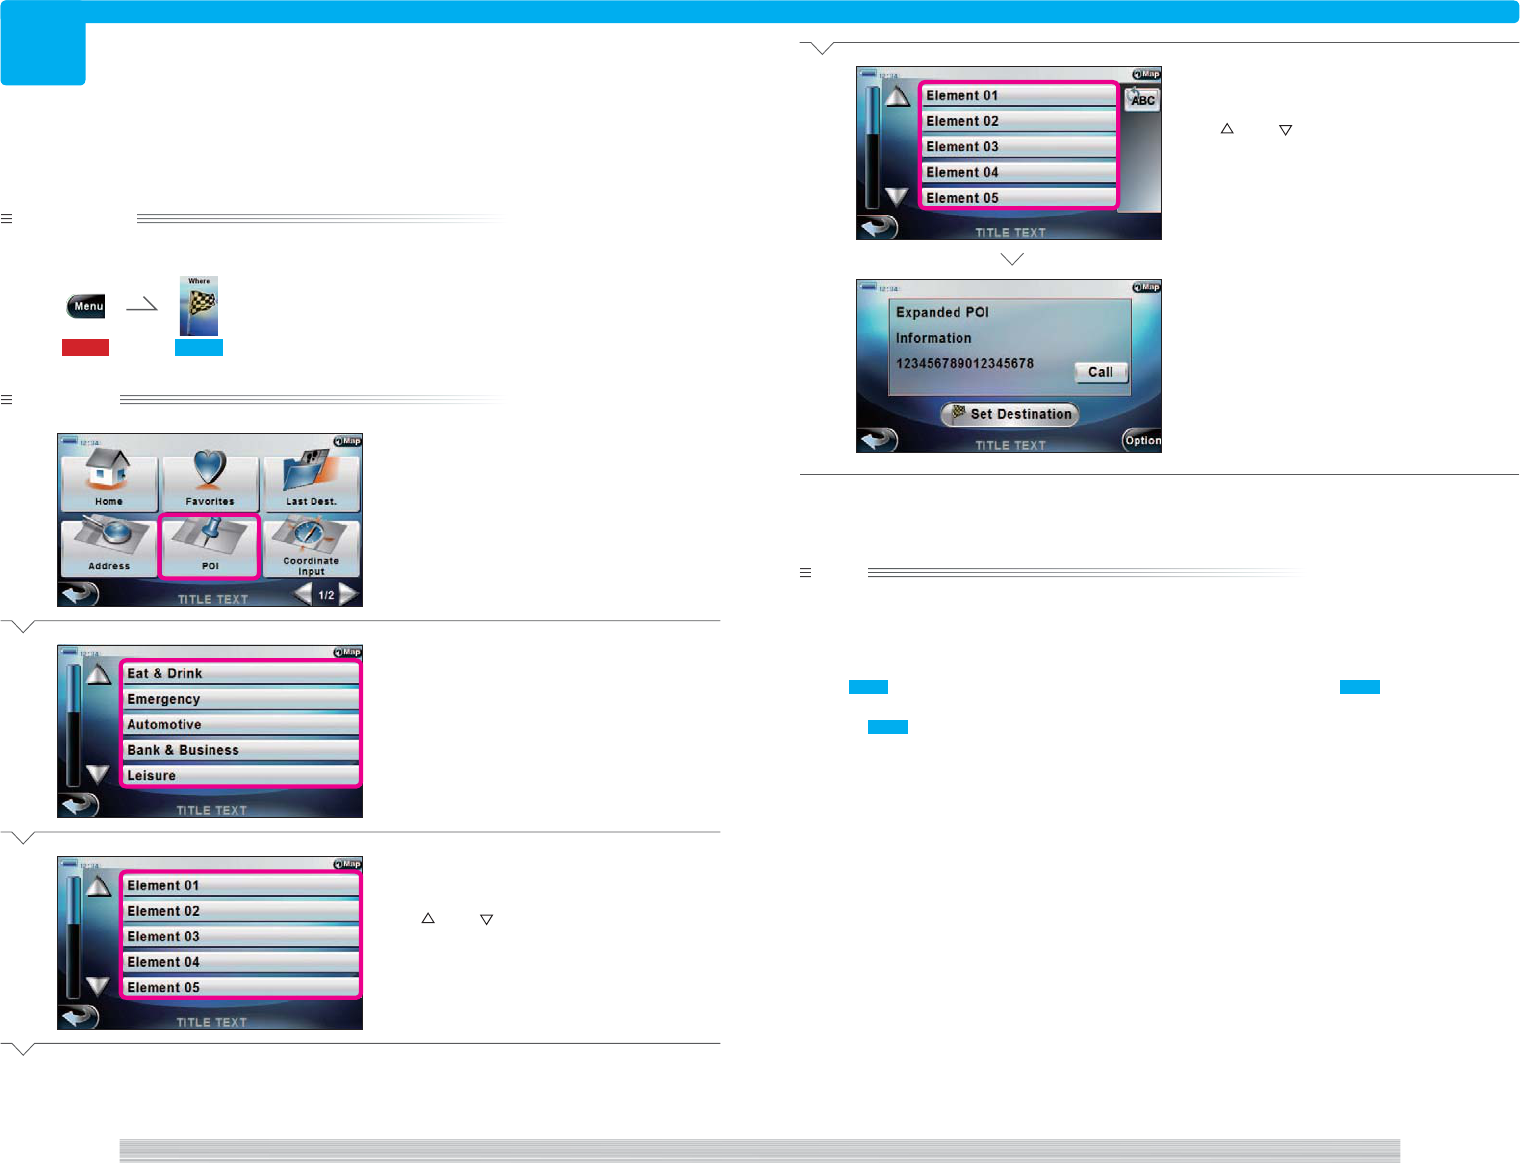
Operation
1
Select [POI].
2
Select the category button of the
point of interest.
3
Select the sub-category button of the
point of interest.
Use [ ] and [ ] to scroll the list.
Next Page
Search location by point of interest type
Searching for points of interest (POI Search).
4
Select the button of the point of
interest.
Use [ ] and [ ] to scroll the list.
The POI information screen appears.
Complete
note
• The current sort order is shown on the right of the list with buttons in
4
. Select these buttons to change the
sort order of the list as Alphabetical = Distance = Sort off.
• If a cell phone is connected, you can select [Call] in
4
to call the searched location.
• You can also set the searched location as the destination or add it to Favorites.
See 206 to set the searched location as the Final destination (Short tour) or see 207 to set as Destination
(Round trip tour) or Intermediate destination (Short tour).
Or, see 209 to add to Favorites.
<NW0000a>
<NW2100a>
<NW2110>
<NW2111>
<NW2112>
70
page Where 71
page
Where
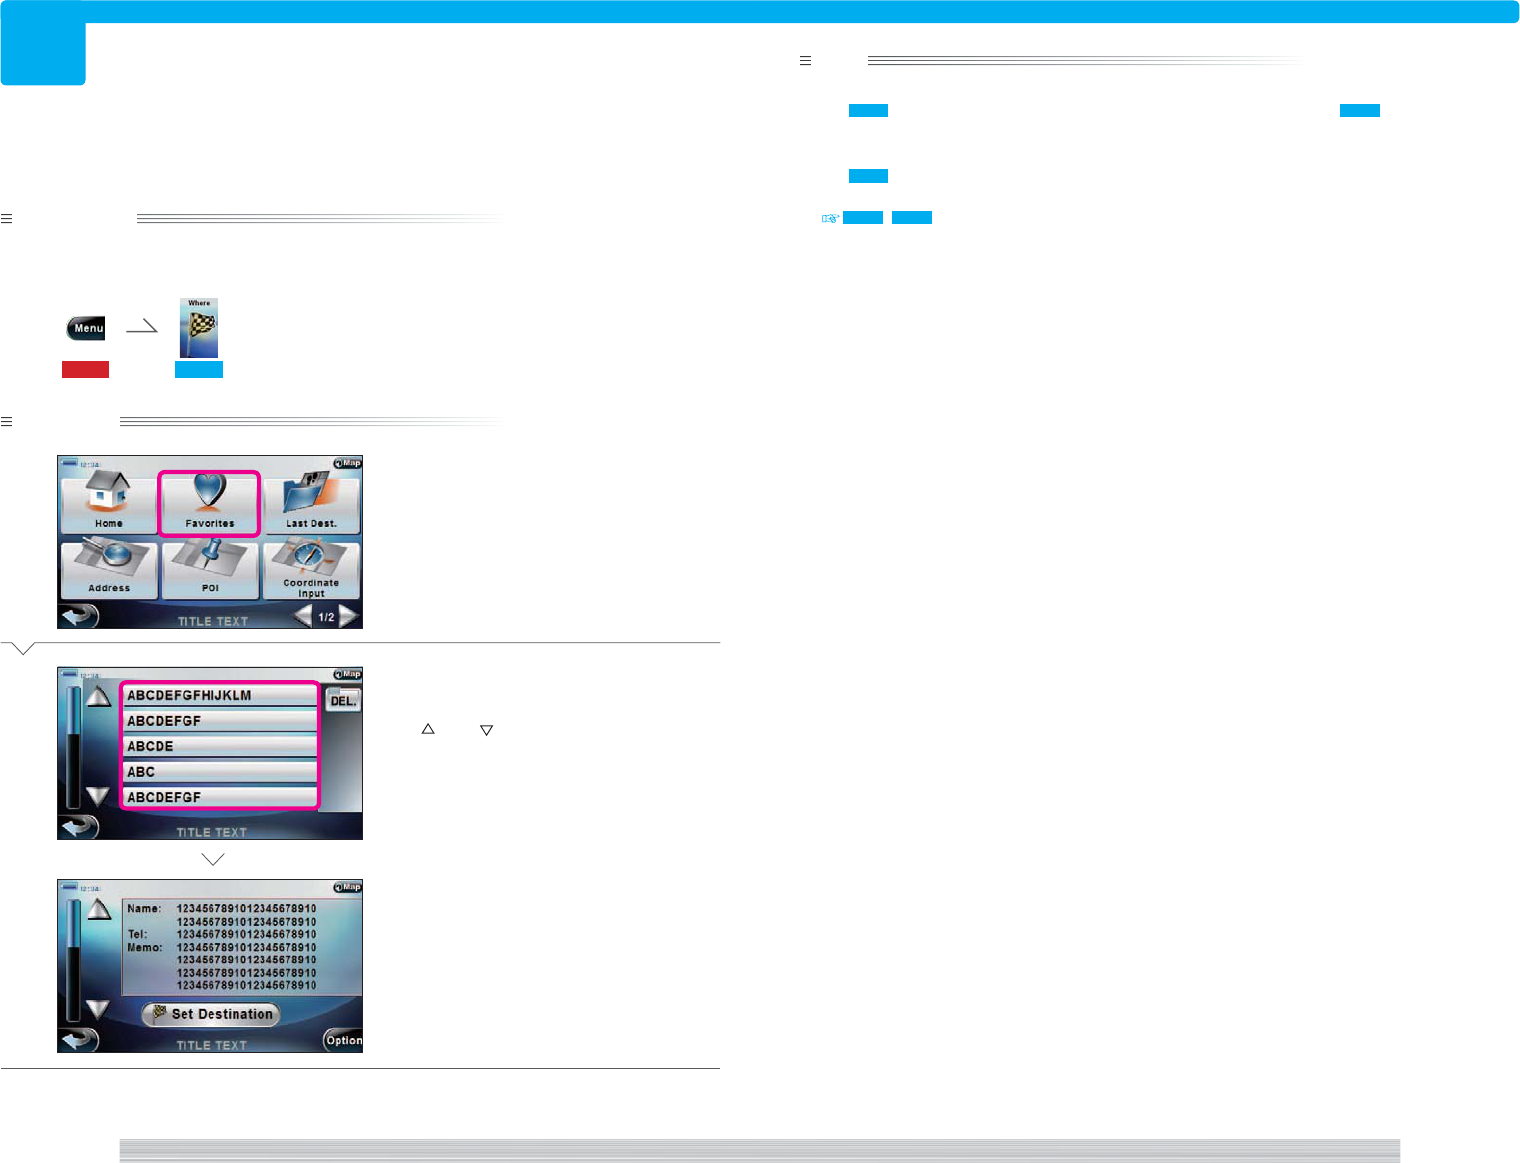
212
212
Preparation
Have your destination added to Favorites.
Have the Search menu displayed.
115 201
Operation
1
Select [Favorites].
2
Select the button of the desired
location.
Use [ ] and [ ] to scroll the list.
The Favorites information screen appears.
Complete
Search from Favorites
Searching for destination from saved Favorites.
note
• You can set the searched location as the destination.
See 206 to set the searched location as the Final destination (Short tour) or see 207 to set as Destination
(Round trip tour) or Intermediate destination (Short tour).
• If you selected [DEL.] in
2
, all locations in Favorites are deleted.
• See 209 for information on how to add to favorites.
• You can edit the Favorites by selecting [Option] in the Favorites information screen in
2
.
213 , 215
<NW0000a>
<NW3000>
<NW3100>
72
page Where 73
page
Where
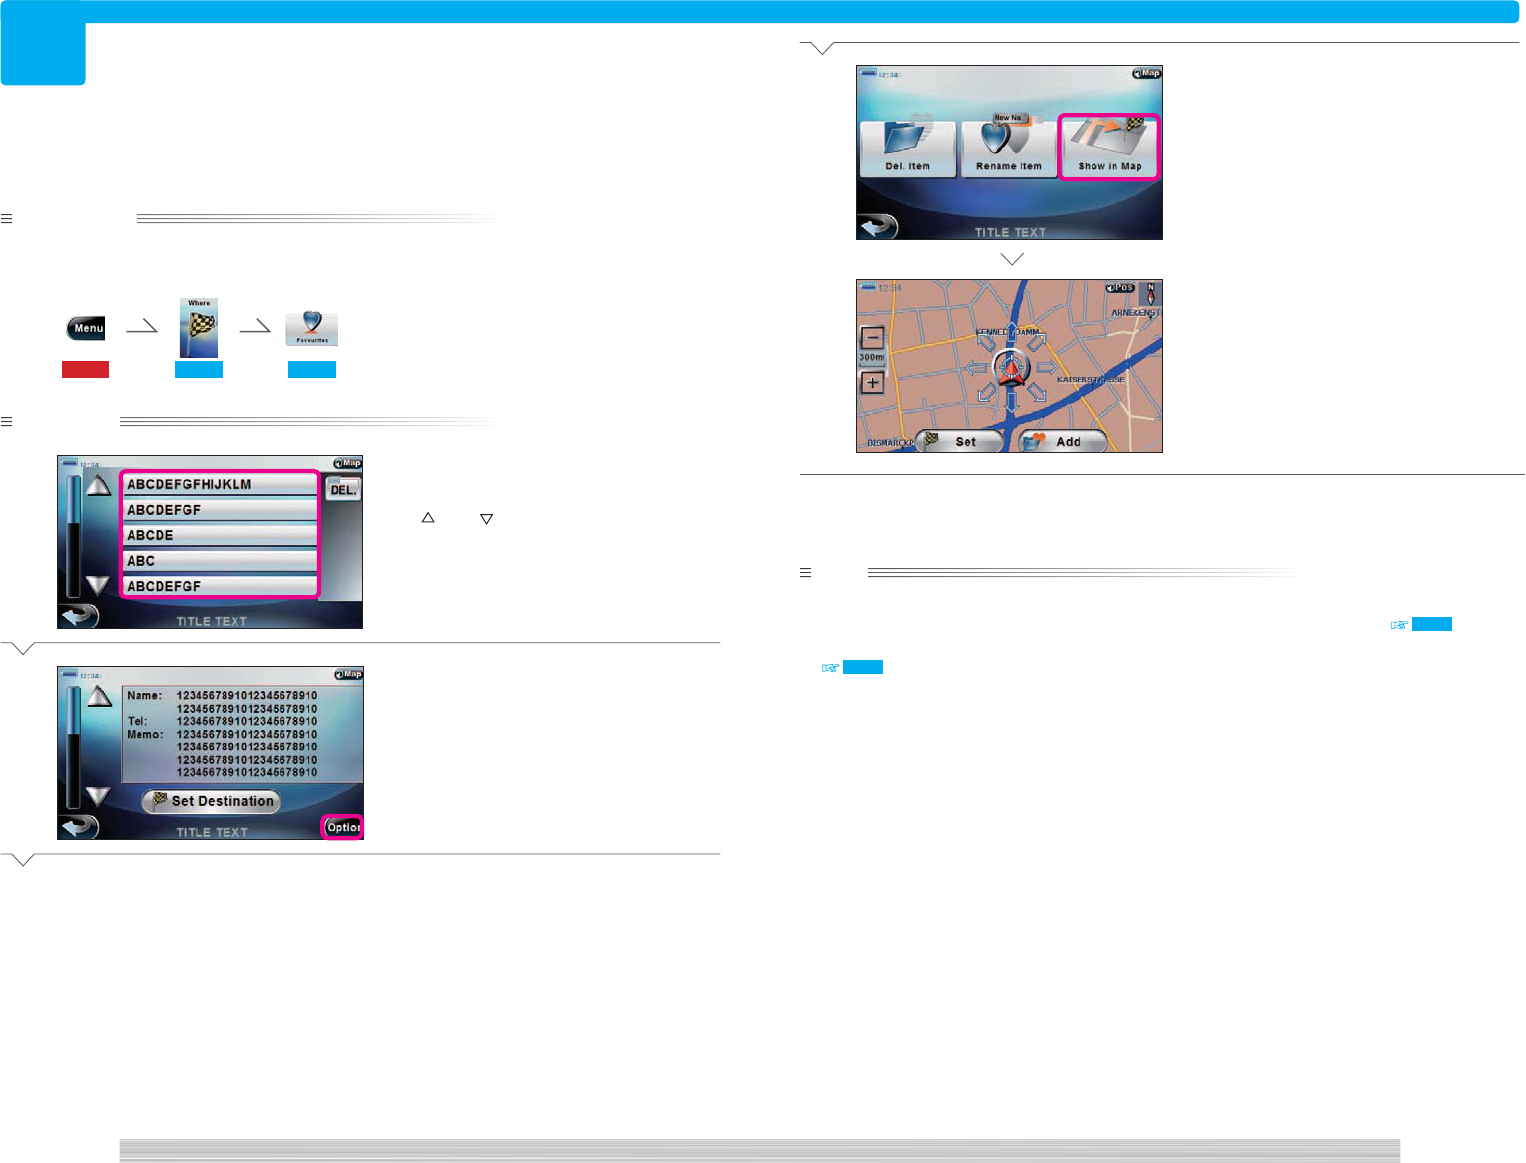
213
213
Preparation
Have your destination added to Favorites.
Have the Favorites list displayed.
115 201 212
Operation
1
Select the button of the location to
check.
Use [ ] and [ ] to scroll the list.
2
Select [Option].
Next Page
Check Favorite location on map
Checking the location in Favorites on the map.
3
Select [Show in Map].
The Scroll map screen appears.
Complete
note
• If you selected [DEL.] in
2
, all locations in Favorites are deleted.
• If you select [Del. Item] in
3
, you can delete the location you selected in
1
from Favorites. 215
• If you select [Rename Item] in
3
, you can edit the information of the location you selected in
1
.
214
<NW3110>
<NW3000>
<NW3100>
<NM1000>
74
page Where 75
page
Where
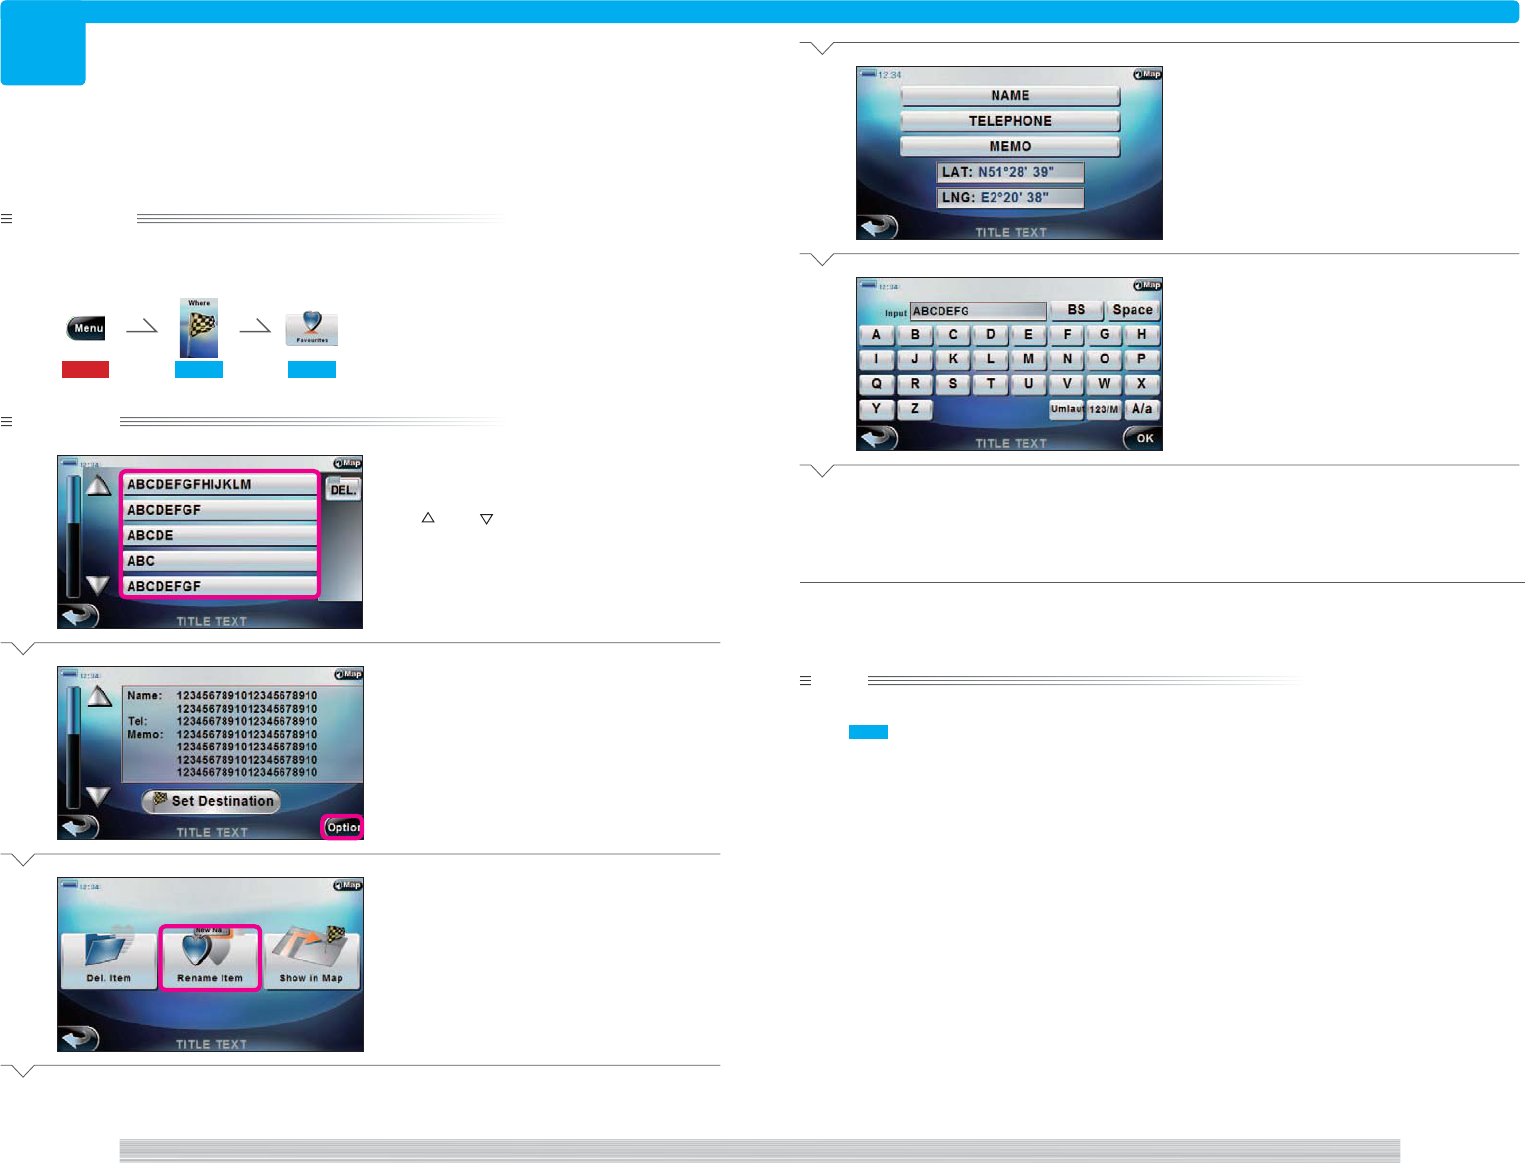
214
214
Preparation
Have the memory location added to Favorites.
Have the Favorites list displayed.
115 201 212
Operation
1
Select the button of the location to
edit the information.
Use [ ] and [ ] to scroll the list.
2
Select [Option].
3
Select [Rename Item].
Next Page
Edit Favorite location information
Editing information of location in Favorites.
4
Select the button of the item to edit.
5
Enter the information.
6
Select [OK].
Returns you to the screen in
4
.
Complete
note
• If you selected [DEL.] in
1
, you can delete all the locations in Favorites.
• See 205 for information on how to use the keyboard.
<NW3112a>
<NW3110>
<NW3111>
<NW3000>
<NW3100>
76
page Where 77
page
Where
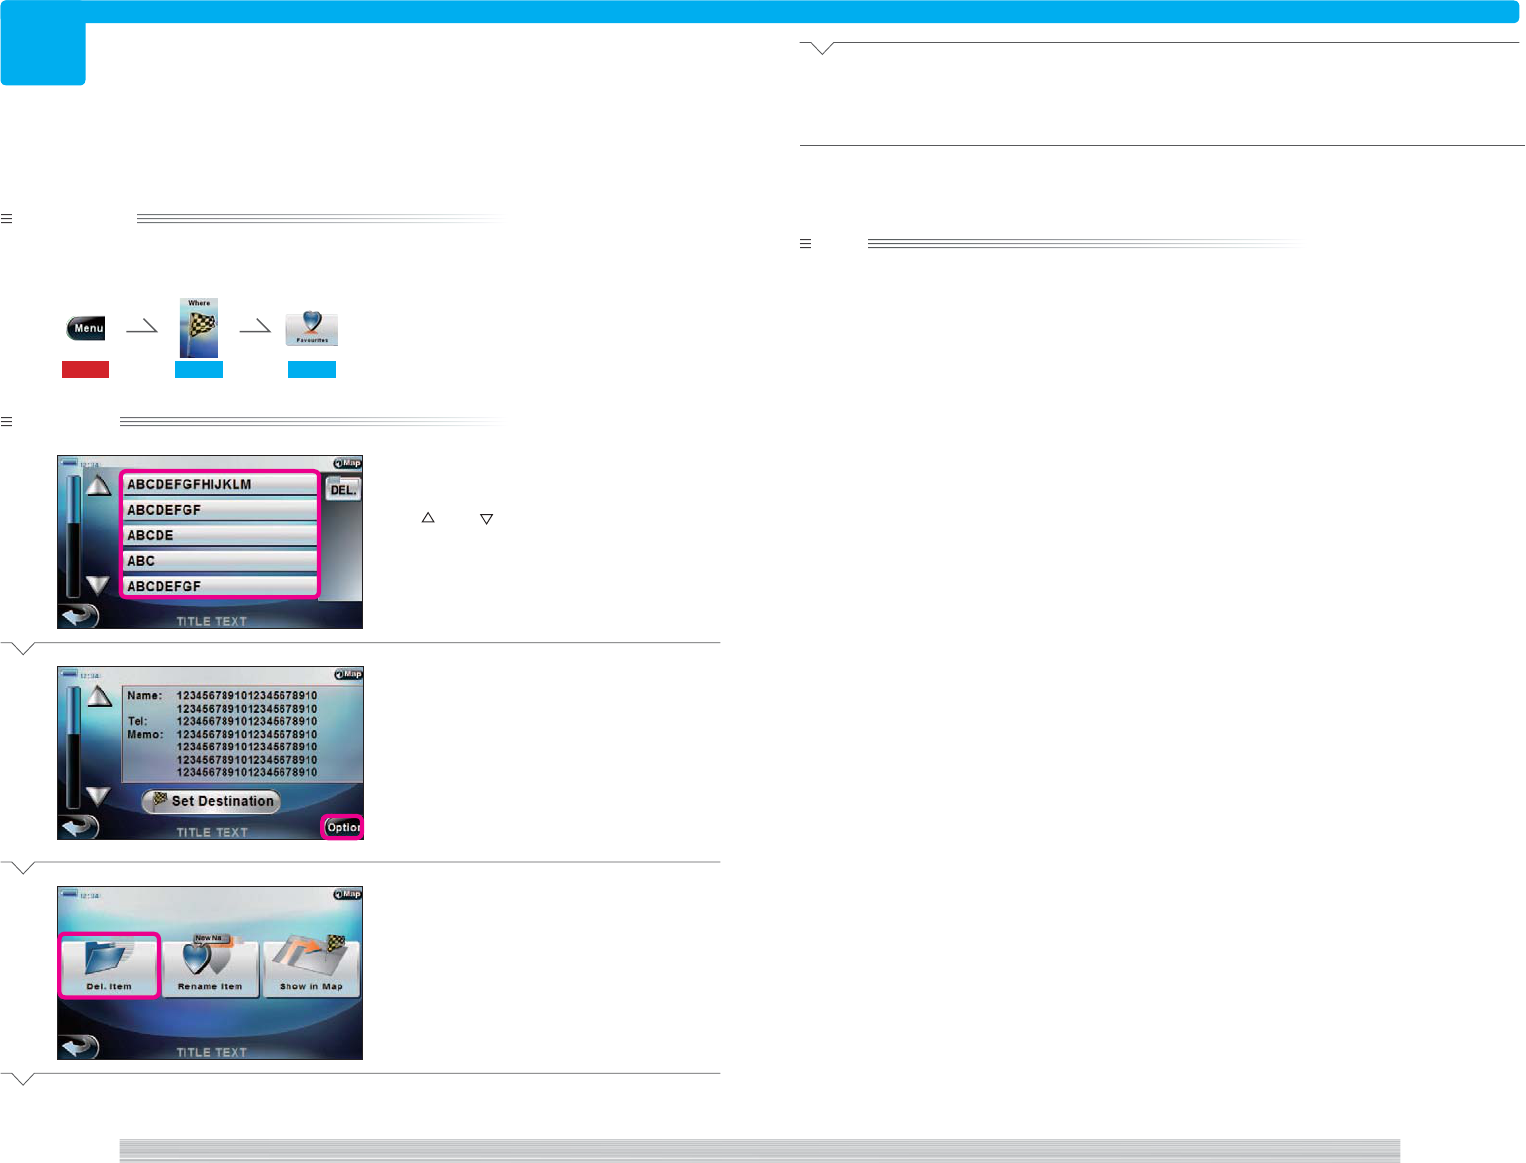
215
215
Preparation
Have the memory location added to Favorites.
Have the Search menu displayed.
115 201 212
Operation
1
Select the button of the location to
delete.
Use [ ] and [ ] to scroll the list.
2
Select [Option].
3
Select [Del. Item].
A confirmation message is displayed.
Next Page
Delete Favorites
Deleting location in Favorites.
4
Select [OK].
Returns you to the screen in
1
.
Complete
note
• If you selected [DEL.] in
1
, you can delete all the locations in Favorites.
<NW3110>
<NW3000>
<NW3100>
78
page Where 79
page
Where
216
216
Preparation
Have the Search menu displayed.
115 201
Operation
1
Select [Last Dest.].
2
Select the button of the desired
location.
Use [ ] and [ ] to scroll the list.
The Previously visited destination information
screen appears.
Complete
Search from previously visited destination
The destination you searched and visited along the way as you receive route guide are stored as
previously visited destination.
You can search for destination from stored previously visited destinations.
note
• If you select [DEL.] in
2
, you can delete all previous destinations.
• You can also set the searched location as the destination or add it to Favorites.
See 206 to set the searched location as the Final destination (Short tour) or see 207 to set as Destination
(Round trip tour) or Intermediate destination (Short tour).
Or, see 209 to add to Favorites.
• Select [Option] on the Previously visited destination information screen in
2
to edit previous destinations.
217
<NW0000a>
<NW4100>
<NW4000>
80
page Where 81
page
Where
217
217
Preparation
Have the Search menu displayed.
115 201
Operation
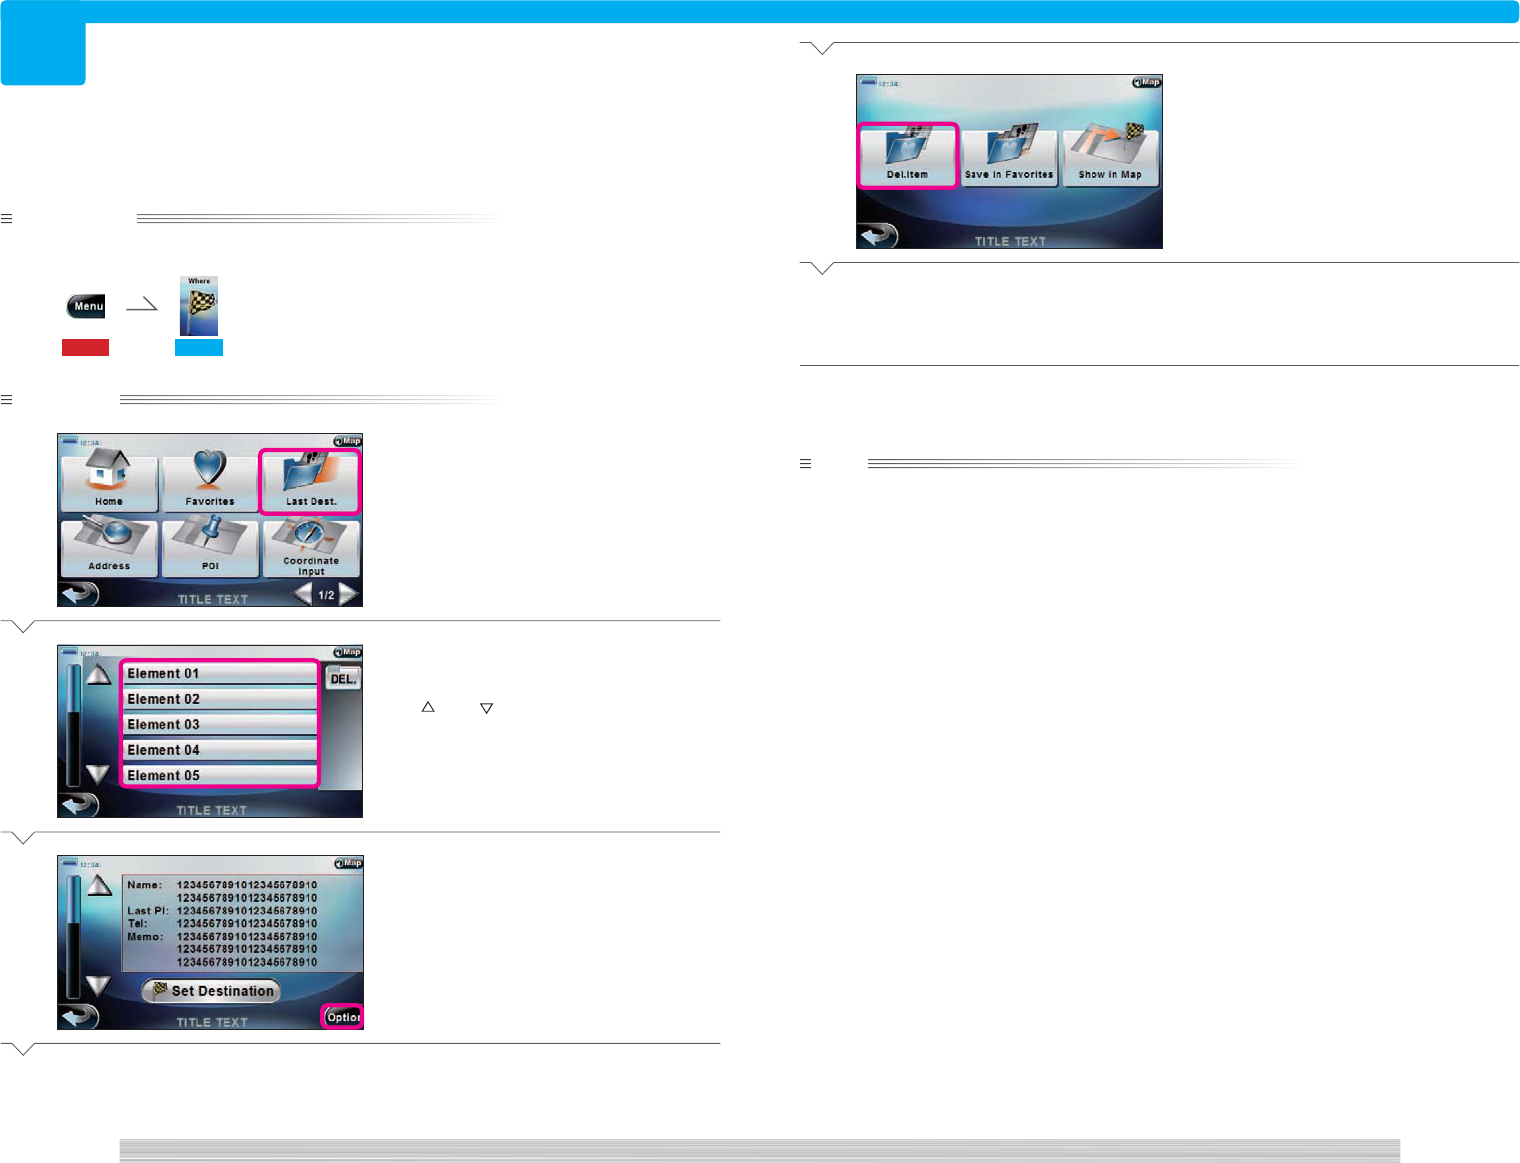
1
Select [Last Dest.].
2
Select the button of the previous
destination to edit.
Use [ ] and [ ] to scroll the list.
3
Select [Option].
Next Page
Edit previously visited destination
Editing stored previously visited destination.
4
Select [Del. Item].
A confirmation message is displayed.
5
Select [YES].
The previously visited destination selected in
2
is deleted and you are returned to
2
.
Complete
note
• Select [DEL.] in
2
to delete all previous destinations.
• Select [Save in Favorites] in
4
to add the previously visited destination selected in
2
to Favorites.
• Select [Show in Map] in
5
to check the previously visited destination selected in
2
on the map.
<NW0000a>
<NW4110>
<NW4000>
<NW4100>
82
page Where 83
page
Where
218
218
Preparation
Have the Search menu displayed.
115 201
Operation
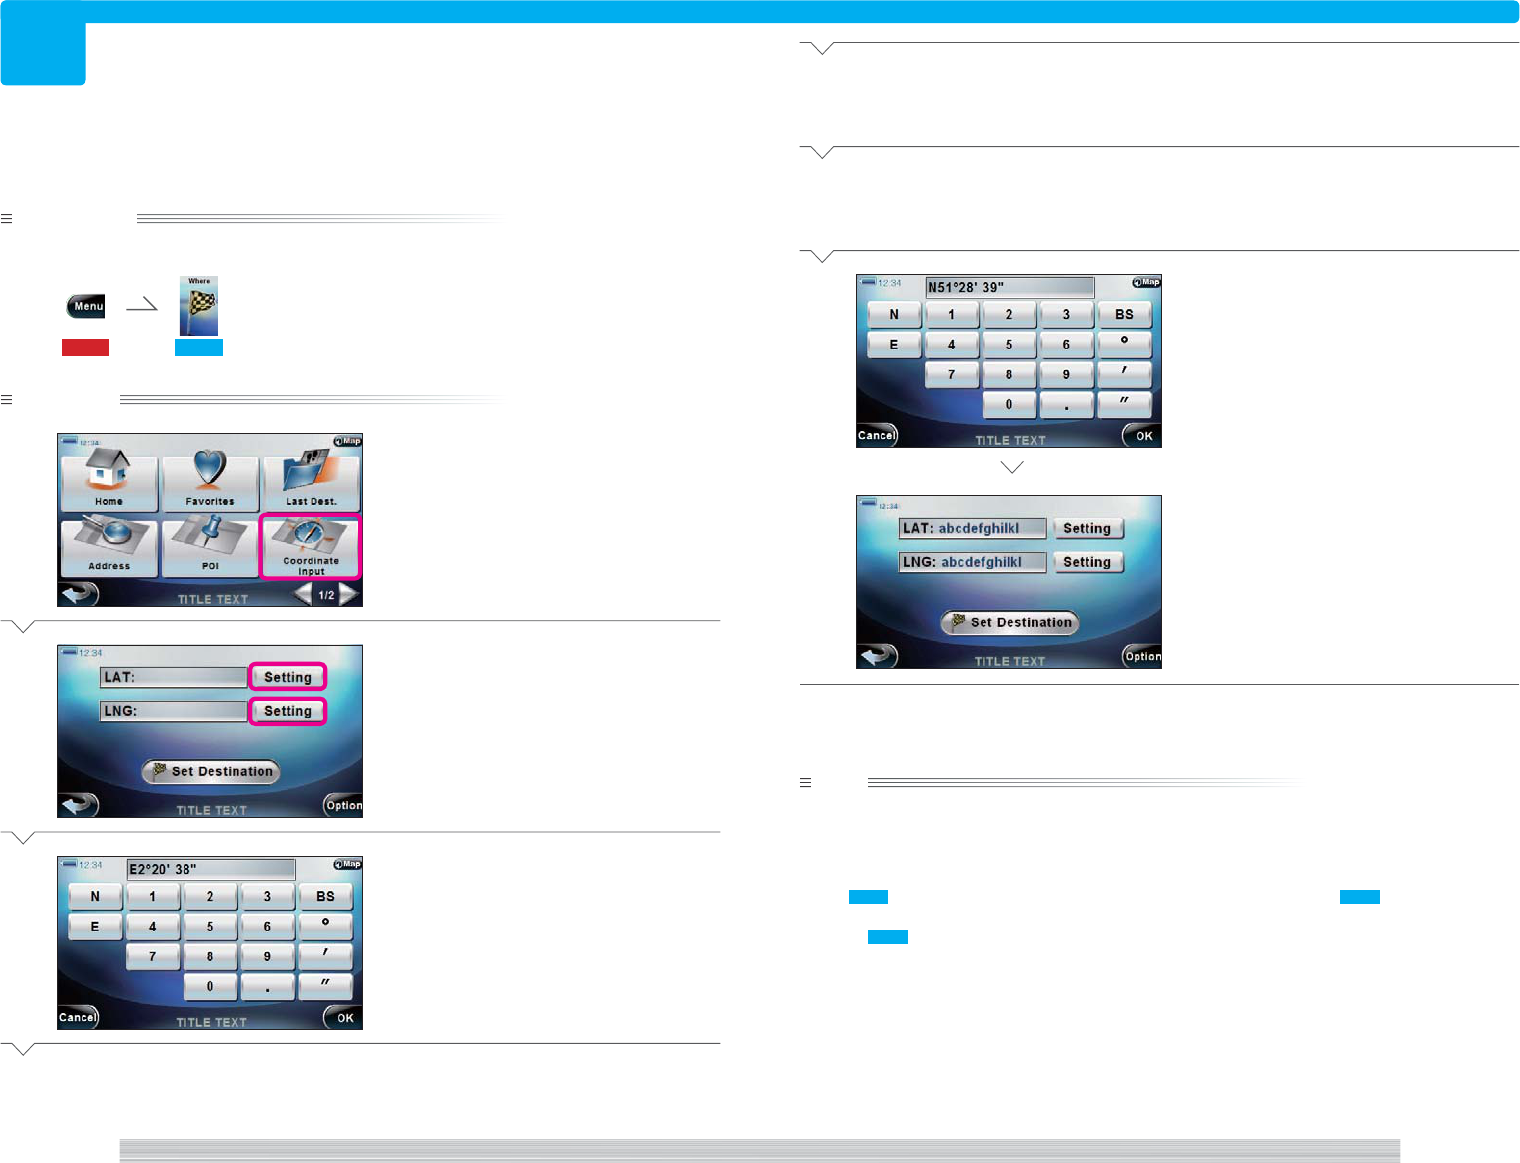
1
Select [Coordinate Input].
2
Select [Setting] of the item to enter
longitude or latitude.
3
Enter the longitude or latitude in the
following format.
Example: If East longitude 2 degrees 2 min.
38 sec.
[E]2[°]20[']38["]
Next Page
Search by coordinates
Searching locations by coordinates (Coordinate Search).
4
Select [OK].
5
Repeat
2
and
3
to enter longitude
and latitude.
6
Select [OK].
Complete
note
• You can enter longitude or latitude first.
• If you select [Setting.] for Latitude in
2
, [N] (North latitude) and [S] (South latitude) appear in
3
. If you select
[Setting.] for Longitude in
2
, [E] (East longitude) and [W] (West longitude) appear in
3
.
• You can also set the searched location as the destination or add it to Favorites.
See 206 to set the searched location as the Final destination (Short tour) or see 207 to set as Destination
(Round trip tour) or Intermediate destination (Short tour).
Or, see 209 to add to Favorites.
<NW0000a>
<NW5000_1>
<NW5100_1>
<NW5100_2>
<NW5000_2>
84
page Where 85
page
Where
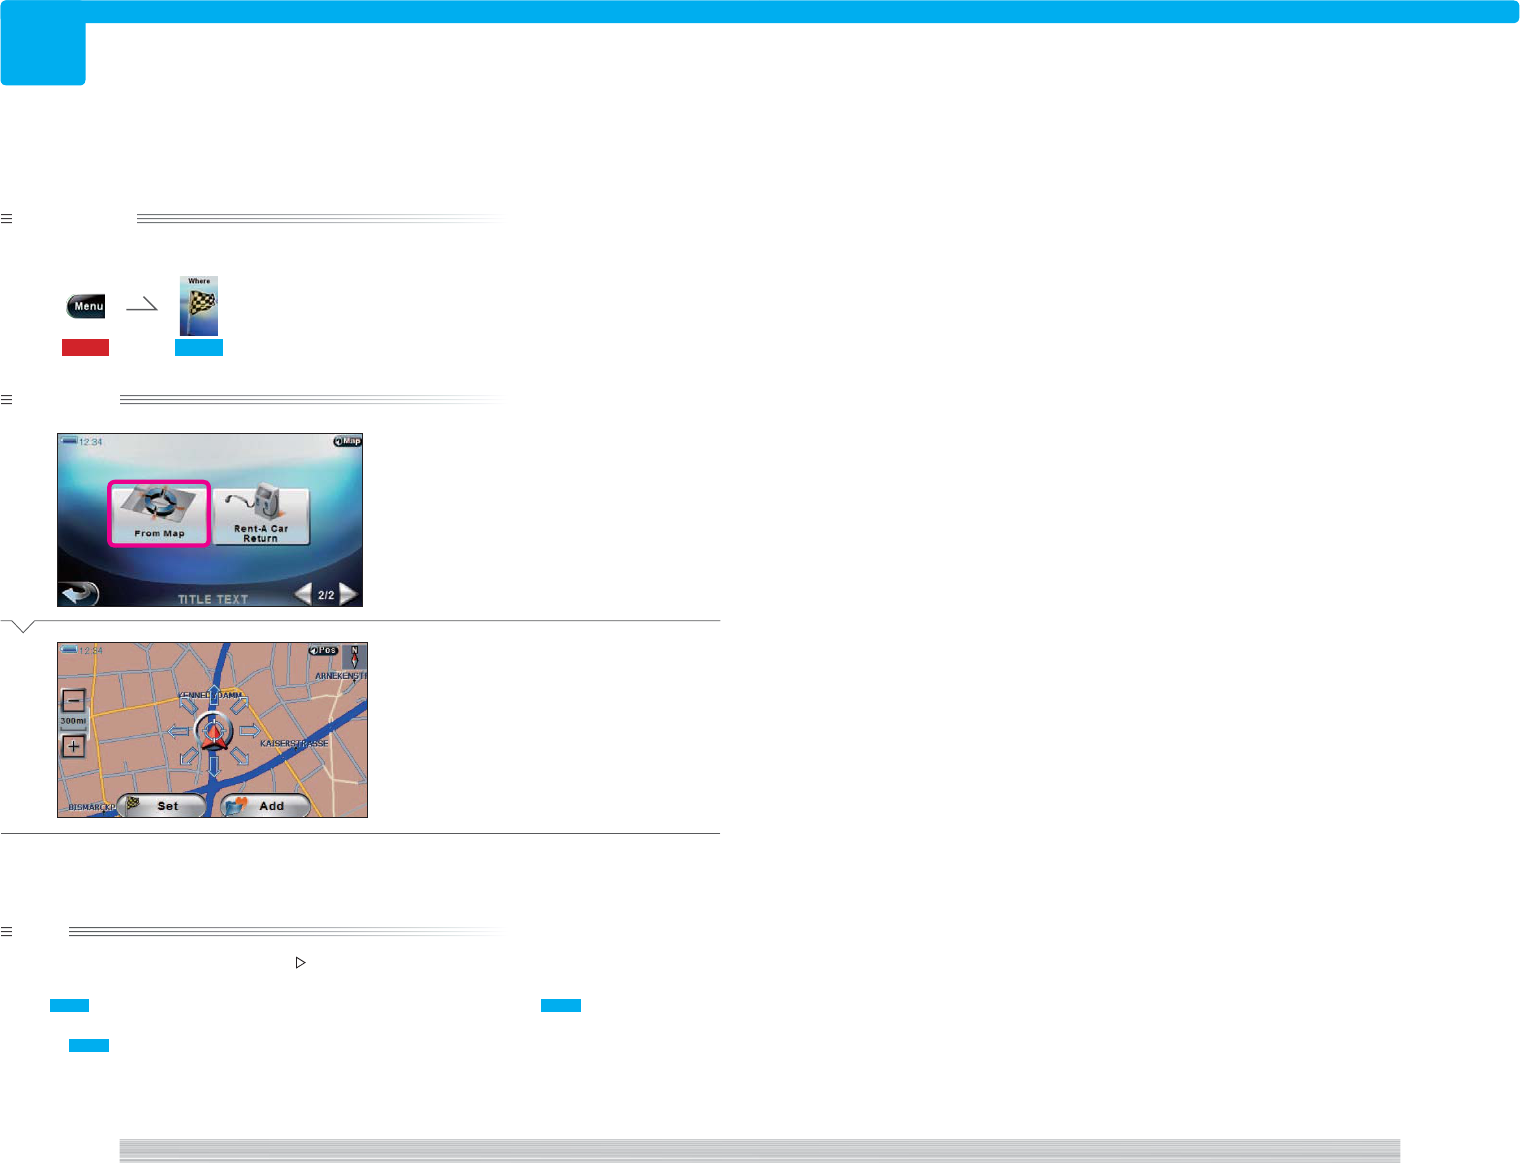
219
219
Preparation
Have the Search menu displayed.
115 201
Operation
1
Select [From Map].
2
Scroll the map and place the cursor
on the desired location.
Complete
note
• If [From Map] does not appear in
1
, select [ ].
• You can also set the searched location as the destination or add it to Favorites.
See 206 to set the searched location as the Final destination (Short tour) or see 207 to set as Destination
(Round trip tour) or Intermediate destination (Short tour).
Or, see 209 to add to Favorites.
Search from map
Searching for destination from a map.
<NW0000b>
<NM1000>
86
page Where 87
page
Where
220
220
Preparation
Have the Search menu displayed.
115 201
Operation
1
Select [Rent-A-Car Return].
2
Select the button of the item to enter.
3
Enter the address information.
Next Page
Search for rent-a-car return
Searching for drive route with rent-a-car return as the Final destination and its nearest gas sta-
tion as Intermediate destination.
4
Select [LIST].
5
Select the button of the desired
location.
Use [ ] and [ ] to scroll the list.
6
Select [OK].
7
Select the button of the desired rent-
a-car dealer.
8
Select [Set Destination].
An inquiry message is displayed.
Next Page
<NW0000b>
<NW2200>
<NW1100a>
<NW2200>
<NW2111>
<NW1110>
<NW3100>
88
page Where 89
page
Where
220
9
Select [YES] or [NO].
[YES] : Set the gas station nearest the rent-a-
car parking as Intermediate destination.
[NO] : Set the rent-a-car parking as the nearest
destination.
10
Select [Go] to start route guide.
Returns you to the current map screen and
displays the drive route appears.
Complete
note
• If a cell phone is connected, you can select [Call] on the POI information screen in
8
to make a phone call.
• Set the desired arrival time by selecting [ ] or [ ] in
10
and select [Recalculation] to recalculate and display
the start time.
• The current sort order is shown on the right of the list with buttons in
5
and
7
. Select these buttons to
change the sort order of the list as Alphabetical = Distance = Sort off.
• A list screen may be displayed in
3
.
<NW1310a>
90
page Where 91
page
Where
221
221
Preparation
Have home set.
Have the Search menu displayed.
115 201
Operation
1
Select [Home].
2
Select [New Guidance] or
[Intermediate Destination].
[New Guidance]:
A tour route is created and your home is set as
destination. (
3
)
[Intermediate Destination] :
Home is added as Intermediate destination to
the current route. 207
Next Page
Go home
Searching for drive route to return home or drive route with home as Intermediate destination.
3
Select [Go] to start route guide.
Returns you to the current map screen and
displays the drive route appears.
Complete
note
• If home is not added, select [Home] to display the screen to add home. See 222 for information on adding
home.
• To add home as Intermediate destination, have a tour route created with the destination set.
• You can set the drive route search condition by selecting [Route Option] in
2
.
312 , 313
• Set the desired arrival time by selecting [ ] or [ ] in
3
and select [Recalculation] to recalculate and display
the start time.
<NW0000a>
<NW1300>
<NW1310a>
92
page Where 93
page
Where
222
222
Change/Add home
Preparation
Have the Search menu displayed.
115
Operation
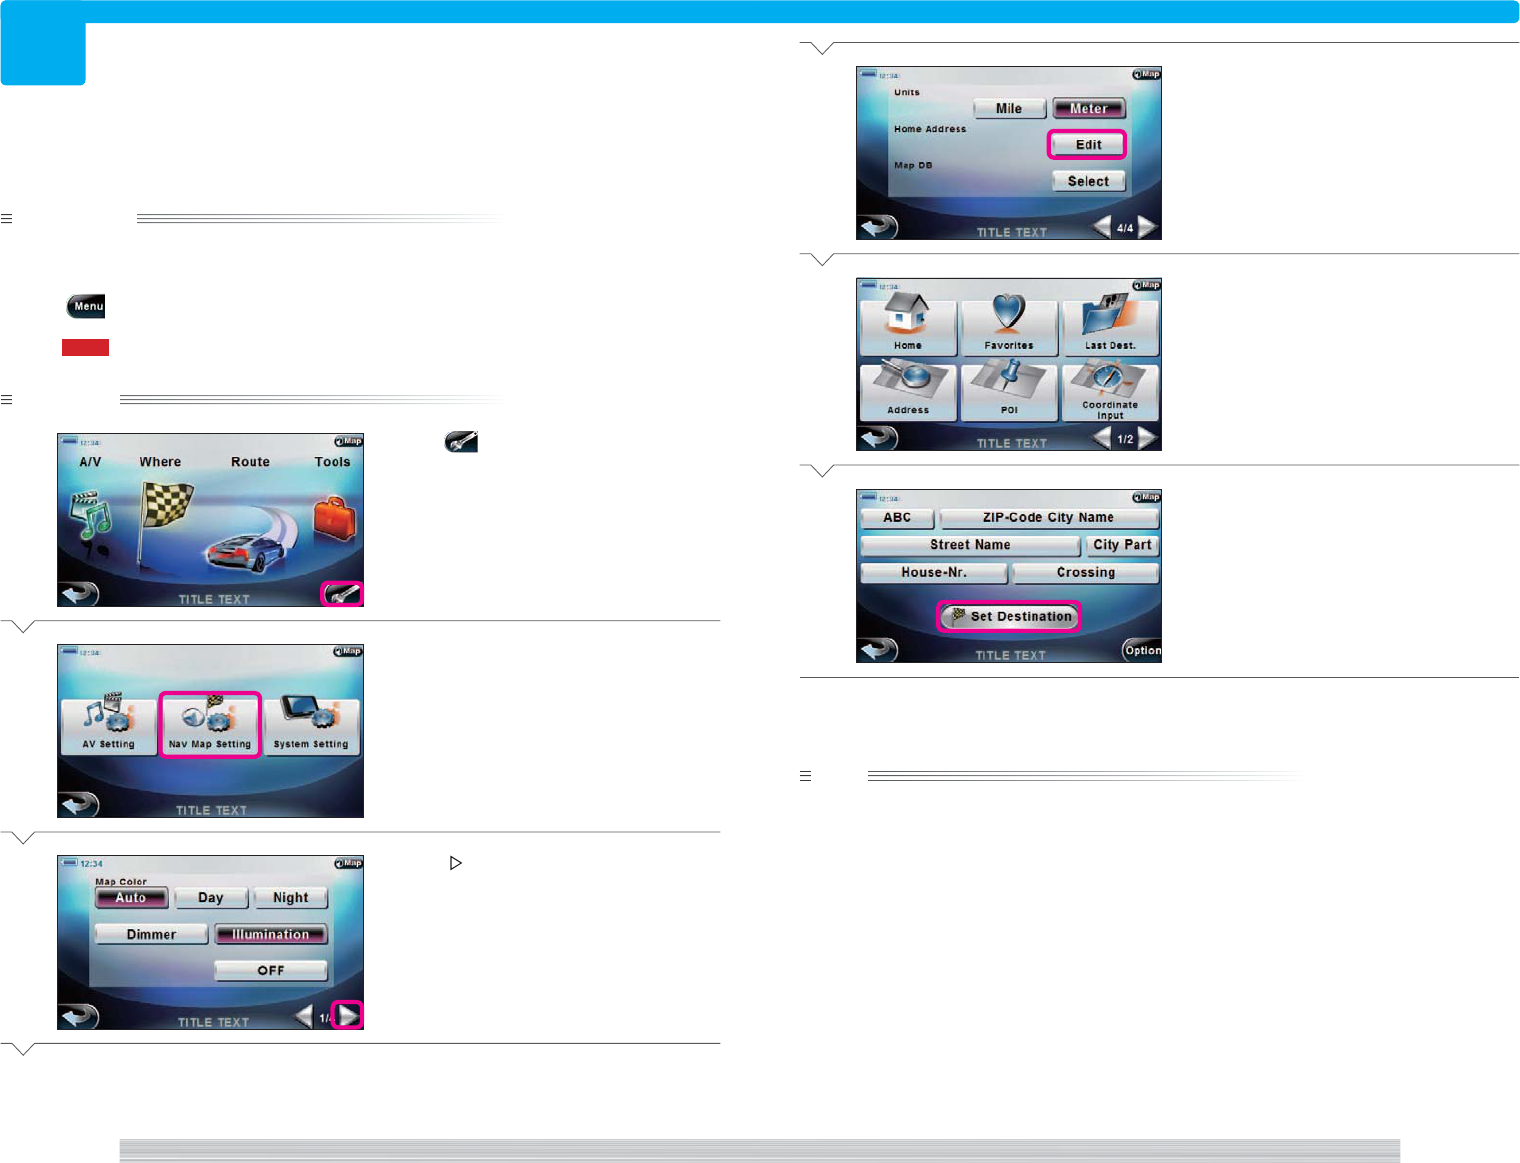
1
Select .
2
Select [Nav Map Setting].
3
Select [ ] to display screen 4/4.
Next Page
Adding home.
4
Select [Edit] for Home Address.
5
Search home by any Search method.
6
Select [Set Destination].
Home is added and you are returned to
3
.
Complete
note
• If home is already added, a confirmation message appears before
5
. Select [YES] and go to
5
.
In this case, the previous home location will be overwritten.
<S00000>
<SN1000a>
<SN1000d>
<NW0000>
<NW1000>
<TOP0000>
94
page Route
301
95
page
Route
301
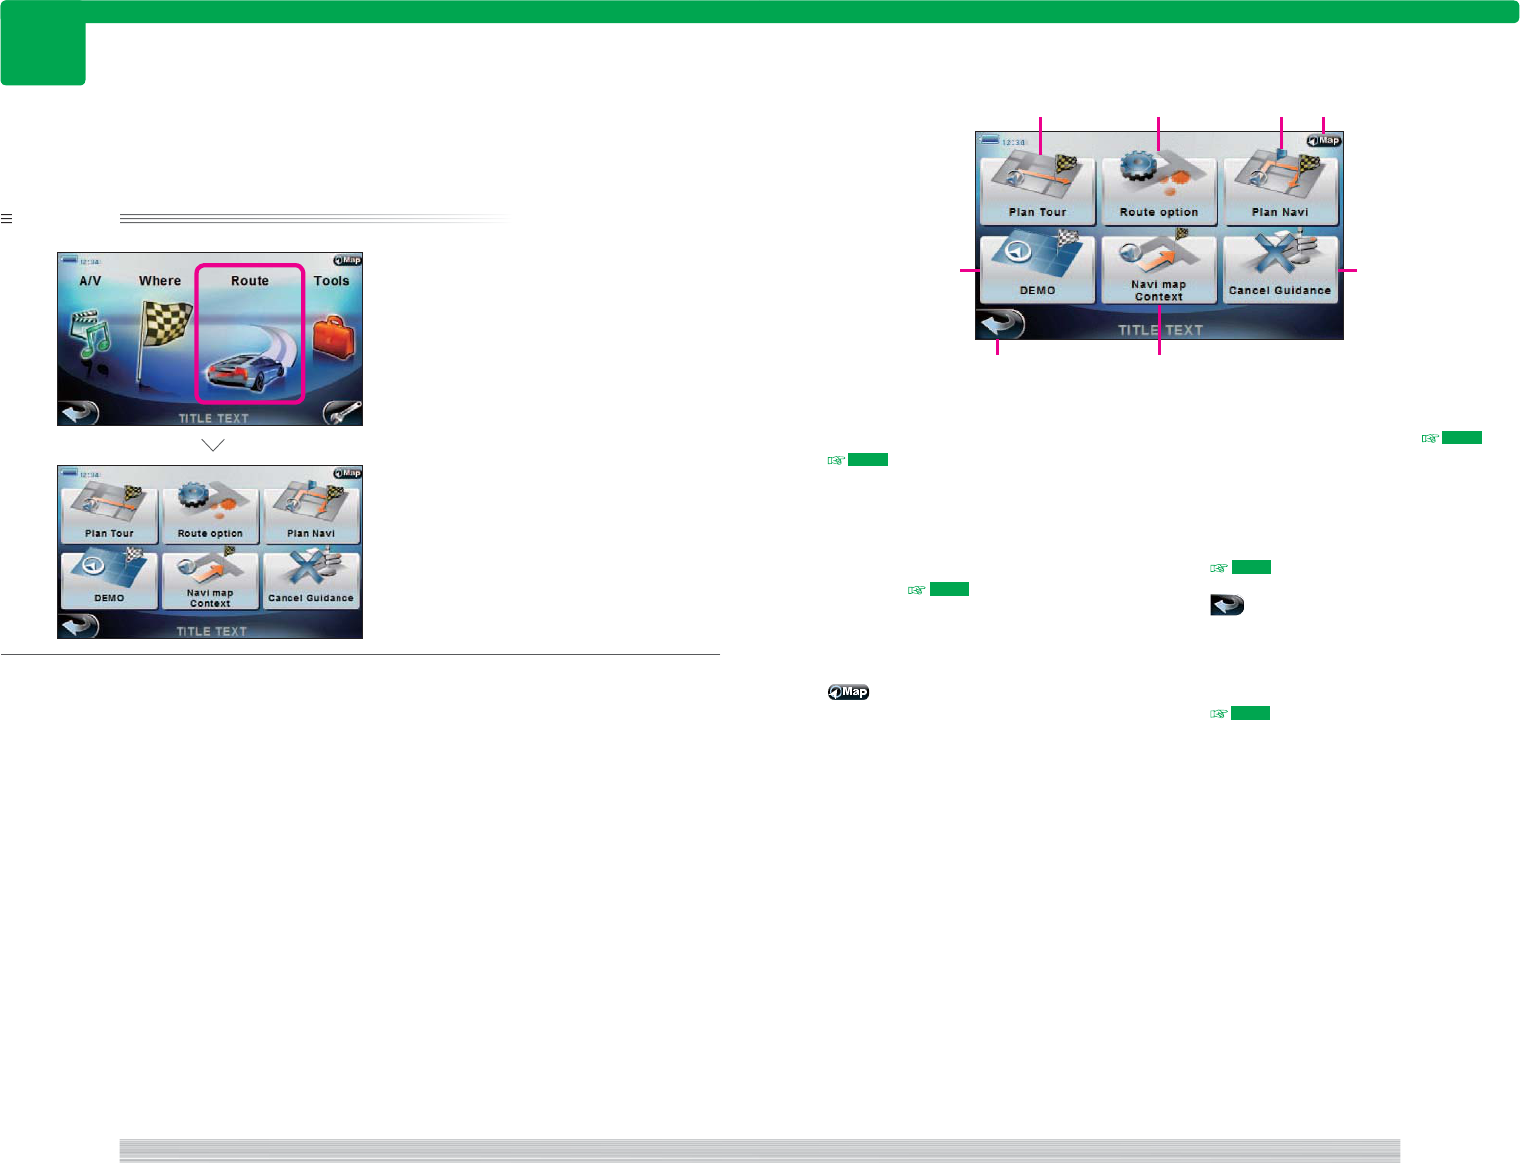
Operation
1
Select [Route].
The Route menu appears.
Complete
Displaying Route menu to handle tour route or drive route from the Top menu.
1 [Plan Tour]
Select to create a Round trip tour route.
302
If a Round trip tour route is already set, you
can edit the tour route.
2 [Route option]
Select to set the drive route search
condition. 312
3 [Plan Navi]
Select to edit the Short tour route.
4
Select to return to the current map screen.
5 [Cancel Guidance]
Select to cancel route guide. 320
6 [DEMO]
Select to simulate the drive guide. The
start location and destination can be set
independently of the current drive route.
321
7
Select to return to the Top menu.
8 [Navi map Context]
Select to control during route guide.
315
<NR0000>
<NR0000>
<TOP0000>
Route menu
7
1
5
2
6
43
8
Display Route menu
96
page Route 97
page
Route
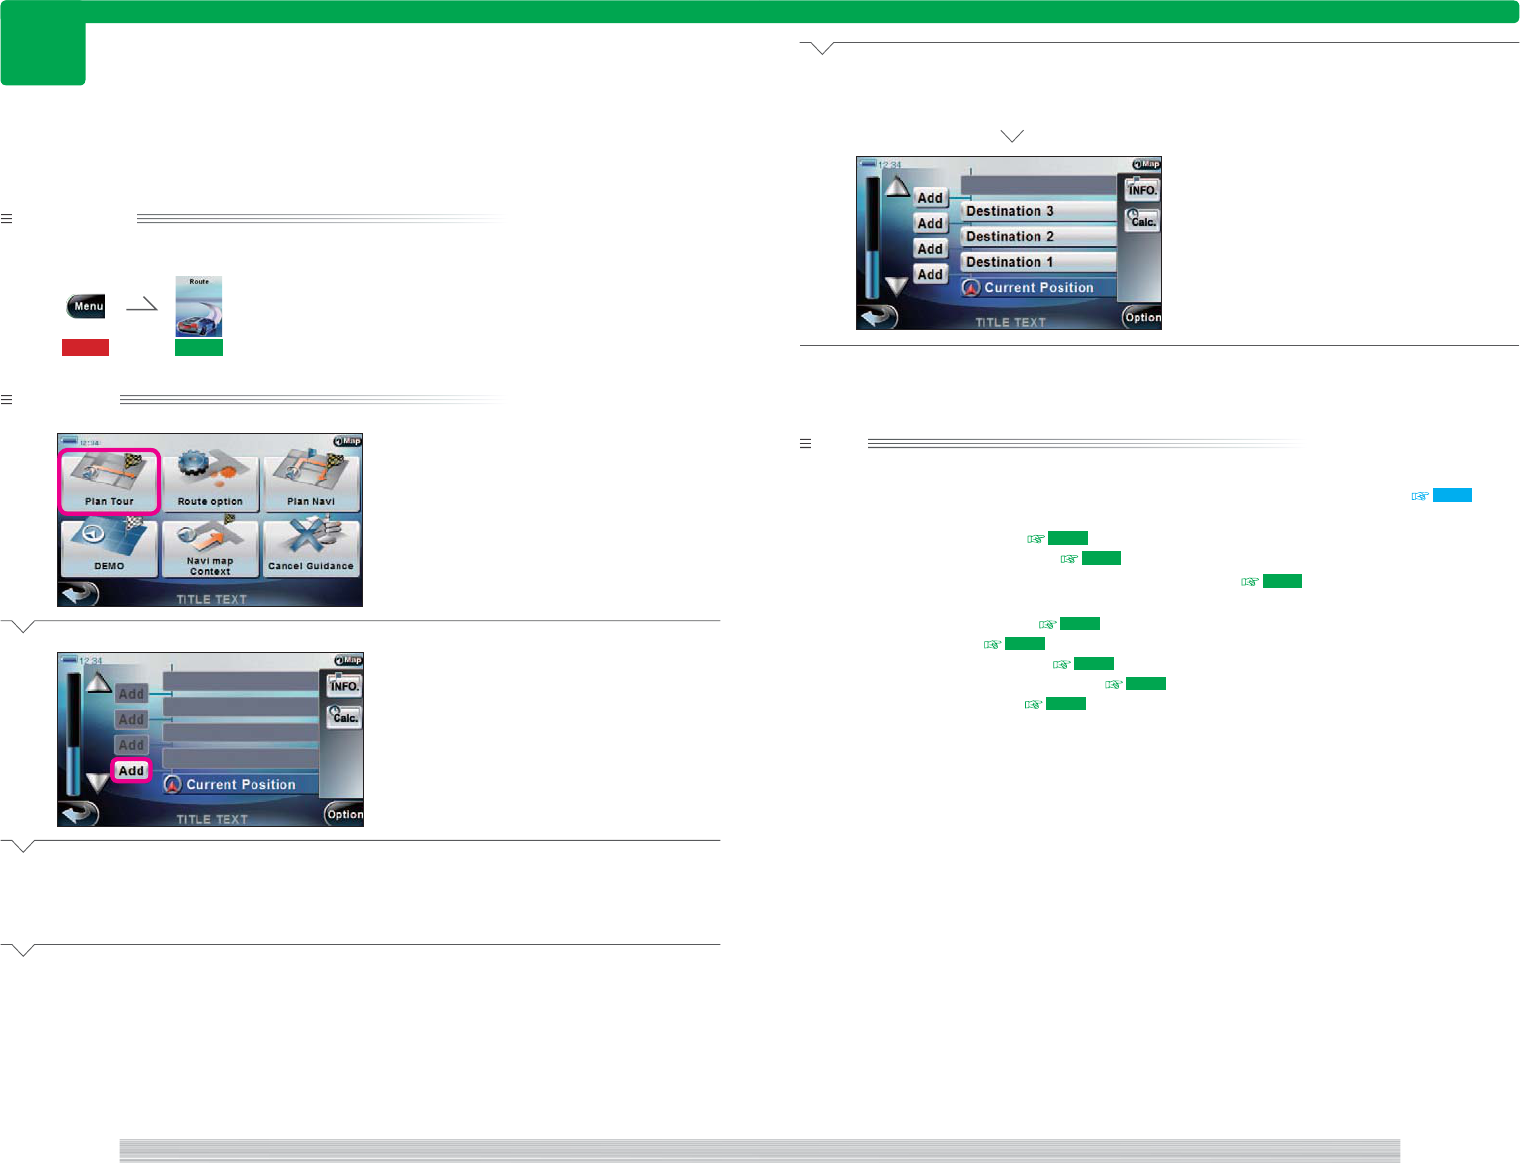
302
302
Setting the destination of Round trip tour.
4
Repeat
2
to
3
to set all Destinations.
Complete
note
• Select [Plan tour] when a route is already set in
1
to display the destination list of the Round trip tour.
• Select [Calc.] in
4
to search the drive route from the current location to the next destination. 206
• Select [INFO.] in
4
to perform the following:
– View destination information. 304
– Check the destination on the map. 305
• Select [Delete Destination] in
4
to delete destination individually. 306
• Select [Option] in
4
to perform the following:
– Add all destination to Favorites. 309
– Delete all destinations. 308
– Change the order of destinations. 307
– Display the entire drive route on the map. 310
– Display the drive route as list. 311
Preparation
Have the Route menu displayed.
115 301
Operation
1
Select [Plan Tour].
Round trip tour route is displayed.
2
Select [Add].
3
Search the destination by any
method and select [Set Destination].
Next Page
<NR0000>
<NR1000>
<NR1000a>
Set round trip tour
98
page Route 99
page
Route
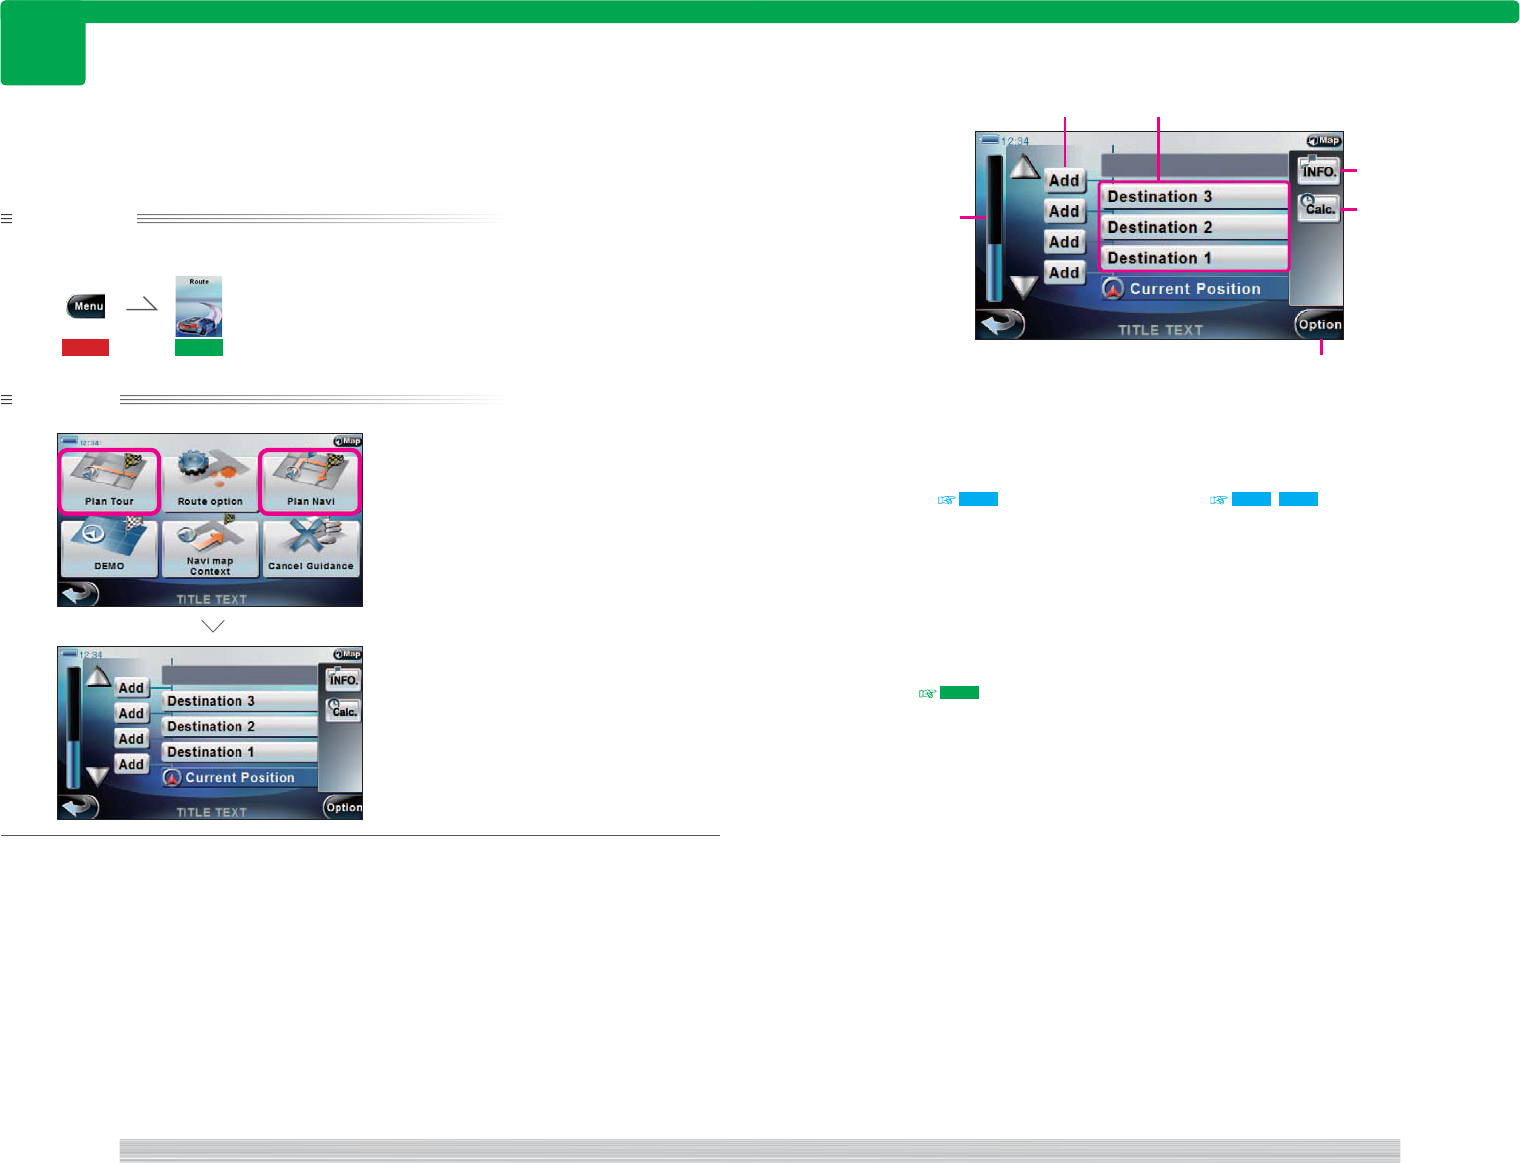
303
303
Preparation
Have the Route menu displayed.
115 301
Operation
1
Select [Plan Tour] or [Plan Navi].
The Tour route screen appears.
Complete
Displaying destinations set in Short tour or Round trip tour route.
1 [Add]
Select to add destination. The Search
menu appears. 201
2 Destination
Select to display the set destinations.
The drive route is searched to travel the
displayed destinations from the top.
3 [INFO.]
Select to display the selected destination's
information. 304
4 [Calc.]
Select to search the drive route.
206 , 207
5 Scroll bar
Activates when the destinations do not fit
in one screen and allows you to scroll the
list of destinations.
6 [Option]
Select to display tour route details and add
destination to Favorites.
Tour route screen
<NR1000a>
<NR1000a>
<NR0000>
1
3
2
54
6
View tour route
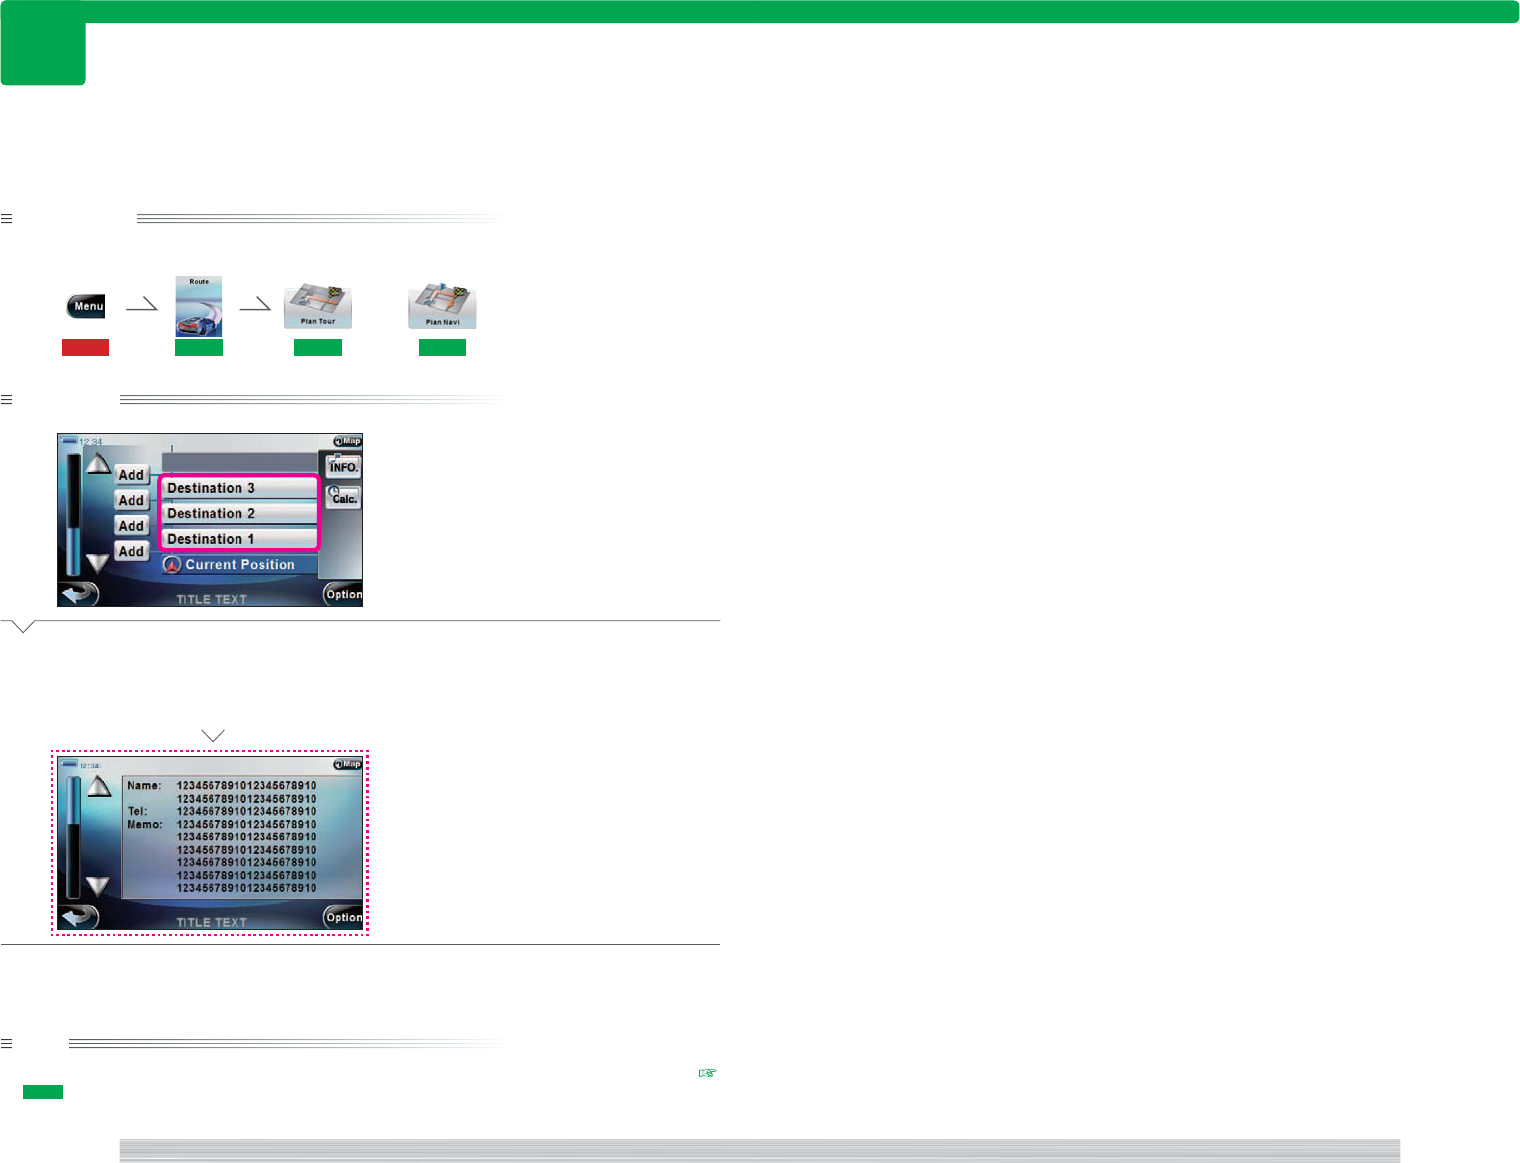
100
page Route 101
page
Route
304
304
Preparation
Have the Tour route screen displayed.
or
115 301 303 303
Operation
1
Select the button of the destination
to display the information.
2
Select [INFO.].
Information of the selected destination is
displayed.
Complete
note
• Select [Show in Map] on the destination information screen in
2
to display a map around the destination (
305 ).
Displaying information of destinations set in tour route.
<NR1000a>
<NR1200a>
Display destination information
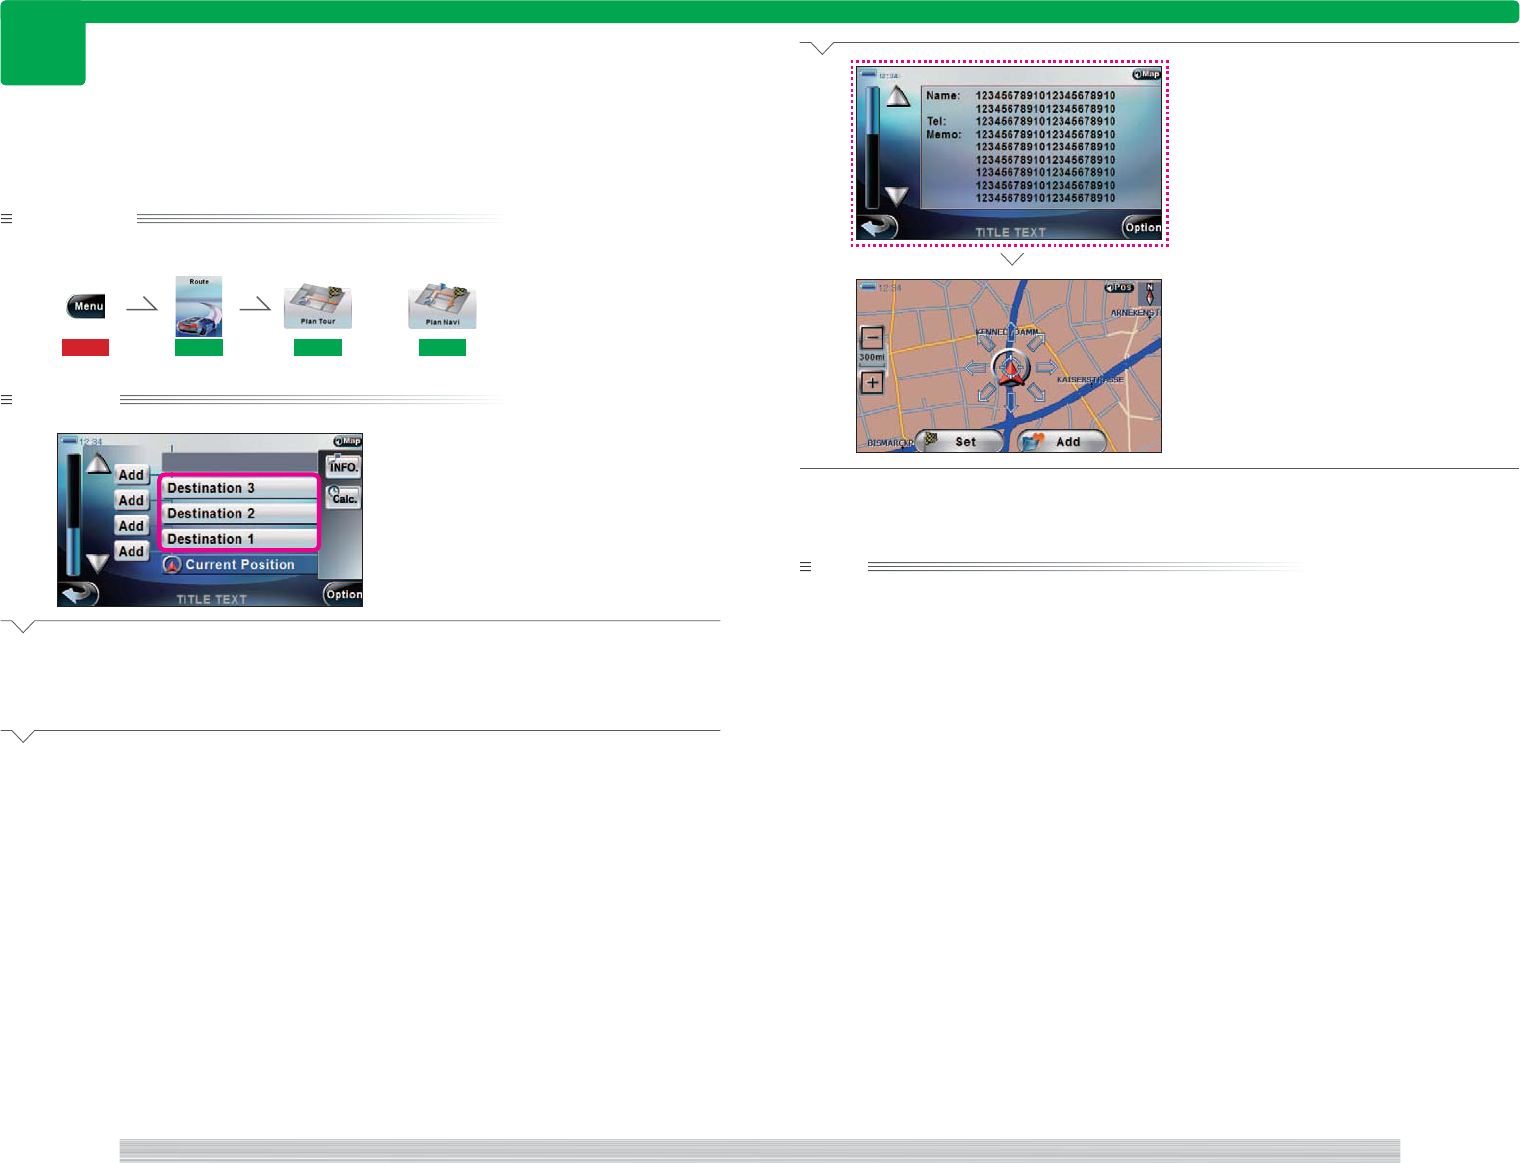
102
page Route 103
page
Route
305
305
Checking the location of destination set in Short tour or Round trip tour on the map.
3
Select [Show in Map].
The Scroll map screen appears.
Complete
note
• Select [Add] on the Scroll map screen in
3
to add the location displayed on map to Favorites.
• Select [Set] on Scroll map screen in
3
to set the location displayed on map as destination.
Preparation
Have the Search menu displayed.
or
115 301 303 303
Operation
1
Select the button of the destination
to display on map.
2
Select [INFO.].
Next Page
<NR1000a>
<NM1000>
<NR1200a>
Check destination on the map
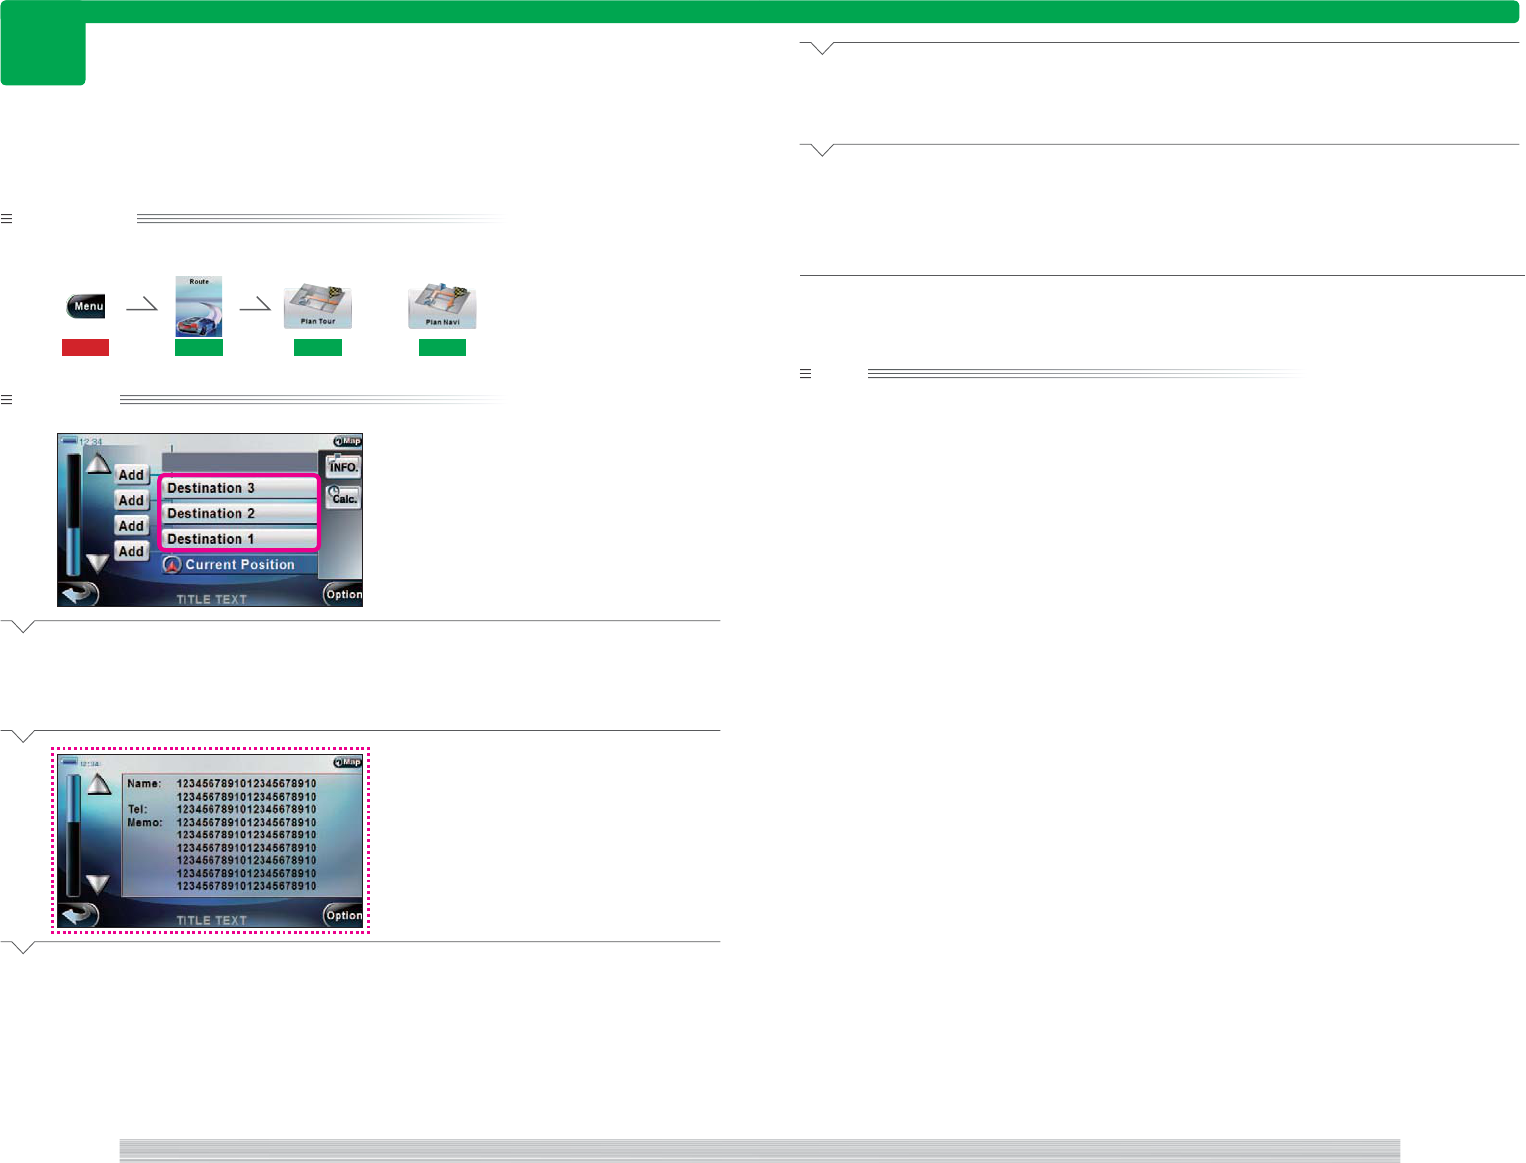
104
page Route 105
page
Route
306
306
Preparation
Have the Tour route screen displayed.
or
115 301 303 303
Operation
1
Select the button of the destination
to delete.
2
Select [Option].
3
Select [Delete Destination].
A confirmation message is displayed.
Next Page
Individually deleting destination set in tour route.
4
Select [YES].
Route guide is stopped.
5
Select [YES].
The selected destination is deleted and you
are returned to the Tour route screen.
Complete
note
• Step
4
is not necessary if route guide is not active or if the destination you are trying to delete (Round trip
tour) is not a destination of the current drive route.
• If you stop route guide in
4
, the searched drive route is deleted.
<NR1000a>
<NR1210a>
Individually delete destination
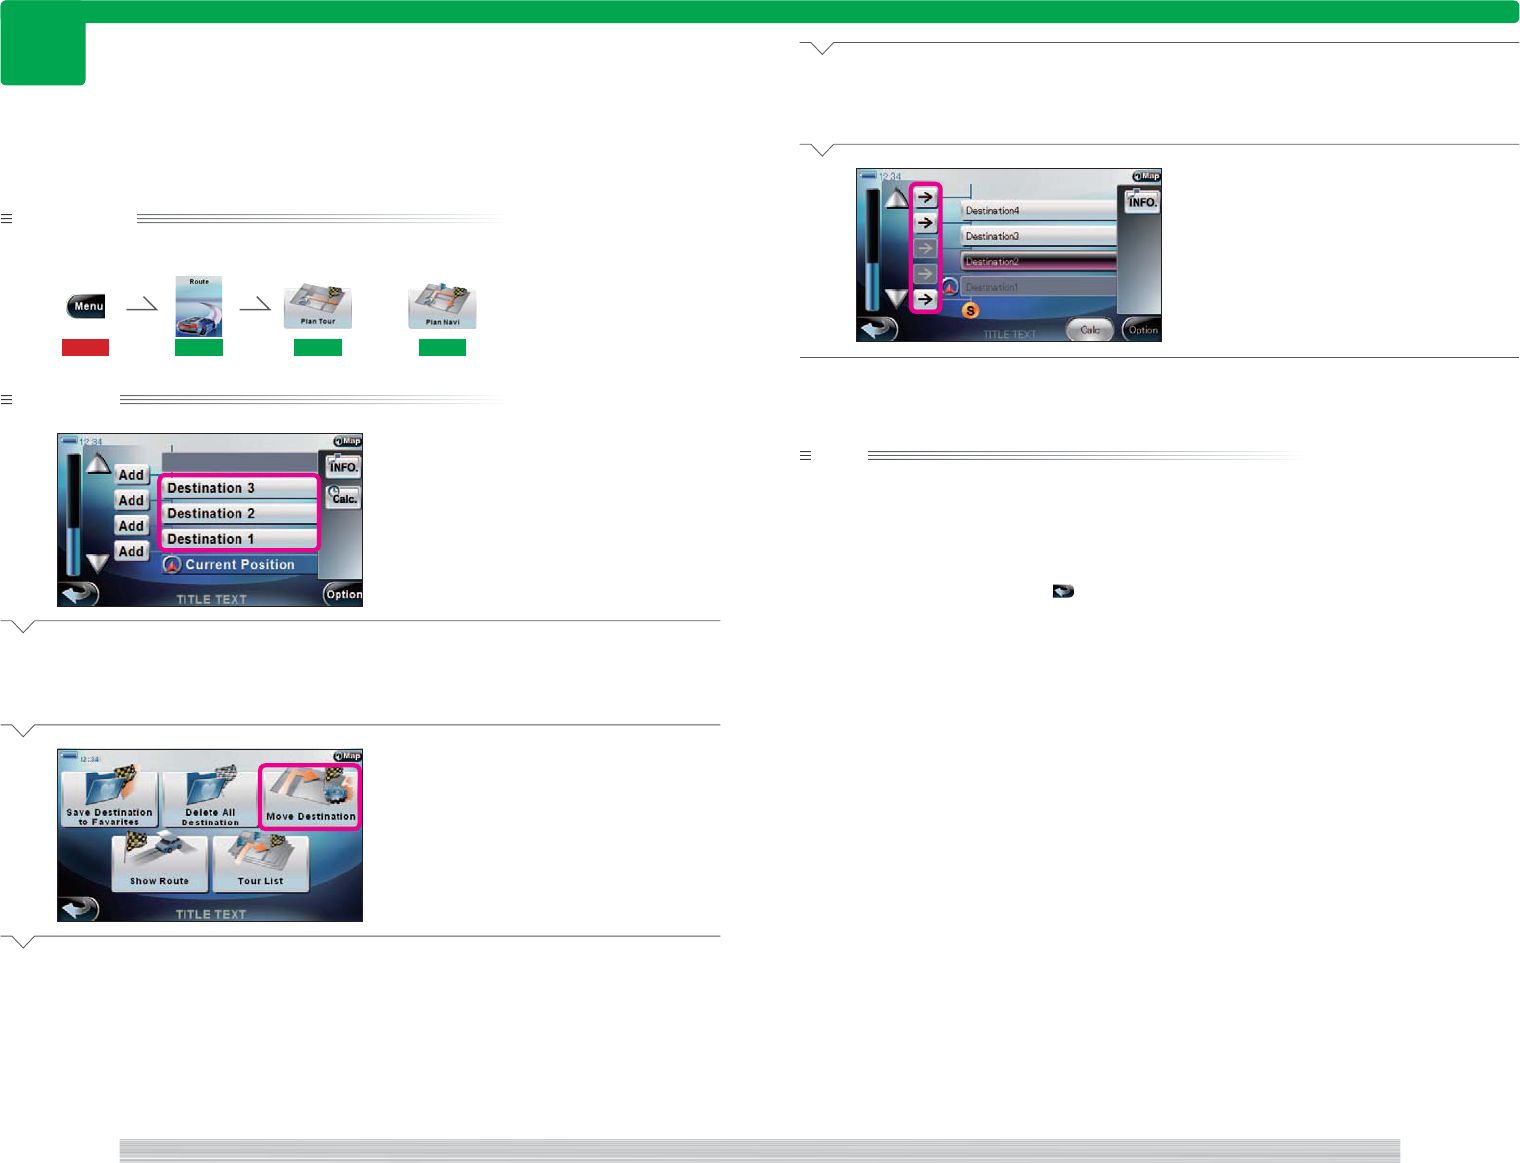
106
page Route 107
page
Route
307
307
Preparation
Have the Tour route screen displayed.
or
115 301 303 303
Operation
1
Select the button of the destination
to change the order.
2
Select [Option].
3
Select [Move Destination].
A confirmation message is displayed.
Next Page
Changing the order of destinations set in the tour route.
4
Select [YES].
Route guide is stopped.
5
Select the arrow button of the
destination.
The order of destinations changes.
Complete
note
• If you stop route guide in
4
, the searched drive route is deleted.
• A vehicle mark in
5
indicates the zone you are currently traveling.
The button of the destinations you already traveled (destination on the Start side of the vehicle mark) is
grayed out and you cannot move to location before that destination.
• To search the drive route once again with the new order, select [Calc] following
5
.
To edit the tour route further, select after
5
. Returns you to the Tour route screen.
<NR1000a>
<NR1110a>
<NR1100a>
Change the order of destinations
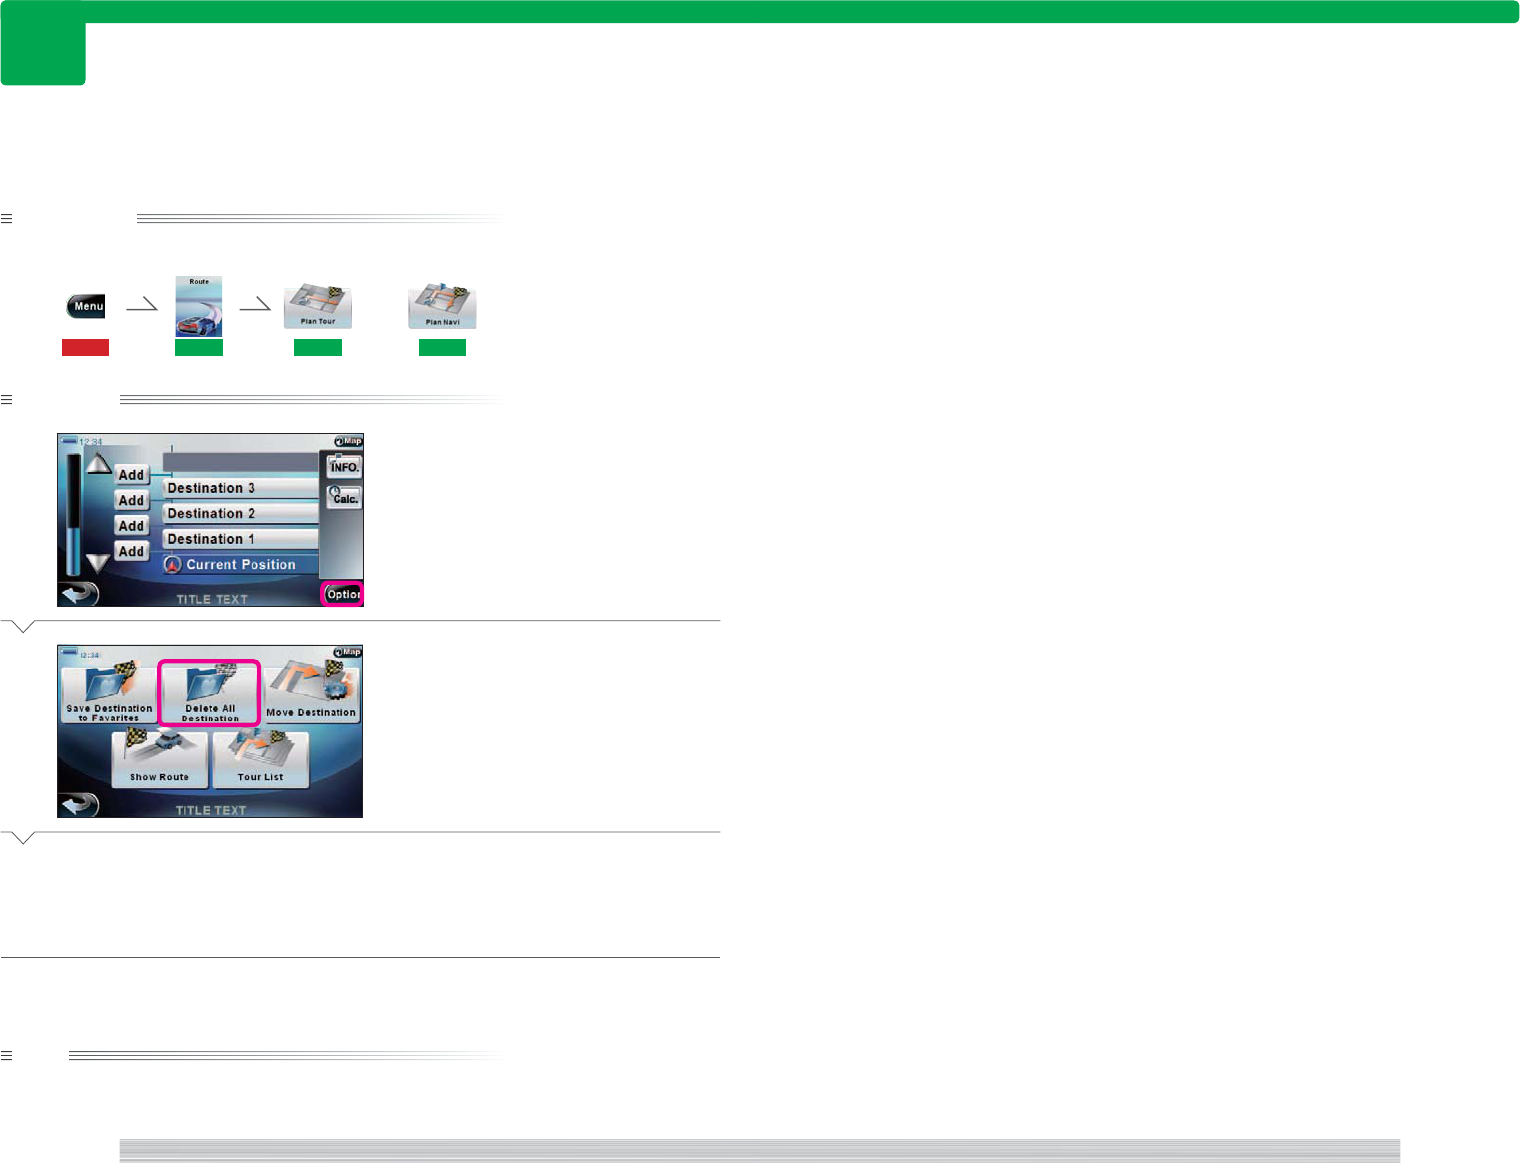
108
page Route 109
page
Route
308
308
Preparation
Have the Tour route screen displayed.
or
115 301 303 303
Operation
1
Select [Option].
2
Select [Delete All Destinations].
A confirmation message is displayed.
3
Select [YES].
All destinations are deleted and you are
returned to the Tour route screen.
Complete
note
• If you delete all destinations with the above procedure, the tour route itself is deleted as well as the drive
route.
Deleting all destinations set in the tour route.
<NR1100a>
<NR1000a>
Delete tour route
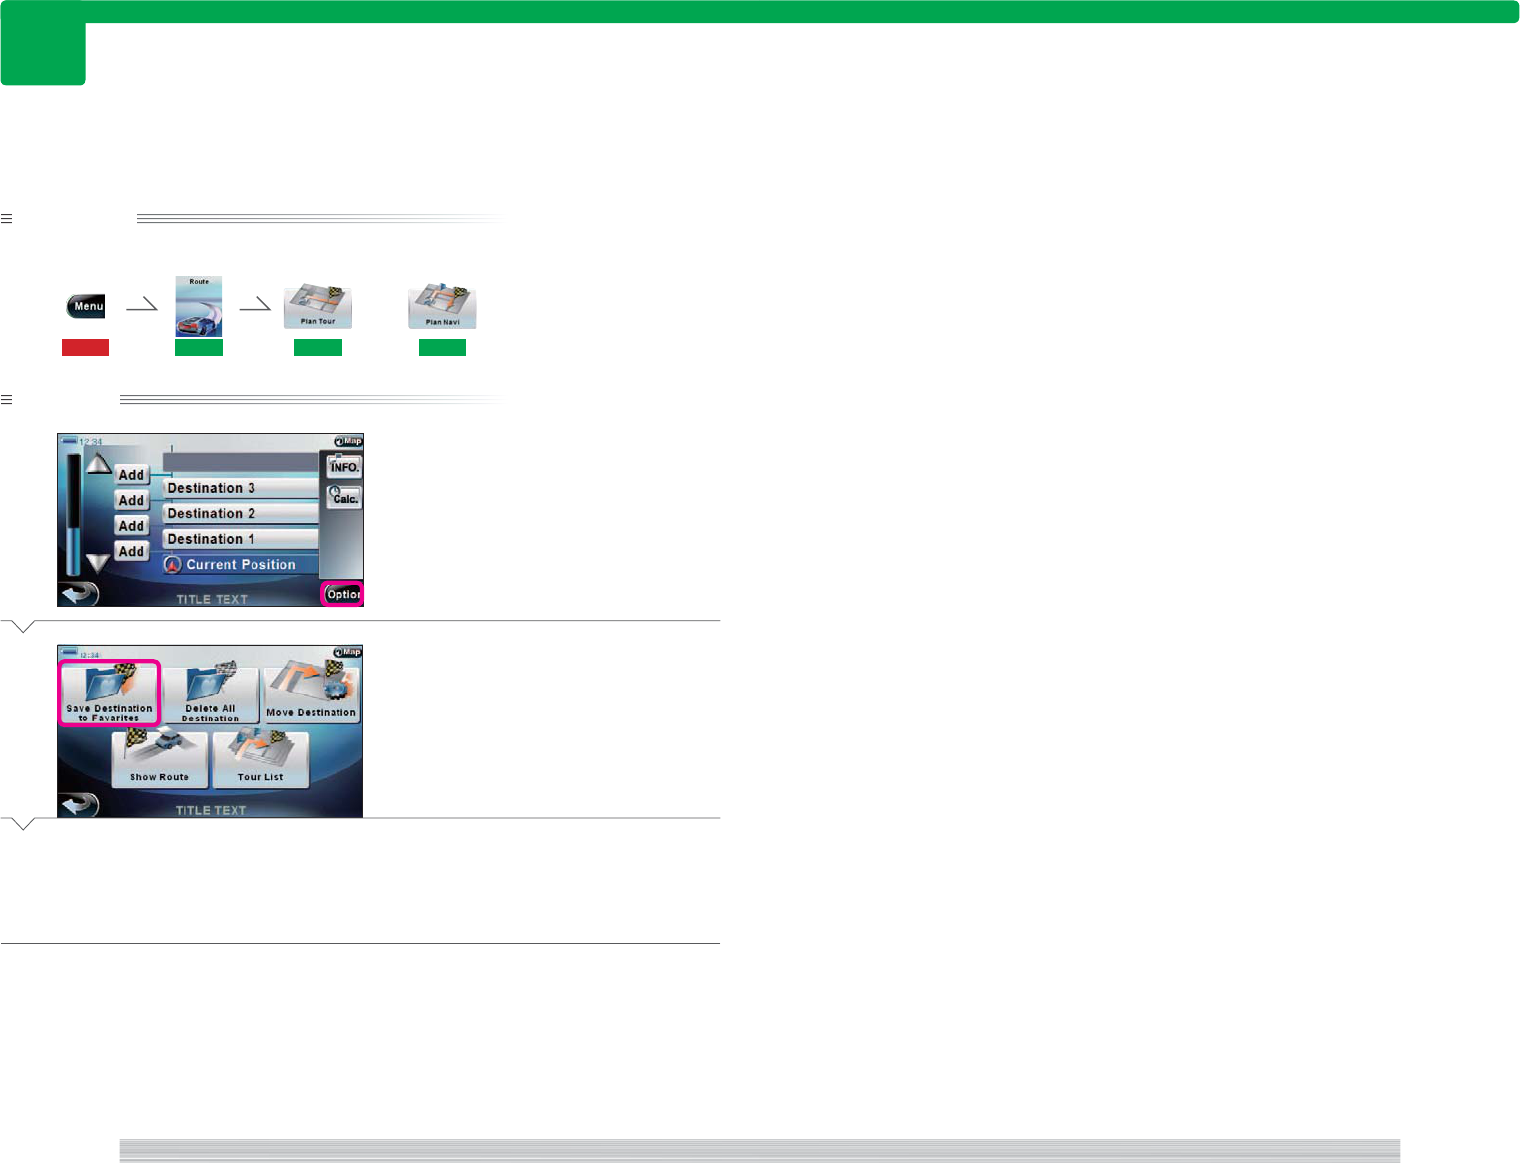
110
page Route 111
page
Route
309
309
Preparation
Have the Tour route screen displayed.
115 301 303 303
Operation
1
Select [Option].
2
Select [Save Destination to Favorites].
A confirmation message is displayed.
3
Select [YES].
All destinations are added to Favorites and you
are returned to the Tour route screen.
Complete
Adding destinations set in tour route to Favorites.
<NR1000a>
<NR1100a>
Add all destination to Favorites
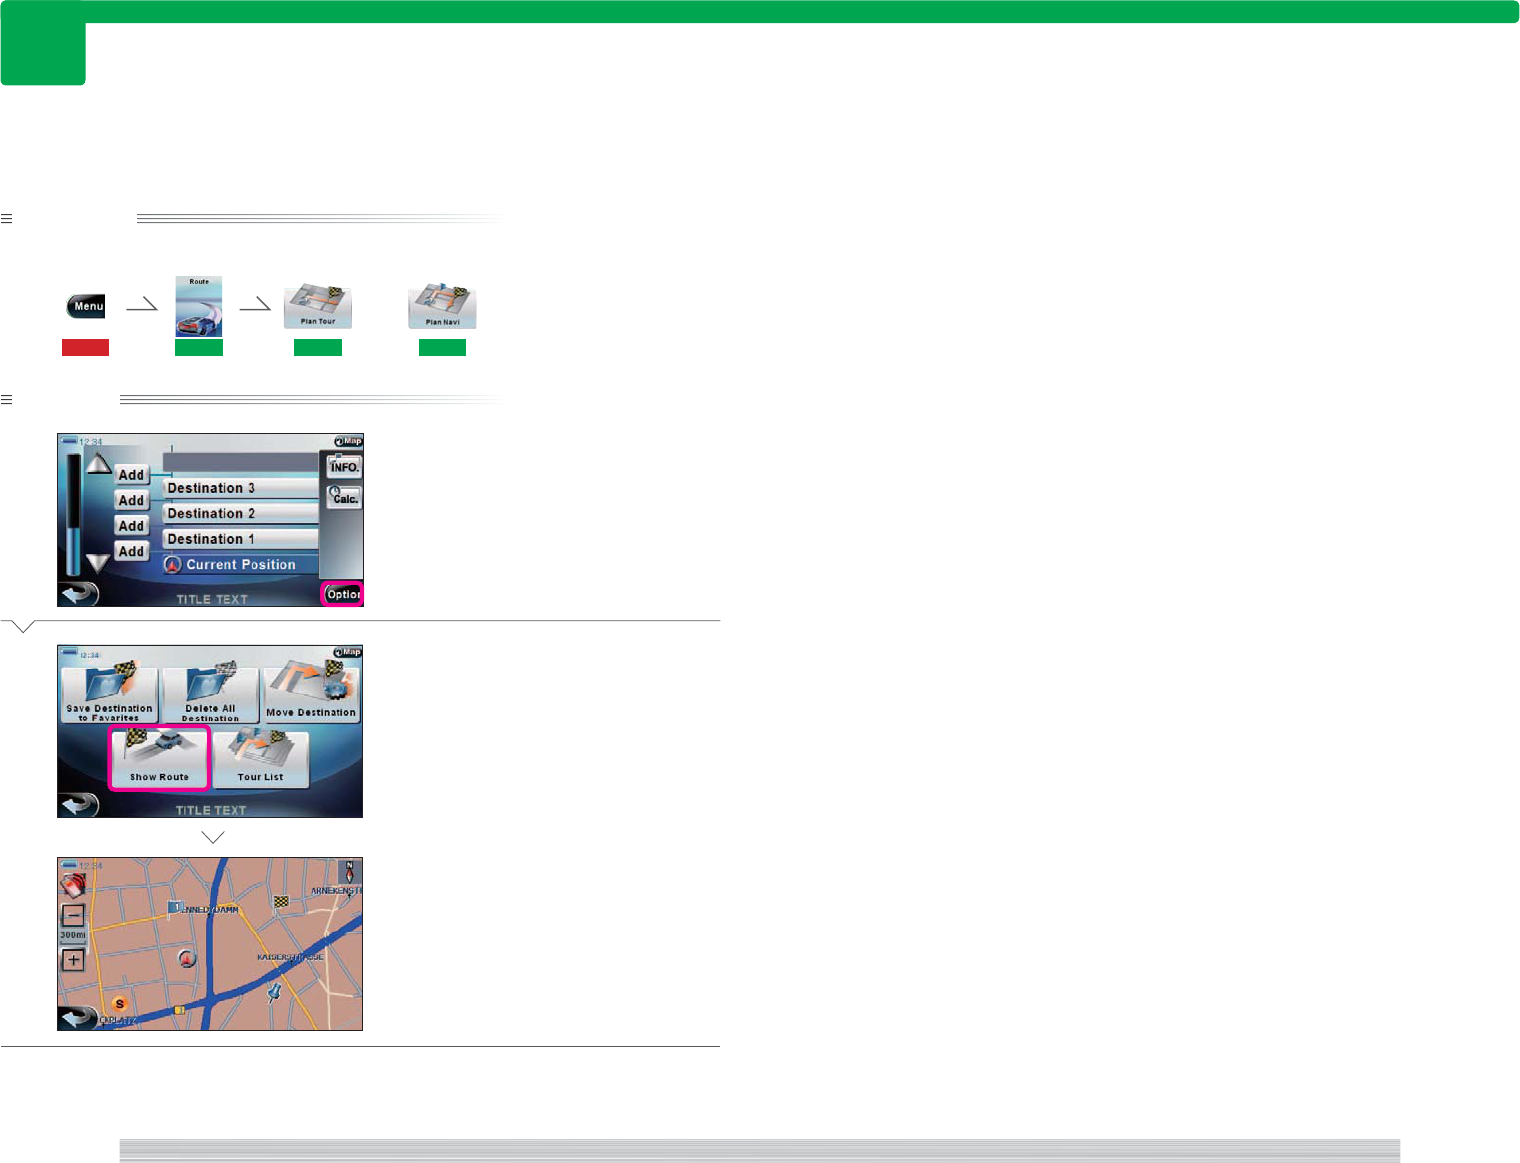
112
page Route 113
page
Route
310
310
Preparation
Have the Tour route screen displayed.
115 301 303 303
Operation
1
Select [Option].
2
Select [Show Route].
Complete
Displaying the drive route of a Short tour from the current location to the Final Destination or of
a Round trip tour from the current location to the next destination on the map.
<NR1000a>
<NR1100a>
<NM3000>
Display entire drive route on map
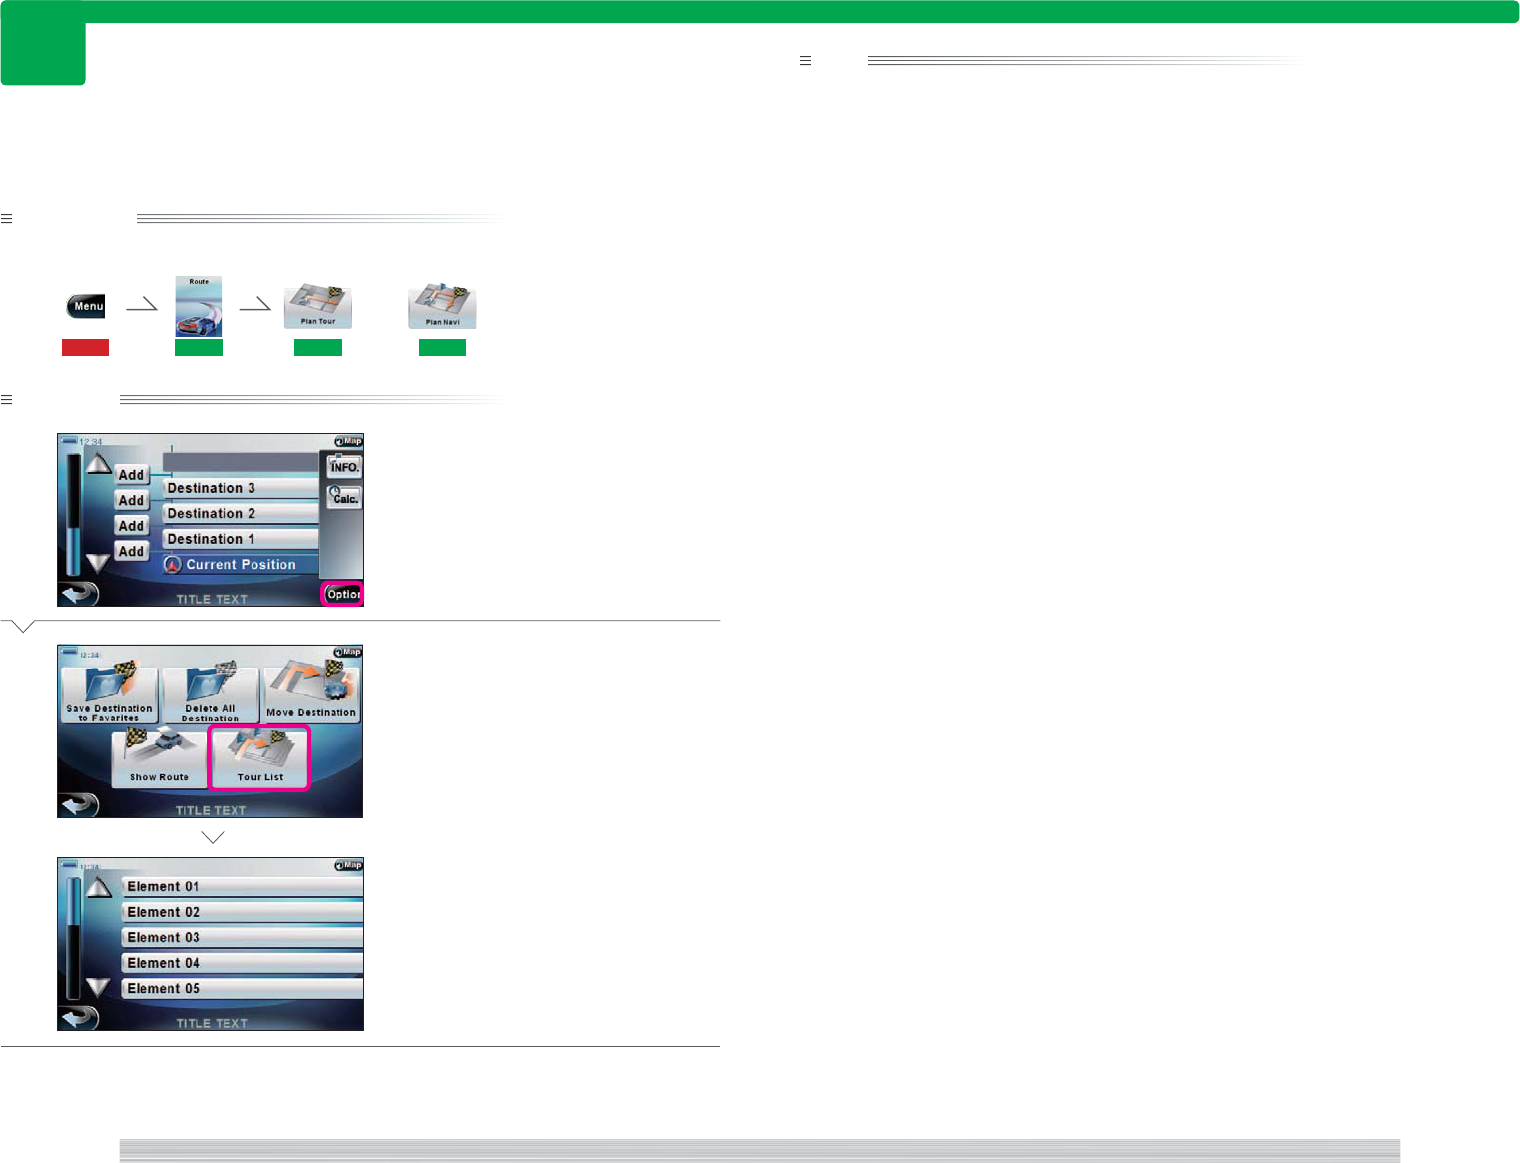
114
page Route 115
page
Route
311
311
Preparation
Have the Tour route screen displayed.
115 301 303 303
Operation
1
Select [Option].
2
Select [Tour List].
The Route list screen appears.
Complete
Displaying drive route details.
note
• On the Route list screen in
2
, location with TMC information are displayed as button. Select the button of the
location to display TMC information.
<NR1000a>
<NR1100a>
<NR4300>
Display drive route details
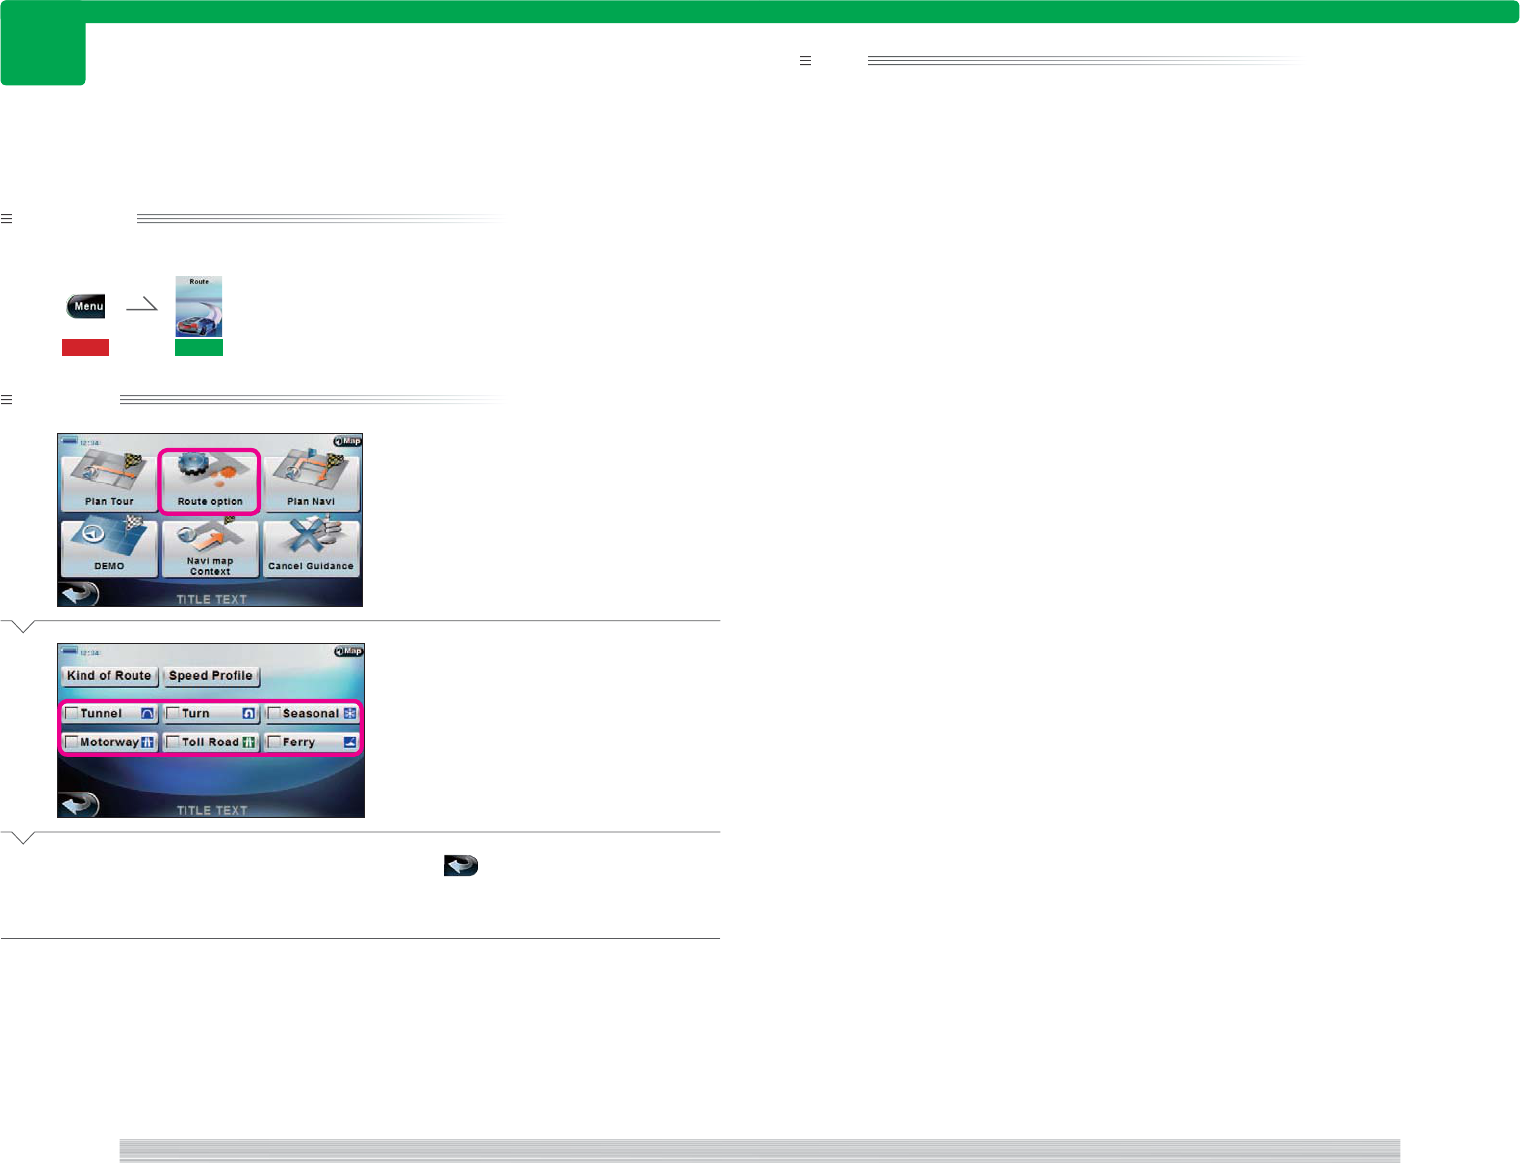
116
page Route 117
page
Route
312
312
Preparation
Have the Route menu displayed.
115 301
Operation
1
Select [Route option].
2
Select the search condition button.
[Turn] : Avoid left/right turns.
[Motorway] : Allow use of express ways.
[Toll Road] : Allow use of toll roads.
[Ferry] : Allow use of ferries.
3
Select .
Returns you to the Route menu.
Complete
Setting the drive route search condition.
note
• Even if you set to avoid left/right turns, they will be used if the destination cannot be reached without them.
• Even if you set to avoid express ways, toll roads, and ferries, they will be used if the destination cannot be
reached without them.
<NR0000>
<NR2000>
Select to set the drive route search condition
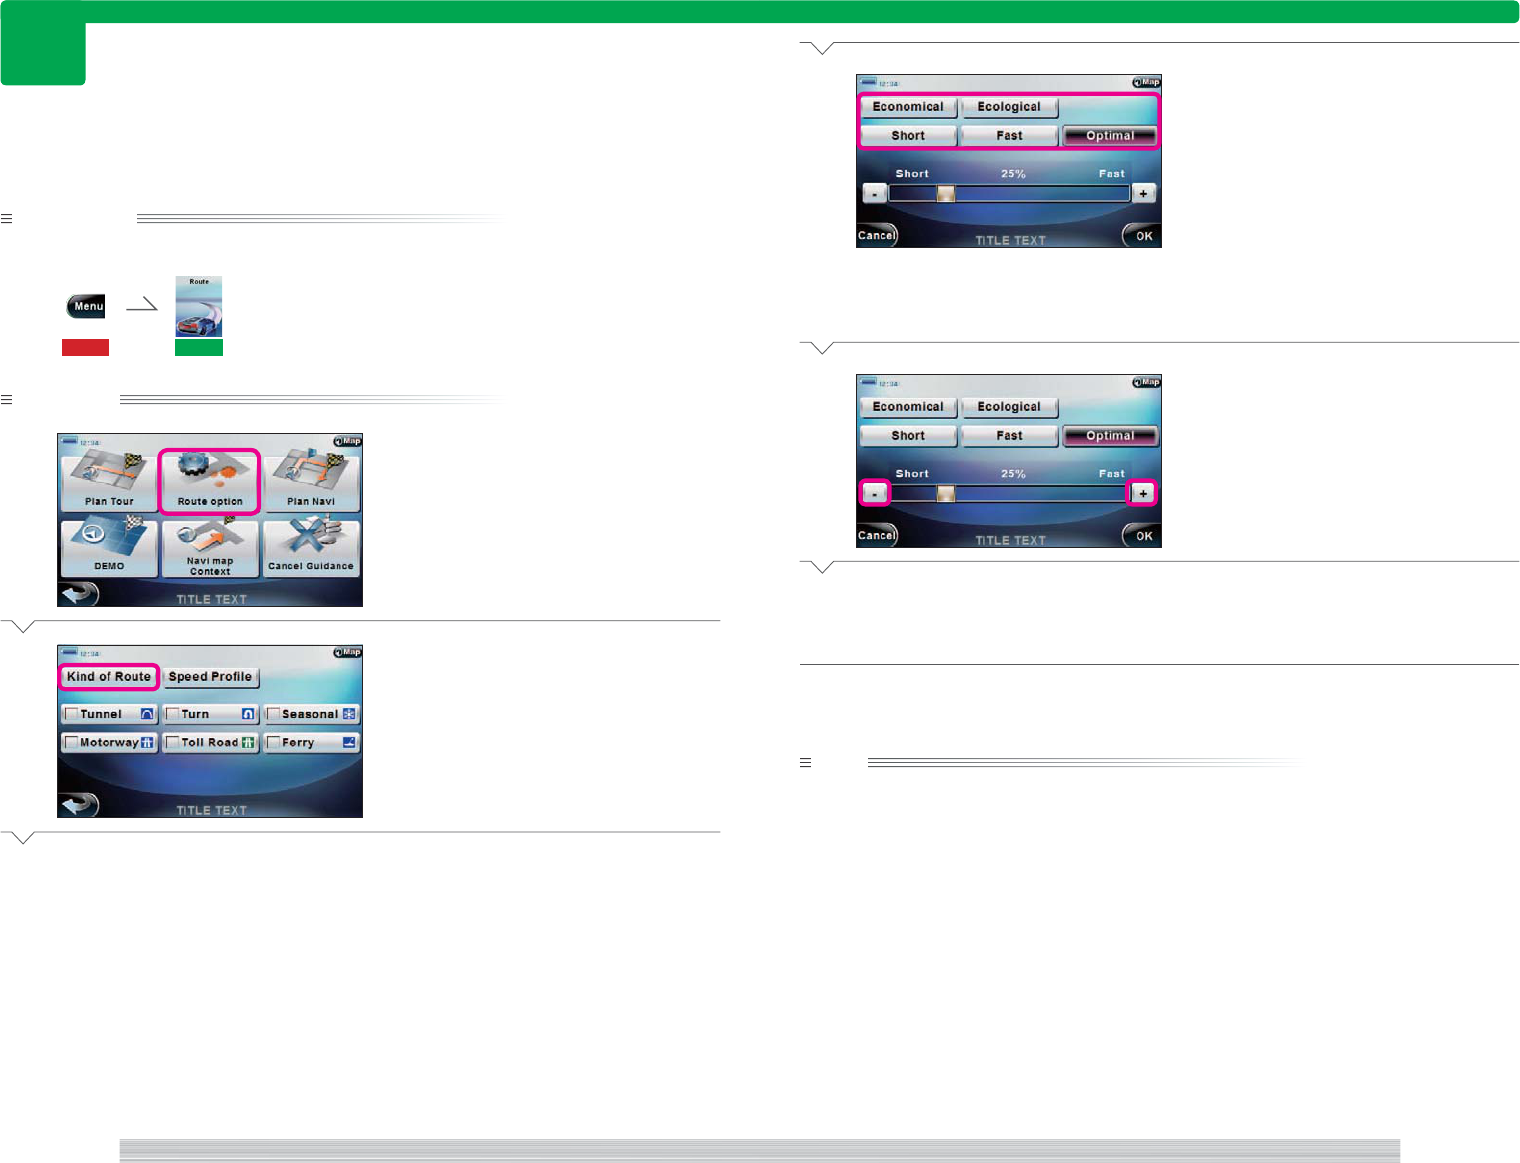
118
page Route 119
page
Route
313
313
Preparation
Have the Route menu displayed.
115 301
Operation
1
Select [Route option].
2
Select [Kind of Route].
Next Page
Setting the drive route type.
3
Select the route type button.
[Economical] : Search the most economical
route. Go to
5
.
[Ecological] : Search the route with least effect
on environment. Go to
5
.
[Short] : Search the route with shortest dis-
tance. Go to
5
.
[Fast] : Search the route with shortest travel
time. Go to
5
.
[Optimal] : Allows you to set the balance be-
tween travel time and distance.
4
If you select [Optional] in
3
, select
[+] or [–] to set the balance between
emphasizing travel time and
distance.
5
Select [OK].
Returns you to the Route menu.
Complete
note
• Even if you select [Fast] in
3
, the searched route may not always be the fastest. Also, even if select [Short], the
searched route may not always be the shortest.
<NR0000>
<NR2100>
<NR2000>
<NR2100>
Set drive route type
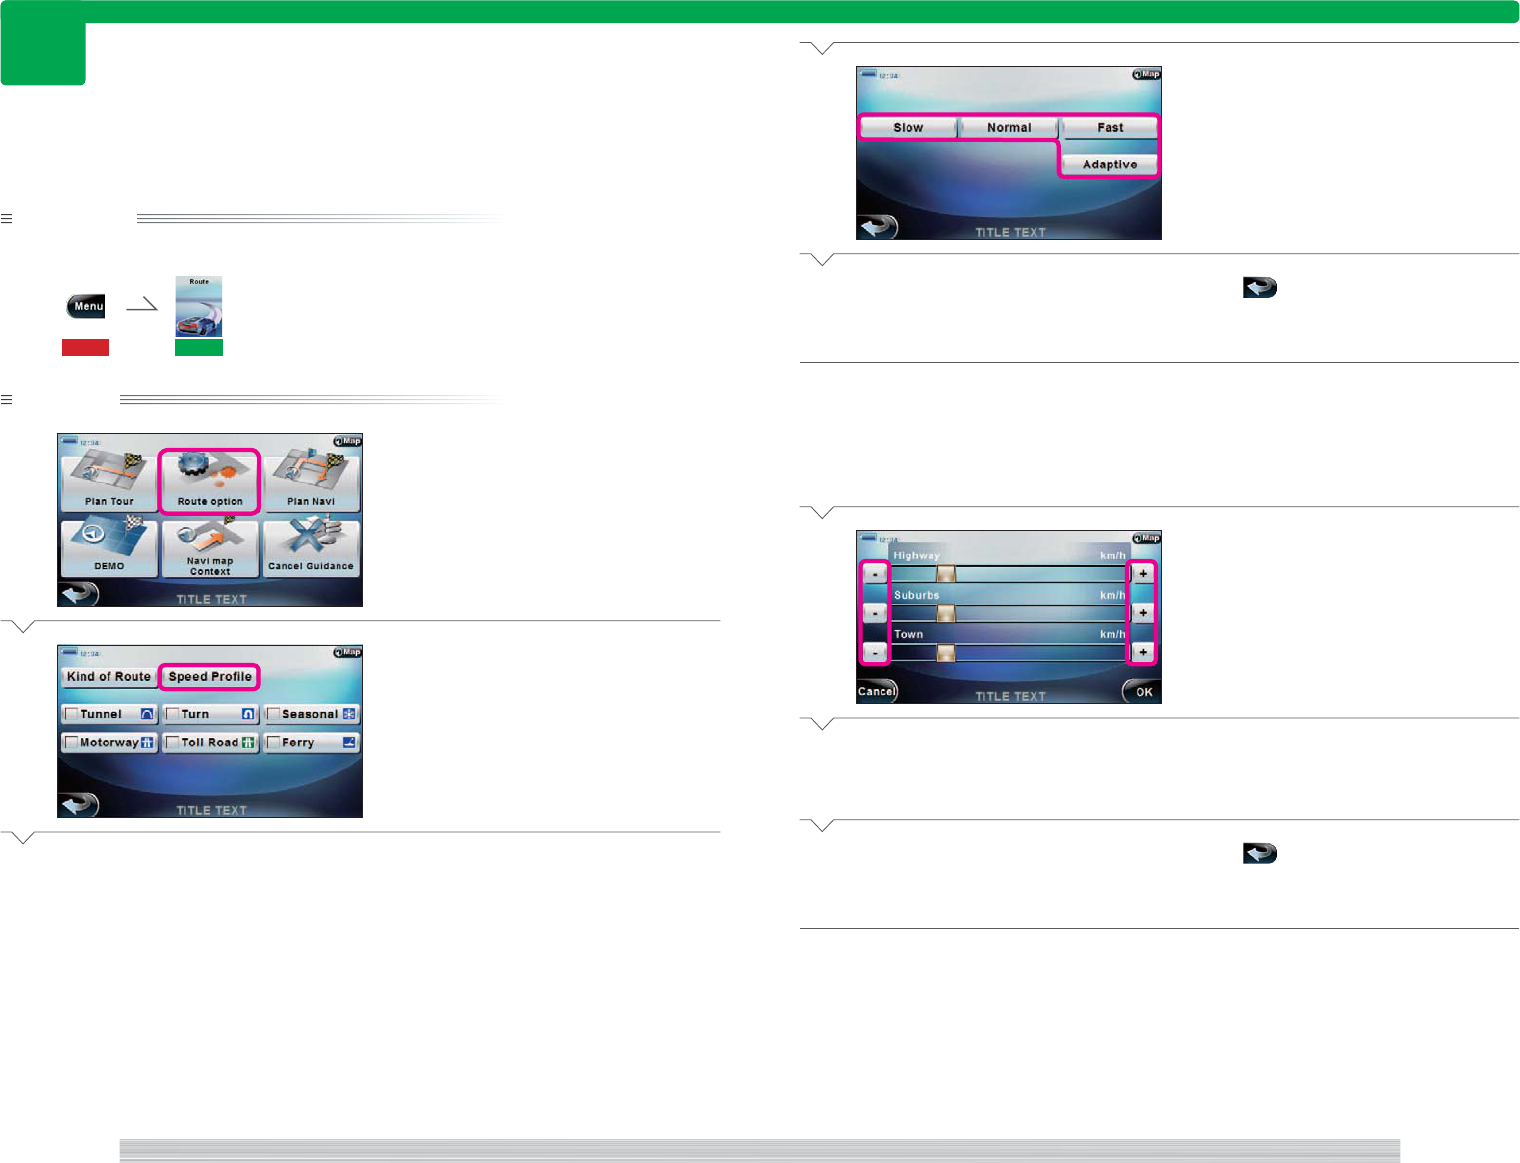
120
page Route 121
page
Route
314
314
Preparation
Have the Route menu displayed.
115 301
Operation
1
Select [Route option].
2
Select [Speed Profile].
Next Page
Setting the average speed used to calculate the travel time or expected arrival time.
3
Select the button of the desired speed.
[Slow] : Assume driving at relatively slow
speed.
[Normal] : Assume driving at normal speed.
[Fast] : Assume driving at relatively fast speed.
[Adaptive] : Set according to road condition.
4
Select .
Complete
■ When [Adaptive] is selected
4
If you select [Adaptive] in
3
, select
[+] or [–] to set the assumed speed
according to street condition.
5
Select [OK].
6
Select .
Complete
<NR0000>
<NR2000>
<NR2200>
<NR2210>
Set average speed
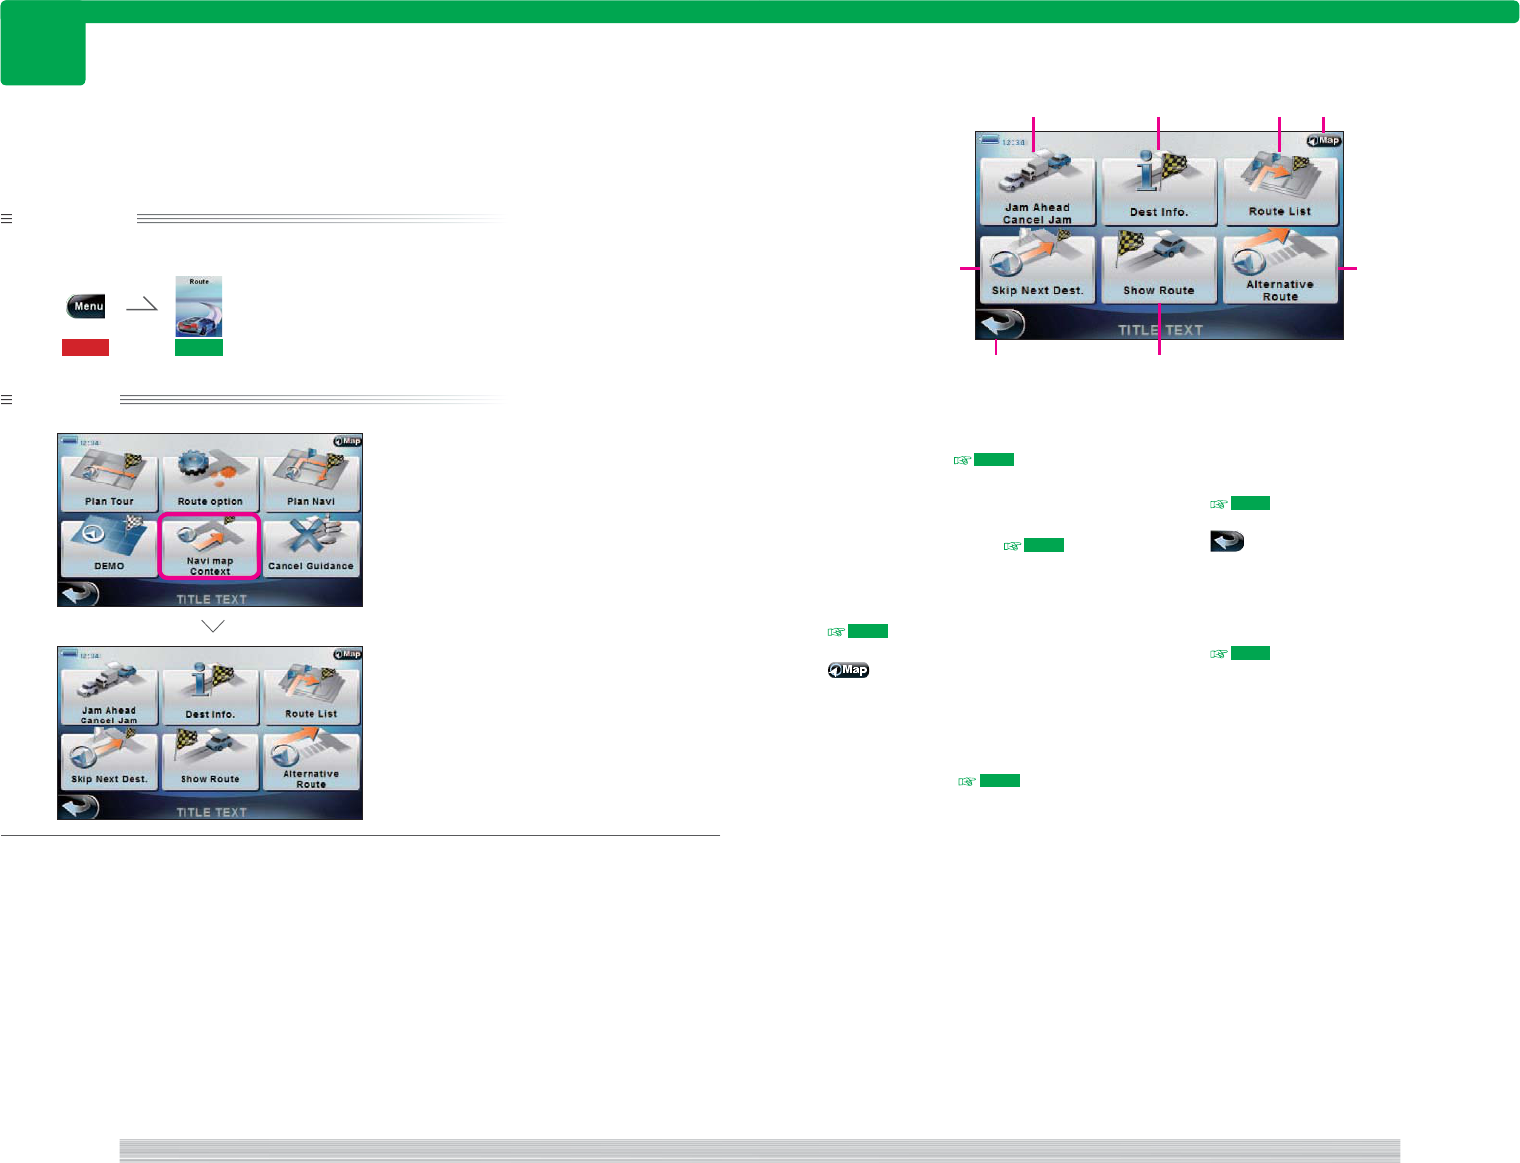
122
page Route 123
page
Route
315
315
Preparation
Have the Route menu displayed.
115 301
Operation
1
Select [Navi map Context].
The Route guide menu appears.
Complete
Displaying route guide menu.
1 [Jam Ahead Cancel Jam]
Select to repeat drive route search to avoid
traffic jam ahead. 316
2 [Dest Info.]
Select to display next intermediate
destination information. 318
3 [Route List]
Select to display drive route details.
311
4
Select to return to the current map screen.
5 [Alternative Route]
Select to repeat route search with different
search condition. 319
6 [Skip Next Dest.]
Select to cancel next intermediate
destination and search drive route once
more.
317
7
Select to return to the top menu.
8 [Show Route]
Select to display drive route on map.
310
Route guide menu
<NR4000>
<NR0000>
<NR4000>
1 2
65
7
3 4
8
Display route guide menu
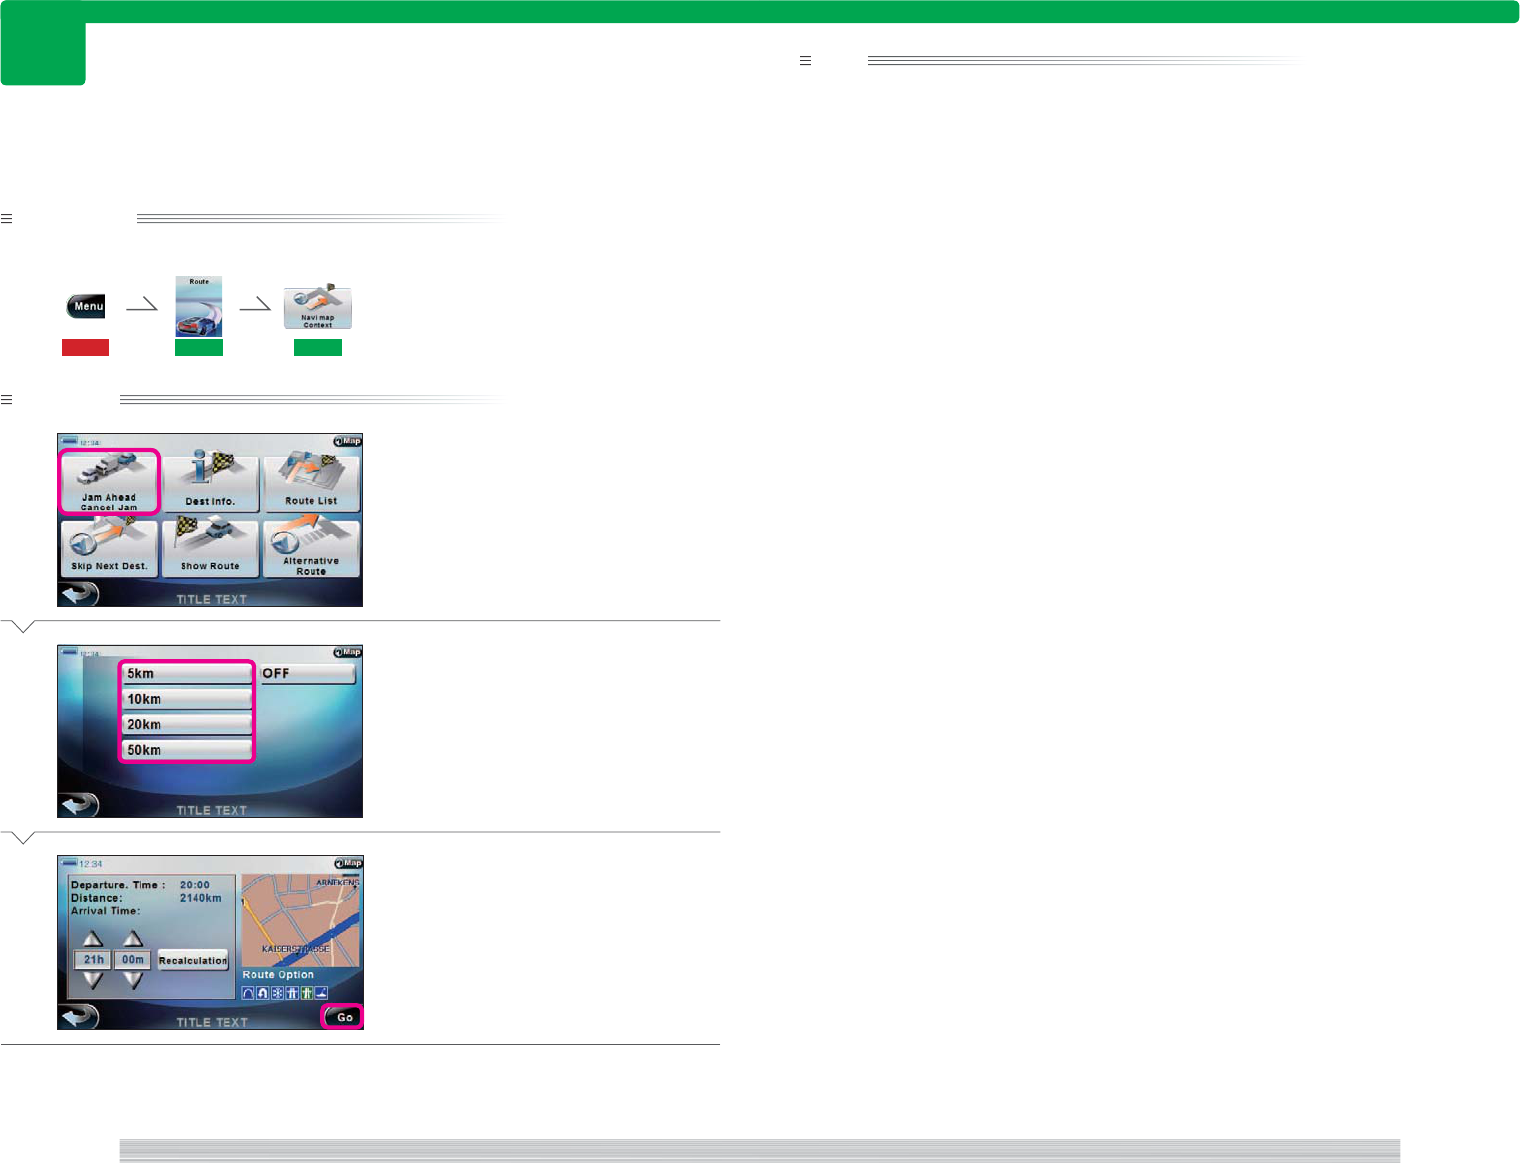
124
page Route 125
page
Route
316
316
Preparation
Have the Route guide menu displayed.
115 301 315
Operation
1
Select [Jam Ahead Cancel Jam].
2
Select the distance to start avoiding
traffic jam.
3
Select [Go].
Returns you to the current map screen and
displays the new drive route.
Complete
Searching for route avoiding traffic jam.
note
• The traffic jam avoiding distance is different between normal street and express way.
• Set the desired arrival time in
3
and select [Recalculation] to recalculate and display the start time.
<NR4000>
<NR4100b>
<NW1310a>
Avoid traffic jam
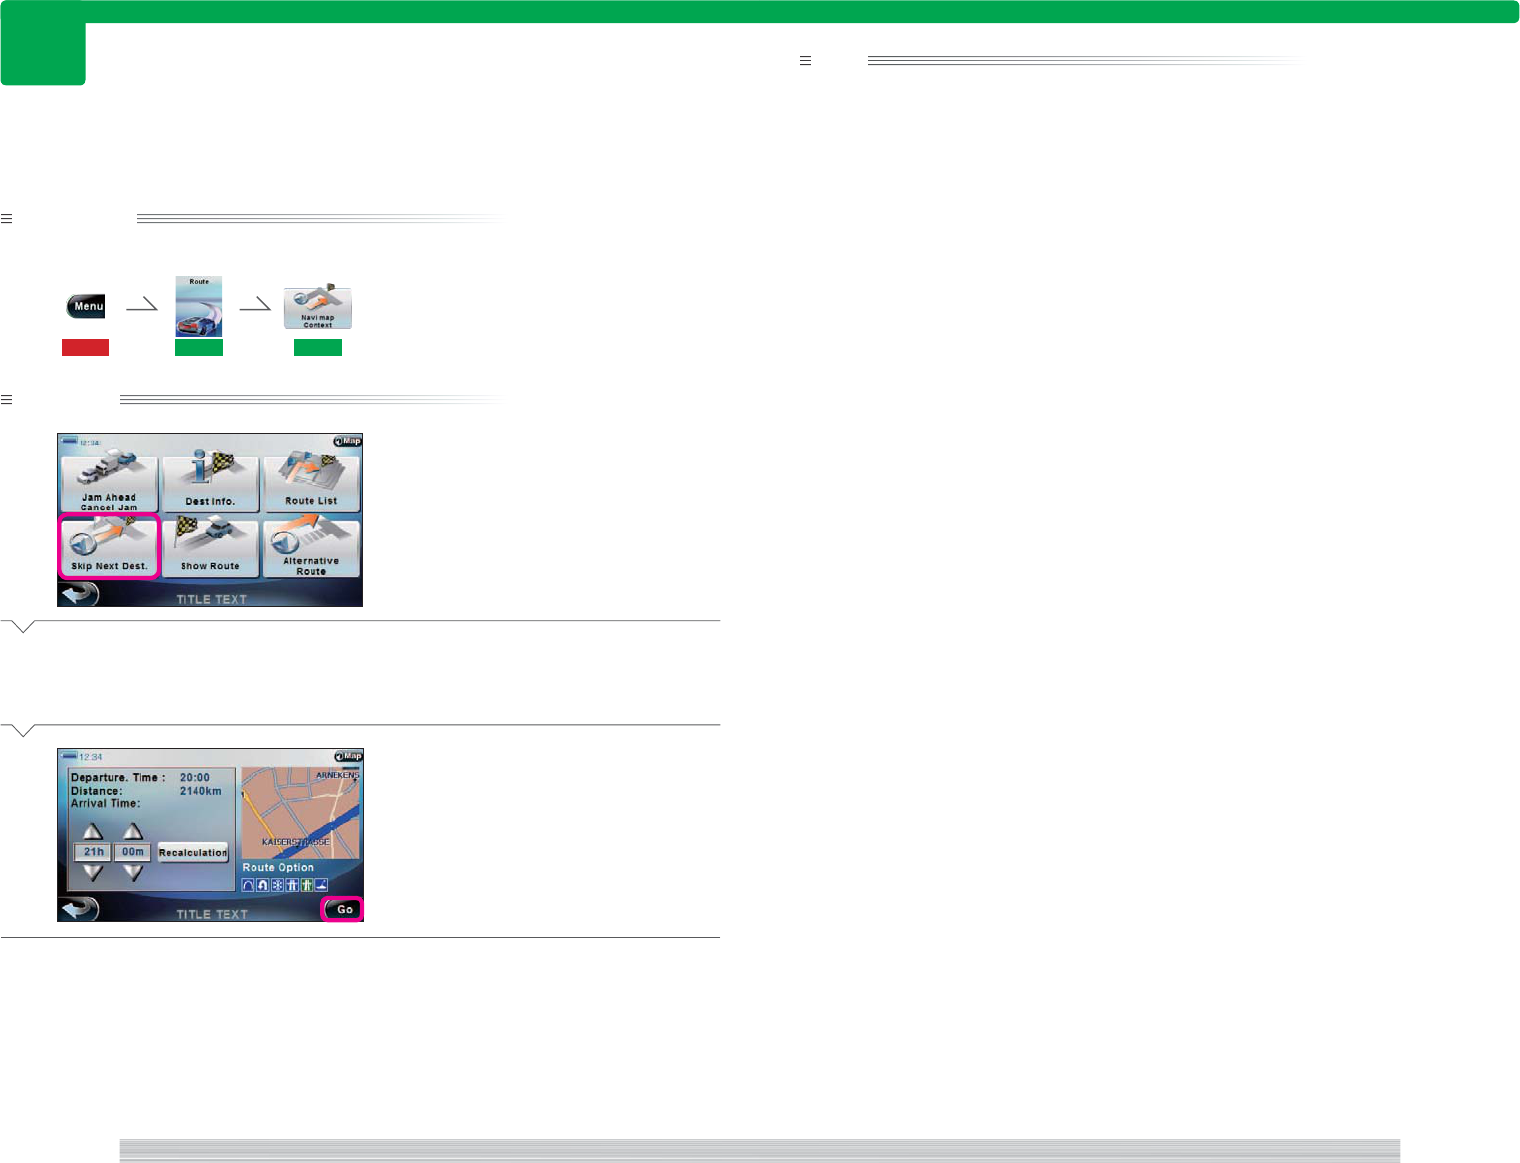
126
page Route 127
page
Route
317
317
Preparation
Have the Route guide menu displayed.
115 301 315
Operation
1
Select [Skip Next Dest.].
A confirmation message is displayed.
2
Select [OK].
3
Select [Go].
Returns you to the current map screen and
displays the new drive route.
Complete
Searching drive route skipping the next destination.
note
• If there is no destination remaining in the tour route when the next destination is skipped, the current map
screen appears when you select [OK] in
2
.
• Set the desired arrival time in
2
and select [Recalculation] to recalculate and display the start time.
<NR4000>
<NW1310a>
Skip next destination
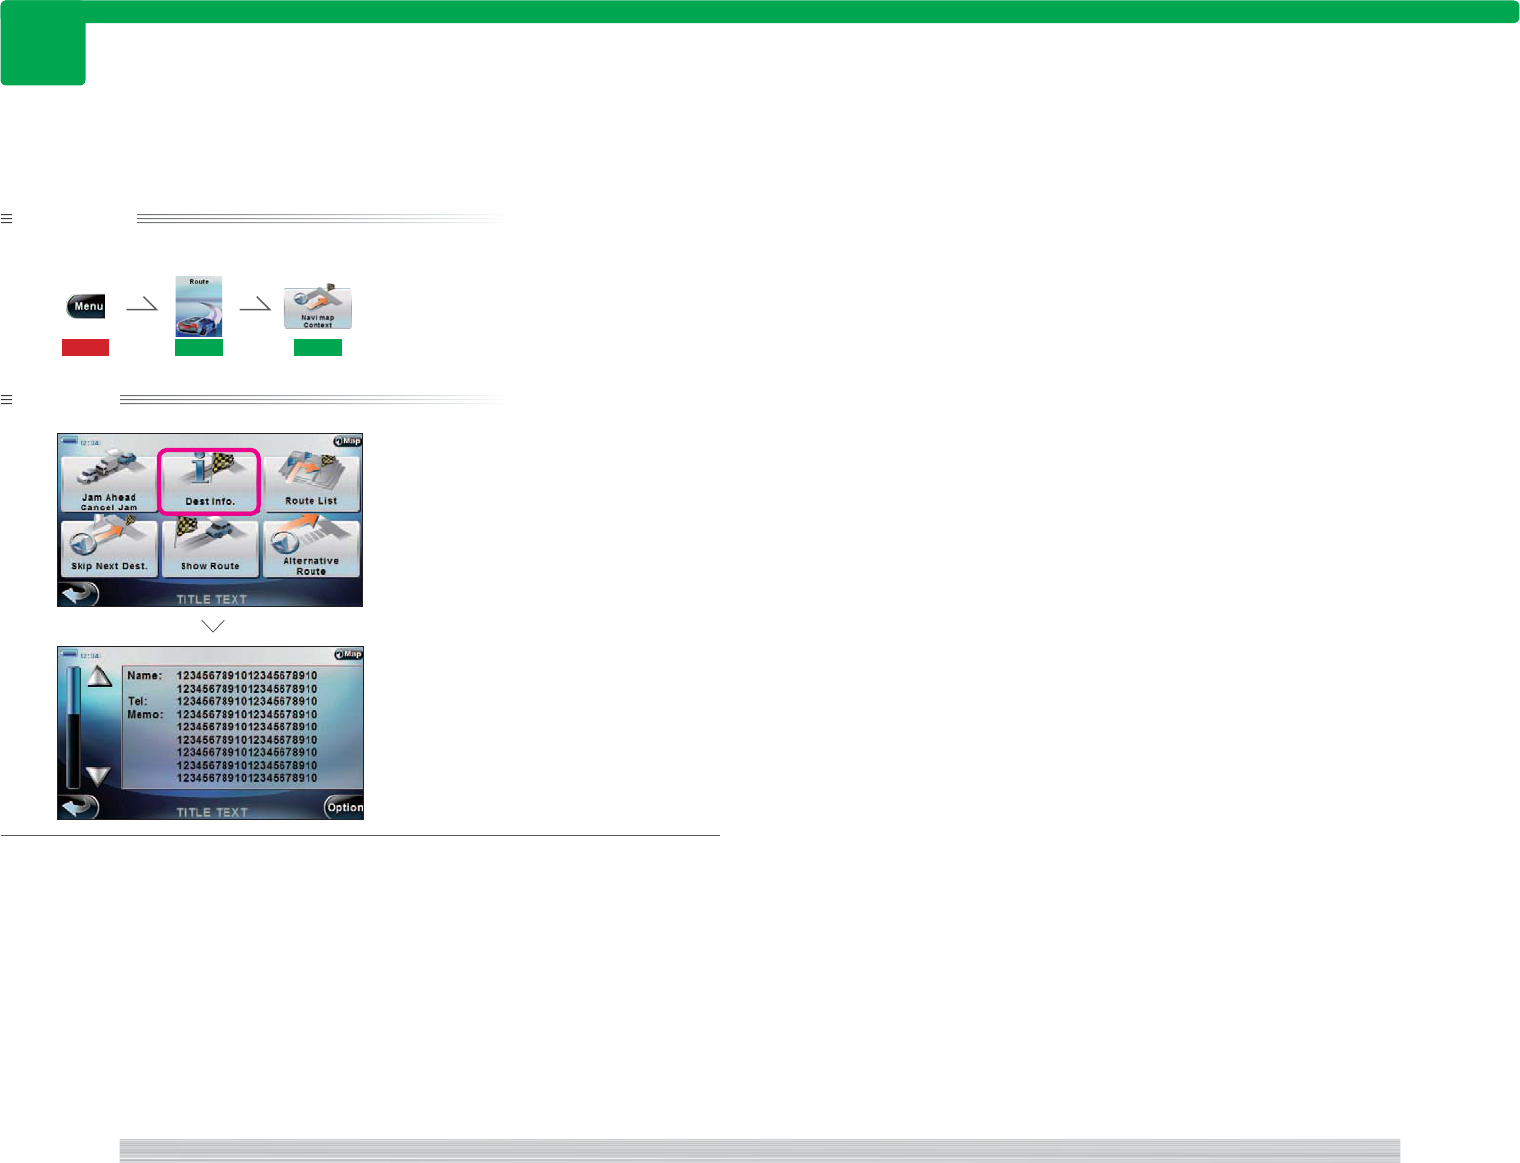
128
page Route 129
page
Route
318
318
Preparation
Have the Route guide menu displayed.
115 301 315
Operation
1
Select [Dest Info.].
Complete
Displaying the next destination's information.
<NR4000>
<NR1200a>
Display next destination information
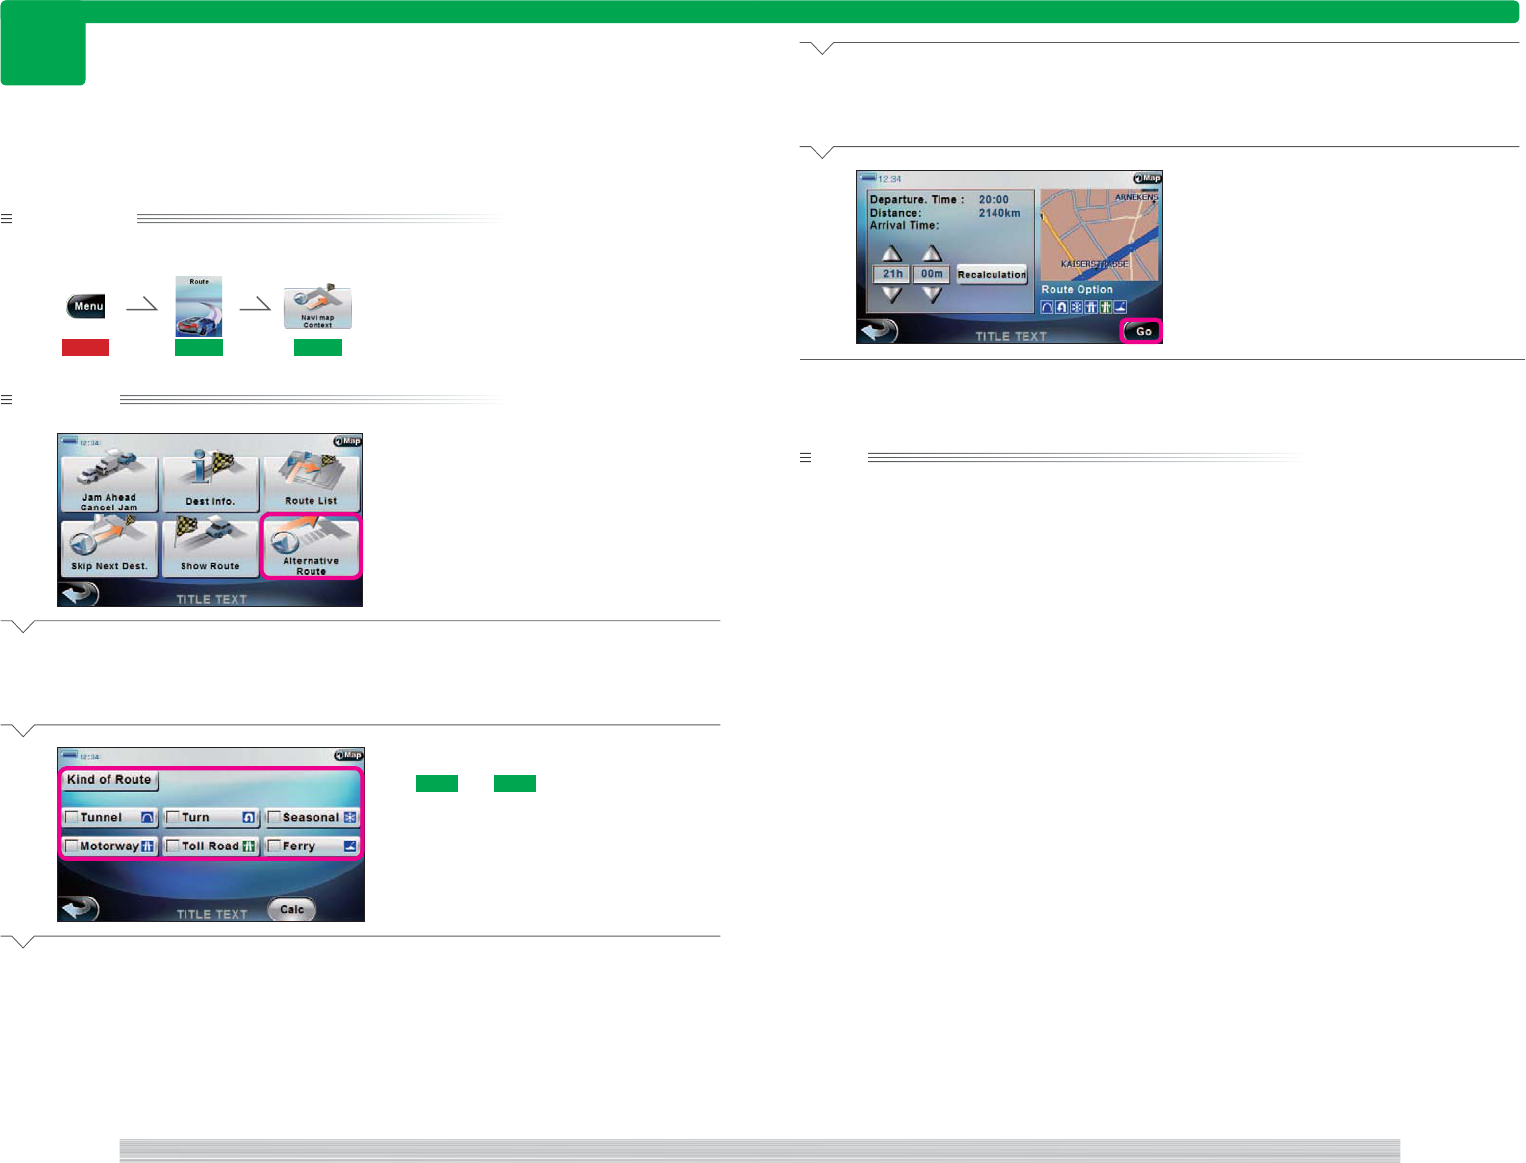
130
page Route 131
page
Route
319
319
Preparation
Have the Route guide menu screen displayed.
115 301 315
Operation
1
Select [Alternative Route].
A confirmation message is displayed.
2
Select [YES].
3
Set the search condition.
See 312 and 313 .
Next Page
Repeating route search with different condition.
4
Select [Calc].
5
Select [Go].
Returns you to the current map screen and
displays the new drive route.
Complete
note
• Set the desired arrival time in
5
and select [Recalculation] to recalculate and display the start time.
<NR4000>
<NW1310a>
<NR4200>
Search alternate route
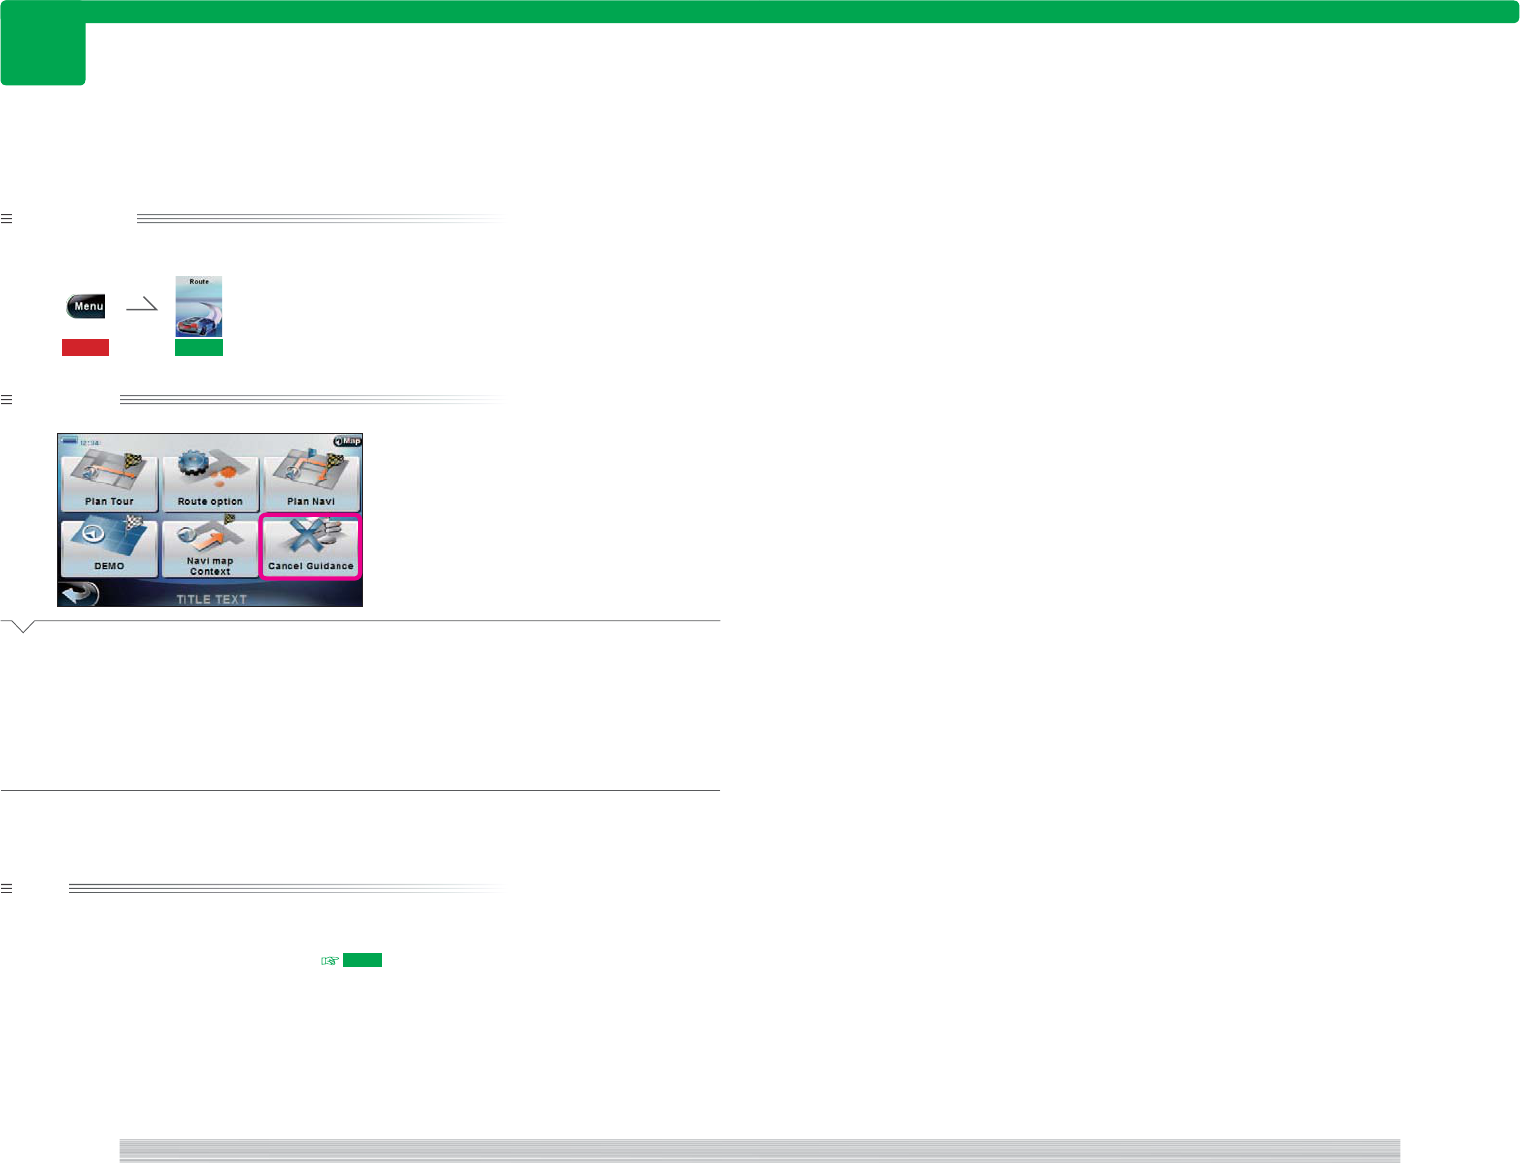
132
page Route 133
page
Route
320
320
Preparation
Have the Route menu displayed.
115 301
Operation
1
Select [Cancel Guidance].
2
Select [OK].
Route guide is canceled and you are returned
to the current map screen.
No drive route is displayed on the current map
screen.
Complete
note
• You should cancel route guide if you want to travel off the drive route.
• The drive route is not deleted even if you cancel it.
To resume route guide, display the tour route ( 303 ) and select [Calc].
Canceling current route guide.
<NR0000>
Cancel route guide
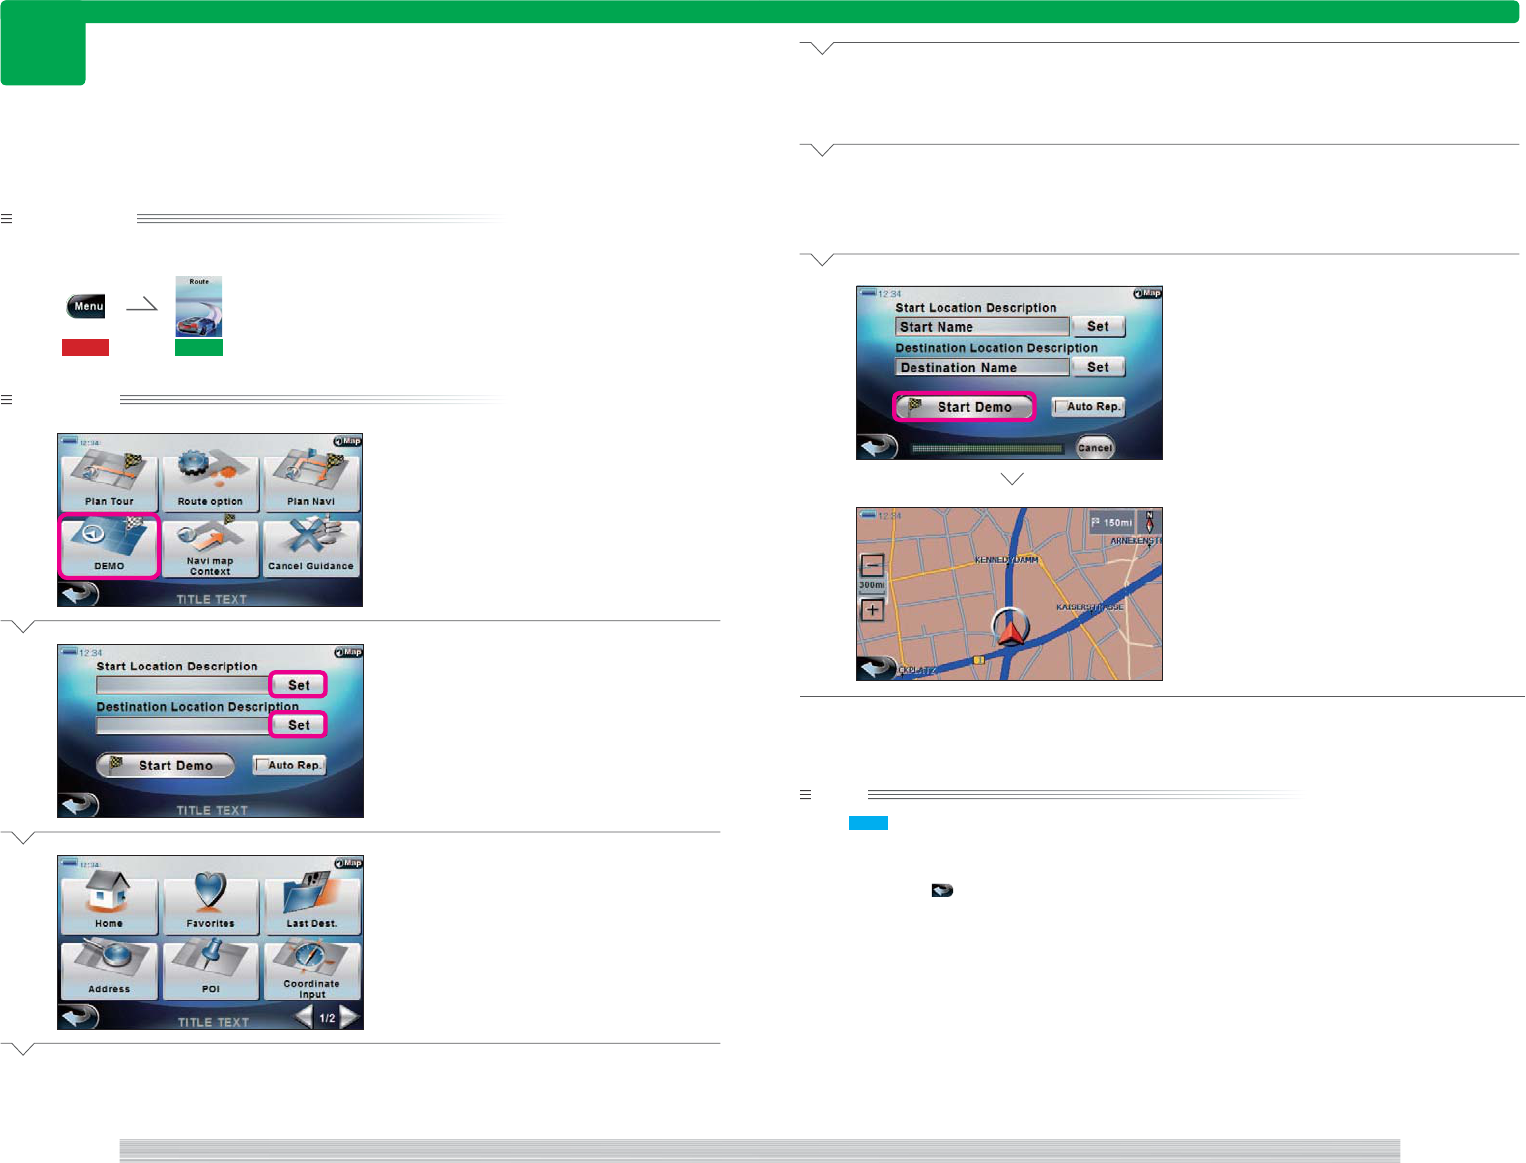
134
page Route 135
page
Route
321
321
Preparation
Have the Route menu displayed.
115 301
Operation
1
Select [DEMO].
2
Select [Set] for the Start Location
Description or Destination Location
Description.
3
Set the start location or destination.
Next Page
Simulating the route guide specifying the start and destination locations.
4
Select [Set Destination].
Returns you to the screen in
2
.
5
Repeat
2
to
4
to set both the start and
destination locations.
6
Select [Start Demo].
Starts route search and demo mode drive.
Complete
note
• See 202 for information on how to set the start or destination location in
3
.
• You are returned to
2
when you arrive at the destination in demo mode.
Select [Auto Rep.] in
6
to repeat demo mode from the start location.
• When you select in demo mode, a confirmation message appears and you are returned to
2
after you
select [YES].
• The searched drive route is canceled if you select [Set Demo] in
6
when a drive route is already searched.
However, the destination is saved as previous destination.
<NM5000>
<NR0000>
<NR3000b>
<NR3000a>
<NW0000a>
Drive in demo mode
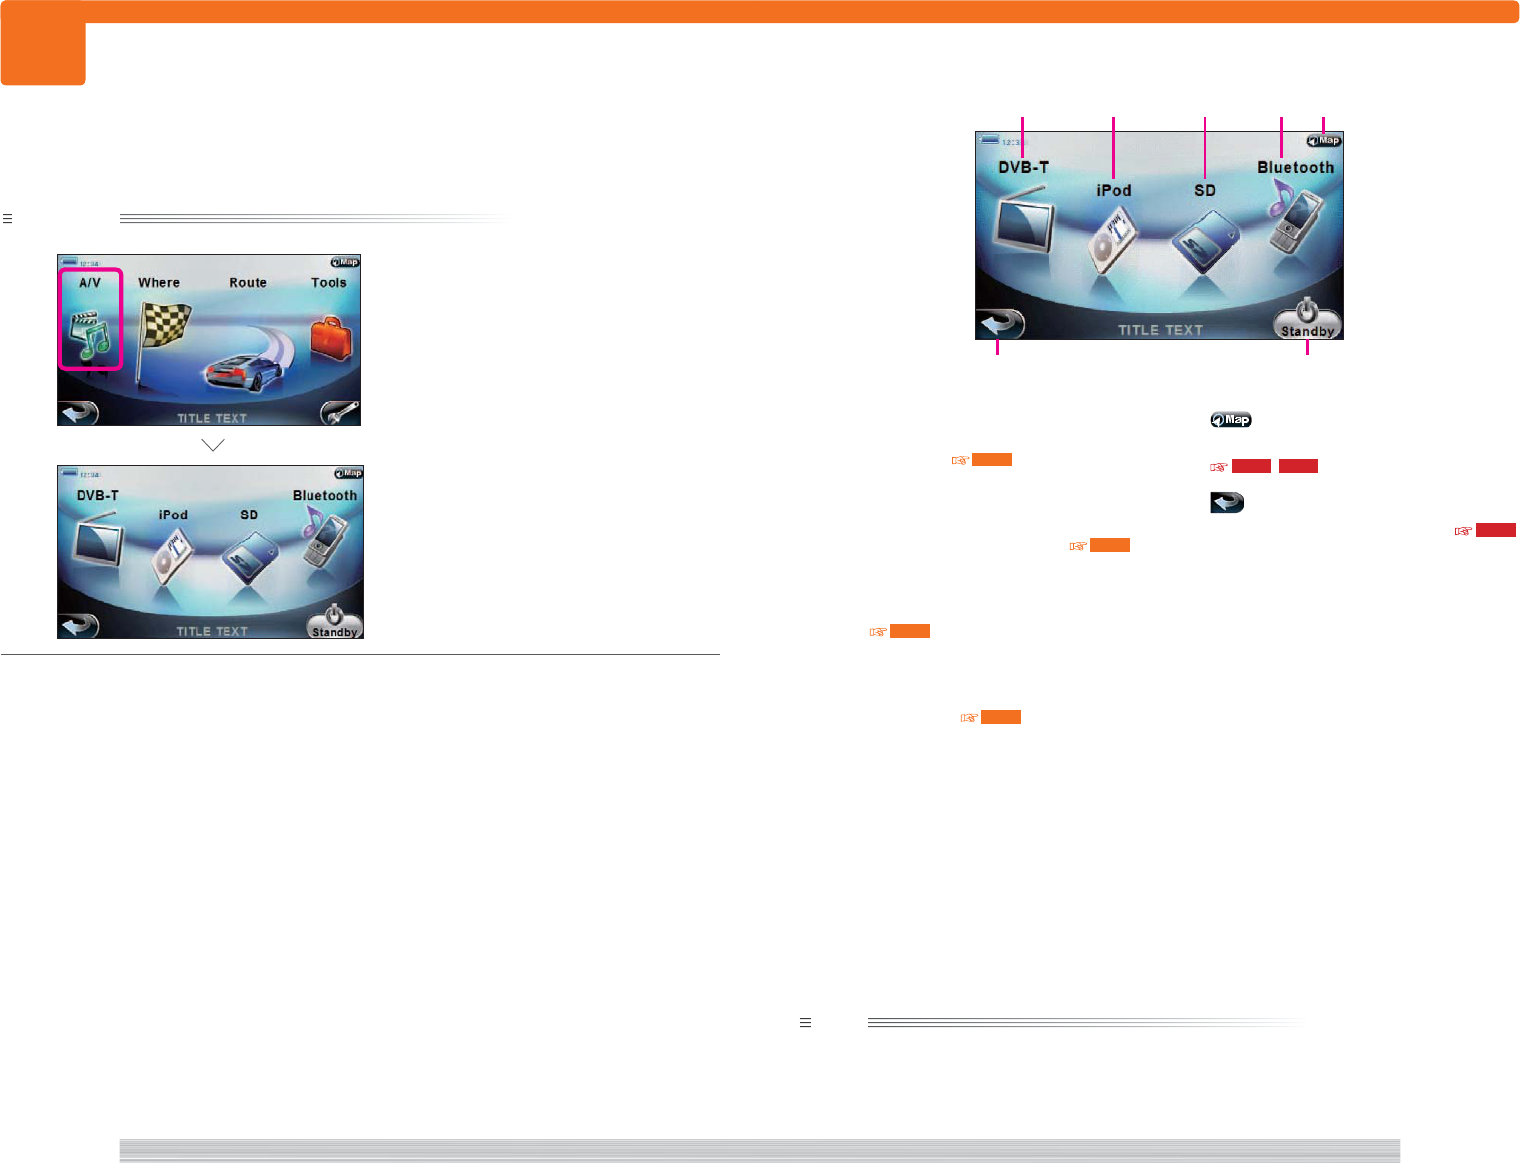
136
page A/V
401
137
page
A/V
401
Operation
1
Select [A/V].
The Source menu appears.
Complete
Displaying the Source menu to switch the AV source from the Top menu.
1 [iPod]
Select to play music and video in the
connected iPod. 413
2 [DVB-T]
Select to switch to terrestrial digital
television broadcasts (digital TV). 423
3 [SD]
Select to play files inside the inserted SD
card. 402
4 [Bluetooth]
Select to play music in the connected
Bluetooth device. 419
5
Select to return to the current map screen.
107 , 112
6
Select to return to the Top menu. 115
7 [Standby]
Select to turn off the AV source.
note
• Unplayable AV source cannot be selected.
• Only PNX-7 can be viewed for digital TV.
• If the previously played AV source is available, select [A/V] to switch to the playback screen of that source and
start playback.
<A00000-1>
<TOP0000>
Source menu (When connecting iPod)
<A00000-1>
Display Source menu
12345
67
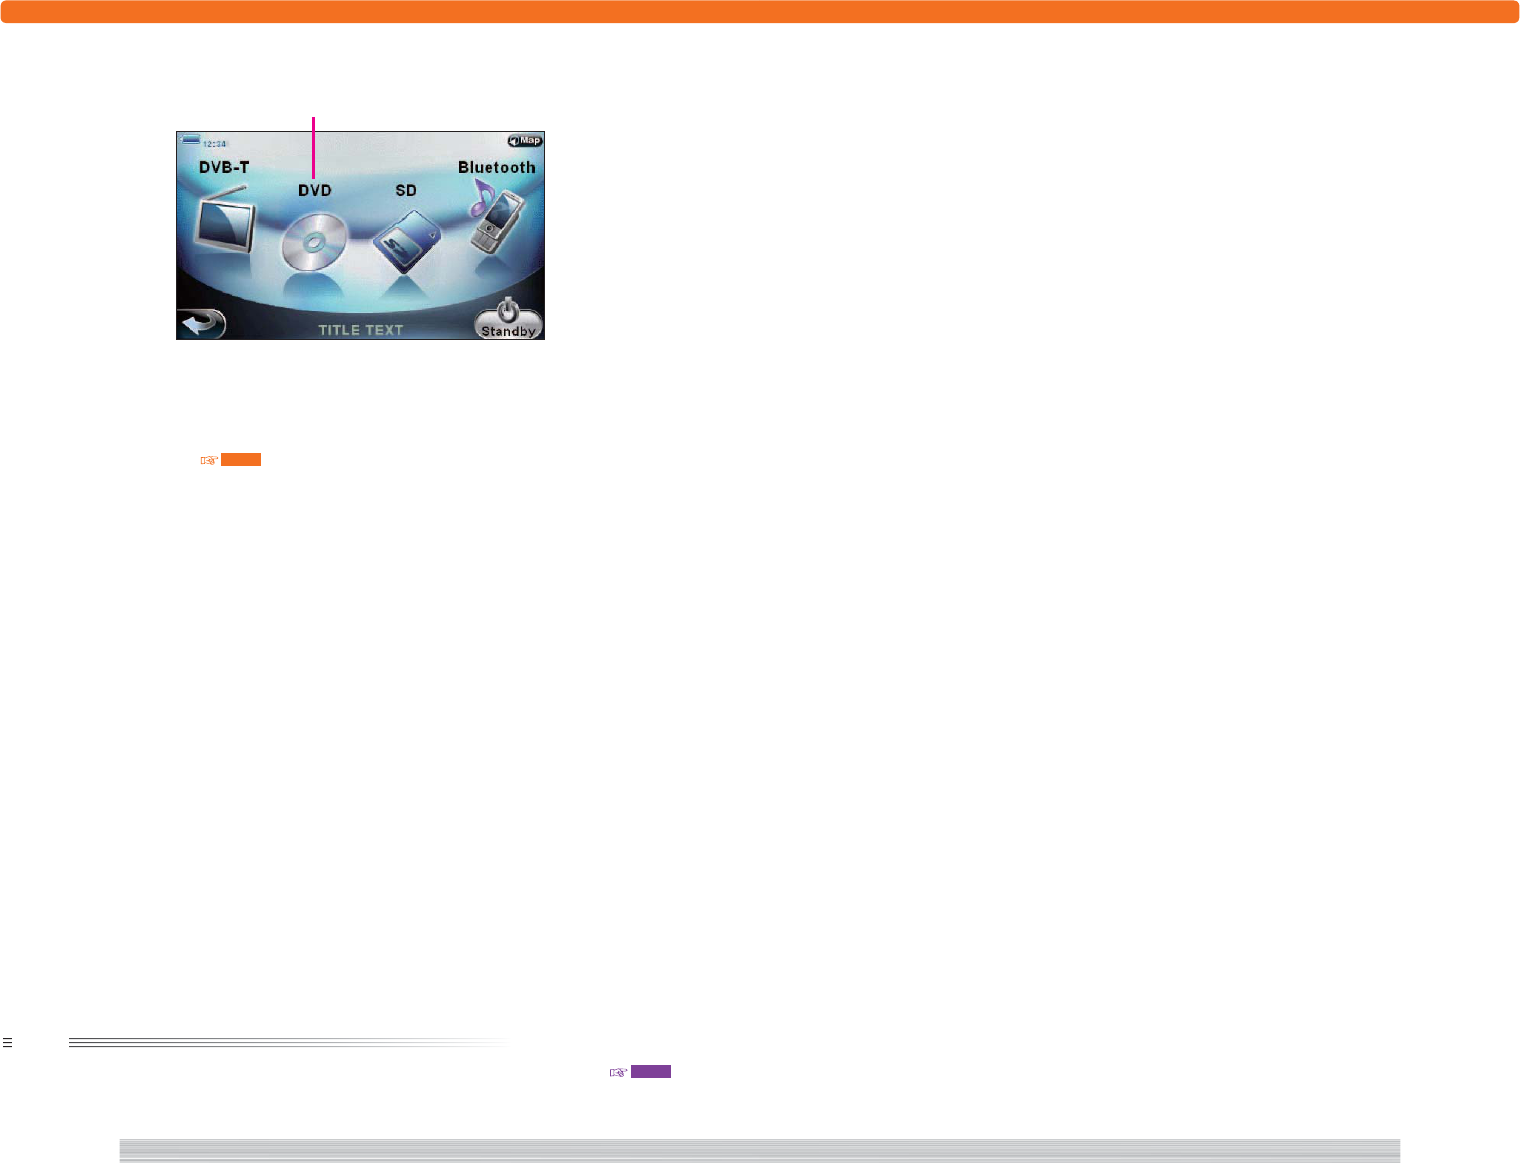
138
page A?V 139
page
A/V
401
8 [DVD]
Select to play music and video in the
connected DVD player. 420
note
• [DVD] can be selected when a DVD player is connected and the Input Select is set to “DVD” ( 616 ).
• When Input Select is set to “AV in”, [AV IN] is displayed instead of [DVD].
• When iPod is connected, neither [DVD] nor [AV IN] is displayed.
Source menu (When connecting DVD)
<A00000-2>
8
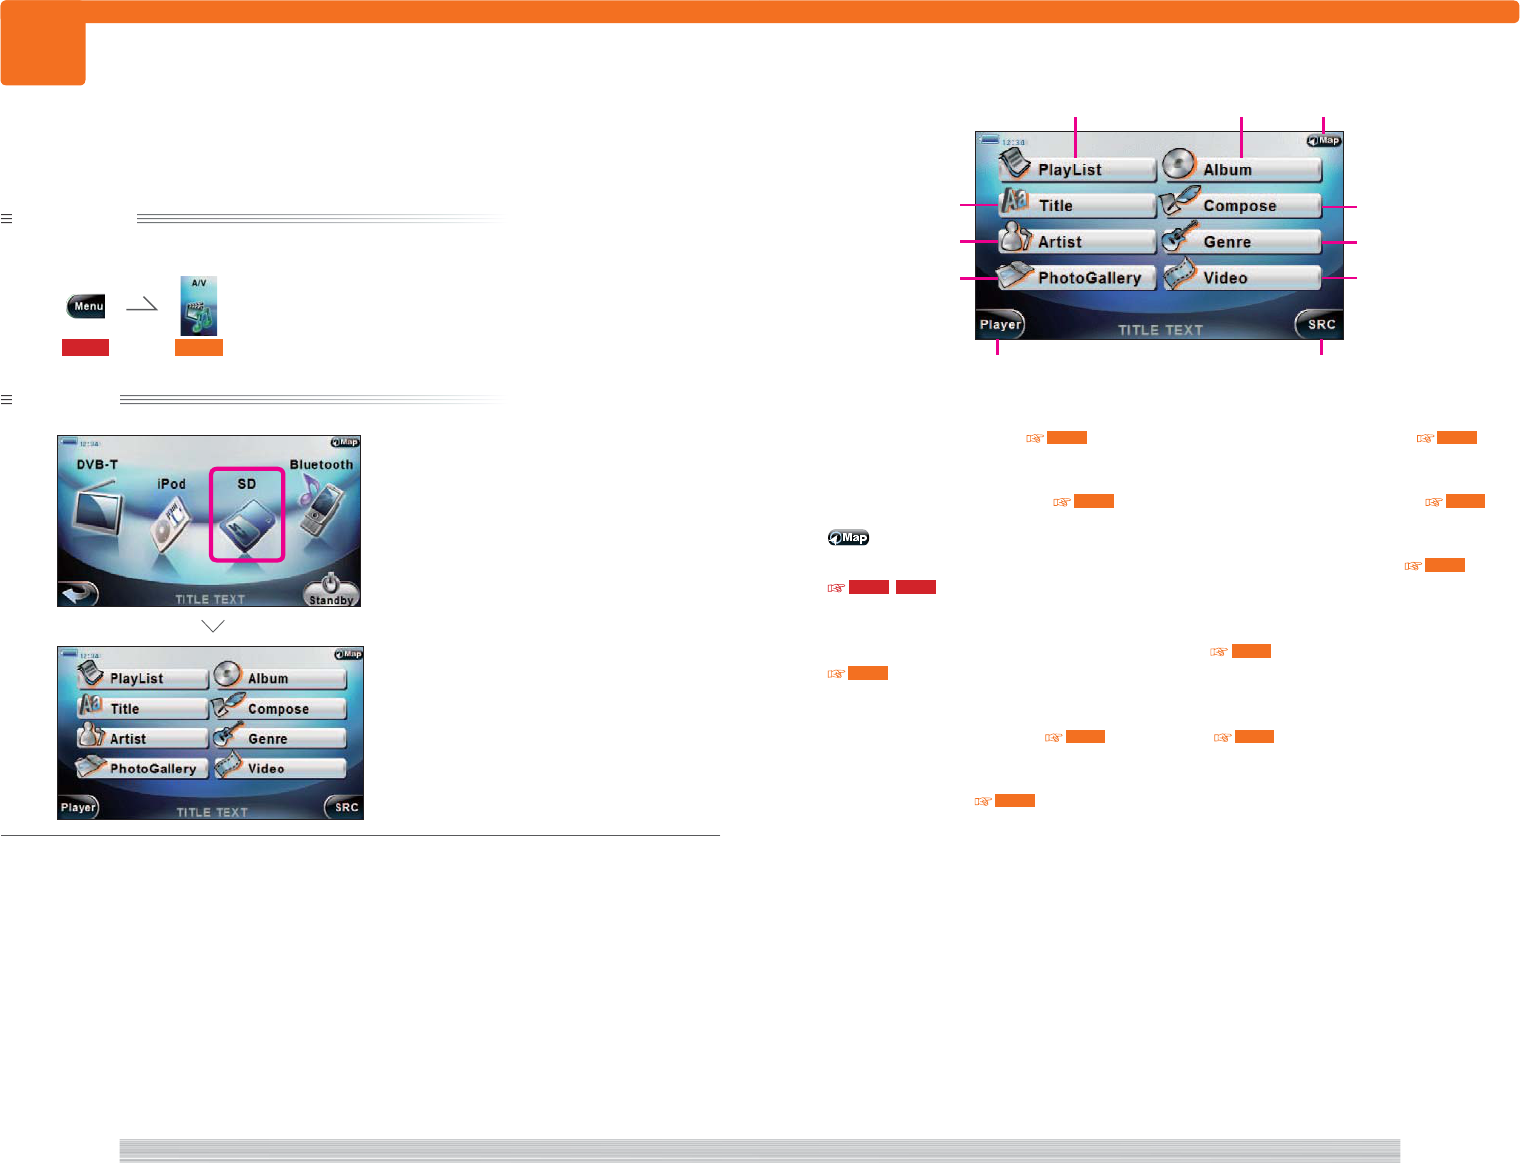
140
page A/V 141
page
A/V
402
402
Preparation
Have the Source menu displayed.
115 401
Operation
1
Select [SD].
The top category of the SD card appears.
Complete
Display SD card's top category
Displaying the top category for music selection from the Source menu.
1 [PlayList]
Select to play from playlist. 407
2 [Album]
Select to play music by album. 405
3
Select to return to the current map screen.
107 , 112
4 [Compose]
Select to play music by composer.
408
5 [Genre]
Select to play music by genre. 409
6 [Video]
Select to play video. 411
7 [Title]
Select to play music by title. 404
8 [Artist]
Select to play music by artist. 406
9 [Photo Gallery]
Select to view still images. 410
0 [Player]
Select to display the Player screen.
403
- [SRC]
Select to return to the Source menu.
401
SD card Top category screen
<AC2000>
<AC2000>
<A00000-1>
4
0-
1
6
5
2 3
7
8
9
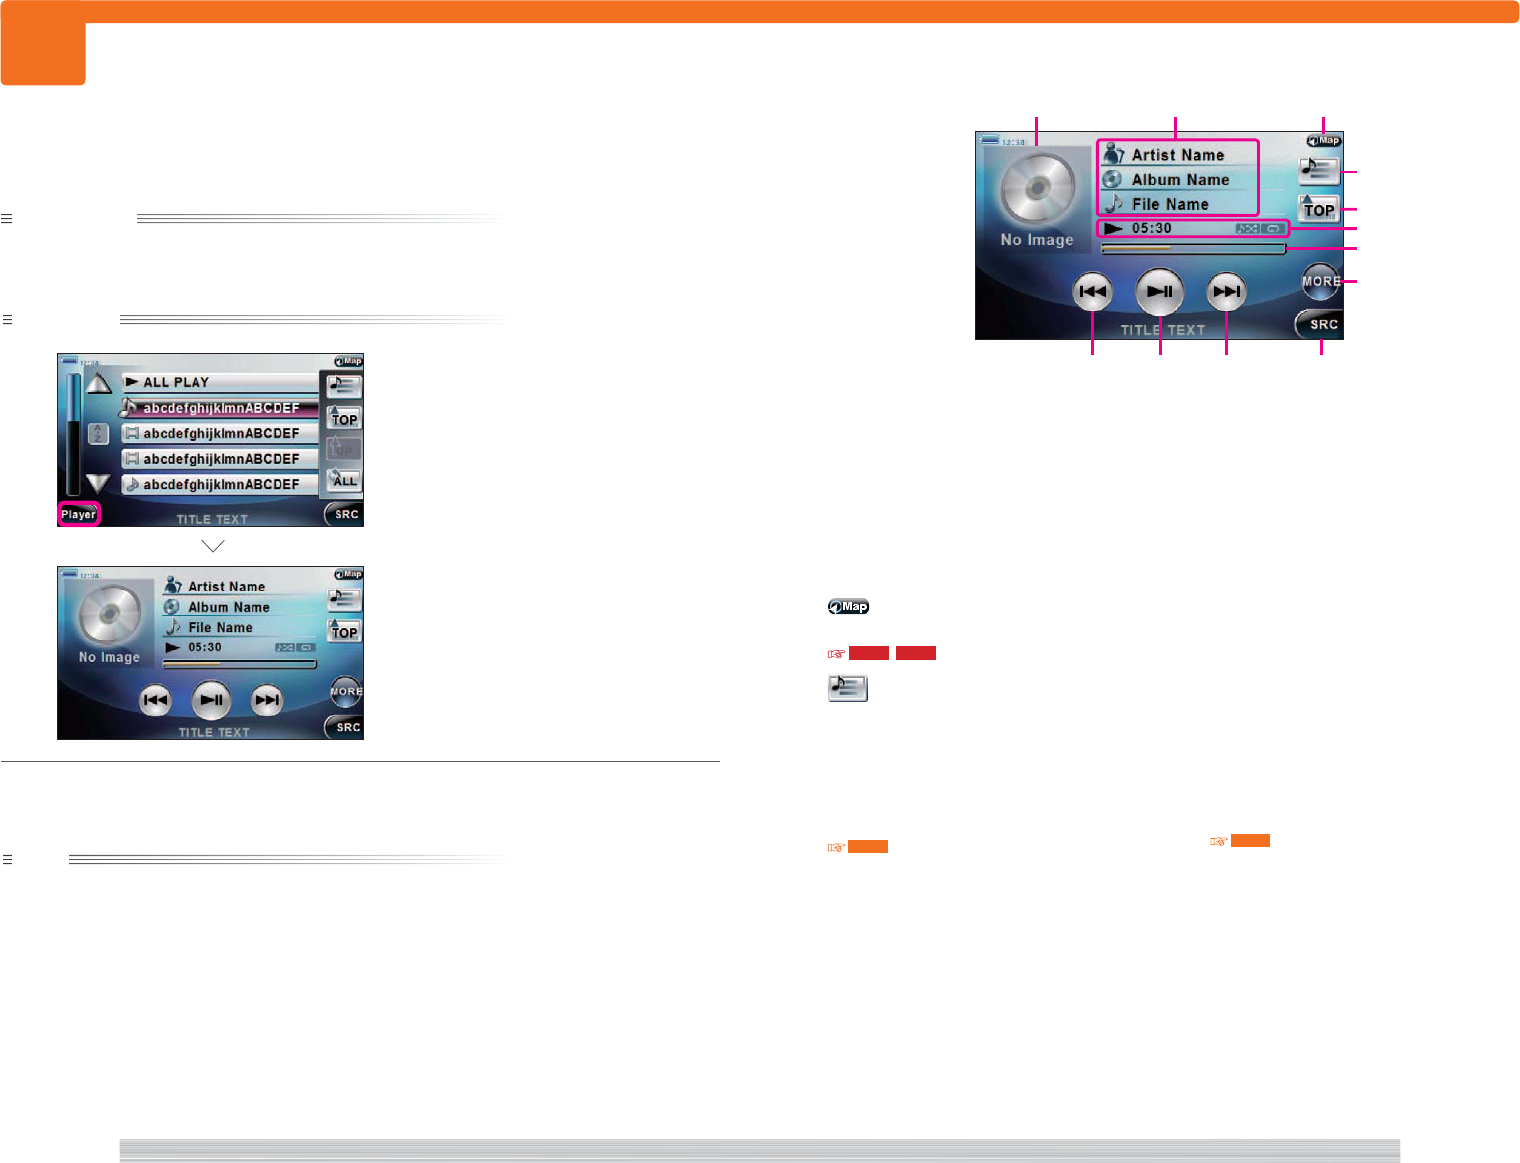
142
page A/V 143
page
A/V
403
403
1 Album art
Select to display album art.
2 Music information
Select to display the artist name, music
title, and album title.
Select the name to horizontally scroll the
selected information.
3
Select to return to the current map screen.
107 , 112
4
Select to display the music in the list
(Playlist, Album. etc.) containing the
current music.
5 [TOP]
Select to display the top category.
402
6 Playback status
7 Play time bar
Select to display the playback progress.
Touch the bar to play from the touched
location.
8 [MORE]
Select to display the More screen.
9 [4]
Select to play from the beginning of the
music or the previous music.
0 [38]
Select to toggle between play and halt.
- [¢]
Select to play the next music.
= [SRC]
Select to return to the Source menu.
401
Preparation
Have the music in the SD card playing.
Operation
1
Select [Player].
The Music playback control screen (Main
screen) appears.
Complete
note
• If you select [Player] in
1
, all songs are played.
SD card music playback control screen
(Main screen)
<MC0000a>
<MC0000a>
<AC2200>
4
9=
2
1 3
5
8
0 -
6
7
Control while playing music in SD card
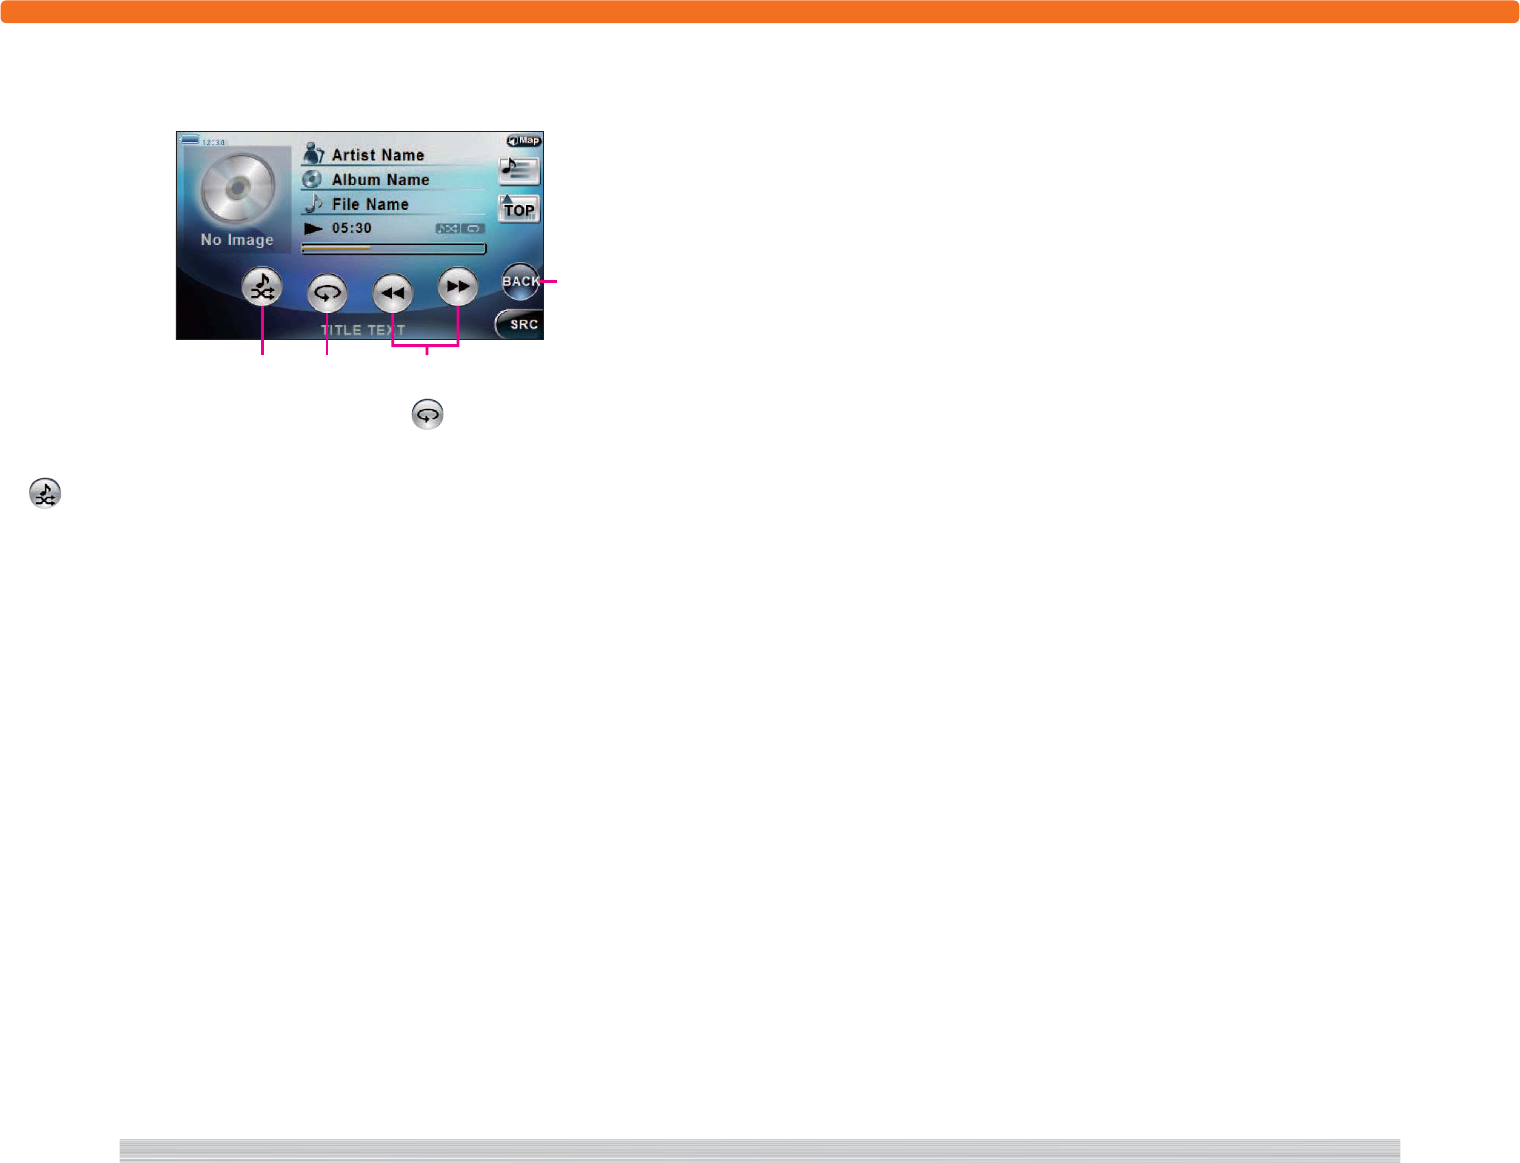
144
page A?V 145
page
A/V
403
1 [BACK]
Select to return to the Music playback
control screen (Main screen).
2
Select to randomly play music in the
current list (Playlist, Album, etc.).
3
Select to repeat the current music.
4 [1][¡]
Select to play at x2 speed in the forward or
backward direction.
SD card music playback control screen
2
1
3
<MC0000b>
4
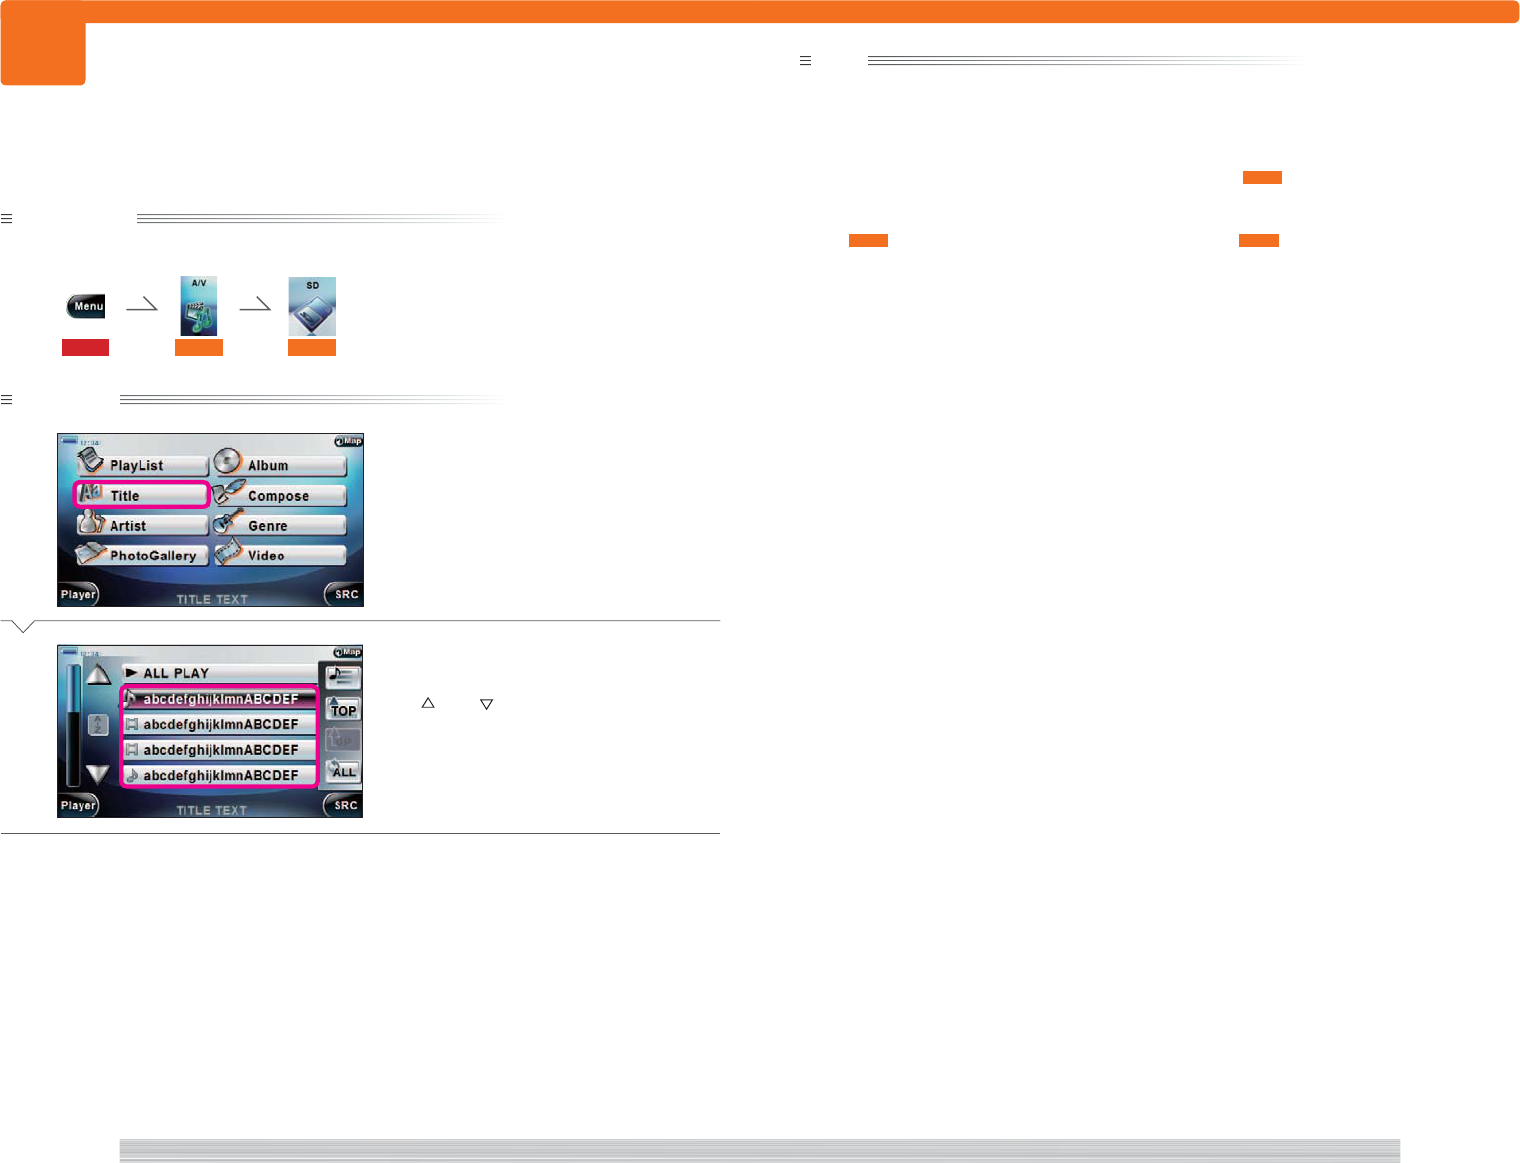
146
page A/V 147
page
A/V
404
404
Preparation
Have the SD card Top category screen displayed.
115 401 402
Operation
1
Select [Title].
2
Select the button of the title to play.
The music starts playing.
Use [ ] and [ ] to scroll the list.
Complete
Selecting and playing music file or video file in the SD card by title.
note
• If you select [ALL PLAY] or [Player] in
2
, all songs are played.
• Select [A-Z] or [A-Z] in
2
to sort the list in ascending or descending order.
• Select [SRC] in
2
to return to the Source menu or [TOP] to return to the Top category screen. Or select [HOME]
to display a list of songs being played.
• If you displayed the screen in
2
from the Playlist selection screen ( 407 ), the screen changes in the order of
[All] = [Audio] = [Movie] = [All] each time you select [All].
Select [All] to list all files, [Audio] to list only audio files, and [Movie] to list only video files.
• See 403 for the screen displayed while playing a music file. See 412 for the screen displayed while
playing a video file.
<AC2200>
<AC2200>
Select by title and play
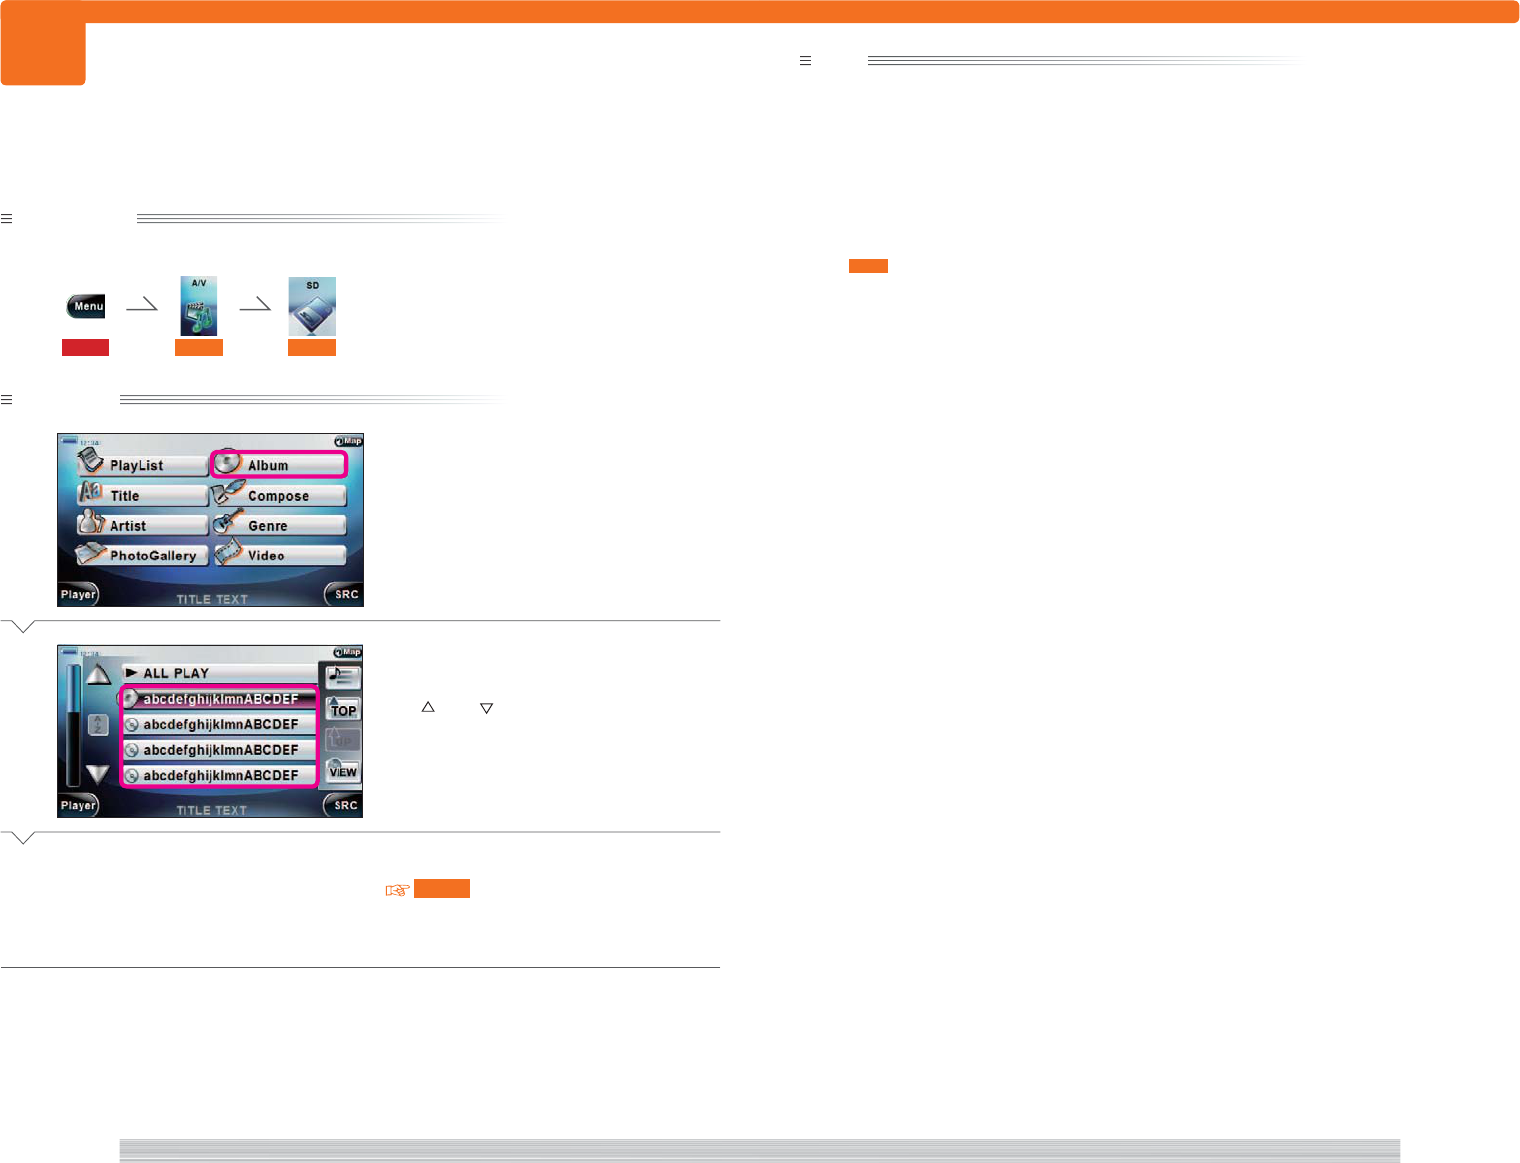
148
page A/V 149
page
A/V
405
405
Preparation
Have the SD card Top category screen displayed.
115 401 402
Operation
1
Select [Album].
2
Select the button of the album to
play.
Use [ ] and [ ] to scroll the list.
3
Select the button of the music to play.
404
The music is played.
Complete
Selecting and playing music in SD card by album title.
note
• Select [ALL PLAY] in
2
to select songs in all albums.
• Select [Player] in
2
to play songs from the first song in the top album.
• Select [A-Z] or [A-Z] in
2
to sort the list in ascending or descending order.
• Select [VIEW] in
2
to change the album display method from list display = album art thumbnail display =
rotation display. Select an album art during album art thumbnail display or rotation display to play the album.
• Select [SRC] in
2
to return to the Source menu or [TOP] to return to the Top category screen. Or select [HOME]
to display a list of songs being played.
• Select [ALL PLAY] in
3
to play all songs in the album.
• See 403 for the screen while playing.
<AC2400>
<AC2000>
Select by album title and play
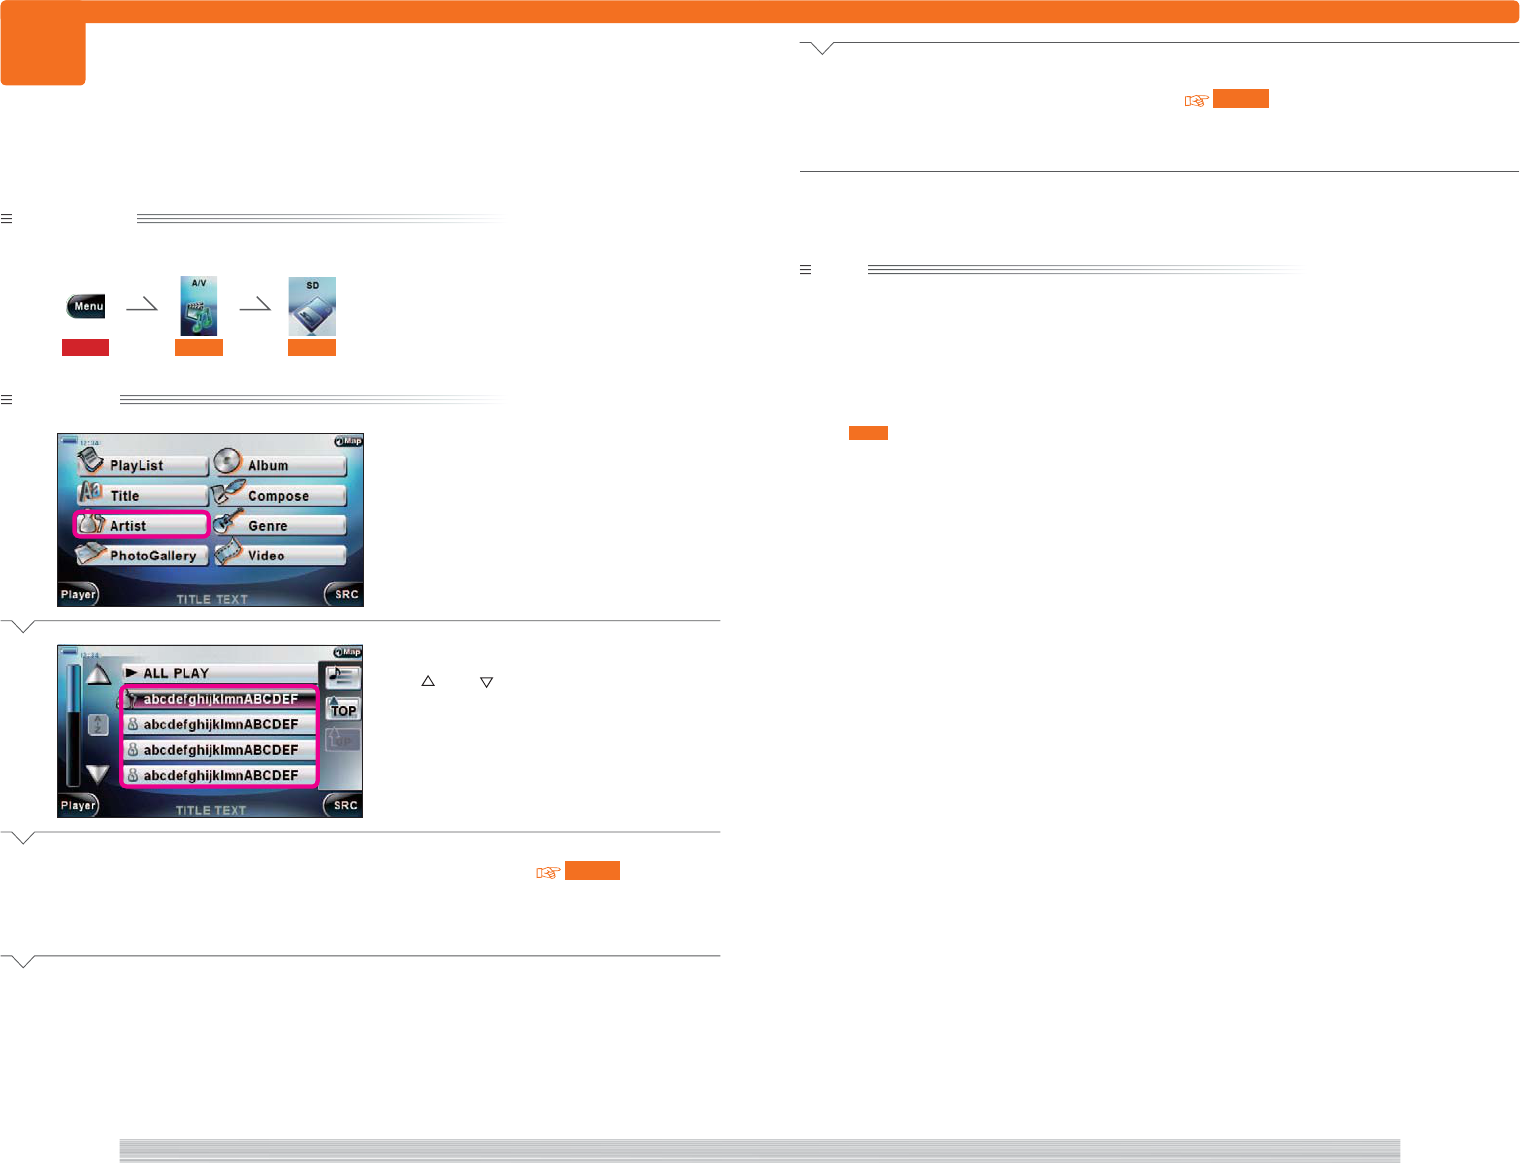
150
page A/V 151
page
A/V
406
406
Preparation
Have the SD card Top category screen displayed.
115 401 402
Operation
1
Select [Artist].
2
Select the button of the artist to play.
Use [ ] and [ ] to scroll the list.
3
Select an album. 405
Next
Selecting and playing music in SD card by artist name.
4
Select the button of the music to play.
404
The music is played.
Complete
note
• Select [ALL PLAY] in
2
to select songs of all artists.
• Select [Player] in
2
to play songs from the first song of the top artist.
• Select [A-Z] or [A-Z] in
2
to sort the list in ascending or descending order.
• Select [ALL PLAY] in
3
to play all songs of artist selected in
2
.
• Select [SRC] to return to the Source menu or [TOP] to return to the Top category screen. Or select [HOME] to
display a list of songs being played.
• See 403 for the screen while playing.
<AC2000>
<AC2300>
Select by artist name and play

152
page A/V 153
page
A/V
407
407
Preparation
Have the SD card Top category screen displayed.
115 401 402
Operation
1
Select [PlayList].
2
Select the button of the playlist to
play.
Use [ ] and [ ] to scroll the list.
3
Select the button of the music to play.
404
The music is played.
Complete
Playing from playlist in the SD card.
note
• You cannot create or edit Playlist from the PND. You must use a PC.
• Select [ALL PLAY] in
2
to select files in all playlists.
• Select [Player] in
2
to play songs from the first song in the top playlist.
• Select [A-Z] or [A-Z] in
2
to sort the list in ascending or descending order.
• Select [ALL PLAY] in
3
to play all songs in playlist selected in
2
.
• Select [SRC] to return to the Source menu or [TOP] to return to the Top category screen. Or select [HOME] to
display a list of songs being played.
• See 403 for the screen while playing.
<AC2100>
<AC2000>
Play from Playlist
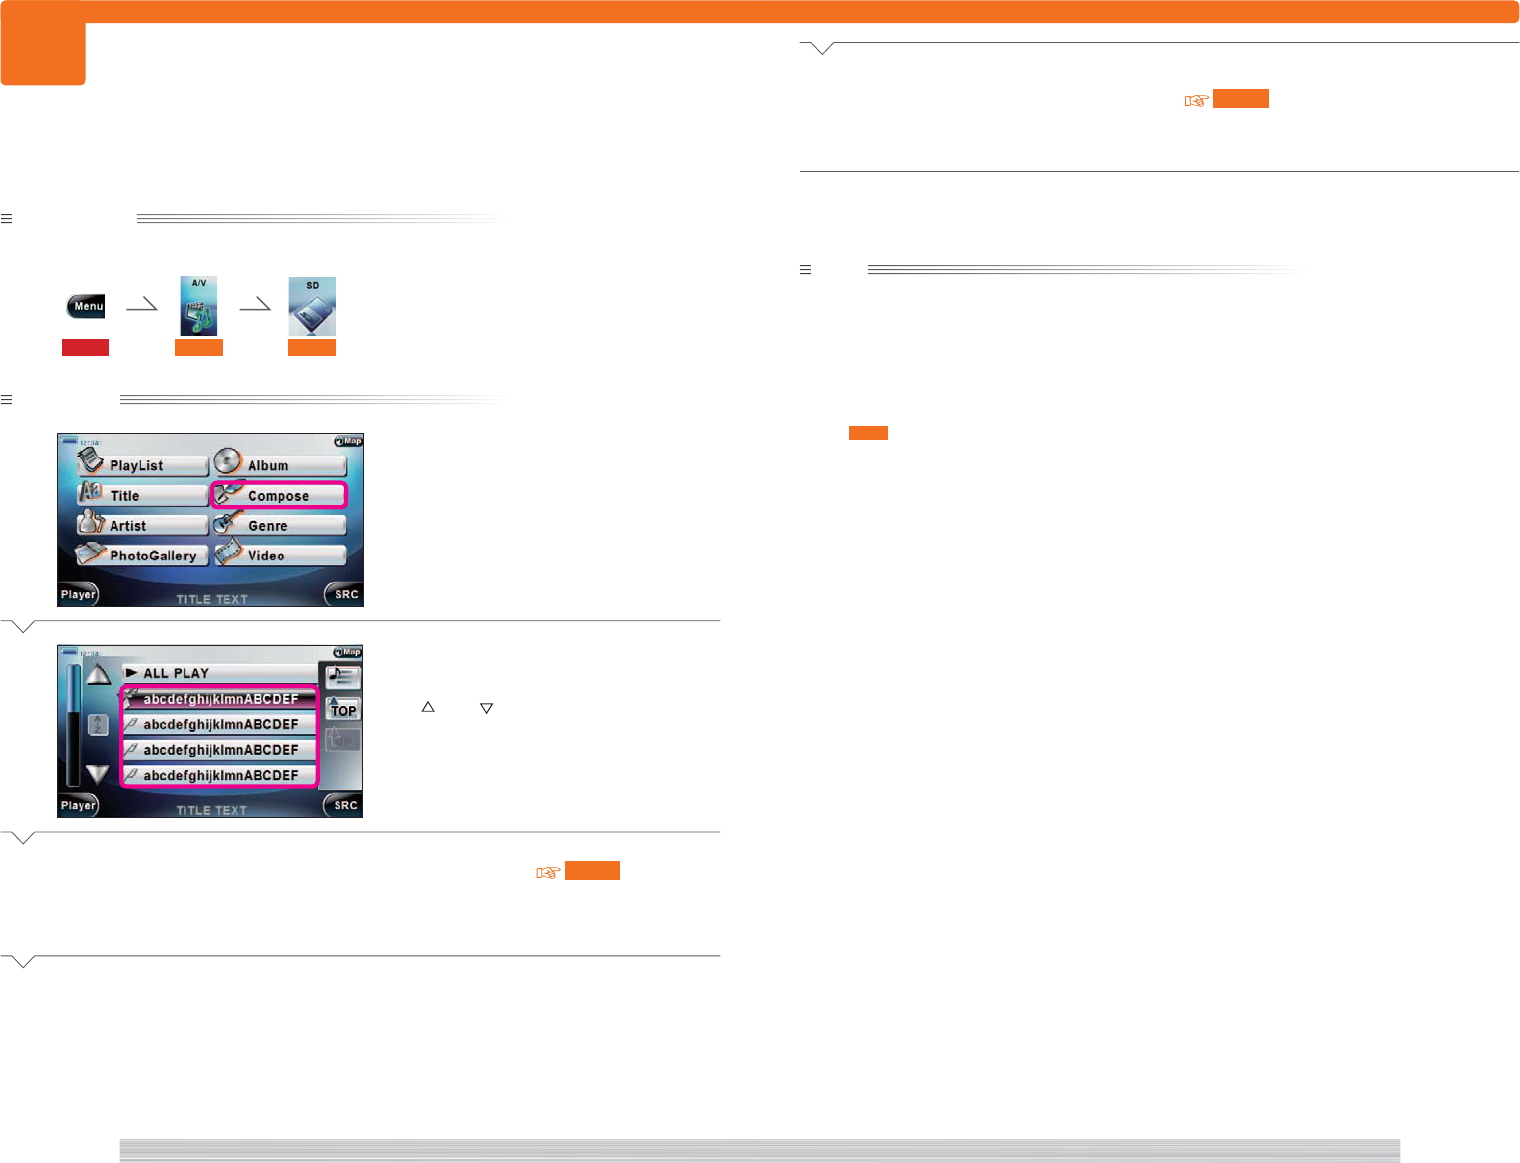
154
page A/V 155
page
A/V
408
408
Preparation
Have the SD card Top category screen displayed.
115 401 402
Operation
1
Select [Composer].
2
Select the button of the composer to
play.
Use [ ] and [ ] to scroll the list.
3
Select an album. 405
Next
Selecting and playing music in SD card by composer.
4
Select the button of the music to play.
404
The music is played.
Complete
note
• Select [ALL PLAY] in
2
to select songs of all composers.
• Select [Player] in
2
to play songs from the first song in the top composer.
• Select [A-Z] or [A-Z] in
2
to sort the list in ascending or descending order.
• Select [SRC] in
2
to return to the Source menu or [TOP] to return to the Top category screen. Or select [HOME]
to display a list of songs being played.
• Select [ALL PLAY] in
3
to play all songs of composer selected in
2
.
• See 403 for the screen while playing.
<AC2500>
<AC2000>
Select by composer and play

156
page A/V 157
page
A/V
409
409
Preparation
Have the SD card Top category screen displayed.
115 401 402
Operation
1
Select [Genre].
2
Select the button of the genre to play.
Use [ ] and [ ] to scroll the list.
3
Select an album. 405
Next
Selecting and playing music in SD card by genre.
4
Select the button of the music to play.
404
The music is played.
Complete
note
• Select [ALL PLAY] in
2
to select songs in all genre.
• Select [Player] in
2
to play songs from the first song in the top genre.
• Select [A-Z] or [A-Z] in
2
to sort the list in ascending or descending order.
• Select [SRC] in
2
to return to the Source menu or [TOP] to return to the Top category screen. Or select to
display a list of songs being played.
• Select [ALL PLAY] in
3
to play all songs of genre selected in
2
.
• See 403 for the screen while playing.
<AC2600>
<AC2000>
Select by genre and play
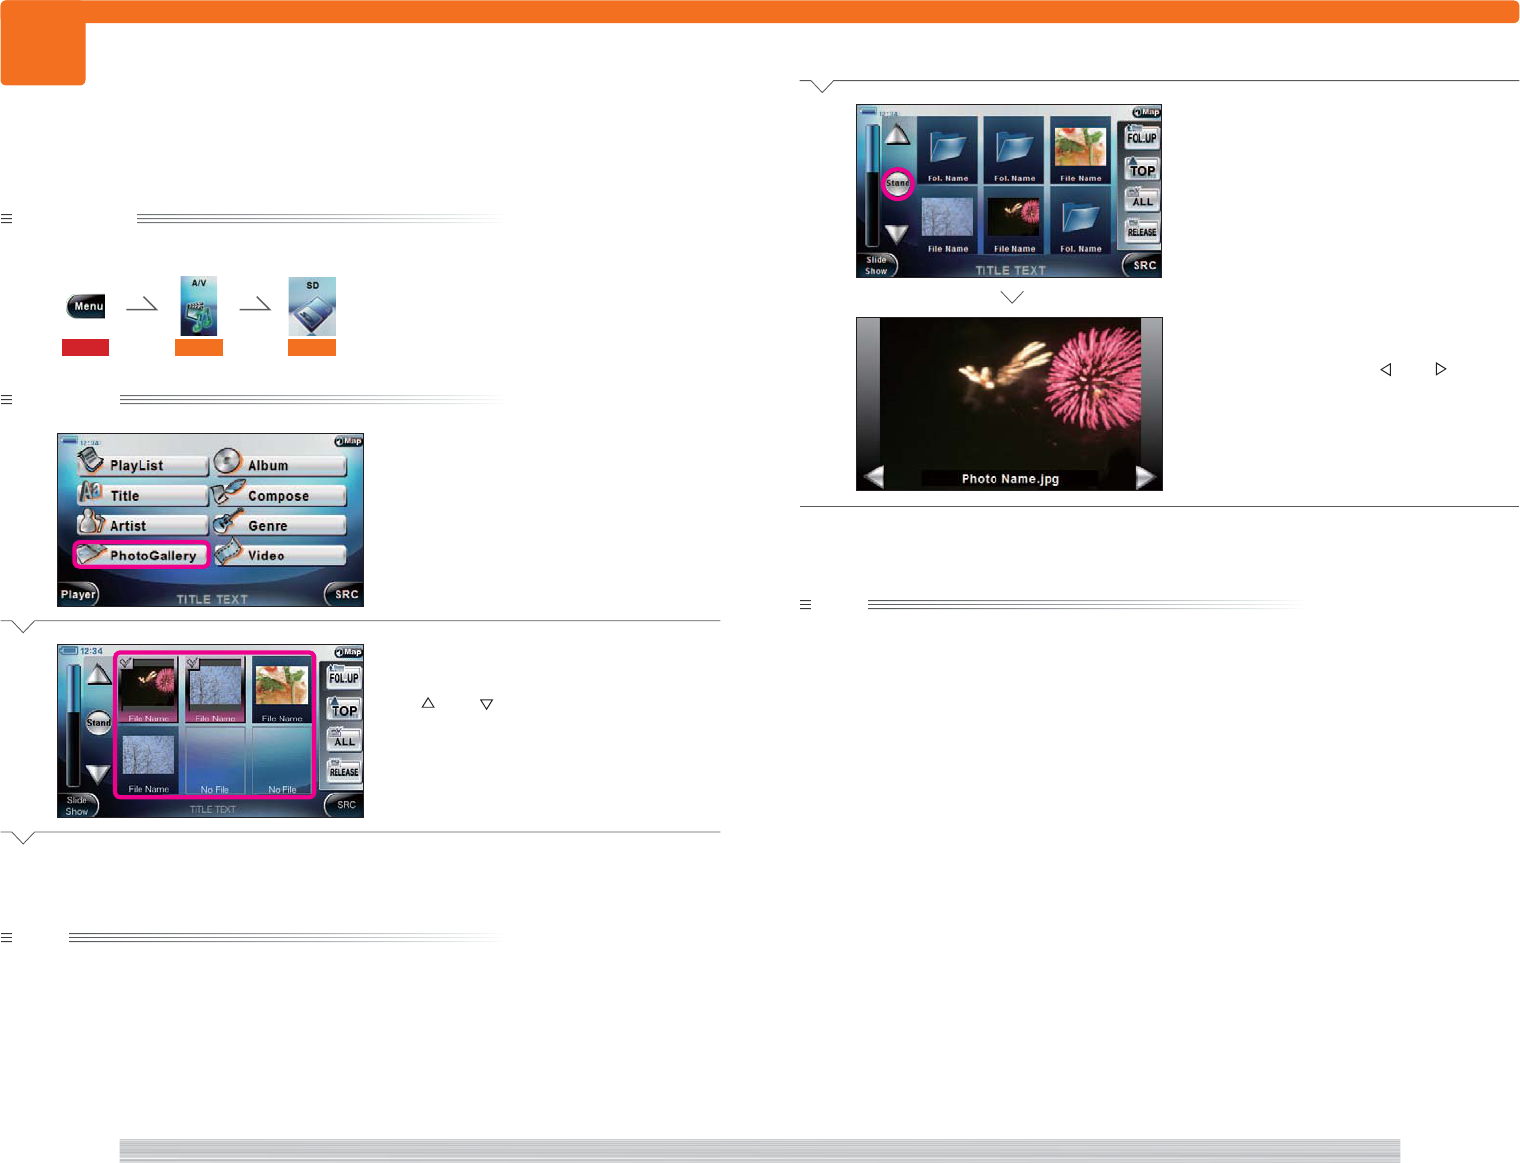
158
page A/V 159
page
A/V
410
410
Preparation
Have the SD card Top category screen displayed.
115 401 402
Operation
1
Select [Photo Gallery].
2
Select the images to display.
The selected images are checked.
Use [ ] and [ ] to scroll the thumbnail
display.
Next Page
note
• Select [ALL] in
2
to select all images. Or, select [Release] to cancel all selections.
• When selecting [FOL.UP] in
2
, content of folder of one upper hierarch is displayed. Or, when selecting [TOP],
content of the top hierarchy is displayed.
Displaying the still images in the SD card.
■ Viewing each image in full screen
3
Select [Stand].
The selected image is displayed full screen.
If you select more than one image in
2
, you
can scroll the images with [ ] and [ ].
Complete
note
• Touch the screen when an image is displayed full screen to return to thumbnail display.
<AC2700_2>
<AC2710>
<AC2700_1>
<AC2000>
View still images
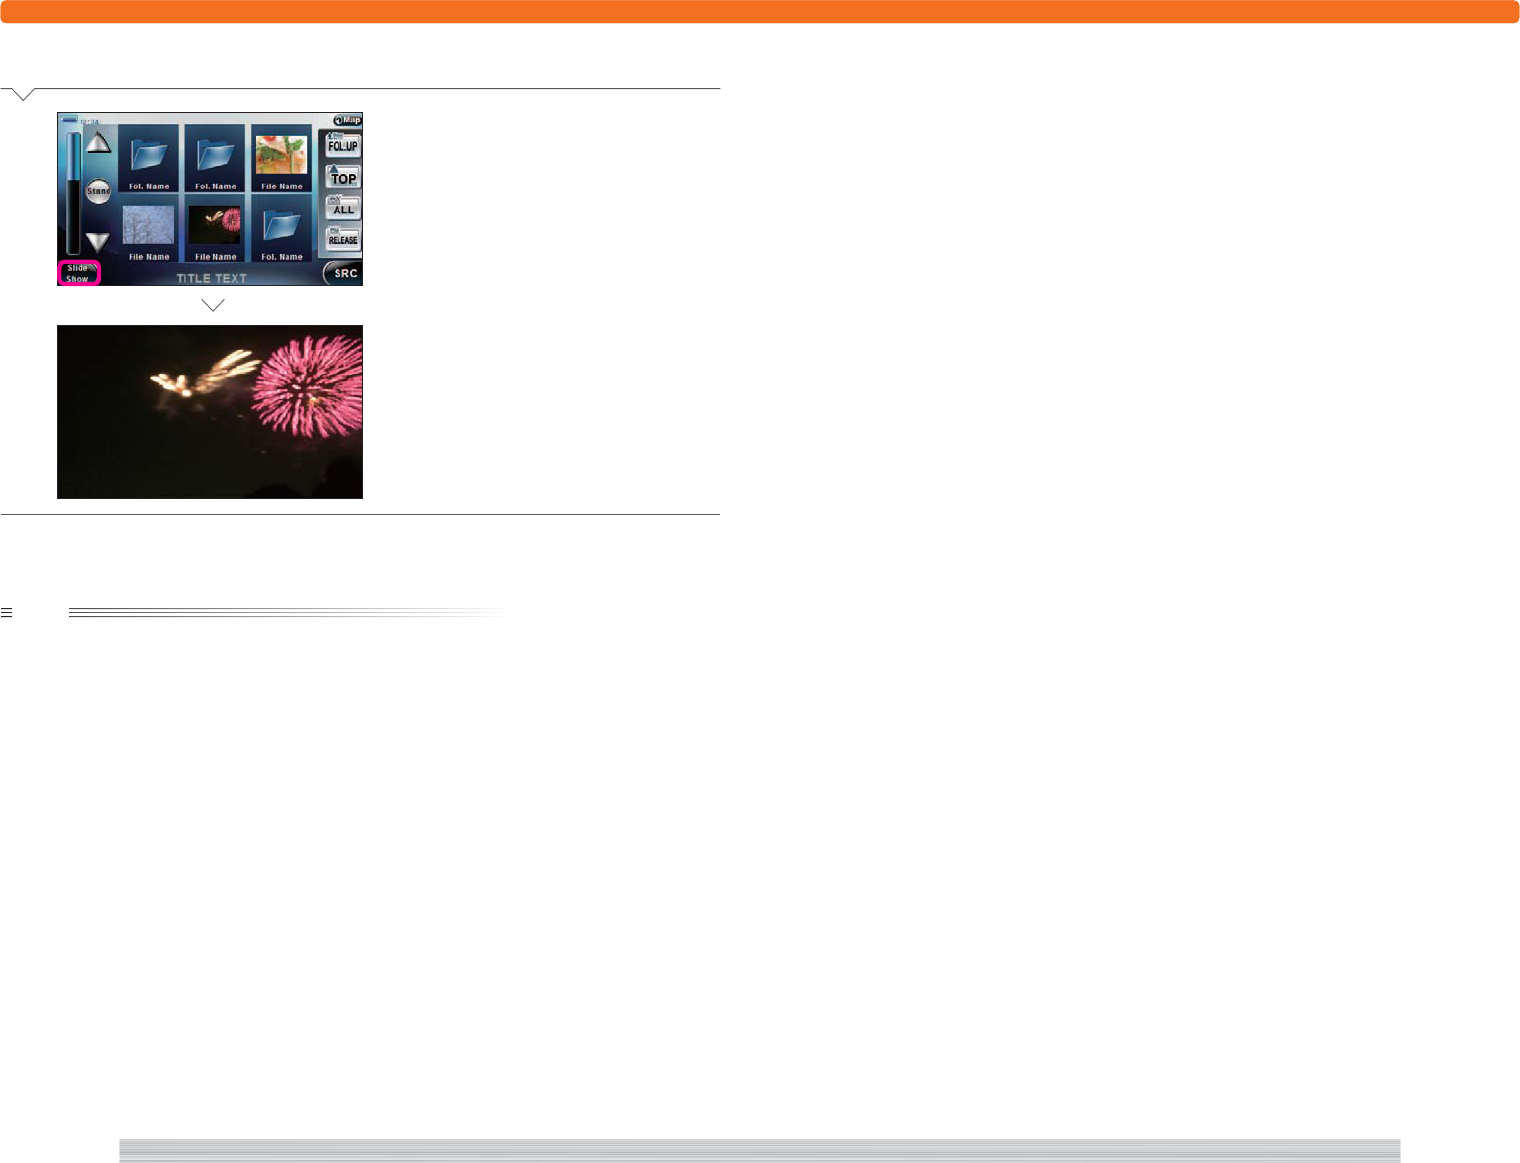
160
page A?V 161
page
A/V
■ Viewing a slideshow
3
Select [Slide Show].
The selected images are displayed as slide
show.
Complete
note
• Touch the screen during slide show to return to thumbnail display.
410
<AC2700_2>
<AC2720>