Motorola Mobility P56MD1 Portable Cellular/ PCS CDMA and 2.5 GHz WiMAX Transceiver with WLAN and Bluetooth User Manual APPLICANT MOTOROLA INC
Motorola Mobility LLC Portable Cellular/ PCS CDMA and 2.5 GHz WiMAX Transceiver with WLAN and Bluetooth APPLICANT MOTOROLA INC
Contents
Exhibit 8 Users Manual 5
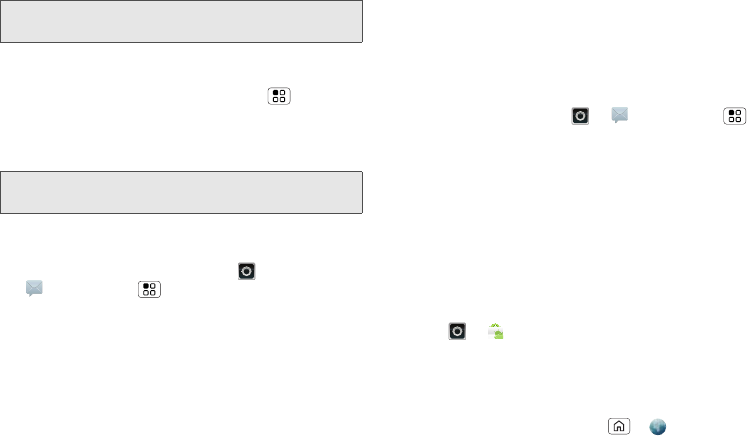
2I. Bluetooth and Wi-Fi 59
Bluetooth
ࡗ
Using Bluetooth® (page 59)
ࡗ
Connecting New Devices (page 60)
ࡗ
Connecting With Wi-Fi (page 61)
Using Bluetooth
®
Bluetooth is a short-range communications technology
that allows you to connect wirelessly to a number of
Bluetooth devices, such as headsets and hands-free
car kits, and Bluetooth-enabled handhelds, computers,
printers, and wireless phones. The Bluetooth
communication range is usually up to approximately
30 feet.
ᮣ
Touch >
Settings
>
Wireless & networks
>
Bluetooth settings
.
Turning Bluetooth On or Off
ᮣ
Touch >
Settings
>
Wireless & networks
>
Bluetooth
.
2I. Bluetooth and Wi-Fi
Note:
To extend battery life, turn Bluetooth power off when not
in use.
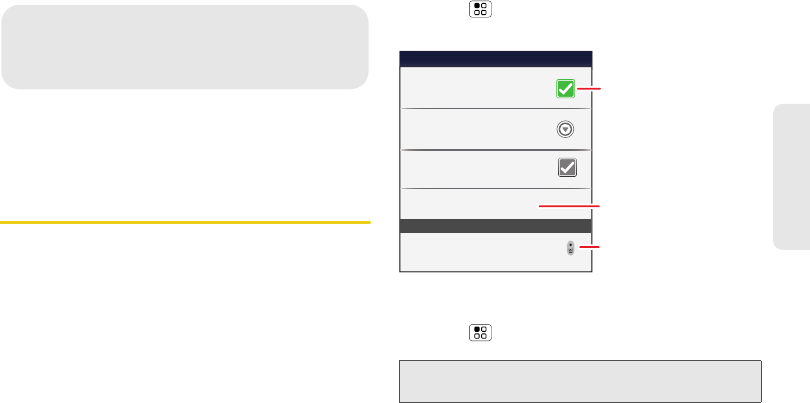
Bluetooth devices
Bluetooth settings
Motorola Phone
Device name
Scan for devices
Make device discoverable
Discoverable
Bluetooth
Pair with this device
Motorola Headset
Touch to turn on
& off & to scan.
Touch to re-scan.
Touch to connect.
60 2I. Bluetooth and Wi-Fi
Connecting New Devices
To connect with a new device, you need to pair with it.
You only need to do this once for each device – to
connect again, just turn on the device.
1.
Make sure the device you are pairing with is in
discoverable mode.
2.
Touch >
Settings
>
Wireless & networks
>
Bluetooth settings
.
3.
Touch
Bluetooth
to turn on and scan. If Bluetooth
power is already on, touch
Scan for devices
.
4.
Touch a device to connect.
5.
If necessary, touch
OK
, or enter the device passkey
(like
0000
) to connect to the device. When the
device is connected, the Bluetooth indicator
appears in the status bar.
.
Reconnecting Devices
ᮣ
To automatically reconnect your phone with a
paired device, simply turn on the device.
ᮣ
To manually reconnect your phone with a paired
device, touch the device name in the
Bluetooth
devices
list.
Disconnecting Devices
ᮣ
To automatically disconnect your phone from a
paired device, simply turn off the device.
ᮣ
To manually disconnect your phone from a paired
device, touch the device name in the devices list,
and then touch >
Disconnect
.
Note:
This feature requires an optional accessory.
Note:
Refer to the guide that came with the device for details.
Note:
Using a mobile device or accessory while driving may
cause distraction and may be illegal. Always obey the
laws and drive safely.
The Bluetooth Enhanced Audio setting is not
recommended for older Bluetooth headsets, as it may
not deliver acceptable sound quality.
2I. Bluetooth and Wi-Fi 61
Bluetooth
Editing Settings
ᮣ
Touch >
Settings
>
Wireless & networks
>
Bluetooth settings
>
Device name
. Enter a name
and touch
OK
.
Connecting With Wi-Fi
To use a Wi-Fi computer network for even faster Internet
access:
ᮣ
Touch >
Settings
>
Wireless & networks
>
Wi-Fi settings
.
Turning Wi-Fi On or Off
ᮣ
Touch >
Settings
>
Wireless & networks
>
Wi-Fi
.
Note:
Your phone's Wi-Fi features and power levels are not
allowed for outdoor operation in France. To avoid
unlawful interference with radio signals, do not use the
Wi-Fi features in France unless you are indoors.
Note:
To extend battery life, turn off Wi-Fi power when not in
use.
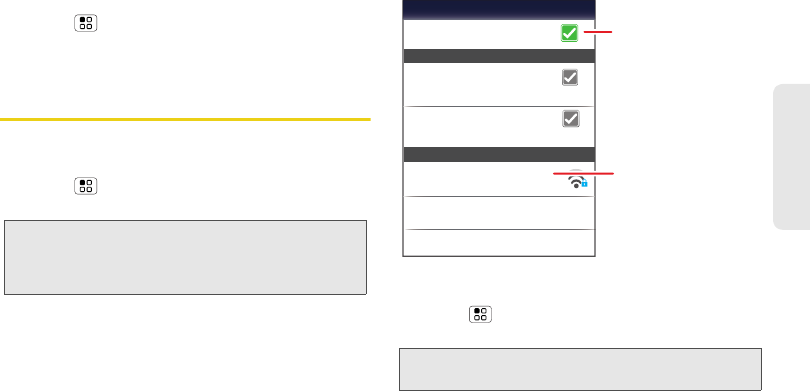
Wi-Fi networks
Notify me when a secure network is available
Secure Network
Wi-Fi
Jenny’s Coffee Shoppe
Network notification
Notify me when an open network is available
Open Network
Add Wi-Fi network
Manage Networks
Secured with WEP
Wi-Fi settings
Touch to turn on & scan.
Touch to connect.
62
Wi-Fi Search and Connect
To find networks in your range:
1.
Touch >
Settings
>
Wireless & networks
>
Wi-Fi settings
.
2.
Touch
Wi-Fi
to turn on and scan. If Wi-Fi is already
on, touch >
Scan
. Your phone lists the
networks it finds within range.
3.
Touch a network to connect.
4.
If necessary, enter
Network SSID
,
Security
, and
Wireless password
, and touch
Connect
. When your
phone is connected to the network, the wireless
indicator appears in the status bar.
Wi-Fi Hotspot
You can set up your phone as a Wi-Fi hotspot to provide
portable, convenient internet access for up to 5 other
Wi-Fi enabled devices.
Setting Up
To add security to your Wi-Fi hotspot:
1.
Touch >
Mobile Hotspot
>
Configure Mobile
Hotspot
.
2.
Touch a setting to modify it:
Ⅲ
SSID
: Enter a unique name for your hotspot.
Tip:
To see your phone’s MAC address or other Wi-Fi details,
touch >
Advanced
.
Tip:
When you are in range and Wi-Fi is on, you will
automatically reconnect to available networks you’ve
connected to before.
Note:
You need to subscribe to Wi-Fi hotspot service to use
this feature. Contact your service provider.
You cannot use a Wi-Fi hotspot when your phone is
roaming.
Note:
Risks can be associated with connecting to the public
internet. Your phone allows you to create a 3G Mobile
Hotspot, which may be accessible by unauthorized
users. It is highly recommended that you use a
password other possible steps to protect your
computer from unauthorized access.
2I. Bluetooth and Wi-Fi 63
Bluetooth
Ⅲ
Security
: Select the type of security you want, and
touch
Save
:
WEP
,
WPA
, or
WPA2
. Enter a unique
Wireless password
. Other users can access your
Wi-Fi hotspot only if they enter the correct
password.
Ⅲ
Channel
: Select a channel that minimizes
potential interference. You may need to try
different channels after your hotspot is active for a
time.
3.
Touch
Save
when the settings are complete.
Activating the Hotspot
ᮣ
Touch >
Mobile Hotspot
> touch check
mark next to
Mobile Hotspot
.
When your Wi-Fi hotspot is active, other Wi-Fi enabled
devices can connect by entering your hotspot’s
SSID
,
selecting a
Security
type, and entering the correct
Wireless password
.
Note:
WEP
is the weakest option because it is highly
vulnerable to hacking.
WPA2
is recommended by IEEE.
Section 3
Sprint Service
66 3A. Sprint Service: The Basics
ࡗ
Voicemail (page 66)
ࡗ
Messaging (page 66)
ࡗ
Social Networking (page 69)
ࡗ
Making a Conference Call (page 69)
ࡗ
Roaming (page 69)
Voicemail
Setting Up Your Voicemail
To set up voicemail, see “Setting Up Your Voicemail”
on page 4
.
Retrieving Your Voicemail Messages
When you have a new voicemail, shows at the top
of your screen. To hear the message, touch
Dialer >
Contacts, and then
touch and hold .
If you need to change your voicemail number, in the
home screen touch >
Settings
>
Call settings
>
Voicemail settings
.
Messaging
View your text, IM, and email messages all in one
place.
View Your Inbox
ᮣ
Touch >
Messaging
>
Universal Inbox
.
3A. Sprint Service:
The Basics
1
SCREEN NOT YET AVAILABLE
3A. Sprint Service: The Basics 67
Sprint Service
Reading and Replying to Messages
ᮣ
Touch >
Messaging
>
Universal Inbox
.
Ⅲ
To
open
a text message or social networking
message and all of its replies, touch it.
Ⅲ
To
reply
to a message, just open it and enter your
response in the text box at the bottom.
Ⅲ
To
forward
a text message,
touch and hold a message
in the conversation, and then
touch
Forward message
.
For email, touch to choose a reply or forward
option.
Ⅲ
To open
options
, touch and hold a message.
Creating Messages
1.
Press the Voice key on the keypad and say, “send
text.”
2.
Choose a message type, such as
Text Messaging
or
Facebook
. Then, enter the recipient and
message. In text messages and emails, touch
for options such as
Insert...
or
Insert smiley
.
Sending and Receiving Attachments
ᮣ
To send a file in a message, open a new message
and touch >
Insert
.
When you receive a message with an attachment,
open the message and touch the file name to
download it. Then, touch the name again to open it.
Some file formats can be converted to HTML for faster
viewing, and your phone will show
Get HTML version
.
While viewing the attachment, touch it to save it, share
it, and more.
Tip:
To see more messages, flick or drag up.
Note:
Universal Inbox
shows all of your messages together—
text, email, and social networking messages. To show
only one type of message, touch a message account
type instead of
Universal Inbox
.
Note:
Try the
Messages
widget in “Widgets” on page 15.
SCREEN NOT YET AVAILABLE
SCREEN NOT YET AVAILABLE
Note:
You can also touch >
Messaging
>.
Messaging
68 3A. Sprint Service: The Basics
Setting Up Messaging
ᮣ
To add other email accounts, touch >
Settings
>
Accounts
>
Add account
.
Ⅲ
Corporate Sync
is for Exchange server work email
accounts. Enter details from your IT administrator.
Ⅲ
Email
is for most personal email accounts. For
account details, contact the account provider.
ᮣ
To change your settings, touch >
Messaging
> , and then touch:
Ⅲ
Manage accounts
to add or remove an account.
Ⅲ
Edit Universal Inbox
to choose which accounts
show messages in the
Universal Inbox
.
Ⅲ
Messaging Settings
to set the notification for each
account type (along with other preferences, for
email).
Email
The first time you turned on your phone (see page 2),
you were prompted to log in to your Gmail™ account.
You can add any other email account that you set up.
To add other email accounts to your
Messaging
widget
and
Universal Inbox
, touch >
Messaging
>,
and then touch
Manage accounts
>
Add account
. On
the
Setup accounts
screen, touch
Email
or
Corporate
Sync
and enter your email account information.
Instant Messages
To send and receive instant messages, use an instant
messaging app or your browser. Your device comes
preloaded with Google Talk™. You can also download
an instant messaging app from the Android Market:
ⅷ
To download and use an instant messaging app,
touch >
Market
>
Apps
>
Communication
,
and then choose an app for your provider. Once you
download the app, you’ll see it in the app menu. See
“App Menu” on page 16.
ⅷ
If you don’t see an app for your IM provider, you can
use your Web browser. Touch >
Browser
, and
Tip:
To send and receive large attachments faster, use Wi-Fi.
See “Connecting With Wi-Fi” on page 47.
Tip:
You might need to enter your domain name with your
user name (like domain/username).
3A. Sprint Service: The Basics 69
Sprint Service
then enter your provider’s Web address. Once you’re
there, follow the link to sign in.
Social Networking
ᮣ
To add a social networking account, see “Setting
Up Messaging & Social Networking Accounts” on
page 4.
When you sign into social networking accounts, you’ll
see your friends and contacts in your Contacts list, and
your status and updates can appear in Social Status and
Happenings widgets.
Twitter and MySpace messages will always appear as
“read” on your phone, but your phone notifies you
when you receive a new message.
Making a Conference Call
With 3-way calling, you can talk to two people at the
same time. When using this feature, the normal airtime
rates will be charged for each of the two calls.
ᮣ
To start a conference call, call the first number.
After the call connects, touch
Add Call
. Dial the next
number, or select it from contacts or favorites.
When the next number answers, touch
Merge calls
.
Roaming
Roaming Icon
Your phone lets you know when you’re off the
Nationwide Sprint Network. Anytime you are roaming,
the phone shows the roaming icon ( ).
Setting Voicemail While Roaming
ᮣ
Touch >
Settings
>
Call settings
>
Set roaming
voicemail
.
Note:
Your IM options will depend on your IM provider. To
browse instant messaging apps from your computer,
go to
www.android.com/market
.
70 3A. Sprint Service: The Basics
Setting Roam Mode
Control your roaming capabilities.
ᮣ
Touch >
Settings
>
Wireless & networks
>
Mobile networks
, and then make selections under
Roaming
and
CDMA Roaming Settings
.
Call Guard
Your phone has two ways of alerting you when you are
roaming off the Nationwide Sprint Network: the
onscreen roaming icon and Call Guard. Call Guard
requires an extra step before you can place or answer
a roaming call. (This extra step is not required when
you make or receive calls on the Nationwide Sprint
Network.)
To turn Call Guard on or off:
1.
Touch >
Settings
>
Wireless & networks
>
Mobile networks
>
Roaming Guards
.
2.
Check or uncheck options under
Domestic CDMA
and
International CDMA
.
Data Roam Guard
Depending on service availability and roaming
agreements, your phone may be able to access data
services while roaming on certain digital systems. You
can set your phone to alert you when you are roaming
off the Nationwide Sprint Network and try to use data
services such as messaging.
To set your Data Roam Guard notification:
1.
Touch >
Settings
>
Wireless & networks
>
Mobile networks
>
Roaming Guards
.
2.
Check or uncheck
Data
under
Domestic CDMA
and
International CDMA
.
Note:
Call Guard is turned off by default on your phone.
Voice dialing is not available when you are roaming
with Call Guard enabled.
Note:
If the Call Guard feature is set to
On
, you need to take
extra steps to make and receive roaming calls.
Note:
Data Roam Guard is turned off by default on your
phone.

72 3B. Web and Data Services
ࡗ
Surfing the Web (page 72)
ࡗ
Android Market™ (page 74)
ࡗ
Downloading Apps (page 75)
ࡗ
YouTube (page 76)
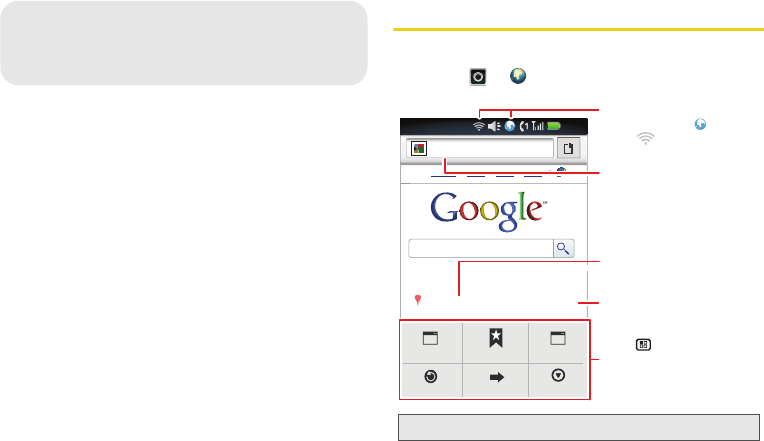
Surfing the Web
To launch the WebKit browser:
ᮣ
Touch
>
Browser
.
3B. Web and Data Services
Note:
If you can’t connect, contact your service provider.
Web Images
Places News
more
http://www.google.co...
Chicago, IL - updated
See places near:
New window
Refresh
Bookmarks
Forward
Windows
More
12:00
Connection
Mobile Network:
Wi-Fi:
Links
Touch to open.
Press to open a menu
where you can open a new
window, your bookmarks,
refresh a page, and more.
Drag or flick to scroll.
Web Address
To go to a URL, touch address
bar and enter Web address.
3B. Web and Data Services 73
Web and Data
Select Web Links
When you touch a link,
your phone outlines it and
goes to that page. If you
touch and hold the link,
your phone shows options, such as
Open in new
window
.
WebKit Browser Options
Press
Menu /
to see browser options:
Going to a Specific Website
To go to a particular website by entering a Web address
(URL):
ᮣ
Touch the address bar, enter a Web address, and
touch
Go
.
Creating a Bookmark
Bookmarks allow you to store the address of your
favorite websites for easy access at a later time.
1.
Press
Menu /
> Bookmarks > Add.
2.
Confirm or edit the bookmark title, and then
touch
OK
.
Options
New Window
Open a new browser window.
(Becomes “Windows” when more
than one are open.)
Bookmarks
Add delete and manage
bookmarks.
Windows
View the browser windows that are
currently open.
Refresh
Reload the current page.
Back/Forward
Navigate to previously viewed
pages.
source/android.com/ - Options
Android Community - Tracking the Android
Platform
application
developer
sreern
More
Show browser options, such as
Find on page
,
Select text
,
Page info
,
Share page
,
Downloads
, and
Settings
.
Note:
Not all websites are viewable on your phone.
Options
74 3B. Web and Data Services
Accessing a Bookmark
1.
Press
Menu /
>
Bookmarks
.
2.
Touch a bookmark to open the Web page.
Reloading a Web Page
Press
Menu / > Refresh
at the bottom of the screen.
(The browser will reload the current Web page.
Zoom
Android Market™
ᮣ
Touch >
Market
.
Get all the fun games and cool apps you want! Android
Market provides access to applications created by
developers worldwide, so you can find the app you
want. If you need help or have questions about Android
Market, touch >
Help
.
Browsing and Installing Apps
ᮣ
Scroll to and touch the app you want to install.
Then, touch
Install
(if app is free) or
Buy
.
If an app you are downloading requires access to your
data or control of functions on your phone, you’ll be
asked to give your permission. After selecting
Install
,
the app will download. After selecting
Buy
, you may be
asked to sign in to an additional Google™ account.
Sign in and select
Purchase now
to proceed. Follow the
on-screen instructions. To see the download progress,
open the notifications window.
Note:
Bookmarking a page does not store the page contents,
just its address.
Some pages cannot be bookmarked. Whether a
particular Web page may be marked is controlled by its
creator.
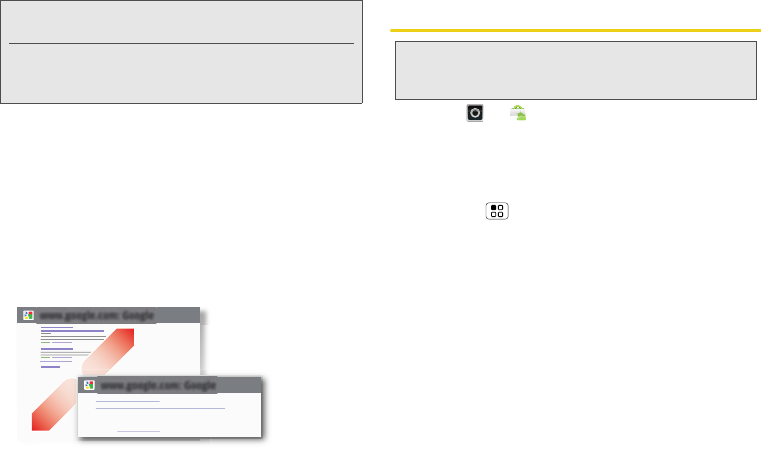
www.google.com: Google
www.google.com: Google
News results for android
Verizon Droid Success Limited by Android Market -
7 hours ago
The idon't ad campaign pits the Android-based Droid head-to-head
against the formidable iphone. Based on preliminary predictions ..
PC World - 1778 related articles »
Zoom
To zoom in or out,
pinch two fingers
together or apart.
Note:
You must set up a Gmail account (see “Setting Up Your
Phone” on page 2) in order to buy and download apps
from the Android Market.
3B. Web and Data Services 75
Web and Data
After you download an app, the icon for that app
appears on the App menu. (See “App Menu” on
page 16.)
Managing and Restoring Apps
1.
Touch >
Settings
>
Applications
>
Manage
applications
.
2.
Touch an app in the list, and then touch
Uninstall
(for apps you downloaded),
Clear cache
, or other
options.
Downloading Apps
To download apps:
1.
To download apps from any Web page, touch
>
Settings
>
Applications
>
Unknown sources
.
2.
To launch the browser, touch
Browser
.
3.
Find the app you want to download and touch the
download link.
Manage Your Downloads
ᮣ
To view files or apps you’ve downloaded,
touch
Browser
> >
More
>
Downloads
.
ᮣ
To clear your download history, touch >
Clear
list.
To cancel, touch >
Cancel all downloads
.
Tip:
To reinstall any downloaded items, touch >
Market
.
WARNING:
Apps downloaded from unknown sources can
include spyware, phishing, or viruses that affect
your phone, phone performance, and personal
data. For security, download apps only from
trusted sites like
Market
.
Note:
Downloaded apps are stored in your phone’s memory.
76 3B. Web and Data Services
YouTube
ᮣ
Touch >
YouTube
.
YouTube™ lets you share videos with YouTube users
everywhere. You don’t need a YouTube account to
browse and view videos.
Watch Videos
See popular video categories, like
Featured
,
Most
viewed
, and
Top rated
. Touch a category, then touch the
video to start playing it. To see more video categories,
touch
Menu /
>
Categories
. To see a video in high
quality, touch
Menu /
>
Settings
>
High quality video
.
Search for Videos
1.
Touch >
YouTube
, and then touch
Menu /
>
Search
.
2.
Enter text and then touch
Search
.To clear your
search history, touch
Menu /
>
Settings
>
Clear
search history
.
SCREEN NOT YET AVAILABLE
Note:
If you don’t have a YouTube account, visit
www.youtube.com
to find out more. To create an
account or sign in, go to “Your Account” on page 77.
3B. Web and Data Services 77
Web and Data
Share Videos
Send someone a link to a video that you are watching.
1.
Touch the video to select it.
2.
Press
Menu /
>
Share
.
Your Account
Log In or Create Account
1.
Touch >
YouTube
, then press
Menu /
>
My account
.
2.
To create your YouTube account, touch the “Don’t
have a YouTube account? Touch here to create
one” link.
If you already have a YouTube account, enter your
username, password and touch
Sign in
.
3.
For a new account, enter a username, and
complete the fields, then touch
I accept
.
Upload Videos
1.
Touch >
YouTube
, then press
Menu /
>
Upload
.
2.
Touch the video you want to upload. You can
change the video title, description, set the access,
and add tags.
3.
Touch
Upload
.
78 3C. Entertainment: TV and Music
ࡗ
Music (page 78)
ࡗ
Digital Living (page 81)
ࡗ
Connections (page 81)
ࡗ
Entertainment Center (page 83)
ࡗ
Webtop application (page 83)
ࡗ
Sprint Entertainment Options (page 85)
Music
Open your music library, and then select what to play.
1.
Touch >
Music
.
2.
Touch a category, and then touch the song or
playlist you want to play. Or, touch >
Shuffle all
to randomly play all your songs, or touch
Search
to
find a song.
3C. Entertainment:
TV and Music
Tip:
When a song is playing, you can add it to a playlist by
touching >
Add to playlist
.
SCREEN NOT YET AVAILABLE

3C. Entertainment: TV and Music 79
TV and Music
Play Music
1.
Touch a song or playlist to start playing music.
2.
Use these music player controls:
Ⅲ
Play/pause
: touch / .
Ⅲ
Previous/next
: touch / .
Ⅲ
Fast forward/rewind
: touch and hold / .
Ⅲ
View playlist
: touch .
Ⅲ
Shuffle
: touch .
Ⅲ
Repeat
: touch .
Ⅲ
Volume
: press the side volume buttons.
Ⅲ
View library
: touch >
Library
.
Ⅲ
Manage speakers
: touch >
Audio effects
.
Ⅲ
Set visual effects
: touch >
Visualization
.
Ⅲ
Add to playlist
: touch >
Add to playlist
.
Ⅲ
Set as ringtone
: touch >
Use as ringtone
.
Ⅲ
Delete
: touch >
Delete
.
Hide, Wake, Turn Off
1.
Touch to use another app. Your music
continues to play.
2.
When you see in the status bar, a song is
playing. Flick down to see details. Touch the song
to return to the music controls.
3.
To turn off your music, touch .
SCREEN NOT YET AVAILABLE

80 3C. Entertainment: TV and Music
Playlists
ᮣ
To add a song from the music library to a playlist,
touch and hold the song then touch
Add to playlist
.
Choose an existing playlist, or touch
New
to create
one.
ᮣ
To add a song to the playlist you're playing, press
Menu >
Add to playlist
in the music player.
ᮣ
To edit, delete and rename playlists, touch and
hold the playlist in the music library.
Setting Up Music
What music transfer tools do I need?
To put music on your computer and then load it on your
phone, you need:
ⅷ
Microsoft
®
Windows
®
PC or Apple™ Macintosh™.
ⅷ
USB data cable (included with your phone).
ⅷ
microSD memory card (2GB—included with your
phone).
Yo ur music is stored on your memory card. Your
phone supports removable microSD memory cards
up to 32GB capacity. To make sure your memory card
is installed, go to “Your Phone’s microSD Card” on
page 37.
What audio file formats can I play?
Your phone can play many types of files: AAC, AMR,
MP3, WAV, WMA, AAC+, and MIDI.
What headphones can I use?
Your phone has a 3.5mm headset jack for wired stereo
listening. You can go wireless with Bluetooth
®
stereo
headphones or speakers. (See “Using Bluetooth®” on
page 45.)
Getting Music
You can transfer music from your computer to your
phone by using a USB connection.
For more information on transferring music, see
“Connecting Your Phone to Your Computer” on
page 38.
Tip:
To see the available memory on your memory
card, touch >
Settings
>
SD card & phone
storage
.
Note:
Your phone does not support DRM-protected files.