Motorola Mobility P56ME1 CDMA/LTE TRANSCEIVER WITH BT & WLAN User Manual 2
Motorola Mobility LLC CDMA/LTE TRANSCEIVER WITH BT & WLAN Users Manual 2
Contents
- 1. Users Manual 1
- 2. Users Manual 2
- 3. Users Manual 3
- 4. Users Manual
Users Manual 2
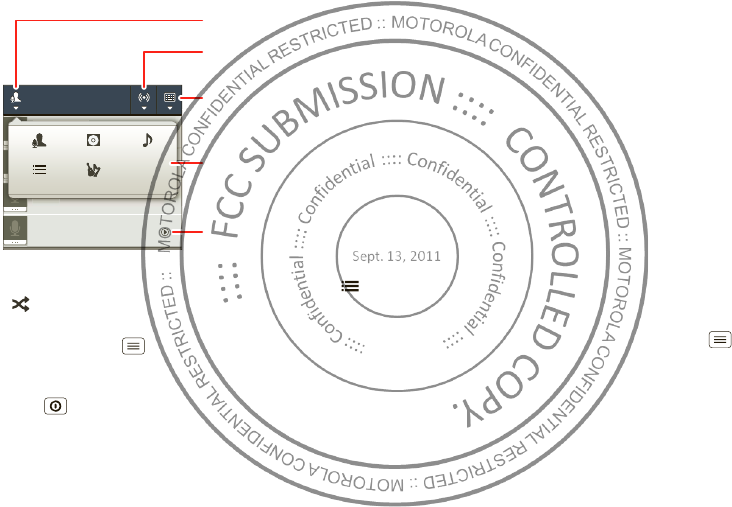
16 Contacts
Contacts
contacts like you’ve never had before
Quick start: Contacts
Find it: >
Cont acts
Tip: To search the list, touch to open a touchscreen
keypad, then type a name. When you flick or drag the
list, a scroll bar appears that you can drag to move the
list faster.
FavoritesRecent
Contacts
Dialer
Displaying 297 contacts
I n case of emergency
A
Abe Baudo
Allie Sm yth
Anna M edina
Astrid Fanning
#
A
B
C
D
E
F
G
H
I
J
K
L
M
N
O
P
Q
R
S
T
U
V
W
X
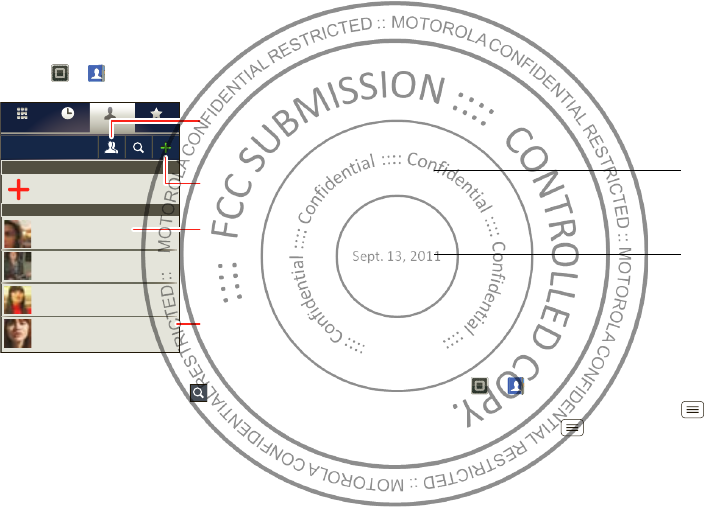
Group
Create & view groups
of contacts.
Contacts List
Touch to view contact
information. Touch & hold
to call, send a text message,
& more.
Add contacts.
Touch a letter to jump to
contact names that start
with the letter.
Transfer contacts
Get all your contacts, all in one place. Here’s a few
helpful hints:
•Use Gmail™
All your Gmail contacts will automatically get synced
to your phone. Various computer applications for
mobile phones and email accounts allow you to
export your contacts as a “.CSV” file. You can then use
Gmail to import the file. For more details, go to
ww w .motorola.com/transfercontacts or log in to your
Gmail account on your computer and select “ Help”.
•More
There are other methods and tools to help you at
ww w .motorola.com/transfercontacts.
Link contacts
You might have two or more contacts for the same
person, maybe a Gmail contact w ho is also stored on
your phone, or one friend w ith two email addresses. To
combine these contacts:
Find it: >
Cont acts
Touch a contact to open it, touch M enu >
Edit
contact
, touch M enu >
Join
, touch the second
contact, then touch
Save
.

17Contacts
Call or email contacts
Find it: >
Cont acts
•To view contact information, touch the contact.
•To call, text, send an email, or see other options,
touch and hold the contact.
•To add a contact to Favorites, touch the contact, then
touch the star next to the contact’s name. The star
turns green.
View & use contacts
When you set up a social networking account (see
“Social networking” on page 23), you’ll know w hat
everybody’s up to and w hen. Every time you pick up a
call, check a message, or look up a friend’s contact info,
you’ll see their name and number, but you can see their
social network status and smiling face, too.
Find it: >
Cont acts
•To find a contact, touch in the
Cont acts
screen and
type the contact name.
Touch a contact to open its details. While viewing
details, you can start a call or message by touching
icons next to the phone number, email address, or
social network. To see your interactions w ith the
person, touch
Contact Hist ory
.
•To change w hich group of contacts is shown (
All
,
Facebook
, and so on) touch the filter name at the top.
•To change how you view the list of contacts, flick left
or right at the bottom of the screen to select
History
(recently used),
A-Z
(list without status), or
Stat us
(list
with status).
Create contacts
Find it: >
Cont acts
>
Touch any entry area to open the touchscreen keypad.
When you’re finished, touch
Save
.
Sar a
Walker
Phon e
Google contact
fr om your accoun t@gmail.co m
Hom e
Em ail
Hom e
Postal addr ess
Mor e
Cont acts
Save Cancel
Select a picture
for the contact.
Set the number type.
Add more name details.
Remove this number.
Add another number.

18 Contacts
Where are contacts saved? Your smartphone saves
new contacts in its memory and on the Google Server, if
you have an account. It also updates your social
networking account.
Edit or delete contacts
Find it: >
Cont acts
Touch the contact, then touch Menu >
Edit cont act
or
Delet e contact
.
Synchronize contacts
When you change one of your contacts, your
smartphone automatically updates your other social
networking accounts. When you change a social
networking friend, your smartphone updates your
contacts.
Personalize contacts
Find it: >
Cont acts
Add a photo: Touch the contact, touch M enu >
Edit
contact
, then touch .
Set a ringtone: Touch the contact, then touch Menu
>
Options
>
Ringtone
.
Groups
Find it: >
Cont acts
> >group name
You can put your contacts into groups that you create
(like “ friends”, “ family”, or “ w ork” ). Then, you can find
contacts faster by show ing one group at a time.
To create a new group, touch
Cont acts
>, then
touch M enu >
New group
.
19Messaging
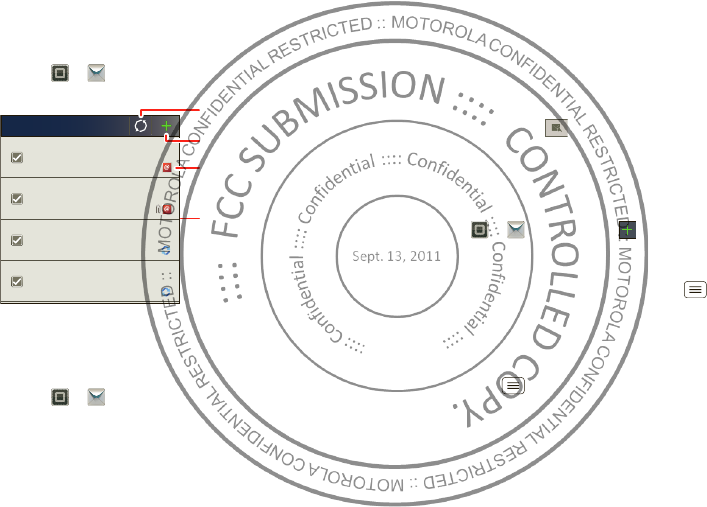
Messaging
sometimes it’s best to text, or IM, or email . . .
Quick start: Messaging
Find it: >
Messaging
>
Universal I nbox
Tip: To see more messages, flick or drag up.
Read & reply to messages
Find it: >
Messaging
>
Universal I nbox
Note:
Universal Inbox
show s all of your messages
together—text, email, and social netw orking messages.
To show only one type of message, touch a message
type instead of
Universal I nbox
.
Universal I nbox (1)
fr eelancers
Paul, We’re going to need help w...
2:41 PM
Mary Morgan
Cop y Revisions
Hi Paul, Please take a look at the ...
2:50 PM
Anna M edina
Meet me ou tside the th eat er at 8
and don’t f orget yo ur ID. Wou ld yo...
2:47 PM
Jim Somers
Meeting invitat ion
Meeting is set for next Thur sday at ...
2:45 PM
Arther Bando
Create messages.
Check for messages now.
Message Type
Message List
Touch to open a message.
Touch & hold to move,
delete, & more.
•To open a text message or social networking
message and all of its replies, touch it.
•To respond to a message, just open it and enter your
response in the text box at the bottom.
To forward a text message, touch and hold a
message in the conversation, then touch
Forward
message
.
For email, touch to choose a reply or forw ard
option.
•To open options, touch and hold a message.
Create messages
Find it: >
Messaging
>
Choose a message type, such as
Text M essage
or
Facebook
. Then, enter the recipient and message. In
text messages and emails, touch M enu for options
like
I nsert ...
or
At tach Files
.
Send & receive attachments
To send a file in a message, open a new message and
touch M enu >
I nsert
.
When you receive a message w ith an attachment, open
the message and touch the file name to dow nload it.
Then, touch the name again to open it. Some file
formats can be converted to HTM L for faster viewing,
and your smartphone w ill show
Get HTML version
.
20 Messaging
While viewing the attachment, touch it to save it, share
it, and more.
Tip: To send and receive large attachments faster, use a
Wi-Fi connection (see “ Wi-Fi networks” on page 42).
Set up messaging
To add email accounts, touch >
My Account s
>
Add account
.
•
Corporate Sync
is for Exchange server work email
accounts. Enter details from your IT administrator.
Tip: You might need to enter your domain name w ith
your user name (like domain/username).
•
Email
is for most personal email accounts. For
account details, contact the account provider.
To change your settings, touch >
M essaging
,
touch Menu , then touch:
•
Manage accounts
to add or remove an account.
•
Edit Universal Inbox
to choose which accounts show
messages in the
Universal I nbox
.
•
Settings
to set the notification for each account type
(along with other preferences, for email).
Tip: For social network accounts, see “ Add accounts” on
page 23.
Account Manager
Email
The first time you turned on your smartphone (see “ Set
up & go” on page 4), you probably logged in to your
Gmail™ account. You can add any other email account
that you set up.
To add other email accounts to your
Messages
w idget
and
Universal I nbox
, touch >
My Account s
>
Add
account
>
Email
.
Instant messages
To send and receive instant messages, you can use
Google Talk™.
Find it: >
Talk
Tip: You can also download an instant messaging app
from Android Market™.
Voicemail
When you have a new voicemail, appears at the top
of the screen. Drag dow n the status bar and touch the
New voicemail
notification to listen to your voicemail
message.
If you need to change your voicemail number, in the
home screen touch Menu >
Settings
>
Call settings
>
Voicemail settings
.
Account Manager
21Text entry
Text entry
keys when you need them
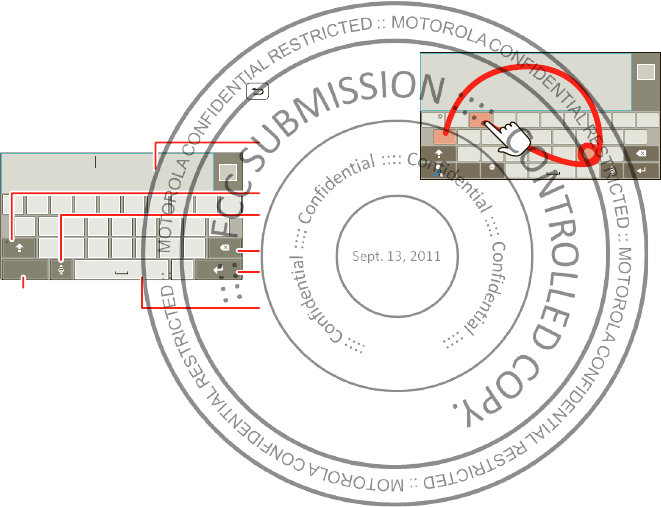
Touchscreen keypad
You can open a keypad on your screen by touching a text
box. To close the keypad, touch Back .
Input methods
To select an input method, touch and hold a text entry
area on the screen to open the
Edit text
menu. Touch
I nput met hod
, then touch the method you want.
Dinner at Bistro Fanta
asdf gh j k l
zxcvbnm
er tyui opqw
21 09876543
.
?123
Done
Open a keypad for
numbers & symbols.
Voice Input/
Dictation
Delete
Shift
Space
Return/
New Line
Text Box
Touch to open
touchscreen
keypad.
Shift
Swype™ text entry
Enter words w ith one continuous motion. Just drag your
finger over the letters in the word.
Tips:
•To enter apostrophes in common w ords (like “ I’ll” ),
drag through the
n
as though it was an apostrophe.
•To enter several symbols, other punctuation, or
numbers, touch
SYM
.
•To correct a word, double-tap it. Sw ype show s a small
menu of other w ord options. Sw ype might also show
a menu if it can’t guess your word.
•If Sw ype doesn’t know a word, you can still touch the
letter keys to enter it. Sw ype remembers, so next
time you can just drag over the letters.
Anne
Done
x
asd f gh j k l
we r t yu i opq
zx vbnmc
.
‘
,
-
@#
12 3 _%()
&$
456
+:;“
!7890 /?
SYM ES
i
To enter a word,
just trace a path
through the
letters. To
capitalize, go
above the keypad.
For double letters,
circle the letter.
aa
ee
nn

22 Text entry
Multi-touch keyboard
Enter text a letter at a time. As you type, your
smartphone suggests w ords from your dictionary and
chosen language. The smartphone also automatically
enters apostrophes in some words, like “ dont.”
To add a word to your dictionary, touch and hold the
word, then select
Add “word” to dictionary
.
Typing tips
To . . .
Enter one capital
letter
Touch Sh if t .
Enter only capital
letters, until you touch
Shift again
Touch Shift tw ice. Touch
again to revert to lowercase.
Move the text entry
cursor
Touch the text w here you
want the cursor to go.
Select text Touch and hold text, then
touch
Select text
or
Select
all
.
Cut or Copy selected
text
Touch and hold text, then
touch
Cut
or
Copy
.
Paste cut or copied
text at cursor location
Touch and hold location to
paste, then touch
Paste
.
Text input settings
Find it: Menu >
Settings
>
Language & keyboard
•To edit your dictionary, touch
User dictionary
.
•To change the language and the style for your
touchscreen keypad, touch
Select locale
.
•To change input method and settings, touch
Swype
or
Multi-touch keyboard
.
Delete character to left
of cursor
Touch Delete (hold to
delete more).
To . . .
23Social netw orking
Social networking
my life, your life
Your social networking account
Integrate and sync all your contacts, emails, and social
networking sites. No opening and closing apps and
menus. Just touch the
Social Networking
and
Social
Status
w idgets on your home screen.
Tip: Use the gallery to view all of yours and your friends’
online albums. Touch >
Gallery
.
Add accounts
You can add your
Facebook
,
Twitter
, or other accounts
to your social netw orking account. If you don’t have
accounts on these sites, visit their websites to set them
up.
To set up email accounts, see “ Set up messaging” on
page 20.
Find it: >
My Account s
>
Add account
Add an account by touching it. Then enter your user
name and password for that account.
When you sign into social networking accounts, you’ll
see your friends and contacts in your
Cont acts
list, and
your status and updates can appear in your
Social
Networking
w idget.
Account Manager
Tw itter messages w ill always appear as “ read” on your
smartphone, but your smartphone notifies you when
you receive a new message.
Tip: To download updates faster, see “ Wi-Fi networks”
on page 42.
Edit & delete accounts
Find it: >
My Accounts
Touch and hold an account, then touch
Open account
to
edit it, or touch
Remove account
to remove it (along w ith
its contacts and messages).
Note: You can’t delete the Google™ account you used
or created when you set up your smartphone.
Account Manager
24Tips & tricks
Tips & tricks
a few handy hints
General tips
•If you can’t see the screen w hile wearing sunglasses,
take them off. Screen brightness changes as your
smartphone senses the current lighting conditions.
•To return to home screen, touch Home .
•To see recently dialed numbers, touch
Phone
>
Recent
.
•To sleep/wake your smartphone, press Power .
•To set screen timeout, touch M enu >
Set tings
>
Display
>
Screen timeout
.
•To search, touch Search .
•To voice search, touch and hold Search .
•To show the most recent apps you’ve used, touch and
hold Home .
•To change one of the dock shortcuts at the bottom of
the home screen, touch and hold the shortcut, then
select the shortcut you want to replace it.
•To turn sound on/off, press and hold Power
>
Silent mode
.
•To turn airplane mode on/off, press and hold
Pow er >
Airplane mode
.
•To use the FM radio app, you need a wired headset.
The wires in your headset act as the antenna. For best
performance, use a M otorola Original headset. Indoor
reception may vary.
Battery tips
Want to extend your battery life? Try these:
•Use the Smart Actions app to manage smartphone
settings and help minimize battery use. For more
information, touch >
Smart Actions
, then touch
Menu >
Help
.
•To turn off background data transfers, touch M enu
>
Settings
>
Dat a manager
>
Background data
.
•To turn off Bluetooth™ power, touch M enu
>
Settings
>
Wireless & net works
>
Bluet ooth
.
•To turn off W i-Fi power, touch M enu >
Set tings
>
Wireless & net works
>
Wi-Fi
.

25Webtop application
Webtop application
smart mobile computing
Quick start: Webtop
Browse, or use web apps, on a large screen in a full
Firefox™ browser. Create and share documents,
spreadsheets, and presentations w ith online tools like
Google Docs.
To open the webtop application, connect your
smartphone to an HD display or monitor using an
optional dock accessory.
LapDock Display, HDTV, or Monitor
Mobile View
App Tr ay Full Desktop
Brow ser
Optional LapDock or HD Station
Connect the webtop application
Connect your smartphone to the Motorola Lapdock to
automatically launch the webtop application.
Connect your smartphone to an HD display using the
optional HD Station or Adapter for webtop application,
then choose the w ebtop application from the
application menu.
When you’re done using the w ebtop application, just
disconnect your phone from the accessory.
Control the webtop application
To navigate the webtop application display:
•In the Phone w indow, you can open your phone apps.
•At the bottom of the screen, you’ll see App
Shortcuts.
You can open multiple Firefox browsers.
•At the top right of the screen, you’ll see icons for
status and
Settings
.
For help in the webtop application, open
Settings
>
Help
at the top right of the screen.
26 Digital living
Send current web page to phone
When you find an interesting web page in the webtop
application, you can send it to your smartphone to view
after undocking. In the Firefox browser, select File
> Send to phone. If prompted to complete the action,
select Browser. The web page opens in your phone
browser.
Digital living
connect and enjoy
MotoCast
Note: Copyright—do you have the right? Always follow
the rules. See “ Content Copyright” in your legal and
safety information.
Stream or download music and videos from your
computer directly to your smartphone. Download
documents and files to your smartphone, and upload
them back to your computer. MotoCast lets you transfer
data to and from your home or work computers. Blazing
4G LTE speeds provide secure, nearly instant remote
access to your files.
To get started, touch >
MotoCast
and follow the
on-screen instructions to create an account on your
smartphone.
You’ll be prompted to dow nload and install the
MotoCast client on your computer, log in to the same
account, and specify which computer files you want to
share.
Then, complete the setup process on your smartphone
to access your shared files.
27Photos & videos
HD viewing
You can create your ow n HD videos (see “ HD videos” on
page 30) to view on your w ide screen HDTV or monitor.
1Connect an HDM I cable (sold separately) from the
HDM I port on your smartphone (see “ Your
smartphone” on page 2) to an HDM I port on the TV
monitor.
2Adjust the viewable area on the HDM I screen by
touching M enu >
Set tings
>
HDMI
.
Mirror mode
Connect your smartphone to your HDTV, monitor, or
projector so you can view and interact w ith your
smartphone on the big screen. Show off your photos,
videos, and dow nloaded movies. Enjoy the big screen
for gaming, movies, the web, and more. Just connect
your smartphone to an HDTV or monitor using an
optional HD cable. Everything you see on your display
will appear on the big screen as well.
Photos & videos
see it, capture it, share it!
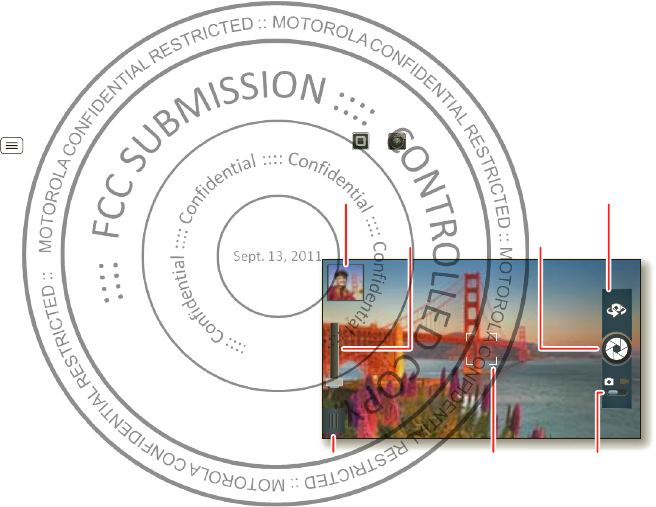
Photos
Take & share photos
Take that family photo, and post it online for everyone to
see.
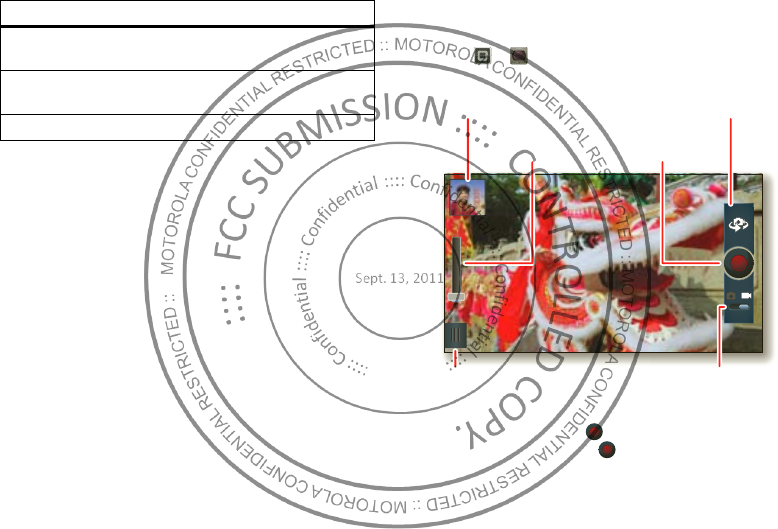
Find it: >
Camera
756
Sw itch between front
& back cameras.
Zoom
in/out.
Take
photo.
See your
last photo.
Adjust camera
settings.
Autofocus Box Sw itch to
camcorder.
28 Photos & videos
Note: Photos are stored in your phone’s internal
memory, unless you switch it to the microSD memory
card. Photo resolution can be set to 8M P or
Widescreen
(6MP).
Tip: Press the volume keys to zoom in and out on the
viewfinder image.
To take the photo, touch in the view finder.
Your phone stores the photo, and shows a thumbnail
image of the photo in the corner of the screen. To see
the photo you just took, touch the thumbnail. Then:
•To set the photo as a wallpaper, contact photo, or
social netw ork photo, touch Menu >
Set as
.
•To send the photo in a message or post it online,
touch . For more info on sharing your photos, see
“Share photos & videos” on page 31.
•To upload the photo to an online photo album,
touch .
•To print the photo, touch Menu >
More
>
Print
.
•To delete the photo, touch Menu >
Delete
.
Panoramic photos
In the viewfinder, touch Menu >
Modes
>
Panorama
to take a w ide panoramic photo. The
camera auto-captures up to six multiple shots as you
move the camera, and joins them together to make one
large image.
Camera settings
In the viewfinder, drag the tab in the lower-left corner of
the screen (or touch M enu ) to adjust camera
settings:
Options
Set tings
•
Widescreen
(6M P) or 8M P photo
resolution
•
Video Resolution
•
Storage Locat ion
(phone or
SD card)
•
Geo-Tag
(auto location information)
•
Video Stabilization
•
Shutt er Tone
Effects
Set a photo effect:
Normal
,
Black and
Whit e
,
Negative
, and more.
Scenes
Set the type of photo you want to
take:
Aut o
,
Portrait
,
Landscape
,
Sport
,
and more.
29Photos & videos
Modes
Set to
Single shot
,
Panoram a
,
Multi-shot
, or
Timer
.
Bright ness
Set the viewfinder image brightness
level.
Flash
Set
Flash On
,
Flash Off
, or
Auto Flash
.
Options
Videos
Record & share videos
Find it: >
Camcorder
To record a video, touch in the viewfinder. To stop
the video recording, touch again.
00:13:50
Sw itch between front
& back cameras.
Zoom
in/out.
Record
video.
Watch your
last video.
Adjust camcorder
settings.
Sw itch to camera.
30 Photos & videos
Your phone stores the video, and shows a thumbnail
image of the video in the corner of the screen. To see
the video you just took, touch the thumbnail. Then:
•To play the video, touch .
•To send the video in a message or post it online,
touch . For more info on sharing your video, see
“Share photos & videos” on page 31.
•To upload the video to an online album, touch .
•To delete the video, touch Menu >
Delete
.
HD videos
You can capture HD-quality videos to watch on an HDTV
or monitor.
To record an HD quality video, be sure to select the
correct
Video resolution
. From the active camcorder
viewfinder, touch M enu >
Set t ings
>
Video
Resolution
>
HD+ (1080p)
or
High Definition (720p)
.
To enhance the video quality, touch M enu >
Audio
Scenes
or
Effects
.)
Camcorder settings
In the viewfinder, drag the tab in the lower-left corner of
the screen (or touch M enu ) to adjust camcorder
settings:
Options
Set tings
•
Widescreen
•
Video Resolution
(1080p, 720p,
DVD, VGA, CIF, or QVGA)
•
Storage Locat ion
(phone or
SD card)
•
Geo-Tag
(auto location information)
•
Video Stabilization
(reduce
shakiness during video capture)
•
Shutt er Tone
Effects
Set a video effect:
Normal
,
Black and
Whit e
,
Negative
, and more.
Audio
Scenes
Set sound recording options:
Everyday
,
Outdoors
,
Concert
,
Narrative
, or
Subject
.
Modes
Set to
Normal video
,
Video M essage
,
Fast mot ion
, or
Slow motion
.
Bright ness
Set the viewfinder image brightness
level.
Light
Turn the camcorder light on or off.

31Photos & videos
View photos & videos
Find it: >
Gallery
View all of your photos and your friends’ photos/videos
from different media sites like Picasa™, Flickr,
PhotoBucket, and Facebook™. You can add comments
to others’ photos, and see comments that others have
posted.
richi
e
Upl oa
d
Yester
d
richie
Upl oaded a phot o
Yesterd ay
i
ie
e
e
e
e
a
a
d
d
d
e
e
e
d
d
d
d
a
a
a
p
p
p
h
h
h
e
e
r
d
d
a
a
a
ay
y
y
richie
Upl oad ed a p ho to
Yesterday
3
My libr ar y Onlin e
Cam er a roll
Frien ds MotoCast
See your online albums (like
Picasa, Flikr, or Facebook).
Go to your friends’
online albums.
Stream media from your
computer w ith M otoCast.
See your captured
photos & videos.
Sort your photos & videos.
Note: To see the controls when a video is playing, touch
the display.
Share photos & videos
Find it: >
Gallery
> photo or video
Touch , then choose how you want to share—like
Bluet ooth
,
Email
,
Text M essaging
, or an online album.
Manage photos & videos
Find it: >
Gallery
> photo or video
Touch M enu , then select
Edit
,
Delete
,
Add to
album
,
Set as
(photo), or
Map
(video). Touch
More
for
additional options.
Tip: To copy photos to/from a computer, go to “ USB
connection” on page 46.
Edit photos & videos
Find it: >
Gallery
> photo or video
Touch M en u >
Edit
. You can choose advanced
editing features to resize, crop, or change the color.
Stream & sync photos & videos
Use M otoCast to stream photos and videos from your
computer to your smartphone. M otoCast also lets you
use iTunes or Window s M edia Player to sync the photos
and videos stored on your computer and smartphone.
32 Music
Find it: >
Gallery
>
MotoCast
For more information about using M otoCast, see
“MotoCast” on page 26.
Music
when music is what you need...
Quick start: Music
Find it: >
Music
My librar y Podcasts
DLNA server sInt er net radio
Now playing
Listen to &
download podcasts.
Listen to Internet radio.
Stream or copy music to &
from other DLNA devices.
Go to the current song.
Listen to music stored
on your phone.
33Music
To play music stored on your phone, touch
My library
.
To randomly play all of the songs in a playlist, touch
>.
Tip: When a song is playing, you can add it to a playlist
by touching M enu >
More
>
Add to playlist
.
Tip: To listen to music during a flight, turn off all your
network and w ireless connections: Press and hold
Power then touch
Airplane mode
.
12 songs
Max Keppler and AnnaLee...
2 songs
Brooks Fairfax
3 songs
Jon Levy
14 songs
Lisa Palleschi
Artists
2
son
g
s
Brooks Fair
f
a
x
3
son
g
s
J
on Lev
y
1
4 son
g
s
L
i
sa
P
a
ll
esc
hi
Art ists Alb ums
GenresPlaylists
Songs
Categories
Select music by
artist, album, song,
playlist, or genre.
Last Played
Touch to play again.
Open the categories menu.
Stream music from your
computer w ith M otoCast.
Search the music library.
Set up music
What music transfer tools do I need?
Note: Copyright—do you have the right? Always follow
the rules. See “ Content Copyright” in your legal and
safety information.
To put music on your computer and then load it on your
smartphone, you need:
•M icrosoft™ Window s™ computer or Apple™
Macintosh™ computer.
•USB data cable (included with your smartphone).
•microSD memory card (included with your
smartphone).
Your smartphone supports removable microSD
memory cards up to 32GB capacity. To make sure
your memory card is installed, go to “ Assemble &
charge” on page 3.
Tip: To see the available memory on your memory
card, from the home screen touch M enu
>
Settings
>
Storage
.
What audio file formats can I play?
Your smartphone can play many types of files: AAC,
AAC+, AAC+ Enhanced, AMR NB, AMR WB, MP3,
WAV, WM A v9, and M IDI.
34Music
What headphones can I use?
Your smartphone has a 3.5mm headset jack for wired
stereo listening (required for FM radio). You can go
wireless w ith Bluetooth™ stereo headphones or
speakers (see “ Bluetooth™ handsfree devices” on
page 43).
Get music
Transfer
Transfer music from your computer to your smartphone
using a USB cable connection. See “ USB connection” on
page 46 to learn how.
Stream & sync
Use MotoCast to stream music from your computer to
your smartphone. MotoCast also lets you use iTunes or
Windows Media Player to sync the music files stored on
your computer and smartphone.
Find it: >
Music
, then touch Menu >
Set up
music player
For more information about using M otoCast, see
“MotoCast” on page 26.
Buy
Buy M P3 music files that you can install and play on your
smartphone.
Find it: >
Music Store
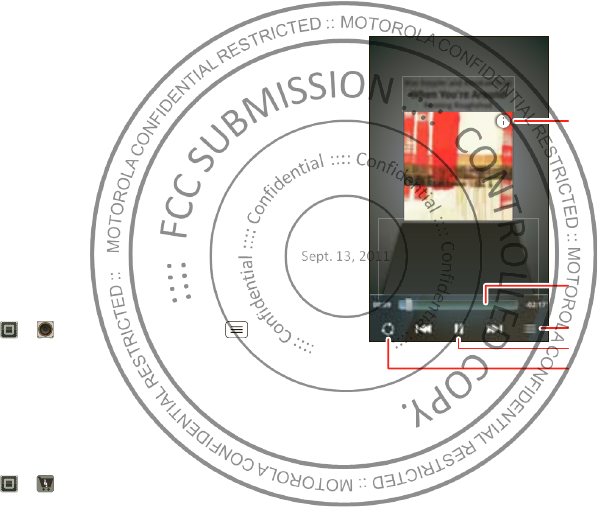
Play music
Touch a song or playlist to start playing music.
Max Keppler an d AnnaLee Scott
When You're Around
Run nin g Roughshod
Progress Bar
Playlist
Music Controls
Create Playlist
Artist Information