Motorola Mobility T56MB1 Portable PCS GSM/ EDGE Transceiver with WLAN and Bluetooth User Manual APPLICANT MOTOROLA INC
Motorola Mobility LLC Portable PCS GSM/ EDGE Transceiver with WLAN and Bluetooth APPLICANT MOTOROLA INC
Contents
- 1. Exhibit 8 Users Manual 1
- 2. Exhibit 8 Users Manual 2
- 3. Exhibit 8 Users Manual 3
- 4. Exhibit 8 Users Manual 4
- 5. Exhibit 8 Users Manual 5
Exhibit 8 Users Manual 3
20 Messaging
Messaging
sometimes it’s best to text, or IM, or email...
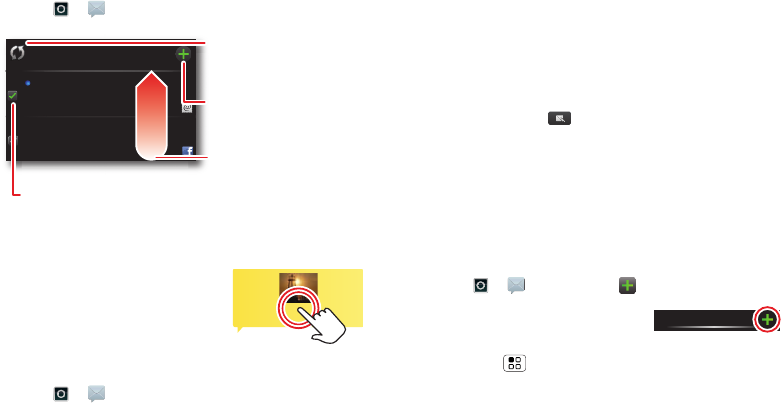
Quick start: Messaging
Find it: > Messaging > Universal Inbox
•To show other messages in your inbox, flick or drag
up.
•To forward, save attachments,
and more, open a message,
then touch and hold it to
open options.
Read & reply to messages
Find it: > Messaging > Universal Inbox
8:34 PM
Sep 25
Keith Zang
Job
It’s only a freelance gig, but it ...
Universal Inbox (4)
Some guys have all the luck - me...
Right now, you’re busy flexing...
Alex Pico
Create a message.
Check for messages.
Flick up for more.
Select multiple messages to move, delete and more
.
<Subject: Multimedia message>
7:30 PM
Note: Universal Inbox shows all of your messages
together—text, email, and social networking
messages. To show only one type of message, touch a
message account type instead of Universal Inbox.
•To open a message and all of its replies, touch it.
•To respond to a message, just open it and enter
your response in the text box at the bottom.
To forward a text message, touch and hold a
message in the conversation, then touch Forward
message.
For email, touch to choose a reply or forward
option.
•To open options, touch and hold a message.
To add a Messages widget, touch and hold an empty
spot on your home screen, then touch Motorola
widgets.
Create messages
Find it: > Messaging >
Choose a message type. Then,
enter the recipient and message.
In text messages and emails,
touch Menu to add files or choose other options.
For more, see “Text entry” on page 39.
Messaging

21Messaging
Send & receive attachments
To send a file in a message, open a new message,
touch Menu , and choose the file.
When you receive a message with an attachment,
open the message and touch the file name to
download it. Then, touch the name again to open it.
Some file formats can be converted to HTML for faster
viewing, and your phone will show a button that
says Get HTML version.
Tip: To send and receive large attachments faster, see
“Wi-Fi search & connect” on page 47.
Set up messaging
To add email accounts, touch Menu > More
>Settings > Accounts > Add account.
•Corporate Sync is for Microsoft™ Exchange server
work email accounts. Enter details from your IT
administrator.
Tip: You might need to enter your domain name
with your user name (like domain/username). To
enter a backslash, touch Symbols .
Note: Some work accounts might require you to
add a password lock to your phone, for security. To
stop an account from showing the contacts you
create on your phone, touch > Contacts,
touch Menu > More > Settings, then uncheck
the account.
•Email is for most personal and other accounts that
aren’t on a Microsoft™ Exchange Server. For
account details, contact the account provider.
To change your settings, touch > Messaging >
Menu , then touch:
•Manage accounts to change your user name or
password (or server settings, for email).
•Edit Universal Inbox to choose which accounts
show messages in the Universal Inbox.
•Messaging Settings to set the notification for each
account type (along with other preferences, for
email).
Tip: You can tell your phone to send email as soon
as you hit send (Data push), or set how often your
phone sends and receives messages (Fetch
schedule).
To get Gmail™ in your Messages widget and
Universal Inbox, you’ll need to add it as an Email
account: Touch > Messaging > Menu , then
touch Manage accounts > Add account > Email and
enter your Gmail™ details. If you added your Google
account too, turn off its email sync to avoid duplicate
email notices: Touch Menu > More > Settings

22 Media Share
>Accounts, touch your Google™ account, and touch
the checkmark to turn off Gmail.
Tip: For social network accounts, see “Add accounts”
on page 11.
Voicemail
When you have a new voicemail, shows at the top
of your screen. To hear the voicemail, flick down the
status bar and touch the .
If you have Visual Voicemail, you can open and
manage a list of your voicemail messages: Touch >
Voicemails. Touch a message to open details or
play it. For options, touch Menu .
Media Share
connect and enjoy
Share media content
Note: Copyright—do you have the right? Always follow
the rules. See “Content Copyright” in your legal and
safety information.
Media Share gives you an easy way to share your
media content—photos, videos, and tunes—with
friends and family.
Share your media over DLNA devices: The Media
Share wizard guides you through the easy setup steps.
Swap photos & videos: Share any photos or videos
on your phone, even the ones you created. Or, if you
want, see your photos and videos in HD quality on an
HDTV or monitor.
More tunes: Enjoy favorites from your phone playlist
on your sound system at home. Or get music from
your portable music player and add it to your phone’s
music library.
Connect
You'll need to connect to a network or other device:
•Connect to your computer with a USB cable (see
“USB, memory card & file transfer” on page 48.
23Media Share
•Connect to a Wi-Fi network or use your own Wi-Fi
hotspot (see “Wi-Fi™” on page 46).
Media Share will guide you the rest of the way.
Your Media Share world
Note: If you’re using a Wi-Fi connection, you’ll need to
allow access to other devices to download media from
your phone and to share your files. If you want to
access media files on other devices, they will need to
allow access.
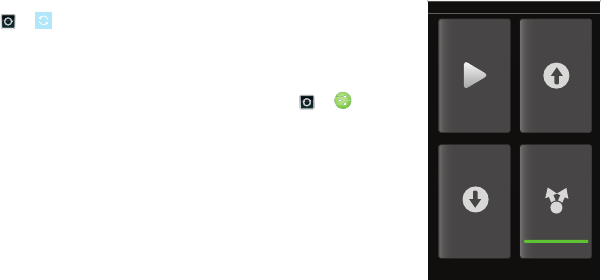
To use Media Share, touch > Media Share, then
select the feature you want to use:
•Play media—Select media for playback on another
device in a Wi-Fi network.
•Upload media—Select media files on your phone to
copy or move to another device.
•Download media—Select media files on another
device to download to your phone.
•Share media—Allow other devices to access media
files on your phone. Without downloading any
media from your phone, other people can view your
pictures or videos, or play your songs, on their own
devices.
HD viewing
You can create your own videos (see “HD videos” on
page 27) to view your wide screen HDTV or monitor in
the comfort of your home.
Share using DLNA
DLNA lets you expand the ways you can enjoy your
photos and videos on a DLNA Certified computer, TV,
or monitor, using your own Wi-Fi network.
Make sure your phone is
connected to an active
Wi-Fi network and has
access to a DLNA
Certified device.
1Tou ch > DLNA.
2Tou ch Play media, Copy
media to server, Copy
media to phone, or
Share media. Then
follow the instructions
you see on your phone.
Play media
DLNA
Copy media
to server
Share media
Copy media
to phone
24 Photos & videos
Photos & videos
see it, capture it, share it!
Photos
Take & share photos
Take that family photo, and post it online for everyone
to see. Your camera has a built-in flash, for perfect
photos every time.
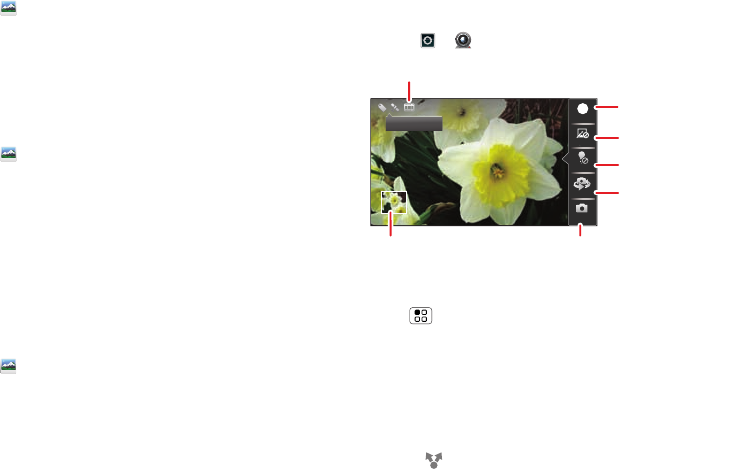
Find it: Press the Camera key
Tip: You can also touch Camera.
Note: To set where photos are stored touch Menu
>Settings > Storage location. You can store photos on
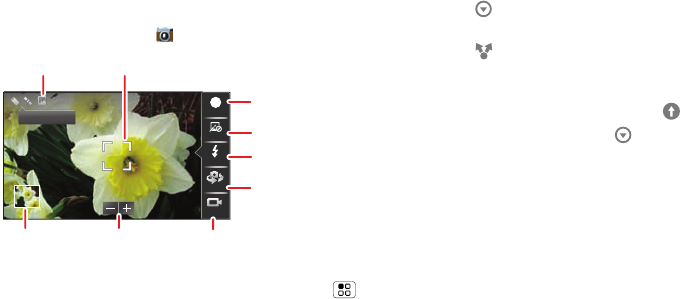
Scenes
Effects
A
Flash
Front
Switch to
Searching for location
WS 1589
Set photo effects.
Touch to switch to video.
Zoom Controls
Autofocus Box
Set photo type.
Turn flash on/off.
Camera Settings
Touch to use front
camera.
Open your
last photo.
your SD card or Internal phone storage. Picture
Resolution is 8MP, unless you change it.
To take the photo, lightly press the Camera key
halfway until the autofocus box turns green, then
press all the way to take the photo.
Your phone shows a brief preview and then stores the
photo. To see the photo, touch the viewfinder, then
touch the photo thumbnail. Then:
•To set the photo as a wallpaper or contact photo,
touch > Set as.
•To send the photo in a message or post it online,
touch > Photo Share, Text Messaging or
Bluetooth. For more info on sharing your photos,
see “Share a photo” on page 26.
•To quick upload the photo, touch .
•To delete the photo, touch > Delete.
25Photos & videos
Camera settings
Touch the viewfinder, then touch an option to change
camera settings:
In the viewfinder, touch Menu > Settings to set
Picture resolution, Exposure, Shutter tone, Storage
location or Shutter animation.
Options
Scenes Set the type of photo you want to
take: Auto, Portrait, Landscape,
Sport, Night Portrait, Sunset,
Macro, or Steady shot.
Effects Set a photo effect: Normal, Black
and White, Negative, Sepia,
Solarize, Red Tint, Green Tint or
Blue Tint.
Flash Touch Flash to choose Flash On,
Flash Off, or Auto Flash.
Front or Back Touch to choose the Front or Back
camera.
Switch to Touch to switch between camera
and video.
In the viewfinder, touch Menu > Picture modes to
set Single shot, Panorama or Mult-shot modes.
In the viewfinder, touch Menu > Tags > Auto
Location Tag or Custom Tags to save details of where
the photo was taken or add tags.
View your photos
Find it: Gallery
Play a slideshow
Find it: Gallery
To start a slideshow, touch a photo, then touch
Menu > Slideshow. To stop the slideshow, touch
the display.
To return to the gallery, touch Back .
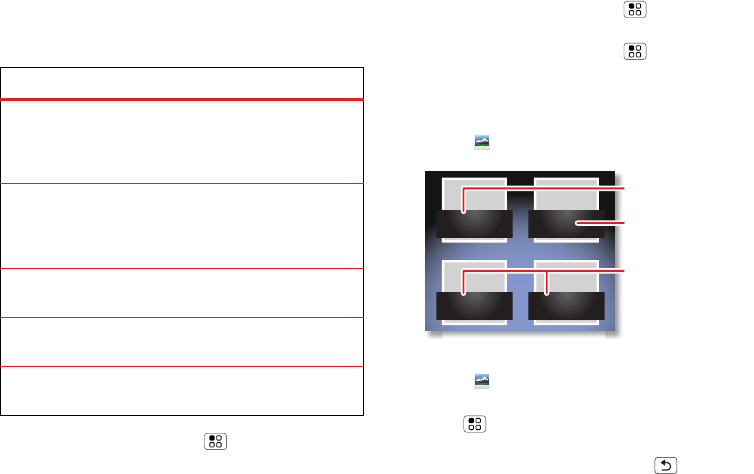
Camera roll
All photos
Folders
All videos
104 items
137 photos
8 folders
6 videos
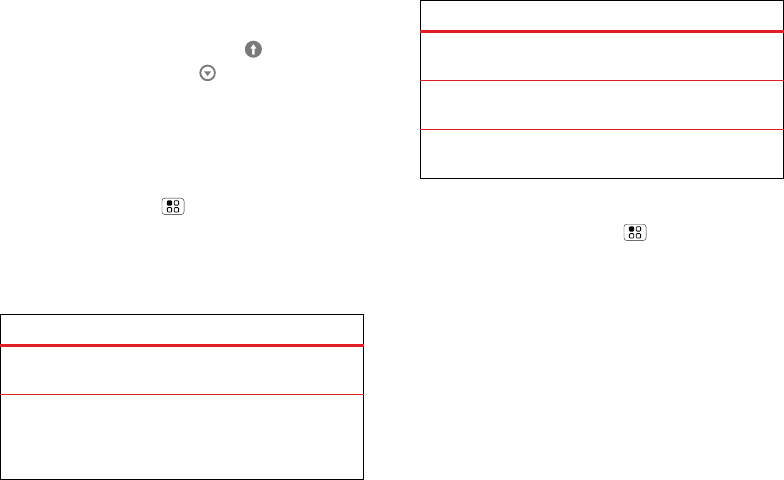
Show photos you took.
Open folders you
created.
Show all images and
videos that you
captured or
downloaded.
26 Photos & videos
Share a photo
Find it: Gallery
To send your photo:
1Touch and hold a photo, then touch Share.
2Choose how you want to share—Photo Share, Text
Messaging, Bluetooth, or Email.
Manage your photos
Find it: Gallery
Touch and hold a photo, then:
•To delete the photo, touch Delete.
•To set the photo as a contact picture or wallpaper,
touch Set as.
•To print the photo, touch Print.
Note: To copy photos to/from a computer, go to “USB
drag & drop” on page 48.
Edit your photos
Find it: Gallery
Touch and hold a photo, then touch Edit > Rotate or
Tags or Crop.
Videos
Record & share videos
Find it: > Camcorder
Tip: To send your video in a message, set the video
quality to QVGA (320 x 240) by touching
Menu > Settings > Video Resolution.
To record the video, press the Camera key. To stop the
video recording, press the Camera key again.
Your phone shows a brief preview and then stores the
video. To see the video, touch the viewfinder, then
touch the video thumbnail.
•To send the video in a message or post it online,
touch > Photo Share, Text Messaging or
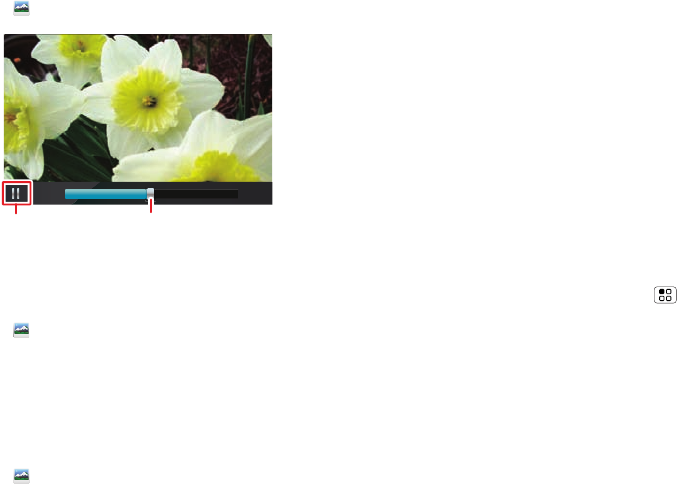
Scenes
Effects
A
Light
Front
Switch to
Searching for location
HD 00:37:34
Set video effects.
Set video type.
Turn light on/off.
Video Settings
Open your last video.
Touch to use front
camera.
Touch to switch to camera.
27Photos & videos
Bluetooth. For more information on sharing your
videos, see “Share your video gallery” on page 28.
•To quick upload the video, touch .
•To delete the photo, touch > Delete.
HD videos
You can capture HD-quality videos that you can watch
on an HDTV or monitor.
To record an HD quality video, be sure to select the
correct video resolution. From the active camcorder
viewfinder, touch Menu > Settings > Video
Resolution > High Definition (720p).
Video settings
Touch the viewfinder, then touch an option to change
video settings:
Options
Scenes Set the type of video you want to
take: Auto or Night.
Effects Set a video effect: Normal, Black
and White, Negative, Sepia,
Solarize, Red Tint, Green Tint or
Blue Tint.
Video options
In the viewfinder, touch Menu > Video modes >
Normal video, Video Message, Slow motion, or Fast
motion.
Light Touch Light to choose Light on or
Light off.
Front or Back Touch to choose the Front or Back
camera.
Switch to Touch to switch between camera
and video.
Options
28 Photos & videos
Play your videos
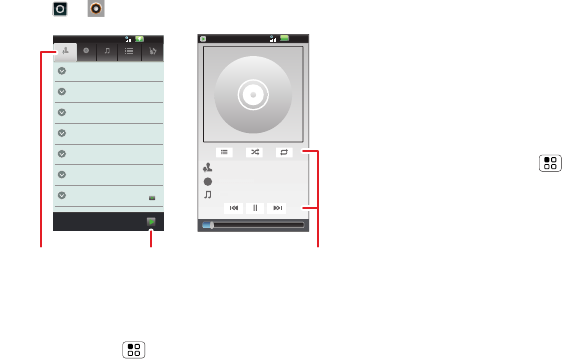
Find it: Gallery > All videos > video
Note: To see the controls while the video is playing,
touch the display.
Share your video gallery
Find it: Gallery > All videos > video
To send your video in a message:
1Touch and hold a video, then touch Share.
2Choose how you want to share—Bluetooth, Email,
or Text Messaging.
Manage your videos
Find it: Gallery > All videos > video
00:15 00:30
Pause/PlayProgress Bar
Touch and hold a video, then:
•To delete the video, touch Delete.
•To tag the video, touch Edit > Tags.
Note: To copy videos to/from a computer, go to “USB
drag & drop” on page 48.
Send movies and videos to your
HDTV
Watch the latest HD movies and videos by streaming
the video to your phone over the Internet.
Tip: For lightning fast Internet video streaming, use a
Wi-Fi network or use your own Wi-Fi hotspot (see
“Wi-Fi™” on page 46).
Want a larger HD experience? Send the video from the
phone to your HDTV over an HDMI cable connection.
Start playing the video, then press Menu > Power
On HDMI.
29Music
Music
when music is what you need...
Quick start: Music
Just open your music library, then select what you
want to play.
Find it: > Music
Tip: When a song is playing, you can add it to a playlist
by touching Menu > Add to playlist.
10:05
0:15 3:10
Alri
g
ht, Still [UK
]
LDN
Lily Allen
D’you Know What I Mean-
Oasis
10:05
Albums Songs Playlists GenresArtists
Unknown artist
3
son
g
s
DJ Fronter
1
album
1
album
1
album
1
album
1
album
1
album
Ernesto vs. Bastian
Green Day vs Oasis
Lily Allen
Ludwig van Beethovan, composer.
Oasis
Music
Controls
Categories
Touch to list &
select songs
or playlists.
Last Played
Touch to play
again.
Set up music
What music transfer tools do I need?
To put music on your computer and then load it on
your phone, you need:
•A Microsoft™ Windows™ PC or
Apple™ Macintosh™ computer.
•A USB data cable.
You need a memory card
Your music is stored on your memory card. Your phone
supports removable microSD memory cards up to
32 GB capacity. To make sure your memory card is
installed, go to “Assemble & charge” on page 3.
Tip: To see the available memory on your memory
card, touch Menu > More > Settings > Storage.
What music file formats can I play?
Your phone can play many types of files: MP3, MP4,
AAC, ACC+, ACC+ Enhanced, MIDI, WAV and
WMA v10.
Note: Your phone does not support any DRM
protected files.

30 Music
What headphones can I use?
You can go wireless with Bluetooth™ stereo
headphones or speakers (see “Bluetooth™ wireless”
on page 44).
Get music
Rip a CD
Not literally. If you’re new to digital music transfer, this
means transferring music from a music CD to your
computer.
To rip a music CD on your computer, you can use
Microsoft™ Windows™ Media Player. You can
download Windows Media Player from
www.microsoft.com.
1On your computer, open Windows Media Player.
2Insert a music CD into the computer’s CD
ROM drive.
Note: Make sure you change the format to MP3 in
“Rip > Format > Rip Settings”.
3In the Windows Media Player window, click on the
“Rip” tab.
4Highlight the songs you want to import, and click
“Start Rip“.
The songs are imported to the Windows Media Player
Library.
Transfer using Windows Media Player
Transfer music files from a computer to your memory
card.
Note: Copyright—do you have the right? Always follow
the rules “Content Copyright” on page 62.
1With a memory card inserted, and your phone
showing the home screen, connect a Motorola
micro USB data cable from your phone’s micro USB
port to a USB port on your computer. Your phone
should show in the status bar.
Note: Your phone supports Microsoft™ Windows™
XP, Windows Vista™, and Apple™ Macintosh™.
Other operating systems may not be compatible.
2Your phone shows a USB connection dialog. Touch
Windows Media Sync. You can’t use the files on your
memory card while it is connected.
3On your computer, open Windows Media Player.
4On the “Sync” tab, select “More Options”. Under
“Device”, select your phone.
5Select “Properties”, check the “Create folder
hierarchy on device” box, and click “OK”.
6Drag your music files over to the “Sync List” and
press “Start Sync”.
31Music
Transfer using USB
Transfer music files from a computer to your memory
card.
1With a memory card inserted, and your phone
showing the home screen, connect a Motorola
micro USB data cable from your phone’s micro USB
port to a USB port on your computer. Your phone
should show in the status bar.
Note: Your phone supports Microsoft™ Windows™
XP, Windows Vista™, and Apple™ Macintosh™.
Other operating systems may not be compatible.
2Your phone shows a USB connection dialog. Touch
USB Mass Storage. You can’t use the files on your
memory card while it is connected.
3Find “Removable Device” (your memory card) in the
“My Computer” window.
4Drag and drop your music to a folder on your
memory card.
Tip: To help manage your music, create a “Music”
folder on your memory card.
5When you’re done, use the “Safely Remove
Hardware” feature to finish.
Play music
Music library
Open your music library, then select what you want to
play.
Find it: > Music
Your music is stored by artists, albums, songs,
playlists, and genres. Touch a category, then touch the
D’you Know What I Mean-
Oasis
10:05
Albums Songs Playlists GenresArtists
Unknown artist
3
son
g
s
DJ Fronter
1
album
1
album
1
album
1
album
1
album
1
album
Ernesto vs. Bastian
Green Day vs Oasis
Lily Allen
Ludwig van Beethovan, composer.
Oasis
Categories
Touch to list & select songs
or playlists.
Last Played
Touch to play again.
Touch to open.