Motorola Mobility T56NS6 XT902 GSM TRANSCEIVER WITH BT & WLAN User Manual User Guide
Motorola Mobility LLC XT902 GSM TRANSCEIVER WITH BT & WLAN User Guide
Contents
User Guide 4
BackNext
Menu More
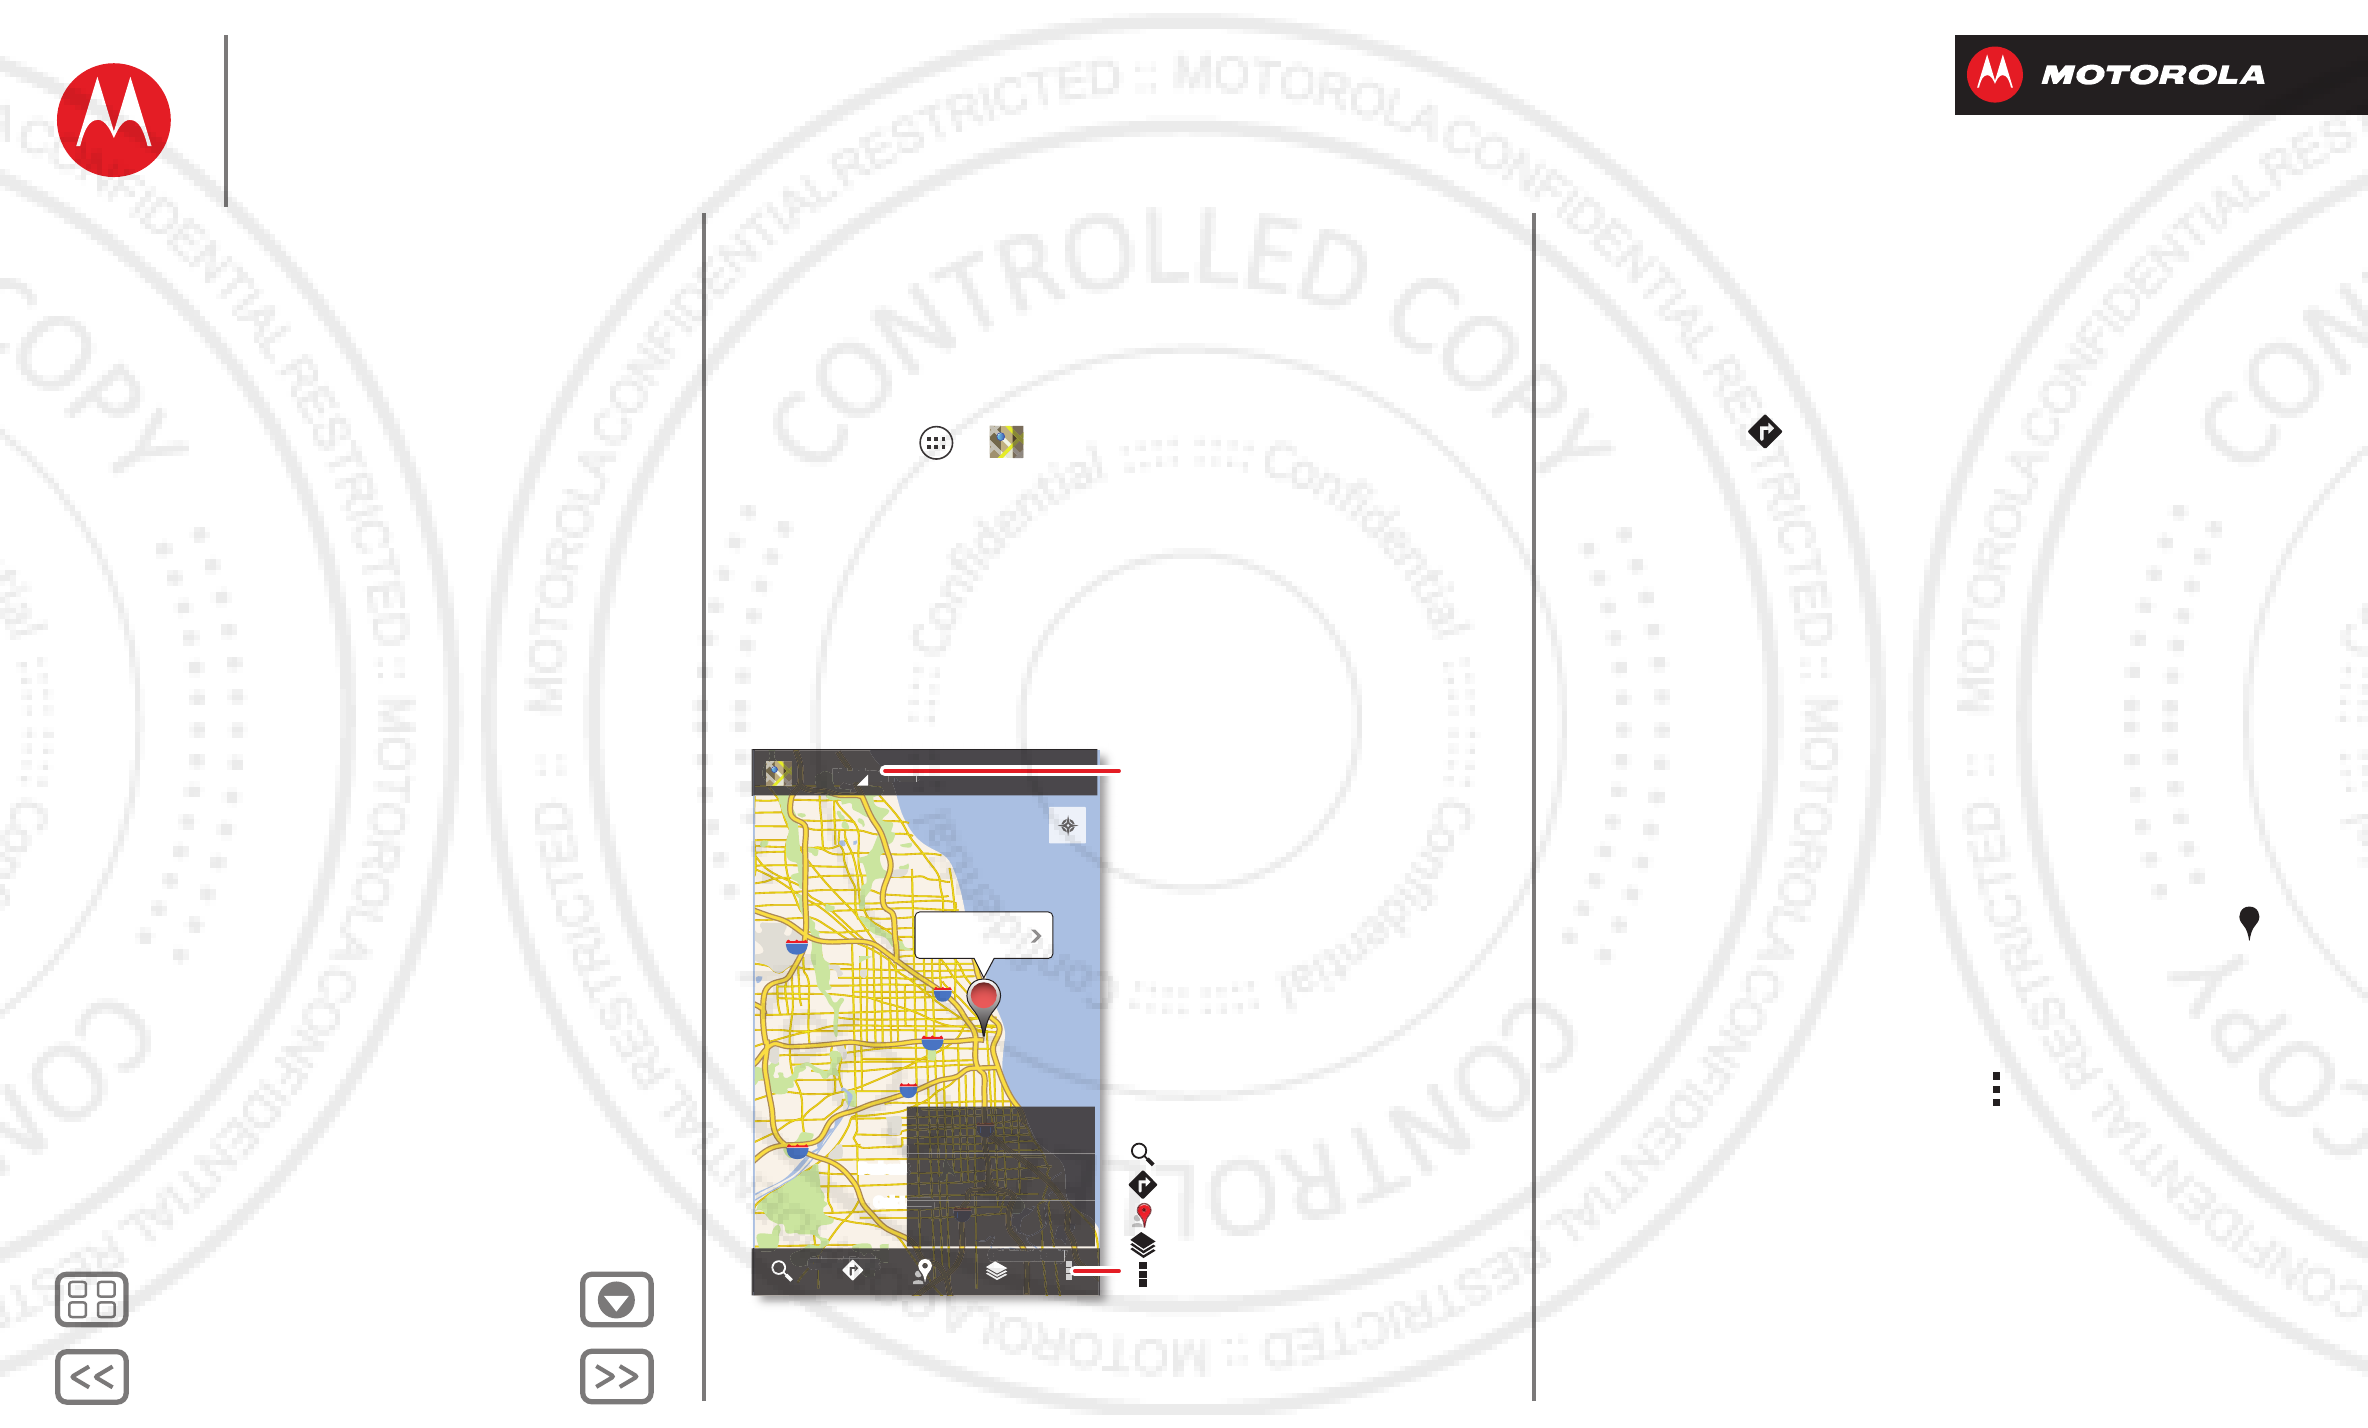
Locate & navigate
where you are, where you’re going
Quick start: Locate & navigate
Find an address, find a place, see what’s close by, get
directions or full navigation, and so much more—all with
the Google Maps™ you know and love.
Find it: Apps >
Maps
190
294
57
94
55
90
290
Oak ParkOak Park
CiceroCicero
Oak Lawn
Orland Park Calumet City
ChicagoChicago
EvanstonEvanston
Highland Park
NorthbrookNorthbrook
Des PlainesDes Plaines
La GrangeLa Grange
Burbank
LincolnwoodLincolnwood
Oak Park
Cicero
Oak Lawn
Orland Park Calumet City
Chicago
Evanston
Highland Park
Northbrook
Des Plaines
La Grange
Burbank
Lincolnwood
Chicago, IL
A
P
P
Orland
O
O
dP
k
Orland Park
Calumet City
Calumet C
Calumet City
Park
and P
Hi
Hi hl d
h
k
Highland Park
5
7
9
4
Lawn
L
Lawn
k
k
Clear Map
Settings
Help
Maps Open Navigation, Latitude,
history, and more.
Search
Directions
Local
Layers
Menu
Tips & tricks
• Find an address: Enter the address in the search box
at the top. The map moves to show the address.
• Get directions: Find an address on the map, touch it,
then touch .
• Save an address: Touch the address, then touch the
star by its name. To show your starred places,
touch
Maps
and choose
My Places
. Touch a star to
remove it.
• Zoom: To zoom in or out, drag two fingers together or
apart on the screen.
• Turn and tilt: Rotate two fingers on map to turn it or
drag down/up to tilt.
• Send your location: To tell others where you are,
touch your location on the map, touch the
My Location
bubble, then choose
Send location to others
.
• Find nearby businesses or attractions: To uch at
the bottom.
• Identify address: Touch and hold a spot on the map to
show the nearest address.
• Get map help: To u ch M enu >
Help
.
Locate & navigate
Quick start: Locate & navigate
Google Local™
Google Maps with Navigation™ beta
Google Latitude™
2012.09.06
FCC
BackNext
Menu More
Locate & navigate
Google Local™
Google Local lets you find the restaurants, cafes, bars,
and attractions that are close to you:
Find it: Apps >
Local
Tip: In
Maps
, just touch at the bottom.
Google Maps with Navigation™ beta
Get spoken turn-by-turn directions to the destination you
specify.
Find it: Apps >
Navigation
Speak, type, or select your destination.
Navigation
shows
a map and starts telling you directions.
Tip: To add to your
STARRED
places, open Google
Maps™, find an address, then touch the next to it.
To
Exit navigation
or see other options, touch at the
bottom. Touch to show gas stations and other points
along the way.
Note: Using a mobile device or accessory while driving
may cause distraction and may be illegal. Always obey
the laws and drive safely.
For more, go to www.google.com/mobile/navigation.
Google Latitude™
Google Latitude lets you see where your friends and
family are on Google Maps™. Plan to meet up, check that
they got home safely, or just stay in touch. Don’t worry,
your location is not shared unless you agree to it. After
you join Google Latitude, you can invite your friends to
view your location, or accept their invitations.
To join Google Latitude, touch Apps >
Maps
, touch
Maps
at the top, then choose
Join Latitude
.
To use Google Latitude after you join, touch Apps >
Latitude
:
•To add friends, touch .
Touch
Select from Contacts
or
Add via email address
.
Your friend will receive an email notice.
•To remove friends, touch next to their name.
•To share your location when you receive a request,
you can choose
Accept and share back
(show your
location and see theirs),
Accept, but hide my location
(hide your location, but see theirs), or
Don’t accept
(hide both locations).
•To hide your location, touch Menu >
Location
Settings
>
Location reporting
>
Do not update your
location
.
•To sign out, touch Menu >
Location Settings
>
Sign
out of Latitude
.
Locate & navigate
Quick start: Locate & navigate
Google Local™
Google Maps with Navigation™ beta
Google Latitude™
2012.09.06
FCC
BackNext
Menu More
Work
get it done anytime
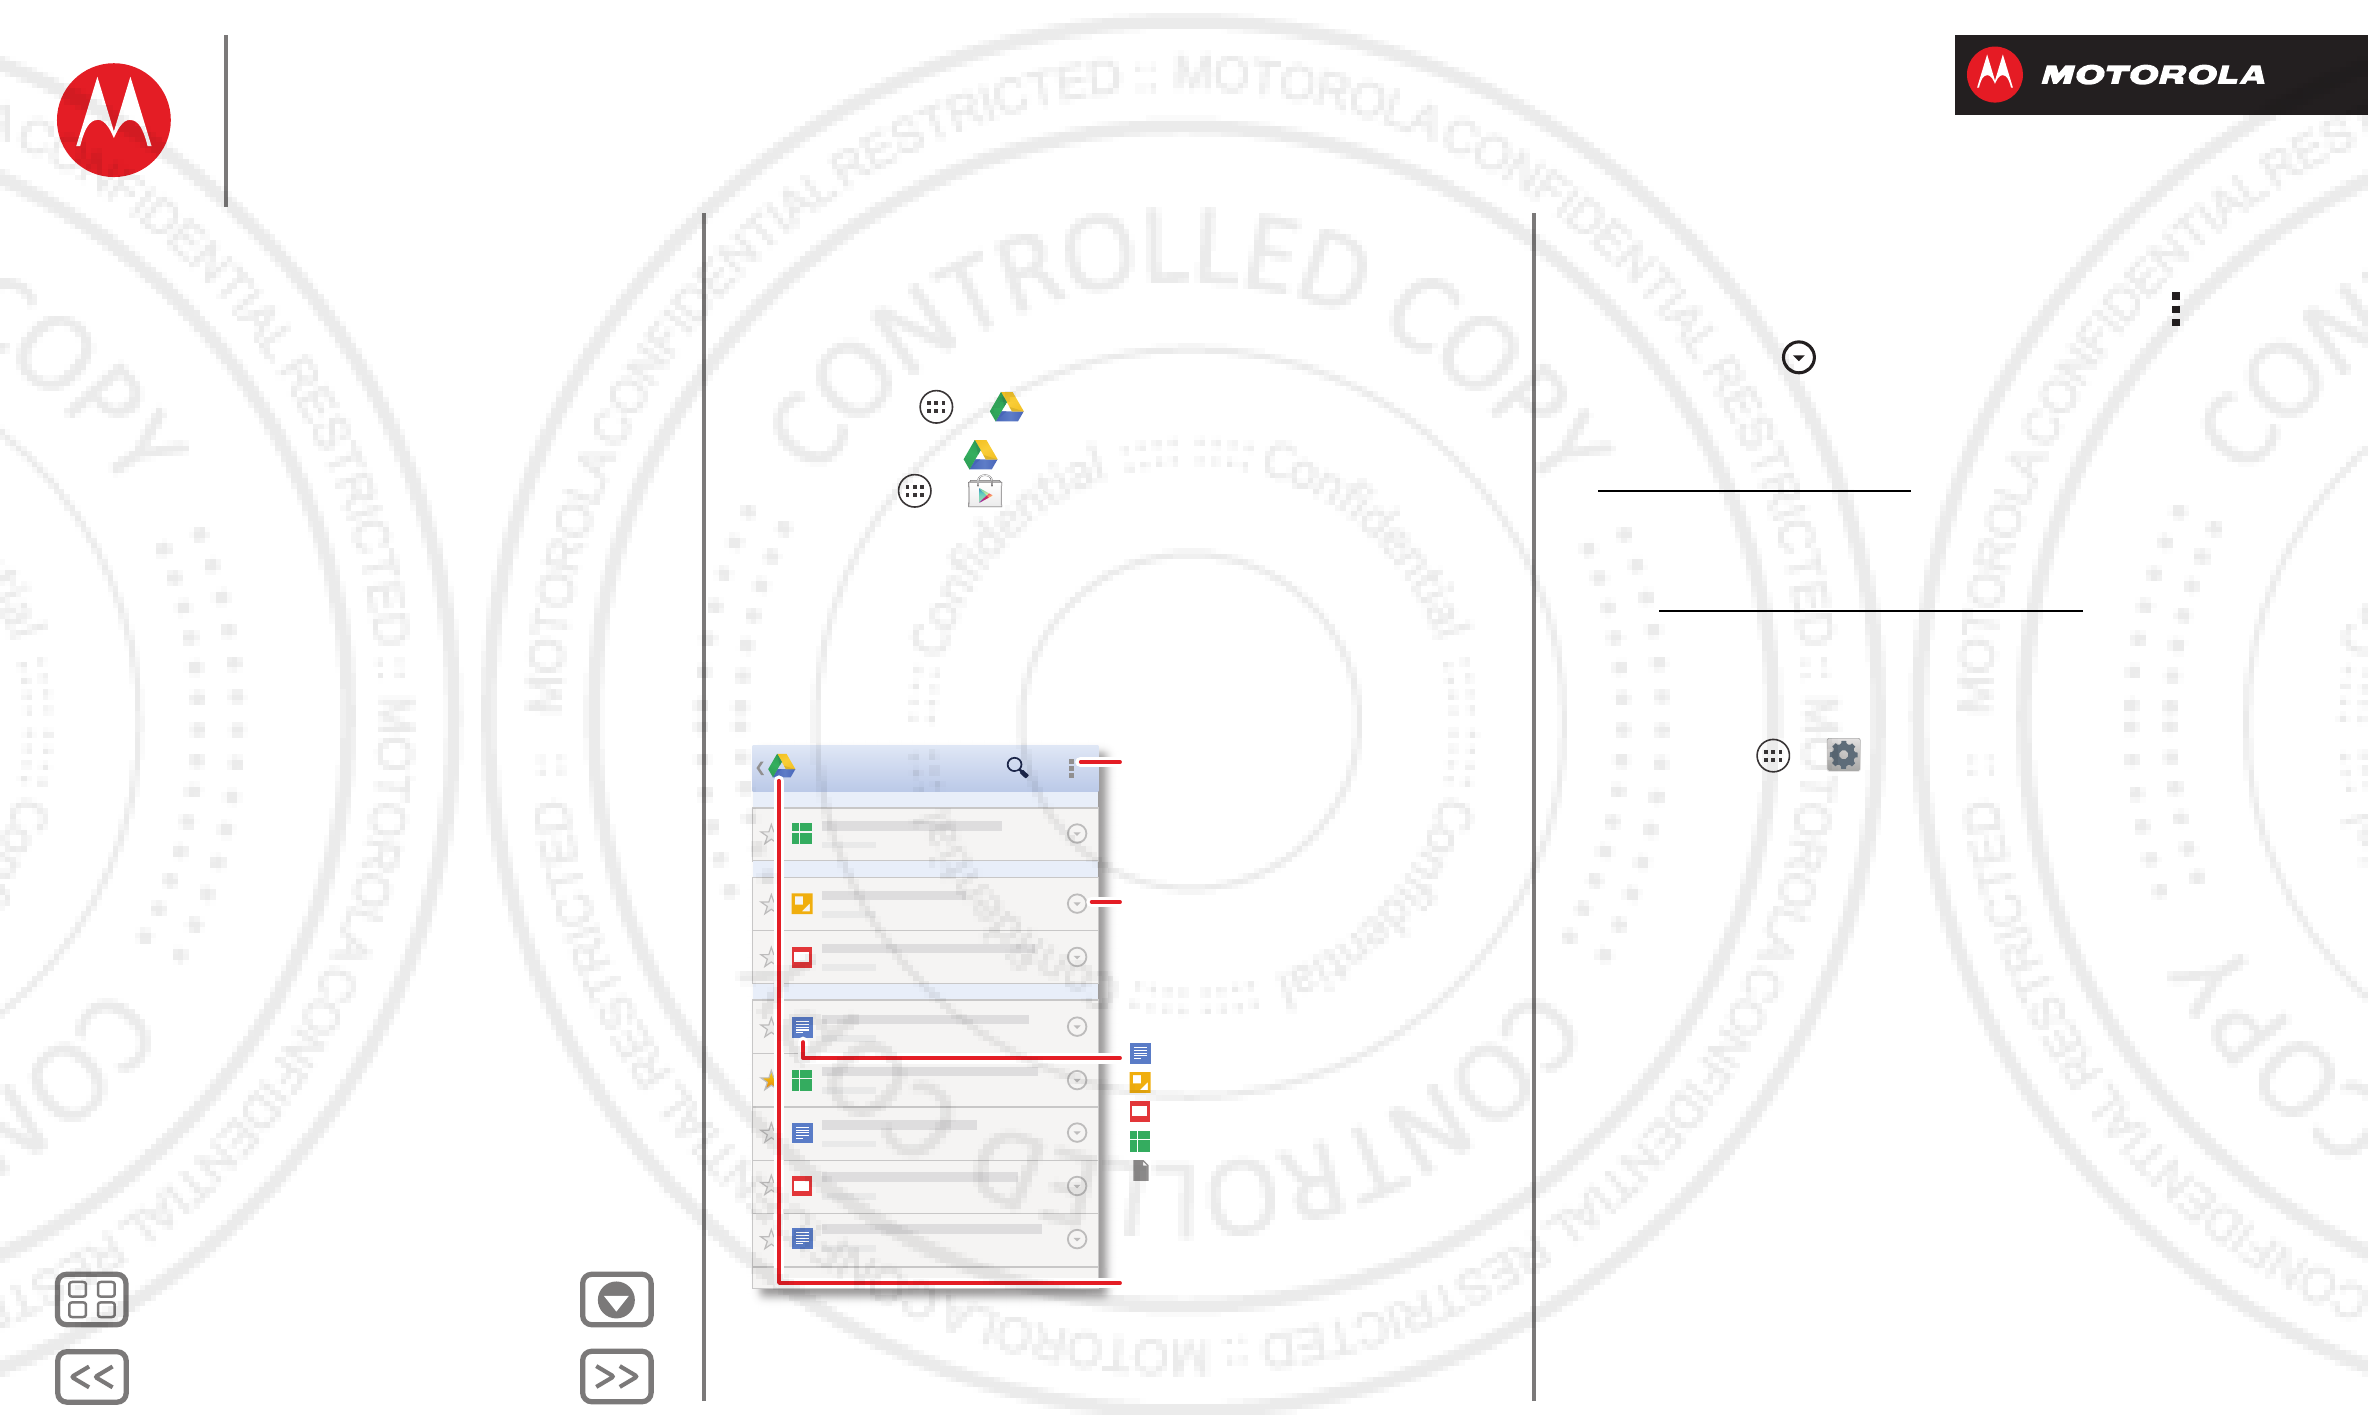
Quick start: Work
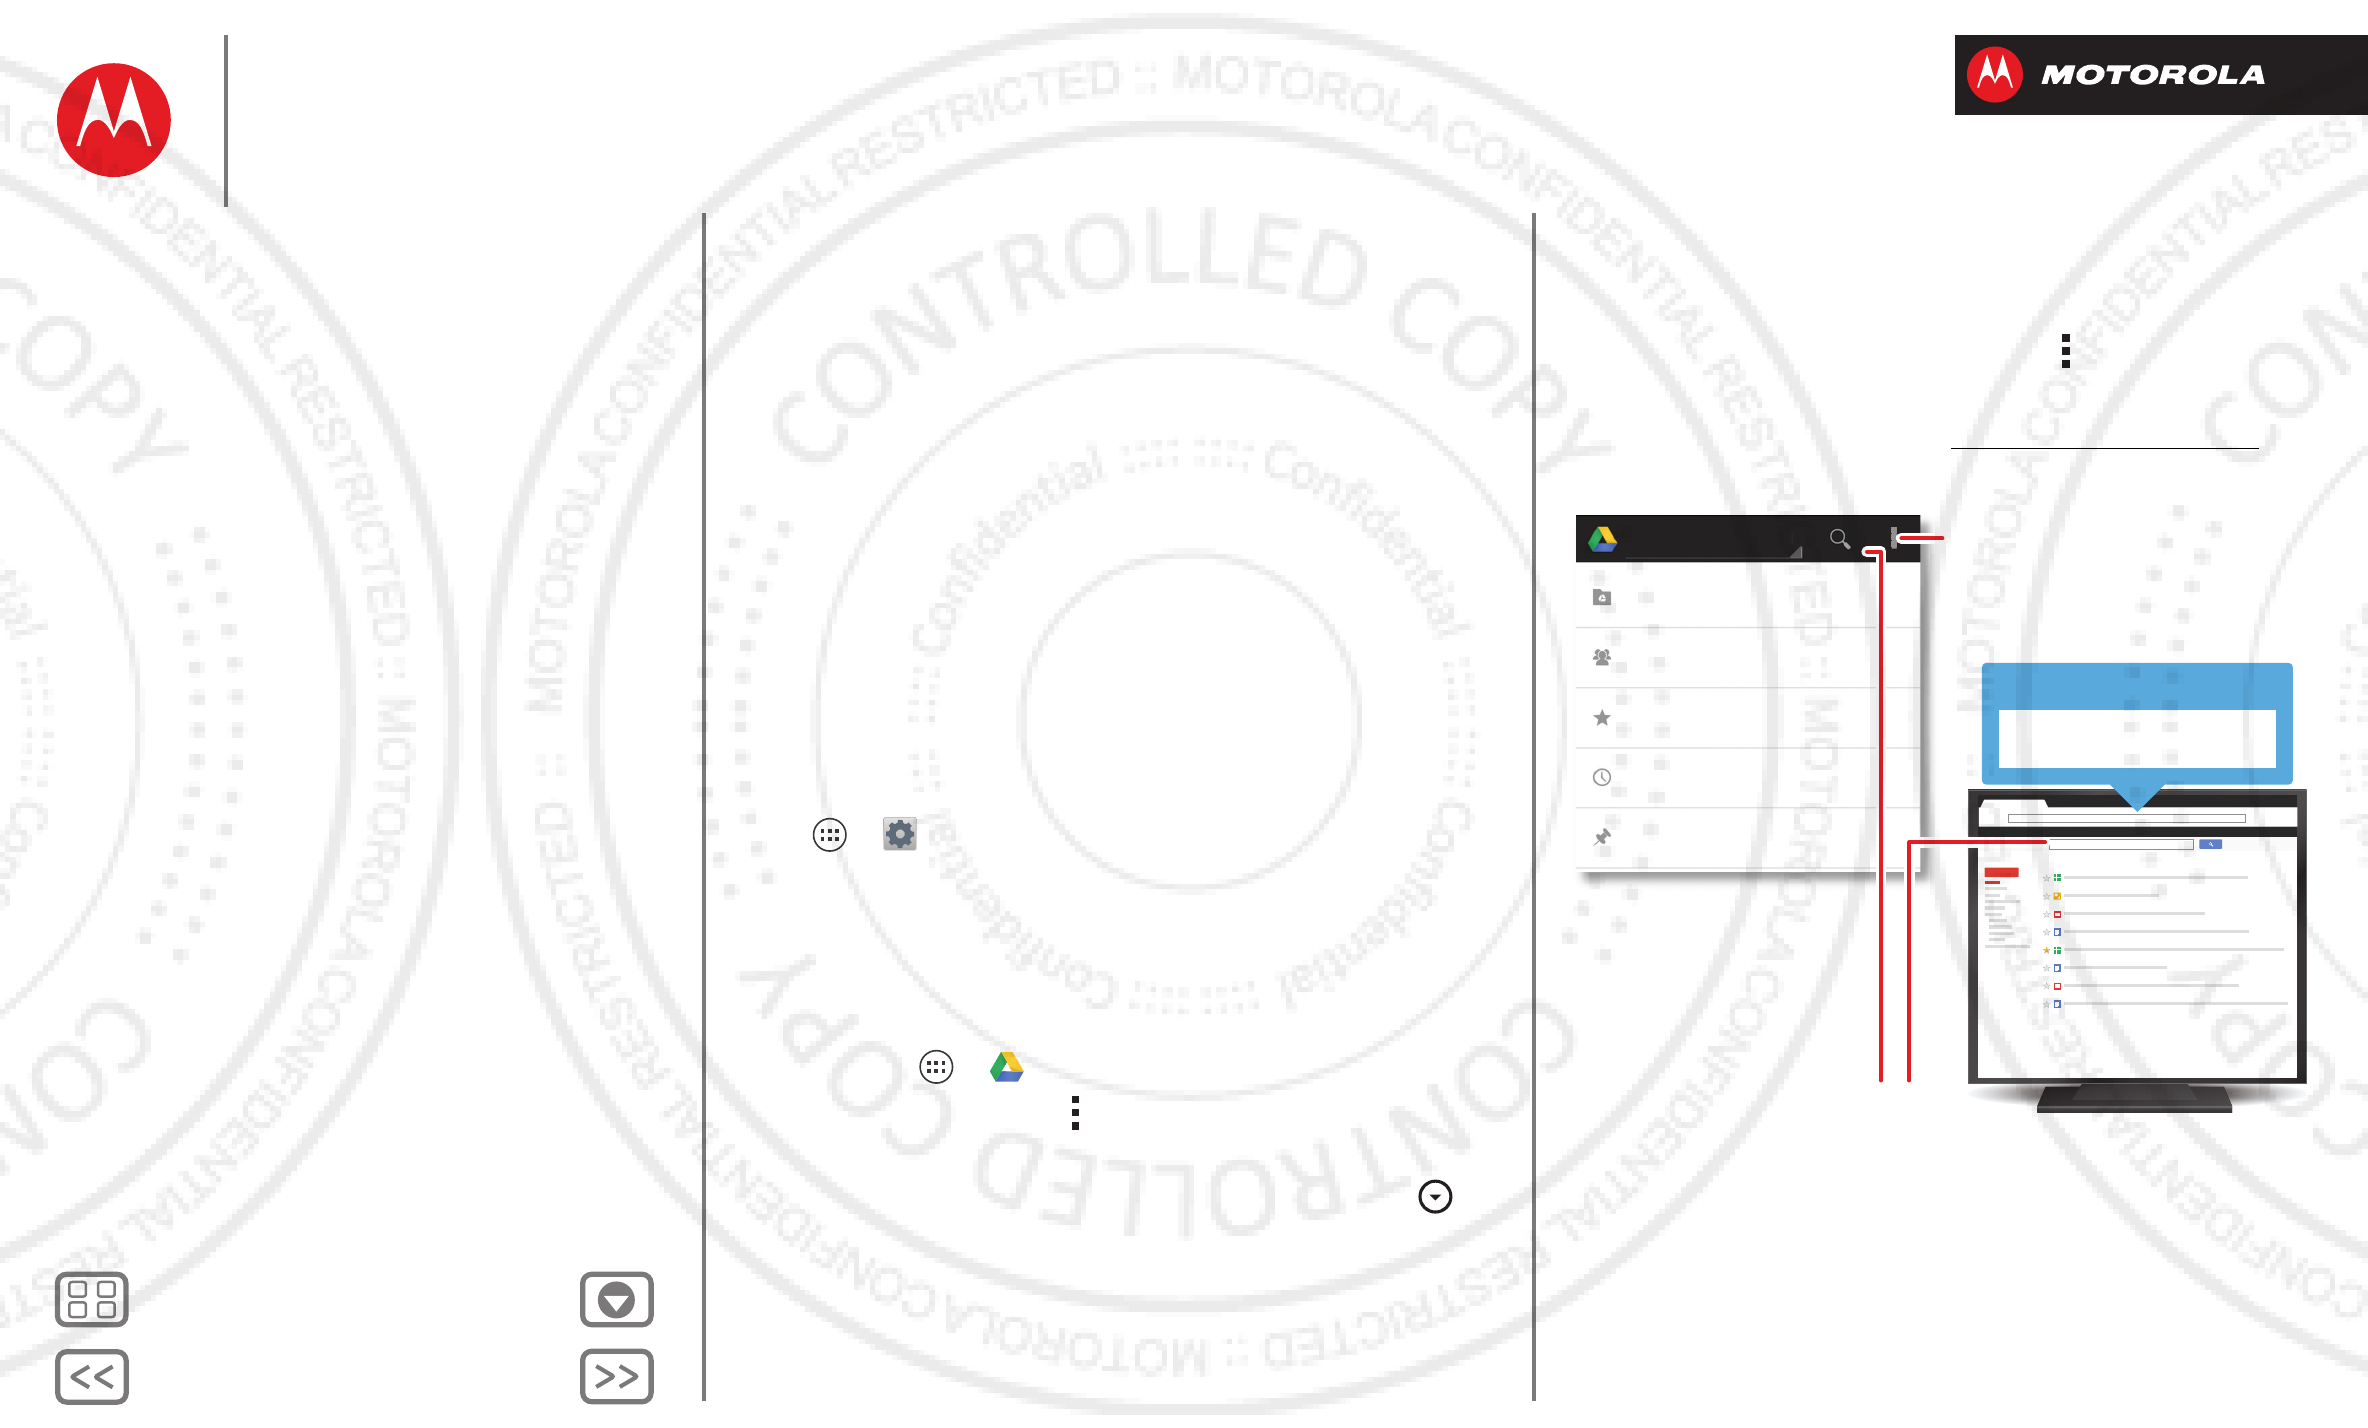
Google Drive™ lets you create documents on the web, to
share with any computer, phone, or smart phone.
Find it: Apps >
Drive
>
My Drive
If you don’t have
Drive
, you can download it for free:
Touch Apps >
Play Store
and search on
Google Drive.
My Drive
YESTERDAY
Document
Drawing
Presentation
Spreadsheet
Other File Type
Share, send, rename, download
offline, and more.
Return to the main Drive screen.
Sort the list, or create a new
document.
Tips & tricks
• Create: To create a new doc, touch Menu >
New
.
•Share: Touch next to a document in your list to
share it, make it available offline, and more.
•Import: On your computer, access your docs at
www.drive.google.com. There, you can create or
upload documents from your computer.
•Help: For help or more information on Google Drive,
visit www.google.com/support/drive.
• Accelerate: Use a dock or Bluetooth™ keyboard and
mouse when you want to make your phone more like a
laptop computer. To connect them, turn them on and
touch Apps >
Settings
>
Bluetooth
. To
disconnect them, turn them off. For more, see
“Bluetooth™ wireless”.
Work
Quick start: Work
Corporate sync
Quickoffice
Tasks
Office network
Alarm & timer
Calendar
2012.09.06
FCC
BackNext
Menu More
Work
Corporate sync
If you use Microsoft™ Office Outlook on your work
computer, your phone can synchronize emails, events,
and contacts with your Microsoft Exchange server.
•To add your
Corporate
account, see “Email”.
•To choose what to sync from your
Corporate
account,
touch Apps >
Settings
>
Accounts & sync
, touch
your account, then choose options like
Calendar
,
Contacts
, or
Email
.
Quickoffice
Use
Quickoffice
to view and edit files.
Find it: Apps >
Quickoffice
Touch a file or folder to open, or touch and hold a file for
options. You can edit most text or spreadsheet files:
•Place your cursor by touching the text.
•Select text by double-tapping it.
•Open a keyboard, choose formatting, save the file, or
choose other options by touching Menu .
Tasks
Turn your to-do list into groups of tasks, share tasks, and
set reminders:
Find it: Apps >
Tasks
To add a task, touch .
From the tasks main screen, touch
All tasks
to view your
tasks by due date, priority, and more.
Tip: To add a tasks widget to your home screen, touch
Apps , touch
WIDGETS
at the top, then touch and hold
the
Tasks
widget to drag it to your home screen.
Office network
To connect your office network with a Virtual Private
Network connection, see “Virtual Private Networks
(VPN)”.
Alarm & timer
Find it: Apps >
Clock
•Alarm: Touch the checkbox next to an alarm to set it.
Touch an alarm to edit it, or touch to add a new
alarm.
When an alarm sounds, touch
Dismiss
to turn it off or
Snooze
to delay for ten minutes.
• Settings: To change your alarm sound, snooze delay,
or other settings, touch .
•Timer: Touch
TIMER
at the top, touch
+
and
-
to set a
duration, then touch
Start
to start counting down.
Tip: Touch the timer numbers to open a keypad.
Tip: To set your date, time, time zone, and formats, touch
Apps >
Settings
>
Date & time
.
Work
Quick start: Work
Corporate sync
Quickoffice
Tasks
Office network
Alarm & timer
Calendar
2012.09.06
FCC
BackNext
Menu More
Work
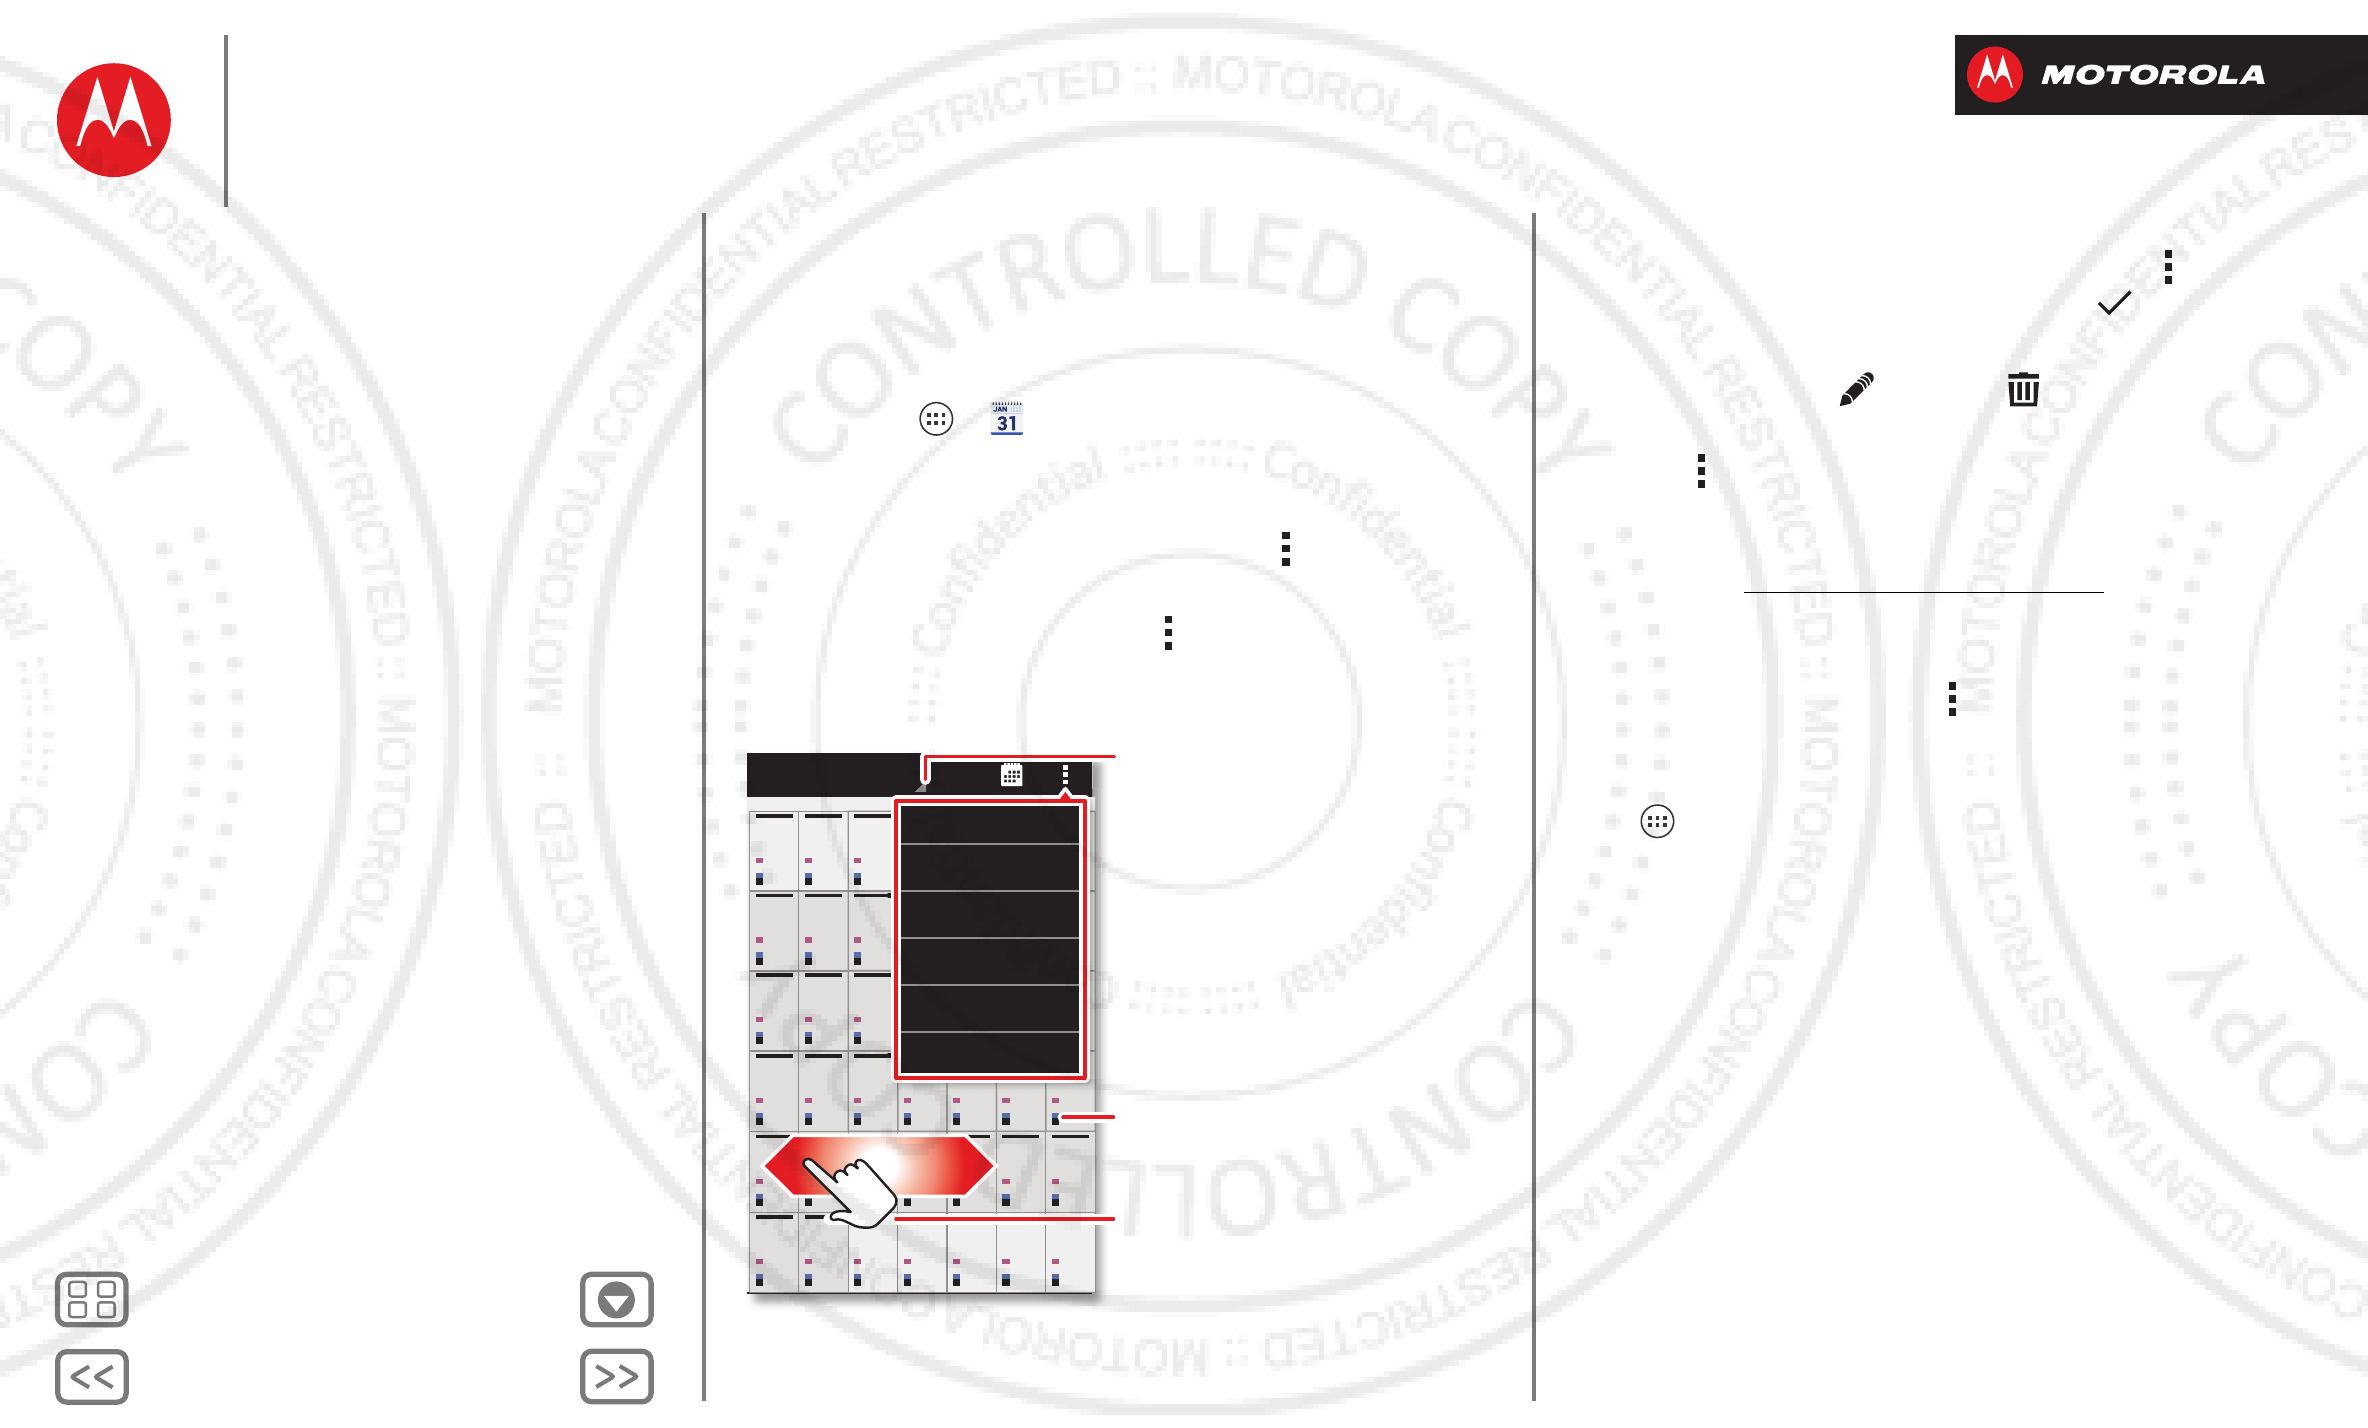
Calendar
Show events stored on your phone and in your online
calendars, all together in one place.
Find it: Apps >
Calendar
• Change the view: Touch the date at the top left to
choose
Day
,
Week
,
Month
, or
Agenda
.
To set your default view, touch Menu >
Settings
>
General settings
>
Default view
.
To go to a date, touch Menu >
Go to date
.
30 31 12345
23 24 25 26 27 28 29
16 17 18 19 20 21 22
910 11 12 13 14 15
2345678
25 26 27 28 29 30 1
Sun Mon Tue Wed Thu Fri Sat
December 2012
8
19 20 2
1
22
1
12
13
14
15
4
5
6
7
8
7
28
29
30
1
e
W
e
d
Thu
Fr
i
Sa
t
New event
Go to date
Refresh
Search
Calendars to display
Settings
Flick to see previous/next month.
Event colors indicate different
calendars.
View Options
•Add events: From any view, touch Menu >
New
event
, enter event details, then touch
SAVE
.
• Show, edit, or delete events: Touch an event to open
it, then touch edit or delete .
• Show, hide, or add calendars: Tou ch
Menu >
Calendars to display
to show or hide
calendars from your Google™ account. You can use a
computer to add or remove calendars on your Google
account at www.google.com/calendar.
Where are events stored and changed? Your phone
can store your events in your Google account or on
your phone: Touch Menu >
Settings
>
General
settings
>
Default calendar
.
Tip: Add a
Calendar
widget to your home screen. Touch
Apps >
WIDGETS
, then touch and hold the
Calendar
widget to add it to you home screen.
Work
Quick start: Work
Corporate sync
Quickoffice
Tasks
Office network
Alarm & timer
Calendar
2012.09.06
FCC
BackNext
Menu More
Connect & transfer
wired up or wireless
Quick start: Connect & transfer
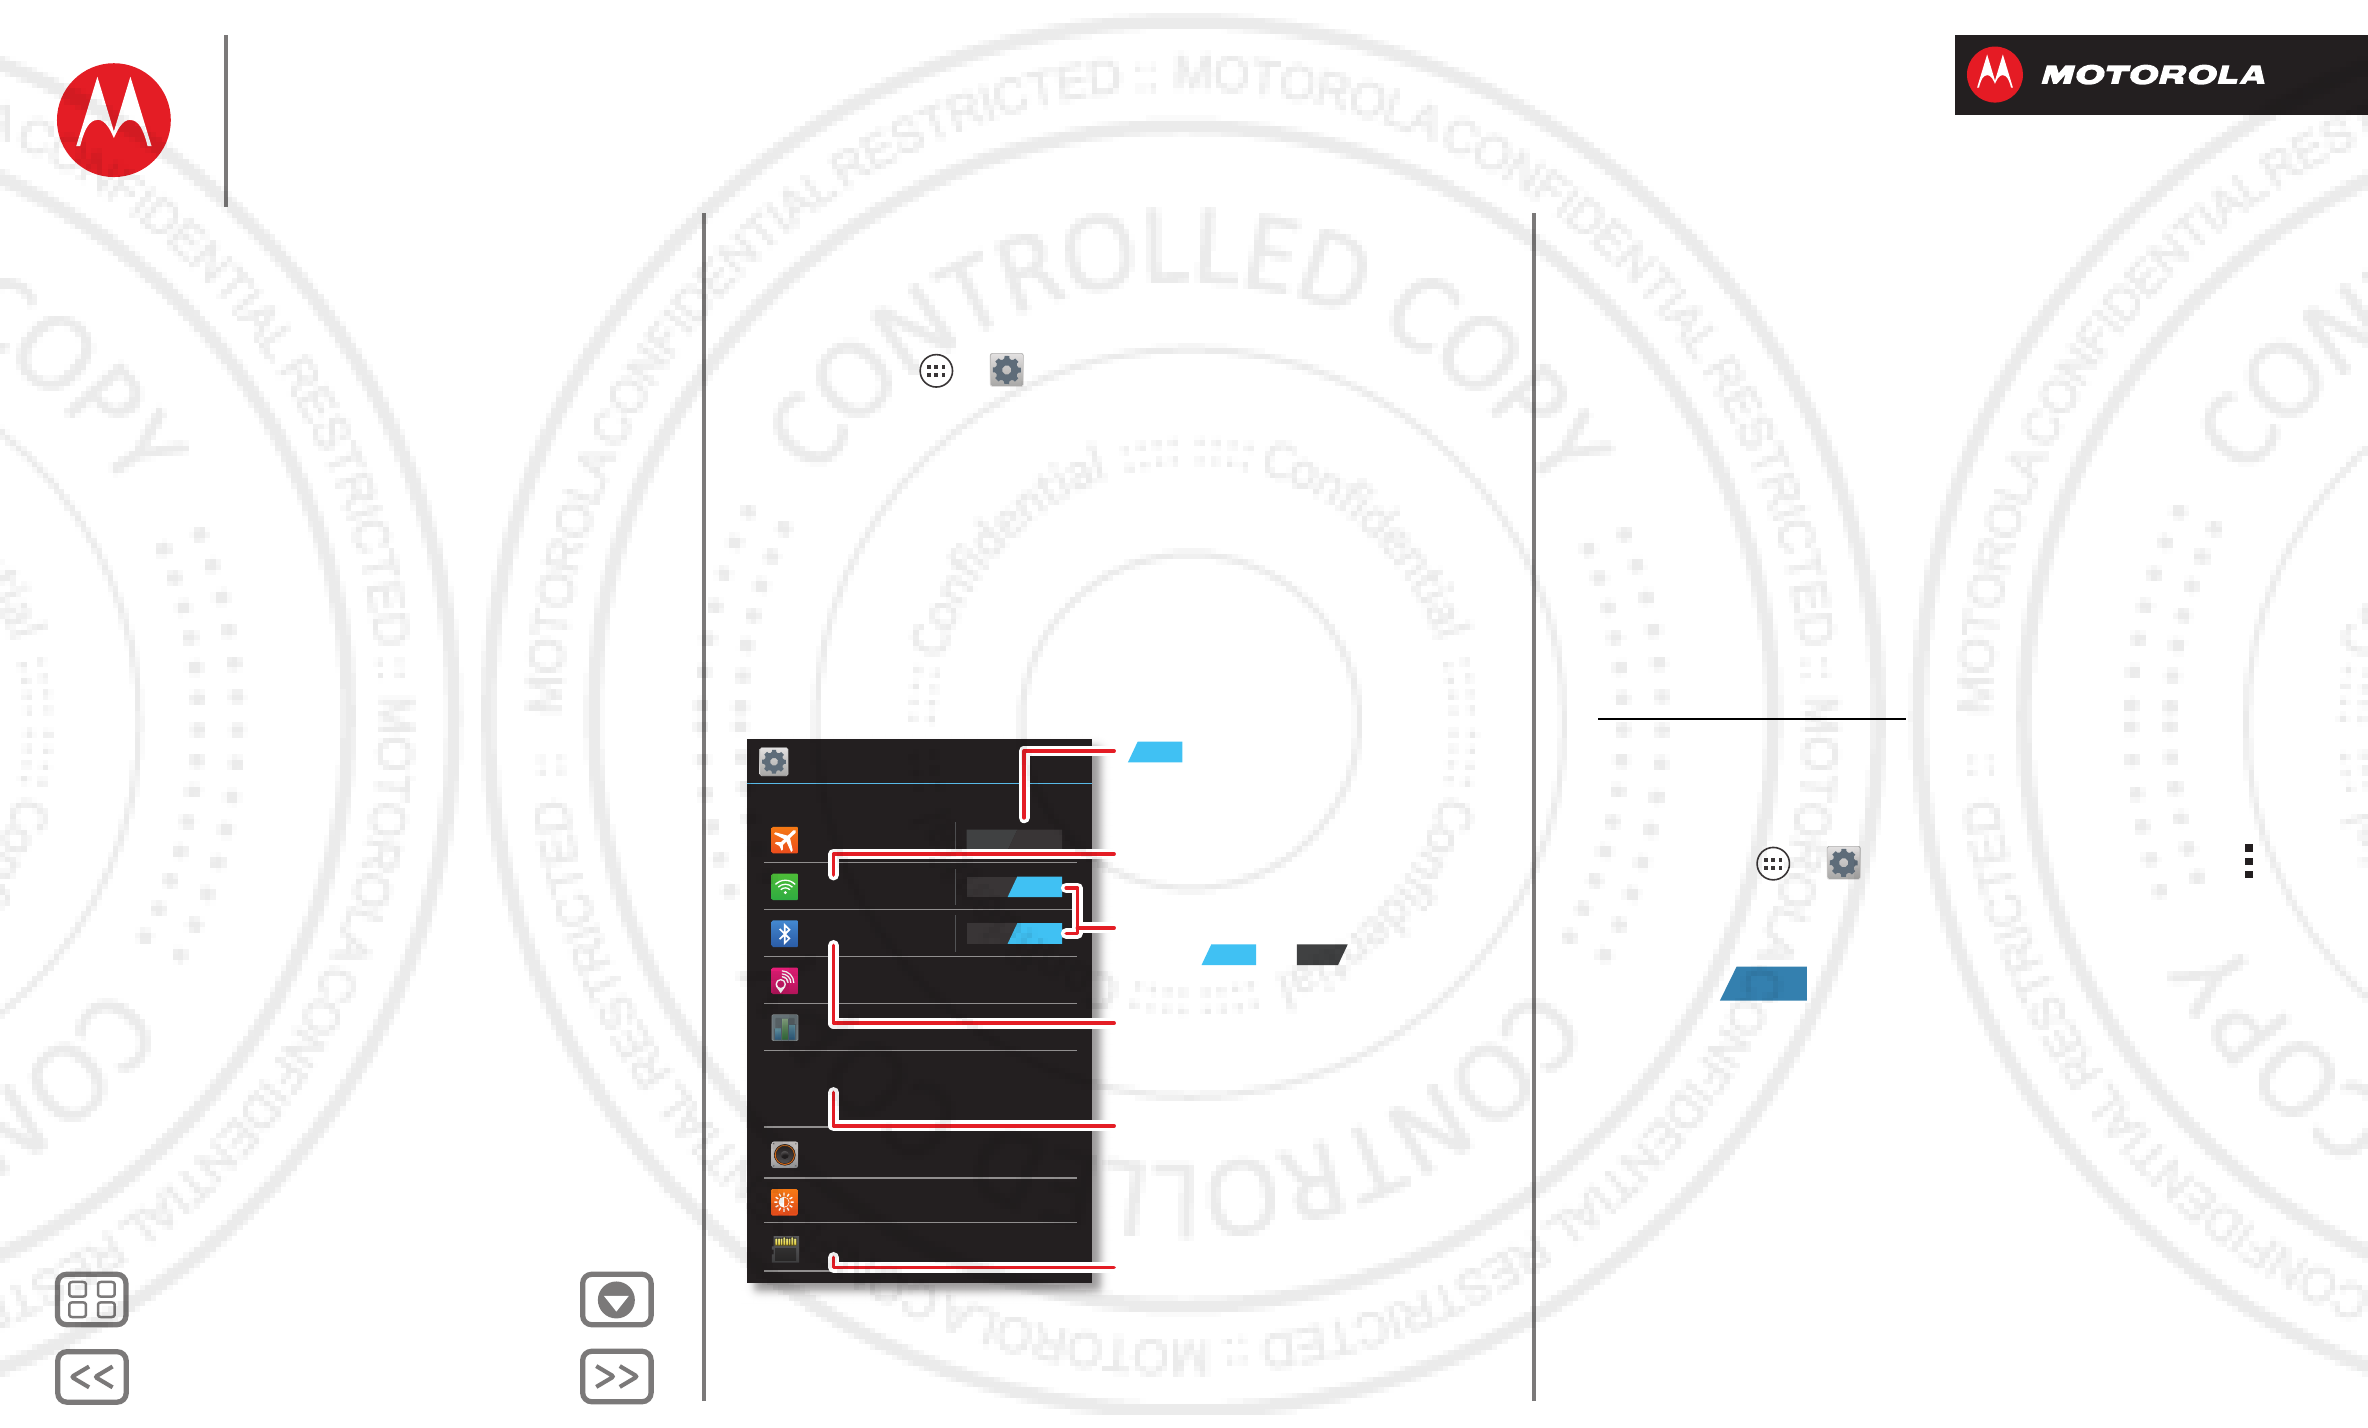
Connect accessories, computers, networks, and more.
Find it: Apps >
Settings
Wi-Fi
WIRELESS & NETWORKS
DEVICE
Bluetooth
Tethering & Mobile Hotspot
Data usage
More...
Sound
Display
Storage
ON
OFF
ON
Settings
Airplane mode
Change Wi-Fi settings.
disables all wireless
connections.
ON
Turn Wi-Fi or Bluetooth
power or .
Change Bluetooth settings.
Change connection & sharing
settings.
Move pictures, music, & other
media to an optional microSD
memory card.
ON OFF
Tips & tricks
• Bluetooth™ devices: To connect a Bluetooth
headset, keypad, or other device, touch
Bluetooth
.
• Wi-Fi networks: To connect, touch
Wi-Fi
.
•Wi-Fi hotspot: To make your phone a hotspot, touch
Tethering & Mobile Hotspot
, then check
Mobile Hotspot
.
You can change hotspot security.
• Google Drive™: Upload files to the web, so that you
can access them from the browser in
Microsoft™ Windows™ or Apple™ Macintosh™
computers, as well as other Android™ devices. Visit
http://drive.google.com.
• USB cable: Your phone’s micro USB port lets you
exchange media and other files with a connected
computer. To change the type of USB connection,
touch Apps >
Settings
>
Storage
>Menu
>
USB computer connection
.
• Automatic connections: When Bluetooth™ or Wi-Fi
power is , your phone automatically reconnects
to available devices or networks it has used before.
ON
Connect & transfer
Quick start: Connect & transfer
Bluetooth™ wireless
Wi-Fi Networks
USB cables
Memory card & file management
Share your data connection
Data use
NFC
Your cloud
Phone & tablet
DLNA™ media devices
MotoPrint remote printing
Virtual Private Networks (VPN)
Mobile network
Airplane mode
2012.09.06
FCC
BackNext
Menu More
Connect & transfer
Bluetooth™ wireless
Turn Bluetooth power on/off
Find it: Apps >
Settings
, then touch the
Bluetooth
switch to turn it
Tip: To extend battery life or stop connections, turn the
Bluetooth switch when you’re not using it.
Connect devices
The first time you connect a device, follow these steps:
1Make sure the device you are pairing with is in
discoverable mode (for details, refer to the guide that
came with the device).
2Touch Apps >
Settings
>
Bluetooth
.
3Make sure the switch at the top is , then touch
SEARCH FOR DEVICES
.
4Touch a found device to connect it (if necessary, touch
Pair
or enter a passkey like
0000
).
Tip: Touch next to a device to rename it.
When the device connects, the Bluetooth status
indicator turns blue .
To automatically disconnect or reconnect a device
anytime, just turn it off or on.
Note: Using a mobile device or accessory while driving
may cause distraction and may be illegal. Always obey
the laws and drive safely.
ON
OFF
ON
Manage devices
To manually reconnect your phone with a paired device,
touch the device name in the
AVAILABLE DEVICES
list.
To manually disconnect your phone from a paired device,
touch the device name in the devices list, then touch
OK
.
To remove a paired device, touch the next to the
device name in the
PAIRED DEVICES
list, then touch
Unpair
.
Touch Apps >
Settings
>
Bluetooth
, turn Bluetooth
power on, then touch Menu >
Rename phone
. Enter a
name and touch
OK
.
Let devices find your phone
To let a Bluetooth device discover your phone:
1Touch Apps >
Settings
>
Bluetooth
.
2Touch
Only visible to paired devices
to make your phone
visible to all devices for two minutes.
Transfer files
• Photos or videos: Open the photo or video, then
touch >
Bluetooth
.
•People: Touch Apps >
People
>Menu >
Share contacts
, check what you want to
share (you can choose
Unselect all
), then touch
OK
>
Bluetooth
.
Connect & transfer
Quick start: Connect & transfer
Bluetooth™ wireless
Wi-Fi Networks
USB cables
Memory card & file management
Share your data connection
Data use
NFC
Your cloud
Phone & tablet
DLNA™ media devices
MotoPrint remote printing
Virtual Private Networks (VPN)
Mobile network
Airplane mode
2012.09.06
FCC
BackNext
Menu More
Connect & transfer
Wi-Fi Networks
Turn Wi-Fi power on/off
Find it: Apps >
Settings
, then touch the
Wi-Fi
switch to turn it .
Note: To extend battery life, turn the Wi-Fi switch
when you’re not using it.
Connect to networks
To find networks in your range:
1Touch Apps >
Settings
>
Wi-Fi
.
Tip: To see your phone’s MAC address and Wi-Fi
settings, touch Menu >
Advanced
.
2Make sure the switch at the top is , then touch
SCAN
.
3Touch a found network to connect it (if necessary,
enter
Network SSID
,
Security
, and
Wireless password
,
and touch
Connect
).
When your phone connects, the Wi-Fi status
indicator appears in the status bar.
Note: If you see a question mark in the Wi-Fi status
indicator , pull down the status bar, touch the
network, and enter the network’s password.
Tip: When Wi-Fi power is on, your phone automatically
reconnects to available networks it has used before
ON
OFF
ON
Manage networks
To remove a network, touch it in the list, then touch
Forget
.
To manage your networks, touch Apps >
Settings
>
Wi-Fi
, turn Wi-Fi power on, then touch Menu
>
Manage Networks
.
Wi-Fi hotspot
Your can make your phone a Wi-Fi hotspot to provide
portable, convenient internet access to other Wi-Fi
enabled devices.
Note: Keep it secure. To protect your phone and hotspot
from unauthorized access, it is strongly recommended
that you set up hotspot
Security
(
WPA2
is the most
secure), including password.
Find it: Apps >
Settings
>
Tethering & Mobile
Hotspot
and check
Mobile Hotspot
.
1Your phone turns off
Wi-Fi
power and uses the mobile
network for Internet access. Touch
Mobile Hotspot
Settings
>
Configure Mobile Hotspot
to set up security:
• SSID—Enter a unique name for your hotspot.
•Security—Select the type of security you want:
Open
or
WPA2
. For
WPA2
, enter a unique password
that others will need to access your Wi-Fi hotspot.
Note:
WPA2
is recommended by IEEE.
Connect & transfer
Quick start: Connect & transfer
Bluetooth™ wireless
Wi-Fi Networks
USB cables
Memory card & file management
Share your data connection
Data use
NFC
Your cloud
Phone & tablet
DLNA™ media devices
MotoPrint remote printing
Virtual Private Networks (VPN)
Mobile network
Airplane mode
2012.09.06
FCC
BackNext
Menu More
Connect & transfer
• Channel—If you notice interference after your
hotspot has been active for a while, try different
channels.
2Touch
Save
when the settings are complete.
When
Mobile Hotspot
is active, other Wi-Fi enabled
devices can connect by entering your hotspot’s
SSID
,
selecting a
Security
type, and entering the correct
Wireless password
.
Wi-Fi modes
For those who like to get a bit more technical, your phone
supports the following Wi-Fi modes: 802.11a, b, g, n.
USB cables
Note: Copyright—do you have the right? Always follow
the rules. See “Content Copyright” in your legal and
safety information.
To load music, pictures, videos, documents, or other files
from your computer, connect your phone to your
computer with a USB cable. To change the type of USB
connection, touch Apps >
Settings
>
Storage
>Menu >
USB computer connection
.
•For Microsoft™ Windows™ XP, Windows Vista, and
Windows 7: On your computer, choose Start, then
select Windows Explorer from your list of programs. In
Windows Explorer, your phone will appear as a
connected drive (mass storage device) where you can
drag and drop files, or it will appear as an MTP or PTP
device that lets you use Windows Media Player to
transfer files. For more instructions or driver files, visit
www.motorola.com/myrazrm.
•For Apple™ Macintosh™: Use Android File Transfer,
available at www.android.com/filetransfer.
Memory card & file management
Your photos, videos, and other files are automatically
stored in your phone’s internal memory.
Optional microSD memory cards
can help store more files.
Tip: To move media from internal
memory to a microSD card, touch
Apps >
Settings
>
Storage
>
Manage internal storage
.
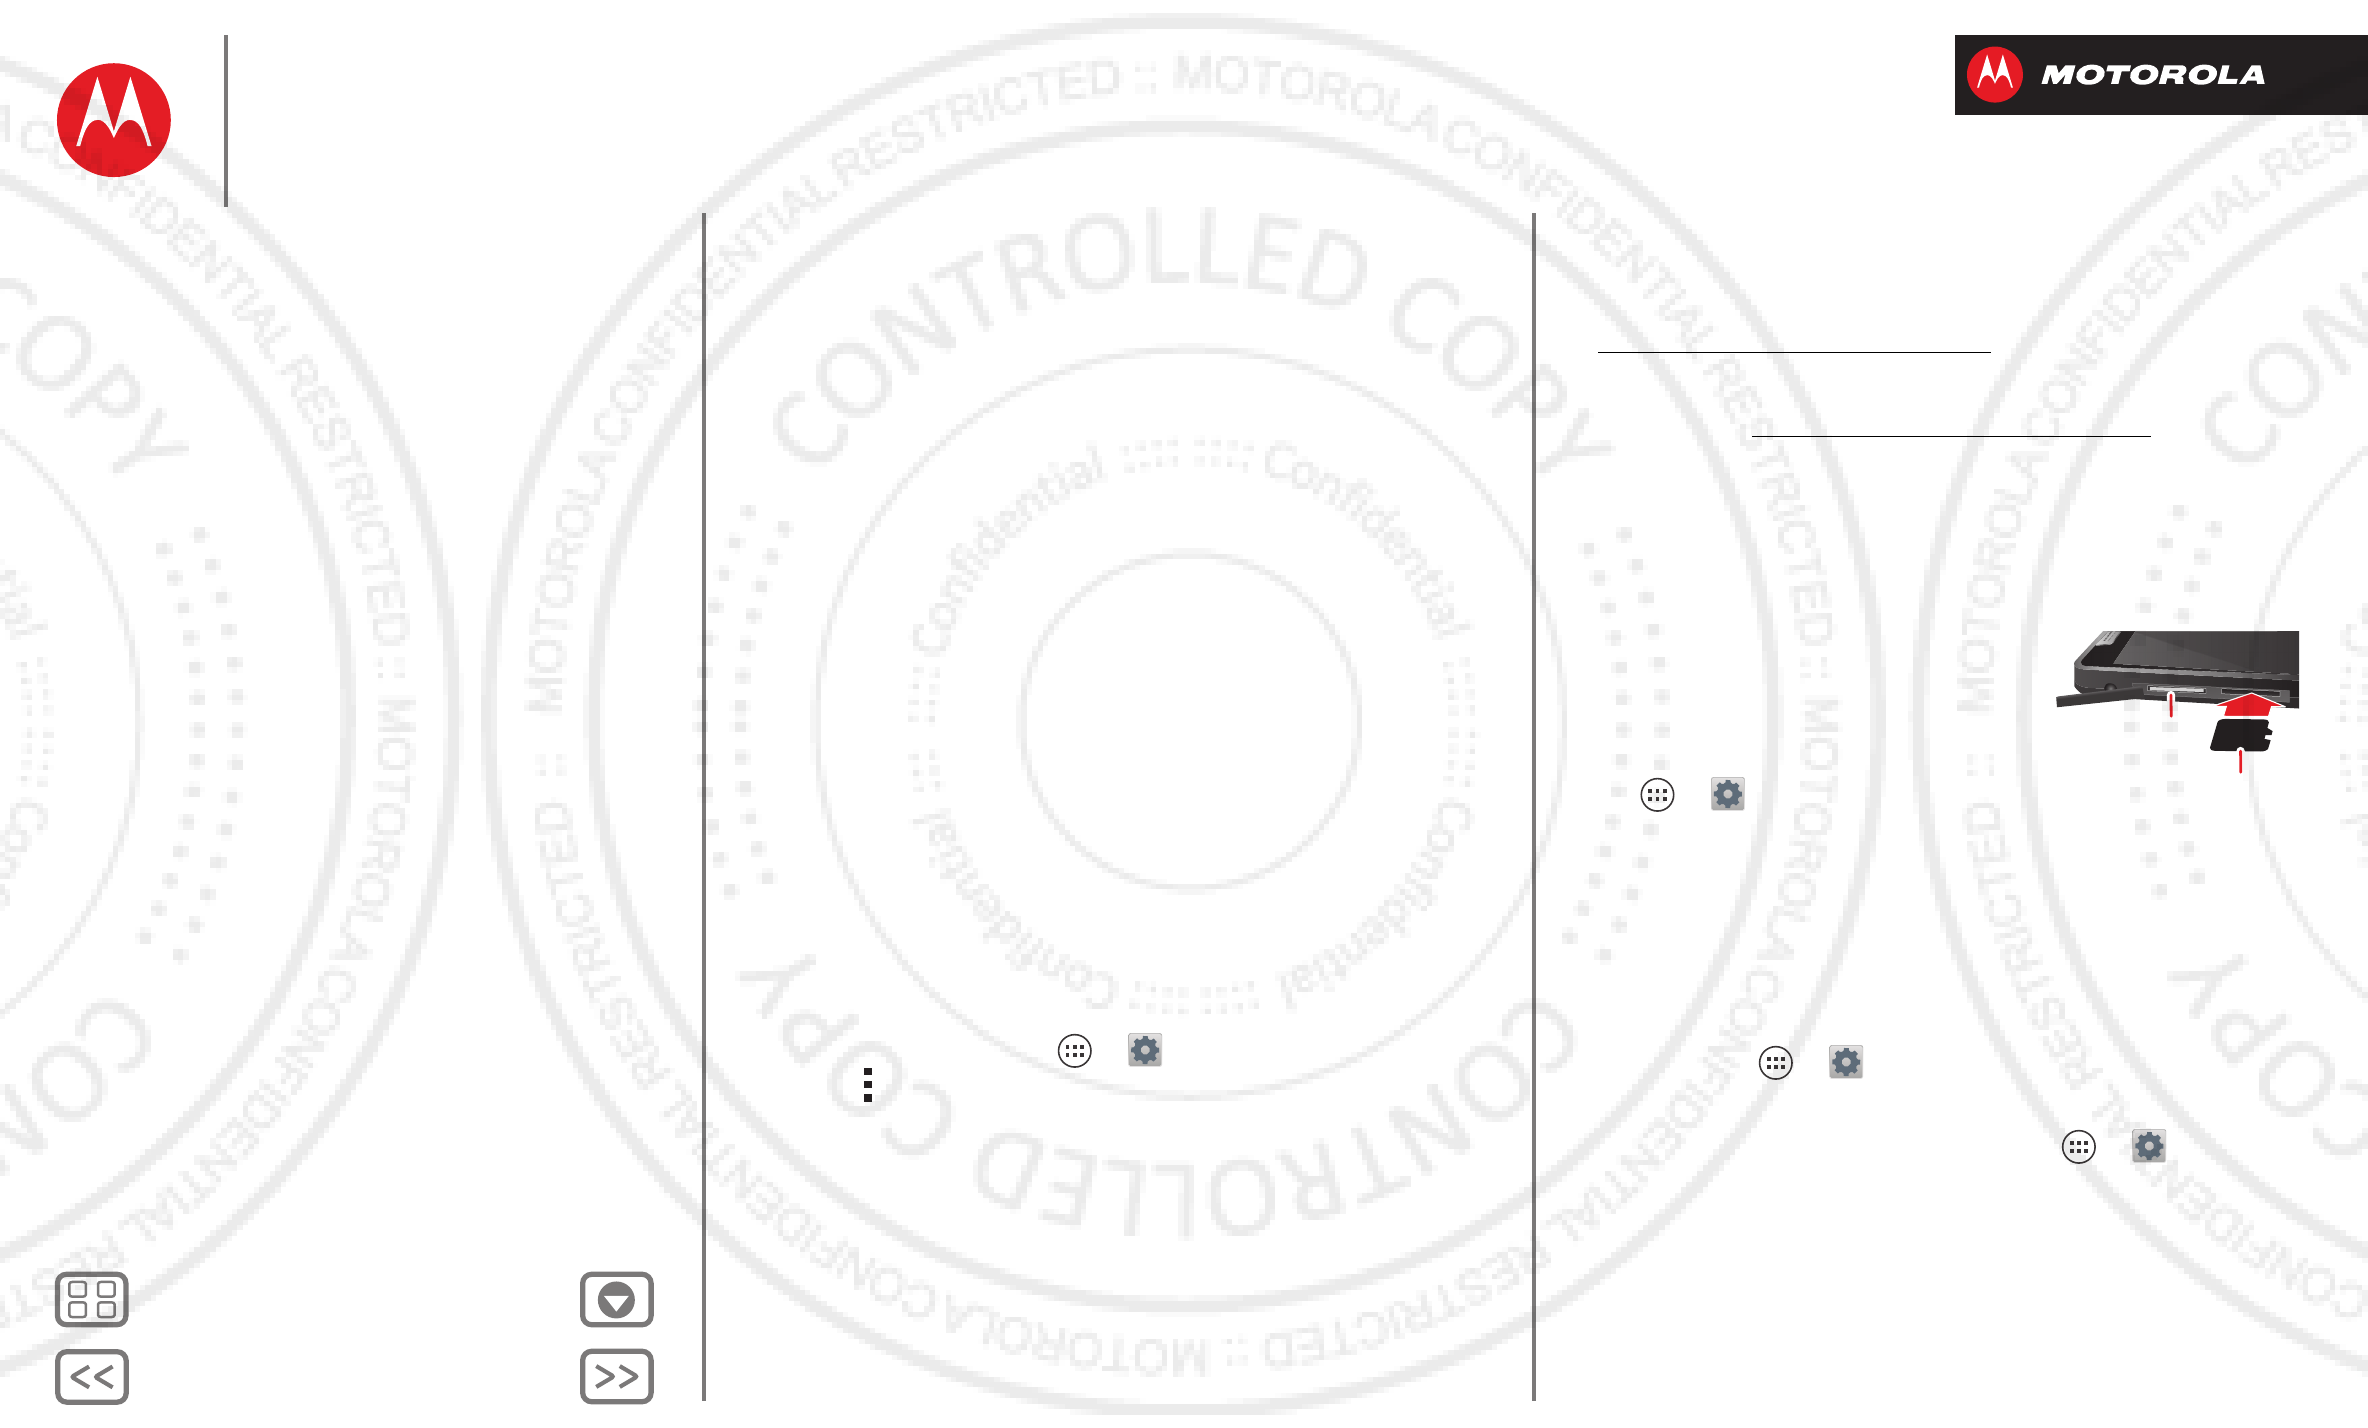
Remove or erase a memory card
Note: Do not remove a microSD memory card while your
phone is using it or writing files on it.
Before you remove a microSD card you need to unmount
it. Touch Apps >
Settings
>
Storage
>
Unmount SD card
.
To erase a microSD card, touch Apps >
Settings
>
Storage
>
Erase SD card
.
Warning: All data on the microSD card will be deleted.
microSD
micro SIM
Connect & transfer
Quick start: Connect & transfer
Bluetooth™ wireless
Wi-Fi Networks
USB cables
Memory card & file management
Share your data connection
Data use
NFC
Your cloud
Phone & tablet
DLNA™ media devices
MotoPrint remote printing
Virtual Private Networks (VPN)
Mobile network
Airplane mode
2012.09.06
FCC
BackNext
Menu More
Connect & transfer
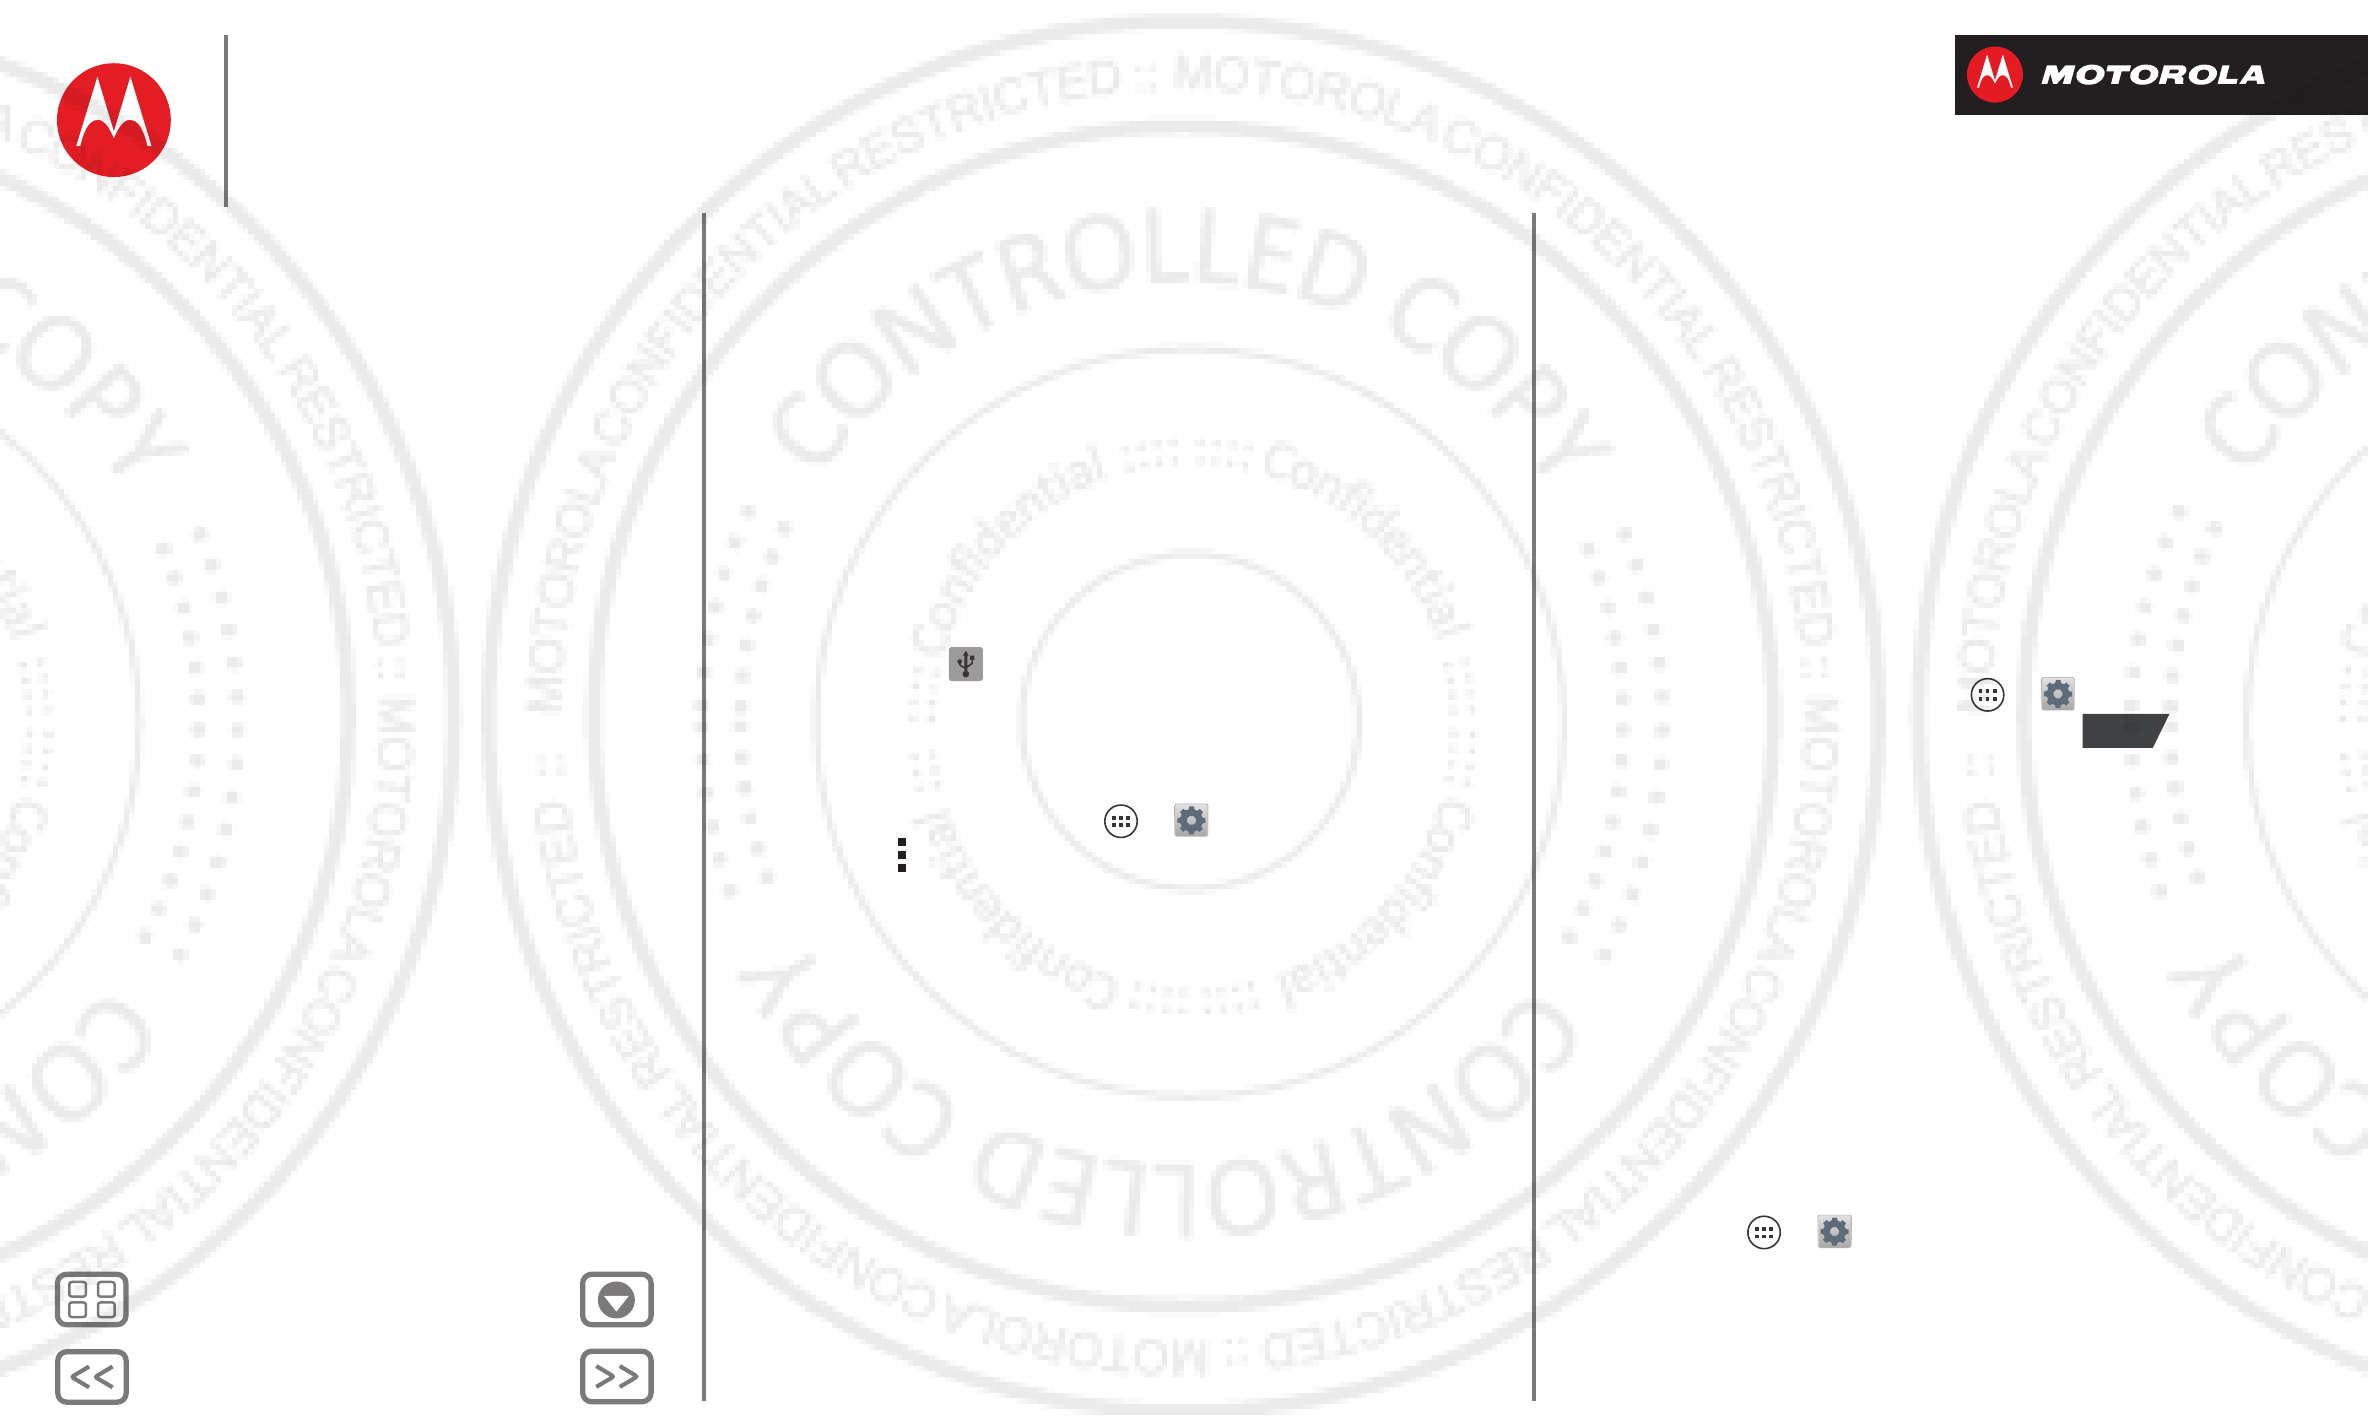
USB connection
You can connect your phone to a computer with a USB
cable.
Note: The first time you use a USB connection, your
computer may indicate that drivers are being installed.
Follow any prompts you see to complete the installation.
This may take a few minutes.
1With the home screen showing, connect a Motorola
micro USB data cable from your phone’s micro USB
port to a USB port on your computer. Your phone
should show in the status bar.
Note: Make sure to connect the phone to a high
power USB port. Typically, these are located directly on
your computer. To change the type of USB connection
if necessary, touch Apps >
Settings
>
Storage
>Menu >
USB computer connection
>
Mass Storage
,
Media device (MTP)
or
Camera (PTP)
.
2Your phone and microSD memory card appear as two
separate removable disks on your computer.
Drag and drop files between your computer and the
phone or microSD card folders. When you’re done,
use “Safely Remove Hardware” before disconnecting
the USB cable.
Note: You can’t use files on the microSD card while your
phone is connected to the computer.
Share your data connection
Your computer can access the internet through your
phone's mobile network—you just need a USB cable.
Tip: To share a Wi-Fi connection, see “Wi-Fi hotspot”.
1Connect your phone to your computer using a USB
cable.
Note: If your computer is running something older
than Microsoft™ Windows™ 7 or
Apple™ Macintosh™ OSX, it might require special
configuration.
2On your phone, touch Apps >
Settings
, then
make sure the
Wi-Fi
switch is set to .
3In
Settings
, touch
Tethering & Mobile Hotspot
, then
check
USB tethering
to start the connection.
To stop the connection, uncheck
USB tethering
, then
disconnect your phone from your computer.
Data use
You can track and set limits on your data usage.
Note: Usage information is provided to help you manage
your phone. This may not match the amounts charged by
your service provider, as they’re not measured in the
same way.
Find it: Apps >
Settings
>
Data usage
Your phone shows a data usage graph, followed by a list
of the apps that are running, from highest data usage
OFF
Connect & transfer
Quick start: Connect & transfer
Bluetooth™ wireless
Wi-Fi Networks
USB cables
Memory card & file management
Share your data connection
Data use
NFC
Your cloud
Phone & tablet
DLNA™ media devices
MotoPrint remote printing
Virtual Private Networks (VPN)
Mobile network
Airplane mode
2012.09.06
FCC
BackNext
Menu More
Connect & transfer
down to least. Touch an app to open its details. Apps that
use a lot of data might also use a lot of battery power.
The data usage screen shows information and settings
for data transferred over your service provider's mobile
network.
Tip: To track Wi-Fi and ethernet data usage in separate
tabs, touch Apps >
Settings
>
Data usage
>Menu >
Show Wi-Fi usage
or
Show Ethernet usage
.
Data usage
ON
Mobile data
Set mobile data limit
Apr 26
-
May 26
Data usage cycle
May 19
-
26: about 38.65MB used
Apr 26 May 26
Measured by your phone. Your carrier’s data
usage accounting may differ.
Browser 14.46MB
limit
4.0
GB
warning
1.5
GB
Set data restrictions, or show
Wi-Fi or Ethernet usage.
Activate a data limit.
Touch to show or restrict
background data.
Drag white bars to change dates.
Drag bars to change your warning
(orange) or limit (red).
Set a data usage warning
Touch Apps >
Settings
>
Data usage
, then drag the
right side of the orange bar up/down to set the data
warning level. You'll receive a notification when your data
usage reaches the specified level.
Set a data usage limit
Touch Apps >
Settings
>
Data usage
>
Set mobile
data limit
, then drag the right side of the red bar up/down
to set the data usage limit.
When you reach your data usage limit, mobile data is
turned off automatically and many of your phone’s
features won't work correctly. You'll receive a notification
when mobile data is turned off.
Restrict background data
Some apps transfer data in the background, when you're
not using them. You can restrict background data usage
for individual apps to help reduce your overall data usage.
Touch Apps >
Settings
>
Data usage
, and scroll
down to see which apps are transferring data over the
mobile network. Touch an app, then touch
Restrict
background data
.
You can also restrict background data for all apps across
all available networks (mobile, Wi-Fi, and/or Ethernet).
Find it: Menu >
System settings
>
Data usage
>Menu >
Restrict background data
Connect & transfer
Quick start: Connect & transfer
Bluetooth™ wireless
Wi-Fi Networks
USB cables
Memory card & file management
Share your data connection
Data use
NFC
Your cloud
Phone & tablet
DLNA™ media devices
MotoPrint remote printing
Virtual Private Networks (VPN)
Mobile network
Airplane mode
2012.09.06
FCC
BackNext
Menu More
Connect & transfer
Caution: Restricting all background data can cause some
features to stop working.
NFC
Near Field Communication
technology lets you instantly share
content (like web links, contacts,
and photos), information, and
more, by touching the back of your
phone to another NFC-enabled
device.
Activate NFC & Android Beam™
To activate NFC on your phone, touch Apps >
Settings
>
More
>
NFC
. Make sure the checkbox is
checked.
To activate Android Beam, touch Apps >
Settings
>
More
>
Android Beam
, then touch the power switch to
turn it .
Share with Android Beam
Use Android Beam to share content on your phone with
another NFC-enabled phone or tablet.
Note: The other device must support NFC too.
1Open the screen that contains what you want to
share—map page, browser page, photo, whatever.
2Touch the back of your phone to the back of the other
device.
NFC Antenna
ON
When the devices connect, you’ll see
Touch to Beam
on your phone.
3Touch your screen to share your content.
Receive with NFC
Receive web links, e-coupons, brochures, maps and
more from an NFC tag. Look for the NFC logo on posters,
signs, store displays and other areas. Just touch the back
of your phone to the logo to receive its tag information.
Bluetooth & Wi-Fi one-touch setup
Just touch your phone to an NFC-enabled Bluetooth
device or Wi-Fi access point to automatically pair or
connect with the device.
Mobile payment
You can use Google Wallet™ or another secure payment
app to pay for your purchase (where available).
Look for the NFC logo to confirm that you can make a
mobile payment. Touch the back your phone to the
payment device to pay for your purchase.
Security
Mobile payments, wireless connections, and content
sharing all demand security:
•Range: NFC only works over a short range (about
4 cm/1.5 inches), so it's unlikely you’ll connect by
mistake—if you did, you would still have to accept the
connection to send or receive information.
Connect & transfer
Quick start: Connect & transfer
Bluetooth™ wireless
Wi-Fi Networks
USB cables
Memory card & file management
Share your data connection
Data use
NFC
Your cloud
Phone & tablet
DLNA™ media devices
MotoPrint remote printing
Virtual Private Networks (VPN)
Mobile network
Airplane mode
2012.09.06
FCC
BackNext
Menu More
Connect & transfer
• Encryption: Your phone uses the latest security,
encryption, and authentication features to protect your
personal information for mobile payments and content
sharing.
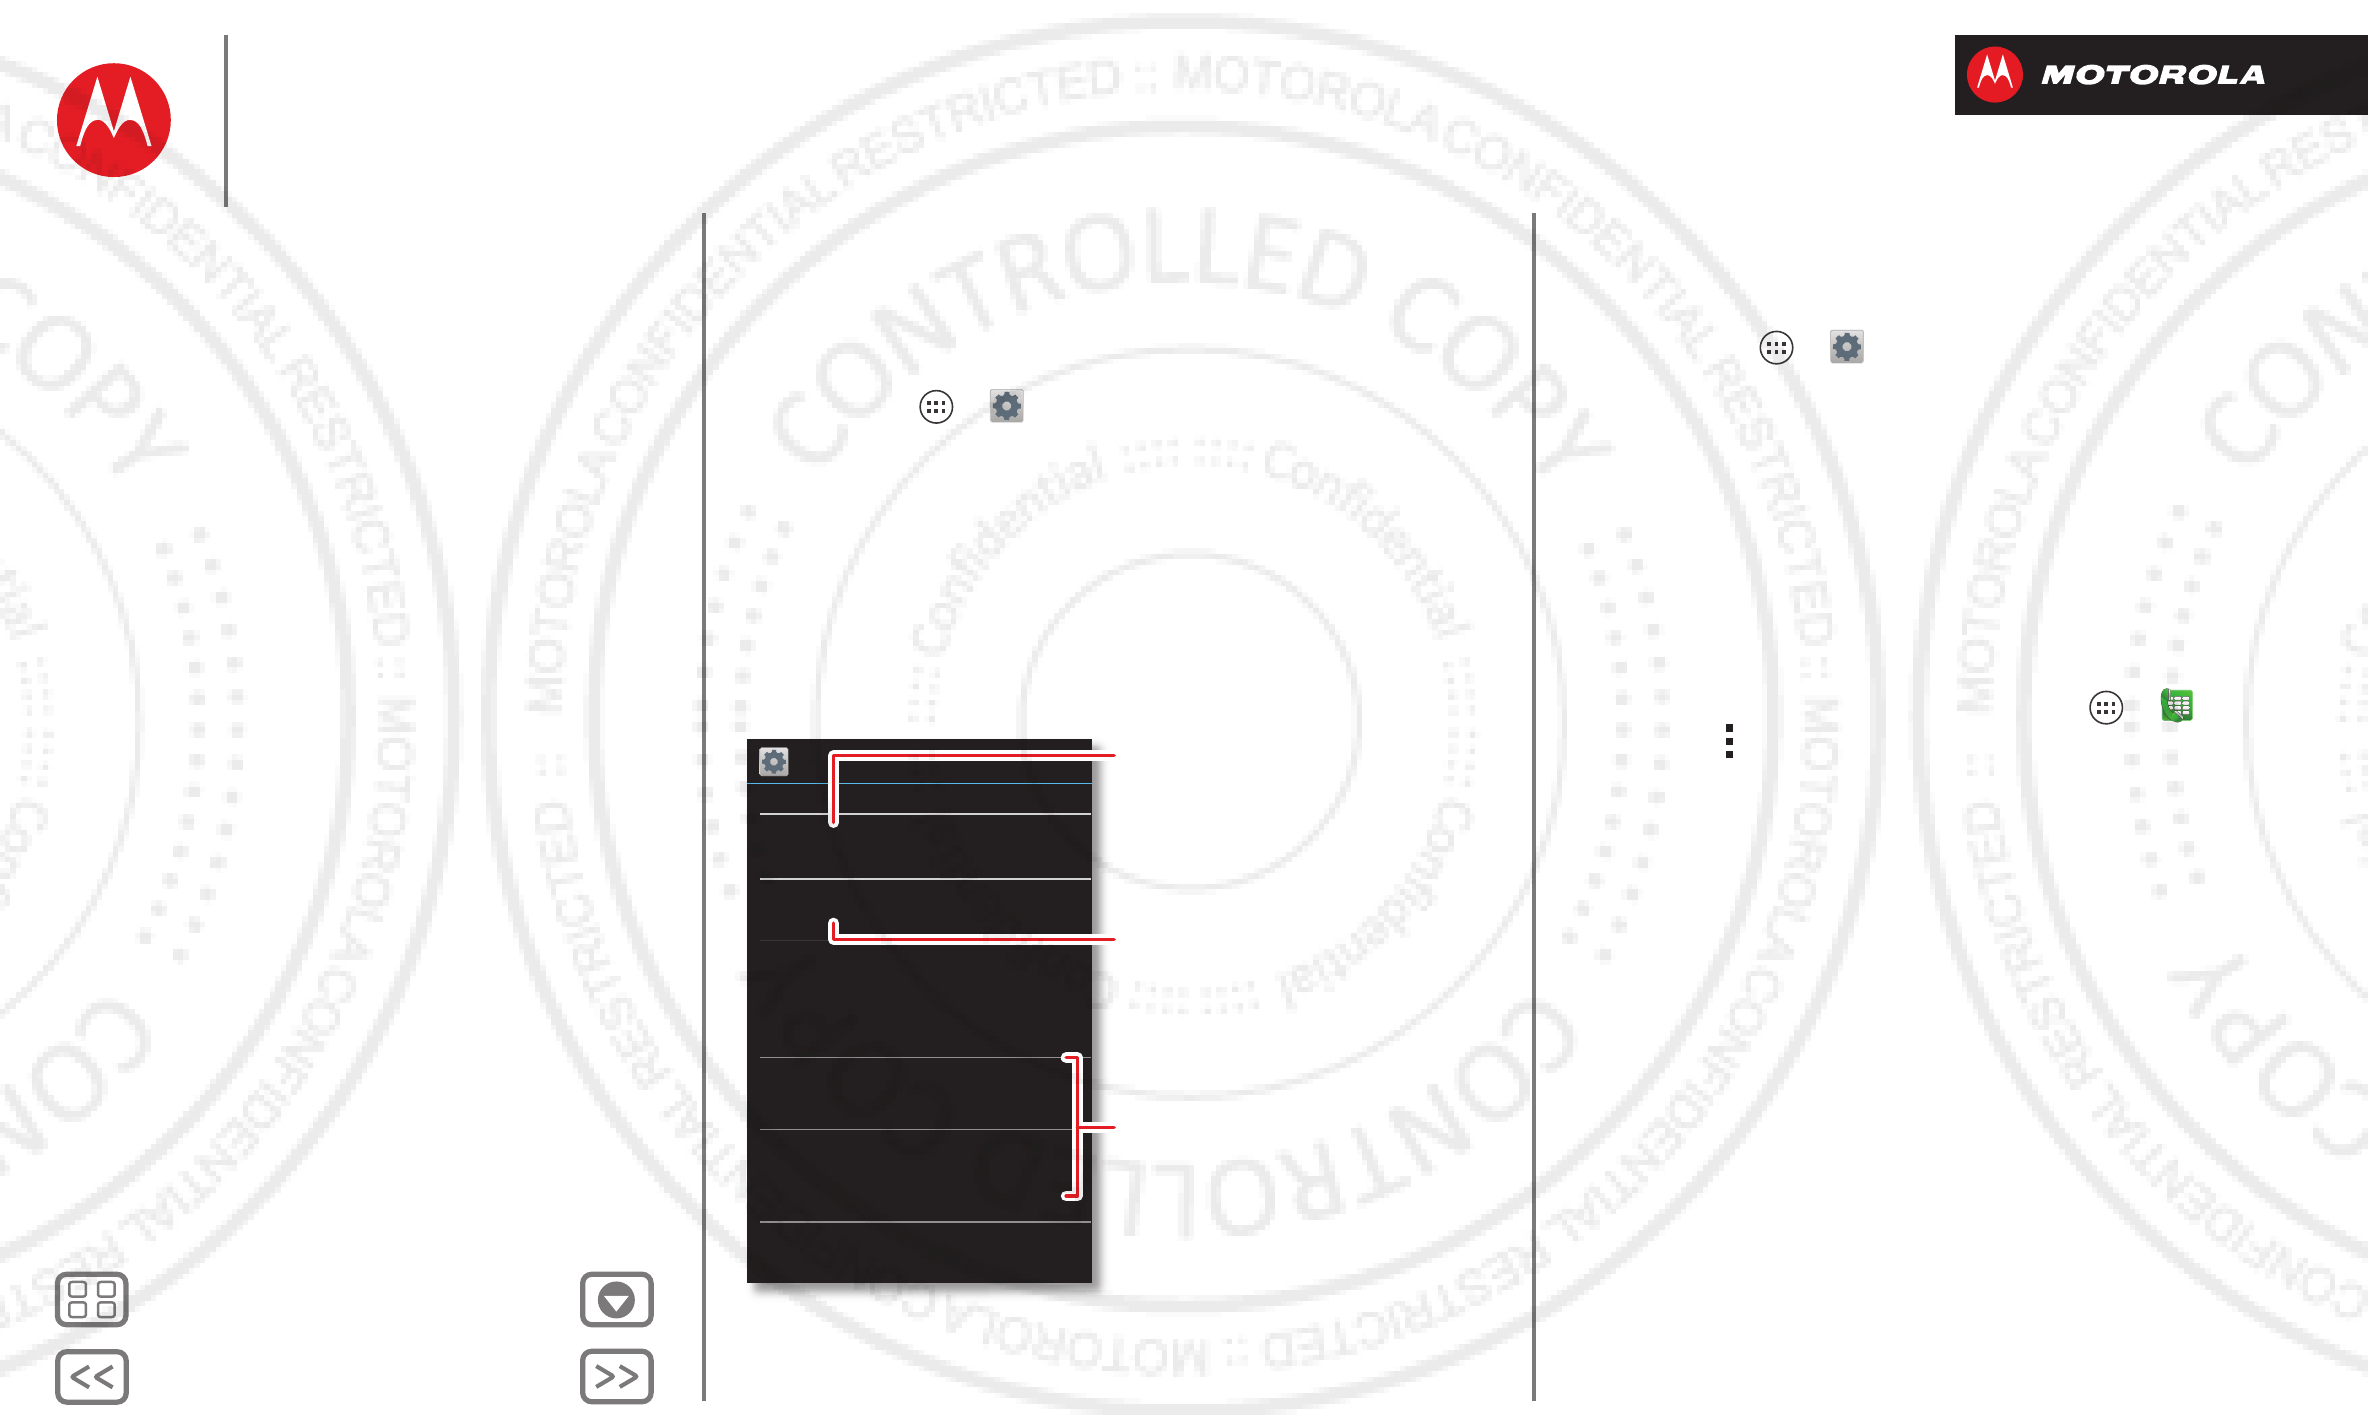
Your cloud
One account with access to everything,
everywhere—phone, tablet, computer.
Sync your Google™ account
When you log in to the same Google account, all devices
can get to all the same apps, movies, books, and music
from “Google Play™”—plus you share the same Google
Drive™, Gmail™, Google Calendar™, and other Google
services. To add accounts to your phone, touch
Apps >
Settings
>
Accounts & sync
.
Google Drive™
Google Drive is everywhere you are—on the web, in your
home, at the office, and on the go. Your files are
protected in your Google account.
Find it: Apps >
Drive
• Upload: Touch Menu >
New...
>
Upload
to choose a
song, file, picture, or other file to upload.
• Download or share: Tou ch
All items
, then touch
next to a file to share it, make it available offline, and
more. Touch
Offline
to show your downloaded
documents.
•Documents: To u ch
My Drive
to open and edit your
Google Drive (see “Quick start: Work”).
• Update the file list: Touch Menu >
Refresh
to
update the list of files from your computer.
• From any browser: Go to http://drive.google.com and
log into your account to see your files.
Phone & tablet
Your Android™ phone and tablet can work together to
help you get the most out of both:
your@gmail.com
On your computer, go to:
http://drive.google.com
My Drive
Shared with me
Starred
Recent
Offline
Create a document, or change
encryption and other settings.
Search all files on your drive.
Connect & transfer
Quick start: Connect & transfer
Bluetooth™ wireless
Wi-Fi Networks
USB cables
Memory card & file management
Share your data connection
Data use
NFC
Your cloud
Phone & tablet
DLNA™ media devices
MotoPrint remote printing
Virtual Private Networks (VPN)
Mobile network
Airplane mode
2012.09.06
FCC
BackNext
Menu More
Connect & transfer
• Your cloud: Access to all your stuff on both devices.
See “Your cloud”.
• Transfer media and files: Upload files to your “Google
Drive™” from any Android device on your Google
account, or you can copy files to your phone’s memory
card and transfer it to other devices with “Memory card
& file management”.
• Phone hotspot: If you have a Wi-Fi tablet, turn your
phone into a Wi-Fi hotspot to let your tablet access the
Internet anywhere—see “Wi-Fi hotspot”,
• Bluetooth accessories: If you have a Bluetooth
keyboard or other accessories to use with your tablet,
remember you can use them with your phone too. To
connect them, see “Bluetooth™ wireless”,
DLNA™ media devices
Use DLNA Certified computers,
TVs, and other devices to show
the videos and pictures stored on
your phone.
1Make sure your phone is connected to a Wi-Fi network
that has another DLNA Certified device.
2Touch Apps >
Gallery
, then open the picture or
video you want to show.
3Touch at the top of the screen.
Your phone searches for DLNA devices on your
network.
4Choose a device to connect.
To turn on media share so other DLNA Certified devices
on your Wi-Fi network can view the videos and pictures
stored on your phone, touch Apps >
Settings
>
More
>
Media share settings
>
Media share
.
For more about DLNA devices, visit www.dlna.org.
MotoPrint remote printing
Print email, documents, pictures, and contacts directly to
shared printers on a Wi-Fi network—no printer drivers
necessary. MOTOPRINT automatically discovers
networked printers for you.
Open the document or file you want to print in
Email
,
Quickoffice
, or
Gallery
, then touch Menu >
Print
>
Print with MotoPrint
. To find a new printer, touch
Find
printers
(home) or select an advanced search option
(work).
To show, rename, or remove your printers, touch
Apps >
Settings
>
Printer settings
>
My printers
.
Touch and hold a printer for options.
Virtual Private Networks (VPN)
A VPN lets you access files on a secured network (like an
office network with a firewall). Contact the network
administrator to ask for VPN settings, and any additional
apps or other requirements.
Connect & transfer
Quick start: Connect & transfer
Bluetooth™ wireless
Wi-Fi Networks
USB cables
Memory card & file management
Share your data connection
Data use
NFC
Your cloud
Phone & tablet
DLNA™ media devices
MotoPrint remote printing
Virtual Private Networks (VPN)
Mobile network
Airplane mode
2012.09.06
FCC

BackNext
Menu More
Connect & transfer
To enter VPN settings, touch Apps >
Settings
>
More...
>
VPN
. Choose the type of VPN and enter
settings from the network administrator. The network is
stored in the
VPN
list so that you can select it whenever
you need to connect.
Mobile network
You should not need to change any network settings.
Contact your service provider for help.
Touch Apps >
Settings
>
More...
>
Mobile networks
to see network settings options.
Airplane mode
Use airplane mode to turn all your wireless connections
off—useful when flying. Press and hold the Power key
>
Airplane mode
.
Note: When you select airplane mode, all wireless
services are disabled. You can then turn Wi-Fi and/or
Bluetooth power back on, if permitted by your airline.
Other wireless voice and data services (such as calls and
text messages) remain off in airplane mode. Emergency
calls to your region's emergency number can still be
made.
Connect & transfer
Quick start: Connect & transfer
Bluetooth™ wireless
Wi-Fi Networks
USB cables
Memory card & file management
Share your data connection
Data use
NFC
Your cloud
Phone & tablet
DLNA™ media devices
MotoPrint remote printing
Virtual Private Networks (VPN)
Mobile network
Airplane mode
2012.09.06
FCC
BackNext
Menu More
Protect
help keep it safe
Quick start: Protect
Make sure your information is protected, in case your
phone is lost or stolen.
Find it: Apps >
Settings
>
Security & Screen Lock
The easiest way to protect your phone is to use
Screen
lock
. You can choose facial recognition, a pattern, or a PIN
to unlock your phone.
Security & Screen Lock
SCREEN SECURITY
ENCRYPTION
Screen lock
Owner info
Default
Encrypt phone
Require a numeric PIN or password to decrypt
your phone each time you power it on
Encrypt SD card
Protect the data on your memory card
Allow Bluetooth bypass
Allow Voice Commands to be launched
via Bluetooth Multi-function button
while device is locked
SIM CARD LOCK
Set up SIM card lock
Change your screen lock to use a
slide, facial recognition, a pattern,
PIN, password, or no lock.
Your info can show on the lock
screen.
Encrypt the data stored on your
phone or memory card.
Tips & tricks
• Face unlock: Unlock your phone by looking at it!
Touch Apps >
Settings
>
Security & Screen Lock
>
Screen lock
>
Face Unlock
and follow the prompts.
• Forgotten pattern: If you enter the wrong unlock
Pattern
five times, your device shows a
Forgot pattern?
option that lets you enter your Google™ account email
and password to unlock your device.
• Forgotten password: You will need to reset your
phone (see “Reset”).
• Restrict dialing: To restrict your phone so that it can
only dial a few numbers, touch Apps >
Phone
>Menu >
Settings
>
Fixed dialing numbers
.
Protect
Quick start: Protect
Screen lock
SIM lock
Encrypt your phone
Backup & restore
Reset
2012.09.06
FCC

BackNext
Menu More
Protect
Screen lock
To keep your phone secure, you can make the
touchscreen lock when it goes to sleep.
Find it: Apps >
Settings
>
Security & Screen Lock
>
Screen lock
, then select the lock type:
•
None
: Turn off the screen lock.
•
Slide
: Flick to the right to unlock.
•
Face Unlock
: Look at your phone to unlock it.
Follow the prompts to capture your face and enter a
PIN or password (for backup or to change the lock
setting). When the screen is dark, press the
Power key, then frame your face in the square at the
bottom to unlock.
Note: This feature is less secure than a pattern, PIN, or
password.
•
Pattern
: Draw a pattern to unlock.
•
PIN
: Enter four to sixteen digits to unlock.
•
Password
: Enter four to sixteen letters, digits, or
symbols to unlock.
To change when your touchscreen goes to sleep, see
“Power key”.
Note: You can make emergency calls on a locked phone
(see “Emergency calls”). A locked phone still rings, but
you need to unlock it to answer.
Can’t unlock?
Face unlock: If your phone doesn’t recognize your face,
you’ll be prompted to enter your backup pattern or PIN
code to unlock it.
Pattern, PIN, or password: If you forget your pattern,
PIN, or password, your device shows an option that lets
you enter your Google™ account email and password to
unlock your device.
SIM lock
Caution: If you enter an incorrect PIN code three times,
your phone locks your SIM card and asks for your PIN
unlock code. Contact your service provider for your PIN
unlock code.
To set a SIM card PIN that you must enter when you turn
on your phone:
Find it: Apps >
Settings
>
Security & Screen Lock
>
Set up SIM card lock
>
Lock SIM card
To set your SIM PIN, enter a 4-digit code. To change your
code, choose
Change SIM PIN
.
Encrypt your phone
Caution: If you forget your encryption code, you cannot
recover the data stored on your phone or memory card.
Encrypting your files can take an hour or more. Leave
your phone plugged in, and be careful not to interrupt the
process.
Protect
Quick start: Protect
Screen lock
SIM lock
Encrypt your phone
Backup & restore
Reset
2012.09.06
FCC

BackNext
Menu More
Protect
Encryption protects the accounts, settings, apps, and
files on your phone, so that people cannot access them if
your phone is stolen.
To encrypt your phone and require a PIN or password
whenever you turn on your phone:
Find it: Apps >
Settings
>
Security & Screen Lock
>
Encrypt phone
Backup & restore
Your Google™ account data is backed up online. So, if
you reset or replace your phone, just log into your Google
account to restore the contacts, events, and other details
you synced with the account. To choose what syncs with
the account, touch Apps >
Settings
>
Accounts &
sync
, touch your Google™ account, and check things to
sync. Please note that text messages, call logs, and
items stored on your phone will not be restored. To
restore your apps from Google Play™, see “Take Care of
your apps”.
Reset
To reset your phone to factory settings and erase all the
data on your phone, touch Apps >
Settings
>
Privacy
>
Factory Data Reset
>
Reset Phone
.
Warning: All downloaded apps and user data on your
phone will be deleted. Data on your memory card will not
be deleted.
Protect
Quick start: Protect
Screen lock
SIM lock
Encrypt your phone
Backup & restore
Reset
2012.09.06
FCC