Motorola Mobility T6FL1 PCS GSM Transceiver PCMCIA Card User Manual M2501 Electra E M2501 00 0Hyo2 E
Motorola Mobility LLC PCS GSM Transceiver PCMCIA Card M2501 Electra E M2501 00 0Hyo2 E
Contents
- 1. Exhibit 8 Users Manual 1
- 2. Exhibit 8 Users Manual 2
Exhibit 8 Users Manual 1
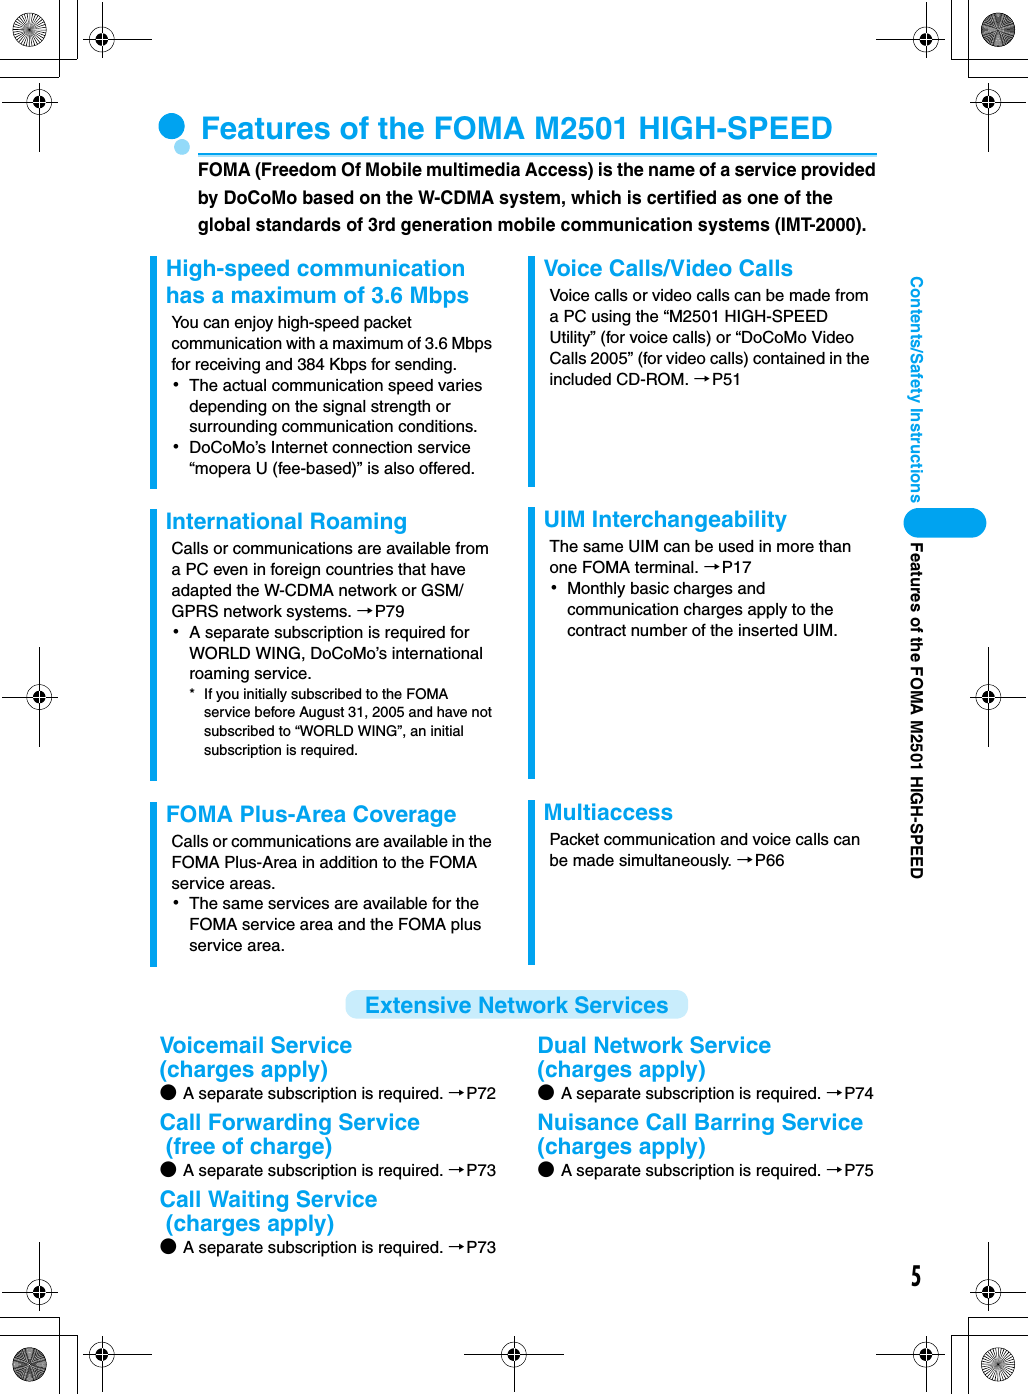
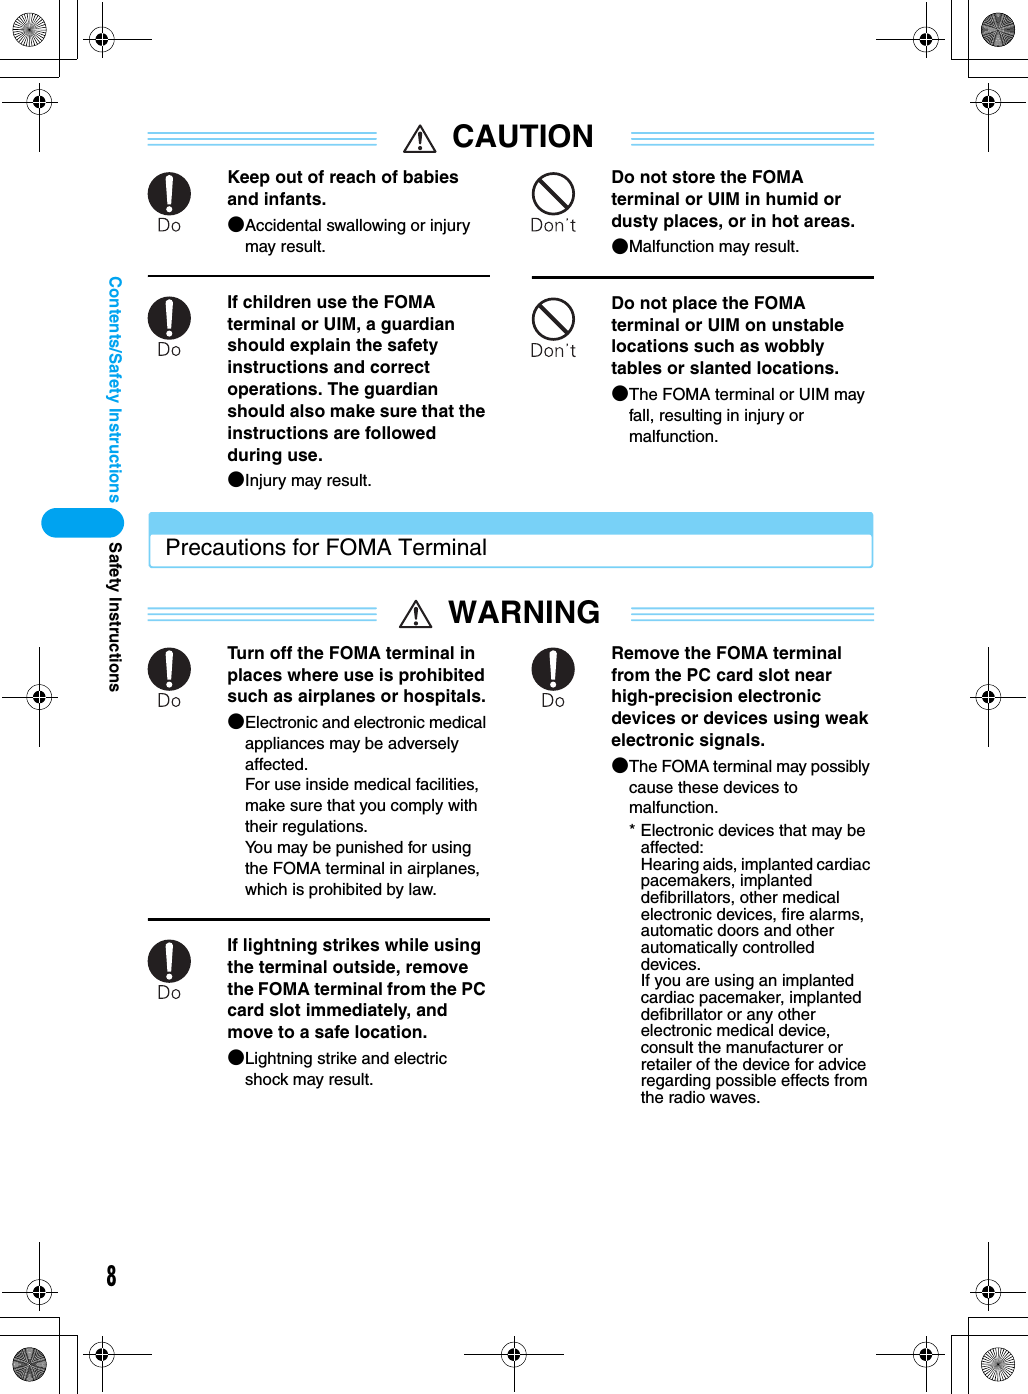
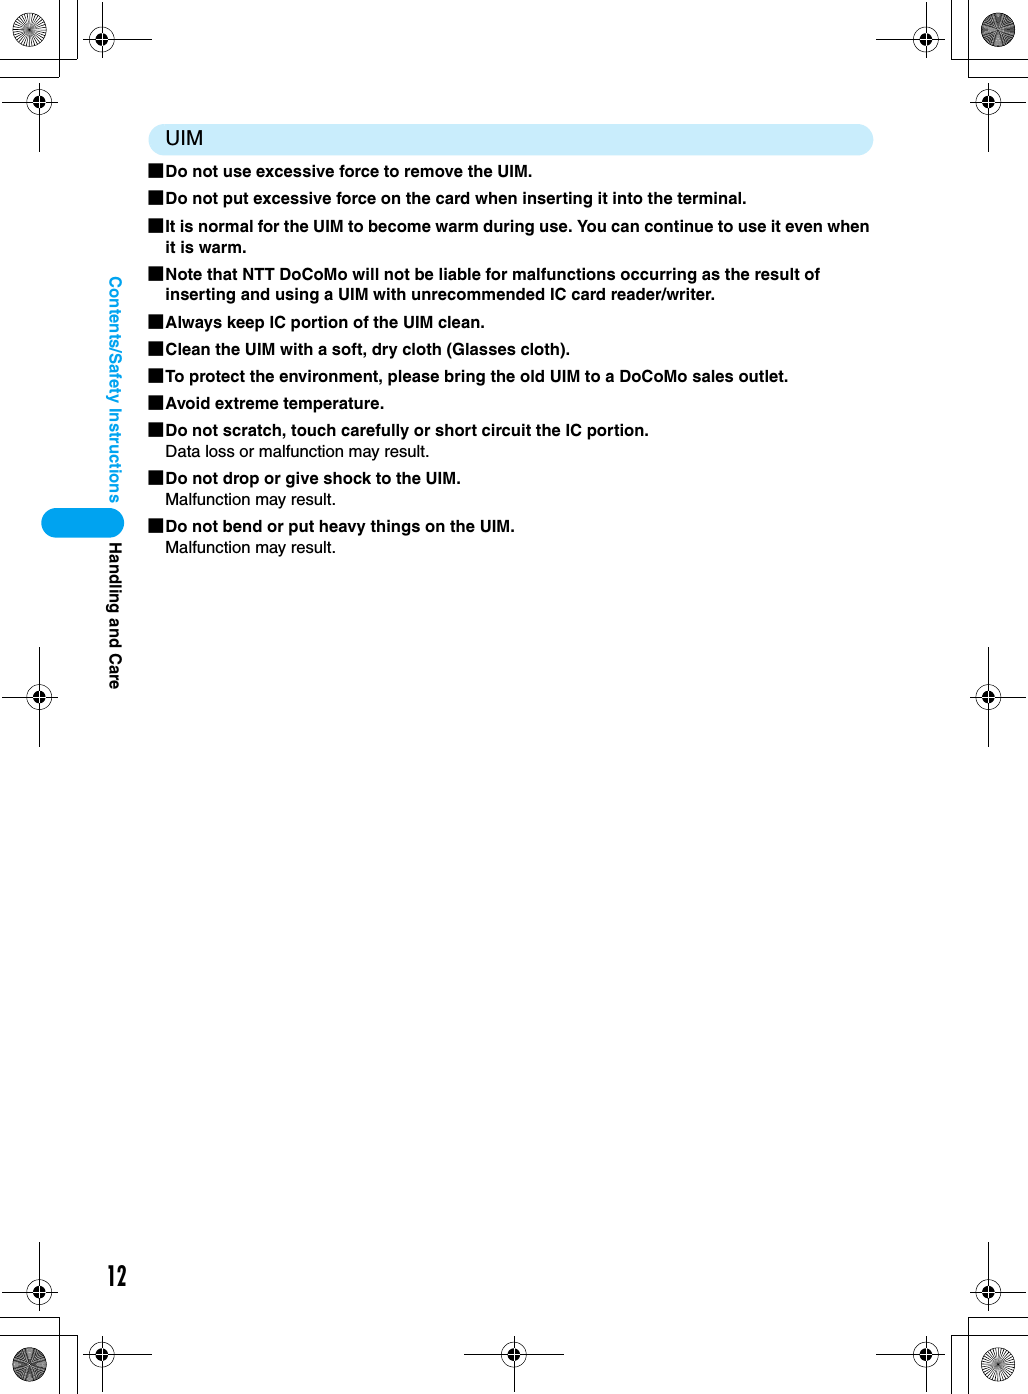
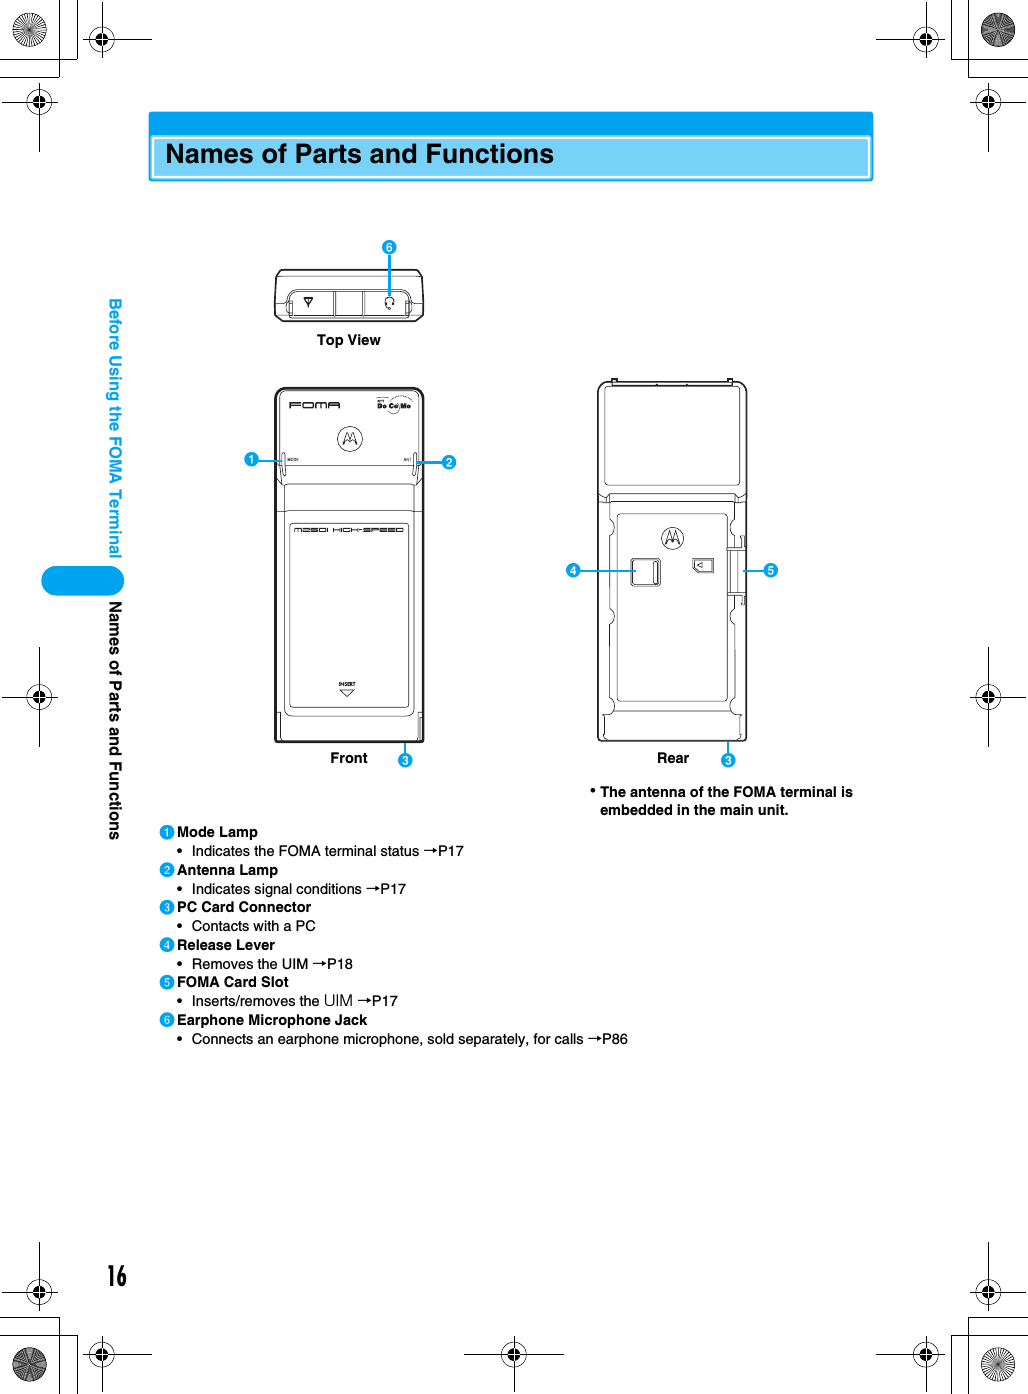
![355erawtfoS ytilitULaunching/ExitingLaunching/Exiting the FOMA M2501 HIGH-SPEED UtilityLaunching• Log into a user account with the Administrator or PC supervisor privileges.aDouble click the “M2501 HIGH-SPEED Utility” icon on the DesktopThe Main screen (P54) opens.■If the icon is not displayedClick “スタート (Start)” y “すべてのプログラム (All Programs)” / “プログラム (Programs)” y“M2501 HIGH-SPEED” y “M2501 HIGH-SPEED Utility”ExitingaClick (Orange) on the Main screen (P54)The exiting confirmation screen appears.bClick [OK]• You cannot exit the utility under the following circumstances : (checking the specifications)- While dialing or receiving/performing a call- While the Redial/Received Calls/Phonebook screen is openPhonebookUsing PhonebookAddingSaving Entries in PhonebookaClick (電話帳 (Phonebook)) on the Main screen (P54)bClick [追加 (Add)]cPerform the following stepsNameEnter using Kanji, Hiragana, Katakana, alphanumeric or symbols.yEnter a name• Enter characters using the keyboard of the PC.• Up to 16 double-byte or 32 single-byte characters can be entered.• An entry cannot be saved to the Phonebook until this field is filled in.ReadingEnter using double-byte katakana, single-byte alphanumeric, or single-byte symbols.yEnter a reading• Enter characters using the keyboard of the PC.• A reading is entered automatically when “名前 (Name)” is entered.• Up to 16 double-byte or 32 single-byte characters can be entered.Phone numberEnter using single-byte alphanumeric characters.yEnter a phone number• Enter characters using the keyboard of the PC.• Up to 26 characters from 0 to 9 (including #, *, and +) and up to five - (hyphens) can be entered.dClick [登録 (Add)]• To save Phonebook to the PC after adding a contact, click [更新 (Refresh)] → [OK] on the Contacts screen.Security SettingsSetting UIM PINYou can set the PIN1 code for the UIM.• Insert the FOMA terminal into the PC card slot before performing these steps.• While the Security Settings screen is displayed, no operations can be performed from the Main screen. If a call arrives during the operation, the call can be answered after [閉じる (Close)] is clicked, however, the options being set will be canceled.Entering a PIN1 Code/Changing the PIN1 CodeYou can require the PIN1 code entry each time the M2501 HIGH-SPEED Utility is launched. You can also change the PIN1 code.Phonebook ScreenDefault 起動時PINコード照合 (PIN Code Verification at Start-up): 無 (No)NIP MIU/koobenohP/gnitixE/gnihcnuaLDefault settingsAn item name actually shown on the screen. Some functions cannot be performed depending on operations.Chapter index tab with function name or title.* The above page is an example.* Screen images and illustrations contained in this manual are for reference only. They may differ from those seen for the actual product.PageA section titleOperation stepsUseful information or suggestions relating to an operationKey screen for a function. This is an image of a screen seen on the PC.Numbers, settings or characters entered are for reference only.](https://usermanual.wiki/Motorola-Mobility/T6FL1.Exhibit-8-Users-Manual-1/User-Guide-700344-Page-5.png)
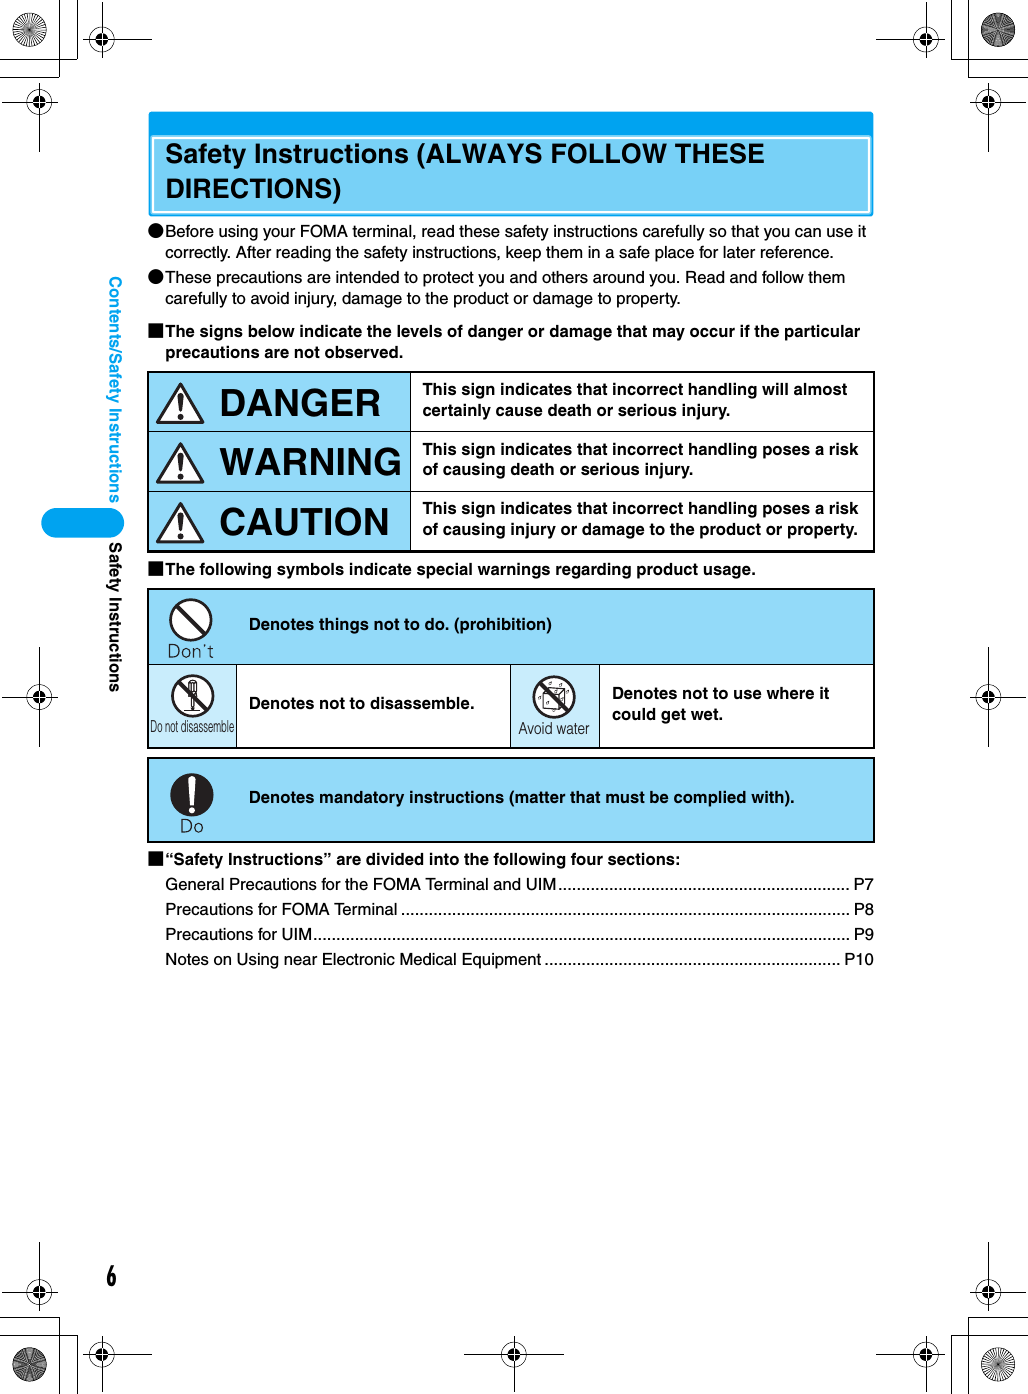
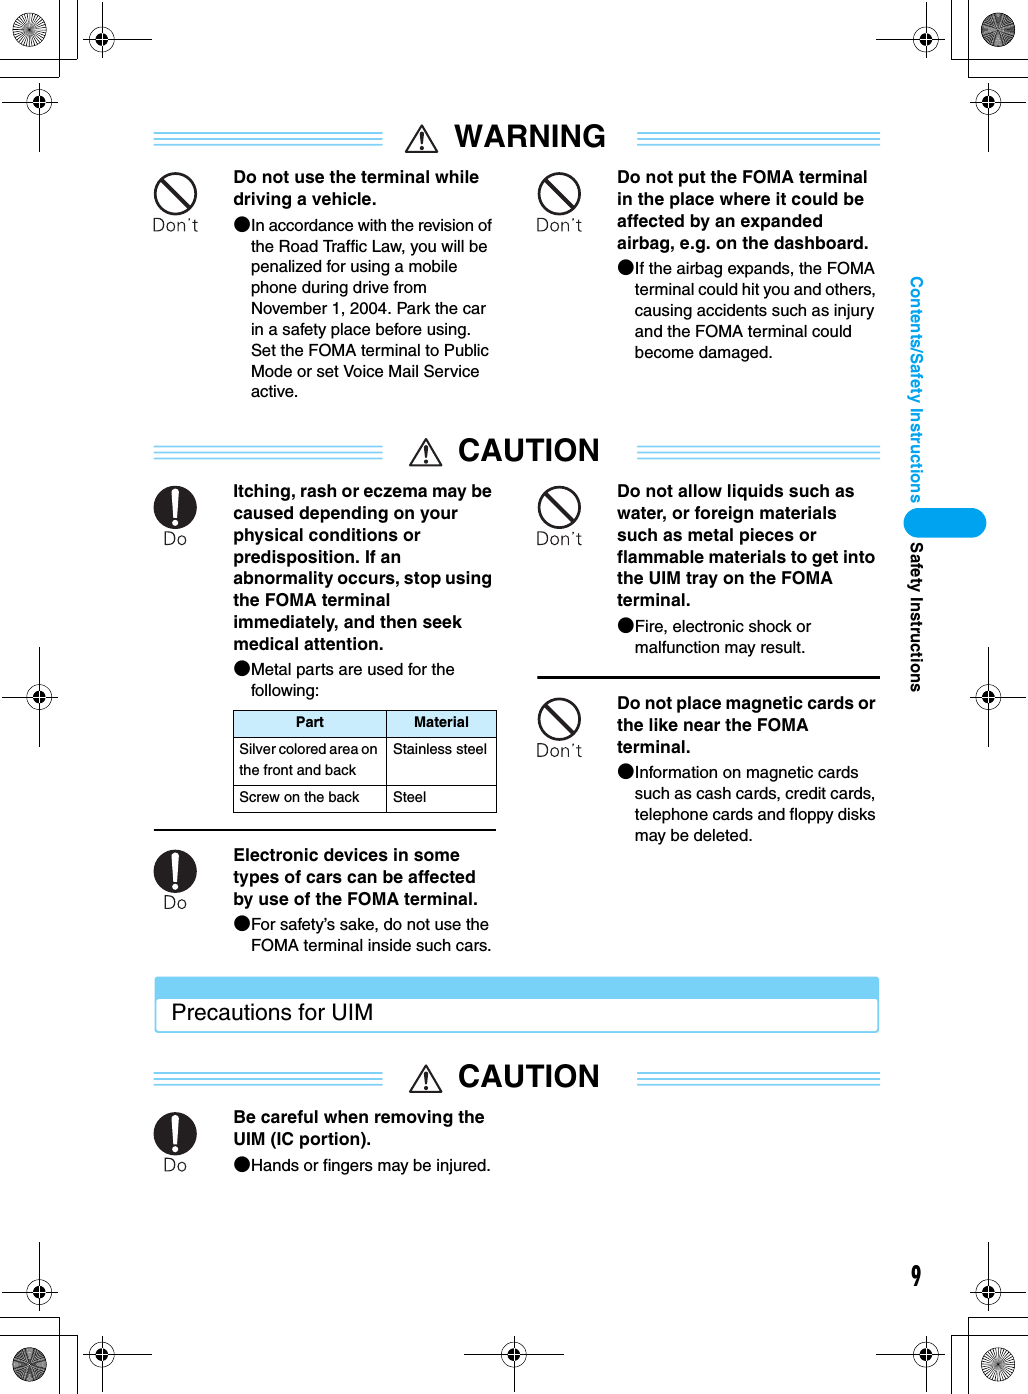
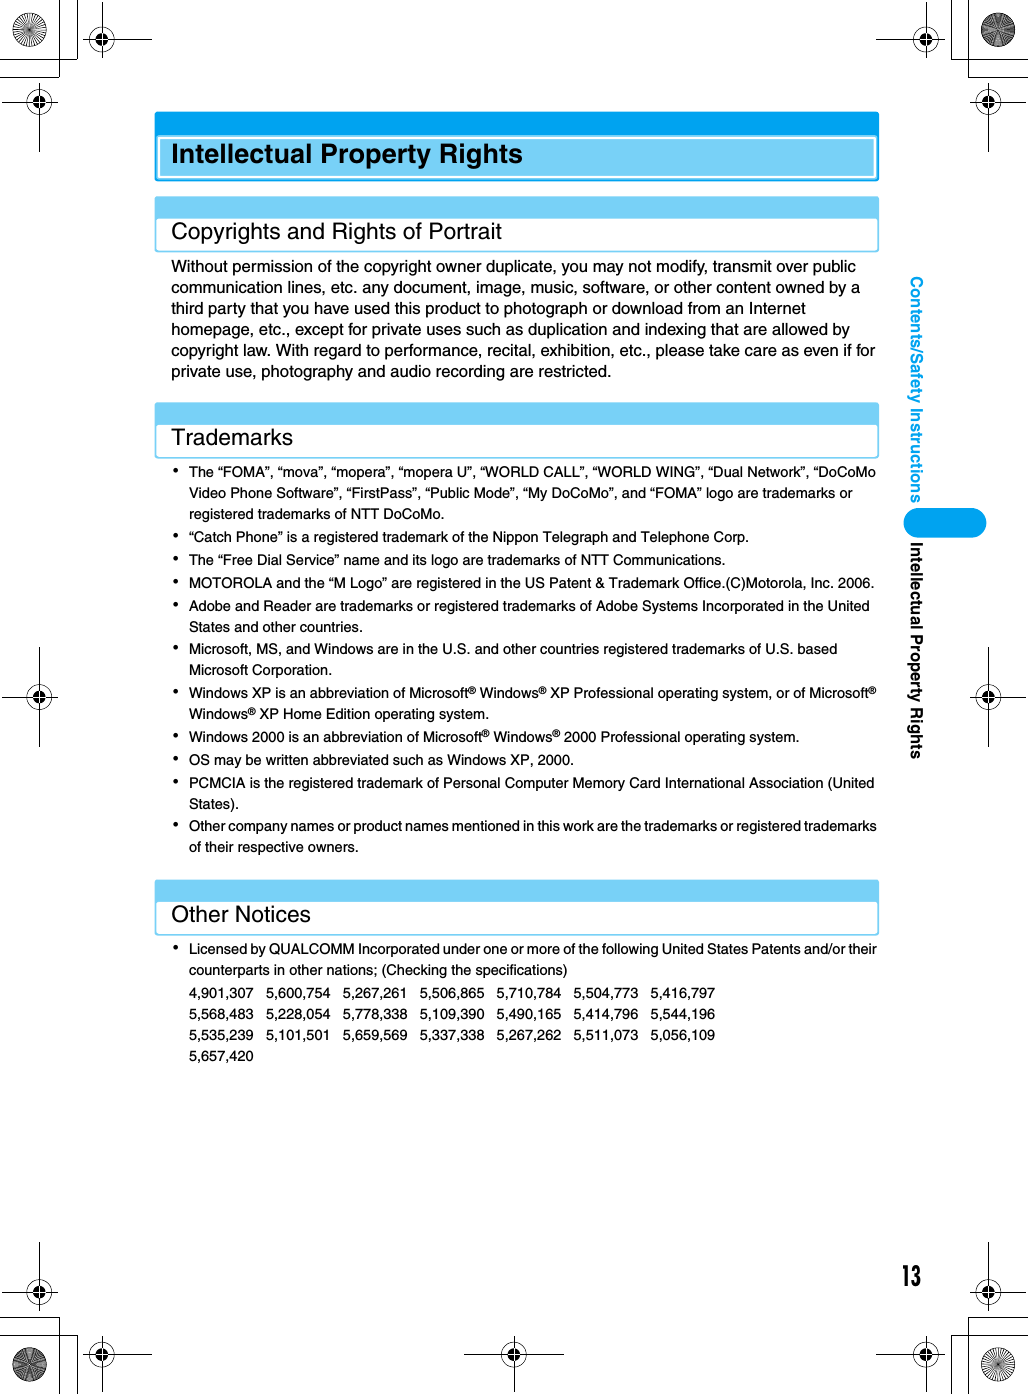
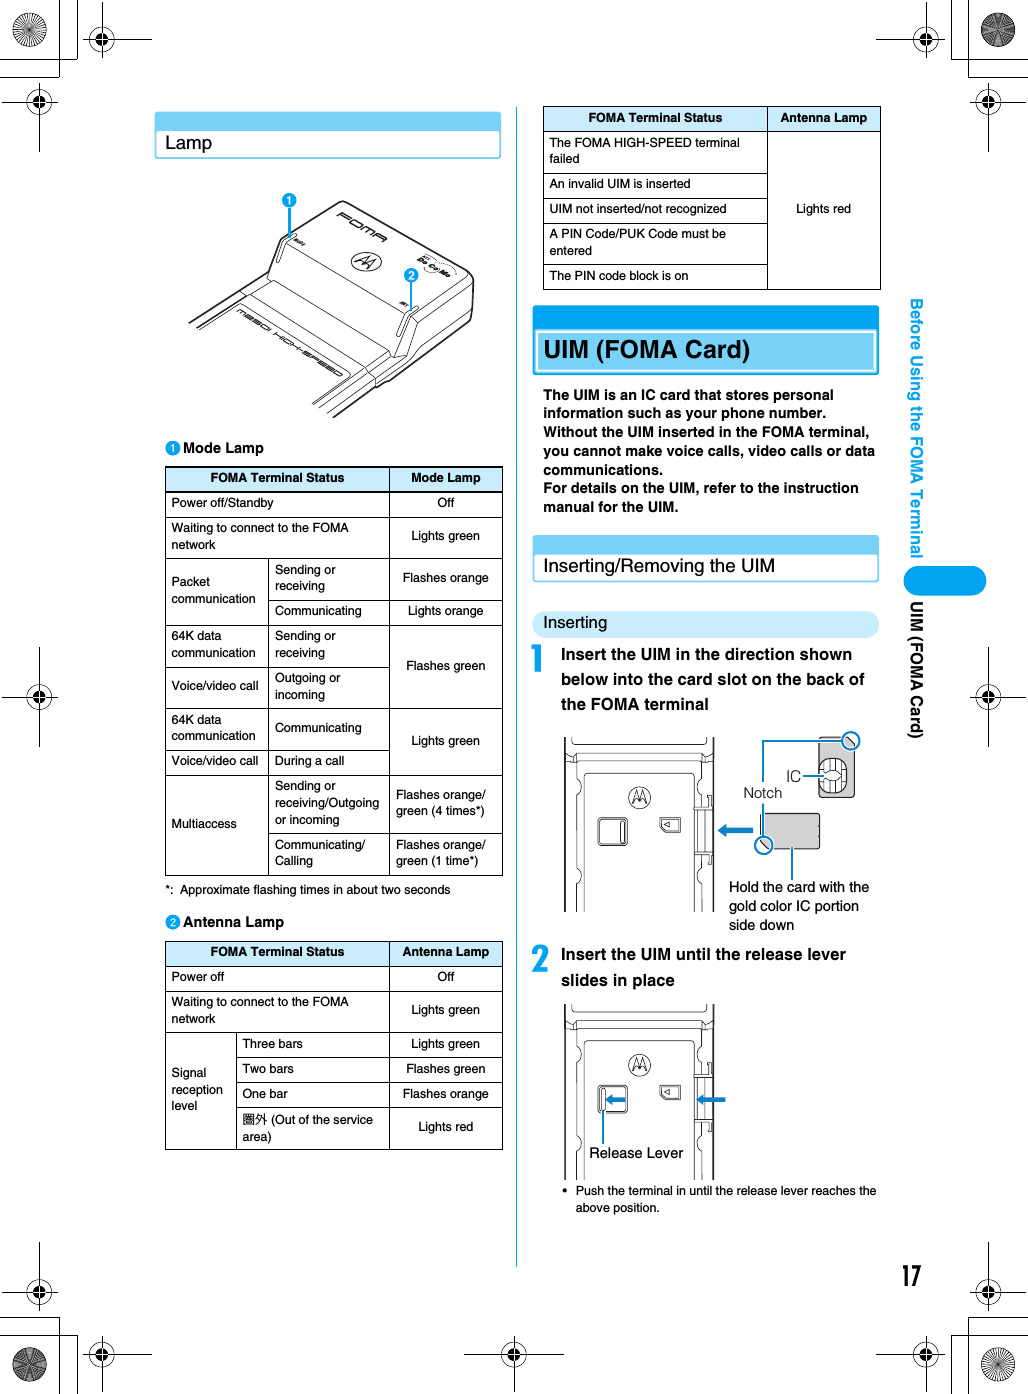

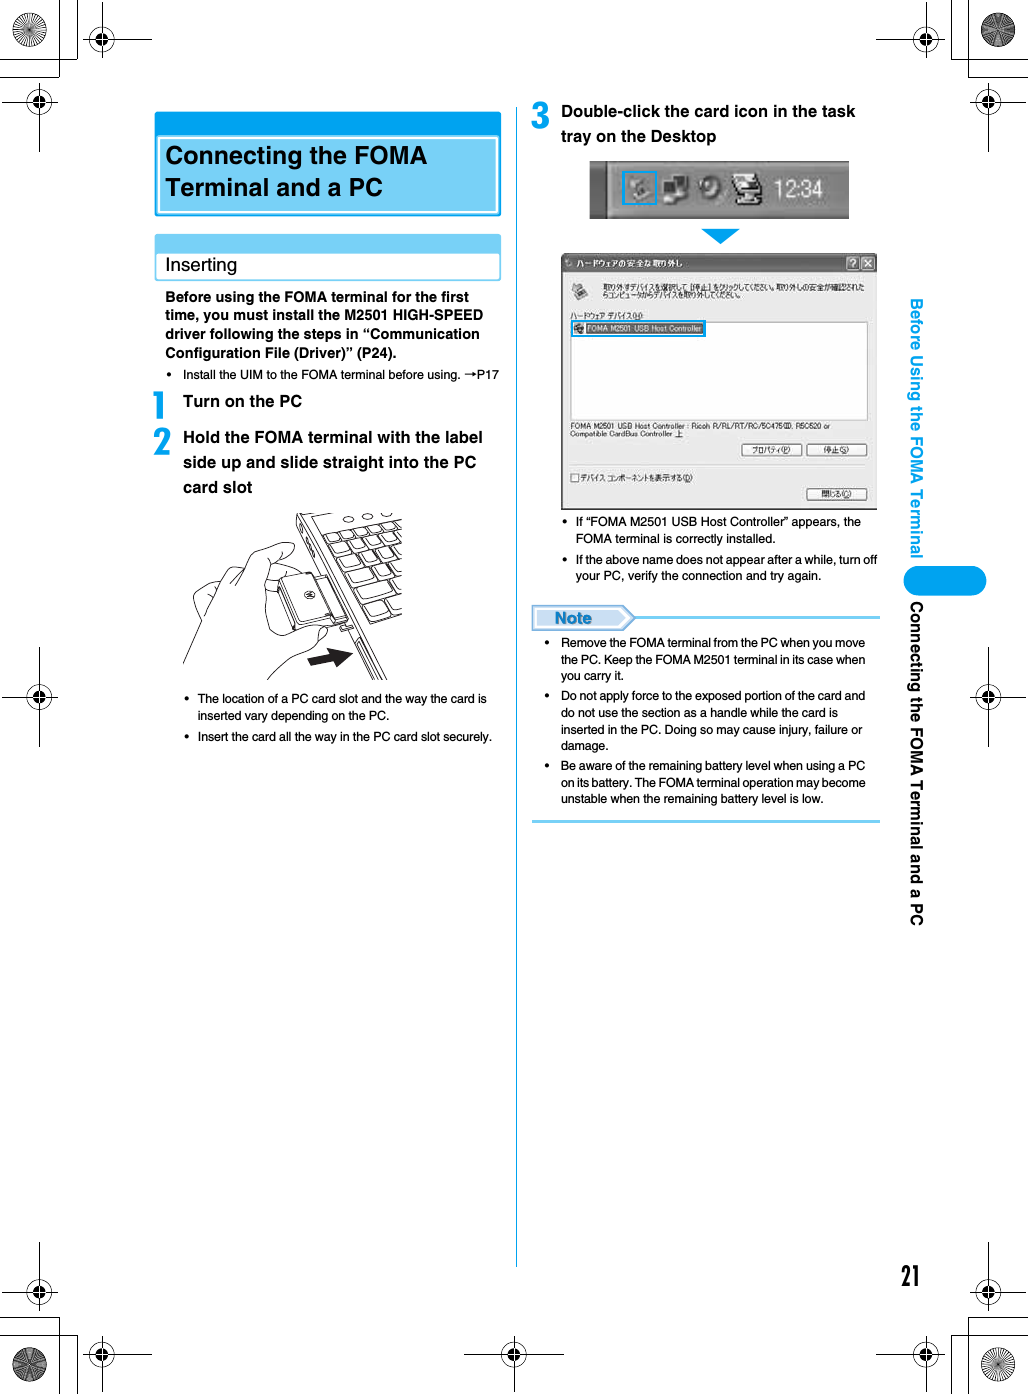
![22Before Using the FOMA TerminalRemovingDisconnect the line when communicating, and remove the FOMA terminal.aDouble-click the card icon in the task traybSelect “FOMA M2501 USB Host Controller”, and click [停止 (Exit)]cClick [OK]dWhen a message indicating that the PC card can be removed safely, remove the FOMA terminal from PC• Always store the removed FOMA terminal in the FOMA M2501 HIGH-SPEED terminal card case.Connecting the FOMA Terminal and a PC](https://usermanual.wiki/Motorola-Mobility/T6FL1.Exhibit-8-Users-Manual-1/User-Guide-700344-Page-24.png)

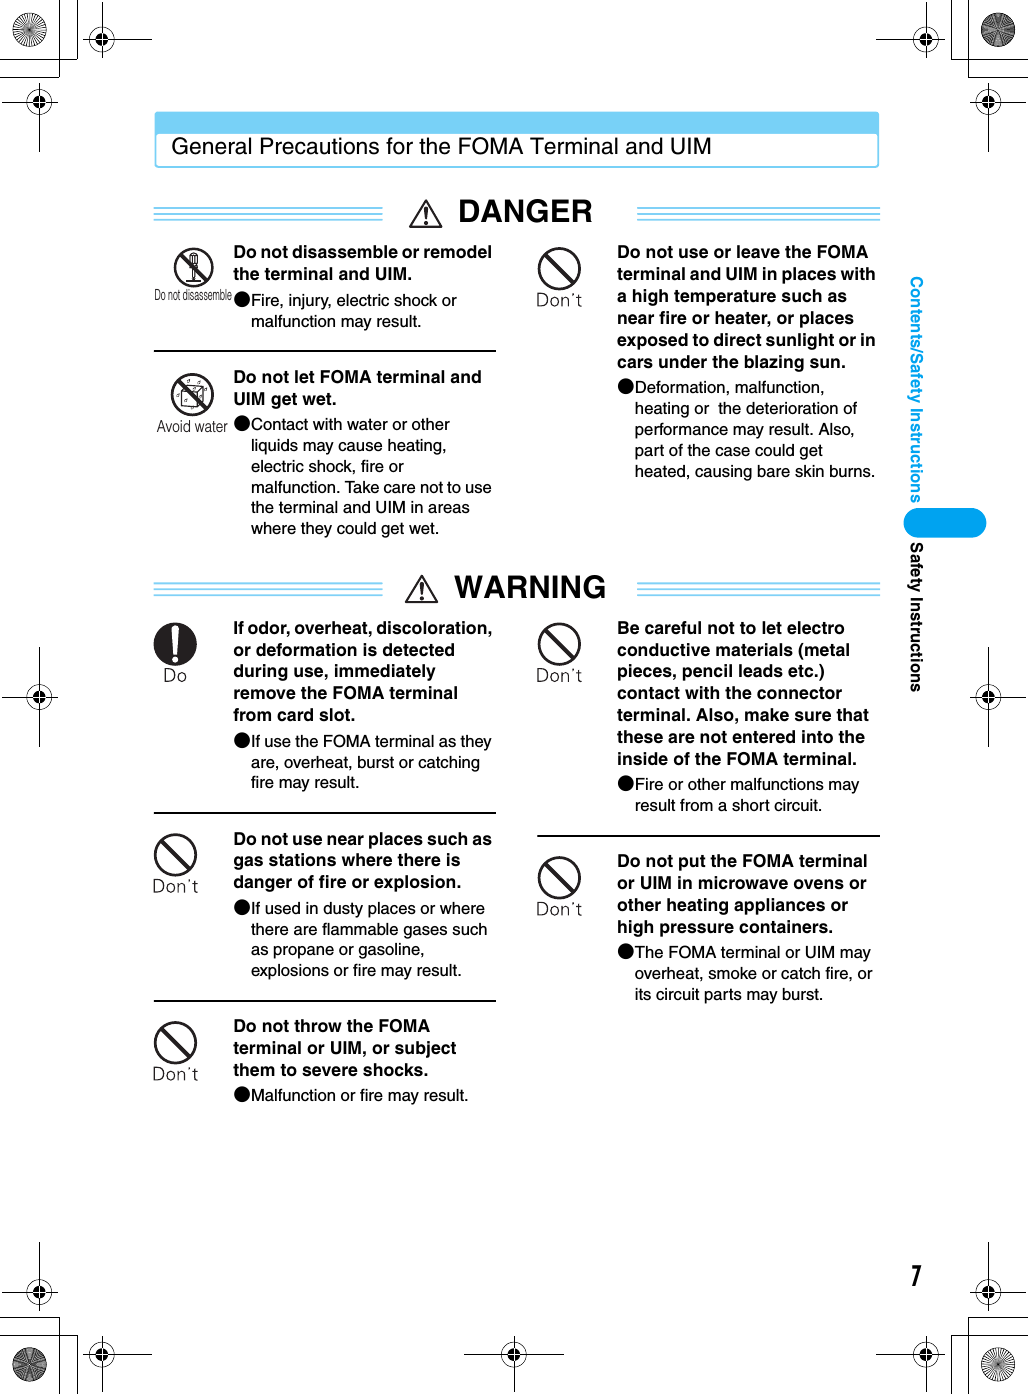
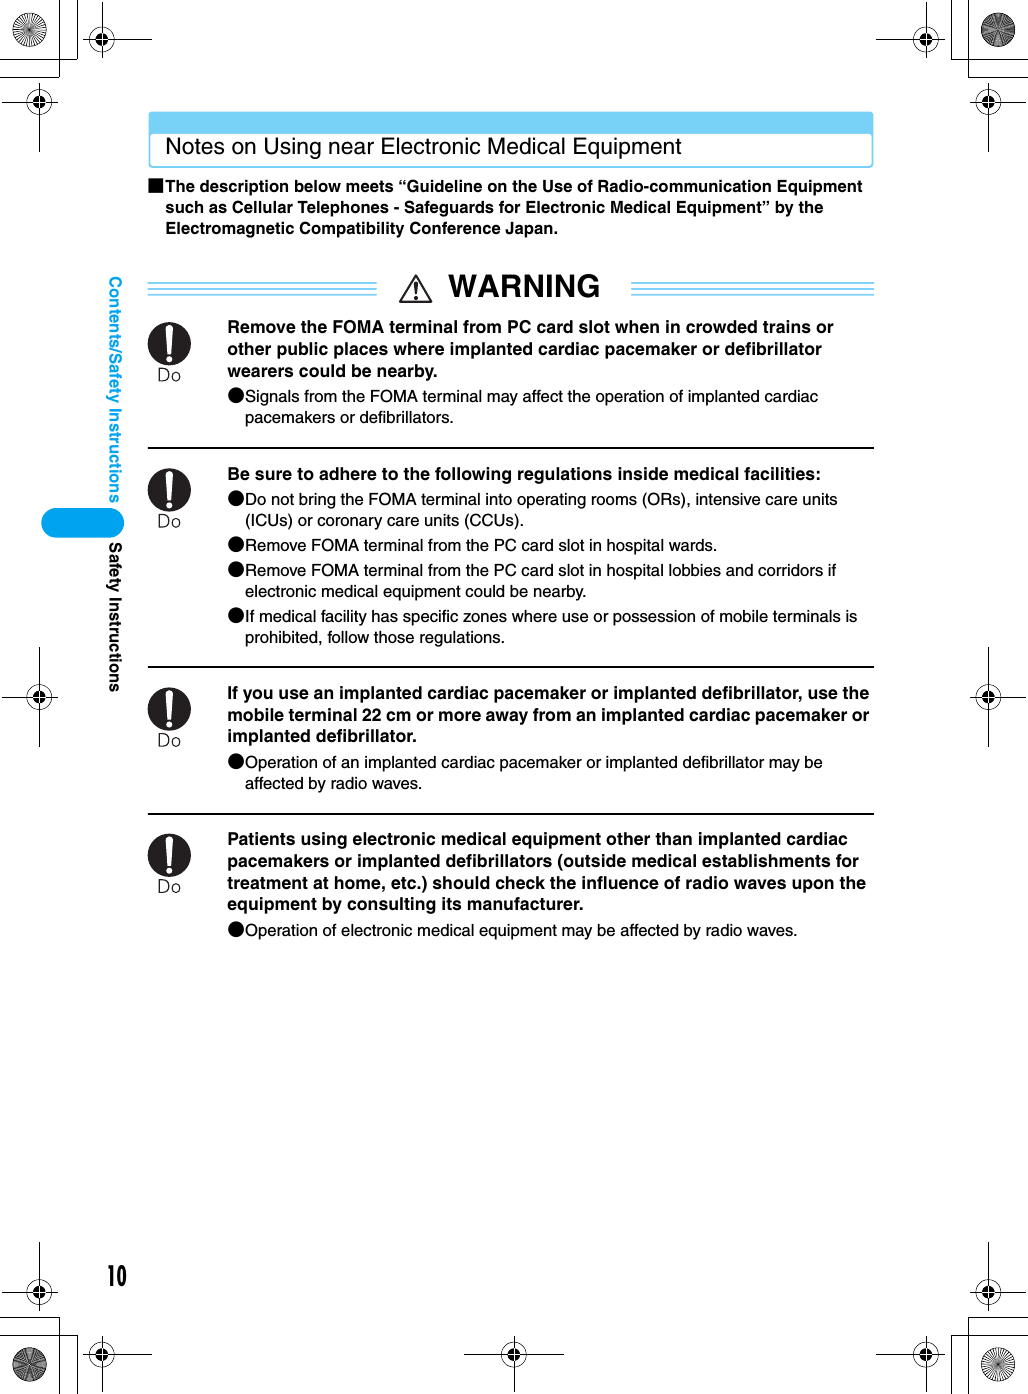
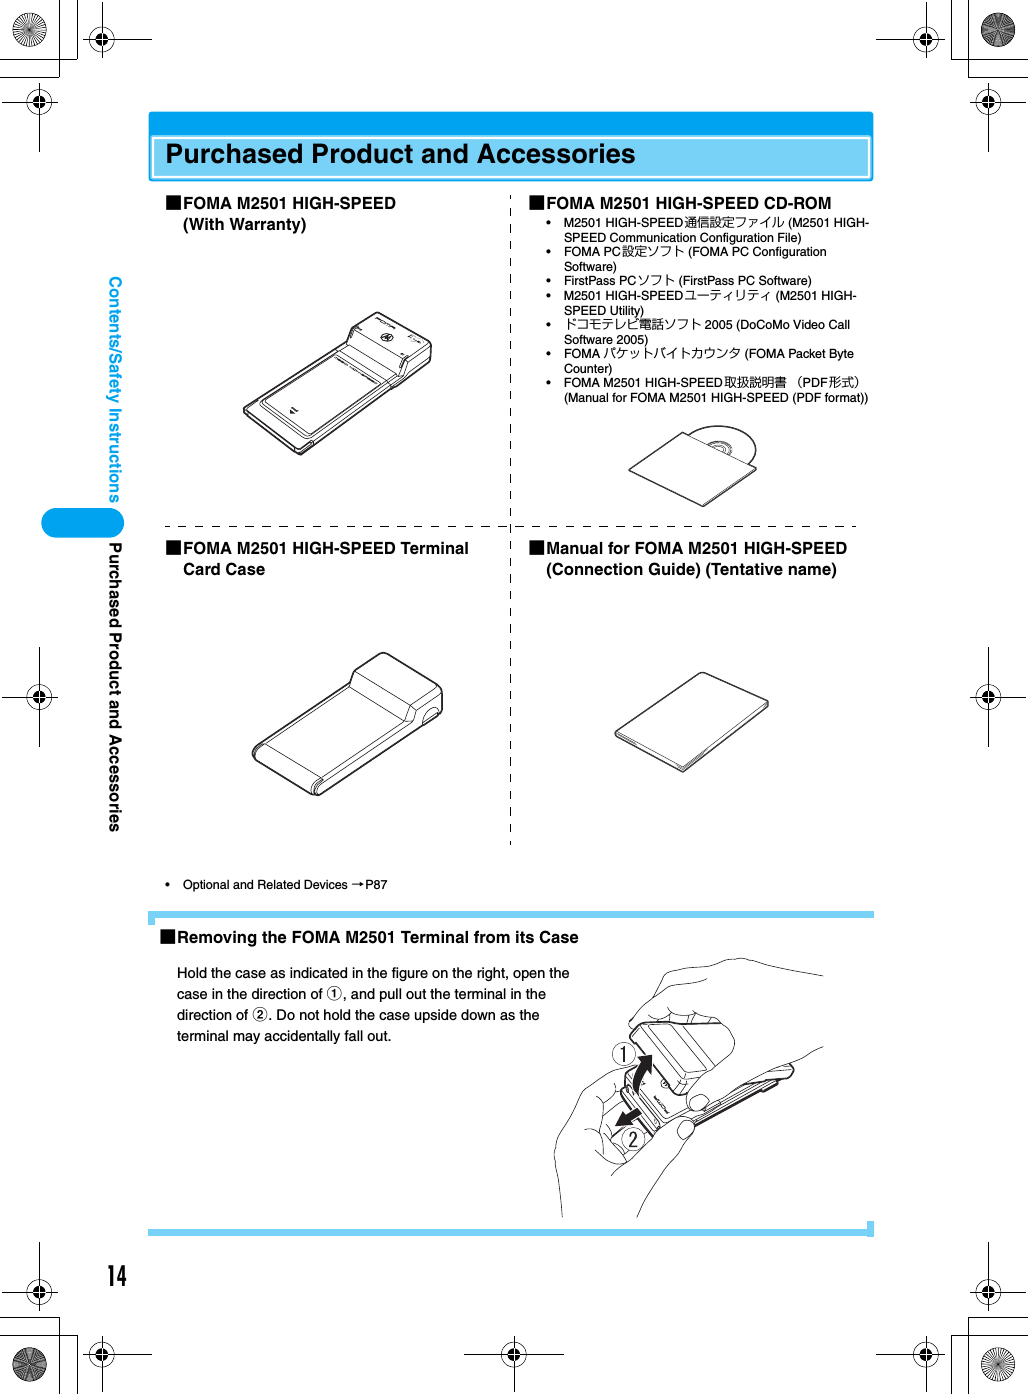
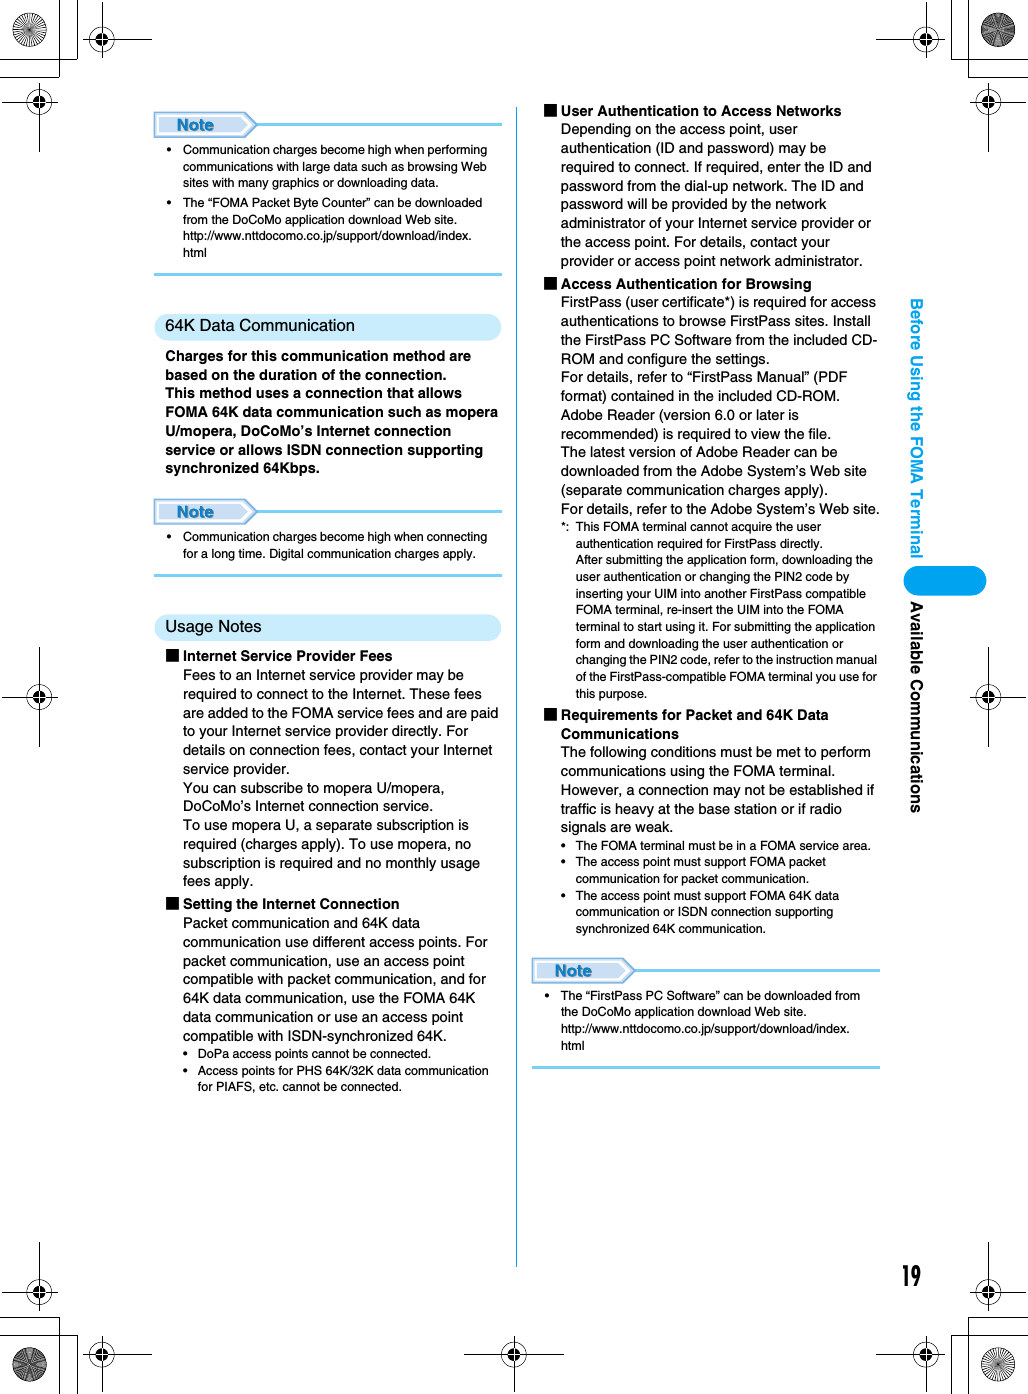
![24Setting UpSetting UpInstall the following software from the included CD-ROM for the FOMA M2501 HIGH-SPEED terminal.Operating EnvironmentsUse the Communication Configuration File (driver) and the FOMA PC Configuration Software under the following operational environments:*1: Japanese Version Service Pack 4 or later*2: Japanese Version Service Pack 1 or later• Required memory or available hard disk space may vary depending on the system environment.• Depending on the operating environment, the software may not work. DoCoMo does not respond to any inquiries about the use, guarantee proper operation, nor is responsible for proper operation under operating environments other than the above.• DoCoMo does not guarantee the operation under the supported OS if the OS is changed through upgrade.Communication Configuration File (Driver)The Communication Configuration Files (drivers) are required to connect to the PC for the first time.Installing• Remove the FOMA terminal from the PC before starting the software installation.• Log into a user account with the Administrator or PC supervisor privileges. An error will occur during installation if you log into an account without these privileges. For details on setting up Administrator or PC supervisor privileges, contact your computer manufacturer or Microsoft Corporation.For Windows XPaStart Windows and insert the FOMA M2501 HIGH-SPEED CD-ROM to the PCbClick [スタート (Start)] y “ファイル名を指定して実行 (Select file name and run)”cClick [参照 (Browse)] to specify the file setup.exe, then click [OK]• Specify the file “<CD-ROM drive letter>:/Drivers/setup.exe” (the CD-ROM drive letter varies depending on the configuration of your PC).Item RequirementPC Main Unit PC-AT compatibleThe PC must have a PC card slot of PCMCIA TYPE II.OS Windows 2000 Professional*1,Windows XP Professional/HomeEdition*2Required Memory 128Mbytes or moreHard Disk Space 50Mbytes or more available spaceDisplay 800 x 600 pixels or more recommended1Installing the Communication Configuration FilesThe communication configuration software (drivers) makes communication possible using the FOMA terminal.• Windows XP →P24• Windows 2000 →P262Installing the FOMA PC Configuration SoftwareThe FOMA PC configuration software allows you set up packet communication/64K data communication using simple steps.• Steps in Common for Windows →P313Configuring Communication SettingsConfigure settings to establish a connection with packet communication/64K data communication.• Setting up Packet Communication Using the Easy Settings of the PC Configuration Software →P32• Setting up 64K Data Communication Using the Easy Settings of the PC Configuration Software →P32• Setting up Communication without Using the PC Configuration Software →P374Establishing a ConnectionConnect to the Internet.Setting Up/Installing the Driver](https://usermanual.wiki/Motorola-Mobility/T6FL1.Exhibit-8-Users-Manual-1/User-Guide-700344-Page-26.png)
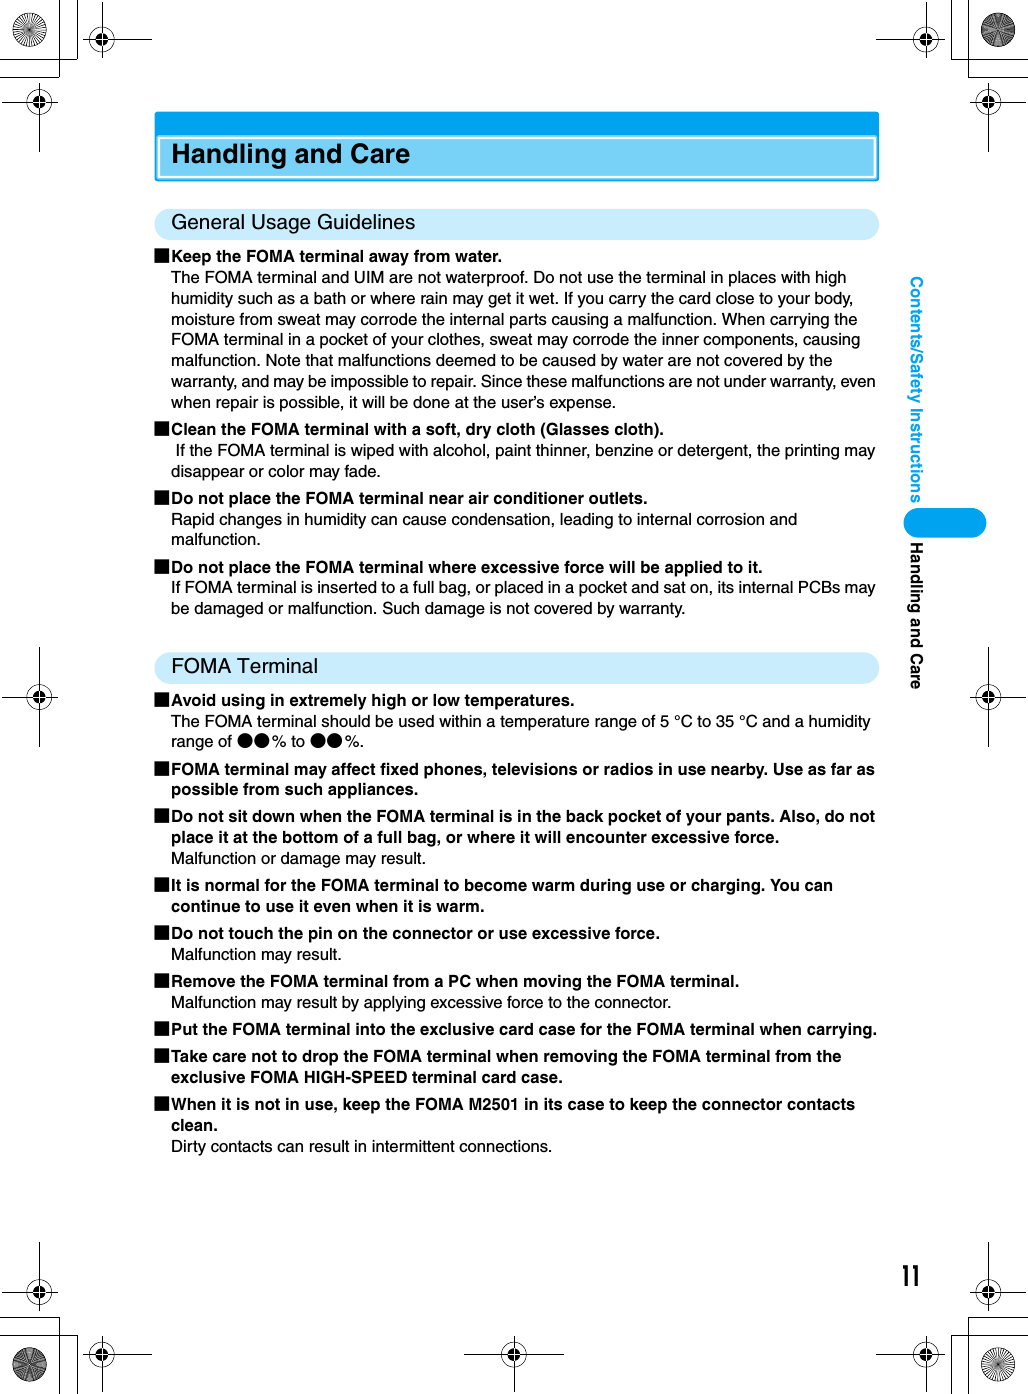
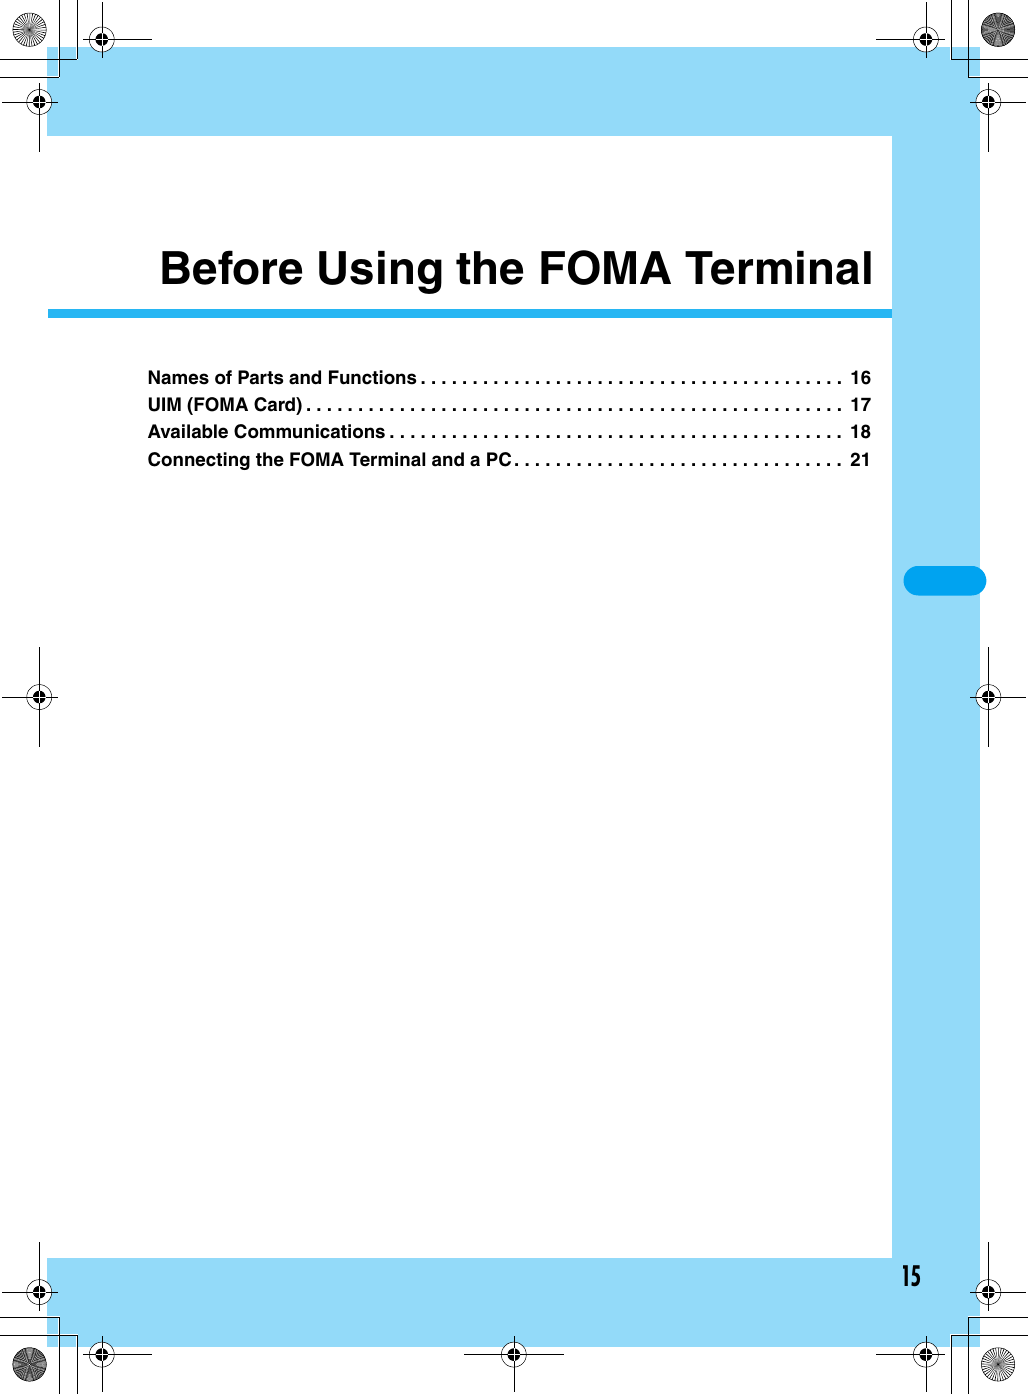
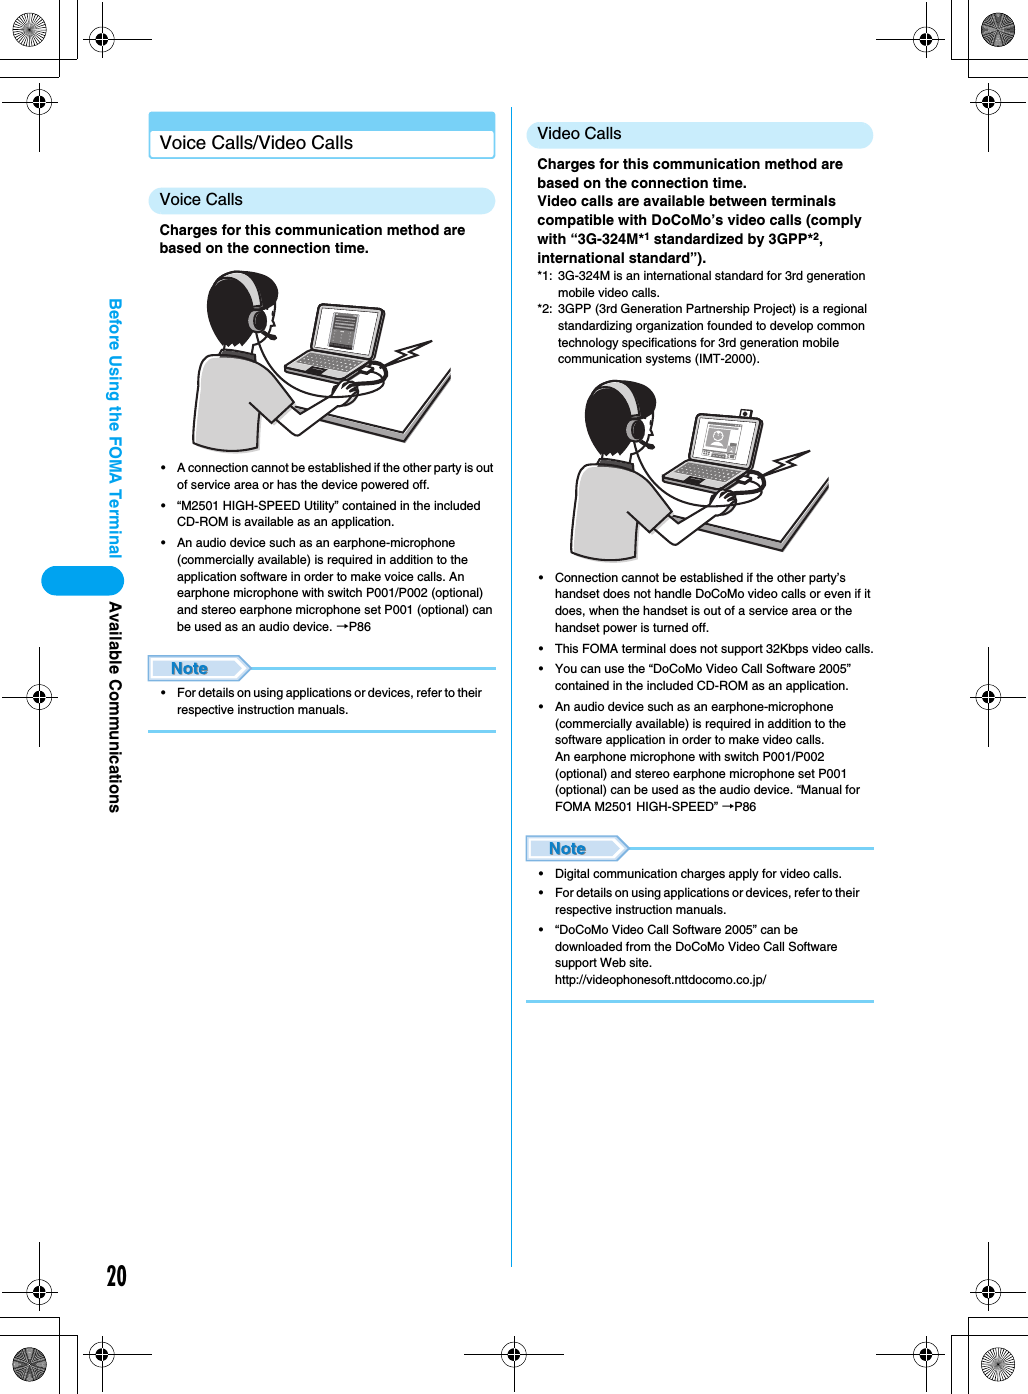
![25Setting UpdVerify the destination folder and click [Install]• [Browse] : You can change the destination folder. However, you can only specify folders on a local hard disk. Other folders (on a network drive or removable media) cannot be specified.eClick [続行 (Continue)]• This software behaves in the same way as Windows logo certified software. Click [続行 (Continue)]. This screen opens three times.fClick [OK]gInsert the FOMA terminal into the PC card slot (P21)hSelect “いいえ、今回は接続しません (No, not this time)” and click [次へ (Next)]• Depending on your PC, this screen may not appear.iSelect “一覧または特定の場所からインストールする (詳細) (Install from a list or a specific location (Advanced))” and click [次へ (Next)]jSelect “次の場所で最適のドライバを検索する (Search for the most suitable driver in the following place)”, check “次の場所を含める (Include the following)”, click [参照 (Browse)], specify the folder, and click [次へ (Next)]• Specify the file “<CD-ROM drive letter>:/Drivers” (the CD-ROM drive letter varies depending on the configuration of your PC). Installation starts.■If a message appears indicating that this software has not passed the Windows Logo Test to certify the compatibility with Windows XP• This software behaves in the same way as Windows logo certified software. Click [続行 (Continue)].kClick [完了 (Done)]Screen to be replacedScreen to be replacedScreen to be replacedInstalling the Driver](https://usermanual.wiki/Motorola-Mobility/T6FL1.Exhibit-8-Users-Manual-1/User-Guide-700344-Page-27.png)
![26Setting UplInstall the other three driversInstall all three drivers referring to Steps 8-11.For Windows 2000aStart Windows and insert the FOMA M2501 HIGH-SPEED CD-ROM to the PCbClick [スタート (Start)] y “ファイル名を指定して実行 (Select file name and run)”cClick [参照 (Browse)] to specify the file setup.exe, then click [OK]• Specify the file “<CD-ROM drive letter>:/Drivers/setup.exe” (the CD-ROM drive letter varies depending on the configuration of your PC).dVerify the destination folder and click [Install]• [Browse] : You can change the destination folder. However, you can specify only folders on the local hard disk. Other folders (on a network drive or removable media) cannot be specified.eClick [Yes]• Click [はい (Yes)] because this software behaves in the same way as a software with a digital signature.fClick [OK]gInsert the FOMA terminal into the PC card slot (P21)hClick [次へ (Next)]iSelect “デバイスに最適なドライバを検索する (推奨) (Search for the most suitable driver) (Recommended))” and click [次へ (Next)]jCheck “場所を指定 (Find in)” and click [次へ (Next)]Screen to be replacedScreen to be replacedScreen to be replacedInstalling the Driver](https://usermanual.wiki/Motorola-Mobility/T6FL1.Exhibit-8-Users-Manual-1/User-Guide-700344-Page-28.png)
![27Setting UpkClick [参照 (Browse)] to specify the file, then click [OK]• Specify the file “<CD-ROM drive letter>:/Drivers” (the CD-ROM drive letter varies depending on the configuration of your PC).lVerify the driver name “m2501hcd.inf” and click [次へ (Next)]Installation starts.■If a message appears indicating that the software does not have a digital signature• Click [はい (Yes)] because this software behaves in the same way as a software with a digital signature.mClick [完了 (Done)]n“新しいハードウェアが見つかりました (New hardware found)” is displayed and the other three drivers will be installed automatically• The installation is completed when “新しいハードウェアが見つかりました (New hardware found)” message disappears.Checking the Installed DriverVerify that the M2501 Communication Configuration Files have been installed correctly.aOpen the Windows Control Panel■For Windows XPClick [スタート (Start)] y “コントロールパネル (Control Panel)”■For Windows 2000Click [スタート (Start)] y [設定 (Settings)] y “コントロールパネル (Control Panel)”bOpen “システム (System)” in “コントロールパネル (Control Panel)”■ For Windows XPClick the “システム (System)” icon from “パフォーマンスとメンテナンス (Performance and Maintenance)”■For Windows 2000If the “システム (System)” icon does not appear on the “コントロールパネル (Control Panel)”, click “すべてのコントロールパネルのオプションを表示する (Show all Control Panel options)”.cOpen the Device Manager■For Windows XPClick the “ハードウェア (Hardware)” tab and click [デバイスマネージャ (Device Manager)]■For Windows 2000Click the [デバイスマネージャ (Device Manager)] tabdClick “モデム (Modem)” to view the installed driver nameVerify that the driver name appears under “モデム (Modem)”, “ポート (Port)”, “USB コントローラー (Universal Serial Bus) controller”.For Windows XPInstalling the DriverContinued on the next page](https://usermanual.wiki/Motorola-Mobility/T6FL1.Exhibit-8-Users-Manual-1/User-Guide-700344-Page-29.png)
![28Setting Up* The COM port number varies depending on the PC.• To configure the access point, continue with the following.Configuring the Access Point using the FOMA PC Configuration Software →P29Configuring the Access Point without using the FOMA PC Configuration Software →P37• If the driver name does not appear after performing steps to verify the driver name, follow the instructions of “Uninstalling” to delete the M2501 Communication Configuration files and re-install them.UninstallingTo uninstall the Communication Configuration files (drivers), perform the following steps:• Remove the FOMA terminal from the PC before starting the software uninstallation.• Log into a user account with the Administrator or PC supervisor privileges. An error will occur during uninstallation if you log into an account without these privileges. For details on setting up Administrator or PC supervisor privileges, contact your computer manufacturer or Microsoft Corporation.aStart “プログラム (アプリケーション)の追加と削除 (Add or Remove Programs (Applications))” from Windows■For Windows XPClick [スタート (Start)] y “コントロールパネル (Control Panel)” y “プログラムの追加と削除 (Add or Remove Programs)” icon■For Windows 2000Click [スタート (Start)] y “設定 (Settings)” y “コントロールパネル (Control Panel)” y “アプリケーションの追加と削除 (Add or Remove Applications)” iconbSelect “M2501 Datacard USB Driver (Tentative Name)” and click [変更と削除 (Change/Remove)]cClick [Uninstall]dClick [OK]eClick [はい (Yes)] to restart WindowsDevice Name Driver NameUniversal Serial Bus Controller/USB (Universal Serial Bus)FOMA M2501, FOMA M2501 USBHost Controllerポート (Port (COM/LPT)) FOMA M2501Command Portモデム (Modem) FOMA M2501For Windows 2000Select “M2501 Datacard USB Driver”Click hereScreen to be replacedInstalling the Driver](https://usermanual.wiki/Motorola-Mobility/T6FL1.Exhibit-8-Users-Manual-1/User-Guide-700344-Page-30.png)
![39Setting UpUsing FirstPass PCThe FirstPass PC Software allows you to access to sites supporting FirstPass from the Web browser on a PC by using the user authentication obtained from another FOMA terminal that supports FirstPass.• This FOMA terminal cannot directly obtain the user authentication required for FirstPass. After submitting the application form, downloading the user authentication or changing the PIN2 code by inserting your UIM into another FirstPass compatible FOMA terminal, re-insert the UIM into the FOMA terminal to start using it. For submitting the application form and downloading the user authentication or changing the PIN2 code, refer to the instruction manual of the FirstPass compatible FOMA terminal you use for this purpose.Note When Installing FirstPass PC SoftwareOperating EnvironmentsUse the FirstPass PC software in the following operating environments:*1: Japanese Version Service Pack 4 or later *2: Japanese Version Service Pack 1 or later • Required memory or available hard disk space may vary depending on your system.• Depending on the operating environment, the software may not work. DoCoMo does not respond to any inquiries about the use, guarantee proper operation, nor is responsible for proper operation under operating environments other than the above.• DoCoMo does not guarantee the operation under the supported OS if the OS is changed through upgrade.Before InstallingBefore installing the FirstPass PC Configuration software, read the “FirstPass Manual” (in PDF format) in the “FirstPass PC Soft” folder contained in the included CD-ROM. Adobe Reader (version 6.0 or later is recommended) is required to view the file. The latest version of Adobe Reader can be downloaded from the Adobe System’s Web site (separate communication charges apply).For details, visit the Adobe System’s Web site.InstallingaStart Windows and insert the FOMA M2501 HIGH-SPEED CD-ROM to the PCbClick [スタート (Start)] y “ファイル名を指定して実行 (Select file name and run)”cClick [参照 (Browse)], specify “< CD-ROMドライブ名> CD-ROM drive letter>:¥FirstPassPCSoft¥FirstPassPCSetup.exe”, and click [OK]Continue the installation following the instructions in the “FirstPass Manual” (in PDF format) in the “FirstPass PC Soft” folder contained in the included CD-ROM.• The CD-ROM drive letter varies depending on the configuration of your PC.UninstallingaStart “プログラム (アプリケーション)の追加と削除 (Add or Remove Programs Applications)” from Windows ■For Windows XPClick [スタート (Start)] y “コントロールパネル (Control Panel)” y “プログラムの追加と削除 (Add or Remove Programs)” icon■For Windows 2000Click [スタート (Start)] y “コントロールパネル (Control Panel)” y “アプリケーションの追加と削除 (Add or Remove Applications)” iconbSelect “FirstPass PC Soft” and click [変更と削除 (Change/Remove)]Continue the uninstallation following the instructions in the “FirstPassManual” (in PDF format) in the “FirstPass PC Soft” folder contained in the included CD-ROM.Item RequirementPC Main Unit PC-AT CompatibleThe PC must have a PC card slot of PCMCIA TYPE II.OS Windows 2000 Professional*1, Windows XP Professional/Home Edition*2Required Memory Windows 2000 Professional : Required 32M upsWindows XP*2 : Required 128M upsHard Disk Space 10Mbyte or More Available SpaceBrowser Internet Explore 5.5 upsInternet Explorer 6.0 for Windows XP or higherUsing FirstPass PC](https://usermanual.wiki/Motorola-Mobility/T6FL1.Exhibit-8-Users-Manual-1/User-Guide-700344-Page-41.png)
![40Setting UpAT CommandsAT commands are used to check the FOMA terminal function settings or status using a PC. Usually, the communication software issues AT commands so that you do not need to be concerned about them. Use AT commands if you want to control the FOMA terminal in your own way.Format of AT CommandsAT commands should be entered on the Terminal Mode screen of the communication software. Use only single-byte alphanumeric characters.<Example>• An AT command must be entered on a single line including parameters (numbers and symbols) following the command. On the Terminal Mode screen of the communication software, one line is from the first character to the previous character of . Up to XX characters (including “AT” and ) can be entered.• In the Terminal mode, a PC functions as a communication terminal. Characters entered from the keyboard are sent to a line connected to a communication port.Switching between On-line Data Mode and On-line Command ModeFollowing two methods are available to switch between on-line data mode and on-line command mode on the FOMA terminal:• Enter the “+++” command or the code set to “S2” register.→See the right column• When “AT&D1” is set, set the ER signal of the serial (COM) port to OFFEnter “ATO ” to switch from the on-line command mode to the on-line data mode.■Saving the SettingsSettings by AT commands are initialized when the FOMA terminal power is turned off and turned on again except: APN settings set by the AT+CGDCONT command, QoS settings by AT+CGEQMIN/AT+CGEQREQ command, setting to show or hide the packet communication number by AT*DGPIR command, and settings to restrict notifying the Caller ID by AT+CLIR command. Settings set by commands with [&W] can be saved by entering [AT&W ] after configuring the settings. Any other values set by other commands with [&W] are also saved at the same time. These values can be restored by entering “ATZ ” even after the FOMA terminal power was turned off and turned on again.ATD*99***1#Hard ReturnParameter : Content of the commandCommand NameAT Commands](https://usermanual.wiki/Motorola-Mobility/T6FL1.Exhibit-8-Users-Manual-1/User-Guide-700344-Page-42.png)
![41Setting UpAT Command ListThe following AT commands can be used on the FOMA M2501 HIGH-SPEED.• [&F] : A command to initialize settings used as AT&F command.• [&W] : A command to save settings used as AT&W command. ATZ command can restore set values.• [?] [=?] : The current settings appear when adding “?” at the end of the command, and the effective range of the current settings appear when adding “=?” at the end of the command.AT Command Overview Parameters/Description Command ExamplesAT¥S Show the command settings and S register. ーAT¥SOKAT¥V<n> Select whether to use the extended result code at connection.n=0 (default) : The extended result code is not used.n=1 : The extended result code is used.AT¥V0OKAT%V Display the version of the FOMA terminal. ーAT%VVer1.00OKAT&C<n>[&F] [&W]Set the operating conditions of the circuit CD for DTE.n=0 : Always keeps line CD signal ON.n=1 (default) : CD changes depending on the other party’s modem status.AT&C1OKAT&D<n>[&F] [&W]Set the operation performed when circuitER signal received from DTE is switched from ON to OFF.n=0 : Ignore ER signals (Always regard as ON)n=1 : On-line command mode starts when ER signals change from ON to OFF.n=2 (default) : Off-line mode starts when ER signals change from ON to OFF.AT&D1OKAT&E<n>[&F] [&W]Select the specification to show the connection speed.n=0 : Show the communication speed for wireless segment.n=1 (default) : Show the communication speed between the PC and FOMA terminal.AT&E0OKAT&F<n> Reset the FOMA terminal AT command set values to factory defaults. If executed during a communication, the line is disconnected.Only n=0 can be set (skippable)ーAT&S<n>[&] [&W]Set the control of DR (data set ready) signals output by the FOMA terminal.n=0 (default) : Set DR signals always to ON.n=1 : Set DR signals to ON when the line is connected.AT&S0OKAT&W<n> Write the current setting values to the FOMA terminal.Only n=0 can be specified (can be skipped) ーAT Command ListContinued on the next page](https://usermanual.wiki/Motorola-Mobility/T6FL1.Exhibit-8-Users-Manual-1/User-Guide-700344-Page-43.png)
![42Setting UpAT*DANTE Show the signal strength at the FOMA terminal.=0 : Out of service area=1 : One antenna bar=2 : Two antenna bars=3 : Three antenna barsAT*DANTE*DANTE : 3OKAT*DANTE=?*DANTE : (0-3)OK(Show the range of values that can be displayed)AT*DGPIR=<n>[?] [=?]The setting of this command becomes valid when a call is dialed. 184/186 can also be added to the APN number even for the setting in a dial-up network.n=0 (default) : Use APN as it is.n=1 : Add “184” to APN (always hide).n=2 : Add “186” to APN (always show).AT*DGPIR=0OKAT*DRPW Show an indicator of the received radio signal power at the FOMA terminal. (0 : lowest - 75 : highest value)ーAT*DRPW*DRPW : 0OK+++ Switch the FOMA terminal from the on-line data mode to on-line command mode.This command is not applicable to the connection using packet communication.(Online Data Mode)+++ (Unable to see thedisplay)OKAT+CBST[&F] [&W][?] [=?]Set the bearer (communication type) service.AT+CBST=<speed>,<name>,<ce>speed=116 : 64K data communication.speed=134 : Video calls 64Kname=1 : data circuitsynchronous.ce=0 : transparent.AT+CBST=116, 1, 0AT+CEER Display the reason for disconnection of the previous connection.“Reasons for Disconnection” →P50AT+CEER+CEER : ●●OKAT+CGDCONT[?] [=?]Set APN when sending Packet communication.→P49 →P49AT+CGEQMIN[?] [=?]Register criteria value for determining if QoS (Quality of Service) sent from network when Packet communication is established, is acceptable or not.AT+CGEQMIN=[Parameters] →P49→P49AT+CGEQREQ[?] [=?]Set QoS (Quality of Service) to request for the network when Packet communication is established.AT+CGEQREQ= [Parameters] →P49→P49AT+CGMR Display the version of the FOMA terminal (16-digit number). ーAT+CGMR1234512345123456OKAT Command Overview Parameters/Description Command ExamplesAT Command List](https://usermanual.wiki/Motorola-Mobility/T6FL1.Exhibit-8-Users-Manual-1/User-Guide-700344-Page-44.png)
![43Setting UpAT+CGREG=<n>[&F] [&W][?] [=?]Set whether to be notified of the network registration status.n=0 (default) : Do not notify.n=1 : Notify when outside and inside the service area is changed.Execute “AT+CGREG?” then appears as “+CGREG : <n>,<start>”.n : Setting value.start=0 : Outside the packet service area.start=1 : Inside the packet service area.start=4 : Unknown.start=5 : Inside the packet service area (while roaming).AT+CGREG=1OKAT+CGSN Display the serial number of the FOMA terminal (15-digit number). ーAT+CGSN123456789012345OKAT+CLCK Lock applications (checking the specifications).(checking the specifications) (checking the specifications)AT+CLIP=n[&F] [&W][?] [=?]When a phone number with sub-address is received, the call is rejected.(checking the specifications) AT+CLIP=0OKAT+CLIR=<n>[?] [=?]Set whether to send the Caller ID when making 64K data communication/video calls.n=0 : In accord with the CLIR service subscription.n=1 : Do not send.n=2 (default) : Send.When “AT+CLIR?” is executed appear in the format of “+CLIR : <n>,<m>”.m=0 : CLIR is not running. (Always send).m=1 : CLIR is running. (Always hide).m=2 : Unknown.m=3 : CLIR temporary mode (Default for hide).m=4 : CLIR temporary mode (Default for show).AT+CLIR=0OKAT+CMEE=<n>[&F] [&W][?] [=?]Set the error report format of the FOMA terminal.n=0 (default) : Display “ERROR”.n=1 : Display in the format of “+CMEE ERROR : xxxx” (where xxxx are numbers).n=2 : Display in the format of “+CMEE ERROR : xxxx” (where xxxx are text).AT+CMEE=0OKAT Command Overview Parameters/Description Command ExamplesAT Command ListContinued on the next page](https://usermanual.wiki/Motorola-Mobility/T6FL1.Exhibit-8-Users-Manual-1/User-Guide-700344-Page-45.png)
![44Setting UpAT+CNUM Display the own number of the FOMA terminal.Executing “AT+CNUM” displays in the format of “+CNUM : <number>,<type>”number : phone number type=129 : Excluding the international access code+type=145 : Including the international access code+AT+CNUM+CNUM;,+819012345678”,145OKAT+CPAS[?] [=?]Display FOMA terminal state. Executing “AT+CPAS?” displays in the format of “+CPAS : <n>”.n=0 : Available to set AT commands.n=1 : Unavailable to set AT commands.n=2 : Unknown (Response to AT commands is not guaranteed).n=3 : Available to set AT commands even during incoming.n=4 : Available to set AT commands even during a call.AT+CPAS?+CPAS : 0OKAT+CPAS=?+CPAS : (0,2,3,4)OKAT+CPIN=“pin”/AT+CPIN=“puk”,“pin”[?]Command to enter the PIN1 code or PUK code for UIM.Enter the PIN1 code or PUK code for “pin”.Execute “AT+CPIN?” then “+CPIN : <n>” is displayed.n=READY : Authenticated.n=SIM PIN : Waiting for input.n=SIM PUK : Waiting for PUK code entry.n=ERROR : Locked.(+CPIN : SIM PIN status)AT+CPIN=“1234”OK(+CPIN : SIM PUK status)AT+CPIN=“12345678”,“1234”OKAT+CPWD Change the UIM password. (checking the specifications)(checking the specifications) (checking the specifications)AT+CR=<n>[&F] [&W][?] [=?]Set whether to display the bearer (communication type) before “CONNECT” is displayed when 64K data communication or GSM dial up data communication is connected.n=0 (default) : Hide.n=1 : Display in the format of “+CR : <serv>”.serv=GPRS : Packet communication.serv=SYNC : 64K data communication.serv=AV64K : Video calls.AT+CR=1OKATD*99***1#+CR : GPRSCONNECTAT+CRC=<n>[&F] [&W][?] [=?]Set to use extend result code for incoming connection.n=0 (default) : Not to use +CRING.n=1 : Use +CRING, <type>Executing “AT+CRC?” displays in the format of “+CRING : <type>”.+CRING : GPRS“PPP”,,,<APN> (When PPP packets are sent or received)AT+CRC=0OKAT Command Overview Parameters/Description Command ExamplesAT Command List](https://usermanual.wiki/Motorola-Mobility/T6FL1.Exhibit-8-Users-Manual-1/User-Guide-700344-Page-46.png)
![45Setting UpAT+CREG=<n>[&F] [&W][?] [=?]Set whether to show Out of service area or in the service area.n=0 (default) : Hiden=1 : ShowEnter “AT+CREG?” then it is shown in the format of “+CERG : <n>, <start>”start=0 : Out of the service area of 64K data. communication/video callsstart=1 : Inside of the service area of 64K data. communication/video callsstart=4 : Unknown.start=5 : Inside of the service area of 64K data communication/video calls (while roaming).AT+CREG=1OKAT+GMI Display the manufacturer of the FOMA terminal.ーAT+GMI+GMI :“Motorola CE, Copyright 2006”OK (checking the specifications)AT+GMM Display the name of the FOMA terminal.ーAT+GMM+GMM : “GSM900”,“GSM1800”,“GSM1900”,“WCDMA”,“MODEL=M2501 HIGH-SPEED”OK (checking the specifications)AT+GMR Display FOMA terminal’sversion.ーAT+GMR+GMR : “M2501 HIGH-SPEED_12_34.56.78”OKAT+IFC=<n>,<m>[&F] [&W][?] [=?]Set the local flow control method between the PC and the FOMA terminal.n : DCE by DTE controln=0 : No flow control.n=1 : XON/XOFF control.n=2 (default) : RS/CS (RTS/CTS) flow control.m : DTE by DCE control.m=0 : No flow control.m=1 : XON/XOFF control.m=2 (default) : RS/CS (RTS/CTS) flow control.AT+IFC=2,2OKAT+WS46=<n>[&F] [&W][?] [=?]Set the wireless network to be used by the FOMA terminal when dialing.n=12 : GSMn=22 : 3G (WCDMA)n=25 : Auto switchAT+WS46?25OKATA The FOMA terminal processes the incoming according to the receiving mode.ーRINGATACONNECTA/ Retry a command just before performing. ーA/OKAT Command Overview Parameters/Description Command ExamplesAT Command ListContinued on the next page](https://usermanual.wiki/Motorola-Mobility/T6FL1.Exhibit-8-Users-Manual-1/User-Guide-700344-Page-47.png)
![46Setting UpATD Start packet communication or 64K data communication.Packet communication : ATD*99***<cid>#<cid> X to X : +CGDCONT64K data communication : ATD <phone number>Packet communication : ATD*99***1#CONNECT64K data communication : ATD XXXXXXXXXXCONNECTATE <n>[&F] [&W]Set whether to echo back the text sent from a PC.n=0 : Not to echo back.n=1 (default) : Echo back.ATE1OKATH <n> Disconnect packet communication or 64K data communication.n=0 : Disconnect line (can be skipped).(In communication)+++ATHOKATI <n> Display the confirmationcode.n=0 : Display “NTT DoCoMo”.n=1 : Display the name of the FOMA terminal (same as +GMN).n=2 : Display the FOMA terminal version (same as +GMR).n=3 : Display “OK”.n=4 : Display the details of a function, that can be controlled by DTE, in 0 - 15. →P48ATI0NTT DoCoMoOKATM Set the monitor speaker mode. (checking the specifications)(checking the specifications) ATMOOKATO Switch from On-line command mode to Off-line command mode during communication.ーATOCONNECTATQ <n>[&F] [&W]Set whether to display the result code on a PC.n=0 (default) : Show result codes.n=1 : Hide result codes.ATQ0OKATQ1(OK is not displayed)ATS0=<n>[&F] [&W][?]Set number of rings until FOMA terminal receives connection automatically.n=0 (default) : No auto receive is performed.n=1 to 255 : Number of rings.ATS0=0OKATS2=<n>[&F] [?]Set the escape character. n=0 to 127 (default n=43) : If set to n=127, the escape process becomes invalid.ATS2=43OKATS3=<n>[&F] [?]Set the return character (CR) to recognize the end of AT command text string.n=13 (default) : only n=13 can be specified.ATS3=13OKATS4=<n>[&F] [?]Set the line feed character. It is positioned next to the return character (CR) if displaying the result code in alphanumeric characters.Only n=10 (default) can be specified.ATS4=10OKATS5=<n>[&F] [?]Set the back space character (BS) to delete the last character in the input buffer while AT commands are entered.Only n=8 (default) can be specified.ATS5=8OKAT Command Overview Parameters/Description Command ExamplesAT Command List](https://usermanual.wiki/Motorola-Mobility/T6FL1.Exhibit-8-Users-Manual-1/User-Guide-700344-Page-48.png)
![47Setting UpATS6=<n>[&F] [?]Set the pause time (in seconds) until dialing. When this command is used, the register is set but does not operate.n=2 to 10 (Default n=5) ATS6=5OKATS7=<n>[&F] [&W][?]Set the maximum waiting time (in seconds) from the starting of packet communication or 64K data communication until the connection is established.n=1 to 255 (default n=60) : However, the values between 121 to 255 are regarded as 120.ATS7=60OKATS8=<n>[&F] [?]Set the pause time (in seconds) until comma dialing. When this command is used, the register is set, but the pause time remains 3 seconds.n=0 : Does not pausen=1 to 255 (default n=3) :ATS8=3OKATS10=<n>[&F] [&W][?]Set the delay time (1/10 seconds) of auto disconnect. When this command is used, the register is set, but does not operate.n=1 to 255 (Default n=1) ATS10=1OKATS30=<n>[&F] [?]Set the timeout (in minutes) before communication is disconnected if there is no data exchange during 64K data communication.n=0 (Default) : Does not disconnect.n=1 to 255 : Time (in minutes) before disconnection.ATS30=0OKATS103=<n>[&F] [?]In 64K data communication, set the delimiter when dialing with a destination sub-address.n=0 : *(Asterisk).n=1 (Default) : / (Slash).n=2 : ¥ or back slash.ATS103=0OKATS104=<n>[&F] [?]In 64K data communication, set the delimiter when dialing with an originating sub-address.n=0 : # (Sharp).n=1 (Default) : % (Percent).n=2 : & (and).ATS104=0OKATV<n>[&F] [&W]Set the display method of the result code.n=0 : Display in numeric characters.n=1 (Default) : Display in text.ATV1OKATX<n>[&F] [&W]Set to detect the busy tone and dial tone, and to display the communication speed.n=0 : Not to detect busy tones, not to detect dial tones, not to display speed.n=1 : Not to detect busy tones, not to detect dial tones, display speed.n=2 : Not to detect busy tones, detect dial tones, not to display speed.n=3 : Detect busy tones, not to detect dial tones, display speed.n=4 (Default) : Detect busy tones, detect dial tones, display speed.ATX1OKAT Command Overview Parameters/Description Command ExamplesAT Command ListContinued on the next page](https://usermanual.wiki/Motorola-Mobility/T6FL1.Exhibit-8-Users-Manual-1/User-Guide-700344-Page-49.png)