Motorola Mobility T6FL1 PCS GSM Transceiver PCMCIA Card User Manual M2501 Electra E M2501 00 0Hyo2 E
Motorola Mobility LLC PCS GSM Transceiver PCMCIA Card M2501 Electra E M2501 00 0Hyo2 E
Contents
- 1. Exhibit 8 Users Manual 1
- 2. Exhibit 8 Users Manual 2
Exhibit 8 Users Manual 2
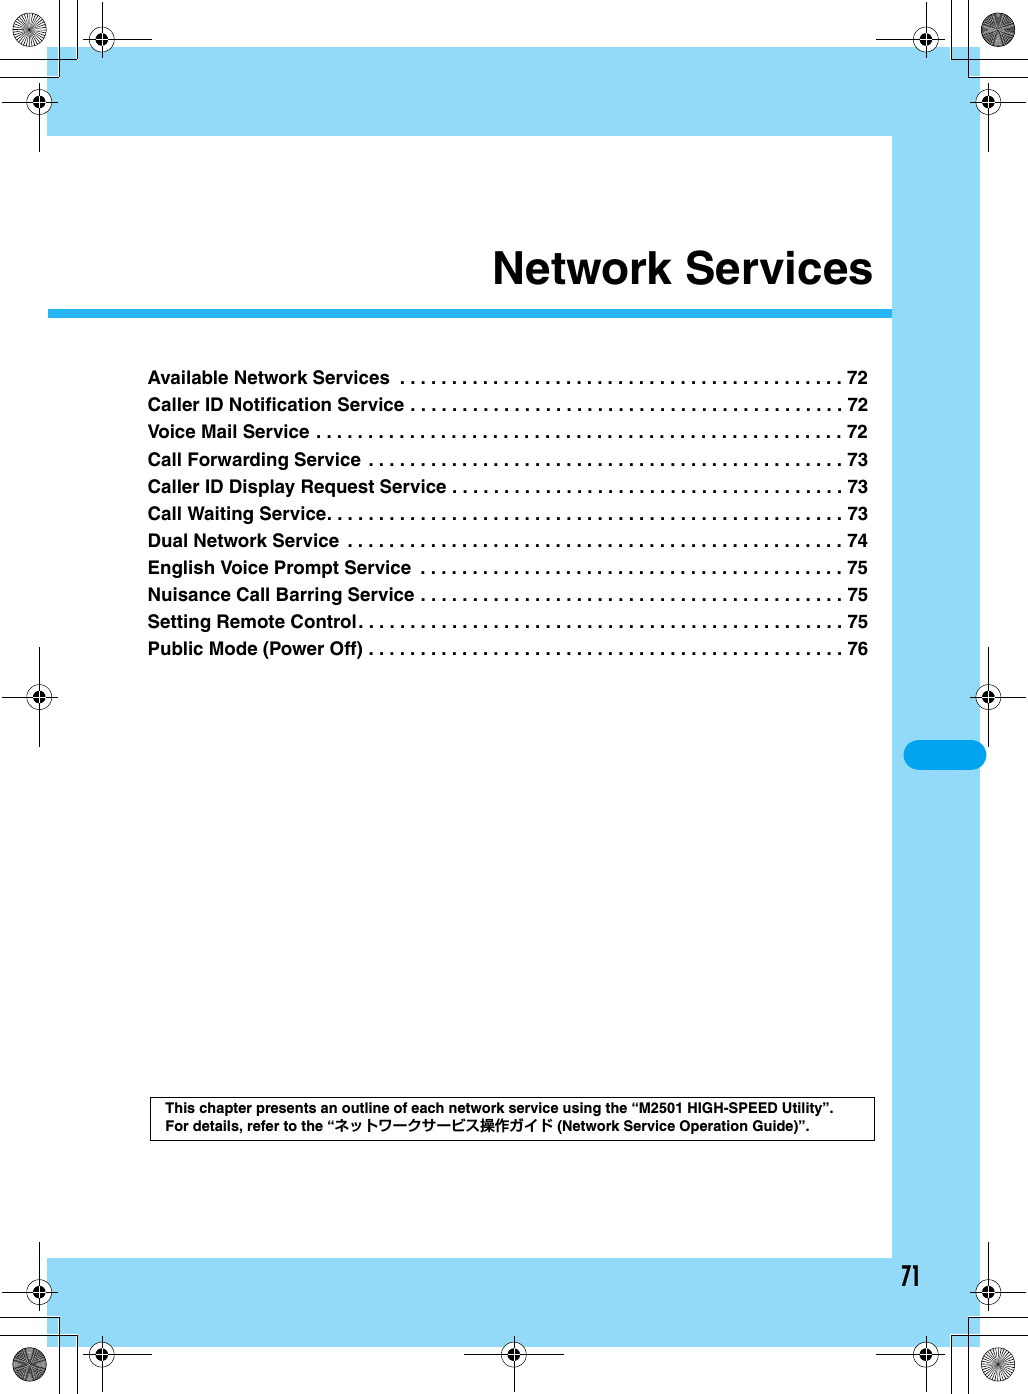
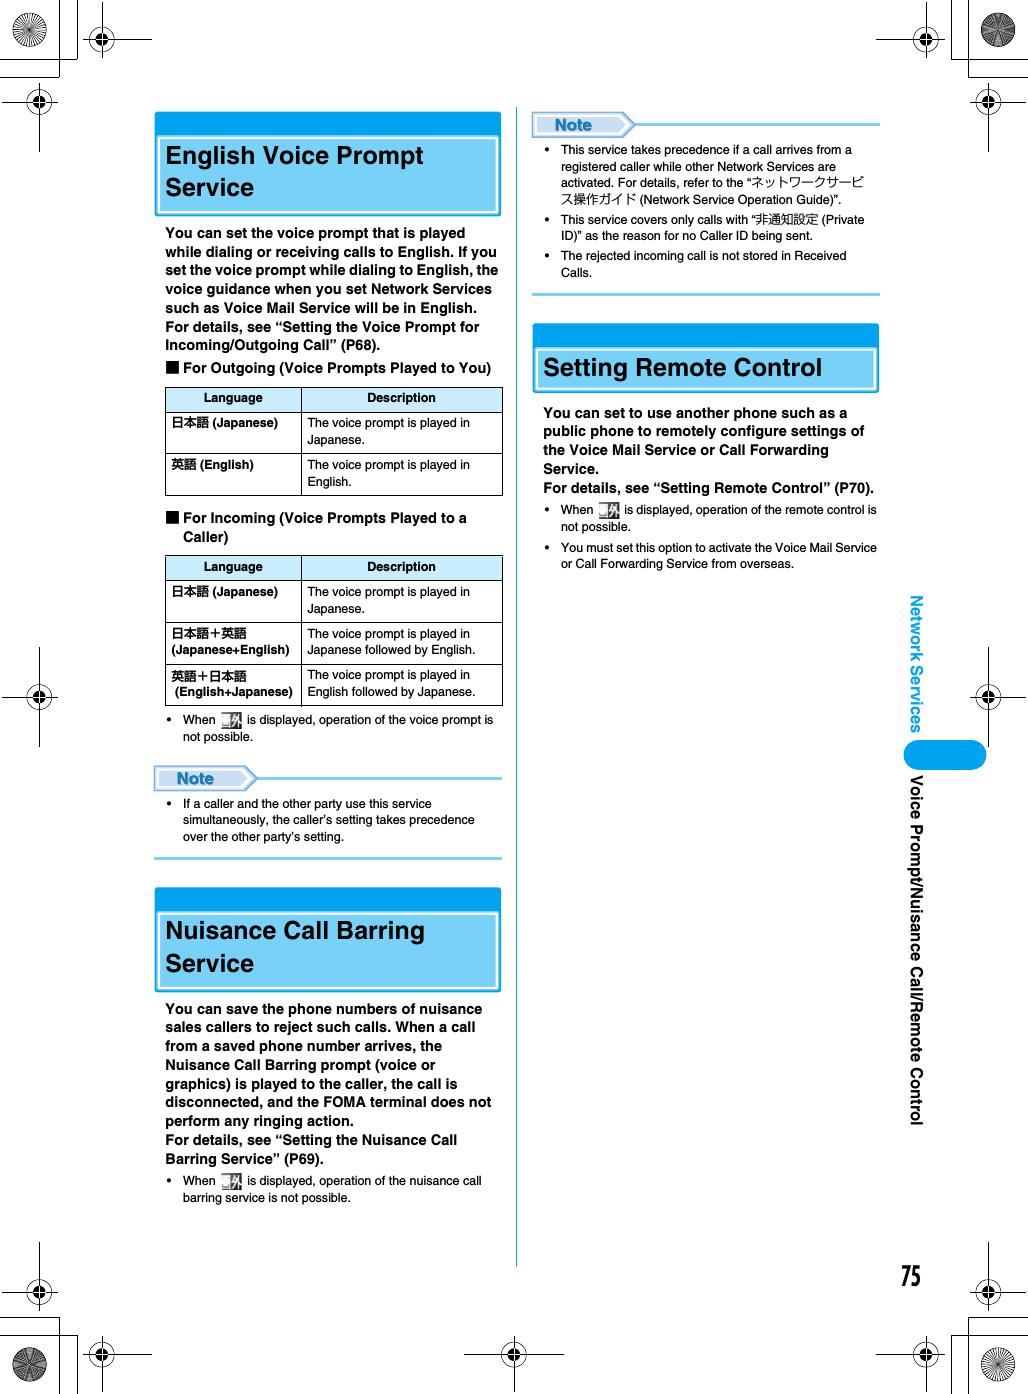
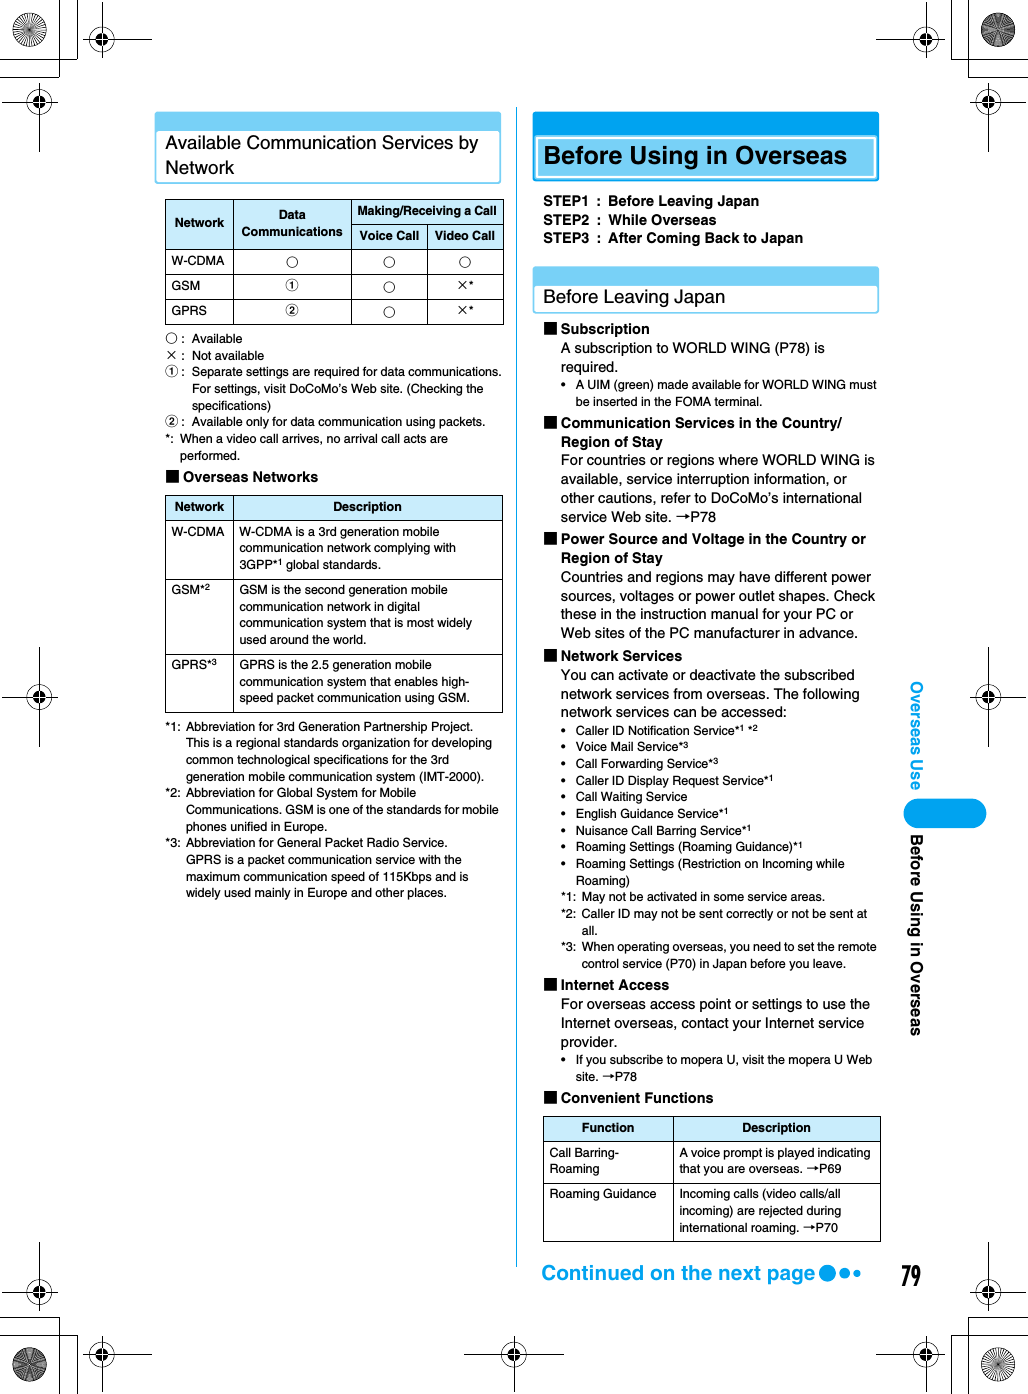
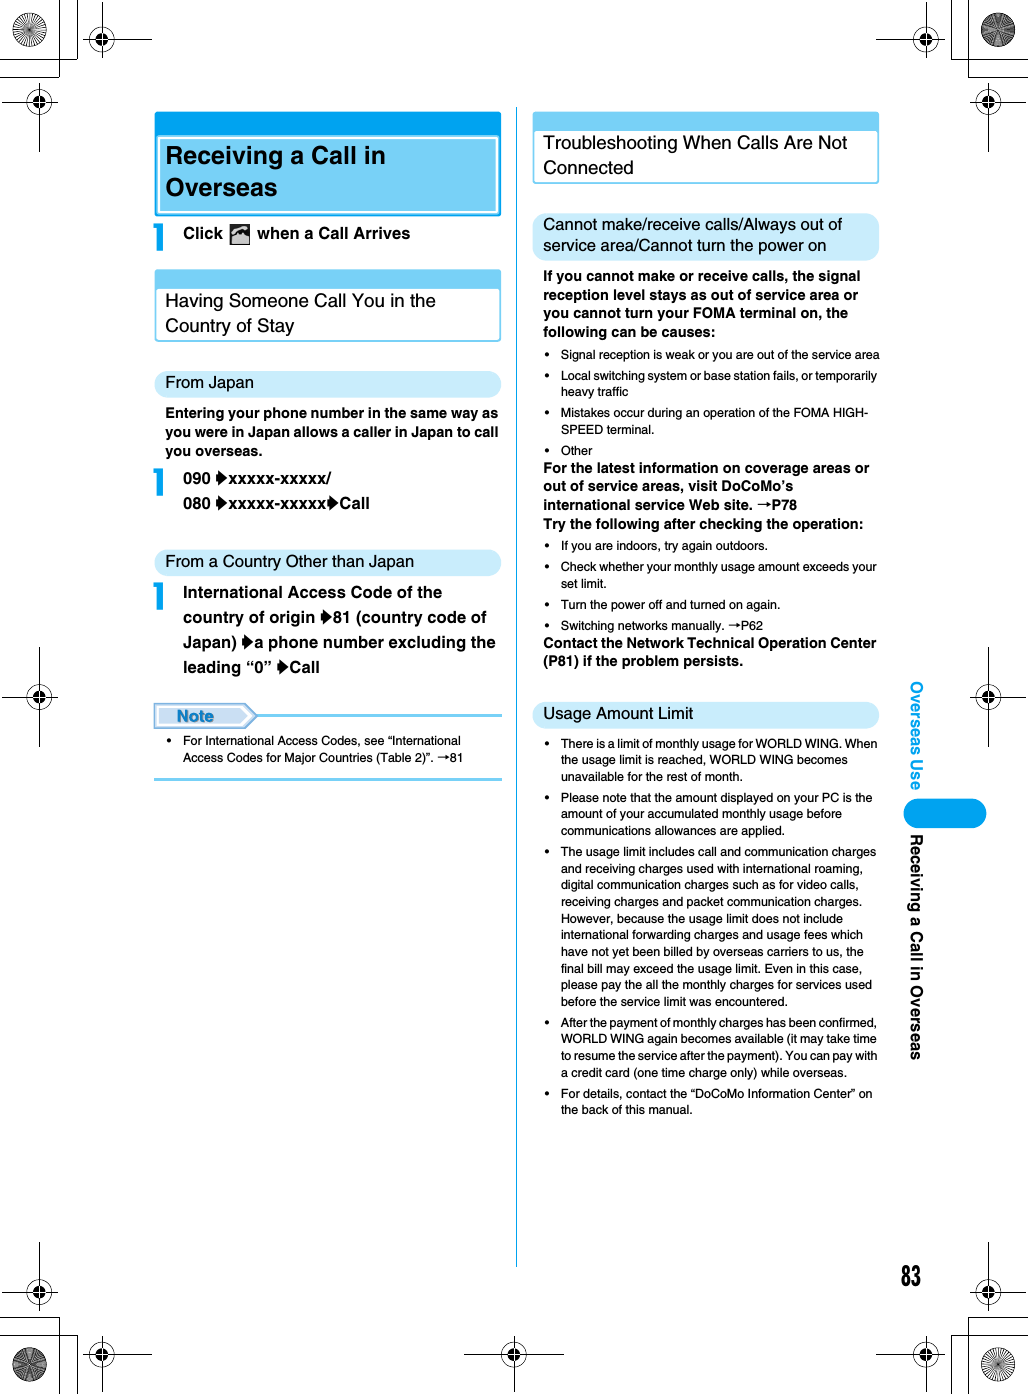
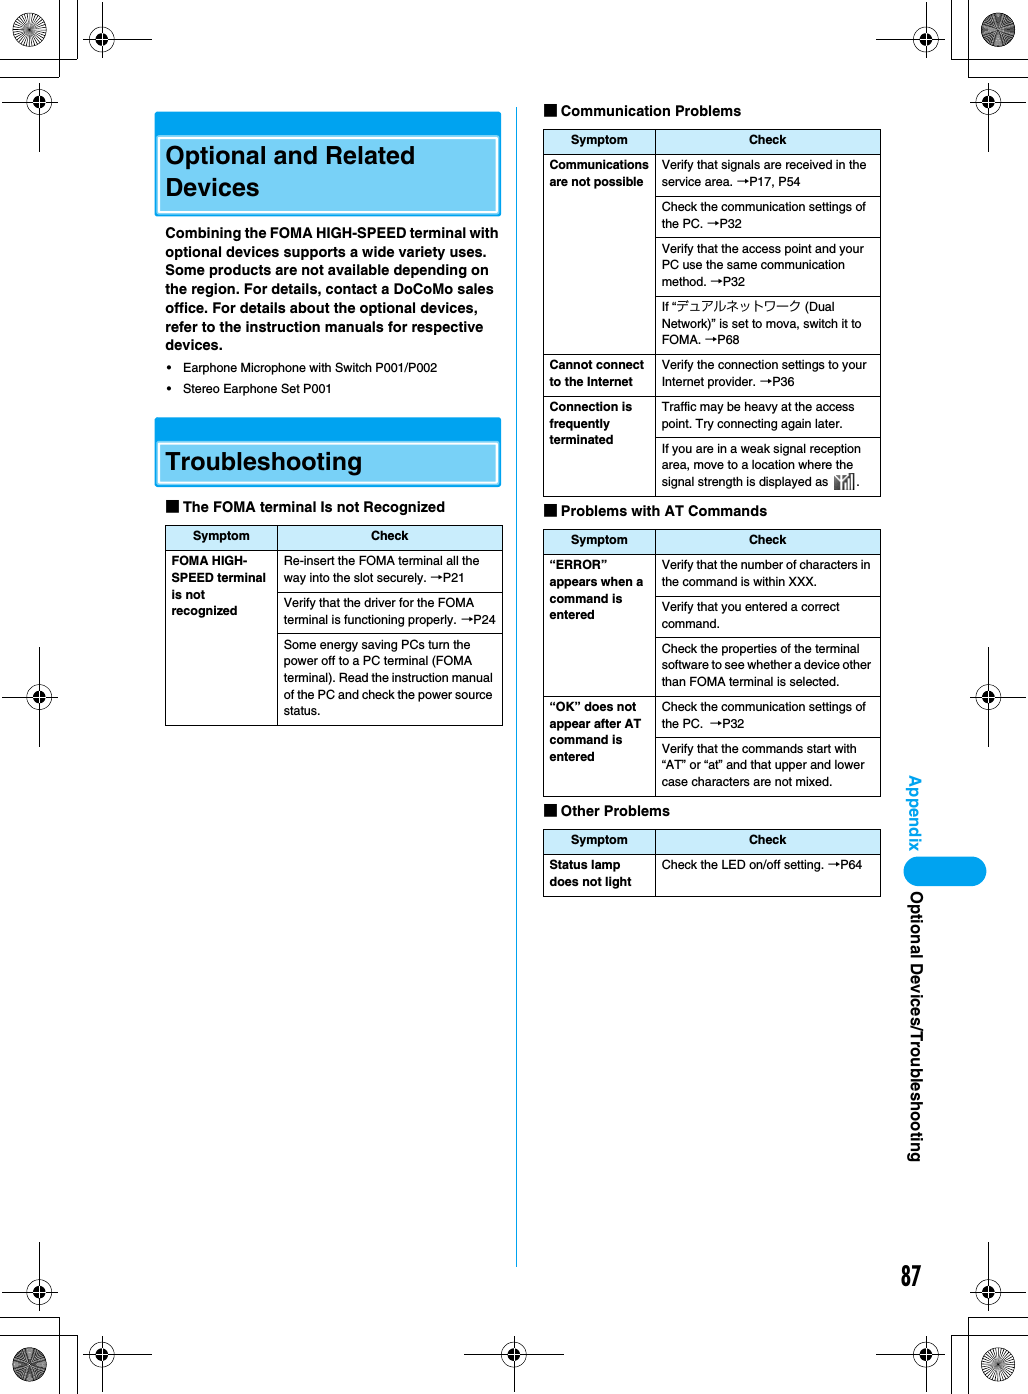
![49Setting UpSupplementary Explanation of AT Commands■Command name : +CGDCONT• OverviewSet APN when sending packet connection.•Form+CGDCONT=[<cid>[,“<PDP type>” [ ,“<APN>”] ] ]• Parameter descriptionsSet APN when sending Packet communication. See examples in command operation lists<cid>* : X to X<PDP type>* : PPP or IP<APN>* : Optional*: <cid> is the number used to control the destination (APN) for the Packet communication to be registered in FOMA terminal. X to X can be registered.<PDP type> is a protocol for packet communication.<APN> is optional connection name that indicates each destination.• Operation without parameterAT+CGDCONT=<cid> : Set specified <cid> as defaultAT+CGDCONT=? : Display list of values that can be configuredAT+CGDCONT=? : Display list of values that can be configured• Command examplesRegistered APN named abc (When PDP type is “PPP” and cid=3)AT+CGDCONT=3,“PPP”,“abc”OK* This command, which is a setting command, is not stored in the nonvolatile memory written by [&W] and is not reset by [&F] and [Z], either.■Command name : +CGEQMIN=[Parameter]• OverviewRegister criteria value to determine if QoS sent from network when Packet communication established is permitted.•Form+CGEQMIN=[<cid>[,,<Maximum bit rate UL>[,<Maximum bit rate DL>] ] ]• Parameter description<cid>* : X to X<Maximum bit rate UL>* : None (default) or 64<Maximum bit rate DL>* : Non (default) or 384*: <cid> is the number used to control the destination (APN) for the Packet communication to be registered in FOMA terminal. X to X can be registered.In <Maximum bit rate UL> and <Maximum bit rate DL>, the minimum connection speed [Kbps] is set for both upload and download traffic between FOMA terminal download traffic between FOMA terminal and the base station. If the parameter is set to None (default), all speeds are permissible.If 64 and 384 are set, any communication at a speed except the above limit is not permitted, and the Packet communication will not be connected.• Operation without parameterAT+CGEQMIN= :Set all <cid> as default valueAT+CGEQMIN=<cid> : Set specified <cid> as default value• Command examples(1) Command used to permit all speed both upload and download both upload and download (when<cid>=2)AT+CGEQMIN=2OK(2) Command used to permit only 64Kbps upload and 384Kbps download (when<cid>=2)AT+CGEQMIN=2,,64,384OK(3) Command used to permit 64Kbps upload and all speed download (when<cid>=3)AT+CGEQMIN=3,,64OK(4) Command used to permit all speed upload and only 384Kbps download (when<cid>=3)AT+CGEQMIN=3,,,384OK* This command, which is a setting command, is not stored in the nonvolatile memory written by [&W], and is not reset by [&F] and [Z], either.■Command name : +CGEQREQ=[Parameter]• OverviewSets up QoS request to the network when Packet communication is established.•Form+CGEQREQ=[<cid>[,,<Maximum bit rate UL>[ ,<Maximum bit rate DL>] ] ]• Parameter Description<cid>* : X to X<Maximum bit rate UL>* : None (default) or 64<Maximum bit rate DL>* : None (default) or 384*: <cid> is the number used to control the destination (APN) for the Packet communication to be registered in FOMA terminal.1 to 3 can be registered to FOMA terminal.In <Maximum bit rate UL> and <Maximum bit rate DL>, the minimum connection speed [in Kbps] is set for both upload and download traffic between FOMA terminal and the base station. If the parameter is set to None (default), all speeds are permissible.If 64 and 384 are set, any connection at a speed except the above limit is not permitted, and the Packet communication will not be connected.• Operation without parameterAT+CGEQREQ=<cid> : Set all <cid> as default.AT+CGEQREQ=<cid> : Set specified <cid> as default.• Command examplesCommand used to require 64Kbps upload and 384Kbps download (when<cid>=3)AT+CGEQREQ=3,,64,384OKAT Command ListContinued on the next page](https://usermanual.wiki/Motorola-Mobility/T6FL1.Exhibit-8-Users-Manual-2/User-Guide-700345-Page-2.png)
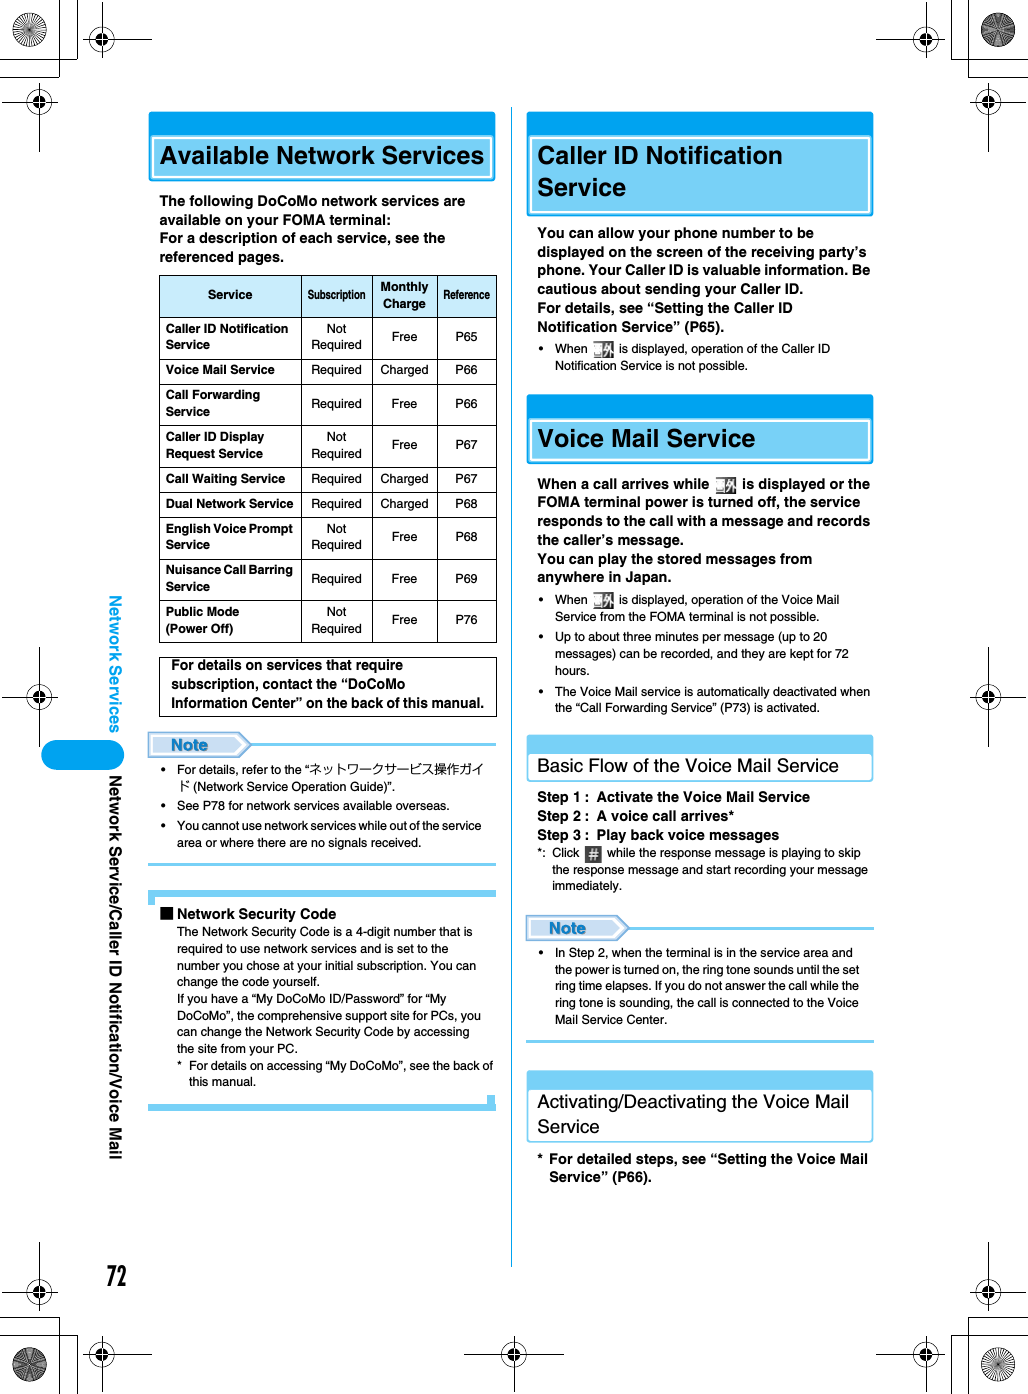
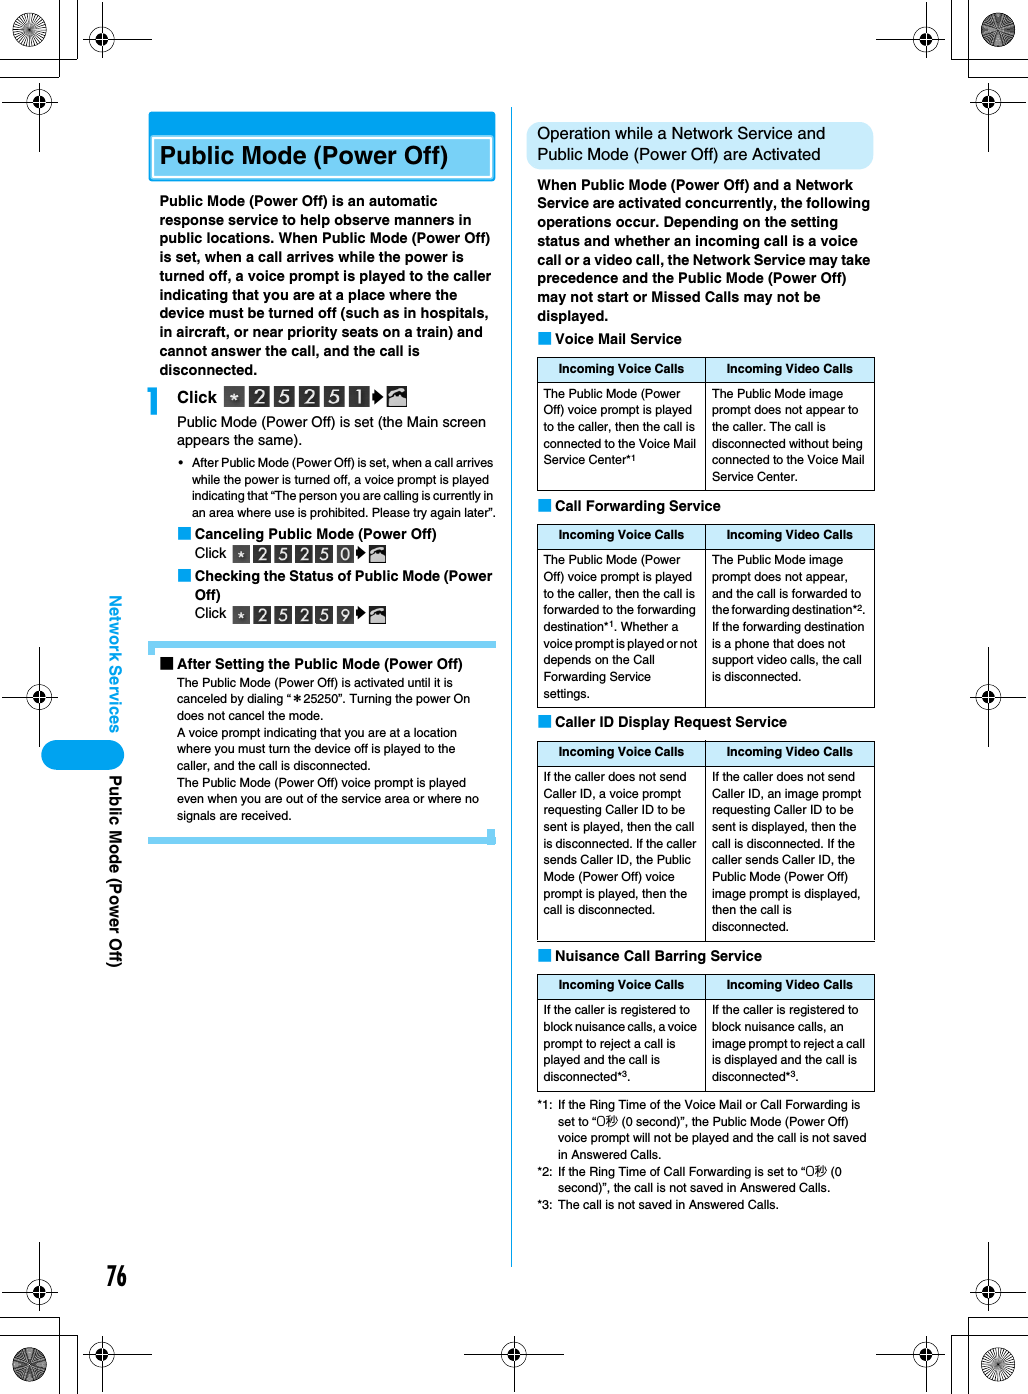
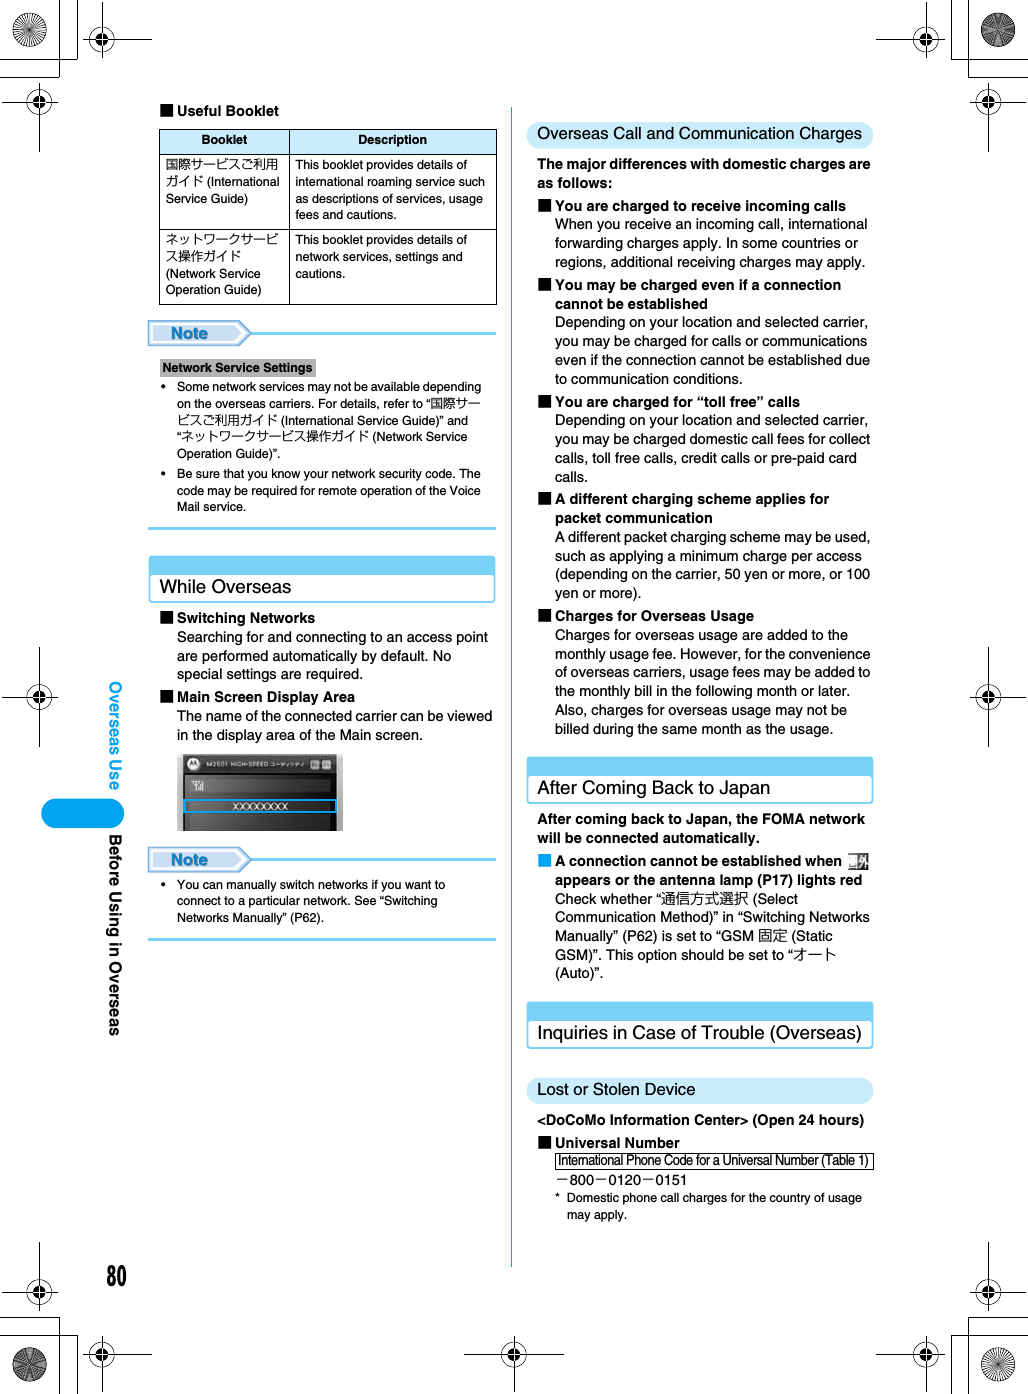
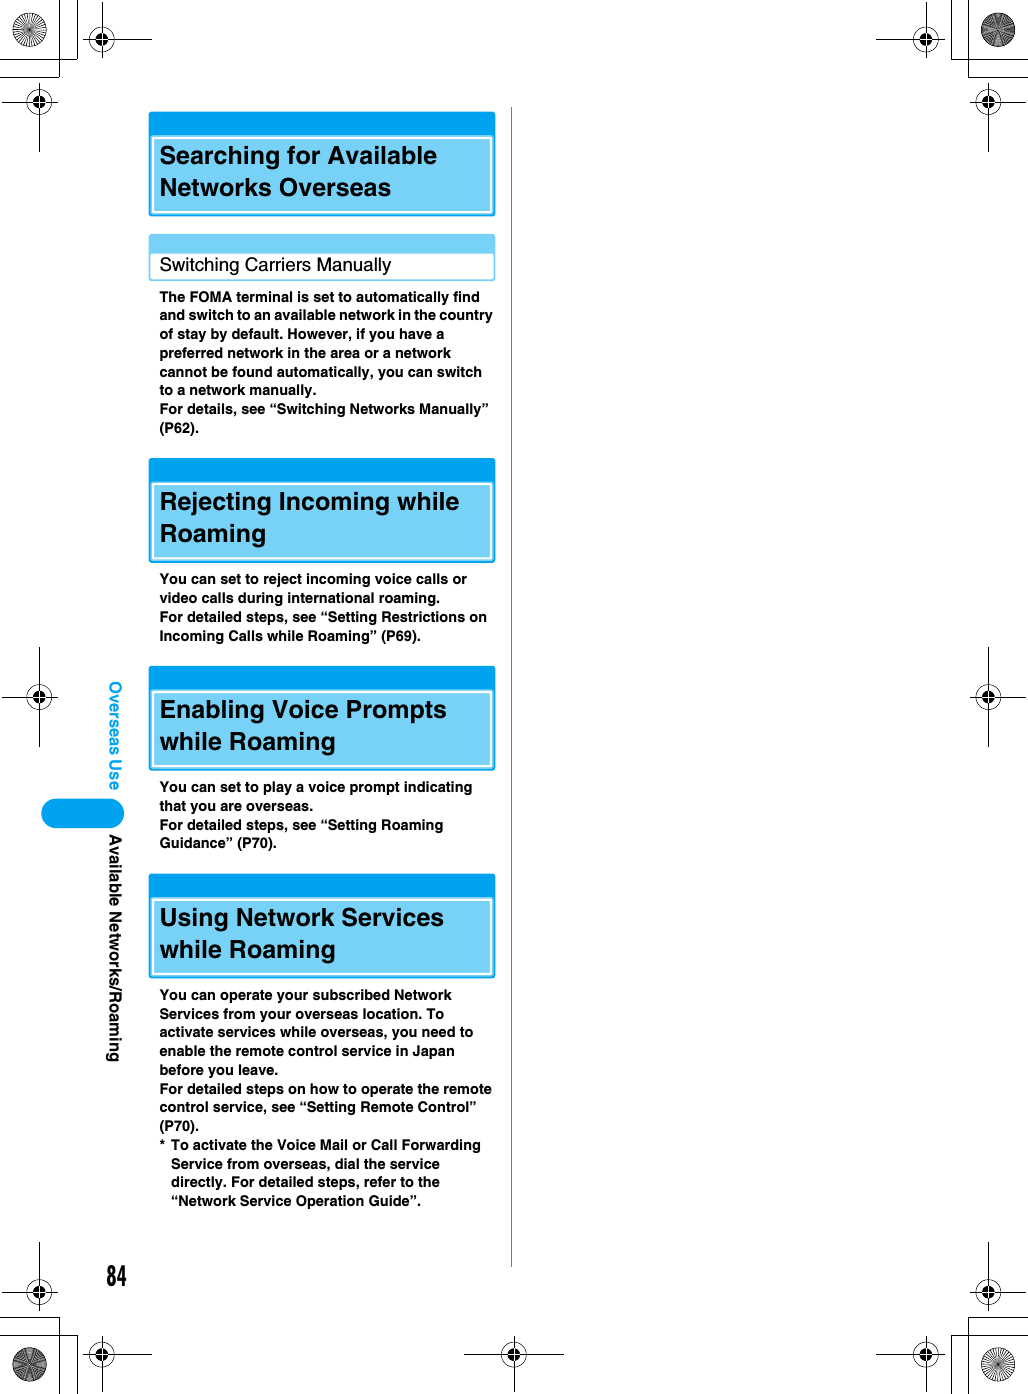
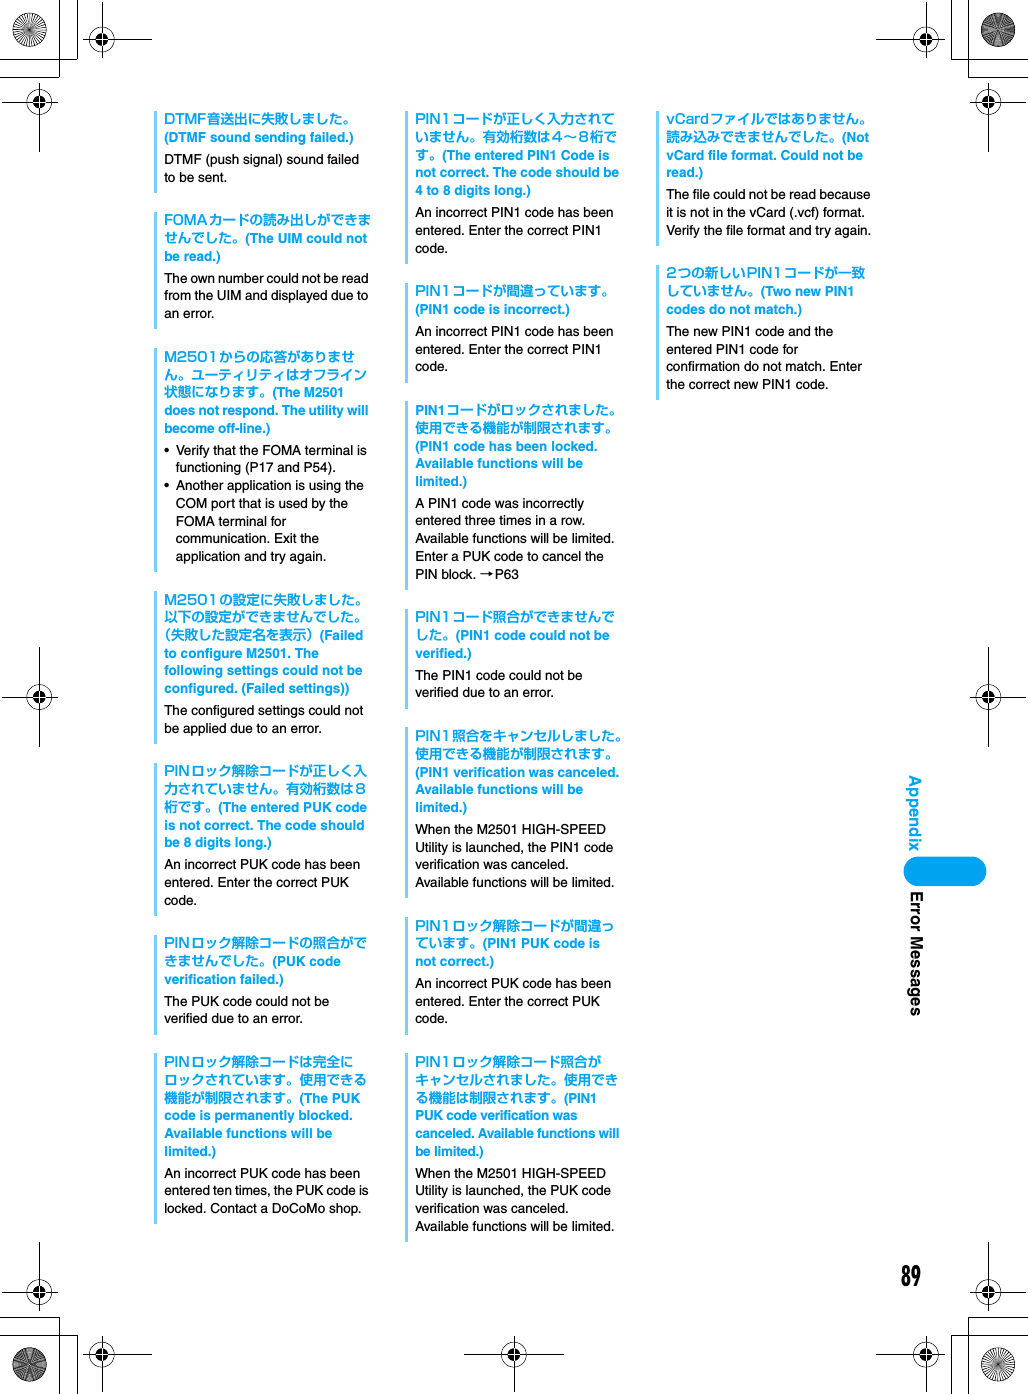
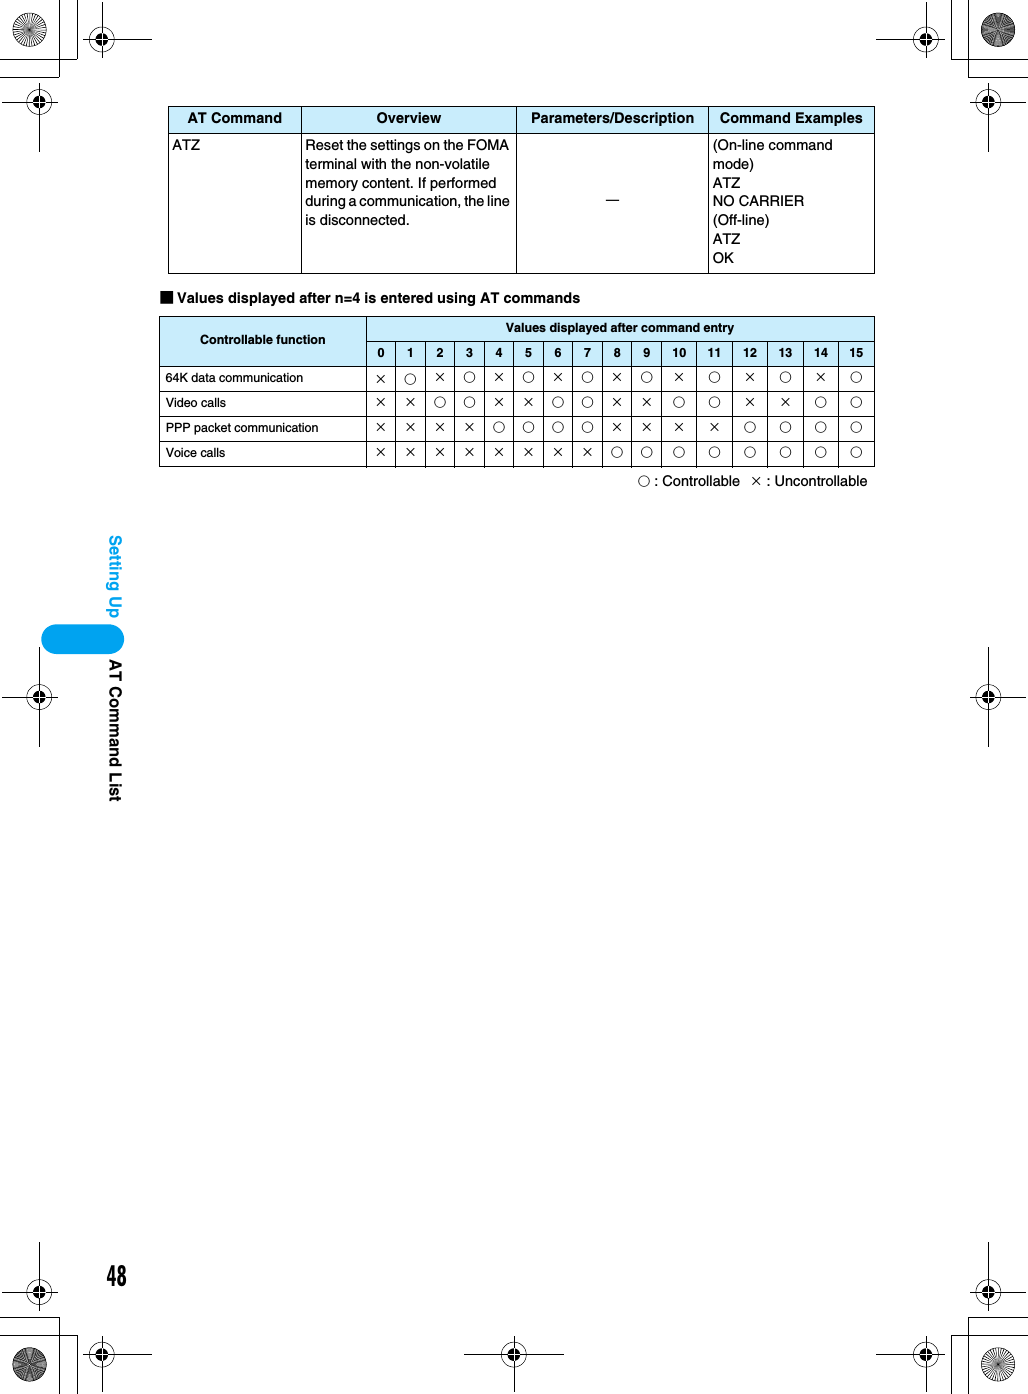
![50Setting Up* This command, which is a setting command, is not stored in the nonvolatile memory written by [&W], and is not reset by [&F] and [Z], either.List of Reasons of Disconnection(Checking the specification)Result Codes■List of Result Code■Extended Result CodesWhen &E0Show the connection speed between the FOMA terminal and the base.When &E1■Communication Protocol Result Codes■Examples of Displayed Result CodesWhen ATX0 is setRegardless of the AT Commands (P46) settings, only CONNECT is displayed after connection is established.Example of text display : ATD*99***1# CONNECTExample of numeric display : ATD*99***1#1When ATX1 is set• When ATX1, AT¥V0 is set (default)Display in the format of CONNECT <Speed between FOMA and PC> after the connection is established.Example of text display:ATD*99***1# CONNECT 460800Example of numeric display:ATD*99***1# 121• When ATX1, AT¥V1 is setDisplay in the following format after the connection is established.CONNECT <Speed between FOMA and PC> PACKET <Destination APN>/<Maximum uplink speed (between FOMA terminal→Base)> / <Maximum downlink speed (between FOMA terminal←Base)>Example of text display:ATD*99***1# CONNECT 46080 PACKET mopera.ne.jp/64/384 (which means connection is established with mopera.ne.jp/64/384mopera.ne.jp/64/384.)Example of numeric display:ATD*99***1# 1215* If ATX1 and AT¥V1 are set concurrently, a dial-up connection may not be executed correctly. It is recommended to use only AT¥V0.No. Text display Description0 OK Operation performed properly.1 CONNECT Connected to the other party.2 RING Incoming call.3 NO CARRIER Line disconnected.4 ERROR Unable to accept command.6 NO DIAL TONE Unable to detect dial tone.7BUSY Detect busy tone. (Applied only when dialing by circuit switching.)8 NO ANSWER Completed connection timeout.100 RESTRICTION Network use is restricted.101 DELAYED Redial is delayed because of restrictions.Numeric display Text display Connection speed121 CONNECT 32000 32000bps122 CONNECT 64000 64000bps125 CONNECT 384000 384000bps133 CONNECT 3648000 3648000bpsNumeric display Text display Connection speed5 CONNECT 1200 1200bps10 CONNECT 2400 2400bps11 CONNECT 4800 4800bps13 CONNECT 7200 7200bps12 CONNECT 9600 9600bps15 CONNECT 14400 14400bps16 CONNECT 19200 19200bps17 CONNECT 38400 38400bps18 CONNECT 57600 57600bps19 CONNECT 115200 115200bps20 CONNECT 230400 230400bps21 CONNECT 460800 460800bpsNumeric displayText display Connection speed1PPPoverUD Connection with 64K data communication3AV64K Connection with video call (64K) communication5PACKET Connection with packet communicationAT Command List](https://usermanual.wiki/Motorola-Mobility/T6FL1.Exhibit-8-Users-Manual-2/User-Guide-700345-Page-3.png)
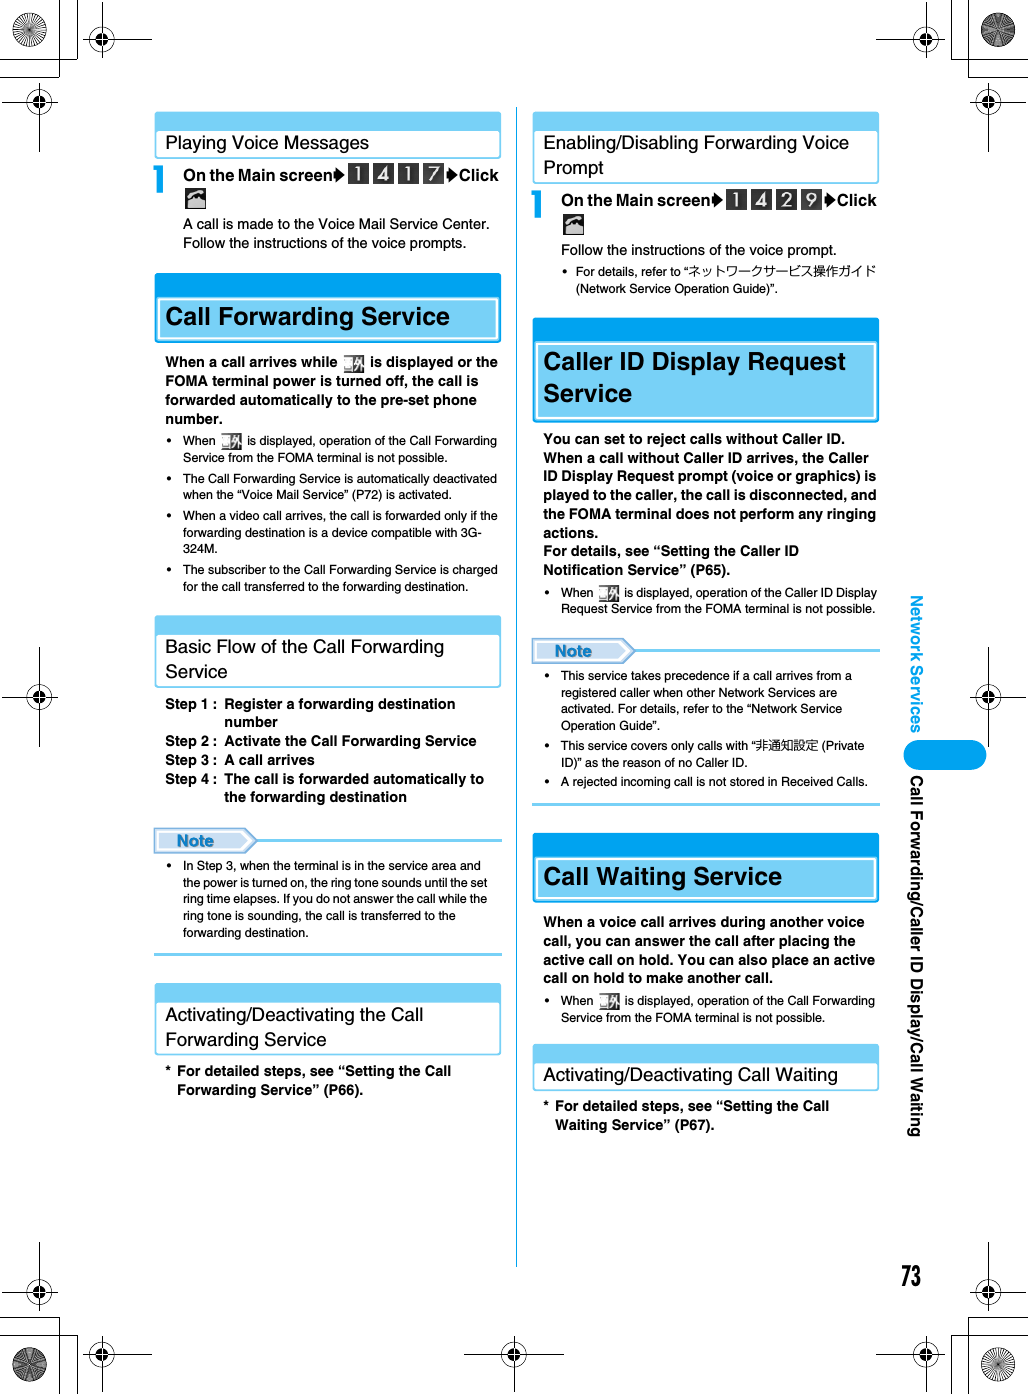
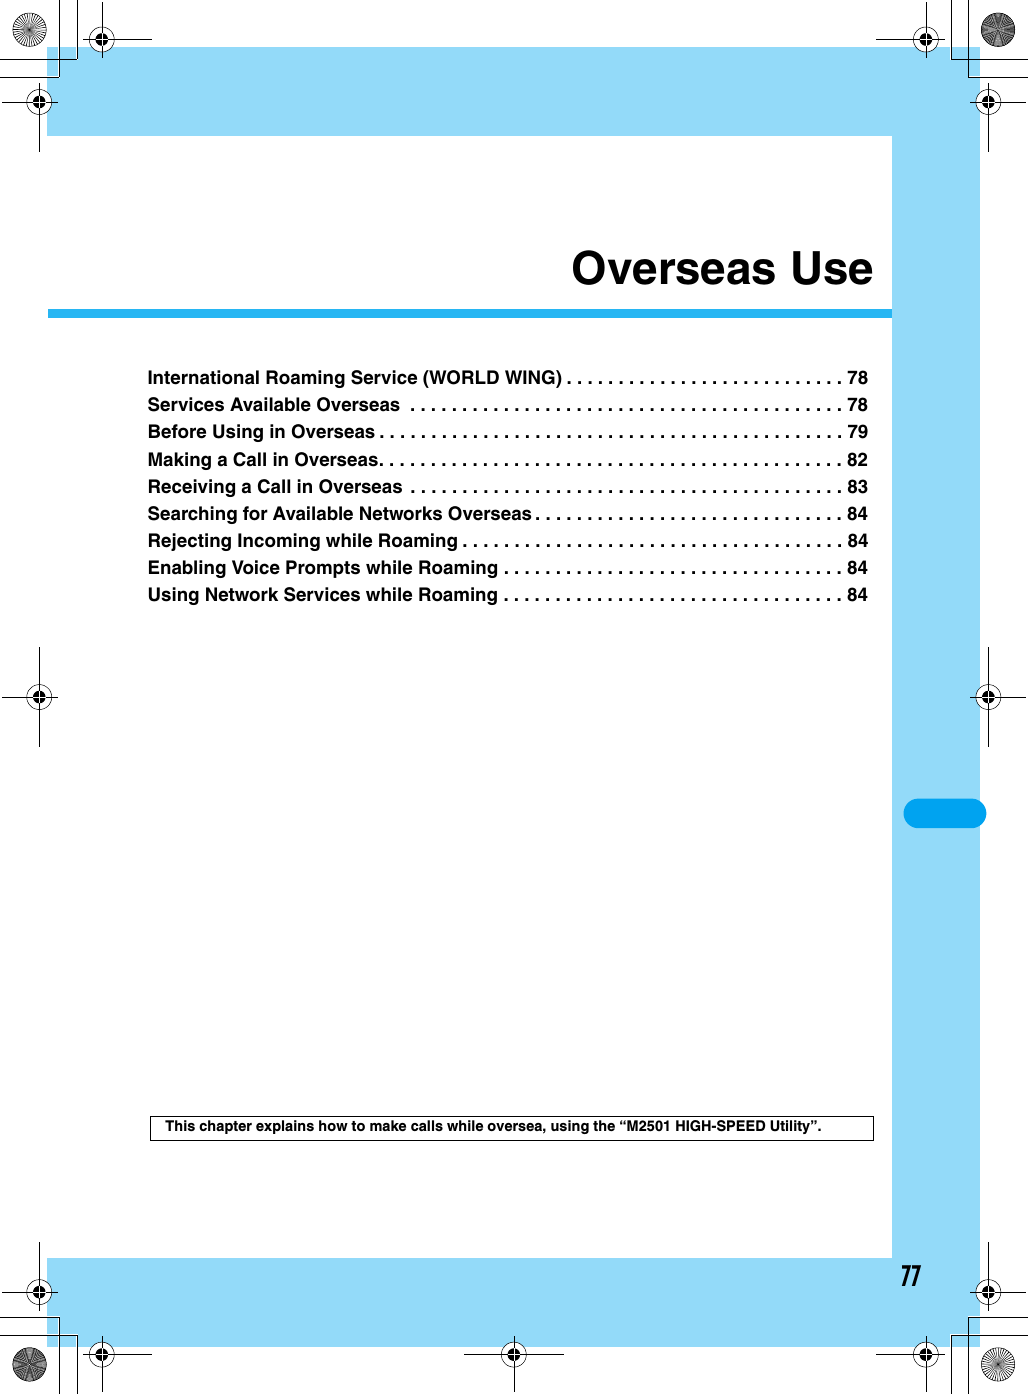
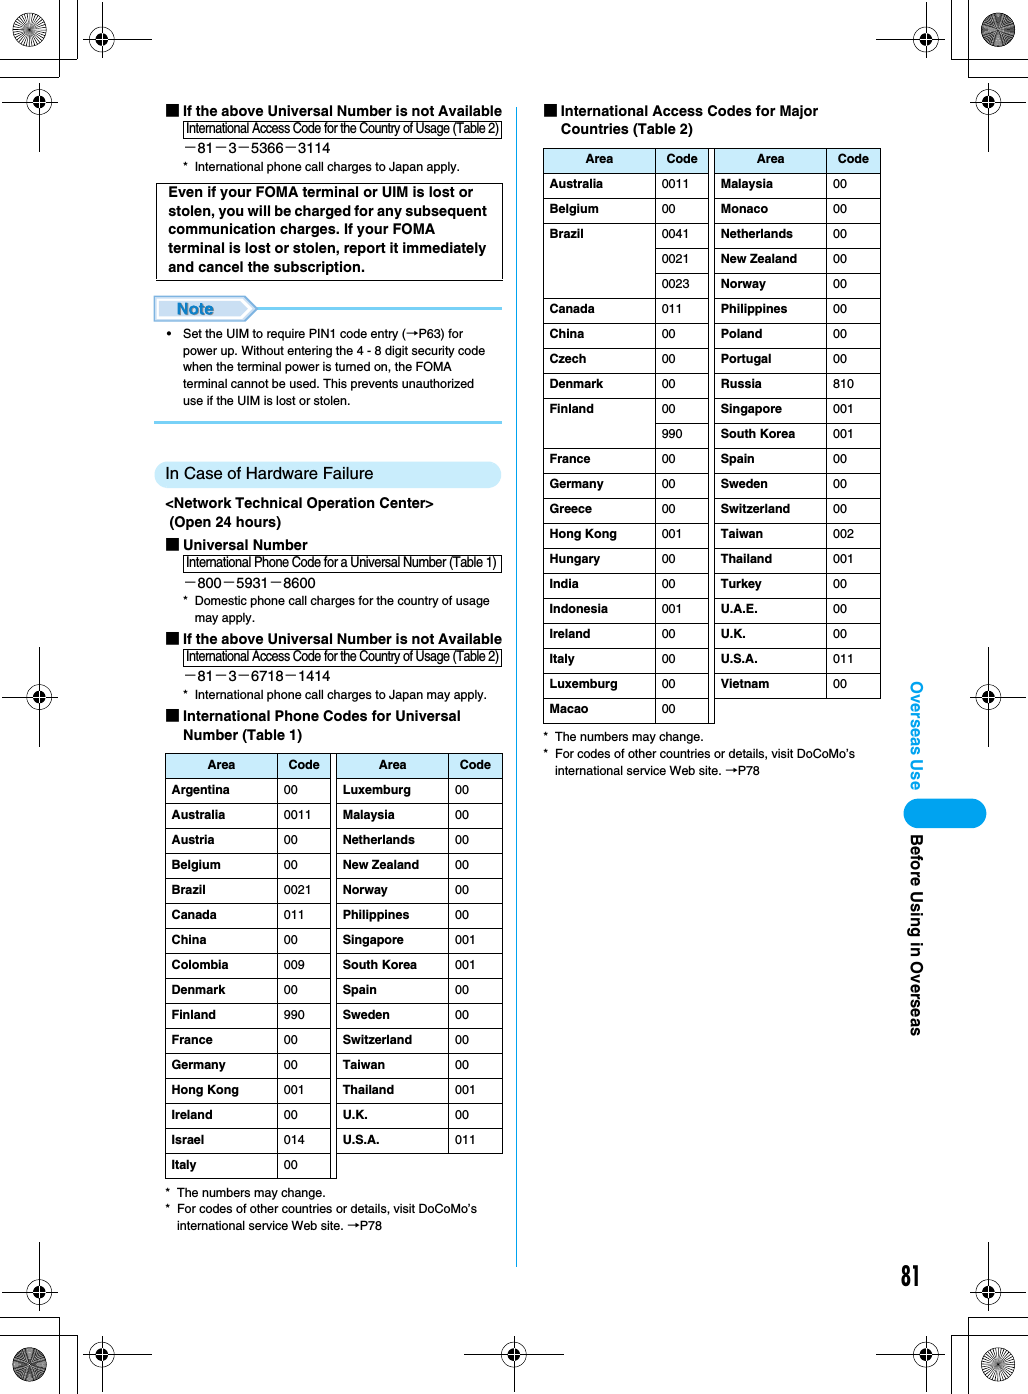
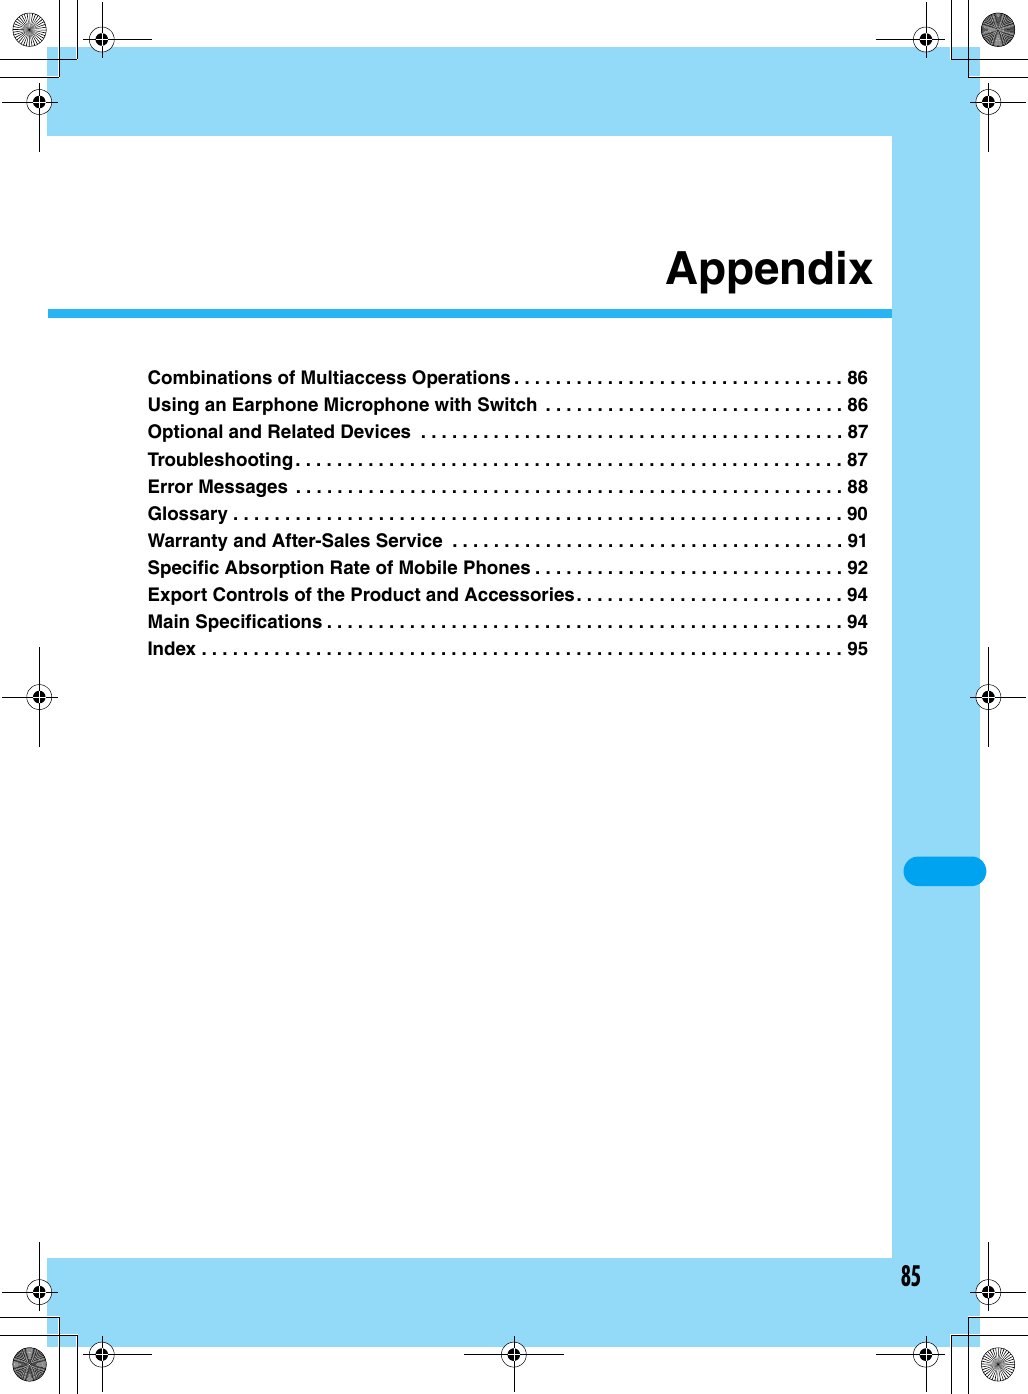
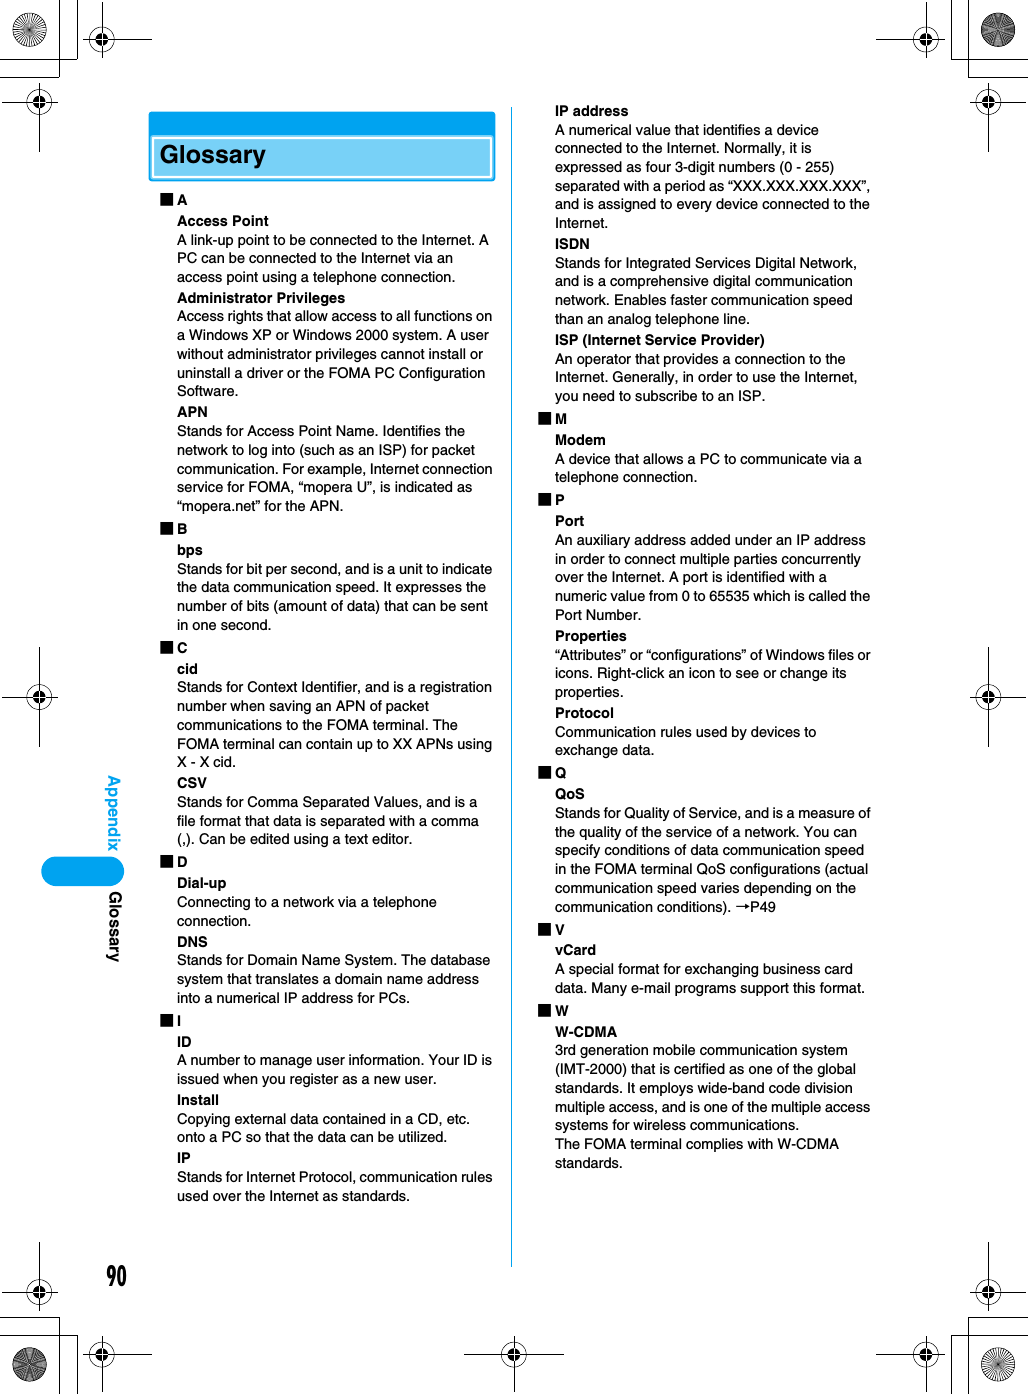
![52Utility SoftwareM2501 HIGH-SPEED UtilityFollowing functions are available using the M2501 HIGH-SPEED Utility:Operating EnvironmentsThe M2501 HIGH-SPEED Utility requires the following operating environments:*1: Japanese Version Service Pack 4 or later*2: Japanese Version Service Pack 1 or later• Required memory or available hard disk space may vary depending on the system environment.• Depending on the operating environment, the software may not work. DoCoMo does not respond to any inquiries about the usage, guarantee proper operation, nor is responsible for proper operation under operating environments other than the above.• DoCoMo does not guarantee the operation under the supported OS if the OS is changed through upgrade.Installing the FOMA M2501 HIGH-SPEED UtilityInstalling• The screen images shown in this section are typical for Windows XP. Your PC may have different screen images.• Log into a user account with the Administrator or PC supervisor privileges. An error occurs if you log into an account without these privileges. For details on setting up Administrator or PC supervisor privileges, contact your computer manufacturer or Microsoft Corporation.aStart Windows and insert the FOMA M2501 HIGH-SPEED CD-ROMbClick [スタート (Start)]y“ファイル名を指定して実行 (Select file name and run)”cClick [Browse (参照)] to specify the file setup.exe, then click [OK]• Specify the file “<CD-ROM ドライブ名 (CD-ROM drive letter)>¥Utility¥XXX/setup.exe” (the CD-ROM drive name varies depending on settings of PCs).Making/Receiving Voice Calls →P56, P58You can make or receive voice calls overseas as well as in Japan.Redial/Received Calls →P57, P58You can easily make calls using Redial or Received Calls.Phonebook →P59You can store a phone number in Phonebook and easily make calls.Network Services →P65You can use network services such as Voice Mail and Call Forwarding services.Item RequirementPC Main Unit PC-AT CompatiblePC Card Slot (Type II)OS Windows 2000 Professional*1, Windows XP Professional/Home Edition*2Required Memory128Mb or moreHard Disk Space50Mb or more available spaceDisplay 800 x 600 pixels or more recommendedSound Sound function and speakerScreen to be replacedM2501 HIGH-SPEED Utility](https://usermanual.wiki/Motorola-Mobility/T6FL1.Exhibit-8-Users-Manual-2/User-Guide-700345-Page-5.png)
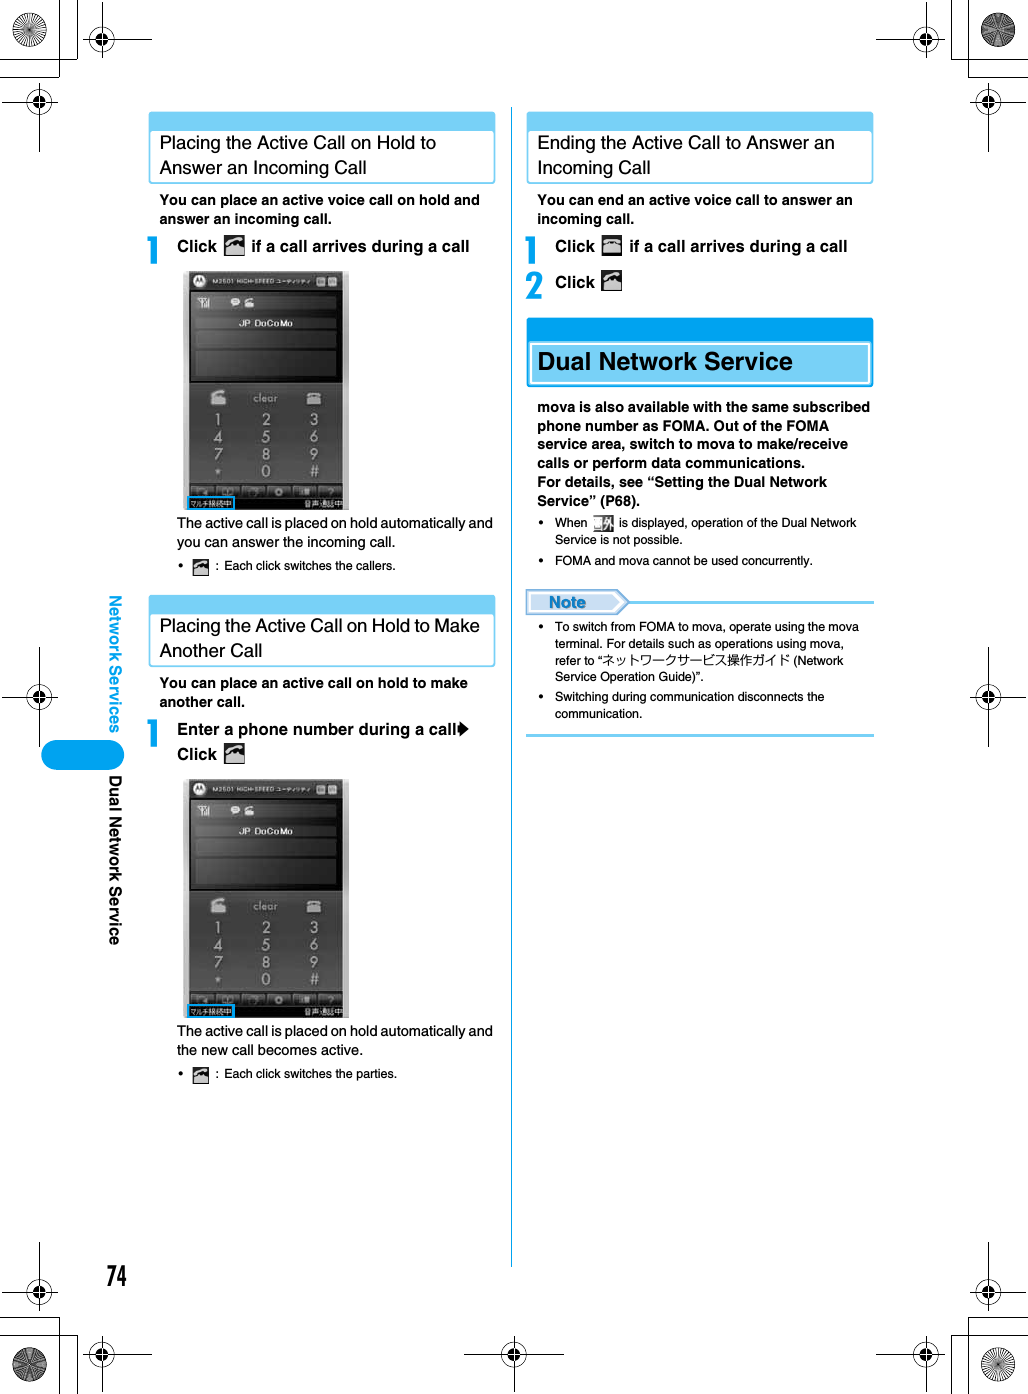
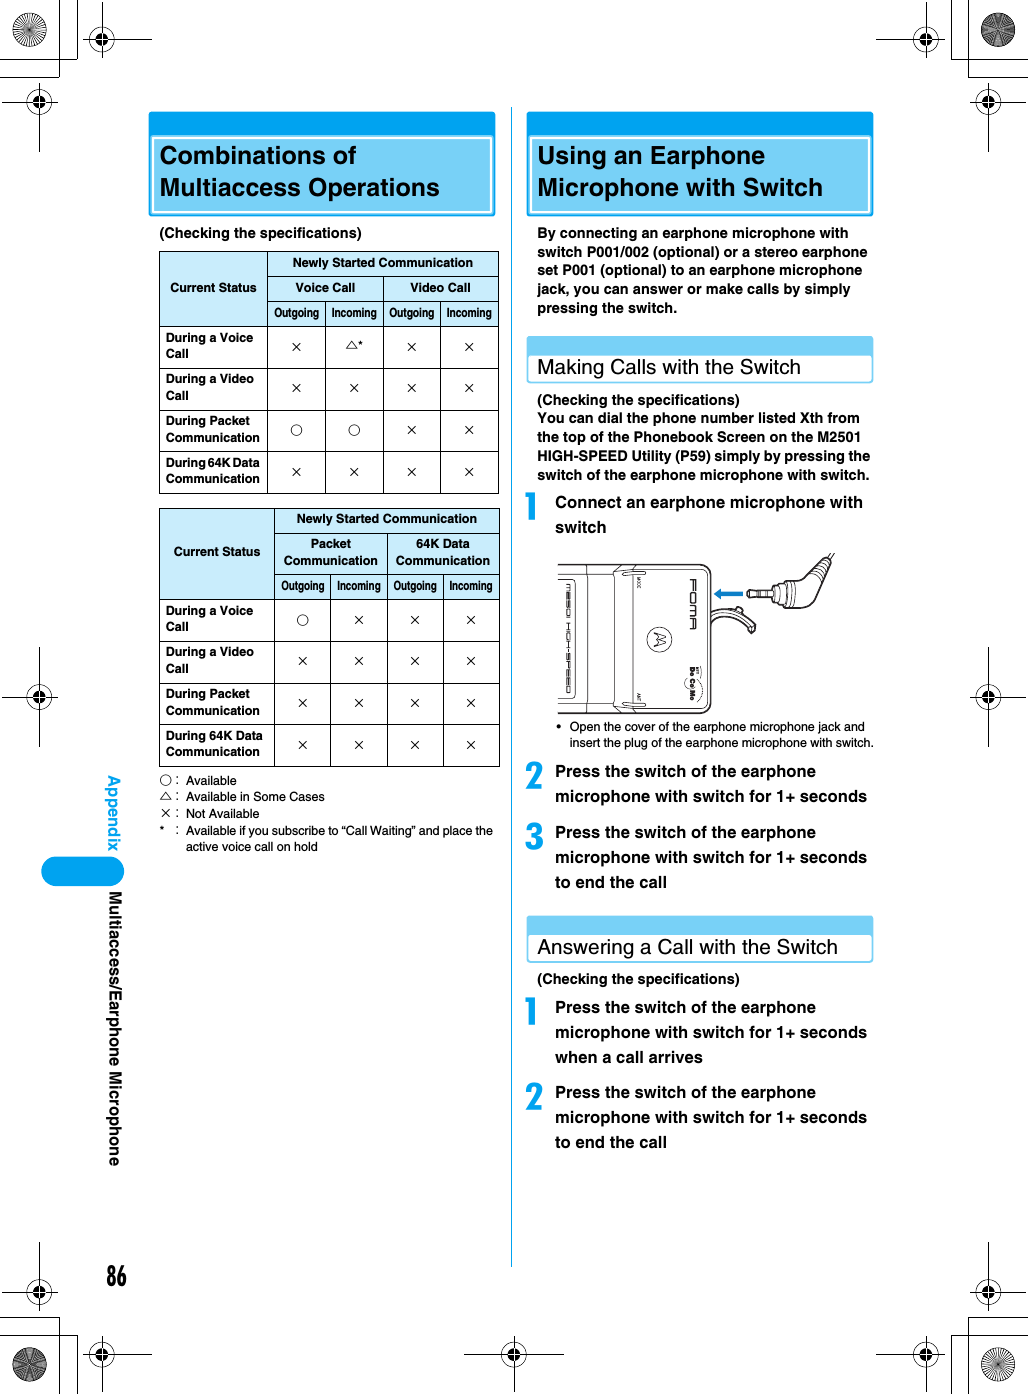
![53Utility SoftwaredClick [次へ (Next)]• Before starting the installation, make sure that no other applications are running. If there are any other applications running, click [キャンセル (Cancel)] to stop them, then start the installation.eRead the license agreement and check “使用許諾契約の条項に同意します (I agree)”, then click [次へ (Next)]fVerify the destination folder and click [次へ (Next)]•[変更 (Browse)] : You can change the destination folder. However, you can only specify folders on a local hard disk. Other folders (on a network drive or removable media) cannot be specified.gClick [インストール (Install)]hClick [完了 (Done)]• An icon appears on the Desktop screen. For the icon, see Step 1 in “Launching” (P55). Uninstalling• The screen images shown in this section are typical for Windows XP. Your PC may have different screen images.• Exit the M2501 HIGH-SPEED Utility before uninstalling.• Log into a user account with the Administrator or PC supervisor privileges. An error occurs if you log into an account without these privileges. For setting up Administrator or PC supervisor privileges, contact your computer manufacturer or Microsoft Corporation.aStart “アプリケーションの追加と削除(Add or Remove Applications)”■For Windows XPClick [スタート (Start)] y “コントロールパネル (Control Panel)” y “プログラムの追加と削除(Add or Remove Programs)” icon■For Windows 2000Click [スタート (Start)] y “設定 (Settings)” y “コントロールパネル (Control Panel)” y “アプリケーションの追加と削除 (Add or Remove Applications)” iconbSelect “FOMA M2501 HIGH-SPEED ユーティリティ (FOMA M2501 HIGH-SPEED Utility)” and click [変更と削除 (Change/Remove)]Screen to be replacedScreen to be replacedScreen to be replacedScreen to be replacedSelect “FOMA M2501 HIGH-SPEED ユーティリティ (M2501 HIGH-SPEED Utility)”Click hereScreen to be replacedContinued on the next pageInstalling the FOMA M2501 HIGH-SPEED Utility](https://usermanual.wiki/Motorola-Mobility/T6FL1.Exhibit-8-Users-Manual-2/User-Guide-700345-Page-6.png)
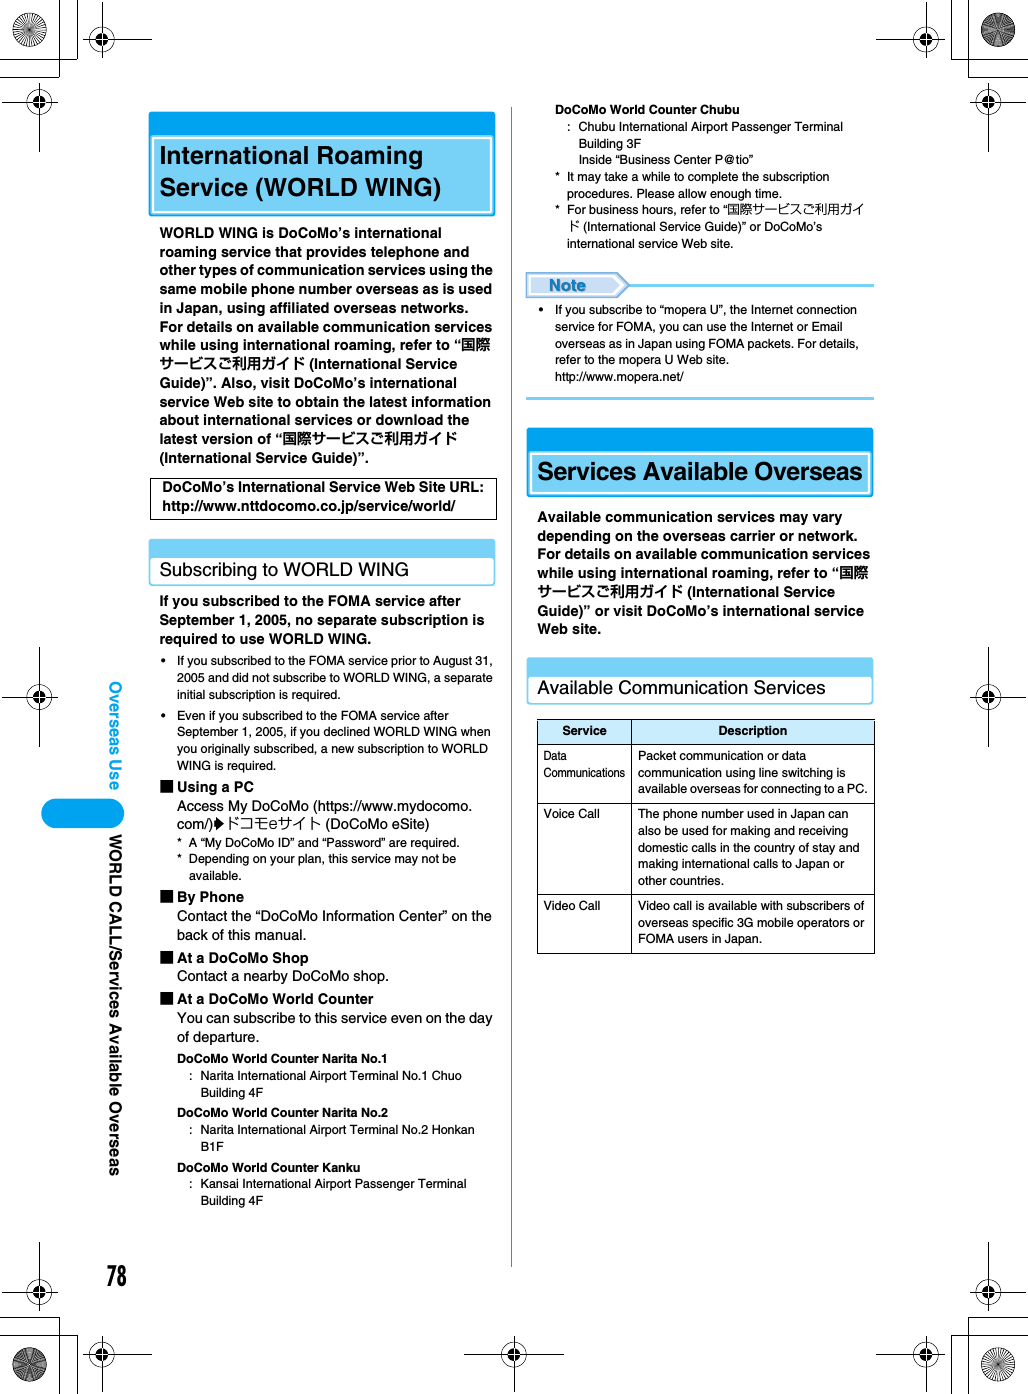
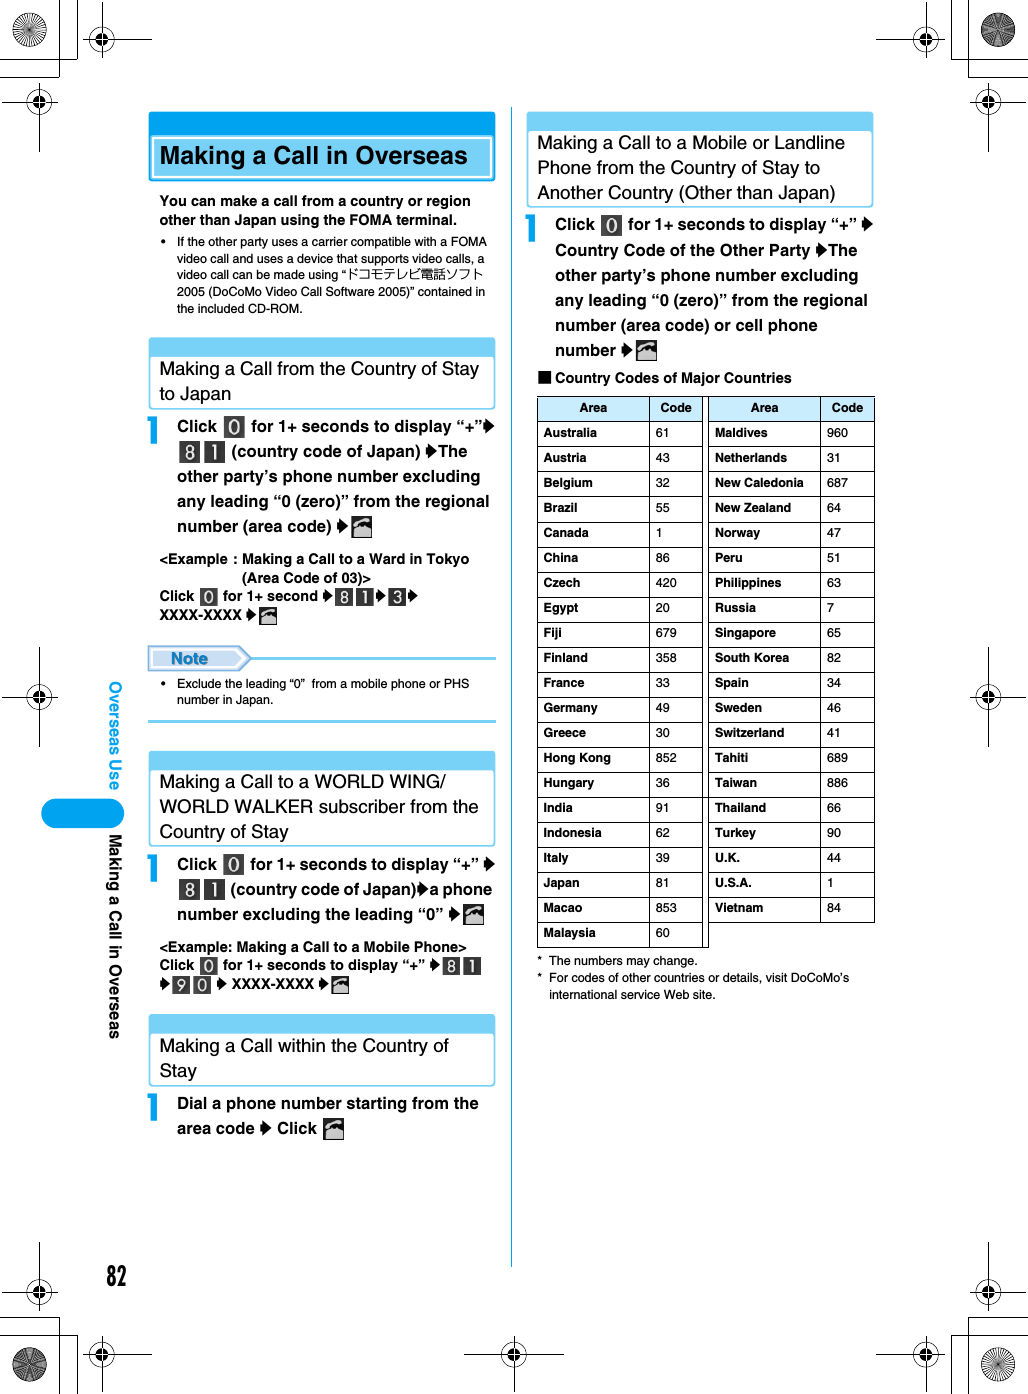
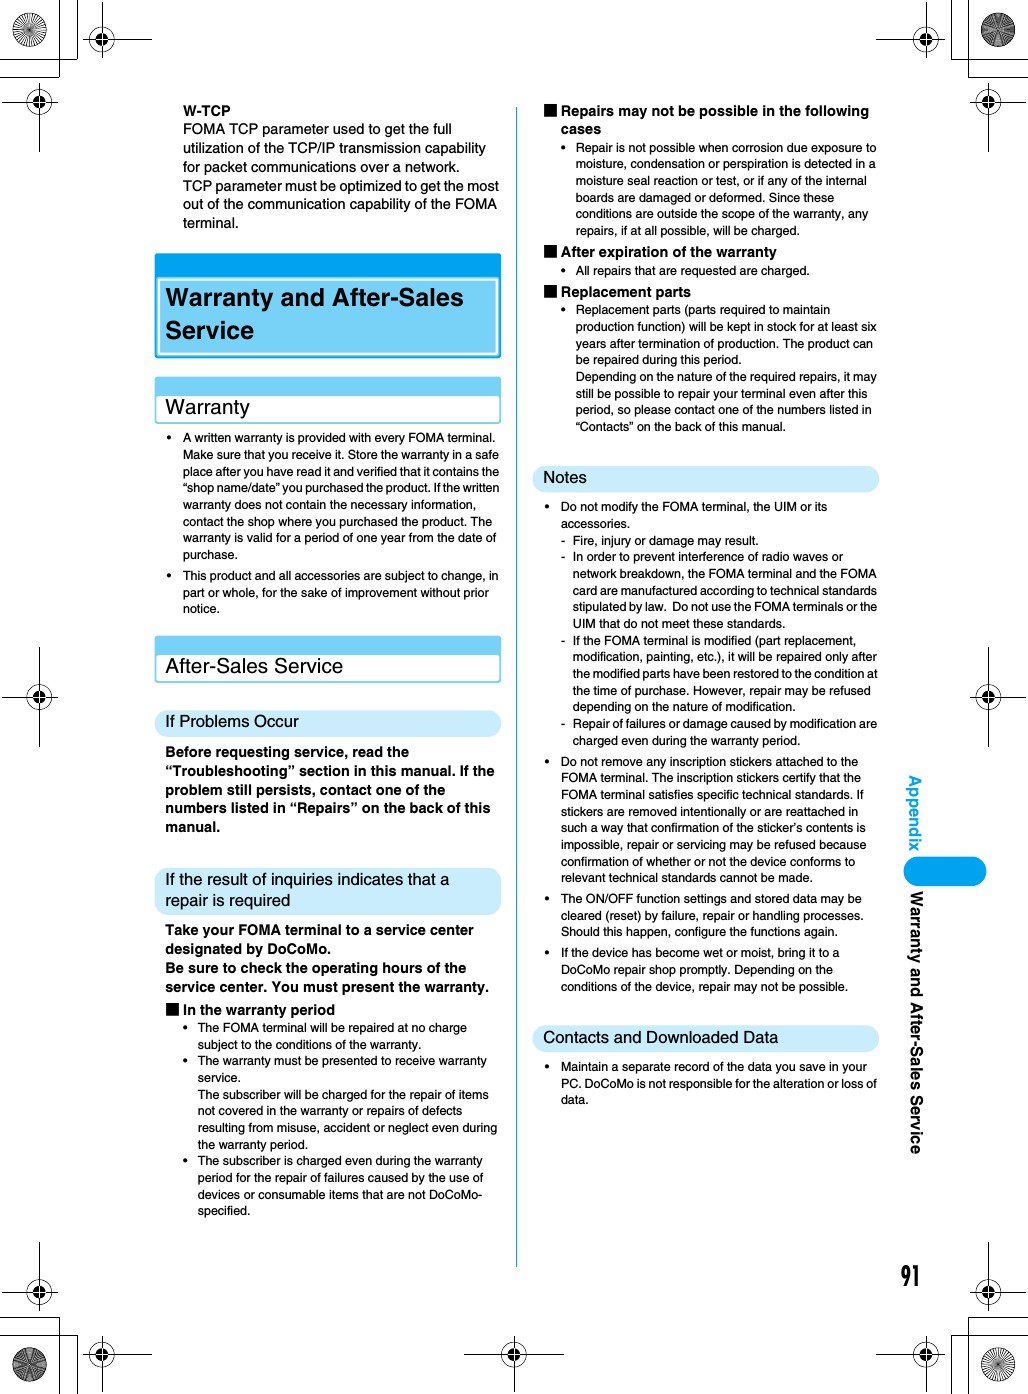
![54Utility SoftwarecClick [はい (OK)]When “M2501 HIGH-SPEED ユーティリティ (Utility)” disappears from the screen in Step 2, the installation has completed.• Uninstalling the program does not delete entries in Redial, Received Calls or the Phonebook. To delete those files, manually delete the folder to which the M2501 HIGH-SPEED Utility had been installed (default folder is “C:¥Program Files¥M2501 HIGH SPEED Utility”).Main Screen ComponentsaMinimizing Button• The Main screen closes but remains on the Task BarbExit Button• The Main screen closes and the M2501 HIGH-SPEED Utility endscStatus Indicator Area: Signal Strength (Rough Indication)…Strong…Weak…Very Weak: Out of Service Area or No Signal Reception Area: FOMA terminal is not inserted in a PC card slot: An invalid UIM or UIM is not inserted: PIN1 or PUK Code Must be Entered: Voice Call Arriving: Dialing a Voice Call: Performing a Voice Call: During a video call using another application: Performing Packet Communication: Performing 64K Data Communication: Performing Multiaccess: Missed Call(s)dNetwork Name Display Area• Displays the network name currently connected ePhonebook Entry Name Display Area• Displays the other party’s name if the name and phone number are saved in Phonebook• Displays the reason for no Caller ID if Caller ID is hiddenfPhone Number Display Area• Displays the entered phone number• Displays the Caller IDgStart Button• Makes or receives calls →P56, P58Screen to be replacedgabcdefjhiklMain Screen Components](https://usermanual.wiki/Motorola-Mobility/T6FL1.Exhibit-8-Users-Manual-2/User-Guide-700345-Page-7.png)
![55Utility SoftwarehClear Button• Clear the entered phone numberiEnd Button• Ends the call →P56• Ends a functionjKeypad• Enter a phone numberkMenu Icons: Received Call →P58: Phonebook →P59: Redial →P57: Settings →P62 - P70: Own Number Display →P56: Help →P56lStatus Bar• Displays communication or call status■Icons Displayed in the Task Tray: Signal Strength (Rough Indication)(Green)…Strong(Yellow)…Weak(Red)…Very Weak: Out of Service Area or No Signal Reception Area: FOMA terminal is not inserted in a PC card slot: An invalid UIM or UIM is not inserted: When the terminal:• Requires PIN1 code• Requires PUK Code• Is locked with PIN Lock• Has a completely blocked UIM Card ■Right click on the icon displayed in the Task Tray•“表示 (Display)” … Display/minimize the Main screen•“常に手前に表示 (Pin on Top)” … The Main screen is always displayed on top.•“バージョン情報 (Version Information)” … Show the version of the M2501 HIGH-SPEED Utility and the firm ware of the M2501 HIGH-SPEED terminal•“アプリケーションの終了 (Exit Application)” … Exit the M2501 HIGH-SPEED Utility■Operations from the PC KeyboardLaunching/ExitingLaunching/Exiting the FOMA M2501 HIGH-SPEED UtilityLaunching• Log into a user account with the Administrator or PC supervisor privileges.aDouble click the “M2501 HIGH-SPEED Utility” icon on the DesktopThe Main screen (P54) opens.■If the icon is not displayedClick “スタート (Start)” y “すべてのプログラム (All Programs)” / “プログラム (Programs)” y “M2501 HIGH-SPEED” y “M2501 HIGH-SPEED Utility”ExitingaClick (Orange) on the Main screen (P54)The exiting confirmation screen appears.bClick [OK]• You cannot exit the utility under the following circumstances : (checking the specifications)- While dialing or receiving/performing a call- While the Redial/Received Calls/Phonebook screen is openOperation Keyboard OperationEntering 0 - 9, #, *Press “0” - “9”, “#”, “*” keys.Entering +, - Press “+”, “-” keys.Erasing one character at a timePress “Back Space” key.Pressing the selected buttonPress “Space” or “Enter” key.Highlighting Press “Esc” key.Highlighting up, down, left or right key on the keypadPress “↑”, “↓”, “←”, “→” keys.Highlighting keys on the keypad in orderPress “Tab” key.Launching/Exiting](https://usermanual.wiki/Motorola-Mobility/T6FL1.Exhibit-8-Users-Manual-2/User-Guide-700345-Page-8.png)
![57Utility SoftwareRedialUsing RedialDialed phone number, time and date of the call are saved in Redial.aClick (リダイヤル (Redial)) on the Main screen (P54)• [Add to Phonebook]: “Saving Entry to Phonebook” →P59bSelect a Redial entryyClick [選択(Select)]The selected Redial entry appears on the Main screen.cClick dClick to end the call• Up to 20 entries can be saved in “Redial”. If more than 20 entries are saved, oldest entries are overwritten first.• Clicking a header (“電話番号 (Phone Number)”, “名前 (Name)”, or “発信時刻 (Dialed Time)”) rearranges the list temporarily. Clicking again restores the original list.• When a name and phone number are saved in Phonebook, the name appears under “名前 (Name)” on the Redial screen.• If you use a FOMA terminal with different UIM card inserted or use the terminal with different user account, the same Redial list is shared.Deleting Entries from RedialaRight click the Redial entry on the Redial screen (P57)yClick [削除 (Delete)]/[全削除 (Delete All)] The deletion confirmation screen appears.bClick [OK]• Selecting entries while holding down the “Shift” key on the keyboard allows you to specify a range.• Selecting entries while holding down the “Ctrl” key on the keyboard allows you to select more than one entry.Dialing a Phone Number with Preceding “186” or “184”You can set whether to send Caller ID for each outgoing call.aDial a phone number with 186 or 184 before the number■Sending Caller ID → → Click ■Hiding Caller ID → → Click Redial Screena phone numbera phone numberMaking/Voice Calls](https://usermanual.wiki/Motorola-Mobility/T6FL1.Exhibit-8-Users-Manual-2/User-Guide-700345-Page-10.png)
![58Utility SoftwareInternational CallsWORLD CALL is an international calling service available from a DoCoMo mobile phone.FOMA service subscribers are also signed up for WORLD CALL at the time of initial subscription (except subscribers explicitly declining this service).• You can make calls to about 220 countries and regions around the world.• Charges for “WORLD CALL” are added to your monthly call charges.• No initial fee and no fixed monthly charges apply.• Changes to the International Call Dialing ProcedureThe international call dialing procedure from a cell phone has been changed due to the introduction of the “マイライン (My Line)” service. Consequently, the previous dialing procedure (Step 1 in “Making an International Call” (P58) without the prefix “010”) can no longer be used.• Some billing plans may not be applied to WORLD CALL.• For details on WORLD CALL, contact the “DoCoMo Information Center” on the back of this manual.• When using international carriers other than DoCoMo, contact the prospective carrier directly.• An “International Video Call” to an overseas party can be made using the “DoCoMo Video Call Software 2005” contained in the included CD-ROM.* For countries where such a connection can be made and carriers, see DoCoMo’s Web site.* Depending on the terminal of the other party connected via the international video call, the picture displayed by the FOMA terminal may be distorted or the connection may not be established.Making an International CallaEnter → → Country Code → Area Code → Phone Numbery• If the area code starts with “0”, exclude “0”. However, in some countries, such as Italy, or in some regions, the leading “0” may be required.Receiving a Voice CallaClick on the Main screen (P54)The ring tone sounds and (animation) appear in the Status Indicator Area on the Main screen.bClick to end the call• When a name and phone number are saved in the Phonebook, the name appears on the Main screen.• An audio device such as an earphone microphone is required to make a call using this FOMA terminal. An earphone microphone with switch P001/P002 (optional) or stereo earphone set P001 (optional) can be used as an audio device.For using the set, see “Using an Earphone Microphone with Switch” (P86).■If you do not answer an incoming call appears in the Status Indicator Area on the Main screen. Click to view Missed Calls. →P58• disappears after opening the Received Calls screen.• If a call is not answered while the Received Calls screen is open, does not appear.Received CallsUsing Received CallsThe phone number, time and date of incoming calls are saved in “Received Calls”.aClick (着信履歴 (Received Call)) on the Main screen (P54)•[電話帳に追加 (Add to Phonebook)] : “Saving Entries in Phonebook” →P59• appears for a Missed Call.Making a Voice CallReceived Calls ScreenReceiving a Voice Call](https://usermanual.wiki/Motorola-Mobility/T6FL1.Exhibit-8-Users-Manual-2/User-Guide-700345-Page-11.png)
![59Utility SoftwarebSelect a Received CallyClick [選択 (Select)]The selected Received Call appears in the Text Area on the Main screen.• : A voice call can be made to the displayed phone number.• Up to 20 entries can be saved in “着信履歴 (Received Calls)”. If more than 20 entries are saved, oldest entries are overwritten first.• Clicking a header (“不在 (Missed Calls)”, “電話番号 (Phone Number)”, “名前 (Name)”, or “着信時刻 (Incoming Time)”) rearranges the list temporarily. Clicking again restores the original list.• When a name and phone number are saved in Phonebook, the name appears under “名前 (Name)” on the Received Calls screen.• If you use a FOMA terminal with different UIM card inserted or use the terminal with different user account, the same Received Calls are shared.Deleting Entries from Received CallsaRight click the Received Call entry on the Received Calls screen (P58)yClick [削除 (Delete)]/[全削除 (Delete All)]The deletion confirmation screen appears.bClick [OK]• Selecting entries while holding down the “Shift” key on the keyboard allows you to specify a range.• Selecting entries while holding down the “Ctrl” key on the keyboard allows you to select more than one entry.PhonebookUsing PhonebookAddingSaving Entries in PhonebookaClick (電話帳 (Phonebook)) on the Main screen (P54)bClick [追加 (Add)]cPerform the following stepsNameEnter using Kanji, Hiragana, Katakana, alphanumeric or symbols.yEnter a name• Enter characters using the keyboard of the PC.• Up to 16 double-byte or 32 single-byte characters can be entered.• An entry cannot be saved to the Phonebook until this field is filled in.ReadingEnter using double-byte katakana, single-byte alphanumeric, or single-byte symbols.yEnter a reading• Enter characters using the keyboard of the PC.• A reading is entered automatically when “名前 (Name)” is entered.• Up to 16 double-byte or 32 single-byte characters can be entered.Phone numberEnter using single-byte alphanumeric characters.yEnter a phone number• Enter characters using the keyboard of the PC.• Up to 26 characters from 0 to 9 (including #, *, and +) and up to five - (hyphens) can be entered.Phonebook ScreenPhonebookContinued on the next page](https://usermanual.wiki/Motorola-Mobility/T6FL1.Exhibit-8-Users-Manual-2/User-Guide-700345-Page-12.png)
![60Utility SoftwaredClick [登録 (Add)]• To save Phonebook to the PC after adding a contact, click [更新 (Refresh)] → [OK] on the Contacts screen.• Up to 1,000 entries can be saved in the Phonebook. By default, entries are saved in the “C:¥Program Files¥M2501 HIGH SPEED Utility¥XXX” folder.• Characters entered in excess of the maximum number of characters allowed will be ignored.• You cannot move/copy Phonebook to or from the UIM using the FOMA terminal.• If you use a FOMA terminal with another UIM card inserted or use the terminal with another user account, the same Phonebook is shared.• DoCoMo is not responsible for the loss of saved data.Making a Call from PhonebookaClick [検索 (Find)] on the Phonebook screen (P59)bPerform the following stepsSearch TargetsPull down menuySelect an option from the followingEnter a text string to findyEnter a part of the text to find• Enter characters using the keyboard of the PC.cClick [検索 (Find)]The Find Result screen opens.dSelect a Phonebooky[選択 (Select)]The selected entry appears on the Main screen.• This [選択 (Select)] is not displayed if “電話番号 (phone number)” of phonebook is empty.eClick fClick to end the call• Clicking a header (“名前 (Name)”, “フリガナ (Reading)”, or “電話番号 (Phone Number)”) rearranges the list temporarily. Clicking again restores the original list.• An audio device such as an earphone microphone is required to make a call using this FOMA terminal. An earphone microphone with switch P001/P002 (optional) or stereo earphone set P001 (optional) can be used as an audio device.For using the set, see “Using an Earphone Microphone with Switch” (P86).EditEditing PhonebookaSelect a Phonebook on the Phonebook screen (P59)yClick [編集 (Edit)]Perform Step 3 in “Saving Entries in Phonebook” (P59) to edit items.bAfter editingyClick [登録 (Save)]• To save Phonebook to the PC after editing a content, click [更新 (Refresh)] → [OK] on the Phonebook screen.DeleteDeleting PhonebookaSelect a Contact on the Phonebook screen (P59)yClick [削除 (Delete)]The deletion confirmation screen appears.bClick [OK]• To save Contacts to the PC after deleting a content, click [更新 (Refresh)] → [OK] on the Phonebook screen.• Selecting entries while holding down the “Shift” key on the keyboard allows you to specify a range.• Selecting entries while holding down the “Ctrl” key on the keyboard allows you to select more than one Contact.名前 (Name) : Find an entry by nameフリガナ (Reading) : Find an entry by reading電話番号 (Phone Number) : Find an entry by phone numberMaking a Voice CallPhonebook](https://usermanual.wiki/Motorola-Mobility/T6FL1.Exhibit-8-Users-Manual-2/User-Guide-700345-Page-13.png)
![61Utility SoftwareImport / Export PhonebookImporting / Exporting PhonebookImporting (CSV)You can read (import) Contacts in the CSV (.csv) / text. (.txt) format. However, depending on the file, even a file in a compatible file format may not be imported.• A Phonebook entry has a format of “名前 (Name)”, “なまえ (Reading)”, and “番号 (Number)” in this order from the beginning of each line. Each field must be inside “ ” (double quotation marks)” and separated with “<Tab>” or “, (comma)”.Example using a Tab delimiter“携帯はな子 (Keitai Hanako)”<Tab>“ケイタイハナコ (Keitai Hanako)”<Tab>“090XXXXXXXX”* Each <Tab> becomes a gap between fields when entered.Example : Using a Comma delimiter“携帯はな子 (Keitai Hanako)”,“ケイタイハナコ (Keitai Hanako)”, “090XXXXXXXX”aRight click on the Phonebook screen (P59)yClick “電話帳インポート (Import Phonebook)”y“CSVファイル (CSV File)”The file selection screen appears.bSelect a fileyClick [開く (Open)]cSpecify a “Delimiter”•“タブ文字 (Tab)”…Check if importing a tab delimited CSV /text (.txt) formatted file.•“カンマ (Comma)”…Check if importing a comma delimited CSV /text (.txt) formatted file.•“先頭の行を無視する (Ignore the First Line)”…Check if ignoring the first line of the file to be imported.dClick [OK]• As many Phonebook entries can be imported as to have a combined total of up to 1,000 Phonebook entries with both the existing Phonebook entries and the new entries. Entries that exceed the limit will be ignored.The types and number of characters that can be imported are the same as for the corresponding fields for the Phonebook. →P59• If the data in the file to be imported does not have the Name field “名前 (Reading)”, the record cannot be imported even if it has “なまえ (Reading)”, or “番号 (Phone Number)” fields filled.Importing (vCard)You can read (import) Contacts in the vCard (.vcf)* format. However, depending on the file, even a file in a compatible file format may not be imported.*: Supports up to Version 2.1 vCard format.aRight click on the Phonebook screen (P59)yClick “電話帳インポート (Import Phonebook)”y“vCard”The file selection screen appears.bSelect a fileyClick [開く (Open)]• As many Phonebook entries can be imported as to have a combined total of up to 1,000 Phonebook entries with both the existing Phonebook entries and the new entries. Entries that exceed the limit will be ignored.The types and number of characters that can be imported are the same as for the corresponding fields for the Phonebook. →P59ExportingYou can save (export) all Phonebook entries in a file in CSV (.csv) or vCard (.vcf)* format.*: Supports up to Version 2.1 vCard format.aRight click on the Phonebook screen (P59) yClick “電話帳エクスポート (Export Phonebook)”y“CSVファイル (CSV File)”/”vCard”The screen for entering a name for the file to be saved appears.bEnter a file nameyClick [保存 (Save)]• Enter characters using the keyboard of the PC.• Each line in a file exported in the CSV format has a “名前 (Name)”, “なまえ (Reading)”, and “番号 (Number)” separated by commas.Phonebook](https://usermanual.wiki/Motorola-Mobility/T6FL1.Exhibit-8-Users-Manual-2/User-Guide-700345-Page-14.png)
![62Utility SoftwareNetwork SettingsNetwork Settings (Overseas Use)• Insert the FOMA terminal into the PC card slot before performing these steps.• While the Communication Settings screen is displayed, no operations can be performed from the Main screen. If a call arrives during the operation, the call can be answered after [閉じる (Close)] is clicked, however, the options being set will be canceled.Switching Networks ManuallySelecting and setting networks manually.• Usually, set “通信方式選択 (Communication system)” to “オート (Auto)”.aClick (各種設定 (Settings)) on the Main screen (P54)y“ネットワーク設定 (Network Settings)” bPerform the following stepsSelect Communication SystemSelect a communication system to connect to the network.yPull down menuySelect an option from the followingy[選択 (Select)] (a)• Enter the PIN1 code using the keyboard of the PC.Selecting a NetworkSelect a network (carrier). No operations are available if “オート (Auto)” is set for “通信方式設定 (Communication system)”.yPull down menuySelect an option from the followingy[Select] (b)■If no appropriate networks were found with “Communication System”Click [ネットワーク再検索 (Search again for a Network)] on the Communication Setting screen.• After the search, found networks will be displayed in “Networks2*”.*: The names of available networks appear.• When using the FOMA terminal in Japan, set “通信方式選択 (Select Communication Method)” to “オート (Auto)”.• Depending on the network or signal status, this option may not be set.• The set network is displayed on the Main screen.Default通信方式 (Communication System): オート (Auto)ネットワーク選択 (Select Network): オート (Auto)Communication Setting Screenab“オート (Auto)”: You can connect to an available network automatically. “ネットワーク選択 (Select Network)” cannot be performed.“W-CDMA固定 (Static W-CDMA)” : Connection to a W-CDMA network will be established.“GSM固定 (Static GSM)”: Connection to a GSM/GPRS network will be established.“オート (automatic Selection)”: Available networks specified in “通信方式設定 (Communication system)” will be searched automatically.“ネットワーク1*/ネットワーク2* (Network 1*/Network 2*)” : Directly select a network found by clicking “オート (Auto)” or [ネットワーク再検索 (Search again for a Network)].*: The names of available networks appear.Network Settings](https://usermanual.wiki/Motorola-Mobility/T6FL1.Exhibit-8-Users-Manual-2/User-Guide-700345-Page-15.png)
![63Utility SoftwareSecurity SettingsSetting UIM PINYou can set the PIN1 code for the UIM.• Insert the FOMA terminal into the PC card slot before performing these steps.• While the Security Settings screen is displayed, no operations can be performed from the Main screen. If a call arrives during the operation, the call can be answered after [閉じる (Close)] is clicked, however, the options being set will be canceled.Entering a PIN1 Code/Changing the PIN1 CodeYou can require the PIN1 code entry each time the M2501 HIGH-SPEED Utility is launched. You can also change the PIN1 code.aClick (各種設定 (Settings)) on the Main screen (P54)y“セキュリティ設定 (Security Settings)”bPerform the following stepsPIN Verification at Start-upYou can set to require the PIN1 code to use the utility software.yPull down menuy“有 (Yes)”/“無 (No)”y[設定 (Set)]yEnter the PIN (4 - 8 digits)yClick [照合 (Verify)]• Enter the PIN1 code using the keyboard of the PC.Changing the PINYou can change the PIN1 code. Set “起動時PIN1コード照合 (Verification at Start up)” to “有り (Yes)” before performing steps.y[変更 (Change)]yEnter the current PIN1 code (4 - 8 digits)yEnter the new PIN1 code (4 - 8 digits)yEnter the new PIN1 again for verificationyClick [変更 (Change)]• Enter the PIN1 code using the keyboard of the PC.• The PIN1 code is set to “0000” by default. However, if you are using a UIM that has been changed from the default, the PIN1 code remains the same as set previously.• If an incorrect PIN1 code is entered three times in a row, the PIN is locked automatically. Write down the PIN and keep it in a safe place.• If you intend to perform packet communication or 64K data communication, set “起動時PINコード照合 (PIN1 Code Verification at Start up)” to “(無) No”.• The PIN1 code is stored on the UIM.Unlocking a Locked PINIf an incorrect PIN1 code is entered three times in a row on the screen requiring the PIN1 code entry, the PIN1 code is locked. If this happens, you need to unlock the PIN1 code and set a new PIN1 code.aEnter the PUK code (8 digits)• Enter the PUK code using the keyboard of the PC.• For the PUK code, refer to your original FOMA subscription form (customer’s copy).bEnter the new PIN1 code (4 - 8 digits)• Enter the PIN using the keyboard of the PC.cEnter the new PIN1 code againyClick [解除 (Unlock)]• If an incorrect PUK code is entered ten times in a row, the PUK code is locked automatically. Write down the code and keep it in a safe place.• If you do not have the PUK code or the code is completely locked, you need to bring the FOMA HIGH-SPEED terminal, the UIM, and an ID (driver’s license, etc.) to a DoCoMo shop.Default 起動時PINコード照合 (PIN Code Verification at Start-up): 無 (No)Security Setting ScreenSecurity Settings](https://usermanual.wiki/Motorola-Mobility/T6FL1.Exhibit-8-Users-Manual-2/User-Guide-700345-Page-16.png)
![64Utility SoftwareCard SettingsSound/Other Settings• Insert the FOMA terminal into the PC card slot before performing these steps.• While the Sound/Other Setting screen is displayed, no operations can be performed on the Main screen. If a call arrives during the operation, the call can be answered by clicking [キャンセル (Cancel)], however, the options being set will be canceled.Sound SettingsSetting a Ring Tone and Earphone VolumeaClick (各種設定 (Settings)) on the Main screen (P54)y“カード設定 (Card Settings)”y“音の設定 (Sound Settings)” tabbPerform the following stepsUsing the PC Speaker for Incoming Calls (Ring tone)yClick the check box•[再生 (Play)] / [停止 (Stop)] : You can try the ring tone.Earpiece volumeYou can adjust the earpiece volume during a call in eight levels from “小 (Low)” to “大 (High)”.yDrag the slide right or left.Earphone ring tone volumeYou can adjust the earphone ring tone volume for an incoming call in eight levels from “小 (Low)” to “大 (High)”.yDrag the slide right or left.cClick [OK]/[適用 (Apply)]• Adjust ring volume from the PC using the volume control of the PC.Other SettingsSetting Other OptionsYou can set whether to send Caller ID, turn on/off the status lamp or whether to display the Main screen at start-up.aClick (各種設定 (Settings)) on the Main screen (P54)y“カード設定 (Card Settings)”y“その他の設定 (Other Settings)” tabDefault着信音 (Ring tone): イヤホン受信音量 (Earpiece volume): 4イヤホン着信音量 (Earphone ring tone volume): 4: The ring tone does not sound from the PC speakers.: The ring tone sounds from the PC speakers.Sound Setting ScreenDefaultユーティリティ起動時にメイン画面を表示する (Display the Main screen when launching the utility software): メイン画面を常に手前に表示する (Display the Main screen always on top): 着信時にメイン画面を手前に表示する (The Main screen opens on top at start-up): 番号通知 (Caller ID): 通知 (Notify)(LED) 点灯消灯切替 (Turn on/off the LED): ONコンピュータの電源OFF スタンバイ移行時に音声電話を切断する (Disconnect a voice call when shutting down the PC/moving to standby mode): Other Settings ScreenCard Settings](https://usermanual.wiki/Motorola-Mobility/T6FL1.Exhibit-8-Users-Manual-2/User-Guide-700345-Page-17.png)
![65Utility SoftwarebPerform the following stepsDisplay the Main screen when launching the utility software (Main screen operation settings)yClick the check boxDisplay the Main screen always on top (Main screen operation settings)yClick the check boxDisplay the Main screen always on top when a call arrives (Main screen operation settings)yClick the check boxSend Caller ID (Card settings)yPull down menuySelect an option from the followingsTurn on/off the LED (Card settings)yPull down menuyClick “ON” / “OFF”• Setting to “OFF” disables the LED status indicator of the FOMA terminal (P17).Disconnect a voice call when shutting down the PC/moving to standby modeyClick the check boxcClick [OK]/[適用 (Apply)]Network Service SettingsNetwork Service SettingsYou can configure necessary settings to use DoCoMo’s network services. For descriptions and instructions for using each service, refer to “Network Services” (P71).• Insert the FOMA terminal into the PC card slot before performing these steps.• While the Network Service Settings screen is displayed, no operations can be performed from the Main screen. If a call arrives during the operation, the call can be answered after [閉じる (Close)] is clicked, however, the options being set will be canceled.Caller ID NotificationSetting the Caller ID Notification Service• When is displayed, operation is not possible.aClick (各種設定 (Settings)) on the Main screen (P54)y“ネットワークサービス設定 (Network Service Settings)”y“発信者番号通知 (Caller ID Notification)” tab•[設定確認 (Check Settings)] : The setting of “発信者番号通知サービス設定 (Caller ID Notification Service Setting)” can be checked.bPerform the following stepsCaller ID Notification Service SettingsyPull down menuySelect an option from the followingyClick [設定送信 (Send Settings)]yEnter the network security codeyClick [OK]• Enter the network security code from the keyboard of the PC.: The Main screen is displayed as an icon in the Task tray.: The Main screen opens.: Newly opened screens are displayed on the Main screen.: The Main screen opens at start-up.: The Main screen does not open on top when a call arrives.: The Main screen opens on top when a call arrives.通知 (Display): Caller ID is sent to the other party.非通知 (Hide): Caller ID is not sent to the other party.未設定 (Not set): According to the setting in “Setting Caller ID Notification Service” (P65).: Cancels shutting down/moving to the standby mode without disconnecting a voice call.: Disconnects the voice call and shuts down/moves to the standby mode.通知する (Display) : Caller ID is sent to the other party.通知しない (Hide) : Caller ID is not sent to the other party.Caller ID Notification Service Setting ScreenNetwork Service Settings](https://usermanual.wiki/Motorola-Mobility/T6FL1.Exhibit-8-Users-Manual-2/User-Guide-700345-Page-18.png)
![66Utility SoftwareVoice MailSetting the Voice Mail Service• When is displayed, operation is not possible.• A separate subscription is required.aClick (各種設定 (Settings)) on the Main screen (P54)y“ネットワークサービス設定 (Network Service Settings)”y“留守番電話 (Voice Mail)” tab•[設定確認 (Check Settings)] : The settings of “留守番電話サービス (Voice Mail Service)” and “留守番電話呼び出し時間 (Voice Mail Paging Time (in seconds) [0 - 120])” can be checked.bPerform the following stepsVoice Mail ServiceyPull down menuySelect an option from the followingsyClick [設定送信 (Send Settings)]yClick [OK]Voice Mail Ring Time (in seconds) [0 - 120] (Voice Mail Service)You can set the access time to connect to the Voice Mail Service Center.This can be skipped.yPut a check in the box yEnter the ring time (in seconds)yClick [設定送信 (Send Settings)]y[OK]• You can also enter the ring time in seconds using the keyboard of the PC.• If “留守番電話呼び出し時間(秒) (Voice Mail Ring Time (in seconds) [0 - 120])” is set to 0 (zero), a call is not saved in Received Calls. (Checking the specifications)Call ForwardingSetting the Call Forwarding Service• When is displayed, operation is not possible.• A separate subscription is required.• Save the forwarding phone number in Phonebook before setting the service.aClick (各種設定 (Settings)) on the Main screen (P54)y“ネットワークサービス設定 (Network Service Settings)”y“転送でんわ (Call Forwarding)” tab•[設定確認 (Check Settings)] : The setting of “転送でんわサービス設定 (Caller Forwarding Service Setting)” can be checked.bPerform the following stepsCall Forwarding ServiceyPull down menuySelect an option from the followingsyClick [設定送信 (Send Settings)] (a)yClick [OK]Call Forwarding Ring Time (in seconds) [0 - 120] (Voice Mail Service)You can set the ring time before a call is forwarded. This can be skipped.yPut a check in the box yEnter the ring time (in seconds)yClick [設定送信 (Send Settings)] (a)y[OK]Changing Forwarding DestinationSpecify a forwarding phone number from Phonebook.y[転送先選択 (Select Forwarding Destination)]ySelect a forwarding destinationyClick [選択 (Select)]yClick [設定送信 (Send Settings)] (b)y[OK]開始 (Activate) : Voice Mail Service starts.停止 (Deactivate) : Voice Mail Service stops.Voice Mail Service Setting Screen開始 (Activate) : Call Forwarding Service starts.停止 (Deactivate) : Call Forwarding Service stops.Call Forwarding Service Setting ScreenacbNetwork Service Settings](https://usermanual.wiki/Motorola-Mobility/T6FL1.Exhibit-8-Users-Manual-2/User-Guide-700345-Page-19.png)
![67Utility SoftwareConnecting to Voice Mail when the Forwarding Party is Busy (Forwarding Party Busy Setting)You can set whether to use Voice Mail when the Call Forwarding Destination is busy.yCheck boxyClick [設定送信 (Send Settings)] (c)y[OK]• You can also enter the ring time in seconds using the keyboard of the PC.• You cannot specify a toll-free number or a 3-digit phone number such as 110 as a forwarding destination.• If a PBX, pager* or FAX is set as a forwarding destination, a caller may get confused.*: From January, 2001, the DoCoMo pager service changed its name to QUICKCAST.• If a forwarding destination has already been set, you can skip the steps in “呼び出し時間(秒) [0 - 120] (Ring Time (in seconds) [0 - 120])” and “転送先変更 (Change Forwarding Destination)”.• If “呼び出し時間(秒) [0 - 120] (Ring Time (in seconds) [0 - 120])” is set to 0 (zero), a call is not saved in Received Calls. (Checking the specifications)• To use the option for “転送先通話中設定 (When the Call Forwarding Destination is Busy)”, you need to subscribe the “Voice Mail Service” and activate the service.Caller ID Display Request ServiceSetting the Caller ID Display Request Service• When is displayed, operation is not possible.aClick (各種設定 (Settings)) on the Main screen (P54)y“ネットワークサービス設定 (Network Service Settings)”y“番号通知お願い (Caller ID Display Request)” tab•[設定確認 (Check Settings)] : The setting of “番号通知お願いサービス (Caller ID Display Request Service)” can be checked.bPerform the following stepsCaller ID Display Request ServiceyPull down menuySelect an option from the followingyClick [設定送信 (Send Settings)]yClick [OK]Call WaitingSetting the Call Waiting Service• When is displayed, operation is not possible.• A separate subscription is required.aClick (各種設定 (Settings)) on the Main screen (P54)y“ネットワークサービス設定 (Network Service Settings)”y“話中着信 (Call Waiting)” tab•[設定確認 (Check Settings)] : The setting of “Call Waiting Service Setting” can be checked.bPerform the following stepsCall Waiting Service SettingsyPull down menu, select an option from the followingyClick [設定送信 (Send Settings)]yClick [OK]: A call is disconnected without using Voice Mail.: Voice Mail is used.Caller ID Display Request Service Settings Screen開始 (Activate) : Caller ID Display Request Service starts.停止 (Deactivate) : Caller ID Display Request Service stops.開始 (Activate) : Call Waiting Service starts.停止 (Deactivate) : Call Waiting Service stops.Call Waiting Service Settings ScreenNetwork Service Settings](https://usermanual.wiki/Motorola-Mobility/T6FL1.Exhibit-8-Users-Manual-2/User-Guide-700345-Page-20.png)
![68Utility SoftwareSwitching between Foma/movaSetting the Dual Network ServiceYou can switch to the Dual Network Service when the FOMA terminal or a mova terminal is not available. This section describes steps to switch from a mova terminal to the FOMA terminal.• When is displayed, operation is not possible.• A separate subscription is required.aClick (各種設定 (Settings)) on the Main screen (P54)y“ネットワークサービス設定 (Network Service Settings)”y“Foma/movaを切替 (Switch Foma/mova)” tab•[設定確認 (Check Settings)] : The status of the dual network can be checked.bClick [設定送信 (Send Settings)]yEnter Network security codeyClick [OK]y[OK]• Enter the network security code from the keyboard of the PC.• Switching during communication disconnects the communication.• To switch to use mova, perform the operation using a mova terminal. You cannot perform steps to switch to mova using the FOMA terminal. For details such as operations using mova, refer to “ネットワークサービス操作ガイド (Network Service Operation Guide)”.Voice Prompt for Incoming/Outgoing CallsSetting the Voice Prompt for Incoming/Outgoing CallsThe language of the voice prompt that explains how to set the network service or announces incoming/outgoing calls can be switched between Japanese and English. Settings for incoming and outgoing calls are specified separately.• When is displayed, operation is not possible.aClick (各種設定 (Settings)) on the Main screen (P54)y“ネットワークサービス設定 (Network Service Settings)”y“発着信時ガイダンス (Voice Prompt for Incoming/Outgoing Calls)” tab•[設定確認 (Check Settings)] : The settings of “発信時ガイダンス選択 (Select Voice Prompt for Outgoing)” and “着信時ガイダンス選択 (Select Voice Prompt for Incoming)” can be checked.bPerform the following stepsVoice Prompt for Outgoing (Select Voice Prompt for Outgoing)You can set the language for the voice prompt you hear.yPull down menuySelect an option from the followingyClick [設定送信 (Send Settings)] (a)yClick [OK]Dual Network Service Settings Screen日本語 (Japanese) : The voice prompt is played in Japanese.英語 (English) : The voice prompt is played in English.Voice Prompt for Incoming/Outgoing Calls ScreenabNetwork Service Settings](https://usermanual.wiki/Motorola-Mobility/T6FL1.Exhibit-8-Users-Manual-2/User-Guide-700345-Page-21.png)
![69Utility SoftwarePrompt for Incoming (Select Voice Prompt for Incoming)You can set the language for the voice prompt for the caller.yPull down menuySelect an option from the followingsyClick [設定送信 (Send Settings)] (b)yClick [OK]Call Barring-RoamingSetting Restrictions on Incoming Calls while RoamingYou can set to restrict incoming calls while roaming (overseas use).• When is displayed, operation is not possible.aClick (各種設定 (Settings)) on the Main screen (P54)y“ネットワークサービス設定 (Network Service Settings)”y“ローミング時着信規制 (Restricting Incoming while Roaming)” tab•[設定確認 (Check Settings)] : The setting of “ローミング時着信規制 (Restricting Incoming while Roaming)” can be checked.bPerform the following stepsRestricting Incoming Calls while RoamingyPull down menuySelect an option from the followingyClick [設定送信 (Send Settings)]yEnter the network security codeyClick [OK]y[OK]Nuisance Call Barring ServiceSetting the Nuisance Call Barring Service• When is displayed, operation is not possible.• A separate subscription is required.aClick (各種設定 (Settings)) on the Main screen (P54)y“ネットワークサービス設定 (Network Service Settings)”ythe “迷惑電話ストップサービス (Nuisance Call Barring Service)” tab•[設定確認 (Check Settings)] : The setting of “迷惑電話着信拒否登録 (Nuisance Call Block Registration)” can be checked.bPerform the following stepsNuisance Call Block RegistrationYou can save a phone number to block from incoming calls.yPull down menuySelect an option from the followingsy[番号選択 (Select a Number)]*ySelect a phone number*y[選択 (Select)]*yVerify the selected phone number yClick [設定送信 (Send Settings)] (a) y[OK]*: These steps are not necessary if “最終着信呼指定 (Specify the Last Incoming)” is selected.日本語 (Japanese) : The voice prompt is played in Japanese.日本語+英語 (Japanese+English): The voice prompt is played in Japanese followed by English.英語+日本語 (English+Japanese): The voice prompt is played in English followed by Japanese.全着信規制を開始 (Start Restricting All Incoming): All incoming calls are restricted.データ呼着信規制を開始 (Start Restricting Data Incoming): Only incoming video calls are restricted.Call Barring-Roaming Settings Screen着信規制を停止 (Stop Restricting Incoming): Restriction on incoming while roaming stops.最終着信呼指定 (Specify the Last Incoming): The phone number of the last incoming call is specified.電話帳リスト (Phonebook List): Specify a phone number to restrict from the Contact List.リダイヤルリスト (Redial List): Specify a phone number to restrict from the Redial List.着信履歴リスト (Received Calls List): Specify a phone number to restrict from the Received Calls List.Nuisance Call Barring Service Settings ScreenabNetwork Service SettingsContinued on the next page](https://usermanual.wiki/Motorola-Mobility/T6FL1.Exhibit-8-Users-Manual-2/User-Guide-700345-Page-22.png)
![70Utility SoftwareCancel RegistrationThe registered phone numbers are unregistered.yPull down menuySelect an option from the followingsyClick [設定送信 (Send Settings)] (b)yClick [OK]• Phone numbers with no Caller ID can also be registered to reject.• International phone numbers may not be registered.• If 30 numbers are already registered, delete the oldest and register a new one following the message.• You cannot check or inquire about numbers registered in Nuisance call block. It is recommended that you write them down.Remote ControlSetting Remote ControlYou can set to operate the Voice Mail or Call Forwarding Service from a public phone other than the FOMA terminal.• When is displayed, operation is not possible.aClick (各種設定 (Settings)) on the Main screen (P54)y“ネットワークサービス設定 (Network Service Settings)”y“遠隔アクセス(Remote Control)” tab•[設定確認 (Check Settings)] : The setting of “遠隔アクセス制御 (Remote Control)” can be checked.bPerform the following stepsRemote ControlyPull down menuySelect an option from the followingsyClick [設定送信 (Send Setting)]yClick[OK]Roaming GuidanceSetting Roaming GuidanceA message informing a caller that you are overseas can be set to play to a anyone attempting to call you while you are overseas.• When is displayed, operation is not possible.aClick (各種設定 (Settings)) on the Main screen (P54)y“ネットワークサービス設定 (Network Service Settings)”y“ローミングガイダンス (Roaming Guidance)” tab•[設定確認 (Check Settings)] : The setting of “ローミングガイダンス設定 (Roaming Guidance Settings)” can be checked.bPerform the following stepsRoaming Guidance SettingsyPull down menuySelect an option from the followingyClick [設定送信 (Send Settings)]全件解除 (Cancel All) : All registered phone numbers are deleted.1件削除 (Delete One) : The last saved phone number is deleted.Remote Control Setting Screen開始 (Activate) : Remote Control Service starts.停止 (Deactivate) : Remote Control Service stops.有り (Yes)無し (No): Roaming Guidance is played.: Roaming Guidance is not played.Roaming Guidance Settings ScreenNetwork Service Settings](https://usermanual.wiki/Motorola-Mobility/T6FL1.Exhibit-8-Users-Manual-2/User-Guide-700345-Page-23.png)