Motorola Mobility T6JC1 Portable PCS GSM Transceiver with Bluetooth User Manual Exhibit 8 Users Manual Part3
Motorola Mobility LLC Portable PCS GSM Transceiver with Bluetooth Exhibit 8 Users Manual Part3
Contents
- 1. Exhibit 8 Users Manual Part1
- 2. Exhibit 8 Users Manual Part2
- 3. Exhibit 8 Users Manual Part3
- 4. Exhibit 8 Users Manual Part4
Exhibit 8 Users Manual Part3

144
145
Organizer
1 Morning call/Alarms ..................... 146
2 Calendar ......................................... 148
3 Scheduler ........................................ 149
4 Memo ......................................... 150
5 Diary ....................................... 151
6 Calculator ........................................ 153
7 World Time ..................................... 154
09
146
Note
09 Organizer
147
1. Morning call/Alarm
The phone provides bell or vibrates at the designated time.
Easy Alarm
If the designated timer for easy alarm expires, the alarm rings once.
- After alarm rings once, it automatically turns off.
You can set time by 1~999min.
Press (Left) ▶Press ▶Press ▶Press
▶
Press after selecting Easy Alarm
When the time reaches to the period user have set, the alarm rings once.
•
If an alarm is on, is displayed on the screen and when it is off, icon is
no longer displayed on the screen.
•
If the phone is set to ‘Vibrate’ or ‘Etiquette mode’, the phone vibrates
instead of rings. (The phone rings for morning call.)
•
When alarms set to the same time, operate in the following priority order:
(Easy Alarm → Morning Call → My Alarm 1~5)
•
You can turn off the alarm by opening/closing the folder when alarm rings.
- You can also turn off the alarm by pressing the Volume button,
Camera button, , , Hold switch or (Right).
• If you set the morning call to repeat more than once, you must press
(Right) to turn off the morning call.
Press (Left) ▶Press ▶Press
Morning Call
Even if you open or close the folder or press the Volume button and Camera
button, the phone is set to Morning Call Standby and the morning call is
sounded at the time of repeat previously set.
If you press upon Morning Call sounding, Morning Call of the day will be
cleared regardless of a repeat time previously set.
Press (Left) ▶Press ▶Press ▶Press
▶Press after selecting Morning Call
You can set the repeat count and cycle for morning call at the required time.
You can set alarm at the desired day of a
week by selecting a day with (Right)
and setting the desired time in the cycle field.
If a morning call sounded with one or
more repeat times previously set, you can
set Morning Call Standby function by
pressing .
-
If the repeat time set is ended or you do not
press (Right), the internal and external
screens are waiting for Morning Call.
My Alarm
You can set an alarm to be sounded at a desired time by setting a time and
interval.
You can enter maximum 20 Korean characters and 40 English character
for memo, a message content will be displayed when an alarm is sounded.
You can set alarm at the desired day of a week by selecting a day with
(Right) and setting the desired time in the cycle field.
Press (Left) ▶Press ▶Press ▶Press
▶Press after selecting My Alarm
You can set the Alarm to ring at a desired time.
You can set an alarm to be sounded at a desired time by setting a time and
If the designated timer for easy alarm expires, the alarm rings once.
148
09 Organizer
149
2. Calendar
If you set and save a schedule, alarm rings on a corresponding date and displays the stored content.
New schedule :
The phone provides the alarm and displays memo in accordance with the alarm cycle until the cycle
is expired.
New to-do : The to-do item is displayed as a block from the start date to the end date.
New anniversary : The phone provides the alarm and displys memo at the designated anniversary.
New D-Day : Days remaining to or passed from a specific day is displayed on the standby screen.
The alarm rings on the designated date.
New meeting planner :
If you enter a time, the times of major cities of the world are displayed. The alarm rings and the
memo appears until the end date of the selected period.
Menu description
You can select New Schedule, New Things To-do, New Anniversary Date, New D-Day, and New Meeting Planner
by pressing (Right) at a desired date.
(You can add 180 items for schedule, things to do and anniversary date, 30 items for d-day and 50 items for
meeting planner.)
If you select ‘Calendar top/bottom’ or ‘3 Months top/bottom’ in ‘Set Standby’, the current month is displayed with
the scheduled dates in different color.
When schedules set to the same time, alarm operate in the following priority order:
- D-Day → Anniversary → Schedule → Meeting Planner
Schedule start up page is the montly calendar.
- Press (Left) to find the schedules by Day/Month/Year.
Press (Left) to use Month, Week, Go to a date, Delete, Delete by day or month, and Delete all.
- When setting View by week, select a day of a week and press to check the daily schedule.
Press (Left) ▶Press ▶Press
Schedule
Press (Left) to use View by month, Delete or Delete all.
Press (Right) to add a new schedule.
Press (Left) ▶Press ▶Press ▶Press
3. Scheduler
You can view or add schedule you have entered in.
To-do
Press (Left) ▶Press ▶Press ▶Press
Press (Left) to use View by month, Delete or Delete all.
Press (Right) to add a new to-do.
Anniversary
Press (Left) ▶Press ▶Press ▶Press
Press (Left) to use View by month, Delete or Delete all.
Press (Right) to add a new schedule.
150
09 Organizer
151
D-day
Press (Left) to use View by month, Delete or Delete all.
Press (Right) to to add a new d-day.
If you select the calculation by date for D-day setting, D-day will be indicated
from a current date based on the date entered. If you select the calculation by a
certain date, entering remaining dates or passing dates based on the date entered
will indicate D-day..
Press (Left) ▶Press ▶Press ▶Press
3. Scheduler (Cont’d)
You can view or add schedule you have entered in.
Meeting Planner
Press (Left) to use View by month, Delete or Delete all.
Press (Right) to add a new meeting plan.
Press (Left) ▶Press ▶Press ▶Press
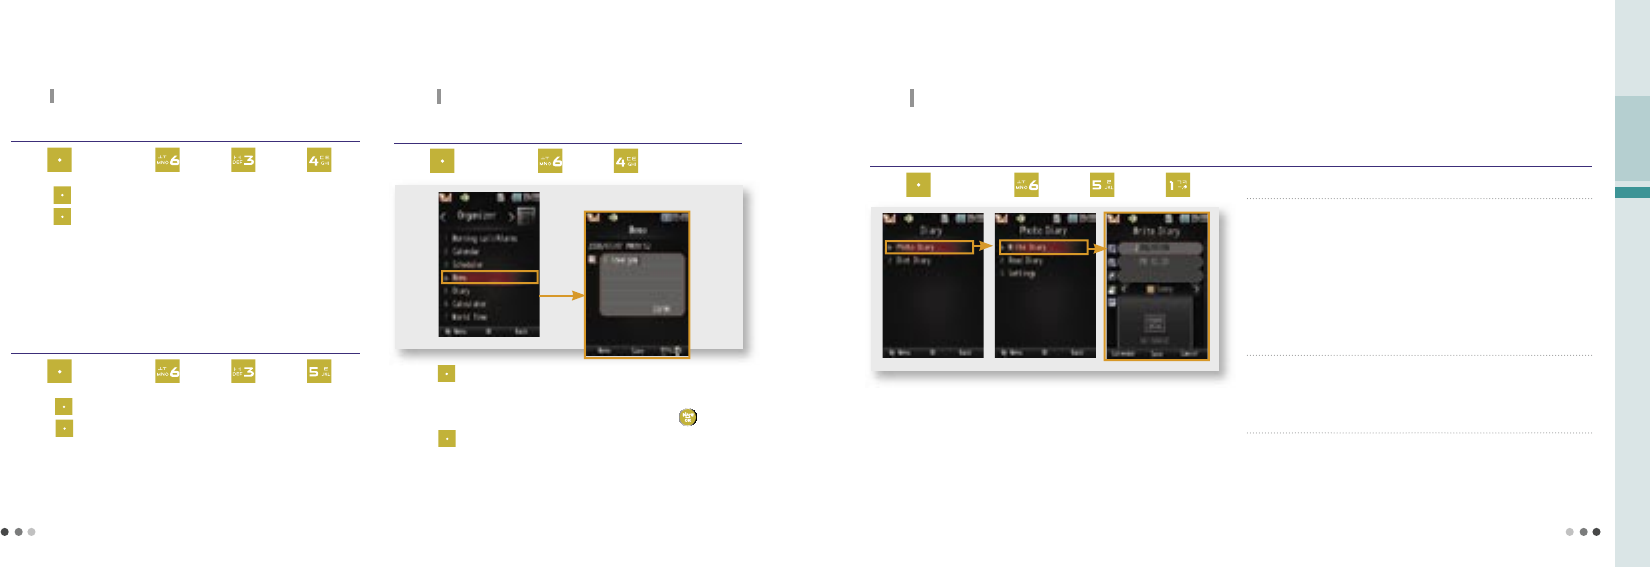
4. Memo
You can store upto 50 memos in the phone.
Press (Right) to add a new meeting plan.
You can enter a memo of upto 48 Korean letters or 96 English letters.
When checking a written memo,ou can edit it by pressing .
Press (Left) on the list to delete, protect/lock or delete all.
Press (Left) ▶Press ▶Press
5. Diary
You can write the photo diary or diet diary on the phone.
Photo Diary
Press (Left) ▶Press ▶Press ▶Press
You can write and manage diary with the photos.
➊ Write Diary
•
The photos used in the photo diary are not deleted even if the same
photos are deleted from ‘Photo Album’.
•
You can store upto 180 photo diaries and cannot duplicate diaries on the
same date.
•
You cannot use photos saved in the external memory.
➋ Read Diary
•
You can check, delete, or edit the stored photo diary.
➌ Settings
•
You can set font color and diary background.
152
Note
09 Organizer
153
5. Diary (Cont’d)
You can write the photo diary or diet diary on the phone.
Diet Diary
Press (Left) ▶Press ▶Press ▶Press
Set goals for weightloss, this can help from this function or diet.
➊ My Diet Diary
How to Record My Body Info
Press (Left) to select a desired date on the calendar and
press to record.
Press (Right) to Input the body info.
-You can check standard weight, B.M.I, and B.M.R.
➋ My Food Log
•
The records are displayed.
•
Press to check the monthly record.
•
Press (Right) to add a record.
•
Press (Left) to view/delete/delete all of diet records lists and graphs.
•
When searching dates on the calendar, you can search daily/monthly/
yearly/records by pressing (Left).
•
Dates indicating that body and meal records are kept on the calendar
are displayed in color, and you can check their contents on the bottom
of the screen.
➌ My Body History
•
The records are displayed.
•
Press to check the monthly record.
•
Press (Right) to add a record.
•
Press (Left) to view/delete/delete all of diet records lists and graphs.
6. Calculator
You can make simple calculation with the phone.
Press (Right) to make the calculation again.
When entering numbers or symbols, press to delete a character, press
and hold to delete all.
You can use the operators several times in a calculation.
Press (Left) ▶Press ▶Press
: + : x : - : ÷
: ( : ) (Left): . : =
Operators
How to Record Food Log
Press to select the food, press (Right) to find out
the total calories.
Press (Left) to select [User Input] or [Add Food].
154
155
Summer
Time(DST) You can set summer time periods by cities.
World Clock
•The local time of your area and the selected city are displayed on the standby screen.
•You can change the clock type on the standby screen, and you can see preview by pressing (Right).
(However you cannot use this function if a phone theme or flash is selected.)
City Info. You can check desired city information.
Menu description
7. World Time
You can check a current time of world main cities (50 countries)
and city information, and set various functions.
Press to display the country, country code, area code, emergency number/information of the selected cities.
Press (Left) ▶Press ▶Press
Message
1 Message Box ................................. 156
2 New Message ................................ 160
3 Mobile Messenger ....................... 163
4 e-mail ....................................... 163
5 Report Spam/Service .................. 164
6 Contents Box ................................. 165
7 Settings ......................................... 166
10

156
10 Message
157
1. Message Box
Press (Left) ▶Press ▶Press
When you receive the message, the icon is displayed on the standby screen.
- The information on the latest message received is shown at the top.
When you receive the messsage with the phone number shown on the screen, press to make
a call to the person who sent the message.
If you press when receiving a voice message, you are connected to the voice mailbox, and
you can listen to the recorded voice message.
When checking the message, press to move to the previous or the next message.
- When checking the message, press to move to the other message box.
- When checking the text message, press Volume button to zoom in/out the screen.
You can view and manage the received messages.
You can check and manage the received messages. (Including voice
messages)
Select a message and press to read the message.
The content attached to the multi-mail is automatically played.
INBOX
unconfirmed SMS Message confirmed SMS Message
unconfirmed MMS Message confirmed MMS Message
unconfirmed Movie Message confirmed Movie Message
Icon description
Press (Left) ▶Press ▶Press
▶Select INBOX
Note
• If the capacity for received message is exceeded, the oldest message deleted first.
•
You can check the received message in the standby screen using the Message Alarm and Preview.
(Settings, see p.166)
Reply : You can reply the message to the sender.
Delete : You can delete the selected message.
Forward : You can forward the received message to other person.
Save Number : You can save the phone number indicated in the message in
the phonebook.
Save Message : You can save the selected message in SAVED box.
Save to USIM :
If the selected message is SMS, you can save the message
in USIM box.
Add to Spam List : Register a selected message as a spam number to block
the message.
Sort Message :
You can sort the message into name/time/size order.
Message Search :
You can search and find the message by name/number/string.
Delete All : You can delete all saved message in the inbox.
Menu description
158
159159
1. Message Box (Cont’d)
You can view and manage the received messages.
You can manage sent message, draft message, and failed message.
Select the message and press to check the content of the message.
While writing the message, press (Left) to save the message.
- You can press to continue and rewrite the message.
OUTBOX
Temporary saved message
SMS sent meesage
MMS sent message
Icon description
You can move the selected messages from the inbox or outbox to the
saved box.
For outbox message, press to delete, forward, save number, save
message, and delete all.
For inbox message, press to reply, delete, forward, save number, save
message, save to USIM, add to spam list, sort message, message search,
and delete all.
SAVED
You can manage and save the message by selecting a message In the
inbox, and select the menu ‘Save to USIM’.
USIM
10 Message
Press (Left) ▶Press ▶Press
▶Select OUTBOX
Press (Left) ▶Press ▶Press
▶Select SAVED
Press (Left) ▶Press ▶Press
▶ Select USIM
159
Delete : You can delete the selected message.
Forward : You can forward the received message to other person.
Save Number :
You can save the phone number indicated in the message in
the phonebook.
Save Message : You can save the selected message in SAVED box.
Delete All : Delete All : You can delete all saved message in the inbox.
Menu description
160
2. New Message
The integrated MMS function enables you to attach content to the long text message and send to the mobile phone
or e-mail address.
A message can be sent to upto 20 people at a time.
You can answer a call while you are writing a message, and return to the message screen after the call.
You can send 3 image files (photo or picture) and 1 music and movie file.
After writing a message, you can preview the message with (Right).
※
MMS is an SKT’s new multimedia transmission service integrating the text message function and
the color mail function.
Letter Paper
Select ▶Press
You can select the various background.
Image Background :
You can select a image stored in the phone and set the
image as a background.
Photo Background :
You can select a photo stored in the photo album and
set the photo as a backround. (Press to select.)
Color Background :
You can select the background color of the letter paper.
(Note that the content might not be identified if the letters
are written on the paper of the same color.)
No Background : You can set the background as a white paper.
Contents Download :
You can connect to NATE content shop and download
the latest contents.
Avartar
Select ▶Press
The character or the photo of the sender is displayed on the message
receiver’s phone.
Character Avatar :
You can set a character in the photo album as a avartar.
Photo Avatar : You can set the photo in the photo album as a avartar.
(Press to select.)
No Avatar : No avartar is displayed on the receiver’s phone.
An Avatar? : Description on avartar is displayed.
Contents Download :
You can connect to NATE content shop and download
the latest contents.
Press (Left) ▶Press ▶Press
10 Message
161
MessageMessage
Note
Cautions in writing messages
•
Messages are sent as SMS in default. However In the following cases, they are changed to MMS and
additional data fee is charged: message exceeding 40 Korean letters/80 English letters, font color changed,
emoticon added, avatar added, paper set, content attached (photo, movie, background music, etc.).
• If a message is changed to MMS, a message ‘Converted to MMS’ is displayed on the message windown.
MMS fee
•
The same information fee is charged for long text message, changed font color, paper set, avatar set, and
emoticon added between MMS and SMS.
•
Additional service fee is charged. No data call fee is charged for sending and receiving MMS. Visit SKT
T-World homepage (http://www.tworld.co.kr) or contact SKT Customer Center for further information.
162
Set Text Color Use or to set the color of the text.
Picture Emoticon Press to move page, and press the number key pad to
select the emoticon.
Text Emoticon Press to move page, and press the number key pad to
select the emoticon.
Add Number Select the phone number in the phonebook and press to
input the phone number automatically.
Used word
You can store and use the frequently used word.
- You can edit the word in settings.
(Settings, see p.166)
Save to Draft box
You can save the draft message in the outbox.
(OUTBOX, see p.158)
Using menu in the message writing field
Press (Right) to change the writing mode (Korean, Symbol, Number,
English upper/lower case).
2. New Message (Cont’d)
The integrated MMS function enables you to attach content to the long text message and send to the mobile phone
or e-mail address.
Menu description
Attach Photo You can attach the photo stored in the attachment box.
Attach Video You can attach the video stored in the attachment box.
Attach Music/
Voice
You can attach the music or voice stored in the
attachment box.
Attach Image You can attach the image downloaded from NATE.
Take Photo You can take a photo and attach in the message.
Record Video You can take a video and attach in the message.
Record Voice You can record a voice and attach in the message.
Using menu in the attachment field
Menu description
• If you select and press , you can connect to NATE
content shop and download the most latest contents.
•
You can check and manage contents in Attachment box.
(Contents Box, see p.165) Press (Left) on the window.
Using menu in the receiver field
You can use the various functions such as search by name, recent
addresses, add group, enter e-mail, read-reply rqst, send receiver’s list
by pressing (Left).
3. Mobile Messenger
You can use the real time messenger function without
registering friends.
If you press (Right), you can add an entry by searching name/number
or entering number.
If you press (Left), you can use talk, delete, message box, settings,
help, update functions.
4. e-mail
Using the phone, you can manage inbox and
outbox of the e-mail.
When writing the email, you can attach the photo.
You can check recived contents, images, attachments.
Press (Left) ▶Press ▶Press Press (Left) ▶Press ▶Press
10 Message
163
Press (Left) in the (Attachment) field
MessageMessage
NoteNote
•
The mobile messenger service is charged with the fixed service fee per
message, and no data fee will be charged.
-
Use Help or visit the messenger homepage (http://mm.nate.com) for
further information.
•
In order to use e-mail service, you have to register and make a e-mail account.
Additional service fee is charged.
164
10 Message
Press (Left) ▶Press ▶Press
6. Contents Box
You can manage and check attachment of the received MMS.
Note
Spam Messages You can check received spam messages.
Report Msg. Spam You can report spam by selecting the spam message and press (Right).
Report Voice Spam You can report spam by selecting the spam number and press (Right).
Spam Settings You can block the number or message to set as a spam.
Help
You can check the guide for spam report.
Menu description
•
Visit the spam handling center of Korea Information Security Agency (www.spamcop.or.kr) for further information.
Press (Left) ▶Press ▶Press
If you select and press , you can connect to NATE content shop and download the latest contents.
Press (Left) to use Send MMS, Set Background, Rename, Delete, Protect/Release, and Delete All functions.
165
Menu description
5. Report Spam/Service
To promote convenience of the user and to prevent damage caused by illegal spam, you can report
the received spam messages to the spam handling center of Korea Information Security Agency.
Photo You can view and manage the attachable photos.
Image
You can store and manage the images downloaded
from NATE.
Music/Voice
You can view and manage the attachable music, and
voice files.
Movie You can view and manage the attachable movie files.
Nate Shop
You can connect to NATE content shop and download
the latest contents.
Menu description
166
167
7. Settings
You can set preferences for the message functions.
Press (Left) ▶Press ▶Press
MMS Settings : You can select and set various contents when writing messages.
•Background Settings : You can select the background of the message. (Letter Paper, see p.161)
•Avartar Settings :
You can send the character or photo with the message. (Avartar, see p.161)
• Font Color Settings : You can select the font color. (Press or to select font color.)
• Photo Size Settings : You can set the size of photos transmitted from the phone via wireless Web (Internet).
•Set Name Card : You can determine whether to attach your phone name card to all the messages.
•MMS mode change : You can set alarm when switching SMS to MMS message.
Signature Settings :
You can attach the designated sentence at the end of the message.
•Edit Signature :
You can change font color or enter emoticon by pressing (Left),
and change letter input mode by pressing (Right).
• Signature Setting : You can set the designated sentence at the end of the message.
MSG Noti. Setting : You can set ring volume, alarm type, and alarm on calls.
Msg. Notification : You can set to display the message on the standby screen when a message is received.
Sent Msg. Auto Save : You can set auto save option on/off for sent messages.
Spam Settings : You can block the message from the designated phone number and string.
•Number Block : You can check the number, or cancel block, add, or delete all by pressing (Left).
• String Block : You can check the blocked phone number and use cancel block, add, delete all by pressing (Left).
• Spam Setup/Release : You can set to block spam number or sentence.
Phrase Settings : You can set the frequently used phrase.
167
Phonebook
1 Search Number ............................. 168
2 Add New Contact ........................ 170
3 Edit Group ...................................... 171
4 Edit Speed Dial ............................. 171
5 Call History/Time .......................... 172
6 Block Calls ...................................... 172
7 Memory Usage .............................. 173
8 Automatic Backup ....................... 173
9 My Number .................................... 174
11
168
1. Search Number
You can search the saved phone number list.
You can check or edit phone numbers.
If you press (Right) on the standby screen, ‘Search All’, ‘Group’,
‘Speed Dial’, and ‘Number’are displayed.
Select a phone number and press to place a call to the number.
You cannot delete the default mobile security number.
Press (Left) ▶Press ▶Press
Search All
Press (Left) ▶Press ▶Press ▶Press
•
Phone numbers beginning with the entered character are listed.
• If you enter the first sound of a name, all the names starting with the sound are searched.
Group
Press (Left) ▶Press ▶Press ▶Press
•
It is displayed in the order of groups. You can search for the phone number by
moving to a group you want.
•
If you enter the first sound of a name, all the names starting with the sound are searched.
Speed Dial
Press (Left) ▶Press ▶Press ▶Press
•
Saved speed dial number is searched when entering speed dial key.
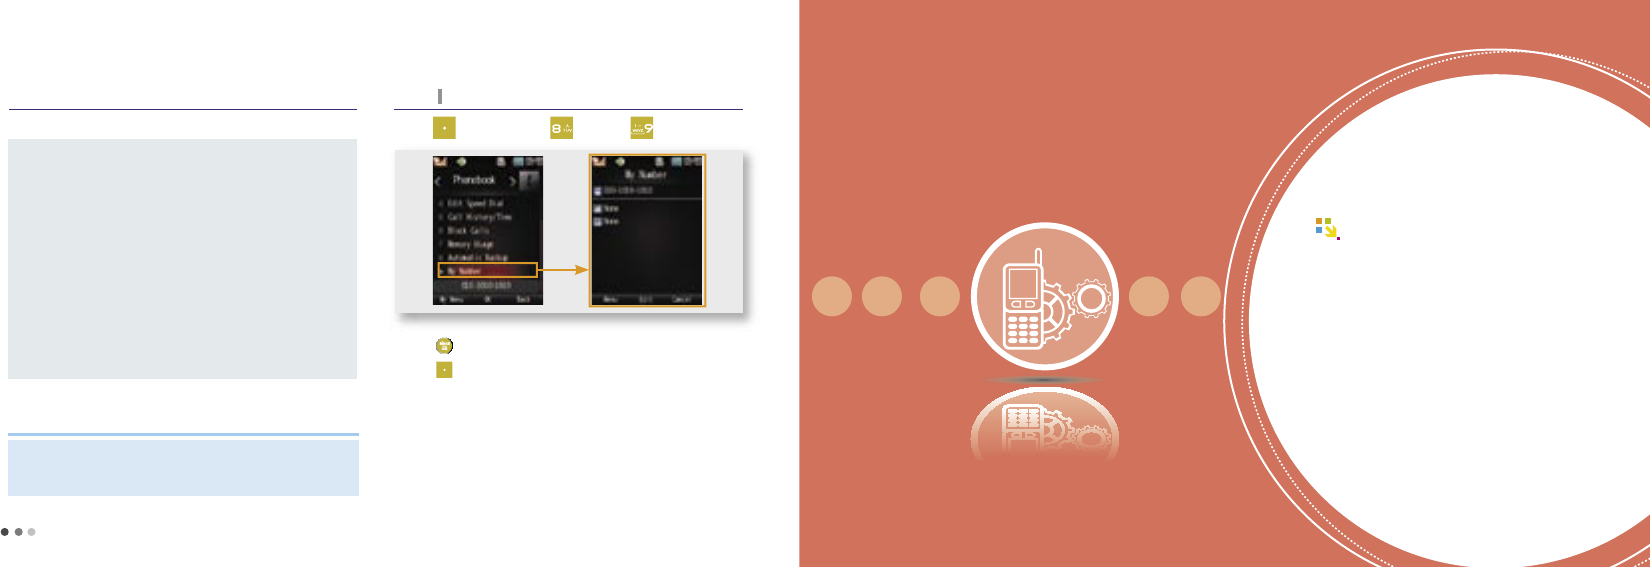
Number
Press (Left) ▶Press ▶Press ▶Press
• Pressing the number you want to search for displays the phone number
including the number you entered.
11 Phonebook
169
Note
•
You can see the phone number and group saved in USIM card only
when USIM card is mounted in the phone.
New Message Send message to selected number.
ⓜMessenger Real-time messenger service. (
ⓜMessenger, see p.163)
Video Call Place a video call to selected number.
Cyworld Connect to the mobile homepage. (NATE Mobile Homepage, see p.81)
Send/Connect Use e-mail, Voice Message Call, Call Me Free, Number Via Message, and Via Bluetooth functions for selected number. (Bluetooth, see p.130)
Add New Contact Save the phone number in the phonebook, if it’s not saved in the USIM card.
Add Speed Dial Assign selected number as a speed dial.
Set as Primary # Assign a specific number as a primary number.
View Set view of the number saved in the phone or USIM card.
(This will affect search all and number screen.)
Move/Copy to USIM
Copy or move the saved phone number in USIM card to the phone.
(You can only save the phone number and email information when copy/move USIM file.
- Depends on the USIM card capacity, some data may not be stored due to availabe space.)
Delete
Delete all or delete the selected number.
Menu description
170
Save by phone
Press (Left) to set the primary number, and (Right) to assign as a
speed dial number.
Press (Left) ▶Press ▶Press
2. Add New Contact
You can save phone numbers in the phone or USIM card.
Including mobile security numbers, you
can save upto 2000 numbers.
When saving as a new contact, you
can select the saving location (phone,
USIM card).
If you select ‘Add to Contact’
when saving phone number on
the standby screen, you can add or
modify the existing phone number of the
phonebook.
Save by USIM
Press (Left) ▶Press ▶Press
You can save the phone number upto
USIM card capacity.
When saving as a new contact, you
can select the saving location (phone,
USIM card).
If you select ‘Add to Contact’
when saving phone number on
the standby screen, you can add or
modify the existing phone number of
the phonebook.
Press (Left) to set the primary number, and (Right) to assign as a
speed dial number.
When saving by
USIM, you can save name, group, mobile1, mobile2, and
e-mail.
Depends on the USIM card capacity, some data may not be stored due
to availabe space.
3. Edit Group
You can manage the groups in the phonebook.
Press (Right) to select the saving location (by phone or by USIM) and
add a group.
If you press (Left), you can use ‘Edit’, ‘Move Members’, ‘Move/Copy to
USIM’, and ‘Delete Members’.
If you delete a group, the phone numbers in the group are moved to ‘Other’
group. For group saved in USIM, numbers are moved to ‘None’.
You cannot delete or rename the default groups.
- Phone: Family, Other, Office, Friend
- USIM: None
Press (Left) ▶Press ▶Press
11 Phonebook
171
4. Edit Speed Dial
You can assign speed dial numbers to the frequently used phone numbers.
On the standby screen, if you press the registered speed dial number,
holding the last digit, the phone dials the registered phone number.
(Placing a call with speed dial, see p.46)
You can store upto 200 speed dial numbers (including mobile security
numbers) in the phonebook.
If you press (Left), you can use ‘Edit Speed Dial’, ‘Change Speed Dial’, ‘
View List’, and ‘Delete’.
You cannot delete the mobile security number.
Press (Left) ▶Press ▶Press
Press
(Left) to set the primary number, and
(Left) to set the primary number, and
Name
Other
Anniversary date
Group
Ringtone
Mobile
Image
Memo
Home
e-mail
Fax
Office
Anniversary type
Icon description
Note
•
You can visit Motorola homepage (www.mymotorola.co.kr), download
PC Sync program, and save, edit, and send phone number to PC.
172
11 Phonebook
173
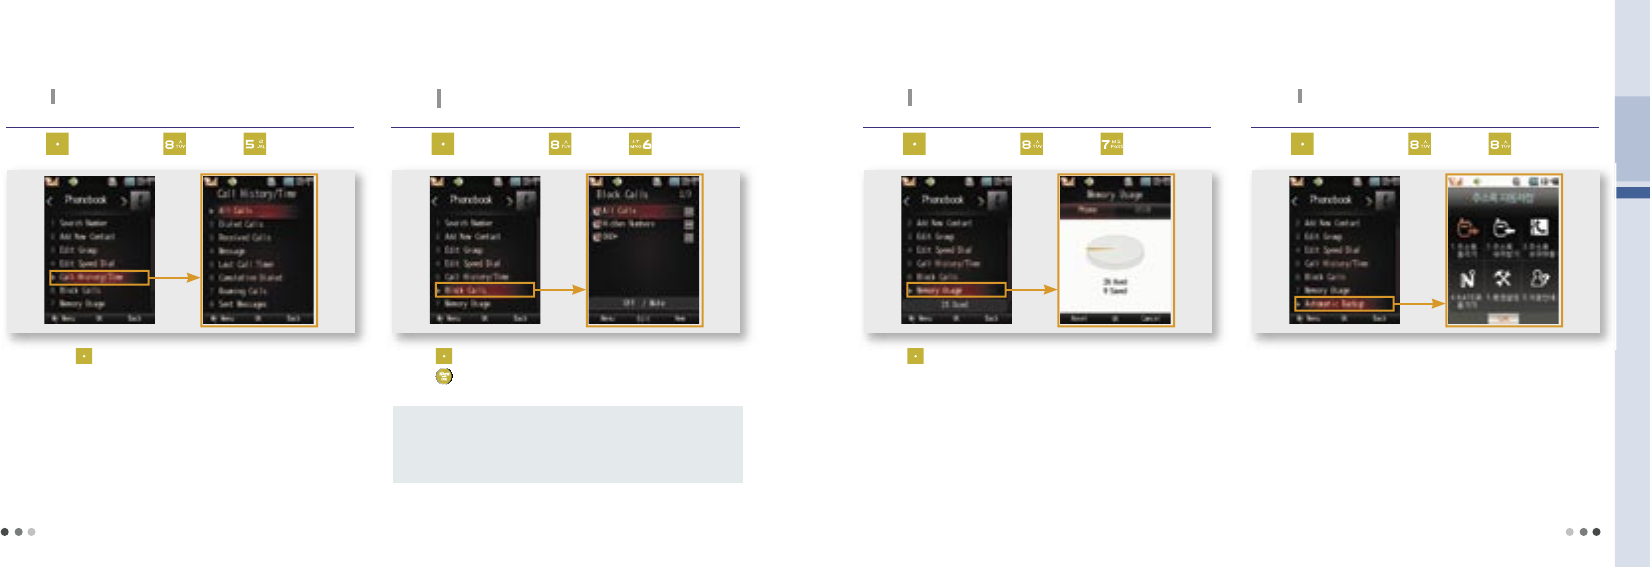
5. Call History/Time
You can view the call history and time.
If you press (Left) while viewing the call time, the call time is reset to zero.
The call time is counted from the point the ringer is generated, and charging
begins after the call is connected.
Press (Left) ▶Press ▶Press
6. Block Calls
You can register a phone number you want to block.
Press (Right) to add a phone number to the block phone number list.
Press to set/release and edit block calls.
Press (Left) ▶Press ▶Press
7. Memory Usage
You can check the memory status of the phonebook.
Press (Left) to reset memory.
-
All phone numbers in the phone except mobile security are deleted.
Press (Left) ▶Press ▶Press
8. Automatic Backup
The phone updates the phonebook everyday to the server.
Press (Left) ▶Press ▶Press
All Calls : You can block all incoming calls.
Hidden Numbers :
You can block all restricted calls.
060* :
You can block calls starting with 060 numbers.
Menu description
174
175
8.
Automatic Backup
(Cont’d)
9. My Number
You can view your own number.
Press to register user information in the phone.
Press (Left) to send via message or send via bluetooth.
(Bluetooth, see p.127)
Press (Left) ▶Press ▶Press
Settings
1 Phone Settings .............................. 176
2 Call Settings ................................... 177
3 Nate Settings ................................. 178
4 Powersave ...................................... 179
5 USIM Setting ................................. 179
6 Set Time ......................................... 180
7 Lock/Password ............................. 181
8 언어/Language ............................... 182
9 Reset ......................................... 183
10 Moto Customer Service .......... 183
11 About ........................................ 184
12
Note
Upload Address Book :
You can view changed address and upload to
the server.
Download Address Book : You can download saved address in the server.
(Additional fee is charged when downloading.)
Address Book Info :
You can check the information of the most recent
saved address book to the server.
Move to NATE :
You can view phonebook saved in the phone or NATE web
phonebook. The phonebook in the phone is synchronized
with NATE.
Settings : You can set various preferences such as password, phonebook
automatic backup, time, delete, and update.
Help :
You can view guidelines on the phone automatic backup services.
Menu description
•
In order to use automatic backup service, you have to register first and
additional service fee is charged. Contact SKT Customer Center for
further information.
176
1. Phone Settings
Integrated menu for phone setting.
Sounds
Press (Left) ▶Press ▶Press ▶Press
You can set the sound functions in the sound menu.
Display
Press (Left) ▶Press ▶Press ▶Press
You can set the display functions in the display menu.
(Display, see p.92)
(Sound, see p.84)
Message
Press (Left) ▶Press ▶Press ▶Press
You can set the message functions in the message menu.
(Settings, see p.166)
Camera
Press (Left) ▶Press ▶Press ▶Press
카메라환경설정 메뉴로 이동하여 카메라 기능 관련 환경을
설정할 수 있습니다 .
(Camera, see p.125)
june Setting
Press (Left) ▶Press ▶Press ▶Press
You can set the june contents box functions in the june contents
box menu.
Play Setting :
You can set the preference for content play.
Display :
You can change settings for skin, preview, or recommended
content.
Live screen sound :
You can select the background sound when a live
screen is set in the standby screen.
Memory :
You can check the total space, used space, and free space of
internal/external memory.
Bluetooth
Press (Left) ▶Press ▶Press ▶Press
You can set the bluetooth functions in the bluetooth menu.
(Preference, see p.132)
T Live
Press (Left) ▶Press ▶Press ▶Press
You can set the T Live functions in the T Live menu.
(T LIVE Settings, see p.41)
2. Call Settings
Integrated menu for call setting.
Answer Options
Press (Left) ▶Press ▶Press ▶Press
You can set the call answer mode.
12 Settings
177
Open Phone : Receive a call when opening the folder.
Any Key : Receive a call when pressing any buttons except .
[Send] Key Only : Press to receive calls.
After 3 Seconds :
The call is connected automatically in 3 seconds after
the ringtone.
Auto Area Code
Press (Left) ▶Press ▶Press ▶Press
You can set an area code that you use frequently.
If you enter a number starting with ‘0’ on the standby screen after setting an auto area
code, the area code is not displayed and only the number you entered is displayed.
(Ex : Mobile phone number, international call number, and other area codes)
If you select ‘Off’ in area code list, the area code display will be cleared.
You can enter upto 5 numbers for auto area code.
178
Note
2. Call Settings
(Cont’d)
Integrated menu for call setting.
Airplane Mode
Press (Left) ▶Press ▶Press ▶Press
▶Password
You can use all the mobile phone functions (MP3, game, organizer).
- Except the communication services (sending/receiving call/message,
network communication including internet).
Network Settings
Press (Left) ▶Press ▶Press ▶Press
You can use this setting only in international roaming.
Press (Left) to see the description on the plane mode.
You can edit/change network setting to use the phone in the foreign
contry.
You can have difficuties of using the phone regarding of phone call
services if you change it within your own discretion.
3. Nate Settings
You can change NATE preferences.
Press (Left) ▶Press ▶Press
Home URL :
You can set the initial access address for wireless internet.
Proxy : If the service provider extends the proxy, and adds or deletes
address, you can set the proxy at your own discretion.
Reset :
If you correct Home URL and Proxy, you can recover them to the
factory-set default.
•
Proxy is the server located between the user and the service server to
speed up date transmission. When the user request a specific data, the
data in the proxy, rather than the concerned server, are sent to the user.
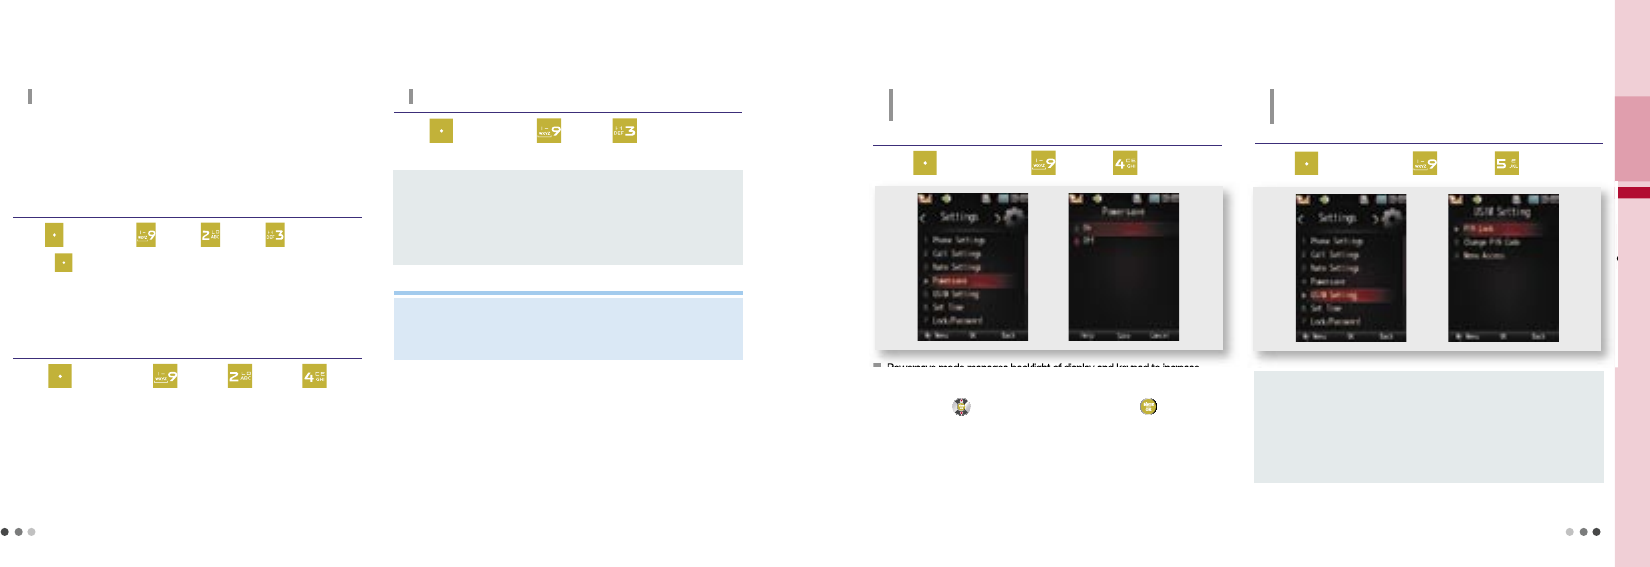
4. Powersave
When the folder is opened without using it, backlight
turns off and change to powersave mode.
Press (Left) ▶Press ▶Press
5. USIM Setting
To prevent loss of information when lost or stolen the
phone, you can set lock and PIN.
Press (Left) ▶Press ▶Press
12 Settings
Powersave mode manages backlight of display and keypad to increase
battery life.
You can press to move and select on/off by pressing .
179
NATE Setting Menu
SettingsSettings
Powersave mode manages backlight of display and keypad to increase
PIN Lock :
You can set PIN code when turning on/off the mobile phone.
Change PIN Code : You can change PIN code.
(Set PIN lock to use this function)
Menu Access :
You can lock the menu when USIM card is not
mounted in the phone.
(Set PIN lock to use this function)
180
12 Settings
5. USIM Setting
(Cont’d)
To prevent loss of information when lost or stolen the
phone, you can set lock and PIN.
6. Set Time
You can set current time in the phone.
Press (Left) ▶Press ▶Press
If you set to manual, you have to input the time or select city info and
summer time(DST).
Auto : Set the time automatically from service provider.
Manual : The user inputs the information manually.
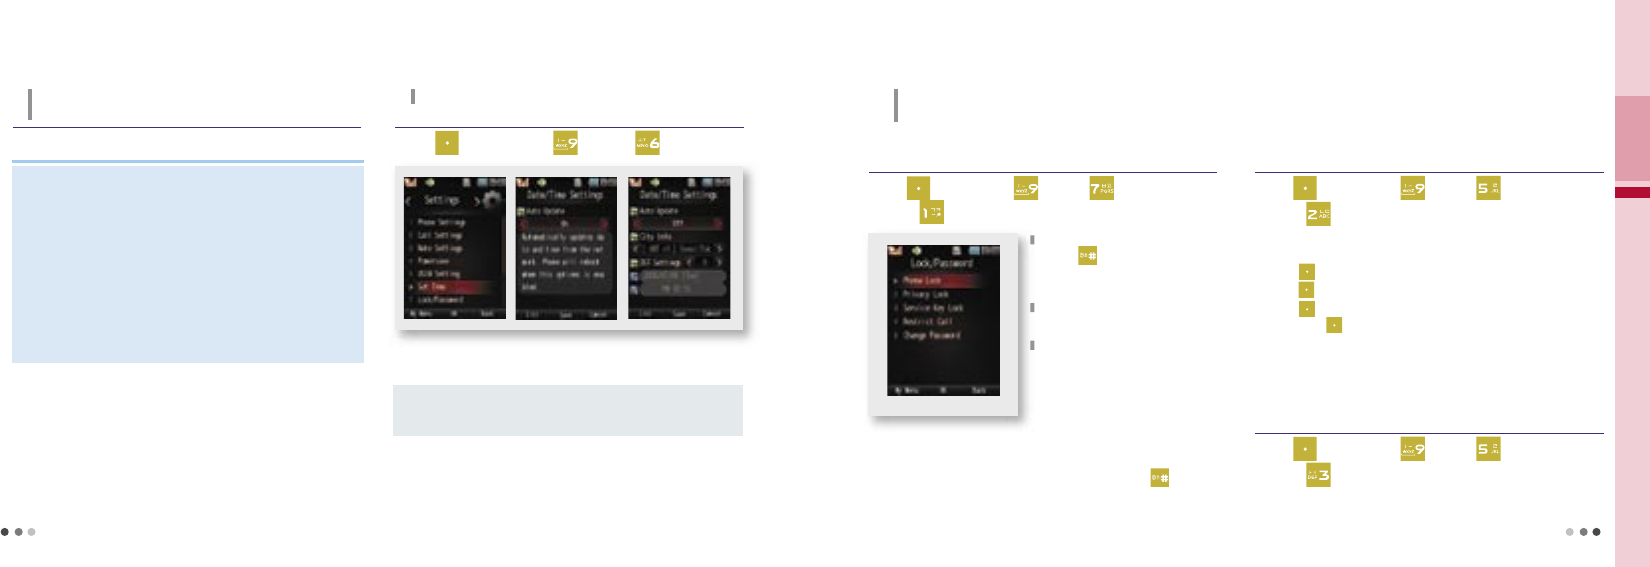
7. Lock/Password
You can set the password of the phone to prevent
unapproved use. (The default password is ‘0000’)
Phone Lock
Press (Left) ▶Press ▶Press ▶Input Password
▶Press
All the phone functions are locked. (except receiving the call)
When you receive a call, the lock mode is released temporarily, and the phone
returns to the lock mode after the call.
In order to release the lock mode completely, press and hold and enter the
password, or select ‘Unlock’ in the Phone Lock menu.
You can set phone lock by pressing and
holding on the standby screen.
-
You can still receive the call even when
the phone is locked.
The phone maintains the lock even if
you switch on/off the phone.
You can still place the emergency calls
(111, 112, 113, 119, 125, 127) or use
the Speed Dial 1 and 9 (Mobile Security)
even when phone is locked.
Privacy Lock
Press (Left) ▶Press ▶Press ▶Input Password
▶Press
You can select the menu and set lock.
If you set lock for a menu, you need to enter the password to use the
selected function. This will protect your privacy.
Press (Left) to select all and lock all menu. In order to unlock the menu
press (Left) again.
Press (Right) to select and lock several menu. In order to unlock the
menu press (Right) again.
If you select ‘Hide Phonebook Name’, sender names stored in phonebook
are not displayed. However the calling number is displayed. (When a
message is received, the ‘Hide Phonebook Name’ function is not applied.)
Service Key Lock
Press (Left) ▶Press ▶Press ▶Input Password
▶Press
When connecting to wireless internet, you have to input the password.
You need to enter the password to use the one-touch dial button (NATE, W,
T MAP, GXG, ⓜPlayon, etc). This will protect your privacy, and prevent from
paying additional fee for unwanted wireless internet service.
181
Note
• If you have entered in wrong PIN code for 3 times, it turns to PIN unlock code
(PUK)
. If you have entered in wrong PUK code 10 times, you have to
replace USIM card.
- PIN(Personal Identification Number) Code : This is to prevent others from
using your phone.
(Upon purchasing the product, the passwrod is ‘0000’.)
-
PUK(PIN Unlock Key) Code : This code is 8 digit number to reset USIM
code, i
f you have entered in wrong PIN code for 3 times.
This number can
be found on the USIM card envelope or card holder.
•
If you have lost
PIN/PUK code, visit SKT retail center to reset
the password.
182
7. Lock/Password
(Cont’d)
You can set the password of the phone to prevent
unapproved use. (The default password is ‘0000’)
Restric Call
Press (Left) ▶Press ▶Press ▶Input Password
▶Press
You can restrict origination to overseas of 700/060 numbers.
Change Password
Press (Left) ▶Press ▶Press ▶Input Password
▶Press
You can change the password.
Be sure not to forget your password.
-
If you lose your password, you have to visit the service center in person
with the ID card.
Motorola takes no responsibility for any damage caused by leakage of
password.
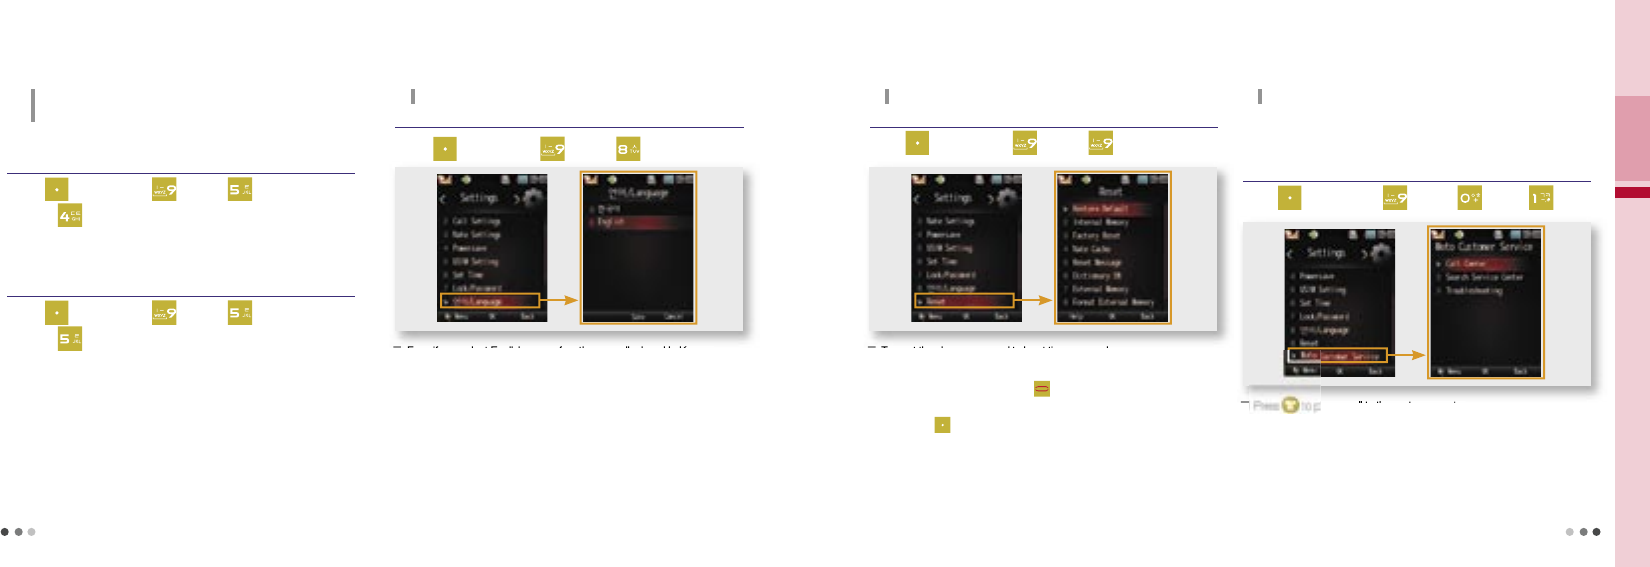
8. Language
You can select the language to be used in the phone.
(Language : Korean/English)
Press (Left) ▶Press ▶Press
Even if you select English, some functions are displayed in Korean.
9. Reset
You can reset the phone to default setting.
Press (Left) ▶Press ▶Press
To reset the phone, you need to input the password.
The phone gets automatically switched off and rebooted.
-If the phone fails to reboot, press to turn on the power.
You can view function description of the item you wish to reset
by pressing (Left).
10. Moto Customer Service
You can receive the service guide about the phone.
Press (Left) ▶Press ▶Press ▶Press
to place a call to the customer center.
12 Settings
183
Call Center
Representative number and business hours of Motorola Customer
Call Center is displayed.
Even if you select English, some functions are displayed in Korean.
To reset the phone, you need to input the password.
to place a call to the customer center.

184
185
10.
Moto Customer Service
(Cont’d)
You can receive the service guide about the phone.
Press (Left) ▶Press ▶Press ▶Press
Press to place a call to the customer center.
-
Press (Left) to save the local customer center number.
Search Service Center
You can check the local customer center number and how to get there.
Press (Left) ▶Press ▶Press ▶Press
Troubleshooting
You can check the solution against phone failure.
11. About
You can check the S/W version of the phone.
Press (Left) ▶Press ▶Press
S/W upgrade
If you wish to upgrade the software to the recent version, or if you
need to upgrade software due to a bug, you can visit Motorola
homepage (www.mymotorola.co.kr) and easily upgrade it with the
Moto Upgrade program without having to visit a Motorola service center.
•Visit the Motorola homepage, sign up and log in.
•
Select ‘MOTOPRODUCT INFORMATION’and click Version Upgrade.
• Before starting the Moto Upgrade program, make sure to read
‘Prerequisites’, and run the program in accordance with the procedure.
(Some software versions require you to visit the service center for
upgrade. If you visit the nearest Motorola service center for free
Moto Upgrade.
Contact the Motorola Customer Center (1588-6633) for details.
185
Appendix
01 Accessories ...................... 186
02 Troubleshooting .......................... 186
03 Spec and Feature ...................... 187
04 Authentication label .................. 187
05 Specific Absorption Rate ........ 188
06 Collecting wasted-mobile phones .. 189
13
186
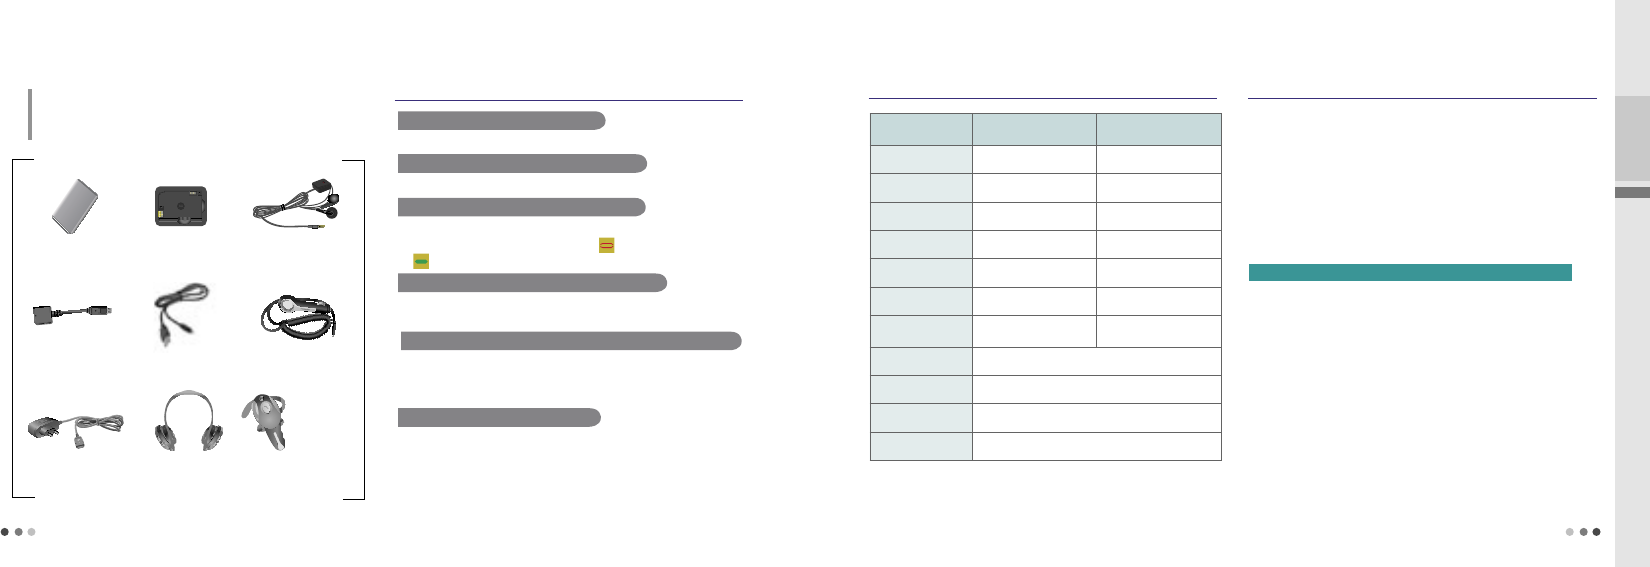
1. Accessories
You can purchase optional items at the nearest Motorola
service center or accessory shop. Contact the service provider
or visit Motorola homepage (www.mymotorola.co.kr) for details.
Standard-type
battery
Battery charger Stereo earphone
Battery adapter
5PIN USB
data cable
Car charger
Travel charger Bluetooth headset
2. Troubleshooting
Nothing is displayed on the screen
- Check the battery.
No antenna bar is displayed on the screen
- Move to other place and then attempt a call again.
It sounds ‘Toot-Toot’ when a call is placed
-
There is no communication channel available or your phone has failed in
communicating with a base station. Press to clear the call and press
to redial the number.
The charging lamp of the charger blinks in red
-
Check the battery position or clean the terminals before reattempting
charging. If the lamp keeps blinking, contact the nearest service center.
Battery operating time does not comply with the User Manual
-
The battery operating time reduces slowly as the battery repeats charging
and discharging. The operating time reduces rapidly if the battery is left in
a cold or hot place for a long time.
Malfunction or failure to power On
- Remove the battery and reinstall it, and then turn the power on.
13 Appendix
187
3. Spec and Feature
Wireless communications
service Bluetooth
Transmit frequency 1942.8~1977.2MHz 2402~2480MHz
Receive frequency 2132.8~2167.2MHz 2402~2480MHz
TX power 230mW 0.1mW
Number of channel 8CH 79CH
Type of emission G7W F1D
Modulation system QPSK GFSK
Communication
mode duplex operation system semi-duplex operation
Transformer
PLL
Power DC 3.7V
Exterior, weight
53.00(W)mmX102.90(L)mmX14.99(T)mm, 112g
Relative humidity -20℃~+50℃, 0%~95%
4. Authentication label
1. Name of the model : Wireless communications service device
(MS500W)
2. Authentication number : MOT-W-MS500W-0109
3. Authentication Trade name : Motorola Korea Inc.
4. The date of manufacture : . . .
5. Manufacturer/country : Motorola Korea Inc. / China
Notice to Users
※
The manufacturer and the installer are not allowed to provide the service that
affects people’s lives since there can be an interference of in this equipment.
188
5. Specific Absorption Rate
This mobile phone satisfies the Standard of Human Body Protection against Electromagnetic Wave specified on No.2008-37 notified by
Ministry of Information and Communication Republic of Korea.
The phone is designed and manufactured to limit or not to exceed RF exposure level as a wireless transceiver.
The limit requirement is a part of the synthetic guidline to define the permissible value of high frequency for general users.
The guidelines are based on the standard developed through regular and thorough research & evaluation at a separate research institute.
One of them is the practical safety limit which is to seek everybody’s safety regardless of age and health condition.
The exposure standard of mobile phone has been established by the use of Specific Absortion Rate (SAR), a measuring unit.
SAR limit is set to 1.6 W/kg in this model. SAR test is done; the mobile phone in normal operation is tested under which transmission is done at
the maximum output level authorized in all tested frequency band.
SAR is set at authorized maximum output level, but real SAR level of a phone in operation is likely to be lower than the maximum level.
Because the phone is designed to be operated at various output levels in order to use only output required to reach wireless base station.
In general, the nearer the base station, power gets lower.
We test our products to confirm if they satisfy these requirements before sales for general users.
The phones are tested at the position subject to the test method determined by professional standard institute.
The maximum SAR level is 0.41 W/kg when the phone is tested under which it is placed on a user’s ear.
SAR level is subject to change depending on places where each phone is used, but it satisfies our governments safety exposure requirements.
SAR level of next models may vary thanks to improved functions of the phone but we hope you understand our products are designed to
satisfy the above guidelines in any case.
13 Appendix
189
6. Collecting wasted-mobile phones
The collected wasted-mobile phones are utilized as resources and the resides are treated ecologically. Motorola is willing to do its best to protect
environment not only today but in the future also. We kindly inviting you to participate in this movement for the protection of environment.
M otorola phone collecting centers
▶ ▶
Wasted-mobile phones
collecting centers
Recycling Plant Recycling
Recycling of wasted-mobile phone
▒ Return the old one to the distributor when you purchase a new phone. ▒ Visit a near-by representative of the manufacturer or A/S center.
▒ Return your mobile phone to a representative of mobile service provider.
▒ Utilize a collecting bag with no charger (arranged in provincial office, distributor, representative)
Guidelines for collecting discarded Motorola mobile phones
Please think of environment when you discard your phones and accessories.
Do not discard old mobile phones or accessories such as battery pack, battery charger, etc. together with household waste.
In some countries and areas, they have established a system to treat useless electronic and electrical products and batteries.
Please contact your area for more information. If there is no appropriate system available, please send useless mobile phone and
accessories to a near-by Motorola service center.
190
FCC Notice to User
encouraged to try to correct the interference by one or more of the
following measures:
•
Reorient or relocate the receiving antenna.
•
Increase the separation between the equipment and the
receiver.
•
Connect the equipment to an outlet on a circuit different
from that to which the receiver is connected.
•
Consult the dealer or an experienced radio/TV technician
for help.
The following statement applies to all products that have
received FCC approval. Applicable products bear the FCC
logo, and/or an FCC ID in the format FCC-ID:IHDT6JC1 on
the product label.
Motorola has not approved any changes or modifications to this
device by the user. Any changes or modifications could void the
user’s authority to operate the equipment. See 47 CFR Sec. 15.21.
This device complies with part 15 of the FCC Rules. Operation is
subject to the following two conditions: (1) This device may not
cause harmful interference, and (2) this device must accept any
interference received, including interference that may cause
undesired operation. See 47 CFR Sec. 15.19(3).
This equipment has been tested and found to comply with the
limits for a Class B digital device, pursuant to part 15 of the FCC
Rules. These limits are designed to provide reasonable protection
against harmful interference in a residential installation. This
equipment generates, uses and can radiate radio frequency energy
and, if not installed and used in accordance with the instructions,
may cause harmful interference to radio communications.
However, there is no guarantee that interference will not occur in a
particular installation. If this equipment does cause harmful
interference to radio or television reception, which can be
determined by turning the equipment off and on, the user is
European Union Directives Conformance Statement
Hereby, Motorola declares that this product is in compliance with:
•
The essential requirements and other relevant provisions of Directive 1999/5/EC.
•
All other relevant EU Directives
The above gives an example of a typical Product Approval Number.
You can view your product’s Declaration of Conformity (DoC) to Directive
1999/5/EC (to R&TTE Directive) at www.motorola.com/rtte. To find your
DoC, enter the product Approval Number from your product’s label in the
“Search” bar on the web site.
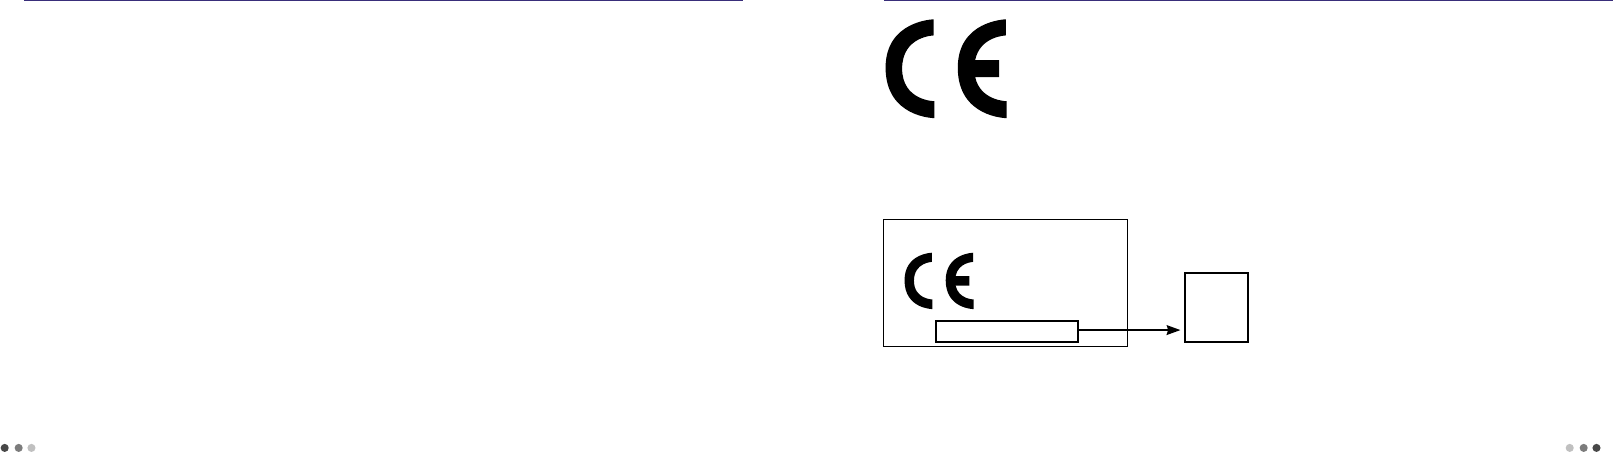
IMEI : 350034/40/394721/9
0168
Type : MC2-41H14
Product
Approval
Number
191
192
193
Summary Table
Bluetooth
•Bluetooth mode : (Left)[Menu] ▶ ▶ ▶
•Connect bluetooth : (Left)[Menu] ▶ ▶ ▶
•Settings : (Left)[Menu] ▶ ▶ ▶
•My Device Info : (Left)[Menu] ▶ ▶ ▶
Dictionary
• English-Korean : (Left)[Menu] ▶ ▶ ▶
• Korean-English : (Left)[Menu] ▶ ▶ ▶
• My Vocabulary : (Left)[Menu] ▶ ▶ ▶
• Previous Key Word : (Left)[Menu] ▶ ▶ ▶
• Settings : (Left)[Menu] ▶ ▶ ▶
Photo Capture
• In standby screen, press and hold Camera button.
Movie Capture
• In standby screen, press and hold Camera button ▶ ▶
192
MEMO
194
195
Saving Phone Number
•Save number from menu : (Right)[Phonebook] ▶ (Right)[Add New]
•Save number in standby screen: Enter number ▶ (Right)[Save]
Searching Phone Number
•
In the standby screen, press and hold (Right)[Phonebook]
and select Speed/All/Group/Number ▶
Messages
• Checking message : ▶
• Writing meesage : ▶
T LIVE
• Recent video list : ▶
• Video message box : ▶
• VTC contents box : ▶
• Movie/Photo album : ▶
• T LIVE settings : ▶
Main Menu Setting
• Sounds : (Left)[Menu] ▶ ▶ ▶
• Display : (Left)[Menu] ▶ ▶ ▶
• Message : (Left)[Menu] ▶ ▶ ▶
• Camera : (Left)[Menu] ▶ ▶ ▶
• june setting : (Left)[Menu] ▶ ▶ ▶
• Bluetooth : (Left)[Menu] ▶ ▶ ▶
• T LIVE settings : (Left)[Menu] ▶ ▶ ▶
One-Touch Dial
• Set/Release Etiquette : In standby screen, press and hold
• Lock/Unlock : In standby screen, press and hold
• W : In standby screen, press
• Moneta : In standby screen, press
• My Menu : In standby screen, press
• T MAP : In standby screen, press and hold
• NATE : In standby screen, press and hold
•
Operation Effects :
In standby screen, press the
Volume button
• T interactive : In standby screen, press and hold
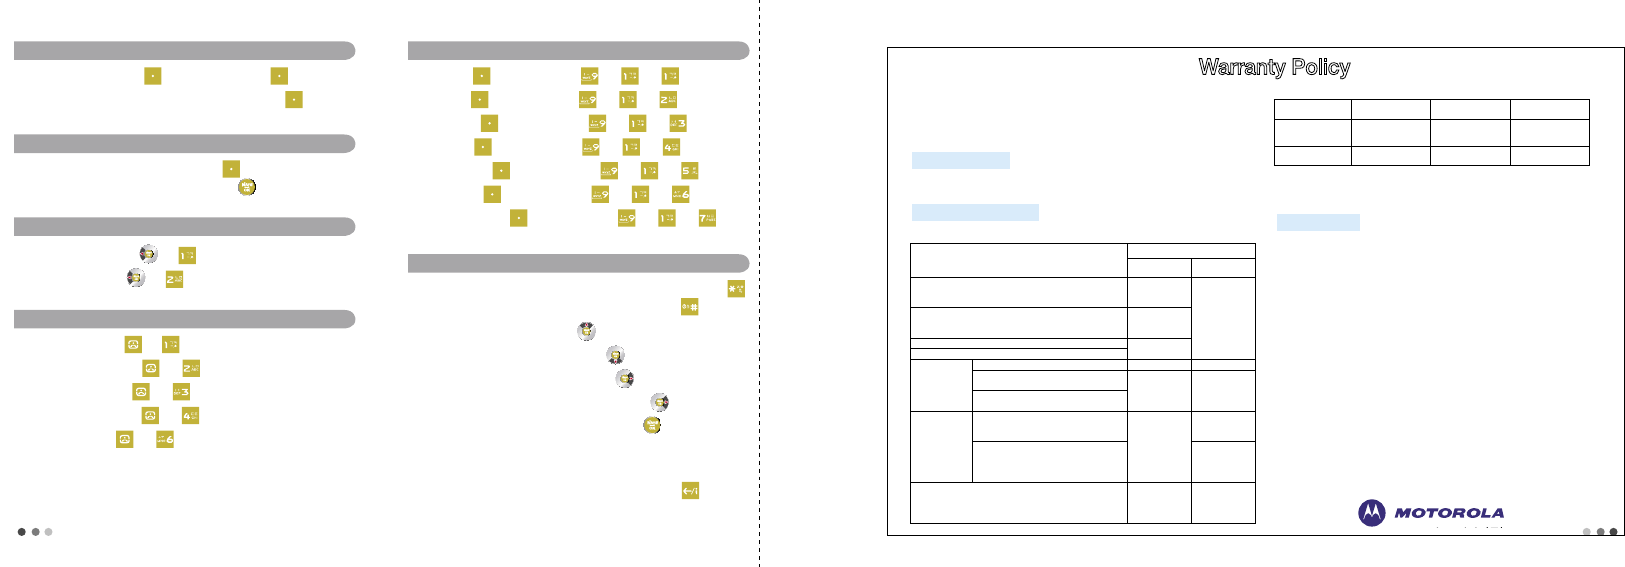
Warranty Policy
Thank you for purchasing a Motorola product.
This product has passed a strict quality control and inspection of the Motorola
Tehchnology Team. If a defect is found in your product during the warranty period,
it will be repaired free of charge at a Motorola Service Center.
■ Terminal Equipment : 1 year ■ Other Accessories : 1year
■ Lithium ion battery : 6 months
Free warranty service will be provided for one year (warranty period) after purchasing.
※
When you purchase the product, please fill the blanks on the Warranty Policy
and keep it together with the receipt in order to obtain more beneficial service.
■
Reasons other than defects
Service requests for symptoms other than defects will be charged after expiry of the
warranty period. Carefully read the User’s Manual before you visit a service center.
■
Defects resulting from user’s errors
-
Defects caused by careless handling (soaking, impact) or improper repairing
and remodeling.
-
Defects caused by using improper power supply.
-
Defects caused by repairs done at a place other than the Motorola Service Centers.
-
Defects caused by using accessories not provided by Motorola.
(hands free, quick charger, charger, battery, stereo headset, battery cover, etc.)
-
Defects or damages resulting from dropping while moving the product.
■ Others
- Defects resulting from natural disasters such as fire, earthquake, flodd, etc.
- Expiry of life time of consumables
(battery, stereo headset, external memory, antenna, and various accessories)
Warranty Period
Free Warranty Service Paid Service
Model Serial No.
Purchase Date Year Month Day Customer
Distributor Price
Type of defects or trouble
Compensation
Under warranty After expiry of
warranty
Critical repair service request resulting from performance
and function failures occurred in normal operation within
10 days after purchasing
Exchange or
refund
N/A
Critical repair service request resulting from performance
and function failures occurred in normal operation within
1 month after purchasing
Exchange or
repair
Critical repair service request within 1 month of exchange
Refund
Exchange the product is impossible
Repairable
Performance and function failures occurred Free service Paid service
Three times of repair and four times of
detects resulting from the same reason
Exchange or
refund
Paid service
Four times of repair and five times of detects
resulting from the different reasons
Non-repairable
A/S parts are available but repair is impossible
Exchange or
refund
Refund the price
deducted by the
depreciation amount
Repair is impossible because A/S parts are
not in stock.
Refund the price
deducted by the
depreciation amount
and added by its 10%
lost of repair request product by the user
Exchange or
refund
Refund the price
deducted by the
depreciation amount
and added by its 10%

196
Safety Information
Safety and General Information
Safet y In formati on
This section contains important information on the safe and
efficient operation of your mobile device. Read this
information before using your mobile device.
Exposure to Radio Frequency (RF)
Energy
Your mobile device contains a transmitter and receiver. When it is
ON, it receives and transmits RF energy. When you communicate
with your mobile device, the system handling your call controls the
power level at which your mobile device transmits.
Your Motorola mobile device is designed to comply with local
regulatory requirements in your country concerning exposure of
human beings to RF energy.
Operational Precautions
For optimal mobile device performance, and to be sure that human
exposure to RF energy does not exceed the guidelines set forth in
the relevant standards, always follow these instructions and
precautions.
Product Operation
When placing or receiving a phone call, hold your mobile device
just like you would a landline phone.
If you wear the mobile device on your body, always place the
mobile device in a Motorola-supplied or approved clip, holder,
holster, case, or body harness. If you do not use a body-worn
accessory supplied or approved by Motorola, keep the mobile
device and its antenna at least 2.5 centimeters (1 inch) from your
body when transmitting.
Using accessories not supplied or approved by Motorola may
cause your mobile device to exceed RF energy exposure
guidelines. For a list of Motorola-supplied or approved
accessories, visit our Web site at:
www.motorola.com
.
RF Energy Interference/Compatibility
Nearly every electronic device is subject to RF energy interference
from external sources if inadequately shielded, designed, or
otherwise configured for RF energy compatibility. In some
circumstances your mobile device may cause interference with
other devices.