Motorola Solutions 89FT4853 T7100 and T7200 User Manual 6864110R94
Motorola Solutions, Inc. T7100 and T7200 6864110R94
UserManual.wiki
>
Motorola Solutions
>
89FT4853 User Manual
>
Amended User Manual
Contents
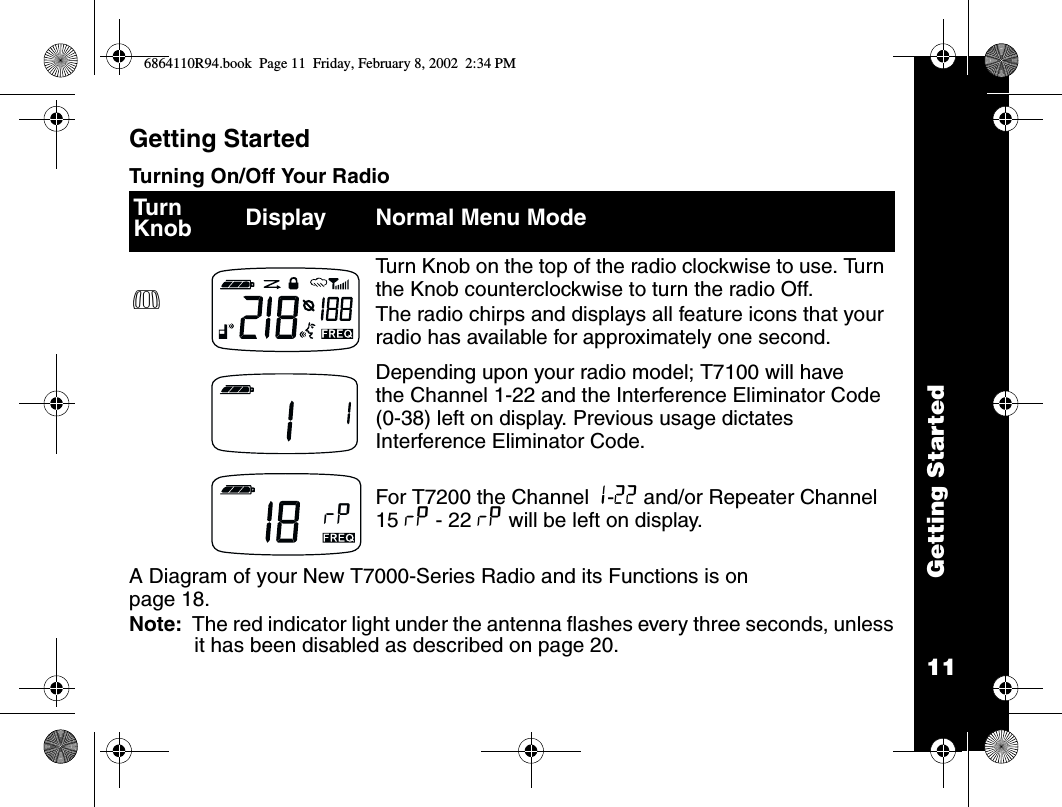
1.
Users Manual
2.
Amended User Manual
3.
GMRS Lic Information
Amended User Manual
Navigation menu
Upload a User Manual
Namespaces
Wiki Guide
HTML
PDF
Info
Views
User Manual
Discussion / Help
Navigation

![Getting Started18Diagram of Your New Talkabout T7000 Series Radio and its Functions Indicator Light Use M to Ta l k Exit a menuUse B to Transmit Call Tone Use G to Turn on Backlight (short press) Press and hold to switch between Weather Mode & Two-way Mode(T7200 only)Microphone Speaker Use P (Power) toTurn power On/Off Adjust volume to talk on your radio Use [ and ] toScroll through menu settingsChange Channels Accessory cover/flap Use J toTurn Scan On/Off (Short press.) Monitor the Frequency (Long press.) Use \toScroll through menusLock the keypad(when held down & not in a menu) 6864110R94.book Page 18 Friday, February 8, 2002 2:34 PM](https://usermanual.wiki/Motorola-Solutions/89FT4853.Amended-User-Manual/User-Guide-234208-Page-23.png)
![Operating Your T7000-Series Radio20Changing Your Radio’s Settings through Button CombinationsNote: The following table lists the functions you can set by pressing and holding specific key combinations while turning your radio to the On position: P.Note: For more specific information regarding Menu/\Button Combinations, please refer to Menu Functions on page 30.Key(s) Pressed FunctionP\ M Reset factory settings by holding down for three seconds.P MEnable VOX/Hands-free use without accessories.P ]Tu r n s “Roger” Beeps/Talk Confirmation Tone, On or Off.P [Turns Audible Button Beeps On or Off.P GDisable backlight so it lights up when pressing G. The Indicator Light is also disabled.Enable backlight so it lights up at any press of a button. The Indicator Light is also enabled. Please refer to page 21.P B M Enable/Disable Repeater Channels by holding down B and Mfor three seconds. (T7200 only)PJ M Select bandwidth between 12.5 kHz and 25 kHz. Does not apply to Channels 8-14.6864110R94.book Page 20 Friday, February 8, 2002 2:34 PM](https://usermanual.wiki/Motorola-Solutions/89FT4853.Amended-User-Manual/User-Guide-234208-Page-25.png)
![21Operating Your T7000-Series RadioAccessing the BacklightYour radio has a Backlight that turns On automatically any time you press a front button. The Backlight turns Off automatically five seconds after you last pressed a front button.•By pressing and holding G as you turn your radio On, you can disable the backlight.•To return to normal Backlight operation, turn your radio Off and then back On while pressing and holding G.Lock•To avoid accidentally changing radio operation, press \ for three seconds. Now you will see f.•The Lock Feature locks \, [ and ], Weather (T7200 only), and Scan functions. When the keypad is locked you can still adjust the volume, transmit M, send a Call Tone B, and monitor J (Long Press).•To unlock, press \ for three seconds.Checking Monitor/Signal Strength IndicatorJ allows you to listen to all activity on a Channel to tell whether the Channel is currently in use. J can also help you determine when a radio is moving out of range.•To check for Channel activity, press and hold J for three seconds, then release. You’ll hear static if the Channel is clear and w will display. To avoid interrupted conversation, wait until the Channel is clear or switch to another Channel. To stop monitoring, briefly press J and release.6864110R94.book Page 21 Friday, February 8, 2002 2:34 PM](https://usermanual.wiki/Motorola-Solutions/89FT4853.Amended-User-Manual/User-Guide-234208-Page-26.png)
![Operating Your T7000-Series Radio22Note: Obstacles that block the signal path affect the strength of the incoming signal.“Roger” Beeps/Talk Confirmation ToneWhen you turn this feature On, your two-way radio transmits a unique tone when you finish transmitting. It’s like saying “Roger” or “Over” and lets others know you’re finished talking. If the person you are talking to does not hear the talk confirmation tone, you can enable it by pressing and holding ] as you turn On your radio. Now, whenever you release M, you let your friends know you’re finished talking by transmitting a “Roger” Beep tone. “Roger” Beeps will be disabled as the Default Setting.Note: To toggle the Talk Confirmation Tone feature, turn your radio Off and then back On while pressing and holding ].Button BeepsEvery time you press a button on the front of your radio, it beeps unless you turn Button Beeps Off. To turn Button Beeps Off, turn your radio On while you press and hold [.. To turn Button Beeps back On, turn the radio Off and then back On again while you press and hold [.. Button Beeps will be turned On, out of the factory. On is the Default setting.The w helps you determine when a radio is moving out of range by displaying a receive signal-strength value next to the w while you press and hold J. This value from 0 (weakest) through 6 (strongest) indicates the relative strength of the incoming signal.6864110R94.book Page 22 Friday, February 8, 2002 2:34 PM](https://usermanual.wiki/Motorola-Solutions/89FT4853.Amended-User-Manual/User-Guide-234208-Page-27.png)
![23Changing your Radio’s Settings\Changing your Radio’s SettingsSetting the Channel•Turn radio On.•Press [ or ] to select Channel.Note: The red indicator light below the antenna on the left front of the radio flashes every second when the Channel is in use.To set Repeater Channels (T7200 only), please refer to Setting Repeater Channels on page 35.Setting the Interference Eliminator CodeThe Interference Eliminator Code helps minimize interference by providing you with a choice of code combinations.•Turn radio On.•To set, press \ once the Code display begins to flash. •Then press [ or ] to choose the Code. •Press M to exit this menu. Note: To hear everyone on your Channel, select Interference Eliminator Code 0.You can specify a different Interference Eliminator Code for each Channel. •To set a Channel and Code combination, press [ or ] to select the Channel. •Press \and then press [ or ] to select a Code. •To exit the menu, press M. •To set another Channel and Code combination, repeat these steps.Note: To set your Repeater Interference Eliminator Code (T7200 only), please refer to Setting Repeater Interference Eliminator Codes on page 35.66864110R94.book Page 23 Friday, February 8, 2002 2:34 PM](https://usermanual.wiki/Motorola-Solutions/89FT4853.Amended-User-Manual/User-Guide-234208-Page-28.png)
![Changing your Radio’s Settings24\Setting Eavesdrop Reducer (T7200 Only)Your radio has the Eavesdrop Reducer feature, a scramble code that makes your transmissions sound garbled to anyone listening without the same Code. It doesn’t guarantee secrecy, but it adds an extra layer of privacy. Note: All the radios have to be set to the same Scramble Code for transmission to be clear.•Turn radio On.•To turn the Eavesdrop Reducer feature On, press \ as needed until e is displayed.•Then press [ or ] to choose the Code. •Select Code 0-3. Factory Default is set on 0, which means that the feature is Off.•When you exit by pressing M, radio displays e.•To turn the Eavesdrop Reducer feature Off, press \ as needed until e is displayed, then select [ or ] until 0 appears. •Then press M to exit.Setting the Call ToneYour radio can transmit different individual call tones to other radios in your group so you can alert the group that you want to talk to them. There are ten distinct individual call tones to choose from and you can also turn Call Tones Off by selecting Call Tone 0. Once selected, press B to transmit the Call Tone to others. 6864110R94.book Page 24 Friday, February 8, 2002 2:34 PM](https://usermanual.wiki/Motorola-Solutions/89FT4853.Amended-User-Manual/User-Guide-234208-Page-29.png)
![25Changing your Radio’s Settings\Microphone GainThe sensitivity of your radio’s microphone can be adjusted to fit different users or operating environments. Please refer to page 26.Hands-Free Use/VOXWith Compatible VOX Accessories To set your Call Tone:• Tu r n r ad io O n.• Press \ as needed to display: E. • You can press [ or ] to scroll through the available call tones. The radio plays a sample of each individual Call tone as you scroll through them. • The default is set on 1, or you may choose 0 -10. •Turn radio Off.•Open Accessory Cover.•Insert plug of audio accessory firmly into Accessory Jack. •Turn radio On. Radio will display: g. •Lower radio volume BEFORE placing accessory on head or in ear.•To transmit, speak into Accessory Microphone and to receive, stop talking.•VOX operation can be disabled by pressing Mor removing audio accessory.1E6864110R94.book Page 25 Friday, February 8, 2002 2:34 PM](https://usermanual.wiki/Motorola-Solutions/89FT4853.Amended-User-Manual/User-Guide-234208-Page-30.png)
![Changing your Radio’s Settings26\Note: There is a short delay between when you start talking and the radio transmits. To order accessories, please refer to: www.motorola.com/talkaboutWithout Accessories •Enable VOX by pressing M while turning the radio On. •VOX operation can be temporarily disabled by pressing M, g will flash.•A short press of M will re-enable VOX. g will be displayed (not flashing).Note: There is a short delay between when you start talking and the radio transmits. Setting Sensitivity LevelAdjusting your radio’s Sensitivity Level helps minimize the possibility of unintended noises triggering a transmission, or enhances the ability to pick up quiet voices.•Press \ as needed to display g. The radio will also display the sensitivity type you are setting: ? = Microphone Gain H = External VOX (with audio accessory) - appears if a VOX-capable audio accessory is inserted and VOX is enabled.I = Internal VOX (without accessory) - appears if internal VOX is enabled. •Select Sensitivity Level of1, 2, or 3 by using [ or ]:3 = High Sensitivity, for quiet environments2 = Medium Sensitivity, for most environments1 = Low Sensitivity, for noisy environmentsNote: There is a short delay between when you start talking and the radio transmits.3H6864110R94.book Page 26 Friday, February 8, 2002 2:34 PM](https://usermanual.wiki/Motorola-Solutions/89FT4853.Amended-User-Manual/User-Guide-234208-Page-31.png)
![27Changing your Radio’s Settings\ScanningBy using J, you can monitor Channels and Codes for transmissions and lock in on the one that interests you. More importantly, you can find someone in your group who has accidentally changed Channels and is talking during your scan. You don’t have to set a new Channel or Code, the radio just resets itself temporarily to that Channel and Code and you can start talking.•To start scanning, briefly press J. Your Channel/Code screen displays h and begins to scroll through Channels. When the radio detects channel activity, it stops on that channel and displays its Channel and Code. You can talk to the person(s) transmitting without having to switch Channels by pressing M. •To stop scanning, briefly press J. If you press M while the radio is scanning, the radio will transmit on the Channel which was selected before you activated Scan. If no transmission occurs within five seconds, scanning will resume.If you want to scan channels without Interference Eliminator Codes, change the Code for your set Channel to 0 before you briefly press J. Note: To Scan Repeater Channels (T7200 only), refer to page 36.Scan Manual AdvanceIf Scan stops on a Channel that you don’t want, briefly press ] to resume scanning for the next active Channel in the Scan List.6864110R94.book Page 27 Friday, February 8, 2002 2:34 PM](https://usermanual.wiki/Motorola-Solutions/89FT4853.Amended-User-Manual/User-Guide-234208-Page-32.png)
![Changing your Radio’s Settings28\Scan Nuisance DeleteIf Scan continuously stops on an undesired Channel, briefly press [ . This will temporarily remove the undesired Channel from being scanned. To restore the deleted Channel, turn Scan Off by pressing J, then turn Scan back On by pressing J again. Note: Your Home Channel is the Channel your radio was set to when you activated Scan. You cannot Nuisance Delete your Home Channel. Editing Scan ListScan List is changed by pressing \until h displays.•The flashing Channel will appear on the display with a flashing Y or n.•Press [ or ] to increase or decrease the Channel.•Pressing J will change the Scan List to include Y or exclude n that particular Channel.Note: Your home Channel will be scanned even if it is deleted from the Scan List.Setting the Battery TypeNote: Battery type needs to be set when non Motorola batteries are used. However, if you use the Motorola NiMH battery, the battery type menu will not display because your radio automatically detects the type of battery.•Selecting the battery type, allows the battery meter to recognize and properly display the power usage for single-cell batteries. •First, press \ until d displays. Either A (Alkaline) or n (NiMH or NiCd rechargeable) is blinking. •Press [ or ] until your choice of A or n displays.•Then press M or \ to exit.A6864110R94.book Page 28 Friday, February 8, 2002 2:34 PM](https://usermanual.wiki/Motorola-Solutions/89FT4853.Amended-User-Manual/User-Guide-234208-Page-33.png)
![Changing your Radio’s Settings30\Menu FunctionsRadioModel Press ToT7100 [ or ] one time Change the Channel. Please refer to page 23.\ one time Change the Interference Eliminator Code. Please refer to page 23.\ two times Change the Call Tone (10 to choose from). Choose 0 if you want to turn Call Tone Off. Please refer to page 24.\ three times Sensitivity Level selection. Please refer to Setting Sensitivity Level on page 26.\ four times Select Y (yes) or n (no) for each Channel you want to keep or delete from your Scan List. Please refer to page 27.\ five times Choose Battery setting type A for alkaline, n for rechargeable cells. Please refer to page 28.Note: This menu will not appear if the radio detects a Motorola rechargeable pack.6864110R94.book Page 30 Friday, February 8, 2002 2:34 PM](https://usermanual.wiki/Motorola-Solutions/89FT4853.Amended-User-Manual/User-Guide-234208-Page-35.png)
![31Changing your Radio’s Settings\T7200 [ or ] one time Change the Channel. Please refer to page 23. Can scroll through Repeater Channels after basic powerup sequence. Please refer to Setting Repeater Channels on page 35.\ one time Choose the Interference Eliminator Code. Please refer to Setting the Interference Eliminator Code on page 23.\ two times Choose Eavesdrop Reducer Code (0-3). Please refer to Setting Eavesdrop Reducer (T7200 Only) on page 24. \ three times Change the Call Tone (0-10). Please refer to Setting the Call Tone on page 24.\ four times Sensitivity Level selection. Please refer to Setting Sensitivity Level on page 26.Menu FunctionsRadioModel Press To6864110R94.book Page 31 Friday, February 8, 2002 2:34 PM](https://usermanual.wiki/Motorola-Solutions/89FT4853.Amended-User-Manual/User-Guide-234208-Page-36.png)

![35Advanced FeaturesTo disable Repeater Channels:•Turn your Radio Off.•Turn your radio back On while you press and hold the M and B for 3 seconds.A single power-up chirp will sound (if Button Beeps are enabled) indicating that your radio now has returned to normal Channel mode. Channels 15 x - 22 x will no longer appear on your display.Setting Repeater ChannelsOnce you enable your Repeater Channels on your T7200:•Press ] to scroll up to Channel 15 x - 22 x, located just after Channel 22. •When you scroll to a repeater Channel, the selected Interference Eliminator Code will be displayed briefly. Then, x will appear in these digits to indicate repeater operation. l will also display when you are on a Repeater Channel.Setting Repeater Interference Eliminator CodesThe Interference Eliminator Codes for GMRS Repeater Channels 15 x - 22 x and GMRS Direct Channels 15-22 are linked. This means that when you change the Code on a GMRS Repeater Channel, the Code on the equivalent GMRS Direct Channel will change as well and vice versa (i.e. If you are on Channel 15, Code 30 and you change to Code 31, then the Code will automatically change from 30 to 31 on Channel 15 x). To change your Repeater Interference Eliminator Code:•Press the ] to scroll up to any Channel between 15 x - 22 x. 6864110R94.book Page 35 Friday, February 8, 2002 2:34 PM](https://usermanual.wiki/Motorola-Solutions/89FT4853.Amended-User-Manual/User-Guide-234208-Page-40.png)
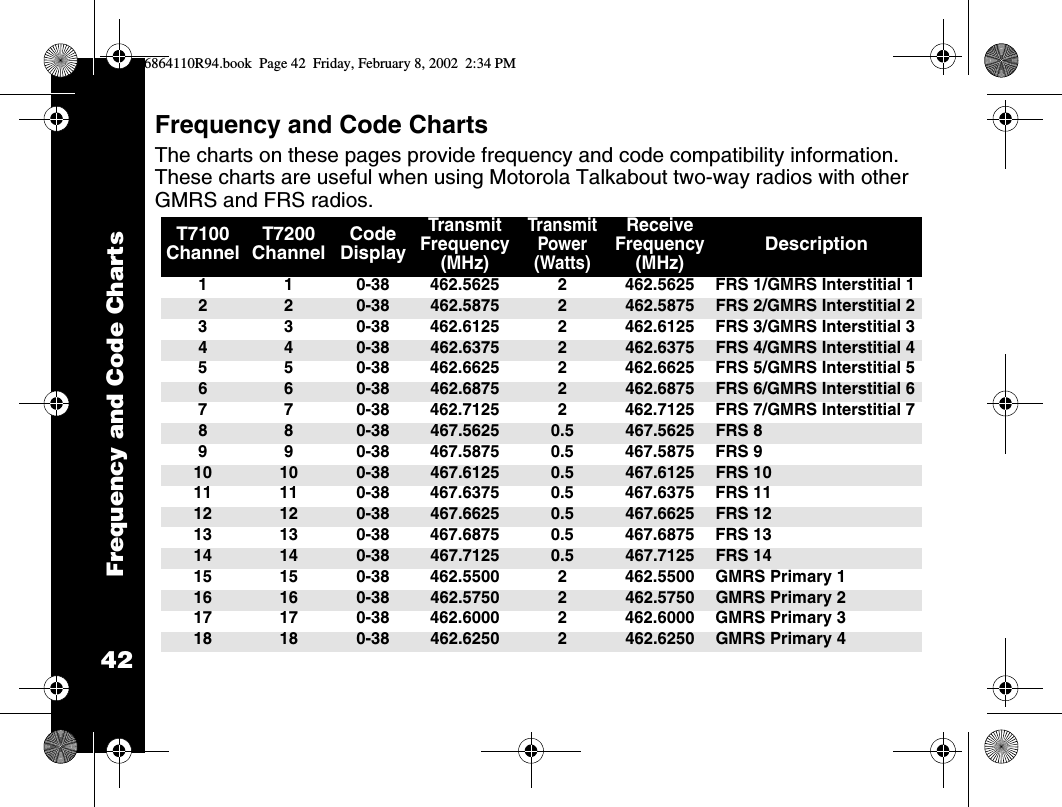
![Advanced Features36•The Interference Eliminator Code assigned to the Repeater Channel selected will show for two seconds until x replaces it.•Press \ once and the Interference Eliminator Code will flash.•Press ] or [ until you select an Interference Eliminator Code.•Press \ again or press M.Scanning Repeater ChannelsIf you have Repeater Channels and Scan enabled, l will display as Scan is scrolling through or landing on Channels 15 x- 22 x.Note: To enhance your radio’s performance, remove the GMRS direct or GMRS Repeater Channels that you do not plan to use from the Scan List (see page 28.) For example, it would be beneficial to remove Channel 16 from your Scan List if you are using Channel 16 x and vice versa. Your radio will talk back on the correct transmit frequency if you follow this procedure. If you need additional help, please refer to Scanning on page 27. You may also refer to Frequency and Code Charts on page 42 for more details.6864110R94.book Page 36 Friday, February 8, 2002 2:34 PM](https://usermanual.wiki/Motorola-Solutions/89FT4853.Amended-User-Manual/User-Guide-234208-Page-41.png)
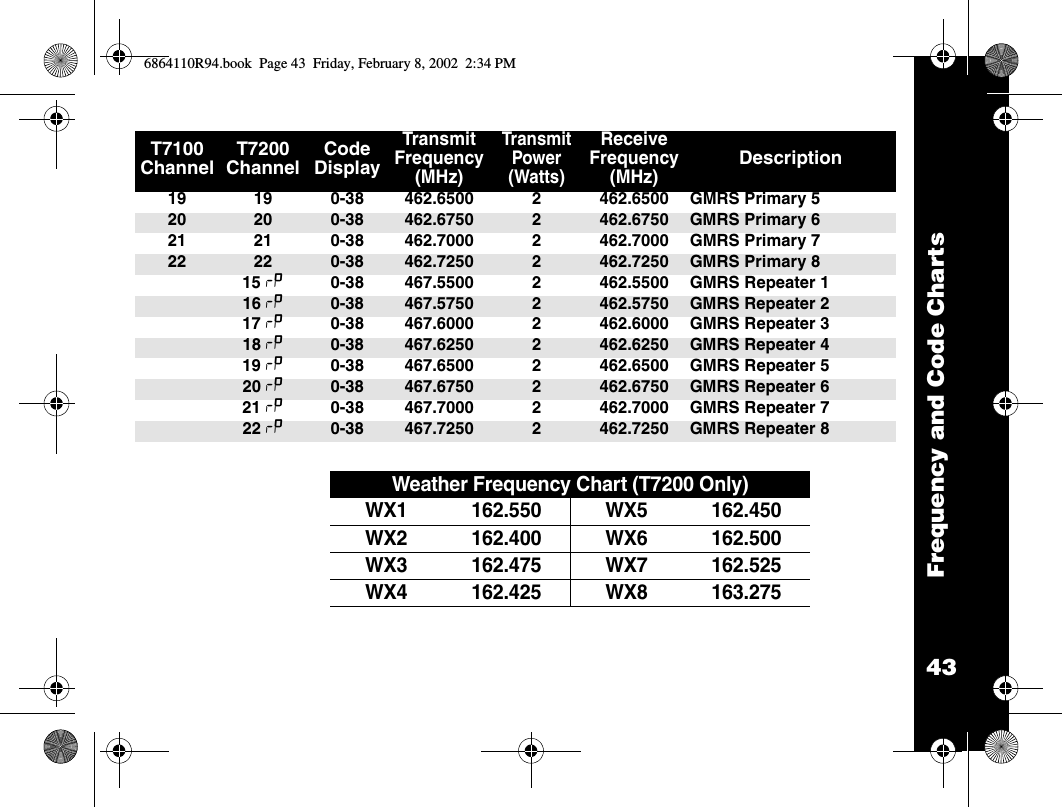
![Advanced Features38Setting the Weather ChannelYour radio receives eight frequencies. See the Weather Frequency Chart on page 43. for a complete list. •After turning on the weather broadcast, press [ or ] to select the strongest Channel.As with two-way radio reception, Weather Channel Reception depends on how close you are to a transmitter and whether you are indoors or outdoors. Also, because Weather Channels are transmitted without Codes, they may contain static or noise.Note: The Talkabout T7200 two-way radios are designed to be two-way radios primarily, with the added utility of features such as Weather Alert. The radio uses the same circuitry for both two-way radio and weather alert receptions. Therefore, you can miss a weather alert while you are engaged in two-way communication (either transmitting or receiving). To ensure that you do not miss a weather alert, leave the radio in the Weather Mode.Note: In some isolated areas, it may not be possible to receive Weather Channel Transmissions.To Set Weather Alert:•Switch to weather mode, •press \ once, and •press [ or ] to select Y (On).•If you activate Weather Alert and return to two-way mode, owill display. 6864110R94.book Page 38 Friday, February 8, 2002 2:34 PM](https://usermanual.wiki/Motorola-Solutions/89FT4853.Amended-User-Manual/User-Guide-234208-Page-43.png)

![Talkabout T7100/T7200 Quick Reference FunctionAppearanceChannel Use [ or ] for 1 through 22.Interference Eliminator CodeUse [ or ] for 0 through 38Eavesdrop Reducer Use [ or ] for 1-3 or 0 for disables feature.(T7200 Only)Function Appearance Call ToneUse [ or ] for 1 through 10 or Off = 0.Mic Gain/Sensitivity LevelUse [ or ] for 1 low, 2 medium, or 3 high. ? = Mic Gain, H = External VOX, I= Internal VOX.Scan ListUse J for Y/yes or n/no for each channel.Battery TypeUse [ or ] for A = Alkalinen = NiMH or NiCd.d101E1?1YhA6864110R94.book Page 67 Friday, February 8, 2002 2:34 PM](https://usermanual.wiki/Motorola-Solutions/89FT4853.Amended-User-Manual/User-Guide-234208-Page-63.png)
![Talkabout T7100/T7200 Quick ReferenceWeather Mode (T7200 Only)Talkabout T7000 Series Controls.P•Tu r n p o we r On/Off•Adjust VolumeM•Talk on the radio •Exit a menuG•Weather*/Backlight \•Scroll through menus•Lock KeypadB•Transmit call tone [ or ]•Scroll through and select settingsSJ•Scan/Monitor * T7200 OnlyFunction AppearanceWeather ChannelPress and hold G to access. Use [ or ] for 1 through 8..Weather AlertPress \once. Use [ or ] for n (off) and Y (on)n16864110R94.book Page 68 Friday, February 8, 2002 2:34 PM](https://usermanual.wiki/Motorola-Solutions/89FT4853.Amended-User-Manual/User-Guide-234208-Page-64.png)