Motorola Solutions 89FT5795 Hand Held Portable Transmitter User Manual WarisN APrefUser
Motorola Solutions, Inc. Hand Held Portable Transmitter WarisN APrefUser
UserManual.wiki
>
Motorola Solutions
>
89FT5795 User Manual
Users manual
Navigation menu
Upload a User Manual
Namespaces
Wiki Guide
HTML
PDF
Info
Views
User Manual
Discussion / Help
Navigation


![Safety and Warranty48EnglishSAFETY AND WARRANTYOPERATIONAL CAUTIONSAntennas• Do not use any portable two-way radio that has a damaged antenna. If a damaged antenna comes into contact with your skin, a minor burn can result.• Make sure you have the correct antenna installed for your radio’s frequency band. Ask your dealer for details.BatteriesAll batteries can cause property damage and/or bodily injury such as burns if a conductive material such as jewelry, keys, or beaded chains touch exposed terminals. The conductive material may complete an electrical circuit (short circuit) and become quite hot. Exercise care in handling any charged battery, particularly when placing it inside a pocket, purse, or other container with metal objects.BATTERY INFORMATIONCharging BatteriesThis product is powered by a nickel-cadmium (Ni-Cd), nickel-metal-hydride (NiMH), or lithium-ion rechargeable battery. Charge the battery before use to ensure optimum capacity and performance. The battery was designed specifically to be used with a Motorola charger. Charging in non-Motorola equipment may lead to battery damage and void the battery warranty.Note: When charging a battery attached to aradio, turn the radio off to ensure a fullcharge.The battery should be at about 77°F (25°C) (room temperature), whenever possible. Charging a cold battery (below 50° F [10°C]) may result in leakage of electrolyte and ultimately in failure of the battery. Charging a hot battery (above 95°F [35°C]) results in reduced discharge capacity, affecting the performance of the radio. Motorola rapid-rate battery chargers contain a temperature-sensing circuit to ensure that batteries are charged within the temperature limits stated above.!C a u t i o n#WarisN/APrefUser.book Page 48 Tuesday, November 3, 1998 2:27 PM](https://usermanual.wiki/Motorola-Solutions/89FT5795/User-Guide-89717-Page-47.png)
![49Safety and WarrantyEnglishSAFETY AND WARRANTYRecycling of Nickel-Cadmium BatteriesNickel-cadmium (Ni-Cd) rechargeable batteries can be recycled. However, recycling facilities may not be available in all areas. Under various U.S. state laws and the laws of several other countries, Ni-Cd batteries must be recycled or disposed of properly and cannot be disposed of in landfills or incinerators. Contact your local waste management agency for specific requirements and information in your area. Motorola fully endorses and encourages the recycling of Ni-Cd batteries. In the U.S. and Canada, Motorola participates in the nationwide Rechargeable Battery Recycling Corporation (RBRC) program for Ni-Cd battery collection and recycling. Many retailers and dealers participate in this program. For the location of the drop-off facility closest to you, access RBRC's Internet website at www.rbrc.com or call 1-800-8-BATTERY. This internet site and telephone number also provide other useful information concerning recycling options for consumers, businesses, and governmental agencies.INTRINSICALLY SAFE RADIO INFORMATIONFMRC Approved EquipmentAnyone intending to use a radio in a location where hazardous concentrations of flammable materials exist (hazardous atmosphere) is advised to become familiar with the subject of intrinsic safety and with the National Electric Code NFPA 70 (National Fire Protection Association) Article 500 (hazardous [classified] locations).An Approval Guide, issued by Factory Mutual Research Corporation (FMRC), lists manufacturers and the products approved by FMRC for use in such locations. FMRC has also issued a voluntary approval standard for repair service (“Class Number 3605”).FMRC Approval labels are attached to the radio to identify the unit as being FM Approved for specified hazardous atmospheres. This label specifies the hazardous Class/Division/Group along with the part number of the battery that must be used. Depending on the design of the portable unit, this FM label can be found on the back or the bottom of the radio #WarisN/APrefUser.book Page 49 Tuesday, November 3, 1998 2:27 PM](https://usermanual.wiki/Motorola-Solutions/89FT5795/User-Guide-89717-Page-48.png)
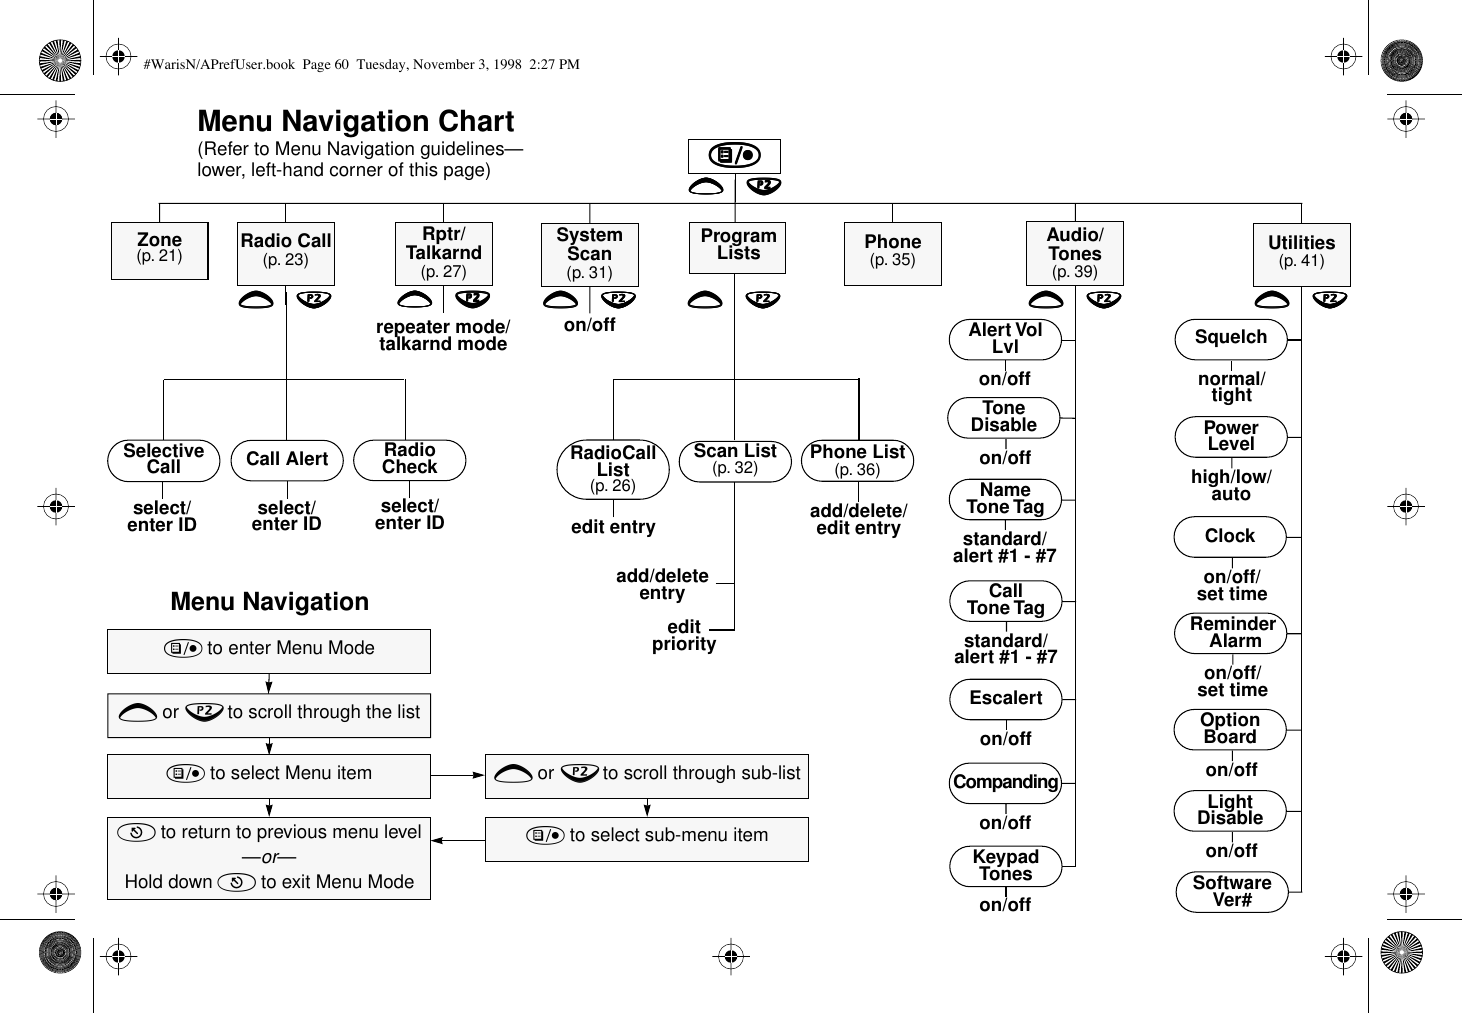
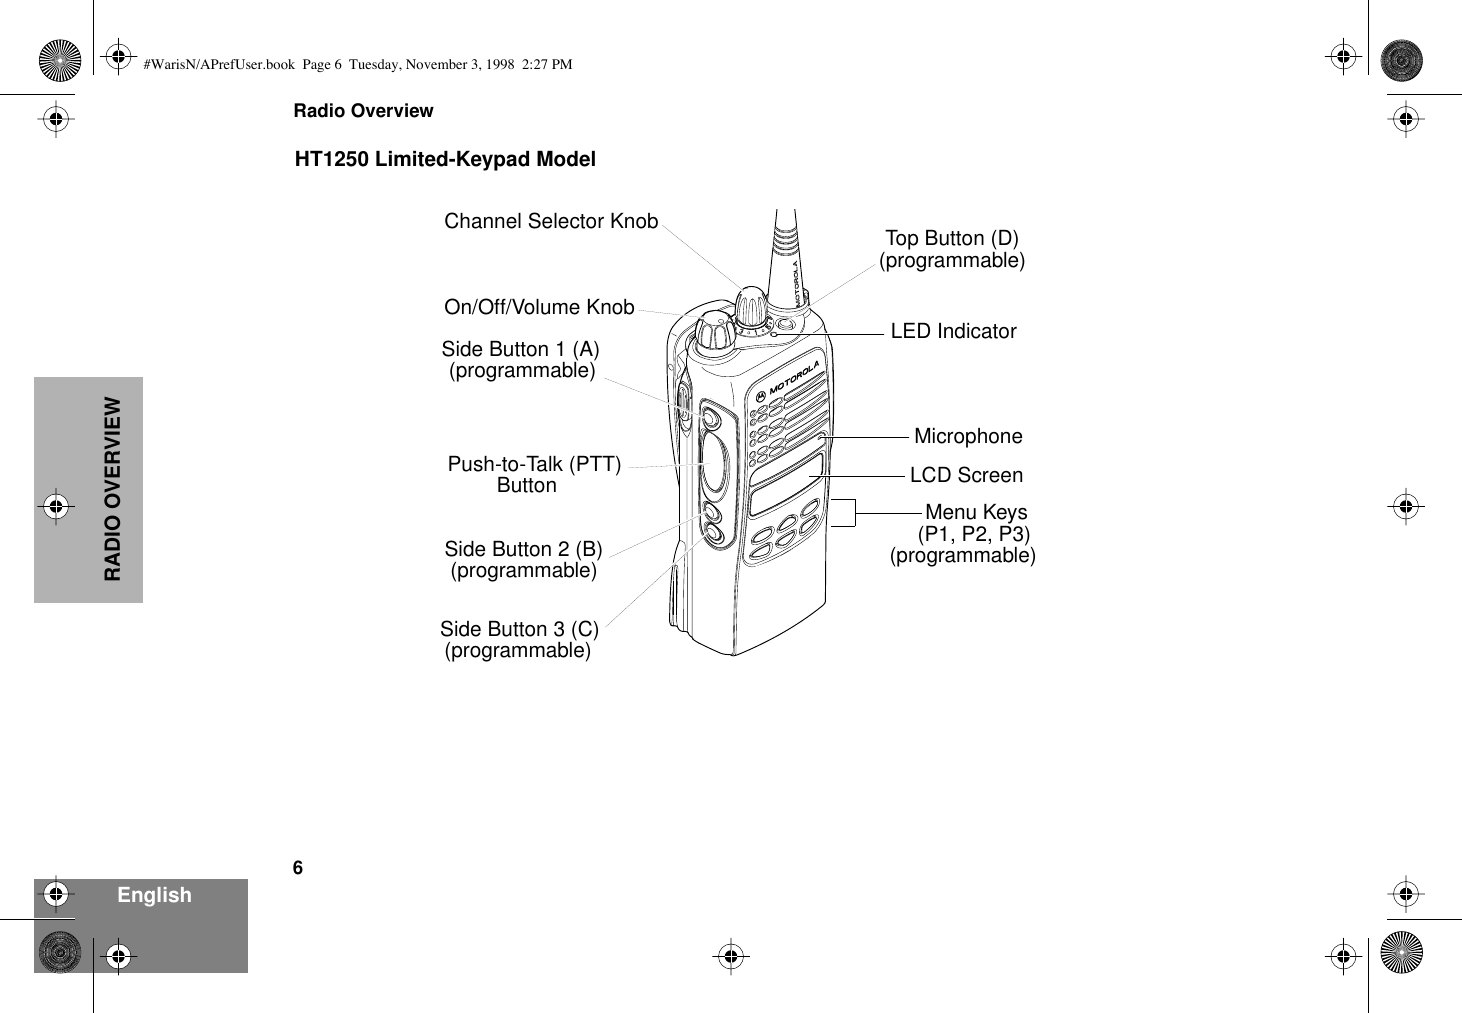
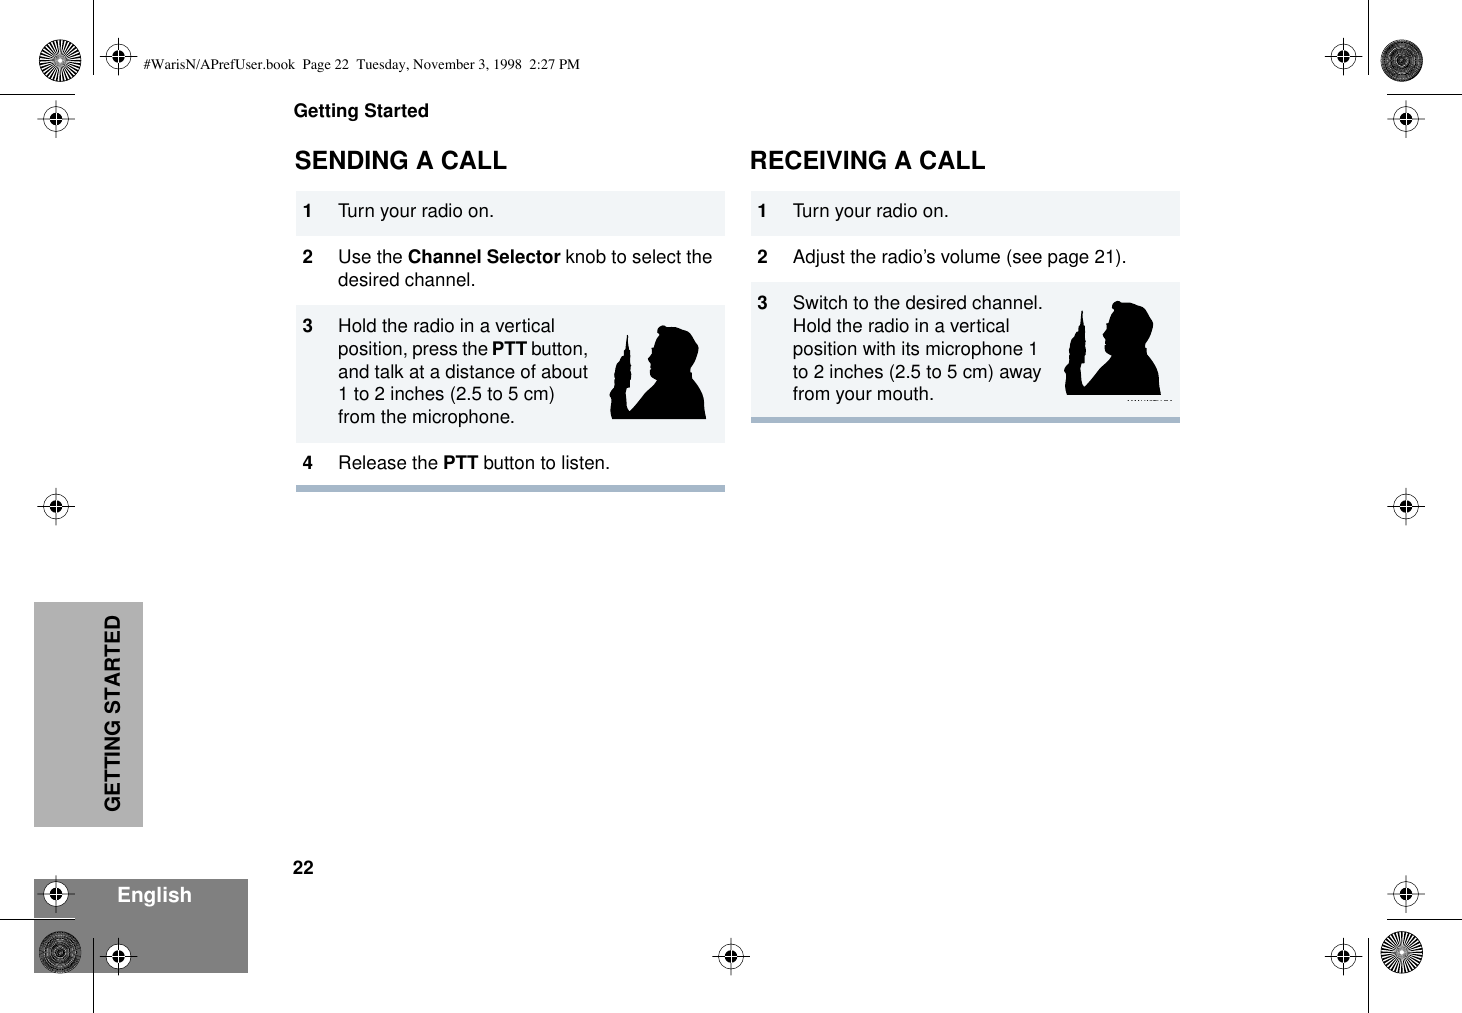
![Sending a Call1. Select appropriate zone.2. Turn Channel Selector knob to desired channel.3. Press PTT and speak clearly with mouth about 2.5 to 5 cm (1 to 2 inches) away from microphone.4. Release PTT to listen.Receiving a Call1. Turn radio on and set volume level.2. Switch to desired channel.3. When a call is received, it will be heard at the volume level you set.Deleting a Nuisance Channel During Scanning1. While on a nuisance channel, press and hold preprogrammed Scan button until you hear a tone.2. Release Scan button.Making a Phone Call1. Press Phone button, or select Phone from the menu.2. Send access code, if required.3. Send phone number in one of the following ways:• Press and release PTT to send last dialed number. —or— (For full-keypad radios only) • Press preprogrammed Speed Dial button, followed by a keypad key (1–9), to access first nine numbers in your phone list. (Press PTT if buffered dial.)—or— (For full-keypad radios only) • Enter phone number using the keypad. (Press PTT if buffered dial.)4. Hold radio in vertical position with microphone about 2.5 to 5 cm (1 to 2 inches) away from your mouth. Press PTT to talk; release it to listen.Ending a Phone Call1. Send de-access code, if required.2. Press preprogrammed Phone button, or press (.Sending and Cancelling an Emergency Alert• Press preprogrammed Emergency button (Top button [D]) to activate Emergency Alert.• Press and hold down Emergency button to cancel Emergency Alert.HT1250™ Quick Reference CardRecord the functions for your radio’s programmable buttons in the table provided below. For further information, see pages 8 and 9 in this User Guide.On/Off/Volume KnobLCD ScreenMicrophoneKeypadMenu Keys(programmable)Side Button 1 (A)Push-to-Talk (PTT)LED Indicator(programmable)Side Button 2 (B)(programmable)Side Button 3 (C)Channel Selector Knob(programmable)Top Button (D)Button(P1, P2, P3)(programmable)(optional)Button Function Short Press Long Press Hold Down Page#WarisN/APrefUser.book Page 59 Tuesday, November 3, 1998 2:27 PM](https://usermanual.wiki/Motorola-Solutions/89FT5795/User-Guide-89717-Page-58.png)