Motorola Solutions 89FT7001 Hand held data terminal User Manual Exhibit 8 cvr pg
Motorola Solutions, Inc. Hand held data terminal Exhibit 8 cvr pg
New Exhibit 8 User Card and User Manual

Applicant: Motorola, Inc. FCC ID: AZ489FT7001
Exhibit 8
Exhibit VIII. User Information and User Manual:
1.) User Card - 2 pages
User Safety, Training, and General Information
Operational Instructions and Training Guidelines
2.) User Manual - 59 pages
UPScan Release 2.0 Loader/ Supervisor Training

68P02962C35-A Please retain for future use
User Safety, Training, and General Information
READ THIS IMPORTANT INFORMATION ON SAFE AND EFFICIENT OPERA-
TION BEFORE USING YOUR MOTOROLA HANDHELD PORTABLE TERMINAL
The information provided in this document supersedes the general safety informa-
tion contained in user guides published prior to June 2001. For information regard-
ing terminal use in a hazardous atmosphere please refer to the Factory Mutual (FM)
Approval Manual Supplement or Instruction Card, which is included with terminal
models that offer this capability.
Compliance with RF Energy Exposure Standards
Your Motorola terminal is designed and tested to comply with a number of national
and international standards and guidelines (listed below) regarding human expo-
sure to terminal frequency electromagnetic energy. This terminal complies with the
IEEE (FCC) and ICNIRP exposure limit. In terms of measuring RF energy for com-
pliance with the FCC exposure guidelines, your terminal radiates measurable RF
energy only while it transmits data, not when it is receiving data.
Your Motorola terminal complies with the following RF energy exposure stan-
dards and guidelines:
•United States Federal Communications Commission, Code of Federal Regula-
tions; 47CFR part 2 sub-part J
•American National Standards Institute (ANSI) / Institute of Electrical and Elec-
tronic Engineers (IEEE) C95. 1-1992
•Institute of Electrical and Electronic Engineers (IEEE) C95.1-1999 Edition
•International Commission on Non-Ionizing Radiation Protection (ICNIRP)
1998
•Ministry of Health (Canada) Safety Code 6. Limits of Human Exposure to Ter-
minal frequency Electromagnetic Fields in the Frequency Range from 3 kHz to
300 GHz, 1999
•Australian Communications Authority Terminal communications (Electromag-
netic Radiation - Human Exposure) Standard 2001 (applicable to wireless
phones only)
•ANATEL, Brasil Regulatory Authority, Resolution 256 (April 11, 2001) "addi-
tional requirements for SMR, cellular and PCS product certification."
Operational Instructions and Training Guidelines
Body-worn Operation
•Always place the terminal in a Motorola approved clip, holder, holster, case,
attachment, or body harness for this product. Use of non-Motorola-approved
accessories may exceed FCC RF exposure guidelines.
•If you do not use a Motorola approved body-worn accessory, then ensure the
terminal is kept 2.5 cm (one inch) from the body when transmitting.
Antennas & Batteries
•Use only Motorola approved supplied antenna or Motorola approved replace-
ment antenna. Unauthorized antennas, modifications, or attachments could
damage the terminal and may violate FCC regulations.
•Use only Motorola approved, supplied batteries or Motorola approved replace-
ment batteries. Use of non-Motorola-approved antennas or batteries may
exceed FCC RF exposure guidelines.
Approved Accessories
For a list of Motorola approved accessories see the appendix of this user manual or
visit the following website which lists approved accessories:
Electromagnetic Interference/Compatibility
Note: Nearly every electronic device is susceptible to electromagnetic in-
terference (EMI) if inadequately shielded, designed, or otherwise
configured for electromagnetic compatibility.
Facilities
To avoid electromagnetic interference and/or compatibility conflicts, turn off your ter-
minal in any facility where posted notices instruct you to do so. Hospitals or health
care facilities may be using equipment that is sensitive to external RF energy.
Aircraft
When instructed to do so, turn off your terminal when on board an aircraft. Any use
of a terminal must be in accordance with applicable regulations per airline crew in-
structions.
Medical Devices
Pacemakers
The Advanced Medical Technology Association (AdvaMed) recommends that a
minimum separation of 6 inches (15 centimeters) be maintained between a hand-
held wireless terminal and a pacemaker. These recommendations are consistent
with those of the U.S. Food and Drug Administration.
HANDHELD PORTABLE
TERMINAL
EMERALD
ab

Persons with pacemakers should:
•ALWAYS keep the terminal more than 6 inches (15 centimeters) from their
pacemaker when the terminal is turned ON.
•not carry the terminal in the breast pocket.
•turn the terminal OFF immediately if you have any reason to suspect that inter-
ference is taking place.
Hearing Aids
Some digital wireless terminals may interfere with some hearing aids. In the event
of such interference, you may want to consult your hearing aid manufacturer to dis-
cuss alternatives.
Other Medical Devices
If you use any other personal medical device, consult the manufacturer of your de-
vice to determine if it is adequately shielded from RF energy. Your physician may
be able to assist you in obtaining this information.
Operational Warnings
For Vehicles With an Air Bag
Do not place a portable terminal in the area over an air bag or in
the air bag deployment area. Air bags inflate with great force. If a
portable terminal is placed in the air bag deployment area and the
air bag inflates, the terminal may be propelled with great force and
cause serious injury to occupants of the vehicle.
Potentially Explosive Atmospheres
Turn off your terminal prior to entering any area with a potentially
explosive atmosphere, unless it is a terminal type especially qual-
ified for use in such areas as "Intrinsically Safe" (for example, Fac-
tory Mutual, CSA, UL, or CENELEC). Do not remove, install, or
charge batteries in such areas. Sparks in a potentially explosive
atmosphere can cause an explosion or fire resulting in bodily injury
or even death. The areas with potentially explosive atmospheres
referred to above include fueling areas such as below decks on
boats, fuel or chemical transfer or storage facilities, areas where
the air contains chemicals or particles, such as grain, dust or metal
powders, and any other area where you would normally be ad-
vised to turn off your vehicle engine. Areas with potentially explo-
sive atmospheres are often but not always posted.
Blasting Caps and Blasting Areas
To avoid possible interference with blasting operations, turn off
your radio when you are near electrical blasting caps, in a blasting
area, or in areas posted: "Turn off two-way radio." Obey all signs
and instructions.
Batteries
All batteries can cause property damage and/or bodily injury such
as burns if a conductive material such as jewelry, keys, or beaded
chains touches exposed terminals. The conductive material may
complete an electrical circuit (short circuit) and become quite hot.
Exercise care in handling any charged battery, particularly when
placing it inside a pocket, purse, or other container with metal ob-
jects.

UPScan Release 2.0 Loader/Supervisor
Training
Participant’s Guide
NOTICE:
CONFIDENTIAL, UNPUBLISHED PROPERTY OF UNITED PARCEL SERVICE.
USE AND DISTRIBUTION LIMITED SOLELY TO AUTHORIZED PERSONNEL.
The use, disclosure, reproduction, modification, transfer, or transmittal of this work
for any purpose in any form or by any means without the written permission
of United Parcel Service is prohibited.

Page 2 Oct-01
About This Training
I.S. Learning and Development developed this training in collaboration with the Corporate
Package Process Management (PPM) team in Paramus, New Jersey. For more information about
UPScan or this training, contact Bill Van Note at ATLAS 283-3190 or access the UPScan
Intranet web site:
http://p3rarb0.inside.ups.com/Scan/Content/projects/UPScan/Overview.htm.
Page 3 Oct-01
Table of Contents
USING THE UPSCAN LOADER/SUPERVISOR TRAINING MATERIALS___________________4
LESSON 1: UPSCAN OVERVIEW______________________________________________________9
LESSON 2: LOG IN TO UPSCAN _____________________________________________________14
LESSON 3: SET UP LOADS __________________________________________________________24
LESSON 4: SCAN PACKAGES _______________________________________________________33
LESSON 5: REMOVE LOAD FROM LOAD LIST AND LOG OUT _________________________41
BARCODE SECTION________________________________________________________________45
EVALUATION _____________________________________________________________________56
Page 4 Oct-01
Using the UPScan Loader/Supervisor
Training Materials

UPScan Release 2.0 Loader/Supervisor Training Participant’s Guide
Using the UPScan Loader/Supervisor Training Materials
Page 5 Oct-01
Using the UPScan Loader/Supervisor Training Materials
Introduction This training will present the basic workflow of UPScan for loaders and
supervisors, including the new equipment and the procedures needed to use
them.
UPScan
Training
Materials
To support the implementation of UPScan, the following training materials
have been developed:
Audience Document
Loader/Supervisor UPScan Release 2.0 Training: Participant's Guide
Management Team UPScan Release 2.0 Loader/Supervisor Training:
Facilitator’s Guide
UPScan User
Guides To support the implementation of UPScan, the following system
documentation has been developed:
System Document
UPScan UPScan Release 2.0 User's Guide
UPScan Release 2.0 Loader/Supervisor Training Participant’s Guide
Using the UPScan Loader/Supervisor Training Materials
Page 6 Oct-01
Use of the
Participant's
Guide in
Training
The Participant's Guide is a workbook for use with training at local sites.
Training can be done in a small group, classroom setting, or as self-study.
Each lesson contains a summary page that provides basic information as
follows:
Lesson
Overview: Summarizes the lesson content.
Audience: Identifies who should take the lesson.
Suggested
Time: Estimates the time needed to complete the
lesson.
Lesson
Outline: Provides an outline of the content in the lesson.
Objectives: Describes what the student will be able to do at
the end of the lesson.
Basic Key
Navigation
Job Aid
Your instructor will provide a UPScan job aid of information you will need
until you get familiar with the new Mobile Terminal’s keypad. You will also
see posters in your work area with helpful information.

UPScan Release 2.0 Loader/Supervisor Training Participant’s Guide
Using the UPScan Loader/Supervisor Training Materials
Page 7 Oct-01
Each lesson also contains some of the following information:
• Structured sequence for learning the particular tasks
• Outline of steps for important processes
Practice Exercise
This icon indicates a practice exercise that participants should complete.
Tips for Use of
this Guide • Complete each lesson in the order as it appears in this guide. Each lesson
builds on the information presented in previous lessons. If you skip a
lesson, you may miss important information.
• Write notes in your Participant's Guide. Hands-on training will be
provided.
UPScan System
ID’s You must have a User ID and password before you begin training. The first
five letters of your last name, the last four numbers of your Social security
number and the first letter of your first name. Use upper case (all caps)
letters.
Example: Name: Steven Jones
SS#: 123-45-6789
User ID: JONES6789S
Please Note: If your last name is less than five letters, include the last 5
numbers of your Social Security number.

UPScan Release 2.0 Loader/Supervisor Training Participant’s Guide
Using the UPScan Loader/Supervisor Training Materials
Page 8 Oct-01
Course
Evaluation
Form
Complete the Training Evaluation Survey at the end of this Training. It
should take 5-10 minutes. Send the evaluations to the address below:
Doris Sanders-Headley
IS Learning and Development
340 MacArthur Blvd A-243
Mahwah, NJ 07430 USA
You may also email recommendations and comments about this training to
dsanders-headley@ups.com. We welcome all comments on the content and
format of the guide.
Page 9 Oct-01
Lesson 1: UPScan Overview
UPScan Release 2.0 Loader/Supervisor Training Participant’s Guide
Lesson 1: UPScan Overview
Page 10 Oct-01
Lesson 1: UPScan Overview
Lesson Overview: This lesson provides a high-level introduction to
UPScan.
Audience: Loaders\Supervisors
Suggested Time: 10 minutes
Lesson Outline: I. Introduction
II. Benefits of UPScan
III. New Equipment in UPScan
Objectives: Trainees will:
• List several benefits of UPScan
• Understand how to properly use the new equipment

UPScan Release 2.0 Loader/Supervisor Training Participant’s Guide
Lesson 1: UPScan Overview
Page 11 Oct-01
Introduction UPScan is a new global scanning system. Before deploying this
new scanning system, certain UPS facilities are selected to test our
products. Your facility is being asked to help us test UPScan
which will replace your current IPLD scanning system. The
UPScan project will ultimately be deployed to various UPS sites.
UPScan will replace all the current equipment with the Emerald
mobile terminal and the Emerald ring scanner.
___________________________________________________
Benefits of UPScan There are several benefits that UPS will receive from UPScan:
• Flexibility of Scanning
Loaders and Supervisors are able to use one global easy-to-use
scanning system. Nine terminals have been reduced to two.
• Simpler Process
The Emerald mobile terminal, and the Emerald cordless ring
scanner will simplify the process. The equipment is more
durable.
• Ease of Use
There is a single point of functionality within several scanning
systems. User Login and Scanner Setup have been
standardized.
• Hands-free Scanning
There is wireless communication between the Emerald
terminals and ring scanner.
• Scanner International and Triggerless Features
There are beep tones and voice messaging for international
exceptions/holds, as well as a tri-color light indicating when
status information is available.
UPScan Release 2.0 Loader/Supervisor Training Participant’s Guide
Lesson 1: UPScan Overview
Page 12 Oct-01
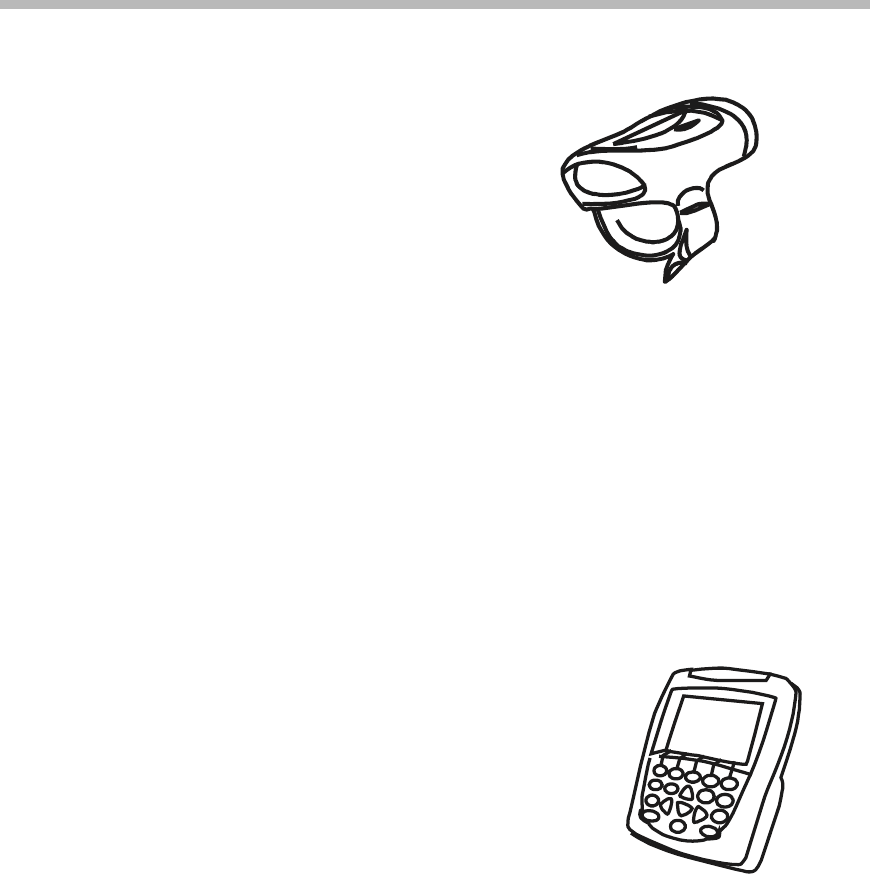
New Equipment in
UPScan
The Emerald ring scanner is designed to be worn on the second and
third fingers of the hand that is used to scan the tracking number.
The scan window should be facing out. The battery should be
slotted on the underside of the ring scanner.
To expedite the scanning process, the ring scanner was designed to
emit a continuous laser beam. The loader does not have to press a
trigger to emit the beam. The laser beam will only be available in
those fields where scanning can take place.
Note: Jewelry should not be worn when using the ring scanner.
The Emerald mobile terminal will be placed either in a waist or
wrist attachment when working with the equipment. In UPScan the
Emerald mobile terminal and the Emerald ring scanner are used as
a set.
Radio Frequency (RF) allows real-time access of data, beep tones
and voice messaging to the user.
Blue tooth communication eliminates cables attached to the user. If
a communication problem develops between the ring scanner and
the mobile terminal, the scanner will emit a continuous beeping
tone. The loader should inform his supervisor if this happens.
Emerald Ring Scanner
Emerald Mobile Terminal
UPScan Release 2.0 Loader/Supervisor Training Participant’s Guide
Lesson 1: UPScan Overview
Page 13 Oct-01
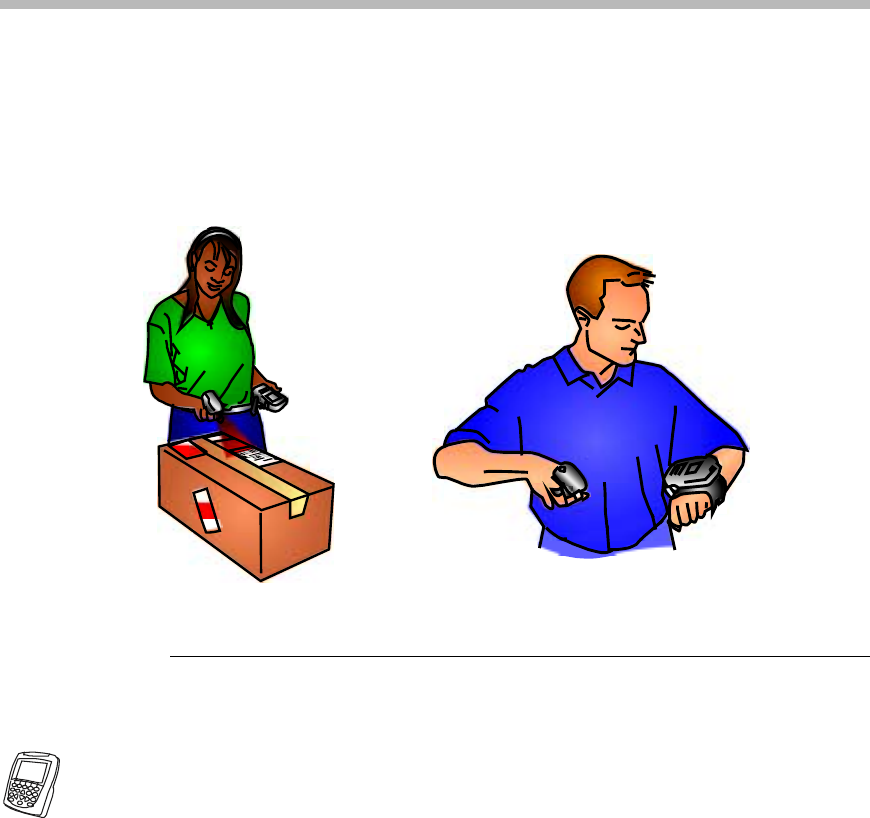
Mobile Terminal Belts
In UPScan the wrist and waist attachments allow the loader to scan
hands free. The belts are adjustable, and the terminals mount easily
into the holder attached to the belt by snaps.
Figure 1: Emerald Mobile Terminal and Ring Scanner - Waist and Wrist Attachments
Practice Exercise: If you have not put on the new UPScan equipment, do so now.
• Emerald ring scanner
• Emerald mobile scanner
Page 14 Oct-01
Lesson 2: Log In to UPScan
UPScan Release 2.0 Loader/Supervisor Training Participant’s Guide
Lesson 2: Log In to UPScan
Page 15 Oct-01
Lesson 2: Log In to UPScan
Lesson Overview: This lesson describes how to log in to UPScan and
navigate using the various keypad features.
Audience: Loaders\Supervisors
Suggested Time: 20 minutes
Lesson Outline: I. Introduction
II. Basic Navigation
III. Modes
IV. Other Important Keys
V. Log In Procedures
Objectives: Trainees will
• Log in to UPScan
UPScan Release 2.0 Loader/Supervisor Training Participant’s Guide
Lesson 2: Log In to UPScan
Page 16 Oct-01
Introduction To access UPScan, you must log in with your unique ID. Before you
log in, there are some basics you must know about how to use the
navigation keys.
Basic Navigation Mobile Terminal Screen and Keypad
F1 F2 F3 F4 F5
12 45
60
ABC
MNO
.GHI JKL
Figure 2: Keypad with Mobile Terminal Screen
UPScan Release 2.0 Loader/Supervisor Training Participant’s Guide
Lesson 2: Log In to UPScan
Page 17 Oct-01
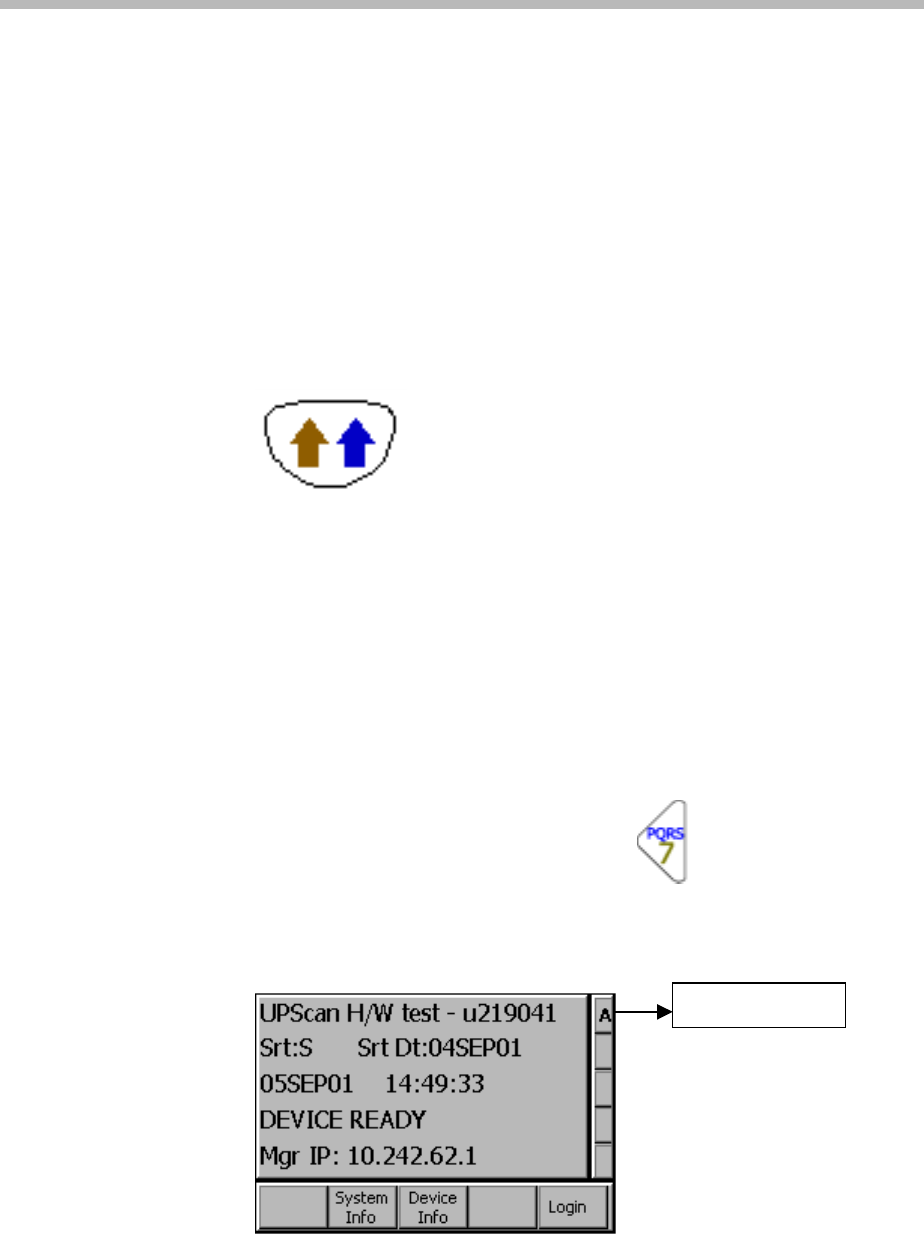
Modes What Is a Mode?
There are three different modes, Alpha, Numeric and Normal. The
mode determines which entry will appear when you press a key on the
keypad.
Mode Key
This key allows you to navigate through the 3 different mode functions.
Figure 3: Double Arrow Mode Key
How to Identify Modes
You can identify the mode by the letter/number on the right of the
screen.
In Figure 4: Alpha Mode is selected. In this mode, you get the upper
entry on the key that you press, normally a letter of the alphabet. When
more than one letter is on the key, keep pressing the key until the correct
letter appears in the field. For example, if you are in Alpha Mode and
want to enter the letter R, you must press the
key three times.
Alpha Mode
UPScan Release 2.0 Loader/Supervisor Training Participant’s Guide
Lesson 2: Log In to UPScan
Page 18 Oct-01
Figure 4: Alpha Mode
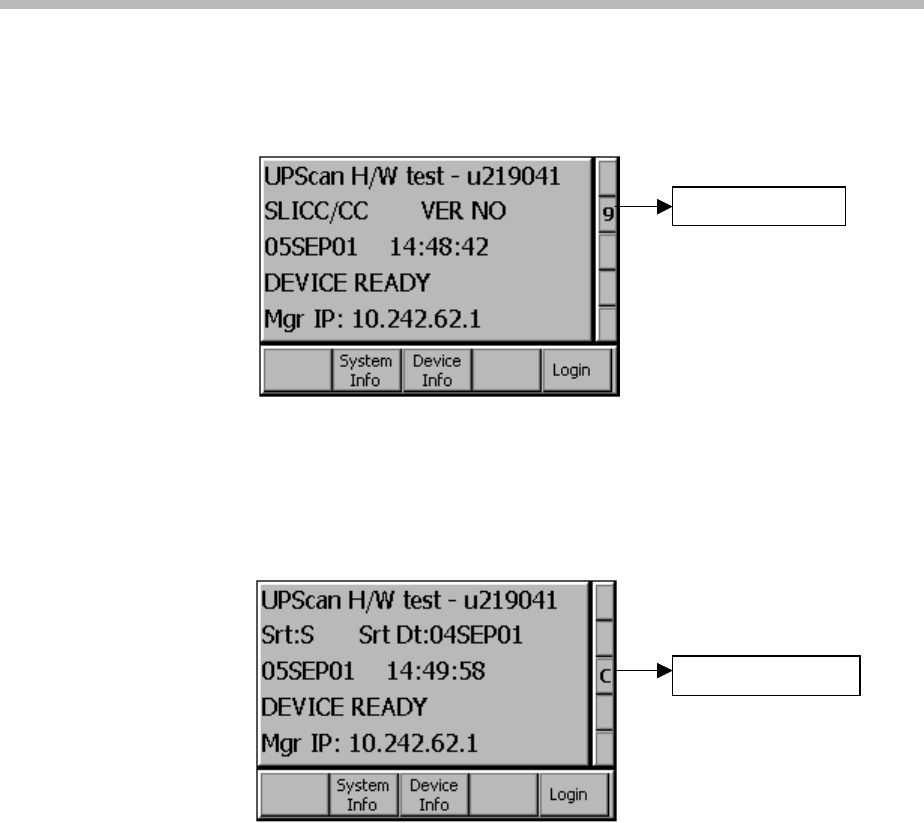
In Figure 5: Numeric Mode is selected. In this mode press the key for
the number you wish to enter.
Figure 5: Numeric Mode
Figure 6: Normal Mode is selected. In this mode you may use the
Arrow keys to Page Up, Page Down, Back Tab and Tab forward.
Figure 6: Normal Mode
Numeric Mode
Normal Mode
UPScan Release 2.0 Loader/Supervisor Training Participant’s Guide
Lesson 2: Log In to UPScan
Page 19 Oct-01
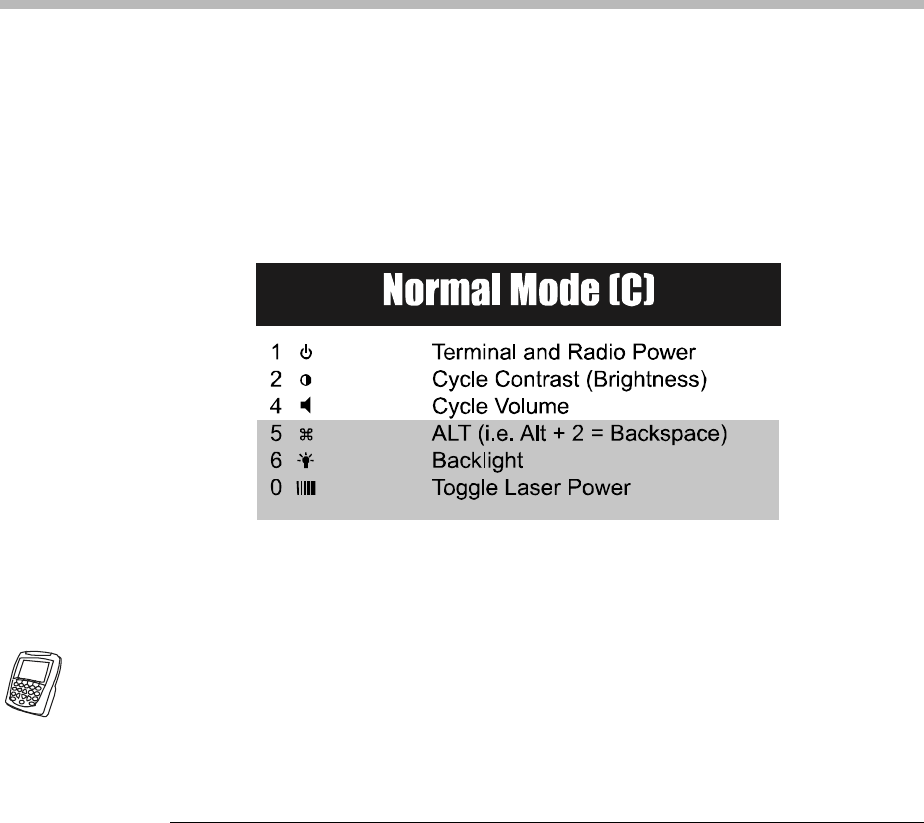
Figure 7: Normal Mode (C) displays the keys, icons for each key and
the function the key performs.
Figure 7: Normal Mode (C)
Practice Exercise: From the Device Status screen, press the Mode key several times to see
the mode change.
If you are not at the Device Status screen, press Cancel/Esc key to
navigate to the Device Status screen.
In Normal Mode, press 6 for the backlight.
UPScan Release 2.0 Loader/Supervisor Training Participant’s Guide
Lesson 2: Log In to UPScan
Page 20 Oct-01
Other Important Keys Arrow Keys
The arrow keys perform the following functions in Normal Mode:
Figure 8: Page Up
Figure 9: Page Down
Figure 10: Back Tab
Figure 11: Tab
UPScan Release 2.0 Loader/Supervisor Training Participant’s Guide
Lesson 2: Log In to UPScan
Page 21 Oct-01
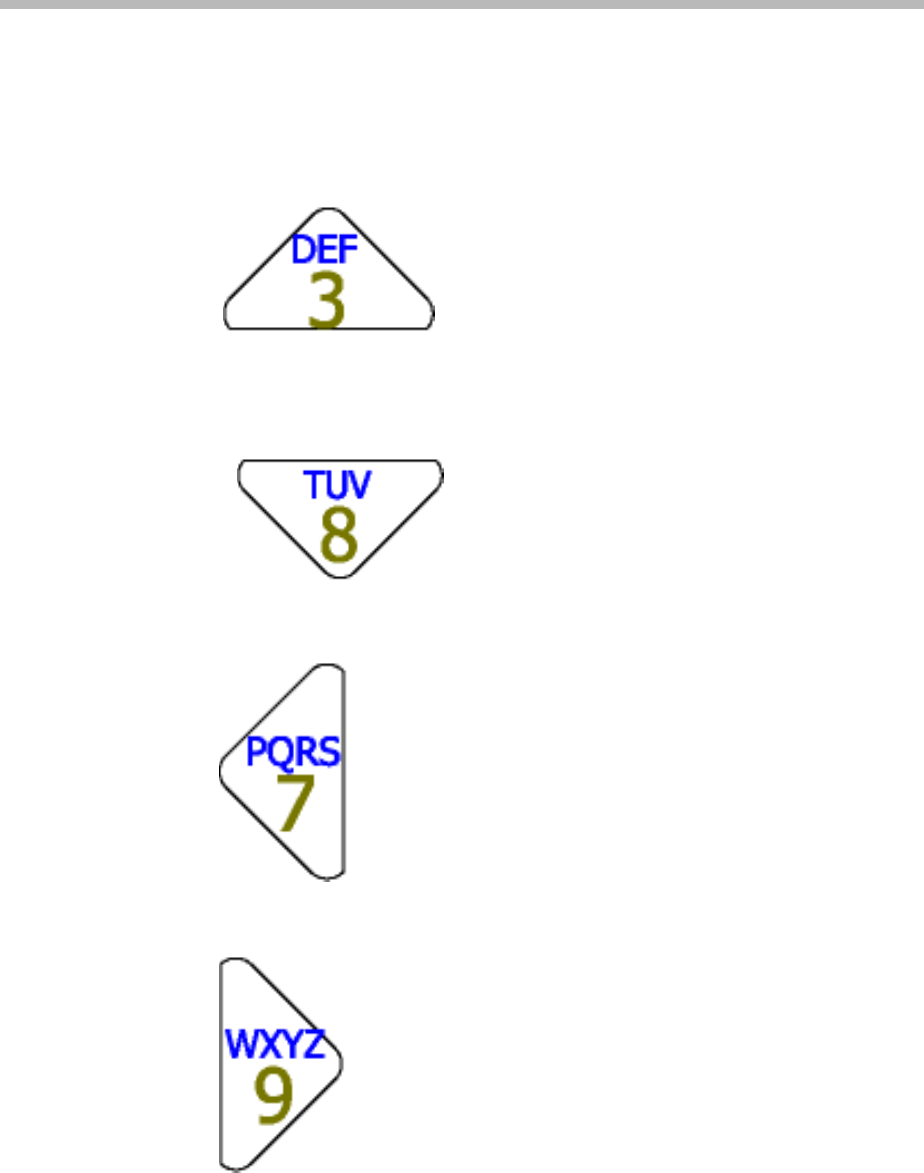
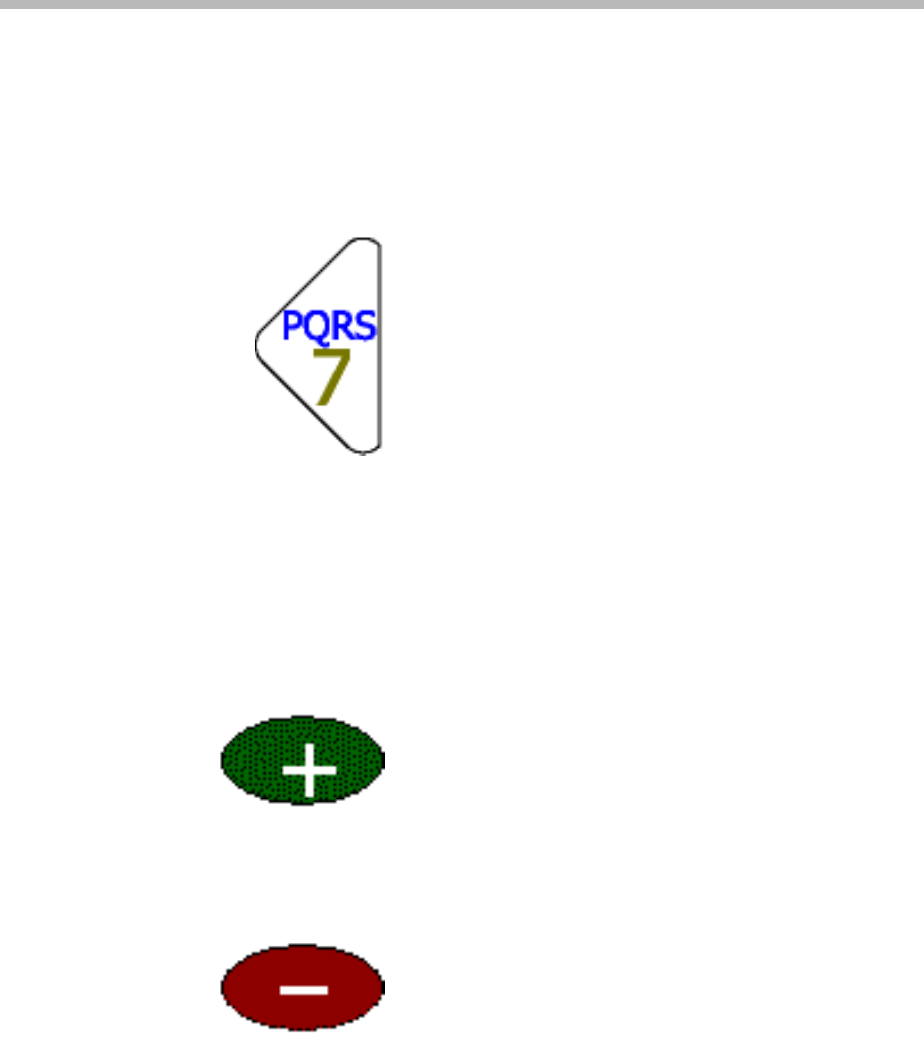
Notice that the keys in the middle of the keypad can provide various
results when pressed. For example, the key below in Figure 12:
Back Tab Key can be used to enter letters P, Q, R, or S; the number 7;
or tab backward. The result depends on the mode.
Figure 12: Back Tab Key
While using UPScan, you will use function keys (F1 through F5) to
select option buttons on the screen. Function keys align directly with
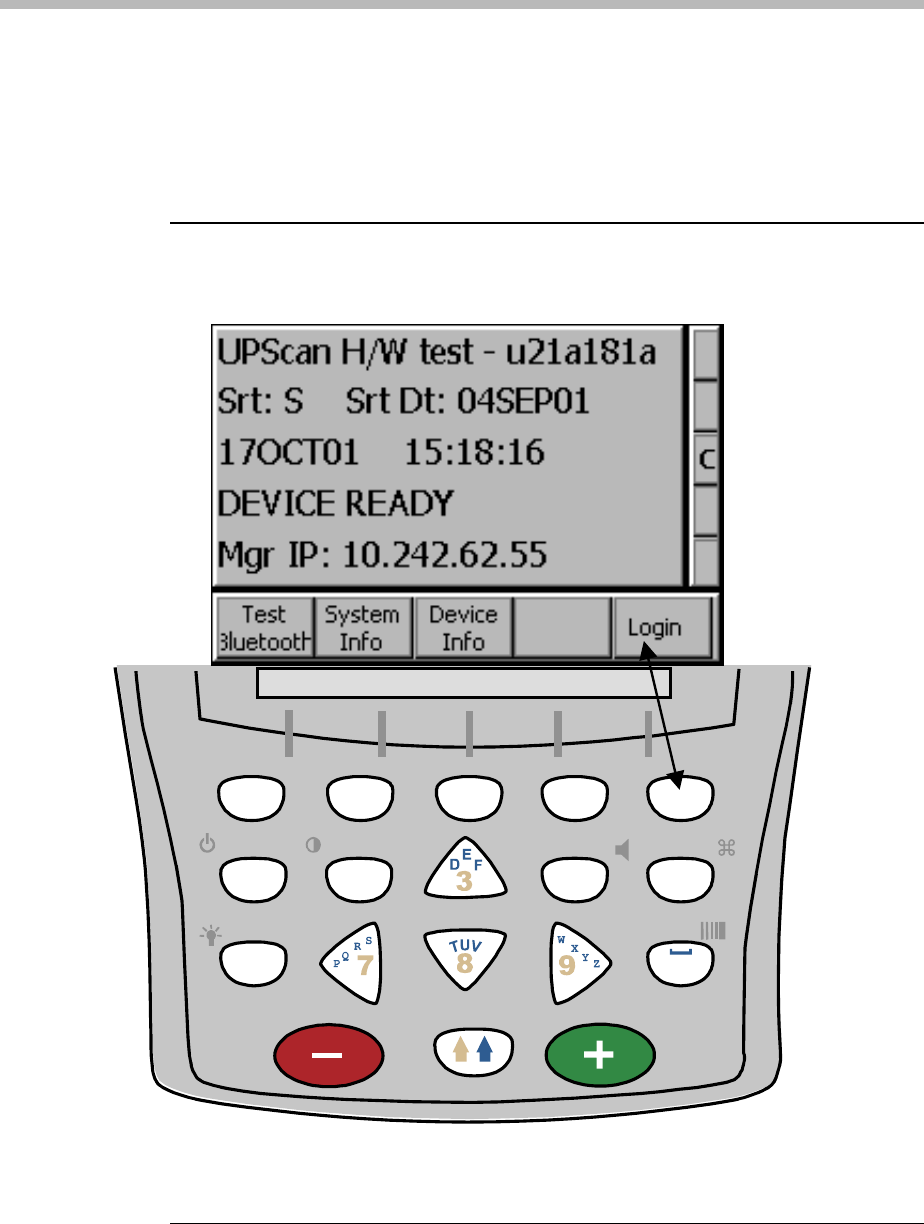
the option buttons. For example, you will press F5 to select Login.
Figure 13: Enter
Press this key to advance to a new field or accept a response.
Figure 14: Cancel/Esc
This key cancels the current action and returns you to the previous screen.
UPScan Release 2.0 Loader/Supervisor Training Participant’s Guide
Lesson 2: Log In to UPScan
Page 22 Oct-01
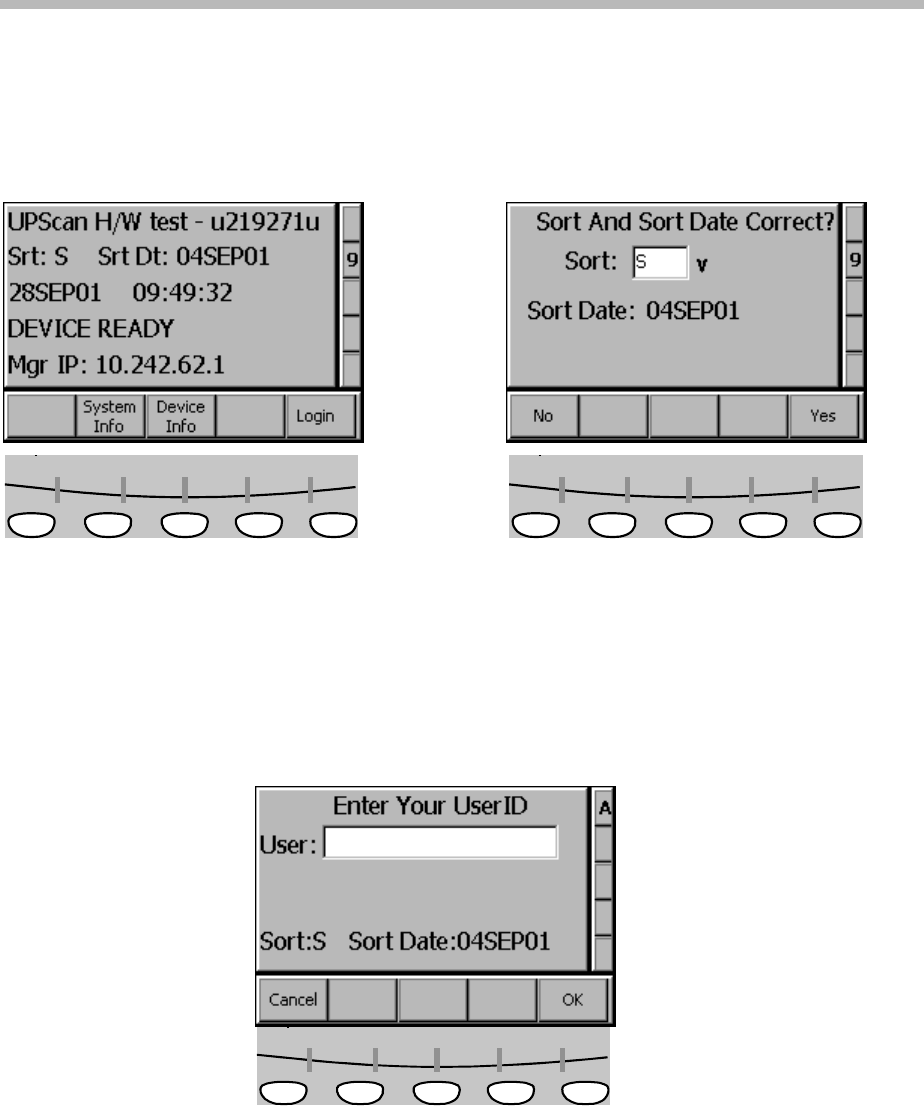
Login Procedure To log in to UPScan:
1. At the Device Status screen,Press F5 for Login. The Sort
Screen appears.
2. Press F5 for Yes. The Login screen appears.
F1 F2 F3 F4 F5 F1 F2 F3 F4 F5
Figure 16: Device Status Screen
NOTE: When keying information, wait for the cursor to process your
entry and move to the next space before you continue to key.
3. The Login screen appears. You will normally scan your ID, but for
this practice key enter your User ID. When you are finished, press
F5 for OK.
F1 F2 F3 F4 F5
Figure 17: Login Screen
NOTE: The laser will be on in this field.
Figure 15: Sort Screen – Default Sort Available
UPScan Release 2.0 Loader/Supervisor Training Participant’s Guide
Lesson 2: Log In to UPScan
Page 23 Oct-01
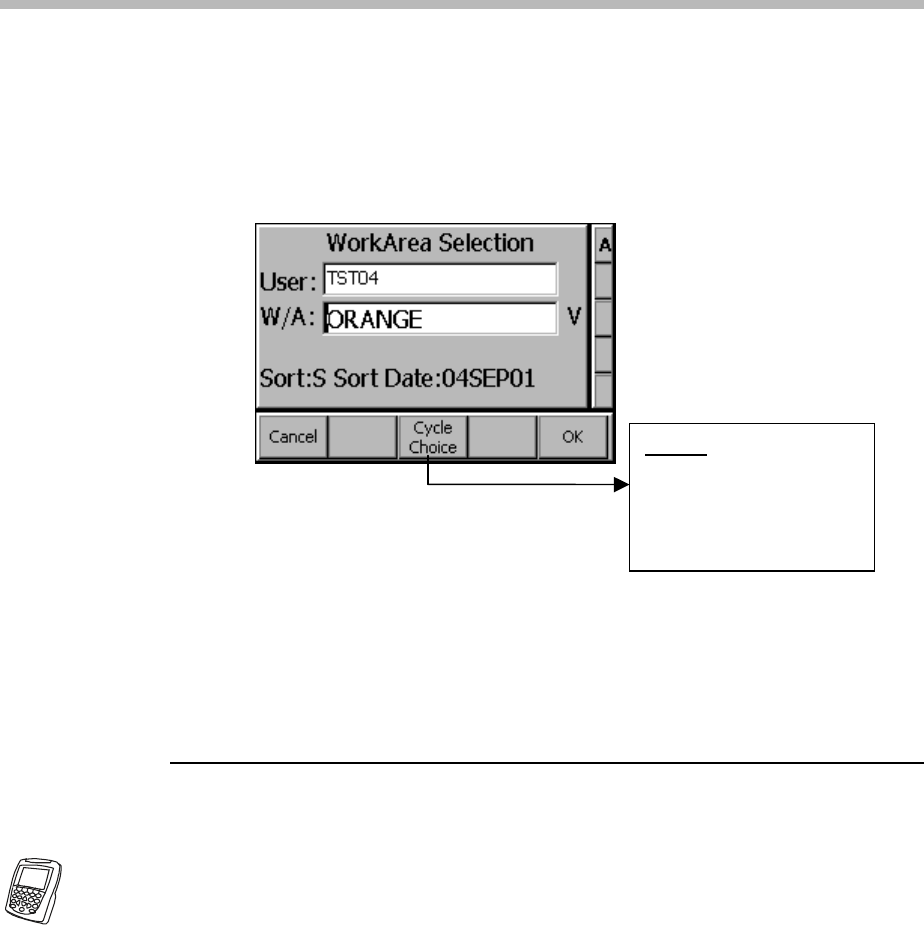
4. The WorkArea Selection screen appears. Press F3 to cycle
through the choices, then select the correct Work Area (W/A).
5. Press F5 for OK.
Figure 18: WorkArea Selection
6. The Position Entry screen appears.This will be covered in the
next lesson.
Practice Exercise: If you need more practice return to the Device Status screen and log
into UPScan using the Login Procedure outlined above.
NOTE: Any time you
see the Cycle Choice,
you may activate the
choices v with the
function key below.
Page 24 Oct-01
Lesson 3: Set Up Loads

UPScan Release 2.0 Loader/Supervisor Training Participant’s Guide
Lesson 3: Set Up Loads
Page 25 Oct-01
Lesson 3: Set Up Loads
Lesson Overview: This lesson identifies how to set up loads in UPScan.
Audience: Loaders\Supervisors
Suggested Time: 15 minutes
Lesson Outline: I. Introduction
II. Set Up a Load
III. Set Up Multiple Loads
Objectives: • Set up a single load with the correct load service
level
• Set up a multiple load with various package service
levels
UPScan Release 2.0 Loader/Supervisor Training Participant’s Guide
Lesson 3: Set Up Loads
Page 26 Oct-01
Introduction You must set up loads to identify the ULD into which you scan
packages, allowing customers to track their packages.
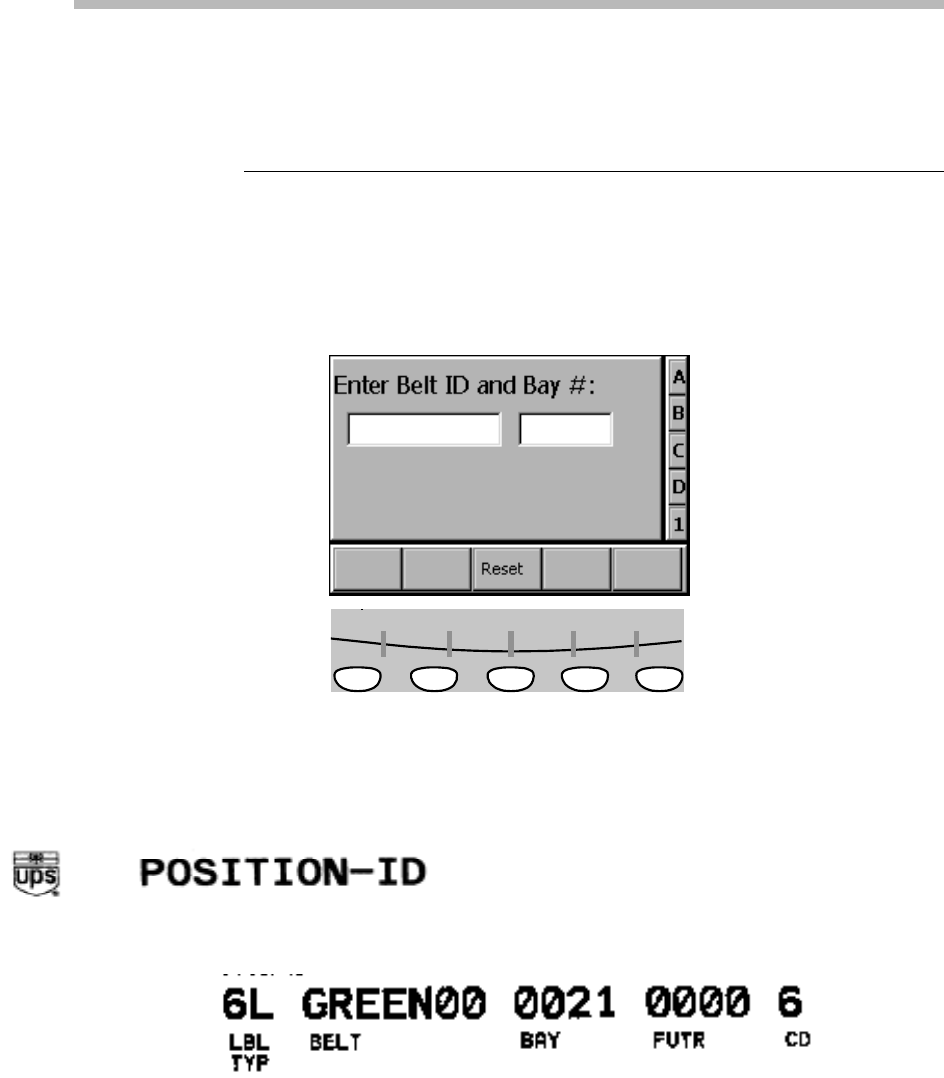
Set Up a Load To set up a load from the Figure 19: Position Entry Screen below:
1. Scan or key in the Belt ID and Bay #. Key in the Belt ID, press
Enter to move to the next field and key in the Bay #.
F1 F2 F3 F4 F5
Figure 19: Position Entry Screen
Note: For this practice, key in the information from Figure B - 1
below.
Figure B - 1
2. Once the Belt ID and Bay # are entered, press the Enter key on
the terminal keypad to Accept. The ULD screen appears.
UPScan Release 2.0 Loader/Supervisor Training Participant’s Guide
Lesson 3: Set Up Loads
Page 27 Oct-01
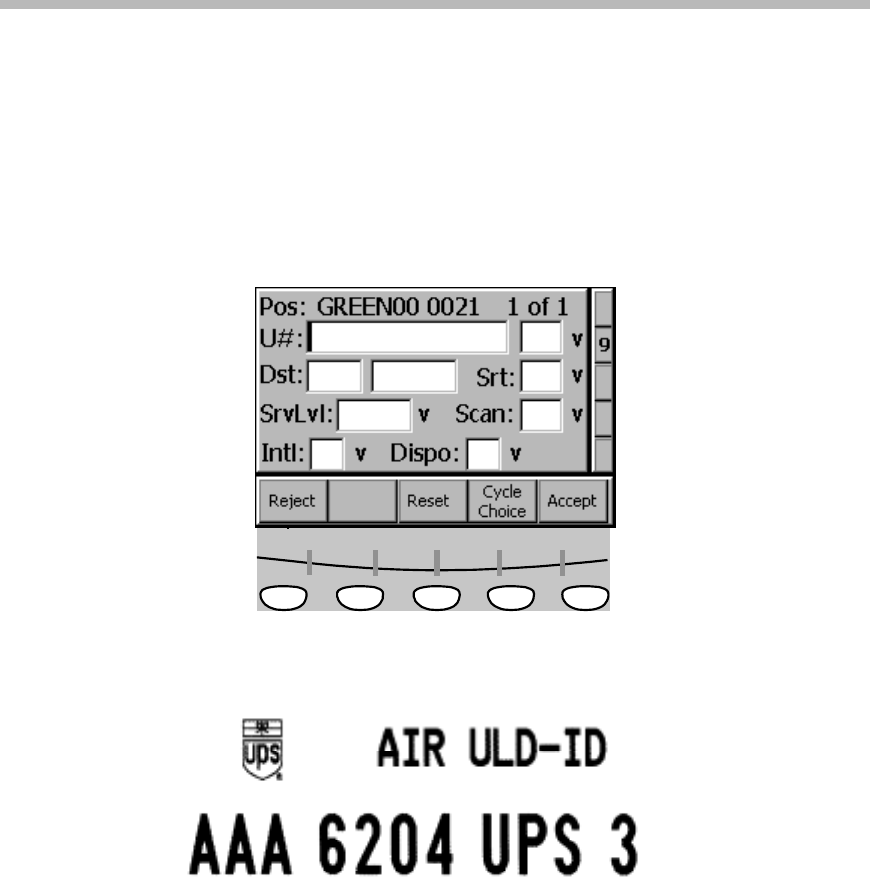
3. Key in the ULD ID. Press the Enter key to Accept.
NOTE: For this practice, key in the information from Figure B - 2
below.
NOTE: Always re-key information to verify.
F1 F2 F3 F4 F5
Figure 20
Figure B - 2

UPScan Release 2.0 Loader/Supervisor Training Participant’s Guide
Lesson 3: Set Up Loads
Page 29 Oct-01
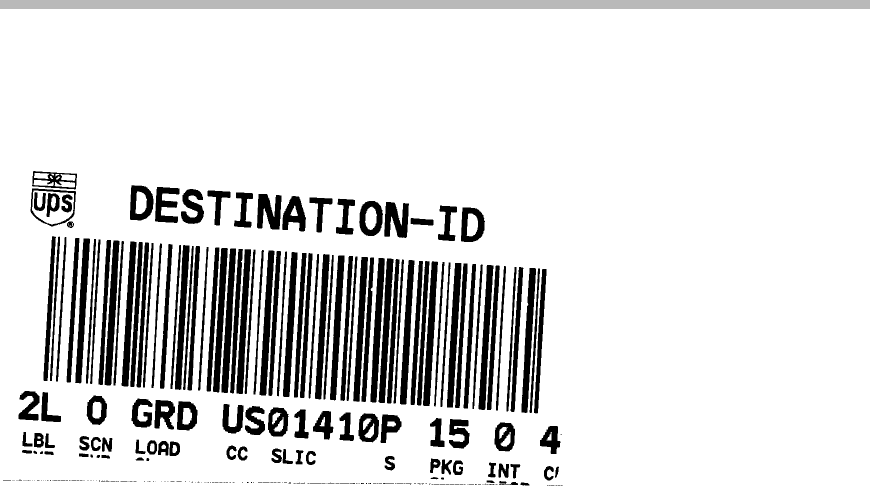
4. Scan or key enter the destination information in the Dst. field
which is composed of the Country Code and SLIC Code.
Dst-Destination
• Country Code-CC
• SLIC Code-SLIC
5. Press the Enter key to move to the next field.
6. For each of the fields, press F4 to display the cycle choices.
• Sort (Srt)-S
◦ S-Sunrise
◦ P-Preload
◦ M-Morning
◦ D-Day
◦ A-Afternoon
◦ T-Twilight
◦ L-Local
◦ N-Night
• Service Level (SrvLvl)-Load SL
◦ 1DA
◦ 2DA
◦ 3DS
◦ GRD
◦ EAM
• Scan-SCN TYP
◦ O-Origin
◦ L-Location
◦ D-Destination
• International (Intl)
◦ Y-Yes
◦ N-No
• Disposition (Dispo)-INT DISP
◦ N – None
◦ H – Hot
◦ U – Upgrades
◦ M – Mixed
◦ C – Cold
◦ I – International
◦ S – Smalls
◦ L – Holdover
◦ O – Offshore
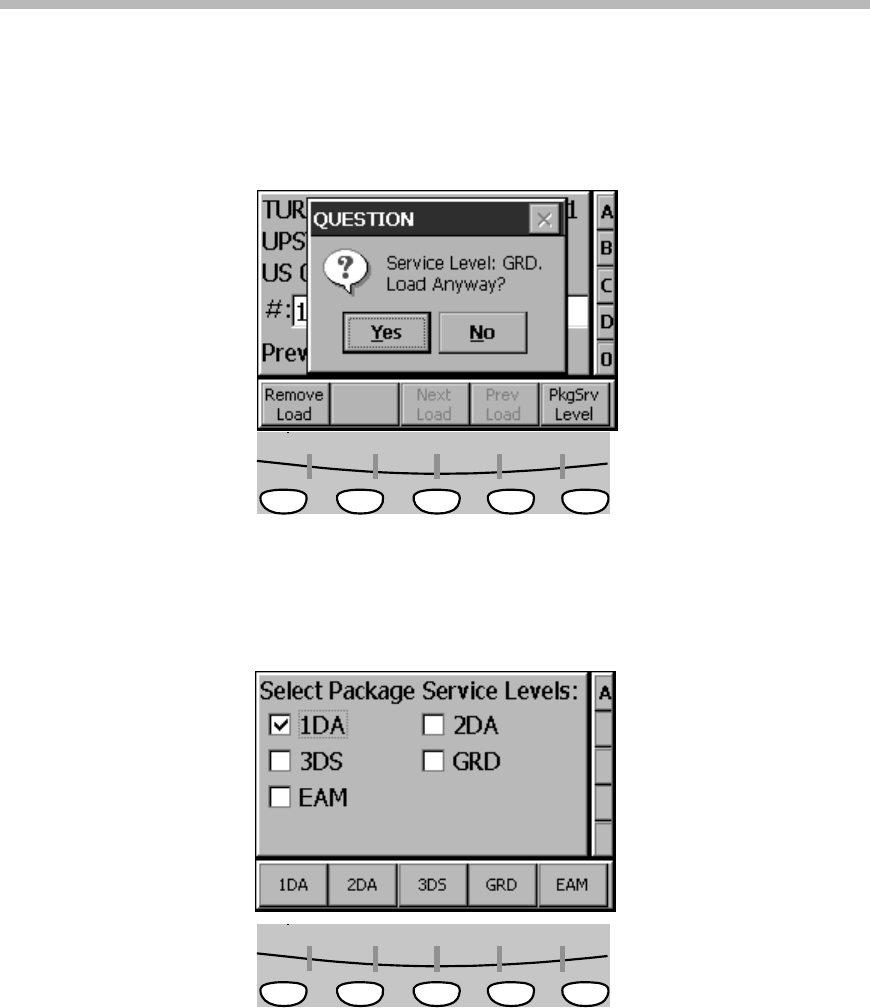
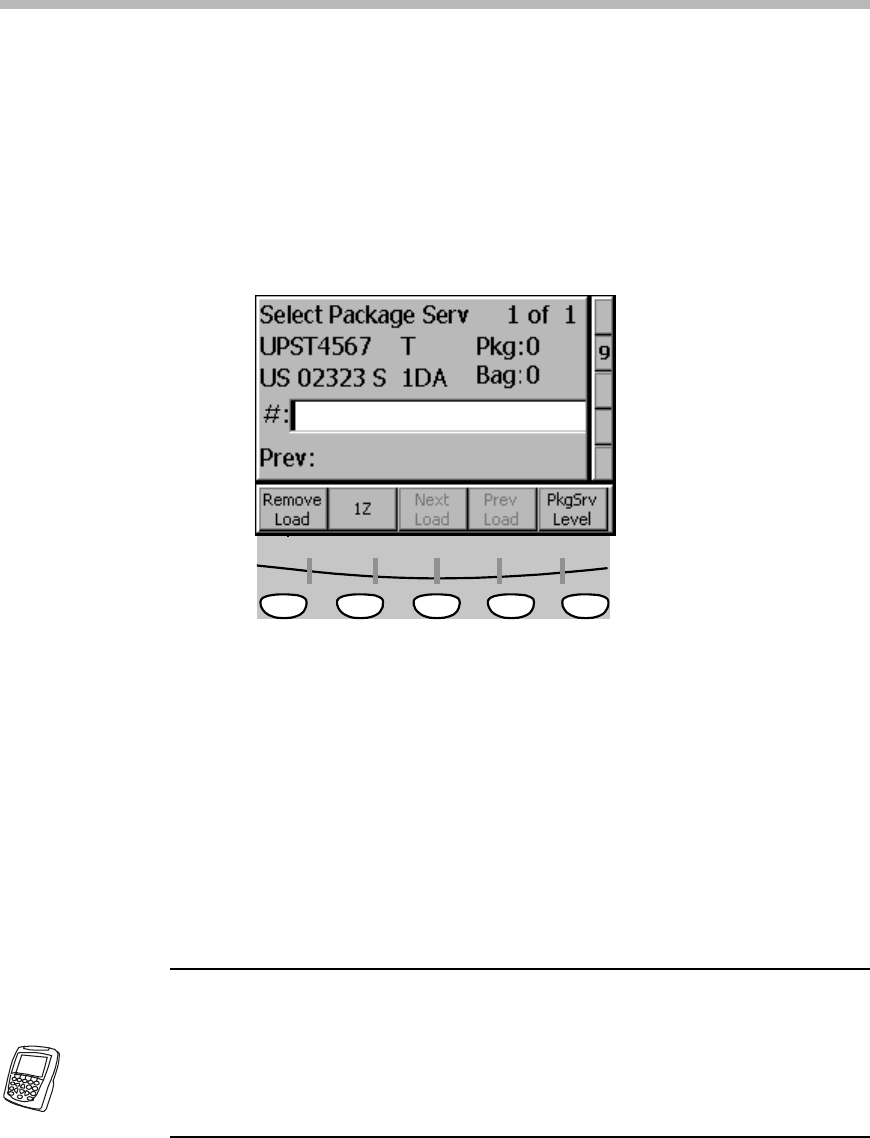
7. Once all the fields are updated, press F5 to Accept. The Package
Service Level screen appears.
8. Select the service levels needed, and press Enter to Accept. The
Package Scan screen appears.
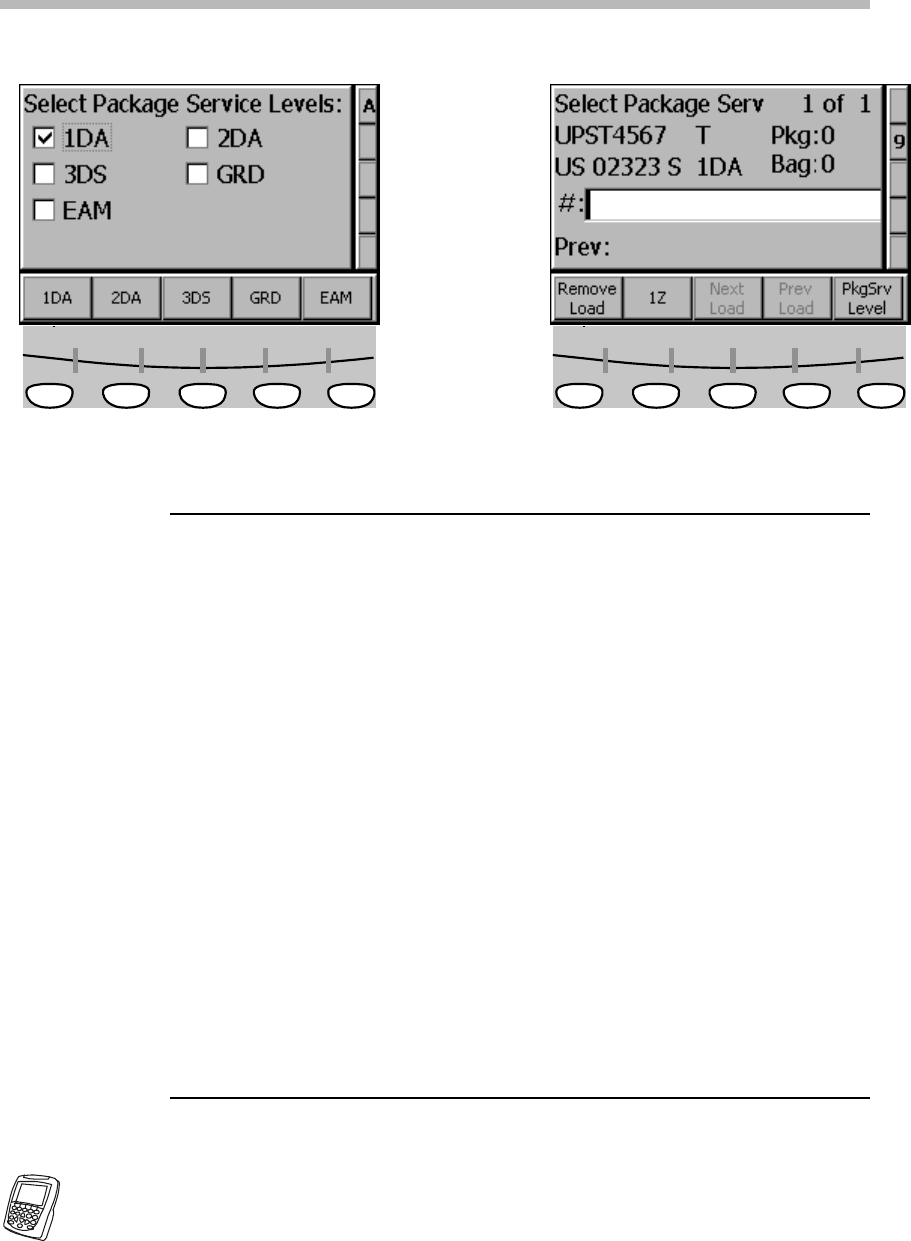
UPScan Release 2.0 Loader/Supervisor Training Participant’s Guide
Lesson 3: Set Up Loads
Page 30 Oct-01
F1 F2 F3 F4 F5 F1 F2 F3 F4 F5
Figure 23: Package Service Level Screen
Set Up Multiple Loads When you need to scan packages into more than one ULD, repeat
steps 1 through 7 to Set Up Another Load.
1. At the Package Scan screen, select the CANCEL/ESC key to
return to the Main Menu, use the down arrow key to select Set Up
Load.
2. Press Enter to accept; the Position Entry screen appears.
3. Scan in the Belt ID and Bay #. “No Load Data for Position:
GREENOO OO21”. Press Enter to accept. The Set Up Load
screen appears.
4. When the Set Up Load screen is completed, press F5 to Accept.
5. The Package Service Level screen appears. Select the appropriate
service and press Enter to Accept.
Toggle Between Loads 1. The Package Scan screen appears showing More than 1 Load
Setup in the top right corner of the screen. (2 of 2)
2. The Toggle Keys Next Load and Prev Load will be activated.
Use these keys to toggle back and forth between loads.
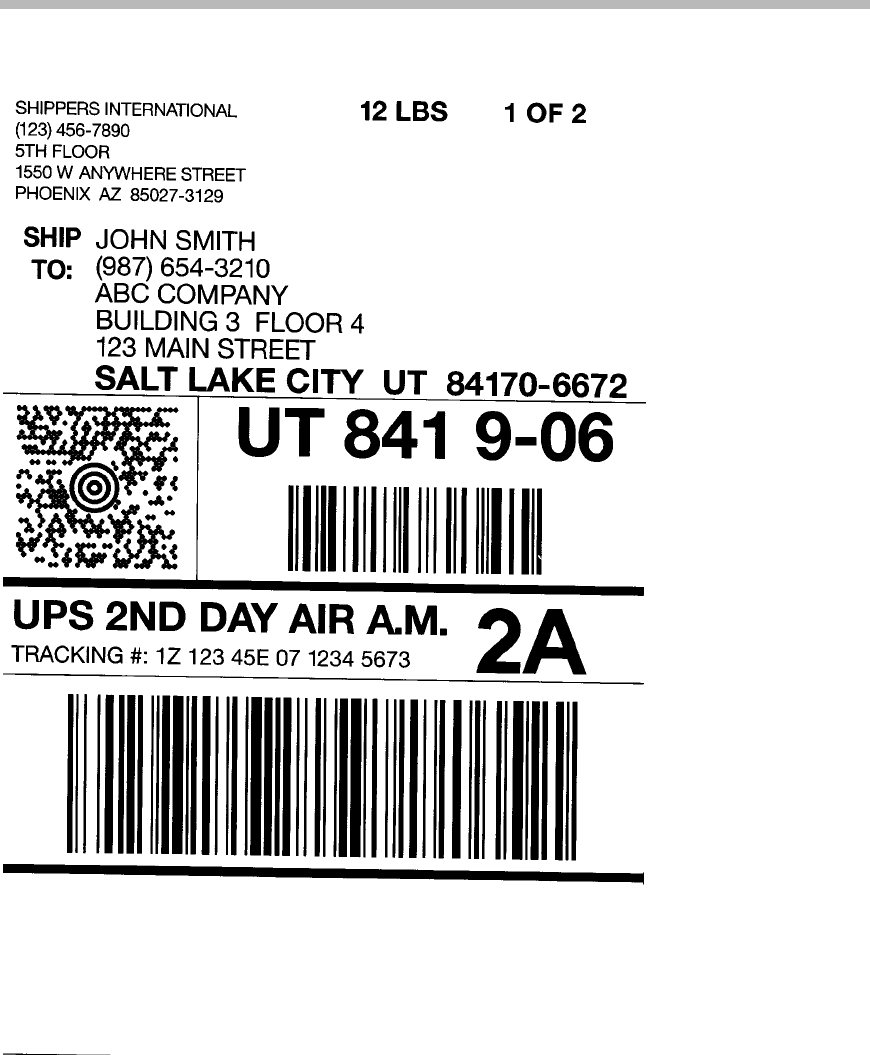
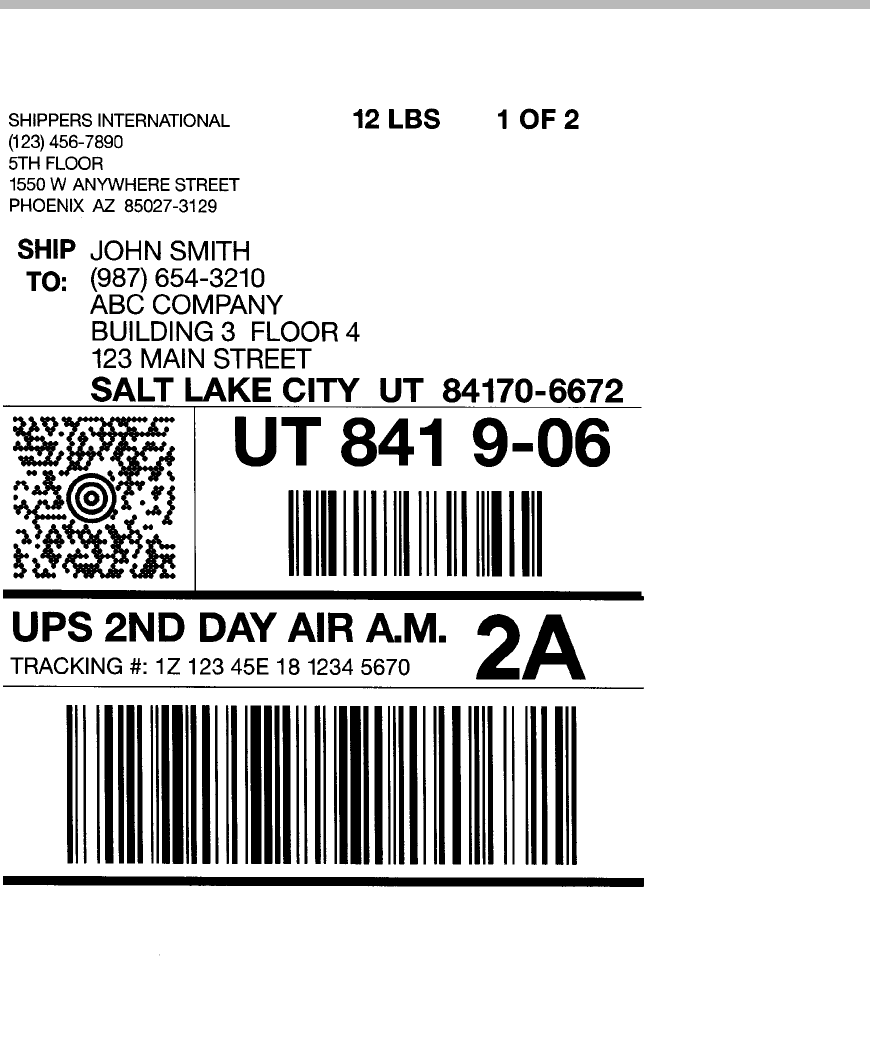
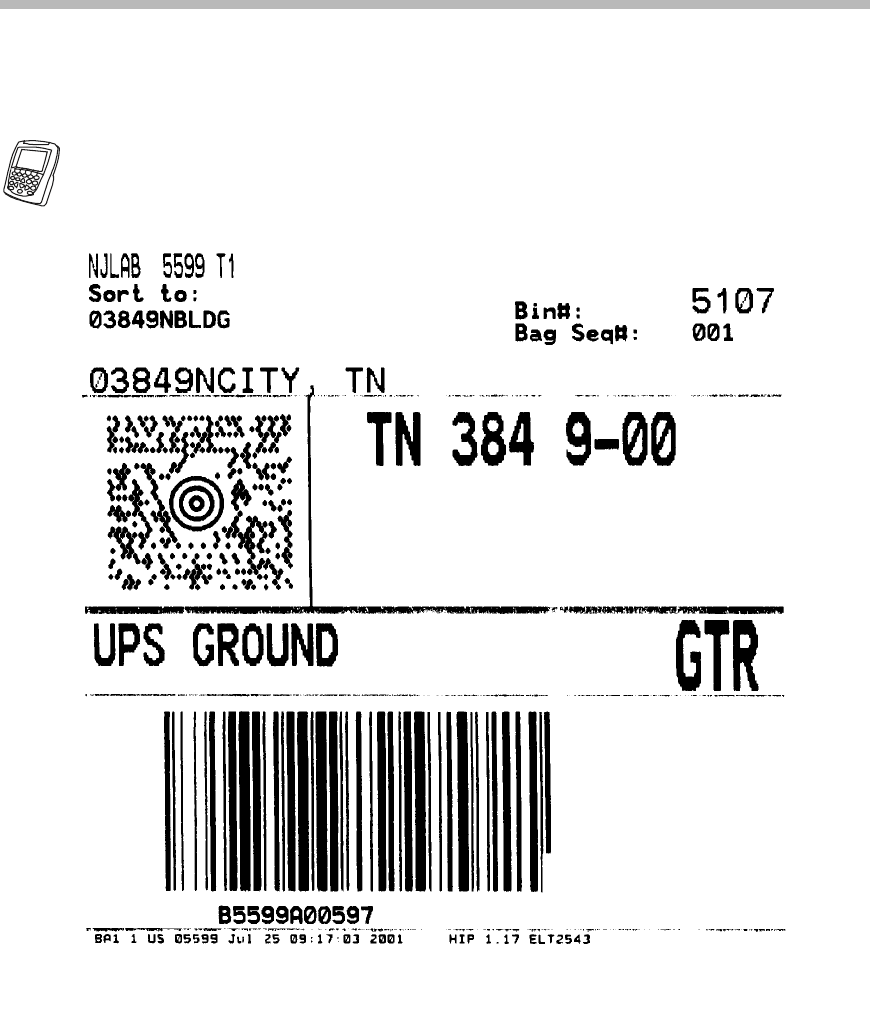
Practice Exercise: Using the steps given above, set up a multiple load. Refer to Barcodes
found on page 31 and 32.
Figure 22: Package Scan Screen
UPScan Release 2.0 Loader/Supervisor Training Participant’s Guide
Lesson 3: Set Up Loads
Page 31 Oct-01
Figure B - 4
Figure B - 5
UPScan Release 2.0 Loader/Supervisor Training Participant’s Guide
Lesson 3: Set Up Loads
Page 32 Oct-01
Figure B - 6
Page 33 Oct-01
Lesson 4: Scan Packages

UPScan Release 2.0 Loader/Supervisor Training Participant’s Guide
Lesson 4: Scan Packages
Page 34 Oct-01
Lesson 4: Scan Packages
Lesson Overview: This lesson describes how to scan packages.
Audience: Loaders\Supervisors
Suggested Time: 10 minutes
Lesson Outline: I. Introduction
II. Scan Packages Barcodes
Objectives: Trainees will:
• Scan packages barcodes

UPScan Release 2.0 Loader/Supervisor Training Participant’s Guide
Lesson 4: Scan Packages
Page 35 Oct-01
Introduction After setting up the load(s), you are ready to scan packages into a
ULD.
_______________________________________________________
Scanning Packages
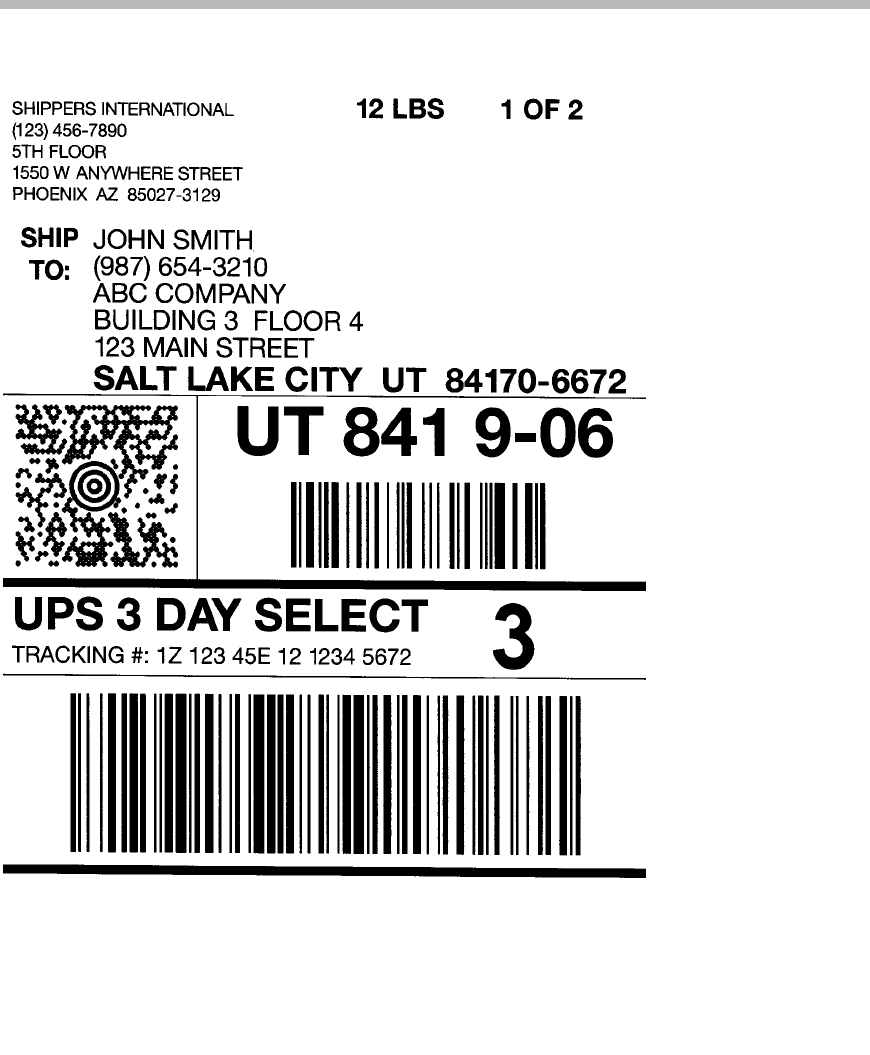
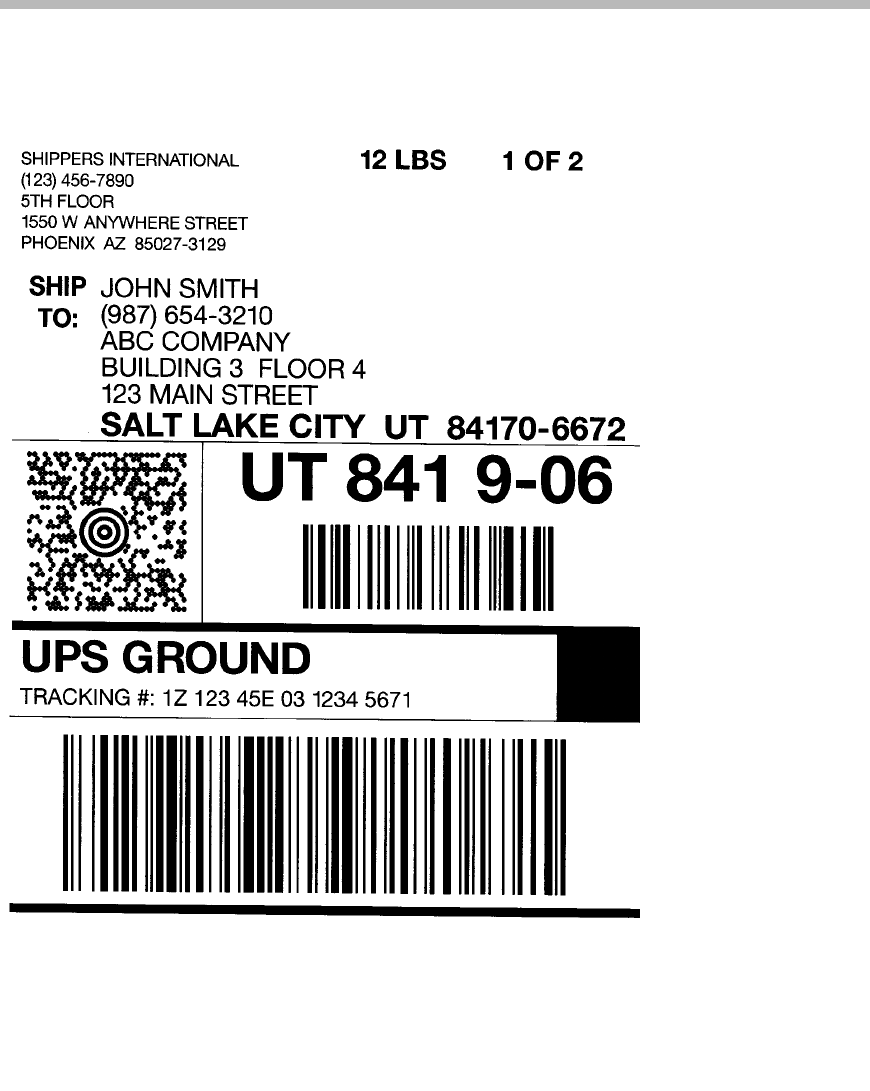
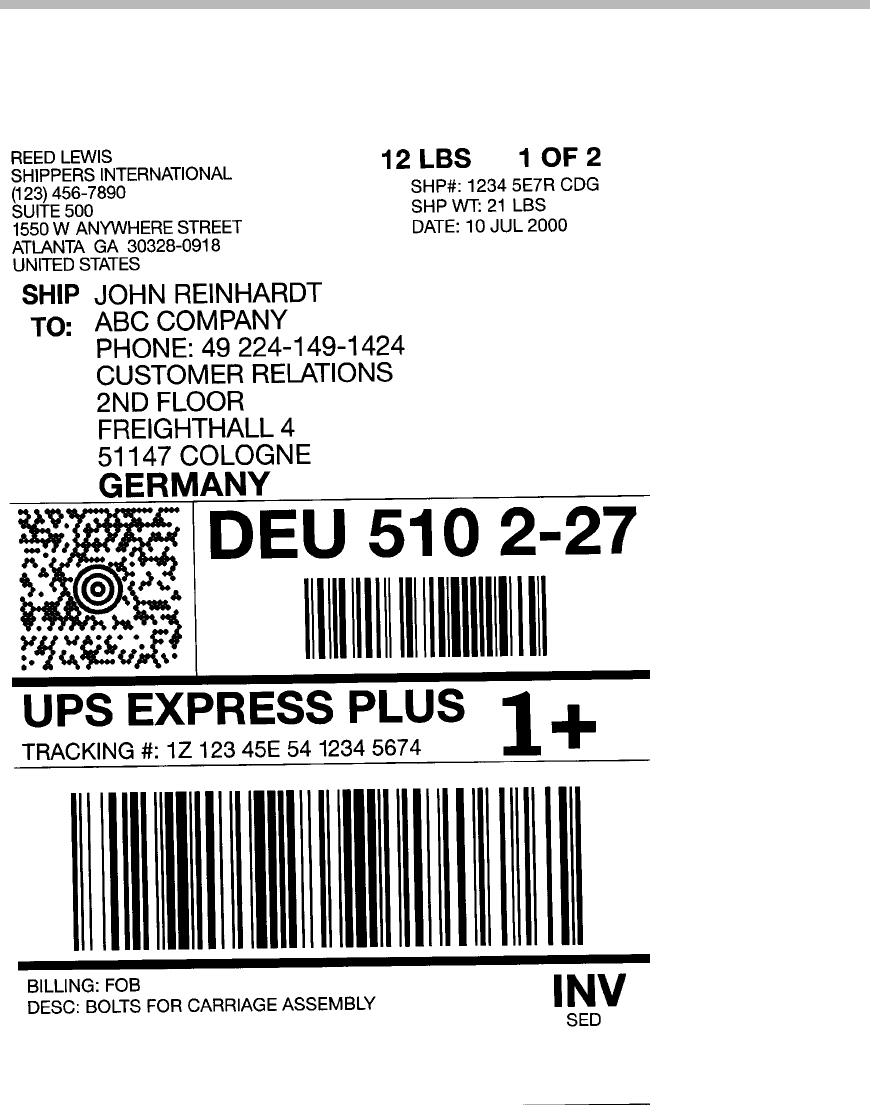
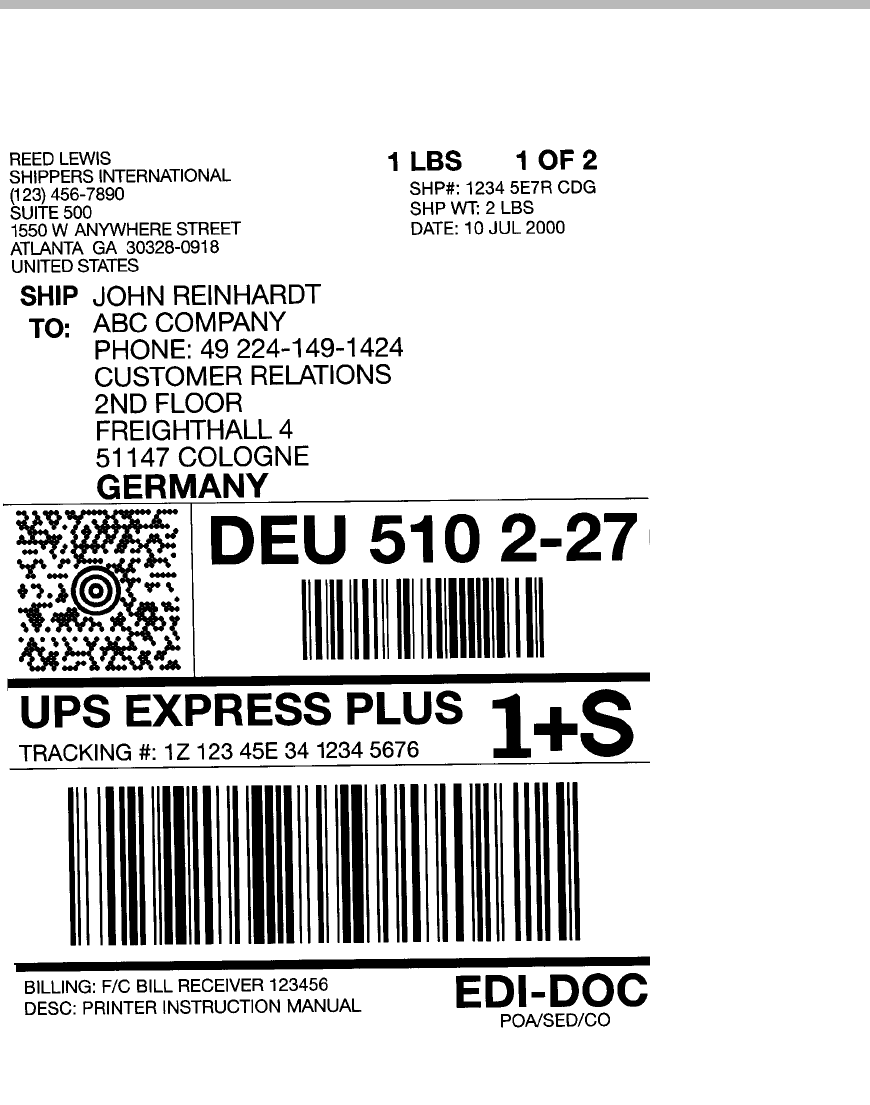
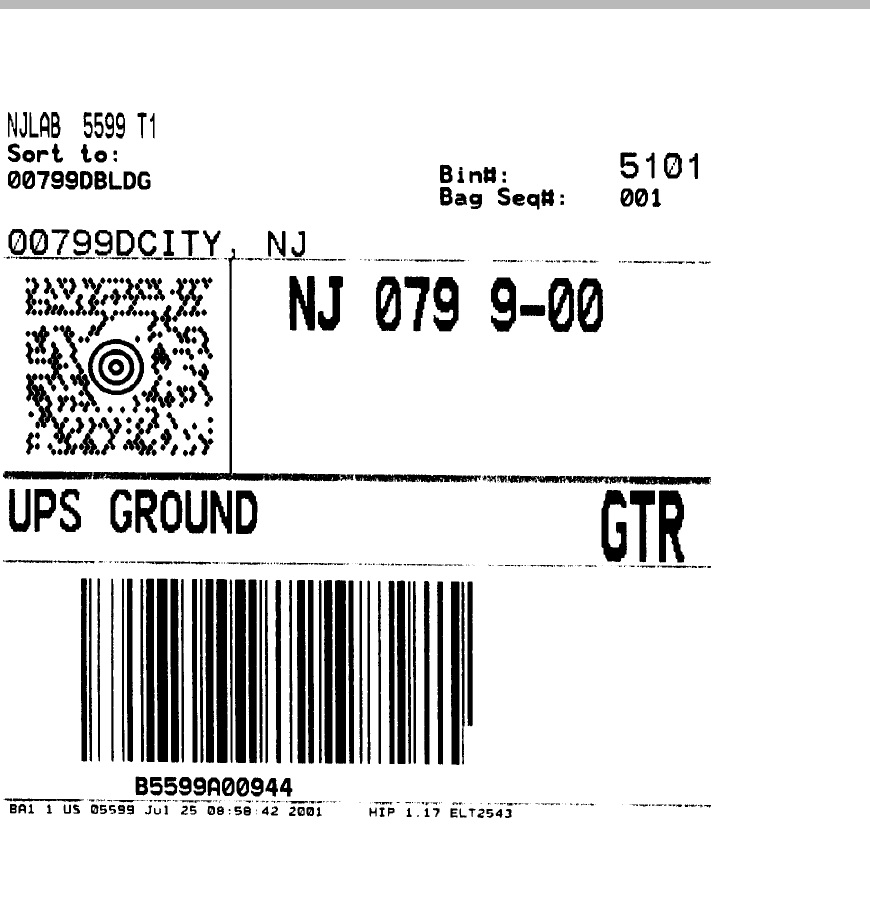
using Barcodes 1. Scan or key enter the package barcodes. Refer to, Figure B - 7
Figure B - 8, Figure B - 9 and Figure B - 10 below.
Figure B - 7
UPScan Release 2.0 Loader/Supervisor Training Participant’s Guide
Lesson 4: Scan Packages
Page 36 Oct-01
Figure B - 8
UPScan Release 2.0 Loader/Supervisor Training Participant’s Guide
Lesson 4: Scan Packages
Page 37 Oct-01
Figure B - 9
UPScan Release 2.0 Loader/Supervisor Training Participant’s Guide
Lesson 4: Scan Packages
Page 38 Oct-01
Figure B - 10
UPScan Release 2.0 Loader/Supervisor Training Participant’s Guide
Lesson 4: Scan Packages
Page 39 Oct-01
2. Press the Enter key. The Package Service Level Message Box
appears.
F1 F2 F3 F4 F5
Figure 24: Package Service Level Message Box
3. Press F5 for the Package Service Level screen, select the service
level needed using the Function Keys F1 through F5 (for
example F1=1DA).
F1 F2 F3 F4 F5
Figure 25: Package Service Level
4. Once the service levels are selected, press the Enter key to
accept the selections or the Cancel/Esc key to cancel.
Page 41 Oct-01
Lesson 5: Remove Load From Load List
and Log Out
UPScan Release 2.0 Loader/Supervisor Training Participant’s Guide
Lesson 5: Remove Load from Load List and Log Out
Page 42 Oct-01
Lesson 5: Remove Load from Load List and Log Out
Lesson Overview: This lesson describes how to remove a load from the
load list and log out.
Audience: Loaders\Supervisors
Suggested Time: 5 minutes
Lesson Outline: I. Introduction
II. Remove a load from the load list
III. Log out
Objectives: Trainees will:
• Remove a load
• Log out of UPScan
UPScan Release 2.0 Loader/Supervisor Training Participant’s Guide
Lesson 5: Remove Load from Load List and Log Out
Page 43 Oct-01
Introduction You should remove the load from the load list when the ULD will no
longer be needed.
NOTE: In UPScan you will not close loads. Instead, when you
finish loading the ULD, you remove the load from the UPScan
application.
_______________________________________________________
F1 F2 F3 F4 F5
Figure B - 12
Remove a Load from
a Load List Procedure To remove a load:
1. Press F1 to Remove a load. For this practice use the Load
that packages were scanned.
2. Press the Enter key for OK. The screen reads, “ Are you sure
you want to Remove the Load?”
3. The load is no longer available. You will return to the
Position Entry screen.
4. Press the Cancel/Esc key to return to the Main Menu screen.
Practice Exercise: Using the Remove a Load from a Load List procedure, remove the
load that you did not use.
UPScan Release 2.0 Loader/Supervisor Training Participant’s Guide
Lesson 5: Remove Load from Load List and Log Out
Page 44 Oct-01
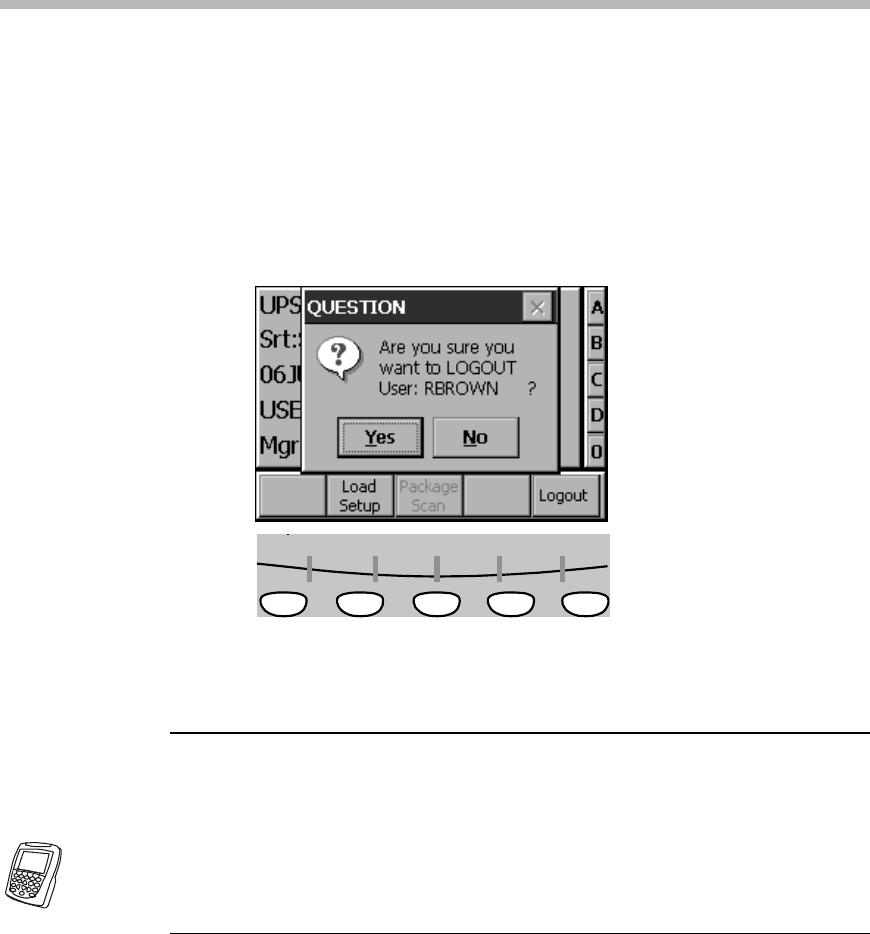
Log Out Procedure To key out of UPScan:
1. Press F5 to Logout.
2. Press the Enter key to select Yes to accept the logout.
3. User is successfully logged out.
4. Press the Enter for OK.
F1 F2 F3 F4 F5
Figure 26: Logout Screen
Practice Exercise: Following the steps given above, log out of the system.
Page 45 Oct-01
Barcode Section

UPScan Release 2.0 Loader/Supervisor Training Participant’s Guide
Barcodes Section
Page 46 Oct-01
UPScan Release 2.0 Loader/Supervisor Training Participant’s Guide
Barcodes Section
Page 47 Oct-01

UPScan Release 2.0 Loader/Supervisor Training Participant’s Guide
Barcodes Section
Page 48 Oct-01
UPScan Release 2.0 Loader/Supervisor Training Participant’s Guide
Barcodes Section
Page 49 Oct-01

UPScan Release 2.0 Loader/Supervisor Training Participant’s Guide
Barcodes Section
Page 50 Oct-01
UPScan Release 2.0 Loader/Supervisor Training Participant’s Guide
Barcodes Section
Page 51 Oct-01
UPScan Release 2.0 Loader/Supervisor Training Participant’s Guide
Barcodes Section
Page 52 Oct-01

UPScan Release 2.0 Loader/Supervisor Training Participant’s Guide
Barcodes Section
Page 53 Oct-01
UPScan Release 2.0 Loader/Supervisor Training Participant’s Guide
Barcodes Section
Page 54 Oct-01
UPScan Release 2.0 Loader/Supervisor Training Participant’s Guide
Barcodes Section
Page 55 Oct-01
Page 56 Oct-01
Evaluation

UPScan Release 2.0 Loader/Supervisor Training Participant’s Guide
Evaluation
Page 57 Oct-01
UPScan Release 2.0 Load/Supervisor Training Evaluation
Name (optional): Course Name/No.:
Instructor: Start Date:
High Low
Administrative Logistics: 54321
1. I had the skills and/or knowledge required
starting this course.
❏❏❏❏❏
2. The facilities and equipment were favorable to
learning.
❏❏❏❏❏
Comments:
High Low
Content: 54321
3. I was able to take this training when I needed it. ❏❏❏❏❏
4. I clearly understood the course objectives. ❏❏❏❏❏
5. The course met all of its stated objectives. ❏❏❏❏❏
Comments:

UPScan Release 2.0 Loader/Supervisor Training Participant’s Guide
Evaluation
Page 58 Oct-01
High Low
Design: 54321
6. The way this course was delivered (such as
classroom, computer, or video) was an effective
way for me to learn this subject matter.
❏❏❏❏❏
7. Training Guide materials were useful during the
course.
❏❏❏❏❏
8. I had enough time to learn the subject matter
covered in the course.
❏❏❏❏❏
9. The course content was logically organized. ❏❏❏❏❏
Comments:
High Low
Instructor: 54321
10. Overall, I was satisfied with the instructor(s). ❏❏❏❏❏
Comments:
High Low
Perceived Impact: 54321
11. My knowledge and/or skills increased as a result
of this course.
❏❏❏❏❏
12. The knowledge and/or skills gained through this
course are directly applicable to my job. ❏❏❏❏❏
13. Overall, I was satisfied with this training. ❏❏❏❏❏
Comments:
General Comments:
Please tell us anything else about this class that you
may want to bring to our attention.

UPScan Release 2.0 Loader/Supervisor Training Participant’s Guide
Evaluation
Page 59 Oct-01
Class Logistics:
Yes No N/A
Were there any problems with the
equipment/software in class?
If yes, please explain.
❏❏❏
Alternative Learning Methods:
Yes No Maybe
Would you rather have had an alternative method to
learn the material covered in this class?
❏❏❏
If so, what method would you have preferred (i.e.,
Computer-based Training, Web-based Training,
more sessions over longer period of time, etc.)?
❏❏❏