Motorola Solutions 89FT7030 Handheld Computer w/ Dual-Band GSM/EDGE, WLAN & BT User Manual Enhanced IMD Users

Motorola Solutions, Inc. Handheld Computer w/ Dual-Band GSM/EDGE, WLAN & BT Enhanced IMD Users
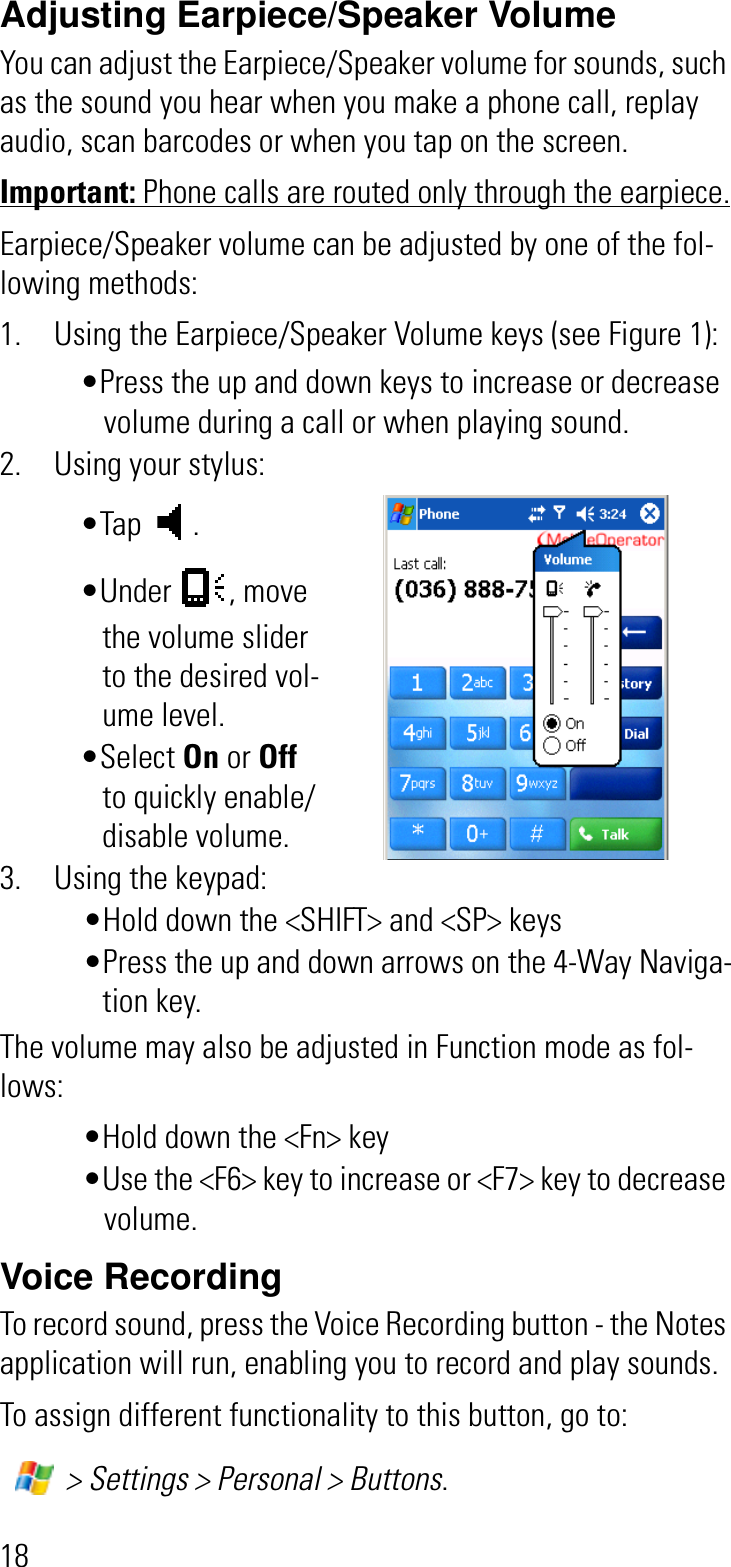
Contents

Exhibit 8 Users Manual
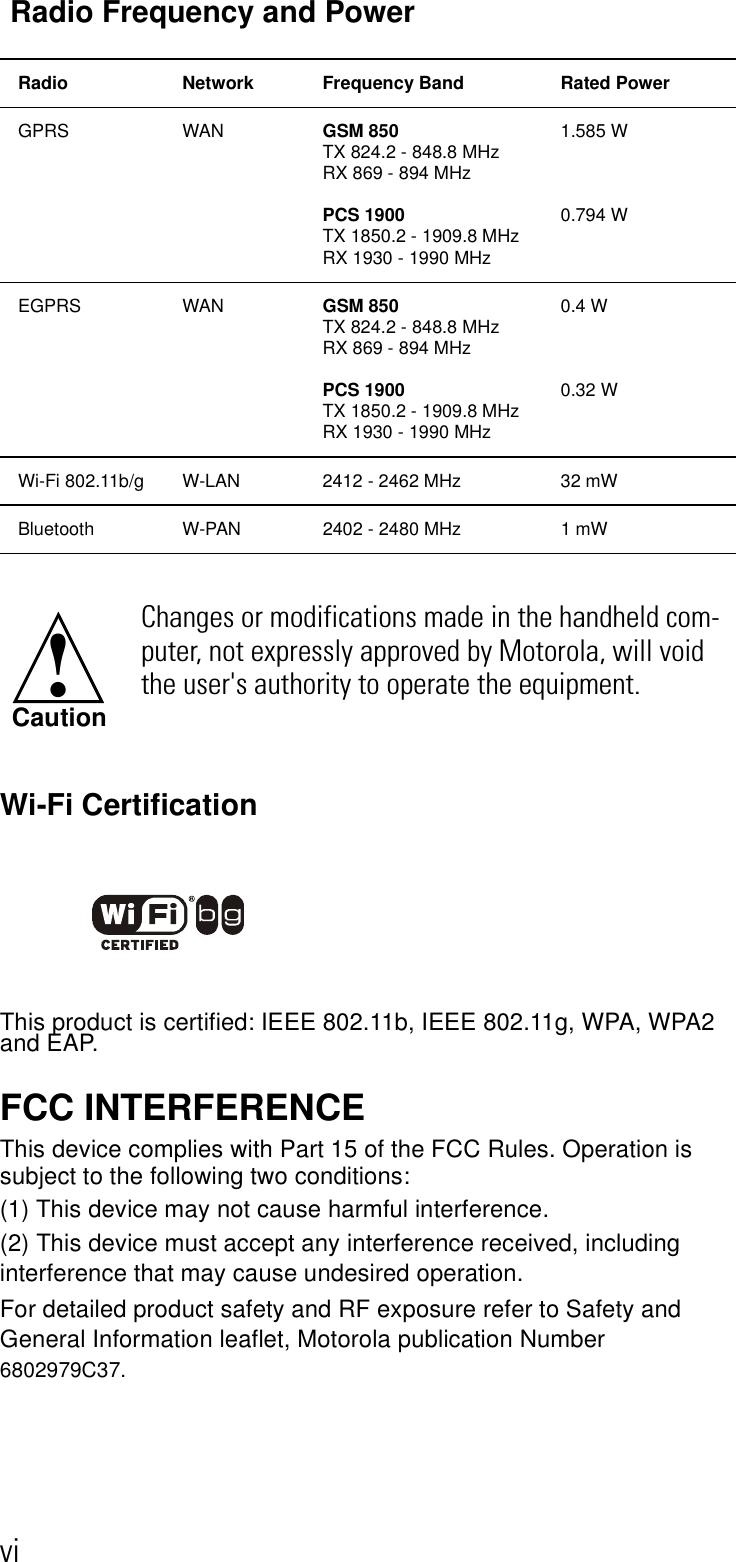
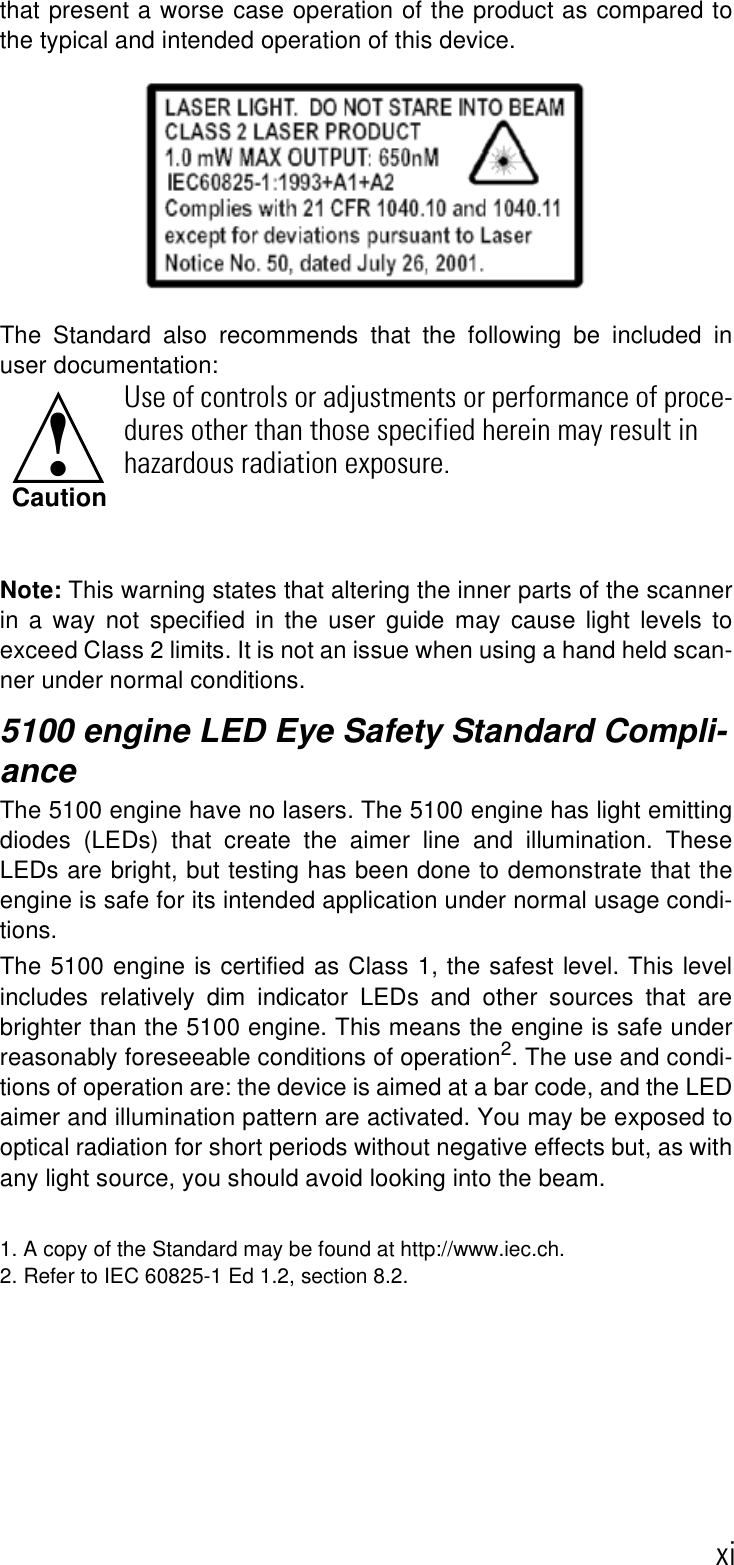
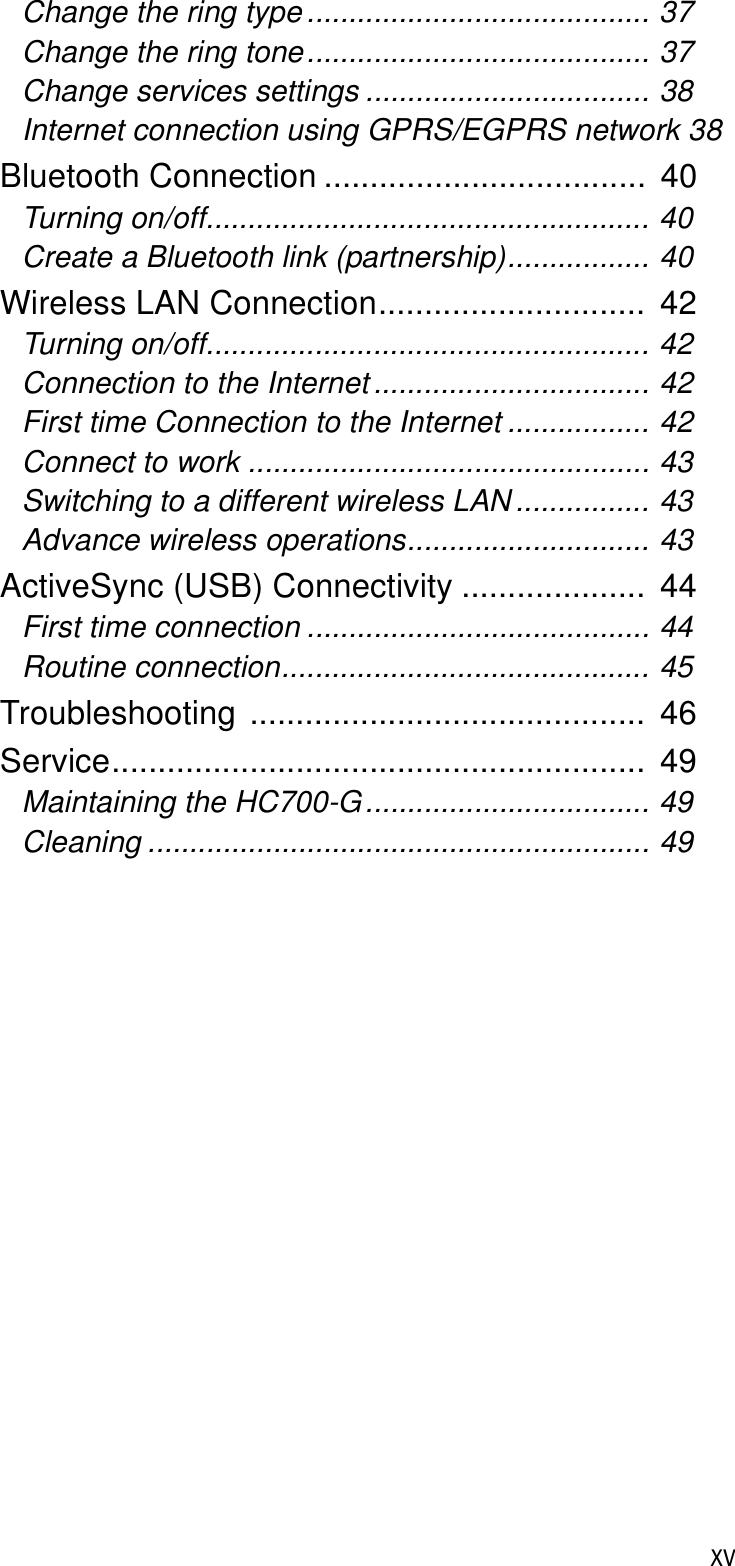
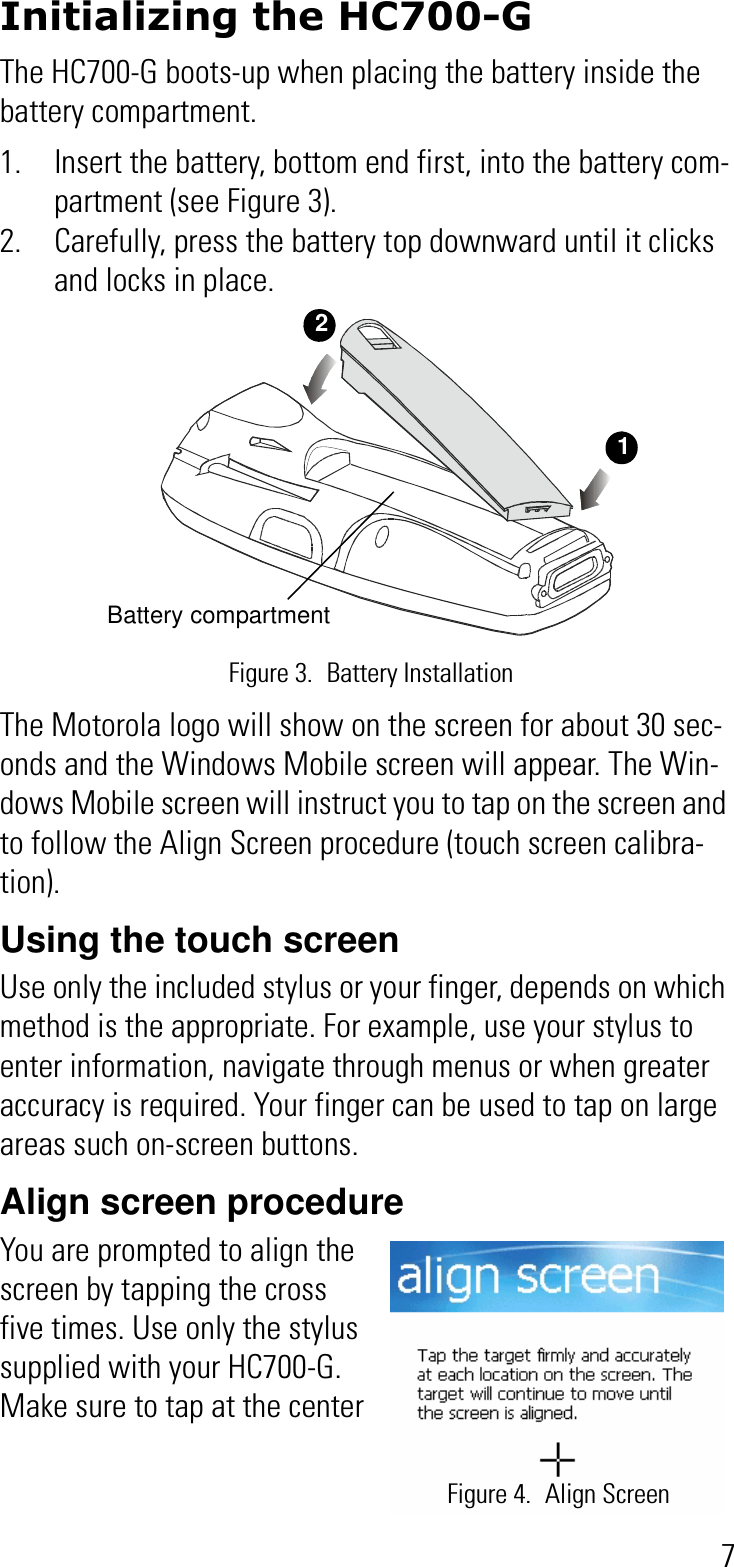
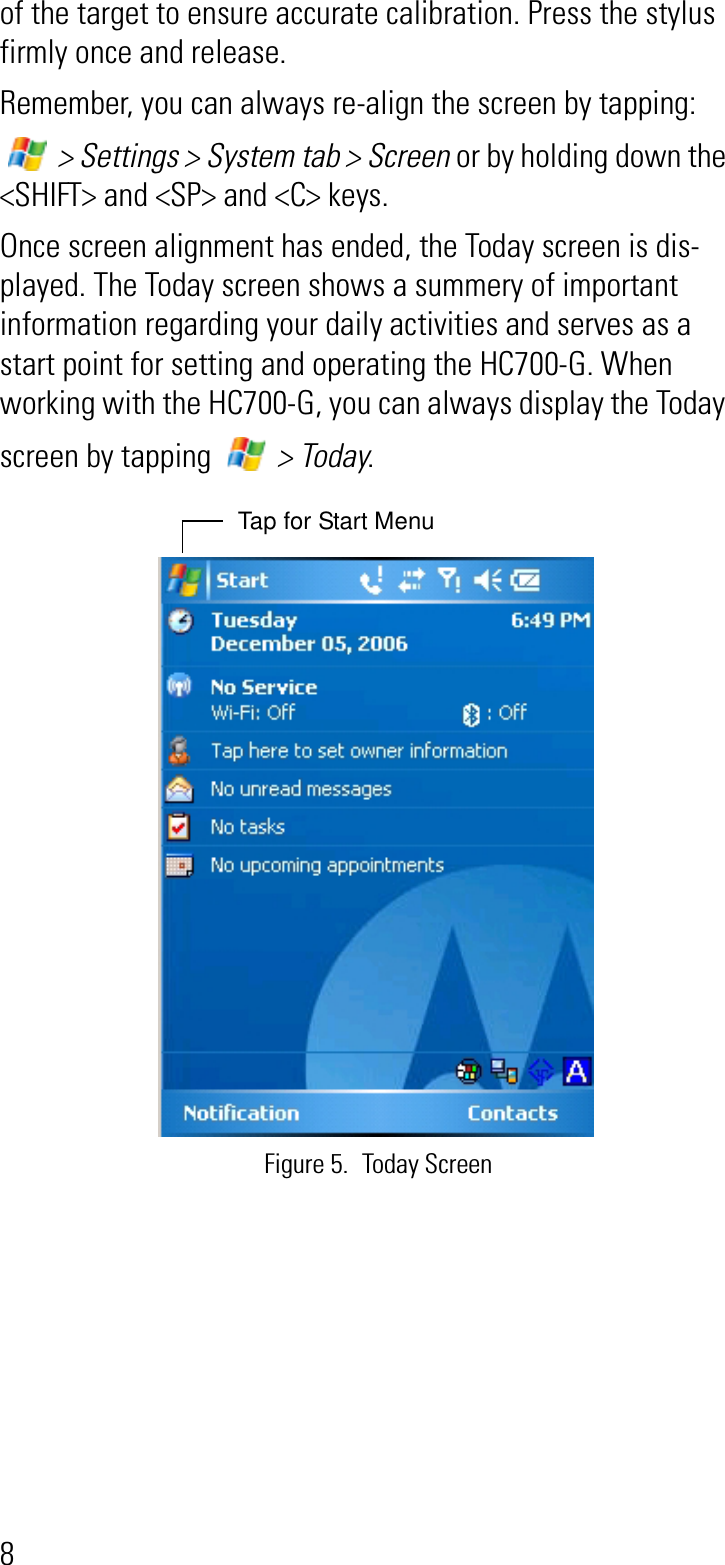
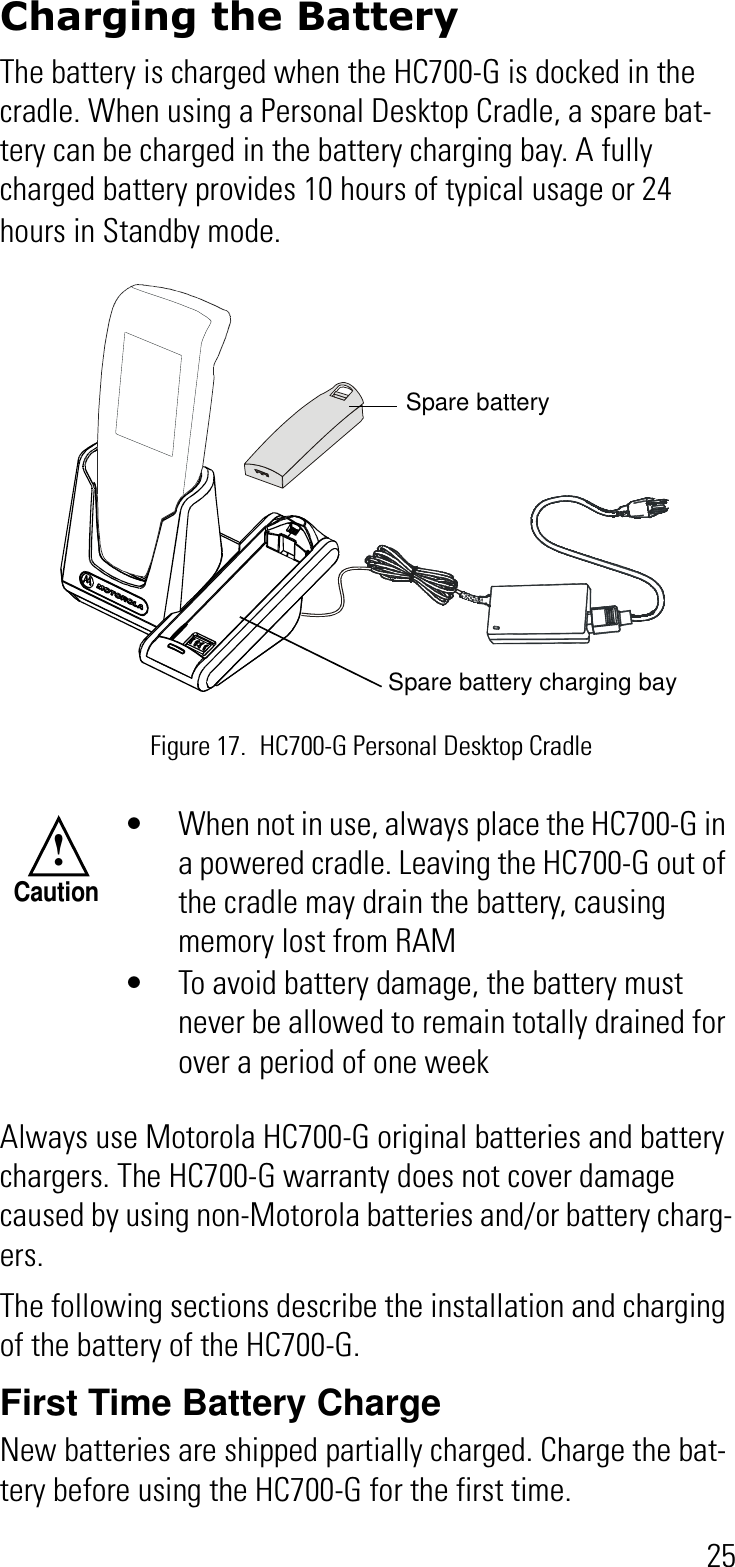
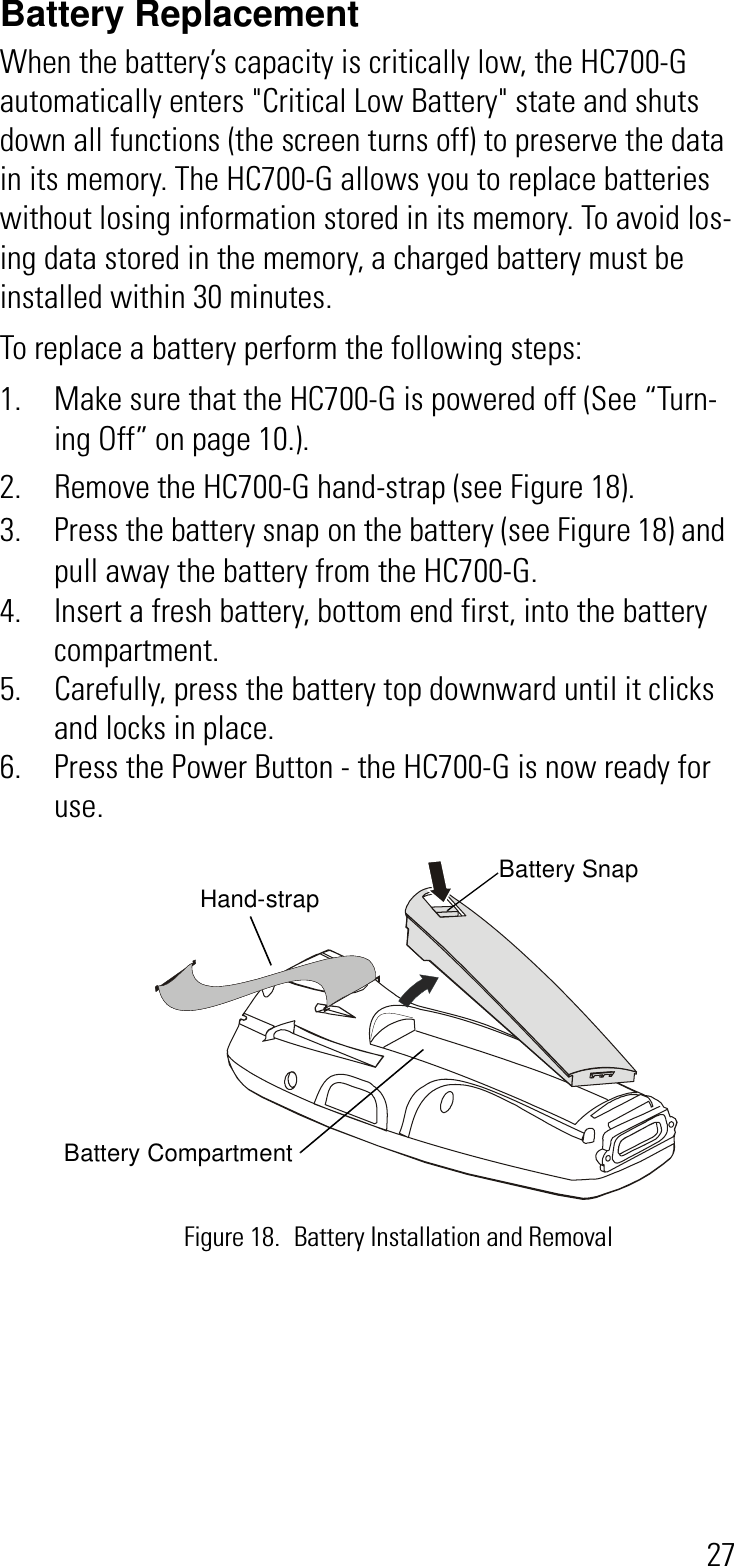
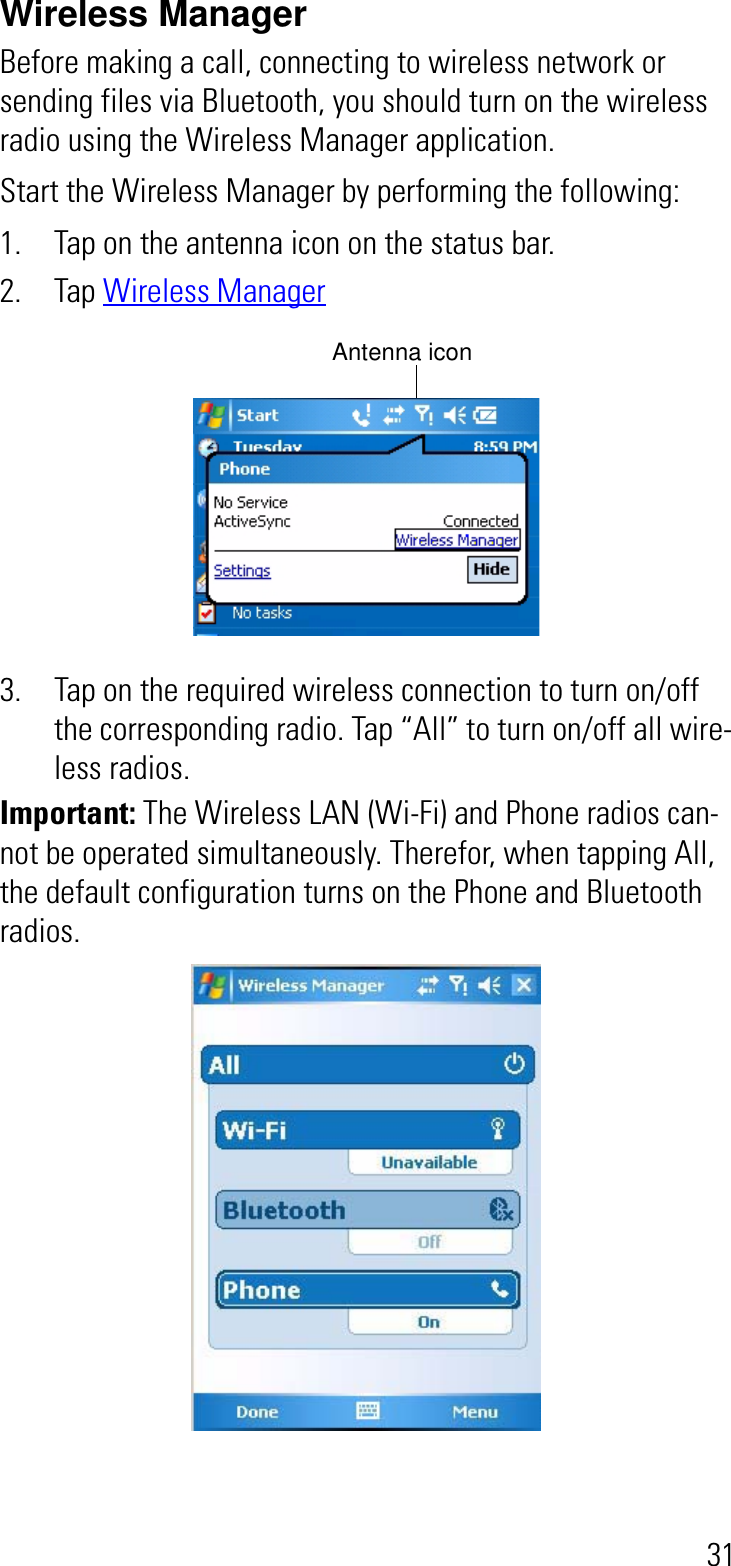
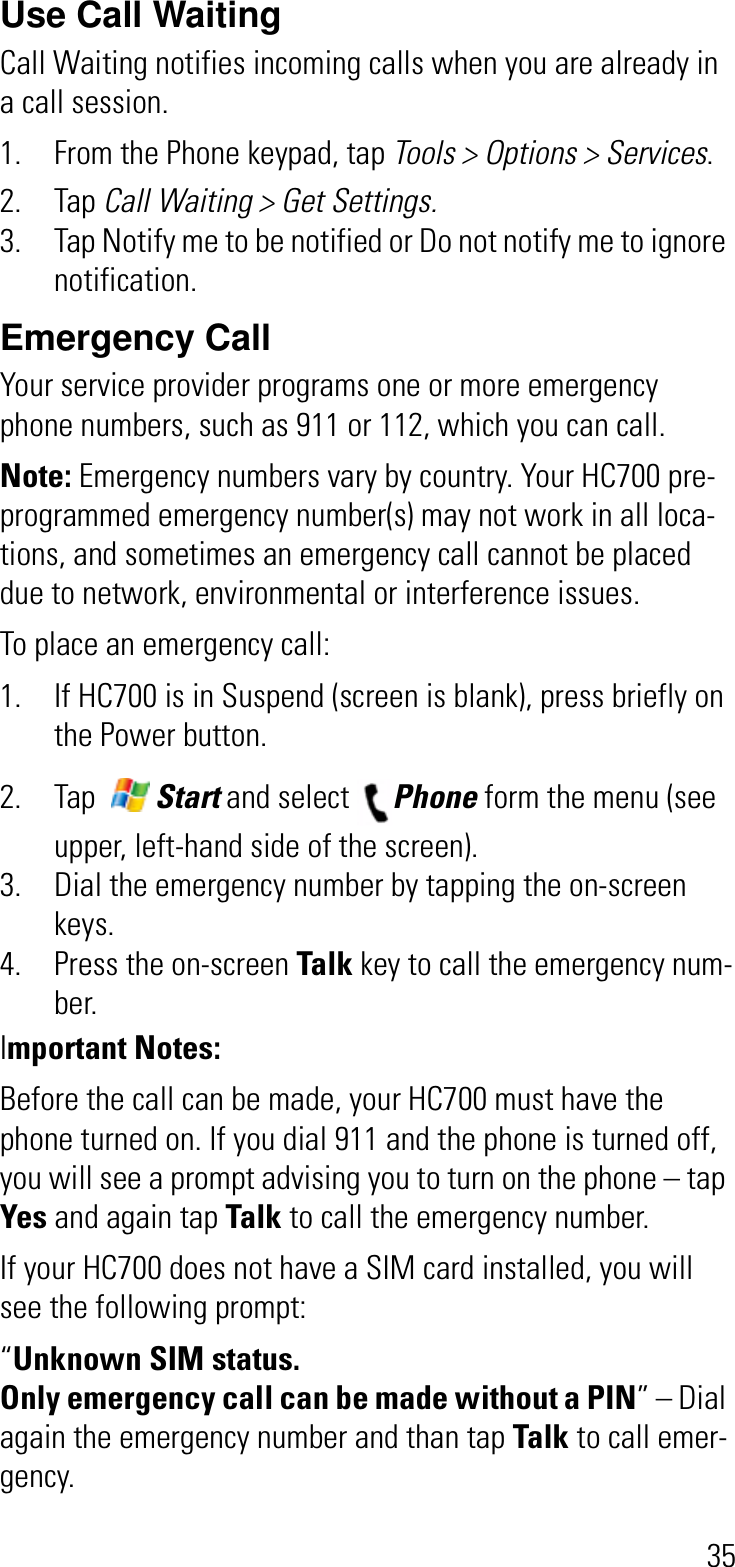
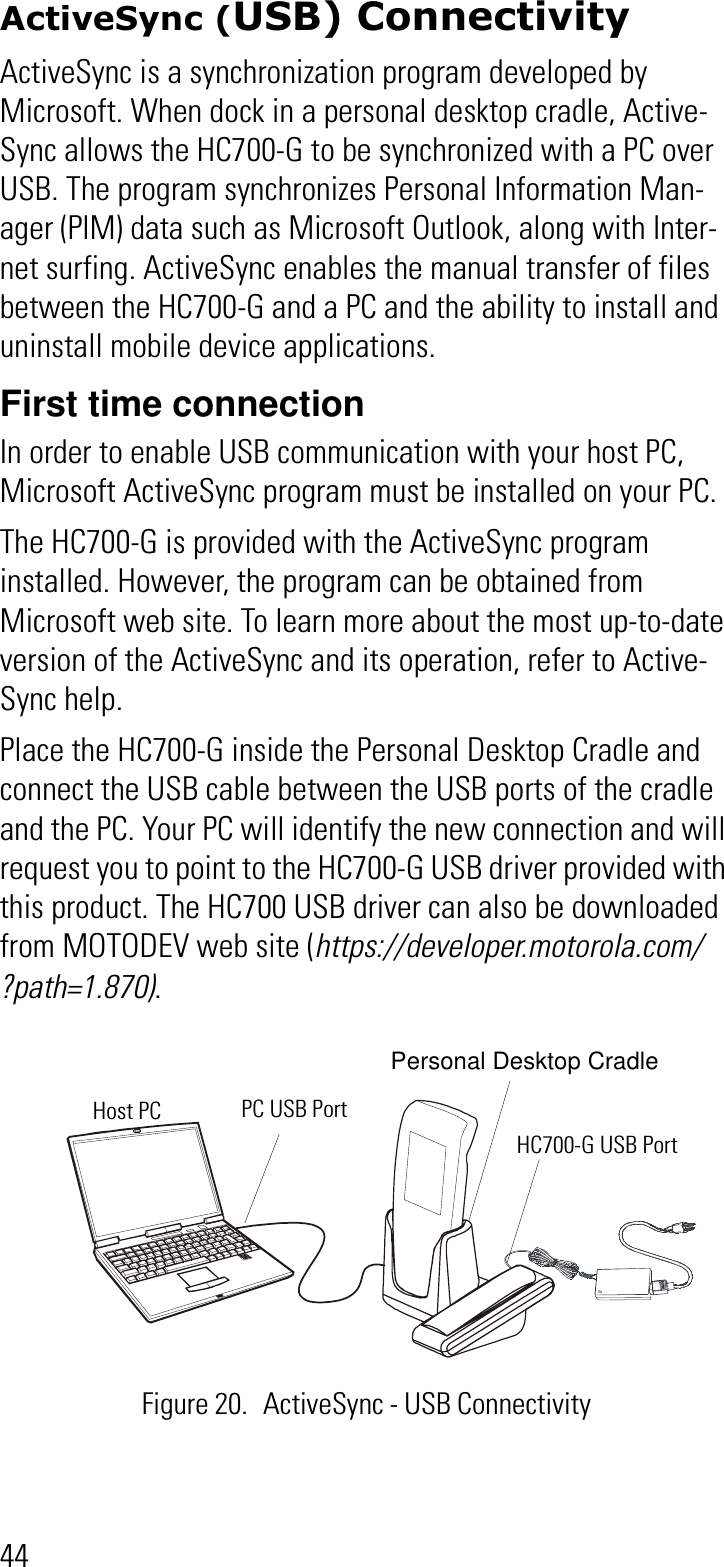
HC700-G & HCe700-GHandheld ComputersModels F4705A, F4707A & F4708AQuick Start Guidea
iCOMPUTER SOFTWARE COPYRIGHTSThe Motorola products described in this instruction manual may include copyrighted Motorola computer programs stored in semicon-ductor memories or other media. Laws in the United States and other countries preserve for Motorola certain exclusive rights for copy-righted computer programs, including the exclusive right to copy or reproduce in any form the copyrighted computer program. Accord-ingly, any copyrighted Motorola computer programs contained In the Motorola products described in this instruction manual may not be copied or reproduced in any manner without the express written per-mission of Motorola. Furthermore, the purchase of Motorola products shall not be deemed to grant either directly or by implication, estop-pel. or otherwise. any license under the copyrights, patents or patent applications of Motorola, except for the normal non-exclusive, royalty free license to use that arises by operation of law in the sale of a product.EPS – 34440- BThis warranty applies within the fifty (50) United States, the District of Columbia and Canada.Document CopyrightsNo duplication or distribution of this document or any portion thereof shall take place without the express written permission of Motorola. No part of this manual may be reproduced, distributed, or transmitted in any form or by any means, electronic or mechanical, for any pur-pose without the express written permission of Motorola.DisclaimerThe information in this document is carefully examined, and is believed to be entirely reliable. However, no responsibility is assumed for inaccuracies.Furthermore, Motorola reserves the right to make changes to any products herein to improve readability, function, or design. Motorola does not assume any liability arising out of the applications or use of any product or circuit described herein; nor does it cover any license under its patent rights nor the rights of others.Commercial WarrantyLimited WarrantyMOTOROLA COMMUNICATION PRODUCTSI. What This Warranty Covers And For How LongMOTOROLA INC. (“MOTOROLA”) warrants the MOTOROLA manu-factured Communication Products listed below (“Product”) against defects in material and workmanship under normal use and service for a period of time from the date of purchase as scheduled below:HC700-G unit One (1) YearProduct Accessories One (1) Year
iiMotorola, at its option, will at no charge either repair the Product (with new or reconditioned parts), replace it (with a new or reconditioned Product), or refund the purchase price of the Product during the war-ranty period provided it is returned in accordance with the terms of this warranty. Replaced parts or boards are warranted for the bal-ance of the original applicable warranty period. All replaced parts of Product shall become the property of MOTOROLA.This express limited warranty is extended by MOTOROLA to the original end user purchaser only and is not assignable or transferable to any other party. This is the complete warranty for the Product man-ufactured by MOTOROLA. MOTOROLA assumes no obligations or liability for additions or modifications to this warranty unless made in writing and signed by an officer of MOTOROLA. Unless made in a separate agreement between MOTOROLA and the original end user purchaser, MOTOROLA does not warrant the installation, mainte-nance or service of the Product.MOTOROLA cannot be responsible in any way for any ancillary equipment not furnished by MOTOROLA which is attached to or used in connection with the Product, or for operation of the Product with any ancillary equipment, and all such equipment is expressly excluded from this warranty. Because each system which may use the Product is unique, MOTOROLA disclaims liability for range, cov-erage, or operation of the system as a whole under this warranty.II. General ProvisionsThis warranty sets forth the full extent of MOTOROLA’s responsibili-ties regarding the Product. Repair, replacement or refund of the pur-chase price, at MOTOROLA’s option, is the exclusive remedy. THIS WARRANTY IS GIVEN IN LIEU OF ALL OTHER EXPRESS WAR-RANTIES. IMPLIED WARRANTIES, INCLUDING WITHOUT LIMI-TATION, IMPLIED WARRANTIES OF MERCHANTABILITY AND FITNESS FOR A PARTICULAR PURPOSE, ARE LIMITED TO THE DURATION OF THIS LIMITED WARRANTY. IN NO EVENT SHALL MOTOROLA BE LIABLE FOR DAMAGES IN EXCESS OF THE PURCHASE PRICE OF THE PRODUCT, FOR ANY LOSS OF USE, LOSS OF TIME, INCONVENIENCE, COMMERCIAL LOSS, LOST PROFITS OR SAVINGS OR OTHER INCIDENTAL, SPECIAL OR CONSEQUENTIAL DAMAGES ARISING OUT OF THE USE OR INABILITY TO USE SUCH PRODUCT, TO THE FULL EXTENT SUCH MAY BE DISCLAIMED BY LAW.III. State Law RightsSOME STATES DO NOT ALLOW THE EXCLUSION OR LIMITA-TION OF INCIDENTAL OR CONSEQUENTIAL DAMAGES OR LIMI-TATION ON HOW LONG AN IMPLIED WARRANTY LASTS, SO THE ABOVE LIMITATION OR EXCLUSIONS MAY NOT APPLY.This warranty gives specific legal rights, and there may be other rights which may vary from state to state.
iiiIV. How To Get Warranty ServiceYou must provide proof of purchase (bearing the date of purchase and Product item serial number) in order to receive warranty service and, also, deliver or send the Product item, transportation and insur-ance prepaid, to an authorized warranty service location. Warranty service will be provided by Motorola through one of its authorized warranty service locations. If you first contact the company which sold you the Product, it can facilitate your obtaining warranty service. You can also call Motorola at 1-888-567-7347 US/Canada.V. What This Warranty Does Not CoverA. Defects or damage resulting from use of the Product in other than its normal and customary manner.B. Defects or damage from misuse, accident, water, or neglect.C. Defects or damage from improper testing, operation, maintenance, installation, alteration, modification, or adjustment.D. Breakage or damage to antennas unless caused directly by defects in material workmanship.E. A Product subjected to unauthorized Product modifica-tions, disassemblies or repairs (including, without limi-tation, the addition to the Product of non-Motorola supplied equipment) which adversely affect perfor-mance of the Product or interfere with Motorola's nor-mal warranty inspection and testing of the Product to verify any warranty claim.F. Product which has had the serial number removed or made illegible.G. Rechargeable batteries if:•any of the seals on the battery enclosure of cells are bro-ken or show evidence of tampering.•the damage or defect is caused by charging or using the battery in equipment or service other than the Product for which it is specified.H. Freight costs to the repair depot.I. A Product which, due to illegal or unauthorized alteration of the software/firmware in the Product, does not func-tion in accordance with MOTOROLA’s published speci-fications or the FCC type acceptance labeling in effect for the Product at the time the Product was initially dis-tributed from MOTOROLA.J. Scratches or other cosmetic damage to Product sur-faces that does not affect the operation of the Product.K. Normal and customary wear and tear.
ivVI. Patent And Software ProvisionsMOTOROLA will defend, at its own expense, any suit brought against the end user purchaser to the extent that it is based on a claim that the Product or parts infringe a United States patent, and MOTOROLA will pay those costs and damages finally awarded against the end user purchaser in any such suit which are attribut-able to any such claim, but such defense and payments are condi-tioned on the following:A. that MOTOROLA will be notified promptly in writing by such purchaser of any notice of such claim;B. that MOTOROLA will have sole control of the defense of such suit and all negotiations for its settlement or com-promise; andC. should the Product or parts become, or in MOTOR-OLA’s opinion be likely to become, the subject of a claim of infringement of a United States patent, that such purchaser will permit MOTOROLA, at its option and expense, either to procure for such purchaser the right to continue using the Product or parts or to replace or modify the same so that it becomes noninfringing or to grant such purchaser a credit for the Product or parts as depreciated and accept its return. The depreciation will be an equal amount per year over the lifetime of the Product or parts as established by MOTOROLA.MOTOROLA will have no liability with respect to any claim of patent infringement which is based upon the combination of the Product or parts furnished hereunder with software, apparatus or devices not furnished by MOTOROLA, nor will MOTOROLA have any liability for the use of ancillary equipment or software not furnished by MOTOR-OLA which is attached to or used in connection with the Product. The foregoing states the entire liability of MOTOROLA with respect to infringement of patents by the Product or any parts thereof.Laws in the United States and other countries preserve for MOTOR-OLA certain exclusive rights for copyrighted MOTOROLA software such as the exclusive rights to reproduce in copies and distribute copies of such Motorola software. MOTOROLA software may be used in only the Product in which the software was originally embod-ied and such software in such Product may not be replaced, copied, distributed, modified in any way, or used to produce any derivative thereof. No other use including, without limitation, alteration, modifi-cation, reproduction, distribution, or reverse engineering of such MOTOROLA software or exercise of rights in such MOTOROLA soft-ware is permitted. No license is granted by implication, estoppel or otherwise under MOTOROLA patent rights or copyrights.VII. Governing LawThis Warranty is governed by the laws of the State of Illinois, USA.EPS – 48759 – O
vNotational ConventionsThroughout this publication, you will notice the use of cautions and notes. These notations are used to emphasize that safety hazards exist, and care must be taken.CAUTIONDo not proceed beyond a CAUTION until the indicated conditions are fully understood and met.Equipment AuthorizationIMPORTANT: Unauthorized repairs or modifications could result in permanent damage to the equipment and void your warranty and our authority to operate this device under Part 15 of the FCC Rules.Indicates a potentially hazardous situation which, if not avoided, may result in minor or moderate injury. CAU-TION may also be used to alert against unsafe practices and property-damage-only accident hazards.Model FCC ID Industry Canada IDF4708A AZ489FT7027 109U-89FT7027This Class B digital apparatus complies with Canadian ICES-003F4705A AZ489FT7030 109U-89FT7030This Class B digital apparatus complies with Canadian ICES-003!Caution
viRadio Frequency and PowerWi-Fi CertificationThis product is certified: IEEE 802.11b, IEEE 802.11g, WPA, WPA2 and EAP.FCC INTERFERENCEThis device complies with Part 15 of the FCC Rules. Operation is subject to the following two conditions: (1) This device may not cause harmful interference.(2) This device must accept any interference received, including interference that may cause undesired operation.For detailed product safety and RF exposure refer to Safety and General Information leaflet, Motorola publication Number 6802979C37.Radio Network Frequency Band Rated PowerGPRS WAN GSM 850TX 824.2 - 848.8 MHzRX 869 - 894 MHzPCS 1900TX 1850.2 - 1909.8 MHzRX 1930 - 1990 MHz1.585 W 0.794 WEGPRS WAN GSM 850TX 824.2 - 848.8 MHzRX 869 - 894 MHzPCS 1900TX 1850.2 - 1909.8 MHzRX 1930 - 1990 MHz0.4 W 0.32 WWi-Fi 802.11b/g W-LAN  2412 - 2462 MHz  32 mWBluetooth W-PAN 2402 - 2480 MHz 1 mWChanges or modifications made in the handheld com-puter, not expressly approved by Motorola, will void the user's authority to operate the equipment.!Caution
viiDECLARATION OF CONFORMITYPer FCC CFR 47 Part 2 Section 2.1077(a) Responsible Party Name: Motorola, Inc.Address: 8000 West Sunrise Boulevard, Plantation, FL 33328 USAPhone Number: 1 (800) 453-0920Hereby declares that the product:Product Name: HC700GModel Number: F4708A/F4705AConforms to the following regulations:FCC Part 15, subpart BClass B Digital DeviceDate: September 12th, 2006 (F4708A). April 17th, 2007 (F4705A)NOTE: This equipment has been tested and found to comply with the limits for a Class B digital device, pursuant to Part 15 of the FCC Rules. These limits are designed to provide rea-sonable protection against harmful interference in a residen-tial installation. This equipment generates, uses and can radiate radio frequency energy and, if not installed and used in accordance with the instructions, may cause harmful inter-ference to radio communications. However, there is no guar-antee that interference will not occur in a particular installation.If this equipment does cause harmful interference to radio or television reception, which can be determined by turning the equipment off and on, the user is encouraged to try to correct the interference by one or more of the following measures:• Reorient or relocate the receiving antenna.•  Increase the separation between the equipment and receiver.• Connect the equipment into an outlet on a circuit different from that to which the receiver is connected.• Consult the dealer or an experienced radio/TV technician for help.
viiiHC700-G (US) Transmission ModesHC700-G contains GPRS, WLAN and BT radios.Below please find the radios transmitting combinations:- Simultaneous transmission of the WAN (all bands) and WLAN radios is not allowed when used in the present configuration.- The WAN (all bands) and Bluetooth transmitters may work simulta-neously when used in the present configuration. - The WLAN and Bluetooth transmitters may work simultaneously when used in the present configuration.European Union Directives Conform-ance StatementYou can view your product's Declaration of Conformity (DoC) to Directives 89/336/EEC and 73/23/EEC at www.motorola.com/rtte - to find your DoC, enter the product Approval Number from your prod-uct's label in the "Search" bar on the Web site. This product conforms with the restriction of the use of certain haz-ardous substances in electrical and electronic equipment (RoHS). Please contact your supplier to view your product's RoHS informa-tion.Radio Frequency and PowerThe CE Mark on the product indicates that this product has been tested to and conforms with the provisions noted within the 89/336/EEC Electromagnetic Compatibil-ity Directive and the 73/23/EEC Low Voltage Directive. Radio Network Frequency Band Rated PowerGPRS WAN GSM 900880 - 960 MHz DCS 18001710 - 1880 MHz1.5 W0.8 WWi-Fi 802.11b/g W-LAN  2412 - 2462 MHz  32 mWBluetooth W-PAN 2402 - 2480 MHz 1 mWChanges or modifications made in the handheld com-puter, not expressly approved by Motorola, will void the user's authority to operate the equipment.!Caution
ixHCe700-G (EU) Transmission ModesHC700-G contains GPRS, WLAN and BT radios.Below please find the radios transmitting combinations:- Simultaneous transmission of the GPRS (all bands) and WLAN radios is not allowed when used in the present configuration.- The GPRS (all bands) and Bluetooth transmitters may work simulta-neously when used in the present configuration. - The WLAN and Bluetooth transmitters may work simultaneously when used in the present configuration.France Indoor OnlyWaste (Disposal) of your Electronic and Electric EquipmentTrademarksSD® is a registered trademark of SanDisk Corporation.Microsoft® Windows® and ActiveSync® are either registered trade-marks or trademarks of Microsoft Corporation in the United Statesand/or other countries.The BluetoothTM trademarks are owned by their proprietor and usedby Motorola, Inc. under license in the U.S. and other countries.MOTOROLA and the Stylized M Logo are registered in the U.S.Patent and Trademark Office. All other product or service names arethe property of their registered owners. © Motorola, Inc. 2007.Wi-Fi and the Wi-Fi CERTIFIED logo are registered trademarks ofthe Wi-Fi Alliance.Note: Bluetooth features and Bluetooth Class 1 power levels are not allowed for outdoor operation in France. To avoid unlawful interference with radio signals, do not use the Bluetooth features in France unless you are indoors.European Union (EU) Waste of Electrical and Elec-tronic Equipment (WEEE) directiveThe European Union's WEEE directive requires that products sold into EU countries must have the crossed out trashbin label on the product (or the package in some cases). As defined by the WEEE directive, this cross-out trashbin label means that customers and end-users in EU countries should not dispose of electronic and electrical equipment or acces-sories in household waste. Customers or end-users in EU countries should contact their local equipment supplier rep-resentative or service centre for information about the waste collection system in their country.
xEye Safety Standard for Imager EnginesThe HC700-G and the HCe700-G is manufactured with the following Imager Engine options:- 5300 series with Laser aiming technology.- 5100 series with light emitting diodes aiming technology.Eye Safety Standard for 5100 EngineThe standard, "IEC 60825-1 Safety of Laser Products"1 ("Standard") gives guidelines as to the acceptable brightness of lasers and LEDs. This depends on how bright the LED is itself, but also how it is arranged in a device. The Standard sets the acceptable levels of light and testing conditions for the product. This Standard, like many oth-ers, is written by a group of technical experts and undergoes a rigor-ous approval process prior to adoption. One should also note that the specifics of this Standard assume exposure conditions and distances that present a worse case operation of the product as compared to the typical and intended operation of this device. Class 1 instruments are required to carry the following symbol either on the item, or in manuals to indicate the level of safety when compared against the Standard:The Standard also recommends that the following be included inuser documentation:Note: This warning states that altering the inner parts of the scanner in a way not specified in the user guide may cause lightlevels to exceed Class 1 limits. It is not an issue when using a hand held scanner under normal conditions.Eye Safety Standard for 5300 Series EngineThe standard, "IEC 60825-1 Safety of Laser Products”1 ("Standard")gives guidelines as to the acceptable brightness of lasers and LEDs.This depends on how bright the laser is itself, but also how it isarranged in a device. The Standard sets the acceptable levels of lightand testing conditions for the product. This Standard, like many oth-ers, is written by a group of technical experts and undergoes a rigor-ous approval process prior to adoption. One should also note that thespecifics of this Standard assume exposure conditions and distancesUse of controls or adjustments or performance of proce-dures other than those specified herein may result in hazardous radiation exposure.!Caution
xithat present a worse case operation of the product as compared tothe typical and intended operation of this device.The Standard also recommends that the following be included inuser documentation: Note: This warning states that altering the inner parts of the scannerin a way not specified in the user guide may cause light levels toexceed Class 2 limits. It is not an issue when using a hand held scan-ner under normal conditions.5100 engine LED Eye Safety Standard Compli-anceThe 5100 engine have no lasers. The 5100 engine has light emittingdiodes (LEDs) that create the aimer line and illumination. TheseLEDs are bright, but testing has been done to demonstrate that theengine is safe for its intended application under normal usage condi-tions. The 5100 engine is certified as Class 1, the safest level. This levelincludes relatively dim indicator LEDs and other sources that arebrighter than the 5100 engine. This means the engine is safe underreasonably foreseeable conditions of operation2. The use and condi-tions of operation are: the device is aimed at a bar code, and the LEDaimer and illumination pattern are activated. You may be exposed tooptical radiation for short periods without negative effects but, as withany light source, you should avoid looking into the beam. 1. A copy of the Standard may be found at http://www.iec.ch. 2. Refer to IEC 60825-1 Ed 1.2, section 8.2.Use of controls or adjustments or performance of proce-dures other than those specified herein may result in hazardous radiation exposure.!Caution
xii
© Motorola Inc., 2007  6802981C55-FApril, 2007ContentsCOMPUTER SOFTWARE COPYRIGHTS........ iDocument Copyrights........................................ iDisclaimer.......................................................... iCommercial Warranty........................................ iNotational Conventions ..................................... vEquipment Authorization ................................... v Radio Frequency and Power............................ viFCC INTERFERENCE ...................................... viHC700-G (US) Transmission Modes................. viiiEuropean Union Directives Conformance Statement  viiiRadio Frequency and Power............................. viiiHCe700-G (EU) Transmission Modes............... ixWaste (Disposal) of your Electronic and Electric Equipment ixTrademarks ......................................................... ixEye Safety Standard for Imager Engines .......... xWelcome.......................................................  1What is the HC700-G Handheld Computer?..... 1Unpacking ......................................................... 3HC700-G Features .......................................  5Front Panel and Top Side Features................... 5Rear and Bottom Side Features........................ 6Initializing the HC700-G................................  7Using the touch screen...................................... 7Align screen procedure ..................................... 7Attaching the hand-strap ................................... 9Using the HC700-G ......................................  10Turning Off......................................................... 10Resuming Operation ......................................... 10Suspend Mode .................................................. 11The Status LED  ................................................ 12Using the Keypad .............................................. 14Keypad Backlight............................................... 17Screen Backlight ............................................... 17Calibrating the Touch Screen ............................ 17
xivAdjusting Earpiece/Speaker Volume................. 18Voice Recording ................................................ 18Resetting the HC700-G..................................... 19miniSD Memory Card ...................................  21Installing a miniSD Card.................................... 21miniSD Card Handling Precautions................... 21Allocating Memory............................................. 21Scanning Barcodes ......................................  22Scanning with LED aimer imager ...................... 22Scanning with Laser aimer imager .................... 23Charging the Battery.....................................  25First Time Battery Charge ................................. 25Checking the Remaining Battery Power............ 26Routine Battery Charge..................................... 26Battery Replacement......................................... 27Battery Maintenance ......................................... 28Battery Disposal ................................................ 29Using the Phone...........................................  30SIM Card Installation ......................................... 30Wireless Manager ............................................. 31Switching on the phone ..................................... 32Starting the Phone Application .......................... 32Make a Call ....................................................... 33Answer a Call .................................................... 33Make a call using speed dial ............................. 33Call Waiting ....................................................... 33Create a Contact from a Call............................. 33Make a conference call ..................................... 34Display/hide your caller ID................................. 34Block incoming/outgoing calls ........................... 34Forward calls to a different phone ..................... 34Use Call Waiting................................................ 35Emergency Call................................................. 35Turn the phone on and off (flight mode) ............ 36Place a call on hold ........................................... 36Speed Dial......................................................... 36Change phone settings ..................................... 37Change the ringer volume................................. 37
xvChange the ring type......................................... 37Change the ring tone......................................... 37Change services settings .................................. 38Internet connection using GPRS/EGPRS network 38Bluetooth Connection ...................................  40Turning on/off..................................................... 40Create a Bluetooth link (partnership)................. 40Wireless LAN Connection.............................  42Turning on/off..................................................... 42Connection to the Internet................................. 42First time Connection to the Internet ................. 42Connect to work ................................................ 43Switching to a different wireless LAN................ 43Advance wireless operations............................. 43ActiveSync (USB) Connectivity ....................  44First time connection ......................................... 44Routine connection............................................ 45Troubleshooting ...........................................  46Service..........................................................  49Maintaining the HC700-G.................................. 49Cleaning ............................................................ 49
xvi
1WelcomeWelcome to the world of Motorola digital wireless communi-cations! We are pleased that you have chosen the Motorola HC700-G GSM wireless Handheld Computer.The HC700-G unique functionality and features make this state-of-the-art device, superior for use in a wide range of data collection and management applications.This manual covers the basic operations and use of the HC700-G. However, evaluation of the HC700-G performance can be fully achieved by referring to Microsoft® Windows®Mobile 2003/Mobile 5.0 documentation and by using the demo software applications provided with the HC700-G.What is the HC700-G Handheld Computer?The HC700-G is a rugged handheld computer. The HC700-G is designed for field applications where Automatic Identifica-tion and Data Capture (AIDC) is required.The HC700-G has three models: the North American HC700-G (models F4708 & F4705) and the European/Asian HCe700-G (model F4707). This manual refers to all models as HC700-G.The HC700-G serves as a Personal Digital Assistant (PDA),  using one of the following operating systems:•  Microsoft® Windows® Mobile 2003 SE for Pocket PC, Phone Edition• Microsoft Windows Mobile 5.0Both operating systems, run Microsoft.NET Compact Frame-work 2.0 applications.The device contains a built-in imager (camera), capable of reading one of the following barcode options: 1D or 1D and PDF or all 1D and 2D.Wide Area Network (WAN) wireless communication enables the following phone access and data exchange with the out-side world:• Global System for Mobile Communication (GSM)• General Packet Radio Service (GPRS)
2• Enhanced General Packet Radio Service (EGPRS) (model F4705A only)Wireless Local Area Network (WLAN) communication enables work and Internet access in a limited area using the 802.11b/g modulation standard ( Wi-FiTM).Wireless Personal Area Network (WPAN) data exchange with peripheral wireless equipment, such as: printers and body-worn devices, through Bluetooth® radio.When docked in a Personal Desktop Cradle, the HC700-G supports full RS232 and USB (1.1 Client) serial communica-tion with a host computer (USB via Microsoft® ActiveSync®)or a dial-up modem. Ethernet connection can be established through 10/100 base T interface via multi-bay communication cradles.The HC700-G is equipped with a QVGA 3.5 inch transflective TFT display, built to withstand high impact. Display backlight is designed to enable clear screen visibility under varied light conditions.A touch-screen enables easy on-screen menu navigation, in addition to using keypad navigation. The keypad uses an adjustable backlight illumination, designed for low-light working conditions.The HC700-G is powered by an 1800 mAh 7.2V Lithium-Ion battery pack. The battery is fully recharged within four hours when the HC700-G is docked in a cradle.A drained battery can be replaced without data loss from the HC700-G memory. A built-in power source, independent of the battery pack, maintains the data in the HC700-G memory for at least 30 minutes until a charged battery is placed.The HC700-G may use a range of Motorola docking cradles for network communications and power charging. The Personal Desktop Cradle is designed for office use of the HC700-G. The 8- and 4-bay charging/communication cradles (HCC700-8, -4) provide multi-bay docking in large operations. The Vehicle Cradle (HCV700) is used for the mobile applica-tions of the HC700-G, allowing charging while driving.
3For detailed installation and operation of each cradle, refer to the specific user manual of each cradle.UnpackingThe HC700-G basic package includes the following items:• HC700-G• 7.2V Lithium-Ion battery pack•Stylus• Hand-strap• This Quick Start Guide• Safety and General Information leaflet, Motorola P.N. 6802979C37 Optional items include:• Personal Desktop Cradle with USB, RS232 pass through and spare battery charging • 4-slot Communication Cradle with RS232 and Ethernet ports • 8-slot Communication Cradle with RS232 and Ethernet ports• Vehicle Cradle with USB and RS232 pass through• Vehicle Power Adapter 12V• Serial Cables - DB25 or DB9• Travel Charger 220/110VAC• Belt/Shoulder holster without shoulder strap• Spare Stylus Pack of 5• Spare Tethered Stylus Pack of 5• Spare Hand-strap - user replaceable• 7.2V Lithium-Ion spare battery packCarefully unpack each item from the shipping carton. Check all items for shipping damage, and check that you have received all items ordered.Note: Retain the original carton packaging in the event that the HC700-G should need to be returned for service.The HC700-G is shipped with a plastic film, protecting the screen. Before usage, remove the film and use a soft cloth to
4buff the screen. A clean screen ensures smooth gliding of the stylus over the surface.
5HC700-G FeaturesFront Panel and Top Side FeaturesFigure 1. HC700-G - Front and Top Views1. Imager Window 2. Stylus Compartment3. Power Button with Status LED (see page 10) & (see page 12)4. Earpiece/Speaker Volume Keys (see page 18)5. Scan/Picture Key (see page 22)6. miniSD Card Door (see page 21)7. IrDA Window (IrDA communication is not supported)8. Speaker (see page 18)9. Keypad (see page 14)10. Microphone (see page 18)11. Application LED (see page 13)12. Earpiece (see page 18)123567810114912
6Rear and Bottom Side FeaturesFigure 2. HC700-G - Rear and Bottom Views1. Bluetooth address identification label (Used to link the HC700-G with another device using Bluetooth)2. Stylus Compartment3. Voice Recording Button (see page 18)4. Scan/Picture Key5. Hand-strap6. Battery Pack (see page 27)7. Access Door to the miniSD Memory Card (see page 21)8. IrDA Window (IrDA communication is not supported)9. Cradle Interface Connector10. Tethered Stylus12356789410
7Initializing the HC700-GThe HC700-G boots-up when placing the battery inside the battery compartment.1. Insert the battery, bottom end first, into the battery com-partment (see Figure 3).2. Carefully, press the battery top downward until it clicks and locks in place.The Motorola logo will show on the screen for about 30 sec-onds and the Windows Mobile screen will appear. The Win-dows Mobile screen will instruct you to tap on the screen and to follow the Align Screen procedure (touch screen calibra-tion).Using the touch screenUse only the included stylus or your finger, depends on which method is the appropriate. For example, use your stylus to enter information, navigate through menus or when greater accuracy is required. Your finger can be used to tap on large areas such on-screen buttons.Align screen procedureYou are prompted to align the screen by tapping the cross five times. Use only the stylus supplied with your HC700-G. Make sure to tap at the center Battery compartmentFigure 3. Battery Installation12Figure 4. Align Screen
8of the target to ensure accurate calibration. Press the stylus firmly once and release.   Remember, you can always re-align the screen by tapping:  > Settings > System tab > Screen or by holding down the <SHIFT> and <SP> and <C> keys.Once screen alignment has ended, the Today screen is dis-played. The Today screen shows a summery of important information regarding your daily activities and serves as a start point for setting and operating the HC700-G. When working with the HC700-G, you can always display the Today screen by tapping   > Today.Tap for Start MenuFigure 5. Today Screen
9Attaching the hand-strapThe HC700-G has an adjustable hand-strap which enables to hold the unit for extended periods and provide ease of use. The strap is made of flexible material with Velcro attachment patches.To attach the hand-strap to the back of the HC700-G:1. Turn the HC700-G to view the back side.2. Insert the U shaped clip of the strap into the holes on the imager housing. 3. Attach the end of the strap through the cavity located next to cradle interface connector.Figure 6. Attaching the hand-strapU shaped clipHoleBuckleHand-strap
10Using the HC700-GTurning OffTurn off the HC700-G when not in use for long duration and when charging is not available.Important: When the HC700-G is out of the cradle, do not attempt to turn off the unit when the Status LED (inside the Power button) shows red. Pressing the Power button when the Status LED shows red (system initialization), may cause damage to the operating system.Turning off when the unit is onIf the unit is turned on (the screen is on), perform the following: Hold down the Power button for at least four seconds until the screen turns off - the Status LED should be off. The HC700-G will store the information of the last used program screen and will turn off. No information will be lost from the memory. Once turned on again, the HC700-G will return to the last program screen that previously in use.Turning off when the unit is in Suspend modeIf the unit is in Suspend mode (the screen is off and the Sta-tus LED flashes green), perform the following:1. Resume operation by momentarily pressing the Power button.2. Wait for five seconds.3. Hold down the Power button pressed for four seconds until the screen turns off.Resuming OperationWhenever the HC700-G screen is off, press the Power Button (see Figure 1) to resume operation.Important: When the battery is critically drained, operation can not be resumed by pressing the Power button. The HC700-G automatically turns off the screen and Status LED. The unit maintains its memory content until charged again. To
11resume operation, place the HC700-G for charging or replace battery.Suspend ModeUse Suspend mode as often as possible during daily use to conserve battery power. For power saving, the HC700-G will automatically turn to Suspend after 1 minute (default). To configure the time duration before the HC700-G enters Sus-pend mode, go to:   > Settings > System > Power > Advanced (duration range is 0 to 5 minutes).To manually shift to Suspend mode - while the HC700-G is turned on, momentarily press the Power Button (see Figure 1).During Suspend mode the display turns off and the status LED inside the Power Button slowly flashes green. To resume operation, momentarily press the Power Button again. In Suspend mode, the battery power is conserved by auto-matically turning off the display and the computer sections of the HC700-G. During Suspend mode, the radios in use con-tinue to operate. When the HC700-G resumes operation, it returns to the program screen shown prior to entering Sus-pend mode.
12The Status LED The status LED, located inside the Power Button (see Fig-ure 7), may show three colors to indicate the HC700-G power sta-tus. The Status LED indications are not identical and have differ-ent meaning when the HC700-G is used outside of the cradle and when docked in the cradle.LED indications when HC700-G is used out-side of the cradleTable 1: Status LED indications when HC700-G is used out of the CradleStatus DescriptionSlowly flashing green HC700-G is in Suspend modeFast flashing green with off intervalHC700-G display is offSteady red for 6 seconds HC700-G is resuming from critical off or power off.Important!: to avoid system failure, do not remove the battery when the LED illuminates steady red.Status LEDFigure 7. HC700-G - Status LED
13LED Indications when HC700-G is docked in the cradleThe Application LEDThe Application LED (see Figure 8) may be used for any kind of application notifica-tion. For example; the LED may show com-munication indication when the application establishes connection with a host computer or indicate an alert that needs to be handled. For more information, refer to your software application guide and the HC700-G Software Development Kit (SDK).Table 2: Status LED indications when HC700-G is docked in the CradleStatus DescriptionSteady red Battery is chargingSteady green Battery is fully chargedFlashing amber 1. Battery temperature is out of range - battery charging has stopped. Charging will resume when battery temperature is within range.2. Battery Voltage is out of range (drained battery). The cradle will attempt to initiate charging for 20 min-utes and than stop if unsuccessful.Flashing red/green Charging error/defective battery.Remove the HC700-G from the cradle and dock it back again.If the LED begins to flash red/green, within 20 minutes, replace the battery.Figure 8. HC700-G - Application LEDApplication LED
14Using the KeypadThe HC700-G keypad enables the user to enter both alpha-betic and numeric data to the software application. However, since the keypad can only contain a limited number of keys, some special keys are assigned to perform special tasks that are usually found on full-size computer keyboards. These are produced using a combination of the existing keys on the HC700-G keypad.Two sets of keys exist on the HC700-G:1. Keys active when in Alphabetic mode, which are those seen on the overlay of the HC700-G keypad.2. Keys active when in Shift or Function mode which are those seen next to each key on the HC700-G keypad panel.Press the <SHIFT> key to toggle between the Alphabetic and Numeric keypad modes. Figure 9 shows the HC700-G keypad and Table 3 describes the HC700-G keys assignment.Figure 9. HC700-G - Keypad4-Way Navigation Key Enter KeySpace KeyBackspace KeyEnd KeyEscape KeyShift key (yellow)TAB/Send KeyFunction KeyMainScan/PictureButtonApplication Key
15Key assignmentTable 3: HC700-G - Key AssignmentKey FunctionUse the <TAB/Send> key to make & answer phone calls. The key also serves as <TAB> key when editing text.Use the <Esc> key to exit from a menu or an application.The <End> key turns the phone off and ends a call.The Main Scan Button is used for scanning barcodes (refer to “Scanning Barcodes” on page 22).The 4 Way Navigation key is used for screen navigation. The <Up bump> and <Down bump> keys are used to scroll up and down. The <Right bump> and <Left bump> are used for horizontal navigation between action buttons and entry fields.The <ENT> key is used to continue to the next field/screen (i.e., continue processing).The <SP> key enables entering blank space(s) within a text field. The <SP> key is active only on those text entry screens which contain fields that allow spaces to be entered. The <BKSP> key moves the cursor to the previ-ous character in the field, and while doing so, erases the character. Any remaining characters to the right of the cursor are shifted to the left. If there are no more characters to erase, the unit beeps. The <BKSP> key is only active on data entry screens.TABESC
16On-screen keypadTo display the on-screen keypad - hold down the <SHIFT> and <SP> keys and toggle the Scan button to display or remove the virtual keyboard.The Function <Fn> key changes the alphabetic keypad to preset function keys. For example, the <A> key in <Fn> mode becomes <F1>. Pressing the <Fn> key produces the   function icon on the lower Taskbar.When pressed once, the orange <SHIFT> key toggles between alphabetic and numeric keypad modes, shifting between letter entry and digit entry. Pressing the <SHIFT> key produces the  alphabetic mode or numeric mode   icon on the lower Taskbar.For example, pressing the <SHIFT> key and then the <P> key displays the digit “8”. Pressing the <SHIFT> again and then the <P> key displays the letter “P”.Hold down the <SHIFT> key and press on any alphabet key for uppercase letter (default mode is lowercase letters).The <SHIFT> is also used for screen and keypad illumination (see page 16).The Application <P1/P2> key functionality is set by the software application running on the HC700-G. Use the <SHIFT> key to toggle between P1 and P2. To learn more about these keys, consult the software application guide.To set the Application key functionality, go to:  > Settings > Personal > Buttons.Table 3: HC700-G - Key AssignmentKey FunctionFN
17Keypad BacklightTurning backlight on/off Hold down the <SHIFT> key for four seconds - the keypad backlight will turn on.To turn off - hold down the <SHIFT> key for another two sec-onds.When not in use, the backlight turns off automatically. To configure the keypad illumination duration, go to:   > Set-tings > System > Backlight.Backlight adjustmentThe keypad backlight can be adjusted by holding down the <SHIFT> key and pressing the right or left arrows   to increase or decrease the keypad backlight.Screen BacklightTurning backlight on/offHold down the <SHIFT> for two seconds - the screen back-light will turn on. To turn off - hold down for another two sec-onds.When not in use, the backlight turns off automatically. To configure the screen illumination duration, go to:  > Settings > System > Backlight.Backlight adjustmentThe screen backlight can be adjusted by holding down the <SHIFT> key and pressing the up or down arrows   to increase or decrease the screen backlight.Calibrating the Touch ScreenTo calibrate the touch screen - hold down the <SHIFT> and <SP> and <C> keys and follow the calibrate application instructions to complete your touch screen calibration.
18Adjusting Earpiece/Speaker VolumeYou can adjust the Earpiece/Speaker volume for sounds, such as the sound you hear when you make a phone call, replay audio, scan barcodes or when you tap on the screen.Important: Phone calls are routed only through the earpiece.Earpiece/Speaker volume can be adjusted by one of the fol-lowing methods:1. Using the Earpiece/Speaker Volume keys (see Figure 1):•Press the up and down keys to increase or decrease volume during a call or when playing sound.2. Using your stylus:•Tap . •Under , move the volume slider to the desired vol-ume level. •Select On or Offto quickly enable/disable volume.3. Using the keypad:•Hold down the <SHIFT> and <SP> keys•Press the up and down arrows on the 4-Way Naviga-tion key. The volume may also be adjusted in Function mode as fol-lows:•Hold down the <Fn> key •Use the <F6> key to increase or <F7> key to decrease volume.Voice RecordingTo record sound, press the Voice Recording button - the Notes application will run, enabling you to record and play sounds.To assign different functionality to this button, go to: > Settings > Personal > Buttons.
19Resetting the HC700-GYou may need to reset the HC700-G; for example, you may need to reset due to communication cut-off, or if the operat-ing system or the application stops responding. If the HC700-G stops responding, perform the steps described on the following page.Step 1: Warm ResetImportant Note: When the HC700-G performs Warm Reset, all recorded information remains stored in mem-ory.Hold down the <ESC>and <A> and <F> keys (see Figure 10) for at least 5 seconds - the Motorola logo will show on the screen for about 30 seconds and then Windows Mobile desktop or application screen will appear - the HC700-G functions again. Warm Reset can also be performed in the following way: go to:   > TaskManager and tap on “Soft Reset”.If the HC700-G still does not respond, perform “Step 2: Cold Reset”:Step 2: Cold ResetCold Reset restarts the HC700-G by erasing all stored records and entries.Do Not perform Cold Reset unless Warm Reset fails to solve the problem. Figure 10. Warm Reset - Key CombinationFigure 11. Cold Reset - Key Combination
20Hold down the Power Button and <S> and <X> keys for at least 5 seconds (see Figure 11); the HC700-G will restart its operating system. Cold Reset can also be performed in the following way: go to:   > TaskManager and tap on “Cold Reset”.
21miniSD Memory CardInstalling a miniSD CardImportant: Turn off the HC700-G before removing or install-ing the miniSD (Secure Digital) card. When using Windows Mobile 2003, memory size is limited to1 GB.1. Use Torx T-8 tool to remove the screw that secures the access door of the miniSD card compartment (see Figure 12).2. Insert the miniSD card as shown in the figure. Verify that the card is fully inserted before closing the access door.3. Close the miniSD card cover and secure the screw.4. Tap    > Programs > File Explorer - and verify that the SDCard folder is shown on the root directory of the HC700-G miniSD Card Handling Precautions• SanDisk are recommended miniSD cards• Do not bend or apply force to the miniSD card• Do not store the miniSD card in locations subjected to high humidity or temperaturesAllocating MemoryYou can allocate the HC700-G memory by setting the size of the storage and the programs memory. You can also view the amount of memory used by running programs or storage space. To view and allocate the memory of the HC700, go to:  > Settings > System > Memory.Figure 12. miniSD Card InstallationminiSD CardAccess Door
22Scanning BarcodesThe HC700-G houses a digital camera (imager) that scans the most commonly used 1D and 2D barcodes (depend on your imager options). The HC700-G and the HCe700-G are manufactured with the following imager engine options:• 5100 series with Light Emitting Diodes (LED) aiming technology• 5300 series with Laser aiming technologyScanning with LED aimer imagerTo scan barcode/capture image, perform the following:1. Run the Bcr barcode reader application: > Programs > Sample Applications > Bcr.2. Aim and hold the HC700-G at about 7 inches from the target.3. Press one of the Scan/Picture keys and adjust your posi-tion to place the emitted green bar at the target. The red light, emitted form the imager, serves as an ambient illu-mination.Note: When adjusting your position, you may rotate the wrist left or wright and pitch by dropping or lifting the wrist. Move back or forth from the target to capture the entire object. A successful scan is followed by a beeping sound.
23The HC700-G supports 360° omni-directional capture for easy use in daily work. The green aiming bar can be positioned at any angle across the barcode symbol(see Figure 14). Scanning with Laser aimer imagerTo scan a barcode or capture an image, perform the follow-ing:1. Run the Bcr barcode reader application: > Programs > Sample Applications > Bcr.2. Aim and hold the HC700-G at about 7 inches from the target.Press one of the Scan/Picture keys and adjust your position to place the emitted red pattern at the target. Red Ambient Light Aim the green light bar at the barcodeScan/Picture Keys About 7 inches from barcode± 40 degreesScan/Picture Key Figure 13. Capturing Barcodes with LED Aimer ImagerFigure 14. LED Aimer Imager - Barcode Capture Positions2D Barcode Symbol1D Barcode Symbol
24Note: When adjusting your position, you may rotate the wrist left or wright and pitch by dropping or lifting the wrist. Move back or forth from the target to capture the entire object. A successful scan is followed by a beeping soundThe HC700-G supports 360° omni-directional capture for easy use in daily work. The aiming pattern can be positioned at any angle across the barcode symbol (see Figure 16).Aim the Laser pattern at the barcodeScan/Picture Keys Scan/Picture Key Figure 15. Capturing Barcodes with the HC700-G ImagerFigure 16. Laser Aimer Imager - Barcode Capture Positions
25Charging the BatteryThe battery is charged when the HC700-G is docked in the cradle. When using a Personal Desktop Cradle, a spare bat-tery can be charged in the battery charging bay. A fully charged battery provides 10 hours of typical usage or 24 hours in Standby mode. Always use Motorola HC700-G original batteries and battery chargers. The HC700-G warranty does not cover damage caused by using non-Motorola batteries and/or battery charg-ers.The following sections describe the installation and charging of the battery of the HC700-G.First Time Battery ChargeNew batteries are shipped partially charged. Charge the bat-tery before using the HC700-G for the first time.• When not in use, always place the HC700-G in a powered cradle. Leaving the HC700-G out of the cradle may drain the battery, causing memory lost from RAM• To avoid battery damage, the battery must never be allowed to remain totally drained for over a period of one weekFigure 17. HC700-G Personal Desktop CradleSpare battery charging baySpare battery !Caution
263. Insert the battery, bottom end first, into the battery com-partment.4. Carefully, press the battery top downward until it clicks and locks in place. 5. Place the HC700-G inside the cradle - the Status LED inside the Power button shows steady red. Charge the battery until the status LED shows steady green.The HC700-G cradle charges the battery most effectively when it is at room temperature [approx. 68°F (20°C)]. The ambient temperature range during battery charging should be 32°F to 95°F (0°C to 35°C).Checking the Remaining Battery PowerTo the status of the remaining battery power is shown as an icon on the upper status bar. However to view the accurate power level, go to:   > Settings > System > Power. The status of the remaining power will show as a bar.Routine Battery ChargeThe battery is fully charged after four hours. During the charge, the Status LED inside the Power Button shows steady red and turns green when charging is completed.Important: The battery will not charge if the HC700-G is not properly docked in the cradle.Do not store the HC700-G for more than two weeks with battery installed. Storing the HC700-G with battery installed for more than two weeks without charging may damage the battery.!Caution
27Battery Replacement When the battery’s capacity is critically low, the HC700-G automatically enters "Critical Low Battery" state and shuts down all functions (the screen turns off) to preserve the data in its memory. The HC700-G allows you to replace batteries without losing information stored in its memory. To avoid los-ing data stored in the memory, a charged battery must be installed within 30 minutes.To replace a battery perform the following steps:1. Make sure that the HC700-G is powered off (See “Turn-ing Off” on page 10.).2. Remove the HC700-G hand-strap (see Figure 18).3. Press the battery snap on the battery (see Figure 18) and pull away the battery from the HC700-G. 4. Insert a fresh battery, bottom end first, into the battery compartment.5. Carefully, press the battery top downward until it clicks and locks in place. 6. Press the Power Button - the HC700-G is now ready for use.Figure 18. Battery Installation and RemovalHand-strap Battery SnapBattery Compartment
28Battery SafetyThe battery or HC700-G may carry warning symbols, defined as follows:Important safety information will follow.Your battery or HC700-G should not be disposed of in a fire.To prevent injury or burns:• USE ONLY SPECIFIED BATTERIES AND CHARGERS - RISK OF EXPLO-SION IF BATTERY IS REPLACED BY AN INCORRECT TYPE!• DO NOT DISPOSE OF ANY BATTERIES IN FIRE, AS THEY MAY EXPLODE!• DO NOT PUNCTURE OR ALLOW METAL TO CONTACT THE BATTERY CONTACTS• DO NOT DISPOSE OF IN WATER• DO NOT DISASSEMBLEBattery MaintenanceThe performance of the battery depends on the way the bat-tery is treated. Therefore, to comply with Motorola Warranty for batteries and to assure high performance and a long life for the rechargeable battery, please read and follow the bat-tery maintenance instructions described in the following sec-tions.Battery StorageBatteries which have already been charged and then stored for more than two months should be recharged before use.Use the following guidelines for battery storage:• Before storage, the capacity level of the battery must be over 30%• The battery must be recharged over 30% once every six months• The battery must be stored in dry location• Optimal storage temperature is 68°F (20°C)Do not store batteries installed inside the HC700-G. Used batteries must be removed from the HC700-G before storage.!Caution
29Extending Battery LifeBattery performance depends on many factors, including the temperature at which you operate your handheld computer; the features and/or settings you select and use; peripherals attached to the computer and other application usage pat-terns.Batteries are expendable parts and gradually wear down and require longer charging times. This is normal. If you charge your battery regularly and notice a decrease in usage time or an increase in charging time, then it is probably time to switch to a new battery.To ensure maximum service life of the HC700-G, always replace the battery with a genuine Motorola replacement.Battery DisposalBatteries must be recycled or disposed of properly in accor-dance with local requirements. Recycling facilities may not exist in all areas. Please contact your local environmental agency for more information regarding proper disposal.To prevent injuries or burns, do not allow metal objects to come in contact with or short-circuit the battery contacts.!Caution
30Using the Phone SIM Card InstallationBefore using the HC700-G as a phone, make sure that your phone is equipped with a SIM (Subscriber Identity Module) card. SIM card is a small smart card that fits inside the HC700-G. The SIM card holds the personalized information about its user including the network activation and even phone book entries.Before installing the SIM Card, Turn off the HC700-G (see page 10), disconnect the hand strap (see page 9) and remove the battery (see page 27).To install a SIM card, perform the following steps (see Figure 19):1. Open the SIM card door.2. Slide the SIM card holder forward to unlock the SIM card and pivot up.3. Slide the new SIM card inside the holder with the cut corner on the upper right side and the gold plate facing down.4. Lower the SIM card holder and press downward to lock the SIM card holder.5. Close the SIM card door install the battery.6. Perform Cold Reset “Resetting the HC700-G” on page 19.Figure 19. SIM Card Installation123564
31Wireless ManagerBefore making a call, connecting to wireless network or sending files via Bluetooth, you should turn on the wireless radio using the Wireless Manager application. Start the Wireless Manager by performing the following:1. Tap on the antenna icon on the status bar.2. Tap Wireless Manager3. Tap on the required wireless connection to turn on/off the corresponding radio. Tap “All” to turn on/off all wire-less radios.Important: The Wireless LAN (Wi-Fi) and Phone radios can-not be operated simultaneously. Therefor, when tapping All, the default configuration turns on the Phone and Bluetooth radios.Antenna icon
32Switching on the phoneBefore making a call, you should verify that the phone radio is turned on. To turn on the phone perform the following:1. Tap   > Settings > System > Radio > Turn Radio On.2. Wait until the radio demonstrates a signal quality and register to your GPRS networkStarting the Phone ApplicationThe Phone application can be started by one of the following methods:1. Pressing the <TAB> key.Important: the <TAB> key starts the Phone application only in Alphabetic keypad mode (use the <SHIFT> to tog-gle Alphabetic/Numeric keypad). Once the Phone appli-cation appears on the screen, press the <SHIFT> key to enable the hardware keypad of the phone. 2. Tapping   > Phone.Quality signalGPRS network registration icon
33Make a CallThere are few ways to make a call. The most direct method is to use the on-screen Phone keypad or the HC700-G keypad.From the Phone keypad, tap the number you want to call, and press TALK or press the <TAB> key. To end a call, press END or press the <End> key.Answer a Call 1. Tap Answer.When receiving a call, you can ignore it. If you choose to ignore, tap Ignore. The phone will stop ring-ing and the caller will be directed to your voice mail, depending on your service provider.Make a call using speed dial1. From the  , tap Phone.2. On the Phone keypad, tap the Speed Dial button.3. Tap the speed dial number next to the contact you want to call from the list.Call Waiting   If you receive a call while in a call, tap Wait to place the new call in on hold.Create a Contact from a CallYou can create a contact from Call History.1. Tap Call History.2. Tap hold your stylus on the call - a popup menu will show.3. Tap Save to Contacts.
34Make a conference callYou can create a phone session between yourself and other per-sons.1. From the Phone keypad, tap the first number. 2. Tap Hold.3. Dial the second number, and tap Menu > Conference.4. To add another person, tap Hold, dial the number, and tap Conference.During the conference call, you can talk to one of the persons privately by tapping Private. To join everyone in the call again, tap Conference.Display/hide your caller IDTo display/hide your identity when you are calling someone.1. From the button bar of the Phone keypad, tap Tools > Options > Services tab.2. Tap Caller ID > Get Settings.3. Tap Everyone to display your ID. To prevent your identity from being revealed to others, tap No one.Block incoming/outgoing callsUse Call Barring to block a type of incoming and/or outgoing calls.1. From the Phone keypad, tap Tools > Options > Servicestab.2. Tap Call Barring > Get Settings.3. Select the type of incoming and/or outgoing calls you want to block.Forward calls to a different phoneUse Call Forwarding to forward all incoming calls to a differ-ent phone number.
35Use Call WaitingCall Waiting notifies incoming calls when you are already in a call session.1. From the Phone keypad, tap Tools > Options > Services.2. Tap Call Waiting > Get Settings.3. Tap Notify me to be notified or Do not notify me to ignore notification.Emergency CallYour service provider programs one or more emergency phone numbers, such as 911 or 112, which you can call. Note: Emergency numbers vary by country. Your HC700 pre-programmed emergency number(s) may not work in all loca-tions, and sometimes an emergency call cannot be placed due to network, environmental or interference issues.To place an emergency call:1. If HC700 is in Suspend (screen is blank), press briefly on the Power button. 2. Tap  Start and select  Phone form the menu (see upper, left-hand side of the screen). 3. Dial the emergency number by tapping the on-screen keys.4. Press the on-screen Talk key to call the emergency num-ber.Important Notes:Before the call can be made, your HC700 must have the phone turned on. If you dial 911 and the phone is turned off, you will see a prompt advising you to turn on the phone – tap Yes and again tap Talk to call the emergency number. If your HC700 does not have a SIM card installed, you will see the following prompt: “Unknown SIM status.Only emergency call can be made without a PIN” – Dial again the emergency number and than tap Talk to call emer-gency.
36Turn the phone on and off (flight mode)You can turn off the phone on/off while using your HC700 turned on. Your phone is turned off when it is in flight mode.1. While using any program on your device, tap the aerial icon on the upper tool bar. 2. Tap Turn off flight mode to turn the phone on or Turn on flight mode to turn the phone off.Place a call on hold   During a call, you can place a call on hold so you can call another number or answer an incoming call. If you have more than one call on the line, you can switch between one call and the other.1. To place a call on hold, tap Hold.2. To move from one call to another, tap Swap. Speed Dial   Create a speed dial entryYou can create speed dials for frequently-called phone num-bers so you can dial a number with a single tap. Speed dials can only be created for numbers stored in Contacts.1. Tap Phone > Speed Dial.2. Tap Menu > New.3. Tap a contact.4. Tap the phone number for which you want to create a speed dial.5. In the Location box, select an available location for the new speed dial.Note: The first speed dial location is reserved for your voice mail.
37To create a speed dial from Contacts, tap and hold the con-tact name, tap Add to Speed Dial, and then select an avail-able location for the new speed dial.Change phone settingsYou can customize phone settings, such as the ring type and ring tone to be used for incoming calls, and the keypad tone to be used when entering phone numbers. 1. Tap Settings > Phone.2. To change phone settings from the Phone keypad, tap Menu > Options > Phone tab.3. From the Phone keypad, tap Menu > Options > Servicestab.4. Tap Voice Mail and Text Messages, and tap Get Settings.5. Enter the voice mail or text message phone number in the appropriate box.Change the ringer volumeAs you move between loud and quiet surroundings through-out your day, you may want to change the ringer volume to suit your situation.1. Tap the volume icon on the upper Taskbar.2. Move the Phone  slider to the desired volume level.Change the ring typeYou can change the way that you are notified of incoming calls. For example, you can choose to be notified by using an increasing ring or single ring tone.1. From the Phone keypad, tap Tools > Options > Phone tab.2. In the Ring type list, tap the desired option.Change the ring toneYou can select a ring tone to notify you of incoming calls.
38From the Phone keypad, tap Tools > Options > Phone tab.In the Ring tone list, tap the sound you want to use.To use custom sound files as ring tones, use ActiveSync on your PC to copy the file to the Mobile Device/My pocket PC/Windows/Rings folder on your device. Then, select the sound from the Ring tone list. For more information on copying files to your device, see ActiveSync Help on your PC.Change services settings1. From the Start   menu tap Settings.2. Tap Phone > Services tab. You can access and configure settings for the phone services you subscribed to through your wireless service provider. For example, you may want to block certain types of incoming and/or outgoing calls, forward incoming calls to a different phone number based on your situation, be notified of incom-ing calls when you're already in a call, or let others know your identity when making calls.Tip: To change Services settings from the Phone keypad, tap Menu > Options > Services tab, tap a service, and then tap Get Settings.Internet connection using GPRS/EGPRS networkInternet access and surfing is available through the HC700-G GPRS mobile phone network.1. Tap   > Settings > Connections tab > Connections > Network Cards2. Select The Internet for Internet connection and Press OK.To edit a connection:Before you start, obtain the following information from your Internet Service Provider (ISP) administrator: connection phone number, User Name, Password and Domain.1. Tap   > Settings > Connections tab > Connections2. In My ISP, tap Add a new modem connection
393. Enter a name for the connection (for example: My Link)4. Select a mode: Cellular Line (GPRS) and tap Next5. Enter the phone number provided by your ISP and tap Next6. Enter User Name, Password and Domain provided by your ISP and tap Finish7. Switch to Internet Explorer Mobile and surf the Internet. Your HC700 will connect automatically.To view Help information for any screen in the wizard or while changing settings, tap the question mark icon.
40Bluetooth ConnectionTurning on/offEnsure that both Bluetooth devices are within 10 meters of each other and that both Bluetooth-enabled devices are dis-coverable. Note that in Flight Mode Bluetooth is turned off.1. Tap   > Settings > System tab.2. Tap Bluetooth Enable/Disable icon (note that the default state of the Bluetooth radio is turned on).3. Press the OK button to turn on the Bluetooth radioCreate a Bluetooth link (partnership) You can create a link between your HC700-G and another remote device. The link enables to transmit information between the two devices. Ensure that the two devices are turned on, discoverable, and within 10 meters.1. Tap   > Settings > System tab.2. Tap the Bluetooth Monitor icon.3. Tap Device > Find Devices. Your device searches for other remote devices, and displays them on the screen.4. Tap Device > Trust this Device.
415. Passkey is used to secure your HC700-G. You can use a passkey by entering a alphanumeric passkey between 1 and 16 characters, and tap Next. Otherwise, leave the passkey blank, and tap OK.6. If you use passkey, enter the same passkey on the other device. You may change the name of the remote device name. Tap OK.
42Wireless LAN ConnectionTurning on/offEnsure that your HC700-G is within active Wireless LAN cov-erage. Note that in Flight Mode, Wireless LAN is turned off.1. Tap   > Settings > System tab.2. Tap Wireless LAN Power icon.3. Press the On button to turn on the Wireless LAN radio.Connection to the InternetWhen the HC700-G Wireless LAN radio is turned on, an Auto-matic mechanism will keep looking for wireless networks. When entering a wireless LAN coverage area, the HC700-G will popup a message that will require you to confirm connec-tion to a network.LAN connection can be made to either Internet through your ISP or to your work server.First time Connection to the InternetBefore you connect to the Internet for the first time, perform the following:1. Tap   > Settings > Connections tab > Connections.2. In My ISP, tap Add a new modem connection and follow the connection wizard. You will be required to provide your ISP phone number, domain and password.
433. To start surfing the net, switch to your Internet browser ( > Internet Explorer). Your HC700-G will automati-cally connect.Connect to workBefore you connect to the Internet for the first time, perform the following:1. Tap   > Settings > Connections tab > Connections.2. In My Work Network, You will be required to set up a modem, network card, wireless network, or VPN server.To start connecting to your work, switch to your Internet browser (  > Internet Explorer). Your HC700-G will auto-matically connect.Switching to a different wireless LANThere may be times when you want to manually select or switch to a different wireless network. For example, you may want to select a specific network out of many available in order to control costs.1. From the Phone keypad, tap   > Settings > Connec-tions tab.2. Tap Network Cards.3. From the list of networks, tap and hold your stylus on the available network you want to use - an option list will popup.4. From the option list select Connect - the background of aerial icon (next to the network name) will turn blue.Advance wireless operationsFor advanced wireless operations, use the “swluce” wireless LAN utility, go to:   > Programs > Sample Applications > swluce.
44ActiveSync (USB) ConnectivityActiveSync is a synchronization program developed by Microsoft. When dock in a personal desktop cradle, Active-Sync allows the HC700-G to be synchronized with a PC over USB. The program synchronizes Personal Information Man-ager (PIM) data such as Microsoft Outlook, along with Inter-net surfing. ActiveSync enables the manual transfer of files between the HC700-G and a PC and the ability to install and uninstall mobile device applications.First time connectionIn order to enable USB communication with your host PC, Microsoft ActiveSync program must be installed on your PC.The HC700-G is provided with the ActiveSync program installed. However, the program can be obtained from Microsoft web site. To learn more about the most up-to-date version of the ActiveSync and its operation, refer to Active-Sync help.Place the HC700-G inside the Personal Desktop Cradle and connect the USB cable between the USB ports of the cradle and the PC. Your PC will identify the new connection and will request you to point to the HC700-G USB driver provided with this product. The HC700 USB driver can also be downloaded from MOTODEV web site (https://developer.motorola.com/?path=1.870).Figure 20. ActiveSync - USB ConnectivityPC USB PortHost PCHC700-G USB PortPersonal Desktop Cradle
45Routine connectionOnce ActiveSync is installed, connect the USB cable from the HC700-G Personal Desktop Cradle to the USB port of your PC. The ActiveSync icon  , located on the PC Taskbar, will become green and a Partnership window will appear - follow the instructions shown on the screen to set partnership. The USB connection icon  will appear at the button of the HC700-G screen.When the cradle remains connected to the PC, removing the HC700-G from the cradle and docking it again triggers the ActiveSync program.To explore the HC700-G from your PC, perform the following:1. Run the Desktop Explorer program on your PC. Tap the Mobile Device icon located under the rout directory of your PC.
46Troubleshooting Table 4: Troubleshooting the HC700-GProblem Cause SolutionHC700-G does not turn onBattery is drainedReplace with charged bat-teryBattery is not installed prop-erly or not chargedEnsure proper battery installation in HC700-G.Charge or replace the bat-teryBattery con-tacts are dirty.Remove the battery and clean the battery contacts as described in “Cleaning” on page 49.Battery does not charge in HC700-G Cra-dleHC700-G is not locked in the HC700-G Cra-dleRe-install the HC700-G in the HC700-G Cradle. Place the HC700-G properly in HC700-G Cradle. (Verify that the HC700-G Cradle LED is On and charge for 4 hours)HC700-G bat-tery contacts are not cleanClean the battery contacts, see “Cleaning” on page 49 Battery temper-ature is out of range (Status LED flashes amber)Ensure that the battery temperature is within range. (refer to “Charging the Battery” on page 25). If battery remains hot, replace battery (defective battery).Defective bat-teryReplace battery
47HC700-G does not detect scan inputAiming pattern not directed at the barcode symbolScan again and make sure that the green light is aimed across the barcode Check for readable bar-code (not covered, or obstructed)Unreadable barcodeBe sure the barcode symbol is not covered, damaged or obstructed. Make sure the barcode symbology is config-ured. For a list of desired symbologies configured by default, refer to the Specifica-tions section.HC700-G does not respondProblem in the HC700-G oper-ating system or communica-tions networkEnsure proper battery installation in HC700-G.Charge or replace the bat-teryExecute Warm Reset “Resetting the HC700-G” on page 19. The HC700-G should function againIf HC700-G still does not respond, perform Cold Reset (see “Resetting the HC700-G” on page 19). The operating system will reboot in 30 secondsHC700-G ran-domlyshuts offUnclean bat-tery contacts.Clean the battery contacts, see “Cleaning” on page 49.Table 4: Troubleshooting the HC700-GProblem Cause Solution
48Communica-tion failure between HC700-G and HC700-G Cra-dleHC700-G is not docked prop-erly in the cra-dleMake sure that the HC700-G is properly docked in the cradleCommunica-tion software was incorrectly installed or configuredRefer to your system administrator for program installation or configura-tionTable 4: Troubleshooting the HC700-GProblem Cause Solution
49ServiceThe HC700-G does not contain user serviceable parts. How-ever, the following sections provide maintenance guidelines.Maintaining the HC700-GIn order to maintain the HC700-G in good working order:• Do not scratch the screen. Use only Motorola supplied stylus• Never use a pen or pencil or any sharp object on the screen• Protect the HC700-G from temperature extremes. Do not leave the HC700-G on the dashboard of a car on a hot day, and keep the HC700-G away from hot places• Do not store or use the HC700-G in any location that is extremely dusty, damp or wetCleaningIf the battery contacts, screen or surface of the HC700-G become dirty, use a soft lint cloth moistened with solution to remove dirt.Cleaning MaterialsTo clean the HC700-G, use Chemical Pure grade (C.P) “Isopro-pyl Alcohol (IPA)” also named “Propanol”. The IPA can be diluted with water up to 20%.You may use IPA manufactured by Merck, Riedel-de Haen.It is recommended to use a soft lint free cloth such as Tex-wipe TX512, BlueWipe cleaning rag/cloth. It is also possible to use optic lens wiping paper such as "rice paper".Before using any of the materials detailed below, refer to the safety instructions shown on the product’s label or package.!Caution
50Blank Page
IndexIndex 1Numerics4-Way Navigation Key 158 and 4 bay cradles 2802.11b/g 2Aalphabetic/numeric icon 16Answer 33Application LED 13BBack-Light Adjustment 17Battery Maintenance 28battery snap 27battery temperature 26BKSP 15Block calls 34Bluetooth label 6body-worn devices 2Ccall on hold 36Call Waiting 33, 35caller ID 34Capture Position 23, 24Cleaning 49Cold Reset 19conference call 34critical off 12Ddeep sleep 10Disposal 29does not charge 46does not respond 47does not turn on 46EEarpiece 5End 15ENT 15Esc 15Ethernet 2FFast flashing green 12Flashing orange inside cradle13Flashing red/green 13flight mode 36Fn 16GGPRS 1, 2green aiming pattern 22, 23GSM 1HHand-strap 3IImager Window 5IrDA Window 5KKeypad 14keypad backlight 17LLocal Area Network 2Mmake a call 33Microphone 5Mini SD Card 21NNavigation Key Panel 6PP1/P2 16package 3PDA 1Personal 1Personal Digital Assistant 1Phone Contact 33
Index 2phone settings 37Pocket PC® 1Power Button 10Rred ambient light 23, 24remaining battery power 26Resetting 30Routine Battery Charge 26SScan Button 15screen backlight 17SHIFT 16Slowly flashing green out of cradle 12SP 15Speaker 5Speed Dial 36speed dial 33status LED 12Steady green inside cradle13Steady red 12Steady red inside cradle 13Storage 28Stylus 5Suspend 11system failure 12TTAB/Send 15TFT 2turn on the phone 32Turning On 10, 12Vvehicle cradle 2Volume Keys 5WWarm Reset 19WATER 28Wi-Fi 2
abMotorola, Inc.1301 E. Algonquin Road, Schaumburg, IL 60196 U.S.A.For Motorola Customer Support call:1-888-877-7023 (US domestic)1-847-725-4150 (International)MOTOROLA and the Stylized M Logo are registered in the U.S. Patent and Trademark Office. All other product or service names are the property of their respective owners. © Motorola, Inc. 2007.6802981C55-F@6802981C55@

Navigation menu