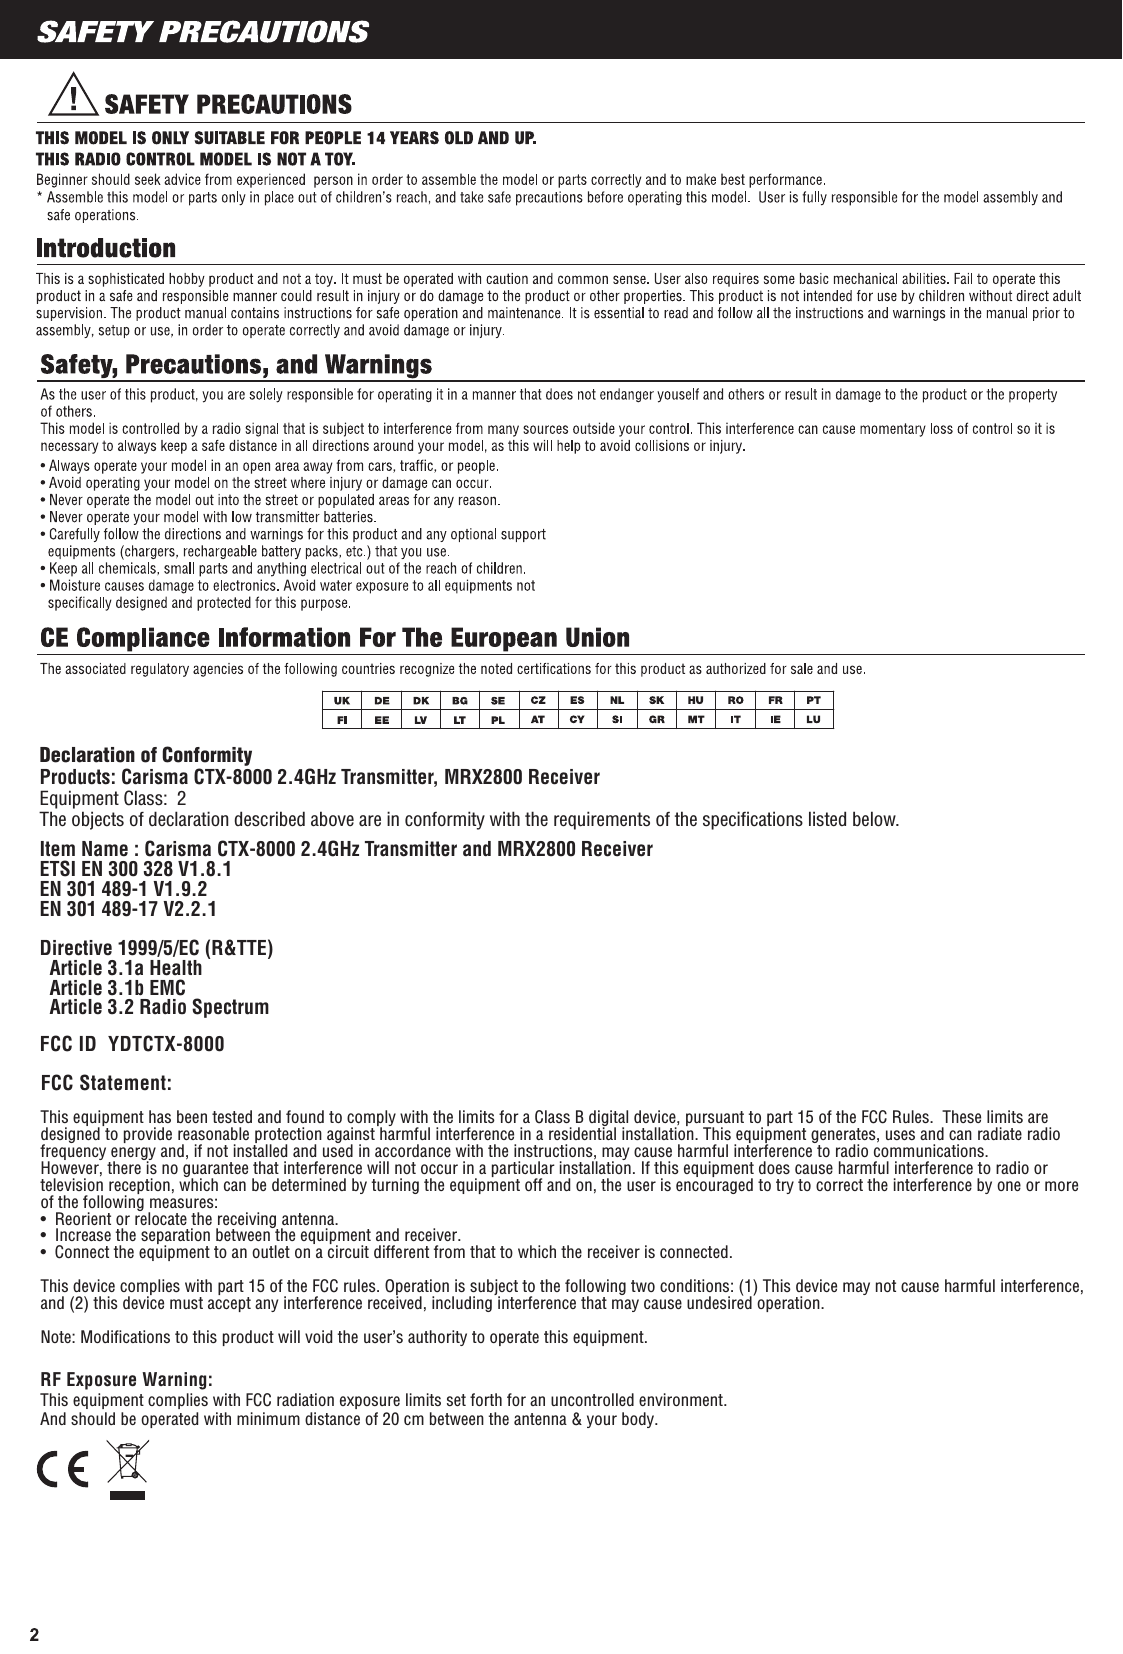
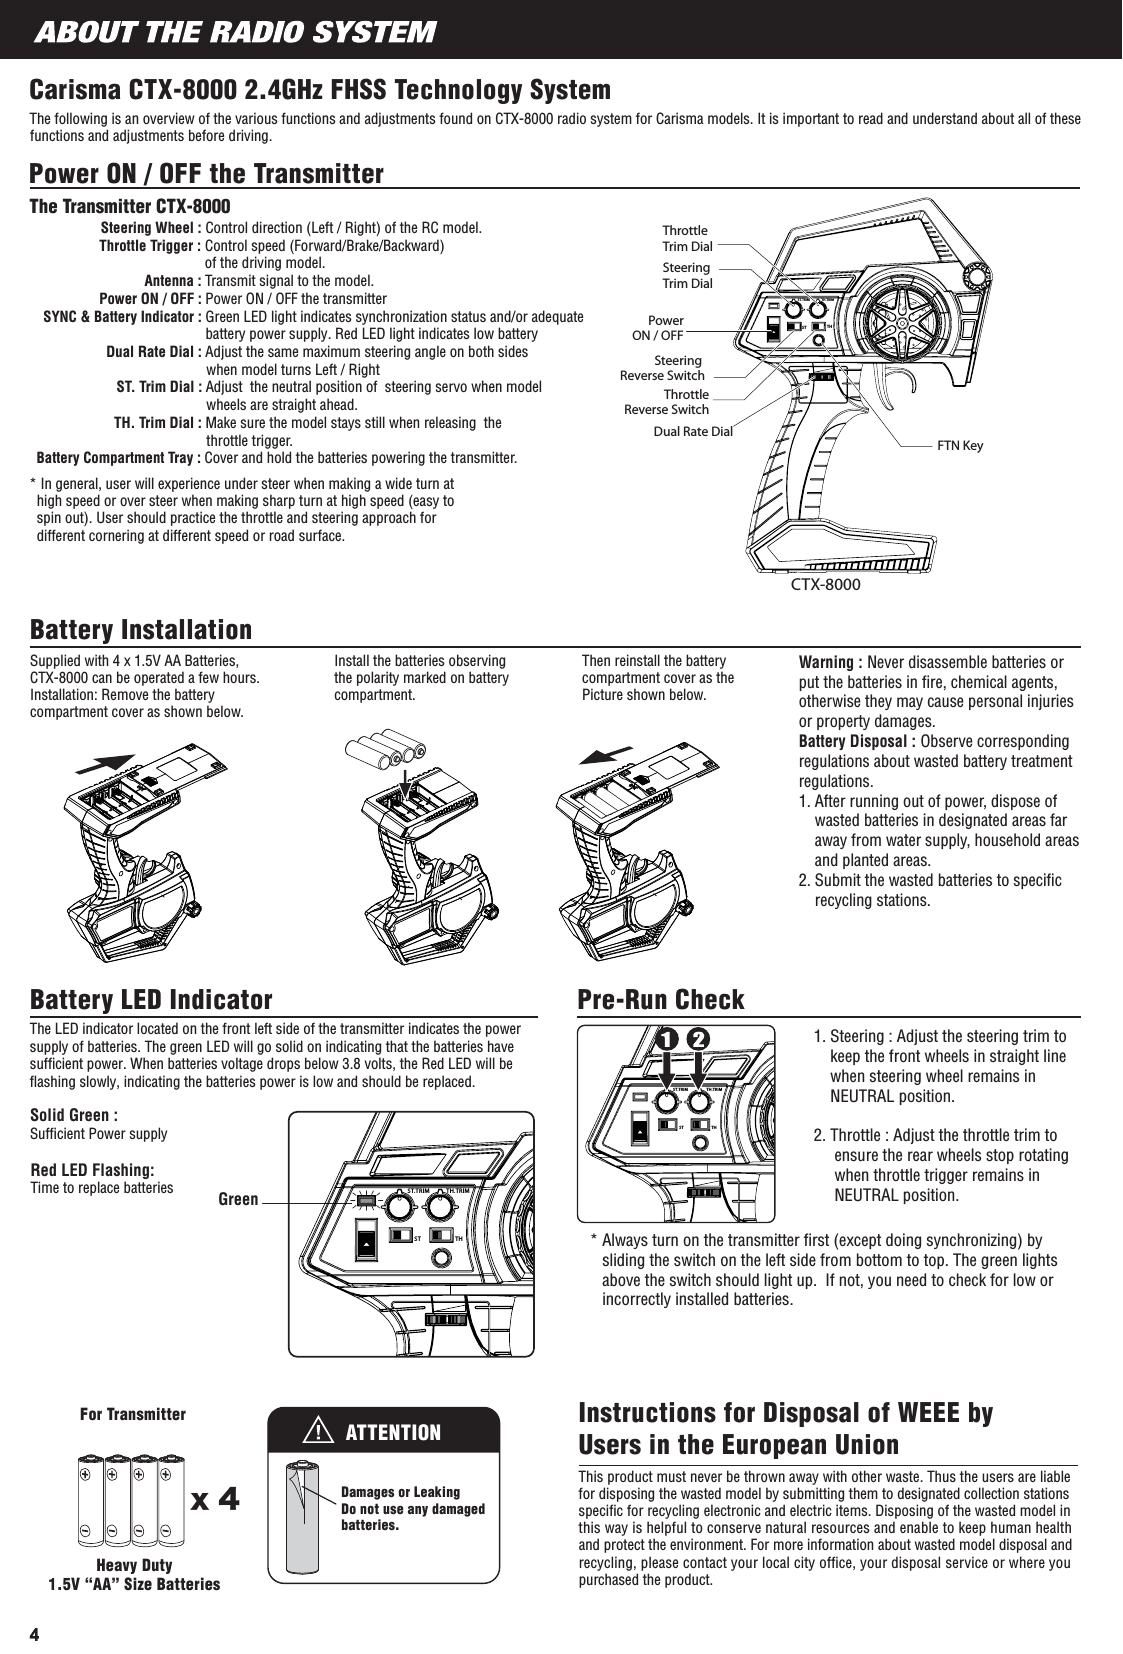
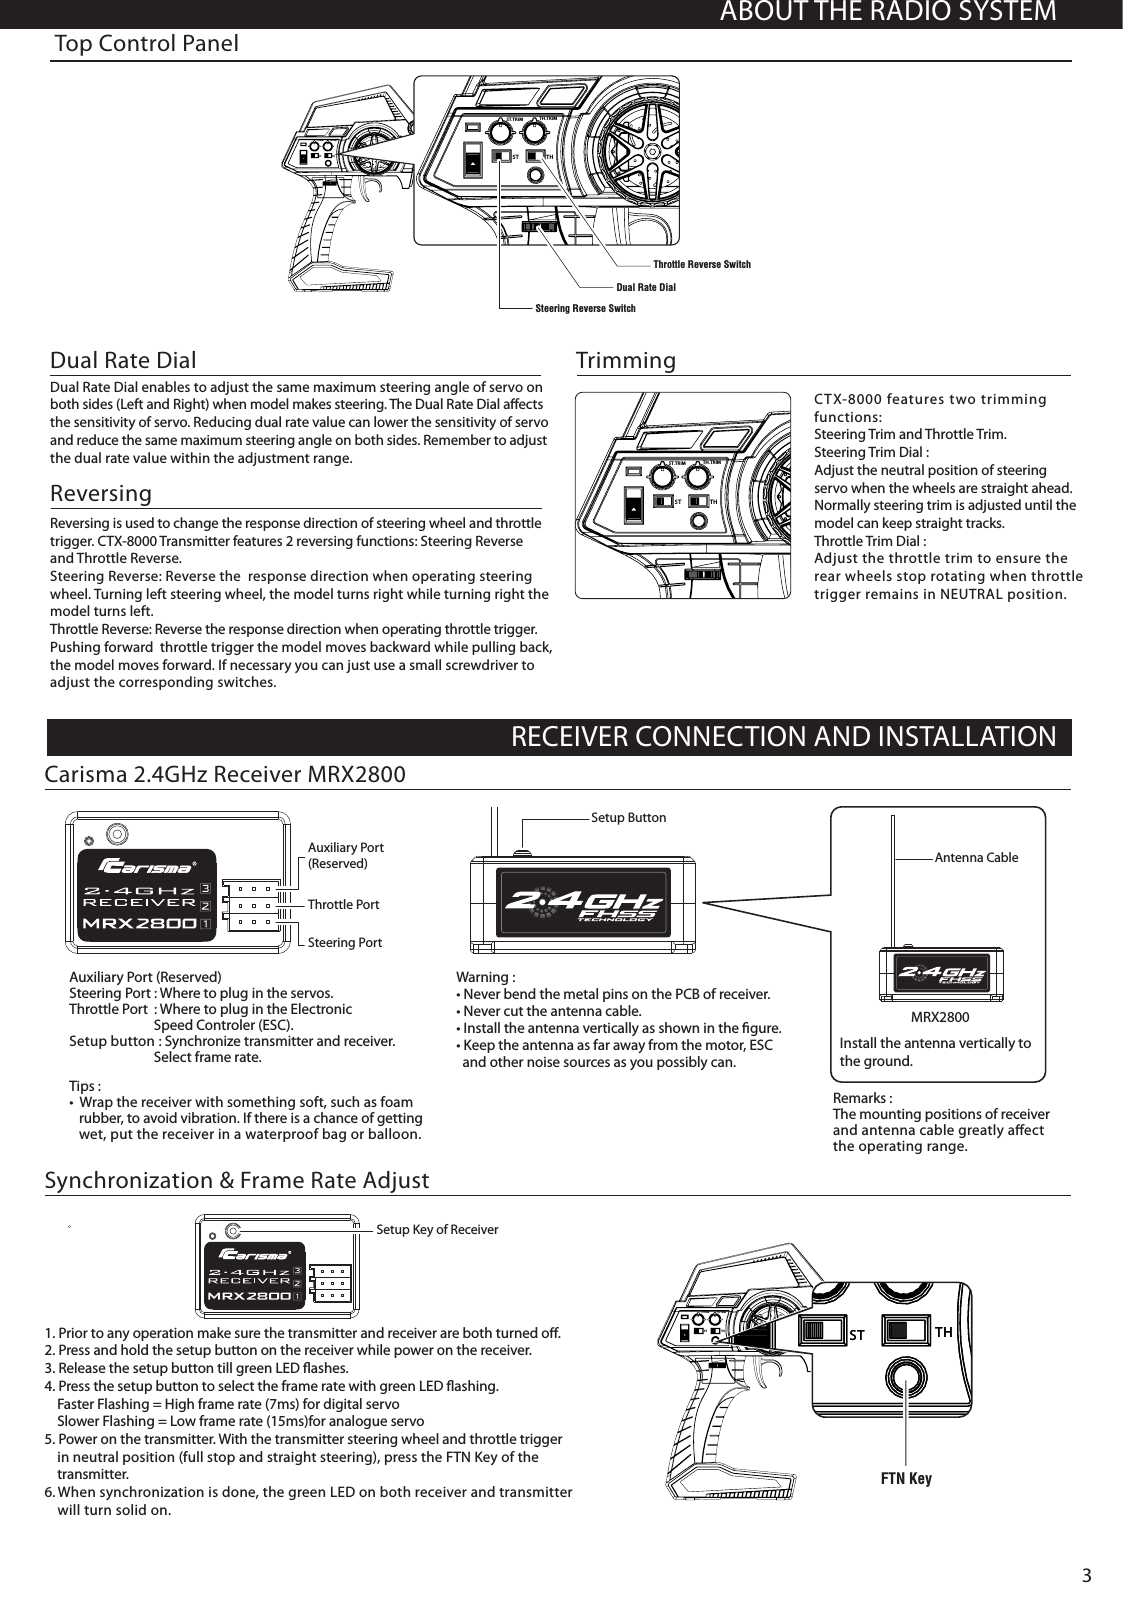
Mun Ah Plastic Electronic Toys CTX-8000 2.4 GHz Transmitter User Manual ctx8000 1

Mun Ah Plastic Electronic Toys Co., LTD. 2.4 GHz Transmitter ctx8000 1

Manual

Declaration of ConformityProducts: Carisma CTX-8000 2.4GHz Transmitter, MRX2800 ReceiverItem Name : Carisma CTX-8000 2.4GHz Transmitter and MRX2800 ReceiverETSI EN 300 328 V1.8.1EN 301 489-1 V1.9.2EN 301 489-17 V2.2.1Directive 1999/5/EC (R&TTE)  Article 3.1a Health  Article 3.1b EMC  Article 3.2 Radio SpectrumEquipment Class:  2The objects of declaration described above are in conformity with the requirements of the specifications listed below. This equipment complies with FCC radiation exposure limits set forth for an uncontrolled environment.And should be operated with minimum distance of 20 cm between the antenna & your body.RF Exposure Warning:FCC ID  YDTCTX-8000FCC Statement:This equipment has been tested and found to comply with the limits for a Class B digital device, pursuant to part 15 of the FCC Rules.  These limits aredesigned to provide reasonable protection against harmful interference in a residential installation. This equipment generates, uses and can radiate radiofrequency energy and, if not installed and used in accordance with the instructions, may cause harmful interference to radio communications.However, there is no guarantee that interference will not occur in a particular installation. If this equipment does cause harmful interference to radio ortelevision reception, which can be determined by turning the equipment off and on, the user is encouraged to try to correct the interference by one or moreof the following measures:•  Reorient or relocate the receiving antenna.•  Increase the separation between the equipment and receiver.•  Connect the equipment to an outlet on a circuit different from that to which the receiver is connected.This device complies with part 15 of the FCC rules. Operation is subject to the following two conditions: (1) This device may not cause harmful interference,and (2) this device must accept any interference received, including interference that may cause undesired operation. Note: Modifications to this product will void the user’s authority to operate this equipment.
Carisma CTX-8000 2.4GHz FHSS Technology SystemThe following is an overview of the various functions and adjustments found on CTX-8000 radio system for Carisma models. It is important to read and understand about all of these functions and adjustments before driving.Power ON / OFF the Transmitter* In general, user will experience under steer when making a wide turn at   high speed or over steer when making sharp turn at high speed (easy to  spin out). User should practice the throttle and steering approach for   different cornering at different speed or road surface.The Transmitter CTX-8000Steering Wheel : Control direction (Left / Right) of the RC model.Throttle Trigger : Control speed (Forward/Brake/Backward)of the driving model.Antenna : Transmit signal to the model.                  Power ON / OFF : Power ON / OFF the transmitterSYNC & Battery Indicator : Green LED light indicates synchronization status and/or adequate battery power supply. Red LED light indicates low battery      Dual Rate Dial : Adjust the same maximum steering angle on both sides                                                when model turns Left / Right ST. Trim Dial : Adjust  the neutral position of  steering servo when model                                               wheels are straight ahead.                      TH. Trim Dial : Make sure the model stays still when releasing  the                                               throttle trigger. Battery Compartment Tray : Cover and hold the batteries powering the transmitter. Battery Installation Supplied with 4 x 1.5V AA Batteries, CTX-8000 can be operated a few hours.  Installation: Remove the battery compartment cover as shown below.Install the batteries observing the polarity marked on battery compartment.Then reinstall the battery compartment cover as the Picture shown below.Warning : Never disassemble batteries or put the batteries in fire, chemical agents, otherwise they may cause personal injuries or property damages.Battery Disposal : Observe corresponding regulations about wasted battery treatment regulations. 1. After running out of power, dispose of    wasted batteries in designated areas far    away from water supply, household areas    and planted areas.2. Submit the wasted batteries to specific    recycling stations. Battery LED Indicator Pre-Run CheckSolid Green : Sufficient Power supplyGreen1. Steering : Adjust the steering trim to     keep the front wheels in straight line    when steering wheel remains in    NEUTRAL position.2. Throttle : Adjust the throttle trim to     ensure the rear wheels stop rotating     when throttle trigger remains in     NEUTRAL position.For TransmitterDamages or LeakingDo not use any damagedbatteries.x 4This product must never be thrown away with other waste. Thus the users are liable for disposing the wasted model by submitting them to designated collection stations specific for recycling electronic and electric items. Disposing of the wasted model in this way is helpful to conserve natural resources and enable to keep human health and protect the environment. For more information about wasted model disposal and recycling, please contact your local city office, your disposal service or where you purchased the product.Instructions for Disposal of WEEE by Users in the European UnionHeavy Duty1.5V “AA” Size BatteriesATTENTIONCTX-8000Dual Rate DialPowerON / OFFSteering Trim Dial Throttle Trim Dial FTN KeyThrottle Reverse SwitchSteering Reverse SwitchST.TRIM TH.TRIMST THST.TRIM TH.TRIMST THST.TRIM TH.TRIMST THThe LED indicator located on the front left side of the transmitter indicates the powersupply of batteries. The green LED will go solid on indicating that the batteries havesufficient power. When batteries voltage drops below 3.8 volts, the Red LED will beflashing slowly, indicating the batteries power is low and should be replaced.Red LED Flashing:Time to replace batteries* Always turn on the transmitter first (except doing synchronizing) by   sliding the switch on the left side from bottom to top. The green lights   above the switch should light up.  If not, you need to check for low or   incorrectly installed batteries.
Steering Reverse SwitchST.TRIM TH.TRIMST THST.TRIM TH.TRIMST THThrottle Reverse SwitchDual Rate DialST.TRIM TH.TRIMST THABOUT THE RADIO SYSTEMRECEIVER CONNECTION AND INSTALLATIONTop Control Panel ReversingReversing is used to change the response direction of steering wheel and throttle trigger. CTX-8000 Transmitter features 2 reversing functions: Steering Reverse and Throttle Reverse.Steering Reverse: Reverse the  response direction when operating steering wheel. Turning left steering wheel, the model turns right while turning right the model turns left.Throttle Reverse: Reverse the response direction when operating throttle trigger. Pushing forward  throttle trigger the model moves backward while pulling back, the model moves forward. If necessary you can just use a small screwdriver to adjust the corresponding switches.CTX-8000 features two trimming functions:Steering Trim and Throttle Trim.Steering Trim Dial : Adjust the neutral position of steering servo when the wheels are straight ahead. Normally steering trim is adjusted until the model can keep straight tracks.Throttle Trim Dial : Adjust the throttle trim to ensure therear wheels stop rotating when throttletrigger remains in NEUTRAL position.Trimming Dual Rate Dial enables to adjust the same maximum steering angle of servo on both sides (Left and Right) when model makes steering. The Dual Rate Dial affects the sensitivity of servo. Reducing dual rate value can lower the sensitivity of servo and reduce the same maximum steering angle on both sides. Remember to adjustthe dual rate value within the adjustment range.Dual Rate Dial 1. Prior to any operation make sure the transmitter and receiver are both turned off.2. Press and hold the setup button on the receiver while power on the receiver.3. Release the setup button till green LED flashes.4. Press the setup button to select the frame rate with green LED flashing.     Faster Flashing = High frame rate (7ms) for digital servo    Slower Flashing = Low frame rate (15ms)for analogue servo5. Power on the transmitter. With the transmitter steering wheel and throttle trigger    in neutral position (full stop and straight steering), press the FTN Key of the    transmitter.6. When synchronization is done, the green LED on both receiver and transmitter    will turn solid on. Synchronization & Frame Rate AdjustSetup Key of ReceiverCarisma 2.4GHz Receiver MRX2800Remarks : The mounting positions of receiver and antenna cable greatly affect the operating range.Install the antenna vertically to the ground.Auxiliary Port (Reserved)Steering Port : Where to plug in the servos. Throttle Port  : Where to plug in the Electronic                           Speed Controler (ESC).Setup button : Synchronize transmitter and receiver.                          Select frame rate.Steering PortThrottle PortAuxiliary Port (Reserved)Warning : • Never bend the metal pins on the PCB of receiver.• Never cut the antenna cable.• Install the antenna vertically as shown in the figure.• Keep the antenna as far away from the motor, ESC   and other noise sources as you possibly can.Setup ButtonAntenna CableMRX2800Tips :•  Wrap the receiver with something soft, such as foam    rubber, to avoid vibration. If there is a chance of getting   wet, put the receiver in a waterproof bag or balloon.3ST.TRIM TH.TRIMST THST.TRIM TH.TRIMST THST.TRIM TH.TRIMST THFTN Key

Navigation menu