Nedap N V PROX1356 Inductive Proximity RFID Card Reader User Manual User 03
N. V. Nederlandsche Apparatenfabriek NEDAP Inductive Proximity RFID Card Reader User 03
Contents
- 1. User 01
- 2. User 02
- 3. User 03
- 4. User 04
User 03

[Installation Guide]
Installation Guide
Version 3.2 | 12 May 2011

2

3
info@nedaplibrix.com
Nedap Librix
Parallelweg 2d
Groenlo
The Netherlands
Nedap Librix
P.O. box 102
7140 AC Groenlo
The Netherlands
Tel: +31(0)544 47 15 09
Fax: +31(0)544 46 58 14
©Nedap Librix
Netherlands
Parallelweg 2d, 7141 DC Groenlo
The software / hardware described in this document / file is furnished under a license
agreement and may be used only in accordance with the terms of agreement.
Documentation Installation Guide Copyright Notice
Any technical documentation that is made available by Nedap Librix is the copyrighted
work of Nedap Librix and is owned by Nedap Librix.
NO WARRANTY. The technical documentation is being delivered to you and Nedap Librix
makes no warranty as to its accuracy or use. Any use of the technical documentation or
the information contained herein is at the risk of the user. Documentation may include
technical or other inaccuracies or typographical errors. Nedap Librix has the right to
make changes without prior notice. No part of this publication may be copied without
the express written permission of Nedap Librix, Parallelweg 2d, 7141 DC Groenlo, The
Netherlands.
Trademarks
Nedap and the Nedap logo are registered trademarks of N.V. Nederlandsche
Apparatenfabriek “Nedap”, Parallelweg 2, 7141 DC Groenlo, The Netherlands. Other
product names mentioned in this manual may be trademarks or registered trademarks
of their respective companies and are hereby acknowledged. Printed in the Netherlands.

4
Date
Version
Description
27-10-2006
1.0
First version
21-09-2010
2.0
Changed layout to librix style
03-03-2011
3.0
Changed screenshots
18-04-2011
3.1
Added FCC section
12-05-2011
3.2
Add text to FCC section

5
1.1. Steps 07
2.1. Steps 09
2.2. Contact & support 13
6
The staff station can, in principle, replace barcode scanners. The unit enables the staff
to identify all articles with an RFiD-label. The standard staff station consists of an RFID
reader positioned on the counter/desk (tabletop model). The reader is connected to the
existing hardware (PC) and/or library automation system. The BiblioCheck 4 Lite
software is designed for the simple use of the reader in combination with your current
database management system.
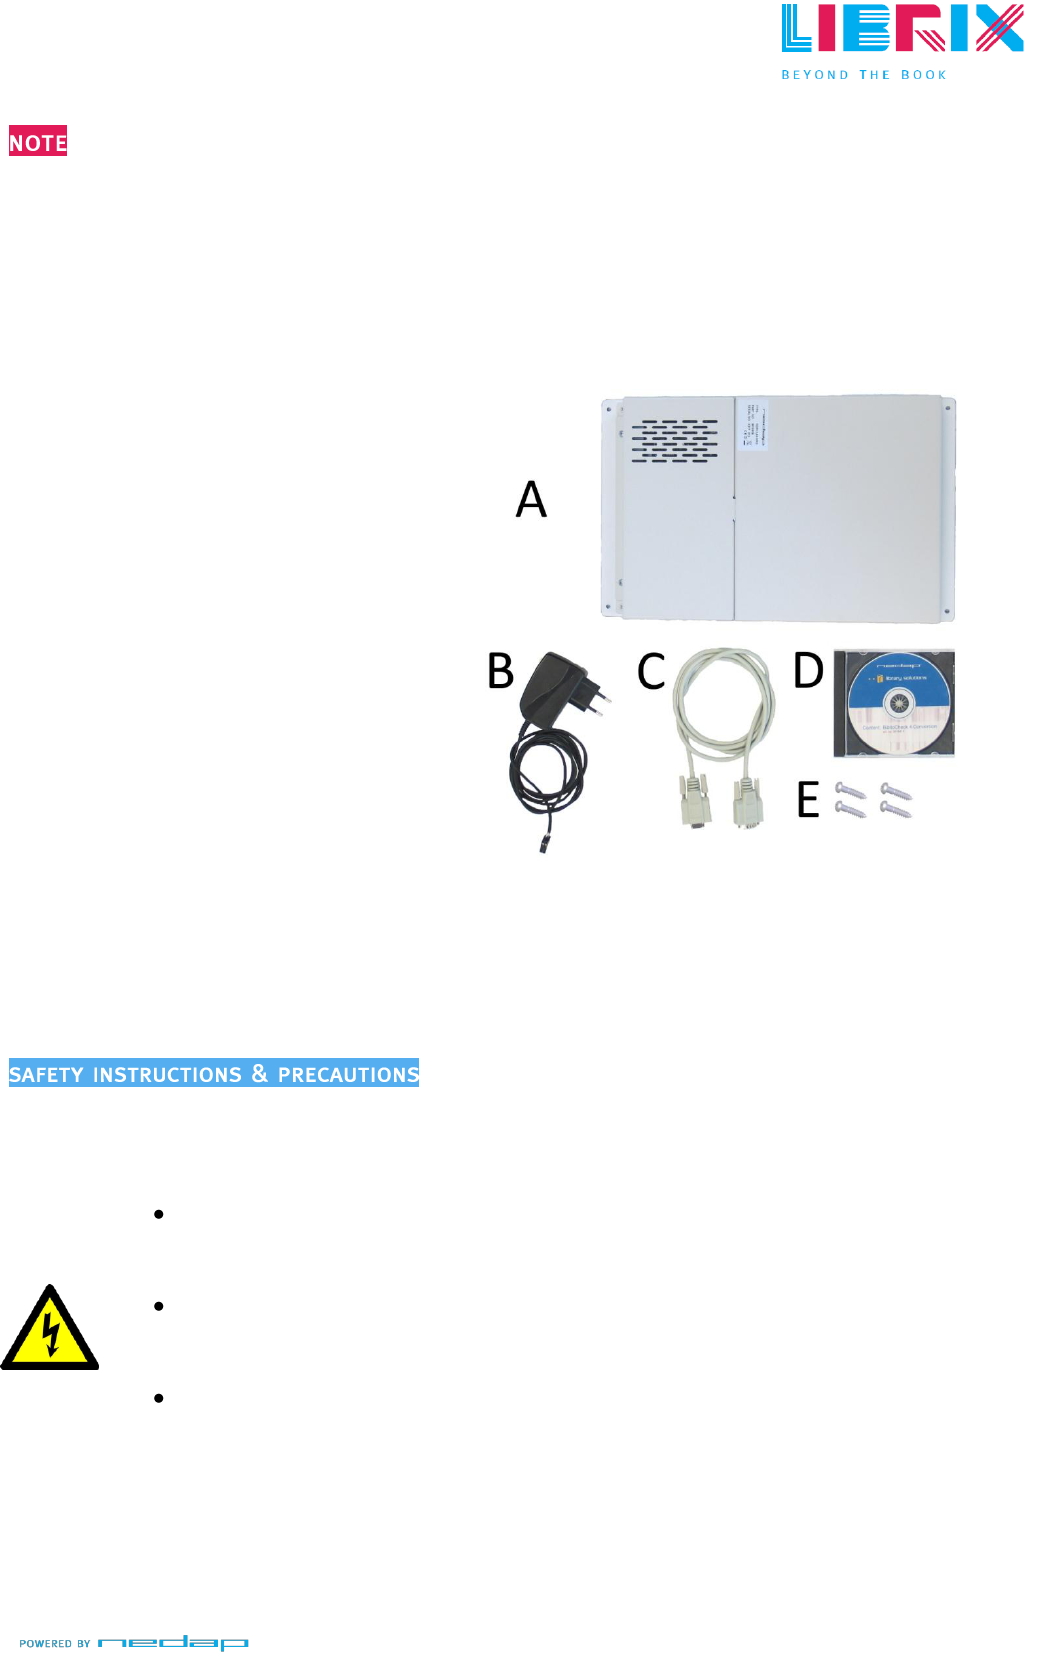
Included:
1x
[A]
Proximity Reader
1x
[B]
Power cable
1x
[C]
RS232-cable
1x
[D]
Nedap installation CD
4x
[E]
Screw for mounting the
proximity reader
Not Included:
1x Cross point-screwdriver
1x Computer with CD/DVD-drive
1x Item containing a RFiD-Label
If no serial-port is available on the computer, a Serial-to-USB convertor needs to
ordered to make this product work.
The following safety instructions and precautions should be observed during normal
use, service and repair.
Do not change anything regarding the proximity reader or the
installation procedure.
Always switch off the power (by disconnecting the power plug) before
you remove the cover.
Do not mount the proximity under a table with an metal frame or under
metal tables.
7
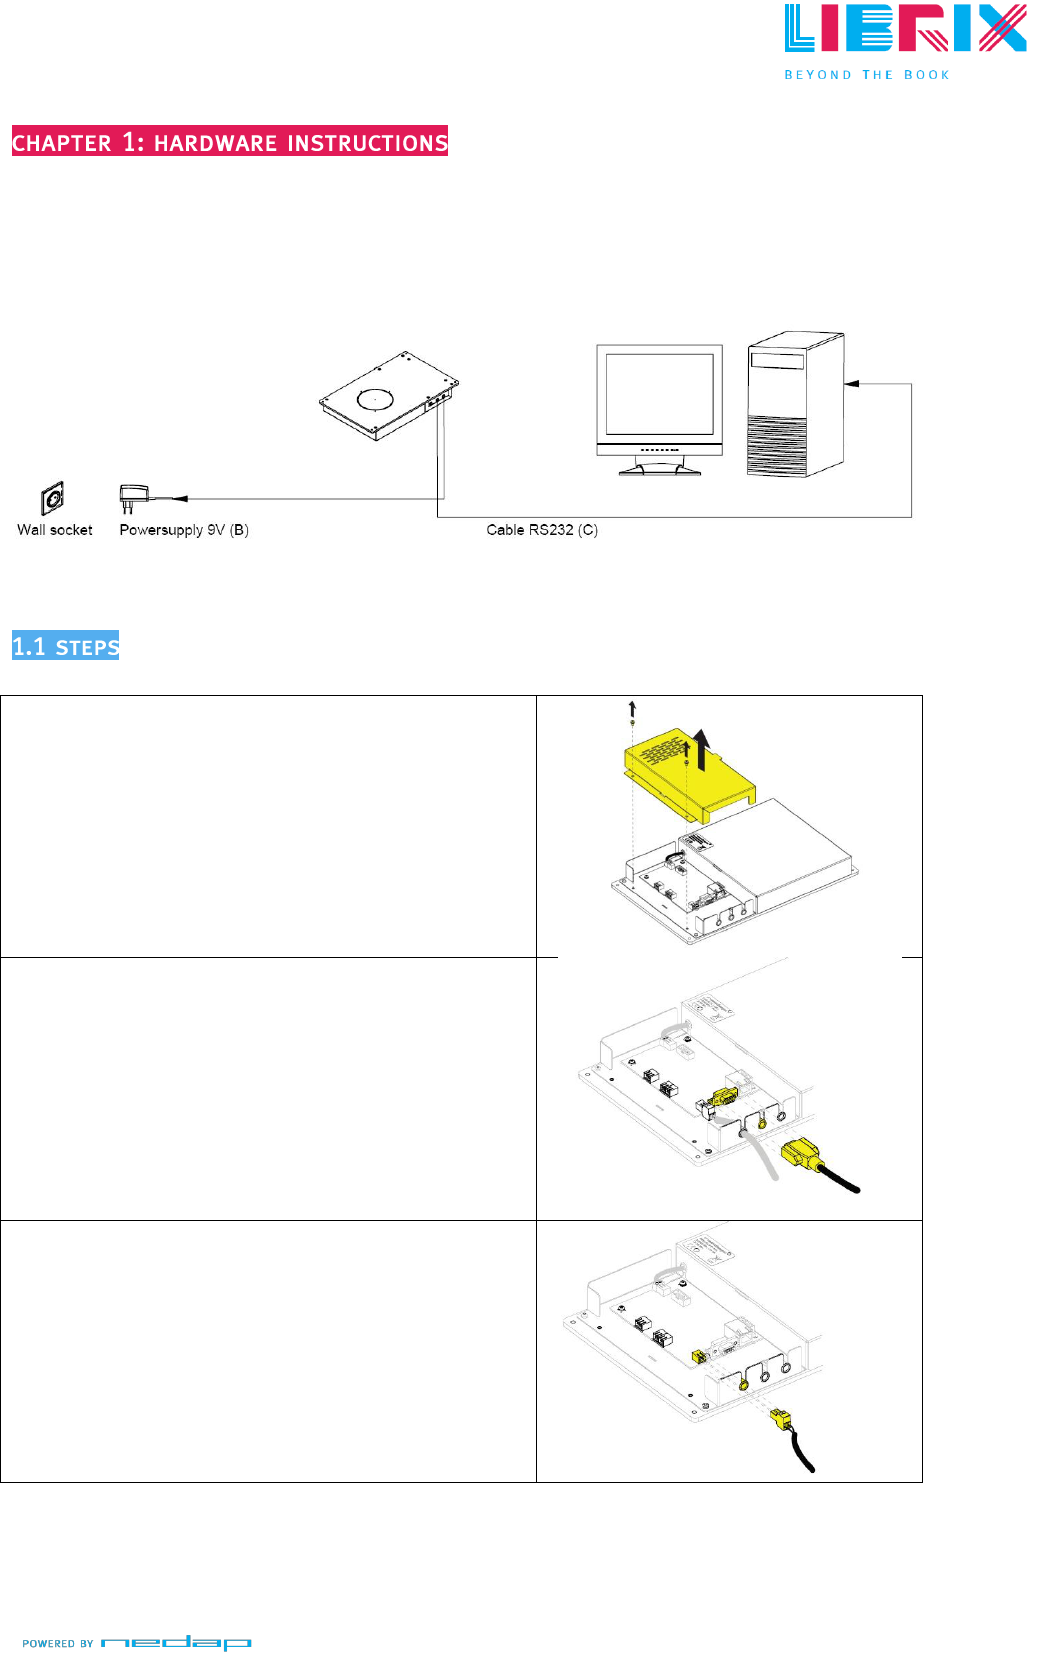
Installation scheme:
Step 1:
Remove the cover of the proximity reader [A] by
removing the two screws which hold the cover in
place.
Step 2:
Connect the RS232-cable
[C]
to the proximity
reader
[A]
.
Step 3:
Connect the RS232-cable
[C]
to the serial-port of
the computer. The serial-port is most likely
located on the back of the computer.
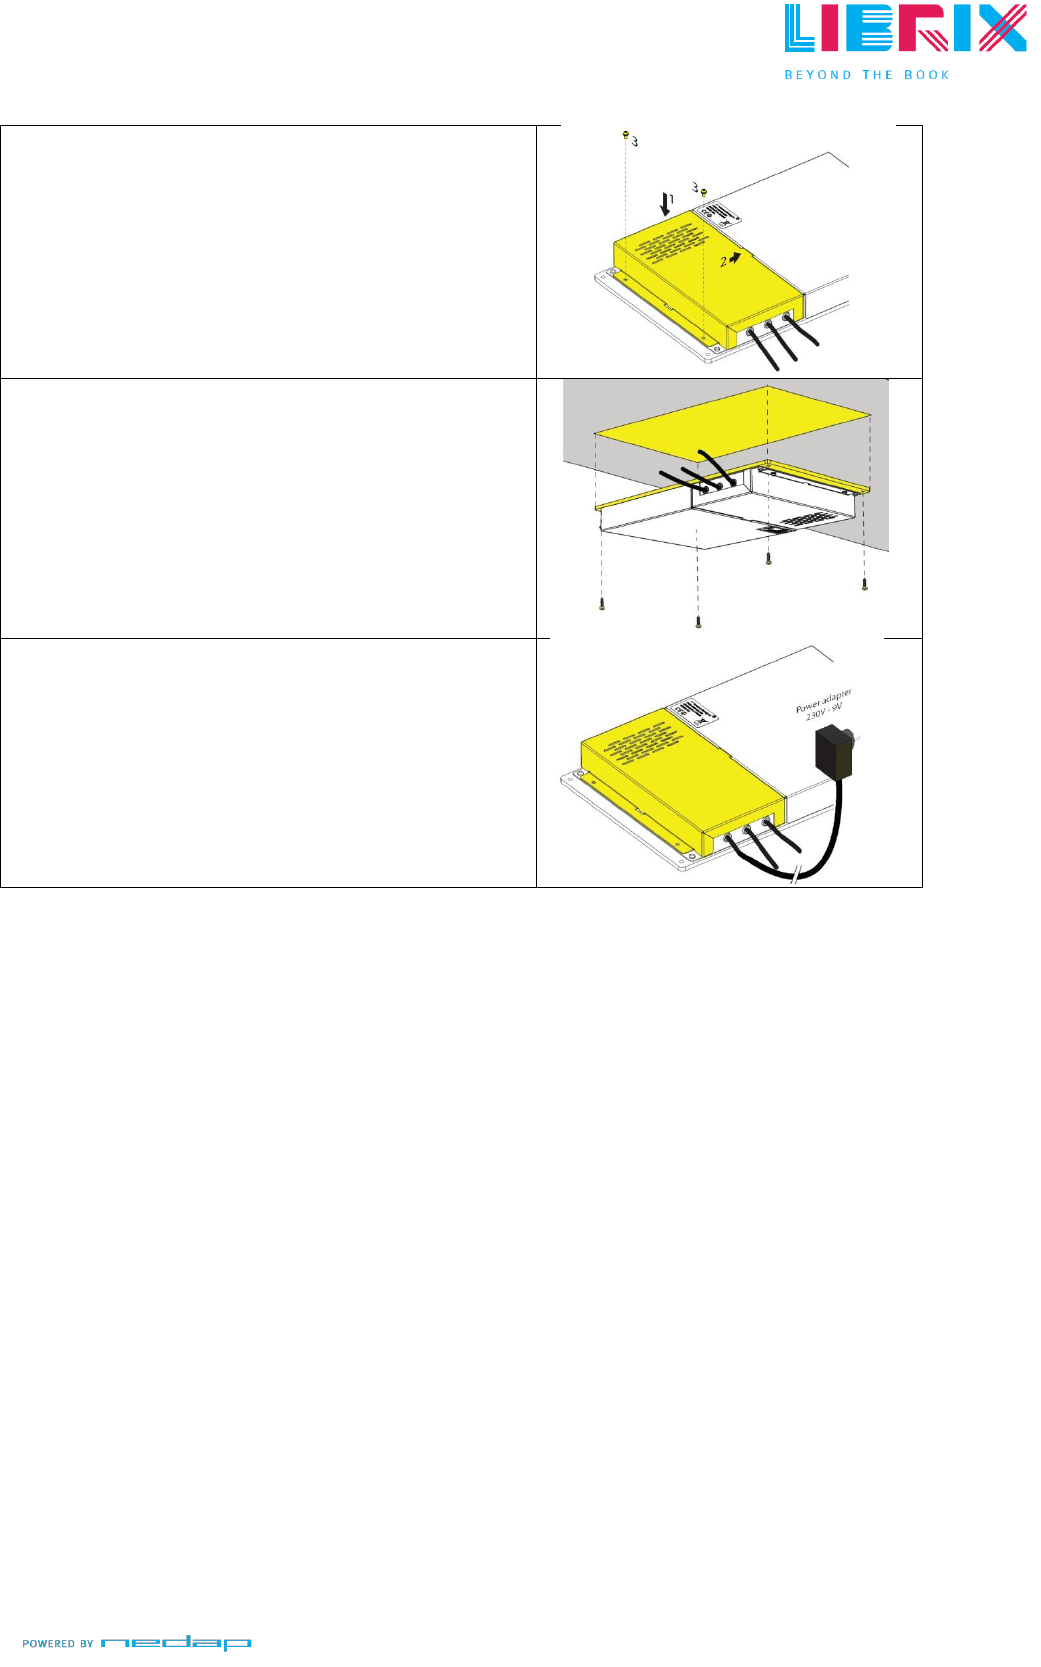
Step 4:
Connect the power cable
[B]
to the proximity
reader
[A]
. The side with the screws needs to be
up. This way, you will insert the plug the correct
way.
DO NOT ACTIVATE THE POWER BEFORE YOU
HAVE COMPLETED STEP 5!
ProximityReader 13.56MHz (A)
8
Step 5:
Replace the proximity reader‟s cover. Make sure
you also put the screws back in their original
place.
Step 6:
Mount the proximity reader
[A]
using the
supplied screws
[E]
. Keep in mind that the center
spot in the circle is the center of the antenna‟s
detection field.
Step 7:
Activate the power by putting the plug of the
power cable
[B]
in an electric point
Step 8:
Proceed to the SOFTWARE INSTRUCTIONS.
9
Notice:
The screenshots in this guide may differ from what the computer is displaying.
However, the procedure remains the same.
Minimal system requirements:
- Operating system:
o Windows 2000, XP Professional SP3,
Vista Business and 7 Business
o Windows Installer 3.1
o Microsoft .NET framework 2 sp2
- CD/DVD-drive
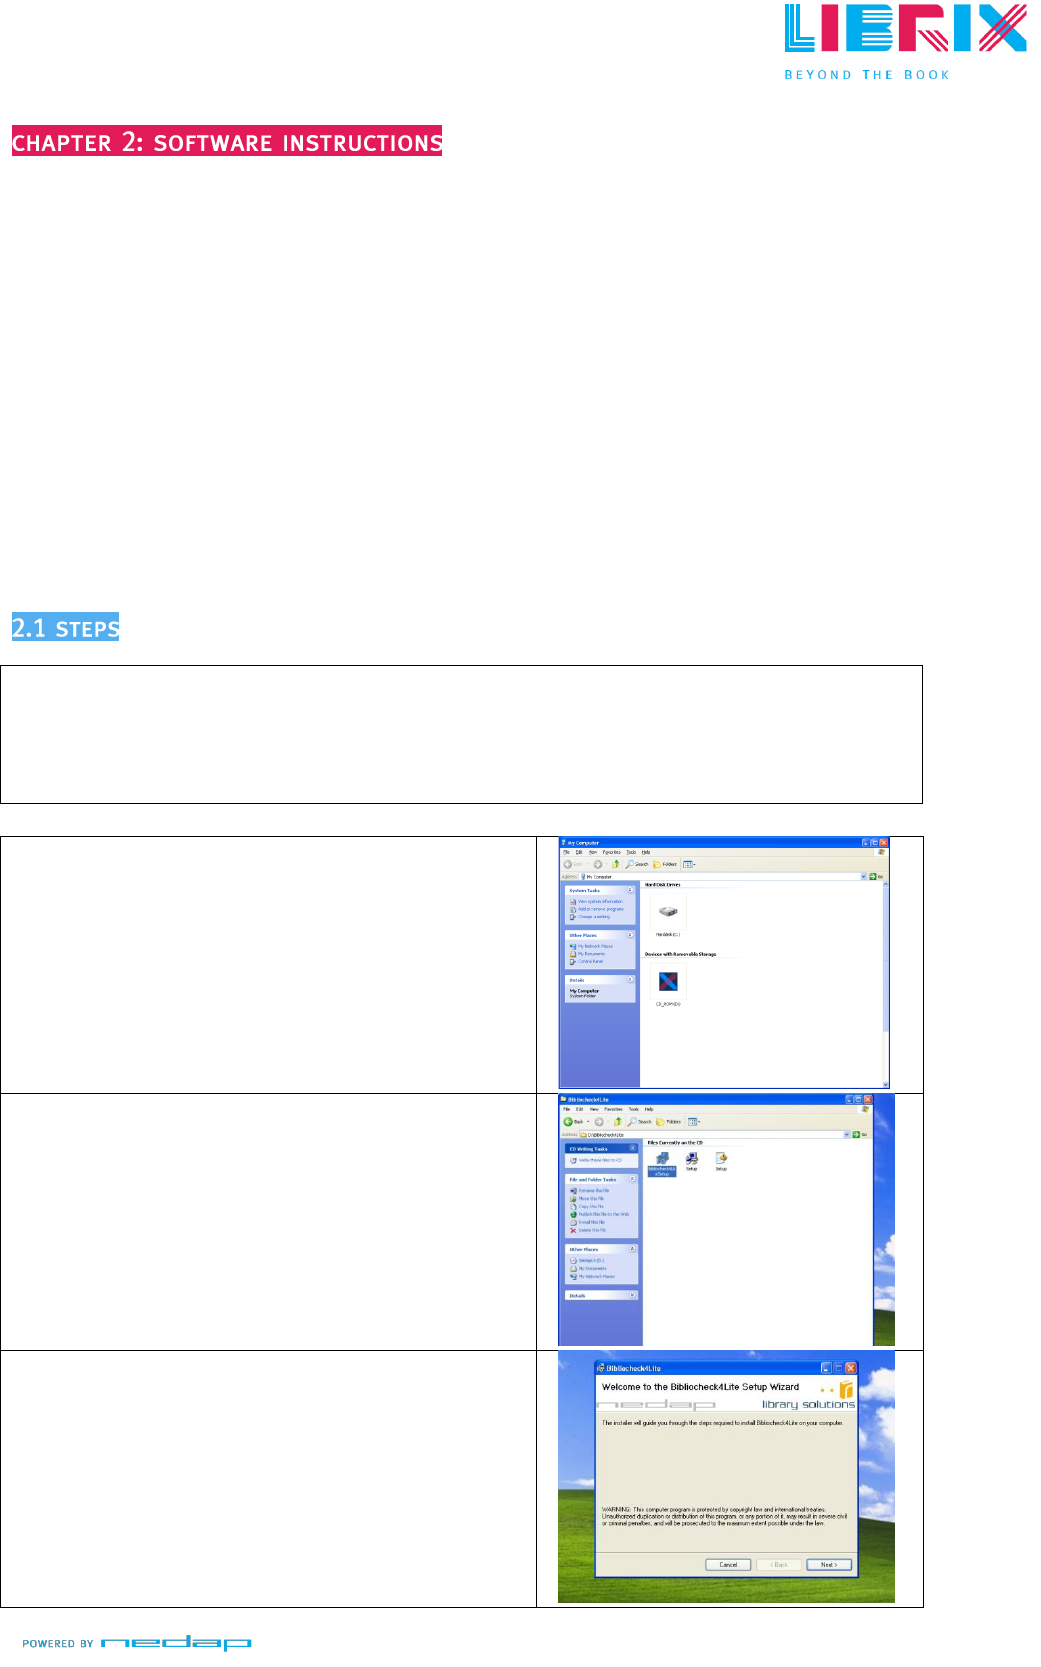
Step 1:
Start up the computer. Log in with „administrator rights‟.
Step 2:
Insert the installation-CD
[D]
.
Step 3:
Normally, the CD will run automatically. When
this does not occur:
Go to: Start > My Computer > CD/DVD-drive (Now
called: Nedap Librix).
Step 4:
Enter the folder „BiblioCheck4Lite‟.
Step 5:
Run „BiblioCheck4LiteSetup.msi‟.
Step 6:
Read the instructions and click on „
Next >‟.

10
Step 7:
Make sure „Run Configuration‟ is checked and
click „Next >‟.
Step 8:
Make sure „
Everyone‟
is checked so
Bibliocheck4Lite is installed for all accounts using
the computer.
Click
„Next>‟
Step 9:
Click „
Next >‟
to start the installation.
Step 10:
The installation progress will be displayed. Wait
for the installation to be finished.
Step 11:
Click „Close‟ to finish the installation.
Step 12:
The configuration tool will start up.
11
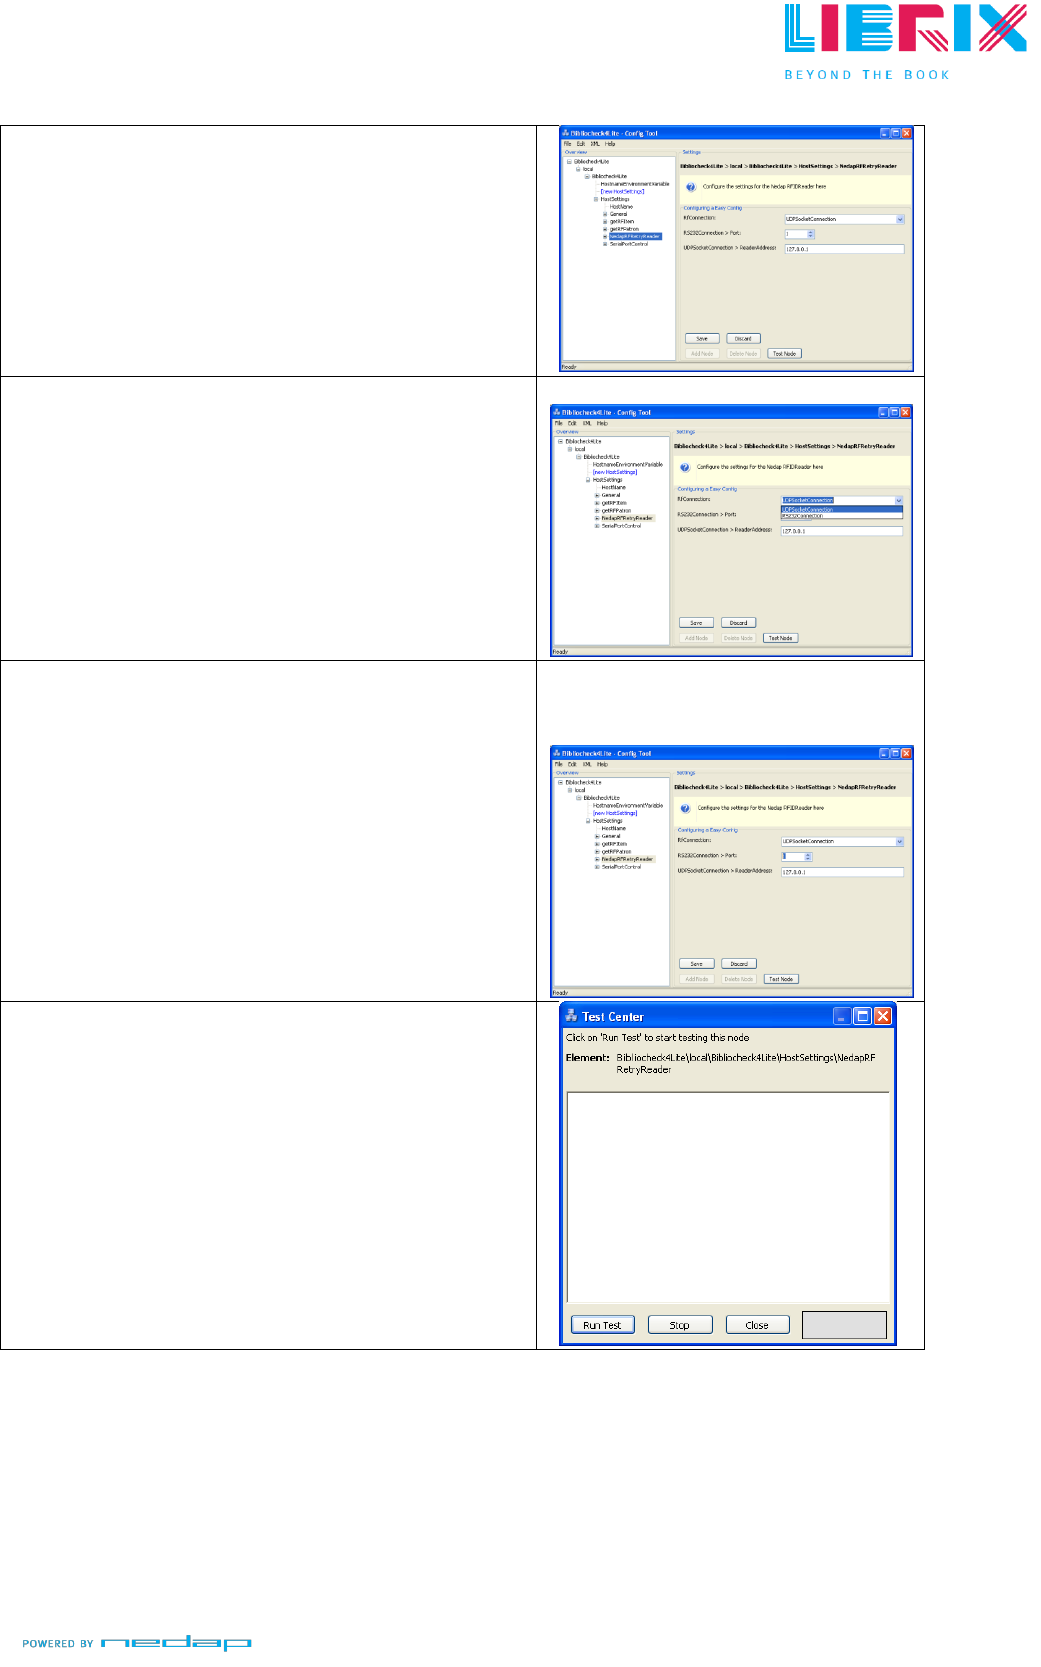
STEP 13
At the configuration tool:
If the „+‟ is clicked, it will expand the menu.
In the configuration tool. Go to:
Bibliocheck4Lite
> local > Bibliocheck4Lite > Hostsettings >
NedapRFRetryReader.
Step 14:
On the right side, click on the arrow nex to
RFconnection, and choose
„RS232Connection‟
from the dropdown-menu
.
Step 15:
Click „
Save‟.
Step 16:
Select the correct COM-Port as the the proximity-
reader is connected to.
Step 17:
Click
„Save‟.
Step 18:
Click
„Test Node‟.
Step 19:
Click
„Run Test‟
.
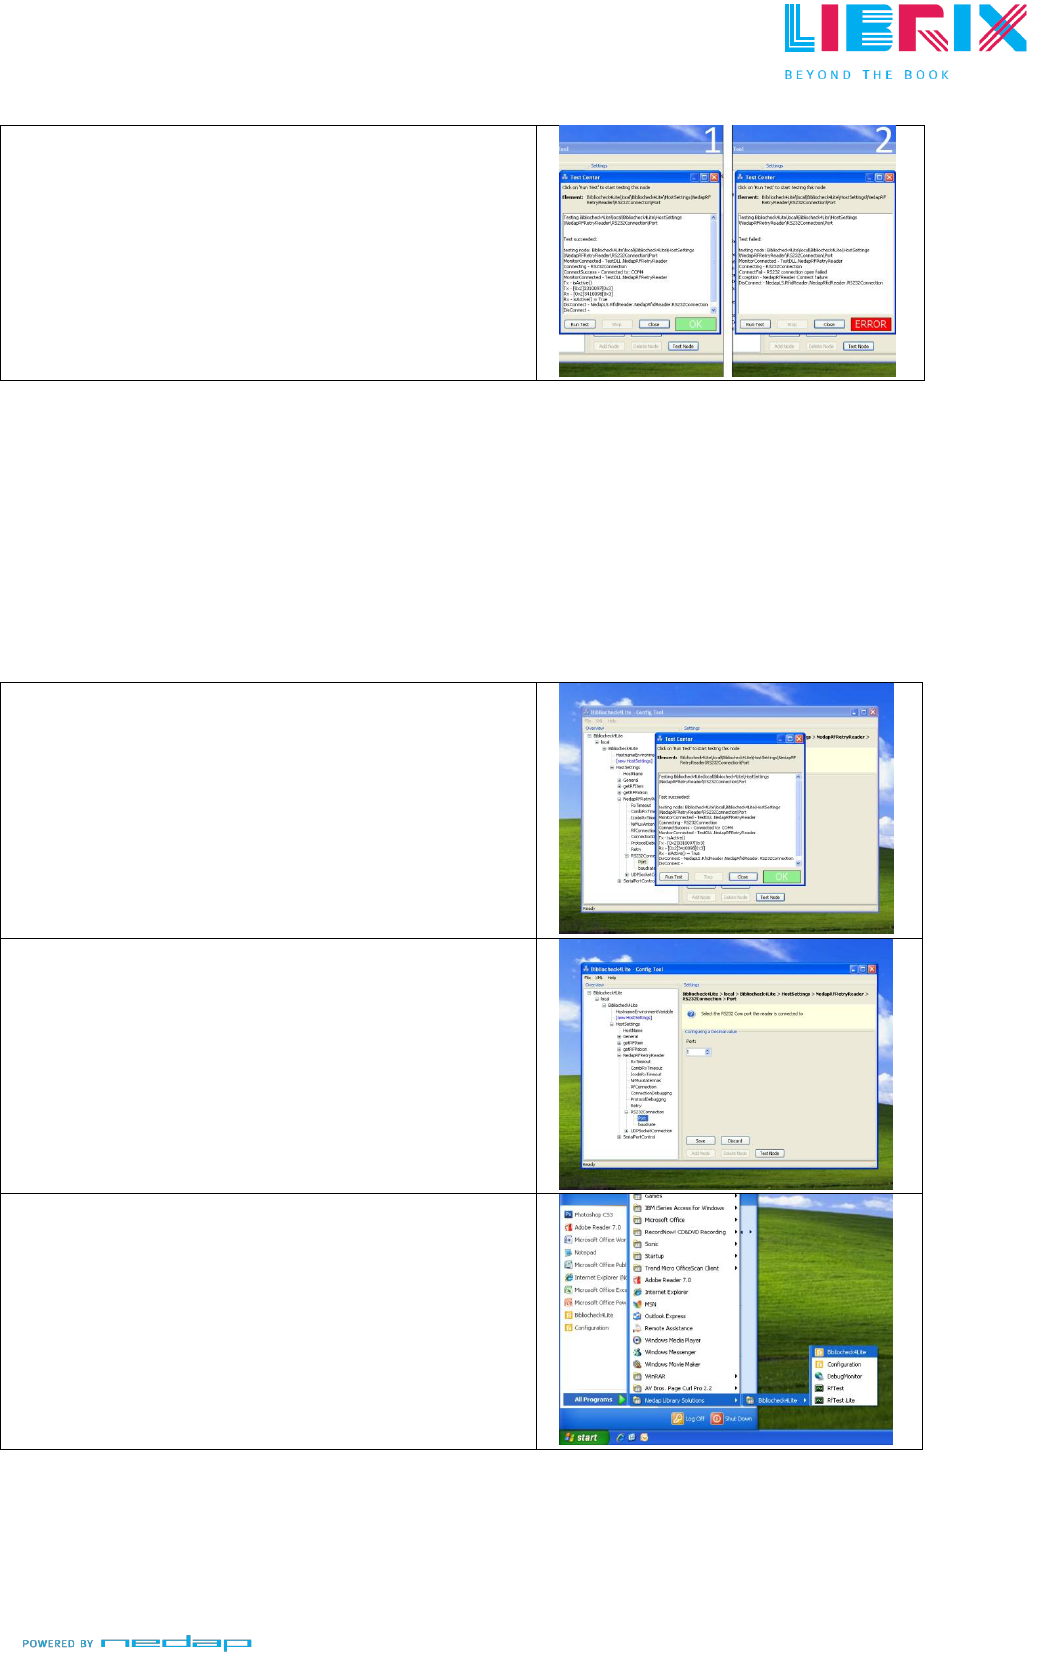
12
Step 20:
If the right COM-Port is selected it will display
the message:
„OK‟
.
[1]
If the wrong COM-Port is selected it will display
the message „
ERROR
‟.
[2]
If an „ERROR‟-message occurs; repeat STEP 16 to 21 until the right COM-Port is
selected.
Example:
Switch from COM-Port 1 to COM-Port 2 (or COM-Port 2 to 3, etc) and test the
connection again. Repeat this procedure until you get the green „OK‟ as result. Then,
proceed to STEP 21.
Step 21:
Click
„Close‟
.
Step 22:
Quit the configuration tool by pressing the „X‟ in
the upper-right corner.
Step 23:
Go to:
Start > (All) Programs > Nedap Librix >
Bibliocheck4Lite
and run „
Bibliocheck4Lite‟.
13
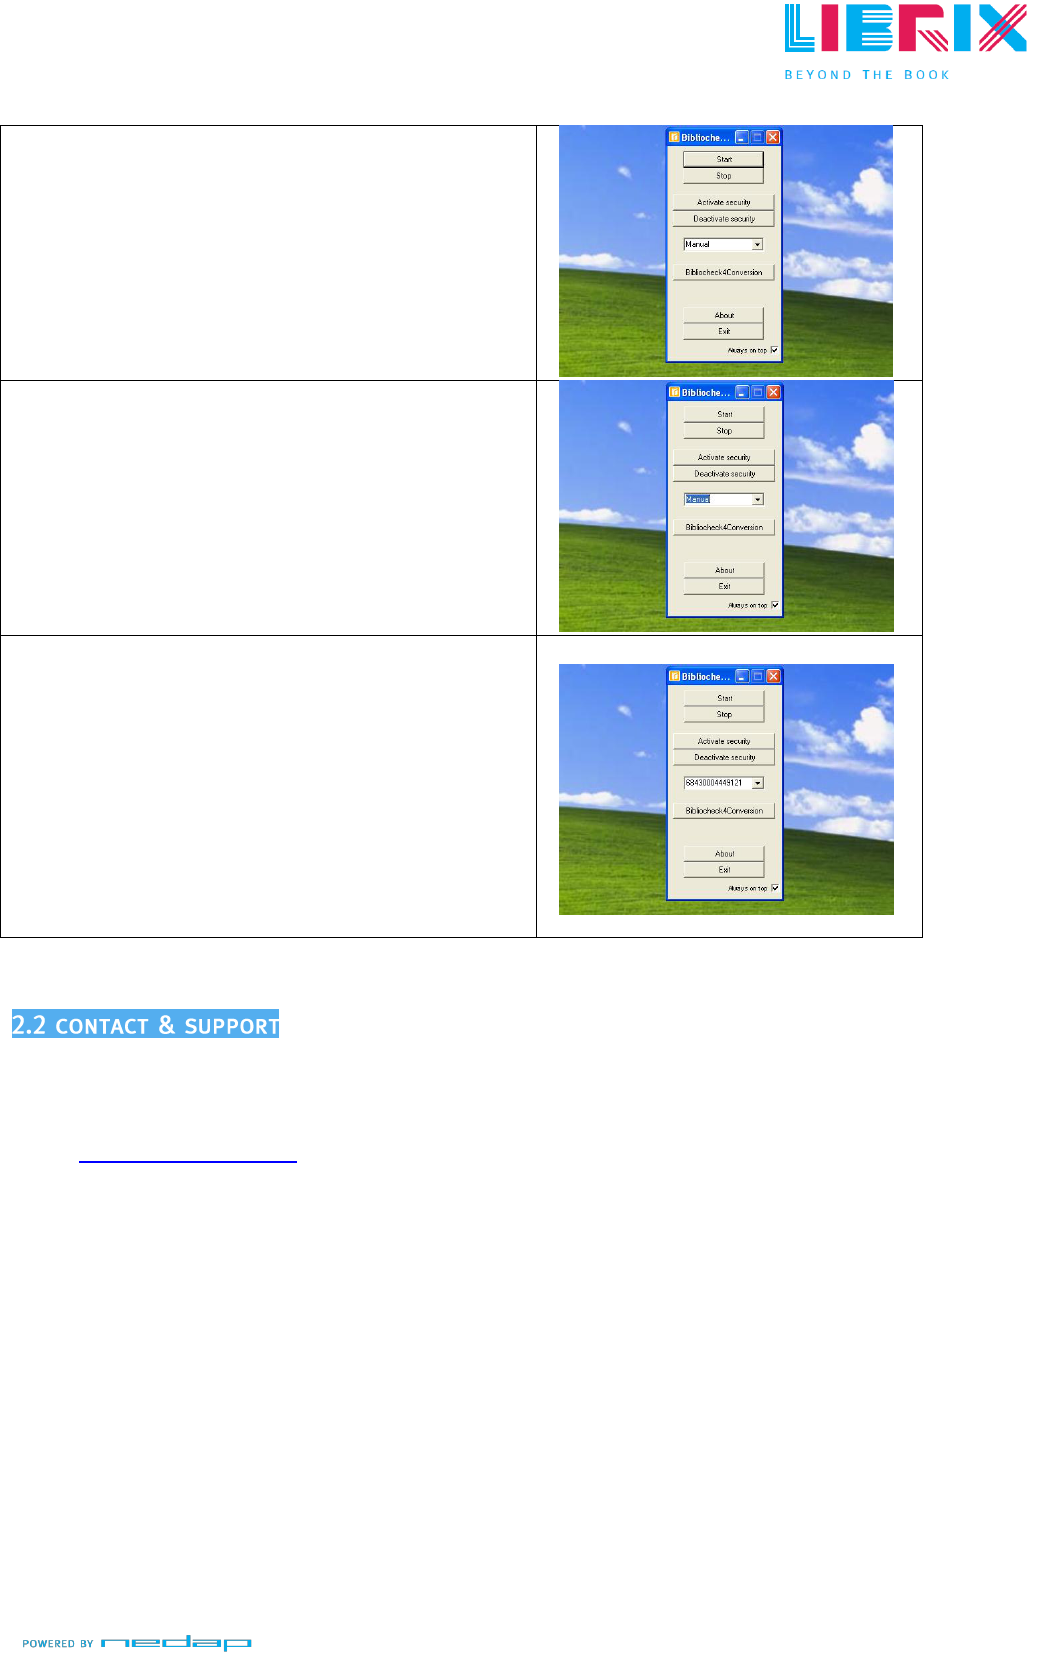
Step 24:
Click
„Start‟
so the reader starts the data-reading
process. If activated, the Bibliocheck4Lite icon in
the right-hand corner of the taskbar will turn
yellow.
Step 25:
Click
„Manual‟
. This way it will be selected as the
screenshot (blue and selected) displays.
Step 26:
Scan a RFID-tag by placing it on the proximity-
reader‟s antenna
[A].
Step 27:
If the reader scans the RFiD-tag successfully, a
chain of numbers will be displayed. (the numbers
will be shown where
„Manual‟
was selected
during the previous step).
Step 28:
Click
„Exit‟.
The proximity reader is now installed, configured
and ready for use.
Want to know more about the solutions Nedap Librix has to offer?
Visit:
www.nedaplibrix.com
In case of problems during the installation or use of the product; contact your local
supplier.

14
1. There is no serial-port located on the computer? What now?
Order a serial-to-USB convertor. This convertor makes it possible for the
proximity reader to communicate through a USB-port.
2. Help! „Run configuration‟ wasn‟t checked while installing Bibliocheck4Lite. I can‟t
find the configuration-tool anywhere.
Go to:
Start > (All) Programs > Nedap Library Solutions > Bibliocheck4Lite >
Configuration
.
3. It seems that I can‟t get the connection between the proximity reader and the
computer to work properly. What is going wrong?
Make sure that you do not miss a COM-port while testing. Also, make sure you
click the „
Save‟
button every time after switching COM-ports.
4. I‟ve installed and configured the proximity reader following this Quick
Installation Guide. Still, I can‟t seem to find the software anywhere using my
normal account.
A) While installing the software, be sure to use an „administrator rights‟-account.
B) Also, while installing, be sure to check the „Everyone‟-box.
This way the software will be available for every account using the computer.
Reinstalling the software will solve this problem.
1. Go to:
Start > Run
.
2. Type:
“appwiz.cpl”
(without the quotes).
3. Remove Bibliocheck4Lite.
Follow the SOFTWARE INSTRUCTIONS which are in this Quick Installation Guide.
5. I‟ve installed and configured the proximity reader following this Quick
Installation Guide. Still it isn‟t performing well.
Make sure the reader isn‟t mounted under an table/desk which contains an
metal frame. Metal causes the reader to not function properly.

15
FCC for USA according to Part 15 with FCC ID: CGDPROX1356
IC for Canada according to RS-210 with IC: 1444A-PROX1356
Part 15.19(3) and RSS_Gen Labelling
This device complies with part 15 of the FCC Rules and to RSS210 of Industry Canada.
Operating is subject to the following two conditions:
(1) this device may not cause harmful interference, and
(2) this device must accept any interference received, including interference that may
cause undesired operation.
Cet appareil se conforme aux normes RSS 210 exemptés de license du Industry Canada.
L'opération est soumis aux deux conditions suivantes :
(1) cet appareil ne doit causer aucune interférence, et
(2) cet appareil doit accepter n'importe quelle interférence, y inclus interférence qui
peut causer une opération non pas voulu de cet appareil.
Warning (part15.21)
Changes or modifications not expressly approved by party responsible for compliance
could void the user‟s authority to operate the equipment.
This information is furnished for guidance, and with no guarantee as to its accuracy or
completeness; its publication conveys no license under any patent or other right, nor
does the publisher assume liability for any consequence of its use; specifications and
availability of goods mentioned in it are subject to change without notice; it is not to
be reproduced in any way, in whole or in part, without the written consent of the
publisher.
Nedap Librix
P.O. Box 102
NL-7140 AC Groenlo
The Netherlands