Nikon 1143EA 802.11 b/g Wireless Transmitter User Manual
Nikon Corporation 802.11 b/g Wireless Transmitter
Nikon >
Contents
- 1. Manual Pt1
- 2. Manual Pt2
- 3. Manual Pt3
- 4. Manual Pt4
- 5. Manual Pt5
Manual Pt2
13
Help
Click the Help button for online help.
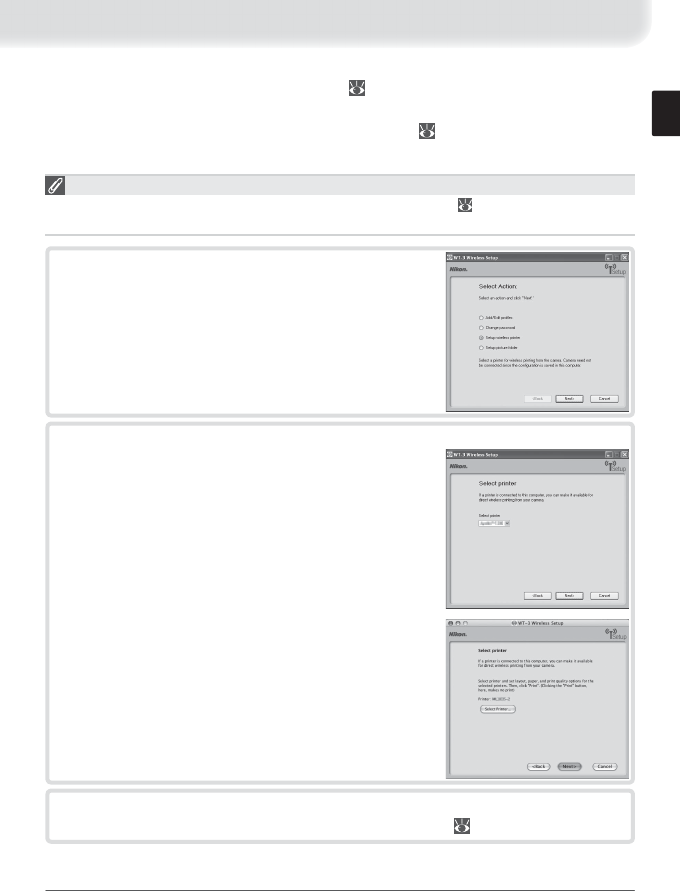
The “Select Action” Dialog
The other options in the “Select Action” dialog are described below. Note that the camera
need not be connected to a computer to choose a printer or change the upload folder.
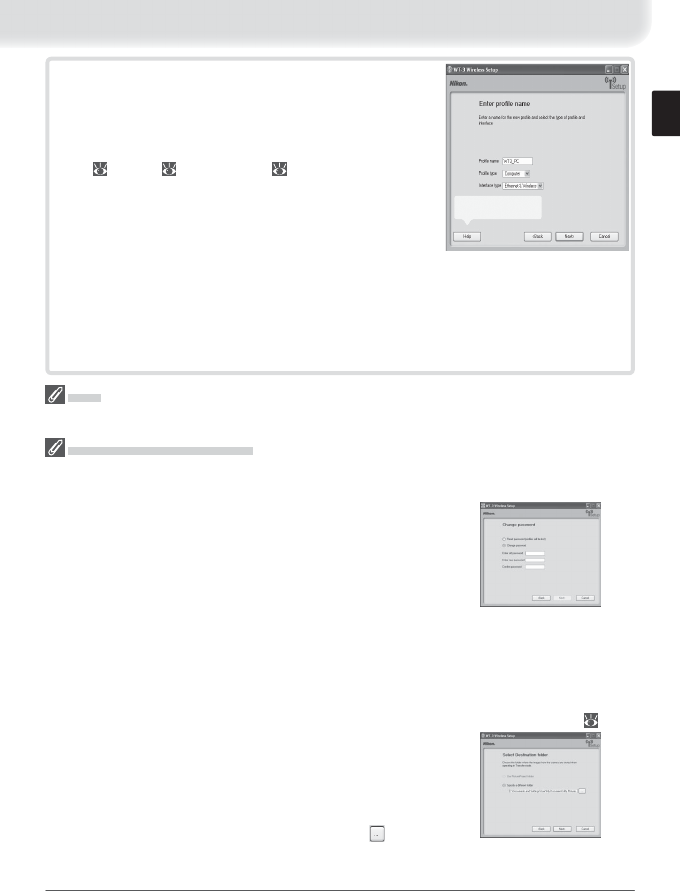
• Change password: The dialog shown at right will be displayed.
By default, no password is required to change device pro-
fi les using the WT-3 Setup Utility. A password can be added
by selecting Change password. If the camera is later con-
nected to a diff erent computer, a password prompt will be
displayed. Once the correct password has been entered, the
prompt will not be displayed again. To change an existing password, enter the old password
before typing the new password. To remove the password, select Reset password (pro-
fi les will be lost) and click Next. Please note that resetting the password deletes all existing
device profi les from the camera. Click Back to exit without changing password settings.
• Setup wireless printer: By default, the system default printer for the host computer will be used
when printing pictures. To choose a diff erent printer, select Setup wireless printer ( 17).
• Setup picture folder: The dialog shown at right will be dis-
played. Select a destination for uploaded pictures from the
following options and click Next:
Use PictureProject folder: Pictures will be cataloged in
PictureProject version 1.6.1 or later.
Specify a diff erent folder: To choose a folder, click the button.
The default destination is the “WT-3” folder in “My Pictures” (Windows) or “Pictures” (Macin-
tosh).
7 Enter the following information.
• Profi le name: Enter a name of up to 16 characters.
• Profi le type: Choose FTP server to confi gure the cam-
era for ftp (transfer mode only), or Computer to con-
fi gure the camera for use with a computer in transfer
( 21), PC ( 26), and print ( 30) modes.
• Interface type: Choose Ethernet only if the network
does not include wireless, or Ethernet and Wireless
for wireless or wireless and Ethernet networks.
Click Next. When a new profi le is created under
Windows XP Service Pack 2, the dialog shown in Step 8 will be displayed.
With third-party LAN adapters or fi xed IP addressing, or a profi le created un-
der Windows XP Service Pack 1 or Mac OS, proceed to Step 9 if Ethernet
and Wireless is selected for interface type, or to Step 10 if Ethernet only
is selected.
Help button
14
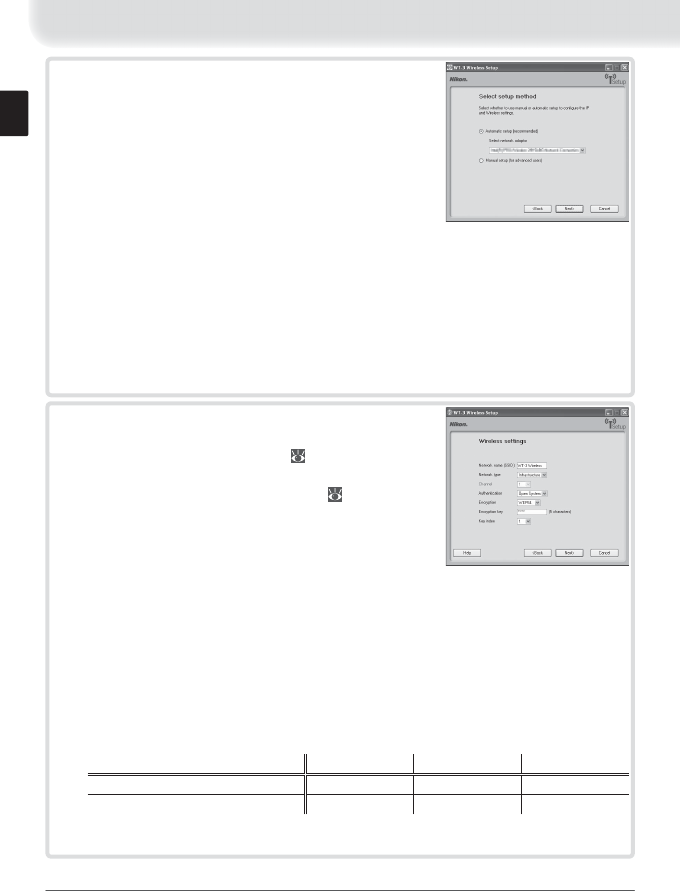
8 Choose from the following options.
• Automatic setup (recommended): If more than one
network adapter is available, choose an adapter
from the pull-down menu (if Ethernet only is
selected in Step 7, the menu will list Ethernet
adapters only). Click Next. If Ethernet and
Wireless was selected in Step 7 and the com-
puter is confi gured for use with an existing in-
frastructure network, you will be prompted either to choose an existing
infrastructure network or to set up a new ad-hoc network for use with the
camera; select the desired option and click Next. If FTP server was se-
lected in Step 7, proceed to Step 11. Otherwise proceed to Step 12.
• Manual setup (for advanced users): To adjust settings manually, select this option
and click Next. If Ethernet and Wireless was selected in Step 7, proceed
to Step 9. Otherwise proceed to Step 10.
9 Enter wireless network settings and click Next.
• Network name (SSID): Enter a network name or choose
from a list of existing networks ( 36). Do not change
the name if it is supplied automatically.
• Network type: Infrastructure or ad-hoc ( 36).
• Channel (ad-hoc networks only): Choose the channel
(1–13) used by the host. If channel 12 or 13 is selected
for the WT-3A, channel 11 will be used instead.
• Authentication: Choose the type of authentication used
by the computer or access point. The camera supports WPA-PSK, WPA2-PSK, open
system, and shared key authentication. WPA-PSK and WPA2-PSK are available only in
infrastructure mode.
• Encryption: Choose the type of encryption used on the network. Depending on the
authentication used, the following types of encryption are available:
Open: none, 64-bit WEP, 128-bit WEP Shared: 64-bit WEP, 128-bit WEP
WPA-PSK: TKIP, AES WPA2-PSK: AES
• Encryption key: If the network uses encryption, enter the network key. The number of
the characters required depends on the type of encryption used:
WEP (64-bit) WEP (128-bit) TKIP, AES
Number of characters (ASCII) 5 13 8–63
Number of characters (hexadecimal) 10 26 64
• Key index: In infrastructure networks that use WEP encryption, enter the host or access
point key index. The default index is 1.
15
Ad-hoc Wireless Networks
Ad-hoc mode uses IP addresses beginning with 169.254. If the computer later becomes part
of an infrastructure network, it must be reconfi gured for automatic IP addressing and the
camera wireless profi le modifi ed to refl ect the new settings. Consult the network administra-
tor for details.
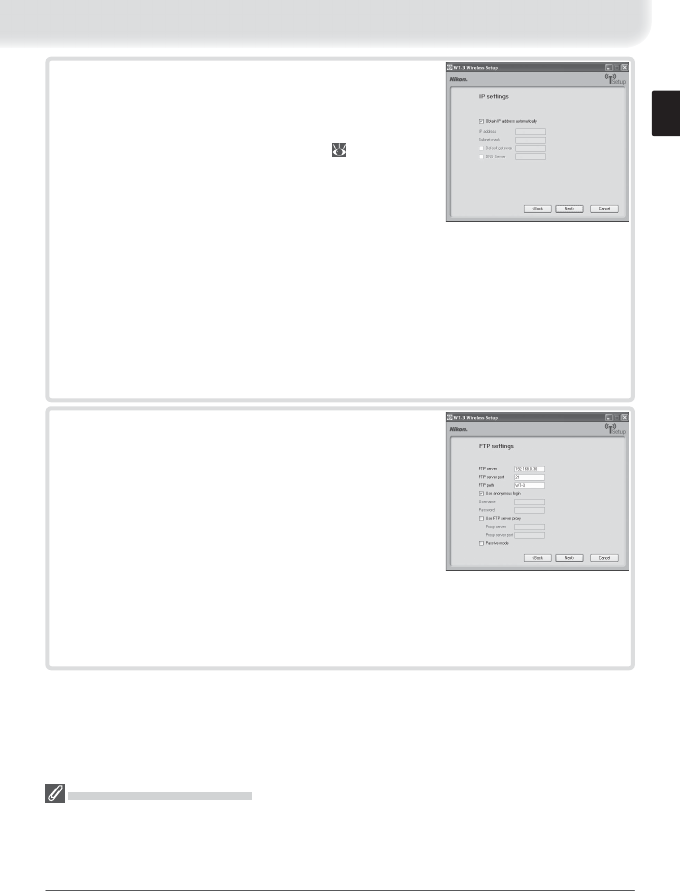
10
Enter network TCP/IP settings.
• Obtain IP address automatically: Select this option if the
network is confi gured to supply IP addresses automati-
cally. If the network does not include a DHCP server,
addresses will be supplied by Auto IP ( 52).
• IP address: If the network is confi gured for manual IP ad-
dressing, enter an IP address for the WT-3.
• Subnet mask: If the network is confi gured for manual IP
addressing, enter a subnet mask for the WT-3.
• Default gateway: If the network requires a gateway address, select this option and enter
the address supplied by the network administrator. This option applies only if FTP
server is selected for Profi le type in Step 7.
• DNS server: If a Domain Name Server exists on the network, select this option and enter
the address supplied by the network administrator. This option applies only if FTP
server is selected for Profi le type in Step 7.
Click Next. If FTP server was selected for Profi le type in Step 7, the dialog
shown in Step 11 will be displayed. Otherwise proceed to Step 12.
11
Enter ftp settings and click Next.
• FTP server name: Enter the URL or IP address of the ftp
server.
• FTP server port: Enter the port number for the ftp server.
The default is port 21.
• FTP server path: Choose the folder to which pictures will
be uploaded. If no path is specifi ed, pictures will be
uploaded to the home directory.
• Use anonymous login: Select this option for anonymous
login, or leave this option unchecked to supply a user name and password.
• Use FTP server proxy: If a proxy server is required for ftp, select this option and enter the
server name and port number for the proxy server.
• Passive mode: Select this option to use PASV mode.
16
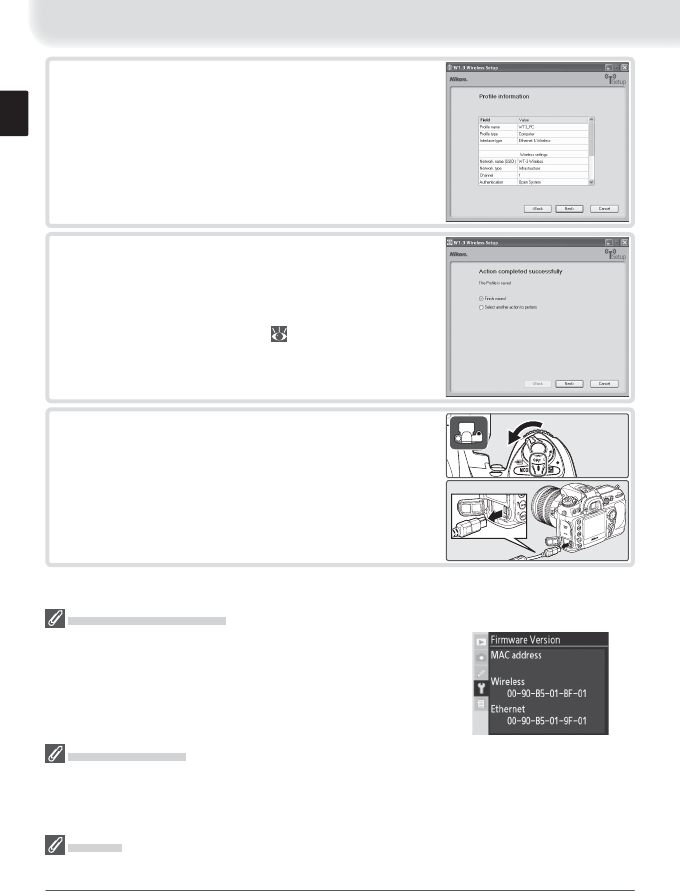
MAC Address Filtering
If the network using MAC address fi ltering, the fi lter must be
supplied with the MAC address of the WT-3. After attaching
the WT-3 to the camera, choose Firmware version > MAC
address from the camera setup menu and note the wireless
and Ethernet MAC addresses.
12
Network settings will be listed as shown at right.
Click Next to proceed to Step 13, or Back to re-
turn to the previous step.
13
The dialog shown at right will be displayed. Se-
lect Finish wizard and click Next to exit the WT-
3 Setup Utility and proceed to Step 14, or choose
Select another action to perform and click
Next to return to Step 5 ( 12) and add or edit
profi les, change the password, choose a printer,
or change the upload folder.
14
Turn the camera off and disconnect the USB ca-
ble.
Firewall Settings
The WT-3 uses TCP ports 20 and 21 for ftp and TCP port 15740 and UDP port 5353 when con-
necting to a computer. Computer fi rewalls must be confi gured to allow access to these ports,
as otherwise the computer may not be able to access the WT-3.
Profi les
A separate profi le must be created for each host and ftp server.
17
Creating a Printer Profi le
The default printer for computer profi les ( 13) is the system printer for the host
computer. To choose a diff erent printer, start the WT-3 Setup Utility as described in
Step 4 of “Copying Network Profi les to the Camera” ( 12; there is no need to con-
nect the camera to the computer), then follow the steps below.
Using the PD-10
See “Printing Pictures Using the PD-10 Wireless Printer Adapter” ( 32) for more information
on printing pictures using the PD-10.
1 Select Setup wireless printer in the “Select Ac-
tion” dialog and click Next.
2 Choose a printer and click Next.
• Windows: Select a printer from the pull-down
down menu. Printer settings can be adjusted
in the Windows “Printer and Fax” dialog before
printing.
• Macintosh: Click Select Printer… to choose a
printer and adjust printer settings. Click Print to
return to the WT-3 Setup Utility.
3 Exit the WT-3 Setup Utility and disconnect the camera as described in Steps
13–14 of “Copying Network Profi les to the Camera” ( 16).
18
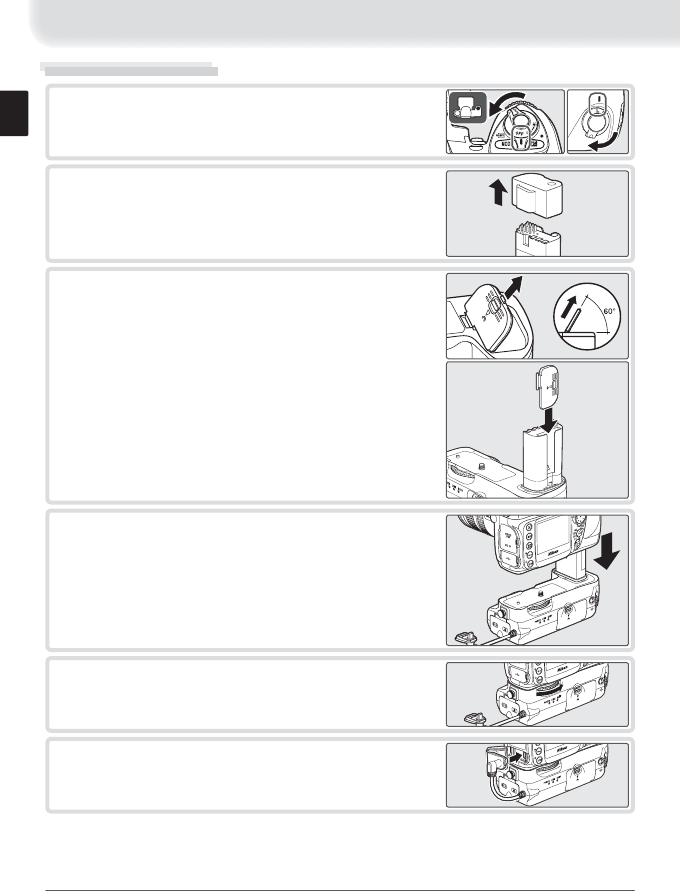
Connecting the WT-3
2 Remove the power connector cover from the
WT-3 and attach it to the camera strap or store it
in a safe place. Be sure to replace the power con-
nector cover when the WT-3 is not in use.
4 Insert the WT-3 into the camera battery chamber
as shown.
5 Rotate the knob in the direction shown to fasten
the WT-3 securely to the camera.
3 Open the camera battery chamber cover and re-
move the battery, then remove the battery cham-
ber cover as shown at right.
Important: To ensure that the cover is not lost, place
it in the WT-3 battery chamber cover holder.
1 Turn the camera off and rotate the control lock on
the WT-3 to the L position.
6 Open the camera USB connector cover and con-
nect the USB cable from the WT-3 to the camera
USB connector.
19
PB-6 Bellows
A PK-13 auto-extension ring and a PB-6D spacer are required when using PB-6 bellows with
the WT-3.
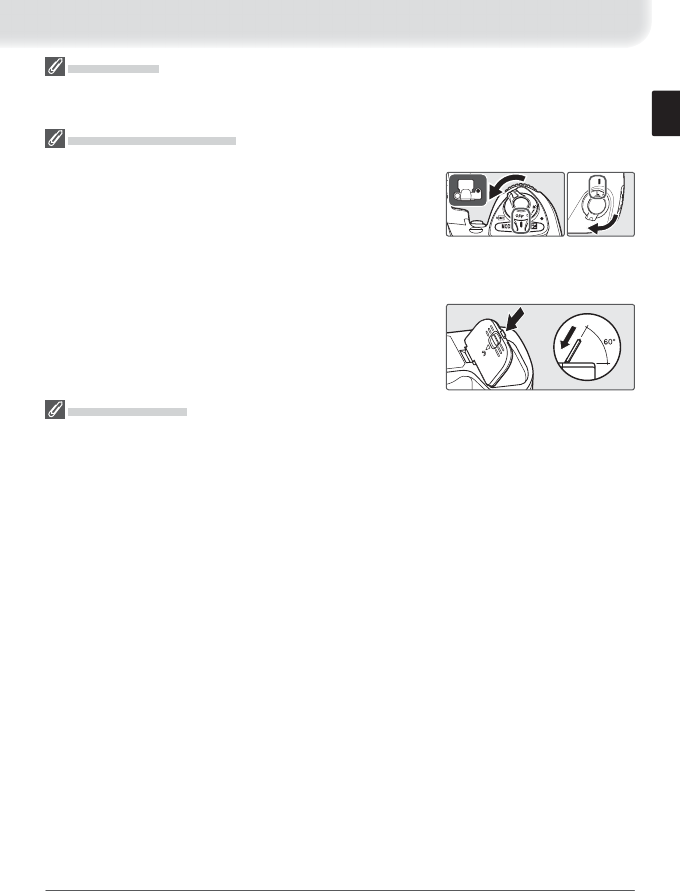
Disconnecting the WT-3
To disconnect the WT-3:
1
Rotate the WT-3 control lock to the L position and turn the
camera off .
2
Disconnect the USB cable.
3
Rotate the knob clockwise to unscrew the WT-3 from the camera tripod mount and remove
the WT-3 from the camera battery chamber.
4
Replace the camera battery chamber cover.
The Control Lock
Turn the camera off and rotate the WT-3 control lock to the L position when connecting or
disconnecting the WT-3 or inserting or removing the battery.
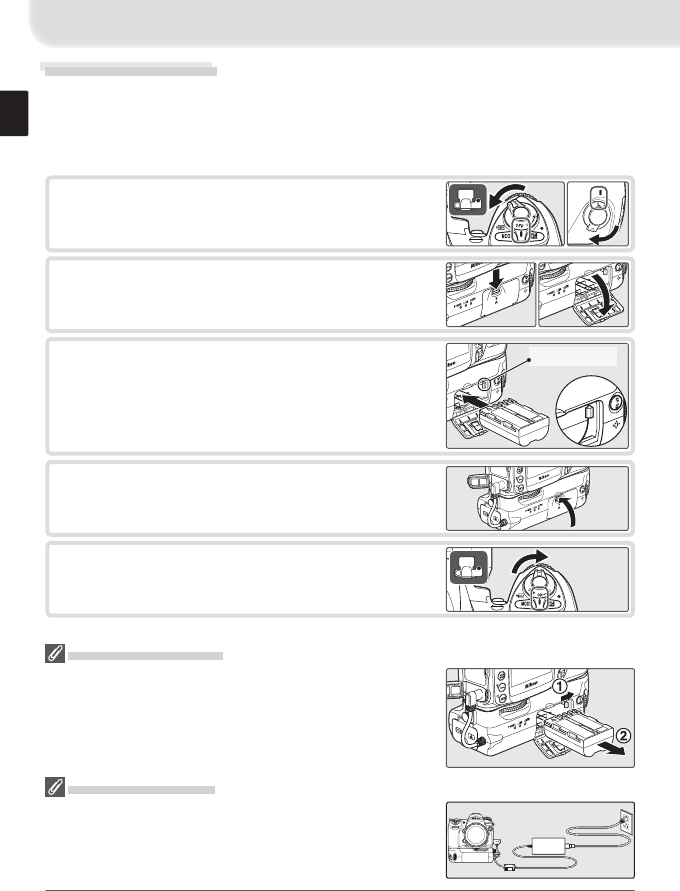
20
3 Insert the battery as shown on the inside of the
battery chamber cover. The battery latch will slide
aside during insertion and pop up to lock the bat-
tery in place when fully inserted.
Inserting the Battery
To power the camera when the WT-3 is in place, insert the camera battery into the
WT-3 battery chamber. The WT-3 takes one EN-EL3e rechargeable Li-ion battery;
other batteries can not be used. Note that the drain on the battery is increased
when the WT-3 is attached.
The EH-6 AC Adapter
The optional EH-6 AC adapter can also be used to power the
camera when the WT-3 is connected. Connect the DC plug
on the AC adapter to the WT-3 DC-IN connector, not to the
camera.
2 Open the battery chamber cover.
4 Close the battery-chamber cover.
5 Turn the camera on and check the battery level in
the control panel or viewfi nder or using the Bat-
tery Info option in the camera setup menu.
1 Turn the camera off and rotate the control lock on
the WT-3 to the L position.
Removing the Battery
Being careful not to drop the battery, open the battery cham-
ber cover and remove the battery as shown at right.
Batery latch
21
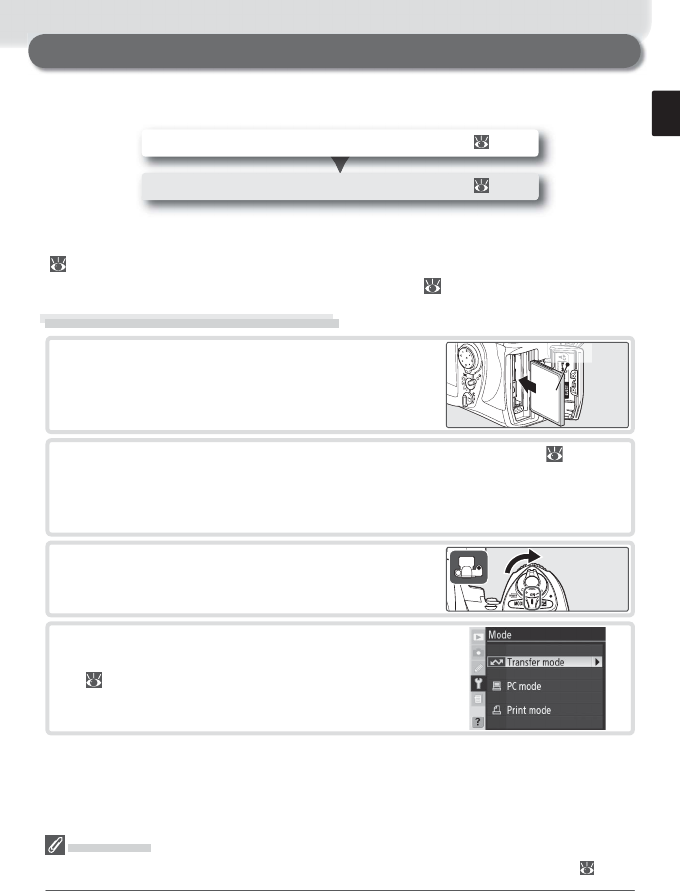
Uploading Images: Transfer Mode
Choose transfer mode to upload photographs to a computer or ftp server. The
principal steps are:
Upload images ...................................................................................... 23–25
Before connecting to the host, create a host profi le using the WT-3 Setup Utility
( 11–16) and be sure that the host is running. Settings for connection for an ftp
server can also be adjusted from the camera menus ( 48–50).
Connecting to the Host or ftp Server
Choose PTP
Before connecting the WT-3, set the USB option in the camera setup menu to PTP ( 11).
1 Turn the camera off and insert the memory card
containing the pictures to be sent.
Front
2 To access the network via Ethernet, connect the Ethernet cable ( 4). Note
that wireless transfer is disabled while an Ethernet cable is connected. Dis-
connect the Ethernet cable before accessing a wireless network. Turn the
camera off before connecting or disconnecting the Ethernet cable.
3 Turn the camera on.
4 Select Transfer mode for the Wireless trans-
mitter > Mode option in the camera setup menu
( 34).
Connect to the host or ftp server .................................................... 21–22
22
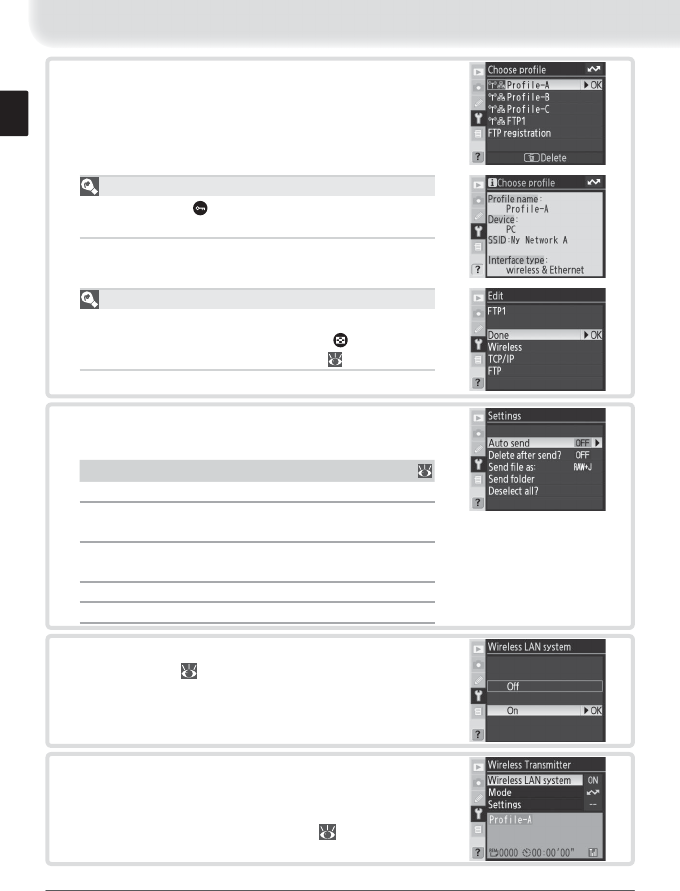
Viewing Profi le Information
Press the camera button to view information on the
selected profi le.
5 A list of available connection profi les will be dis-
played. Press the multi selector up or down to
highlight the desired profi le and press to the right
to select.
Editing ftp Server Profi les
If an ftp server profi le is selected, ftp settings can be ed-
ited manually by pressing the camera button. See
the Menu Guide for more information ( 35).
6 Choose Settings in Wireless transmitter menu
to edit the following transfer options:
Option Description
Auto send Upload photos as they are taken. 46
Delete
after send?
Delete photos from camera memory
card after upload. 46
Send fi le as Send NEF + JPEG images as JPEG only or
as NEF and JPEG. 46
Send folder Upload all photos in selected folder. 47
Deselect all? Deselect all images selected for upload. 47
7 Select On for Wireless transmitter > Wireless
LAN system ( 34).
8 Confi rm that the selected profi le is displayed in
green in the top level of the wireless transmitter
menu. For information on what to do if an error is
displayed, see “Troubleshooting” ( 51).