Nikon 1143EA 802.11 b/g Wireless Transmitter User Manual
Nikon Corporation 802.11 b/g Wireless Transmitter
Nikon >
Contents
- 1. Manual Pt1
- 2. Manual Pt2
- 3. Manual Pt3
- 4. Manual Pt4
- 5. Manual Pt5
Manual Pt4
37
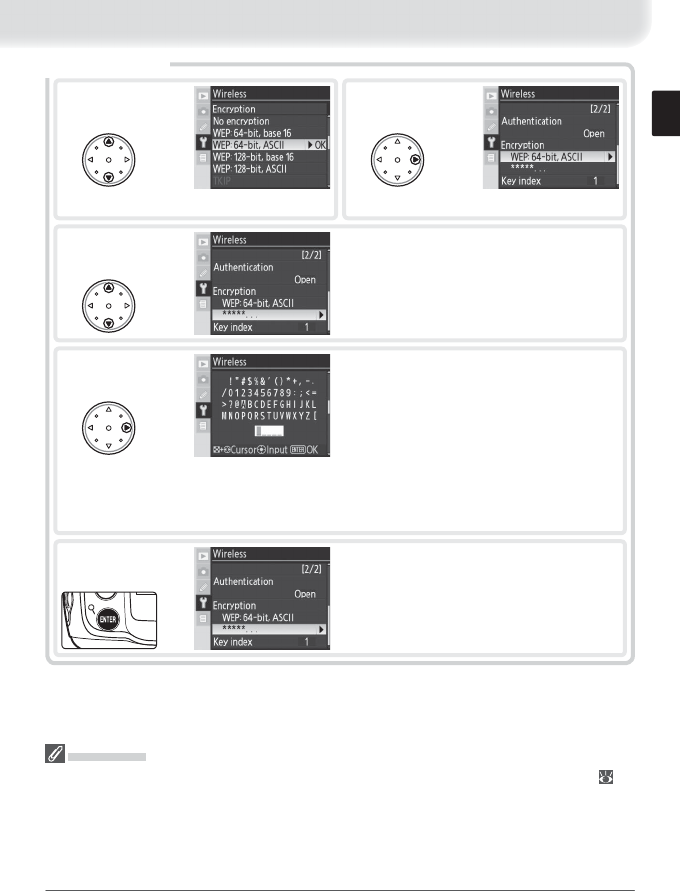
Encryption
1
Highlight encryption method.
2
Return to wireless menu (2/2).
3Highlight encryption key. Skip Steps 3–5 if
No encryption was selected in Steps 1–2.
4Edit encryption key:
• Base 16: press multi selector left or right to
select character, up or down to change. 64-
bit keys require 10 digits, 128-bit keys 26
digits, TKIP and AES keys 64 digits.
• ASCII : enter key as described on page 26.
64-bit keys are 5 characters long, 128-bit
keys 13 characters long, TKIP and AES keys
8 to 63 characters long.
5Return to wireless menu (2/2).
Encryption
The type of encryption available depends on the option selected for Authentication ( 14,
36):
• Open: none, Wep: 64-bit,base 16, Wep: 64-bit,ASCII, Wep: 128-bit,base 16, Wep: 128-bit,ASCII
• Shared: Wep: 64-bit,base 16, Wep: 64-bit,ASCII, Wep: 128-bit,base 16, Wep: 128-bit,ASCII
• WPA-PSK: TKIP, AES
• WPA2-PSK: AES
38
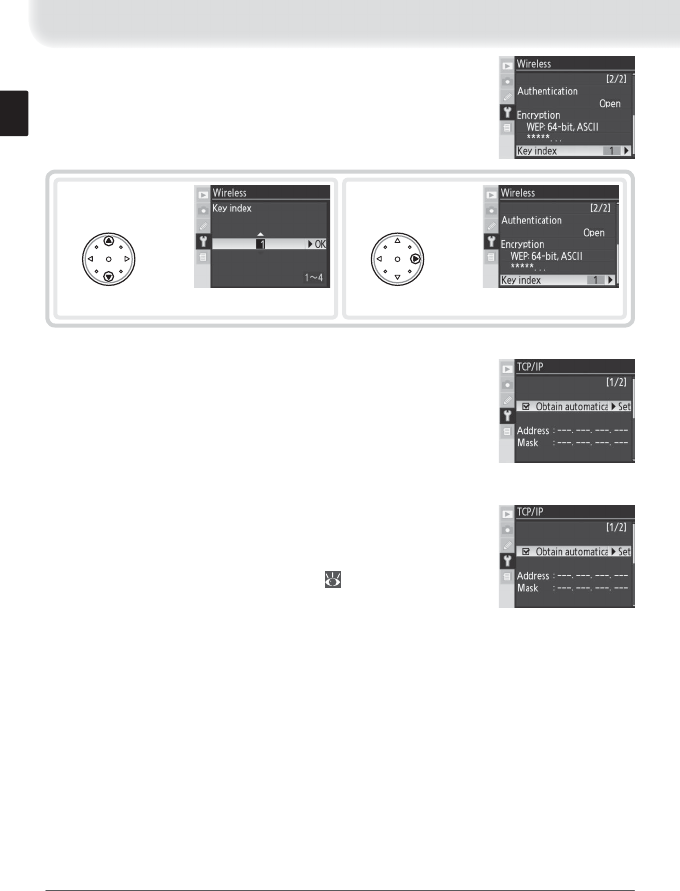
1
Choose index.
2
Return to wireless menu (1/2).
Key index: In infrastructure networks that use WEP encryption,
choose the key index used by the host or access point.
TCP / IP
Adjust TCP / IP settings as described on the following pages.
The TCP / IP menu has two pages of options; to scroll between
pages, press the multi selector up or down.
TCP / IP Menu, Page 1/2
Obtain automatically: Highlight this option and press the multi
selector right to toggle it on (✔) or off . Turn this option on if
the wireless network is confi gured to supply an IP address au-
tomatically by DHCP server or Auto IP ( 52). Otherwise turn
it off and enter the address and subnet mask supplied by the
network administrator as described on the following page.

39
1
Highlight Address.
2
Enter edit mode.
5
Highlight Mask.
6
Enter edit mode.
4
Exit to TCP / IP menu (1/2). If subnet mask
is required, proceed to Step 5.
3
Press multi selector left or right to select,
up or down to change.
8
Exit to TCP / IP menu (1/2).
7
Choose subnet mask.
40
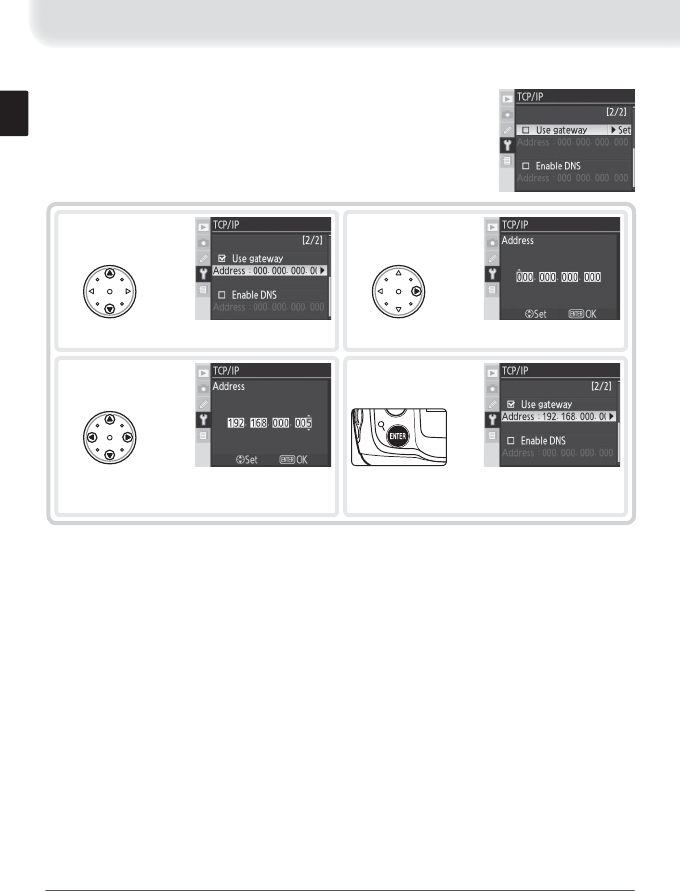
TCP / IP Menu, Page 2/2
Use gateway: Highlight this option and press the multi selector
right to toggle it on (✔) or off . If the network requires a gate-
way address, turn this option on and enter the address sup-
plied by the network administrator as described below.
2
Enter edit mode.
1
Highlight Address.
4
Return to TCP / IP menu (2/2).
3
Press multi selector left or right to select,
up or down to change.
41
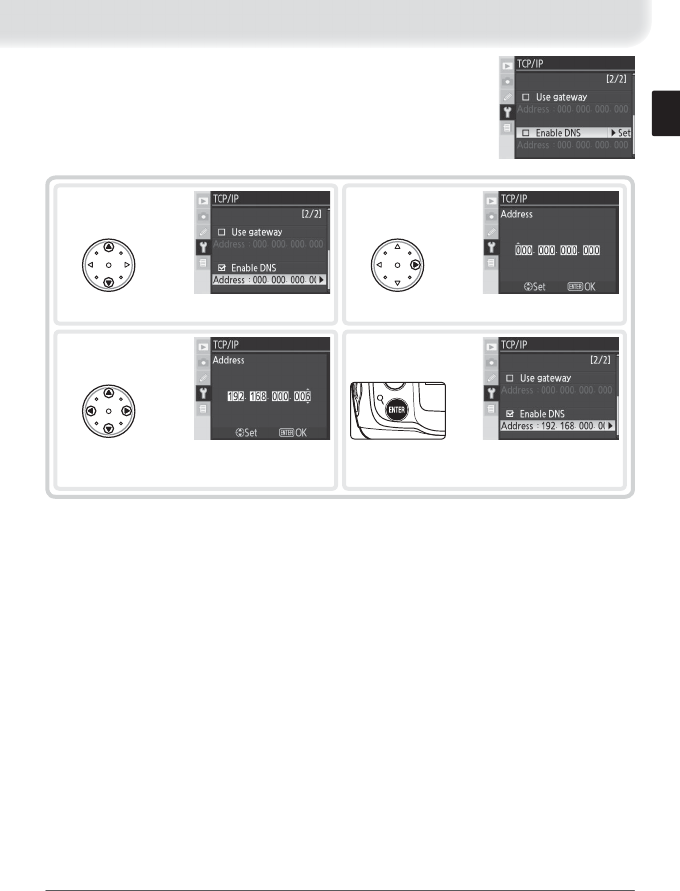
Enable DNS: Highlight this option and press the multi selector
right to toggle it on (✔) or off . If a Domain Name Server (DNS)
exists on the network, turn this option on and enter the ad-
dress supplied by the network administrator as described be-
low.
1
Highlight Address.
2
Enter edit mode.
4
Return to TCP / IP menu (2/2).
3
Press multi selector left or right to select,
up or down to change.
42
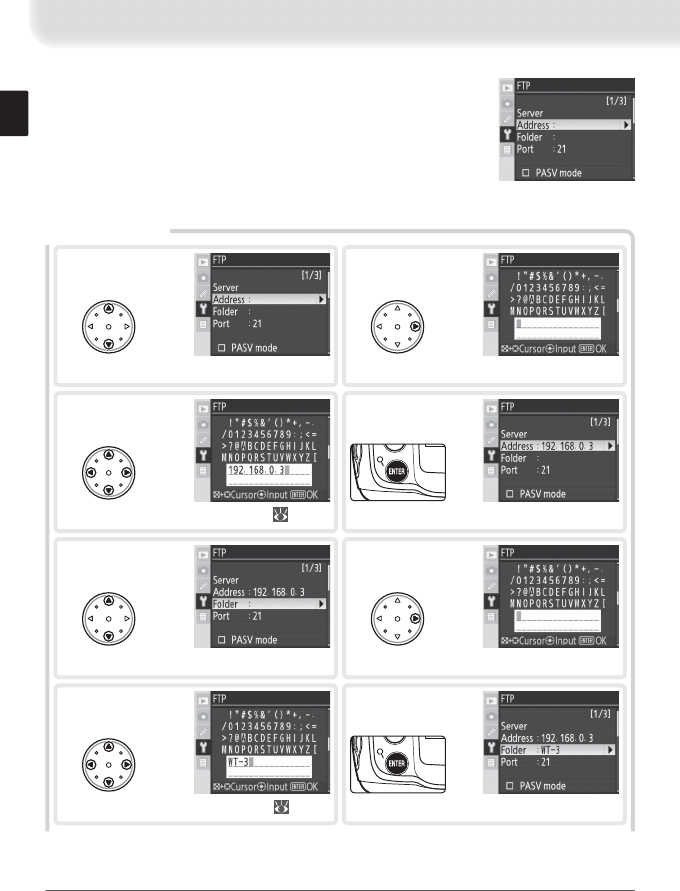
FTP Menu, Page 1/3
Server
1
Highlight Address.
2
Display text entry dialog.
5
Highlight Folder.
6
Display text entry dialog.
FTP
Adjust ftp settings as described on the following pages. The
ftp menu has three pages of options; to scroll between pages,
press the multi selector up or down.
4
Return to ftp menu (1/3).
3
Enter server address (required; 35).
8
Return to ftp menu (1/3).
7
Enter destination folder name ( 35).
43
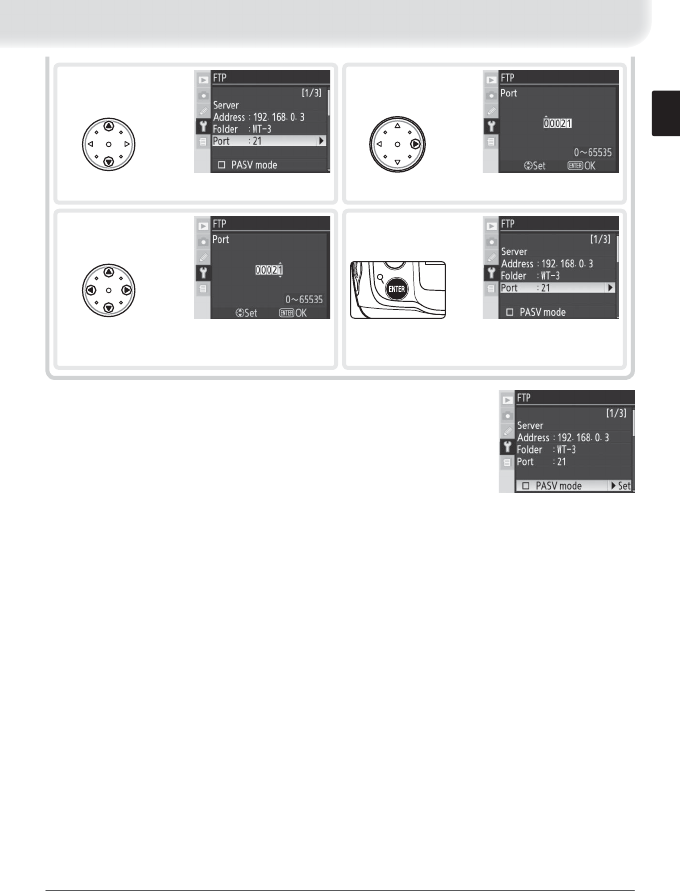
10
Enter edit mode.
9
Highlight Port.
PASV mode: Highlight this option and press the multi selector
right to toggle PASV mode on (✔) or off . Turn this option off
to use normal (PORT) mode. Be sure the server supports PASV
mode before turning this option on.
12
Return to ftp menu (1/3).
11
Press multi selector left or right to select,
up or down to change.
44
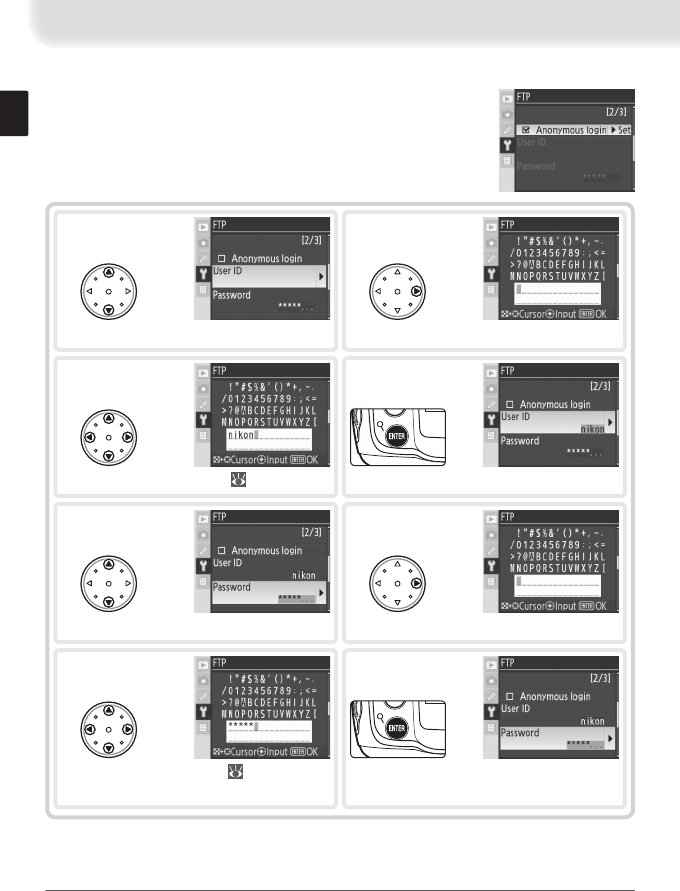
FTP Menu, Page 2/3
Anonymous login: Highlight this option and press the multi se-
lector right to toggle it on (✔) or off . Turn this option on for
anonymous login, off to enter a user name and password as
described below.
1
Highlight User ID.
3
Enter user name ( 35).
5
Highlight Password.
7
Enter password ( 35).
6
Display text entry dialog.
2
Display text entry dialog.
4
Return to ftp menu (2/3).
8
Return to ftp menu (2/3). Password is dis-
guised as a row of dots.
45
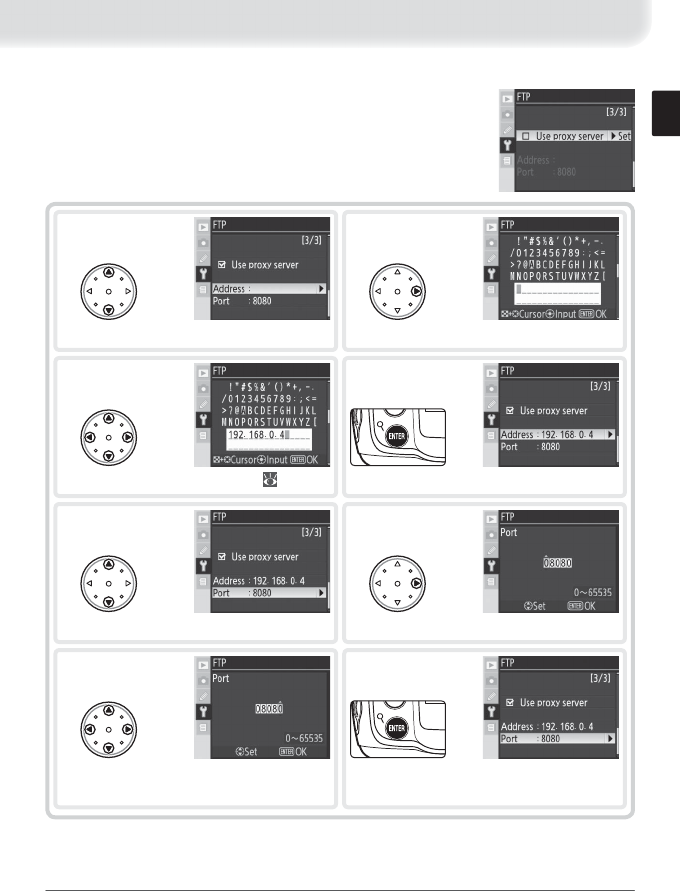
FTP Menu, Page 3/3
Use proxy server: Highlight this option and press the multi selec-
tor right to toggle it on (✔) or off . If a proxy server is required
for ftp, turn this option on and enter an address and port num-
ber as described below.
1
Highlight Address.
2
Display text entry dialog.
3
Enter proxy server address ( 35).
5
Highlight Port.
6
Enter edit mode.
7
Press multi selector left or right to select,
up or down to change.
4
Return to ftp menu (3/3).
8
Return to ftp menu (3/3).
46
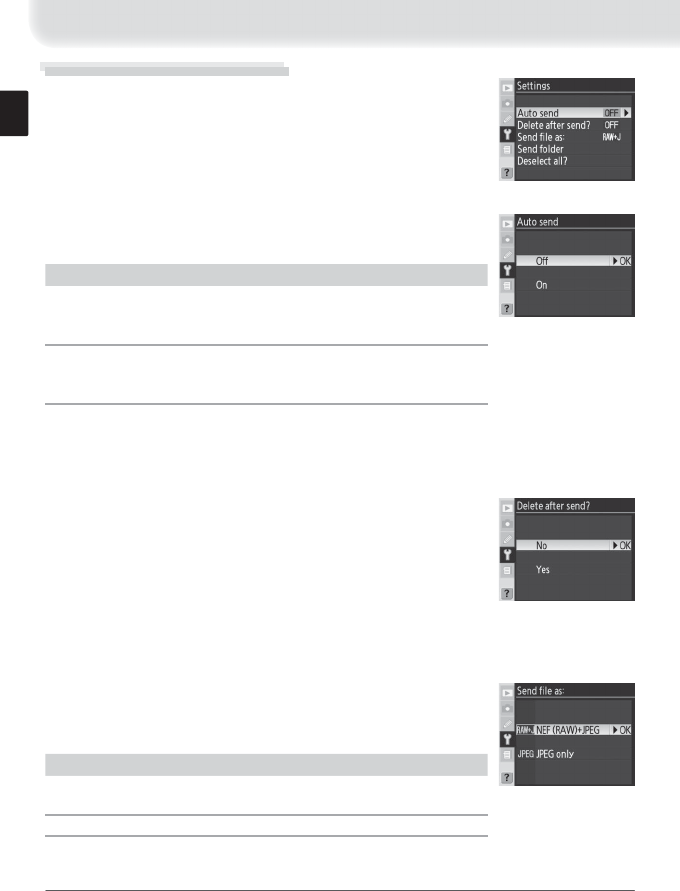
Settings (Transfer Mode Only)
The following settings are available in transfer mode:
Auto Send
Choose whether to upload photographs to the server as they
are taken.
Option Description
Off
(default)
Photos are not automatically uploaded as they are taken.
Photos can be selected for transmission when camera is in
playback mode.
On
Photos are uploaded immediately after being recorded to
camera memory card. * Be sure memory card is inserted in
camera before shooting.
* Pictures will not be uploaded to the server if Off is selected in the Wireless transmit-
ter > Wireless LAN system menu. Pictures will instead be marked with a “send” indicator as
they are recorded to the memory card.
Delete After Send?
Select Yes to delete photographs from the camera memory
card automatically once upload is complete (the default op-
tion is No). Files uploaded before this option was selected are
not aff ected. Photographs will not be deleted while displayed
in slide shows or in the delete, print set, and preset white bal-
ance menus. Sequential fi le numbering is used while this option is in eff ect, regard-
less of the option selected for Custom Setting d6 (File No. Sequence).
Send File As
When uploading NEF + JPEG images to an ftp server, choose
whether to send both NEF (RAW) and JPEG fi les or only the
JPEG fi les.
Option Description
NEF (RAW) + JPEG
(default)
Upload both NEF (RAW) and JPEG fi les. JPEG fi les are
sent fi rst.
JPEG only Upload JPEG fi les only.
47
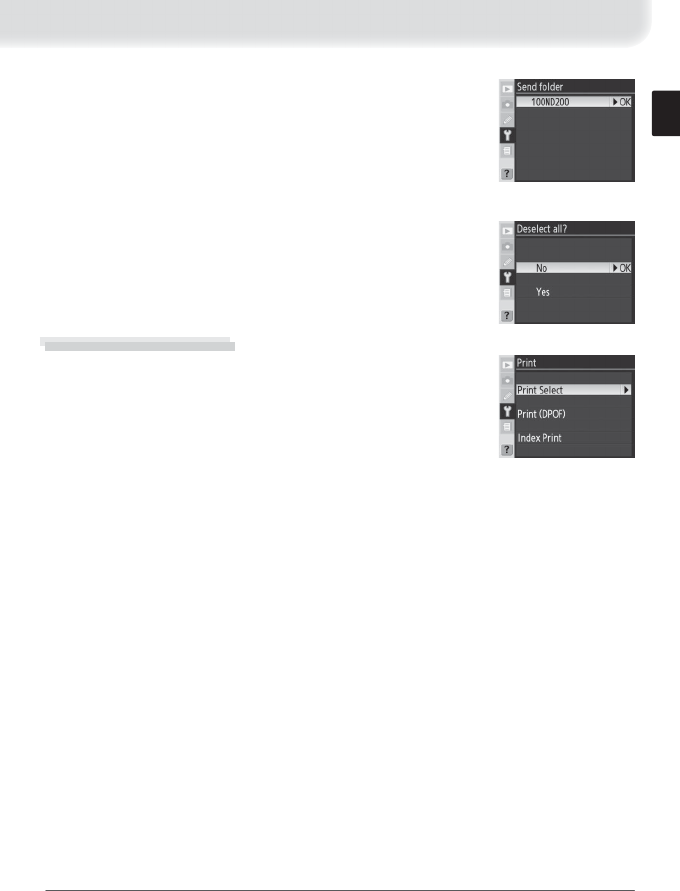
Send Folder
All fi les in the selected folder (including those already marked
as “sent”) will be uploaded in ascending order by fi le number,
beginning when the folder is selected. The folder itself will not
be uploaded. This option is not available when the memory
card contains no folders.
Deselect All?
Select Yes to remove “send,” “sending,” and “sent” marking from
all images on the memory card. Upload of any images marked
with a “sending” icon will immediately be terminated.
Print (Print Mode Only)
Choose a printer from the profi le list. Once a connection has
been established, photographs can be printed as described
in “Printing Via Direct USB Connection: Printing Multiple Pho-
tographs” in the camera manual. This option is only available
when On is selected for Wireless transmitter > Wireless
LAN system in the camera setup menu. Note that index
printing is only available with the optional PD-10 wireless
printer adapter.
48
Appendices
Creating ftp Profi les Using the Camera Menus
In transfer mode, the camera menus can be used to create ftp profi les in place of
the WT-3 Setup Utility. Before creating an ftp profi le with the camera menus, set
the camera USB option to PTP and connect the WT-3. To prevent unexpected loss
of power, be sure the battery is fully charged or use an optional EH-6 AC adapter.
The drain on the battery can be reduced by selecting Off for the Wireless trans-
mitter > Wireless LAN system option in the camera setup menu before adjusting
ftp settings.
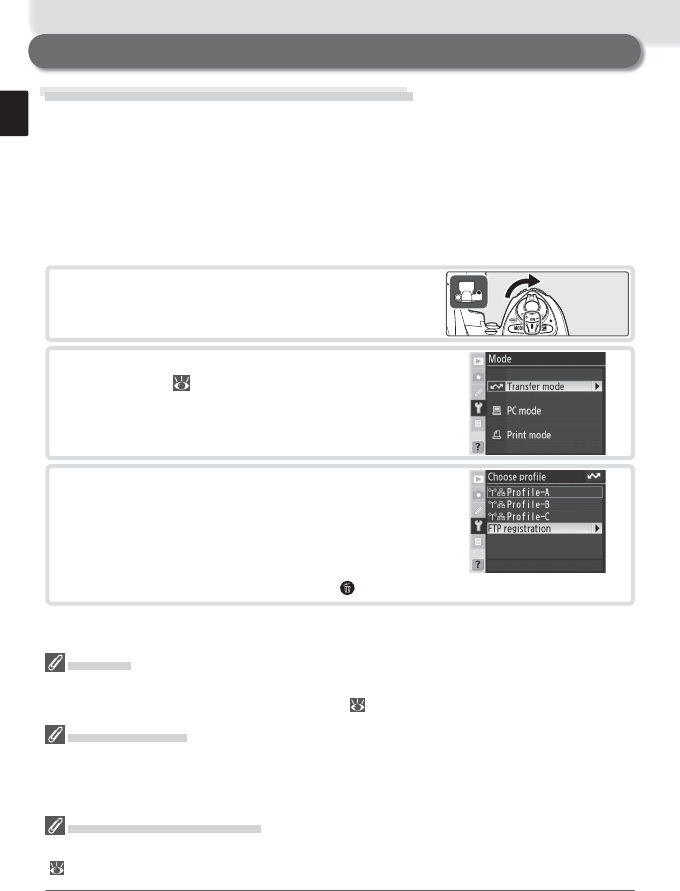
1 Turn the camera on.
2 Select Transfer mode for Wireless transmit-
ter > Mode ( 34).
Firewalls
The WT-3 uses TCP ports 20 and 21 for ftp. It may be necessary to adjust fi rewall settings
before connecting to a server behind a fi rewall ( 16).
Using the Menus
If the shutter-release button on the camera or WT-3 is pressed while menus are displayed,
the monitor will turn off and any changes to the current profi le will be lost. Do not press the
shutter-release button while editing profi les.
Editing Existing ftp Profi les
See the Menu Guide for information on using the camera menus to edit existing ftp profi les
( 35).
3 A profi le list will be displayed showing the con-
nections available in transfer mode. Highlight
FTP registration and press the multi selector to
the right. Note a new ftp profi le can not be cre-
ated if the camera already contains nine profi les; if
necessary, delete a profi le using the button.
49
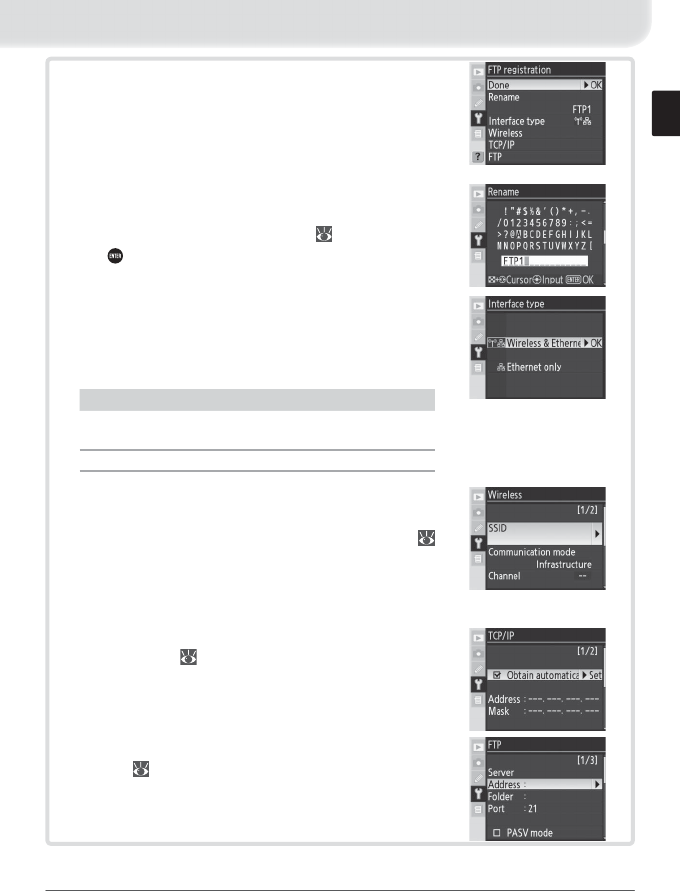
4 The registration dialog shown at right will be
displayed. Press the multi selector up or down
to highlight an option, then press to the right to
select. Select Done to proceed to Step 5 when
settings are complete.
Rename: The dialog shown at right will be dis-
played. Enter a profi le name of up to 16 charac-
ters as described in “Text Entry” ( 35) and press
the button to return to the registration dialog.
Interface type: The dialog shown at right will be
displayed. Highlight one of the following options
and press the multi selector to the right to return
to the registration dialog.
Option Description
Wireless & Ethernet
(default) Connect via wireless and/or Ethernet.
Ethernet only Connect via Ethernet only.
Wireless: If Wireless & Ethernet is selected for
Interface type, select this option to adjust wire-
less settings as described in the Menu Guide (
35–38). Press the multi selector to the left to re-
turn to the registration dialog when settings are
complete.
TCP/IP: Adjust TCP/IP settings as described in the
Menu Guide ( 38–41). Press the multi selector
to the left to return to the registration dialog
when settings are complete.
FTP: Adjust ftp settings as described in the Menu
Guide ( 42–45). Press the multi selector to the
left to return to the registration dialog when set-
tings are complete.

50
5 If On is selected for Wireless transmitter > Wireless LAN system, a confi r-
mation dialog will be displayed. Choose from the following options:
• Yes : Open a connection to the new server and return to the top level of the
wireless transmitter menu.
• No: Return to Step 3 without connecting to the server.
If the wireless transmitter is off , the dialog shown in Step 3 will be displayed
and the WT-3 will not open a connection to the new server.
Errors
An error will be displayed if the new profi le does not match server settings. Edit wireless,
TCP/IP, and ftp settings as described in the Menu Guide ( 35).

51
Troubleshooting
Problem Solution
“POWER” LED does not light.
• Confi rm that battery is inserted in WT-3 and is fully
charged.
• Reattach WT-3.
• Insert memory card (transfer and print modes
only).
• Turn camera on.
• Press shutter-release button halfway to activate ex-
posure meters.
• Select On for Wireless transmitter > Wireless
LAN system option in camera setup menu.
• Open connection to printer (print mode only).
20
18
21, 30
—
—
34
31
All LEDs blink at once. WT-3 hardware error. Contact a Nikon-authorized
service representative.
25, 29,
31
Wireless transmitter option
not available.
• Reattach WT-3.
• Select PTP for USB option in camera setup menu.
18
11
Excessive radio interference. Change orientation of camera or antenna. 4
Camera displays “Ethernet ca-
ble is not connected.”
Connect Ethernet cable or change interface setting
to Wireless & Ethernet.
4, 13,
49
Camera displays wireless error.
• Confi rm that host and wireless LAN adapter are on.
• Ensure that there are no obstacles between WT-3
and wireless LAN adapter.
• Check settings for host and / or wireless LAN adapter
and adjust camera settings appropriately.
—
—
14, 35
Camera displays TCP/IP or FTP
error.
• Check settings for host and / or wireless LAN adapter
and adjust camera settings appropriately.
• Check fi rewall settings.
14, 35
16, 48
Memory card error displayed. Confi rm that memory card is properly inserted. 21, 30
Photos can not be trans-
ferred to computer to which
PictureProject has been in-
stalled.
• PictureProject version is incorrect. Update to latest
version or install version supplied with D200.
• Macintosh: If PictureProject was installed after WT-3
Setup Utility, reinstall WT-3 Setup Utility.
—
Transfer interrupted before all
photographs are sent.
Transfer will resume if camera is turned off and then
on again, exposure meters are reactivated, or On for
Wireless transmitter > Wireless LAN system.
34
Error displayed stating that no
images are available for print-
ing.
Only JPEG images can be printed from the camera.
Transfer RAW (NEF) images to computer and print
them from PictureProject or Nikon Capture version
4.4 or later.
—

52
Glossary
Ad-hoc: Devices in an ad-hoc wireless network communicate directly (“peer to peer”), without
a wireless access point.
AES (Advanced Encryption Standard): An encryption standard developed for use by the American
government. AES has been praised for combining strong encryption with rapid processing.
Auto IP (APIPA—Automatic Private IP Addressing): Allows devices in a network to automatically
assign themselves unique IP addresses if no DHCP server is found on the network. Auto IP
uses addresses from 169.254.1.0 to 169.254.254.255 and a subnet mask of 255.255.0.0. These
addresses are neither global nor private but are reserved for Auto IP.
BSS-ID (Basic Service Set ID): All wireless devices on an ad-hoc wireless network share the same
BSS-ID. The BSS-ID may be up to thirty-two characters long and is case sensitive. See also
Ad-hoc.
Channel: When multiple wireless LANs with diff erent ESS-IDs are operating on a single
frequency within a given area, transmission speeds will drop. Specifying a separate channel
(frequency) for each network can prevent interference and increase transmission speeds (note
that all devices in the same network must be set to the same channel). In the IEEE 802.11b/g
standard, the 2.4 GHz band is divided into 14 channels, each separated by 4 MHz.
DHCP (Dynamic Host Confi guration Protocol) Server: Each device in a TCP/IP network requires
an IP address. If a DHCP server is present on the network, IP addresses will be assigned
automatically.
DNS (Domain Name Server): A server that contains a database of IP addresses and host names
for the machines it administers and that converts host names to IP addresses in response to
queries from clients. Each DNS can also query other Domain Name Servers for addresses not
listed in its database.
ESS-ID (Extended Service Set ID): Multiple BSSs can be confi gured to form an ESS, allowing users
to roam between wireless access points. Only devices with the same ESS-ID as a given access
point can communicate with that access point. The ESS-ID may be up to thirty-two characters
long and is case sensitive.
Ethernet: The name given to the IEEE 802.3 LAN standard. Devices in an Ethernet network are
connected via UTP cables for transmission speeds of up to 10 Mbps (10 base-T) or 100 Mbps
(100 base-TX).
Gateway: A network node that acts as an entrance to another network, for example between a
company network and the Internet.
IIS (Internet Information Services): Microsoft’s name for its Web server software. Notable for its
close connection to Windows-based systems through Active Server Pages (ASPs). When
installed as part of the operating system, IIS makes it relatively easy to build web a server.

53
Infrastructure: Devices in an infrastructure network communicate via wireless access points
that may be connected to an Ethernet network, allowing wireless and Ethernet devices to
coexist on a single network.
IP address: The address given to each node in a TCP/IP network. All nodes in a TCP/IP network
must have a unique IP address. Private IP addresses are recommended for nodes that are part
of a local network.
Key index: A number identifying which WEP key is to be used for encryption when
communicating via an access point with more than one WEP key. All devices on the network
must use the same key index.
LAN (Local Area Network): A network of computers located in relatively close proximity to one
another. LANs generally support data transfer speeds of 10–100 Mbps.
MAC (Media Access Control) Address: A unique hardware address for each device on a network,
required when sending and receiving packets.
Open system: The name given to a wireless network using no authentication (open
authentication). Open systems are relatively insecure, as a password is not required to gain
access to the server.
PASV mode: PASV mode is used by clients behind fi rewalls, when it allows the ftp server to
supply the port number.
Private IP address: An IP address that is only visible within a local network. Because packets using
a private IP address can not be transmitted to another network, they are usually sent between
networks via a proxy server or NAT. Private IP addresses in the range 10.0.0.0–10.255.255.255
are termed “class A.” Class B addresses are in the range 172.16.0.0–172.31.255.255, class C
addresses in the range 192.168.0.0–192.168.255.255. The class of address used depends on
the size of the network. Class C addresses are often used for small networks.
Protocol: A set of rules for passing information back and forth between devices in a network.
By defi ning such elements of communication as how links are established, how receipt of a
signal is acknowledged, how data are encoded, and how to handle errors, a protocol ensures
that data are transmitted without loss of information.
Proxy: A server that stands between large networks and local networks or computers, typically
to ensure security. One element of a fi rewall.
PTP-IP (Picture Transfer Protocol over Internet Protocol): A commonly used name for the CIPA DC-005-
2005 image transfer protocol for transmitting images over LANs. It represents an extension to
the Picture Transfer Protocol (PTP) used to transfer images between cameras and computers
connected via USB cable. The WT-3 uses PTP-IP to communicate with host computers.
Shared key: An authentication system in which WEP keys are used to establish whether a client
has access to the network. Communication is restricted to devices with the same WEP key.

54
SS-ID (Service Set ID): An SS-ID prevents interference between devices in diff erent networks by
allowing communication only between devices that share an SS-ID. See BSS-ID, ESS-ID.
Subnet mask: A mask that divides a network into subnets.
TCP/IP (Transmission Control Protocol/Internet Protocol): A dual protocol consisting of a transport-
layer protocol (TCP) that divides data into packets which it later reassembles, and a network
protocol (IP) that handles transmission of the packets between points in the network. It can
be implemented on diff erent platforms, allowing data to be transmitted between machines
with diff erent operating systems.
TKIP (Temporal Key Integrity Protocol): An encryption standard using dynamic WPA-PSK keys that
change periodically or after a specifi ed amount of data have been transmitted, making it
more secure that WEP, which uses fi xed keys.
UDP (User Datagram Protocol): A fast but unreliable transport layer transmission protocol using
the OSI model.
USB (Universal Serial Bus): A standard for connecting peripheral devices. USB supports data
transfer rates of up to 480 Mbps (USB 2.0). Devices connected via USB can be connected
and disconnected with the power on (“hot plug”) and do not require separate IRQ (interrupt
request) numbers, preventing confl icts with other devices.
WAN (Wide Area Network): A network connecting computers or LANs in widely separated
locations. The Internet is an example of a WAN.
WEP (Wired Equivalent Privacy): A type of encryption in which the data transmitted between
devices is encoded using a shared encryption key (WEP key).
Wireless LAN access point: A wireless transceiver that acts as the connection between wireless
devices and a wireless network.
WPA-PSK (WiFi Protected Access with Pre-Shared Key): A type of authentication for wireless networks
using previously-established (pre-shared) TKIP or AES keys. Wireless devices using this form of
authentication can only communicate with devices with the same pre-shared key.

55
Specifi cations
Wireless
Standards IEEE 802.11b/g (standard wireless LAN protocol), ARIB STD-T66
(standard for low power data communications systems)
Communications
protocols
IEEE 802.11g: OFDM
IEEE 802.11b: DBPSK, DQPSK, CCK
Operating frequency WT-3: 2412–2472 MHz (13 channels)
WT-3A: 2412–2462 MHz (11 channels)
Range (line of sight) Approximately 80 m (262 ft.) with built-in antenna
Approximately 280 m (919 ft.) with WA-E1 extended range antenna
and large antenna at wireless LAN access point
Data rates
*IEEE 802.11g: 6, 9, 12, 18, 24, 36, 48, and 54 Mbps
IEEE 802.11b: 1, 2, 5.5, and 11 Mbps
Security TKIP, AES, 128/64-bit (104/40-bit) WEP
Access protocols Infrastructure / ad-hoc
Ethernet
Standards IEEE 802.3u (100 base-TX)/IEEE 802.3 (10 base-T)
Data rates 10/100 Mbps with auto detect
Port 100 base-TX/10 base-T (AUTO-MDIX)
Data transfer protocols PTP-IP, ftp
Power consumption 3.5 W maximum
Power source Rechargeable EN-EL3e Li-ion battery × 1 (supplied with D200), EH-6
AC adapter (available separately)
Operating environment Temperature: 0–40 °C (32–131 °F)
Humidity: less than 85% (no condensation)
Weight WT-3: 295 g / 10.4 oz (body only)
WT-3A: 295 g / 10.4 oz (body only)
Dimensions (W × H × D) 152 mm × 110 mm × 72.5 mm (6.0 in. × 4.3 in. × 2.9 in.)
* Maximum logical data rates according to IEEE standard. Actual rates may diff er.

56
Battery Life
The number of shots that can be taken with a fully-charged EN-EL3e battery (1500 mAh) varies
with the con di tion of the batteries, temperature, and how the camera and WT-3 are used.
The following measurements were performed at a temperature of 20 °C (68 °F) both with the
WT-3 off and while uploading photographs to a Windows XP Professional SP2 computer using
Auto send.
Example 1
Network None (WT-3 off ) Wireless (802.11g, infrastructure mode) Ethernet (100 base-TX)
No. of shots 1600 1000 1100
Camera
settings
Zoom Nikkor AF-S VR 70–200 mm f/2.8G IF ED lens (VR off ); con tin u ous high-
speed shoot ing mode; con tin u ous-servo autofocus; image quality set to JPEG
Basic; im age size set to M; shutter speed ½50 s; shut ter-re lease pressed half way for
three sec onds and fo cus cycled from infi nity to min i mum range three times with
each shot; after six shots, mon i tor turned on for fi ve seconds and then turned off ;
cycle re peat ed after eight seconds.
Example 2
Network None (WT-3 off ) Wireless (802.11g, infrastructure mode) Ethernet (100 base-TX)
No. of shots 300 200 210
Camera
settings
Zoom Nikkor AF-S VR 24–120 mm f/3.5–5.6G IF ED lens (VR off ); sin gle-frame
shoot ing mode; single-ser vo autofocus; image qual i ty set to JPEG Normal; im age
size set to L; shut ter speed ½50 s; shut ter-re lease pressed half way for fi ve seconds
and fo cus cycled from infi nity to min i mum range once with each shot; built-in
Speedlight fi red at full power with every other shot; AF-assist illuminator lights
when Speedlight is used; cycle re peat ed after eight seconds; camera turned off
for one minute after ten photographs have been transferred.
The following can reduce battery life:
• Using the monitor
• Keeping the shutter-release button pressed
halfway
• Repeated autofocus operations
• Taking NEF (RAW) photographs
• Slow shutter speeds
To ensure maximum battery performance:
• Keep the battery contacts clean. Soiled contacts can reduce battery performance.
• Use EN-EL3e batteries immediately after charging. Batteries will lose their charge if left un-
used.
The battery level displayed by the camera may vary with changes in temperature.

57
Index
G
Gateway, 15, 40, 52
I
IP address, 15, 38, 53
Infrastructure, 2, 14, 36, 53
L
LAN. See Wireless LAN, Ethernet
LED. See Status LEDs
LINK. See Status LEDs
M
MAC address, 16
Memory cards, 21, 30
Menus, 34–47, 48–50
entering text in, 35
Mode, 2, 21, 26, 30, 34
N
Nikon Capture 4, 26, 28
P
Password, 13
PASV mode, 15, 43, 53
PC mode, 2, 26
PictureProject, 13, 26
Port, 16, 48
POWER. See Status LEDs
Printing, 30
Print mode, 2, 30
Proxy, 15, 45, 53
PTP-IP, 53, 55
S
Send folder, 47
Send fi le as, 46
Server. See ftp, server
Settings, 46
SS-ID, 14, 36, 53
Status. See Link quality; Status
LEDs
Status LEDs, 4, 25, 29, 31
T
TCP/IP, 38, 49
TCP/IP, 15, 38, 49, 54
Transfer mode, 2, 21, 35, 46, 48
U
Upload, 21, 23
deleting images after, 46
interrupting, 24
selecting images for, 23
USB, 11
User ID, 44
W
Wireless, 35, 49
Wireless LAN, 2, 14, 35, 49
access point, 2, 54
Wireless LAN system, 22, 27,
31, 32, 34
Wireless transmitter, 34
WT-3 Setup Utility, 2, 3, 7, 11
Symbols
, , , 24
A
AC adapter, 20
Access point. See Wireless LAN,
access point
Ad-hoc, 2, 14, 36, 52
Antenna, 4
Auto send, 46
B
BSS-ID, 36, 52
BUSY. See Status LEDs
C
Channel, 14, 36, 52
Connecting the WT-3, 18
D
Delete after send?, 46
Deselect all?, 47
DHCP server, 15, 38, 52
Domain Name Server (DNS), 15,
41, 52
E
Encryption, 14, 37
key, 14, 37, 54
Errors, 51
ftp, 51
TCP / IP, 51
wireless, 51
ESS-ID, 36, 52
Ethernet, 2, 4, 21, 26, 30, 52
F
File names, 23, 24, 25
Folders, 15, 42. See also Send
folder
FTP, 42, 49
ftp
errors. See Errors, ftp
server, 2, 3, 15, 21, 35, 48
FTP ERROR. See Errors, ftp