Nikon CXP1 Digital camera with 802.11b/g transmitter User Manual 2 of 3
Nikon Corporation Digital camera with 802.11b/g transmitter 2 of 3
Nikon >
Contents
- 1. User Manual 1 of 3
- 2. User Manual 2 of 3
- 3. User Manual 3 of 3
User Manual 2 of 3
49
More on Photography
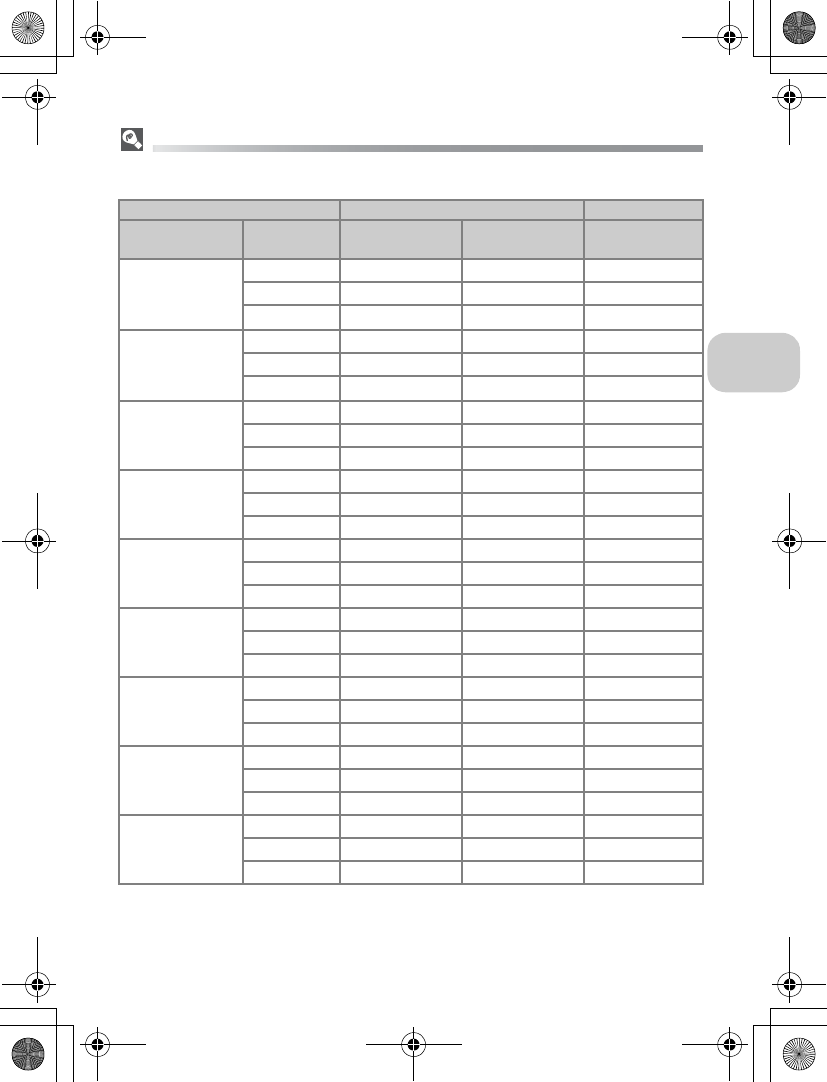
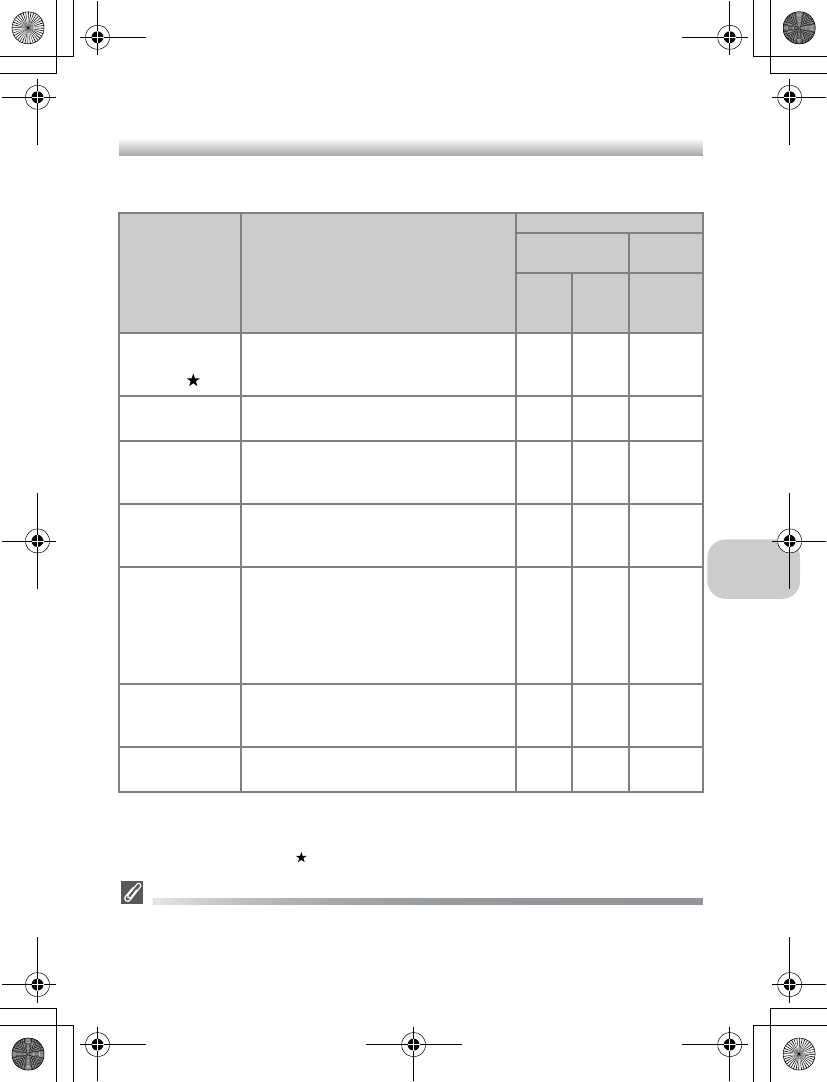
Image Quality/Size and Number of Exposures Remaining
The following table shows the approximate number of pictures that can be stored in internal
memory and on a 256-megabyte memory card at different image modes.
• If memory remains for more than 999 pictures, camera exposure count display will show 999.
• The number of exposures remaining varies widely, depending on the type of memory card, the
nature of JPEG compression, or the content of the image.
Image mode Memory Memory card
Image size Image
quality
About 32 MB
(for P1)
About 16 MB
(for P2)
256 MB
c
3264 × 2448
(default setting
for P1)
FINE XXX XXX XXX
NORMAL XXX XXX XXX
BASIC XXX XXX XXX
d
2592 × 1944
(default setting
for P2)
FINE XXX XXX XXX
NORMAL XXX XXX XXX
BASIC XXX XXX XXX
e
2048 × 1536
FINE XXX XXX XXX
NORMAL XXX XXX XXX
BASIC XXX XXX XXX
f
1600 × 1200
FINE XXX XXX XXX
NORMAL XXX XXX XXX
BASIC XXX XXX XXX
g
1280 × 960
FINE XXX XXX XXX
NORMAL XXX XXX XXX
BASIC XXX XXX XXX
h
1024 × 768
FINE XXX XXX XXX
NORMAL XXX XXX XXX
BASIC XXX XXX XXX
i
640 × 480
FINE XXX XXX XXX
NORMAL XXX XXX XXX
BASIC XXX XXX XXX
j
3264 × 2176
(for P1)
FINE XXX XXX XXX
NORMAL XXX XXX XXX
BASIC XXX XXX XXX
j
2592 × 1728
(for P2)
FINE XXX XXX XXX
NORMAL XXX XXX XXX
BASIC XXX XXX XXX
en_q3175.book Page 49 Thursday, June 16, 2005 10:54 AM
50
More on Photography
W
Taking Pictures Using Sensitivity: Setting Sensitivity
Sensitivity is a measure of how sensitive the camera reacts to light. As the sensi-
tivity is increased, the amount of light required for a certain exposure is decreased,
allowing for faster shutter speeds. This is recommended when taking pictures in
places under low light or of moving subjects. However, noise in the form of ran-
domly-spaced, brightly colored pixels may appear.
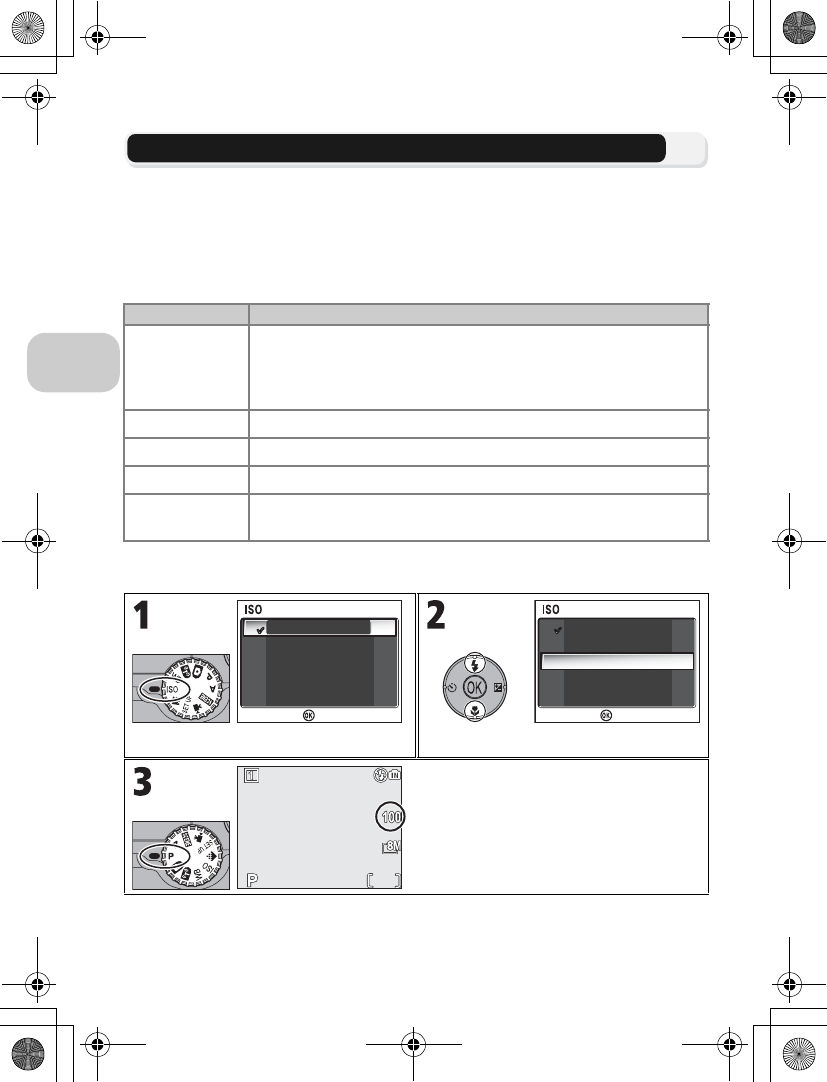
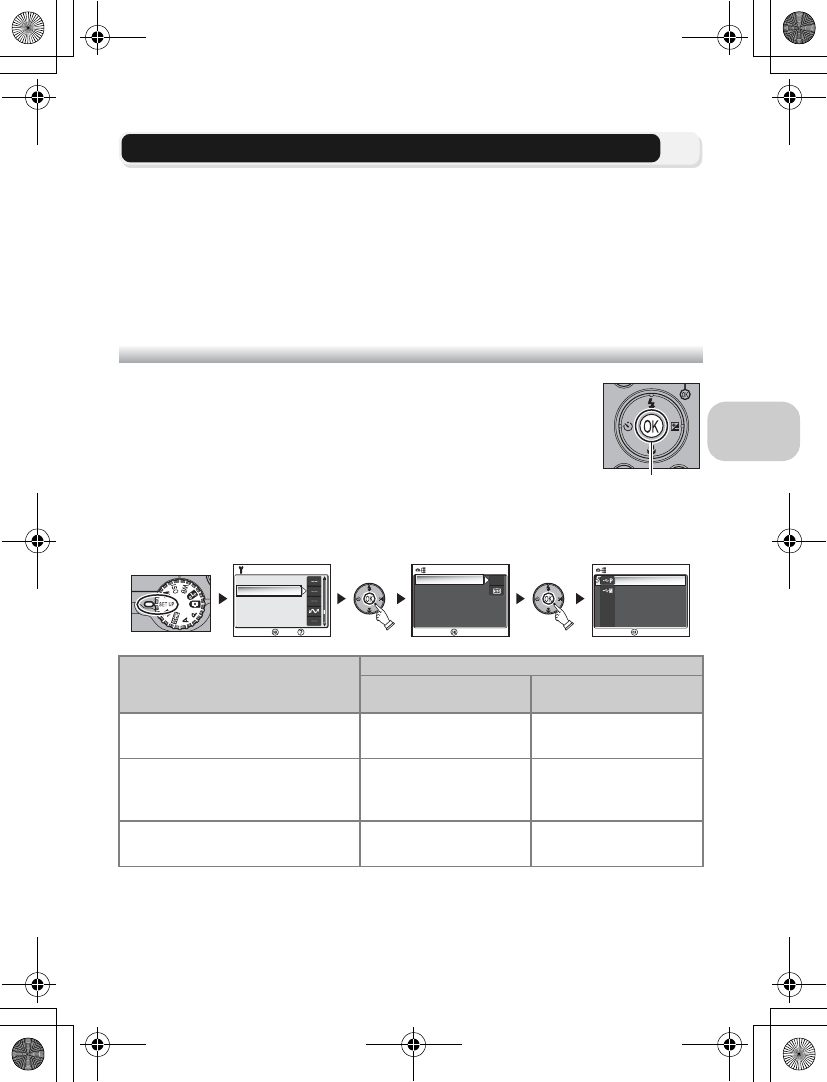
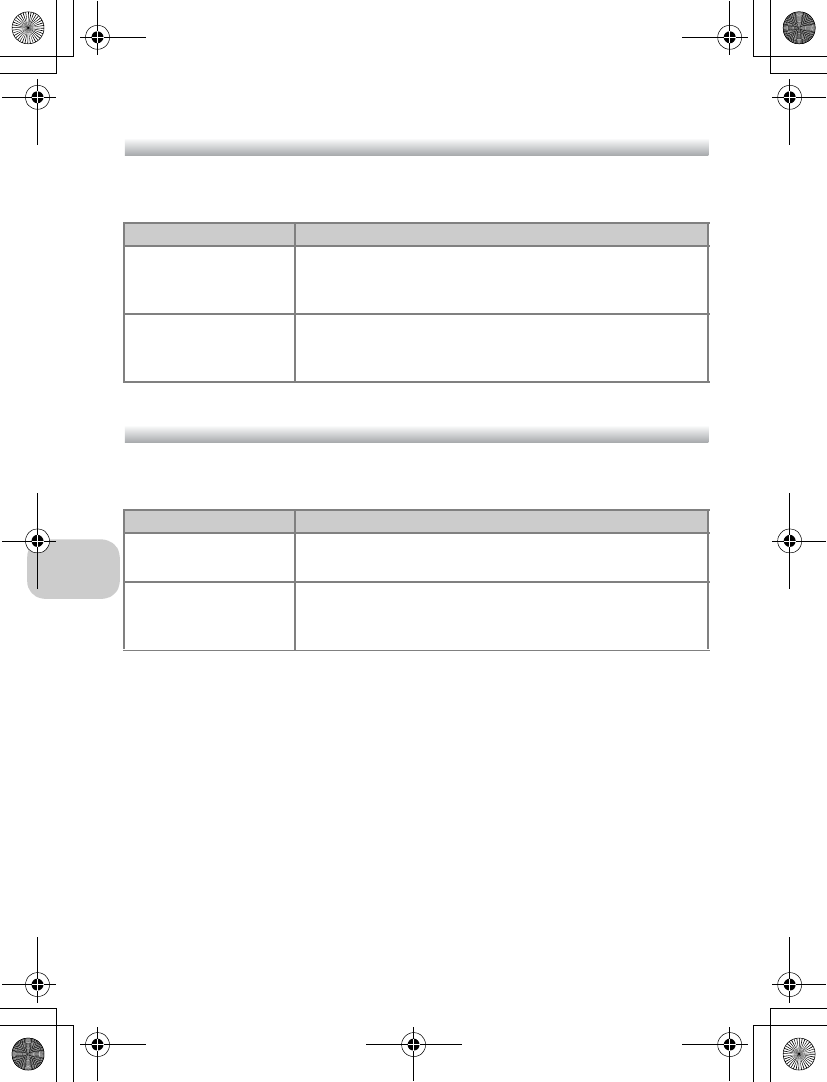
In P and A modes, sensitivity can be selected from the following options:
To choose a value for sensitivity:
Option Description
Auto
(default setting)
Approximately equivalent to ISO 50 (for COOLPIX P1) or ISO 64
(for COOLPIX P2) under normal conditions; when lighting is poor,
however, camera automatically compensates by raising sensitivity
to maximum of ISO 200 equivalent.
50 Approximately equivalent to ISO 50.
100 Approximately equivalent to ISO 100.
200 Approximately equivalent to ISO 200.
400 Approximately equivalent to ISO 400. Intended for use with natu-
ral lighting; not recommended when using flash.
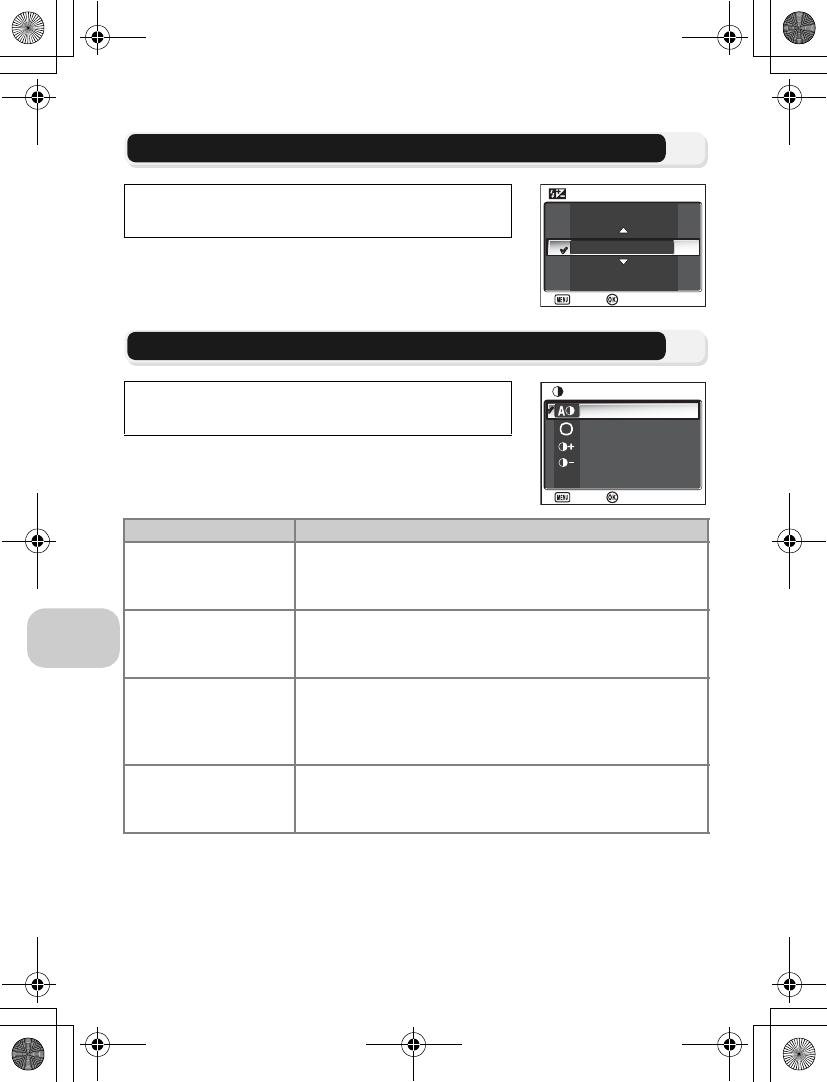
SENSITIVITY menu is displayed. Highlight option and press d.
At settings other than Auto, current set-
ting is shown in shooting display.
SENSITIVITY
SENSITIVITY
Auto
50
100
200
400
Confirm
SENSITIVITY
SENSITIVITY
Auto
50
100
200
400
Confirm
15
15
NORM
NORM
en_q3175.book Page 50 Thursday, June 16, 2005 10:54 AM
51
More on Photography
Using the Flash
A setting of 400 is intended for use with natural lighting. Choose Auto, 50, 100, or 200
when using the flash (c27).
The Shooting Menu
Sensitivity can also be set using the Sensitivity option in the Shooting menu (c86).
en_q3175.book Page 51 Thursday, June 16, 2005 10:54 AM
52
More on Photography
d
Adjusting the Hue: Using White Balance
The color of the light reflected from an object varies with the color of the light
source. The human brain is able to adapt to such changes in color, with the result
that we see white objects as white, regardless of whether they are in the shade,
direct sunlight, or under incandescent lighting. Digital camera can mimic this ad-
justment by processing information from the camera’s image sensor (CCD) ac-
cording to the color of the light source. This process is known as a “white balance
adjustment.”
If White balance has been set to eAuto and the results are not to your satis-
faction or when shooting under the special light sources or conditions, use white
balance settings other than eAuto.
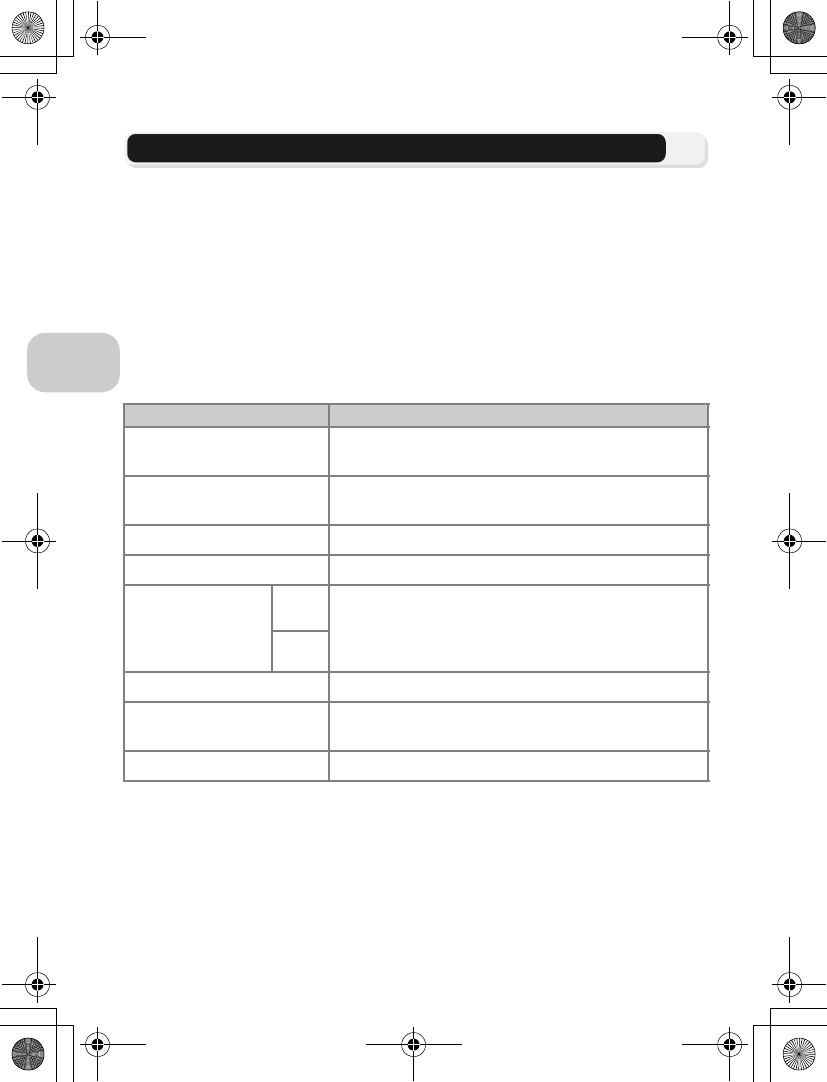
In P and A modes, white balance can be selected from the following options:
Option Description
e Auto
(default setting)
White balance automatically adjusted to suit lighting
conditions. Best choice in most situations.
f White bal. preset Gray object used as reference to set white balance
under unusual lighting conditions (c54).
g Daylight White balance adjusted for direct sunlight.
h Incandescent Use under incandescent lighting.
i Fluorescent
FL1 Use under most types of fluorescent lighting. Press
multi selector right, and select FL1 (White (W)) or FL2
(Daylight White/Natural (N)) according to the bulb
types, and then press d.
FL2
j Cloudy Use when taking pictures under overcast skies.
k Shade Use under sunny skies when your subject is in the
shade.
l Speedlight Use with the flash.
en_q3175.book Page 52 Thursday, June 16, 2005 10:54 AM
53
More on Photography
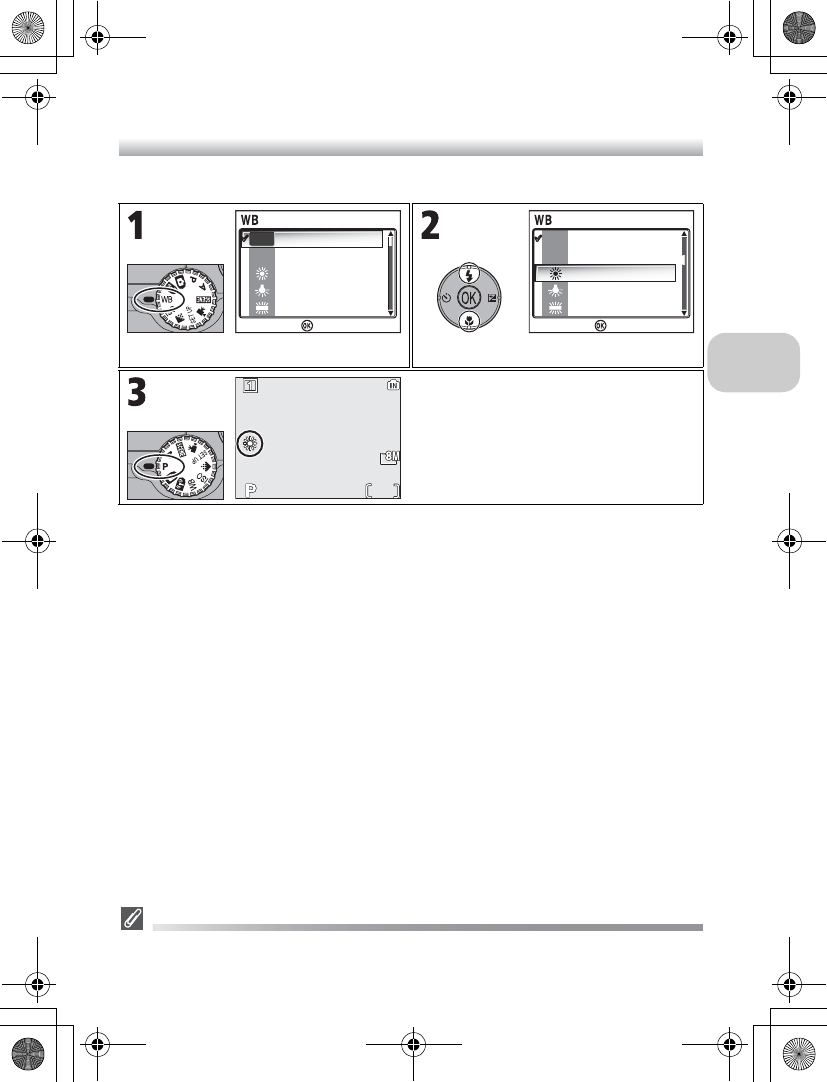
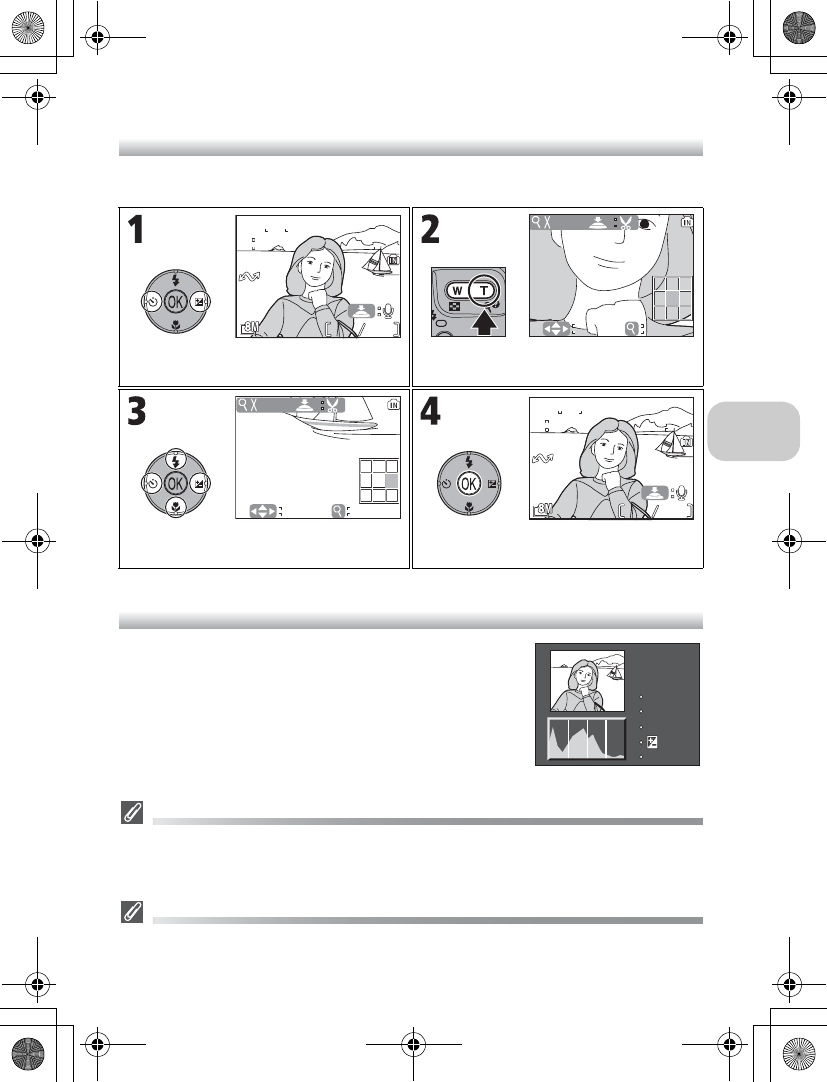
Setting White Balance
To choose a white balance setting:
The Shooting Menu
White balance can also be set using the White balance option in the Shooting menu (c86).
WHITE BALANCE menu is displayed. Highlight option and press d.
At settings other than e, current set-
ting is shown in shooting display.
Auto
White bal. preset
White bal. preset
Direct sunlight
Direct sunlight
Incandescent
Incandescent
Fluorescent
Fluorescent
WHITE BALANCE 1/2
WHITE BALANCE 1/2
A-WB
PRE
Confirm
Auto
AutoAuto
White bal. preset
White bal. preset
Direct sunlight
Incandescent
Incandescent
Fluorescent
Fluorescent
WHITE BALANCE 1/2
WHITE BALANCE 1/2
A-WB
PRE
Confirm
15
15
NORM
NORM
1/60
1/60
F2.7
F2.7
en_q3175.book Page 53 Thursday, June 16, 2005 10:54 AM
54
More on Photography
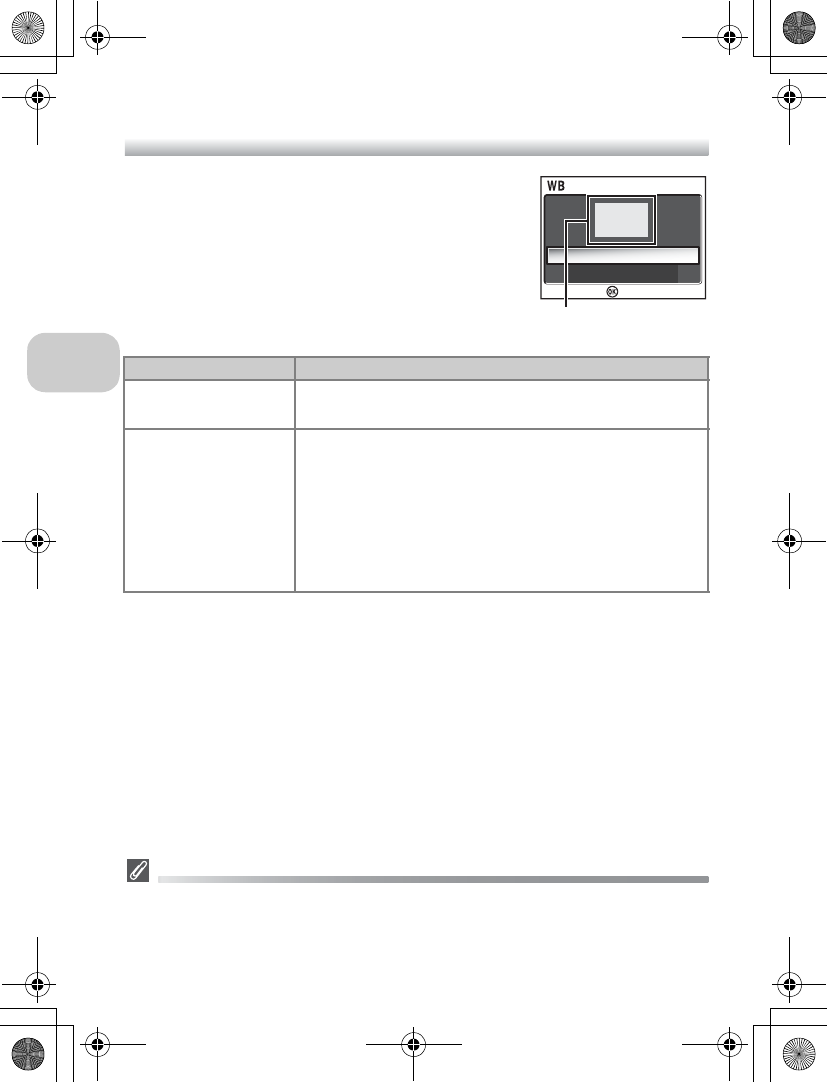
f Preset White Balance
Preset white balance is used when shooting under
mixed lighting or to compensate for light sources with a
strong color cast (for example, to make pictures taken
under a lamp with a red shade look as though they had
been taken under white light). When fWhite bal.
preset is selected from the White balance menu, the
camera will zoom in and the menu shown above at right
will be displayed in the monitor.
Preset White Balance
•The camera cannot measure a value for preset white balance when the flash fires. Regard-
less of the Flash mode selected, the flash will not fire when selecting Measure.
•When Auto bracketing is set to xWB bracketing, preset white balance cannot be
used.
Option Description
Cancel Recalls the most recent value for preset white balance from
the memory and sets white balance to this value.
Measure
To measure a new value for white balance, place a neutral
gray object, such as a piece of cardboard, under the lighting
that will be used in the final picture. Frame this object so
that it fills the square in the center of the menu shown
above. Highlight Measure and press d to measure a new
value for white balance (shutter will be released and camera
will return to original zoom position, but no picture will be
recorded).
WHITE BAL PRESET
WHITE BAL PRESET
Cancel
Measure
Confirm
White balance
measuring window
en_q3175.book Page 54 Thursday, June 16, 2005 10:54 AM
55
More on Playback
More on Playback
Viewing Pictures on the Camera
Full-screen Playback Mode
Press the i button when shooting for Full-screen playback mode (c24).
•When the camera is turned off, pressing the i button for about one second
turns on the camera in Full-screen playback mode (except when in Wireless
transfer mode).
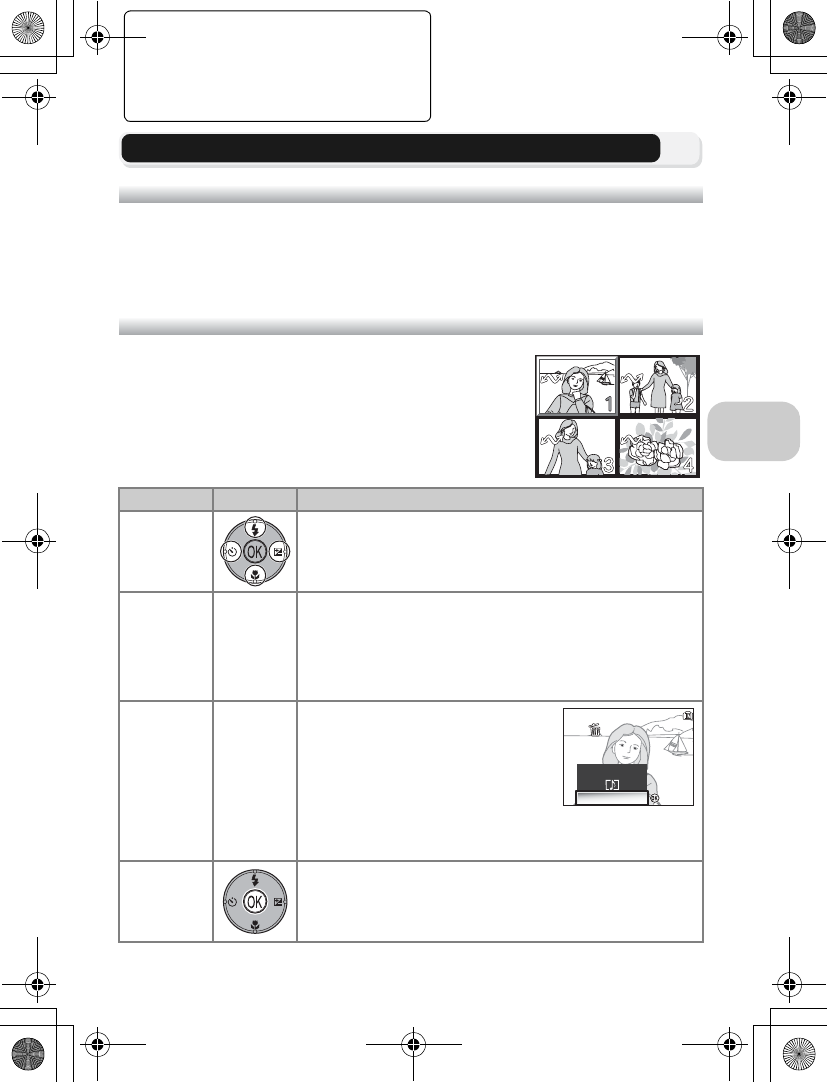
Viewing Multiple Pictures: Thumbnail Playback
Pressing the j (W) button in Full-screen playback
mode (c24) displays the pictures in the memory or on
the memory card in “contact sheets” of four thumbnail
images.
To Press Description
Highlight
pictures Use multi selector to highlight pictures.
Change
number of
pictures
displayed
j(W)/
k(T)
With 4 thumbnails displayed, press the j (W) button
once to view 9 thumbnails. With 9 thumbnails displayed,
press the j (W) button once to view 16 thumbnails. Press
the k (T) button to “zoom in” from 16-thumbnails to 9-
thumbnail view or, from 9-thumbnails to 4-thumbnail
view.
Delete
highlighted
picture
A
The confirmation dialog will be dis-
played. Press multi selector down to
highlight Yes, and press d to delete
the picture.
•No: Return to Playback mode
without deleting a picture.
•P: Delete only the voice memo
recorded with a picture (c58). P is displayed when
selecting a picture with the voice memo.
Cancel
thumbnail
playback
Press d when viewing thumbnails to display selected pic-
ture in Full-screen playback mode.
No
:
Confirm
:
Confirm
Yes
Erase 1 image?
Erase 1 image?
en_q3175.book Page 55 Thursday, June 16, 2005 10:54 AM
56
More on Playback
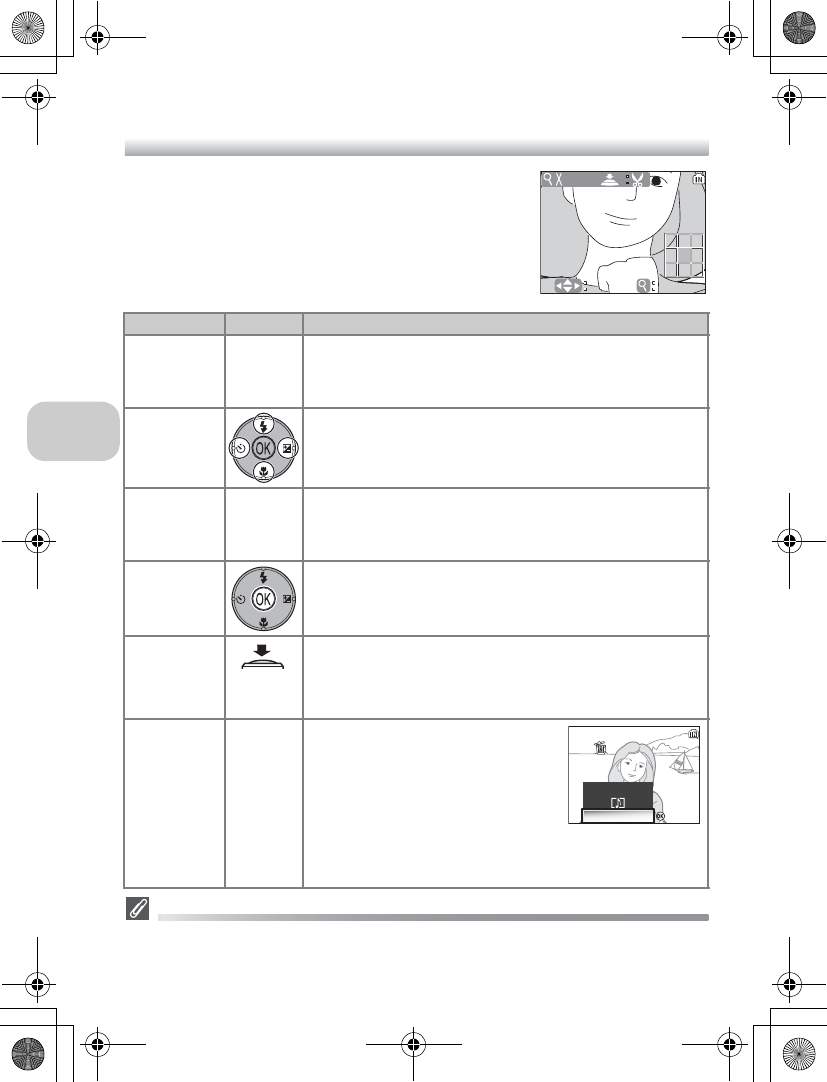
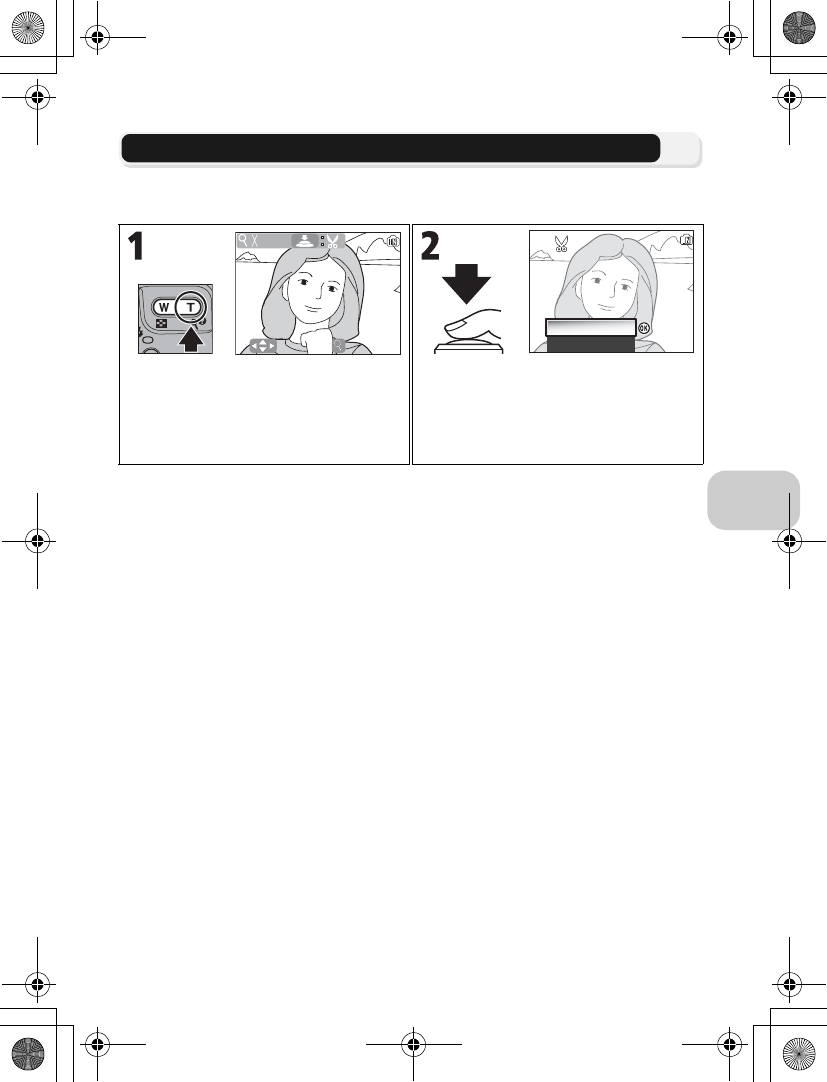
Taking a Closer Look: Playback Zoom
In Full-screen playback mode, press k (T) to activate
Quick playback zoom and display an enlarged (approxi-
mately× 3) view of the picture (c57).
While Quick playback zoom is in effect, use k (T) and
j (W) to zoom the picture in and out.
Playback Zoom
Playback zoom is not available with movies (c80), copies created using the Small pic. op-
tion (c79), or cropped copies (640 × 480 pixels or smaller) (c77).
To Press Description
Zoom in k(T)
Press k (T) while quick playback zoom is in effect to
increase zoom to a maximum of 10×. While image is
zoomed in, k icon and zoom ratio are displayed in top left
corner of monitor.
View other
areas of
picture
Use multi selector to scroll to areas of picture not visible in
monitor. To use multi selector to view other pictures, can-
cel zoom.
Zoom out j(W)
Zoom decreases each time this button is pressed in play-
back zoom. To cancel zoom, zoom picture out until entire
picture is displayed. If zoom is canceled, you can use the
multi selector to display another picture.
Cancel zoom
Cancel zoom and return to Full-screen playback. If zoom is
canceled, you can use the multi selector to display another
picture.
Crop picture shutter-
release
button
Only portion of picture visible in monitor can be cropped
(c77).
Delete
picture A
The confirmation dialog will be dis-
played when you press the A but-
ton. Press multi selector down to
highlight Yes, and press d to delete
the picture.
•
No
: Return to Full-screen playback
without deleting the picture.
•P: Delete only the voice memo
recorded with a picture (c58). P is displayed when
selecting a picture with the voice memo.
3.0
Scroll
Scroll
Scroll Zoom
Zoom
Zoom
No
:
Confirm
:
Confirm
Yes
Erase 1 image?
Erase 1 image?
en_q3175.book Page 56 Thursday, June 16, 2005 10:54 AM
57
More on Playback
Quick Playback Zoom
In Full-screen playback mode, press k (T) to activate Quick playback zoom and dis-
play an enlarged (approximately× 3) view of the picture.
Histogram display
Press d in Full-screen playback mode to view the histo-
gram display (c33). The following current settings are
displayed on the right side of the display:
Shooting mode, shutter speed, aperture, exposure com-
pensation, ISO
Images in the Memory
The pictures in the memory and on the memory card cannot be displayed simultaneously. To
display pictures stored in the memory, select either of the following:
•Remove the memory card from the camera, and display the pictures.
•Copy pictures stored in the memory to a memory card (c114), and display the pictures.
Shooting Information
The shooting conditions displayed in the full-screen playback mode or shooting mode can be
specified. See “Z Monitor Settings” (c120) in the Set-up menu.
Select picture to enlarge. Zoom picture in × 3. Center of picture is
visible in display.
View other areas of picture. Area currently vis-
ible indicated by display in lower right corner.
End zoom and return to playback.
1
1
1
1
100NIKON
100NIKON
JPG
JPG
2005
2005
12
12
12
12
00
00
01
01
0008
0008
NORM
NORM
3.0
Scroll
Scroll
Scroll Zoom
Zoom
Zoom
3.0
Scroll
Scroll
Scroll Zoom
Zoom
Zoom
1
1
1
1
100NIKON
100NIKON
JPG
JPG
2005
2005
12
12
12
12
00
00
01
01
0008
0008
NORM
NORM
0025.JPG
0025.JPG
P
P
1/60
1/60
F2.7
F2.7
0.0
0.0
AUTO
AUTO
en_q3175.book Page 57 Thursday, June 16, 2005 10:54 AM
58
More on Playback
Voice Memos: Recording and Playback
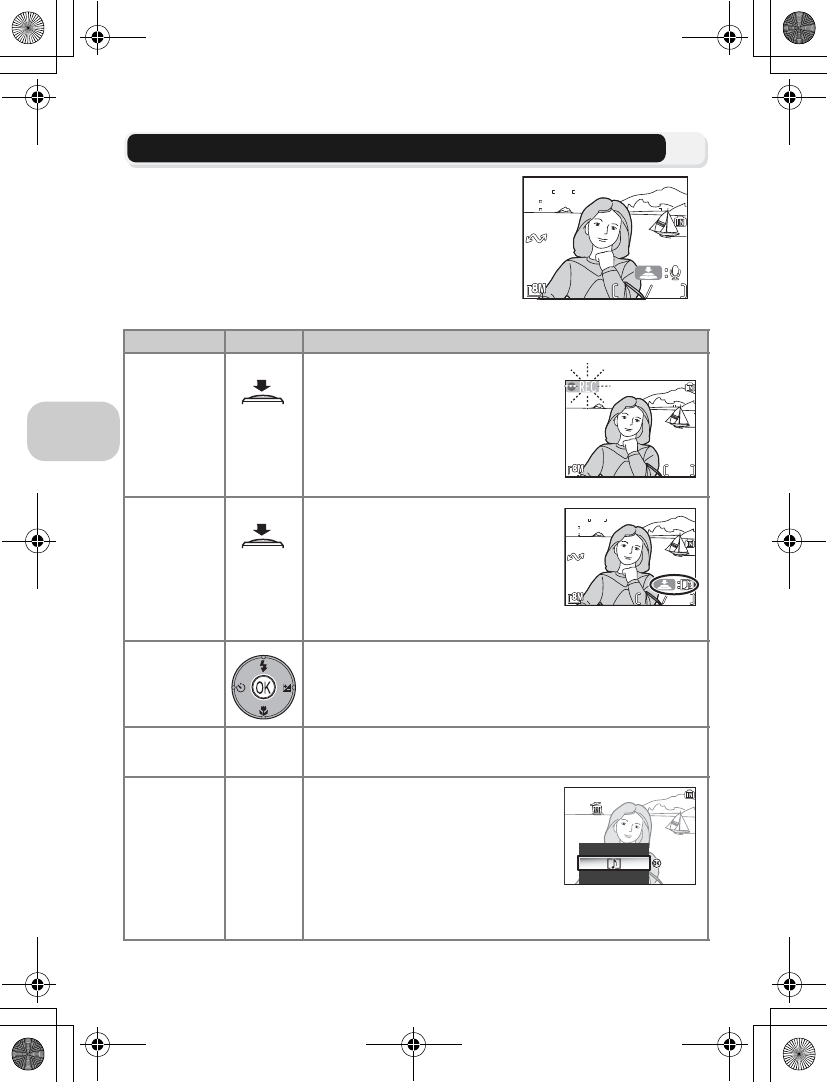
A voice memo can be recorded using the built-in mi-
crophone and appended to any picture marked with
N:O (voice memo recording guide) icon shown in
Full-screen playback (c24).
To Press Description
Record voice
memo
shutter-
release
button
If N:O icon is displayed on cur-
rent picture, memo will be recorded
when shutter-release button is held
down. During recording, y icon
blinks. Recording ends after about
20s or when shutter-release button
is released.
Play voice
memo/
End play-
back
shutter-
release
button
Pictures with voice memos are
marked by N:P icon displayed
in the Full-screen playback mode.
Press shutter-release button to play
voice memo. Playback ends when
voice memo ends or shutter-release
button is pressed again.
Pause/
Resume
show
Press d during voice memo playback to pause. Press d
again to resume playback.
Change
volume
j
(
W
)/
k
(
T
)
Zoom buttons control volume during playback. Press j
(W) button to lower volume, k (T) button to increase.
Delete voice
memo A
The confirmation dialog will be dis-
played. Press multi selector down to
highlight P, and press d. Only a
voice memo will be deleted.
•No : Exit without deleting pic-
ture or voice memo
•Yes : Delete both picture and
voice memo
1
1
1
1
100NIKON
100NIKON
JPG
JPG
2005
2005
12
12
12
12
00
00
01
01
0008
0008
NORM
NORM
NORM
NORM
12s
12s
1
1
1
1
100NIKON
100NIKON
JPG
JPG
2005
2005
12
12
12
12
00
00
01
01
0008
0008
NORM
NORM
No
:
Confirm
:
Confirm
Yes
Erase 1 image?
Erase 1 image?
en_q3175.book Page 58 Thursday, June 16, 2005 10:54 AM
59
More on Playback
Storage
Voice memo file names consist of an identifier (“DSCN” for memos appended to original pic-
tures), a four-digit file number copied from the associated picture, and the extension
“.WAV” (e.g., “DSCN0015.WAV”).
Notes on Voice Memos
•Voice memos cannot be recorded for movies.
•If a voice memo already exists for the current picture, it must be deleted before a new
memo can be recorded.
•Do not touch the microphone during recording.
en_q3175.book Page 59 Thursday, June 16, 2005 10:54 AM
60
More on Playback
Viewing Pictures on TV
The EG-CP14 audio/video (A/V) cable provided with your camera can be used to
connect the camera to a television or video-cassette recorder (VCR).
Choosing Video Mode
Video mode
in the
Interface
option of the camera Set-up menu offers a choice of
NTSC
and
PAL
standards (
c
129). Be sure that the standard selected matches that used in the device.
1Turn the camera off
Turn the camera off before connecting or disconnecting the A/V cable.
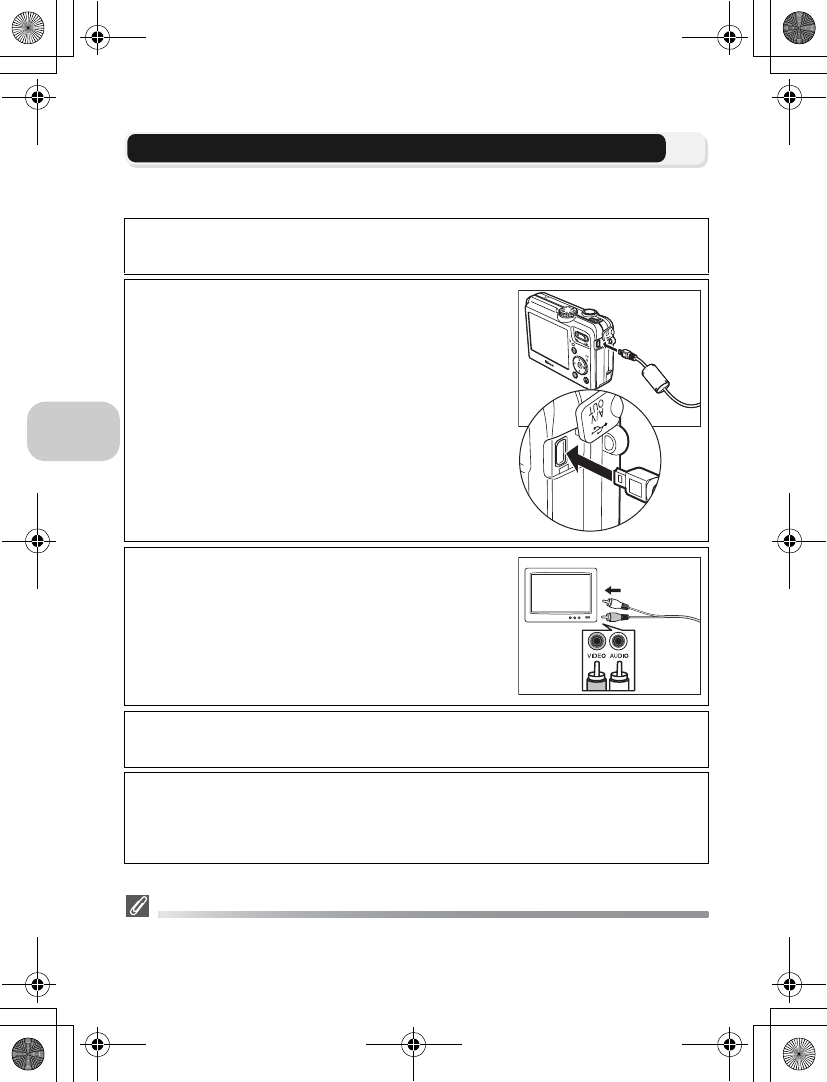
2Connect the A/V cable to the camera
Open the interface connector cover and insert the
black plug of the A/V cable into the camera’s
audio/video (A/V) out connector.
Check to be sure the connector is in the cor-
rect orientation and insert the plug straight.
Do not insert or disconnect it forcibly.
3Connect the A/V cable to the televi-
sion or VCR
Insert the yellow plug of the A/V cable into the
video-in jack on your television or VCR and the
white plug into the audio-in jack.
4Tune the television to the video channel
For more information, see the manual for your television or VCR.
5Turn the camera on
Press the i button for at least one second to turn the camera on. The camera
monitor will turn off and the television will display the image normally shown in
the monitor.
en_q3175.book Page 60 Thursday, June 16, 2005 10:54 AM
61
More on Playback
Viewing Pictures on a Computer
Using the UC-E6 USB cable and PictureProject software provided with your cam-
era, you can transfer photographs and movies to a computer and view them. Be-
fore images can be transferred (copied) to your computer, PictureProject must be
installed. For information on installing PictureProject, see the Quick Start Guide
and the PictureProject Reference Manual (on CD).
You can transfer images to a computer using a wireless LAN and play back the
pictures on computer. See “Wireless Transfer Mode” (c133) for more informa-
tion.
Before Connecting the Camera
Pictures can be copied from the camera to the computer by:
•Pressing the d (Transfer E) button on the camera
•Clicking the transfer button in PictureProject
Which method you will use depends on your computer’s operat-
ing system and the USB option selected in the Set-up menu of the
camera.
After consulting the following table, select the appropriate option
using the USB option in the Set-up menu of the camera. The de-
fault option is PTP.
*The camera d (E) button cannot be used to transfer images in the following cases. Use the
Transfer button in PictureProject.
• When transferring images from the camera memory and Mass storage is selected for the
USB option
• When the memory card write-protect switch is in the “lock” position. Unlock by sliding the
switch to the “write” position before transferring images.
Operating system
Images transferred using:
Camera d (Transfer
E) button*
PictureProject
transfer button
Windows XP Home Edition
Windows XP Professional
Choose Mass storage
or PTP.
Choose Mass storage
or PTP.
Windows 2000 Professional
Windows Millennium Edition (Me)
Windows 98 Second Edition (SE)
Choose
Mass storage.Choose Mass storage.
Mac OS X (10.1.5 or later) Choose PTP.Choose Mass storage
or PTP.
d (Transfer
E) Button
USB
Video mode
INTERFACE
INTERFACE
Confirm
PTP
Mass storage
USB
USB
Confirm
Language
Interface
Auto transfer
Reset all
Firmware version
SET-UP 3/4
SET-UP 3/4
Confirm
Help
en_q3175.book Page 61 Thursday, June 16, 2005 10:54 AM
62
More on Playback
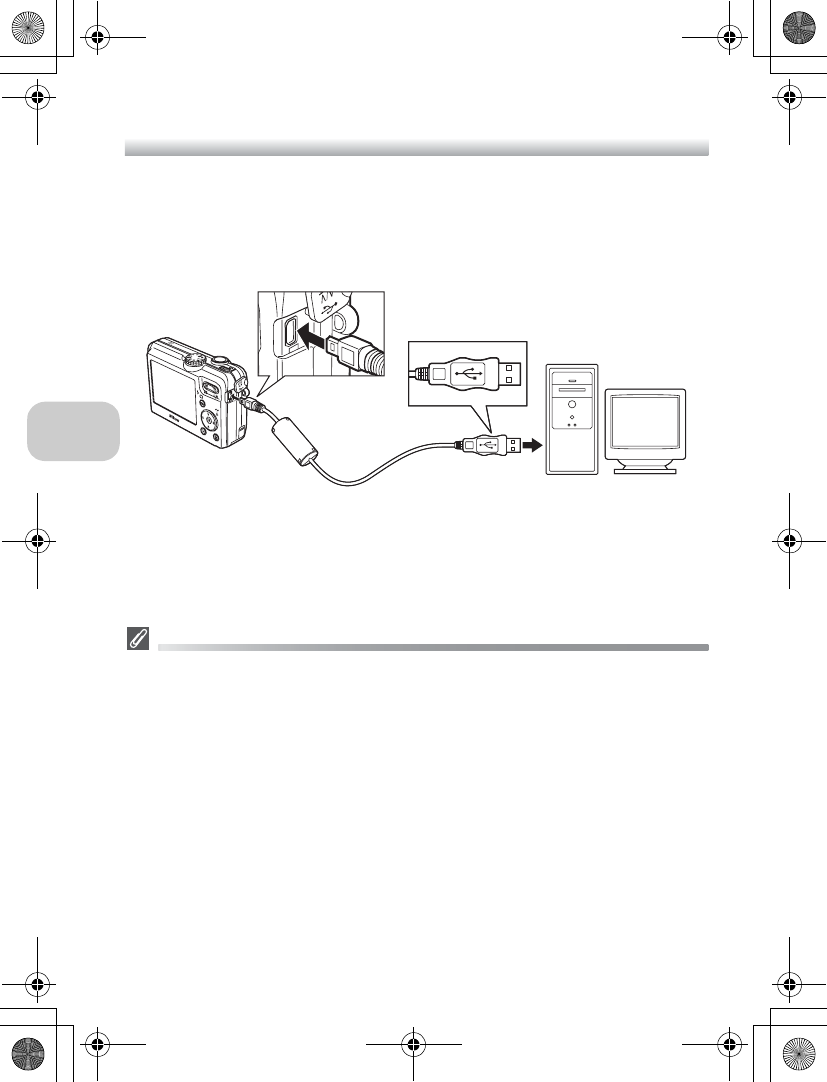
Connecting the USB Cable
Turn the computer on and wait for it to start up. After confirming that the camera
is off, connect the UC-E6 USB cable (provided with your camera) as shown below.
Check to be sure the connector is in the correct orientation and insert the
plug straight. Do not insert or disconnect it forcibly. Connect the camera di-
rectly to the computer; do not connect the cable via a USB hub or keyboard.
You can now turn the camera on.
Windows 2000 Professional, Windows Millennium Edition (Me),
Windows 98 Second Edition (SE)
When using one of the above operating systems, select Mass Storage for the USB option
in the Set-up menu. If you have connected the camera to a computer running one of the
above operating systems with PTP (default setting) selected in USB, disconnect the camera
as described below. Be sure to select Mass storage before reconnecting the camera.
Windows 2000 Professional
A dialog will be displayed welcoming you to the Found New Hardware Wizard. Click Cancel
to close the dialog, and then disconnect the camera.
Windows Millennium Edition (Me)
After displaying a message stating that the hardware information database is being updated,
the computer will start the Add New Hardware Wizard. Click Cancel to exit the wizard, and
then disconnect the camera.
Windows 98 Second Edition (SE)
The Add New Hardware Wizard will be displayed. Click Cancel to exit the wizard, and then
disconnect the camera.
UC-E6 USB cable
en_q3175.book Page 62 Thursday, June 16, 2005 10:54 AM
63
More on Playback
Transferring Images
When the PictureProject Transfer is displayed in the computer monitor, pressing
the d (Transfer E) button on the camera or clicking the Transfer button in
PictureProject will transfer images to the computer. For information on using
PictureProject, see the Quick Start Guide or the PictureProject Reference Manual
(on CD).
To Transfer Images Using d (Transfer E) Button
When the PictureProject transfer screen is displayed in the computer
monitor, press the d (Transfer E) button on the camera.
Images marked with an E icon (c112, 130) will be transferred.
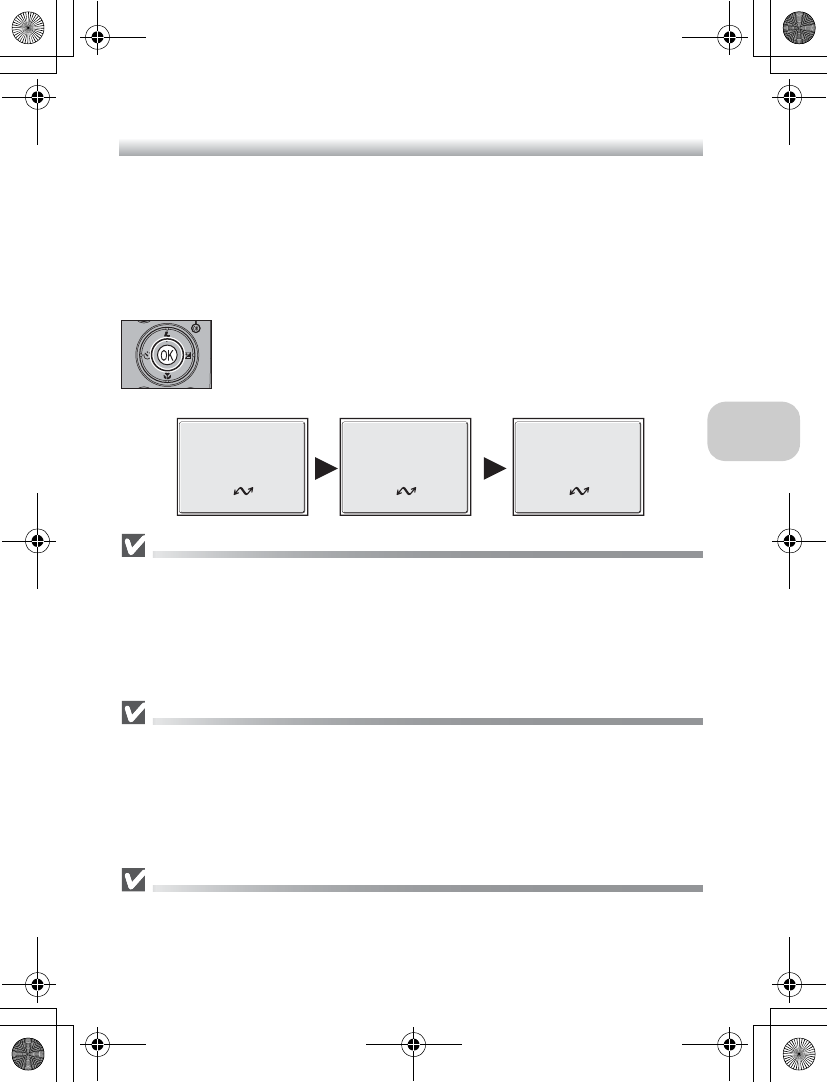
When the d (Transfer E) button is pressed, the transfer will start
and the following messages will be displayed in the camera monitor.
During Transfer
While transfer is in progress, do not:
•Disconnect the USB cable
•Turn the camera off
•Remove the battery or the memory card
•Disconnect the AC adapter kit
Failure to observe this precaution could interfere with normal functioning of both the camera
and the computer.
Transferring Images Stored in the Memory
•
Remove the memory card from the camera before connecting the camera to the computer.
•When transferring images with the camera d (Transfer E) button, note the following.
– For Windows XP or Mac OS X (10.1.5 or later), set the USB option in the Set-up menu
to PTP.
– For Windows 2000, Windows Me or Windows 98SE, the camera d (Transfer E) but-
ton cannot be used. Use the Transfer button in PictureProject, or copy the pictures in the
memory to the memory card (c114) and then transfer the pictures to the computer.
Using Mac OS X (10.1.5 or Later)
Before using the d (Transfer E) button on the camera to transfer images, set the USB op-
tion in the Set-up menu to PTP. When the USB option is set to Mass Storage, the images
cannot be transferred.
PREPARING TO TRANSFER
TRANSFERRING IMAGES TO
COMPUTER
TRANSFER COMPLETED
en_q3175.book Page 63 Thursday, June 16, 2005 10:54 AM
64
More on Playback
Disconnecting the Camera
When PTP Is Selected in USB:
You can turn the camera off and disconnect the USB cable once transfer is com-
plete.
When Mass Storage (default setting) Is Selected in USB:
You must remove the camera from the system as shown below before turning the
camera off and disconnecting the cable.
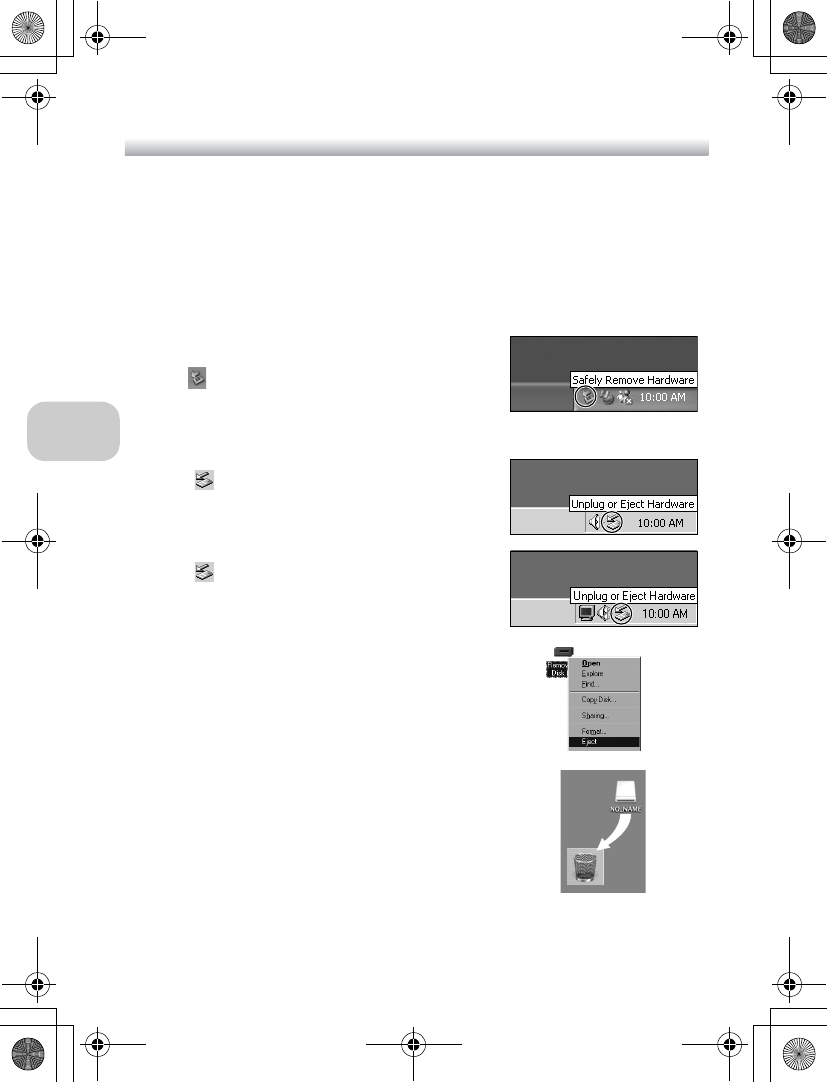
Windows XP Home Edition/
Windows XP Professional
Click the (Safely Remove Hardware) icon in the task-
bar and select Safely remove USB Mass storage
Device from the menu that appears.
Windows 2000 Professional
Click the (Unplug or Eject Hardware) icon in the
taskbar and select Stop USB Mass storage Device
from the menu that appears.
Windows Me
Click the (Unplug or Eject Hardware) icon in the
taskbar and select Stop USB Disk from the menu that
appears.
Windows 98SE
In My Computer, click with the right mouse button on
the removable disk corresponding to the camera and
select Eject from the menu that appears.
Mac OS X
Drag the “NO_NAME” camera volume into the Trash.
Mac OS X
en_q3175.book Page 64 Thursday, June 16, 2005 10:54 AM
65
More on Playback
Printing Pictures
Pictures stored in the internal memory or on the memory card can be printed in
the same way as pictures taken with a film camera. Using Print set in the Playback
menu, you can specify the pictures to be printed, the number of prints, and the
information to be included with each print.
Printing Pictures
Stored pictures in the internal memory or on the memory card can be printed as
follows:
*1 If Print set is not set, one copy of all pictures is printed.
*2 A separate dongle must be purchased. For more information, see the manual for the dongle.
Printing the Date and Time of Recording on Pictures
The date of recording can be printed by performing one of the following procedures:
•Before taking pictures set the Date imprint option in the Set-up menu (c69, 122).
•If the printer or print service supports Digital Print Order Format (DPOF), use the Date op-
tion in the Print set in the Playback menu (c66-69).
•Transfer the pictures to a computer using PictureProject and print them using PictureProject
print settings. For more information, see the PictureProject Reference Manual (on CD).
DPOF
DPOF (Digital Print Order Format) is a recording format that stores the print order, such as pic-
tures or quantity to be printed and recording date, and the shooting information, on the mem-
ory card. Before using this option, check that the digital photo lab or printer supports DPOF.
How to print Memory card The memory c
Take the memory card
to a digital photo lab
Take the memory card contain-
ing pictures for which DPOF
(Digital Print Order Format) is
created using. Print set*1 to a
digital photo lab, and ask for
them to be printed.
Copy (
c
114) the
pictures to the mem-
ory card, and print as
described on the left.
Depending on the
digital photo lab,
take the camera and
ask for printing.
66
Use a printer equipped
with a card slot
Insert the memory card contain-
ing pictures for which DPOF
(Digital Print Order Format) is
created using Print set*2 into a
printer equipped with a card
slot, and print them.
66
Use a printer that sup-
ports PictBridge
Connect the camera to a printer that supports PictBridge
using a USB cable or wireless LAN
*2
, and print pictures.
70
Transfer the pictures to a
computer and print them
For more information, see the PictureProject Refer-
ence Manual (on CD). –
Use a printer connected
to a computer
Store the printer as a host for Wireless transfer mode
and print pictures directly. XXX
en_q3175.book Page 65 Thursday, June 16, 2005 10:54 AM
66
More on Playback
w Print Set
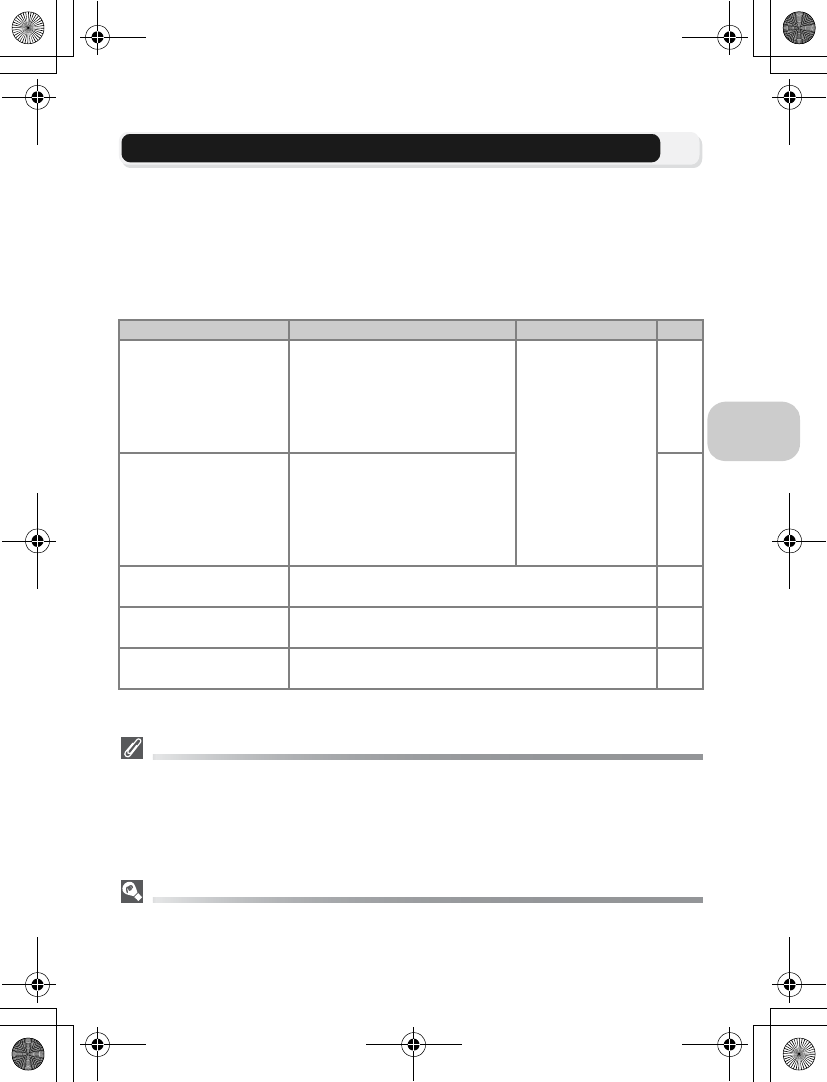
Print set in the playback menu is used to create digital “print orders” listing the
pictures to be printed, the number of prints, and the information to be included
on each print. This print order is stored on the memory card in Digital Print Order
Format (DPOF). Once a print order has been created, pictures can be printed di-
rectly from the memory card by inserting it in a DPOF-compatible device. Alterna-
tively, you could take the memory card to a digital photo lab which supports
DPOF. Pictures can also be printed using Print set settings, by connecting the
camera to a printer supporting PictBridge (c70).
To use w Print set:
Option Description
P
Print selected Set to print selected pictures.
XXX
Choose date Set to print all pictures from a selected date.
w
Delete print set Delete all print settings.
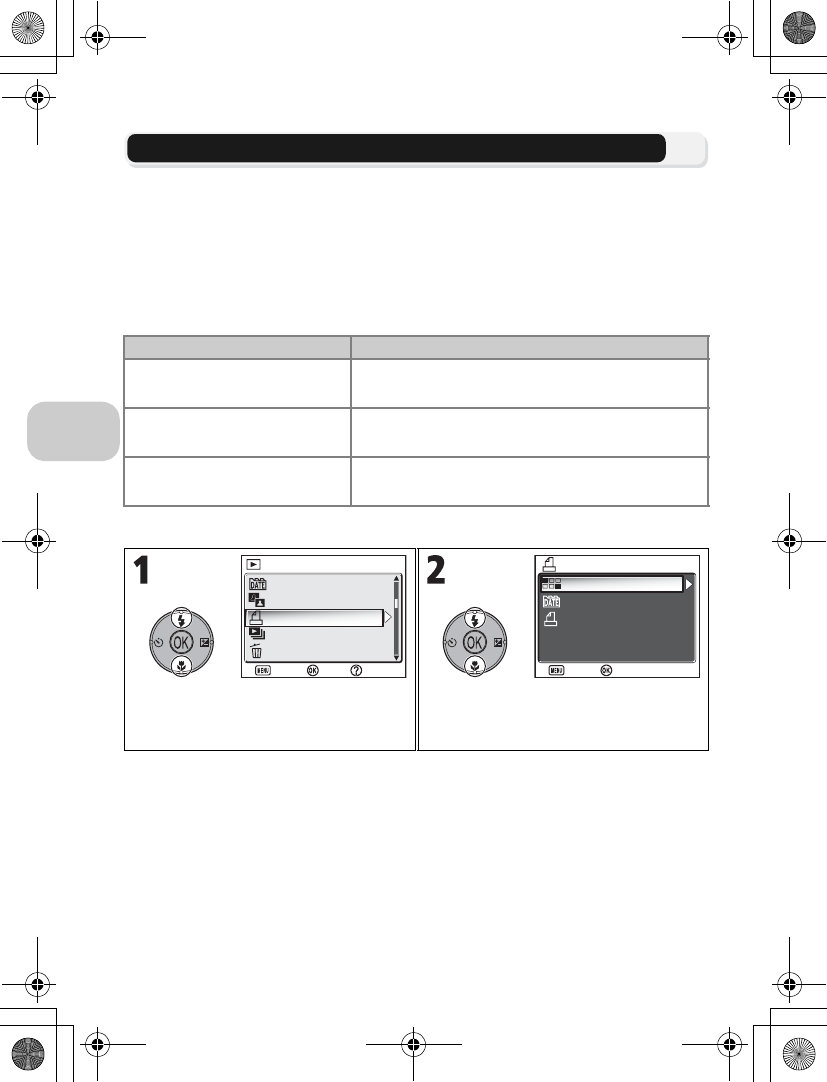
Highlight Print set in the playback menu
and press d.
Highlight Print selected and press d.
•To cancel all print settings, highlight
Delete print set and press d.
List by date
D-Lighting
Print set
PLAYBACK MENU 1/2
PLAYBACK MENU 1/2
Slide show
Delete
Confirm
Exit Help
Print selected
Choose date
PRINT SET
PRINT SET
Delete print set
Confirm
Exit
en_q3175.book Page 66 Thursday, June 16, 2005 10:54 AM
67
More on Playback
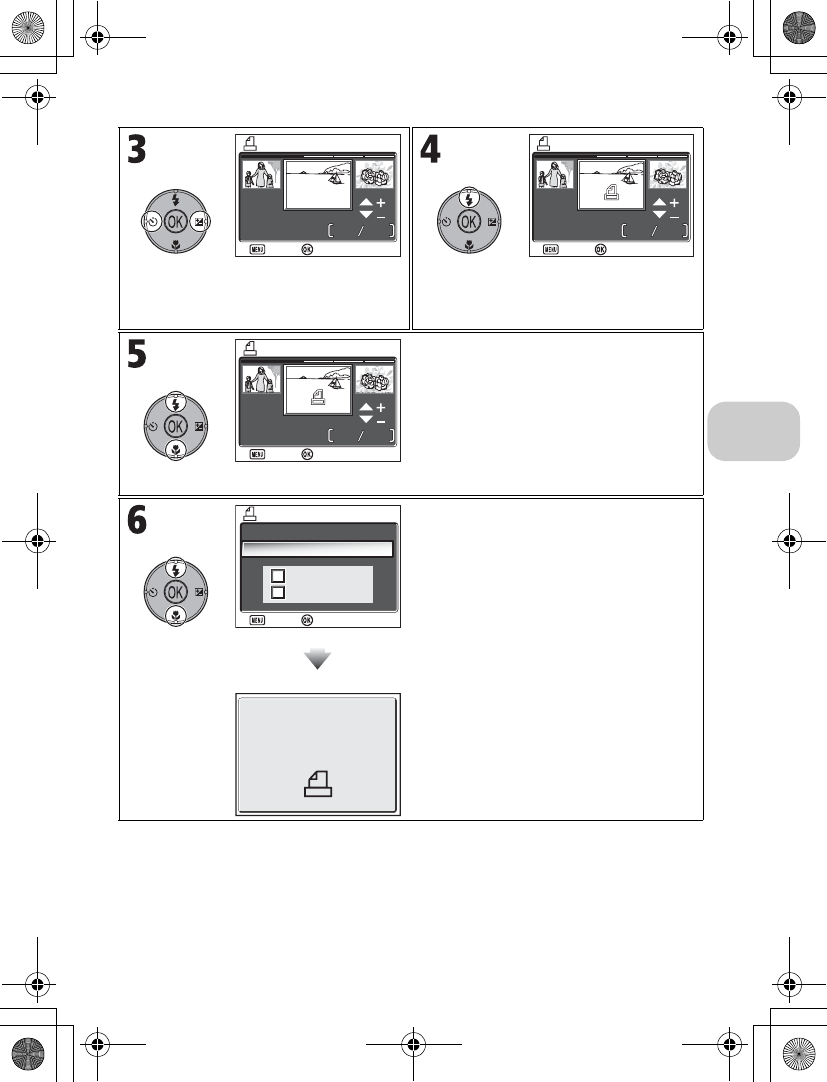
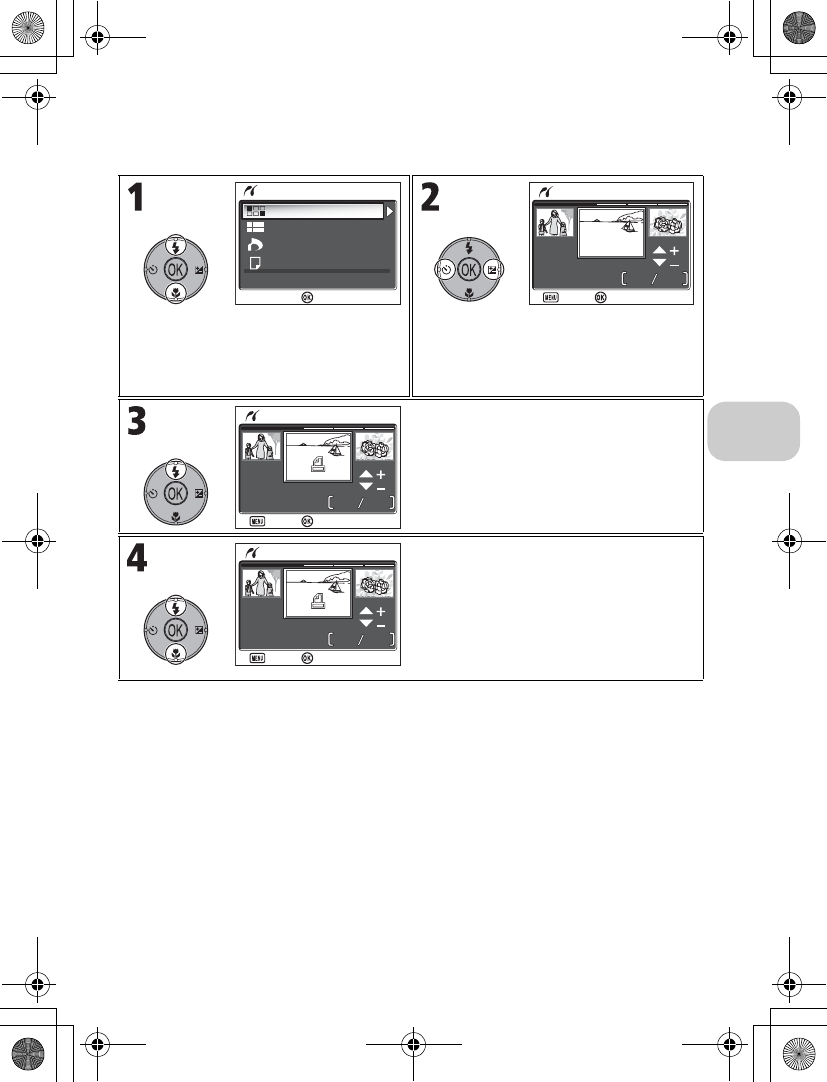
Scroll through pictures. Select current picture. 1 (number of
prints) and w icon are marked on the
selected picture.
Use multi selector up (+) or down (–) to
specify number of prints (up to 9) and
press d.
•To deselect picture, press multi selec-
tor down (–) when number of print is
1.
•Repeat steps 3 to 5 to select additional
pictures.
PRINT SET screen is displayed. Use multi
selector to specify information to print.
•To print date of recording on all pic-
tures in print order, highlight Date and
press d. y will appear in box next to
item.
•To print shutter speed and aperture on
all pictures in print order, highlight
Info and press d. y will appear in
box next to item.
•To turn selected item off, highlight and
press d.
•To complete print order and return to
playback, highlight Done and press
d. Done is displayed and the screen
returns to the Playback menu.
PRINT SELECTION
PRINT SELECTION
12
:
00
12
:
00
5
5
4
4
2005
.
12 .
01
2005
.
12 .
01
Back
Back
Confirm
12
:
00
12
:
00
5
5
4
4
2005
.
12 .
01
2005
.
12 .
01
1
1
PRINT SELECTION
PRINT SELECTION
Back
Back
Confirm
12
:
00
12
:
00
5
5
4
4
2005
.
12 .
01
2005
.
12 .
01
2
2
PRINT SELECTION
PRINT SELECTION
Confirm
Exit
Date
Info
PRINT SET
PRINT SET
Done
Confirm
Exit
Done
en_q3175.book Page 67 Thursday, June 16, 2005 10:54 AM
68
More on Playback
Setting Print Order by Day
You can cancel the individual print order for pictures and set a print order to print
all pictures on the same date of recording.
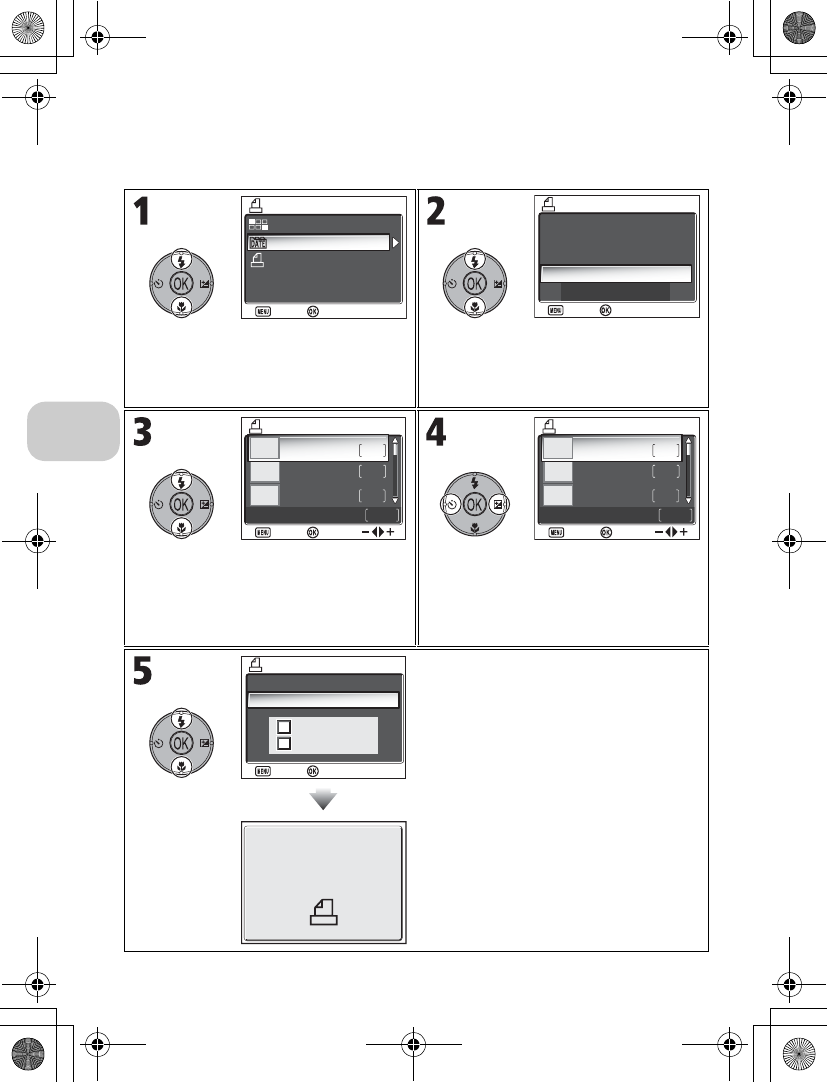
In the PRINT SET screen (c66), highlight
Choose date and press d.
•If individual print orders are not being
set, advance to step 3.
Highlight Yes and press d.
•To cancel, highlight No and press d.
Select date. Set print order and press d.
•1 (number of prints) and w icon are
marked on the selected picture.
•Use multi selector right or left to spec-
ify number of prints (up to 9) (c66).
PRINT SET screen is displayed. Use multi
selector to specify information to print.
•To print date of recording on all pic-
tures in print order, highlight Date and
press d. y will appear in box next to
the item.
•To print shutter speed and aperture on
all pictures in print order, highlight
Info and press d. y will appear in
box next to item.
•To turn selected item off, highlight and
press d.
•To complete print order and return to
playback, highlight Done and press
d. Done is displayed and the screen
returns to the Playback menu.
Print selected
Choose date
PRINT SET
Delete print set
Exit
Exit
Confirm
No
Yes
CHOOSE DATE
Cancel existing print order?
Confirm
Exit
Exit
2005 .12 .01
2005 .11 .01
2005 .10 .01
3
4
8
ONOFF
0
copies
CHOOSE DATE
Back
Back
Confirm
2005 .12 .01
2005 .11 .01
2005 .10 .01
3
4
8
ONOFF
8
1
1
Confirm
Back
Back
copies
CHOOSE DATE
Date
Info
PRINT SET
PRINT SET
Done
Confirm
Exit
Done
en_q3175.book Page 68 Thursday, June 16, 2005 10:54 AM
69
More on Playback
Print Set
If you display the Print set menu after creating a print order, the Date and Info options will
be reset.
Difference Between Date Imprint and Date
There are differences between Print set in the Playback menu and Date imprint (c122) in
the Set-up menu as follows:
•Setting Date in the Print set option:
- A date set in Print set can be printed only with a printer that supports date-print con-
figuration for DPOF.
- You can set after taking pictures.
- A date is not imprinted on the images, but recorded in the DPOF setting files. When
printing, a date on the picture can be printed as if it is imprinted on the image. The po-
sition of the date depends on the printer.
•Setting Date imprint:
- A date can be printed without any other setting because it is imprinted on the images.
- You need to make setting before taking pictures.
- A date is imprinted on the images and the position of the date is fixed at the bottom
right corner of the images.
- Once a date is imprinted, it cannot be deleted from the image.
•When both Print set and Date imprint are set, the date of Date imprint option will be
printed even if using a printer that supports DPOF.
Date
If Date is selected, the date of recording will appear on pictures printed using DPOF. The date
to be printed will remain unchanged even if Date in the Set-up menu is changed after shoot-
ing pictures. If a picture is taken without setting date, it will not be printed even if the y
icon is added to the date in the Print set menu.
en_q3175.book Page 69 Thursday, June 16, 2005 10:54 AM
70
More on Playback
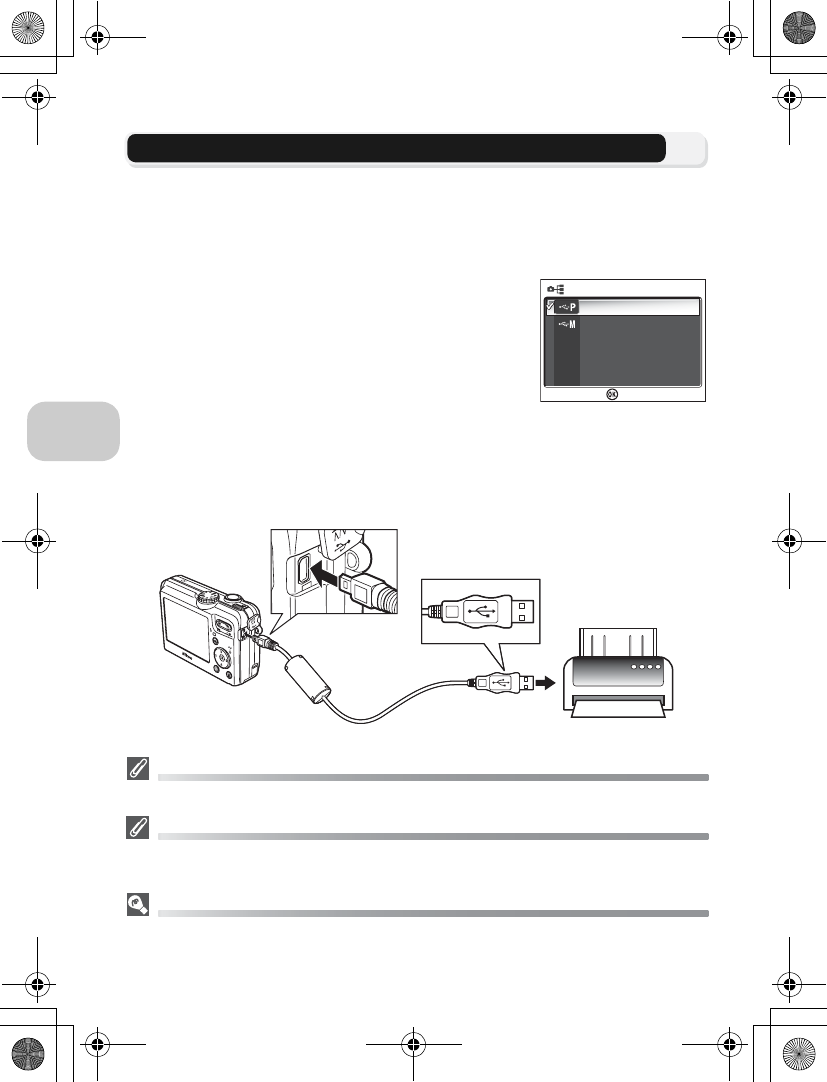
Printing via Direct USB Connection
Your camera allows pictures to be printed directly from the camera using Pict-
Bridge. If the UC-E6 USB cable is used to connect the camera to a printer that sup-
ports PictBridge, pictures can be printed directly from the memory or the memory
card without having to be transferred to a computer.
1
Choose PTP in the USB option
Set the USB option to PTP in the Interface menu of the
Set-up menu before connecting the camera to a printer
(c61).
2
Connect the USB cable
After turning the camera off, connect the camera to the printer with the UC-E6
USB cable (provided with your camera) as shown below. Check to be sure the
connector is in the correct orientation and insert the plug straight. Do not
insert or disconnect it forcibly.
Before Printing
Before printing via a direct USB connection, make sure that the printer supports PictBridge.
Use a Reliable Power Source
When printing pictures via a direct USB connection, be sure the battery is fully charged. If in
doubt, recharge the battery before printing or use the optional EH-62C AC adapter kit.
PictBridge
PictBridge is an industry standard for direct printing that ensures compatibility when different
devices are connected.
PTP
Mass storage
USB
USB
Confirm
en_q3175.book Page 70 Thursday, June 16, 2005 10:54 AM
71
More on Playback
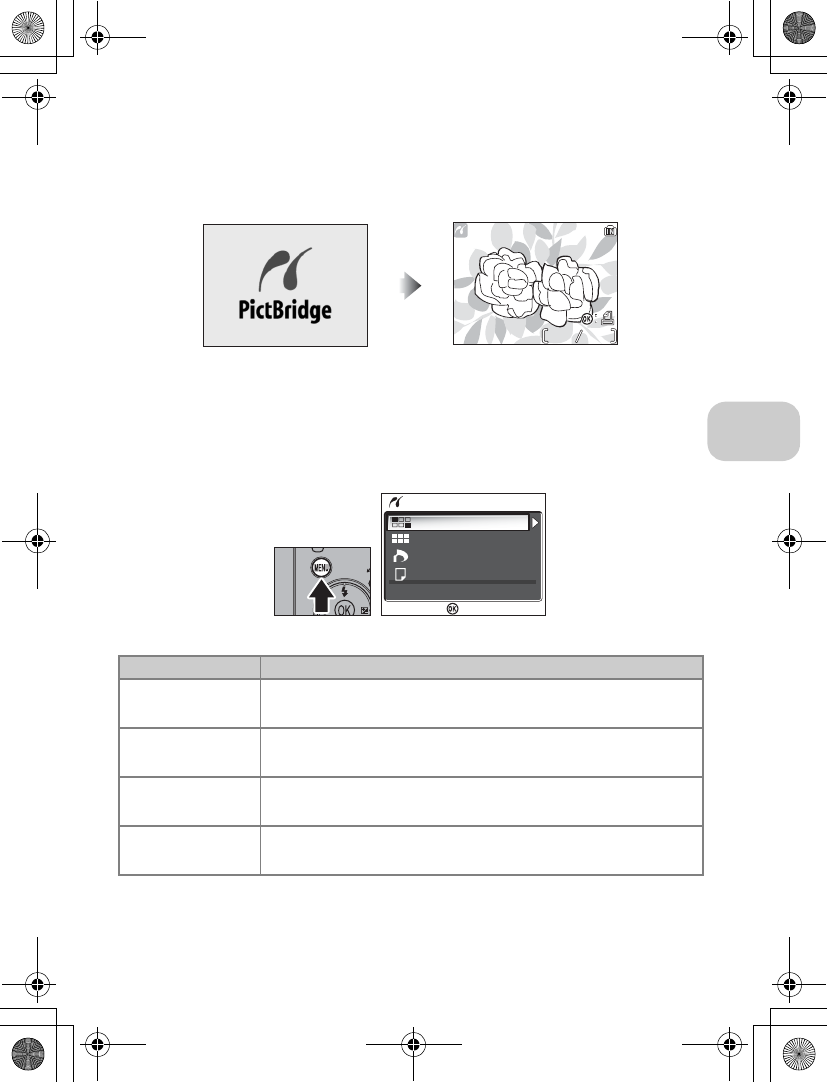
3
Turn the camera and printer on
The lens will extend and the recorded picture will be displayed after the opening
screen.
•Press j (W) or k (T) to switch to thumbnail view.
•Press d to print only the displayed image. (c74)
4
Display the PictBridge menu.
Press the m button to display the PictBridge menu.
•Press the m button to return to the picture display.
Option Description
P
Print selection Select pictures and specify number of prints.
Q
Print all images All pictures in the memory or the memory card are printed.
p
DPOF printing
Pictures for which print order has been created are printed
accordingly (c75).
q
Paper size The size of paper for printing can be set.
5
5
5
5
Print selection
Print all images
DPOF printing
Paper size
Cancel
PictBridge
Confirm
en_q3175.book Page 71 Thursday, June 16, 2005 10:54 AM
72
More on Playback
5
Confirm the settings on the printer
Before printing, confirm the settings on the printer by following the instructions
supplied with the printer. Be sure to perform the paper settings before selecting
Print selection, Print all images, or DPOF printing.
To Set the Size of Paper on the Camera
When printing according to the size of paper that can be set on the camera, select
the Paper size option in the PictBridge dialog.
Highlight Paper size and press d. Select size of paper and press d.
•Select Default to print according to
the paper settings of the printer.
•Following size options can be selected:
3.5" × 5" (89mm × 127mm), 5" × 7"
(127mm × 178mm), Postcard,
100mm × 150mm (3.9" × 5.9"), 4" ×
6" (102mm × 152mm), 8" × 10"
(203mm × 254mm), Letter (8.5" ×
11", 216mm × 279mm), A3 (11.7" ×
16.5", 297mm × 420mm), and A4
(8.3" × 11.7", 210mm × 297mm)
Selectable size options may vary
depending on the printer.
Print selection
Print all images
DPOF printing
Paper size
Cancel
PictBridge
Confirm
PAPER SIZE 1/2
PAPER SIZE 1/2
Default
3.5" × 5"
5" × 7"
Postcard
100mm × 150mm
Confirm
en_q3175.book Page 72 Thursday, June 16, 2005 10:54 AM
73
More on Playback
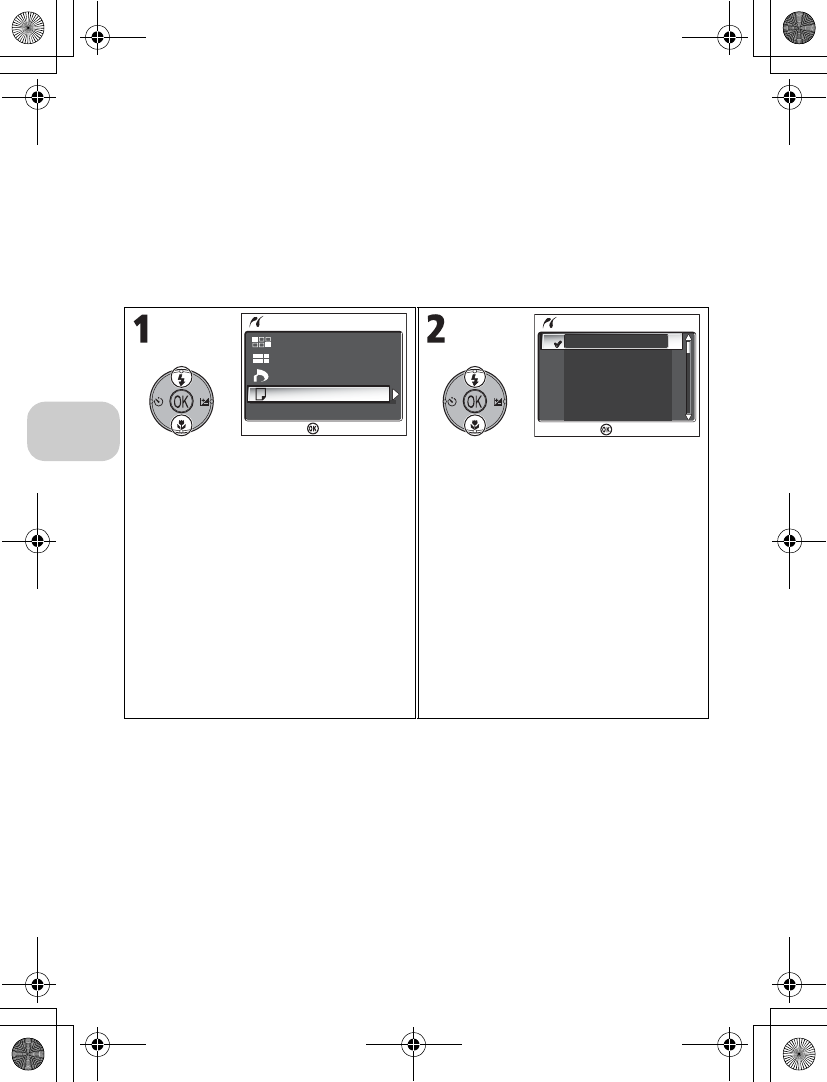
6
Select pictures to print
Highlight Print selection and press d.
•To print one copy of all pictures in the
memory or on the memory card, high-
light Print all images and press d.
Scroll through pictures.
Select current picture. 1 (number of
prints) and w icon are marked on the
selected picture.
Use multi selector up (+) or down (–) to
specify number of prints (up to 9).
•To deselect picture, press multi selec-
tor down (–) when number of prints is
1.
•Repeat steps 2 to 4 to select additional
pictures.
Print selection
Print all images
DPOF printing
Paper size
Cancel
PictBridge
Confirm
PRINT SELECTION
PRINT SELECTION
12
:
00
12
:
00
5
5
4
4
2005
.
12 .
01
2005
.
12 .
01
Back
Back
Confirm
12
:
00
12
:
00
5
5
4
4
2005
.
12 .
01
2005
.
12 .
01
1
1
PRINT SELECTION
PRINT SELECTION
Back
Back
Confirm
12
:
00
12
:
00
5
5
4
4
2005
.
12 .
01
2005
.
12 .
01
3
3
PRINT SELECTION
PRINT SELECTION
Back
Back
Confirm
en_q3175.book Page 73 Thursday, June 16, 2005 10:54 AM
74
More on Playback
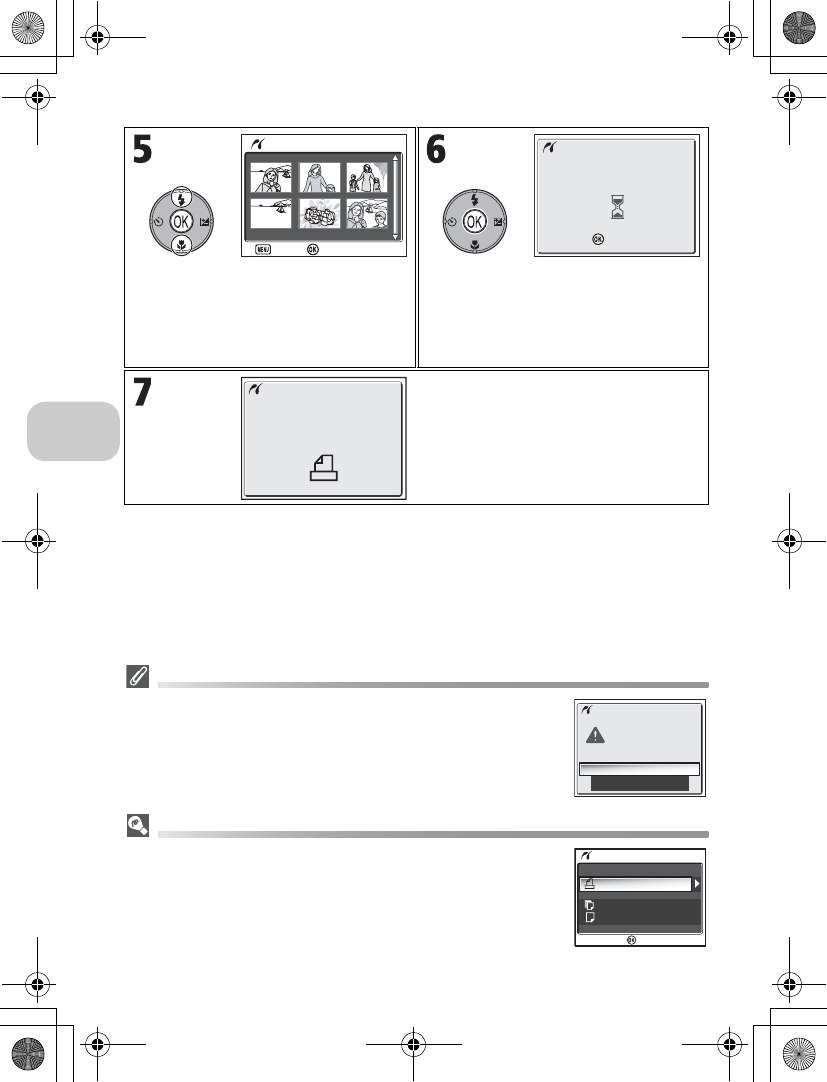
Error Messages
If an error message is displayed, an error has occurred. After checking
the printer and resolving any problems as directed in the printer man-
ual, highlight Resume and press d to resume printing. Select Can-
cel to exit without printing the remaining images.
Resume may not be selected depending on the type of error. If this
happens, select Cancel.
Printing Displayed Picture
Connect the camera to the printer. Press d with the picture dis-
played to display the Print menu. To print a single picture according
to the printer paper size settings, press multi selector up or down to
select Start print and press d.
To change the number of prints or paper size, press multi selector up
or down and select Copies or Paper size.
View selected pictures. Press multi selec-
tor up or down to view pictures not visi-
ble in display.
•To return to the PRINT SELECTION
screen, press m button.
Start printing.
•To interrupt printing, press d.
Message shown on the left is displayed
when printing is complete. Turn camera
off and disconnect USB cable.
•To print continuously press d. The dis-
play returns to the PictBrigde dialog
(c71).
006 PRINTS
006 PRINTS
Back
Start print
1
1
2
2
3
3
6
6
5
5
4
4
Printing
002/006
Cancel
Cancel
Done
PRINTER ERROR
CHECK PRINTER
STATUS
Resume
Cancel
Copies
Start print
PRINT MENU
PRINT MENU
Paper size
Confirm
en_q3175.book Page 74 Thursday, June 16, 2005 10:54 AM
75
More on Playback
Directly Printing the Pictures Specified in a Print Set
The pictures stored in the memory or on the memory card are printed directly, ac-
cording to the print order specified in Print set (c66).
If selecting DPOF printing in the PictBridge dialog (c71), the DPOF printing di-
alog will be displayed.
DPOF Printing
•DPOF printing is only available if a print order has been created for the pictures stored in
the memory or a memory card using Print set.
•When printing directly with a printer that supports PictBridge, shooting information
cannot be printed even if Info is set in Print set.
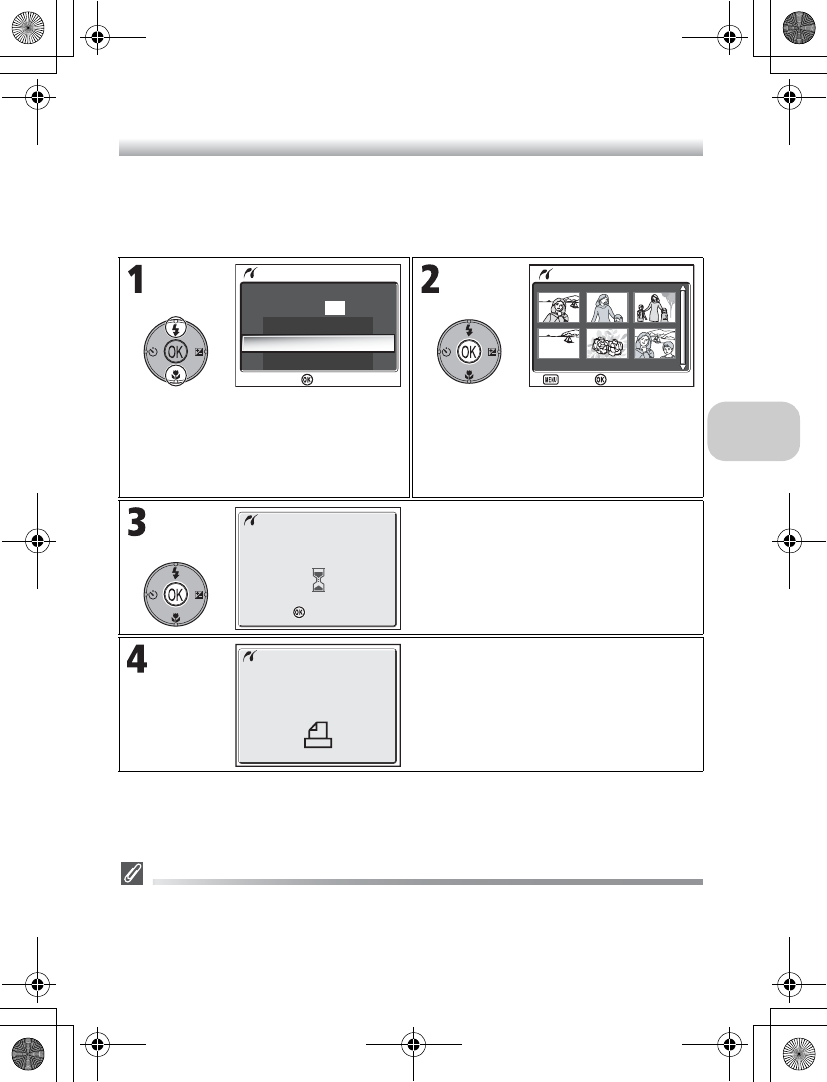
Highlight Confirm.
•To start printing immediately, highlight
Start print and press d.
•To exit without printing pictures, high-
light Cancel and press d.
View selected pictures. Press multi selec-
tor up or down to view pictures not visi-
ble in display.
•To return to the DPOF PRINTING menu,
press m button.
Start printing.
•To interrupt printing, press d.
Message shown on the left is displayed
when printing is complete. Turn camera
off and disconnect USB cable.
•To print continuously, press d. The
display returns to the PictBrigde dialog
(c71).
DPOF PRINTING
DPOF PRINTING
Confirm
Cancel
Start print
006prints
Confirm
CONFIRM
CONFIRM
Back
Start print
1
1
2
2
3
3
6
6
5
5
4
4
Printing
002/006
Cancel
Cancel
Done
en_q3175.book Page 75 Thursday, June 16, 2005 10:54 AM
76
Picture Editing
Picture Editing
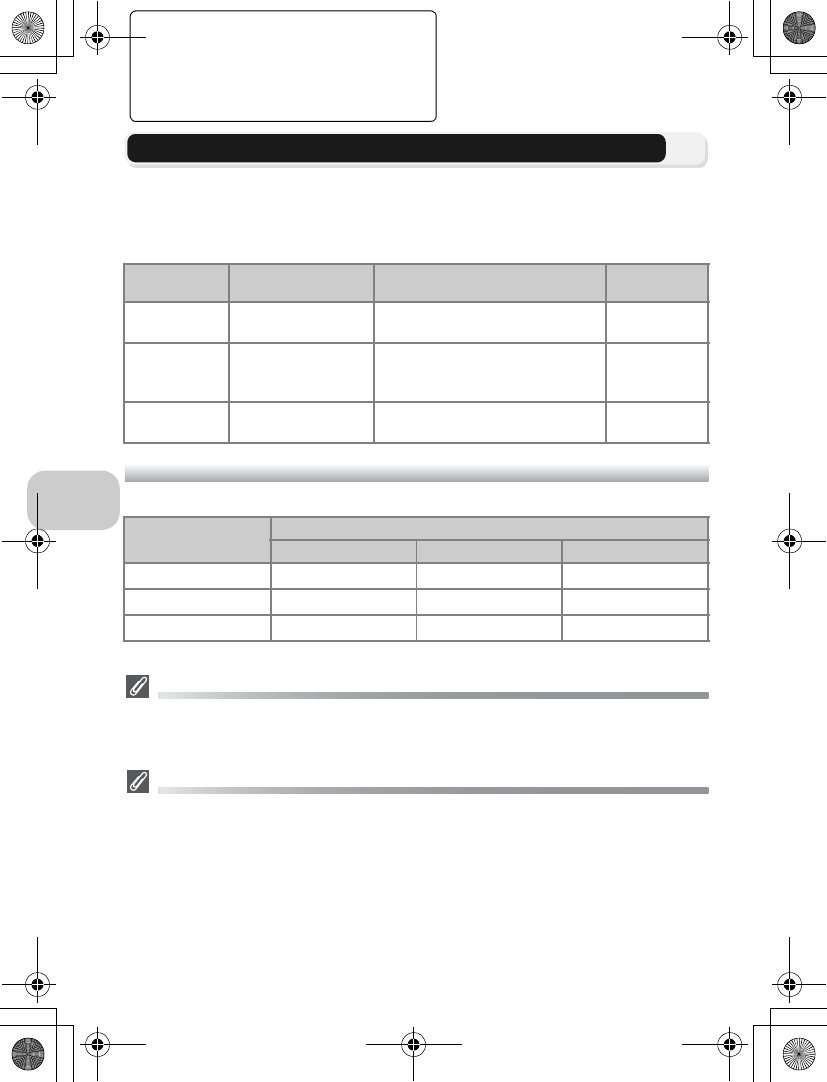
Available Picture Editing
The COOLPIX P1/P2 can edit a picture using the following editing functions and
store it as a separate file.
Edited copies are identified by identifiers corresponding to the editing function
and file numbers assigned automatically by the camera (c25).
Restrictions for Editing Pictures
Editing copies that have already been edited have restrictions as follows.
* Attempting the second editing displays the message “IMAGE CANNOT BE SAVED” (c157).
Other Restrictions on Editing Pictures
•Pictures cannot be edited if Image size is set to j, or if recorded with xUltra HS or
zIntvl timer shooting.
•Pictures cannot be trimmed if recorded with Panorama assist mode.
Images in the Memory
•The COOLPIX P1/P2 editing functions may not be available for pictures taken with non-
COOLPIX P1/P2 digital cameras.
•If a copy created using the COOLPIX P1/P2 is viewed on a different digital camera, the pic-
ture may not be displayed or may not be transferred to a computer.
•Copies created with editing functions are not deleted if the original pictures are deleted.
The original pictures are not deleted if copies created with editing functions are deleted.
•Editing functions are not available when there is not enough free space in the memory or
on the memory card.
•Edited copies are stored with the same recording date and time as the original.
Editing
function Description Purpose Identifier
Crop Crops part of a pic-
ture.
To enlarge a subject or retouch
the composition. RSCN
D-Lighting Adjusts the picture
tone automatically.
To brighten a picture which is
dark due to backlight or insuffi-
cient flash light volume.
FSCN
Small Picture
Creates a small
copy of the picture.
To display pictures on web pages,
or send as e-mail attachment.
SSCN
1st editing 2nd editing
Crop D-Lighting Small Picture
Crop Not available* Not available Not available
D-Lighting Available Not available Available
Small Picture Not available Not available Not available
en_q3175.book Page 76 Thursday, June 16, 2005 10:54 AM
77
Picture Editing
Cropping Pictures – Crop
When a picture is displayed in the Playback zoom mode (c56), you can crop part
of a picture and save it as a separate file.
•Depending on the size of the original and the zoom ratio at the time the copy was
created, copies will be c3,264 × 2,448 (COOLPIX P1 only), d2,592 × 1,944,
e2,048 × 1,536, f1,600 × 1,200, g1,280 × 960, h1,024 × 768,
i640 × 480, J320 × 240, or K160 × 120 pixels in size.
•Cropped pictures are stored in JPEG format (compression ratio 1:8) as separate
pictures from the original pictures.
Zoom picture in and out.
Use multi selector to scroll picture until
desired portion of image is displayed in
monitor.
The confirmation dialog displayed. Press
multi selector down to highlight Yes, and
press d to create cropped copy.
•To exit without creating copy, high-
light No and press d.
4.0
:
:
:
:
Scroll
Scroll
Scroll Zoom
Zoom
Zoom
Save this image
as displayed?
Save this image
as displayed?
CROP
CROP
Yes
No
:
Confirm
:
Confirm
en_q3175.book Page 77 Thursday, June 16, 2005 10:54 AM
78
Picture Editing
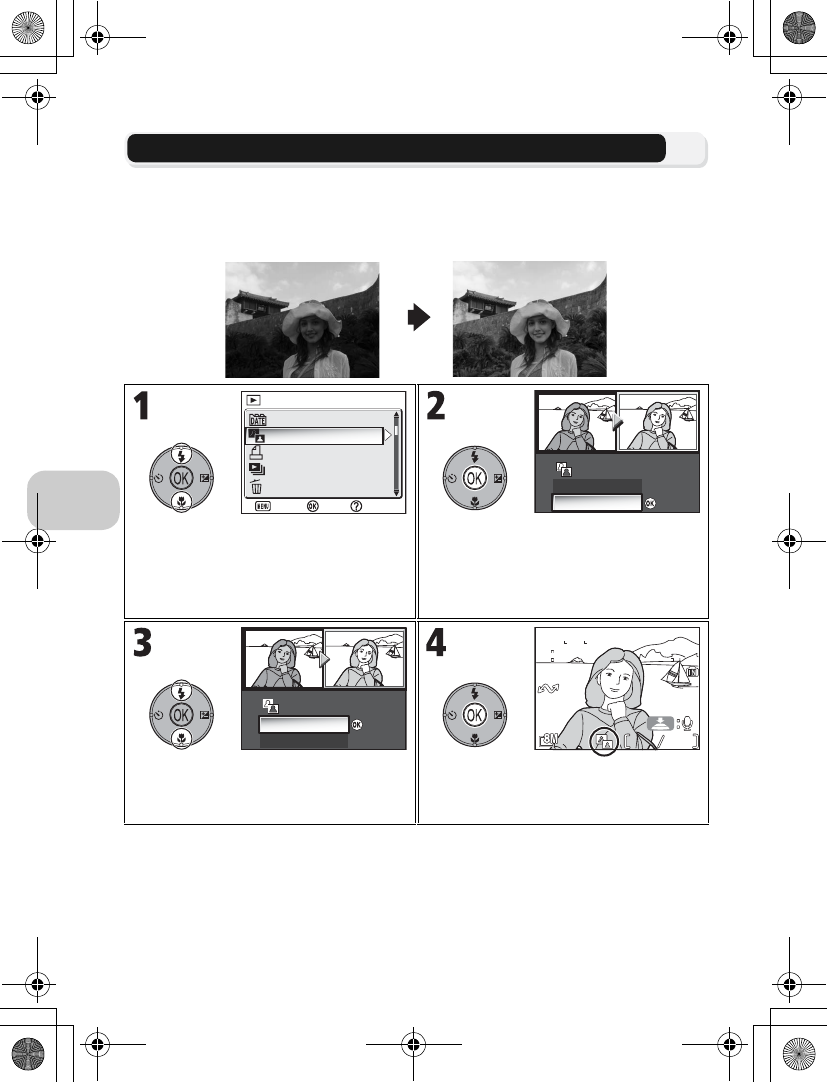
Enhancing Contrast: D-Lighting
The tone adjusted picture is created automatically as a separate picture. Using D-
Lighting, pictures that are backlit or have insufficient flash output can be adjusted
to be brighter.
To enhance a picture, display the picture in Playback mode.
Highlight D-Lighting in the Playback
menu.
The tone adjusted picture is displayed.
•The original picture is displayed in top
left corner of the monitor and the
adjusted picture is displayed in the top
right corner.
Highlight OK.
•Select Cancel to exit.
Save adjustments.
•D-lighting icon is displayed on pictures
created with D-Lighting.
List by date
D-Lighting
Print set
PLAYBACK MENU 1/2
PLAYBACK MENU 1/2
Slide show
Delete
Confirm
Exit Help
OK
D-Lighting
D-Lighting
Cancel
:
Confirm
:
Confirm
:
Confirm
:
Confirm
OK
D-Lighting
D-Lighting
Cancel
2
2
2
2
100NIKON
100NIKON
JPG
JPG
2005
2005
12
12
12
12
00
00
01
01
0009
0009
NORM
NORM
en_q3175.book Page 78 Thursday, June 16, 2005 10:54 AM
79
Picture Editing
H
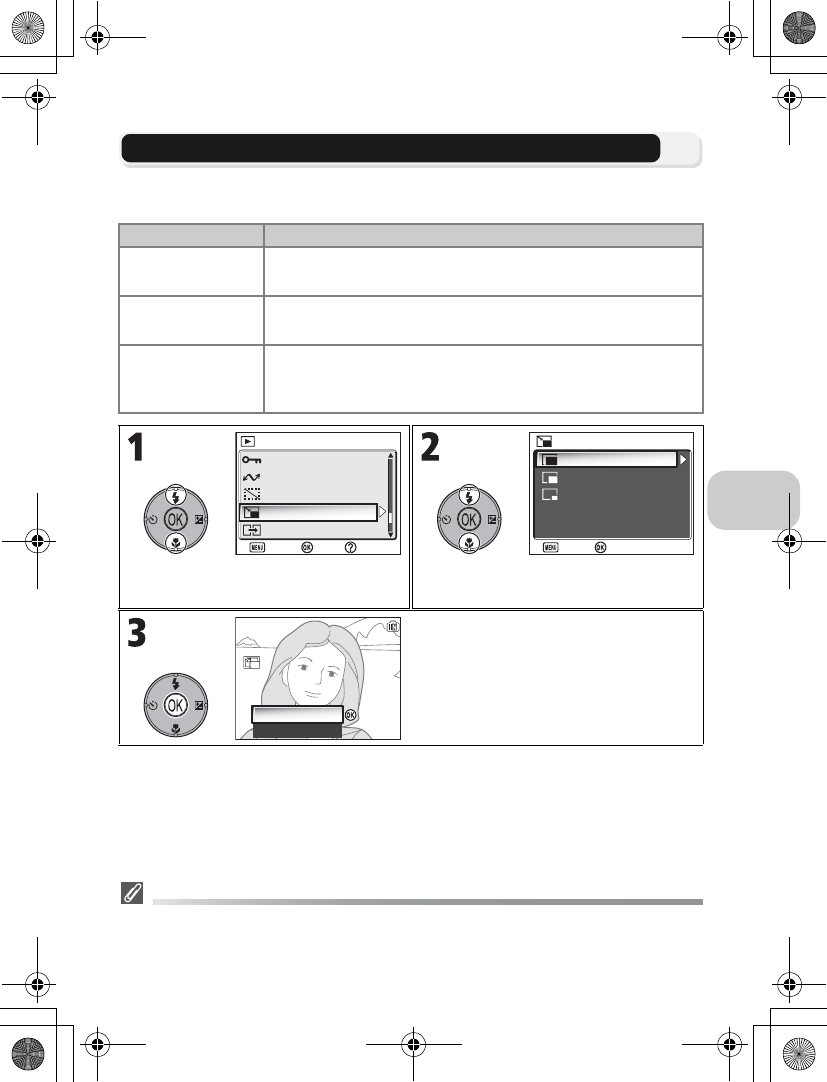
Creating a Smaller Picture: Small Pic
To create a small copy of a picture, select Small pic. after displaying the image in
Full-screen playback mode. The following resize options are available:
Notes on Small Picture
•Copies are stored on the memory as BASIC-quality JPEG files (compression ratio 1:16).
•Small pictures cannot be zoomed.
Size (pixels) Description
I
640×480
Copy can be displayed full-screen on television or 13" monitor
with no drop in quality.
J
320×240
Suited to display on web pages. Small file size reduces time
needed to display picture in web browser.
K
160×120
Copy can be sent and received quickly as e-mail attachment.
Where application supports display of JPEG images, picture can
be viewed in message window.
Highlight Small pic. in the playback
menu and press d.
Highlight the picture size.
Confirmation dialog displayed.
Highlight Yes and press d to copy the
picture.
•Highlight No and press d to exit with-
out creating copy.
Protect
Transfer marking
Hide image
PLAYBACK MENU 2/2
PLAYBACK MENU 2/2
Small pic.
Copy
Confirm
Exit Help
640 × 480
320 × 240
160 × 120
SMALL PIC
SMALL PIC
Confirm
Exit
Yes
No
:
Confirm
:
Confirm
Create small picture file?
Create small picture file?
en_q3175.book Page 79 Thursday, June 16, 2005 10:54 AM
80
Movies
Movies
S Recording Movies
Movies will be recorded with sound recorded via the camera’s built-in microphone.
To record a movie:
Notes on Movies
•Depending on the make of memory card used, recording may end before the memory
card is full. If this happens, “CANNOT RECORD MOVIE” will be displayed, but the incom-
plete recording is stored as a movie.
•During recording, do not touch the built-in microphone.
•In the Movie shooting mode, the following options will be fixed:
-Flash mode (c27) is BFlash Cancel when not recording Time-lapse movie.
-Self-timer (c30) is OFF.
-White balance (c52) is eAUTO.
-Metering (c88) is mMatrix.
•
While recording a movie, optical zoom is unavailable but digital zoom (up to 2.0 ×) is available.
To use optical zoom, set before recording. When recording starts, optical zoom position is fixed.
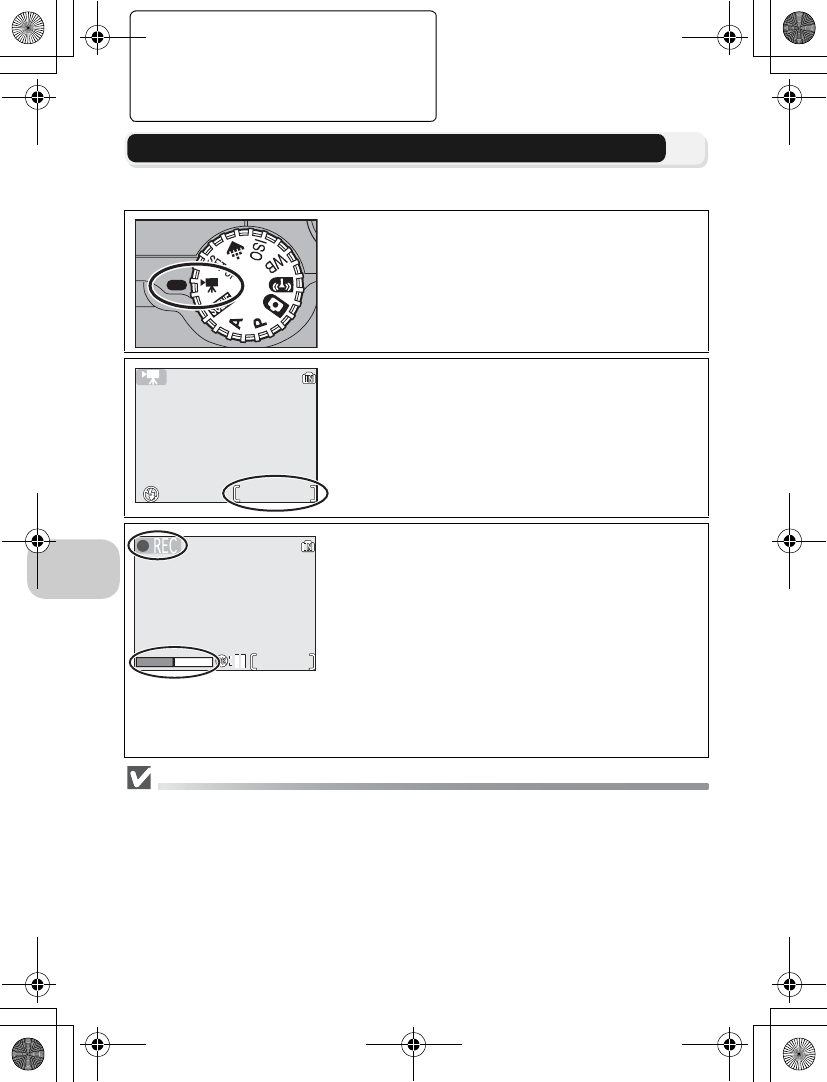
1Rotate the mode dial to S
2Turn the camera on
The monitor shows the available recording time.
3Start recording
Press the shutter-release button all the way down
to start recording.
•Camera focuses on subject in the center of the
frame (c84).
•During recording, y icon blinks and progress
will be shown by the indicator at the bottom of
the monitor.
•Press d to pause recording. Press d again to
resume recording.
•To finish recording, press the shutter-release
button again.
•
Recording will end automatically when no more space
is available in the memory or on the memory card.
0h 0m20s
0h 0m20s
0h0m12s
0h0m12s
en_q3175.book Page 80 Thursday, June 16, 2005 10:54 AM
81
Movies
Selecting Movie Options
In Movie options, you can select the type of movie depending on how you plan
to use the movie.
* Approximate maximum total recording time for the memory card is indicated as a guide. Actual
total recording time varies depending on the make of memory cards even when they have the
same memory capacity.
**To prevent TV movie 640 from ending unexpectedly, use card rated for 10MB/s.
Movies
Movies are recorded as QuickTime movie files with the extension “.MOV” and can be played
back on a computer after transfer.
Option Description
Max. recording time*
Memory
Memory
card
About
32 MB
(for P1)
About
16 MB
(for P2)
256 MB
Q
TV movie
640
Movies are recorded at 30 frames per
second. Each frame is 640 × 480 pixels. XXXs XXXs
XXXmXX
Xs**
R
TV movie 640
Movies are recorded at 15 frames per
second. Each frame is 640 × 480 pixels. XXXs XXXs XXXmXX
Xs
S
Small size 320
(default setting)
Movies are recorded at 15 frames per
second. Each frame is 320 × 240 pixels. XXXs XXXs XXXmXX
Xs
U
Smaller size
160
Movies are recorded at 15 frames per sec-
ond. Each frame is 160 × 120 pixels. Small
size allows longer movies to be recorded.
XXXm
XXXs
XXXm
XXXs XXXm
V
Time-lapse
movie
Camera takes up to 1050 stills at speci-
fied intervals and joins them to create
silent movie with frame rate of 30 frames
per second and frame size of 640 × 480
(
c
83). Shoot flowers opening, a butter-
fly emerging from a cocoon, etc.
XXXs XXXs XXXs
W
Sepia movie
320
Record sepia-toned movies at 5 frames
per second and frame size of 320 × 240.
XXXm
XXXs
XXXm
XXXs
XXXmXX
Xs
X
B/W movie 320
Record black-and-white movies at 15 frames
per second and frame size of 320 × 240.
XXXm
XXXs
XXXm
XXXs
XXXmXX
Xs
en_q3175.book Page 81 Thursday, June 16, 2005 10:54 AM
82
Movies
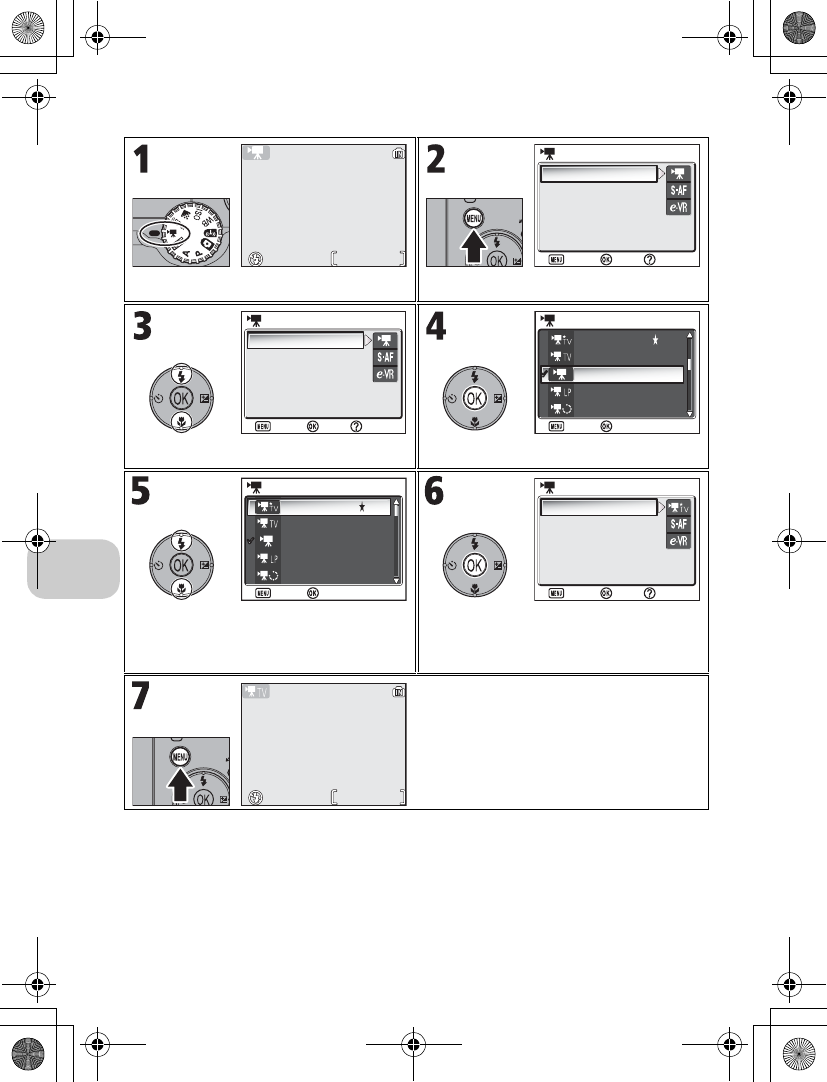
Rotate the mode dial to S. Movie menu is displayed.
q
Highlight MOVIE OPTIONS. Options menu is displayed.
Highlight movie type.
•Press multi selector left to return to
previous screen.
Exit menu. Selected option is set.
Return to Movie shooting screen.
0h 0m20s
0h 0m20s
Movie options
Auto-focus mode
Electronic VR
MOVIE
MOVIE
Confirm
Exit Help
Movie options
Auto-focus mode
Electronic VR
MOVIE
MOVIE
Confirm
Exit Help
TV movie 640
TV movie 640
Time-lapse movie
Small size 320
Smaller size 160
MOVIE OPTIONS 1/2
MOVIE OPTIONS 1/2
Confirm
Exit
TV movie 640
TV movie 640
Small size 320
Smaller size 160
MOVIE OPTIONS 1/2
MOVIE OPTIONS 1/2
Confirm
Exit
Time-lapse movie
Movie options
Auto-focus mode
MOVIE
MOVIE
Confirm
Exit Help
Electronic VR
0h 0m 8s
0h 0m 8s
en_q3175.book Page 82 Thursday, June 16, 2005 10:54 AM
83
Movies
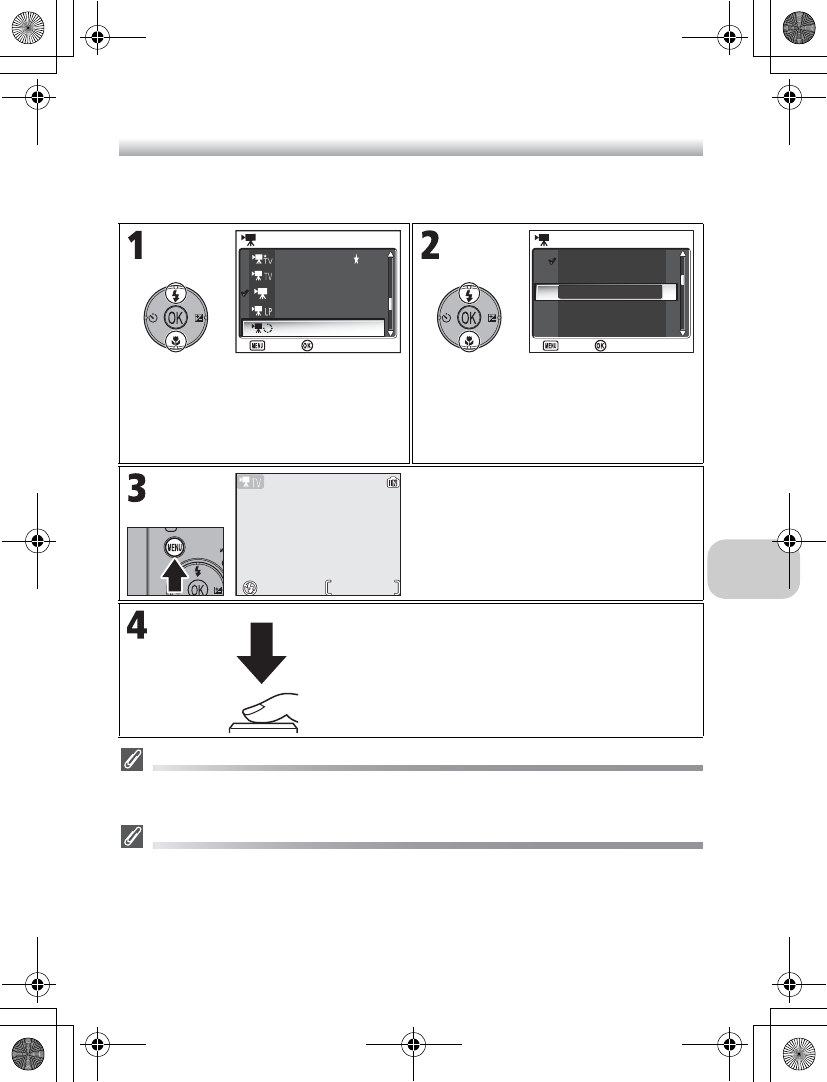
Recording a Time-Lapse Movie
Selecting Time-lapse movie from the MOVIE menu displays the menu shown in
Step 1, below.
Notes on Time-Lapse Movie
•If possible, use the optional EH-62C AC adapter when recording time-lapse movies.
•Take a test shot and view the results before beginning recording.
Time-Lapse Movie
•To save power, the monitor turns off between frames. The display turns on automatically
immediately before the camera takes the next shot.
•The file size of time lapse movies varies greatly depending on the option selected for image
quality.
•Movies recorded at settings of FINE and NORMAL may seem slightly jerky when viewed
on the camera but will play back normally when displayed on a computer.
Highlight Time-lapse movie and press
d.
Choose interval between frames from
30 s
(thirty seconds),
1m
(one minute),
5m
(five
minutes),
10 m
(ten minutes),
30 m
(thirty
minutes), and
60 m
(sixty minutes).
Press
d
to set and return to shooting display.
Return to Movie shooting screen.
Start recording. Camera will take pictures
at the specified interval until shutter-
release button is pressed again, memory
card is full, or 1050 frames have been
recorded.
TV movie 640
TV movie 640
Small size 320
Smaller size 160
MOVIE OPTIONS 1/2
MOVIE OPTIONS 1/2
Confirm
Exit
Time-lapse movie
Confirm
Exit
30s
1m
5m
10m
30m
SET INTERVAL TIME
1/2
SET INTERVAL TIME
1/2
0h 0m 8s
0h 0m 8s
en_q3175.book Page 83 Thursday, June 16, 2005 10:54 AM
84
Movies
Selecting Auto-Focus Mode
The Auto-focus mode for movie recording can be set. Select Auto-focus mode
in the Movie menu, and choose from the following two modes.
Setting Electronic VR
The vibration reduction for movie recording can be set. Select Electronic VR in
the Movie menu, and select On or Off.
Option Description
Z
Single AF
(default setting)
Camera focuses when shutter-release button is pressed
halfway. Focus locks when focus operation is complete.
a
Continuous AF
Camera adjusts focus continuously.
To prevent the sound of the camera focusing from interfer-
ing with recording, select Single AF.
Option Description
b
On Reduces effects of camera shake.
c
Off
(default setting)
Vibration reduction off.
en_q3175.book Page 84 Thursday, June 16, 2005 10:54 AM
85
Movies
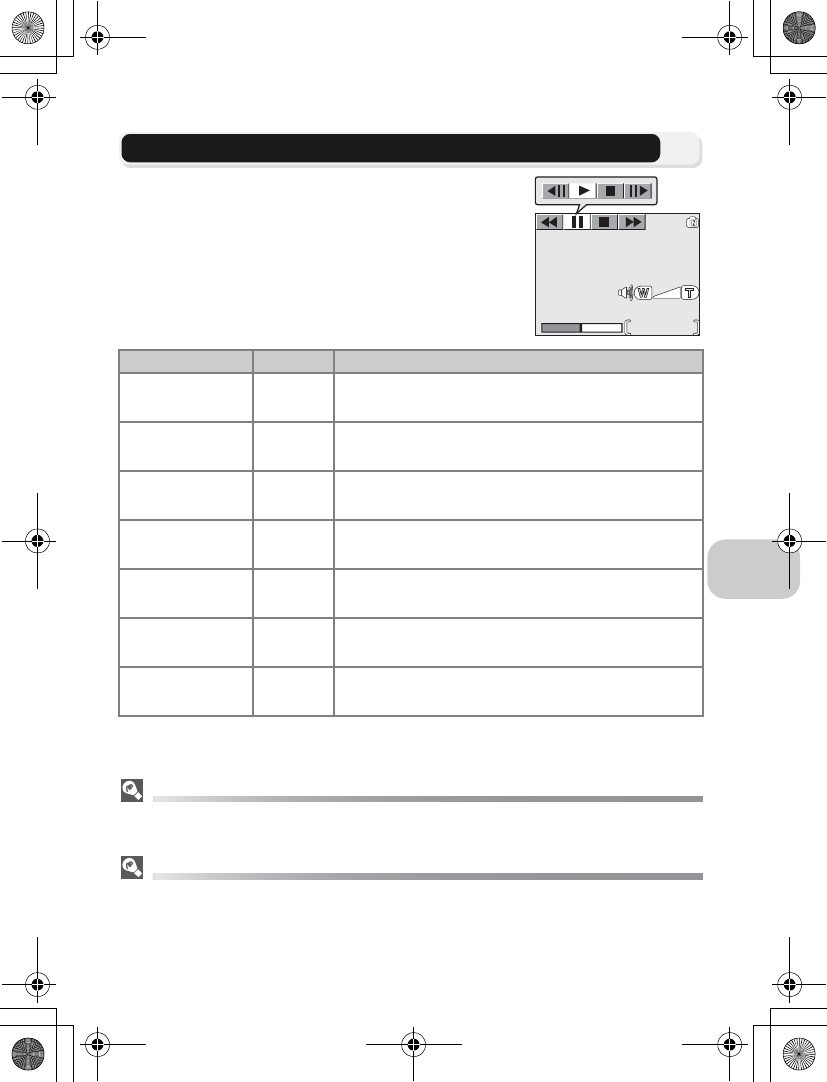
Viewing Movies
In Full-screen playback mode (c24), movies can be
played with sound. Movies are indicated by S icon and
can be viewed by pressing d. Playback controls are dis-
played at the top of the monitor; press multi selector
right or left to highlight a control, then press d to per-
form the selected operation.
Playback Volume
The zoom buttons control volume during playback. Press the j (W) button to decrease vol-
ume, the k (T) button to increase.
Deleting Movies
To delete a movie, press the A button. A confirmation dialog will be displayed; press multi
selector up or down to highlight an option, then press d.
•Yes : delete the movie and return to playback mode
•No : exit to playback mode without deleting the movie
Control Button Description
Rewind QWhile movie is in progress, use multi selector to
select Q, then press and hold d.
Advance UUse multi selector to select U, then press and hold
d. Playback ends at the last frame.
Pause RUse multi selector to select R, then press d to pause
display.
Rewind movie by
one frame VWhen movie is paused, use multi selector to select
V, then press d.
Advance movie by
one frame WWhen movie is paused, use multi selector to select
W, then press d.
Resume zWhen movie is paused, use multi selector to select
z, then press d.
Stop SUse multi selector to select S, then press d to
return to playback mode.
0h 0m25s
0h 0m25s
en_q3175.book Page 85 Thursday, June 16, 2005 10:54 AM
86
The Shooting Menu
The Shooting Menu
Using the Shooting Menu
Rotate the mode dial to P or A (c6) to use the Shooting menu.
The Shooting menu contains the following options:
Option Description c
White balance Match white balance to your light source. 52
Metering Select a metering method from Matrix, Cen-
ter-weighted, Spot, and Spot AF area.88
Continuous
Shooting method from seven options, such as
rSingle, sContinuous H, y5 shot
buffer, and wMulti-shot 16.
89
BSS Turn the Best Shot Selector (BSS) on or off. 92
Auto bracketing Allow continuous shooting with gradually
changing exposure or white balance. 93
Flash exp. comp. Set flash output. 94
Image adjustment Adjust contrast of pictures. 94
Image sharpening Control how much outlines in your pictures
are sharpened. 95
Saturation control Adjust vividness of the color of a picture. 96
Sensitivity Help exposure compensation and minimize
blur when lighting is poor and the flash is off. 50
Image quality Select image quality. 47
Image size Select an image size to fit display size or print
size. 47
AF area mode Select an area to be focused from Auto, Man-
ual and Off. 97
Auto-focus mode Select an Auto-focus mode between Single
AF and Continuous AF.100
Fixed aperture Maintain aperture when camera is zoomed in
or out. 100
Noise reduction Reduce dotted noise contained in a picture
taken at low shutter speed. 101
Reset Reset User setting. 102
User setting Store two sets of camera settings. 103
en_q3175.book Page 86 Thursday, June 16, 2005 10:54 AM
87
The Shooting Menu
To display the Shooting menu:
Pressing the shutter-release button halfway in the Shooting menu exits and re-
turns to Shooting screen.
Rotate the mode dial to P or A. Shooting menu is displayed.
The most recent values for the menu
options are displayed selected.
Highlight menu option. Setting screen for selected option is dis-
played.
Highlight option. Pressing d selects
option and returns to previous screen.
•To exit without changing settings,
press m.
Return to Shooting screen.
NORM
NORM
15
15
1/60
1/60
F2.7
F2.7
White balance
Metering
Continuous
BSS
Auto bracketing
SHOOTING MENU 1/4
SHOOTING MENU 1/4
Confirm
Exit Help
White balance
Metering
Continuous
BSS
Auto bracketing
SHOOTING MENU 1/4
SHOOTING MENU 1/4
Confirm
Exit Help
Matrix
Center-weighted
METERING
METERING
Spot
Spot AF area
Confirm
Exit
Matrix
Center-weighted
METERING
METERING
Spot
Spot AF area
Confirm
Exit
NORM
NORM
15
15
1/60
1/60
F2.7
F2.7
en_q3175.book Page 87 Thursday, June 16, 2005 10:54 AM
88
The Shooting Menu
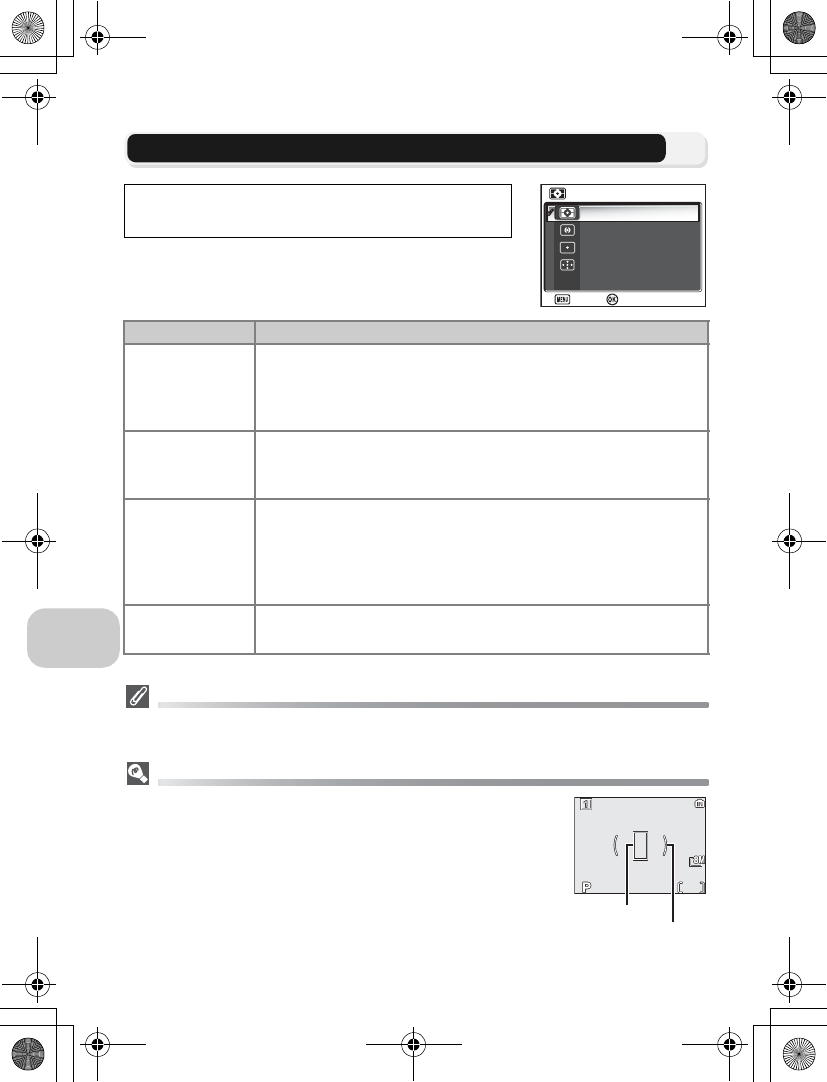
m Metering
The Metering menu offers a choice of four metering
methods for determining how the camera sets expo-
sure.
Notes on Metering
When the digital zoom is in effect, the camera automatically switches to the setting just like
Center-weighted. The metering target does not appear.
Metering
When nCenter-weighted or oSpot is selected,
the metering target is displayed in the center of the
monitor.
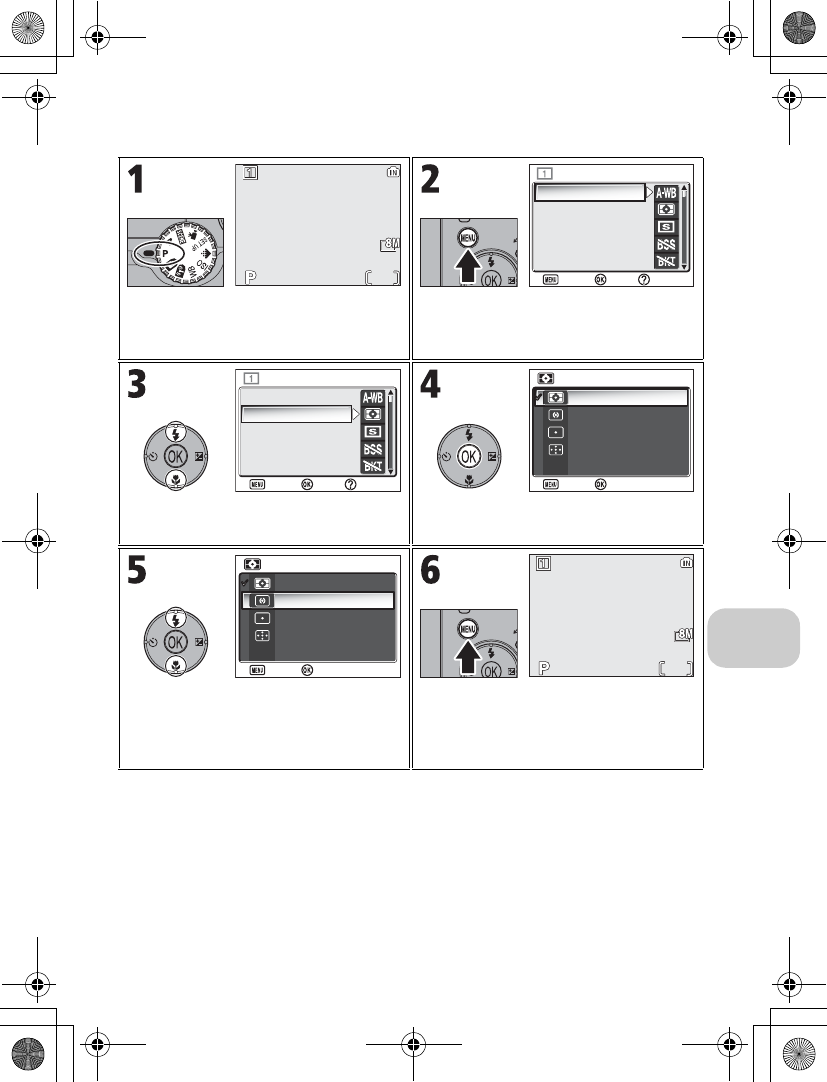
Rotate the mode dial to P or A and press the m but-
ton to select Metering, and then press d.
Option Description
m
Matrix
(default setting)
Compares measurements from multi areas of frame with library
of typical compositions to produce optimal exposure for entire
image.
Best choice in most situations.
n
Center-
weighted
Use for portraits; adjusts exposure according to lighting at the
center of the frame, but still preserves background details. Can be
used with AF lock (c98) to meter off-center subjects.
o
Spot
Camera measures light in area shown by circle in center of mon-
itor.
Ensures that subject in metering target will be correctly exposed
even when background is much brighter or darker. Can be used
with AF lock (c98) to meter off-center subjects.
p
Spot AF area
Links spot metering to active focus area when auto or manual
focus area selection is in effect (c97).
Matrix
Center-weighted
METERING
METERING
Spot
Spot AF area
Confirm
Exit
NORM
NORM
15
15
1/60
1/60
F2.7
F2.7
Spot metering target
Center-weighted
metering target
en_q3175.book Page 88 Thursday, June 16, 2005 10:54 AM
89
The Shooting Menu
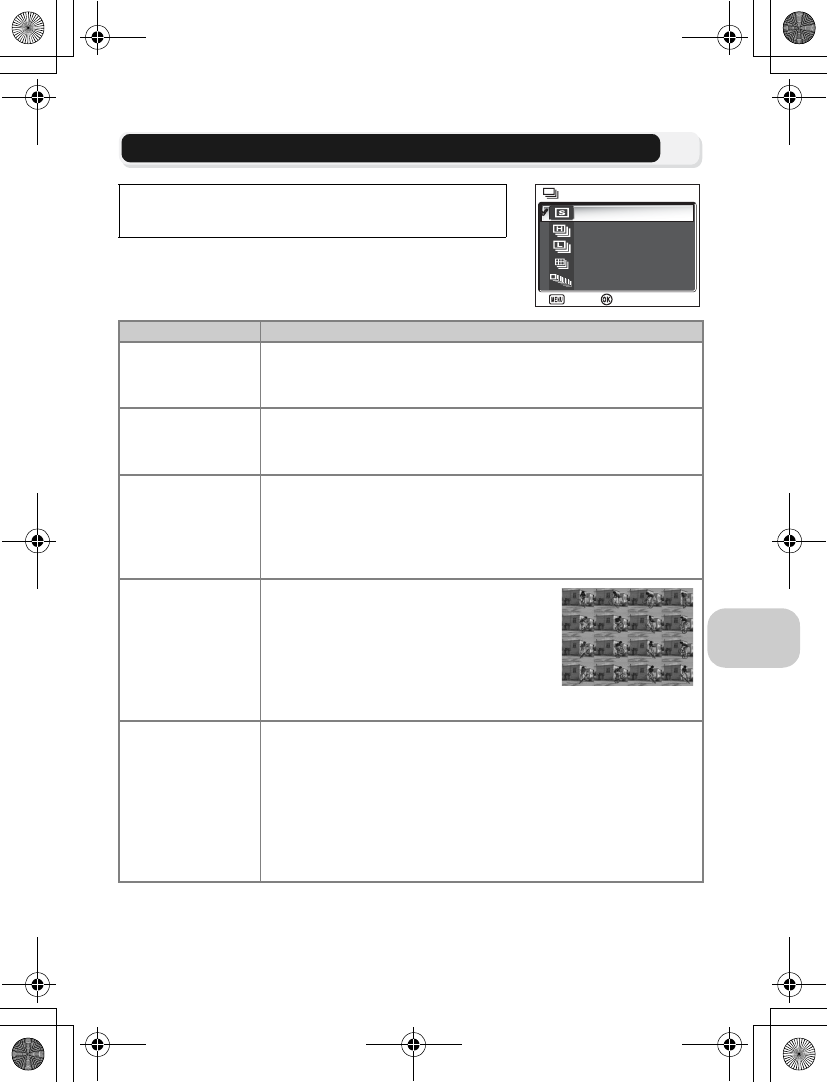
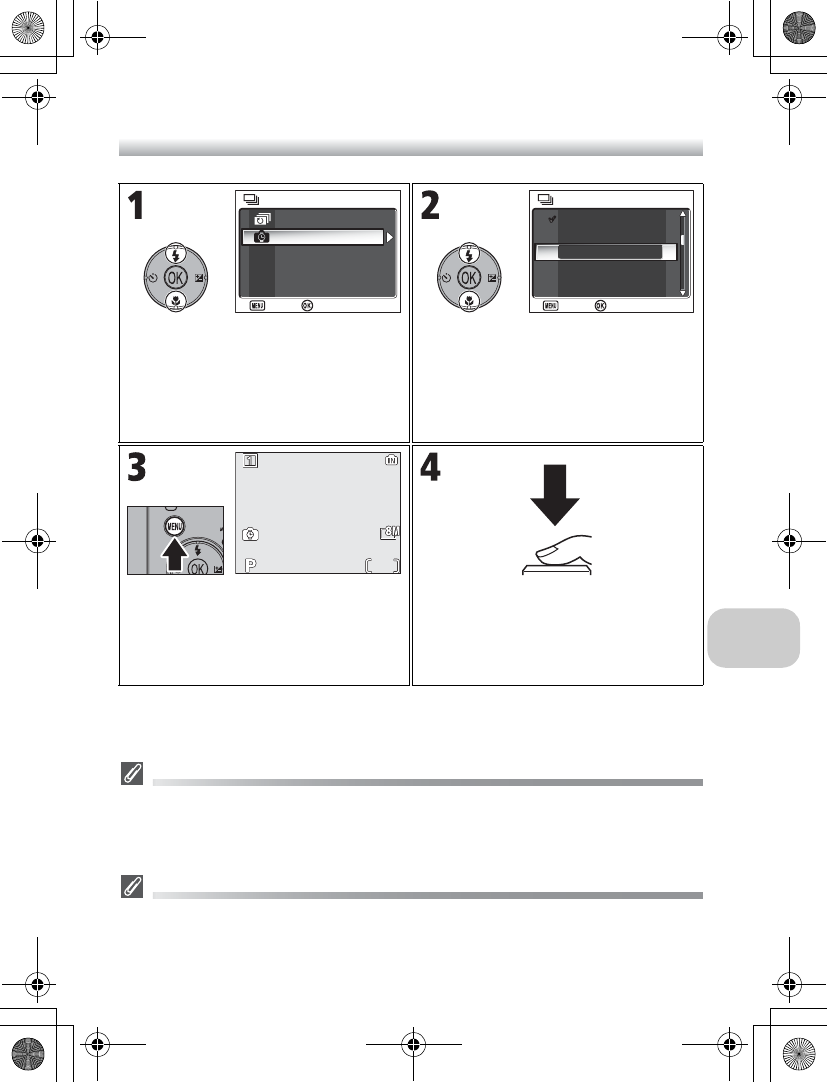
q Continuous
Depending on the shooting condition, rSingle or
six continuous options can be selected.
Rotate the mode dial to P or A and press the m but-
ton to select Continuous, and then press d.
Option Description
r
Single
(default setting)
Camera takes one picture each time shutter-release button is
pressed.
s
Continuous H
While shutter-release button is pressed, camera records up to 5
pictures (for COOLPIX P1) or 3 pictures (for COOLPIX P2) at up
to 2.5 frames per second.
u
Continuous L
Camera shoots at up to 1.5 frames per second while shutter-
release button is pressed. Number of pictures that can be
recorded before y icon is displayed and shooting is suspended
varies with image mode; up to XXX FINE/c pictures (for P1) or
XXX FINE/d pictures (for P2) can be recorded.
w
Multi-shot 16
Each time shutter-release button is
pressed down, camera takes 16 consecu-
tive shots at rate of about 1.5 frames per
second. Camera arranges pictures in four
rows to form a single picture measuring
3,264 × 2,448 pixels (for P1) or 2,592 ×
1,944 pixels (for P2).
x
Ultra HS
While shutter-release button is pressed, camera records up to
100 pictures (for P1) or 40 pictures (for P2) at up to 30 frames
per second. Image quality is automatically set to NORMAL
and Image size to i 640 × 480. With each sequence, camera
creates new folder in which all photos in sequence are stored.
Folder name consists of “N_” followed by three-digit sequence
number assigned automatically by camera. Exposure count is
shown in shooting display.
Single
Continuous H
CONTINUOUS
CONTINUOUS
Continuous L
Multi-shot 16
Ultra HS
Confirm
Exit
en_q3175.book Page 89 Thursday, June 16, 2005 10:54 AM

90
The Shooting Menu
Other Camera Settings
•Settings other than rSingle cannot be used in combination with BSS (c92), Auto
bracketing (c93), or Noise reduction (c101).
•With sContinuous H, uContinuous L, wMulti-shot 16, xUltra HS, and
y5 shot buffer, settings for focus, exposure, and white balance are determined by the
first picture in each series. Flash is automatically set to Flash Cancel B.
•Digital zoom (c21) cannot be used at settings of wMultishot 16 or xUltra HS.
•When using the self-timer, rSingle is automatically set. The settings will return to the
original after an image has been taken using the self-timer.
Ultra HS
•During shooting, progress is shown by the zoom indicator in the
monitor, from S (start) to E (end). To interrupt shooting before one
hundred pictures have been recorded, lift your finger from the
shutter-release button.
•During shooting, pressing the A button while the y icon appears
displays the delete confirmation dialog. From this screen, you can
delete all the pictures in the same folder as the picture you are de-
leting.
y
5 shot buffer
While shutter-release button is pressed and held, pictures can
be recorded at rate of up to about 1 frame per second. When
the shutter button is released, continuous shooting will stop.
Only the last five images taken during each continuous shooting
burst will be recorded to the memory or memory card.
z
Intvl timer shooting
Camera takes pictures automatically at a specified interval. See
“Interval Timer Shooting” (c91).
Option Description
en_q3175.book Page 90 Thursday, June 16, 2005 10:54 AM
91
The Shooting Menu
Interval Timer shooting
Notes on Interval Timer shooting
•To prevent shooting from ending unexpectedly, use the optional EH-62C AC adapter for
interval timer photography.
•Because the same settings are used during Interval timer shooting, setting Continuous
mode to rSingle is recommended.
During Recording
•To save power, the monitor turns off between pictures. The display turns on automatically
immediately before the camera takes the next shot.
•Full screen review is not available during interval timer shooting.
Highlight Intvl timer shooting and
press d.
Choose interval between pictures from
30 s (30 seconds), 1 m (1 minute), 5 m (5
minutes), 10 m (10 minutes), 30 m (30
minutes), and 60 m (60 minutes).
Press d to set and return to Shooting
menu.
Return to shooting mode. Start recording. Camera will take pictures
at a specified interval until shutter-release
button is pressed again, memory or
memory card is full, or 1800 frames have
been recorded.
5 shot buffer
Intvl timer shooting
CONTINUOUS
CONTINUOUS
Confirm
Exit
Confirm
Exit
SET INTERVAL TIME 1/2
SET INTERVAL TIME 1/2
30s
1m
5m
10m
30m
NORM
NORM
15
15
1/60
1/60
F2.7
F2.7
en_q3175.book Page 91 Thursday, June 16, 2005 10:54 AM
92
The Shooting Menu
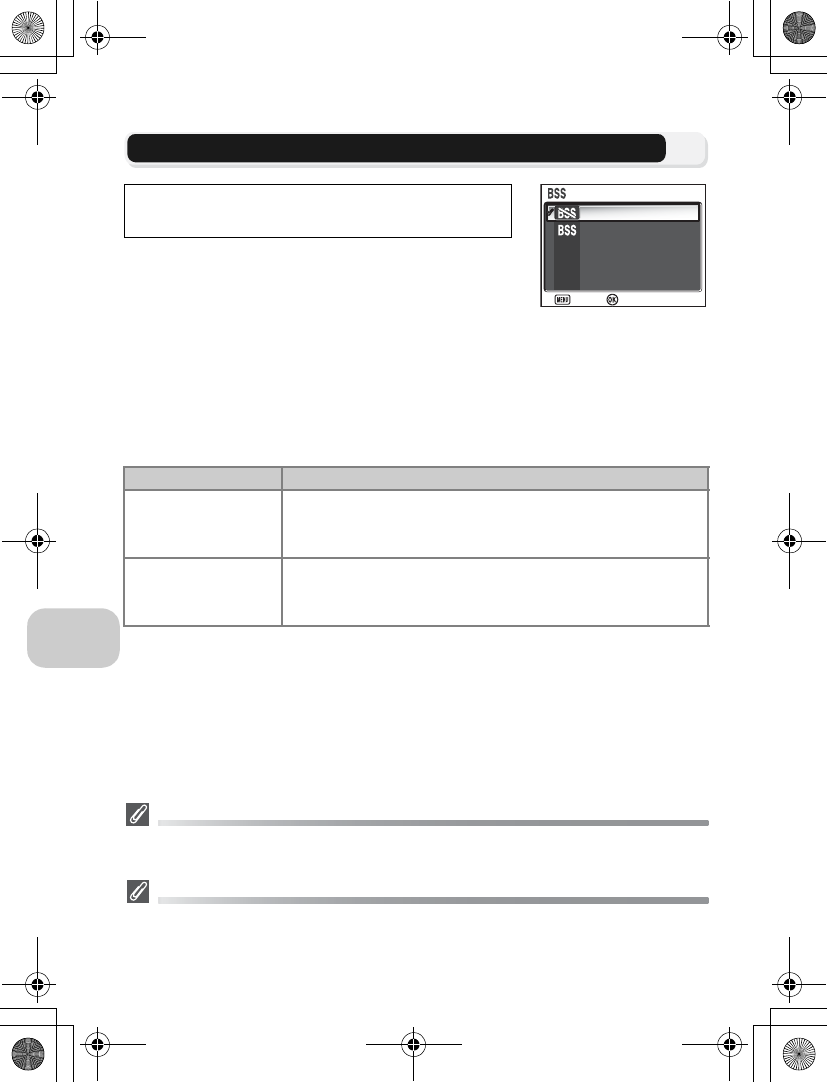
A Best Shot Selector
When the “Best Shot Selector” (BSS) is on, the camera
takes a maximum of ten pictures as long as the shut-
ter-release button is held down. These images are
then compared and the sharpest picture (the picture
with highest level of detail) is saved to the memory or memory card. BSS is recom-
mended for situations in which inadvertent camera movement can produce
blurred pictures, for example when:
•the camera is zoomed in
•the camera is in Macro close-up mode
•lighting is poor and the flash cannot be used
Notes on BSS
BSS may not produce the desired results with a moving subject or if you change the compo-
sition while the shutter-release button is pressed all the way down.
Restrictions on BSS
BSS cannot be used with the self timer (c30), Continuous (c89) settings other than
rSingle, CAuto bracketing, xWB bracketing (c93), or Noise reduction
(c101).
Rotate the mode dial to P or A and press the m but-
ton to select BSS, and then press d.
Option Description
B
Off
(default setting)
BSS off; camera functions normally.
A
On
BSS on. Flash mode set to B automatically and focus, expo-
sure, and white balance for all photos are determined by the
first picture in each series.
Off
On
BEST SHOT SELECTOR
BEST SHOT SELECTOR
Confirm
Exit
en_q3175.book Page 92 Thursday, June 16, 2005 10:54 AM
93
The Shooting Menu
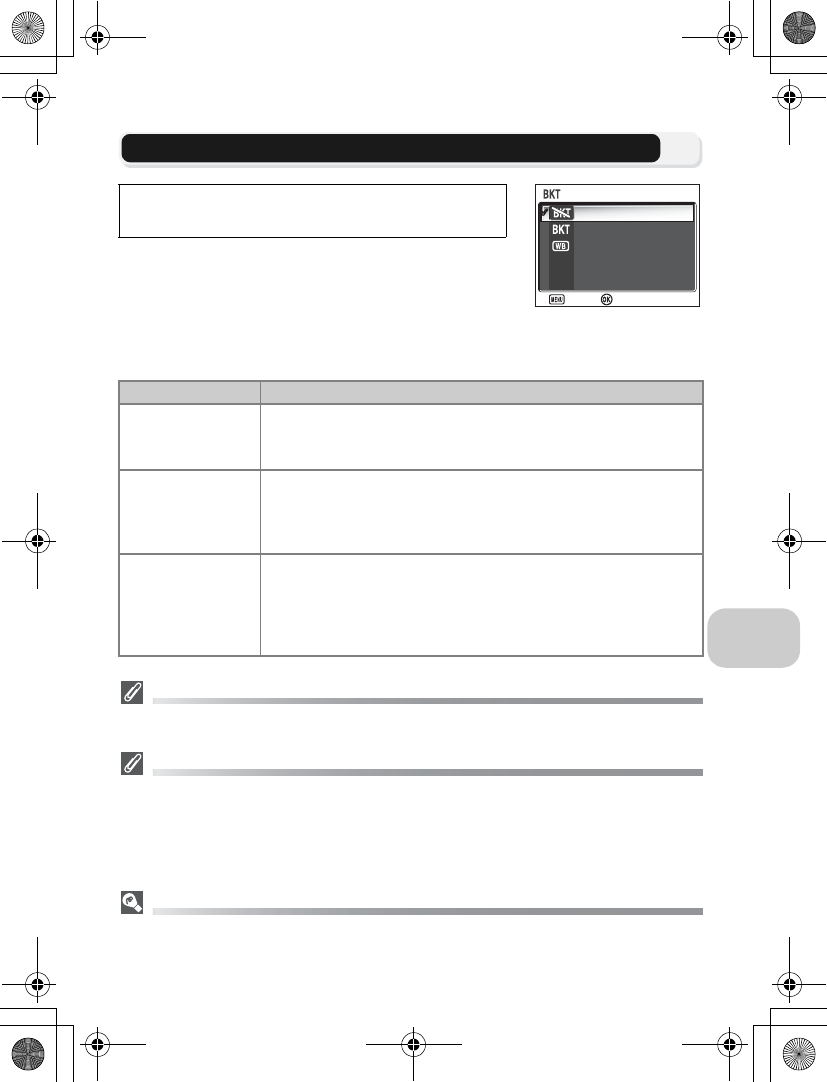
C Auto Bracketing
In some situations, you may find it difficult to select
appropriate Exposure compensation and White bal-
ance settings, and yet not have time to check the re-
sults and adjust settings after each shot. Auto
bracketing can be used to vary these settings auto-
matically over a series of pictures, “bracketing” a selected exposure compensa-
tion or white balance setting.
When C Auto Bracketing is set
•The Flash mode is set to B.
•Noise reduction (c101) has no effect even if this option is set to On.
Restrictions on Auto Bracketing
•Auto bracketing cannot be used with Continuous settings other than rSingle, or BSS.
The latest setting is used and the earlier setting is canceled.
•While White balance (c52) is set to White bal. preset, xWB bracketing cannot be
used for shooting.
•If the space in the memory or on the memory card is capable of storing only a few images,
only that number of images will be stored.
Exposure Compensation
When Exposure compensation (c33) and Auto bracketing are set simultaneously, expo-
sure will be compensated at the sum of both compensation values.
Rotate the mode dial to P or A and press the m but-
ton to select Auto bracketing, and then press d.
Option Description
D
Off
(default setting)
Restores normal exposure and white balance.
C
Auto bracketing
Each time the shutter-release button is fully pressed, the camera
takes three shots, one shot with the current exposure, and two
shots varying the exposure by values of +0.5 and -0.5 compen-
sation.
x
WB bracketing
The camera takes three shots each time shutter-release button
is fully pressed, bracketing current white balance setting to pro-
duce one picture with normal white balance, one picture with
bluish cast, and one picture with reddish cast. Recording time
roughly triples.
Off
Auto bracketing
AUTO BRACKETING
AUTO BRACKETING
WB bracketing
Confirm
Exit
en_q3175.book Page 93 Thursday, June 16, 2005 10:54 AM
94
The Shooting Menu
E Flash Exp. Comp.
This option is used to adjust flash output by -2.0EV to
+2.0EV in increments of 1/3EV.
Highlight desired value and press d.
F Image Adjustment
Image adjustment is used to adjust contrast automat-
ically for optimal results before recording pictures to
the memory or the memory card.
Rotate the mode dial to P or A and press the m but-
ton to select Flash Exp. Comp., and then press d.
Rotate mode dial to P or A and press m button to
select Image adjustment, and then press d.
Option Description
G
Auto
(default setting)
Camera automatically adjusts contrast according to shoot-
ing conditions.
H
Normal
Camera performs same standard contrast adjustment on all
pictures. Suitable for a wide variety of scenes, from dark to
bright.
I
More contrast
Picture processed to emphasize difference between light
and dark areas, enhancing contrast. Useful when shooting
under overcast skies or shooting low contrast subjects such
as landscapes.
J
Less contrast
Picture processed to decrease difference between light and
dark areas, reducing contrast. Recommended when light is
very bright, creating strong shadows on subject.
FLASH EXPOSURE COMP.
FLASH EXPOSURE COMP.
+0.3
0
-0.3
Confirm
Exit
Auto
Normal
IMAGE ADJUSTMENT
IMAGE ADJUSTMENT
More contrast
Less contrast
Confirm
Exit
en_q3175.book Page 94 Thursday, June 16, 2005 10:54 AM
95
The Shooting Menu
M Image Sharpening
The camera automatically processes pictures to em-
phasize the borders between light and dark areas of
the picture, making edges seem sharper.
Image Sharpening Effects
Cannot be previewed in the monitor. You can view the results in the playback mode.
Rotate the mode dial to P or A and press the m but-
ton to select Image sharpening, and then press d.
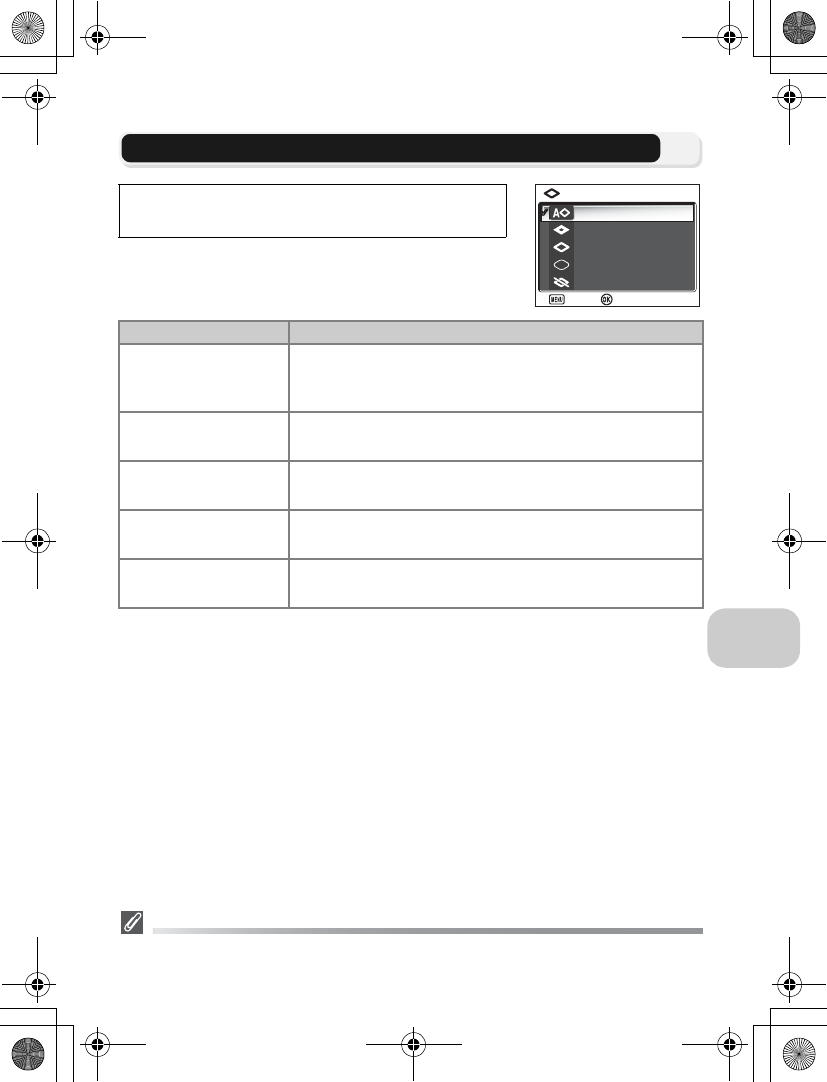
Option Description
K
Auto
(default setting)
Camera sharpens edges for optimal results; amount of
sharpening varies from shot to shot.
L
High
Pictures processed to increase sharpness, making edges
more distinct.
M
Normal
Camera performs same standard level of sharpening on all
images.
N
Low Sharpening reduced below normal level.
O
Off
No sharpening performed. Suitable for pictures that will
later be retouched on a computer.
Auto
High
IMAGE SHARPENING
IMAGE SHARPENING
Normal
Low
Off
Confirm
Exit
en_q3175.book Page 95 Thursday, June 16, 2005 10:54 AM
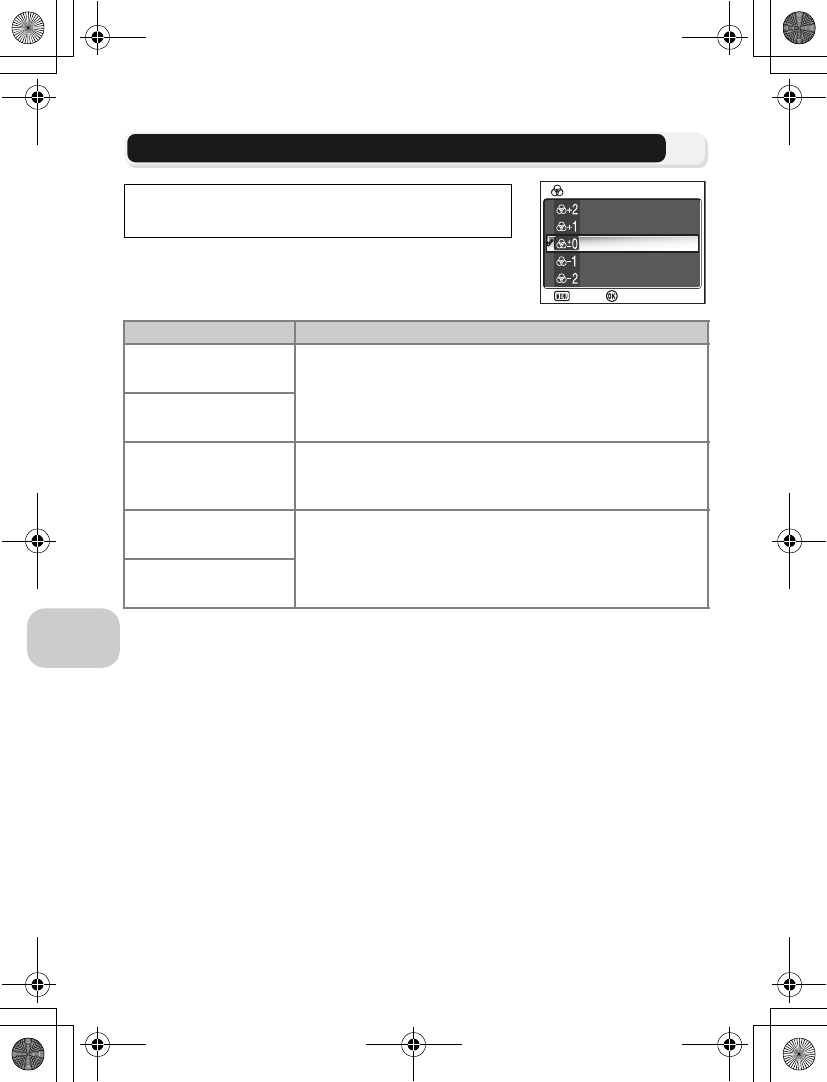
96
The Shooting Menu
P Saturation Control
This option is used to heighten or reduce the vividness
of colors.
Rotate the mode dial to P or A and press the m but-
ton to select Saturation control, and then press d.
Option Description
Q
Maximum Use for vivid, photoprint effect when taking pictures that
will be printed “as is,” without further modification.
R
Enhanced
S
Normal
(default setting)
Best choice in most situations.
U
Moderate Use when taking pictures that will later be retouched on a
computer.
V
Minimum
Maximum
Enhanced
SATURATION CONTROL
SATURATION CONTROL
Normal
Moderate
Minimum
Confirm
Exit
en_q3175.book Page 96 Thursday, June 16, 2005 10:54 AM
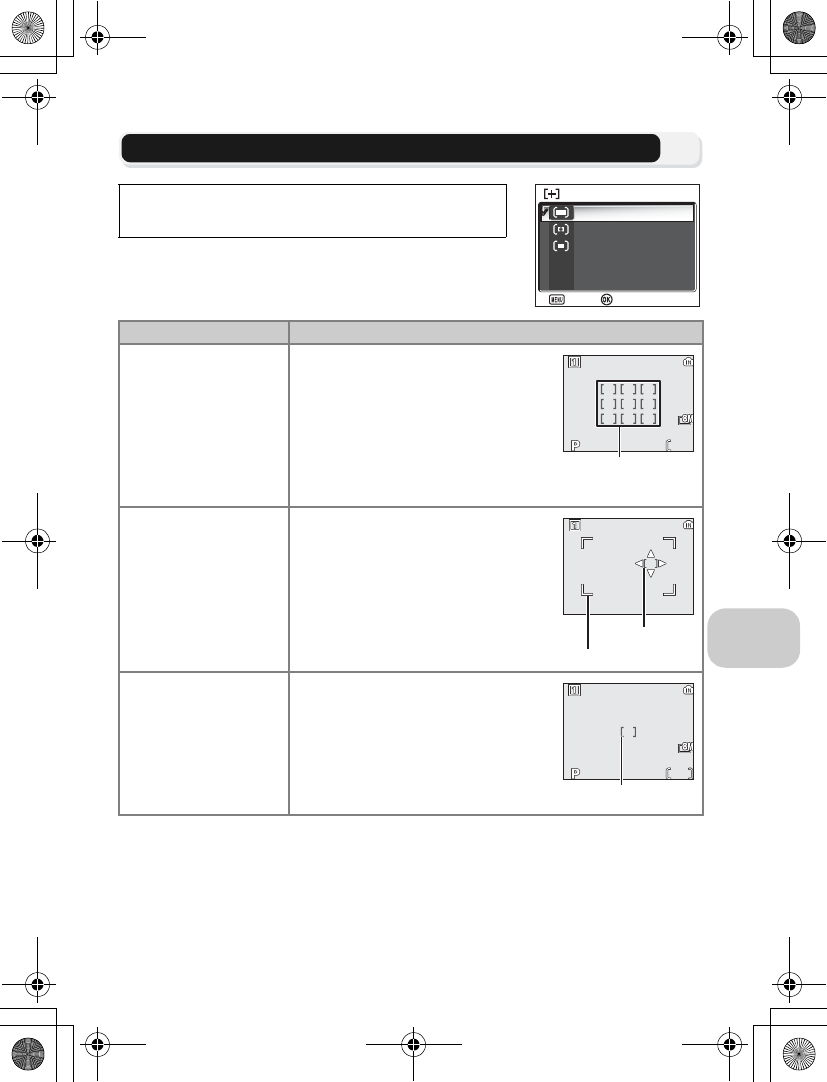
97
The Shooting Menu
k AF Area Mode
This option is used to determine how the focus area is
selected.
Rotate the mode dial to P or A and press the m but-
ton to select AF area mode, and then press d.
Option Description
l
Auto
(default setting)
Camera automatically selects focus
area containing subject closest to
camera. Selected focus area is dis-
played in green (focused) or red (not
focused) when shutter-release button
is pressed halfway. This setting is use-
ful when your subject is moving or
you have little time to check focus.
m
Manual
User selects an area from 99 focus
areas manually using multi selector.
This option can be used instead of AF
lock (c98) to focus on a relatively
motionless subject that is not at the
center of the frame. For more infor-
mation see “Using m Manual
Option” (c99).
n
Off
Center focus area is used. This option
can be used in combination with AF
lock (c98) to focus on off-center
subjects.
Auto
Manual
AF AREA MODE
AF AREA MODE
Off
Confirm
Exit
NORM
NORM
15
15
1/60
1/60
F2.7
F2.7
Focus area
Focus area
Selectable area
NORM
NORM
7
7
1/60
1/60
F2.7
F2.7
Focus area
en_q3175.book Page 97 Thursday, June 16, 2005 10:54 AM
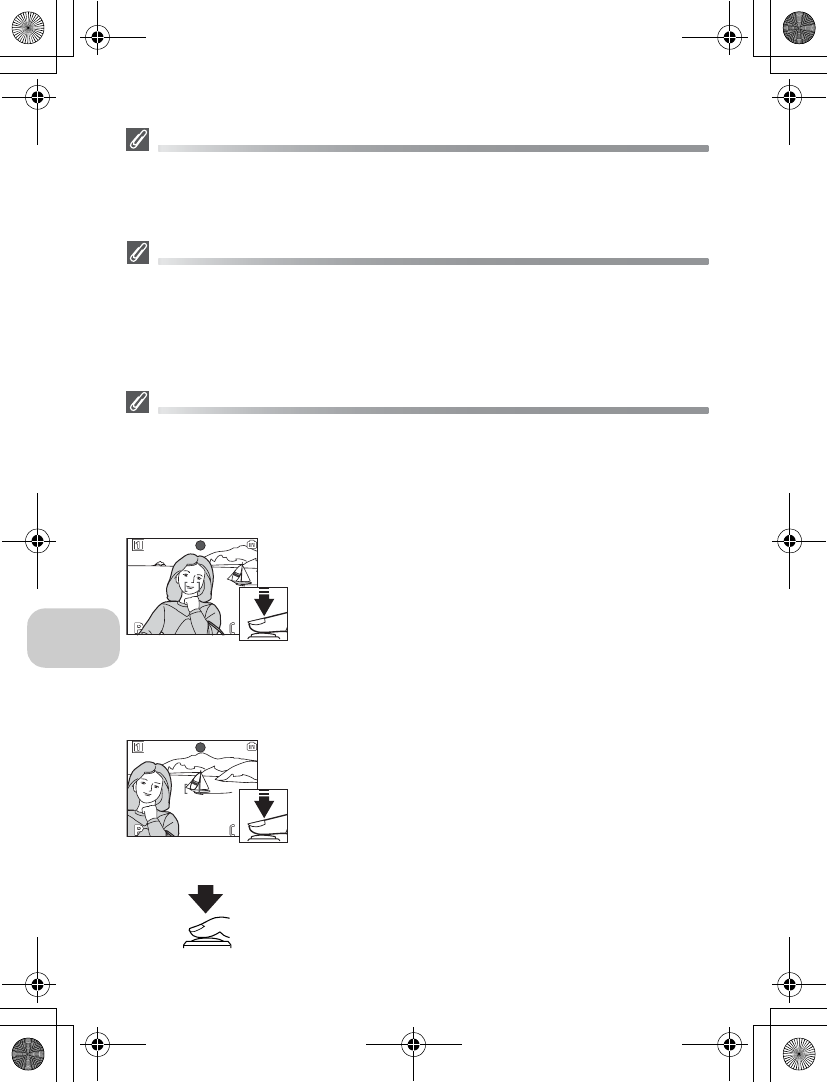
98
The Shooting Menu
Focus Area Display
•When the subject is in focus, focus area will be displayed in green.
•When the subject is out of focus, focus area will blink in red.
•When AF area mode is lAuto, focus area will be displayed when the shutter-release
button is pressed halfway.
Notes on Focus Area Selection
•In Scene mode (c34), the camera automatically selects optimal focus area for the selected
mode.
•In Movie mode, camera automatically focuses on the subject using the center focus area.
Focus area mode cannot be used.
•While digital zoom (c20) is in effect, the center focus area is used. AF area mode cannot
be used.
AF Lock
Focus and exposure are locked when the shutter-release button is pressed halfway, and re-
main locked while the Shutter-release button is held in this position (AF lock). AF lock can be
used to take pictures of off-center subjects or in situations in which the camera is unable to
focus using autofocus (c23).
Procedures for AF lock are described below. In this example, AF area mode (c97) is set to
nOff.
1Focus
Position the subject in the center of the frame in the
monitor and press the shutter-release button half-
way.
2 Check the focus indicator
When the subject is in focus, the focus indicator on
the monitor is lit. Focus area shows green on the
monitor.
•Focus and exposure will remain locked while the shutter-
release button is pressed halfway.
3 Recompose the picture
Keeping the shutter-release button pressed halfway,
recompose your picture. Do not change the distance
between the camera and your subject while AF lock
is in effect. If your subject moves, remove your finger
from the shutter-release button and focus again at
the new distance.
4 Take the picture
Press the shutter-release button the rest of the way
down to shoot.
7
7
NORM
NORM
AF
AF
1/60
1/60
F2.7
F2.7
7
7
NORM
NORM
AF
AF
1/60
1/60
F2.7
F2.7
en_q3175.book Page 98 Thursday, June 16, 2005 10:54 AM