Nortek Security and Control 00115 Wireless glass break detector User Manual 235512A GB00Z 1 Iris Instructions indd
Nortek Security & Control LLC Wireless glass break detector 235512A GB00Z 1 Iris Instructions indd
Contents
- 1. Instructions1
- 2. Instruction2
Instruction2

DETECTOR TESTING
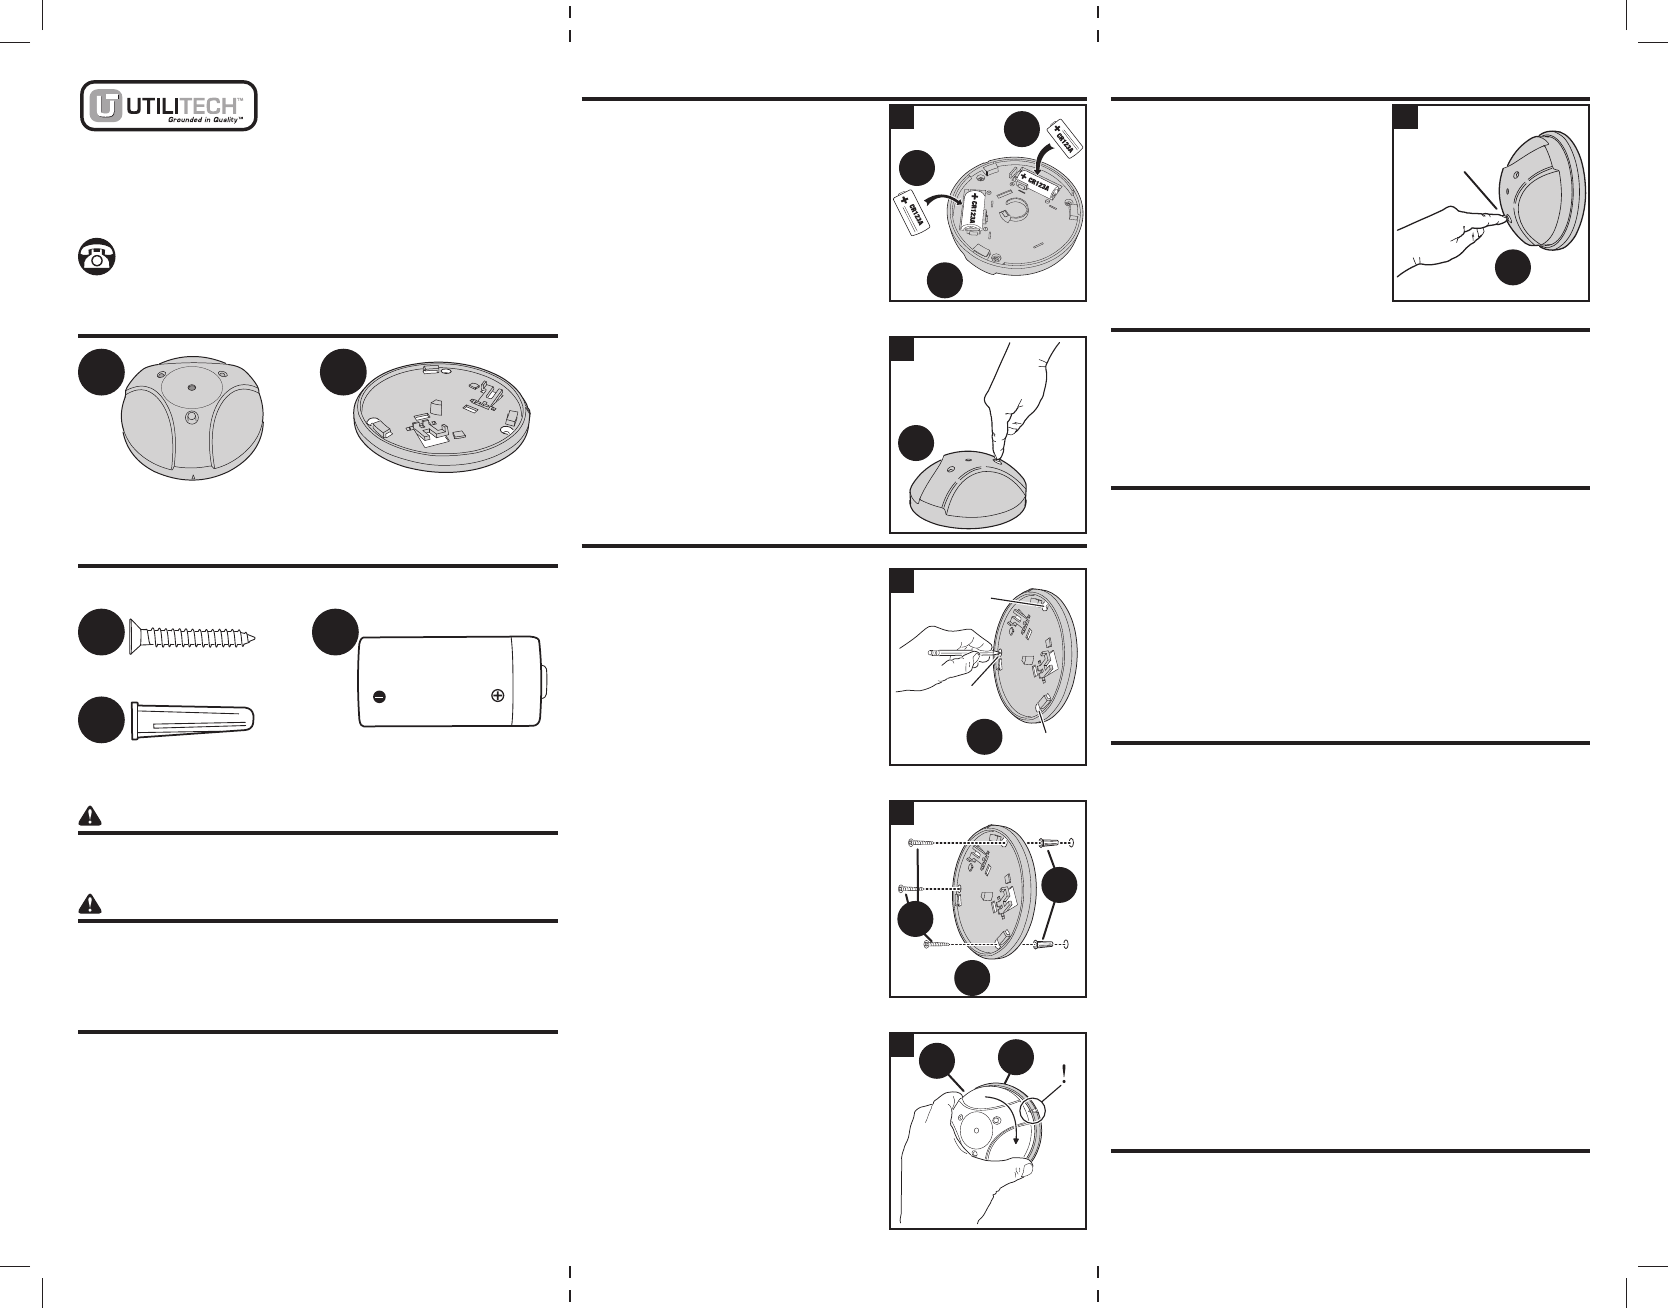
1. Follow the system’s
instructions to select Test
Mode. When instructed,
press button on Detector
(A) three times.
SPECIFICATIONS
Operating Temperature: 32° to 120° F (0° to 49° C)
Operating Relative Humidity: 5 to 95%, non-condensing
Operating Frequency: 908.42 MHz
Sensor Type: Single microphone, dual-stage
Glass Thickness: 1/8” (3.2 mm) to 1/4” (6.4 mm)
HELPFUL TIPS
• The minimum size for all glass types is 11” x 11”
(28 cm x 28 cm) square. Glass must be framed, in
a wall of the room or mounted in a barrier of 36” (91
cm) minimum width.
• The Detector will not lock onto the Mounting Plate
unless both CR123A batteries are installed.
• The Detector sends Z-Wave® signals to the system.
Z-Wave® is a registered trademark of Sigma
Designs Inc. and/or its subsidiaries.
WARRANTY
Lowe’s Utilitech Warranty Here??
REGULATORY NOTICE
Changes or modifi cations to the device may void FCC compliance.
Les modifi cations apportées à l’appareil peuvent annuler la
conformité Industrie Canada
PARING INSTRUCTIONS
1. Install two Batteries (CC) into
the Detector (A). Observe
polarity!
2. Bring detector within 10 feet
of the system. Set system
to add glass break detector
device, when instructed,
press the button on Detector
(A) three times to pair with the
system.
MOUNTING THE DETECTOR
1. Choose a location on the
ceiling or on an adjacent or
opposite wall within 12 feet
of the glass to be monitored.
Use the Mounting Plate (B) as
a template to mark the three
mounting holes.
2. Drill three 3/16” pilot holes
and insert Screw Anchors
(BB). Attach Mounting Plate
(B) with three Mounting
Screws (AA).
3. Match alignment marks on
Detector (A) and Mounting
Plate (B). Turn Detector
(A) clockwise to lock onto
Mounting Plate (B).
ITEM #0000000
MODEL #GB00Z-1
GLASS BREAK DETECTOR
Questions?
Call customer service at 1-000-000-0000,
5:00 a.m. - 4:30 p.m., PST, Monday-Friday
PACKAGE CONTENTS
HARDWARE CONTENTS
Note: Hardware shown actual size.
SAFETY INFORMATION
Please read and understand this entire manual before
attempting to assemble, operate, or install the product.
WARNING
Danger of explosion if batteries are installed
incorrectly. Replace only with the same or equivalent
type recommended by the manufacturer.
PREPARATION
Before beginning installation of product, make sure
all parts are present. Compare parts with package
contents list and hardware contents list. If any part
is missing or damaged, do not attempt to assemble,
install or operate the product.
Estimated Installation Time: 15 minutes.
Tools required for installation (not included):
Pencil, Phillips screwdriver, drill, 3/16” drill bit
x 1
Mounting Plate
x 3
Mounting Screw
x 3
Screw Anchor
x 2
CR123A Battery
x 1
Detector
A
AA CC
CC
A
A
B
B
A
A
B
AA
BB
CC
BB
B
xxxxx Printed in China
PRINTER’S INSTRUCTIONS:
INSTR,INSTL,GLASS BREAK,ZW - P/N: 235512 X11 - INK: BLACK - MATERIAL: 20 LB. MEAD BOND - SIZE: 11.000” X 8.500” - FOLDING: Z-FOLD, FINISH WITH LOGO SHOWING - SCALE: 1-1
235512 X11
1
3X
1
2
2
1
3
1
2
3
Utilitech & UT Design® is a registered
trademark of LF, LLC. All rights reserved.