Northfield Telecommunications d b a Advanced Wireless Communications 07161688P Portable FM UHF PTT Radio Transceiver User Manual AWR1688 service manual 2
Northfield Telecommunications, Inc. d/b/a Advanced Wireless Communications Portable FM UHF PTT Radio Transceiver AWR1688 service manual 2
Contents
- 1. USERS MANUAL
- 2. SERVICE MANUAL
SERVICE MANUAL
1
Forward
Manual Scope
This manual is intended for use by experienced technicians familiar with similar types of
communication equipment. It contains all service information required for the equipment
and is current as of the publication date.
2
Product Safety and RF Exposure for Portable Two-Way Radios
Compliance with RF Energy Exposure Standards
NOTICE: This radio is intended for use in occupational/controlled applications where users have
been made aware of the potential for exposure and can exercise control over their exposure. This
radio device is NOT authorized for general population, consumer or similar use.
BEFORE USING THIS RADIO, READ THE TRAINING MATERIAL BELOW WHICH
CONTAINS IMPORTANT OPERATING INSTRUCTIONS FOR SAFE USAGE AND RF
ENERGY AWARENESS AND CONTROL INFORMATION FOR COMPLIANCE WITH RF
ENERGY EXPOSURE LIMITS IN APPLICABLE NATIONAL AND INTERNATIONAL
STANDARDS.
Federal Communication Commission (FCC) Regulations
The FCC has established limits for safe exposure to radio frequency (RF) emissions from
portable two-way radios. The FCC requires manufacturers to demonstrate compliance with
RF exposure limits before portable two-way radios can be marketed in the U.S. When
two-way radios are approved for occupational/controlled environment exposure limits, the
FCC requires users to be fully aware of, and exercise control over, their exposure.
Awareness and control of RF exposure can be accomplished by the use of labels, or by
education and training through appropriate means, such as information and instructions in
user manuals or safety booklets. Your Advanced Wireless two-way radio has an RF
exposure information label in the battery compartment. The training material below
includes useful information about RF exposure and helpful instructions on how to control
your RF exposure.
Your Advanced Wireless two-way radio is designed and tested to comply with a number of
national and international standards and guidelines (listed below) regarding human
exposure to RF electromagnetic energy. In terms of measuring RF energy for compliance
with FCC exposure guidelines, your radio radiates measurable RF energy only while it is
transmitting (during talking), not when it is receiving (listening) or in standby mode.
Compliance and Control Guidelines and Operating Instructions for Portable
Two-Way Radios
To control your exposure and ensure compliance with the occupational/controlled
environment exposure limits, always adhere to the following procedures:
* Transmit no more than 50% of the time. To transmit (talk), push the Push-To-Talk (PTT)
button. To receive calls, release the PTT button. Transmitting 50% of the time or less is
important since the radio generates measurable RF energy exposure only when
transmitting (in terms of measuring standards compliance).
*Hold the radio in a vertical position in front of the face with the microphone positioned at
least one inch (2.5 cm) away from the lips. Keeping the radio at the proper distance is
important since RF exposure decreases with increasing distance from the antenna.
*
For body-worn operation, always use the radio with the AWC Belt-Clip Part No.:
420855203393. AWC-approved accessories, antennas, and device combinations have
been tested and comply with the occupational/controlled environment RF exposure limits.
The use of non–AWC approved accessories may result in exposure levels that exceed the

3
RF exposure limits for the occupational/controlled environment.
*
If you are not using a body-worn accessory and are not using the radio held in front of
the face, ensure the radio is kept a minimum of 0.7 cm from the body when transmitting.
Keeping the radio at a proper distance is important since RF exposure decreases with
increasing distance from the antenna.
FCC license Information
Your Advanced Wireless Communications radio operates on communications frequencies
which are subject to FCC (Federal Communications Commission) Rules & Regulations.
FCC Rules require that all operators using Private Land Mobile radio frequencies obtain a
radio license before operating their equipment. Application for license must be made on
FCC form 601, and schedules D, E, and G.
FAX: Forms can be obtained by fax from the FCC Fax-On-Demand system. Call
1-202-418-0177 from your fax machine and request document number 000600 for the form,
schedules, and instructions.
MAIL: Forms can be ordered by telephone, and will be sent to you by first class mail. Call
the FCC Forms Hotline at 1-800-418-FORM (1-800-418-3676).
INTERNET: Form 601 and instructions can be downloaded from the FCC Forms website at:
http://www.fcc.gov/Forms/Form601/601.html
Before filling out your Form 601 application Technical Data section, you must decide which
frequency (or frequencies) you will operate on. Refer to the frequency chart on page 26.
Questions? Call the FCC for license application questions at
1-888-CALL-FCC (1-888-225-5322).
If you have any questions, call Advanced Wireless Communications:
1-800-475-5852
Notices to The User
This device complies with Part 15 of the FCC Rules. Operation is subject to the following
two conditions:
(1) this device may not cause harmful interference, and
(2) this device must accept any interference received, including interference that may
cause undesired operation.
One or more of the following statements may be applicable:
FCC WARNING
This equipment generates or uses radio frequency energy. Changes or modifications to this
equipment may cause harmful interference unless the modifications are expressly approved
in the instruction manual. The user could lose the authority to operate this equipment if an
unauthorized change or modification is made.

4
SAFETY INFORMATION:
Your wireless portable two-way radio has been designed using a low power transmitter.
When the PTT switch is pressed, the radio generates radio frequency (RF)
electromagnetic energy (EME). This radio is designed to comply with the FCC Report and
Order FCC 96-326 (August, 1996).
User Safety Information
The following precautions are recommended for personnel safety:
DO NOT transmit until all RF connectors are verified secure and any open
connectors are properly terminated.
SHUT OFF and do not operate this equipment near electrical blasting caps or in an
explosive atmosphere.
When in vehicles with an airbag, do not place a portable radio in the area over an
airbag or in the airbag deployment area.
Do not expose the radio to direct sunlight for a long time nor place it close to a
heating source.
Do not use any portable radio with a damaged antenna. If a damaged antenna comes
into contact with your skin, a minor burn may result.
This equipment should be serviced by a qualified technician only.
INFORMATION TO THE DIGITAL DEVICE USER REQUIRED BY THE FCC
This equipment has been tested and found to comply with the limits for a Class B digital
device, pursuant to Part 15 of the FCC Rules. These limits are designed to provide
reasonable protection against harmful interference in a residential installation. This
equipment generates, uses and can generate radio frequency energy and, if not installed and
used in accordance with the instructions, may cause harmful interference to radio
communications. However, there is no guarantee that the interference will not occur in a
particular installation. If this equipment does cause harmful interference to radio or television
reception, which can be determined by turning the equipment off and on, the user is
encouraged to try to correct the interference by one or more of the following measures:
• Reorient or relocate the receiving antenna.
• Increase the separation between the equipment and receiver.
• Connect the equipment to an outlet on a circuit different from that to which the receiver is
connected.
• Consult the dealer for technical assistance.
5
Contents
Brief Introduction
LCD Display
Software Description
Assembly and Disassembly for Repair
Exploded View
Packing

6
Brief Introduction
1. Antenna
2. Programming Jack
3. Speaker/Mic Jack
4. Power/Volume Knob
Rotate the Power/Volume Knob clockwise until a “click” is heard to turn the radio on,
fully counter clockwise to turn the radio off. When the radio is on, turn the knob to adjust
volume.
5. LCD Display
Indicate operation status of the radio. (Refer to “LCD Display” for details)
6. MENU key
In standby mode, briefly press MENU key to display current channel information and
hold down this key to enter menu mode. During setting, press MENU key to save and
switch to the next setting.
7. “-” key
Used to select the channel/interference eliminator code downwards or change menu
settings.
8. MON key
In standby mode, briefly press MON key to begin channel scanning; hold down MON
key to begin monitoring.
9. MIC
10. Speaker
11. “ ”key (CALL key)
If Call feature is enabled, briefly press the CALL key to transmit a call signal; During
setting, press CALL key to save and return to the first setting or exit; Hold down the CALL
key to lock/unlock keypad.
12. “+” key
Used to select the channel/interference eliminator code upwards or change menu
settings.
13. PTT button
Press and hold PTT, radio operates in transmit mode. Release PTT, radio returns to
receive mode.
14. Belt Clip
7
Used to clip radio on your belt.
15. Charging Connectors
Connect the charging connectors with that on the charger to begin charging.
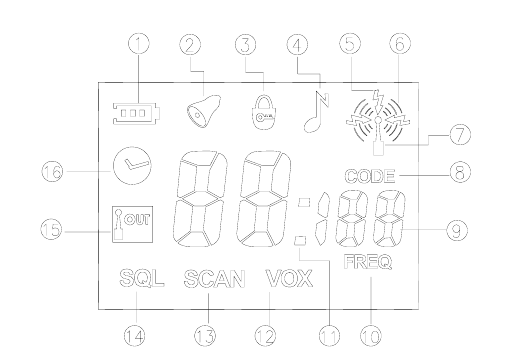
LCD Display
1. Battery Meter, used to indicate the battery power.
2. Appears when setting the Alarm Clock or the Alarm Clock is on; Flashes when the
Alarm Clock rings.
3. Appears when keypad lock is on.
4. Appears when setting the call tone.
5. Appears when receiving signals from the selected channel.
6. Appears when transmitting.
7. Appears when transmitting/receiving is enabled.
8. Indicate that the number on the LCD displays interference eliminator code and channel
number. The number under it indicates current interference eliminator code.
9. Two large “8”, a small “1” and two small “8” display the current channel number,
interference eliminator code, frequency number, time or the status of current setting.
10. Indicate that the number on the LCD displays channel number and frequency number.
The number above the icon indicates the frequency number of current channel.
11. Appears between hour and minute when LCD displays clock.
12. Appears when setting VOX or VOX feature is enabled.
13. Appears when scanning channel or setting channel scan add/delete.
14. Appears when setting squelch level.
15. Communication Range Alarm, flashes when your companion are out of range; appears
when setting communication range alarm or communication range alarm is enabled.
16. Appears when setting the clock.

8
Software Description
Radio Feature Description
Feature Description
1 56 UHF frequencies available Frequency Range:
461.0375 - 469.5625 MHz
2 Selectable number of available
channels 1-8
User can select 1-8 frequencies from 56
available frequencies
3 Selectable 121 Interference Eliminator
Codes
Include 38 CTCSS and 83 CDCSS
4 LCD Display Display operation status and setting
modes
5 LCD Backlight
6 Keypad Lock Pressing any key is invalid except PTT,
briefly pressing MENU key and holding
down CALL key.
7 VOX Feature Only available when connected with
external audio accessory.
8 Five VOX Sensitivity Levels Available The lower the level, the higher the
sensitivity.
9 Battery Power Indicator
10 Low Battery Alert The radio will sound alert when the
battery voltage is lower than preset
threshold value.
11 Channel Scan The radio will only scan the selected 1-8
channels. If 4 channels are selected, the
radio will scan these 4 channels only.
12 Battery Save (Sleep Mode) The radio will enable battery save
feature if no button is pressed and no
operation takes place within 25 seconds.
The radio will switch between 200ms
standby mode and 600ms sleep mode.
13 Clock Display and Alarm Clock
14 Five CALL TONES available The radio will sound call tone when
receiving a valid call. User can disable
the call tone.
15 PC Programmable In this mode, MCU is connected with PC
via UART port.
16 Enable/Disable Certain Features
(through PC programming)
17 Wired Clone MCU transfer the data in one radio to
another via UART port.
9
18 Monitor
19 Time Out Timer TOT time: 1 minute or 5 minutes. This
feature can be disabled.
20 Auto Squelch 4 squelch levels available. Higher
squelch level makes it harder for the
radio to receive weak signals
21 Communication Range Alarm The radio will sound alert when you are
almost out of communication range.
Radio Modes
Functions and Operations
1. Conventional Mode
Turn the power on. If no key is pressed, the radio will enter conventional mode. In this
mode, you can operate as following:
Receive or press PTT to transmit;
Display clock (It’s set by your dealer) or channel number;
Low battery detect and battery power indication;
VOX feature (Only valid when connecting with external audio accessory) (It’s set by
your dealer);
Communication Range Alarm (It’s set by your dealer);
Alarm Clock (It’s set by your dealer);
Briefly press CALL key to transmit a CALL (It’s set by your dealer);
Press and hold CALL key to enable/disable keypad lock (It’s set by your dealer);
User Mode Conventional Mode
Clock and Alarm Clock Setting Mode
MENU Mode
Dealer Mode Channel Setting Mode
PC Programming Mode
Wired Clone Mode
Default Setting Mode

10
Briefly press MENU key to display current channel information (frequency number
and interference eliminator code); Press and hold MENU key to enter setting menu;
Press UP/DOWN key to increase/decrease channel number;
Briefly press MONI key to enter channel scan mode; Press and hold MONI key to
begin monitor;
Battery Save feature (It’s set by your dealer).
2. Clock and Alarm Clock Setting Mode
Turn the power on while holding down CALL key and PTT key simultaneously. After 2
seconds, the radio enters clock and alarm clock setting mode.
Press UP/DOWN to select upwards/downwards. Press MENU key to save and go to next
setting item. Press CALL key to save and go to the first setting item. If the current item is
the first setting item, press CALL key to save and exit.
In this mode, you can operate as following:
Select to display clock or channel number in conventional mode;
Set hour of the clock;
Set minute of the clock;
Alarm clock enable/disable setting;
Set hour of the alarm clock;
Set minute of the alarm clock.
3. Menu Mode
In conventional mode, press and hold down MENU key to enter menu mode.
Press UP/DOWN to select upwards/downwards. Press MENU key to save and go to next
setting item. Press CALL key to save and go to the first setting item. If the current item is
the first setting item, press CALL key to save and exit.
In menu mode, LCD displays “ ” icon indicating that you can transmit/receive. LCD
displays channel information when pressing PTT to transmit. And the display returns to the
setting mode before transmission when releasing PTT or time out timer is due.
In this mode, you can operate as following:
VOX feature enable/disable and five sensitivity levels setting (It’s set by your dealer);
Call tone setting (five call tones) (It’s set by your dealer);
Button beep enable/disable (It’s set by your dealer);
Squelch level setting;
Communication rang alarm feature enable/disable (It’s set by your dealer);
Battery type setting.
4. Channel Setting Mode
Turn the power on while holding down MON and PTT key simultaneously. After 2 seconds,
the radio enters channel setting mode.
Press UP/DOWN to select upwards/downwards. Press MENU key to save and go to next
setting item. Press CALL key to save and go to the first setting item. If the current item is
the first setting item, press CALL key to save and exit.
In this mode, you can operate as following:
Select channel number from 1 to 8;
Select frequency number from 1 to 56;
Select interference eliminator code from 0 to 121;
11
Set the number of available channels from 1 to 8;
Scan Add/Delete.
5. PC Programming Mode
Insert programming cable into the programming jack and then turn the power on, the radio
enters PC programming mode.
6. Wired Clone Mode
Connect the radio with wired clone cable and then turn the power on while holding down
CALL and MON key simultaneously, the radio enters wired clone mode after 2 seconds.
And then press MON key to begin data transmission.
7. Default Setting Mode (It’s set by your dealer)
Turn the power on while holding down “+” and “-“ key simultaneously to restore the factory
settings after 2 seconds.
12
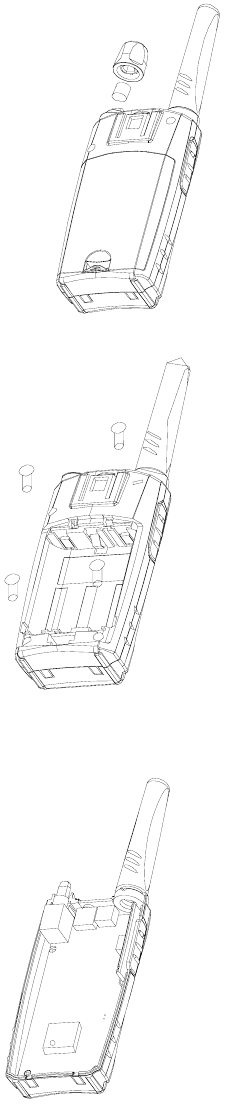
Assembly and Disassembly for Repair
Fig. 1
Remove the power knob. See figure1.
Fig. 2
Remove the four screws on the chassis. See figure 2.
Fig. 3
The disassembled unit is shown as figure 3.

13
Fig. 4
Take out the antenna spring, antenna cover and PCB. See figure 4.
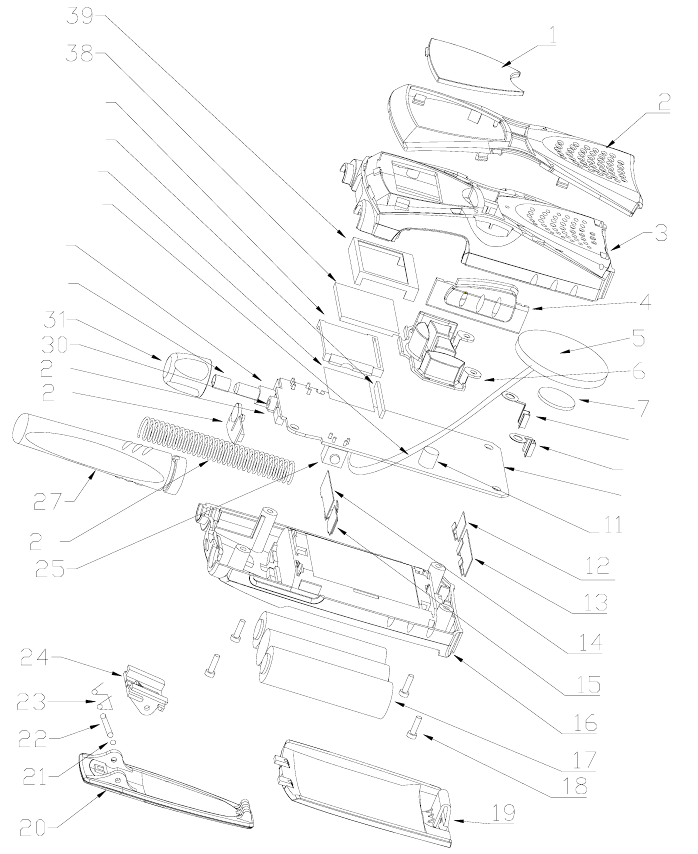
14
Exploded View
6
9
8
32
33
10
8
9
34
35
36
37
15
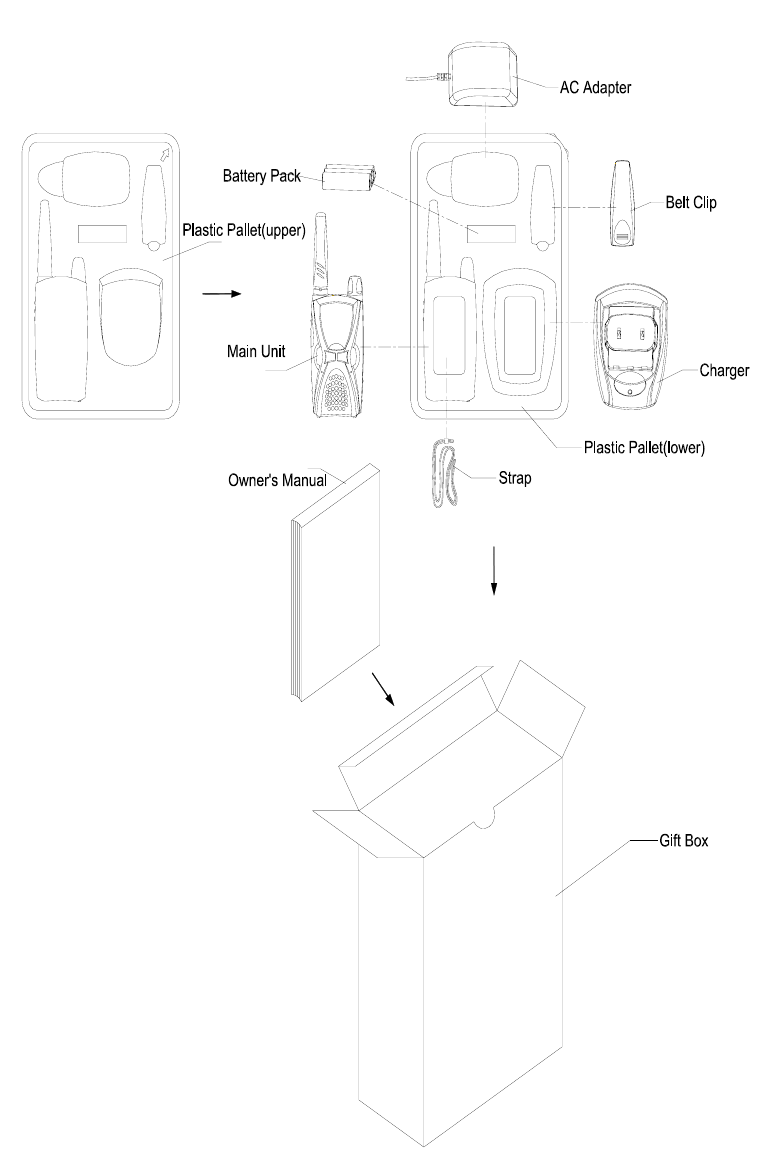
Packing