Novatron HD36WNTD MEDIA PLAYER User Manual NTD36HD English 0811
Novatron Co., Ltd MEDIA PLAYER NTD36HD English 0811
Novatron >
Contents
- 1. users manual 1
- 2. users manual 2
- 3. users manual 3
users manual 3
55
Creating DVD Library and Enjoying it
You can create your own virtual DVD Library
by storing your private collection of DVDs
1. How to play.
As NTD36HD supports IFO and ISO file, you can
create your own DVD library by storing your
private collections of DVD into NTD36HD.
* IFO : Information file commonly found on
DVDs. Such files contain navigational
information..
* ISO : One image file backup of the DVD title.
* FAT32 file system only supports up to 4GB.
* NTFS file system is unlimited.
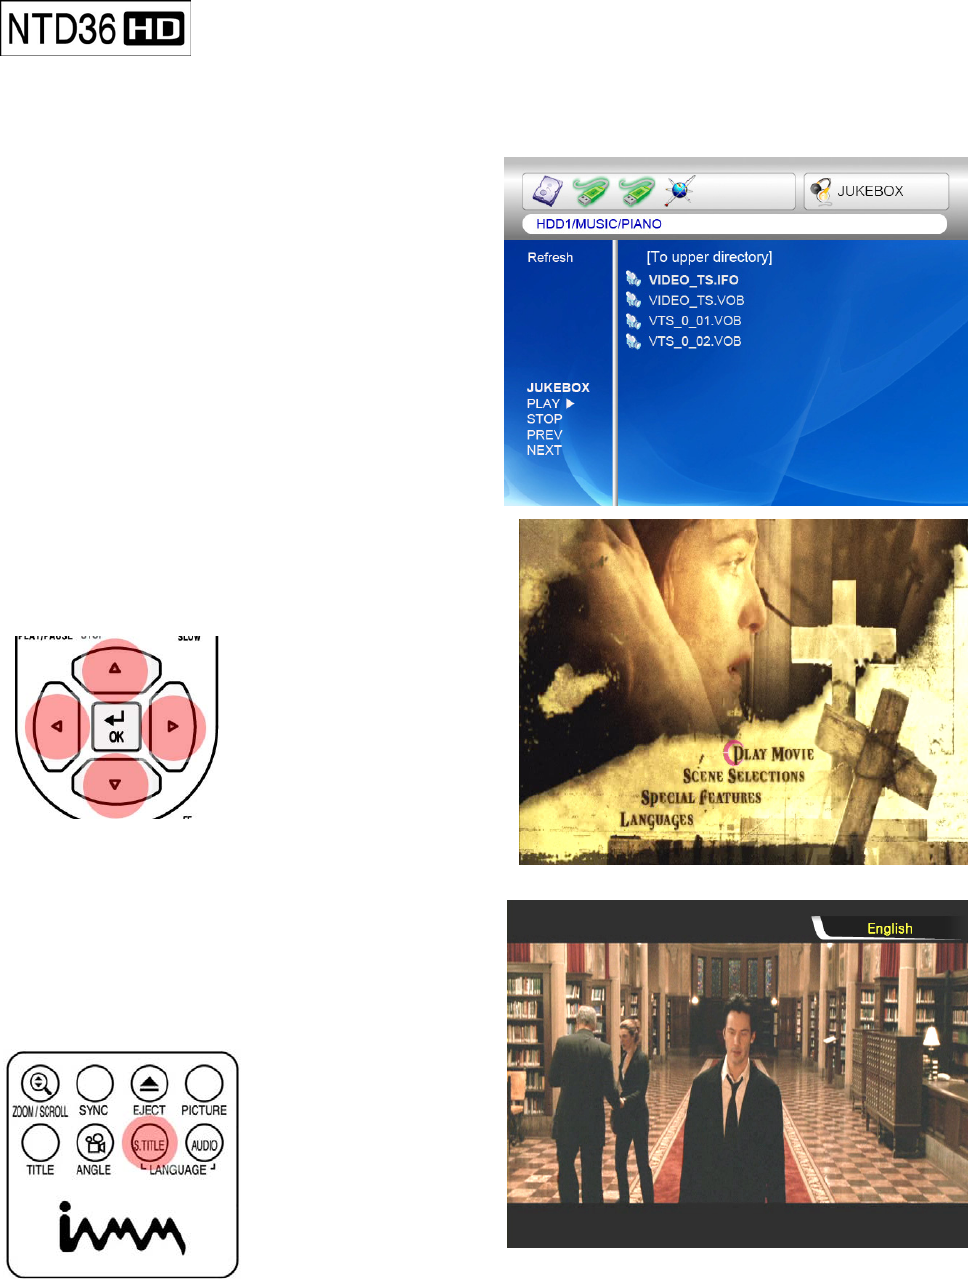
2. DVD menu controlling
Using directional button, you can select DVD
menu from DVD menu screen.
3. Multi Subtitle Language Selection
In playing DVD, you can select a subtitle
language that you want by pressing “S.TITLE”
button.
56
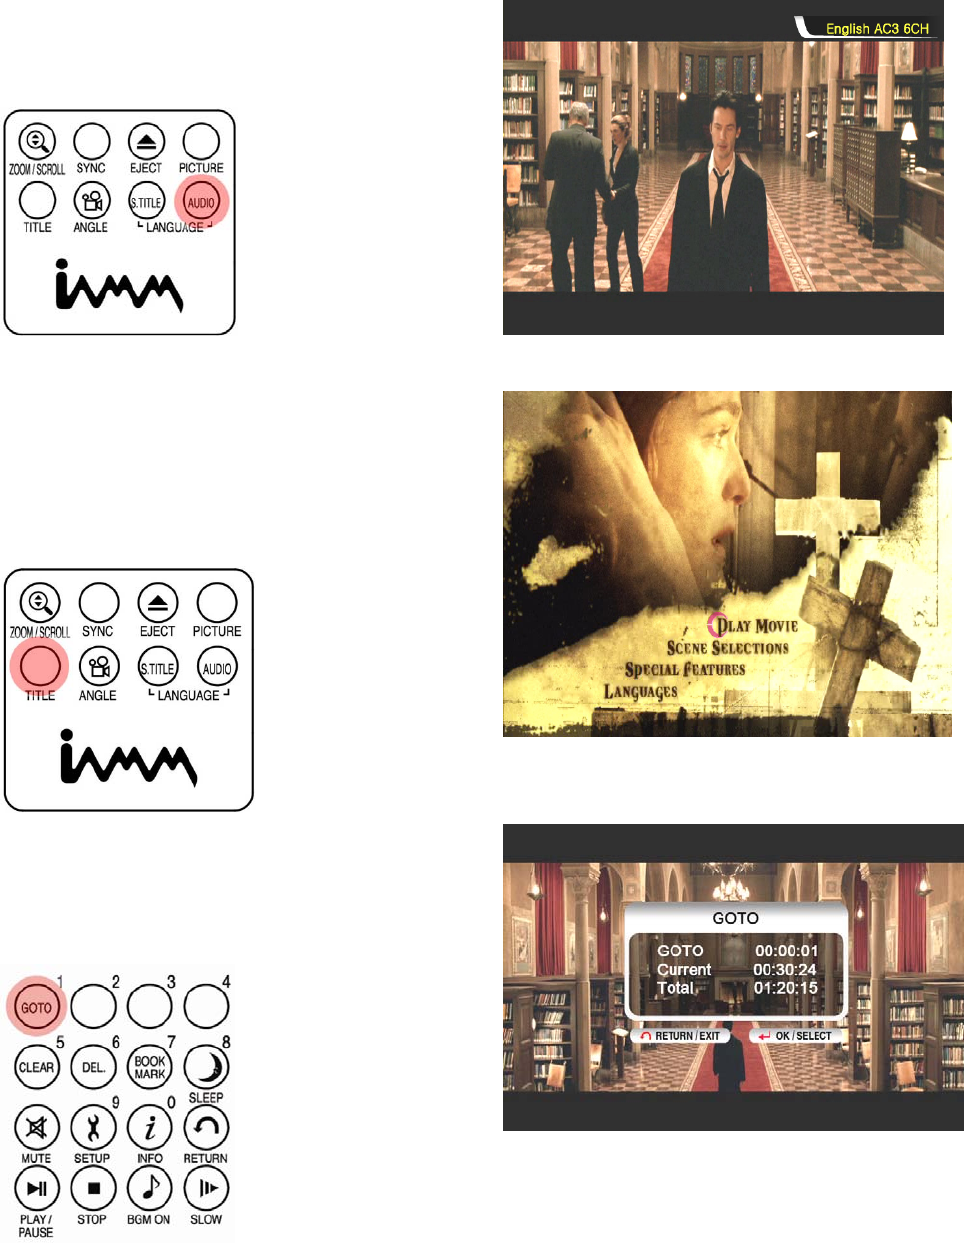
4. Multi Dubbing Audio Selection
In playing DVD, you can select a dubbing audio
that you want by pressing “AUDIO” button.
5. Return to DVD menu Screen
In playing a DVD, you can go to DVD menu
screen by pressing “TITLE” button. When you
play DVD again after setting, it starts from
stopped position of DVD.
6. GOTO function
In playing a movie, you can go to the specific
position that you want by pressing “GOTO”
button.
● Volume control, color setting and media information are same as “Enjoying movie file”
functions.
● To go next or previous chapter of DVD, use “-PAGE+” button.
57
Enjoying Music Library
NTD36HD supports mp3, WMA, OGG, M3U and PLS files.
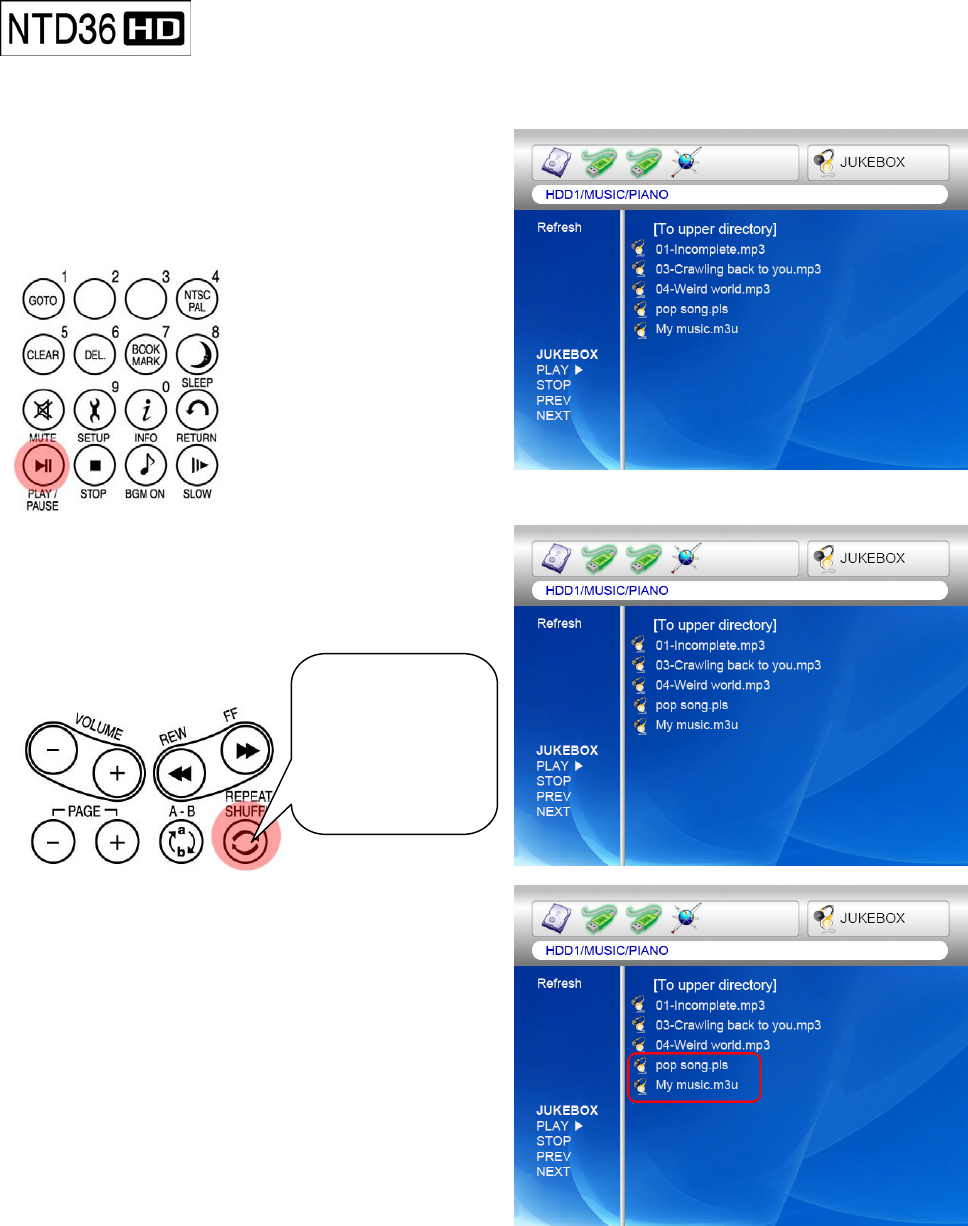
1. How to play
Select a files in a folder that contains music
files and push “PLAY ▶∥” button .
2. How to change Music Play Mode
In playing a music file, you can change play
mode by pressing “REPEAT/SHUFFLE” button.
3. M3U and PLS file support
NTD36HD supports M3U playlist and PLS playlist
by created WINAMP. To play these files, music
files linked with M3U and PLS should be in same
HDD partition.
1st press : Single
2nd press : Folder
3rd press : Shuffle
58
Enjoying Photo Library
NTD36HD supports JPG, BMP and PNG files.
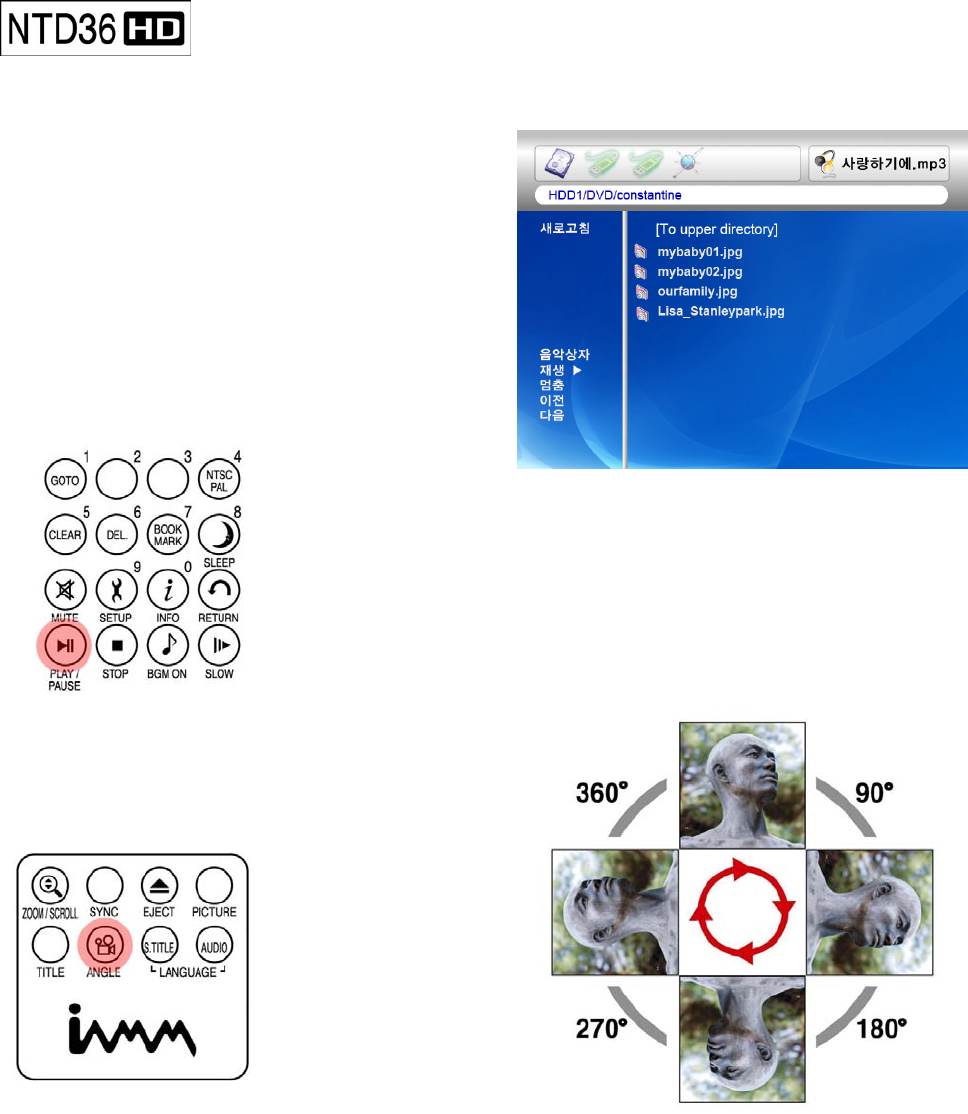
1. How to play.
Select a files in a folder that contains photo files
and push “PLAY ▶∥” button. Basically, all
photo files in same folder are played slideshow
with 10 seconds interval. You can change
slideshow time delay setting on “ETC” section of
SETUP Menu. If you want to see one photo file
only, please push “OK” button instead of “PLA
Y
▶∥”.
2. Rotation of photo
If you want to rotate the photo, push “ANGLE”
button of remote controller to be rotated it
clockwise by 90 degree.
* This service is not yet available, but will be in a
future firmware release.
Color setting function is same as “Enjoy Movie”.
59
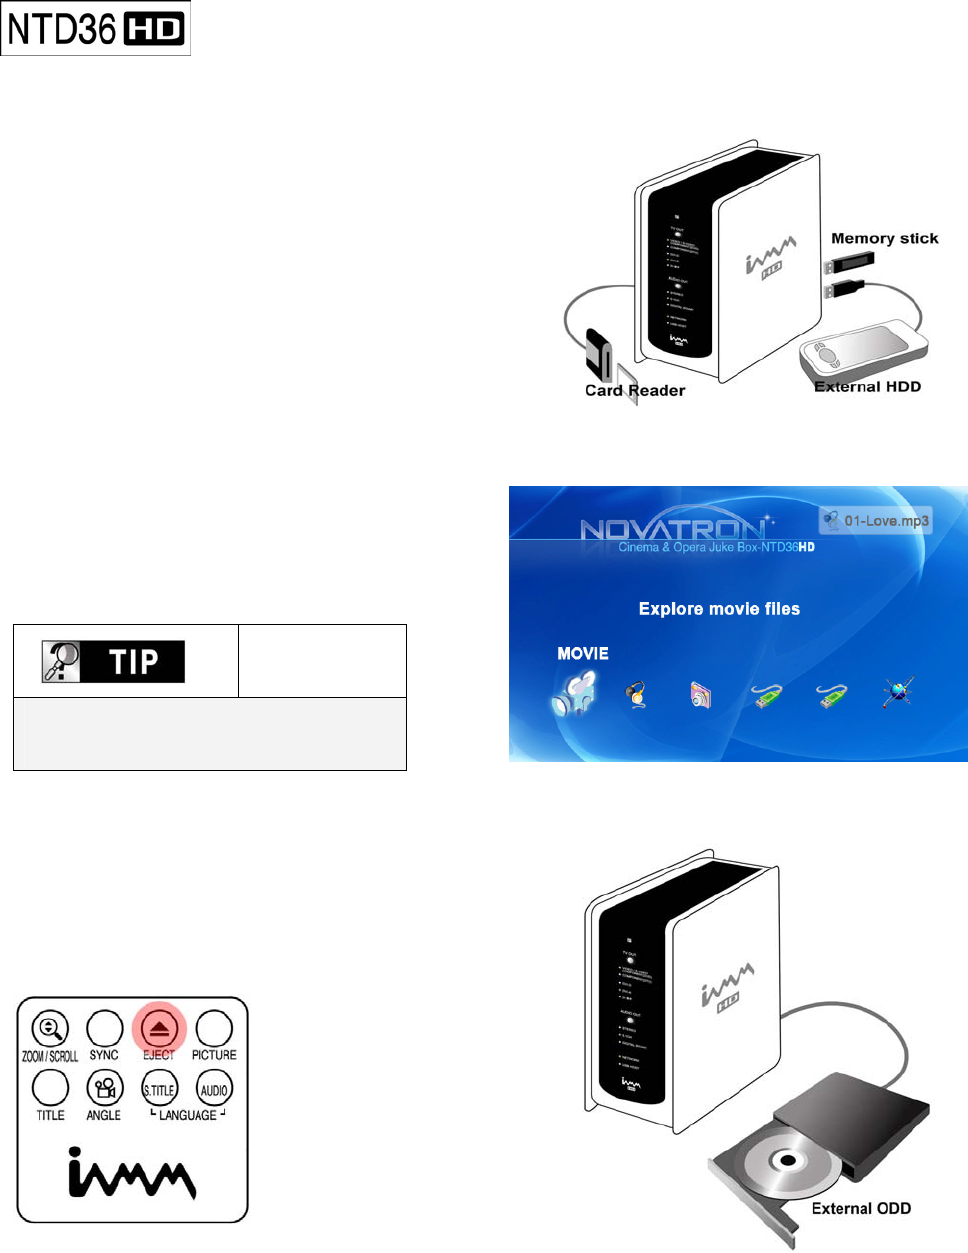
External USB devices connection
Various external USB devices can be attached to USB HOST ports of NTD36HD
1. Connecting various external USB devices
With USB host function, NTD36HD supports
external USB devices like hard drives, memory sticks
and USB card readers up to two devices one time.
2. USB connection usage.
Once you have connected your device properly,
you can access the files in the USB device by
pressing the highlighted USB icon.
NOTE
NTD36HD supports mass storage
device in “read only” mode only.
3. ODD tray controlling
NTD36HD controls ODD tray on and off by pressing
“EJECT” button when ODD USD device is connected.
60
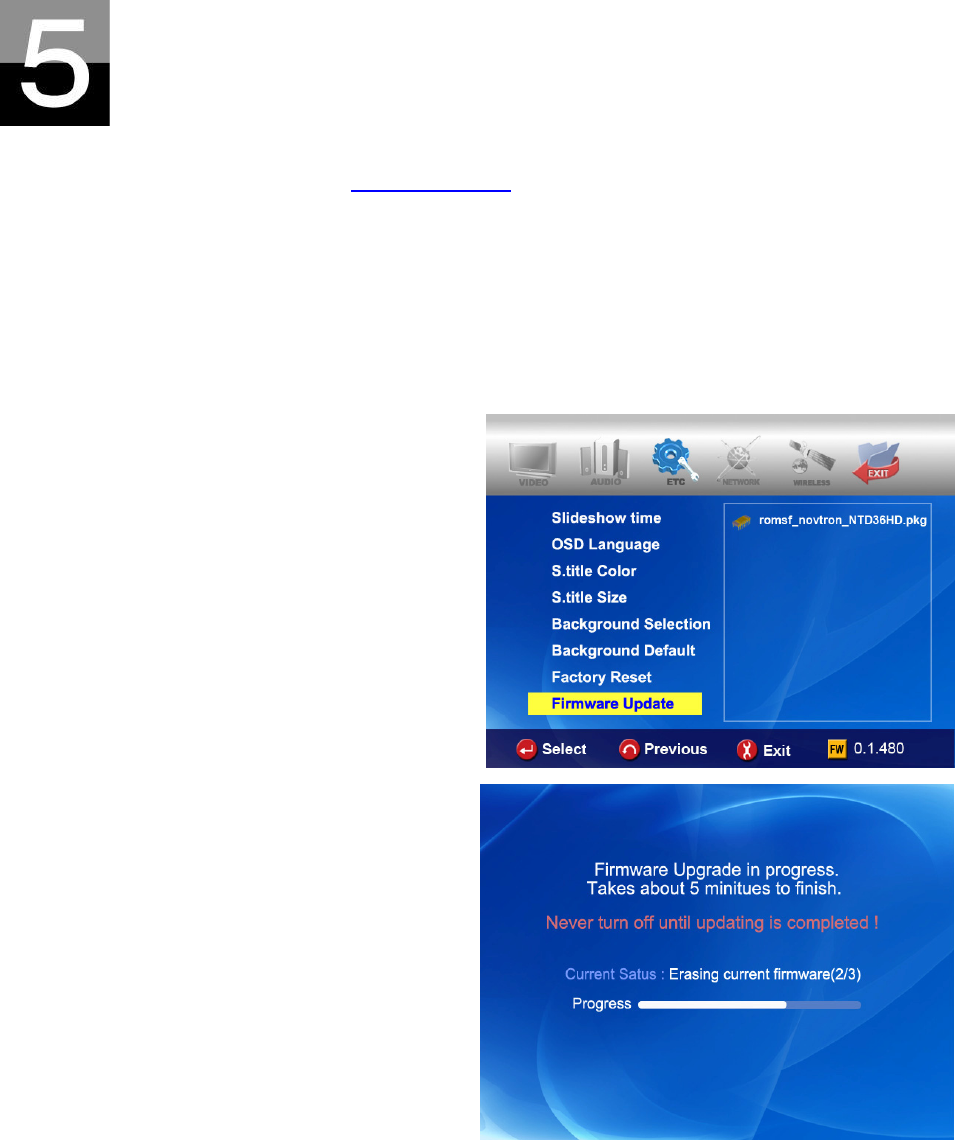
Firmware update
This section explains how to update firmware.
Getting the latest firmware to enjoy the added features and improved function.
1. Firstly, visit NTD36HD website(www.iamm.co.kr) or designated website(Please ask the shop
where you bought NTD36HD). You can download the newest firmware and save it on your PC.
2. Please extract the compressed firmware file and move or copy the file into NTD36HD through
USB cable. If NTD36HD is connected an internal network, installing the newest firmware via
internal network is also possible without copying the firmware file into a NTD36HD. In this
case, the firmware file should be stored in the shared folder of PC.
3. Connect the NTD36HD to a TV and power it on. Click the “SETUP” button on remote controller
and go to ETC setting section of SETUP.
4. Select “Firmware update” and search the
folder where the new firmware file is saved.
5. Select update file and push “OK” button on
remote controller.
6. Firmware update will start automatically
when you select “Yes” on confirmation
message box.
7. NTD36HD will power off in 10 sec
automatically after update process is
completed successfully.
8. Power on NTD36HD again, then go to “ETC” section of SETUP. Select “Factory Reset” and
press “OK” button for factory reset. And, power off NTD36HD again. After this, you can enjoy with
new firmware.
* Caution !!!
While updating, please make sure that NTD36HD is not powered off. If powered off
while updating, the NTD36HD has t be repaired from customer service center.
61
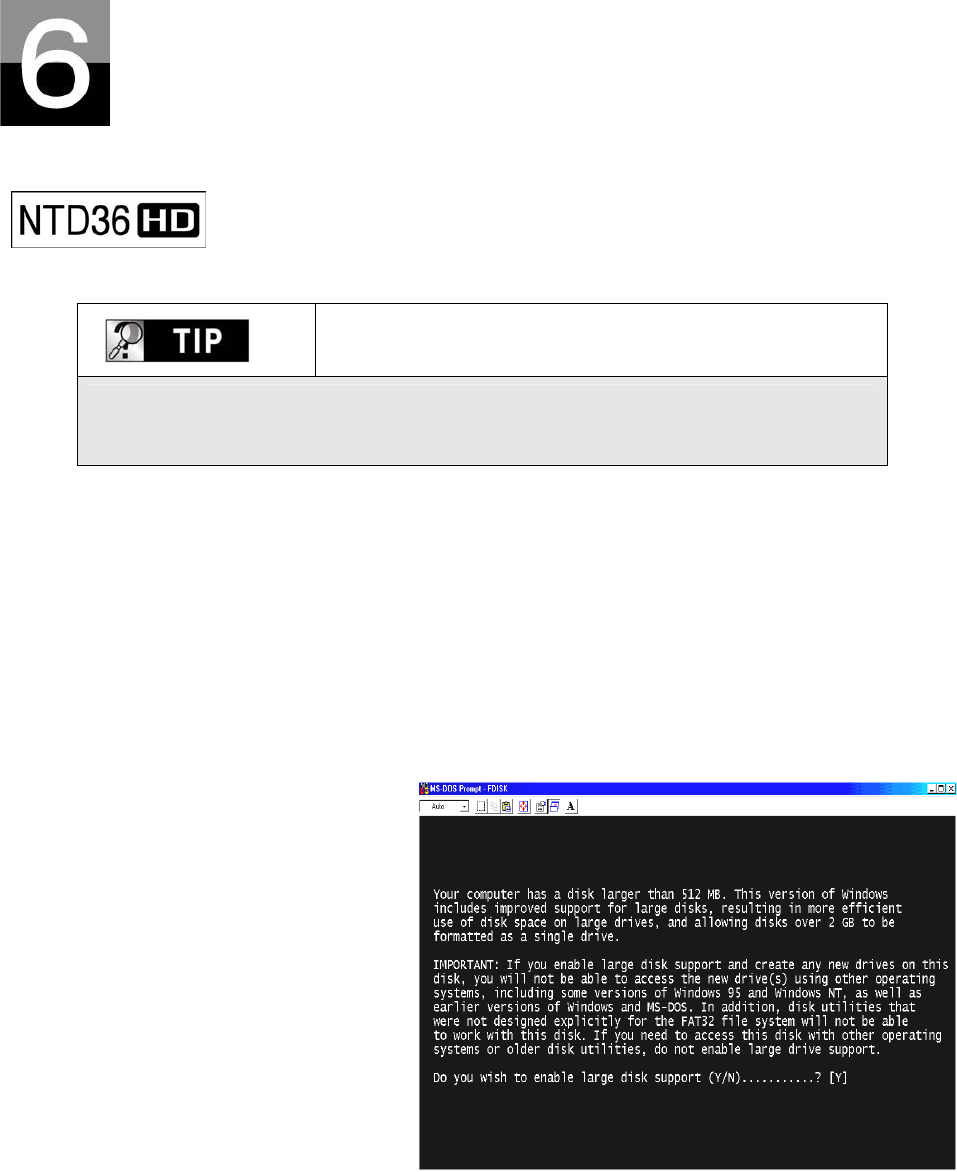
HDD Partition and Formatting
This section explains how to make partition and format the
HDD installed in NTD36HD.
Under Window 98SE/ME environment
Single partition is recommended.
Even if NTD36HD supports multi partitions, we recommend single
partition for your convenient using.
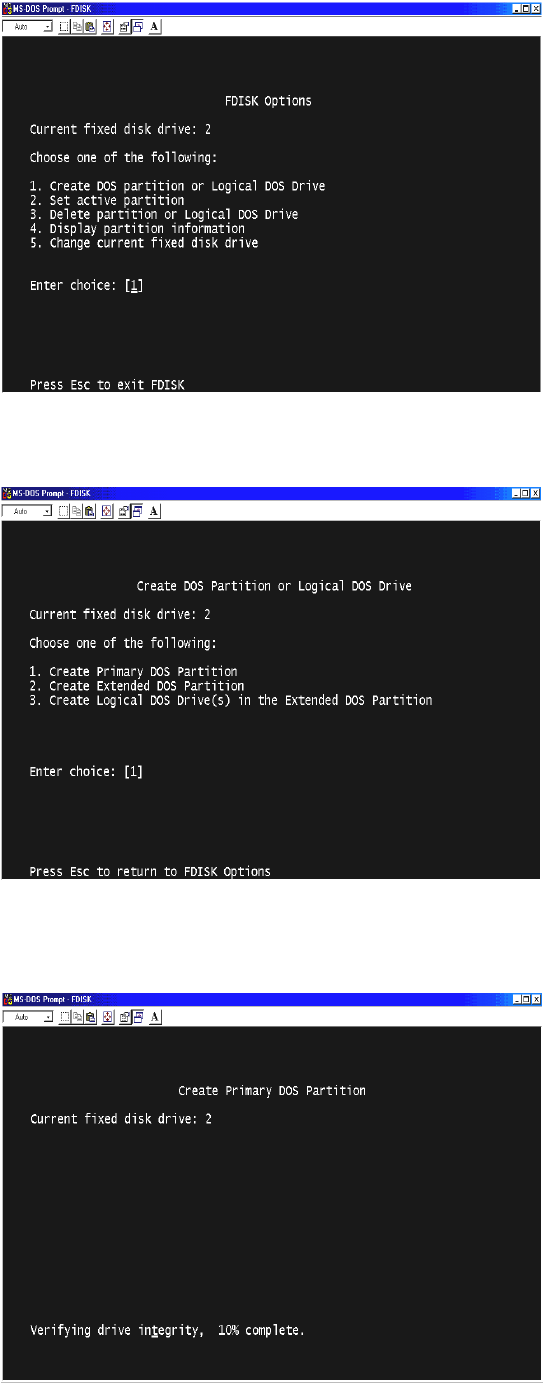
1. Open command prompt program(Start- Program MS-DOS Prompt)
2. Type “fdisk” and click enter.
Select “Y” to enable large disk support.
62
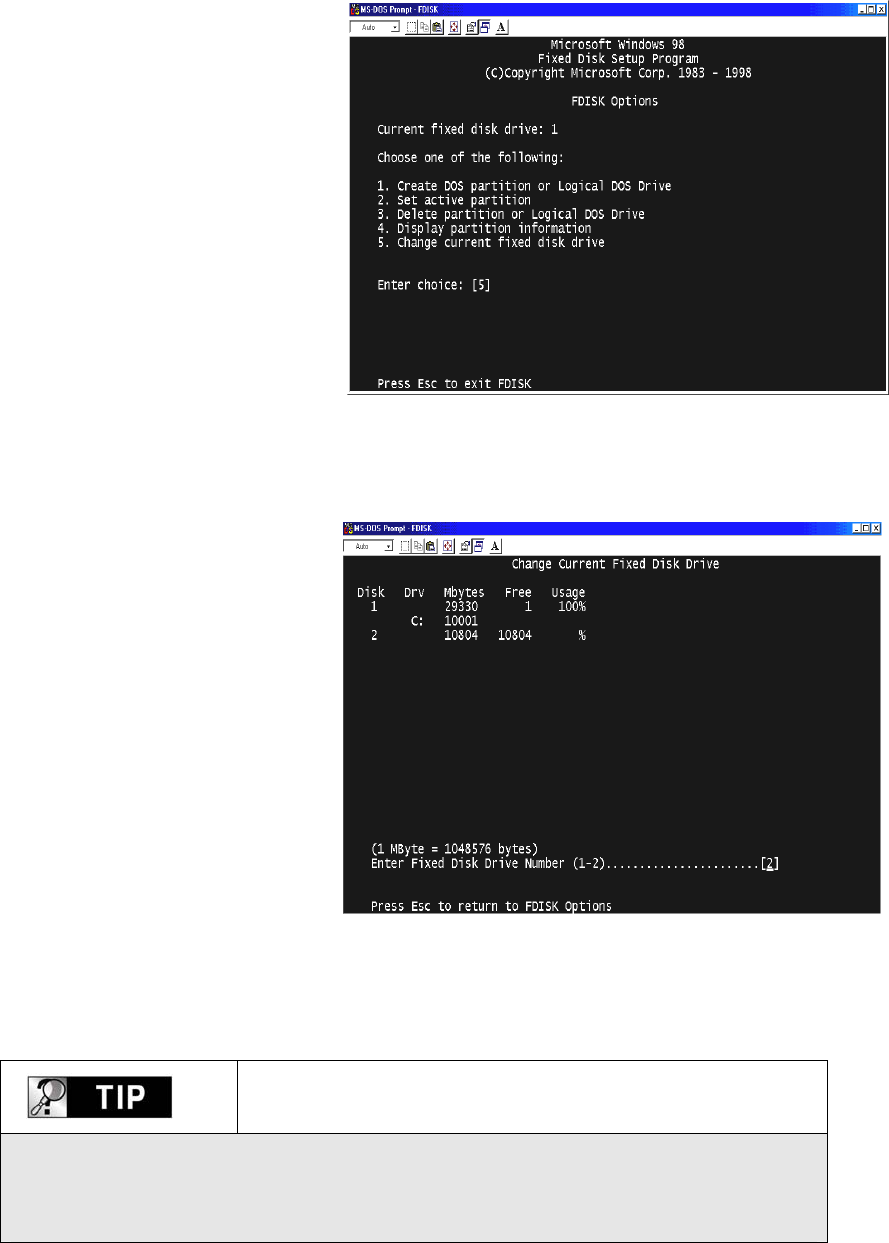
3. Click “5” to change current fixed disk
drive.
4. Select the last Disk number that you
want to initialize.
In case of more than 2 HDDs
In case that there are several hard disk drives in your PC, the disk
number may be changed. In this case, you can select the number
corresponding to each percent(“%”).
63
5. Select “1. Create DOS partition or
Logical DOS Drive .
6. Select “1. Create Primary DOS
Partition”.
7. Wait to be finished verifying drive
integrity until 100%.
64
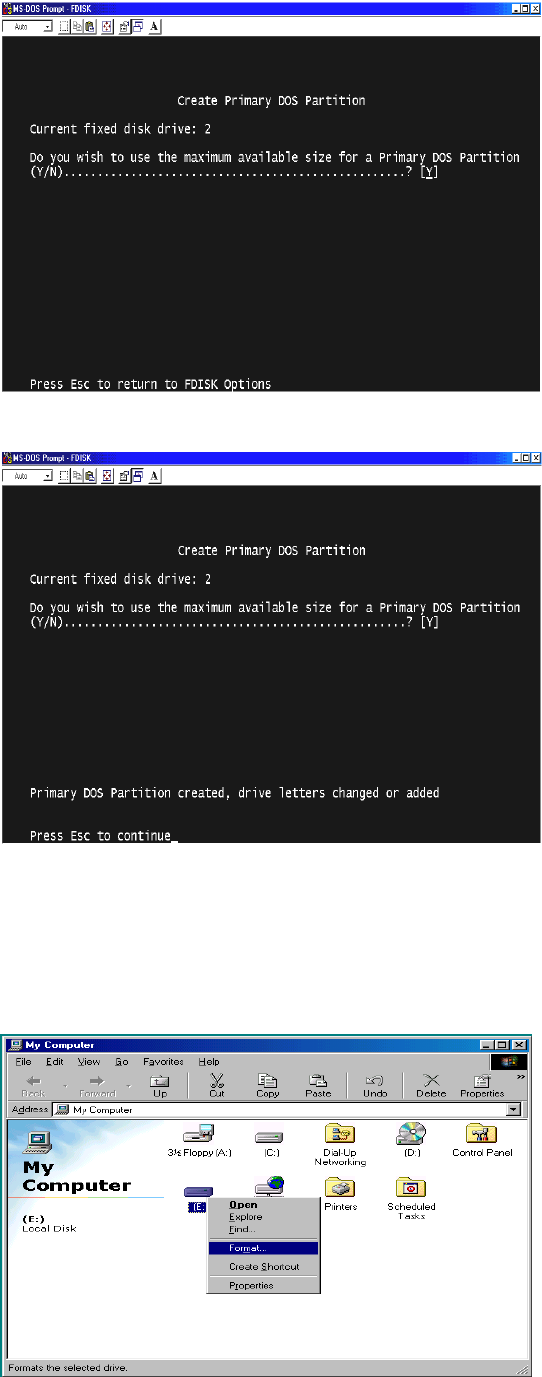
8. Select “Y” and Enter to use the
maximum available size for a Primary
DOS Partition.
9. Wait to be finished verifying drive
integrity once again and click “ESC”
two times to finish MS-DOS prompt
program.
10. Reboot your PC.
11. After restart, the new hard disk drive
will be shown on My Computer. Click
the right button of your mouse and
select “Format” to be formatted.
65
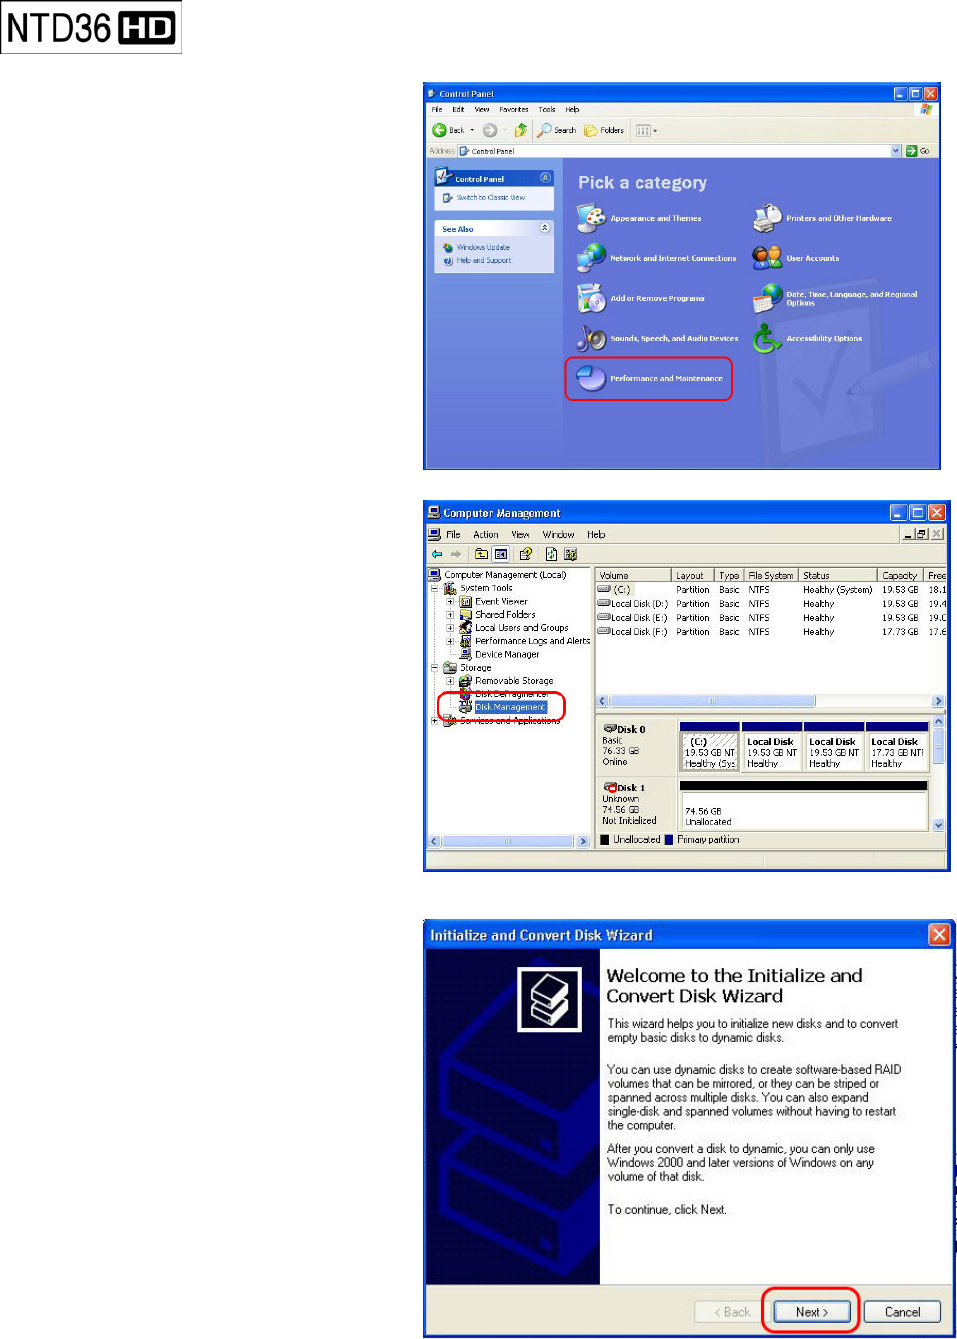
Under Windows 2000/XP environment
1. Click the Start and go to
Control panel. Then, select
“Performance & Maintenance”
2. Select “Computer Management”
and go to “Disk Management”.
3. Click the next on “The initialize and
Covert Disk Wizard” window.
66
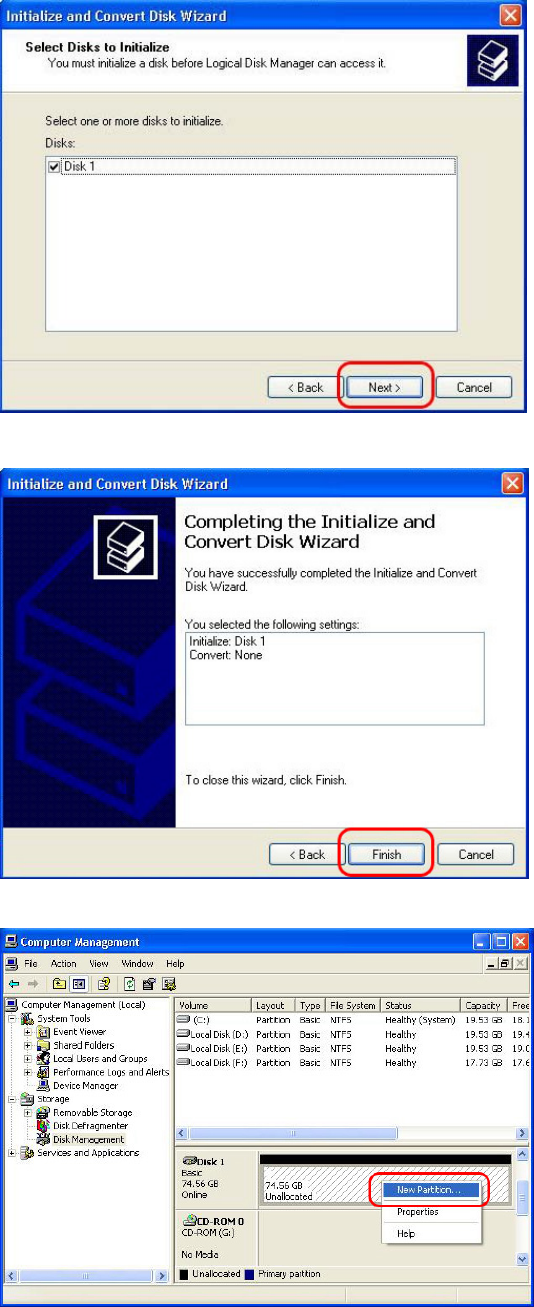
4. Select disk to initialize and click the
next.
5. Click the Finish on “ Completing the
initialized and convert Disk Wizard”
window.
6. Click the right button on your mouse
and select the “New Partition…”.
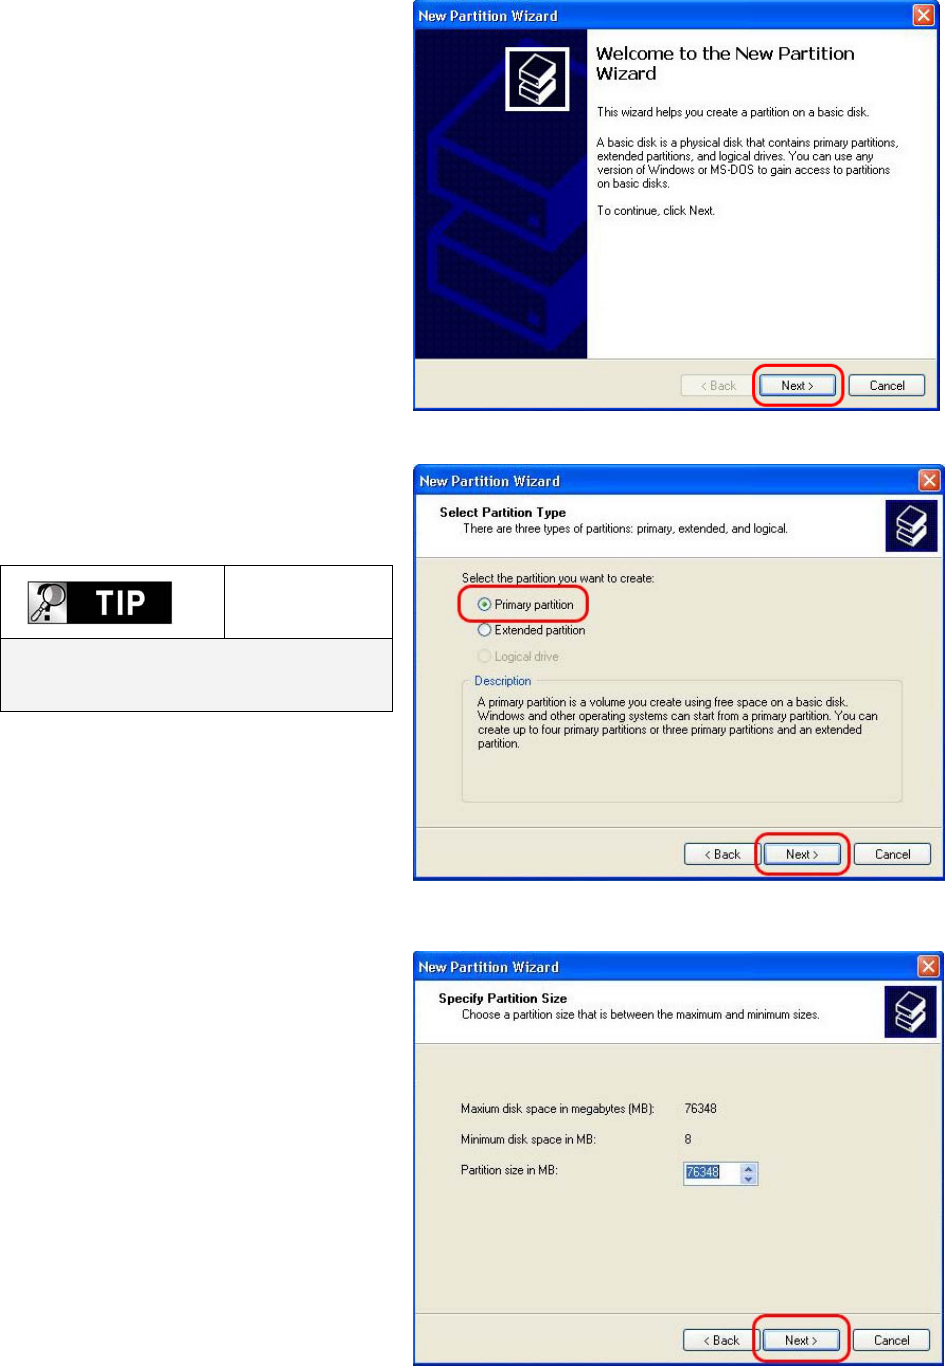
67
7. Click the next.
8. Select “Primary partition” and Click
the next.
Important
NTD36HD work properly with TV in
case of Primary partition type only.
9. Specify partition size and click the
next.(10GB = 10000 MB)
68
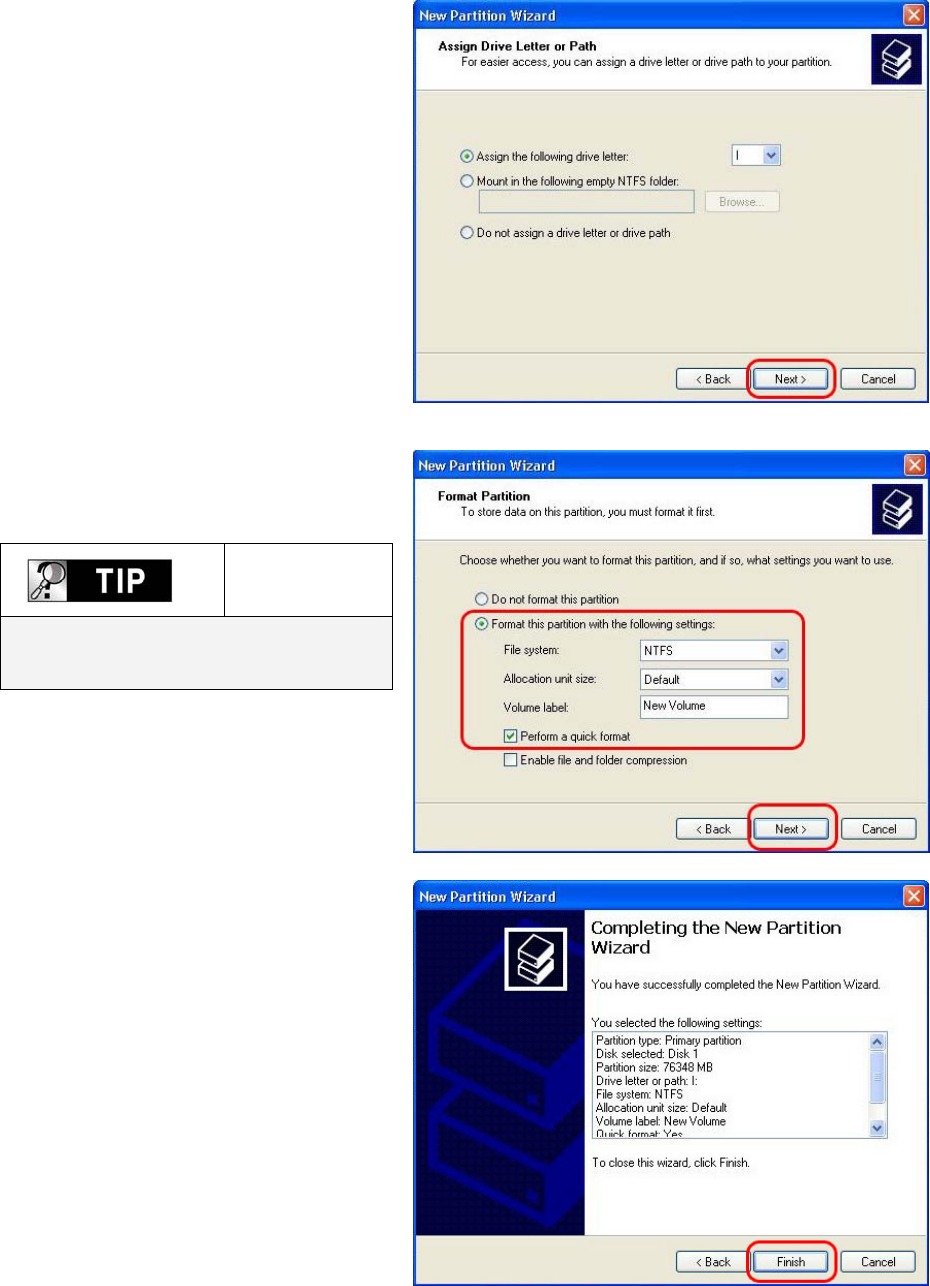
10. Click the next.
(Drive letter will be assigned
automatically)
11. Select file system and click the next.
(FAT32 can not be selected over 32GB
HDD).
Important
Do not check “Enable file and folder
compression.
12. Click the finish to close “The New
Partition Wizard”.
13. After setup the New Partition Wizard, the new HDD will be formatted automatically. Please
wait until 100% formatting is completed.

69
Troubleshooting
Before contacting Customer Service Center, please check
below points first.
Problems related to TV screen
1. In case of no-display on the TV screen.
Check if TV Out mode is set properly with your TV or Monitor. You may use TV
OUT button of remote controller(of NTD36HD unit). Press this button several times
with 2~3sec time interval.
Check whether you set your TV as Video input or Component input.
Check if A/V cable or Component cable is connected properly and firmly.
Check whether the file that you want play is supported by NTD36HD, or not
2. Much noise on TV screen.
Check whether video cable is connected properly and tightly.
Check if TV Out mode is matched with your TV, or not.
In case that you connect NTD36HD to TV indirectly through DVD player or VCR,
etc, there may some noise on TV screen. Please connect NTD35 to TV directly.
In case there is some moisture inside of NTD36HD when you move it from cold
outside to warm inside, you need to wait for some time until NTD36HD is
conformed to inside temperature.
3. In case that the size of playing picture does not fit to TV screen.
As aspect ratio is fixed, please set it properly again in the SET-UP menu..

70
1. In case of no-sound or much noise
Check whether stereo cable(A/V cable) is connected properly and tightly
between NTD36HD and TV set.
Check if [MUTE] button is pressed and volume level is set properly
Check whether digital audio cable is connected properly and tightly to the audio
input connectors of Home Theater System or Audio Amplifier
Try changing the value(Down mix or pass through) of Audio Out on SET-UP
menu
Try changing audio cable with new one.
Check the Audio channels(2channel or 5.1 channel) on SETUP MENU
2. In case of no-sound or bad sound quality when connected with digital audio
system
Check the Audio channels(2channel or 5.1 channel) on SETUP MENU
Set as ‘pass through’ on SETUP menu.
Check the status of connection and set up for digital audio system(Refer to the
manual of digital audio system)
Check whether optical cable or coaxial cable is connected properly and tightly
Problems related to Sound

71
1. In case that NTD36HD does not recognize HDD
Check whether the root folder or specific folder contains too many files. In
this case, make sub folders and move some files to the sub folders to
reduce files number in specific folder.
Check whether HDD is connected with NTD35 properly(Check IDE flat
cable and power cable)
Check whether HDD is formatted properly( It should be based on ‘Primary
partition’ and you must not check ‘file and folder compression’ option in
formatting HDD)
Check HDD jumper setting(It must be set as ‘Single’ or ‘Master’)
Try changing with new HDD(There may be some problem in HDD itself
caused by impact or damage from outside.)
2. In case that PC does not recognize NTD36HD as external USB mass storage.
If PC is operated by Windows 98SE, you need to install the USB driver for
Windows98SE into your PC properly.
Check whether NTD36HD is powered ON.(It should be powered ON)
Try changing with new HDD(There may be some problem in HDD itself
caused by impact or damage from outside.)
3. In case that Remote Controller does not work properly.
Check if there is any obstacle between remote controller and IR Receiver of
NTD36HD
Check battery of remote controller.
Check whether the IR receiver is exposed to strong light such as direct sun
light.
Problems related to HDD
or Remote Controller

72
As the network is not set up correctly. Try setting up again according to
“Setting up NETWORK(Page 31)
Check cable connection status. Cables should be connected to each port
of the Router or switch HUB properly.
The NTD36HD and PC are not on the same NET MASK( Subnet)
Wrong IP address input, check the IP address and subnet mask
The NETWORK icon is activated, but can not read the Shared DATA. In
this case, check whether firewall is set in PC. If firewall is set, please
disable it for NTD36HD to communicate with PC.
Contact to below for Customer Service.
Problem related to NETWORK

73
SPECIFICATION
High Definition Multimedia Player, NTD36 HD
File Playback Format
Video HD file format (tp), Window Media 9, Window Media 9 HD
DivX3.11,DivX4, DivX5, DivX HD, Xvid, MPEG1, MPEG2(IFO,VOB,ISO)
Audio MP3, Ogg Vorbis, WMA, AC3, DTS
Picture JPG, JPEG, BMP, PNG
Subtitle SMI, .SUB, .SRT
Output Connection
Video DVI-D, Component Video (Y, Pb, Pr), S-Video, Composite Video,
Maximum Resolution: Up to 1920 x 1080 Progressive Scan
Audio Analog 2 Channel Stereo(AC3 & DTS down mixing)
Analog 5.1 Channel, Optical & Coaxial Digital Audio out
USB Interface 1 x USB 2.0 Target port, 2 x USB 2.0 Host port(Bus power Max 500mA)
Networking
1 x RJ45 LAN port (Ethernet 100BASE-TX/10BASE-T)
Optional 54Mbps Wireless LAN(IEEE 802.11b/g, 64/128bit WEB
security)
HDD Type to be Used
Size 3.5 inch E-IDE type Hard Disk Drive
File Format Support NTFS, FAT32
Compatible Operating System
OS Windows 98SE, ME, 2000, XP or Higher
Physical Dimension & Weight
Dimension(mm) Width(95mm) x Height(190mm) x Depth(145mm)
Weight(g) 730g (Excluding HDD), Approx. 1,240g(Including HDD)
Power / Operating
Power Adapter
Operating
Input : AC 90V ~ 240V 50/60Hz 1.5A Output : DC 12V 3.5A
Temperature : 0 ~ 40 ˚C Humidity : 10 ~ 70%
* note : specification may be changed without any notification