OSANG Healthcare RPM-A432 Robotic Packing Machine User Manual 2 of 2
Infopia Co.,Ltd. Robotic Packing Machine 2 of 2
Contents
- 1. User manual 1 of 2
- 2. User manual 2 of 2
User manual 2 of 2

1
RPM
Getting Started

2
Table of Contents
Introduction………………….……..…………….3
Safe Handling Information……...3
Care and Handling…………….….3
RPM Components……………..….4
Machine Specification………..….5
Power on………………………….5-6
Getting Started with Cartridges………….…7
Installing Cartridges…………....7
Refilling Cartridges………..…….7
Getting Started with MDC…………………….8
Dispensing with MDC……..……8
Getting Started with Lower Unit……………9
Key Parts of Lower Unit…..……9
Installing Paper………..……....10
Key Parts of Print Assembly…11
Installing Print Ribbon………..11
3
Introduction
Thank you for selecting RPM as your new
solution for repacking oral solid
medications. This machine, rather
integrated with hospital system or
standalone, is designed to quickly and
easily repack medication with barcodes, lot
number, brand name, generic name and
any other information that will benefit both
the pharmacy and patients.
This guide is to help users to get familiar
with some of the parts consisted in RPM as
well as easily get set up to repack oral solid
medication.
Safe Handling Information
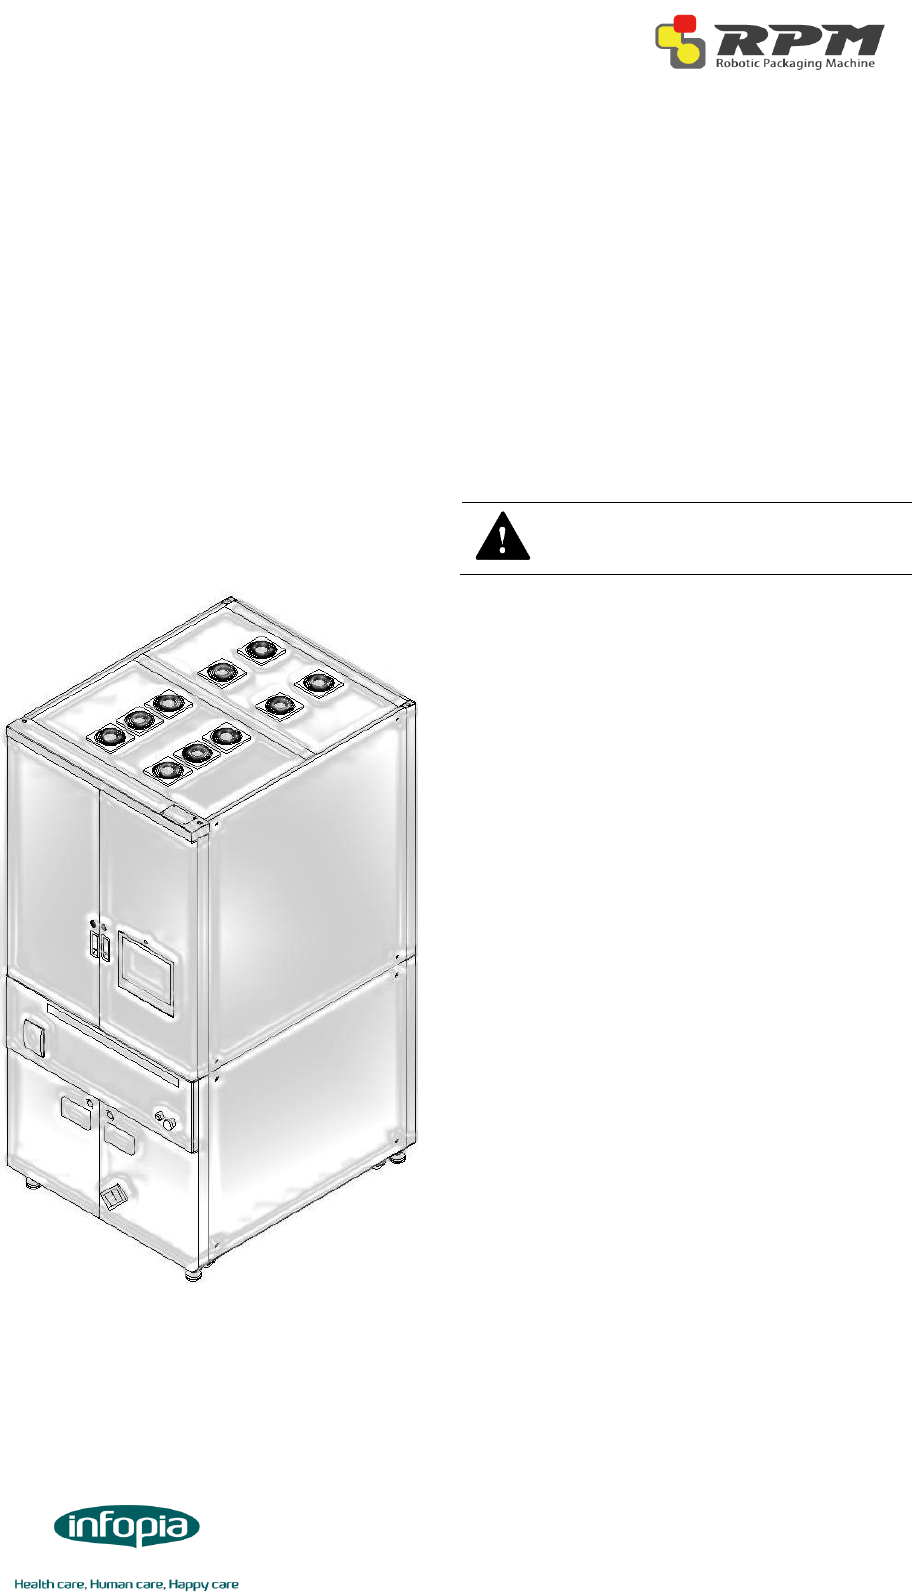
The RPM is designed to be used as a
stationary unit. It is very important that you
handle this machine carefully to avoid
hardware and electrical damage.
Please read the following warnings before
attempting to install, use, or move the RPM
Care and Handling of Your
HP Personal Media Drive
WARNING: The warnings for the
care and handling of the RPM are
listed below
Do not move the machine while it is
operating to avoid hardware and
electrical damage. You can safely move
the machine only when you have
properly disconnected and powered off
the machine
Do not use the machine in a hot and
humid atmosphere to prevent machine
and stored medication from
overheating. It is recommended to
keep the room temperature under
24ºC.
Do not block airflow around the
machine while the machine is turned on.
It is recommended to keep the back
of the machine at least 0.5 meter
away from its facing wall
Do not stack anything on top of the
machine; this can overheat and damage
the machine
Do not set any liquids or drinks on the
machine. Liquids can damage the
internal electronics
Do not use the machine without proper
cleaning. Pill dusts can decrease
machine’s performance and potentially
damage the machine. Please refer to
RPM Cleaning Guide to properly clean
the machine.
4
RPM Components
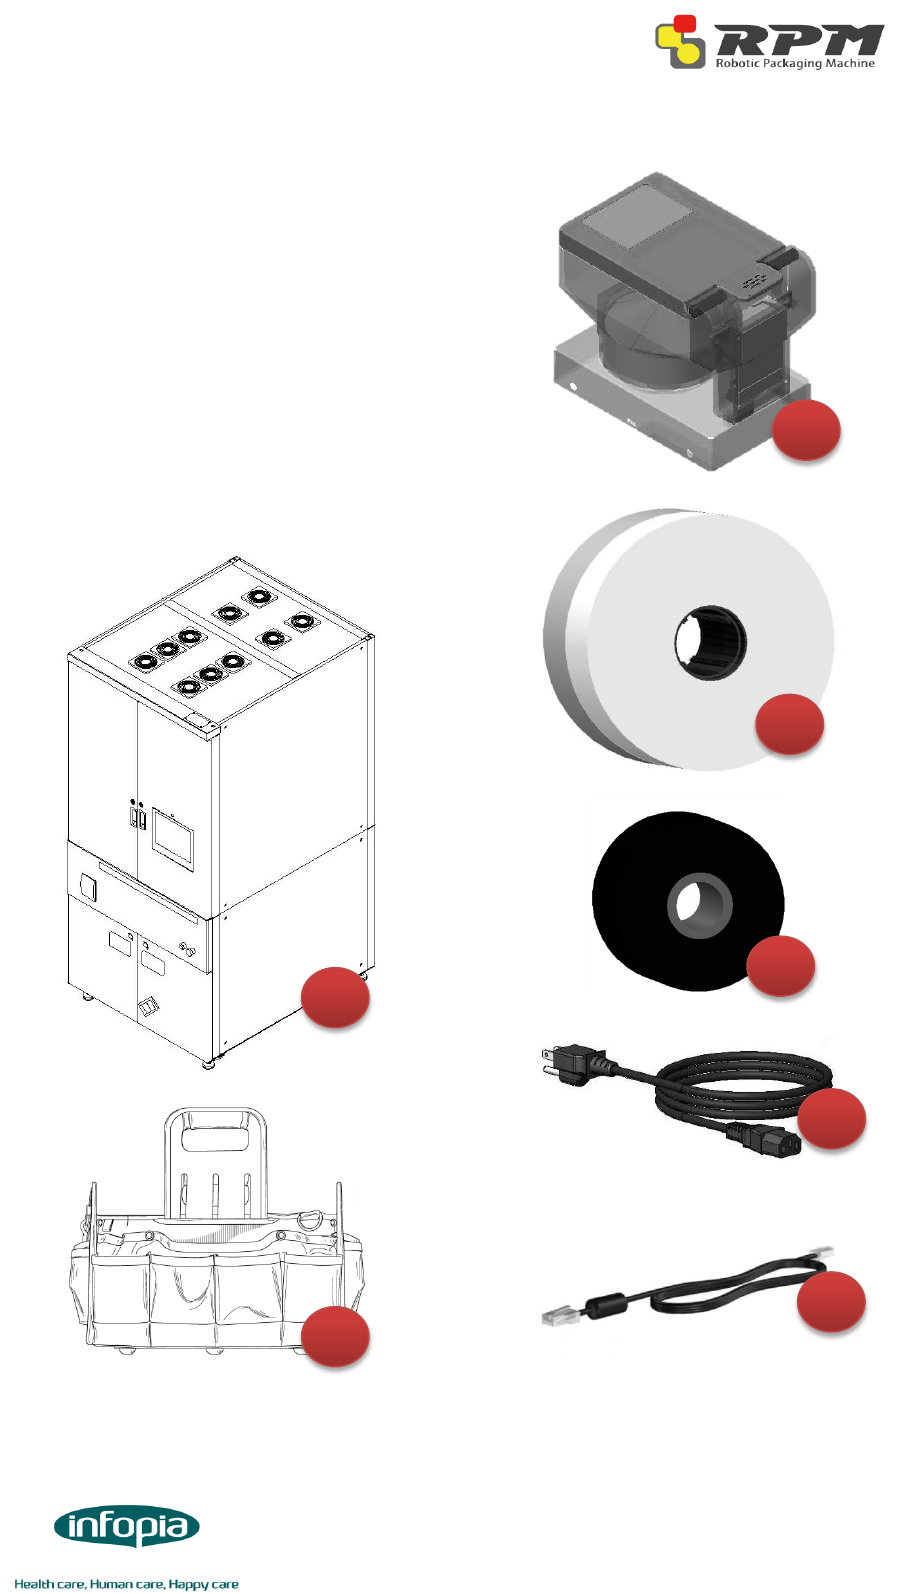
RPM components are listed below:
A RPM
B Tool Kit
C Cartridges
D Packing Paper
E Print Ribbon
F Power Cable
G Ethernet Cable
A
B
F
G
E
D
C
5
Machine Specification
RPM-A432
RPM-A360
RPM-A288
Fixed Cartridges
360
300
240
Flexible Cartridges
72
60
48
Dimension (w x h x d)
(m)
95 x 204 x 115
95 x 188 x 115
95 x 172 x 115
Weight
Power On
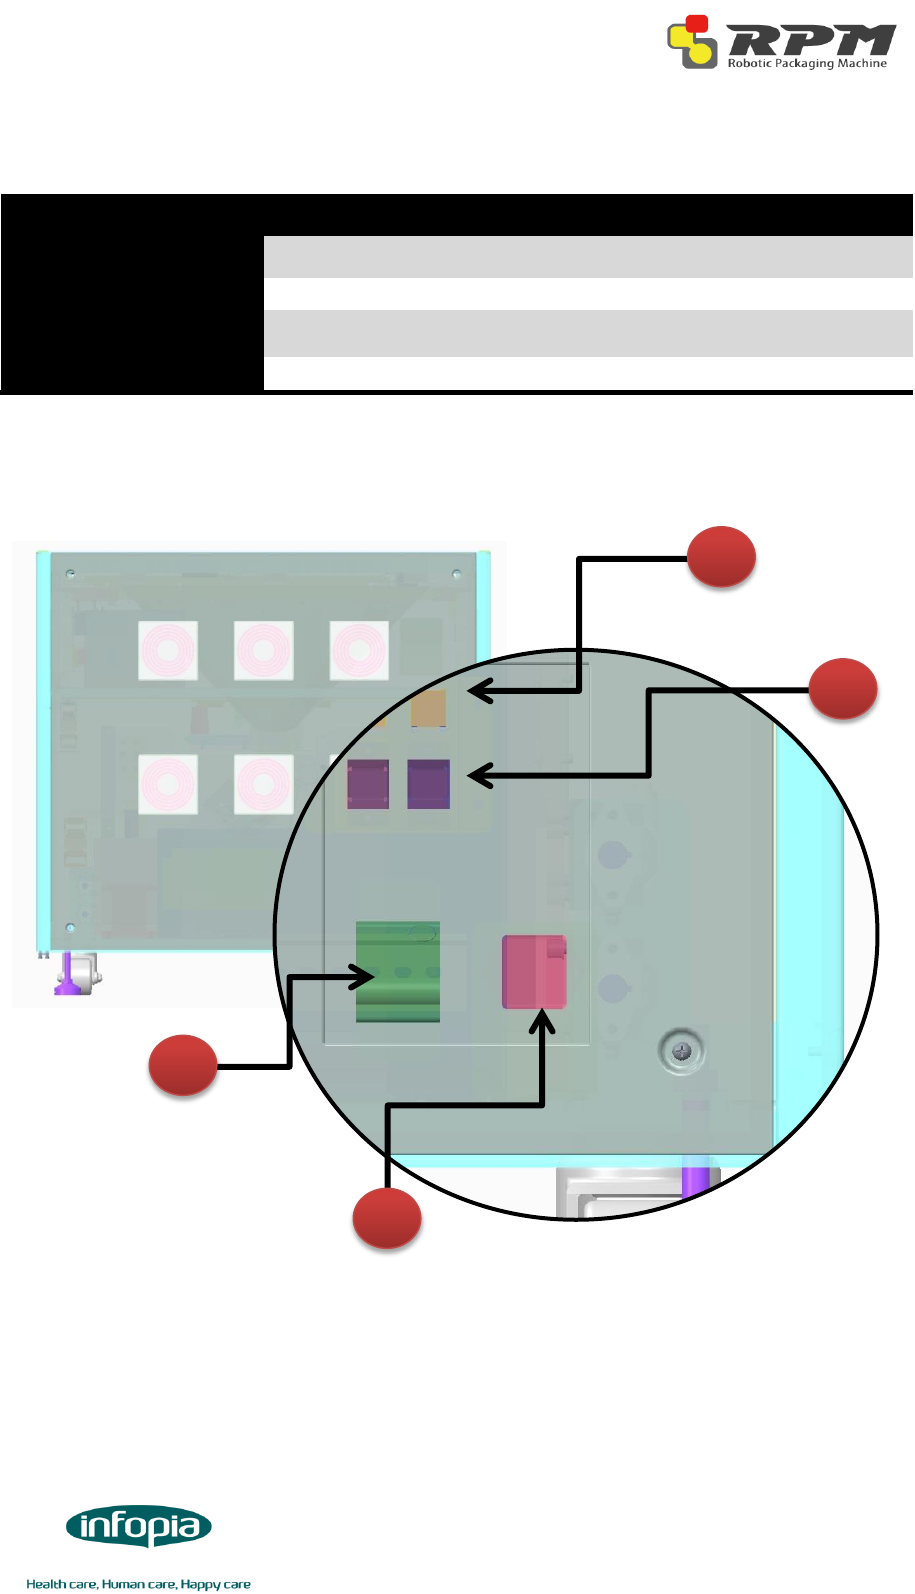
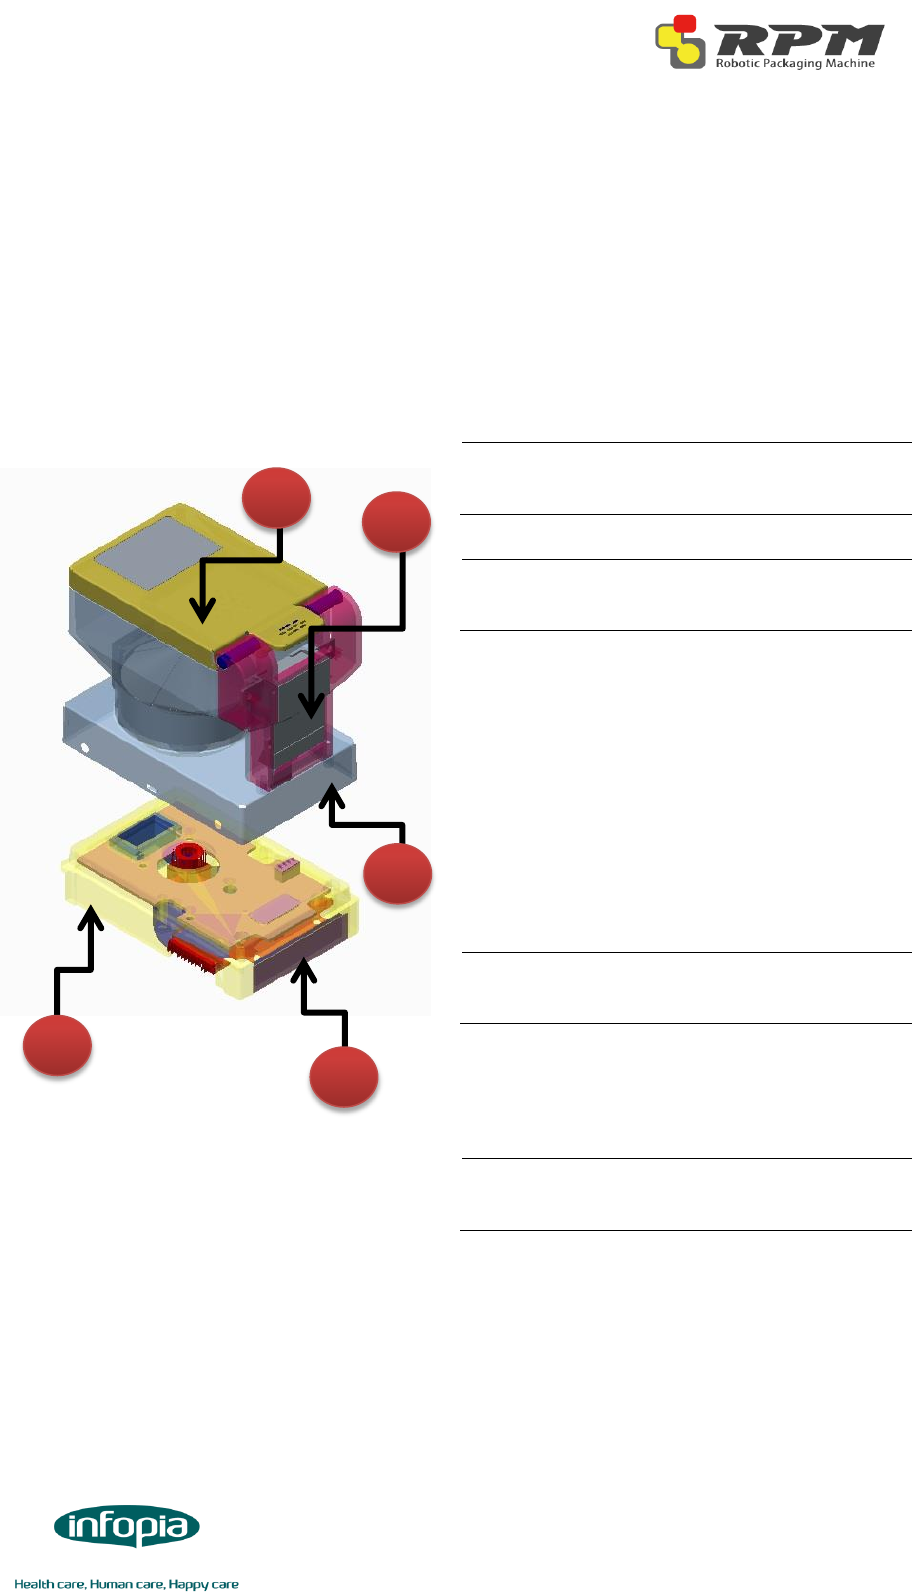
Below is a diagram of the lower back of the machine
A Power Plug
B Circuit Breaker
C Ethernet Ports
D USB Port
A
C
D
B
6
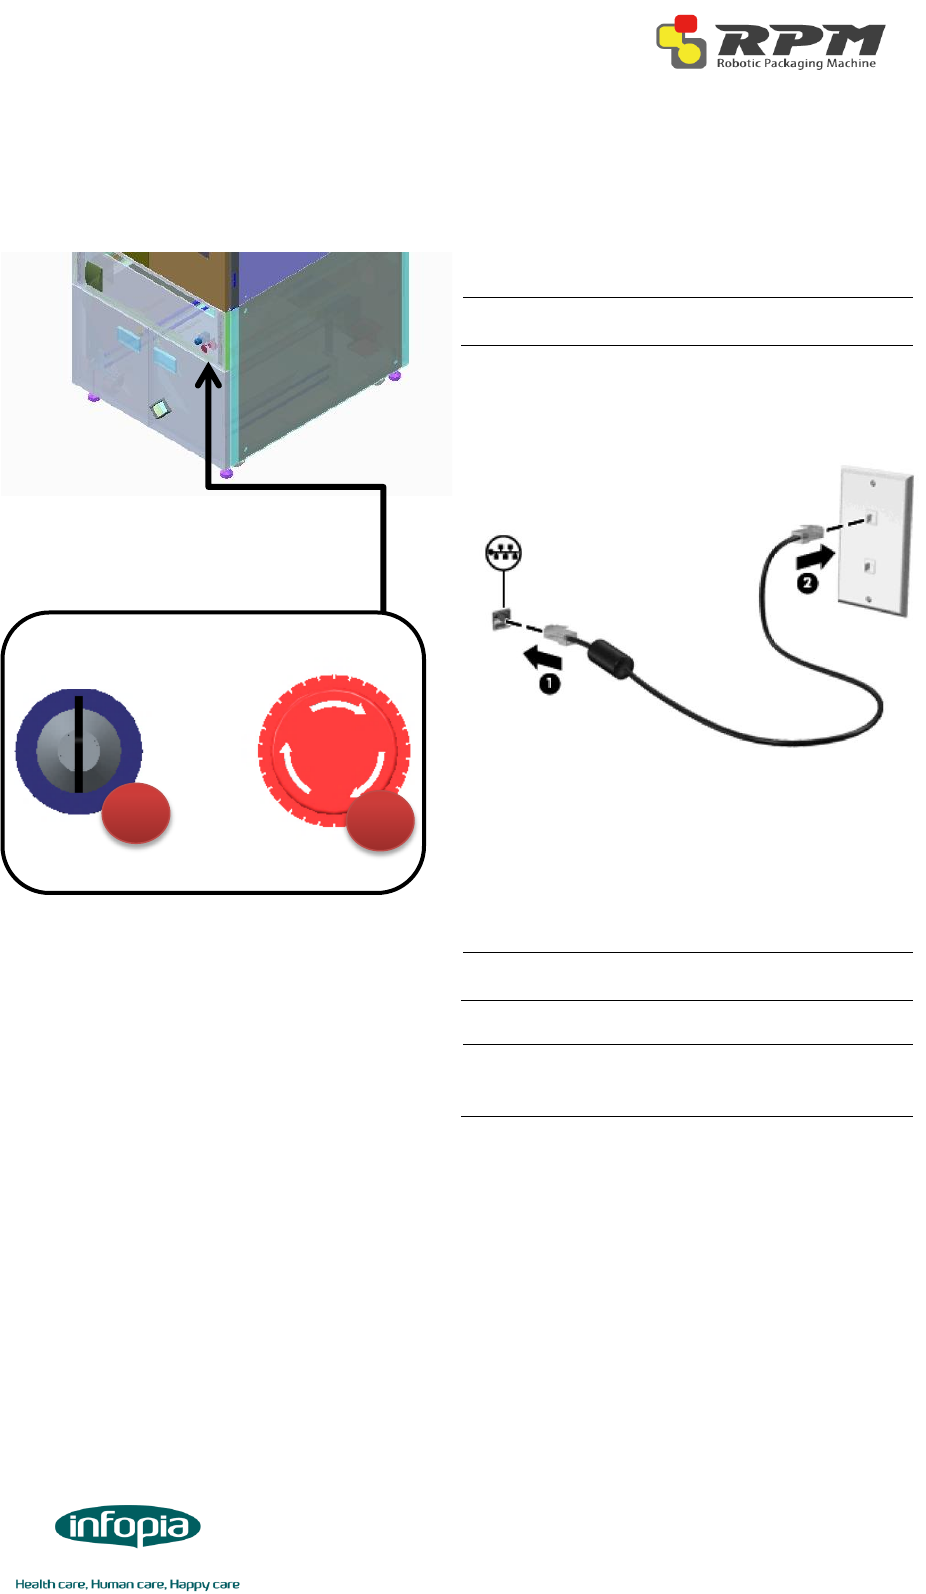
Below is the diagram of the lower front
of the machine
E Key Switch
F Emergency Button
Steps to turn the RPM on are listed below:
1. Plug the power cable into the machine (A)
and then to the power outlet.
NOTE: Uninterrupted power supply (UPS)
battery is strongly recommended
2. Plug the Ethernet cable into the machine
(C) and then to the hospital network source.
3. Double check to make sure the circuit
breaker (B) is up and emergency button (F)
is out.
NOTE: If the circuit breaker is down, pull
both levers up until they click
NOTE: If the emergency button is pushed
in, twist the switch clockwise to pull it
out
4. Turn the key (E) to turn on the machine
E
F
ON
OFF
7
Getting Started with
Cartridges
Cartridges are the main dispensing device
for the RPM. They hold the medication and
when needed, operate and dispense correct
amount of pill to the bottom unit.
Cartridges are calibrated for specific sized
drug. Therefore, it is recommended that the
cartridge gets recalibrated if the
manufacturer for that drug is switched.
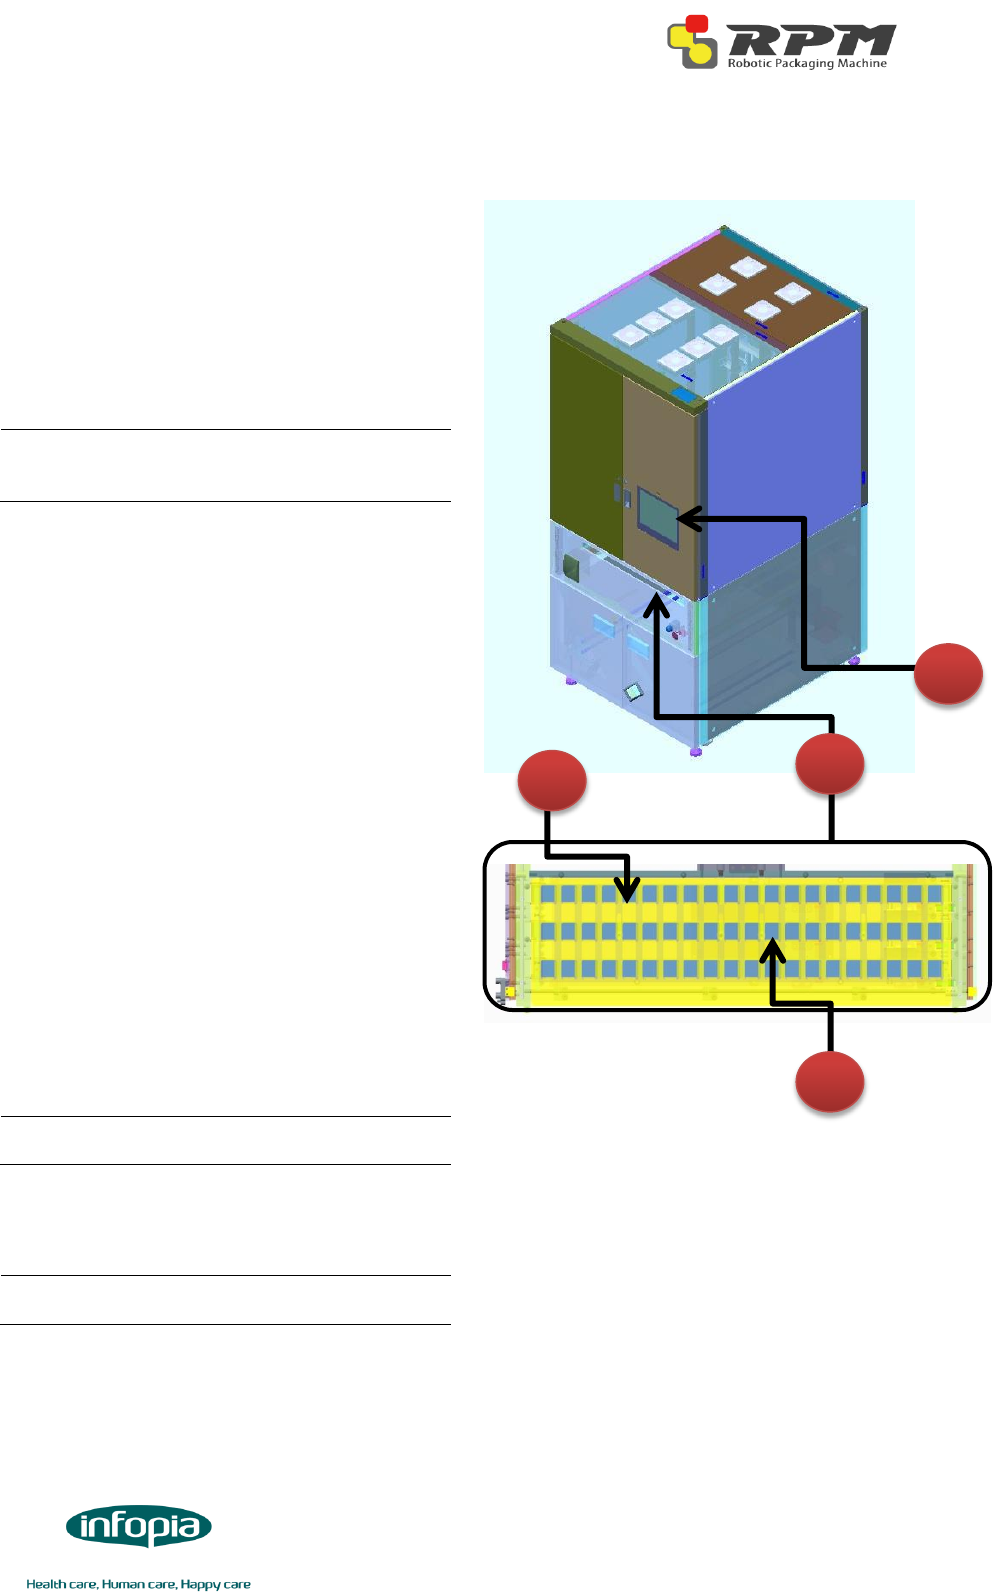
A Cartridge
B Cartridge Number
C Medication Name
D Cartridge Base
E Base Number
Installing Cartridges
All cartridges (A) are assigned to a number.
If the cartridge number is below 500, find
the cartridge base (D) with the same
number and install it.
If the cartridge number is above 500, find
an empty flexible cartridge base and install
it.
NOTE: Please refer to the RPMS manual
to assign the medication with its
cartridge on the software
NOTE: Install the back first for easier
installation. Do the reverse process to
remove
Refilling Cartridges
Pour the medication into the canister. Then
using the RPMS software, update the system
with the refilled medication information
such as refilled quantity, lot number, and
expiration date.
NOTE: Please refer to the RPMS manual
to update the quantity, lot number, and
expiration date of the drug filled
Depending on the size of the medication,
one cartridge can hold from minimum of
250 to maximum of 500.
NOTE: It is recommended not to
completely fill the canister to prevent
from cartridge drum to jam.
A
B
C
D
E
8
Getting Started with MDC
MDC (Manual Dispensing Cell) is an
alternative method for dispensing
medication. It is ideal for medications that
are short-term and that are used rarely.
MDC is located in the middle unit of RPM,
just above the switch key and emergency
button. Unlike cartridges, MDC requires
users to fill the tray when needed.
NOTE: Please refer to the RPMS manual
to assign medication to MDC and
change configuration of MDC
Tray consists of 90 cells and it is removable.
One cell represents one package, so if
dispensing in multi-dose format, all the
medication that are needed in one package
will go into one cell.
If an order contains both medications from
canisters and from MDC, the machine will
direct user to fill the cell with just the MDC
medications. Then, RPM will automatically
operate both canister and MDC to repack
desired order.
Dispensing with MDC
Steps on using the MDC are listed below:
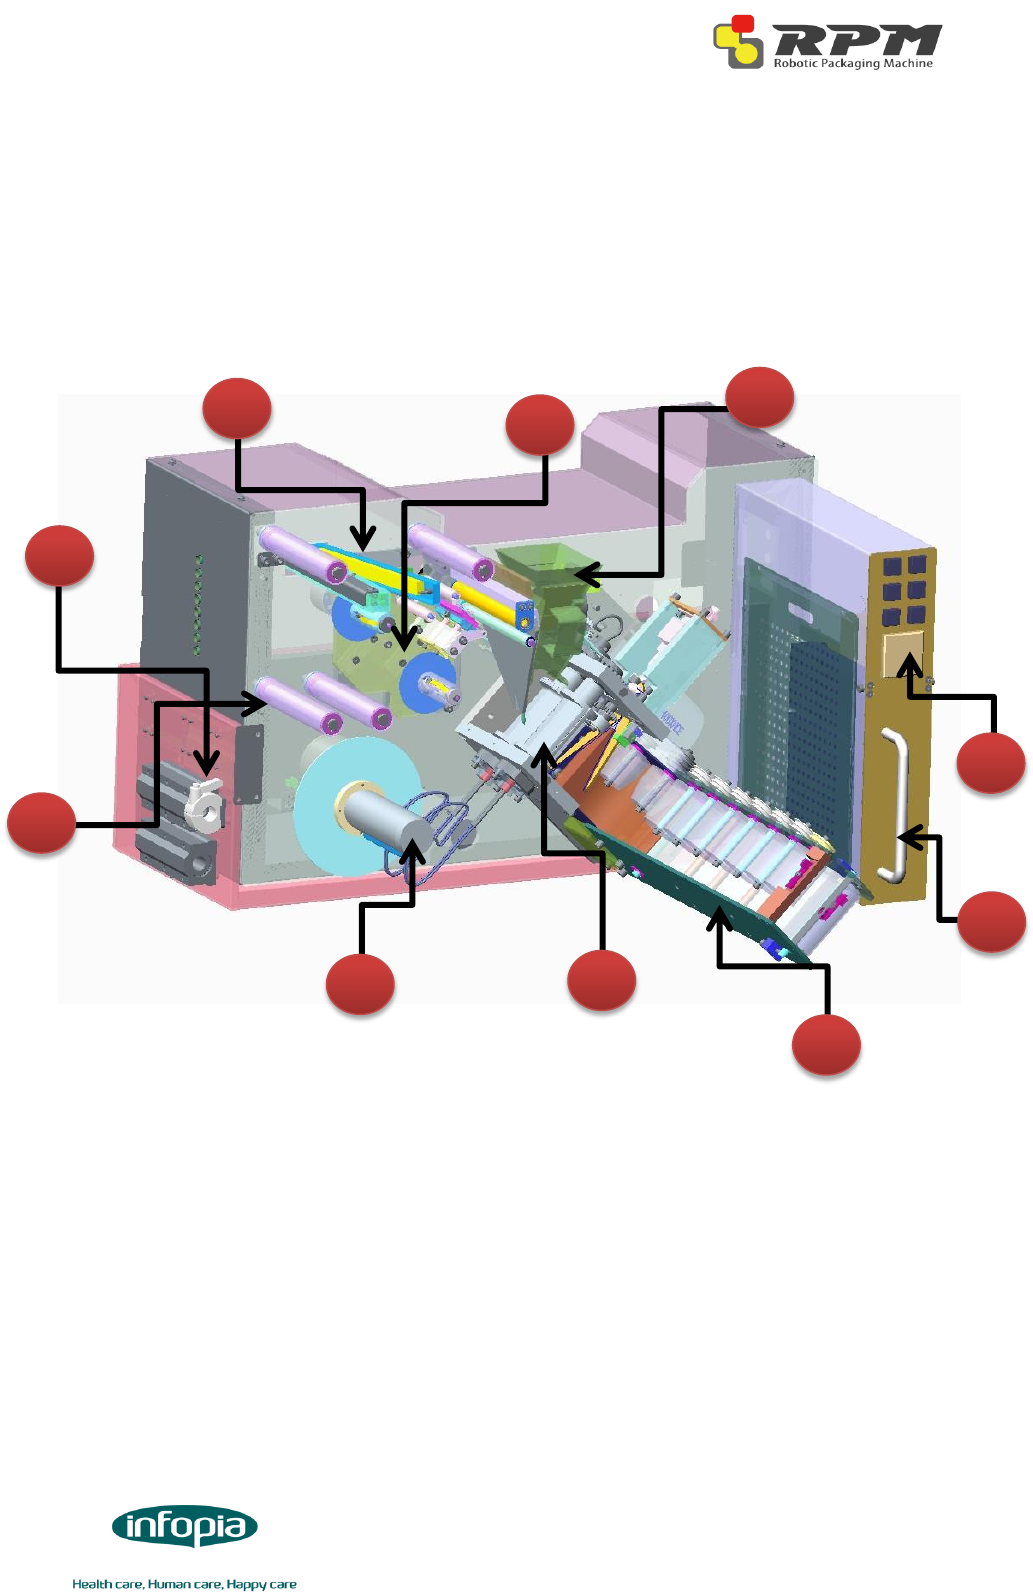
1. Press MDC open on the touch display (D)
to open the device
2. Fill the cells (B) as directed on the screen
NOTE: User can either take out the tray
to fill it, or fill it in front of the machine
3. Close MDC by pressing MDC close on the
touch display. Proceed by pressing resume
NOTE: MDC does not have a repel
mechanism. Do not push MDC in.
A MDC Tray
B MDC Tray
C Cell (x90)
D Touch Display
C
B
D
A
9
Getting Started with Lower Unit
Lower unit is solely responsible for receiving the dispensed medications, print their
medication information, and repack them. The repacked items will be delivered to the lower
door by conveyor.
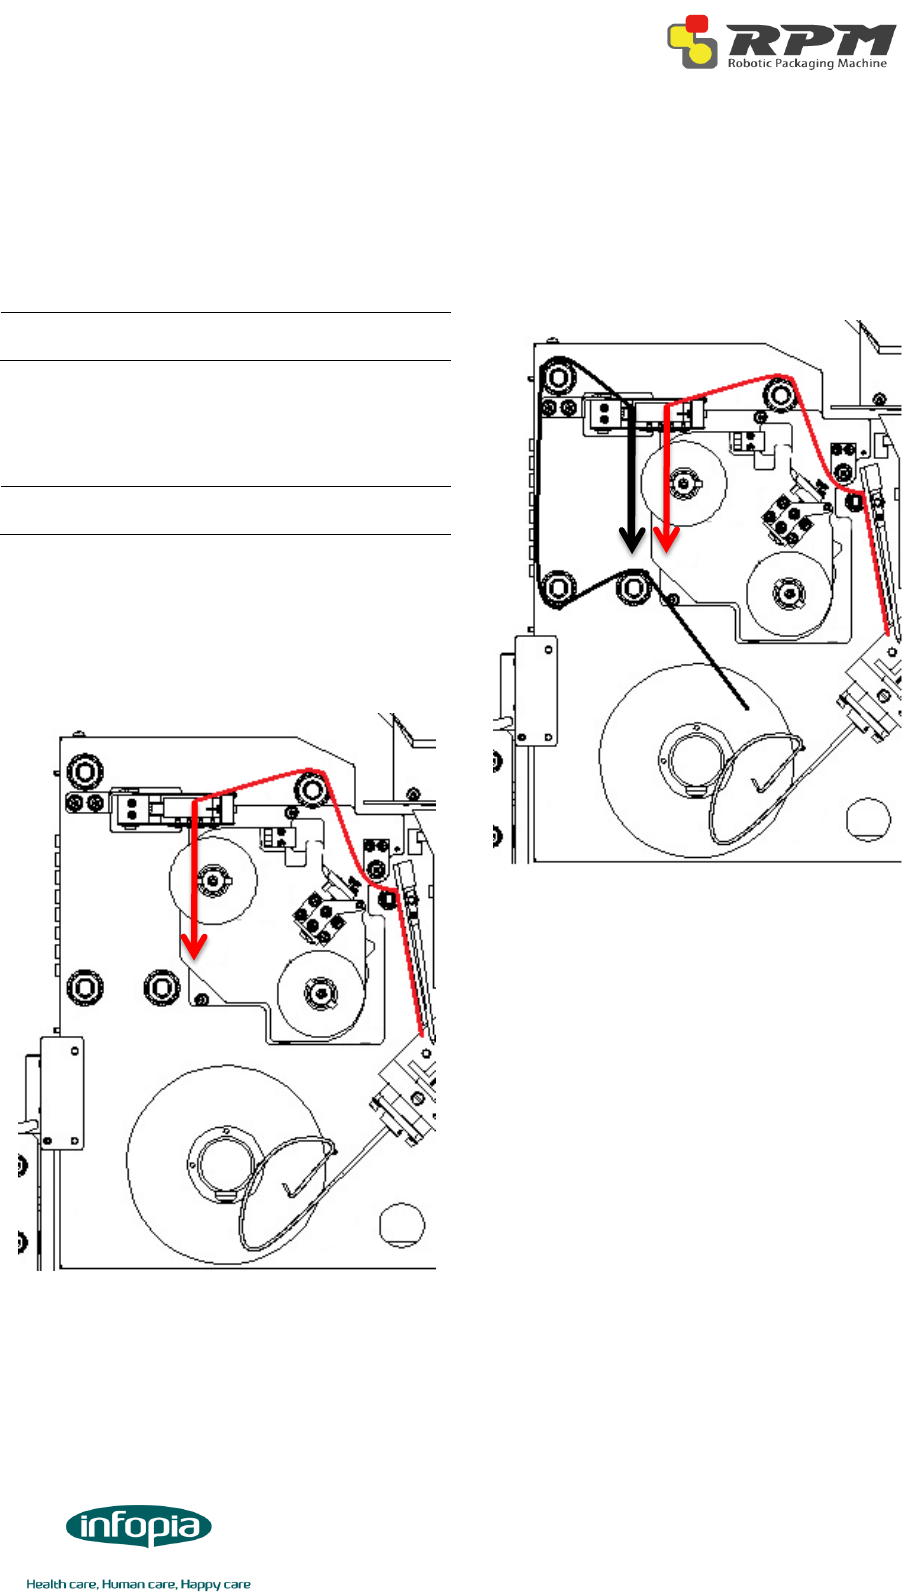
Key Parts of Lower Unit
A Control Box
B Pull-Out Handle
C Conveyor
D Sealer
E Paper Mount
F Paper Guide Rollers
G Lower Unit Lock
H V Sealer
I Print Assembly
J Last Shutter
E
B
A
F
J
I
H
C
D
G
10
Installing Paper
Steps to turn the RPM on are listed below
1. Pull the lower unit out by using the pull-
out handle (B)
NOTE: Do not use the conveyor (C) to pull
the unit out
2. Remove the empty barrel from the paper
mount (E)
NOTE: Make sure the barrel does not
leave its magnets on the paper mount.
3. Lock the lower unit by using lower unit
lock for easier operation (G)
4. Feed the old paper through the v sealer
(H)
5. Insert the new roll to the paper mount
then feed the paper around the paper
guide rollers (F) and through the v sealer
6. Close and hold the v sealer for 5 seconds
to attach the two pieces together. While
holding, remove the excess by pulling
towards the right.
7. Once attached, press forward button on
the control box (A) until the connected
parts are out of the machine
11
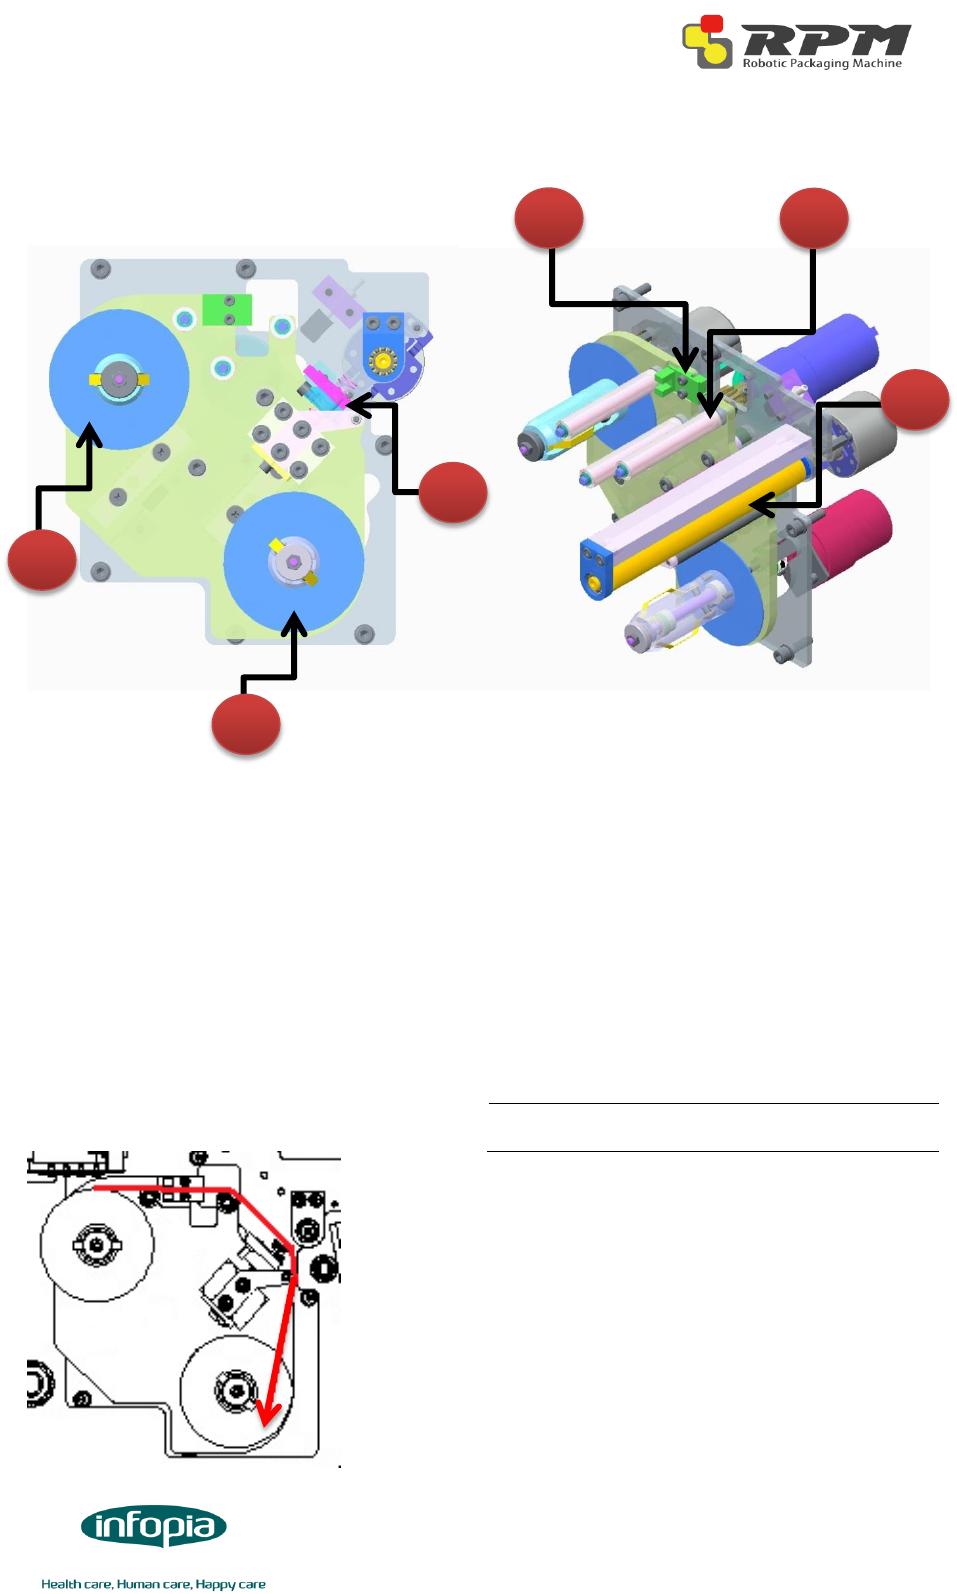
Key Parts of Print Assembly
A Driving Shaft
B Following shaft
C Print Head Assembly
D Ribbon sensor
E Ribbon Rollers
F Rubber Roller
Installing Print Ribbon
1. Trash the used roll on the driving shaft
(A) but save the empty cardboard on the
following shaft (B)
2. Install the saved cardboard to the driving
shaft
3. Install a new print ribbon. Feed the
ribbon over two ribbon rollers and print
head assembly (C). Use the adhesive at
the very beginning of the ribbon to
connect it to the empty cardboard on the
driving shaft
NOTE: Make sure that the ribbon goes
through the ribbon sensor
4. Turn the driving shaft to pull the ribbon
until the clear part of the ribbon is rolled
up and sensor senses the ribbon. The
ribbon sensor will turn off the green LED
light
A
B
C
D
F
E

12
Product description
Features
Contactless protocols
ISO/IEC 14443 Type A and B
ISO/IEC 15693
ISO/IEC 18092
Contactless transmission of data and RF energy
Peer-to-peer communication
NFC card reader/write
RF Baud rates up to 26kbps
Programmable receiver sensitivity
Carrier frequency: 13.56MHz
RF Field detection
Single ended external antenna connection
Power supply voltage : 2.7V to 3.3V
Operating temperature range : -20℃ to 85℃
13
Notice
This device complies with Part 15 of the FCC Rules. Operation is subject to the following
two condition: (1) this device may not cause harmful interference, and (2) this device
must accept any interference received, including interference that may cause undesired
operation
FCC WARNING
Changes or modifications not expressly approved by the party responsible for
compliance could void the user’ s authority to operate the equipment.
This transmitter must not be co-located or operated in conjunction with any other antenna
or transmitter.
This equipment complies with FCC radiation exposure limits set forth for an uncontrolled
environment and meets the FCC radio frequency (RF) Exposure Guidelines in Supplement
C to OET65. This equipment has very low levels or RF energy that are deemed to comply
without testing of specific absorption ratio (SAR)
Note)
Portable equipment: Equipment for which the spaces between human body and antenna are
used within 20cm.
Mobile equipment: Equipment used at position in which the spaces between human body and
antenna exceeded 20cm.