Olympus Medical Systems GN4215 Endoscope Reprocessor with RFID User Manual Manual P1 P114
Olympus Medical Systems Corp. Endoscope Reprocessor with RFID Manual P1 P114
Contents
- 1. Users Manual 1
- 2. Users Manual 2
- 3. Users Manual 3
- 4. Users Manual 4
Users Manual 1

For details on installation and setup, refer to “Instructions - Installation Manual”.
USA: CAUTION: Federal law restricts this device to sale by or on the order of a physician.
INSTRUCTIONS
ENDOSCOPE REPROCESSOR
OER-Pro
(For Aldahol III)

Contents
i
ENDOSCOPE REPROCESSOR OER-Pro Operation Manual
Contents
Labels and Symbols ..................................................................... 1
Important Information — Please Read Before Use.................... 7
Intended use ............................................................................................. 7
Instruction manuals ................................................................................... 7
User qualifications..................................................................................... 8
Ensuring the safety of reprocessing personnel ......................................... 8
Equipment compatibility ............................................................................ 10
Care and storage ...................................................................................... 10
Maintenance and administration ............................................................... 10
Repair and modification ............................................................................ 10
Disposal of waste fluids............................................................................. 11
Disposal of this equipment ........................................................................ 11
Signal words.............................................................................................. 11
Dangers, warnings, and cautions.............................................................. 12
Terms used in these manuals ................................................................... 14
Chapter 1 Checking the Package Contents............................ 16
Chapter 2 Nomenclature and Functions ................................. 20
2.1 Front and top panel......................................................................... 20
2.2 Rear panel ...................................................................................... 22
2.3 Side panel ....................................................................................... 22
2.4 Cleaning tub.................................................................................... 23
2.5 Control panels................................................................................. 24
2.6 Consumable accessories (Optional) ............................................... 29
Chapter 3 Inspection Before Use............................................. 32
3.1 Inspecting for water leakage from the water supply piping
and within the equipment ................................................................ 34
3.2 Inspecting the equipment’s connectors........................................... 35
3.3 Inspecting the connecting tubes and leak test air tube ................... 36
3.4 Inspecting the remaining quantity of detergent, and replenishment 37
3.5 Inspecting the remaining quantity of alcohol, and replenishment ... 43
3.6 Inspecting the mesh filters .............................................................. 48
3.7 Inspecting for disinfectant solution odor.......................................... 49
3.8 Inspecting the disinfectant solution’s concentration level ............... 50
3.9 Inspecting the printer paper roll ...................................................... 53

ii
Contents
ENDOSCOPE REPROCESSOR OER-Pro Operation Manual
Chapter 4 Basic Endoscope Reprocessing Operations ........ 54
4.1 Power activation and opening the faucet ........................................ 57
4.2 Inspection before use...................................................................... 60
4.3 Endoscope precleaning .................................................................. 60
4.4 Recognition of the Scope ID ........................................................... 61
4.5 User ID detection ............................................................................ 64
4.6 Endoscope setup ............................................................................ 66
4.7 Leak test ......................................................................................... 72
4.8 Connecting tube installation ............................................................ 78
4.9 Reprocessing .................................................................................. 80
4.10 Alcohol flushing ............................................................................... 87
4.11 Removing the endoscopes ............................................................. 94
4.12 Printing of the reprocessing results................................................. 95
Chapter 5 End-of-Day Checks.................................................. 109
5.1 Turning the power OFF, closing the faucet and cleaning
the outer surface ............................................................................. 110
5.2 Cleaning the mesh filters................................................................. 111
5.3 Removal or storage of alcohol ........................................................ 113
5.4 Cleaning the fluid level sensor ........................................................ 116
Chapter 6 Other Functions ....................................................... 119
6.1 Confirming the disinfectant solution temperature............................ 119
6.2 Heating the disinfectant solution ..................................................... 120
6.3 Setting the reprocessing programs ................................................. 122
6.4 Setting the disinfectant solution counter ......................................... 126
6.5 Display of the total number of times the disinfectant solution was
supplied........................................................................................... 131
6.6 Display the total operation count of the equipment ......................... 131
6.7 Air purge ......................................................................................... 132
6.8 Rinsing ............................................................................................ 133
6.9 Emergency stop and automatic processing after stopping ............. 134

Contents
iii
ENDOSCOPE REPROCESSOR OER-Pro Operation Manual
Chapter 7 Routine Maintenance .............................................. 136
7.1 Replacing the gas filter (MAJ-822).................................................. 138
7.2 Replacing the water filter (MAJ-824)............................................... 142
7.3 Disinfecting the water supply piping................................................ 152
7.4 Microbiological surveillance ............................................................ 160
7.5 Replacing the air filter (MAJ-823) ................................................... 165
7.6 Cleaning the float switch ................................................................. 168
7.7 Checking the lid and lid packing ..................................................... 170
7.8 Cleaning the detergent/alcohol drawer ........................................... 171
7.9 Cleaning the detergent tank............................................................ 172
7.10 Cleaning the accessories and accessory holders........................... 173
7.11 Cleaning the alcohol tank................................................................ 175
7.12 Replacing the disinfectant solution ................................................. 176
7.13 Cleaning the mesh filter in the water supply adapter connector ..... 193
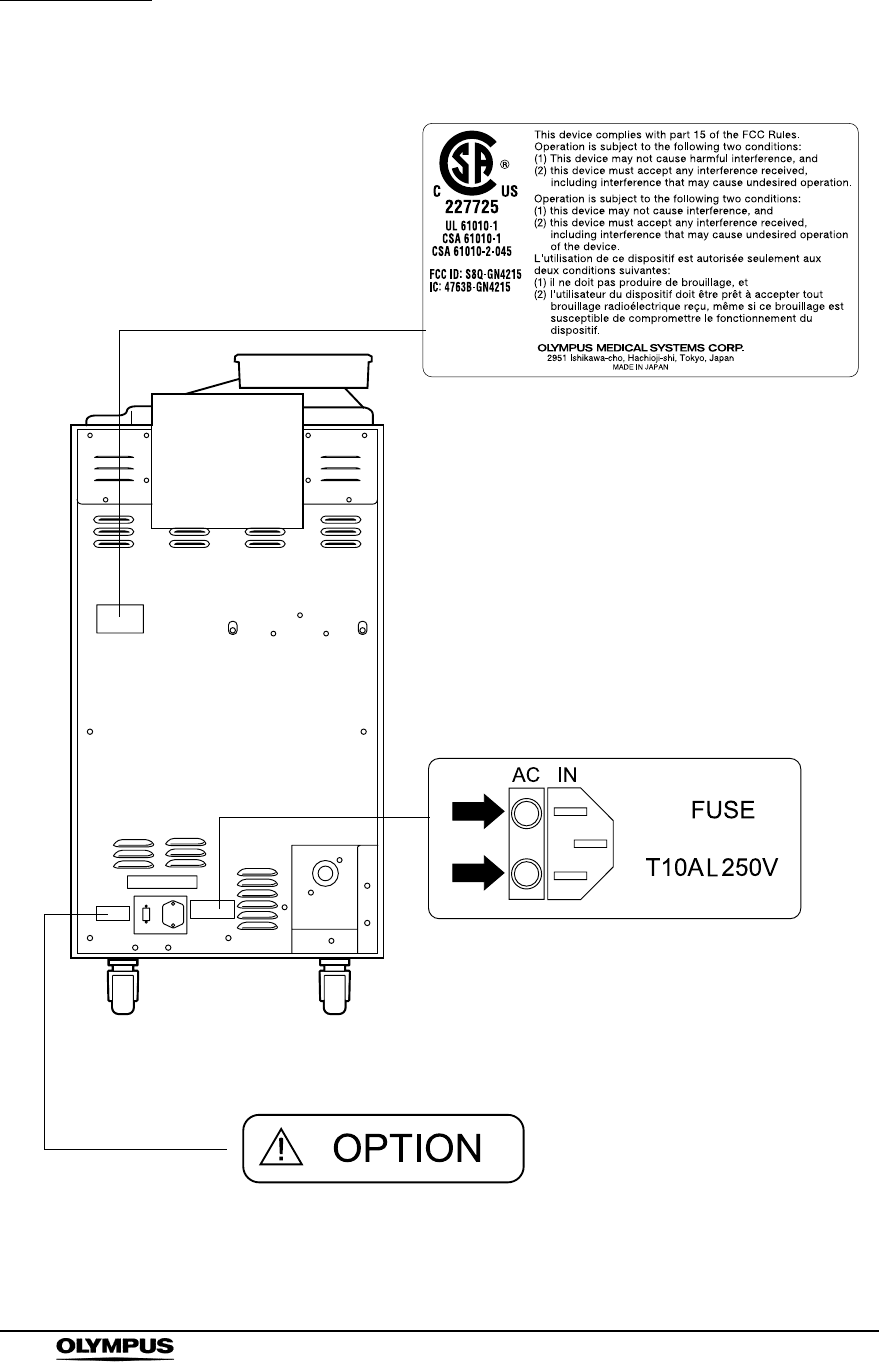
7.14 Replacing the fuse .......................................................................... 195
7.15 Disinfecting the detergent/alcohol pipe ........................................... 196
7.16 Preparing the reprocessor for long-term storage ............................ 204
7.17 Installing the printer paper roll......................................................... 211
7.18 Care and maintenance after long-term storage .............................. 217
Chapter 8 Troubleshooting and Repair................................... 218
8.1 Troubleshooting guide .................................................................... 218
8.2 Returning the endoscope reprocessor for repair ............................ 227
Appendix ....................................................................................... 228
System chart ............................................................................................. 228
Shipping environment ............................................................................... 230
Operating environment.............................................................................. 230
Specifications ............................................................................................ 230
EMC information ....................................................................................... 233

iv
Contents
ENDOSCOPE REPROCESSOR OER-Pro Operation Manual
Labels and Symbols
1
ENDOSCOPE REPROCESSOR OER-Pro Operation Manual
Labels and Symbols
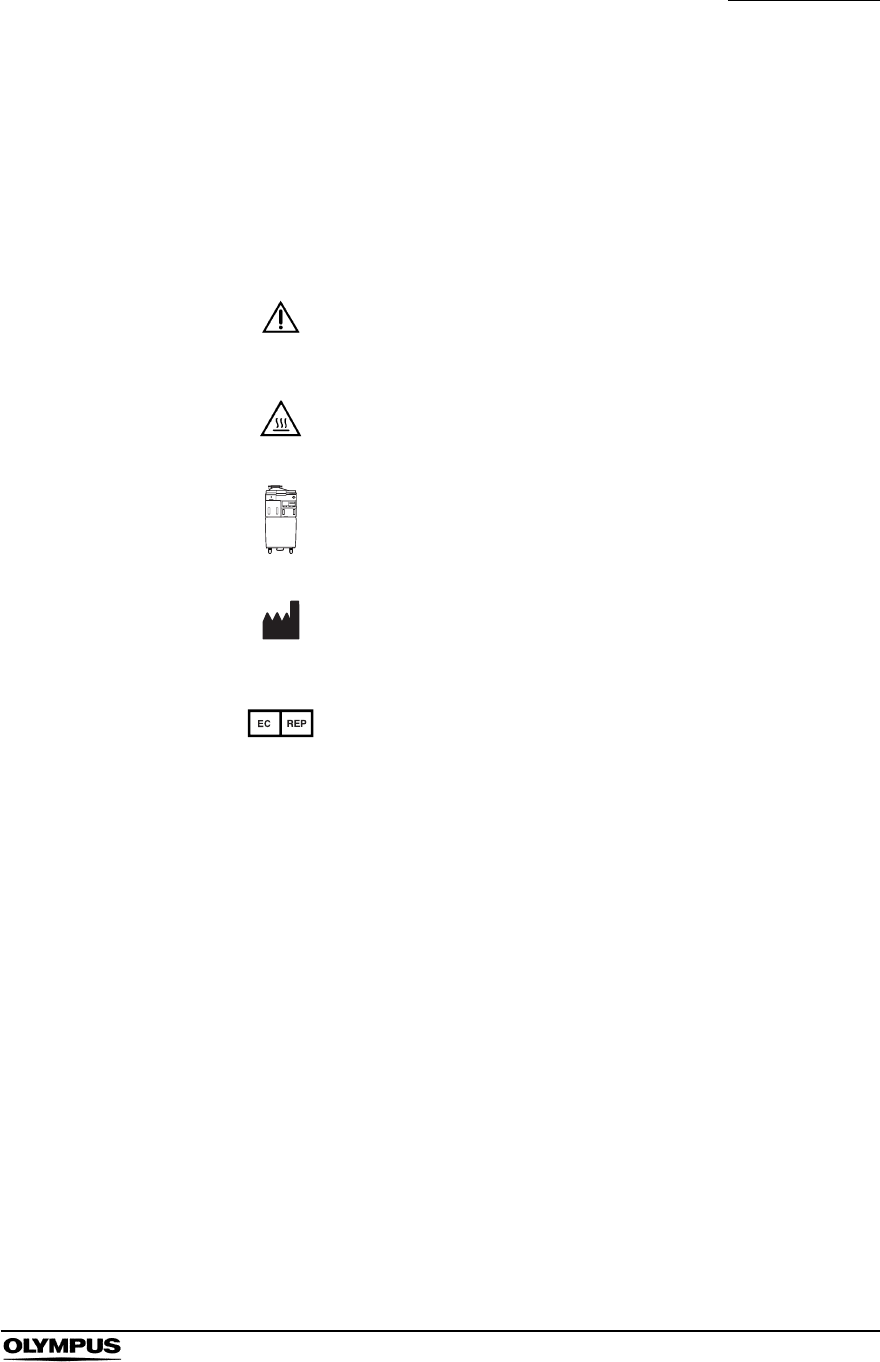
The meaning(s) of the symbol(s) shown on the package with the components,
the back cover of this instruction manual and/or this equipment are as follows:
Refer to instructions.
Caution, hot surface
Endoscope reprocessor
Manufacturer
Authorized representative in the European Community
2
Labels and Symbols
ENDOSCOPE REPROCESSOR OER-Pro Operation Manual
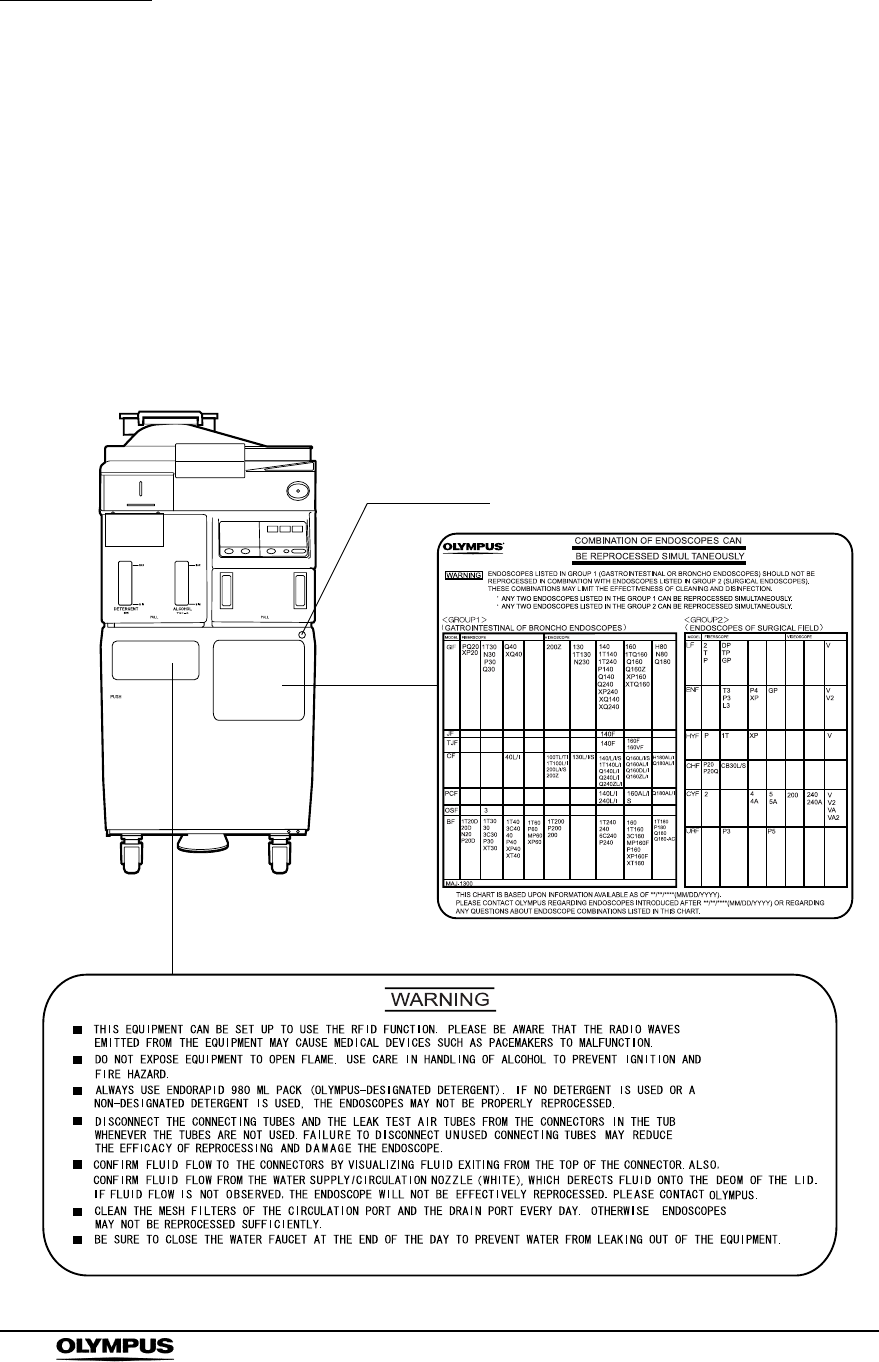
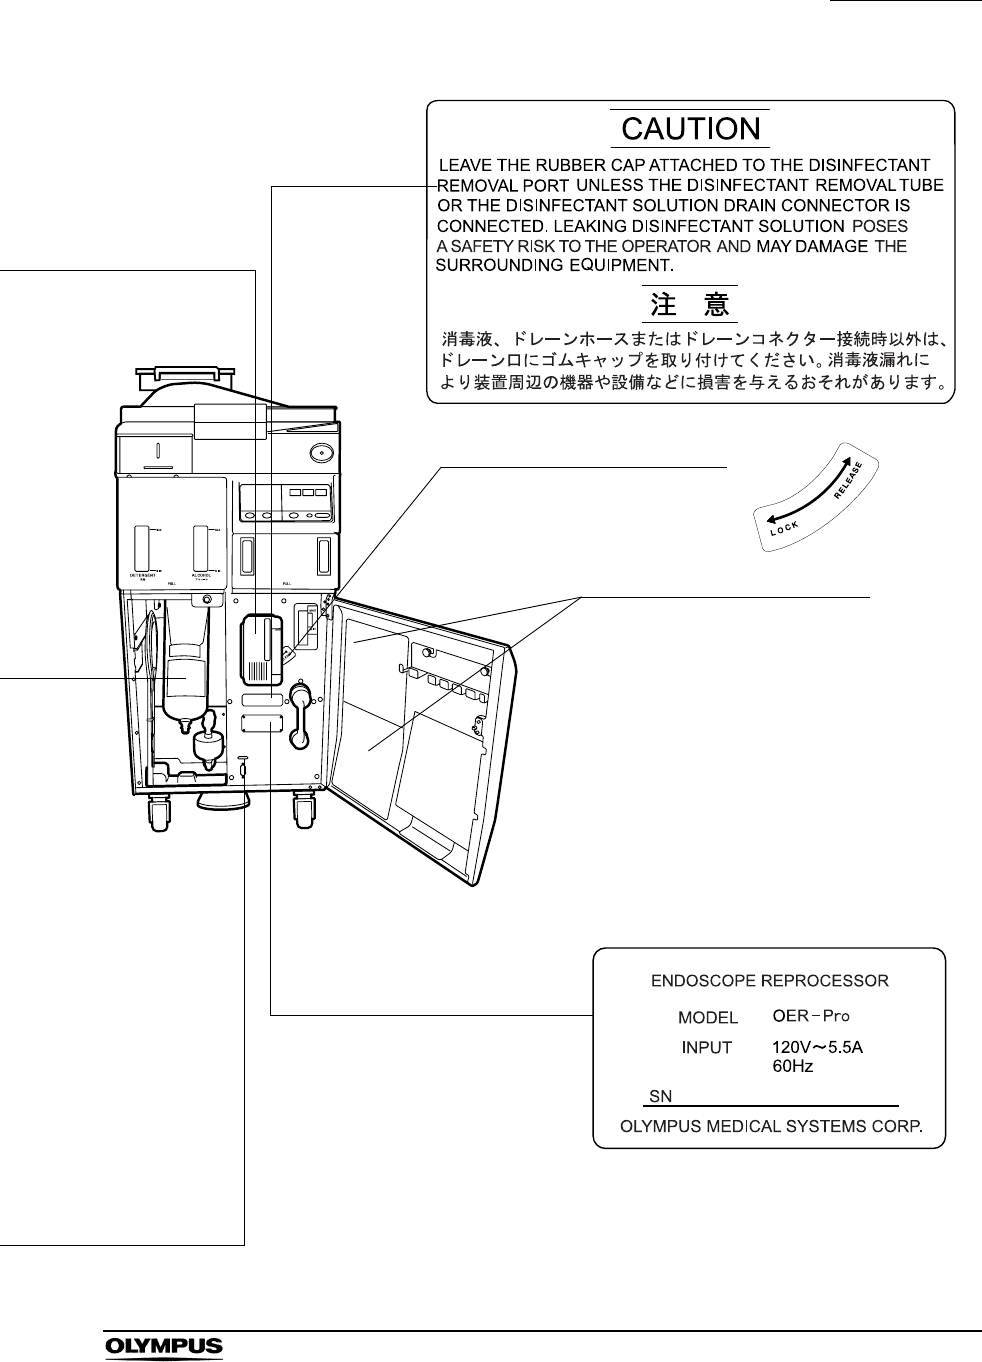
Safety-related labels and symbols are attached to the equipment at the locations
shown below. If labels or symbols are missing illegible, contact Olympus.
Front panel
RFID marking
Labels and Symbols
3
ENDOSCOPE REPROCESSOR OER-Pro Operation Manual
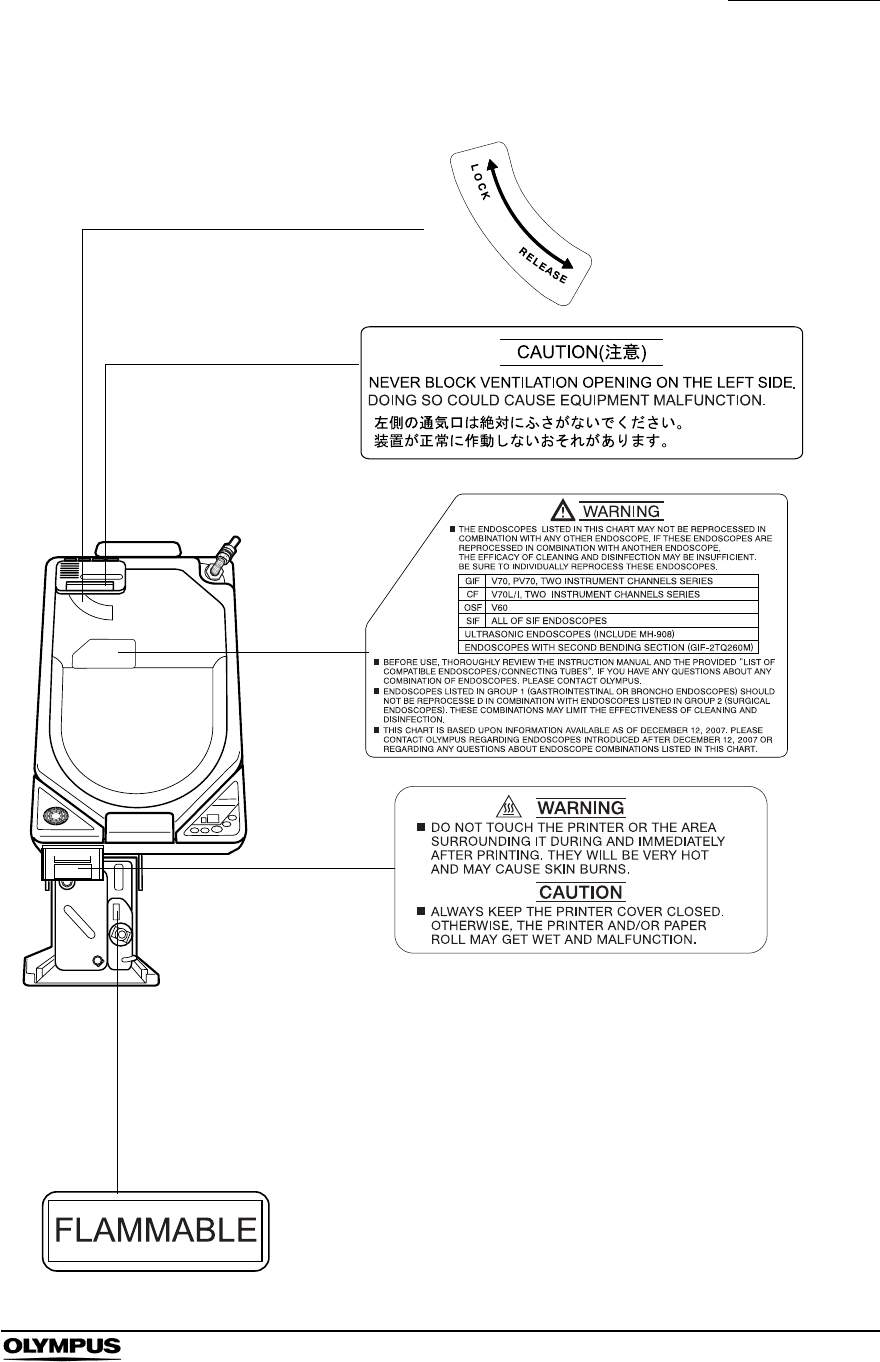
Top panel
Rotation direction indicator label
Indicates the rotation directions for
locking and releasing each gas filter
case.
4
Labels and Symbols
ENDOSCOPE REPROCESSOR OER-Pro Operation Manual
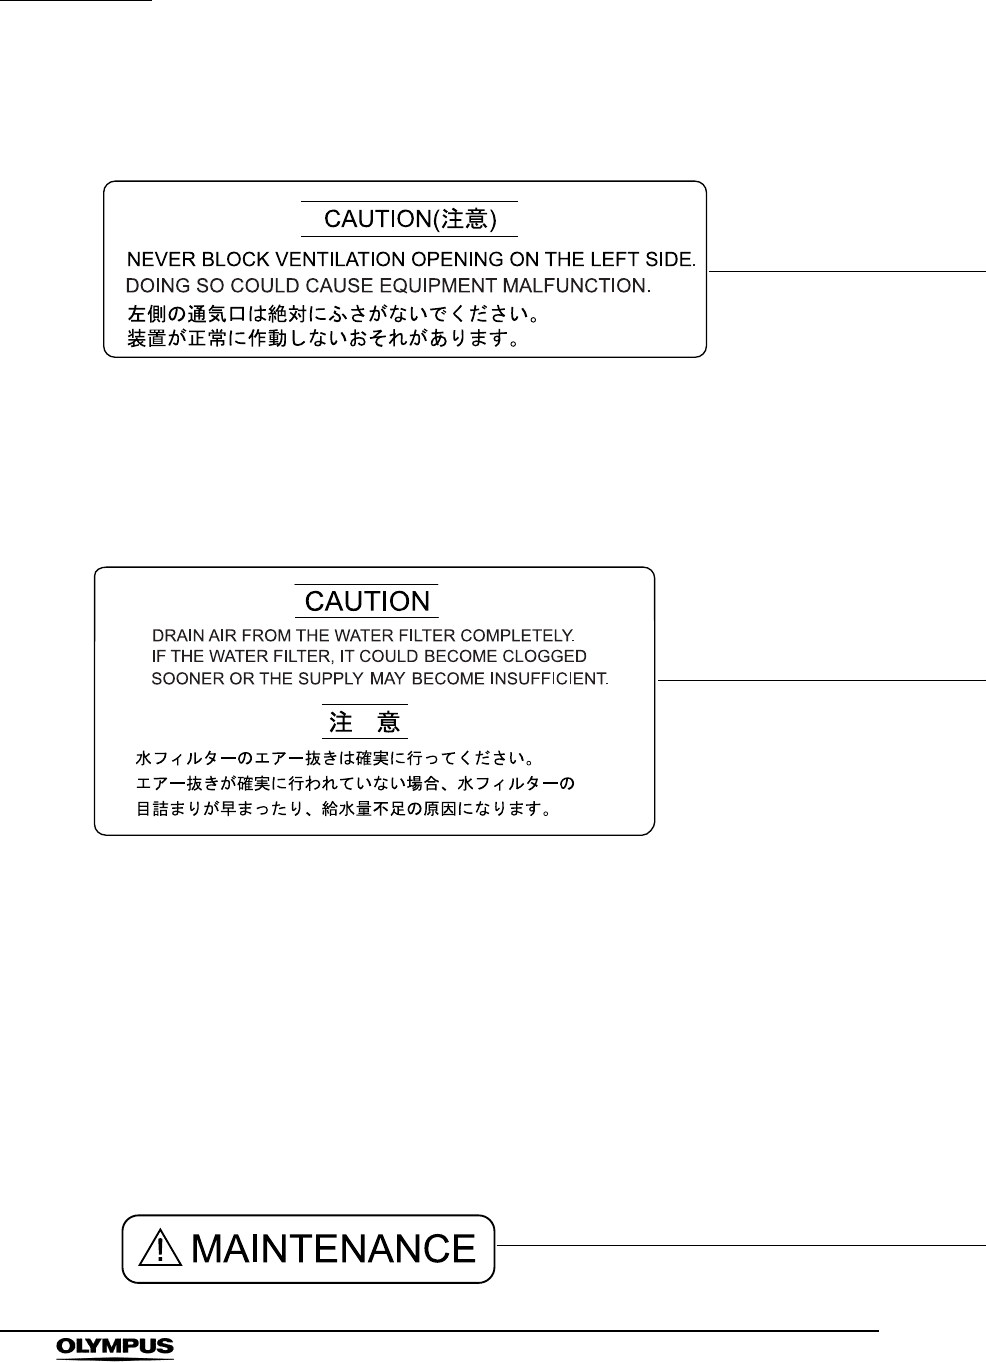
Inner side
Labels and Symbols
5
ENDOSCOPE REPROCESSOR OER-Pro Operation Manual
Error code table
Lists error codes, possible causes, and
remedial actions for details, see
Section 8.1, “Troubleshooting guide” on
page 218 in the “Instructions-Operation
Manual”.
Rotation direction indicator label
Indicates the rotation direction for
locking and releasing each gas filter
case.
Rating plate
Shows the product model, power
rating, and serial number.
6
Labels and Symbols
ENDOSCOPE REPROCESSOR OER-Pro Operation Manual
Rear panel
CSA/UL MARKING
Option terminal
Used for connecting
ancillary equipment
(for service engineer
use only).

Important Information — Please Read Before Use
7
ENDOSCOPE REPROCESSOR OER-Pro Operation Manual
Important Information — Please Read
Before Use
Intended use
This subject device has been designed to wash and disinfect flexible
endoscopes and their accessories utilizing an alkali detergent and an
FDA-approved liquid chemical germicide for semi critical medical devices. Both
the detergent and the LCG are exclusively used for this subject.
Instruction manuals
The instructions for this equipment are divided into two volumes:
“Instructions-Installation Manual” and “Instructions-Operation Manual”. Each
manual contains essential information for using this equipment safely and
effectively (“Instructions-Installation Manual” describes how to install the
equipment and “Instructions-Operation Manual” describes how to inspect and
use the equipment. These manuals will be referred to as “the instruction
manuals”.). Before using this reprocessor, be sure to review these manuals
thoroughly, as well as the manuals of any other equipment that will be used
during reprocessing. Always, use this equipment as instructed. It might cause
unexpected danger if you don't follow the installation and operation manual.
The descriptions in these manuals assume that all endoscopes are reprocessed
using the Olympus-designated detergent (EndoRapid 980 ml pack) and
disinfectant solution (Aldahol III).
Keep these and all related instruction manuals and documents in a safe,
accessible location.
If you have any questions or comments about any information in these manuals,
please contact Olympus.

8
Important Information — Please Read Before Use
ENDOSCOPE REPROCESSOR OER-Pro Operation Manual
User qualifications
The operator of this equipment must be sufficiently trained in reprocessing of
endoscopes. Medical literature reports cases of infections due to inappropriate
cleaning, disinfection, and /or sterilization. Thoroughly review and understand
the following items before use:
Cleaning, disinfection, and sterilization procedures
described in the instruction manuals for the endoscope
and ancillary equipment.
Professional health and safety standards.
Applicable guidelines on cleaning, disinfection, and
sterilization of endoscopy equipment.
Structure and handling of endoscopic equipment.
Personal protective equipment requirements to minimize
exposure to chemicals and infectious materials.
These manuals do not explain or discuss the detailed cleaning, disinfection, and
sterilization procedures. For more details, please consult your facility's
procedures, professional guidelines, and regulatory requirements for
reprocessing endoscopes.
Ensuring the safety of reprocessing personnel
• Before handling the high-level disinfectant solution (Aldahol III), carefully
read the instructions for use and the material safety data sheet.
• During reprocessing, wear appropriate personal protective equipment to
prevent contact with or inhalation of infectious substances or
disinfectant. Personal protective equipment includes eye wear, face
mask, moisture-resistant clothing, and chemical-resistant gloves that fit
properly and are long enough so that your skin is not exposed. All
personal protective equipment should be inspected before use and
replaced periodically before it is damaged.

Important Information — Please Read Before Use
9
ENDOSCOPE REPROCESSOR OER-Pro Operation Manual
• When using the disinfectant solution and alcohol, Olympus recommends
the use of gas filters and running this equipment in well-ventilated areas.
Wear a facemask, gloves, and protective clothes to
minimize aspiration and skin contact.
Wear goggles for eye protection.
• Before handling the detergent or disinfectant, read the material safety
data sheets and learn what measures to take in the event of exposure.
• Operators who exhibit symptoms of an allergic reaction or sensitivity to
the reprocessing chemicals should not operate this equipment.
• This equipment can be set up to use the RFID function. Please be
aware that the radio waves emitted from the equipment may cause
medical devices such as pacemakers to malfunction.
Refer to the following association's guidelines related to ventilation:
SGNA (Society of Gastroenterology Nurses and Associates)
ASGE (American Society of Gastroenterological Endoscopy)
APIC (Association for Professionals of Infection Control and
Epidemiology)
AORN (Association of Preoperative Registered Nurses)
ASTM (American Society for Testing and Materials)
OSHA (Occupational Safety and Health Administration)
ACGIH (American Conference of Governmental Industrial
Hygienists)
NIOSH (National Institute for Occupational Safety and Health)
AIA (American Institute of Architects)
Do not handle the equipment if the operator shows any allergic
symptoms even while wearing protective gear.

10
Important Information — Please Read Before Use
ENDOSCOPE REPROCESSOR OER-Pro Operation Manual
Equipment compatibility
Use this equipment in combination with ancillary equipment listed in “System
chart” in Appendix. Using incompatible equipment may result in patient or
operator injury and equipment damage and/or malfunction.
Care and storage
After use, reprocess and store this equipment referring to the instructions in
Chapter 5, “End-of-Day Checks” in this manual. Inappropriate care and storage
could present an infection control risk and/or cause equipment damage or
malfunction.
Maintenance and administration
• Endoscopes or ancillary devices that have been used many times or for
a long time are more likely to fail. In addition to checks before use, the
person in charge of maintenance and administration of the medical
equipment at the hospital should periodically check all of the items
described in this manual. If any irregularity is observed, do not use the
equipment and inspect it as described in 8.1, “Troubleshooting guide” on
page 218. If the irregularity is still present, the equipment must be
repaired prior to next use.
• If the lamp of the PERIODICAL MAINTENANCE indicator described in
Section 2.5, “Control panels” on page 24 blinks, contact Olympus.
Repair and modification
Do not disassemble, modify or attempt to repair this equipment and its
accessories. Doing so could result in operator or patient injury and/or equipment
damage or malfunction. Some problems that appear to be malfunctions may be
corrected by referring to Chapter 8, “Troubleshooting and Repair”. If the problem
cannot be resolved using the information in Chapter 8, “Troubleshooting and
Repair”, contact Olympus.

Important Information — Please Read Before Use
11
ENDOSCOPE REPROCESSOR OER-Pro Operation Manual
Disposal of waste fluids
The waste fluids of this equipment should be treated as directed in the Aldahol III
instruction manuals and follow all applicable national and local guidelines.
Disposal of this equipment
When disposing of this equipment and accessories, follow all applicable
national, state, and local regulations and guidelines.
Signal words
The following signal words are used throughout these manuals:
Indicates an imminently hazardous situation which, if not
avoided, will result in death or serious injury.
Indicates a potentially hazardous situation which, if not
avoided, could result in death or serious injury.
Indicates a potentially hazardous situation which, if not
avoided, may result in minor or moderate injury. It may also
be used to alert against unsafe practices or potential
equipment damage.
Indicates additional helpful information.

12
Important Information — Please Read Before Use
ENDOSCOPE REPROCESSOR OER-Pro Operation Manual
Dangers, warnings, and cautions
Follow the dangers, warnings, and cautions given below when handling this
equipment. This information is supplemented by the dangers and warnings given
in each chapter.
• Do not insert an EndoTherapy accessory or other object
through an opening including the air vent of the equipment.
Also, do not allow any liquid (including water or disinfectant
solution) to flow into an opening. Contact with an electrical
part inside the equipment could cause an electric shock or
equipment failure.
• Always remove the tank from the detergent/alcohol drawer
before putting detergent or alcohol in the tank. If detergent or
alcohol is spilled on the detergent/alcohol drawer, it could get
inside the equipment and contact an electrical part inside,
causing an electric shock or fire hazard.
• Do not install this equipment in any place where any of the
following are present.
High oxygen concentration
Oxidizing substance such as Nitrous Oxide (N2O)
Flammable anesthetic gas
This equipment is not explosion-proof and may explode or
cause fire under these conditions.
Always use the power cord provided with this equipment.
Otherwise, equipment failure or power cord burnout may
result. Also, remember that the provided power cord is for
use only with this equipment and should not be used with any
other equipment.
• Do not press any of the switches on the main or subcontrol
panel of this equipment with a pointed or hard object.
Otherwise, the switch may be damaged.
• Be sure to turn off the faucet and the power switch of the
equipment at the end of the day. Otherwise, water supply
hose might slip off the connection when not in use (e.g.,
nighttime or holidays) because of the unexpected change in
water pressure.

Important Information — Please Read Before Use
13
ENDOSCOPE REPROCESSOR OER-Pro Operation Manual
• To avoid malfunctions, do not use this equipment in a dusty
environment.
• To avoid electromagnetic interference from other equipment,
do not install any other electrical devices in close proximity to
this equipment (aside from ancillary devices used with this
equipment).
• This equipment provides a radio communication function by
RFID and emits RF (Radio Frequency) energy to perform the
said intended functions. Therefore, it may cause
electromagnetic interference in nearby electronic equipment,
and is labeled with the following symbol. If electromagnetic
interference occurs, mitigation measures may be necessary,
such as moving the electronic equipment away, reorienting or
relocating this instrument, or shielding the location. An
electromagnetic interference with other devices may shorten
the communications distance of the designated ID tag and
cause signals to become unreadable. Try to take mitigation
measures such as keeping the affecting device away from
this equipment.

14
Important Information — Please Read Before Use
ENDOSCOPE REPROCESSOR OER-Pro Operation Manual
Terms used in these manuals
Cleaning fluid
Refers to the water treated by the water filter for use by this equipment in
reprocessing. When cleaning fluid is used in the detergent cleaning process,
detergent is added to it.
Detergent
Olympus-designated alkaline detergent (EndoRapid).
Disinfectant solution
Olympus-designated disinfectant solution (Aldahol III).
Alcohol
70% ethyl alcohol or isopropyl alcohol.
Process
Generic term for any operation, including cleaning and disinfection, that is
performed automatically by this equipment.
Cleaning process
A series of operations programmed into the equipment that enable it to
perform ultrasonic cleaning and detergent cleaning of an endoscope.
Disinfection process
A series of operations programmed into the equipment that enable it to
perform disinfection of an endoscope.
Leak test
A test to confirm that an endoscope is waterproof.
Air purge
In this operation, air is fed into an endoscope channel to blow out any
internal moisture. This operation is usually performed automatically during a
process, but it can also be activated independently. Air purge is also used to
drain cleaning fluid or disinfectant solution from inside the equipment when
the operation has stopped due to an error code, etc.

Important Information — Please Read Before Use
15
ENDOSCOPE REPROCESSOR OER-Pro Operation Manual
Reprocessing programs
A series of operations for ultrasonic cleaning, detergent cleaning,
disinfection, and rinsing of the outer surface and channels of endoscopes
that run in a specified sequence and for a specified time. Reprocessing
programs [1] to [3] can be selected by the user. Program [1] consists of a
preset series of processes confirmed as effective at our factory. Programs
[2] and [3] can be set up by the user.
Alcohol flushing
To dry the channel after reprocessing, alcohol is passed through the
endoscope channel and then air is fed through. This operation can be
performed as the last step after completion of the reprocessing program or
as an independent operation.
Disinfectant solution heating
A process for heating disinfectant solution until it reaches the appropriate
temperature. When this process is included in a reprocessing program, it is
performed automatically during the program. It can also be performed as an
independent operation.
Test strip
Device used to test if the concentration of disinfectant solution is effective
for disinfection. Meets the minimum recommended concentration (MRC)
specified by the disinfectant manufacturer.
Error code
A code consisting of [E] and a two-digit number. This code is displayed on
the main control panel if there is a problem with the equipment. When an
error code is displayed, check the error code list to find out what corrective
measures to take.
Automatic Processing
When the equipment is stopped by the operator or due to an error, it
identifies its status and executes the optimum operation automatically. For
example, if the device stops in the middle of disinfection process, it
terminates the disinfection process and removes the disinfectant solution.

16
Chapter 1 Checking the Package Contents
ENDOSCOPE REPROCESSOR OER-Pro Operation Manual
Chapter 1 Checking the Package
Contents
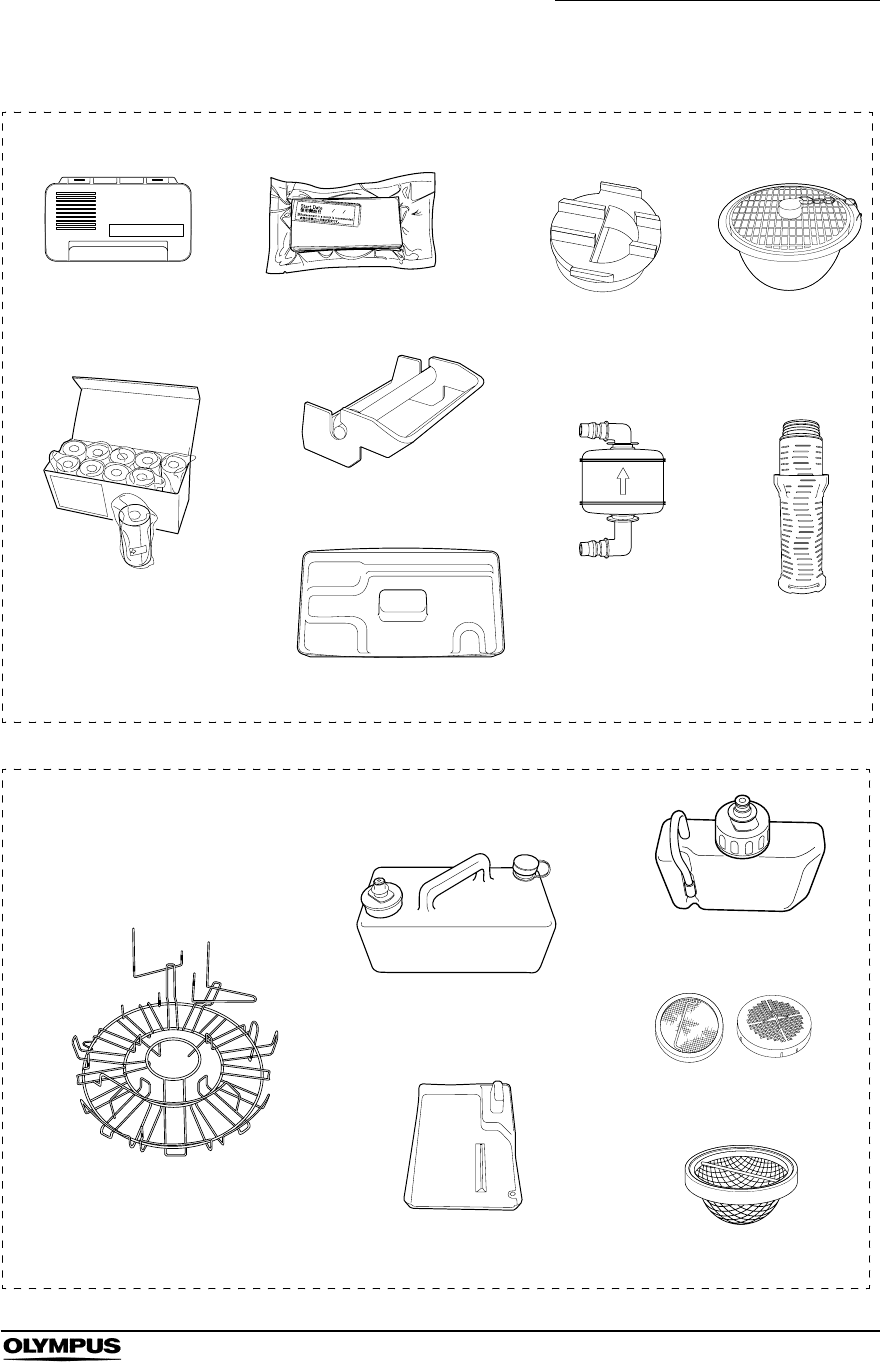
Check that the package contains all the items listed below. Inspect each item for
damage. If the device is damaged, a component is missing, or there is any
question regarding items, do not use the device and contact Olympus
immediately.
Accessories for use in installation
Wrench
(GC748400)
Buckling guard
(GT143100)
Buckling guard
retaining screws (u3)
(GC783700)
Grommet (u4)
(GC784100)
Power cord
(DW662000)
Drain hose
(GJ853400)
Water supply adapter
(GN513000)
1 Not used with OER-Pro.
Accessories for use in reprocessing
Leak test air tubes (u 2)
(MAJ-821)
ENDOSCOPE
REPROCESSOR
OER-Pro
Connecting tubes (u 2)
(MAJ-1501)
Connecting tubes (u 2)
(MAJ-1500)
Gas cap1
Chapter 1 Checking the Package Contents
17
ENDOSCOPE REPROCESSOR OER-Pro Operation Manual
Gas filter cases (u 2)
(GJ460700)
Gas filters (u 2)
(MAJ-822) Adapter
(GC949900)
Washing case
(MAJ-827)
Air filter
(MAJ-823)
Water filter
(MAJ-824)
Paper roll axle
(MAJ-1498)
printer paper roll
(MAJ-1497)
Water tray
(GC601400)
Accessories to be attached to the equipment
Accessories pre-attached to the equipment
Retaining rack
(GL830600)
Detergent/alcohol inner tray
(GT115400)
Circulation port mesh filters
(GC574000, GC693900)
Drain port mesh filter
(GC220100)
Detergent tank
(GJ457500)
Alcohol tank
(GN042300)
18
Chapter 1 Checking the Package Contents
ENDOSCOPE REPROCESSOR OER-Pro Operation Manual
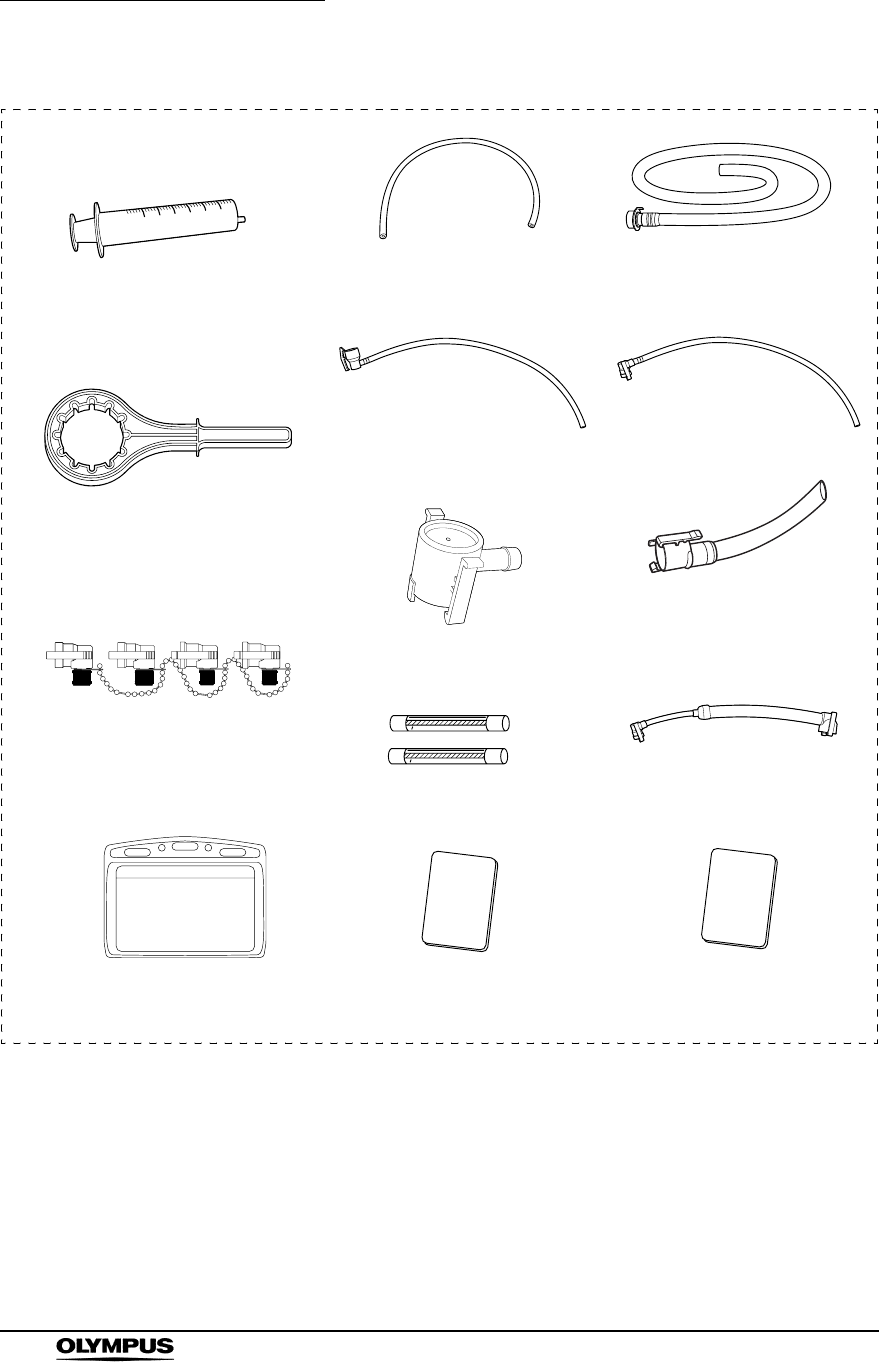
Accessories for use in maintenance
Syringe
(GT173600)
Tube
(GC651300)
Disinfectant collection hose
(GJ668000)
Water filter wrench
(GC601300)
Filter tubes (u 2)
(GJ460500)
Spare fuses (u 2)
(DB181500)
Water supply piping
disinfection hose
(GL860800)
Scope ID master card
(GT210400)
User ID master card
(GT210300)
Card holders (u 2)
(GT271000)
Connector jig
(GN312400)
Drain connector
(GL366300)
Disinfectant
removal tube
(GJ460200)
Sampling tube
(GN513100)
Chapter 1 Checking the Package Contents
19
ENDOSCOPE REPROCESSOR OER-Pro Operation Manual
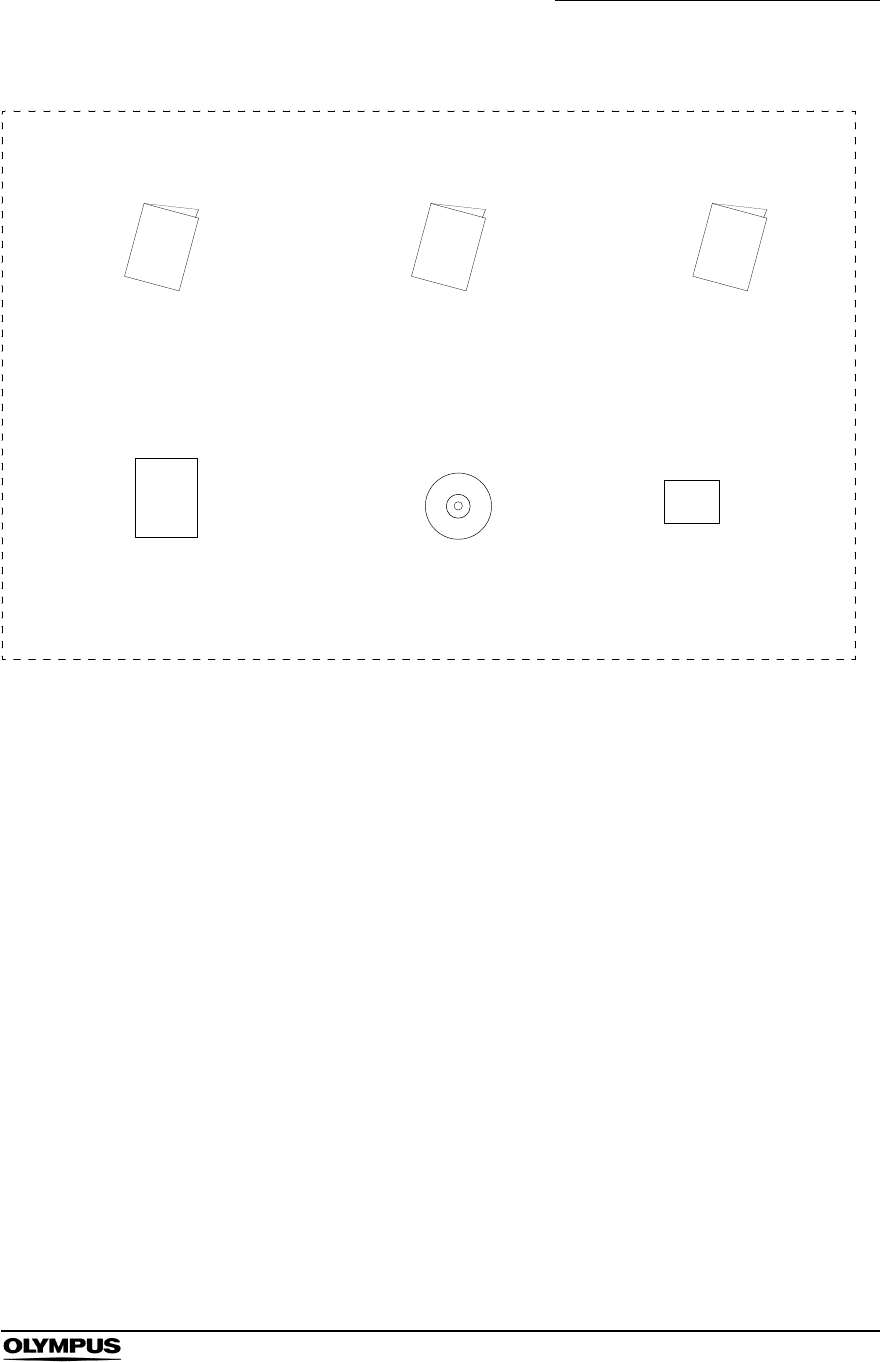
Instructions-Installation Manual Instructions-Operation Manual
(this manual)
OER-Pro Quick Reference Guide OER-Pro Operation Guide
DVD
Manuals
List Of Compatible
Endoscopes/Connecting
Tubes <OER-Pro>
Endoscope Reprocessor
Information Card
20
Chapter 2 Nomenclature and Functions
ENDOSCOPE REPROCESSOR OER-Pro Operation Manual
Chapter 2 Nomenclature and Functions
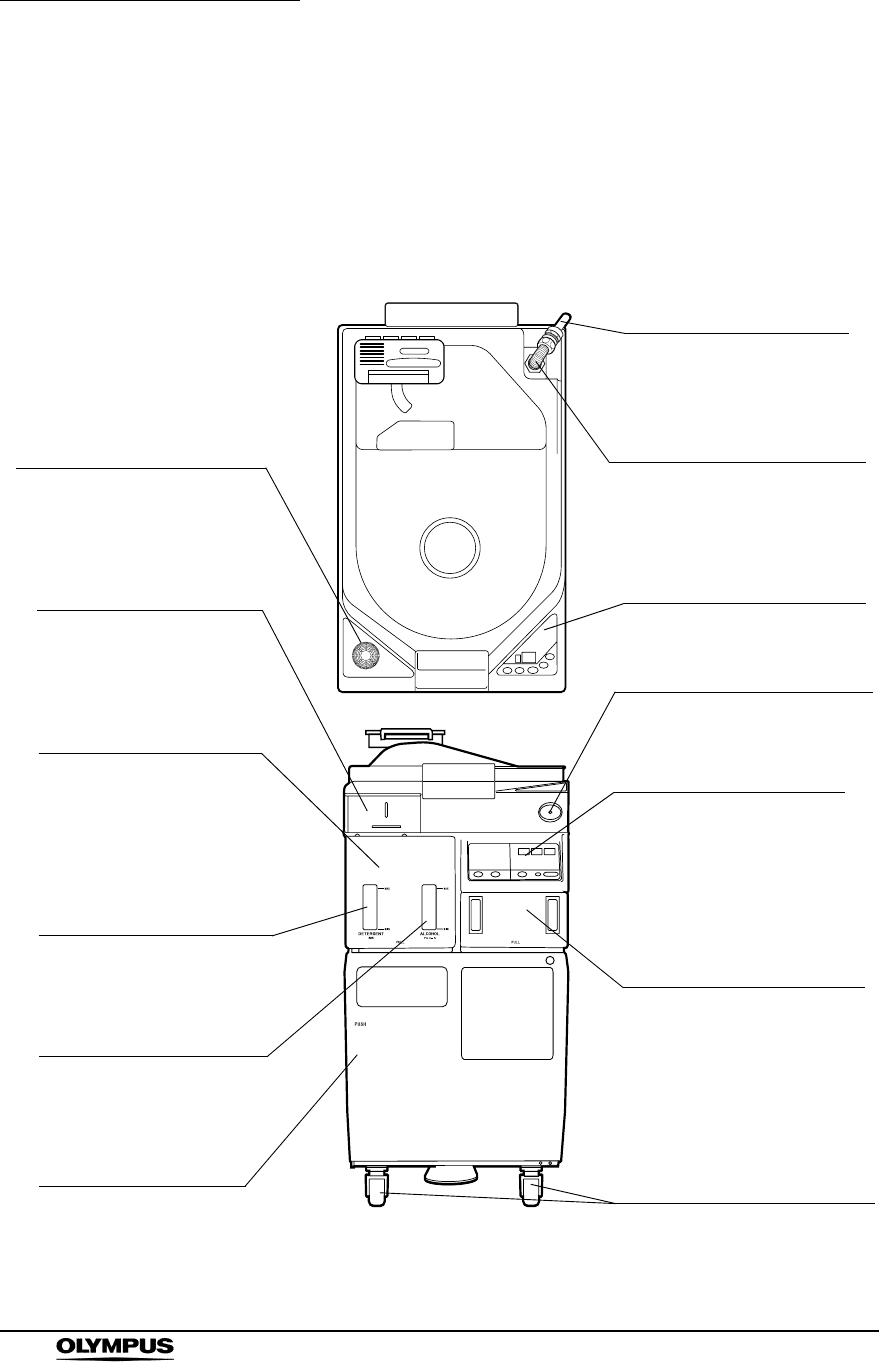
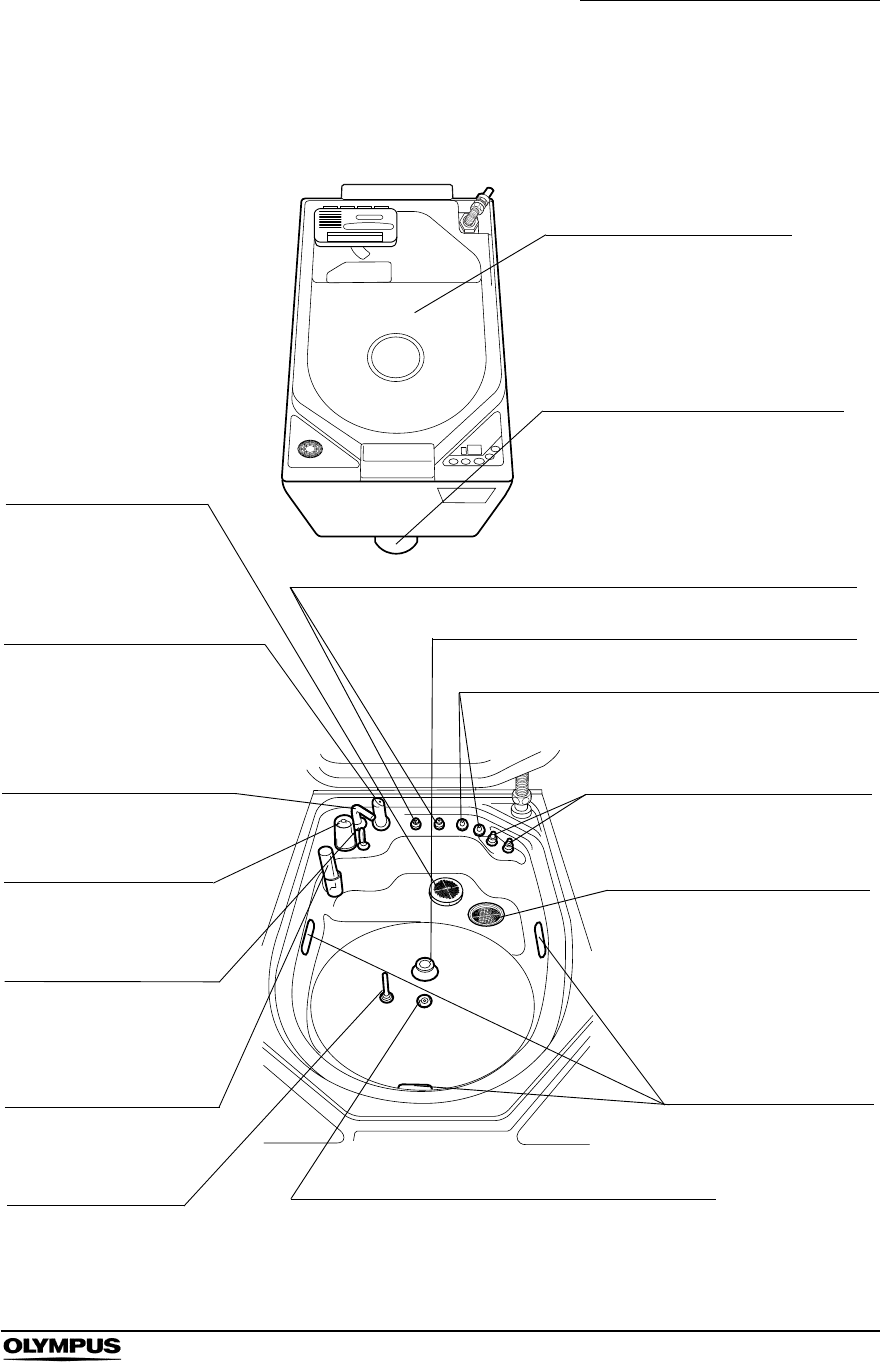
2.1 Front and top panel
ID reader section
Reads the user ID and
scope ID.
Printer
Prints information such as
the scope ID of the
reprocessed scope and the
reprocessing time.
Detergent/alcohol drawer
Accommodates the specially
designed tanks of detergent
for cleaning and alcohol for
alcohol flushing.
Detergent indicator
Indicates the amount of
residual detergent.
Alcohol indicator
Indicates the amount
of residual alcohol.
Front door
Push the area marked
“PUSH” to open.
Water supply adapter
Supplies municipal water for
use in cleaning.
Water supply adapter
connector
Connect the water supply
adapter here. A mesh filter is
built in.
Main control panel
Used mainly to start or stop the
reprocessing processes.
Power switch
Press to switch the power
ON/OFF. The green light is lit
when the equipment is ON.
Subcontrol panel
Used for various setups
and operations.
Disinfectant bottle drawer
Accommodates disinfectant
cassette bottles. This drawer
cannot be opened when using
Aldahol III. Contact Olympus
for information.
Casters
The two front casters have lock
mechanisms. The caster
heights can be adjusted to level
the equipment.
Chapter 2 Nomenclature and Functions
21
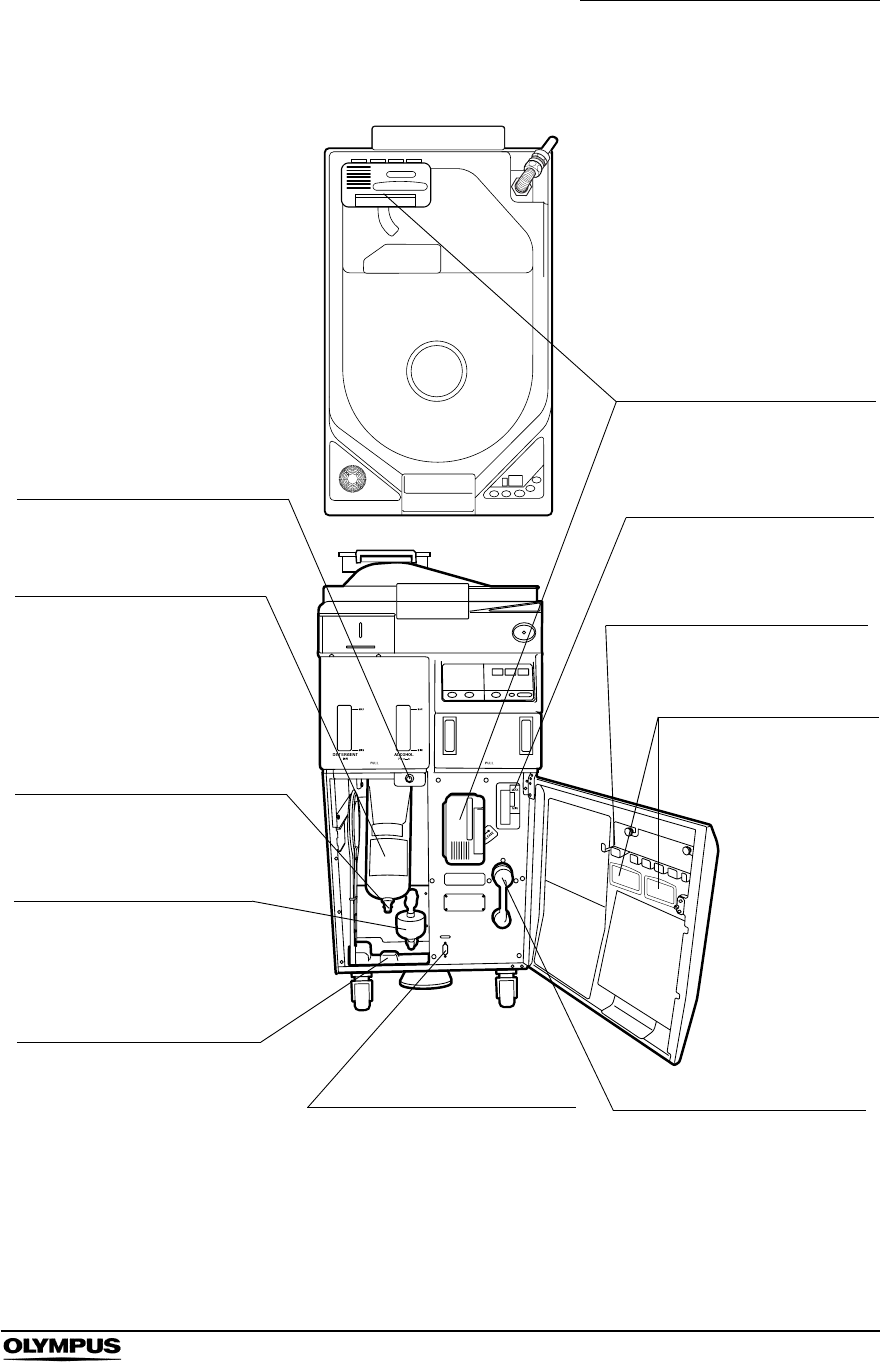
ENDOSCOPE REPROCESSOR OER-Pro Operation Manual
Connector above water filter
housing
For use in draining water and air
from the water filter housing.
Water filter (housing)
Accommodates the water filter
inside. The water filter is used
to remove microorganisms and
fine particles in the water.
Connector below water filter
housing
For use in draining water from the
water filter housing.
Air filter
Filters the supply air.
Water tray
Collects water during
maintenance such as the
water filter replacement. Maintenance terminal
Used for connecting ancillary
equipment (for service
engineer use only).
Disinfectant removal port
Used to check the disinfectant
manufacturer's recommended
concentration or drain the
disinfectant solution
(Remove the rubber cap and
attach the drain connector the
disinfectant removal tube).
Accessory holder
Used to store the connecting
tubes, etc.
Disinfectant indicator
Used to check the amount of
remaining disinfectant
solution.
Gas filters (cases)
Accommodates the gas filters
for removing the odor and vapor
of the disinfectant solution.
Card holders
Hold the scope ID master
card and user ID master
card.
22
Chapter 2 Nomenclature and Functions
ENDOSCOPE REPROCESSOR OER-Pro Operation Manual
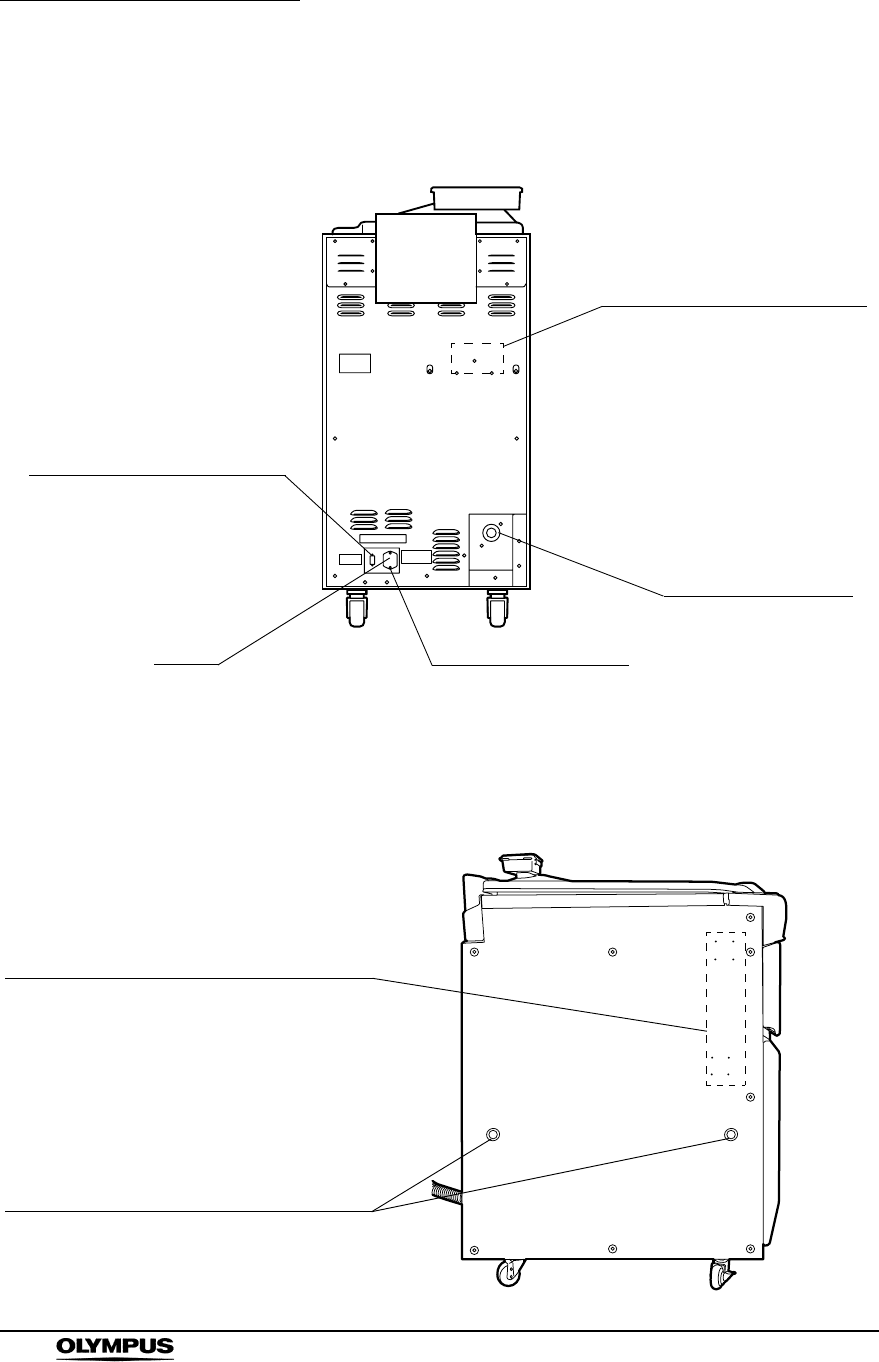
2.2 Rear panel
2.3 Side panel
Option terminal
Used for connecting ancillary
equipment (for service
engineer use only).
Fuses Power cord receptacle
Drain hose connector
Buckling guard attaching holes
Screw holes used to attach the
buckling guard.
Connector hanger attaching holes
(Provided on both left and right side panels)
Grommet attaching holes
(Provided on both left and right side panels)
Used to attach the grommets.
Used to attach the optional connector
hanger (MAJ-865).
Chapter 2 Nomenclature and Functions
23
ENDOSCOPE REPROCESSOR OER-Pro Operation Manual
2.4 Cleaning tub
Lid
Step the foot pedal to open the
cover.
Foot pedal
Press to open the lid. It is locked
during the reprocessing process.
Circulation port
Aspirates the cleaning
fluid or disinfectant
solution for circulation
during cleaning or
disinfection.
Water supply/circulation nozzle
Supplies water for cleaning and
washing. Also supplies the
cleaning fluid or disinfectant
solution aspirated through the
circulation port for circulation.
Disinfectant solution nozzle
Supplies disinfectant solution
to the cleaning tub.
Float switch
Detects abnormal fluid
levels in the cleaning tub.
Detergent nozzle
Supplies detergent to the
cleaning tub.
Fluid level sensor
Detects the fluid level in the
cleaning tub to control it.
Temperature sensor
For use in detergent
heating.
Washing case mount
Attach the Washing case that is used to hold the
endoscope accessories including valves for
reprocessing.
Water level scales (u 3)
Markings for confirming
that the equipment is
level.
Drain port
Drains liquid from the cleaning
tub and supplies disinfectant
solution.
Connect the leak test air tube that is
connected to the endoscope.
Auxiliary water/forceps elevator connector (Yellow)
Connect a connecting tube that is
connected to the endoscope here.
Air/water/instrument channel connector (Gray)
Connect a connecting tube that is connected to the endoscope here.
Water supply piping disinfection connector
Connect the water supply piping disinfection hose here.
Leak test connector (Black)
24
Chapter 2 Nomenclature and Functions
ENDOSCOPE REPROCESSOR OER-Pro Operation Manual
2.5 Control panels
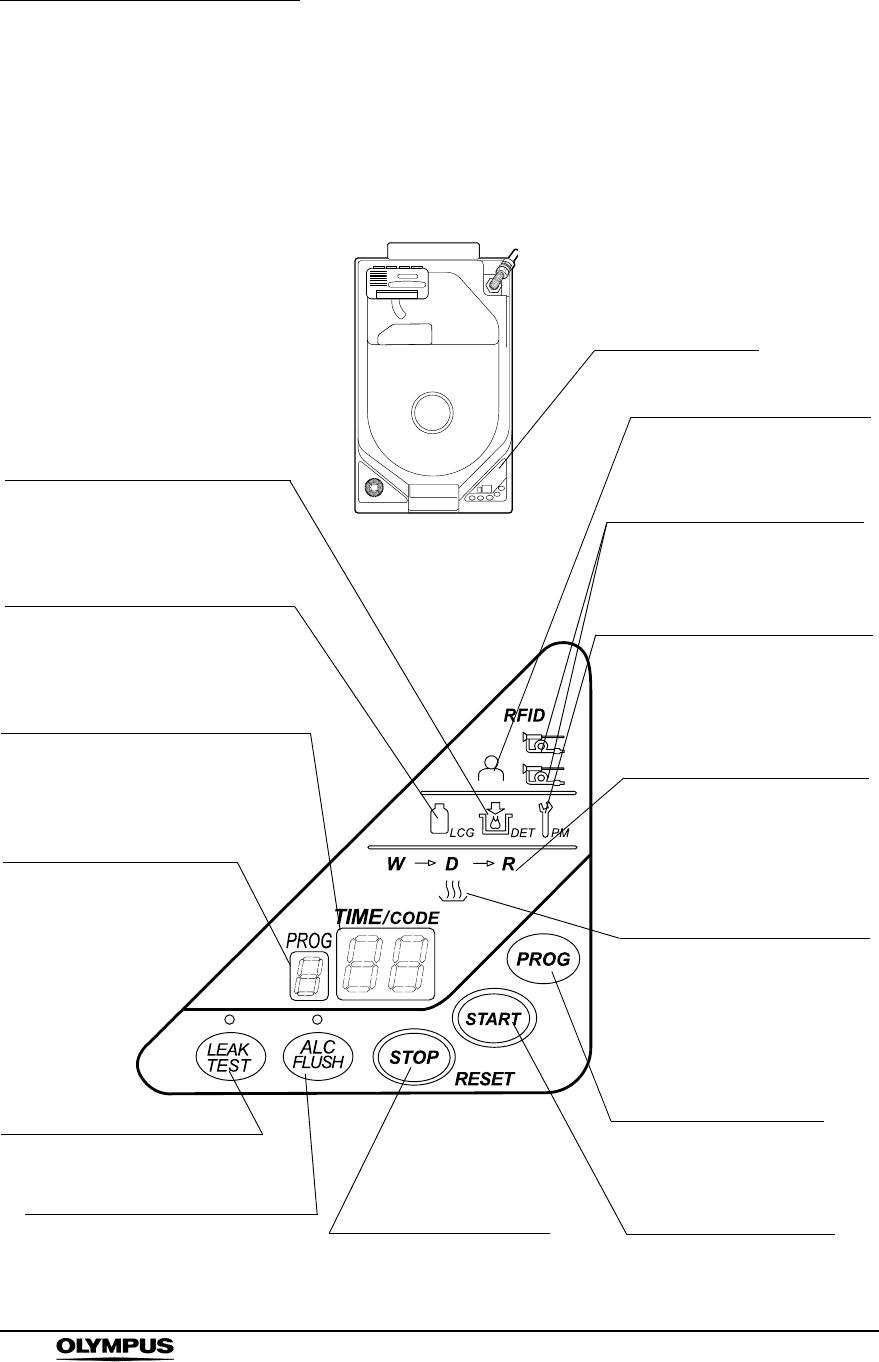
Main control panel
Main control panel
PROG button
Press this button to select
a reprocessing program.
Disinfectant solution
heating indicator
This lamp lights when the
disinfectant solution heating
operation is set for the program
being selected. The lamp blinks
during the disinfection process
and goes out after completion.
Process step indicators
The lamps included in the
program being selected light up.
Each lamp blinks when its
corresponding process is being
executed.
Periodical maintenance indicator
This lamp blinks when it is time for
regularly scheduled maintenance.
When the lamp blinks, contact
Olympus.
Scope ID recognition indicators
The lamp lights when the scope
ID is recognized.
User ID recognition indicator
The lamp lights when the user
ID is recognized.
Add detergent indicator
The lamp blinks when the detergent
tank becomes empty. The error code
[E95] is also displayed.
Disinfectant replacement indicator
The lamp blinks when the number
of times or days of disinfectant
usage reaches the set value.
TIME/CODE display
Displays the remaining time and
execution time of the process, etc.
An error code is displayed in case of
an error.
Program No. display
Displays the program
number being selected.
“E” is displayed in case of
an error.
LEAK TEST button
Press the button to add the leak
test process.
ALC FLUSH button
Press this button to add the alcohol
flushing process. This function cannot
be added once the reprocessing
process has started.
STOP/RESET button
Press this button to stop a
process or clear an error
code.
START button
Press this button to start
the program.
Chapter 2 Nomenclature and Functions
25
ENDOSCOPE REPROCESSOR OER-Pro Operation Manual
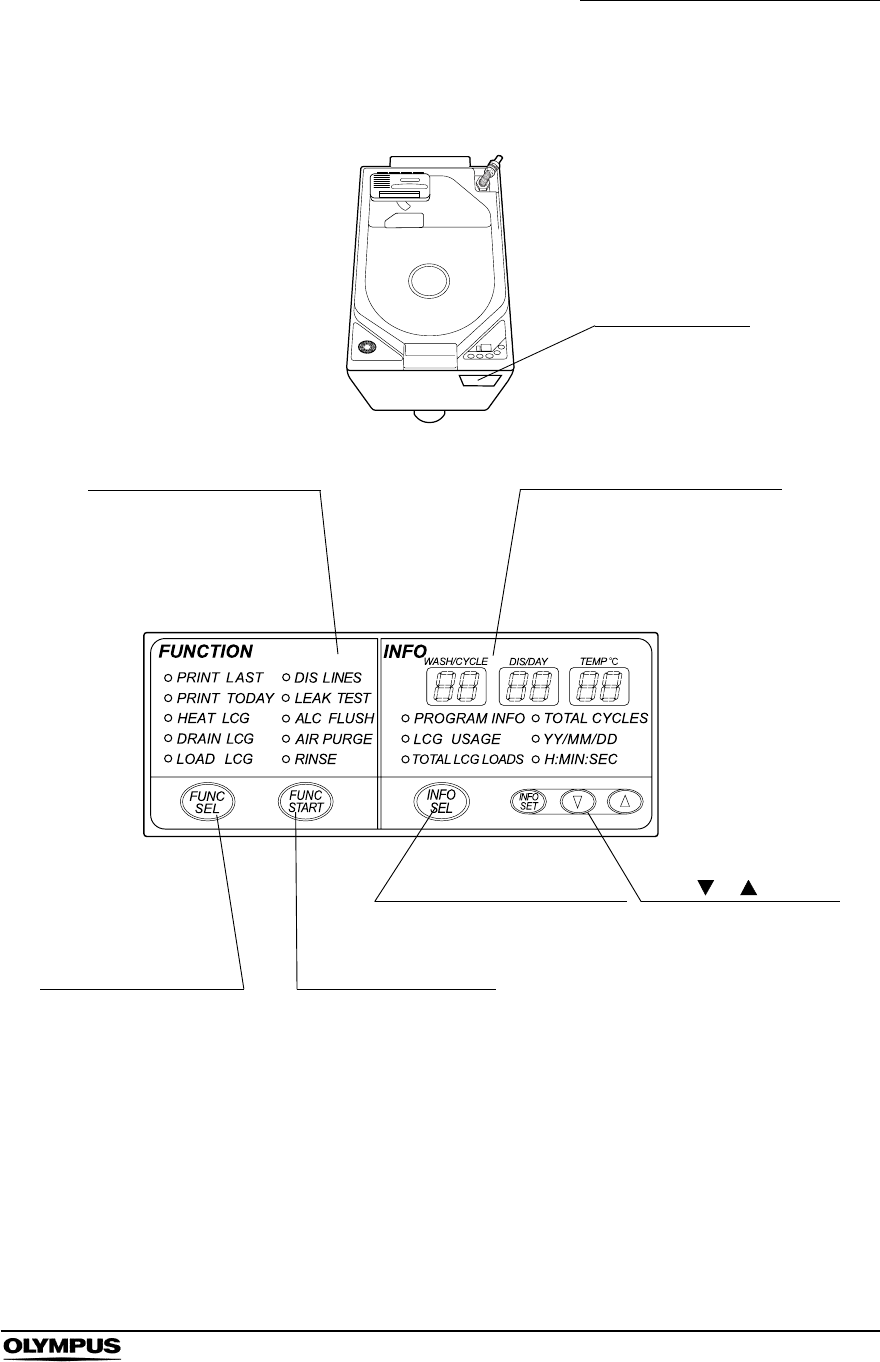
Subcontrol panel
Subcontrol panel
INFO
The lamp corresponding to the
selected information lights and
the details are displayed. For
details, see “INFO” on page 27.
FUNCTION
The lamp corresponding to
the selected function lights.
For details, see
“FUNCTION” on page 26.
Set “ ”/“ ” buttons
Press these buttons to
set the program details,
date, and time.
INFO SEL button
Press this button to select the
information to be displayed.
FUNC START button
Press this button to start
the selected function.
FUNC SEL button
Press this button to select
a function.

26
Chapter 2 Nomenclature and Functions
ENDOSCOPE REPROCESSOR OER-Pro Operation Manual
FUNCTION
PRINT LAST
Prints information about the previous reprocessing operation, such as the
scope ID and cleaning time. For details, see Section 4.12, “Printing of the
reprocessing results” on page 95.
PRINT TODAY
Prints details on all reprocessing operations carried out during the day,
including scope IDs and cleaning time. For details, see Section 4.12,
“Printing of the reprocessing results” on page 95.
PRINT ALL
Prints details on up to the last 60 reprocessing operations, including scope
IDs and cleaning time. For details, see Section 4.12, “Printing of the
reprocessing results” on page 95.
HEAT LCG
Heats the disinfectant solution before starting the disinfection process. For
details, see Section 6.2, “Heating the disinfectant solution” on page 120.
DRAIN LCG
Drains the disinfectant solution from the disinfectant solution tank. For
details, see Section 7.12, “Replacing the disinfectant solution” on page 176.
LOAD LCG
Supplies the disinfectant solution from the cleaning tub. For details, see
Section 7.12, “Replacing the disinfectant solution” on page 176.
DIS LINES
Disinfects the water supply piping as well as the inside of the equipment.
For details, see Section 7.3, “Disinfecting the water supply piping” on
page 152.
LEAK TEST
Performs a leak test on the endoscope. For details, see Section 4.7, “Leak
test” on page 72.

Chapter 2 Nomenclature and Functions
27
ENDOSCOPE REPROCESSOR OER-Pro Operation Manual
ALC FLUSH
Performs alcohol flushing of the endoscope channel. For details, see
Section 4.10, “Alcohol flushing” on page 87.
AIR PURGE
Feeds air into the equipment and endoscope channels to drain residual
water. For details, see Section 6.7, “Air purge” on page 132.
RINSE
Rinses the inside of the equipment and endoscope. For details, see Section
6.8, “Rinsing” on page 133.
INFO
WASH/CYCLE display
Pressing the information select button changes the information displayed on
the subcontrol panel as shown in Table 2.1.
DIS/DAY display
Pressing the information select button changes the information displayed on
the subcontrol panel as shown in Table 2.1.
TEMP qC display
Pressing the information select button changes the information displayed on
the subcontrol panel as shown in Table 2.1.
WASH/CYCLE
display DIS/DAY display TEMP qC display
PROGRAM INFO Cleaning time Disinfection time Temperature1
LCG USAGE Cycles Days – –
TOTAL LCG
LOADS 6-digit display
TOTAL CYCLES 6-digit display
YY/MM/DD Year Month Day
H:MIN:SEC Hour Minute Second
1 Any temperature equal to or higher than 20qC (68qF) is displayed as
“20qC” (68qF). “[- -]” is displayed there is not enough disinfectant solution
in the disinfectant tank to measure the temperature.
Table 2.1

28
Chapter 2 Nomenclature and Functions
ENDOSCOPE REPROCESSOR OER-Pro Operation Manual
PROGRAM INFO
Displays the actual measured values for cleaning time, disinfection time,
and temperature.
LCG USAGE
Displays the number of times or days the disinfectant solution has been
used.
TOTAL LCG LOADS
Displays the total number of times that disinfectant solution has been loaded
(6 digits).
TOTAL CYCLES
Displays the total number of times that the equipment was used (6 digits).
YY/MM/DD
Displays the year, month, and day.
H:MIN:SEC
Displays the hour (24 hour system), minute, and second.
Chapter 2 Nomenclature and Functions
29
ENDOSCOPE REPROCESSOR OER-Pro Operation Manual
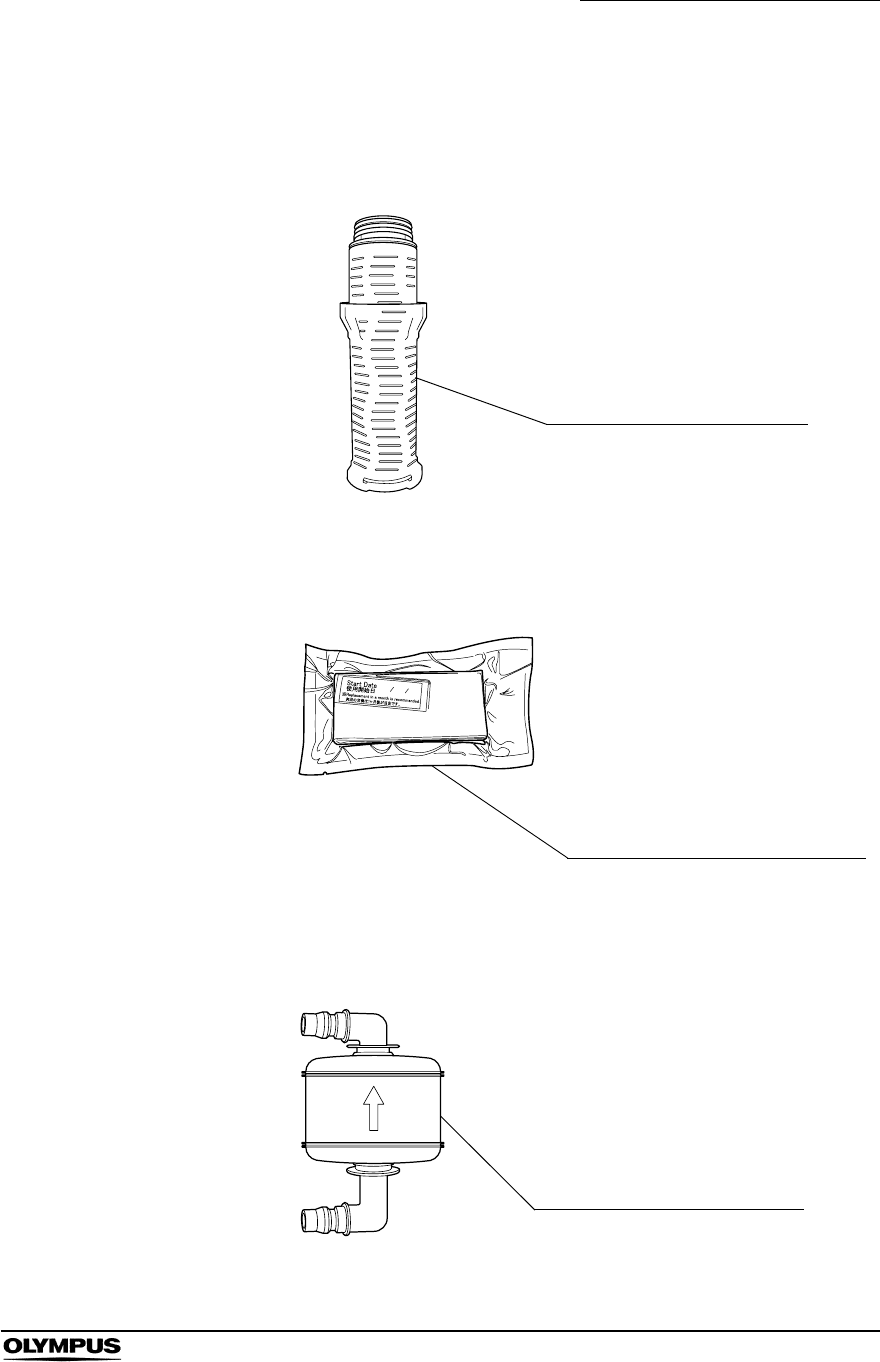
2.6 Consumable accessories (Optional)
Water filter (MAJ-824)
Gas filters (MAJ-822)
Air filter (MAJ-823)
Filters microorganisms and fine
particles in the water.
Incorporated in the gas filter cases to
remove the odor of disinfectant
solution.
Filters microorganisms and fine
particles in the air fed into the
equipment.
30
Chapter 2 Nomenclature and Functions
ENDOSCOPE REPROCESSOR OER-Pro Operation Manual
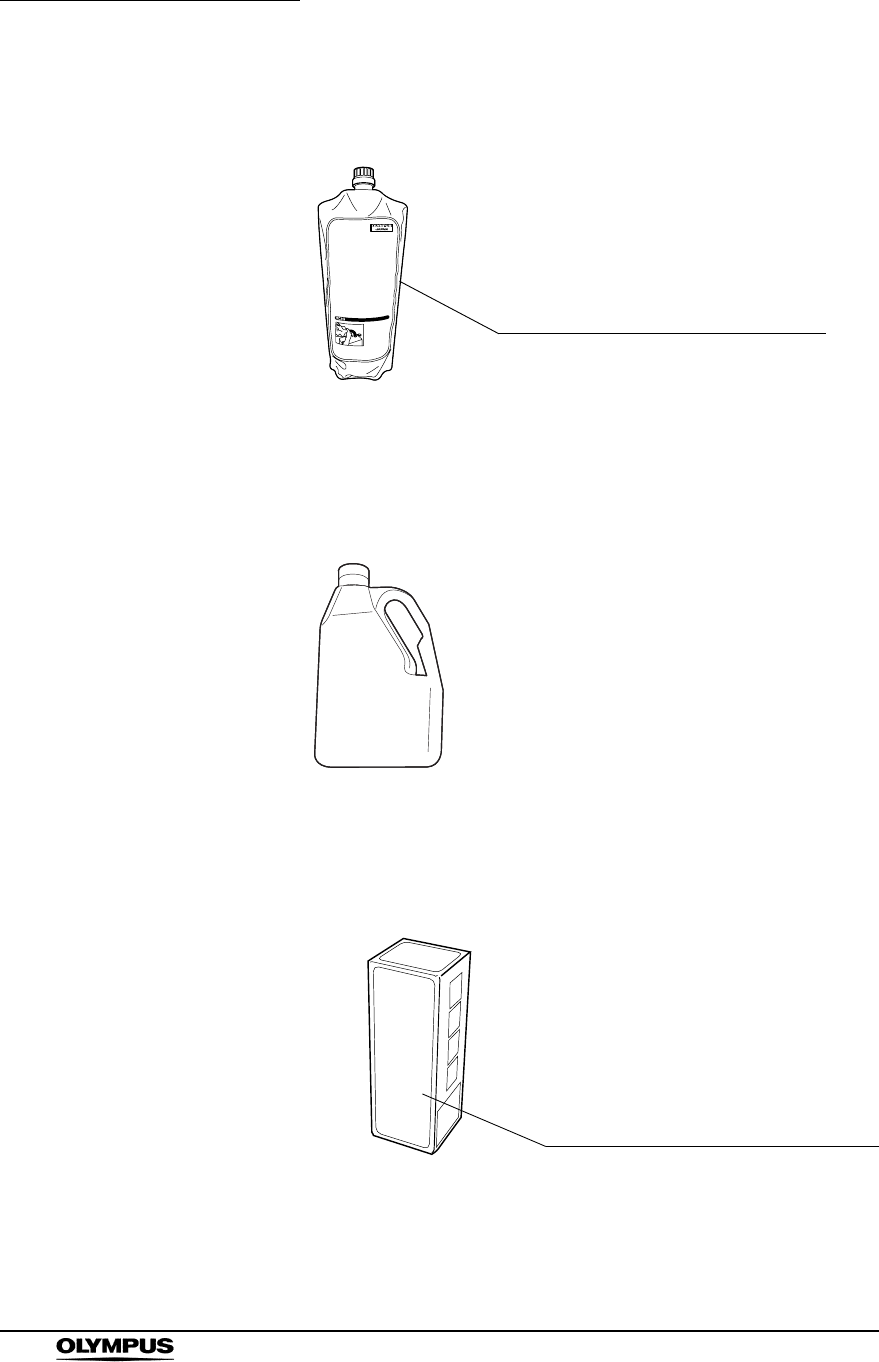
EndoRapid 980 ml pack (Olympus-designated detergent)
Aldahol III (Olympus-designated disinfectant solution)
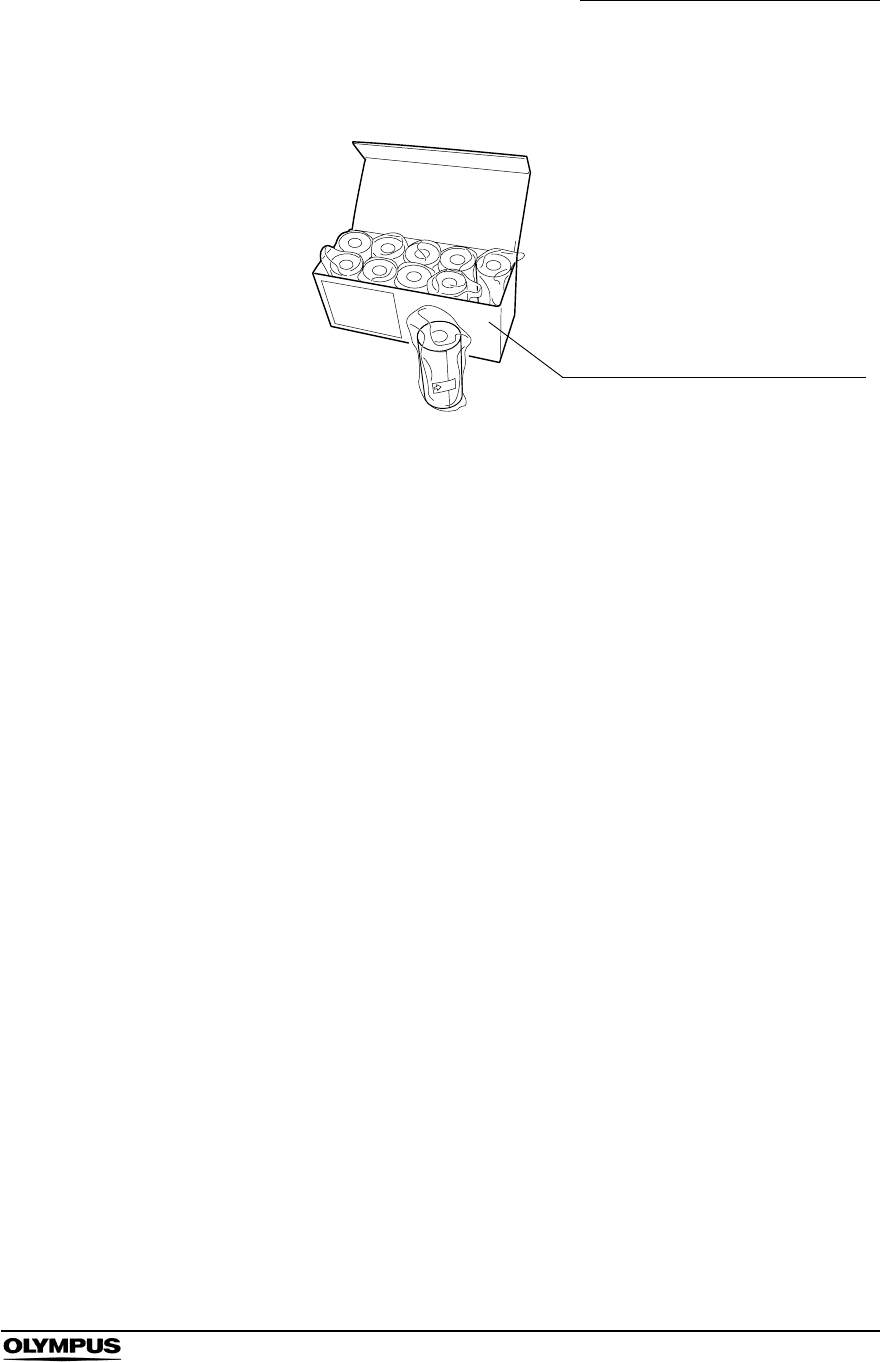
Test strip
The OER-Pro exclusive alkaline detergent.
Available as a 980 mL pack.
Test paper for use in checking the effective
concentration of the Aldahol III High-level
Disinfectant.
Chapter 2 Nomenclature and Functions
31
ENDOSCOPE REPROCESSOR OER-Pro Operation Manual
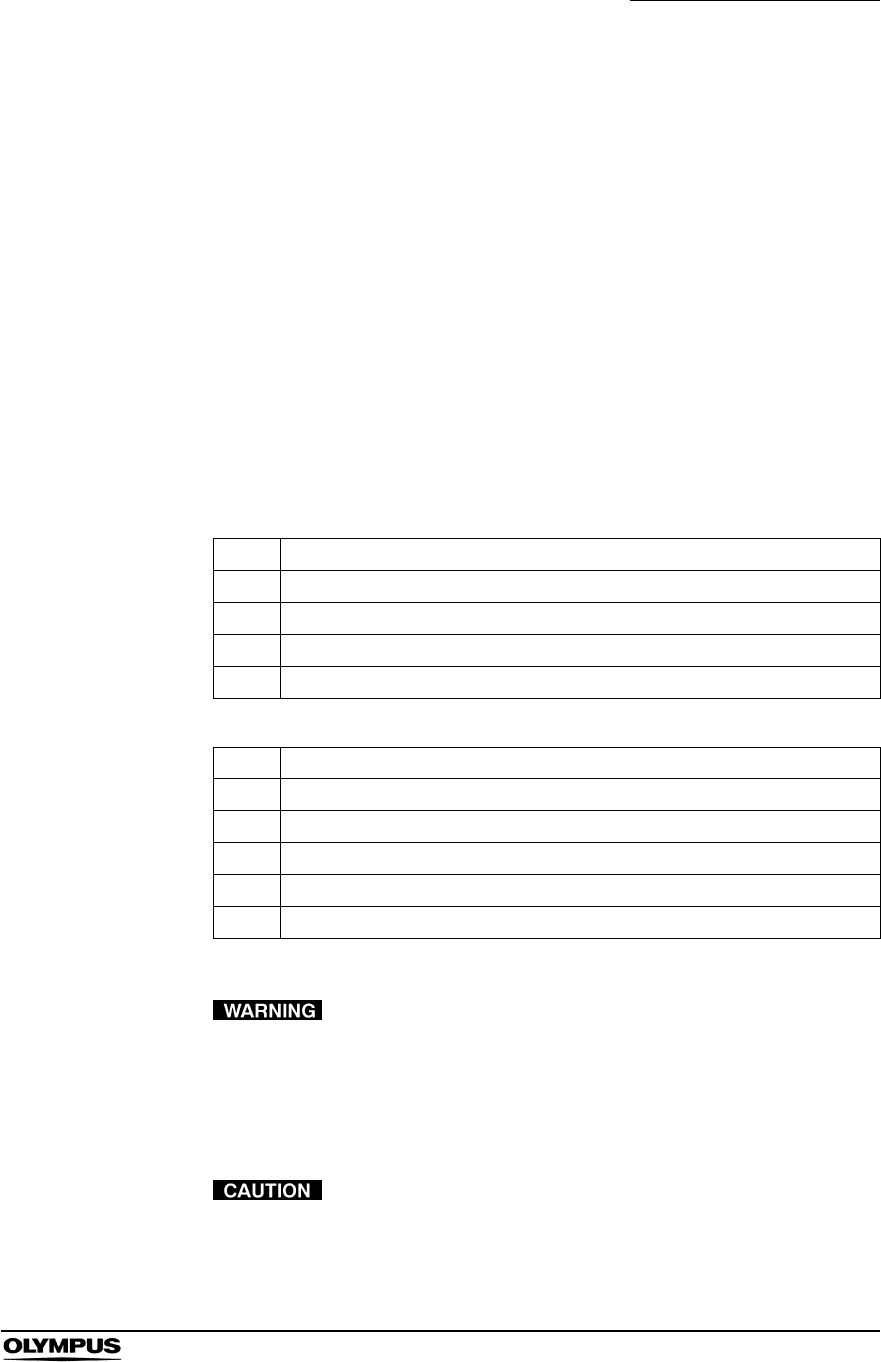
Printer paper roll (MAJ-1497)
Exclusive print sheet for the OER-Pro
32
Chapter 3 Inspection Before Use
ENDOSCOPE REPROCESSOR OER-Pro Operation Manual
Chapter 3 Inspection Before Use
To ensure that this equipment operates safely and reliably, inspect and clean all
parts before use. Also, check all consumables and replace or replenish as
necessary.
Check Inspection items before the first use of the day
3.1 Inspecting for water leakage from the water supply piping and within the
equipment
3.2 Inspecting the equipment’s connectors
3.3 Inspecting the connecting tubes and leak test air tube
3.4 Inspecting the remaining quantity of detergent, and replenishment
3.5 Inspecting the remaining quantity of alcohol, and replenishment
3.6 Inspecting the mesh filters
3.7 Inspecting for disinfectant solution odor
Table 3.1
Check Inspection items before each reprocessing
3.8 Inspecting the disinfectant solution’s concentration level
3.9 Inspecting the printer paper roll
Table 3.2

Chapter 3 Inspection Before Use
33
ENDOSCOPE REPROCESSOR OER-Pro Operation Manual
• When using the disinfectant solution and alcohol, Olympus
recommends the use of gas filters and running this
equipment in well-ventilated areas.
Wear a facemask, gloves, and protective clothes to
minimize aspiration and skin contact.
Wear goggles for eye protection.
• Be sure to perform all inspections and replenish
consumables as described in this chapter. Otherwise, the
equipment may not work properly.
• If any irregularity is observed during the inspections, do not
use the equipment and contact Olympus. Using the
equipment when an irregularity has been detected may
impair operation of the equipment and could cause leakage,
electric shock, burns, and/or fire.
• During inspection, always wear appropriate personal
protective equipment, such as eye wear, face mask,
moisture-resistant clothing, and chemical-resistant gloves
that fit properly and are long enough so that your skin is not
exposed. All personal protective equipment should be
inspected before use and replaced periodically before it is
damaged.
Refer to the following association's guidelines related to
ventilation:
SGNA (Society of Gastroenterology Nurses and
Associates)
ASGE (American Society of Gastroenterological
Endoscopy)
APIC (Association for Professionals of Infection
Control and Epidemiology)
AORN (Association of Preoperative Registered
Nurses)
ASTM (American Society for Testing and Materials)
OSHA (Occupational Safety and Health
Administration)
ACGIH (American Conference of Governmental
Industrial Hygienists)
NIOSH (National Institute for Occupational Safety
and Health)
AIA (American Institute of Architects)
Do not handle the equipment if the operator shows any
allergic symptoms even while wearing protective gear.

34
Chapter 3 Inspection Before Use
ENDOSCOPE REPROCESSOR OER-Pro Operation Manual
3.1 Inspecting for water leakage from the water
supply piping and within the equipment
Confirm that water or fluid does not leak from the water supply piping, inside the
equipment, Drain hose connector, etc.
Do not continue using the equipment if it is leaking water.
Doing so may result in an electric shock or malfunction.
If water or fluid leaks from inside the equipment, close the
faucet, set the power switch to OFF, unplug the power cord,
and contact Olympus.
1. Slowly open the water supply faucet.
2. Confirm that water is not leaking from the connections on the water supply
devices to the equipment: the faucet, the water supply hose, and the water
supply adapter.
3. Confirm that water or fluid is not leaking from inside the equipment.
If water leaks from the connections on the water supply
devices to the equipment: the faucet, the water supply
hose, and the water supply adapter
1. Close the faucet.
2. Check the installation of the water supply devices by referring to Section
4.2, “Connection of the water supply adapter” in “Instructions-Installation
Manual”.
If water leaks from the water filter housing
1. Close the faucet.
2. Check the installation of the water filter housing by referring to Section 3.9,
“Installation of water filter (MAJ-824)” in “Instructions-Installation Manual”.
If water or fluid leaks from inside the equipment
1. Close the faucet.
2. Set the power switch of the equipment to OFF.
3. Unplug the power cord from the power outlet.
Chapter 3 Inspection Before Use
35
ENDOSCOPE REPROCESSOR OER-Pro Operation Manual
If water leaks from the Drain hose connector
1. Close the faucet.
2. Check the drain hose installation by referring to Section 4.3, “Connection of
drain hose” in “Instructions-Installation Manual”.
3.2 Inspecting the equipment’s connectors
Check the following for each connector.
The connector should be connected firmly.
The O-rings should be free of abnormalities such as
cracks, tears, or dents.
If any irregularity is found, do not use the equipment and contact Olympus.
Do not use the equipment if any connector seems to be
damaged or defective. Using the equipment when an
irregularity has been detected may interfere with
reprocessing. Furthermore, fluid leakage may damage
peripheral devices or facilities near the equipment.
Connect each connector firmly by pushing until the connector
clicks into place. After connection, pull the connector gently
to confirm that it cannot be disconnected easily.
Check Connectors in the cleaning tub
Air/water/instrument channel connectors
Auxiliary water/forceps elevator connectors
Leak test connector
Water supply piping disinfecting connector
Table 3.3
Check Other connectors
Connector above water filter housing
Connector below water filter housing
Disinfectant removal port
Tube connector on detergent tank
Tube connector on alcohol tank
Table 3.4
36
Chapter 3 Inspection Before Use
ENDOSCOPE REPROCESSOR OER-Pro Operation Manual
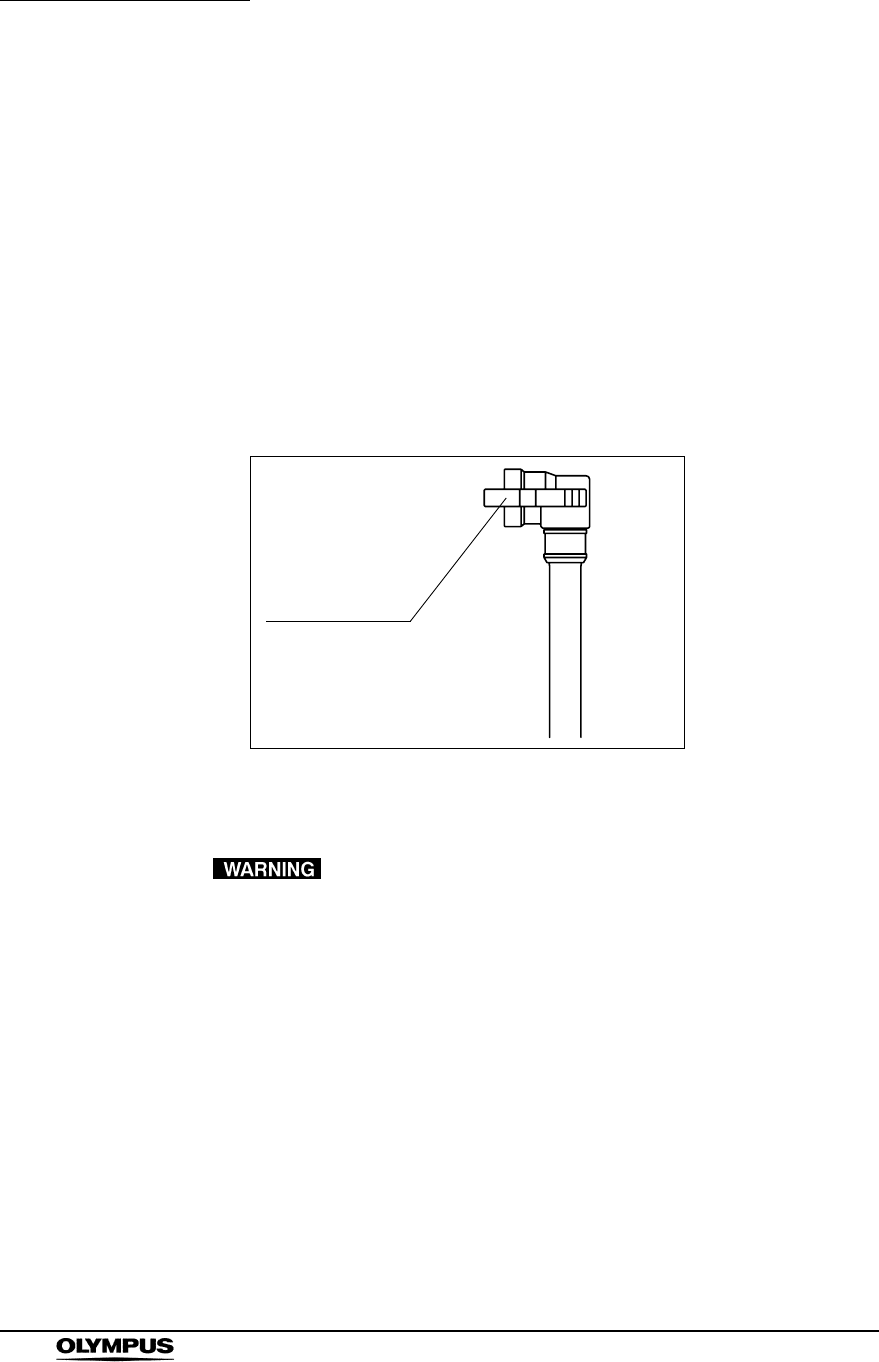
3.3 Inspecting the connecting tubes and leak test air
tube
Before using the equipment, always check that there is no abnormality regarding
the following points on the cleaning tubes and leak test air tube.
All tubes should be free of cracks, breaks, fissures,
scratches, or stains.
There should be no cracks in the lock levers of connecting
tube connectors.
The tube should not be easy to disconnect once
connected.
Figure 3.1
If a tube has any irregularities, do not use it and replace with a new one.
Do not use the connecting tubes or leak test air tubes if they
have any irregularities. Doing so could prevent effective
reprocessing or damage the endoscope.
Lock lever
Chapter 3 Inspection Before Use
37
ENDOSCOPE REPROCESSOR OER-Pro Operation Manual
3.4 Inspecting the remaining quantity of detergent,
and replenishment
Contact Olympus to obtain EndoRapid 980 ml packs
(Olympus-designated detergent).
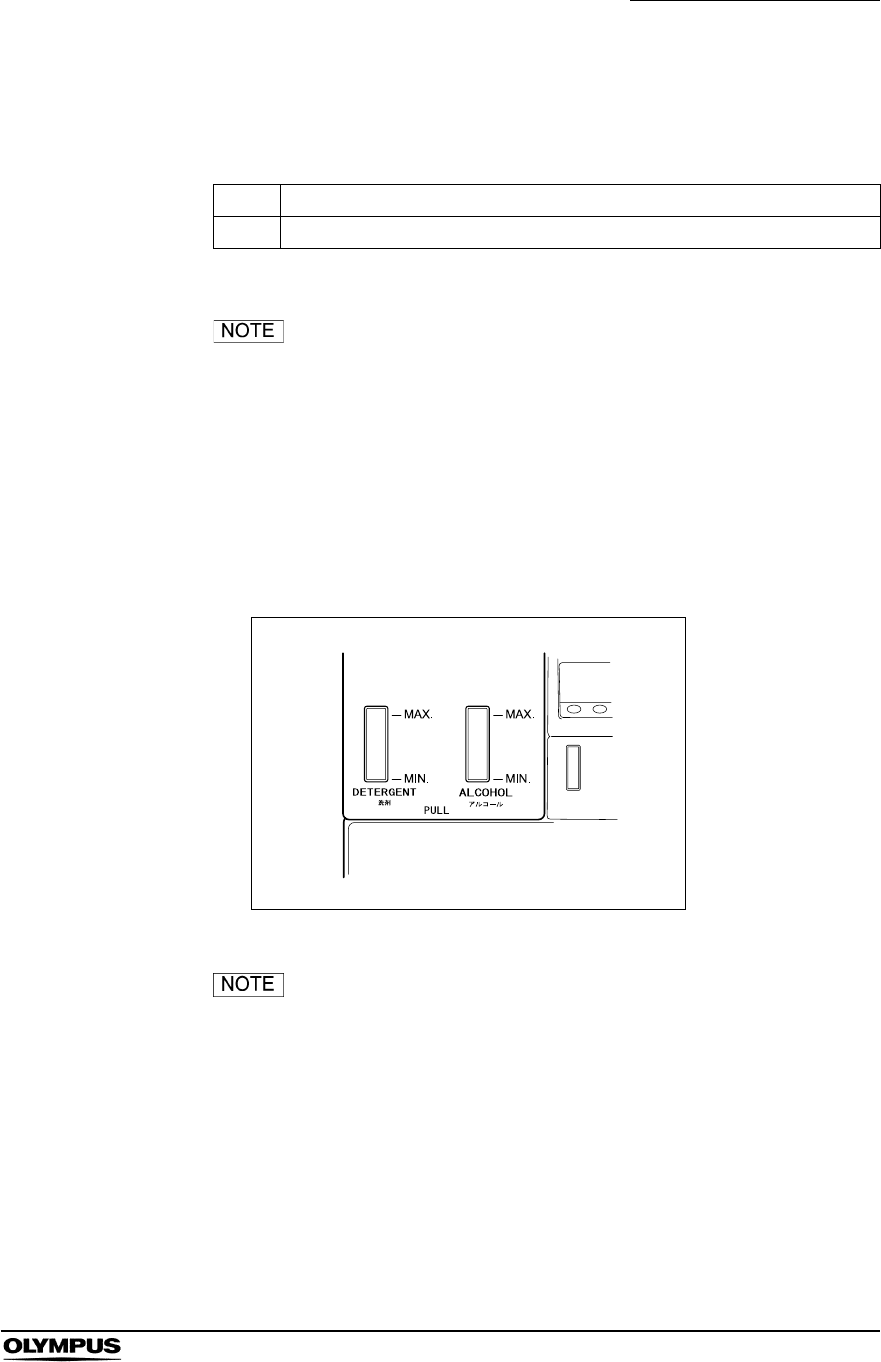
Inspection of the amount of detergent
Check the DETERGENT indicator on the detergent/alcohol drawer of the device
to confirm that detergent is present. Add detergent as described in “Addition of
detergent” before the level reaches “MIN.” or if the Add Detergent indicator lights
up.
Figure 3.2
• The detergent tank can hold about 2 L of detergent (which
can be used for about 30 reprocessing operations).
• If the reprocessing process is initiated without detergent, the
error code [E95] is displayed and the reprocessing is
stopped. The Add Detergent indicator on the main panel
blinks.
Check Required items
EndoRapid 980 ml pack (Olympus-designated detergent)
Table 3.5

38
Chapter 3 Inspection Before Use
ENDOSCOPE REPROCESSOR OER-Pro Operation Manual
Addition of detergent
• Before handling the detergent, read the precautions and
instructions for use carefully, get fully accustomed to the
content, and use the detergent as instructed. Make sure that
you fully understand what measures need to be taken if you
get any detergent on your skin.
• Always use the EndoRapid 980 ml pack
(Olympus-designated detergent). If a nondesignated
detergent is used, the endoscope may not be properly
cleaned or the predetermined sterilization effect may not be
achieved.
• When handling the detergent, always wear appropriate
personal protective equipment, such as eye wear, face mask,
moisture-resistant clothing, and chemical-resistant gloves
that fit properly and are long enough so that your skin is not
exposed. All personal protective equipment should be
inspected before use and replaced periodically before it is
damaged.
• To prevent the detergent from leaking, do not tilt the
detergent tank when there is detergent inside.
• If the reprocessing process is initiated without detergent, the
error code [E95] is displayed and the reprocessing is
stopped. The Add Detergent indicator on the main panel
blinks.
• Contact Olympus to obtain EndoRapid 980 ml packs
(Olympus-designated detergent).
• The detergent tank can hold about 2 L (67 ounces) of
detergent (which can be used for about 30 reprocessing
operations).
Chapter 3 Inspection Before Use
39
ENDOSCOPE REPROCESSOR OER-Pro Operation Manual
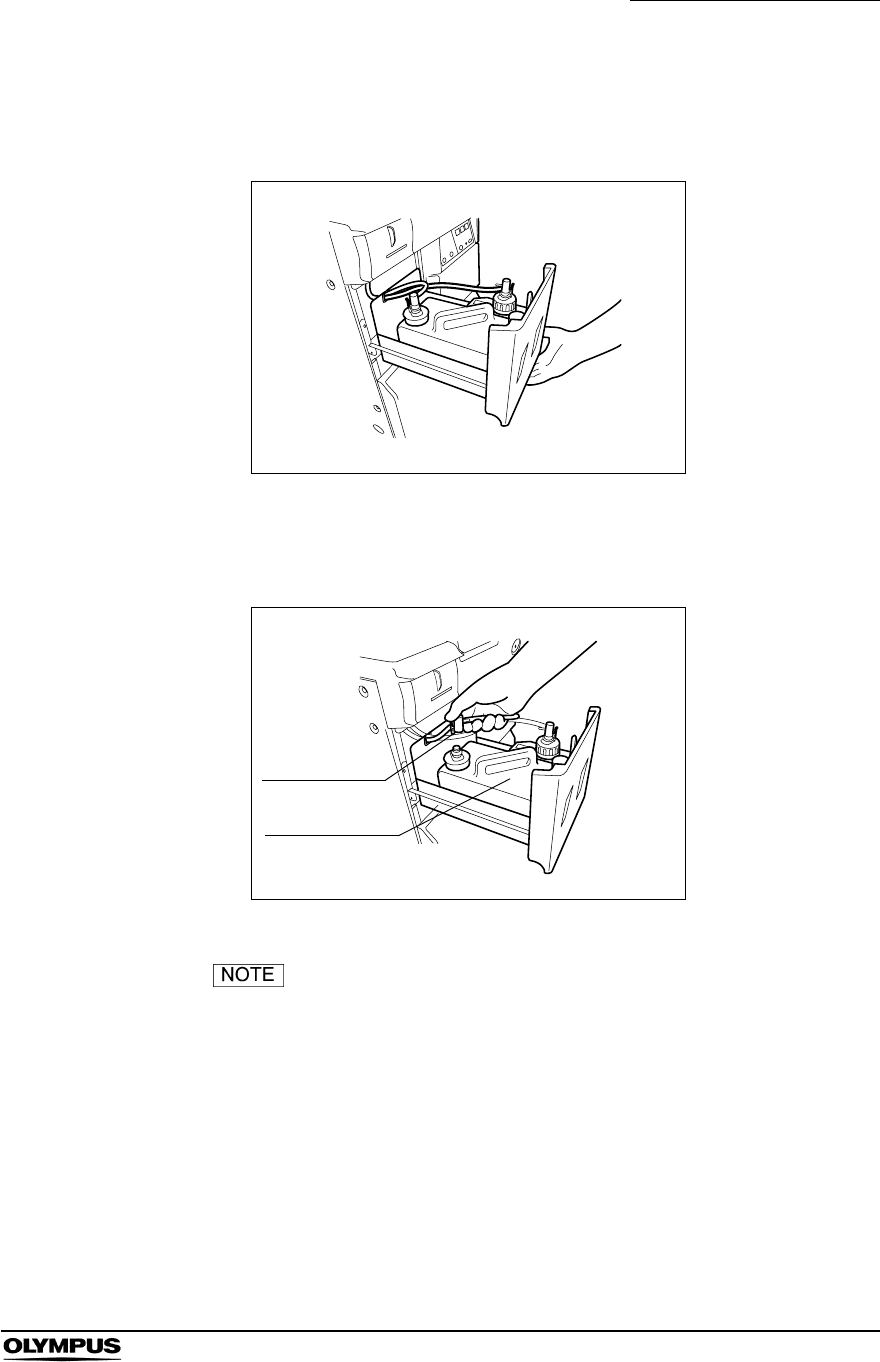
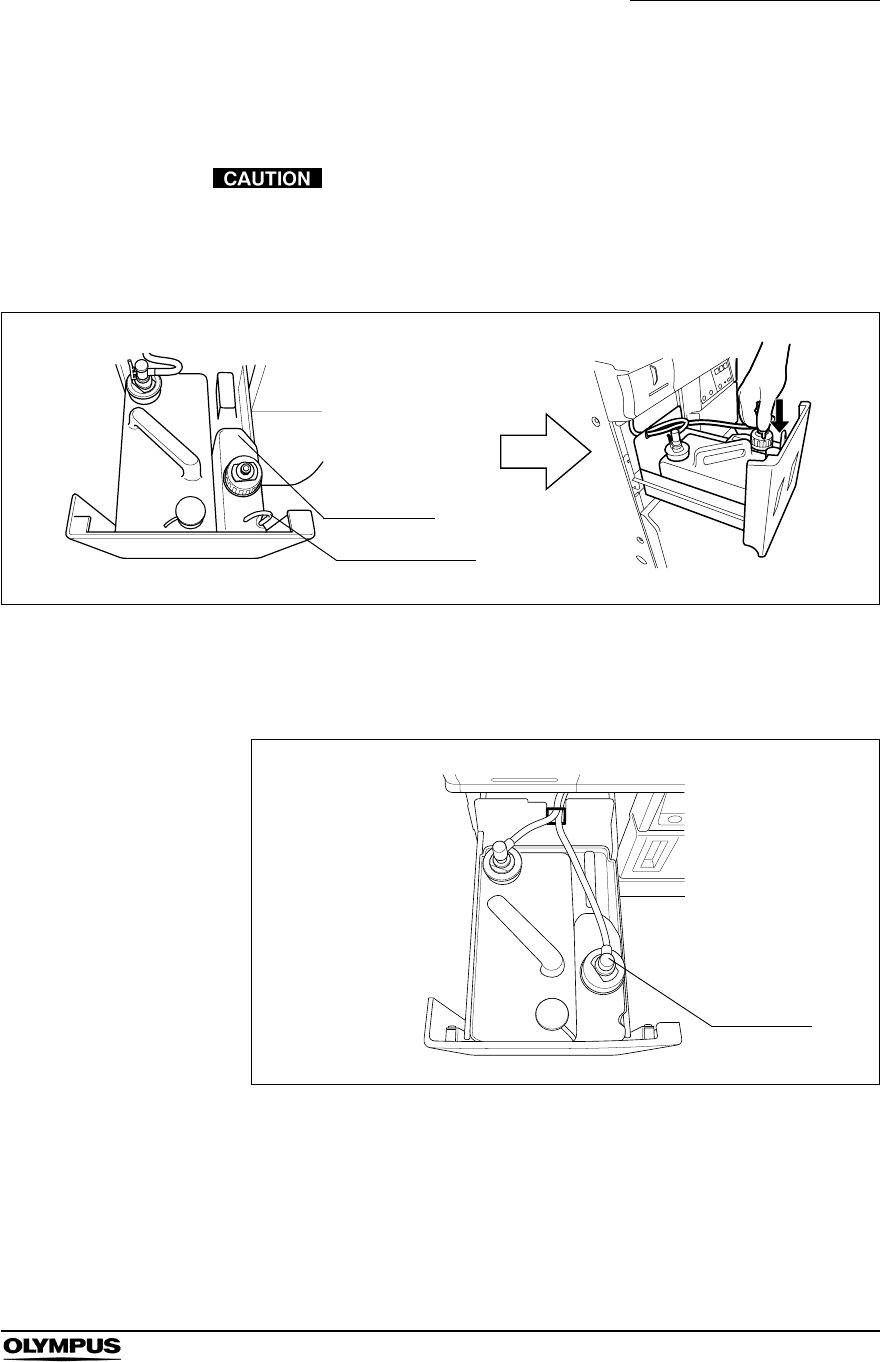
1. Hold the section marked “PULL” of the detergent/alcohol drawer and pull it
out.
Figure 3.3
2. Push the lock lever on the connector of the tube connected to the detergent
tank to detach the tube.
Figure 3.4
If a few drops of detergent drip from the connector, wipe it
with a piece of clean gauze or similar cloth.
3. Remove the detergent tank and place it in a sink or other tub.
Detergent tank
Lock lever
40
Chapter 3 Inspection Before Use
ENDOSCOPE REPROCESSOR OER-Pro Operation Manual
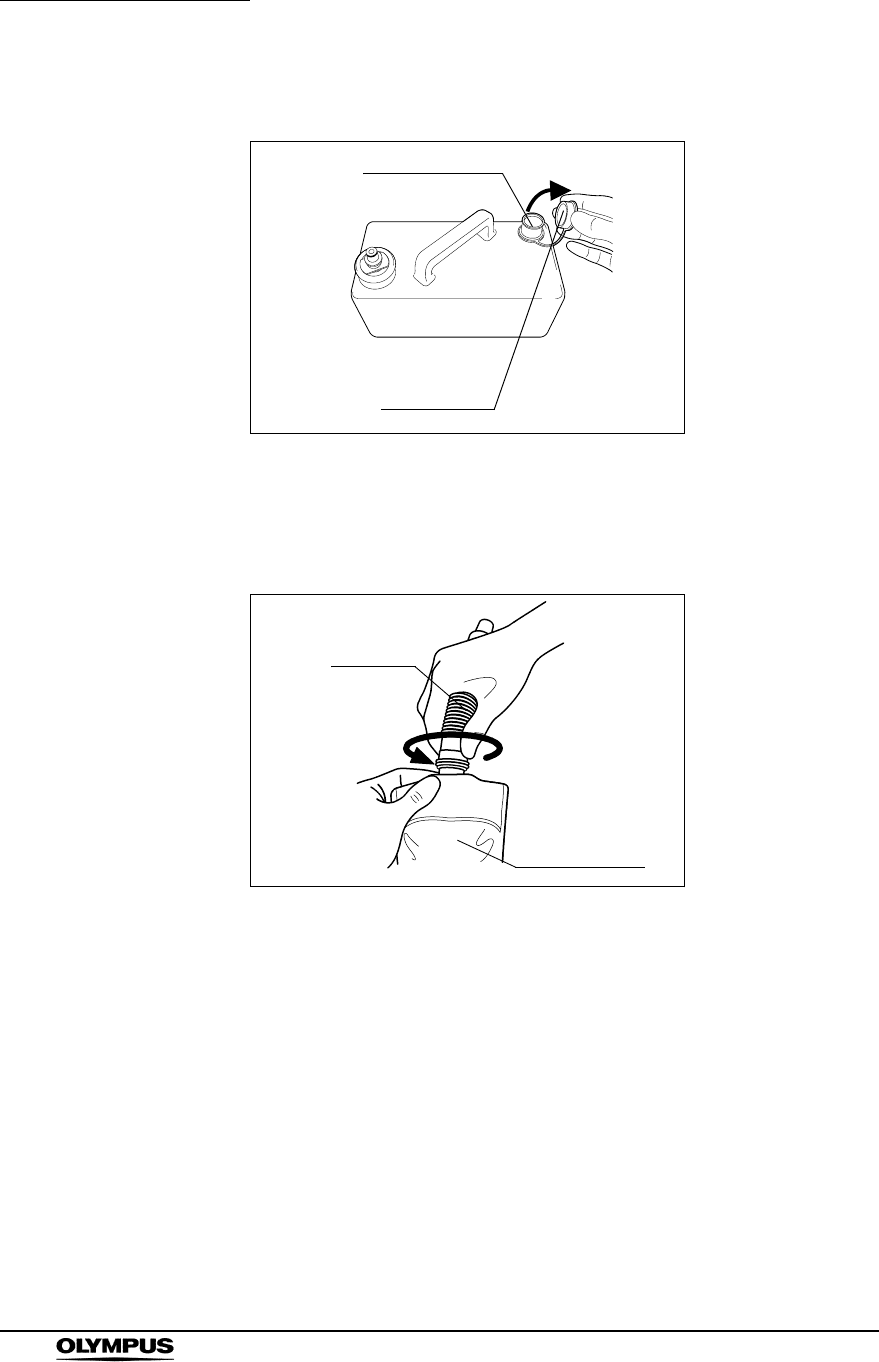
4. Remove the rubber cap from the detergent inlet of the detergent tank.
Figure 3.5
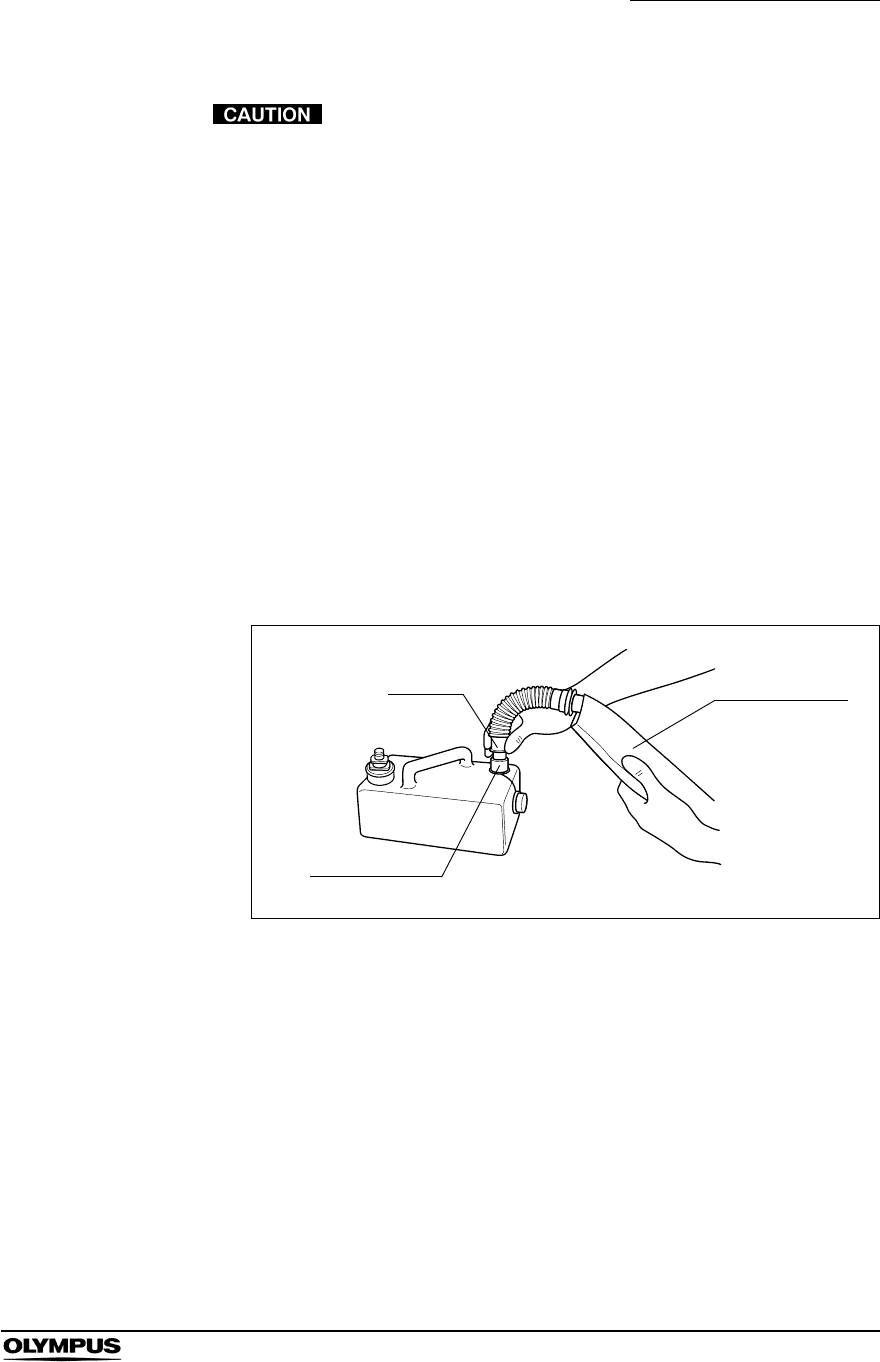
5. Remove the cap from the EndoRapid 980 ml pack (Olympus-designated
detergent) and attach the provided nozzle to it by turning the nozzle all the
way in the direction shown in Figure 3.6.
Figure 3.6
Detergent inlet
Rubber cap
Detergent pack
Nozzle
Chapter 3 Inspection Before Use
41
ENDOSCOPE REPROCESSOR OER-Pro Operation Manual
• Do not add detergent when the tank is on the
detergent/alcohol drawer. If detergent is spilled on the tray,
this equipment may be damaged.
• Do not push the center of the detergent pack with too much
force while adding detergent. Otherwise, the detergent may
spill out of the tank.
• Do not tilt the detergent tank while there is still detergent
inside. Otherwise, the detergent may spill.
• Make sure that the nozzle provided with the detergent pack is
connected firmly to the pack. Otherwise, the nozzle may get
disconnected from the pack and detergent may leak as a
result.
6. Insert the end of the nozzle into the detergent inlet and add detergent. If any
detergent spills out of the detergent tank, wash the outside of the tank, while
taking care not to allow water to get in the tank. Wipe the tank dry with a
clean cloth.
Figure 3.7
Detergent inlet
Detergent pack
Nozzle
42
Chapter 3 Inspection Before Use
ENDOSCOPE REPROCESSOR OER-Pro Operation Manual
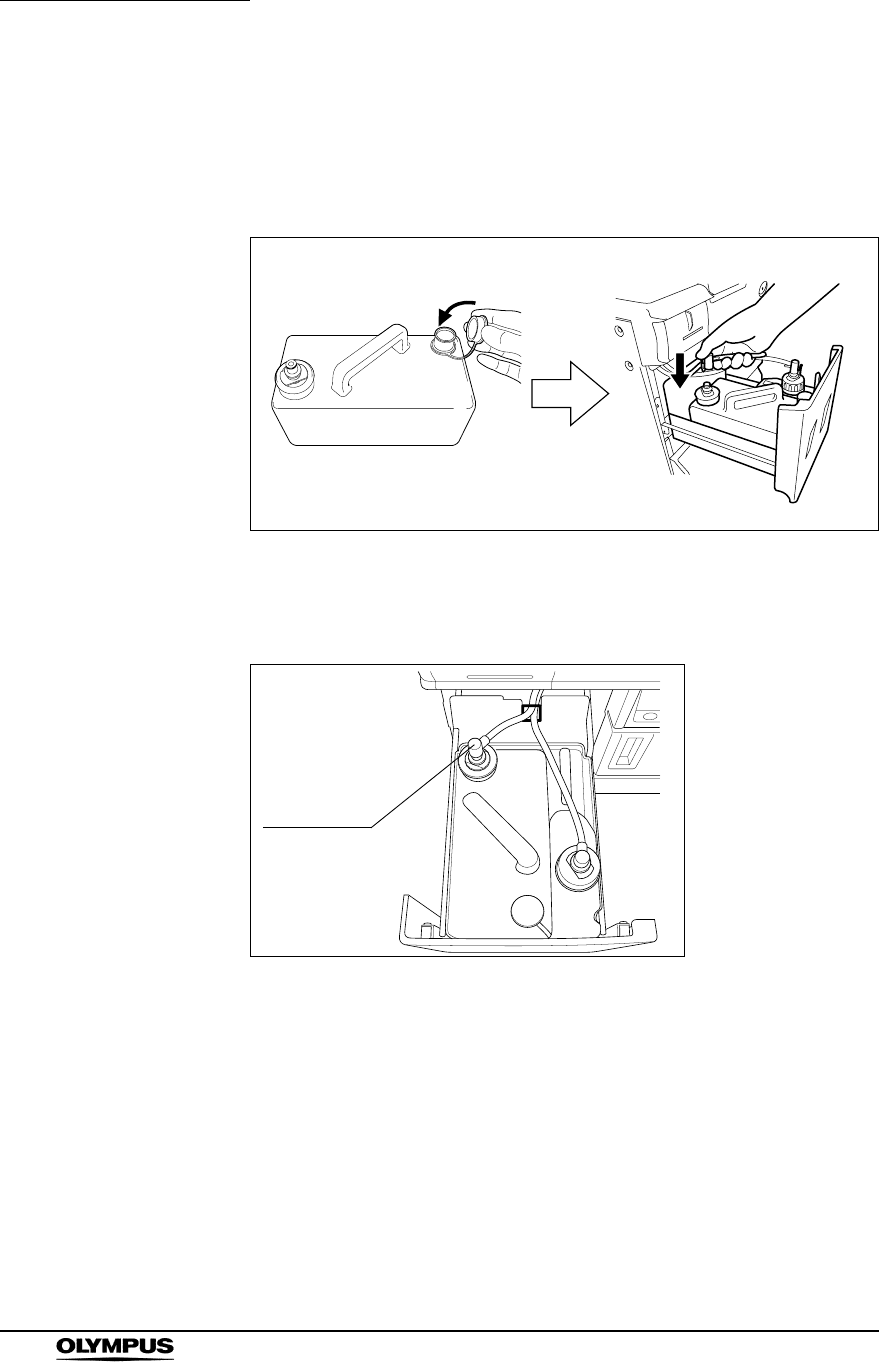
7. Attach the rubber cap to the detergent inlet of the detergent tank and ensure
that detergent is not leaking from the detergent tank.
8. Place the detergent tank on the equipment’s detergent/alcohol drawer and
connect the connector.
Figure 3.8
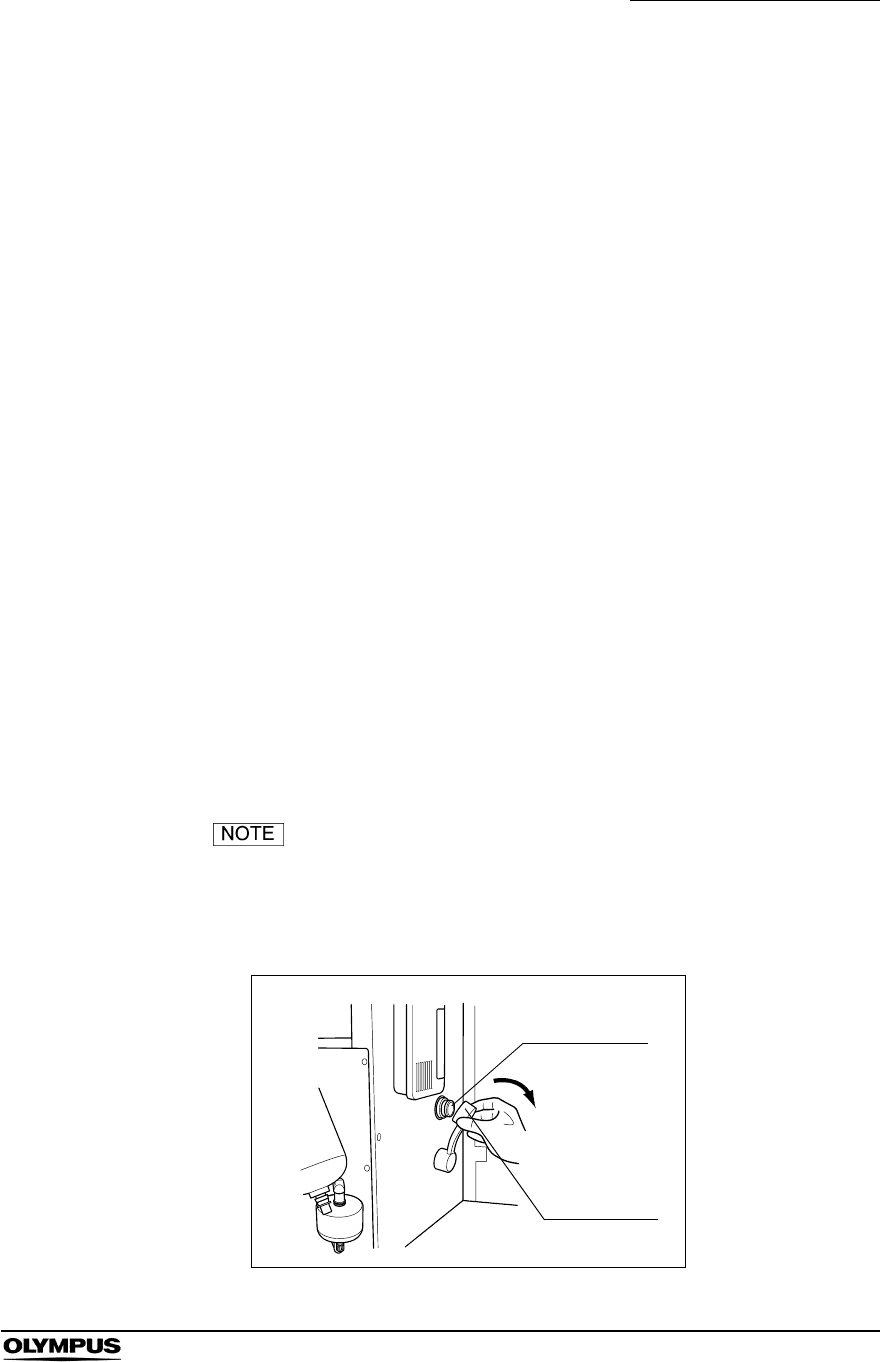
9. Turn the connector to correct the tube orientation as shown below. Confirm
that the tube is not bent.
Figure 3.9
10. Close the detergent/alcohol drawer.
Connector

Chapter 3 Inspection Before Use
43
ENDOSCOPE REPROCESSOR OER-Pro Operation Manual
3.5 Inspecting the remaining quantity of alcohol, and
replenishment
Check how much alcohol is in the alcohol tank and add more as required.
• The alcohol used with the equipment should be 70% ethyl
alcohol or isopropyl alcohol. Using any other kind of alcohol
may result in malfunction of the equipment or the endoscope,
difficulty drying the endoscope, or a hazard due to toxic vapor
emitted from the alcohol.
• Alcohol is flammable and should be handled with extra care.
At the end of work, be sure to drain the alcohol from the tank
or to remove the tank from the equipment and store it at a
safe distance from the equipment. For more information on
draining the alcohol or removing the alcohol tank, refer to
Section 5.3, “Removal or storage of alcohol” on page 113
Leaving alcohol in the tank could pose a fire hazard.
• Remove the alcohol in the alcohol tank and replace it with
new alcohol at least once a week. Otherwise, the alcohol in
the alcohol tank may degrade.
• Before handling the alcohol, carefully read the precautions
for use carefully, get fully accustomed to the content, and use
the alcohol as instructed.
Check Required items
70% ethyl alcohol or isopropyl alcohol
Table 3.6

44
Chapter 3 Inspection Before Use
ENDOSCOPE REPROCESSOR OER-Pro Operation Manual
Inspection of the amount of alcohol
Check the ALCOHOL indicator on the detergent/alcohol drawer of the equipment
to confirm that alcohol is present. If the amount of alcohol has decreased, add
alcohol as described in “Addition of alcohol” before the level reaches “MIN.”.
Figure 3.10
If alcohol flushing is executed when no alcohol is present, the
equipment will stop and display an error code [E93].
Chapter 3 Inspection Before Use
45
ENDOSCOPE REPROCESSOR OER-Pro Operation Manual
Addition of alcohol
1. Hold the section on the detergent/alcohol drawer marked “PULL” and pull it
out.
Figure 3.11
If the alcohol runs out, the equipment will stop and display an
error code [E93].
2. Push the lock lever on the connector of the tube connected to the cap on the
alcohol tank to detach the tube.
Figure 3.12
3. Remove the alcohol tank and put it in a sink or other tub.
Alcohol tank
Cap
Lock lever
46
Chapter 3 Inspection Before Use
ENDOSCOPE REPROCESSOR OER-Pro Operation Manual
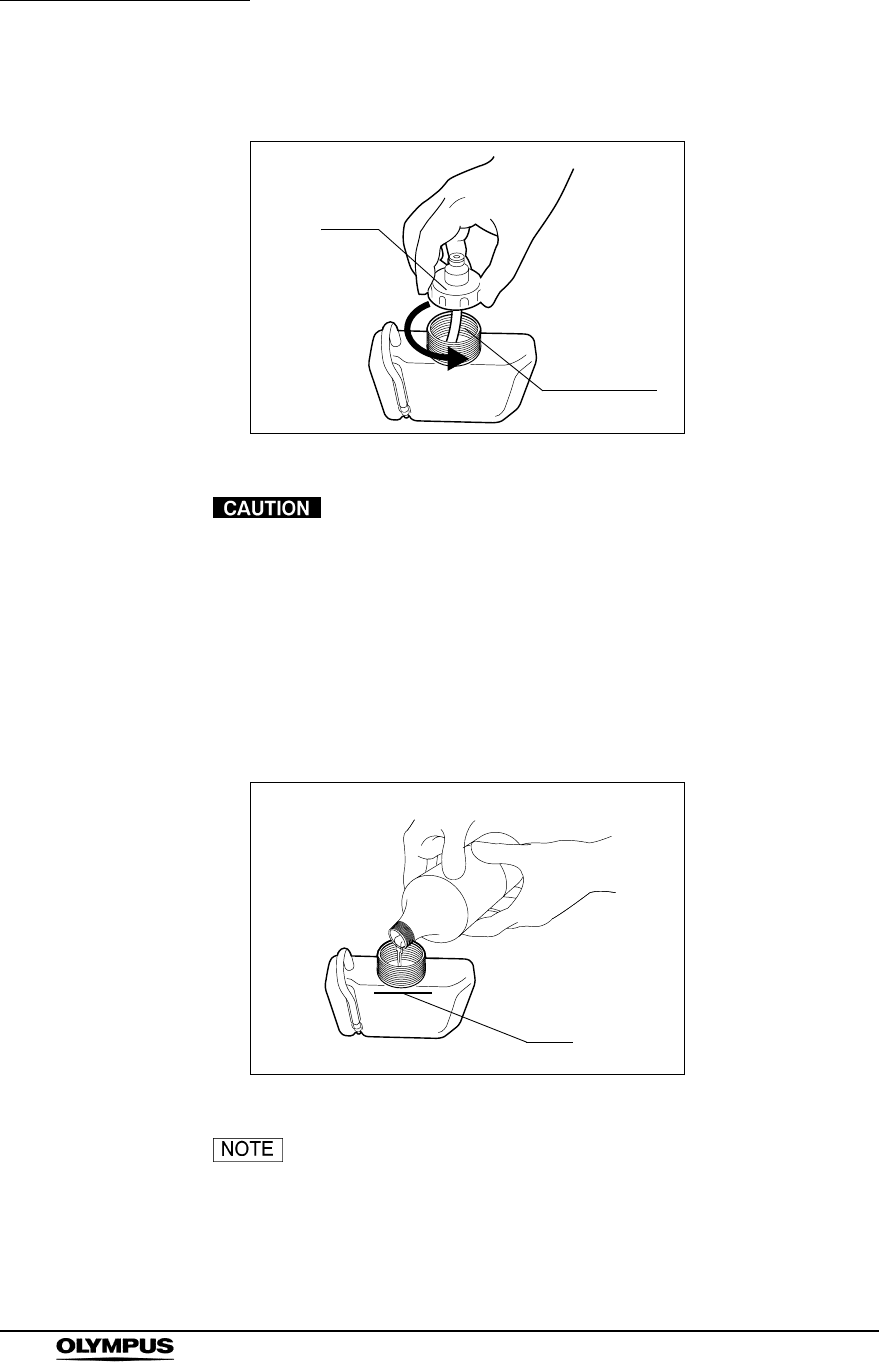
4. Turn the cap on the alcohol inlet in the direction shown to remove the cap.
Figure 3.13
• Do not add alcohol while the tank is on the detergent/alcohol
drawer. If alcohol is spilled on the tray, it could damage the
equipment.
• Do not tilt the alcohol tank while there is still alcohol inside.
Otherwise, the alcohol may spill.
5. Pour alcohol until it is level with the line inside the alcohol tank. Be careful
not to spill any. If any alcohol spills from the tank, wipe it off with a clean
cloth. After adding the alcohol, replace the cap on the alcohol tank.
Figure 3.14
The amount of alcohol required to fill the tank up to the level
of the line is about 500 mL (approximately 16 ounces,
enough for about 10 alcohol flushes).
Alcohol inlet
Cap
Line
Chapter 3 Inspection Before Use
47
ENDOSCOPE REPROCESSOR OER-Pro Operation Manual
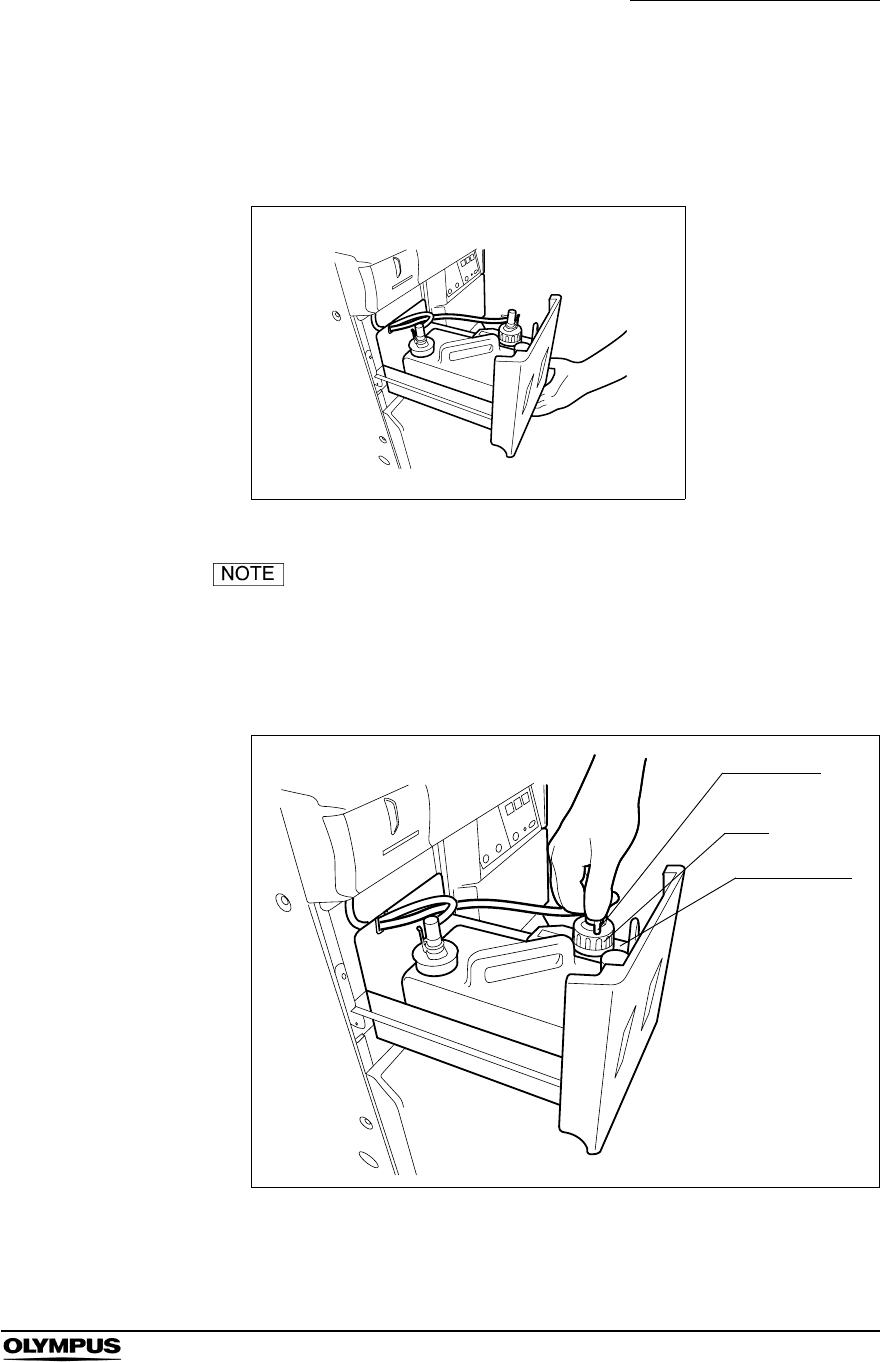
6. Place the alcohol tank in the detergent/alcohol drawer so that the ventilation
tube of the alcohol tank sits on the front of the tray.
Placing the alcohol tank so that the ventilation tube sits on
the deeper side of the tray could damage the alcohol tank.
7. Connect the tube that was originally connected to the cap.
Figure 3.15
8. Turn the connector to correct the tube orientation as shown below. Confirm
that the tube is not bent.
Figure 3.16
9. Close the detergent/alcohol drawer.
Alcohol tank
Ventilation tube
Connector
48
Chapter 3 Inspection Before Use
ENDOSCOPE REPROCESSOR OER-Pro Operation Manual
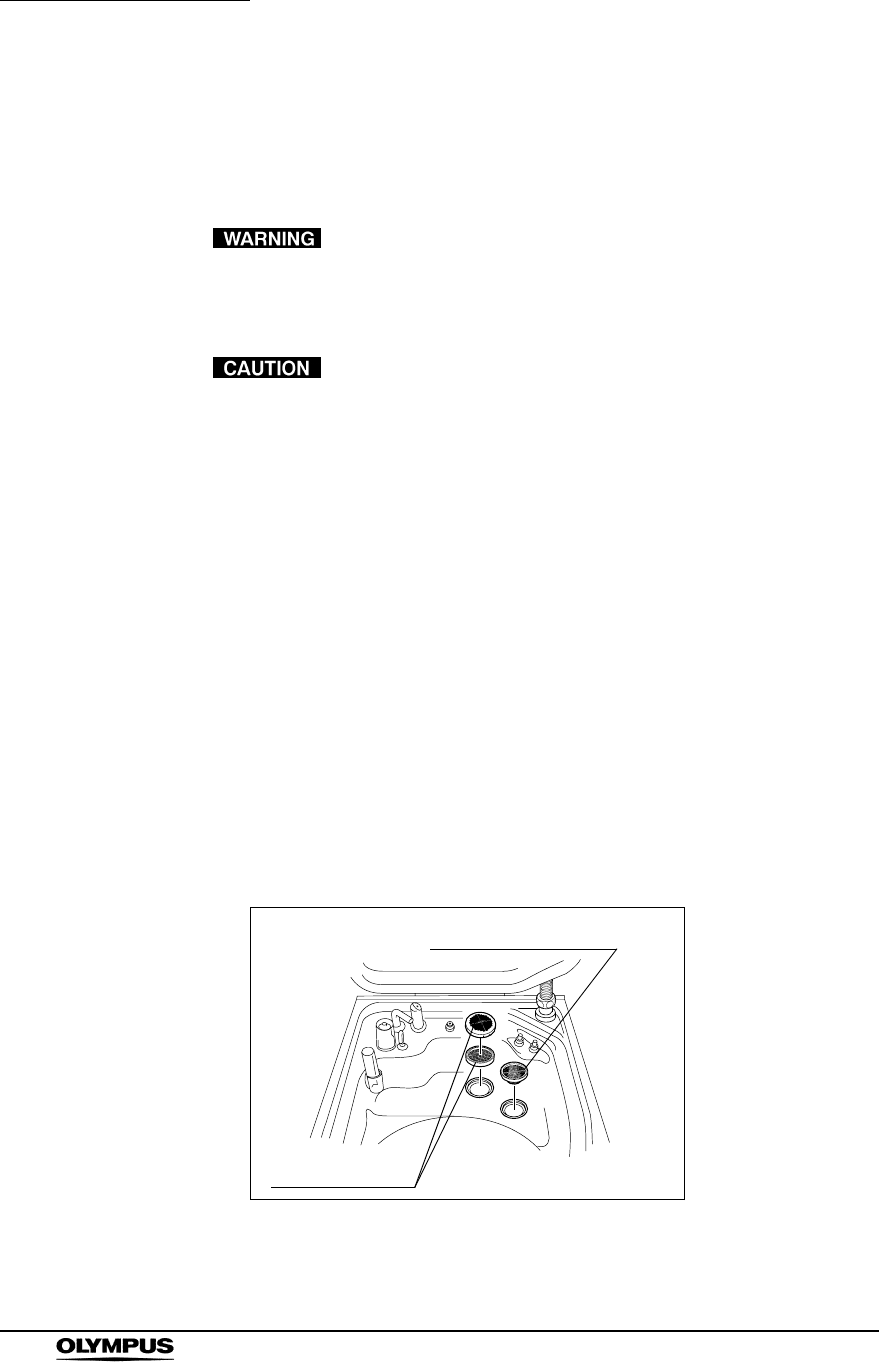
3.6 Inspecting the mesh filters
Make sure that the circulation port mesh filters (two types) and the drain port
mesh filter are not clogged.
A clogged mesh filter not only prevents the equipment from
functioning properly, but may also cause the endoscopes to
malfunction or prevent effective reprocessing.
• If the mesh filters have been removed, be sure to put them
back in their original positions before using the equipment. If
you forget to attach the mesh filters, the pump may
malfunction and/or foreign objects may enter the endoscope
channels including the nozzle and clog them.
• When cleaning the mesh filters, take care not to leave brush
hair or cotton swab fiber in the meshes. Otherwise, their
filtering effectiveness may be reduced.
• If a mesh filter is dropped or subjected to an impact, make
sure that the mesh shape is not deformed. Otherwise, the
filtering effect may degrade.
• Two-type mesh filters are installed on the outer and inner
sides of the circulation port. Be sure to remove, inspect, and
clean both of them.
1. Step the foot pedal to open the lid.
2. Remove the mesh filters from the cleaning tub.
Figure 3.17
3. Check that the mesh filters are not clogged by a foreign object.
Drain port mesh filter
Circulation port
mesh filters
Chapter 3 Inspection Before Use
49
ENDOSCOPE REPROCESSOR OER-Pro Operation Manual
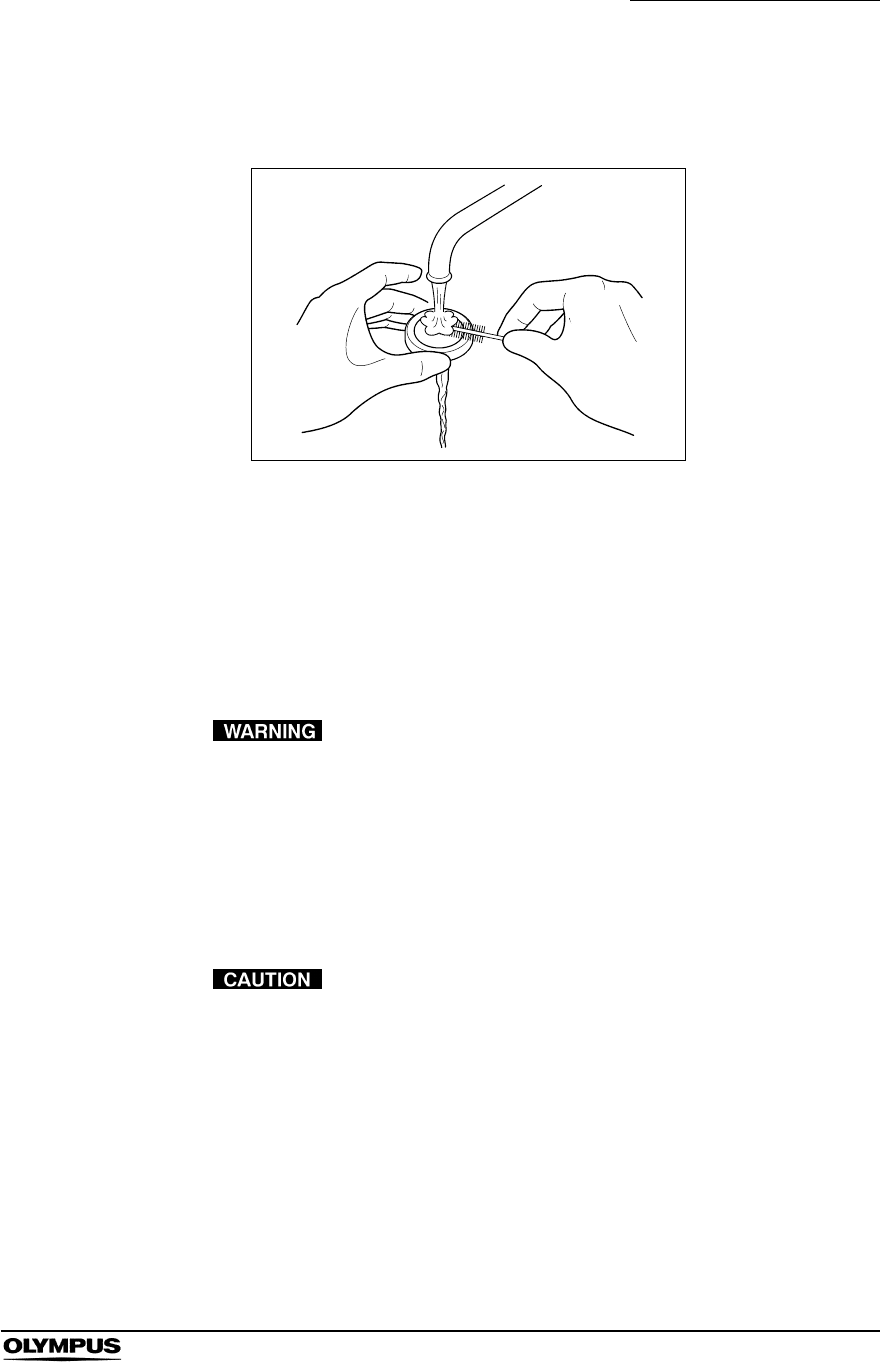
4. If any foreign object is found to be clogging the filter, clean the mesh filter in
running water using a brush or cotton swab.
Figure 3.18
5. Attach the mesh filters in their original positions.
3.7 Inspecting for disinfectant solution odor
Check that the disinfectant solution is not producing an abnormal odor.
Before handling the disinfectant solution, carefully read the
precautions attached to the Aldahol III bottle and use as
instructed.
1. Activate the room’s ventilation system.
2. Check that there is no abnormal disinfectant solution odor coming from the
equipment or its surroundings.
If the odor increases after replacement of the gas filters,
contact Olympus.
50
Chapter 3 Inspection Before Use
ENDOSCOPE REPROCESSOR OER-Pro Operation Manual
3.8 Inspecting the disinfectant solution’s
concentration level
Check the concentration of the disinfectant solution before reprocessing an
endoscope, always check that the concentration of disinfectant solution is
effective using the test strip. Be sure to replace the disinfectant solution before
the disinfecting effect is lost.
• The expiration of the disinfectant solution varies depending
on many factors including the drain condition, the
temperature of the environment where the equipment is
installed. Routinely check the concentration of the
disinfectant solution with the test strip before performing
endoscope disinfection. If this check is not applied,
disinfection may be insufficient. Also, be sure to replace the
disinfectant solution before it becomes ineffective.
• The container used in the following check, such as a beaker,
and the drain connector should be completely dry. Residual
moisture will affect the results.
• Before handling the disinfectant solution, read the attached
document for the disinfectant solution carefully, get fully
accustomed to the content, and use the solution as
instructed. Be sure to fully understand what to do if the
disinfectant solution comes in contact with your skin.
Check Required items
Test strip (For Aldahol III)
Drain connector (should be dry)
Cup-shape container with a capacity of about 200 ml, such as a beaker
(should be dry)
Clean cloth
Table 3.7
Chapter 3 Inspection Before Use
51
ENDOSCOPE REPROCESSOR OER-Pro Operation Manual
• When handling the disinfectant solution, wear appropriate
personal protective equipment. To avoid adverse physical
effects, be careful not to touch the disinfectant solution
directly or to inhale too much vapor. If any disinfectant
solution gets in your eyes, immediately rinse with a large
amount of fresh water and then consult a medical specialist.
Personal protective equipment includes eye wear, face mask,
moisture-resistant clothing, and chemical-resistant gloves
that fit properly and are long enough so that your skin is not
exposed. All personal protective equipment should be
inspected before use and replaced periodically before it is
damaged.
• Do not block the disinfectant removal port with a finger or
other objects when the rubber cap is not attached.
Otherwise, the disinfectant solution may flow out.
• To prevent peripheral devices and facilities near the
equipment from being damaged by leaked disinfectant
solution, do not remove the rubber cap from the disinfectant
removal port except when connecting the drain connector to
the disinfectant removal port.
• If disinfectant solution leaks out of the disinfectant removal
port when the rubber cap has been removed, immediately
reattach the rubber cap and follow the procedure in Section
8.1, “Troubleshooting guide” on page 218. If leaking does not
stop, contact Olympus.
To obtain test strip, contact Olympus.
1. Push [PUSH] on the front door to open the front door and remove the rubber
cap from the disinfectant removal port.
Figure 3.19
disinfectant
removal port
Rubber cap