Olympus Medical Systems GN4215 Endoscope Reprocessor with RFID User Manual Manual P115 P244
Olympus Medical Systems Corp. Endoscope Reprocessor with RFID Manual P115 P244
Contents
- 1. Users Manual 1
- 2. Users Manual 2
- 3. Users Manual 3
- 4. Users Manual 4
Users Manual 4
174
Chapter 7 Routine Maintenance
ENDOSCOPE REPROCESSOR OER-Pro Operation Manual
2. Using a cloth moistened with neutral detergent solution, clean the external
surfaces of the accessory holder and the accessories listed above, rinse
them in running water, and wipe them with a clean cloth. To prevent the
spread of various germs, it is also recommended to wipe the accessories
and accessory holder with a cloth moistened with 70% ethyl alcohol or
isopropyl alcohol.
3. Dry the accessories thoroughly and store them in a clean place near the
device.
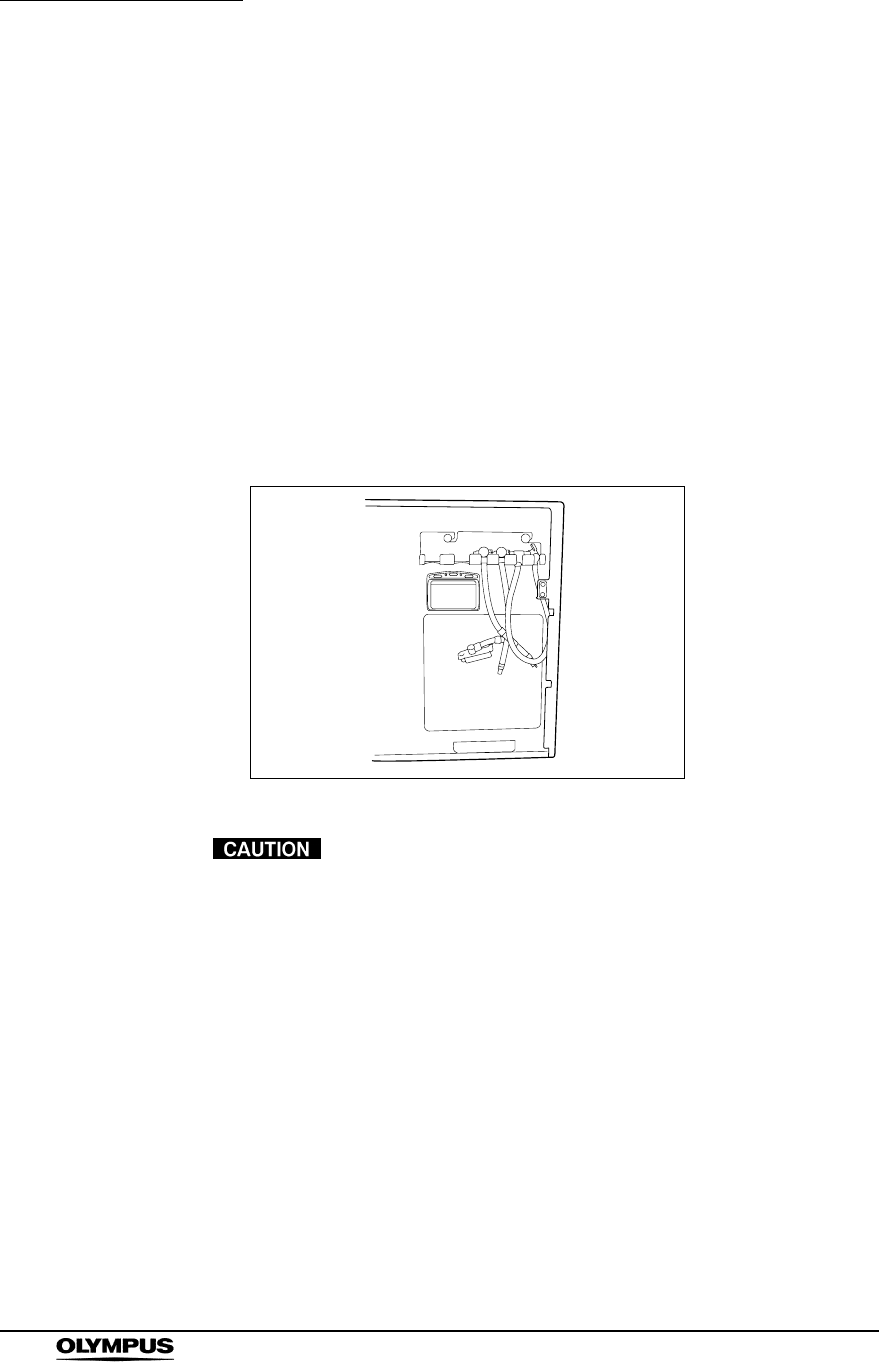
4. Attach the accessory holder to the back side of the front door using the two
retaining screws.
5. Store the frequently used tubes in the accessory holder. Note that the
accessory holder cannot accommodate all of the tubes.
Figure 7.53
Do not hook tubes on the accessories holder in a disorderly
fashion as this could make it impossible to open or close the
front door and may also damage the accessories.
Chapter 7 Routine Maintenance
175
ENDOSCOPE REPROCESSOR OER-Pro Operation Manual
7.11 Cleaning the alcohol tank
Do not tilt the alcohol or detergent tank while fluid is still
inside. Otherwise, the fluid may spill.
1. Pull out the detergent/alcohol drawer.
2. Disconnect the tube from the alcohol tank and take the tank out of the
detergent/alcohol drawer.
3. Empty the tank.
4. Using a cloth moistened with neutral detergent solution, clean the external
surface, rinse the inside and external surface of the tank in running water,
and wipe it with a clean cloth. To prevent bacterial growth, wipe the outside
of the tank with a cloth moistened with 70% ethyl alcohol or isopropyl
alcohol.
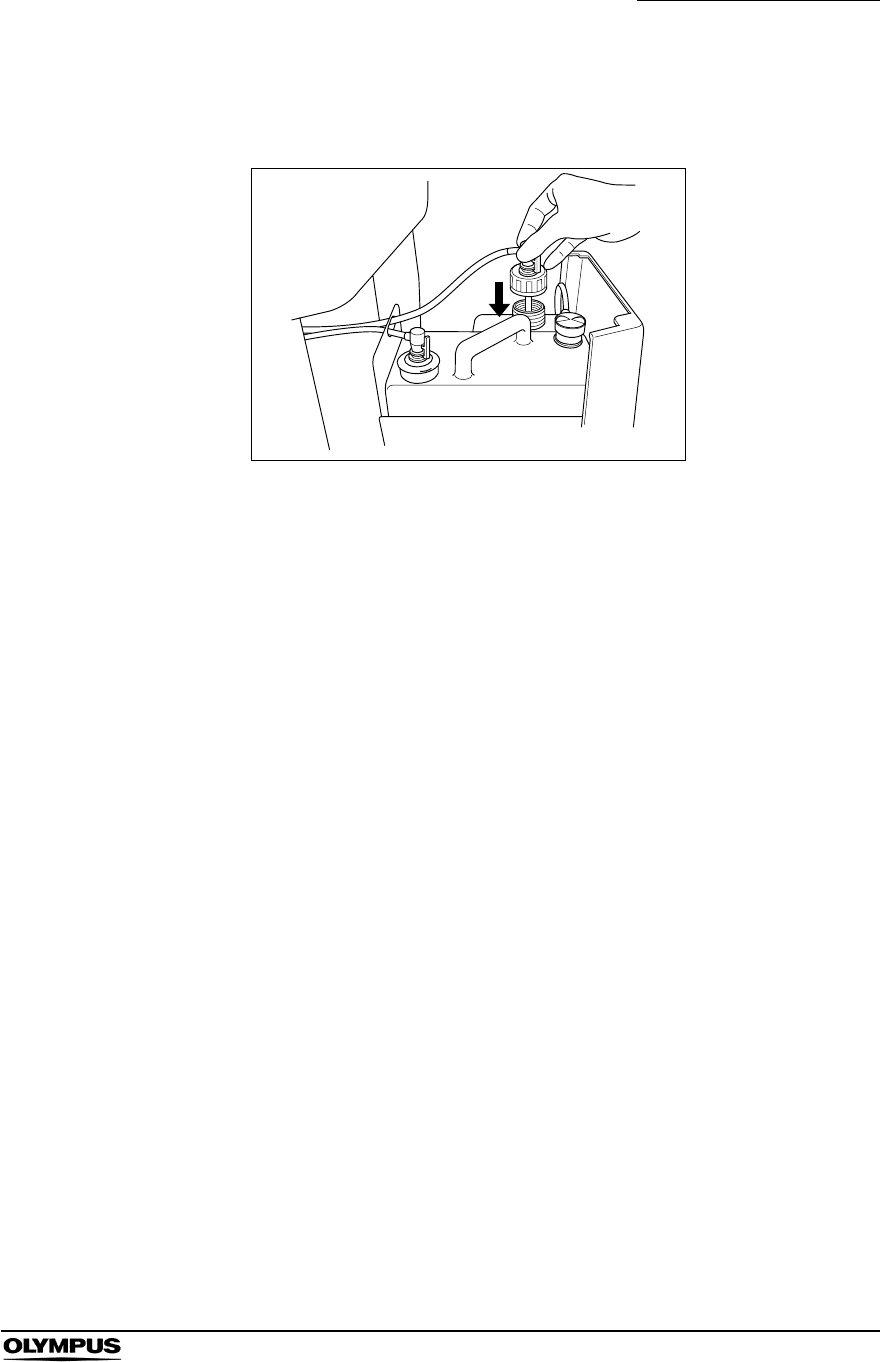
5. Drain out the water inside the tank, dry it thoroughly, put it back on the
detergent/alcohol drawer and attach the cap and tube to it.
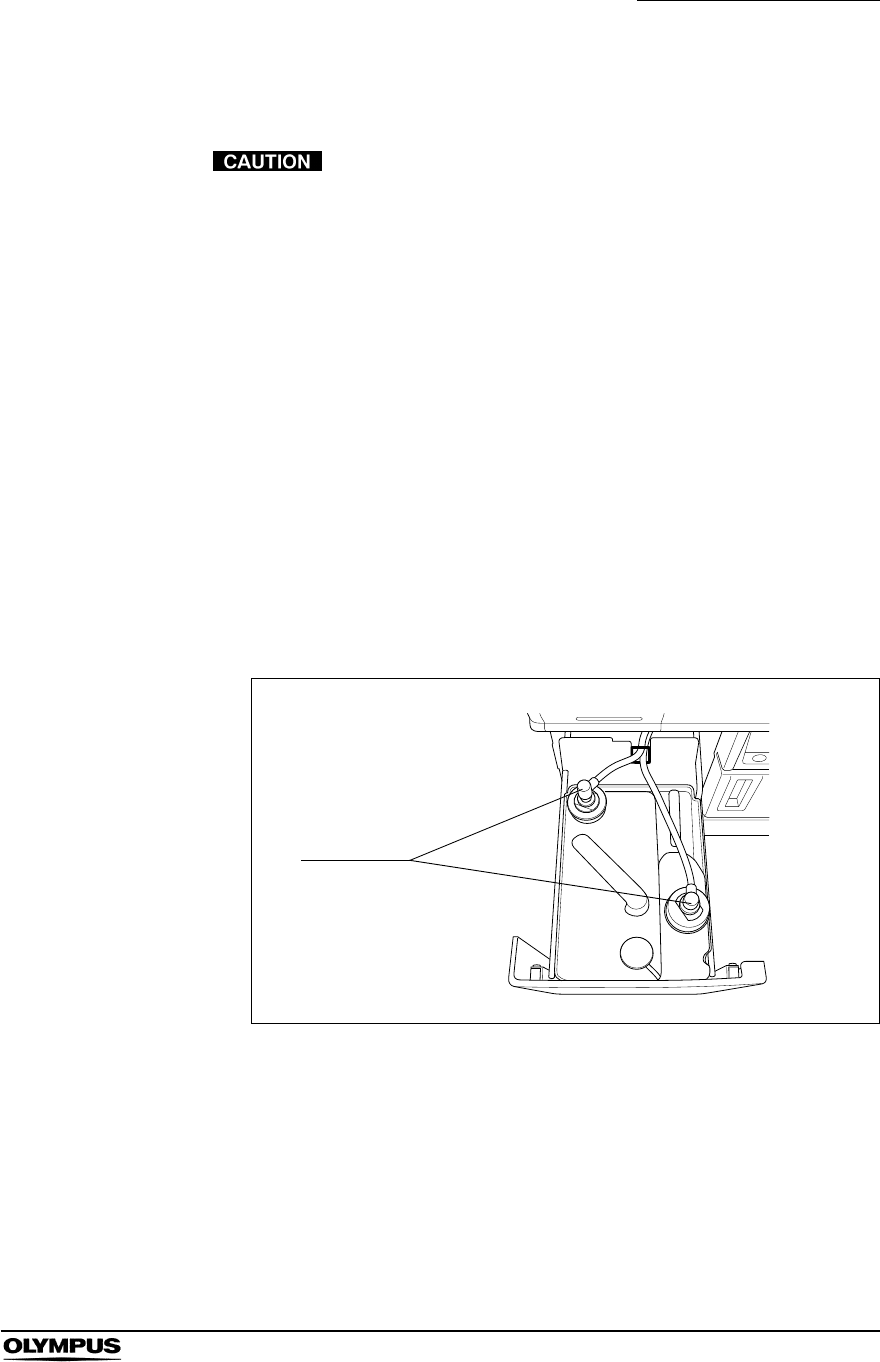
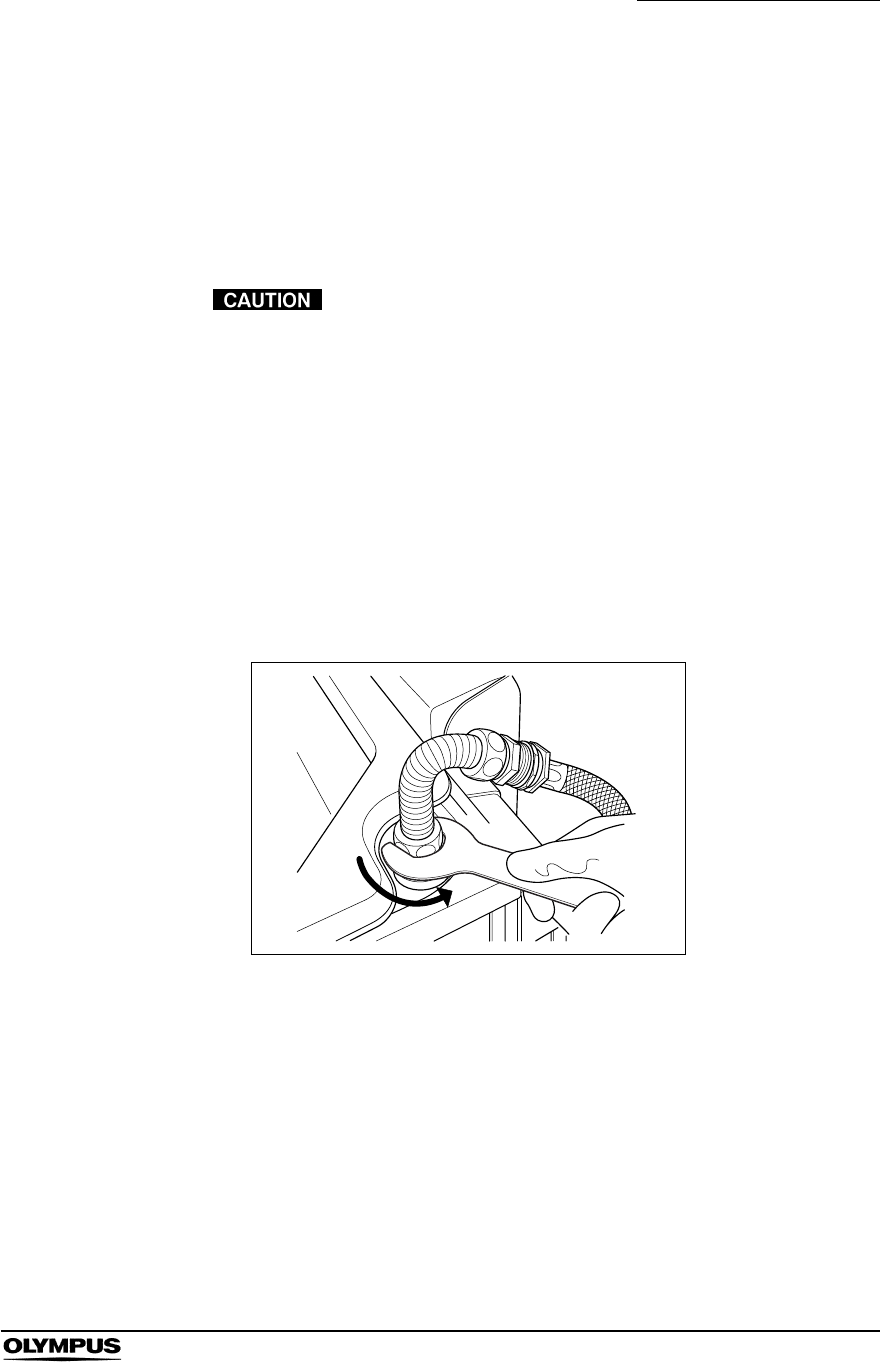
6. Turn the connectors to correct the orientations of the tubes as shown below.
Figure 7.54
7. Close the detergent/alcohol drawer.
Connectors
176
Chapter 7 Routine Maintenance
ENDOSCOPE REPROCESSOR OER-Pro Operation Manual
7.12 Replacing the disinfectant solution
When the disinfectant solution in the device is no longer effective, drain the
disinfectant solution completely and add new disinfectant solution. Waste fluid
should be treated as directed in the documents supplied with Aldahol III.
• Before handling the disinfectant solution, read the
precautions carefully and use it as instructed. Be sure that
you fully understand what measures need to be taken if you
get any disinfectant solution on your skin.
• When handling the disinfectant solution, wear appropriate
personal protective equipment to prevent it from making
direct contact with your skin and to prevent excessive
inhalation of the vapor. The disinfectant solution and its vapor
may adversely affect the human body. If you get disinfectant
solution in your eyes, immediately rinse with a large quantity
of water and then call the doctor. Personal protective
equipment, such as eye wear, face mask, moisture-resistant
clothing, and chemical-resistant gloves that fit properly and
are long enough so that your skin is not exposed. All
personal protective equipment should be inspected before
use and replaced periodically before it is damaged.
The disinfectant solution’s waste fluid should be treated in
accordance with the instructions supplied with the Aldahol III.
It is recommended to treat the waste fluid properly and to
drain it according to local wastewater standards defined by
law, or temporarily collect and store the waste fluid and have
it treated by a waste disposal firm.
Chapter 7 Routine Maintenance
177
ENDOSCOPE REPROCESSOR OER-Pro Operation Manual
Draining the disinfectant solution
Before draining the disinfectant solution, disconnect the
connecting tube from the connector on the device.
Otherwise, the disinfectant solution may spout out of the
tube, causing a leak from the cleaning tub.
Draining through the disinfectant collection hose
• Do not block the disinfectant removal port with a finger when
the rubber cap is not attached. Otherwise, the disinfectant
solution may flow out.
• To prevent the device and facilities near the equipment from
being damaged by leaked disinfectant solution, do not
remove the rubber cap from the disinfectant removal port
except when the disinfectant removal tube is connected.
• If disinfectant solution leaks out of the disinfectant removal
port when the rubber cap has been removed, immediately
reattach the rubber cap and follow the procedure in Section
8.1, “Troubleshooting guide” on page 218. If it does not stop
leaking, contact Olympus.
Drained disinfectant solution
Drain quantity Approximately 17.5 L (4.6 gallons)
Table 7.12
Check Required items
Disinfectant collection hose
Disinfectant removal tube
Containers (Large) with 18 L (5 gallons) or larger capacity such as PVC
tanks (u2)
Container (Small) with 200 mL or larger capacity (wide-mouthed container
such as a vat)
Clean cloth
Table 7.13

178
Chapter 7 Routine Maintenance
ENDOSCOPE REPROCESSOR OER-Pro Operation Manual
• When handling the disinfectant solution, wear appropriate
personal protective equipment to prevent it from making
direct contact with your skin and to prevent excessive
inhalation of the vapor. The disinfectant solution and its vapor
may adversely affect the human body. If you get disinfectant
solution in your eyes, immediately rinse with a large quantity
of water and then call the doctor. Personal protective
equipment, such as eye wear, face mask, moisture-resistant
clothing, and chemical-resistant gloves that fit properly and
are long enough so that your skin is not exposed. All
personal protective equipment should be inspected before
use and replaced periodically before it is damaged.
• Be sure to disconnect the disinfectant collection hose after
collecting the disinfectant solution. If the device is run with
the disinfectant collection hose connected, the cleaning fluid
and disinfectant solution may leak out of the device.
• Be sure to disconnect the drain connector except when
collecting the disinfectant solution or checking its strength.
Otherwise, disinfectant solution may leak and damage the
equipment and facilities near the device.
If “DRAIN LCG” is selected and the FUNC START button is
pressed without connecting the disinfectant collection hose,
the buzzer repeats short beeps, disinfectant solution is output
in the cleaning tub and error code [E72] is displayed. In this
case, treat it by following the procedure in Section 8.1,
“Troubleshooting guide” on page 218.
1. Make sure that the power switch is ON.
2. Step the foot pedal to open the lid.

Chapter 7 Routine Maintenance
179
ENDOSCOPE REPROCESSOR OER-Pro Operation Manual
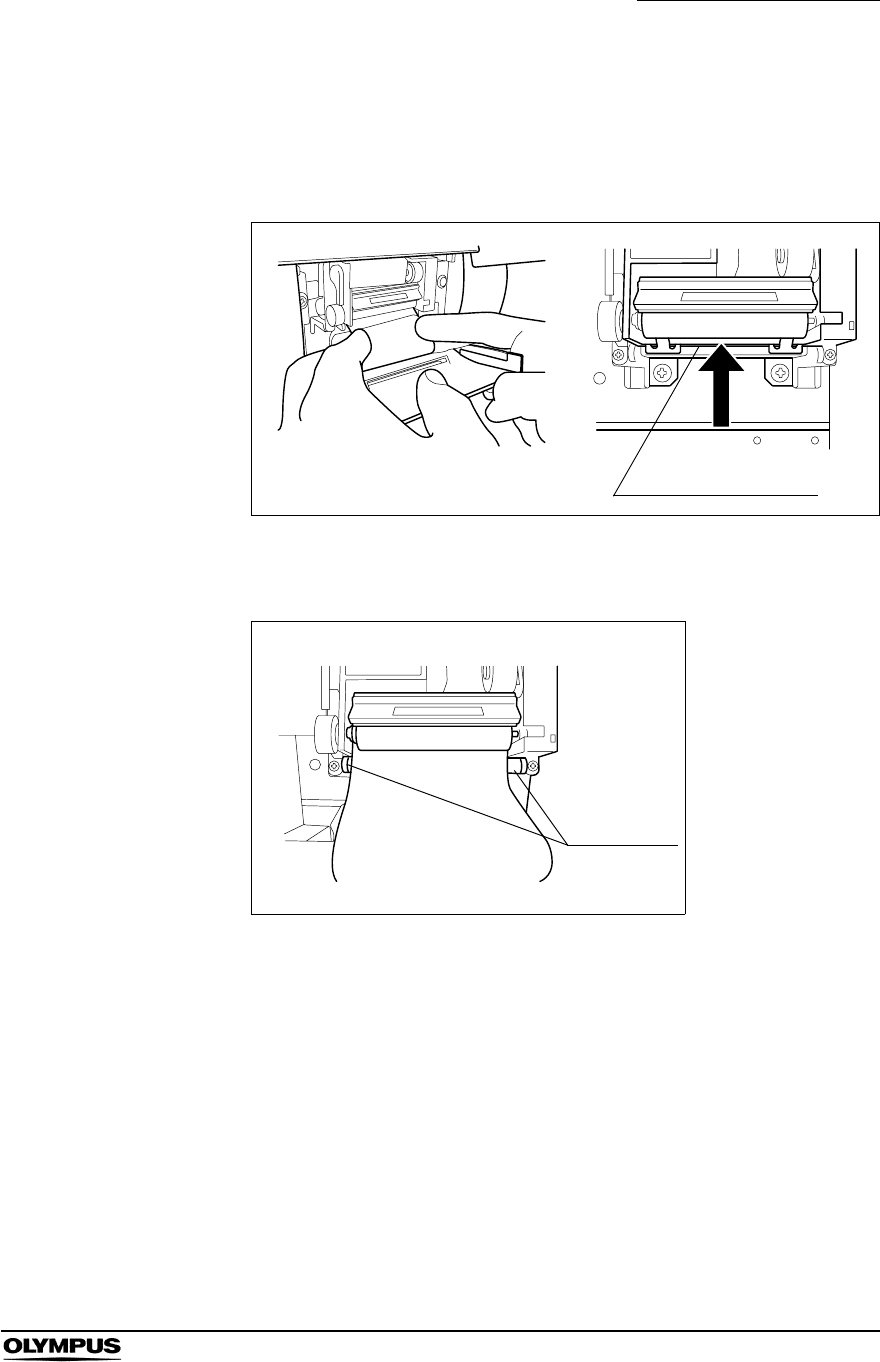
3. While pulling the sleeve on the connector of the disinfectant collection hose,
connect the connector into the disinfectant solution nozzle inside the
cleaning tub. After connection, pull the hose gently to make sure it is
properly attached.
Figure 7.55
4. Put the other end, of the disinfectant collection hose (the end without a
connector) in the large container.
Figure 7.56
180
Chapter 7 Routine Maintenance
ENDOSCOPE REPROCESSOR OER-Pro Operation Manual
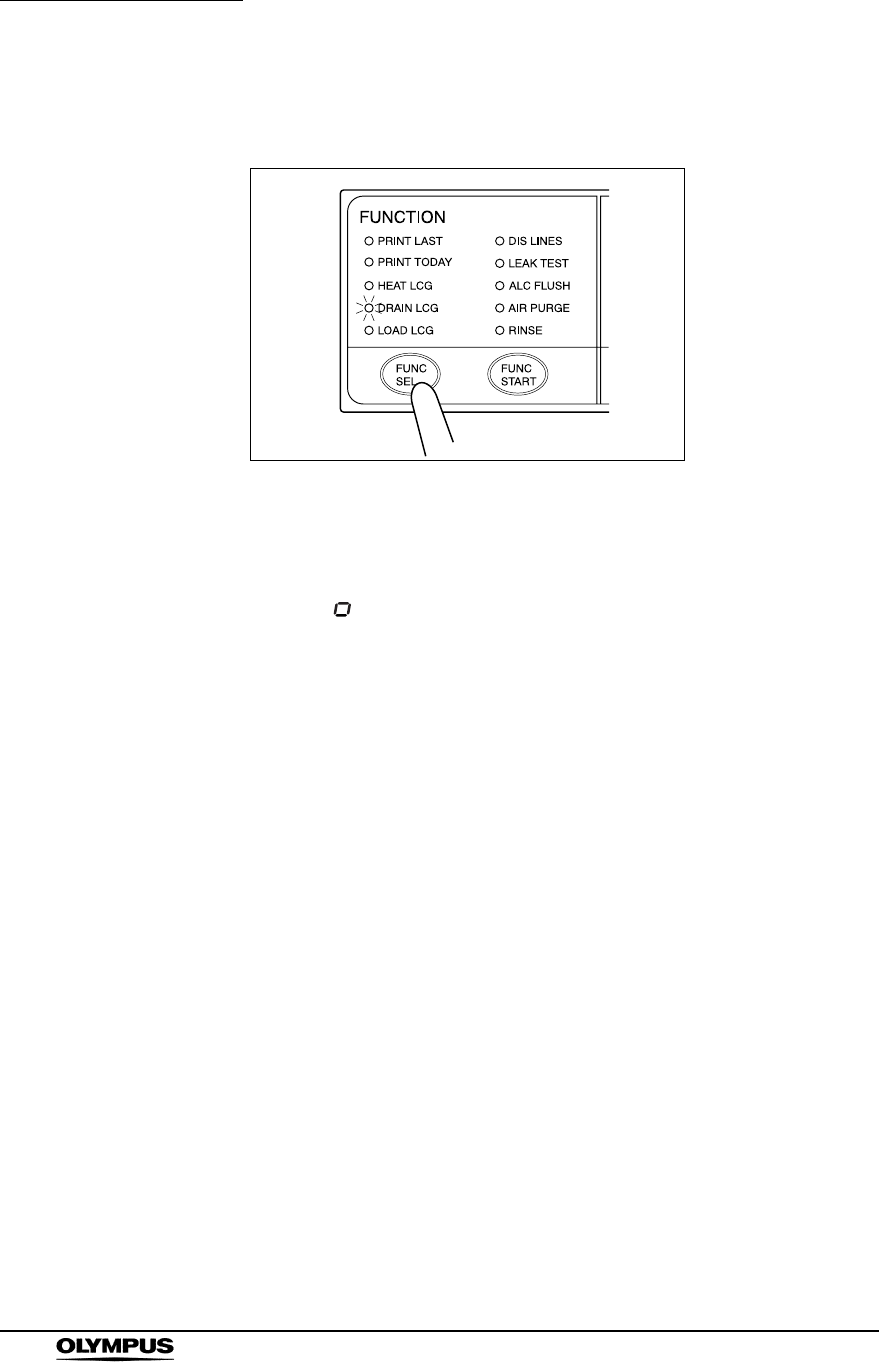
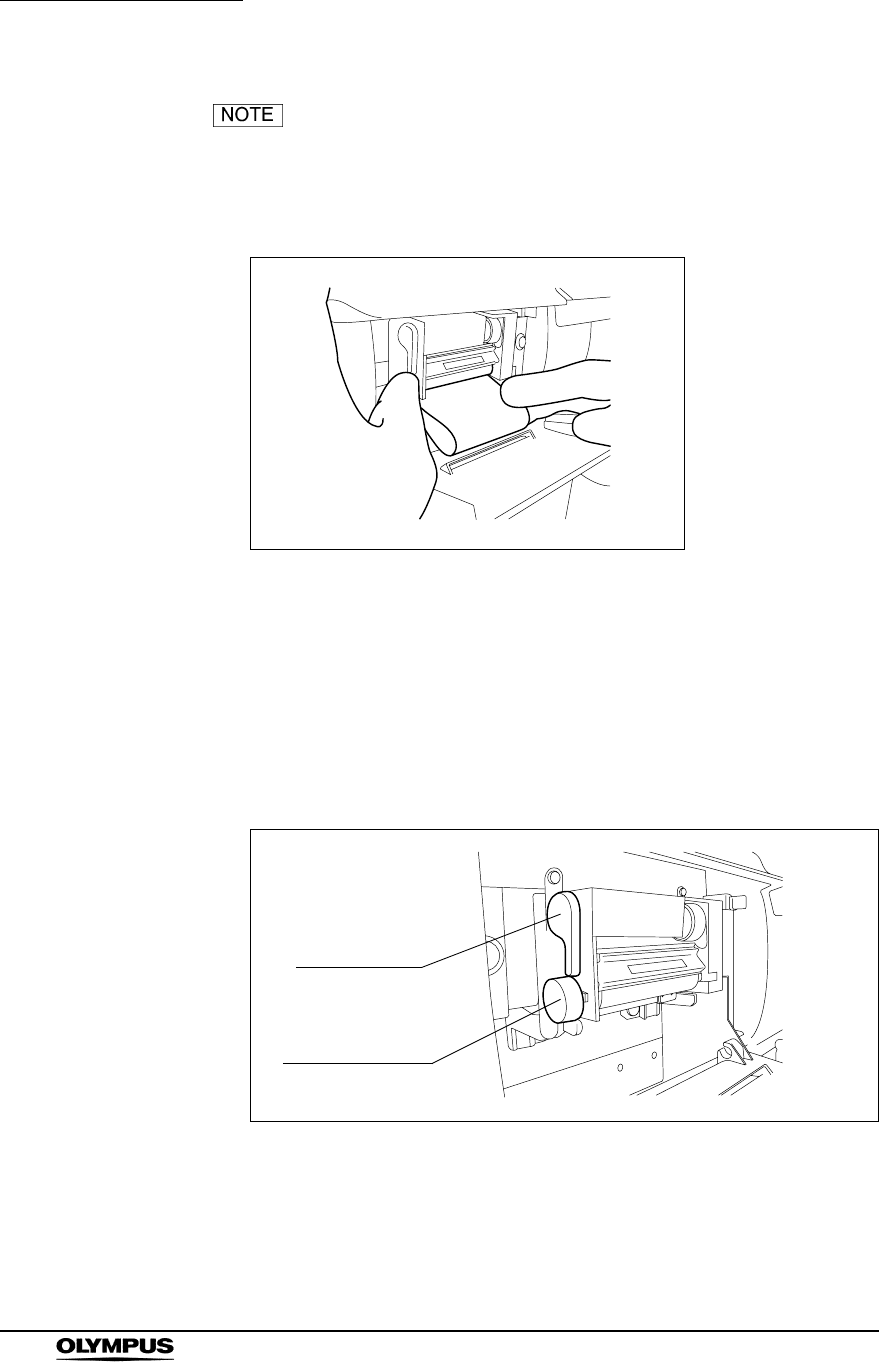
5. While supporting the disinfectant collection hose so that it does not move,
press the FUNC SEL button on the subcontrol panel to select “DRAIN LCG”.
Figure 7.57
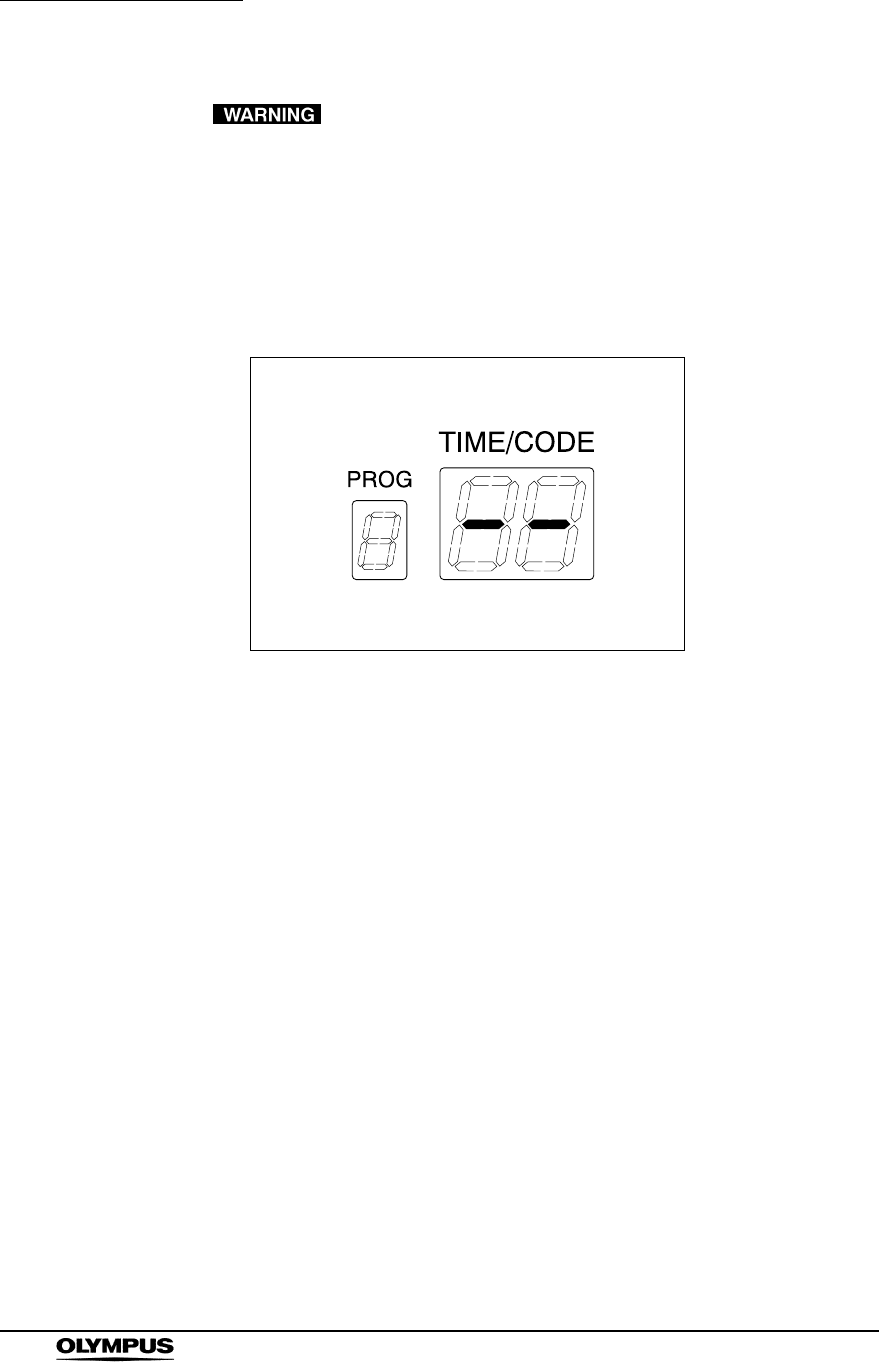
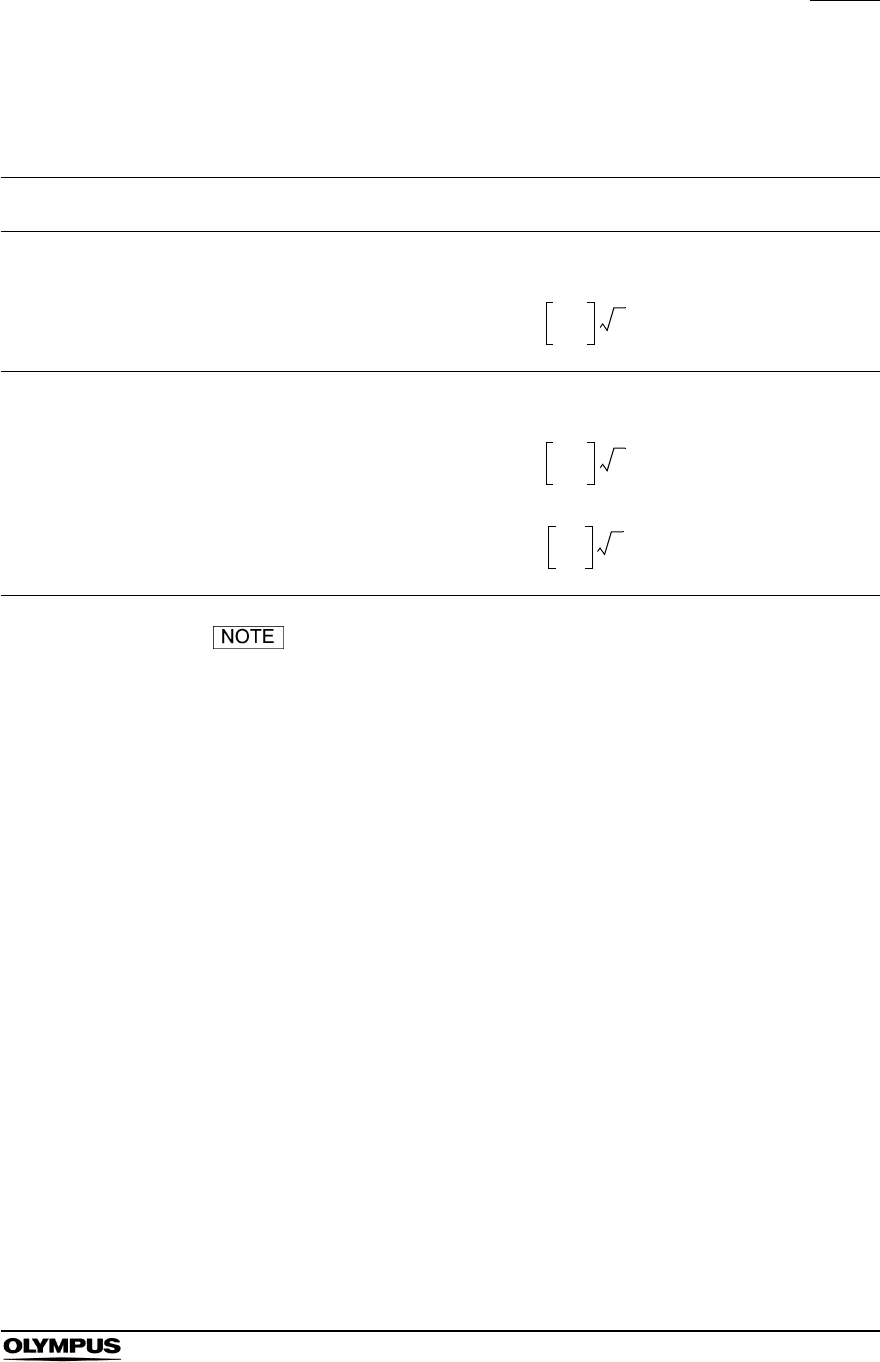
6. Press the FUNC START button on the subcontrol panel. The buzzer repeats
short beeps to indicate that the disinfectant solution drain process is
underway, the TIME/CODE display on the main control panel shows a
spinning [ ] as shown below, and the disinfectant solution begins draining.
7. When the container (large) becomes nearly full, press the STOP/RESET
button on the main control panel to interrupt the disinfectant solution
collection.
8. Prepare a new container (large) and put the other end of the disinfectant
collection hose in it.
9. While supporting the disinfectant collection hose so that it does not move,
press the FUNC SEL button on the subcontrol panel to select “DRAIN LCG”,
and then press the FUNC START button to restart draining of the
disinfectant solution.
Chapter 7 Routine Maintenance
181
ENDOSCOPE REPROCESSOR OER-Pro Operation Manual
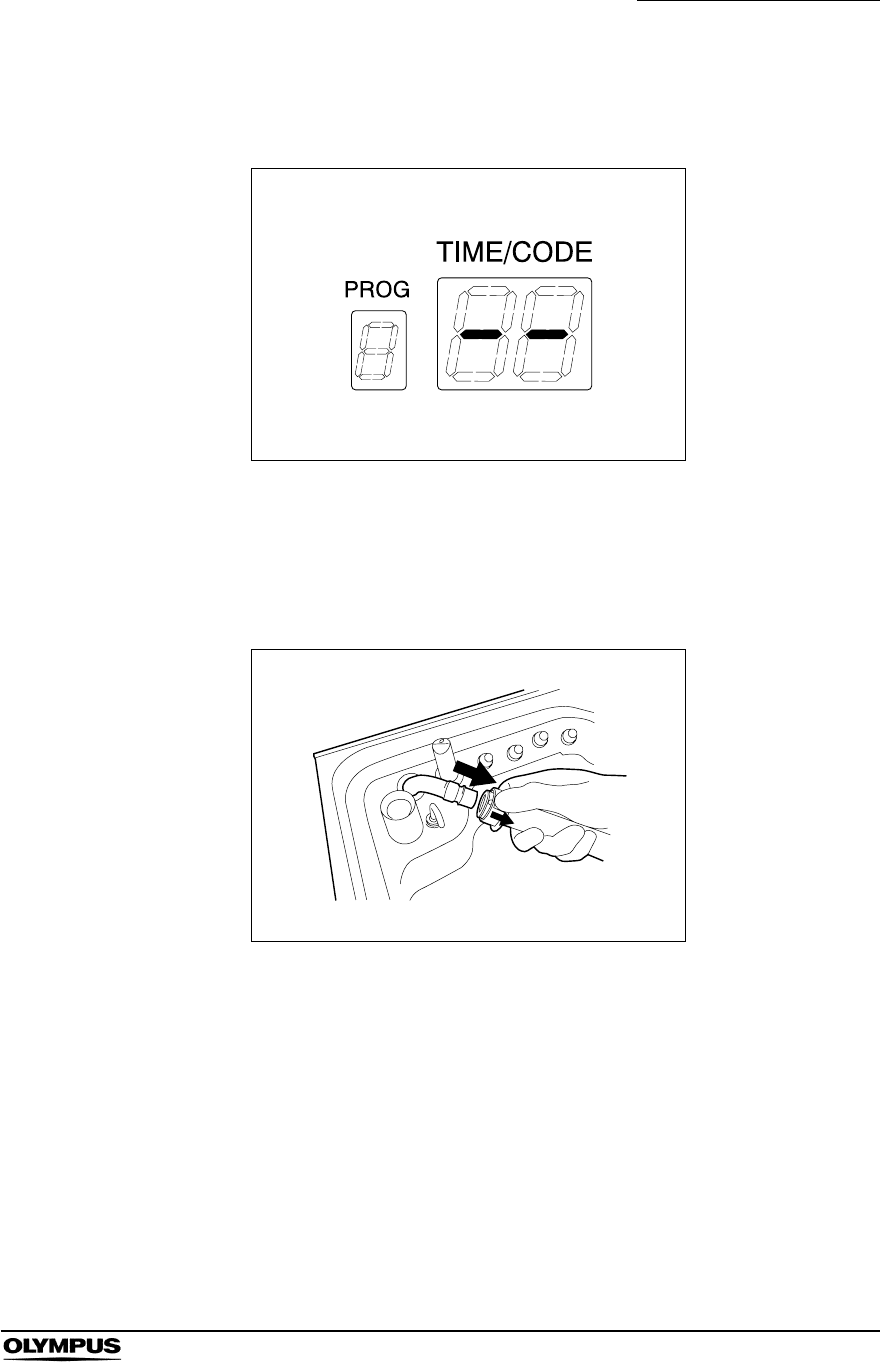
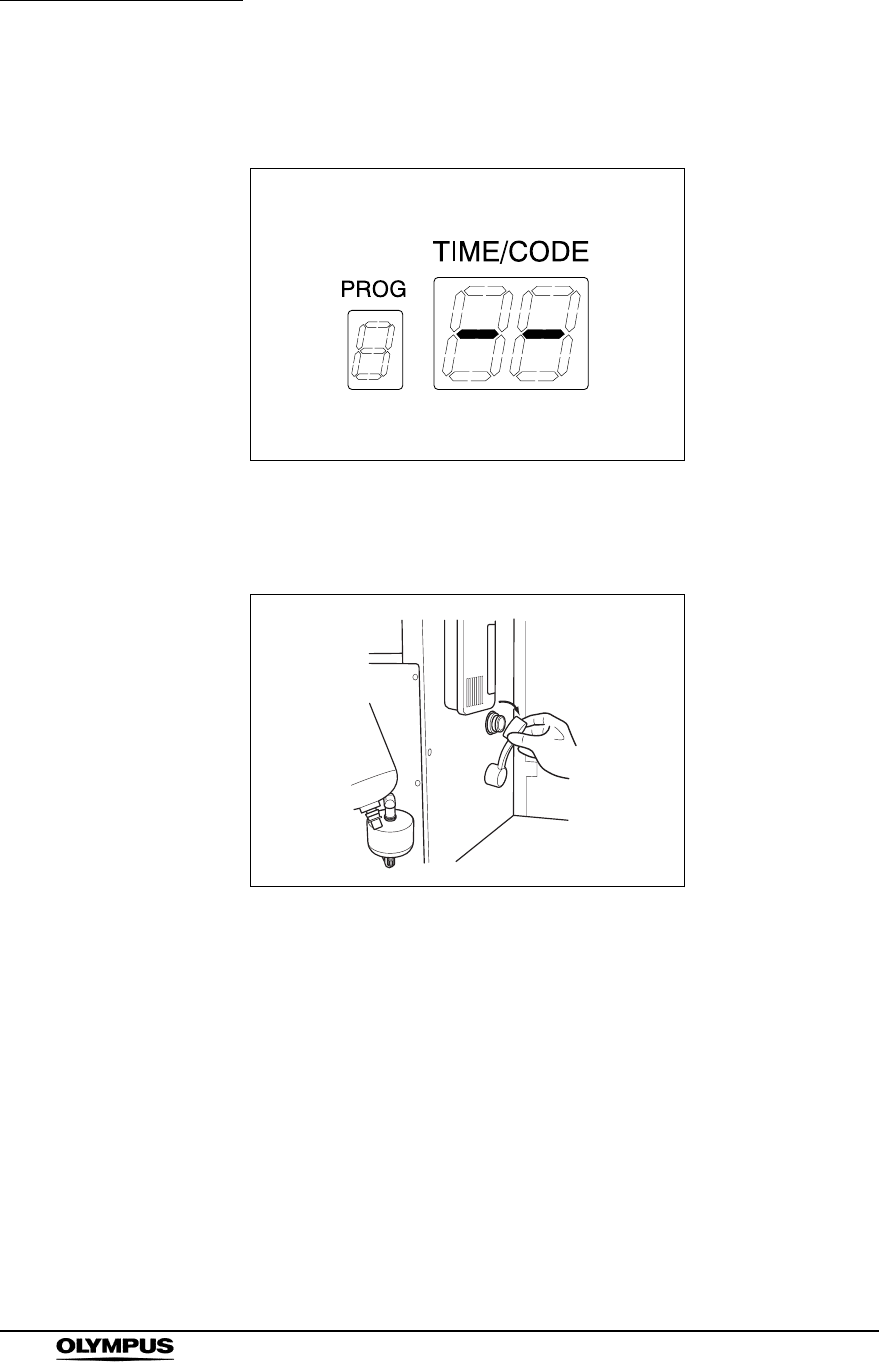
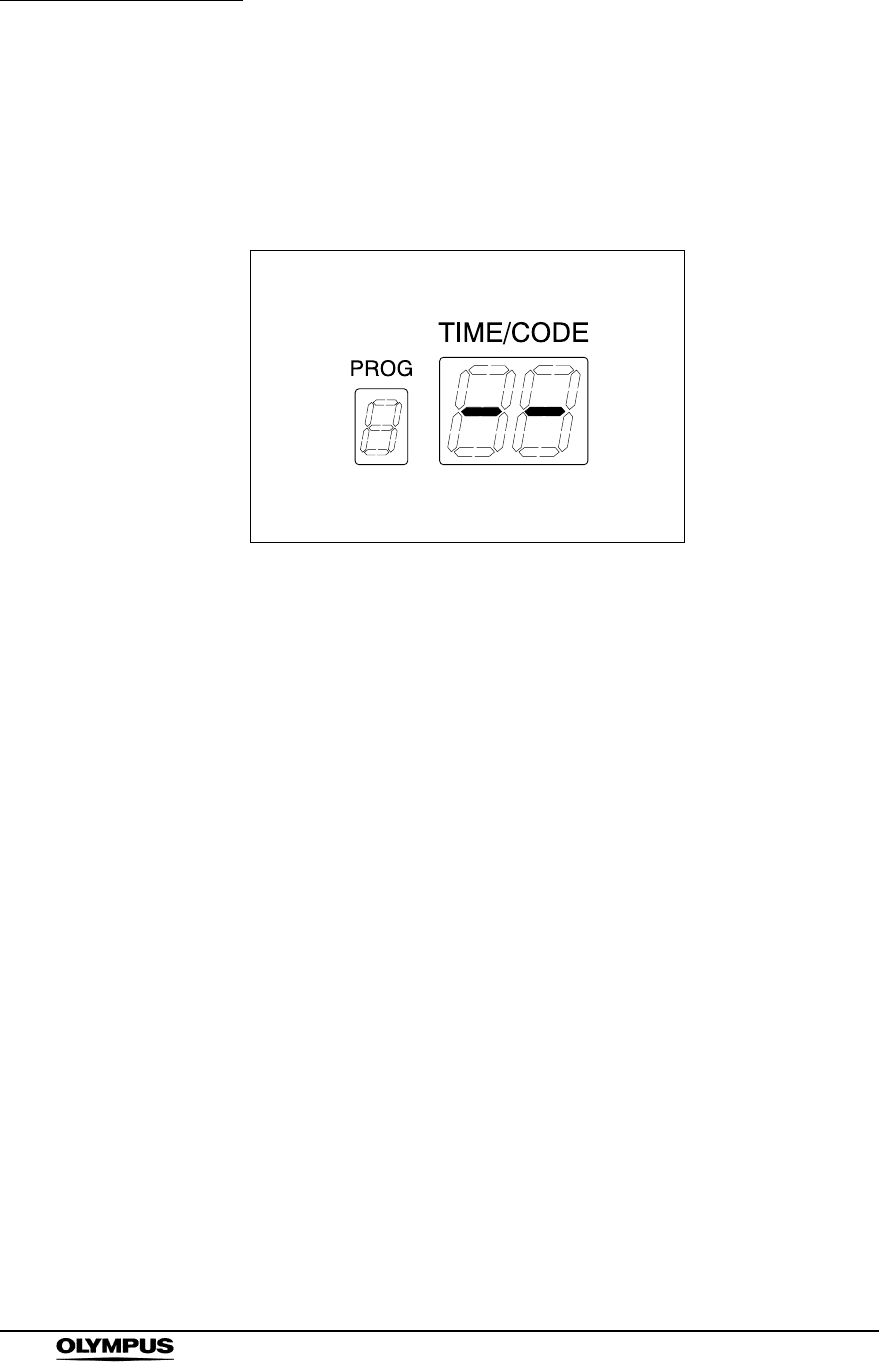
10. When draining is stopped, the long buzzer beeps, and the TIME/CODE
display on the main control panel shows [- -] indicating the end of process.
Figure 7.58
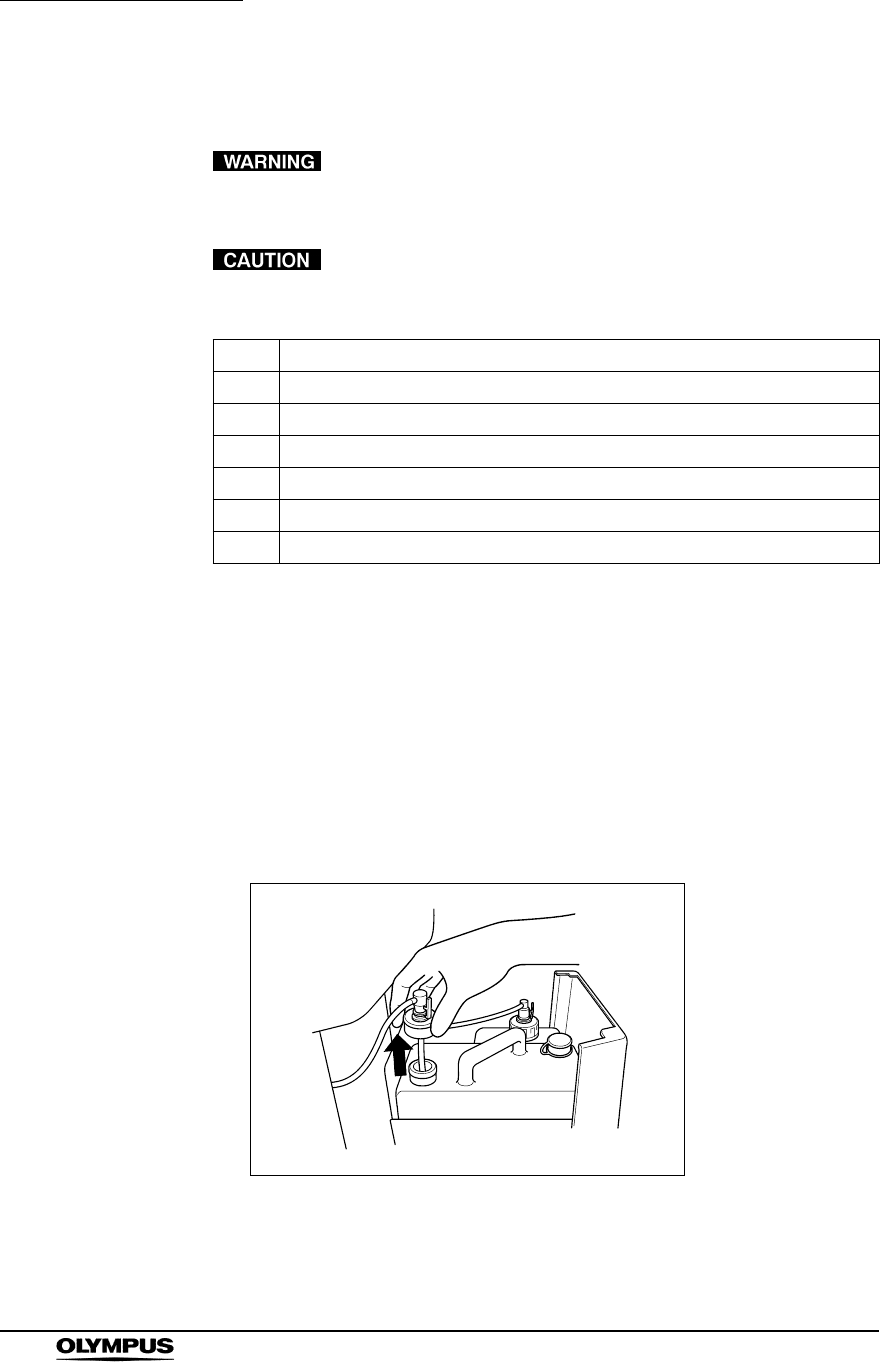
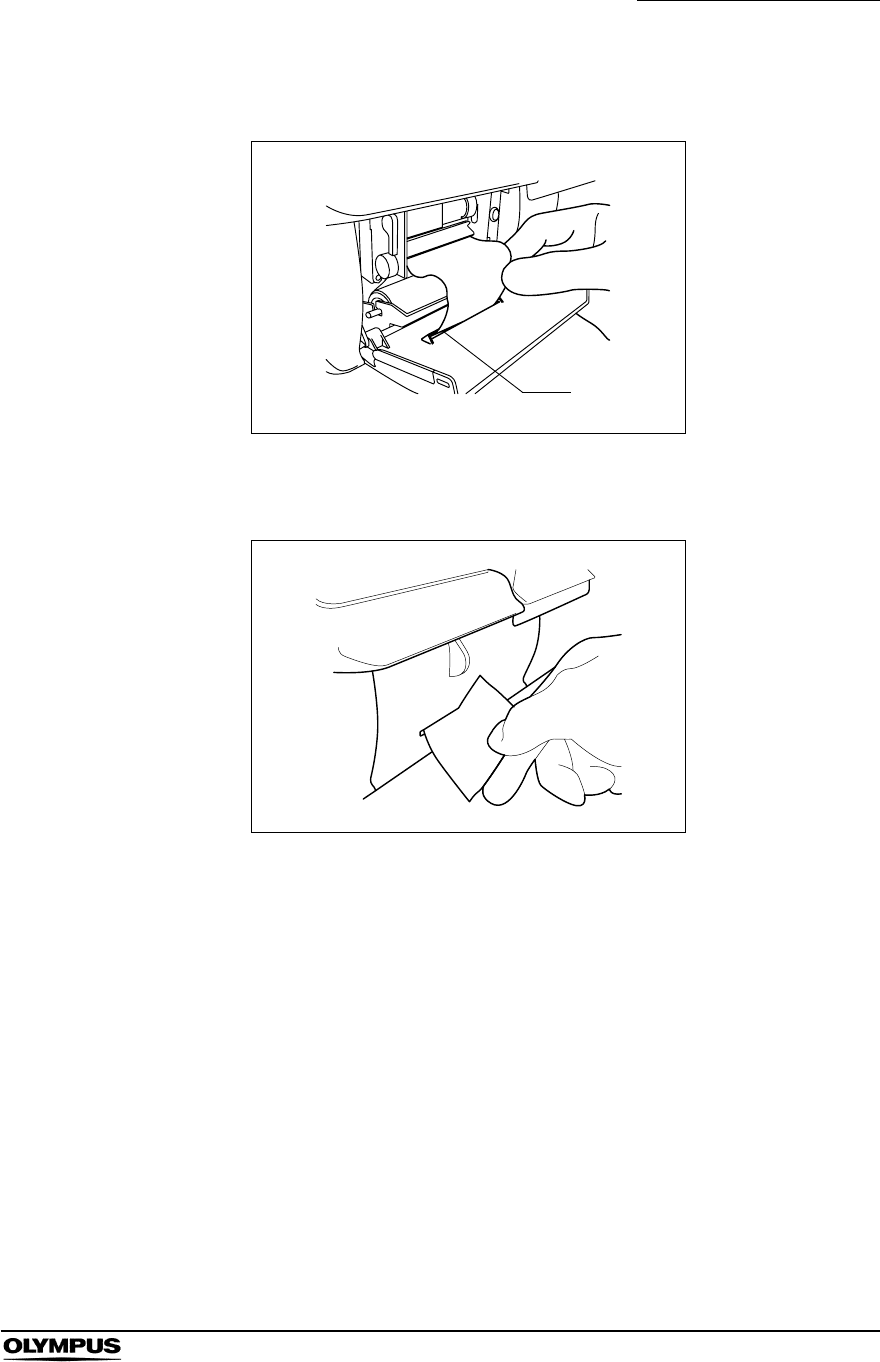
11. Pull the sleeve on the connector of the disinfectant collection hose to
disconnect it from the disinfectant solution nozzle. Be sure to drain the
disinfectant solution that remains in the disinfectant collection hose into the
container (large).
Figure 7.59
12. Rinse both the outside and inside of the disinfectant collection hose
thoroughly in running water, dry it thoroughly, and store it in a clean place.

182
Chapter 7 Routine Maintenance
ENDOSCOPE REPROCESSOR OER-Pro Operation Manual
13. Open the front door and remove the rubber cap from the disinfectant
removal port.
Figure 7.60
14. Put the tube-side end of the disinfectant removal tube in the container
(small), and connect the disinfectant removal tube to the disinfectant
removal port to drain the small amount of residual disinfectant solution from
the disinfectant solution tank (see Figure 7.61).
Figure 7.61
Disinfectant
removal port
Rubber cap
Chapter 7 Routine Maintenance
183
ENDOSCOPE REPROCESSOR OER-Pro Operation Manual
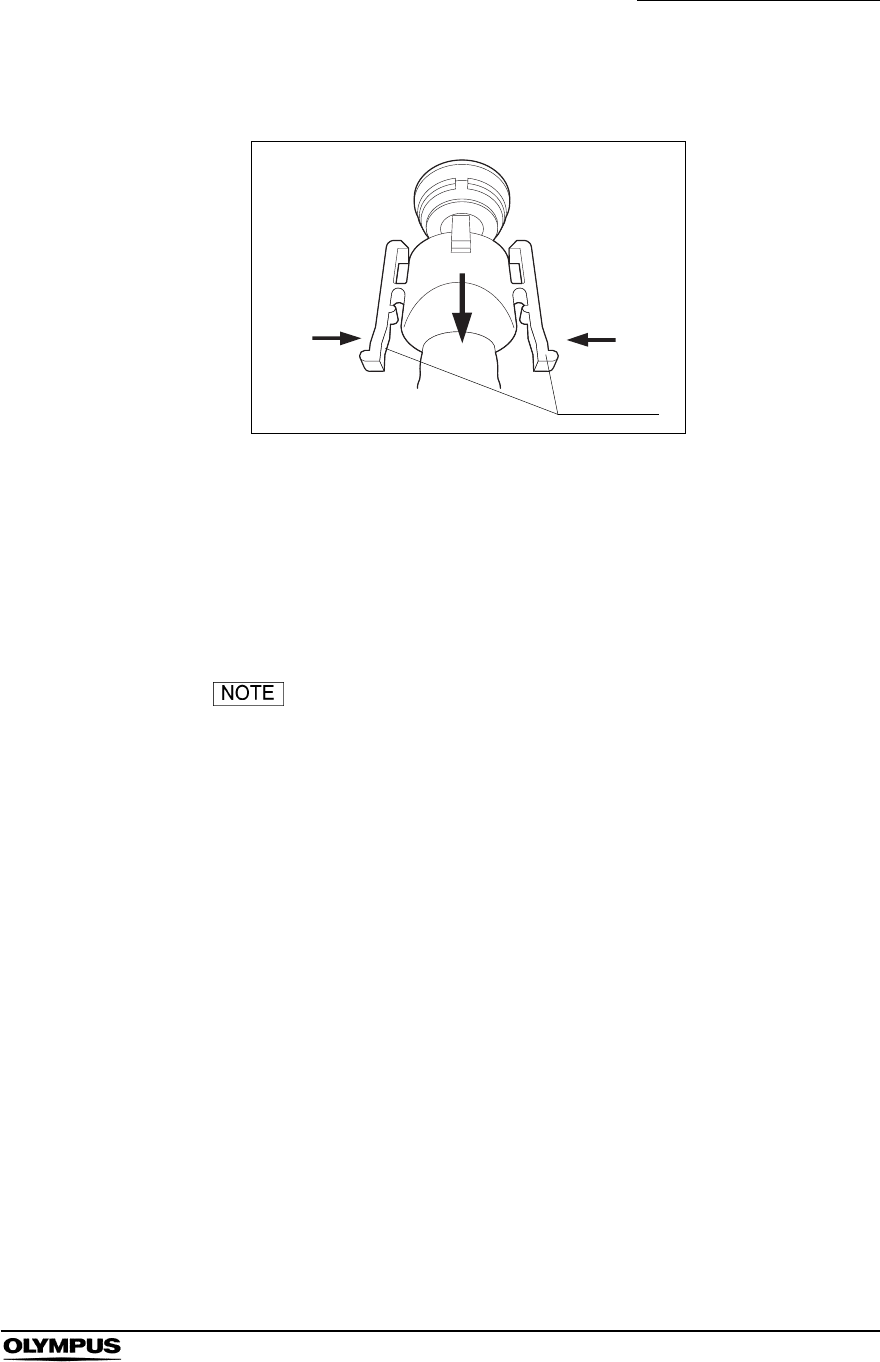
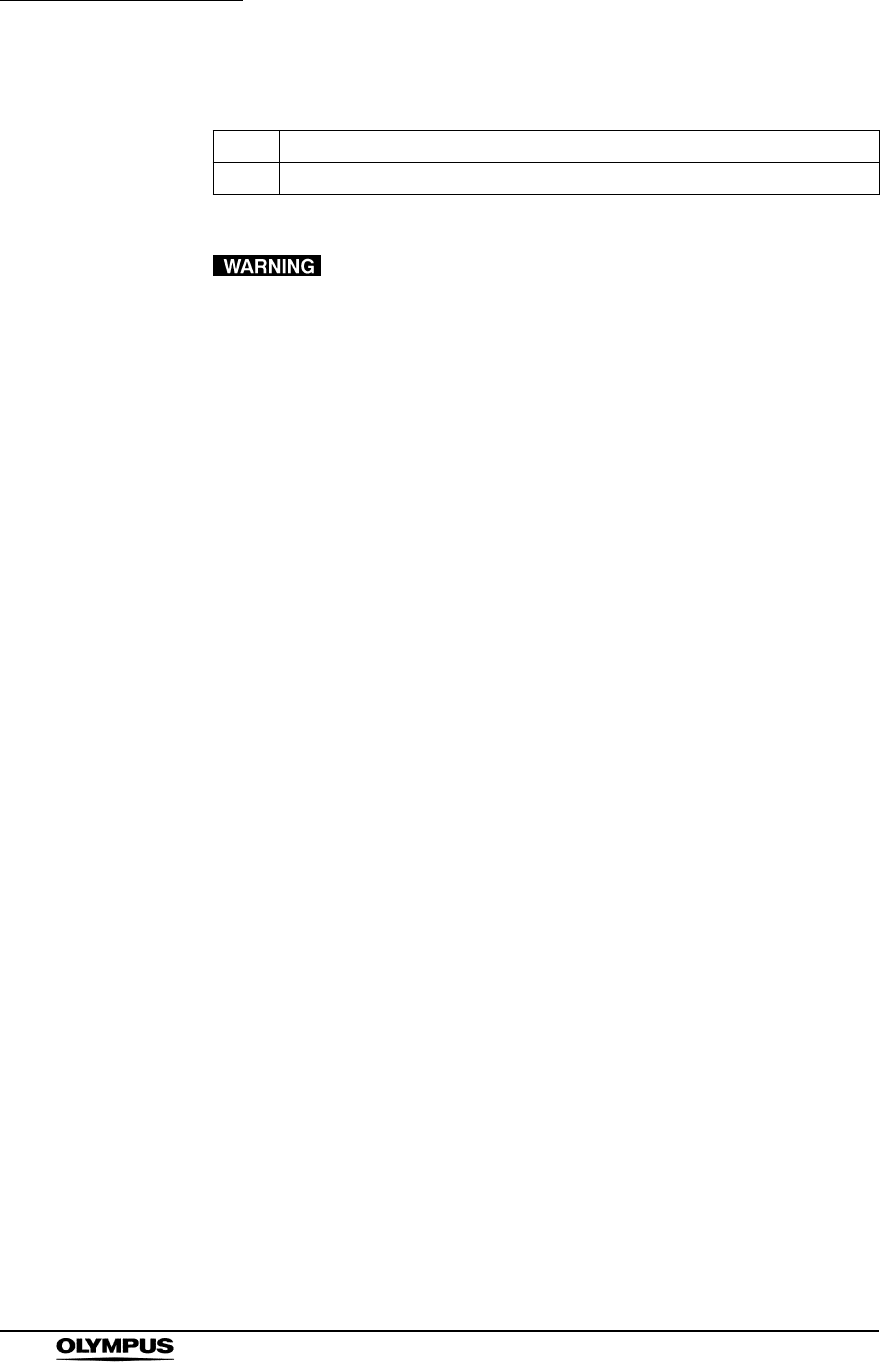
15. Hold the lock levers and slowly disconnect the tube (see Figure 7.62).
Figure 7.62
16. Rinse the disinfectant removal tube thoroughly under running water, dry it
completely, and store it in a clean place.
17. Wipe the disinfectant removal port with the clean cloth and attach the rubber
cap to it.
18. Close the front door.
The front door cannot be closed unless the rubber cap is
attached.
Lock lever
184
Chapter 7 Routine Maintenance
ENDOSCOPE REPROCESSOR OER-Pro Operation Manual
Draining through the drain hose
• Be sure to close the lid before proceeding. If the lid is not
closed, the disinfectant solution may spatter out of the
cleaning tub.
• Take out the scopes and valves from the cleaning tub before
draining the disinfectant solution through the drain hose.
Otherwise, the disinfectant solution cannot be drained
properly and the scopes and valves may be unable to be
rinsed sufficiently.
• Do not block the disinfectant removal port with a finger while
the rubber cap is not attached. Otherwise, the disinfectant
solution may flow out.
• To prevent the device and facilities near the equipment from
being damaged by leaked disinfectant solution, do not
remove the rubber cap from the disinfectant removal port
except when the disinfectant removal tube is connected.
• If disinfectant solution leaks out of the disinfectant removal
port while the rubber cap is removed, immediately reattach
the rubber port and follow the procedure in Section 8.1,
“Troubleshooting guide” on page 218. If it does not stop
leaking, contact Olympus.
1. Slowly open the water supply faucet.
2. Make sure that the power switch is ON.
3. Close the lid by pushing it until it clicks.
Check Required items
Disinfectant removal tube
Glass container (Small) with a capacity of about 200 ml, such as a beaker
Clean cloth
Table 7.14

Chapter 7 Routine Maintenance
185
ENDOSCOPE REPROCESSOR OER-Pro Operation Manual
4. Press the FUNC SEL button on the subcontrol panel to select “DRAIN
LCG”.
Figure 7.63
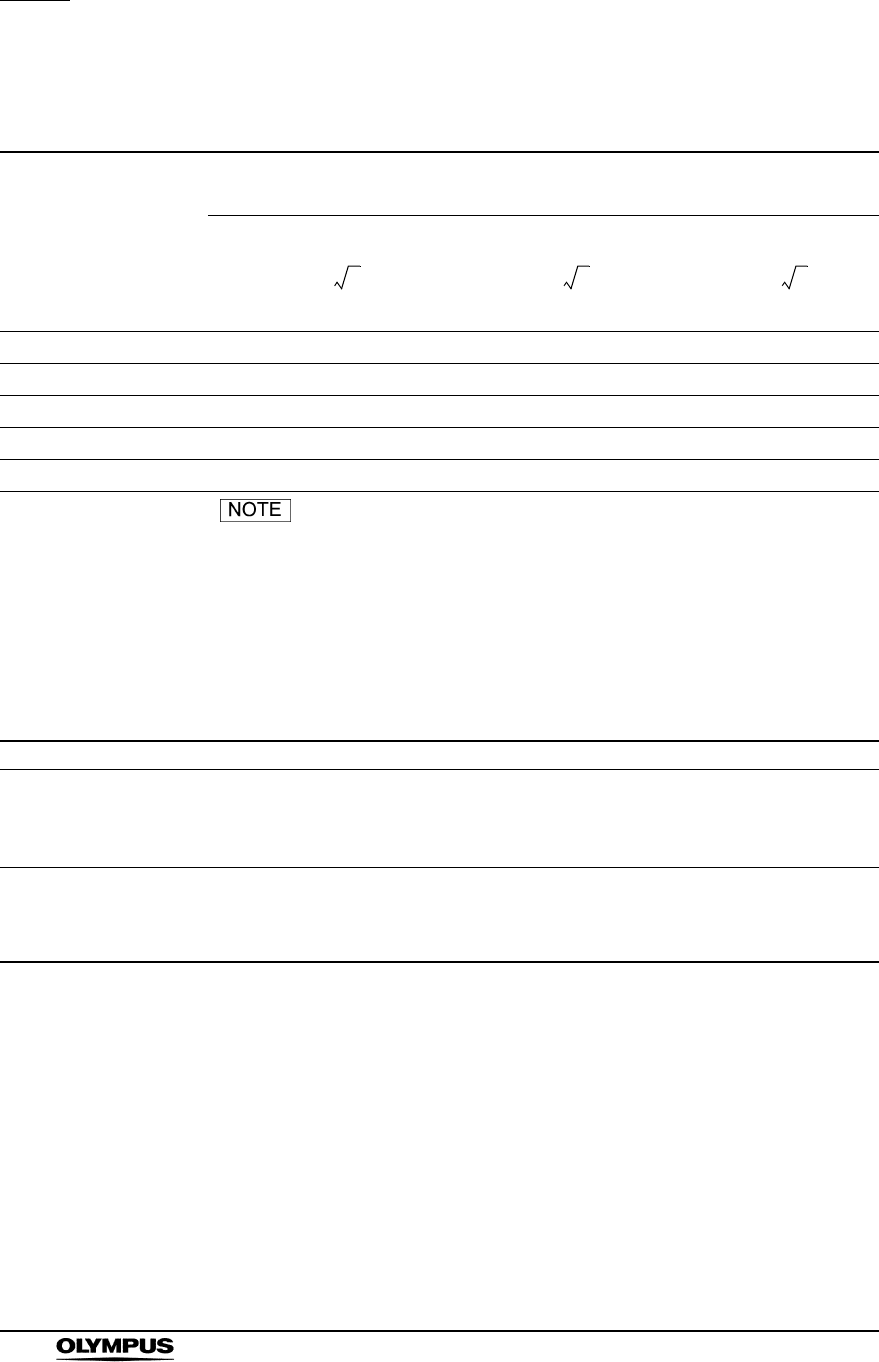
5. Press the FUNC START button on the subcontrol panel. The buzzer beeps,
the disinfectant solution begins draining, and the cleaning tub is rinsed. The
TIME/CODE display on the main control panel shows a [ ] mark spinning
to indicate that the process is underway.
Figure 7.64
If “DRAIN LCG” is selected and the FUNC START button is
pressed while the lid is open, the buzzer makes several short
beeps, the disinfectant is drained into the cleaning tank, and
error code [E72] is displayed. If error code [E72] is displayed,
take the countermeasure by following the procedure in
Section 8.1, “Troubleshooting guide” on page 218.
186
Chapter 7 Routine Maintenance
ENDOSCOPE REPROCESSOR OER-Pro Operation Manual
6. When draining stops, the long buzzer sounds and the TIME/CODE display
on the main control panel shows [- -] indicating the end of the process.
Figure 7.65
7. Open the front door and remove the rubber cap from the disinfectant
removal port.
Figure 7.66

Chapter 7 Routine Maintenance
187
ENDOSCOPE REPROCESSOR OER-Pro Operation Manual
8. Put the tube-side end of the disinfectant removal tube in the container
(small), and connect the disinfectant removal tube to the disinfectant
removal port to drain the small amount of residual disinfectant solution from
the disinfectant solution tank (see Figure 7.67).
Figure 7.67
9. Hold the lock levers and slowly disconnect the tube (see Figure 7.68).
Figure 7.68
10. Rinse the disinfectant removal tube thoroughly under running water, dry it
completely, and store it in a clean place.
11. Wipe the disinfectant removal port with the clean cloth and attach the rubber
cap to it.
12. Close the front door.
The front door cannot be closed unless the rubber cap is
attached.
Lock lever
188
Chapter 7 Routine Maintenance
ENDOSCOPE REPROCESSOR OER-Pro Operation Manual
Setting up the disinfectant solution
• Before handling the disinfectant solution, read the
precautions carefully and uses it as instructed. It is especially
important to know what to do if the disinfectant solution
comes in contact with your skin.
• When handling the disinfectant solution, wear appropriate
personal protective equipment to prevent any disinfectant
from getting on your skin or being inhaled. To avoid adverse
physical effects, be careful not to touch the disinfectant
solution directly or to inhale too much vapor. If any
disinfectant solution gets in your eyes, immediately rinse with
a large amount of fresh water and then consult a medical
specialist. Personal protective equipment, such as eye wear,
face mask, moisture-resistant clothing, and
chemical-resistant gloves that fit properly and are long
enough so that your skin is not exposed. All personal
protective equipment should be inspected before use and
replaced periodically before it is damaged.
Check Required items
Aldahol III (Olympus-designated disinfectant solution) 1 gallon bottle u5
Table 7.15

Chapter 7 Routine Maintenance
189
ENDOSCOPE REPROCESSOR OER-Pro Operation Manual
• When using the disinfectant solution and alcohol, Olympus
recommends the use of gas filters and running this
equipment in well-ventilated areas.
Wear a facemask, gloves, and protective clothes to
minimize aspiration and skin contact.
Wear goggles for eye protection.
• Effective reprocessing cannot be guaranteed when a
nondesignated disinfectant solution is used. Equipment
malfunction may also result.
• Before adding the disinfectant solution, mix the base
compound and buffer agent thoroughly as directed by the
documents supplied with Aldahol III. Effective cleaning and
disinfecting cannot be guaranteed when two are added
separately resulting in the improperly mixed disinfectant
solution.
• When adding the disinfectant solution, continuously monitor
the fluid level via the disinfectant solution indicator. When the
Max line is exceeded, the disinfectant solution may spill from
the equipment or be drained from the equipment.
Refer to the following association's guidelines related to
ventilation:
SGNA (Society of Gastroenterology Nurses and
Associates)
ASGE (American Society of Gastroenterological
Endoscopy)
APIC (Association for Professionals of Infection
Control and Epidemiology)
AORN (Association of Preoperative Registered
Nurses)
ASTM (American Society for Testing and Materials)
OSHA (Occupational Safety and Health
Administration)
ACGIH (American Conference of Governmental
Industrial Hygienists)
NIOSH (National Institute for Occupational Safety
and Health)
AIA (American Institute of Architects)
Do not handle the equipment if the operator shows any
allergic symptoms even while wearing protective gear.
190
Chapter 7 Routine Maintenance
ENDOSCOPE REPROCESSOR OER-Pro Operation Manual
• When adding the disinfectant solution, slowly dispense it into
the drain port. Otherwise, the disinfectant solution may spill
over from the equipment or be drained from the equipment.
• When adding the disinfectant solution, check the indicators
on the main panel showing the disinfectant solution supplying
process and listen to the buzzer sound. When attempted on
other instances, the disinfectant solution may spill from the
equipment or be drained from the equipment.
• The required amount is approximately 17.5 L (4.6 gallons).
• If the power supply gets cut off during the process of adding
the disinfectant solution and recovers afterward, the main
control panel will display error code [E41]. In this case, the
quantity of the disinfectant solution in the disinfectant solution
tank is not sufficient. Press the STOP/RESET button to clear
the error code [E41] and restart “Setting up the disinfectant
solution” on page 188.
1. Make sure that the power switch is ON.
2. Press the FUNC SEL button on the subcontrol panel to select “LOAD LCG”.
3. Press the FUNC START button on the subcontrol panel.
4. Step the foot pedal to open the lid.
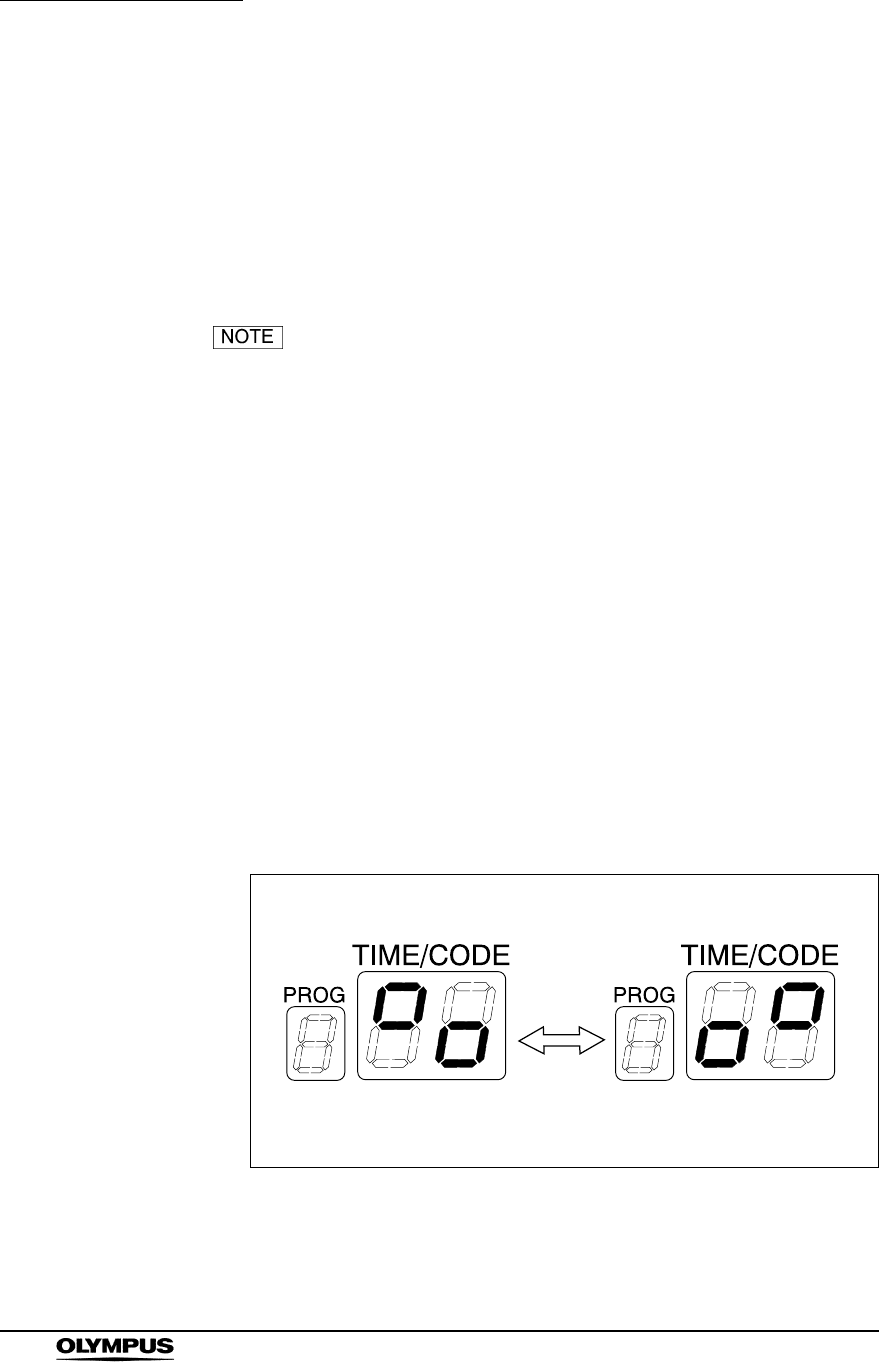
5. As multiple beeps sound, the time display on the main panel alternates
between Figure 7.69 (a) and (b) indicating that it is ready to add the
disinfectant solution.
Figure 7.69
(a) (b)
Chapter 7 Routine Maintenance
191
ENDOSCOPE REPROCESSOR OER-Pro Operation Manual
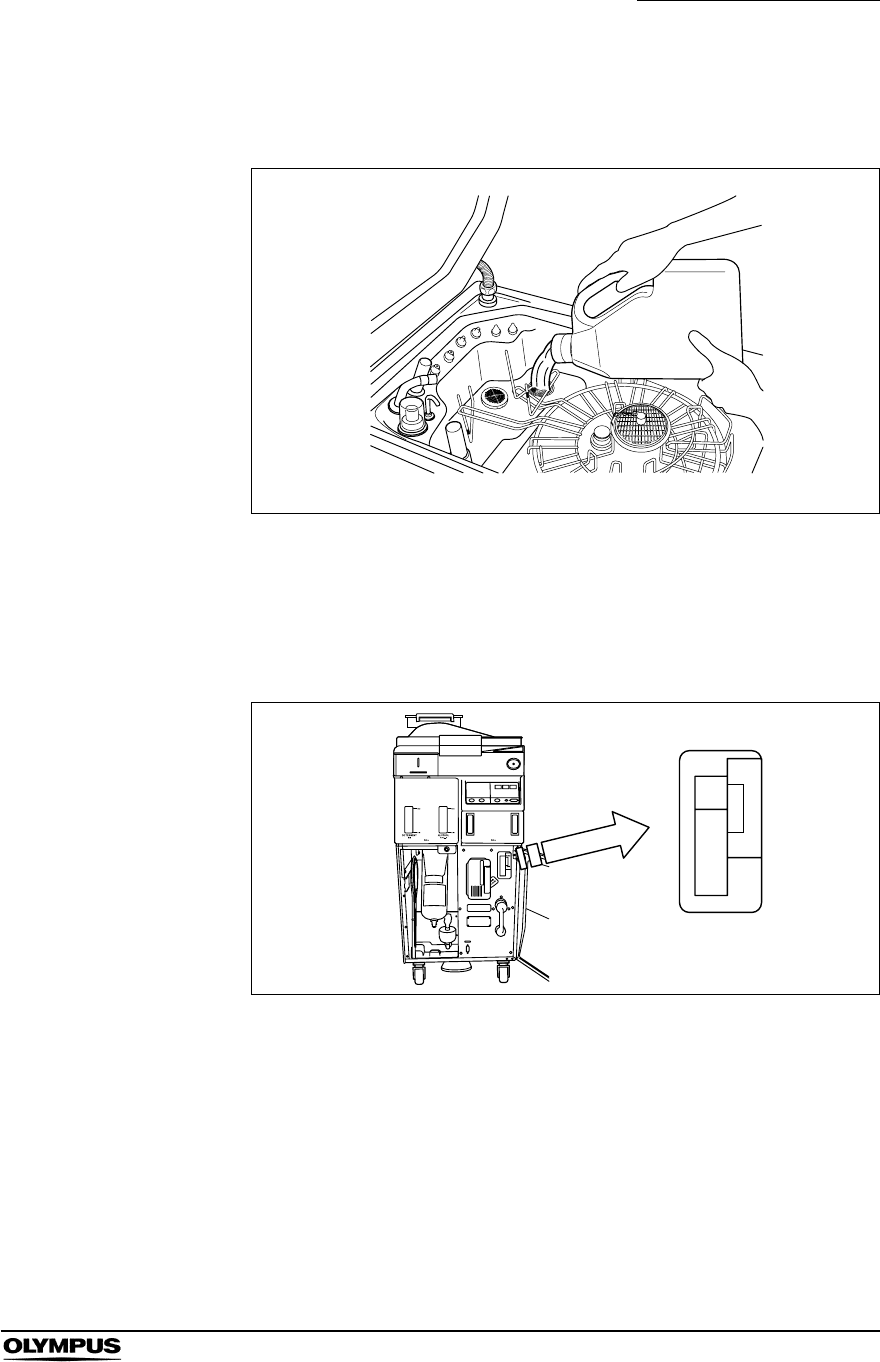
6. Slowly pour the disinfectant solution to the drain port into the cleaning tub
(see Figure 7.70).
Figure 7.70
7. When the beeps increase in frequency, the level of disinfectant solution is
near full. Stop pouring the disinfectant solution and check the disinfectant
solution indicator located at the front of the equipment and slowly add more
solution (see Figure 7.71).
Figure 7.71
MAX
MIN
192
Chapter 7 Routine Maintenance
ENDOSCOPE REPROCESSOR OER-Pro Operation Manual
If the buzzer beeps and the TIME/CODE display shows [- -],
stop adding the disinfectant solution. Otherwise, the
disinfectant solution may spill from the equipment or be
drained from the equipment.
8. When the amount added is adequate, the buzzer beeps for three seconds.
Stop adding the solution. At this time, the TIME/CODE display on the main
panel will show [--] indicating the end of the process (see Figure 7.72).
Figure 7.72
9. Make sure that the water supply faucet is open.
10. Perform the rinsing process following the procedure in Section 6.8, “Rinsing”
on page 133. Any residual fluid in the cleaning tub is cleaned.
Chapter 7 Routine Maintenance
193
ENDOSCOPE REPROCESSOR OER-Pro Operation Manual
7.13 Cleaning the mesh filter in the water supply
adapter connector
When the device stops with error code [E01], the water filter should be replaced
first. However, if the device stops again with error code [E01], clean the mesh
filter as described below.
To prevent leakage or damage, do not deform or
disassemble the water supply adapter.
1. Close the water supply faucet. Press the FUNC SEL button on the
subcontrol panel to select “LEAK TEST”, and press the FUNC START
button.
2. In about 10 seconds, press the STOP/RESET button to stop the leak test.
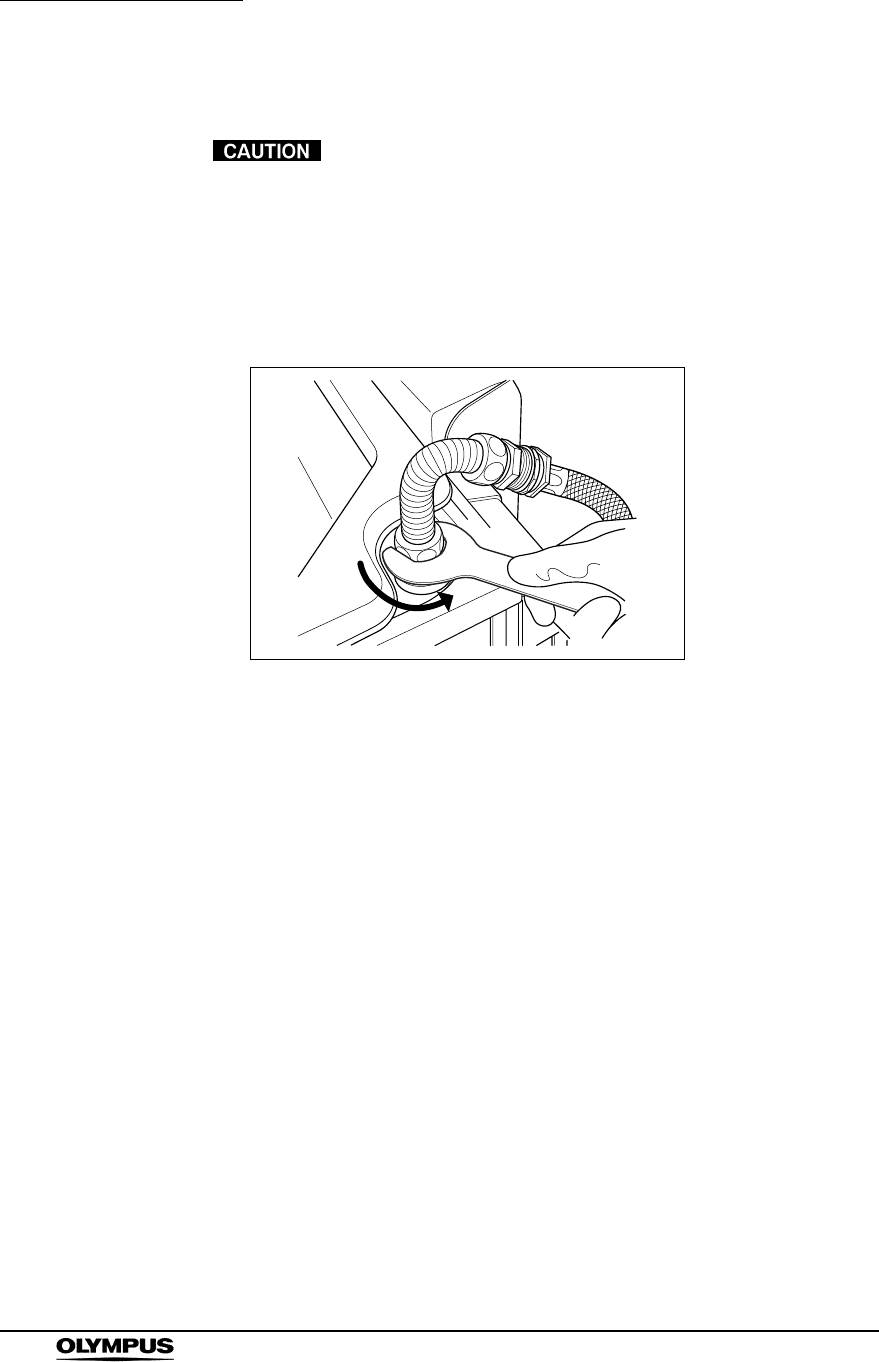
3. Turn the connection ring of the water supply adapter in the direction shown
to disconnect the adapter from the equipment with the provided wrench. If
residual water is spilled from the water supply adapter, wipe it away with a
clean cloth.
Figure 7.73
194
Chapter 7 Routine Maintenance
ENDOSCOPE REPROCESSOR OER-Pro Operation Manual
4. Using clean tweezers, remove the mesh filter from the water supply adapter
connector.
Figure 7.74
Do not pinch the mesh filter in the water supply adapter
connector too hard. This could deform the mesh filter or
injure your fingers.
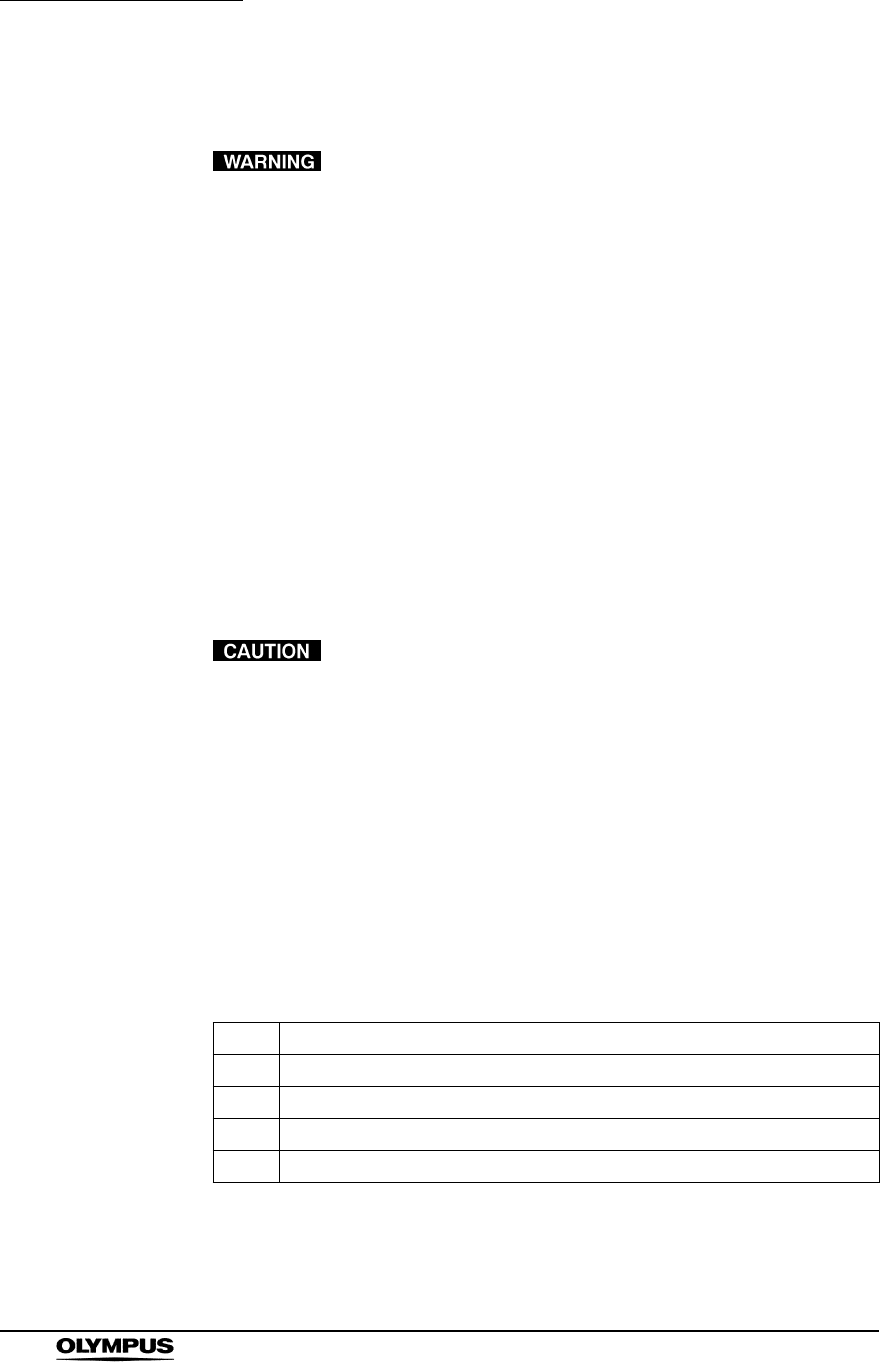
5. Clean the mesh filter in running water using a brush, cotton swab etc.
Figure 7.75
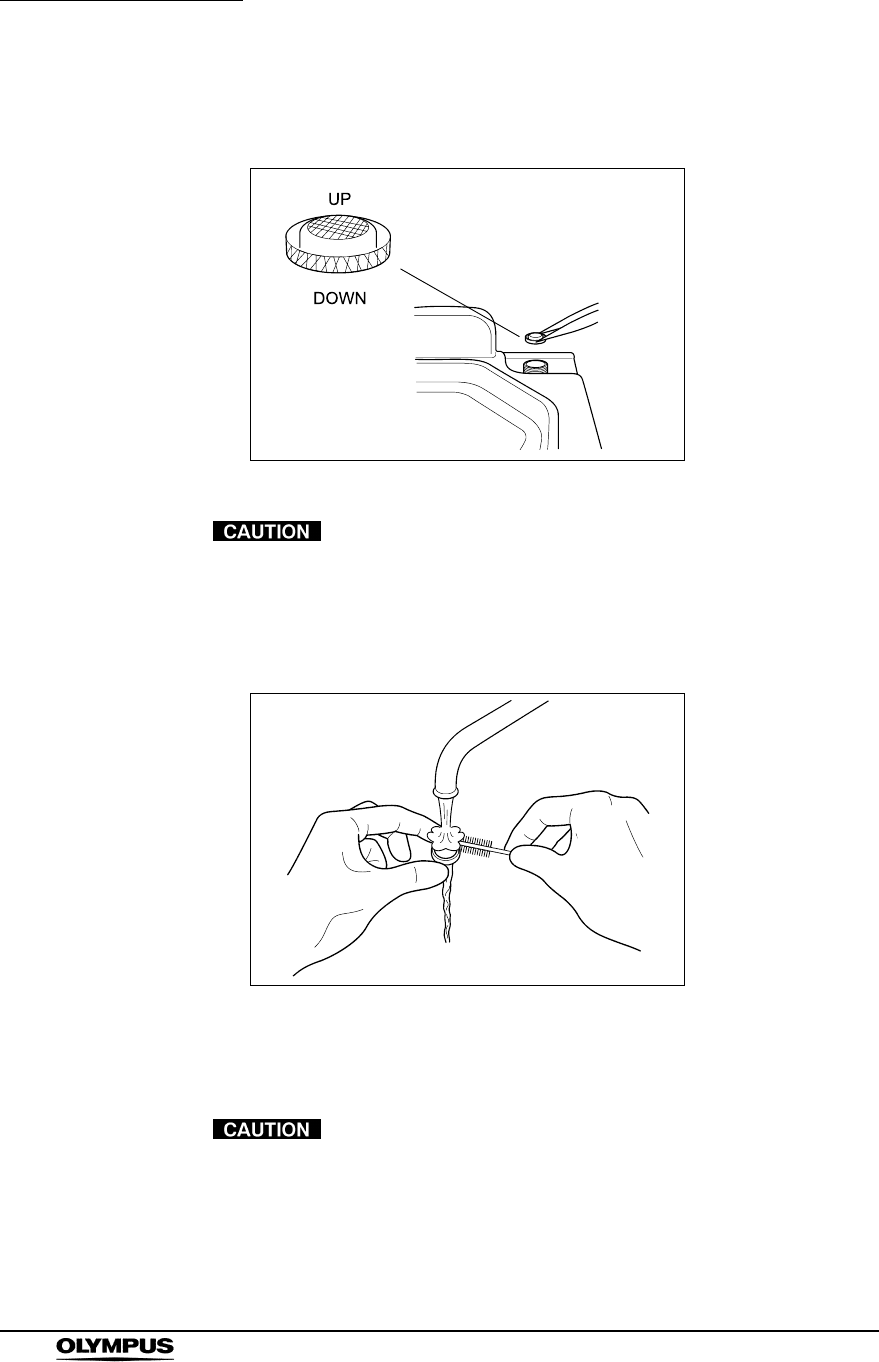
6. Place the mesh filter in the orginal position in the water supply adapter
connector. Pay attention to the up-down orientation.
Be sure to install the mesh filter in the water supply adapter
connector. Otherwise, dirt and foreign matter in the water
may enter the device and cause it to malfunction.

Chapter 7 Routine Maintenance
195
ENDOSCOPE REPROCESSOR OER-Pro Operation Manual
7. Attach the connection ring of the water supply adapter in the original
position on the equipment. Turn manually the connection ring clockwise and
tighten it until it stops.
To prevent leakage, firmly fix the water supply adapter to the
equipment with the provided wrench. To prevent damage to
the equipment, do not apply excessive force to the water
supply adapter.
8. With the provided wrench, turn the connection ring 90 degrees or more to
firmly fix the water supply adapter to the equipment.
7.14 Replacing the fuse
Replace the fuse as described in “If the lamp in the power switch does not turn
ON” on page 58.
196
Chapter 7 Routine Maintenance
ENDOSCOPE REPROCESSOR OER-Pro Operation Manual
7.15 Disinfecting the detergent/alcohol pipe
• When handling the disinfectant solution and
detergent/alcohol, carefully read the precautions for its use in
order to fully understand the given information and use as
instructed. Particular understanding is required for measures
to be taken in case the disinfectant solution comes into
contact with your skin.
• When handling the disinfectant solution and
detergent/alcohol, wear appropriate personal protective
equipment to avoid direct contact with your skin or excessive
inhalation of its vapor. The disinfectant solution and its vapor
may affect the human body. Personal protective equipment,
such as eye wear, face mask, moisture-resistant clothing,
and chemical-resistant gloves that fit properly and are long
enough so that your skin is not exposed. All personal
protective equipment should be inspected before use and
replaced periodically before it is damaged.
To prevent spills, make sure to not topple tanks with
detergent or alcohol when working.
Draining and using the disinfectant solution from the
equipment
Collects the disinfectant solution as described in Section 3.8, “Inspecting the
disinfectant solution’s concentration level” on page 50. Always check the
disinfectant solution concentration and use it to disinfect detergent/alcohol
supply pipe only when it's effective.
Disinfecting of the detergent supply pipe
Check Required items
Syringe and tube
Two Cup-shape container with a capacity of about 200 ml, such as a beaker
Disinfectant solution: approximately 30 ml
Sterilized water: more than 50 ml
Table 7.16

Chapter 7 Routine Maintenance
197
ENDOSCOPE REPROCESSOR OER-Pro Operation Manual
1. Pull out the detergent/alcohol drawer.
2. Detach the detergent tank cap to which a tube is connected (Do not
disconnect the connector.) (see Figure 7.76).
Figure 7.76
3. Step the foot pedal to open the lid.
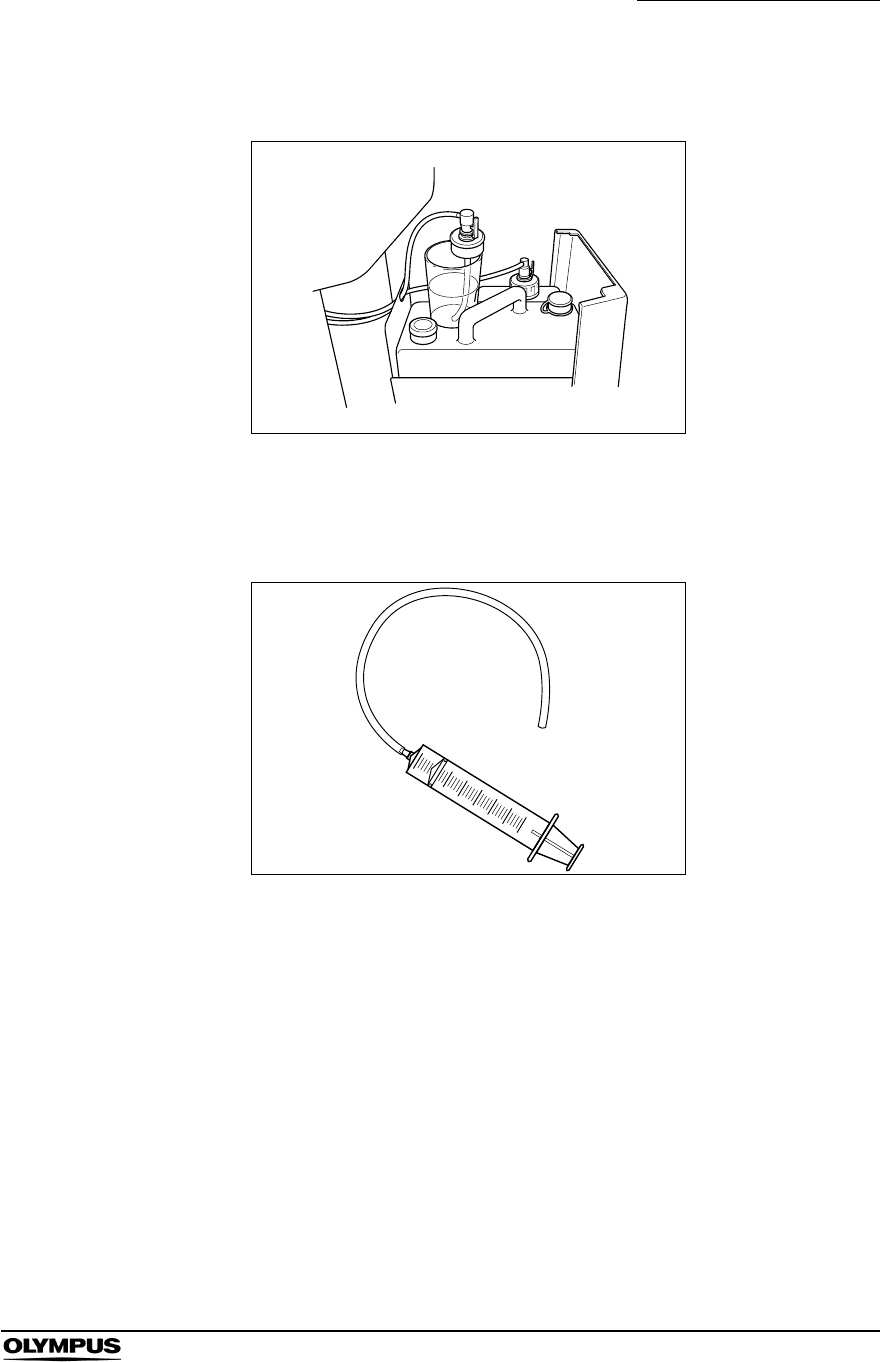
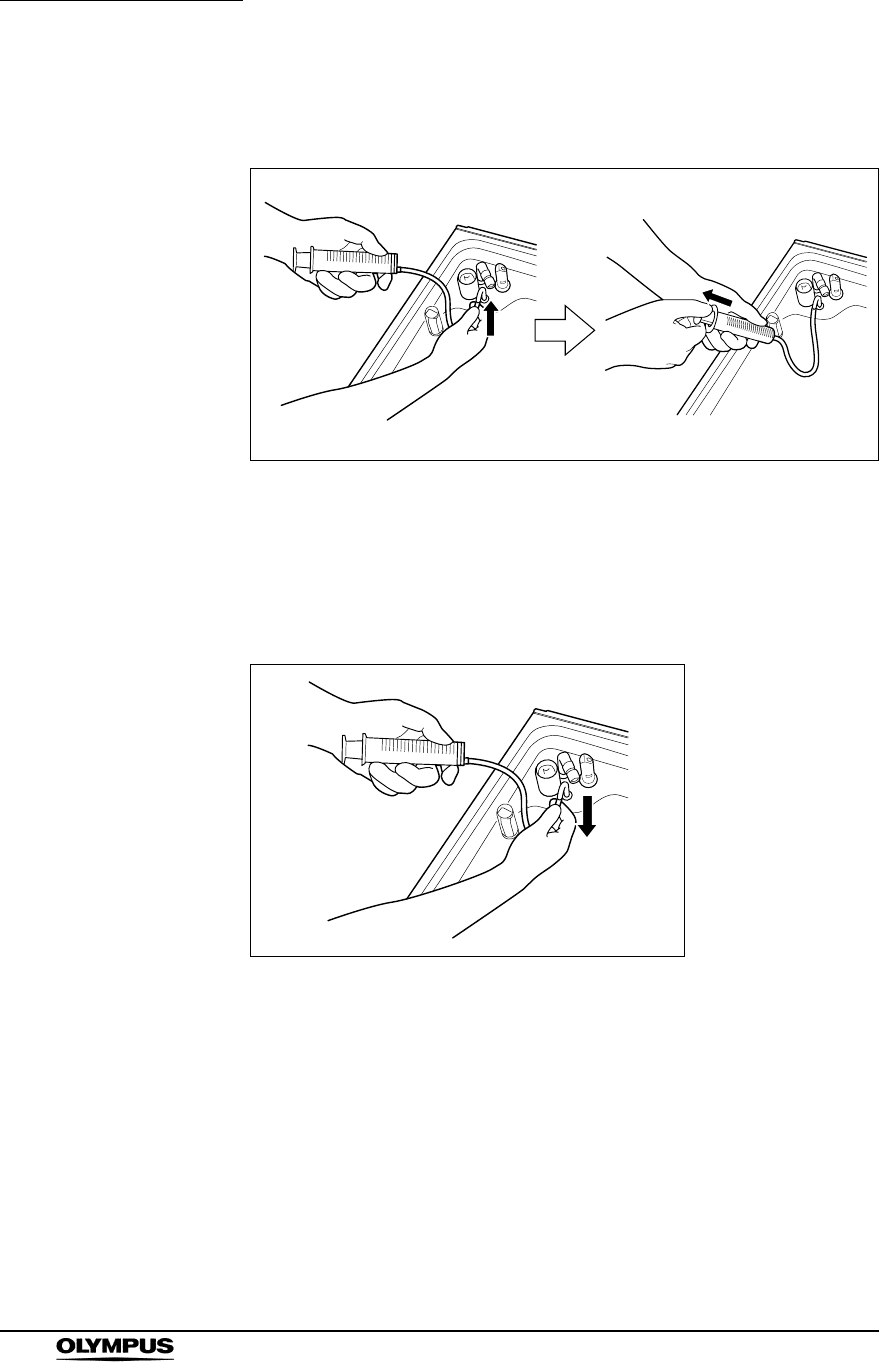
4. Connect the provided syringe and tube.
Figure 7.77
5. Connect the tube attached to the syringe to the detergent nozzle inside the
cleaning tub.
198
Chapter 7 Routine Maintenance
ENDOSCOPE REPROCESSOR OER-Pro Operation Manual
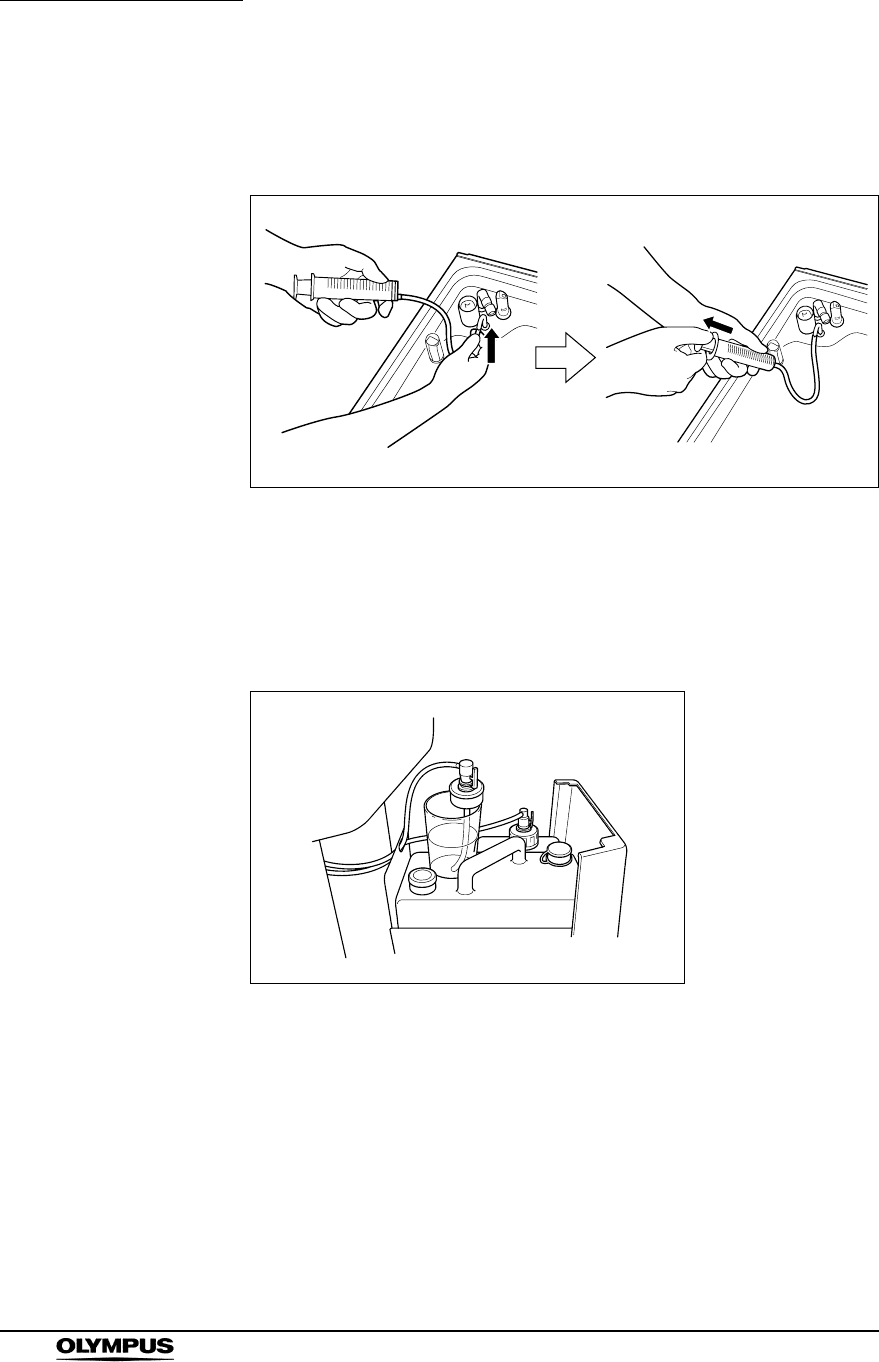
6. To drain off the detergent inside of the pipe, connect the tube attached to the
syringe to the detergent nozzle inside the cleaning tub and suction the
detergent with the syringe (see Figure 7.78).
Figure 7.78
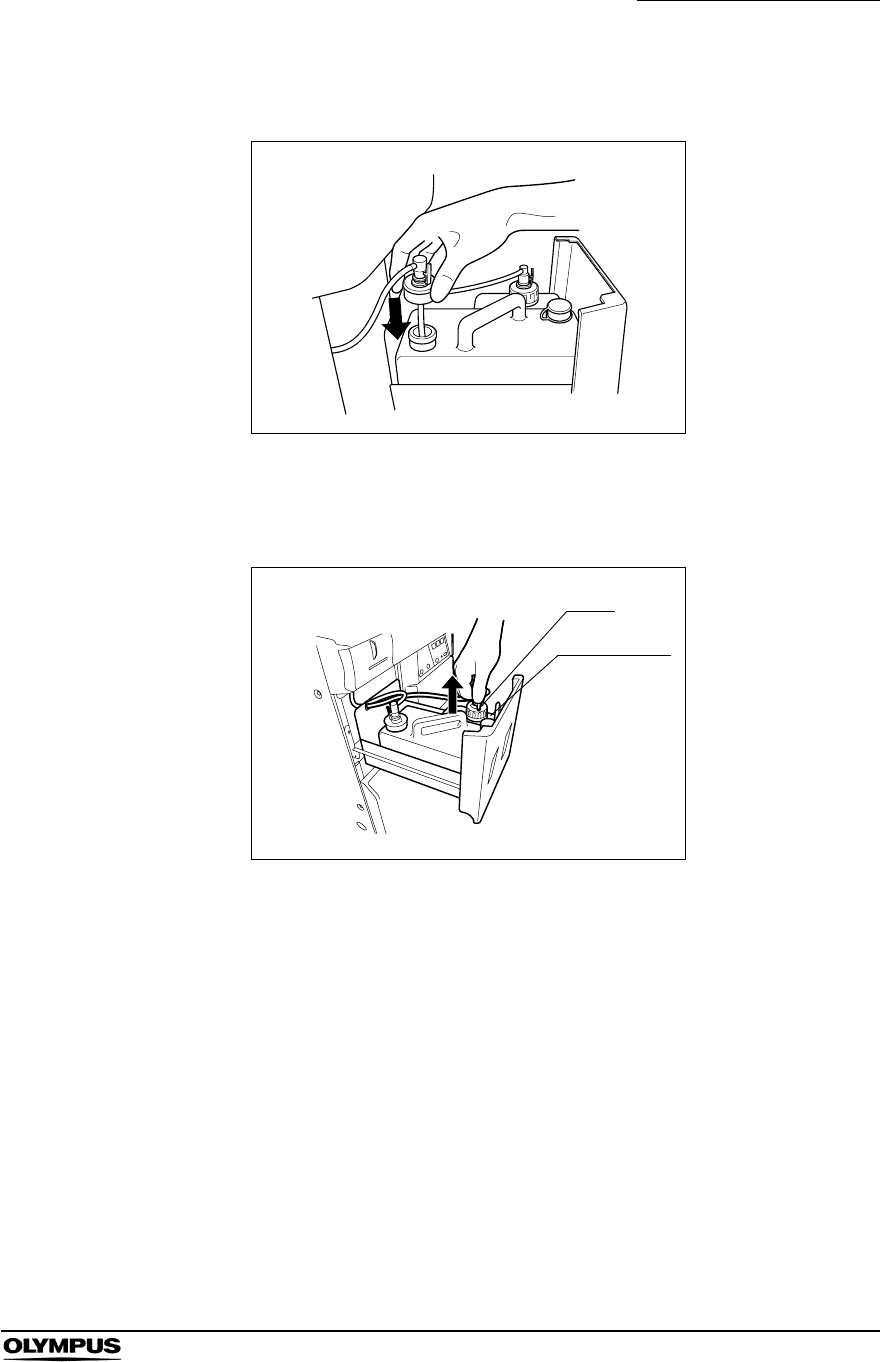
7. Prepare a beaker or similar container and pour about 30 ml of the
disinfectant solution into it.
8. Put the detached cap in the container of the disinfectant solution (see Figure
7.79).
Figure 7.79
9. To fill the detergent supply pipe with the disinfectant solution, connect the
tube attached to the syringe to the detergent nozzle and repeat the suction
operation with the syringe until the disinfectant solution comes out of the
tube. During this process, do not let the air come into the detergent supply
pipe (see Figure 7.78).
10. Wait until the necessary time for disinfection passes. Refer to the
documentation supplied with the disinfectant solution for specifics regarding
disinfection.
Chapter 7 Routine Maintenance
199
ENDOSCOPE REPROCESSOR OER-Pro Operation Manual
11. When the disinfection time ends, take the cap out of the container filled with
the disinfectant solution.
12. To drain off the disinfectant solution inside of the pipe, connect the tube
attached to the syringe to the detergent nozzle and suction the disinfectant
solution with the syringe until the disinfectant solution does not come out of
the pipe (see Figure 7.79).
13. Prepare a beaker or similar container and pour more than 50 ml of the
sterilized water into it (see Figure 7.78).
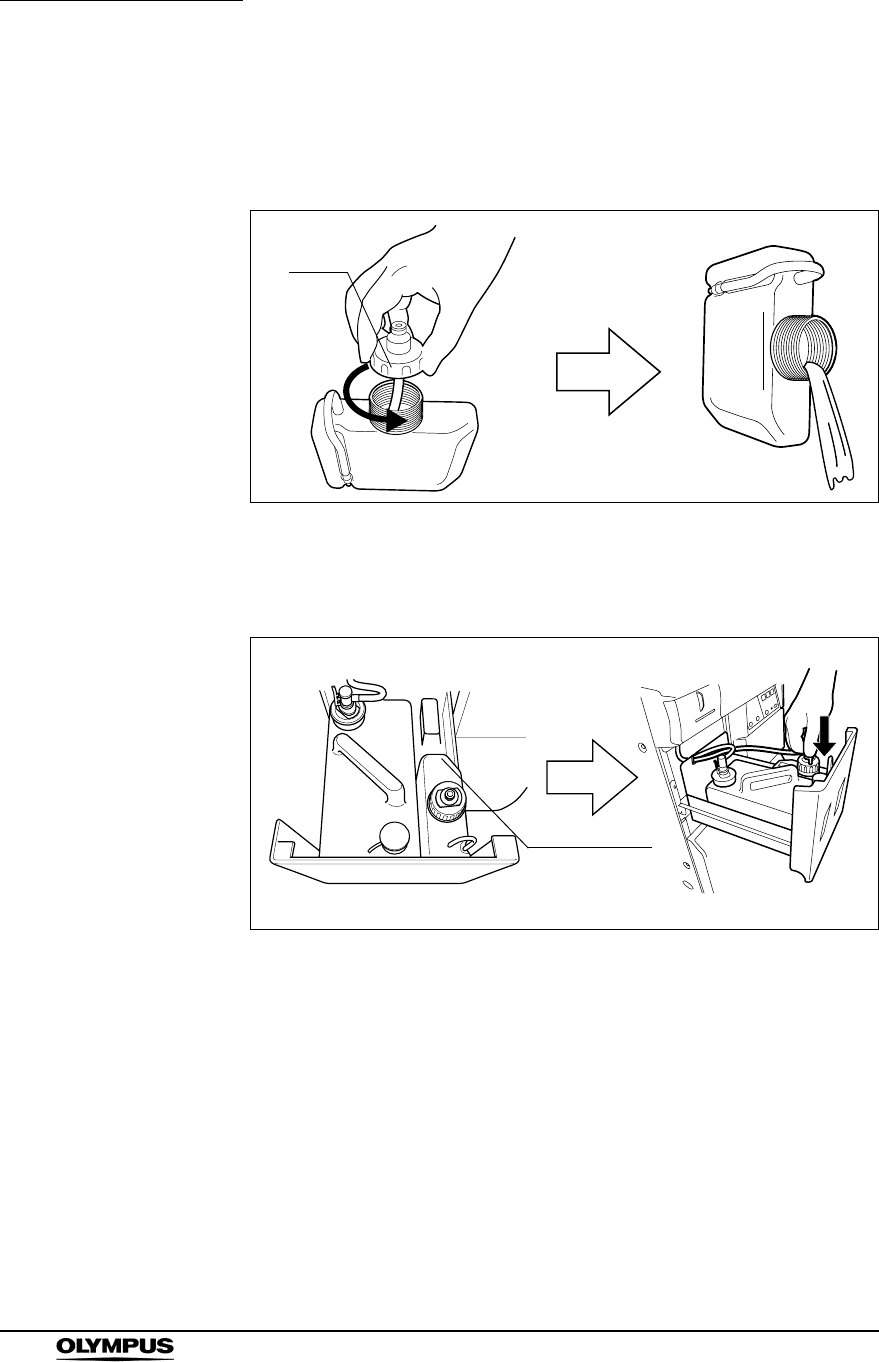
14. Put the cap in the container filled with the sterilized water (see Figure 7.80).
15. To rinse the pipe, connect the tube attached to the syringe to the detergent
nozzle and suction more than 50 ml of sterilized water with the syringe (see
Figure 7.78).
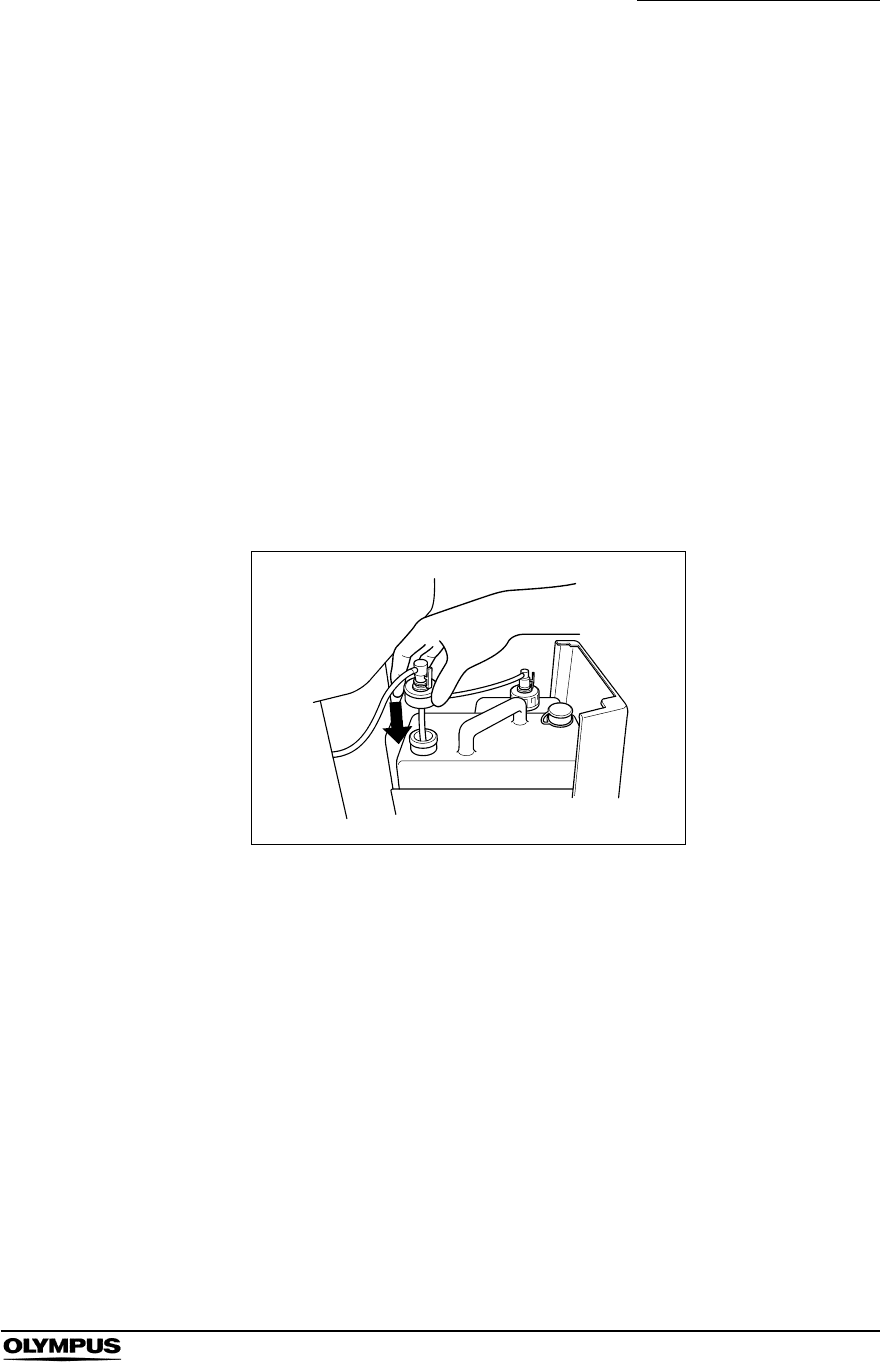
16. Attach the cap to the detergent tank and close the detergent/alcohol drawer
(see Figure 7.80).
Figure 7.80
17. To drain the rinse water in the pipe and fill them with detergent, connect the
tube attached to the syringe to the detergent nozzle and suction more than
50 ml of detergent with the syringe (see Figure 7.78).
18. Disconnect the tube from the detergent nozzle and close the lid.
19. Rinse the cleaning tub by performing the rinsing process on the subcontrol
panel.
200
Chapter 7 Routine Maintenance
ENDOSCOPE REPROCESSOR OER-Pro Operation Manual
Disinfecting the alcohol supply pipes
• Make sure to attach the connector jigs. Otherwise, the
disinfection of the alcohol supply pipes may not be effective.
• After disinfecting the alcohol supply pipe, always rinse it
thoroughly. Otherwise, disinfectant solution that remained in
the pipe may adhere to the endoscope, as this could cause
adverse physical effects.
1. Make sure that the power switch of the device is ON.
2. Make sure that the water supply faucet is open.
3. Step the foot pedal to open the lid.
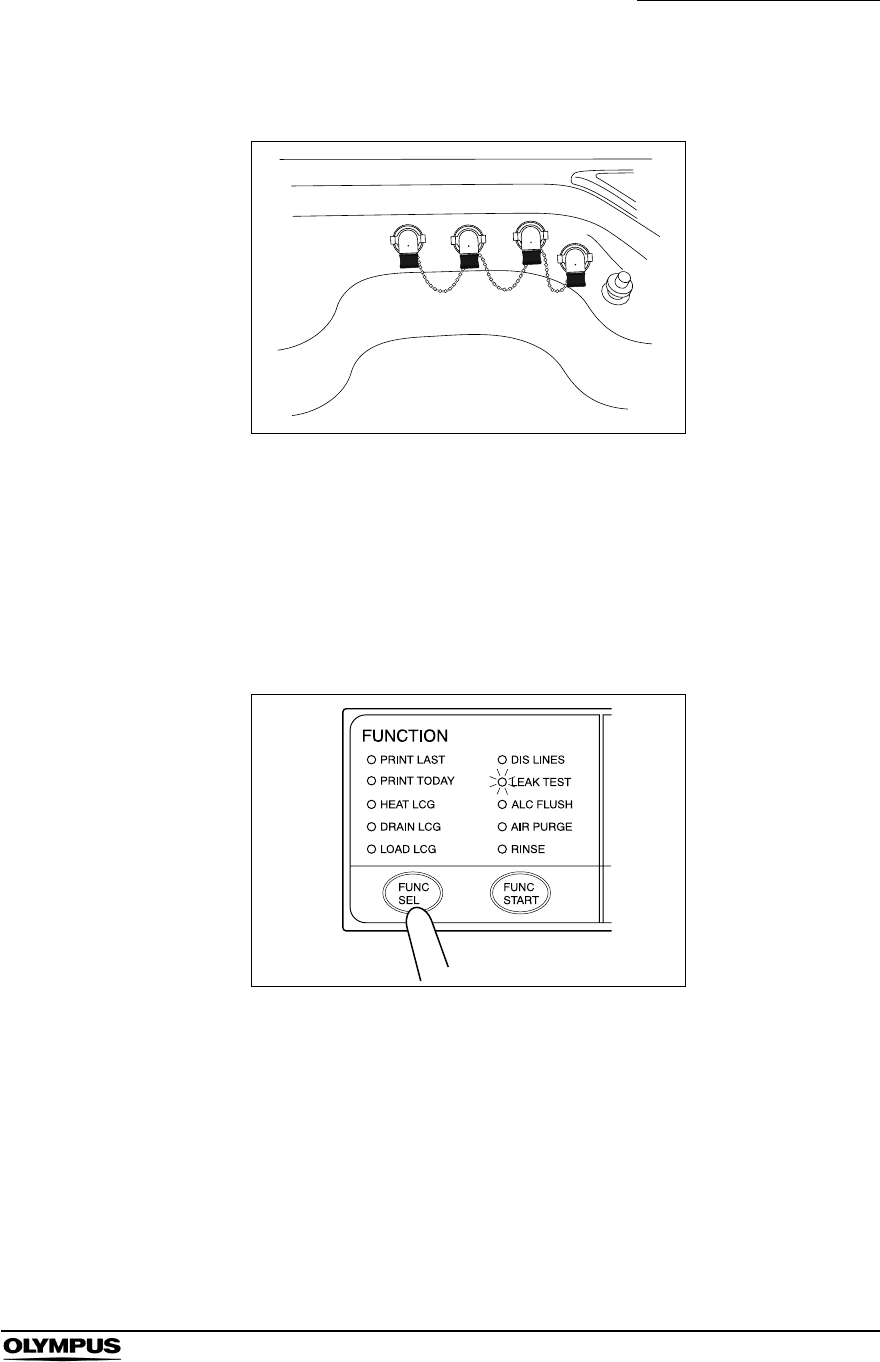
4. Attach the connector jigs to the connectors on the cleaning tub and close
the lid.
5. Pull out the detergent/alcohol drawer.
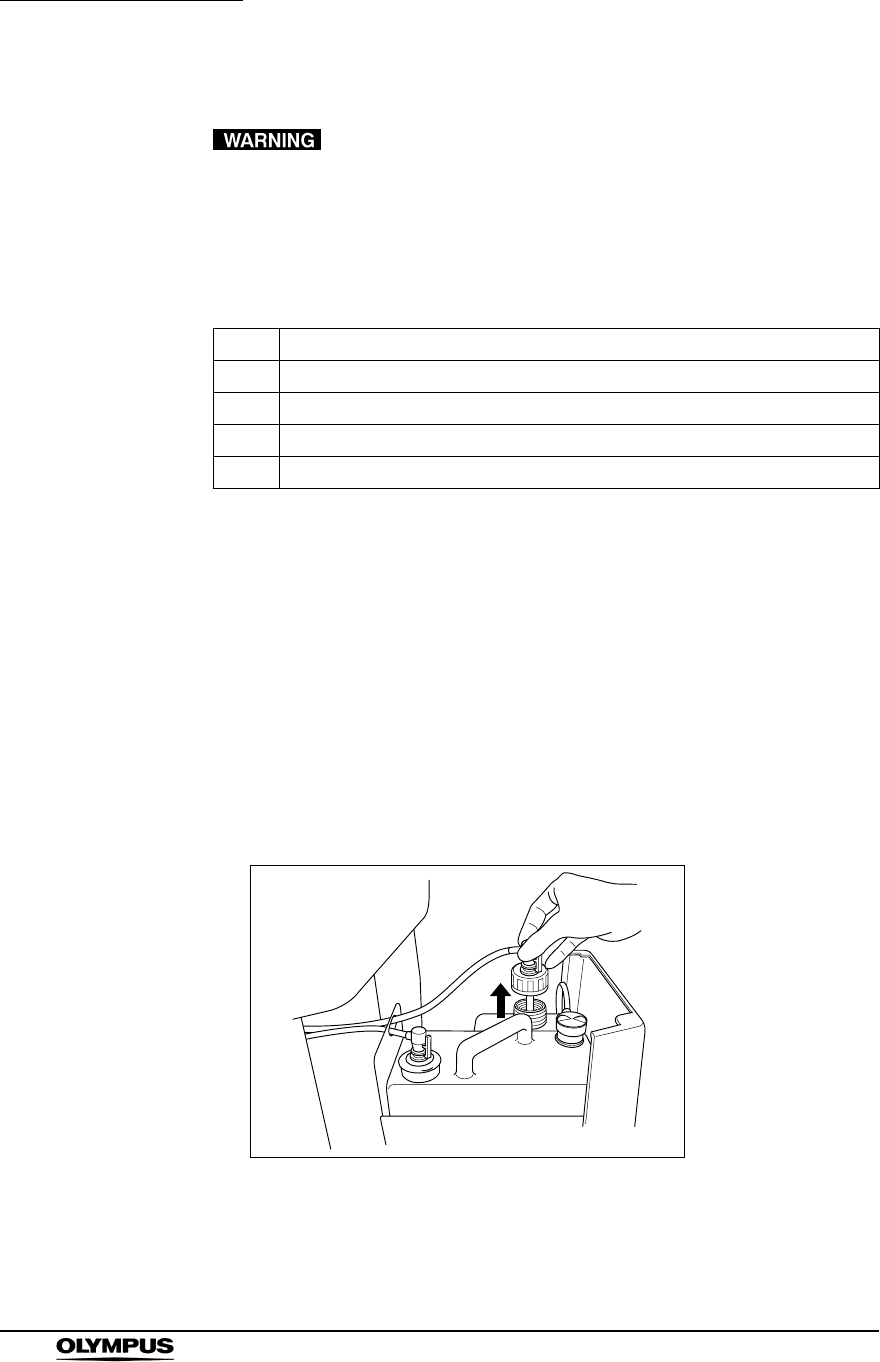
6. Detach the alcohol tank cap to which the tube is connected (Do not
disconnect the connector.) (see Figure 7.81).
Figure 7.81
Check Required items
Connector jigs
Two Cup-shape container with a capacity of about 200 ml, such as a beaker
Disinfectant solution: approximately 80 ml
Sterilized water: more than 80 ml
Table 7.17
Chapter 7 Routine Maintenance
201
ENDOSCOPE REPROCESSOR OER-Pro Operation Manual
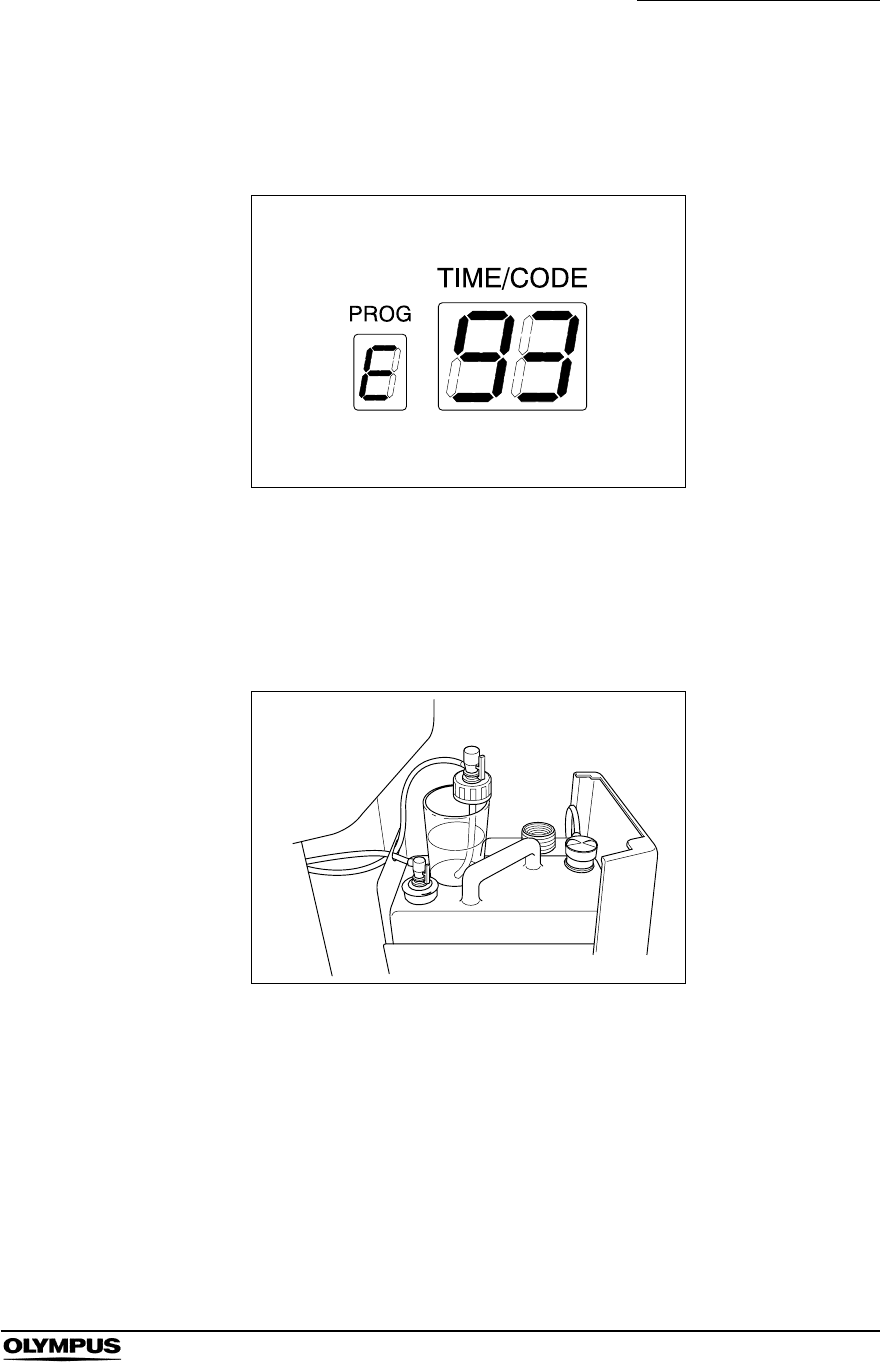
7. Drain the alcohol in the pipe by performing the alcohol flush process on the
subcontrol panel. Check that the fluids are drained from the cap. Wait until
the error code [E93] is displayed and the process ends (see Figure 7.82).
Figure 7.82
8. Prepare a beaker or similar container and pour about 80 ml of the
disinfectant solution into it.
9. Put the detached cap in the container filled with the disinfectant solution
(see Figure 7.83).
Figure 7.83
202
Chapter 7 Routine Maintenance
ENDOSCOPE REPROCESSOR OER-Pro Operation Manual
10. Fill the alcohol supply pipe with the disinfectant solution by performing the
alcohol flush process on the subcontrol panel. Check that the air does not
get inside of the alcohol supply pipe. Also check that the disinfectant
solution in the container is decreasing as the process progresses. The
process ends automatically in three minutes.
Figure 7.84
11. Wait until the necessary time for disinfection passes. Refer to the
documentation supplied with the disinfectant solution for specifics regarding
disinfection.
12. When the disinfection time ends, take the cap out of the container filled with
the disinfectant solution.
13. Drain off the disinfectant solution in the pipe by performing the alcohol flush
process on the subcontrol panel. The process ends automatically with the
E93 displayed on the main control panel.
14. Prepare a beaker or similar container and fill it with at least 80 ml of
sterilized water.
15. Put the cap in the container filled with the sterilized water (see Figure 7.85).
16. Rinse the alcohol supply pipe by performing the alcohol flushing process on
the subcontrol panel. Check that the sterilized water in the container is
decreasing as the process progresses. The process ends automatically in
three minutes (see Figure 7.84).
Chapter 7 Routine Maintenance
203
ENDOSCOPE REPROCESSOR OER-Pro Operation Manual
17. Attach the cap to the alcohol tank and close the detergent/alcohol drawer
(see Figure 7.85).
Figure 7.85
18. Drain the pipe of rinsing water and fill the pipe with alcohol by performing the
alcohol flush process on the subcontrol panel. The process ends
automatically in three minutes (see Figure 7.84).
19. Rinse the cleaning tub by performing the rinsing process on the subcontrol
panel.
20. Open the lid and disconnect the connector jigs.
204
Chapter 7 Routine Maintenance
ENDOSCOPE REPROCESSOR OER-Pro Operation Manual
7.16 Preparing the reprocessor for long-term storage
Before handling the alcohol, read the precautions carefully
and use it as instructed.
Do not tilt the alcohol tank while there is still alcohol inside.
Otherwise, the alcohol may spill.
1. Discharge disinfectant solution from the device as described in “Draining
through the disinfectant collection hose” on page 177. Also drain detergent
from the detergent piping.
2. Pull out the detergent/alcohol drawer.
3. Prepare a beaker or similar container and pour about 50 mL of 70% ethyl
alcohol or isopropyl alcohol into it.
4. Remove the detergent tank cap to which a tube is connected.
Figure 7.86
Check Required items
Syringe and tube
Connector jigs
70% ethyl alcohol or isopropyl alcohol
Small glass container with a capacity of about 200 ml, such as a beaker
Provided wrench
Clean cloth
Table 7.18
Chapter 7 Routine Maintenance
205
ENDOSCOPE REPROCESSOR OER-Pro Operation Manual
5. Put the removed cap in the container of 70% ethyl alcohol or isopropyl alcohol.
Figure 7.87
6. Step the foot pedal to open the lid.
7. Connect the provided syringe and tube.
Figure 7.88
206
Chapter 7 Routine Maintenance
ENDOSCOPE REPROCESSOR OER-Pro Operation Manual
8. Connect the tube to the detergent nozzle inside the cleaning tub and suction
it with the syringe until detergent comes out.
Figure 7.89
9. Remove the syringe from the tube, discharge the alcohol from inside the
syringe, and repeat the suction operations until the container runs out of
70% ethyl alcohol or isopropyl alcohol.
10. Remove the tube from the detergent nozzle.
Figure 7.90
11. Remove the detergent tank and discharge detergent from the tank. Rinse
the detergent tank thoroughly in running water, dry it thoroughly, and put it
back on the detergent/alcohol drawer.
Chapter 7 Routine Maintenance
207
ENDOSCOPE REPROCESSOR OER-Pro Operation Manual
12. Attach the cap to the detergent tank.
Figure 7.91
13. To disconnect the tube connected to the alcohol tank cap, push and hold the
lock lever on the connector and pull the tube.
Figure 7.92
Cap
Alcohol tank
208
Chapter 7 Routine Maintenance
ENDOSCOPE REPROCESSOR OER-Pro Operation Manual
14. Take the alcohol tank out of the device.
15. Turn the alcohol tank cap to remove it, empty the alcohol from the tank and
dry the inside.
Figure 7.93
16. Put the cap back on the tank, place the tank on the detergent/alcohol
drawer, and connect the tube to the cap again.
Figure 7.94
17. Close the detergent/alcohol drawer.
Cap
Alcohol tank
Chapter 7 Routine Maintenance
209
ENDOSCOPE REPROCESSOR OER-Pro Operation Manual
18. Attach the connector jigs to the connectors on the cleaning tub.
Figure 7.95
19. Close the lid.
20. Perform the operation described in Section 6.7, “Air purge”.
21. Close the water supply faucet.
22. Press the FUNC SEL button on the subcontrol panel to select “LEAK TEST”,
and press the FUNC START button.
Figure 7.96
23. In about 10 seconds, press the STOP/RESET button to stop the leak test.
24. Drain water from the water filter housing as described in “Draining water
from the water filter housing” on page 143.
25. Step the foot pedal to open the lid, disconnect the connecting tubes, dry
them thoroughly and store them in a clean place.
210
Chapter 7 Routine Maintenance
ENDOSCOPE REPROCESSOR OER-Pro Operation Manual
26. Press the power switch to set it OFF.
To prevent leakage or damage, do not deform or
disassemble the water supply adapter.
27. Turn the connection ring of the water supply adapter in the direction shown
to disconnect the adapter from the equipment with the provided wrench. If
residual water is spilled from the water supply adapter, wipe it away with a
clean cloth.
Figure 7.97
28. Put the water supply adapter in the wide-mounthed container to collect any
residual water and disconnect the water supply hose from the faucet.
29. Disconnect the water supply adapter from the water supply hose.
30. Step the foot pedal to open the lid, dry the cleaning tub thoroughly so that no
bacterial growth will occur inside it, and then close the lid.
31. Disconnect the power cord plug from the hospital-grade power outlet.

Chapter 7 Routine Maintenance
211
ENDOSCOPE REPROCESSOR OER-Pro Operation Manual
7.17 Installing the printer paper roll
Do not touch the printer or its surroundings during and
immediately after printing. They will be very hot and may
cause burns.
• Always use the Olympus-designated printer paper roll with
this equipment. Otherwise, incorrect printing or equipment
failure may result.
• To prevent printer failure or printer paper roll discoloration, do
not touch the printer or printer paper roll with wet hands.
• Always keep the printer cover closed. Otherwise, the printer
and/or printer paper roll may get wet and cause malfunction.
• To avoid damage to or deterioration of the printout, do not
allow the paper to make contact with the following:
Alcohol or EndoRapid 980 ml pack (Olympus-designated
detergent)
Oil, fat, organic solvents, or chemicals (medical, industrial
or cosmetic)
Stamp ink
Water
Materials containing plasticizer (PVC film, desk mat,
leather products, journal cover, etc.)
Certain stationery (plastic tape, mending tape,
fluorescent-ink pen, oil-ink pen, adhesives other than
starchy paste)
• To prevent discoloration of unused paper, store the printer
paper roll without opening in a place meeting the following
conditions.
Dark, cool place
Place not exposed to NOx, SOx, or O3 (ozone)
• When red lines appear on both sides of the printer paper roll
during printing, replace the printer paper roll.
212
Chapter 7 Routine Maintenance
ENDOSCOPE REPROCESSOR OER-Pro Operation Manual
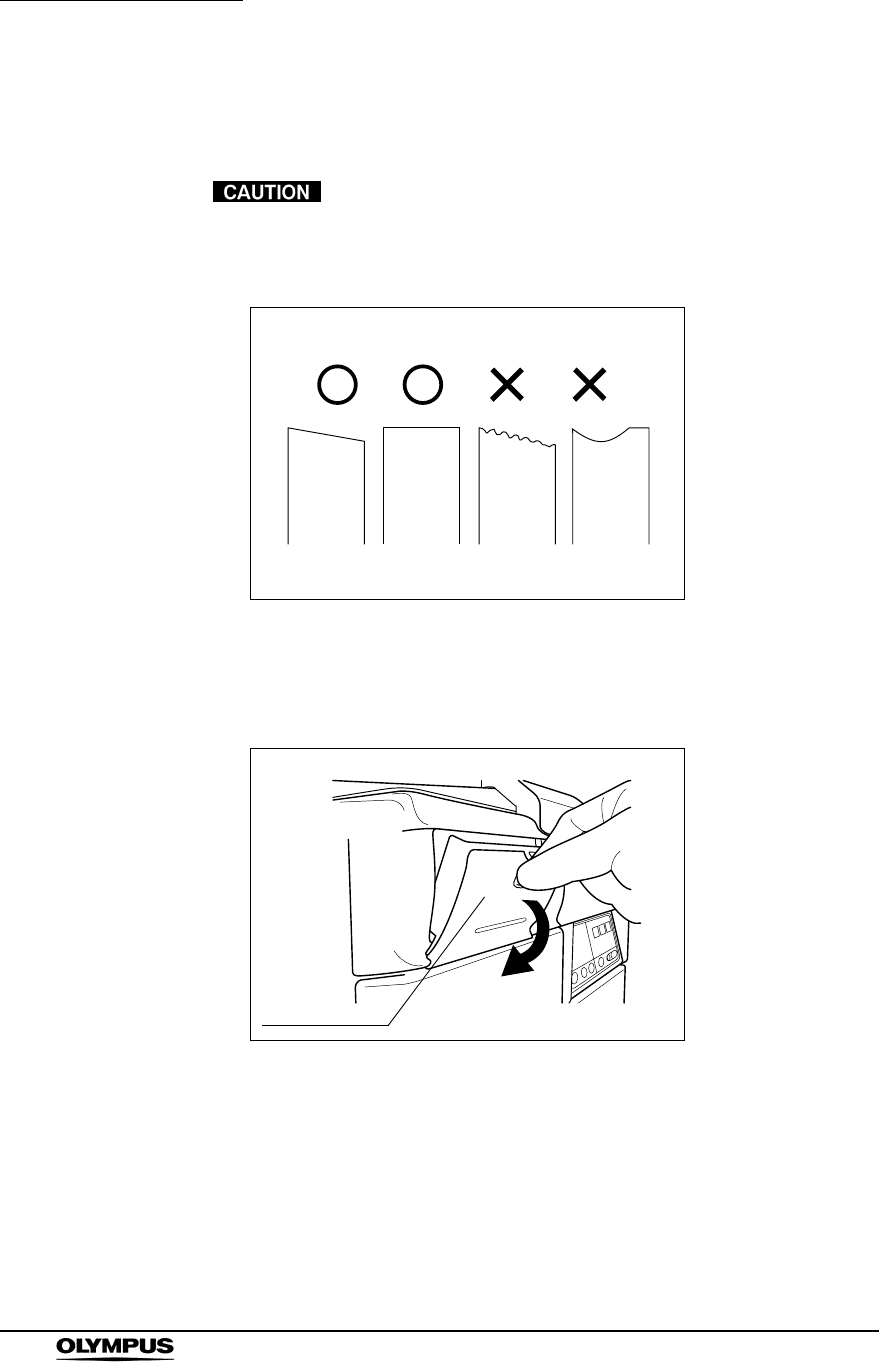
1. Take out the printer paper roll from the package and peel off the tape holding
the end of the paper.
If the end of the paper is not straight, trim it so that it is
perpendicular to the side edges. Otherwise, the printer paper
roll may not load properly in the printer.
Figure 7.98
2. Make sure that the power switch is ON.
3. Hold the printer cover handle and pull it toward the front.
Figure 7.99
Printer cover
Chapter 7 Routine Maintenance
213
ENDOSCOPE REPROCESSOR OER-Pro Operation Manual
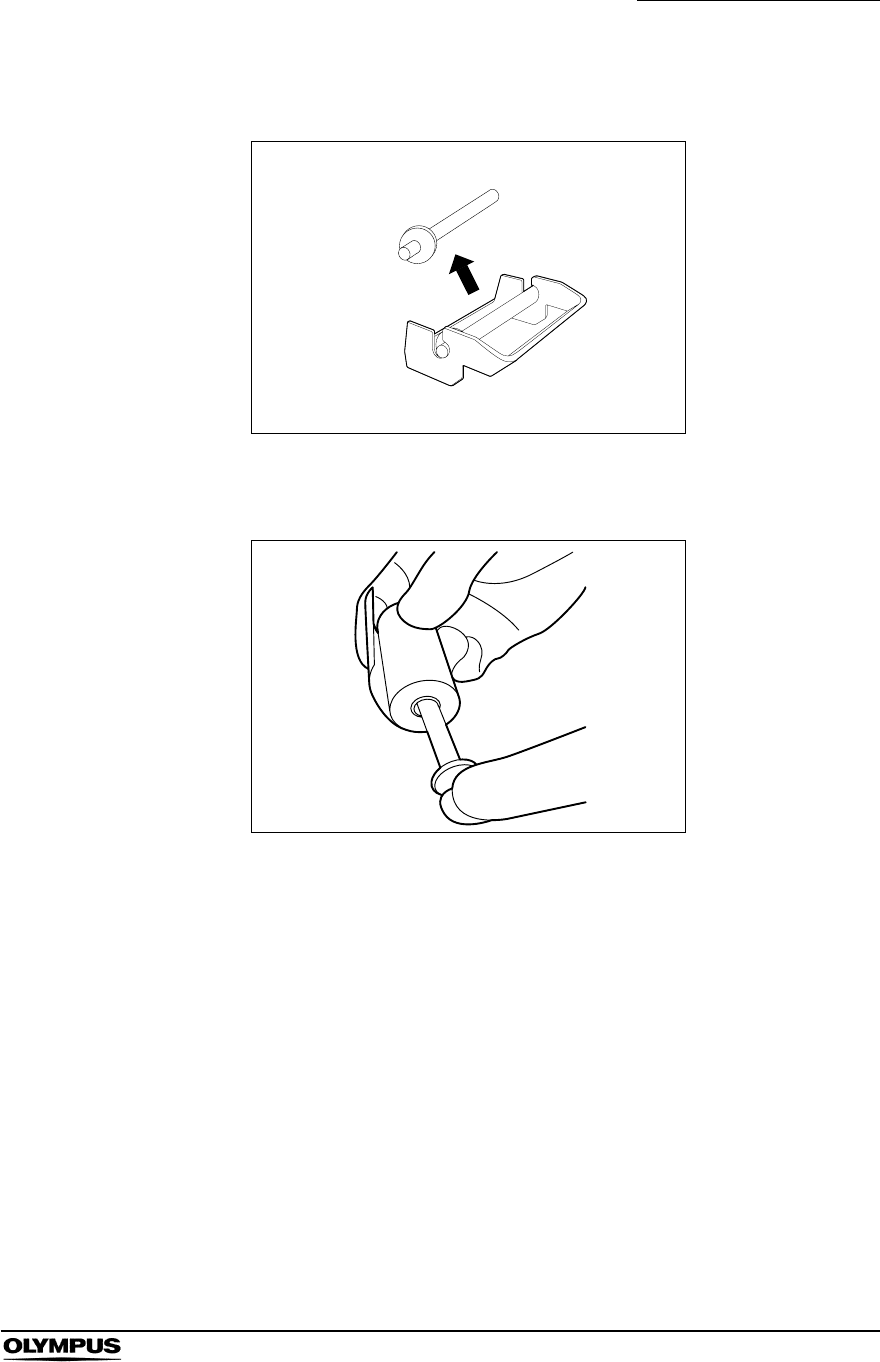
4. Take out the roll shaft from the printer roll axle.
Figure 7.100
5. Insert the roll shaft through the printer paper roll as shown below.
Figure 7.101
214
Chapter 7 Routine Maintenance
ENDOSCOPE REPROCESSOR OER-Pro Operation Manual
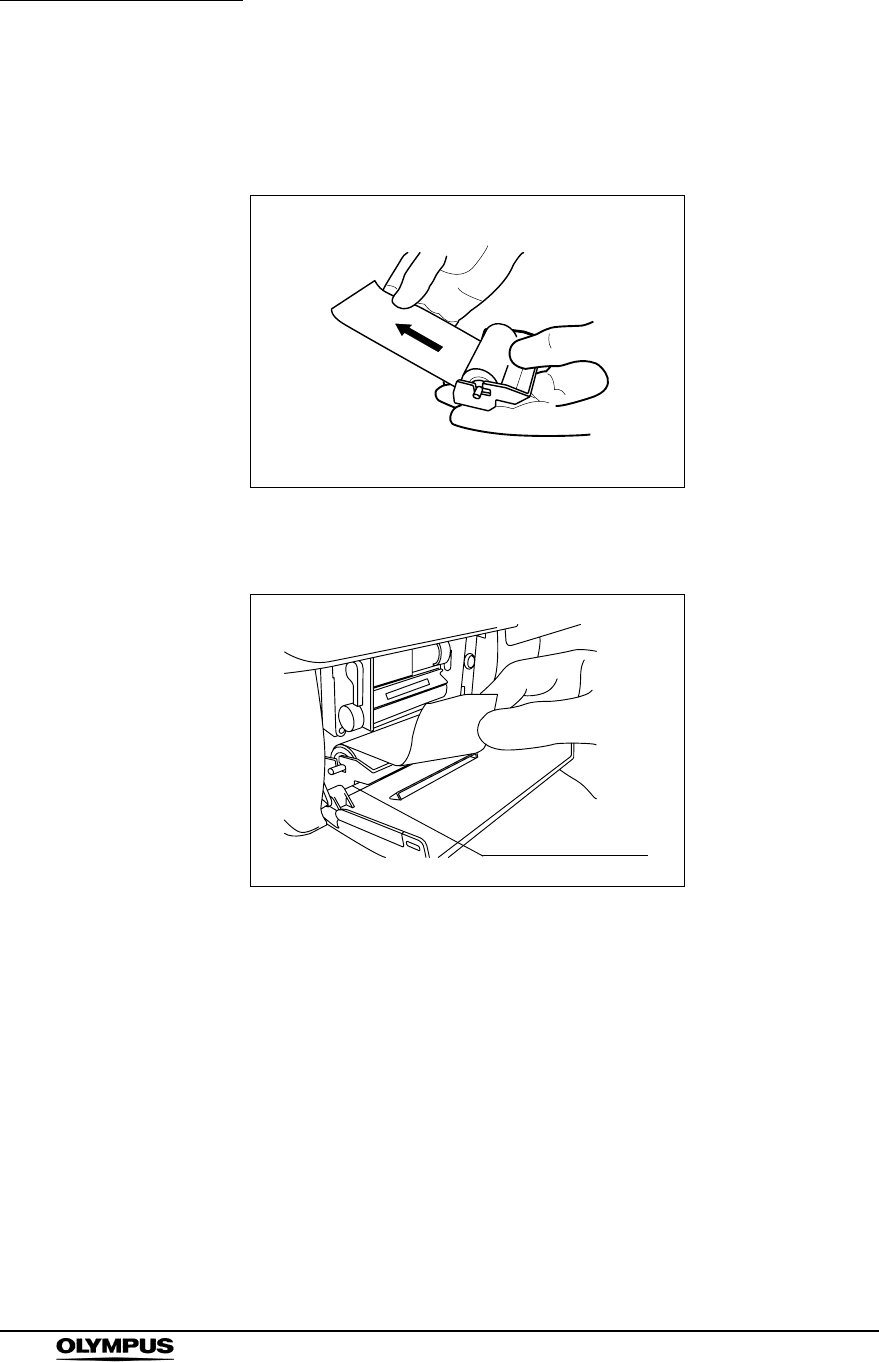
6. Place the roll shaft, inserted through the printer paper roll, on the printer roll
axle. Make sure the printer paper roll feed direction is set as shown below,
and pull the paper out about 10 cm (4 inches).
Figure 7.102
7. Attach the printer roll axle on the printer roll axle mount of the printer.
Figure 7.103
Paper roll axle
mount
Chapter 7 Routine Maintenance
215
ENDOSCOPE REPROCESSOR OER-Pro Operation Manual
8. Hold the two edges of the printer paper roll as shown in Figure 7.104 below
and insert the paper into the printer paper roll inlet of the printer. Insert so
that the printer paper roll is between the projections as shown in Figure
7.105.
Figure 7.104
9. The printer paper roll is fed automatically.
Figure 7.105
printer paper roll inlet
Projections
216
Chapter 7 Routine Maintenance
ENDOSCOPE REPROCESSOR OER-Pro Operation Manual
• If the paper is not fed automatically, rotate the paper feed
roller on the left of the printer while keeping the printer paper
roll inserted into the printer paper roll inlet. This should cause
the printer paper roll to be fed automatically.
Figure 7.106
• If the printer paper roll cannot be inserted neatly, cut the
paper, raise the release lever, rotate the paper feed roller to
remove the printer paper roll from the printer, lower the
release lever, and retry insertion.
• If the release lever on the left side of the printer is raised, the
printer paper roll cannot be fed automatically. Make sure that
the release lever is lowered.
Figure 7.107
10. Rotate the paper feed roller on the left side of the printer clockwise to feed
the paper by about 5 cm.
Release lever
Paper feed roller
Chapter 7 Routine Maintenance
217
ENDOSCOPE REPROCESSOR OER-Pro Operation Manual
11. Insert the edge of the fed paper into the slit on the printer cover.
Figure 7.108
12. Close the printer cover and cut any excessive paper protruding from the slit.
Figure 7.109
7.18 Care and maintenance after long-term storage
When using the equipment after it has been stored for a long period without
being used, install the equipment again by referring to “Instructions-Installation
Manual”.
Slit
218
Chapter 8 Troubleshooting and Repair
ENDOSCOPE REPROCESSOR OER-Pro Operation Manual
Chapter 8 Troubleshooting and Repair
When the cleaning/disinfection process is interrupted, the
scopes will not be properly cleaned and disinfected. In this
case, reprocessing should be started again from the
beginning.
If any irregularity is detected during an inspection or if the device is clearly
malfunctioning, do not use it. Contact Olympus for repair.
Some problems that appear to be malfunctions may be correctable by referring
to Section 8.1, “Troubleshooting guide” on page 218. If the problem cannot be
resolved by the described remedial action, do not use the device and contact
Olympus.
8.1 Troubleshooting guide
• When the cleaning/disinfection process is interrupted, the
scopes will not be properly cleaned and disinfected. In this
case, reprocessing should be started again from the
beginning.
• Before handling the disinfectant solution, read the
precautions carefully and use it as instructed. It is especially
important to know what to do if the disinfectant solution
comes in contact with your skin.
• When handling the disinfectant solution, wear appropriate
personal protective equipment to prevent any disinfectant
from getting on your skin or being inhaled. To avoid adverse
physical effects, be careful not to touch the disinfectant
solution directly or to inhale too much vapor. If any
disinfectant solution gets in your eyes, immediately rinse with
a large amount of fresh water and then consult a medical
specialist. Personal protective equipment, such as eye wear,
face mask, moisture-resistant clothing, and
chemical-resistant gloves that fit properly and are long
enough so that your skin is not exposed. All personal
protective equipment should be inspected before use and
replaced periodically before it is damaged.

Chapter 8 Troubleshooting and Repair
219
ENDOSCOPE REPROCESSOR OER-Pro Operation Manual
• Do not open the lid, in case the process stops and
disinfectant solution remains in the cleaning tub due to the
power failure or the internal irregularly. Otherwise,
disinfectant vapor could cause adverse physical effects.
• When using the disinfectant solution and alcohol, Olympus
recommends the use of gas filters and running this
equipment in well-ventilated areas.
Wear a facemask, gloves, and protective clothes to
minimize aspiration and skin contact.
Wear goggles for eye protection.
• If the rinsing process is started during error treatment while
disinfectant solution remains in the cleaning tub, the
disinfectant solution will be drained out of the device. To
prevent this, the disinfectant solution should be collected first
when an error code is displayed by referring to “Error codes
and what to do about them”.
• Do not press the power switch OFF when an error code is
displayed. Doing so may result in malfunction. The device
automatically starts automatic error treatment (The error
code will blink during automatic processing). After the error
code starts blinking, follow the instructions in “Error codes
and what to do about them” below.
Refer to the following association's guidelines related to
ventilation:
SGNA (Society of Gastroenterology Nurses and
Associates)
ASGE (American Society of Gastroenterological
Endoscopy)
APIC (Association for Professionals of Infection
Control and Epidemiology)
AORN (Association of Preoperative Registered
Nurses)
ASTM (American Society for Testing and Materials)
OSHA (Occupational Safety and Health
Administration)
ACGIH (American Conference of Governmental
Industrial Hygienists)
NIOSH (National Institute for Occupational Safety
and Health)
AIA (American Institute of Architects)
Do not handle the equipment if the operator shows any
allergic symptoms even while wearing protective gear.

220
Chapter 8 Troubleshooting and Repair
ENDOSCOPE REPROCESSOR OER-Pro Operation Manual
Error codes and what to do about them
Error
Code Problem Possible Causes Remedial Actions
E00 Process is
interrupted.
STOP/CODE
CLEAR button is
pressed during
process.
Wait until automatic processing is finished. During the error
processing, the error code may either blink or light steadily. If
you want to interrupt automatic processing and discharge fluid
inside the device, perform air purge. If you want to rinse the
tub, perform rinsing.
E01 Filling the tub
with water takes
too long (water
supply time is
too long).
• The faucet is not
open enough.
• Water leakage
or clogging in
the water supply
piping.
• Open the faucet all the way.
• Check if water is leaking from the connections on the water
supply devices to the equipment: the faucet, the water supply
hose, and the water supply adapter.
• Replace the water filter.
• Clean the mesh filter in the water supply adapter connector.
E02 Cleaning fluid is
not discharged.
• Irregularity in
the drain tubing.
• Clogging of the
mesh filter in the
drain port of the
cleaning tub.
• Check the drain hose for improper installation.
• Clean the mesh filter in the drain port of the tub.
• Close the lid and perform air purge to remove water.
E04 Cleaning fluid
decreases
during the
cleaning
process.
Internal problem
with the device.
Contact Olympus.
E05 Cleaning fluid
level is too high.
Irregularity in the
fluid level sensor.
Contact Olympus (if water supply will not stop, close the
faucet).
E06 Fluid level
sensor
malfunctions.
Erroneous
detection due to
dirt attached to the
fluid level sensor
(middle).
Clean the fluid level sensor.
E07 Fluid level
sensor
malfunctions.
Erroneous
detection due to
dirt attached to the
fluid level sensor
(lower).
Clean the fluid level sensor.
E11 There is too
much
disinfectant
solution in the
disinfectant
solution tank.
• Irregularity in
the drain piping.
• Irregularity in
the disinfectant
solution
collection
piping.
• Close the lid if it is open. Automatic Processing will start after
the lid is closed.
• Check that the drain hose is installed properly.
• Clean the mesh filter in the drain port of the tub.
• If you want to continue the use of the device, check the
disinfectant solution concentration with the test strip and
replace the disinfectant solution if it has lost the potency.
Chapter 8 Troubleshooting and Repair
221
ENDOSCOPE REPROCESSOR OER-Pro Operation Manual
E12 There is an
insufficient
amount of
disinfectant
solution in the
disinfectant
solution tank.
Not enough
disinfectant
solution in the
disinfection
solution tank.
• Clean the mesh filters in the circulation port.
• Drain the disinfectant solution from the disinfectant solution
tank and add new disinfectant solution.
E13 It takes very
little time for the
cleaning tub to
fill with
disinfectant
solution.
Due to improper
discharge, fluid
remains in the tub
before the
disinfection
process.
• Check the drain hose for proper installation.
• Clean the mesh filter in the drain port of the tub.
• Discharge the disinfectant solution remaining in the device
with the following procedure, prepare a new disinfectant
solution and restart the process.
1. Discharging the residual disinfectant solution from the tub:
Close the lid and perform the air purge operation to
discharge residual disinfectant solution in the tub through
the drain hose. If discharge through the drain hose is
difficult, contact Olympus.
2. Discharging disinfectant solution from the disinfectant
solution tank:
Connect the drain connector to the disinfectant removal
port and drain disinfectant solution from the tank.
Alternatively, connect the disinfectant collection hose to the
disinfectant solution nozzle and perform the
“DISINFECTANT DRAIN” operation to drain disinfectant
solution from the tank.
E14 Disinfectant
solution cannot
be recollected.
Clogging of the
cleaning tub’s
drain port mesh
filter.
• Wait until the disinfectant solution is collected.
• Remove and clean the mesh filters in both the drain port and
circulation port.
• If the quantity of the disinfectant solution in the disinfectant
solution tank is not sufficient, drain the disinfectant solution
from the tank and add a new disinfectant solution.
E15 Fluid level
sensor
malfunctions.
• Erroneous
detection due to
dirt attached to
the fluid level
sensor (middle).
• Internal problem
with the device.
Clean the fluid level sensor.
E16 It takes too long
to fill the
cleaning tub
with disinfectant
solution.
Internal problem
with the device.
Contact Olympus.
Error
Code Problem Possible Causes Remedial Actions

222
Chapter 8 Troubleshooting and Repair
ENDOSCOPE REPROCESSOR OER-Pro Operation Manual
E17 Disinfectant
solution cannot
be heated.
Internal problem
with the device.
Contact Olympus.
E18 Temperature
sensor
malfunctions.
Internal problem
with the device.
Contact Olympus.
E21 Air is not purged
through scope
channels (air
purge pressure
is low).
• Improper
installation of air
filter.
• Clogging of air
filter.
• Check that the air filter is properly installed.
• If the air filter is installed properly, replace it.
E22 Insufficient fluid
pressure.
Clogging of the
mesh filters in the
circulation port.
Clean the mesh filters in the circulation port of the tub.
E23 Excessive fluid
pressure.
Internal problem
with the device.
Contact Olympus.
E31 lid is open. At the beginning of
the process:
START button was
pressed while the
lid is open.
Close the lid firmly and restart the process.
During the
process:
Internal problem
with the device.
Contact Olympus.
E41 The power was
lost and then
restored during
the process.
• Power supply
was interrupted.
• Power cord
contact failure.
Check the power cord for proper connection. Disconnect the
power cord from the power outlet and check that it is free from
scratches or damage. If irregularities are found, replace the
power cord.
E51 Water leakage
inside the
device.
Internal problem
with the device.
Close the faucet and contact Olympus.
E61 Ultrasonic
cleaning is not
functioning.
Irregularity in the
ultrasonic
oscillator.
Contact Olympus.
E71 Abnormalities
with the
disinfectant
solution
cassette bottle
tray sensor.
Internal problem
with the device.
Contact Olympus.
Error
Code Problem Possible Causes Remedial Actions

Chapter 8 Troubleshooting and Repair
223
ENDOSCOPE REPROCESSOR OER-Pro Operation Manual
E72 Disinfectant
solution in the
disinfectant
solution tank
cannot be
discharged.
Internal problem
with the device.
If disinfectant solution remains in the tub, perform the same
remedial action as [E13]. In other cases, contact Olympus.
E76 Irregularity in
the fluid level
sensor in the
disinfectant
tank.
Internal problem
with the device.
Contact Olympus.
E81 The process
cannot be
properly
controlled.
Internal problem
with the device.
Contact Olympus.
E82 Internal
irregularity in
the device.
Irregularity in the
electrical circuitry
inside the device.
Contact Olympus.
E83 The process
cannot be
properly
controlled.
Irregularity in the
electrical circuitry
inside the device.
Contact Olympus.
E84 Malfunction of
the ID reader.
Irregularity in the
electrical circuitry
inside the device.
Contact Olympus.
E91 ID read error. • ID is not read.
• Multiple IDs are
read.
Press the STOP/CODE CLEAR button, check that the ID
Recognition indicators are not lit on the main control panel, and
read the IDs again.
E92 Exceeded leak
test time.
Exceeded test
time (10 minutes).
Perform leak test again.
E93 No alcohol
remains.
• The alcohol has
run out.
• Alcohol cannot
be supplied to
the device.
• Irregularity in
the alcohol
sensor.
• Clog in the
pump or piping.
• Check the amount of alcohol in the tank.
• Correct the orientation of the alcohol connector (follow the
procedure in Section 3.5, “Inspecting the remaining quantity
of alcohol, and replenishment” on page 43).
• Inspect them as described in “If error code [E93] is displayed
while alcohol is still present in the alcohol tank:” on page 90.
Error
Code Problem Possible Causes Remedial Actions
224
Chapter 8 Troubleshooting and Repair
ENDOSCOPE REPROCESSOR OER-Pro Operation Manual
Other errors and their treatment
E94 The equipment
is not printing.
• Printer paper
roll has run out.
• The release
lever is raised.
• Install the printer paper roll properly.
• Check that the release lever is set in the proper position.
E95 No detergent
remaining.
• The detergent
has run out.
• The detergent
cannot be
supplied to the
equipment.
• Abnormality in
the alcohol
sensor.
• Clog in the
pump or piping.
• Check the detergent tank for remaining detergent.
• Correct the orientation of the detergent connector. Follow the
procedure in Section 3.4, “Inspecting the remaining quantity
of detergent, and replenishment” on page 37).
• Inspect them as described in “When the error code [E95] is
displayed even though there is enough detergent in the tank”
on page 84.
Problem Possible Causes Remedial Actions
The odor of the disinfectant
solution is stronger than
before.
• The gas filter has
expired.
• Disinfectant solution is
leaking.
• Replace the gas filter as described in Section 7.1,
“Replacing the gas filter (MAJ-822)” on page 138. If
the problem persists after replacement, contact
Olympus.
• Check if the disinfectant solution is leaking. If it is, do
not use the device and contact Olympus.
Water leaks from the
device.
Improper installation of
water filter housing.
Stop the current process and reattach the water filter
housing as described in Section 7.2, “Replacing the
water filter (MAJ-824)” on page 142.
However, the STOP/CODE CLEAR button may not work
if stopping the water might cause a hazardous situation,
for example during disinfectant solution replacement. In
this case, close the faucet, tighten the water filter
housing, then open the faucet again and continue the
process. If an error code is displayed, take the
appropriate remedial action for that error.
Internal problem with the
device.
Close the faucet, set the power switch to OFF,
disconnect the power cord plug from the wall mains
outlet and contact Olympus.
Error
Code Problem Possible Causes Remedial Actions
Chapter 8 Troubleshooting and Repair
225
ENDOSCOPE REPROCESSOR OER-Pro Operation Manual
Fluid leaks from the
disinfectant removal port.
Something is clogging the
disinfectant removal port.
Connect the drain connector as described in to Section
3.8, “Inspecting the disinfectant solution’s concentration
level” on page 50, push the head of the connector
several times so that the material stuck in the port is
removed. If leakage is still detected, attach the rubber
cap to the disinfectant solution drain port and contact
Olympus.
Flow of the water in the
cleaning tub is weaker than
before.
Incomplete opening of the
faucet.
Open the faucet fully.
Improper installation of
water filter.
Reattach the water filter as described in Section 7.2,
“Replacing the water filter (MAJ-824)” on page 142.
Clogging of water filter. Replace the water filter as described in Section 7.2,
“Replacing the water filter (MAJ-824)” on page 142.
Clogging of the mesh filter
in the water supply adapter
connector.
Clean the mesh filter as described in Section 7.13,
“Cleaning the mesh filter in the water supply adapter
connector” on page 193.
Connecting tube cannot be
connected.
Not using the appropriate
connecting tube.
Consult the List Of Compatible Endoscopes/Connecting
Tubes <OER-Pro>.
Lid cannot be closed. Lid is locked. Step the foot pedal to unlock the lid.
A part of the cleaning tub is
applied against the lid.
Check that the lid is not pushed by the fluid level sensor,
washing case or scope inside the tub. If it is pushed out
of position, correct its positioning.
Ultrasonic endoscopes
cannot be placed on the
retaining rack.
Retaining rack for
ultrasonic scopes is not
used.
Use the retaining rack for ultrasonic scopes (optional
MAJ-840) and place the ultrasonic scopes on it.
Disinfectant solution is left
in the cleaning tub.
STOP/CODE CLEAR
button was pressed during
disinfection process to
force it stop.
If an error code is displayed, take the corresponding
remedial action. Collect or drain the disinfectant solution
and then rinse the tub as described in Section 6.8,
“Rinsing” on page 133. Since the scopes may not be
properly disinfected, they should be put through the
reprocessing process again from the beginning.
Cleaning fluid is remaining
in the cleaning tub.
STOP/CODE CLEAR
button was pressed during
cleaning process to force it
stop.
Rinse the tub as described in Section 6.8, “Rinsing” on
page 133. Since the scopes may not be properly
disinfected, they should be put through the reprocessing
process again from the beginning.
Problem Possible Causes Remedial Actions
226
Chapter 8 Troubleshooting and Repair
ENDOSCOPE REPROCESSOR OER-Pro Operation Manual
Panel display disappears
completely during a
process.
• Power cord is
disconnected from the
power outlet.
• Circuit breaker is
activated.
• The power failure
occurred.
Perform the checks described in Section 4.1, “Power
activation and opening the faucet” on page 57. Error
code [E41] will be displayed when the device is turned
ON.
After checking, press the STOP/CODE CLEAR button to
release the error code. However, if the error code is
blinking, the disinfectant solution in the tub is being
collected in the tank and pressing the button will have no
effect; in this case, wait until the blinking changes to a
steady light.
Panel display does not light
in sequence when the
device is turned on.
Power switch is set to ON
in less than 5 seconds after
it was set to OFF.
Set the power switch to OFF, wait for 5 seconds or more
and set the power switch to ON again.
Reprocessing operator
feels sick during work.
The operator may be
allergic to the disinfectant,
detergent or alcohol.
Stop doing any reprocessing and consult a medical
specialist.
Disinfectant solution is
judged to be ineffective with
the test strip.
Expiration of the service life
of the disinfectant solution.
Replace the solution as described in Section 7.12,
“Replacing the disinfectant solution” on page 176.
Bacteria were detected as
a result of culture test of a
reprocessed scope.
• Expiration of service life
of filters, degradation of
disinfectant solution, etc.
• Water supply piping is not
disinfected.
Inspect the equipment as described in Chapter 3,
“Inspection Before Use”, preclean the scope and put it
through the reprocessing process again from the
beginning. If bacteria are detected again in the next
culture test, contact Olympus.
Bacterial were detected as
a result of culture test of
rinsing water collected from
the device.
• Expiration of service life
of filters, degradation of
disinfectant solution, etc.
• Water supply piping is not
disinfected.
Inspect the equipment as described in Chapter 3,
“Inspection Before Use”. If bacteria are detected again in
the next culture test, contact Olympus.
Scopes were not
precleaned before being
reprocessed. –
Inspect the equipment as described in Chapter 3,
“Inspection Before Use” to confirm that the disinfectant
solution has not lost its strength, the mesh filters are not
clogged, etc. Next, preclean the scopes and reprocess
them again from the beginning.
Printed paper is not output
from the printer.
• Printer paper roll has run
out.
• Paper jam.
Take the remedial action by referring to Section 3.9,
“Inspecting the printer paper roll” on page 53.
Abnormal noise from the
device.
Internal problem with the
device.
Contact Olympus.
Problem Possible Causes Remedial Actions

Chapter 8 Troubleshooting and Repair
227
ENDOSCOPE REPROCESSOR OER-Pro Operation Manual
8.2 Returning the endoscope reprocessor for repair
Before returning the device for repair, contact Olympus. When you return the
equipment, include a description of the malfunction or damage and how it
occurred. Olympus will repair the equipment free of charge within the warranty
period.

228
Appendix
ENDOSCOPE REPROCESSOR OER-Pro Operation Manual
Appendix
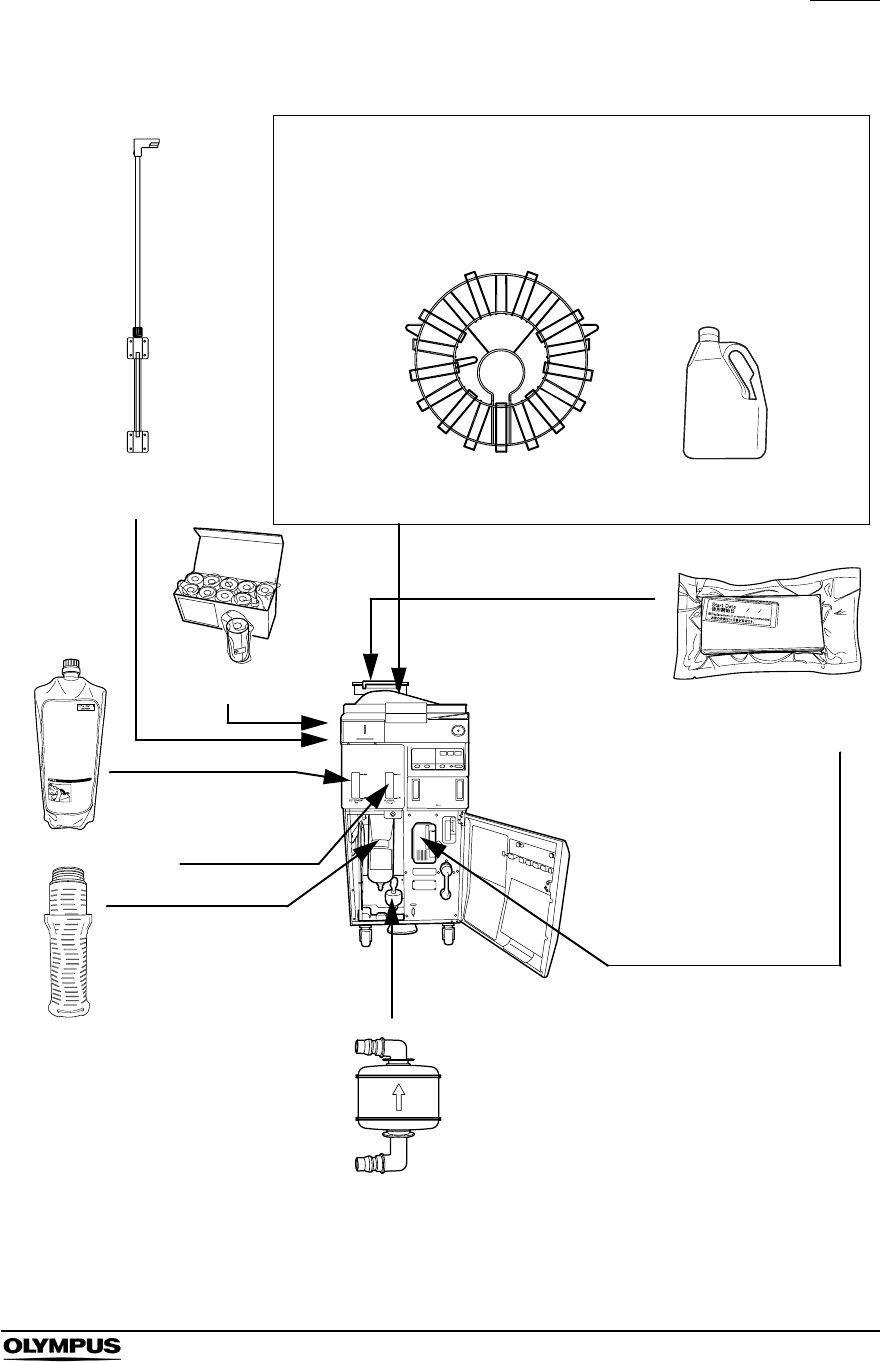
System chart
The recommended combinations of equipment and accessories that can be
used with this equipment are listed below. Some items may not be available in
some areas. New products released after the introduction of this equipment may
also be compatible with this equipment. For further details, contact Olympus.
If combinations of equipment other than those shown below
are used, Olympus cannot guarantee that the device will
perform as expected or the safety of patients and operators.
Nor can the durability of the device be guaranteed when
nondesignated equipment is used. Any damage resulting
from improper combinations will not be serviced or repaired
free of charge.
Appendix
229
ENDOSCOPE REPROCESSOR OER-Pro Operation Manual
Cleaning tub
Olympus scopes (for the applicable models, refer to the separately
provided “List of Compatible Endoscopes/Connecting Tubes
<OER-Pro>”).
Connecting tubes (for the connecting tubes usable with each scope
model, also refer to the “List of Applicable Endoscopes and
Connecting Tubes <OER-Pro>”).
Connector Hanger
(MAJ-865)
Retaining Rack for ultrasonic
scopes (MAJ-840)
EndoRapid 980 ml pack
(Olympus-designated
detergent)
Water filter
(MAJ-824)
alcohol
Gas filter
(MAJ-822)
Air filter (MAJ-823)
ENDOSCOPE
REPROCESSOR (OER-Pro)
Aldahol III
(Olympus-designated
disinfectant solution)
Printer paper roll
(MAJ-1497)

230
Appendix
ENDOSCOPE REPROCESSOR OER-Pro Operation Manual
Shipping environment
Operating environment
Specifications
Shipping
environment
Ambient temperatures –40 to +60qC (–40 to +140qF)
Relative humidity 10 – 90
Atmospheric pressure 700 – 1060 hPa
Operating
environment
Ambient temperatures 10 – 40qC (50 – 140qF)
Relative humidity 30 – 85
Atmospheric pressure 700 – 1060 hPa
(0.7 – 1.1 kgf/cm2)
(10.2 – 15.4 psia)
Elevation 3000 meters (maximum)
Designed for use Indoors
Water supply flow 17 l/min. or more when the faucet is fully
open
Water supply pressure Between 0.1 to 0.5 MPa
Water supply
temperature
Max. 25qC
Applicable
scopes
Olympus flexible endoscopes
(Refer to the “List of compatible Endoscopes and Connecting Tubes
<OER-Pro>” for details)
(Note 1) There is no data supporting the sterilization effect of this
equipment. Therefore, after cleaning/disinfecting a
scope that requires sterilization, be always sure to
sterilize the scope as instructed in its instruction
manual.
Number of
reprocessed
scopes
Max. 2 (1 with certain models)
Cleaning
method
Exterior surfaces Ultrasonic cleaning, running fluid
cleaning
Channel interiors Fluid flushing cleaning
Valves Ultrasonic cleaning, fluid flushing
cleaning
Appendix
231
ENDOSCOPE REPROCESSOR OER-Pro Operation Manual
Disinfection
method
Exterior surfaces Disinfectant solution immersion
Channel interiors Disinfectant solution flushing and
flooding
Valves Disinfectant solution immersion
Cleaning time
setting
2 – 10 minutes (Setting variable in
1 min. increments)
Disinfection
time setting
10 minutes
Disinfectant
solution
heating setting
20qC (68qF)
(If the temperature of disinfectant
solution is below 20qC, it is heated to
20qC (68qF).)
Disinfectant
solution
heating method
Built-in heater in the cleaning tub.
1. Heating immediately before
disinfection process in a
reprocessing program
2. Heating before the start of a
reprocessing program
Water
discharge
method
Forced draining using a pump (Floor
draining)
Disinfectant
solution
discharge
method
1. Draining through disinfectant
collection hose
2. Draining through drain hose
Cleaning tub
capacity
Approximately 14 L
Disinfectant
solution tank
capacity
Approximately 17.5 L
Disinfectant
solution
Aldahol III (Olympus-designated
disinfectant solution)
Detergent EndoRapid 980 ml pack
(Olympus-designated detergent)
Visual leakage
detection
Bubble detection during immersion
Alcohol
flushing
Automatic flushing/draining using a
pump and compressor
Dimensions 450 (W) u 765 (D) u 955 (H) mm
Weight 120 kg (dry condition)
232
Appendix
ENDOSCOPE REPROCESSOR OER-Pro Operation Manual
Power supply Voltage 120 V AC
Frequency 60 Hz
Input current 5.5 A
Voltage fluctuation r10
Medical device
classification
Protection against
electric impact Class I
Ultrasonic wave Frequency 36 r2kHz
Power 100 W r20
EMC Applied standard;
IEC 61326: 2002
This equipment complies with the
standards listed in the left column.
CISPR 11 of emission:
Group1,Class B
Electrical safety Applicable standard;
UL 61010-1: 2004
CSA C22.2 No. 61010-1:
2004
CSA C22.2
No.61010-2-045: 2004
IEC 61010-1: 2001
IEC 61010-2-040: 2005
This equipment complies with the
standard listed in the left column.
Installation category: II
Pollution degree: 2
Radio
Transmitter
Compliance ISO/IEC 18000-3 (Mode1)
Center Frequency 13.56 MHz
Modulation ASK
Effective Radiated
Power
300 mWr20

Appendix
233
ENDOSCOPE REPROCESSOR OER-Pro Operation Manual
EMC information
This model is intended for use in the electromagnetic environments specified
below. The user and the medical staff should ensure that it is used only in these
environments.
Magnetic emission compliance information and
recommended electromagnetic environments
Olympus confirmed that the level of this equipment's
harmonic emissions is low.
Emission
standard Compliance Guidance
RF emissions
CISPR 11
Group 1 This equipment uses RF (radio frequency) energy only for its internal
function. Therefore, its RF emissions are very low and are not likely to cause
any interference in nearby electronic equipment.
RF emissions
CISPR 11
Class B This equipment’s RF emissions are very low and are not likely to cause any
interference in nearby electronic equipment.
Main terminal
conducted
emissions
CISPR 11
Harmonic
emissions
IEC 61000-3-2
Not applicable Power supply specification of this equipment is less than 220VAC, and this
equipment can be exempt from requirements of IEC 61000-3-2.
Voltage
fluctuations/flicker
emissions
IEC 61000-3-3
Not applicable Power supply specification of this equipment is less than 220 VAC, and this
equipment is exempt from requirements of IEC 61000-3-3.
234
Appendix
ENDOSCOPE REPROCESSOR OER-Pro Operation Manual
Electromagnetic immunity compliance information and
recommended electromagnetic environments
UT is the a.c. mains power supply prior to application of the
test level.
Immunity test IEC 61326 test level Compliance level Guidance
Electrostatic
discharge (ESD)
IEC 61000-4-2
Contact:r 2, r 4kV
Air:r 2, r 4, r 8kV
Same as left Floors should be made of wood, concrete, or
ceramic tile that hardly produces static. If floors
are covered with synthetic material that tends to
produce static, the relative humidity should be
at least 30%.
Electrical fast
transient/burst
IEC 61000-4-4
r 2kV
for power supply lines
r 1kV
for input/output lines
Same as left Mains power quality should be that of a typical
commercial (original condition feeding the
facilities) or hospital environment.
Surge
IEC 61000-4-5
Differential mode:
r 1kV
Common mode:
r 2kV
Same as left Mains power quality should be that of a typical
commercial or hospital environment.
Voltage dips,
short interruptions
and voltage
variations on
power supply
input lines
IEC 61000-4-11
< 5% UT
(>95% dip in UT)
for 0.5, 1 cycle
Same as left Mains power quality should be that of a typical
commercial or hospital environment. If the user
of this equipment required continued operation
during power mains interruptions, it is
recommended that this equipment be powered
from an uninterruptible power supply or a
battery.
Power frequency
(50/60 Hz)
magnetic field
IEC 61000-4-8
30 A/m Same as left It is recommended to use this equipment by
maintaining enough distance from any
equipment that operates with high current.
Appendix
235
ENDOSCOPE REPROCESSOR OER-Pro Operation Manual
Cautions and recommended electromagnetic environment
regarding portable and mobile RF communications
equipment such as a cellular phones
• Where “P” is the maximum output power rating of the
transmitter in watts (W) according to the transmitter
manufacturer and “d” is the recommended separation
distance in meters (m).
• This equipment complies with the requirements of
IEC 61326: 2002. However, under electromagnetic
environment that exceeds its noise level, electromagnetic
interference may occur on this equipment.
Immunity test IEC 61326
test level
Compliance
level Guidance
Conducted RF
IEC 61000-4-6
3 Vrms
(150 kHz – 80 MHz)
3V (V
1) Formula for recommended separation distance
(V1=3 according to the compliance level)
Radiated RF
IEC 61000-4-3
10 V/m
(80 MHz – 1 GHz)
10 V/m (E1) Formula for recommended separation distance
(E1=10 according to the compliance level)
80 MHz – 800 MHz
800 MHz – 1 GHz
d3.5
V1
------- P=
d3.5
E1
------- P=
d7
E1
------P=
236
Appendix
ENDOSCOPE REPROCESSOR OER-Pro Operation Manual
Recommended separation distance between portable and
mobile RF communications equipment and this equipment
Rated maximum output
power of transmitter
P (W)
Separation distance according to frequency of transmitter (m)
(Calculated as V1=3 and E1=10)
150 kHz – 80 MHz 80 MHz – 800 MHz 800 MHz – 1 GHz
0.01 0.12 0.04 0.07
0.1 0.38 0.12 0.23
1 1.2 0.35 0.70
10 3.8 1.2 2.3
100 12 3.5 7
The guidance may not apply in some situations.
Electromagnetic propagation is affected by absorption and
reflection from structures, objects and people. Portable and
mobile RF communications equipment such as cellular
phones should be used no closer to any part of this
equipment, including cables than the recommended
separation distance calculated from the equation applicable
to the frequency of the transmitter.
FCC & IC information
This equipment complies with part15 of the FCC rules and the IC RSS210. FCC ID: S8Q-GN4215
IC: 4763B-GN4215
FCC WARNING
Change or modifications not expressly approved by the party responsible for compliance could void the
user’s authority to operate the equipment.
d1.2 P=d0.35 P=d0.7 P=

©2007 OLYMPUS MEDICAL SYSTEMS CORP. All rights reserved.
No part of this publication may be reproduced or distributed without the
express written permission of OLYMPUS MEDICAL SYSTEMS CORP.
OLYMPUS is a registered trademark of OLYMPUS CORPORATION.
Trademarks, product names, logos, or trade names used in this
document are generally registered trademarks or trademarks of each
company.

Manufactured by
2951 Ishikawa-cho, Hachioji-shi, Tokyo 192-8507, Japan
Fax: (042)646-2429 Telephone: (042)642-2111
(Premises/Goods delivery) Wendenstrasse 14-18, 20097 Hamburg, Germany
(Letters) Postfach 10 49 08, 20034 Hamburg, Germany Telephone: (040)237730
3500 Corporate Parkway, P.O. Box 610 Center Valley, PA
18034-0610, U.S.A.
Fax: (484)896-7128 Telephone: (484)896-5000
KeyMed House, Stock Road, Southend-on-Sea, Essex SS2 5QH, United Kingdom
Fax: (01702)465677 Telephone: (01702)616333
491B, River Valley Road #12-01/04, Valley Point Office Tower, Singapore 248373
Fax: 6834-2438 Telephone: 6834-0010
Room 1202, NCI Tower, A21 Jianguomenwai Avenue Chaoyang
District Beijing 100022 PRC
Fax: (10)6569-3545 Telephone: (10)6569-3535
117071, Moscow, Malaya Kaluzhskaya 19, bld. 1, fl.2, Russia
Fax: (095)958-2277 Telephone: (095)958-2245
31 Gilby Road, Mount Waverley, VIC., 3149, Australia
Fax: (03)9543-1350 Telephone: (03)9265-5400
5301 Blue Lagoon Drive, Suite 290 Miami, FL 33126-2097, U.S.A.
Fax: (305)261-4421 Telephone: (305)266-2332
Distributed by
Printed in Japan 20070319 *0000
GT2990 01
One Corporate Drive, Orangeburg, N.Y. 10962, U.S.A.
Fax: (845)398-9444 Telephone: (845)398-9400
8F, Hyundai Marines Bldg., 646-1, Yeoksam-Dong, Kangnam-Gu, Seoul 135-080 Korea
Fax: (02)6255-3499 Telephone: (02)1544-3200