Olympus Medical Systems GN4215 Endoscope Reprocessor with RFID User Manual Manual P115 P244
Olympus Medical Systems Corp. Endoscope Reprocessor with RFID Manual P115 P244
Contents
- 1. Users Manual 1
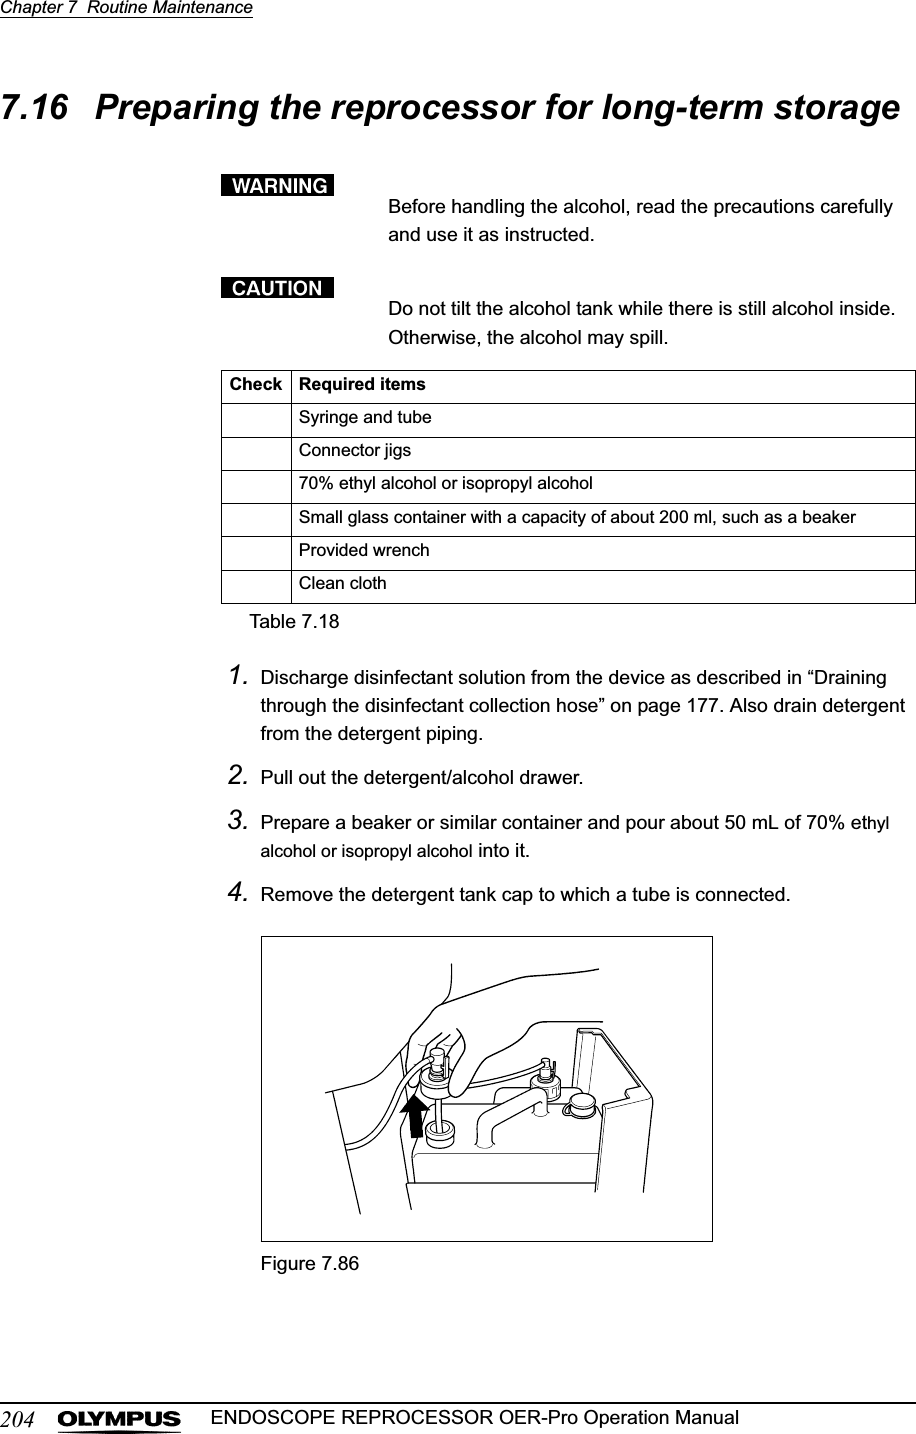
- 2. Users Manual 2
- 3. Users Manual 3
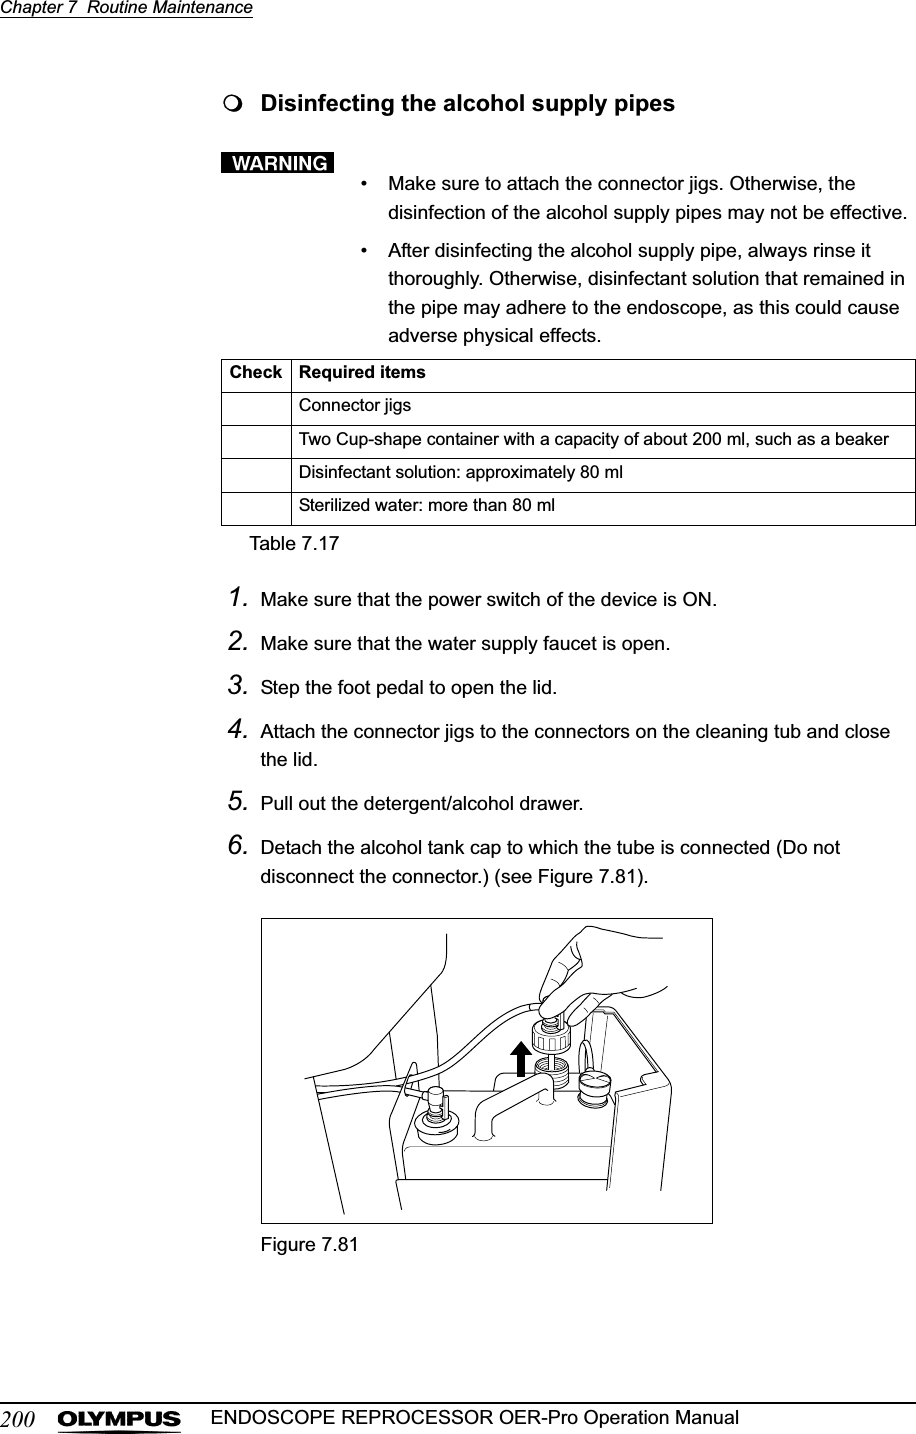
- 4. Users Manual 4
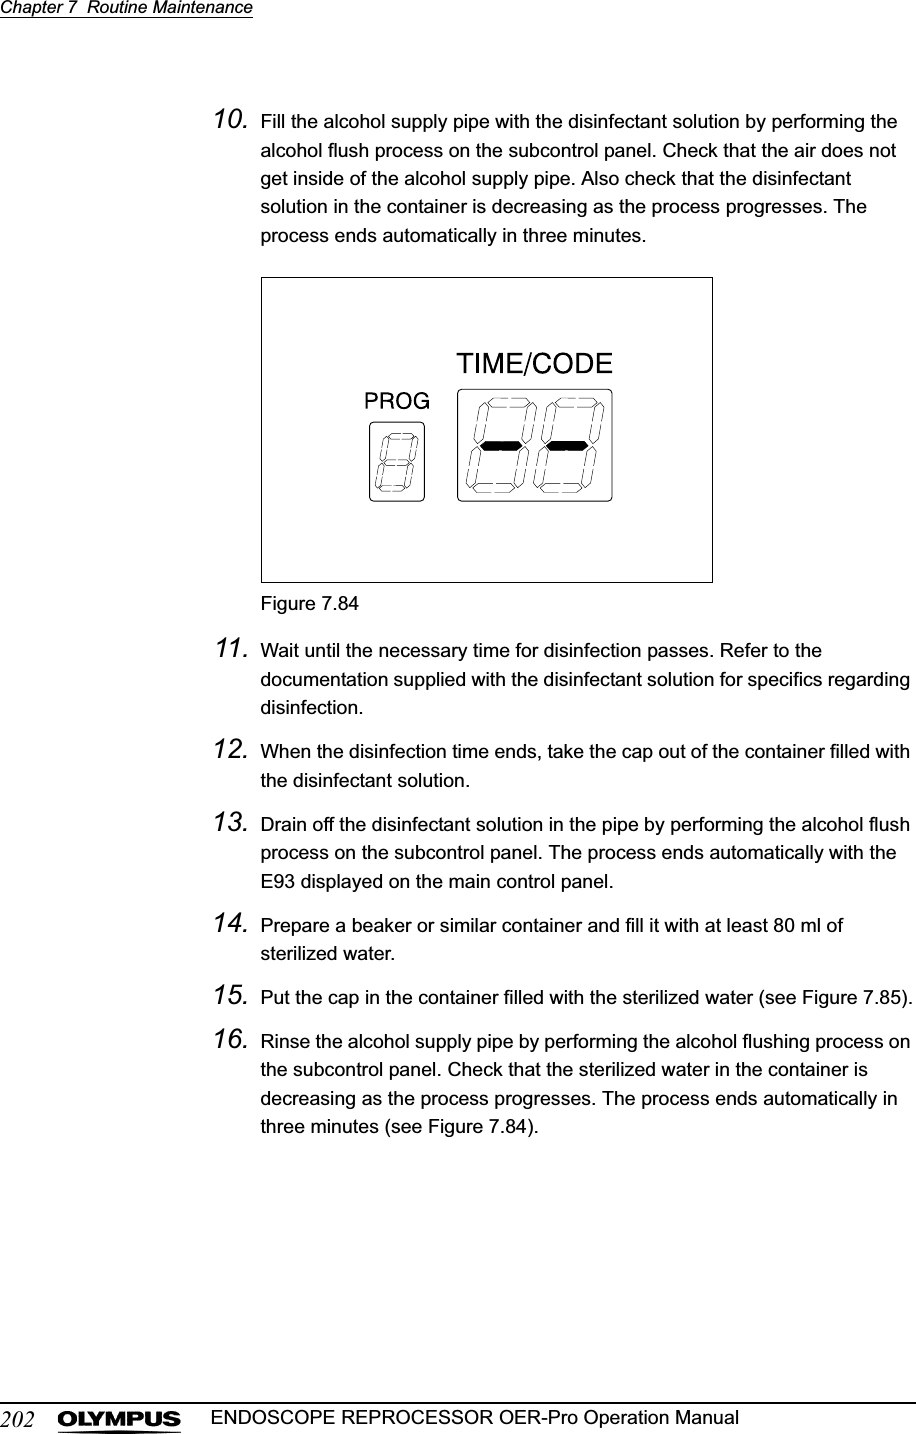
Users Manual 4
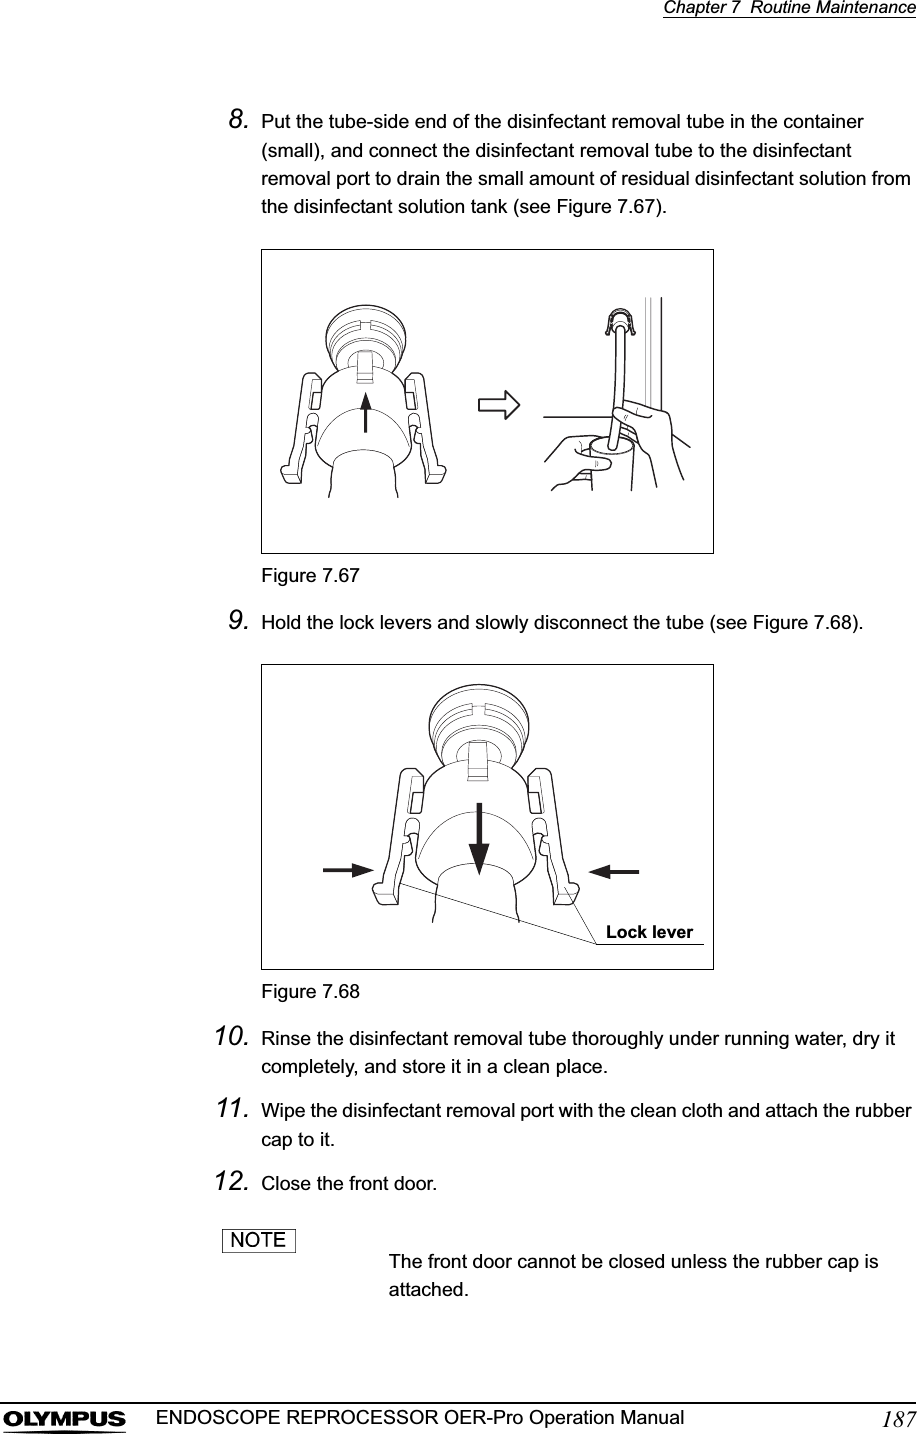
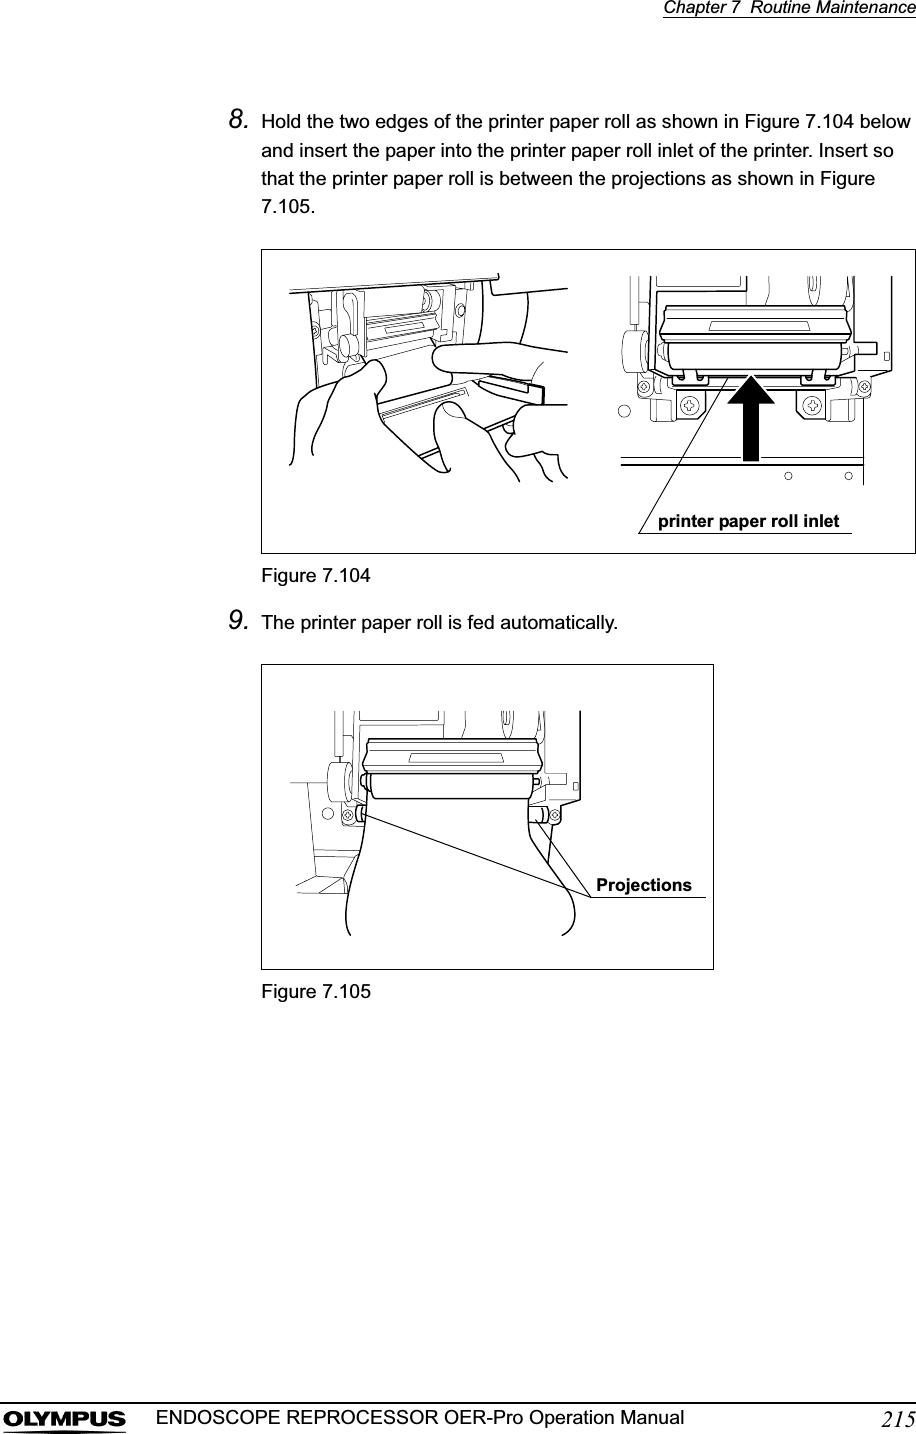
![178Chapter 7 Routine MaintenanceENDOSCOPE REPROCESSOR OER-Pro Operation Manual• When handling the disinfectant solution, wear appropriate personal protective equipment to prevent it from making direct contact with your skin and to prevent excessive inhalation of the vapor. The disinfectant solution and its vapor may adversely affect the human body. If you get disinfectant solution in your eyes, immediately rinse with a large quantity of water and then call the doctor. Personal protective equipment, such as eye wear, face mask, moisture-resistant clothing, and chemical-resistant gloves that fit properly and are long enough so that your skin is not exposed. All personal protective equipment should be inspected before use and replaced periodically before it is damaged.• Be sure to disconnect the disinfectant collection hose after collecting the disinfectant solution. If the device is run with the disinfectant collection hose connected, the cleaning fluid and disinfectant solution may leak out of the device.• Be sure to disconnect the drain connector except when collecting the disinfectant solution or checking its strength. Otherwise, disinfectant solution may leak and damage the equipment and facilities near the device.If “DRAIN LCG” is selected and the FUNC START button is pressed without connecting the disinfectant collection hose, the buzzer repeats short beeps, disinfectant solution is output in the cleaning tub and error code [E72] is displayed. In this case, treat it by following the procedure in Section 8.1, “Troubleshooting guide” on page 218.1. Make sure that the power switch is ON.2. Step the foot pedal to open the lid.](https://usermanual.wiki/Olympus-Medical-Systems/GN4215.Users-Manual-4/User-Guide-870330-Page-5.png)
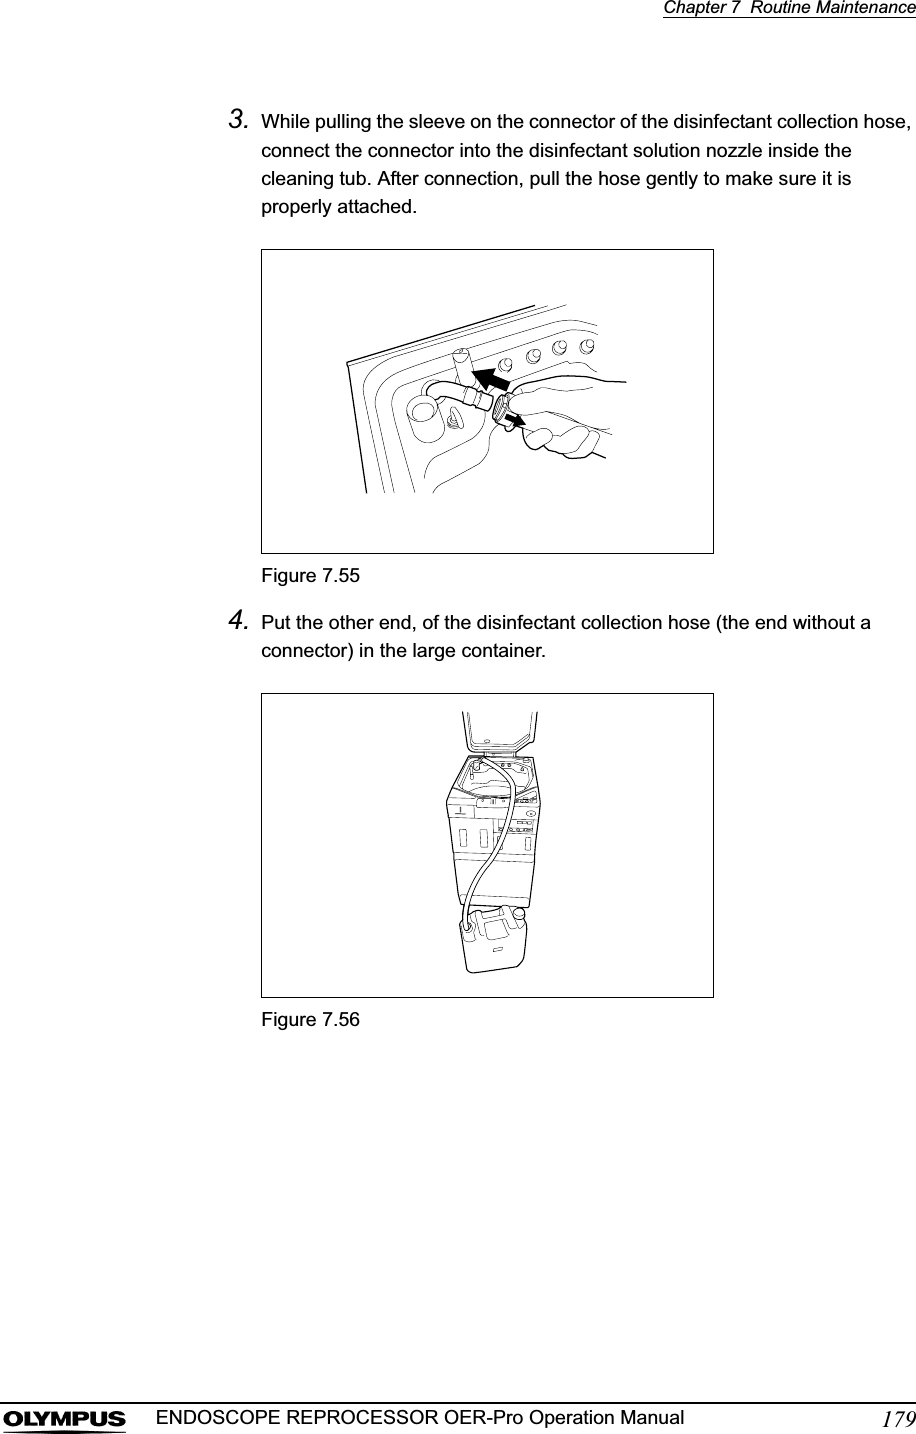
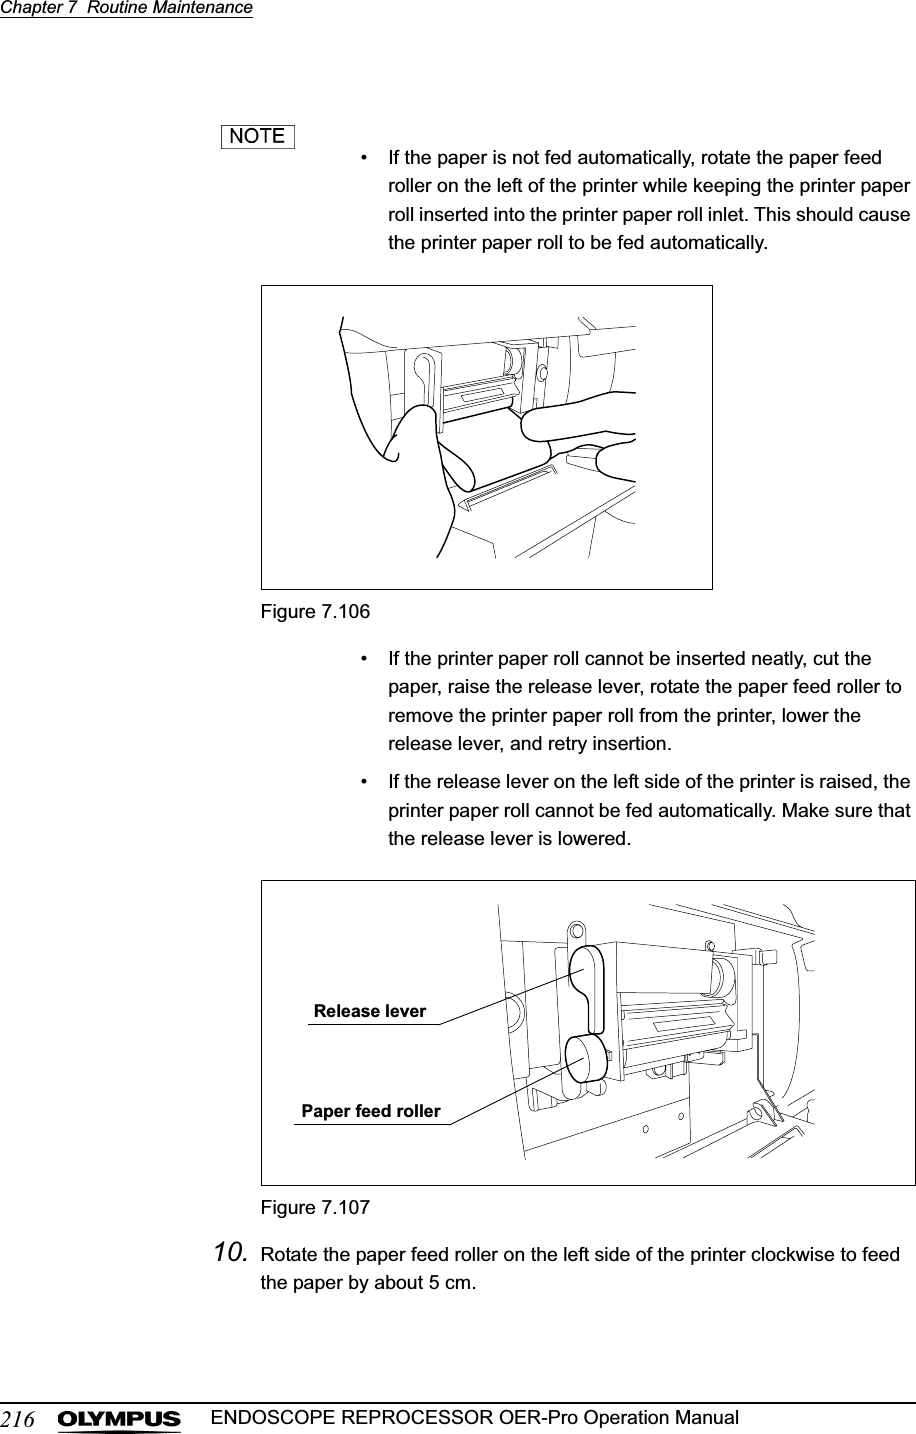
![180Chapter 7 Routine MaintenanceENDOSCOPE REPROCESSOR OER-Pro Operation Manual5. While supporting the disinfectant collection hose so that it does not move, press the FUNC SEL button on the subcontrol panel to select “DRAIN LCG”.Figure 7.576. Press the FUNC START button on the subcontrol panel. The buzzer repeats short beeps to indicate that the disinfectant solution drain process is underway, the TIME/CODE display on the main control panel shows a spinning [ ] as shown below, and the disinfectant solution begins draining.7. When the container (large) becomes nearly full, press the STOP/RESET button on the main control panel to interrupt the disinfectant solution collection.8. Prepare a new container (large) and put the other end of the disinfectant collection hose in it.9. While supporting the disinfectant collection hose so that it does not move, press the FUNC SEL button on the subcontrol panel to select “DRAIN LCG”, and then press the FUNC START button to restart draining of the disinfectant solution.](https://usermanual.wiki/Olympus-Medical-Systems/GN4215.Users-Manual-4/User-Guide-870330-Page-7.png)
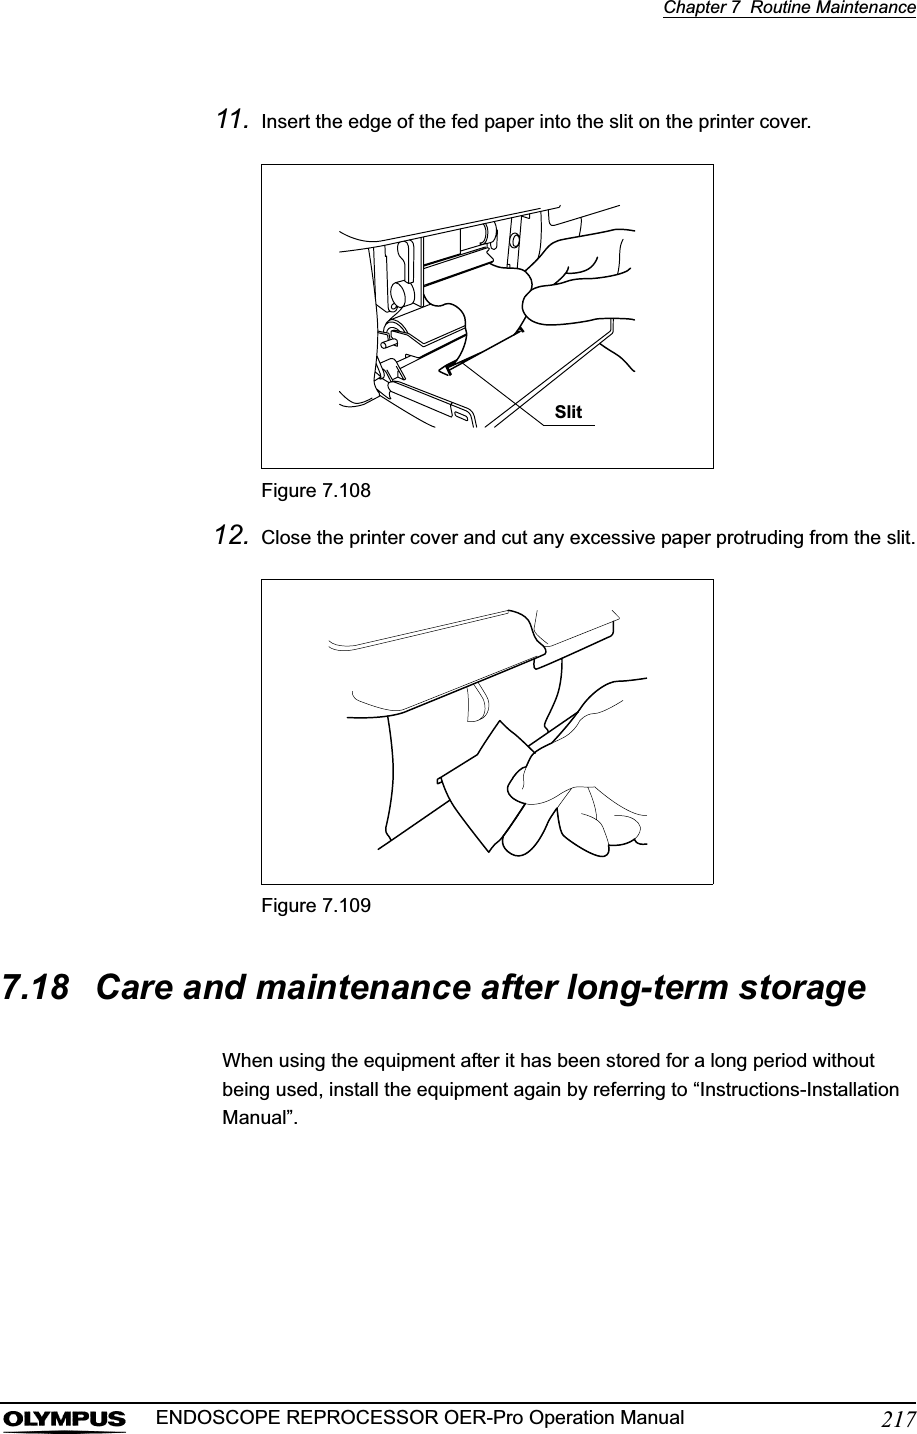
![Chapter 7 Routine Maintenance181ENDOSCOPE REPROCESSOR OER-Pro Operation Manual10. When draining is stopped, the long buzzer beeps, and the TIME/CODE display on the main control panel shows [- -] indicating the end of process.Figure 7.5811. Pull the sleeve on the connector of the disinfectant collection hose to disconnect it from the disinfectant solution nozzle. Be sure to drain the disinfectant solution that remains in the disinfectant collection hose into the container (large).Figure 7.5912. Rinse both the outside and inside of the disinfectant collection hose thoroughly in running water, dry it thoroughly, and store it in a clean place.](https://usermanual.wiki/Olympus-Medical-Systems/GN4215.Users-Manual-4/User-Guide-870330-Page-8.png)

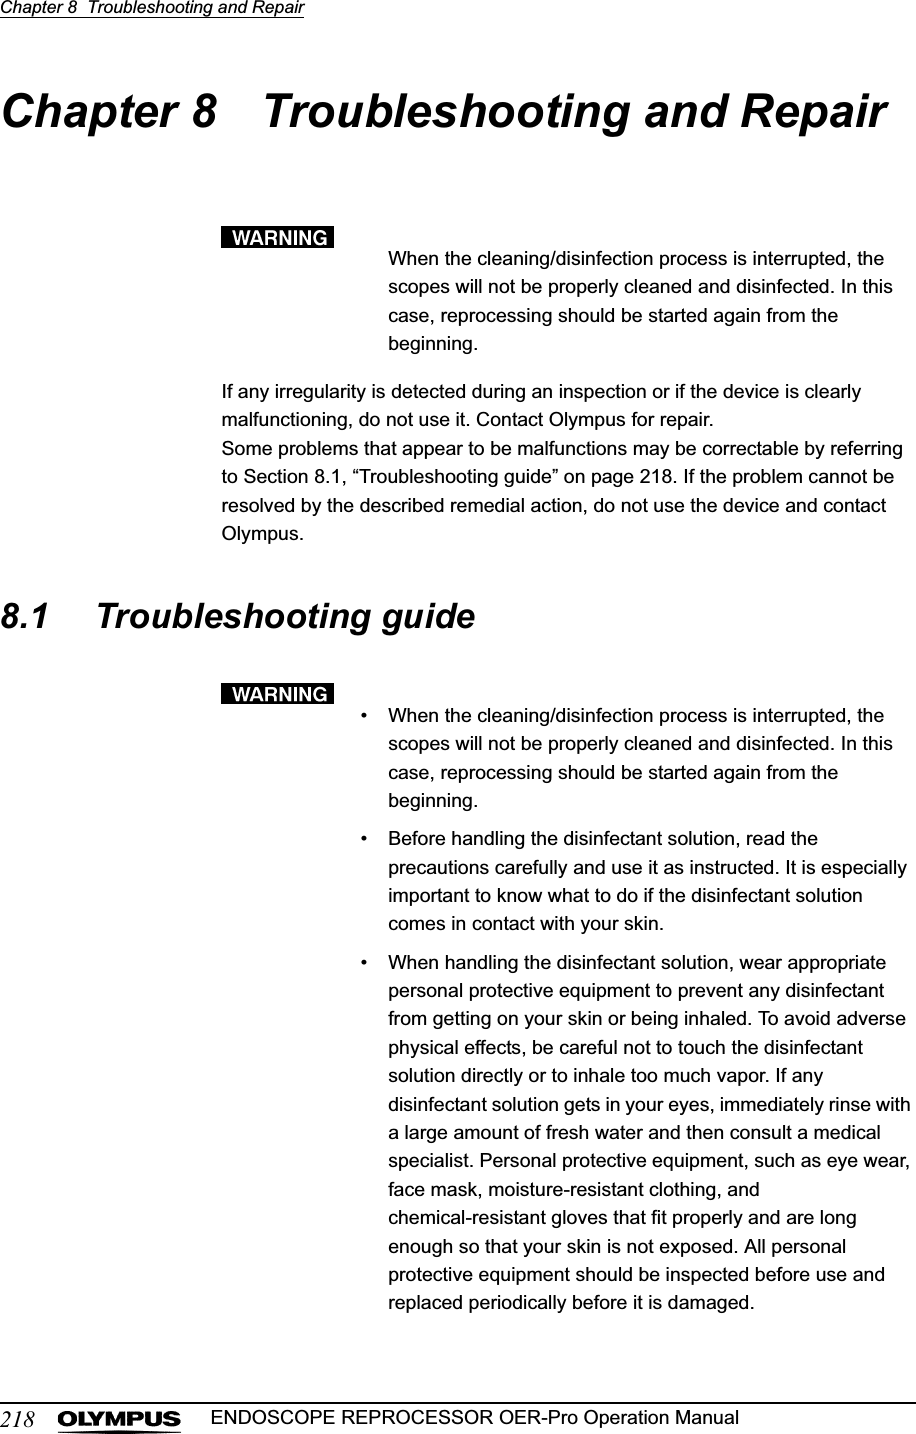
![Chapter 7 Routine Maintenance185ENDOSCOPE REPROCESSOR OER-Pro Operation Manual4. Press the FUNC SEL button on the subcontrol panel to select “DRAIN LCG”.Figure 7.635. Press the FUNC START button on the subcontrol panel. The buzzer beeps, the disinfectant solution begins draining, and the cleaning tub is rinsed. The TIME/CODE display on the main control panel shows a [ ] mark spinning to indicate that the process is underway.Figure 7.64If “DRAIN LCG” is selected and the FUNC START button is pressed while the lid is open, the buzzer makes several short beeps, the disinfectant is drained into the cleaning tank, and error code [E72] is displayed. If error code [E72] is displayed, take the countermeasure by following the procedure in Section 8.1, “Troubleshooting guide” on page 218.](https://usermanual.wiki/Olympus-Medical-Systems/GN4215.Users-Manual-4/User-Guide-870330-Page-12.png)
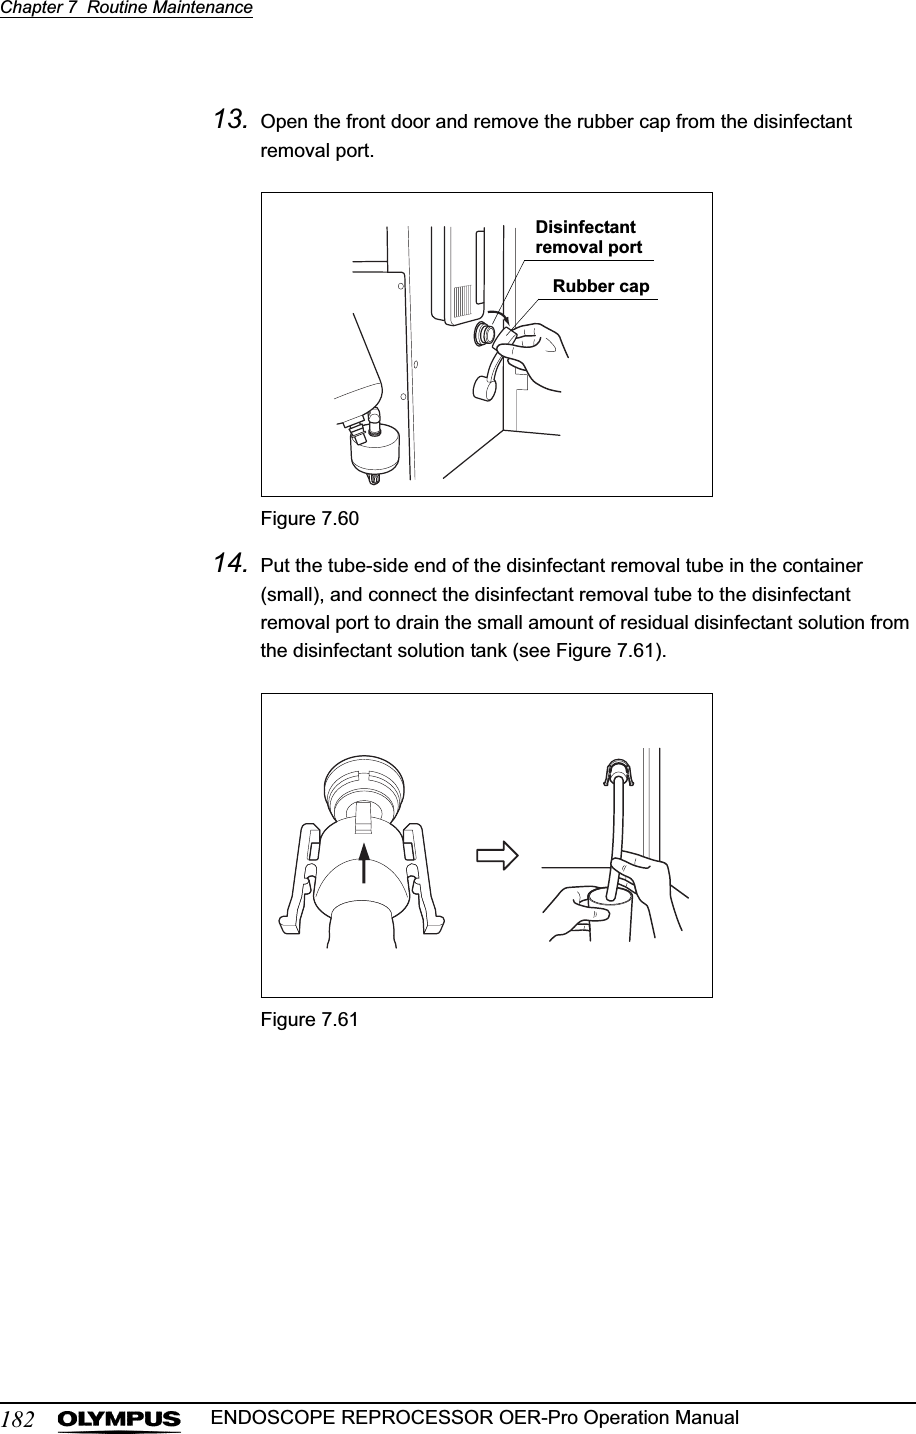
![186Chapter 7 Routine MaintenanceENDOSCOPE REPROCESSOR OER-Pro Operation Manual6. When draining stops, the long buzzer sounds and the TIME/CODE display on the main control panel shows [- -] indicating the end of the process.Figure 7.657. Open the front door and remove the rubber cap from the disinfectant removal port.Figure 7.66](https://usermanual.wiki/Olympus-Medical-Systems/GN4215.Users-Manual-4/User-Guide-870330-Page-13.png)
![190Chapter 7 Routine MaintenanceENDOSCOPE REPROCESSOR OER-Pro Operation Manual• When adding the disinfectant solution, slowly dispense it into the drain port. Otherwise, the disinfectant solution may spill over from the equipment or be drained from the equipment.• When adding the disinfectant solution, check the indicators on the main panel showing the disinfectant solution supplying process and listen to the buzzer sound. When attempted on other instances, the disinfectant solution may spill from the equipment or be drained from the equipment.• The required amount is approximately 17.5 L (4.6 gallons).• If the power supply gets cut off during the process of adding the disinfectant solution and recovers afterward, the main control panel will display error code [E41]. In this case, the quantity of the disinfectant solution in the disinfectant solution tank is not sufficient. Press the STOP/RESET button to clear the error code [E41] and restart “Setting up the disinfectant solution” on page 188.1. Make sure that the power switch is ON.2. Press the FUNC SEL button on the subcontrol panel to select “LOAD LCG”.3. Press the FUNC START button on the subcontrol panel.4. Step the foot pedal to open the lid.5. As multiple beeps sound, the time display on the main panel alternates between Figure 7.69 (a) and (b) indicating that it is ready to add the disinfectant solution.Figure 7.69(a) (b)](https://usermanual.wiki/Olympus-Medical-Systems/GN4215.Users-Manual-4/User-Guide-870330-Page-17.png)
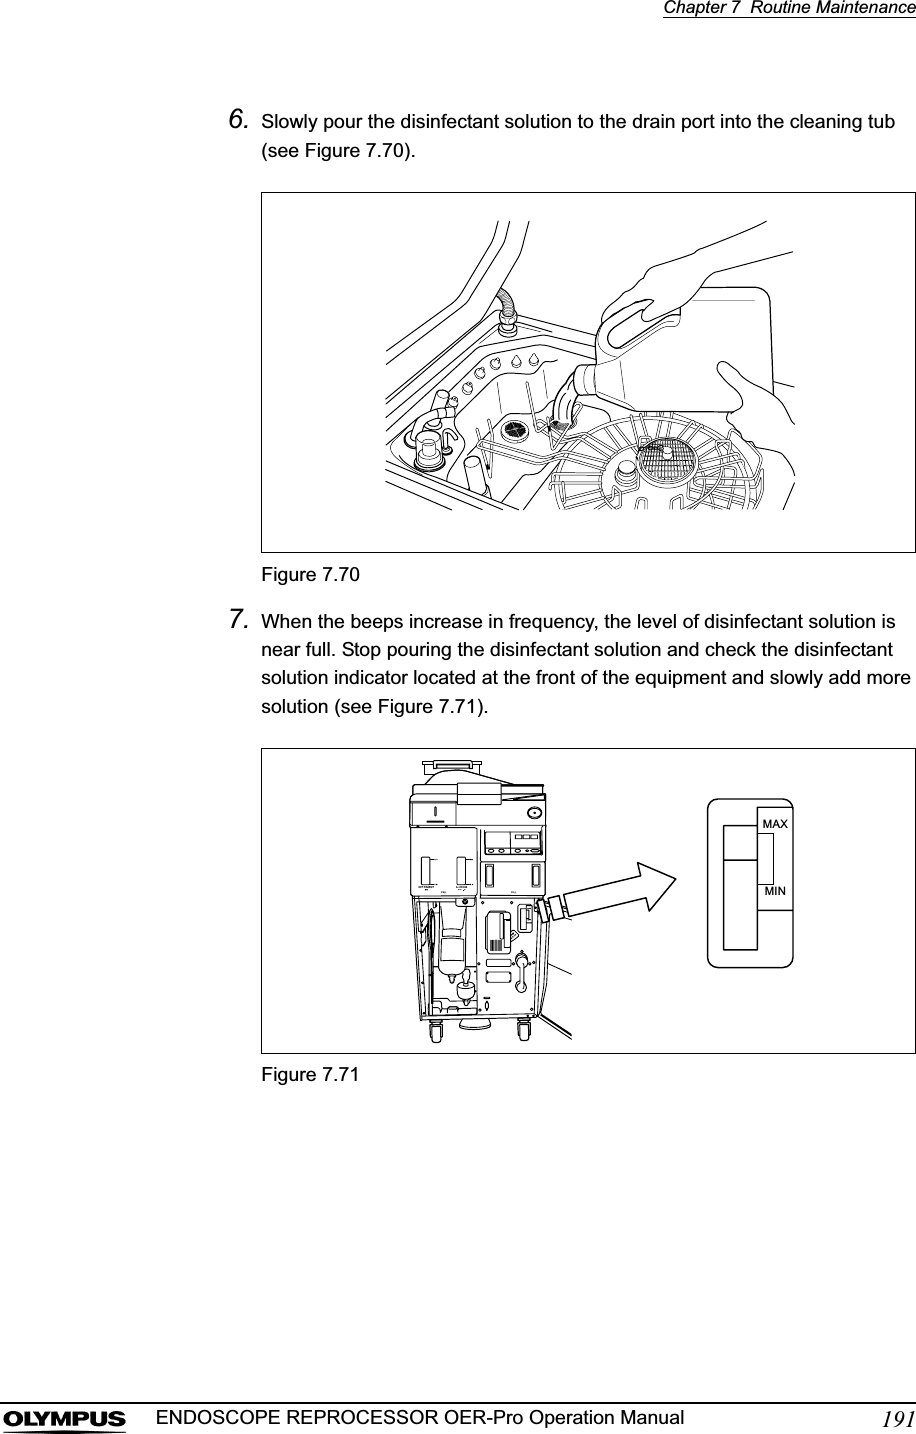
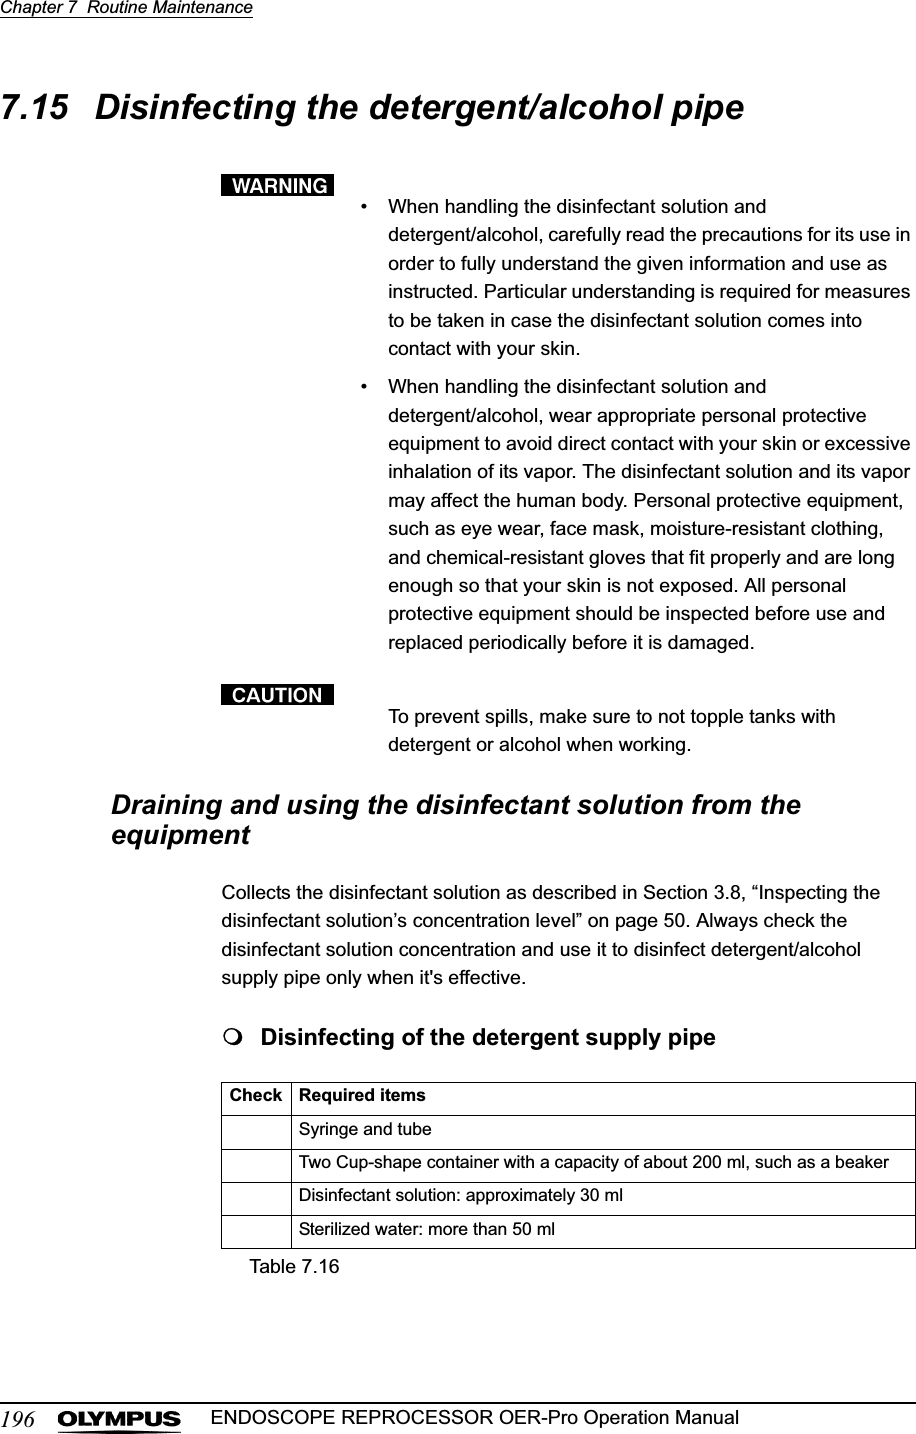
![192Chapter 7 Routine MaintenanceENDOSCOPE REPROCESSOR OER-Pro Operation ManualIf the buzzer beeps and the TIME/CODE display shows [- -], stop adding the disinfectant solution. Otherwise, the disinfectant solution may spill from the equipment or be drained from the equipment.8. When the amount added is adequate, the buzzer beeps for three seconds. Stop adding the solution. At this time, the TIME/CODE display on the main panel will show [--] indicating the end of the process (see Figure 7.72).Figure 7.729. Make sure that the water supply faucet is open.10. Perform the rinsing process following the procedure in Section 6.8, “Rinsing” on page 133. Any residual fluid in the cleaning tub is cleaned.](https://usermanual.wiki/Olympus-Medical-Systems/GN4215.Users-Manual-4/User-Guide-870330-Page-19.png)
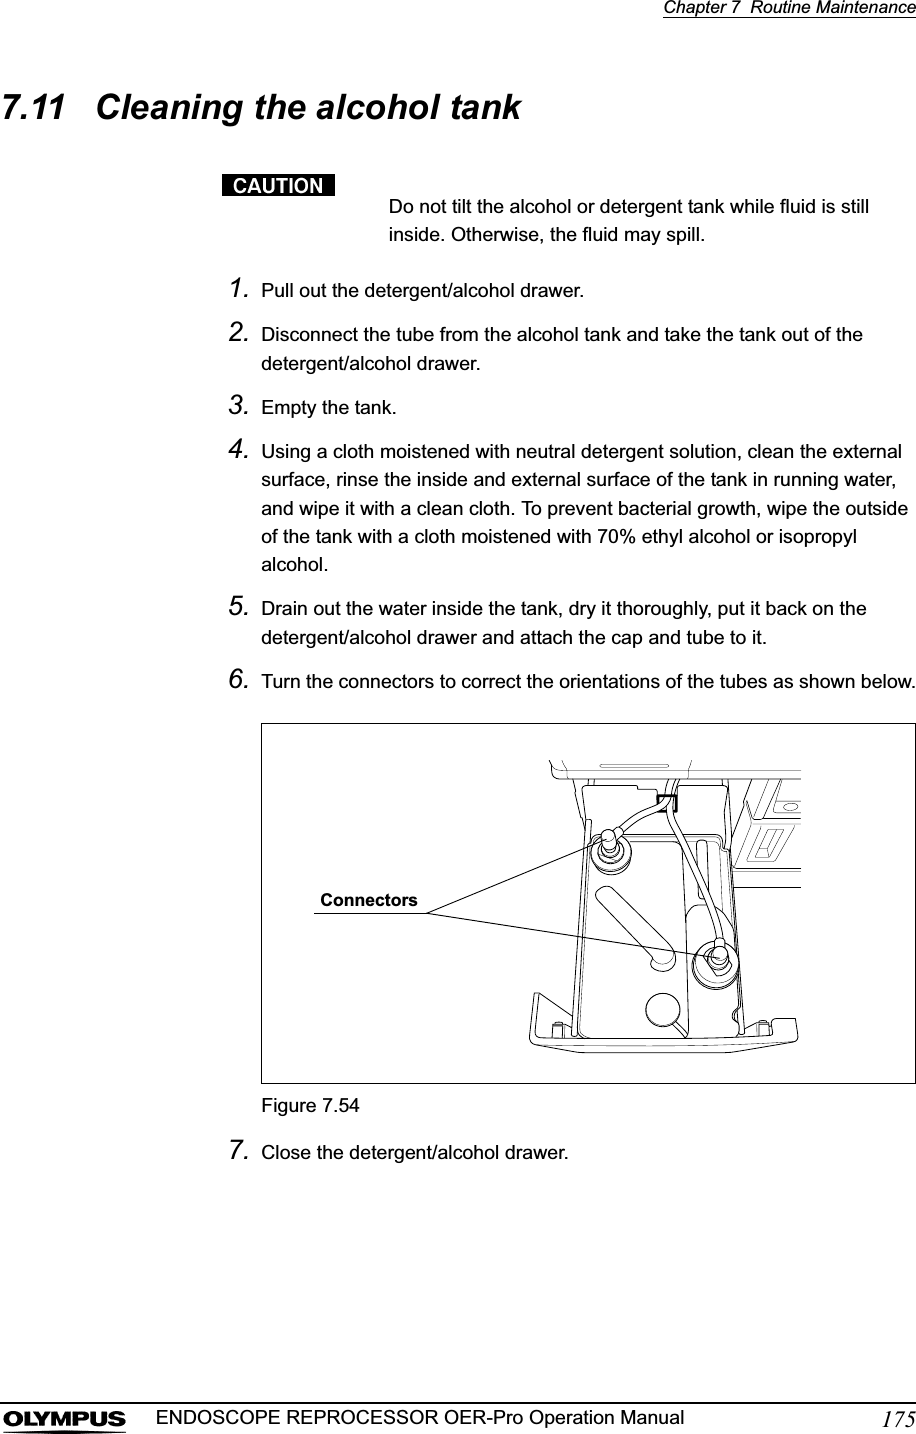
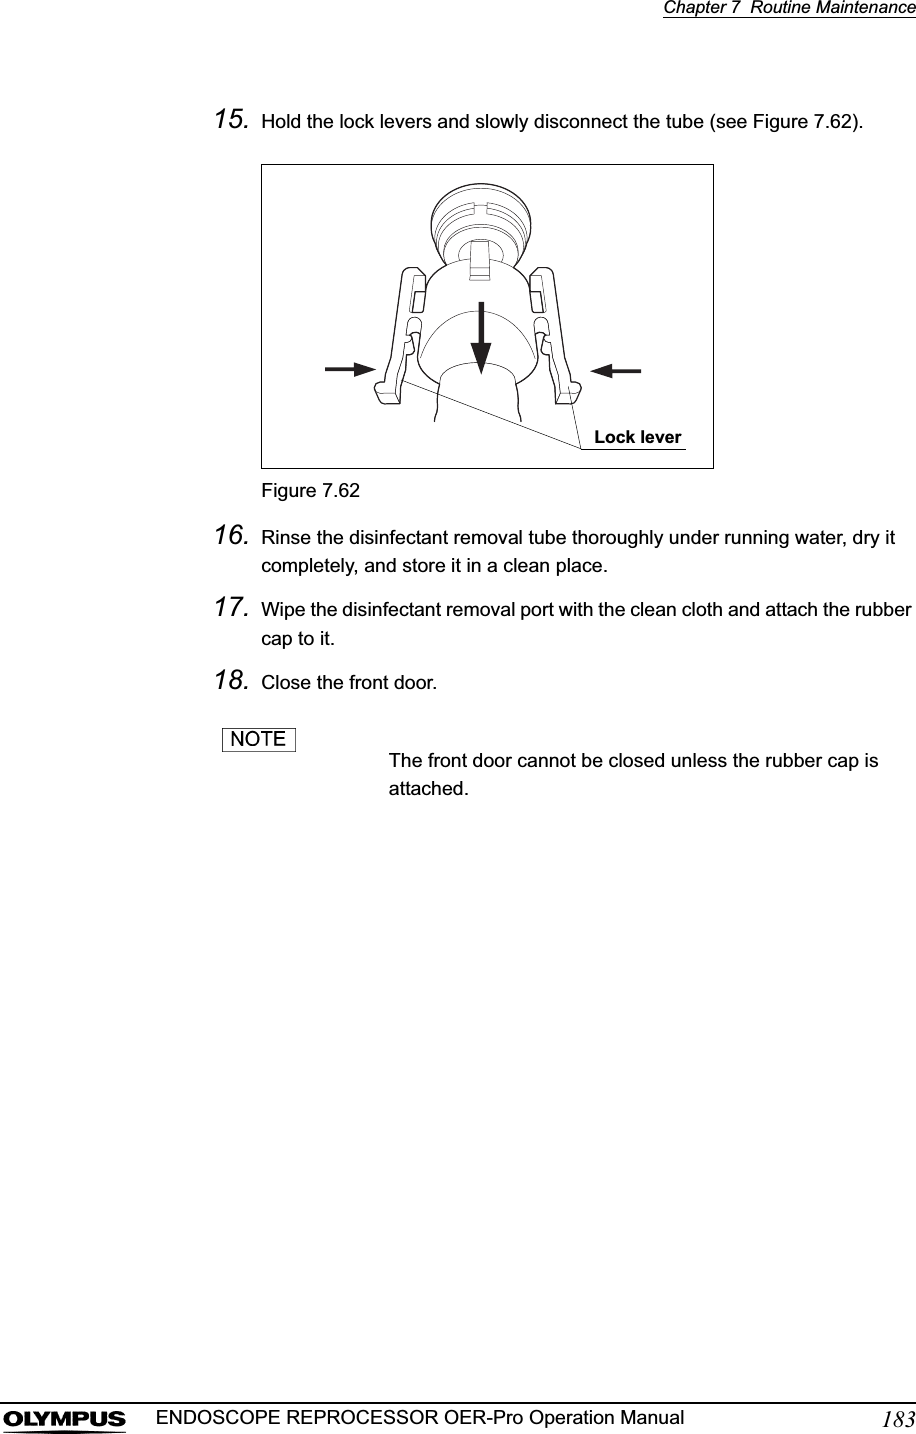
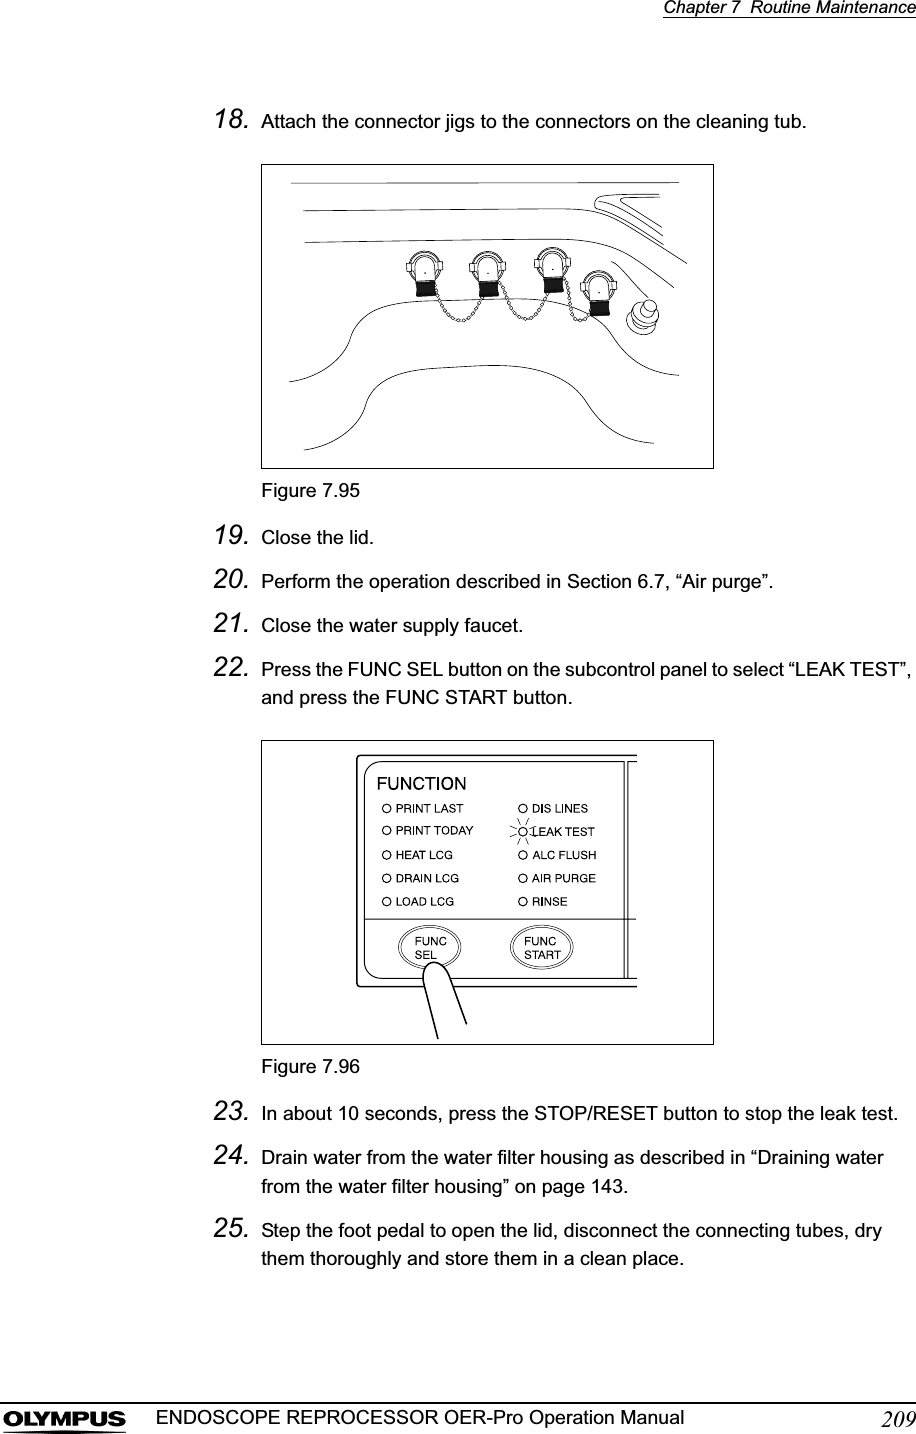
![Chapter 7 Routine Maintenance193ENDOSCOPE REPROCESSOR OER-Pro Operation Manual7.13 Cleaning the mesh filter in the water supply adapter connectorWhen the device stops with error code [E01], the water filter should be replaced first. However, if the device stops again with error code [E01], clean the mesh filter as described below.To prevent leakage or damage, do not deform or disassemble the water supply adapter.1. Close the water supply faucet. Press the FUNC SEL button on the subcontrol panel to select “LEAK TEST”, and press the FUNC START button.2. In about 10 seconds, press the STOP/RESET button to stop the leak test.3. Turn the connection ring of the water supply adapter in the direction shown to disconnect the adapter from the equipment with the provided wrench. If residual water is spilled from the water supply adapter, wipe it away with a clean cloth.Figure 7.73](https://usermanual.wiki/Olympus-Medical-Systems/GN4215.Users-Manual-4/User-Guide-870330-Page-20.png)


![Chapter 7 Routine Maintenance201ENDOSCOPE REPROCESSOR OER-Pro Operation Manual7. Drain the alcohol in the pipe by performing the alcohol flush process on the subcontrol panel. Check that the fluids are drained from the cap. Wait until the error code [E93] is displayed and the process ends (see Figure 7.82).Figure 7.828. Prepare a beaker or similar container and pour about 80 ml of the disinfectant solution into it.9. Put the detached cap in the container filled with the disinfectant solution (see Figure 7.83).Figure 7.83](https://usermanual.wiki/Olympus-Medical-Systems/GN4215.Users-Manual-4/User-Guide-870330-Page-28.png)
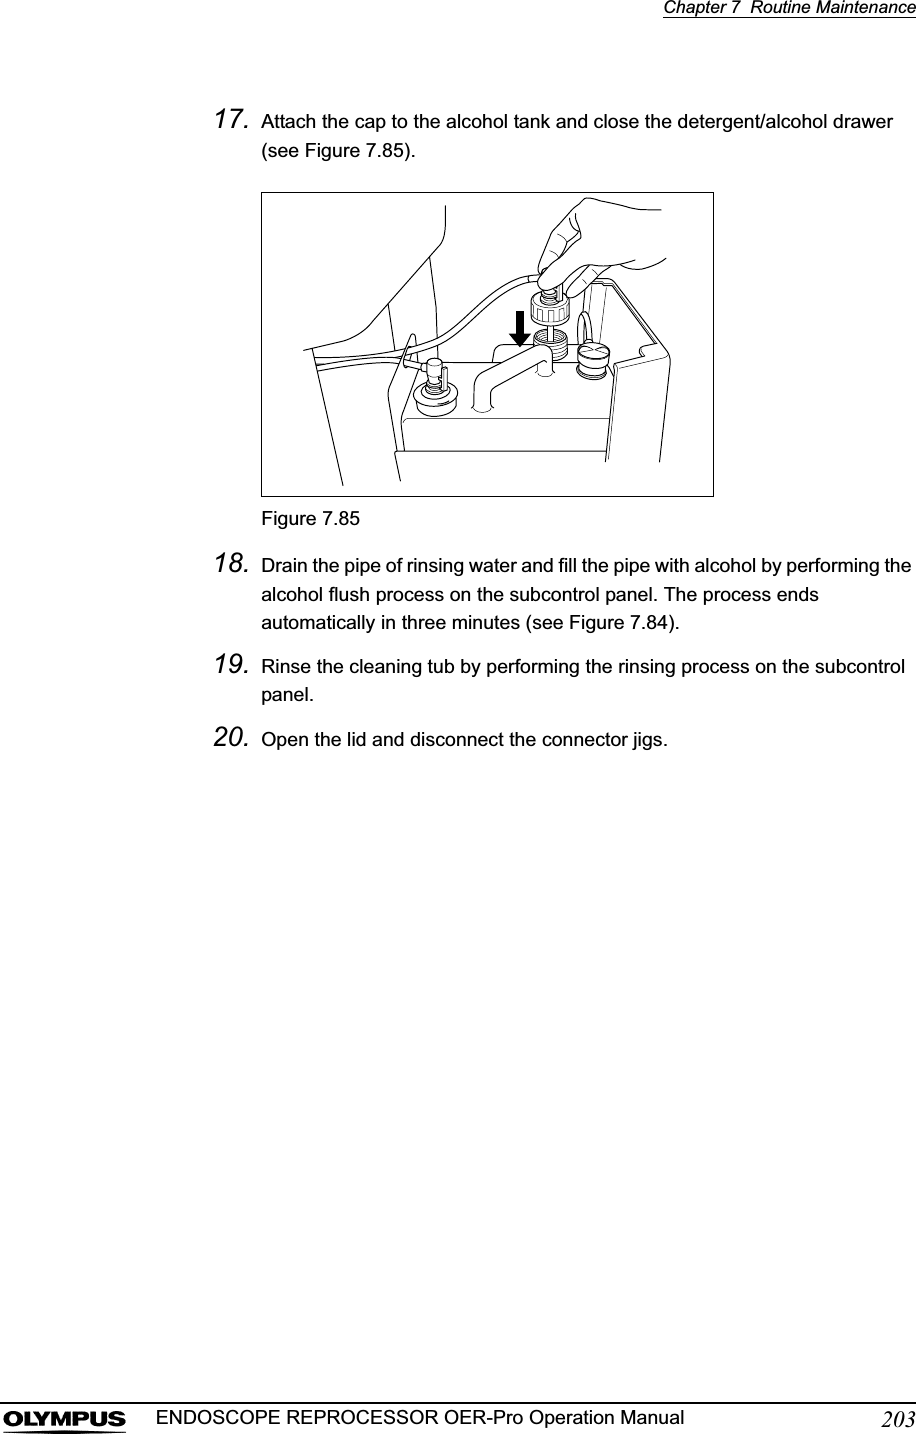


![Chapter 8 Troubleshooting and Repair223ENDOSCOPE REPROCESSOR OER-Pro Operation ManualE72 Disinfectant solution in the disinfectant solution tank cannot be discharged. Internal problem with the device.If disinfectant solution remains in the tub, perform the same remedial action as [E13]. In other cases, contact Olympus.E76 Irregularity in the fluid level sensor in the disinfectant tank.Internal problem with the device.Contact Olympus.E81 The process cannot be properly controlled.Internal problem with the device.Contact Olympus.E82 Internalirregularity in the device.Irregularity in the electrical circuitry inside the device.Contact Olympus.E83 The process cannot be properly controlled.Irregularity in the electrical circuitry inside the device.Contact Olympus.E84 Malfunction of the ID reader.Irregularity in the electrical circuitry inside the device.Contact Olympus.E91 ID read error. • ID is not read.• Multiple IDs are read.Press the STOP/CODE CLEAR button, check that the ID Recognition indicators are not lit on the main control panel, and read the IDs again.E92 Exceeded leak test time.Exceeded test time (10 minutes).Perform leak test again.E93 No alcohol remains.• The alcohol has run out.• Alcohol cannot be supplied to the device.• Irregularity in the alcohol sensor.• Clog in the pump or piping.• Check the amount of alcohol in the tank.• Correct the orientation of the alcohol connector (follow the procedure in Section 3.5, “Inspecting the remaining quantity of alcohol, and replenishment” on page 43).• Inspect them as described in “If error code [E93] is displayed while alcohol is still present in the alcohol tank:” on page 90.ErrorCode Problem Possible Causes Remedial Actions](https://usermanual.wiki/Olympus-Medical-Systems/GN4215.Users-Manual-4/User-Guide-870330-Page-50.png)
![224Chapter 8 Troubleshooting and RepairENDOSCOPE REPROCESSOR OER-Pro Operation ManualOther errors and their treatmentE94 The equipment is not printing.• Printer paper roll has run out.• The release lever is raised.• Install the printer paper roll properly.• Check that the release lever is set in the proper position.E95 No detergent remaining.• The detergent has run out.• The detergent cannot be supplied to the equipment.• Abnormality in the alcohol sensor.• Clog in the pump or piping.• Check the detergent tank for remaining detergent.• Correct the orientation of the detergent connector. Follow the procedure in Section 3.4, “Inspecting the remaining quantity of detergent, and replenishment” on page 37).• Inspect them as described in “When the error code [E95] is displayed even though there is enough detergent in the tank” on page 84.Problem Possible Causes Remedial ActionsThe odor of the disinfectant solution is stronger than before.• The gas filter has expired.• Disinfectant solution is leaking.• Replace the gas filter as described in Section 7.1, “Replacing the gas filter (MAJ-822)” on page 138. If the problem persists after replacement, contact Olympus.• Check if the disinfectant solution is leaking. If it is, do not use the device and contact Olympus.Water leaks from the device.Improper installation of water filter housing.Stop the current process and reattach the water filter housing as described in Section 7.2, “Replacing the water filter (MAJ-824)” on page 142.However, the STOP/CODE CLEAR button may not work if stopping the water might cause a hazardous situation, for example during disinfectant solution replacement. In this case, close the faucet, tighten the water filter housing, then open the faucet again and continue the process. If an error code is displayed, take the appropriate remedial action for that error.Internal problem with the device.Close the faucet, set the power switch to OFF, disconnect the power cord plug from the wall mains outlet and contact Olympus.ErrorCode Problem Possible Causes Remedial Actions](https://usermanual.wiki/Olympus-Medical-Systems/GN4215.Users-Manual-4/User-Guide-870330-Page-51.png)
![226Chapter 8 Troubleshooting and RepairENDOSCOPE REPROCESSOR OER-Pro Operation ManualPanel display disappears completely during a process.• Power cord is disconnected from the power outlet.• Circuit breaker is activated.• The power failure occurred.Perform the checks described in Section 4.1, “Power activation and opening the faucet” on page 57. Error code [E41] will be displayed when the device is turned ON.After checking, press the STOP/CODE CLEAR button to release the error code. However, if the error code is blinking, the disinfectant solution in the tub is being collected in the tank and pressing the button will have no effect; in this case, wait until the blinking changes to a steady light.Panel display does not light in sequence when the device is turned on.Power switch is set to ON in less than 5 seconds after it was set to OFF.Set the power switch to OFF, wait for 5 seconds or more and set the power switch to ON again.Reprocessing operator feels sick during work.The operator may be allergic to the disinfectant, detergent or alcohol.Stop doing any reprocessing and consult a medical specialist.Disinfectant solution is judged to be ineffective with the test strip.Expiration of the service life of the disinfectant solution.Replace the solution as described in Section 7.12, “Replacing the disinfectant solution” on page 176.Bacteria were detected as a result of culture test of a reprocessed scope.• Expiration of service life of filters, degradation of disinfectant solution, etc.• Water supply piping is not disinfected.Inspect the equipment as described in Chapter 3, “Inspection Before Use”, preclean the scope and put it through the reprocessing process again from the beginning. If bacteria are detected again in the next culture test, contact Olympus.Bacterial were detected as a result of culture test of rinsing water collected from the device.• Expiration of service life of filters, degradation of disinfectant solution, etc.• Water supply piping is not disinfected.Inspect the equipment as described in Chapter 3, “Inspection Before Use”. If bacteria are detected again in the next culture test, contact Olympus. Scopes were not precleaned before being reprocessed. –Inspect the equipment as described in Chapter 3, “Inspection Before Use” to confirm that the disinfectant solution has not lost its strength, the mesh filters are not clogged, etc. Next, preclean the scopes and reprocess them again from the beginning.Printed paper is not output from the printer.• Printer paper roll has run out.• Paper jam.Take the remedial action by referring to Section 3.9, “Inspecting the printer paper roll” on page 53.Abnormal noise from the device.Internal problem with the device.Contact Olympus.Problem Possible Causes Remedial Actions](https://usermanual.wiki/Olympus-Medical-Systems/GN4215.Users-Manual-4/User-Guide-870330-Page-53.png)