Oxford Instruments W2CBW003 802.11 b/g + Bluetooth Module User Manual part 1
Oxford Instruments 802.11 b/g + Bluetooth Module part 1
Contents
User manual part 1
X-MET8000 Series User Manual

Contents
Welcome...................................................................................................................5
Who Is This Guide For?...................................................................................................................................................5
X-MET8000 Series Operator’s Guide...........................................................................6
The X-MET8000 Series...................................................................................................................................................6
The X-MET8000 Series Components....................................................................................................................6
The X-MET8000 Series Features...........................................................................................................................7
The X-MET8000 Series External Connections.......................................................................................................7
Safety First!....................................................................................................................................................................8
Safety Symbols....................................................................................................................................................8
Caution X-Rays.....................................................................................................................................................8
Caution Beryllium................................................................................................................................................9
Caution Lanyard Use............................................................................................................................................9
X-MET8000 Series Safety Features.......................................................................................................................9
How To Operate The X-MET8000 Series.......................................................................................................................10
The Control Panel...............................................................................................................................................10
The Touch Screen...............................................................................................................................................11
The Virtual Keyboard..........................................................................................................................................11
The Menu Screen...............................................................................................................................................12
The Status Bar...................................................................................................................................................12
The Tools Menu..................................................................................................................................................13
Take The First Measurement.........................................................................................................................................13
Switch On The X-MET8000 Series......................................................................................................................14
Add A Sample Name..........................................................................................................................................16
Take A Measurement..........................................................................................................................................16
The Results Screen.............................................................................................................................................18
Delete A Poor Measurement...............................................................................................................................19
Print Result From Result Screen To Bluetooth Printer.........................................................................................19
Switch Off The X-MET8000 Series......................................................................................................................20
Average A Batch Of Measurements..............................................................................................................................20
Sample And Batch Names..................................................................................................................................20
Which Method?..................................................................................................................................................20
Auto Select Modes Make Analysis Easy..............................................................................................................21
How Long For A Measurement?..........................................................................................................................23
Add The Sample And Batch Names....................................................................................................................24
Choose A Method...............................................................................................................................................24
Set The Measurement Time...............................................................................................................................25
Check The Status Bar.........................................................................................................................................26
Set The Batch Size.............................................................................................................................................27
Take Averaged Measurements...........................................................................................................................28
The Average Results Screen...............................................................................................................................28
Search The Results History................................................................................................................................29
Delete The Results History.................................................................................................................................32
Generate Report to USB Memory Device...........................................................................................................33
Generate Report to Printer.................................................................................................................................35
Generate Report to Network Share....................................................................................................................37
The X-MET8000 Series User Manual and USB Driver ...................................................................................................38
Save The X-MET8000 Series User Manual and USB Driver ................................................................................39
Operation With A PC.....................................................................................................................................................40
Connect To A PC And Login................................................................................................................................40
2
X-MET8000 Series User Manual
8

About The Report Generator..............................................................................................................................42
Wireless Network Use Cases..............................................................................................................................48
X-MET Application Programming Interface.........................................................................................................80
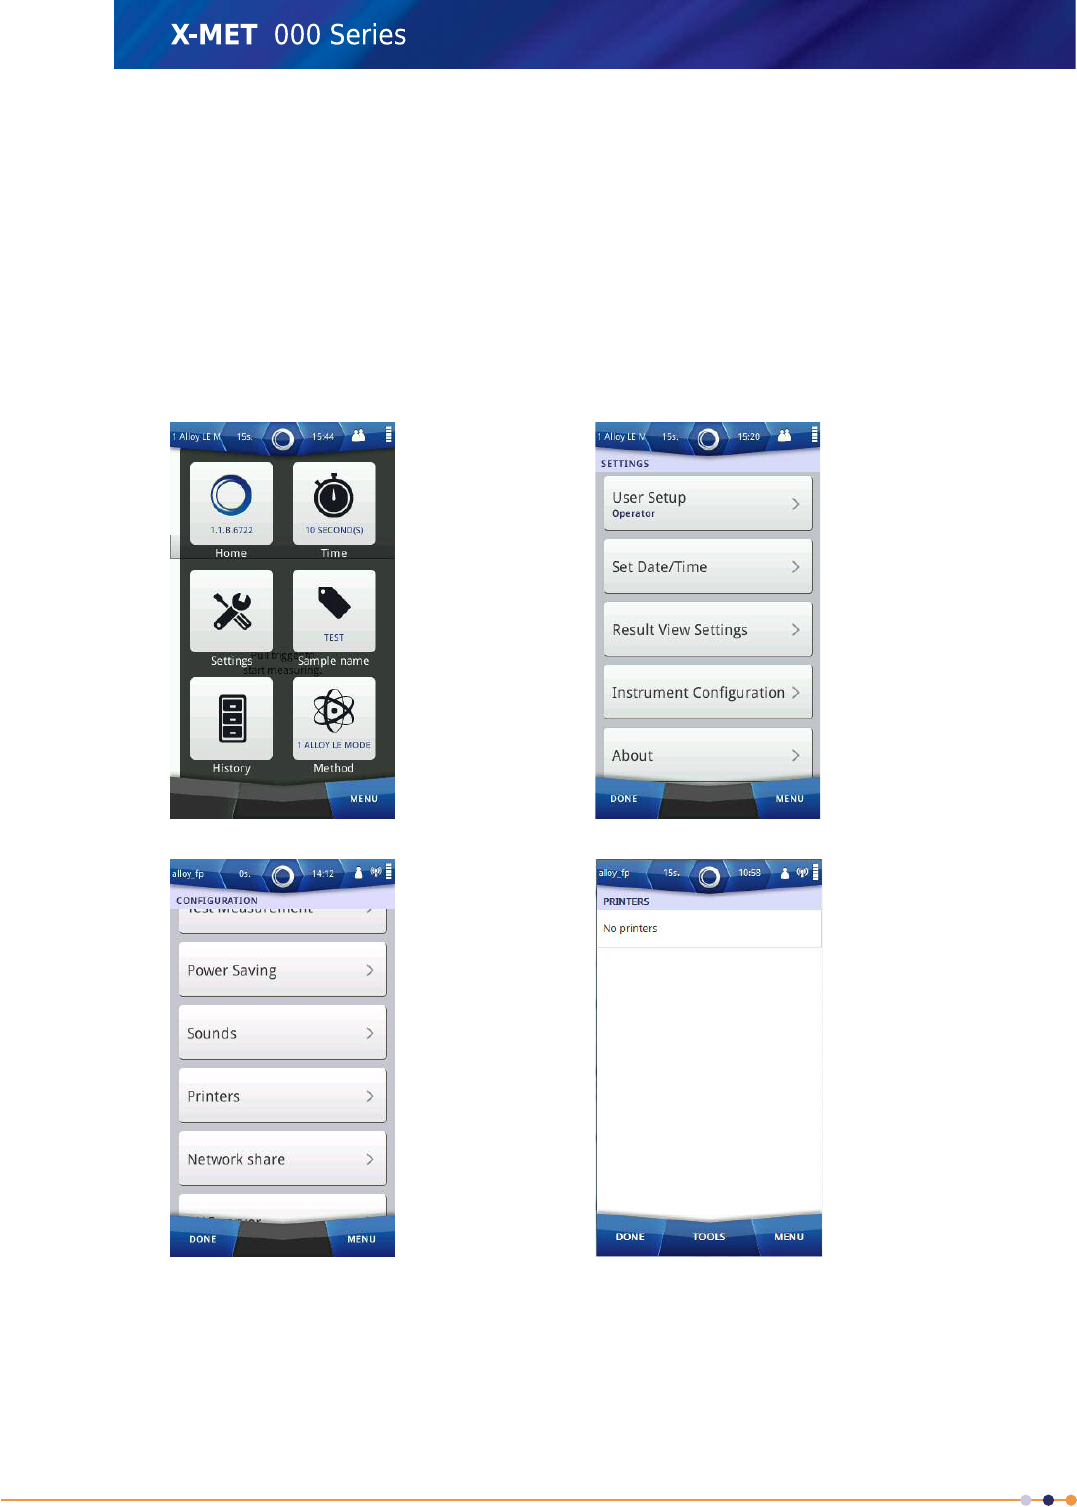
X-MET8000 Series Settings..........................................................................................................................................82
Set The Date And Time......................................................................................................................................83
Set The Language..............................................................................................................................................84
Make Safe Measurements............................................................................................................................................85
Handle The X-MET8000 Series Carefully............................................................................................................85
Safe, Reliable Measurements.............................................................................................................................87
Use The Correct Accessory................................................................................................................................89
X-MET8000 Series For Hot Samples...................................................................................................................91
Battery Usage....................................................................................................................................................92
Maintenance and Troubleshooting...............................................................................................................................92
Recommended Daily Maintenance.....................................................................................................................93
Recommended Weekly Maintenance.................................................................................................................93
Battery Maintenance..........................................................................................................................................94
Troubleshooting..................................................................................................................................................97
Recertification....................................................................................................................................................98
End Of Life.........................................................................................................................................................98
Technical Specifications...............................................................................................................................................99
Technical Specifications, X-MET8000 Series.......................................................................................................99
Technical Specifications, Battery........................................................................................................................99
Technical Specifications, Battery Charger..........................................................................................................99
Technical Specifications, DC Power Supply......................................................................................................100
EC Declaration of Conformity, X-MET8000.................................................................................................................100
X-MET8000 Series Supervisor’s Guide.....................................................................102
Users And Security.....................................................................................................................................................102
Set Passwords..................................................................................................................................................102
Switch User......................................................................................................................................................103
Advanced Use............................................................................................................................................................104
Sample Preparation..........................................................................................................................................104
Choose The Right Method................................................................................................................................105
Analyze And Report Results.............................................................................................................................107
Modify The Results Screen.........................................................................................................................................115
About Results Screen Formats.........................................................................................................................116
A Custom Results Screen.................................................................................................................................117
About The Grade Table.....................................................................................................................................134
About Pseudo Elements...................................................................................................................................138
Wireless Network Use Cases......................................................................................................................................141
Wireless Connections.................................................................................................................................................141
Add A Bluetooth Connection............................................................................................................................143
Add A Bluetooth Keyboard...............................................................................................................................145
Check GPS Information....................................................................................................................................147
Connect the X-MET8000 series to a company network....................................................................................149
Add A Broadcast Wi-Fi Connection...................................................................................................................149
Add A Hidden Wi-Fi Connection........................................................................................................................153
Wireless Printing........................................................................................................................................................158
Configure A Printer...........................................................................................................................................158
Print A Test Page..............................................................................................................................................161
Generate Report to Printer...............................................................................................................................162
Wireless File Transfers................................................................................................................................................164
Configure Network Share Settings...................................................................................................................164
Write Test File To Network................................................................................................................................165
Generate Report to Network Share..................................................................................................................166
3
X-MET8000 Series User Manual
8

VNC connection to the X-MET8000 series..................................................................................................................167
Configure VNC Server Settings........................................................................................................................168
Setup a VNC connection on a PC.....................................................................................................................168
Control the X-MET8000 series using an iPad..............................................................................................................170
Setup an iPad to control the X-MET8000 series................................................................................................170
Control the X-MET8000 series using an iPad....................................................................................................172
Manage Backups........................................................................................................................................................175
Create A Backup..............................................................................................................................................175
Restore A Backup.............................................................................................................................................177
Delete A Backup...............................................................................................................................................179
Configuration.............................................................................................................................................................180
Set The Power Saving......................................................................................................................................181
Choose Sounds................................................................................................................................................182
Configure Camera Settings..............................................................................................................................183
Disable the Proximity Safety Sensor................................................................................................................185
Calibration Adjustments.............................................................................................................................................186
Auto-Select Mode Calibration Adjustments......................................................................................................186
Empirical Calibration Adjustments...................................................................................................................191
Fundamental Parameter Calibration Adjustments............................................................................................194
About The Energy Calibration..........................................................................................................................196
Operation With A PC...................................................................................................................................................197
Connect To A PC And Login..............................................................................................................................198
About The Report Generator............................................................................................................................200
Software Installation........................................................................................................................................214
Operation With A GPS................................................................................................................................................221
Bluetooth.........................................................................................................................................................221
X-MET8000 series Internal GPS........................................................................................................................221
Nokia LD-3W Bluetooth GPS.............................................................................................................................221
Trimble Field Computer and GPS......................................................................................................................222
Major Differences Internal GPS vs. Nokia LD-3W vs. Trimble Field Computer...................................................222
Setup and use the Internal GPS.......................................................................................................................223
Setup and use the Nokia LD-3W Bluetooth GPS...............................................................................................225
Setup and use a Trimble Field Computer and GPS...........................................................................................234
Troubleshooting GPS........................................................................................................................................246
X-MET Application Programming Interface.......................................................................................................247
Additional Troubleshooting.........................................................................................................................................250
Missing Menus Or Methods..............................................................................................................................250
Do A Test Measurement...................................................................................................................................250
Save Diagnostics Information..........................................................................................................................253
Radiation Specifications.............................................................................................................................................253
Primary Beam Intensity....................................................................................................................................254
Primary Beam Direction...................................................................................................................................254
Scattered Radiation Profile...............................................................................................................................254
4
X-MET8000 Series User Manual
8

Welcome
This guide covers several products, and uses ‘X-MET8000 series’ to refer to them. The X-MET8000
series can analyze all elements between Magnesium and Uranium.
Oxford Instruments wishes to ensure that every customer is able to get the maximum benefit from
their use of the X-MET8000 series. There are two booklets to help operators:
This booklet helps operators to make safe, reliable and accurate
measurements. When and how to use the right accessories. How to
Safe, Accurate
Measurements With The
X-MET8000 Series maintain the X-MET8000 series to get the maximum benefit from it, and
basic troubleshooting information. This booklet also includes safety,
regulatory and compliance information, technical specifications and the
EC Declaration of Conformity.
This booklet demonstrates how to use the X-MET8000 series. How the
software works. It shows how to make typical measurements which
How To Use The
X-MET8000 Series
every customer is likely to need, and how to search the results. How to
save the X-MET8000 Series User Manual to a USB memory device.
The X-MET8000 Series User Manual is stored within the X-MET8000 series, and has more in depth
information, and how to use the X-MET8000 series in some specific situations. It shows how a supervisor
can prepare the X-MET8000 series for an operator to use.
Oxford Instruments Industrial Analysis
Tubney Woods, Abingdon, Oxfordshire, OX13 5QX, UK
Who Is This Guide For?
This guide is for the operators and supervisors who are trained to analyze samples with X-ray
fluorescence. The local Oxford Instruments representative can train personnel in the safe and accurate
use of the X-MET8000 series, or give advice about how to train personnel.
5
X-MET8000 Series User Manual
8
X-MET8000 Series Operator’s Guide
The X-MET8000 Series
These are the main components and features of the X-MET8000 series, and the external connections
to it.
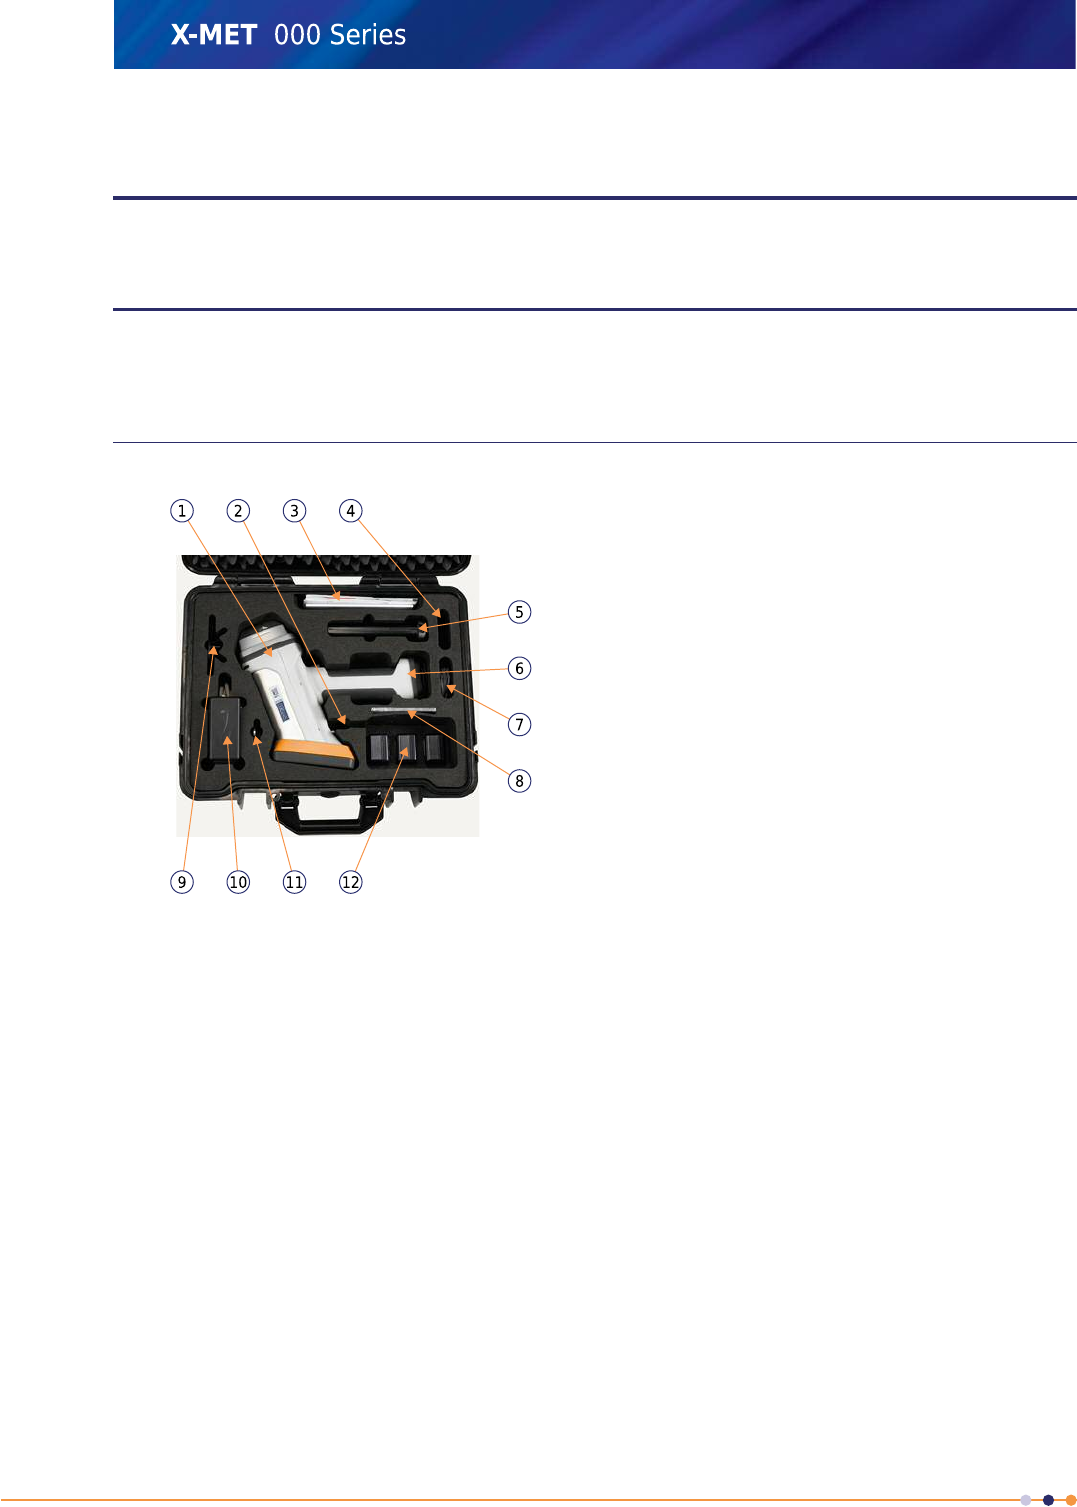
The X-MET8000 Series Components
The X-MET8000 series includes a rugged transit case as standard. This contains the following items:
1. X-MET8000 series analyzer
2. Slot for lanyard
3. Slot for wrist lanyard
4. Operator’s Manuals on a CD
5. Spare protective film windows
6. Spare battery
7. Battery, inside handle
8. USB cable
9. Background plate (optional accessory)
10. Slot for optional light radiation shield or weld adapter
11. DC power supply with cable and plug adapter
12. Desktop battery charger
13. Alloy CRM sample
14. Sample boxes
The included accessories depend upon the version of the X-MET8000 series. The background plate,
the light radiation shield, and the weld adapter are optional accessories. The DC power supply (battery
charger) includes international plug adapters.
6
X-MET8000 Series User Manual
8
The X-MET8000 Series Features
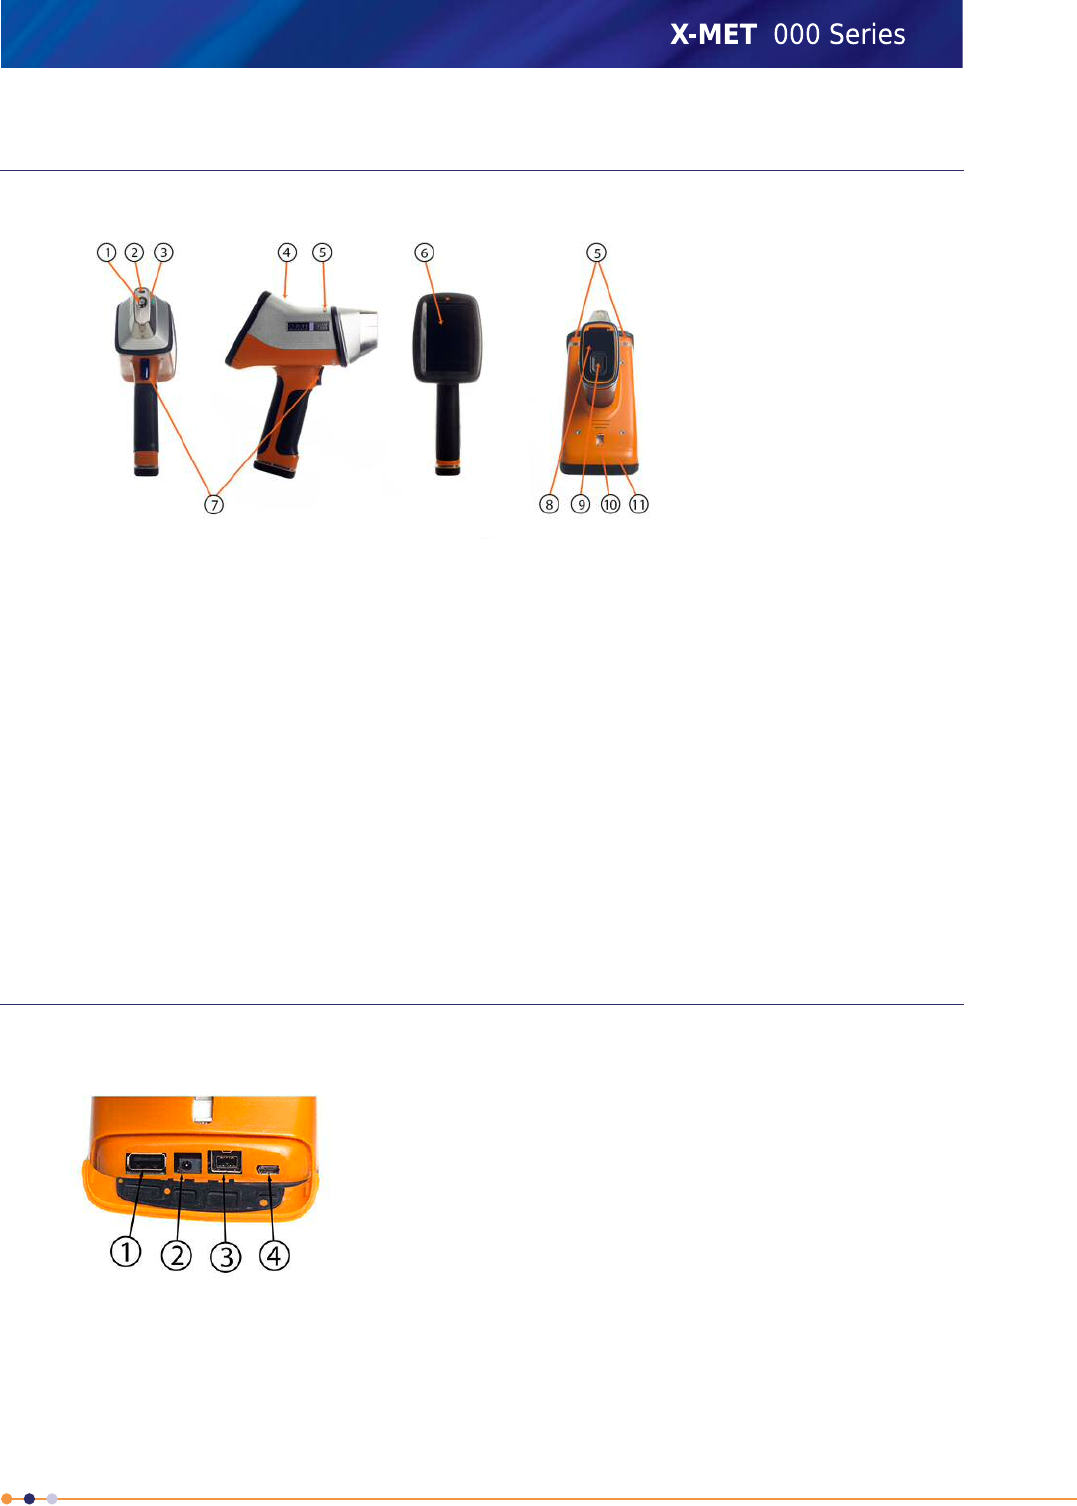
These are the main features of the X-MET8000 series.
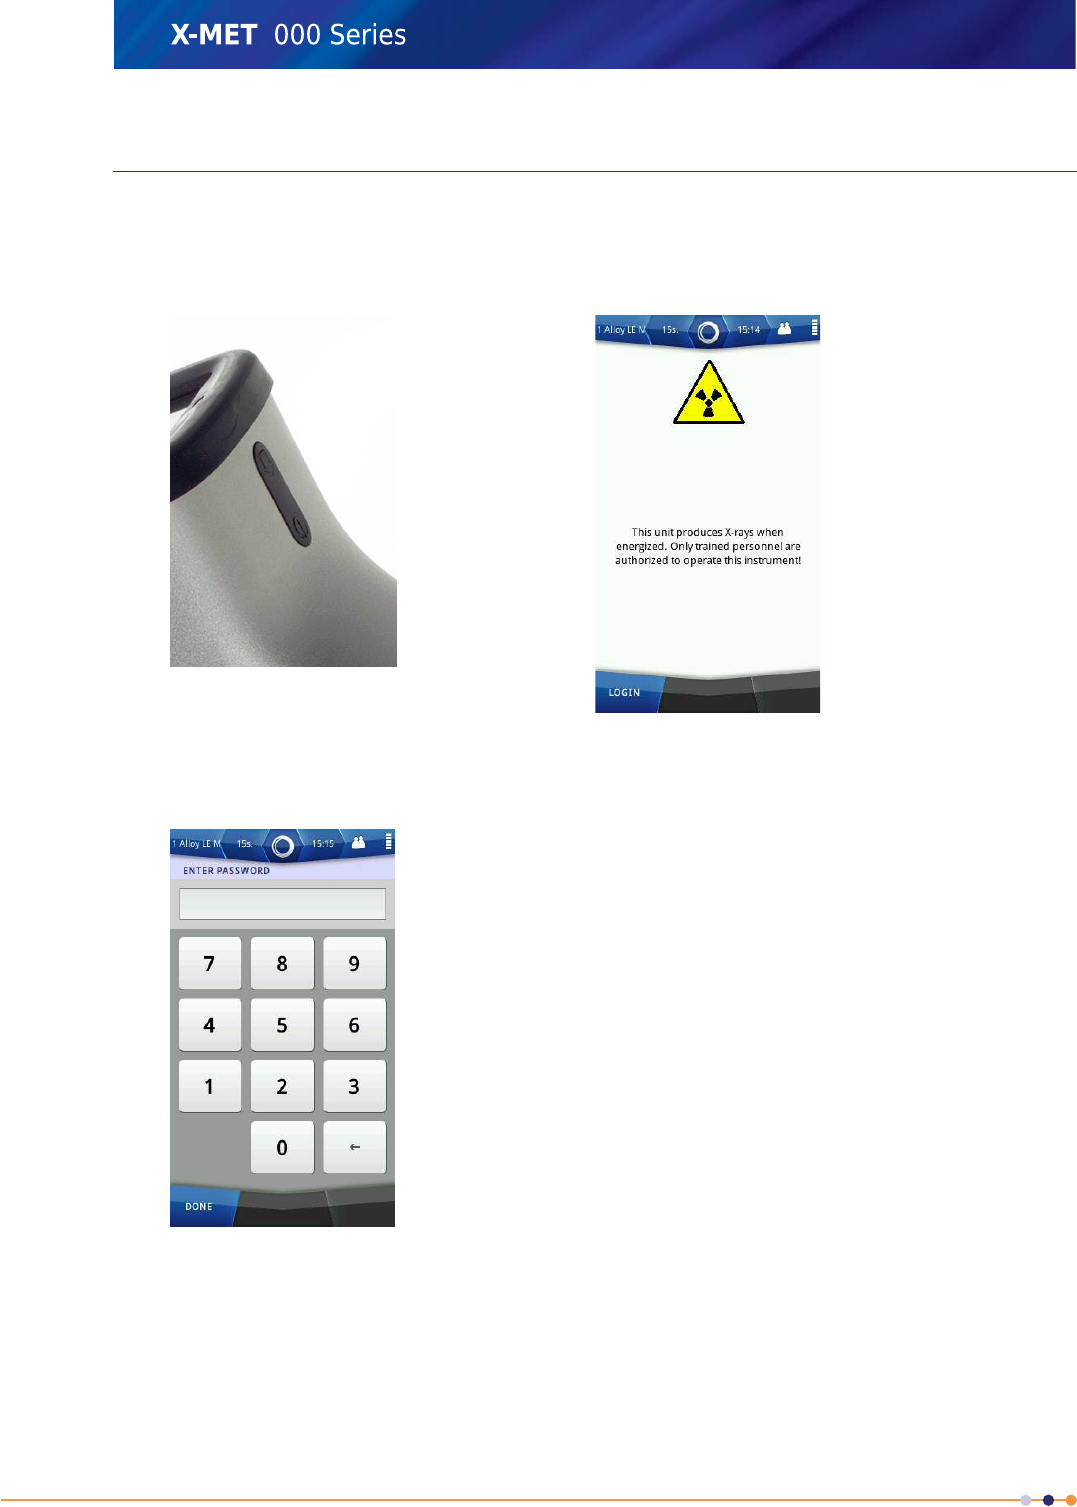
1. Measurement window
2. Proximity window
3. Hot surface protection
4. Control panel
5. Proximity and X-Ray On indicators
6. Touch screen display
7. Trigger
8. Battery cover
9. Battery cover release
10. Ring for lanyard
11. Connector cover
The control panel contains the Power On button and the Home button. The labels include safety
information and the serial number. Open the connector cover to access the external connections.
Check both batteries before use. Refer to: Battery Maintenance on page 94.
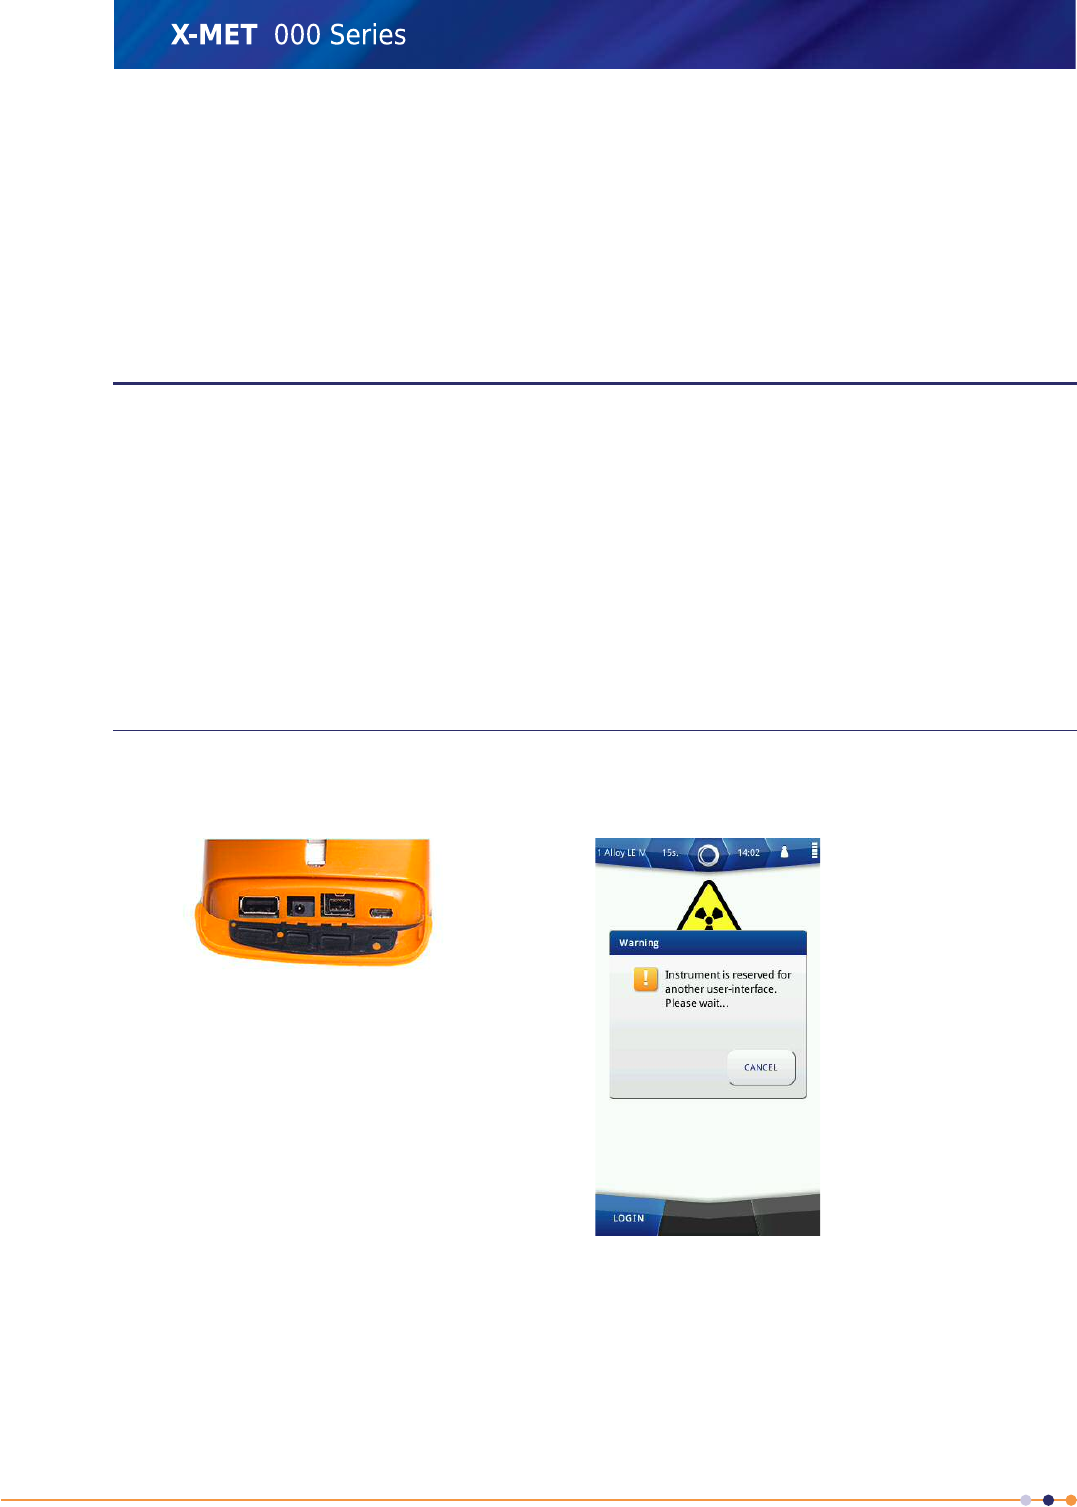
The X-MET8000 Series External Connections
The X-MET8000 series has four external connections that are underneath the display. Open the plastic
connector cover to access them.
1. USB A connector.
2. DC supply connector.
3. Extension connector.
4. USB Micro-AB connector.
Use the USB Micro-AB connector to connect the X-MET8000 series to a PC with the USB cable. Use the
USB A connector for a USB memory device or an external display. Use the DC supply connector to
connect the external DC power supply to charge or power the X-MET8000 series.
7
X-MET8000 Series User Manual
8
Only use the included DC power supply to charge or power the X-MET8000 series and it's batteries.
Use of incompatible DC power supply and/or charger might result in damage or personal injury.
The extension connector is designed for X-MET8000 series accessories and is not compatible with
generic consumer devices. Connecting incompatible devices to the extension port might damage the
X-MET8000 series and/or the device(s) connected to it.
Safety First!
The X-MET8000 series is designed to meet rigorous safety requirements, and is safe to operate in
accordance with these instructions.
If the X-MET8000 series is used in a manner not specified by Oxford Instruments, the safety features
of the X-MET8000 series can be impaired.
Many regulatory organizations require each customer to register the X-MET8000 series. The local
Oxford Instruments representative can assist with the specific regulatory requirements.
The X-MET8000 has regulatory approval as Type Number: XMDS 2770.
Safety Symbols
These symbols appear on the X-MET8000 series and in the documentation.
Caution; X-Rays: This symbol is a warning about X-ray generation.
Caution; X-Rays (Ca): This symbol is a warning about X-ray generation for use in Canada.
Caution; Toxic Material: This symbol is a warning about the presence of toxic material.
Caution; Electricity: This symbol is a warning about the presence of electricity.
Caution: This symbol provides a general warning.
Caution X-Rays
The X-MET8000 series generates X-ray radiation when it is energized.
Caution; X-Rays: Do not misuse or abuse the X-MET8000 series because of the risk of direct
exposure to X-ray radiation above permissible levels. Prolonged direct exposure to X-ray radiation
can cause serious personal injury.
Contact the local Oxford Instruments representative for advice about X-ray radiation, or for X-ray
safety training.
8
X-MET8000 Series User Manual
8
Caution Beryllium
The detector has a thin beryllium window. Beryllium is a toxic compound, however, the beryllium
window poses no health hazard when it is intact.
Caution; Toxic Material: Do not puncture, break or damage the beryllium window in any
way. This can produce airborne particles. Prolonged inhalation of beryllium can cause cancer.
Do not allow the detector to come into contact with moisture, or condensation from high humidity.
This can corrode the beryllium window, in particular if chlorine, sulphates, copper or iron is also present.
Contact the local Oxford Instruments representative for advice about beryllium, or if the beryllium
window is pierced, broken, damaged or corroded.
Caution Lanyard Use
The X-MET8000 series includes a lanyard. This is only applicable for use at ground level.
Caution: Do not use the X-MET8000 series lanyard as a safety lanyard for work at height
because of the risk of a fall. This can result in serious personal injury.
The anchor for the lanyard on the underside of the X-MET8000 series is applicable for use with a tool
safety lanyard for work at height.
X-MET8000 Series Safety Features
The X-MET8000 series includes these 10 key safety features to protect the operator.
Power On Button And Indicator
Safety Feature: Press and hold the Power On button for 5 seconds to switch the X-MET8000
series on or off.
Password Protection
Safety Feature: An operator must have the correct password to use the X-MET8000 series.
Safety Feature: The supervisor can change the passwords.
Proximity Sensors
Safety Feature: The sample must cover the proximity window before the X-MET8000 series
can generate an X-ray beam.
Safety Feature: When the sample covers the proximity window, the proximity indicators
change to green.
Safety Feature: The X-MET8000 series switches the X-ray beam off if there is no return signal
from the sample.
Trigger And X-Ray On Indicators
Safety Feature: An operator must pull the trigger for the X-MET8000 series to generate an
X-ray beam.
9
X-MET8000 Series User Manual
8
Safety Feature: The X-Ray On indicators blink red when the X-MET8000 series generates an
X-ray beam.
Safety Feature: If one of the X-Ray On indicators fails, the X-MET8000 series will not generate
an X-ray beam.
X-ray shutter
Safety Feature: The shutter state is indicated on the X-MET8000 series screen "Shutter
open/Shutter closed".
How To Operate The X-MET8000 Series
Use the control panel and touch screen display to operate the X-MET8000 series. The touch screen
display includes a virtual keyboard to type text and numbers. There is a Menu screen and a status
bar to access the main functions and the configuration, and a Tools menu can appear for some screens.
The Control Panel
The control panel contains the Power On button and the Home button.
1. Home button
2. Power On button
Press the Home button to immediately leave the current screen and cancel
an operation.
Home button
The symbol on the Home button is lit white when the X-MET8000 series is
on.
The symbol on the Power On button is lit white when the X-MET8000 series
is on.
Power On button
Press and hold the Power On button for 5 seconds to switch the X-MET8000
series on or off.
10
X-MET8000 Series User Manual
8
The Touch Screen
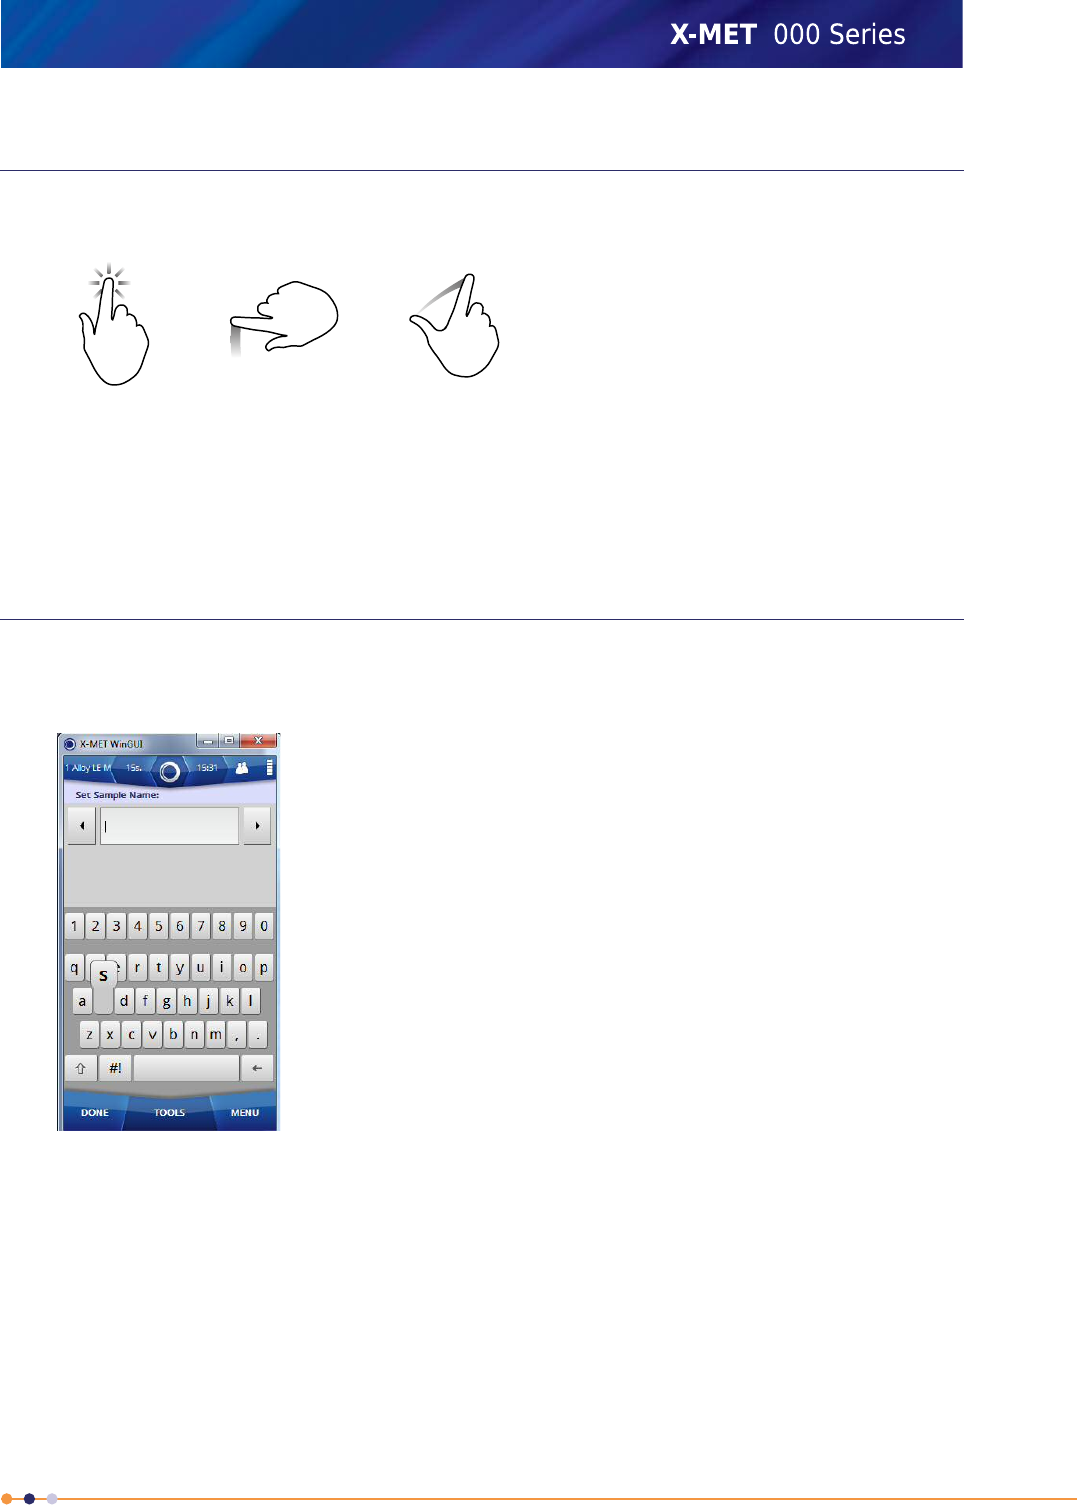
Use these finger movements to control the X-MET8000 series.
FlickSlideTap
•Tap a button or arrow to select or activate it.
•Press and Slide to scroll a list up or down.
•Flick a screen to left or right to display the previous or next screen.
The Virtual Keyboard
Use the virtual keyboard to type text into a text box. Tap the character, and it will pop up above the
other keys. Release the character, and it appears in the text box. Tap the arrows on either side of the
text box to move the cursor to the left or right.
11
X-MET8000 Series User Manual
8
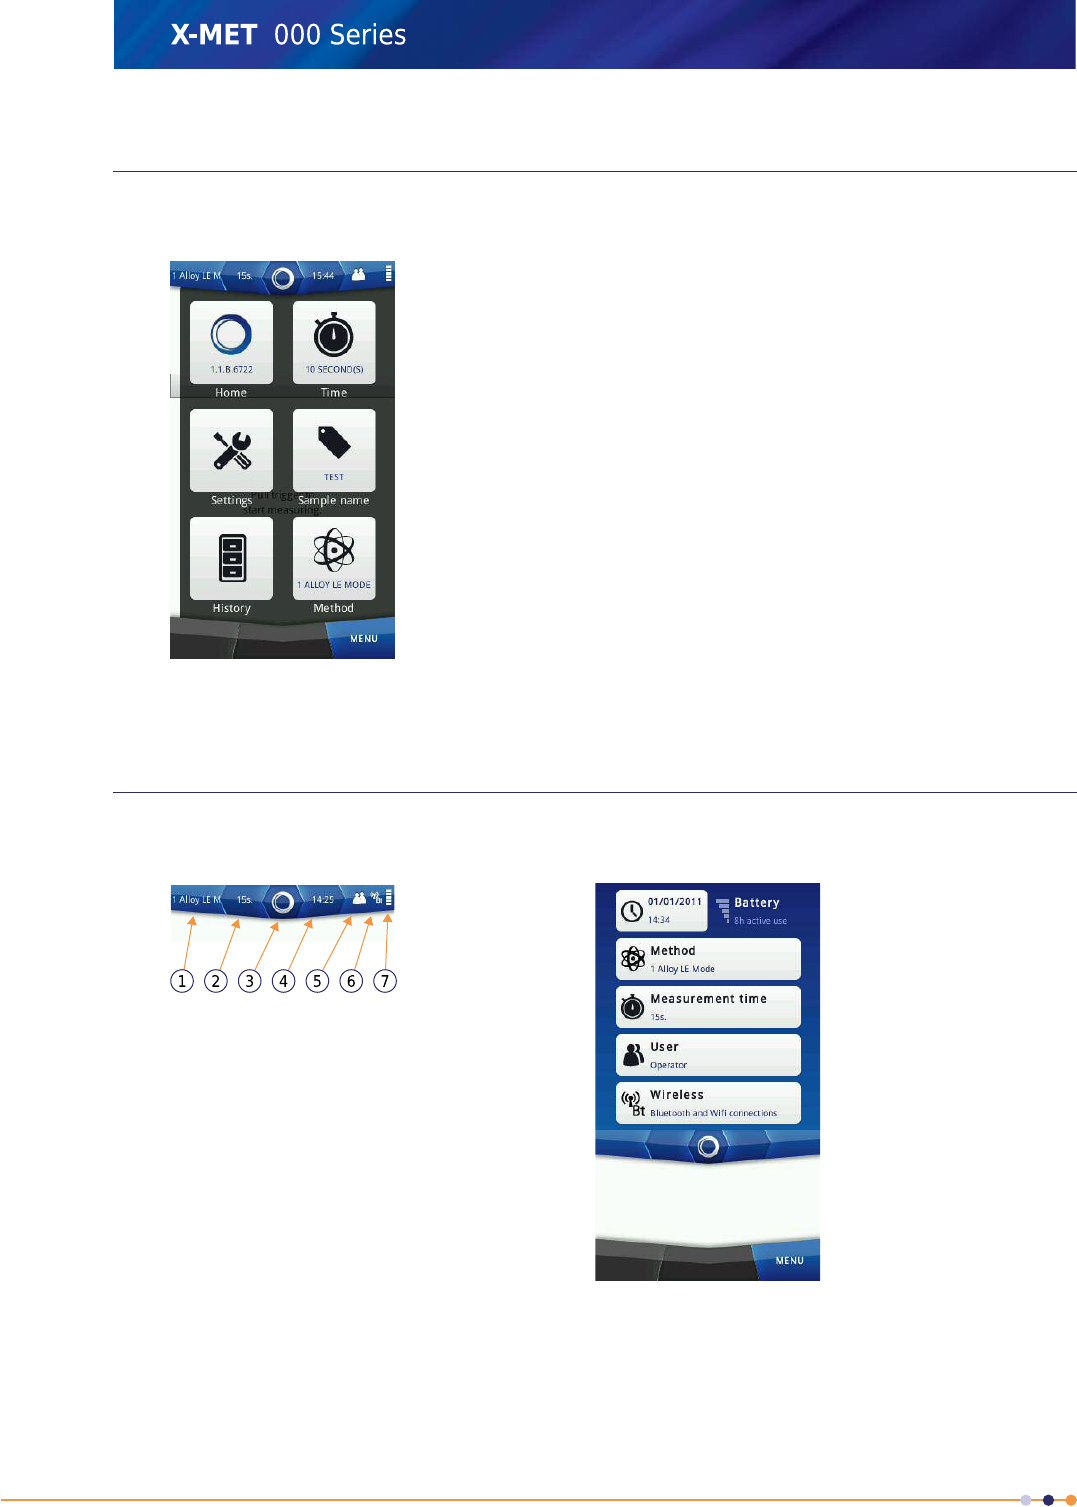
The Menu Screen
Tap Menu in the bottom right of the screen and the Menu screen appears. This gives access to the
main functions of the X-MET8000 series.
The Menu screen is always available. Tap Menu, and then tap Home to immediately leave the current
screen and cancel an operation.
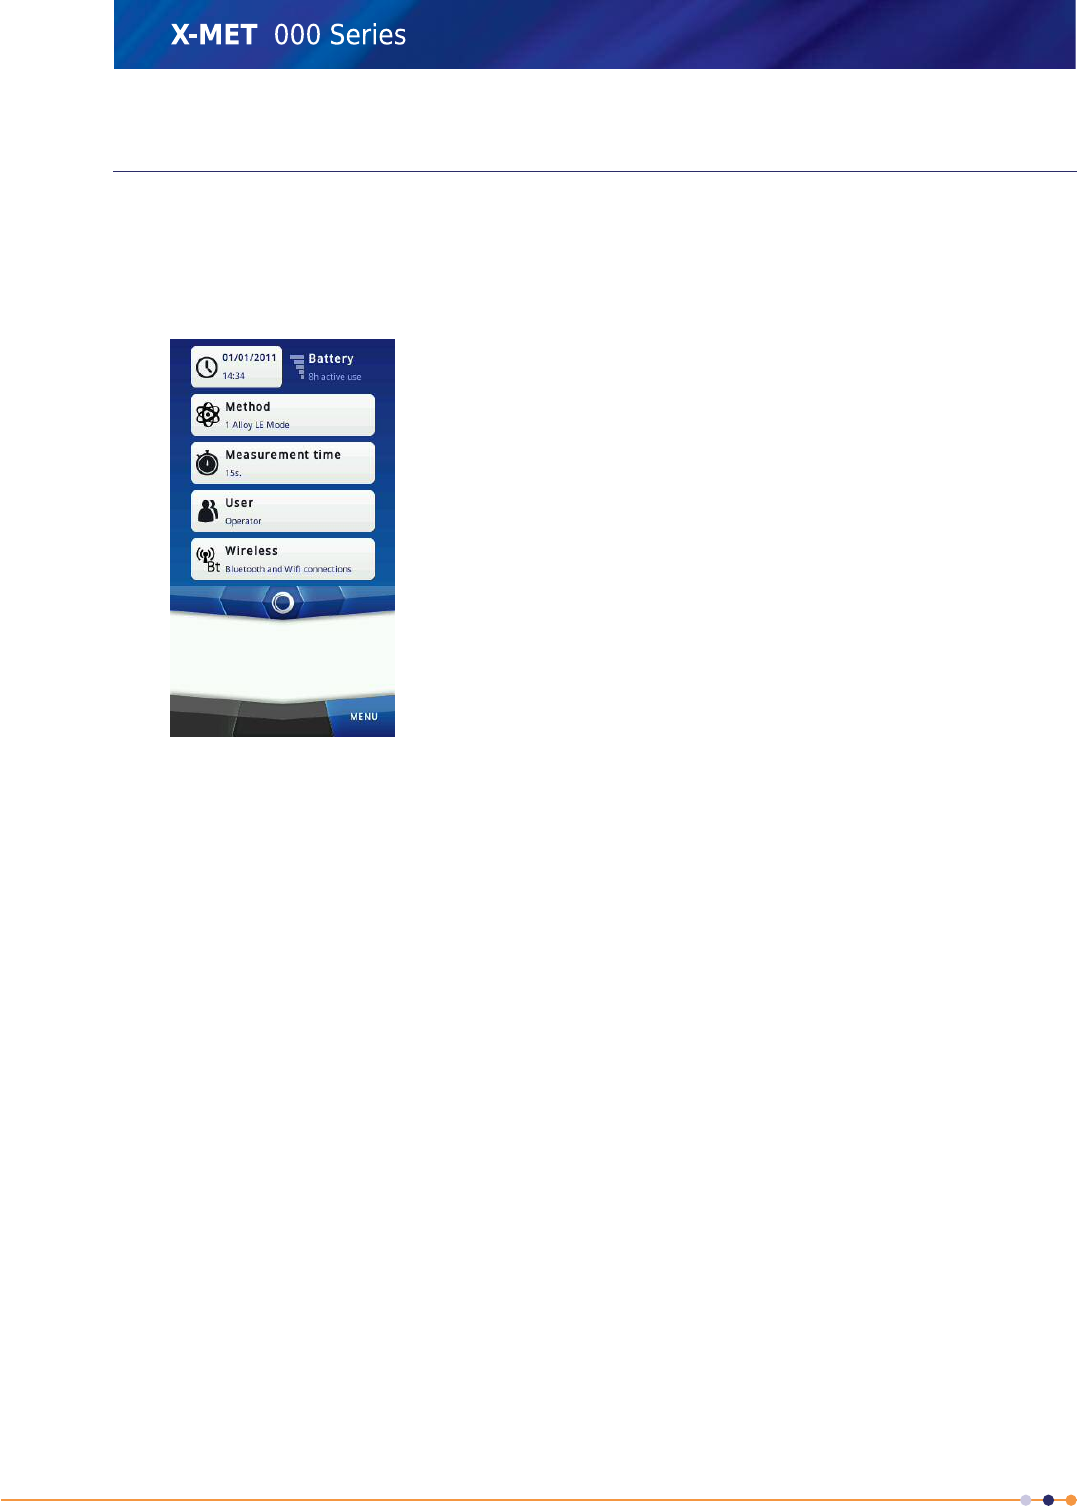
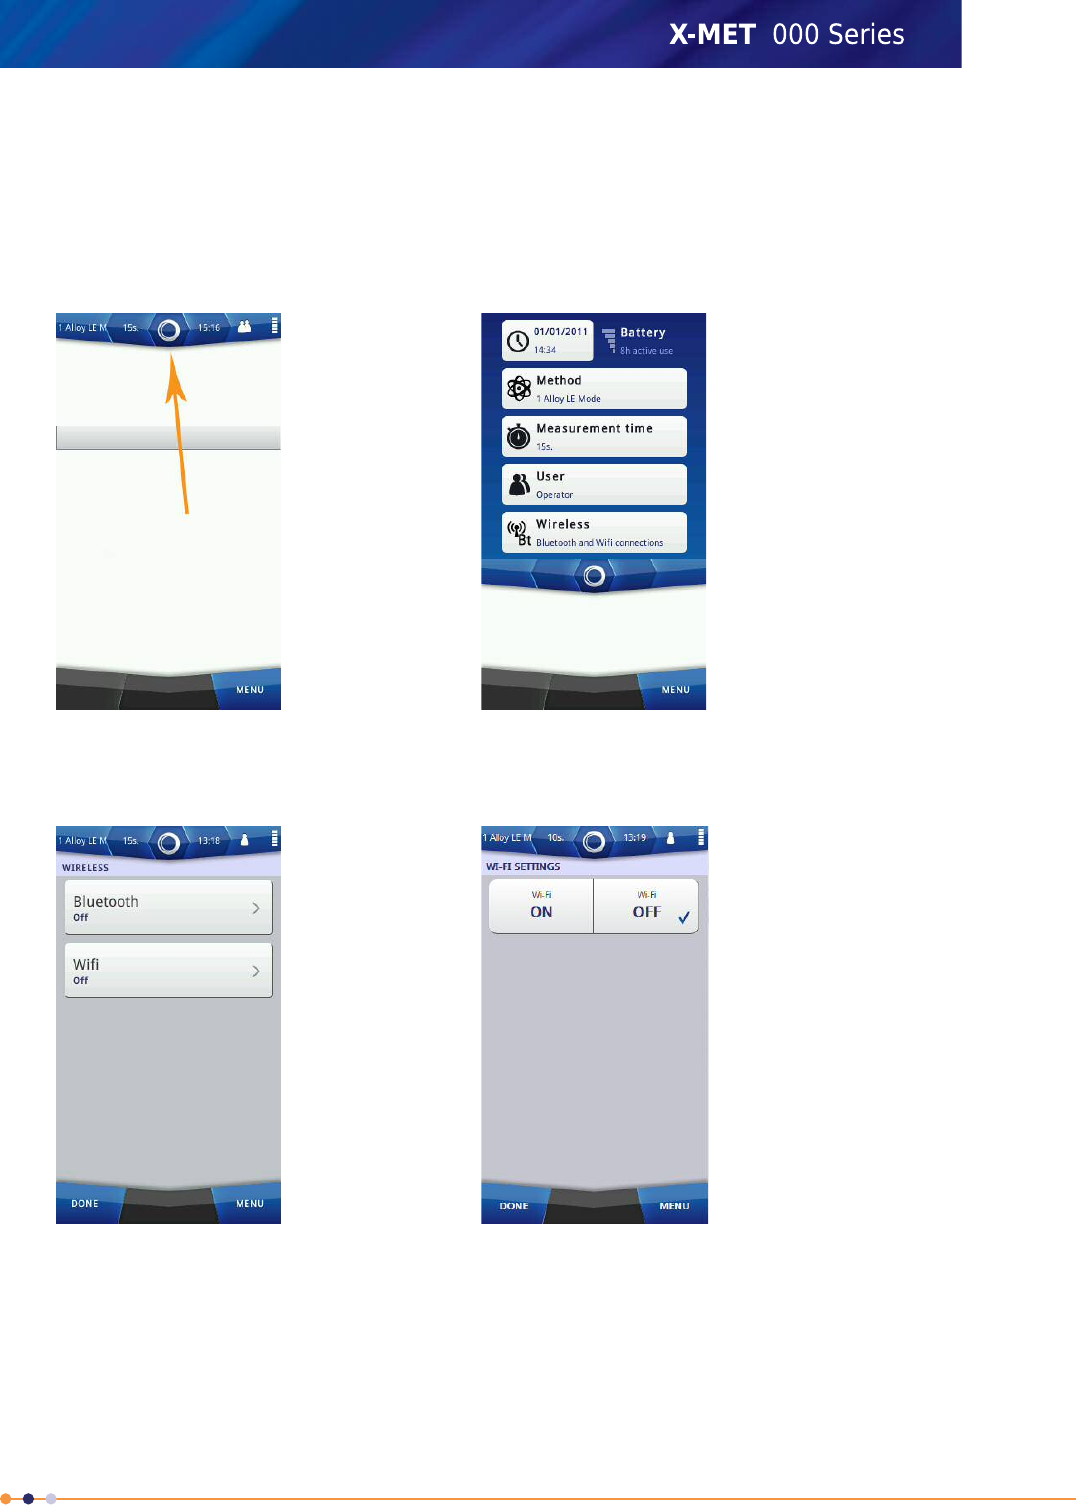
The Status Bar
Tap the status bar at the top of the screen and the status bar screen appears. This contains information
about the configuration and provides quick access to these settings. The status bar is always available.
1. Method name
2. Measurement time
3. Proximity indicator
4. Time
5. User level
6. Bluetooth and Wi-Fi
7. Battery level
The user level is shown as:
•Operator: two people
•Supervisor: one person
12
X-MET8000 Series User Manual
8
The Tools Menu
When available, Tools appears in the middle at the bottom of the screen because a Tools menu is
available. Not every screen requires a Tools menu. Tap Tools to make the Tools menu appear. The
function of the Tools menu varies with the screen that it supports. These are two examples.
Take The First Measurement
The X-MET8000 series has factory settings which are applicable to many measurements. It is a good
idea to give each sample a name, because it is easier to find it in the results history if it has one.
Follow these instructions to take the first measurement.
Remember that the booklet ‘Safe, Accurate Measurements With The X-MET8000 Series’ contains
important safety information, as well as guidance for accurate measurements.
13
X-MET8000 Series User Manual
8
Switch On The X-MET8000 Series
Take the X-MET8000 series out of the transit case, and then follow these steps to switch it on.
1. Press and hold the Power On button for 5 seconds.
The X-MET8000 series powers on, and the Safety screen appears.
2. Tap Login in the bottom left of the Safety screen.
The Login screen appears, with the numeric keypad.
14
X-MET8000 Series User Manual
8
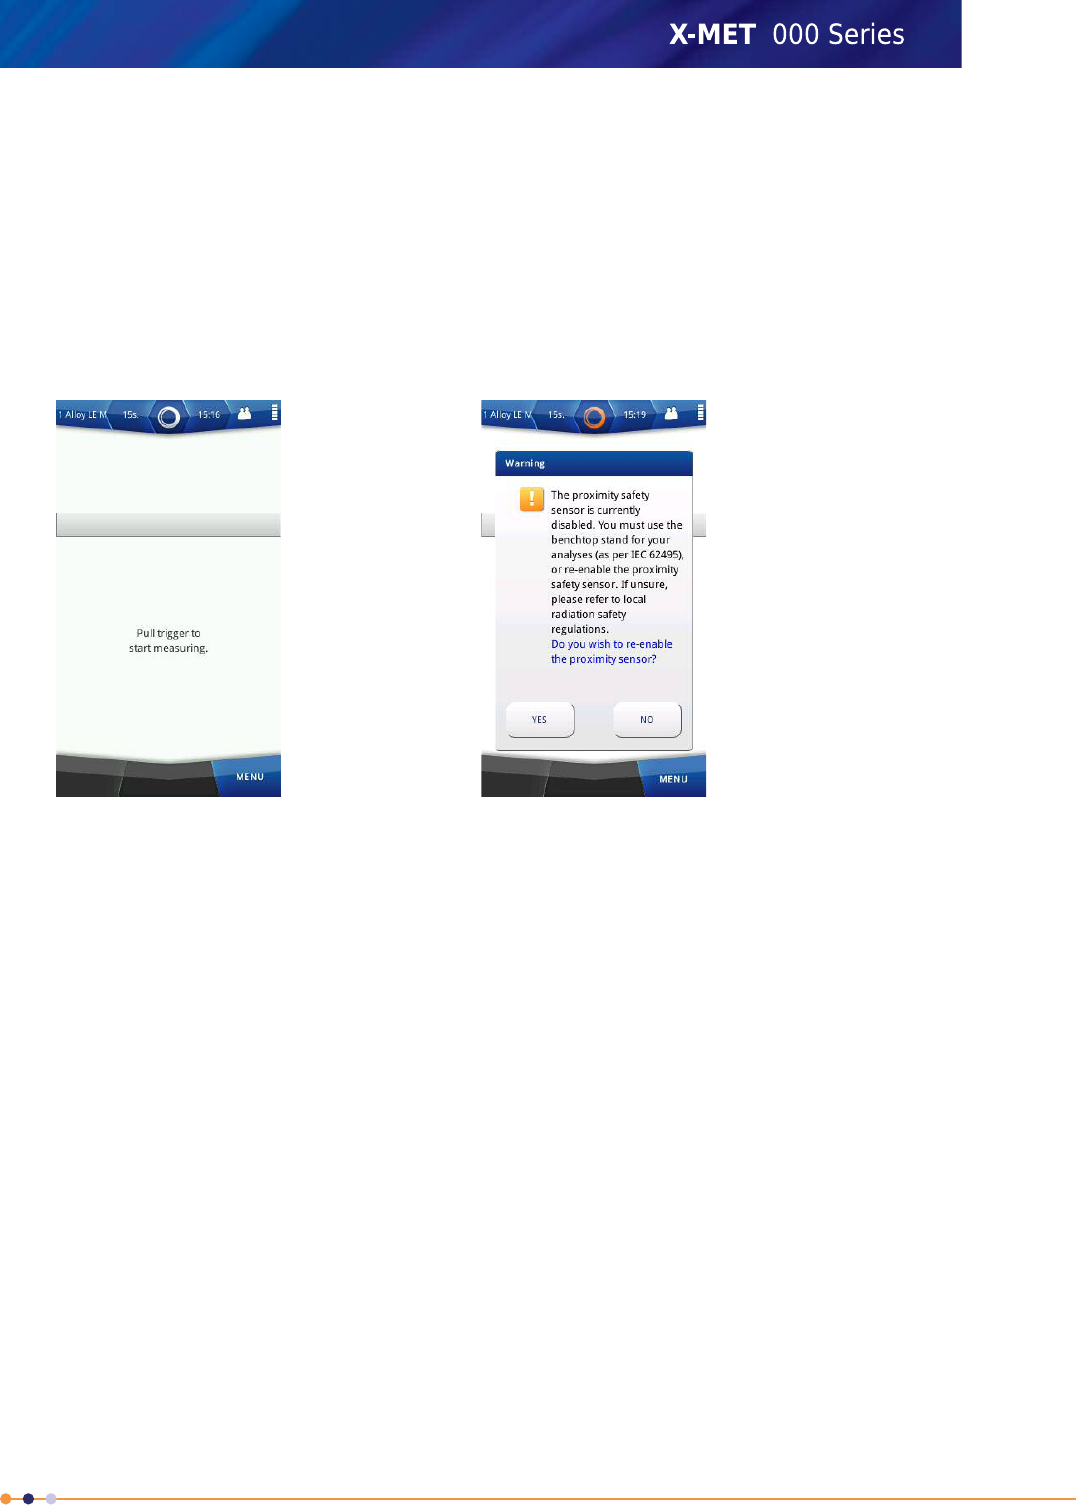
3. Tap the numbers to type the password.
The factory settings are:
•Operator: 1111
•Supervisor: 0000
The supervisor should change the passwords. Refer to the X-MET8000 Series User Manual .
4. Tap Done.
The main screen appears. If the Proximity Safety Sensor has been disabled a warning message is
shown. The Proximity Safety Sensor can be re-enabled by tapping Yes.
If it is necessary to set the date, time or language, refer to: X-MET8000 Series Settings on page
82.
15
X-MET8000 Series User Manual
8
Add A Sample Name
Follow these steps to name the sample.
1. Tap Menu, and then tap Sample Name.
The Sample Information screen appears.
2. Tap Set Sample Name.
The Set Sample Name screen appears, with the virtual keyboard.
3. Use the virtual keyboard to type the Sample Name, and then tap Done.
4. Tap Done again to return to the main screen.
Take A Measurement
Follow these steps to measure the sample.
1. Carefully hold the X-MET8000 series so that it touches the sample, and that both the proximity
and measurement windows are covered.
Do not press the X-MET8000 series into the sample.
The proximity indicators change to green.
16
X-MET8000 Series User Manual
8
2. Pull and hold the trigger firmly.
The X-ray On indicators blink red.
3. Keep the X-MET8000 series upright and steady during the measurement.
Use both hands to hold the X-MET8000 series and keep them away from the sample.
The Results screen refreshes approximately every 2 seconds.
4. At the end of the measurement time, the X-MET8000 series makes a ‘ping’ sound. Release the
trigger to stop the measurement.
The measurement stops, and the X-MET8000 series displays the result.
It is possible to release the trigger and stop the measurement before the ‘ping’ sound.
Follow these steps again to make the next measurement.
Flick the screen to left or right to access other results.
17
X-MET8000 Series User Manual
8
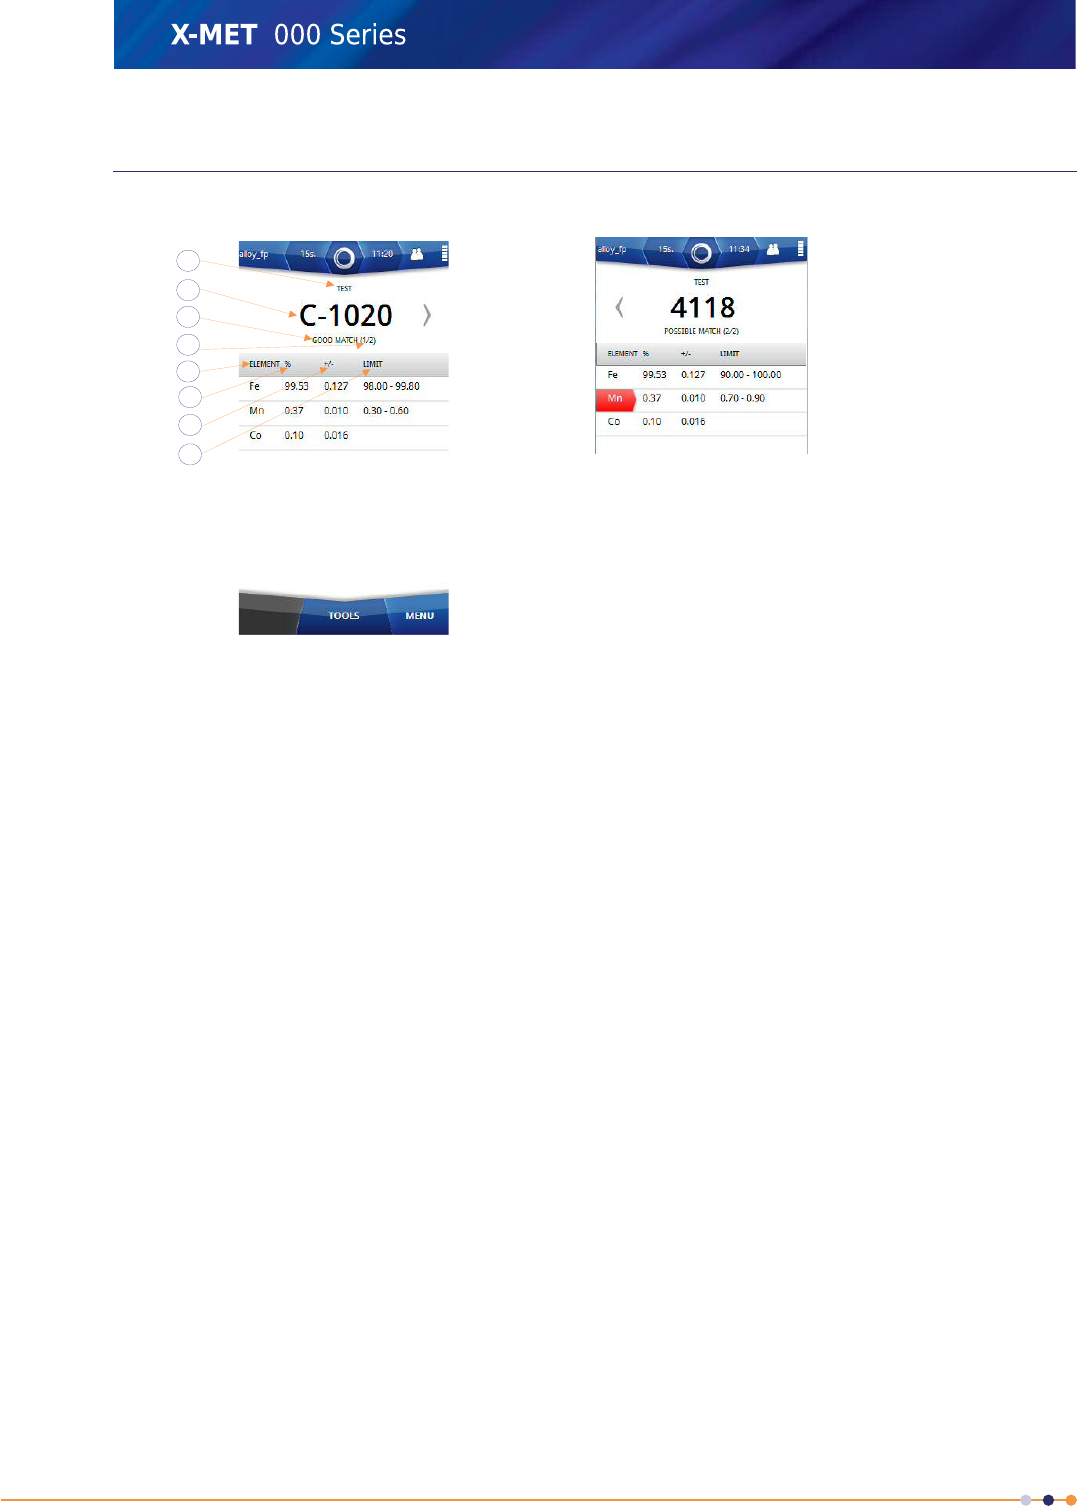
The Results Screen
The Results screen has this information.
1
7
6
5
4
3
2
8
1. Sample name
2. Grade ID
3. Match level
4. The number of potential
matches
5. Element
6. % or PPM
7. +/-
8. Limit
This is defined in Add A Sample Name on page 16.Sample name
The grade or trade name for the sample. Tap the arrow on the left or
right of the grade ID to display the next or previous possible match.
Grade ID
‘Good Match’ or ‘Possible Match’.Match level
There can be more than one match for the sample. The best match is
always shown first.
The number of potential
matches
The chemical symbol. If an element has a red background it is because
it is outside the required limits for that grade.
Element
The measurement unit, for example %(percentage) or PPM(parts per
million).
% or PPM
This indicates the precision(2 sigma) of the measurement. The lower
the +/- value, the greater the precision.
+/-
The required limits for the grade.Limit
18
X-MET8000 Series User Manual
8
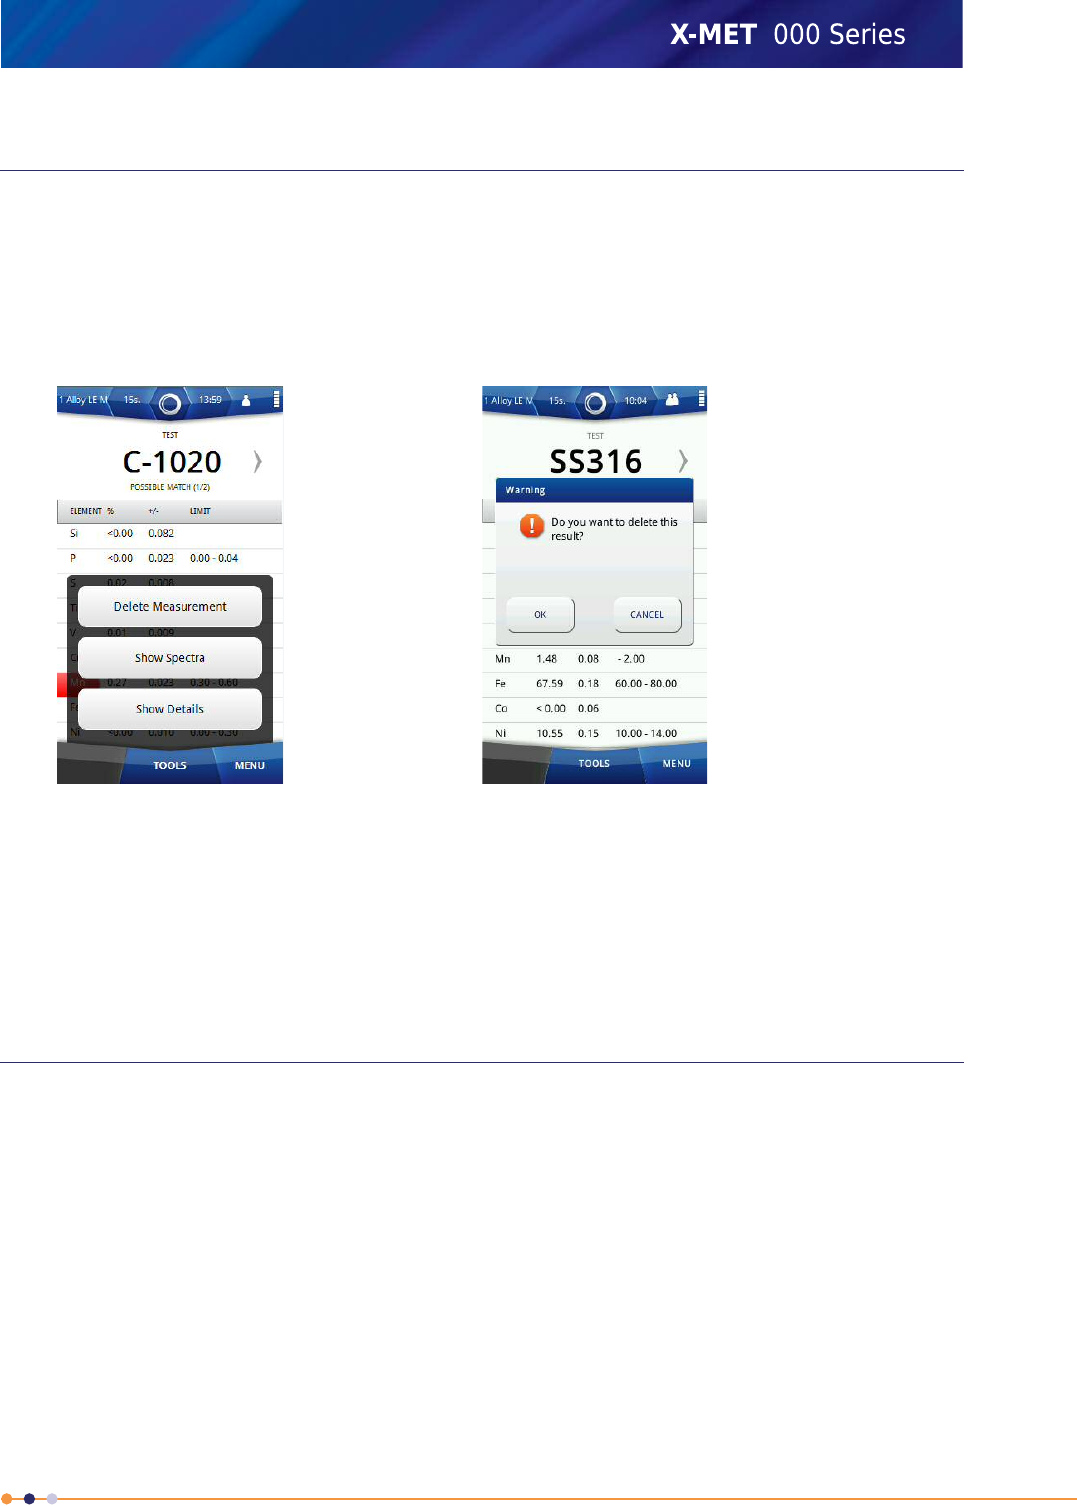
Delete A Poor Measurement
Occasionally a poor measurement will occur. This can be because the sample is badly positioned, or
because the measurement time is too short. The booklet ‘Safe, Accurate Measurements With The
X-MET8000 Series’ contains guidance for accurate measurements. Follow these steps to delete a
measurement from the Results screen.
1. Tap Tools when a result is visible.
The Results screen Tools menu appears.
2. Tap Delete Measurement.
A Warning dialog box appears.
3. Do one of the following:
•Tap OK to delete the measurement.
•Tap Cancel to not delete the measurement.
Print Result From Result Screen To Bluetooth Printer
Before printing the results, it is necessary to configure a Bluetooth Printer and select Connect as
Printer option from the Tools menu in the Bluetooth Settings screen. Please refer to the Supervisor
manual to set this up. Follow these steps to print a measurement from the Results screen to a Bluetooth
Printer.
1. Tap Tools when a result is visible.
The Results screen Tools menu appears.
2. Tap Print Result.
Device begins to send the result for the printing. In few seconds, result is printed at the Bluetooth
Printer.
19
X-MET8000 Series User Manual
8
Switch Off The X-MET8000 Series
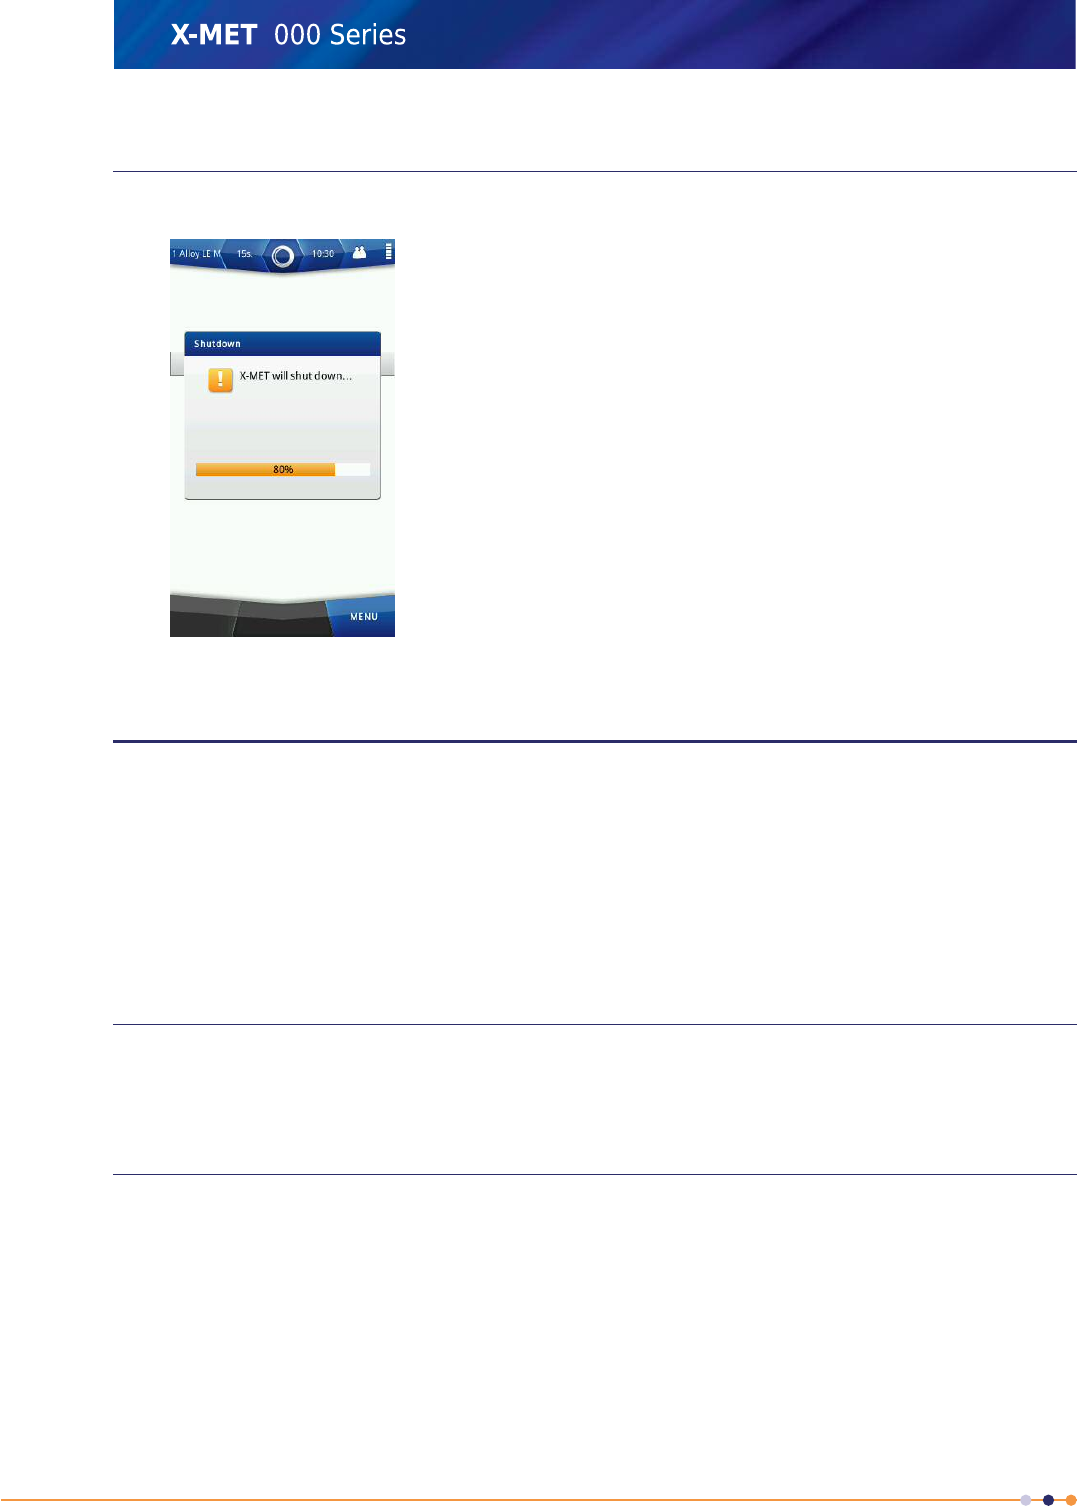
Press and hold the Power On button for 5 seconds. The X-MET8000 series powers off.
Average A Batch Of Measurements
Sometimes it is necessary to average a batch of measurements on a larger, mixed sample. It is
important that all measurements use the same conditions:
•The same method
•The same measurement time.
When all the measurements are complete, it is very easy to switch between the various results. The
X-MET8000 series also provides comprehensive search facilities to find a series of measurements from
the results history.
Sample And Batch Names
The X-MET8000 series automatically increments an index number appended to the sample name, and
uses a separate name for a batch of measurements. For example, ‘Sample Batch’ could include ‘Sample
1’, ‘Sample 2’,’Sample 3’ and so on.
Which Method?
The method defines how the X-MET8000 series analyses the sample. The available methods depend
upon the version of the X-MET8000 series.
Some of the method names include ‘FP’, for example Alloy FP, Mining FP or Soil FP. This refers to
‘fundamental parameters’, which is a complex mathematical algorithm to analyse materials.
The X-MET8000 series can include auto select modes, with a ‘Mode’ suffix. If an applicable mode is
available, this is the first choice for the operator. These appear at the top of the method list, and
include Alloy Mode, Alloy LE Mode, Mining Mode and RoHS Mode. Modes chose the most applicable
calibration for the sample.
20
X-MET8000 Series User Manual
8
The X-MET8000 series can include empirical calibrations. These are calibrations of specific elements
with a specific concentration range, and include stainless steel, copper, titanium, iron and many other
elements. An operator will not see these in the list of available methods. Only a supervisor can see
these. An auto select mode can chose the correct empirical calibration for the sample, which makes
analysis easier for the operator.
The X-MET8000 includes ‘LE’ in some of the method names, for example Stainless LE, Alloy LE FP or
Alloy LE Mode. The LE refers to ‘light elements’, and these methods can analyse alloys that include
magnesium, aluminum, silicon, phosphorous and sulfur.
Sometimes a mode is not able to fully measure a sample, because some of the concentrations in the
sample are outside the limits for that method. If this occurs, a greater than, >, or less than, <, indicator
appears next to the concentration.
When this occurs, the operator should choose an applicable ‘FP’ method. These work with a wider
range of concentrations and sample types, and is the second choice for the operator.
Auto Select Modes Make Analysis Easy
Auto select modes make use of both empirical and fundamental parameter calibrations. Use the
numbers in the illustrations to follow how Alloy LE Mode analyzes first stainless steel and then gold.
It uses an empirical calibration for stainless steel, and a fundamental parameter calibration for gold.
All steps happen automatically, and can make life very easy for an operator!
Alloy LE Mode, Empirical For Stainless Steel
These steps show how Alloy LE Mode uses an empirical calibration to analyze a stainless steel sample,
and return the grade.
1. The X-MET8000 series acquires a spectrum to identify the sample.
2. It compares the identification spectrum with all the empirical calibrations to obtain a match.
3. It finds a match with the stainless steel empirical calibration, shown in green.
4. It uses the stainless steel calibration to analyze the sample and then display the results.
5. It compares the results with the grade library and finds SS316 is the best match.
21
X-MET8000 Series User Manual
8
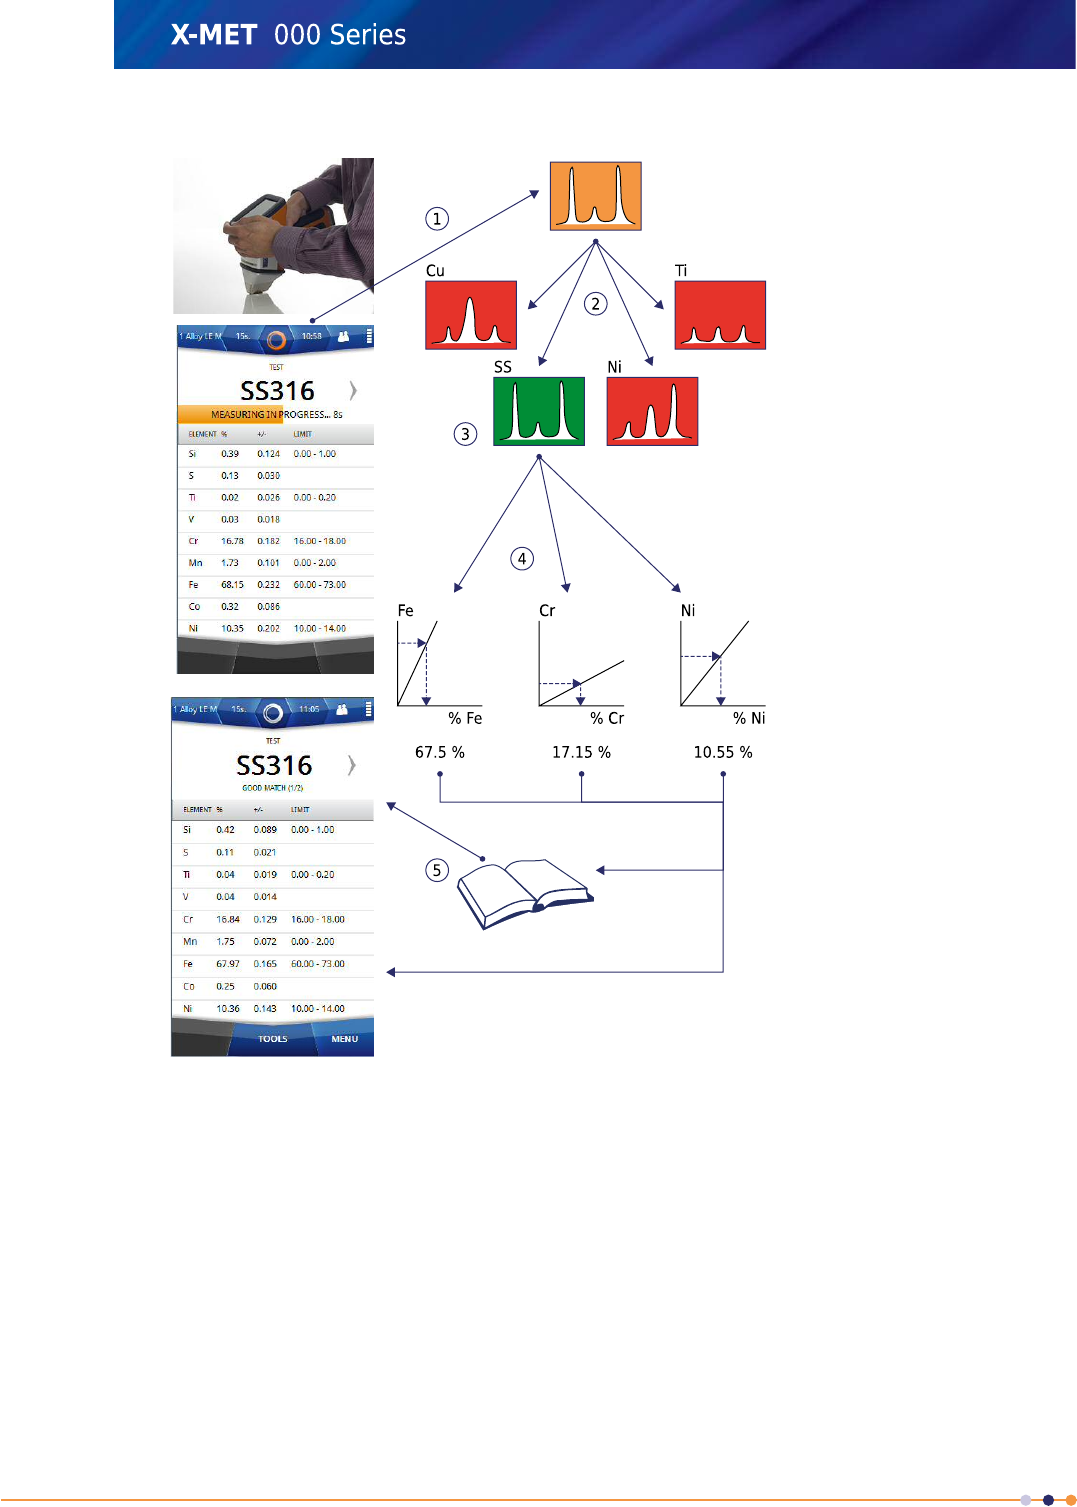
Alloy LE Mode, Empirical For Stainless Steel
Alloy LE Mode, Fundamental Parameter For Gold
These steps show how Alloy LE Mode uses a fundamental parameter calibration to analyze a gold
sample, and return the grade.
1. The X-MET8000 series acquires a spectrum to identify the sample.
2. It compares the identification spectrum with all the empirical calibrations to obtain a match.
3. It does not find a match with any empirical calibration, all shown in red.
4. It switches to a fundamental parameter calibration and uses the internal calculator to analyze the
sample, compute and then display the results.
5. It compares the results with the grade library and finds 24 carat gold is the best match.
22
X-MET8000 Series User Manual
8
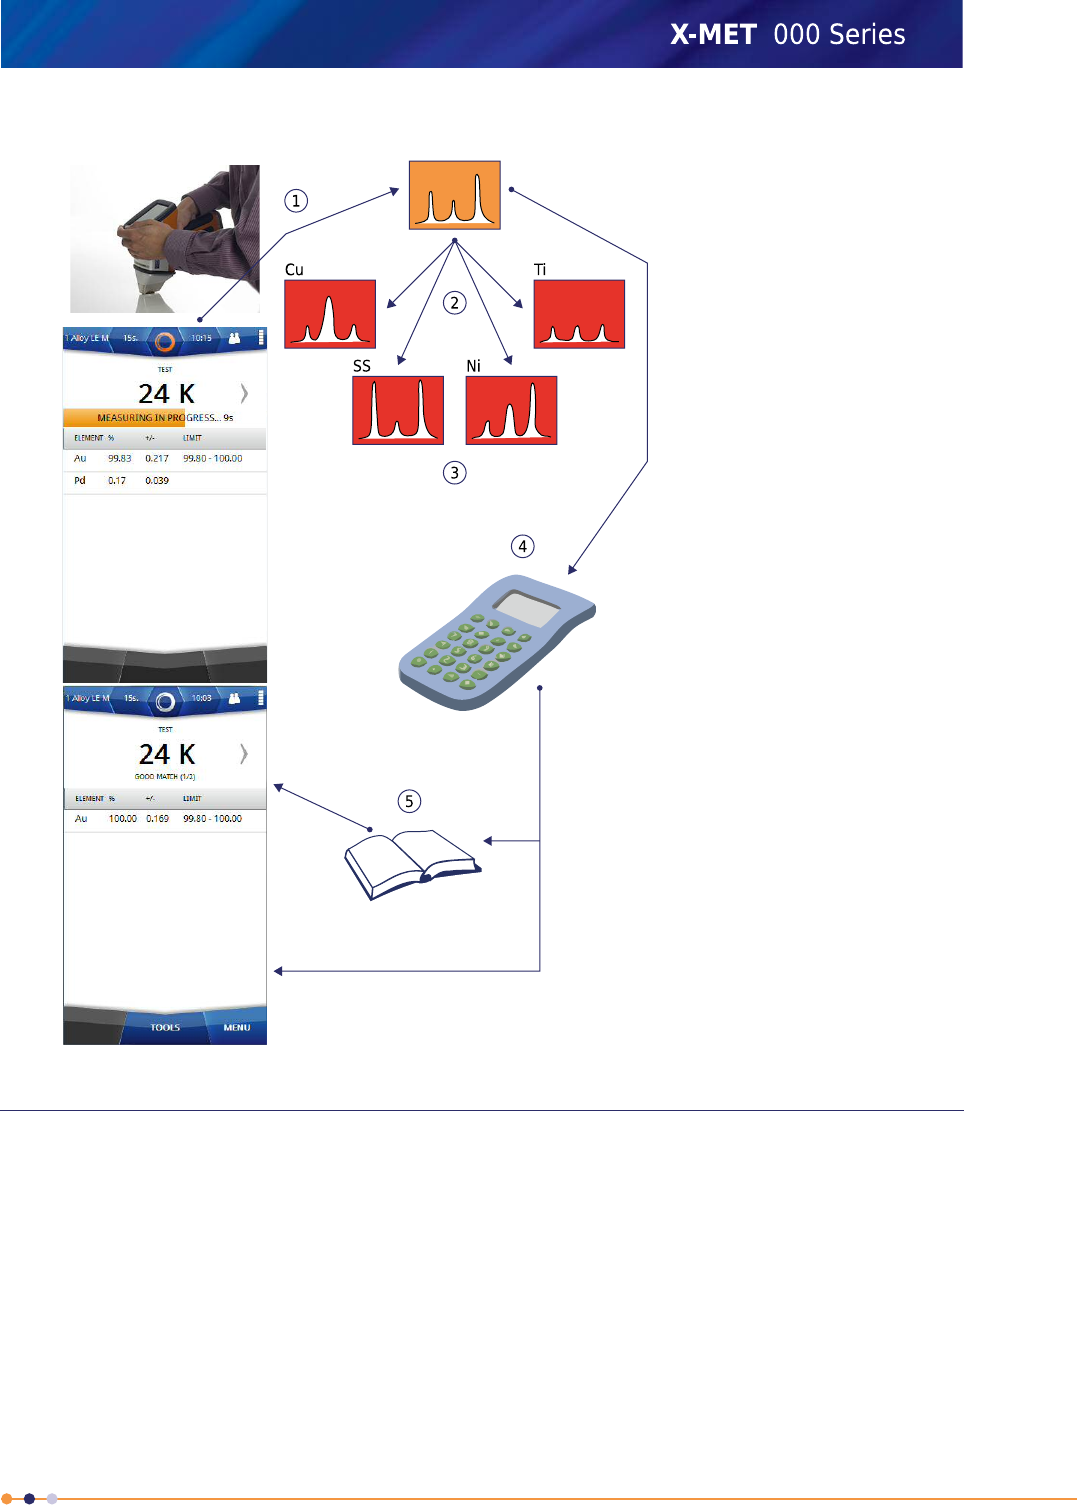
Alloy LE Mode, Fundamental Parameter For Gold
How Long For A Measurement?
The factory set measurement time of 15 seconds is applicable for many measurements. Quicker
measurements for iron, copper, nickel and similar alloys require as little as 5 seconds. Magnesium
and aluminum alloys need longer measurement times, for example 30 seconds or more. Complex
alloys also require longer measurement times to analyze all the trace elements.
Longer measurements will always give more precise results. However, the X-MET8000 series can
provide excellent results in only a few seconds. The standard deviation, STD, figures indicate the
measurement precision. The longer the measurement time, the lower the standard deviation figures,
the greater the precision.
At the end of the measurement time, the X-MET8000 series makes a ‘ping’ sound. It is also possible
to use the internal timer to fully control the measurement. This is known as ‘Timed Assay’. The operator
23
X-MET8000 Series User Manual
8
pulls the trigger, and then releases it to start the measurement. The internal timer automatically stops
the measurement.
When Timed Assay is off, the operator must release the trigger when the ‘ping’ sounds to stop the
measurement. The Results screen refreshes approximately every 2 seconds, and the operator can
decide to release the trigger before the ‘ping’ sounds to stop the measurement immediately.
Timed Assay is very useful for longer measurements and measurements with the bench-top stand. It
is also useful to make sure that a batch of measurements all have the same measurement time.
It is possible to set the measurement time to zero. There is no ‘ping’ sound, and the operator must
decide when to stop the measurement. If Timed Assay is off, the operator pulls the trigger to start the
measurement, and then releases the trigger to stop the measurement. If Timed Assay is on, the
operator pulls and releases the trigger to start the measurement, and then pulls and releases it again
to stop the measurement.
Add The Sample And Batch Names
Follow the Add A Sample Name on page 16 steps to name the sample. Make sure that the sample
name has a single word, then a space, then a number. For example, ‘Steel 1’ or ‘Alloy 1’, but not ‘Steel
alloy 1’.
Follow the Add A Sample Name on page 16 steps again, but tap Set Average Result Name. Use
the virtual keyboard to type the batch name.
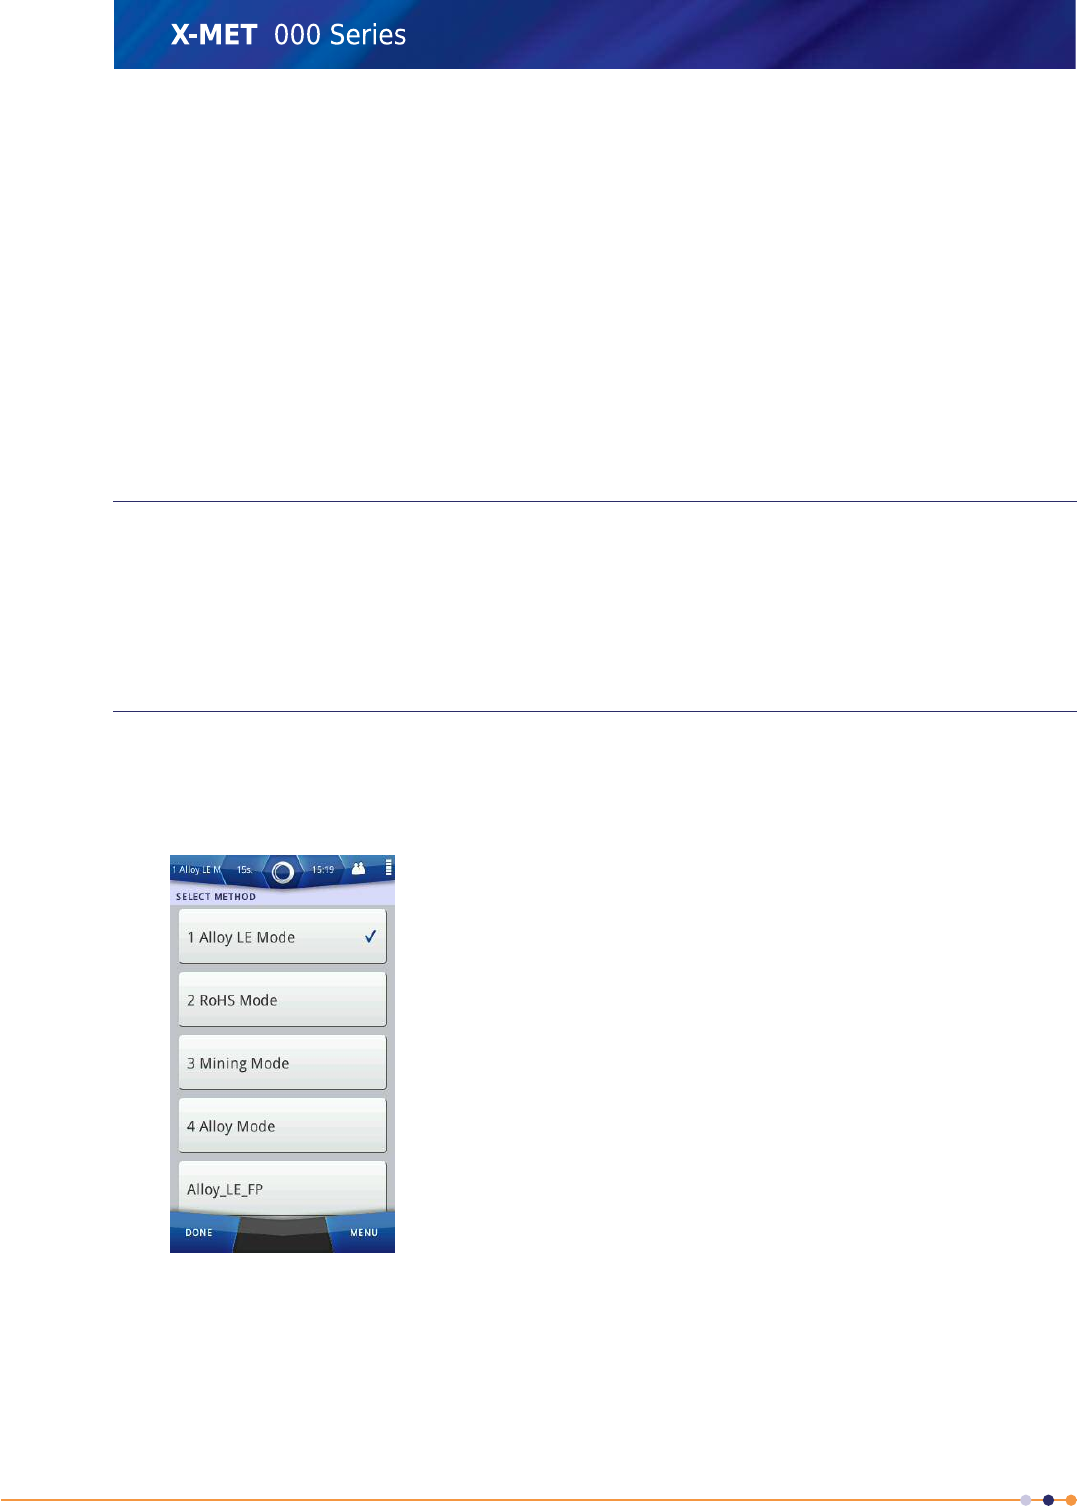
Choose A Method
Follow these steps to choose a method.
1. Tap Menu, and then tap Method.
The Method screen appears.
2. Tap a method to choose it from the list of available methods. If the list of Methods is long, press
and slide the list to scroll it up or down.
•The first preference is for a Mode, and these appear at the top of the list.
•The second preference is for a method with an ‘FP’ suffix.
24
X-MET8000 Series User Manual
8
3. Tap Done to return to the main screen.
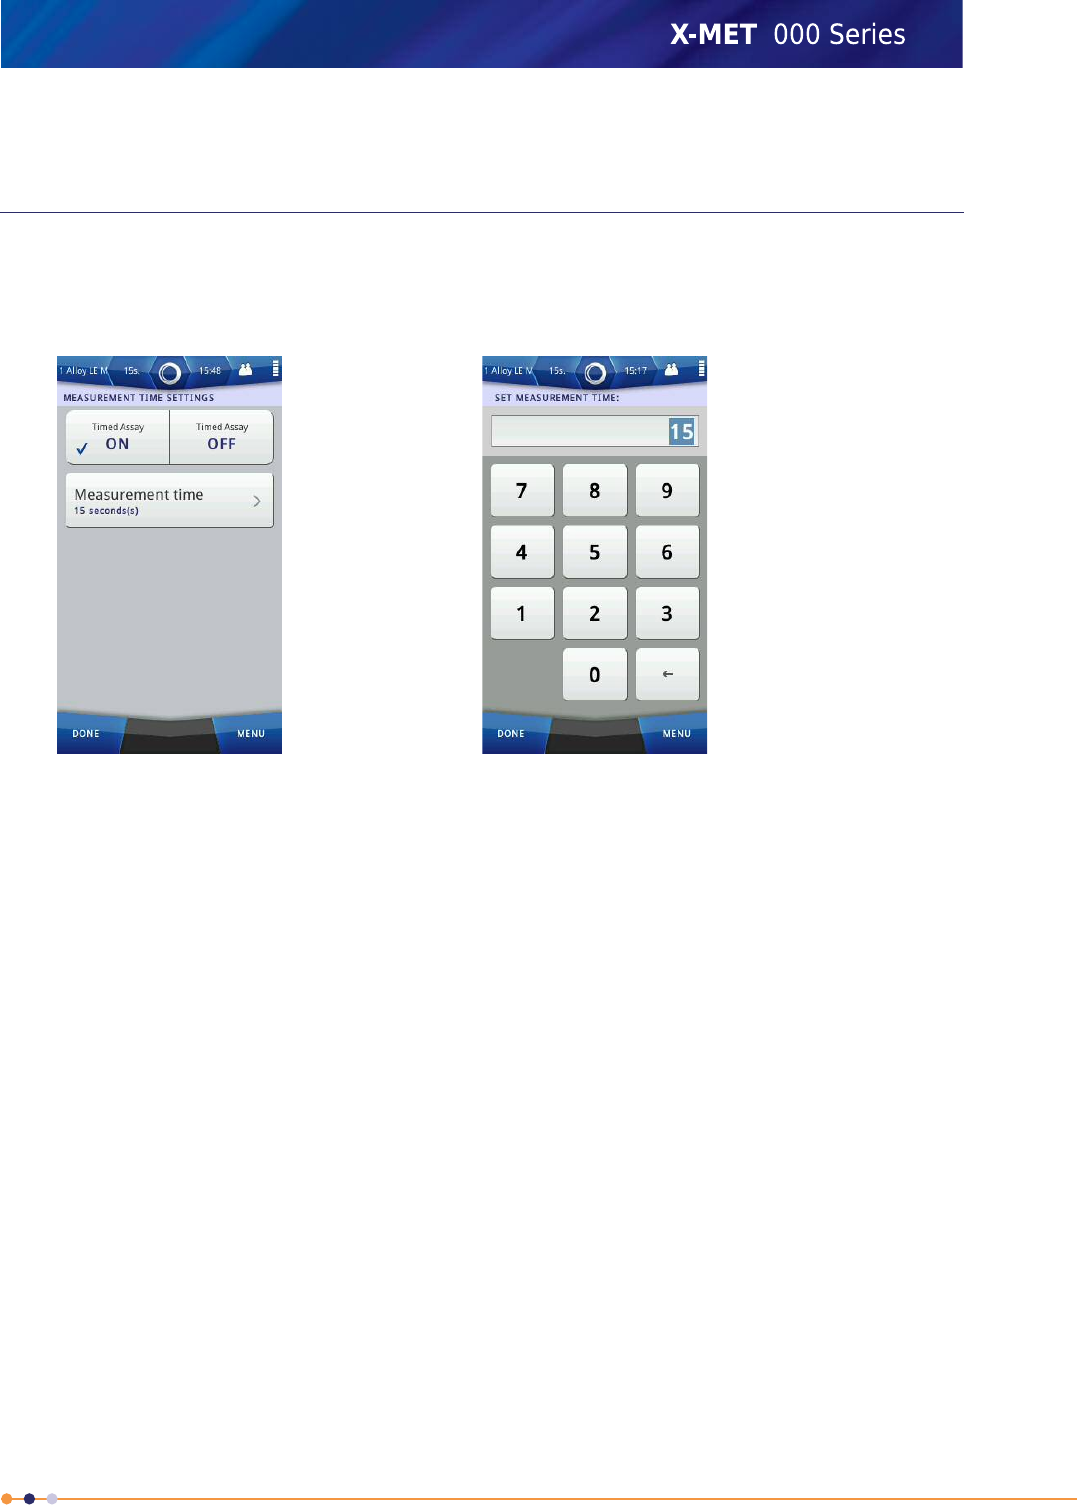
Set The Measurement Time
Follow these steps to set the measurement time.
1. Tap Menu, and then tap Time.
The Measurement Time Settings screen appears.
2. For an average of a batch of measurements, tap Timed Assay ON.
Make sure that a tick appears in the correct Timed Assay tick box.
3. Tap Measurement Time.
The Set Measurement Time screen appears, with the numeric keypad.
4. Use the numeric keypad to type the measurement time, in seconds, and then tap Done.
5. Tap Done again to return to the main screen.
25
X-MET8000 Series User Manual
8
Check The Status Bar
The status bar at the top of the screen shows the Method and Measurement Time. Check that the
values shown are correct.
1. Tap the status bar to access the Method and Measurement Time.
The Status Bar screen appears.
2. Do one of the following:
•If it is necessary to change one or the other, tap Method or Measurement Time to navigate
straight to the applicable settings.
•Tap the status bar again to close it.
26
X-MET8000 Series User Manual
8
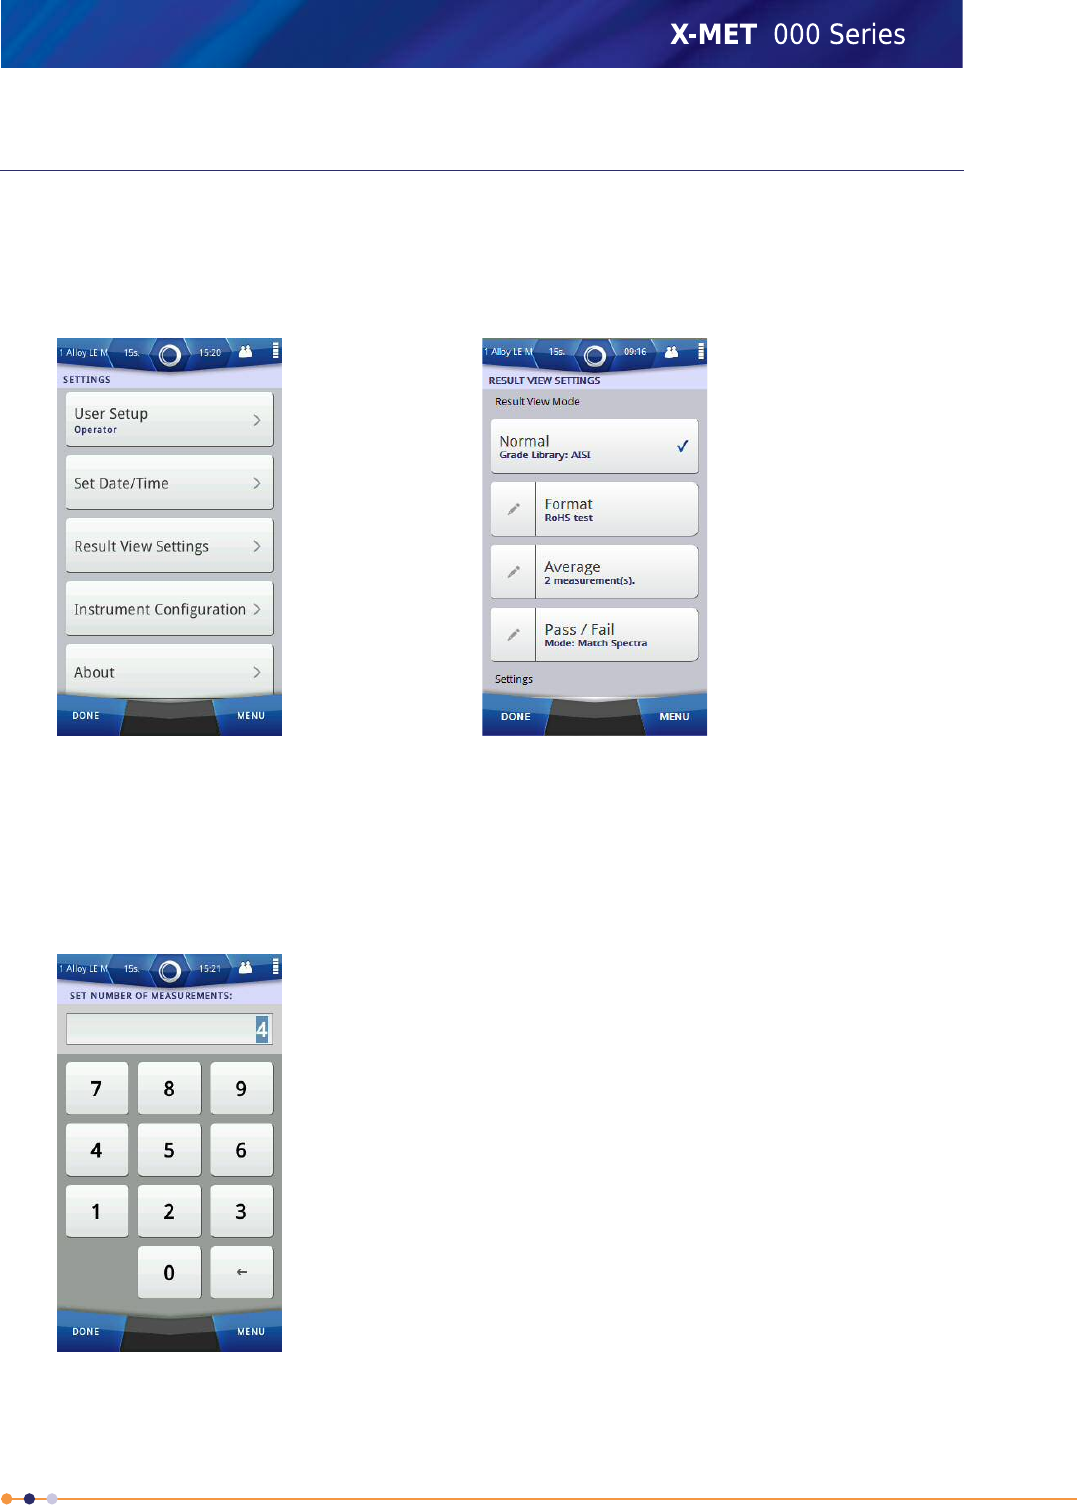
Set The Batch Size
To assist an average of a batch of measurements, it is possible to set the number of measurements
to average. Follow these steps to set the number of measurements.
1. Tap Menu, and then tap Settings.
The Settings screen appears.
2. Tap Result View Settings.
The Result View Settings screen appears.
3. Tap Average, and make sure that the tick appears in the box.
4. Tap Edit (pencil) next to Average.
The Set Number Of Measurements screen appears, with the numeric keypad.
5. Use the numeric keypad to type the number of measurements to average, and then tap Done.
27
X-MET8000 Series User Manual
8
6. Tap Done twice again to return to the main screen.
Take Averaged Measurements
Follow the steps in Take A Measurement on page 16, but pull the trigger firmly, then release it. When
Timed Assay is on, the internal timer controls the measurement and stops it automatically. When it
is complete, the X-MET8000 series displays the result. The display includes both the individual result,
and an average of all the results in the batch. Flick the screen to left or right to access other results.
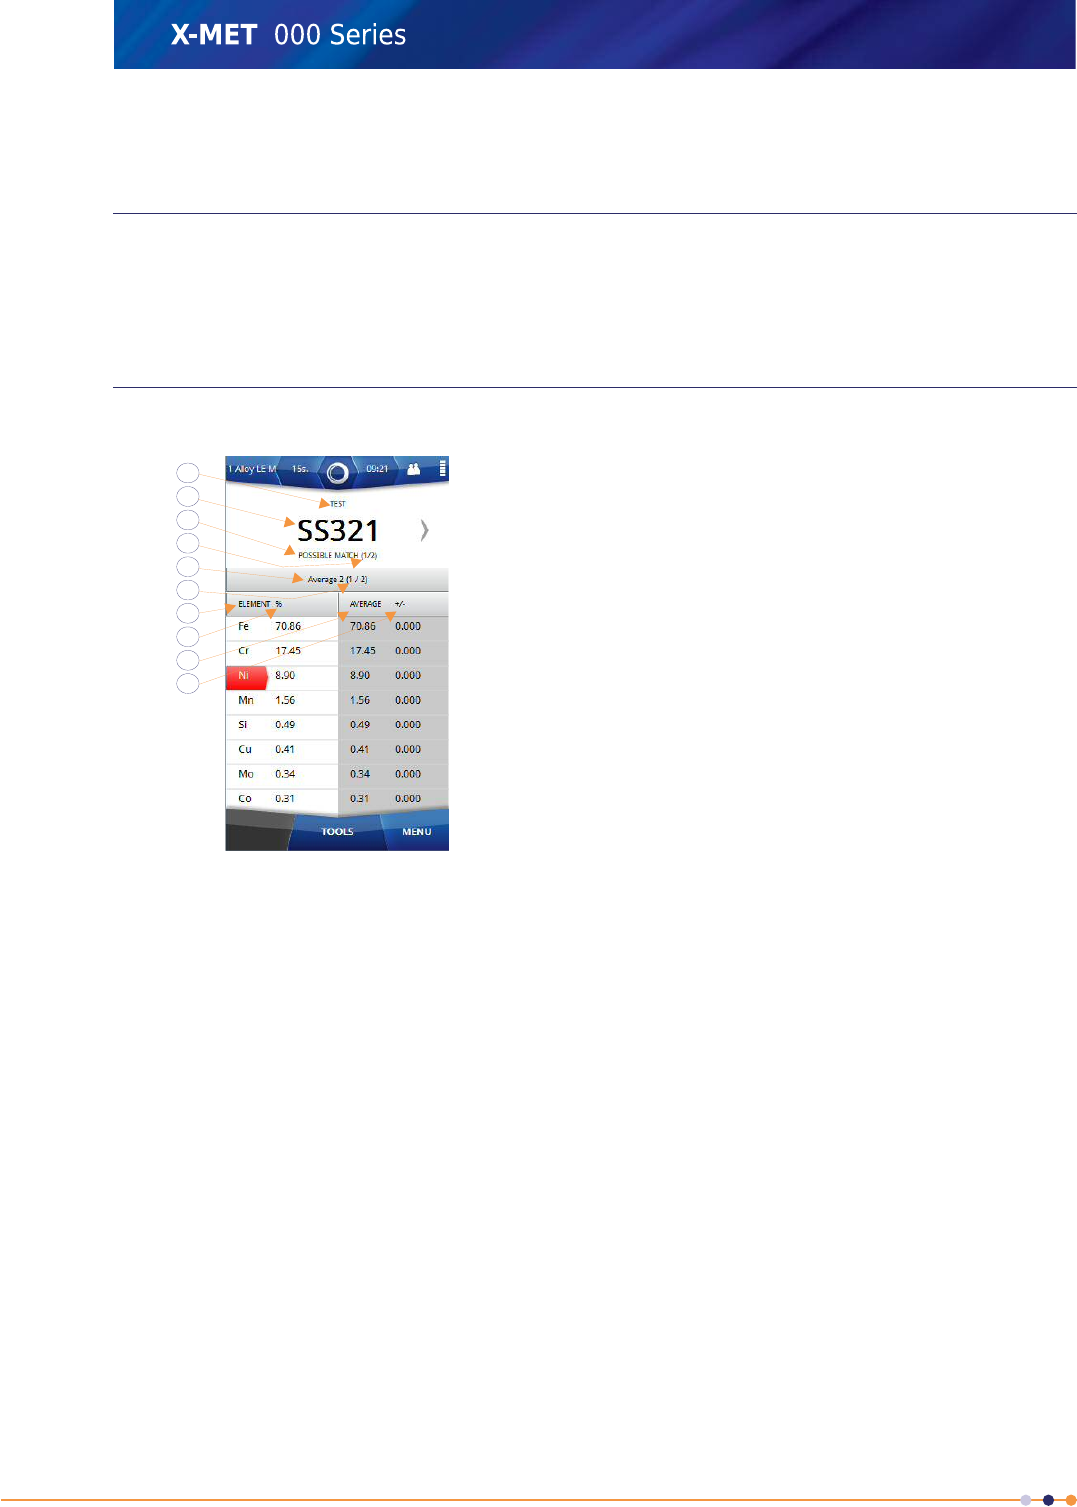
The Average Results Screen
The Average Results screen has this information.
1. Sample name
2. Grade ID
3. Match level
4. The number of potential
matches
5. Average name
6. Average result
7. Element
8. % or PPM
9. Average
10. +/-
10
9
8
7
6
5
4
3
2
1
This is defined in Add The Sample And Batch Names on page 24.Sample name
The grade or trade name for the sample. Tap the arrow on the left or
right of the grade ID to display the next or previous possible match.
Grade ID
‘Good Match’ or ‘Possible Match’.Match level
There can be more than one match for the sample. The best match is
always shown first.
The number of potential
matches
This is defined in Add The Sample And Batch Names on page 24.Average name
The result number within the batch and the batch size.Average result
The chemical symbol. If an element has a red background it is because
it is outside the required limits for that grade.
Element
The measurement unit, for example %(percentage) or PPM(parts per
million).
% or PPM
The average concentration of the element across the batch.Average
This indicates the precision(2 sigma) of the measurement. The lower
the +/- value, the greater the precision.
+/-
28
X-MET8000 Series User Manual
8
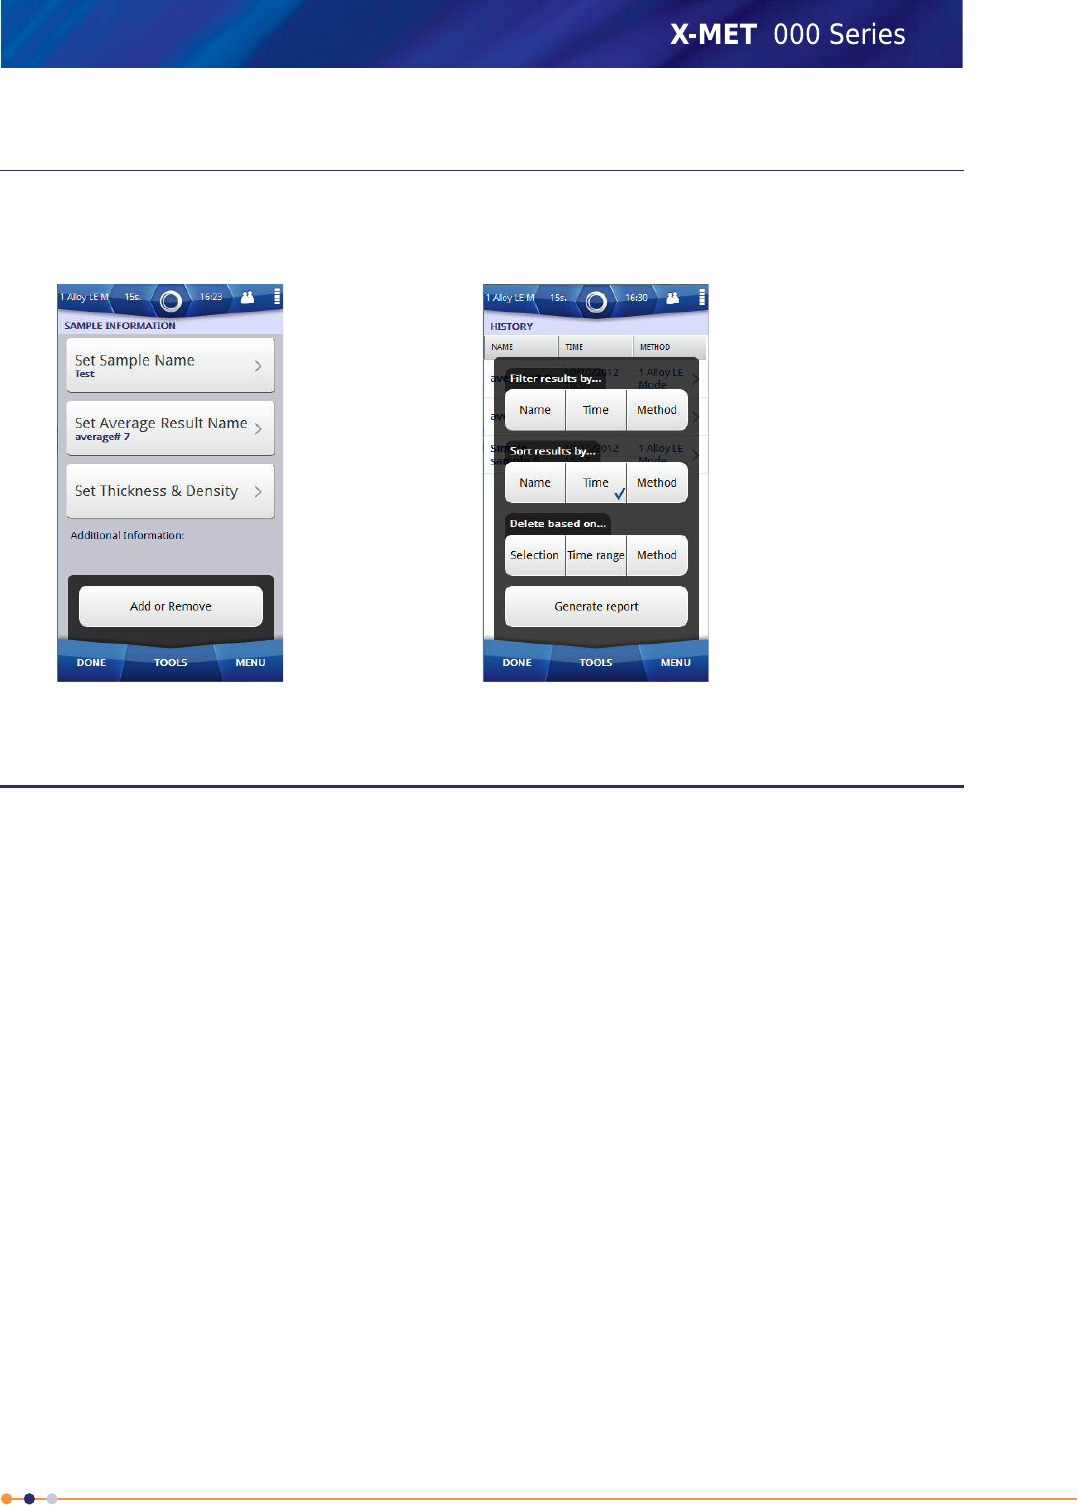
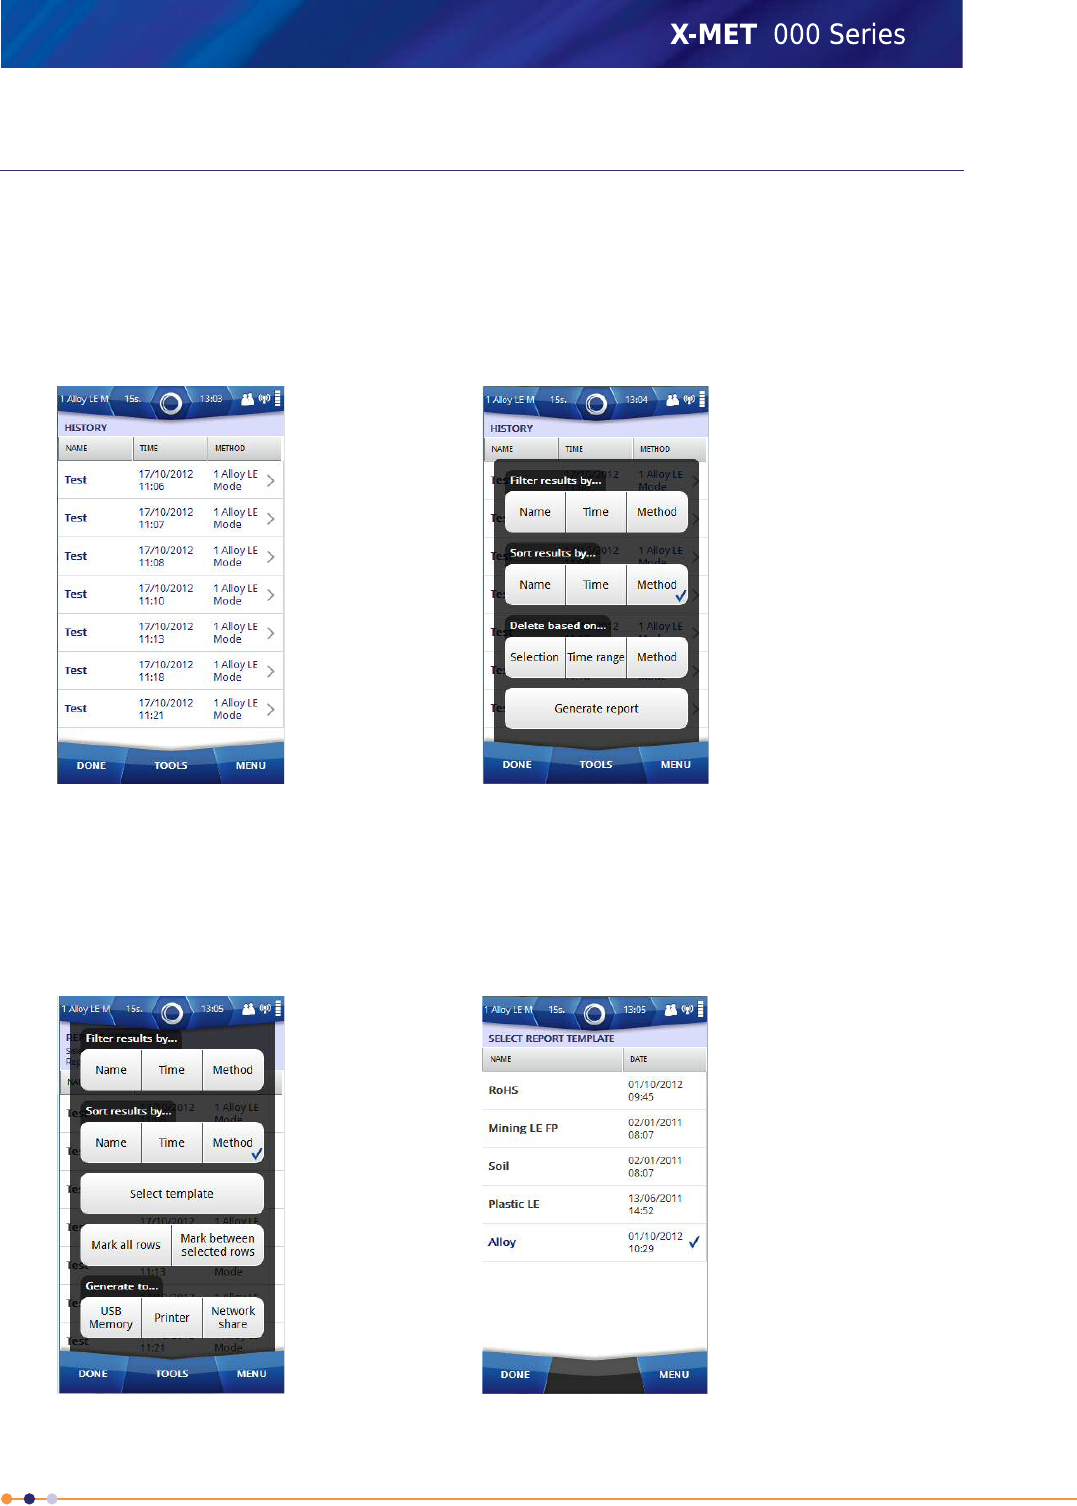
Search The Results History
The X-MET8000 series has a search facility to find results with a specific name, date, or method. Follow
these steps to search and manage the results history.
1. Tap Menu, and then tap History.
The History screen appears.
2. Tap Tools.
The History screen Tools menu appears.
29
X-MET8000 Series User Manual
8
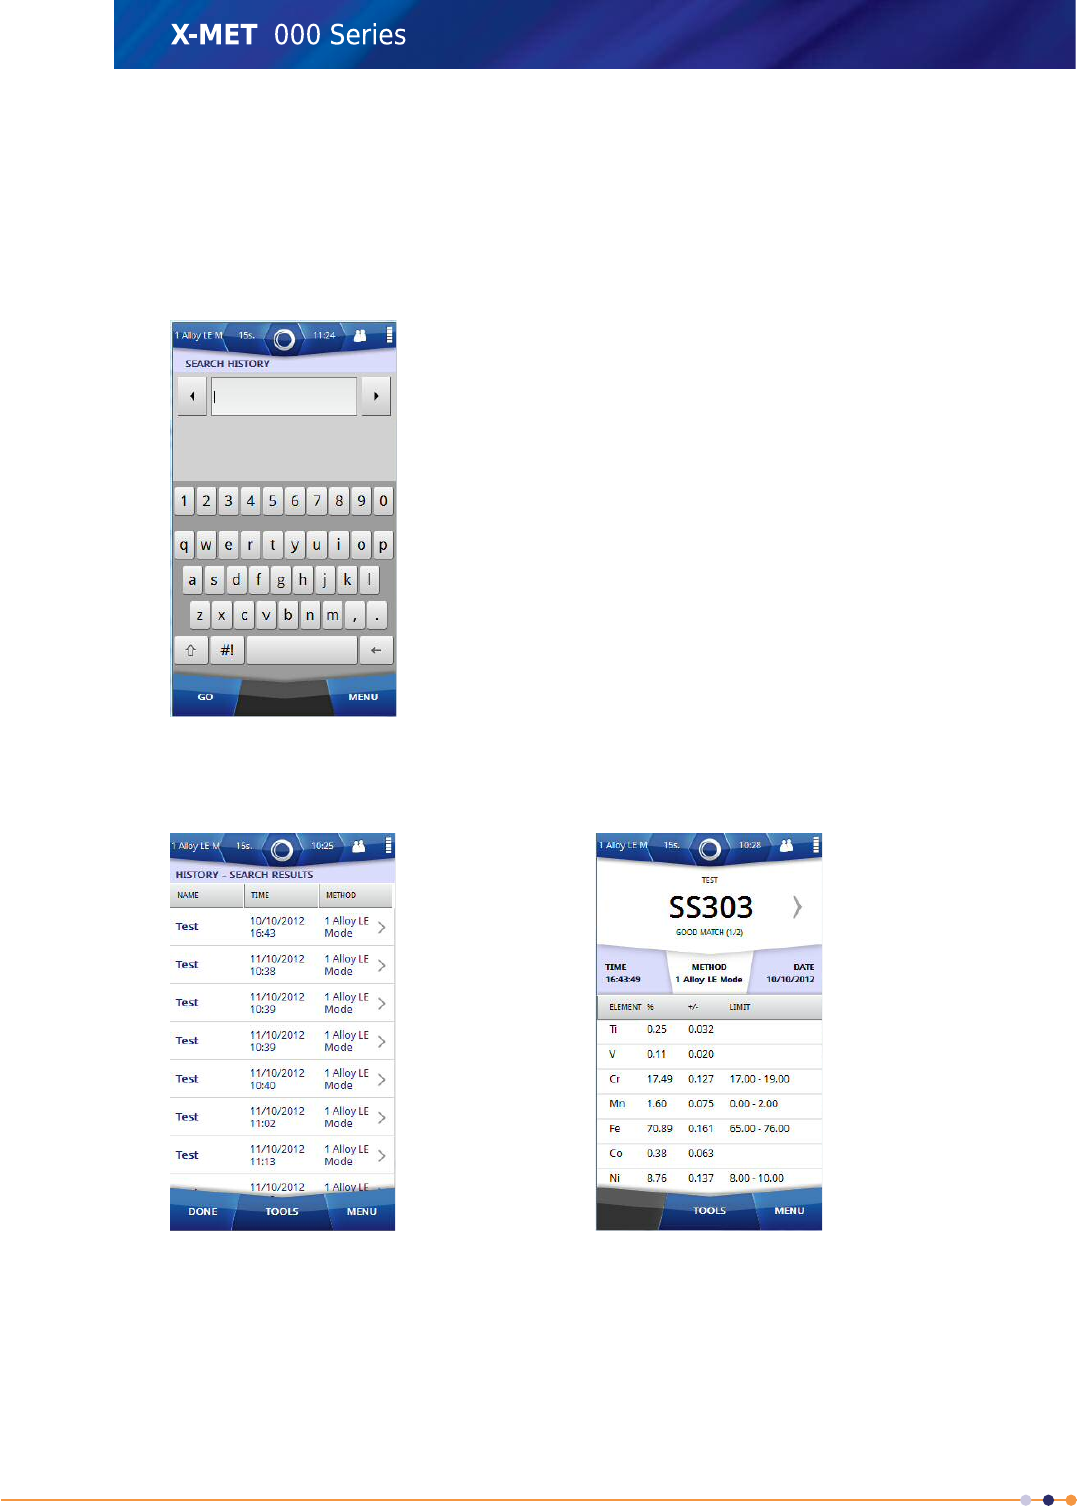
3. Tap one of the following Filter Results By options.
•Name
•Time
•Method
The Search History screen appears, with the virtual keyboard when Name or Method is selected.
And Set Date Range screen appears when Time is selected.
4. Use the virtual keyboard to type the item to search for, and then tap Go.
The History screen appears with search results.
5. Tap a measurement in the list to display the results.
The History Results screen appears.
6. To restore all the results to the History screen, tap Tools and then Restore.
The Tools menu now includes Filter Results By option.
30
X-MET8000 Series User Manual
8
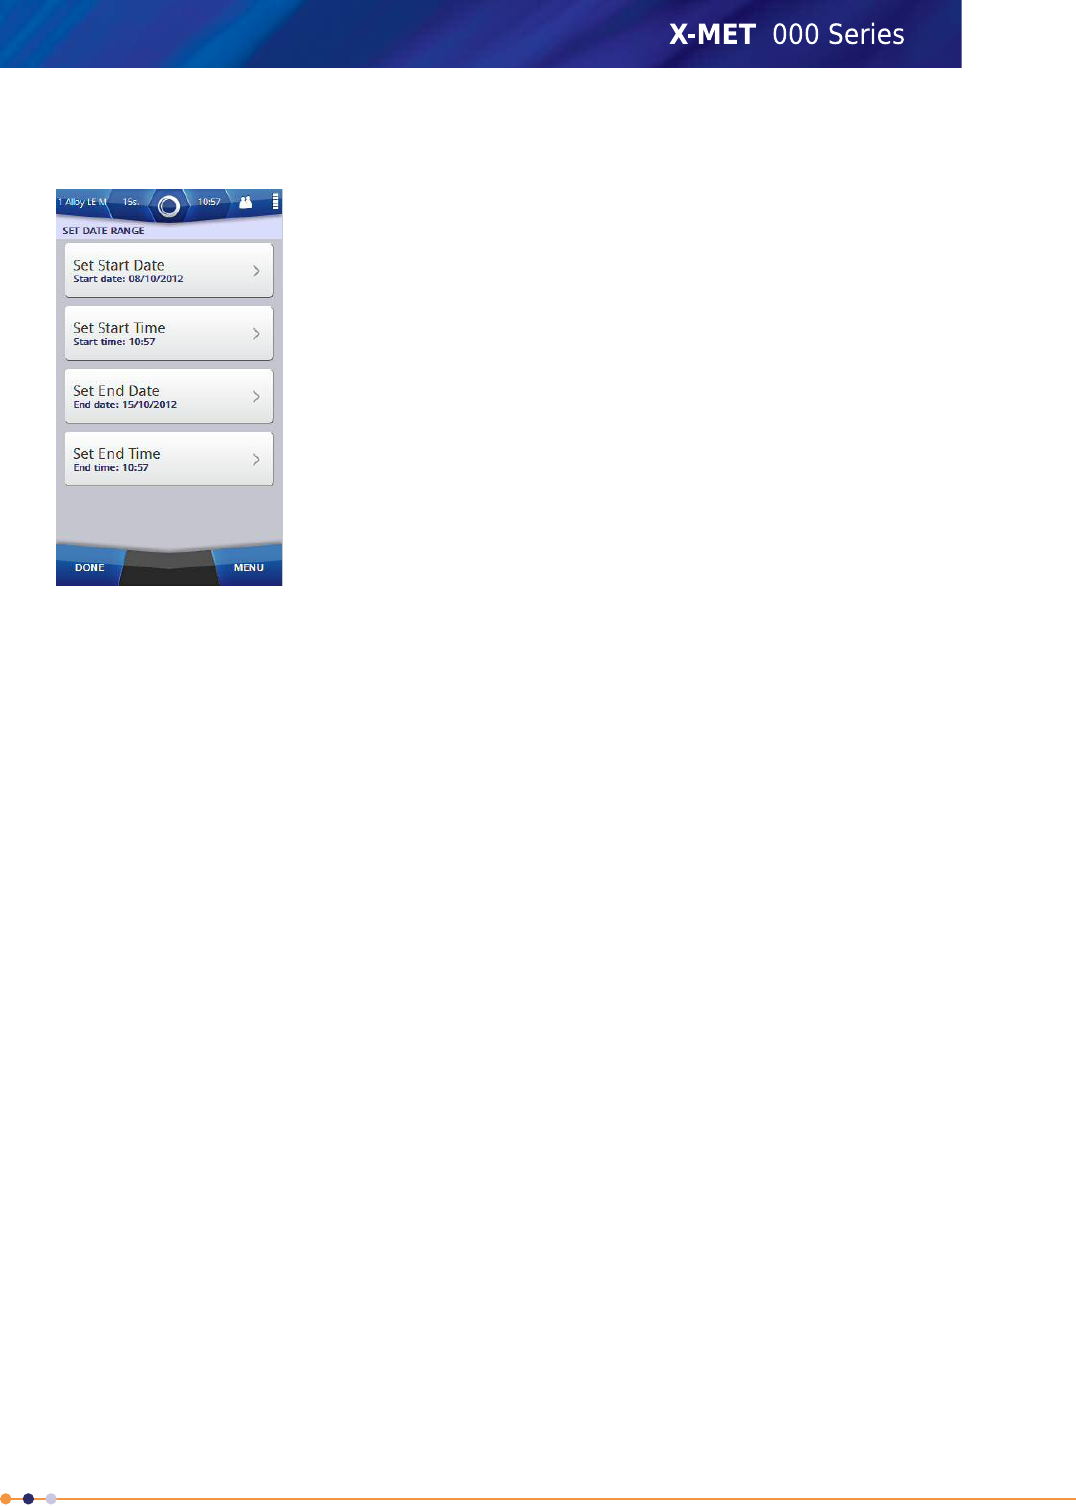
7. To search results by time , tap: Tools >Filter Results By >Time
Set Date Range screen appears.
8. Tap Set Start Date or Set End Date
The Select Date screen appears .
9. Tap an arrow on the left or right of the month to scroll to the correct month in Select Date screen.
10. Tap the correct date in the month, and then tap Done to return to the Set Date Range screen.
11. Tap Set Start Time or Set End Time
The Set Time screen appears, with the numeric keypad.
12. Use the numeric keypad to type the correct hour, or use the up or down arrows on the right of the
time to increase or decrease the hour.
13. Slide over the minutes to select them, and type the minutes with the numeric keypad or arrows.
14. Tap Done twice to return to the History screen.
The History screen appears with filtered results.
15. If necessary, tap one of the three Sort Results By options to sort search results.
•Name
•Time
•Method
The History screen appears with sorted results.
31
X-MET8000 Series User Manual
8
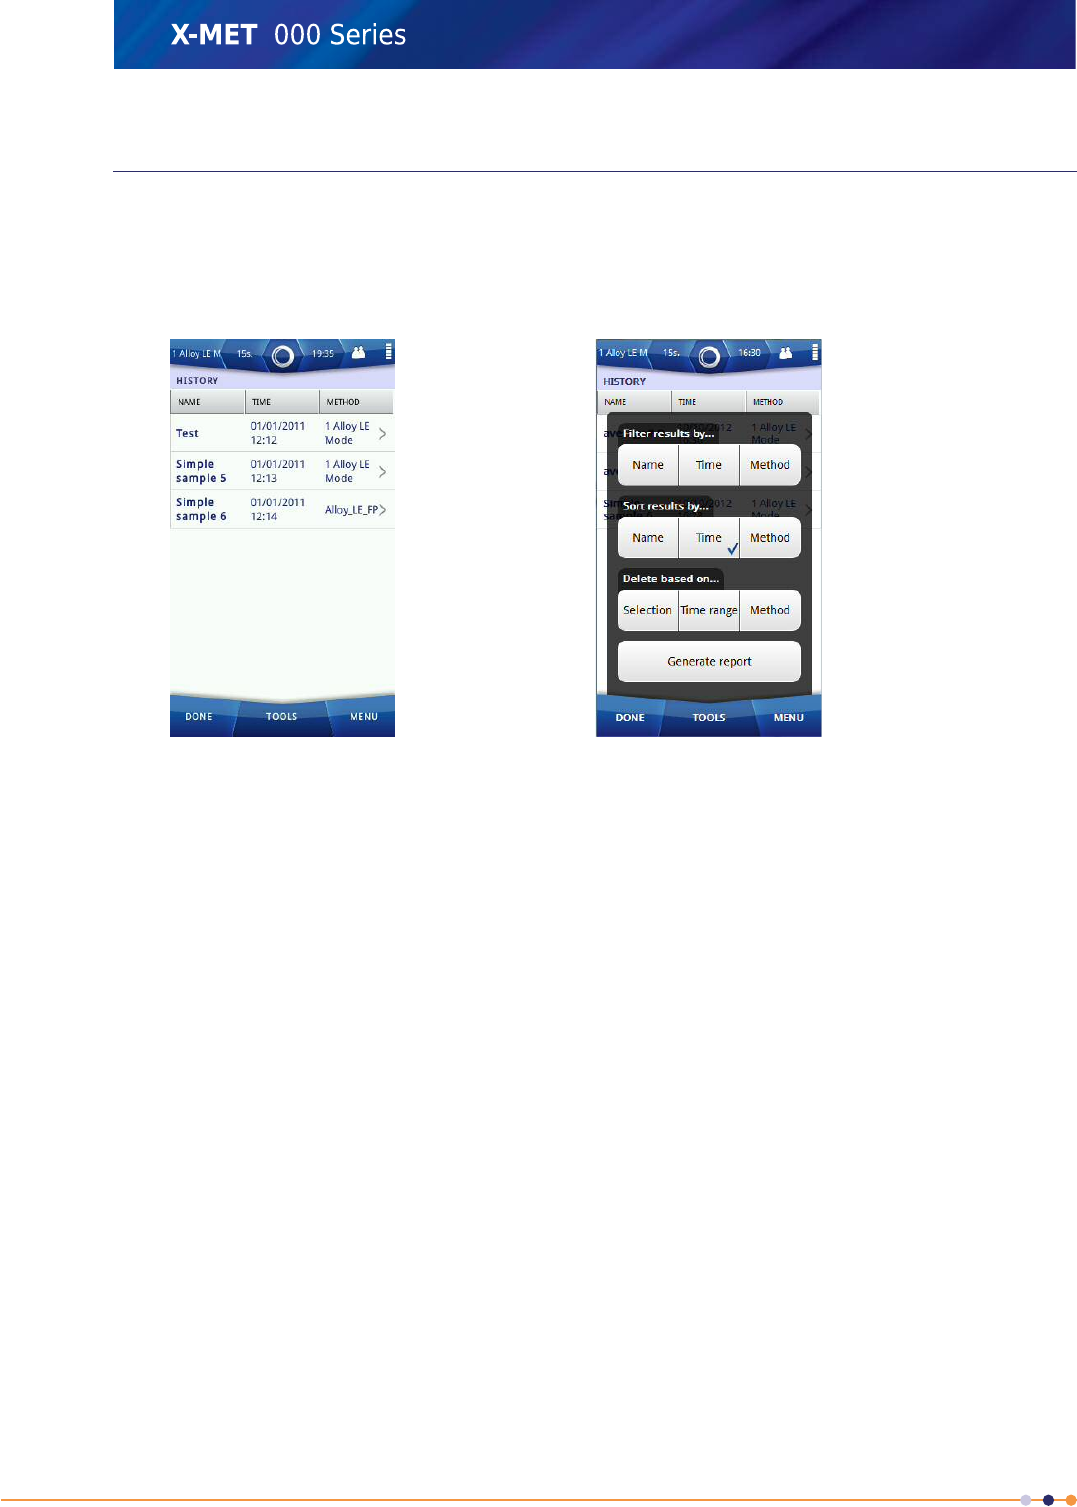
Delete The Results History
The X-MET8000 series has a delete facility to delete results with a selection, time range, or method.
Follow these steps to delete and manage the results history.
1. Tap Menu, and then tap History.
The History screen appears.
2. Tap Tools and then tap one of the following three Delete based on options.
•Selection
When Selection is selected, the Delete Results screen appears. Select the results to be deleted
by tapping on each result row or by selecting one of the Tools menu options Filter Results
By,Mark All,Mark between selected rows.
•Time range
When Time range is selected, the Set Date Range screen appears. Enter the values into Set
Start Date,Set End Date,Set Start Time and Set End Time
•Method
When Method is selected, the Delete based on screen appears. Tap on the applicable method
to delete that method's results.
3. Tap Done after selecting the results to be deleted.
AWarning Message appears.
4. Do one of the following:
•Tap OK to delete the measurement.
•Tap Cancel to not delete the measurement.
The History screen appears.
5. Tap Done to return to the main screen.
32
X-MET8000 Series User Manual
8
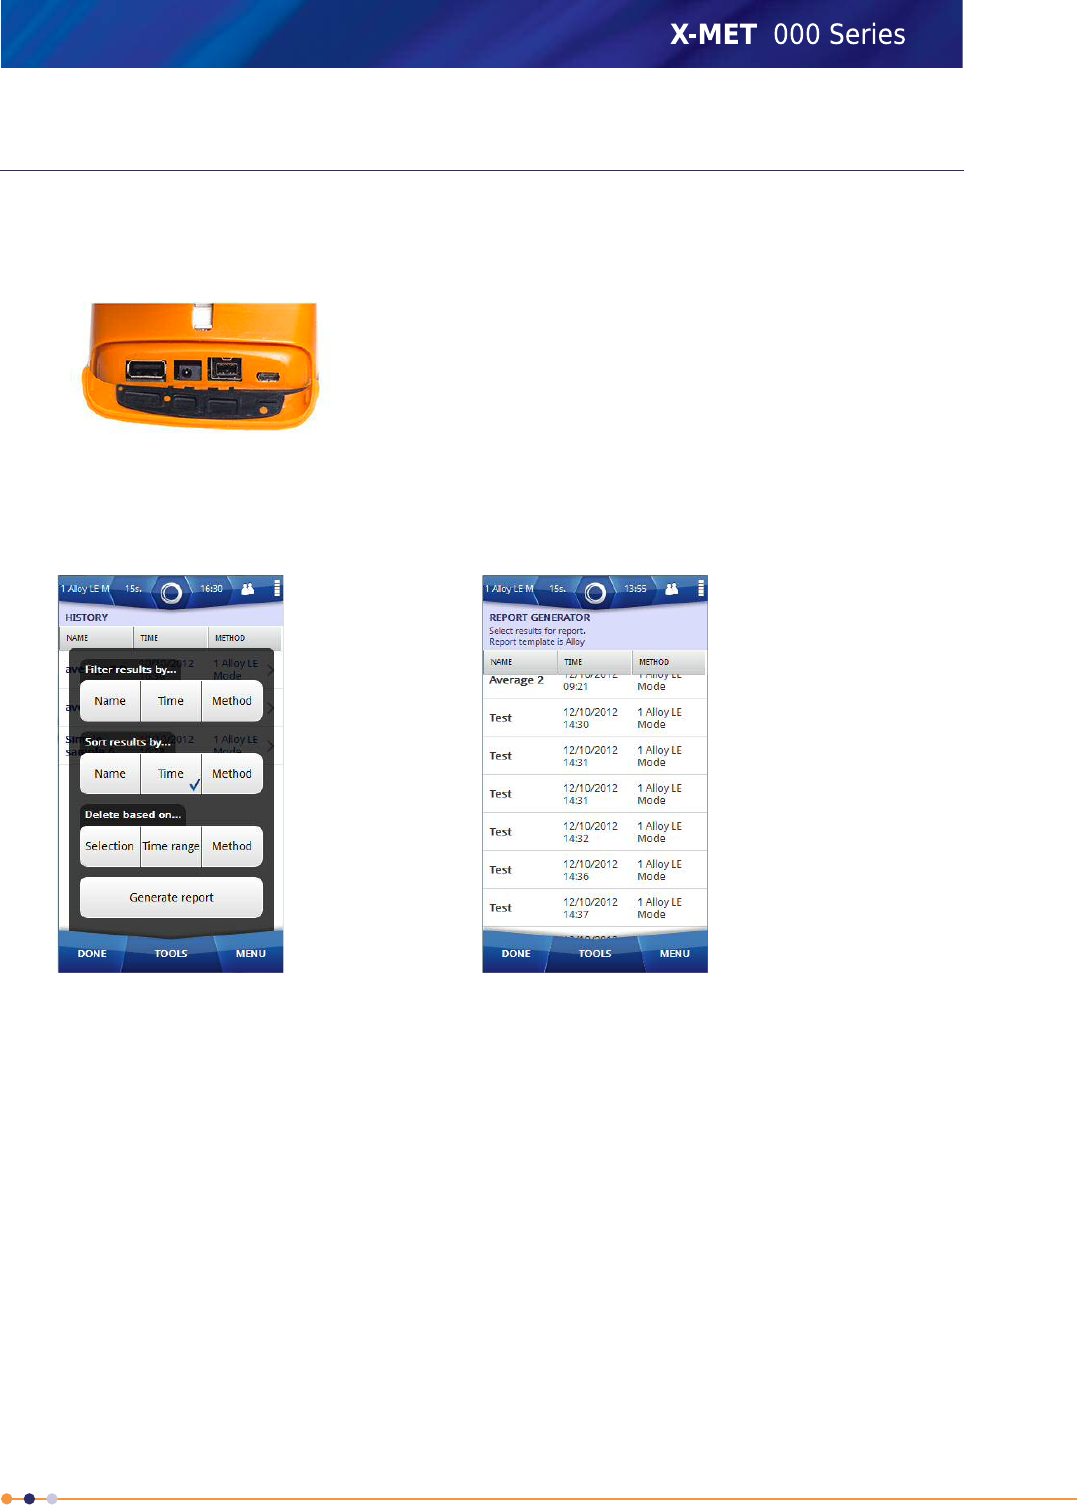
Generate Report to USB Memory Device
Follow the below steps to generate report to USB memory device.
1. Open the connector cover underneath the display to access the external connections. Plug a USB
memory device into the USB A connector.
2. Tap Menu, and then tap History.
The History screen appears.
3. Tap Tools to select Generate Report option.
The History screen Tools menu appears.
4. Tap Generate Report.
The Report Generator screen appears.
33
X-MET8000 Series User Manual
8
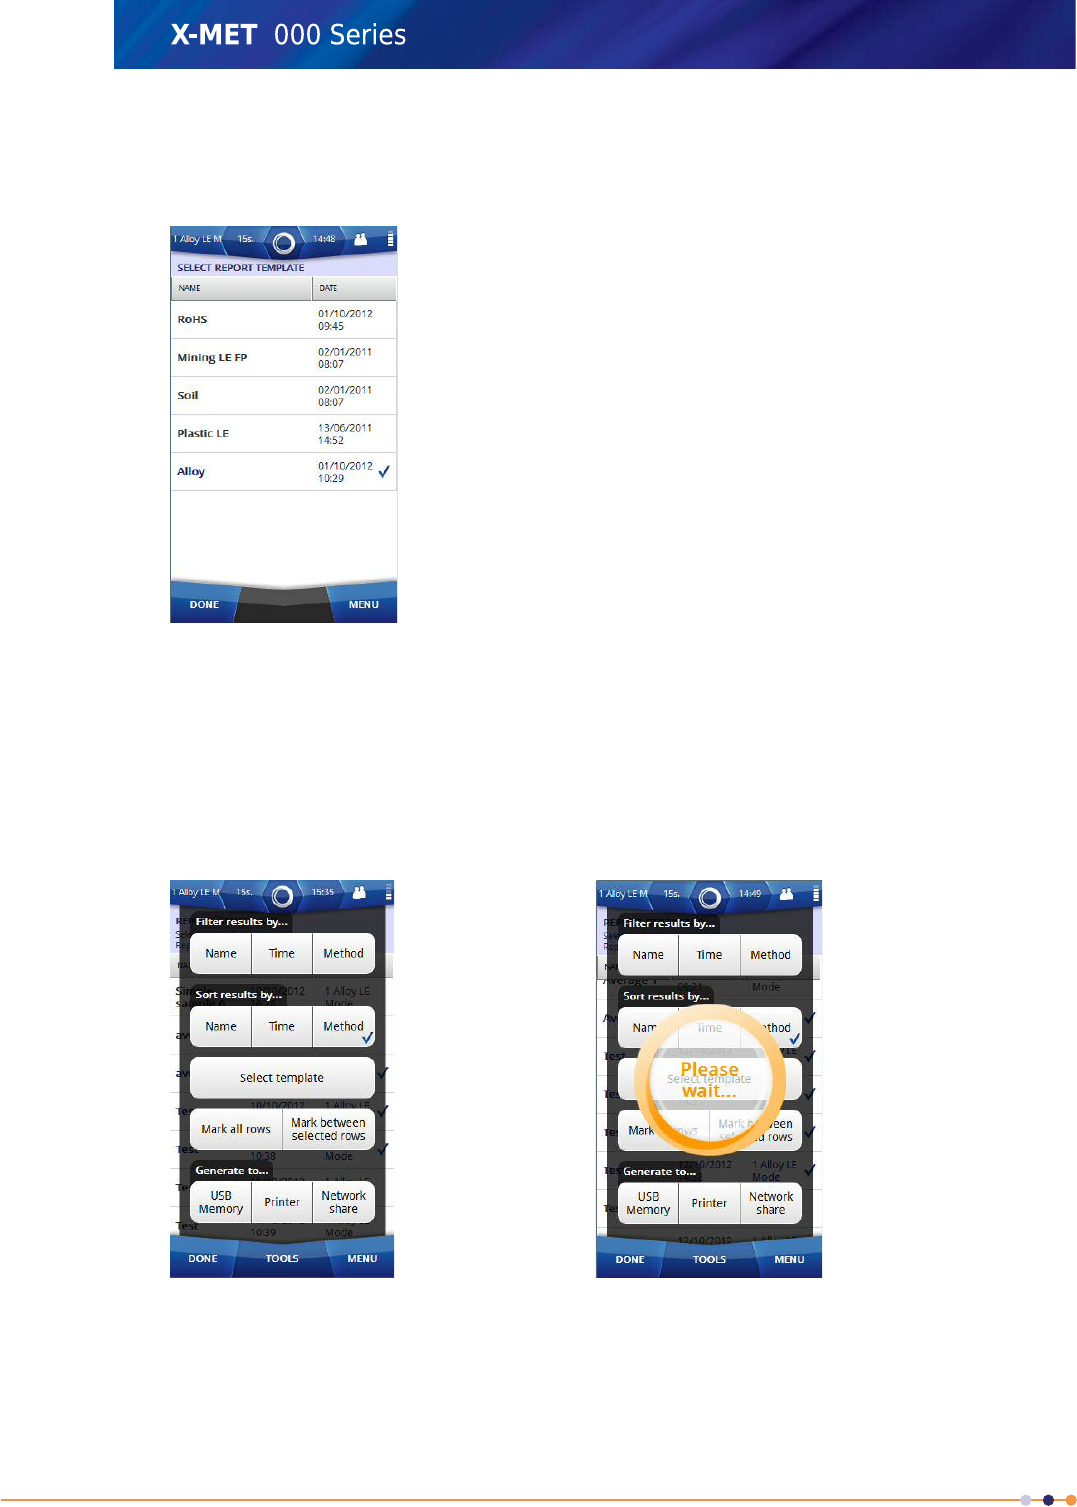
5. Tap Tools and then tap on Select Template to select template.
The Select Report Template screen appears with the default report template list and also user
defined templates which were created in Web GUI.
6. Tap on the applicable template and then tap Done to return to the Report Generator screen.
7. Select the measurement results for the report by tapping on each result row in Report Generator
screen or tap Tools and select results using following options
•Filter by
•Sort by
•Mark All
•Mark between selected rows
8. Tap: Tools >USB Memory after selecting the results.
Device starts generating report to USB memory device. Once the report is generated to USB memory
device, Report Generator screen appears.
9. Tap Done twice to return to the main screen.
34
X-MET8000 Series User Manual
8

Generate Report to Printer
The Supervisor must configure a network printer in the device in order to generate reports directly
on a printer, and must connect the device to the same WiFi network as the one to which the network
printer is connected. Please refer to the Supervisor manual to set this up. Follow the below steps to
generate report to printer.
1. Tap Menu, and then tap History.
The History screen appears.
2. Tap: Tools >Generate Report
The Report Generator screen appears.
3. Tap: Tools >Select Template
The Select Report Template screen appears with the default report template list and also user
defined templates which were created in the Web GUI.
35
X-MET8000 Series User Manual
8
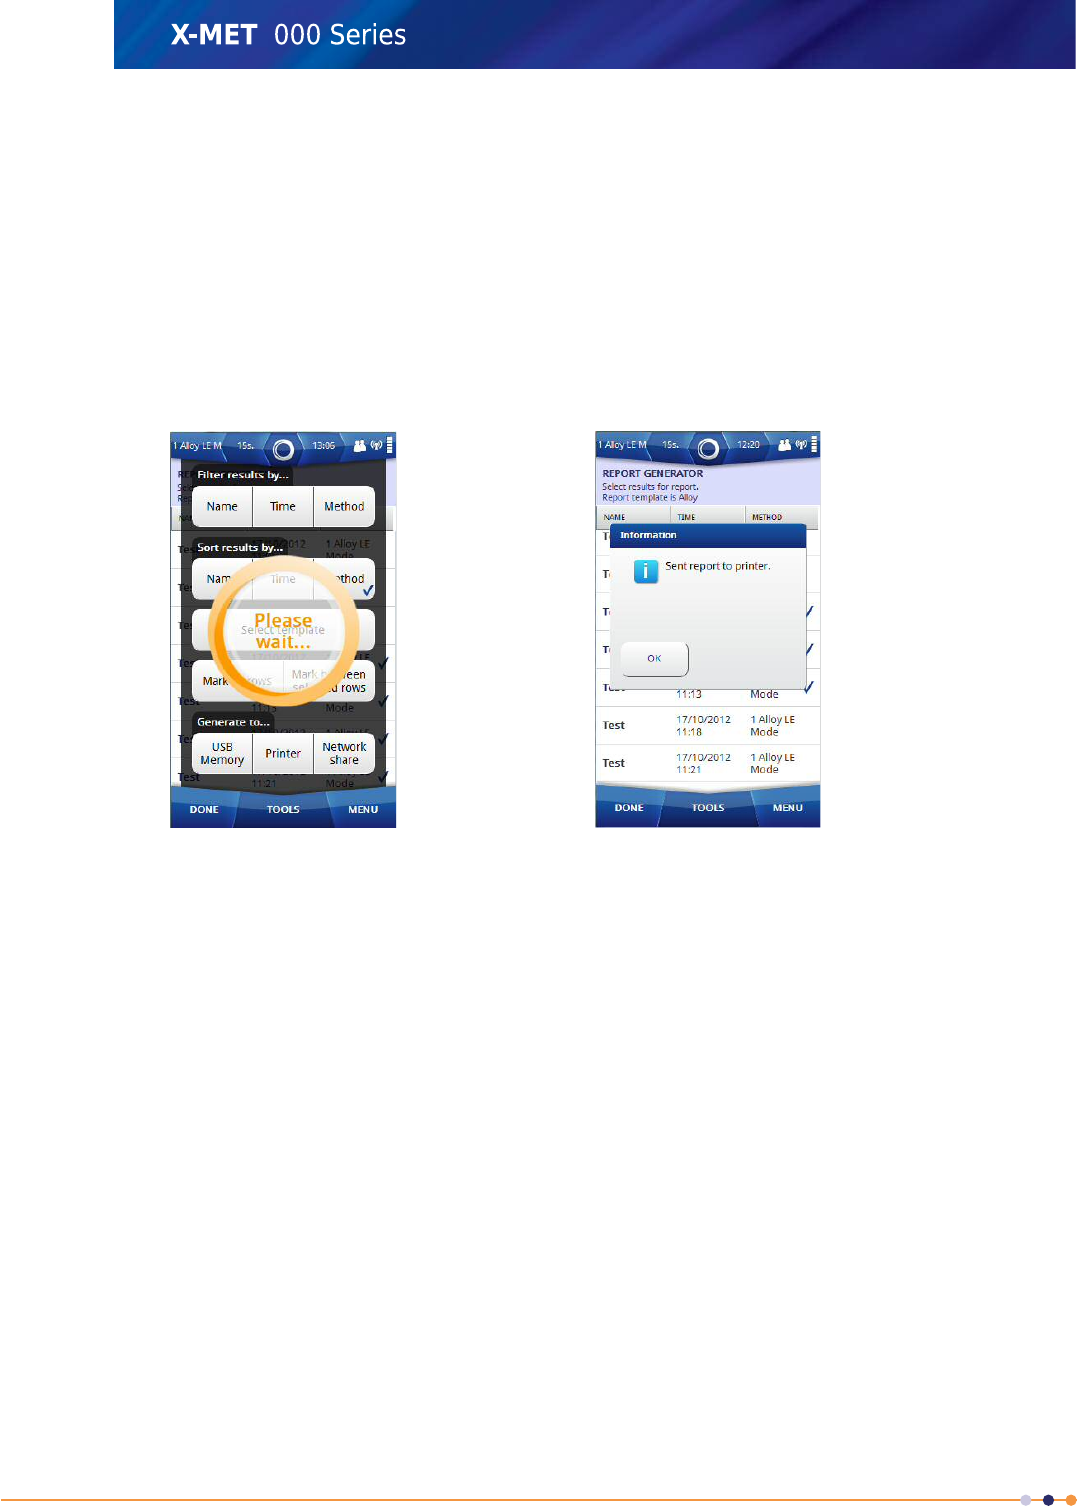
4. Tap on the applicable template and then tap Done to return to Report Generator screen.
5. Select the measurement results for the report by tapping on each result row in Report Generator
screen or tap Tools and select results using following options
•Filter by
•Sort by
•Mark All
•Mark between selected rows
6. Tap: Tools >Printer after selecting results.
Device starts generating report to the printer. Once the report is generated to the printer, an
Information dialog box appears .
7. Tap OK.
The Report Generator screen appears.
8. Tap Done twice to return to the main screen.
36
X-MET8000 Series User Manual
8
Generate Report to Network Share
The Supervisor must configure the network share in order to save reports on the selected network,
and must connect the device to the same WiFi network as the one to which the server hosting the
network share is connected. Please refer to the Supervisor manual to set this up. Follow the below
steps to generate report to Network Share.
1. Tap Menu, and then tap History.
The History screen appears.
2. Tap: Tools >Generate Report
The Report Generator screen appears.
3. Tap: Tools >Select Template
The Select Report Template screen appears with the list of the default report templates and user
defined templates which were created in the Web GUI.
37
X-MET8000 Series User Manual
8
4. Tap on applicable template and then tap Done to return to Report Generator screen.
5. Select the measurement results for the report by tapping on each result row in the Report Generator
screen or tap Tools and select the results using following options.
•Filter by
•Sort by
•Mark All
•Mark between selected rows
6. Tap: Tools >Network Share after selecting the results.
Device starts generating report to the printer. Once the report is generated to the network share
Report Generator screen appears.
7. Tap Done twice to return to the main screen.
The X-MET8000 Series User Manual and USB Driver
The X-MET8000 Series User Manual is stored within the X-MET8000 series, and has more in depth
information, and how to use the X-MET8000 series in some specific situations. It shows how a supervisor
can prepare the X-MET8000 series for an operator to use.
The USB Driver is stored within the X-MET8000 series, and has detailed information about how to
install a USB Driver on different Windows versions.
38
X-MET8000 Series User Manual
8

Save The X-MET8000 Series User Manual and USB Driver
Follow these steps to access the X-MET8000 Series User Manual , USB Driver and save it to a USB
memory device.
1. Open the connector cover underneath the display to access the external connections.
2. Plug a USB memory device into the USB A connector.
3. Tap Menu, and then tap Settings.
The Settings screen appears.
4. Tap About.
The About screen appears.
5. Tap Save User Manual.
An Information dialog box appears.
39
X-MET8000 Series User Manual
8
6. Tap OK to save the X-MET8000 Series User Manual .
7. Tap Save USB Driver to save the USB driver and it's installation instructions to the USB memory
device.
8. Tap Done to return to the Settings screen.
9. Tap Done again to return to the main screen.
10. Remove the USB memory device.
Operation With A PC
It is possible to operate the X-MET8000 series with a PC to do the following:
•Create a report for a series of results.
•Do a test measurement.
•Access the X-MET8000 Series User Manual .
Both supervisors and operators can operate the X-MET8000 series with a PC. Each uses their own
login code. There is not a separate login code for PC operation.
Operations with the PC use an Internet browser. The standard URL to connect to the X-MET8000 series
is http://10.0.0.1/. Please contact the local Oxford Instruments representative if it is necessary to
change the URL.
Connect To A PC And Login
Follow these steps to connect the X-MET8000 series to a PC and then login.
1. Open the connector cover underneath the display to access the external connections.
2. Use the USB cable to connect the X-MET8000 series to a PC.
•Connect the smaller USB Mini-AB connector to the X-MET8000 series.
•Connect the larger USB A connector to the PC.
Make sure that the connections are correct.
40
X-MET8000 Series User Manual
8
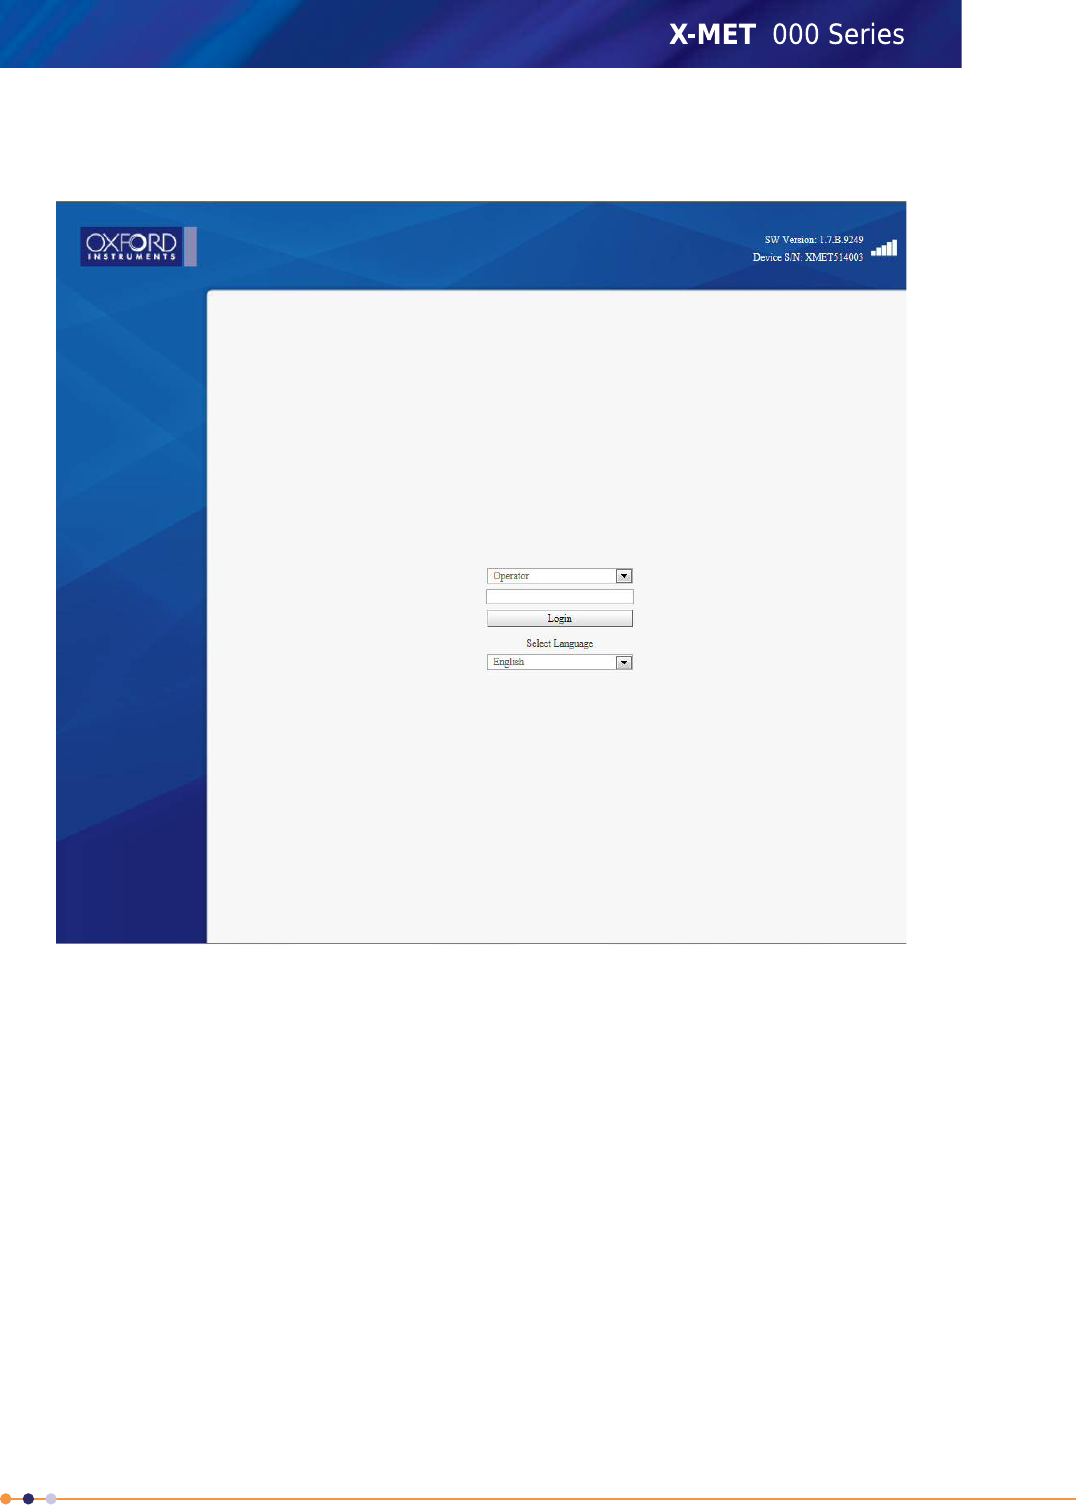

4. Select the language from drop down list and Choose the correct user from the User drop down
list, type the login code into the text box, and click Login.
The PC main screen appears.
The X-MET8000 series shows the Safety screen with a Warning dialog box.
About The Report Generator
The X-MET8000 series has a comprehensive report generator. It is possible to create templates to use
for different reports. The supervisor can create templates for an operator to use. The report generator
creates a PDF file or a CSV file. A CSV file is applicable for a spreadsheet and not available in operator
level.
The template can include company information with the logo, a report header, the date and page
number, and the X-MET8000 series serial number, as applicable. To create a report, it is necessary to
have a report template. The logo file must be less than 1024kB and one of the formats: .jpg, .png or
.bmp.
The report can include one or more results. Each result can include the operator's name, the grade
and element concentration and standard deviation. It is also possible to include the spectra for the
result, and it is possible to save the spectra with the report.
Once a supervisor creates a template, it is possible to download it to the PC, and then upload it to
other X-MET8000 series.
42
X-MET8000 Series User Manual
8
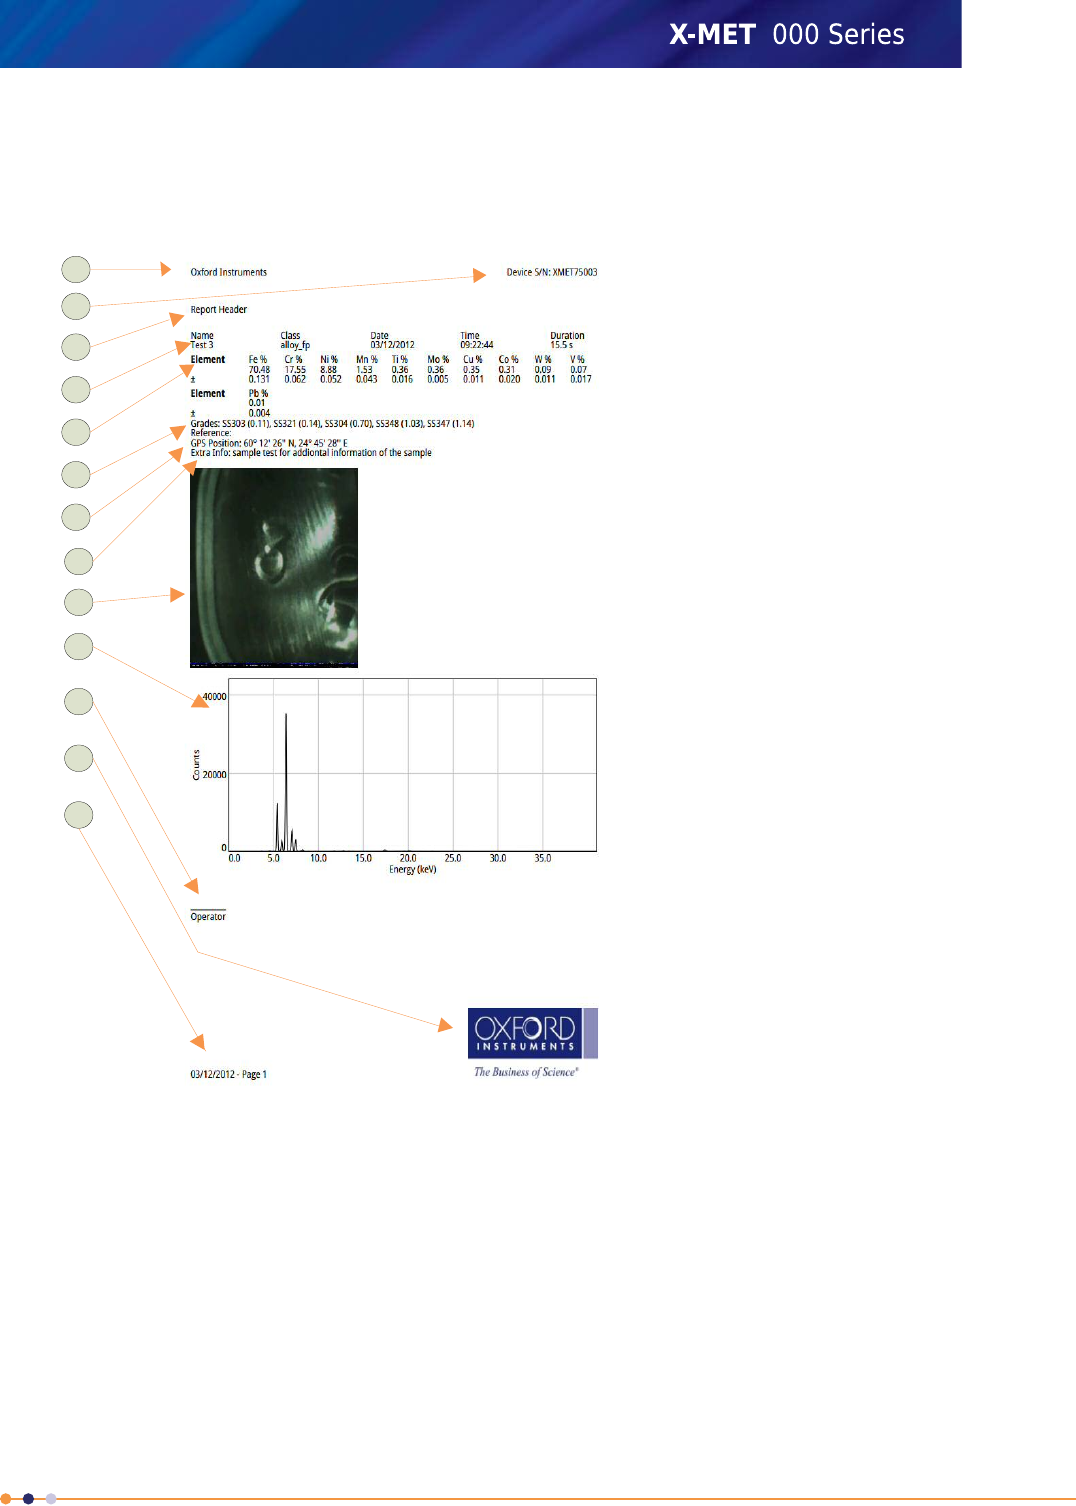
A Custom Report
This is a typical custom report. The report template provides full control of all these aspects of the
report.
1. Margin: company
information
2. Margin: serial number
3. Report header
4. Sample information
5. Element: concentration and
+/-
6. Grade
7. GPS Position
8. Additional Information
9. Camera Image
10. Spectra
11. Operator information
12. Margin: logo
13. Margin: date and page
number
1
12
11
10
9
8
7
6
5
4
3
2
13
The margins can include:Margins
•Company information
•Company logo
•The device serial number
•The date and page number.
It is possible to place these items in any of the four margins.
The report can start with an introduction.Report header
Sample information includes:Sample information
•The sample name
43
X-MET8000 Series User Manual
8
•The mode or method
•The date and time
•The measurement time.
It is necessary to select the elements to appear in the report. Chosen
elements that are not present in the sample donot appear in the report
Element information
unless All The Elements From The Result option is selected .
Element information can include the concentration and +/- value.
The report can include the grade information.Grade
The report can include the GPS information.GPS Position
The report can include the additional information for the sample.Additional Information
The report can include the camera image of the sample.Camera Image
The report can include the spectra for the sample.Spectra
The report can include information about the operator.Operator information
Create A Report
It is necessary to have a report template to create a report. Follow these steps to create a report.
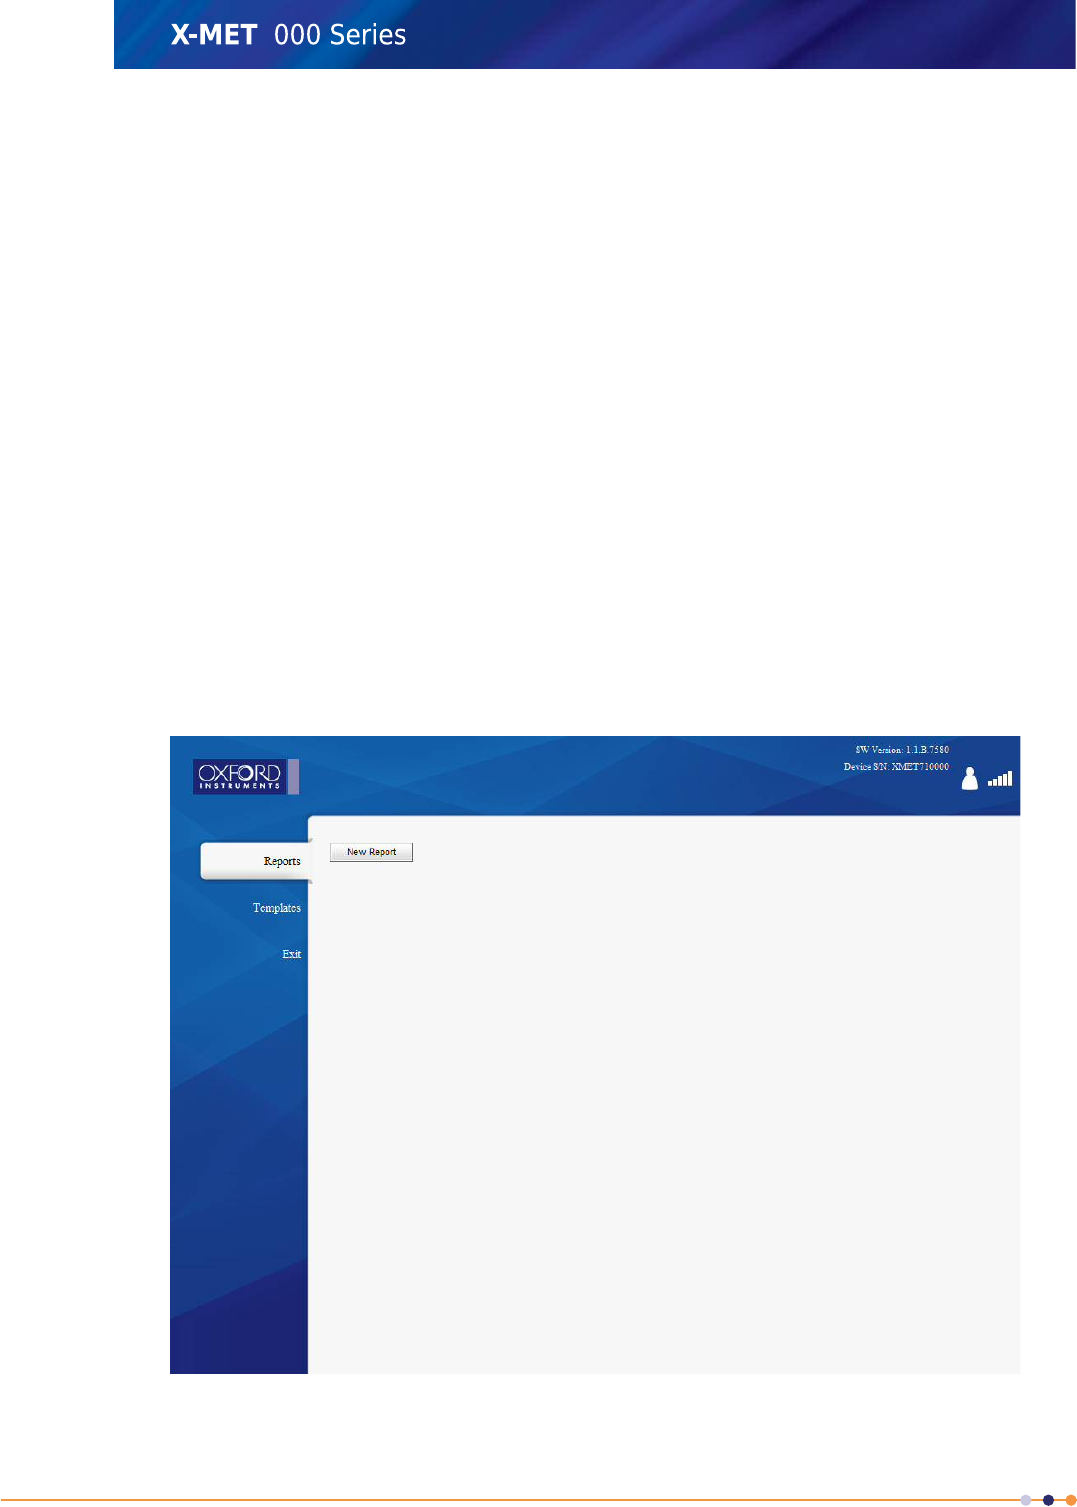
1. From the PC main screen, click Report Generator.
The Reports screen appears.
44
X-MET8000 Series User Manual
8
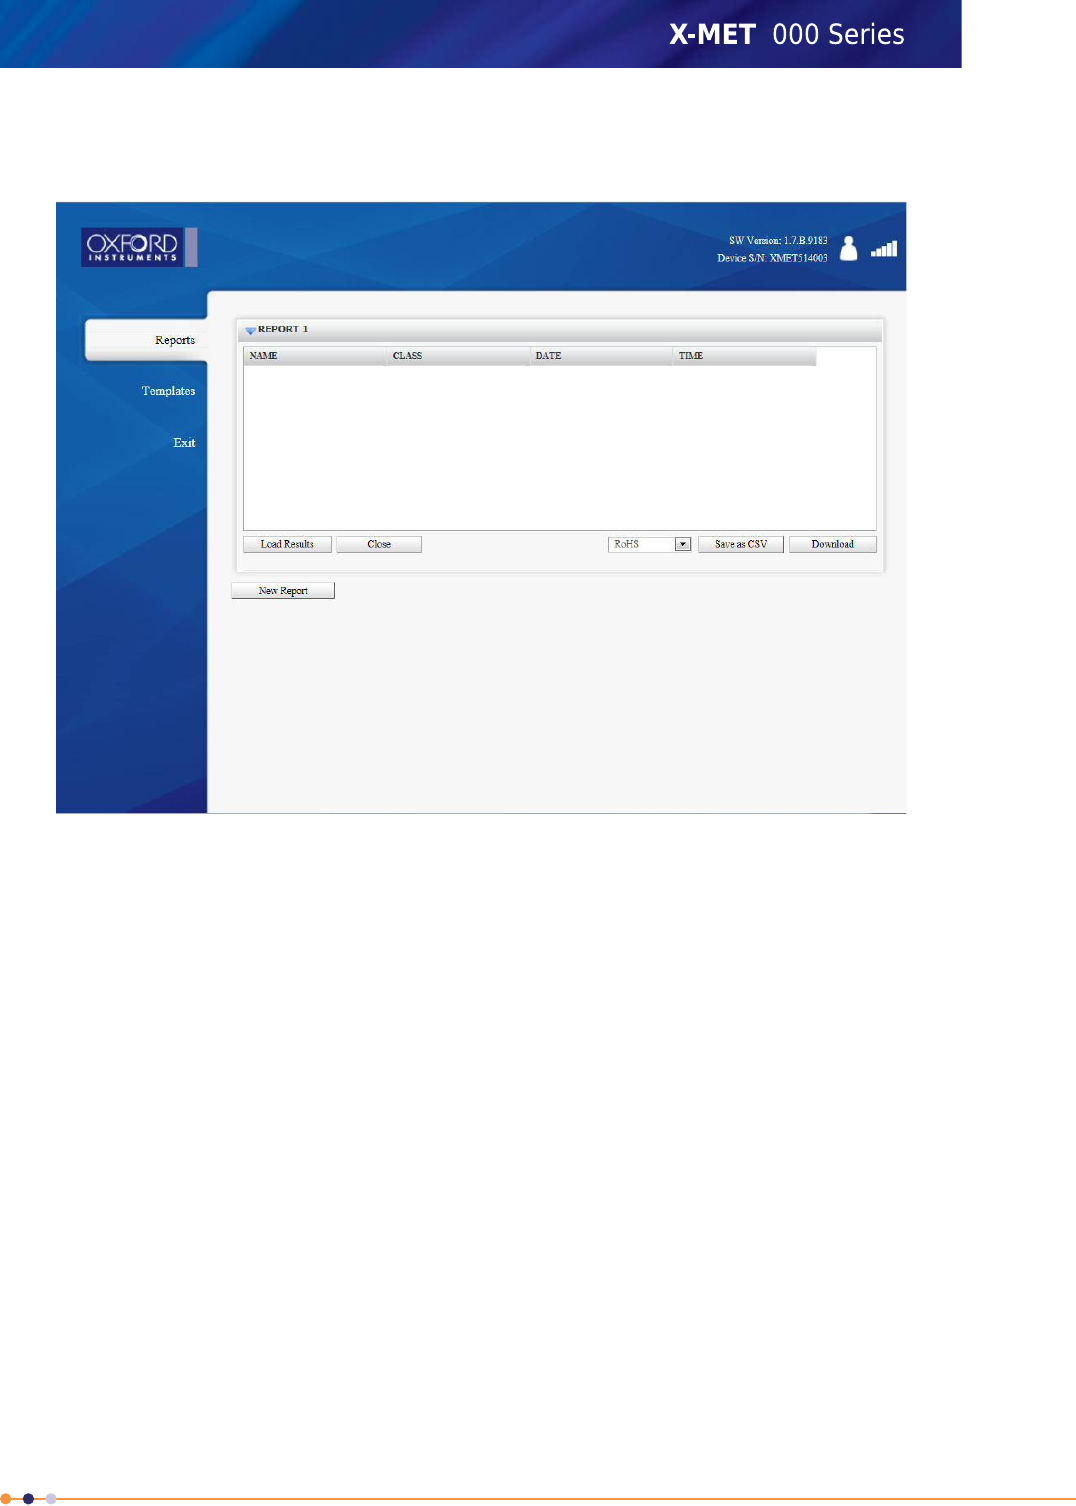
2. Click New Report.
The Reports screen has a new report.
45
X-MET8000 Series User Manual
8
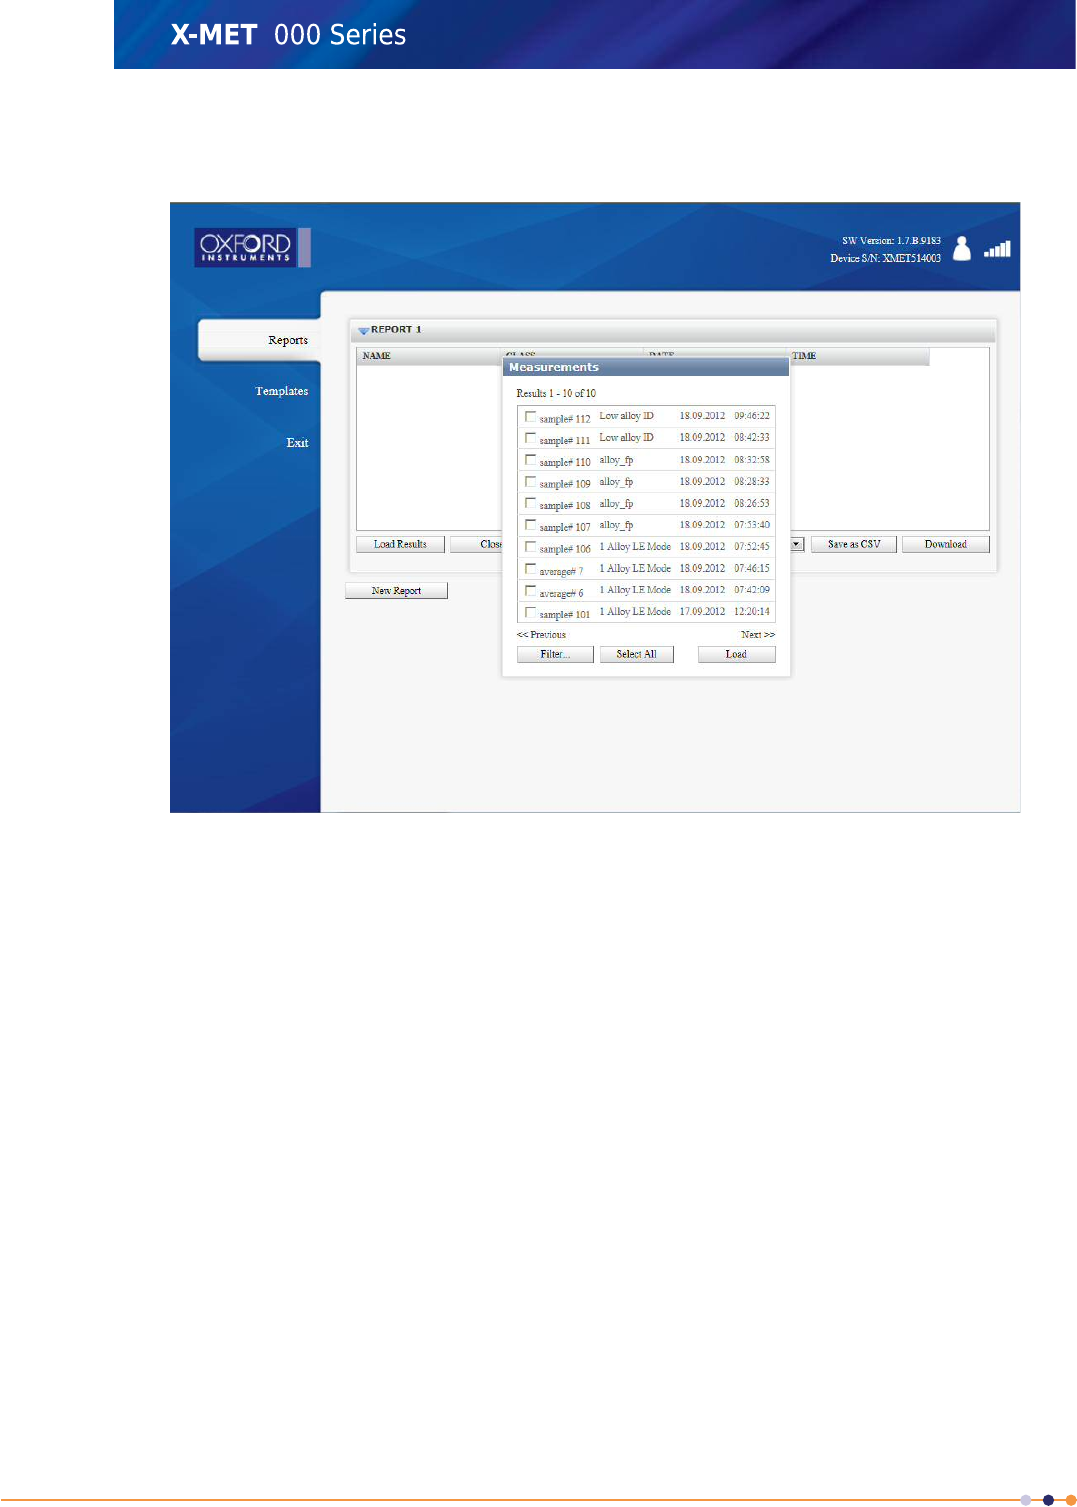
3. Click Load Results.
The Measurements dialog box appears.
46
X-MET8000 Series User Manual
8

4. If required, click Filter ....
The Filter by dialog box appears.
5. To use the filter, do one or more of the following, as required:
•Click the Start Date tick box, and use the calendar to choose a date.
•Click the End Date tick box, and use the calendar to choose a date.
•Click the Sample Name tick box, and type all or part of the sample name.
•Click the Method tick box, and type all or part of the Method name.
6. Click OK to return to the Measurements dialog box, with filtered results.
47
X-MET8000 Series User Manual
8
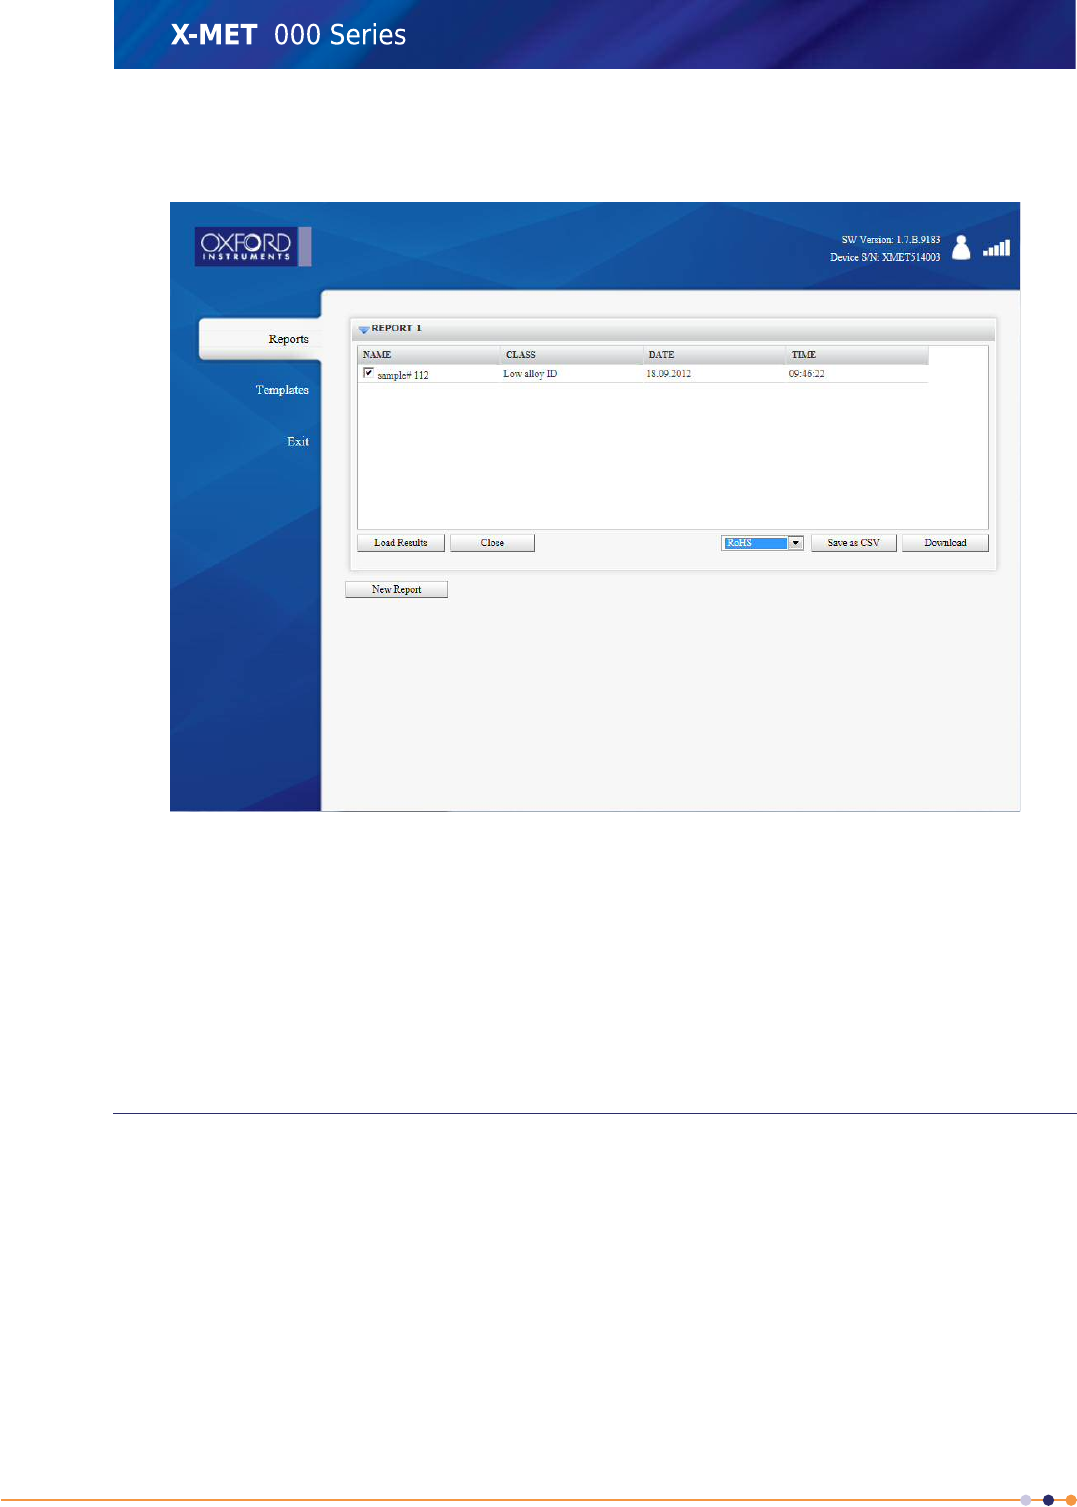
7. If required click Select All to select all the results for the report, and then click Load.
The Reports screen shows the result or results for the report.
8. Select the required template for the report from the Report Template drop down list.
9. Click Download to download a PDF file.
The File Download dialog box appears.
10. Click Save to save the file.
The Zip file contains the report PDF file.
11. Click Exit to return to the PC main screen.
Wireless Network Use Cases
The X-MET8000 series can connect to Wi-Fi networks in Managed and Ad hoc mode. A typical use for
Wi-Fi is to connect to a PC. This can allow more than one PC to connect to the X-MET8000 series.
The Wi-Fi connection can be used to transfer reports directly to a shared network resource and for
operation of the X-MET8000 series trough a PC or tablet device using the WEB-interface or VNC. The
Wi-Fi connection can also be used to control the X-MET8000 series remotely using the XAPI protocol.
In a managed network the X-MET8000 series can write reports to shared network folders and print
reports to network printers. In addition the X-MET8000 series can be controlled from any computer
on the local network providing that the IP address for the X-MET8000 series is known.
48
X-MET8000 Series User Manual
8

This manual will in detail explain how to connect the X-MET8000 series to a Wi-Fi network, enable
shared folders for file transfer and connect to the X-MET8000 series using a Wi-Fi enabled computer
or tablet.
Trough an ad hoc network connection it is possible to remotely access and control the X-MET8000
series using an WEB-browser or VNC and from the X-MET8000 series use shared folders and printers
physically connected to the computer providing the ad hoc network.
Note that shared network resources may not work in ad hoc mode unless the resources are located
on the device providing the ad hoc network.
The X-MET8000 series can be remotely controlled trough a VNC connection and using most common
WEB browsers. This manual includes instructions on how to setup and control the X-MET8000 series
using a WEB browser running on a PC and trough a VNC-connection from a PC and an iPad.
WEB browsers on mobile devices may not be fully compatible with the X-MET8000 series web interface,
some features might not work properly if used with a mobile device web browser.
Multiple Wi-Fi connected X-MET8000 series devices can be controlled from a single computer using
tabs in the WEB browser, one tab for each X-MET8000 series device.
Using the XAPI interface and a Wi-Fi connection multiple X-MET8000 series devices can be used for
automated operation with a minimum of additional equipment and infrastructure.
Wireless Connections
The X-MET8000 series can connect to Bluetooth and Wi-Fi networks. Both networks are switched off
by default. A typical use for Bluetooth would be to connect to a precision GPS receiver for mining
applications, and it is possible to check the GPS information from the X-MET8000 series. A typical use
for Wi-Fi is to connect to a PC. This can allow more than one PC to connect to the X-MET8000 series.
The Wi-Fi connection can be to a broadcast network or to a hidden network. For a broadcast network,
it can be necessary to know the passkey. For a hidden network, it is necessary to know the SSID.
Hidden networks can be either managed or ad-hoc. Managed networks can use either WPA or WPA2
Personal encryption, and ad hoc networks can use WPA None encryption. If a hidden network uses
encryption, it is necessary to know the passkey. The network administrator will know the type of
network in use, and can provide the SSID and passkey, as applicable.
An ad hoc Wi-Fi network is a decentralized type of wireless network. The network is ad hoc because
it does not rely on a pre existing infrastructure, such as access points in managed wireless networks.
Network shared folders and printer will most likely not work trough an ad hoc network
A managed Wi-Fi network utilizes access points providing wireless access to the network infrastructure
including shared folders and printers
Most common full featured web browsers i.e. IE, Mozilla and Chrome will work with the X-MET8000
series web user interface and are platform and X-MET8000 series software version independent.
Many mobile devices use web browsers optimized for mobile web browsing, these might not include
all features required by the X-MET8000 series web GUI. Multiple X-MET8000 series devices running
different software versions can be operated simultaneously using tabs in the web browser.
49
X-MET8000 Series User Manual
8
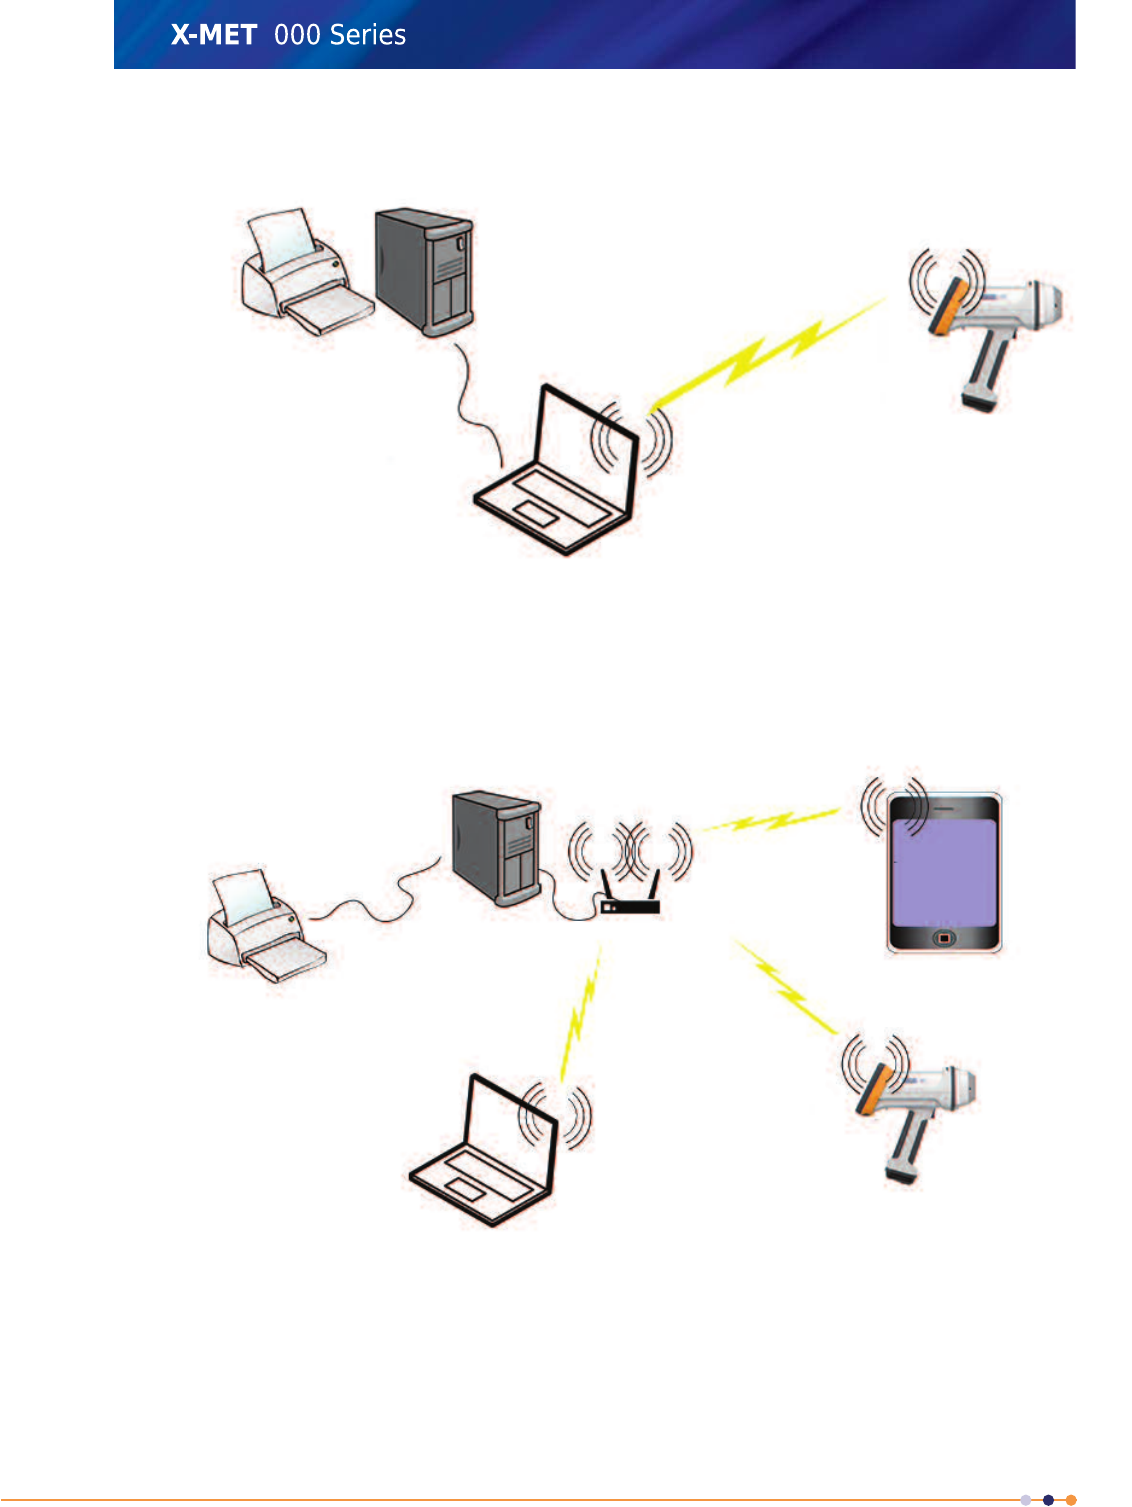
Wi-Fi ad hoc network topology
The laptop provides the Wi-Fi network in ad hoc mode and the X-MET8000 series connects directly to
the laptop. Network resources might not be accessible from the X-MET8000 series.
Wi-Fi managed network topology
In managed networks existing infrastructure like routers and switches connects the clients to the
network, shared resources are accessible from all network connected clients.
50
X-MET8000 Series User Manual
8
Connect the X-MET8000 series to a company network
The procedure may differ depending on the network security level and server versions used. If the
network utilizes device based authentication or you are unable to connect to the network using the
following steps, please contact your local network administrator for support.
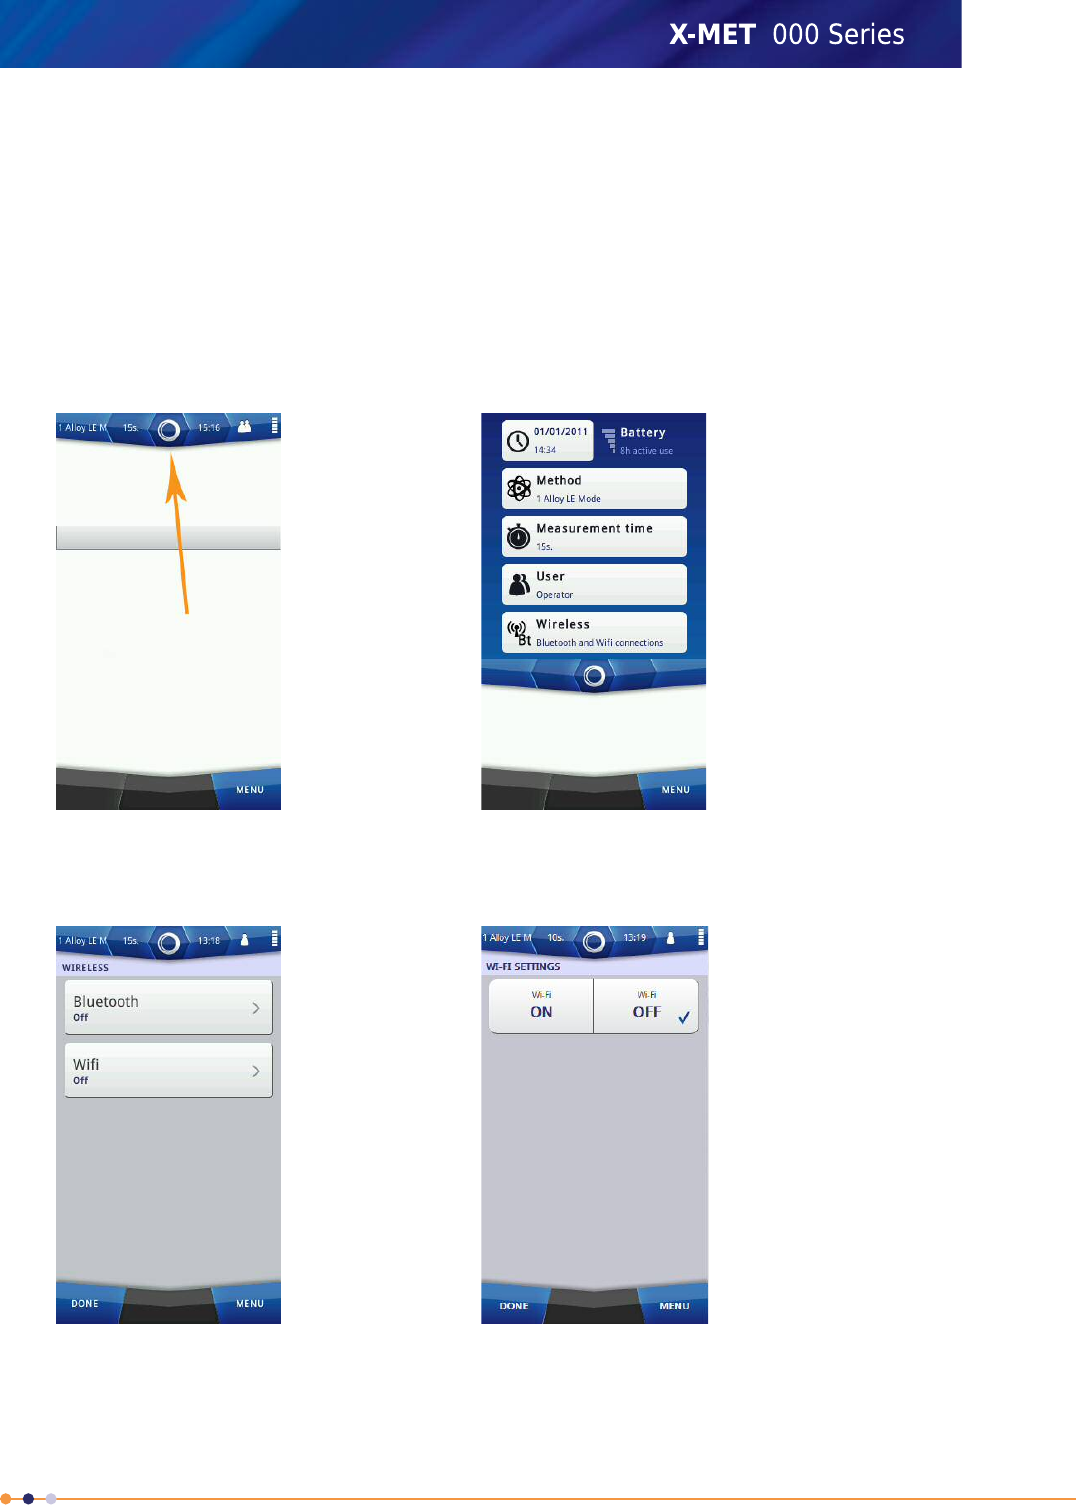
Add A Broadcast Wi-Fi Connection
Follow these steps to connect to a broadcast Wi-Fi network.
1. Navigate: Status Bar >Wireless .
The Wireless screen appears.
2. Tap Wi-Fi.
The Wi-Fi Settings screen appears.
51
X-MET8000 Series User Manual
8
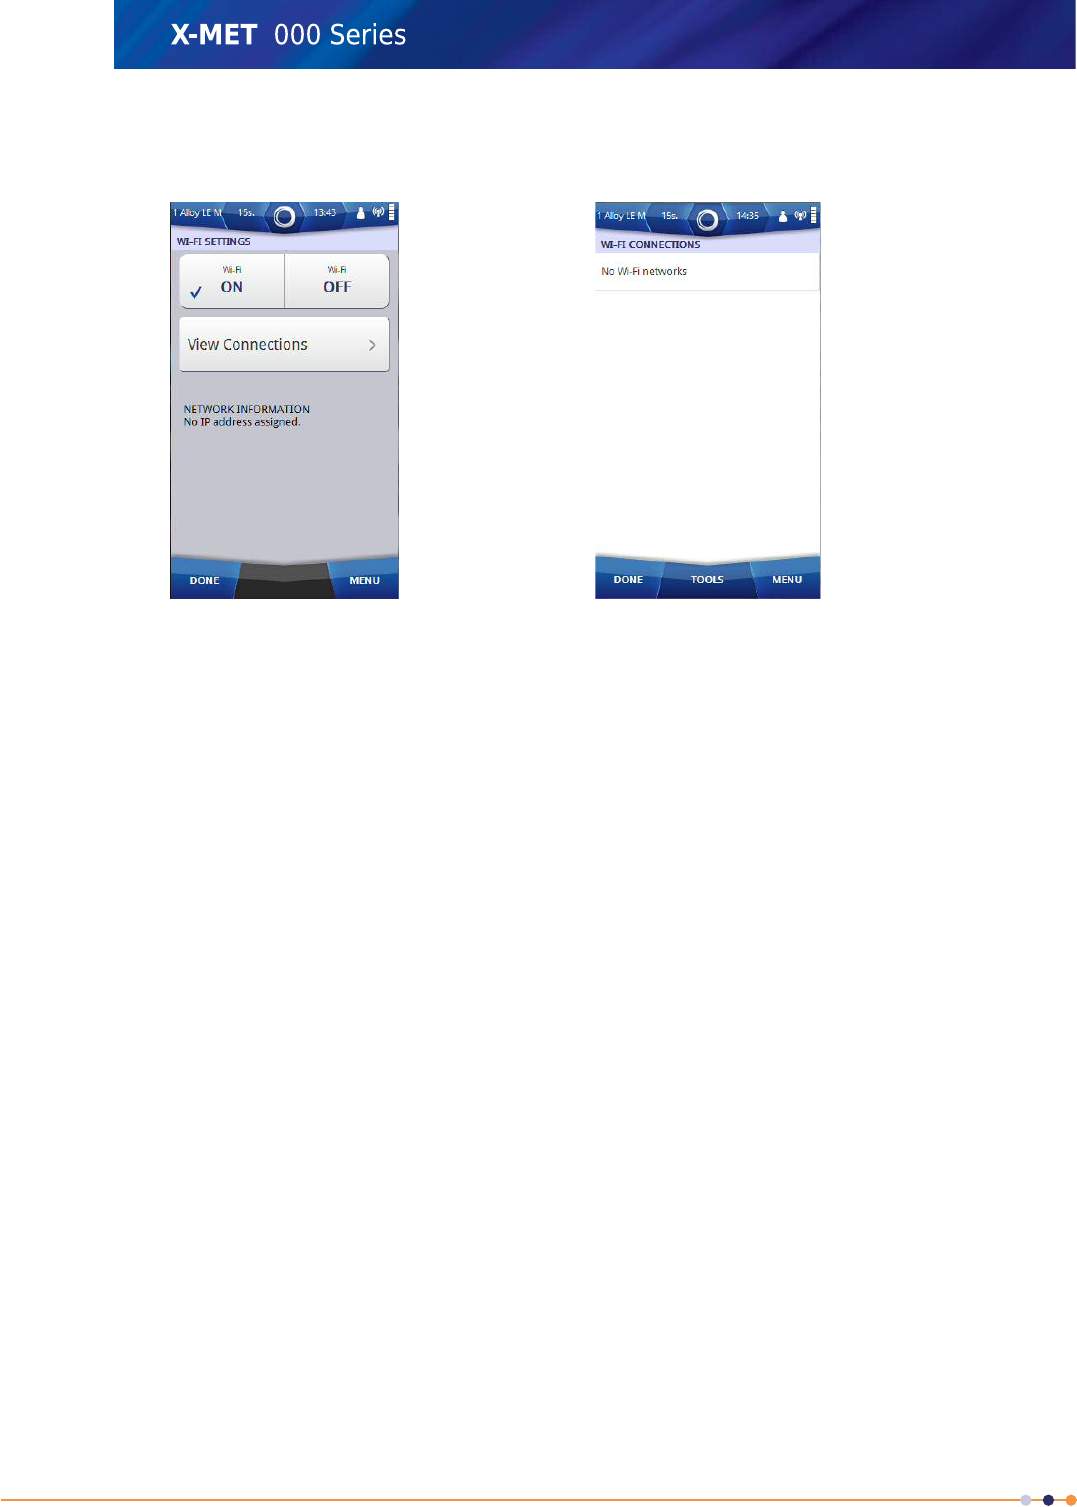
3. Tap the ON tick box.
The Wi-Fi Settings screen changes.
4. Tap View Connections.
The Wi-Fi Connections screen appears.
52
X-MET8000 Series User Manual
8
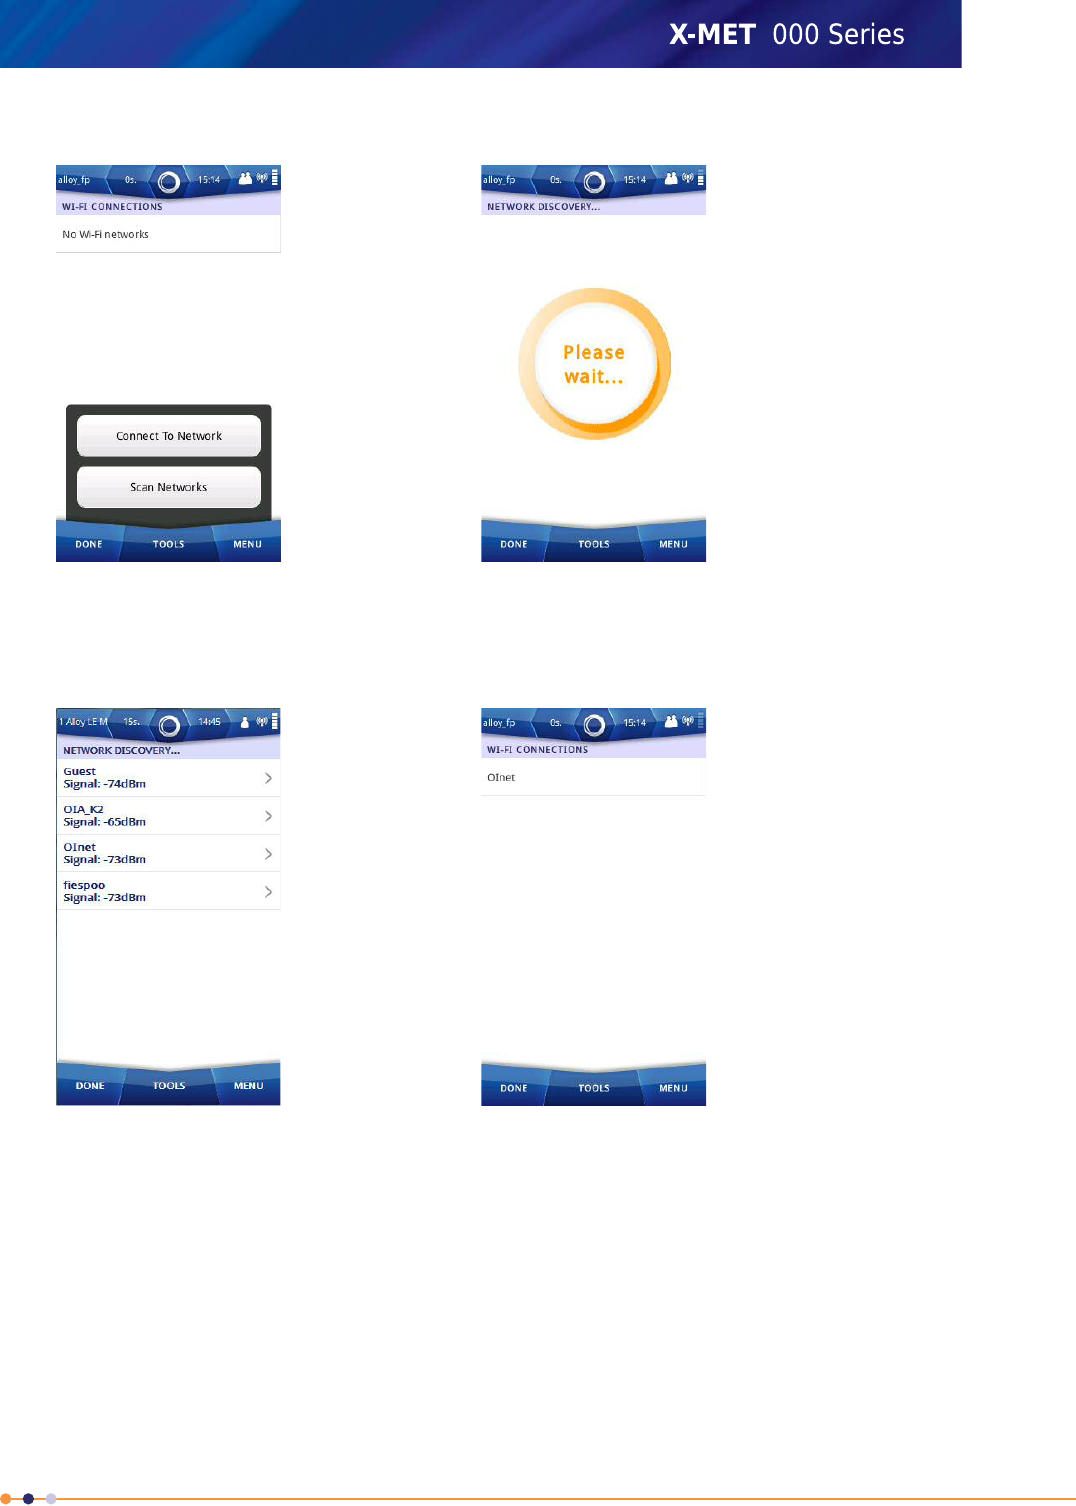
5. Tap: Tools >Scan Networks .
The Network Discovery screen appears, and a search for Wi-Fi networks begins.
When the search is complete, the screen shows the available Wi-Fi networks.
The list is ordered with the strongest signals at the top.
6. If necessary, tap: Tools >Scan Again .
Another search for Wi-Fi networks begins, and the Network Discovery screen is refreshed.
7. Tap one of the Wi-Fi networks.
53
X-MET8000 Series User Manual
8
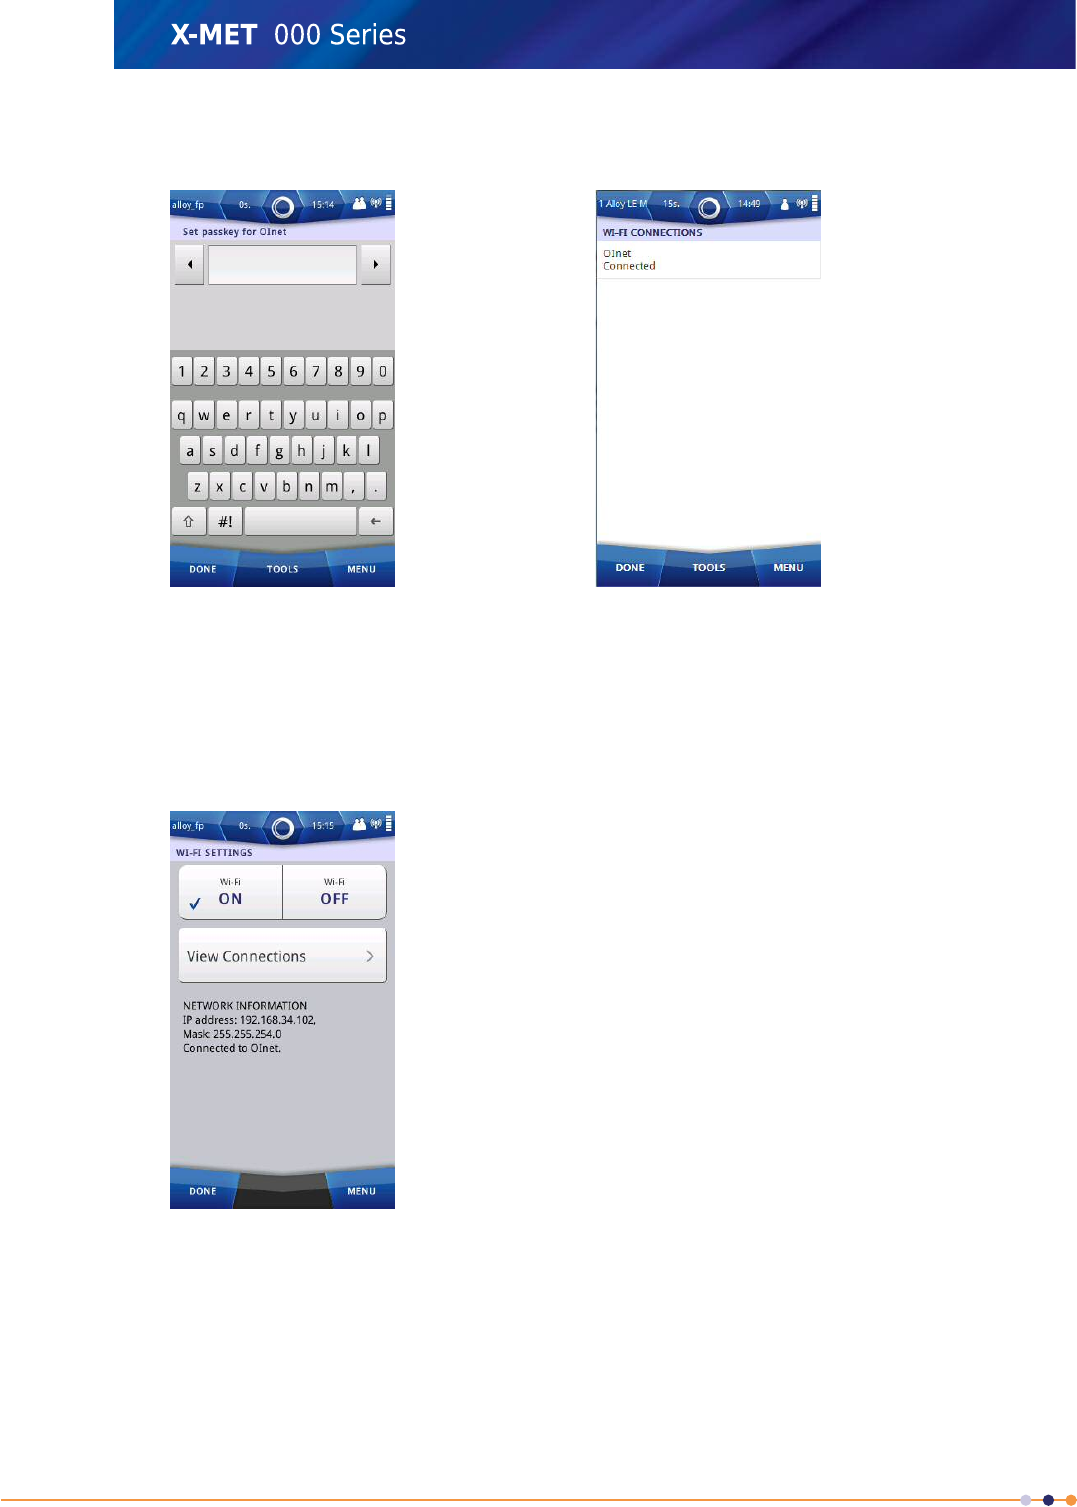
8. If the selected Wi-Fi network requires a passkey, use the virtual keyboard to type the passkey for
the network, then tap Done to return to the Network Discovery screen.
9. Tap Done to return to the Wi-Fi Connections screen.
This shows the active Wi-Fi connection.
10. Tap Done to return to the Wi-Fi Settings screen.
Wait until the Network Information IP address and Mask update in the Wi-Fi Settings screen. The
updated IP address can be used to access the X-MET8000 series from the other computers that
are in the same network.
11. Tap Done twice to exit the Wi-Fi Settings screen.
54
X-MET8000 Series User Manual
8
Add A Hidden Wi-Fi Connection
Follow these steps to connect to a hidden Wi-Fi network. Managed networks can use either WPA or
WPA2 Personal encryption, and ad hoc networks can use WPA None encryption.
1. Navigate: Status Bar >Wireless .
The Wireless screen appears.
2. Tap Wi-Fi.
The Wi-Fi Settings screen appears.
55
X-MET8000 Series User Manual
8
3. Tap the ON tick box.
The Wi-Fi Settings screen changes.
4. Tap View Connections.
The Wi-Fi Connections screen appears.
5. Tap: Tools >Connect To Network .
The Connect To Hidden Network screen appears.
6. Tap Set SSID.
56
X-MET8000 Series User Manual
8
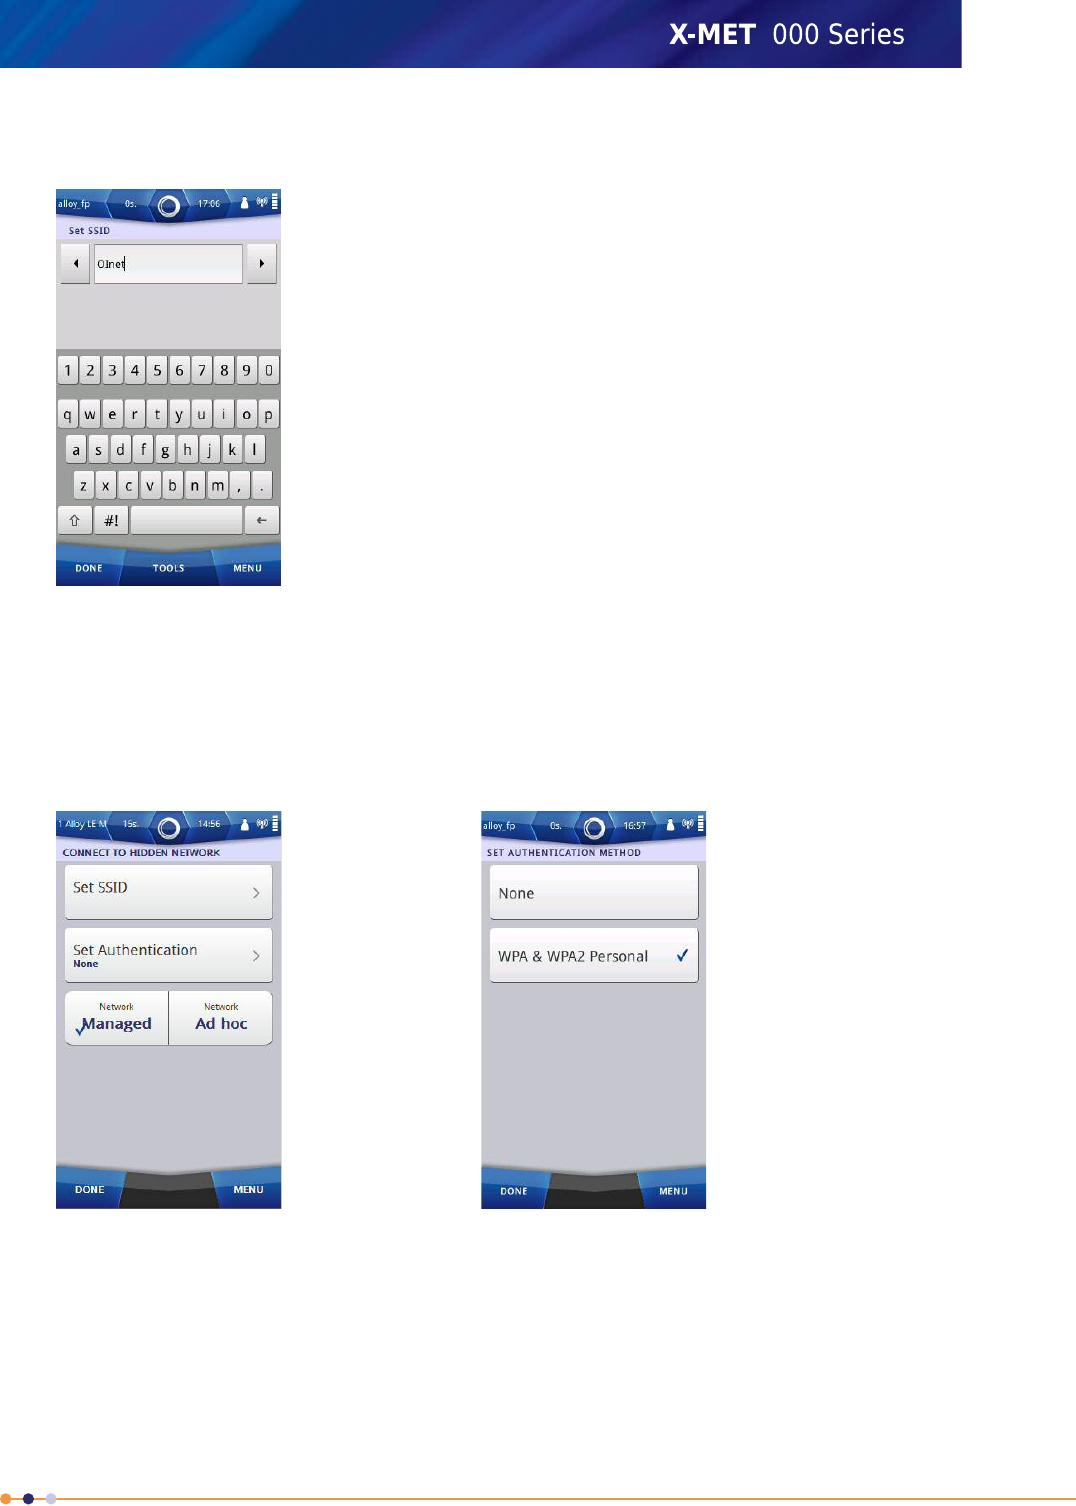
7. Use the virtual keyboard to type the SSID, and then tap Done to return to the Connect To Hidden
Network screen.
8. Do one of the following:
•Tap Managed
•Tap Ad Hoc
9. Tap Set Authentication.
The Set Authentication Method screen appears.
57
X-MET8000 Series User Manual
8
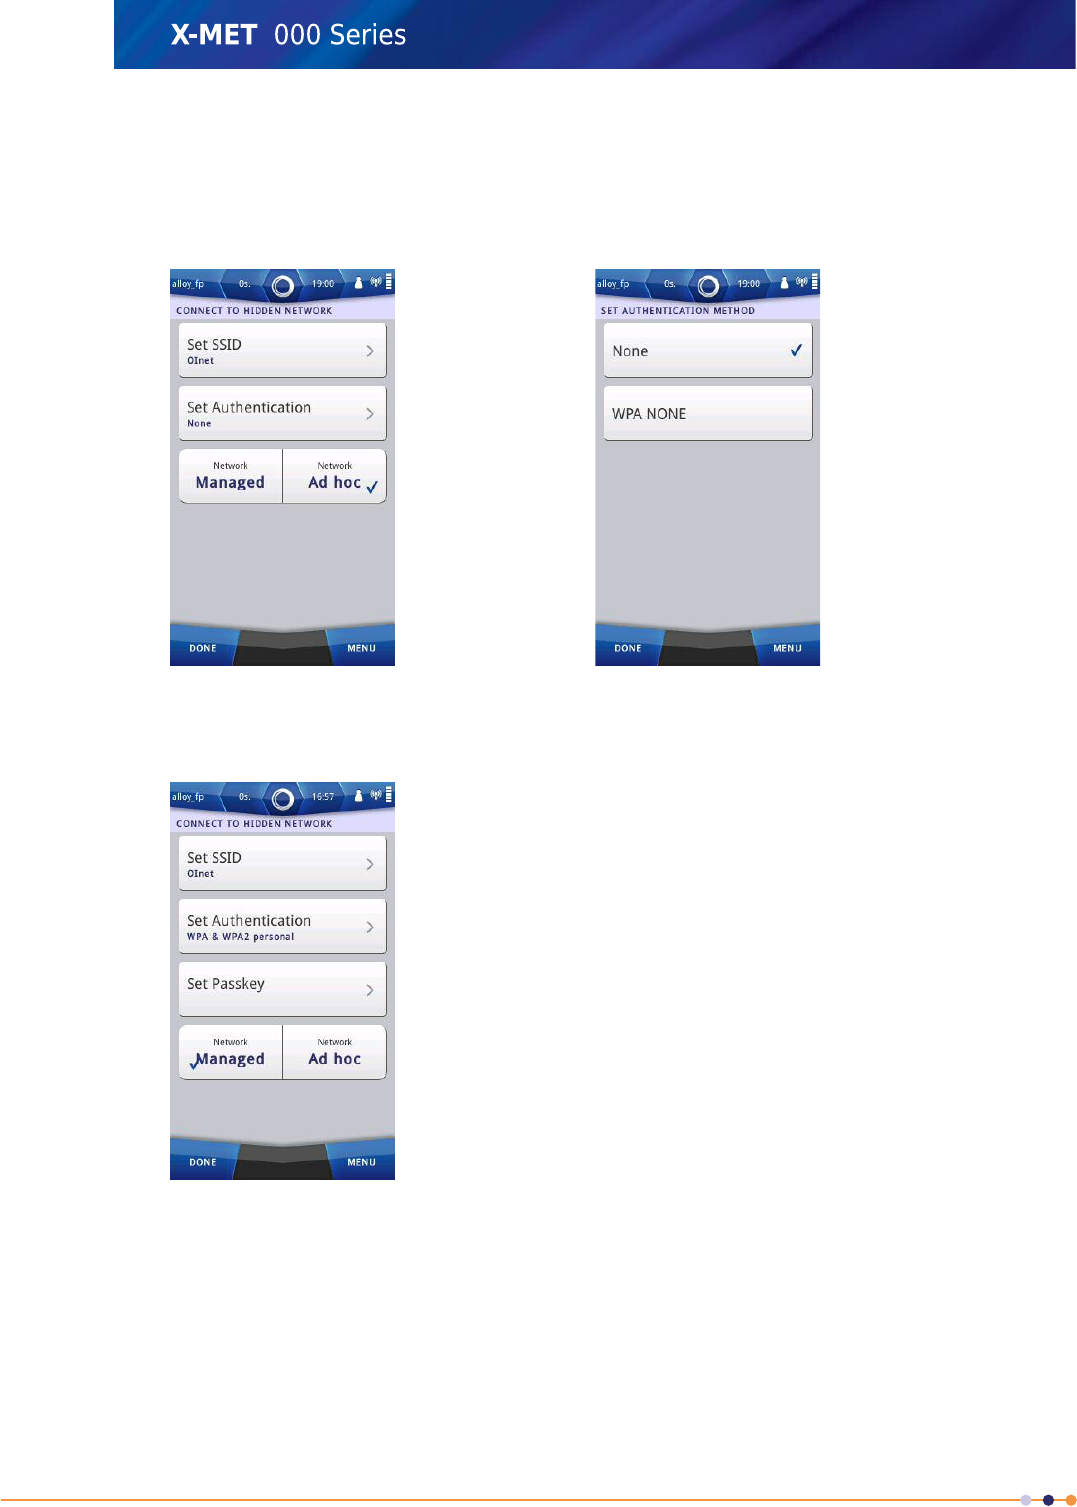
10. Do one of the following:
•Tap None
•Tap WPA & WPA2 Personal
For an ad hoc network, the second choice is WPA None.
11. Tap Done to return to the Connect To Hidden Network screen.
The Connect To Hidden Network screen changes.
12. Tap Set Passkey.
58
X-MET8000 Series User Manual
8
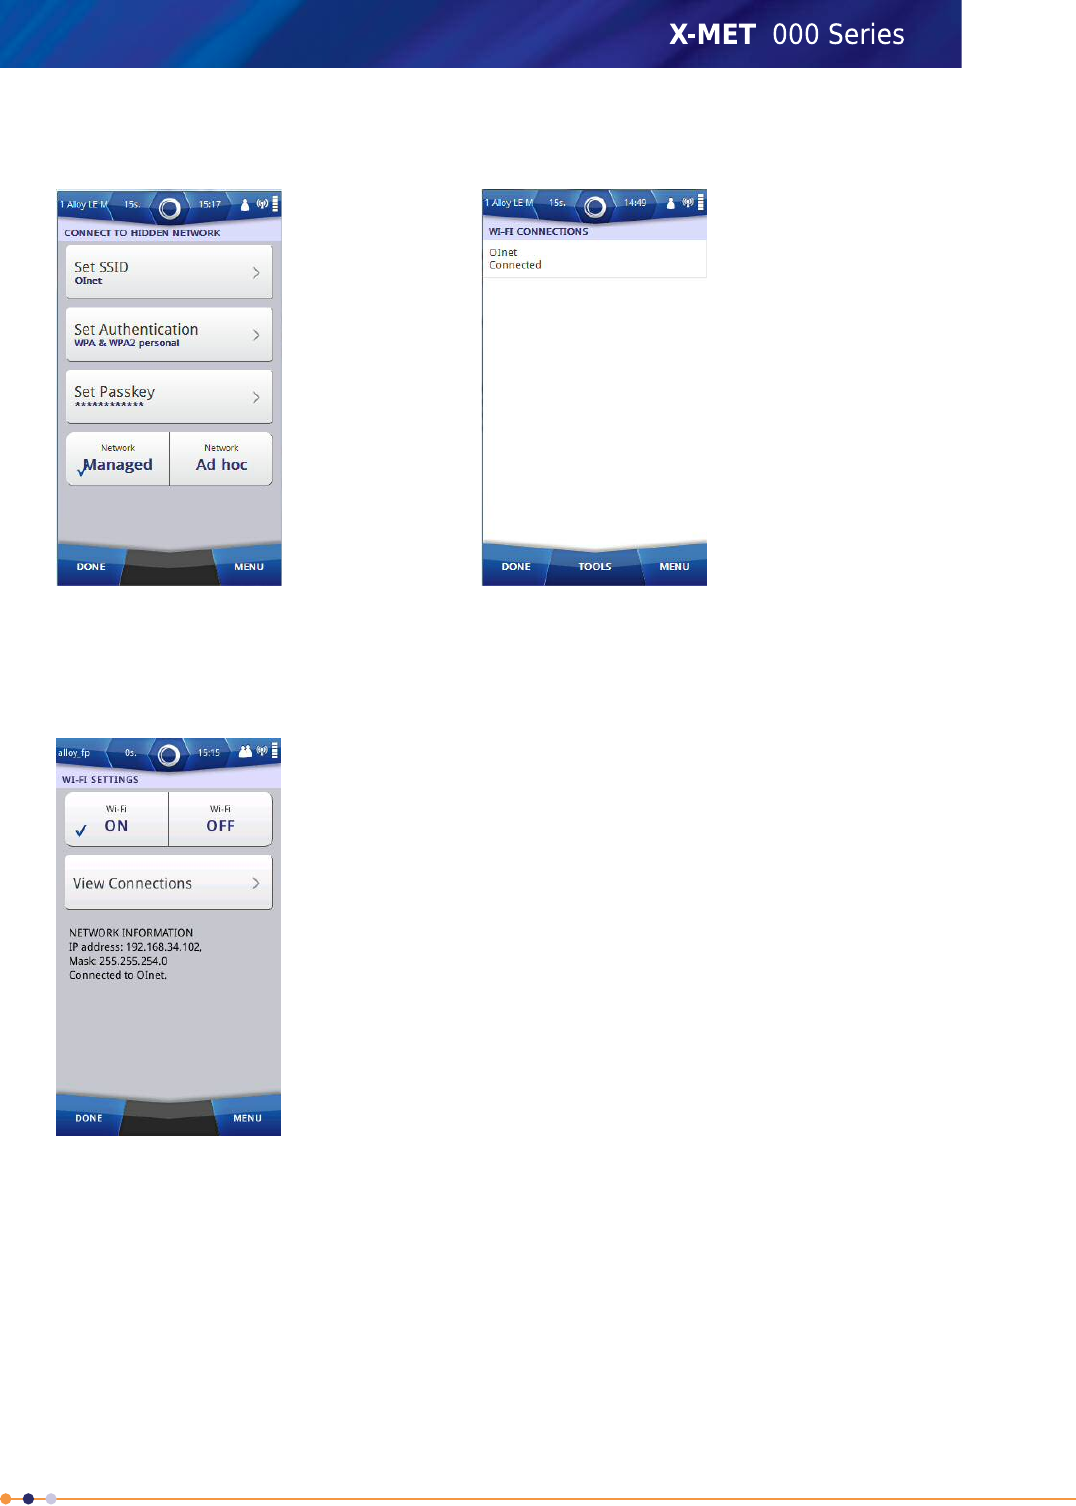
13. Use the virtual keyboard to type the passkey for the network, and then tap Done to return to the
Connect To Hidden Network screen.
14. Tap Done to return to the Wi-Fi Settings screen.
Wait until the Network Information IP address and Mask update in the Wi-Fi Settings screen. The
updated IP address can be used to access the X-MET8000 series from the other computers that
are in the same network.
15. Tap Done twice to exit the Wi-Fi Settings screen.
59
X-MET8000 Series User Manual
8
Wireless Printing
The X-MET8000 series supports printing Reports directly to a network connected printer over a Wi-Fi
connection. Setup wireless printing using the following instructions.
Configure A Printer
It is necessary to connect the X-MET8000 series device to a Wi-Fi network before configuring a printer.
Follow the steps below to configure a printer.
The supervisor must configure network printers.
1. Navigate: Menu >Settings >Instrument Configuration >Printers .
The Printers screen appears.
60
X-MET8000 Series User Manual
8

2. Tap Tools >Add Printer .
The Select Printer screen appears and a search begins for the network printers. When the search
is complete, the screen shows the available Network Printers and Add Other Printer.
3. If necessary, scan again by selecting Tools >Scan Again .
4. Tap either on the found Network Printers or Add Other Printer to input the printer information
manually.
The Add/Edit Printer screen appears.
5. Do the following:
•Tap Name
The Printer name can be any text, it is used to identity a printer when multiple printers are
configured in the device.
•Tap URI
The system administrator will need to provide the IPP address for the printer.
61
X-MET8000 Series User Manual
8
6. Use the virtual keyboard to type the new value, and tap Done to return to the Add/Edit Printer
screen.
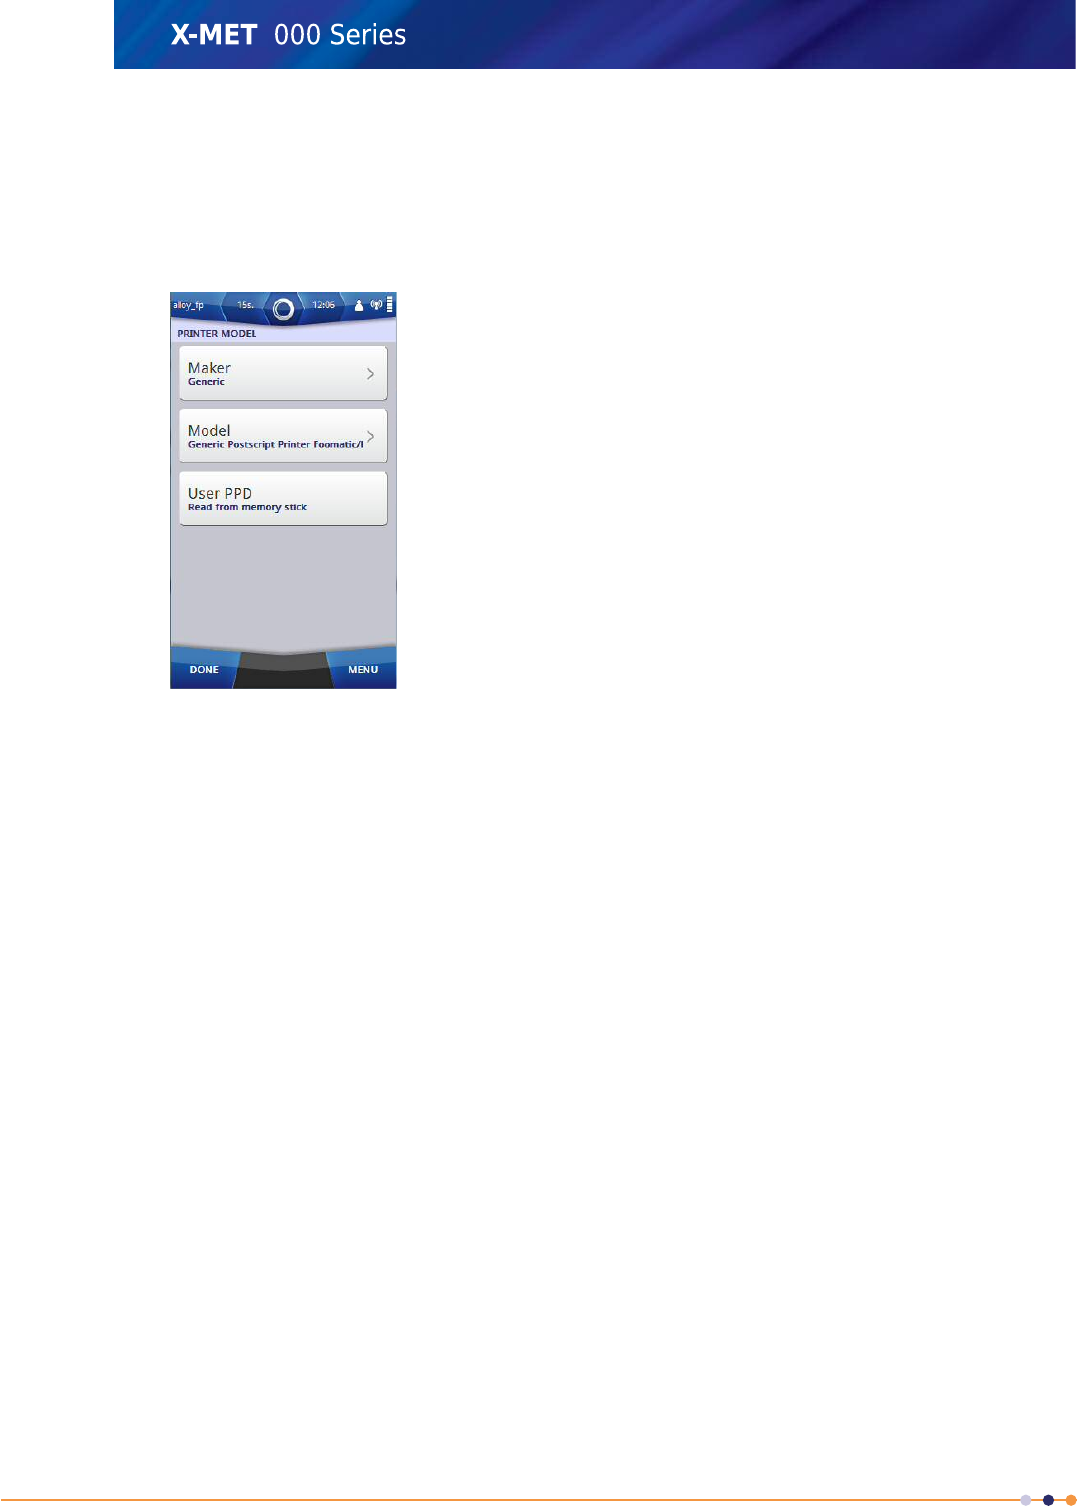
7. It is not necessary to change Model as most of the printers work with a default generic postscript
driver which is available in the device. If the user wants to install a different PPD driver from a USB
memory device, then tap Model .
The Printer Model screen appears.
8. Tap Maker to select the applicable maker. Tap Done to return to the Printer model screen.
The Printer Model screen updates with the new values.
9. Tap User PPD to install the PPD file for the printer from the memory stick.
10. Tap Done.
The Information dialog box appears.
11. Tap OK to return to the Select Printer screen.
12. Tap Done 4 times to return to the main screen.
62
X-MET8000 Series User Manual
8
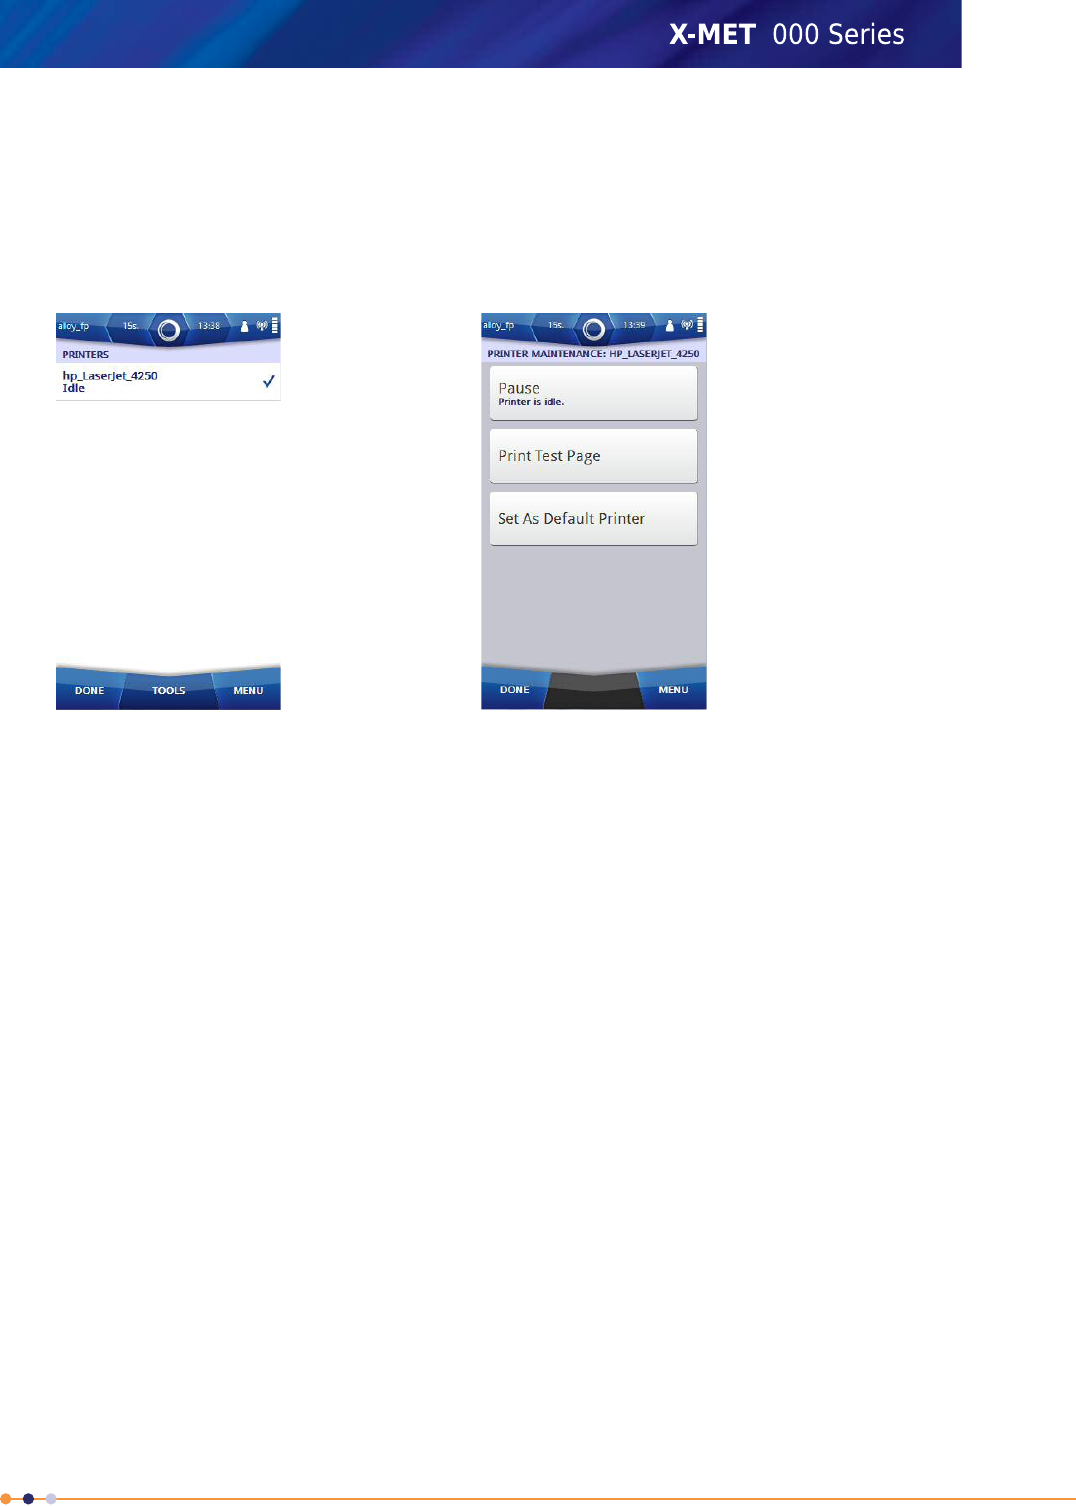
Print A Test Page
It is necessary to configure a printer before printing a test page. Follow the steps below to print a test
page.
1. Navigate: Menu >Settings >Instrument Configuration >Printers .
The Printers screen appears.
2. Select a printer and tap Tools >Maintenance Selected .
The Printer Maintenance screen appears.
3. Tap Print Test Page.
The Information dialog box appears.
4. Tap OK to return to the Printer Maintenance screen.
5. If the printing of the test page is successful, set the printer as the default printer by selecting Set
As Default Printer in the Printer Maintenance screen.
6. Tap Done 4 times to return to the main screen.
63
X-MET8000 Series User Manual
8
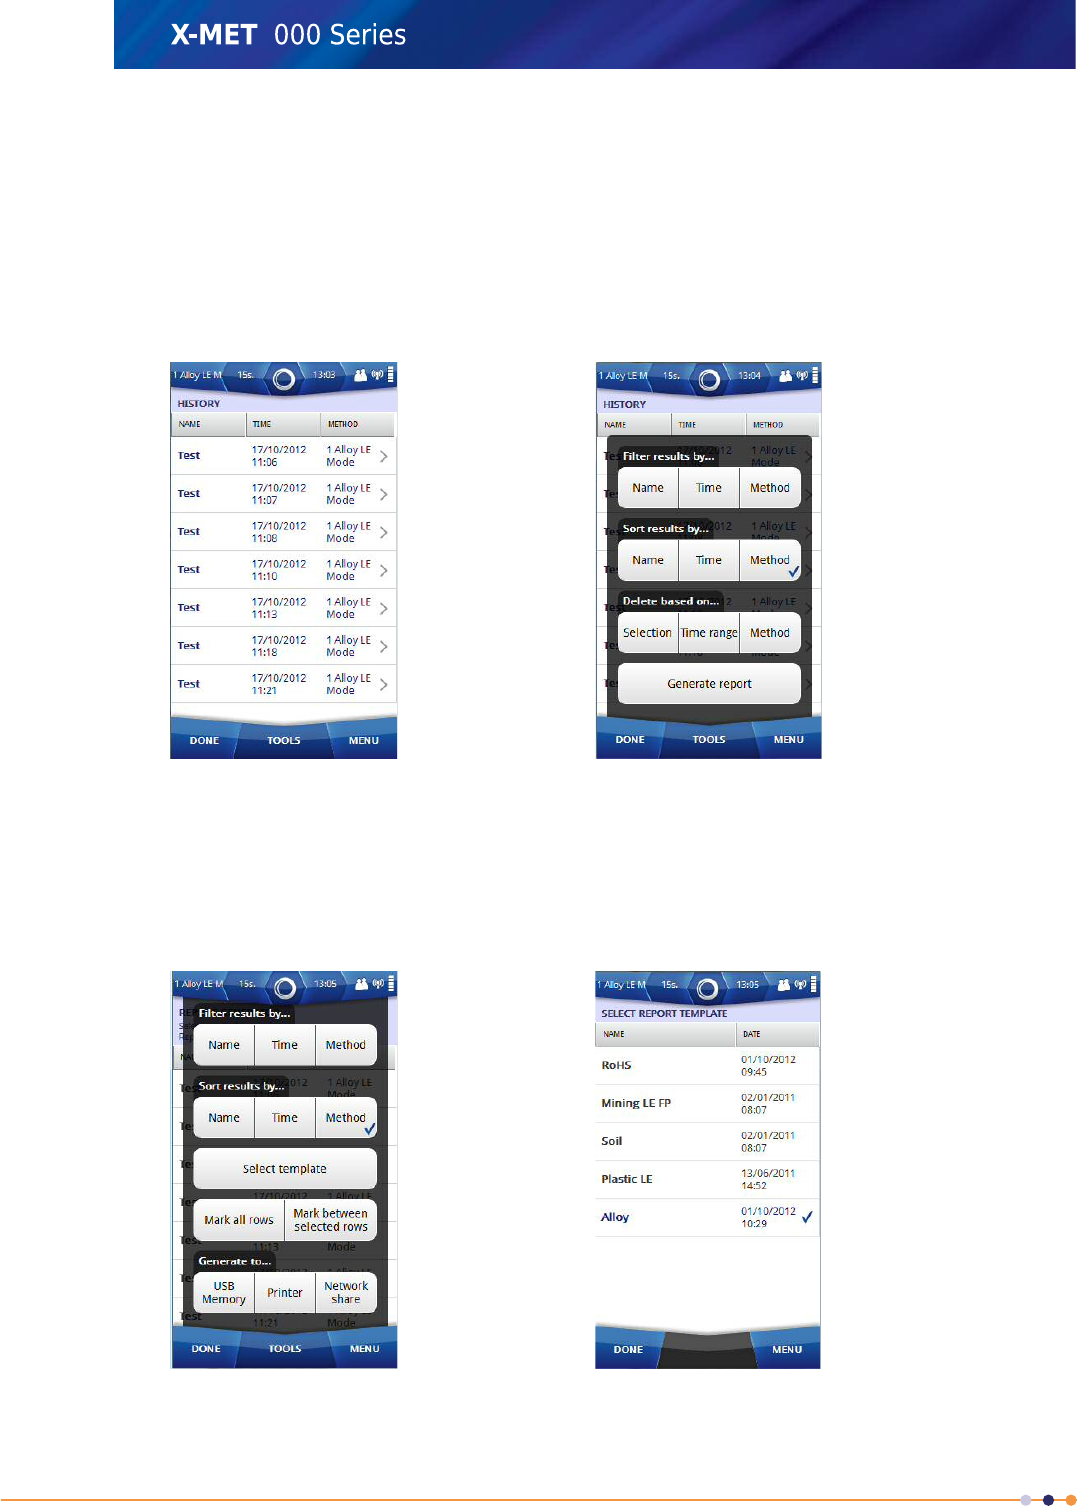
Generate Report to Printer
The Supervisor must configure a network printer in the device in order to generate reports directly
on a printer, and must connect the device to the same WiFi network as the one to which the network
printer is connected. Please refer to the Supervisor manual to set this up. Follow the below steps to
generate report to printer.
1. Tap Menu, and then tap History.
The History screen appears.
2. Tap: Tools >Generate Report
The Report Generator screen appears.
3. Tap: Tools >Select Template
The Select Report Template screen appears with the default report template list and also user
defined templates which were created in the Web GUI.
64
X-MET8000 Series User Manual
8
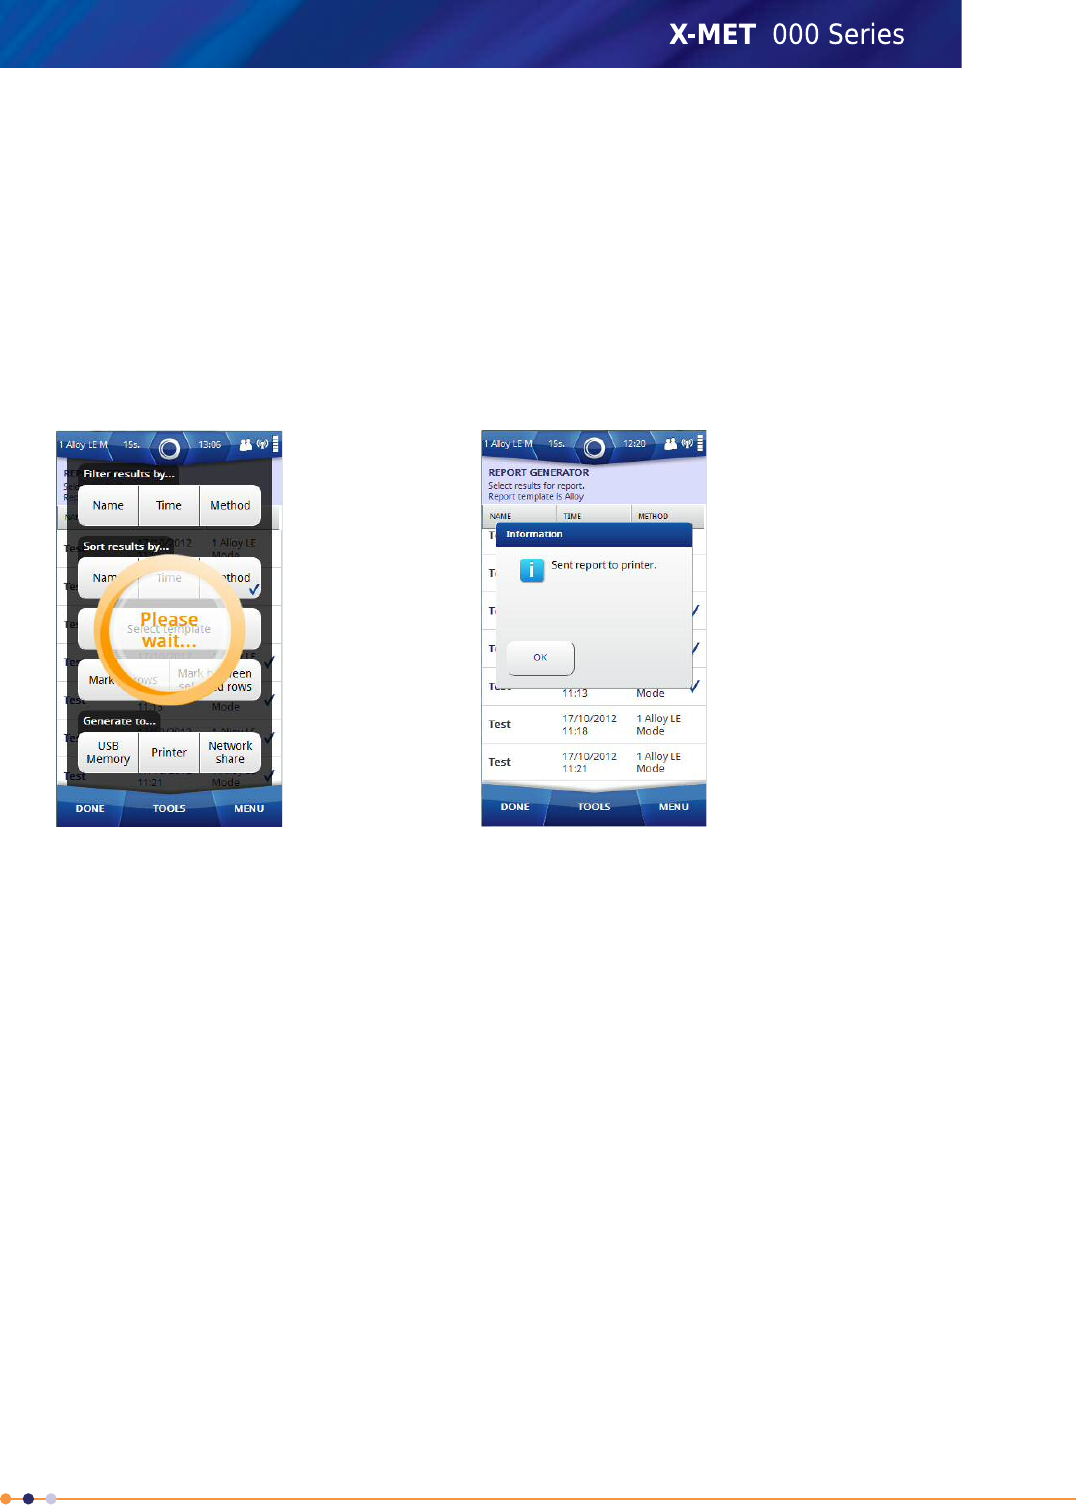
4. Tap on the applicable template and then tap Done to return to Report Generator screen.
5. Select the measurement results for the report by tapping on each result row in Report Generator
screen or tap Tools and select results using following options
•Filter by
•Sort by
•Mark All
•Mark between selected rows
6. Tap: Tools >Printer after selecting results.
Device starts generating report to the printer. Once the report is generated to the printer, an
Information dialog box appears .
7. Tap OK.
The Report Generator screen appears.
8. Tap Done twice to return to the main screen.
65
X-MET8000 Series User Manual
8
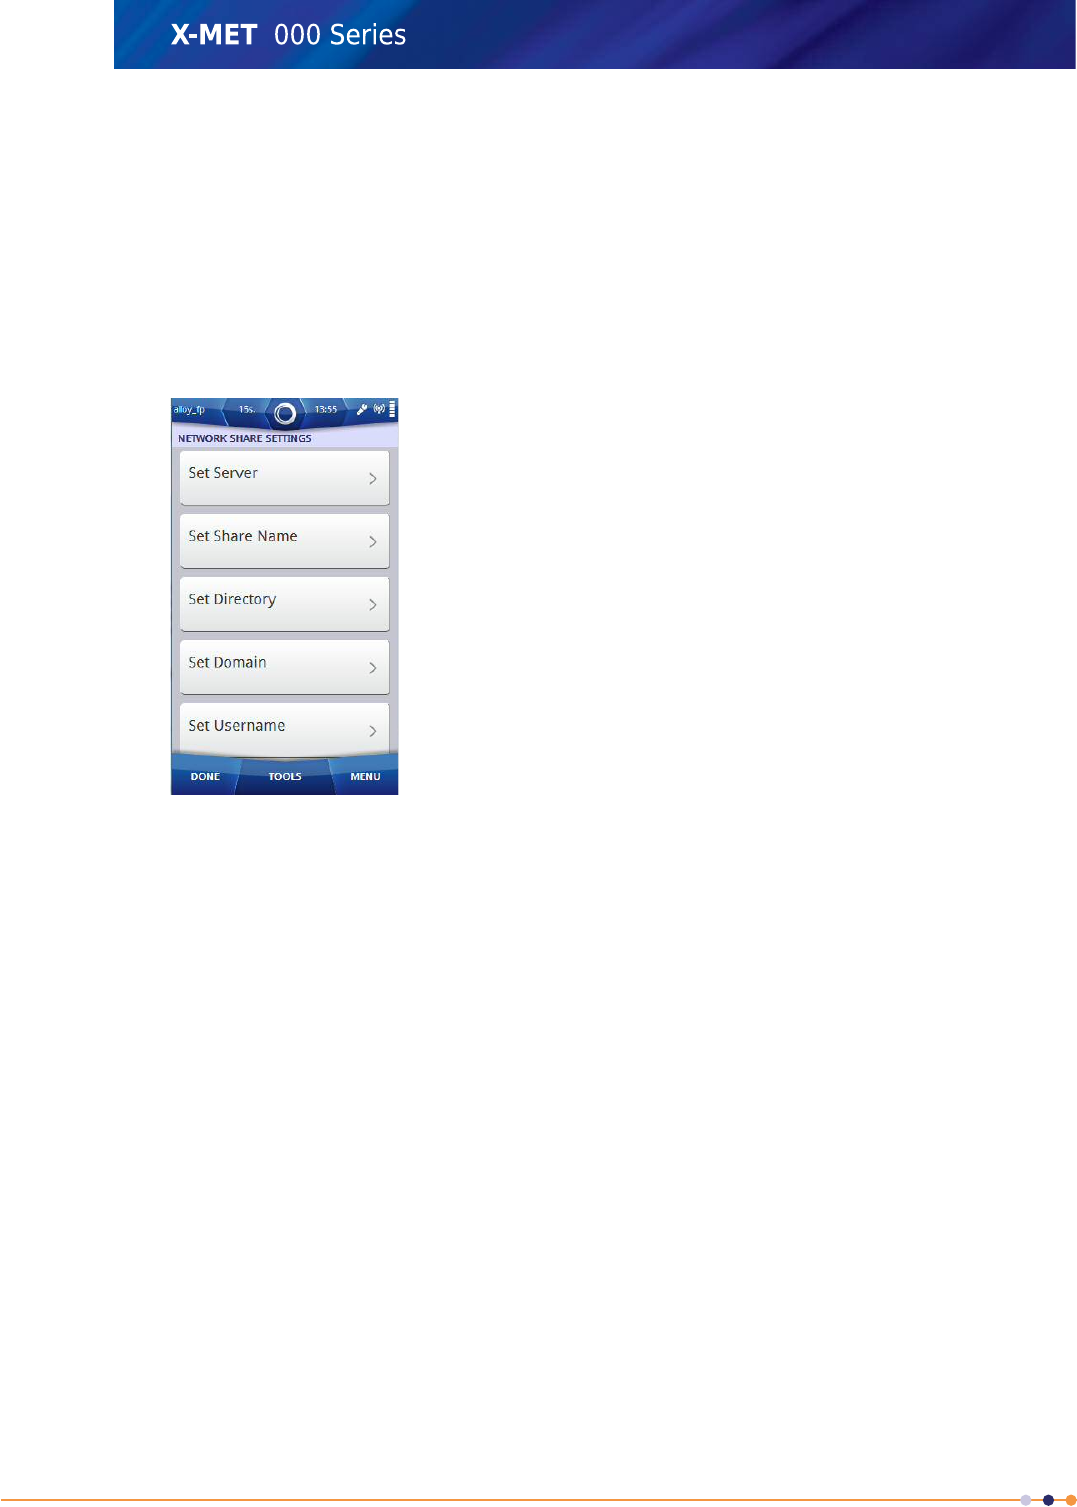
Wireless File Transfers
The X-MET8000 series can store reports directly to a network share over a Wi-Fi connection. Setup
shared folders using the following instructions.
Configure Network Share Settings
Follow the steps below to configure the Network Share Settings.
1. Navigate: Menu >Settings >Instrument Configuration >Network Share .
The Network Share Settings screen appears.
2. Do all of the following:
•Set Server
Set Server is the IP address of the server hosting the network share.
•Set Share Name
Set Share name is the name of the network share.
•Set Directory
Set Directory is the directory path inside the network share.
•Set Domain
Set Domain is the domain or workgroup where the user account is created.
•Set Username
Set Username is the username of the user to access the network share.
•Set Password
Set Password is the password of the user to access the network share.
3. The sytem administrator will know the settings of the available shares in the network, and can
provide the necessary information for the Network Share Settings. Use the virtual keyboard to type
the new value, and tap Done to return to the Network Share settings.
4. Tap Done three times to return to the main screen.
66
X-MET8000 Series User Manual
8

Write Test File To Network
It is necessary to configure the Network Share Settings before writing a test file to the network. Follow
these steps to write a test file.
1. Navigate: Menu >Settings >Instrument Configuration >Network Share .
The Network Share Settings screen appears.
2. Tap Tools >Write Test File .
The Information dialog box appears.
3. Tap OK and then tap Done three times to return to the main screen.
67
X-MET8000 Series User Manual
8

Generate Report to Network Share
The Supervisor must configure the network share in order to save reports on the selected network,
and must connect the device to the same WiFi network as the one to which the server hosting the
network share is connected. Please refer to the Supervisor manual to set this up. Follow the below
steps to generate report to Network Share.
1. Tap Menu, and then tap History.
The History screen appears.
2. Tap: Tools >Generate Report
The Report Generator screen appears.
3. Tap: Tools >Select Template
The Select Report Template screen appears with the list of the default report templates and user
defined templates which were created in the Web GUI.
68
X-MET8000 Series User Manual
8
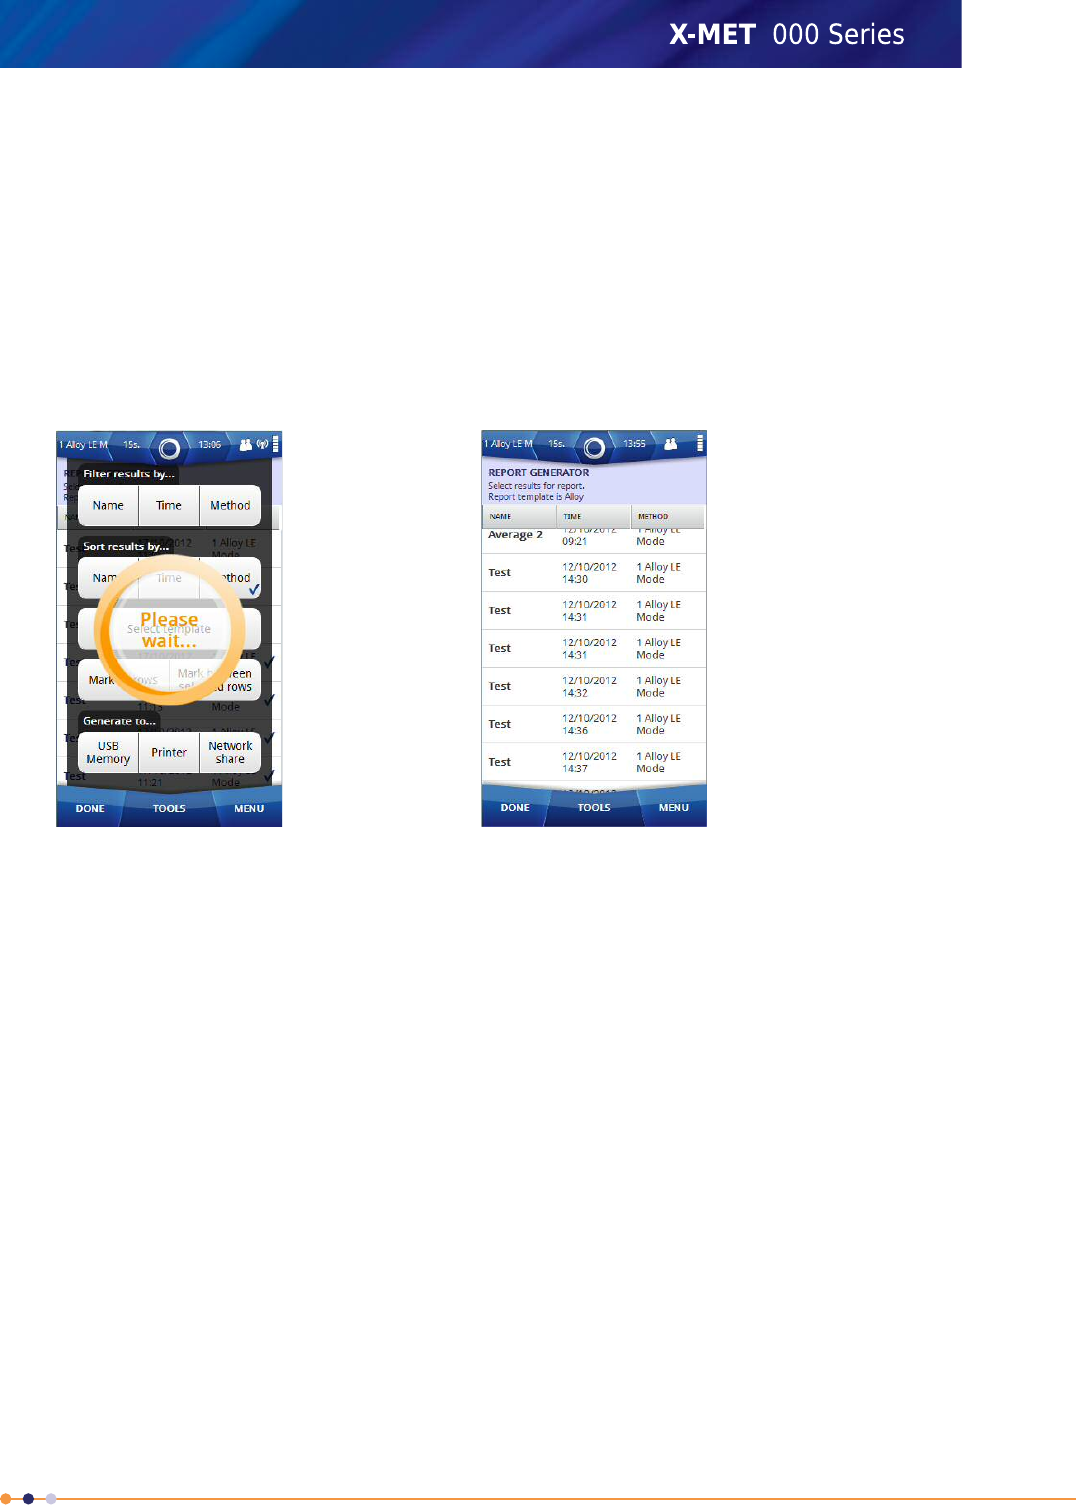
4. Tap on applicable template and then tap Done to return to Report Generator screen.
5. Select the measurement results for the report by tapping on each result row in the Report Generator
screen or tap Tools and select the results using following options.
•Filter by
•Sort by
•Mark All
•Mark between selected rows
6. Tap: Tools >Network Share after selecting the results.
Device starts generating report to the printer. Once the report is generated to the network share
Report Generator screen appears.
7. Tap Done twice to return to the main screen.
Operation With A PC
It is possible to operate the X-MET8000 series with a PC to do the following:
•Create a report for a series of results.
•Do a test measurement.
•Access the X-MET8000 Series User Manual .
Both supervisors and operators can operate the X-MET8000 series with a PC. Each uses their own
login code. There is not a separate login code for PC operation.
Operations with the PC use an Internet browser. While using an USB connection the standard URL to
connect to the X-MET8000 series is http://10.0.0.1/. Please contact the local Oxford Instruments
representative if it is necessary to change the URL. When connecting to the X-MET8000 series over
Wi-Fi the URL depends on the IP address assigned to the X-MET8000 series by the network.
Connect To A PC And Login
Follow these steps to login on the X-MET8000 series from a PC over WLAN.
1. Follow the steps to connect the X-MET8000 series to a Wi-Fi network. Please note that the PC must
be connected to the same WLAN network for the connection to work.
69
X-MET8000 Series User Manual
8

2. Open the Wi-Fi Settings screen on the X-MET8000 series and note the IP address found under
NETWORK INFORMATION.
70
X-MET8000 Series User Manual
8
3. Open an Internet browser on the PC and type the IP from the previous step in the address field in
the browser and hit ENTER.
The PC Login screen appears.
71
X-MET8000 Series User Manual
8

4. Select the language from drop down list and Choose the correct user from the User drop down
list, type the login code into the text box, and click Login.
The PC main screen appears.
The X-MET8000 series shows the Safety screen with a Warning dialog box.
VNC connection to the X-MET8000 series
The X-MET8000 series can be used trough VNC over a Wi-Fi connection. Setup a VNC connection using
the following instructions.
Using a VNC connection all the operations that are available locally on the X-MET8000 series are
accessible trough remote screen.
72
X-MET8000 Series User Manual
8
Configure VNC Server Settings
It is necessary to have a VNC client on computer to connect to the X-MET device's VNC server. Contact
your IT service administrator to setup a VNC client on your computer. A VNC connection can be
established by connecting a VNC client with a VNC server using either the X-MET device's Wi-Fi IP
address, or the IP address 10.0.0.1 when using a direct USB connection. Follow the steps below to
configure the VNC server settings in the device.
1. Navigate: Menu >Settings >Instrument Configuration >VNC Server .
The VNC Server Settings screen appears.
2. Tap VNC Server ON.
The Information dialog box appears.
3. Tap OK to return to the VNC Server Settings.
4. If necessary, do the following to change the VNC screen width and height before setting VNC
Server ON.
•Set VNC Screen Width
•Set VNC Screen Height
5. Use the virtual keyboard to type the new value, and tap Done to return to the VNC Server Settings.
6. To reset the VNC screen width and height to the default values, tap Reset VNC Screen Size.
7. Tap Done three times to return to the main screen.
Setup a VNC connection on a PC
Follow these steps to set up a VNC connection on a PC and connect to the X-MET8000 series.
It is necessary to have a VNC client on computer to connect to the X-MET8000 series device's VNC
server. Contact your IT service administrator to setup a VNC client on your computer. A VNC connection
can be established by connecting a VNC client with a VNC server using either the X-MET8000 series
device's Wi-Fi IP address, or the IP address 10.0.0.1 when using a direct USB connection. The VNC
Server must be set up on the X-MET8000 series before a connection can be established.
1. On the PC, Download and install a VNC client, i.e. RealVNC Viewer from http://www.realvnc.com.
Follow the instructions for the selected software to install the VNC client.
73
X-MET8000 Series User Manual
8
2. Start the VNC Client on the PC and enter the X-MET8000 series IP address found under Network
settings Status Bar >Wireless >Wi-Fi .
3. On the VNC client, tap Connect to open the remote connection.
If the VNC client is unable to connect to the X-MET8000 series it might be necessary to disable and
restart the Wi-Fi on the X-MET8000 series, from the Wi-Fi settings, tap OFF and then ON again to
restart the adapter.
4. If prompted for a passcode in the VNC client, leave this blank.
The X-MET8000 series screen appears on the PC. The X-MET8000 series can now be controlled
from the PC.
5. To end the VNC connection, tap Close Connection from the tools menu.
The VNC window on the PC closes.
74
X-MET8000 Series User Manual
8
Control the X-MET8000 series using an iPad
An iPad or similar tablet can be used to control the X-MET8000 series trough VNC over a Wi-Fi
connection. Setup a iPad VNC connection using the following instructions.
Setup an iPad to control the X-MET8000 series
Follow these steps to install and set up a VNC client on a iPad to connect to the X-MET8000 series.
The same basics can be applied to other tablets.
The Wi-Fi and VNC Server must be set up and started on the X-MET8000 series before a VNC connection
can be established.
1. On the iPad, purchase and install a VNC client of choice, these instructions are for Mocha VNC client
and can also be used as a guide for other VNC clients.
Follow the instructions for the selected software to install the VNC client.
2. Start the VNC Client on the iPad. When started for the first time, add a New connection by tapping
on New.
If a connection already exists, use Menu/Add another Server to add new servers.
Once a connection is stored, use the Menu in the upper left corner to switch between Connect
and Configure.
75
X-MET8000 Series User Manual
8
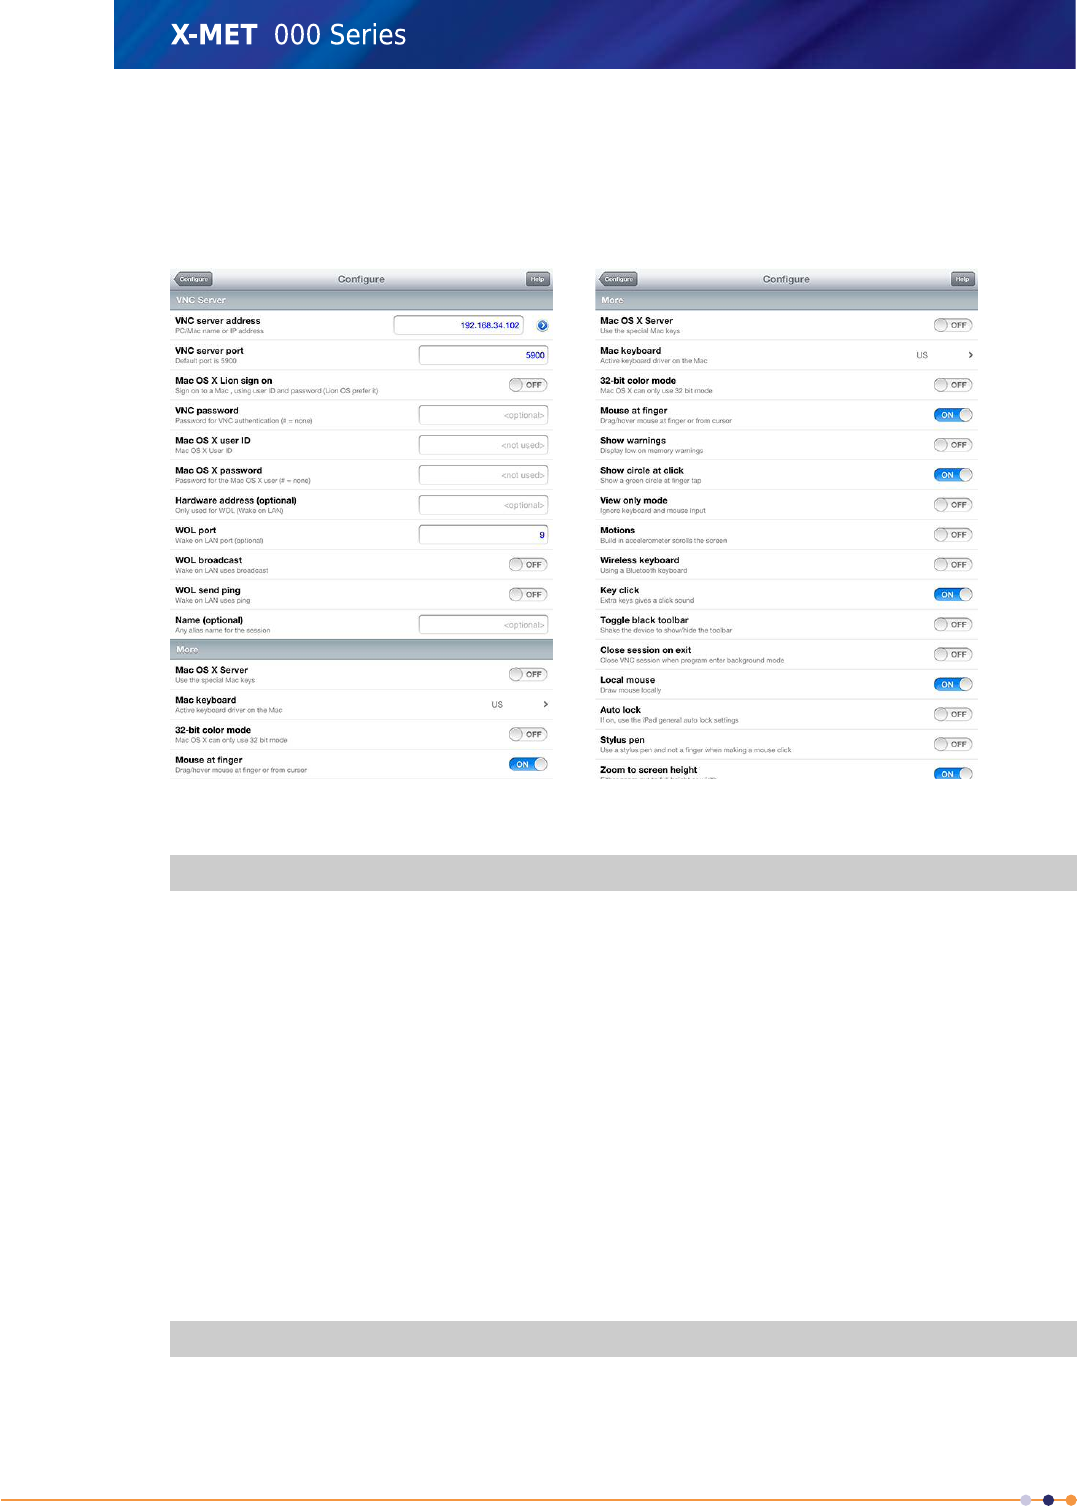
3. In the VNC client, enter the X-MET8000 series IP address found under Network settings (Navigate:
Status Bar >Wireless >Wi-Fi ) and verify that that the settings in the VNC client are according
to the following table:
Note, 32-bit color mode will not work with the X-MET8000 series, other default settings in Mocha
VNC should be adequate.
Table 1: Configuration table
ValueVNC Server
X-MET8000 series IP addressVNC server address
5900VNC server port
OFFMac OS X Lion sign on
<optional>VNC password
<not used>Mac OS X User ID
<not used>Mac OS X Password
<optional>Hardware address
(optional)
9WOL port
OFFWOL broadcast
OFFWOL send ping
<optional>Name (optional)
ValueMore
OFFMac OS X server
76
X-MET8000 Series User Manual
8

ValueMore
US or according to keyboard preferencesMac keyboard
OFF32bit color mode
ONMouse at finger
OFFShow warnings
ONShow circle at click
OFFView only mode
OFFMotions
OFFWireless keyboard
ONKey click
OFFToggle black toolbar
OFFClose session on exit
ONLocal mouse
OFFAuto lock
OFFStylus pen
ONZoom to screen height
4. Follow the steps in the next chapter to connect and control the X-MET8000 series using the iPad.
Control the X-MET8000 series using an iPad
Follow these steps to connect to the X-MET8000 series using an iPad. The same basics apply also to
other tablets.
Wi-Fi and the VNC Server must be set up and started on the X-MET8000 series and the IP address of
the X-MET8000 series must be known before a connection can be established.
77
X-MET8000 Series User Manual
8
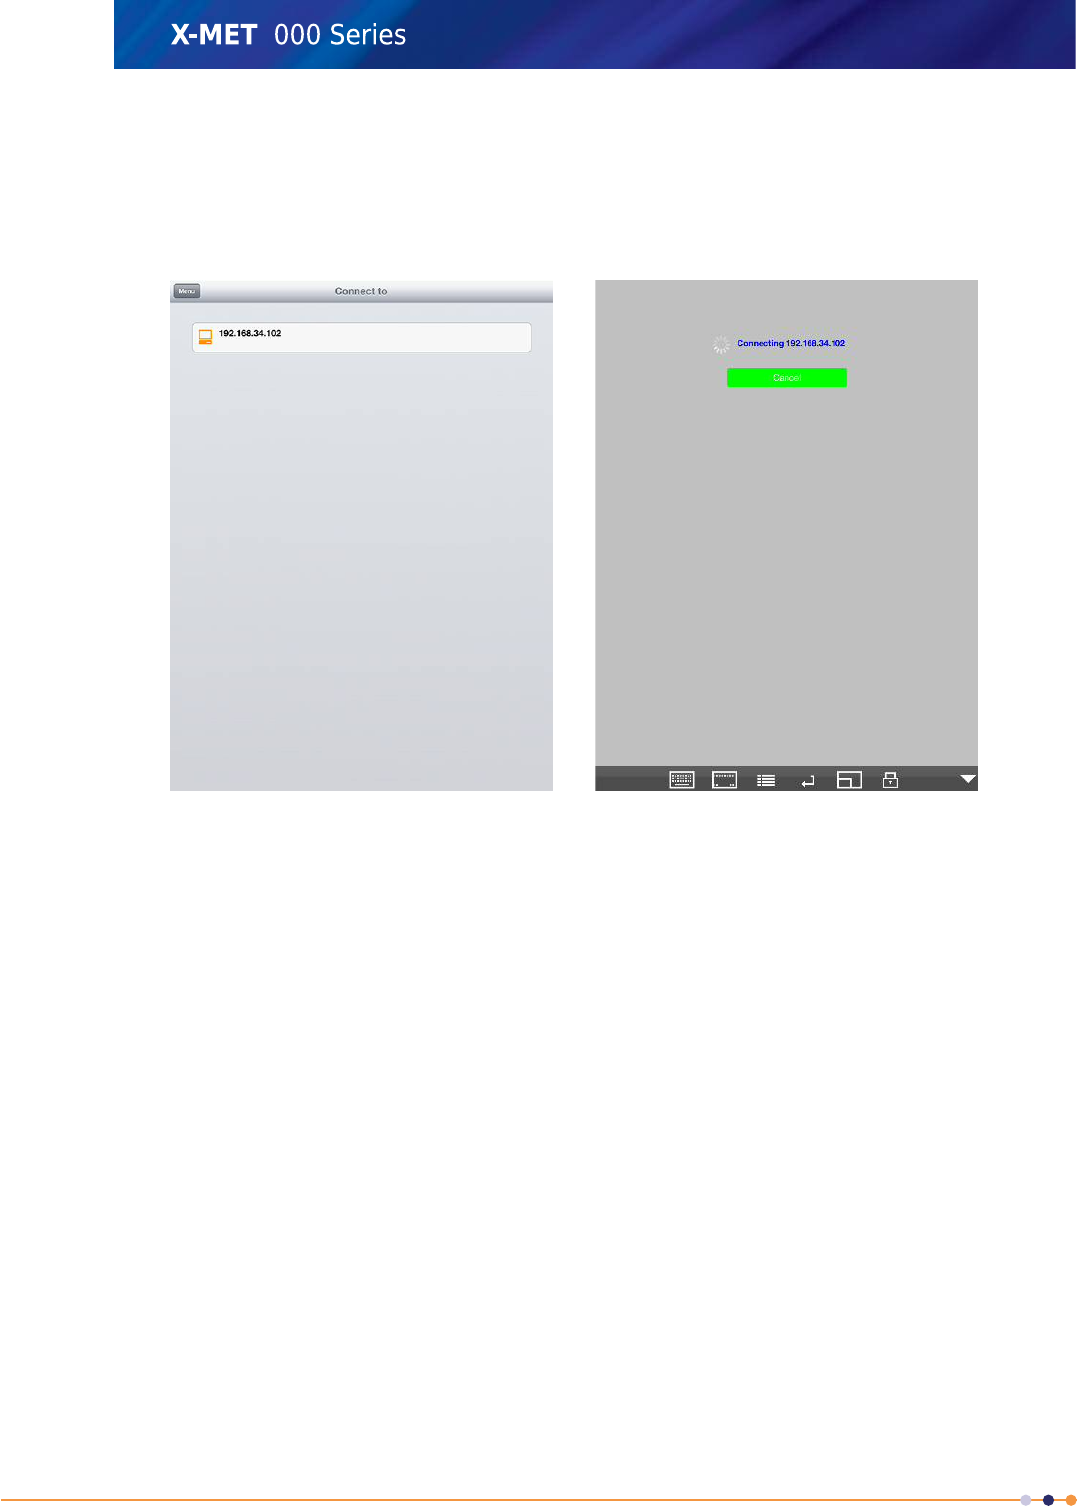
1. Tap on the connection with the IP address for the X-MET8000 series to connect to. If necessary,
tap Menu in the upper left corner to switch between Connect and Configure.
If no connection exist for the correct IP address, add a new server or modify an existing connection
to match the X-MET8000 series current IP address.
The VNC connection to the X-MET8000 series is started.
78
X-MET8000 Series User Manual
8
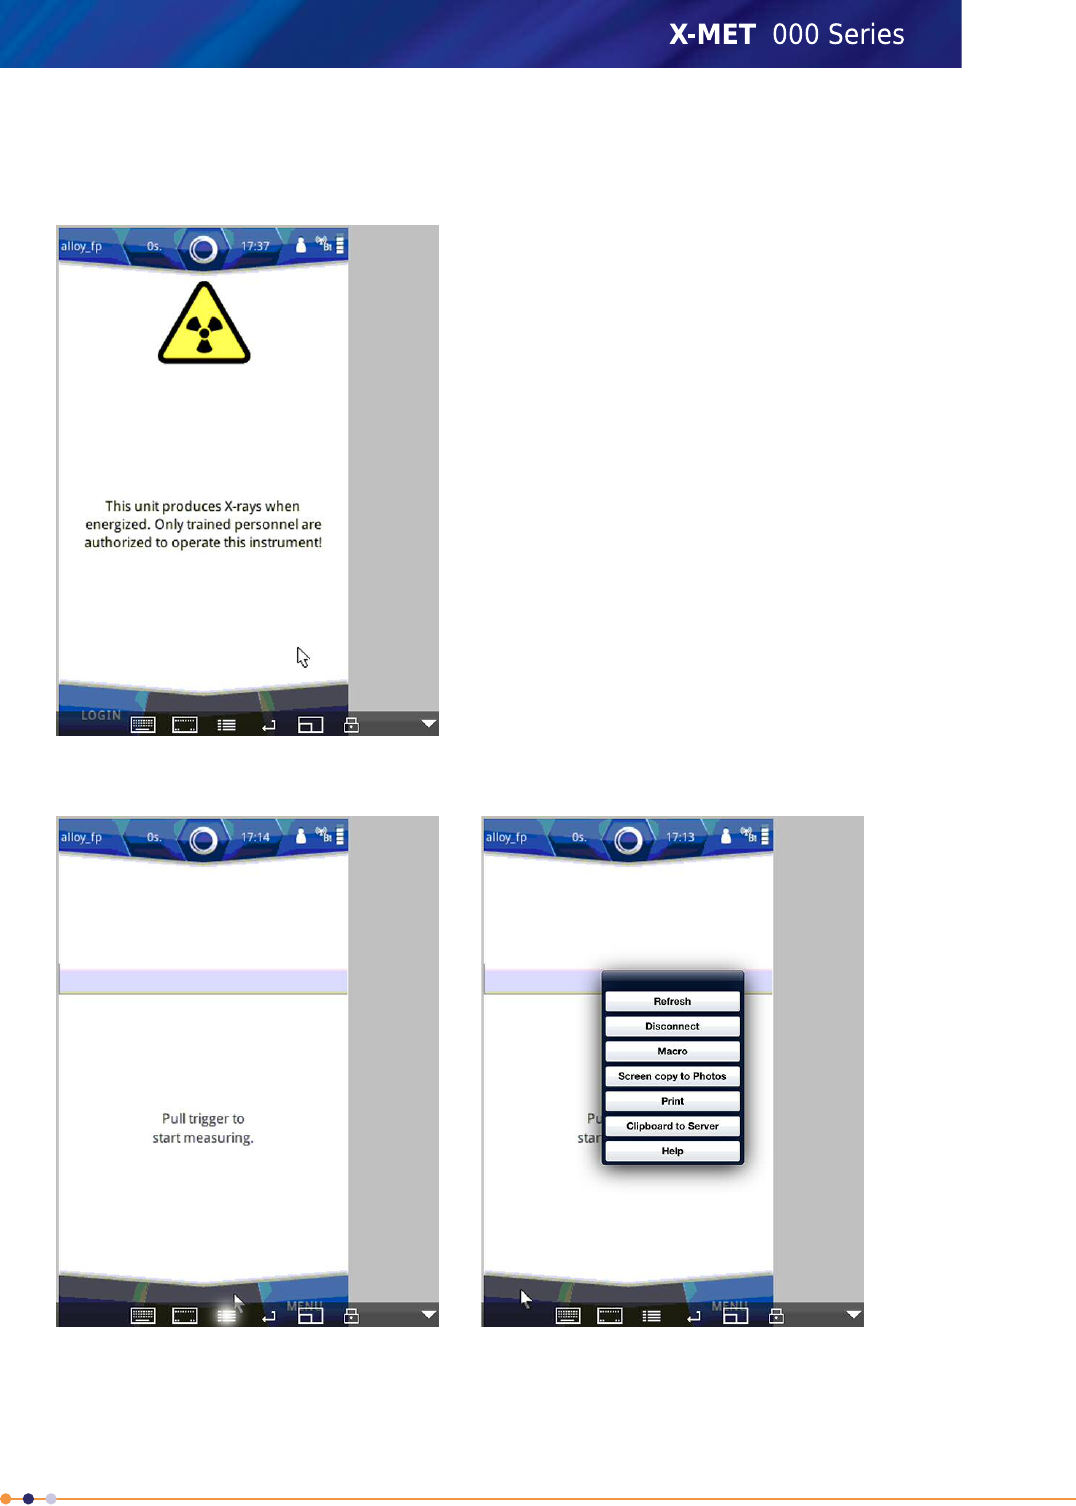
2. If prompted for a passcode, this can be left blank.
The X-MET8000 series screen appears on the iPad. Log in to the X-MET8000 series as usual, the
X-MET8000 series can now be controlled using the iPad.
3. To end the VNC connection, tap Menu Symbol at the bottom of the iPad screen.
4. Tap Disconnect to end the VNC session.
The VNC session ends.
79
X-MET8000 Series User Manual
8
X-MET Application Programming Interface
The X-MET8000 series provides software access to measurement data and other information over
USB or WLAN connection.
X-MET Application Programming Interface (XAPI)
XAPI is a RESTful web service accessible via the URL http://10.0.0.1:8080/xapi/ if the X-MET8000 series
is configured to use the default IP address of 10.0.0.1. The data is returned in XML format. This
document contains examples of retuned data and an XML Schema Document "xapi.xsd" is provided
for reference. The X-MET8000 series can also be configured to push new measurement results to a
HTTP server.
Oxford Instruments Analytical Customer Support provides example files for usage of the XAPI on
request.
Resources
The following resources under the XAPI URL can be queried with HTTP GET request.
/A directory of top level resources. The following list is returned in software version 1.2:
<DirectoryListing>
<Entry name ="Measurements" xlink="measurements" />
<Entry name ="Methods" xlink="methods" />
<Entry name ="Report Templates" xlink="reporttemplates" />
<Entry name ="Report PDF" xlink="reportpdf" />
<Entry name ="Push Client Settings"
xlink="pushclientsettings" />
</DirectoryListing>
/measurements A list of all available measurements. The list can be filtered using HTTP GET
parameters startDate,endDate,measurementNamePart and methodNamePart. For example,
the URL /measurements?startDate=2011-02-16 lists measurements with date 16th February 2011 or
later. Entries in the list have the datetime,methodName,id and name attributes:
<Measurements>
<MeasurementRef datetime="2011-01-01T13:01:56.253"
methodName="metal_fp" id="1" xlink="1"
name="Noname 1" />
</Measurements>
Individual measurement resources are located at /measurements/<id> where the <id> is the ID
number of the measurement. Normal Measurements use the Measurement root element, average
measurements have an AverageMeasurement element instead. Depending on the method used
there is at least one FundamentalParametersResult,EmpiricalAssayResult or
EmpiricalIdentificationResult element. An average measurement also have an AverageResult
element.
FP and empirical assay results contain ConcentrationResults and Grades elements while an
identification method result contains an IdentificationResults element instead. The Spectrums,
AdditionalInfo, and Location (GPS position) elements are common to all result types.
<Measurement measurementTime="2011-01-01T13:01:56.253"
id="1" name="Noname 1">
<Result>
<FundamentalParametersResult1
measurementTime="2011-01-01T13:01:56.253"
name="Noname 1" measurementDuration="6">
<ScreeningInfo>
<ScreeningMethod name="metal_fp" />
80
X-MET8000 Series User Manual
8
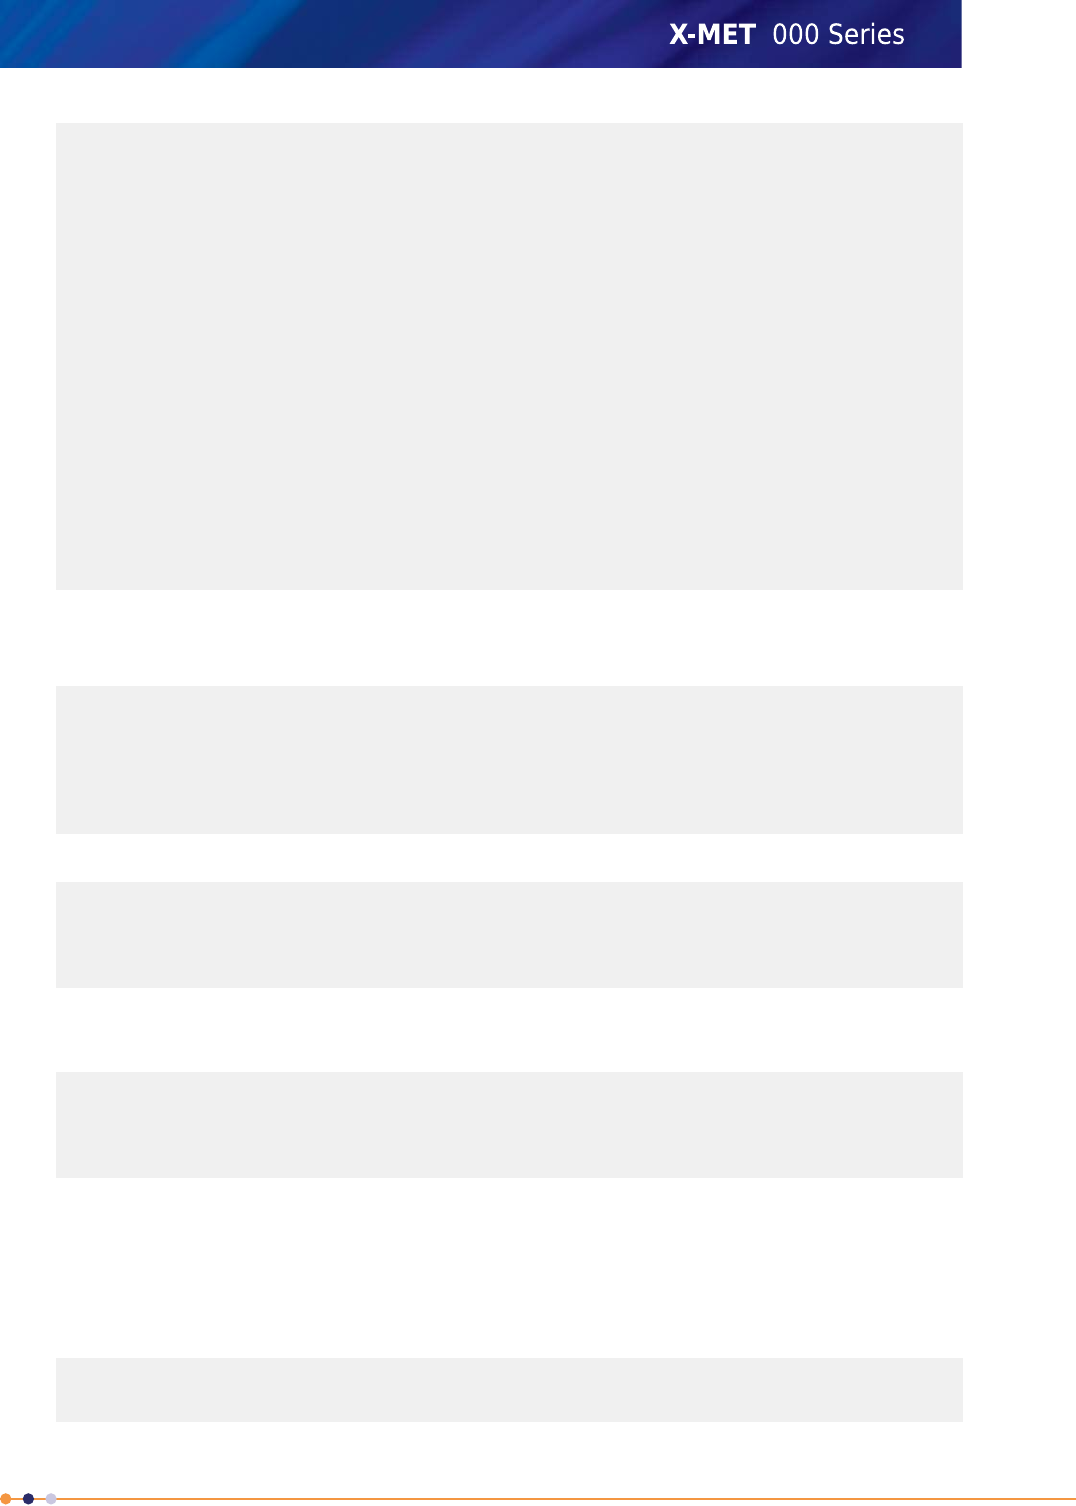
</ScreeningInfo>
<spectrums>
<Spectrums>
<SpectrumRef xlink="/xapi/spectrums/1" />
</Spectrums>
</spectrums>
<ConcentrationResults>
<ConcentrationResult name="Fe"
standardDeviation="0.259588"
numberOfDecimals="2" concentration="68.6963"
unit="%" />
</ConcentrationResults>
<Grades>
<Grade name="SS316" match="0.612988">
<GradeElement elementShortName="Fe"
highLimit="0.8" result="OK"
lowLimit="0.6" />
</Grade>
</Grades>
</FundamentalParametersResult>
</Result>
</Measurement>
/spectrums The resource /spectrums/<id> contains the mapping from channels to energy (slope>
and intercept units), measurement parameters (current and voltage and the counts for each
channel.
<Spectrum slope="20046" name=""
measurementTime="2011-01-01T13:04:15 current="10"
intercept="0" voltage="40" id="3" accumulationTime="5">
<Counts value="0" channel="0" />
<Counts value="0" channel="1" />
...
</Spectrum>
/methods A list of methods in the device with method ID and name.
<Methods>
<MethodInfo id="1" name="Aluminium" />
<MethodInfo id="2" name="Aluminium ID" />
<MethodInfo id="3" name="alloy_fp" />
</Methods>
/reporttemplates A list of report templates in the device with name, modification date and ID.
The ID is used for generating PDF reports.
<ReportTemplates>
<ReportTemplateInfo
modificationDate="2011-01-01T14:31:10.249"
id="1" name="basic" />
</ReportTemplates>
/reportpdf Generate and return a measurement report in the PDF format used by the report generator
in device GUI and web GUI. Report template and measurements must be selected using the
reportTemplateId and measurementId GET parameters. For example, the URL
/reportpdf?reportTemplateId=1&mesurementId=10&mesurementId=12 would generate report PDF
using template 1 ad containing the two measurements with IDs 10 and 12.
/pushclientsettings returns current settings of the push client. The default values are
<pushclientsettings>
<server-url>http://localhost:5000/measservice</server-url>
<user>user</user>
81
X-MET8000 Series User Manual
8

<password>password</password>
<buffersize>0</buffersize>
<retryinterval>60</retryinterval>
<send-measurements>false</send-measurements>
<send-spectrums>false</send-spectrums>
</pushclientsettings>
The parameters are explained below.
Push API
The X-MET8000 series can be configured to send new measurements and spectra to a specified URL
in HTTP POST requests. The push client is enabled and configured by performing a HTTP PUT request
to the /pushclientsettings resource in the format defined above. If the PUT request was successful,
HTTP Status code 200 OK is returned and the new settings come to effect immediately. In case of an
error, HTTP Status code 400 Bad Request is returned and settings are not modified. Settings are saved
and restored when the X-MET8000 series device is restarted.
The following parameters can be set:
•server-url: Valid server URL to the root directory of the push-server.
•user: Username used in HTTP Basic authentication.
•password: Password used in HTTP basic authentication.
•buffersize: The amount of extra spectra and measurement results that are stored in a queue in
case of a connection error. Buffer size must be an integer in range [0, 100]. No data is sent if
buffer size is set to 0.
•retryinterval: Interval in second between retry attempts in case of a connection error. Value must
be a positive integer.
•send-measurements: Configures if measurements results are sent to the server. Valid values
are "true" and "false".
•send-spectrums: Configures if spectra are sent to the server. Valid values are "true" and "false".
Push Client sends spectra and measurement results to the server whenever a new spectrum or result
is finished. Measurements are sent in a HTTP POST request to the URL
<server-url>/[serial-number]/measurements where [serial-number] is the serial number of the
X-MET7000 series
Measurement results are sent in the same XML format that is used for the /measurements resource,
except that the Spectrums element containing links to spectra is replaced with a SpectrumData
element containing the data directly.
Spectra are sent to the URL <server-url>/[serial-number]/spectrums in the same XML format
used for the /spectrum resource.
Push Client uses HTTP Basic authentication when communicating with the server. In case of an error,
Push Client keeps spectra and measurements in the queue and tries sending again every
<retryinterval> seconds.
X-MET8000 Series Settings
Follow these procedures to set the date, time and language for the X-MET8000 series.
82
X-MET8000 Series User Manual
8
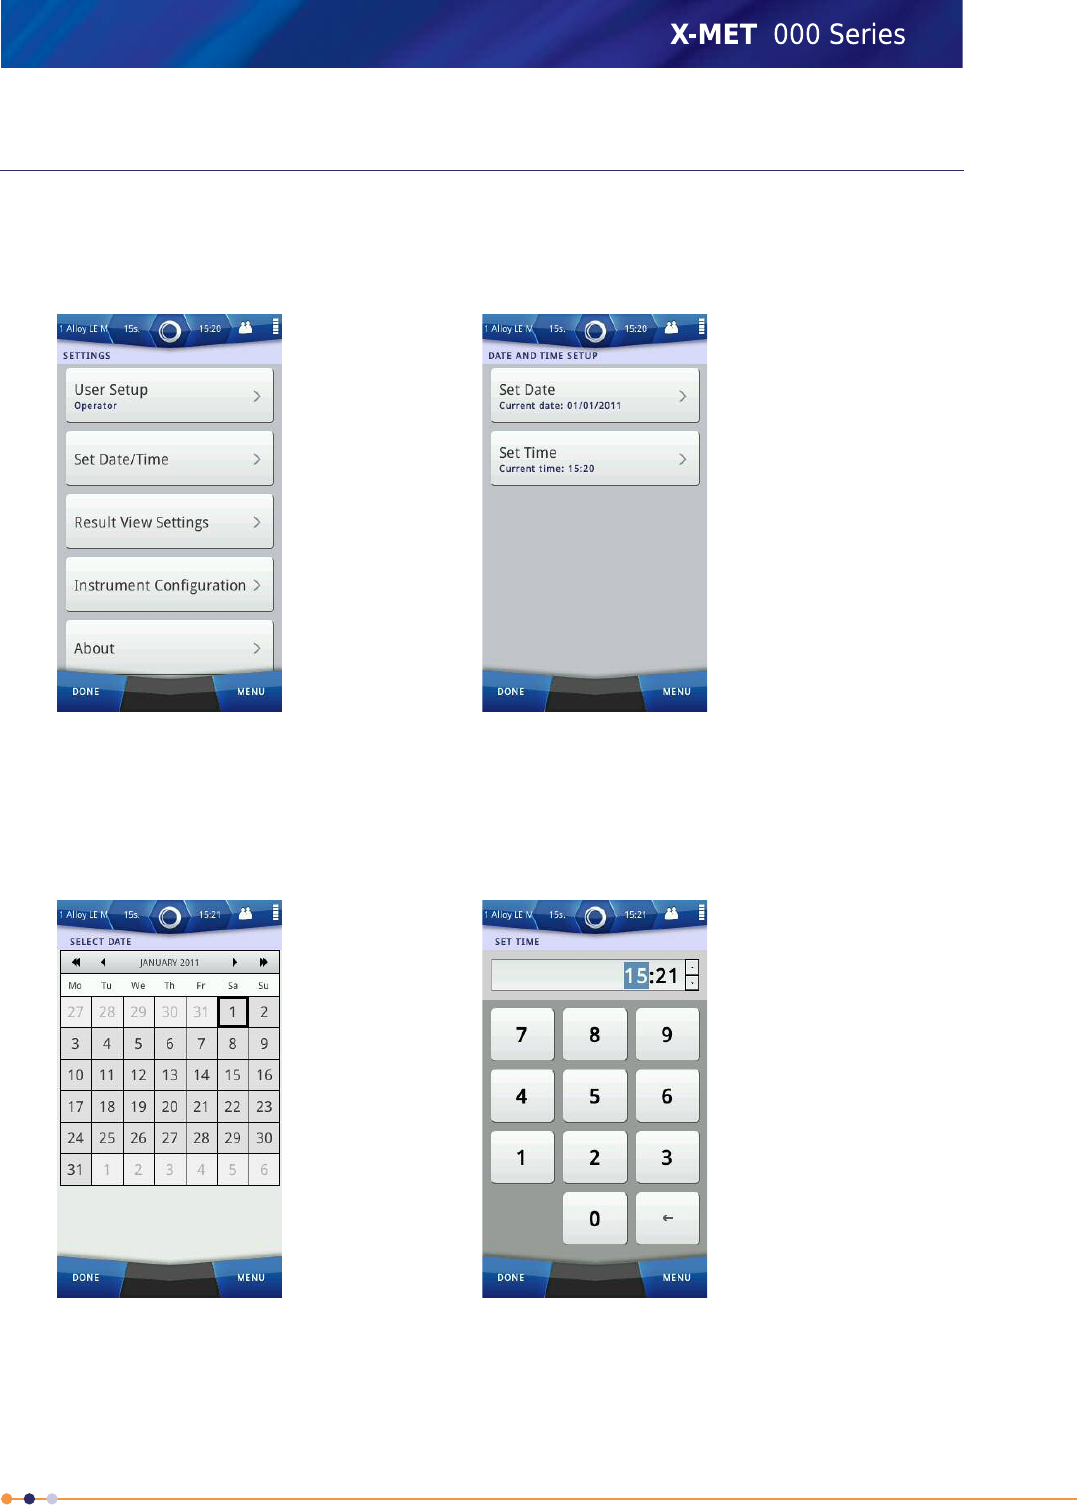
Set The Date And Time
Follow these steps to set the date and time.
1. Tap Menu, and then tap Settings.
The Settings screen appears.
2. Tap Set Date/Time.
The Date And Time Setup screen appears.
3. Tap Set Date.
The Select Date screen appears.
4. Tap an arrow on the left or right of the month to scroll to the correct month.
5. Tap the correct date in the month, and then tap Done to return to the Date And Time Setup screen.
83
X-MET8000 Series User Manual
8
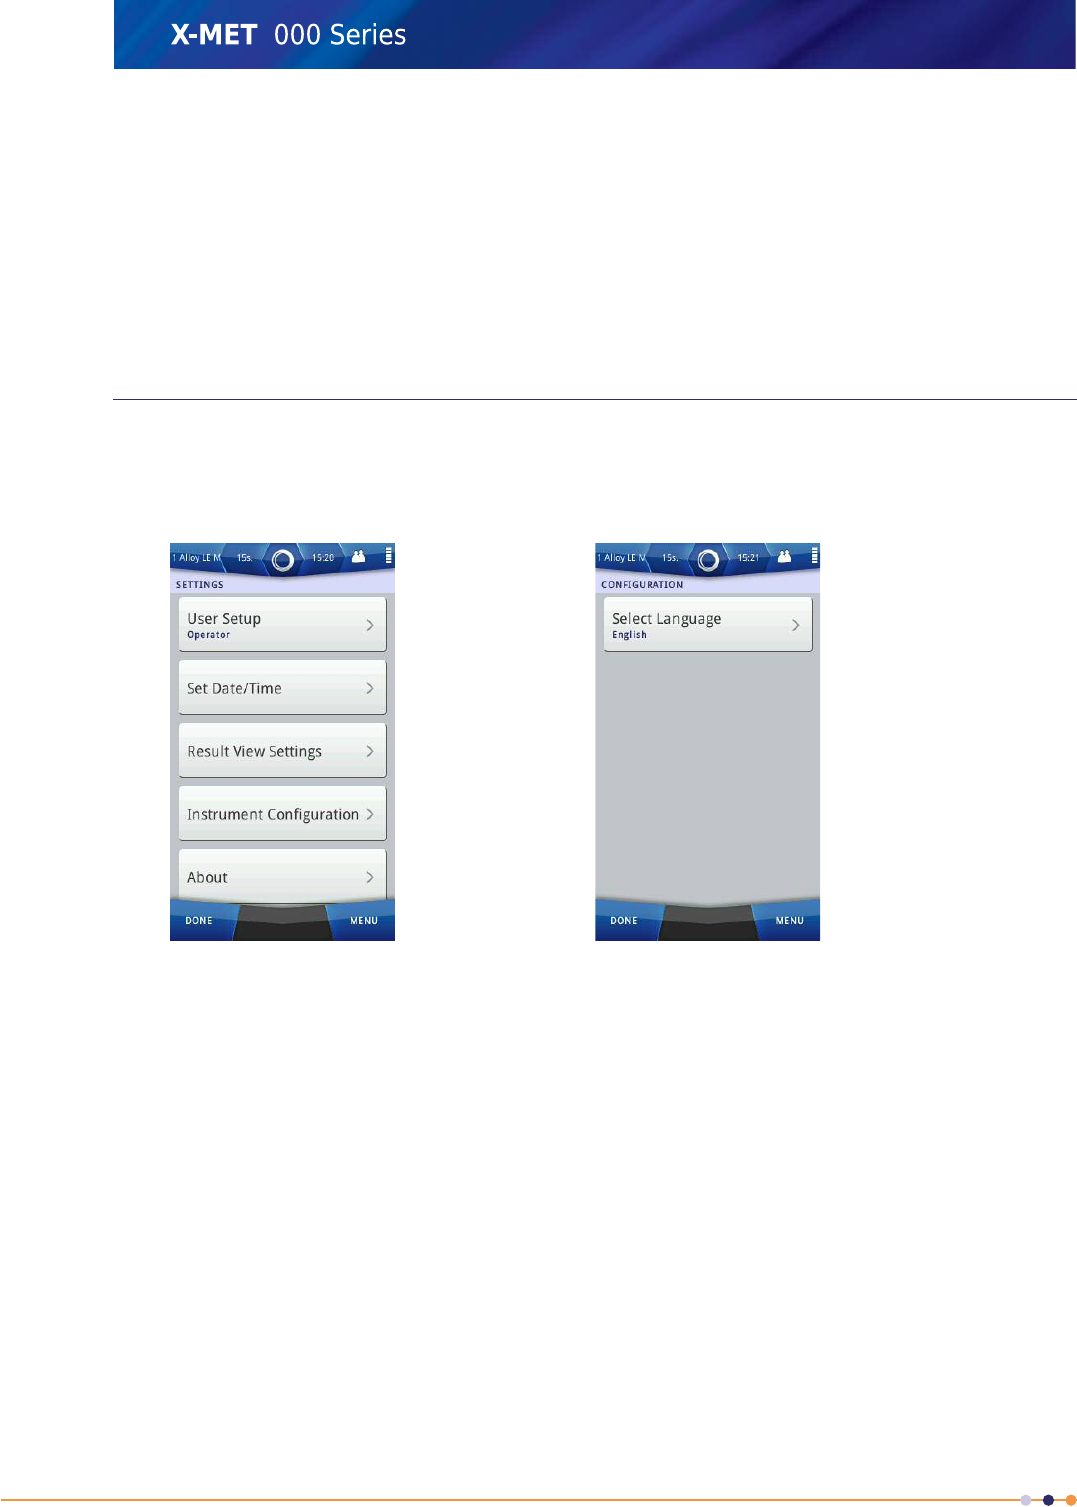
6. Tap Set Time.
The Set Time screen appears, with the numeric keypad.
7. Use the numeric keypad to type the correct hour, or use the up or down arrows on the right of the
time to increase or decrease the hour.
8. Slide over the minutes to select them, and type the minutes with the numeric keypad or arrows.
9. Tap Done to return to the Date And Time Setup screen.
10. Tap Done twice again to return to the main screen.
Set The Language
Follow these steps to set the language for the user interface.
1. Tap Menu, and then tap Settings.
The Settings screen appears.
2. Tap Instrument Configuration.
The Configuration screen appears.
84
X-MET8000 Series User Manual
8
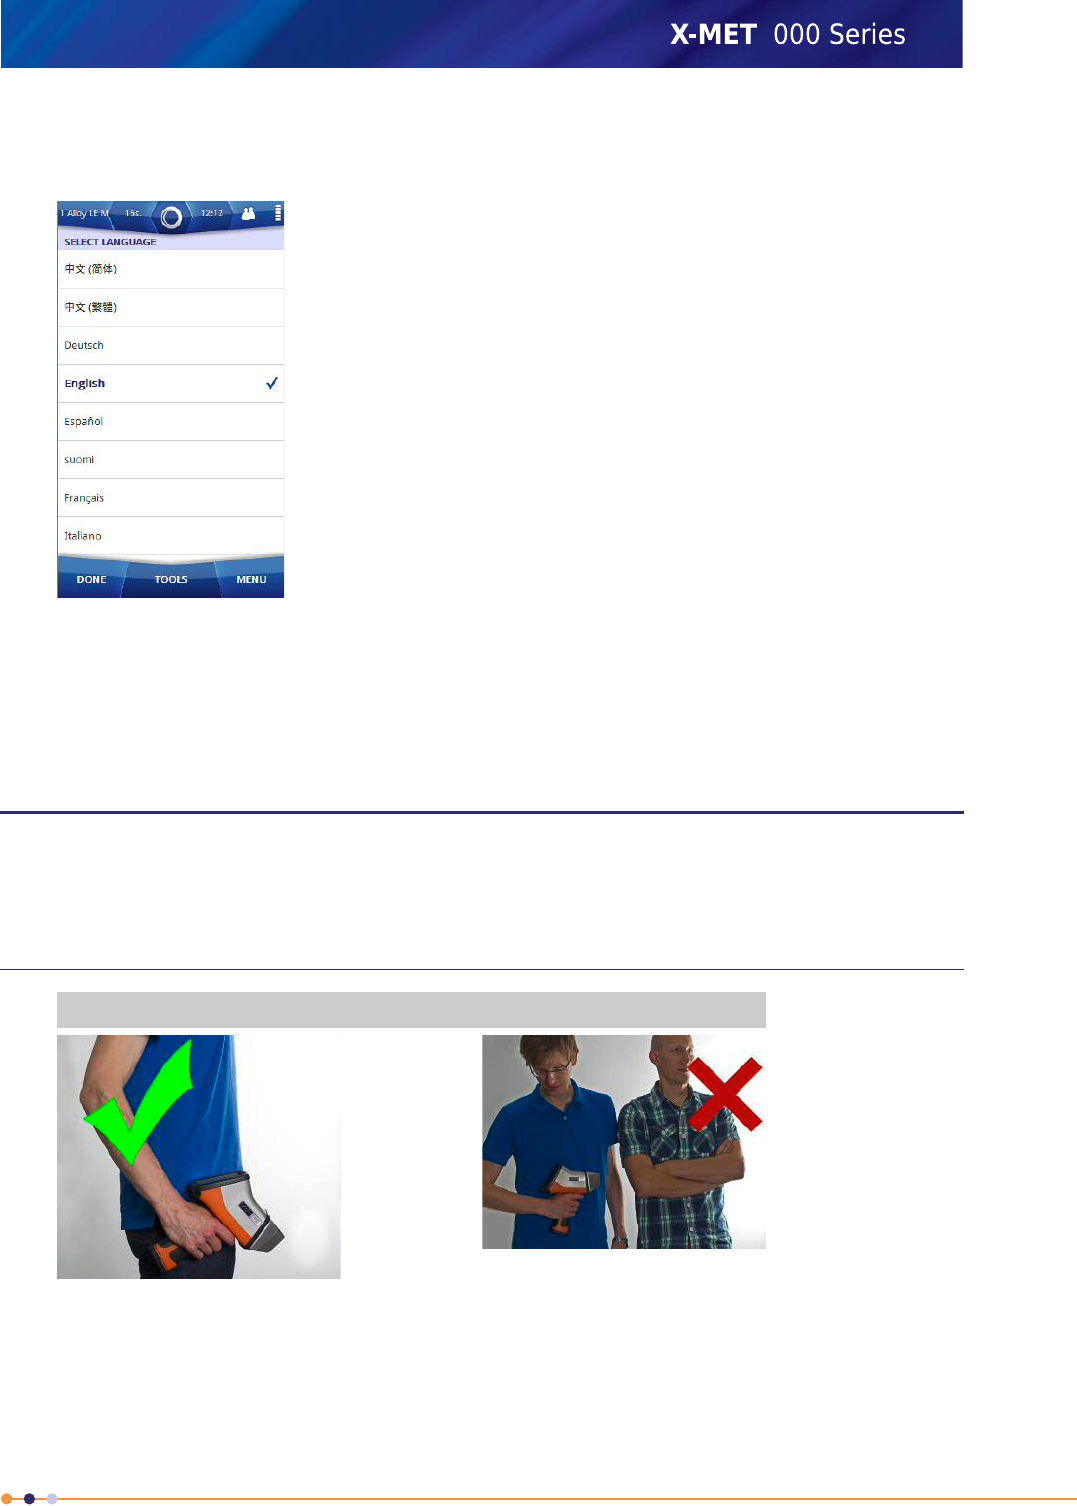
3. Tap Select Language.
The Select Language screen appears.
4. Press and slide the list to scroll it up or down, and then tap the correct language to select it.
5. Tap Done to return to the Configuration screen.
6. Tap Done twice again to return to the main screen.
Make Safe Measurements
Follow these simple guidelines to make safe, reliable and accurate measurements with the X-MET8000
series. The local Oxford Instruments representative can provide training in safety and how to use the
X-MET8000 series.
Handle The X-MET8000 Series Carefully
Do Not ...Do ...
Never point the X-MET8000
series at another person.
Hold the X-MET8000 series
downwards when it is not in use,
or put it in the holster.
85
X-MET8000 Series User Manual
8
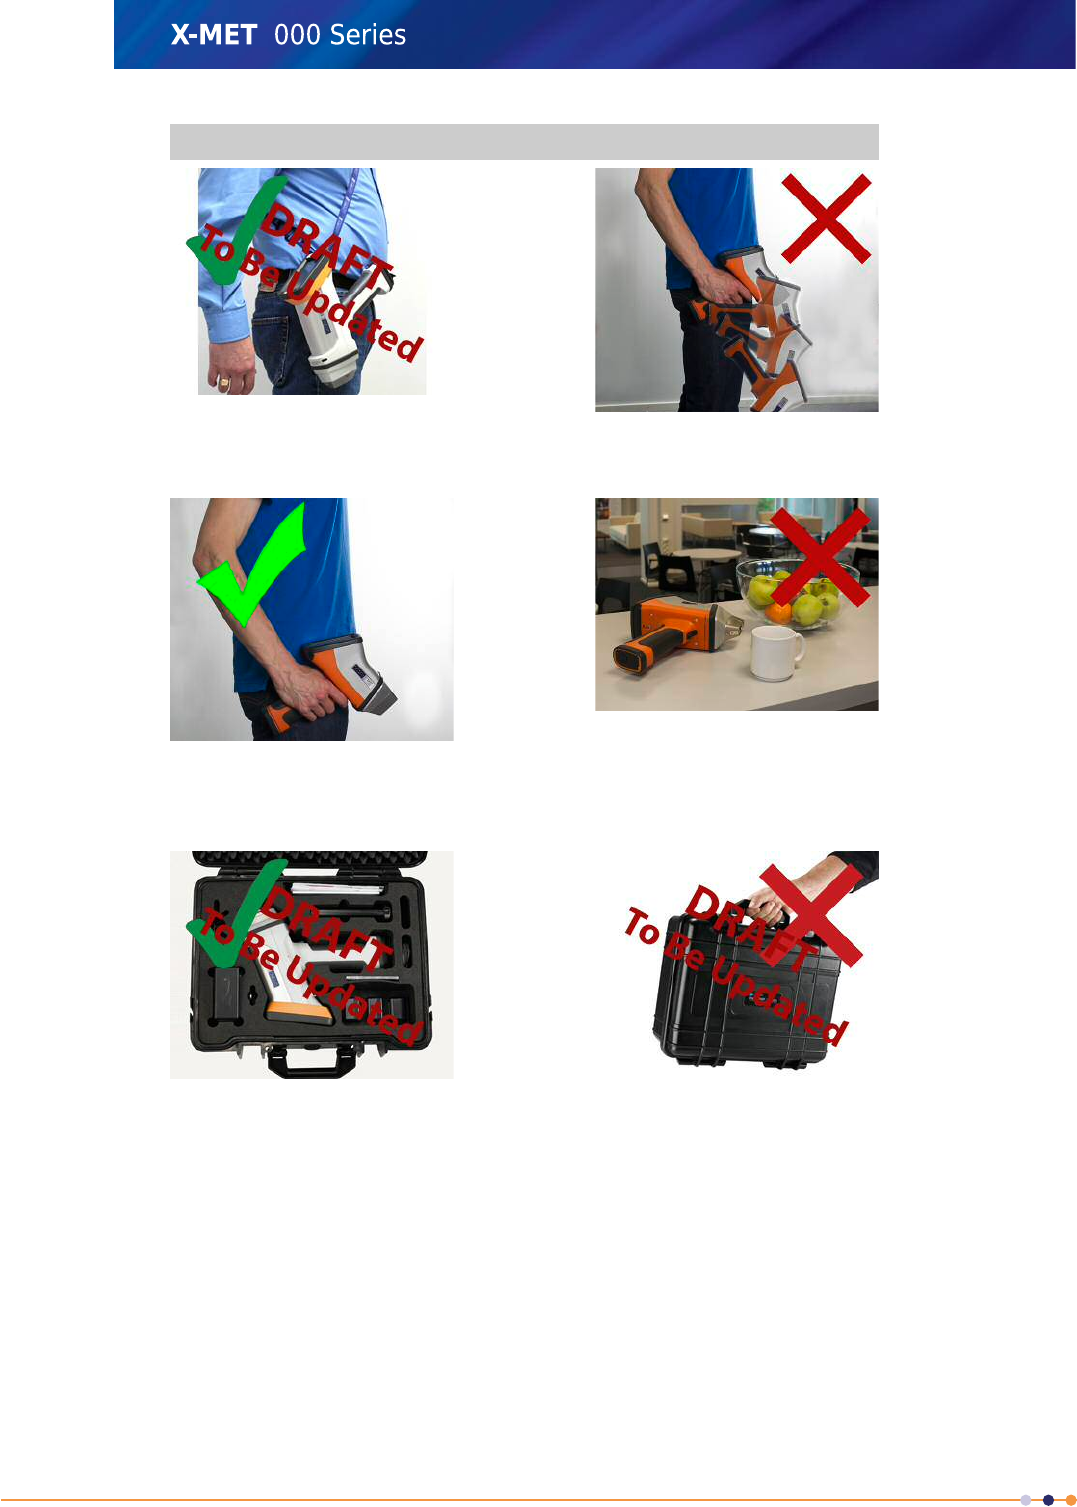
Do Not ...Do ...
Do not let the X-MET8000 series
drop.
Use the lanyard to hold the
X-MET8000 series safely.
Do not leave the X-MET8000
series unattended.
The operator must keep the
X-MET8000 series with them at
all times.
Do not allow the possibility of
loss or theft.
Store the X-MET8000 series in
the transit case.
86
X-MET8000 Series User Manual
8
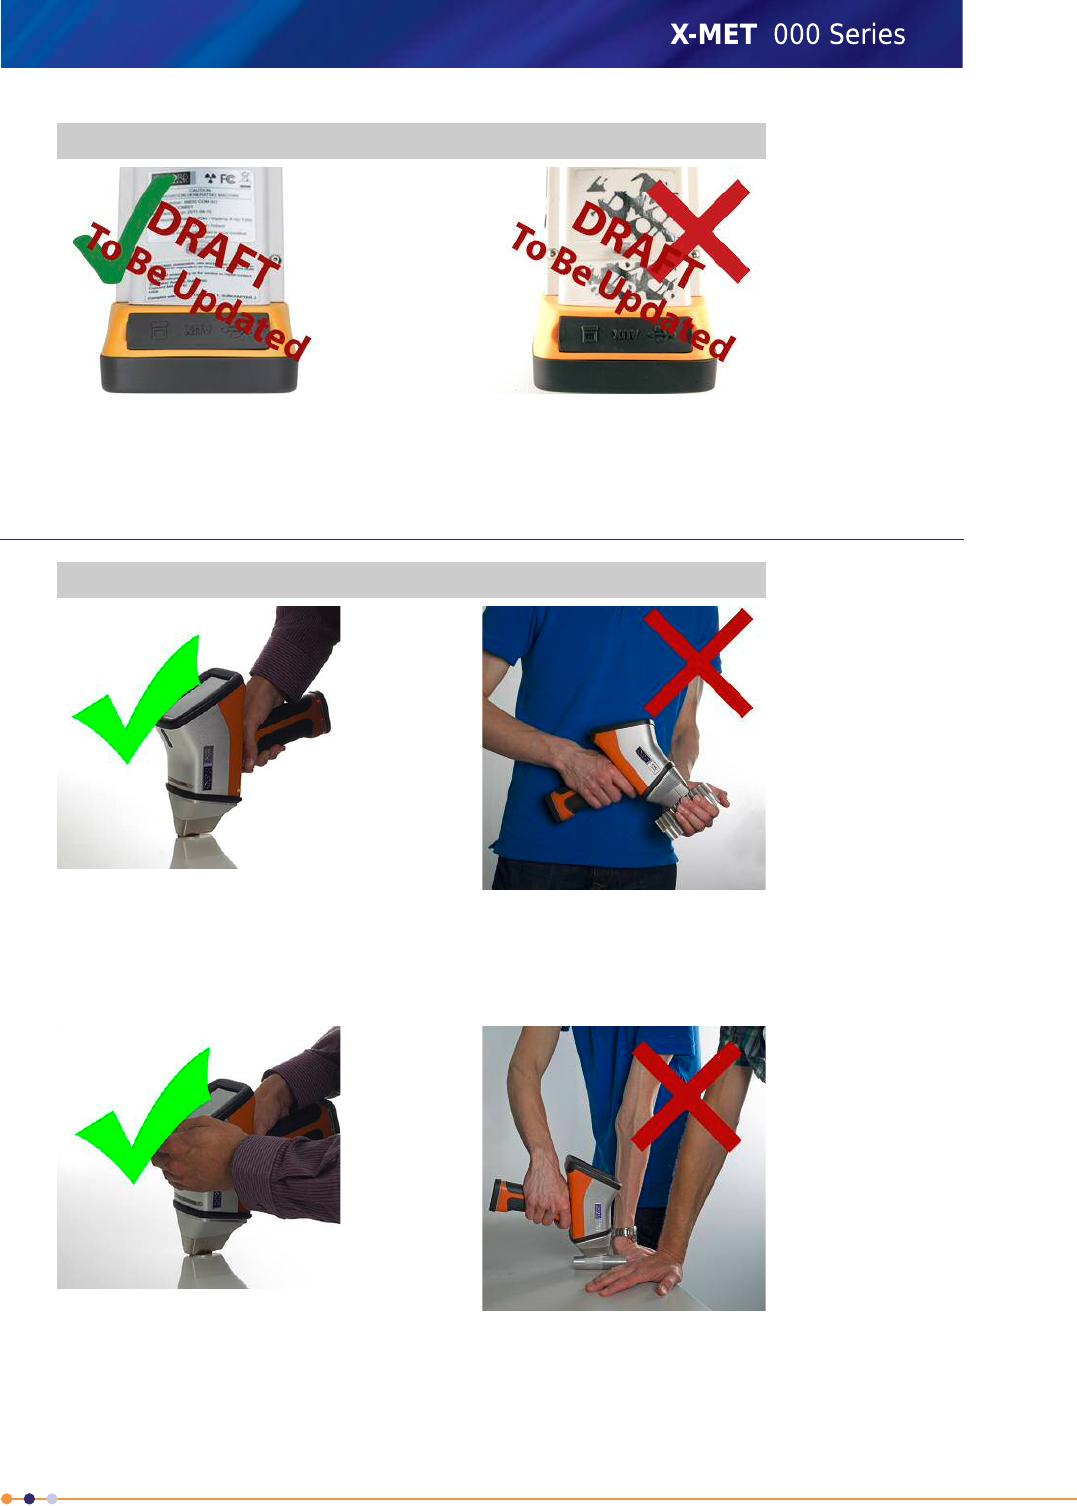
Do Not ...Do ...
Do not use the X-MET8000
series if the void label is visible.
Only use the X-MET8000 series
if the labels are intact.
Safe, Reliable Measurements
Do Not ...Do ...
Never pick up or hold a sample
to measure it.
Always place the sample on a
flat surface to measure it (table
or ground). Ensure the sample
is larger than the analyser's
measurement window.
Do not lean against the table
near to a sample.
Use both hands to hold the
X-MET8000 series and keep
them away from the sample.
87
X-MET8000 Series User Manual
8
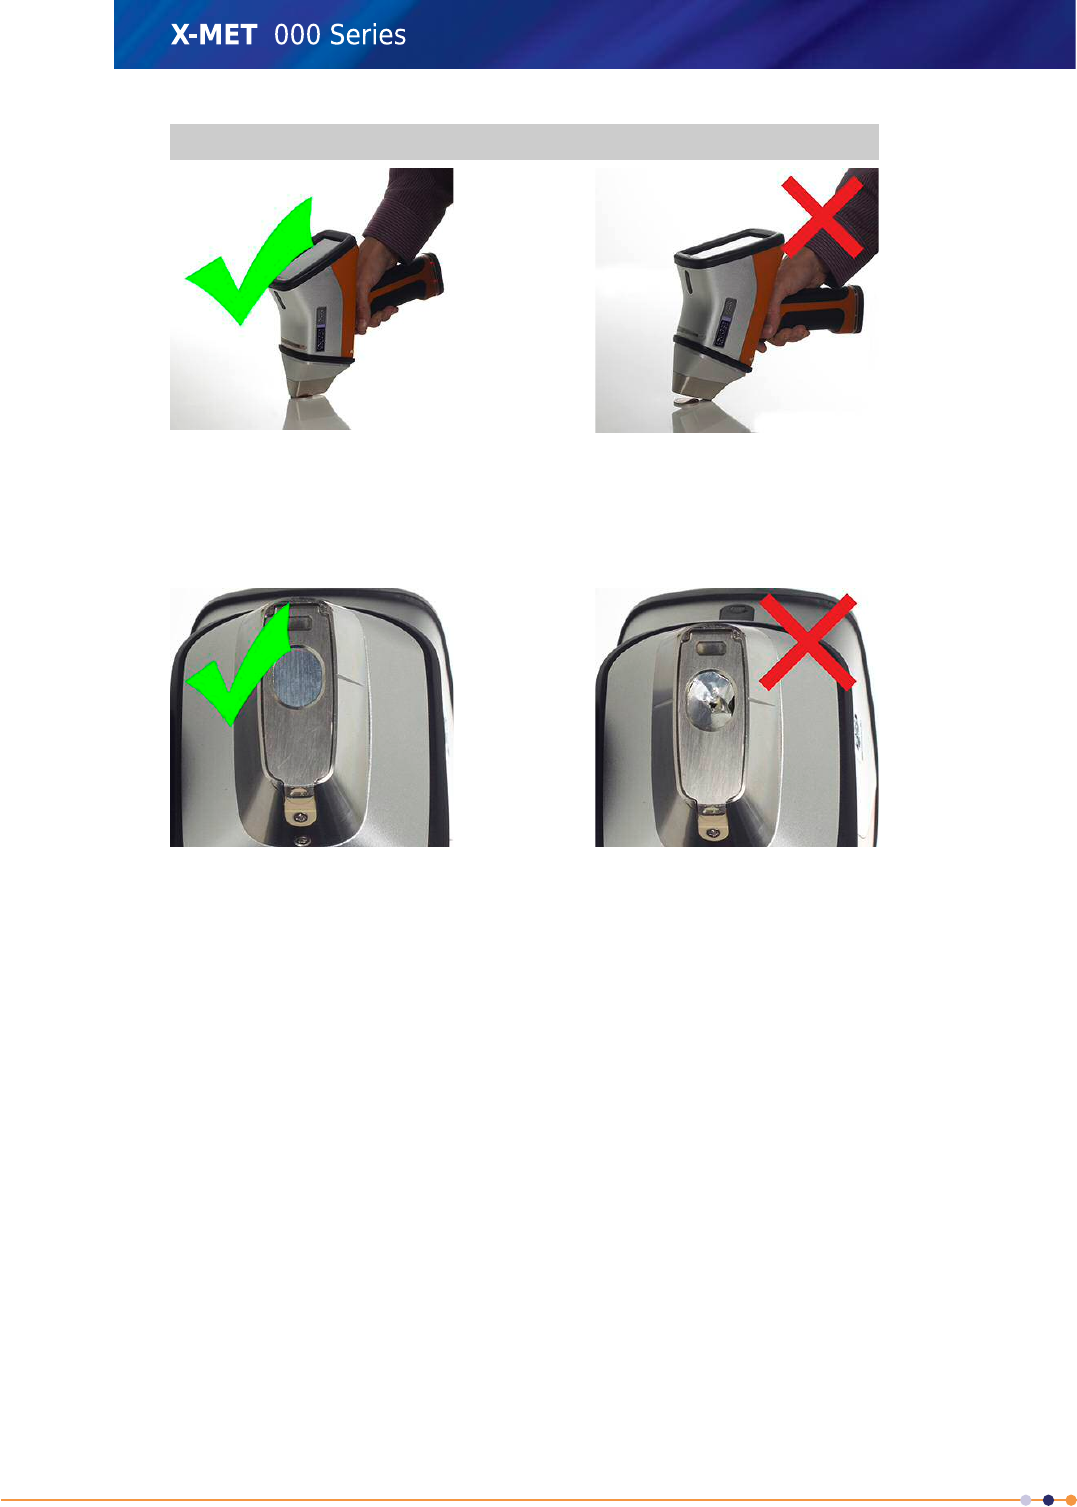
Do Not ...Do ...
Do not use the X-MET8000
series at an angle.
Make sure that the X-MET is
upright (vertical) during
measurements, and that the
nose of the analyser is in full
contact with the sample.
Do not use the X-MET8000
series when the protective film
window is broken. Do not press
the X-MET8000 series into sharp
objects.
Make sure that the protective
film window is intact, and
measure sharp objects, in
particular metal swarf, with
care. It is possible to puncture
the protective film window.
Refer to: The Protective Film
Window Is Broken on page 98.
88
X-MET8000 Series User Manual
8
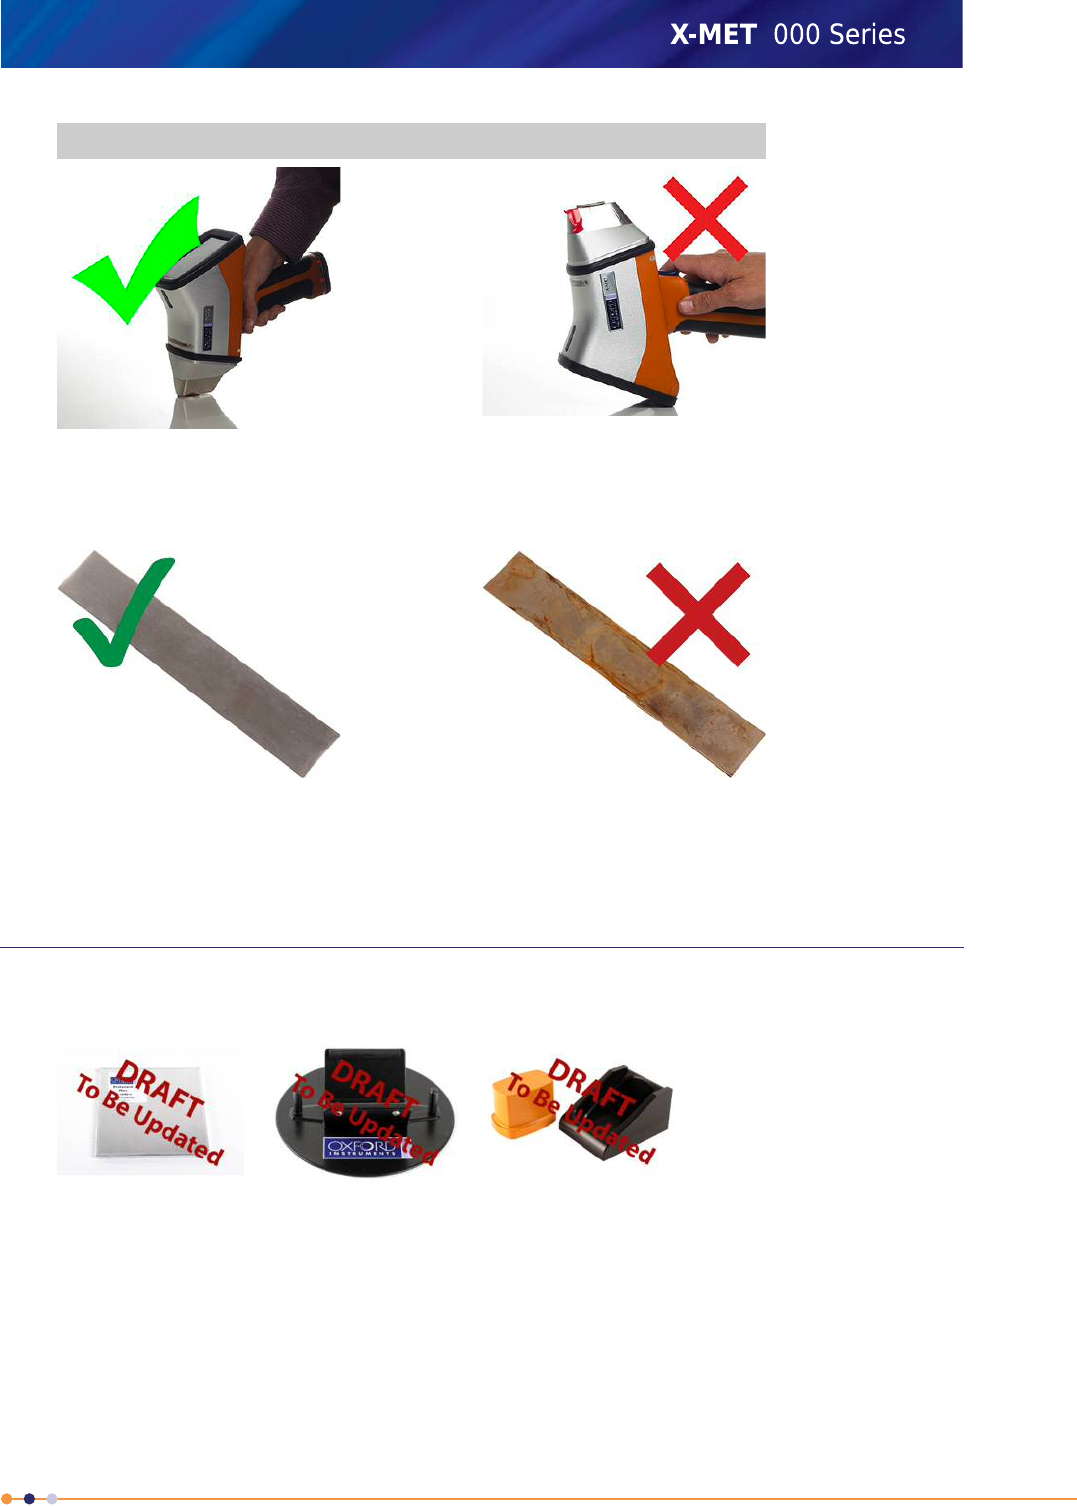
Do Not ...Do ...
Do not cover the proximity
window with a finger, piece of
tape, or anything other than the
sample.
Make sure that the sample
covers the proximity window.
Do not measure dirty, rusty,
coated or painted samples. This
can give poor results.
Make sure that the sample is
clean and remove any dirt, rust,
paint or coating.
Use The Correct Accessory
The background plate, light radiation shield, safety shield, travel stand, bench-top stand and weld
adapter are optional accessories.
Safety shield and
light stand
Light radiation shieldBackground plate
89
X-MET8000 Series User Manual
8

Do Not ...Do ...
Do not measure thin or low
density samples against a table
without the background plate
and the light radiation shield, as
this will give poor results and
may produce scattered
radiations.
Always use the background
plate and the light radiation
shield to measure thin and/or
low density samples (e.g. wood,
drywall, plastics, light alloys, soil
and minerals in bags, rubber,
paper, ceramics, etc.). Ensure
the X-MET is held in a vertical
position, and the light radiation
shield is pressed horizontally on
the sample.
Never use the light radiation
shield to hold the sample. Some
of the primary radiation will pass
through and be scattered by the
sample.
Always use the light stand and
safety shield (or the benchtop
stand) when measuring small
samples.
90
X-MET8000 Series User Manual
8
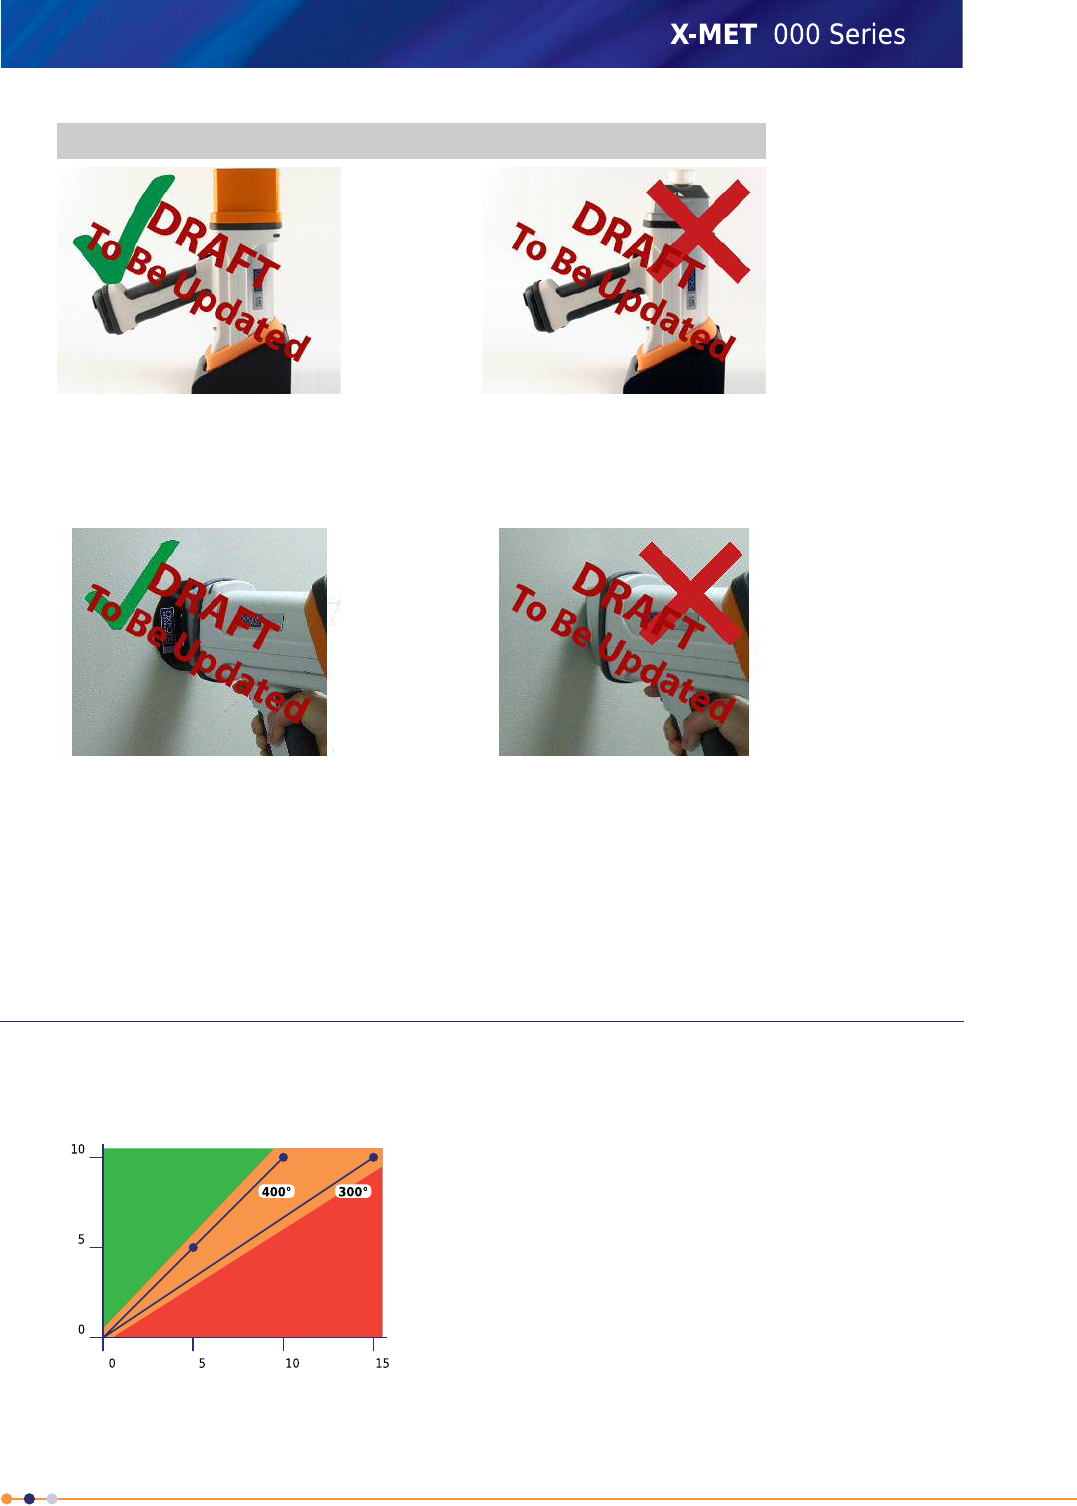
Do Not ...Do ...
Never use the travel stand
without the safety shield.
Always use the safety shield
with the travel stand to measure
small samples. The X-ray beam
now points upwards!
Never measure large, low
density samples without the
light radiation shield.
When measuring large, low
density samples (e.g. wall,
planks of wood, large rocks, soil
or minerals on the ground, large
plastic, aluminium or light alloy
sheets, etc.), always use the
light radiation shield.
X-MET8000 Series For Hot Samples
Use the kapton protective film window for the X-MET8000 to measure hot samples. The prolene
protective film window for the X-MET8000 would melt at temperatures above 100° C.
Cool Off Time, Minutes
Measurement Time, Seconds
91
X-MET8000 Series User Manual
8
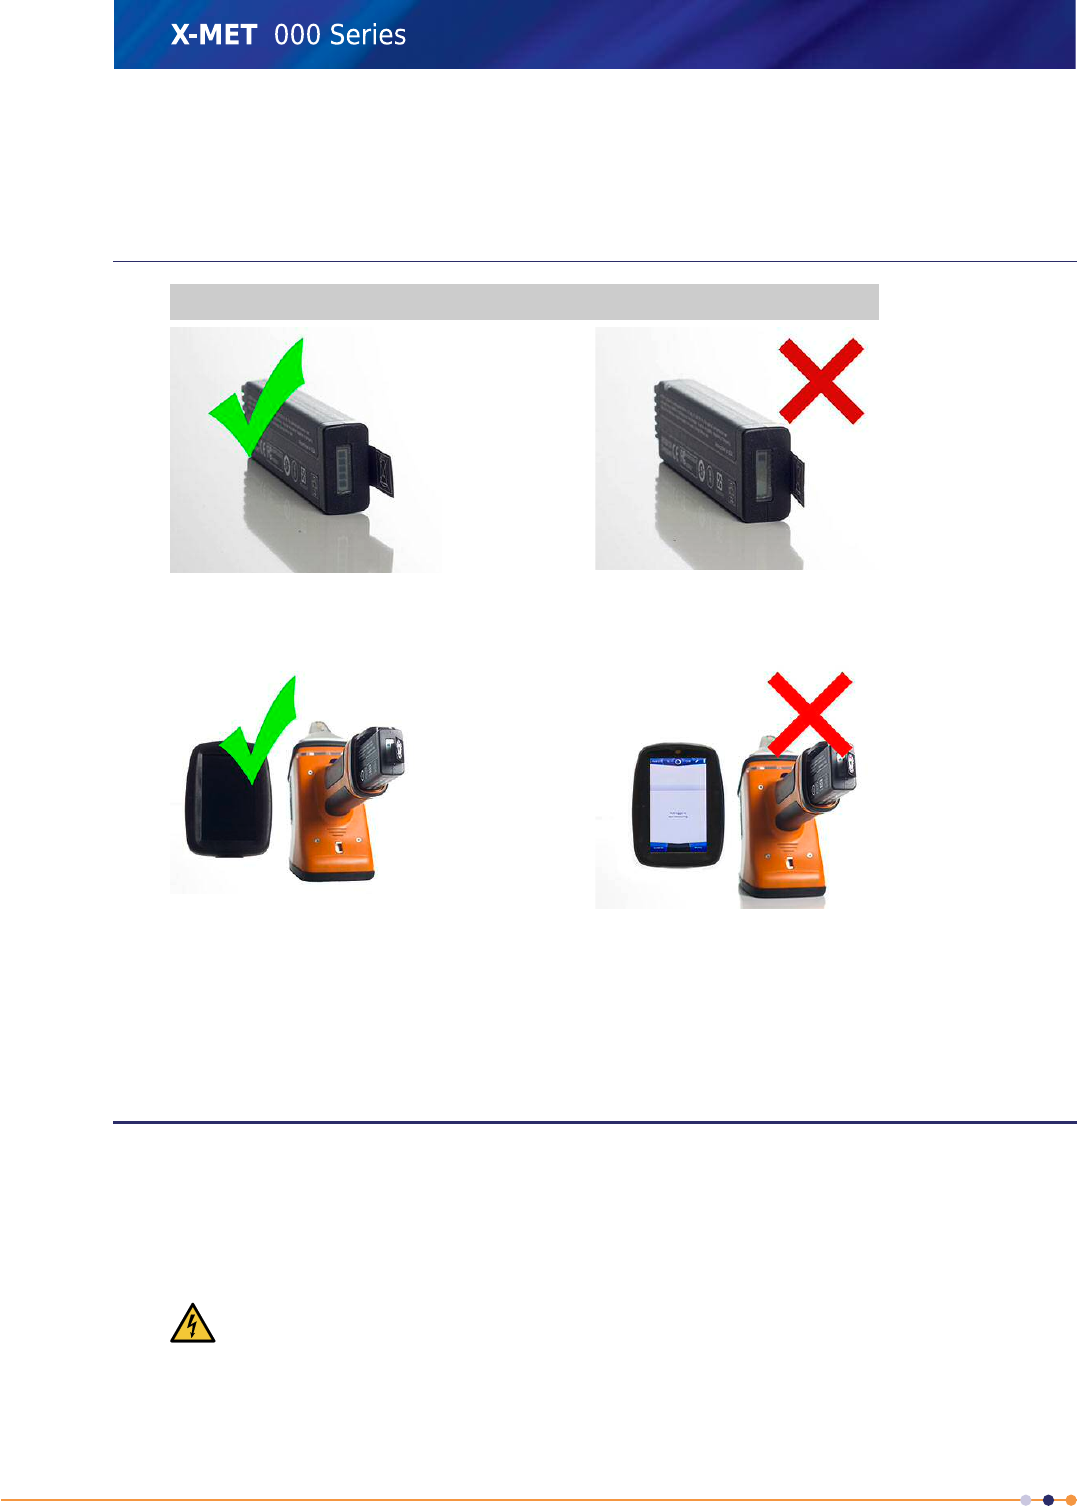
Make quick measurements for hot samples, and make sure that the X-MET8000 has enough time to
cool off between hot measurements. Do not let the X-MET8000 get too hot.
Measure in seconds, but it takes minutes to cool off!
Battery Usage
Do Not ...Do ...
Do not make measurements if
only one bar is lit.
Make sure that the battery has
sufficient charge.
Do not remove the battery when
the X-MET8000 series is on.
Only remove the battery when
the X-MET8000 series is off.
Charge the battery overnight to use the next day. Refer to: Battery Maintenance on page 94.
Maintenance and Troubleshooting
Careful maintenance is the key to a long life for the X-MET8000 series. Use the maintenance schedule
to check that the X-MET8000 series continues to function correctly.
Only the local Oxford Instruments representative can service the X-MET8000 series. There is nothing
inside the X-MET8000 series for the customer to service. The operator must not remove any cover
from the X-MET8000 series. If the operator does remove a cover, the warranty will become invalid.
Caution; Electricity: There are extremely high voltages inside the X-MET8000 series, with an
extreme risk of electric shock. This can cause serious personal injury.
92
X-MET8000 Series User Manual
8
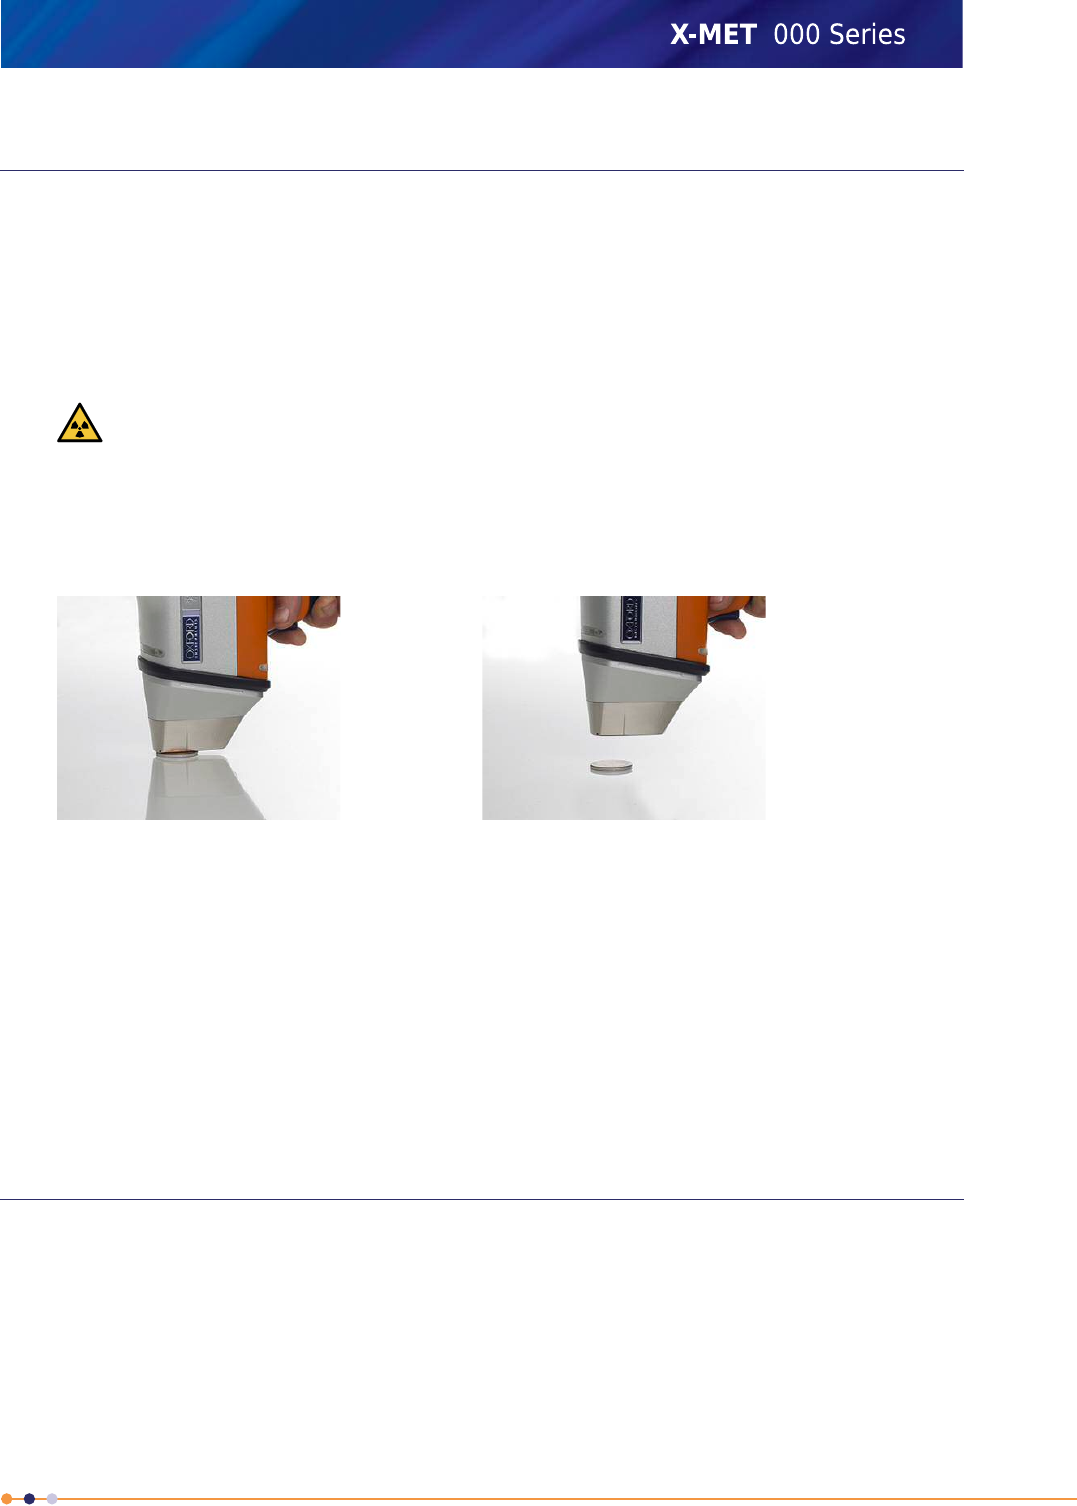
Recommended Daily Maintenance
Follow these procedures on a daily basis.
Check The Battery Charge Levels
Make sure that all batteries are fully charged. Refer to: Battery Maintenance on page 94
Check The Proximity Sensor
Do this test to make sure that the proximity sensor works.
Caution; X-Rays: Do not operate the trigger to make a measurement during this test. If the
X-MET8000 series emits X-ray radiation when it is not in close contact with the sample, the
radiation can scatter. Prolonged direct exposure to X-ray radiation can cause serious personal
injury.
1. Switch the X-MET8000 series on.
2. Hold the X-MET8000 series in the correct position against a sample.
3. Make sure that the proximity indicators change to green.
Do not pull the trigger.
4. Slowly withdraw the X-MET8000 series away from the sample.
5. Make sure that the proximity indicators switch off.
6. Measure the distance from the sample when the proximity indicators switch off.
The distance should be no more than 15 millimetres. If the X-MET8000 series does not achieve this
test, it must be returned to the local Oxford Instruments representative for service.
Note: the proximity sensor may be disabled by a Supervisor for operation of the analyser with a
benchtop stand only (as per IEC 62495). If unsure, please refer to local radiation safety regulations.
Recommended Weekly Maintenance
Follow these procedures on a weekly basis.
Check The Alloy CRM Sample
The supervisor should make a measurement of the Alloy CRM sample.
If there is a significant change from the Alloy CRM reference measurement, contact the local Oxford
Instruments representative for assistance.
93
X-MET8000 Series User Manual
8

The X-MET8000 series can include additional check samples that are application specific. The supervisor
can also use these to check the X-MET8000 series against a representative sample.
Battery Maintenance
The DC power supply (battery charger) can charge a battery and supply power to the X-MET8000
series. The X-MET8000 series display has two indicators: Charge Status and PSU.
The Charge Status indicator on the X-MET8000 series display indicates when the battery is charging.
The PSU symbol on the X-MET8000 series display indicates when the X-MET8000 series is connected
to the DC power supply (charger).
If the X-MET8000 series is connected to the DC power supply (charger) while turned off, the power
button light on the X-MET8000 series will pulsate to indicate that the X-MET8000 series is charging.
The time required to fully charge a battery is up to 4 hours.
The X-MET8000 series can be operated from the DC power supply (charger) without a battery. When
connected to the DC power supply (charger) the battery can be removed while the X-MET8000 series
is powered up.
Make sure that the DC power supply (battery charger) has the correct mains adapter, or a mains
extension lead.
Remove And Check The Battery
Follow these steps to check the battery charge level in the X-MET8000 series.
1. Make sure that the X-MET8000 series is off.
2. Slide the clip at the base of the handle forward to open the battery cover.
3. The display at the bottom of the battery indicates the charge level.
One or more of the Charge Level indicators should be lit.
If no Charge Level indicators are lit, the battery has no charge.
The battery is fully charged when all Charge Level indicators are lit.
4. Decide if it is necessary to charge the battery.
5. To remove the battery, pull it out using the tab.
Make sure that the X-MET8000 series is off before removing the battery.
94
X-MET8000 Series User Manual
8
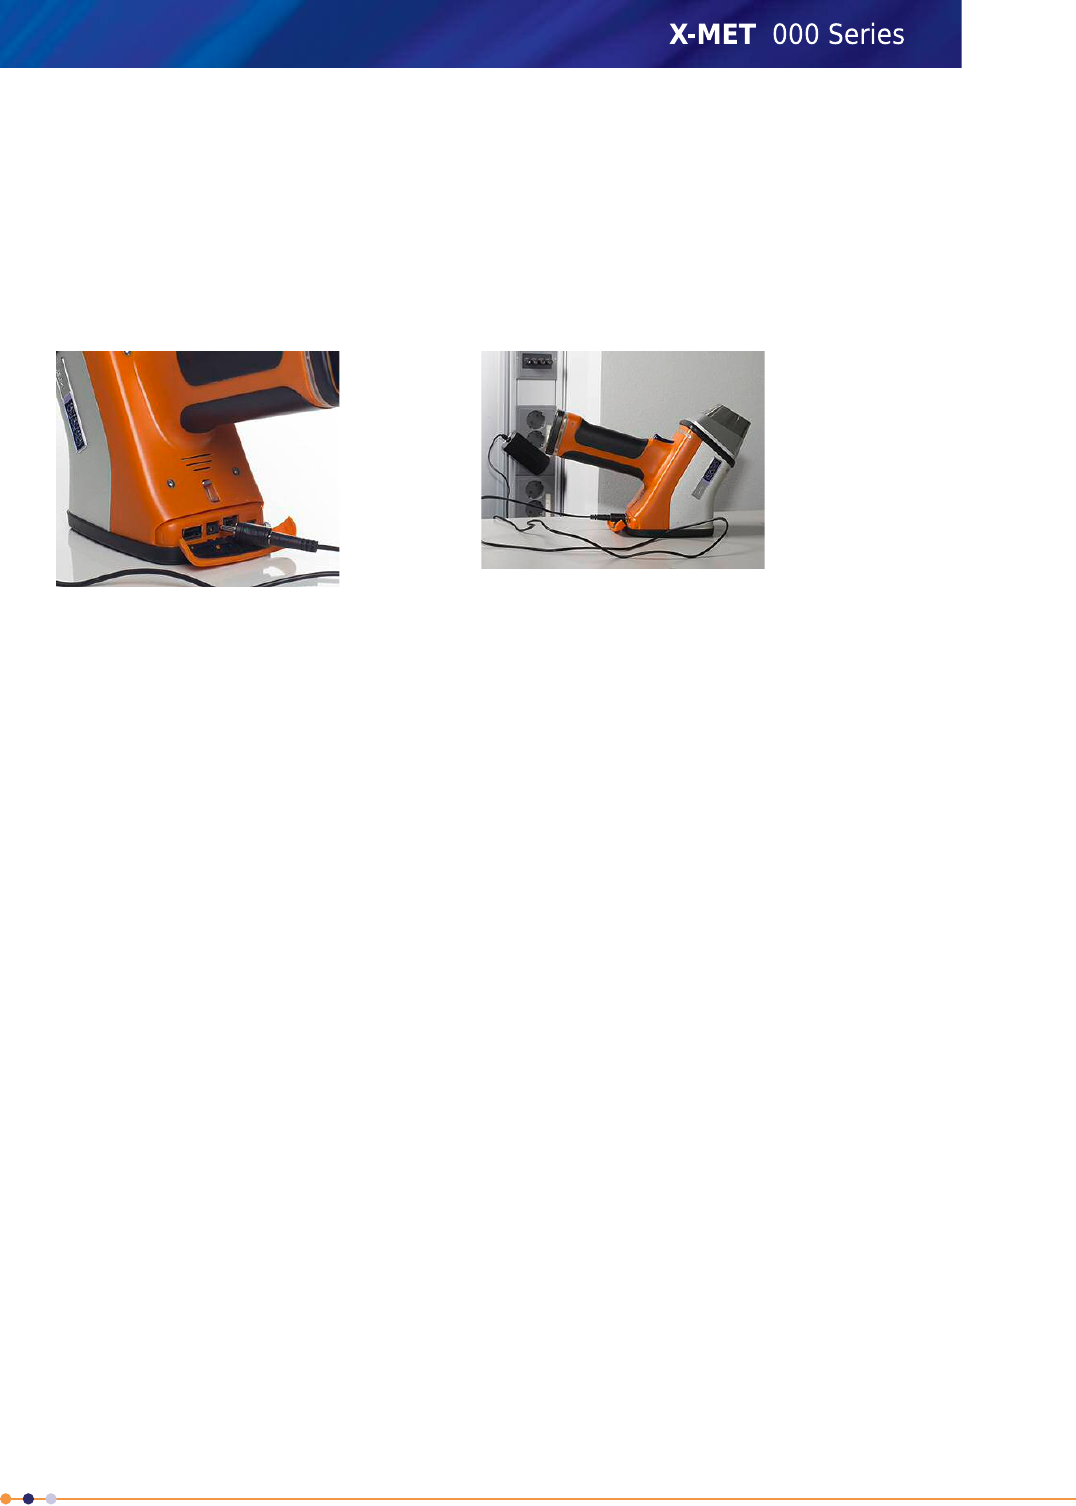
Charge The Battery
Follow these steps to charge the battery. The battery can be charged inside the X-MET8000 series or
separately using an optional desktop charger.
1. Open the plastic cover underneath the display and connect the DC power supply (battery charger)
lead to the X-MET8000 series.
•Switch the X-MET8000 series off for faster charging.
2. Connect the DC power supply (battery charger) to a mains power supply. Make sure that the mains
socket is easily accessible when the DC power supply (charger) is in use.
If the X-MET8000 series is charged while powered off, the power button light on the X-MET8000
series pulsates to indicate that the battery is charging.
3. It is possible to switch the X-MET8000 series on to power it from the DC power supply (battery
charger).
The DC power supply (charger) is able to charge the battery and power the X-MET8000 series at
the same time.
The PSU indicator on the display indicates that the DC power supply (charger) is connected, and
the Charge Status indicator on the display indicates that the battery is charging.
4. When the DC power supply (battery charger) is not required to charge a battery or power the
X-MET8000 series, disconnect it from the mains power supply.
5. Remove the DC power supply (battery charger) lead from the X-MET8000 series and close the
plastic cover.
To charge the battery using the optional desktop charger, place the battery in the desktop charger
and connect the DC power supply to the charger. Connect the power supply to a mains power
supply.
Make sure that the mains socket is easily accessible when the DC power supply (charger) is in use.
95
X-MET8000 Series User Manual
8
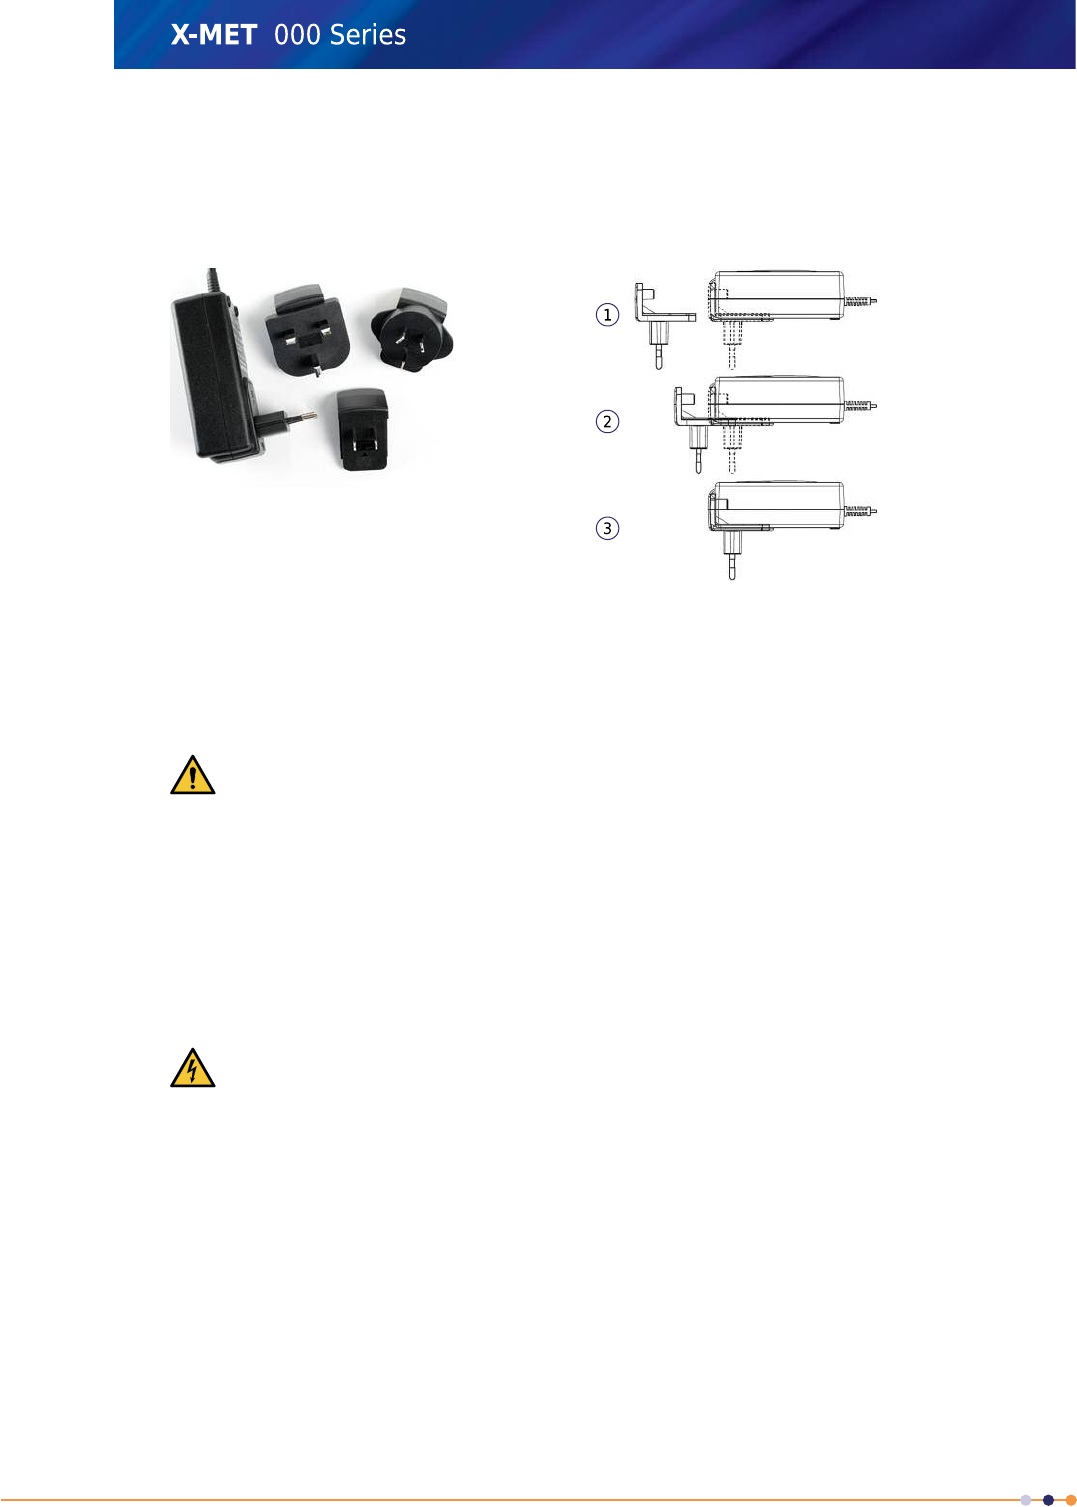
Mains Adapters For The DC Power Supply (Battery Charger)
The DC power supply (battery charger) includes mains plug adapters for Europe, UK, US and Australia.
To change a mains plug adapter, slide the adapter along the body of the DC power supply (battery
charger). Replace with the correct adapter.
Use The Battery And DC Power Supply Safely
Battery Usage
The X-MET8000 series uses a lithium ion battery that contains safety and protection circuits.
Caution: Do not misuse or abuse the battery because it can become very hot, ignite or explode
and cause serious personal injury.
•Only use the correct battery.
•Never use a damaged battery.
•Do not drop, disassemble, crush, incinerate, puncture, or heat the battery above 100° C (212° F).
•Do not connect any of the battery terminals together with water, salt water or a metallic object.
DC Power Supply and Battery Charger Usage
The DC power supply and battery charger are designed for indoor use only, the DC power supply is
double insulated and fuse protected. They have no user serviceable parts.
Caution; Electricity: Do not attempt to open the DC power supply because there are dangerous
voltages and an electric shock can cause serious personal injury.
•Only use the correct DC power supply and battery charger.
•Do not use the DC power supply connector to connect anything other than the DC power supply
(battery charger).
•Do not allow the DC power supply (battery charger) to come into contact with dust, water, oil,
grease or chemical solvents.
•Do not cover the DC power supply (battery charger) when it is in use because it can overheat.
Refer to: Disposal Of The X-MET8000 Series on page 99 for information about the proper disposal of
batteries and the DC power supply (battery charger).
96
X-MET8000 Series User Manual
8
Troubleshooting
Use this information to diagnose any problems with the X-MET8000 series. If this information does
not deal with the problem, refer to the local Oxford Instruments representative.
Location Of The Serial Number
Always refer to the X-MET8000 series serial number when in contact with the local Oxford Instruments
representative.
The serial number is on a label on the inside of the X-MET8000 series battery cover.
Make sure that this label is kept clean at all times, and that it is possible to read the serial number.
Unexpected Loss Of Power
Problem
The X-MET8000 series suddenly turns off while there still is charge in the battery, it is not possible to
switch the X-MET8000 series on. Refer to: Battery Maintenance on page 94.
The battery has an overload protection circuit, and it will shut down if there is a power surge. This can
occur if the X-MET8000 series is exposed to a strong radio interference.
If the overload protection circuit is triggered no indicators are lit on the Charge Level indicator.
Solution
It is necessary to reset the battery. If connected, disconnect the DC power supply (charger) from the
X-MET8000 series.
Remove the battery from the X-MET8000 series for a short time and re-insert the battery in the
X-MET8000 series. Connect the DC power supply (battery charger) to a mains power supply and then
connect the DC power supply to the X-MET8000 series to reset the battery. It is not necessary to
charge the battery.
To reset the battery using the external charger, connect the DC power supply to a mains power supply
and connect the DC power supply to the charger. Place the battery in the charger to reset the protection
circuit. The charge indicators will lite up and the battery starts charging when the battery is reset and
ready for use.
The X-MET8000 Series Cannot Make A Measurement
Problem
It is possible to switch the X-MET8000 series on, but it is not possible to make a measurement.
97
X-MET8000 Series User Manual
8

Solution 1
The sample must cover the proximity window for the X-MET8000 series to generate an X-ray beam.
Use the background plate to measure small samples. Never cover the proximity window with anything
other than the sample.
Solution 2
Clean the proximity window with a dry cloth. Make sure that the proximity sensor works correctly.
Refer to: Check The Proximity Sensor on page 93.
The Protective Film Window Is Broken
Problem
An operator must never use the X-MET8000 series when the protective film window is broken.
Solution
Press the release button to release the front plate which retain the protective film window. Check
whether the window on the detector is pierced, broken, damaged or corroded. If it is, contact the local
Oxford Instruments representative to arrange a repair. Only if the detector window is intact, use a
new protective film window, and lock the front plate to hold it in place.
The X-MET8000 Series Is Damaged
Problem 1
The X-MET8000 series suffered light damage, but continues to operate.
Solution 1
Do not continue to use the X-MET8000 series. It must be fully checked and verified. Contact the local
Oxford Instruments representative for assistance.
Problem 2
The X-MET8000 series suffered significant damage, and cannot operate.
Solution 2
The X-MET8000 series must be fully checked and verified. Contact the local Oxford Instruments
representative for assistance.
Recertification
The X-MET8000 series provides accurate and reliable measurements for many years with minimal
maintenance. Recertification verifies the accuracy of the X-MET8000 series with a series of known,
traceable standard samples. Oxford Instruments recommends annual recertification. Please contact
the local Oxford Instruments representative for additional information.
End Of Life
Use this information when the X-MET8000 series reaches the end of its useful life.
Resale, Loss Or Theft
It may be necessary to register the change of ownership of the X-MET8000 series with a regulatory
organization. Contact the local Oxford Instruments representative for assistance.
98
X-MET8000 Series User Manual
8

Disposal Of The X-MET8000 Series
Contact the local Oxford Instruments representative for assistance.
WEEE: Within the EU, return the X-MET8000 series, batteries, DC power supply and battery
chargers to the local Oxford Instruments representative for proper disposal in accordance with
WEEE regulations.
This symbol means that used electrical and electronic products should not be mixed with general
household waste. For proper treatment, recovery and recycling, return to the local Oxford Instruments
representative. The correct disposal of this product will help save valuable resources and prevent any
potential negative effects on human health and the environment, which could otherwise arise from
inappropriate waste handling. Penalties may be applicable for incorrect disposal of this waste, in
accordance with national legislation.
Technical Specifications
Technical Specifications, X-MET8000 Series
15 mm, maximumProximity sensor distance
12.0V - 15.0V
-10° C - +50° COperating temperature range
-10° C - +50° CStorage temperature range
20 % RH - 95 % RHOperating humidity range
2000mMaximum operating altitude
IP54Ingress protection
1.5 kg, maximumWeight
5.0 kg, maximumWeight including case
Technical Specifications, Battery
OI IA, 000000-xxxBattery part number
Lithium ionBattery type
7.2 VBattery voltage
6.8 AhBattery capacity
Technical Specifications, Battery Charger
The battery charger is designed for indoor use only
OI IA, 0000000-xxxBattery charger part number
-10° C - +50° COperating temperature range
99
X-MET8000 Series User Manual
8

-10° C - +50° CStorage temperature range
20 % RH - 95 % RHOperating humidity range
12.0 VDC - 15.0 VDC
2000mMaximum operating altitude
Technical Specifications, DC Power Supply
The DC Power Supply is designed for indoor use only
OI IA, 0000000-xxxBattery charger part number
12 VDC
-10° C - +50° COperating temperature range
-10° C - +50° CStorage temperature range
100 VAC - 240 VACMains supply voltage range
0.35 A, maximumMains supply current
50 Hz - 60 HzMains supply frequency range
2000mMaximum operating altitude
EC Declaration of Conformity, X-MET8000
We:
Oxford Instruments Industrial Products Limited
Of:
Tubney Woods, Abingdon, Oxfordshire, OX13 5QX, UK
In accordance with the following Directives:
The Low Voltage Directive 2006/95/EC
The Electromagnetic Compatibility Directive 2004/108/EC
R&TTE Directive 1999/5/EC
Declare under our sole responsibility that the following equipment:
X-MET8000, Type Number: XMDS 2770
Is in conformity with the applicable requirements of the following standards:
EN 61010-1 2010
EN 61326-1 2006
EN 62311 2008
EN 301 489-1 V1.8.1 April 2008
EN 301 489-17 V2.1.1 May 2009
EN 300 328 V1.7.1 October 2006
100
X-MET8000 Series User Manual
8