PHILIPS Consumer Electronics CD365H US-EN TELEPHONE ANSWERING MACHINE User Manual 2
Philips Consumer Electronics B.V. US-EN TELEPHONE ANSWERING MACHINE Users Manual 2
Contents
- 1. Users Manual 1
- 2. Users Manual 2
- 3. Users Manual 3
Users Manual 2
14
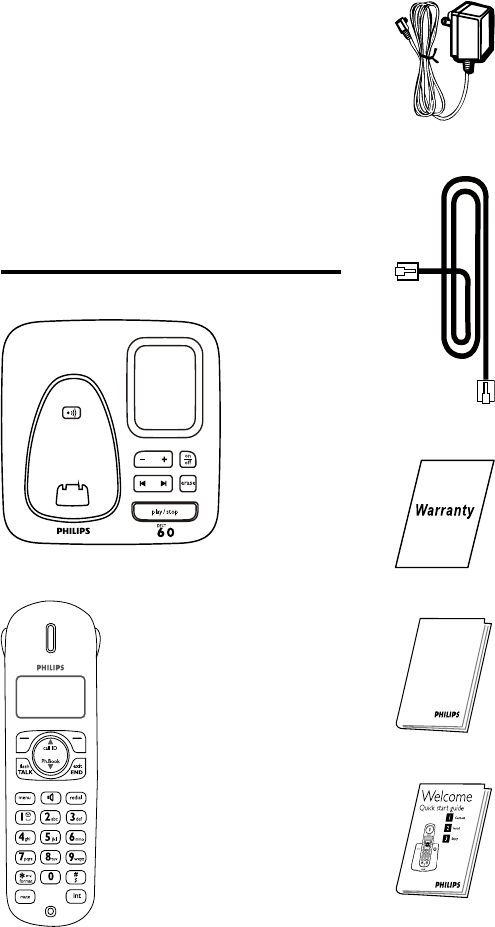
Power supply
Line cord
Guarantee
User Manual
Quick start guide
3 Your CD360/
CD365
Congratulations on your purchase and welcome
to Philips!
To fully benet from the support that Philips
offers, register your product at www.philips.
com/welcome.
What is in the box
Base station with bracket
Headset
EN
15
7 LED
indicator
Slowashingat1
second inteval:
Unread messages
Fastashingat0.5
second interval:
The answering
machine memory
is full
Steady On:
The answering
machine is on.
Ongoing answering
machine operation.
Ongoing remote
operation via the
handset
8 Paging key Find handset(s)
Enter registration
mode
Overview of the phone
o
Note
In some countries, you have to connect the •
line adaptor to the line cord, then plug the line
cord to the line socket.
Note
In multi-handset packs, there are additional •
handsets and chargers with power supply
units.
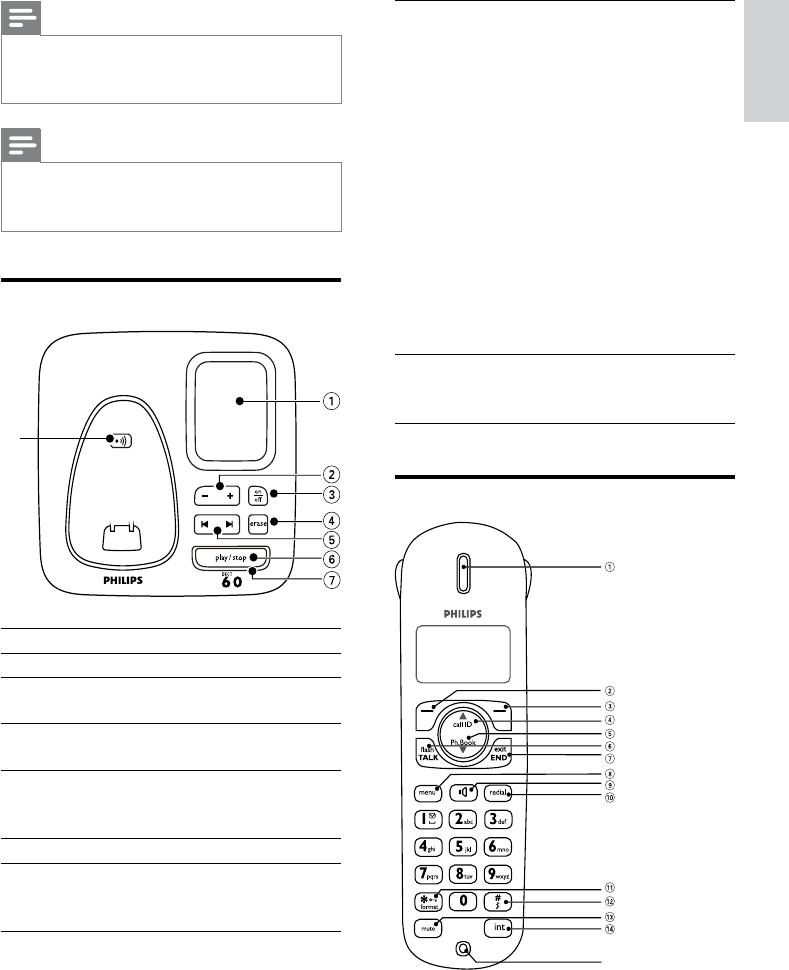
Overview of the base station
Key Name Descriptions
1Loudspeaker
2 Volume up/
down key
Increase/decrease
the speaker volume
3 On/Off key Turn the answering
machine on/off
4Forward/
backward
key
Skip forward/
backward during
playback
5 Delete key Delete messages
6 Play/Stop key Play messages
Stop message
playback
h
English
EN
16
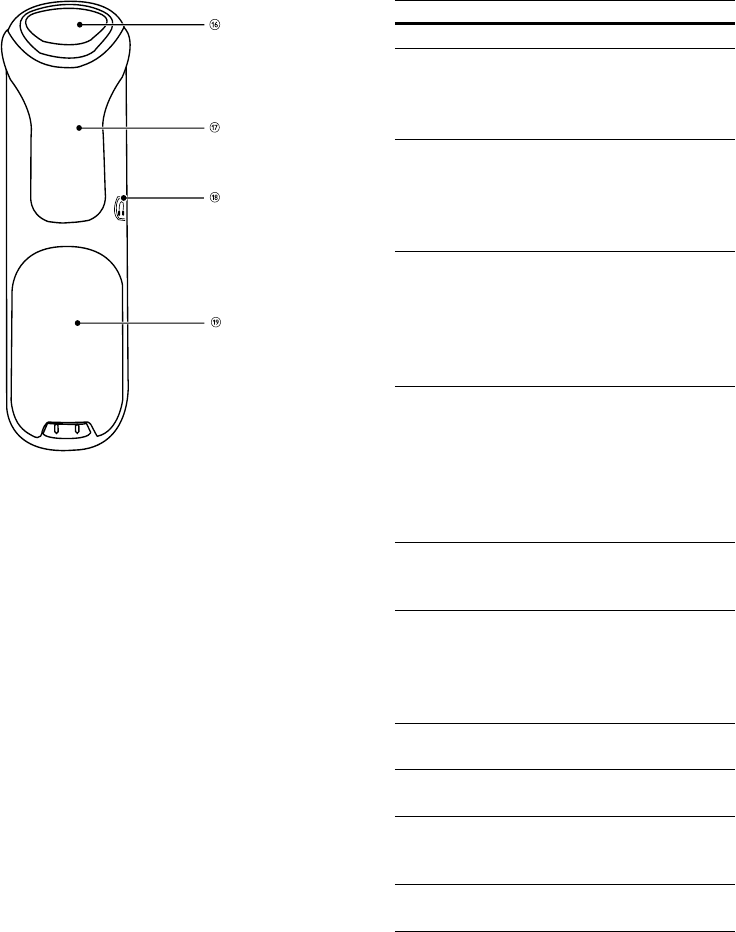
Key Name Descriptions
1Earpiece
2 OK key Conrm the
selection
Enter the options
menu
3 Back/Clear
key
Delete the text or
digits
Cancel the operation
View more
information
4 Call Log/Up
key
Scroll up on the
menu
Increase the
earpiece/speaker
volume
Enter the call log
5Phonebook/
Down key
Scroll down on the
menu
Decrease the
earpiece/speaker
volume
Enter the
phonebook
6 Talk/Recall
key
Make and receive
calls
Send the ash signal
7 End /On/Off
key
End the call
Exit the menu/
operation
Turn the handset
on/off
8 Menu key Access the main
menu
9 Speaker key Turn the speaker
on/off
10 Redial key Enter redial list
and dial the recent
number
11 Star/Keylock
key
Lock/unlock keypad
EN
17
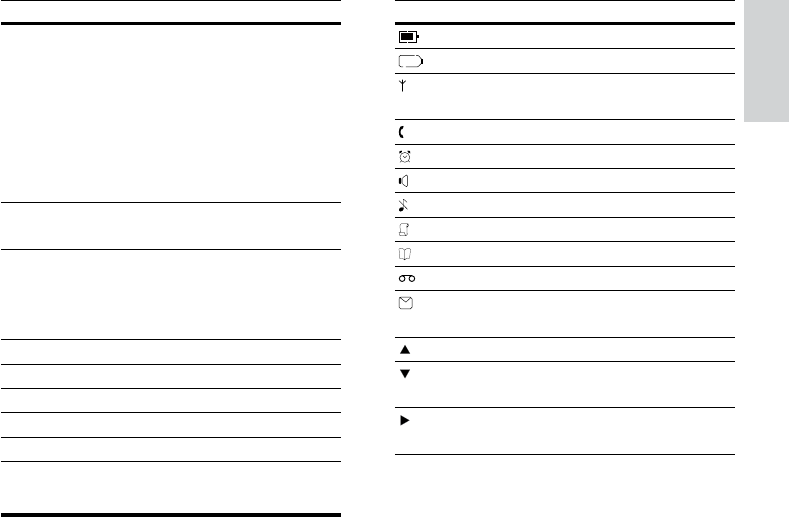
Icon Descriptions
The battery is fully charged.
The battery is empty.
It indicates if your phone is
registered with a network.
The call is in progress.
The alarm is activated.
The speaker is on.
The ringer is off.
Call log
Phonebook
Answering machine
There is unheard voice
message.
Scroll up for more options
Scroll down for more
options
More digits or characters
on the right.
Key Name Descriptions
12 Ringer Off/
Pause key
Press to enter a
pause
Turn the ringer
on/off
Switch between the
lower and upper
case during text
editing
13 Mute key Mute/unmute the
microphone
14 Intercom/
Conference
key
Make the intercom
call
Make the conference
call
15 Microphone
16 Loudspeaker
17 Belt clip
18 Headset jack
19 Battery door
Display icons
The icons tell you what features are available on
your handset.
English
EN
18
Call from the redial list
You can make a call from the redial list. (see
‘Redial a call’ on page 28)
Call from the phonebook
You can make a call from the phonebook list.
(see ‘Phonebook’ on page 24)
Call from the call log
You can return a call from the outgoing,
received or missed call log. (see ‘Call log’ on
page 26)
Note
The call timer displays the talk time of your •
current call.
Note
If you hear warning tones, the handset is •
almost out of battery or the handset is out
of range. Charge the battery or move the
handset nearer to the base station.
End a call
You can end a call in these ways:
Press • ; or
Place the handset to the base station •
or charging cradle.
Answer a call
When the phone rings. Press or to answer
the call.
Warning
When the handset rings or when the •
handsfree is activated, keep the handset away
from your ear to avoid ear damage.
4 Calls
When the power fails, the phone cannot •
access emergency services.
• Check the signal strength before you
make a call or when you are in a call. (see
‘Check the signal strength’ on page 13)
Make a call
You can make a call in these ways:
Quick call•
Dial before you call•
Redial the most recent number•
Call from the redial list.•
Call from the phonebook list•
Call from the call log•
Quick call
1 Press .
2 Dial the phone number.
The number is dialed out. »
The duration of your current call is »
displayed.
Dial before you call
1 Dial the phone number
To erase a digit, press • [BACK].
To enter a pause, press and hold • .
2 Press to dial out the call.
Redial the most recent number
1 Press .
2 Press .
3 Press [OK].
The most recent number is then dialed »
out.
EN
19
Make a second call
Note
This service is network dependent. •
1 You can make a second call in these ways:
Press • during a call; or
Press • [OK]. Select [START 2ND
CALL], then press [OK] again to
conrm.
The rst call is put on hold.•
2 Dial the second number.
The number displayed on the screen is »
dialed out.
Answer a second call
Note
This service is network dependent. •
When there is a periodical beep to notify you
of an incoming call, you can answer the call in
these ways:
1 Press and to answer the call.
The rst call is put on hold, and you »
are now connected to the second call.
2 Press and to end the current call
and answer the second call.
Toggle between two calls
You can toggle your calls in these ways:
1 Press and ; or
2 Press [OK] and select [SWITCH
CALLS], then press [OK] again to
conrm.
The current call is put on hold, and you »
are now connected to the other call.
Note
The caller ID service is network dependent. •
Tip
When there is a missed call, the handset •displays a notication message.
Turn off the ringer for all incoming
calls
There are two ways to turn off the ringer:
1 Press and hold in standby mode.
» displays on the screen.
2 When the phone rings, press .
Adjust the earpiece volume
Press or to adjust the volume during a call,
then press [OK] to conrm.
The earpiece volume is adjusted and »
the phone is back to the call screen.
Mute the microphone
1 Press during a call.
The handset displays »[MUTE ON].
The caller cannot hear you, but you »
can still hear his voice.
2 Press again to unmute the microphone.
You can now communicate with the »
caller.
Turn the speaker on or off
Press .
English
EN

20
Make a conference call
Note
This service is network dependent. Check with •
the service provider for additional charges.
When you are connected to two calls, press
[OK], select conference and then press [OK]
again to conrm.
The two calls are combined and a »
conference call is established.
EN
21
Wait for the other side to answer your »
call.
Toggle between calls
Press to switch between the outside call
and the intercom call.
Transfer a call
1 Press during a call.
2 Select or enter the handset number, then
press [OK] to conrm.
3 Press when the other side answers
your call.
The call is now transferred to the »
selected handset.
Make a conference call
A 3-way conference call is a call between you,
another handset user and the outside callers. It
requires two handsets to share the same base
station.
During an external call
1 Press to initiate an internal call.
The handsets available for intercom are »
displayed.
The external caller is put on hold. »
2 Select or enter a handset number, then
press [OK] to conrm.
The selected handset rings. »
3 Press on the selected handset.
The intercom is established. »
4 Press and hold on your handset.
You are now on a 3-way conference »
call with the external call and the
selected handset.
5 Press to end the conference call.
5 Intercom and
conference calls
An intercom call is a call to another handset
that shares the same base station. A conference
call involves a conversation among you, another
handset user and the outside callers.
Make a call to another
handset
Note
If the base station only has 2 registered •
handsets, press to make a call to another
handset.
1 Press . The handsets available for
intercom are displayed.
2 Select or enter a handset number, then
press [OK] to conrm.
The selected handset rings. »
3 Press on the selected handset.
The intercom is established. »
4 Press to cancel or end the intercom
call.
Note
If the selected handset is occupied in a call, you •
hear a busy tone.
While you are on the phone
You can go from one handset to another
during a call:
1 Press .
The current caller is put on hold. »
2 Select or enter a handset number, then
press [OK] to conrm.
English
EN
22
Note
Press •to join an ongoing conference with
another handset.
During the conference call
1 Press to put the external call on hold
and go back to the internal call.
The external call is put on hold. »
2 Press to toggle between the external
and internal call.
3 Press and hold to establish the
conference call again.
Note
If a handset hangs up during the conference •
call, the other handset remains connected to
the external call.
EN
23
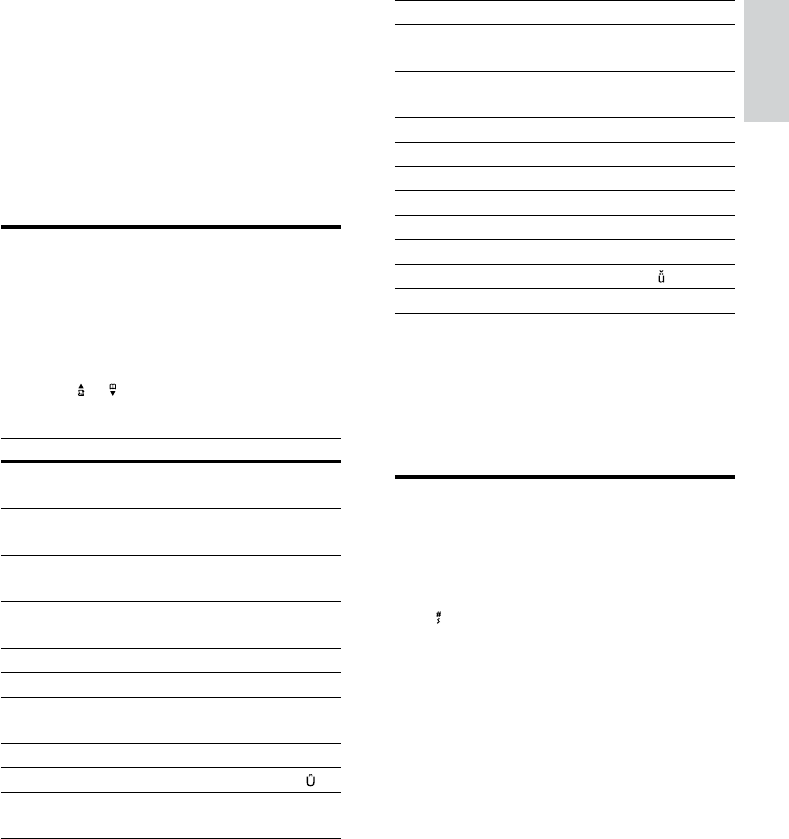
Key Characters (Lower case)
0 . 0 , / : ; “ ‘ ! ¡ ? ¿ * + - % \ ^
~ |
1 [Sp] 1 @ _ # = < > ( ) & € £
$ ¥ [ ] { } ¤ § …
2a b c 2 à â Æ á ã â ä å ą ç ć č
3d e f 3 ď đ ė ĕ è é ê ë ę Δ Φ
4g h i 4 í ì î ï l Γ
5j k l 5 Λ ł ĺ ľ
6m n o 6 ñ ň ń ó ô õ ö ő
7p q r s 7 ř ş š ś β Π Θ Σ
8t u v 8 ţ ť ù ú û ü ů ű μ
9w x y z 9 ý ž ź ż ƒ ø Ω Ξ Ψ
Example to write “PAUL”
Press 7 once: P
Press 2 once: A
Press 8 two times: U
Press 5 three times: L
Switch between uppercase
and lowercase
By default, the rst letter of each word in a
sentence is uppercase and the rest is lowercase.
Press to switch between the uppercase and
lowercase letters.
6 Text and
numbers
You can enter text and numbers for handset
name, phonebook records, and other menu
items.
Enter text and numbers
1 Press once or several times on the
alphanumeric key to enter the selected
character.
2 Press [BACK] to delete the character.
Press to move the curson left and
right.
Key Characters(Uppercase)
0 . 0 , / : ; “ ‘ ! ¡ ? ¿ * + - % \ ^
~ |
1 [Sp] 1 @ _ # = < > ( ) & € £
$ ¥ [ ] { } ¤ § ...
2A B C 2 À Â Æ Á Ã Ă Ä Å
Ą Ç Ć Č
3D E F 3 Ď Ð Ė Ě È É Ê Ë Ę
Δ Φ
4G H I 4 Ğ Í Ì Î Ï İ Γ
5J K L 5 Λ Ł Ĺ Ľ
6M N O 6 Ñ Ň Ń Ó Ô Õ
Ö Ő
7P Q R S 7 Ř Ş Š Ś β Π Θ Σ
8T U V 8 Ţ Ť Ù Ú Û Ü Ů Ű
9W X Y Z 9 Ý Ž Ź Ż ſ Ø Ω
Ξ Ψ
English
EN
24
The rst record that starts with this »
character is displayed.
Access the phonebook during
a call
1 Press [OK], select [PHONEBOOK] then
press [OK] again to conrm.
2 Select the contact, then press [OK] to
conrm.
The number can be viewed. »
Call from the phonebook
1 Press to access the phonebook.
2 Select a contact in the phonebook list.
3 Press to make the call.
Add a record
Note
If your phonebook memory is full, the handset •displays a notication message. Delete some
records to add new ones.
1 Press .
2 Select [PHONEBOOK] > [NEW
ENTRY], then press [OK] to conrm.
3 Enter the name then press [OK]to
conrm (see ‘Text and numbers’ on page
23).
4 Enter the number, then press [OK]to
conrm (see ‘Text and numbers’ on page
23).
Note
The phonebook only saves new number. •
7 Phonebook
This phone has a phonebook that stores up
to 100 records. You can access the phonebook
from the handset. Each record can have a name
up to 14 characters long and a number up to
24 digits long.
View the phonebook
Note
You can view the phonebook on one handset •
only each time.
1 Press .
2 Select a contact and view the available
information.
Tip
Press •[OK] to access the phonebook options
menu.
Search a record
You can search the phonebook records in these
ways:
Scroll the contacts list.•
Enter the rst character of the contact.•
Scroll the contact list
Access the phonebook menu, then press and
to scroll through the phonebook entries.
Entertherstcharacterofacontact
Access the phonebook menu and press the
alphanumerica key that corresponds to the
character.
EN
25
All records are deleted. »
Tip
Press and hold • to insert a pause.
Your new record is saved. »
Edit a record
1 Press .
2 Select [PHONEBOOK] > [EDIT
ENTRY], then press [OK] to conrm.
3 Select the contact, then press [OK] to
conrm.
4 Edit the name, then press [OK] to
conrm.
5 Edit the number, then press [OK] to
conrm.
The record is saved. »
Delete a record
1 Press .
2 Select [PHONEBOOK] > [DELETE
ENTRY?], then press [OK] to conrm.
3 Select a contact, then press [OK] to
conrm.
The handset displays a conrmation »
request.
4 Press [OK] to conrm.
The record is deleted. »
Delete all records
1 Press .
2 Select [PHONEBOOK] > [DELETE
ALL], press [OK] to conrm.
The handset displays a conrmation »
request.
3 Press [OK] to conrm.
English
EN