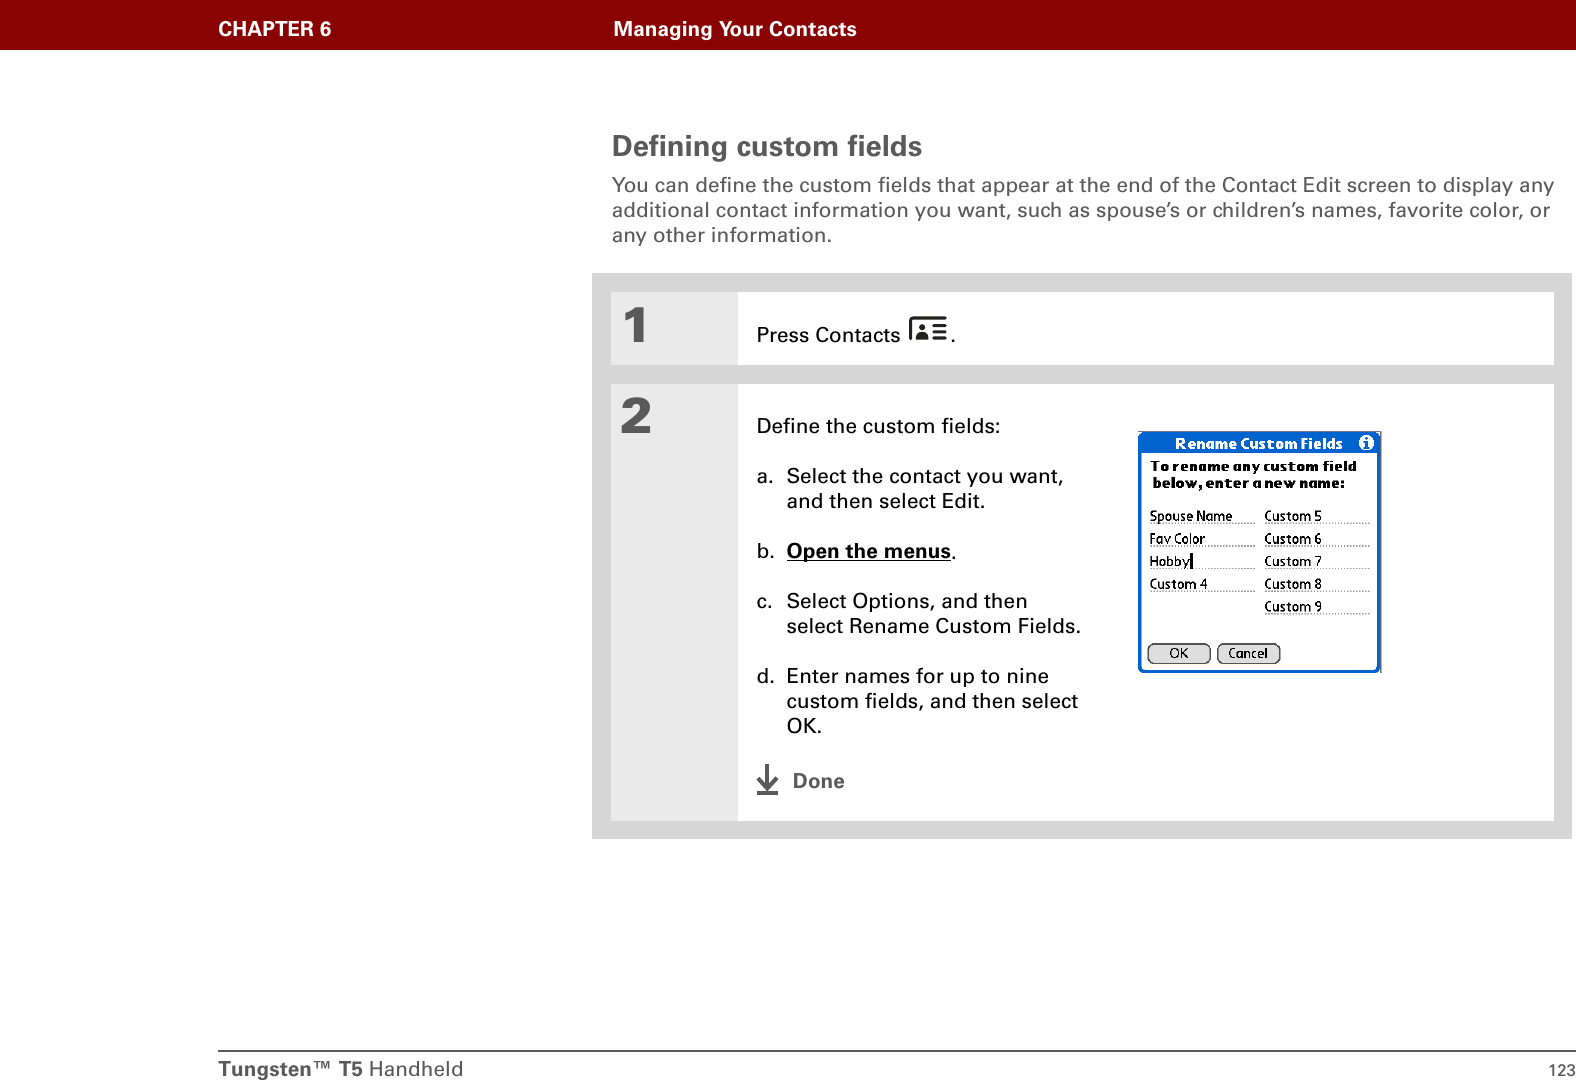
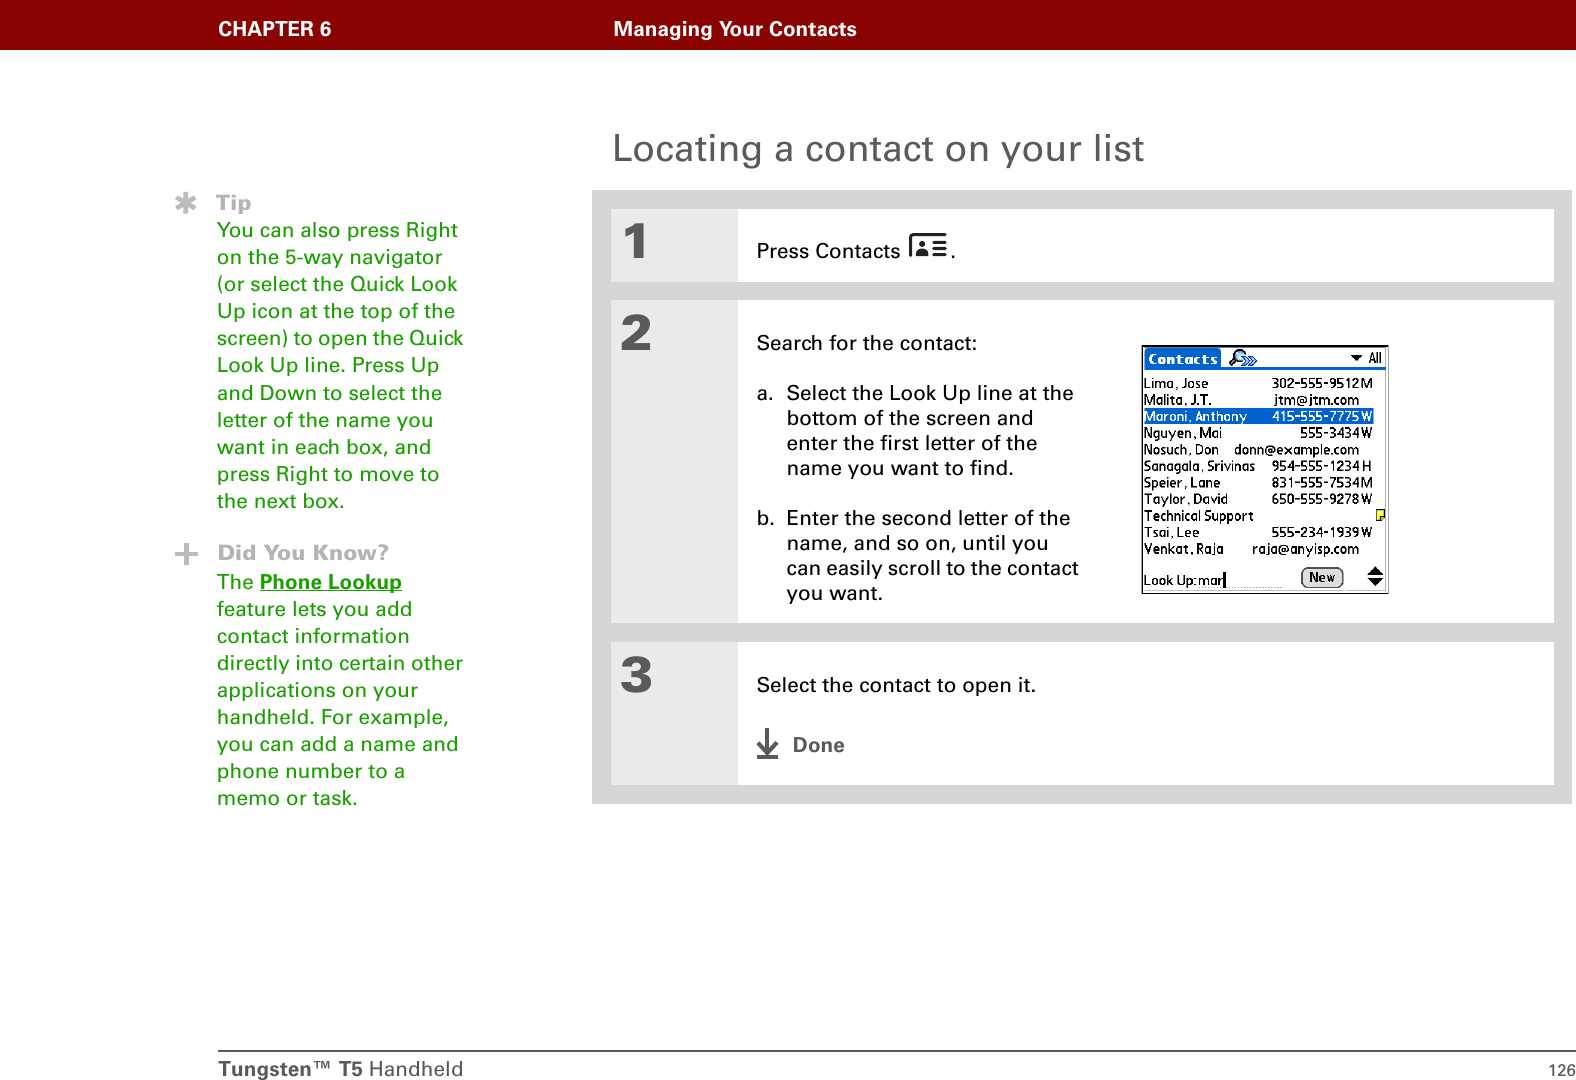
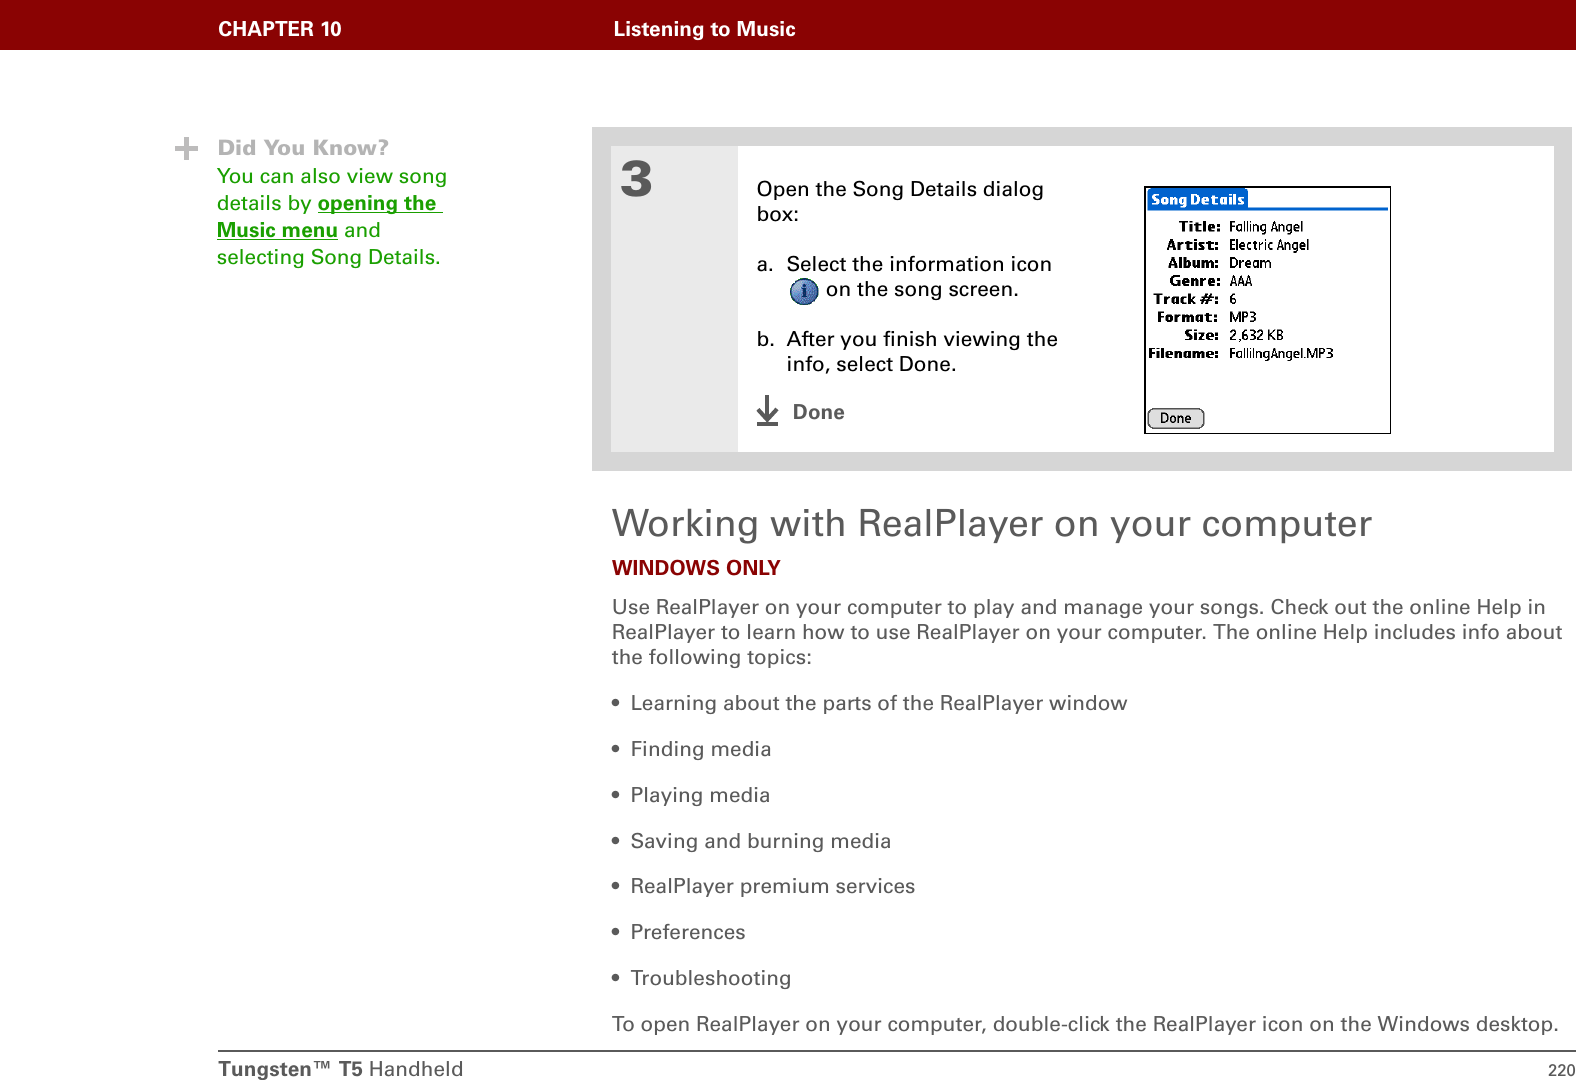
Palm 820 PDA With Bluetooth User Manual User Guide for the Tungsten T5 Handheld
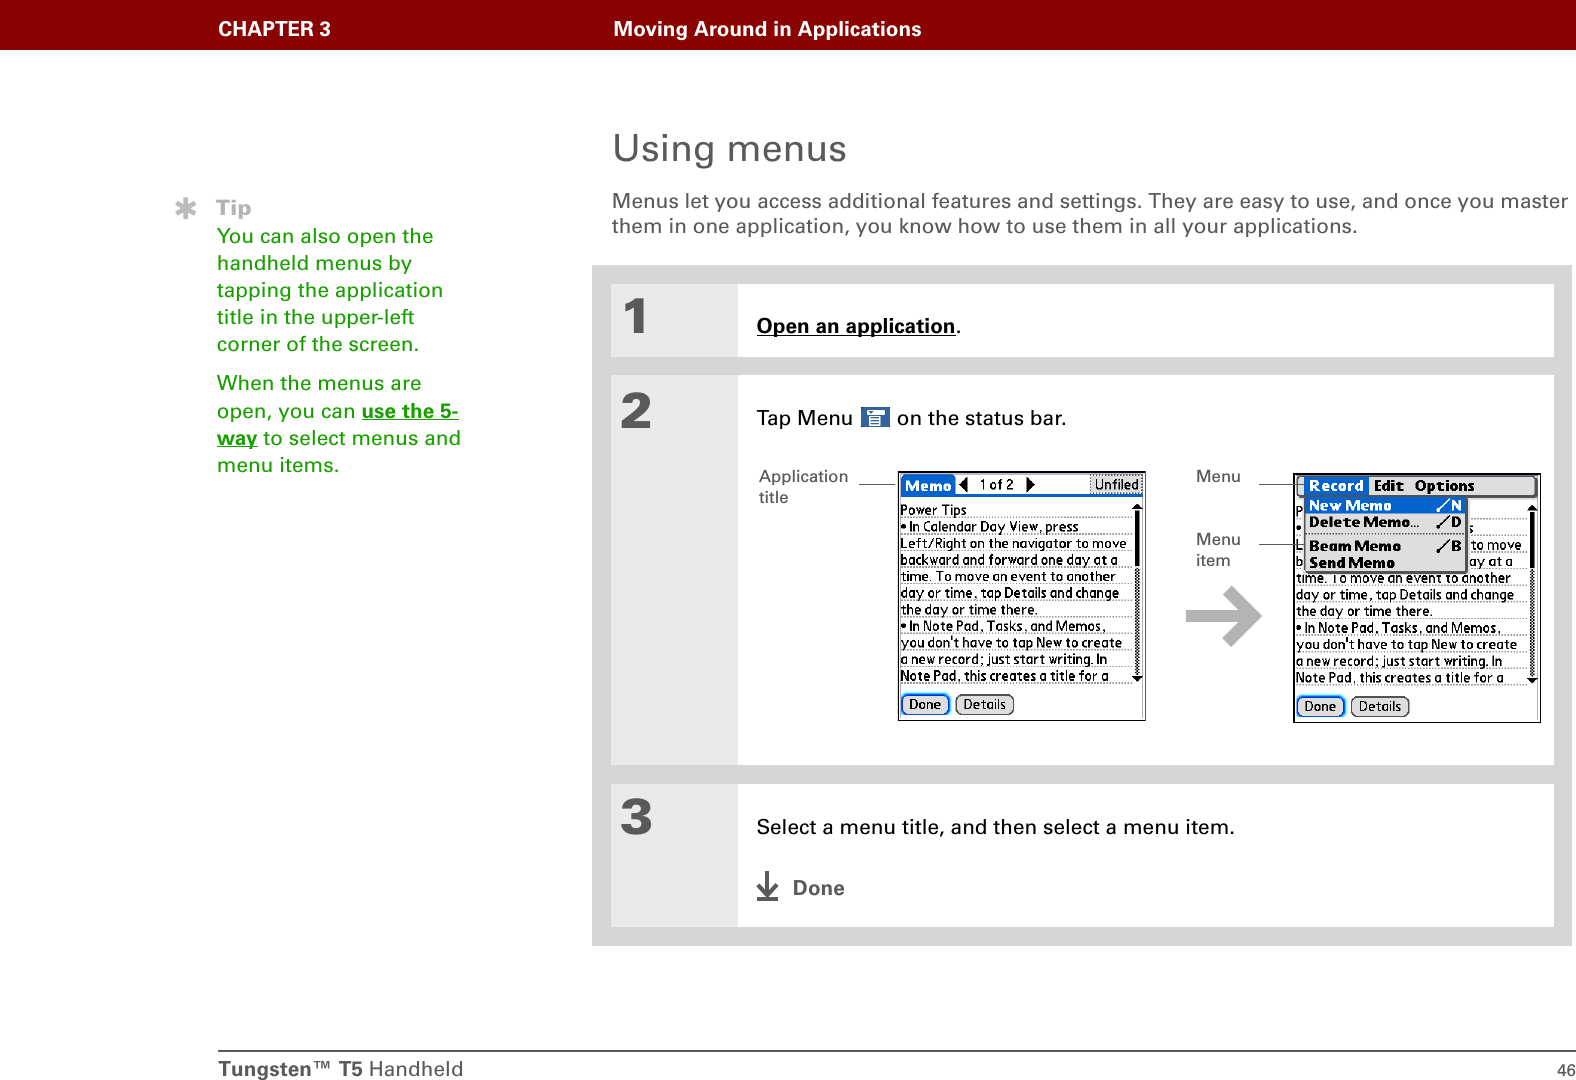
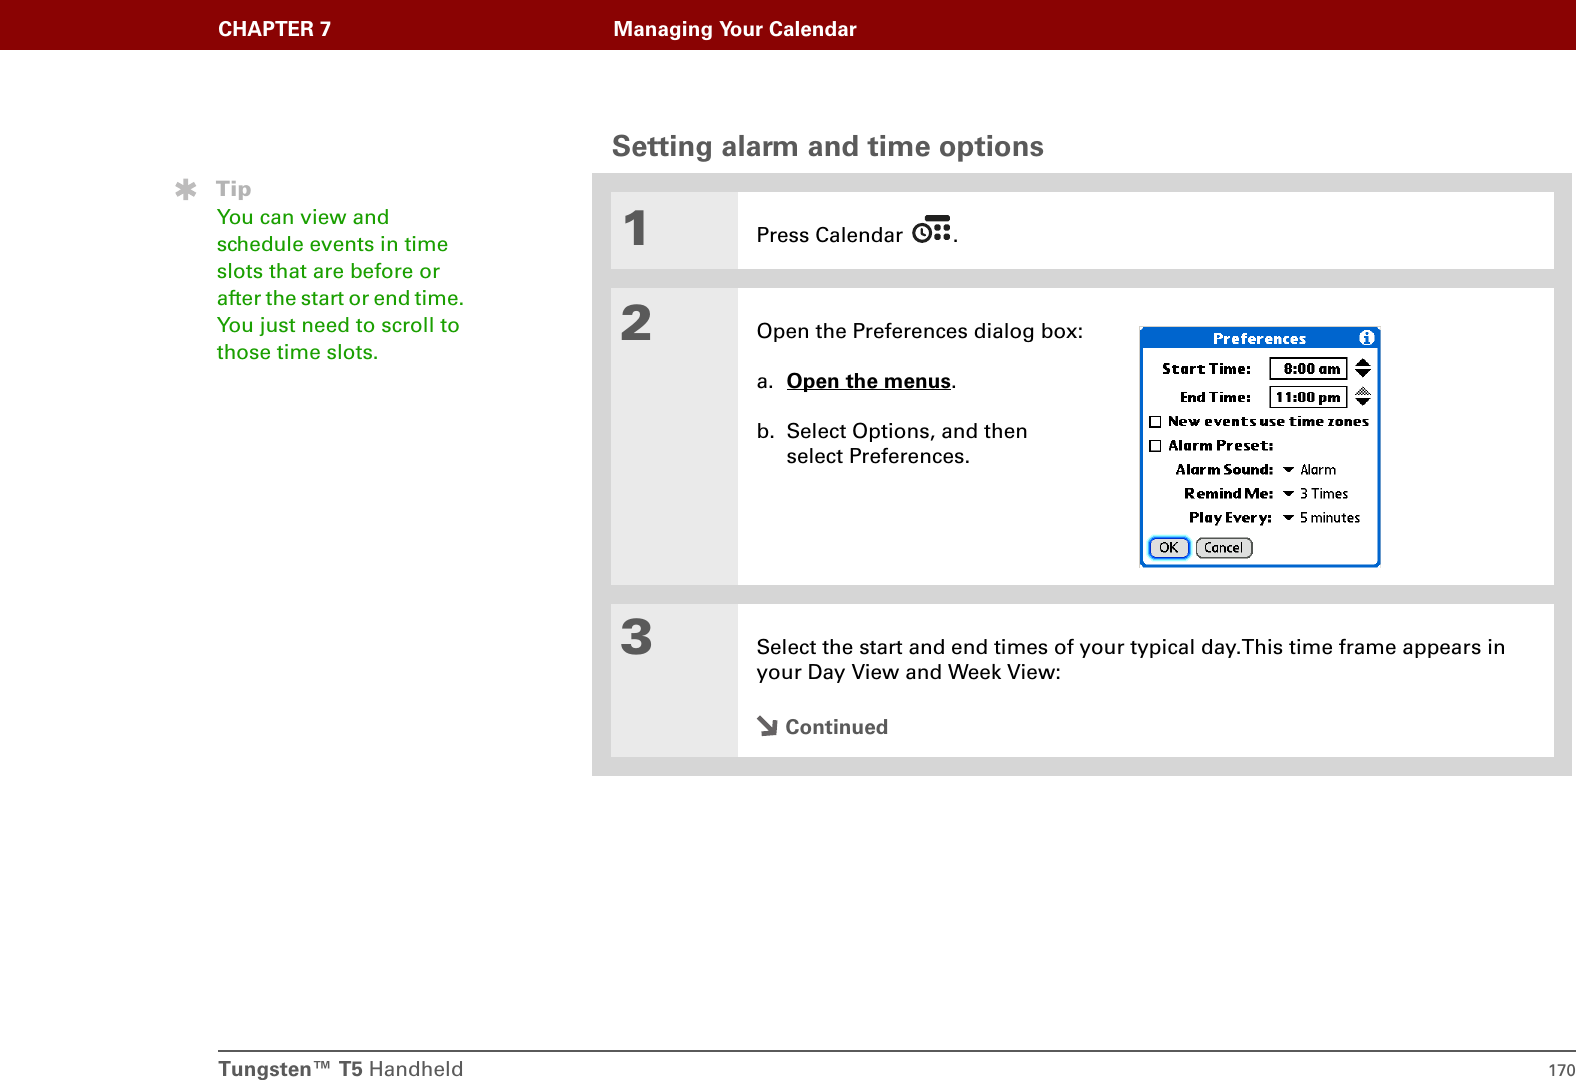
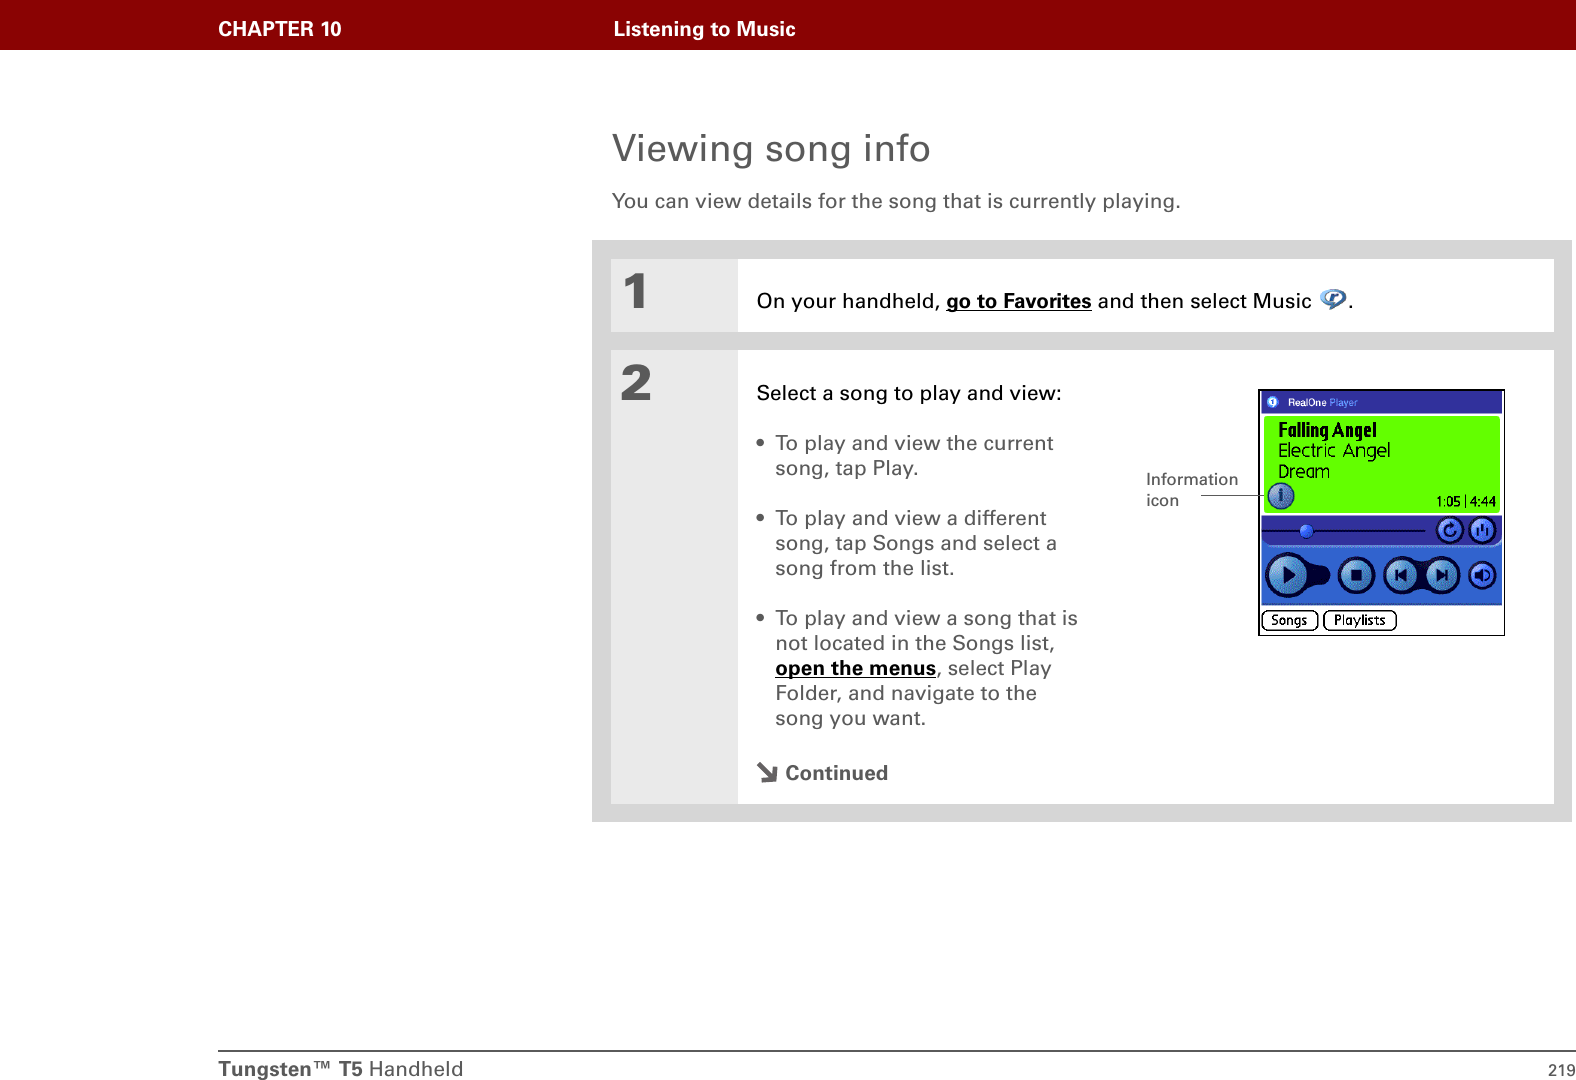
Palm Inc PDA With Bluetooth User Guide for the Tungsten T5 Handheld
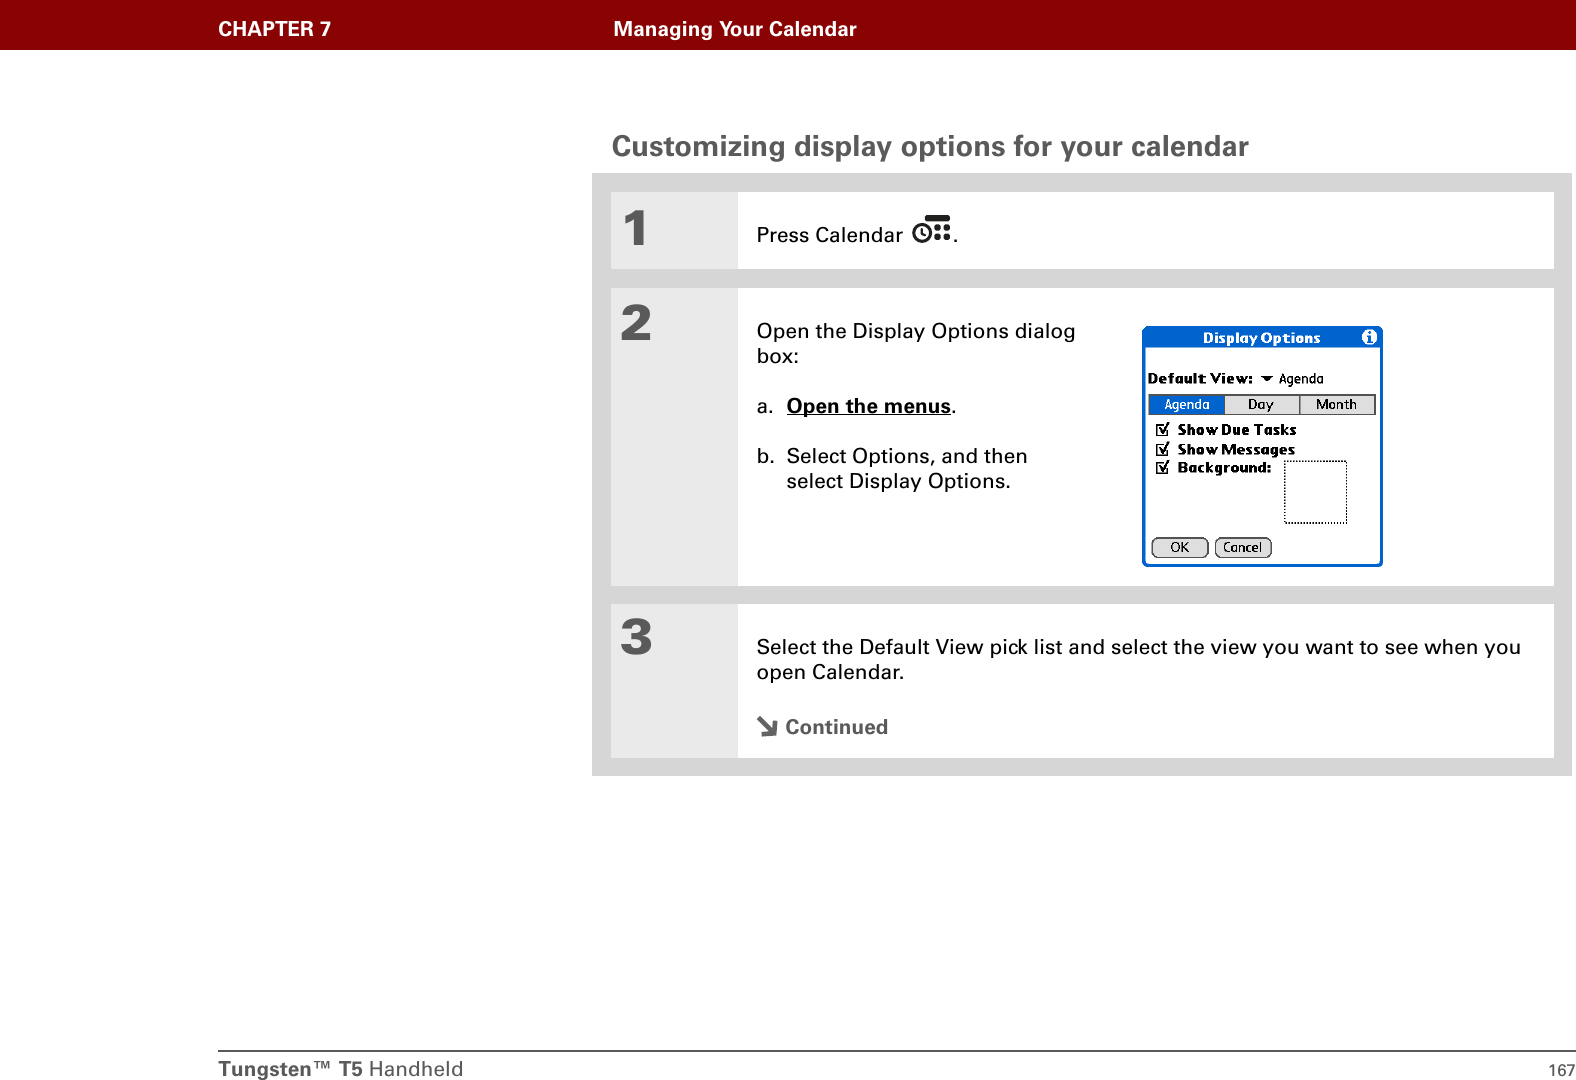
UserManual.wiki
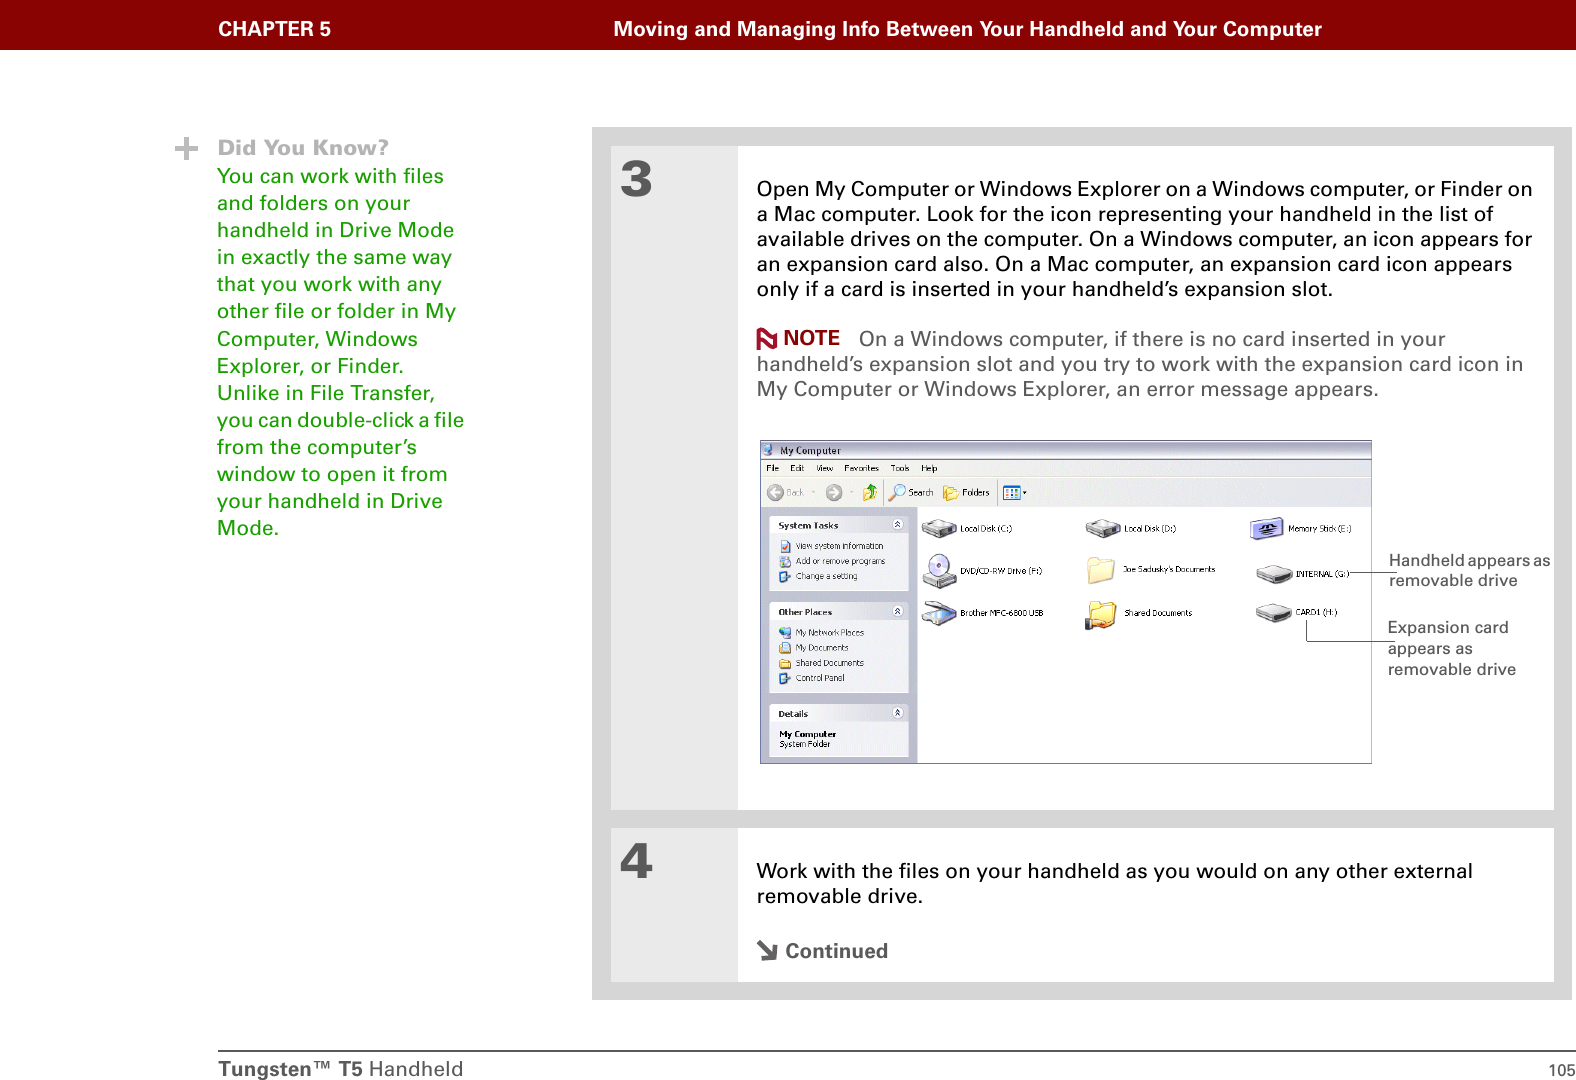
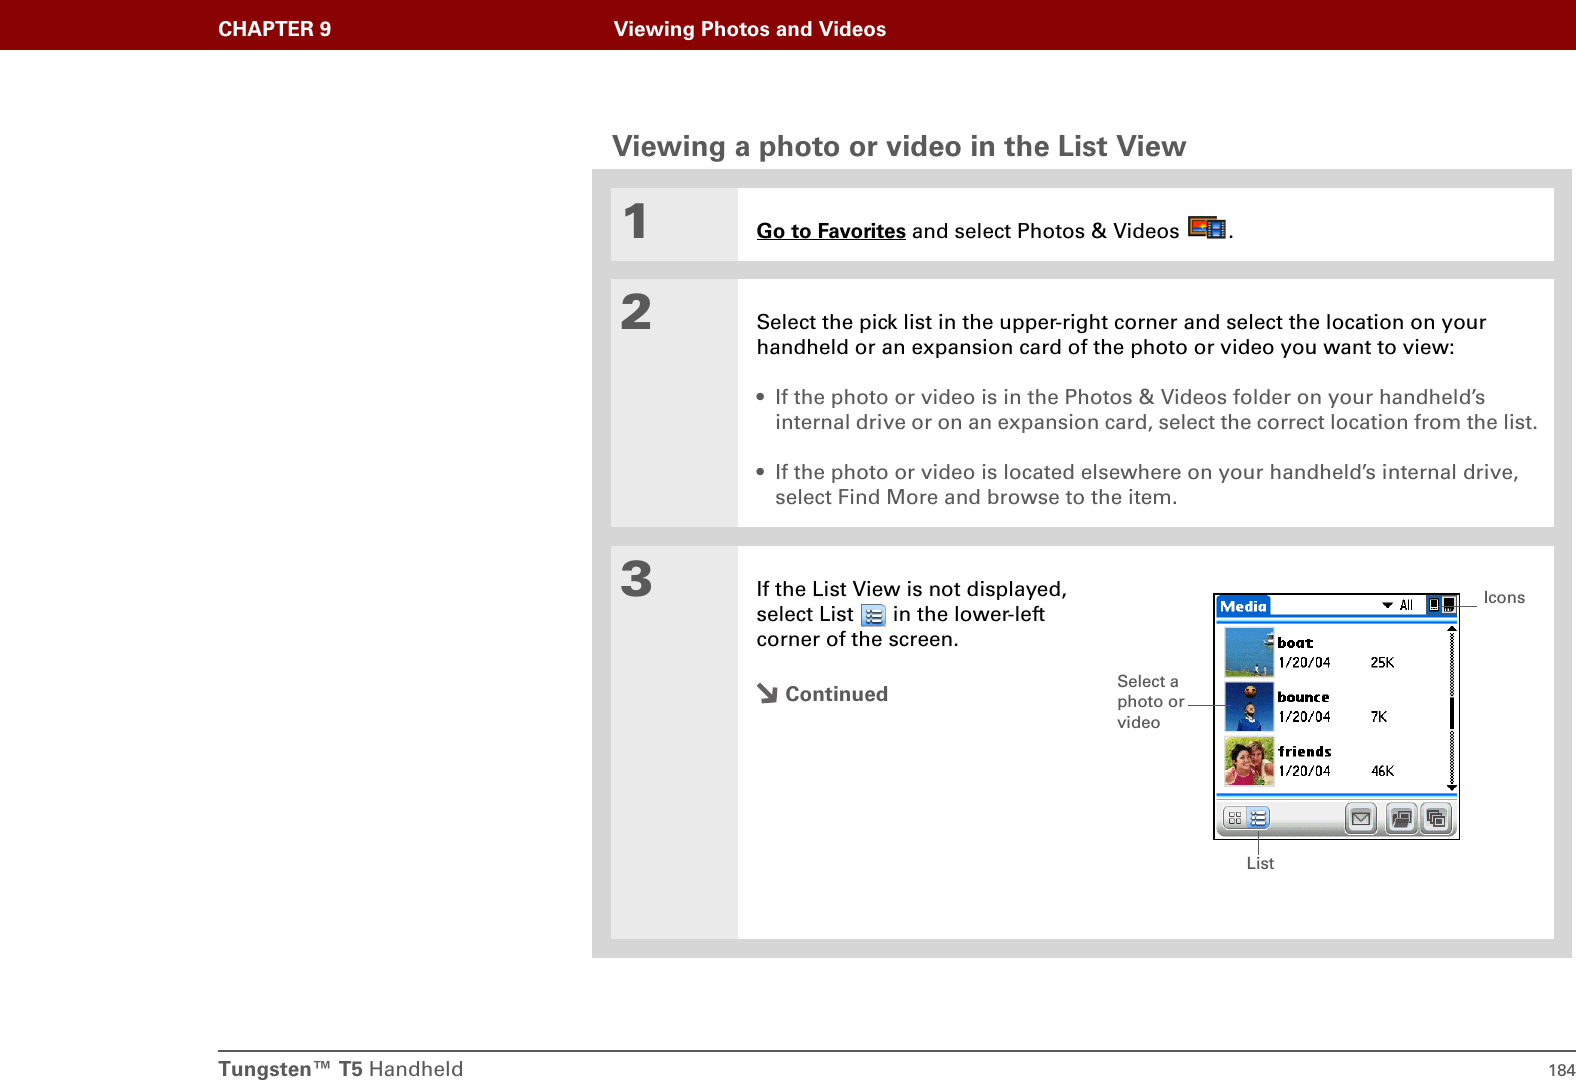
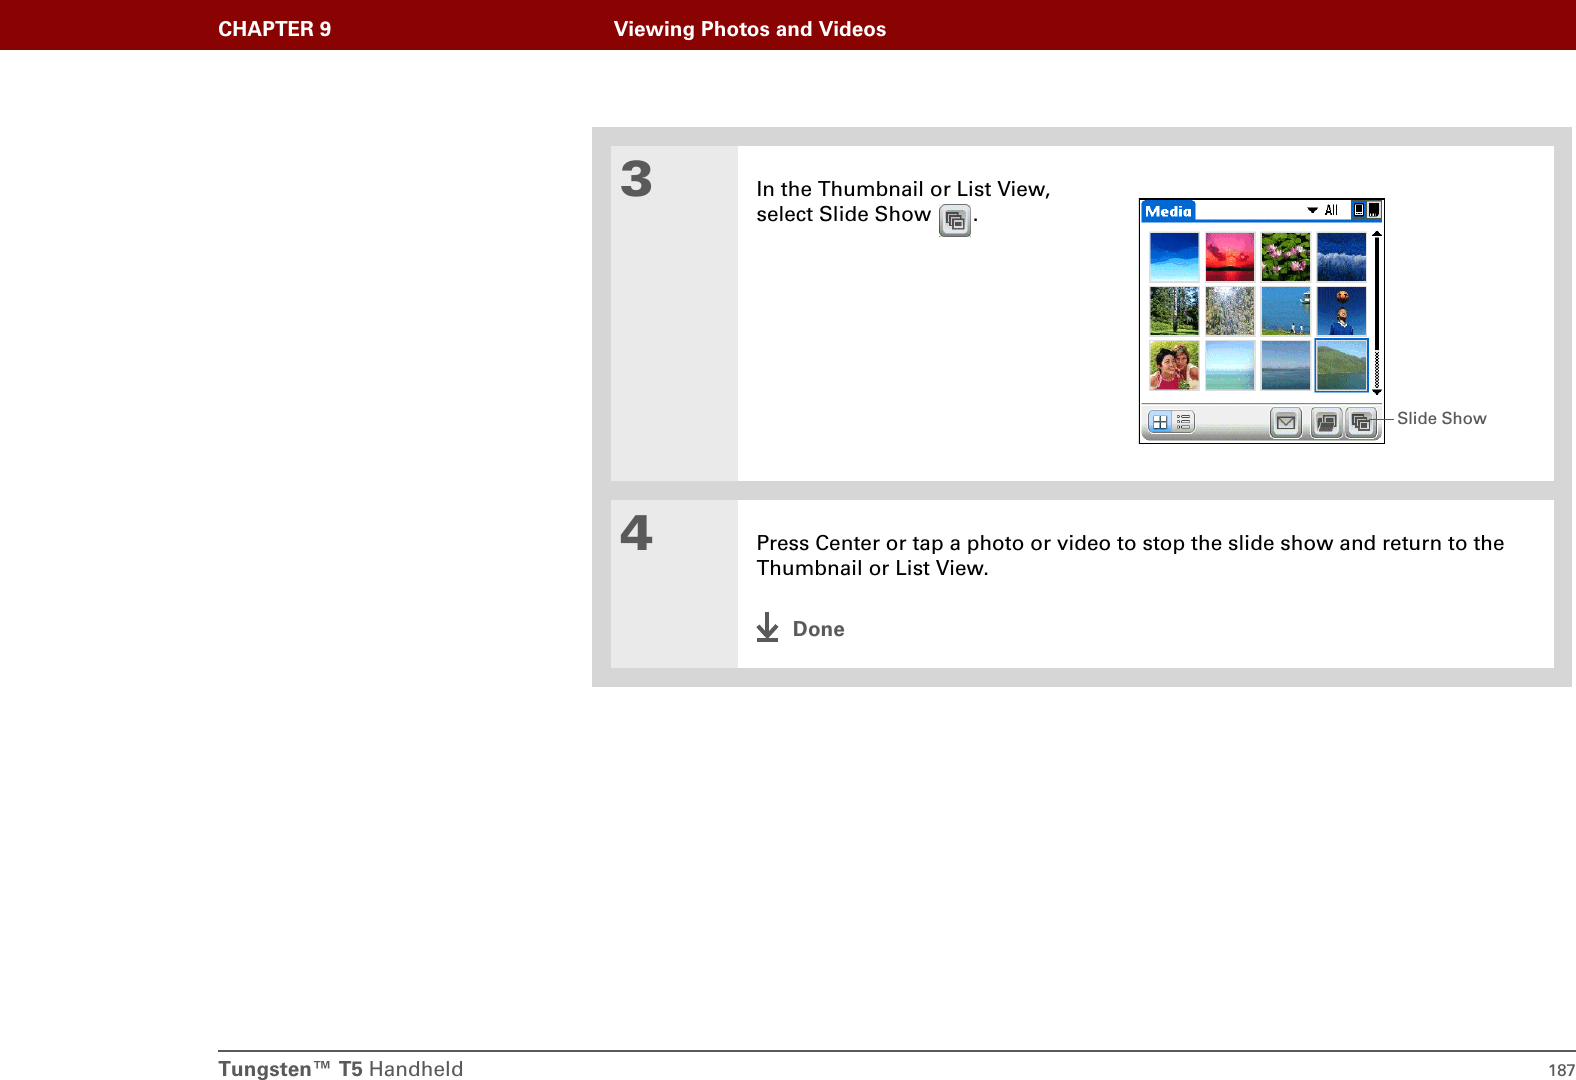
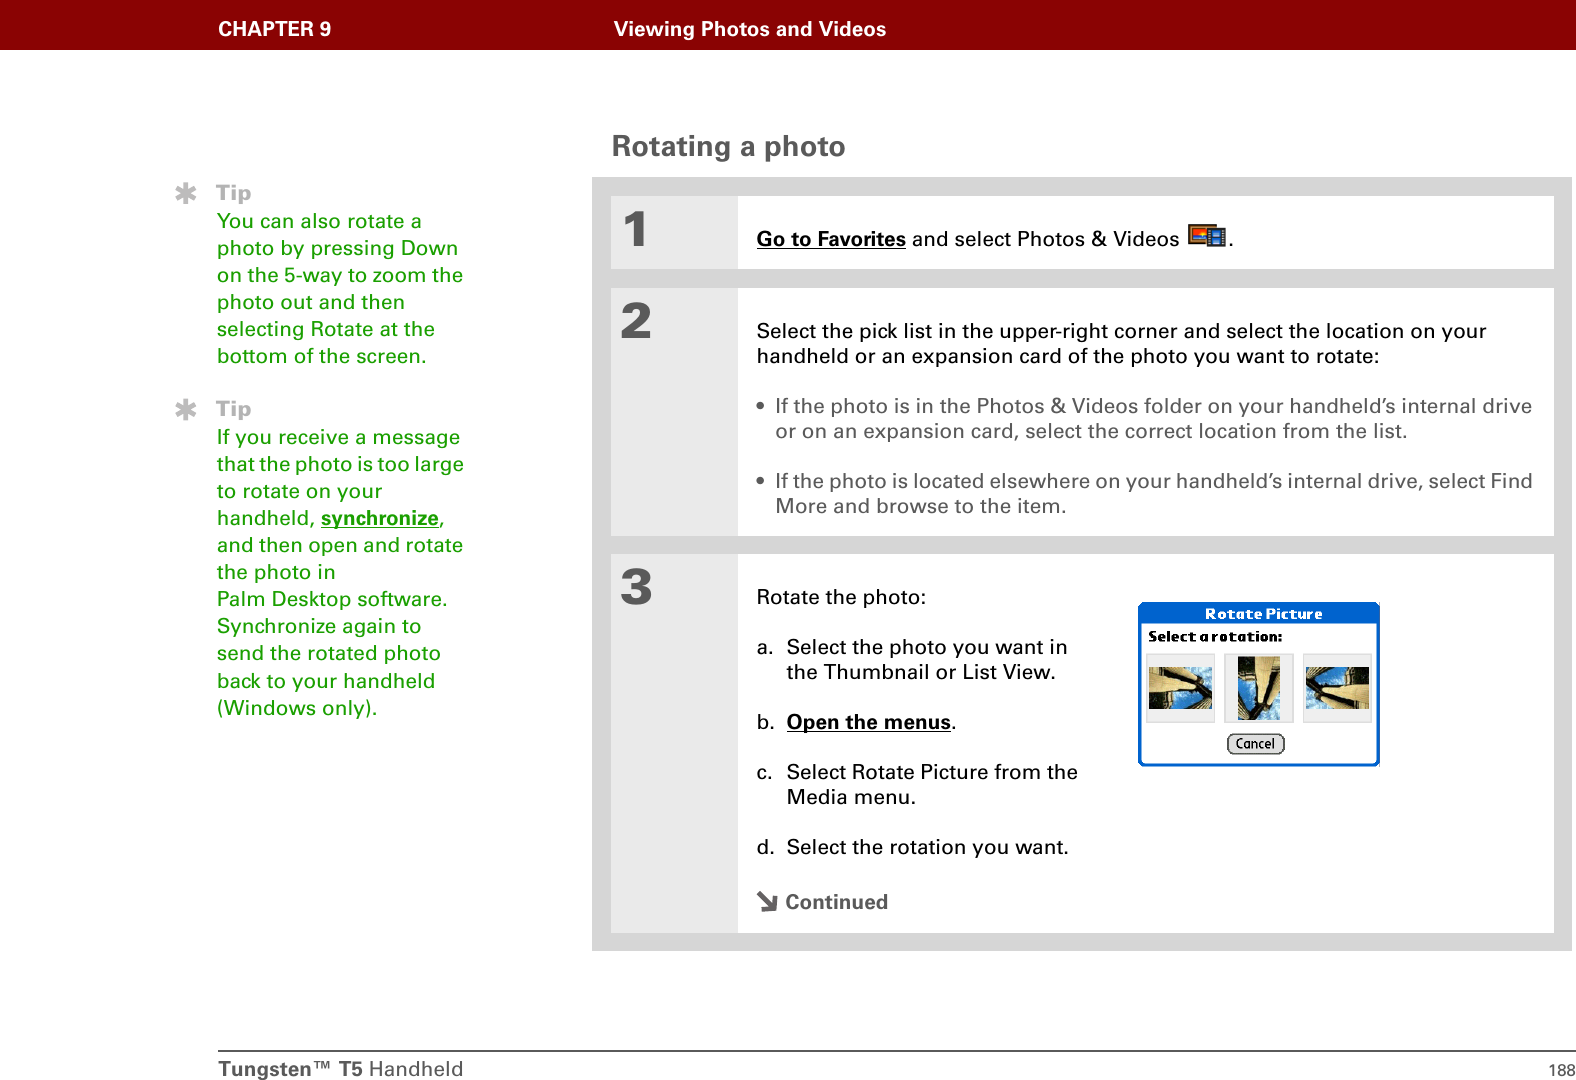
>
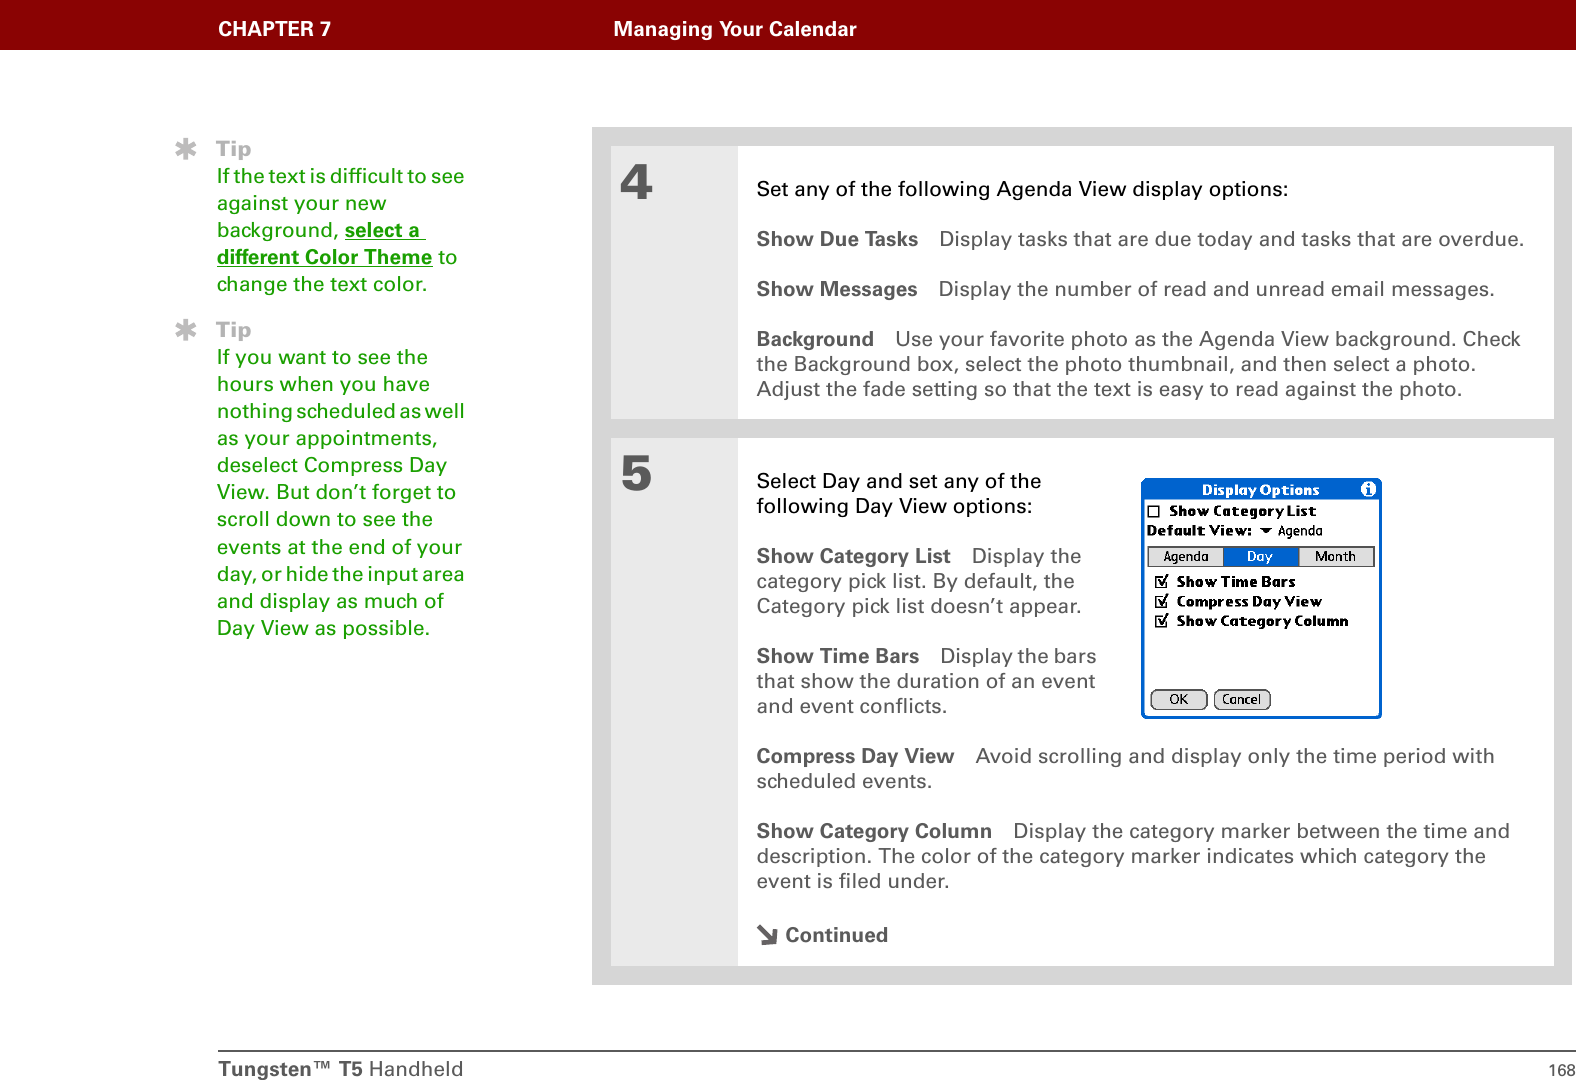
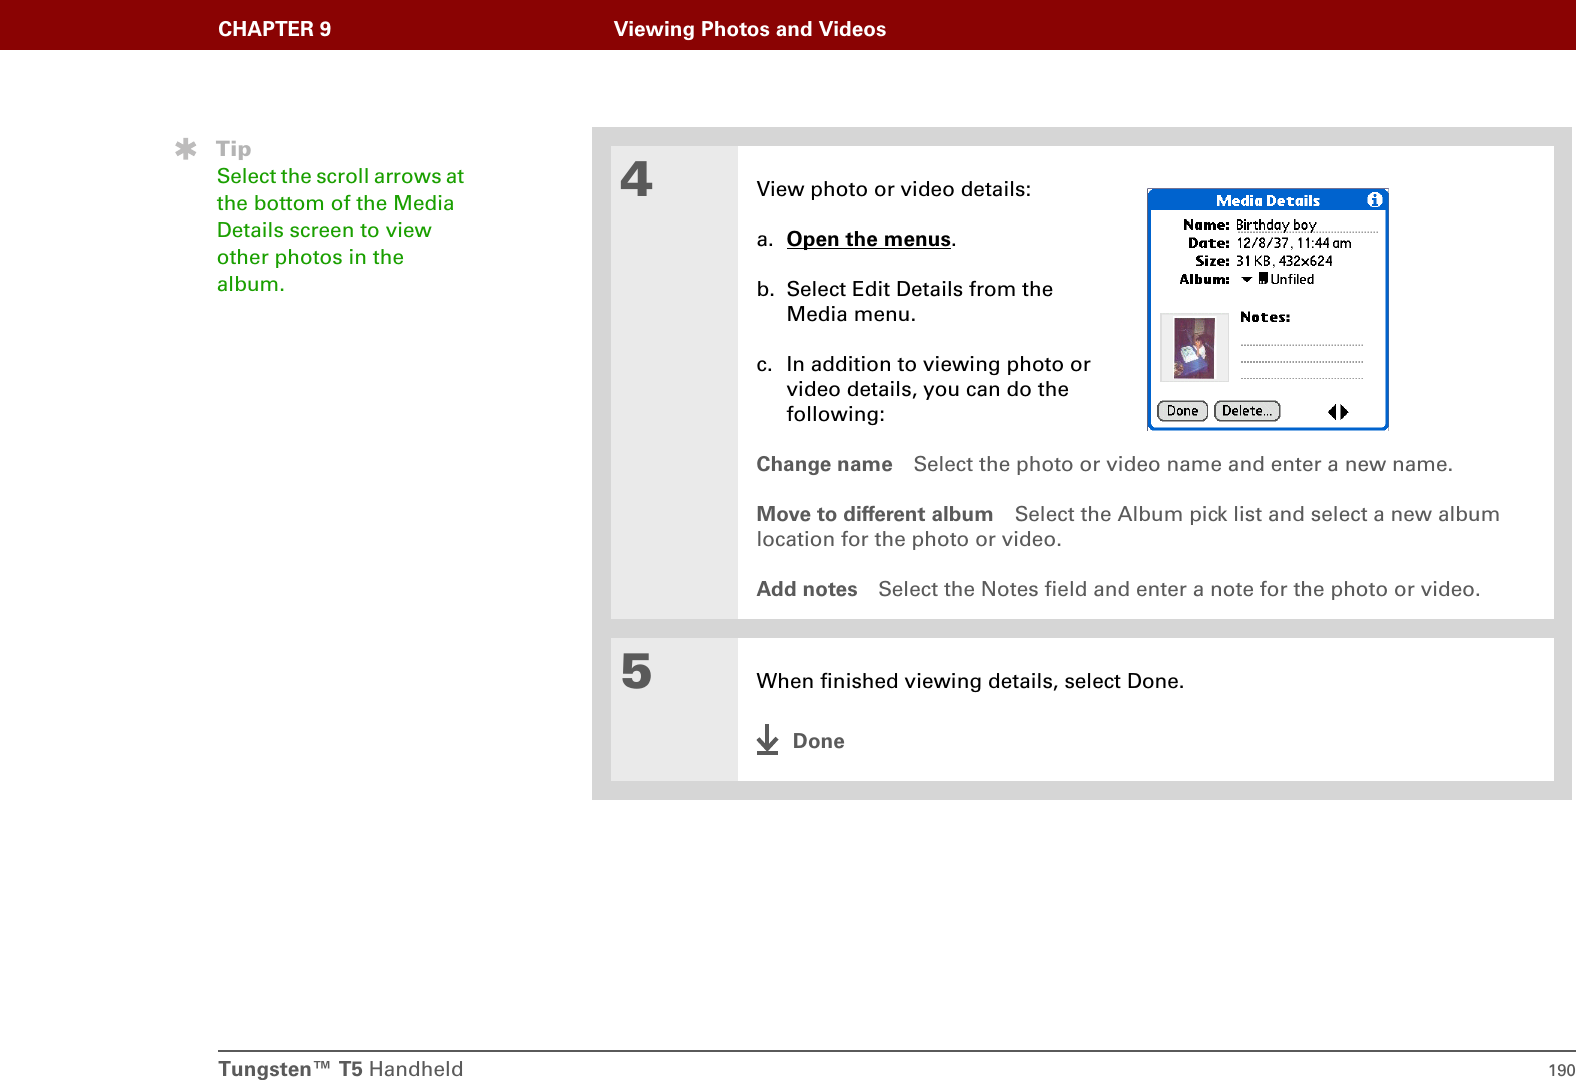
Palm
>
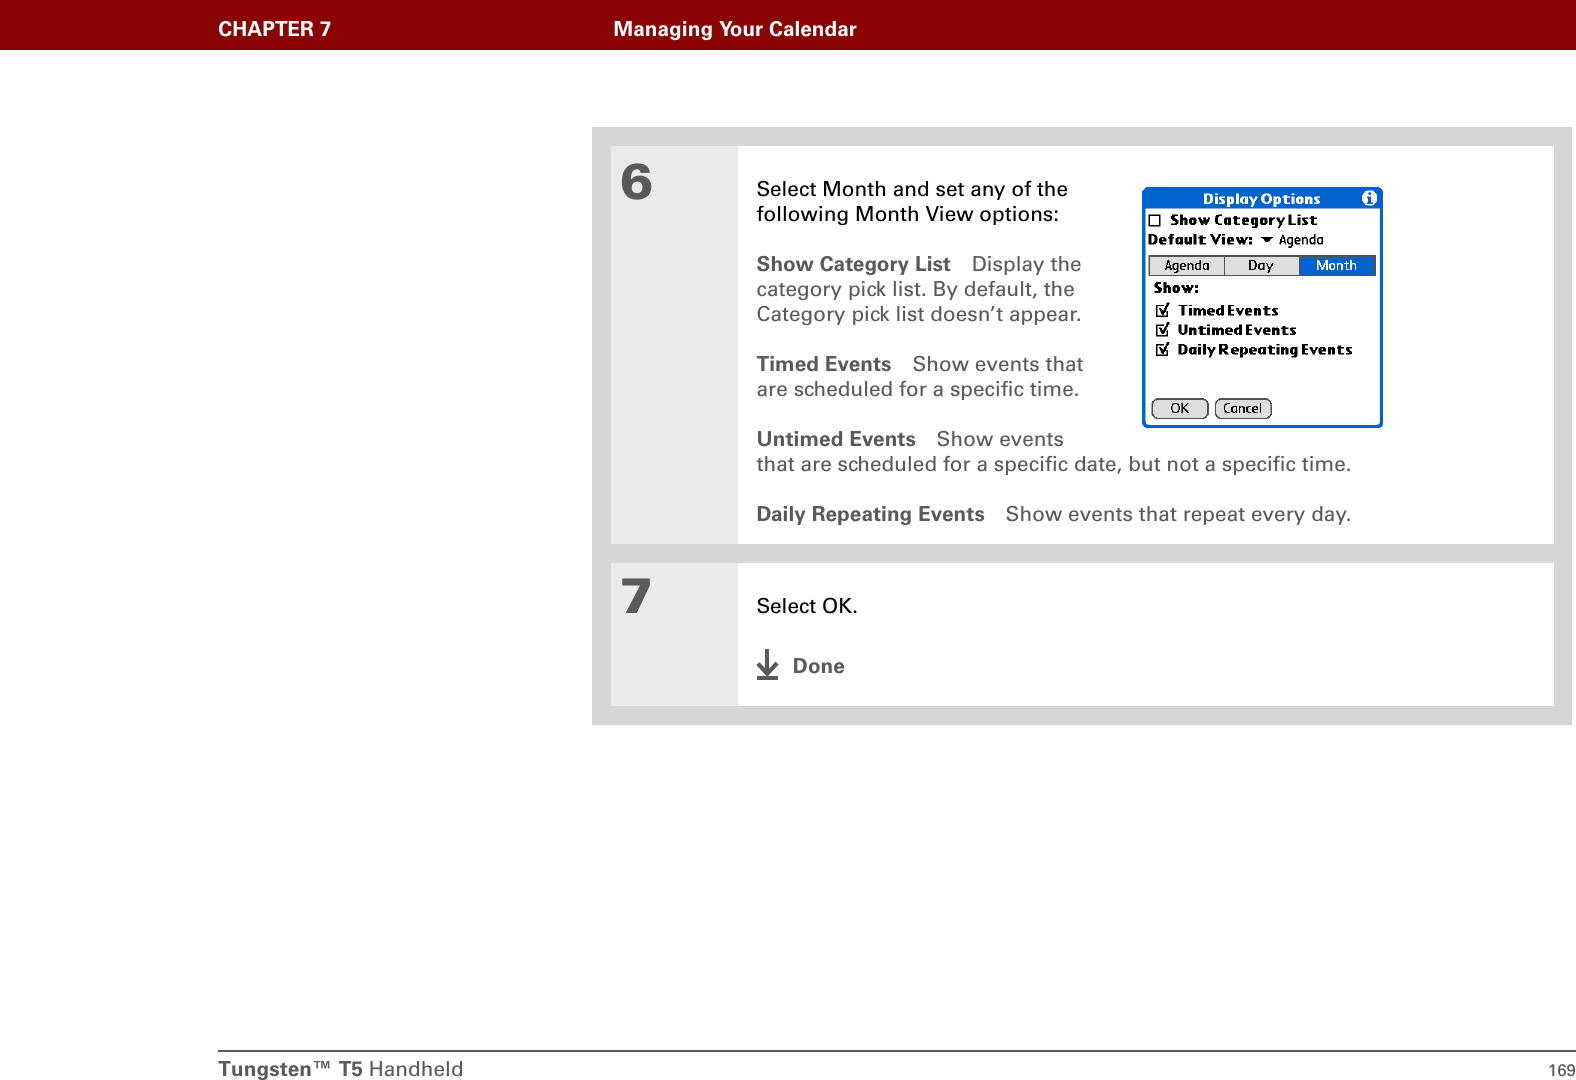
820 User Manual
>
User Manual 1
Contents
1.
User Manual 1
2.
User Manual 2
User Manual 1
Navigation menu
Upload a User Manual
Namespaces
Wiki Guide
HTML
PDF
Info
Views
User Manual
Discussion / Help
Navigation
![Tungsten™ T5 Handheld iiCopyright and Trademark© 2004 palmOne, Inc. All rights reserved. palmOne, Tungsten, the Tungsten logo, “T” (Stylized), Addit, Blazer, Graffiti, HotSync, the HotSync logo, Palm, Palm Powered, Palm OS, the Palm logo, and VersaMail are among the trademarks or registered trademarks owned by or licensed to palmOne, Inc. All other brand and product names are or may be trademarks of, and are used to identify products or services of, their respective owners.palmOne, Inc. uses the Bluetooth wireless technology trademark under express license from Bluetooth SIG, Inc. RealPlayer is a trademark or registered trademark of RealNetworks, Inc. MPEG Layer-3 audio decoding technology is licensed from Fraunhofer IIS and Thomson. This product is licensed under the MPEG-4 systems patent portfolio license for encoding in compliance with the MPEG-4 systems standard, except that an additional license and payment of royalties are necessary for encoding in connection with (i) data stored or replicated in physical media which is paid for on a title-by-title basis and/or (ii) data which is paid for on a title-by-title basis and is transmitted to an end user for permanent storage and/or use. Such additional license may be obtained from MPEG, LLC. See www.mpegla.com for additional details. This product includes technology owned by Microsoft Corporation and cannot be used or distributed without a license from Microsoft Licensing, GP. Disclaimer and Limitation of LiabilitypalmOne, Inc. assumes no responsibility for any damage or loss resulting from the use of this guide.palmOne, Inc. assumes no responsibility for any loss or claims by third parties which may arise through the use of this software. palmOne, Inc. assumes no responsibility for any damage or loss caused by deletion of data as a result of malfunction, dead battery, or repairs. Be sure to make backup copies of all important data on other media to protect against data loss.Please read the End User Software License Agreement with this product before using the accompanying software program(s). Using any part of the software indicates that you accept the terms of the End User Software License Agreement.Software Download AvailablePalm®Desktop software is supplied on a CD. If you do not have access to a CD drive for your computer, you can download Palm Desktop software from www.palmOne.com/intl/supportIMPORTANT[!]](https://usermanual.wiki/Palm/820.User-Manual-1/User-Guide-475658-Page-2.png)

![Tungsten™ T5 Handheld xxiWhat’s in this guide?The info in this guide includes step-by-step instructions, links to cross-references, and sidebars.Step-by-step instructionsHere you’ll find how-to information. Look for these cues in instructions:LinksLinks appear as underlined words in sidebars and other places throughout this guide.Cue that means the procedure continues on the next page.Cue that signals the end of the procedure. You're done.A step that you must follow; otherwise, you could experience an error or even lose information.[ & ] OPTIONAL A step you might find useful.Information that applies only in certain cases or that tells more about a procedure step.WINDOWS ONLYMAC ONLYA procedure or text that applies to one platform only. In most cases, if you see one heading, check the following or preceding sections for the other. Sometimes, there is no Mac counterpart for a Windows procedure or text—this feature is not available to Mac users.In this chapter Links on the first page of each chapter that send you to a specific section. Related topics Links that send you to other topics in this guide to learn about more things you can do with an application or feature. ContinuedDoneIMPORTANT[!]NOTE](https://usermanual.wiki/Palm/820.User-Manual-1/User-Guide-475658-Page-21.png)
![Tungsten™ T5 Handheld xxiiSidebarsBefore You Begin[!]Things you must complete before you can do the steps described in a procedure or group of procedures.TipA suggestion on how to use a feature more fully; a shortcut; a pointer to a related feature.Did You Know?An interesting fact about the topic being described; may include a link to more information.»Key TermA technical term related to the topic being described. The term may appear in this guide or only on your handheld.My HandheldA pointer to a website where you can obtain general information about your handheld and learn the latest tips, tricks, and more.SupportA pointer to a website where you can find help if you experience problems with a specific feature or with your handheld.](https://usermanual.wiki/Palm/820.User-Manual-1/User-Guide-475658-Page-22.png)
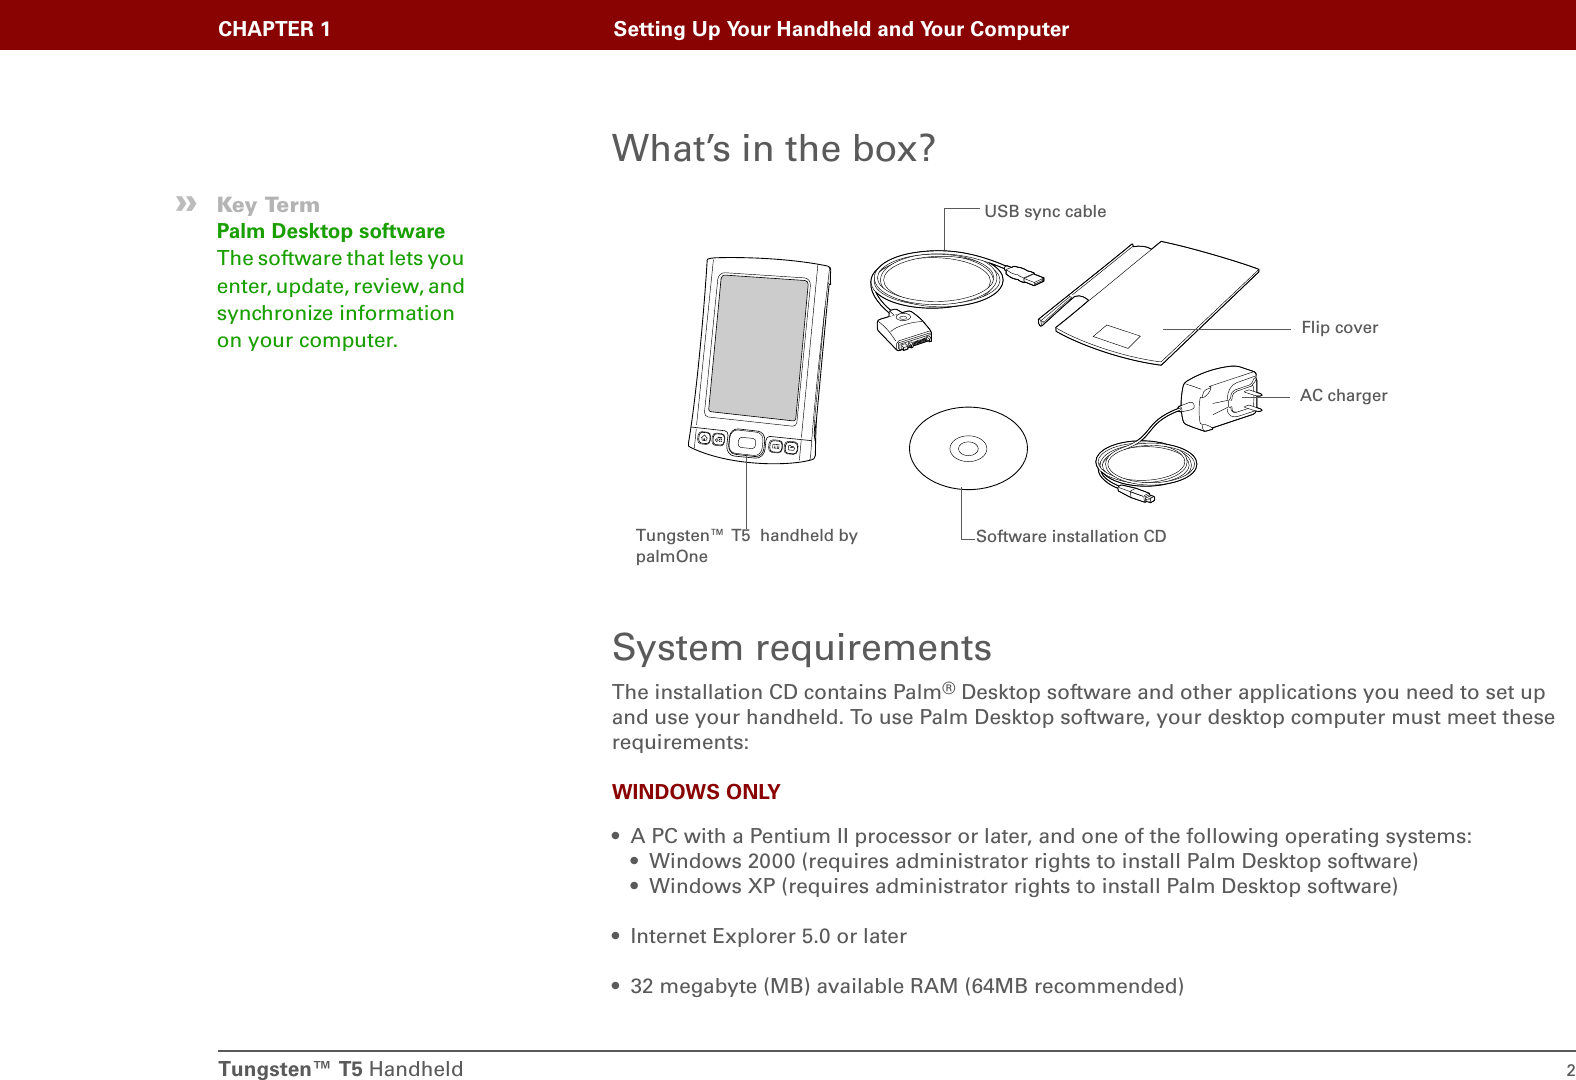
![Tungsten™ T5 Handheld 4CHAPTER 1 Setting Up Your Handheld and Your ComputerStep 1: Charging your handheld01Connect your handheld:a. Plug the USB sync cable into your handheld and into a USB port on the back of your computer.b. Plug the AC charger into the Multi-connector on the sync cable and into an outlet.2Charge your handheld for three hours. Be sure your handheld is fully charged before going on to Step 2.DoneBefore You Begin[!]If you’re upgrading from another Palm Powered device, synchronize your old handheld with your old desktop software.TipAfter the initial charge, charge your handheld at least half an hour every day.](https://usermanual.wiki/Palm/820.User-Manual-1/User-Guide-475658-Page-26.png)
![Tungsten™ T5 Handheld 6CHAPTER 1 Setting Up Your Handheld and Your ComputerStep 2: Turning on your handheld for the first time01Unplug the USB sync cable from your handheld.2Press the power button.3Slide the stylus out of the slot.4Hold the stylus as you would hold a pen, and follow the onscreen instructions to set up your handheld.DoneBefore You Begin[!]Be sure to fully charge your handheld, as described in the preceding procedure.TipAfter you set up your handheld, review the Quick Tour on your handheld and take the tutorial on the CD to learn the basics. Power buttonStylus](https://usermanual.wiki/Palm/820.User-Manual-1/User-Guide-475658-Page-28.png)
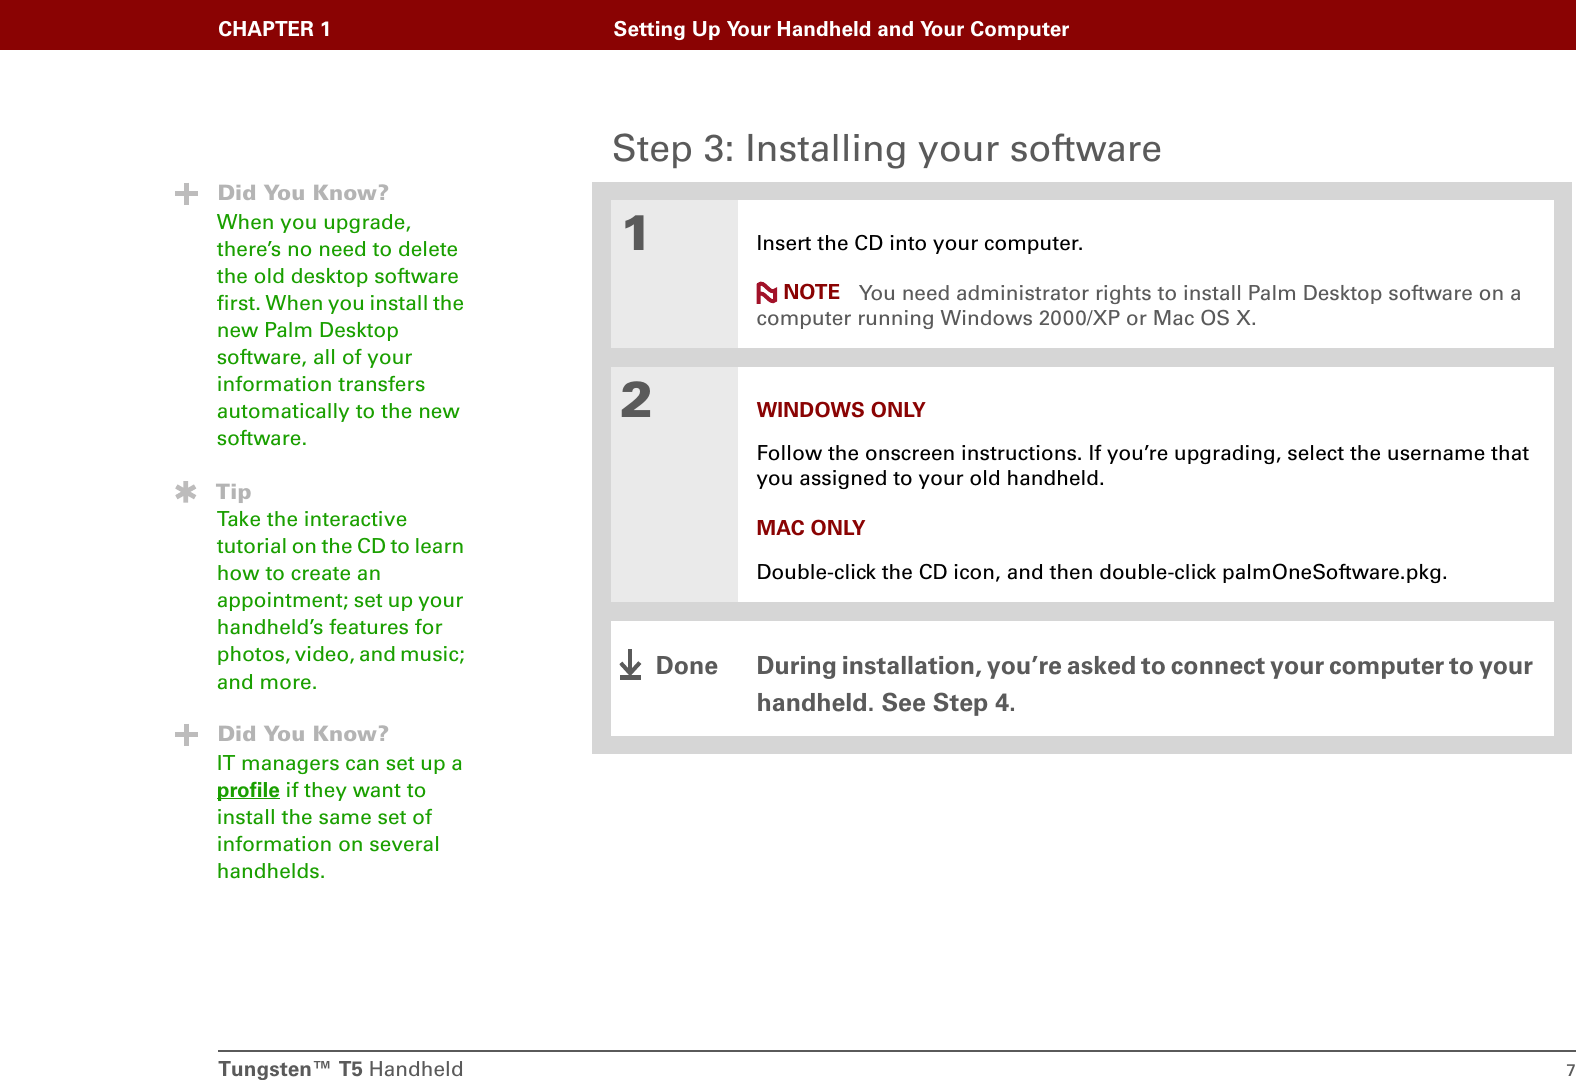
![Tungsten™ T5 Handheld 8CHAPTER 1 Setting Up Your Handheld and Your ComputerStep 4: Connecting your handheld to your computerIn this step, you connect your handheld to your computer and synchronize for the first time. Synchronizing simply means that any information you enter in one place (your handheld or computer) is automatically updated in the other. Be sure to synchronize the info in your handheld’s program memory at least once a day so that you always have an up-to-date backup copy of this info on your computer.01Connect your handheld to your computer:a. Plug the USB sync cable into a USB port on the back of your computer.b. Plug the cable into your handheld.ContinuedIMPORTANT[!]TipIf the Select User dialog box appears during synchronization, select the username of the handheld you want to synchronize, and click OK.»Key TermThird-party applicationA software program that runs on a Palm Powered device, but is not created or supported by palmOne, Inc.TipIf you have problems with your new handheld after you synchronize, you may need to update your third-party applications.](https://usermanual.wiki/Palm/820.User-Manual-1/User-Guide-475658-Page-30.png)
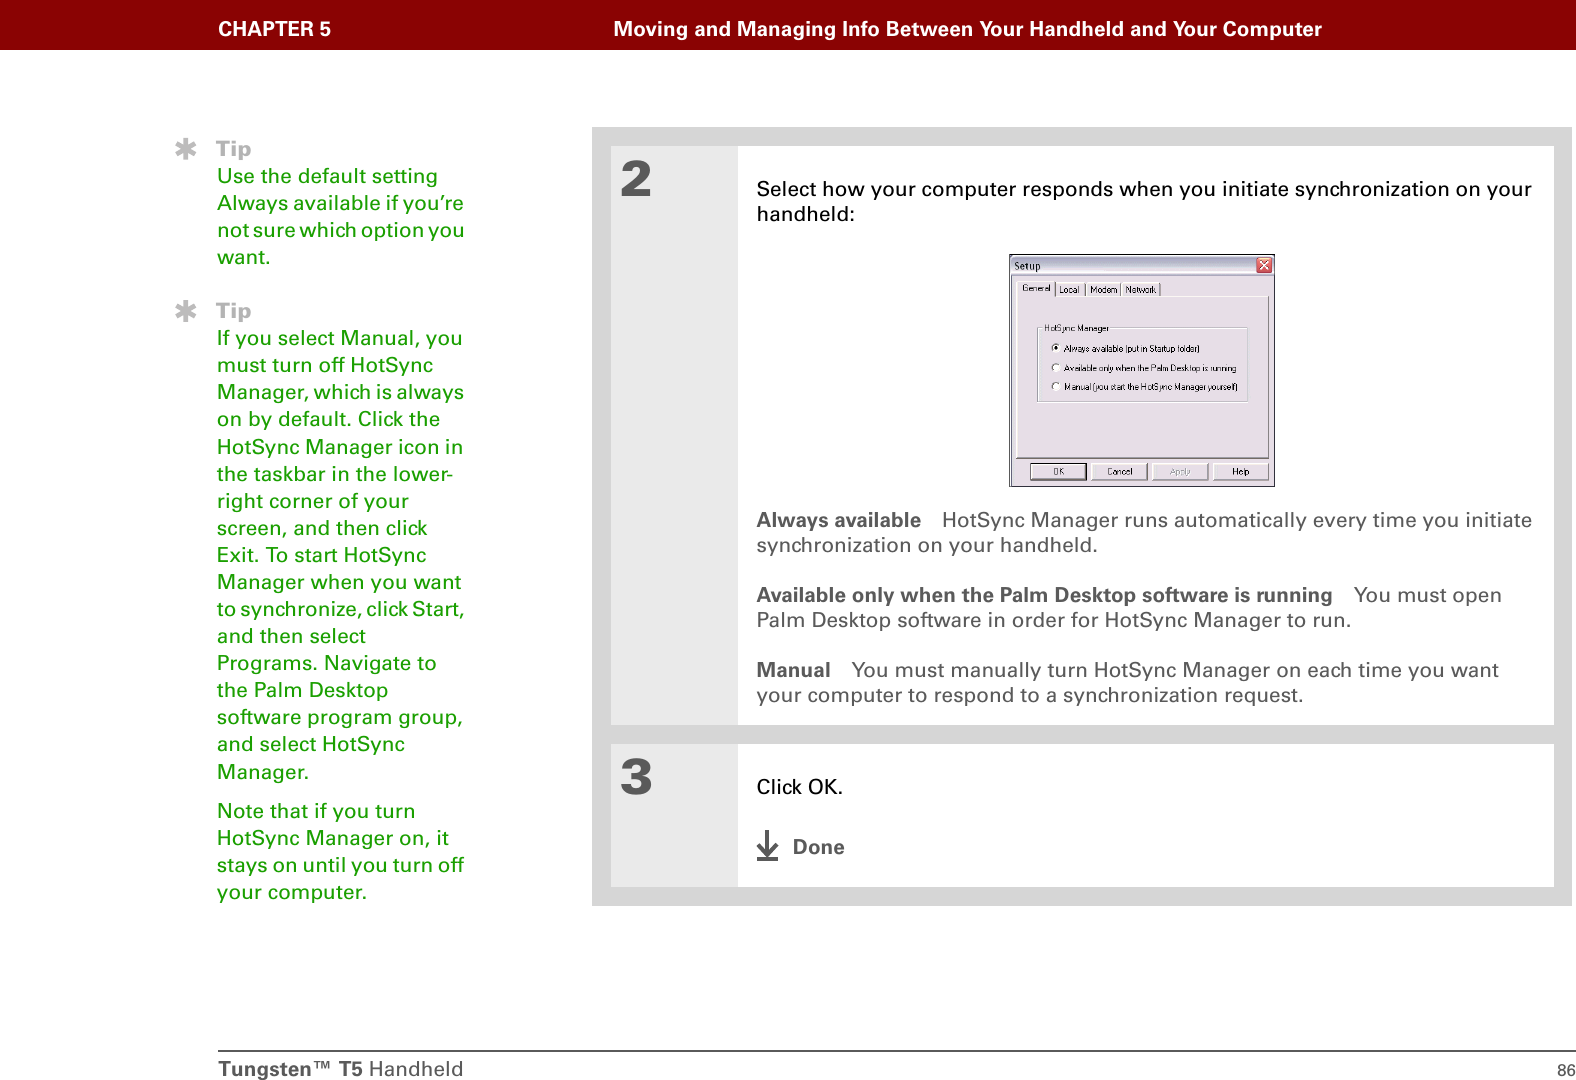
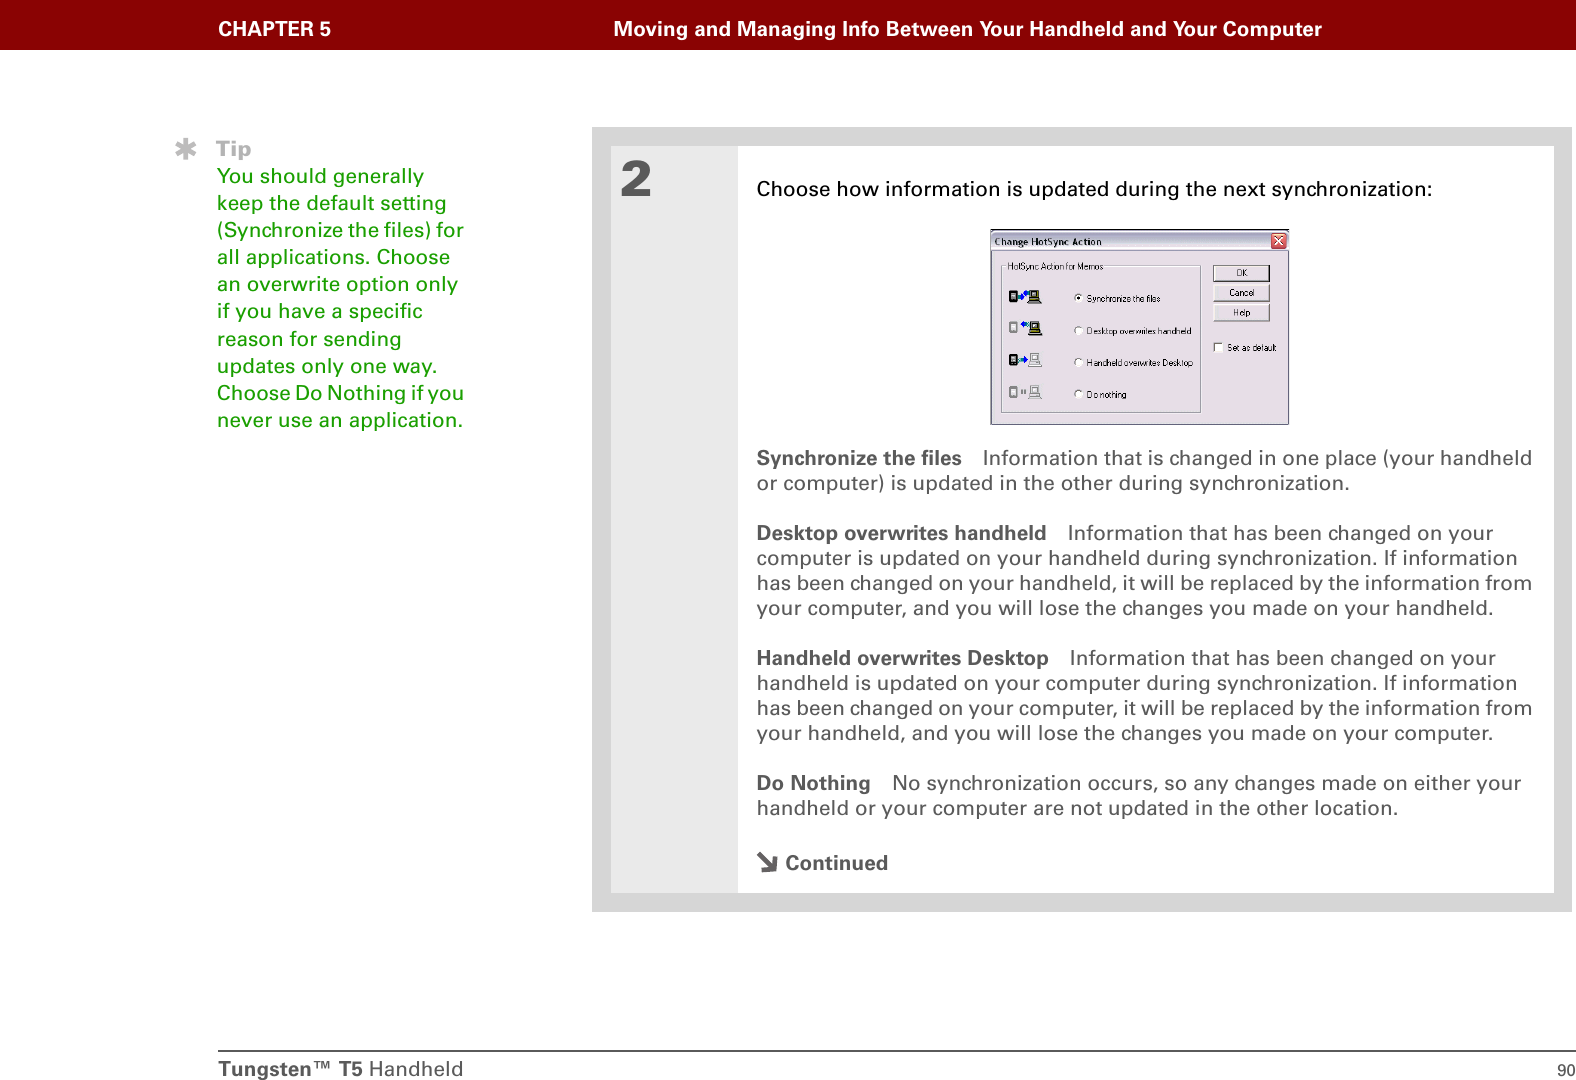
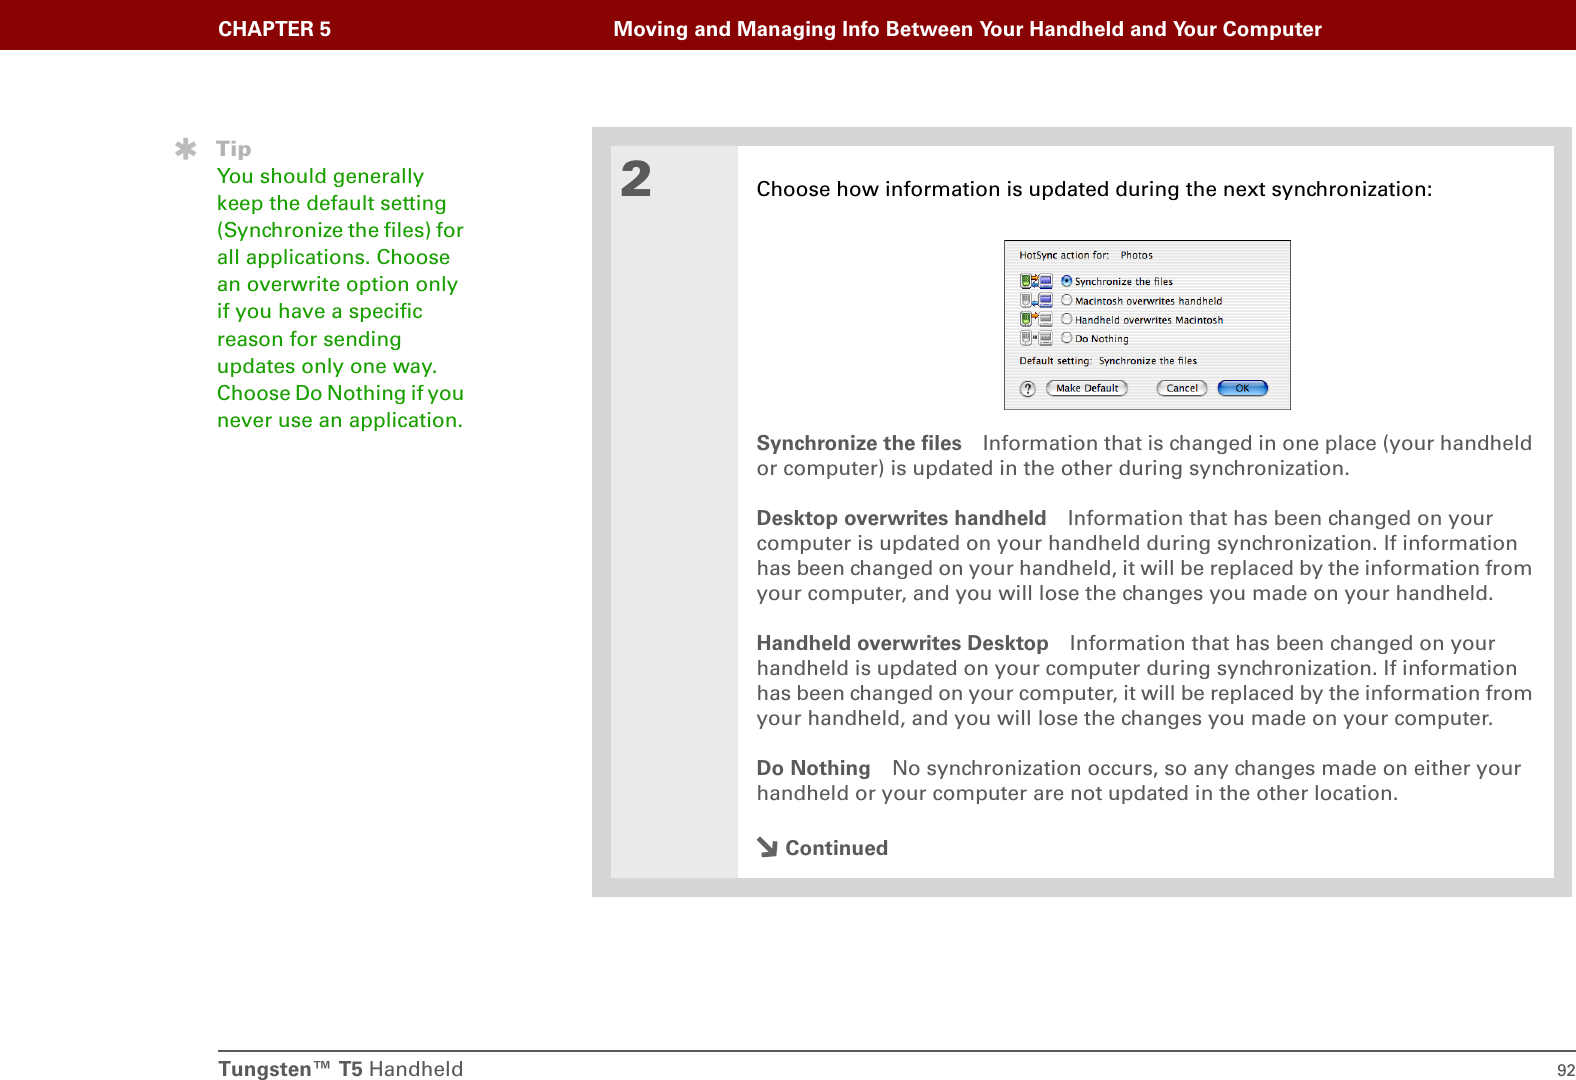
![Tungsten™ T5 Handheld 10CHAPTER 1 Setting Up Your Handheld and Your ComputerSwitching to another desktop software applicationWINDOWS ONLYDuring CD installation, you chose a desktop software application to synchronize with your handheld. You may have chosen Palm Desktop software at that time. But if Microsoft Outlook already contains all of your contacts, appointments, tasks, and notes, you can change your synchronization method so that your handheld synchronizes with Outlook instead. You can also change from Outlook to Palm Desktop software. If you choose to synchronize with Outlook, info from Contacts, Calendar, Tasks, and Memos is synchronized with Outlook. You can also set up the VersaMail® application to synchronize with Outlook. Other info, such as photos and notes, is synchronized with Palm Desktop software.01Insert the CD into your computer.2Select Change your synchronization method.3Follow the onscreen instructions for the desktop software you want to use.DoneNOTEBefore You Begin[!]You must have completed CD installation and chosen Palm Desktop software as your desktop application for synchronization in order to switch to Outlook. Note that you can choose Outlook as your synchronization software for Contacts, Calendar, Tasks, and Memos during CD installation.](https://usermanual.wiki/Palm/820.User-Manual-1/User-Guide-475658-Page-32.png)
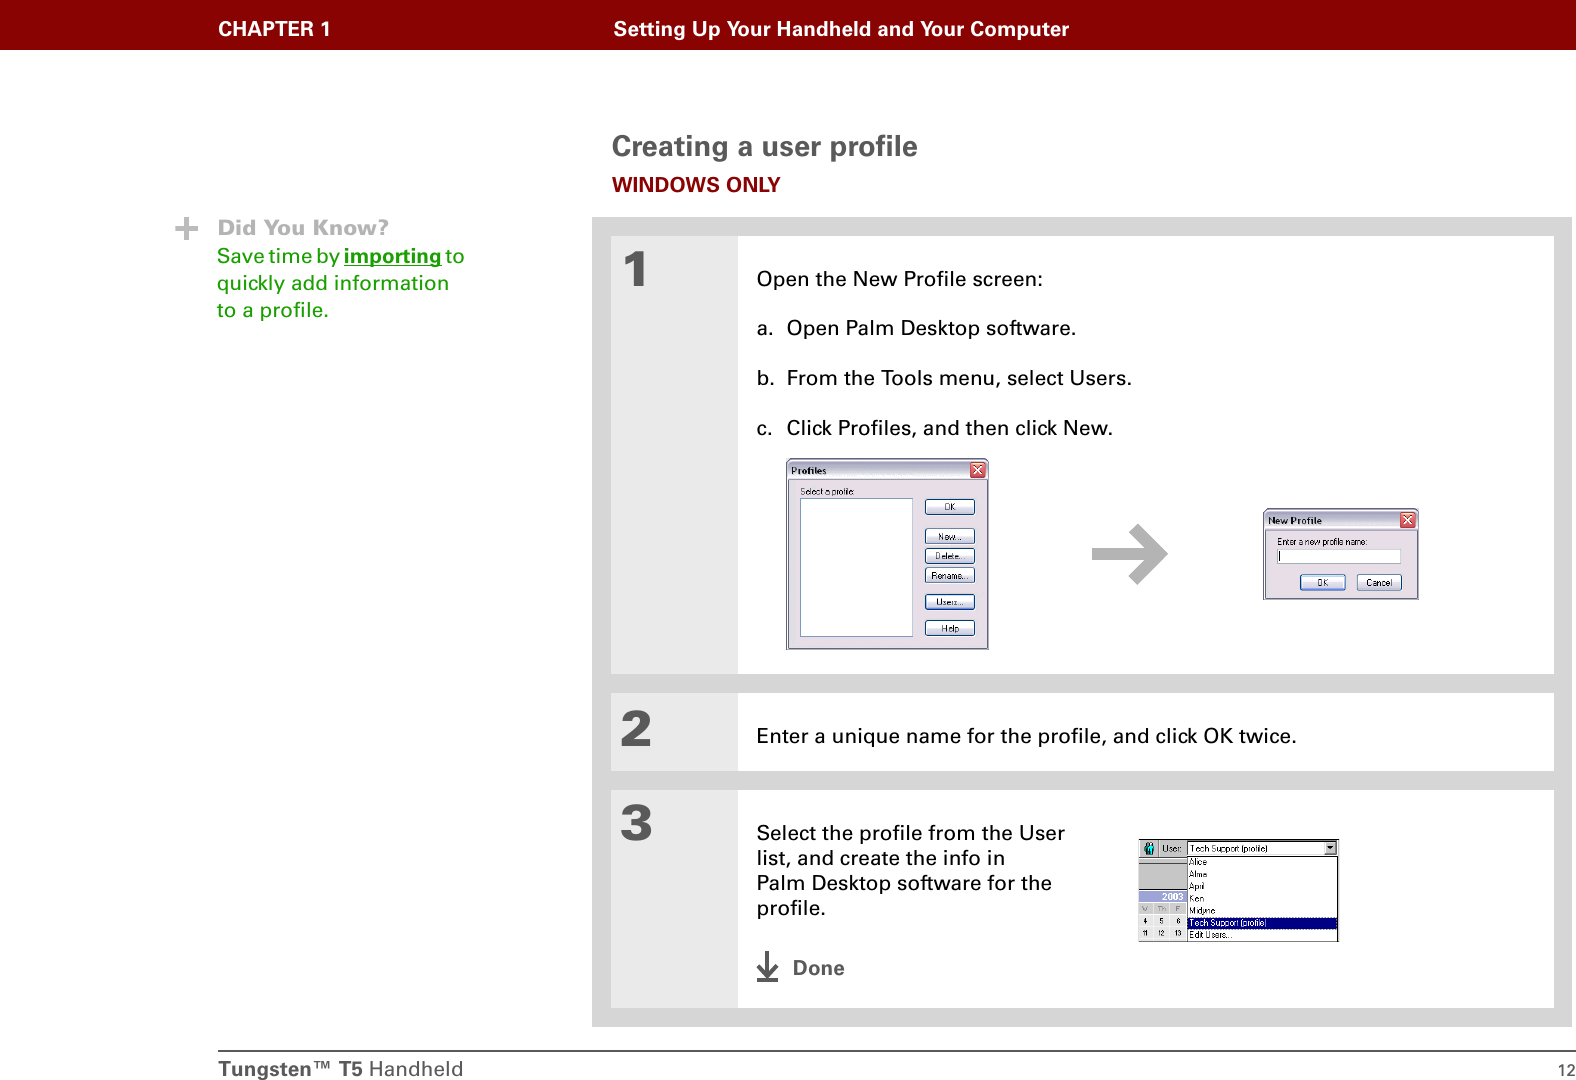
![Tungsten™ T5 Handheld 11CHAPTER 1 Setting Up Your Handheld and Your ComputerUsing user profiles Only IT managers may need to use user profiles for their company. If you are not an IT manager, you can skip this section.Suppose your sales organization wants to distribute two dozen handhelds that all have a common company phone list, a set of memos, and several key applications. A user profile can be created to install this information before the handhelds are distributed to employees. When the employees synchronize for the first time, this common information becomes part of their user-specific information.A user profile enables you to install the same information onto multiple handhelds before each handheld is individualized with a unique username and user-specific information. A handheld that has a user profile installed can be given to anyone, because the handheld is not yet identified by a unique username. When the new user synchronizes for the first time, he or she gives the handheld a unique username. Handhelds that are synchronized with a user profile must be either new ones that have never been synchronized or handhelds that have had their usernames and information removed by a hard reset.IMPORTANT[!]NOTE](https://usermanual.wiki/Palm/820.User-Manual-1/User-Guide-475658-Page-33.png)

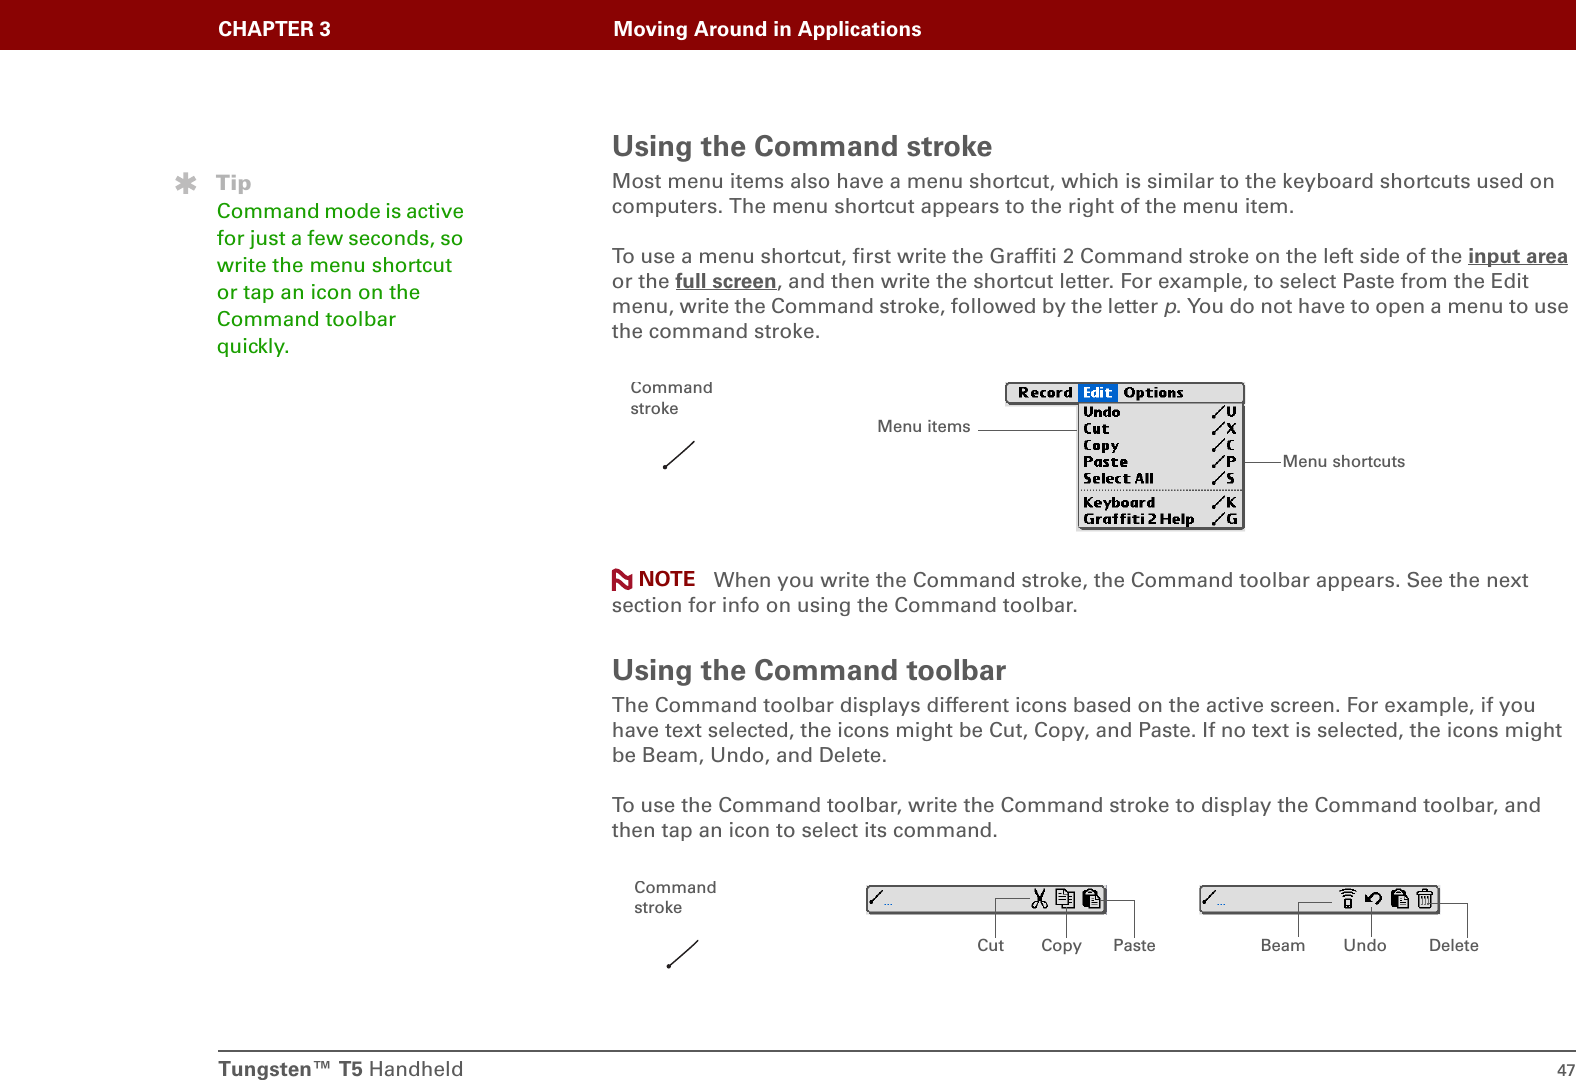
![Tungsten™ T5 Handheld 45CHAPTER 3 Moving Around in ApplicationsRead dialog boxes carefully. Selecting a button such as OK or Yes may cancel an action or delete information.Moving around menusAfter you open the menus you can use the 5-way to move between and to select menu items:Up, Down, Right, or LeftHighlights the next item in the dialog box (pick list, box, button) in the corresponding direction.Center • If highlight is on a box: Checks or unchecks the box. • If highlight is on a pick list: Opens the pick list. When a pick list is open:Up or Down Scrolls to the previous or next entry.Center Selects the highlighted entry.• If highlight is on a button: Activates the button, and then closes the dialog box. Up or Down Scrolls within the current menu list.Right or Left Scrolls to the next or previous menu on the menu bar.Center Selects the highlighted menu item.BoxPick listButton with highlightIMPORTANT[!]](https://usermanual.wiki/Palm/820.User-Manual-1/User-Guide-475658-Page-67.png)

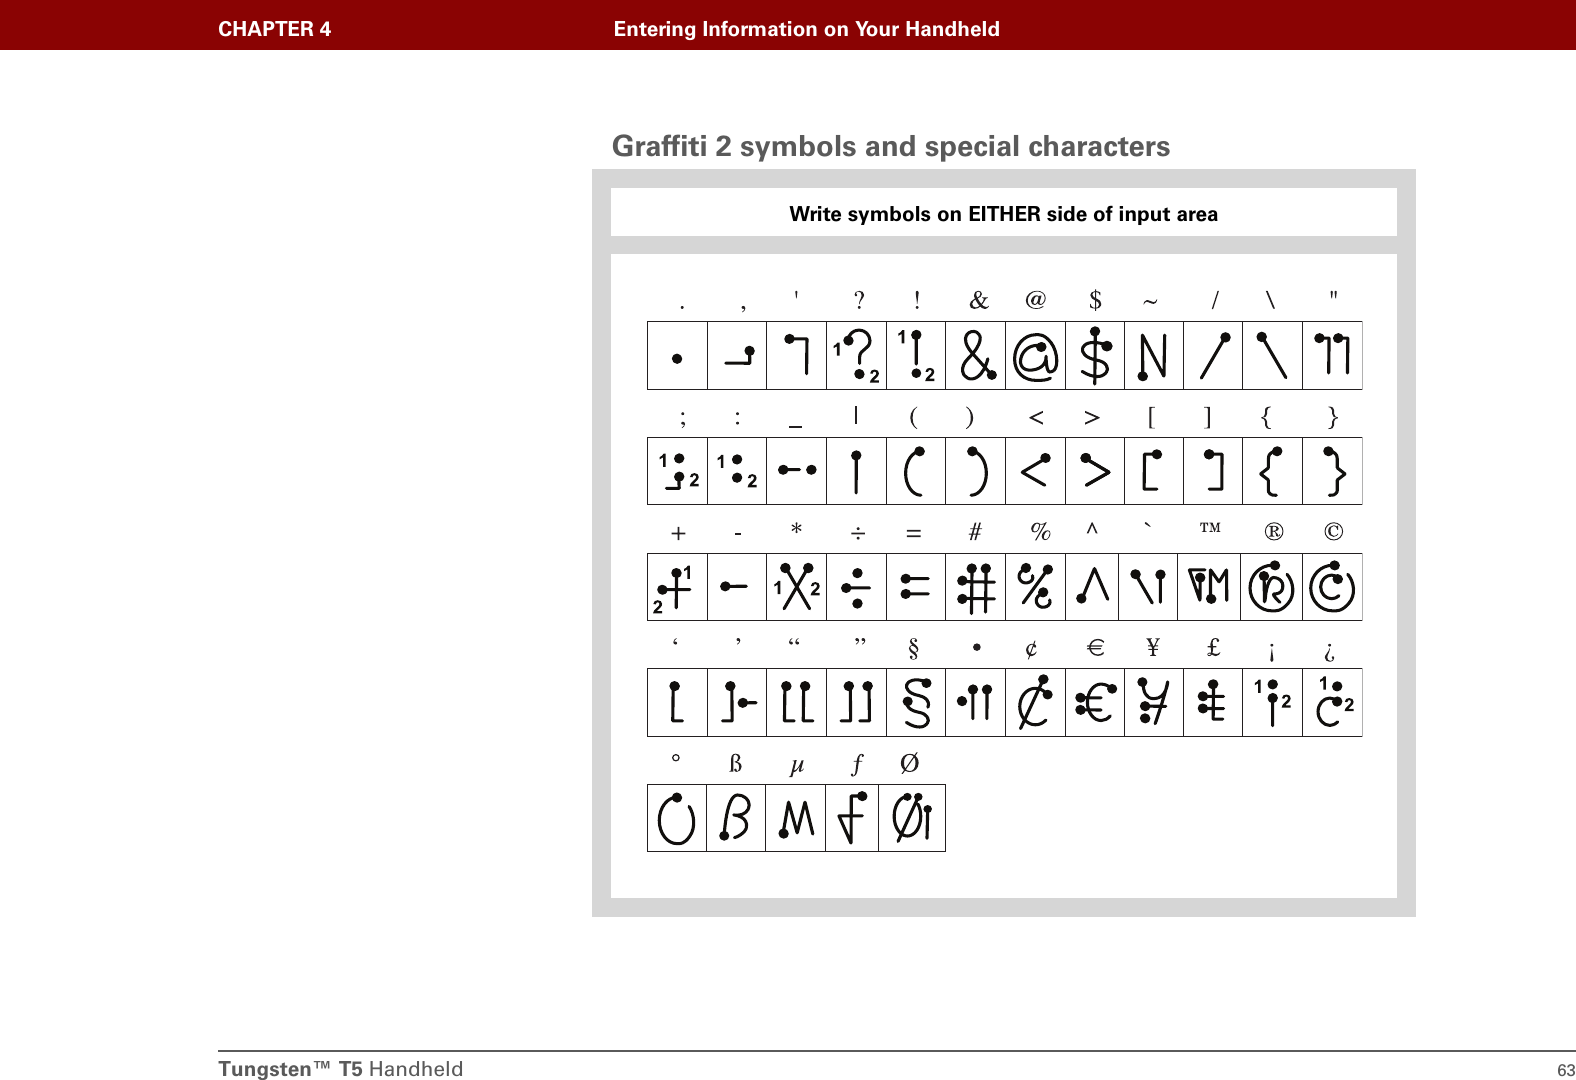
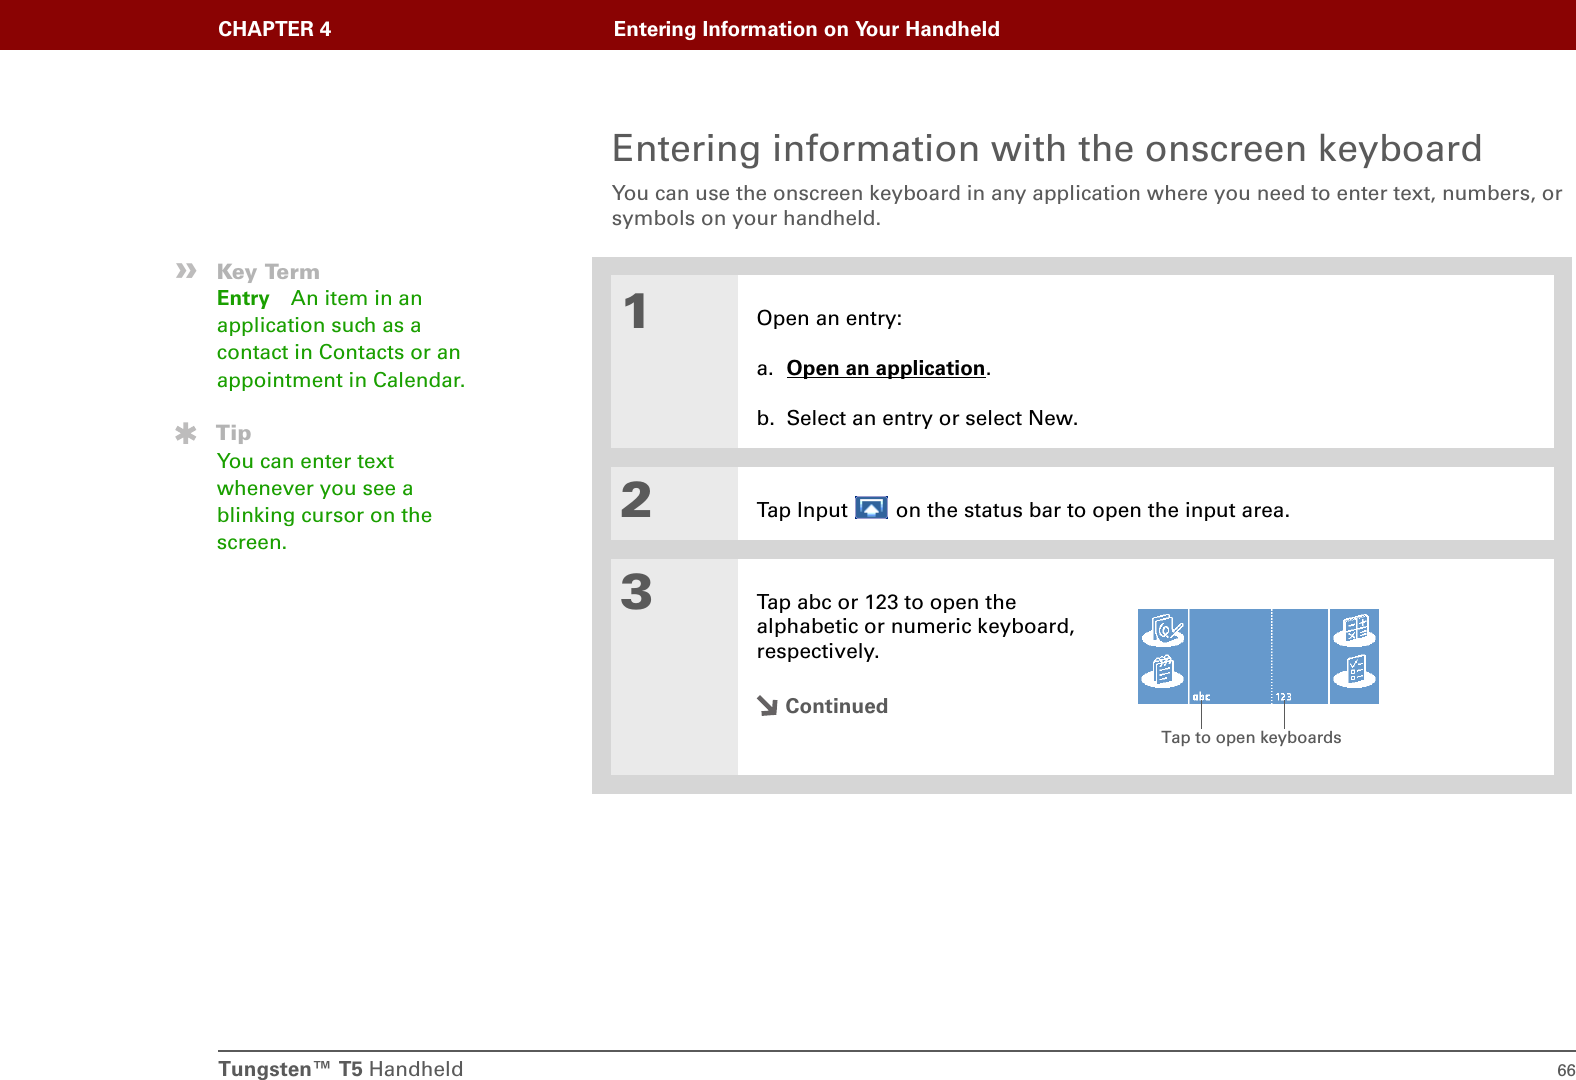
![Tungsten™ T5 Handheld 67CHAPTER 4 Entering Information on Your Handheld4[ & ] OPTIONAL Select from among four different keyboards.5Tap the characters to enter text, numbers, and symbols.DoneBackspaceCarriage returnTabCaps shiftTap here to display lowercase keyboard Tap here to display uppercase keyboard Tap here to display international keyboard abc - lowercaseABC - uppercase int. - international123 - numericTap here to display numeric keyboard TipWhen a keyboard is open, you can tap abc, 123, or Int’l to open any of the other keyboards.](https://usermanual.wiki/Palm/820.User-Manual-1/User-Guide-475658-Page-89.png)
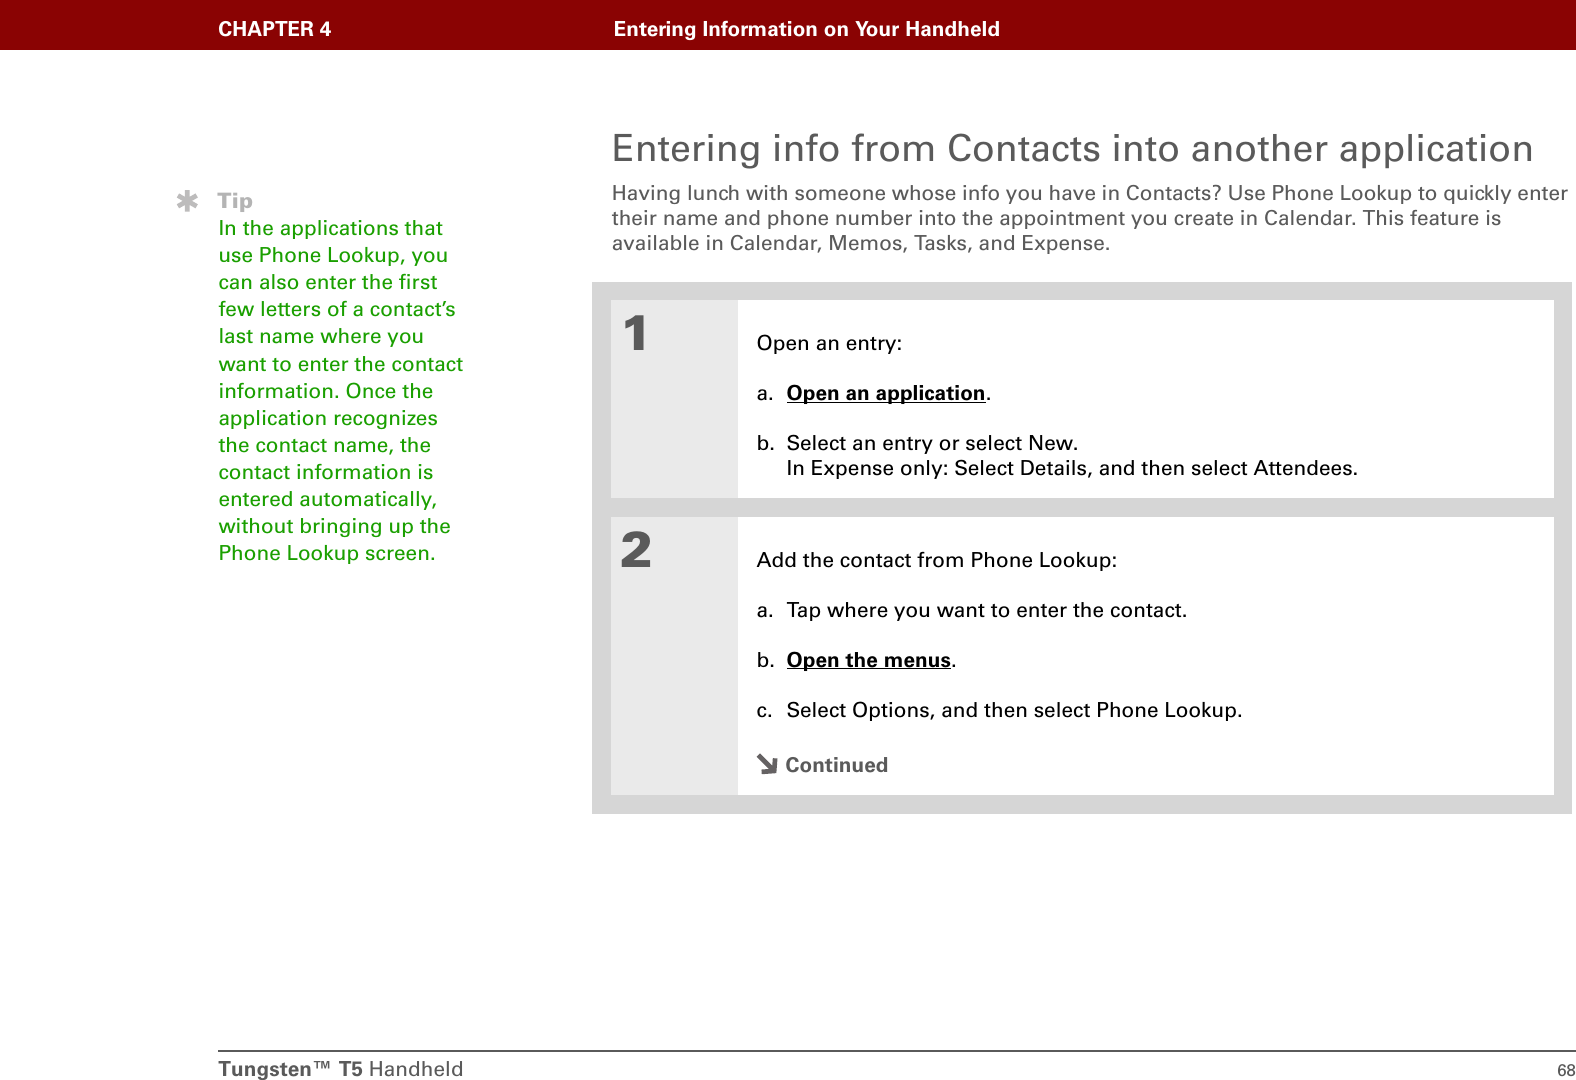
![Tungsten™ T5 Handheld 69CHAPTER 4 Entering Information on Your HandheldCont’d.d. Select the contact, and then select Add.3[ & ] OPTIONAL To add another contact, repeat step 2.The name and phone number of the contact are automatically entered.Done](https://usermanual.wiki/Palm/820.User-Manual-1/User-Guide-475658-Page-91.png)
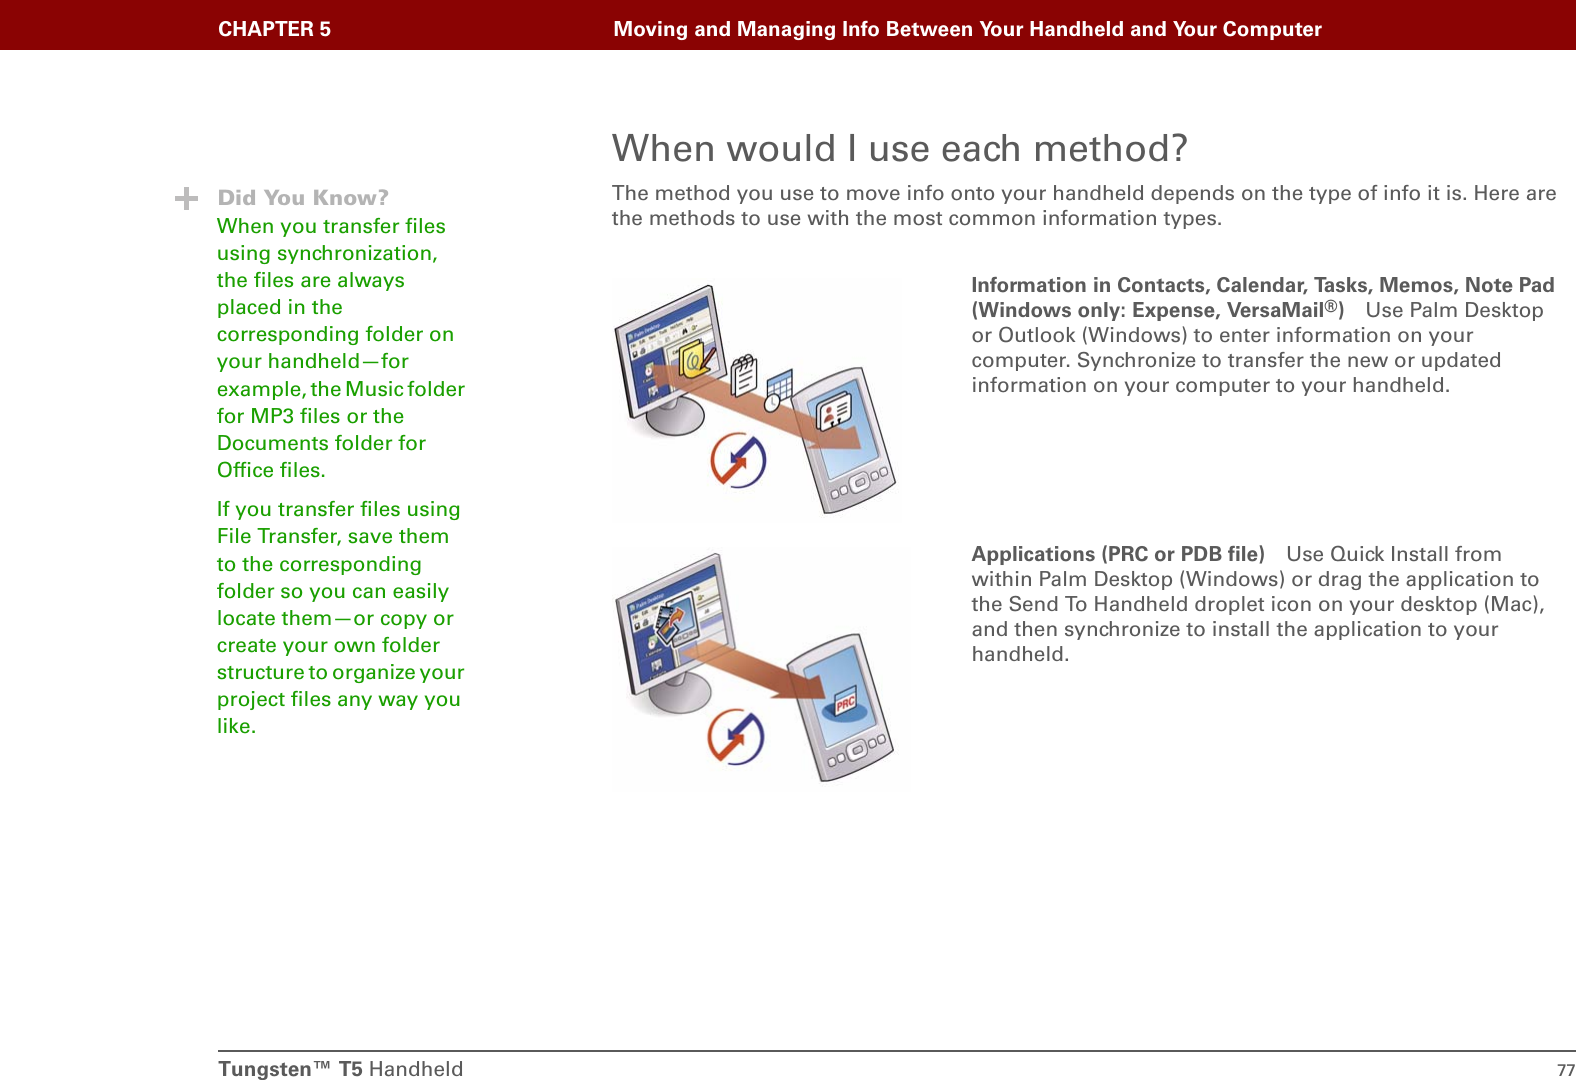
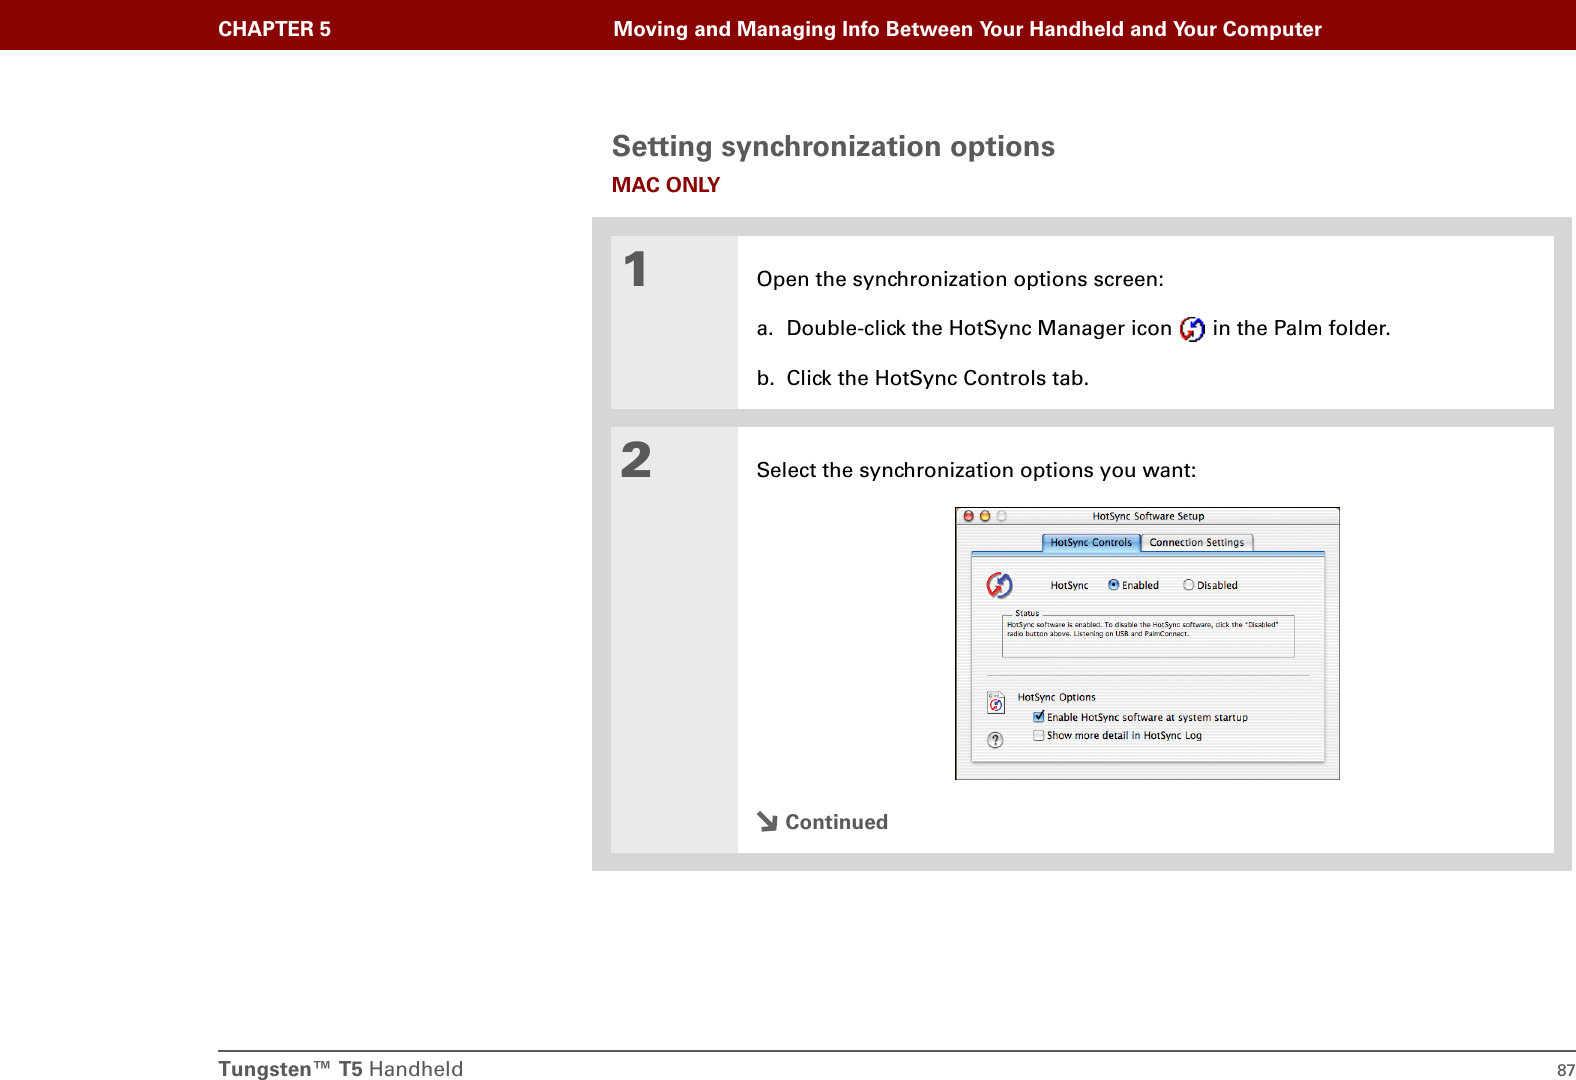
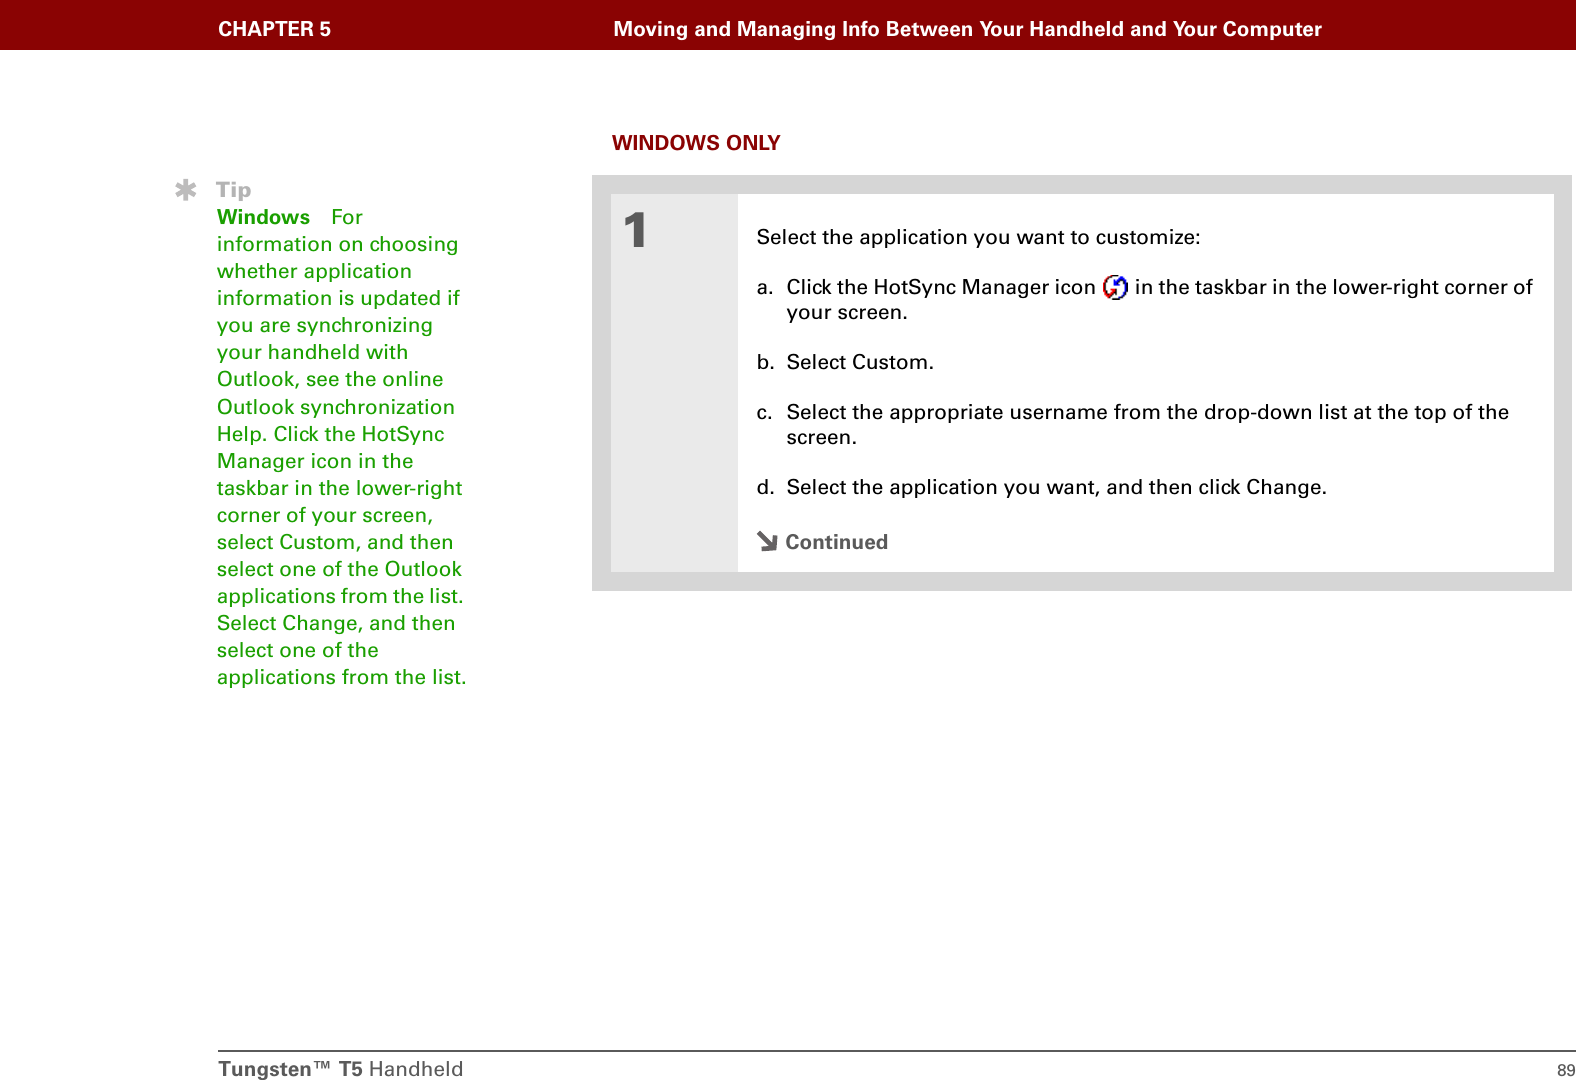
![Tungsten™ T5 Handheld 79CHAPTER 5 Moving and Managing Info Between Your Handheld and Your ComputerSynchronizing informationSynchronizing means that information that is entered or updated in one place (your handheld or your computer) is automatically updated in the other. No need to enter information twice.Be sure to synchronize the info in your handheld’s program memory frequently so that you always have an up-to-date backup copy of this info on your computer.Entering information using desktop software Use Palm Desktop or Outlook to enter information on your computer. When you synchronize, the information is updated on your handheld.If you use the default settings, information from all the following applications is transferred each time you synchronize your handheld with your computer:If you choose to synchronize with Outlook, info from Contacts, Calendar, Tasks, and Memos is synchronized with Outlook. You can also set up the VersaMail application to synchronize with Outlook. Other info, such as photos and notes, is synchronized with Palm Desktop software. Applications, files, and folders moved to your handheld's internal drive with File Transfer are not automatically backed up during synchronization. Use File Transfer to copy or move the updated files and folders to your computer, or to back up the contents of your handheld's entire internal drive to your computer.IMPORTANT[!]TipYou can synchronize your handheld with your computer wirelessly using the built-in Bluetooth® wireless technology on your handheld.Did You Know?Everybody in your family can synchronize their handheld with the same copy of Palm Desktop software. Just make sure that each handheld has its own username; Palm Desktop software reads the username and recognizes the handheld during synchronization. IMPORTANT[!]](https://usermanual.wiki/Palm/820.User-Manual-1/User-Guide-475658-Page-101.png)

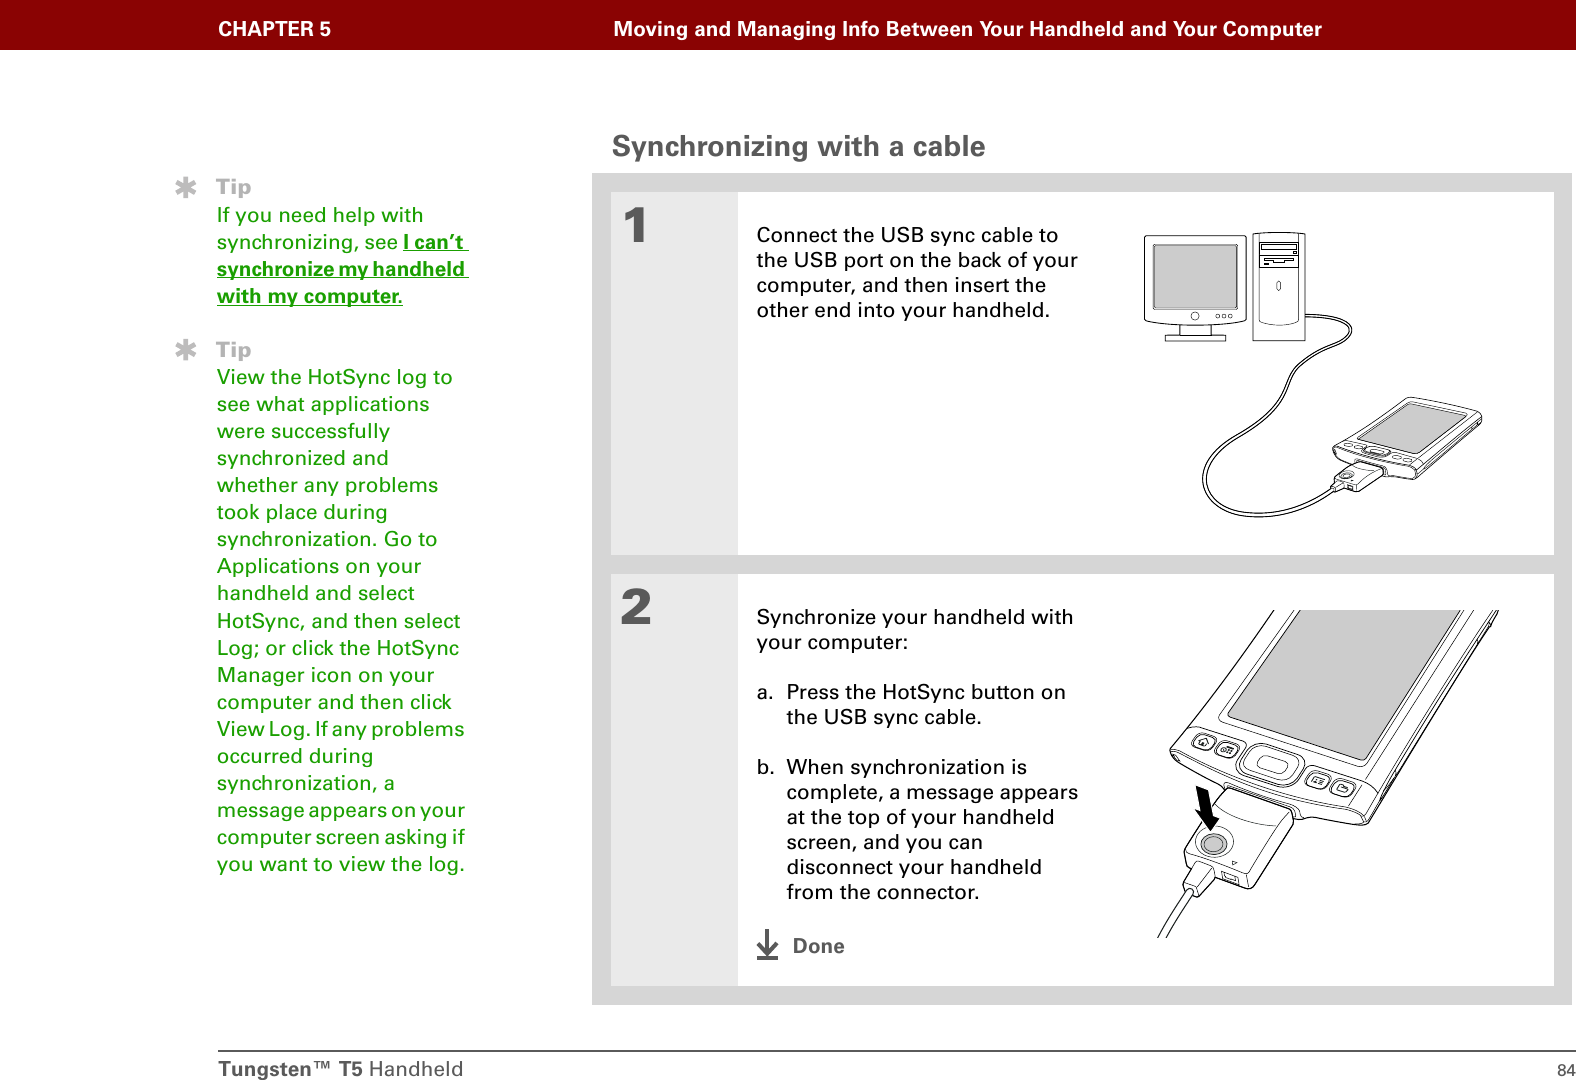
![Tungsten™ T5 Handheld 83CHAPTER 5 Moving and Managing Info Between Your Handheld and Your ComputerSynchronizing your handheld with your computerYou can synchronize your handheld with your computer in the following ways:• Using the USB sync cable attached to your handheld and your computer•Wirelessly using Bluetooth® wireless technology on your handheld• Using your handheld’s infrared (IR) port•Connecting to your company’s network, either wirelessly or using a cable (Windows only) The first time you synchronize, you must use the USB sync cable or your handheld’s IR port. If you followed the instructions to synchronize during initial setup, you’ve already covered this requirement.To synchronize, HotSync Manager must be active. HotSync Manager was installed when you installed the software installation CD; if you didn't install the CD, you don't have HotSync Manager on your computer.On a Windows computer, you know HotSync Manager is active when its icon appears in the lower-right corner of your screen. If the icon is not there, turn it on by clicking Start and then selecting Programs. Navigate to the Palm Desktop software program group, and select HotSync Manager.3Enter the information, and then click OK.4Synchronize your handheld with your computer.Done»Key TermHotSync®Techno lo gy that allows you to synchronize the info on your handheld with the info on your computer.»Key TermHotSync Manager Software you use to choose synchronization settings and that must be active when you synchronize.TipIf the Select User dialog box appears during synchronization, select the username whose information you want to synchronize, and click OK. Or create a new username.IMPORTANT[!]](https://usermanual.wiki/Palm/820.User-Manual-1/User-Guide-475658-Page-105.png)


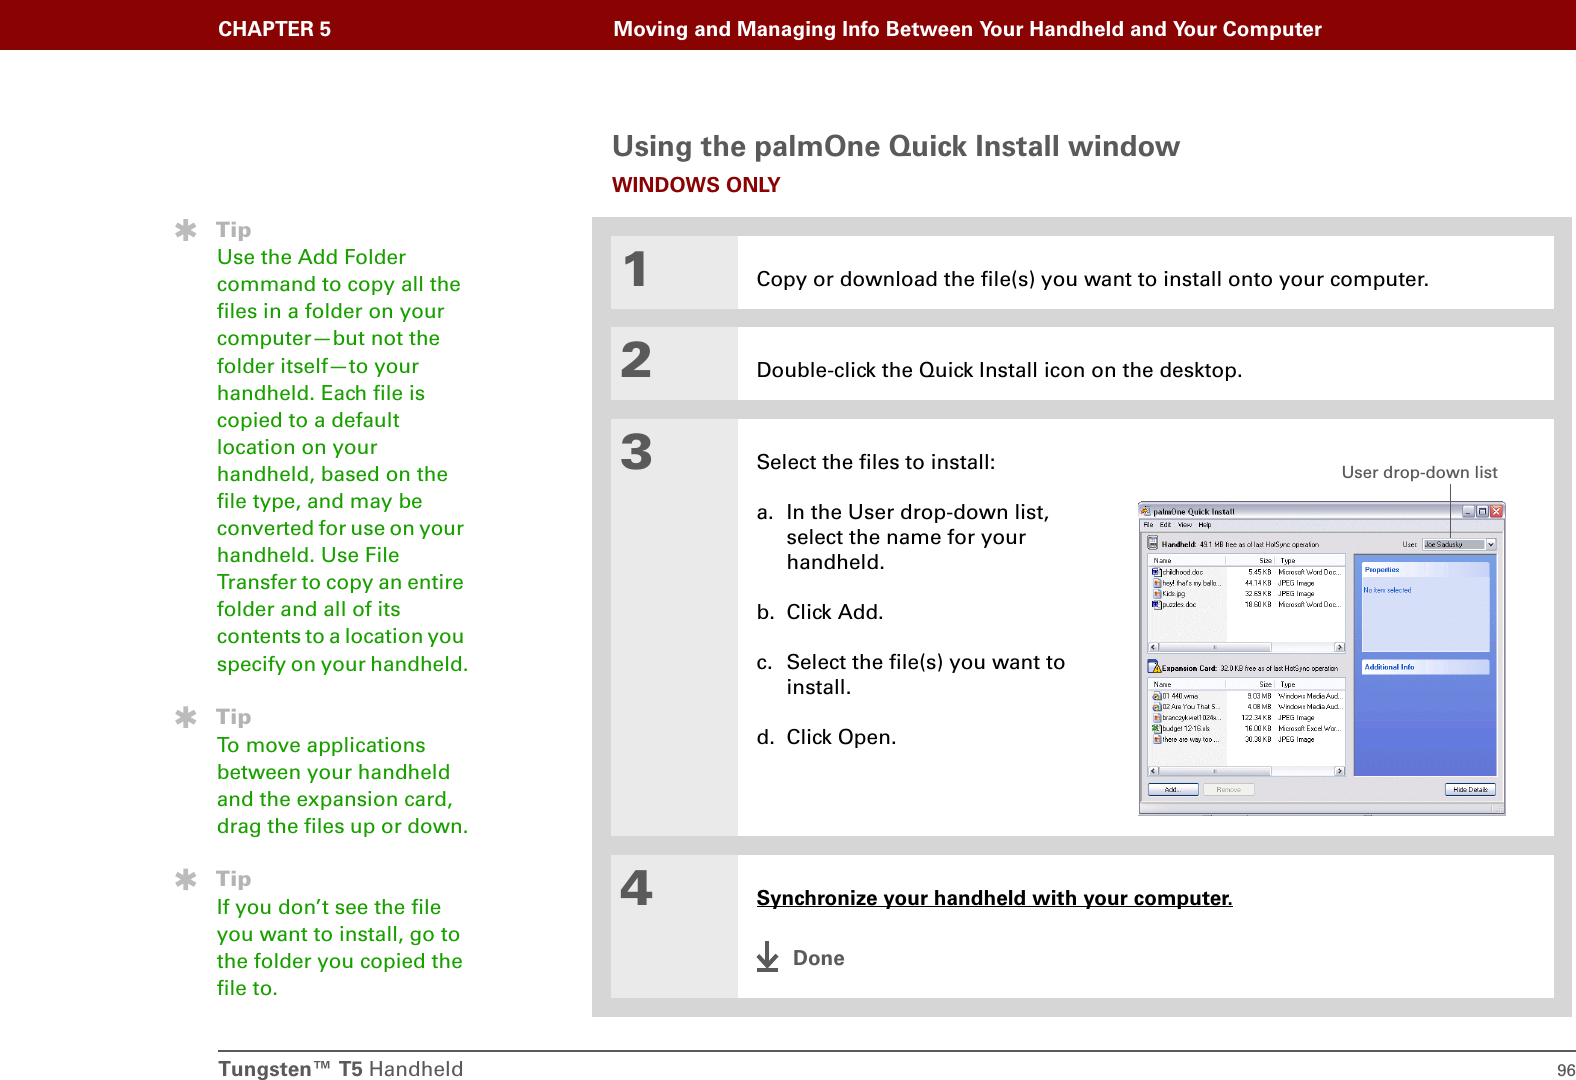
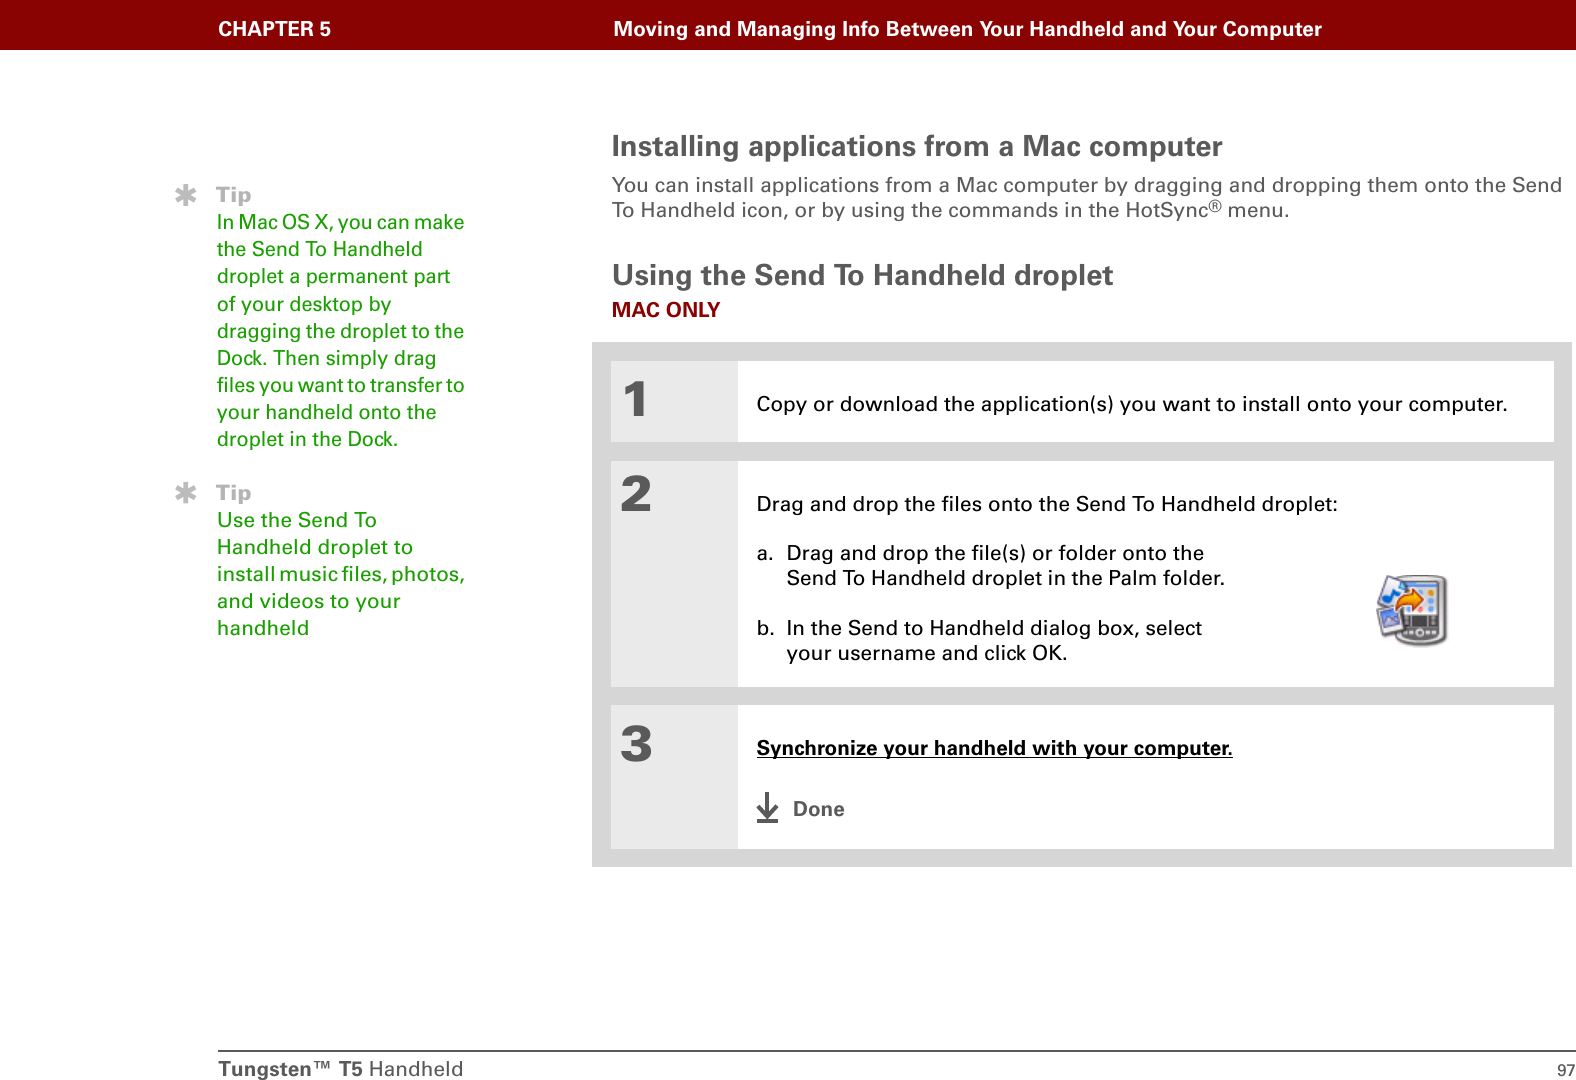
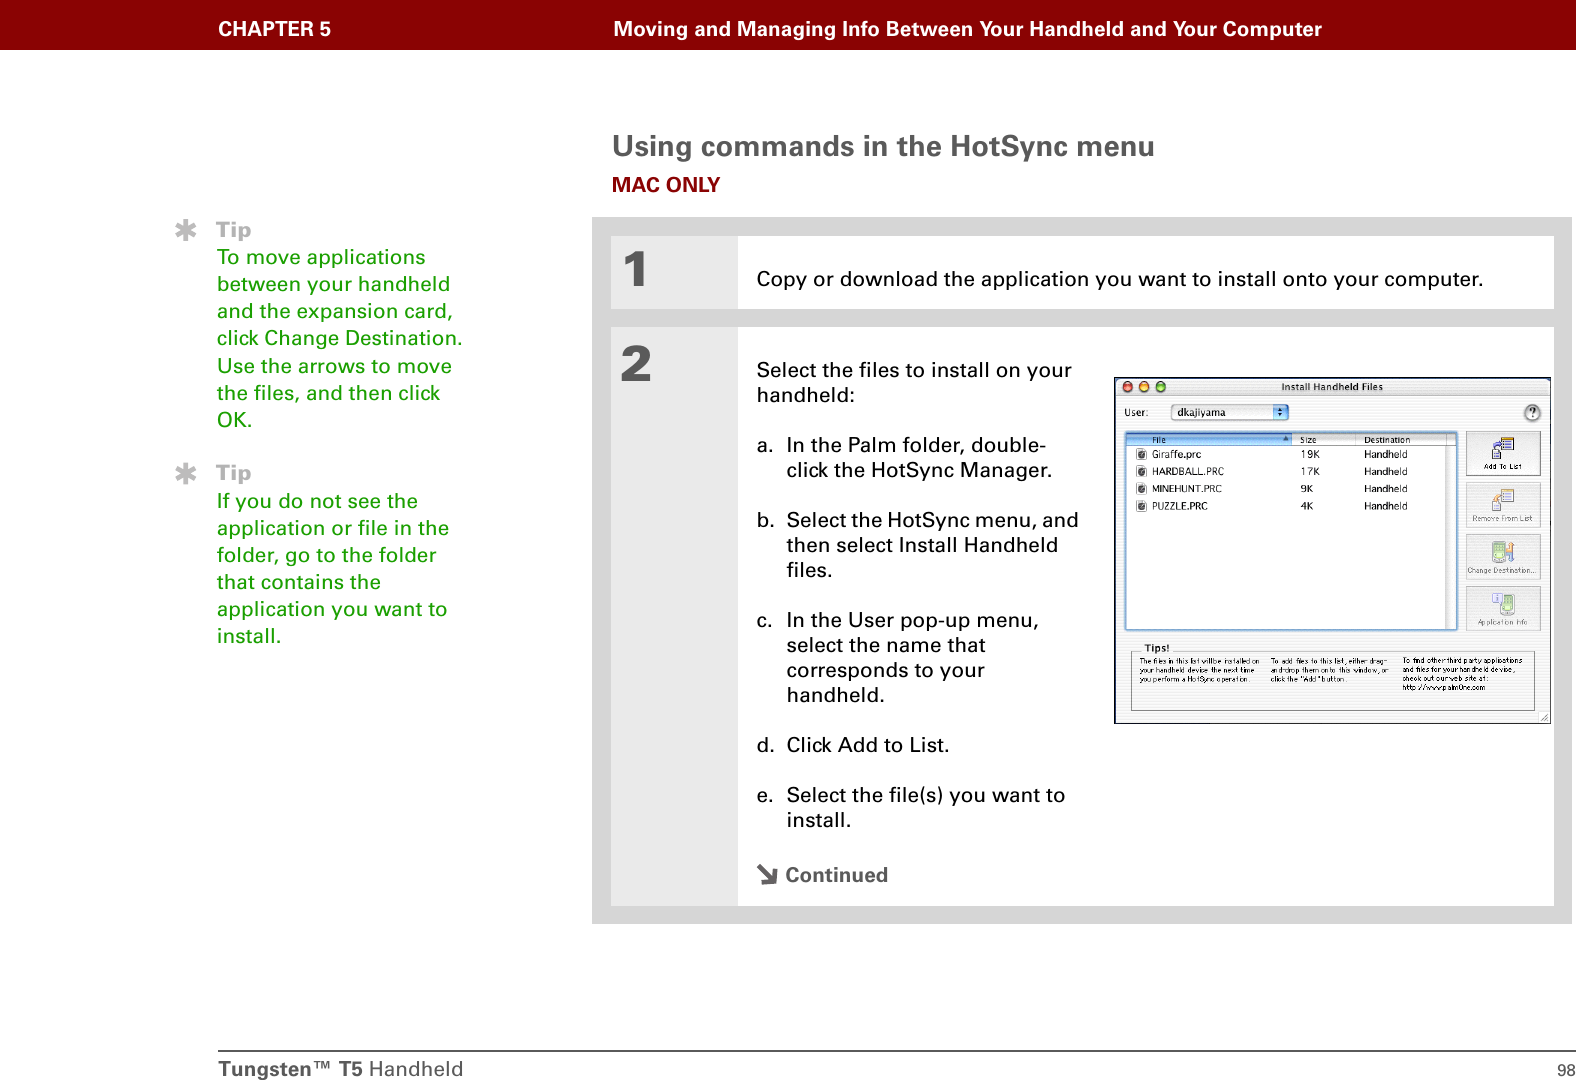
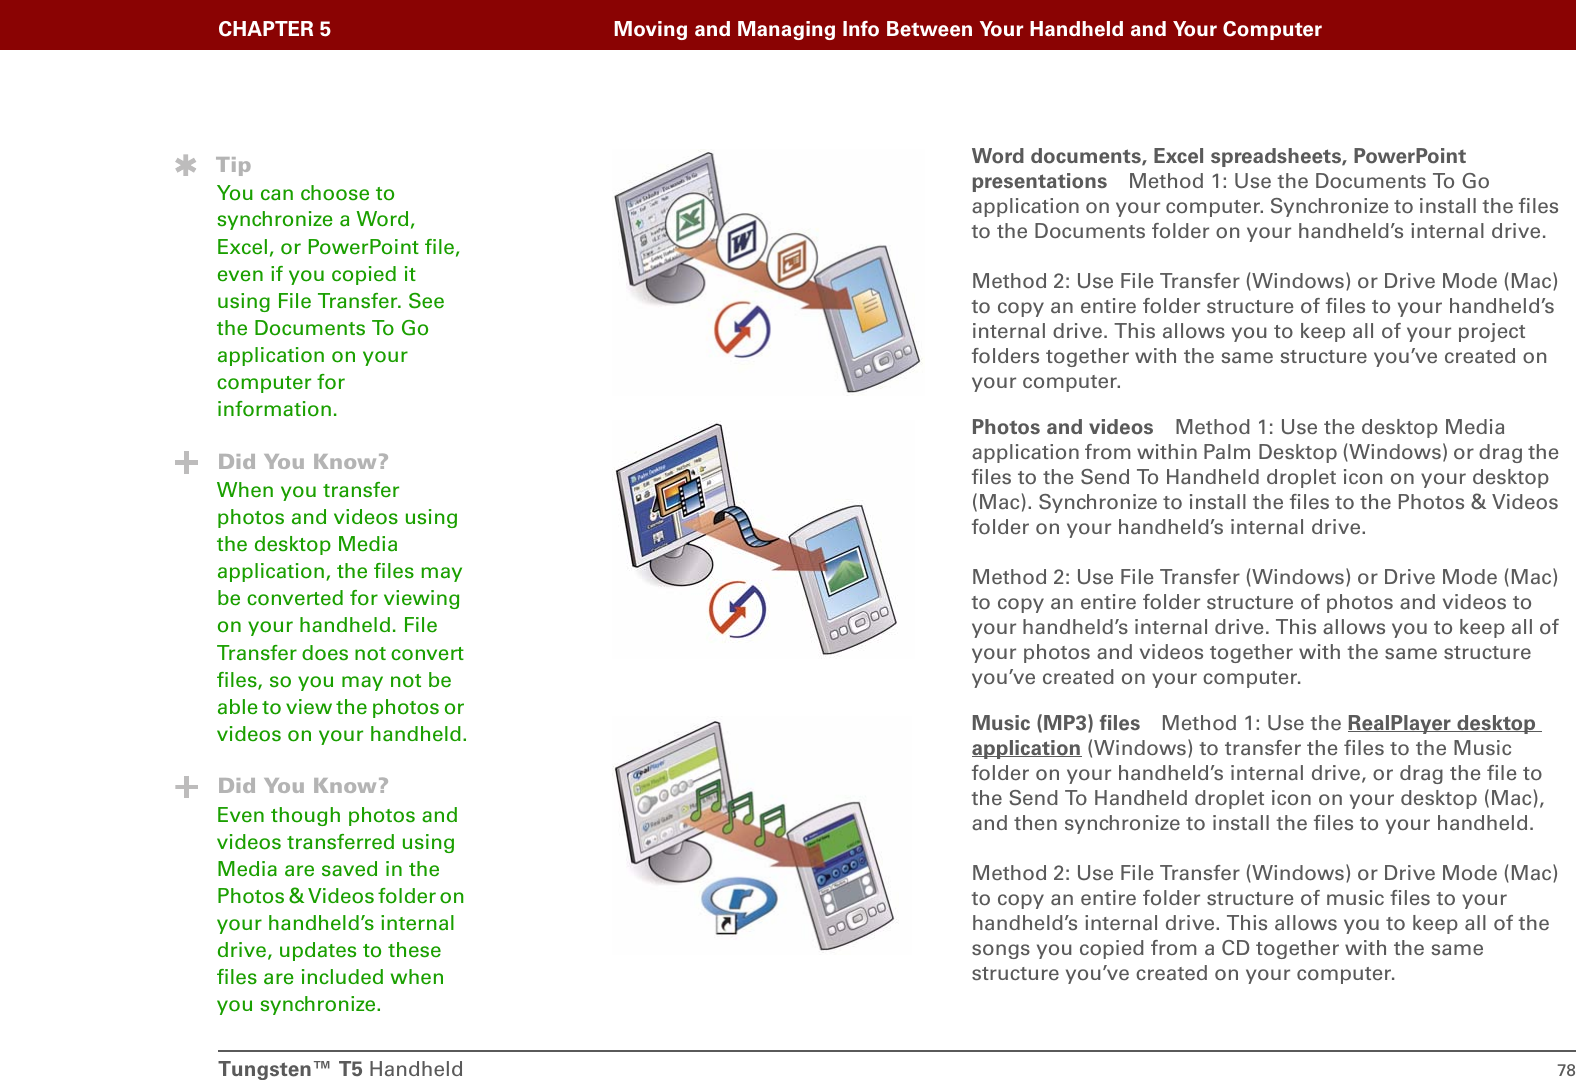
![Tungsten™ T5 Handheld 99CHAPTER 5 Moving and Managing Info Between Your Handheld and Your ComputerUsing File Transfer to transfer info to your handheld On a Mac computer, use Drive Mode to move files to your handheld’s internal drive.WINDOWS ONLYOn a Windows computer, File Transfer provides a live window onto your handheld's large internal drive. Use File Transfer to copy, move, and manage files and folders on your handheld. File Transfer copies and moves items instantly; you do not need to synchronize. With File Transfer you can also work on your handheld even while transferring files.Using File Transfer, quickly move and carry large amounts of your important Office files, photos, music, videos, and other files or folders on your handheld. Access and edit this information on your handheld or, using Drive Mode, from another computer (computer must support standard USB removable drives). File Transfer installs automatically when you install Palm Desktop software. Applications, files, and folders moved to your handheld's internal drive with File Transfer are not automatically backed up during synchronization. Use File Transfer to copy or move the updated files and folders to your computer, or to back up the contents of your handheld's entire internal drive to your computer.3Install the files on your handheld:a. Click Add File.b. Close the Install Handheld Files window.c. Synchronize your handheld with your computer.DoneTipIf you have an expansion card inserted into your handheld’s expansion slot, you can view and work with files and folders on the card in the File Transfer window in exactly the same way as files on the internal drive—copying, moving, and so on. You can also copy and move files between the internal drive and the card.NOTEIMPORTANT[!]](https://usermanual.wiki/Palm/820.User-Manual-1/User-Guide-475658-Page-121.png)
![Tungsten™ T5 Handheld 100CHAPTER 5 Moving and Managing Info Between Your Handheld and Your Computer001Open File Transfer:a. Connect the USB sync cable to the USB port on the back of your computer, and then insert the other end into your handheld.b. Double-click the File Transfer icon on your computer desktop to open the File Transfer window. The File Transfer window opens to display the contents of the internal drive on your handheld; if an expansion card is inserted into your handheld’s expansion slot, the window displays the card’s contents as well. If another task is running that uses the USB sync cable—such as synchronizing or transferring music files with RealPlayer—File Transfer waits until the task is complete before displaying the contents of your handheld or an expansion card.ContinuedTipUse File Transfer to back up the contents of your handheld’s internal drive to your main computer. In the File Transfer window, right-click the folder next to the handheld icon, and then click Save to PC.IMPORTANT[!]](https://usermanual.wiki/Palm/820.User-Manual-1/User-Guide-475658-Page-122.png)
![Tungsten™ T5 Handheld 102CHAPTER 5 Moving and Managing Info Between Your Handheld and Your Computer4Access or move files from your handheld to a computer that has File Transfer installed: Use Drive Mode if you are at a computer that does not have File Transfer installed. The computer must support standard USB removable drives.a. Connect the USB sync cable to the USB port on the back of the computer, and then insert the other end into your handheld.b. Double-click the File Transfer icon on the computer desktop to open the File Transfer window. The File Transfer window opens to display the contents of the internal drive on your handheld.c. Access, move, or copy files from the File Transfer window to the computer desktop. Unlike Windows Explorer, you cannot double-click a file in File Transfer to open it. If you double-click a file, you are prompted to save it to your computer and then to open and work with the file on your computer. After working on the file, you can copy it or move it back to your handheld with File Transfer.DoneDid You Know?You can work with files and folders in the File Transfer window in many of the same ways that you work with files and folders in Windows Explorer. For example, click a plus sign to the left of a folder name to view the contents of a folder; select multiple items using the Control or Shift buttons on your keyboard; or click the Refresh button to view updated contents of the handheld’s internal drive or expansion card. You can also manage files or folders by right-clicking a file or folder name to open a menu that lets you rename, move, copy, delete, and perform other tasks on the file or folder.NOTEIMPORTANT[!]](https://usermanual.wiki/Palm/820.User-Manual-1/User-Guide-475658-Page-124.png)
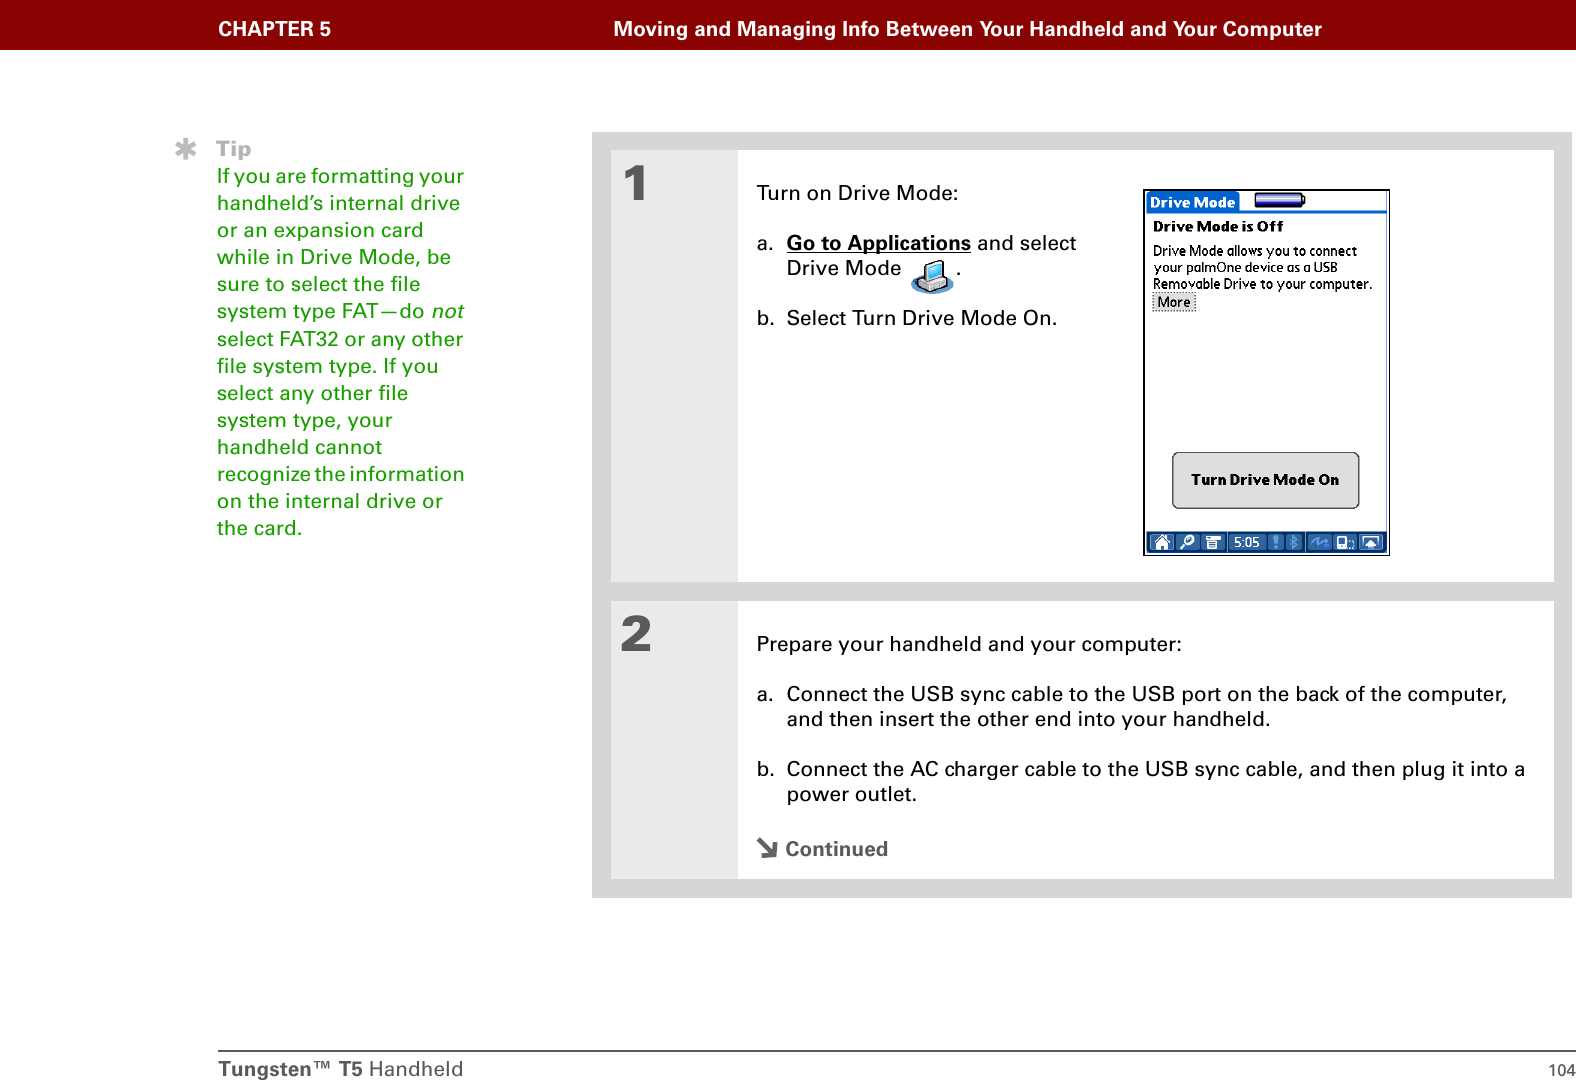
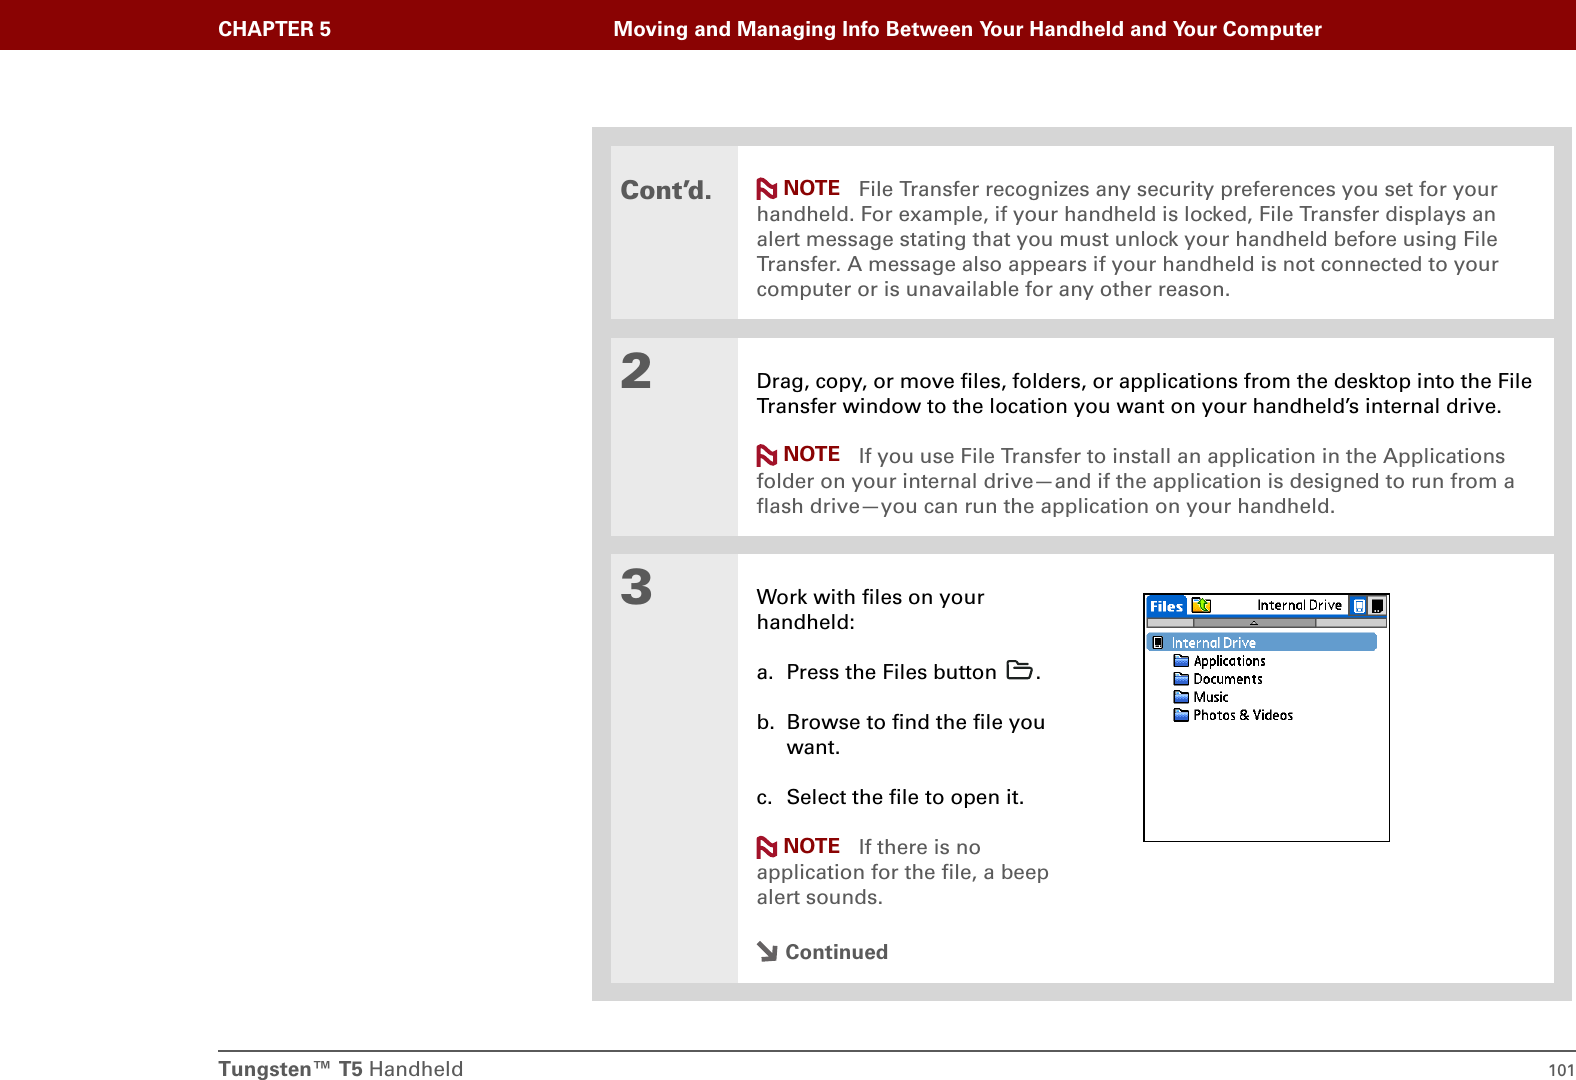
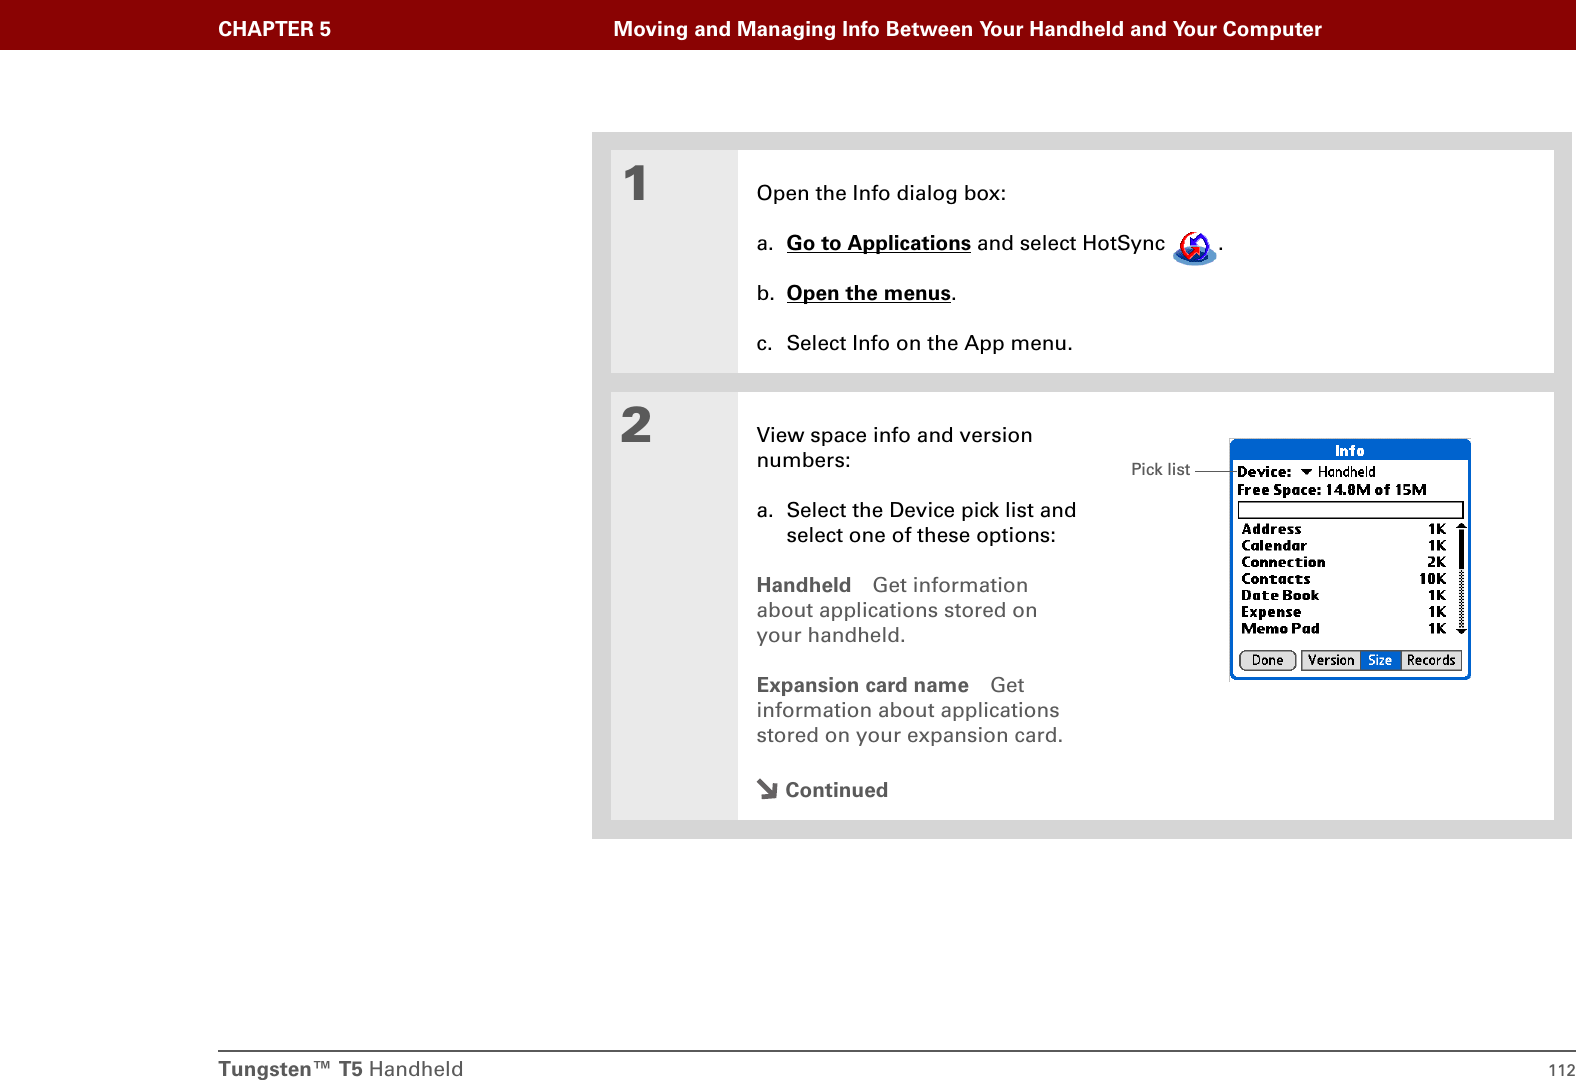
![Tungsten™ T5 Handheld 106CHAPTER 5 Moving and Managing Info Between Your Handheld and Your ComputerOther ways of managing informationYou can move and manage information on your handheld and your computer in the following additional ways:• Importing information from other applications into Palm Desktop software• Restoring archived info on your computer• Installing additional applications from the software installation CD• Checking space and version numbers of applications on your handheld5When you have finished working with Drive Mode, do the following: To avoid losing any information that was transferred, be sure to follow these steps to disconnect from Drive Mode before you unplug your handheld from your computer.a. Eject the handheld from your Windows computer by selecting the Safely Remove Hardware (XP) or Unplug or Eject Hardware (2000) icon in the taskbar in the lower-right corner of your computer screen. On a Mac computer, select the Eject command from the File menu or drag the drive icon to the Eject icon on the Dock.b. Select Turn Drive Mode Off on your handheld screen, and then select Turn Off.DoneTipIf you are working with an expansion card, you must eject the card from the computer (using the Eject command in Windows or dragging the card to the Eject icon on the Dock for Mac) before removing the card in order to avoid losing info on the card.IMPORTANT[!]](https://usermanual.wiki/Palm/820.User-Manual-1/User-Guide-475658-Page-128.png)
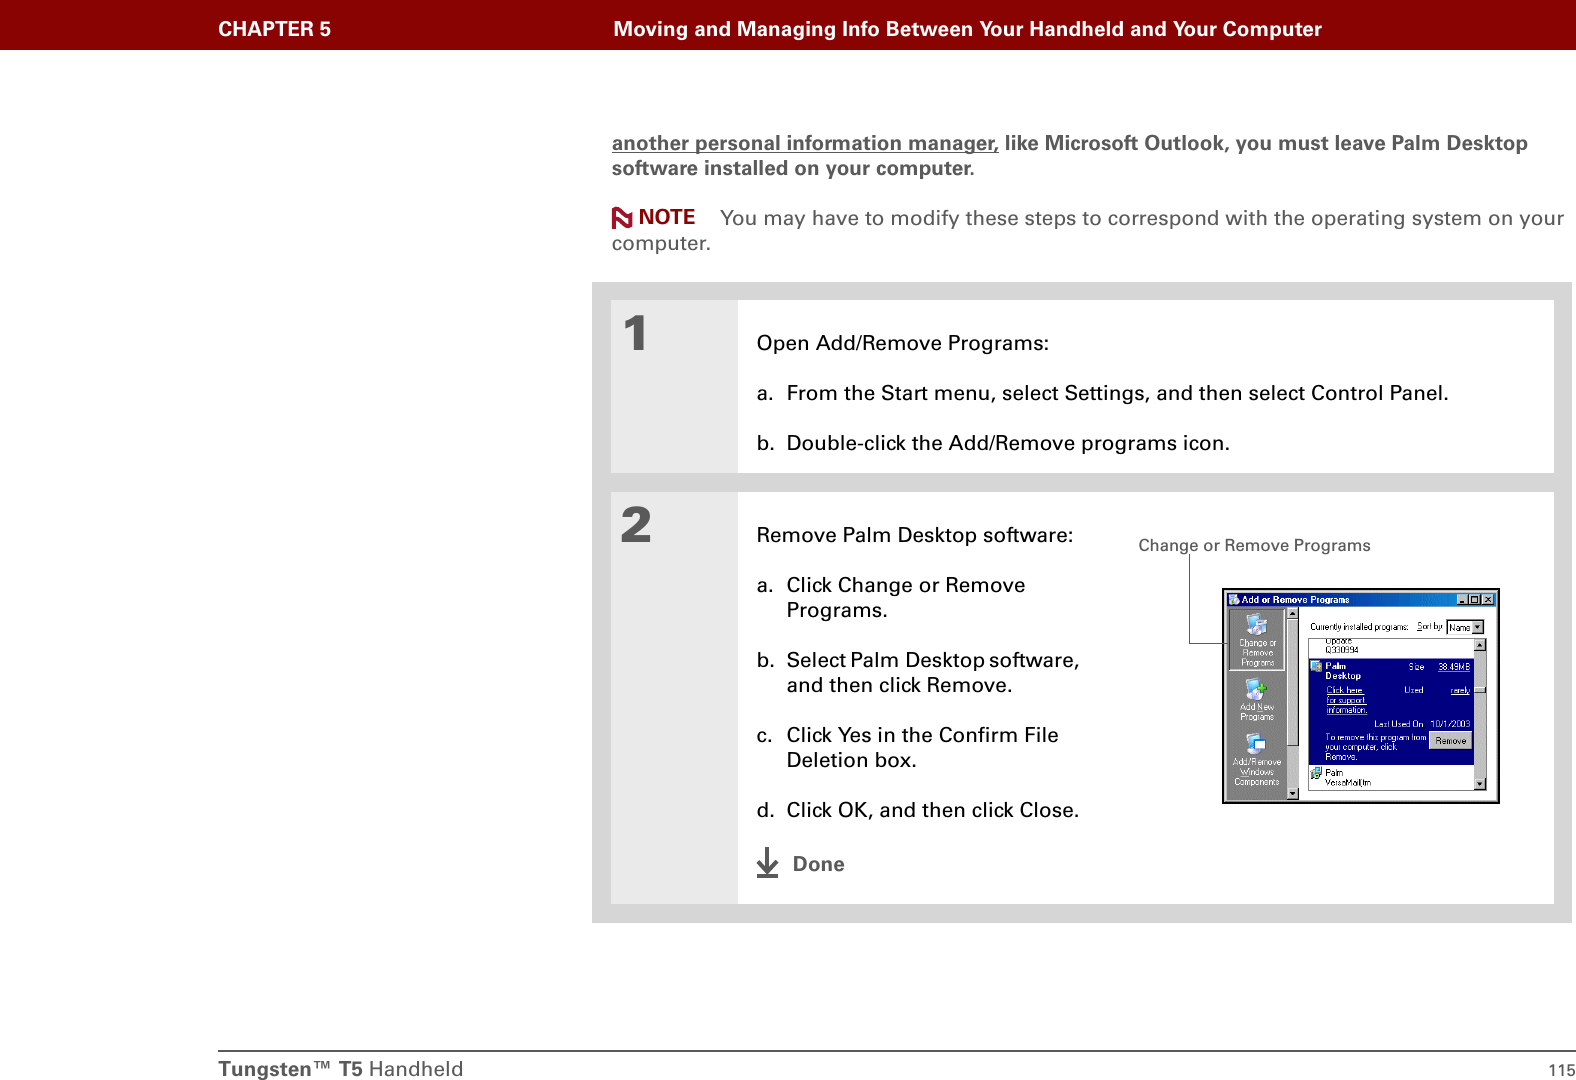
![Tungsten™ T5 Handheld 114CHAPTER 5 Moving and Managing Info Between Your Handheld and Your ComputerRemoving Palm Desktop software from your computerWINDOWS ONLY Mac computers do not provide an option for uninstalling Palm Desktop software.If you think you’ll never want to synchronize your handheld with your computer again, you can remove Palm Desktop software from your computer. This process removes only the application files. The information in your Users folder remains untouched.If you remove Palm Desktop software, you also remove the synchronization software and can no longer synchronize your information. Even if you want to synchronize with 2Open the Delete dialog box:a. Open the menus.b. Select Delete from the App menu.3Delete the application:a. Select the Delete From pick list, and then select Handheld or an expansion card.b. Select the application that you want to remove, and then select Delete.c. Select Yes, and then select Done.DoneNOTEIMPORTANT[!]](https://usermanual.wiki/Palm/820.User-Manual-1/User-Guide-475658-Page-136.png)

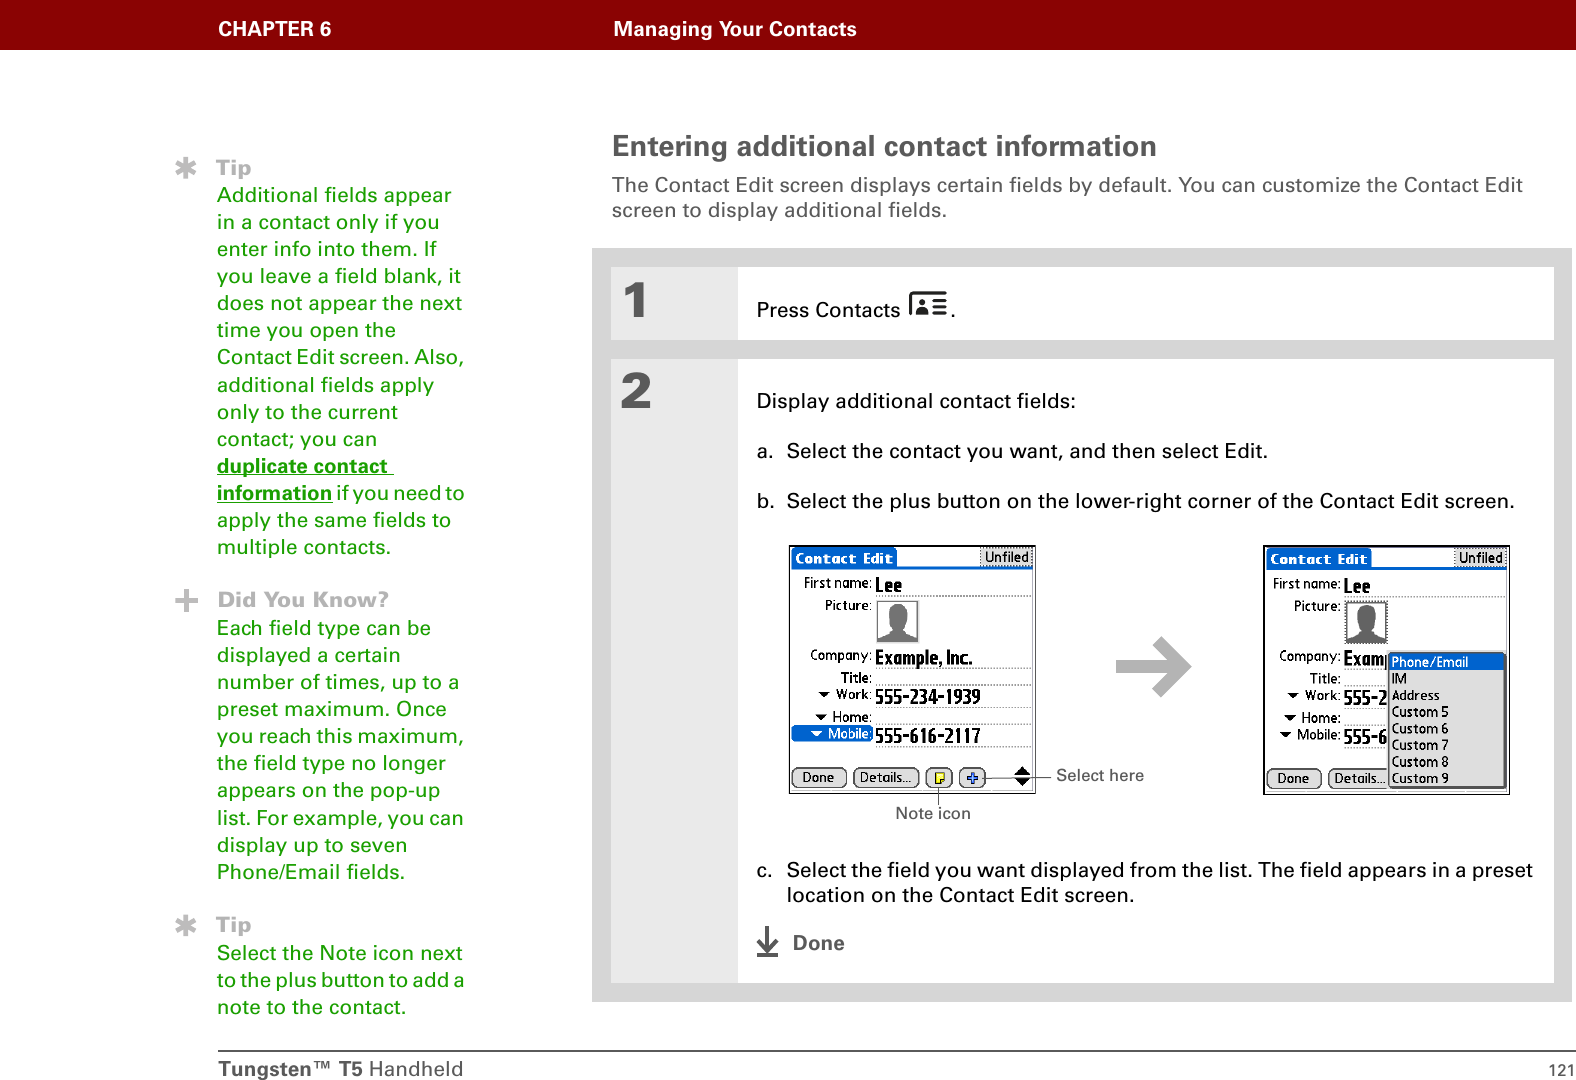
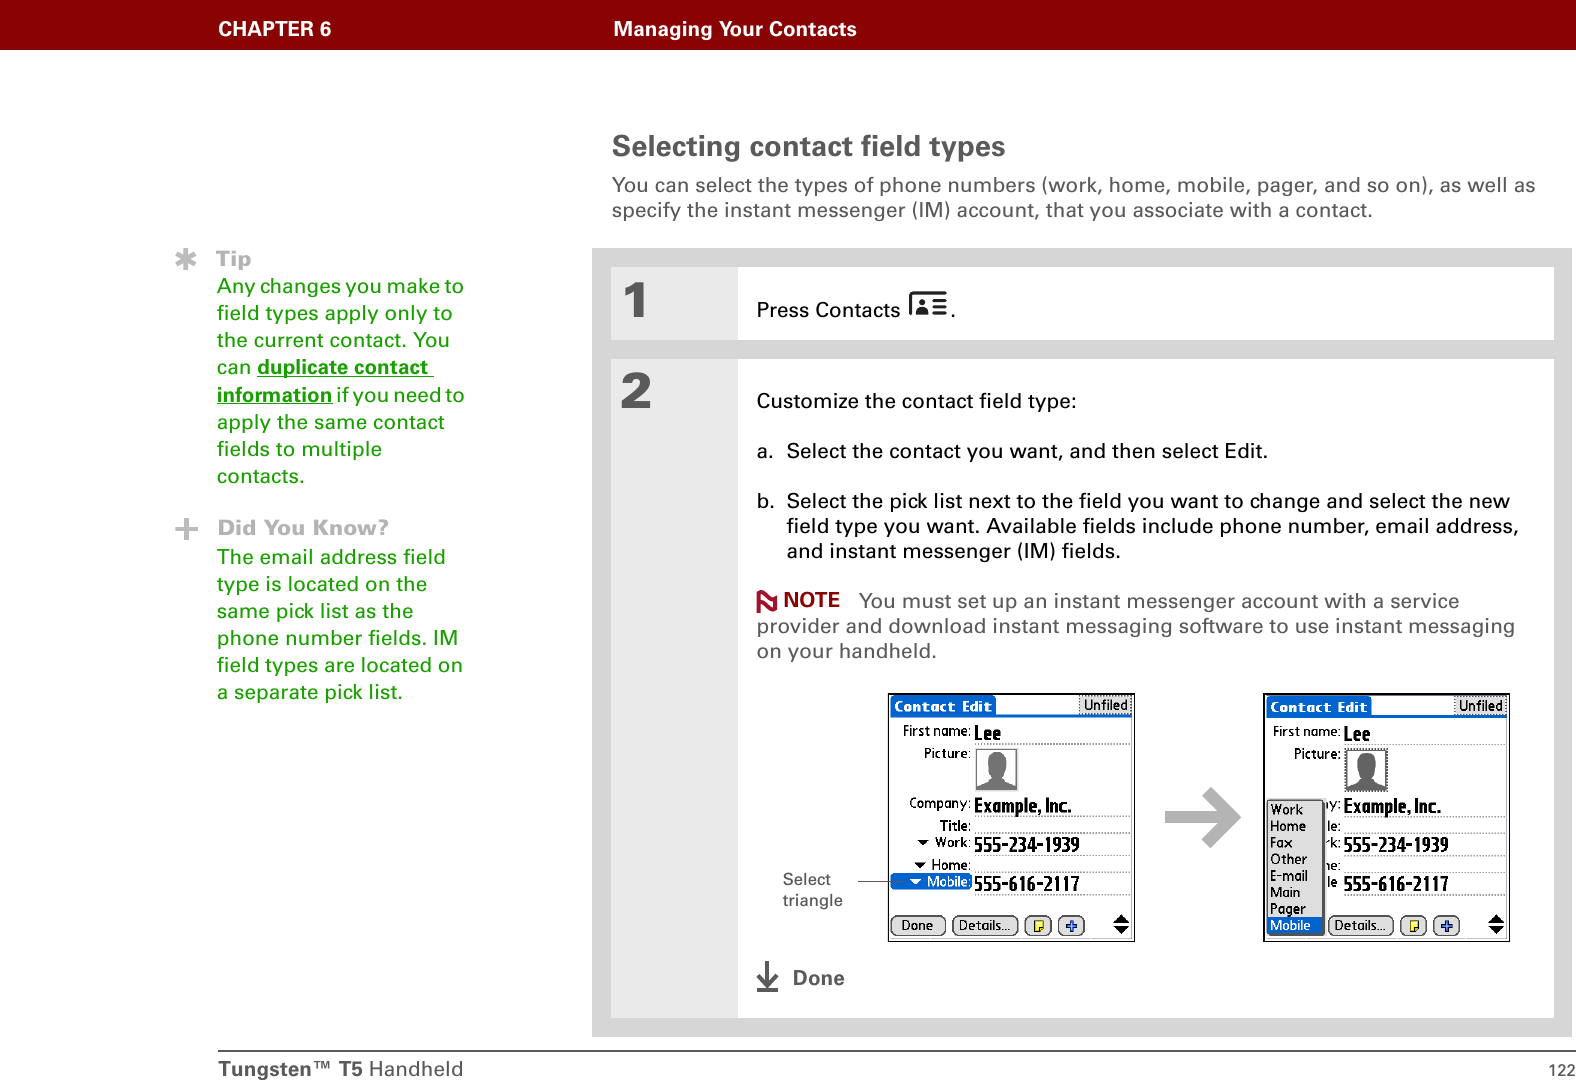
![Tungsten™ T5 Handheld 118CHAPTER 6 Managing Your ContactsAdding a contact01Press the Contacts button.2Add your contact information:a. Select New.b. Select each field where you want to enter information, and enter it. Select the scroll arrows to view more fields.ContinuedTipIf the first character you enter in the Last Name or Company field is an asterisk (*) or another symbol, that record always appears at the top of the Contacts list. That’s useful for an entry like “If Found Call [your phone number].”Did You Know?You can also enter one or more contacts on your desktop computer, and then copy them to your handheld by synchronizing.](https://usermanual.wiki/Palm/820.User-Manual-1/User-Guide-475658-Page-140.png)
![Tungsten™ T5 Handheld 119CHAPTER 6 Managing Your ContactsCont’d.The following fields contain features to help you enter information quickly:All fields except numeric and email fields The first letter is automatically capitalized.Title, Company, City, and State As you enter letters, a match appears if you have one on your Contacts list. For example, if you enter S, Sacramento might appear, and if you then enter a and n, San Francisco might replace Sacramento. When the word you want appears, select the next field.Address You can enter up to three addresses, each containing five fields: Addr, City, State, Zip Code, and Country. You can designate an address as work (W), home (H), or other (O). By default, the first address is designated as work.3[ & ] OPTIONAL Add a photo:a. Select the Picture box.b. Select a picture from palmOne Media.c. Select Done.ContinuedTipTo learn how to download photos to your handheld, see palmOne™ Media.TipIf multiple contacts share information, such as a company name and address, you can enter the first contact, and then copy the information into other contacts.](https://usermanual.wiki/Palm/820.User-Manual-1/User-Guide-475658-Page-141.png)
![Tungsten™ T5 Handheld 120CHAPTER 6 Managing Your Contacts4[ & ] OPTIONAL Add a birthday:a. Select the Birthday box.b. Use the left and right arrows to move to and select the birth year. Hold down either arrow to scroll quickly through the years.c. Select the month and date.5After you finish entering all the information you want, select Done.That's it. Your handheld automatically saves the contact. Make sure you have a current backup. Synchronize often.TipIf you want a reminder about a birthday, check the Reminder box, enter the number of days before the birthday that you want to see the reminder, and then select OK.Did You Know?Birthdays you enter in Contacts appear as untimed events in Calendar. If you update the birthday in Contacts, it automatically updates in Calendar as well.Done](https://usermanual.wiki/Palm/820.User-Manual-1/User-Guide-475658-Page-142.png)
![Tungsten™ T5 Handheld 127CHAPTER 6 Managing Your ContactsDeleting a contact01Press Contacts .2Open the Delete Contact dialog box:a. Locate the contact you want.b. Open the menus. c. Select Delete Contact on the Record menu.3[ & ] OPTIONAL Check the box to save an archive copy of the contact on your computer.4Select OK.DoneTipYou never know when you’re going to need to look up an old business associate. If you save an archive copy of your deleted contacts, you can refer to them later by importing them.](https://usermanual.wiki/Palm/820.User-Manual-1/User-Guide-475658-Page-149.png)

![Tungsten™ T5 Handheld 130CHAPTER 6 Managing Your ContactsMaking connections from ContactsYou can set up your contacts so that you can do tasks like dialing a phone number; creating an email or text message; accessing the web; or sending an instant message (requires additional software, sold separately) directly from a contact screen. Contacts gives you two tools to perform these tasks:Quick Connect Lets you select a connection type and opens the application for making that type of connection directly from a contact’s information screen.Tap-to-Connect Opens the application to perform a connection task directly by selecting the appropriate entry (phone number, email address, and so on) from a contact’s information screen.Using Quick ConnectIf you have a compatible mobile phone (sold separately) that includes Bluetooth technology, you can use Quick Connect to dial a phone number; address an email or a text message, go to a website, or send an instant message (requires additional software, sold separately) directly from a contact.01Press Contacts .ContinuedBefore You Begin[!]You must complete all the prerequisites for the email and messaging applications.To use Quick Connect with your handheld’s built-in Bluetooth technology, you must set up a phone connection. To use it with your handheld’s IR port, run Phone Link Updater, and then use the Phone Link application to set up a phone connection.](https://usermanual.wiki/Palm/820.User-Manual-1/User-Guide-475658-Page-152.png)
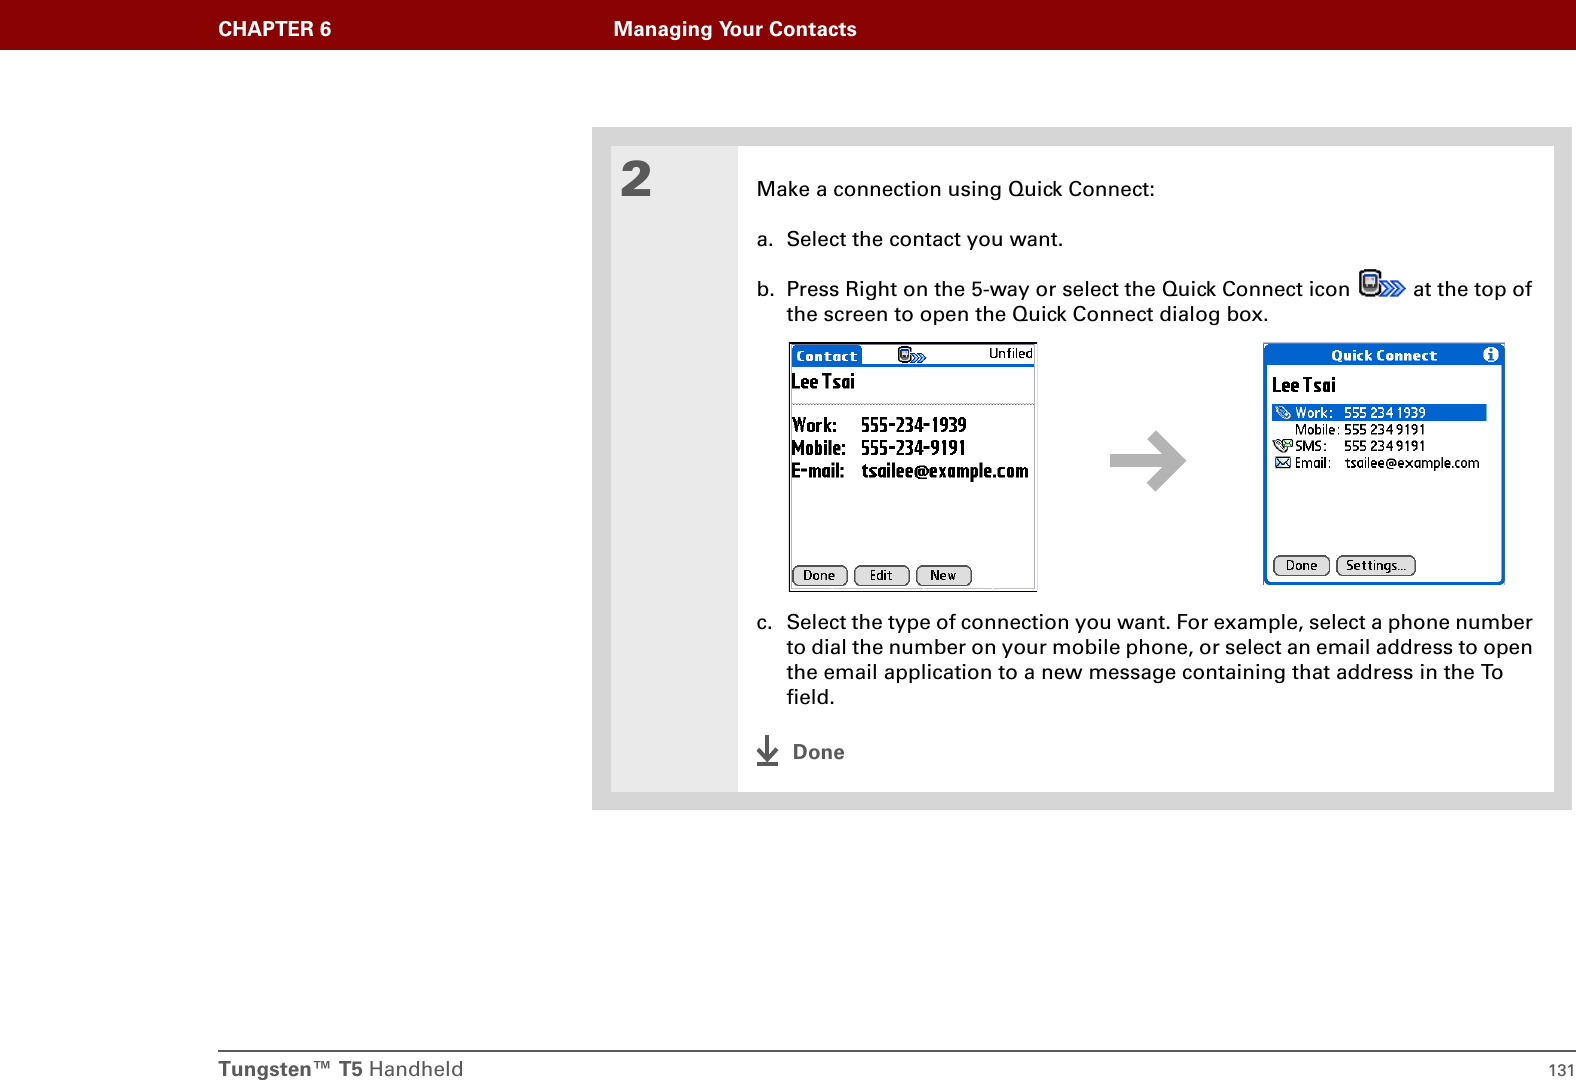

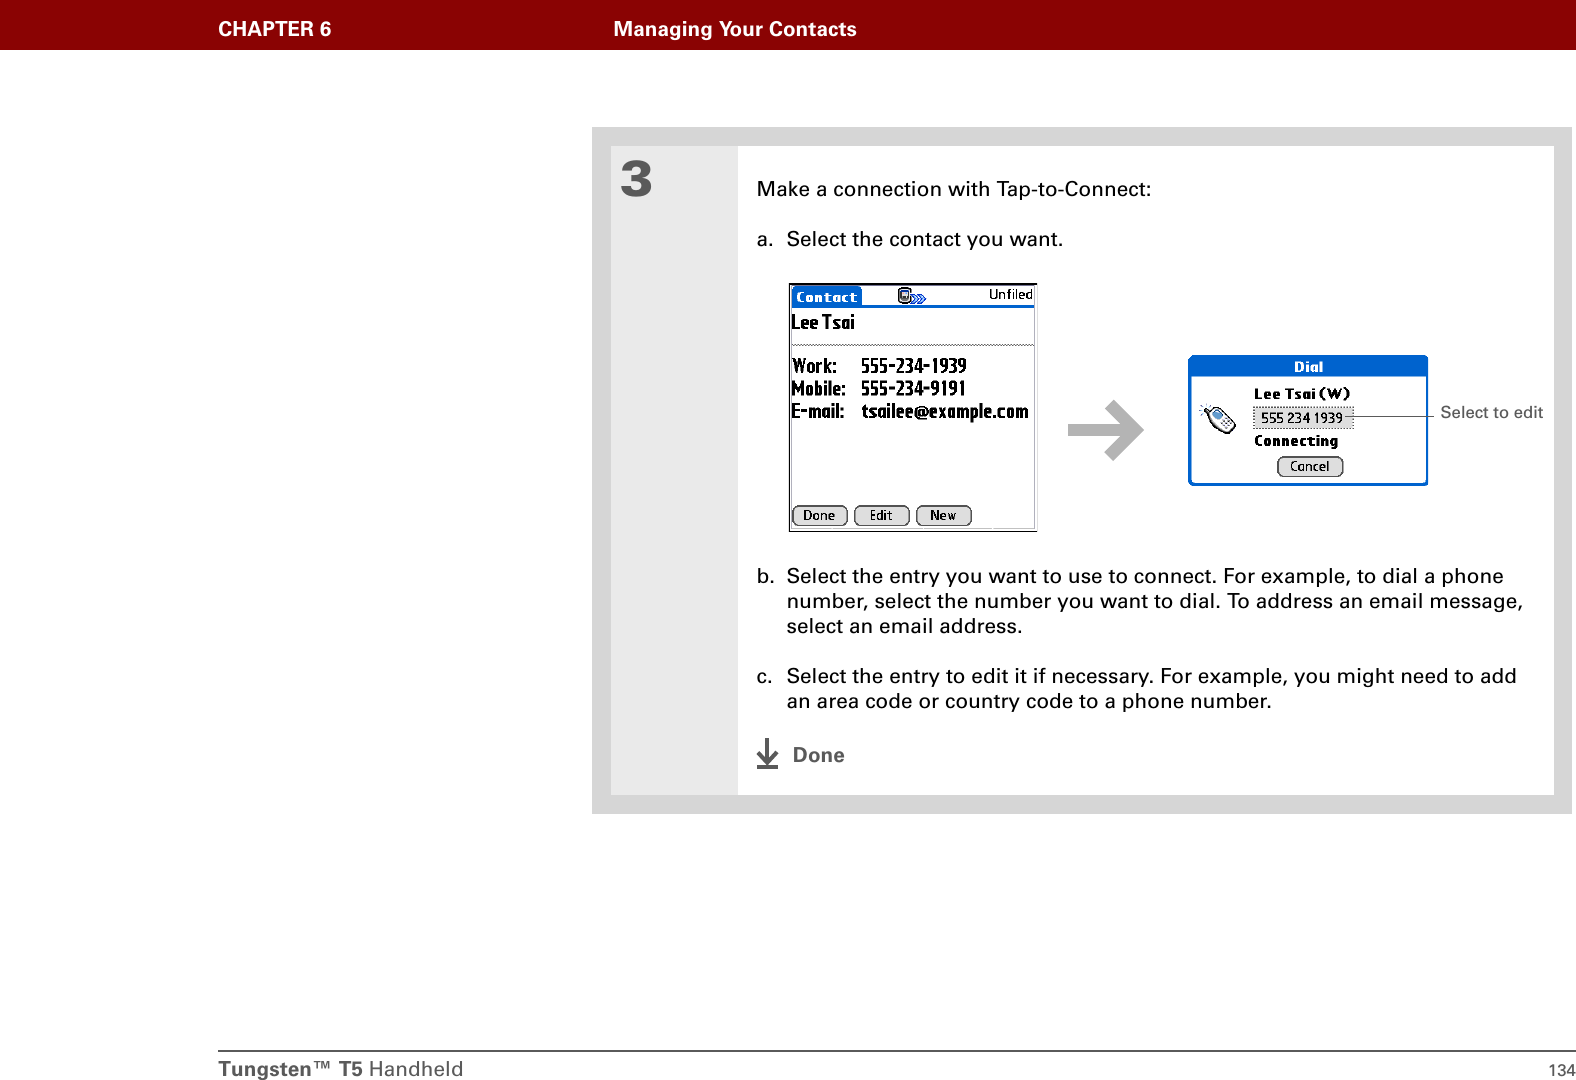
![Tungsten™ T5 Handheld 133CHAPTER 6 Managing Your ContactsUsing Tap-to-ConnectWith Tap-to-Connect, you can select a contact and dial a phone number or address an email or text message by selecting the appropriate entry on the contact screen. By default, Tap-to-Connect is not enabled.01Press Contacts .2Enable Tap-to-Connect:a. From the Contacts list, open the menus.b. Select Options, and then select Preferences.c. Select Enable Tap-to-Connect, and then select OK.ContinuedBefore You Begin[!]You must have a compatible mobile phone (sold separately) that includes Bluetooth wireless technology, and you must complete all the prerequisites for the email and messaging applications.To use Tap-to-Connect with your handheld’s built-in Bluetooth technology, you must set up a phone connection. To use it with your handheld’s IR port, run Phone Link Updater and then use the Phone Link application to set up a phone connection.](https://usermanual.wiki/Palm/820.User-Manual-1/User-Guide-475658-Page-155.png)

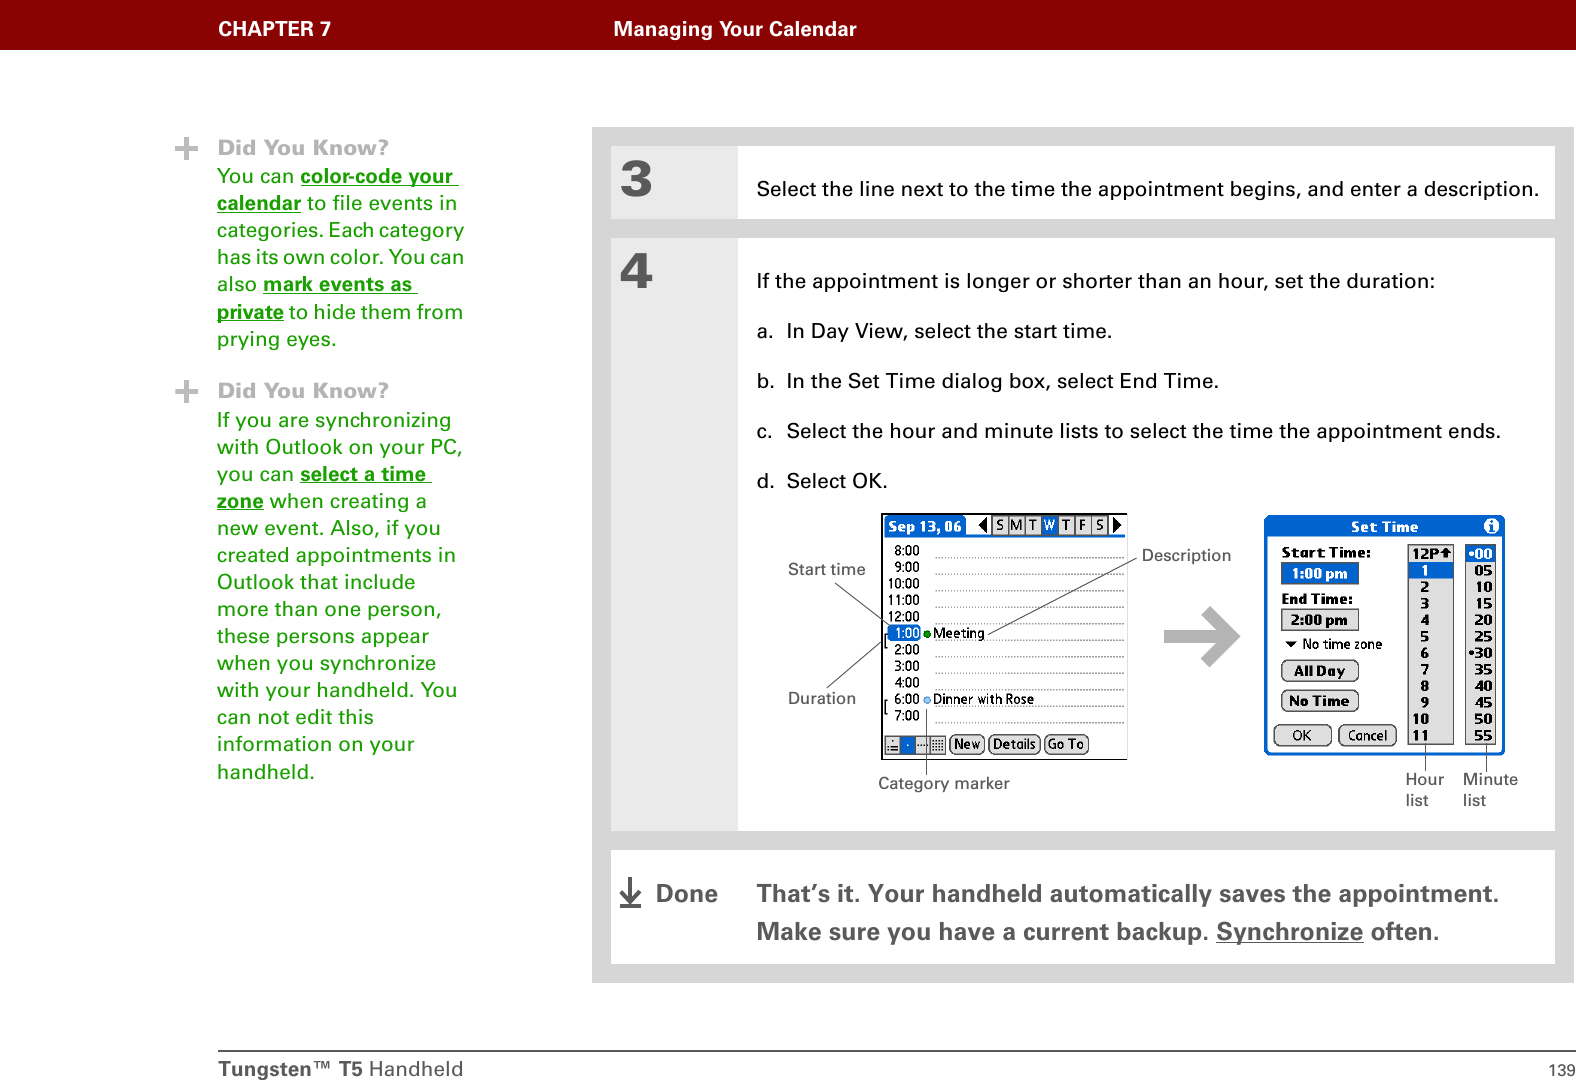
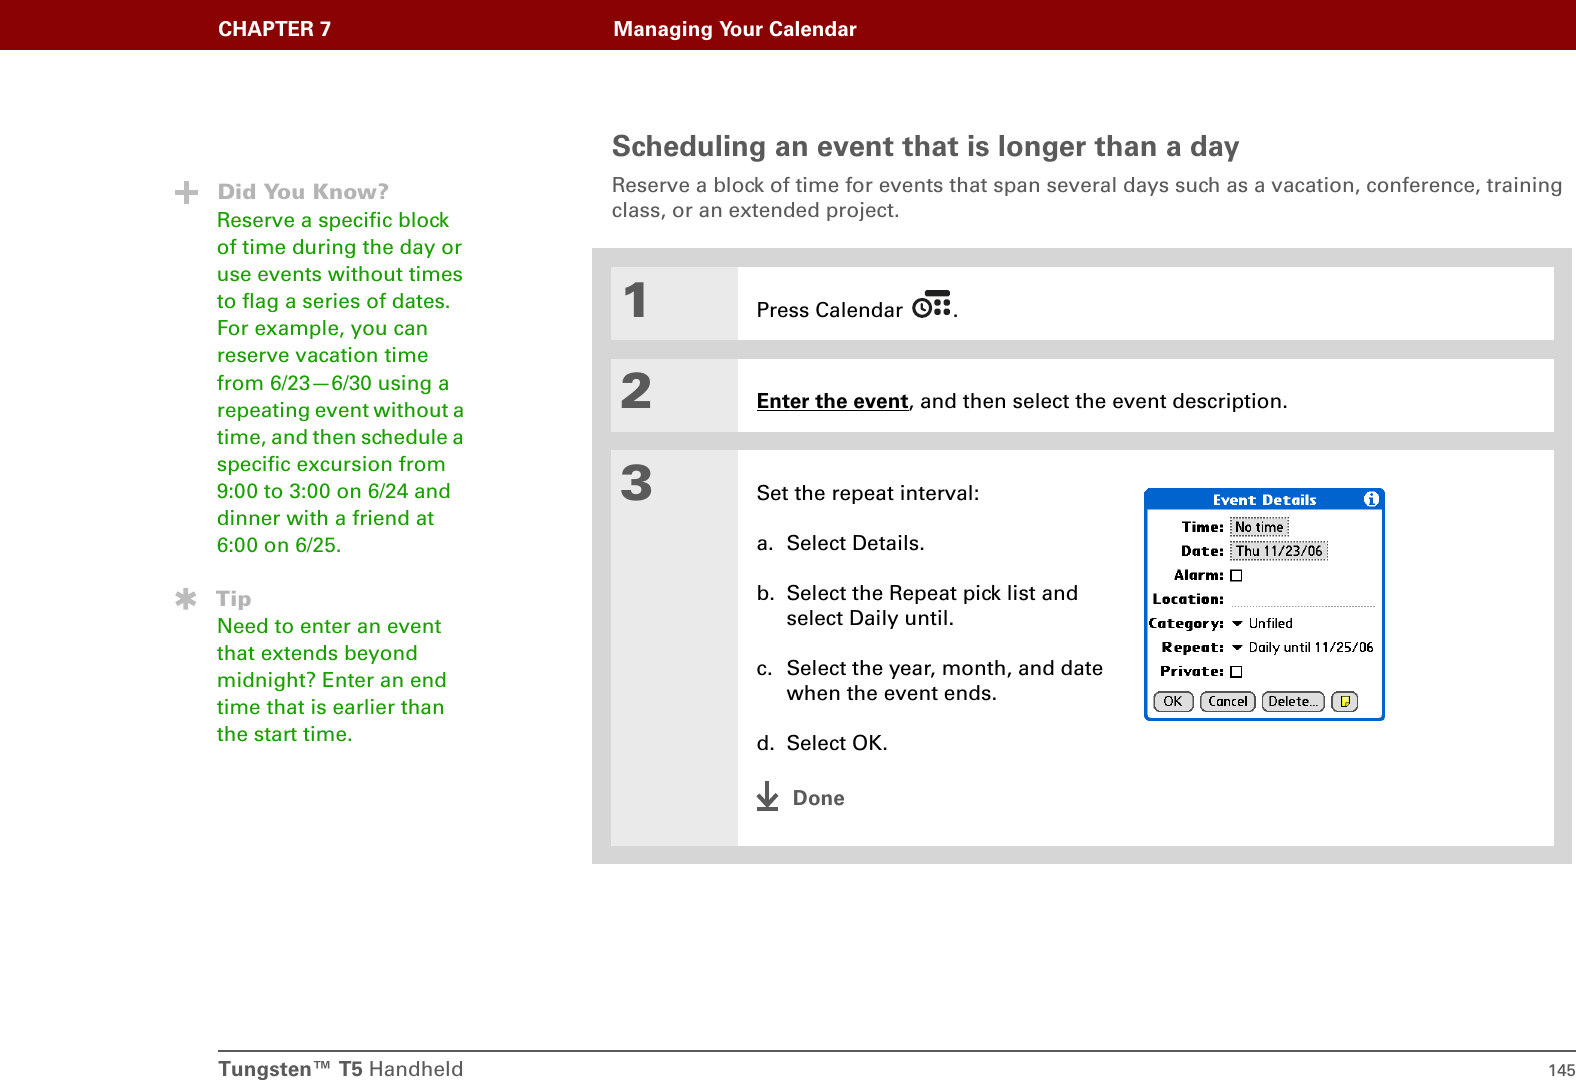
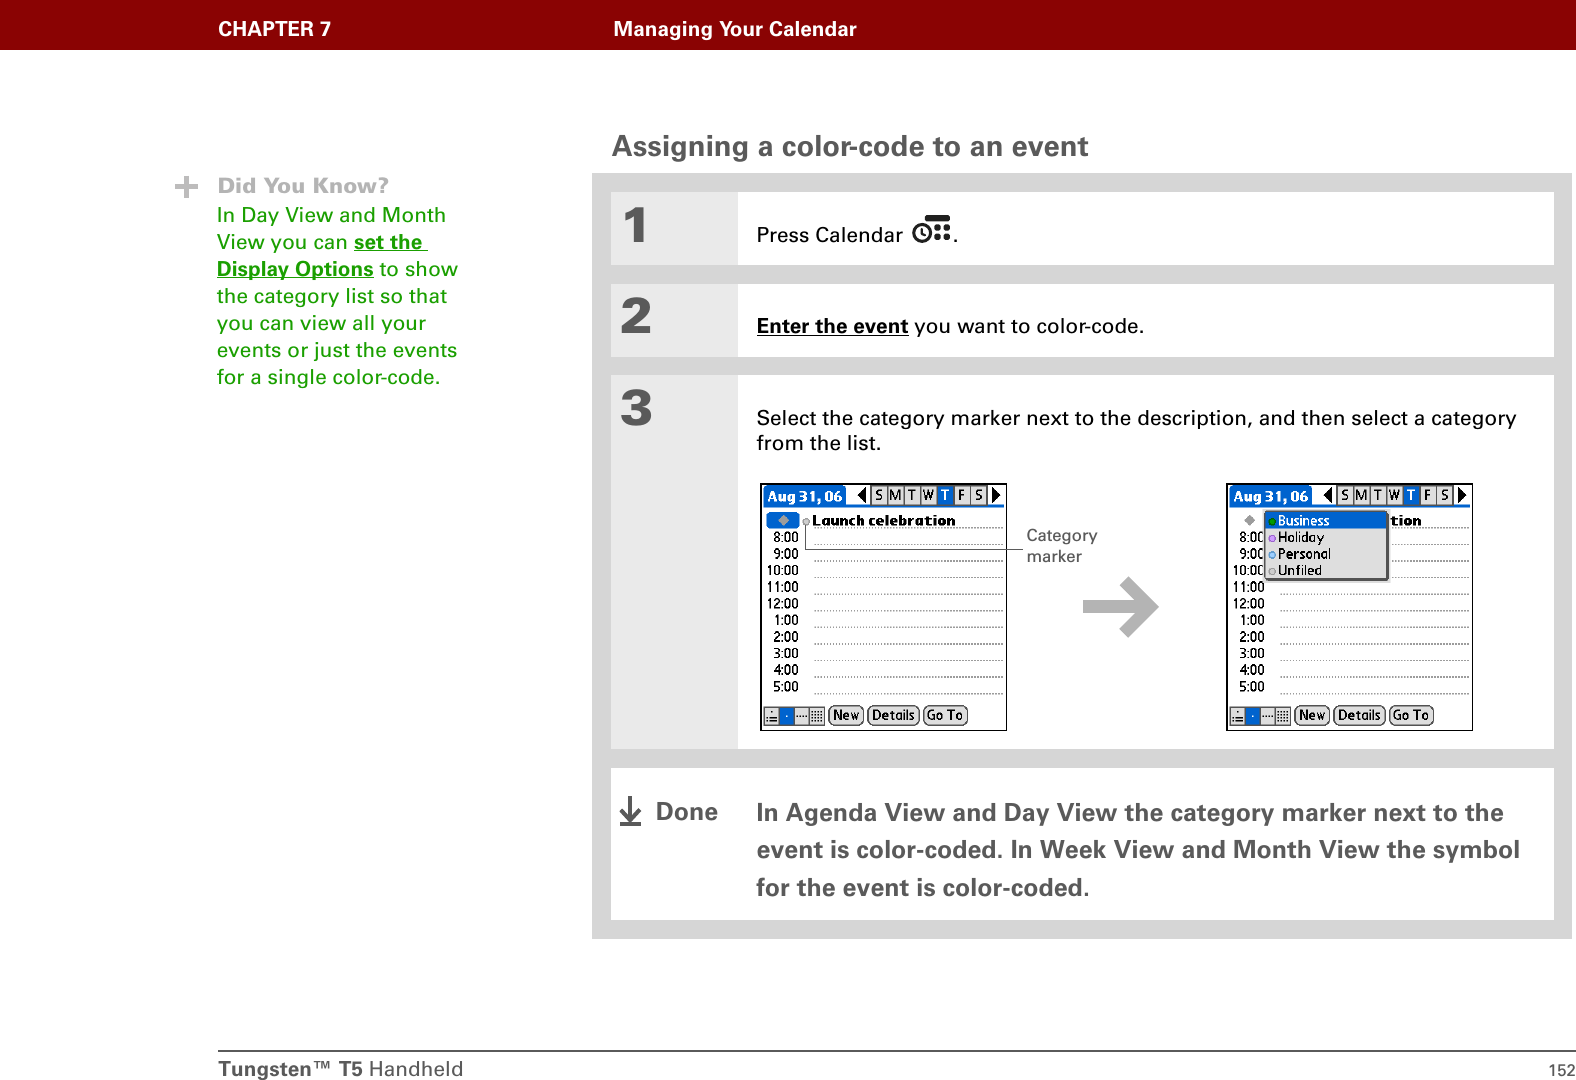
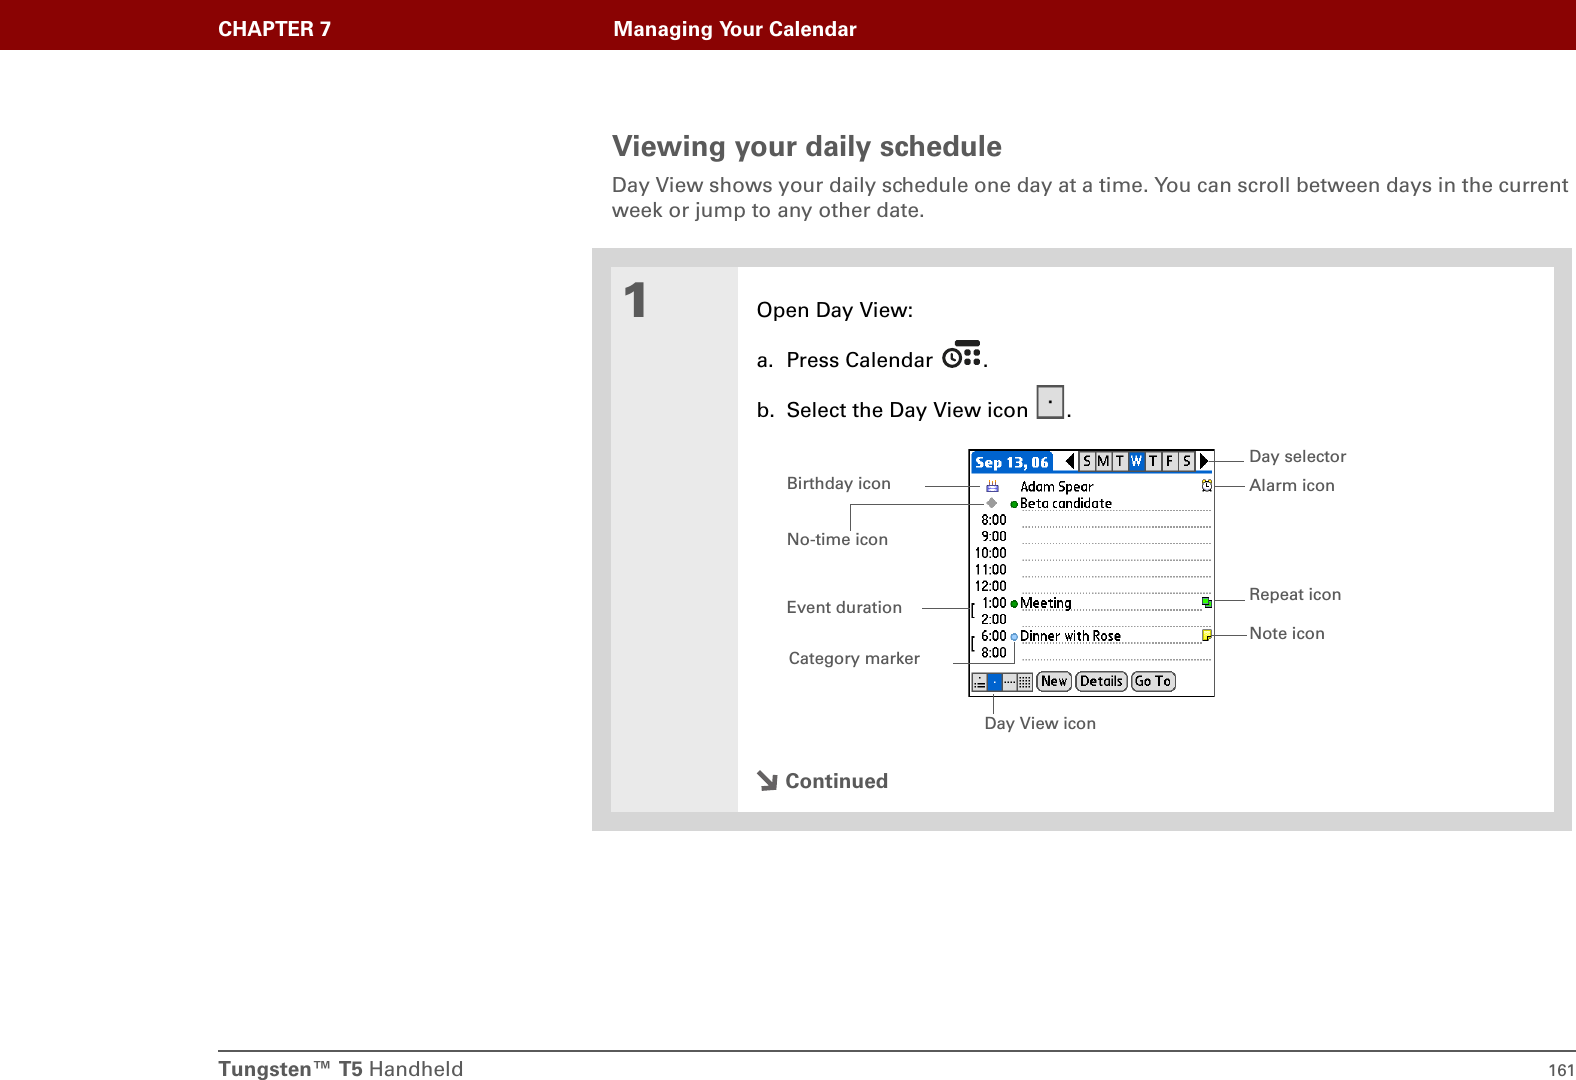
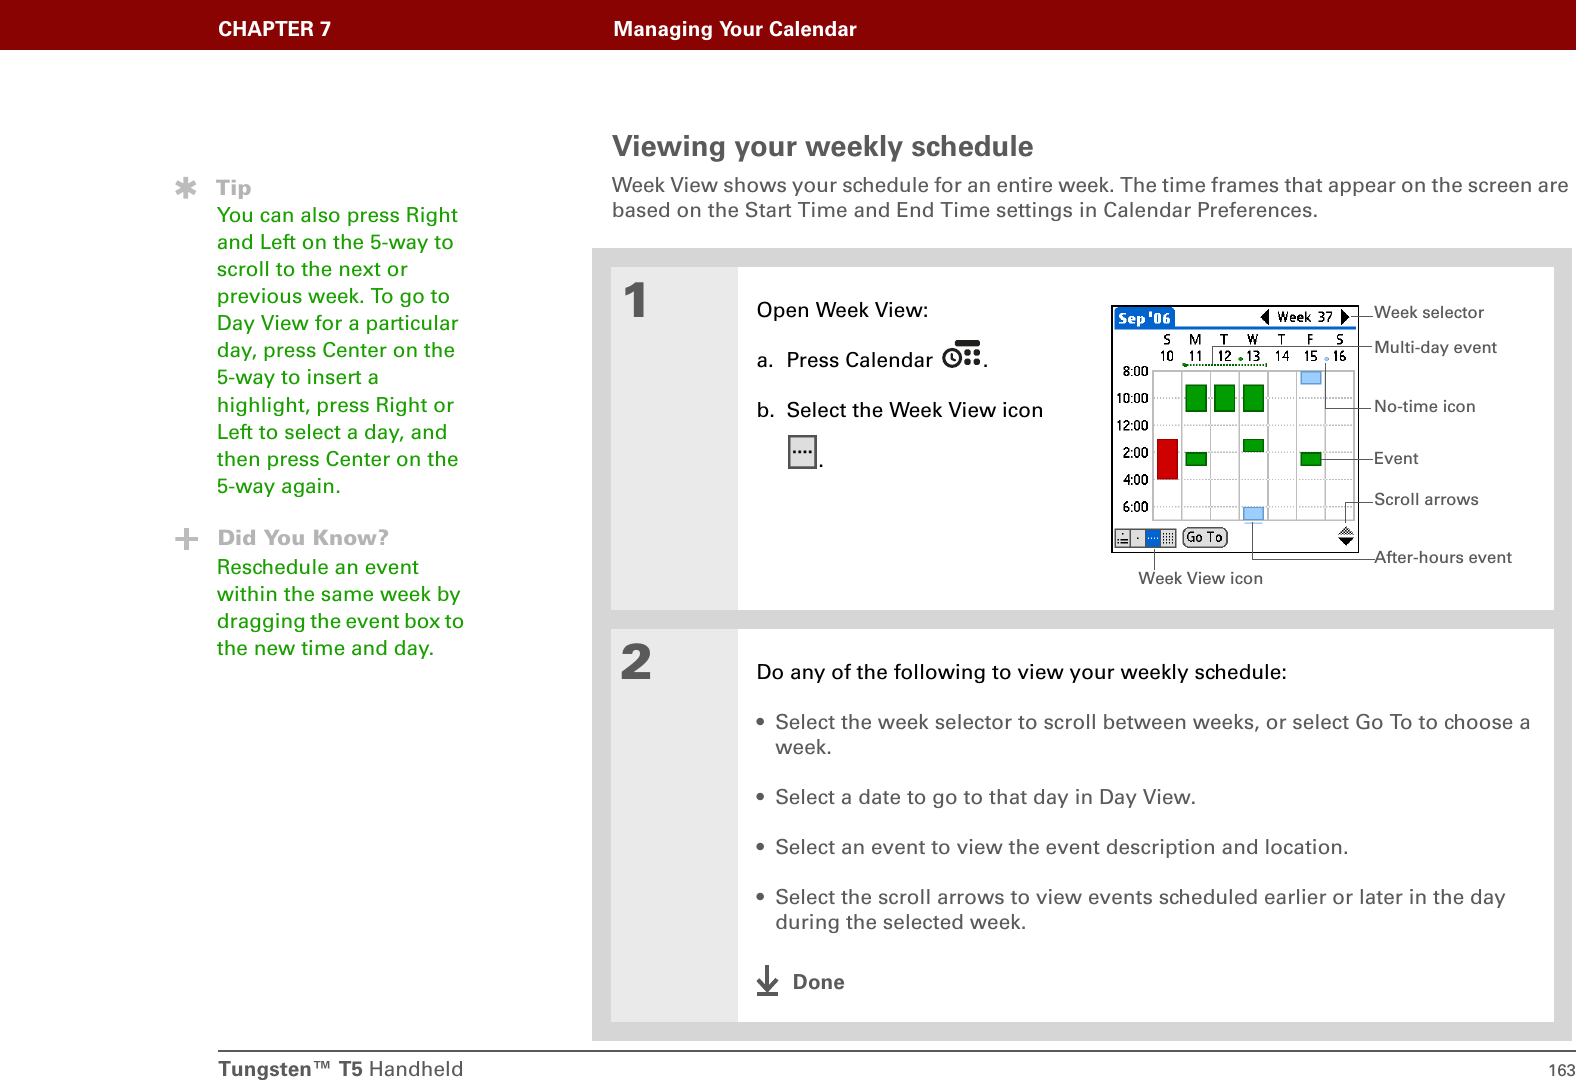
![Tungsten™ T5 Handheld 146CHAPTER 7 Managing Your CalendarEntering a location or a note for an eventEnter a description of the event’s location such as a restaurant, a conference room, or your friend’s house. Enter a note such as dial-in info for a conference call or directions to a location.01Press Calendar .2Enter the event, and then select the event description.3[ & ] OPTIONAL Enter the location:a. Select Details.b. Select the Location field and enter a description of the location.Continued](https://usermanual.wiki/Palm/820.User-Manual-1/User-Guide-475658-Page-168.png)
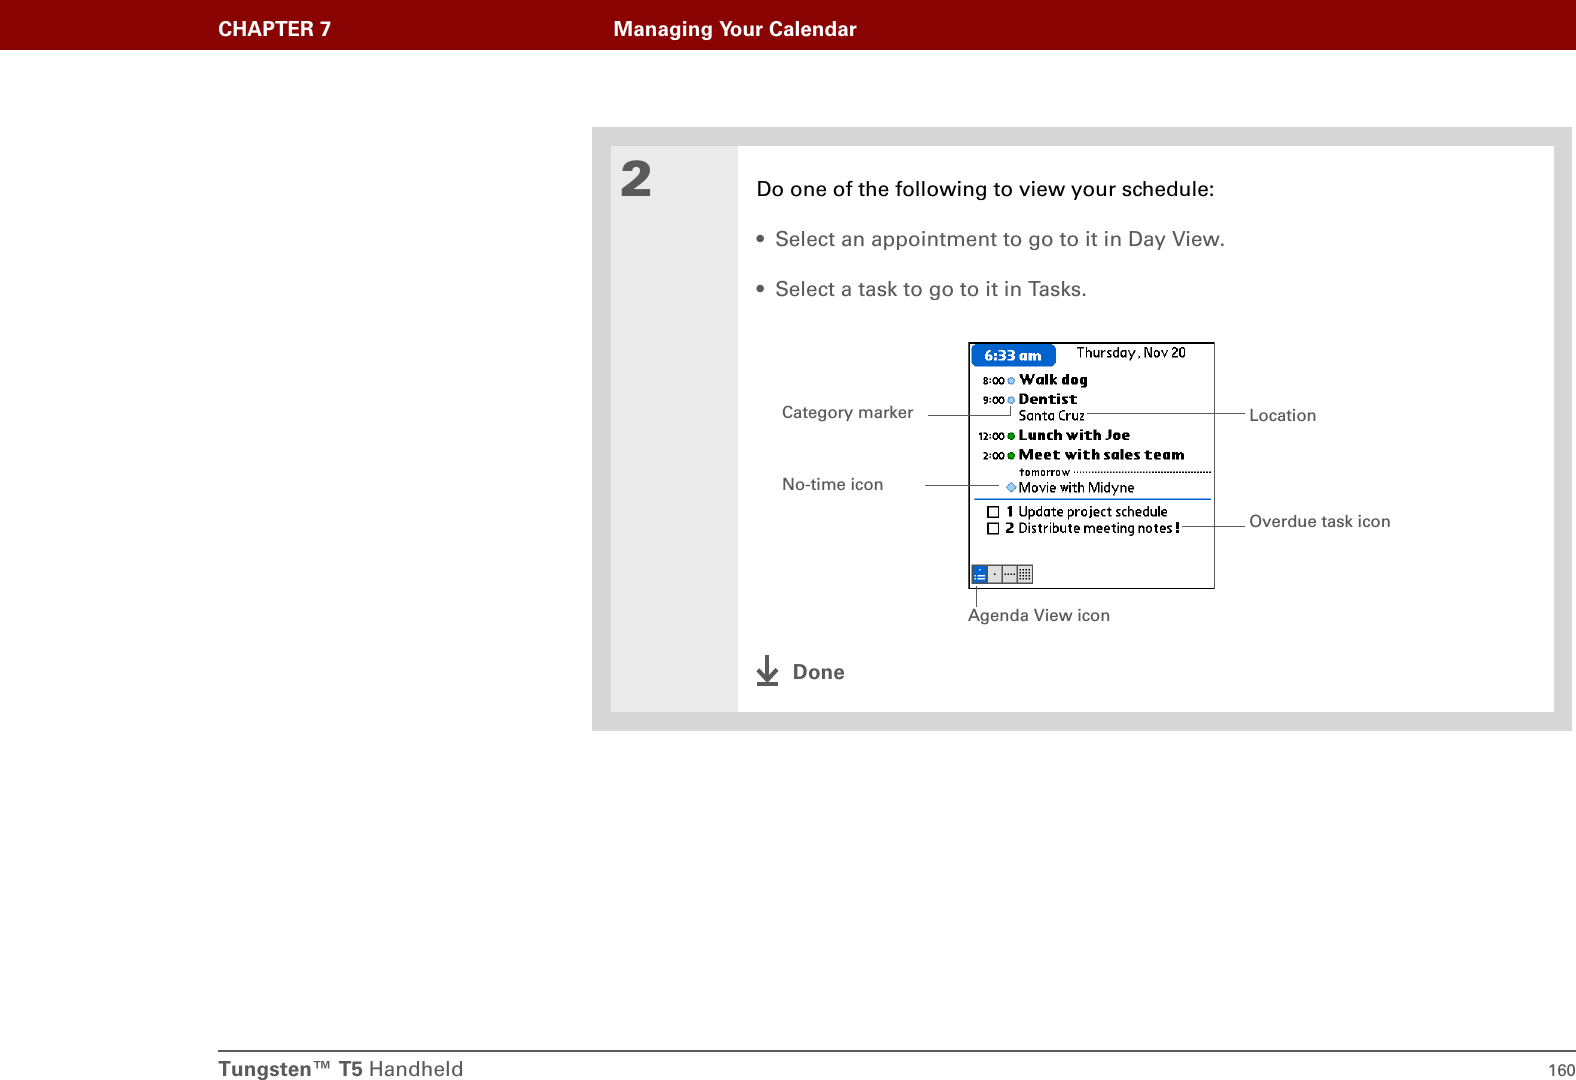
![Tungsten™ T5 Handheld 147CHAPTER 7 Managing Your Calendar4[ & ] OPTIONAL Enter the note:a. Select Note .b. Enter the note text.c. Select Done.5Select OK.The location name and a note icon appear next to the event description in the Agenda View and in the Day View.Done](https://usermanual.wiki/Palm/820.User-Manual-1/User-Guide-475658-Page-169.png)
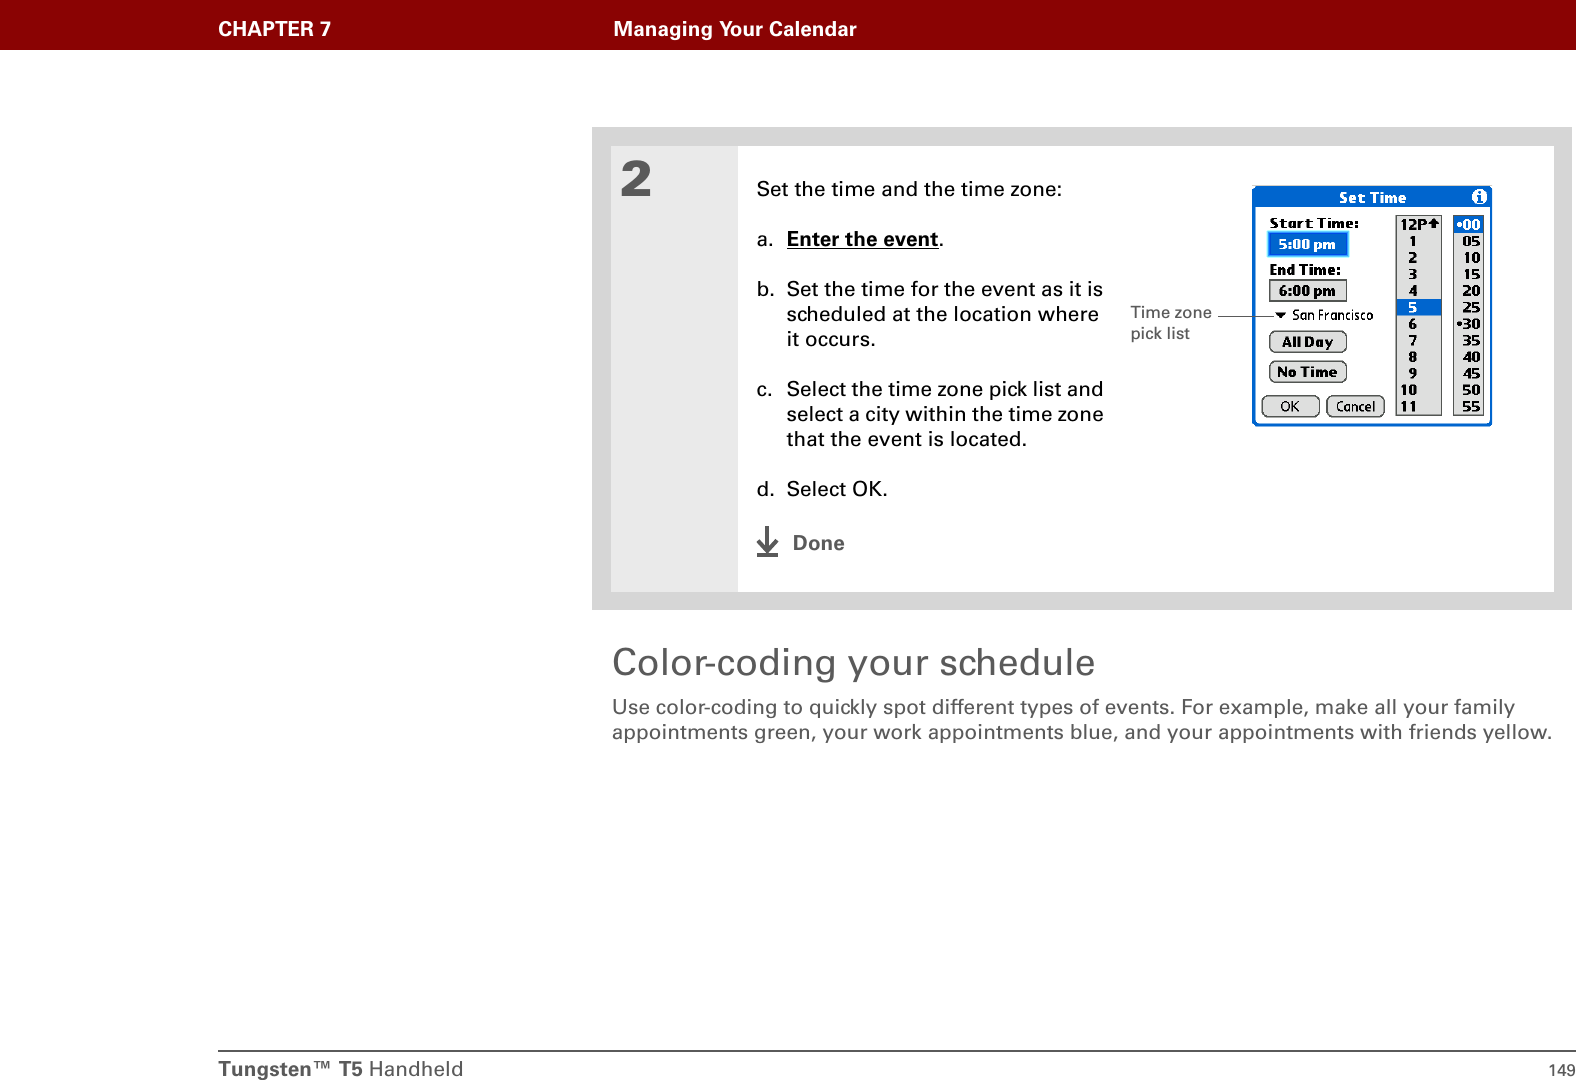
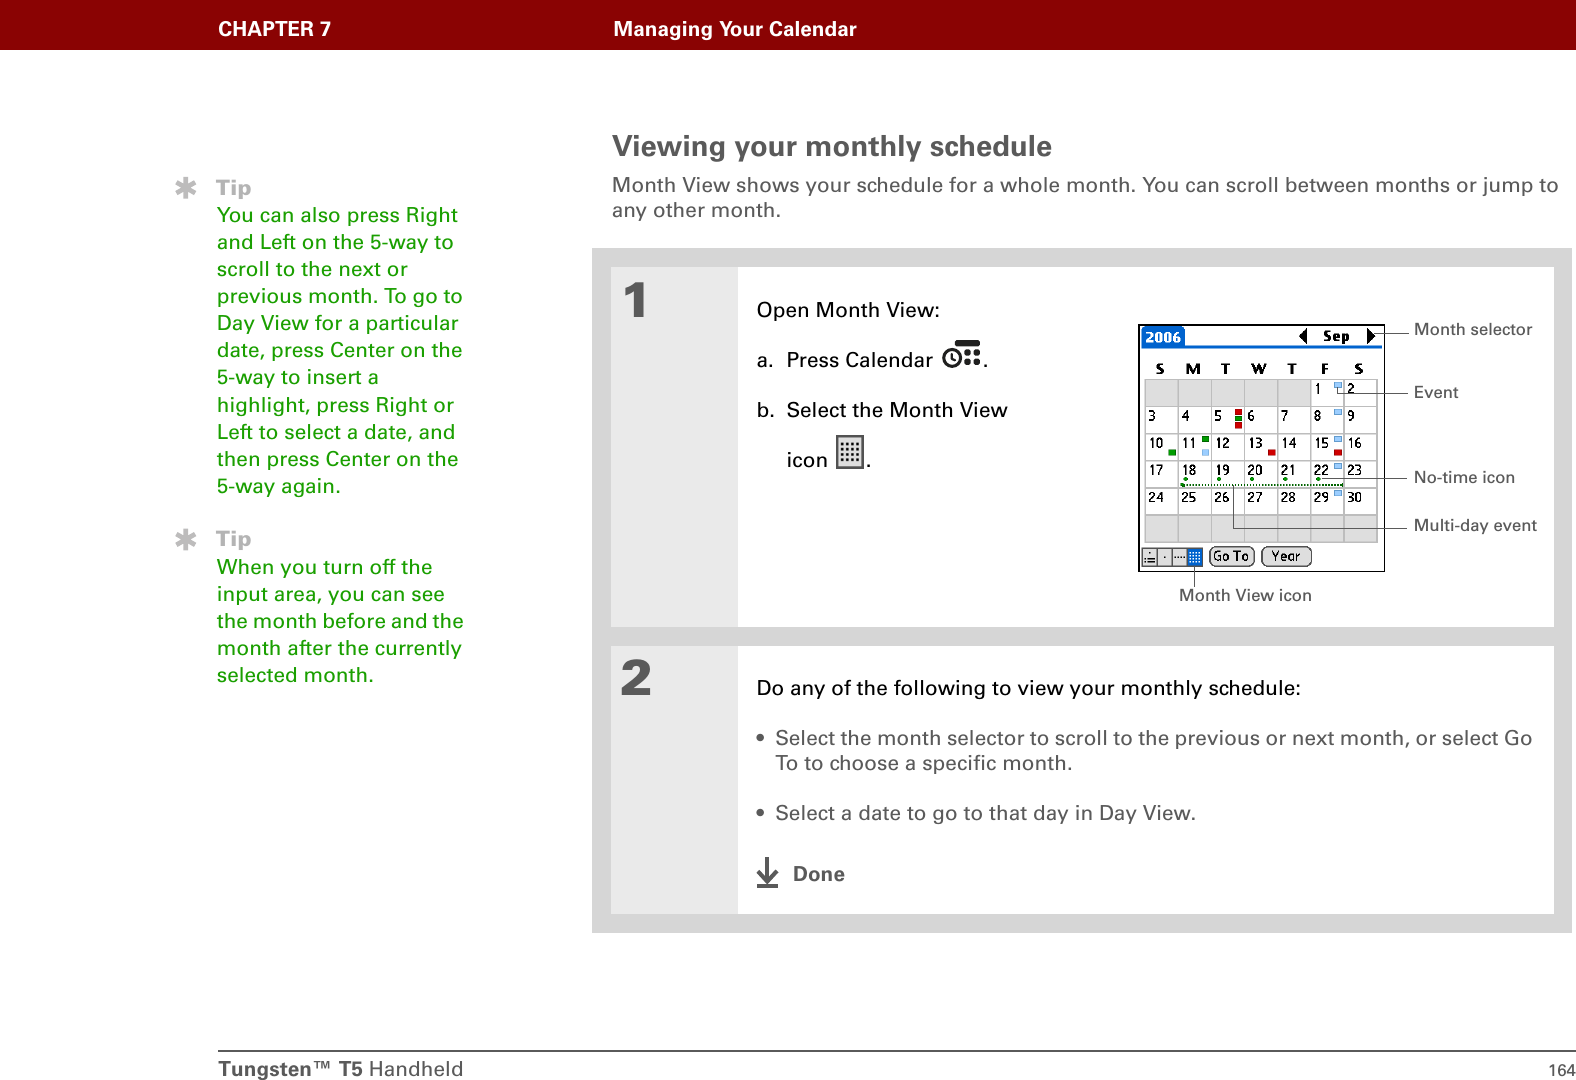
![Tungsten™ T5 Handheld 148CHAPTER 7 Managing Your CalendarScheduling an event with a time zone Time zones only work if you are synchronizing with Outlook. Palm®Desktop software does not recognize time zones.Selecting a time zone when creating a new event allows you to travel and have your events automatically adjust to the time zone in your new location. When you schedule an event, set the time zone and time the event occurs in the location of the event. The event automatically adjusts on your schedule based on the primary location you have set on your handheld.When you travel, you can change the primary location on your handheld and the event automatically adjusts on your schedule to the correct time according to the time zone of the new primary location. Only events that have a time zone setting adjust when you change the primary time zone on your handheld. Events that do not have a time zone setting remain at their set time. 01Press Calendar .ContinuedIMPORTANT[!]Did You Know?You can also set a preference to automatically include a time zone whenever you create a new event. Open the Options menu and select Preferences. Select New events use time zones. Only new events created after the preference is set are affected. NOTE](https://usermanual.wiki/Palm/820.User-Manual-1/User-Guide-475658-Page-170.png)
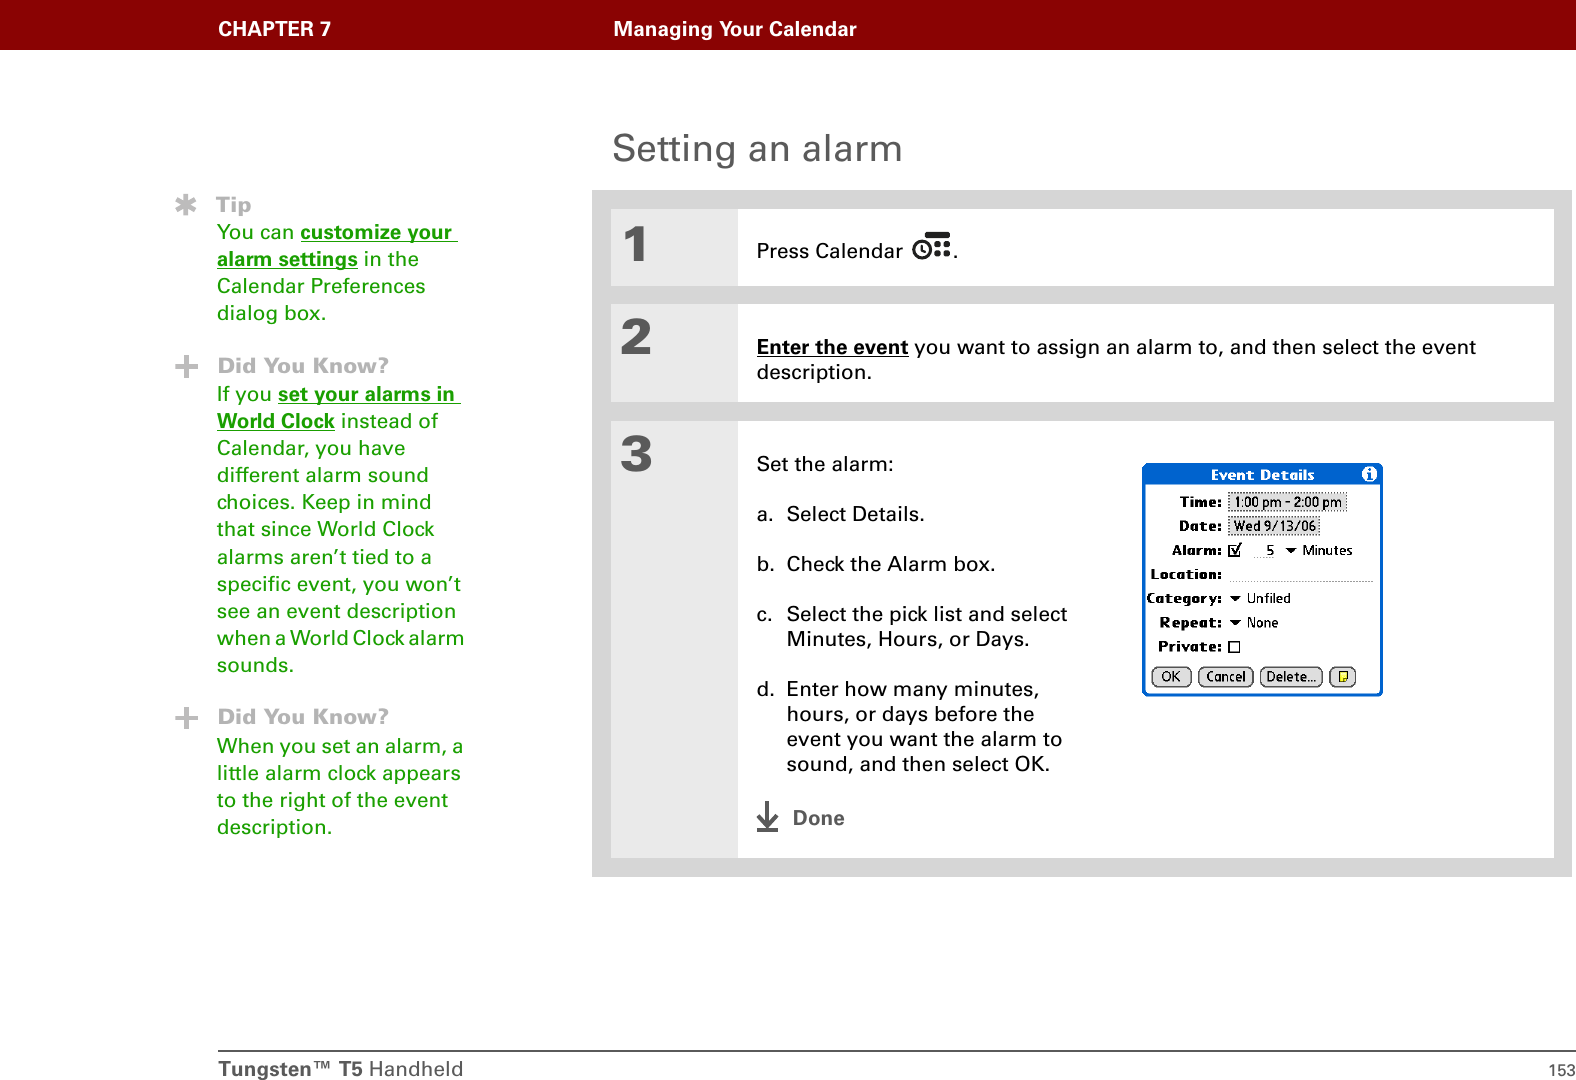
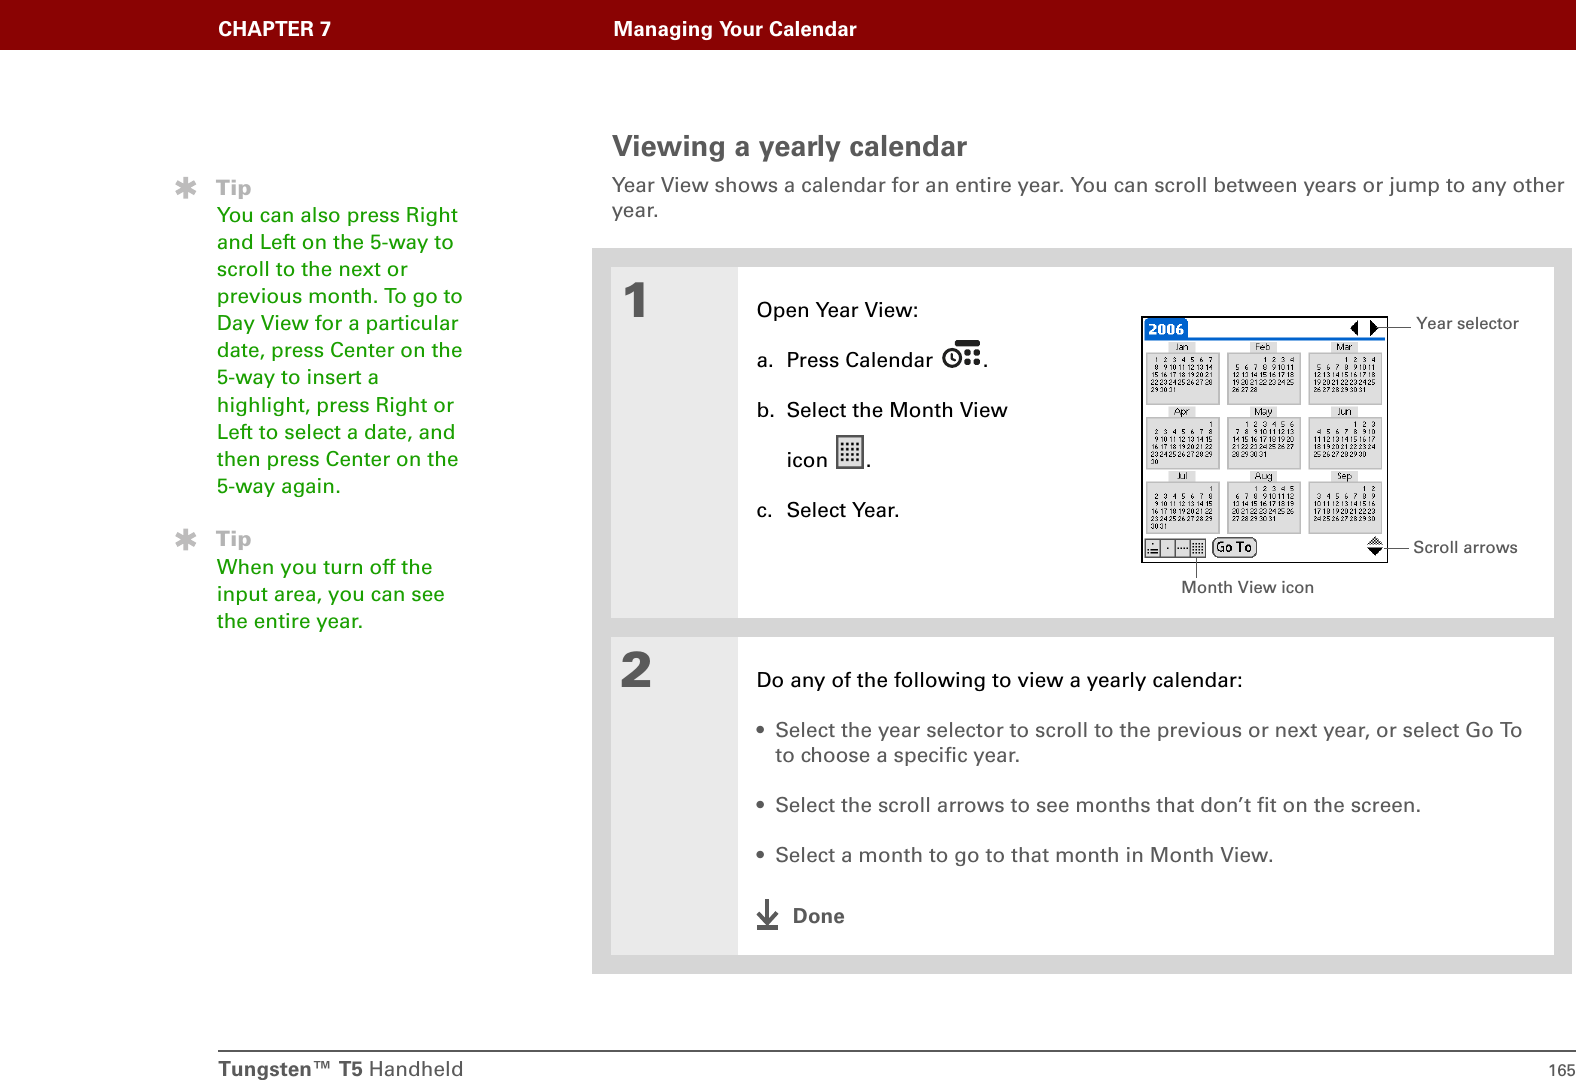
![Tungsten™ T5 Handheld 154CHAPTER 7 Managing Your CalendarRescheduling an event01Press Calendar .2Go to the event you want to reschedule:a. From Day View, select Go To.b. Select the year, month, and date of the event.c. Select the event description, and edit it if necessary. If you edit the description of a repeating event, the new description appears in all instances of the event.3Change the date and time:a. Select Details.b. Select the Time box and select the new start and end times.c. Select the Date box and select the new date.d. Select OK.ContinuedTipYou can also use the Event Details dialog box to change the alarm, location, category, repeat, and privacy settings.IMPORTANT[!]](https://usermanual.wiki/Palm/820.User-Manual-1/User-Guide-475658-Page-176.png)

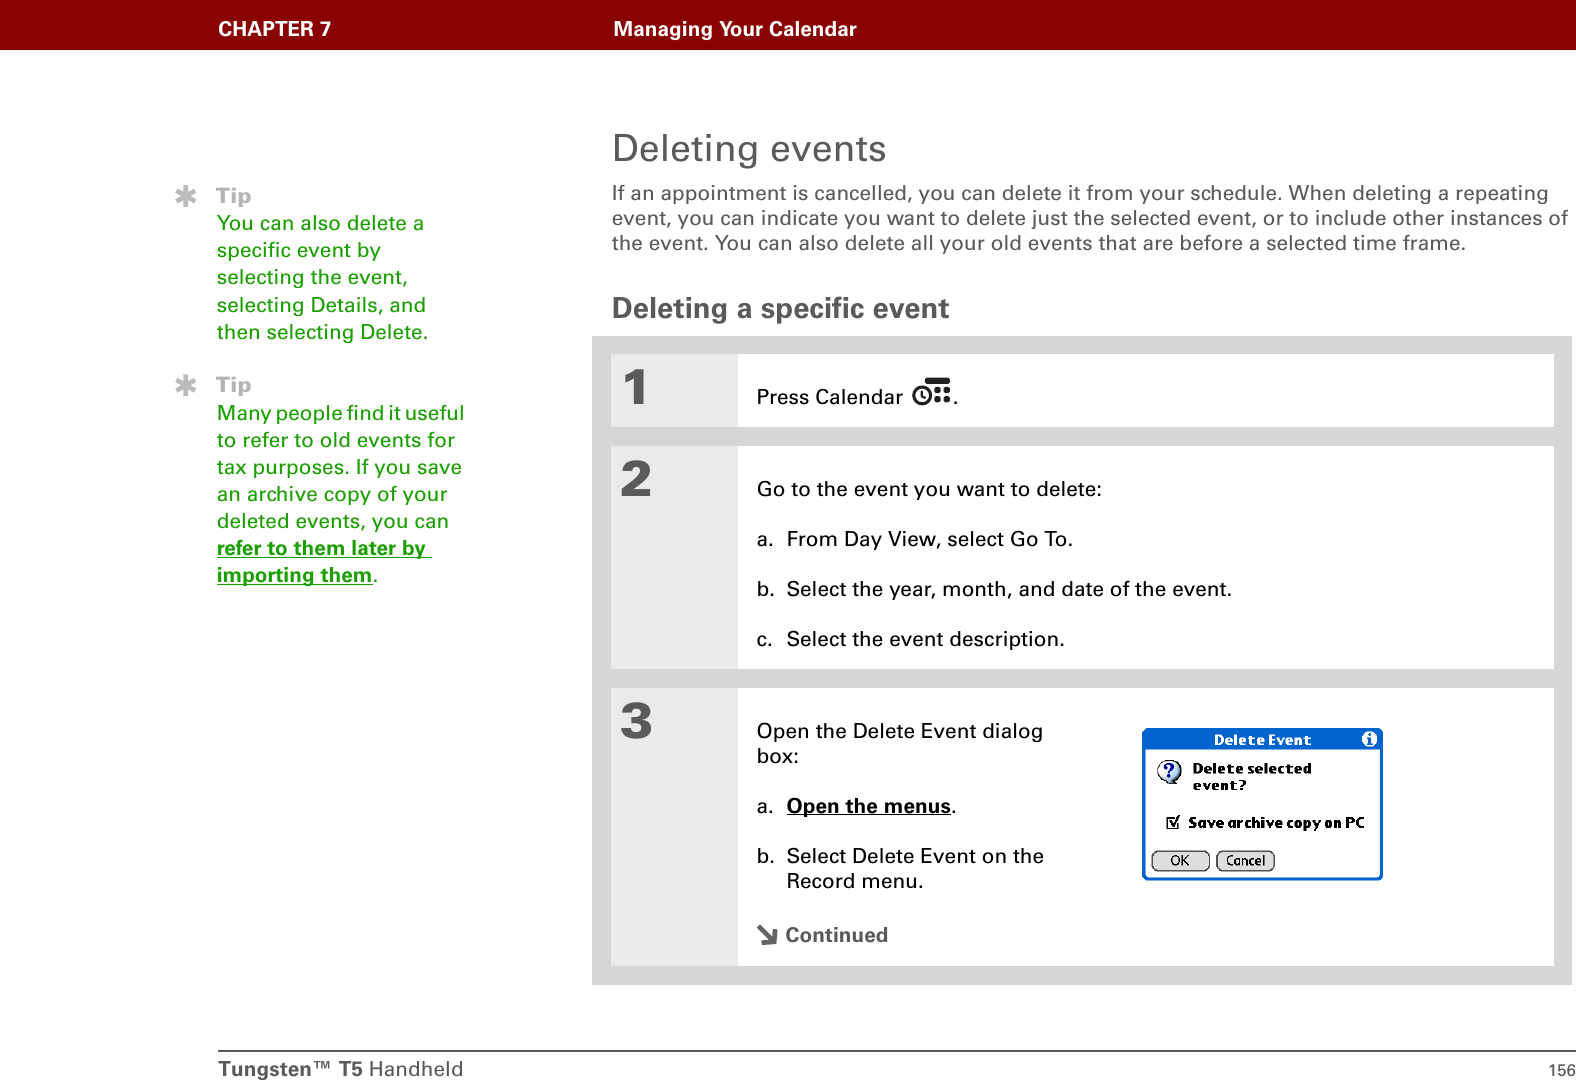
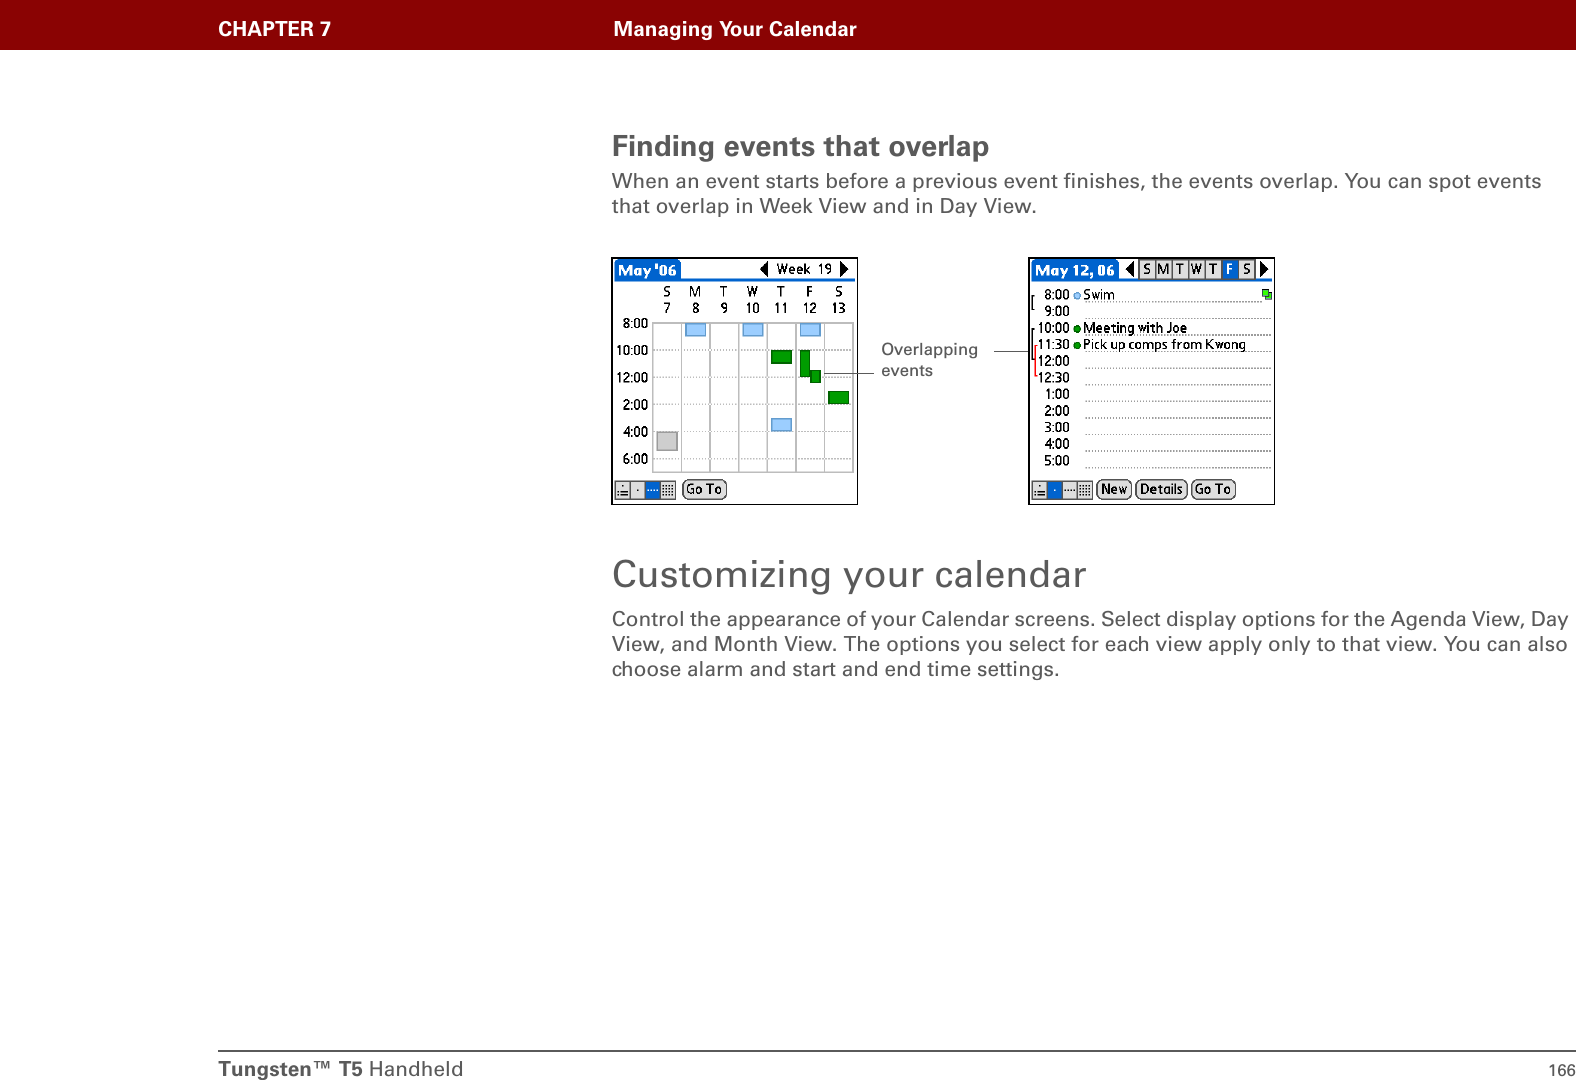
![Tungsten™ T5 Handheld 157CHAPTER 7 Managing Your Calendar4[ & ] OPTIONAL Check the box to save an archive copy of the event on your computer.5Select OK.6If you’re deleting a repeating event, select one of the following to select the event(s) you want to delete:Current Delete only the selected instance of the repeating event.Future Delete the selected event and all instances of the repeating event that occur at a later date.All Delete the selected event and all past and future instances of the repeating event.Done](https://usermanual.wiki/Palm/820.User-Manual-1/User-Guide-475658-Page-179.png)
![CHAPTER 8 Managing Your Office FilesTungsten™ T5 Handheld 176Opening files from within DocumentsIn the Documents application, you can view and open any Word, Excel, or PowerPoint file on your handheld.01Go to Favorites and select Documents.2[ & ] OPTIONAL If the file you want does not appear in the list, browse for the file:a. Open the menus, and then select File.b. Select Search For Files.3Select the file you want from the list.DoneTipWhen you are working on a file, save it to a specific location on your handheld’s internal drive by opening the menus, selecting Save As from the File menu, and then navigating to the location where you want to save the file.TipYou can choose to synchronize a Word, Excel, or PowerPoint file from within the Documents application, even if you copied it using File Transfer. See the Documents To Go application on your computer for information.](https://usermanual.wiki/Palm/820.User-Manual-1/User-Guide-475658-Page-198.png)


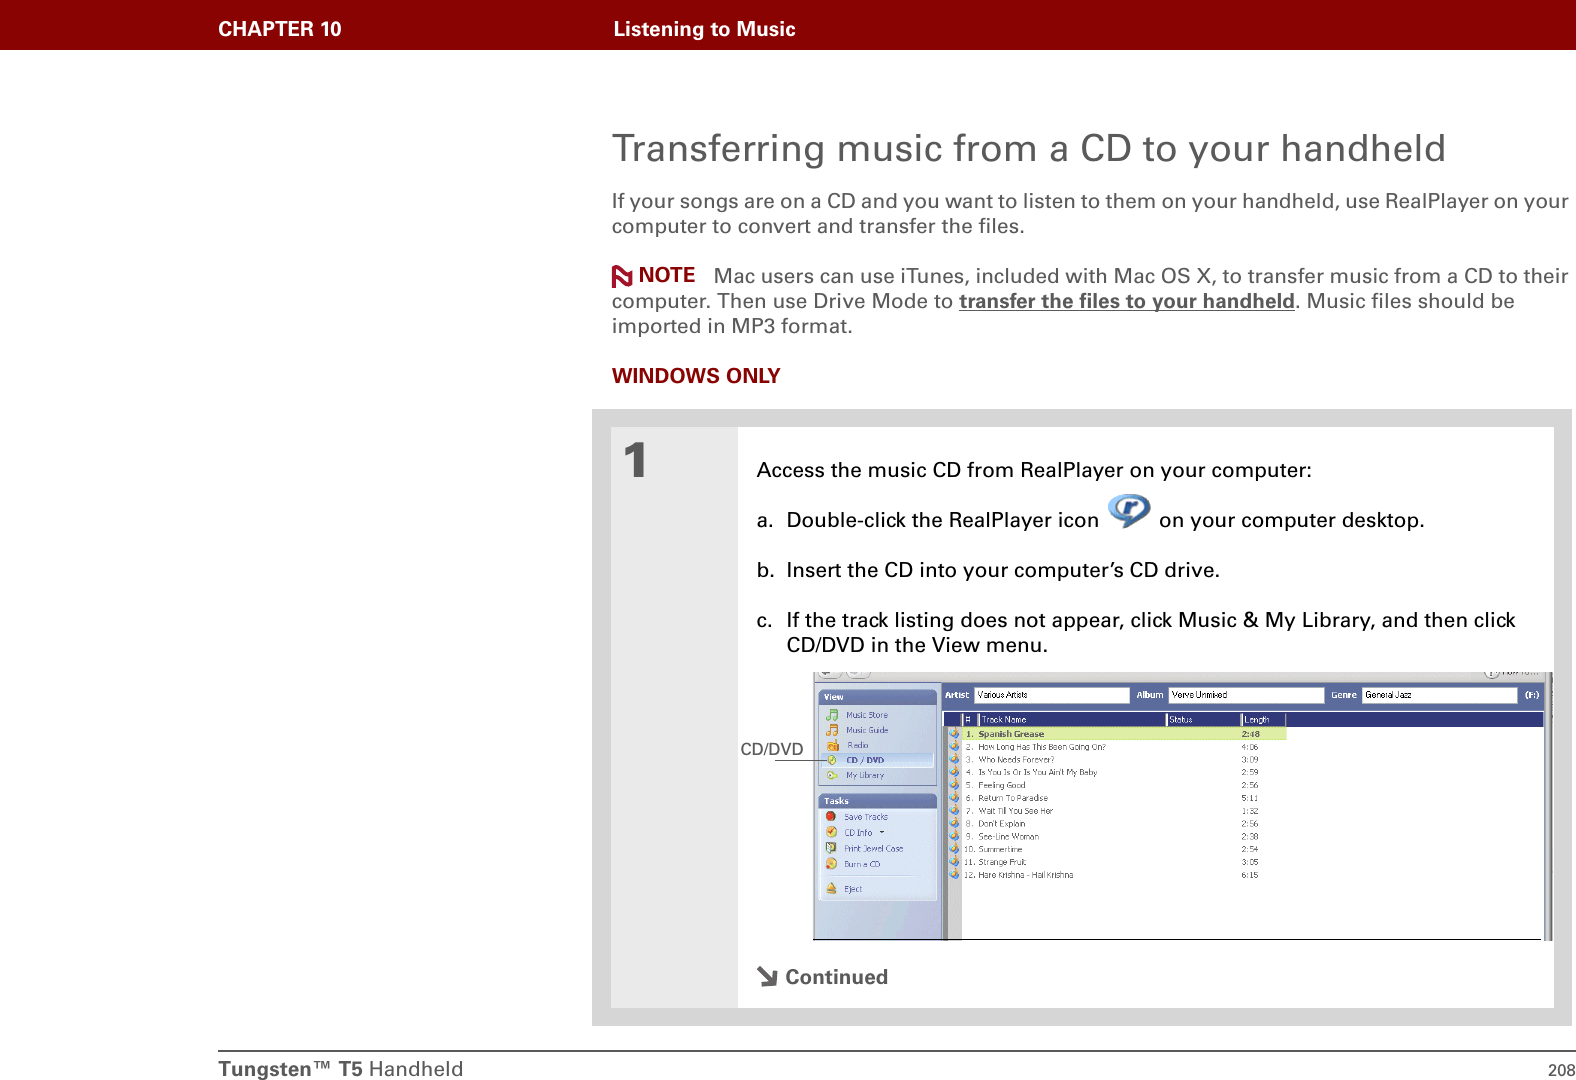
![Tungsten™ T5 Handheld 204CHAPTER 10 Listening to MusicTransferring MP3 files to your handheldThe RealPlayer software that comes with your handheld is compatible with the popular MP3 audio file format. Use RealPlayer on your computer to copy MP3 files to your handheld’s internal drive. WINDOWS ONLY01Connect your handheld to your computer using the USB sync cable.2Prepare RealPlayer on your computer:a. Open the RealPlayer application.b. Select palmOne Handheld from the Current Burner/Device drop-down list.ContinuedBefore You Begin[!]Windows: Install the RealPlayer desktop application on your computer. Insert the software installation CD and follow the onscreen instructions for installing extra software.You must install this software, even if you already have a version of RealPlayer installed on your computer. The version on the CD contains all of the components needed to transfer music files to your handheld.Select palmOne Handheld](https://usermanual.wiki/Palm/820.User-Manual-1/User-Guide-475658-Page-226.png)
![Tungsten™ T5 Handheld 205CHAPTER 10 Listening to Music3Prepare your handheld:a. Go to Favorites and then select Music .b. Connect your handheld to your computer using the USB sync cable.Do not press the HotSync button on your cable.4Select the songs you want to transfer:a. In RealPlayer on your computer, click Burn/Transfer. b. If necessary, select palmOne Handheld from the Current Burn/Transfer Device drop-down list.c. Drag the song files you want from the My Library window on the left into the palmOne Handheld window on the right.ContinuedTipFor tips on using RealPlayer on your computer, go to the Help menu in RealPlayer or visit www.real.com.IMPORTANT[!]](https://usermanual.wiki/Palm/820.User-Manual-1/User-Guide-475658-Page-227.png)
![Tungsten™ T5 Handheld 206CHAPTER 10 Listening to Music5Transfer the selected songs to your handheld:a. Be sure your handheld is on and that RealPlayer is open. If it is, a green Connected light appears in the lower-left corner of RealPlayer on your computer.b. Click Start Transfer. When the transfer is complete, the tracks you selected should say “On Device.” The files are transferred to the Music folder on your handheld’s internal drive.Do not press the HotSync button on your cable. RealPlayer is transferring the files, so there’s no need to do anything. DoneTipYou can also transfer MP3 files by dragging a folder of files or individual files to the File Transfer application on your desktop, and then dragging the item(s) to the Music folder in the File Transfer window. This is useful if you want to copy an entire folder of music to your handheld, for example, to keep all the songs from the same CD in one folder.IMPORTANT[!]](https://usermanual.wiki/Palm/820.User-Manual-1/User-Guide-475658-Page-228.png)
![Tungsten™ T5 Handheld 210CHAPTER 10 Listening to Music3Prepare your handheld:a. Go to Favorites and then select Music .b. Connect your handheld to your computer using the USB sync cable.Do not press the HotSync button on your cable.4Select the songs you want to transfer:a. In RealPlayer on your computer, click Burn/Transfer. b. If necessary, select palmOne Handheld from the Current Burn/Transfer Device drop-down list.c. Drag the song files you want from the My Library window on the left into the palmOne Handheld window on the right.ContinuedTipFor tips on using RealPlayer on your computer, go to the Help menu in RealPlayer or visit www.real.com.IMPORTANT[!]](https://usermanual.wiki/Palm/820.User-Manual-1/User-Guide-475658-Page-232.png)
![Tungsten™ T5 Handheld 211CHAPTER 10 Listening to Music5Transfer the selected songs to your handheld:a. Be sure your handheld is on and that RealPlayer is open. If it is, a green Connected light appears in the lower-left corner of RealPlayer on your computer.b. Click Start Transfer. When the transfer is complete, the tracks you selected should say “On Device.” The files are transferred to the Music folder on your handheld’s internal drive.Do not press the HotSync button on your cable. RealPlayer is transferring the files, so there’s no need to do anything. DoneTipOn your handheld, tap Songs to view a list of the songs available for you to play. The songs you just transferred are at the bottom of the list.IMPORTANT[!]](https://usermanual.wiki/Palm/820.User-Manual-1/User-Guide-475658-Page-233.png)
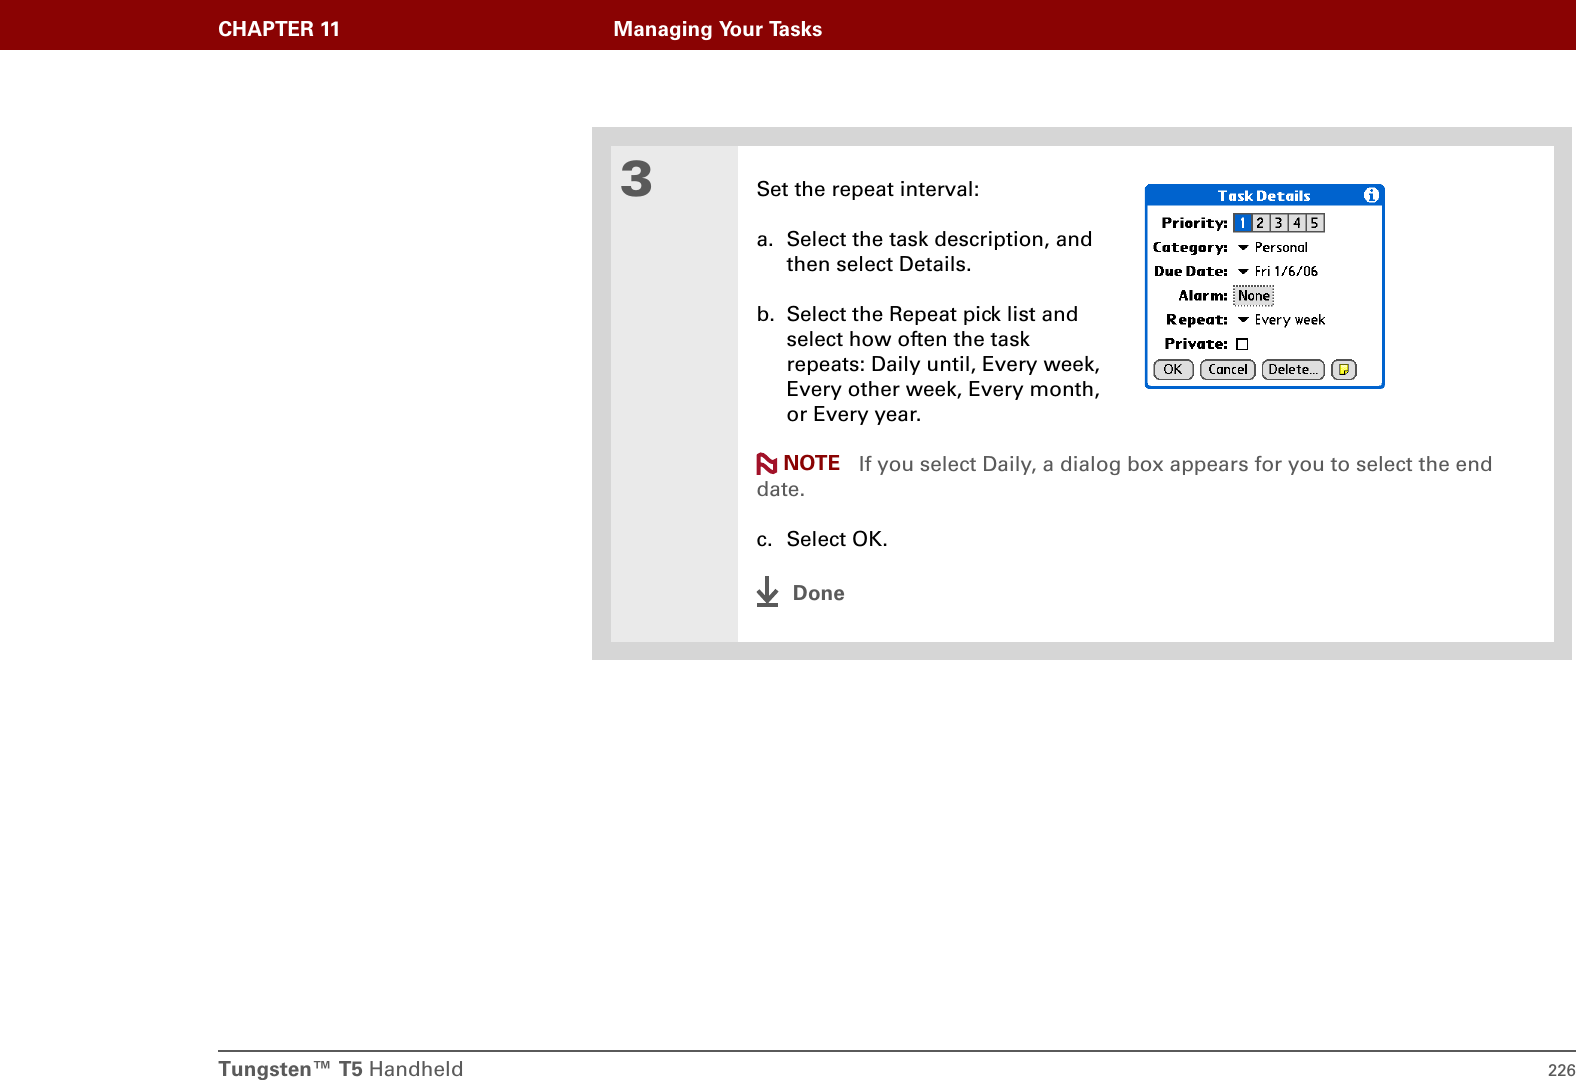
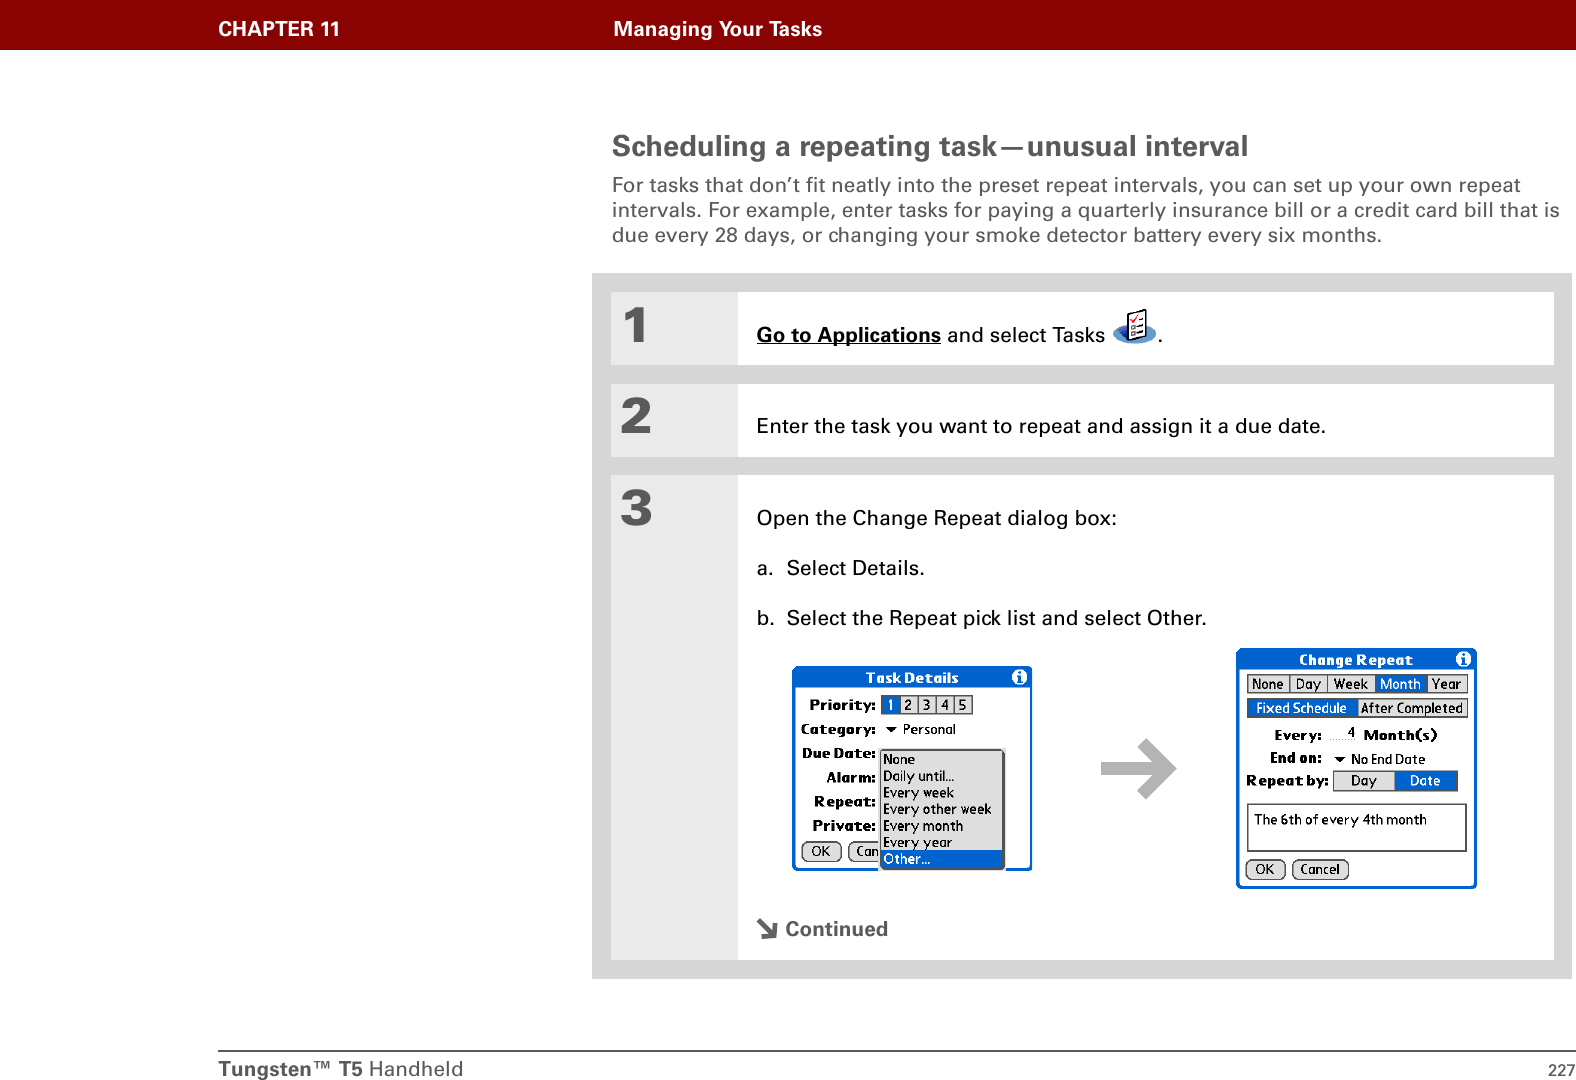
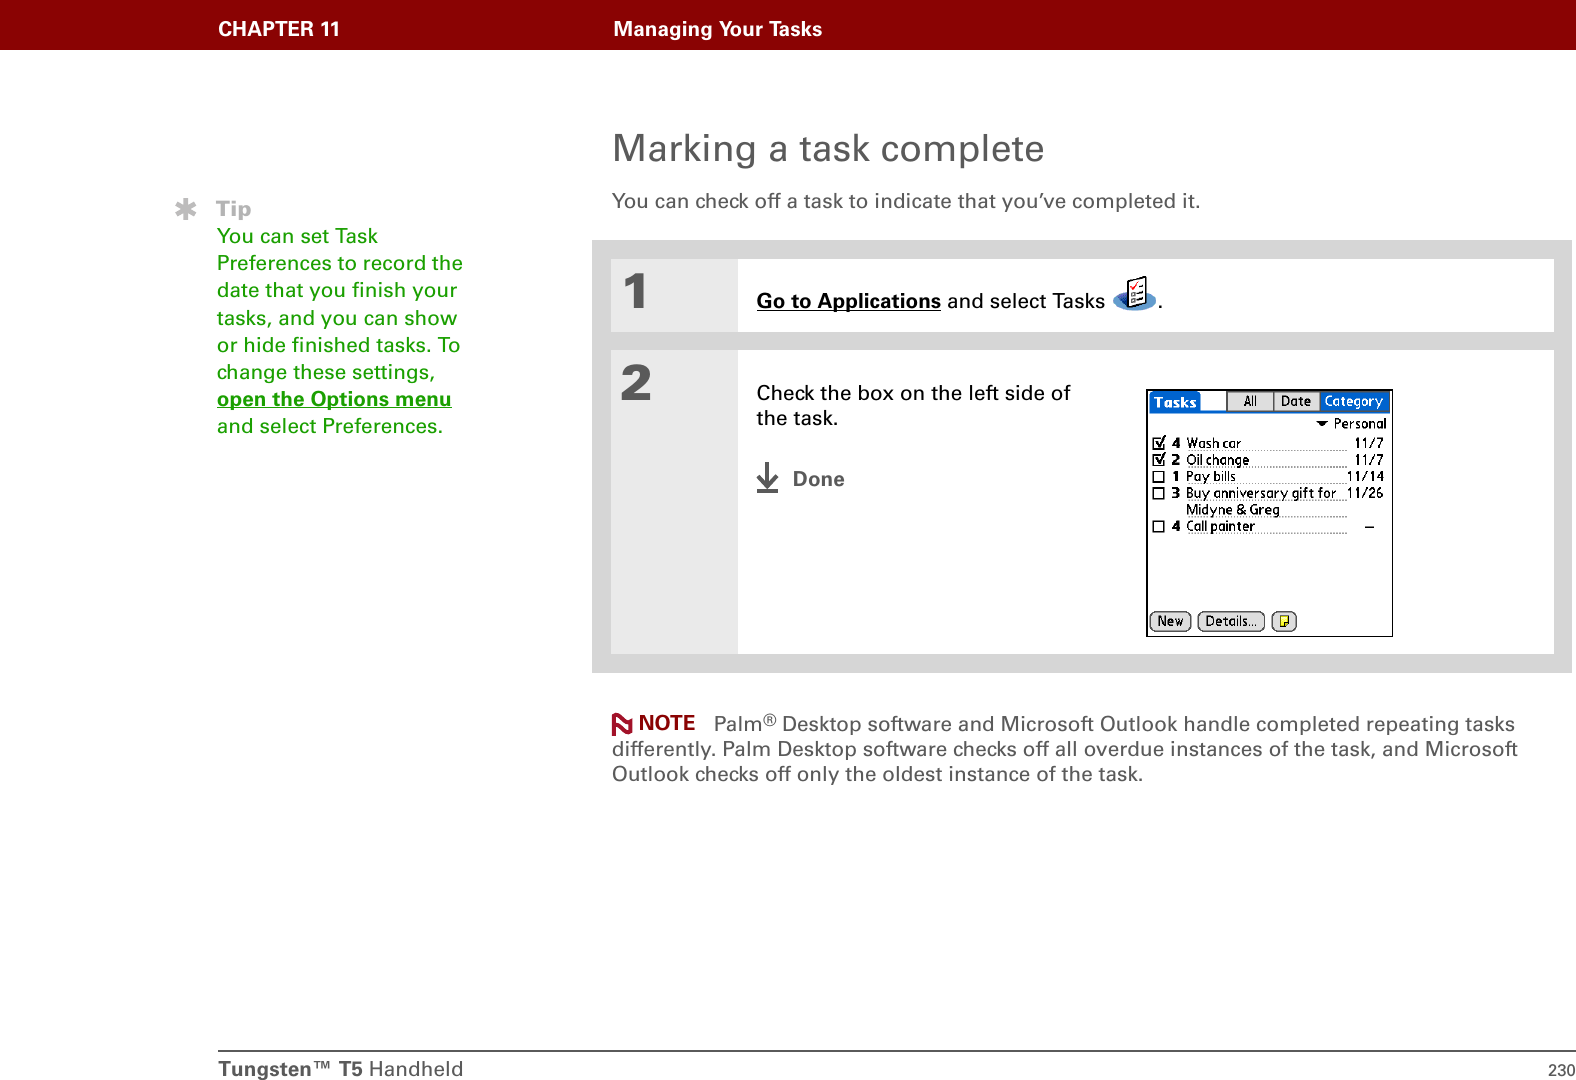
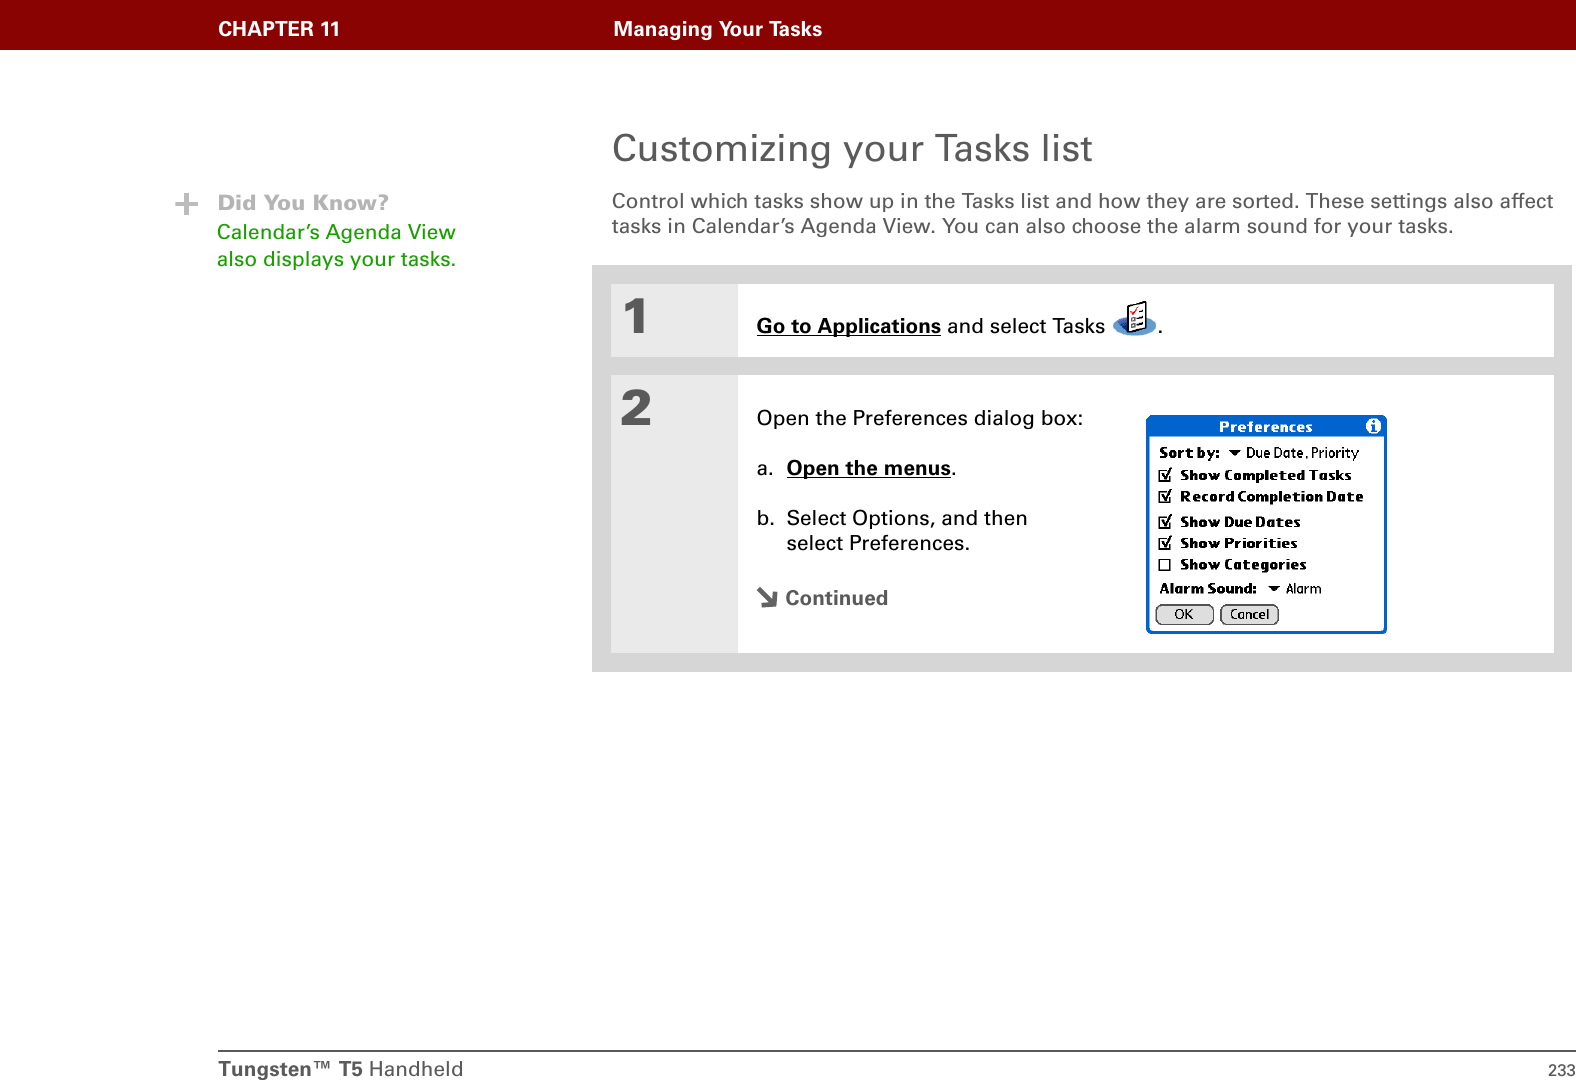
![Tungsten™ T5 Handheld 223CHAPTER 11 Managing Your TasksCreating a task01Go to Applications and select Tasks .2Create a task:a. Select New.b. Enter a description of the task. 3[ & ] OPTIONAL Assign a priority and due date:a. Select the priority number, and then from the pick list select a number 1—5. 1 indicates the most important task.b. Select the due date and select a date from the list, or select Choose Date to select a date from the calendar.That’s it. Your handheld automatically saves the task. Make sure you have a current backup. Synchronize often.TipIf no task is currently selected, you can create a new task by writing Graffiti® 2 characters in the input area.TipAdd a note to a task. Select the Note button, enter the note text, and then select Done.Did You Know?You can organize your tasks by filing them into categories. You can also mark tasks as private to hide them from prying eyes.New task Priority numberDue dateLong descriptionNote buttonDone](https://usermanual.wiki/Palm/820.User-Manual-1/User-Guide-475658-Page-245.png)
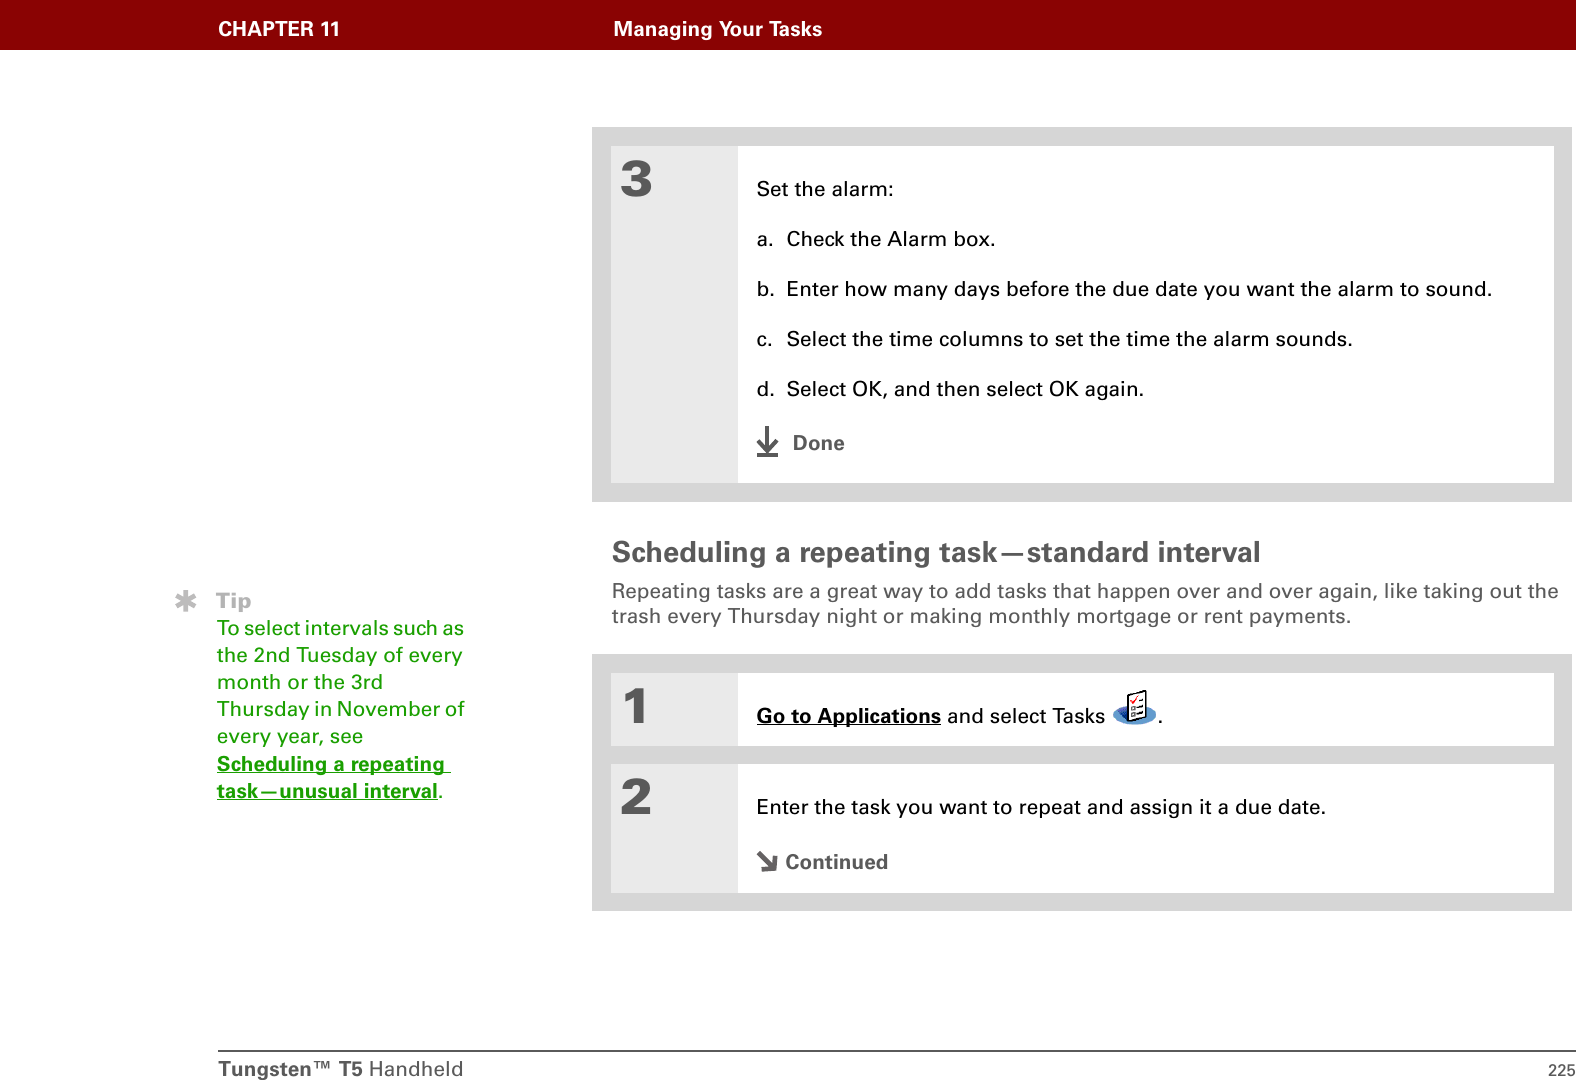
![Tungsten™ T5 Handheld 224CHAPTER 11 Managing Your TasksSetting an alarm01Go to Applications and select Tasks .2Open the Set Alarm dialog box:a. Select the task you want to assign an alarm to. b. Select Details.c. Select the Alarm box.ContinuedBefore You Begin[!]Create a task and assign it a due date. A task must have a due date before you can set an alarm.TipYou can customize the alarm sound for your tasks in the Task Preferences dialog box.Did You Know?When you set an alarm, a little alarm clock appears to the right of the task description.](https://usermanual.wiki/Palm/820.User-Manual-1/User-Guide-475658-Page-246.png)
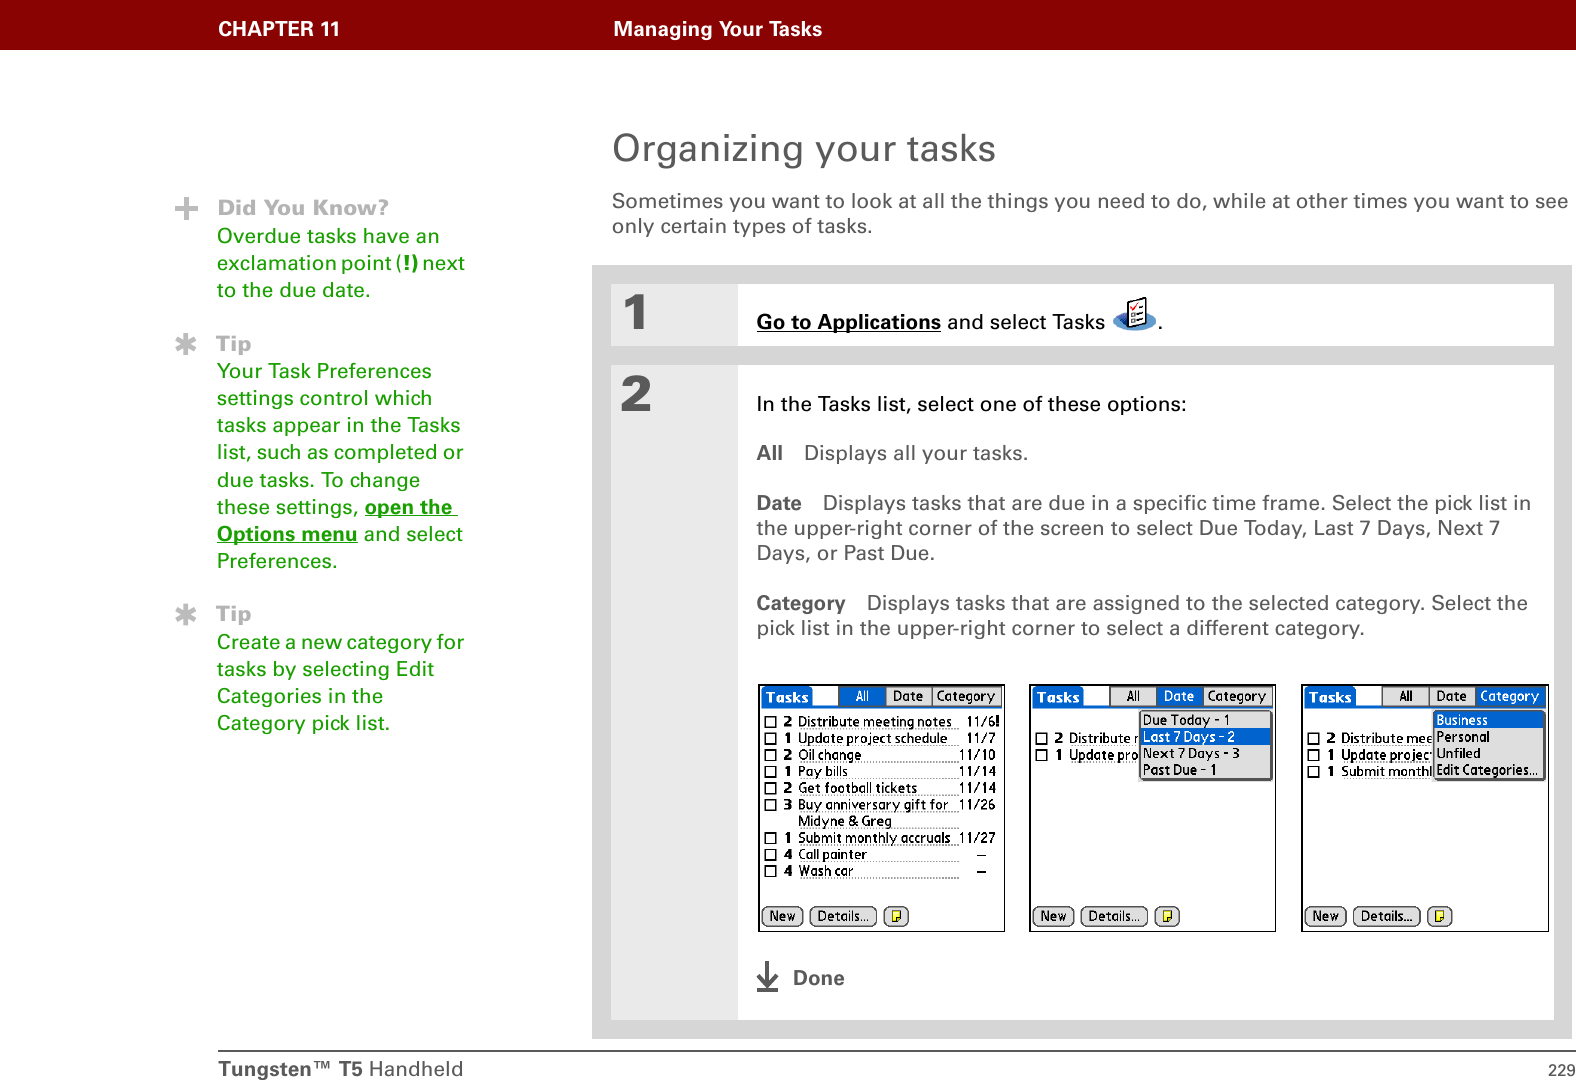
![Tungsten™ T5 Handheld 231CHAPTER 11 Managing Your TasksDeleting tasksIf a task is cancelled, you can delete it from your Tasks list. When you delete a repeating task, you delete all other instances of the task. You can also delete all your completed tasks.Deleting a specific task01Go to Applications and select Tasks .2Select the task you want to delete.3Open the Delete Task dialog box:a. Open the menus. b. Select Delete Task on the Record menu.4[ & ] OPTIONAL Check the box to save an archive copy of the task on your computer.5Select OK.DoneTipYou can also delete a specific task by selecting the task, selecting Details, and then selecting Delete.TipIf you save an archive copy of your deleted tasks, you can refer to them later by importing them.](https://usermanual.wiki/Palm/820.User-Manual-1/User-Guide-475658-Page-253.png)
![Tungsten™ T5 Handheld 232CHAPTER 11 Managing Your TasksDeleting all your completed tasks01Go to Applications and select Tasks .2Open the Purge dialog box:a. Open the menus. b. Select Purge on the Record menu.3[ & ] OPTIONAL Check the box to save an archive copy of your completed tasks on your computer.4Select OK.DoneTipMany people find it useful to refer to old tasks for tax purposes. If you save an archive copy of your deleted tasks, you can refer to them later by importing them.](https://usermanual.wiki/Palm/820.User-Manual-1/User-Guide-475658-Page-254.png)
![Tungsten™ T5 Handheld 241CHAPTER 12 Writing MemosDeleting a memo01Go to Applications and select Memos .2Open the Delete Memo dialog box:a. Locate the memo you want.b. Open the menus. c. Select Delete Memo on the Record menu.3[ & ] OPTIONAL Check the box to save an archive copy of the memo on your computer.4Select OK.DoneTipNeed to retrieve that holiday recipe you stored? If you save an archive copy of your deleted memos, you can refer to them later by importing them.](https://usermanual.wiki/Palm/820.User-Manual-1/User-Guide-475658-Page-263.png)
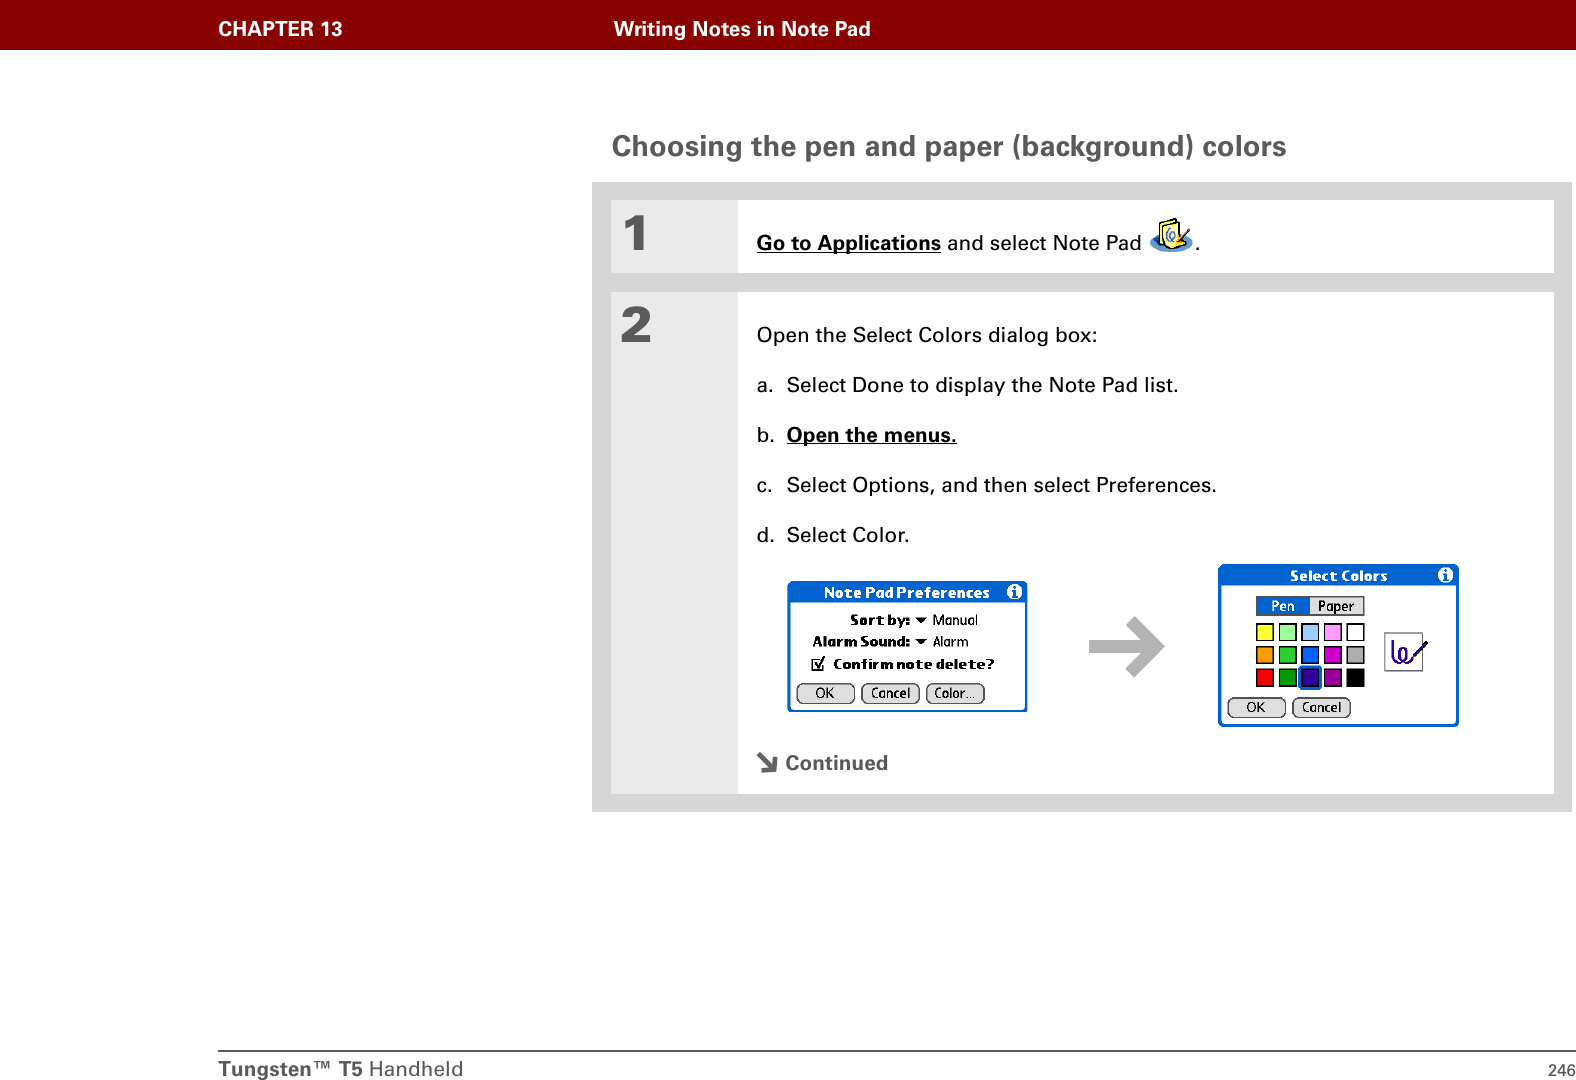
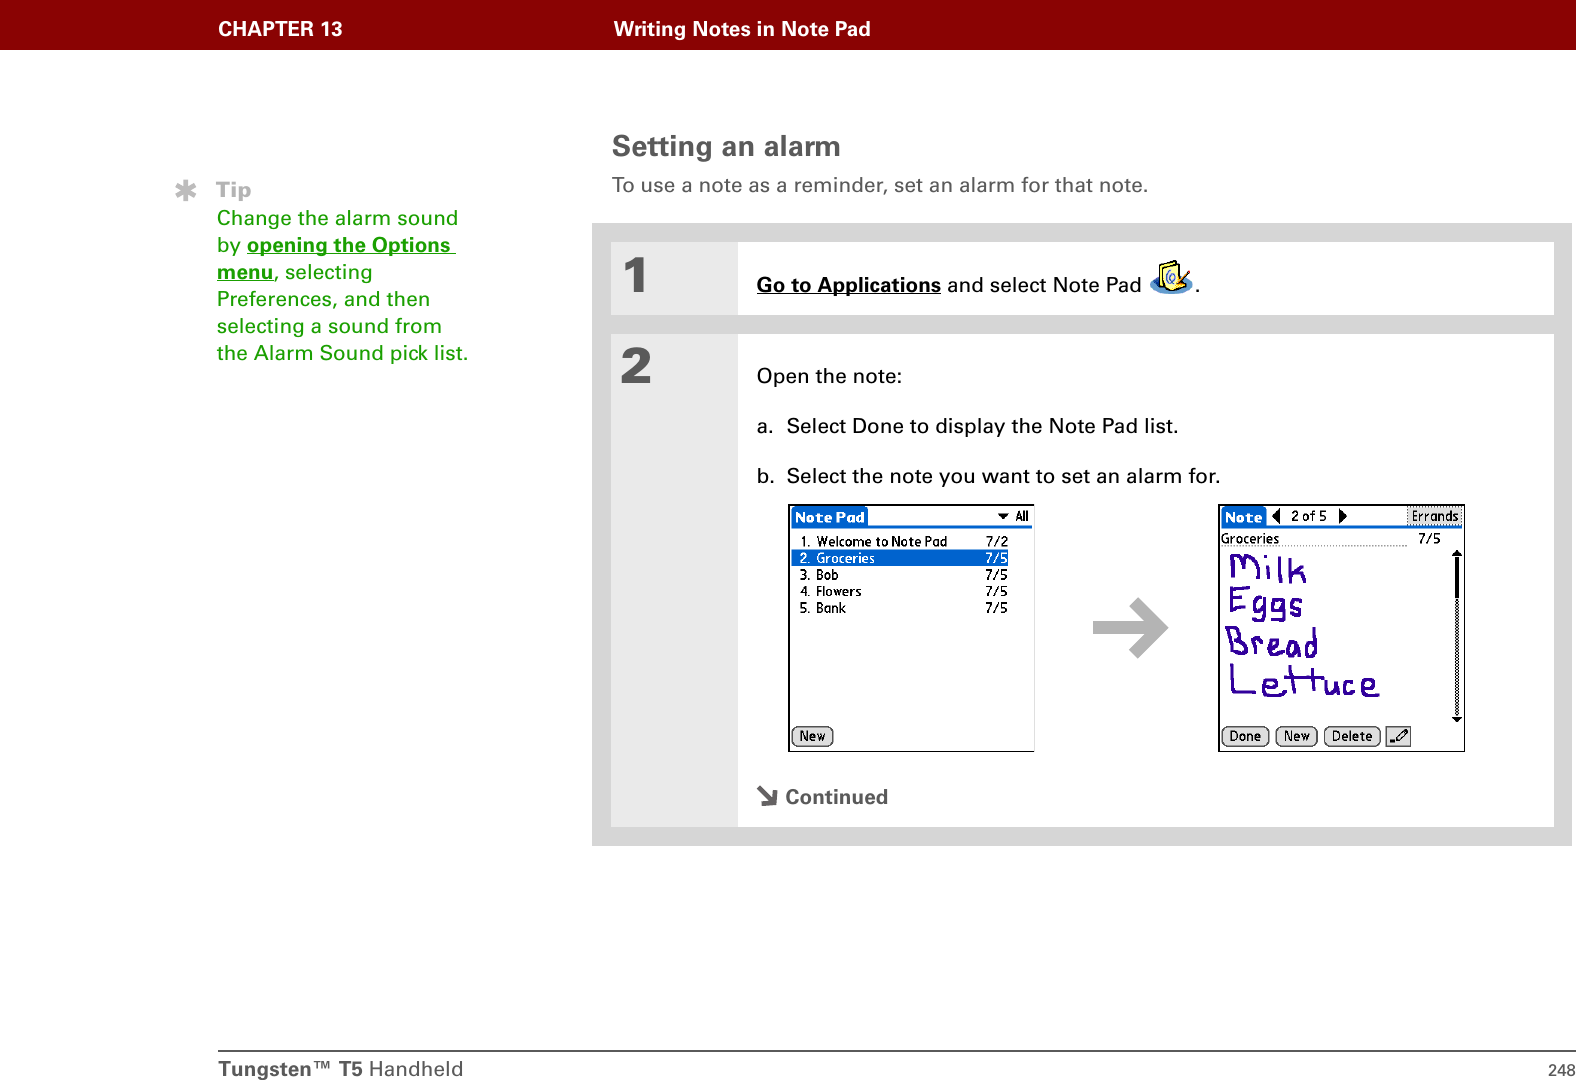
![Tungsten™ T5 Handheld 245CHAPTER 13 Writing Notes in Note PadCreating a note01Go to Applications and select Note Pad .2Create a note:a. Use the stylus to write your note directly on the handheld screen.b. Select the time at the top of the screen and enter a title using Graffiti® 2 writing or the onscreen keyboard.3[ & ] OPTIONAL Assign the note to a category by selecting the Category box in the upper-right corner, and then selecting a category.4Select Done.That’s it. Your handheld automatically saves the note. Make sure you have a current backup. Synchronize often.Before You Begin[!]Make sure full-screen writing is turned off. You cannot create or edit notes in Note Pad when full-screen writing is on.TipSelect the pen selector to change the pen width or to select the eraser. To clear the screen completely, select the note (anywhere but the title), open the Edit menu, and select Clear Note.Did You Know?Prevent others from viewing your notes by marking them as private.Pen selectorScroll barTime or titleEraserCategory boxDone](https://usermanual.wiki/Palm/820.User-Manual-1/User-Guide-475658-Page-267.png)
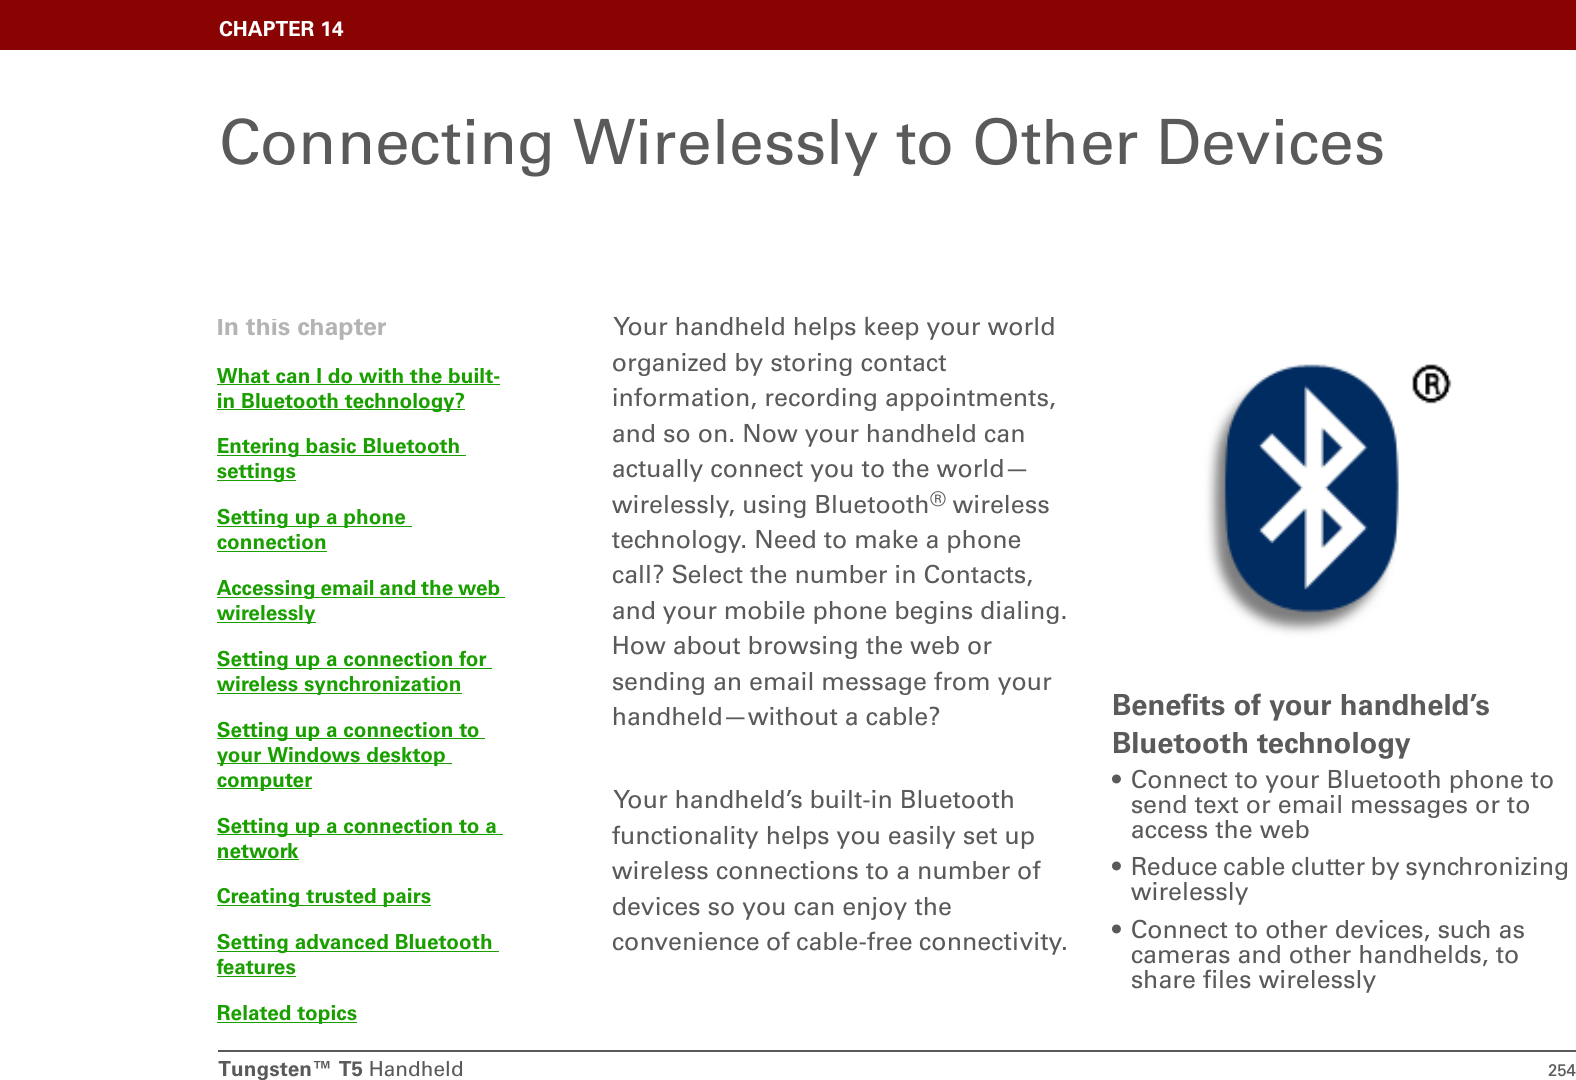
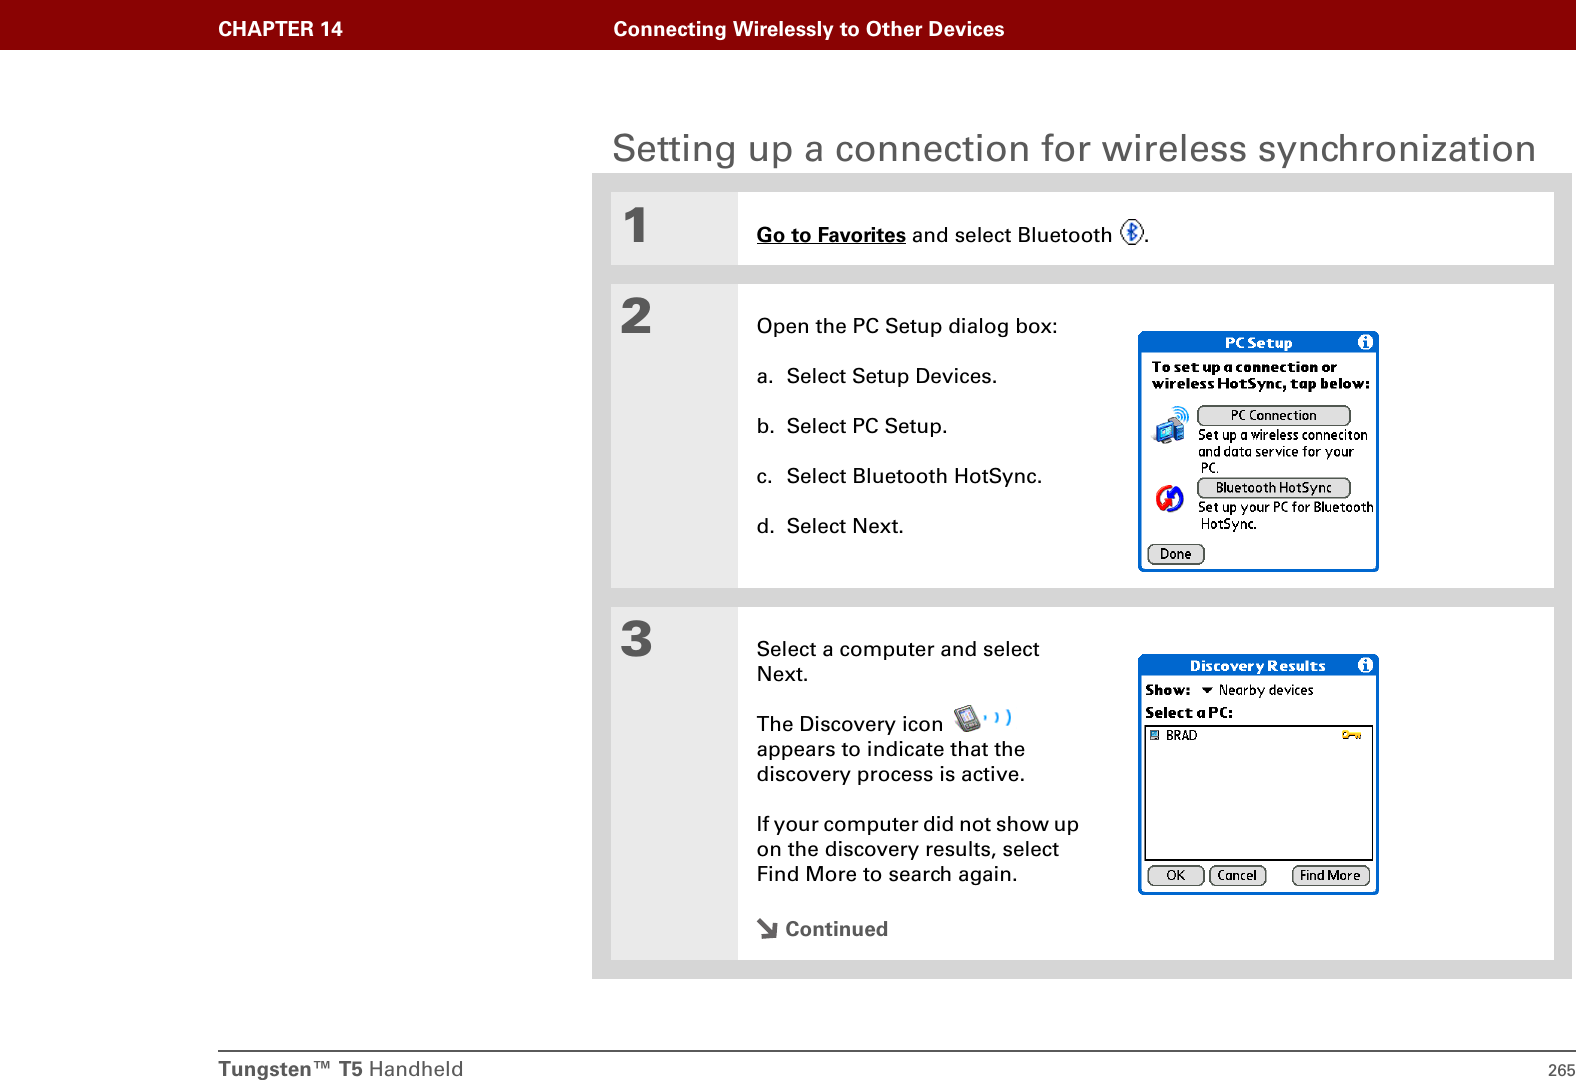
![Tungsten™ T5 Handheld 255CHAPTER 14 Connecting Wirelessly to Other DevicesWhat can I do with the built-in Bluetooth technology?Connect to your Bluetooth phone to send text or email messages or to access the web.Whether you access the Internet or your email account, or send text messages, once a week or constantly throughout the day, wireless connectivity means that you can go online or share files anytime by connecting via your mobile phone or your laptop connected to the Internet. Reduce cable clutter by synchronizing wirelessly. Imagine your desk and workstation without cable clutter. Bluetooth technology on your handheld replaces many of the connecting cables with a wireless connection for tasks such as synchronizing your handheld with your computer. Connect to other devices, such as cameras and other handhelds, to share files wirelessly.Wouldn’t it be great if you could send files such as photos to another handheld? Use the built-in Bluetooth technology to set up connections to devices within approximately 30 feet of your handheld.What types of connections can I make?With Bluetooth technology, you can make the following connections:• Connect to your computer wirelessly to synchronize your handheld.• Access the Internet or an email account using your mobile phone. In order to use a mobile phone, you must dial your ISP or sign up for an account with a high-speed wireless carrier.• Send and receive text messages using your mobile phone.• Share files by forming a trusted pair with a Bluetooth device, such as a camera, handheld, or printer.• Browse the Internet or access your email account by linking through your desktop computer's network connection or establishing a connection to a Bluetooth LAN Access Point.»Key TermBluetooth Technology that enables devices such as handhelds, mobile phones, and computers to connect wirelessly to each other.Before You Begin[!]Any device you connect to must also be a Bluetooth device. Check the user guide for your device to enable the Bluetooth features.](https://usermanual.wiki/Palm/820.User-Manual-1/User-Guide-475658-Page-277.png)
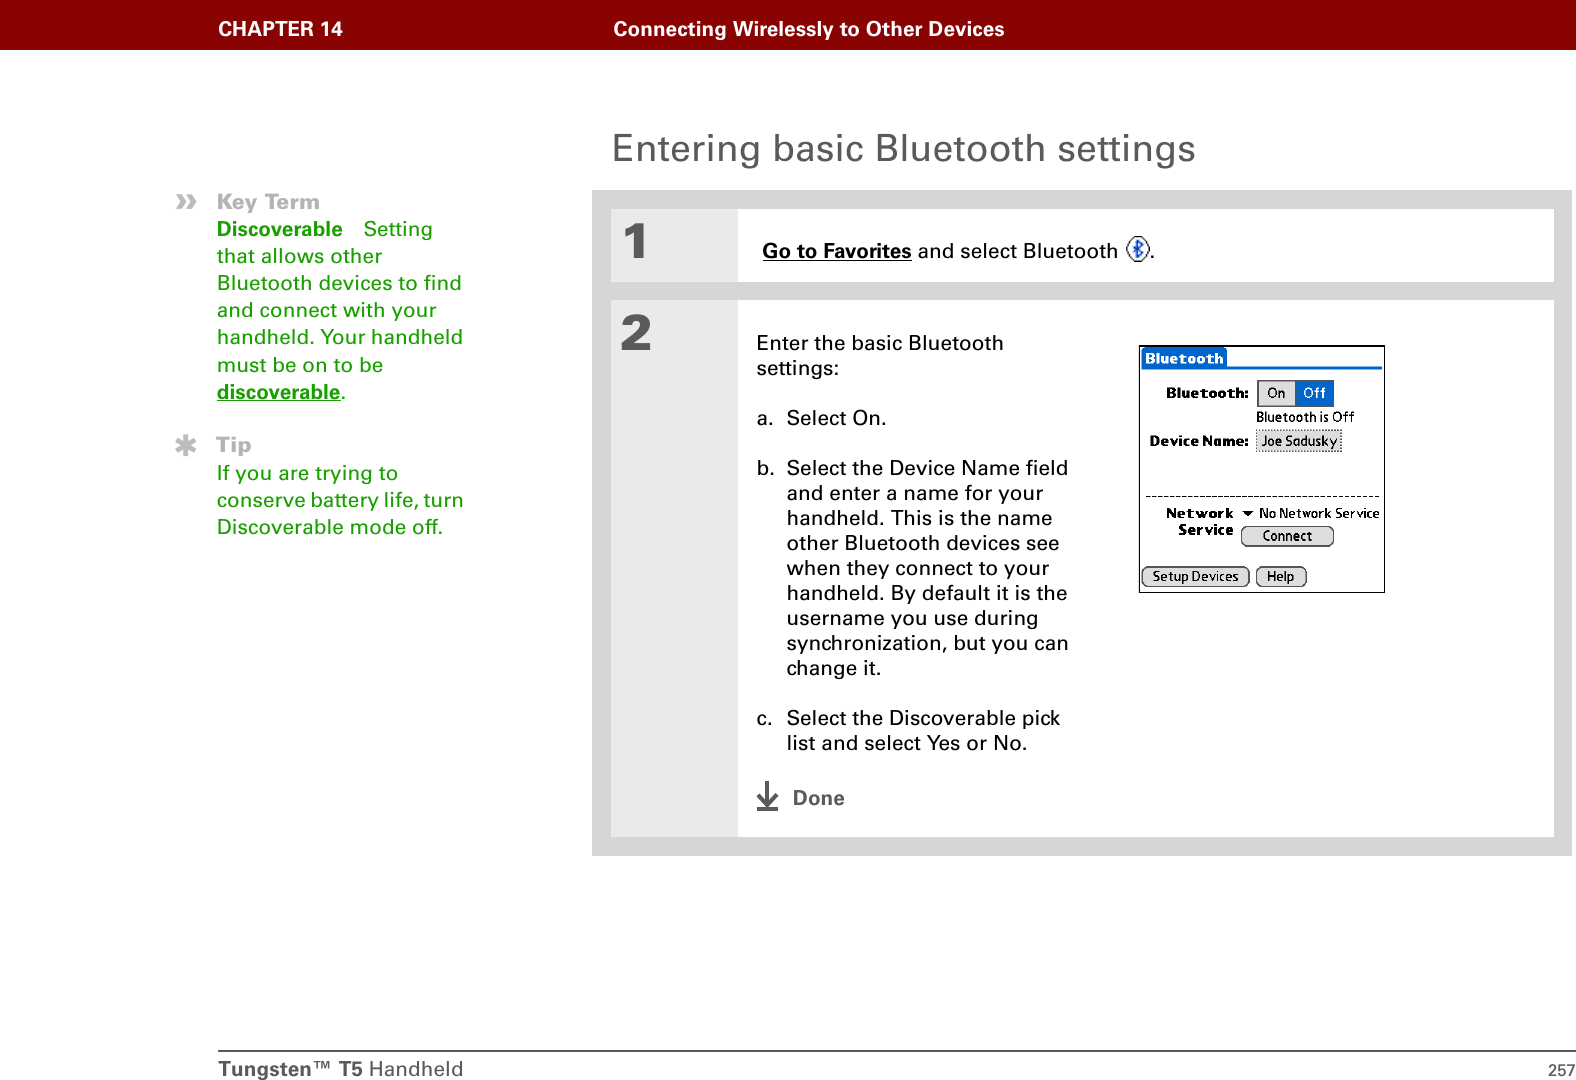
![Tungsten™ T5 Handheld 258CHAPTER 14 Connecting Wirelessly to Other DevicesSetting up a phone connection To use Bluetooth Manager to set up a phone connection, you must have a GSM mobile phone that is optionally enabled with GPRS data services.This is how you form a trusted pair between your handheld and your mobile phone. Once you have set up the trusted pair connection, you automatically connect to your phone when you want a Bluetooth connection.0O1Go to Favorites and select Bluetooth .2Open the Phone Setup dialog box.a. Select Setup Devices.b. Select Phone Setup.c. Select Phone Connection.d. Select Next.ContinuedBefore You Begin[!]If you have an IR phone, you must download the Phone Link application from the web. Go to http://www.palmOne.com/us/support/downloads/phonelink.html to download the software. You can also launch the above link from Phone Link Updater in the palmOne folder located under the Windows Start Programs menu.»Key TermTrusted pair Two devices—for example, your handheld and your mobile phone—that can connect to each other because each device can find the same passkey on the other device. Once you form a trusted pair with a device, you do not need to enter a passkey to connect with that device IMPORTANT[!]](https://usermanual.wiki/Palm/820.User-Manual-1/User-Guide-475658-Page-280.png)
![Tungsten™ T5 Handheld 260CHAPTER 14 Connecting Wirelessly to Other Devices4Enter a passkey:a. Enter a passkey number. This can be any number you choose; it does not, for example, have to be a password you use to access a network or an email account. You must enter the same passkey on your handheld and your mobile phone in order to connect to your phone.b. Select OK.5Select Done to finish phone connection setup.Continued»Key TermPasskey Like a password, the passkey is a security measure. Your handheld can only connect with a device that has the same passkey. For example, to connect to your mobile phone, you need to enter the same passkey on your handheld and on your phone.IMPORTANT[!]](https://usermanual.wiki/Palm/820.User-Manual-1/User-Guide-475658-Page-282.png)
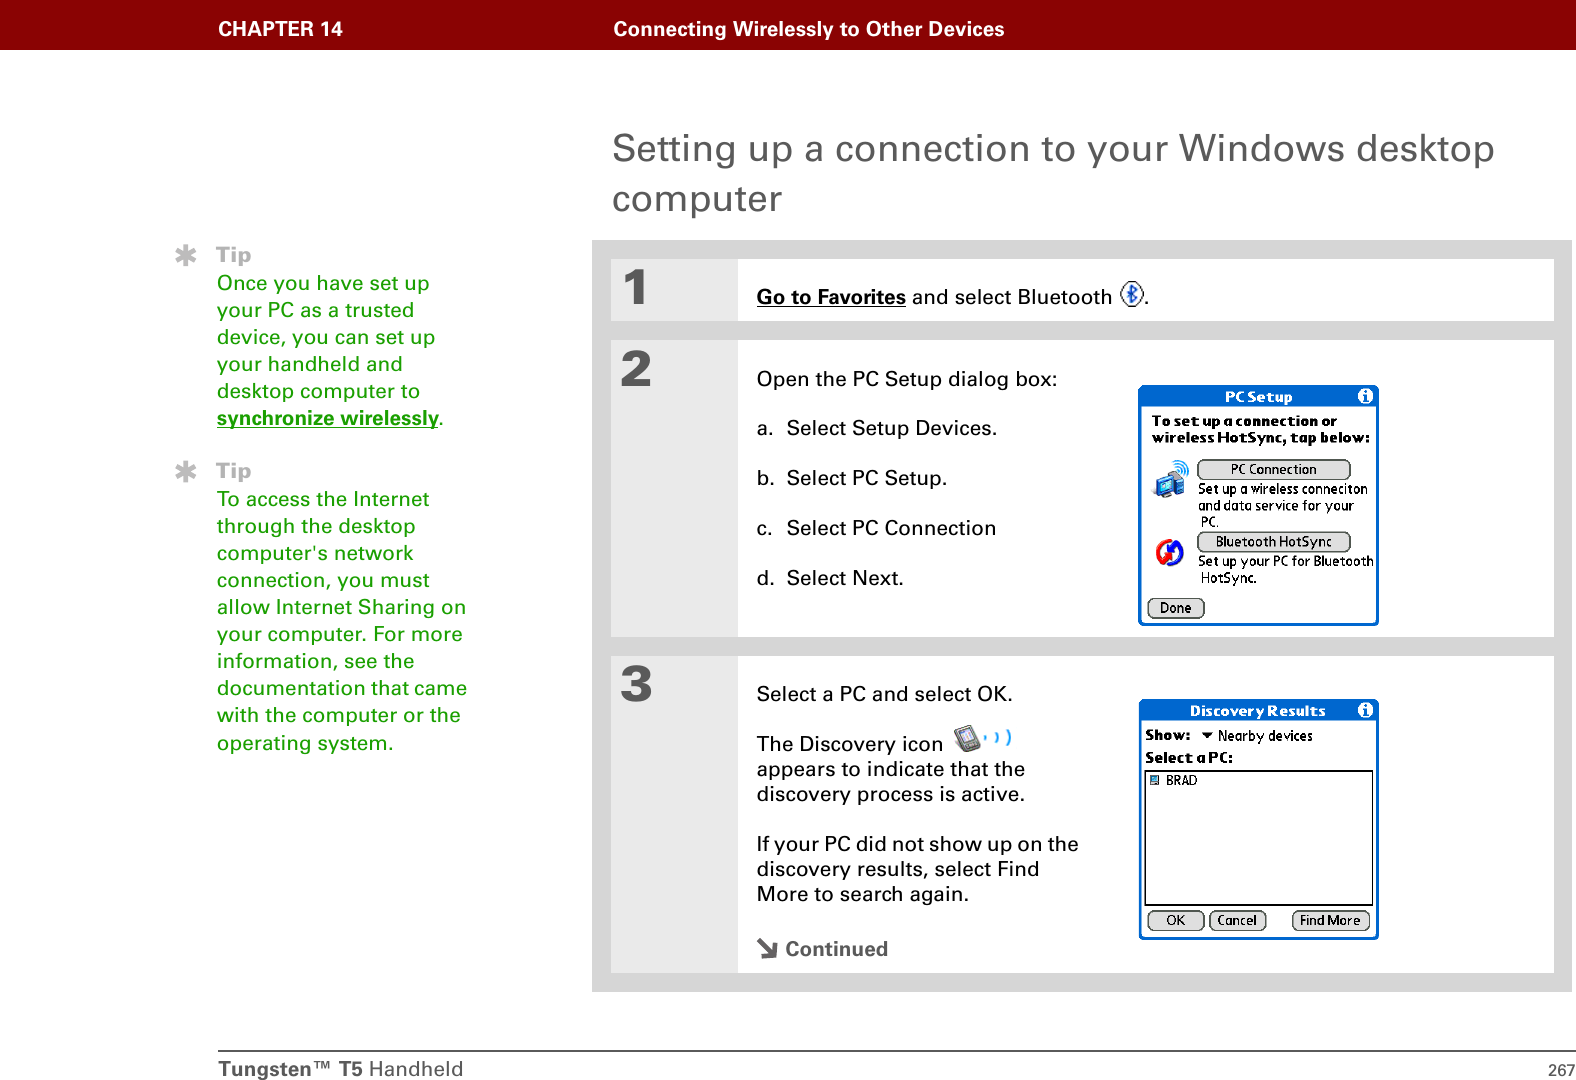
![Tungsten™ T5 Handheld 268CHAPTER 14 Connecting Wirelessly to Other Devices4Choose to add the PC as a trusted device or not:Ye s Go to step 5.No Go to step 6.5[ & ] OPTIONAL Create a trusted connection.a. Select Next.b. Enter the passkey number for your PC and select OK.6[ & ] OPTIONAL Set up your PC username and password:a. Enter the username and password for your PC and select Next.b. If you don't want to use a username and password, leave the fields blank and select Next.7Select Done.DoneTipTo access the Internet through the desktop computer's network connection, you must allow Internet Sharing on your computer. For more information, see the documentation that came with the computer or the operating system.](https://usermanual.wiki/Palm/820.User-Manual-1/User-Guide-475658-Page-290.png)
![Tungsten™ T5 Handheld 269CHAPTER 14 Connecting Wirelessly to Other DevicesSetting up a connection to a network01Go to Favorites and select Bluetooth .2Open the PC Setup dialog box:a. Select Setup Devices.b. Select LAN Setup.c. Select Next.3Select a LAN and select OK. The Discovery icon appears to indicate that the discovery process is active.If the LAN did not show up on the discovery results, select Find More to search again.ContinuedBefore You Begin[!]You must get the passkey, username, and password for the LAN from the system administrator.»Key TermLAN Acronym for local area network. LAN refers to a local network that connects computers located in your home or business.](https://usermanual.wiki/Palm/820.User-Manual-1/User-Guide-475658-Page-291.png)
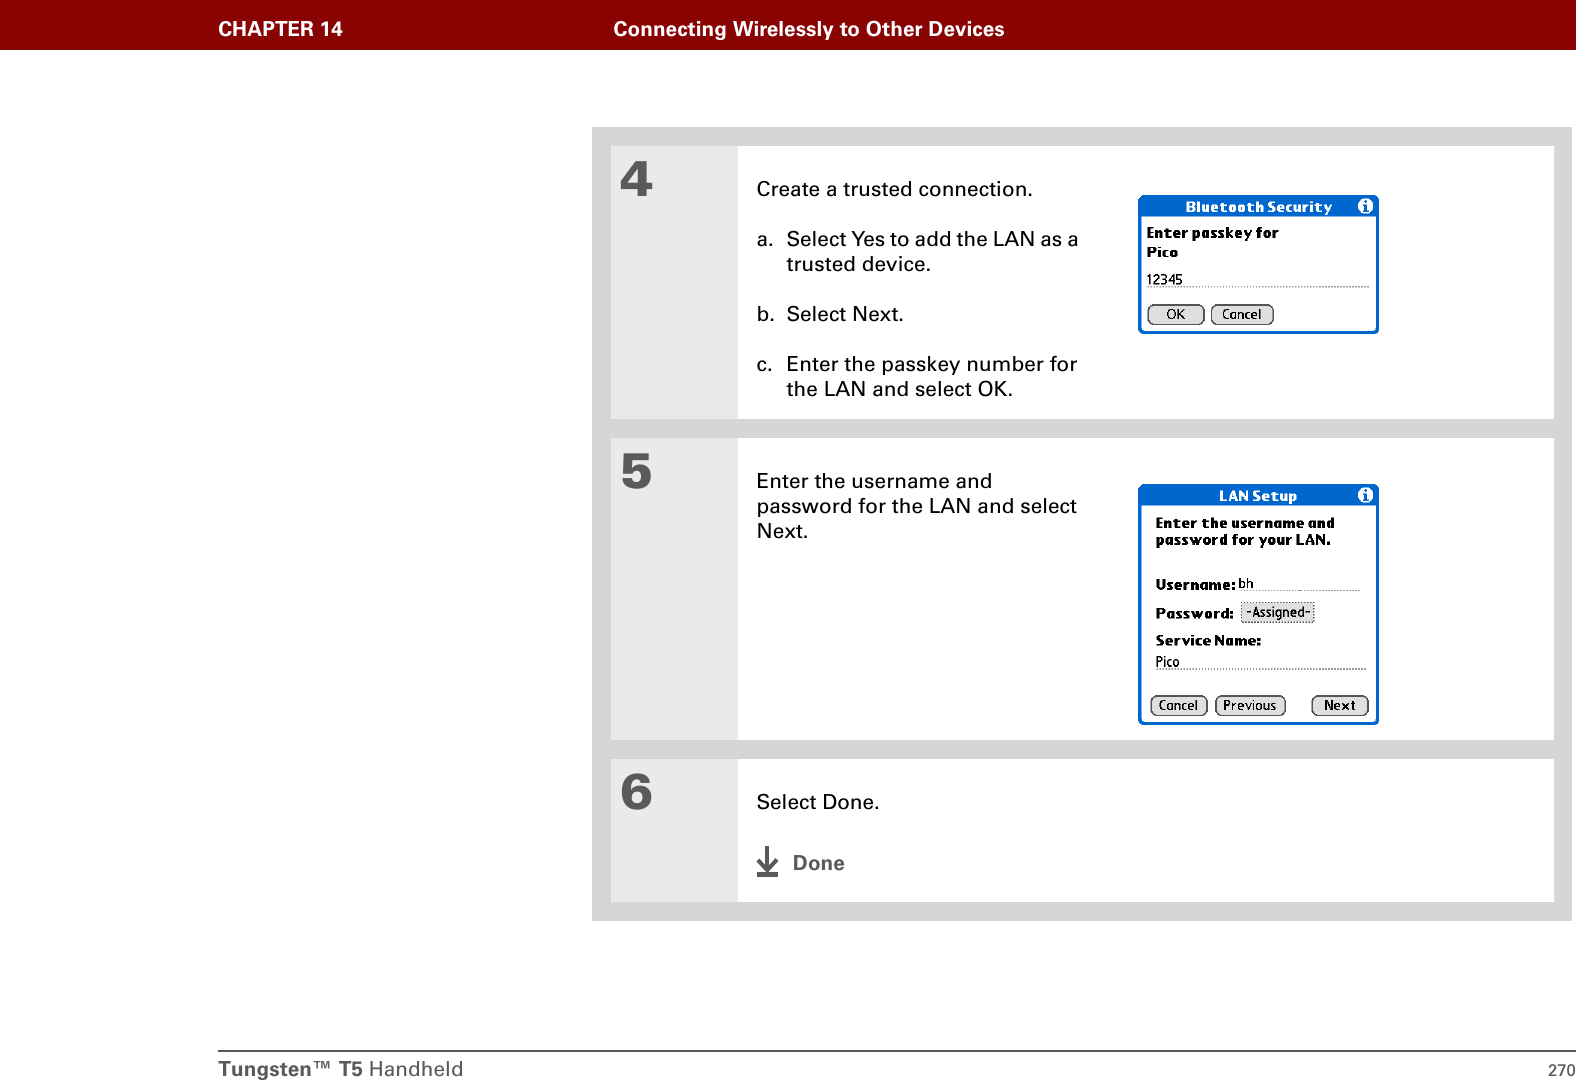
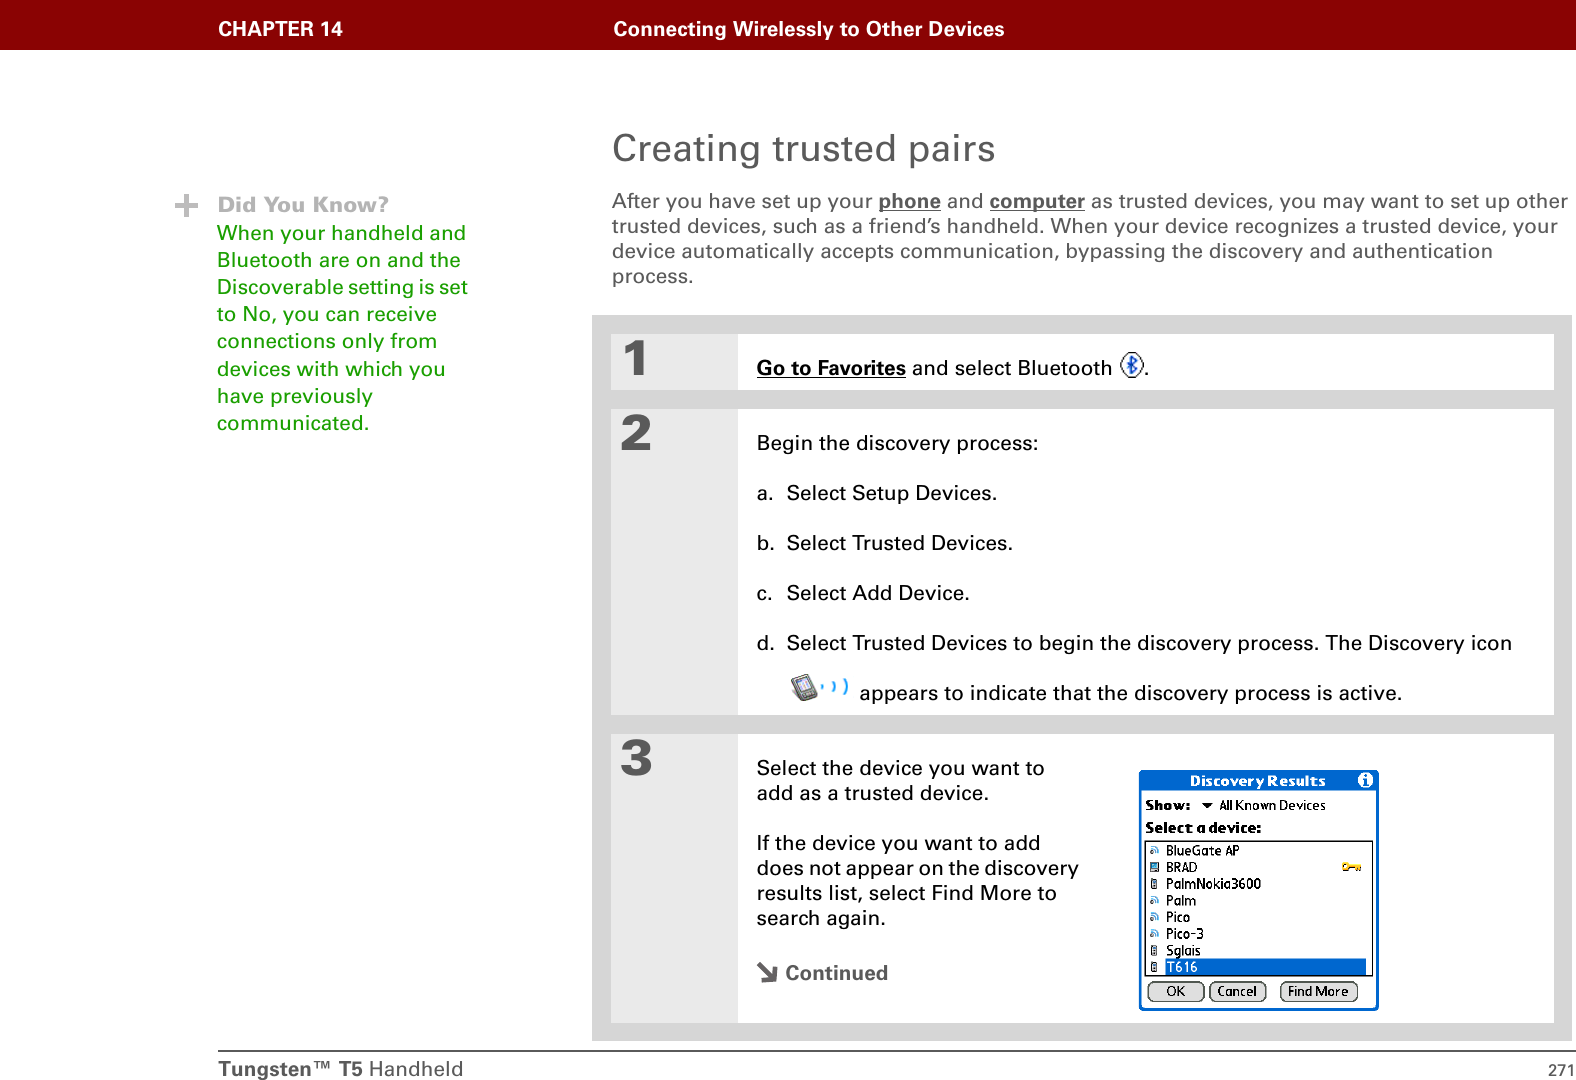
![Tungsten™ T5 Handheld 272CHAPTER 14 Connecting Wirelessly to Other Devices4Enter the same passkey on your handheld and the other device and select OK. Some Bluetooth devices have a built-in passkey; others enable you to choose the passkey; see the documentation included with your Bluetooth device for information. In either case you must use the same passkey on both the device and your handheld. Many phones also require you to put the phone into a mode where it can accept a key exchange for bonding in a trusted pair. See the documentation included with your phone for information.5Select Done.DoneTipYou can delete a trusted device or view the details about a trusted device, such as the device address and your most recent connection. In Bluetooth Manager, select Setup Devices, and then Trusted Devices. Select the appropriate device and select Details.IMPORTANT[!]](https://usermanual.wiki/Palm/820.User-Manual-1/User-Guide-475658-Page-294.png)
![Tungsten™ T5 Handheld 274CHAPTER 14 Connecting Wirelessly to Other DevicesAllowing your handheld to wake up when it is turned offYou can set your handheld to receive information through Bluetooth connections when your handheld is turned off. The radio remains on, but your device is not discoverable. For another Bluetooth device or application to wake up your handheld, it must know your device name. This limits the connections to devices that are trusted or have connected with you before.01Go to Favorites and select Bluetooth .2Open the menus. 3Select Options, and then select Allow wakeup. The selection on the Option menu toggles to Do not allow wakeup. This indicates that Allow Wakeup is enabled.Enabling the Allow Wakeup setting uses battery power even when your handheld is turned off. Be sure to monitor your battery level.DoneIMPORTANT[!]](https://usermanual.wiki/Palm/820.User-Manual-1/User-Guide-475658-Page-296.png)
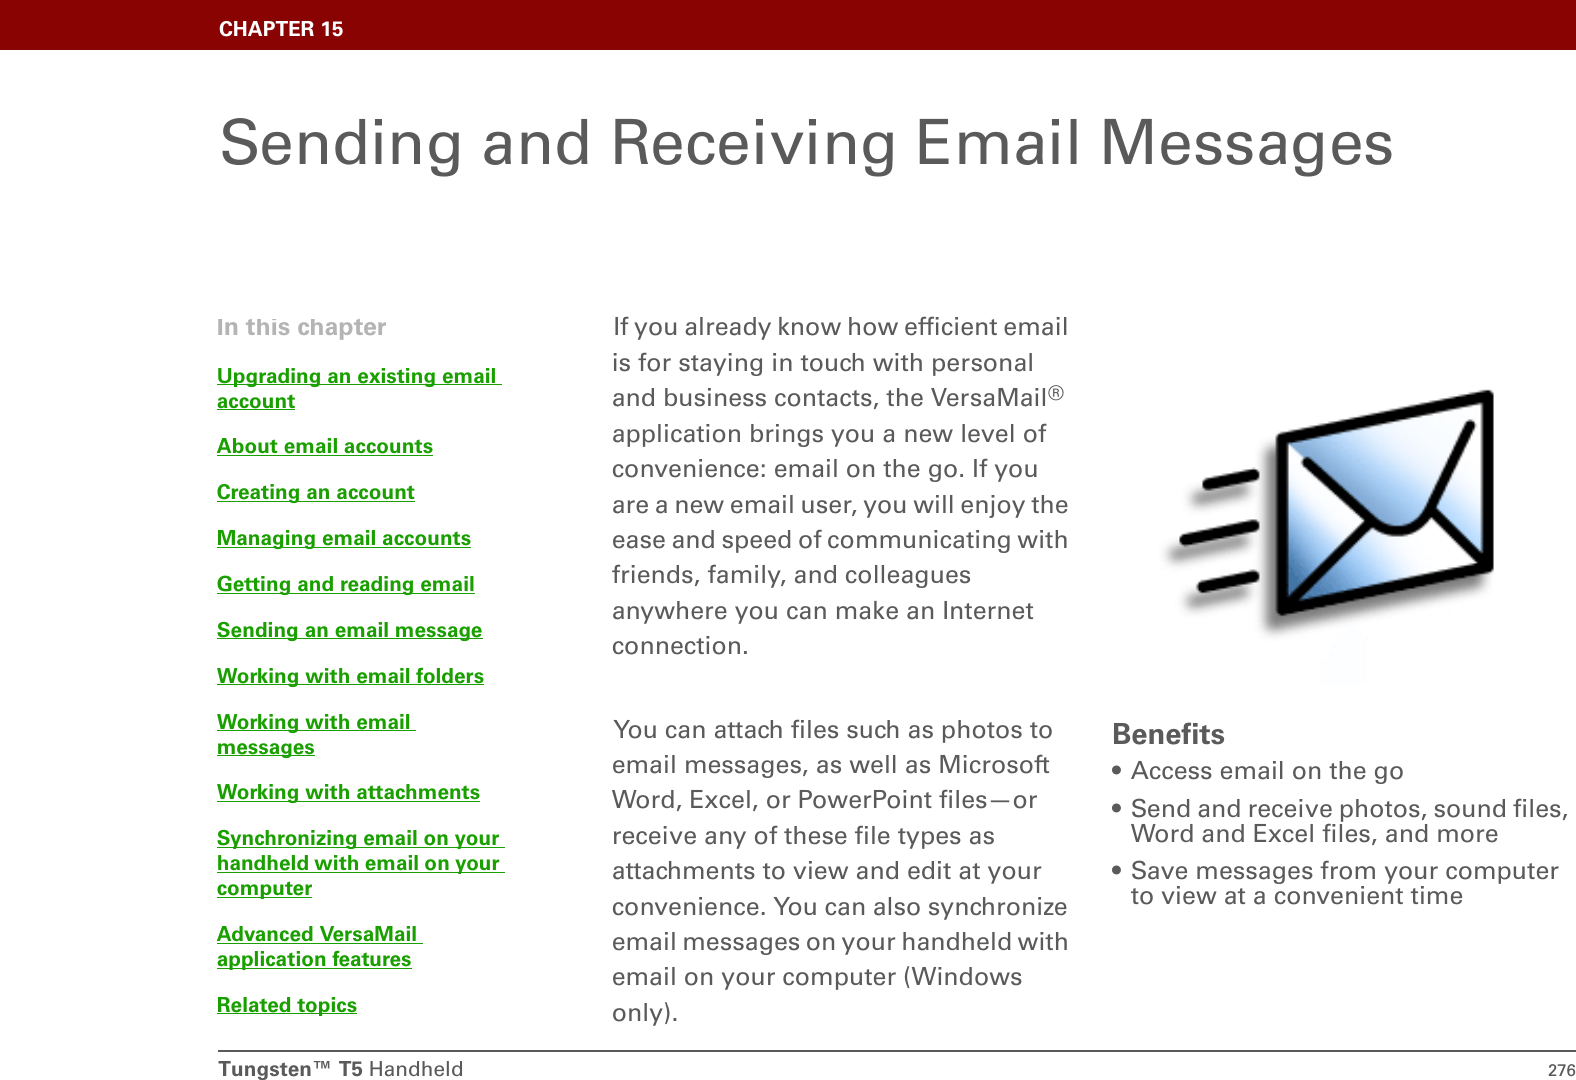
![Tungsten™ T5 Handheld 277CHAPTER 15 Sending and Receiving Email MessagesUpgrading an existing email accountIf you have already used the VersaMail application on a different handheld and have kept your old username, you can upgrade your existing email account for use on your new handheld.01Synchronize your new handheld with your computer. Select the username associated with your old handheld; this contains your existing account information.2On your handheld, go to Favorites and select VersaMail . 3Select Yes to accept the upgrade.DoneBefore You Begin[!]Before you can set up an email account on your handheld, you must do the following:• If you don’t already have one, establish an account with an Internet service provider such as Earthlink or a wireless carrier such as Cingular. You can also use a corporate email account.• For wireless accounts only: Have active service with a wireless carrier and a mobile phone equipped with Bluetooth® wireless technology. You must also set up a phone connection on your handheld. (Not required if you want to access email over your company’s Bluetooth network.)](https://usermanual.wiki/Palm/820.User-Manual-1/User-Guide-475658-Page-299.png)
![Tungsten™ T5 Handheld 278CHAPTER 15 Sending and Receiving Email MessagesAbout email accountsThe VersaMail application is software that lets you access email on your handheld from an account with an email provider (such as Earthlink or Yahoo!) or from your corporate email account. For each email account you want to access, you must set up an account on your handheld. For example, if you have an Earthlink account and a corporate account, set up one account for each. You can create up to eight email accounts on your handheld. You must have an account with an email provider or a corporate account. The VersaMail application works with these accounts to transfer messages to your handheld. The application is not an email service provider.Account and connection typesYou can set up two types of email accounts on your handheld:Wireless Send and receive email directly to and from your handheld using the built-in Bluetooth® technology or by positioning the IR port on your handheld so that it can beam to the IR port on your mobile phone.Synchronize Only (Windows computers only) Transfer messages from the email application on your computer (such as Microsoft Outlook) to your handheld by synchronizing. You can’t send and receive messages wirelessly for this type of account.Using an email providerIf you are setting up a new email account and have a well-known email provider (Internet service provider, or ISP) such as Earthlink or Yahoo!, many of the required settings during the account setup are automatically configured. For other ISPs, you need the following information:• The protocol used for incoming mail, such as Post Office Protocol (POP) or Internet Message Access Protocol (IMAP)• The name of the incoming mail serverIMPORTANT[!]](https://usermanual.wiki/Palm/820.User-Manual-1/User-Guide-475658-Page-300.png)