Palm CAGEMS GSM Cellphone with Bluetooth User Manual Using Your Treo 650 Smartphone by palmOne
Palm Inc GSM Cellphone with Bluetooth Using Your Treo 650 Smartphone by palmOne
Palm >
Contents
- 1. Users Manual
- 2. Users Manual Part 1 Revised 120104
- 3. Users Manual Part 2 Revised 120104
Users Manual Part 1 Revised 120104
using your
Treo™ 650
smartphone
by palmOne
Includes setup information and instructions for most tasks
CrowAce.book Page 1 Wednesday, November 10, 2004 1:52 PM
DRAFT 1A palmOne, Inc. Confidential
Copyright
Copyright © 2004 palmOne, Inc. All rights reserved. palmOne, Treo, the palmOne and Treo logos, Palm, Palm OS,
HotSync, Graffiti, and Palm Powered are among the trademarks or registered trademarks owned by or licensed to
palmOne, Inc. This product contains ACCESS Co., Ltd.’s NetFront 3.0 Internet browser software. © 1996-2004
ACCESS Co., Ltd. and ACCESS Systems America, Inc. NetFront is the trademark or registered trademark of ACCESS
Co., Ltd. in Japan and in other countries except the United States of America. NetFront is a registered trademark of
NetFront Communications, Inc. in the United States of America and is used under a license. A portion of this software
includes software modules developed by the Independent JPEG group. All other brand and product names are or may
be trademarks of, and are used to identify products or services of, their respective owners.
Disclaimer and limitation of liability
palmOne, Inc. and its suppliers assume no responsibility for any damage or loss resulting from the use of this guide.
palmOne, Inc. and its suppliers assume no responsibility for any loss or claims by third parties that may arise through the
use of this software. palmOne, Inc. and its suppliers assume no responsibility for any damage or loss caused by deletion
of data as a result of malfunction, dead battery, or repairs. Be sure to make backup copies of all important data on other
media to protect against data loss.
PN: 406-10151-00
CrowAce.book Page 2 Wednesday, November 10, 2004 1:52 PM
DRAFT 1A palmOne, Inc. Confidential
Contents :: 1
Contents
3Welcome
4If you read nothing else...
5read this now:
getting started
6What you’ll need
7Treo smartphone overview
11 Installing the battery
12 Charging the battery
14 Inserting the SIM card
15 Turning Treo on and off
16 Making your first call
19 first day:
learning the basics
20 Moving around the Treo screen
24 Using the keyboard
28 Opening applications
30 Setting up your computer
33 Synchronizing contacts and other information
35 Battery life
36 Where to learn more
37 first week:
using phone, web, and messaging
38 Phone overview
41 Dialing calls
44 Receiving calls
45 Using voicemail
46 Managing active calls
49 More ways to manage calls
53 Defining favorite buttons
56 Using a phone headset
58 Connecting to devices with Bluetooth wireless
technology
62 Sending and receiving email
74 Messaging
83 Browsing the web
90 Taking photos and videos
97 first two weeks:
using organizer features
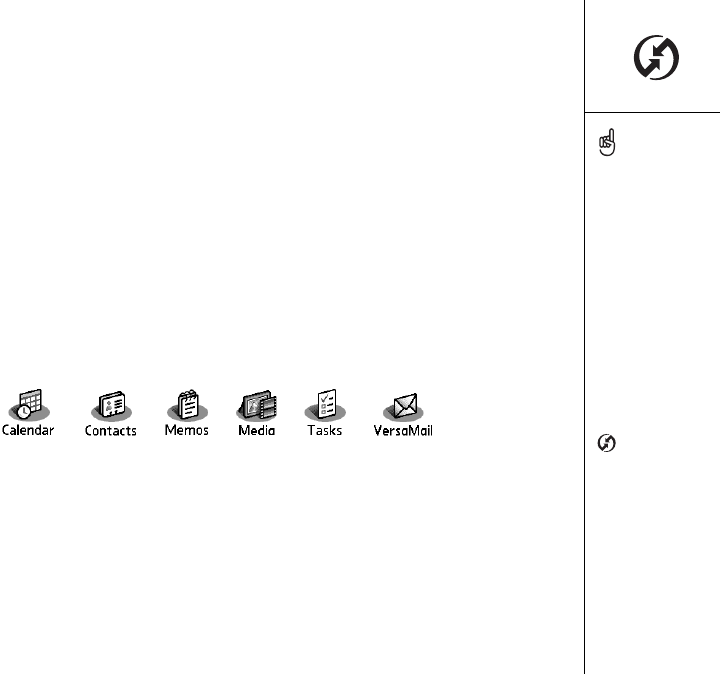
98 Managing contacts
101 Calendar
108 Tasks
112 Memos
CrowAce.book Page 1 Wednesday, November 10, 2004 1:52 PM
DRAFT 1A palmOne, Inc. Confidential
2 :: Contents
113 Listening to music
119 World Clock
121 Calculator
123 Looking up contacts and other information
125 Beaming information
129 first month:
managing applications
130 Installing applications
132 Removing applications
133 Viewing application info
134 Using expansion cards
139 when you’re ready:
customizing your Treo
140 Phone settings
144 System sound settings
145 Display and appearance
147 Applications settings
148 Button settings
149 Date and time settings
151 Power Preferences
152 Locking your phone and info
159 if something happens:
help
160 Upgrading from another Palm Powered®
device
163 Trouble installing the desktop software?
164 Resetting your Treo
166 Replacing the battery
167 Screen
168 Network connection
172 Synchronization (HotSync)
177 Email
181 Web
182 Camera
183 Third-party applications
184 Error messages
185 Making room on your Treo
186 Voice quality
187 Glossary
189 FCC
193 Index
199 Specifications
CrowAce.book Page 2 Wednesday, November 10, 2004 1:52 PM
DRAFT 1A palmOne, Inc. Confidential

Welcome :: 3
Welcome
Congratulations on the purchase of your Treo™ 650 smartphone by
palmOne. In one compact and indispensable device, you now have all
of the following:
• An advanced mobile phone*
• A Palm Powered™ organizer with portable expansion capability (MultiMediaCard/
Secure Digital/Secure Digital input/output [SD/SDIO])
• Email**
• Web browsing**
• Text* and multimedia** messaging
•A digital camera***
* Requires service contract with your wireless service provider.
** Requires service contract and GPRS or EDGE high-speed data service from your wireless ser-
vice provider.
***There are two models of Treo 650: One model has a built-in camera and the other model
does not have a camera. The packaging for your Treo 650 identifies if a camera is included.
This guide will help you set up your Treo 650 smartphone and
quickly learn to use it.
LOOK HERE: Don’t miss
the helpful tips and cross-
references given in this
column.
CrowAce.book Page 3 Wednesday, November 10, 2004 1:52 PM
DRAFT 1A palmOne, Inc. Confidential

4 :: If you read nothing else...
4 :: If you read nothing else...
If you read nothing else...
This guide is designed to get you using your Treo™
650 smartphone by palmOne quickly, starting with
just the basics. As you become more comfortable
with your Treo 650 smartphone and want to learn
more, come back and read the other sections.
Read this Now: Getting Started
Follow the instructions to set up your Treo
smartphone and make your first call.
First Day: Learning the Basics
Learn how to enter text, move around the screen,
and set up synchronization.
First Week: Using Phone, Web,
Messaging, and Email
Learn how to use all the great wireless features of
your Treo 650 smartphone, including phone, email,
web browsing, and messaging.
First Two Weeks:
Using Organizer Features
Your Treo 650 is not just a phone. It also includes a
full-featured Palm Powered™ organizer that gives
you instant access to your Calendar, Tasks, Memos,
music, Calculator, and more.
First Month: Managing Applications
Learn how to add or delete extra applications and
use an expansion card with your smartphone.
When You’re Ready:
Customizing your Treo
Once you’ve learned the basics, you’ll want to
explore additional features on your Treo
smartphone and customize its settings.
If Something Happens: Help
If something goes wrong or you can’t figure out
how to use a Treo feature, we can help. Check this
chapter for answers to frequently asked questions.
CrowAce.book Page 4 Wednesday, November 10, 2004 1:52 PM
DRAFT 1A palmOne, Inc. Confidential

read this now: getting started :: 5
read this now:
getting
started
CrowAce.book Page 5 Wednesday, November 10, 2004 1:52 PM
DRAFT 1A palmOne, Inc. Confidential

6 :: What you’ll need
What you’ll need
As you work through the instructions in this guide, you’ll need all the items that came
in the Treo™ 650 smartphone box (see “Treo smartphone overview” on page 7) as
well as the following:
• A subscriber identity module (SIM) card for which you have an activated mobile
account with data services*
• A location with wireless coverage for your phone
• An electrical outlet
• The computer with which you will synchronize your personal information
• The “palmOne Software Installation CD” included in the box
* We recommend selecting either the GPRS or EDGE data service option. You cannot use
email, web browsing, or photo messaging without data services of some type.
CrowAce.book Page 6 Wednesday, November 10, 2004 1:52 PM
DRAFT 1A palmOne, Inc. Confidential

Treo smartphone overview :: 7
Treo smartphone overview
You should have received all of the following components in the Treo 650
smartphone box:
Hardware
• Treo handset
• Your wireless service provider’s SIM card
•AC charger
• USB sync cable
• Headset
• Electric socket adapter(s) (if required in region)
Documentation and software
•Start Here booklet
• Using Your Treo 650 Smartphone (this guide)
• Software Installation CD (includes desktop synchronization software and bonus
software)
• palmOne warranty
Warranty does not cover
damage by Secure Digital
(SD) cards that do not
meet SD Memory Card
Specifications. SD cards
that do not meet SD
Memory Card Specifications
may damage Treo 650. SD
cards that do meet SD
Memory Card
Specifications are marked
with the following logo:
The Software Installation
CD includes free bonus
software for your phone
and synchronization
software for your computer.
CrowAce.book Page 7 Wednesday, November 10, 2004 1:52 PM
DRAFT 1A palmOne, Inc. Confidential
8 :: Treo smartphone overview
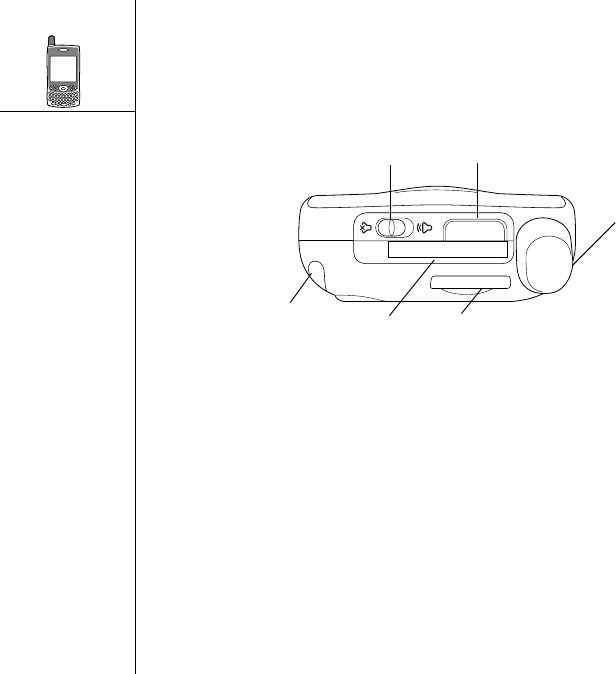
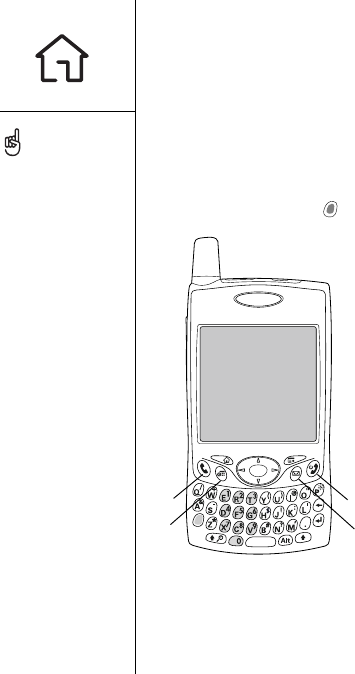
Treo 650 handset features
The following illustrations show the locations and names of the physical features of
the Treo 650 smartphone. Refer to these illustrations while following the instructions
in this guide.
A. Ringer switch
B. Infrared (IR) port
C. Antenna
D. SIM slot
E. Expansion card slot
F. Stylus
A
C
B
E
FD
CrowAce.book Page 8 Wednesday, November 10, 2004 1:52 PM
DRAFT 1A palmOne, Inc. Confidential
Treo smartphone overview :: 9
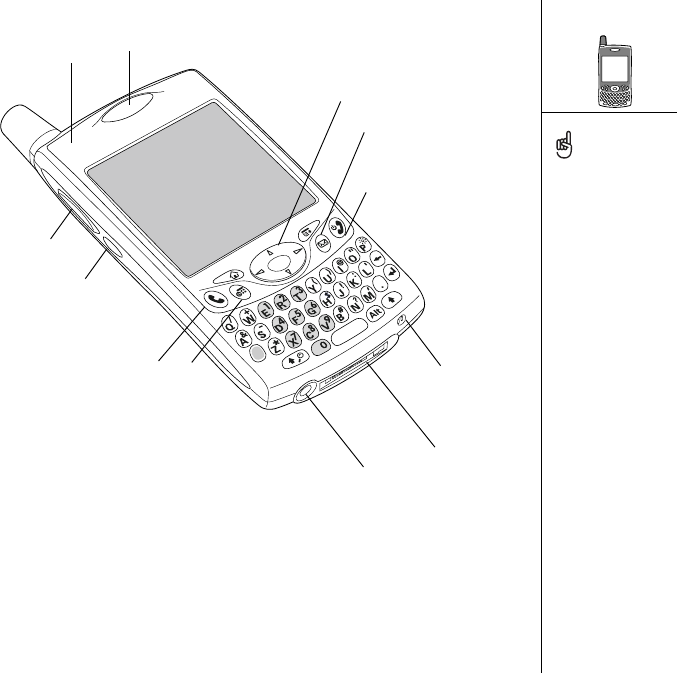
A. Indicator light (phone and charge indicator)
B. Earpiece
C. 5-way navigator
D. Messaging button
E. Power/End button
F. Microphone
G. Multi-connector
H Headset jack
I. Calendar button
J. Phone/Send button
K. Side button
L. Volume button
A
G
C
B
E
F
H
I
J
K
L
D
Be careful not to scratch
or crush your Treo screen.
Do not store it in a place
where other items might
damage it. Visit
www.palmOne.com/intl to
find carrying cases that
protect the screen and
other useful accessories.
CrowAce.book Page 9 Wednesday, November 10, 2004 1:52 PM
DRAFT 1A palmOne, Inc. Confidential
10 :: Treo smartphone overview
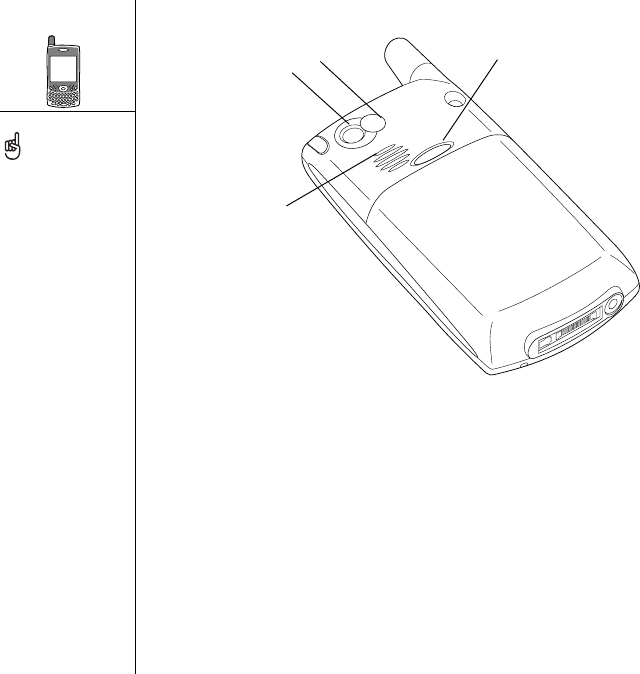
* There are two models of Treo 650: One model has a built-in camera and the other model does
not have a camera. The packaging for your Treo 650 identifies if a camera is included.
A. Camera lens*
B. Self-portrait mirror
C. Battery door release
D. Speaker
AC
D
B
IMPORTANT: The Treo 650
speaker includes a large
magnet, so be sure not to
store your Treo near credit
cards or other items that
could be demagnetized.
CrowAce.book Page 10 Wednesday, November 10, 2004 1:52 PM
DRAFT 1A palmOne, Inc. Confidential
Installing the battery :: 11
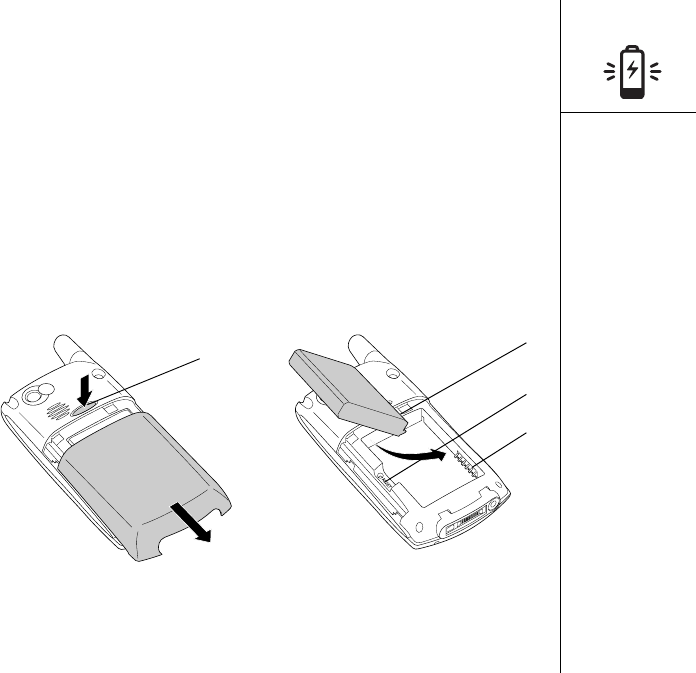
Installing the battery
1. Press the Battery Door Release button and slide the battery door downward to
remove it from your Treo.
2. Align the metal contacts on the battery with the contacts inside the battery
compartment.
3. Insert the battery into the compartment at a 45 degree angle and then press
it into place.
4. Slide the battery door onto the back of the phone until it clicks into place.
5. When the Welcome screen appears, follow the onscreen instructions to set up
your Treo 650.
A
B
C
D
A. Battery Door Release button
B. Battery contacts
C. Notch
D. Phone contacts
CrowAce.book Page 11 Wednesday, November 10, 2004 1:52 PM
DRAFT 1A palmOne, Inc. Confidential
12 :: Charging the battery
Charging the battery
Before using your Treo 650 smartphone, you need to charge the battery. It may not
turn on at all when you first remove it from the box. We recommend four hours for a
full charge, or until the indicator light is solid green.
1. Plug the AC charger into a wall outlet. If necessary, connect an adapter.
2. Connect the charger cable to the bottom of the Treo. Make sure the arrow on the
connector is facing up, toward your Treo screen.
3. To confirm your Treo is charging, check the indicator light.
• When the indicator light is solid red, your Treo is charging.
• When the indicator light turns solid green, your Treo is fully charged.
• If the indicator light does not turn on when you connect your Treo to the AC
charger, double-check the cable connection and the electrical outlet to which
it is connected.
Battery consumption varies
based on personal usage.
Consumption factors
include signal strength,
speakerphone usage, and
whether calls are data or
voice calls.
When your Treo is
connected to a power
source, the indicator
light glows solid (versus
flashing), and the color
of the light indicates the
charging state.
A. Indicator light
A
CrowAce.book Page 12 Wednesday, November 10, 2004 1:52 PM
DRAFT 1A palmOne, Inc. Confidential
Charging the battery :: 13
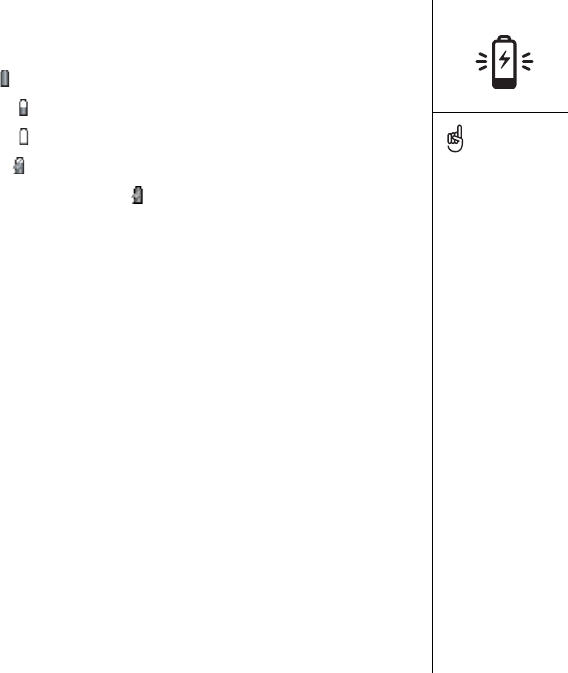
After you turn on your Treo smartphone, the onscreen battery icon displays
power status:
•Full battery icon : Battery is charged
•Partial battery icon : Battery has some power and is not charging
•Empty battery icon : Battery needs charging immediately
•Red lightning bolt : Charging
• Green lightning bolt with full battery : Fully charged
To see exactly how much
power is left in your
battery, tap the onscreen
battery icon.
CrowAce.book Page 13 Wednesday, November 10, 2004 1:52 PM
DRAFT 1A palmOne, Inc. Confidential
14 :: Inserting the SIM card
Inserting the SIM card
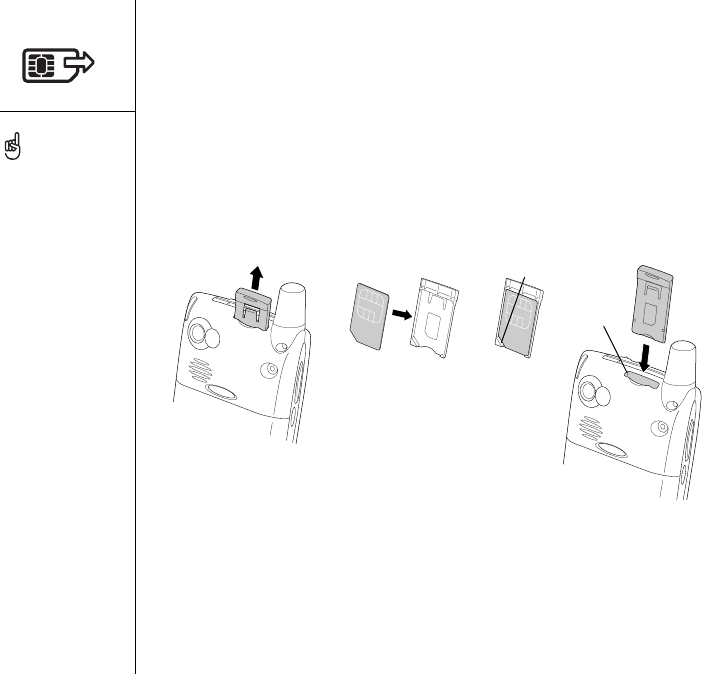
Your subscriber identity module (SIM) card contains account information such as your
phone number and voicemail access number. To use the phone, email, or web features
of your Treo 650 smartphone, you need to insert the SIM card. If a SIM card did not
come with your Treo 650, your wireless service provider will give you one when you
subscribe. If you have an older, 5-volt SIM card, you should request a newer, 3-volt
SIM. This Treo is not compatible with older 5-volt SIM cards.
1. Slide the SIM tray out of the phone.
2. Insert the SIM card into the SIM tray by aligning the notches until you feel it lock
into place.
3. Slide the SIM tray back into the phone.
4. If your SIM card is not already activated, follow the activation steps provided by
your wireless service provider or contact your wireless service provider directly for
assistance. If you want to use email, web browsing, and multimedia messaging, be
sure to confirm that your SIM card is activated for data services.
Your wireless service
provider may already have
inserted the SIM card into
your Treo. In that case, skip
to “Turning Treo on and off”
on page 15.
To remove the SIM card,
pull the SIM tray out of the
slot and remove the card
from the tray.
A. SIM card
B. SIM tray
C. Notches
D. SIM slot
BAC
D
CrowAce.book Page 14 Wednesday, November 10, 2004 1:52 PM
DRAFT 1A palmOne, Inc. Confidential
Turning Treo on and off :: 15
Turning Treo on and off
You can use the Palm OS® features of your Treo 650 smartphone independently
of the wireless features and applications. In other words, the screen and phone are
designed to be turned off and on separately.
Turning your phone on and off
When you turn on your Treo, it connects to a mobile network so that you can make
and receive phone calls and use other wireless services.
1. Press and hold Power/End to turn on your phone. If Sound Mode is on you’ll
hear a series of ascending tones. (See “Setting the ringer switch” on page 144 for
more on Sound Mode.) After your phone locates a signal, you can use the phone
and Internet features (if supported by the local network).
2. Press and hold Power/End again to turn off your phone. If Sound Mode is on
you‘ll hear a series of descending tones. When your phone is off, your Treo is not
connected to any mobile network. You can still use the organizer and other Palm
OS features. This is ideal for airplane flights and for maximizing battery life.
Waking up the screen
To use the Palm OS features when your phone is off, you need to wake up the screen.
You can also turn off your phone’s screen without turning off your phone’s wireless
features.
1. Press Power/End to wake up the screen.
2. Briefly press Power/End to turn off the screen.
The indicator light flashes
green when your phone is
on and you’re inside a
coverage area. If you’re
outside a coverage area,
the indicator light flashes
amber.
Your Treo 650 includes a
keyboard backlight for low-
light conditions. The
keyboard backlight
activates automatically
when the screen turns on.
It turns off automatically
when the screen turns off
and when an active call
lasts longer than a minute.
You can also press any
application buttons on the
front of your phone to wake
up the screen and go
directly to the application
linked to that button.
CrowAce.book Page 15 Wednesday, November 10, 2004 1:52 PM
DRAFT 1A palmOne, Inc. Confidential
16 :: Making your first call
Making your first call
We recommend that you charge your Treo 650 smartphone for a full four hours
(or until the indicator light is solid green) before using it for the first time.
1. Press and hold Power/End . You will hear a series of ascending tones.
2. Allow the Treo to complete a network search. The search may take several
seconds. When it is complete, the Network Status icon appears in the
upper-right.
3. If prompted for a PIN, enter it on the PIN screen. The default PIN is often 1234. If
the default PIN doesn’t work, check the documentation you received from your
wireless service provider or contact your wireless service provider for help.
4. Press Phone/Send .
5. Using the number pad on the Treo keyboard, enter the desired phone number.
6. Press Phone/Send to dial.
7. When your call is complete, press Power/End or use the 5-way navigator to
select Hang Up.
If No Service appears in
the upper left, you are out
of a wireless coverage area.
If you believe you are in a
wireless coverage area and
this problem persists,
contact your wireless
service provider for
assistance.
If you are inside a coverage
and cannot complete a call,
your SIM card may not be
activated. Please contact
your wireless service
provider for assistance.
To quickly redial your most
recent call, press and hold
the Phone/Send button to
display the redial list.
CrowAce.book Page 16 Wednesday, November 10, 2004 1:52 PM
DRAFT 1A palmOne, Inc. Confidential
Making your first call :: 17
Adjusting call volume
While a call is in progress, press the Volume button on the side of your Treo to adjust
call volume.
What’s my number?
1. Make sure your phone is on (see “Turning your phone on and off” on page 15).
2. Press Phone/Send .
3. Press Menu .
4. Select Options, and then select Phone Info.
If your phone number is
not displayed, exit Phone
Info, and make sure your
SIM card is properly
inserted in the SIM slot.
If your phone number still
does not appear in Phone
Info, look on the plastic
holder to which the SIM
card was attached. If you
still need assistance, please
consult your wireless
service provider.
A. Volume button
B. Side button
A
B
A. Look here for your phone number
A
CrowAce.book Page 17 Wednesday, November 10, 2004 1:52 PM
DRAFT 1A palmOne, Inc. Confidential
CrowAce.book Page 18 Wednesday, November 10, 2004 1:52 PM
DRAFT 1A palmOne, Inc. Confidential

first day: learning the basics :: 19
first day:
learning the
basics
CrowAce.book Page 19 Wednesday, November 10, 2004 1:52 PM
DRAFT 1A palmOne, Inc. Confidential
20 :: Moving around the Treo screen
Moving around the Treo screen
To move around the Treo™ 650 smartphone screen, you can use the 5-way navigator
or you can tap items on the screen with the stylus. With use, you will find your own
favorite way to scroll, highlight, and select menu items.
The 5-way includes Right, Left, Up, Down, and Center buttons.
Scrolling through screens
As on a computer, you scroll on the Treo to move from field to field or page to page,
or in some cases to highlight an item or option in a list. There are several methods
of scrolling:
• Press the 5-way on the front of the Treo. Press Right , Left , Up , and
Down to move to the next field, button, or action in that direction.
• Press and hold Up to quickly scroll to the top of a list, or press and hold
Down to quickly scroll to the bottom of a list.
Some third-party
applications may not work
with the 5-way navigator,
and you must use the
stylus instead.
In this guide, we use arrow
icons to indicate directions
on the 5-way. These are
different from any onscreen
arrows that you tap with
your stylus or select with
the 5-way to display
pick lists.
5-way buttons:
Onscreen arrows:
A. Up
B. Right
C. Down
D. Left
E. Center
A
B
D
C
E
CrowAce.book Page 20 Wednesday, November 10, 2004 1:52 PM
DRAFT 1A palmOne, Inc. Confidential
Moving around the Treo screen :: 21
• Tap an onscreen scroll arrow.
• When viewing a list screen, such as the Memo list:
• Press Up or Down to scroll one screen at a time.
• Press Center and then press Up or Down to scroll between line items.
• Press Left to switch from item scrolling to screen scrolling.
• Press Option and Up or Down to scroll to the next page of information
within the current record.
• When inside a text field, press Right and Left to scroll to the next character or
word, and press Up and Down to scroll between lines.
• Drag the slider of an onscreen scroll bar.
Highlighting items
The 5-way lets you highlight items before opening or selecting them.
• When an onscreen button (OK, Cancel, etc.) or pick list is
highlighted, the button acquires a glow around its border.
• When a phone number, email address, or web
link is highlighted on a web page or in a
message, the text appears in reverse type (light
text on a dark background).
• When an entire text entry field is highlighted, you can press Center to edit the text.
After you edit the text, press Center again to highlight the entire field.
Once you’ve opened an
application (see “Opening
applications” on page 28),
you can experiment with
using the 5-way to
highlight different screen
elements.
CrowAce.book Page 21 Wednesday, November 10, 2004 1:52 PM
DRAFT 1A palmOne, Inc. Confidential

22 :: Moving around the Treo screen
You can also use the stylus to highlight text on the screen. When text is highlighted,
it appears in reverse type.
• Drag the stylus across the text you want to highlight.
• Double-tap a word to highlight it.
• Triple-tap a line of text to highlight it.
Accessing command buttons
Command buttons such as New, OK, and Details appear at the bottom of the screen.
In many cases, you can jump directly to these buttons instead of scrolling to them.
• From a list screen, such as the Contacts list or Memos list, press Right to jump
to the first button.
• From a screen where you create or edit entries, such as Edit Contacts, press
Center to jump to the first button.
• From a dialog box, such as Edit Categories, press Up and Down to scroll to
the buttons.
Selecting or activating items
After highlighting an item with the 5-way, you can select or activate it by pressing
Center. You can also select an item by tapping it with the stylus.
CrowAce.book Page 22 Wednesday, November 10, 2004 1:52 PM
DRAFT 1A palmOne, Inc. Confidential
Moving around the Treo screen :: 23
Selecting menu items
Many applications have menus to provide access to additional features. These menus
are usually hidden from view, but they appear when you press Menu . To get the
most out of your Treo, it’s a good idea to familiarize yourself with the additional
features available through the various application menus.
1. Press Menu to display an application’s menus.
2. Press Right and Left to switch between menus.
3. Press Up and Down to highlight a menu item.
4. Press Center to select the menu item, or press
Menu to close the menu and cancel your
selection.
Selecting options in a pick list
A range of options is often presented in a type of menu called a pick list, which can be
identified by a downward-pointing arrow. Pick lists are different from the application
menus described above.
• Use the 5-way to highlight the pick list, and then press Center to display the items
in the list. Press Up and Down to highlight the item you want, and then press
Center to accept your selection.
• To exit the pick list and cancel your selection, press Left or Right .
• Use your stylus to tap the pick list, and then tap the item you want from the list.
Most menu items have
menu shortcuts listed in
the menu. To use a menu
shortcut, press Menu plus
the shortcut letter. You
don’t have to see the menu
item to use the menu
shortcut.
CrowAce.book Page 23 Wednesday, November 10, 2004 1:52 PM
DRAFT 1A palmOne, Inc. Confidential
24 :: Using the keyboard
Using the keyboard
Using the keyboard backlight
Treo includes a keyboard backlight for low light conditions. The keyboard backlight
activates automatically when the screen turns on. It turns off automatically when the
screen turns off and when an active call lasts longer than a minute.
When using the keyboard,
most people find it easiest
to hold the Treo with two
hands and use the tips of
both thumbs to press the
keys, as shown above.
The keyboard backlight
may not be visible in bright
sunlight.
A. Applications
B. Menu
C. Backspace
D. Return
E. Right Shift
F. Alt
G. Space
H. Shift/Find
I. Option
AB
C
D
E
FG
I
H
CrowAce.book Page 24 Wednesday, November 10, 2004 1:52 PM
DRAFT 1A palmOne, Inc. Confidential
Using the keyboard :: 25
Entering lowercase and uppercase letters
• To enter lowercase letters, press the desired keys.
• To enter an uppercase letter, press Shift/Find or Right Shift , and then
enter a letter. You don’t need to press and hold Shift while entering a letter.
• To turn Caps Lock on, press Shift/Find or Right Shift twice. To turn it off,
press Shift/Find or Right Shift again. When Caps Lock is on, this symbol
appears in the lower right: .
Entering numbers, punctuation, and symbols that appear above the
letters on the keys
• Press Option , and then press the key with the desired character shown above
the letter. You don’t need to press and hold Option while pressing the second key.
• To turn Option Lock on, press Option twice. To turn it off, press Option
again. When Option Lock is on, this symbol appears in the lower right: .
Entering other symbols and accented characters
1. Enter the character that corresponds to the symbol or accented character you
want. See the table on the next page.
2. Press Alt .
3. Press Up or Down to highlight the desired character.
4. Press Center to insert the character, or just continue entering the next character.
In many applications, you
can view a list of all the
alternate characters. Open
the Edit menu and select
Keyboard Help.
Some application views
automatically default to
Option Lock, such as the
Dial Pad View in the Phone
application or the
Calculator. In this case, you
do not have to press and
hold Option to enter
numbers.
The alternate characters
are grouped according to
their similarity to the
corresponding key. For
example, the alternate
characters available for the
e key are é, è, ë, ê and .
CrowAce.book Page 25 Wednesday, November 10, 2004 1:52 PM
DRAFT 1A palmOne, Inc. Confidential

26 :: Using the keyboard
26 :: Using the keyboard
Symbols and accented characters
Enter... then press Alt
to select...
Enter... then press Alt
to select...
Enter... then press Alt
to select...
a á à ä â ã å æ o ó ò ö ô œ õ ø 0 % ‰ °
A Á À Ä Â Ã Å Æ O Ó Ò Ö Ô Œ Õ Ø 1
b or B ß p or P % 2
cç ¢ © ^ ˆ r or R® 3
CÇ ¢ © ^ ˆ s ß Šs § .? ! …
d† ‡ Sß ŠS § ,„
D † ‡– D t or T ~ ™ † ‡ ! ¡
eé è ë ê u ú ù ü û ? ¿
EÉ È Ë Ê U Ú Ù Ü Û : ; :-) :-( ;-) :-D
CrowAce.book Page 26 Wednesday, November 10, 2004 1:52 PM
DRAFT 1A palmOne, Inc. Confidential

27 :: Using the keyboard
Using the keyboard :: 27
f or F ƒ x or X x ' ‘ ’ < > ~ `
i í ì ï î y ÿ ¥ "“ ” « »
I Í Ì Ï Î Y
Ÿ ¥$ £ ¥ ¢
l or L £ + &
m or
M
µ - _ ~ • = – —
nñ /% \ ÷ |
NÑ #=
(< [ { ‹
)> ] } ›
Symbols and accented characters
Enter... then press Alt
to select...
Enter... then press Alt
to select...
Enter... then press Alt
to select...
CrowAce.book Page 27 Wednesday, November 10, 2004 1:52 PM
DRAFT 1A palmOne, Inc. Confidential
28 :: Opening applications
Opening applications
There are three application buttons on the front of the Treo 650 smartphone. The
fourth button turns your phone on and off, wakes up the screen, and controls the
keyguard. Each application button can be used to open two applications. To access a
button’s primary application, simply press the button. To access a button’s secondary
application, press Option , and then press the application button.
You can also customize
the buttons yourself; see
“Setting Buttons
Preferences” on page 148
for details.
Your wireless service
provider may have
customized the applications
associated with each
button
A Phone/Send
B. Calendar
C. Messaging
D. Power/End
A
C
B
D
CrowAce.book Page 28 Wednesday, November 10, 2004 1:52 PM
DRAFT 1A palmOne, Inc. Confidential
Opening applications :: 29
Button Primary application Secondary application
Phone/Send + Web browser
Calendar + Memos
Messaging + VersaMail®
Power/End (on/off) + Keyguard
In Palm OS®, you access all available applications through the Applications View:
1. Press Applications .
2. Use the 5-way navigator to highlight the application you want to use.
3. Press Center to open the selected application.
Press Applications
repeatedly to cycle through
different categories of
applications.
In the Applications View,
you can enter the first few
letters of the application’s
name to highlight it. For
example, if you enter “p”
it highlights Phone; if you
then enter “r” it highlights
Prefs. If you pause and
then enter “r,” it highlights
the first application that
starts with “r.”
CrowAce.book Page 29 Wednesday, November 10, 2004 1:52 PM
DRAFT 1A palmOne, Inc. Confidential
30 :: Setting up your computer
Setting up your computer
Synchronization lets you enter information on your computer (using Palm®Desktop
software or Microsoft Outlook for Windows) and then efficiently transfer that info to
your Treo 650 smartphone. At the same time, changes you make on your Treo are
transferred to Palm Desktop or Microsoft Outlook. Even if you manage all your
contacts on your Treo, synchronization is a great way to back up your info.
Before you can synchronize, you need to install the desktop synchronization software
on your computer. Even if you already own a Palm Powered® device and have
installed a previous version, you must install the software that came with your Treo
on the Software Installation CD.
System requirements
Your computer should meet the following minimum system profiles for Windows or
Mac computers.
Windows 2000 or XP (or later)
• 32MB of available memory (RAM)
• 170MB of free hard disk space
•CD drive
• Available USB port
• USB sync cable (included with your Treo 650)
Mac OS 10.2 or later
• 128MB of total memory (RAM)
• 190MB of free hard disk space
•CD drive
• USB port
• USB sync cable (included with your Treo 650)
IMPORTANT: If you’re
upgrading from another
Palm Powered device,
follow the steps in
“Upgrading from another
Palm Powered® device” on
page 160 before you set up
your computer for your new
Treo.
If you want to synchronize
with another desktop
software program, contact
the software developer to
obtain a conduit if one is
available.
CrowAce.book Page 30 Wednesday, November 10, 2004 1:52 PM
DRAFT 1A palmOne, Inc. Confidential
Setting up your computer :: 31
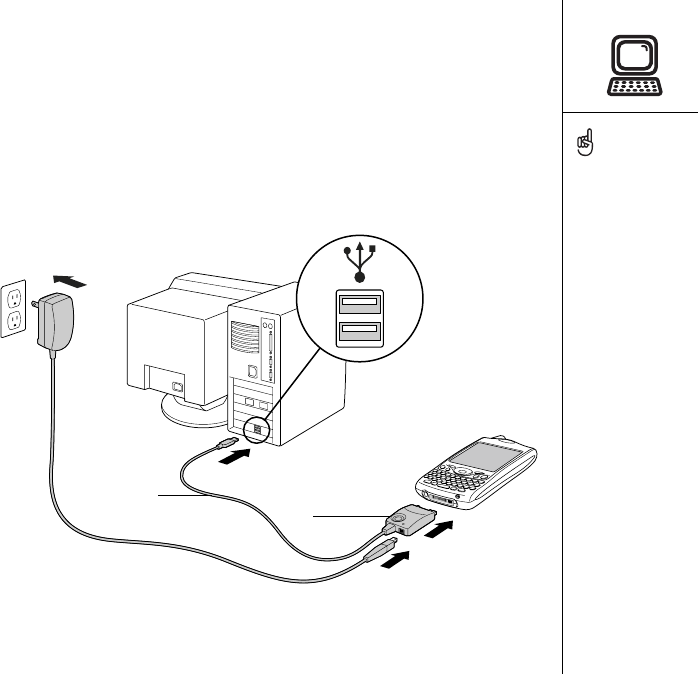
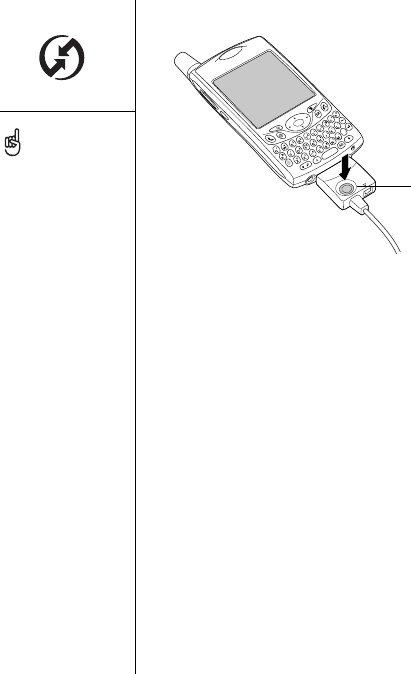
Connecting your Treo to your computer
1. Plug the AC charger into a wall outlet. If necessary connect an adapter.
2. Plug the USB sync cable into an available USB port or a powered USB hub on
your computer.
3. Connect the sync cable to the Multi-connector on the bottom of your Treo with
the HotSync® button facing up. Do not press the HotSync button until you are
instructed to do so.
4. Connect the charger cable to the Multi-connector on the sync cable.
For best performance, plug
your sync cable directly
into a USB port on your
computer. If you use a USB
hub, make sure it is a
powered hub.
A. USB sync cable
B. HotSync button
A
B
CrowAce.book Page 31 Wednesday, November 10, 2004 1:52 PM
DRAFT 1A palmOne, Inc. Confidential

32 :: Setting up your computer
Installing the desktop synchronization software on your computer
Your computer needs to have all its resources available to install the software.
Follow these guidelines for a successful installation:
1. Exit any applications that are currently running on your computer, including those
running in the background.
2. Insert the palmOne Software Installation CD into the CD drive on your computer.
If you are installing on a Mac, double-click the CD icon on the desktop, and then
double-click the palmOneSoftware.pkg icon.
3. Follow the onscreen instructions of the installation program. Please note these
important points about the installation process:
• If a language selection screen appears, click the same language you use
on your Treo.
• During the installation process, you will be prompted to synchronize for the
first time. See the next section for details.
If you are installing on a
computer at work, make
sure your company allows
you to install new software.
Contact your company’s
IT department for help.
CrowAce.book Page 32 Wednesday, November 10, 2004 1:52 PM
DRAFT 1A palmOne, Inc. Confidential
Synchronizing contacts and other information :: 33
Synchronizing contacts and
other information
Synchronizing means that information that is entered or updated in one place
(your phone or your computer) is automatically updated in the other—no need to
enter information twice. We strongly recommend that you synchronize your Treo and
your computer frequently to keep your information up-to-date (and backed up) in
both locations.
Before you can synchronize your contacts and other personal information, you must
install the software from the CD that came with your Treo. See “Installing the desktop
synchronization software on your computer” on page 32 for instructions.
If you use the default settings, information from all the following applications is
transferred each time you synchronize your phone with your computer:
If you choose to synchronize with Outlook, information from Contacts, Calendar, Tasks,
and Memos is synchronized with Outlook. You can also set up the VersaMail
application to synchronize with Outlook. Other info, such as photos, is synchronized
with Palm Desktop software.
1. Connect your Treo 650 smartphone to your computer, as described in “Connecting
your Treo to your computer” on page 31.
2. Press the HotSync button on the sync cable.
We strongly recommend
that you install the
synchronization software
soon after you start using
your Treo, and that you
synchronize your Treo and
computer frequently to
keep your information
up-to-date (and backed up)
in both locations.
If you installed
Palm Desktop software,
the HotSync Manager icon
should appear in
the lower-right corner of
your computer screen.
CrowAce.book Page 33 Wednesday, November 10, 2004 1:52 PM
DRAFT 1A palmOne, Inc. Confidential
34 :: Synchronizing contacts and other information
3. Wait for your Treo to display a message indicating that the process is complete.
• If nothing happens, make sure that you installed the desktop synchronization
software from the Software Installation CD that came with your Treo, and that
it is running on your computer.
• If you want to synchronize information with applications other than
Palm Desktop or Microsoft Outlook, you need to purchase additional third-party
conduit software.
• If you have any problems synchronizing, see “Synchronization (HotSync)” on
page 172 for troubleshooting suggestions.
A. HotSync buttonA
If you use Microsoft
Exchange ActiveSync®,
your email and calendar
information synchronize
directly with your
company's Exchange
server. You must retrieve
email and calendar updates
from the VersaMail
application, they do
not update when you
synchronize with your
computer. See “Working
with Microsoft Exchange
ActiveSync” on page 73
for more information.
Your contacts, tasks,
and memos sync with
Palm Desktop software
or Microsoft Outlook,
depending on which
desktop application
you use.
CrowAce.book Page 34 Wednesday, November 10, 2004 1:52 PM
DRAFT 1A palmOne, Inc. Confidential

Battery life :: 35
Battery life
Battery life depends on individual usage. When used as a phone, your Treo battery
provides up to 6 hours of talk time or up to 300 hours of standby time.
Maximizing battery life
You can increase the life of your Treo battery by following a few easy guidelines.
Remember that battery life depends on how you use your Treo.
• Charge your Treo whenever you’re at your desk, or charge it overnight each day.
The Li-Ion battery in your Treo has a much longer useful life when it is topped off
frequently, versus charging it after it is fully drained.
• The wireless features (phone, email, messaging, and web) of your Treo generally
consume more power than its organizer features. However, if you spend a lot of
time using the camera (if included), games, media players, eBooks, or other Palm
OS applications, keep an eye on the battery icon and charge when necessary.
• If you don’t plan to use the wireless features on your Treo for a while, you may want
to turn off your phone (see “Turning your phone on and off” on page 15). You can
forward calls to a different number or let all calls be picked up by voicemail (see
“Forwarding calls under certain conditions” on page 51).
• As with any mobile phone, if you are in an area with no wireless coverage, your
Treo searches for a signal, which consumes power. If you cannot move to an area
of better coverage, temporarily turn off your phone.
• Turn down the screen brightness (see “Adjusting the brightness” on page 145).
• Decrease the Auto-off setting in Power Preferences (see “Power Preferences” on
page 151). This turns off your screen automatically after a shorter period of
inactivity.
IMPORTANT: You must
charge your Treo fully
before using it the first
time. Wait until the
indicator light turns solid
green, which may take
up to four hours.
If the battery drains to
the point where your Treo
doesn’t turn on, the Treo
stores your info safely until
you recharge the battery.
To avoid draining the
battery, we recommend
that you charge and
synchronize your Treo every
day, especially if you use
your phone often.
If the battery is fully
drained, it may take a few
moments for the indicator
light to turn on while
charging.
CrowAce.book Page 35 Wednesday, November 10, 2004 1:52 PM
DRAFT 1A palmOne, Inc. Confidential
36 :: Where to learn more
Where to learn more
For a quick introduction
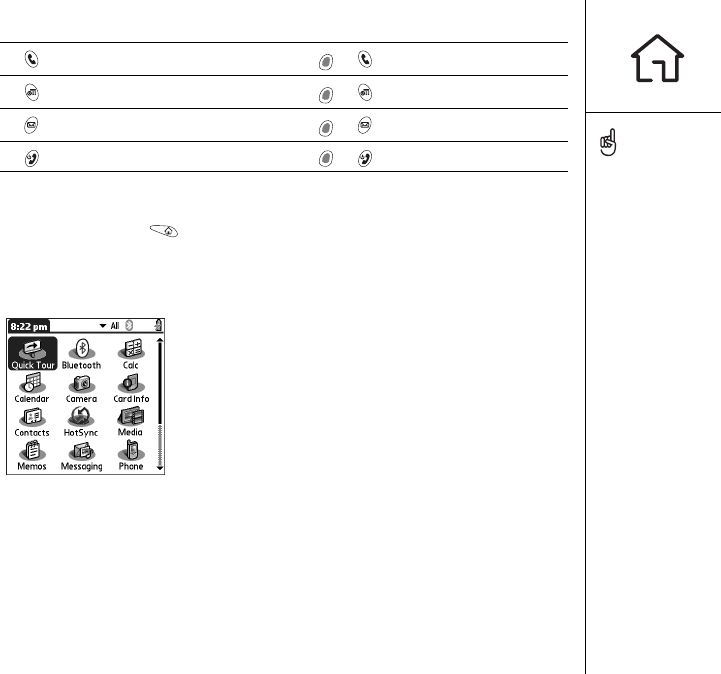
•Quick Tour: The Quick Tour teaches you how to use many features of your Treo.
It is already installed on your Treo, and you can open it any time.
While using your Treo
•Tips: Many of the built-in applications include helpful tips for getting the most out
of your Treo. To view these tips, open an application, open the menus , select
Options, and then select Tips.
•Information: Many screens have a Tips icon in the upper-right corner. Select
the Tips icon to learn about the tasks you can perform in that dialog box.
•Online support from palmOne: For up-to-date downloads, troubleshooting, and
support information, check out www.palmOne.com/intl/support/treo650.
If you need more information
•Books: Many books on Palm Powered devices, such as “Now You Know Treo”, are
available in local or online book retailers (look in the computers section), or visit
www.palmOne.com/intl.
•Online forums: Consult online Treo user discussion groups to swap information
and learn about topics you may find nowhere else. Visit www.palmOne.com/intl for
details.
•Customer service from your wireless service provider: For questions about your
mobile account or features available on the network, contact your wireless service
provider for the latest information and help.
To open the Quick Tour, go
to Applications and select
Quick Tour.
CrowAce.book Page 36 Wednesday, November 10, 2004 1:52 PM
DRAFT 1A palmOne, Inc. Confidential

first week: using phone, web, and messaging :: 37
first week:
using phone,
web, and
messaging
CrowAce.book Page 37 Wednesday, November 10, 2004 1:52 PM
DRAFT 1A palmOne, Inc. Confidential
38 :: Phone overview
Phone overview
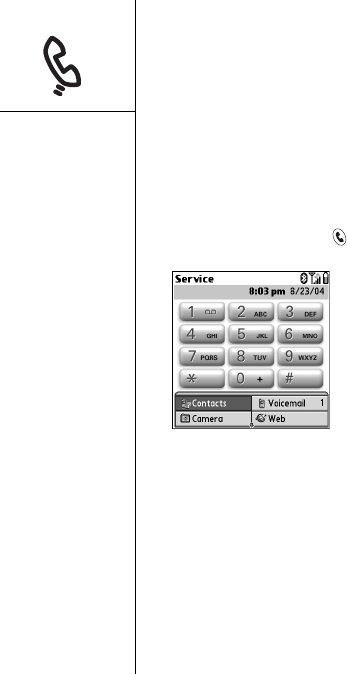
The Phone application lets you make and receive calls and store favorites for
contacting people and opening applications. Be sure you know how to turn on your
phone before reading this section (see “Turning your phone on and off” on page 15).
Accessing the Phone application
• Press the Phone/Send button.
CrowAce.book Page 38 Wednesday, November 10, 2004 1:52 PM
DRAFT 1A palmOne, Inc. Confidential
Phone overview :: 39
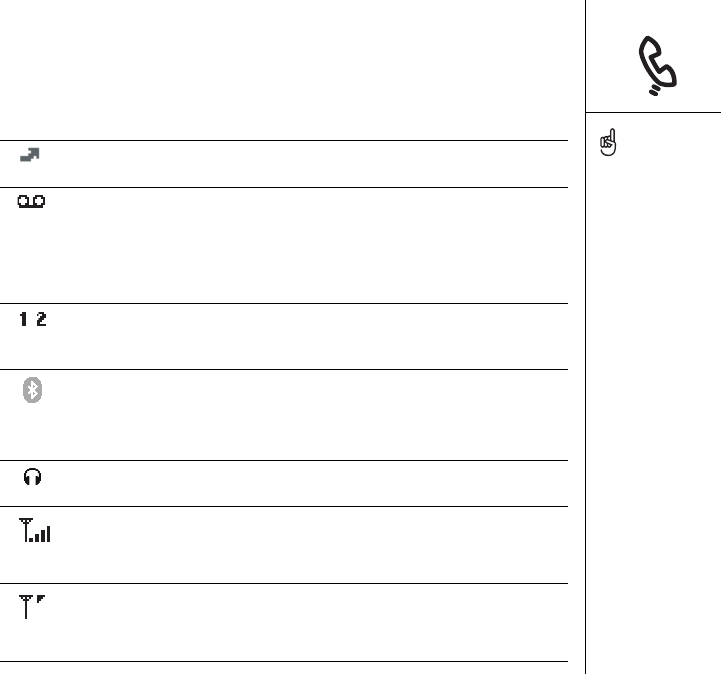
You can monitor the status of several items using icons at the top of the Phone
screen:
Network name Displays the name of your wireless service provider when your
phone is on and you are in a coverage area. If you are outside a
coverage area, No service or SOS Only appears instead. When you
turn off your phone, Phone Off appears.
Appears when call forwarding is active. A 1 and a 2 may appear
above the icon to indicate which line(s) are forwarding.
Appears when you have voicemail. If you have alternate line service
(ALS), the left side is shaded when you have voicemail on line 1, and
the right side is shaded when you have voicemail on line 2.
Some networks use a full-screen alert instead. Call your wireless
service provider for more information.
Appears when ALS is active. This feature may not be available on all
accounts or regional networks. Contact your wireless service
provider for more information.
Appears in gray when Bluetooth® wireless technology is off.
Appears in blue when Bluetooth wireless technology is on. Appears
in reverse blue when and your phone is communicating with other
devices using Bluetooth wireless technology.
Replaces the Bluetooth icon when your phone is connected to a
headset that is enabled with Bluetooth wireless technology.
Appears when your phone is on. The bars display the signal strength.
The stronger the signal, the more bars appear. If you are outside a
coverage area, no bars appear.
The triangle appears when your phone is on and a GPRS or EDGE
network is within range. Some service providers do not show the
triangle.
To display the remaining
battery power, tap the
battery icons at the top of
the screen.
If ALS is active and
available, you can press
and hold # to switch lines.
If you have multiple alerts,
the Alert screen displays all
your pending alerts. Select
an item’s description to
jump to that item, or check
the box to clear that item.
To view all your pending
alerts from any screen on
your phone, press and hold
Center.
You can tap the Bluetooth
icon to quickly turn
Bluetooth on and off.
CrowAce.book Page 39 Wednesday, November 10, 2004 1:52 PM
DRAFT 1A palmOne, Inc. Confidential
40 :: Phone overview
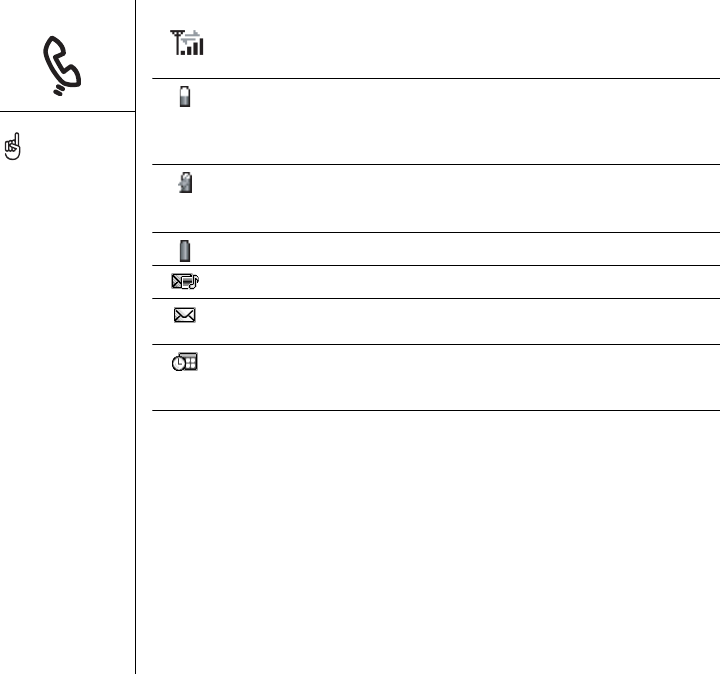
Appears when you are connected to a GPRS or EDGE network.
You can still receive calls.
Displays the battery charge status. When the battery drains to 20%
of its capacity, the icon changes from blue to red. At 10% of its
capacity, you begin to receive warning messages, and at 5% of its
capacity, the phone beeps and the icon changes from red to clear.
Appears when your Treo battery is charging. The lightening bolt
turns from red to green when the battery is fully charged and your
phone remains connected to the AC charger.
Appears when your Treo battery is fully charged.
Indicates the number of unread text and multimedia messages.
Indicates the number of unread email messages. You can select this
icon to retrieve your messages.
Displays the current (or next) event from the Calendar application.
If you have an event conflict during the current time period, a red bar
appears next to the event description.
To display the current
event from the Calendar
application in the Main
View of the Phone
application, open the
Options menu and select
General Preferences. Check
the Show Calendar event
box. You can then select
this event to jump to the
Calendar application.
CrowAce.book Page 40 Wednesday, November 10, 2004 1:52 PM
DRAFT 1A palmOne, Inc. Confidential
Dialing calls :: 41
Dialing calls
Your Treo offers several options for making phone calls. As you get familiar with your
Treo, you’ll discover which method you prefer.
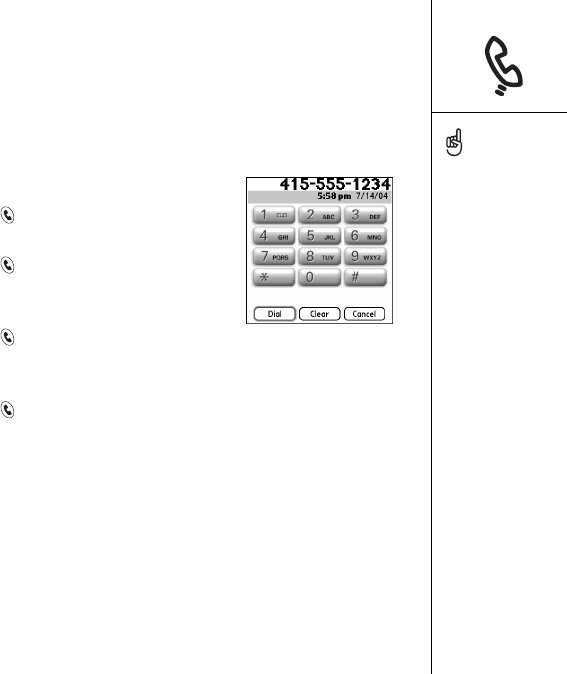
Dialing using the onscreen Dial Pad
1. Press Phone/Send .
2. Tap the onscreen Dial Pad to enter the number.
3. Press Phone/Send to dial.
Dialing with the keyboard
1. Press Phone/Send .
2. Using the numbered keys on the keyboard, start entering a phone number.
You do not need to press Option to access the numbers on the keyboard.
3. Press Phone/Send to dial.
Dialing by contact name
Before you can dial a call by contact name, you must create some contacts (see
“Adding a contact” on page 98), import them by synchronizing (see “Synchronizing
contacts and other information” on page 33), or import them from your SIM card
(see tip on “Viewing your SIM Phonebook” on page 100).
If you changed the
wallpaper in the Main View
of the Phone application
(see “Selecting wallpaper
for the Phone application”
on page 143), you can still
access the Dial Pad. From
the Main View of the Phone
application, press Phone/
Send, and then select
Dial Pad.
You can paste numbers
directly into the Dial Pad
View. Copy a number from
another application, and
then switch to Dial Pad
View. Open the Edit menu
and select Paste. Press
Phone/Send to dial.
CrowAce.book Page 41 Wednesday, November 10, 2004 1:52 PM
DRAFT 1A palmOne, Inc. Confidential
42 :: Dialing calls
1. Press Phone/Send .
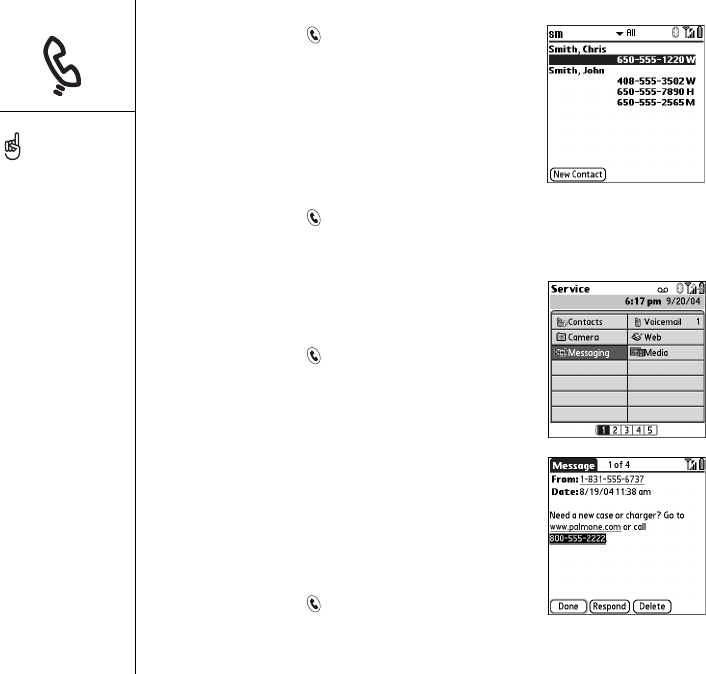
2. Select the Contacts favorite button.
3. Using the keyboard, begin entering one of the
following for the contact you want to call:
• First initial and last name
•First name
•Last name
4. Select the number you want to dial.
5. Press Phone/Send to dial.
Dialing with a favorite button
Before you can use favorite buttons, you must create
some favorites entries. See “Defining favorite buttons”
on page 53.
1. Press Phone/Send .
2. Use the 5-way to access Favorites.
3. Highlight the desired button.
4. Press Center to dial the selected button.
Dialing from a web page or message
Treo recognizes most phone numbers that appear in
web pages or in text, email, or multimedia messages.
1. Use the 5-way to highlight the phone number you
want to dial in the web page or text message.
2. Press Center to open the Dial dialog box.
3. Press Phone/Send to dial.
If you prefer to dial by
contact from the Main
View, open the Options
menu and select General
Preferences. Select the
second pick list and select
the Typing starts Contacts
search option.
To see more information for
a person in your Contacts
list, highlight the name and
press Center to view their
address, company, and
other details.
To start another search,
press Backspace to delete
letters you’ve entered. Or
select Cancel to return to
the Main View.
To view more favorite
buttons, highlight the
bottom row of favorites,
and then press Down.
CrowAce.book Page 42 Wednesday, November 10, 2004 1:52 PM
DRAFT 1A palmOne, Inc. Confidential
Dialing calls :: 43
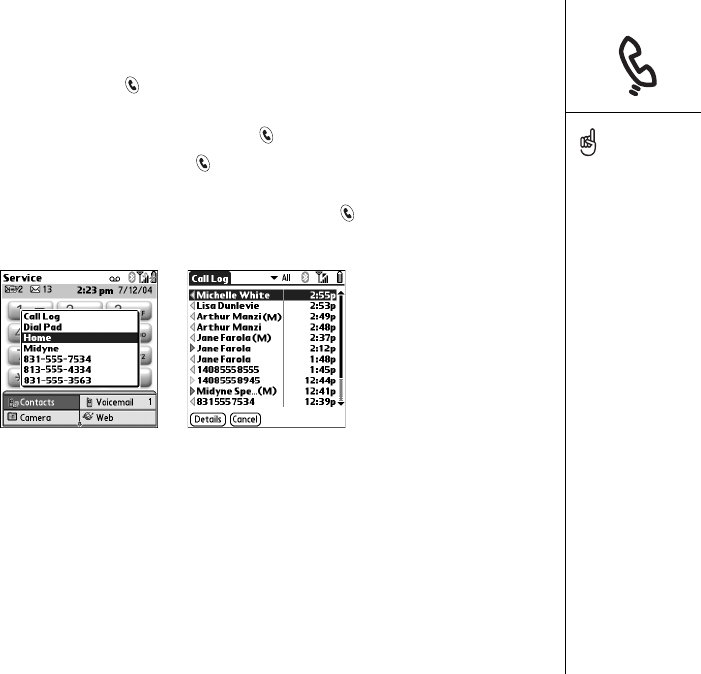
Redialing a recently called number
•To dial the last number: From the Main View in the Phone application, press and
hold Phone/Send to dial the last number you called.
•To select from your most recently dialed numbers: From the Main View in the
Phone application, press Phone/Send , select the number you want to call,
and then press Phone/Send again to dial.
•To select from a chronological list of calls: Select the Call Log favorite. You can
also access the Call Log by pressing Phone/Send twice, and then selecting
Call Log from the recent call list.
If you can’t highlight and
dial a phone number on
a web page or in a text
message using the 5-way
or stylus, it means that Treo
does not recognize it as a
phone number.
CrowAce.book Page 43 Wednesday, November 10, 2004 1:52 PM
DRAFT 1A palmOne, Inc. Confidential

44 :: Receiving calls
Receiving calls
To receive calls, your phone must be on. This is different from having just the screen
turned on (see “Turning your phone on and off” on page 15).
To answer a call, do one of the following:
• Press Phone/Send .
• Using the 5-way navigator, select the onscreen Answer button.
• If the headset is attached, press the headset button.
To ignore a call and send it to voicemail, do one of the following:
• Press Power/End .
• Using the 5-way, select the onscreen Ignore button.
To silence the ringer while your phone is ringing:
• Press the Volume button or any key on your Treo except Phone/Send, Power/End,
or the 5-way.
• To immediately silence all system sounds including the ringer, slide the ringer
switch to Sound Mode Off .
When you silence the ringer, you can either answer the call or let it ring through to
voicemail.
If music is playing, and a call arrives, the phone rings softly. The audio continues
playing, but you won’t hear it during your call. To pause the music, press the Side
button. To answer the call, do one of the following:
• Using the 5-way, select the onscreen Answer button.
• Press the headset button (if a headset is attached).
See a photo of the person
calling you! Learn how to
assign a caller ID photo on
“Assigning a caller ID
photo” on page 142.
CrowAce.book Page 44 Wednesday, November 10, 2004 1:52 PM
DRAFT 1A palmOne, Inc. Confidential
Using voicemail :: 45
Using voicemail
Setting up voicemail
1. Make sure your phone is turned on (see “Turning
your phone on and off” on page 15).
2. Press Phone/Send .
3. Use the 5-way navigator to access Favorites.
4. Select the Voicemail favorite button.
Your Treo connects to your wireless service
provider’s automated voicemail system. If Treo is unable
to connect, contact your wireless service provider for
assistance.
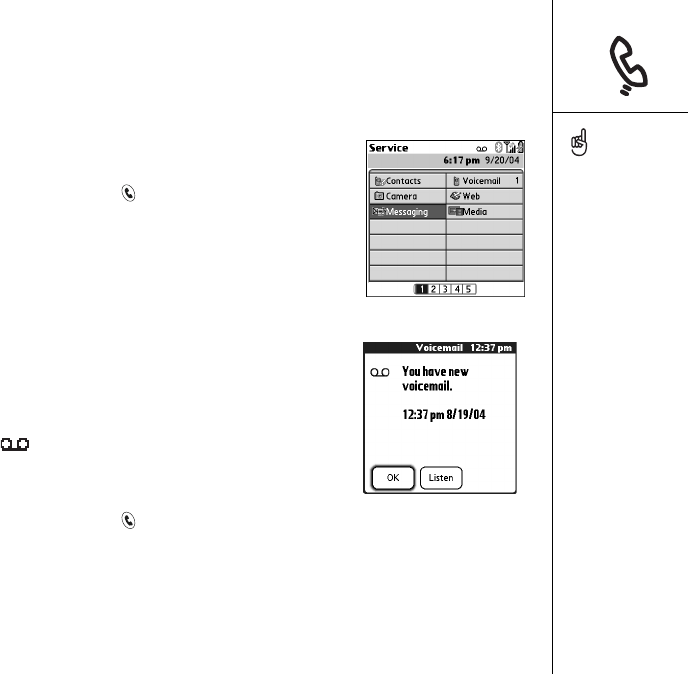
Voicemail notification
When you have a new voicemail message, you are
notified with an Alert screen. The Alert screen reappears
every five minutes until you respond to it. A Voicemail
icon may also appear at the top of your screen
(this feature is not supported by all mobile networks).
Retrieving voicemail messages
1. Press Phone/Send .
2. From the Phone application Main View, Dial Pad, or Favorites, press and hold 1 on
the keyboard. Treo dials your wireless service provider’s voicemail system.
3. Enter your voicemail password using the Treo keyboard, or select Extra Digits if
you defined this option (see “Editing or deleting an existing favorite button” on
page 55 for information on editing favorite buttons). Remember, you do not need
to press Option to enter numbers, *, or # while on an active call.
If a Voicemail icon appears
in the title bar at the top of
the screen, you can tap this
icon to retrieve your
voicemail.
If you have multiple alerts,
the Alert screen displays
all your pending alerts.
Select an item’s
description to jump to that
item, or check the box to
clear that item. To view all
your pending alerts from
any screen on your phone,
press and hold Center.
CrowAce.book Page 45 Wednesday, November 10, 2004 1:52 PM
DRAFT 1A palmOne, Inc. Confidential
46 :: Managing active calls
Managing active calls
When you make or receive a call, the Active Call View appears. Use the 5-way
navigator to access the onscreen buttons in this view.
Ends the call immediately. You can also press the headset button (if the
headset is attached).
Switches to the personal speakerphone so you can use other features,
such as checking your calendar, during a call.
Returns to Handset Mode when the speakerphone feature is active.
Press Phone/Send
repeatedly to toggle
between the Active call
screen and the Main View
of the Phone application.
To avoid accidentally
pressing onscreen buttons
while you’re holding the
phone up to your ear to
speak, you can disable the
screen’s touch-sensitive
feature during active calls
(see “Using Auto-Keyguard
and touchscreen lockout”
on page 153).
When a call lasts longer
than one minute, the
screen turns off. Press any
key except Power/End to
wake up the screen.
A. Caller’s name and number
B. Current duration of call
B
A
CrowAce.book Page 46 Wednesday, November 10, 2004 1:52 PM
DRAFT 1A palmOne, Inc. Confidential
Managing active calls :: 47
Ending a call
Do one of the following:
• Press Power/End. .
• Select Hang Up.
• Press the headset button (if the headset is attached).
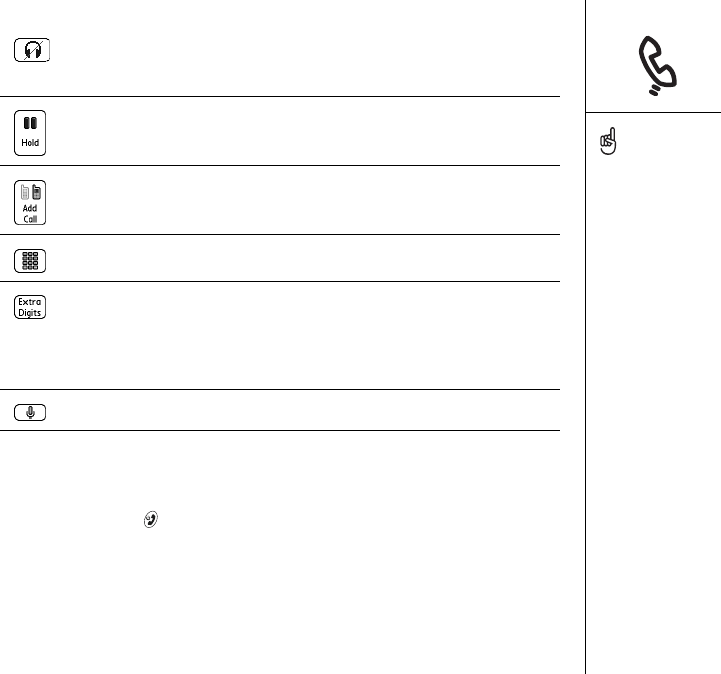
Switches from a headset with Bluetooth wireless technology to the
built-in earpiece. This button replaces the Spkr-phone button when a
headset with Bluetooth wireless technology is attached.
Places the current call on hold.
Lets you place another call while the first call is on hold. This button
replaces the Hold button when a call is on hold.
Opens the Dial Pad so you can manually dial additional numbers.
Dials any extra digits (such as a password or extension) that you
assigned to a Speed Dial favorite button. This button replaces the Dial
Pad button during outbound calls to numbers that include predefined
extra digits. See “Defining favorite buttons” on page 53 for information
on creating a Speed Dial favorite button.
Mutes the Treo microphone so that you cannot be heard.
When a call lasts longer
than one minute, the
screen turns off. Press any
key except Power/End to
wake up the screen, and
then press Power/End to
hang up the call. Be
careful not to press
Power/End to wake up the
screen because this will
accidentally end the call.
CrowAce.book Page 47 Wednesday, November 10, 2004 1:52 PM
DRAFT 1A palmOne, Inc. Confidential

48 :: Managing active calls
Returning to an active call from another application
You can use many other applications on your Treo while holding a phone conversation,
including the organizer and SMS features. You cannot browse the web or send and
receive email while on an active call.
• From any application, press Phone/Send to return to the Active Call View.
Saving phone numbers
After you complete an incoming call from a number (with caller ID) that is not in your
Contacts list, you are prompted to add the number to your Contacts list.
• To add the number, select Yes.
• To decline adding the number, select No.
• To permanently disable the Add New Contact prompt, check the Never ask me to
add new Contacts box when the prompt appears.
If you don’t add a number right away, follow these steps to add it later:
1. In the Call Log (see “Redialing a recently called number” on page 43), highlight the
number you want to save.
2. Select Add Contact.
3. Enter the information for the entry.
4. Select Done.
CrowAce.book Page 48 Wednesday, November 10, 2004 1:52 PM
DRAFT 1A palmOne, Inc. Confidential

More ways to manage calls :: 49
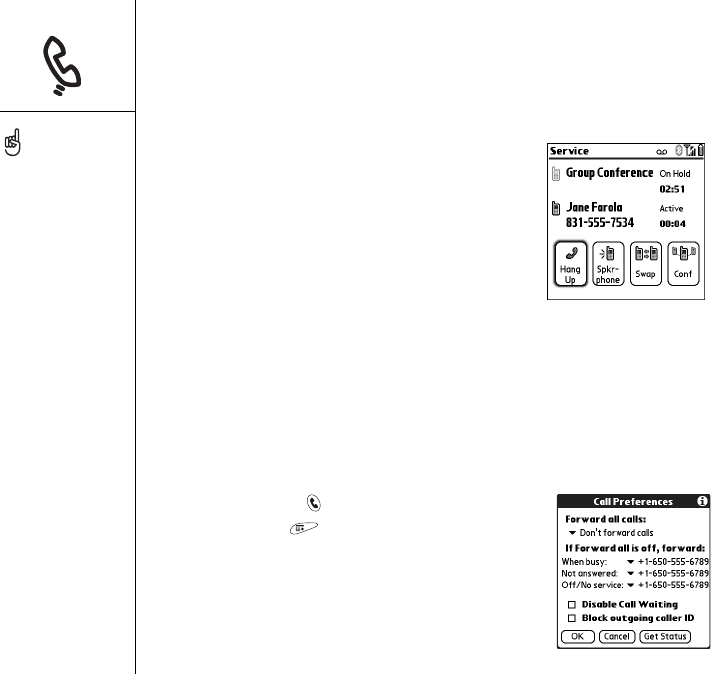
More ways to manage calls
Treo offers many advanced telephone features, including call waiting, conference
calling, and call forwarding.
Making a second call
You can make a second call while your first call is
still active.
1. After dialing the first number, use the 5-way
navigator to select Hold.
2. Use the 5-way to select Add Call.
3. Dial the second number using Favorites,
Contacts, or Dial Pad (see “Dialing calls” on
page 41).
When two calls are active, the Active Call View includes two status lines, each
representing one of the calls. To switch between the two calls, select Swap.
Answering a second call (call waiting)
When you are on an active call, you can receive a second call. When the second call
comes in, the Call Waiting dialog box appears, giving you the following options for
handling the second call:
• To place the current call on hold and answer the new call, use the 5-way navigator
to select Answer.
• To send the new call to voicemail, use the 5-way to select Ignore.
• To hang up the current call and answer the new call, press Power/End .
You can use most of the
other application on your
Treo while holding a phone
conversation, including text
messaging and organizer
features such as Calendar
and Memos. To return to an
active call from another
application, press Phone/
Send. You cannot make a
data connection or use the
Internet while on an active
call. This means that you
also cannot send and
receive email or multimedia
messages while on an
active call.
CrowAce.book Page 49 Wednesday, November 10, 2004 1:52 PM
DRAFT 1A palmOne, Inc. Confidential
50 :: More ways to manage calls
Making a conference call
You can join a total of five other calls in a conference session, provided that your
network and service plan include 6-way conferencing. Please contact your wireless
service provider for more information. Additional charges may apply and minutes in
your mobile account may be deducted for each active call you place.
1. While the first call is active, place or answer a
second call.
2. Use the 5-way to select Conf. This joins the two
active calls in a conference session.
3. Repeat this process to add other calls to the
conference call.
4. To end the conference, use the 5-way to select
Hang Up and end all the calls. To continue a
conversation with one of the parties, select Extract,
and then select the party you want to keep on the line.
Forwarding all calls
You can forward all your calls to another telephone number. You can also selectively
forward certain calls (see “Forwarding calls under certain conditions” on page 51).
Please check with your wireless service provider about availability and pricing of
forwarded calls, as additional charges may apply.
1. Press Phone/Send .
2. Open the menus .
3. Select Options, and then select Call Preferences.
4. Select the Forward all calls pick list.
• If the forwarding number appears in the pick list,
select the number.
After you set your call
forwarding options, call
your Treo to confirm that
call forwarding is active.
CrowAce.book Page 50 Wednesday, November 10, 2004 1:52 PM
DRAFT 1A palmOne, Inc. Confidential
More ways to manage calls :: 51
• If the forwarding number does not appear in the pick list, select Edit Numbers,
and then select New. Enter a forwarding number, including the area code or
country code if it is different from your mobile phone number. Select OK.
5. Select OK.
Forwarding calls under certain conditions
You can forward calls to another number when the line is busy, a call is unanswered,
your phone is off, or you are outside a coverage area.
1. Open the menus .
2. Select Options, and then select Call Preferences.
3. Select the Forward all calls pick list and select Don’t forward calls.
4. Select any of the following pick lists:
•When busy: Forwards calls if the phone is busy.
•Not answered: Forwards calls instead of sending to voicemail.
•Off/No service: Forwards calls when your Treo is not connected to a mobile
network.
5. If the forwarding number appears in the pick list, select the number. If the
forwarding number does not appear in the pick list, select Edit Numbers then
select New, enter a forwarding number, and select OK.
6. Select OK.
CrowAce.book Page 51 Wednesday, November 10, 2004 1:52 PM
DRAFT 1A palmOne, Inc. Confidential

52 :: More ways to manage calls
Barring calls
Call Barring lets you prevent unauthorized calls on your Treo. This feature may not be
available on all mobile networks.
You must enter your Call Barring password every time you change your Call
Barring preferences. Contact your wireless service provider if you do not know this
password or if you need more information.
1. Open the menus .
2. Select Options, and then select Call Barring.
3. Select the onscreen pick lists, and then select your Call Barring preferences.
4. Select OK.
Viewing minutes usage
1. Select the Call Log favorite button.
2. Open the menus .
3. Select Totals from the Record menu.
4. (Optional) To reset the counters to zero, select Reset Counters.
5. Select Done.
Want to see how long you
spent on a particular call?
From the Call Log, select
the call, then select Details.
Keep in mind that your
billing statement may vary
slightly from the
information you see
onscreen. Usage is charged
based on your calling plan.,
and calling plans vary.
CrowAce.book Page 52 Wednesday, November 10, 2004 1:52 PM
DRAFT 1A palmOne, Inc. Confidential
Defining favorite buttons :: 53
Defining favorite buttons
Treo provides approximately 70 programmable favorite buttons for quick access to the
following common tasks:
• Dialing a phone number (speed dial)
• Accessing your Call Log.
• Accessing the onscreen Dial Pad.
• Opening an application
• Accessing a web page
• Addressing a text, MMS, or email message
• Accessing voicemail (preset on Treo)
Your wireless service provider may include special favorite buttons on your Treo that
are customized for their services
When you are in the Main, Favorites, or Dial Pad View, you can press and hold a Quick
Key to open the favorite associated with that key. Quick Keys are optional and can be
letters or numbers, but you can’t use both the letter and number for the same key. For
example, the voicemail Quick Key is 1. The letter equivalent for that key is E, so you
cannot assign E as a Quick Key to another favorite button.
To see the next Favorites
page, press Right
repeatedly. To see the
previous page, press Left
repeatedly.
If you’re upgrading from a
previous Treo, your
favorites are transferred
along with your other info.
However, you may need to
rearrange the order in
which your favorites appear
by opening the Edit menu,
and then selecting Edit
Favorites Pages.
CrowAce.book Page 53 Wednesday, November 10, 2004 1:52 PM
DRAFT 1A palmOne, Inc. Confidential
54 :: Defining favorite buttons
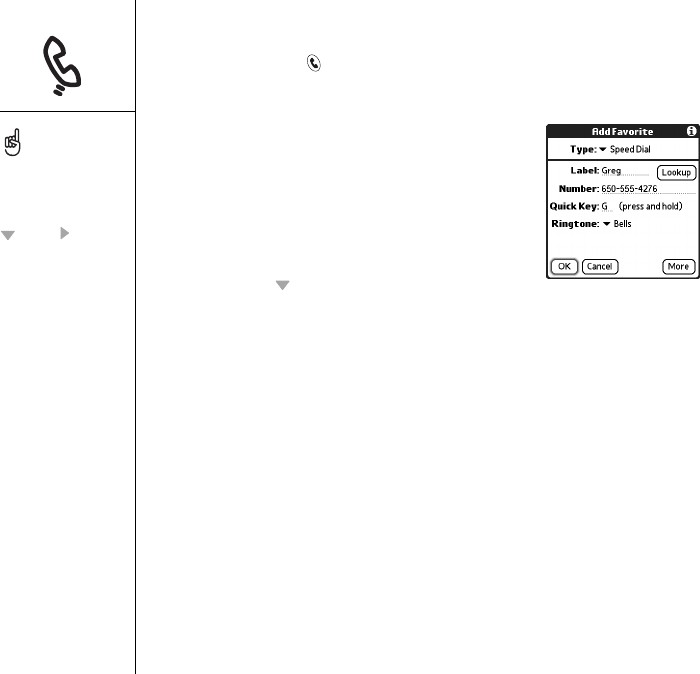
Creating a speed dial favorite button
1. Press Phone/Send .
2. Use the 5-way navigator to access Favorites
3. Select a blank button.
4. Select the Types pick list and select Speed Dial.
5. Enter a label for the favorite:
• If the entry is for an existing contact, select
Lookup. Start entering the last name of the
contact and select the contact when it appears
in the lookup list.
• If the entry is for a new contact, enter the Label,
press Down , and enter the Number.
6. (Optional) Enter a Quick Key. When you are in the Phone application, you can press
and hold the Quick Key to instantly open the favorite.
7. (Optional) Select the Ringtone pick list and select a special ringtone for incoming
calls from that contact.
8. (Optional) Select More, and select advanced options:
•Extra Digits: Lets you define additional digits to dial, such as a password or
extension.
•Dial Extra Digits Automatically: Dials predefined Extra Digits immediately after
dialing the phone number, when checked.
9. Select OK.
If there are no blank
buttons on the current
Favorites page, press Down
or Right to scroll
through the other pages.
To see all the contact
numbers for the selected
person or business,
highlight the favorite button
and press Space.
To add a special ringtone
and extra digits, select
More.
CrowAce.book Page 54 Wednesday, November 10, 2004 1:52 PM
DRAFT 1A palmOne, Inc. Confidential
Defining favorite buttons :: 55
Creating other types of favorite buttons
1. Press Phone/Send .
2. Use the 5-way to access Favorites.
3. Select a blank button.
4. Select the Types pick list and select Call Log, Dial Pad, Application, Message,
Email, or Web Link.
5. Enter a label for the favorite and enter any other necessary information on
the screen.
6. (Optional) Enter a Quick Key that opens the favorite when pressed and held.
7. Select O K .
Editing or deleting an existing favorite button
1. Press Phone/Send .
2. Use the 5-way to access Favorites.
3. Highlight the favorite button you want to edit or delete.
4. Open the menus .
5. Select Edit, and then select Edit Favorites Button.
6. Make the desired changes. For example, you can add a Quick Key shortcut to
any favorite. When you press and hold the assigned key from within the Phone
application, the favorite opens.
7. To delete the entry, select Delete.
8. Select OK.
You can also organize your
buttons on different
Favorites pages. Open the
Edit menu and select Edit
Favorites Pages.
You can edit but not delete
the voicemail entry.
When creating a Message
or Email favorite, you can
enter multiple addresses;
simply separate each
address with a comma.
This is an easy way to send
messages to a group of
people.
CrowAce.book Page 55 Wednesday, November 10, 2004 1:52 PM
DRAFT 1A palmOne, Inc. Confidential
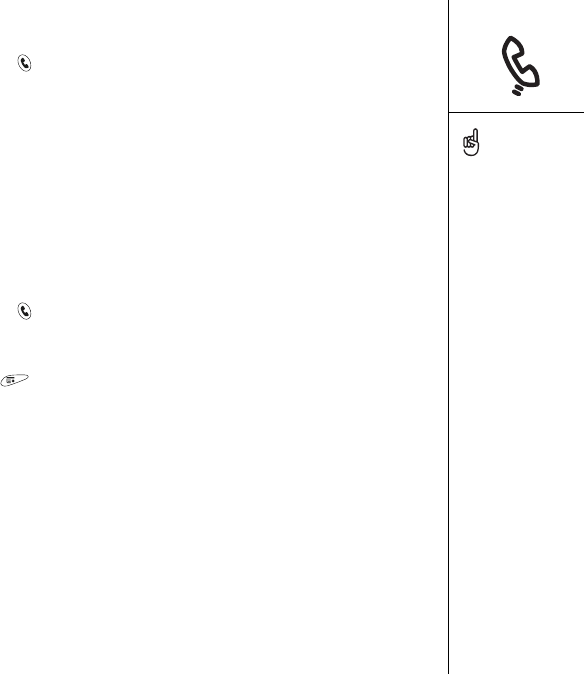
56 :: Using a phone headset
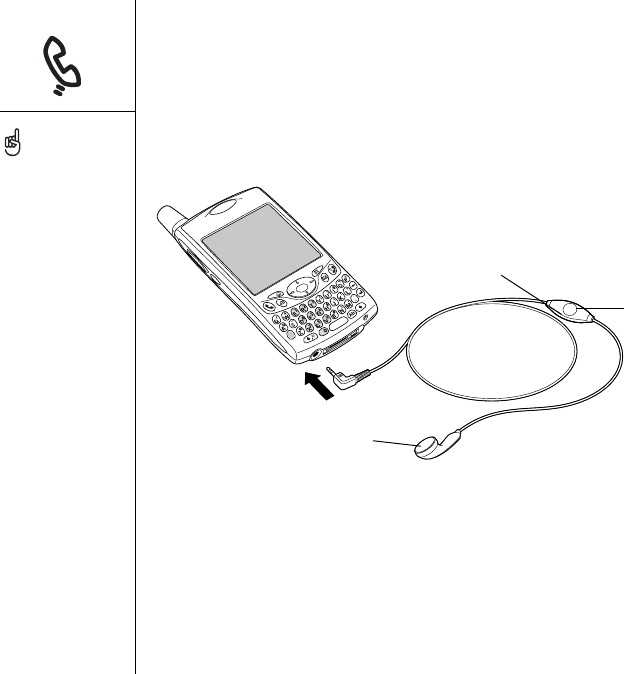
Using a phone headset
You can connect a phone headset for hands-free operation. If you need to use your
phone while driving and this is permitted in your area, we recommend using a phone
headset (sold separately).
• You can press the headset button to perform any of the following tasks:
• Answer an incoming call
• Answer a call waiting call
• Switch between two active calls
•Hang up a single call
• Transfer an outgoing call to a compatible headset with Bluetooth wireless tech-
nology (headset with Bluetooth wireless technology required, sold separately)
If you’re using a headset
with Bluetooth wireless
technology and you want to
return to the handset or a
wired headset during a call,
select Cancel Bluetooth on
the Active Call screen.
A. Speaker
B. Microphone
C. Headset button
A
C
B
CrowAce.book Page 56 Wednesday, November 10, 2004 1:52 PM
DRAFT 1A palmOne, Inc. Confidential

Using a phone headset :: 57
Headset specifications
Your Treo uses a 2.5mm, 3-pin headset connector. Your Treo works with headsets that
are designed for this type of connector. When in doubt, ask the third-party headset
manufacturer if the product is compatible with Treo smartphones. If you hear a
headset buzz or poor microphone performance, your headset may be incompatible
with Treo.
Your Treo 650 is also compatible with headsets enabled with Bluetooth 1.1
wireless technology. This includes most of the headsets with Bluetooth wireless
technology currently available, as many of these headsets support both Bluetooth 1.1
and 1.2 wireless technology. Check the specifications for your headset to confirm
compatibility. Please note, however, that you cannot use a headset with Bluetooth
wireless technology to listen to MP3 files.
In addition to the headset
that came with your Treo,
you can use other third-
party headsets.
To hear stereo through the
jack (such as music), you
should use a stereo
adapter or other accessory.
Visit www.palmOne.com/
intl for more information on
audio accessories and for
the latest compatibility info.
The headset designed for
Treo 180/270/300 is not
compatible with Treo 650.
CrowAce.book Page 57 Wednesday, November 10, 2004 1:52 PM
DRAFT 1A palmOne, Inc. Confidential
58 :: Connecting to devices with Bluetooth wireless technology
Connecting to devices with
Bluetooth wireless technology
With your phone’s built-in Bluetooth wireless technology, you can connect to a
number of devices with Bluetooth wireless technology such as a headset, printer,
or GPS receiver, as well as to other phones and handhelds with Bluetooth wireless
technology. If your computer is enabled with Bluetooth wireless technology, you can
synchronize wirelessly, and even use your phone as a wireless modem for your
computer.
Once you set up a connection with a device with Bluetooth wireless technology, you
can communicate with that device whenever it is within range (about 30 feet).
Connecting to a headset with Bluetooth wireless technology
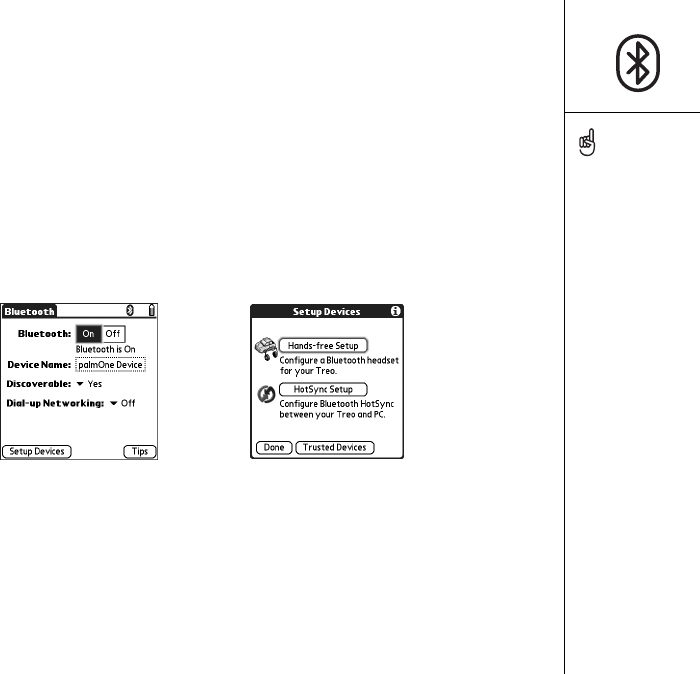
1. Go to Applications and select Bluetooth .
2. Select On.
3. Enter a Device Name for your phone. This is the name other devices with
Bluetooth wireless technology see when they connect to your phone.
4. Select the Discoverable pick list and select one of the following:
•Ye s: Automatically establishes connections with devices with which you’ve
created a trusted pair. New devices can request a connection that you can
accept or refuse.
•No: Only devices with which you’ve already formed a trusted pair can find
your phone. New devices cannot request a connection.
If you’re using a hands-free
device with Bluetooth
wireless technology and it
is within range (30 feet),
Treo automatically routes
all calls to the hands-free
device instead of to the
handset. When a call
comes in, your Treo rings
and the headset beeps.
Even if you pick up the call
on your Treo, the call goes
to the headset.
Your phone must be on and
the Bluetooth setting must
be set to On for your phone
to be discoverable.
CrowAce.book Page 58 Wednesday, November 10, 2004 1:52 PM
DRAFT 1A palmOne, Inc. Confidential
Connecting to devices with Bluetooth wireless technology :: 59
5. Select the Dialup Networking pick list and select one of the following:
•On: Lets you use your Treo as a wireless modem for your laptop, so that you
can connect your computer to the Internet and use email applications.
•Off: Prevents you from using your Treo as a wireless modem for your laptop.
If a Dialup Networking session is in progress when you select this option, it
ends the session.
6. Select Setup Devices.
7. Select Hands-free Setup.
8. Follow the onscreen instructions to create a trusted pair with the specific device.
In some cases you may need to perform setup steps on the other device before
you can complete this step.
9. After you finish setting up the device, close the Bluetooth application.
When Dialup Networking
is on, you cannot use
browser, email, or
messaging applications on
your phone. You can use
these applications only on
the computer to which your
phone is connected. So, be
sure to turn off this option
when you’re not using your
Treo as a wireless modem.
Your Treo does not support
Bluetooth wireless
connections to stereo
headsets, keyboards, or
LAN access points.
CrowAce.book Page 59 Wednesday, November 10, 2004 1:52 PM
DRAFT 1A palmOne, Inc. Confidential
60 :: Connecting to devices with Bluetooth wireless technology
Creating trusted pairs
After you set up a connection with your computer or other accessory devices with
Bluetooth wireless technology, you may want to set up other trusted devices, such as
a friend’s handheld. When your Treo recognizes a trusted device, it automatically
accepts communication, bypassing the discovery and authentication process.
1. Go to Applications and select Bluetooth .
2. Select Setup Devices.
3. Select Trusted Devices.
4. Select Add Device. The Discovery icon appears to indicate that the discovery
process is active.
5. Select the device you want to add as a trusted device. If the device you want to add
does not appear on the discovery results list, select Find More to search again.
6. Enter the same passkey on your phone and the other device and select OK.
IMPORTANT: Some devices with Bluetooth wireless technology have a built-in
passkey; others let you choose the passkey. In either case, you must use the same
passkey on both the other device and your phone. See the documentation for the
device with Bluetooth wireless technology for additional information.
7. S elec t D one.
Sending information over a Bluetooth wireless connection
You can send an individual entry or a category. When you send a category, the items
within the category appear as unfiled items on the receiving device.
1. Open an application.
2. Select the entry or category you want to send.
3. Open the menus .
4. Select Send on the leftmost menu.
5. Select Bluetooth, and then select OK.
6. Select the receiving device on the Discovery Results screen, and then select OK.
After you set up your
Bluetooth wireless
connections and trusted
pairs, you can check the
Allow only trusted devices
to connect box for added
security protection.
Be sure to close the
Bluetooth application when
you’re done setting up
devices and creating
trusted pairs.
CrowAce.book Page 60 Wednesday, November 10, 2004 1:52 PM
DRAFT 1A palmOne, Inc. Confidential
Connecting to devices with Bluetooth wireless technology :: 61
Sending an application over a Bluetooth wireless connection
1. Go to Applications .
2. Open the menus .
3. Select Send on the App menu.
4. Select the Send From pick list and select whether the application you want to send
is located on your Treo or on an expansion card.
5. Select the application you want to transfer. It cannot have a lock next to it.
6. Select Send.
7. Select Bluetooth, and then select OK.
8. Select the receiving device on the Discovery Results screen, and then select OK.
Receiving information over a Bluetooth wireless connection
1. Go to Applications and select Bluetooth .
2. Select Bluetooth On.
3. If you already have a trusted pair with the other device, your Treo is ready to receive
the info. If you don’t have a trusted pair with the other device, select the
Discoverable pick list and select Yes.
4. When the Send dialog box appears, select a category or expansion card. If you
don’t select a category, the item goes in the Unfiled category.
5. Press Up to receive the information, or press Down to refuse it.
You can set your Treo to
receive Bluetooth wireless
connections when your
phone is off. However, keep
in mind that the Bluetooth
radio consumes battery
power even though your
phone is off.
1. Go to Applications and
select Bluetooth.
2. Select Bluetooth On.
3. Open the Options menu
and select Do not allow
wakeup. This toggles the
setting to Allow wakeup.
Check your battery level
before establishing a
Bluetooth wireless
connection. If the battery
level is low, you can’t make
a Bluetooth wireless
connection.
CrowAce.book Page 61 Wednesday, November 10, 2004 1:52 PM
DRAFT 1A palmOne, Inc. Confidential

62 :: Sending and receiving email
Sending and receiving email
If you’ve activated data services on your Treo, you’re ready to set up the VersaMail®
application on your phone. You can use the VersaMail account with your Earthlink or
BellSouth email account or any other POP3 or IMAP email account. You may also be
able use VersaMail with a corporate account.
Before you can use VersaMail with a given email account, you need to set up the
account in VersaMail. If you have multiple email accounts, you must set up a VersaMail
account for each one. You have three setup options:
• On a Windows computer, if the email account is already set up on your computer—
for example, if you use Outlook Express on your computer to access your Earthlink
account—you can transfer the account settings to your phone in just a few steps.
• On a Windows computer, if this is a new account, you can quickly set up the
account on your computer and synchronize the information to your phone.
• For either a new or an existing account, you can set up the account directly on
your phone.
If you are setting up a Microsoft Exchange ActiveSync® account, see “Working with
Microsoft Exchange ActiveSync” on page 73 for more information, and see the
VersaMail User Guide on the CD for setup instructions.
Transferring settings from an existing account (Windows only)
1. Select the option to set up your email software when prompted on the final
screen of the software CD installation. Or select Start > Programs > palmOne >
VersaMail Setup.
2. Select your username from the first drop-down list, and then select the option to
create a new VersaMail email account. Click Next.
VersaMail is not an email
provider. It works with an
account from a provider—
your Earthlink or BellSouth
account, for example—or a
corporate account to
transfer messages to
your phone.
CrowAce.book Page 62 Wednesday, November 10, 2004 1:52 PM
DRAFT 1A palmOne, Inc. Confidential
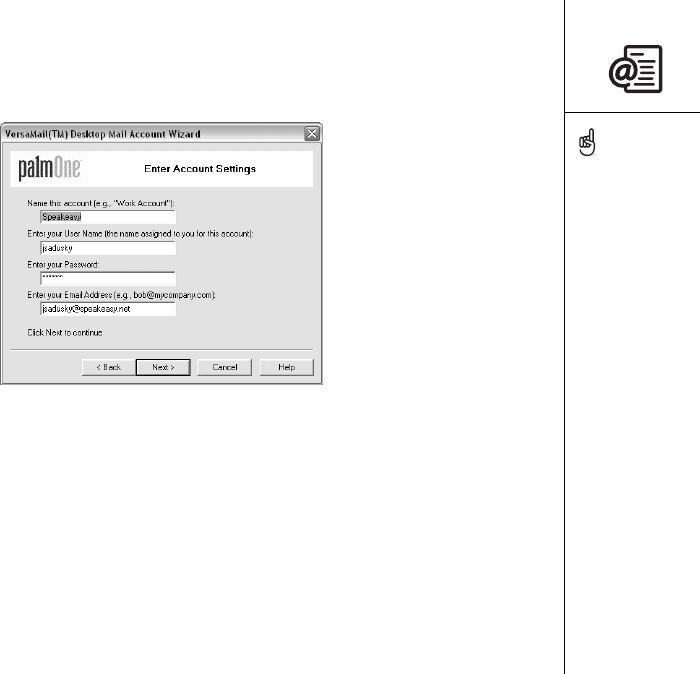
Sending and receiving email :: 63
3. Select the option to synchronize with an email account detected on your PC,
and then select the account from the list. Click Next.
4. Enter a descriptive account name or use the one shown. Enter your email account
password. Click Next.
5. Select whether to synchronize account information to your phone or to set
up another account, and then click Next.
6. When you are finished setting up all accounts, click Finish.
7. Synchronize to transfer all account information to your phone.
Setting up an account on your computer (Windows only)
If you set up an account on your computer and your email provider is not listed in
the Mail Service list, select Other and see the VersaMail User Guide on the CD for
account setup instructions.
1. Select the option to set up your email software when prompted on the final
screen of software CD installation. Or select Start > Programs > palmOne >
VersaMail Setup.
If you are transferring
existing account settings,
your username and email
address automatically
appear on this screen.
CrowAce.book Page 63 Wednesday, November 10, 2004 1:52 PM
DRAFT 1A palmOne, Inc. Confidential
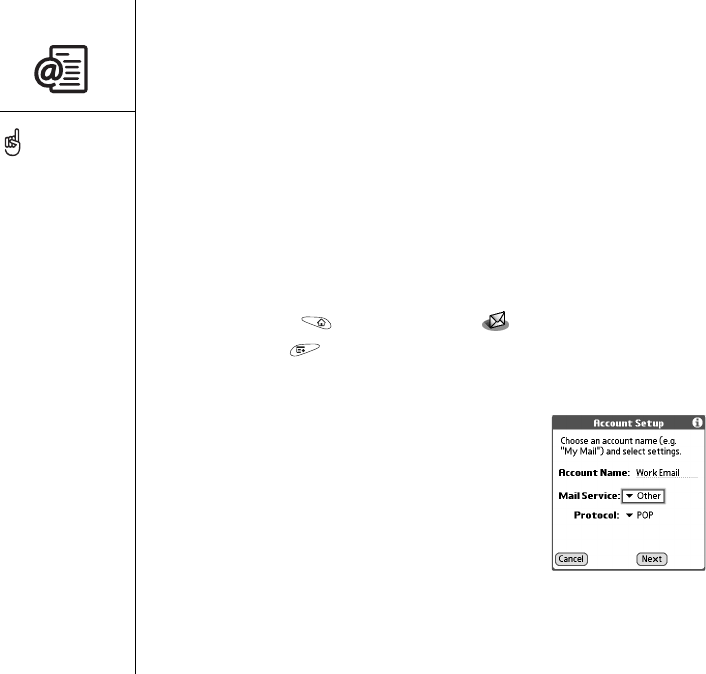
64 :: Sending and receiving email
2. Select your username from the first drop-down list, and then select the option
to create a new VersaMail email account. Click Next.
3. Select the option to synchronize with a mail service from this list, and then select
your mail service from the list. Click Next.
4. In the first field, enter a descriptive account name or use the one shown. In the
next two fields, enter the username you use to access your email and your email
account password. Enter your email address in the last field. Click Next.
5. Select whether to synchronize account information to your phone or to set up
another account, and then click Next.
6. When finished setting up all accounts, click Finish.
7. Synchronize to transfer all account information to your phone.
Setting up an account on your phone
1. Go to Applications and select VersaMail .
2. Open the menus .
3. Select Accounts, and then select Account Setup.
4. Select New.
5. In the Account Name field, enter a descriptive name.
6. Select the Mail Service pick list, and then select your
email provider. Select Other if your provider is not
listed. If you chose Other, select the Protocol pick list,
and then select POP or IMAP. If your email provider
appeared in the list, the protocol is automatically
selected and the Protocol pick list does not appear.
Check with your email service provider to find the
protocol for your email account as well as the names
of the mail servers.
To set more options for
incoming and outgoing
messages select Advanced
on the Account setup
complete screen.
CrowAce.book Page 64 Wednesday, November 10, 2004 1:52 PM
DRAFT 1A palmOne, Inc. Confidential
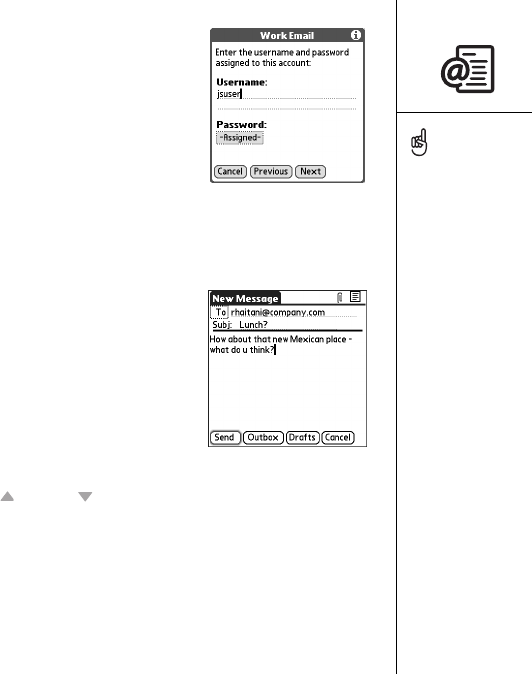
Sending and receiving email :: 65
7. Enter the username you use to access your email.
8. Select the Password box, enter your email account
password, and then select OK.
9. Select Next.
10.If you chose an email provider from the Mail Services
pick list on the Account Setup screen, the mail server
screen is already filled in. If you chose Other, enter
your email address and the names of the incoming
and outgoing mail servers.
11.Select Next, and then select Done.
Creating and sending messages
1. From the Inbox, select New.
2. Begin entering the addressee’s email address, first
name, or last name. If the information you are
entering matches one or more entries in Contacts,
VersaMail displays the matching contacts. To accept
a suggestion, select the correct contact. To send to
a different address, keep entering the email address
or name.
3. Enter the subject and message text. To move
between fields, press Up or Down .
4. Select Send to connect and send all messages immediately, Outbox to put the
message in the Outbox to send later, or Drafts to save the message and continue
working on it at another time. If you select Send and the message cannot be sent
for any reason, the message is stored in your Outbox. VersaMail continues
attempting to send the message at the first available opportunity until the
message is sent.
To send a copy or blind
copy, select Cc or Bcc
and enter the address(es)
in those fields. See
“Customizing your email
settings” on page 70 for
details on displaying the
Bcc field.
You can mark outgoing
messages as high priority.
Open the Options menu
and select Set Priority
To High.
CrowAce.book Page 65 Wednesday, November 10, 2004 1:52 PM
DRAFT 1A palmOne, Inc. Confidential

66 :: Sending and receiving email
Attaching photos and videos
1. Create the message to which you want to attach the
photo or video.
2. On the New Message screen, tap the red paper clip
icon in the upper-right corner.
3. Select Photo/Video from the Type pick list.
4. On the Select Media screen, select the Album pick
list to go to the album containing the photo or video
you want, and then check the box to the left of the photo or video.
5. Select Done.
Attaching ringtones
1. Create the message to which you want to attach the ringtone.
2. On the New Message screen, tap the red paper clip icon in the upper-right
corner.
3. Select Sounds from the Type pick list.
4. Select the ringtone you want, and then select Insert.
5. Select Done.
Attaching Word, Excel, and PowerPoint files
1. Create the message to which you want to attach the item.
2. On the New Message screen, tap the red paper clip icon in the upper-right corner.
3. Select Documents from the Type pick list.
4. Select the file you want on the Documents screen.
5. Select Done.
Repeat steps 3 and 4 to
attach more than one file to
a message. To remove an
attachment, select the file
in the Attachments box,
and then select Delete.
Ringtones that are copy
protected appear in the
Sounds application with a
lock icon. These ringtones
can be used on your phone
only and cannot be sent as
attachments.
CrowAce.book Page 66 Wednesday, November 10, 2004 1:52 PM
DRAFT 1A palmOne, Inc. Confidential
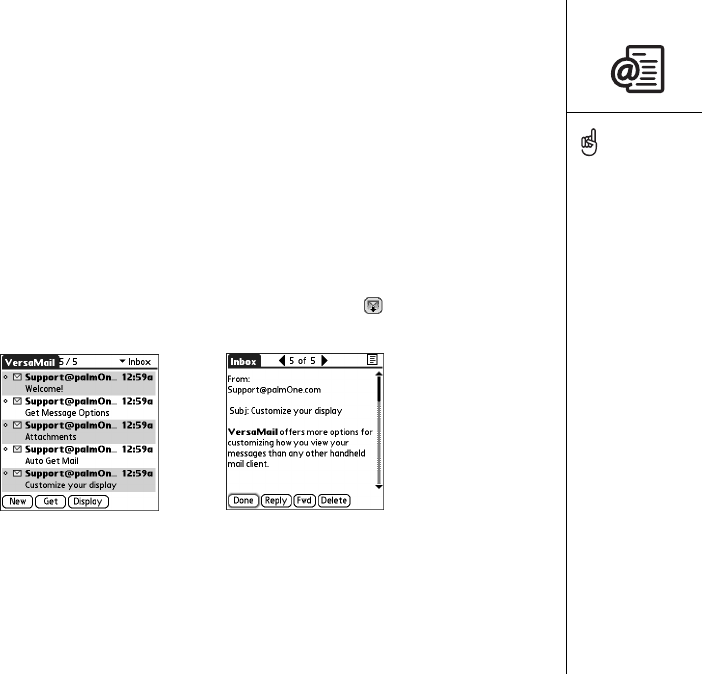
Sending and receiving email :: 67
Attaching other types of files
1. Create the message to which you want to attach the item.
2. On the New Message screen, tap the red paper clip icon in the upper-right corner.
3. Select the type of file to attach—for example, Address, Appointment, or Memo/
Text—from the Type pick list.
4. Select the file you want from the list in the Type box.
5. Select Done.
Receiving and viewing messages
1. Make sure your phone is turned on (see “Turning Treo on and off” on page 15).
2. From any mailbox, select Get or Get & Send.
3. From the Inbox, select the message you want to view.
4. If a large incoming message is truncated, select More .
5. Select Done.
When viewing a message,
tap the scroll arrows at the
top of the screen to view
the previous or next
message.
CrowAce.book Page 67 Wednesday, November 10, 2004 1:52 PM
DRAFT 1A palmOne, Inc. Confidential
68 :: Sending and receiving email
Replying to or forwarding messages
When you respond to messages, you can select whether to include the original text
(see “Customizing your email settings” on page 70).
1. From the Inbox or another folder, open the message to which you want to respond.
2. From the Message View, select Reply. Select whether to reply to just the sender or
to reply to both the sender and all addressees on the messages.
3. Enter your reply.
4. Select Send.
Viewing attachments
There are a number of attachment types you can open with the built-in software
on your Treo (for example, Microsoft Word, Excel, and PowerPoint files; ringtones;
and photos).
1. From any folder, open the message with the attachment you want to view.
Messages with downloaded attachments are indicated by a paper clip icon to the
left of the message icon.
2. Tap the attachment name at the bottom of the message screen to view it in the
default viewer on your phone. Or, tap the folder icon to the left of the attachment
name to open a menu of tasks you can do with the attachment, including View,
Install, or Unzip, depending on the attachment file type; Save to card to save the
attachment to an expansion card; or Select Viewer to select the application you
want to use to view the attachment.
3. When you finish with the attachment, select Done to return to the Attachments
dialog box. If there is no Done button, go to Applications and select
VersaMail to return to the Inbox of the account you were in.
If an attachment is not
downloaded because it is
larger than your maximum
message size, the paper
clip icon does not appear,
and the attachment does
not display at the bottom of
the message screen. Select
More to download and
display any attachments.
CrowAce.book Page 68 Wednesday, November 10, 2004 1:52 PM
DRAFT 1A palmOne, Inc. Confidential
Sending and receiving email :: 69
Managing your messages
The status icons that appear near the messages in your Inbox indicate the following:
You have not read the message.
You have read the message.
The message includes an attachment.
This message is high priority.
You can rearrange the VersaMail list to make it easier to find and view messages.
• In the Inbox, select Sort, and then select one of the following: Sort by Date, Sort by
Name, Sort by Subject.
• To quickly switch between folders in list view, select the folder pick list at the top of
the screen and select the desired folder.
Deleting selected messages from the Inbox
When you delete a message from the Inbox, it moves to the Trash folder, which stores
the 200 most recently deleted messages. If you delete more than 200 messages, the
oldest messages are automatically removed from the phone.
1. Select the bullet next to the icon of each message that you want to delete. To
select adjacent messages, drag the stylus so it hits the bullet to the left of each
message. Lift the stylus and drag again to select more adjacent messages.
2. Open the menus .
3. Select Delete on the Message menu.
4. If a confirmation dialog box appears, select OK to confirm deletion.
To empty (or purge) the
Trash folder, open the
Message menu and select
Empty Trash.
To delete a single message,
select the envelope icon
next to the message, and
then select Delete from
the list.
CrowAce.book Page 69 Wednesday, November 10, 2004 1:52 PM
DRAFT 1A palmOne, Inc. Confidential

70 :: Sending and receiving email
Deleting messages by date
You can quickly delete a group of messages by selecting a range of dates.
1. Open the menus .
2. Select Delete Old on the Message menu.
3. Select the folder and a date range for the messages you want to delete.
4. Select OK.
5. If a confirmation dialog box appears, select OK to confirm deletion.
Switching accounts
You can switch between different email accounts.
1. Open the menus .
2. Select Accounts, and then select an account.
Customizing your email settings
You can customize the VersaMail settings for each individual email account on your
Treo. The preferences you set apply only to the email account you are currently
viewing. If you have multiple accounts, configure each account separately.
You can set up a schedule to automatically retrieve email messages; set
preferences for how and when messages are retrieved; add a signature to an
outgoing message; and more. For complete information on all of the email settings
you can customize, see the VersaMail User Guide on the CD.
CrowAce.book Page 70 Wednesday, November 10, 2004 1:52 PM
DRAFT 1A palmOne, Inc. Confidential
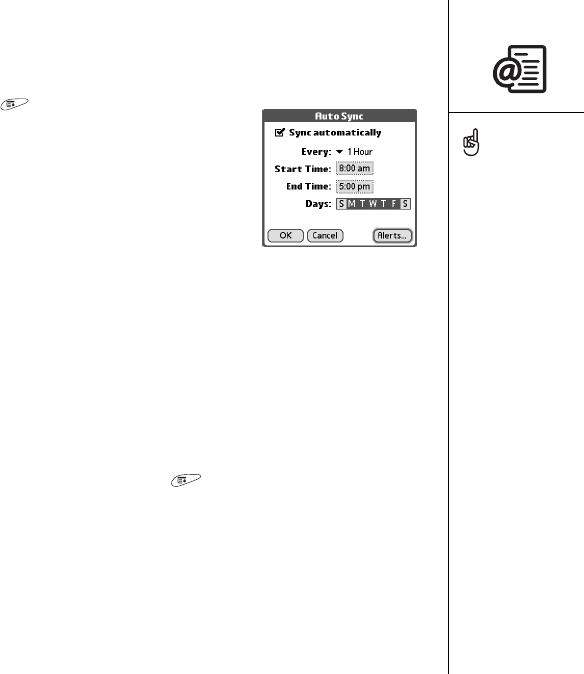
Sending and receiving email :: 71
Scheduling Auto Sync
You can set up VersaMail to automatically download new email messages to your
phone with the Auto Sync feature.
1. Open the menus .
2. Select Options, and then select Preferences.
3. Select Auto Sync.
4. Check the Sync automatically box.
5. Select the Every pick list and select the time interval,
from 15 minutes to 12 hours. Note that if you set a
more frequent interval, you may need to recharge
your phone’s battery more often.
6. Select the Start and End Time boxes, and then select the hour, the minute, and AM
or PM to enter the time for the first and last Auto Sync to take place. Select OK.
7. Select the days you want the schedule to be active. You can choose any number of
days, but you can set up only one schedule for each email account.
8. Select OK, and then select Get Mail.
Selecting alert tones
When you schedule Auto Sync for a given account, you can choose a sound—such as
a bird, a phone, or an alarm—to let you know when new email arrives.
1. From any mailbox screen, open the menus .
2. Select Options, and then select Preferences.
3. Select Auto Sync.
4. Select Alerts.
5. Check the Notify me of new mail box.
6. Select the Notify Sound pick list, and then select a sound. Your Treo plays a brief
demo of the sound.
7. Select O K .
You should perform a
manual get mail after
setting up a scheduled
Auto Sync. Then, only new
messages are retrieved
during Auto Sync.
To receive notifications
of successful Auto Sync
retrievals only, uncheck
the Notify me of auto sync
failures box. Leave the box
checked if you want to
receive notifications of both
successful and failed Auto
Sync retrievals.
CrowAce.book Page 71 Wednesday, November 10, 2004 1:52 PM
DRAFT 1A palmOne, Inc. Confidential
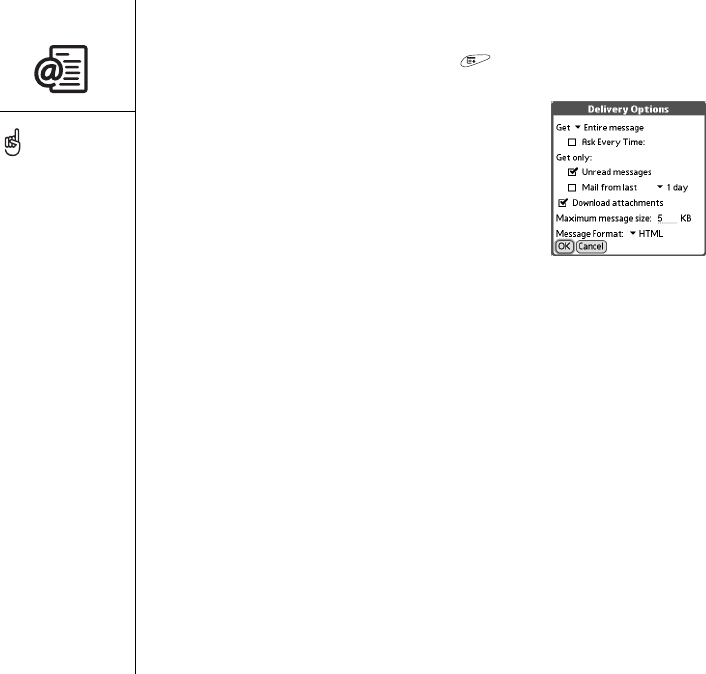
72 :: Sending and receiving email
Setting preferences for getting messages
1. From any mailbox screen, open the menus .
2. Select Options, and then select Preferences.
3. Select Delivery Options.
4. Set any of the following preferences.
•Get: Indicates whether to get message subjects only
or entire messages.
•Ask Every Time: Indicates if you want to see a dialog
box for selecting subjects only or entire messages
each time you retrieve email. If the box is unchecked,
messages are retrieved according to the option you
select in the Get pick list.
•Unread messages (IMAP accounts only): Downloads only unread mail to your
phone. If you don’t check this box and you select Get & Send, all of your messages
on your provider’s mail server are downloaded to your Inbox, including messages
you have already read.
•Mail from last: Gets messages sent within the number of days you specify.
•Download attachments: Automatically downloads files attached to email.
Attachments that exceed the maximum message size cannot be downloaded.
•Maximum message size: Sets the maximum size of an incoming email message.
Enter the size in kilobytes (KB). The default is 5KB, but you can enter any size up
to 2048KB (approximately 2 megabytes, or 2MB), including attachments. The
maximum message size that you can retrieve is 60KB for the body text and
approximately 5MB of total data for any attachments.
•Message Format: Sets the format in which you retrieve messages. Select HTML to
display any messages sent in HTML format with basic HTML formatting intact, and
other messages as plain text. Select Plain Text to display all messages as plain text,
regardless of the format in which they were sent. The default setting is HTML.
5. Select OK.
The VersaMail application
sends all messages as
plain text only, with all
HTML tags stripped, even
if you are forwarding or
replying to a message
that was originally received
as HTML.
The POP protocol does not
support retrieval of unread
mail only from the server.
If you have a POP email
account, VersaMail
downloads all messages
regardless of whether you
have read them, and
regardless of whether this
box is checked.
CrowAce.book Page 72 Wednesday, November 10, 2004 1:52 PM
DRAFT 1A palmOne, Inc. Confidential

Sending and receiving email :: 73
Attaching a signature to a message
You can attach a personal signature, with info like your company's address and fax
and telephone numbers, to the bottom of all messages you send.
1. From any mailbox screen, open the menus .
2. Select Options, and then select Preferences.
3. Select Signature.
4. Check the Attach Signature box.
5. Enter your signature information, and then select OK.
Working with Microsoft Exchange ActiveSync
Microsoft Exchange ActiveSync works with the VersaMail and Calendar applications
on your phone to directly access corporate groupware information on a Microsoft
Exchange 2003 server. You can access business email and calendar info on the
Exchange 2003 server from your phone without using a desktop computer.
When you create an ActiveSync account in the VersaMail application, both your
email and calendar info synchronize directly with the Exchange server; information
does not synchronize with the desktop software application on your computer, such as
Microsoft Outlook or Palm Desktop software. Other information, such as contacts,
tasks, and memos, continues to synchronize with your desktop software.
For complete information on using a Microsoft Exchange ActiveSync account, see the
VersaMail User Guide on the CD.
The POP protocol does not
support retrieval of unread
mail only from the server.
If you have a POP email
account, VersaMail
downloads all messages
regardless of whether you
have read them, and
regardless of whether
this box is checked.
Your phone must be able
to establish a GPRS
connection in order to
download the Xpress Mail
application.
CrowAce.book Page 73 Wednesday, November 10, 2004 1:52 PM
DRAFT 1A palmOne, Inc. Confidential
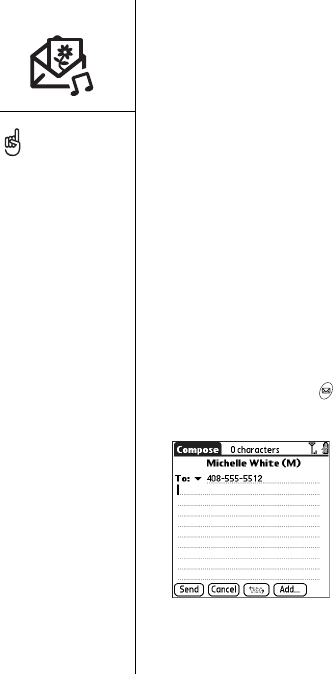
74 :: Messaging
Messaging
You can exchange brief text and multimedia messages with other mobile phones that
support these forms of messaging (also known as SMS and MMS) and with email
addresses. Before you use your Treo to send or receive messages, consult your
wireless service provider for pricing and availability of text and multimedia messaging
services.
Creating and sending a text message
Each text message can hold up to 160 characters. Messages with more than 160
characters are automatically split into several messages. (If you send a text message
to an email address, the email address is deducted from the 160 character count.)
1. Make sure your phone is turned on (see “Turning your phone on and off” on
page 15)
2. Press the Messaging button.
3. Select New.
4. Select the To pick list to address the message:
• If the recipient’s name appears in the To pick list, select it from the list.
To address a message
to multiple recipients,
separate the addresses
with a space or a comma.
If you address a single
message to three people,
you will be billed for three
messages.
When entering a message,
you can insert emoticons
by pressing Center.
To add a new QuickText
phrase, select Edit
QuickText from the list.
CrowAce.book Page 74 Wednesday, November 10, 2004 1:52 PM
DRAFT 1A palmOne, Inc. Confidential
Messaging :: 75
• If the recipient is in your Contacts list, select Lookup in Contacts, and then enter
the first few letters of the recipient’s first or last name. Highlight the recipient’s
phone number or email address, and then select Add.
• If the recipient’s name is not in the pick list or your Contacts list, enter the full
phone number or email address.
5. Enter your message, or select QuickText to insert predefined phrases.
6. (Optional) Open the menus , and then select a priority setting on the
Compose menu.
7. Select Send.
Creating and sending a multimedia message
Multimedia messages consist of photos, videos, text, and sounds presented as one or
more pages. Even if your phone does not include a camera, you can still send, receive,
and view photos and videos. You can include any of the following items:
•Ringtones
•MIDI
•iMelody
•Sound clips
•AMR
•Photos
•JPEG
•GIF
•BMP
• TIFF (including LZW compressed files)
•Videos
•MPEG4
•H.263
•3GP
When addressing a
message, you may need to
press Option to enter letters
or numbers. The Option
Lock setting defaults to the
setting you used the last
time you addressed a
message.
Not all symbols available
on your phone may be
used in text messages. The
Messaging application
automatically replaces
invalid characters before it
sends your message.
Select Save as Draft to
save a draft of the
message without sending
it. To access the draft,
select the category pick list
at the top of the screen
and select Drafts.
CrowAce.book Page 75 Wednesday, November 10, 2004 1:52 PM
DRAFT 1A palmOne, Inc. Confidential
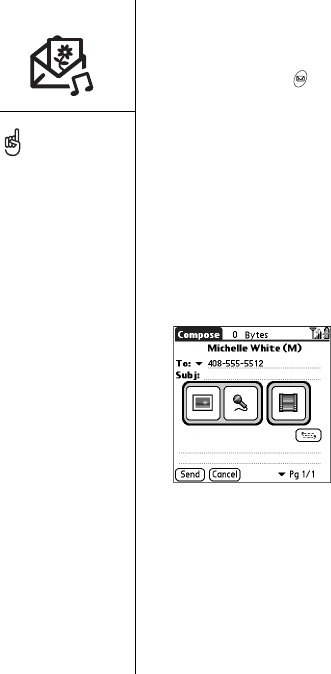
76 :: Messaging
1. Make sure your phone is turned on (see “Turning your phone on and off” on
page 15).
2. Press Messaging .
3. Select New.
4. Select Add.
5. Select the To pick list to address the message:
• If the recipient’s name appears in the To pick list, select it from the list.
• If the recipient is in your Contacts list, select Lookup in Contacts, and then
start entering the first few letters of the recipient’s first or last name. Highlight
the recipient’s phone number or email address, and then select Add.
• If the recipient’s name is not in the pick list or your Contacts list, enter the full
phone number or email address.
6. Select Add.
7. Select one or more of the following:
•Add Photo: Lets you insert one or more photos. You can take the photos with
the built-in camera or insert an existing photo.
•Record Sound: Lets you record a message, such as a voice caption for a photo,
or insert an existing sound, such as a ringtone. You can add only one sound per
page. If you capture a photo with the built-in camera and save it with a voice
caption, the voice caption does not count as a sound file.
A multimedia message can
contain multiple pages. To
navigate between pages or
to add a new one, select
the Pg pick list at the
bottom of the screen.
To delete an item from a
message you’re creating,
highlight it and then press
Backspace.
If you are out of a coverage
area or if your phone is off,
outgoing messages go into
the Outbox. When you
return to a coverage area,
your pending messages are
sent automatically and
transferred to the Sent
folder.
CrowAce.book Page 76 Wednesday, November 10, 2004 1:52 PM
DRAFT 1A palmOne, Inc. Confidential
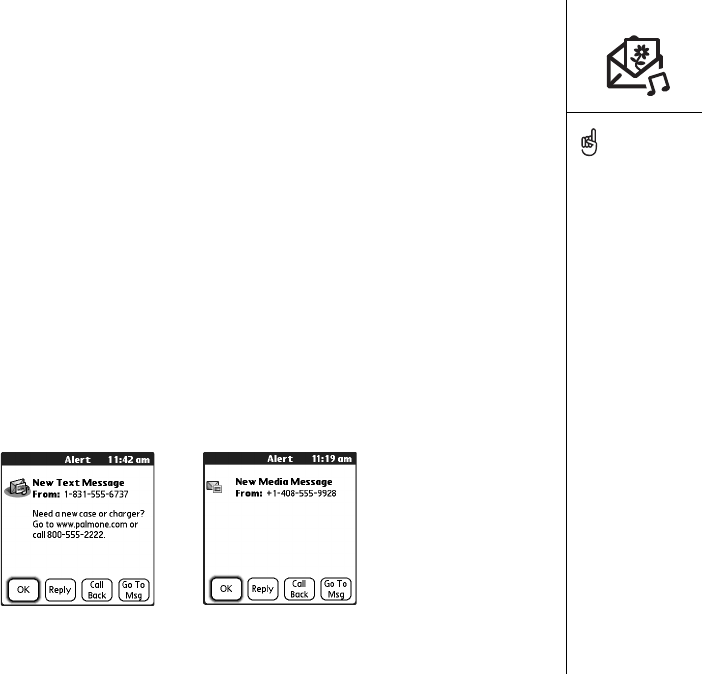
Messaging :: 77
•Add Movie: Lets you insert one or more movies. You can capture a movie with
the built-in camera or insert an existing video clip. If you insert a movie, you
cannot add photos or sounds to the same page.
8. Enter a subject and a text message or caption.
9. (Optional) Select Preview to view the message as the recipient will see it.
10. Select Send.
Receiving messages
When your phone is on and in an area of wireless coverage, you will automatically
receive new text messages. For multimedia messages, you can configure your Treo to
automatically download new messages or to notify you that a message is ready to
download. You can also configure your Treo to notify you when a new text or
multimedia message arrives, using a ringtone and vibration or an onscreen alert.
The new message alert may include any of the following buttons:
•OK: Dismisses the alert and places the message in your Inbox.
•Reply: Opens the Chat View so you can respond to the message.
•Call Back: Dials the sender’s phone number.
•Go To Msg: Opens the message so you can view its full contents.
If you have multiple alerts,
the Alert screen displays all
your pending alerts. Select
an item’s description to
jump to that item, or check
the box to clear that item.
To view all your pending
alerts from any screen on
your phone, press and
hold Center.
You can send and receive
text messages even while
you are on a phone call.
This is easiest when using
a hands-free headset or the
speakerphone.
CrowAce.book Page 77 Wednesday, November 10, 2004 1:52 PM
DRAFT 1A palmOne, Inc. Confidential
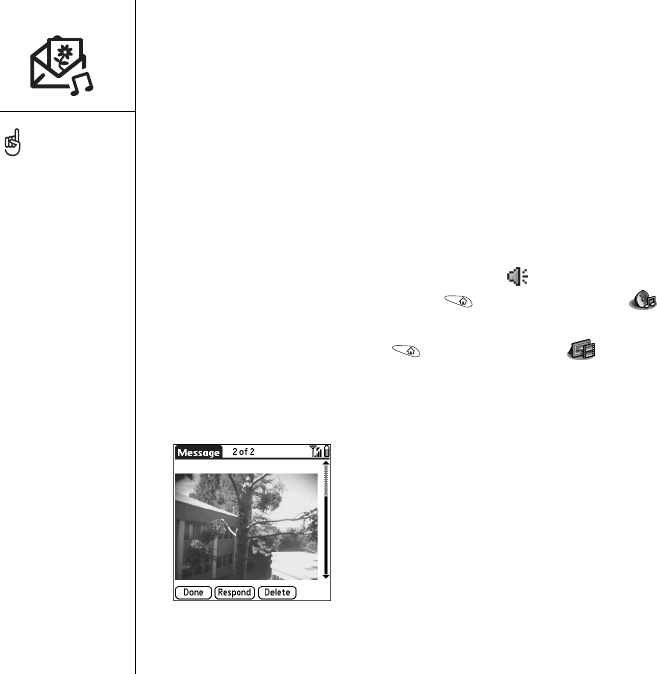
78 :: Messaging
Using links in messages
When you receive a text message that contains a telephone number, email address,
or URL, you can dial the number, send an email message, or go to the web page
immediately. Your Treo automatically opens the appropriate application from the link.
1. Select a message from the list.
2. Select the phone number, email address, or URL (appears as underlined blue text).
Viewing/playing a multimedia message
1. From the Inbox, select the message you want to view.
2. If there are sounds or multiple pages, playback begins immediately.
3. Use the onscreen controls to scroll to other pages and messages.
• To play or save a sound, select the Sound icon . You can access saved
sounds later by going to Applications and selecting Sounds .
• To save a photo, tap it with your stylus or finger. You can access saved photos
later by going to Applications and selecting Media .
• To select the text, position the cursor in the text area, and then press Center.
• To stop playback of a message, select Play/Stop.
4. Select OK.
You can expand and
collapse header information
by selecting one of the
header icons in the title bar
of a message.
CrowAce.book Page 78 Wednesday, November 10, 2004 1:52 PM
DRAFT 1A palmOne, Inc. Confidential
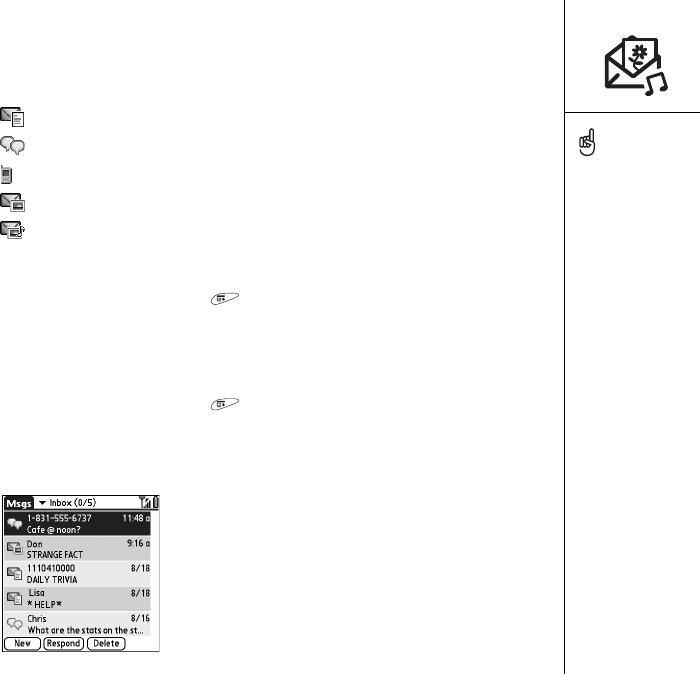
Messaging :: 79
Managing your messages
The status icons that appear next to each message in the Inbox and Outbox folders
indicate the following:
• A text message. Urgent messages appear with a red exclamation point (!).
• A chat session.
• A voicemail or numeric page.
• An incoming message with photos or videos.
• An incoming message with sound.
In list view you can rearrange the messages in any folder using the Sort command.
1. From list view, open the menus .
2. Select View, and then select Sort by Name or Sort by Date.
In list view you can delete several messages at once from any folder using the
Purge command.
1. From list view, open the menus .
2. Select Purge on the Message menu.
3. Select the Purge pick list and select an option.
4. Select OK.
Unread messages appear
in bold. Messages you’ve
read appear in plain text.
CrowAce.book Page 79 Wednesday, November 10, 2004 1:52 PM
DRAFT 1A palmOne, Inc. Confidential
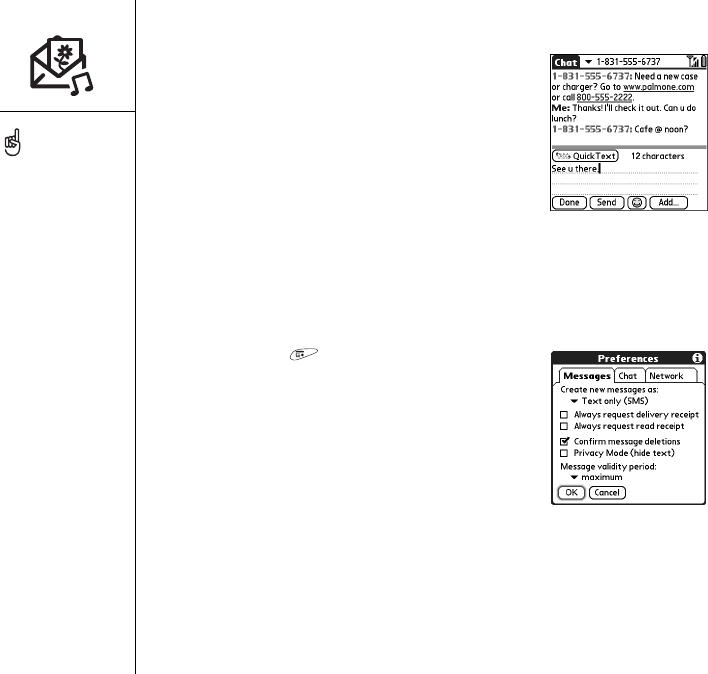
80 :: Messaging
Chatting with Messaging
When you exchange more than one message with a
single contact, your messages are grouped into a chat
session. The upper part of the Chat View displays all
messages you’ve exchanged with this contact, and the
lower part provides a text entry area. You can carry
on multiple chats at the same time and easily switch
between them, using the pick list at the top of
the screen.
1. From the Inbox, select a chat.
2. Enter your message.
3. Select Send.
Customizing your Messaging settings
1. Open the menus .
2. Select Options, and then select Preferences.
3. Set any of the following preferences:
•Messages: Your preferences for individual text
messages.
•Create new messages as: Indicate if a blank text
or a multimedia message appears when you
create a new message.
•Always request delivery receipts: Indicate if you want to receive a confirmation
when a message is received.
•Always request delivery receipts: Indicate if you want to receive a confirmation
when a message is read.
•Confirm message deletions: Indicate if you want deletion confirmation
messages to appear.
To find the conversations
you had with someone,
open your Messaging Inbox
and select a chat session.
You can customize your
Chat View settings on the
Chat tab in Messaging
Preferences. See
“Customizing your
Messaging settings” on
page 80.
CrowAce.book Page 80 Wednesday, November 10, 2004 1:52 PM
DRAFT 1A palmOne, Inc. Confidential
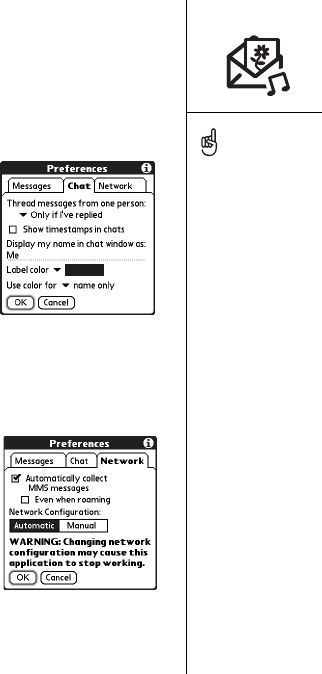
Messaging :: 81
•Privacy Mode (hide text): Indicate if you want the body text to appear in the
alert when you receive a new message.
•Validity period: Set how long you want your wireless service provider to attempt
to deliver your outgoing messages. If a message can’t be delivered within the
specified period of time, the message is discarded. This setting doesn’t affect
your incoming messages.
•Chat: Your preferences for chat sessions.
•Thread messages from one person: Indicate when
you want to group messages from the same person.
•Show message timestamps in chats: Indicate if
you want to see the local date and time the
message was sent next to each message.
•Display my name in chat window as: Enter the
name you want displayed as the label for your
messages in the Chat screen.
•Label color: Select the color in which you want messages to appear.
•Use color for: Indicate if you want to view both the message label and the
message in a different color or only the name.
•Connection: Your preferences for network connections.
•Automatically collect MMS messages: Indicate if
you want to automatically receive multimedia
messages.
•Even when roaming: Indicate if you want to
automatically receive multimedia messages while
roaming.
•Network Configuration: Indicate if you want to use
Automatic or Manual message retrieval. If you select
Manual, select Edit and enter your wireless service provider’s settings.
4. Select OK.
Warning: Changing your
Network preferences may
cause the Messaging
application to stop
functioning.
CrowAce.book Page 81 Wednesday, November 10, 2004 1:52 PM
DRAFT 1A palmOne, Inc. Confidential
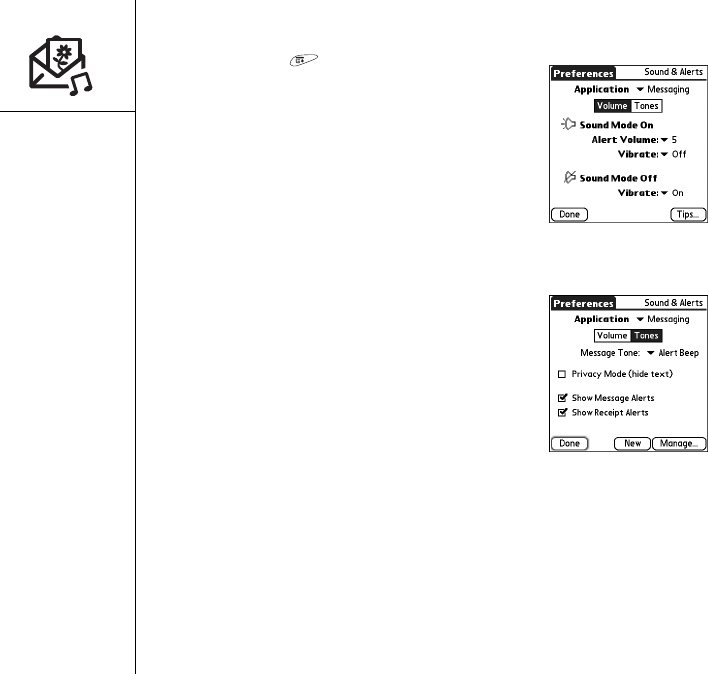
82 :: Messaging
Selecting alert tones
1. Open the menus .
2. Select Options, and then select Alerts.
3. Select the Alert Volume pick list and select a volume
level.
4. Select the first Vibrate pick list and indicate if you
want your phone to vibrate during an incoming alert,
when Sound Mode is on.
5. Select the second Vibrate pick list and indicate if you
want your phone to vibrate during an incoming alert,
when Sound Mode is off.
6. Select the Tones box.
7. Select the Message Tone pick list and select an
alert tone for incoming messages.
8. Check any of the following boxes if they appear on
your screen:
•Show Message Alerts Dialog: Indicate if you
want to receive onscreen alerts when a new
message arrives.
•Show Receipts Alerts Dialog: Indicate if you want
to receive onscreen alerts when a receipt arrives.
9. Select Done.
CrowAce.book Page 82 Wednesday, November 10, 2004 1:52 PM
DRAFT 1A palmOne, Inc. Confidential
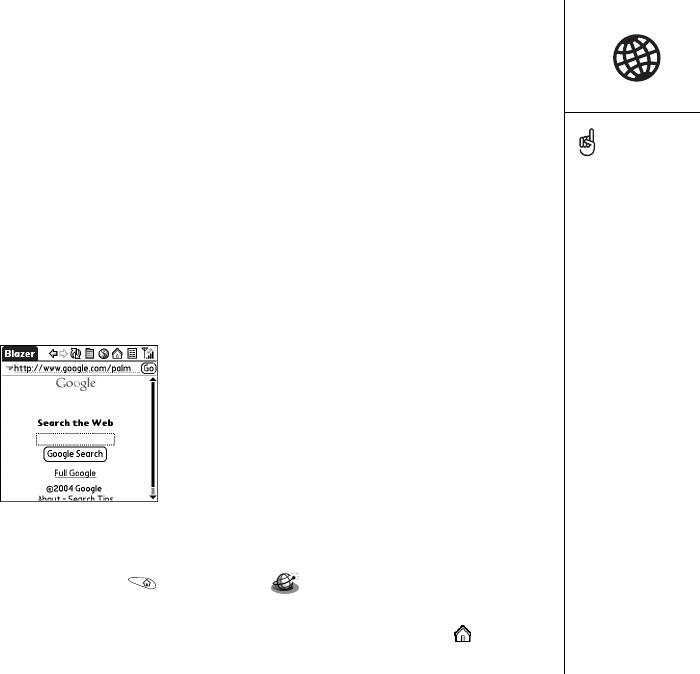
Browsing the web :: 83
Browsing the web
The Web browser on your Treo provides quick and easy access to web pages. You can
view most sites you use on your computer, including those with security and advanced
features, such as JavaScript and frames. To browse the web, you must activate data
services from your wireless service provider.
Viewing a web page
The Blazer® Web browser uses patent-pending technology to optimize web pages for
your phone. By default, the browser reformats web pages into a single column and
resizes images on your screen. This way, you can see most content without scrolling
left or right.
1. Make sure your phone is turned on (see “Turning your phone on and off” on
page 15).
2. Go to Applications and select Web .
3. Navigate to the web page you want:
• To view mobile content designed specifically for your Treo, select .
The navigation bar shows
status info while a page is
loading. You don’t have to
wait for a page to fully load
to navigate within the page
or to select a link to
another page.
To adjust the font size,
open the Options menu and
select Font. To fit more text
on the screen, select Small.
To make the text easier to
read, select Large.
CrowAce.book Page 83 Wednesday, November 10, 2004 1:52 PM
DRAFT 1A palmOne, Inc. Confidential
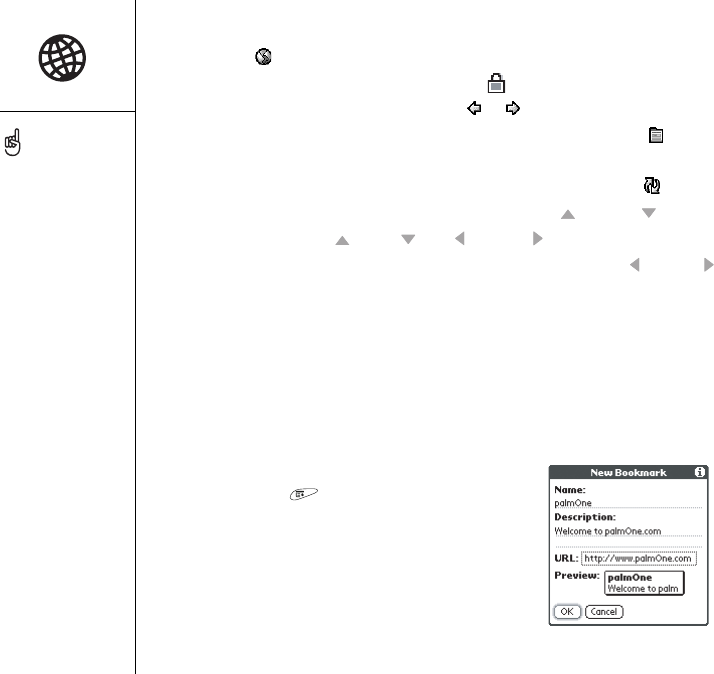
84 :: Browsing the web
• To go to any web page on the Internet, enter the address in the Address Bar,
or select .
• If you browse to a secure web page, a Lock appears in the Address bar.
• To view the previous or next page, select or .
• To view a page in a wide layout format (as on your computer), select and
then select Wide Page Mode.
• To refresh the page with the latest content from the Internet, select .
• To scroll through the page in Optimized View, press Up or Down . In Wide
Page View, press Up , Down , Left , or Right to scroll in all directions.
• To follow a link to another web page in Optimized View, press Left or Right
to highlight the link, and then press Center to go to the selected page. You can
also tap the link on the screen with your stylus.
Creating a bookmark
Bookmarks let you instantly access a web page without needing to enter the address
every time. The Web browser can store up to 100 bookmarks or saved pages,
allowing you to open your favorite web pages quickly. Remember, a bookmark is
different from a favorite (see “Defining favorite buttons” on page 53).
1. Go to the page you want to bookmark.
2. Open the menus .
3. Select Add Bookmark on the Page menu.
4. If desired, change the Name and Description.
5. Select OK, and then select OK again.
Saving a page
The Web browser lets you save a page for offline
viewing, so you don’t need an Internet connection to view it later.
Want to get to the icons
faster? Press Space to
jump to the icons, or open
the menus to access the
same commands through
the menus.
Always using bookmarks?
Make Bookmark View the
default view when you open
the browser. Open the
Options menu and select
Preferences. Select the
Start With pick list and
select Bookmarks.
CrowAce.book Page 84 Wednesday, November 10, 2004 1:52 PM
DRAFT 1A palmOne, Inc. Confidential
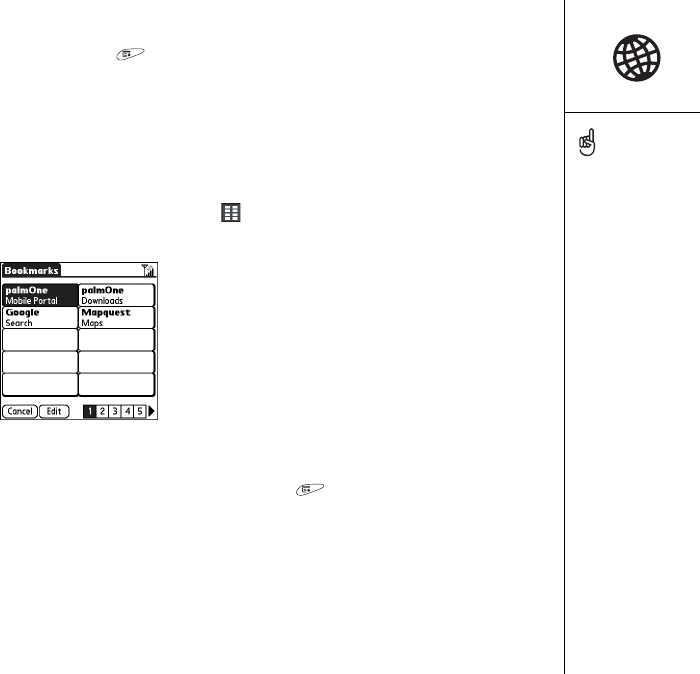
Browsing the web :: 85
1. Go to the page you want to save.
2. Open the menus .
3. Select Save Page from the Page menu.
4. Select OK, and then select OK again.
Viewing bookmarks or saved pages
Bookmarks and saved pages both appear in Bookmark View. Saved pages are
indicated by a small triangle in the upper-right corner of the bookmark.
1. Select the Bookmarks View icon .
2. Select the bookmark or saved page you want to view.
Editing or deleting a bookmark or saved page
1. From the Bookmarks View, open the menus .
2. Select Edit Bookmarks on the Bookmarks menu.
3. Select the bookmark you want to edit or delete.
4. Enter the desired changes.
5. Select OK.
Need to send Email from a
web page on your Treo?
Email addresses appear as
links on web pages. After
you configure an email
application on your Treo,
you can select an email
address link to create a
message to the selected
address.
CrowAce.book Page 85 Wednesday, November 10, 2004 1:52 PM
DRAFT 1A palmOne, Inc. Confidential
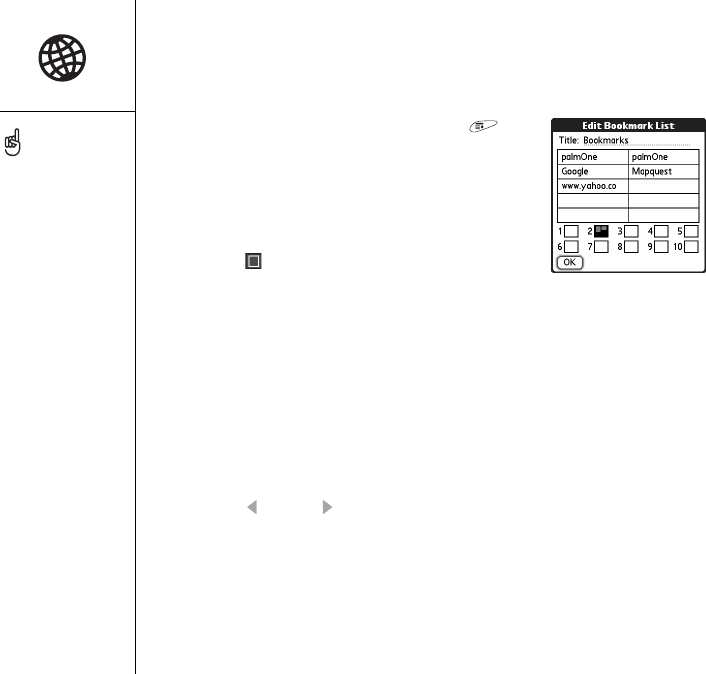
86 :: Browsing the web
Arranging bookmarks and saved pages
The Web browser includes 10 pages so that you can arrange bookmarks and saved
pages in a logical fashion. For example, you can store travel links on one page, stock
links on another, and business links on third page.
1. From the Bookmarks View, open the menus .
2. Select Edit Bookmarks on the Bookmarks menu.
3. Enter a new title for this page.
4. Use the stylus to drag and drop bookmarks into
different slots on the current page. To move a
bookmark to a different page, drag and drop it on the
Page icon .
5. Select OK.
Downloading files from a web page
The Web browser lets you download files of up to 2MB that are usable on your Treo,
such as new applications, MIDI ringtones, or pictures that are specifically tagged for
download. When you download a file, it is automatically sent to the application that can
use the file. For example, if you download an MP3 file, you can store it on an
expansion card and play it on your phone later in the RealPlayer® application. You can
also download files to an expansion card, even if the files are not usable on your Treo.
1. Go to the page that contains the link to the file you want to download.
2. Press Left or Right to highlight the link to the file, and then press Center to
initiate the download process.
Tap and hold the back or
forward buttons to pop up
a list of sites you’ve visited.
If you can’t edit, delete, or
beam a bookmark, it is
probably locked.
CrowAce.book Page 86 Wednesday, November 10, 2004 1:52 PM
DRAFT 1A palmOne, Inc. Confidential
Browsing the web :: 87
Copying text from a web page
You can copy text from a web page and paste it in other applications.
1. Use the stylus to highlight the text you want to copy.
2. Open the menus .
3. Select Edit, and then select Copy.
4. Go to the application in which you want to paste, and then position the cursor
where you want to paste the text.
5. Open the menus .
6. Select Edit, and then select Paste.
Using the History list
The History list stores the addresses of the last 100 pages you visited. Items in the
History list are sorted chronologically.
1. From the Page View, open the menus .
2. Select History on the Page menu.
3. Press Down to navigate through the list.
4. Select the web page you want to load.
Finding text on a web page
1. From the Page View, open the menus .
2. Select Find Text on Page on the Page menu.
3. Enter the text you want to find.
4. Check or uncheck the Wrap Search box to indicate if you want the search to wrap
from the end of the page to the beginning when the end is reached.
5. Select Find to start the search.
Lots of pretty graphics
slowing you down? Browse
the web faster by turning
off images. Open the
Options menu, select
Preferences, select General,
and then check the Disable
Images box.
If the Web browser does
not recognize a phone
number as dialable, you can
copy the phone number (as
text) and paste it into the
Phone Dial Pad.
You can also save an
image from a web page by
tapping and holding it with
the stylus.
CrowAce.book Page 87 Wednesday, November 10, 2004 1:52 PM
DRAFT 1A palmOne, Inc. Confidential
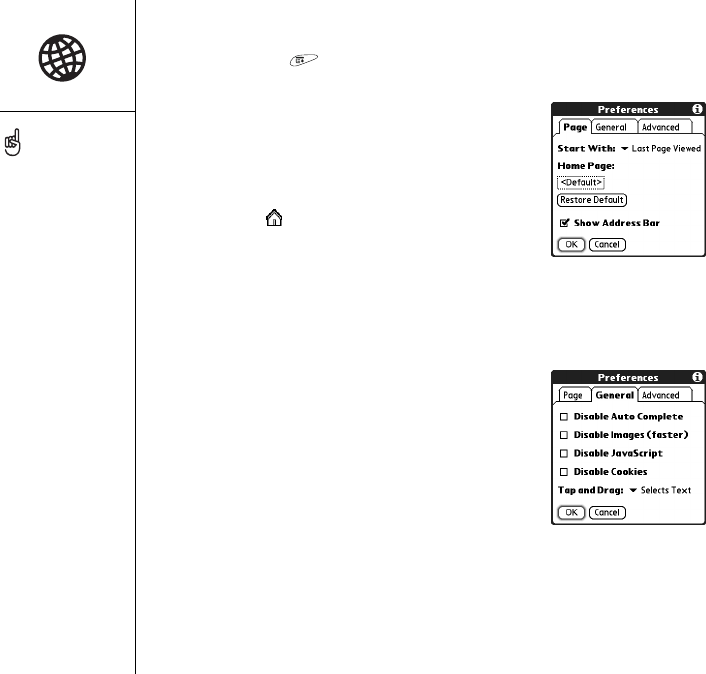
88 :: Browsing the web
Customizing your Web browser settings
1. Open the menus .
2. Select Options, and then select Preferences.
3. Select Page and set any of the following
preferences:
•Start With: Determines which view displays every
time you open the Web browser.
•Home Page: Sets the page that appears when
you select . Your wireless service provider may
have locked this setting.
•Restore Default: Selects the original home page,
if you changed it.
•Show Address Bar: Sets whether the web address appears in Page View.
When it is visible, you can select the pick list to go to a previously viewed page
or enter a URL directly from Page View.
4. Select General and set any of the following
preferences:
•Disable Auto Complete: Determines whether the
Web browser suggests text, based on your
previous entries, when you begin entering info.
•Disable Images (faster): Determines whether
images appear when you load a web page. If you
don’t view images, web pages will load faster. If
you select not to view images, you can still see any image by selecting the
placeholder box on the web page.
•Disable JavaScript: Bypasses JavaScript elements on the web pages you view.
•Disable Cookies: Determines if some web sites can store personalized info on
your Treo. Some sites do not work properly if you select this option.
Visit secure websites. The
security certificates and
128-bit SSL, strong
encryption let you browse
secure sites, such as online
shopping, banking, and
email. Remember: Some
secure sites also require
specific browsers, and may
not work with the Web
browser.
The Web browser supports
JavaScript, Secure Socket
Layer (SSL), and cookies,
but does not support plug-
ins (Flash, Shockwave,
etc.) or Java applets.
CrowAce.book Page 88 Wednesday, November 10, 2004 1:52 PM
DRAFT 1A palmOne, Inc. Confidential
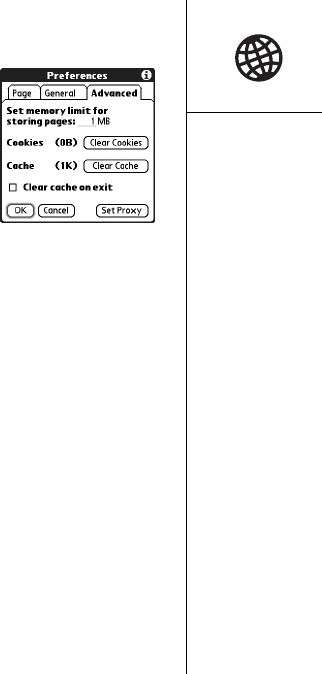
Browsing the web :: 89
•Tap and Drag: Determines whether dragging the stylus selects text or scrolls
through the content of the page.
5. Select Advanced and set any of the following
preferences:
•Set memory limit for storing pages: Sets the
amount of memory used for your cache. Pages
are cached so they load faster the next time you
view them.
•Cookies: Indicates how much memory is being
used by cookies. To free up this memory, select
Clear Cookies.
•Cache: Indicates how much memory is being used by your cache to store
recent pages and history. To free up this memory, select Clear Cache.
•Clear cache on exit: Determines if the cache clears each time you exit the
Web browser.
•Set Proxy: Sets up a proxy server to access the Internet. If your connection
requires a proxy server, please contact your Internet service provider or IT
administrator for this information.
6. Select OK.
CrowAce.book Page 89 Wednesday, November 10, 2004 1:52 PM
DRAFT 1A palmOne, Inc. Confidential
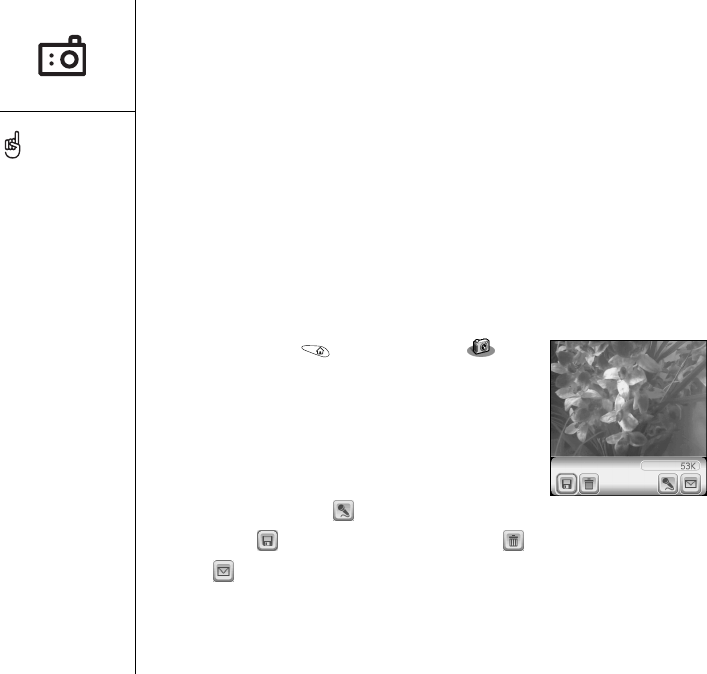
90 :: Taking photos and videos
Taking photos and videos
If your Treo 650 does not have a built-in camera, then the section in this chapter
about taking photos and videos does not apply to you. Even if your phone does not
have a camera, you can still receive and view photos and videos, send photos and
videos to other people as attachments or multimedia messages, and use photos to
personalize your phone (such as wallpaper or photo caller ID; see “Assigning a caller
ID photo” for details). You can also move photos and videos to a Windows computer
by synchronizing your phone with your computer.
Taking a photo
You can store photos on your phone or on an expansion card.
1. Go to Applications and select Camera .
2. Select the Album pick list and select the album
where you want to save the photo.
3. (Optional) Adjust the zoom and resolution settings.
4. Point the lens on the back of your Treo at the subject
you want to photograph.
5. Press Center to capture the photo.
6. (Optional) Select Audio to add a voice caption.
7. Select Save to keep the photo, select Delete to discard it, or select
Send to send the photo.
Photos are 16-bit color at a
maximum of 640 x 480
pixels (0.3 megapixels) in
VGA resolution or 320 x
240 pixels in QVGA
resolution. Videos are 352
x 288 pixels in CIF
resolution or 176 x 144
pixels QCIF in resolution.
CrowAce.book Page 90 Wednesday, November 10, 2004 1:52 PM
DRAFT 1A palmOne, Inc. Confidential
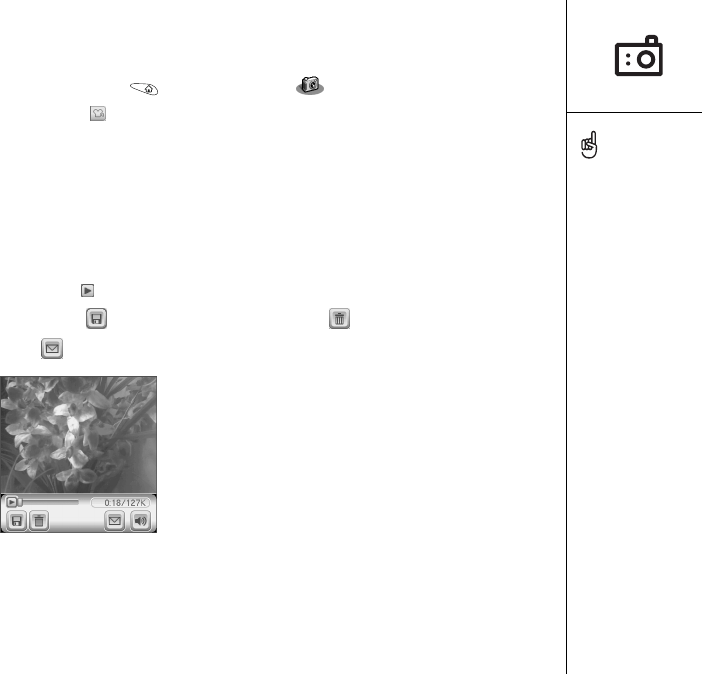
Taking photos and videos :: 91
Recording a video
You can store videos on your phone or on an expansion card.
1. Go to Applications and select Camera .
2. Select Video .
3. Select the Album pick list and select the album where you want to save the video.
To create a new album or change where the video is stored, select Manage Albums
from the list.
4. (Optional) Adjust the resolution settings.
5. Point the lens on the back of your Treo at the subject you want to record.
6. Press Center to start recording.
7. When you’re done recording, press Center again to stop.
8. Select Play to review the video.
9. Select Save to keep the video, select Delete to discard it, or select
Send to send the video.
The video recording screen
displays the approximate
recording time you have
left based on the space
available on your phone or
expansion card. Actual
recording time may vary
depending on how fast you
are moving, how many
colors you are recording,
and so on.
Tap and drag the progress
indicator bar to jump to a
different section of the
video. Select Pause to
pause video playback.
CrowAce.book Page 91 Wednesday, November 10, 2004 1:52 PM
DRAFT 1A palmOne, Inc. Confidential
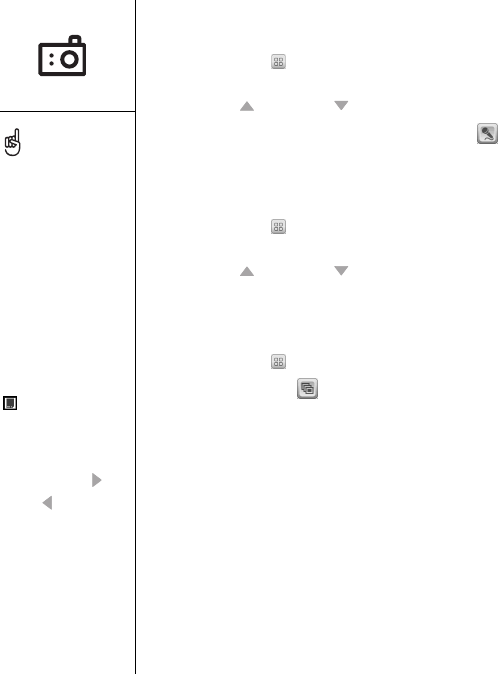
92 :: Taking photos and videos
Viewing a photo
1. Select Gallery .
2. Select the photo you want to view.
3. Press Up and Down to zoom in and out.
4. If the photo has a voice caption, select Audio to hear it.
5. Select Done.
Viewing a video
1. Select Gallery .
2. Select the video you want to view.
3. Press Up and Down to adjust the volume.
4. Select Done.
Viewing a slide show
1. Select Gallery .
2. Select Slide show .
3. Tap the screen to return to the Gallery.
To change the Gallery
display format, select List
and Thumb.
To view a different album,
select the Album pick list in
the upper-right and select
the album you want to view.
To view an album stored on
an expansion card, insert
the card and select Card
in the upper-right
corner.
To view other full-size
photos, press Right
and Left .
To rotate a picture, open
the Media menu and select
Rotate Picture. Select the
picture you want to rotate,
select the orientation.
CrowAce.book Page 92 Wednesday, November 10, 2004 1:52 PM
DRAFT 1A palmOne, Inc. Confidential
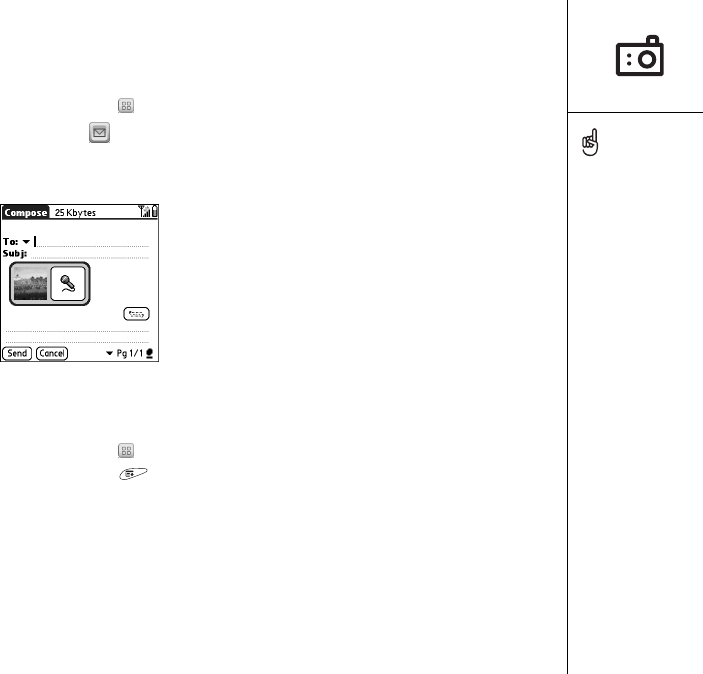
Taking photos and videos :: 93
Sending a photo or video
You can send a photo or video to other photo-enabled mobile phones or to an
email address.
1. From the Gallery , select the photo or video you want to send.
2. Select Send .
3. When the Messaging application opens, address and send the message.
(See “Creating and sending a multimedia message” on page 75 for details.)
Copying photos and videos
You can copy photos or videos from your phone to an expansion card, and vice versa.
1. From the Gallery , select the photo(s) or video(s) you want to copy.
2. Open the menus .
3. Select Copy to Card (for items on your phone) or Copy to Device (for items on an
expansion card) from the Media menu.
You cannot send
copyrighted photos or
videos that appear with
a Lock icon in the
Gallery View.
You can also send photos
and videos as email
attachments. See
“Attaching photos and
videos” on page 66 for
details.
To copy an entire album,
open the Media menu and
select Copy Album to Card
or Copy Album to Device.
Select the album you want,
and then select Copy.
CrowAce.book Page 93 Wednesday, November 10, 2004 1:52 PM
DRAFT 1A palmOne, Inc. Confidential
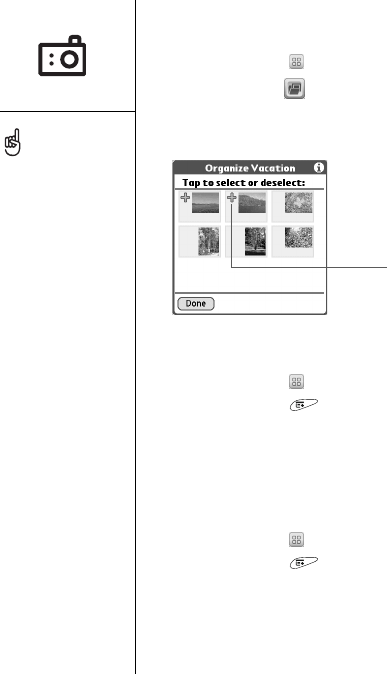
94 :: Taking photos and videos
Organizing photos and videos
1. From the Gallery , select the album you want to organize.
2. Select Organize .
3. Select a photo or video to add it to or to remove it from the album.
4. Select Done.
Saving a photo as wallpaper
1. From the Gallery , select the photo you want to use as wallpaper.
2. Open the menus .
3. Select Save as Wallpaper on the Media menu.
4. When the confirmation message appears, confirm by selecting Yes, or decline
by selecting No.
Deleting a photo or video
1. From the Gallery , select the photo or video you want to delete.
2. Open the menus .
3. Select Delete from the Media menu.
4. Select Delete to confirm deletion.
You can personalize a
photo. Open the Photo
menu, select Draw on
Photo, and then use the
drawing tools to add your
own personal touch. When
you save the photo, you
can replace the original or
save a copy.
You can also open the
Gallery from the
Applications View. Go to
Applications and select
Media.
+ indicates photo is
in album
CrowAce.book Page 94 Wednesday, November 10, 2004 1:52 PM
DRAFT 1A palmOne, Inc. Confidential
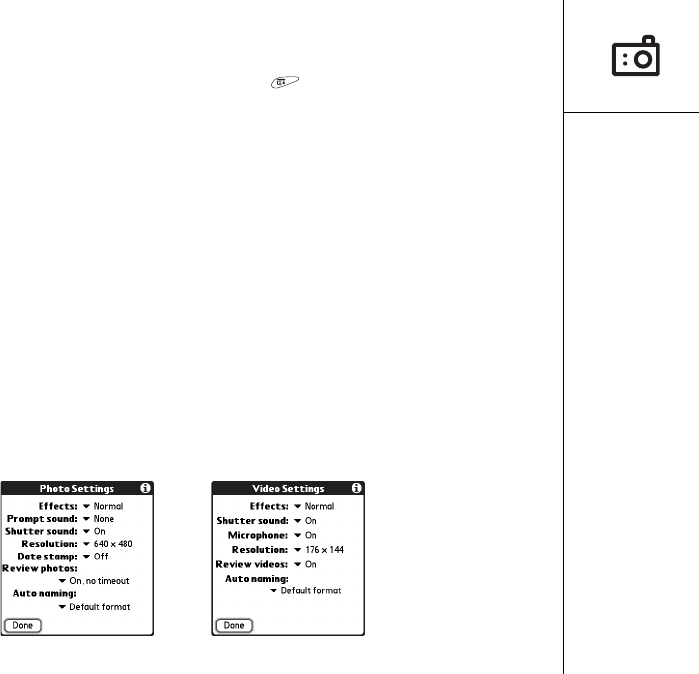
Taking photos and videos :: 95
Customizing your Camera settings
If your Treo has a built-in camera, you can customize the camera’s settings.
1. From any Camera view, open the menus .
2. Select Options, and then select Preferences.
3. Set any of the following preferences:
•Effects: Sets the color palette for the current photo or video. You cannot
change an item’s palette after you take the photo or video.
•Prompt sounds: (photos only) Sets the sound that plays before you take
the photo.
•Shutter sounds: Determines if a sound plays when you take a photo.
•Microphone: (videos only) Turns the microphone on and off so that you can
record videos with or without sound.
•Resolution: Sets the default size for newly captured photos or videos.
•Date stamp: (photos only) Determines if the date the photo is taken appears
on your photos.
•Review photos/videos: Determines if you can review photos or videos before
saving them and how quickly they are automatically saved.
•Auto naming: Assigns a name to a series of photos to be captured, such as
Seattle001, Seattle002, and so on.
4. Select OK.
CrowAce.book Page 95 Wednesday, November 10, 2004 1:52 PM
DRAFT 1A palmOne, Inc. Confidential

96 :: Taking photos and videos
Viewing photos and videos on your computer
When you synchronize, your Treo your photos and videos are copied to your desktop
computer. You can view photos in JPEG format and videos in .3GP format, and you
can email them to friends using your desktop email application.
•Windows: Refer to the Palm Desktop Online Help for information about using the
palmOne Media desktop application.
• To find all synchronized images, look in
C:\Program Files\palmOne\<User folder>\Photos\offline copy location
• To find your captured pictures, look in C:\Documents and Settings\
<User name>\My Documents\My Pictures\palmOne Photos\<User Folder>
• To find your captured videos, look in C:\Documents and Settings\
<User name>\My Documents\My Videos\palmOne Videos\<User Folder>
Use QuickTime 6.5 for Windows to play videos on your computer.
•Mac: There is no palmOne Media desktop application for Mac computers.
• To find your photos, open Home/Pictures/palmOne Photos/
<Palm User Name>, and then double-click the photo you want view.
• To find your videos, open Home/Movies/palmOne Videos/<Palm User Name>.
Use an application that supports 3GP files, such as QuickTime, to play
your videos.
CrowAce.book Page 96 Wednesday, November 10, 2004 1:52 PM
DRAFT 1A palmOne, Inc. Confidential

first two weeks: using organizer features :: 97
first two weeks:
using
organizer
features
CrowAce.book Page 97 Wednesday, November 10, 2004 1:52 PM
DRAFT 1A palmOne, Inc. Confidential

98 :: Managing contacts
Managing contacts
If you are familiar with previous Palm Powered® devices, you may recognize
the Contacts application as similar to the Address Book on previous devices.
Adding a contact
1. Press Phone/Send .
2. Select the Contacts favorite button.
3. Select New Contact.
4. Use the 5-way navigator to move between fields as you enter information.
5. To add a caller ID photo that displays when that person calls, select the Picture
box. Select Camera to take a photo and add it to this contact entry when you
save the photo, or select Photos to add an existing photo to this contact entry.
6. To place the entry in a category or mark it private, select Details.
7. To add a note to an entry, select Note .
8. To display additional fields for this contact, select Plus .
9. After you enter all the information, select Done.
If you have several
contacts to enter, it’s more
efficient to use
Palm®Desktop software
or Microsoft Outlook on
your computer and then
synchronize info on your
Treo™ 650 smartphone
the info and your computer.
For more information, see
“Synchronizing contacts
and other information” on
page 33.
You can also open Contacts
from the Applications View.
Go to Applications and
select Contacts.
Be sure to label your
contacts’ mobile numbers
correctly. The Messaging
application (see
“Messaging” on page 74)
looks up only numbers
labeled as Mobile.
CrowAce.book Page 98 Wednesday, November 10, 2004 1:52 PM
DRAFT 1A palmOne, Inc. Confidential