Palm CAGEMS GSM Cellphone with Bluetooth User Manual Using Your Treo 650 Smartphone by palmOne
Palm Inc GSM Cellphone with Bluetooth Using Your Treo 650 Smartphone by palmOne
Palm >
Contents
- 1. Users Manual
- 2. Users Manual Part 1 Revised 120104
- 3. Users Manual Part 2 Revised 120104
Users Manual Part 2 Revised 120104
Managing contacts :: 99
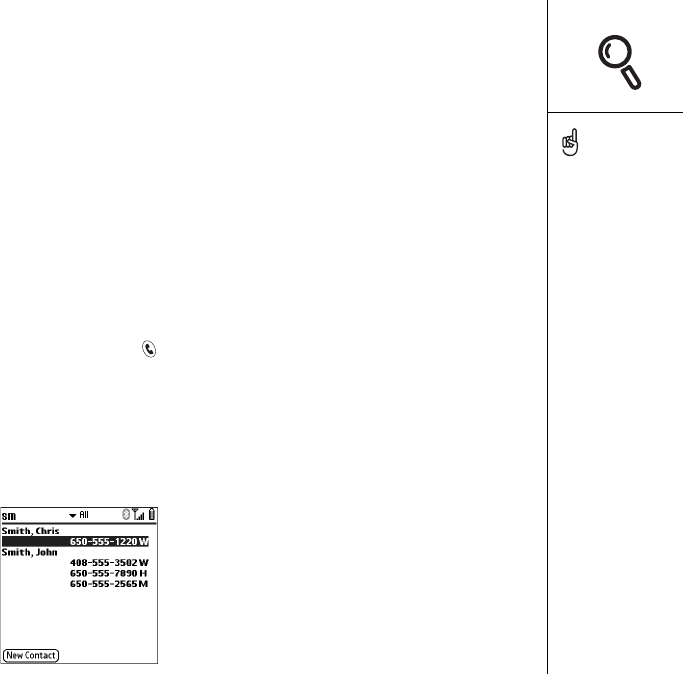
Viewing or changing contact information
1. In the Contacts list, begin entering one of the following for the contact you want
to view or edit:
• First initial and last name
•First name
•Last name
2. Select the name of the entry you want to open.
3. Select Edit.
4. Make changes to the entry as necessary.
5. Select Done.
Deleting a contact
1. Open the contact you want to delete.
2. Open the menus .
3. Select Delete Contact on the Record menu.
4. Select OK.
Defining your business card
1. Create a new contact with your business card.
2. While still in Contact Edit View, open the menus .
3. Select Business Card on the Record menu.
4. Now you can beam your business card to other Palm Powered devices. In any
Phone view, open the menus . Select Beam Business Card on the
Record menu.
In the Contacts list, press
Up and Down to move
to the previous or next
Contacts record.
Import contacts from your
SIM quickly and easily. In
the Contacts list, open the
Record menu and select
Import from SIM.
The entries on your SIM
appear in your Contacts
list. To edit these entries
you must either Import
them into Contacts or edit
them in SIM Book.
CrowAce.book Page 99 Wednesday, November 10, 2004 1:52 PM
DRAFT 1A palmOne, Inc. Confidential

100 :: Managing contacts
Viewing your SIM Phonebook
By default, you can view your SIM Phonebook right in the Contacts application.
1. In the Contacts list, open the menus .
2. Select Options, and then select Preferences.
3. Make sure the Show SIM Phonebook Category box is checked.
4. Select OK.
5. In the Contacts list, select the category pick list at the top of the screen and select
SIM Phonebook.
When the Show SIM
Phonebook Category box
is checked, your SIM
Phonebook entries also
appear when you select the
All category in the Contacts
list or search for a contact.
If you exported contacts
from your SIM to Contacts,
you may want to uncheck
the Show SIM Phonebook
Category box to avoid
seeing duplicate entries.
Need to copy a contact
to your SIM Phonebook?
In Contacts, select the
contact you want to copy,
open the Record menu, and
then select Export to SIM.
CrowAce.book Page 100 Wednesday, November 10, 2004 1:52 PM
DRAFT 1A palmOne, Inc. Confidential
Calendar :: 101
Calendar
Displaying your calendar
• Press the Calendar button repeatedly to cycle through the various views:
•Agenda View: Shows your daily schedule and any items on your Tasks list
that are overdue or due today. If there’s room, Agenda View also shows your
schedule for the next dates that have events scheduled.
•Day View: Shows your daily schedule one day at a time.
•Week View: Shows your schedule for an entire week. The timeframes are
based on the Start Time and End Time settings in Calendar Preferences.
•Month View: Shows your schedule for a whole month.
• From any Calendar view, open the Options menu and select Year View to view
a calendar for an entire year.
• From Day View, Week View, Month View, or Year View, use the 5-way to move to
another day, week, month, or year (based on the current view).
• From Day View, Week View, Month View, or Year View, select Go To, and then
select a date from the calendar.
Creating an event
1. Press Calendar until you are in Day View.
2. Press Left and Right to select the desired day.
3. Using the keyboard, enter a starting hour for the event. For example, enter 5 for
5:00 (remember to press Option before entering numbers).
If you have several
appointments to enter, it’s
more efficient to use
Palm Desktop software or
Microsoft Outlook on
your computer and then
synchronize the info on
your Treo with the info on
your computer. For more
information, see
“Synchronizing contacts
and other information” on
page 33.
CrowAce.book Page 101 Wednesday, November 10, 2004 1:52 PM
DRAFT 1A palmOne, Inc. Confidential

102 :: Calendar
4. Select the starting minute for the event.
5. Select the End Time box and select the ending hour and minute for the event.
6. (Optional) Select the Time Zone pick list and select a time zone.
7. Select OK.
8. Enter a description for the event.
IMPORTANT: If you use Palm Desktop software, do not add time zones to your
events. Palm Desktop does not support time zones. If you use Microsoft Outlook,
you can use the time zone feature, but you must install the conduit that came with
your Treo 650 (or a subsequent update) on all the computers you sync your phone
with. Chapura PocketMirror and other earlier Microsoft Outlook conduits do not
support time zones.
Adding an alarm reminder to an event
1. In Calendar, select the event.
2. Select Details.
3. Check the Alarm box and select the number of minutes, hours, or days before
the event you would like to receive the alarm.
To automatically assign a
time zone to your events,
open the Options menu,
select Preferences, and
check the New events use
time zones box. All your
new events will be
assigned to your local time
zone, and you can change
this setting for individual
events. If you sync with
Outlook and you select the
time zone option on the
Contacts conduit sync
screen, then time zones
will sync for any new
events you create in
Outlook. Time zone settings
are not added to any
events that you created
before you set these time
zone settings.
A. Selected date
B. Starting and ending times
C. Selected day
C
A
B
CrowAce.book Page 102 Wednesday, November 10, 2004 1:52 PM
DRAFT 1A palmOne, Inc. Confidential
Calendar :: 103
4. Select OK.
Creating an untimed event
An untimed event, such as a birthday or anniversary,
does not occur at a particular time.
1. Press Calendar until you are in Day View.
2. Press Left and Right to go to the date of
the event.
3. Make sure nothing is highlighted.
4. Enter a description for the event. A diamond appears
next to the description of an untimed event.
Color-coding your schedule
Use color-coding to quickly spot different types of events. For example, make
your appointments with family green, work blue, and friends yellow.
1. From Day View, select the event description.
2. Select Details.
3. Select the Category pick list and select Edit Categories.
4. Select New or select a category and select Edit.
A. Type of time units
B. Number of time units
A
B
The silent alarm for
untimed events is defined
by minutes, days, or hours
before midnight of the date
of the event.
When an alert occurs, the
Alert screen displays all
your pending alerts. Select
an item’s description to
jump to that item, or check
the box to clear that item.
CrowAce.book Page 103 Wednesday, November 10, 2004 1:52 PM
DRAFT 1A palmOne, Inc. Confidential

104 :: Calendar
5. Enter the category name.
6. Select the color you want to give this category.
7. Select OK, and then select OK two more times.
Now that the category is set up, you can assign a specific event to this category.
See the next section for details.
Editing or deleting an event
1. Select the event you want to reschedule.
2. Select Details.
3. In addition to the settings covered earlier in this chapter, you can also change any
of the following settings:
•Date and Time: When the event takes place. Change these settings to
reschedule the event.
•Location: A description of where the event takes place.
•Category: The color-coded category for this event.
•Note : Space for you to enter additional text.
•Delete: The event is erased from your calendar.
4. Select OK.
Scheduling a repeating event
1. Create an event, and then select it.
2. Select Details.
3. Select the Repeat pick list, and then select a repeat interval.
4. For weekly events, select the day(s) the event repeats; for monthly events,
select Day or Date to indicate the repeating method.
5. If the event has an ending date, select the End on pick list, select Select Date,
and then select the ending date.
To save memory, you can
purge your old events.
Open the Record menu and
select Purge. Select the
Delete events older than
pick list and select a
timeframe. Select OK.
If you sync with Microsoft
Outlook and your events
include other people, a
With field appears in the
Details dialog box and your
attendee info appears in
this field after you sync.
To enter a birthday, add
this info to the person’s
Contacts entry.
To enter an anniversary,
create an untimed event.
Then, from the Details
screen, select Year as the
repeat interval.
CrowAce.book Page 104 Wednesday, November 10, 2004 1:52 PM
DRAFT 1A palmOne, Inc. Confidential
Calendar :: 105
6. Select OK.
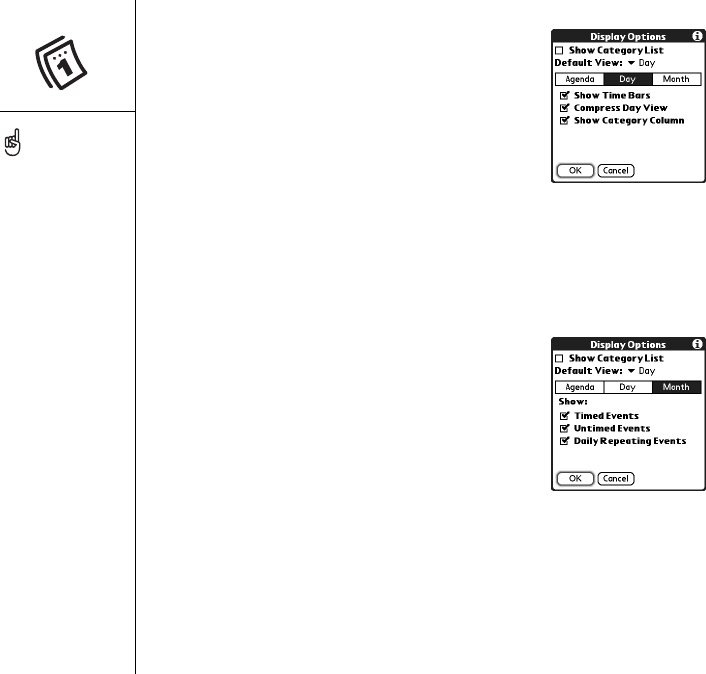
Customizing display options for your calendar
1. Open the menus .
2. Select Options, and then select Display Options.
3. Select the Default View pick list and select the view you want to see when you
open Calendar.
4. Select the Agenda box and set any of the following
options:
•Show Due Tasks: The tasks that are due today
and the tasks that are overdue display in
Agenda View.
•Show Messages: The number of read and unread
email messages displays in Agenda View.
•Background: A favorite photo becomes the
Agenda View background. Check the Background box, tap the photo thumbnail,
and then select a photo. Adjust the fade setting so that the text is easy to read
against the photo.
A. This icon indicates a repeating event.
A
You can customize your
phone to display the most
current Calendar event on
the Main View in the Phone
application. Press Phone/
Send, open the Options
menu, and then select
General Preferences. Check
the Show Calendar event
box.
CrowAce.book Page 105 Wednesday, November 10, 2004 1:52 PM
DRAFT 1A palmOne, Inc. Confidential
106 :: Calendar
5. Select the Day box and set any of the following
Day View options:
•Show Category List: The Category pick list
displays in Day View.
•Start Time and End Time: The beginning and
end of the day shown on the Calendar screens.
•Show Time Bars: The time bars appear in the
Day View to show the duration of an event and
to illustrate event conflicts.
•Compress Day View: When this box is checked, all time slots display. When
this box is unchecked, start and end times display for each event, but blank
time slots toward the bottom of the screen disappear to minimize scrolling.
•Show Category Column: The color-coded category marker appears between
the time and description to indicate which category the event is filed under.
6. Select the Month box and set any of the following
Month View options:
•Show Category List: The Category pick list
appears in Month View.
•Timed Events: The events that are scheduled
for a specific time appear in Month View.
•Untimed Events: The events that are scheduled
for a specific date but not a specific time appear
in Month View.
•Daily Repeating Events: The events that repeat
every day appear in Month View.
7. Select OK.
If you use Microsoft
Exchange ActiveSync®,
your email and calendar
information synchronize
directly with your
company's Exchange
server. You must retrieve
email and calendar updates
from the VersaMail
application, they do not
update when you
synchronize with your
computer. See “Working
with Microsoft Exchange
ActiveSync” on page 73
for more information.
Your contacts, tasks,
and memos sync with
Palm Desktop software
or Microsoft Outlook,
depending on which
desktop application
you use.
CrowAce.book Page 106 Wednesday, November 10, 2004 1:52 PM
DRAFT 1A palmOne, Inc. Confidential
Calendar :: 107
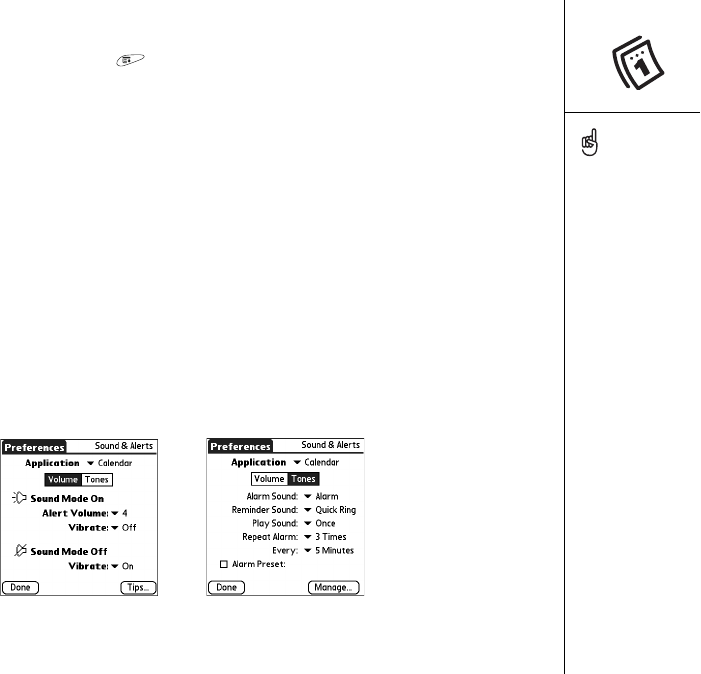
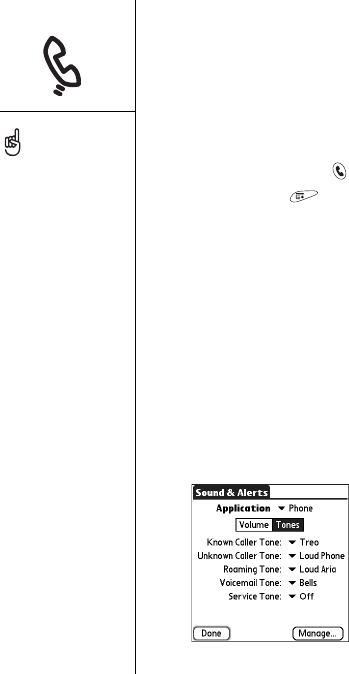
Selecting alarm tones
1. Open the menus .
2. Select Options, and then select Sound Preferences.
3. Select the Volume box.
4. Select each pick list and select an Alert Volume and Vibrate setting.
5. Select the Tones box.
6. Select tones from any of the following pick lists:
•Alarm Sound: The tone played the first time your alarm goes off
•Reminder Sound: The tone played if an alarm is not acknowledged and
the alarm repeats itself
•Play Sound: The number of times an alert tone will play during the alarm
sequence
•Repeat Alarm: The number of times the alarm repeats itself if the alarm is
not acknowledged
•Every: The interval between alarm repeats if the alarm is not acknowledged
•Alarm Preset: A default for the number of minutes, hours, or days before
the event for which the alarm goes off
7. S e l e ct Done.
You can also record,
preview, delete, and send
sounds on your phone. Go
to Applications and select
Sounds. Select Tones, and
then select Manage. To
record a sound, select New.
To play a sound, select it
and press Center. To delete
a sound, select it and press
Backspace, and to send a
sound, select it, and then
select Send.
CrowAce.book Page 107 Wednesday, November 10, 2004 1:52 PM
DRAFT 1A palmOne, Inc. Confidential
108 :: Tasks
Tasks
You can use Tasks as a reminder of tasks you need to complete and to keep a record
of complete tasks.
Adding a task
1. Go to Applications and select Tasks .
2. Select New to create a new task
3. Enter a description of the task. The text can be longer than one line.
You can set Tasks to
record the date that you
completed the task, and
you can select to show or
hide completed tasks.
Completed tasks remain in
the memory of your phone
until you purge them.
You can display your tasks
in your calendar. See
“Customizing display
options for your calendar”
on page 105 details.
Open the menus to access
other features such as
importing phone numbers
into the Tasks list.
CrowAce.book Page 108 Wednesday, November 10, 2004 1:52 PM
DRAFT 1A palmOne, Inc. Confidential
Tasks :: 109
Setting task priority, due date, and other details
The Details dialog box enables you to assign a priority level, due date, category,
privacy flag, and note for each task.
1. Select the task to which you want to assign details.
2. Select Details.
3. Set any of the following:
•Priority: Select the Priority number for this task (1 is most important). Later you
can arrange your tasks based on the importance of each task.
•Category: Assign the task to a specific category.
•Due Date: Select the Due Date pick list and select a due date for the task.
•Alarm: Set an alarm for this task.
•Repeat: Indicate if the task occurs at regular intervals and how often it repeats.
•Private: Check this box to mark this task private.
•Note: Enter additional text you want to associate with the task.
4. Select OK.
You can also set the priority
by selecting the Priority
number next to a task and
then selecting a priority
level from the list
If you turn on the Show
Due Dates option in the
Tasks Preferences screen,
you can tap directly on the
due date in the Tasks list to
select a new date.
CrowAce.book Page 109 Wednesday, November 10, 2004 1:52 PM
DRAFT 1A palmOne, Inc. Confidential
110 :: Tasks
Checking off a task
1. Select the task you want to check off.
2. Press Center to check off the task.
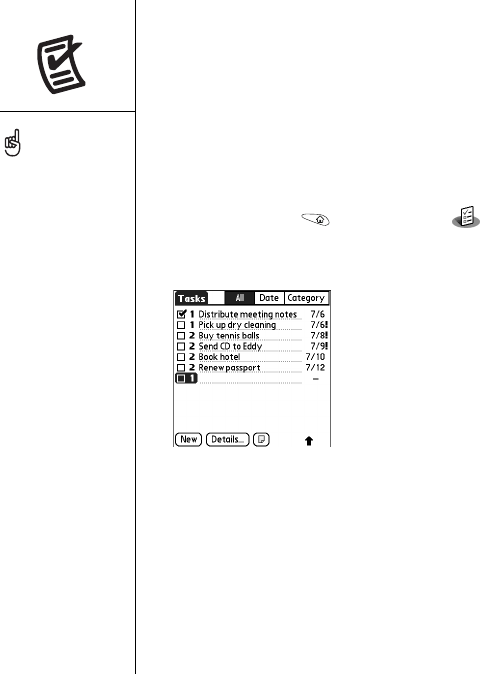
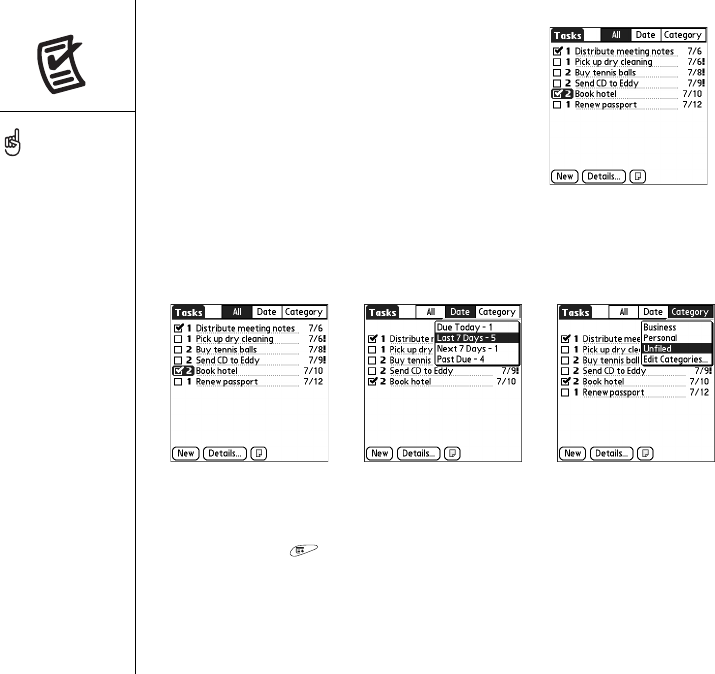
Organizing your tasks
In the Tasks list, select one of these options:
•All: Displays all your tasks.
•Date: Displays tasks that are due in a specific time
frame. Select the Category pick list (in the upper-right)
to select Due Today, Last 7 Days, Next 7 Days, or Past Due.
•Category: Displays tasks that are assigned to the selected category.
Select the Category pick list to select a different category.
Deleting a task
1. Select the task you want to delete.
2. Open the menus .
3. Select Delete Task on the Record menu.
4. Select OK.
To uncheck the selected
task, press Center.
Overdue tasks have an
exclamation point (!) next
to the due date.
To save memory, you can
purge all completed tasks.
Open the Record menu and
select Purge. Select OK.
CrowAce.book Page 110 Wednesday, November 10, 2004 1:52 PM
DRAFT 1A palmOne, Inc. Confidential
Tasks :: 111
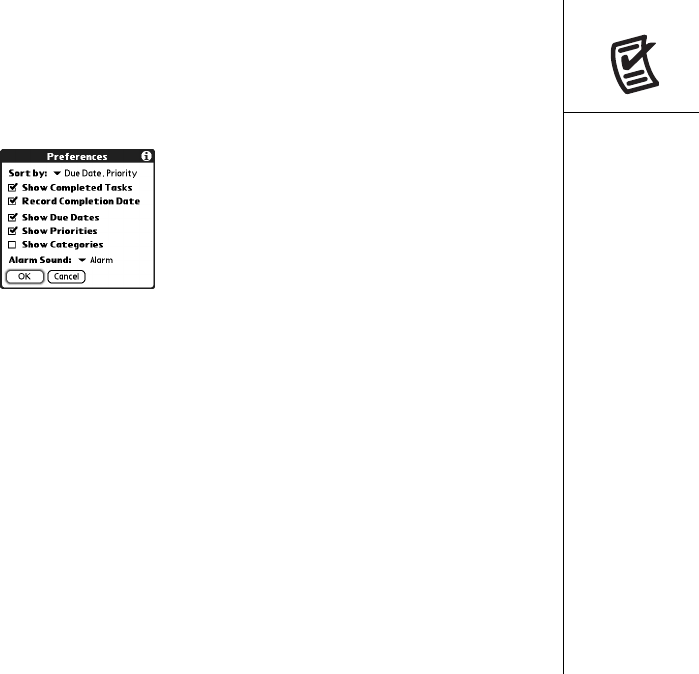
Customizing Tasks
The Tasks Preferences screen enables you to control the appearance of the Tasks
list screen.
1. In the Tasks list screen, select Show.
2. Set any of the following preferences:
•Sort by: Indicates the order in which your tasks appear in the list.
•Show Completed Items: Displays tasks you’ve checked off.
•Record Complete Date: Replaces due date with the completion date when you
complete (check) the task.
•Show Due Dates: Displays task due date, and inserts an exclamation point (!)
next to overdue tasks.
•Show Priorities: Displays the priority setting for each task.
•Show Categories: Displays the category for each task.
•Alarm Sound: Sets the sound for the alarms you assign to your tasks.
3. Select OK.
CrowAce.book Page 111 Wednesday, November 10, 2004 1:52 PM
DRAFT 1A palmOne, Inc. Confidential

112 :: Memos
Memos
Memos are a great way to store notes on your Treo 650 smartphone.
Creating a memo
1. Go to Applications and select Memos .
2. Enter the text you want to appear in the memo.
3. Select Done.
Deleting a memo
1. Select the memo you want to delete.
2. Open the menus .
3. Select Delete Memo on the Record menu.
4. Select OK.
Each memo can include
4,096 characters of text.
You can assign categories
to your memos. Open the
item you want to change,
select the category pick list
at the top of the screen,
and select a category.
CrowAce.book Page 112 Wednesday, November 10, 2004 1:52 PM
DRAFT 1A palmOne, Inc. Confidential

Listening to music :: 113
Listening to music
You can listen to music through the speaker on the back of your phone or through a
stereo headphone (stereo headphone adapter or 2.5mm stereo headphone required,
sold separately).
Transferring MP3 files from your computer
The RealOne software that comes with your phone is compatible with the popular
MP3 audio file format as well as the Real Audio RA, RM, and RMJ file formats. If your
songs are already on your computer’s hard drive in one of these formats, you can use
palmOne™ Quick Install software to transfer your songs to an expansion card (sold
separately) so that you can listen to them on your phone.
If your songs are on a CD, you can use the RealPlayer desktop software on your
Windows computer to convert the files and transfer them to an expansion card. See
the RealPlayer desktop online Help for details. You can install the RealPlayer desktop
software from the Software Essentials section on the Software Installation CD that
came with your Treo.
If you want to download songs from the Real Music Store (additional fees may
apply), you need to download and install a special version of RealPlayer for palmOne
that is compatible with Real Music Store files. To download this special version, visit
www.real.com.
You must use an expansion
card to listen to music on
your phone. You cannot
store music in your phone’s
internal memory.
You can also use a card
reader accessory (sold
separately) to transfer MP3
files from your computer to
your expansion card.
Create an SD_Audio folder
in the root directory of the
card, and store your MP3
files in this folder.
CrowAce.book Page 113 Wednesday, November 10, 2004 1:52 PM
DRAFT 1A palmOne, Inc. Confidential
114 :: Listening to music
1. Connect your Treo to your computer with the USB sync cable.
2. Insert an expansion card into your Treo.
3. Do one of the following:
•Windows: Drag and drop the file(s) or folder onto the
palmOne Quick Install icon on the Windows desktop.
•Mac: Drag and drop the MP3 files onto the Send To
Device droplet in the Palm folder.
4. Select your Username, the File name, and the Destination (card).
5. Click OK.
6. Synchronize your Treo with your computer. Be patient; transferring music to an
expansion card can take several minutes.
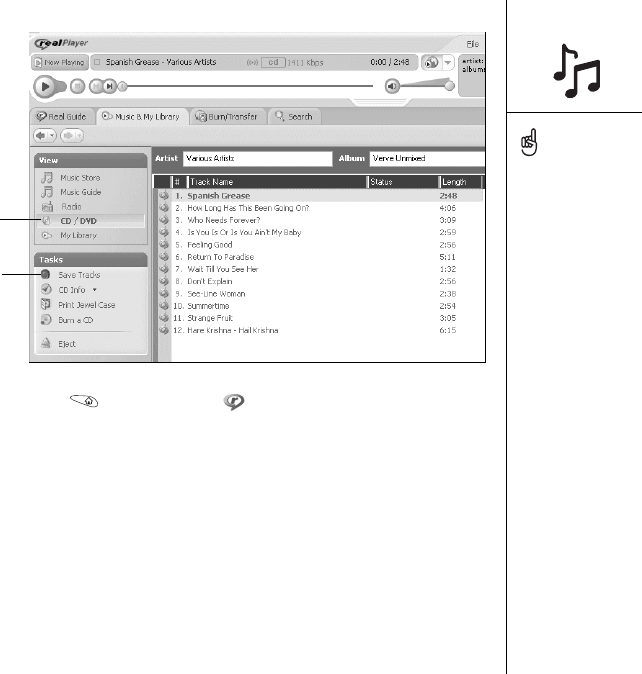
Transferring music from a CD to your phone
To transfer music from a CD to your phone, you must first install the RealPlayer
desktop application onto your Windows computer. You must install this software from
the Software Installation CD even if you already have a version of RealPlayer on
your computer. After you install the software, follow these steps to transfer music to
your phone.
1. Double-click the RealPlayer icon on your computer desktop.
2. Insert the CD into your computer’s CD drive.
3. If the track list doesn’t appear, click Music & My Library, and then click CD/DVD
in the View menu.
4. Click Save Tracks, and follow the onscreen instructions to select and copy tracks.
On a Mac, use iTunes
(included with OS X) to
convert music from a CD to
MP3 format. You can then
follow the steps to transfer
MP3 files onto your phone.
For details on using the
iTunes software, see the
documentation that came
with your Mac.
For tips on using
RealPlayer on your
computer, go to the Help
menu in RealPlayer or
visit www.real.com.
CrowAce.book Page 114 Wednesday, November 10, 2004 1:52 PM
DRAFT 1A palmOne, Inc. Confidential
Listening to music :: 115
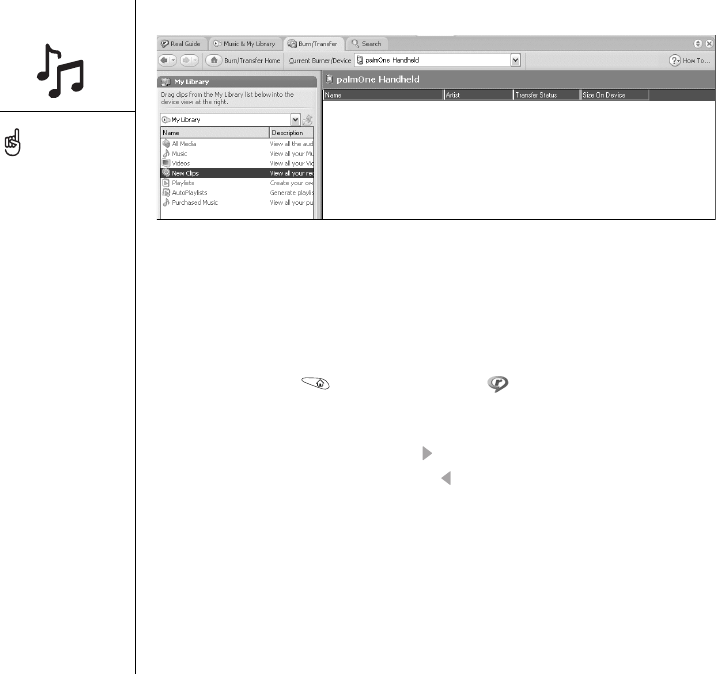
5. Go to Applications and select Music .
6. Connect your phone and your computer to the USB sync cable.
7. In RealPlayer on your computer, click Burn/Transfer.
8. If necessary, select palmOne Handheld from the Current Burn/Transfer Device
drop-down list.
9. Drag the song files you want from the My Library window on the left into the
palmOne device window on the right.
A
.CD/DVD
B. Save Tracks
A
B
Do not press the
HotSync® button on your
cable. RealPlayer transfers
the files, so there’s no need
to do anything.
CrowAce.book Page 115 Wednesday, November 10, 2004 1:52 PM
DRAFT 1A palmOne, Inc. Confidential
116 :: Listening to music
10. Be sure your phone is on and that RealPlayer is open. If it is, a green Connected
light appears in the lower-left corner of RealPlayer on your computer.
11. Click Start Transfer. When the transfer is complete, the tracks you selected should
say “On Device.”
Listening to music on your Treo
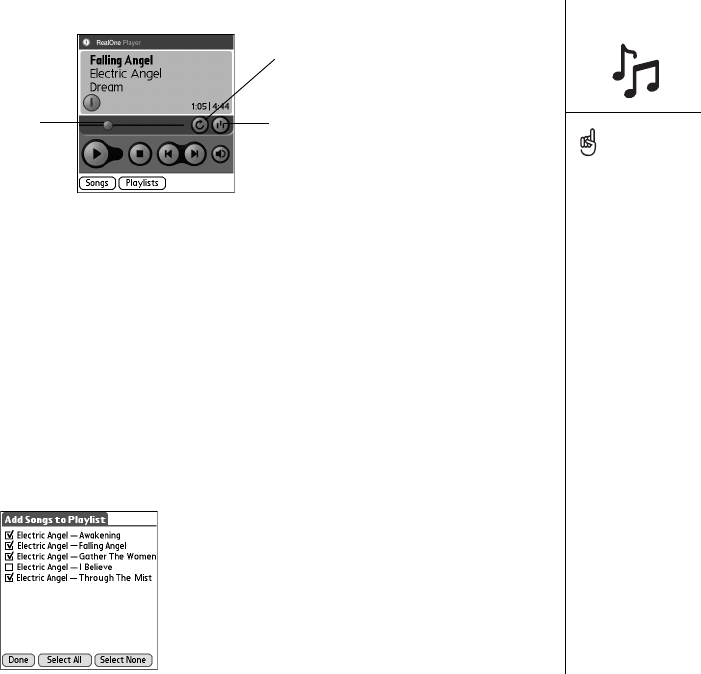
1. Go to Applications and select RealPlayer .
2. Do any of the following:
• To play (or pause) the current song, press Center or the Side button.
• To play the next song, press Right .
• To play the previous song, press Left .
• To play a different song, use the stylus to select Songs and select a
song from the list.
• To select random or continuous playback, use the stylus to select the
onscreen controls.
• To adjust the volume during playback, press the Volume button.
You can customize your
Treo so that pressing and
holding the Side button on
the side of your Treo opens
RealPlayer. See “Button
settings” on page 148
for details.
To view details for the song
that is currently playing,
open the Music menu and
select Song Details.
CrowAce.book Page 116 Wednesday, November 10, 2004 1:52 PM
DRAFT 1A palmOne, Inc. Confidential
Listening to music :: 117
RealPlayer continues playing until it reaches the end of your list or until you select
Stop. Music continues to play even if you switch to another application or turn off your
screen. If you want to stop playing music when you exit RealPlayer, open the Options
menu and select Preferences. Uncheck the Enable Background Playback box, and
then select OK.
Creating a playlist
1. Select Playlists.
2. Select New.
3. Enter a Name for the playlist.
4. Select Add.
5. Check the box next to the songs you want to include on the playlist.
6. Select Done, and then select Done again.
A. Progress indicator
B. Continuous play
C. Random play
A
B
C
To play songs from a
playlist, select Playlists,
select the playlist you want
to play, and then select the
first song you want to hear
on that list.
To delete a playlist, select
Playlists, select the playlist,
and then select Delete.
CrowAce.book Page 117 Wednesday, November 10, 2004 1:52 PM
DRAFT 1A palmOne, Inc. Confidential

118 :: Listening to music
Editing a playlist
1. Select Playlists.
2. Select the playlist you want to edit.
3. Select Edit.
4. Do any of the following:
• To delete a song from the playlist, select the song, and then select Remove.
• To add a song, select Add, check a song’s box, and then select Done.
• To move a song up or down one slot, select a song, and then select the up
or down arrow.
5. Select Done, and then select Done two more times.
CrowAce.book Page 118 Wednesday, November 10, 2004 1:52 PM
DRAFT 1A palmOne, Inc. Confidential
World Clock :: 119
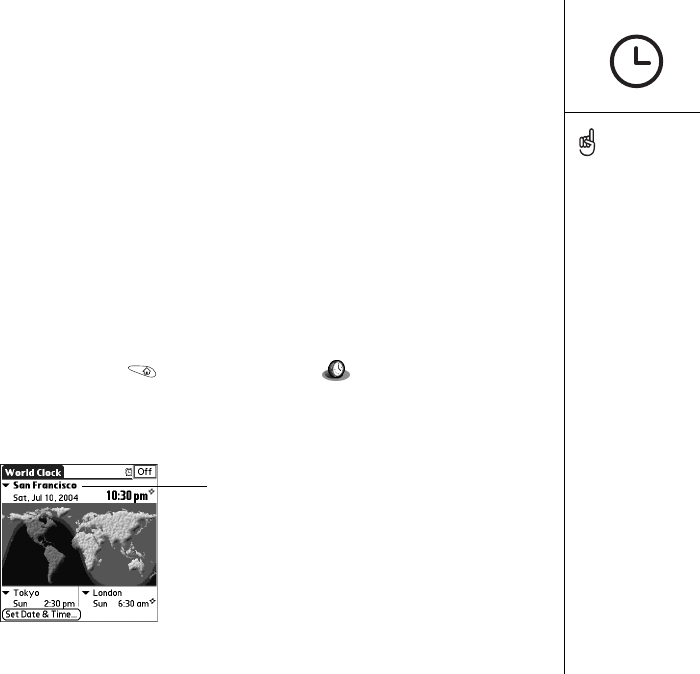
World Clock
World Clock displays the day and time in your home city and in two other cities around
the globe. Whether you’re travelling or at home, it’s easy to keep track of the best time
to reach your business associates, friends, and family in far away places.
Setting your home city
The home city serves as a point of reference for your other city selections. The home
city time reflects the current system time. The information displayed for the other
cities is based on the day and time in your home city.
If the Enable Local Network Time box is checked in your Date & Time
Preferences, your wireless service provider’s network automatically sets the time and
updates it when you travel.
1. Go to Applications and select World Clock .
2. Select the City pick list at the top of the screen and select the city closest to your
location (in the same time zone).
3. Select OK.
World Clock does not
automatically update the
system time for Daylight
Savings Time.
Run your stylus over the
map to see the time in
other cities.
The shadow over the map
represents nighttime
moving across the globe.
A. Home city
A
CrowAce.book Page 119 Wednesday, November 10, 2004 1:52 PM
DRAFT 1A palmOne, Inc. Confidential

120 :: World Clock
Selecting remote cities
In addition to your home city, you can display the day and time for two other
cities anywhere around the globe. These other cities are called remote cities.
• Select a pick list in the lower part of the World Clock screen, and then
select the city closest to the city you want to display.
Adding cities
If the city you want to display is not in the predefined list, you can add it.
1. Select a City pick list and select Edit Cities.
2. Select New.
3. Enter the city name and other information.
4. Select OK.
Setting an alarm
1. Select Off in the upper-right corner.
2. Select the time you want the alarm to sound.
3. Select OK.
To customize the alarm
sound and volume, open
the Options menu and
select Alarm Preferences.
CrowAce.book Page 120 Wednesday, November 10, 2004 1:52 PM
DRAFT 1A palmOne, Inc. Confidential
Calculator :: 121
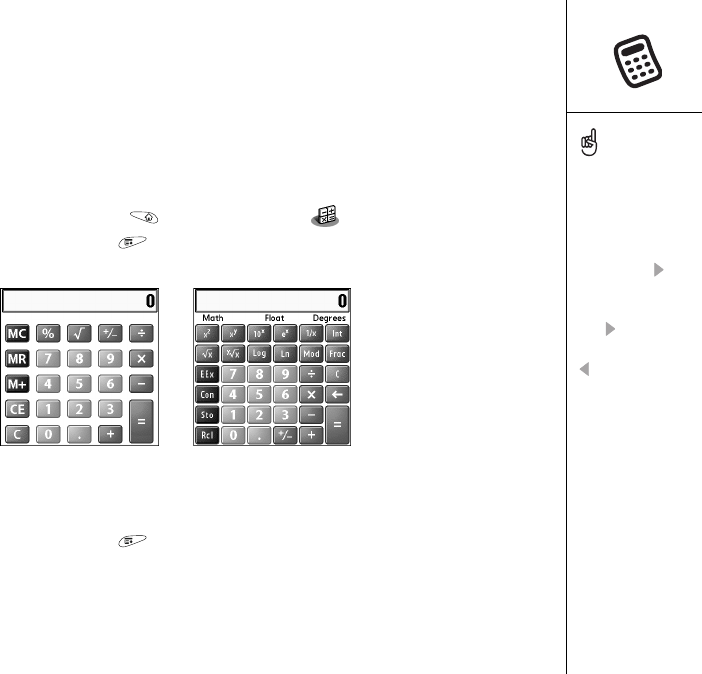
Calculator
Calculator includes a basic calculator, plus an advanced calculator with scientific,
financial, and conversion functions.
Switching between Basic and Advanced Calculator Modes
1. Go to Applications and select Calculator .
2. Open the menus .
3. Select Options, and then select Advanced Mode or Basic Mode.
Selecting functions in Advanced Calculator Mode
1. Switch to Advanced Calculator Mode (see above).
2. Open the menus .
3. Select Options, and then select the function you want to use:
•Math: Advanced mathematical functions such as exponents, roots, and
logarithms.
•Trig: Trigonometric functions such as sine, cosine, tangent, and variants.
•Finance: Financial calculator functions such as APR and amortization.
You can tap the screen or
use the keyboard to input
numbers.
In Basic Mode, you can
also press Right to
switch to Advanced Mode.
In Advanced Mode, press
Right to cycle between
functions, and press Left
to return to Basic
Mode.
CrowAce.book Page 121 Wednesday, November 10, 2004 1:52 PM
DRAFT 1A palmOne, Inc. Confidential

122 :: Calculator
•Logic: Hexadecimal characters in keypad, plus logic functions such as and, not,
or and xor. In place of Float/Degrees (see below), this view includes options for
class (bin, oct, SDec, UDec, hex) and bits (8, 16, 32).
•Statistics: Statistical functions such as sum, factorial, and random number
generator.
•Weight/Temp: Weight and temperature conversions for metric and English
values.
•Length: Length conversions for metric and English values.
•Area: Area conversions for metric, traditional, and English values.
•Volume: Volume conversions for metric and English values.
4. Enter an integer for the number of decimal places to display.
5. Open the menus .
6. Select Pref, and then select the decimal display format: Float, Fixed x), Sci (x),
or Eng (x).
7. Open the menus .
8. Select Pref, and then select the number display format: degrees, radians, or grads.
Select Sto to store a
number in one of ten
memory slots. Select Rcl
to recall a stored number.
Select Con to access a list
of mathematical constants
such as Avogadro’s number
or the speed of light.
CrowAce.book Page 122 Wednesday, November 10, 2004 1:52 PM
DRAFT 1A palmOne, Inc. Confidential
Looking up contacts and other information :: 123
Looking up contacts and
other information
With the built-in search features on your Treo, you can find information quickly:
•Lookup: Enables you to dial your contacts by name. It locates people’s phone
numbers when you’re in the Phone or Messaging applications.
•Find: Searches through the text in all the applications on your Treo.
Looking up contacts
You can look up contacts directly from the Contacts list. This feature helps you locate
contacts quickly by entering just a few letters of a contact’s name.
1. Press the Phone/Send button.
2. Select the Contacts favorite button.
3. From the Contacts list, enter the first few letters of the contact you want to find.
You can enter:
• First name (JOH for John) or
• Last name (SMI for Smith) or
• First name initial and last name (JSM for John Smith)
If entering the first few
letters doesn’t start a
search, go to Applications
and select Contacts, and
then try step 2 again. To
set your Treo to search
from the Main View of the
Phone application, go to
that view, open the Options
menu, and select General
Preferences. Then select
the second pick list and
select Typing starts
contacts search.
To look up contacts in other
applications, select the
Lookup button if it appears.
CrowAce.book Page 123 Wednesday, November 10, 2004 1:52 PM
DRAFT 1A palmOne, Inc. Confidential
124 :: Looking up contacts and other information
For example, entering SM would display Smilla Anderson, John Smith, and
Sally Martin. Entering JSM finds only John Smith.
4. Do one of the following:
• Highlight the contact name, and then press Center to view the contents of
the record.
• Highlight any phone number, and then press Phone/Send to dial.
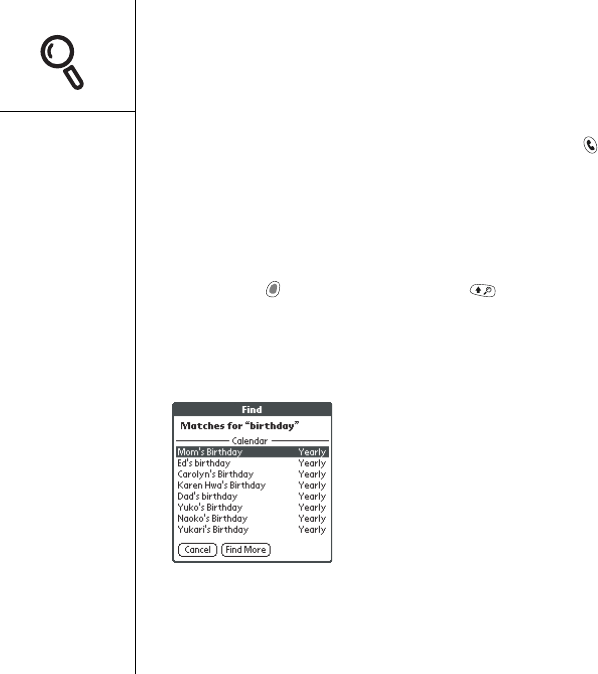
Using Find
The Find feature locates any text in the built-in applications and databases and
in some third-party applications. The Find feature performs an exact search on a
character string, including characters that are parts of words.
1. Press Option , and then press Shift/Find to open the Find dialog box.
2. Enter the text you want to find.
3. Select OK to start the search.
4. In the search results, select the text you want to review, or select Find More to
search additional applications.
CrowAce.book Page 124 Wednesday, November 10, 2004 1:52 PM
DRAFT 1A palmOne, Inc. Confidential
Beaming information :: 125
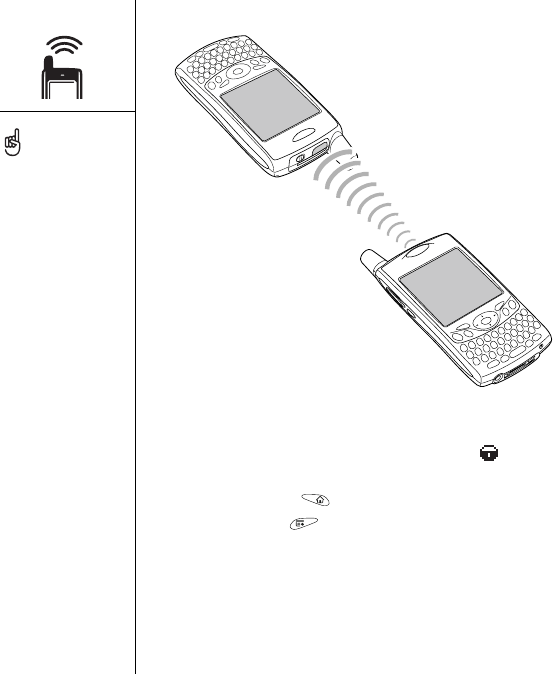
Beaming information
Your Treo is equipped with an IR (infrared) port that lets you beam information to
another Palm Powered device with an IR port. The IR port is located on the top of your
Treo, between the antenna and the ringer switch, behind the small dark shield.
Beaming a record
1. Select the entry or category you want to beam. If a lock appears next to the
item, it can’t be beamed.
2. Open the menus .
3. Select Record, and then select one of the following:
•Beam: Sends an individual record.
•Beam Category: Sends all entries in the current category.
4. When the Beam Status dialog box appears, point the IR port on your Treo directly
at the IR port of the receiving device.
5. Wait for the Beam Status dialog box to indicate that the transfer is complete
before you continue using your Treo.
You can store a beamed
application on your phone,
or send it to an expansion
card inserted in the
expansion card slot.
Beam your business card
in two key presses: From
the Main View in the Phone
application, open the
menus, and then press M.
If you beam a bookmark or
saved page from the Web
browser, it beams the URL,
not the contents of that
page.
CrowAce.book Page 125 Wednesday, November 10, 2004 1:52 PM
DRAFT 1A palmOne, Inc. Confidential
126 :: Beaming information
Beaming an application
Not all applications can be beamed. A Lock icon appears on the Beam screen
next to applications that cannot be beamed.
1. Go to Applications .
2. Open the menus .
3. Select Beam on the App menu.
4. Select the Beam From pick list and select whether the application you want
to beam is located on your Treo or on an expansion card.
5. Select the application you want to transfer.
6. Select Beam.
For best results, the path
between the two devices
must be clear of obstacles,
and both devices kept
stationary. If you have
difficulty beaming, shorten
the distance and avoid
bright sunlight.
If you do not select a
category upon receiving
a beamed item, the item
is placed in the Unfiled
category.
If you can’t receive beamed
information, try a soft reset
(see “Resetting your Treo”
on page 164).
CrowAce.book Page 126 Wednesday, November 10, 2004 1:52 PM
DRAFT 1A palmOne, Inc. Confidential
Beaming information :: 127
7. When the Beam Status dialog box appears, point the IR port on your Treo
directly at the IR port of the receiving device.
8. Wait for the Beam Status dialog box to indicate that the transfer is complete
before you continue using your Treo.
Receiving beamed information
1. Turn on your screen.
2. Point the IR port on your Treo directly at the IR port of the transmitting device
to open the Beam Status dialog box.
3. When the Beam dialog box appears, select a category for the entry.
4. Press Up to receive the beam or press Down to refuse it.
CrowAce.book Page 127 Wednesday, November 10, 2004 1:52 PM
DRAFT 1A palmOne, Inc. Confidential
CrowAce.book Page 128 Wednesday, November 10, 2004 1:52 PM
DRAFT 1A palmOne, Inc. Confidential

first month: managing applications :: 129
first month:
managing
applications
CrowAce.book Page 129 Wednesday, November 10, 2004 1:52 PM
DRAFT 1A palmOne, Inc. Confidential
130 :: Installing applications
Installing applications
Your Treo™ 650 smartphone comes with several built-in and ready to use applications.
You can also install any of the bonus software included on the Software Installation
CD as well as other third-party Palm OS® applications, such as business software,
games, and more. To learn more, go to www.palmOne.com/intl/software.
When you download an application to your computer, it is probably in a
compressed format such as a .zip or .sit file. If the file is compressed, you need to use
a decompression utility on your computer, such as Winzip or Unstuffit, before you
install applications on your Treo.
These instructions tell you how to install basic .prc (Palm OS application) and .pdb
(Palm OS database) files onto your Treo. Some Palm OS software uses an installer or
wizard to guide you through the process. Consult the documentation that came with
the software for details.
Installing applications from the Internet
You can install Palm OS applications directly from the Internet, using the Web browser.
When you download an application, it automatically installs on your Treo. Remember:
Palm OS applications have .prc or .pdb at the end of their file names.
1. Open the Web browser (see “Viewing a web page” on page 83).
2. Go to the page that contains the link to the application you want to download.
3. Press Left or Right to highlight the link to the file, and then press Center to
initiate the download process.
On a Windows computer,
you can also access
palmOne™ Quick Install by
selecting the Quick Install
icon in Palm®Desktop
software or on the Start
menu in the Programs
folder.
CrowAce.book Page 130 Wednesday, November 10, 2004 1:52 PM
DRAFT 1A palmOne, Inc. Confidential

Installing applications :: 131
Installing applications from a Windows computer
1. Drag and drop the file(s) onto the palmOne™ Quick
Install icon on the Windows desktop.
2. Select your username from the list, and then click OK.
3. Synchronize your phone with your computer to install
the application(s) on your Treo.
Installing applications from a Mac computer
1. Drag and drop the file(s) onto the Send To Device droplet in the Palm folder.
2. Select your username from the list, and then click OK.
3. Synchronize your phone with your computer to install the application(s) on
your Treo.
Getting help with third-party applications
If a you encounter a problem with a third-party application (such as an error message),
contact the application’s author or vendor. For general troubleshooting of third-party
applications, see “Third-party applications” on page 183.
Before you can install an
application from your
computer to your Treo,
you need to install
Palm Desktop software on
your computer (see
“Installing the desktop
synchronization software on
your computer” on
page 32).
To control whether files are
installed on your phone or
on an expansion card,
double-click the palmOne
Quick Install icon on a
Windows computer or open
the HotSync® menu and
select Install Handheld files
on a Mac. Select your
username, click Add, and
then select the files you
want to install.
CrowAce.book Page 131 Wednesday, November 10, 2004 1:52 PM
DRAFT 1A palmOne, Inc. Confidential
132 :: Removing applications
Removing applications
If you decide that you no longer need an application, or you want to free up memory on
your Treo, you can remove applications from your Treo or an expansion card (for more
on expansion cards, see “Inserting and removing expansion cards” on page 134). You
can remove only applications, patches, and extensions that you install; you cannot
remove the built-in applications that reside in the ROM portion of your Treo.
1. Go to Applications .
2. Open the menus .
3. Select Options, and then select Delete.
4. If you want to remove an application from an expansion card, insert the card into
your Treo.
5. Select the Delete From pick list and select the location of the application you
want to remove.
6. Select the application that you want to remove.
7. Select Delete.
8. Synchronize to remove the application from the Backup folder on your computer.
Some applications are
factory-installed in your
phone and cannot be
deleted. These are listed
with a Lock icon next
to them.
If you upgraded from a
previous version of
Palm Desktop software
your backup folder may be
located in the Palm folder.
Applications deleted from
your phone are kept on
your computer, in the
Archive folder of your
user folder.
If the application re-appears on your phone,
you may need to manually delete it from your
computer. Locate your Backup folder on your
computer (Windows: C:\Program
Files\palmOne\username; Mac: Mac
HD\Applications\palmOne\Users\username).
If you find a .prc or .pdb file for the application
you just removed, delete the file from the
Backup folder.
CrowAce.book Page 132 Wednesday, November 10, 2004 1:52 PM
DRAFT 1A palmOne, Inc. Confidential
Viewing application info :: 133
Viewing application info
The Info screens display basic statistics about the applications on your Treo.
1. Go to Applications .
2. Open the menus .
3. Select Info on the App menu.
4. At the bottom of the screen, select the type of information you want to view:
•Version: The version numbers of applications on your Treo.
•Size: The size (in kilobytes) of applications and information on your Treo.
•Records: The number of entries in different applications on your Treo.
5. Select Done.
CrowAce.book Page 133 Wednesday, November 10, 2004 1:52 PM
DRAFT 1A palmOne, Inc. Confidential
134 :: Using expansion cards
Using expansion cards
The expansion card slot on your Treo enables you to add Secure Digital (SD) cards
and MultiMediaCard cards to extend the storage capacity of your Treo. For example,
SD or MultiMediaCard expansion cards can store:
• Photos
• MP3 audio files
• Email attachments
•Games
• eBooks
• Applications
• Databases
•... and more
Your Treo is also compatible with Secure Digital input/output (SDIO) cards, which let
you add accessories, such as a presentation module, to your phone.
Although expansion cards are sold separately, your Treo includes a dummy, non-
functional card inside the expansion card slot. When you do not have a functioning
card inside the expansion card slot, reinsert the dummy card to protect the slot
opening.
Inserting and removing expansion cards
1. Press down and release the dummy card.
2. After you feel the expansion card slot eject the dummy card, remove the card
from the slot.
SD cards are faster than
MultiMediaCard cards for
reading and writing
information.
When you’re not using the
expansion card, reinsert the
dummy card to keep the
expansion card slot clean.
The warranty does not
cover damage by Secure
Digital (SD) cards that do
not meet SD Memory Card
Specifications. SD cards
that do not meet SD
Memory Card
Specifications may damage
Treo 650. SD cards that do
meet SD Memory Card
Specifications are marked
with the following logo:
CrowAce.book Page 134 Wednesday, November 10, 2004 1:52 PM
DRAFT 1A palmOne, Inc. Confidential
Using expansion cards :: 135
3. Hold your Treo with the screen facing you and the card with the label facing you.
The notch on the card should be in the lower-left corner next to the antenna.
4. Insert the card into the expansion card slot until you feel it lock into place and hear
the confirmation tone.
When you insert an
expansion card, the card
name appears as a
category with a Card icon
next to the name. To switch
between the applications
on the expansion card and
your phone, select the
category pick list at the top
of the screen and select
another category.
In order to run an
application on an
expansion card, you must
have enough free space in
the internal memory of
your Treo to accommodate
the program.
A. Notch
A
CrowAce.book Page 135 Wednesday, November 10, 2004 1:52 PM
DRAFT 1A palmOne, Inc. Confidential
136 :: Using expansion cards
Opening applications on an expansion card
After you insert an expansion card in the expansion card
slot, you can open any of the applications stored on the
expansion card.
1. Insert the expansion card into the expansion card
slot. The Applications View automatically appears.
2. Select the icon for the application you want to open.
3. Press Center to open the application.
Copying applications to an expansion card
You can copy applications between your Treo and your expansion card.
1. Go to Applications .
2. Open the menus .
3. Select Copy on the App menu.
4. Select the Copy To pick list and select the destination: card name or Phone.
5. Select the From pick list and select the location of the application you want to
copy: card name or Phone.
6. Highlight the application you want to copy.
7. Select Copy.
Before you copy an
application to an expansion
card, make sure that it is
compatible with Palm OS
version 5.4 or higher. Some
applications do not work
with expansion cards and
do not allow you to store
files in a location that is
separate from the
application.
CrowAce.book Page 136 Wednesday, November 10, 2004 1:52 PM
DRAFT 1A palmOne, Inc. Confidential
Using expansion cards :: 137
Viewing expansion card information
The Card Info application displays general information about the expansion card
that is currently in the expansion card slot.
• Go to Applications and select Card Info .
Renaming an expansion card
If you change the contents of an expansion card, you may at some point want to
rename the card to better match its contents.
1. Insert the expansion card into the expansion card slot.
2. Select the category pick list at the top of the screen and select All.
3. Select Card Info .
4. Open the menus .
5. Select Rename Card on the Card menu.
6. Enter a new name for the card.
7. S e l e ct O K.
Formatting an expansion card
Formatting an expansion card is similar to formatting a disk on a computer. When you
format an expansion card, you erase all the information stored on the card.
1. Insert the expansion card into the expansion card slot.
2. Select the category pick list at the top of the screen and select All.
3. Select Card Info .
4. Open the menus .
5. Select Format Card on the Card menu.
6. Enter a new name for the card.
7. S e l e ct O K.
Before copying information
to, renaming, or formatting
and expansion card, make
sure the card is not write-
protected. See the
instructions that came with
your card for details.
CrowAce.book Page 137 Wednesday, November 10, 2004 1:52 PM
DRAFT 1A palmOne, Inc. Confidential
CrowAce.book Page 138 Wednesday, November 10, 2004 1:52 PM
DRAFT 1A palmOne, Inc. Confidential

when you’re ready: customizing your Treo :: 139
when you’re ready:
customizing
your Treo
CrowAce.book Page 139 Wednesday, November 10, 2004 1:52 PM
DRAFT 1A palmOne, Inc. Confidential
140 :: Phone settings
Phone settings
Selecting ringtones
You can set different tones for different types of incoming phone calls and alerts.
1. Press the Phone/Send button.
2. Open the menus .
3. Select Options, and then select Sound Preferences.
4. Select the Tones box.
5. Select ringtones and alerts from any of the following pick lists:
•Known Caller Tone: An incoming call from someone in your Contacts or
Favorites.
•Unknown Caller Tone: An incoming call from someone identified by caller
ID who is not in your Contacts or Favorites.
•Roaming Tone: A special tone for incoming calls when you’re outside your
home mobile network.
•Voicemail Tone: A new voicemail.
•Service Tone: A warning of a service change, such as moving into and out
of a mobile network coverage area.
6. Select Done.
You can also record,
preview, delete, and send,
sounds on your phone. Go
to Applications and select
Sounds. Select Tones, and
then select Manage. To
record a sound, select New.
To play a sound, select it
and press Center. To delete
a sound, select it and press
Backspace, and to send a
sound, select it and then
select Send.
Want more ringtones? You
can download any
compatible ringtone directly
to your phone (see
“Downloading files from a
web page” on page 86).
You can also download
ringtones to your computer
and then email them to
your phone.
CrowAce.book Page 140 Wednesday, November 10, 2004 1:52 PM
DRAFT 1A palmOne, Inc. Confidential
Phone settings :: 141
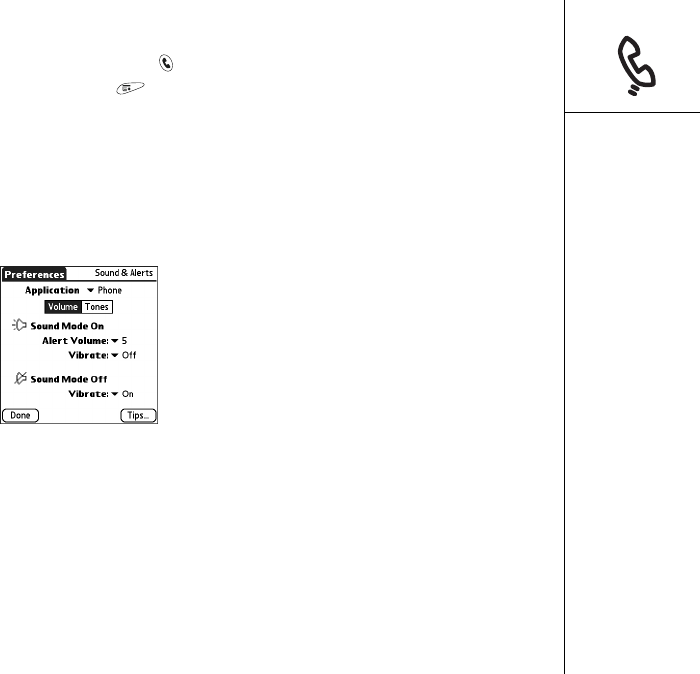
Selecting Alert Volume and Vibrate settings
1. Press the Phone/Send button.
2. Open the menus .
3. Select Options, and then select Sound Preferences.
4. Select the Alert Volume pick list and select a volume level.
5. Select the first Vibrate pick list and indicate if you want your phone to vibrate when
you receive a call or alert and Sound Mode is on.
6. Select the second Vibrate pick list and indicate if you want your phone to vibrate
when you receive a call or alert and Sound Mode is off.
7. Select Done.
Adjusting call or music volume
While a call is in progress, press the Volume button on the side of your Treo™ 650
smartphone to adjust the call volume. While music is playing, press the Volume button
to adjust the music volume.
Adjusting ringer volume
When a call is not in progress and music is not playing, press the Volume button on
the side of your Treo to adjust ringer volume, and then press the Side button to
confirm your selection.
CrowAce.book Page 141 Wednesday, November 10, 2004 1:52 PM
DRAFT 1A palmOne, Inc. Confidential
142 :: Phone settings
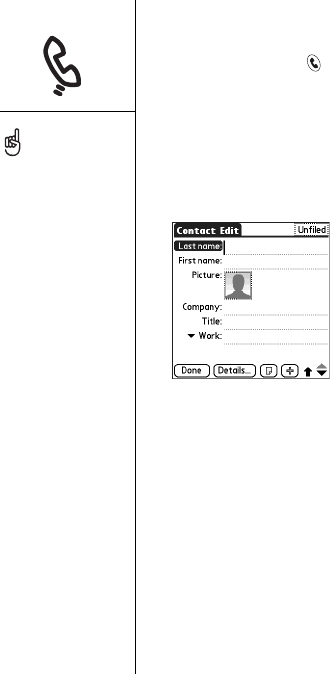
Assigning a caller ID photo
1. Press Phone/Send .
2. Select the Contacts favorites button.
3. Open the contact you want to give a photo caller ID.
4. Select the Picture box.
5. Select Camera to take a photo and add it to this contact entry when you save
the photo (if your Treo includes a camera), or select Photos to add an existing
photo to this contact entry.
6. Select the photo you want to assign to this contact.
7. Sel e c t D o n e.
You can also adjust the
ringer volume by pressing
the Volume button when a
call or music is not in
progress.
CrowAce.book Page 142 Wednesday, November 10, 2004 1:52 PM
DRAFT 1A palmOne, Inc. Confidential
Phone settings :: 143
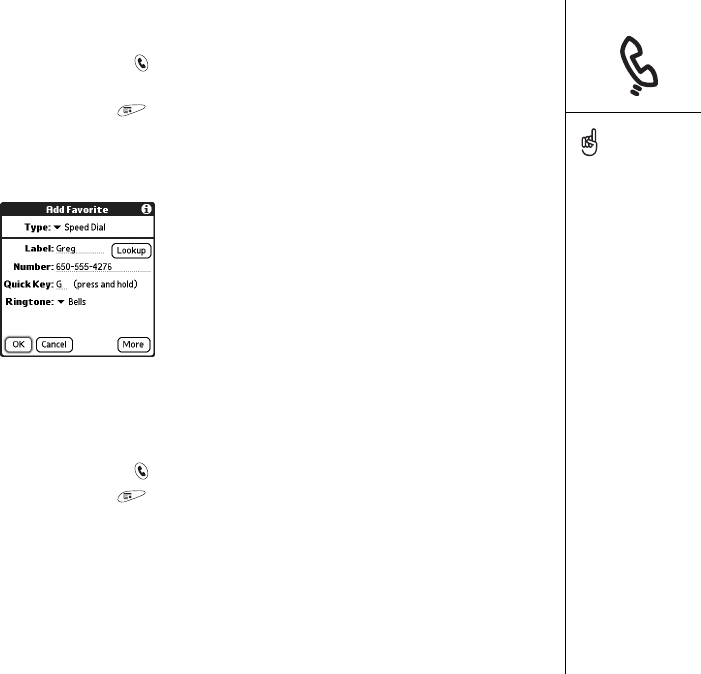
Assigning a caller ID ringtone
1. Press Phone/Send .
2. Select the favorite you want to give a ringtone.
3. Open the menus .
4. Select Edit Favorites on the Record menu.
5. Select the Ringtone pick list and select a tone for this contact entry.
6. Select OK.
Selecting wallpaper for the Phone application
If you have images stored on your Treo, you can select different wallpaper for the
Main View in the Phone application.
1. Press Phone/Send .
2. Open the menus .
3. Select Options, and then select General Preferences.
4. Select the pick list at the top of the screen and select Show Wallpaper.
5. Select the thumbnail image and select a wallpaper image for your Phone
application.
6. Select OK.
If you prefer to use the
onscreen Dial Pad, assign
the Dial Pad as the default
wallpaper.
If you remove the Dial Pad
as the wallpaper, you can
still access it quickly. Press
Phone, and then press
Center. Dial Pad is always
the first selection in your
redial list.
You can also set the
background for the
Calendar’s Agenda View.
See “Customizing display
options for your calendar”
on page 105 for details.
CrowAce.book Page 143 Wednesday, November 10, 2004 1:52 PM
DRAFT 1A palmOne, Inc. Confidential
144 :: System sound settings
System sound settings
You can immediately silence all sounds on your Treo, including phone ringtones,
Calendar alerts, and system sounds. This does not mute the speaker on your Treo
during a phone call.
Setting the ringer switch
1. Slide the ringer switch to Sound Mode Off.
2. To hear all sounds again, slide the ringer switch to Sound Mode On.
When you slide the ringer switch back to the Sound Mode On position, it restores
the previous sound settings. For example, if the phone ring volume is set to 7 and you
slide the ringer switch to Sound Mode Off, you will not hear the phone ring. When you
move the ringer switch back to Sound Mode On, the phone ring volume is still set to 7.
Setting system volume levels
1. Go to Applications and select Sounds .
2. Select the Application pick list and select General.
3. Select the System Volume and Game Volume pick lists and select a volume level.
4. Select Done.
If the ringer switch is set to
no sound, the ringer setting
overrides the sound
settings and all sounds are
turned off.
Your Treo includes a silent
alarm that can vibrate even
when the ringer switch is
set to Sound Mode Off.
A. Sound Mode On
B. Sound Mode Off
BA
CrowAce.book Page 144 Wednesday, November 10, 2004 1:52 PM
DRAFT 1A palmOne, Inc. Confidential
Display and appearance :: 145
Display and appearance
Adjusting the brightness
Depending on the lighting conditions in which you’re using your Treo, you may need
to adjust the brightness of the screen.
1. Press Option , and then press .
2. Press Left and Right to adjust the brightness.
3. Select Done.
Changing the screen font
You can change the screen font in Calendar, Contacts, Memos, Messaging, and Tasks.
The font styles may vary between applications.
1. Open the application in which you want to change the font.
2. Open the menus .
3. Select Options, and then select Font.
4. Select a font style.
5. Select OK.
To automatically set the
brightness to the preset low
setting, press Option, and
then press Right Shift.
A. Small font
B. Small bold font
C. Large font
D. Large bold font
CrowAce.book Page 145 Wednesday, November 10, 2004 1:52 PM
DRAFT 1A palmOne, Inc. Confidential
146 :: Display and appearance
Aligning the screen
Occasionally, your Treo screen may need to be readjusted. If this occurs, you may see
the wrong feature being activated when you tap the screen. To fix the problem, you
can align the screen any time.
1. Go to Applications and select Prefs .
2. Select Touchscreen.
3. Follow the onscreen instructions.
4. Select Done.
Changing the system color scheme
1. Go to Applications and select Prefs .
2. Select Color Theme.
3. Select a color scheme.
4. Select Done.
You can also set the
wallpaper for the Main View
in the Phone application
(see “Selecting wallpaper
for the Phone application”
on page 143) and the
background for the
Calendar’s Agenda View
(see “Customizing display
options for your calendar”
on page 105).
CrowAce.book Page 146 Wednesday, November 10, 2004 1:52 PM
DRAFT 1A palmOne, Inc. Confidential
Applications settings :: 147
Applications settings
Arranging applications by category
You can assign an application to a category and then display a specific category of
applications in the Applications View.
1. Go to Applications .
2. Open the menus .
3. Select Category on the App menu.
4. Select the pick list next to each application and select a category.
5. Select Done.
Displaying applications by category
Do one of the following:
• Press Applications repeatedly to cycle through the categories.
• Select the category pick list at the top of the screen and select a category.
The Applications View
displays each application
as an icon, or you can view
them as a list.
1. Go to Applications.
2. Open the menus.
3. Select Options, and then
select Preferences.
4. Select the View By pick
list and select List.
5. Select OK.
To create a new category,
select the category pick list
and select Edit Categories.
Select New, and then enter
the category name. Select
OK to close the dialog box,
and then select OK.
CrowAce.book Page 147 Wednesday, November 10, 2004 1:52 PM
DRAFT 1A palmOne, Inc. Confidential

148 :: Button settings
Button settings
Setting Buttons Preferences
Buttons Preferences lets you select which applications are associated with
the buttons on your Treo.
1. Go to Applications and select Prefs .
2. Select Buttons.
3. Select the pick list next to the button or key
combination you want to re-assign and select an
application.
4. Select Done.
Setting default applications
Sometimes, one application looks for another
application to handle information (for example, a mail
application might open a browser when you select a link
in an email message).
1. Go to Applications and select Prefs .
2. Select Default Apps.
3. Select each pick list and select the application you
want to associate with that function.
4. Select Done.
You can also pick an
application to open with the
HotSync® button on the
USB sync cable.
To restore all the buttons
and key combinations to
their factory settings, select
Default.
CrowAce.book Page 148 Wednesday, November 10, 2004 1:52 PM
DRAFT 1A palmOne, Inc. Confidential
Date and time settings :: 149
Date and time settings
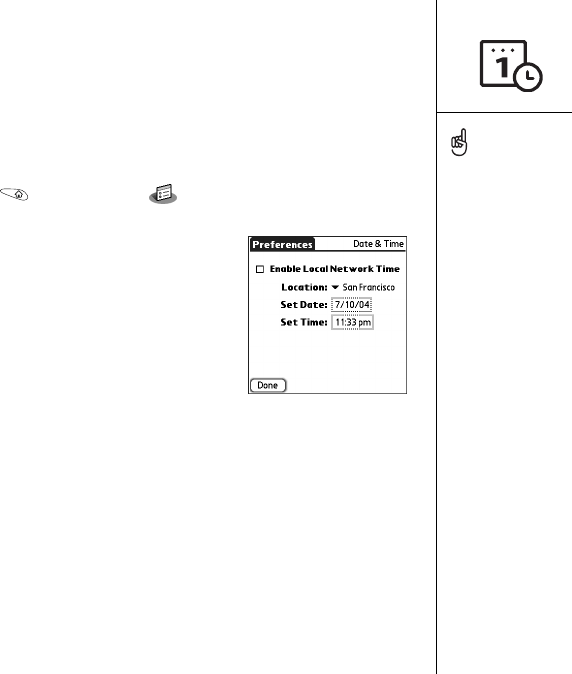
Setting the date and time
Date & Time Preferences enables you to set the time, date, time zone, and Daylight
Savings Time setting for your Treo.
1. Go to Applications and select Prefs .
2. Select Date & Time.
3. Uncheck the Enable Local Network Time box.
4. Select the Location pick list and select the city
closest to your current location. If a nearby city is
not on the list, follow these steps to add a city:
• Select Edit List.
• Select Add.
• Select a city in your time zone, and then
select OK.
• If necessary modify any of the settings in the Edit Location dialog box.
• Select OK.
5. Select the Set Date box. Highlight the current year, month, and date, and then
press Center to set the date.
6. Select the Set Time box, and then select the current time.
7. S e l e ct O K.
8. Select the Daylight Saving pick list and select On or Off.
9. Select Done.
If your wireless service
provider supports this
feature, you can check the
Enable Local Network box
to synchronize the date and
time on your phone with
the network. Then
whenever your phone is on
and you are inside a
coverage area, the date and
time are updated.
CrowAce.book Page 149 Wednesday, November 10, 2004 1:52 PM
DRAFT 1A palmOne, Inc. Confidential
150 :: Date and time settings
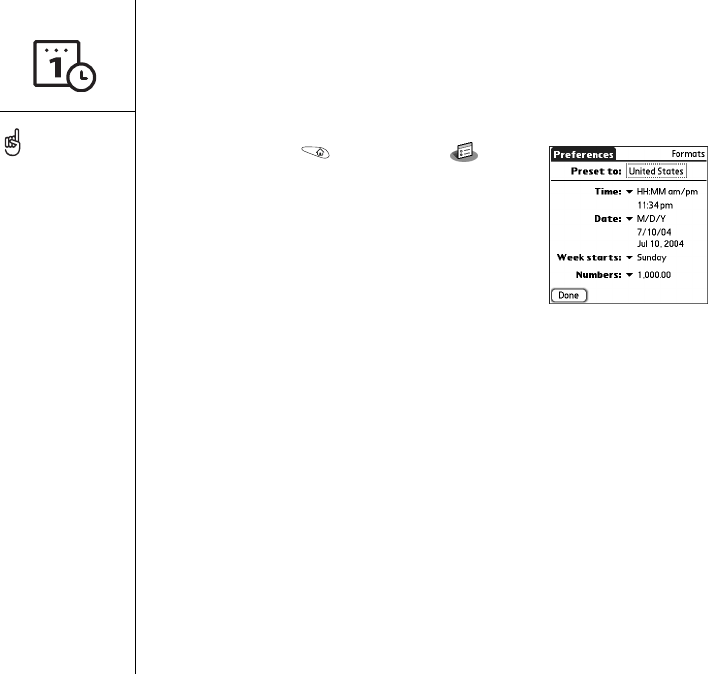
Setting date and time formats
Formats Preferences enables you to select number conventions based on geographic
regions. For example, in the United Kingdom, time often is expressed using a 24-hour
clock. In the United States, time is expressed using a 12-hour clock with an AM or PM
suffix. All the built-in applications on your Treo use the Format Preferences settings.
1. Go to Applications and select Prefs .
2. Select Select Formats.
3. Set any of the following preferences:
•Preset to: The standard number conventions for
your country. When you select a country, the other
Formats Preferences are automatically set to that
country’s conventions. You can also edit each
option individually.
•Time: The time format. Select HH:MM to display a 24-hour clock.
•Date: The date format.
•Week starts: The first day of the week (usually Sunday or Monday).
•Numbers: The format for numbers with decimal points and commas.
4. Select Done.
The Week starts setting
controls the Day, Week,
Month, Year, and List Views
in Calendar and all other
aspects of your phone that
display a calendar.
CrowAce.book Page 150 Wednesday, November 10, 2004 1:52 PM
DRAFT 1A palmOne, Inc. Confidential
Power Preferences :: 151
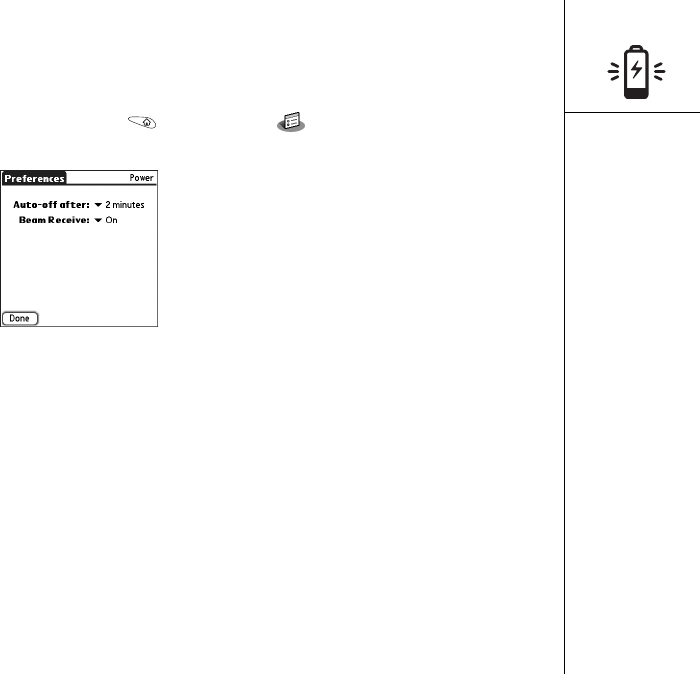
Power Preferences
1. Go to Applications and select Prefs .
2. Select Power.
3. Set any of the following preferences:
•Auto-off After: The time that elapses before your screen turns off automatically.
•Beam Receive: The setting for whether you want your Treo to receive beamed
information.
4. Select Done.
CrowAce.book Page 151 Wednesday, November 10, 2004 1:52 PM
DRAFT 1A palmOne, Inc. Confidential
152 :: Locking your phone and info
Locking your phone and info
Your Treo includes several features that help you protect your phone from inadvertent
use and keep your information private. The built-in security software enables you to
use your Treo for emergency calls even if the handset is locked.
•Keyguard: Manually disables all buttons and the screen’s touch-sensitive feature
to prevent accidental presses in your briefcase or pocket.
•Auto-Keyguard and touchscreen lockout: Automatically enables Keyguard after a
period of inactivity and lets you disable the screen’s touch-sensitive feature during
an active call or call alert.
•Phone Lock: Requires a password to make and receive calls with your SIM card.
•System password lock: Requires a password to see any information on your Treo.
•Private records: Masks or hides items marked as private and requires a password
to view them.
Using Keyguard
Your Treo includes a feature that locks the keyboard so that you don’t accidentally
press buttons or activate screen items while the phone is in a pocket or bag.
1. With the Treo screen on, press Option and the Power/End button to
enable Keyguard.
2. To disable Keyguard, press Center.
To avoid accidentally
pressing onscreen buttons
while you’re holding the
phone up to your ear to
speak, you can disable the
screen’s touch-sensitive
feature during active calls.
When the screen’s touch-
sensitive feature is
disabled, you must use the
5-way navigator to access
the buttons on the Active
call screen. (See “Using
Auto-Keyguard and
touchscreen lockout” on
page 153).
CrowAce.book Page 152 Wednesday, November 10, 2004 1:52 PM
DRAFT 1A palmOne, Inc. Confidential
Locking your phone and info :: 153
Using Auto-Keyguard and touchscreen lockout
Auto-Keyguard lets you automatically lock the keyboard after a period of inactivity.
1. Go to Applications and select Prefs .
2. Select Keyguard.
3. Set either of the following preferences:
•Auto-Keyguard: The period of inactivity that passes before the keyboard
automatically locks.
•Disable touchscreen when: The conditions that disable the screen’s touch-
sensitive feature.
4. Select Done.
Using Phone Lock
You can lock your SIM card to prevent unauthorized use of your mobile account. When
your SIM card is locked, you must enter the correct PIN to unlock it, even if you move
it to a different phone.
1. Press Phone/Send .
2. Open the menus .
3. Select Options, and then select Phone Lock.
4. Check the Lock SIM box.
5. When prompted, enter the current PIN and select OK. Unless you changed
your PIN, enter the default PIN, provided with your wireless service provider’s
account materials.
6. If you want to change the PIN, select Change PIN, enter a new PIN, and then
select OK. Repeat this step to verify the new PIN.
7. Turn your phone off to activate the phone lock feature.
8. To turn your phone on again, press and hold the Power/End button , enter your
PIN, and then select OK to unlock your phone.
Your SIM card locks again when you turn off your phone and then turn it back on.
To change your password,
select the Password box,
enter your current
password, and then enter
the new password. To
delete your password,
select the Password box,
and then select Unassign.
Important: If your SIM card
is locked and you enter the
wrong PIN more than three
times, your SIM will be
blocked, and you must call
your wireless service
provider for your unique
PUK (PIN unlock key).
CrowAce.book Page 153 Wednesday, November 10, 2004 1:52 PM
DRAFT 1A palmOne, Inc. Confidential
154 :: Locking your phone and info
To permanently unlock your SIM card:
1. Open the menus .
2. Select Options, and then select Phone Lock.
3. Uncheck the Lock SIM box.
4. When prompted, enter the current PIN and select OK.
Using system password lock
To protect your personal information, you can lock the system so that you need to
enter your password to access any of your information or use other features of
your Treo.
1. Go to Applications and select Security .
2. Select the Password box.
3. Assign a password and a password hint.
4. Select the Auto Lock Device box.
5. When prompted, enter your password.
6. Select one of the following options:
•Never: Prevents your Treo from locking automatically.
•On power off: Locks your Treo when you turn off the screen, or when it
shuts off with the Auto-off feature.
•At a preset time: Locks your Treo at a specific time of day.
•After a preset delay: Locks your Treo after a period of inactivity.
Important: If you lock your
system, you must enter the
exact password to unlock
it. If you forget the
password, you need to
perform a hard reset to
resume using your phone.
Performing a hard reset
deletes all the entries in
your phone. However, you
can restore all previously
synchronized info the next
time you sync (see
“Synchronizing contacts
and other information” on
page 33).
To lock your system
manually, select Lock &
Turn Off, and then select
Off & Lock.
CrowAce.book Page 154 Wednesday, November 10, 2004 1:52 PM
DRAFT 1A palmOne, Inc. Confidential
Locking your phone and info :: 155
Setting Owner Preferences
You can use Owner Preferences to record information that you want to associate with
your Treo, such as your name, company name, and phone number. If you lock your
keyboard, the Owner Preferences information appears on the screen that requests
your password to unlock it, and you must also enter your password to change the
Owner Preferences information.
1. Go to Applications and select Prefs .
2. Select Owner.
3. If you assigned a password with the Security application, select Unlock, enter
your password, and then select OK to continue.
4. Enter the text that you want to appear in the Owner Preferences screen.
5. Select Done.
Working with private entries
In most applications you can mark individual entries as private. All private entries
remain visible and accessible until you select the Security setting to hide or mask
them. When you hide entries, they do not appear anywhere in the application. When
you mask entries, a visual placeholder appears where the entry would normally
appear. If you define a password, you must enter it to display private entries. If you
do not define a password, you (or anyone else) can reveal private entries without
a password.
As a security measure,
masked Contacts entries
are temporarily hidden
when you perform a
search. So you will not see
a placeholder for masked
entries when viewing the
results of a Lookup or
Find request.
CrowAce.book Page 155 Wednesday, November 10, 2004 1:52 PM
DRAFT 1A palmOne, Inc. Confidential
156 :: Locking your phone and info
1. Display the entry that you want to mark private.
2. Select Details.
3. Check the Private box.
4. Select OK.
Hiding or masking all private records
Make sure the entries you want to mask are marked private.
1. Go to Applications and select Security .
2. Select the Current Privacy pick list and select either Hide Records or Mask
Records.
Viewing all private records
Make sure the entries you want to mask are marked private.
1. Go to Applications and select Security .
2. Select the Current Privacy pick list and select Show Records.
3. If the Show Private Records dialog box appears, enter your password, and then
select OK.
Viewing private entries in a specific application
Open the application that contains the private entries you want to display.
1. Open the menus .
2. Select Options, and then select Security.
3. Select the Current Privacy pick list and select Show Records.
4. Select OK.
CrowAce.book Page 156 Wednesday, November 10, 2004 1:52 PM
DRAFT 1A palmOne, Inc. Confidential
Locking your phone and info :: 157
Security and Palm®Desktop software (Windows)
The Windows version of Palm Desktop software observes the security password for
your Treo. If you forget your Treo password, you cannot view your information in
Palm Desktop. You can change your password, but all entries marked as private will
be deleted. You can restore these entries the next time you sync.
1. Go to Applications and select Security .
2. Select the Password box.
3. Select the Lost Password box.
4. Select Yes.
If you want additional security for Palm Desktop files, you may wish to purchase a
third-party solution.
Connecting to a virtual private network
If you want to use your Treo to access your corporate email account or other files on
your corporate server, you may need to set up a virtual private network (VPN) on your
Treo. A VPN enables you to log in to your corporate server through the company's
firewall (security layer). Without a VPN, you cannot break through the firewall to gain
access to the server.
The Auto Sync feature in
the VersaMail® application
may not work with a VPN
connection.
CrowAce.book Page 157 Wednesday, November 10, 2004 1:52 PM
DRAFT 1A palmOne, Inc. Confidential
158 :: Locking your phone and info
You need to set up a VPN to access a corporate server in either of the following
two situations:
• Your company's wireless local area network (LAN) is located outside the firewall.
• Your company's wireless LAN is located inside the firewall, but you are trying to
access the network from outside the firewall (for example, from a public location
or at home).
Check with your company's system administrator to see if a VPN is required to
access the corporate network. If you need a VPN, you must purchase and install a
third-party VPN client to use this feature.
1. Install your third-party VPN client. See “Installing applications” on page 130
for details.
2. Go to Applications and select Prefs .
3. Select VPN.
4. Enter the settings provided by your corporate system administrator.
CrowAce.book Page 158 Wednesday, November 10, 2004 1:52 PM
DRAFT 1A palmOne, Inc. Confidential

if something happens: help :: 159
if something happens:
help
CrowAce.book Page 159 Wednesday, November 10, 2004 1:52 PM
DRAFT 1A palmOne, Inc. Confidential

160 :: Upgrading from another Palm Powered® device
Upgrading from another Palm
Powered® device
To transfer all compatible applications and information from your previous device to
your new Treo™ 650 smartphone:
1. Synchronize your old device with your old desktop software to back up your
information one last time.
2. Install the desktop synchronization software from the palmOne Software
Installation CD (see “Installing the desktop synchronization software on your
computer” on page 32). During the installation process, sync your new Treo with
your new desktop software. When prompted to select a username for your new
Treo, be sure to select the existing username for your old device.
3. Some third-party applications may be quarantined by HotSync® Manager because
they are not compatible with the Palm OS® software version 5.4 on your Treo. Do
not manually install any quarantined files (see the documentation that came with
the third-party applications for more information).
4. If you plan to continue using your old device, perform a hard reset (see “Performing
a hard reset” on page 165) to remove its associated username. Each device you
synchronize with your computer must have a unique name. The next time you
synchronize with your old device, be sure to assign it a new username.
If you experience problems with your Treo 650 after performing the upgrade steps in
this section, you may have incompatible applications that HotSync Manager did not
quarantine. Incompatible applications can lead to numerous issues, including soft or
hard resets, “system error” warnings, crashes, etc. You may need to create a new user
name for your Treo 650, and then manually install your third-party applications from
Always use the same
language for your Treo and
your desktop software.
Otherwise, you may lose
information.
CrowAce.book Page 160 Wednesday, November 10, 2004 1:52 PM
DRAFT 1A palmOne, Inc. Confidential
Upgrading from another Palm Powered® device :: 161
their original source files (on your hard drive or the original installation CD).
Check with the third-party developer of each program for software updates and
for information regarding compatibility with Treo 650.
If you experience problems after upgrading, visit http://www.palmOne.com/intl/
support and check the Knowledge Library for additional information about transferring
your information from your previous Palm Powered device to
your Treo 650.
After upgrading, there are a few things you need to know about your new Treo:
•Address Book: This application is now called Contacts. To open Contacts, press
the Phone/Send button, and then use the 5-way navigator to select the
Contacts favorite.
•Date Book+: This application is now called Calendar. To access this application,
press the Calendar button.
•Applications: Some previous Palm Powered devices called this the Home screen
or Applications Launcher. To access this screen, press Applications .
•Find: Some previous Palm Powered devices opened this global search engine by
tapping the Magnifying Glass icon in the Graffiti area. Now you can access it by
pressing Option , and then pressing Shift/Find .
•Menu items: Users familiar with Graffiti’s Menu command can now access system
menus by pressing Menu (see “Selecting menu items” on page 23).
•Backlight: Treo includes a keyboard backlight. The keyboard backlight activates
automatically when the screen turns on. It shuts off automatically when the screen
turns off and when an active call lasts longer than a minute.
To access a menu shortcut,
open the menus, and then
press the letter for the
menu shortcut.
Some third-party utilities
allow you to back up your
old device’s information
onto an expansion card,
and then transfer the info
to your Treo. We do not
recommend this method
because any incompatible
applications are also
transferred to your Treo.
CrowAce.book Page 161 Wednesday, November 10, 2004 1:52 PM
DRAFT 1A palmOne, Inc. Confidential

162 :: Upgrading from another Palm Powered® device
•Center button: If you used a previous Treo phone, you probably pressed the
Spacebar to activate commands or dial numbers. With this Treo phone, we
recommend pressing Center to activate commands and pressing Phone/Send
to dial.
•Power/End button: The fourth button on the right is used to control the screen and
is not an application button.
•Internet connection: This Treo was designed to work on high-speed wireless data
network, such as a GPRS or EDGE. When you sign up for a GPRS or an EDGE
wireless data account, these settings are automatically configured on your Treo. If
you prefer to use an older, manual dial-up connection, enter your Internet service
provider’s settings in Network Preferences.
•5-way navigator compatibility: Some Palm OS 5 applications are optimized for a
5-way navigator on devices other than Treo. You may notice inconsistencies with
software that is not designed with Treo in mind.
•Web browser bookmarks: You can use the Web browser on your Treo 650 to store
up to 100 bookmarks, but you cannot import or transfer bookmarks from other
web browsers, such as Web Pro.
•Photos: You can use the Media Desktop application to transfer photos from your
old device onto your Treo 650 (Windows only). To transfer photos from your old
device onto your Treo 650, open the Media Desktop application, select your
username, click Add Media and locate the files in the backup folder. The files may
be located in any of the following folders:
• C:\Program Files\palmOne\Treo Pictures\(user name)
• C:\Program Files\Handspring\Treo Pictures\(user name)
• C:\Program Files\Palm\Treo Pictures\(user name)
Mac users can use the
Send to Device droplet to
transfer photos from your
old device to your Treo
650. “Installing applications
from a Mac computer” on
page 131 for details.
CrowAce.book Page 162 Wednesday, November 10, 2004 1:52 PM
DRAFT 1A palmOne, Inc. Confidential

Trouble installing the desktop software? :: 163
Trouble installing the desktop
software?
The palmOne Software Installation CD installs the software and drivers that let you
synchronize with Palm Desktop software or Microsoft Outlook for Windows. If you
want to synchronize with a different personal information manager (PIM), you must
install a third-party solution. Contact the PIM’s author or vendor to learn if software
is available for your Treo.
1. Restart your computer.
2. Quit any active applications, including virus scanners and Internet security
applications.
3. Make sure you’re installing the version of the software that came with your Treo on
the palmOne Software Installation CD. Other versions may not work with this Treo.
4. Make sure your computer profile includes administrator rights to install software.
In large organizations, these are usually granted by the system administrator.
CrowAce.book Page 163 Wednesday, November 10, 2004 1:52 PM
DRAFT 1A palmOne, Inc. Confidential
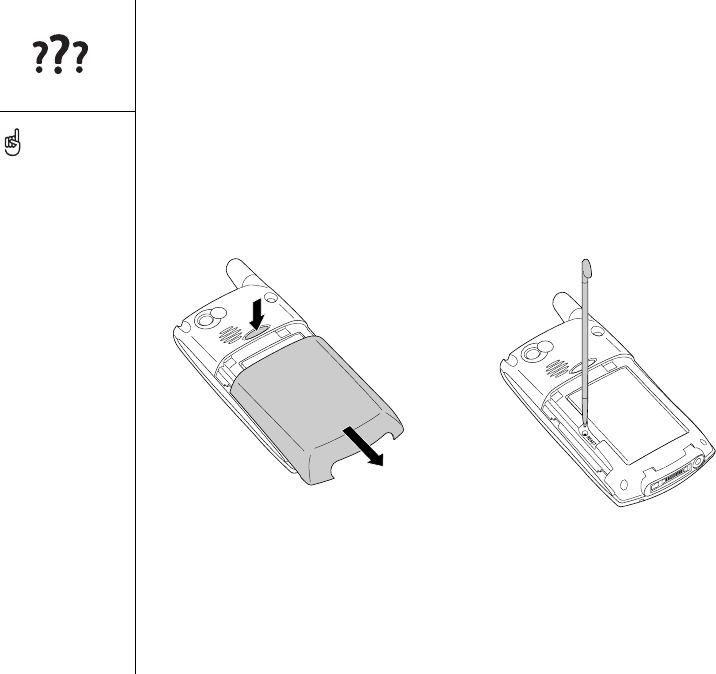
164 :: Resetting your Treo
Resetting your Treo
Performing a soft reset
A soft reset is similar to restarting a computer. If your Treo is not responding
or you have trouble synchronizing with your computer, a soft reset may help.
1. Press the Battery Door Release button and slide the battery door downward
to remove it from your Treo.
2. Use the stylus tip to gently press the reset button on the back of your Treo.
Performing a system reset
A system reset, also called a safe or warm reset, tells your Treo to stop what it’s doing
and start over again without loading any system extras. If your Treo loops or freezes
during a soft reset, a system reset may help. Performing a system reset allows you
to get out of an endless loop in order to uninstall a third-party application causing
the looping.
If you need to perform a
system reset and disable
conflicting applications,
always end the process
with a soft reset. This
returns your Treo to normal
operation.
CrowAce.book Page 164 Wednesday, November 10, 2004 1:52 PM
DRAFT 1A palmOne, Inc. Confidential
Resetting your Treo :: 165
1. Press the Battery Door Release button and slide the battery door downward
to remove it from your Treo.
2. While pressing and holding Up , use the tip of the stylus to gently press
the reset button on the back of your Treo.
3. When the Palm Powered logo appears, release Up .
4. Delete the third-party application that you suspect is causing the problem.
5. Perform a soft reset. The wireless features of your phone are not available until
you complete this step.
Performing a hard reset
A hard reset erases all information and third-party software on your Treo. Never
perform a hard reset without first trying a soft reset and a system reset. You can
restore previously synchronized information the next time you sync.
A hard reset can tell you whether a problem stems from your Treo or from an
application installed on it. If you do not experience the problem after you perform a
hard reset, the problem may be related to software you installed. See “Third-party
applications” on page 183 for suggestions on diagnosing third-party software issues.
1. Press the Battery Door Release button and slide the battery door downward to
remove it from your Treo.
2. While pressing and holding Power/End , use the tip of the stylus to gently
press the reset button on the back of your Treo.
3. Continue pressing and holding Power/End . First the palmOne logo appears
with a progress bar, and then the circular Palm Powered logo appears. When the
circular Palm Powered logo appears, release Power/End .
4. When the “Erase all data?” prompt appears, press Up to confirm the hard reset.
5. If a language selection screen appears, select the same language you selected for
your desktop software.
Some third-party
applications do not create a
backup on your computer
when you synchronize. If
you perform a hard reset,
you may lose data in these
applications and you will
need to reinstall the
application after the hard
reset. Please contact the
developer to find out which
data is backed up during
synchronization.
CrowAce.book Page 165 Wednesday, November 10, 2004 1:52 PM
DRAFT 1A palmOne, Inc. Confidential
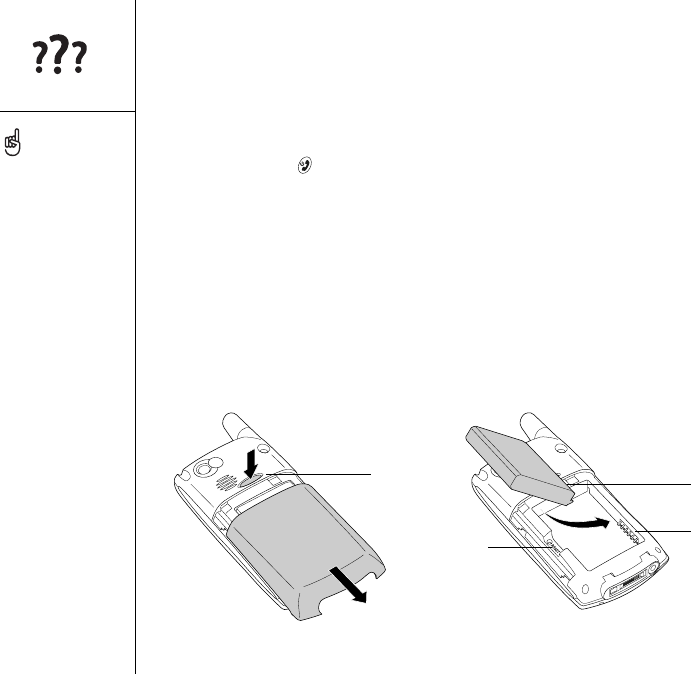
166 :: Replacing the battery
Replacing the battery
Your Treo 650 comes with a replaceable battery. Be sure to use a replacement
battery that is compatible with Treo 650.
1. Press Power/End to turn off the screen.
2. Press the Battery Door Release button and slide the battery door downward
to remove it from your Treo.
3. Place a finger in the notch between the stylus and the battery and lift the
battery up at a 45 degree angle.
4. Align the metal contacts on the battery with the contacts inside the battery
compartment.
5. Insert the battery into the compartment at a 45 degree angle, pressing it into
place. Slide the battery door onto the back of the phone until it clicks into place.
6. Wait for your Treo to turn on, and then enable the network time or set the date
and time when prompted.
Be sure to dispose of your
old battery properly. In
some areas, disposal in
household or business
trash is prohibited.
AB
C
D
A. Battery Door Release button
B. Battery contacts
C. Notch
D. Phone contacts
CrowAce.book Page 166 Wednesday, November 10, 2004 1:52 PM
DRAFT 1A palmOne, Inc. Confidential
Screen :: 167
Screen
The screen appears blank
1. When a call lasts longer than one minute, the screen automatically turns off.
Press any key except Power/End to wake up the screen. Pressing Power/End
hangs up the call.
2. Look closely at the screen. If you can see a dim image, try adjusting the
screen brightness (see “Adjusting the brightness” on page 145).
3. If that doesn’t work, perform a soft reset (see “Performing a soft reset” on
page 164).
4. If that doesn’t work, connect the Treo to the AC charger (see “Charging the battery”
on page 12) and perform a soft reset again.
5. If that doesn’t work, perform a hard reset (see “Performing a hard reset” on
page 165).
The screen doesn’t respond accurately to taps or activates
wrong features
1. Go to Applications and select Prefs .
2. Select Touchscreen.
3. Follow the onscreen instructions to align the screen.
4. Select Done.
To find carrying cases that
protect the screen and
other useful accessories,
visit www.palmOne.com/
intl.
CrowAce.book Page 167 Wednesday, November 10, 2004 1:52 PM
DRAFT 1A palmOne, Inc. Confidential

168 :: Network connection
Network connection
Signal strength is weak
1. If you’re standing, move about 10 feet in any direction.
2. If you’re in a building, move near a window. Open any metal blinds.
3. If you’re in a building, move outdoors or to a more open area.
4. If you’re outdoors, move away from large buildings, trees, or electrical wires.
5. If you’re in a vehicle, move your Treo level with a window.
Treo won’t connect to the mobile network
1. Try the suggestions above for weak signals.
2. Turn off your phone and turn it on again (see “Turning your phone on and off” on
page 15).
3. Remove the SIM card and re-insert it (see “Inserting the SIM card” on page 14).
4. Perform a soft reset (see “Performing a soft reset” on page 164).
Treo hangs up when I hold it to my ear
You may be accidentally pressing the onscreen Hang Up button with your cheek.
Try holding the phone so your face doesn’t press against the screen. If this is not
convenient, you may want to disable the screen’s touch-sensitive feature during
active calls (see “Using Auto-Keyguard and touchscreen lockout” on page 153).
Treo seems to turn off by itself
If a system error and reset occur, Treo automatically turns the phone on if it was on
before the reset. However, if Treo can’t determine if your phone was on before the
reset, it does not automatically turn on the phone (see “Turning your phone on and off”
on page 15).
Become familiar with low
coverage areas where you
live, commute, work, and
play. Then you will know
when to expect signal
strength issues.
CrowAce.book Page 168 Wednesday, November 10, 2004 1:52 PM
DRAFT 1A palmOne, Inc. Confidential

Network connection :: 169
Treo makes or answers calls when it’s in a briefcase or pocket
Items in your briefcase or pocket may be pressing the onscreen Answer button or
otherwise activating screen items. If this happens, be sure to press Power/End to
turn off the screen before placing your Treo in a briefcase or pocket. You may also
want to disable the screen’s touch-sensitive feature during incoming calls (see “Using
Auto-Keyguard and touchscreen lockout” on page 153).
I can’t tell if data services are available
• The following icons indicate data services:
Your phone is on and a GPRS or EDGE network is within range.
Your phone is on but not connected to a GPRS or EDGE network.
Your phone is connected to a GPRS or EDGE network. When the
arrows above the signal bars are green, you can still receive calls.
Your phone is actively using a dial-up, circuit-switched data (CSD)
connection. When the arrows above the signal bars are black, you
cannot receive calls.
Treo won’t connect to the Internet
Treo supports GPRS and EDGE wireless data networks. To connect to the Internet,
you must subscribe to and activate GPRS or EDGE data services with your wireless
service provider.
• Contact your wireless service provider to verify that your subscription plan includes
high-speed data services and that these services have been correctly activated.
Your wireless service provider should also be able to tell you if there are any
outages in your location.
CrowAce.book Page 169 Wednesday, November 10, 2004 1:52 PM
DRAFT 1A palmOne, Inc. Confidential

170 :: Network connection
• Press and hold the Power/End button to turn off your phone. Then press
and hold the same button to turn it back on again.
• Perform a soft reset (see “Performing a soft reset” on page 164).
• Confirm that high-speed data services are correctly configured on your Treo:
1. Go to Applications and select Prefs .
2. Select Network.
3. If the Service field says Untitled, select the Service pick list and select the
appropriate data service for your wireless service provider.
4. Select Done.
I can’t send or receive text or multimedia messages
• Make sure the SIM card is inserted correctly (see “Inserting the SIM card” on
page 14) and your phone is turned on (see “Turning Treo on and off” on page 15).
• Contact your wireless service provider to verify that your plan includes messaging
services, that these services have been correctly activated, and that they are
available at your location (your wireless service provider should be able to tell you if
messaging services have been experiencing transmission delays).
• If possible, contact the recipient or sender of the message, and make sure the
receiving device can handle the type of file that is being sent.
• If an text message arrives but does not display an alert, perform a soft reset
(see “Performing a soft reset” on page 164).
CrowAce.book Page 170 Wednesday, November 10, 2004 1:52 PM
DRAFT 1A palmOne, Inc. Confidential

Network connection :: 171
I can’t make or receive calls using a hands-free device
with Bluetooth technology
Check all of the following:
• The Bluetooth setting is turned on in the Bluetooth application.
• Your device with Bluetooth wireless technology is charged and turned on.
• Your Treo is within range (30 feet) of the hands-free device.
• The Dialup Networking setting is turned off in the Bluetooth application.
• The Bluetooth application screen is closed.
CrowAce.book Page 171 Wednesday, November 10, 2004 1:52 PM
DRAFT 1A palmOne, Inc. Confidential
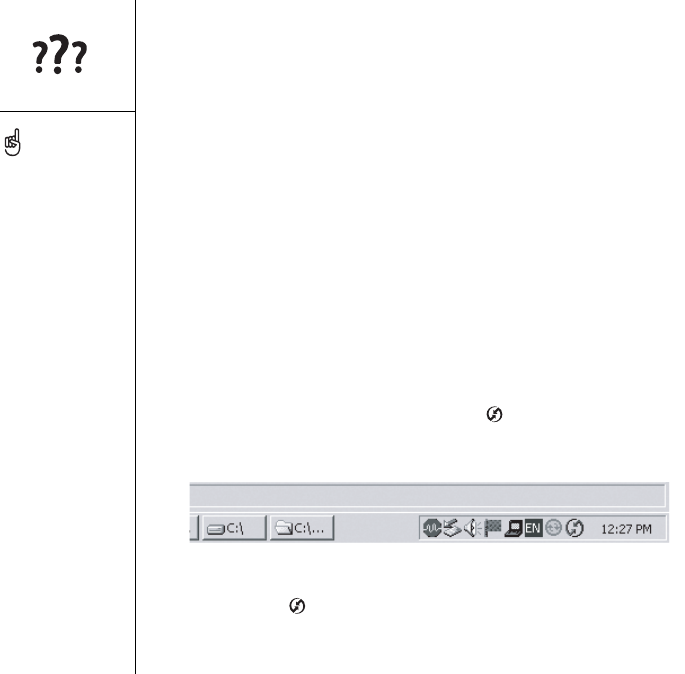
172 :: Synchronization (HotSync)
Synchronization (HotSync)
Synchronization lets you back up your Treo information onto your computer. If you ever
need to perform a hard reset or otherwise erase all your information on your Treo, you
can synchronize your phone with your computer to restore the info. To make sure you
always have an up-to-date backup of your info; synchronize frequently.
Before you attempt to synchronize, make sure you’ve installed the desktop
synchronization software from the palmOne Software Installation CD.
Palm Desktop does not respond to HotSync attempt
As you complete the following steps, synchronize after each step. If the
synchronization is successful, you do not need to complete the remaining steps.
1. Verify that the USB sync cable is securely connected at all points (see “Setting up
your computer” on page 30).
2. Make sure that HotSync Manager is running:
•Windows: Click the HotSync Manager icon in the lower-right corner and
make sure Local USB is checked. If you don’t see the HotSync Manager icon,
click Start, select Programs, select palmOne, and then select HotSync Manager.
•Mac: Find the Palm folder on your Mac hard drive. Double-click the HotSync
Manager icon in the Palm folder. In the Connection Settings panel, set the
Local Setup Port to palmOne USB.
Every device needs a
unique name. Never
synchronize more than one
device to the same
username on your
computer.
CrowAce.book Page 172 Wednesday, November 10, 2004 1:52 PM
DRAFT 1A palmOne, Inc. Confidential

Synchronization (HotSync) :: 173
3. Verify with your computer hardware vendor that your operating system supports
your internal USB controller.
4. Perform a soft reset (see “Performing a soft reset” on page 164).
5. If problems persist and you’re synchronizing through a USB hub, try connecting the
sync cable to a different USB port or directly to your computer’s built-in USB port.
6. Uninstall palmOne software.
7. Reboot your computer.
8. Reinstall the palmOne Software Installation CD that came with your Treo 650.
Synchronization starts but stops without finishing
If you upgraded from a previous Palm Powered device or received a system error,
such as Sys0505, there may be conflicts with software on your phone. As you
complete the following steps, sync after each step. If the synchronization is
successful, you do not need to complete the remaining steps.
1. Locate your Backup folder and rename the folder (e.g. BackupOld):
•Windows: C:\Program Files\palmOne\username
•Mac: Mac HD\Applications\palmOne\Users\username
2. Synchronize.
3. Manually reinstall any third-party applications you want on your phone. If necessary,
use the items in the old Backup folder you moved.
4. (Windows only) If the Windows New Hardware Wizard appears, the HotSync
process may be timing out before the wizard completes its job. Follow all
instructions in the New Hardware Wizard, and attempt another sync.
5. Uninstall palmOne software.
6. Reboot your computer.
7. Reinstall the palmOne Software Installation CD that came with your Treo 650.
CrowAce.book Page 173 Wednesday, November 10, 2004 1:52 PM
DRAFT 1A palmOne, Inc. Confidential

174 :: Synchronization (HotSync)
Synchronization finishes but info doesn’t appear where it should
1. Make sure you’re synchronizing with the intended desktop personal information
manager (PIM). The palmOne Software Installation CD lets you synchronize with
Palm Desktop or Microsoft Outlook for Windows. If you use a different PIM, you
will need to install third-party software to synchronize. Consult the company that
makes the PIM for more information.
2. If there are multiple Palm Powered devices synchronizing with your computer,
make sure you are synchronizing with the correct username. If info is not appearing
in Palm Desktop, make sure the correct username is selected in the toolbar of
Palm Desktop.
3. Open HotSync Manager on your computer, and make sure the necessary conduits
are set to Synchronize the files.
4. Uninstall palmOne software.
5. Reboot your computer.
6. Reinstall the palmOne Software Installation CD that came with your Treo 650.
7. (Outlook only) With the included software, your Treo can synchronize with the root
folders of Contacts, Calendar, Tasks, and Notes. If you want to synchronize with a
global Exchange Address Book, you must copy the addresses to your local
Contacts list in Outlook (right-click the addresses and select Add to Personal
Address Book).
8. (Outlook only) Outlook subfolders and public folders are not accessible with the
included software. You may wish to use a third-party solution instead.
9. (Outlook only) If you’re trying to synchronize offline, be sure to set your Outlook
Calendar, Contacts, Notes, and Tasks to be available offline.
CrowAce.book Page 174 Wednesday, November 10, 2004 1:52 PM
DRAFT 1A palmOne, Inc. Confidential

Synchronization (HotSync) :: 175
I have duplicate entries in Microsoft Outlook after I sync
1. Open Microsoft Outlook and delete the duplicate entries.
2. Manually enter any information you've added to your phone since the last time
you synchronized.
3. Go to the conduit dialog box for the affected application, and select Desktop
overwrites handheld.
4. Synchronize your phone and your computer.
5. Go to the conduit dialog box you selected in step 3, and select Synchronize
the files.
My appointments show up in the wrong time slot after I sync
If you're using Microsoft Outlook:
1. Make sure that you installed the Microsoft Outlook conduit that came with
your Treo 650. If you're not sure whether this software is installed, reinstall it.
2. Open Microsoft Outlook and correct the wrong entries.
3. Manually enter any information you've added to your phone since the last time
you synchronized.
4. Go to the Calendar conduit dialog box, and select Desktop overwrites handheld.
5. Synchronize your phone and your computer.
6. Go to the conduit dialog box, and select Synchronize the files.
You should now be able to assign time zones to your events without encountering
this problem.
If you're using Palm Desktop software:
1. On your phone, press Calendar .
2. Open the menus .
3. Select Options, and then select Preferences.
4. Uncheck the New events use time zones box (if it's checked).
CrowAce.book Page 175 Wednesday, November 10, 2004 1:52 PM
DRAFT 1A palmOne, Inc. Confidential

176 :: Synchronization (HotSync)
5. On your computer, open Palm Desktop software and correct the wrong entries.
6. Manually enter any information you've added to your phone since the last time
you synchronized.
7. Go to the Calendar conduit dialog box, and select Desktop overwrites handheld.
8. Synchronize your phone and your computer.
9. Go to the conduit dialog box, and select Synchronize the files.
To avoid this problem in the future, do not assign time zones to your events.
Palm Desktop software does not support time zones.
CrowAce.book Page 176 Wednesday, November 10, 2004 1:52 PM
DRAFT 1A palmOne, Inc. Confidential

Email :: 177
Email
I have problems using my account
Occasionally you may experience problems using an email account after you set it up.
If you followed the account setup procedure and are experiencing problems using the
account, verify that the account complies with your email provider’s requirements by
following these steps:
• Verify both your password and your username for your email account.
• Some wireless service providers require you to be on their network to use your
email account. If this is the case, be sure to use your provider's network as the
connection type for the account.
• Some wireless service providers have other requirements specific to their service.
For example, Yahoo! requires you to set up POP mail forwarding for your Yahoo!
account to download email messages to your phone. Check with your service
provider to see if any provider-specific requirements exist.
• Service provider settings frequently change. If your email account was working but
you are currently experiencing problems, check with your service provider to see if
any of the account settings have changed.
I have problems sending and receiving email
Short periods of time when email is unavailable are common due to server problems
or poor wireless coverage. If you have problems sending or receiving mail for an
extended period of time, check with your ISP or email service provider to verify that
the service is working properly.
CrowAce.book Page 177 Wednesday, November 10, 2004 1:52 PM
DRAFT 1A palmOne, Inc. Confidential

178 :: Email
Auto Sync is not working
If Auto Sync is occurring and you turn your phone off or the connection to your email
service provider is disconnected, the Auto Sync fails.
I have problems sending email
If you are able to receive email messages but cannot send them, try these steps,
in turn:
• Make sure your ISP or email provider allows you to access email on a wireless
phone. Several providers, like Hotmail, do not offer this option at all; other providers
require an upgrade to access email on a wireless phone.
• Turn on ESMTP. Many services require authenticated access, or ESMTP, to use
their SMTP servers.
• Enter the name of a different outgoing mail server for sending mail. Many ISPs,
such as cable companies, require that you have an Internet connection to their
network to send email through their servers. In this case, you can almost always
receive email from these accounts, but if you want to send email, you must send it
through another server.
I have problems synchronizing messages on my phone with
messages on my computer
Make sure you have chosen the same settings for the account on both your phone
and your computer. For example, if the account is set up on your phone to use the
POP protocol, check the HotSync Manager on your computer to make sure that POP
is selected as the protocol for that account.
CrowAce.book Page 178 Wednesday, November 10, 2004 1:52 PM
DRAFT 1A palmOne, Inc. Confidential

Email :: 179
My vCard or vCal email attachment isn’t forwarding correctly
Palm Desktop software provides several features that work with email client software
on a Windows computer. For these features to work correctly, the email client software
must be properly set up. Follow these steps to check the settings:
1. Click Start on your computer, and then select Settings.
2. Select Control Panel.
3. Select Internet Options, and then click the Programs tab.
4. Make sure that the email field is set to the correct email client software.
5. Click OK.
6. Start the email client software and make sure it is configured as the default MAPI
client. Consult the documentation for your desktop email application for more
information.
After I get messages, either manually or through Auto Sync,
messages disappear from my Inbox
If you have an account that uses Microsoft Exchange ActiveSync®, when you perform
an Auto Sync, the last seven days’ worth of email messages are downloaded from
your mail server to your Inbox. All messages older than seven days are deleted from
your Inbox; they are not, however, deleted on the server.
You can change the setting in VersaMail® preferences to download fewer than seven
days’ worth of messages (in which case, more-recent messages will be deleted from
your Inbox), or to downloaded all messages regardless of the date (in which case all
messages will continue to appear in your Inbox).
CrowAce.book Page 179 Wednesday, November 10, 2004 1:52 PM
DRAFT 1A palmOne, Inc. Confidential

180 :: Email
I am using Microsoft Exchange ActiveSync, but the last seven
days of email messages and Calendar events are not downloading
to my phone
Check with your system administrator to obtain the name of the mail server that offers
you wireless access to the corporate mail system. If you cannot obtain the name of
this server (some companies do not give it out, because they do not want wireless
access to their servers), you cannot synchronize email messages and Calendar events
with the server using Microsoft Exchange ActiveSync.
CrowAce.book Page 180 Wednesday, November 10, 2004 1:52 PM
DRAFT 1A palmOne, Inc. Confidential
Web :: 181
Web
I can’t access a page
First, make sure you have Internet access: Open the Web browser and try to view a
web page you’ve loaded before. To ensure you’re viewing the page directly from the
Internet, open the menus , and then select Connect on the Page menu. After
confirming your Internet connection, try to view the page in question again. If it comes
up blank, open the menus , select Go, and then select Refresh.
If you’re still having trouble, the page may contain elements that are not supported
by the Web browser. These include Flash, Shockwave, VBScript, WML script, and
other plugins.
Some websites use a redirector to their true home page (for example, if you enter
the address http://www.palmOne.com/support it may resolve to http://
www.palmOne.com/intl/support). If the Web browser can’t follow the redirect, try
using a desktop browser to see the landing page of the redirector, and enter that
address in the Web browser.
An image or map displays too small on the Treo screen
The Web browser has two modes: Optimized and Wide Page. Optimized Mode resizes
all images and page elements to fit in a single column on the Treo screen. Switch to
Wide Page Mode to see the full-size image (see “Creating a bookmark” on page 84).
A secure site refuses to permit a transaction
Some websites don’t support certain browsers for transactions. Please contact the
site’s webmaster to make sure the site allows transactions using the Web browser.
Treo can open your email
application when you select
an email address on a web
page. If nothing happens
when you select the link,
try setting up your email
application first.
CrowAce.book Page 181 Wednesday, November 10, 2004 1:52 PM
DRAFT 1A palmOne, Inc. Confidential

182 :: Camera
Camera
If your Treo does not have a built-in camera, then the information in this section about
taking photos does not apply to you.
Here are some tips for taking good photos with the built-in camera:
• Clean the camera’s lens with a soft, lint-free cloth.
• Take photos in bright lighting conditions. Low-light images may be grainy, due
to the sensitivity of the camera.
• Hold the camera as still as possible. You may want to support your photo-taking
arm against your body or a stationary object (such as a wall).
• Keep the subject of the photos still. Exposure time is longer with lower light levels,
so you may see a blur.
• For best results, verify that you have the brightest light source coming from behind
you, lighting the subject’s face. Avoid taking indoor photos with the subject in front
of a window or light.
• Make sure the subject is at least 18 inches away from the camera to ensure
good focus.
Remember, when you synchronize, your Camera images are stored in the My
Pictures/palmOne Photos folder on your hard drive (see “Viewing photos and videos
on your computer” on page 96).
The Camera preview image looks strange
Some third-party applications overwrite the Treo’s color settings with their own 8-bit
color settings. This can affect the Camera Preview Mode. Delete third-party
applications one by one until the preview image improves.
Photos are 16-bit color at a
maximum of 640 x 480
pixels (0.3 megapixels) in
VGA resolution or 320 x
240 pixels in QVGA
resolution. Videos are
352 x 288 pixels in CIF
resolution or 176 x 144
pixels QCIF in resolution.
CrowAce.book Page 182 Wednesday, November 10, 2004 1:52 PM
DRAFT 1A palmOne, Inc. Confidential

Third-party applications :: 183
Third-party applications
Sometimes, third-party applications can cause conflicts on your Treo. Third-party
applications that modify wireless features may require extra troubleshooting. If you
recently installed an application and your Treo seems to be stuck, try the following:
1. Perform a soft reset (see “Performing a soft reset” on page 164).
2. If the problem persists, perform a system reset (see “Performing a system reset” on
page 164).
3. Delete the most recently installed application from your Treo (see “Removing
applications” on page 132).
4. If the problem persists, perform another system reset.
5. If possible, synchronize to backup your most recent info.
6. If you’re unable to perform the steps above or the problem persists, locate your
Backup folder on your computer and rename the folder (e.g. BackupOld):
•Windows: C:\Program Files\palmOne\username
•Mac: Mac HD\Applications\palmOne\Users\username
7. Perform a hard reset (see “Performing a hard reset” on page 165).
8. Synchronize to restore the info in your built-in applications.
9. If the problem is resolved, begin reinstalling your third-party applications one at a
time: double-click a single file in the original Backup folder that you renamed.
10.If the problem recurs, delete the last application you installed and report the
problem to its developer.
Getting more help
Contact the author or vendor of any third-party software if you require further
assistance.
Remember, not all third-
party applications were
written with the Treo
keyboard and 5-way
navigator in mind. You
may encounter strange
behavior or errors in these
applications if you use the
keyboard and 5-way
navigator.
CrowAce.book Page 183 Wednesday, November 10, 2004 1:52 PM
DRAFT 1A palmOne, Inc. Confidential

184 :: Error messages
Error messages
Your Treo is designed to minimize interruptions when a system error occurs. If Treo
encounters a system error, it automatically resets itself and resumes functioning as
normal. If possible, it even turns your phone back on if it was on before the error
occurred.
Sometimes, you might want to know more about an error. Treo uses a special
interface to show error messages in greater detail.
1. Press Phone/Send .
2. Press Center, and then select Dial Pad.
3. Enter # * 377, and then press Phone/Send .
4. Review the screen with details about the conditions that lead up to the most recent
automatic reset.
5. Select OK.
Please note that third-party developers create their own error messages. If you do not
understand an error message, please contact the developer of the application for help.
CrowAce.book Page 184 Wednesday, November 10, 2004 1:52 PM
DRAFT 1A palmOne, Inc. Confidential

Making room on your Treo :: 185
Making room on your Treo
If you store a large number of records, or install many third-party applications, the
internal memory on your Treo may fill up. Here are some common ways to clear space
on your Treo:
•VersaMail: Emails that have large attachments can quickly consume memory on
your Treo. Delete emails with large attachments. If you have hundreds of messages
with or without attachments, you may wish to delete older messages to make room
(see “Deleting selected messages from the Inbox” on page 69).
•Camera: Large size images take up a lot of memory. Move images to an expansion
card or delete images from your Treo (see “Viewing photos and videos on your
computer” on page 96).
•Messaging: Multimedia content can also consume excessive memory. Move
multimedia content to an expansion card, or delete large files from your Treo
(see “Managing your messages” on page 79).
•Internet: If you set a large Web browser cache, you may want to use the Web
browser’s advanced Memory Management settings to clear all recent pages
(see “Customizing your Web browser settings” on page 88).
•Third-party applications: You can delete infrequently used applications or move
them to an expansion card (see “Copying applications to an expansion card” on
page 136).
Also, remember that your Treo includes an expansion card slot, and that you can store
applications and information on expansion cards. However, you still need free memory
on the Treo itself to run applications from an expansion card.
CrowAce.book Page 185 Wednesday, November 10, 2004 1:52 PM
DRAFT 1A palmOne, Inc. Confidential

186 :: Voice quality
Voice quality
Is the other person hearing an echo?
• Try decreasing the volume on your Treo to avoid coupling or feedback on the other
person’s end. This applies to both the speakerphone and to the handset earpiece.
• Position the Treo handset closer to your ear to prevent sound leaking back to the
microphone. Keep your hand away from the microphone hole, which is on the
bottom of your Treo on the right side the phone.
• If you’re using Speakerphone mode with your Treo lying on a flat surface, try
turning the Treo “face down” (screen facing the surface).
Are you hearing your own voice echo?
Ask the other person to turn down their volume or to hold the phone closer to
their ear.
Is your voice too quiet on the other end?
Be sure to hold the bottom of the Treo, or the hands-free microphone, close to
your mouth.
Check the signal strength indicator. If the signal is weak, try to find an area with
better coverage.
CrowAce.book Page 186 Wednesday, November 10, 2004 1:52 PM
DRAFT 1A palmOne, Inc. Confidential
Glossary :: 187
Glossary
ALS (Alternate Line Service): A service that enables two
phone numbers to coexist on one phone/SIM. The Treo™
650 smartphone supports ALS, but be sure to contact your
wireless service provider for regional availability of this
service.
Alt (alternative) : A keyboard key. Enter a letter on the
keyboard, and then press Alt to access variations such
as international characters and symbols.
Applications : The screen on your Treo from which
you can open all applications.
Auto-off interval: The time of inactivity that passes before
the screen on your Treo turns off. The wireless features on
your phone are unaffected by this setting.
Beam: The process of sending or receiving an entry or
application using the infrared port on your Treo.
CSD (circuit-switched data): A dial-up Internet
connection. You pay for the connection time, not how much
information you transfer. Contrast with GPRS.
EDGE (Enhanced Data for GSM Environments): An
enhanced version of GPRS that delivers data speeds that
are up to three times faster than standard GPRS
connections.
GPRS (General Packet Radio Service): A mobile Internet
connectivity technology that allows persistent data
connections. You pay for the amount of information you
transfer, not the connection time.
HotSync®: The PalmSource technology that synchronizes
your Treo and your computer with the simple press of a
button.
HotSync Manager: The computer application that
manages the synchronization with your Treo.
Infrared (IR): A way of transmitting information using light
waves. The IR port on your Treo lets you transfer
information between other IR devices within a short radius.
Lithium Ion (Li-Ion): The rechargeable battery technology
used in Treo phones.
MMS (Multimedia Messaging System): An enhanced form
of messaging that lets you send photos, animations, and
ringtones almost instantly.
CrowAce.book Page 187 Wednesday, November 10, 2004 1:52 PM
DRAFT 1A palmOne, Inc. Confidential

188 :: Glossary
Option key : The keyboard button that lets you access
the alternative feature that appears above the letter on
each key.
Palm®Desktop software: A PIM application for computers
that helps you manage your personal information and keep
your personal information synchronized with your Treo.
Palm OS®: The operating system of your Treo phone. A
trademark of PalmSource, Palm OS is known for its
simplicity of use and for the large number of applications
that can be added to your Treo.
palmOne™ Quick Install: The component on your Windows
computer that enables you to install Palm OS applications
and other information on your Treo.
Phone/Send : The application on your Treo that
provides quick access to the most commonly used
applications on your Treo.
PIM (personal information manager): A genre of software
that includes applications such as Palm Desktop software,
Microsoft Outlook, Lotus Notes, and ACT!. PIMs generally
store contacts, schedules, tasks, and memos.
PIN (personal identification number): The four-digit
password assigned to your SIM card by your wireless
service provider. Turning on the PIN lock secures your
wireless account. See also PUK.
PUK (PIN unlock key): A special extended password
assigned to your SIM card. If you enter the wrong PIN
more than three times, your SIM will be blocked, and you
must call your wireless service provider for the PUK.
SIM (Subscriber Identity Module): The smartcard, inserted
in your Treo, that contains your Global System for Mobile
Communications (GSM) mobile account information. SIM
cards are portable between GSM phones – your mobile
subscriber information moves to whatever phone houses
the SIM.
SMS (Short Messaging Service): The service that
exchanges short text messages almost instantly between
mobile phones. These messages can usually include up to
160 characters. Treo phones can send and receive text
messages while you are on a voice call.
Username: The name associated with your Treo that
distinguishes it from other Palm Powered® devices. When
you first synchronize your Treo, you are asked to give it a
username.
CrowAce.book Page 188 Wednesday, November 10, 2004 1:52 PM
DRAFT 1A palmOne, Inc. Confidential
FCC :: 189
FCC
FCC Statement This equipment has been tested and found to comply
with the limits for a Class B digital device, pursuant to part 15 of the FCC
Rules. These limits are designed to provide reasonable protection against
harmful interference in a residential installation. This equipment generates,
uses and can radiate radio frequency energy and, if not installed and used
in accordance with the instructions, may cause harmful interference to
radio communications. However, there is no guarantee that interference
will not occur in a particular installation. If this equipment does cause
harmful interference to radio or television reception, which can be
determined by turning the equipment off and on, the user is encouraged to
try to correct the interference by one or more of the following measures:
• Reorient or relocate the receiving antenna.
• Increase the separation between the equipment and receiver.
• Connect the equipment into an outlet on a circuit different from that to
which the receiver is connected.
• Consult the dealer or an experienced radio/TV technician for help.
RF Safety Exposure To Radio Frequency Energy (SAR) Radio
transmitting devices radiate Radio Frequency (RF) energy during its
operation. RF energy can be absorbed into the human body and potentially
can cause adverse health effects if excessive levels are absorbed. The unit
of measurement for human exposure to RF energy is “Specific Absorption
Rate” (SAR).
The Federal Communications Commission (FCC), Industrie Canada (IC),
and other agencies around the world have established limits that
incorporate a substantial safety margin designed to assure the safety of all
persons using this equipment.
In order to certify this unit for sale in the US, Canada and Europe this
unit has been tested for RF exposure compliance at a qualified test
laboratory and found to comply with the regulations regarding exposure to
RF Energy.
SAR was measured with the unit transmitting at its maximum certified
RF power. Often, however, during normal operation the unit will transmit
much less than maximum power. Transmit power is controlled
automatically and, in general is reduced as you get closer to a cellular base
station. This reduction in transmit power will result in a lower RF energy
exposure and resulting SAR value.
FCC RF Safety Statement In order to comply with FCC RF exposure
safety guidelines, users MUST use one of the following types of bodyworn
accessories.
1. A palmOne™ brand body-worn accessory that has been tested for SAR
compliance and is intended for use with this product.
2. An accessory that contains NO metal (snaps, clips, etc) and provides AT
LEAST 1.5 cm of separation between the users body and the unit.
Do NOT use the device in a manner such that it is in direct contact with
the body (i.e. on the lap or in a breast pocket). Such use will likely exceed
FCC RF safety exposure limits See www.fcc.gov/oet/rfsafety/ for more
information on RF exposure safety.
Responsible party
(North America) (Europe)
palmOne, Inc. Vesey Chrichton
400 N. McCarthy Blvd. Buckhurst Court
Milpitas, CA 95035 London Road
USA Wokingham, Berkshire RG40 1PA,
www.palmOne.com/intl UK
Antenna Care/Unauthorized Modifications Use only the supplied
integral antenna. Unauthorized antenna modifications or attachments
could damage the unit and may violate FCC regulations. Any changes or
modifications not expressly approved by the party responsible for
compliance could void the user’s authority to operate the equipment.
Potentially Unsafe Areas Potentially explosive atmospheres: Turn off your
smartphone when you are in any areas with a potentially explosive
atmosphere, such as fueling areas (gas or petrol stations) or storage
facilities for fuel or chemicals.
Declaration of Conformity
Treo Model 650
palmOne declares that the above model of Treo smartphone is compliant
with the regulations below. The declaration applies to the smartphone and
its associated accessories (power supply, headset, and USB cable) where
applicable.
Maximum Measured SAR Values (W/kg)
Band (MHz) 850 1900
Head SAR: 1.51 .943
Body SAR: 1.46 .688
EMC: EN 301 489 EN 301 419-1 (Apr 2000)
EN 310 420 (Dec 1999) ANSI/IEEE C95.1 1992
EN 50360 (July 2001) EN 50361 (July 2001)
FCC OET Bulletin 65 Supplement C
Safety: EN 60950: 2000 (Jan-2000)
Radiated Emissions: EN 55022 Immunity: EN 55024
CrowAce.book Page 189 Wednesday, November 10, 2004 1:52 PM
DRAFT 1A palmOne, Inc. Confidential

190 :: FCC
Operational Warnings
IMPORTANT INFORMATION ON SAFE AND EFFICIENT OPERATION.
Read this information before using your integrated multi-service portable
radio.
For the safe and efficient operation of your radio, observe these
guidelines:
Potentially Unsafe Areas / Potentially explosive atmospheres Obey all
signs and instructions regarding turning off your smartphone. In particular,
turn off your smartphone when you are in any areas with a potentially
explosive atmosphere, such as fueling areas (gas or petrol stations, below
deck on boats), storage facilities for fuel or chemicals, blasting areas and
areas near electrical blasting caps, and areas where there are chemicals
or particles (such as metal powders, grains, and dust) in the air.
Interference to Medical and Personal Electronic Devices Most but not
all electronic equipment is shielded from RF signals and certain electronic
equipment may not be shielded against the RF signals from your
smartphone.
Pacemakers The Health Industry Manufacturers Association
recommends that a minimum separation of six inches (6") be maintained
between a smartphone and a pacemaker to avoid potential interference
with the pacemaker. These recommendations are consistent with the
independent research by the recommendations of Wireless Technology
Research.
Persons with pacemakers should:
•ALWAYS keep the smartphone more than six inches from their
pacemaker when the smartphone is turned ON.
•Not carry the smartphone in a breast pocket.
•Use the ear opposite the pacemaker to minimize the potential for
interference.
•Turn the smartphone OFF immediately if you have any reason to
suspect that interference is taking place.
Audio Safety Some hearing aids may be affected by some digital
smartphones. You may want to consult your doctor in the event of you
experience interference with your hearing aid while using your
smartphone. When using the speakerphone feature, it is recommended
that you place your smartphone at a safe distance from your ear.
Other Medical Devices If you use any other personal medical device,
consult the manufacturer of your device to determine if it is adequately
shielded from external RF energy. Your physician may be able to assist you
in obtaining this information.
Turn your smartphone OFF in health care facilities when any regulations
posted in these areas instruct you to do so. Hospitals or health care
facilities may be using equipment that could be sensitive to external RF
energy.
Interference to Other Electronic Devices RF energy may affect
improperly installed or inadequately shielded electronic operating and
entertainment systems in motor vehicles. Check with the manufacturer or
representative to determine if these systems are adequately shielded from
external RF energy. Also check with the manufacturer of any equipment
that has been added to the vehicle.
Repetitive Motion Injuries When using the keyboard or playing games
on your smartphone, you may experience discomfort in your neck,
shoulders, hands, arms, of other parts of the body. To avoid any injury, such
as tendonitis, carpal tunnel syndrome, or other musculoskeletal disorder,
make sure to take necessary breaks from use, take longer rests (such as
several hours) if discomfort or tiring begins, and see a doctor if discomfort
persists.
Blackouts and Seizures Blinking lights, such as those experienced with
television or playing video games, may cause some people to experience
blackout or seizure, even if never experienced before. In the event a
smartphone user should experience any disorientation, loss of awareness,
convulsion, eye or muscle twitching or other involuntary movements, stop
use immediately and consult a doctor. Individuals with personal or family
Using TTY
A TTY (also known as TDD or text telephone) is a
telecommunications device that allows people who are deaf or hard
of hearing, or who have speech or language disabilities, to
communicate by telephone.
Your Treo 650 is compatible with select TTY devices. You can
connect a TTY/TDD machine to your phone through the headset
jack, but you cannot use your headset jack with a headset while this
mode is enabled. Please check with the manufacturer of your TTY
device for connectivity information and to ensure that the TTY device
supports digital wireless transmission.
To use TTY, you may need to make additional arrangements with
your wireless service provider. Please contact your wireless service
provider’s customer service department for more information.
1. Press the Phone/Send button.
2. From the Dial Pad View, tap #*TTY.
3. Select OK. A red “T” appears at the top of the Phone screen
whenever TTY is enabled.
To disable TTY, repeat steps 1 and 2.
CrowAce.book Page 190 Wednesday, November 10, 2004 1:52 PM
DRAFT 1A palmOne, Inc. Confidential
FCC :: 191
history of such events should consult a doctor before using the device. To
limit the possibility of such symptoms, wherever possible every hour take a
minimum of 15 minutes, use in a well lighted area, view the screen from
the farthest distance and avoid exposure to blinking lights if you are tired.
Aircraft While in aircraft, follow all instructions regarding the operation of
your smartphone. Use of your smartphone while on board on aircraft must
be done in accordance in compliance with airline instructions and
regulations.
Vehicles with Air Bags Your smartphone should not be placed in a
position that would affect the operation of air bag deployment or in a
position that, should the air bag inflate, could propel the smartphone. Air
bags will inflate with great force and care should be taken to protect within
a vehicle that has air bags.
Battery Your smartphone includes an internal lithium ion battery. Please
note that use of certain data applications can result in heavy battery use
and may require frequent battery charging. Any disposal of the
smartphone must comply with laws and regulations pertaining to lithium
ion batteries.
Driving Safety Tips Overview
Always obey all laws and regulations on the use of smartphones in your
driving area.
Safety - Your most important call. The Wireless Industry reminds you to
use your smartphone safely when driving.
1. Get to know your smartphone and its features, such as speed dial and
redial.
2. When available, use a hands-free device.
3. Position your smartphone within easy reach.
4. Let the person you are speaking to know you are driving; if necessary,
suspend the call in heavy traffic or hazardous weather conditions.
5. Do not take notes or look up phone numbers while driving.
6. Dial sensibly and assess the traffic; if possible, place calls when you are
not moving or before pulling into traffic.
7. Do not engage in stressful or emotional conversations that may divert
your attention from the road.
8. Dial 9-1-1 to report serious emergencies -it’s free from your
smartphone!
9. Use your smartphone to help others in emergencies.
10. Call roadside assistance or a special non-emergency wireless number
when necessary.
Driving Safety Tips Details
1. Get to know your smartphone and its features such as speed dial and
redial. Carefully read your instruction manual and learn to take
advantage of valuable features most smartphones offer including,
automatic redial and memory dial-most smartphones can store up to 99
numbers in memory dial. Also, work to memorize the smartphone
keypad so you can use the speed dial function without taking your
attention off the road.
2. When available, use a hands-free device. A number of hands-free
smartphone accessories are readily available today. Whether you
choose an installed mounted device for your smartphone or a speaker
phone accessory, take advantage of these devices if available to you.
3. Position your smartphone within easy reach. Make sure you place your
smartphone within easy reach and where you can grab it without
removing your eyes from the road. If you get an incoming call at an
inconvenient time, let your voice mail answer it for you.
4. Suspend conversations during hazardous driving conditions or
situations. Let the person you are speaking to know you are driving; if
necessary, suspend the call in heavy traffic or hazardous weather
conditions. Rain, sleet, snow and ice can be hazardous, but so is heavy
traffic. As a driver, your first responsibility is to pay attention to the road.
5. Do not take notes or look up phone numbers while driving. If you are
reading an address book or business card while driving a car, or writing
a “to do” list, then you are not watching where you are going. It’s
common sense. Don’t get caught in a dangerous situation because you
are reading or writing and not paying attention to the road or nearby
vehicles.
6. Dial sensibly and assess the traffic; if possible, place calls when you are
not moving or before pulling into traffic. Try to plan your calls before you
begin your trip, or attempt to coincide your calls with times you may be
stopped at a stop sign, red light or otherwise stationary. But if you need
to dial while driving, follow this simple tip-dial only a few numbers, check
the road and your mirrors, then continue.
7. Do not engage in stressful or emotional conversations that may be
distracting. Stressful or emotional conversations and driving do not mix-
they are distracting and even dangerous when you are behind the
wheel. Make people you are talking with aware you are driving and if
necessary, suspend phone conversations which have the potential to
divert your attention from the road.
8. Use your smartphone to call for help. Your smartphone is one of the
greatest tools you can own to protect yourself and your family in
dangerous situations-with your smartphone at your side, help is only
three numbers away. Dial 9-1-1 in the case of fire, traffic accident, road
hazard, or medical emergencies. Remember, 9-1-1is a free call on your
smartphone!
9. Use your smartphone to help others in emergencies. Your smartphone
provides you a perfect opportunity to be a “good Samaritan” in your
community. If you see an auto accident, crime in progress, or other
CrowAce.book Page 191 Wednesday, November 10, 2004 1:52 PM
DRAFT 1A palmOne, Inc. Confidential
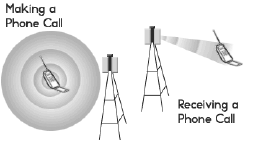
192 :: FCC
serious emergency where lives are in danger, call 9-1-1, as you would
want others to do for you.
10. Call roadside assistance or a special wireless non-emergency
assistance number when necessary. Certain situations you encounter
while driving may require attention, but are not urgent enough to merit
a call to 9-1-1. But you can still use your smartphone to lend a hand. If
you see a broken-down vehicle posing no serious hazard, a broken
traffic signal, a minor traffic accident where no one appears injured, or
a vehicle you know to be stolen, call roadside assistance or other
special non-emergency wireless number.
NOTICE FOR CONSUMERS WITH HEARING DISABILITIES
Digital Wireless Phones to be Compatible with Hearing Aids
On July 10, 2003, the Federal Communications Commission (FCC)
modified the exemption for wireless phones under the Hearing Aid
Compatibility Act of 1988. This means that wireless phone manufacturers
and service providers must make digital wireless phones accessible to
individuals who use hearing aids.
For more information, please go to the FCC’s Consumer Alert on
accessibility of digital wireless phones at http://www.fcc.gov/cgb/
consumerfacts/accessiblewireless.html.
Wireless telephones are hand-held phones with built-in antennas, often
called cell, mobile, or PCS phones. These phones are popular with callers
because they can be carried easily from place to place.
Wireless telephones are two-way radios. When you talk into a wireless
telephone, it picks up your voice and converts the sound to radio
frequency energy (or radio waves). The radio waves travel through the air
until they reach a receiver at a nearby base station. The base station then
sends your call through the telephone network until it reaches the person
you are calling.
When you receive a call on your wireless telephone, the message
travels through the telephone network until it reaches a base station close
to your wireless phone. Then the base station sends out radio waves that
are detected by a receiver in your telephone, where the signals are
changed back into the sound of a voice.
The Federal Communications Commission (FCC) and the Food and
Drug Administration (FDA) each regulate wireless telephones. FCC
ensures that all wireless phones sold in the United States follow safety
guidelines that limit radio frequency (RF) energy. FDA monitors the health
effects of wireless telephones. Each agency has the authority to take
action if a wireless phone produces hazardous levels of RF energy.
FDA derives its authority to regulate wireless telephones from the
Radiation Control provisions of the Federal Food, Drug, and Cosmetic Act
(originally enacted as the Radiation Control for Health and Safety Act of
1968). [http://www.fda.gov/cdrh/comp/eprc.html].
FCC derives its authority to regulate wireless telephones from the
National Environmental Policy Act of 1969 (NEPA) and the
Telecommunications Act of 1996 [http://www.fcc.gov/telecom.html].
Updated 7/16/2003
Hands-Free Capability
All CTIA Certified portable products provide the consumer with a toll-
free number for the purchase of a compatible hands-free device.
CrowAce.book Page 192 Wednesday, November 10, 2004 1:52 PM
DRAFT 1A palmOne, Inc. Confidential
Index :: 193
Index
Numerics
5-way navigator, using 20
A
accented characters 25–27
accessing
command buttons 22
Dial Pad 41
Phone application 38
accounts
setting up VersaMail on computer 63
setting up VersaMail on phone 64
switching between 70
transferring settings to VersaMail 62
activating items 22
active calls
adding a second 49
barring 52
ending 47
forwarding 50–51
managing 46–52
See also calls
using other applications during 48
ActiveSync® 34
adding
a second call 49
music 113, 118
Address Book. See contacts
adjusting volume 141
advanced phone features 49–52
alarm tones, calendar 107
alarms
customizing 111
in calendar 102
Alert screen 39, 45, 77
alert tones
messaging 82
selecting 140
selecting in VersaMail 71
alert volume, selecting 141
aligning screen 146
answering the phone 44
appearance, customizing 145–146
applications
buttons 28
changing categories 147
customizing settings 147
installing 130–131
on expansion cards 136
opening 28
phone conversations and running 48
removing 132
sending over Bluetooth® 61
synchronizing with Microsoft Outlook 33
third-party, help with 131
transferring information from 33
viewing 29
viewing information for 133
appointments, color-coding 103
attaching
files and ringtones in VersaMail 66
photos and videos in VersaMail 66
attachments, viewing with VersaMail 68
audio
files and formats 113
playing during call 44
Auto Sync, scheduling 71
Auto-Keyguard 153
B
backgrounds, adding photos as 105
backlight 15, 24
battery
charging 12
consumption factors for 12
installing 11
replacing 166
viewing status of 13, 40
beaming 125–127
Bluetooth®
application, opening 60
icon on Phone application 39
problems with, solving 171
setting connection information 58
switching from headset to earpiece 47
using 58–61
bonus software 7
bookmarks in Web browser 84, 85–86
brightness, adjusting 145
browsing the web. See Web browser
business card
beaming 125
defining 99
buttons
application 28
preferences 148
See also favorite buttons
C
Cache preference 89
calculator 121
calendar
alarm 102
alarm tones 107
color-coding appointments in 103
customizing display 105
using 101–107
call forwarding 50–51
Call Log view 52
call waiting 49
caller ID
CrowAce.book Page 193 Wednesday, November 10, 2004 1:52 PM
DRAFT 1A palmOne, Inc. Confidential
194 :: Index
photos 98, 142
ringtones 143
calls
barring 52
conference 50
methods of dialing 41–43
receiving 44
See also active calls
viewing minutes usage for 52
volume, adjusting 141
camera
customizing settings 94
solving problems with 182
card readers 113
Category list 106
caution regarding magnet 10
charge indicators 40
chatting 80
choosing music 116
color, system 146
color-coding appointments 103
command buttons, accessing 22
components of Treo 650 3, 7
computers
synchronizing with 33
transferring music from 113
conference calls 50
connecting
to trusted devices 58
to VPNs 157
to Web 83
with Bluetooth® 58
contacts
dialing calls by contact names 41
looking up 123
managing 98–100
synchronizing 33
viewing list details from phone 42
Cookies preference 89
current event, displaying in Main View of Phone
40
customizing
alarms 111
appearance 145–146
applications settings 147
button settings 148
calendar display 105
camera settings 94
date and time settings 149
display 145–146
email setting with VersaMail 70
favorite buttons 55
messaging settings 80
phone settings 140–143
power preferences 151
system sound settings 144
tasks 111
Web browser settings 88
D
data
receiving over Bluetooth® 61
sending over Bluetooth® 60
synchronizing 33
date
preferences 149
setting 119
Day View option 106
decimal values 122
Default View pick list 105
deleting
favorite buttons 55
messages with VersaMail 69
photos 94
songs 118
Device name field 58
devices, naming 58
devices, trusted 60
Dial Pad 41
Dialup Networking 59
disclaimer 2
Discoverable setting 58
display, customizing 145–146
displaying
calendar 106
decimal values 122
tasks 105, 110
unread messages 105
downloading web files 86
E
echoes 186
Edit Favorites Pages command 53
editing
favorite buttons 55
playlists 118
email
problems with, solving 177–180
settings 70
unread messages 40
viewing unread messages for 105
Enable Background Playback check box 117
ending active calls 47
engineering notation 122
entries, private 155–156
errors, system 184
events. See calendar
exchanging information 33
expansion cards
and photos or videos 93
applications on 136
audio files, transferring to 113
pictures, moving to 93
using 134–137
viewing information about 137
CrowAce.book Page 194 Wednesday, November 10, 2004 1:52 PM
DRAFT 1A palmOne, Inc. Confidential
Index :: 195
F
fade setting 105
favorite buttons
defining 53–54
dialing calls with 42
features
monitoring on Phone screen 39–40
of Treo 650 8–10
finding information 123
5-way navigator, using 20
font, screen 145
formats, audio files 113
forwarding
calls 50–51
messages with VersaMail 68
freeing memory 89
freezing during soft reset 164
G
Glossary 187
H
handset, charging 40
hanging up phone 47
hard reset 165
headset
phone 56
specifications 57
help 159
highlighting items 21
History list in Web browser 87
HotSync, solving problems with 172–176
I
Image option 98
images, moving 93
information
expansion cards, viewing 137
finding 123
locking 152–158
synchronizing 33
updating 33
installation problems, solving 163
installing applications 130–131
internal memory, freeing up 185
items
highlighting 21
selecting or activating 22
items needed to use Treo 650 6
iTunes 114
K
keyboard
dialing calls from 41
overview 24–25
Keyguard 152
L
liability 2
links, using in messaging 78
listening to music 113
lists, scrolling 21
Location field 104
locking phone and information 152–158
Lookup feature 123
low lighting conditions 24
lowercase letters 25
M
Macs, listening to music on 114
magnet, caution 10
managing
active calls 46–52
messaging 79
tasks 108–111
media formats 113
memory, freeing up 185
memos 112
menu features, selecting 23
messages
creating 65, 75
dialing calls from 42
displaying unread email 105
managing with VersaMail 69–70
setting preferences with VersaMail 72
signatures with VersaMail 73
VersaMail 67
messaging
alert tones 82
chatting 80
links, using 78
messages, managing 79
messages, receiving 77
multimedia, creating and sending 75
multimedia, playing 78
settings, customizing 80
text, creating and sending 74
using 74–82
Microsoft Exchange ActiveSync and VersaMail
73
Microsoft Outlook, applications that synchronize
33
Month View 106
moving pictures 93
MP3 files 113
multimedia
messages 75
playing or viewing 78
multimedia messaging. See messaging
MultiMediaCard 134
music
changing playlists for 118
details, viewing 116
CrowAce.book Page 195 Wednesday, November 10, 2004 1:52 PM
DRAFT 1A palmOne, Inc. Confidential
196 :: Index
files 113
formats 113
listening to 113
playing during call 44
playing on Treo 650 116
playlists 117–118
selecting 116
stopping 117
storing 113
transferring from CD 114
transferring from computer 113
volume, adjusting 141
N
naming devices 58
navigating screen 20
network connection, problems with 168–171
No Service message 16
notification of voicemail 45
number recently called, redialing 43
numbers
displaying as decimals 122
entering from keyboard 25
rounding 122
O
opening applications 28
operating systems 30
Option Lock 25
overdue tasks 105, 110
overview of document 4
Owner Preferences 155
P
Palm OS features independent of wireless fea-
tures 15
password lock, system 154
pausing video recording and playback 91
pending alerts 39, 45, 77
personal computers
synchronizing with 33
transferring music from 113
phone
adjusting call volume 17
advanced features 49–52
answering 44
before using 16
checking your phone number 17
hanging up 47
locking 152–158
redialing 16
settings, customizing 140–143
using 16
viewing minutes usage for 52
Phone application
accessing 38
Bluetooth® icon 39
email messages, unread 40
monitoring status of features 39–40
phone headset 56
Phone Lock 153
phone numbers
checking yours 17
pasting into Dial Pad View 41
saving 48
photos
caller ID 142
deleting 94
naming groups of 95
on phone without camera 90
organizing 94
saving 90
selecting as backgrounds 105
sending 93
taking 90
thumbnails 105
VersaMail 66
viewing on computer 96
viewing on phone 92
pick lists 23
Picture size option 95
playing multimedia messages 78
playlists
creating 117
deleting songs from 118
reordering music on 118
selecting music from 116
power preferences 151
private entries 155–156
Q
Quick Install icon 114, 131
R
RealOne Mobile Player 113
RealPlayer
getting help with 114
icon 115, 116
receiving
calls 44
information over Bluetooth® 61
messages with VersaMail 67
messaging 77
recharging handset 40
recording time (actual) 91
redialing phone 16, 43
removing
applications 132
songs from playlists 118
repeating events, displaying 106
replacing battery 166
replying to messages with VersaMail 68
required items to set up Treo 650 6
resetting 164
resolution of photos and videos 90, 182
CrowAce.book Page 196 Wednesday, November 10, 2004 1:52 PM
DRAFT 1A palmOne, Inc. Confidential
Index :: 197
resolution pick list 90, 91
retrieving voicemail 45
reverse type 22
ringer
adjusting volume 141
silencing 44
ringer switch
setting 144
ringtones
caller ID 143
selecting 140
VersaMail 66
S
safe reset 164
Save as Wallpaper command 94
saving
phone numbers 48
photos 90
videos 91
scientific calculator 122
screen
adding photos as background 105
aligning 146
brightness 145
font, changing 145
moving around 20
problems with, solving 167
waking up 15
scrolling through screens 20
SD expansion cards
and warranty 7
using 134
SDIO (Secure Digital input/output) cards 134
searching 123
secure sites
in Web browser 88
problems accessing 181
security features 152–158
security password 157
selecting
alert volume 141
items 22
menu features 23
music 116
ringtones and alerts 140
wallpaper for Phone application 143
sending
applications over Bluetooth® 61
information over Bluetooth® 60
multimedia messages 75
photos 93
text messages 74
videos 93
setting
date and time 119
vibrate 141
setting up
VersaMail 62
VersaMail account on computer 63
VersaMail account on phone 64
voicemail 45
settings, messaging 80
signal strength display 39
silencing ringer 44
SIM (subscriber identity module) card
inserting and using 14
required 6
SIM Phonebook, viewing 100
slide shows, viewing 92
soft reset 164
software, bonus 7
Song Details command 116
songlists. See playlists
sound settings, system 144
sounds 111
Sounds icon 107, 140
specifications
headset 57
Treo 650 199
speed dial, creating favorite buttons 54
Start Time and End Time preference 106
stopping music play 117
storing MP3 files 113
switching accounts in VersaMail 70
switching from Bluetooth® headset to earpiece
47
symbols
and accented characters 25–27
entering from keyboard 25
synchronization
discussed 33
preparing for 30
problems with, solving 172–176
software, installing 32
system
errors 184
password lock 154
profiles 30
requirements 30
resetting 164
system requirements 30
system settings
color 146
sound and volume levels 144
T
taking photos 90
tasks
customizing 111
display options 110
displaying 105, 110
managing 108–111
overdue 105, 110
setting alarms for 111
setting preferences 111
text messaging. See messaging
text, viewing against photos 105
CrowAce.book Page 197 Wednesday, November 10, 2004 1:52 PM
DRAFT 1A palmOne, Inc. Confidential
198 :: Index
third-party applications
and 5-way navigator 20
help with 131
problems with, solving 183
thumbnails (photos) 105
time
displaying recording 91
preferences 149
setting 119
timed events 106
touchscreen lockout 153
transferring
audio files 113
data from another device 160
information 33
Treo 650
features 8–10
turning on and off 15
troubleshooting 159
trusted pairs 60
turning Treo 650 on and off 15
U
unread email messages 40, 105
untimed events 106
updating information 33
upgrading from another device 160
uppercase letters 25
USB HotSync cable 31
using
expansion cards 134–137
voicemail 45
V
VersaMail
accounts, switching between 70
alert tones 71
attachments 68
Auto Sync, scheduling 71
email settings, customizing 70
files, attaching 66
messages, creating and sending 65
messages, managing 69–70, 72
messages, receiving and replying 67
Microsoft Exchange ActiveSync 73
photos, attaching 66
ringtones 66
setting up on computer 63
setting up on phone 64
setup options 62
signature, attaching to message 73
transferring settings from other account
62
using 62–73
videos, attaching 66
vibrate, setting 141
video recording screen 91
videos
jumping to specific sections 91
on phones without camera 90
organizing 94
pausing 91
saving 91
sending 93
VersaMail 66
viewing on computer 96
viewing on phone 92
viewing
application information for 133
applications 29
events 106
lists 21
messages with VersaMail 67
multimedia message 78
photos and videos on phone 92
photos or videos on computer 96
tasks 105, 110
unread messages 105
voice quality, problems with 186
voicemail
sending ignored calls to 44
using 45
volume levels, system 144
volume of call, adjusting 17
VPN, connecting to 157
W
waking up screen 15
wallpaper
accessing Dial Pad when using 41
for Phone application 143
saving photo as 94
warm reset 164
Warranty and SD cards 7
Web browser
beaming from 125
bookmarks 85–86
customizing settings 88
downloading web files 86
faster browsing 87
History list 87
problems with, solving 181
secure websites 88
using 83–89
viewing web pages 83
web pages in 84, 85–86, 87
web browsing problems, solving 181
web pages
dialing calls from 42
in Web browser 83, 84, 85–86, 87
setting initial view for 88
wireless features independent of Palm OS fea-
tures 15
World Clock 119
CrowAce.book Page 198 Wednesday, November 10, 2004 1:52 PM
DRAFT 1A palmOne, Inc. Confidential

199 ::
:: 199
Specifications
Radio • GSM 850/900/1800/1900 quad band world phone
• GPRS class 10, class B; also supports CSD
• EDGE up to 170kbps
Phone features • Personal speakerphone
• Hands-free headset jack (2.5 mm, 3-barrel connector)
• Microphone mute option
• TTY compatible
• 6-way calling
Processor technology • Intel PXA270 312MHz processor
Expansion • SD/MultiMediaCard/SDIO card slot
Battery • Rechargeable Lithium Ion
• Removable for replacement
• Up to 6 hours talk time
• Up to 300 hours standby
• 4 hours full charge time
Palm OS® version • Palm OS 5.4
Camera (not included
on all models)
• VGA resolution (640 x 480), 0.3 megapixel • Automatic light balance
Size • 4.4 in x 2.3 in x 0.9 in (11.3 cm x 5.9 cm x 2.3 cm) with antenna
Weight • 6.3 ounces (178 grams)
IR • Yes
Display • Touch-sensitive LCD screen (includes stylus)
• 65,536 colors
(16-bit color)
• User-adjustable brightness
Keyboard • Built-in QWERTY keyboard plus 5-way navigator
• Backlight for low lighting conditions
CrowAce.book Page 199 Wednesday, November 10, 2004 1:52 PM
DRAFT 1A palmOne, Inc. Confidential

200 ::
200 ::
Included software • Phone (including Palm OS Contacts, Favorites, Dial Pad)
• Camera
• Messaging (text and multimedia)
• Web browser (Internet)
•VersaMail
®
• Calendar
• Memos
• Tasks
• Calculator Basic and Advanced
• Palm® Desktop software and
HotSync® Manager
• World Clock
System
requirements
• Windows 2000 or XP with USB port
• Mac OS 10.2 –10.3 with USB port
• Later versions may also be
supported
Operating and
storage temperature
range
• 32°F to 104°F (0°C to 40°C)
•5% to 90% RH
Specifications
CrowAce.book Page 200 Wednesday, November 10, 2004 1:52 PM
DRAFT 1A palmOne, Inc. Confidential