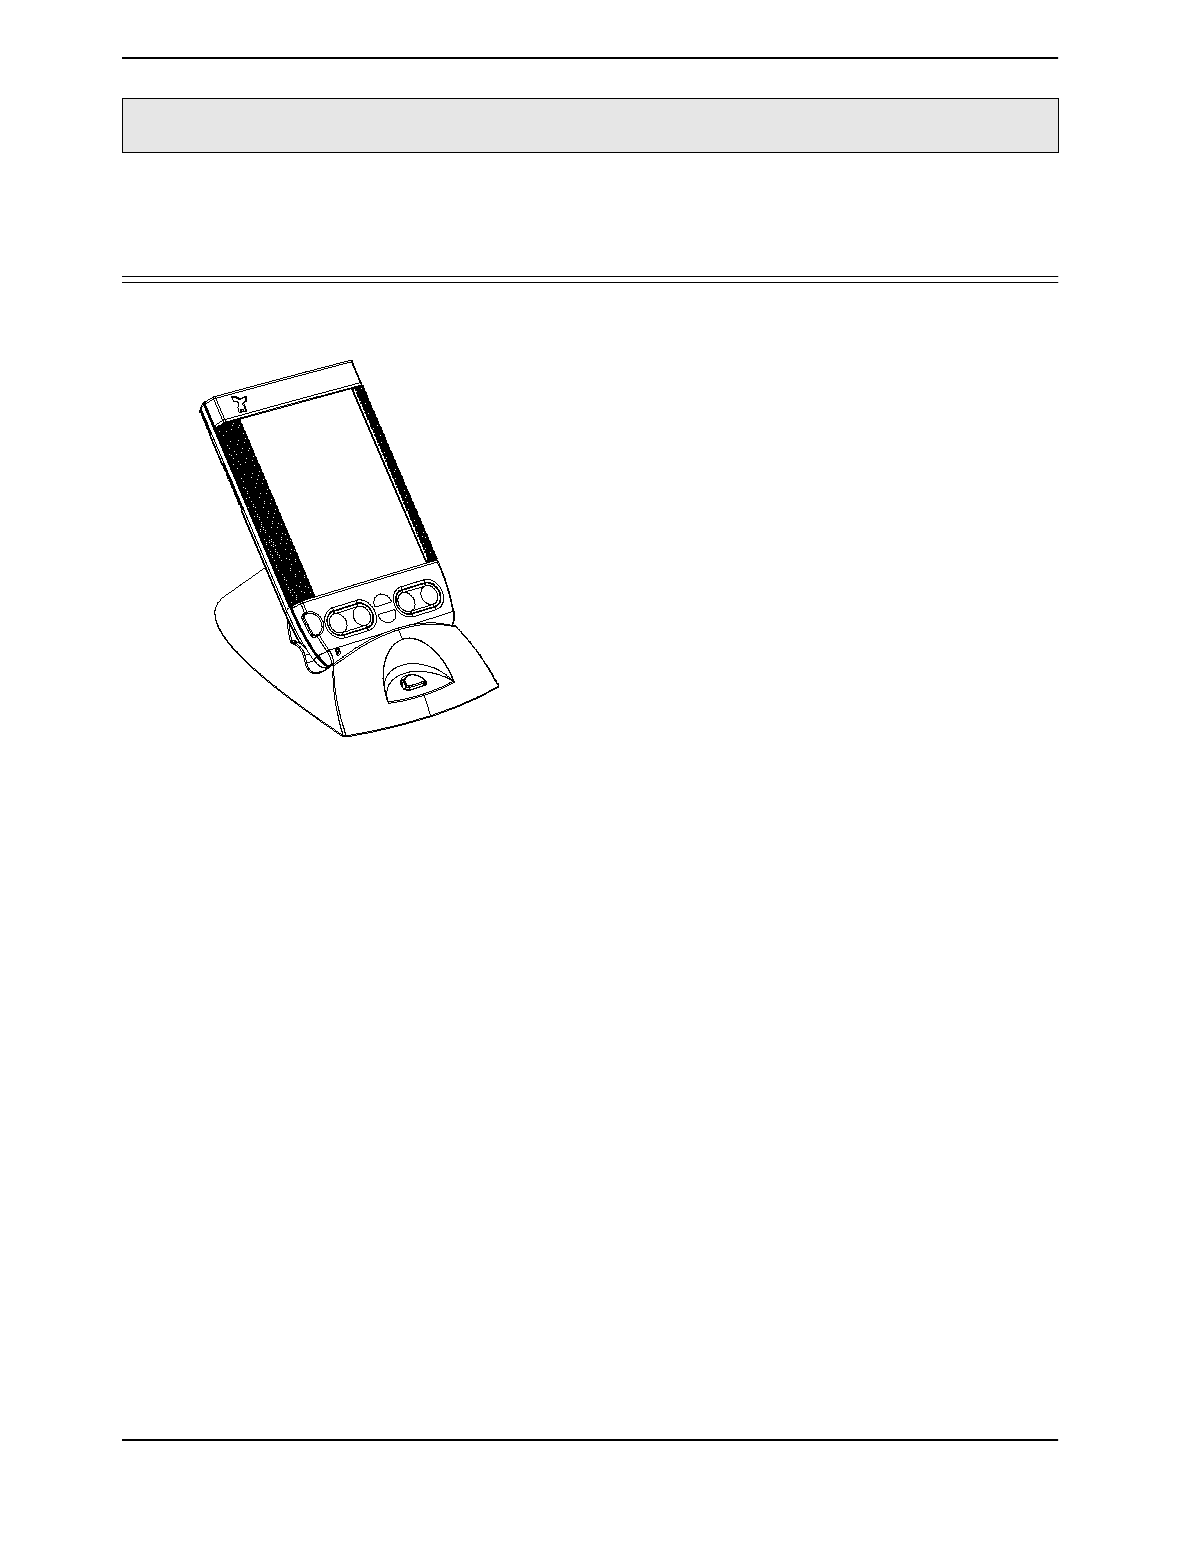
Contents
Visor User Manual

Development Kit for
Handsprin
g
™
Handheld Computers
Release 1.0

9/13/99 Version 0.9
ii Cop
y
ri
g
ht © 1999 b
y
Handsprin
g
, Inc. All ri
g
hts reserved.
Information herein is preliminar
y
and sub
j
ect to chan
g
e without notice.
Cop
y
ri
g
ht © 1999 b
y
Handsprin
g
, Inc. All ri
g
hts reserved.
TRADEMARK ACKNOWLEDGMENT
Handsprin
g
, Visor, and Sprin
g
board are trademarks of Handsprin
g
, Inc.
All other trademarks are the properties of their respective owners.
Document number: 80-0004-00
Handsprin
g
, Inc.
189 Bernardo Ave.
Mountain View, CA 94043-5203
TEL:
(
650
)
230-5000
FAX:
(
650
)
230-2100
www.handsprin
g
.com

Version 1.0 9/13/99
1
Cop
y
ri
g
ht © 1999 b
y
Handsprin
g
, Inc. All ri
g
hts reserved.
Table of contents
Section I Introduction
Chapter 1 Application Development for a Handspring Handheld Computer I-3
Chapter 2 Application development for a Handspring Springboard module I-4
2.1 Sprin
g
board memor
y
-based module software development I-4
2.2 Specialized Sprin
g
board module hardware and software desi
g
n I-5
Section II Springboard expansion slot
Chapter 1 Application development to support plug & play II-2
1.1 Generic Applications II-3
1.2 Special-Purpose Applications II-3
Chapter 2 Module design details II-5
2.1 Memor
y
Space II-5
2.2 Module access time and wait state II-6
2.3 Interrupts II-6
2.4 Interrupt Latenc
y
II-7
2.5 Reset II-7
2.6 Power Mana
g
ement II-7
2.7 Power Mana
g
ement Options for Interrupt Handlers II-8
2.8 Module Insertion Notification II-9
2.9 Catchin
g
Module Removals II-10
Chapter 3 Springboard Software Integration II-12
3.1 Module setup application II-12
3.2 Overridin
g
Module Software II-15
3.3 Module welcome application II-16
3.4 Interrupt Handler Interaction II-16
Chapter 4 Software API Extension II-18
4.1 Checkin
g
Presence and Version of Handsprin
g
Extensions II-18
4.2 Utilit
y
Calls II-19
4.3 Generic Module Support in PalmOS II-19
4.4 Cop
y
Protectin
g
Module Applications II-20
4.5 API Calls II-21
4.5.1 HsAppEventHandlerSet II-22
4.5.2 HsAppEventPost II-23
4.5.3 HsCardAttrGet II-24
4.5.4 HsCardAttrSet II-26
4.5.5 HsCardErrTr
y
/HsCardErrCatch II-27
4.5.6 HsCardEventPost II-29
4.5.7 HsCardPatchInstall II-30
4.5.8 HsCardPatchPrevProc II-32
4.5.9 HsCardPatchRemove II-33
4.5.10 HsDatabaseCop
y
II-34
4.5.11 HsEvtResetAutoOffTimer II-36

9/13/99 Version 1.0
2
Cop
y
ri
g
ht © 1999 b
y
Handsprin
g
, Inc. All ri
g
hts reserved.
Chapter 5 External Interface II-37
5.1 Pinout II-39
5.2 Si
g
nal Descriptions II-40
Chapter 6 Electrical and mechanical specifications II-43
6.1 Absolute electrical maximum ratin
g
s II-43
6.2 DC electrical characteristics II-43
6.3 AC Characteristics II-44
6.4 Sprin
g
board connector insertion/extraction force ratin
g
s II-45
6.5 Sprin
g
board module base color II-46
Chapter 7 HsExt.h Header File II-47
Section III Cradle connector
Chapter 1 Functional Description III-2
Chapter 2 Signal Descriptions III-4
Chapter 3 Keyboard Support via Remote UI III-6
3.1 Remote UI Packet Description III-6
3.2 Remote UI Packet Header III-7
3.3 Remote UI Packet Bod
y
III-9
3.4 CRC Computation III-9
3.5 Remote UI Packet Example III-11
Section IV Development Tools
Section V Mechanical Information
Chapter 1 Visor handheld V-2
Chapter 2 Springboard module with battery V-3
Chapter 3 Springboard standard module V-4
Chapter 4 Cradle base V-5
Chapter 5 Cable connectors V-6
Section VI Compatibility Testing
Chapter 1 PalmOS Software Applications VI-2
Chapter 2 Springboard-Specific Software Applications VI-3
Chapter 3 Springboard-Specific Hardware/Software Applications VI-4
Section VII Handspring Licensing
Section VIII Approved Vendor List
Section IX Trademarks and Logos
Chapter 1 Overview IX-1
Chapter 2 Logos IX-4
Version 1.0
Section I - 1
Cop
y
ri
g
ht © 1999 b
y
Handsprin
g
, Inc. All ri
g
hts reserved.
Section I Introduction
The Visor™ handheld computer is Handsprin
g
™’s first
g
eneration of PalmOS-compatible
products. It is 100% compatible with existin
g
software applications currentl
y
available for
PalmOS 3.1-compatible platforms. In addition, it has a ke
y
enhancement that provides
unparalleled flexibilit
y
for application and peripheral developers: the Sprin
g
board™ expansion
slot.
The Sprin
g
board expansion slot supports true hot plu
g
& pla
y
capabilit
y
of removable plu
g
-in
modules for the Visor handheld. This developer’s kit contains all the necessar
y
information
re
q
uired b
y
developers to manufacture Sprin
g
board-compatible modules.
This document includes the followin
g
information on the Sprin
g
board expansion slot:
• Electrical desi
g
n specifications
• Software desi
g
n inte
g
ration information
• Handsprin
g
’s PalmOS API extension definition
• Mechanical desi
g
n
• Licensin
g
information
For developers desi
g
nin
g
products that communicate with the Visor handheld via the Handsprin
g
cradle connector, this kit also contains the cradle connector’s electrical and mechanical desi
g
n
specifications, as well as information on applicable Handsprin
g
’s API extensions.

Section I: Introduction Version 1.0
Section I - 2 Copyright © 1999 by Handspring, Inc. All rights reserved.
Mechanical information included in this kit is in DXF, IGES, and Pro-E formats. Design files for a
standard Springboard module, the Visor cradle assembly and the exterior dimensions of the
Visor handheld are included.
How to Contact Handspring
Handspring’s on-line developer support web site is currently under construction, therefore we are
currently offering support to our developers via e-mail. If you have any technical questions
regarding the contents of this package, or if you require further technical support, please contact
DevSupport@handspring.com. If you have any business questions regarding this package,
please go to the Developer Program section of Handspring’s web site.

Version 1.0 Application Development for a Handspring Handheld Computer
Section I - 3
Copyright © 1999 by Handspring, Inc. All rights reserved.
Chapter 1 Application Development for a
Handspring Handheld Computer
As previously mentioned, the Visor handheld is Handspring’s first implementation of a handheld
computer. It has been certified as 100% compatible with the PalmOS version 3.1. Thus any
application designed for the Palm Computing Platform and running on a PalmOS 3.1-based
device will run on Visor’s internal memory without modification.
Developers should already be familiar with PalmOS application design before beginning
development of applications for Handspring’s handheld computer.
This development kit does not contain information regarding the design and
implementation of standard PalmOS applications. For this information, please refer to the
PalmOS SDK documentation provided by 3Com at http://www.palm.com/devzone/.
Tools for developing PalmOS applications can be purchased from Metrowerks (http://
www.metrowerks.com). CodeWarrior for PalmOS is the name of Metrowerks’ integrated PalmOS
development package; it includes a compiler, linker, assembly-level debugger, and Palm
emulator. Note that the Palm emulator in CodeWarrior does not currently support Handspring’s
PalmOS API extensions that support Springboard module described in this development kit.
Also provided with this kit is a complete GNU tool kit that can be used to develop applications for
the Visor handheld and your Springboard or cradle module in lieu of CodeWarrior.
Documentation on how to use the GNU tool kit is included when you install it on your PC.
Note that the Visor handheld ROM cannot be used with the current version of POSE (PalmOS
Emulator) because of minor modifications to the hardware design such as button configuration.
However, Handspring’s future goal is to provide a version of POSE that will supports Visor
hardware.
Also included in this developer kit is a new Desktop software that supports the Visor’s USB
interface. You must install this software to communicate with and download your application to
the handheld. The Visor handheld supports USB for higher rates of data synchronization with a
personal computer. Note that the Visor handheld cradle can be purchased in two configurations:
serial or USB. USB is the standard configuration and can be used with PCs running Windows 98
or 2000, and Apple computers that have a USB connector. Serial is recommended for PCs
running Windows 95 and NT, as these operating systems do not have reliable built-in USB
support. Whatever cradle you use, you must install the Desktop software provided by
Handspring.

Section I: Introduction Version 1.0
Section I - 4 Copyright © 1999 by Handspring, Inc. All rights reserved.
Chapter 2 Application development for a
Handspring Springboard module
As mentioned in the previous chapter, software for the Visor handheld can be developed in the
same way as any PalmOS-based application. When you want to transfer your application to a
Springboard-compatible memory module or build a specialized module (a module with special
hardware in it), you must use Handspring’s new development tools.
2.1 Springboard memory-based module software development
If you are an application developer who simply wants to transfer your application to a non-volatile
Springboard memory module, Handspring has set up a supplier to program multiple cards with
your software. You simply need the Palm-makeROM tool as described in Section IV,
“Development Tools,” on page IV-1 to build a ROM image and send it to this supplier.
You can also use Handspring’s available 8MB Flash Module. This module, available on our web
site, is a run-time read-only memory-based module that can be re-programed using the included
GNU debugger, as described in the GNU tool kit documentation. Handspring includes an
application with the module that enables users to transfer any application resident in internal
memory to the module memory.
Handspring is also developing an OTP (One-Time Programmable) memory module kit. You will
be able to buy blank OTP memory modules from an approved vendor and program these
modules yourself with your application.
Since the Springboard memory modules described above (ROM, flash & OTP) are based on
read only memory (at least during run-time) and that they can be removed at any time during
execution, there are some considerations to take into account when designing your application.
Refer to Chapter 1, “Application development to support plug & play,” on page II-2 for a more
detailed description.
For information on Handspring’s approved third-party suppliers, refer to Section VIII, “Approved
Vendor List,” on page VIII-1. This information will also be updated regularly on our developer
support web site.
In addition to the application that you want to transfer to a Springboard module, you should
consider adding a welcome application that is automatically launched when a Springboard
module is inserted in a handheld. Refer to section 3.3, “Module welcome application,” on page
II-16 for a description of the welcome application.

Version 1.0 Application development for a Handspring Springboard module
Section I - 5
Copyright © 1999 by Handspring, Inc. All rights reserved.
2.2 Specialized Springboard module hardware and software design
If you are building a Springboard module with special hardware, you must be familiar with the
PalmOS application developement as described in the previous sections. However, you will have
to use the new Handspring API standard. This API and all other necessary information to built
Springboard compatible modules are explained in the next sections.
This kit also contains source code examples for Springboard module applications. They have
been developed using the GNU tool kit. These examples show how to develop more
sophisticated applications that install interrupt handlers or OS patches when the associated
module is plugged into the Springboard expansion slot. These examples have been fully tested
at Handspring and can be used as a baseline for application development.

Section I: Introduction Version 1.0
Section I - 6 Copyright © 1999 by Handspring, Inc. All rights reserved.

Version 1.0
Section II - 1
Cop
y
ri
g
ht © 1999 b
y
Handsprin
g
, Inc. All ri
g
hts reserved.
Section II Springboard expansion slot
The Sprin
g
board expansion slot allows different functional modules to be inserted and removed
from a handheld computer at
any time
. To support this functionalit
y
, Handsprin
g
has made
extensions to the standard PalmOS in order to enable new, specialized hardware and software
that can detect the insertion of a module, load applications stored on the module, and cleanl
y
remove them when the module is removed. This operation correctl
y
implements plu
g
& pla
y
for
the handheld computer.
Application software that resides in a module’s memor
y
is executed in place
j
ust like applications
in the device’s internal ROM or RAM. It launches and executes
j
ust as fast as built-in
applications. The desi
g
n allows for removin
g
a module while runnin
g
an application on it. The
user is automaticall
y
switched out of the module application and back to the application launcher,
as necessar
y
.
Because the Sprin
g
board expansion slot is a direct extension of the CPU’s parallel bus, modules
can also be desi
g
ned that contain specialized hardware to address new markets not bein
g
touched b
y
the handheld computer toda
y
(
communication, entertainment, professional, etc.
)
.
This section describes the Sprin
g
board expansion slot. It provides
y
ou with the information
necessar
y
to:
• Implement “application-onl
y
” products on a Sprin
g
board compatible memor
y
module
•Desi
g
n Sprin
g
board compatible modules and the applications to support them.
If
y
ou need information to develop application runnin
g
on the handheld internal memor
y
, please
refer to Chapter 1, “Application Development for a Handsprin
g
Handheld Computer,” on pa
g
e I-3
of this document.

Section II: Springboard expansion slot Version 1.0
Section II - 2 Copyright © 1999 by Handspring, Inc. All rights reserved.
Chapter 1 Application development to support plug
& play
The Handspring expansion slot supports true hot plug & play of removable modules. You can
insert or remove a module at any time, regardless of the current state of the machine and
regardless of which applications are currently running. When a module is inserted, any software
resident on the module is immediately available to you, and, in some cases, is automatically
executed as well. A module’s ROM can contain any number of applications. To enable this
automatically, all modules must have code that contains module identification information. This
information is in the module header; it must be generated by the Palm-makeROM utility
described in Section IV, “Development Tools.”.
Modules can also be built with custom hardware and applications that use Handspring’s API. For
this custom purpose, a
module driver
or
control application
is needed on the module itself so that
the driver or application is loaded into the handheld’s internal memory and is used to control the
custom hardware. Typically the custom design includes a setup application, which is responsible
for installing and removing the system extensions required to use the module. To install system
extensions or shared libraries (presumably needed by some special hardware on the module),
Handspring provides a mechanism for specifying a Module setup application. If it is present when
the module is inserted, the setup application is executed. When the module is removed, the
setup application is re-executed to handle removal of the module’s software; the utility is then
deleted from the handheld’s internal memory.
If desired, the module manufacturer can also designate one of the applications in the ROM as a
Module welcome application, which is automatically launched whenever the module is inserted.
Hot plug & play support works with most pre-existing PalmOS applications without any
modification to them. We call these Generic Applications
.
In general, these applications do not
patch any system trap calls, install shared libraries or interrupt handlers, or create background
threads. The vast majority of existing PalmOS applications fall into this category. If a generic
application is running on or using a module when it is removed, the system transparently and
cleanly switches the user back to the applications launcher.
Non-generic
applications and system extensions are those that either enhance or change system
functionality, or interface with special hardware. We will define these applications as Special-
Purpose Applications. These applications cannot support true hot plug & play unless the module
contains a Module setup application. Without a setup application, the system is forced to soft-
reset the device when the module is removed. The Special-Purpose Applications section below
describes how to design these types of applications and modules so that they are fully
compatible with hot insertion and removal.

Version 1.0 Application development to support plug & play
Section II - 3
Copyright © 1999 by Handspring, Inc. All rights reserved.
1.1 Generic Applications
Generic PalmOS applications that are placed onto a memory module, such as the 8MB Flash
Module, are supported by hot plug & play without modifications. Depending on the application,
there are some rare instances where the application might get “confused” when it is relaunched
after a module is pulled out and re-inserted. Designing an application to avoid this possible
problem is straightforward. The following precautions are good design practices and ensure that
an application can be successfully relaunched after any soft reset (which can occur any time a
user presses the soft reset button).
There are two problem areas to consider when designing your application:
1. When the current application is executing out of module memory, or
2. When the current application is using the module memory when it is removed.
In these instances, the operating system is forced to abort the application and clean up any
resources in use by the application. It does that by closing all databases that are still open.
Normally a problem is not presented unless the application was in the middle of writing out
changes to a database it owns. If the module is pulled out during this time, the application's
database could be left in a partially updated state, which might cause the application to be
confused or even crash the next time it executes and re-uses that database again. This window
of vulnerability is very small in most applications; it typically occurs only after dismissing a dialog
or choosing a menu item (to create or delete a new record, for example). It is unlikely, although
possible, that a user would pull a module out during this period of time.
For an application to protect itself from this potential problem, it must perform some simple
checks whenever it re-opens a database it owns. For example, the application could set a valid
bit in a record as the last step in updating the record. If the valid bit is not set when re-reading the
record, the record can be automatically fixed or simply deleted. This process also ensures that
the application can survive any soft reset as well.
1.2 Special-Purpose Applications
As mentioned above, products that extend system functionality by installing system patches or
shared libraries that hook into interrupt handlers or create background threads should not be
placed on a removable module unless it includes a Module setup application. If there is no setup
application, the system is forced into a soft reset when the module is removed.
Typically software of this nature is placed on a module in order to provide access to special
hardware on it. To support hot insertion and removal, the module’s ROM must provide a Module
setup application. The system looks for this utility when the module is installed and automatically
copies it into the built-in RAM of the device. The system calls the utility with an install message.
The setup application can then install interrupt handlers, system patches, shared libraries,
background threads, or whatever else is required in order to support the module and its
hardware. All of the code to support these system extensions must either be present in the setup
application or initially copied into built-in RAM by the setup application before being installed into
the system. When a module is removed, the system calls the setup application again with a
remove message, giving the setup application the opportunity to remove all hooks it had
previously placed into the system. Note that this function call happens
after
the module is
removed, because it is the actual removal that interrupts the OS, which in turn calls the setup

Section II: Springboard expansion slot Version 1.0
Section II - 4 Copyright © 1999 by Handspring, Inc. All rights reserved.
function. The module has tipically been removed when the setup application is called, so it must
not be used to set the module’s hardware in a certain mode. If this operation is needed, the
module must do this operation itself. After the setup application completes the remove operation,
the system deletes the utility from the handheld built-in memory.
The system patches, extensions, interrupt handlers, libraries, etc. that are installed by a setup
application often need to access special hardware devices on the module itself, install and
process interrupts, handle power management, etc. To support these functions, Handspring
provides API calls (described in “API Calls” on page II-21) for querying and changing various
attributes of the module hardware and its interface to the Springboard expansion slot. In addition
to these configuration API calls, Handspring provides other calls that ensure that system
extension code can gracefully detect and recover from a module removal at any time. These
calls are more fully described in “Catching Module Removals” on page II-10.
Version 1.0 Module design details
Section II - 5
Copyright © 1999 by Handspring, Inc. All rights reserved.
Chapter 2 Module design details
This chapter describes hardware aspects regarding memory space, interrupts, reset, power
management, and insertion and removal of the modules. It also references the various Module
Support API calls provided for interfacing to the module hardware; these calls are described in
“API Calls” on page II-21.
2.1 Memory Space
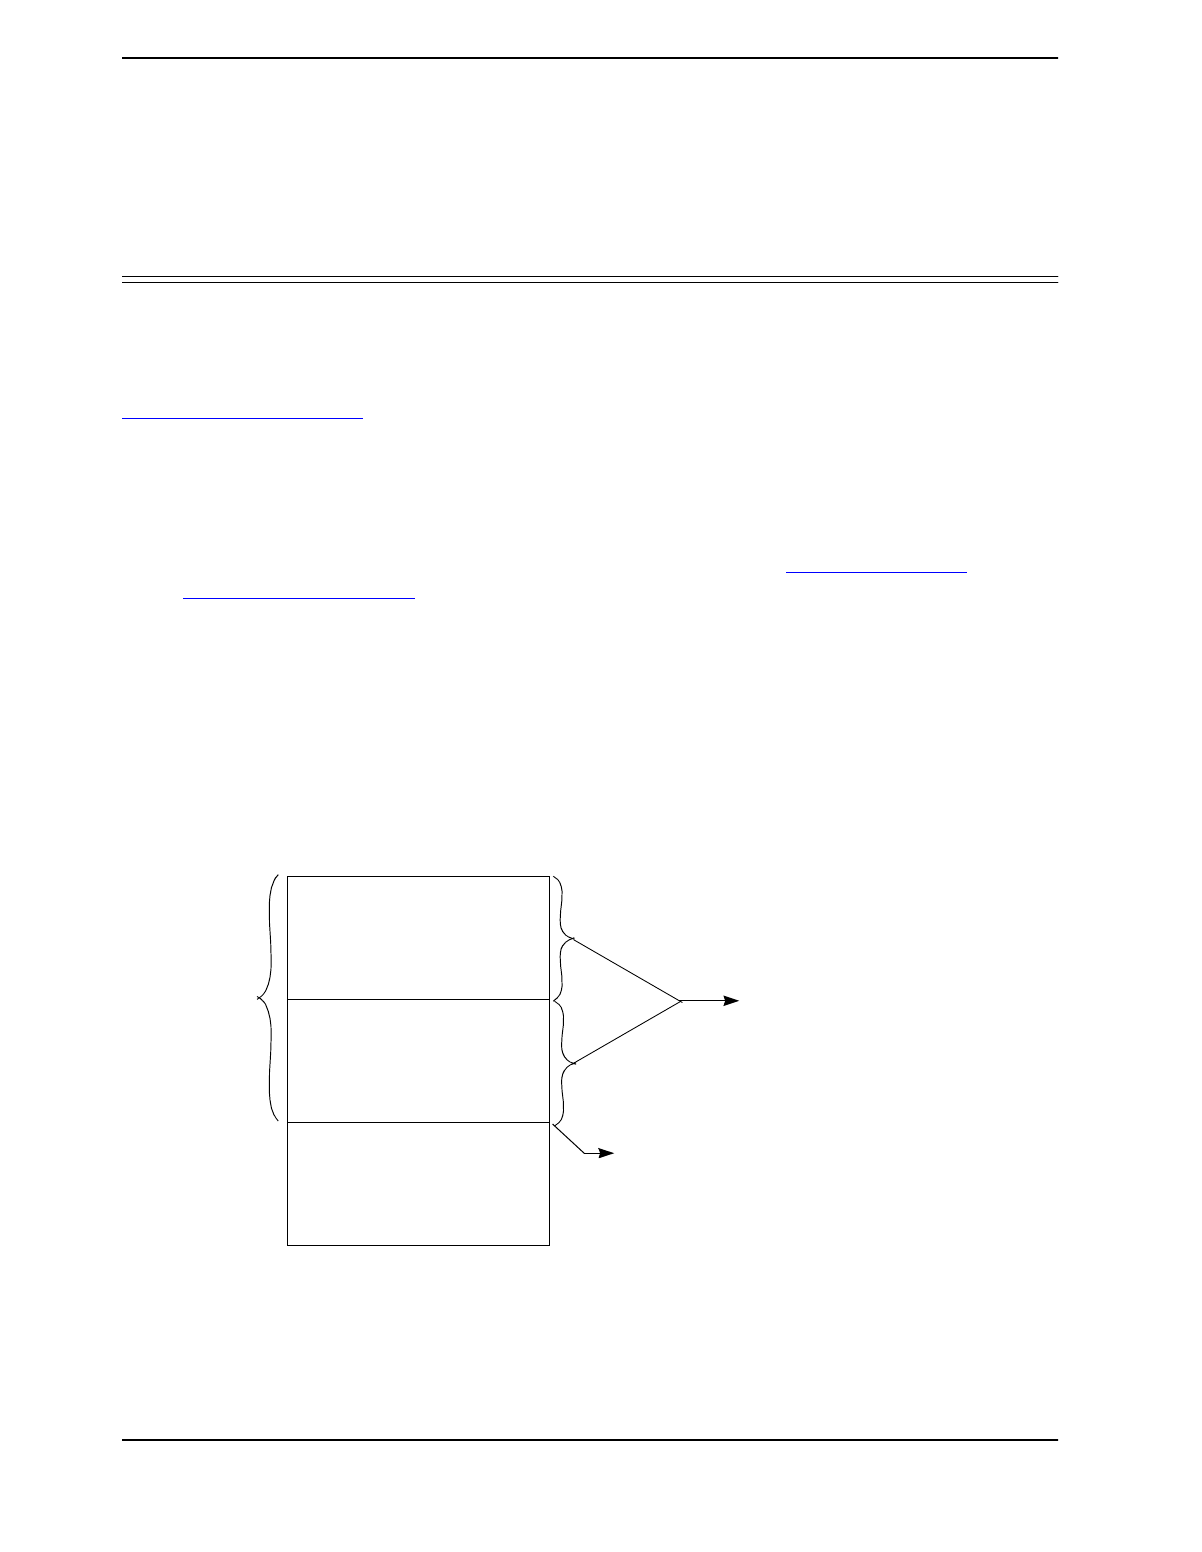
Figure II.1 shows the memory map for the modules. In Handpsring’s first product, the Visor’s
handheld, 32 MB of address space is reserved for the Springboard expansion slot. The base
address and size may change in future releases, you should use the hsCardAttrCsBase attribute
of the HsAppEventHandlerSet() call to obtain this information dynamically at run-time in order to
ensure that your module software remains compatible with future revisions of the base unit and/
or system software. The beginning of the module ROM is expected to be at this base address.
Two chip select lines, called CS0* and CS1* (* means an active low signal), are output to the
Springboard module. By default, when a new module is inserted, the system assigns 16 MB of
address space to each chip select. The address space for CS0* is referred to as csSlot0; the
address space for CS1* is referred to as csSlot1; so csSlot1 starts at csSlot0 + 16 MB.
Figure II.1: Module Memory Map
Each chip select is configured to address 16-bit wide memory devices. The ROM in the module
must reside at the beginning of csSlot0 and must be 16 bits wide in order for the system to
recognize the module. The system makes no assumptions about what resides at csSlot1.
Programmable size using
hsCardAttrCsSize
CsSlot1 Memory Space
(signal name is CS1*)
CsSlot0 Memory Space
(signal name is CS0*)
Basic Internal Memory
Space used by Handheld
32 MB
Maximum
hsCardAttrCsBase

Section II: Springboard expansion slot Version 1.0
Section II - 6 Copyright © 1999 by Handspring, Inc. All rights reserved.
You can use the HsAppEventHandlerSet() and HsCardAttrSet() calls to query or change the
csSlot0 and csSlot1 address ranges via the hsCardAttrCsSize attribute. The ranges can be set to
any power of two between 128 KB and 16 MB, but both ranges must be set to the same size.
csSlot1 always starts immediately after the csSlot0 range. If, for example, csSlot0 start at
address 0x2800 0000 and you change the size of the chip select address ranges to 1
megabytes, then csSlot1 starts at address 0x2810 0000 and continues up to address
0x281F FFFF.
2.2 Module access time and wait state
When a module is first inserted, the system accesses the ROM at csSlot0 with the maximum
number of wait states allowed by the base unit hardware. On the Visor handheld, this value is six
wait states of the Dragonball EZ processor running at ~16.58 MHz, requiring a ROM with a
maximum access time of 430 ns (setup time + 6 wait state = 70 + (6 * 60)). Once the system
validates the ROM header, it reads a value out of the ROM header that indicates the actual
required access time of the module in nanoseconds and re-programs the number of wait states
accordingly. The Palm-MakeROM tool places this value into the ROM header (see -tokStr <id>
<value> on page IV-2). Both csSlot0 and csSlot1 must have the same number of wait states (a
limitation imposed by the processor itself), so you must set this value to the worst case access
time of your ROM and whatever other hardware is present on your module. The
hsCardAttrAccessTime attribute of the HsCardAttrSet() call can also be used to change the
number of wait states dynamically while the module is inserted. This method might be useful, for
example, when temporarily accessing a slow device on your module.
Once the ROM has been validated, the system updates itself so that all applications and
databases present on the ROM are available for access or execution by the system or by other
applications. All applications in the ROM appear in the applications launcher. If there is a setup
application on the module, it is copied in the handheld internal memory and is sent an install
message. Then if the module has a Module welcome application, this application is automatically
launched as well.
2.3 Interrupts
IRQ* is a dedicated interrupt line that hardware on a module can assert to interrupt the CPU. This
interrupt is level sensitive and active low. The software for the module can install an interrupt
handler for this interrupt using the hsCardAttrIntHandler attribute of HsCardAttrSet(). The module
interrupt handler can be written in C or assembly language. It is passed a 32-bit reference
parameter that you specify in the hsCardAttrCardParam attribute of HsCardAttrSet() and a
boolean flag named *sysAwakeP that is passed by reference. Typically the 32-bit reference
parameter is a pointer to the interrupt handler globals. The *sysAwakeP parameter usage is
described below in “Interrupt Handler Interaction” on page II-16.
In general, the interrupt handler must observe a number of restrictions that all interrupt PalmOS
handlers observe. It cannot allocate, free, or move memory chunks, or allocate any system
resources (semaphores, timers, tasks, etc.). If asserted when the handheld is in sleep mode, this
interrupt wakes it up.
The hsCardAttrIntEnable attribute can be used at any time to enable or disable module interrupts
to the processor. It must be called after installing the interrupt handler for the first time.
Version 1.0 Module design details
Section II - 7
Copyright © 1999 by Handspring, Inc. All rights reserved.
When the module is removed, the system immediately disables further module interrupts (using
the hsCardAttrIntEnable attribute), and sends the remove message to the module's setup
application. The setup application should then clear the hsCardAttrIntHandler attribute to zero to
remove the interrupt handler.
2.4 Interrupt Latency
This section describes the interrupt latency times for the Visor handheld computer, which uses a
DragonBall EZ processor running at 16.58 MHz. Latencies are likely to change in future
products, so it is recommended that you design your module hardware and software to be
tolerant of latencies that are at least three times the numbers published here.
Table II.1 shows three examples of interrupt latency times. The latency times were measured on
an actual unit and include all exception processing and function call overhead to get to the first
instruction of the module interrupt handler. The three cases include: 1) when the device is
already awake, 2) the first time the interrupt handler is called after coming out of sleep mode but
before the rest of the system is awake (the *sysAwakeP parameter is false), and 3) the second
time the interrupt handler is called after coming out of sleep mode, which is after the rest of the
system has awakened (the *sysAwakeP parameter is true).
In the third case, the designer must take into account an additional 20 milliseconds if the OS
needs to open the USB library. Note that this case only happens if the USB library was open
when the device went to sleep. This situation is rare because most application will close the USB
library before the device goes to sleep.
2.5 Reset
When a module is first inserted, an interrupt is generated to the handheld and power is slowly
applied to the module. In the Visor handheld computer, the OS ensures that the reset signal
(RESET*) remains asserted for at least 30 ms before releasing it. Because the Springboard
module power is guaranteed to ramp up within 5 ms, there is at least 25 ms of power-on reset
time for the module.
If required, the module software can manually assert and release RESET* after the module has
been inserted by setting the hsCardAttrReset attribute of HsCardAttrSet().
2.6 Power Management
A module can provide software and hardware support for power management. A routine for
taking the module into and out of low power mode can be installed through the
hsCardAttrPwrHandler attribute. The operating system calls this routine whenever the handheld
Table II.1: Interrupt Latency Examples
Condition Latency Recommended Design time
Device already awake 0.047 ms 0.15 ms
Device asleep (*sysAwakeP == false) 1.17 ms 4 ms
Device asleep (*sysAwakeP == true)1
1. Designer should add 20 ms to the recommend design time to allow for opening the USB port as described below.
3.14 ms 10 ms

Section II: Springboard expansion slot Version 1.0
Section II - 8 Copyright © 1999 by Handspring, Inc. All rights reserved.
is turned on or off (that is, taken into or out of sleep mode). Parameters to the routine tell it
whether to power up or down. If powering down, a second parameter indicates the reason. The
reason code is either hsCardPwrDownNormal (a normal power down) or hsCardPwrDownLowVoltage
(indicates that this is an emergency shut down due to low or no battery voltage). Refer to the
HsExt.h Header File for more information on hsCardPwrDownNormal and
hsCardPwrDownLowVoltage.
The power handler routine must observe the same restrictions as an interrupt handler because it
might be called from the context of an interrupt routine, particularly when the system performs an
emergency shutdown due to low battery voltage. In addition, a power handler must execute
very
quickly. When the batteries are removed, the power handler is executed using only the energy
stored in the battery backup capacitor; thus it should do the minimal amount of work necessary to
put the hardware into low power mode before returning. Ideally this process simply involves
setting or clearing a bit in one or two hardware registers.
The base unit asserts the LOWBAT* signal on the module when the batteries fall below a certain
critical threshold voltage level (approximately 1.6 V). In the Visor handheld, power to the module
is removed a few milliseconds after the batteries fall below this critical threshold . When the
batteries are replaced, the module is re-powered and a new initialization sequence occurs.
The handler routine is called first and puts the module into its low power state through software.
However, LOWBAT* must be used to prevent the module from asserting its interrupt, IRQ*, so
that the module does not attempt to wake up the device when the batteries are too low for
operation.
2.7 Power Management Options for Interrupt Handlers
Various power-saving options are available to module interrupt handlers. Through return
parameters and system calls that it makes, the interrupt handler can tell the system how much of
the hardware to power up as a result of the interrupt and how long to stay awake before going
back into sleep mode.
The *sysAwakeP parameter to the module interrupt handler is a boolean flag passed by reference
that tells the interrupt handler how much of the system is currently awake. If the device is asleep
(“off” from a user's perspective) when the module interrupt the handheld, the system calls the
module interrupt handler first before it wakes up any of the remaining hardware (sound, timers,
keypad, etc.) and passes false to *sysAwakeP
. Because the rest of the system is not awake yet,
the interrupt handler cannot make any system calls at this stage except for HsCardErrTry/
HsCardErrCatch. If the handler can process the interrupt at this stage, then it needs to clear the
interrupt source and return. The system then immediately puts the system back into sleep mode.
This procedure is the most power-efficient means of processing the interrupt because no other
extra hardware is powered up, but it does limit the interrupt handler to simple memory
manipulations.
If the interrupt handler is called with *sysAwakeP set to false but needs to make one or more
system calls (such as HsCardEventPost(), SysSemaphoreSet(), etc.), then it should set
*sysAwakeP and return without clearing the source of the interrupt. When the system sees
*sysAwakeP set upon return of the module interrupt handler, it continues the wake-up sequence
and wakes the rest of the system (except for the LCD). Once the system wake-up is completed, it

Version 1.0 Module design details
Section II - 9
Copyright © 1999 by Handspring, Inc. All rights reserved.
calls the module interrupt handler again with *sysAwakeP set true. At this stage, the interrupt
handler is free to make any system calls that are normally valid from interrupt handlers.
Before the interrupt handler returns from being called with *sysAwakeP set true, it has the
additional option of telling the system whether or not to turn on the LCD and how long to stay
awake before returning to sleep mode. To do this, the handler calls HsEvtResetAutoOffTimer(). If
the handler does not call HsEvtResetAutoOffTimer() before exiting, the default behavior of the
system is to return to sleep mode on the next call to EvtGetEvent() by the current application.
Typically, this occurrence is on the order of tens or hundreds of milliseconds, depending on the
current application's event loop.
The HsEvtResetAutoOffTimer() call takes two parameters: a stayAwakeTicks value and a userOn
boolean for controlling the LCD. The stayAwakeTicks tells the system the minimum amount of
time to stay awake before going back to sleep mode. This value is specified in system ticks;
however, keep in mind that the system checks the timer approximately every five seconds to
verify if it needs to put itself in sleep mode. Passing (-1) tells the system to stay awake for the
current auto-off setting indicated in the General Preferences panel. If the interrupt handler wants
the LCD to turn on, then it sets the userOn boolean. The interrupt handler will sets the userOn
boolean if it has just posted an event through HsCardEventPost() that results in an alert being
displayed or other user interface activity.
2.8 Module Insertion Notification
If a module is already plugged in during a device reset,
all
applications and panels on the module
are sent the standard PalmOS reset action code (sysAppLaunchCmdSystemReset), as are all
normal built-in applications and panels.
When a module is hot-inserted at run time, the system also broadcasts the reset action code, but
only to applications (not panels) on the module that have the dmHdrAttrResetAfterInstall bit
set in their database header. This behavior ensures that applications that require the reset
notification are notified, but does not unnecessarily slow down the module insertion process by
having to call every application and panel on a module when it is inserted.
Note that this is a slight modification of the original purpose of the dmHdrAttrResetAfterInstall
bit in the database header. Its original purpose was to tell HotSync to soft reset the device after
one or more of these “reset-after-install” applications are installed onto the device. During the
reset sequence, all applications (and thus the one(s) just installed) are sent the reset action
code. However, when present on a module application this bit now means that the application
wants to receive the reset action code after the module is inserted. Thus the application gets the
reset action code sent to it even though the system has not really gone through a soft reset. This
particular behavior was chosen for maximum compatibility with most existing applications, but
unfortunately a small subset of applications might be confused by it.
Section II: Springboard expansion slot Version 1.0
Section II - 10 Copyright © 1999 by Handspring, Inc. All rights reserved.
Figure II.2: Operational Flowchart when Inserting a Module
2.9 Catching Module Removals
For normal application code, the operating system simply aborts an application that is running on
a module or using a module when it is removed. However, if non-application code such as an
interrupt routine is accessing the module when it is removed, a bus error occurs and, by default,
the system will not know how to “auto-correct” the erroneous access. Other possible problem
areas are shared libraries or patches to system calls that the module has installed.
To handle these situations, Handspring provides the HsCardErrTry/HsCardErrCatch macros.
These macro calls should be wrapped around any code in your interrupt routines, shared
libraries, or system extensions that access memory or other hardware devices out on the
module. If a module is removed when one of these sections of code is executing and a bus error
occurs, the system automatically passes control to the HsCardErrCatch section. You can then
look at various local variables that you have set up to determine the best course of action to take
in dealing with the module removal. In most cases, you can simply set a flag that says the
module has been removed and wait for your setup application to be called with the remove
message. Your setup application should then uninstall all module-dependent hooks that you
have placed into the system.
Start
Was a module
detect interrupt
generated ?
Power is slowly applied to the module
by the handheld hardware and
the OS resets the module
The OS reads the module
header information and updates the
globals for the applications launcher
yes
no
Is there a
setup app
?
Copy setup app
in internal memory
and execute it
Is there a
welcome app
?
no
yes
Execute welcome app
directly from
Module Memory
no
yes
All visible applications
appear in the
applications launcher
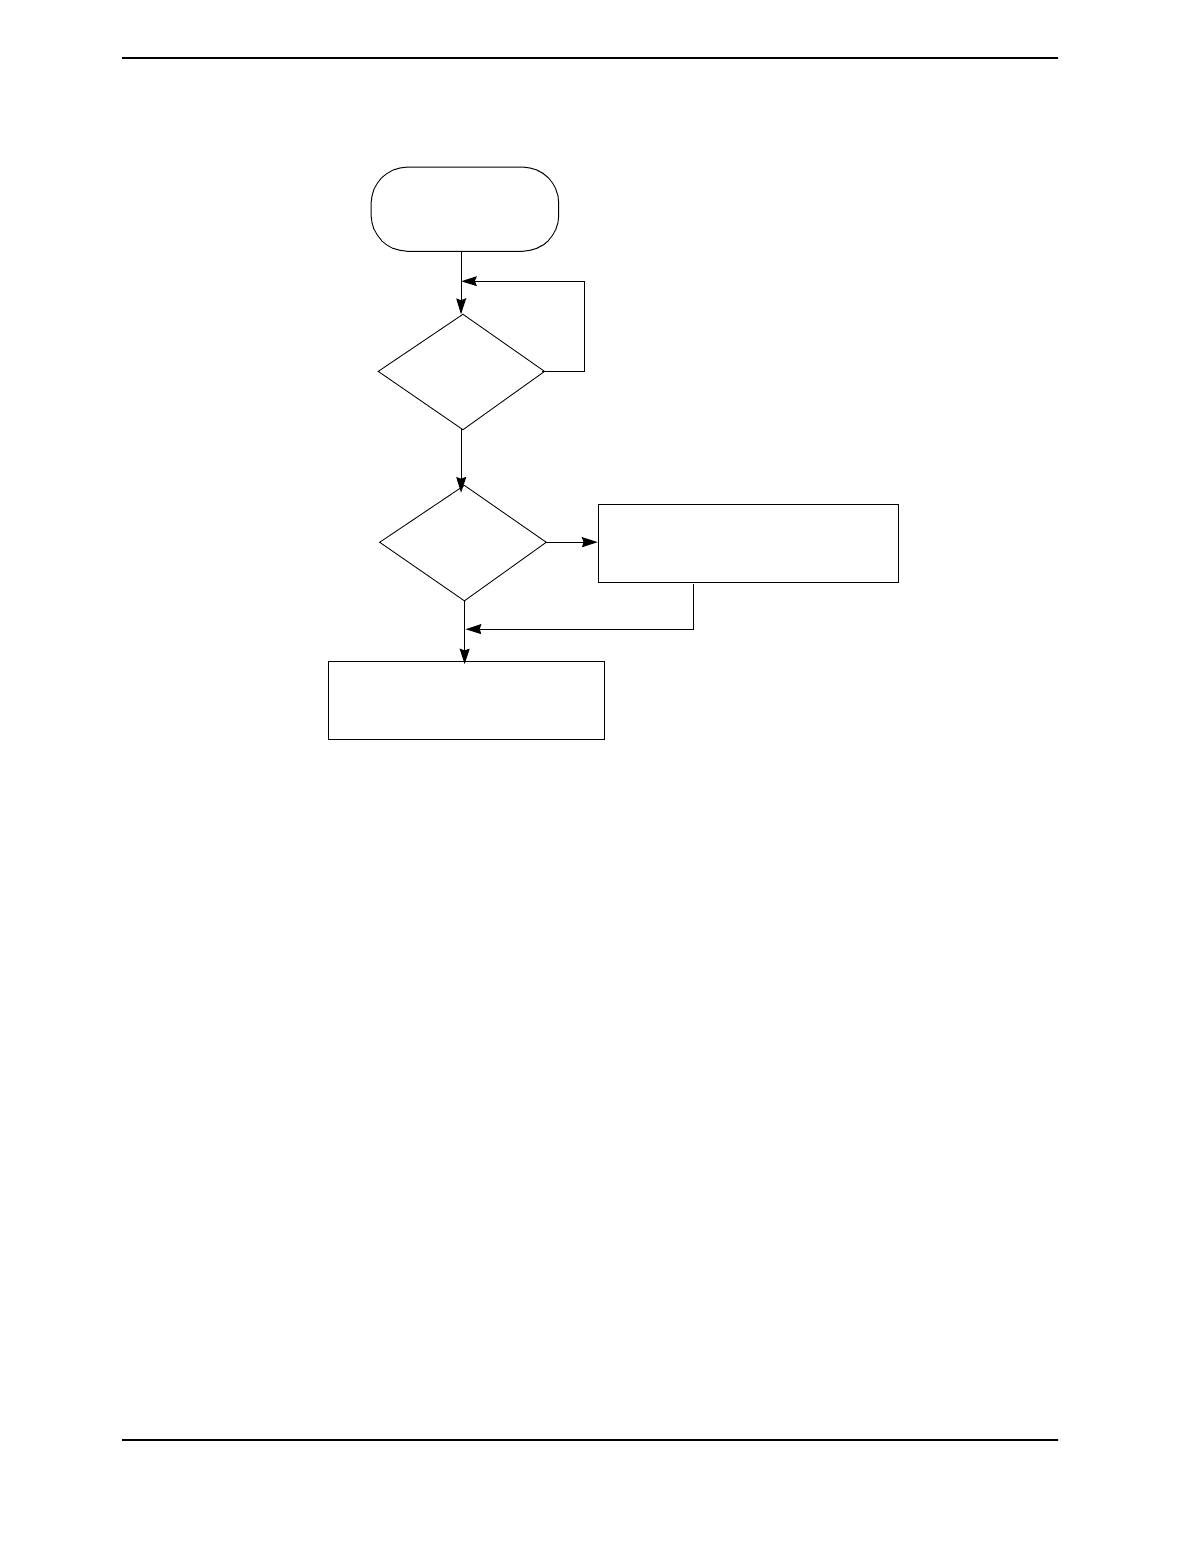
Version 1.0 Module design details
Section II - 11
Copyright © 1999 by Handspring, Inc. All rights reserved.
Figure II.3: Operational Flowchart when Removing a Module
Start
Was a module
detect interrupt
generated ?
The OS deletes the setup app and
updates globals to reflect the removal
of the module and its applications
yes
no
Is there a
setup app
?
The OS calls the setup app
(already in the Handheld’s internal
memory)
no
yes

Section II: Springboard expansion slot Version 1.0
Section II - 12 Copyright © 1999 by Handspring, Inc. All rights reserved.
Chapter 3 Springboard Software Integration
Modules that provide just additional user applications in ROM are straightforward to design and
construct; modules that provide additional hardware functionality often involve interrupt handlers,
shared libraries, and/or system extensions to enable other applications or system software to use
the new hardware. Probably the most critical portion of the software design for a module is the
operation and interaction of these various pieces with each other and the rest of the system.
For example, a pager module might have an interrupt routine that fires off whenever a page
comes in. That interrupt routine might have to store the contents of the incoming page and then
decide whether or not to inform the user that a message came in. If it wanted to inform the user of
the message, it might simply display an alert on the screen (similar to a Datebook alarm going
off) and/or cause a switch to a “Pager” application where the user can view and manage the
incoming pages.
This chapter provides an overview of how interrupt routines and other system extensions can
interact with the module hardware, application code, and the rest of the system. It also
references some of the API calls provided for these purposes. The most important thing to
remember about interrupt handlers, shared libraries, and system extensions is that their code
must be copied into main memory
before
they are installed into the system. If not, the system
cannot recover from a module removal situation without forcing a soft reset. They can, however,
access memory or other devices on the module as long as they follow the guidelines described in
“Catching Module Removals” on page II-10. The Module setup application mechanism provides
a convenient method for copying these types of code into the handheld internal memory before
installation.
3.1 Module setup application
Any module that provides custom hardware and software that access the hardware usually
requires a module setup application. The setup application installs any system extensions,
interrupt handlers, shared libraries, system trap patches, etc. that are necessary for using the
new hardware. It is also responsible for undoing these installations when the module is removed.
Because the setup application is copied into the main memory before being executed, complete
installation and removal of the module software is guaranteed even if the module is removed
prior to or during installation. Note that the module is already removed when the setup
application is called to uninstall. When a module is inserted or when the device is reset, the
operating system automatically queries the module ROM to determine if there is a setup
application for the module. If a setup application exists, the operating system copies it into main
memory and then executes the setup application by sending it an install message. Likewise,
when the module is removed, the system calls the same setup application, sends it a remove
message, then deletes the setup application itself.

Version 1.0 Springboard Software Integration
Section II - 13
Copyright © 1999 by Handspring, Inc. All rights reserved.
A setup application is built just like any other PalmOS application, however, it must be given a
special database creator and type to indicate that it is a module setup application and not a
normal PalmOS application. See the CardSetup Sample for an example (under the
<installDir>\PalmDev\info\Tools\Sample directory after you install the PalmTools included
with this kit). A module setup application is called with one of two action codes sent to its
PilotMain(): hsSysAppLaunchCmdInstall or hsSysAppLaunchCmdRemove. In both cases, the cmdPBP
parameter block passed to the utility is a structure pointer containing the card number that has
been inserted or removed. In this context, card number is the standard PalmOS cardNo
parameter used by function like DmCreateDatabase(UInt cardNo, ...). Usually the setup
application saves this card number in its globals that it allocates during the install. Refer to the
HsExt.h Header File for more information on hsSysAppLaunchCmdInstall and
hsSysAppLaunchCmdRemove.
The parameter block passed during the hsSysAppLaunchCmdInstall action code also contains an
isReset field. This value is true (non-zero) only if the install action code is being sent as a result
of the device going through a soft or hard reset. Most setup applications can safely ignore this
field because their actions are independent of whether or not the module was inserted before the
reset. If the module was inserted before the reset, any shared library or other databases that the
setup application normally copies to built-in RAM are already present in built-in RAM. There is no
harm in copying them from the module again.
During installation and removal processing, a setup application is not allowed to use application
global or static variables; all variables must be normal stack- or register-based local. This
restriction is the same one that is placed on other PalmOS applications when processing other
system actions codes such as find or goto. However, most module software requires globals of
some kind. These globals are most likely shared by the module's interrupt handler, applications,
and other extensions. The hsCardAttrCardParam attribute of the module is provided for this
purpose. Use this attribute to store a 32-bit pointer to the module's globals; it can be set using
HsCardAttrSet() and retrieved using HsAppEventHandlerSet(). In addition, this attribute is
automatically passed to the module's interrupt handler as a parameter on the stack.
If the module setup application needs to install a shared library that is in a separate database out
on the module, it must first copy the shared library database from the removable module into
main memory before installing the library. Likewise it should delete the library from main memory
during removal processing. The library database can be easily copied into memory using the
HsDatabaseCopy() routine.
If a module setup application needs to patch any system traps, it must use the
HsCardPatchInstall() routine to install them. It should
not
use SysSetTrapAddress(). Using
HsCardPatchInstall() ensures that the patch can safely be removed using
HsCardPatchRemove() during removal processing without interfering with other third-party
extensions that may have been activated or de-activated (using an application like HackMaster)
in the meantime.
If a module setup application installs an interrupt handler, event handler, or system patch from its
own code segment (a subroutine linked in with the setup application itself), it must be sure to lock
down its code segment before returning from the install action code. This precaution ensures that
its code segment is not inadvertently moved by the PalmOS memory manager while the module
is installed. The following portion of code does this operation:

Section II: Springboard expansion slot Version 1.0
Section II - 14 Copyright © 1999 by Handspring, Inc. All rights reserved.
// Because we installed a patch from this code resource, make sure
// this code resource remains locked down after we exit.
VoidHand codeResH;
codeResH = DmGet1Resource ('code', 1);
if (codeResH) MemHandleLock (codeResH);
Similarly, during the remove action code, the module setup application should restore the lock
count of the code resource as follows:
// Restore lock count of code resource
VoidHand codeResH;
codeResH = DmGet1Resource ('code', 1);
if (codeResH) MemHandleUnock (codeResH);
A typical module setup application allocates a memory chunk for the module's globals using
MemPtrNew(), resets the owner of this chunk to 0 using MemPtrSetOwner(), and then stores the
returned pointer in the hsCardAttrCardParam attribute of the module. A code example follows:
DWord
PilotMain (Word cmd, Ptr cmdPBP, Word launchFlags)
{
void* globalsP;
Err err;
VoidHand codeResH;
if (cmd == hsSysAppLaunchCmdInstall)
{
HsSysAppLaunchCmdInstallType* installP;
installP = (HsSysAppLaunchCmdInstallType*)cmdPBP
globalsP = MemPtrNew (sizeof (MyGlobalsType));
if (globalsP)
{
MemPtrSetOwner (globalsP, 0);
globalsP->cardNo = installP->cardNo;
HsCardAttrSet (globalsP->cardNo, hsCardAttrCardParam,
&globalsP);
}
// Install shared libraries using SysLibInstall()
// ...
// Patch system traps using HsCardPatchInstall()
// ...
// Install interrupt handler using
// HsCardAttrSet(globalsP->cardNo, hsCardAttrIntHandler, ...)
// ...
// Enable module interrupts using
// HsCardAttrSet (globalsP->cardNo, hsCardAttrIntEnable, ...)
// ...
// Because we installed a patch from this code resource, make sure
// this code resource remains locked down after we exit.
codeResH = DmGet1Resource ('code', 1);
if (codeResH) MemHandleLock (codeResH);
}
else if (cmd == hsSysAppLaunchCmdRemove)
{
HsSysAppLaunchCmdRemoveType* removeP;
removeP = (HsSysAppLaunchCmdRemoveType*)cmdPBP
err = HsCardAttrGet (removeP->cardNo, hsCardAttrCardParam,
&globalsP);
if (!err && globalsP)
MemPtrFree (globalsP);
// Remove shared libraries using SysLibRemove()
// ...
// Restore system traps using HsCardPatchRemove()

Version 1.0 Springboard Software Integration
Section II - 15
Copyright © 1999 by Handspring, Inc. All rights reserved.
// ...
// Restore lock count of our code resource
codeResH = DmGet1Resource ('code', 1);
if (codeResH) MemHandleUnlock (codeResH);
}
return 0;
}
Another restriction placed on a module setup application is when it is called with the remove
message. When this happens, it cannot display any alerts (using FrmAlert() or similar
mechanism) or make system calls that might display UI elements or process user interface
events. The remove action code can be sent to the setup application after the current application
has aborted and before a new application is launched; therefore the system might not be in a
state to process user interface events. The install action code, however, does not have these
restrictions. It can display alerts or progress dialogs if it wishes to because it is always called from
the context of the current application's main event loop.
By the time the setup application is called with the remove message, it can assume that the
system has already done the following:
1. Disabled module interrupts by resetting the hsCardAttrIntEnable attribute to 0.
2. Removed the module interrupt handler by resetting the hsCardAttrIntHandler attribute to 0.
3. Removed the module event handler by resetting the hsCardAttrEvtHandler attribute to 0.
4. Removed the module's power handler by resetting the hsCardAttrPwrHandler attribute to 0.
3.2 Overriding Module Software
The basic principle behind Handspring’s removable modules is that all of the module software
and hardware resides on the module itself. In this way, a module that is inserted in any handheld
is immediately functional without requiring any manual software installation or configuration.
Also, most modules will be built with masked ROM in order to keep costs to a minimum. In the
unfortunate event that a bug is discovered after a masked ROM module has been released,
however, you might need to provide a software patch for users of your module.
By taking special precautions in the design of your setup application, you can minimize the need
to design and implement a software patch for your module. For example, suppose your module
copies a shared library from the module ROM to internal memory. Instead of blindly copying the
shared library from the module to internal memory, your setup application should first check
internal memory for a newer version of that library. If a newer version already exists in internal
memory, you can skip copying the version from the module. Use the
DmGetNextDatabaseByTypeCreator() call in these situations; it automatically searches for the
latest version of a database by type and/or creator. If you find the newer version in internal
memory (card number 0), then you can skip copying the database from the module.
Note: Always register all your database creator IDs with 3Com developer support to ensure that
they are unique.

Section II: Springboard expansion slot Version 1.0
Section II - 16 Copyright © 1999 by Handspring, Inc. All rights reserved.
3.3 Module welcome application
Whenever a module is inserted and after copying and executing the Module setup application (if
present), the system looks for a welcome application on the module. This application is a normal
PalmOS application with a database name of “CardWelcome.” If this application is found, the OS
automatically switches to it. For example, this application could be a module-specific launcher
application or an application that lets you set preferences for the module. Because it is a normal
PalmOS application, it appears in the PalmOS applications launcher and can be accessed
through the launcher anytime after the module has been inserted. The name that appears in the
PalmOS application launcher for this welcome application can be set up in the “tAIN” resource of
the welcome app—the same as for other PalmOS applications. This launcher’s visible name in
the “tAIN” resource is independent of the actual database name of “CardWelcome.”
If a module is inserted during a soft or hard reset, the system does not automatically switch to the
welcome application. You can, however, override this behavior and have the welcome
application launched automatically during a reset. To do this, include the “HsWR” token in the
module's ROM. To include this token, specify it on the command line to the Palm-MakeROM tool
(-tokStr <id> <value>) as described in Section IV, “Development Tools,” on page IV-1.
3.4 Interrupt Handler Interaction
All interrupt handlers in the PalmOS must observe a number of restrictions. They cannot allocate,
free, or move memory in any memory heap; create, modify, or delete databases; create, delete,
or block system resources such timers, tasks, semaphores, etc.; or display any user interface.
About the only thing an interrupt handler can safely do is change the contents of pre-allocated,
locked memory blocks, queue keyboard events, or trigger system semaphores. In addition,
interrupt handlers must execute as quickly as possible in order to maximize user-responsiveness
of the device and minimize the chances of adversely interfering with other interrupt response
times.
One of the first tasks of any module interrupt handler is to remove the source of the interrupt.
This step usually involves reading a register on the module that effectively deasserts the interrupt
line. Module interrupts are level-sensitive and unless the module interrupt handler removes the
source of the interrupt by the time it exits, the interrupt handler is immediately re-executed.
Next the module interrupt handler usually processes and/or stores some data regarding the
interrupt. For this purpose, it usually needs a pointer to some global data containing one or more
buffers and/or counters. This pointer must have been allocated in advance by application or
setup code. Usually this type of buffer is allocated during initialization time using MemPtrNew()
and is set to have an owner ID of 0 (using MemPtrSetOwner) to prevent the system from freeing it
when the current application quits. Module interrupt handlers are passed a 32-bit parameter on
the stack, which is set up through the hsCardAttrCardParam attribute of the HsCardAttrSet() call.
Usually this parameter is the globals pointer for the interrupt handler.
Finally the interrupt handler may have to notify the system or an application that an event of
particular interest has occurred. In particular, if an alert or similar message needs to be
displayed, the interrupt handler must rely on application or system code to display it
after
the
interrupt handler returns, because interrupt handlers themselves are not allowed to have any

Version 1.0 Springboard Software Integration
Section II - 17
Copyright © 1999 by Handspring, Inc. All rights reserved.
user interface. Typically the interrupt handler uses the HsAppEventPost() system routine to
trigger the user interface.
Note: Refer to “Power Management Options for Interrupt Handlers” on page II-8 for important
information about when it is safe to make system calls from a module interrupt handler. System
calls cannot be made from a module interrupt handler if the *sysAwakeP parameter passed to it is
false.
The interrupt handler can use the HsCardEventPost() call to post a module event. This call
accepts an event number between 0 and hsMaxCardEvent and a 16-bit event parameter. After the
interrupt handler exits and control is returned to the main event loop, the system calls the
module's CardEvtHandler() with the given event number and 16-bit event parameter.
CardEvtHandler() is installed through the hsCardAttrEvtHandler attribute of HsCardAttrSet(). For
convenience, the CardEvtHandler() is also passed a copy of the same 32-bit parameter that the
interrupt handler gets (the interrupt handler globals).
Because CardEvtHandler() executes from the context of the main event loop, it has no
restrictions as far as allocating memory or making other system calls. It can put up an alert, call
SysUIAppSwitch() to cause a switch to another application, or do anything else it desires. It is
important to note that the CardEvtHandler() function executes in the context of (or is effectively
called from) the current UI application. For this reason, the module event handler function should
keep its stack usage (local variables, nested function calls, etc.) down to a minimum.

Section II: Springboard expansion slot Version 1.0
Section II - 18 Copyright © 1999 by Handspring, Inc. All rights reserved.
Chapter 4 Software API Extension
This chapter describes in detail the calling conventions and parameters for each of the
Handspring API calls.
For a description of how and where to use most of these calls, refer to Chapter 2, “Module design
details,” on page II-5 and Chapter 3, “Springboard Software Integration,” on page II-12. The use
of the remaining generic utility calls provided by Handspring are described in “Utility Calls” on
page II-19.
The header file “HsExt.h” provided with this kit contains all the public equates referenced in this
chapter including all constants, structure definitions, function prototypes, etc.
4.1 Checking Presence and Version of Handspring Extensions
For application code or other types of code that might be installed onto both non-Handspring
PalmOS devices and Handspring devices, you must first ensure that you are on a Handspring
device before making Handspring-specific API calls. Use the FtrGet() call of PalmOS and check
for the presence of the Handspring extensions feature. The hsFtrCreator and hsFtrIDVersion
constants that are passed to FtrGet() are defined in the Handspring header file HsExt.h. For
example:
DWord value;
err = FtrGet (hsFtrCreator, hsFtrIDVersion, &value);
if (!err)
{
// Since FtrGet() did not return an error, we can
// safely make Handspring specific API calls like
// HsCardAttrGet(), HsCardAttrSet(), etc.
}
If FtrGet() returns no error, then the Handspring extensions are present and it is safe to call any
Handspring API call that is described in this chapter. The current version level of the Handspring
extensions is returned in the value parameter. It is encoded as 0xMMmfsbbb, where MM is the
major version number, m is the minor version number, f is the bug fix level, s is the stage (3-
release, 2-beta 1-alpha, 0-development) and bbb is the build number for non-releases. For
example, Version 2.00a2 would be encoded as 0x02001002, where the major version number is
02, the minor version number is 0, the bug fix level is 0, the stage is alpha, and the build number
is 0x2.
Because the format used for the version number of the Handspring extensions is the same as
that used for the PalmOS ROM version number, your code can use version macros such as
sysGetROMVerMajor and sysGetROMVerMinor (defined in SystemMgr.h of the Palm Computing
Platform SDK) for decoding the version number of the Handspring extensions.
Another Handspring feature provides the modification date of the Handspring extensions. This
feature has an ID of hsFtrIDModDate (replaces hsFtrIDVersion in the above example). The value

Version 1.0 Software API Extension
Section II - 19
Copyright © 1999 by Handspring, Inc. All rights reserved.
of this feature changes with every release of the Handspring extensions, regardless of whether
or not new features were added. Thus you should use it for informative purposes only. If your
software makes decisions based on a certain version or feature of the Handspring extensions in
order to run, it should use the hsFtrIDVersion feature instead.
4.2 Utility Calls
Besides the API calls that are provided specifically for dealing with removable modules, the
Handspring utility functions described in this section are not necessarily module related.
The HsDatabaseCopy() call can be used to copy a database from a module to built-in memory,
vice-versa, or to duplicate an existing database within the same module. This function can be
useful in module setup applications if they need to copy any databases from the module to built-
in memory as part of the setup process.
The HsAppEventHandlerSet() and HsAppEventPost() calls can be used to provide more flexible
event-handling mechanisms for an application. Normally when applications have their own
custom event types, they must specifically look for these events in their main event loop after
calling EvtGetEvent(). This process is not a problem in the main event loop of the application,
but it can be a problem if a system event loop (such as the system “Find” dialog or “Category
Edit” dialog event loops) is executing at the time the event is posted. Because the system event
loop is not aware of any application-specific event types, it simply ignores them.
If the application registers its own custom event handler procedure using
HsAppEventHandlerSet(), then this procedure is called automatically by the system during
SysHandleEvent() in response to any event posted by HsAppEventPost(). This way, the
application's event handler is called even if the event is posted, while the system is in one of its
own custom dialog event loops.
Keep in mind that your application's event handler might be called from the context of another
application's action code processing. Even though your application is the “current” application
visible to the user at the time, the global CPU registers are not your application's globals due to
the action code processing. Thus your application event handler routine must never rely on
global variables. Instead it should use the evtRefCon parameter that is passed to it as a pointer to
any variables it needs to access or update. This evtRefCon parameter value is set up by the
HsAppEventHandlerSet() call.
4.3 Generic Module Support in PalmOS
Besides the calls mentioned in this chapter, the standard PalmOS memory and data manager
calls for dealing with modules and memory on modules are always available. For example,
MemNumCards() returns the number of modules that are present. It returns “2” if there is a
removable module inserted and “1” otherwise. The built-in memory of the handheld base unit is
accessed by passing a module number of “0” to the appropriate memory and data manager calls,
whereas the removable module memory is accessed using a module number of “1.” Calls such
as MemCardInfo() can be used to get the module name, manufacturer name, etc. for any module
by passing the appropriate module number.
Remember that even if MemNumCards() returns a “2”, indicating that the removable module is
currently installed, the user may pull the module out at any time—even immediately after this call

Section II: Springboard expansion slot Version 1.0
Section II - 20 Copyright © 1999 by Handspring, Inc. All rights reserved.
returns. When a module is removed, the system automatically aborts any application code that is
currently in the process of trying to access memory on the removable module and returns control
to the application launcher. In general, application code can simply call MemNumCards() during its
start-up and assume that the information will remain current until the application exits. If the
module is pulled out while the application is using it, the system automatically and immediately
aborts the application. If the application is
not
referencing the module when the module is pulled
out, then the system sends it an exit event and waits for the application to exit normally. When a
module is inserted, the current application is sent a normal exit event as well. It might or might
not be re-launched after it exits, depending on the contents of the module (for example, it might
have a welcome application on it that is launched instead).
4.4 Copy Protecting Module Applications
If desired, module applications easily can be designed so that they will not run if copied off the
module to another device's internal RAM. A simple mechanism is for the application to check for
the presence of the removable module and compare the module's name when it starts up. If the
module is not present or the module's name is not correct, it can display an appropriate error
message and refuse to run.
All removable modules will have unique module names that the module manufacturer must
register with Handspring. This name is an ASCII string of up to 31 characters. To get the name of
a module, use the MemCardInfo() call and pass in the module number of the removable module.
For example:
char cardName[32];
Err err;
err = MemCardInfo (1 /*cardNo*/, cardName, 0 /*manufName*/,
0 /*versionP*/, 0 /*crDateP*/, 0 /*romSizeP*/,
0 /*ramSizeP*/, 0 /*freeBytesP*/);
if (err || StrCompare (cardName, "MyCardName"))
{
DisplayCopyProtectError();
}

Version 1.0 Software API Extension
Section II - 21
Copyright © 1999 by Handspring, Inc. All rights reserved.
4.5 API Calls
This section lists the Handspring API calls in alphabetical order. The calls are summarized in the
table below.
The use of the generic utility calls is described in 4.2, “Utility Calls.”
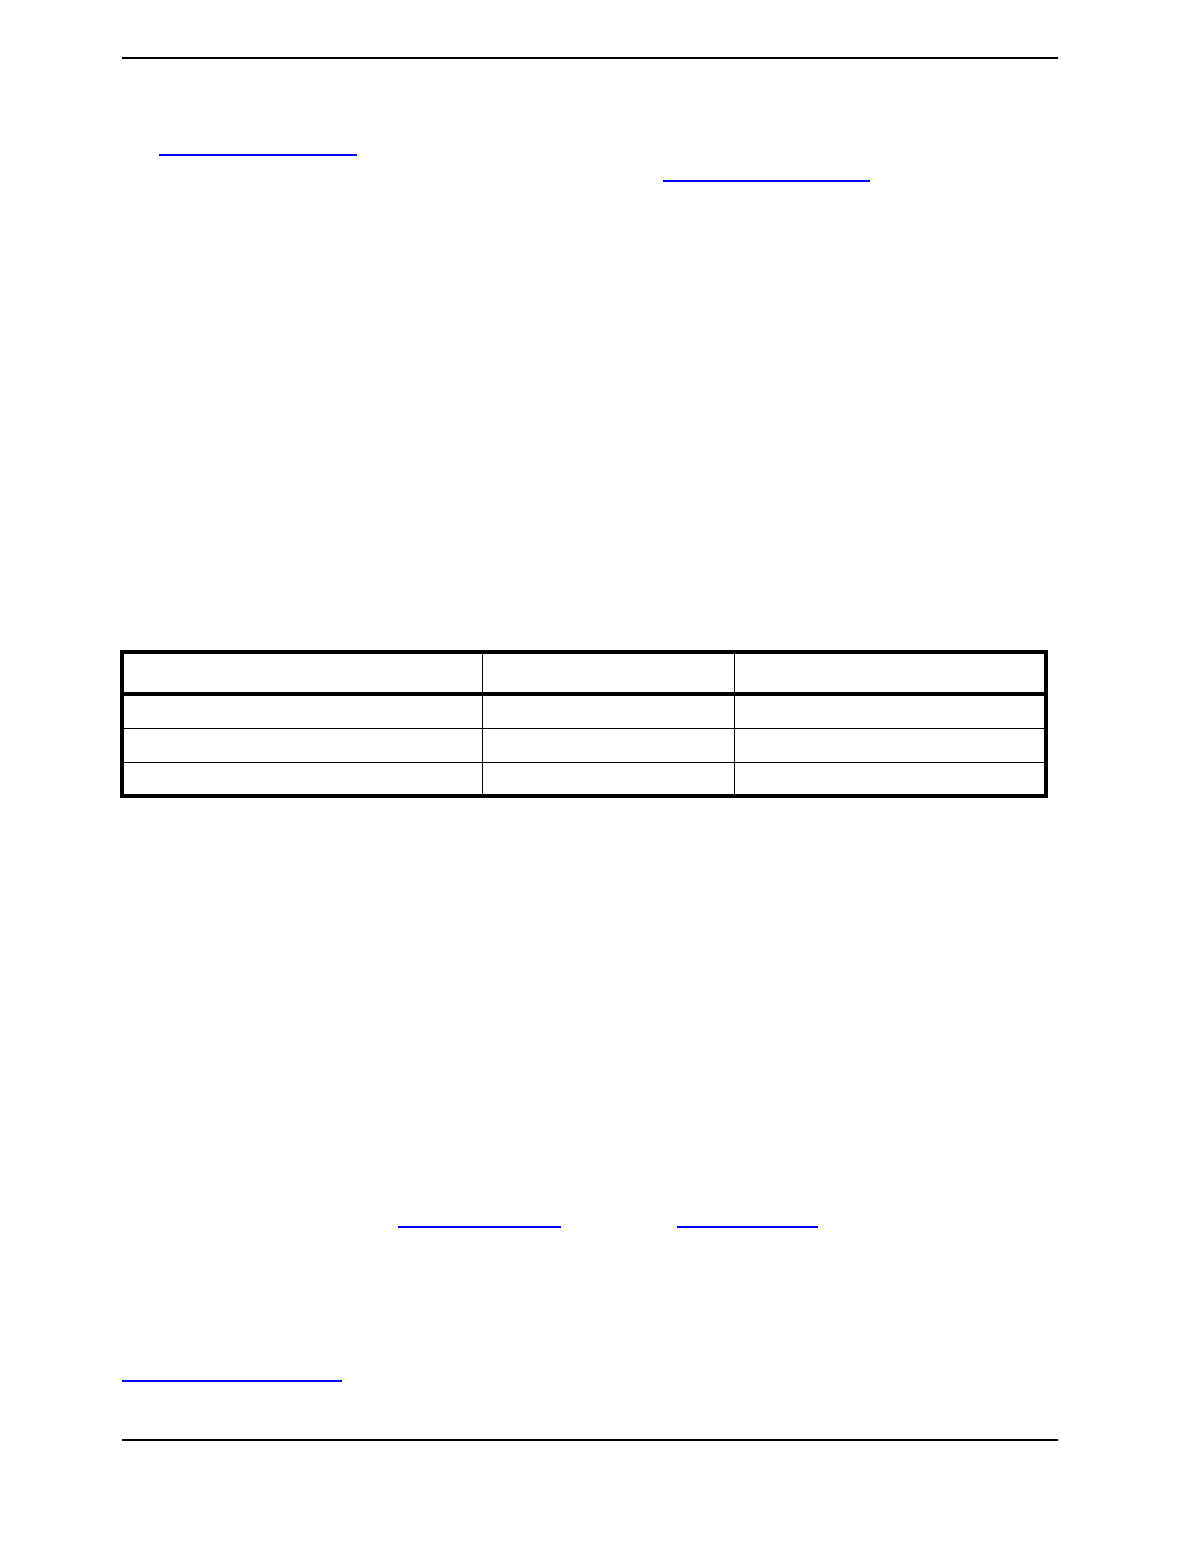
Table II.1: API Call Summary
Call Description Page #
HsAppEventHandlerSet Register event handler procedure page II-22
HsAppEventPost Enable event posting by application event handler page II-23
HsCardAttrGet Retrieve attribute page II-24
HsCardAttrSet Set attribute page II-26
HsCardErrTry/HsCardErrCatch Enable safe recovery for module removals page II-27
HsCardEventPost Queue an event page II-29
HsCardPatchInstall Enable patch installs page II-30
HsCardPatchPrevProc Get address of previous system trap implementation page II-32
HsCardPatchRemove Remove setup application patch page II-33
HsDatabaseCopy Copy PalmOS database page II-34
HsEvtResetAutoOffTimer Reset auto-off timer page II-36

Section II: Springboard expansion slot Version 1.0
Section II - 22 Copyright © 1999 by Handspring, Inc. All rights reserved.
4.5.1 HsAppEventHandlerSet
Summary
Provided for applications so they can register their own event handler
procedure that can be triggered using HsAppEventPost().
Prototype
Err
HsAppEventHandlerSet (HsAppEventHandlerPtr procP, DWord evtRefCon)
Description
Sets up an application's event handler procedure. The system calls this
handler procedure from the main event loop in response to an event
posted by the HsAppEventPost() routine.
The event handler has this prototype:
Boolean AppEvtHandler (DWord evtRefCon, Word evtNum, Word evtParam)
It returns “true” if the event was successfully handled and “false” if not. The
evtRefCon parameter is a copy of the evtRefCon value passed to
HsAppEventHandlerSet(). The evtNum and evtParam parameters are
copies of values passed in to HsAppEventPost().
Note that this event handler can be called while the system is in the middle
of sending an action code, like find, to another application. Even though
your application is the “current” application visible to the user at the time,
the global CPU registers will not be your application's globals due to the
action code processing. Thus the AppEvtHandler routine must never use
global variables. Instead it should use the evtRefCon parameter as a
pointer to a structure containing any variables it needs to reference or
update.
The system automatically removes your AppEvtHandler() for you when
your application quits.
Parameters
Returns
procP IN Pointer to event handler procedure, or NIL to remove the cur-
rent one.
evtRefCon IN This 32-bit reference constant gets passed to the event handler
when it is called by the system.
0 if no error

Version 1.0 Software API Extension
Section II - 23
Copyright © 1999 by Handspring, Inc. All rights reserved.
4.5.2 HsAppEventPost
Summary
Provided for applications so that they can post an event to be processed
by their own application event handler procedure installed using the
HsAppEventHandlerSet() call.
Prototype
Err
HsAppEventPost (Word evtNum, Word evtParam)
Description
Queues an event for the application's own event handler procedure. The
system calls the event handler procedure from the main event loop. The
event handler can be installed using the HsAppEventHandlerSet() call.
The event handler has this prototype:
Boolean AppEvtHandler (DWord evtRefCon, Word evtNum, Word evtParam)
It returns “true” if the event was successfully handled and “false” if not. The
evtRefCon parameter is a copy of the evtRefCon value passed to
HsAppEventHandlerSet().
Parameters
Returns
evtNum IN The event number to post. Can be any value between 0 and
hsMaxAppEvent.
evtParam IN A 16-bit parameter that is passed to CardEvtHandler.
0 if no error
Section II: Springboard expansion slot Version 1.0
Section II - 24 Copyright © 1999 by Handspring, Inc. All rights reserved.
4.5.3 HsCardAttrGet
Summary
Retrieves any one of the attributes of a module or its software/hardware
interface.
Prototype
Err
HsCardAttrGet (Word cardNo, HsCardAttrEnum attr, void* valueP)
Description
Returns the current value of a particular module attribute designated by
the attr parameter. The return value is placed in the buffer pointed to by
valueP
.
Parameters
The possible values of attr and the corresponding return types are shown
below. The R/W column indicates if settings are read-only (R) or read-write
(RW). The read-write attributes can be configured through the
HsCardAttrSet() call.
attr IN which attribute to retrieve
cardNo IN which module number to query about
*valueP OUT value of attribute is returned in this buffer
Setting Value R/W Description
hsCardAttrRemovable Byte R True if this module is a removable module. False if the module is
not removable (built-in module: cardNo = 0). Returns hsErrIn-
validCard if slot “cardNo” does not exist.
hsCardAttrHwInstalled Byte R
True if a module is physically installed at “cardNo” and has fin-
ished its power-on reset cycle. False if not. Returns hsErrInvalid-
Card if slot “cardNo” does not exist.
Note that this attribute is true before hsCardAttrSwInstalled is
true.
hsCardAttrSwInstalled Byte R
True if the PalmOS Memory, Data, and other managers have
been updated to access the given module. False otherwise.
Note that this attribute is not true until some period of time after
the module is physically installed and hsCardAttrHwInstalled is
true.
hsCardAttrCsBase DWord R Base address of first slot chip select. The second chip select
always starts at hsCardAttrCsBase + hsCardAttrCsSize.
hsCardAttrCsSize DWord RW Address range of each of the chip selects.
hsCardAttrAccessTime DWord RW Minimum access time of slot chip selects in nanoseconds. Note
that when set, the value passed in is rounded up to the next
available access time setting available in hardware.
hsCardAttrReset Byte RW If value is non-zero, the module reset signal going to the module
is asserted. If zero, the module reset signal is deasserted.
Version 1.0 Software API Extension
Section II - 25
Copyright © 1999 by Handspring, Inc. All rights reserved.
Returns
hsCardAttrIntEnable Byte RW If value is non-zero, module interrupts are enabled. If value is
zero, the module interrupts are disabled.
hsCardAttrCardParam DWord RW Contains the 32-bit parameter that is passed to the module's
interrupt handler, power handler, and event handler.
hsCardAttrIntHandler void* RW
This attribute is a pointer to the module interrupt handler which
must have this calling convention:
void CardIntHandler (DWord cardParam, Boolean*
sysAwakeP);
The cardParam that is passed to this interrupt handler can be
set up through the hsCardAttrCardParam attribute.
hsCardAttrPwrHandler void* RW
This attribute is a pointer to the module's power handler routine,
which must have this calling convention:
void CardPwrHandler (DWord cardParam, Boolean
sleep, HsCardPwrDownEnum reason)
The cardParam is a convenience copy of the hsCardAttrCard-
Param module attribute.
hsCardAttrEvtHandler void* RW
This attribute is a pointer to a Module Event Handler procedure.
A module interrupt handler can trigger the system to call this
event handler using HsCardEventPost(). This mechanism is
described in “Interrupt Handler Interaction” on page II-16
hsCardAttrLogicalBase void* R
Contains the logical base address reserved for the given module
slot. This value, added to the module's header offset, gives the
address of the module's ROM header. Most applications do not
need to use this value. It is provided mainly for advanced appli-
cations like flash programming applications that need to format
their own module headers.
hsCardAttrLogicalSize DWord R Contains the logical address space reserved for the given mod-
ule. This value is greater than or equal to the actual addressable
memory on the module.
hsCardAttrHdrOffset DWord R
Contains the offset from the module base address to the mod-
ule's ROM header. Most applications do not need to use this
value. It is provided mainly for advanced applications like flash
programming applications that need to format their own module
headers.
0 if no error
hsErrNotSupported this setting is not supported
hsErrInvalidCard invalid module number
Setting Value R/W Description
Section II: Springboard expansion slot Version 1.0
Section II - 26 Copyright © 1999 by Handspring, Inc. All rights reserved.
4.5.4 HsCardAttrSet
Summary
Sets an attribute of a module's interface.
Prototype
Err
HsCardAttrSet (Word cardNo, HsCardAttrEnum attr, void* valueP)
Description
Sets the new value of a particular module attribute designated by the attr
parameter.
Parameters
The possible values of setting and the corresponding data type of
*valueP are documented in the HsCardAttrGet() call. Only those indicated
as being read/write (RW) attributes can be changed through this call.
Returns
attr IN which attribute to set
cardNo IN which module number to set attribute on
*valueP IN new value of attribute is passed in this buffer
0 if no error
hsErrNotSupported this setting is not supported
hsErrInvalidCard invalid module number
hsErrReadOnly this attribute is read-only and cannot be changed.

Version 1.0 Software API Extension
Section II - 27
Copyright © 1999 by Handspring, Inc. All rights reserved.
4.5.5 HsCardErrTry/HsCardErrCatch
Summary
These macros are provided for interrupt handlers, system extensions, and
shared libraries that need to access memory or devices out on a
removable module. These calls enable safe recovery if the module is
removed while in critical sections of code.
Prototype
HsCardErrTry
{
// Do something that accesses the removable module
}
HsCardErrCatch
{
// Recover or cleanup after a failure in the above Try block.
// The code in this Catch block does not execute if
// the above Try block completes without a module removal
} HsCardErrEnd
// You must structure your code exactly as above. You cannot have a
// HsCardErrTry { } without a HsCardErrCatch { } HsCardErrEnd,
// or vice versa.
Description
The HsCardErrTry/HsCardErrCatch macros should be wrapped around
any section of code within an interrupt handler, system extension, shared
library, or other system code that needs to access memory or hardware on
a removable module. If the module is removed while the critical section of
code is executing, control is passed to the HsCardErrCatch() section.
These macros can be nested. For example, you can call a subroutine from
within your HsCardErrTry block that has its own try/catch block. Every
routine that has an HsCardErrTry clause, however, must have an
HsCardErrCatch.
Limitations
HsCardErrTry and HsCardErrCatch are based on setjmp/longjmp. At the
beginning of a Try block, setjmp saves the machine registers. A module
removal triggers longjmp, which restores the registers and jumps to the
beginning of the Catch block. Therefore, any changes in the Try block to
variables stored in registers are not retained when entering the Catch
block.
The solution is to declare variables that you want to use in both the Try
and Catch blocks as “volatile.”

Section II: Springboard expansion slot Version 1.0
Section II - 28 Copyright © 1999 by Handspring, Inc. All rights reserved.
For example:
volatile long x = 1; // Declare volatile local variable
HsErrErrTry
{
...
x = 100; // Set local variable in Try
...
}
HsCardErrCatch
{
if (x > 1) // Use local variable in Catch
SysBeep(1);
} HsCardErrEnd
Parameters
none
Returns
N/A

Version 1.0 Software API Extension
Section II - 29
Copyright © 1999 by Handspring, Inc. All rights reserved.
4.5.6 HsCardEventPost
Summary
Provided for interrupt handlers so that they can queue an event for
processing later by a CardEvtHandler() procedure.
Prototype
Err
HsCardEventPost (Word cardNo, Word evtNum, Word evtParam)
Description
Queues an event for a CardEvtHandler() procedure. The system calls the
CardEvtHandler procedure from the main event loop of the current
application after the interrupt handler returns. The CardEvtHandler can be
installed using the hsCardAttrEvtHandler attribute of HsCardAttrSet().
The CardEvtHandler has this prototype:
Boolean CardEvtHandler (DWord cardParam, Word evtNum, Word evtParam)
It should return “true” if it successfully handled the event and “false” if it did
not. The cardParam value passed to CardEvtHandler is a convenience
copy of the hsCardAttrCardParam module attribute.
Parameters
Returns
evtNum IN The event number to post. Can be any value between 0 and
hsMaxCardEvent.
cardNo IN Module number for which to post event.
evtParam IN A 16-bit parameter that is passed to CardEvtHandler.
0 if no error
hsErrInvalidCard invalid module number

Section II: Springboard expansion slot Version 1.0
Section II - 30 Copyright © 1999 by Handspring, Inc. All rights reserved.
4.5.7 HsCardPatchInstall
Summary
Enables Module Setup utilities to install patches to PalmOS system calls.
Prototype
Err
HsCardPatchInstall (Word trapNum, void* procP)
Description
Patches a PalmOS system trap call. Setup utilities should always use this
call to patch traps rather than the PalmOS SysSetTrapAddress() call
because this call ensures compatibility with other third party extensions
that may have been installed by the user (through HackMaster or
equivalent).
The implementation of the patch must use the HsCardPatchPrevProc()
routine to obtain the address of the “old” trap call in order to pass control
over to it.
When the module Setup application is called to remove the module
software, it must use HsCardPatchRemove() to remove every patch
installed by HsCardPatchInstall().
Important: module setup applications are only allowed to install
one
patch
per system trap number. If HsCardPatchInstall() is called twice for the
same trap without an intervening HsCardPatchRemove(), it returns the
error code hsErrCardPatchAlreadyInstalled.
Here is an example of a patch implementation that does some work then
passes control over to the previous implementation:
static Boolean
PrvCardSysHandleEvent (EventPtr eventP)
{
Boolean handled;
Boolean (*oldProcP) (EventPtr eventP) = 0;
// Do some stuff
//...
// Call old routine
HsCardPatchPrevProc (sysTrapSysHandleEvent,
(DWord*)&oldProcP);
handled = (*oldProcP) (eventP);
return handled;
}
Parameters
trapNum IN The trap number of the call to patch. This value is a SysTrap-
Number PalmOS enum value as found in the PalmOS header
file <SysTraps.h>.
procP IN Pointer to procedure to plug into the system trap.

Version 1.0 Software API Extension
Section II - 31
Copyright © 1999 by Handspring, Inc. All rights reserved.
Returns
0 if no error
hsErrInvalidCard invalid module number

Section II: Springboard expansion slot Version 1.0
Section II - 32 Copyright © 1999 by Handspring, Inc. All rights reserved.
4.5.8 HsCardPatchPrevProc
Summary
Used by system patches installed using HsCardPatchInstall() to get the
address of the previous implementation of the system trap.
Prototype
Err
HsCardPatchPrevProc (Word trapNum, void** prevProcPP)
Description
Use this call inside the implementation of a system patch for a module in
order to get the address of the previous implementation of the call. In most
cases, patches do their own work before calling the previous
implementation. See HsCardPatchInstall() for an example of a patch
implementation.
Parameters
Returns
trapNum IN The trap number of the call that was patched. This value is a
SysTrapNumber PalmOS enum value as found in the PalmOS
header file <SysTraps.h>
*prevProcPP OUT The address of the previous implementation is returned in this
pointer.
0 if no error
ftrErrNoSuchFeature trap was not patched by HsCardPatchInstall
Version 1.0 Software API Extension
Section II - 33
Copyright © 1999 by Handspring, Inc. All rights reserved.
4.5.9 HsCardPatchRemove
Summary
Removes a module setup application patch installed by
HsCardPatchInstall().
Prototype
Err
HsCardPatchInstall (Word trapNum, void* procP)
Description
When the module setup application gets called to remove the module
software, it must use this call to remove every patch installed by
HsCardPatchInstall().
Parameters
Returns
trapNum IN The trap number of the call that was patched. This value is a
SysTrapNumber PalmOS enum value as found in the PalmOS
header file <SysTraps.h>
0 if no error
hsErrCardPatchNotInstalled trap was not patched by HsCardPatchInstall

Section II: Springboard expansion slot Version 1.0
Section II - 34 Copyright © 1999 by Handspring, Inc. All rights reserved.
4.5.10 HsDatabaseCopy
Summary
Copies an entire PalmOS database.
Prototype
Err
HsDatabaseCopy (Word srcCardNo, LocalID srcDbID, Word dstCardNo,
char* dstNameP, DWord hsDbCopyFlags, char* tmpNameP,
LocalID* dstDbIDP)
Description
Copies an entire PalmOS database. The source and destination can be
the same module or different modules, and the source database can be
copied from ROM or RAM.
The hsDbCopyFlags parameter can be used to control the copy operation.
The caller has the option of preserving the creation date, modification
date, backup date, and/or modification number of the source database, as
well as whether or not an existing database with the same name should be
automatically overwritten or not.
Parameters
srcCardNo IN Module number of source database.
srcDbID IN Database ID of source database.
dstCardNo IN Module number of destination database.
dstNameP IN Name of new database. If a nil pointer is passed, then the name
of the source database is used.
hsDbCopyFlags IN One or more of hsDbCopyFlagXXX flags as described below in
Table II.2.
tmpNameP IN Temporary name to use while copying, or nil pointer to use
default temporary name.
*dstDbIDP OUT The database ID of the created destination database is returned
here unless dstDbIDP is a nil pointer.

Version 1.0 Software API Extension
Section II - 35
Copyright © 1999 by Handspring, Inc. All rights reserved.
Table II.2 lists the possible flags for the hsDbCopyFlags parameter.
Returns
Table II.2: hsDbCopyFlags Flags
Flag Description
hsDbCopyFlagPreserveCrDate Preserve the creation date of the source database. If not set, then the desti-
nation database gets the current date and time as its creation date.
hsDbCopyFlagPreserveModDate Preserve the modification date of the source database. If not set, then the
destination database gets the current date and time as its modification date.
hsDbCopyFlagPreserveModNum Preserve the modification number of the source database. If not set, then the
destination database gets a new modification number unrelated to the
source databases.
hsDbCopyFlagPreserveBckUpDate Preserve the backup date of the source database. If not set, then the desti-
nation database gets a backup date of 0.
hsDbCopyFlagOKToOverwrite Preserve the creation date of the source database. If not set, then the desti-
nation database gets the current date and time as its creation date.
hsDbCopyFlagDeleteFirst
Delete existing destination database first, if it exists. Normally any pre-exist-
ing destination database with the same name is left intact until the source
has been copied over as a temporary database. This guarantees that any
pre-existing database is not lost if the copy operation fails. If space is limited
on the destination module, however, there may not be room for two tempo-
rary copies of the destination database, so this flag can be set to override the
default behavior.
0 if no error
non-zero if a Data, Memory, or other type of error occurs during the copy operation

Section II: Springboard expansion slot Version 1.0
Section II - 36 Copyright © 1999 by Handspring, Inc. All rights reserved.
4.5.11 HsEvtResetAutoOffTimer
Summary
Provided for interrupt handlers so that they can reset the auto-off timer of
the system and turn on the LCD if it is not already on.
Prototype
Err
HsEvtResetAutoOffTimer (SDWord stayAwakeTicks, Boolean userOn)
Description
By default, if a module interrupt wakes the device and the handler returns
without calling HsEvtResetAutoOffTimer(), the system puts the device
back to sleep on the next round through the event loop (see “Power
Management Options for Interrupt Handlers” on page II-8 for a complete
description).
However, by calling HsEvtResetAutoOffTimer(), the interrupt handler can
tell the system to turn on the LCD if it is not already turned on and tell the
system to stay awake for at least a certain number of system ticks. If this
call is made when the LCD is already on, it has no effect other than to
possibly extend the auto-off timer.
The stayAwakeTicks parameter is specified in system ticks, but the current
granularity of the system in this respect is only approximately five seconds.
Consequently if you pass a value like sysTicksPerSecond*1, the system
might not shut off for five seconds. Passing (-1) for stayAwakeTicks makes
the system stay awake for at least the current auto-off time as specified in
the General Preferences panel.
Parameters
Returns
stayAwakeTicks IN
The minimum amount of time, in system ticks, to keep the sys-
tem awake. Even though this parameter is specified in ticks, the
minimum granularity of the system in this respect is about five
seconds. Passing (-1) means to stay awake for the current
Auto-off time as specified in the General Preference panel.
userOn IN If true, turn on the LCD if it is not already on.
0 if no error
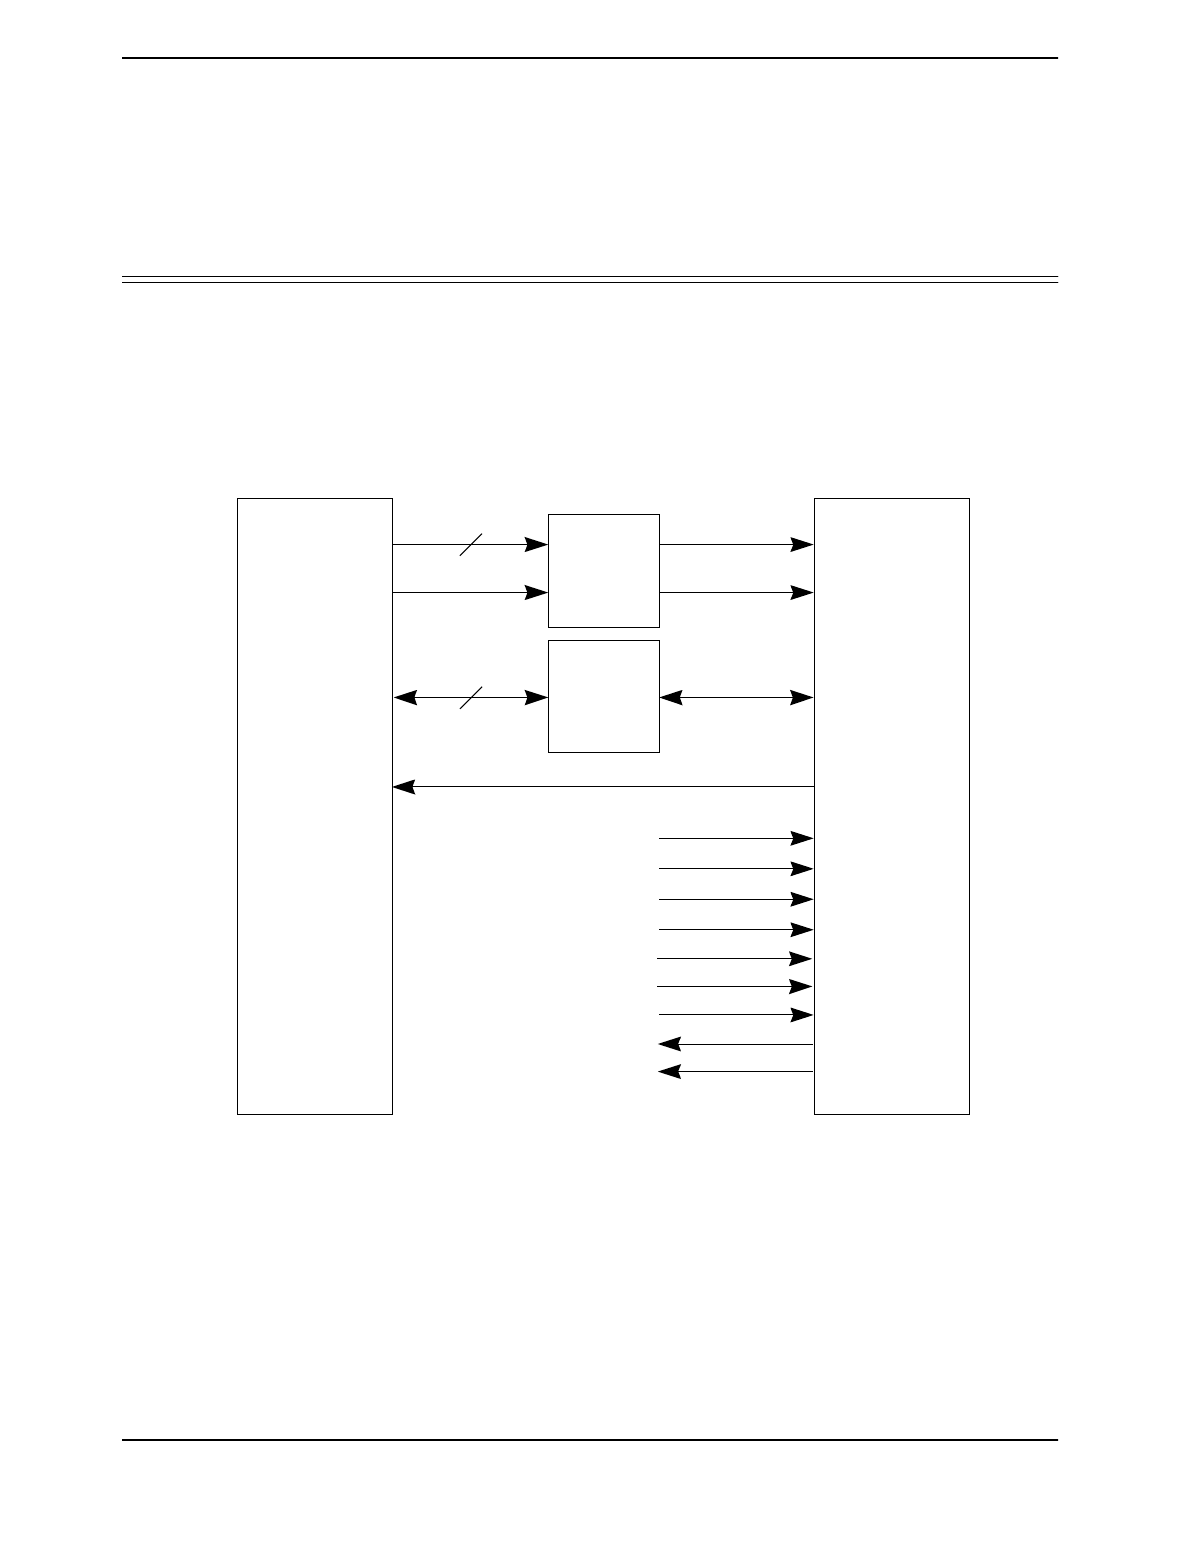
Version 1.0 External Interface
Section II - 37
Copyright © 1999 by Handspring, Inc. All rights reserved.
Chapter 5 External Interface
The Springboard expansion slot allows for hardware and software expansion of Handspring’s
family of PalmOS-compatible handheld computers and for seamless hot Plug & Play capability.
Figure II.1 shows the block diagram of the slot interface.
Figure II.1: Springboard Expansion Slot Connector Block Diagram
The Springboard expansion slot provides a slave-only interface for expanding the capabilities of
the main handheld unit. The slot supports hot swapping via buffers and transceivers; it otherwise
functions as if it is directly connected to the host CPU bus. Physically, the Springboard expansion
slot connector is identical to a PCMCIA connector. However, the electrical specifications differ
between these two connectors.
Modules can be inserted into or removed from the base unit at any time, even when the device is
on. When a module is inserted, the software and hardware automatically configure the module,
making its features instantly available. A module can be a simple ROM-only module with a set of
Buffers
Transceivers
Host CPU
Data
Control
Address
24
16
IRQ*
VCC
VDOCK
MIC+
MIC–
LOWBAT*
RESET*
GND
CD1*
CD2*
Slot
Connector
Section II: Springboard expansion slot Version 1.0
Section II - 38 Copyright © 1999 by Handspring, Inc. All rights reserved.
additional applications, or it can provide additional powerful hardware functionality, such as
network connectivity, sound support, and communications options. A variety of functions, such
as pagers, radios, or backup flash memory, can be interfaced with Handspring’s handheld
computers in this way.
Figure II.2 shows the Springboard 68-pin expansion slot.
Figure II.2: Springboard expansion slot 3-D view
...
Pin 1
Pin 2
Pin 35

Version 1.0 External Interface
Section II - 39
Copyright © 1999 by Handspring, Inc. All rights reserved.
5.1 Pinout
Table II.1 summarizes the signal names with their respective pin numbers on the 68-pin
expansion slot connector. Note that the signal direction (I/O/P/PU1) is viewed from the module to
the handheld.
Table II.1: Springboard Expansion Slot Connector Pin Summary
Pin Name I/O/P/PU1
1. I = input, O = output, and P = power, with respect to the module. PU indicates the signal is internally pulled up within the the handheld.
Function Pin Name I/O/P/PU Function
1 GND P Ground 35 GND P Ground
2 D3 I/O Data Bit 3 36 CD1* O/PU Card detect 1
3 D4 I/O Data Bit 4 37 D11 I/O Data Bit 11
4 D5 I/O Data Bit 5 38 D12 I/O Data Bit 12
5 D6 I/O Data Bit 6 39 D13 I/O Data Bit 13
6 D7 I/O Data Bit 7 40 D14 I/O Data Bit 14
7 CS0*2
2. * indicates an active-low signal.
I Chip Select 0 41 D15 I/O Data Bit 15
8 A10 I Address Bit 10 42 CS1* I Chip Select 1
9 OE* I Output Enable 43 N.C. — No Connect
10 A11 I Address Bit 11 44 N.C. — No Connect
11 A9 I Address Bit 9 45 N.C. — No Connect
12 A8 I Address Bit 8 46 A17 I Address Bit 17
13 A13 I Address Bit 13 47 A18 I Address Bit 18
14 A14 I Address Bit 14 48 A19 I Address Bit 19
15 WE* I Write Enable 49 A20 I Address Bit 20
16 IRQ* O/PU Interrupt Request 50 A21 I Address Bit 21
17 VCC P Module VCC, 3.3V 51 VCC P Module VCC, 3.3V
18 VDOCK P Dock VCC 52 VDOCK P Docking Voltage
19 A16 I Address Bit 16 53 A22 I Address Bit 22
20 A15 I Address Bit 15 54 A23 I Address Bit 23
21 A12 I Address Bit 12 55 N.C. — No Connect
22 A7 I Address Bit 7 56 N.C. — No Connect
23 A6 I Address Bit 6 57 N.C. — No Connect
24 A5 I Address Bit 5 58 RESET* I Reset
25 A4 I Address Bit 4 59 N.C. — No Connect
26 A3 I Address Bit 3 60 MIC+ I Microphone +
27 A2 I Address Bit 2 61 MIC- I Microphone -
28 A1 I Address Bit 1 62 N.C. — No Connect
29 A0 I Address Bit 0 63 LOWBAT* I Low Battery
30 D0 I/O Data Bit 0 64 D8 I/O Data Bit 8
31 D1 I/O Data Bit 1 65 D9 I/O Data Bit 9
32 D2 I/O Data Bit 2 66 D10 I/O Data Bit 10
33 N.C. — No Connect 67 CD2* O/PU Card detect 2
34 GND P Ground 68 GND P Ground

Section II: Springboard expansion slot Version 1.0
Section II - 40 Copyright © 1999 by Handspring, Inc. All rights reserved.
5.2 Signal Descriptions
The signals are described below in alphabetical order. Active-low signals have an asterisk “*” at
the end of their names.
A[23:0] Address Bus I
The 24-bit address bus provides addressing for up to 32 MB. Each of the
two chip selects (CS0 and CS1) has direct access of up to 16 MB. Address
line A23 is the most significant address bit, and A0 is the least significant
address bit. The default size of each region is 16 MB and is software
programmable. This bus is an input to the expansion slot; it is always
driven during normal and sleep mode. The address bus is valid throughout
the entire bus cycle.
Note: In Visor, Handspring’s first generation of handheld computer, A0 is
not used. So in this implementation of the Springboard expansion slot, the
bus is 16-bit only.
CD1*, CD2* Module Detects O
CD1* and CD2* are active-low module detect signals that indicate to the
handheld when the expansion module has been firmly seated into the
Springboard expansion slot. The two Module Detect pins are physically
shorter than all other pins on the expansion connector. On the host side,
the signals perform two functions: 1) they interrupt the handheld to alert
the CPU that a module has been inserted or removed, and 2) they begin
turning on the VCC power supply. Depending on the electrical load on the
module, VCC is valid within 5 ms. Both signals should be tied directly to
GND on the expansion module.
CS0*, CS1* Chip Selects I
These two active-low chip select signals control access to the two
addressable regions on the module. The address space for CS0* is
referred to as csSlot0; the address space for CS1* is referred to as
csSlot1. In order for the PalmOS to recognize the module and its contents,
use CS0* to access ROM or FLASH. CS1* is optional and can be used to
interface with additional ROM, FLASH, UARTs, or other peripheral
devices. Both chip select signals are asserted for the duration of the
memory cycle. Only one of the two chip selects is valid for each module
access. The address bus is guaranteed to be valid before and during the
assertion of the chip select signal. Refer to Section 2.1, “Memory Space,”
for more information on the chip selects and their corresponding address
spaces.
D[15:0] Data Bus I/O
The data bus consists of 16 data lines, D[15:0]. D15 is the most significant
data bit, and D0 is the least significant data bit. Only 16-bit operations are
performed on the data bus.

Version 1.0 External Interface
Section II - 41
Copyright © 1999 by Handspring, Inc. All rights reserved.
GND Module Ground I
GND is the ground connection to the module. All GND signals must be
connected to the module’s ground reference or plane.
IRQ* Interrupt Request O
The active low interrupt request is level sensitive. This signal is output
from the Springboard module whenever interrupt service is required from
the handheld computer. There is no default interrupt service routine for the
module, so the application resident on the expansion module must install
the interrupt service routine (ISR) during initialization (see ““Interrupts” on
page II-6 for more information on interrupt handling). Interrupt
acknowledgment is user-defined and must be accommodated by the
expansion module application as well. The internal Visor interface has a
pull-up resistor, so the module does not require one.
LOWBAT* Low Battery Warning I
The low battery warning signal indicates that the handheld’s batteries are
below 1.6 V or are being swapped out. When this signal is asserted, the
expansion module is electrically “removed” to prevent data loss in the
handheld. When the batteries are replaced, the module is “re-inserted.”
MIC+, MIC- Microphone I
These two signals interface to the microphone on the handheld unit. The
signals are a differential pair and are directly connected to an electret
condenser microphone. Appropriate bias must be supplied by the module
on the MIC+ signal. The Visor handheld uses a microphone with a 2.2K
ohm impedance, a standby operating voltage of 2.0 V, and a maximum
current consumption of 0.5 ma.
OE* Output Enable I
OE* is the active-low output enable, or read signal, for the module. When
qualified with a low on either CS0* or CS1*, a low on OE* indicates a read
cycle from the module. The address bus is valid before the assertion of
OE*. The module can drive the data bus as soon as a chip select and OE*
are asserted. Data must be driven for the entire cycle, as determined by
the levels on the chip select and OE*. WE* is deasserted during read
cycles.
Note: The chip selects are not guaranteed to be asserted prior to the
assertion of OE*. Also the cycle is ended when either a chip select or OE*
is deasserted.
RESET* Module Reset I
RESET* is an active low reset signal for the expansion module. During
module insertion, RESET* is asserted while VCC is rising; it is held
asserted for 30 ms minimum after the module is inserted to allow circuitry
on the module sufficient time to stabilize. Because module power is
guaranteed to be applied within 5 ms, the module will have a minimum

Section II: Springboard expansion slot Version 1.0
Section II - 42 Copyright © 1999 by Handspring, Inc. All rights reserved.
valid reset signal of 25 ms. Application software can also assert this signal
at any time to reset the module.
VCC Module Power I
VCC is the 3.3V power supply, which can be used to power the expansion
module (some expansion modules can supply their own power). Power is
not provided on these pins until the module is firmly seated in the slot and
both module detects, CD1* and CD2*, are asserted. The power supply
ramps up to 3.3V ± 5% within 5 ms of insertion. The maximum current that
can be supplied by the slot is 100 mA. Expansion module designs that use
this power source must take into account what the users will see when
LOWBAT* is asserted and the Springboard expansion slot power is
removed.
VDOCK Docking voltage I
This pin could provide a charging supply to the module when the handheld
is placed into a special charging dock. The handheld passes this charging
supply from a pin on its cradle connector through to pins on the
Springboard expansion module connector.
For developers who want to use this pin, note that future Handspring
products might make use of it and that the preliminary specification is 5V
@ 1A max.
WE* Write Enable I
WE* is the active-low write enable signal for the module. When qualified
with a low on either CS0* or CS1*, a low on WE* indicates a write cycle to
the module. The address bus is valid before the assertion of WE*. The
data bus, driven by the host interface, is valid before the assertion of WE*.
In addition, WE* is deasserted prior to the deassertion of the chip select.
OE* is deasserted during write cycles.
Note: Because there is not a separate write enable for each byte, all 16
bits of the data bus are written at the same time. Thus there is no support
for byte writes to the expansion module.

Version 1.0 Electrical and mechanical specifications
Section II - 43
Copyright © 1999 by Handspring, Inc. All rights reserved.
Chapter 6 Electrical and mechanical specifications
This chapter provides the electrical and timing characteristics of the Visor handheld and
Springboard module. It also provides electrical and mechanical guidelines for your Springboard
design.
6.1 Absolute electrical maximum ratings
Table II.1 lists the maximum electrical ratings for the Visor handheld.
6.2 DC electrical characteristics
Table II.2 lists the DC electrical characteristics for Springboard modules. Unless otherwise
specified, all parameters are specified at VCC = 3.3V, 25 °C.
Table II.1: Absolute electrical maximum ratings for the Visor handheld
Rating Symbol Value Unit
Storage Temperature Range Tstg -20 to 85 °C
Operating Temperature Range TA0 to 50 °C
Table II.2: DC electrical characteristics
Symbol Parameter Min Max Unit
Vcc Supply Voltage1
1. In Visor, Handspring first generation of handheld computer, the minimum supply voltage could actually be zero if LOWBAT* is asserted.
3.0 3.6 V
Icc Operating Current – 100 mA
Is1 Standby Current, LOWBAT* = H – 100 µA
Is2 Standby Current, LOWBAT* = L2
2. Since the Visor handheld (see note 1) actually removes power from the Springboard expansion slot, this specification is for future product
compatibility.
–10
µA
VIH Input High Voltage 2.0 Vcc + 0.5 V
VIL Input Low Voltage 0.0 0.8 V
VOH Output High Voltage (IOH = 2.0 mA) 2.4 Vcc + 0.5 V
VOL Output Low Voltage (IOL = -2.5 mA) 0.0 0.4 V
IIL Input Leakage Current (0V <= VIN <= Vcc)–
±5µA
IOZ 3-state Leakage Current (0V <= VOUT <= Vcc)–
±5µA
VDOCK3
3. Prelimnary.
Docking Voltage – 5 V
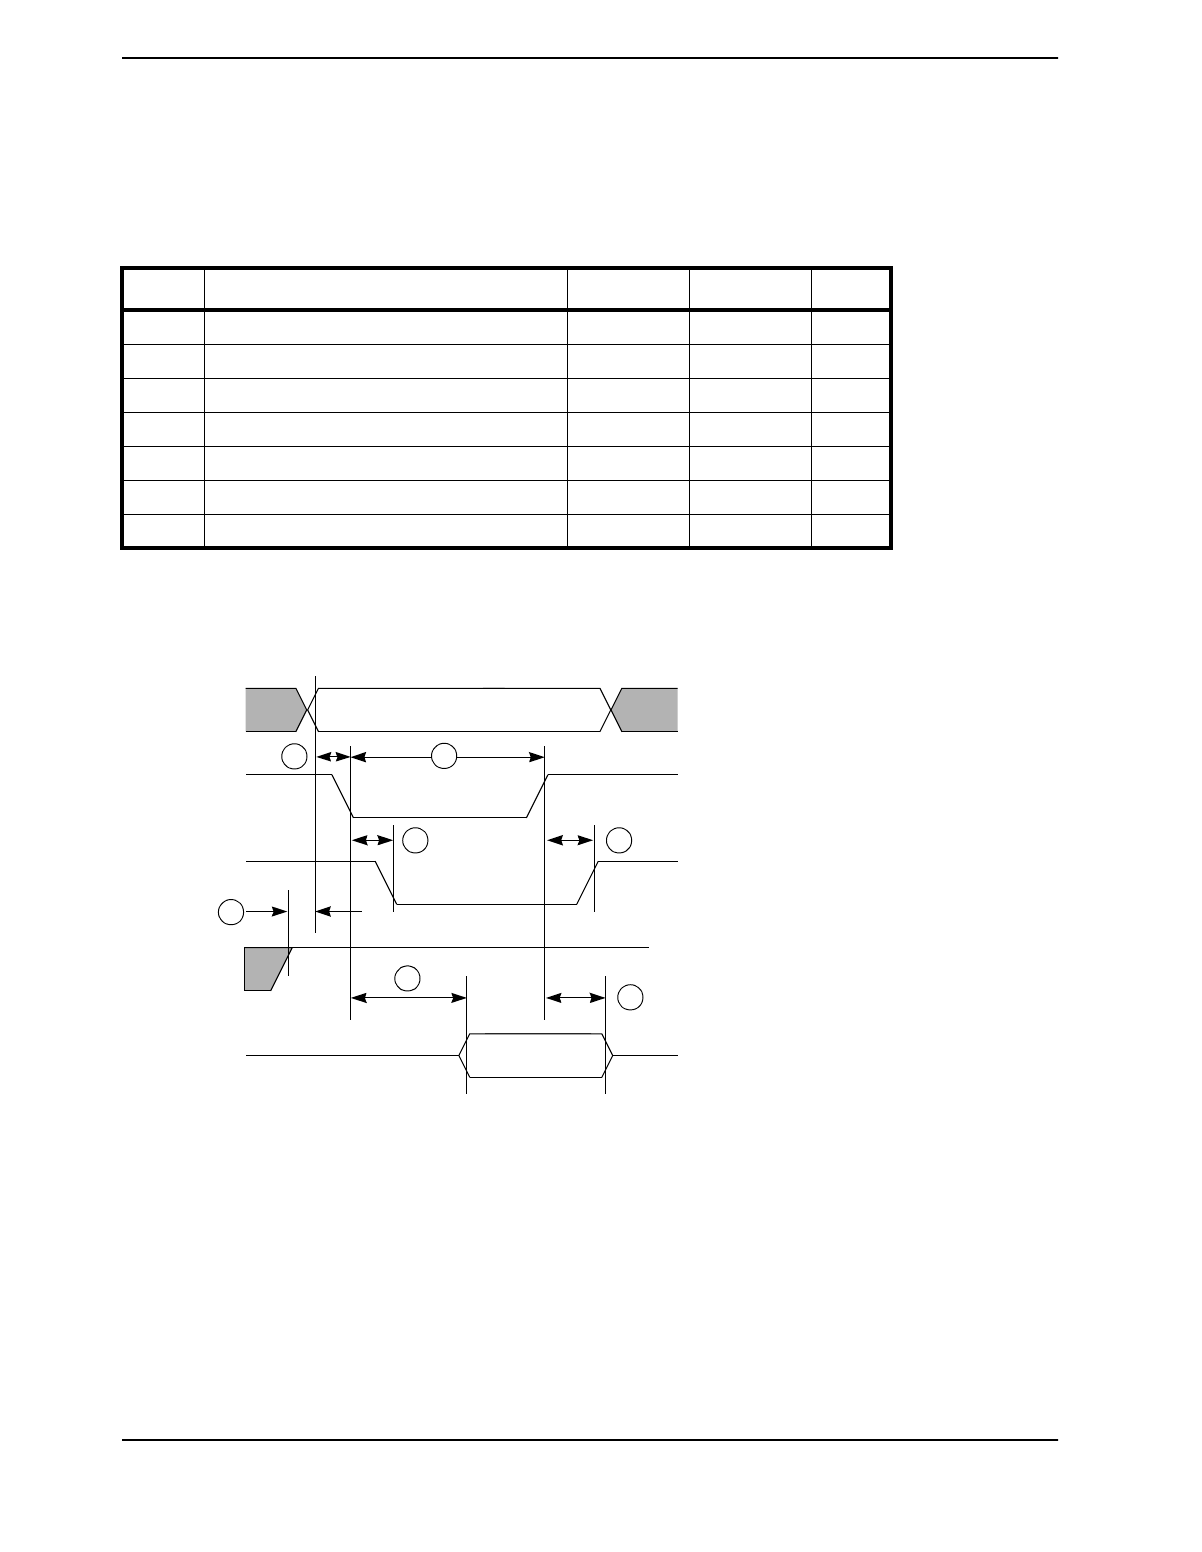
Section II: Springboard expansion slot Version 1.0
Section II - 44 Copyright © 1999 by Handspring, Inc. All rights reserved.
6.3 AC Characteristics
This section lists the AC timing parameters for Springboard modules. Unless otherwise specified,
all parameters are specified at VCC = 3.3V, 25 °C.
Figure II.1: Read Cycle Timing
Table II.3: Read Cycle Timing Parameters
Num Parameter Min Max Unit
1 Address valid to CSx* asserted 55 – ns
2 WE* negated before address valid -5 – ns
3 CSx* asserted to OE* asserted1
1. The chip selects are not guaranteed to be asserted prior to the assertion of OE*. Also the cycle is ended when
either a chip select or OE* is deasserted.
–5ns
4 Data valid from CSx* asserted – 95 + nT2
2. n is the number of wait states. T is the system clock period.
ns
5 CSx* pulse width 125 + nT 425 ns
6 Data in hold after CSx* negated 5 – ns
7 OE* negated after CSx* negated 3 26 ns
A[23:0]
CSx*
OE*
WE*
D[15:0]
2
4
3
15
6
7
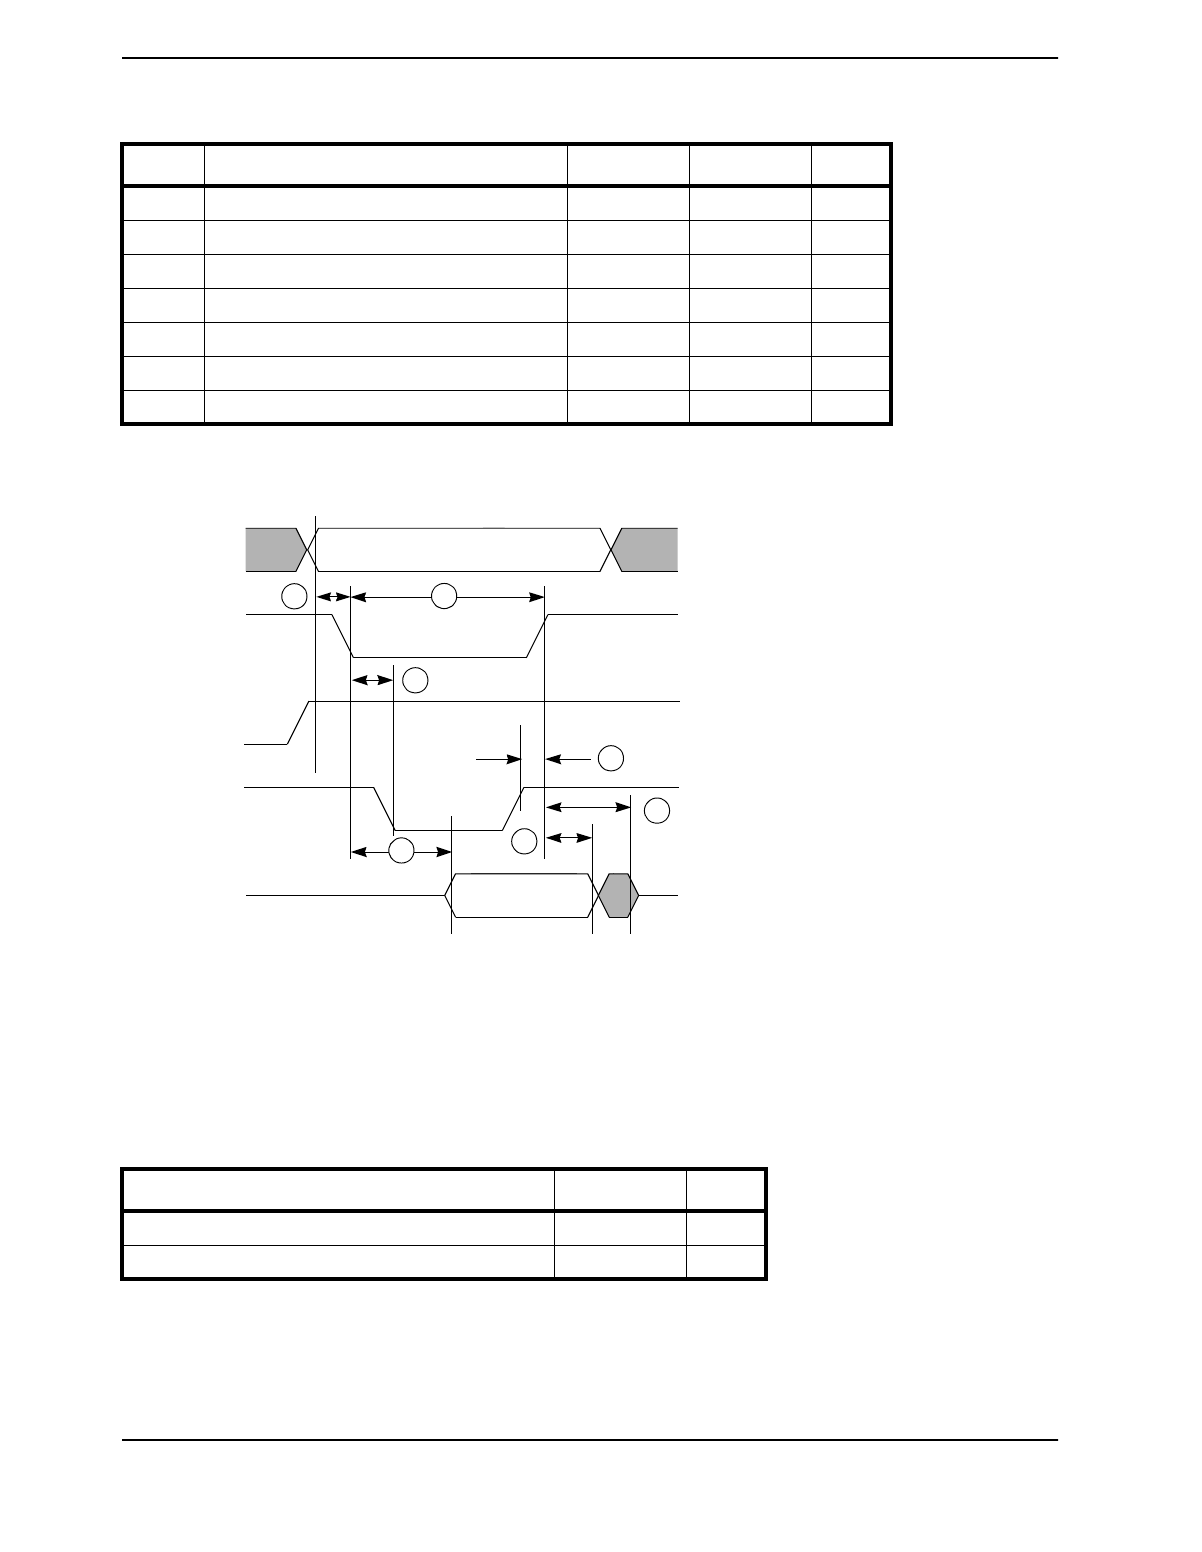
Version 1.0 Electrical and mechanical specifications
Section II - 45
Copyright © 1999 by Handspring, Inc. All rights reserved.
Figure II.2: Write Cycle Timing
6.4 Springboard connector insertion/extraction force ratings
Table II.5 lists the mechanical insertion/extraction force ratings for the Springboard expansion
slot connector.
Table II.4: Write Cycle Timing
Num Parameter Min Max Unit
1 Address valid to CSx* asserted 55 – ns
2 CSx* asserted to WE* asserted -5 13 ns
3 CSx* asserted to data valid – 45 ns
4 CSx* pulse width 125 + nT1425 ns
5 WE* negated before CSx* negated 25 40 ns
6 Data hold after CSx* negated 35 – ns
7 CSx* negated to data in, Hi-Z – 55 ns
1. n is the number of wait states. T is the system clock period.
Table II.5: Insertion/extraction force for the Springboard expansion slot connector
Rating Value Unit
Insertion force1 (PRELIMINARY)
1. These rating were verified up to 3000 insertion/extraction of the module.
1.5 - 6 pounds
Extraction force (PRELIMINARY) 1.5 - 5 pounds
A[23:0]
CSx*
OE*
WE*
D[15:0]
3
2
14
6
7
5

Section II: Springboard expansion slot Version 1.0
Section II - 46 Copyright © 1999 by Handspring, Inc. All rights reserved.
6.5 Springboard module base color
The Visor handheld basic graphite color is also used for the module. The specification for this
color is:
Material GE C2800 PC/ABS
Color BK-1455
Texture 11010

Version 1.0 HsExt.h Header File
Section II - 47
Copyright © 1999 by Handspring, Inc. All rights reserved.
Chapter 7 HsExt.h Header File
This chapter lists the HsExt.h header file, which contains the equates for all the constants
referenced in this manual. After the tools have been installed, the file can be found in the
“<installDir>\PalmTools\m68k-palmos-coff\include\PalmOS\Handspring” folder.
/***************************************************************
*
* Project:
* Handspring Common Includes
*
* Copyright info:
* Copyright 1998 Handspring, Inc. All Rights Reserved.
*
*
* FileName:
* HsExt.h
*
* Description:
* Public header file for the Handspring extensions to PalmOS
*
* ToDo:
*
* History:
* 13-Jan-1999 RM - Created by Ron Marianetti
****************************************************************/
#ifndef __HSEXT_H__
#define __HSEXT_H__
// Include Common equates
#include <Common.h>
// Handspring Database creator IDs
#include <HsCreators.h>
//=============================================================================
// Handspring API Equates
//=============================================================================
// This is the Handspring feature id. Apps can tell if they're on
// a handspring device if they get 0 err back from:
// err = FtrGet (hsFtrCreator, hsFtrIDVersion, &value)
#define hsFtrCreator 'hsEx'
// 0xMMmfsbbb, where MM is major version, m is minor version
// f is bug fix, s is stage: 3-release,2-beta,1-alpha,0-development,
// bbb is build number for non-releases
// V1.12b3 would be: 0x01122003
// V2.00a2 would be: 0x02001002
// V1.01 would be: 0x01013000
#define hsFtrIDVersion 0
// Modification date of Handspring extensions
#define hsFtrIDModDate 1

Section II: Springboard expansion slot Version 1.0
Section II - 48 Copyright © 1999 by Handspring, Inc. All rights reserved.
// Feature number indicating that the Launcher Database Mgr library is loaded.
// The value of the feature is the refNum of the loaded library.
// Call FtrGet (hsFtrCreator, hsFtrIDLdbMgrLibRefNum, ...) to get this feature.
#define hsFtrIDLdbMgrLibRefNum 2
// ------------------------------------------------------------------------------
// Error codes
// ------------------------------------------------------------------------------
#define hsErrorClass (appErrorClass+0x0100)
#define hsErrNotSupported (hsErrorClass | 1)
#define hsErrInvalidCardNum (hsErrorClass | 2)
#define hsErrReadOnly (hsErrorClass | 3)
#define hsErrInvalidParam (hsErrorClass | 4)
#define hsErrBufferTooSmall (hsErrorClass | 5)
#define hsErrInvalidCardHdr (hsErrorClass | 6)
#define hsErrCardPatchAlreadyInstalled (hsErrorClass | 7)
#define hsErrCardPatchNotInstalled (hsErrorClass | 8)
// ------------------------------------------------------------------------------
// Key codes and events
// ------------------------------------------------------------------------------
// Max card user event number that can be passed to HsCardEventPost()
#define hsMaxCardEvent 0x07
// Max app user event number that can be passed to HsAppEventPost()
#define hsMaxAppEvent 0x03
// Keycode range assigned to us from 3Com: vchrSlinkyMin to vchrSlinkyMax
#define hsChrRangeMin 0x1600
#define hsChrRangeMax 0x16FF
// New key codes we generate for the "dot" soft icons
#define hsChrMidLeftDot hsChrRangeMin
#define hsChrMidRightDot (hsChrRangeMin+1)
#define hsChrBotLeftDot (hsChrRangeMin+2)
#define hsChrBotRightDot (hsChrRangeMin+3)
// The virtual cradle 2 character i
#define hsChrCradle2OnChr (hsChrRangeMin+4) // dock input level asserted
#define hsChrCradle2OffChr (hsChrRangeMin+5) // dock input level de-asserted
// card removed or inserted
#define hsChrCardStatusChg (hsChrRangeMin+6)
// Range of key events available to the HsCardEventPost() call
#define hsChrCardUserFirst (hsChrRangeMin+0x80)
#define hsChrCardUserLast (hsChrCardUserFirst+hsMaxCardEvent)
// Range of key events available to the HsAppEventPost() call
#define hsChrAppUserFirst (hsChrCardUserLast+1)
#define hsChrAppUserLast (hsChrAppUserFirst+hsMaxAppEvent)
// ------------------------------------------------------------------------------
// Special Databases that can be present on a card
// ------------------------------------------------------------------------------
// Handspring defined selector codes for the "CardSetup" application on
// a card
#define hsSysAppLaunchCmdInstall (sysAppLaunchCmdCustomBase+0)
#define hsSysAppLaunchCmdRemove (sysAppLaunchCmdCustomBase+1)

Version 1.0 HsExt.h Header File
Section II - 49
Copyright © 1999 by Handspring, Inc. All rights reserved.
// The cmdPBP parmeter to the setup app's PilotMain() will point to
// this structure when the hsSysAppLaunchCmdInstall action code is sent
typedef struct
{
Word cardNo; // card # of removable card
Byte isReset; // true if being called due to a soft or
// hard reset. The setup
app must be "tolerant"
// of being sent an
install action code
// during reset even if
it was already
// installed before the
reset.
Byte reserved;
// Database info of the launched setup app, sent for convenience
Word setupCardNo; // card # of setup app
LocalID setupDbID; // database ID of setup app
} HsSysAppLaunchCmdInstallType;
// The cmdPBP parmeter to the setup app's PilotMain() will point to
// this structure when the hsSysAppLaunchCmdRemove action code is sent
typedef struct
{
Word cardNo; // card # of removable card
} HsSysAppLaunchCmdRemoveType;
// If a card has a database with this type and creator, it will be automatically
// copied to card 0 when inserted and sent an action code of
// hsSysAppLaunchCodeInstall. Likewise, when the card is removed,
// this app will be sent an action code of hsSysAppLaunchCodeRemove and
// then it will be deleted.
//
// hsFileCCardSetup <= defined in HsCreators.h
// hsFileTCardSetup <= defined in HsCreators.h
// If a card has an application database with this name, it will be
// automatically launched when the card is inserted
#define hsWelcomeAppName "CardWelcome"
// ------------------------------------------------------------------------------
// Library alias names that SysLibFind maps to a real library name
// according to the appropriate hsPrefSerialLibXXX setting.
//
// By Convention, library alias names start with a '*'. The exception
// is the "Serial Library" name which is mapped in order to
// be compatible with pre-existing applications that already use it.
// ------------------------------------------------------------------------------
#define hsLibAliasDefault "Serial Library" //hsPrefSerialLibDef
#define hsLibAliasHotSyncLocal "*HsLoc SerLib" //hsPrefSerialLibHotSyncLocal
#define hsLibAliasHotSyncModem "*HsMdm SerLib" //hsPrefSerialLibHotSyncModem
#define hsLibAliasIrda "*Irda SerLib" //hsPrefSerialLibIrda
#define hsLibAliasConsole "*Cons SerLib" //hsPrefSerialLibConsole
// Actual library name of the Dragonball's built-in serial library.
// This is the default value of the hsPrefDefSerialLib pref setting which
// SysLibFind uses to map an incoming library name to an actual library
// name.
#define hsLibNameBuiltInSerial "BuiltIn SerLib"
// ------------------------------------------------------------------------------
// Flags for the HsDatabaseCopy routine
// ------------------------------------------------------------------------------

Section II: Springboard expansion slot Version 1.0
Section II - 50 Copyright © 1999 by Handspring, Inc. All rights reserved.
#define hsDbCopyFlagPreserveCrDate 0x0001 // preserve creation date
#define hsDbCopyFlagPreserveModDate 0x0002 // preserve modification date
#define hsDbCopyFlagPreserveModNum 0x0004 // preserve modification number
#define hsDbCopyFlagPreserveBckUpDate 0x0008 // preserve backup date
#define hsDbCopyFlagOKToOverwrite 0x0010 // if true, it's OK to overwrite
//
existing database.
#define hsDbCopyFlagDeleteFirst 0x0020 // delete dest DB first, if it
//
exists. Use this if space
// is
limited on dest card.
//
Implies hsDbCopyFlagOKToOverwrite
#define hsDbCopyFlagPreserveUniqueIDSeed 0x0040 // preserve database unique ID seed
// ------------------------------------------------------------------------------
// Flags for the HsDmGetNextDBByTypeCreator() call
// ------------------------------------------------------------------------------
#define hsDmGetNextDBFlagOneCard 0x00001 // Only search 1 card
// ------------------------------------------------------------------------------
// Reason codes for the card power handler
// ------------------------------------------------------------------------------
typedef enum
{
hsCardPwrDownNormal = 0, // normal power down
hsCardPwrDownLowVoltage = 1 // low voltage
} HsCardPwrDownEnum;
// ------------------------------------------------------------------------------
// Equates for the HsCardAttrGet/Set calls
// ------------------------------------------------------------------------------
// Prototypes for the various handlers that can be installed for a card
typedef void(*HsCardIntHandlerPtr) (DWord cardParam, Boolean* sysAwakeP);
typedef void(*HsCardPwrHandlerPtr) (DWord cardParam, Boolean sleep,
Word /
*HsCardPwrDownEnum*/ reason);
typedef Boolean (*HsCardEvtHandlerPtr) (DWord cardParam, Word evtNum,
Word evtParam);
// The attributes
typedef enum
{ // Type : RW : Description
// ---------------------------------
hsCardAttrRemovable,// Byte : R : true if card is removable
hsCardAttrHwInstalled,// Byte : R : true if card hardware is installed
hsCardAttrSwInstalled,// Byte : R : true if card software is installed
hsCardAttrCsBase, // DWord : R : address of first chip select
hsCardAttrCsSize, // DWord : RW : size of chip selects
hsCardAttrAccessTime,// DWord : RW : required access time
hsCardAttrReset, // Byte : RW : if true, assert reset to card
hsCardAttrIntEnable,// Byte : RW : if true, enable card interrupt
hsCardAttrCardParam,// DWord : RW : parameter passed to int handler,
// power handler, and event
handler
hsCardAttrIntHandler,// HsCardIntHandlerPtr
// : RW : card interrupt handler
hsCardAttrPwrHandler,// HsCardPwrHandlerPtr
// : RW : card power handler

Version 1.0 HsExt.h Header File
Section II - 51
Copyright © 1999 by Handspring, Inc. All rights reserved.
hsCardAttrEvtHandler,// HsCardEvtHandlerPtr
// : RW : card event handler
hsCardAttrLogicalBase,// DWord : R : logical base address of card
hsCardAttrLogicalSize,// DWord : R : total reserved address space for card
hsCardAttrHdrOffset,// DWord : R : offset from halCardAttrLogicalBase to
// card header
// Leave this one at end!!!
hsCardAttrLast
} HsCardAttrEnum;
// ------------------------------------------------------------------------------
// Equates for the HsPrefGet/Set calls
// ------------------------------------------------------------------------------
// The prefs
typedef enum
{ // Type : Description
// ---------------------------------
// The following are used by SysLibFind() to resolve a virtual library
// name to an actual one.
hsPrefSerialLibDef, // Char[] : Name of serial library
// to substitute for
hsLibAliasDefault
hsPrefSerialLibHotSyncLocal, // Char[] : Name of serial library
// to substitute for
hsLibAliasHotSyncLocal
hsPrefSerialLibHotSyncModem, // Char[] : Name of serial library
// to substitute for
hsLibAliasHotSyncModem
hsPrefSerialLibIrda, // Char[] : Name of serial library
// to substitute for hsLibAliasIrda
hsPrefSerialLibConsole, // Char[] : Name of serial library
// to substitute for
hsLibAliasConsole
// Leave this one at end!!!
hsPrefLast
} HsPrefEnum;
// ------------------------------------------------------------------------------
// Prototype of the App Event Handler that can be setup using
// HsAppEventHandlerSet() and triggered using HsAppEventPost(). The
// evtRefCon is a copy of evtRefCon passed to HsAppEventHandlerSet()
//
// This routine should not rely on globals since it may be called
// while in the context of another app's action code.
// ------------------------------------------------------------------------------
typedef Boolean (*HsAppEvtHandlerPtr) (DWord evtRefcon, Word evtNum,
Word evtParam);
//=============================================================================
// Handspring selectors for the Handspring system trap
//
// NOTE: If you add traps here, you must:
//
// 1.) Add a prototype to the Prototypes section of this header or
// to the prototype section of HsExtPrv.h if it's private call
//
// 2.) Modify the PrvHsSelector routine in HsExtensions.c to recognize

Section II: Springboard expansion slot Version 1.0
Section II - 52 Copyright © 1999 by Handspring, Inc. All rights reserved.
// and dispatch to the new call
//
// IMPORTANT: If you change any of these trap numbers, be sure to
// update any *Patches.txt patch files that use the trap number to patch
// the object code.
//
//=============================================================================
// This is the trap number we use for the Hs trap calls
// IMPORTANT: If this changes, you must manually update the any object code
// patches files. PalmVSystemboot10001Patches.txt is at least one that
// patches this trap in .
#define sysTrapHsSelector sysTrapSysReserved4
#define hsSelectorBase 0
typedef enum
{
hsSelInfo = hsSelectorBase, // 0
hsSelPrvInit, // 1
hsSelPrvCallSafely, // 2
hsSelPrvCallSafelyNewStack, // 3
hsSelDatabaseCopy, // 4
hsSelExtKeyboardEnable, // 5
hsSelCardAttrGet, // 6
hsSelCardAttrSet, // 7
hsSelCardEventPost, // 8
hsSelPrvErrCatchListP, // 9
hsSelPrefGet, // A
hsSelPrefSet, // B
hsSelDmGetNextDBByTypeCreator, // C
hsSelDmGetNextDBInit, // D
hsSelCardHdrUpdate, // E
hsSelAppEventHandlerSet, // F
hsSelAppEventPost, // 10
hsSelUsbCommStatePtr, // 11
hsSelCardPatchInstall, // 12
hsSelCardPatchRemove, // 13
hsSelEvtResetAutoOffTimer, // 14
hsSelDmDatabaseUniqueIDSeed, // 15
hsSelAboutHandspringApp, // 16
hsSelDmDatabaseIsOpen, // 17
hsSelDmDatabaseIsProtected, // 18
// Leave this one at the end!!!
hsSelLast
} HsSelEnum;
#define hsNumSels (hsSelLast - hsSelBase)
// <chg 11-6-98 RM>
#if (defined __GNUC__) && (EMULATION_LEVEL == EMULATION_NONE)
#define SYS_SEL_TRAP(trapNum, selector) \
__attribute__ ((inline (0x3f3c, selector, m68kTrapInstr+sysDispatchTrapNum,trapNum)))
#else
#define SYS_SEL_TRAP(trapNum, selector) \

Version 1.0 HsExt.h Header File
Section II - 53
Copyright © 1999 by Handspring, Inc. All rights reserved.
FOURWORD_INLINE(0x3f3c, selector, m68kTrapInstr+sysDispatchTrapNum,trapNum)
#endif
//=============================================================================
// HsCardErrTry / Catch / support
//
// ---------------------------------------------------------------------
//
// Typical Use:
// x = 0;
// HsCardErrTry
// {
// // access card in some manner that may fail
// value = cardBaseP[0]
//
// // do other stuff too
// x = 1; // Set local variable in Try
//
// // access card again
// value = cardBaseP[1]
//
// }
//
// HsCardErrCatch
// {
// // Recover or cleanup after a failure in above Try block
// // The code in this block does NOT execute if the above
// // try block completes without a card removal
// if (x > 1)
// SysBeep(1);
//
// } HsCardErrEnd
//
//=============================================================================
// Try & Catch macros
#define HsCardErrTry \
{
\
ErrExceptionType_tryObject; \
Ptr* _listP;
\
_listP = HsPrvErrCatchListP(); \
_tryObject.err = 0; \
_tryObject.nextP = (ErrExceptionPtr)*_listP;\
*_listP = (Ptr)&_tryObject; \
if (ErrSetJump(_tryObject.state) == 0) \
{
// NOTE: All variables referenced in and after the ErrCatch must
// be declared volatile. Here's how for variables and pointers:
// volatile Word oldMode;
// ShlDBHdrTablePtr volatile hdrTabP = nil;
//
// If you have many local variables after the ErrCatch you may
// opt to put the ErrTry and ErrCatch in a separate enclosing function.
#define HsCardErrCatch \
*_listP = (Ptr)_tryObject.nextP; \
}
\
else
\
{
\
*_listP = (Ptr)_tryObject.nextP;

Section II: Springboard expansion slot Version 1.0
Section II - 54 Copyright © 1999 by Handspring, Inc. All rights reserved.
#define HsCardErrEnd \
}
\
}
//=============================================================================
// Prototypes
//=============================================================================
DWord HsInfo (Word item, Word paramSize, void* paramP)
SYS_SEL_TRAP (sysTrapHsSelector, hsSelInfo);
Err HsDatabaseCopy (Word srcCardNo, LocalID srcDbID, Word dstCardNo,
char* dstNameP, DWord hsDbCopyFlags, char*
tmpNameP,
LocalID* dstDbIDP)
SYS_SEL_TRAP (sysTrapHsSelector, hsSelDatabaseCopy);
Err HsExtKeyboardEnable (Boolean enable)
SYS_SEL_TRAP (sysTrapHsSelector, hsSelExtKeyboardEnable);
Err HsCardAttrGet (Word cardNo, Word /*HsCardAttrEnum*/ attr,
void* valueP)
SYS_SEL_TRAP (sysTrapHsSelector, hsSelCardAttrGet);
Err HsCardAttrSet (Word cardNo, Word /*HsCardAttrEnum*/ attr,
void* valueP)
SYS_SEL_TRAP (sysTrapHsSelector, hsSelCardAttrSet);
Err HsCardEventPost (Word cardNo, Word evtNum, Word evtParam)
SYS_SEL_TRAP (sysTrapHsSelector, hsSelCardEventPost);
Ptr* HsPrvErrCatchListP (void)
SYS_SEL_TRAP (sysTrapHsSelector, hsSelPrvErrCatchListP);
Err HsPrefGet (Word /*HsPrefEnum*/ pref, void* bufP,
DWord* prefSizeP)
SYS_SEL_TRAP (sysTrapHsSelector, hsSelPrefGet);
Err HsPrefSet (Word /*HsPrefEnum*/ pref, void* bufP,
DWord prefSize)
SYS_SEL_TRAP (sysTrapHsSelector, hsSelPrefSet);
// This call behaves the same as the PalmOS DmGetNextDatabaseByTypeCreator
// but can also be used in conjunction with the HsGetNextDBInit()
// call to start the search at a particular card number or limit
// the search to one card.
Err HsDmGetNextDBByTypeCreator (Boolean newSearch,
DmSearchStatePtr stateInfoP, ULongtype, ULong creator,
Boolean onlyLatestVers, UIntPtr cardNoP, LocalID* dbIDP)
SYS_SEL_TRAP (sysTrapHsSelector, hsSelDmGetNextDBByTypeCreator);
// Can be used to init the stateInfo for HsDmGetNextDBByTypeCreator()
// so that it starts at a particular card number or limits the
// search to one card. The flags are 1 or more of hsDmGetNextDBFlagXXX
Err HsDmGetNextDBInit (DmSearchStatePtr stateInfoP, DWord flags,
Word cardNo)
SYS_SEL_TRAP (sysTrapHsSelector, hsSelDmGetNextDBInit);
// This is an advanced call for use by card flash utilities that
// change which card header to use AFTER the card is installed.
Err HsCardHdrUpdate (Word cardNo, void* newCardHdrP)

Version 1.0 HsExt.h Header File
Section II - 55
Copyright © 1999 by Handspring, Inc. All rights reserved.
SYS_SEL_TRAP (sysTrapHsSelector, hsSelCardHdrUpdate);
// Register an app event handler that can be triggered using
// HsAppEventPost(). The evtRefCon will be passed to the
// event handler when it is called.
// The event Handler should not rely on global variables since it may
// be called while in the context of another app's action code.
// Instead, pass in a pointer in evtRefCon to globals.
Err HsAppEventHandlerSet (HsAppEvtHandlerPtr procP, DWord evtRefCon)
SYS_SEL_TRAP (sysTrapHsSelector, hsSelAppEventHandlerSet);
// Post an event to be processed by the AppEventHandler procedure
// registered with HsAppEventHandlerSet(). The evtNum param
// can be from 0 to hsMaxAppEvent.
Err HsAppEventPost (Word evtNum, Word evtParam)
SYS_SEL_TRAP (sysTrapHsSelector, hsSelAppEventPost);
// Returns a pointer to a 4 byte area of global
// memory that can be shared between the debugger stub's
// communication support and run-time communication support.
// This can be used by USB for example to store the enumeration state.
// This is an exported stub into the HAL layer routine which actually
// does the real work.
DWord* HsUsbCommStatePtr (void)
SYS_SEL_TRAP (sysTrapHsSelector, hsSelUsbCommStatePtr);
// Patch a system trap for a card. This call should be used instead of
// SysSetTrapAddress() by card setup utilities because it will
// insure compatibility with HackMaster and any HackMaster
// hacks that are installed.
// The implementation of the patch should use HsCardPatchPrevProc()
// to get the address of the old routine to chain to:
// HsCardPatchPrevProc (&oldProcP);
// (*oldProcP)();
// IMPORTANT: Setup utilities are only allowed to install *ONE*
// patch for each trapNum!
Err HsCardPatchInstall (Word trapNum, void* procP)
SYS_SEL_TRAP (sysTrapHsSelector, hsSelCardPatchInstall);
// Remove a patch of a system trap installed using HsSysPatchInstall().
// The 'creator' and 'id' must the same as passed to HsSysPatchInstall().
Err HsCardPatchRemove (Word trapNum)
SYS_SEL_TRAP (sysTrapHsSelector, hsSelCardPatchRemove);
// Macro to get the old routine address of a trap patched using
// HsCardPatchInstall()
#define HsCardPatchPrevProc(trapNum,oldProcPP) \
FtrGet (hsFileCCardSetup, trapNum, (DWord*)oldProcPP)
// Called from interrupt routines to reset the auto-off timer
// and tell the system whether or not the user hardware (i.e. LCD)
// needs to be woken up or not. Note: The granularity of the
// stayAwakeTicks is only about 5*sysTicksPerSecond.
Err HsEvtResetAutoOffTimer (SDWord stayAwakeTicks, Boolean userOn)
SYS_SEL_TRAP (sysTrapHsSelector, hsSelEvtResetAutoOffTimer);
// Call to get or set the Unique ID seed field of a database
Err HsDmDatabaseUniqueIDSeed (Word cardNo, LocalID dbID,
Boolean set, DWord* uniqueIDSeed)
SYS_SEL_TRAP (sysTrapHsSelector, hsSelDmDatabaseUniqueIDSeed);
// <chg 29-Jun-99 dia> Added extra credits string parameter.
void HsAboutHandspringApp (UInt16 appCardNo, LocalID appDbId,

Section II: Springboard expansion slot Version 1.0
Section II - 56 Copyright © 1999 by Handspring, Inc. All rights reserved.
Char* copyrightYearStrP, Char* extraCreditsStrP)
SYS_SEL_TRAP (sysTrapHsSelector, hsSelAboutHandspringApp);
// <chg 30-Jun-99 dia> Defined macros to make about box easier to call.
#define HsAboutHandspringAppWithYearId(yearId) \
do
\
{
\
UInt16 appCardNo;
\
LocalID appDbId;
\
VoidHandyearStrH;
\
Char* yearStrP;
\
\
yearStrH = DmGetResource (strRsc, yearId); \
yearStrP = MemHandleLock (yearStrH); \
SysCurAppDatabase(&appCardNo, &appDbId); \
HsAboutHandspringApp (appCardNo, appDbId, yearStrP, NULL);\
MemPtrUnlock (yearStrP);
\
DmReleaseResource (yearStrH); \
}
\
while (0)
#define HsAboutHandspringAppWithYearCredId(yearId, creditsId)\
do
\
{
\
UInt16 appCardNo;
\
LocalID appDbId;
\
VoidHandyearStrH, extraStrH; \
Char* yearStrP;
\
Char* extraStrP;
\
\
yearStrH = DmGetResource (strRsc, yearId); \
yearStrP = MemHandleLock (yearStrH); \
extraStrH = DmGetResource (strRsc, creditsId); \
extraStrP = MemHandleLock (extraStrH); \
SysCurAppDatabase(&appCardNo, &appDbId); \
HsAboutHandspringApp (appCardNo, appDbId, yearStrP, extraStrP);\
MemPtrUnlock (extraStrP);
\
DmReleaseResource (extraStrH); \
MemPtrUnlock (yearStrP);
\
DmReleaseResource (yearStrH); \
}
\
while (0)
Byte HsDmDatabaseIsOpen (UInt16 cardNo, LocalID dbID)
SYS_SEL_TRAP (sysTrapHsSelector, hsSelDmDatabaseIsOpen);
Byte HsDmDatabaseIsProtected (UInt16 cardNo, LocalID dbID)
SYS_SEL_TRAP (sysTrapHsSelector, hsSelDmDatabaseIsProtected);
#endif
Version 1.0
Section III - 1
Cop
y
ri
g
ht © 1999 b
y
Handsprin
g
, Inc. All ri
g
hts reserved.
Section III Cradle connector
The cradle connector provides serial communication with Handsprin
g
’s famil
y
of handheld
computers. The cradle connector, shown in Fi
g
ure III.1
)
is located at the bottom of the handheld
device. It is t
y
picall
y
used for communicatin
g
with a PC or Mac for data s
y
nchronization;
however, a variet
y
of peripherals such as a ke
y
board, pa
g
er, or modem can also be interfaced to
the handheld unit throu
g
h this port.
Figure III.1: Cradle view
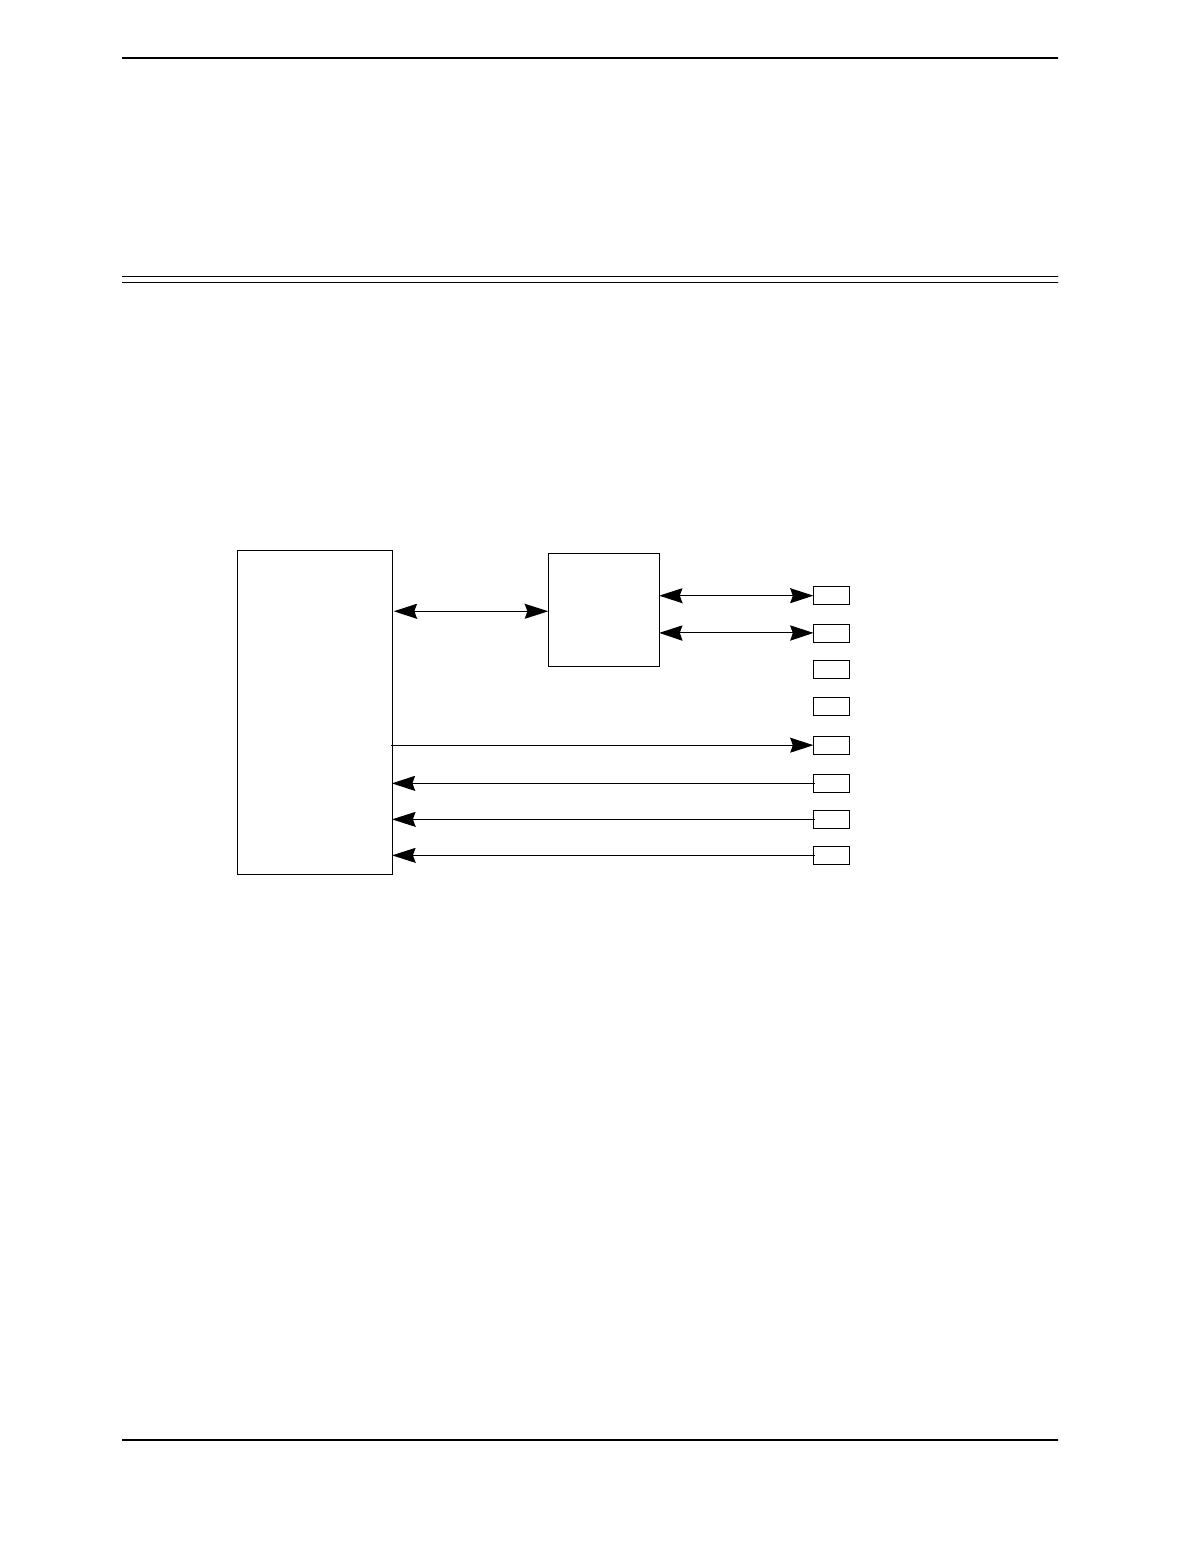
Section III: Cradle connector Version 1.0
Section III - 2 Copyright © 1999 by Handspring, Inc. All rights reserved.
Chapter 1 Functional Description
The Cradle Connector contains two serial buses that communicate with external devices: a USB
bus and a simple serial bus. The high-speed USB interface is a slave-only interface, providing a
payload bandwidth of up to 400 Kbps between a host PC or Mac and the handheld device. The
serial port provides asynchronous capability to low-speed devices (9600 Kbps or less).
Figure III.1 shows how the Cradle Connector interfaces with the handheld.
Figure III.1: Cradle Connector Interface
USB
TXD
Handheld
Interface
RXD
HotSync IRQ*
IRQ2*
Cradle
Connector
USB_D+
USB_D-
VDOCK
GND
TXD
RXD
HS1*
KBD*
Version 1.0 Functional Description
Section III - 3
Copyright © 1999 by Handspring, Inc. All rights reserved.
Figure III.2: 3D View of Visor handheld bottom or cradle connector
Figure III.3: 3D View of Eight-Pin cradle connector
Pin 1

Section III: Cradle connector Version 1.0
Section III - 4 Copyright © 1999 by Handspring, Inc. All rights reserved.
Chapter 2 Signal Descriptions
This section defines the functions of the signals on the eight-pin Cradle Connector. Figure III.1 is
a three-dimensional view of the Visor base, showing the eight pins.
Table III.1 lists the signals with their respective pin assignments. The signals are described in
alphabetical order following the table. Active-low signals have a “*” at the end of their names.
GND Ground P
GND is the ground connection to the handheld. This signal must be
connected to the ground reference in the cradle or peripheral.
HS1* HotSync Interrupt I
This active-low interrupt pin is asserted low in order to initiate a HotSync
with the handheld. In a cradle application, a push button would
momentarily short this signal to GND to begin a HotSync.
KBD* Keyboard Detect I
This active-low pin is held low in order to indicate the presence of a
keyboard. While KBD* is held low, the handheld expects keyboard data to
be sent on the RXD pin. Refer to Chapter 3, “Keyboard Support via
Remote UI,” on page III-6 for information on the keyboard data packet
structure supported by the handheld.
Table III.1: Cradle Connector Pin Summary
Pin Name I/O/P1
1. I = input, O = output, and P = power, with respect to the connector.
Function
1 RXD I UART Receive Data, TTL level
2 KBD* I HotSync 2, ground for keyboard
3 HS1* I HotSync interrupt
4 GND P Ground
5 USB_D- I/O USB Data- differential signal
6 USB_D+ I/O USB Data+ differential signal
7 VDOCK P Expansion module charging voltage
8 TXD O UART Transmit Data, TTL level, or Power

Version 1.0 Signal Descriptions
Section III - 5
Copyright © 1999 by Handspring, Inc. All rights reserved.
RXD Receive Data O
RXD connects directly to the Visor’s CPU UART. Note that RXD is TTL
level, not RS-232 level. This signal is used for asynchronous serial
communications between the handheld and a cradle or peripheral. RXD is
an input to the handheld and an output from a cradle or peripheral.
TXD Transmit Data I
TXD connects directly to the CPU’s UART. Note that TXD is TTL level,
not RS-232 level. This signal is used for asynchronous serial
communications between the handheld and a cradle or peripheral. TXD is
an output from the handheld and an input to a cradle or peripheral. This
pin provides up to 3 mA maximum at 3.0 V when KBD* is asserted for low-
power peripherals, such as keyboards.
USB_D+ USB Data+ I/O
USB_D+ is the positive signal in the USB differential pair. This signal and
USB_D- implement the USB signaling protocol for communicating with a
USB host, such as a PC or a Mac.
USB_D- USB Data- I/O
This signal is the negative signal in the USB differential pair. This signal
and USB_D+ implement the USB signaling protocol for communicating
with a USB host, such as a PC or a Mac.
VDOCK Cradle Power P
This pin provides a high-voltage charging supply to the module when the
handheld is placed into a special charging dock. The handheld passes this
charging supply from a pin on its cradle connector through to pins on the
Springboard Expansion module connector. Typically this supply is used to
recharge batteries integrated into the expansion module.
For developers who want to use this pin, please contact Developer
Support at DevSupport@handspring.com to verify its availability on future
products.

Section III: Cradle connector Version 1.0
Section III - 6 Copyright © 1999 by Handspring, Inc. All rights reserved.
Chapter 3 Keyboard Support via Remote UI
The handheld platform supports character input from an external keyboard or pen-based device
through the Cradle Connector located at the bottom of the handheld device. Pin 2 of the eight-pin
Cradle Connector is the “keyboard detect” pin (KBD*). Grounding this pin indicates to the
handheld processor that:
1. A keyboard or other remote UI device is present on the Cradle Connector, and
2. Incoming serial data packets on RXD (pin 1 on the Cradle Connector) should be interpreted
as described by this document.
Note that the Cradle Connector does not include hardware signaling for buffer overflow
conditions within the handheld device. Therefore the maximum recommended serial transfer
speed to the handheld device is limited to 9600 kbps.
Remote UI is supported in all existing versions of PalmOS; for more information please see the
PalmOS Programmer’s Companion
at http://www.palm.com/devzone/docs.html.
3.1 Remote UI Packet Description
As long as pin 2, KBD*, on the Cradle Connector is held low, the handheld will receive incoming
data packets on RXD and interpret them as Remote UI Packets. Remote UI Packets have three
sections: a header, a body, and a CRC as shown in Figure III.1.
Figure III.1: Remote UI Packet
The Remote UI Packet structure is flexible enough to support remote input from a variety of
devices, but for software simplification, most of these fields can be hardcoded for keyboard-
specific input.
Header Body CRC
10 16 2 # of bytes

Version 1.0 Keyboard Support via Remote UI
Section III - 7
Copyright © 1999 by Handspring, Inc. All rights reserved.
Table III.1 describes in detail the fields in the header, body, and CRC sections.
The following subsections provide more details on the contents of the header, body, and CRC.
3.2 Remote UI Packet Header
The Remote UI Packet header consists of eight fields as shown in Figure III.2.
Table III.1: Remote UI Packet Fields
Field Data Length
(in Bytes) Parameter Name Value Comment
Header Fields
1 2 signature1 0xBEEF Indicates serial link packet.
2 1 signature2 0xED Indicates serial link packet.
3 1 dest 0x02 Indicates remote UI serial link packet.
41src 0x02
Indicates remote UI serial link packet. Typically
used as “return address” for response messages.
Not required for keyboard input.
5 1 type 0x00 Indicates system packet type to the handheld.
6 2 bodySize calculated Size of body in bytes.
7 1 transactionID calculated Increment by one for each new message. Not
required for keyboard input (will not be checked).
8 1 checksum calculated 8-bit sum of header fields NOT including this field.
Data Fields
9 1 command 0x0D Indicates that input is a remote event.
10 1 filler don’t care For word alignment.
11 1 penDown 0 or 1 Indicates pen event. Reset to 0 for keyboard input.
12 1 filler don’t care For word alignment.
13 2 penX 0 Pen X coordinate. Reset to 0 for keyboard input.
14 2 penY 0 Pen Y coordinate. Reset to 0 for keyboard input.
15 1 filler don’t care For word alignment.
16 1 keyPress 0x01 Indicates a key has been pressed.
17 2 keyModifier lookup Modifier bits (shift, control, etc.) Bitmapped to this
16-bit field.
18 2 keyAscii lookup PalmOS keycodes – see chars.h.
19 2 keyCode 0x00 Reserved - Always set to 0.
CRC Field
20 2 CRC calculated Computed using table method; see Section 3.4,
“CRC Computation,” for more information. Uses
big-endian byte ordering.

Section III: Cradle connector Version 1.0
Section III - 8 Copyright © 1999 by Handspring, Inc. All rights reserved.
Figure III.2: Remote UI Packet Header
The first two fields (signature1 and signature2) contain a predefined code that indicates to the
handheld that the incoming packet is a serial link packet.
The dest and src fields refer to the logical socket used for communication for remote UI. For
keyboard applications, these fields are both set to 0x02.
The type field indicates that this packet is a system packet. It is hardcoded to 0x00.
The 16-bit bodySize field must contain the size of the body portion of the packet (in bytes). Do not
include the size of the header or CRC bytes in this calculation.
The transactionID field is a running message counter, and is typically used for two-way
communications over the serial port. Reply messages are tagged with the transactionID of the
original message. Because the handheld does not send responses to keyboard packets, this
field is not used and can be set to any value. However, other types of remote UI devices should
increment transactionID by one for each packet sent.
The checksum value is a simple eight-bit addition of the bytes in the header. If a checksum
mismatch occurs, the handheld searches all incoming data bytes for signature1 in order to
resynchronize to the sender. Sample code to generate a checksum is shown below.
/*********************************************************************
* SlkChecksum PrvCalcHdrChecksum(Checksum SlkChecksum, BytePtr bufP,
* Long count);
*
* Computes the 16-bit checksum of bytes in a buffer.
*
* Arguments:
* SlkChecksum start -- starting checksum value
* BytePtr bufP -- ptr to the data buffer
* Long count -- number of bytes in buffer
*
* Returns:
* 8-bit checksum of the data
*
**********************************************************************/
static SlkPktHeaderChecksum
PrvCalcHdrChecksum(SlkPktHeaderChecksum start, BytePtr bufP, Long count)
{
// The compiler produces the fastest code with a while(--count) loop...
do {
start += *bufP++;
} while(--count);
return( start );
}
signature1 signature2 dest src type bodySize transactionID checksum
211112 1 1

Version 1.0 Keyboard Support via Remote UI
Section III - 9
Copyright © 1999 by Handspring, Inc. All rights reserved.
3.3 Remote UI Packet Body
Figure III.3 shows the Remote UI Packet body.
Figure III.3: Remote UI Packet Body
The command field is always set to 0x0D, indicating that the packet contains remote event data.
The penDown, penX, and penY fields define pen events; they are all reset to 0 for keyboard input.
The keyPress field contains a flag that indicates a keypress has occurred on the remote UI
device. The keyModifier and keyAscii fields define the keypress. The keyCode field is reserved
for future purposes and should always be set to 0x0.
The keyAscii values supported by PalmOS are defined in the chars.h include file within the
PalmOS source code. The keyModifier values are defined in the PalmOS source file event.h;
they are also listed in Table III.2 below.
3.4 CRC Computation
The 16-bit cyclic redundancy check (CRC) value is calculated using the contents of both the
header and the body. Note that the handheld device uses big-endian byte ordering for computing
a CRC, so keyboards must generate CRCs using big-endian byte ordering. CRCs are computed
using the table look-up method. Source code to generate CRCs is shown in the example below.
If the handheld detects a bad CRC, the packet is ignored, but no error response is sent back to
the keyboard.
com-
mand filler pen
Down filler penX penY filler key
Press
key
Modi-
fier
keyAsc
ii key
Code
1 11122 1 1222
Table III.2: Key Modifiers for PalmOS
Key KeyModifier Field Values
shiftKey 0x0001
capsLock 0x0002
numLock 0x0004
commandKey 0x0008
optionKey 0x0010
controlKey 0x0020
autoRepeatKey 0x0040
doubleTapKey 0x0080
poweredOnKey 0x0100
appEvtHookKey 0x0200
libEvtHookKey 0x0400

Section III: Cradle connector Version 1.0
Section III - 10 Copyright © 1999 by Handspring, Inc. All rights reserved.
/*************************************************************
* FUNCTION: Crc16CalcBlock
*
* DESCRIPTION: Calculate the 16-bit CRC of a data block using the table lookup method.
*
* PARAMETERS:
* bufP -- pointer to the data buffer;
* count -- the number of bytes in the buffer;
* crc -- the seed crc value; pass 0 the first time
* function is called, pass in new crc result
* as more data is added to packet and crc is updated.
* RETURNS:
* A 16-bit CRC for the data buffer.
*
*************************************************************/
Word Crc16Calc (VoidPtr bufP, Word count, Word crc)
{
registerBytePtr byteP = (BytePtr)bufP;
WordPtr crctt = (WordPtr)crctt_16; // CRC translation table
//
// Calculate the 16 bit CRC using the table lookup method.
//
if ( count ) {
do {
crc = (crc << 8) ^ crctt[ (Byte)((crc >> 8) ^ *byteP++) ];
} while ( --count );
}
return( crc & 0xffff );
}
// This is the lookup table used when performing the 16-bit CRC calculation. //
static Word crctt_16[ 256 ] =
{
0x0000, 0x1021, 0x2042, 0x3063, 0x4084, 0x50A5, 0x60C6, 0x70E7,
0x8108, 0x9129, 0xA14A, 0xB16B, 0xC18C, 0xD1AD, 0xE1CE, 0xF1EF,
0x1231, 0x0210, 0x3273, 0x2252, 0x52B5, 0x4294, 0x72F7, 0x62D6,
0x9339, 0x8318, 0xB37B, 0xA35A, 0xD3BD, 0xC39C, 0xF3FF, 0xE3DE,
0x2462, 0x3443, 0x0420, 0x1401, 0x64E6, 0x74C7, 0x44A4, 0x5485,
0xA56A, 0xB54B, 0x8528, 0x9509, 0xE5EE, 0xF5CF, 0xC5AC, 0xD58D,
0x3653, 0x2672, 0x1611, 0x0630, 0x76D7, 0x66F6, 0x5695, 0x46B4,
0xB75B, 0xA77A, 0x9719, 0x8738, 0xF7DF, 0xE7FE, 0xD79D, 0xC7BC,
0x48C4, 0x58E5, 0x6886, 0x78A7, 0x0840, 0x1861, 0x2802, 0x3823,
0xC9CC, 0xD9ED, 0xE98E, 0xF9AF, 0x8948, 0x9969, 0xA90A, 0xB92B,
0x5AF5, 0x4AD4, 0x7AB7, 0x6A96, 0x1A71, 0x0A50, 0x3A33, 0x2A12,
0xDBFD, 0xCBDC, 0xFBBF, 0xEB9E, 0x9B79, 0x8B58, 0xBB3B, 0xAB1A,
0x6CA6, 0x7C87, 0x4CE4, 0x5CC5, 0x2C22, 0x3C03, 0x0C60, 0x1C41,
0xEDAE, 0xFD8F, 0xCDEC, 0xDDCD, 0xAD2A, 0xBD0B, 0x8D68, 0x9D49,
0x7E97, 0x6EB6, 0x5ED5, 0x4EF4, 0x3E13, 0x2E32, 0x1E51, 0x0E70,
0xFF9F, 0xEFBE, 0xDFDD, 0xCFFC, 0xBF1B, 0xAF3A, 0x9F59, 0x8F78,
0x9188, 0x81A9, 0xB1CA, 0xA1EB, 0xD10C, 0xC12D, 0xF14E, 0xE16F,
0x1080, 0x00A1, 0x30C2, 0x20E3, 0x5004, 0x4025, 0x7046, 0x6067,
0x83B9, 0x9398, 0xA3FB, 0xB3DA, 0xC33D, 0xD31C, 0xE37F, 0xF35E,
0x02B1, 0x1290, 0x22F3, 0x32D2, 0x4235, 0x5214, 0x6277, 0x7256,
0xB5EA, 0xA5CB, 0x95A8, 0x8589, 0xF56E, 0xE54F, 0xD52C, 0xC50D,
0x34E2, 0x24C3, 0x14A0, 0x0481, 0x7466, 0x6447, 0x5424, 0x4405,
0xA7DB, 0xB7FA, 0x8799, 0x97B8, 0xE75F, 0xF77E, 0xC71D, 0xD73C,
0x26D3, 0x36F2, 0x0691, 0x16B0, 0x6657, 0x7676, 0x4615, 0x5634,
0xD94C, 0xC96D, 0xF90E, 0xE92F, 0x99C8, 0x89E9, 0xB98A, 0xA9AB,
0x5844, 0x4865, 0x7806, 0x6827, 0x18C0, 0x08E1, 0x3882, 0x28A3,
0xCB7D, 0xDB5C, 0xEB3F, 0xFB1E, 0x8BF9, 0x9BD8, 0xABBB, 0xBB9A,
0x4A75, 0x5A54, 0x6A37, 0x7A16, 0x0AF1, 0x1AD0, 0x2AB3, 0x3A92,
0xFD2E, 0xED0F, 0xDD6C, 0xCD4D, 0xBDAA, 0xAD8B, 0x9DE8, 0x8DC9,
0x7C26, 0x6C07, 0x5C64, 0x4C45, 0x3CA2, 0x2C83, 0x1CE0, 0x0CC1,
0xEF1F, 0xFF3E, 0xCF5D, 0xDF7C, 0xAF9B, 0xBFBA, 0x8FD9, 0x9FF8,
0x6E17, 0x7E36, 0x4E55, 0x5E74, 0x2E93, 0x3EB2, 0x0ED1, 0x1EF0
};

Version 1.0 Keyboard Support via Remote UI
Section III - 11
Copyright © 1999 by Handspring, Inc. All rights reserved.
3.5 Remote UI Packet Example
The following example shows a hex dump of a packet representing the keystroke ‘a’ (lowercase
‘a’):
Table III.3 categorizes the above data into the respective packet fields.
For more information, refer to the Serial Link Protocol section in the PalmOS Programmer’s
Companion, available at the Palm developer’s website at http://www.palm.com/devzone/.
BE EF ED 02 02 00 00 10
02 B0 0D CC 00 CC 00 00
00 00 01 CC 00 00 00 61
00 00 2C D8
Table III.3: Packet Example Breakdown
Header
BE EF signature1
ED signature2
02 dest
02 src
00 type
0010 bodySize
02 transactionID
B0 checksum
Body
0D command
CC filler
00 penDown
CC filler
00 00 penX
00 00 penY
01 keyPress
CC filler
00 00 keyModifier
00 61 keyAscii
00 00 keyCode
Checksum
2C D8 CRC

Section III: Cradle connector Version 1.0
Section III - 12 Copyright © 1999 by Handspring, Inc. All rights reserved.

Version 1.0
Section IV - 1
Cop
y
ri
g
ht © 1999 b
y
Handsprin
g
, Inc. All ri
g
hts reserved.
Section IV Development Tools
All modules must have a ROM on them that identifies the module and includes the software for it.
Handsprin
g
provides the Palm-MakeROM tool for creatin
g
a file with the module’s ROM ima
g
e.
This file can then be used to create a ROM for the module.
The be
g
innin
g
of a module ROM has a header structure that contains the name of the module,
the manufacturer's name, the version number of the module, the total size of the ROM, etc.
Besides the module header, the ROM contains one or more PalmOS applications or other t
y
pes
of databases. Modules that include special hardware usuall
y
include a setup utilit
y
; some
modules ma
y
also include a welcome application. The PalmOS applications that are passed to
Palm-MakeROM are standard PalmOS .PRC files that can be built usin
g
an
y
of the standard
PalmOS development tools includin
g
those from Metrowerks or the Handsprin
g
PalmOS GNU
tools.
The Palm-MakeROM utilit
y
is a command-line based tool that accepts parameters identif
y
in
g
the
information to store in the module header, as well as a list of files that are PalmOS databases to
include in the ROM ima
g
e. This tool is
q
uite powerful and has man
y
options, but most developers
will onl
y
need to know about the options described here. For a full list of options, enter the
“-help” option of the tool.
Below is an example command line to build a module ROM with two applications on it. For a
sample makefile that builds a module ROM, see <InstallDir>/PalmTools/../../Tools/
Samples/CardROM/Build/Makefile.
Palm-MakeROM -op create \
-hdr 0x08000000 \
-chName "SampleROMCard" \
-chManuf "Handspring, Inc." \
-chVersion 0x0100 \
-romName "ROM Store" \
-romBlock 0x08000000 0x00010000 \
-chRomTokens 0x0800FF00 0x0100 \
-tokStr HsAT 200 \
-romDB "WelcomeApp.prc" \
-romDB "MyApp.prc" \
-o CardROM.bin
This command line builds a ROM ima
g
e file called “CardROM.bin” with a module header and two
applications in it: WelcomeApp.prc and MyApp.prc.

Section IV: Development Tools Version 1.0
Section IV - 2 Copyright © 1999 by Handspring, Inc. All rights reserved.
Table IV.1 describes each of the command line parameters.
Table IV.1: Command Line Parameters
Parameter Description
-hdr <hdrOffset>
The offset from the base of the module to the module header. Must be
0x08000000 for all Handspring removable modules. This offset, added to the
removable module's assigned logical base address in PalmOS of 0x20000000,
yields the address of the module's ROM at 0x28000000.
-chName <cardName> The ASCII name of the module. Can be up to 31 characters in length. This name
must be registered with Handspring via the developer support web site.
-chManuf <manufName> The name of the manufacturer of the module. Can be up to 31 characters in
length. This name must also be registered with Handspring.
-chVersion <version>
The 16-bit version number of the module. This value is for your purposes only
and can be any format. You should always increase the value with subsequent
versions of the module. A typical use is to store the major version in the high byte
and the minor version in the low byte.
-chRomTokens <offset> <size>
The offset and size of the ROM token area on the module. This area is used to
store data specified in the '-tokStr' parameter. The <offset> should be set to
the end of the ROM minus space for the tokens themselves. In the above exam-
ple, the ROM offset is at 0x08000000 and its size is 0x10000 (64K), so the ROM
tokens are put at 0x08000FF00 with a size of 0x100.
-romName <romName> The name of the ROM to be stored on the module. This parameter is for descrip-
tive purposes only and can be any name up to 31 characters long.
-romBlock <offset> <size>
The offset and size of the ROM area on the module relative to the module base
address. The <offset> must be 0x08000000 for all Handspring modules. The size
is the total size of the formatted ROM area used by the Palm-MakeROM tool,
which can be less than or equal to the size of the ROM chip itself.
-romDB <prcName> The name of a PalmOS .PRC file to include in the ROM image. This option can
be repeated for every .PRC file included in the ROM image.
-tokStr <id> <value>
The ID and value of a ROM token to be placed in the ROM token area specified
by the -chRomTokens option. This option can be repeated for every ROM token
that needs to be included. The ID must be a string of four characters. The value
can be any number of characters long.
All Handspring removable modules contain an 'HsAT' token with a value specify-
ing the required access time of the chip selects in nanoseconds. For modules
without this value, the chip select access time will be set to the slowest possible
value allowed by the base unit hardware. For example:
-tokStr HsAT 200
Optionally, you can also include an 'HsWR' ROM token. The presence of this
token (the value is ignored) tells the system to launch the module welcome appli-
cation on the module if the module is inserted during a soft or hard reset. Nor-
mally, the module welcome application is not launched after a reset. For example:
-tokStr HsWR 1
-o <outputName>
The name of the ROM output image file. This file is a binary output file image of
the ROM with bytes in Motorola order (big-endian). Thus the first byte of the file
corresponds to address 0 in the ROM (the high-order eight bits of the first word),
the second byte corresponds to address 1 (the low-order eight bits of the first
word), the third byte corresponds to address 2, etc.
-help List all options to Palm-MakeROM.

Version 1.0
Section V - 1
Cop
y
ri
g
ht © 1999 b
y
Handsprin
g
, Inc. All ri
g
hts reserved.
Section V Mechanical Information
This section provides mechanical information on the followin
g
:
• Visor handheld
•Sprin
g
board module with batter
y
•Sprin
g
board standard module
• Cradle base
• Cable connectors
Each chapter of this section includes a simple view and the associated file name of the
mechanical drawin
g
s or model included in this kit. The format used are DWG, DXF, PRO-E or
IGES.
Developer’s Note: One of Handsprin
g
’s
g
oals is to provide future products that allow backward-
compatibilit
y
with earlier Sprin
g
board module desi
g
ns. However, take care when desi
g
nin
g
y
our
Sprin
g
board modules. To maintain compatibilit
y
with existin
g
Sprin
g
board modules, the
Sprin
g
board expansion slot depth and width will remain constant; however, the surroundin
g
moldin
g
ma
y
chan
g
e in thickness or size. Please refer to the mechanical drawin
g
s included with
this kit for the recommended non-encroachement areas. Also be aware that future Handpsrin
g
handheld desi
g
ns ma
y
incorporate faster processors, so
y
ou must ensure that
y
our module
desi
g
ns do not have an
y
dependencies, such as wait states, that ma
y
be impacted b
y
processor
speed.
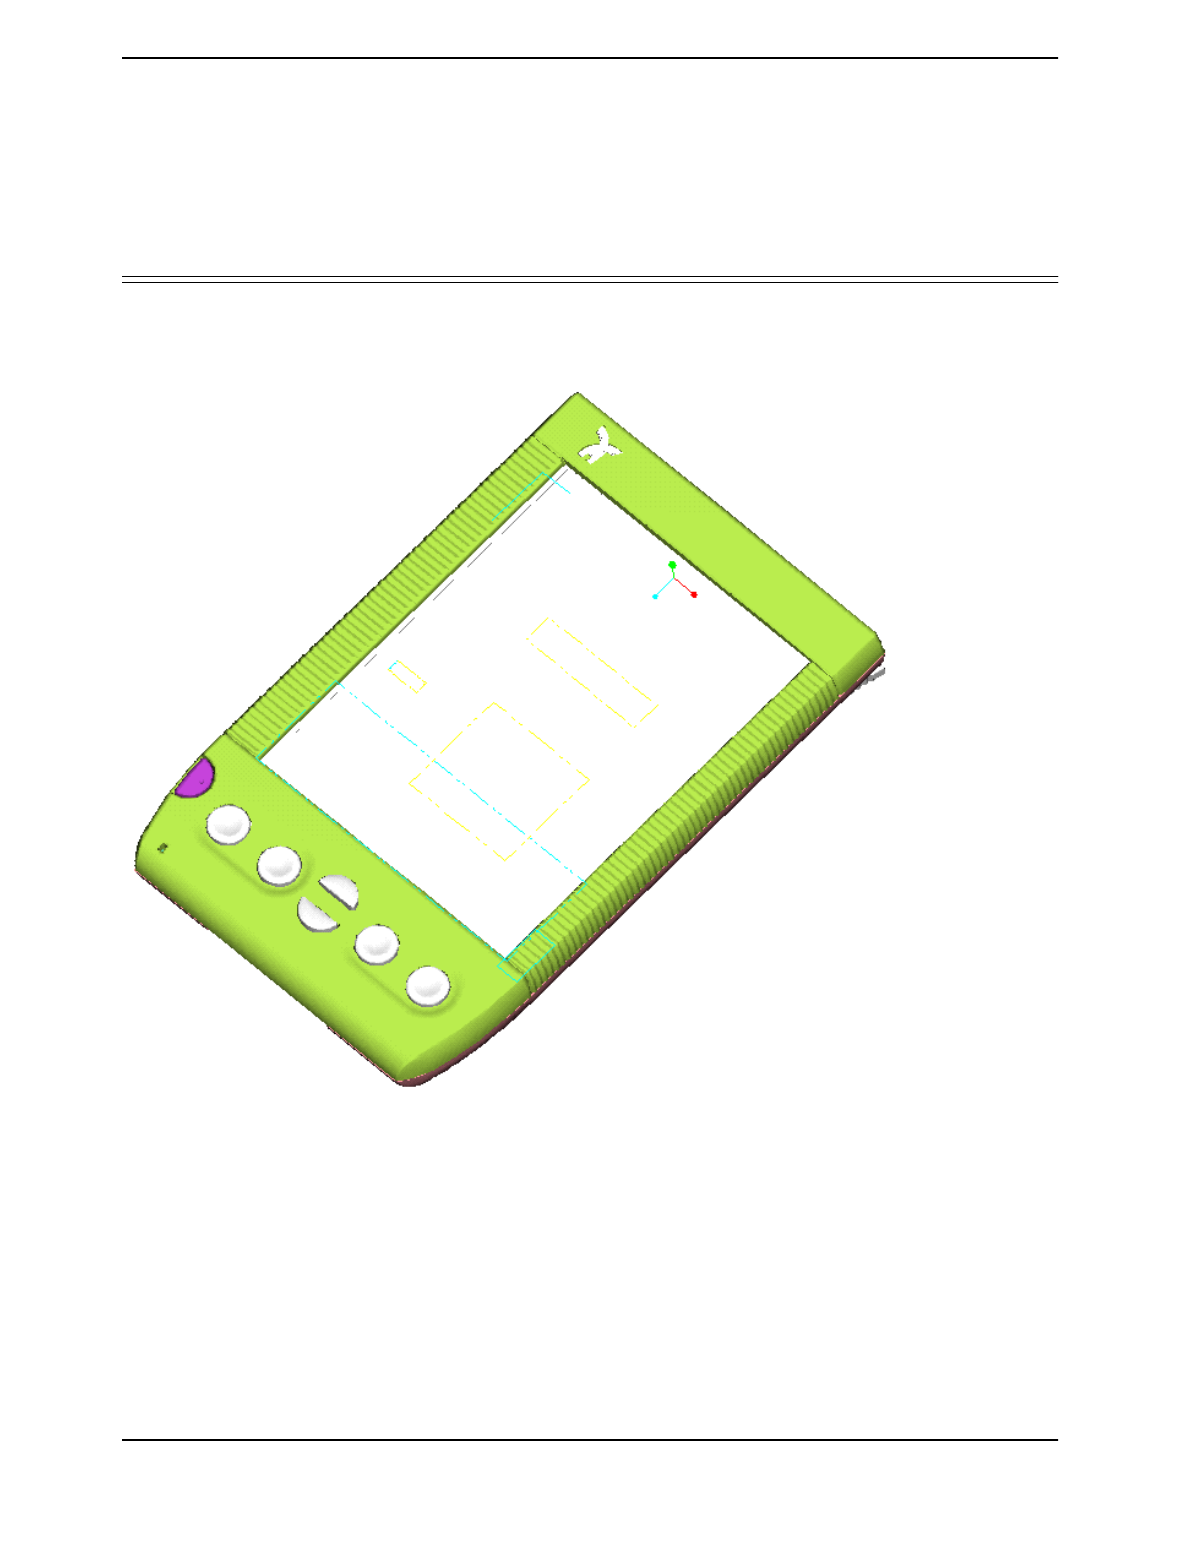
Section V: Mechanical Information Version 1.0
Section V - 2 Copyright © 1999 by Handspring, Inc. All rights reserved.
Chapter 1 Visor handheld
The files for the mechanicals for the Visor handheld is: Visor.zip.
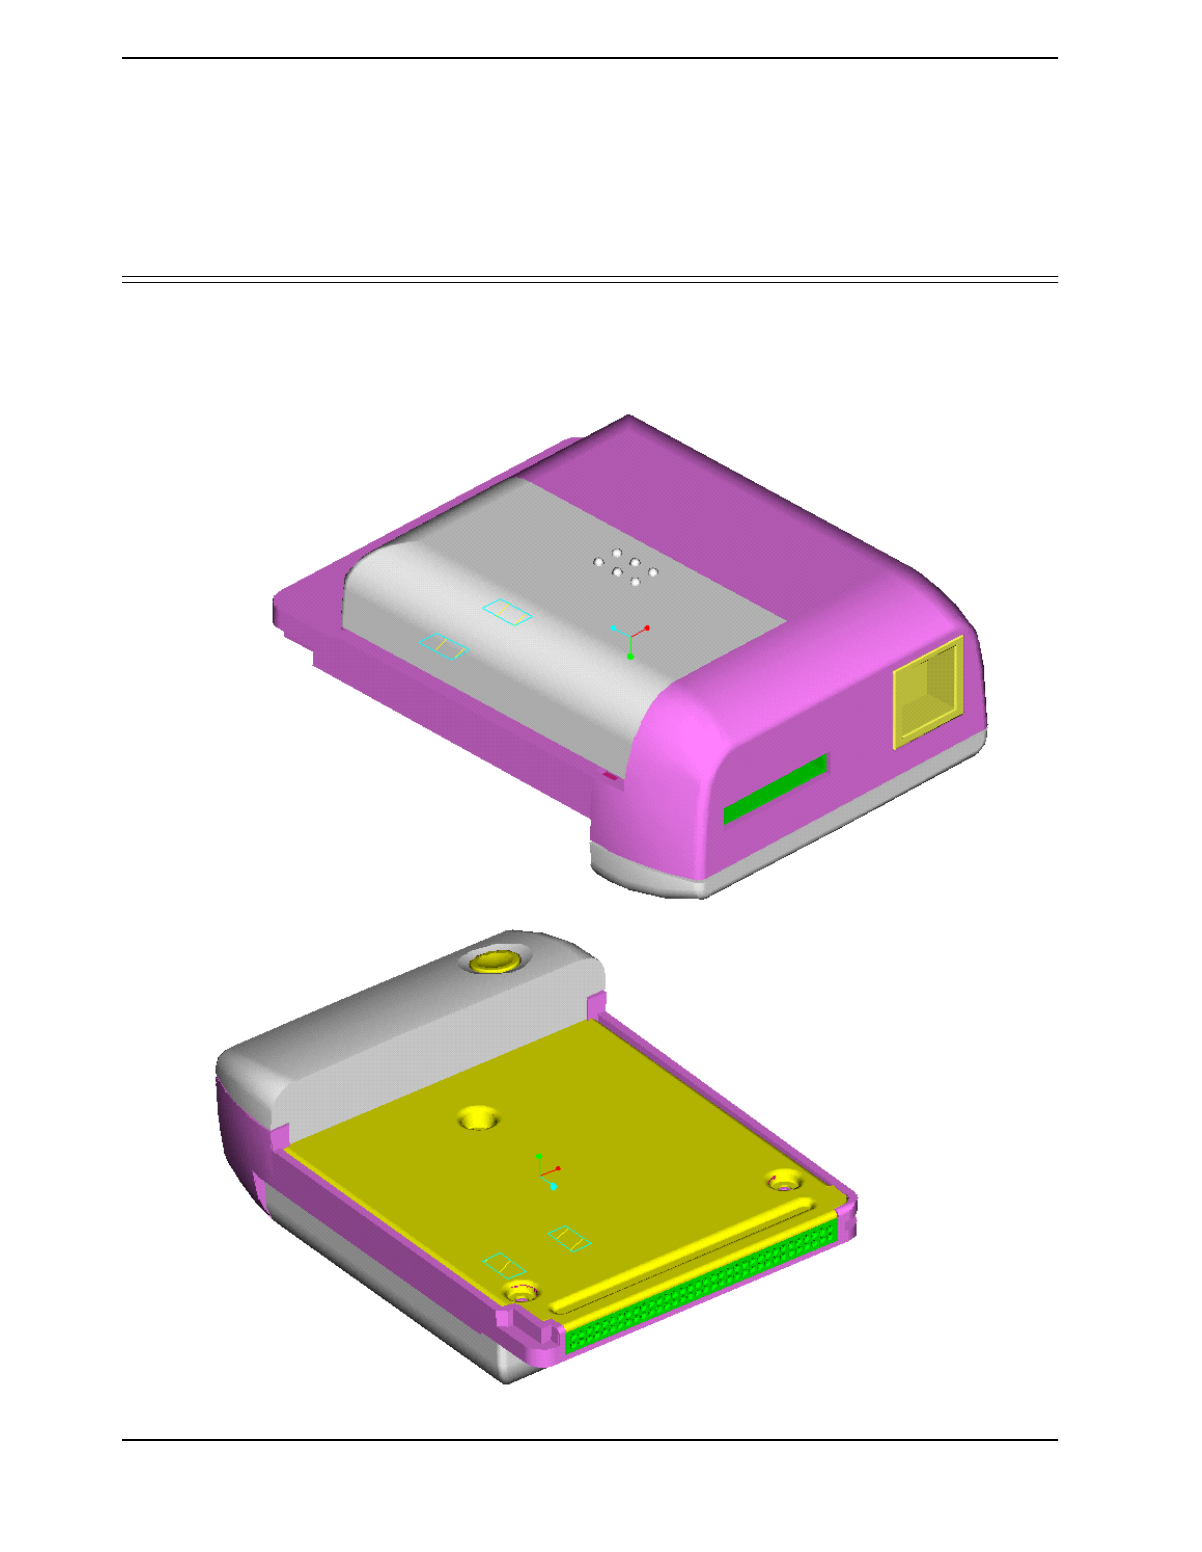
Version 1.0 Chapter: Springboard module with battery
Section V - 3
Copyright © 1999 by Handspring, Inc. All rights reserved.
Chapter 2 Springboard module with battery
The files for the mechanicals for the Springboard Modules with batteries is:
BatterySpringboardModule.zip.

Section V: Mechanical Information Version 1.0
Section V - 4 Copyright © 1999 by Handspring, Inc. All rights reserved.
Chapter 3 Springboard standard module
The files for the mechanicals for the Springboard memory module is: SpringboardStandard.zip.
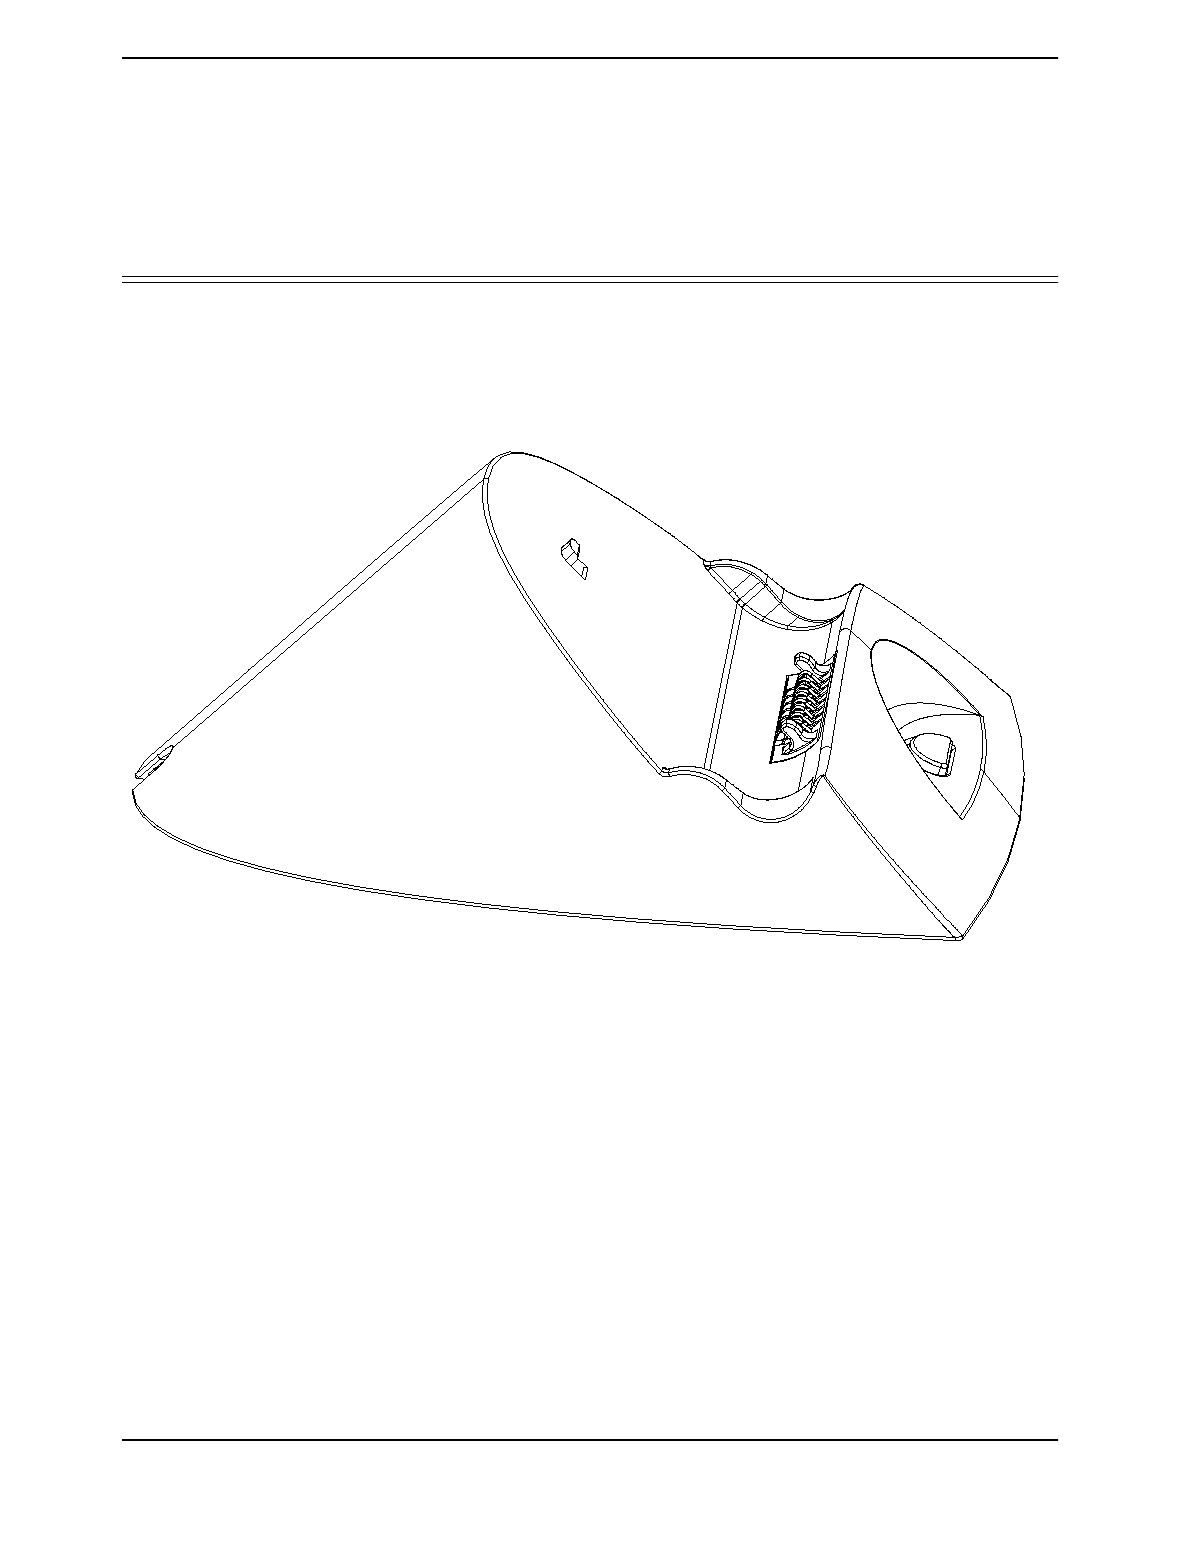
Version 1.0 Chapter: Cradle base
Section V - 5
Copyright © 1999 by Handspring, Inc. All rights reserved.
Chapter 4 Cradle base
The files for Visor handheld cradle is: Cradle.zip.
Note that the cradle connector mechanical definition is part of this design file.

Section V: Mechanical Information Version 1.0
Section V - 6 Copyright © 1999 by Handspring, Inc. All rights reserved.
Chapter 5 Cable connectors
The mechanical file for the different HotSync cable connectors (cradle, USB and 68 pin
Springboard connector) is: connector.zip.

Version 1.0
Section VI - 1
Cop
y
ri
g
ht © 1999 b
y
Handsprin
g
, Inc. All ri
g
hts reserved.
Section VI Compatibility Testing
Developers of Sprin
g
board expansion modules are responsible for self-testin
g
their products for
compatibilit
y
with the followin
g
:
• The PalmOS
•Sprin
g
board-specific modifications to the PalmOS
• Visor hardware
All developers who wish to use the Sprin
g
board-compatible lo
g
o must ensure that their products
conform to the software, electrical, and mechanical specifications outlined below.
The compatibilit
y
testin
g
re
q
uired varies dependin
g
on the t
y
pe of Sprin
g
board expansion
module
y
ou develop. There are three t
y
pes of desi
g
n that can be done for Handsprin
g
handheld
computer and/or a Sprin
g
board expansion modules:
• PalmOS software applications
•Sprin
g
board-specific software applications
•Sprin
g
board hardware/software products
These three t
y
pes are described in more detail in the followin
g
three chapters.

Section VI: Compatibility Testing Version 1.0
Section VI - 2 Copyright © 1999 by Handspring, Inc. All rights reserved.
Chapter 1 PalmOS Software Applications
PalmOS software applications are software-only applications. Handspring does not require any
special testing or certification for such applications that are executed from internal memory.
However, if the software is hosted in non-volatile memory on a Springboard module, the module
itself must be tested for Springboard compatibility.

Version 1.0 Springboard-Specific Software Applications
Section VI - 3
Copyright © 1999 by Handspring, Inc. All rights reserved.
Chapter 2 Springboard-Specific Software
Applications
Springboard-specific software applications are software-only applications. These products run on
a Springboard expansion module and use Handspring’s proprietary software APIs to extend the
PalmOS. Software that runs on a Springboard expansion module and uses calls to Handspring’s
APIs
must
undergo Springboard software compatibility testing, even if a pre-approved expansion
module is used to host the software.
The items that need to be verified are include the following:
• The header file is a valid Springboard header
• All databases, preferences, or other variable data are written to Module 0
• The software meets Palm’s requirements for PalmOS compatibility
• All auto-loading software (welcome apps) runs correctly upon insertion of the module
• Any patches or other system extensions loaded by the module are properly executed, do not
interfere with the proper operation of the Visor handheld, and are properly removed from the
handheld internal memory when the module is removed
• Software interrupts do not interfere with the proper functioning of the Visor unit
• The hsCardAttrCsbase attribute of the HsCardAttrGet() function is used properly
• All module identification information is correct and available
• The software conforms to all other specifications described elsewhere in this DK

Section VI: Compatibility Testing Version 1.0
Section VI - 4 Copyright © 1999 by Handspring, Inc. All rights reserved.
Chapter 3 Springboard-Specific Hardware/Software
Applications
The Springboard-specific hardware/software applications plug into the Springboard expansion
slot. The software included in these products must undergo all of the compatibility testing
described in the previous chapter. In addition, the hardware modules must undergo mechanical
and electrical self-certification to ensure that they conform to the specifications described in
“Electrical and mechanical specifications” on page II-43.
These products must also be tested for conformity with the following mechanical requirements:
• The module must not intrude physically on the cradle, battery-door, IR port, or stylus holder
• The force required to insert or remove the card conforms to the requirements specified in
“Electrical and mechanical specifications” on page II-43
Electrically, the module must be tested for conformity with the following requirements:
• The maximum operating current must not exceed 100 mA
• The standby current when LOWBAT* is asserted must be as low as possible, preferably
below 100 µA.
• The module must not assert IRQ when LOWBAT* is asserted
• Under no circumstances should the module drain the Visor batteries and/or backup capacitor
to such a degree that the handheld computer cannot maintain the integrity of its internal
RAM.

Version 1.0
Section VII - 5
Cop
y
ri
g
ht © 1999 b
y
Handsprin
g
, Inc. All ri
g
hts reserved.
Section VII Handspring Licensing
HANDSPRING, INC.
Developer Agreement
PLEASE READ THE TERMS OF THE FOLLOWING AGREEMENT CAREFULLY. BY USING
THE MATERIALS DISTRIBUTED WITH THIS AGREEMENT
(
THE “DEVELOPMENT KIT”
)
,
YOU ARE AGREEING TO BE BOUND BY THE TERMS AND CONDITIONS OF THIS
AGREEMENT. IF YOU DO NOT AGREE TO THE TERMS AND CONDITIONS OF THIS
AGREEMENT, PLEASE DO NOT USE THE DEVELOPMENT KIT. INSTEAD, PLEASE
DESTROY ALL COPIES OF THE DEVELOPMENT KIT WHICH YOU MAY HAVE.
DEFINITION. “Sprin
g
board Enabled Products” are Handsprin
g
handheld computers that
contain an external “slot”
(
the “Sprin
g
board slot”
)
into which compatible third part
y
hardware or
software products can be inserted.
LICENSE GRANT. Sub
j
ect to the terms and conditions of this A
g
reement, Handsprin
g
hereb
y
g
rants to Developer a non-exclusive, non-transferable license under Handsprin
g
’s intellectual
propert
y
ri
g
hts in the Development Kit
(
a
)
to use, reproduce and create derivative works of the
materials provided b
y
Handsprin
g
under this A
g
reement, solel
y
internall
y
in connection with
Developer’s development and manufacture of i
)
products which plu
g
into the Sprin
g
board slot
and meet Handsprin
g
’s Sprin
g
board compatibilit
y
re
q
uirements
(
“Licensed Plu
g
-Ins”
)
or ii
)
accessor
y
products
(
such as ke
y
boards or reference manuals
)
for use with Sprin
g
board
Enabled Products
(
such plu
g
-in products and accessor
y
products, collectivel
y
, “Licensed
Products”
)
;
(
b
)
to make, have made, use, distribute and sell Licensed Products directl
y
or
indirectl
y
to end users for use with Sprin
g
board Enabled Products; and
(
c
)
to distribute the
unmodified Development Kit in its entiret
y
(
includin
g
this A
g
reement
)
to third parties who a
g
ree to
be bound b
y
the terms and conditions of this A
g
reement.
LICENSE RESTRICTIONS. Except as otherwise expressl
y
provided under this A
g
reement,
Handsprin
g
g
rants and Developer obtains no ri
g
hts, express, implied, or b
y
estoppel, in an
y
Handsprin
g
intellectual propert
y
, and Developer shall have no ri
g
ht, and specificall
y
a
g
rees not to
(
a
)
transfer or sublicense its license ri
g
hts to an
y
other person;
(
b
)
decompile, decr
y
pt, reverse
en
g
ineer, disassemble or otherwise reduce the software contained in the Development Kit to
human-readable form to
g
ain access to trade secrets or confidential information in such software,
except and onl
y
to the extent such activit
y
is expressl
y
permitted b
y
applicable law
notwithstandin
g
such limitation;
(
c
)
use or allow others to use the Development Kit, in whole or
part, to develop, manufacture or distribute an
y
products other than Licensed Products;
(
d
)
use or
allow others to use the Development Kit, in whole or part, to develop, manufacture or distribute
products
(
includin
g
Licensed Products
)
for use as a plu
g
-in or accessor
y
to an
y
product other
than Sprin
g
board Enabled Products;
(
e
)
use or allow others to use the Development Kit, in
whole or part, to develop, manufacture or distribute an
y
products incorporatin
g
an external or
internal slot desi
g
n; or
(
f
)
modif
y
or create derivative works of an
y
portion of the Development Kit.

Section VII: Handspring Licensing Version 1.0
Section VII - 6 Copyright © 1999 by Handspring, Inc. All rights reserved.
OWNERSHIP. Handspring is the sole and exclusive owner of all rights, title and interest in and to
the Development Kit, including, without limitation, all intellectual property rights therein.
Developer’s rights in the Development Kit are limited to those expressly granted hereunder.
Handspring reserves all other rights and licenses in and to the Development Kit not expressly
granted to Developer under this Agreement. Subject to Handspring’s rights in the Development
Kit and the Springboard Enabled Products, Developer shall retain all rights in the Licensed
Products developed by Developer in accordance with this Agreement.
COMPATIBILITY TESTING AND BRANDING. Prior to Developer’s use of Handspring’s
Springboard compatibility trademark (the “Mark”) in connection with a Licensed Plug-In,
Developer shall conduct reasonable testing in accordance with Handspring’s compatibility testing
guidelines to ensure that the Licensed Plug-In conforms in all respects to Handspring’s
Springboard compatibility requirements (the “Compatibility Criteria”). Developer agrees that it
will not use the Mark or make any statements claiming or implying compatibility with the
Springboard slot in connection with any Licensed Plug-Ins which have not passed such
compatibility testing and that, if Handspring determines that any Licensed Plug-In is not
compliant with the Compatibility Criteria, Developer shall immediately cease use of the Mark in
connection with that Licensed Plug-In. All goodwill generated by Developer’s use of the Mark
shall inure to Handspring’s benefit.
Subject to the terms and conditions of this Agreement, Handspring hereby grants to Developer a
non-exclusive, non-transferable license to use, subject to the guidelines set forth in Handspring’s
trademark policy and other applicable guidelines, (i) Handspring’s Springboard compatibility
trademark solely in connection with the marketing and sale of Licensed Plug-ins which comply
with the Compatibility Criteria; and (ii) artwork, icons, logos, color schemes, and other industrial
designs and designations of source provided by Handspring to Developer hereunder solely in
connection with the marketing and sale of Licensed Products
DEVELOPER INDEMNIFICATION. Developer will defend at its expense any action brought
against Handspring to the extent that it arises from or relates to Developer’s development,
manufacturing, marketing or distribution of Licensed Products, and Developer will pay any
settlements and any costs, damages and attorneys' fees finally awarded against Handspring in
such action which are attributable to such claim; provided, the foregoing obligation shall be
subject to notifying Developer promptly in writing of the claim, giving it the exclusive control of the
defense and settlement thereof, and providing all reasonable assistance in connection therewith.
Notwithstanding the foregoing, Developer shall have no liability for any claim of infringement to
the extent required by compliance with the Compatibility Criteria.
WARRANTY DISCLAIMER. HANDSPRING MAKES NO WARRANTIES, EITHER EXPRESS OR
IMPLIED, AS TO ANY MATTER WHATSOEVER, AND SPECIFICALLY DISCLAIMS ALL
WARRANTIES OR CONDITIONS OF MERCHANTABILITY, NONINFRINGEMENT, OR
FITNESS FOR ANY PARTICULAR PURPOSE.
LIMITATION OF LIABILITY. EXCEPT FOR BREACHES OF THE SECTIONS ENTITLED
“LICENSE GRANT”, OR “LICENSE RESTRICTIONS”, IN NO EVENT WILL EITHER PARTY BE
LIABLE TO THE OTHER FOR LOST PROFITS, LOST BUSINESS, OR ANY
CONSEQUENTIAL, EXEMPLARY OR INCIDENTAL DAMAGES ARISING OUT OF OR
RELATING TO THIS AGREEMENT, REGARDLESS OF WHETHER BASED IN CONTRACT OR
TORT, EVEN IF ADVISED OF THE POSSIBILITY OF SUCH DAMAGES.

Version 1.0
Section VII - 7
Copyright © 1999 by Handspring, Inc. All rights reserved.
TERM AND TERMINATION. This Agreement shall remain in effect for the partial calendar year
ending on the first March 31 following the effective date, and shall automatically renew for
additional one (1) year terms ending on each subsequent March 31, except that the Agreement
shall automatically terminate if either party materially breaches or is in default of any obligation
hereunder or if either party provides notice of non-renewal by January 1. The parties agree that
Handspring may provide notice by making the notice available in a manner similar to the manner
in which the Development Kit was made available.
GENERAL. This Agreement will be governed by and construed and interpreted in accordance
with the internal laws of the State of California, excluding that body of law applicable to conflict of
laws. No waiver, amendment or modification of any provision hereof or of any right or remedy
hereunder will be effective unless made in writing and signed by the party against whom such
waiver, amendment or modification is sought to be enforced. No failure by any party to exercise,
and no delay by any party in exercising, any right, power or remedy with respect to the
obligations secured hereby will operate as a waiver of any such right, power or remedy. Neither
this Agreement nor any right or obligation hereunder may be assigned or delegated by Developer
(including by operation of law) without Handspring’s express prior written consent, which consent
will not be unreasonably withheld, and any assignment or delegation without such consent will be
void. This Agreement will be binding upon and inure to the benefit of the successors and the
permitted assigns of the respective parties hereto. If any provision of this Agreement is declared
by a court of competent jurisdiction to be invalid, void, or unenforceable, the parties will modify
such provision to the extent possible to most nearly effect its intent. In the event the parties
cannot agree, then either party may terminate this Agreement on sixty (60) days notice. This
Agreement constitutes the entire understanding and agreement of the parties hereto with respect
to the subject matter hereof and supersedes all prior agreements or understandings, written or
oral, between the parties hereto with respect to the subject matter hereof.

Section VII: Handspring Licensing Version 1.0
Section VII - 8 Copyright © 1999 by Handspring, Inc. All rights reserved.
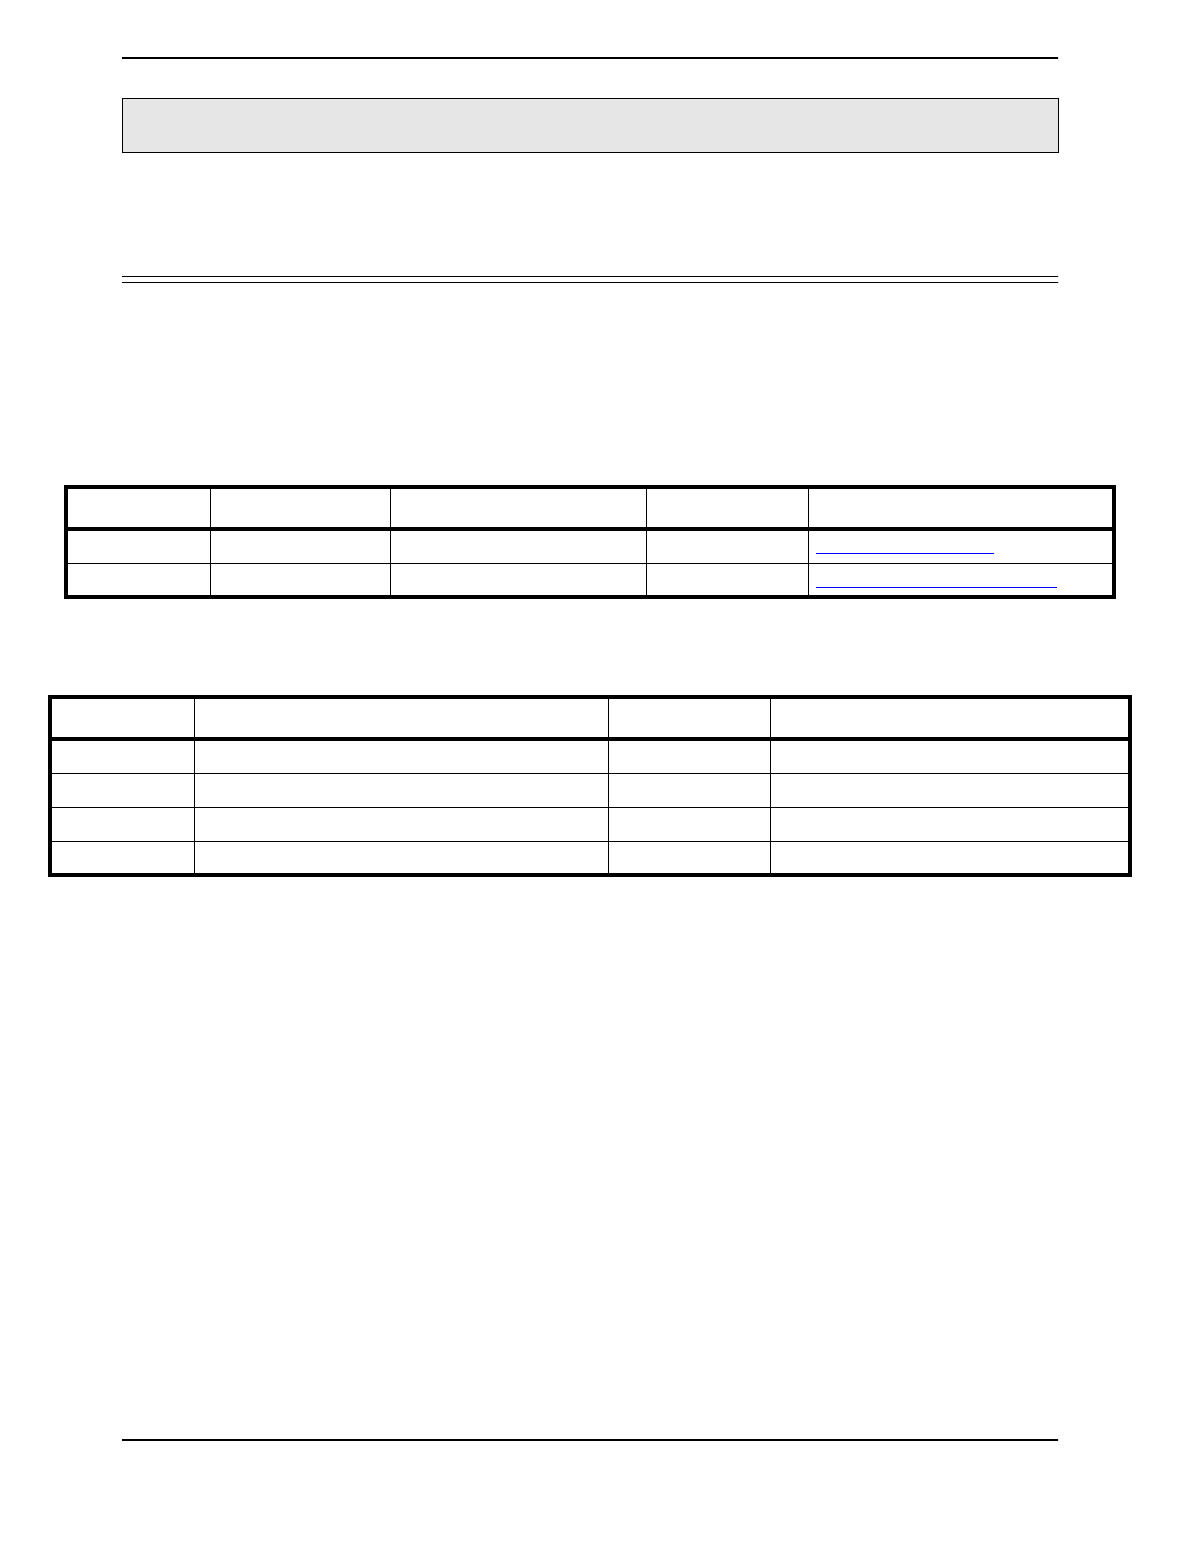
Version 1.0
Section VIII - 1
Cop
y
ri
g
ht © 1999 b
y
Handsprin
g
, Inc. All ri
g
hts reserved.
Section VIII Approved Vendor List
Handsprin
g
desires to make it eas
y
for all developers to implement their ideas on our Visor
handheld platform. Thus we are providin
g
a list of Handsprin
g
-approved components for
developers to use in their desi
g
ns, if so chosen.
Table VIII.1: Approved Vendor List
Name Contact e-mail Phone# Web site
ATL Ton
y
Sass ton
y
s@atllink.com 801-434-0974 http://www.atllink.com/
Smart Modular Dave Floriani dave.floriani@smartm.com 510-624-8137 http://www.smartmodular.com/
Table VIII.2: Approved Components
Part Number Description Supplier Specification
13-0006-00 Sprin
g
board’s slot 68-pin female connector ATL 13000600.pdf
(
.dw
g)
31-0021-00 USB cable connector/overmold ATL 31002100.pdf
(
.dw
g)
13-0003-00 Cradle connector
(
also called dock connector
)
ATL 13000300.pdf
(
.dw
g)
TBD 2MB OTP- or Masked -ROM Sprin
g
board module Smart Modular N/A

Section VIII: Approved Vendor List Version 1.0
Section VIII - 2 Copyright © 1999 by Handspring, Inc. All rights reserved.

Version 1.0
Section IX - 1
Cop
y
ri
g
ht © 1999 b
y
Handsprin
g
, Inc. All ri
g
hts reserved.
Section IX Trademarks and Logos
Chapter 1 Overview
Section IX defines the specifications for the Sprin
g
board s
y
mbol and colors. It also provides a
view of all available Sprin
g
board lo
g
os and Icons on the Visor handheld that are included in this
kit. The source files for these lo
g
os and icons are in Lo
g
o_Icons.zip.
Here is a description of each files per folder.
Under the ”Lo
g
os Developers” folder:
• Color.sprin
g
board = color s
y
mbol with word sprin
g
board in GIF format
•color.ta
g
.sprin
g
board = color s
y
mbol with words sprin
g
board compatible in GIF format
• SB.s
y
mbol = Sprin
g
board 's' in EPS format
• SB.color = Sprin
g
board lo
g
o in color with word Sprin
g
board in EPS format
• SBcom.color = Sprin
g
board lo
g
o in color with words Sprin
g
board compatible in EPS format
Under the ”Lo
g
os Developers\B&W” folder:
• SB S
y
mbol.rev = Sprin
g
board 's' in reverse white in EPS format
• SB.B&W = Sprin
g
board lo
g
o with word sprin
g
board all in black in EPS format
• SBcom.B&W = Sprin
g
board lo
g
o with words sprin
g
board compatible all in black in
EPS format
•BW.sprin
g
board = Sprin
g
board lo
g
o with word sprin
g
board all in black in GIF format
•BW.ta
g
.sprin
g
board = Sprin
g
board lo
g
o with words sprin
g
board compatible all in
black in GIF format
Under the “Icon” folder:
• lcd.area.eps

Section IX: Trademarks and Logos Version 1.0
Section IX - 2 Copyright © 1999 by Handspring, Inc. All rights reserved.
.
The Springboard symbol
was designed to capture
the modularity and flexi-
bility of our Springboard
technology. Shown here
are the color and black-
and-white versions of the
symbol. As with our
corporate symbol, never
alter or reproportion the
Springboard symbol in
any way.
SPRINGBOARD SYMBOL & COLOR
A
B
C
D
E
A
B
DB&W: 100% BLACK
COLOR: HS GREEN (SIMILAR TO PMS 3415)
COLOR: HS BLUE (SIMILAR TO PMS 288)
COLOR: HS YELLOW (SIMILAR TO PMS 130)
MIN. SIZE: 1 PICA 9.5 PTS
E
C

Version 1.0 Overview
Section IX - 3
Copyright © 1999 by Handspring, Inc. All rights reserved.
The Springboard signature
includes the symbol and the
Springboard logotype used
together in a specific orien-
tation, as shown. A variation
on this signature, the
Springboard Compatible
signature, also is featured.
As with our corporate
signature, consistent use of
the elements that comprise
the Springboard and
Springboard Compatible
signatures, helps strengthen
and reinforce our brand.
SPRINGBOARD SIGNATURES
A
B
B
C
D
SB COMPATIBLE SIGNATURE
SPRINGBOARD SIGNATURE
A B MINIMUM SIZE: 2 PICAS 6 PTS
CMINIMUM SIZE: 3 PICAS
D

Section IX: Trademarks and Logos Version 1.0
Section IX - 4 Copyright © 1999 by Handspring, Inc. All rights reserved.
Chapter 2 Logos
Figure IX.1: Color.springboard.gif
Figure IX.2: Color.tag.springboard.gif

Version 1.0 Logos
Section IX - 5
Copyright © 1999 by Handspring, Inc. All rights reserved.
Figure IX.3: SB.symbol.eps
Figure IX.4: SB.color.eps

Section IX: Trademarks and Logos Version 1.0
Section IX - 6 Copyright © 1999 by Handspring, Inc. All rights reserved.
Figure IX.5: SBcom.color.eps
Figure IX.6: SB Symbol.rev.eps

Version 1.0 Logos
Section IX - 7
Copyright © 1999 by Handspring, Inc. All rights reserved.
Figure IX.7: SB.B&W.eps
Figure IX.8: SBcom.B&W.eps

Section IX: Trademarks and Logos Version 1.0
Section IX - 8 Copyright © 1999 by Handspring, Inc. All rights reserved.
Figure IX.9: BW.springboard.gif
Figure IX.10: BW.tag.springboard.gif
Version 1.0 Logos
Section IX - 9
Copyright © 1999 by Handspring, Inc. All rights reserved.
Figure IX.11: lcd.area.eps

Section IX: Trademarks and Logos Version 1.0
Section IX - 10 Copyright © 1999 by Handspring, Inc. All rights reserved.