Palm HVP-1H wireless module User Manual DK
Palm Inc wireless module DK
UserManual.wiki
>
Palm
>
HVP-1H User Manual
>
Visor User Manual
Contents
1.
Module User Manual
2.
Visor User Manual
3.
Revised user manual statement
4.
Revised RF Exposure stmt
5.
user manual with SAR stmt at end
Visor User Manual
Navigation menu
Upload a User Manual
Namespaces
Wiki Guide
HTML
PDF
Info
Views
User Manual
Discussion / Help
Navigation

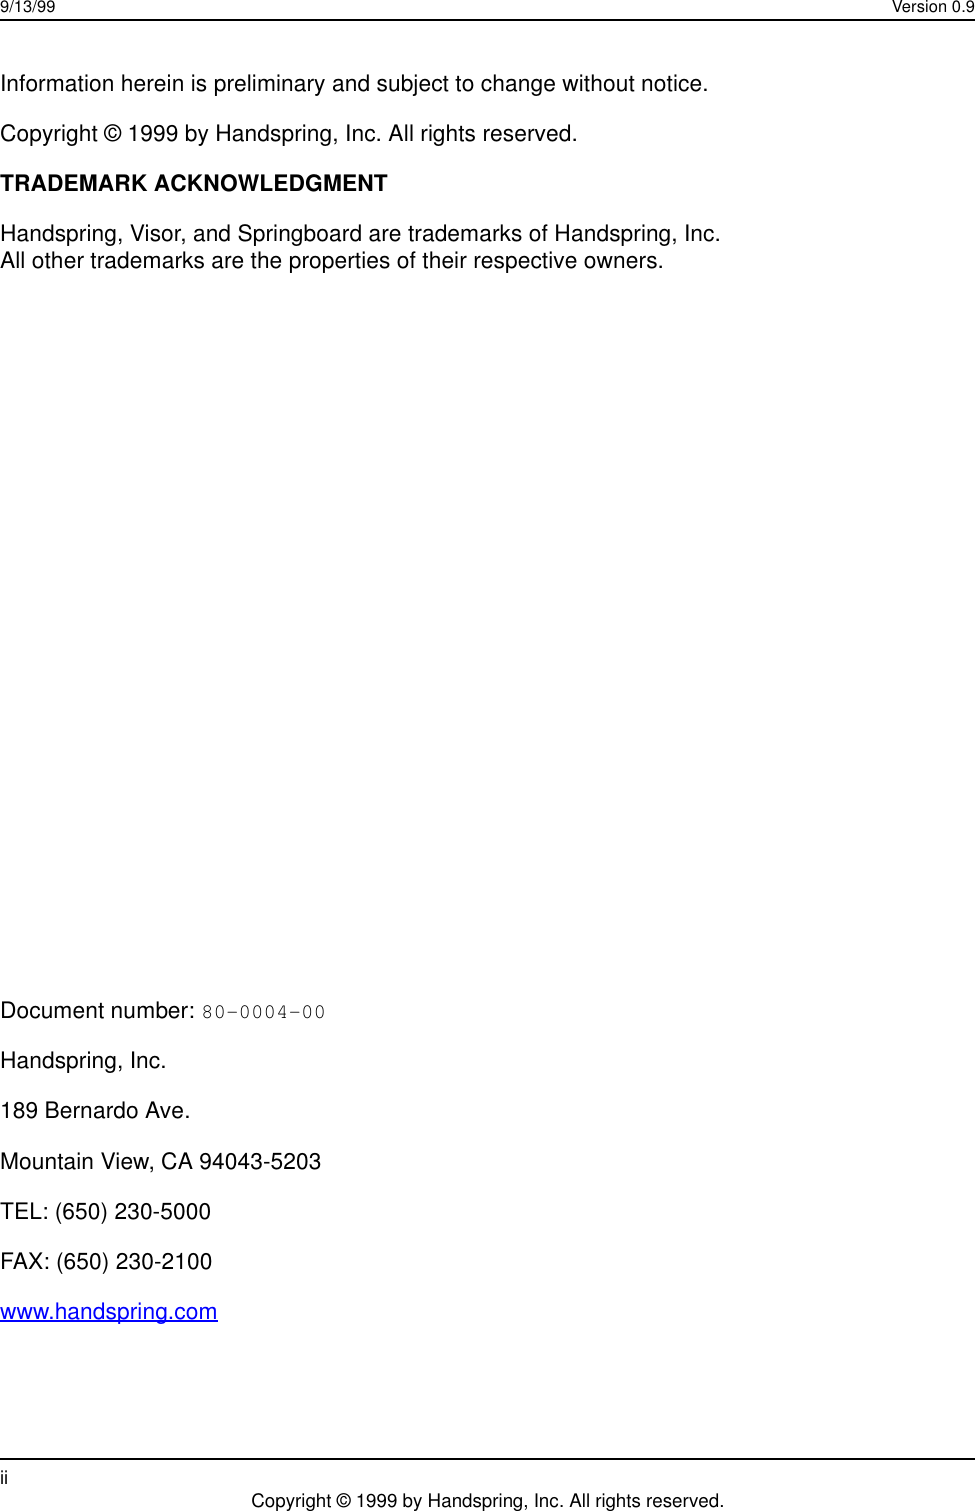

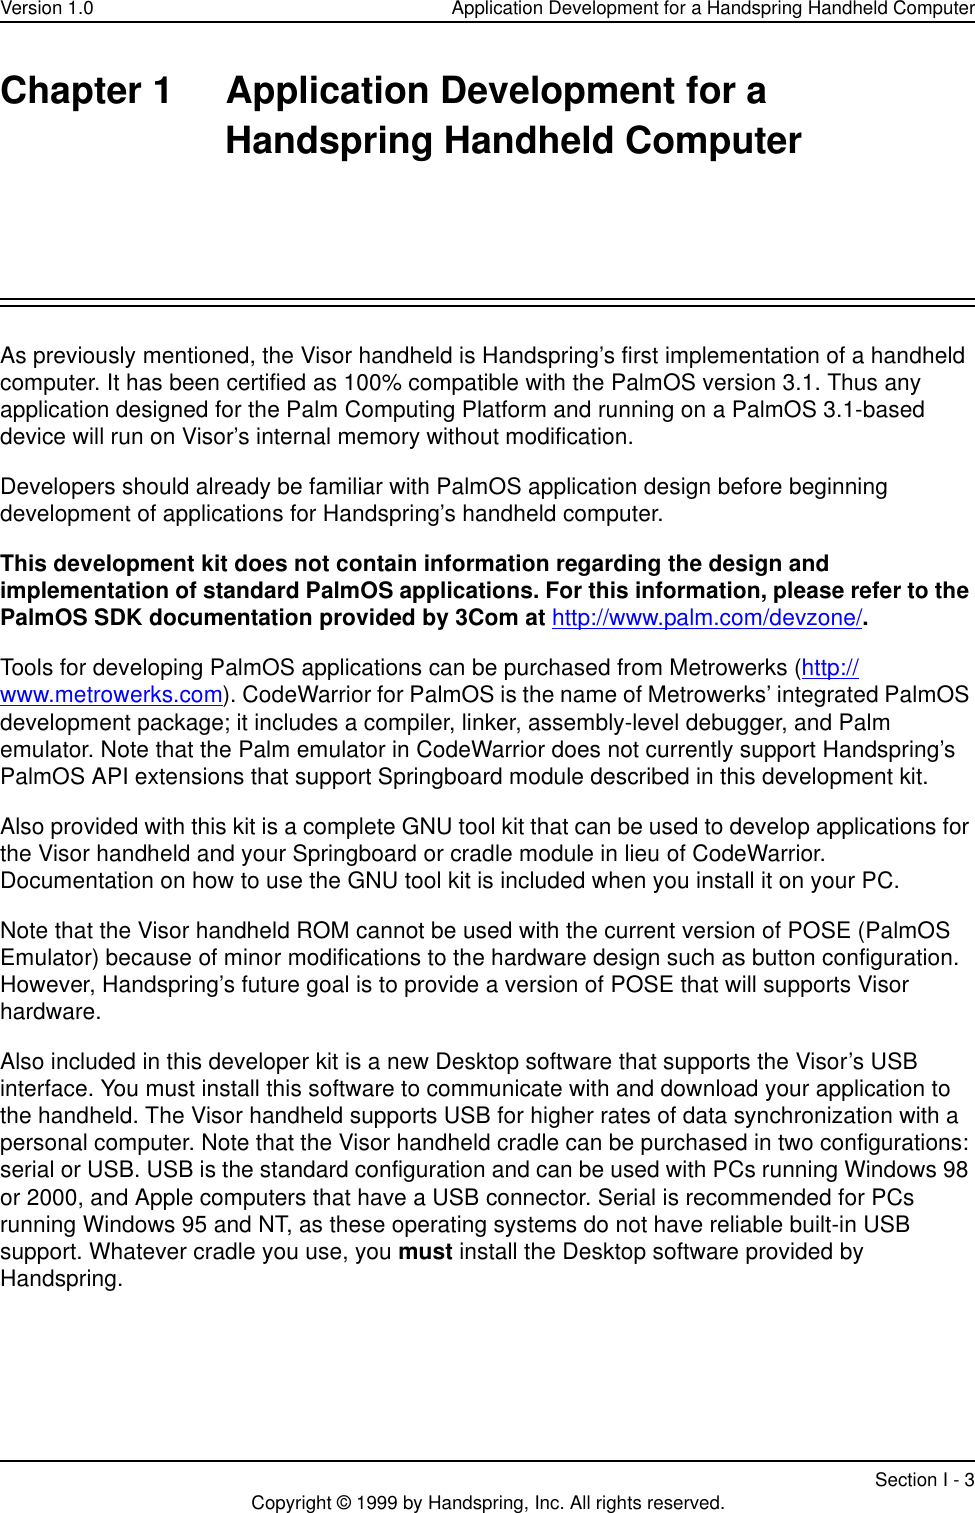
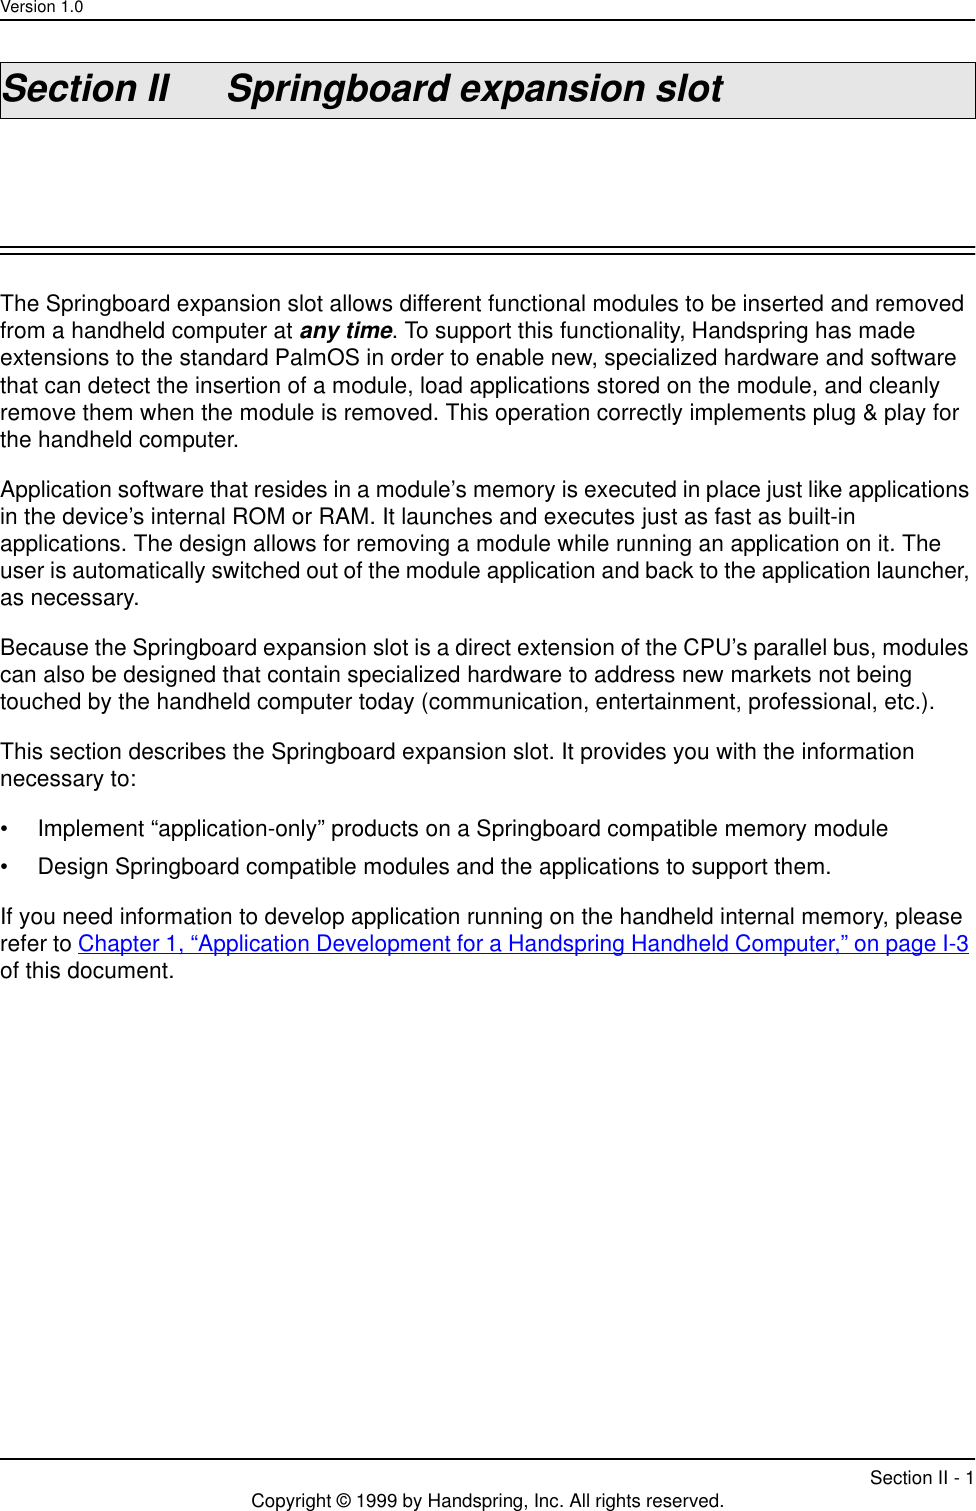
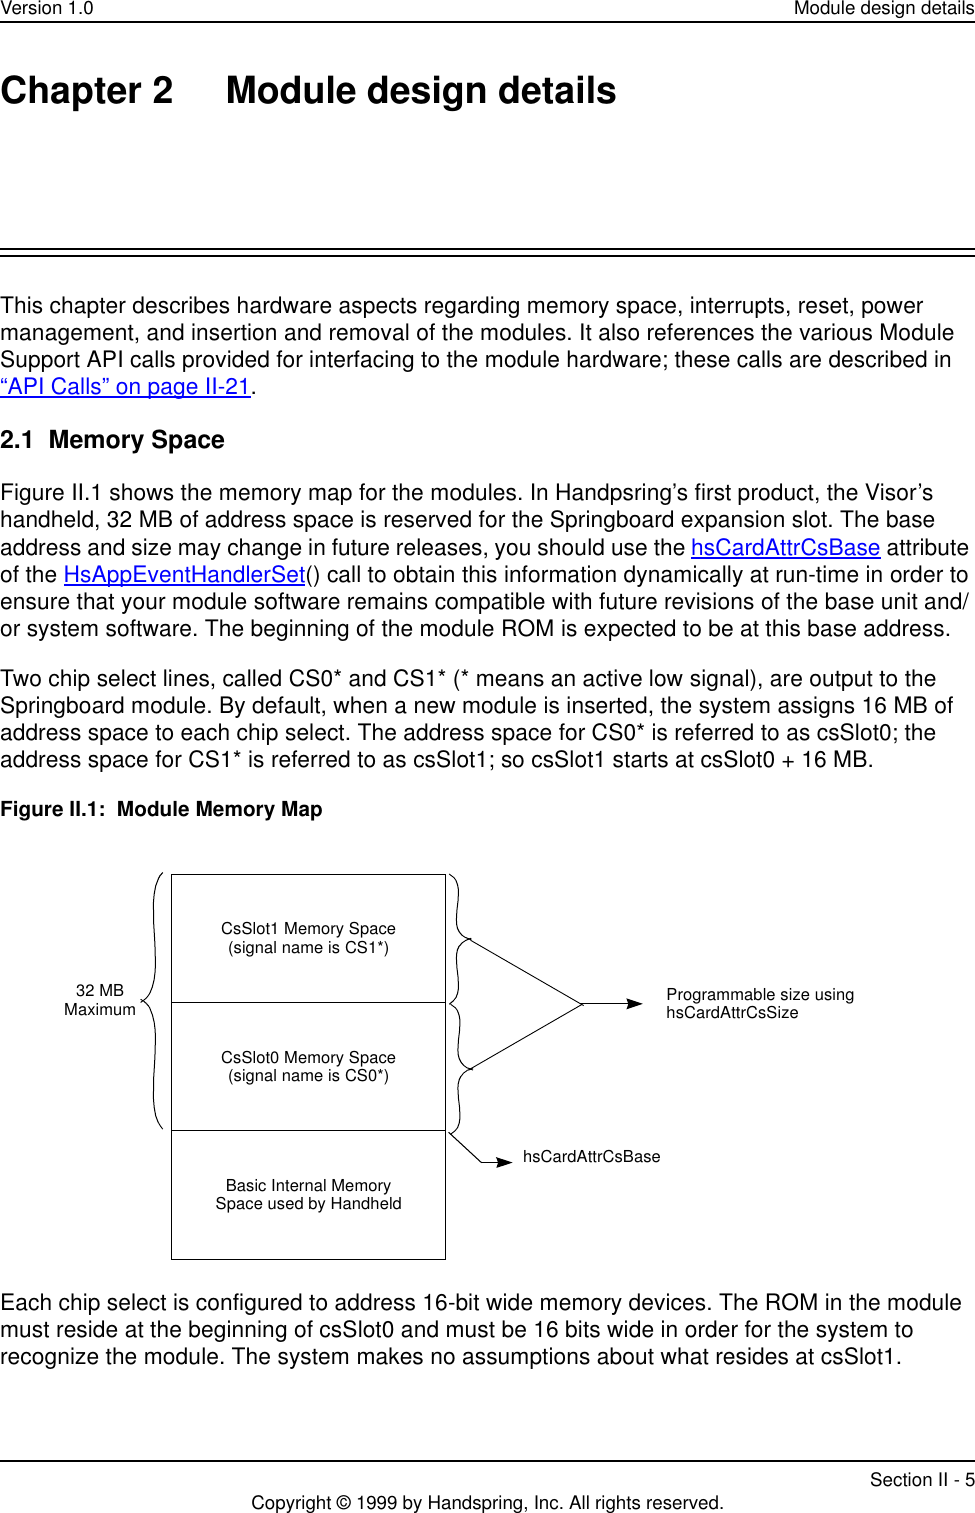
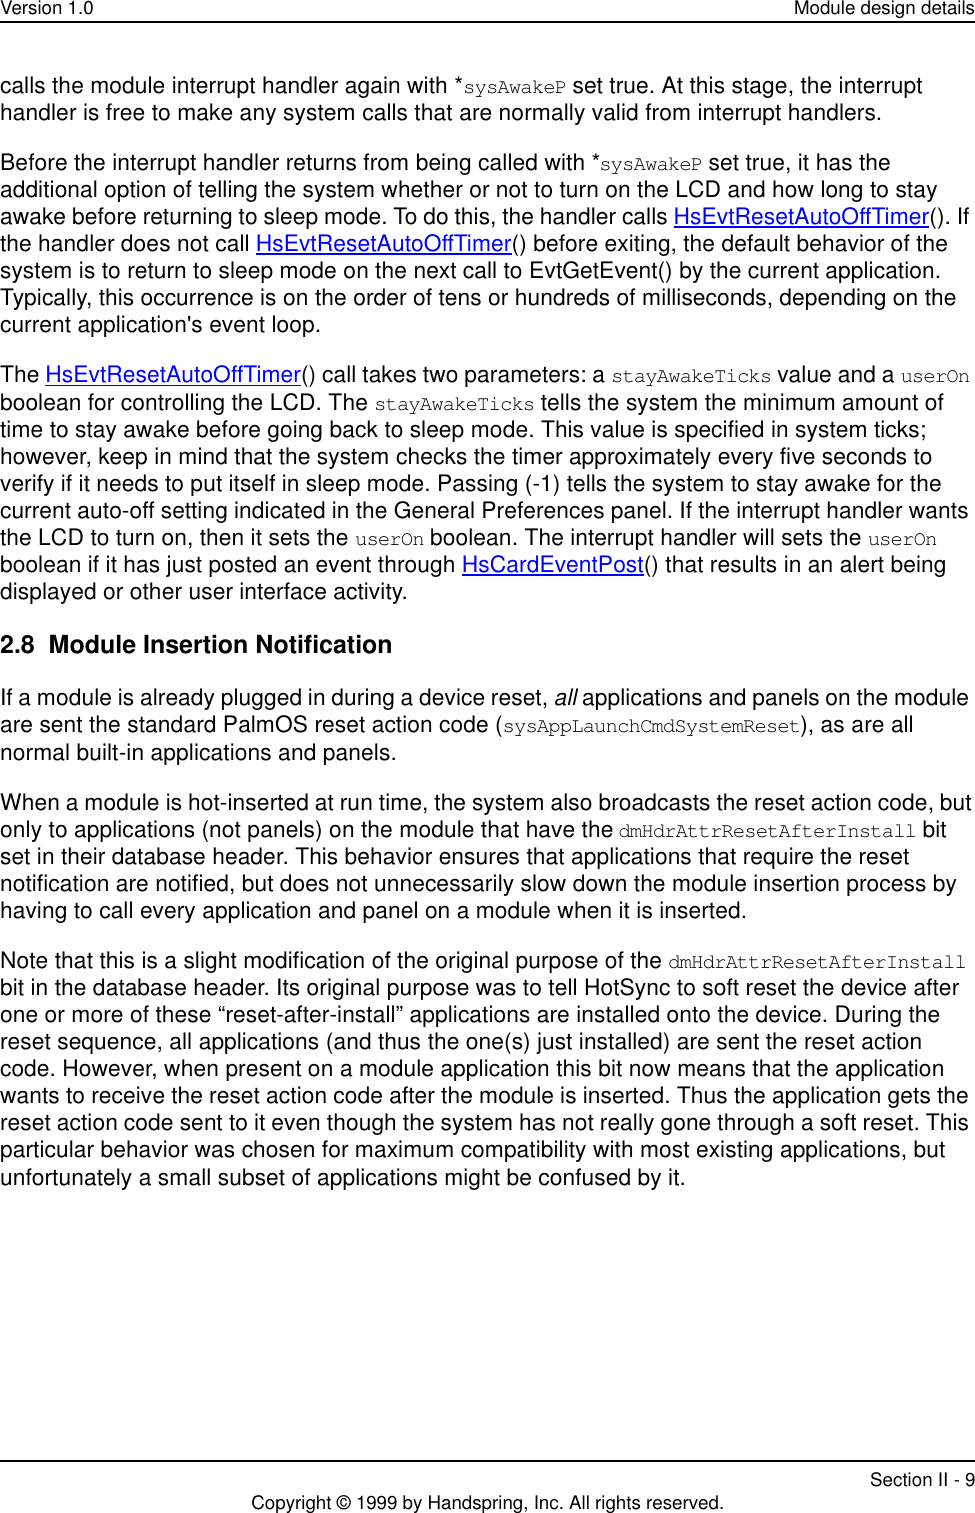
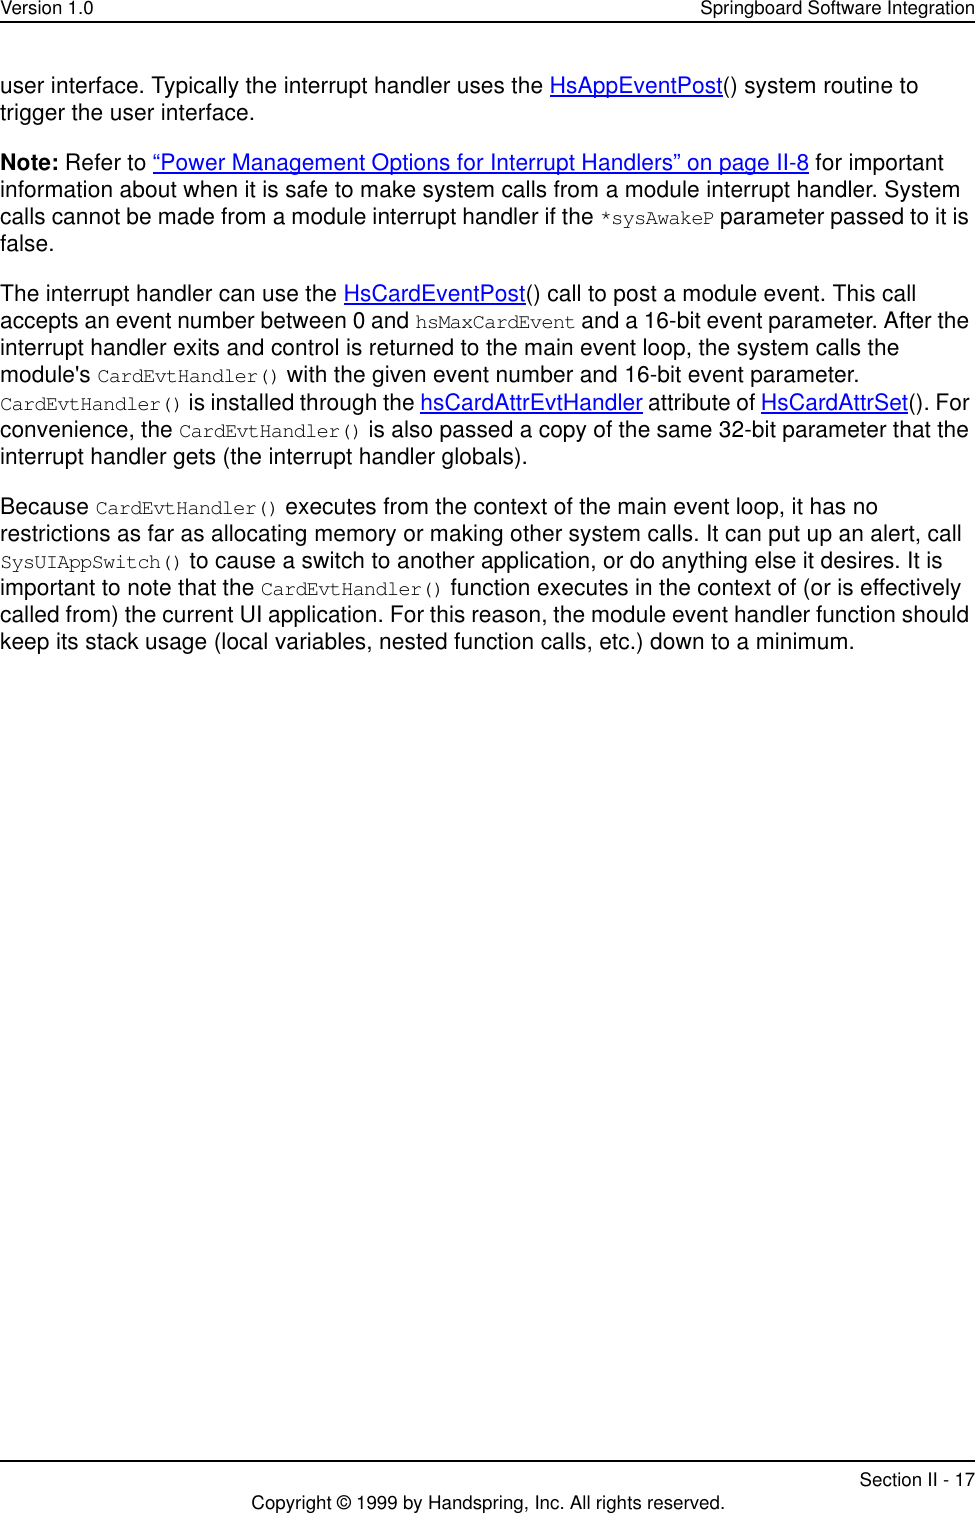
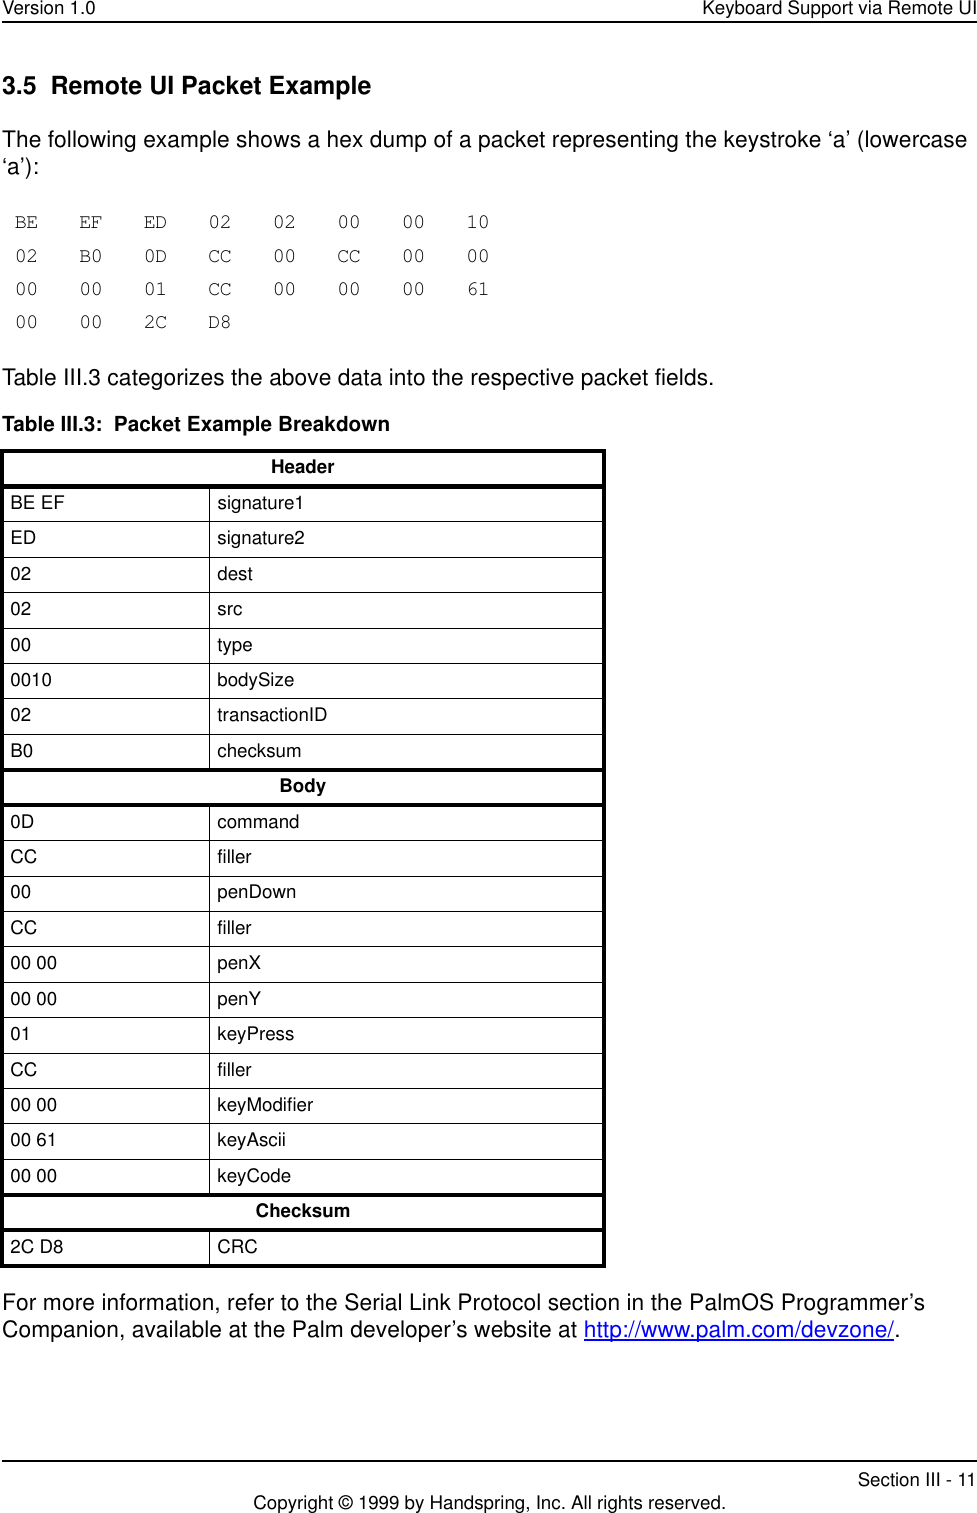
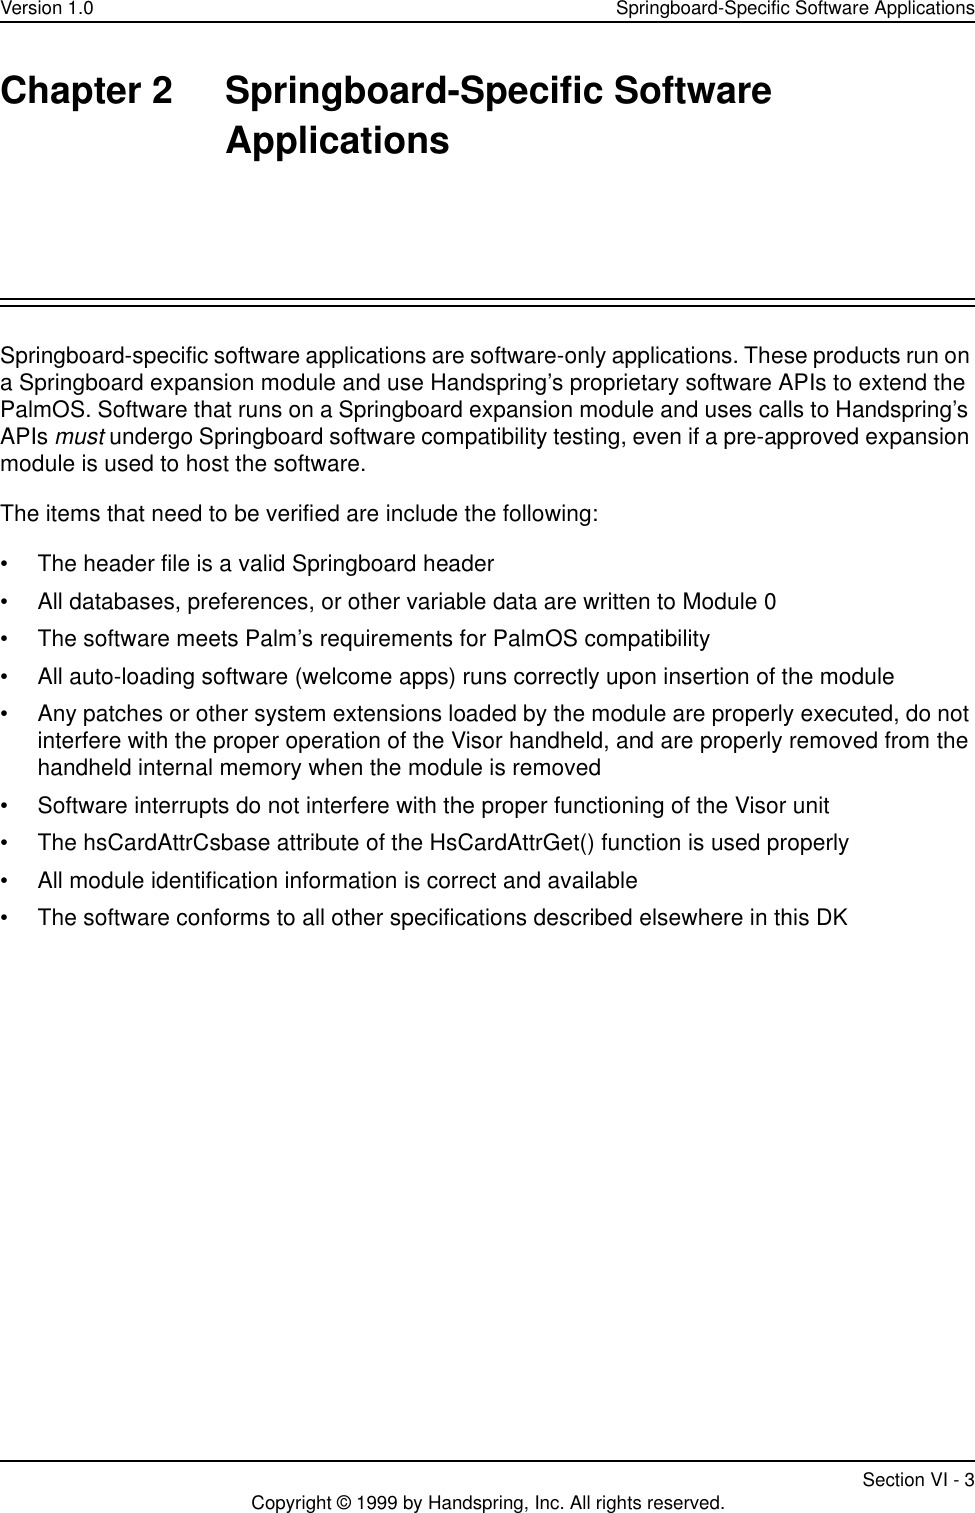
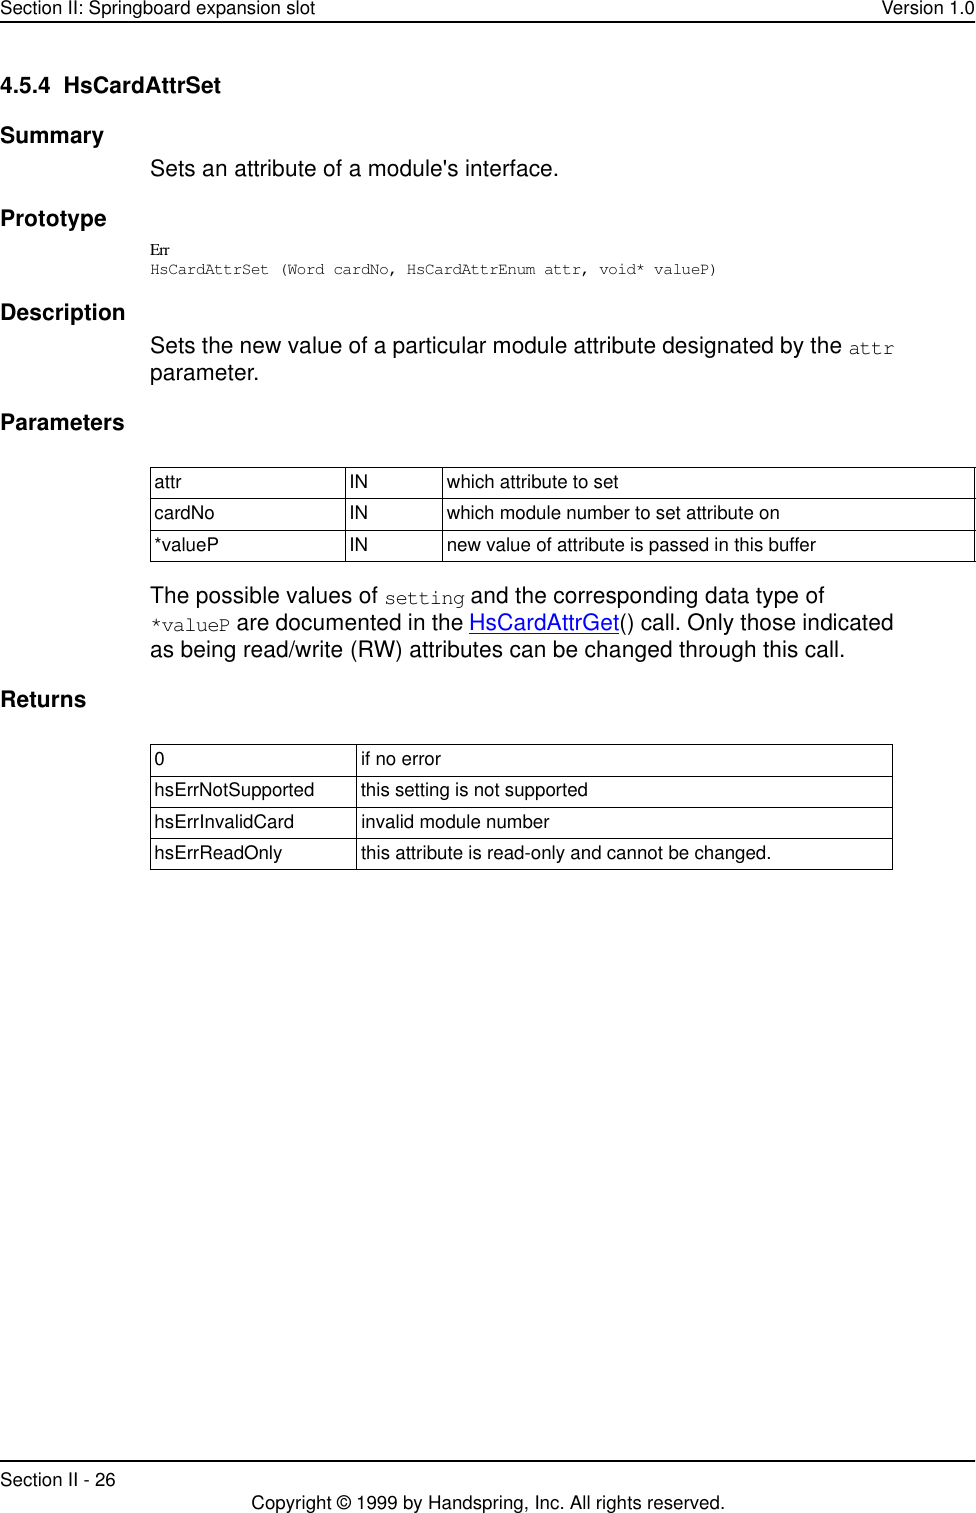
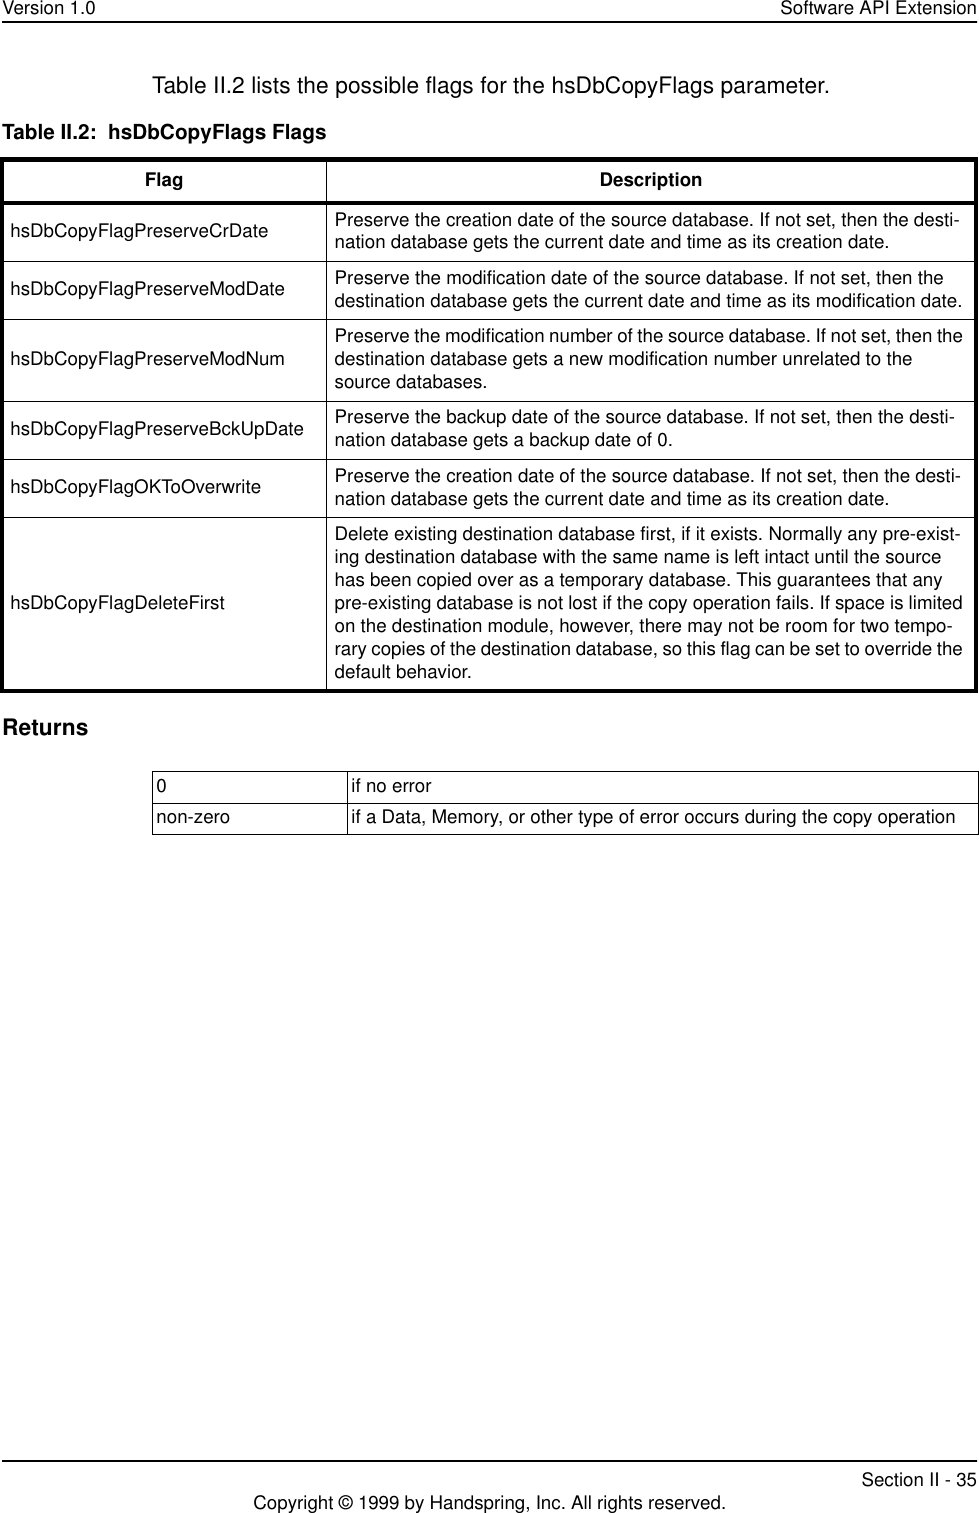
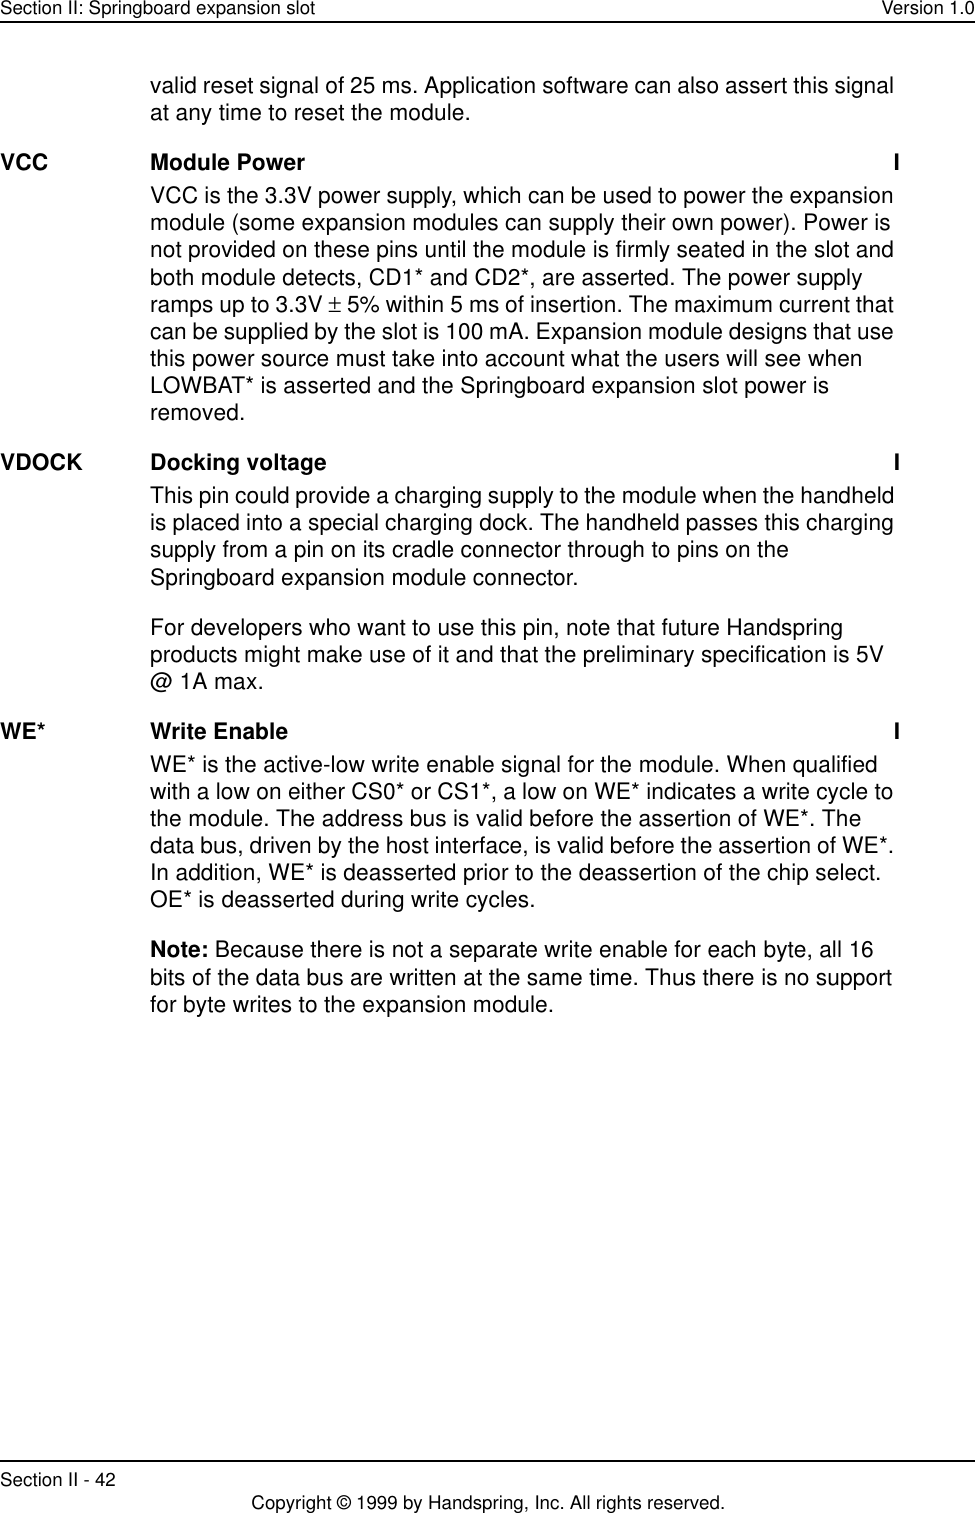
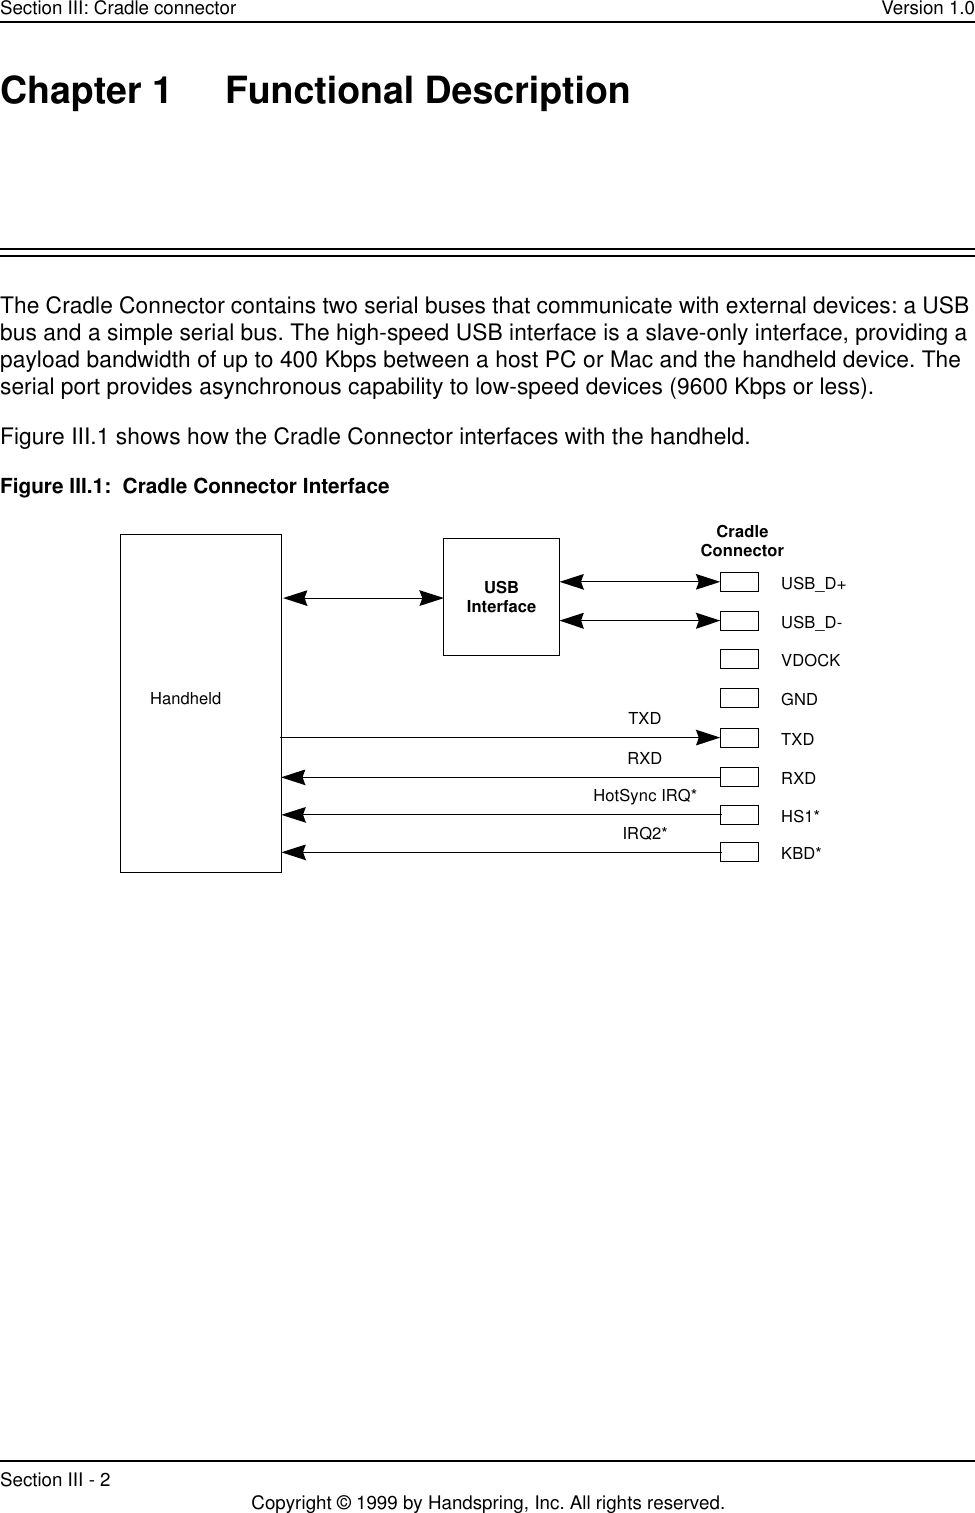
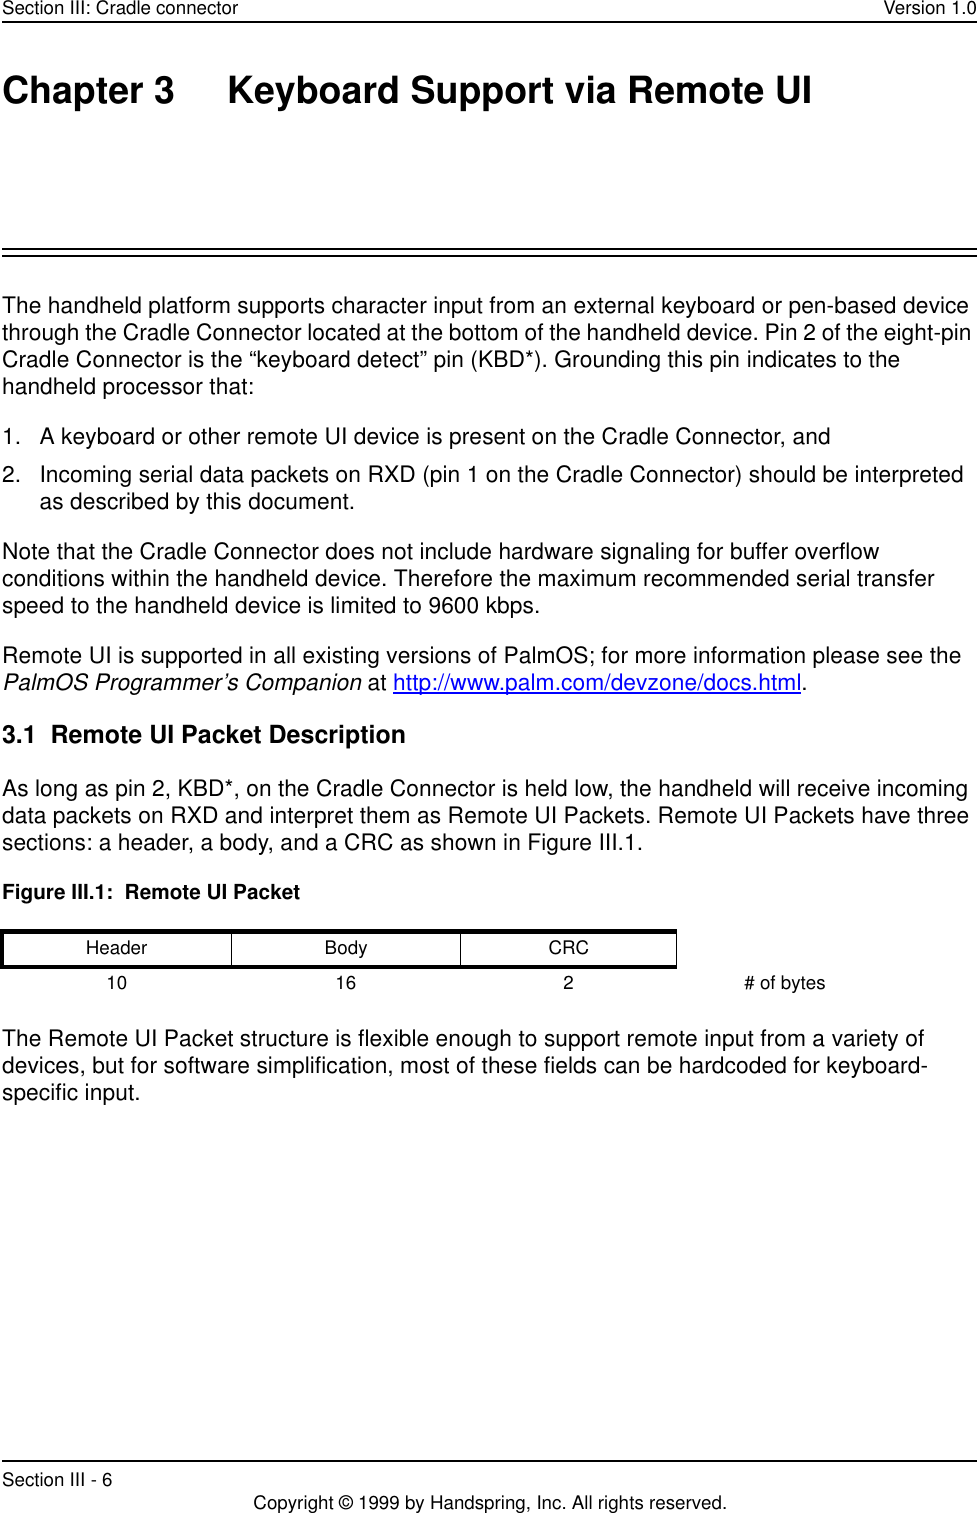
![Section II: Springboard expansion slot Version 1.0Section II - 20 Copyright © 1999 by Handspring, Inc. All rights reserved.returns. When a module is removed, the system automatically aborts any application code that is currently in the process of trying to access memory on the removable module and returns control to the application launcher. In general, application code can simply call MemNumCards() during its start-up and assume that the information will remain current until the application exits. If the module is pulled out while the application is using it, the system automatically and immediately aborts the application. If the application is not referencing the module when the module is pulled out, then the system sends it an exit event and waits for the application to exit normally. When a module is inserted, the current application is sent a normal exit event as well. It might or might not be re-launched after it exits, depending on the contents of the module (for example, it might have a welcome application on it that is launched instead). 4.4 Copy Protecting Module ApplicationsIf desired, module applications easily can be designed so that they will not run if copied off the module to another device's internal RAM. A simple mechanism is for the application to check for the presence of the removable module and compare the module's name when it starts up. If the module is not present or the module's name is not correct, it can display an appropriate error message and refuse to run. All removable modules will have unique module names that the module manufacturer must register with Handspring. This name is an ASCII string of up to 31 characters. To get the name of a module, use the MemCardInfo() call and pass in the module number of the removable module. For example:char cardName[32];Err err;err = MemCardInfo (1 /*cardNo*/, cardName, 0 /*manufName*/, 0 /*versionP*/, 0 /*crDateP*/, 0 /*romSizeP*/, 0 /*ramSizeP*/, 0 /*freeBytesP*/);if (err || StrCompare (cardName, "MyCardName")) { DisplayCopyProtectError(); }](https://usermanual.wiki/Palm/HVP-1H.Visor-User-Manual/User-Guide-118400-Page-30.png)
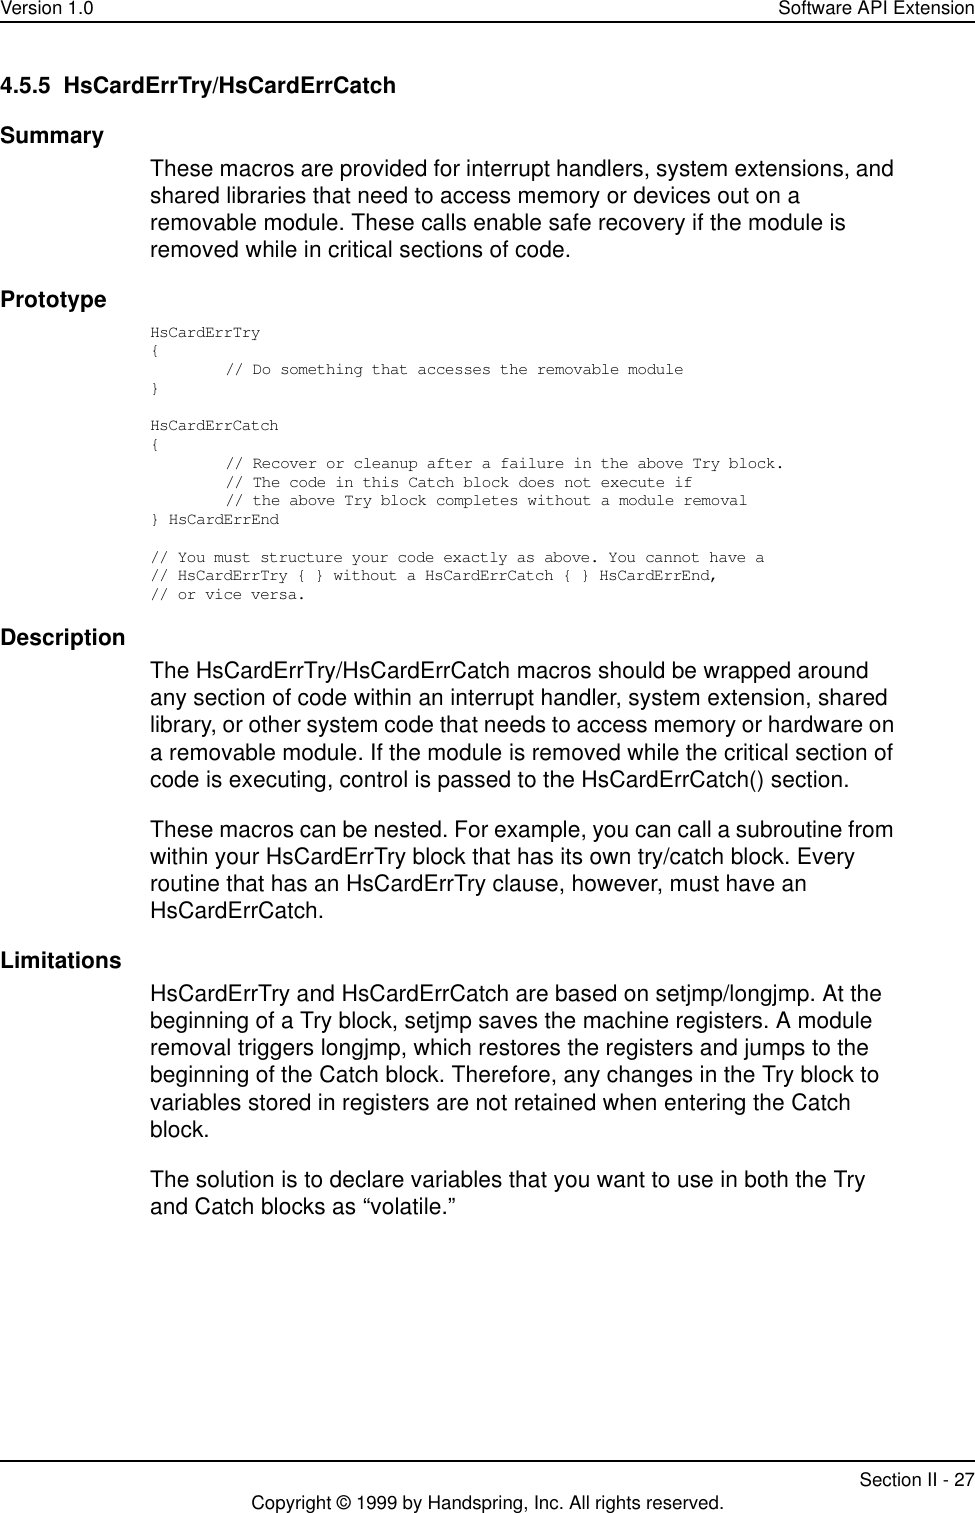


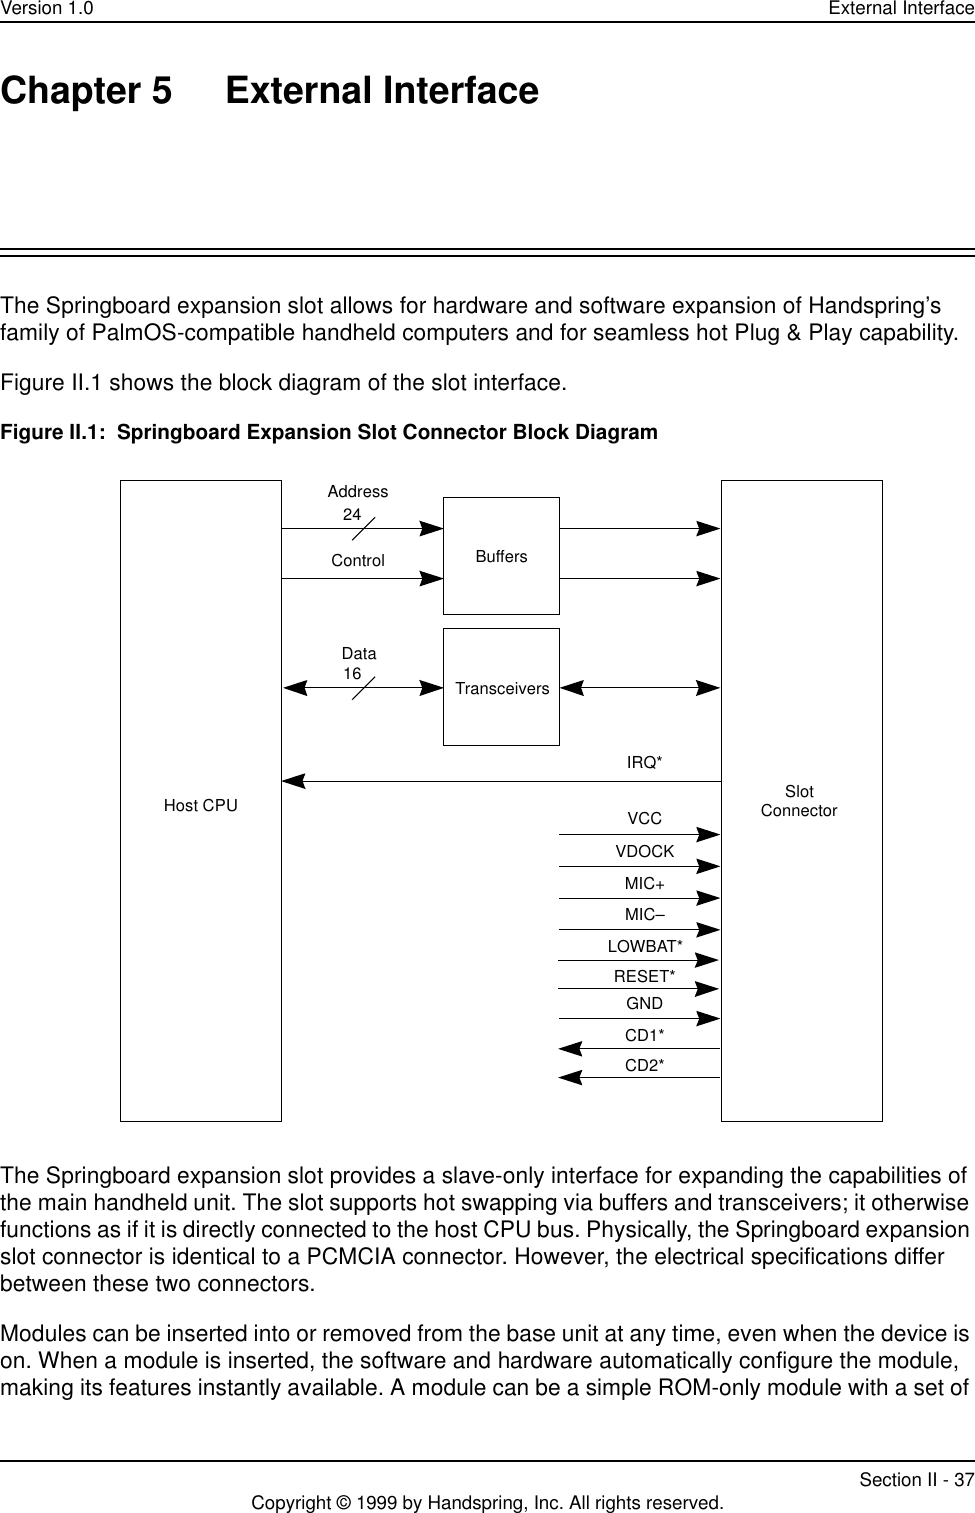
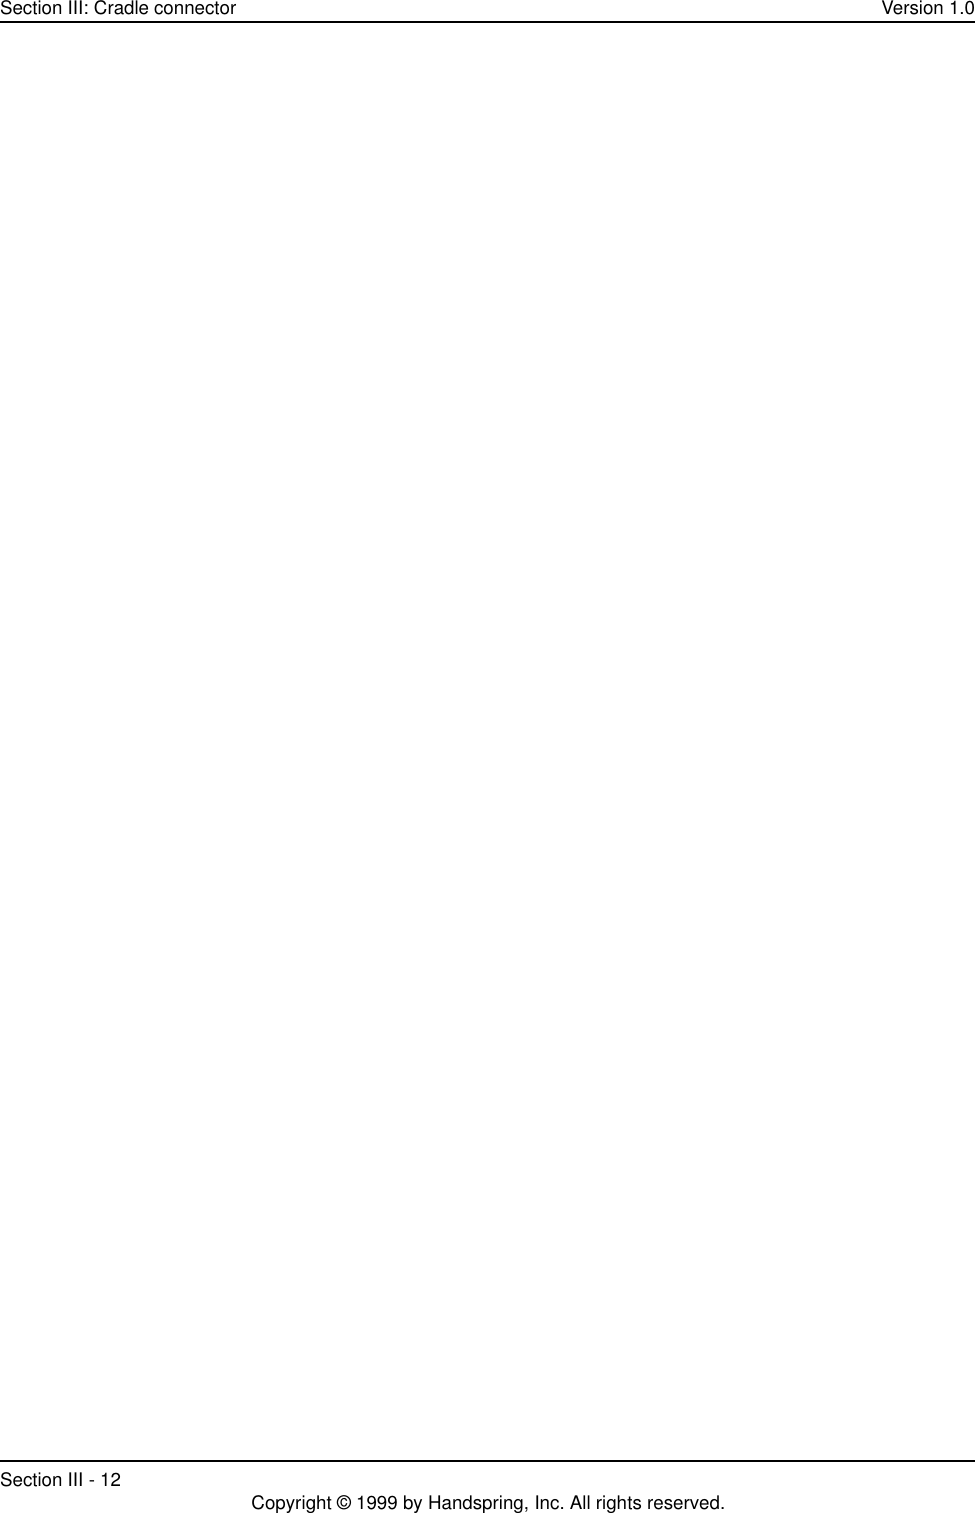
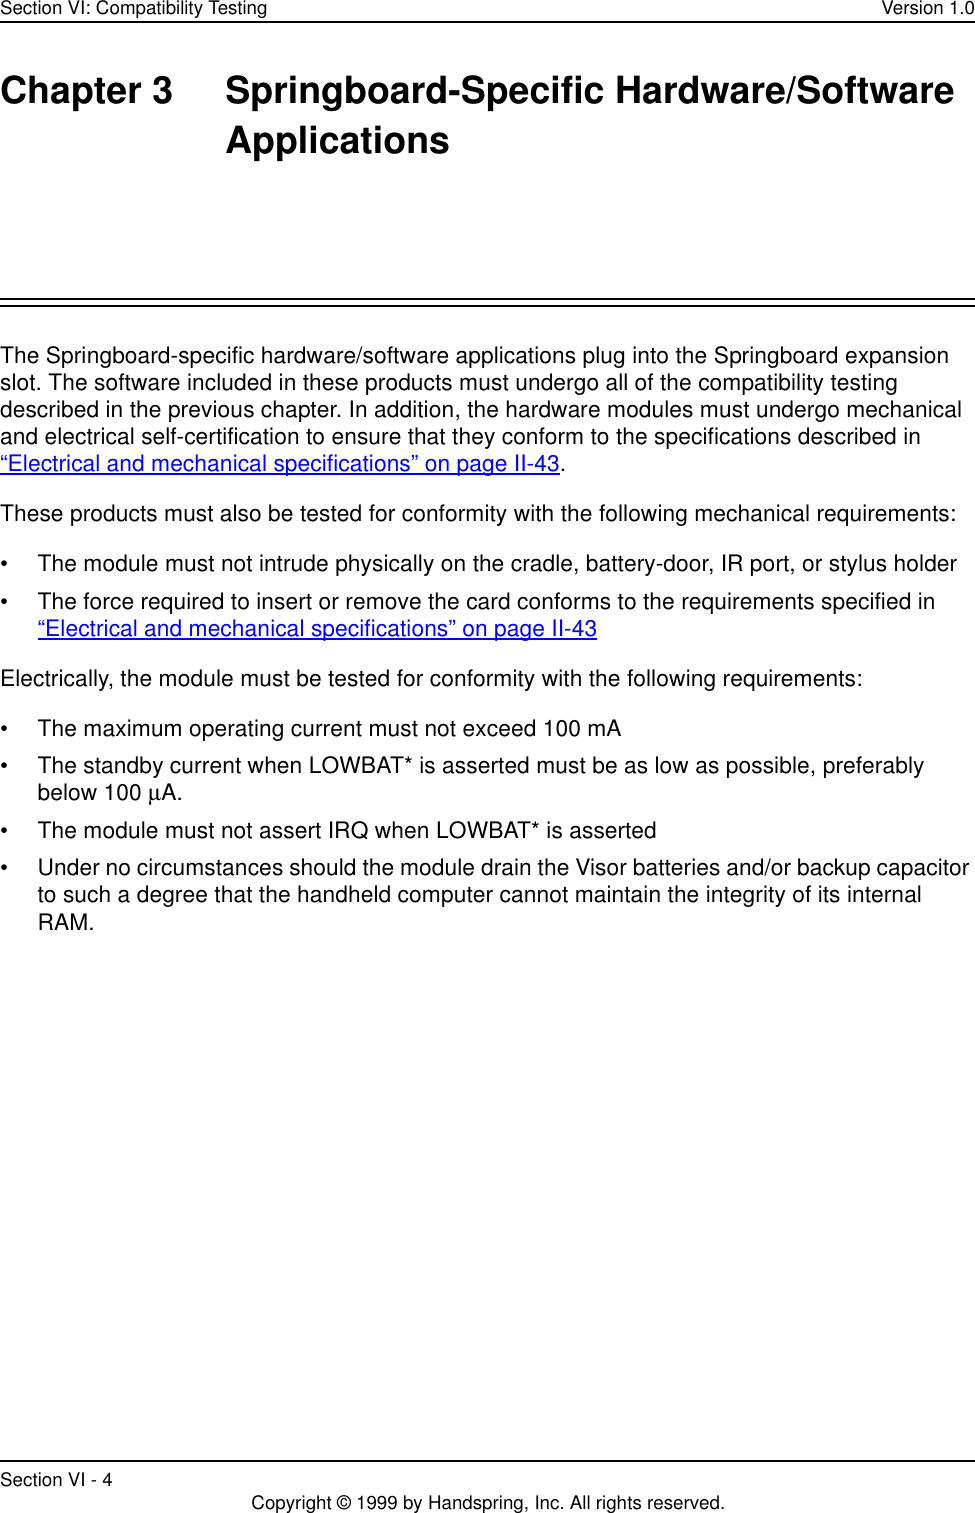
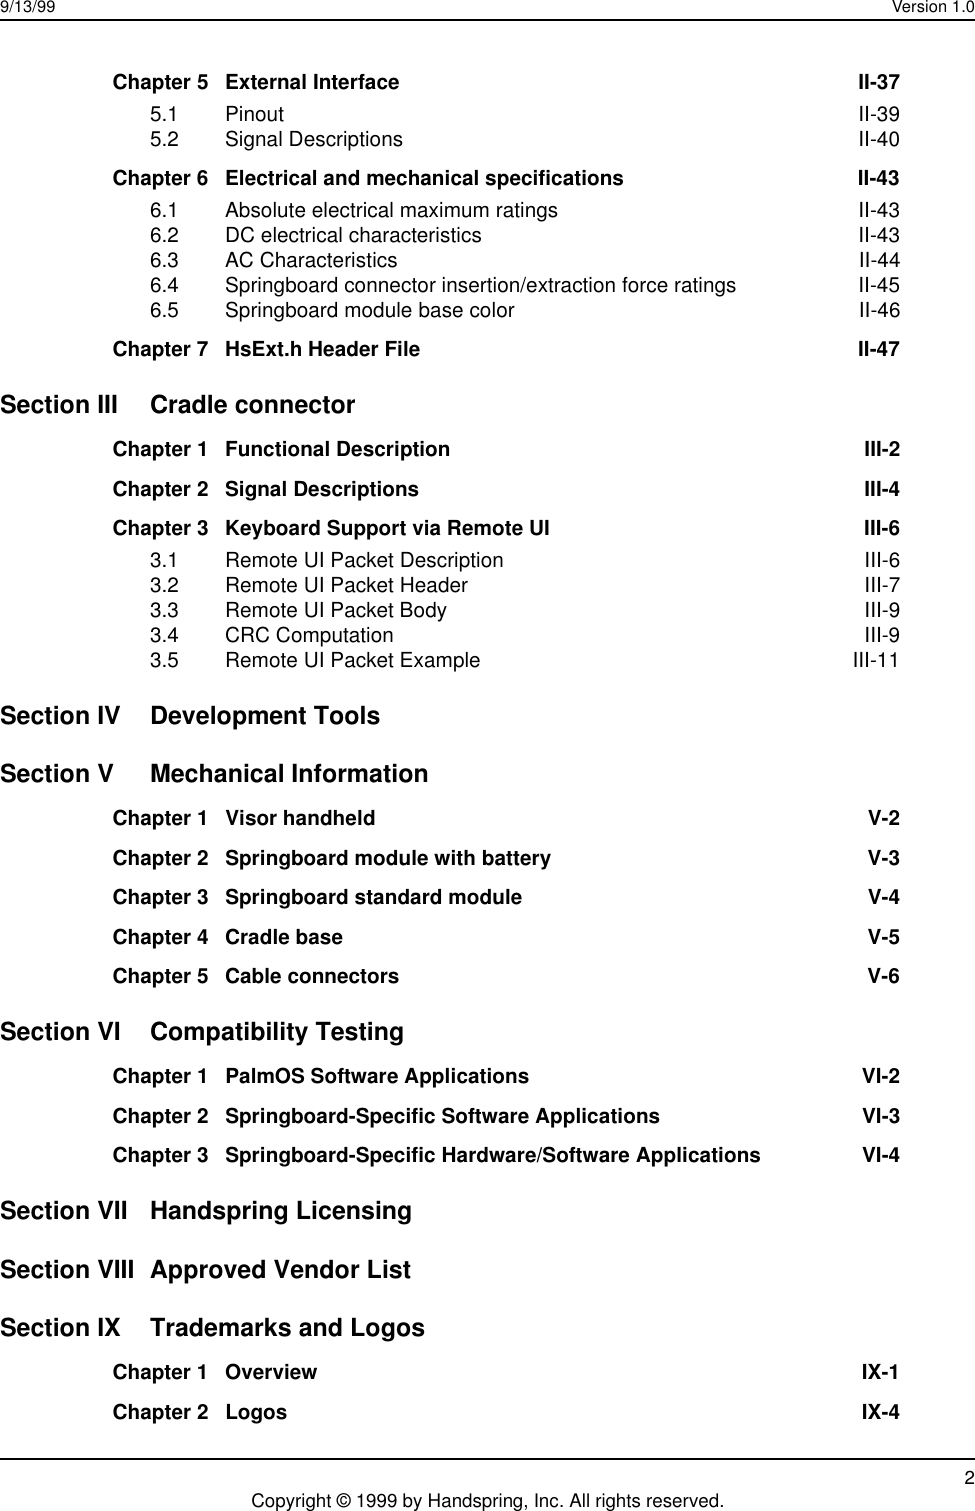
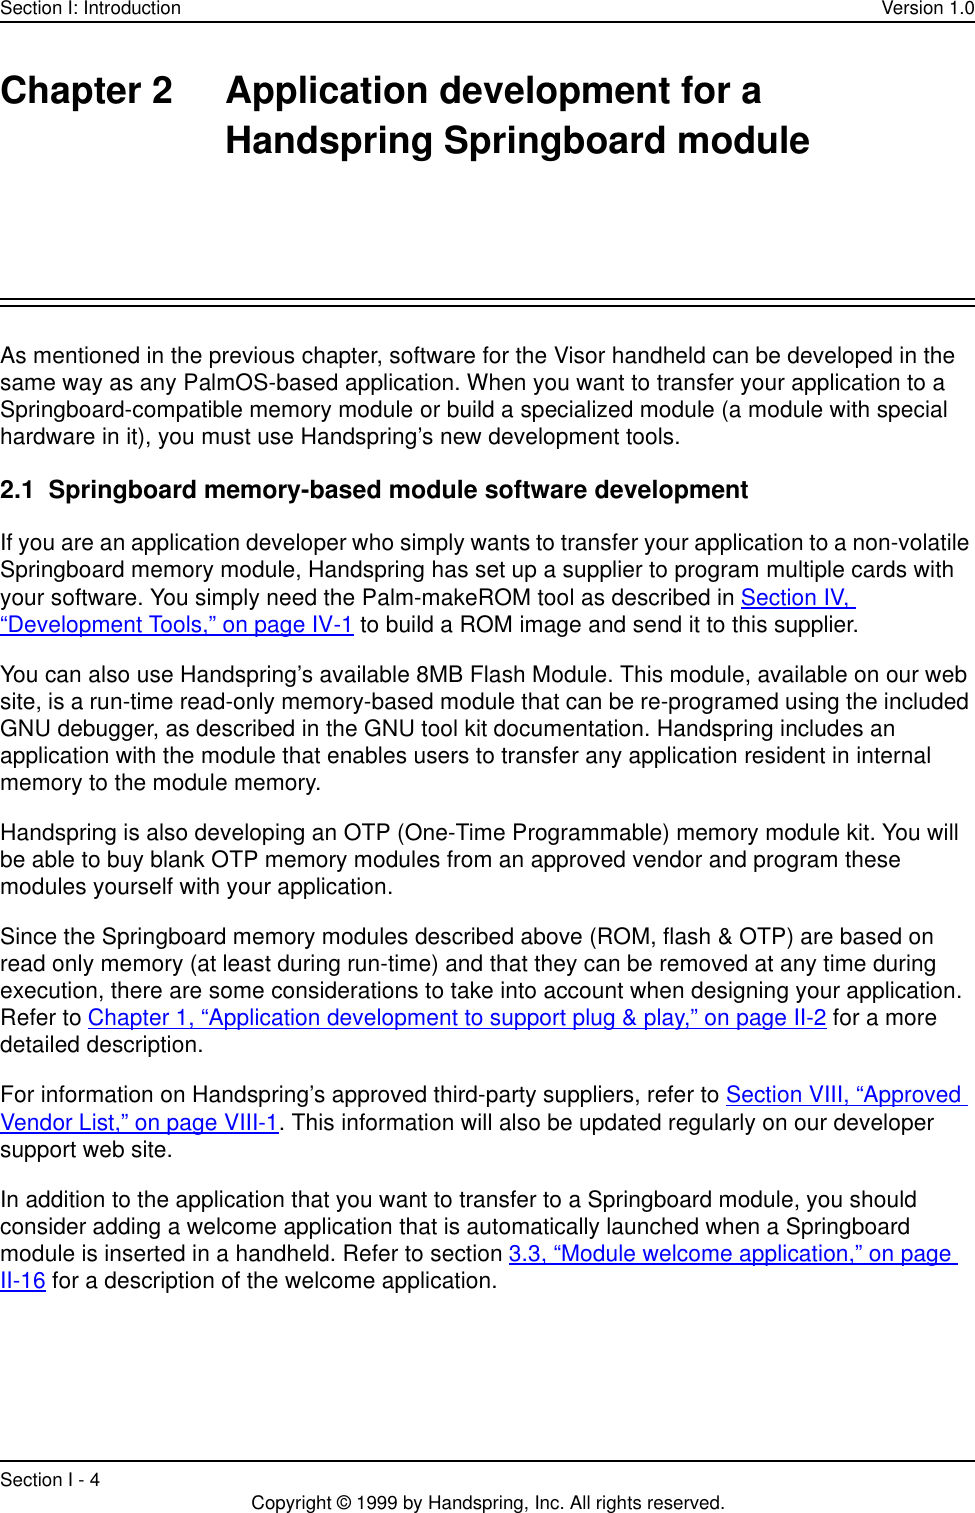
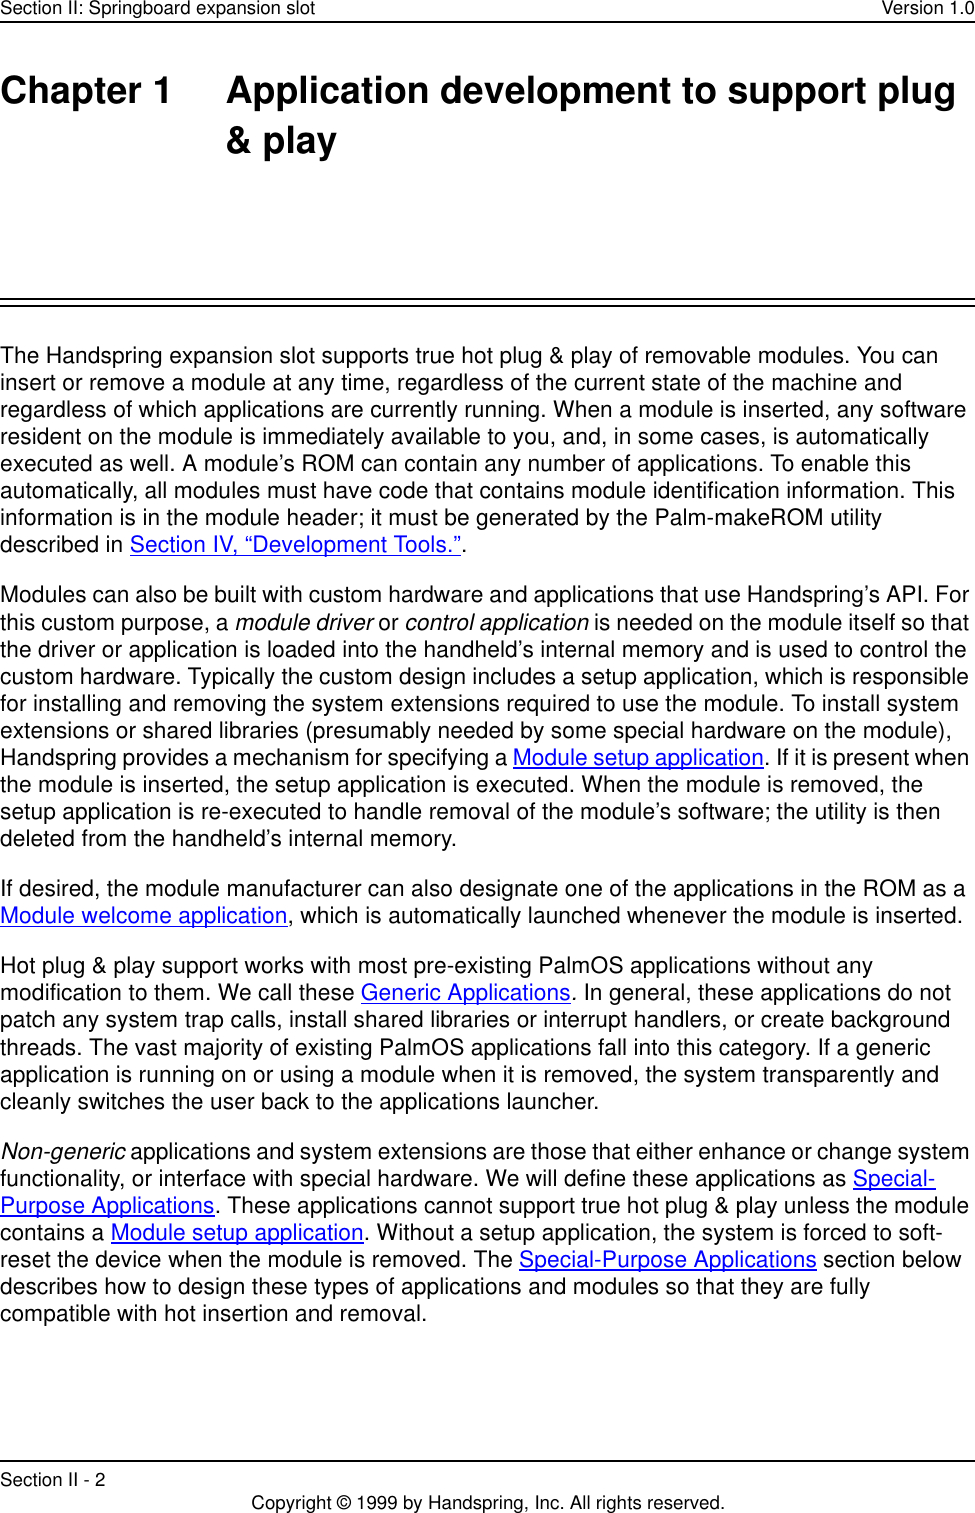
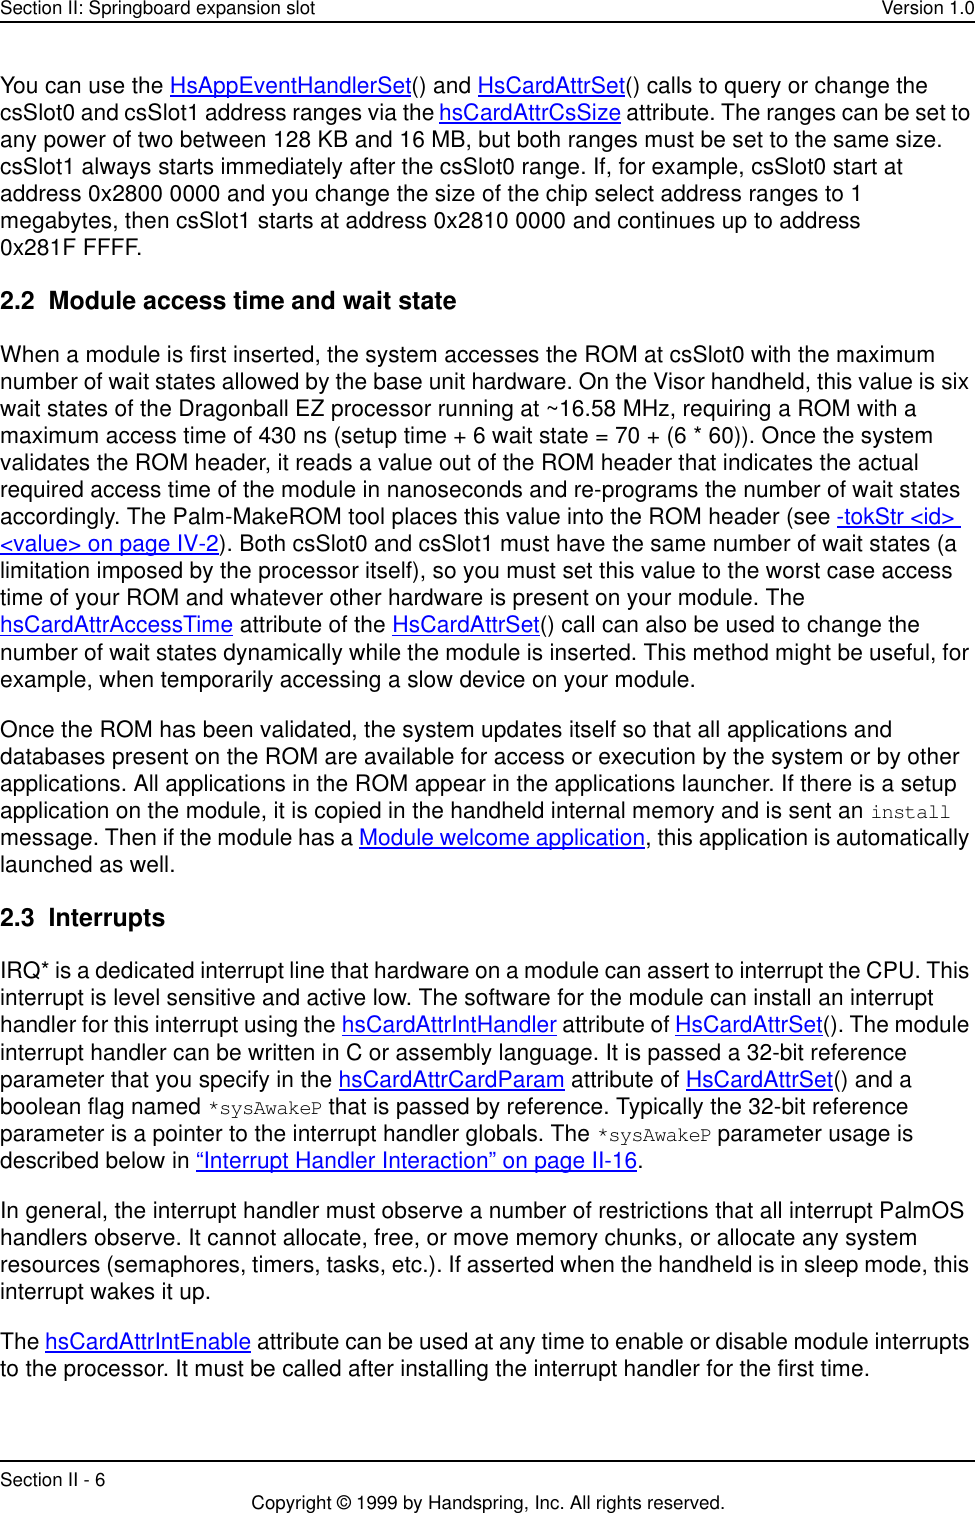
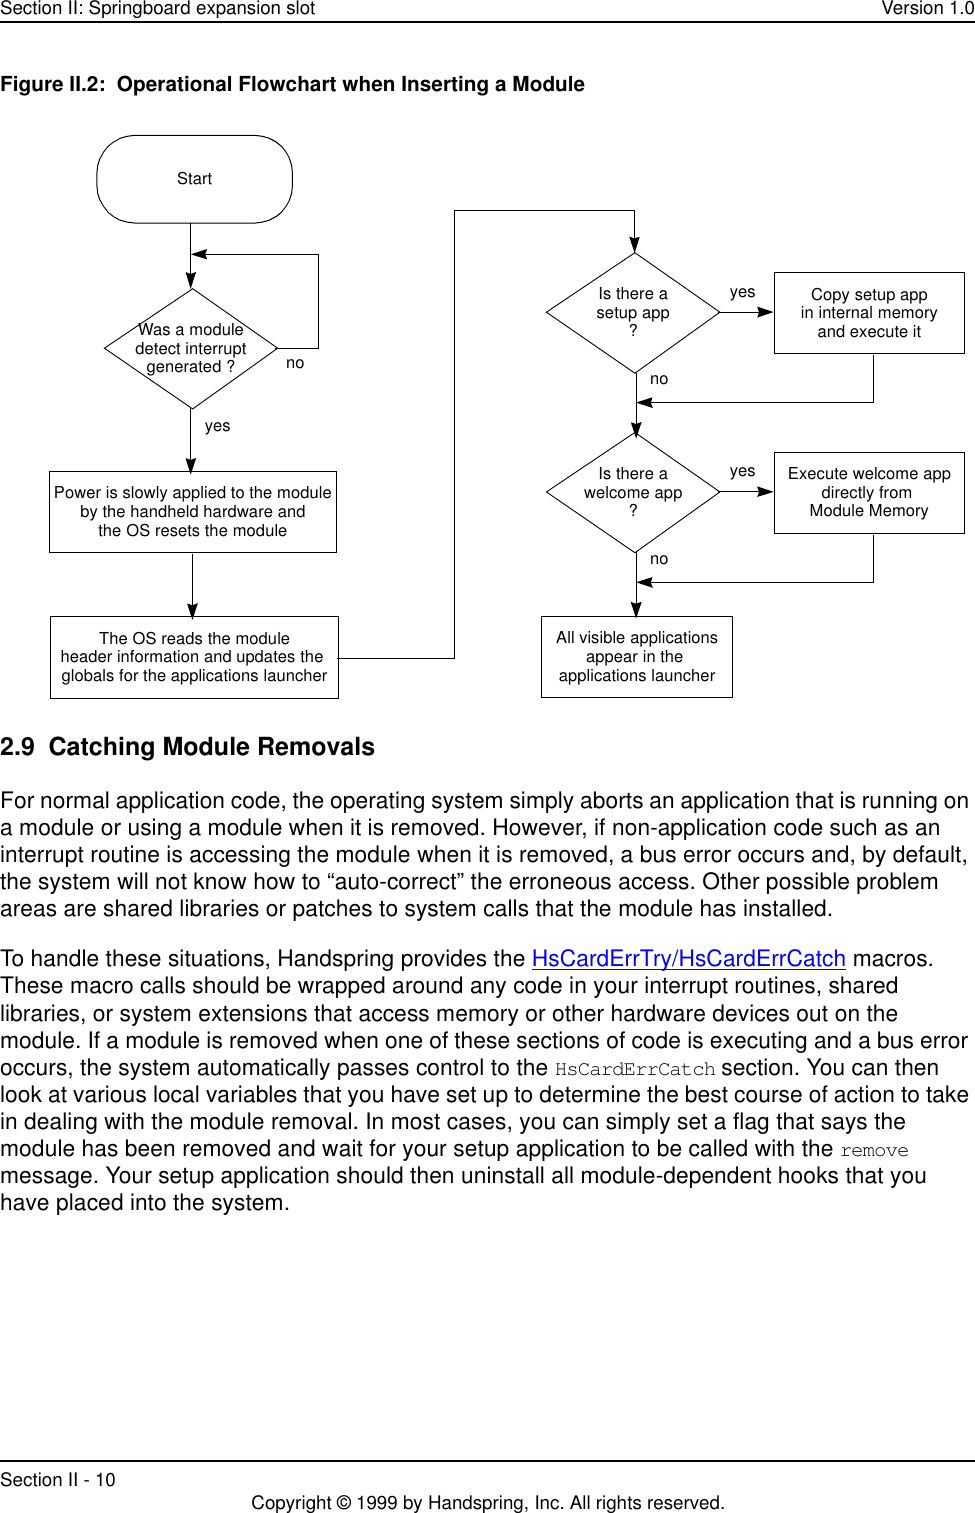
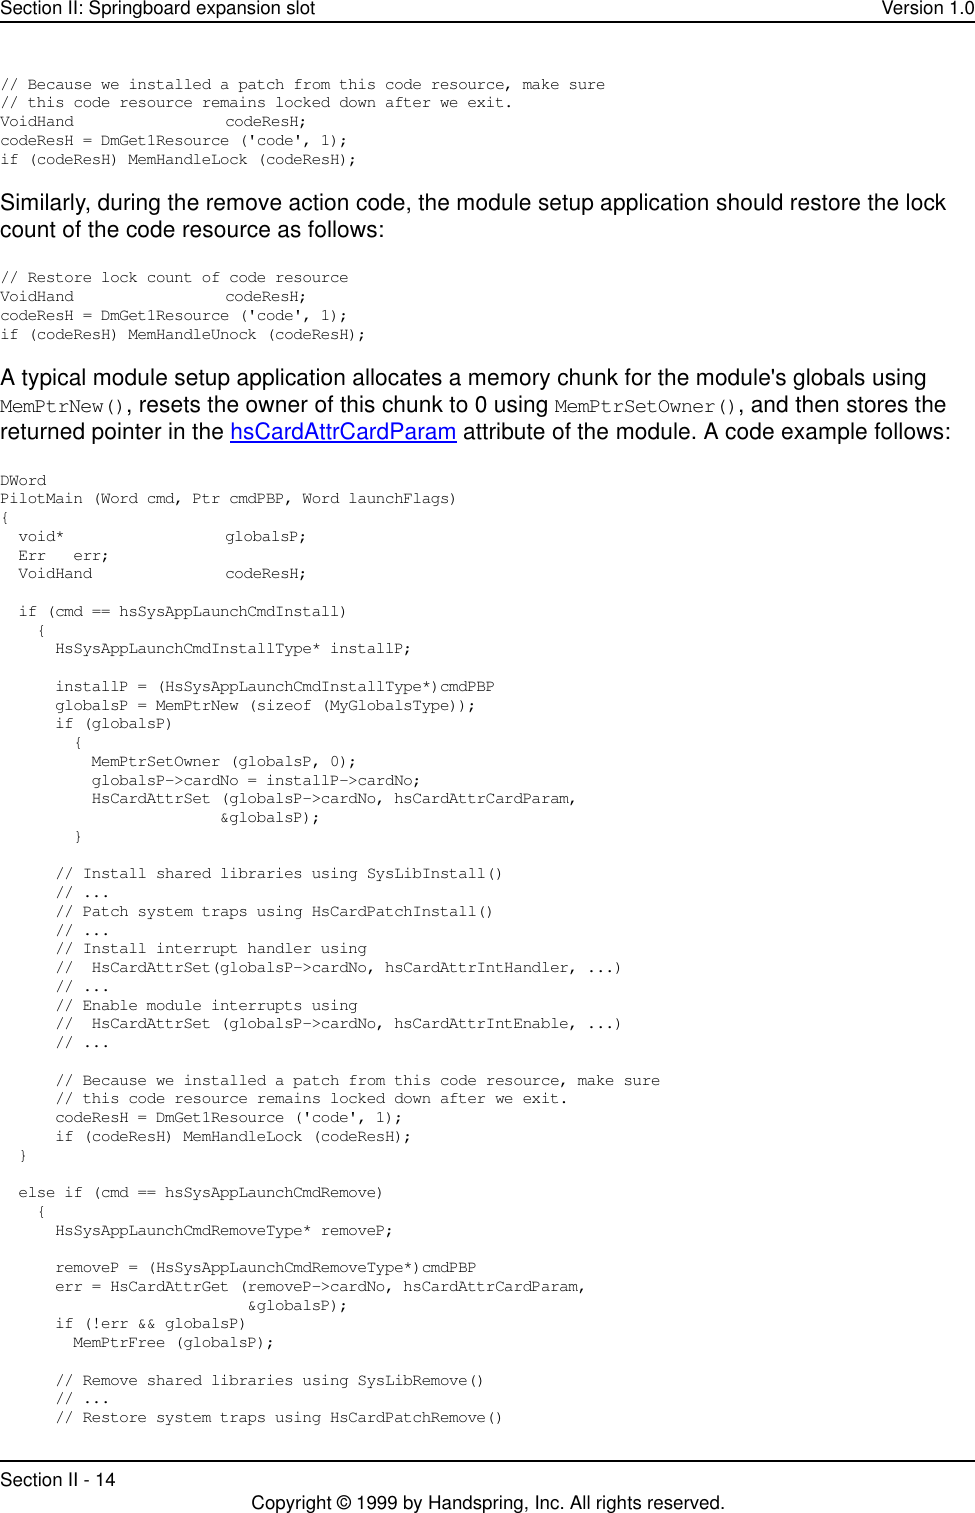
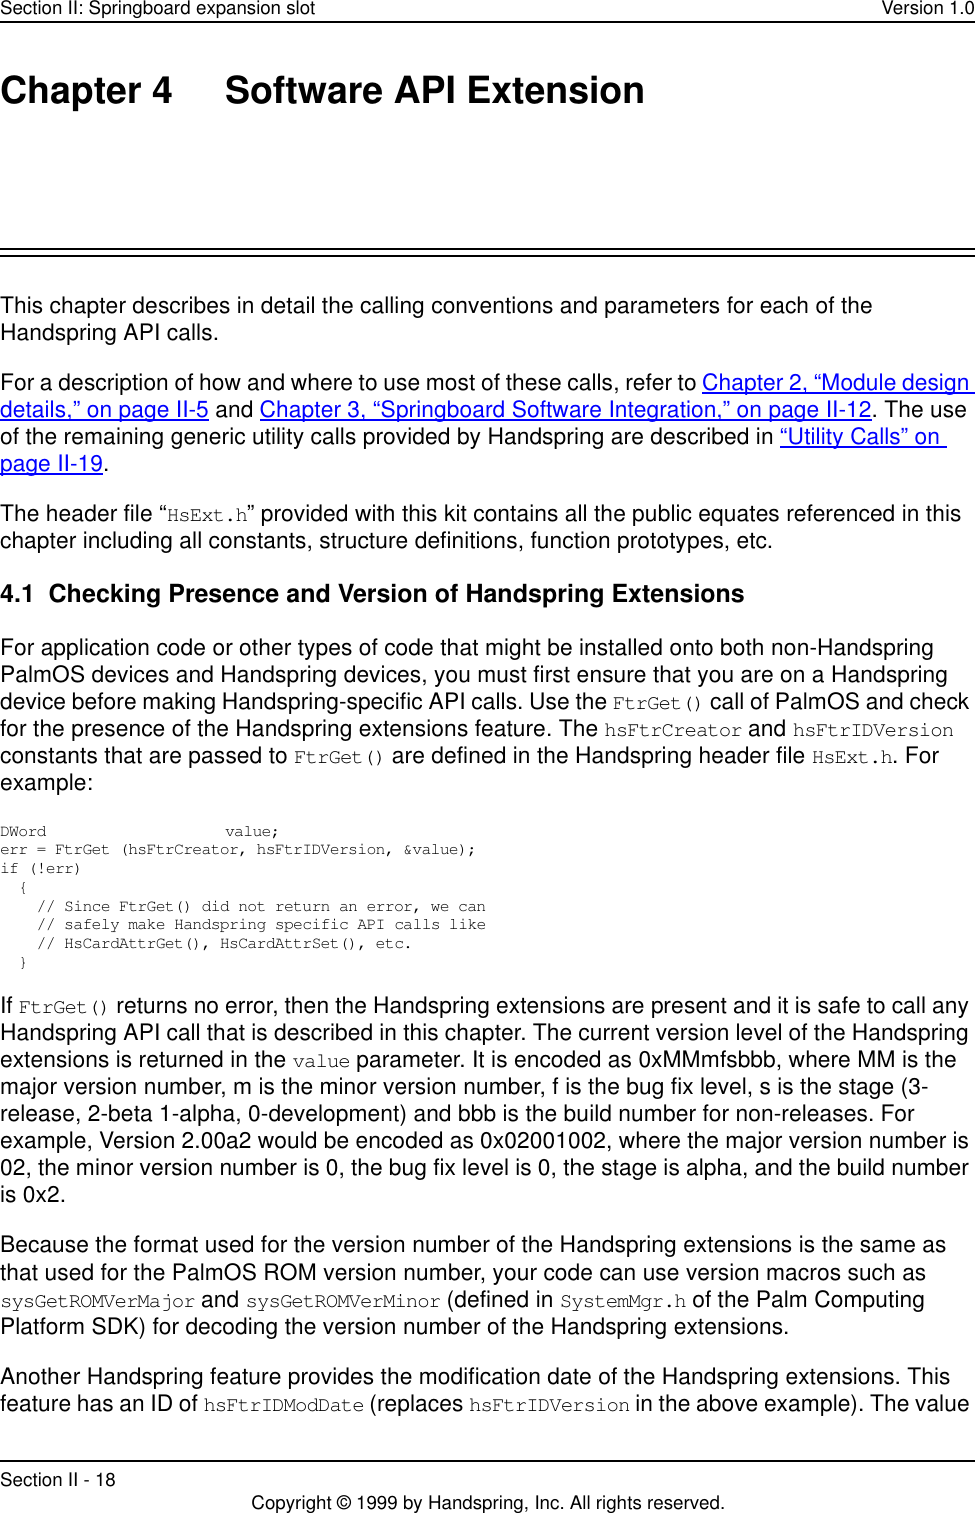
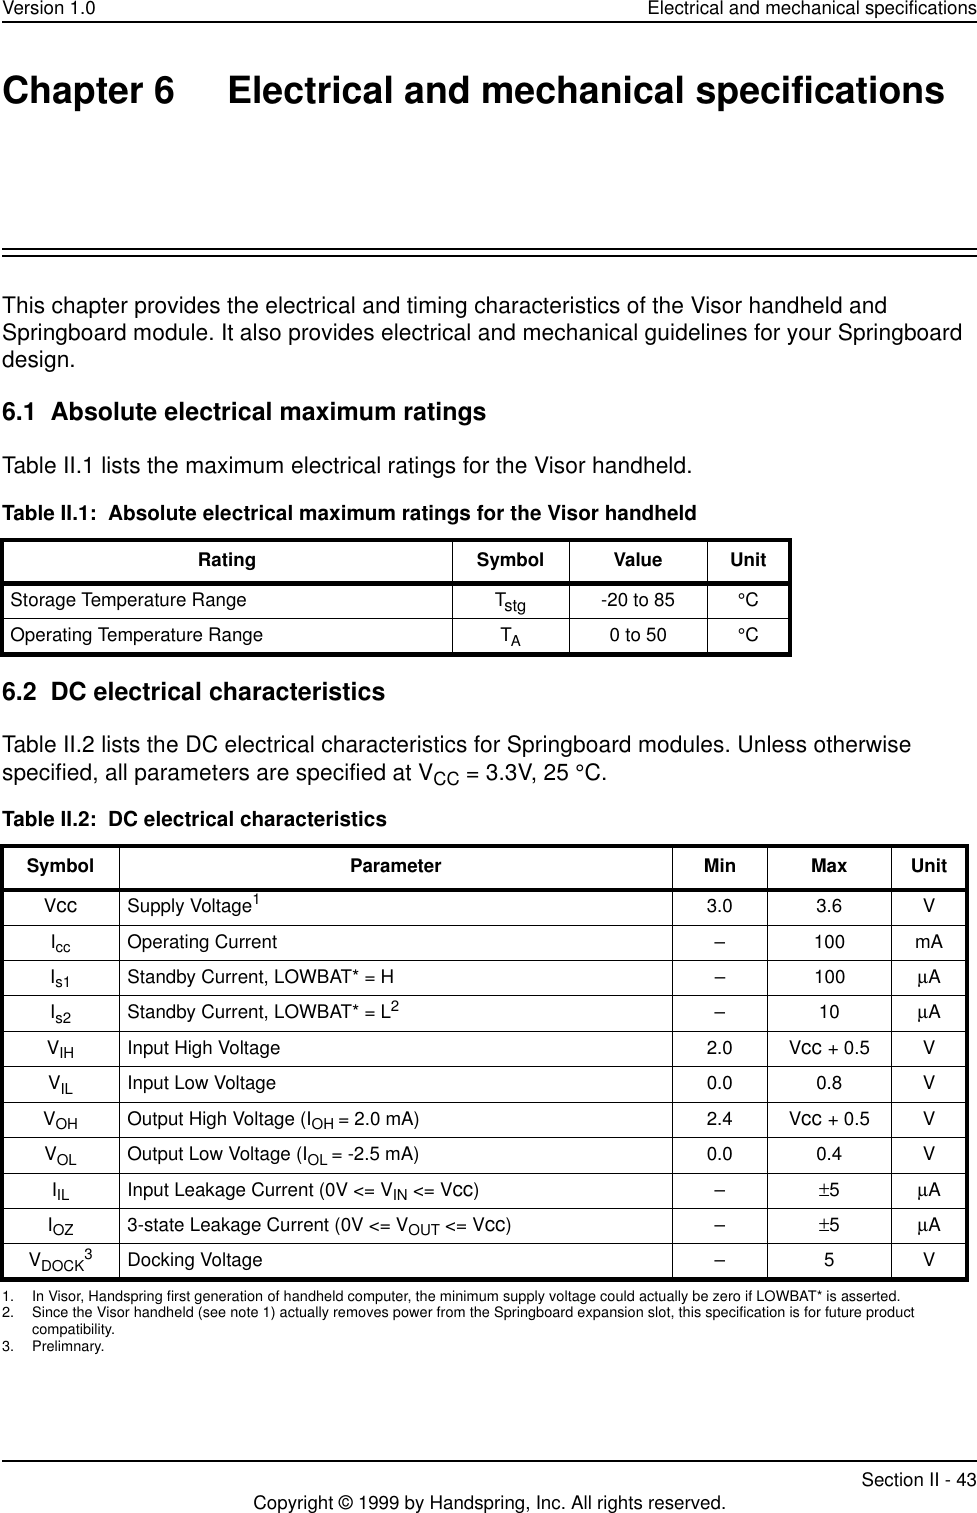
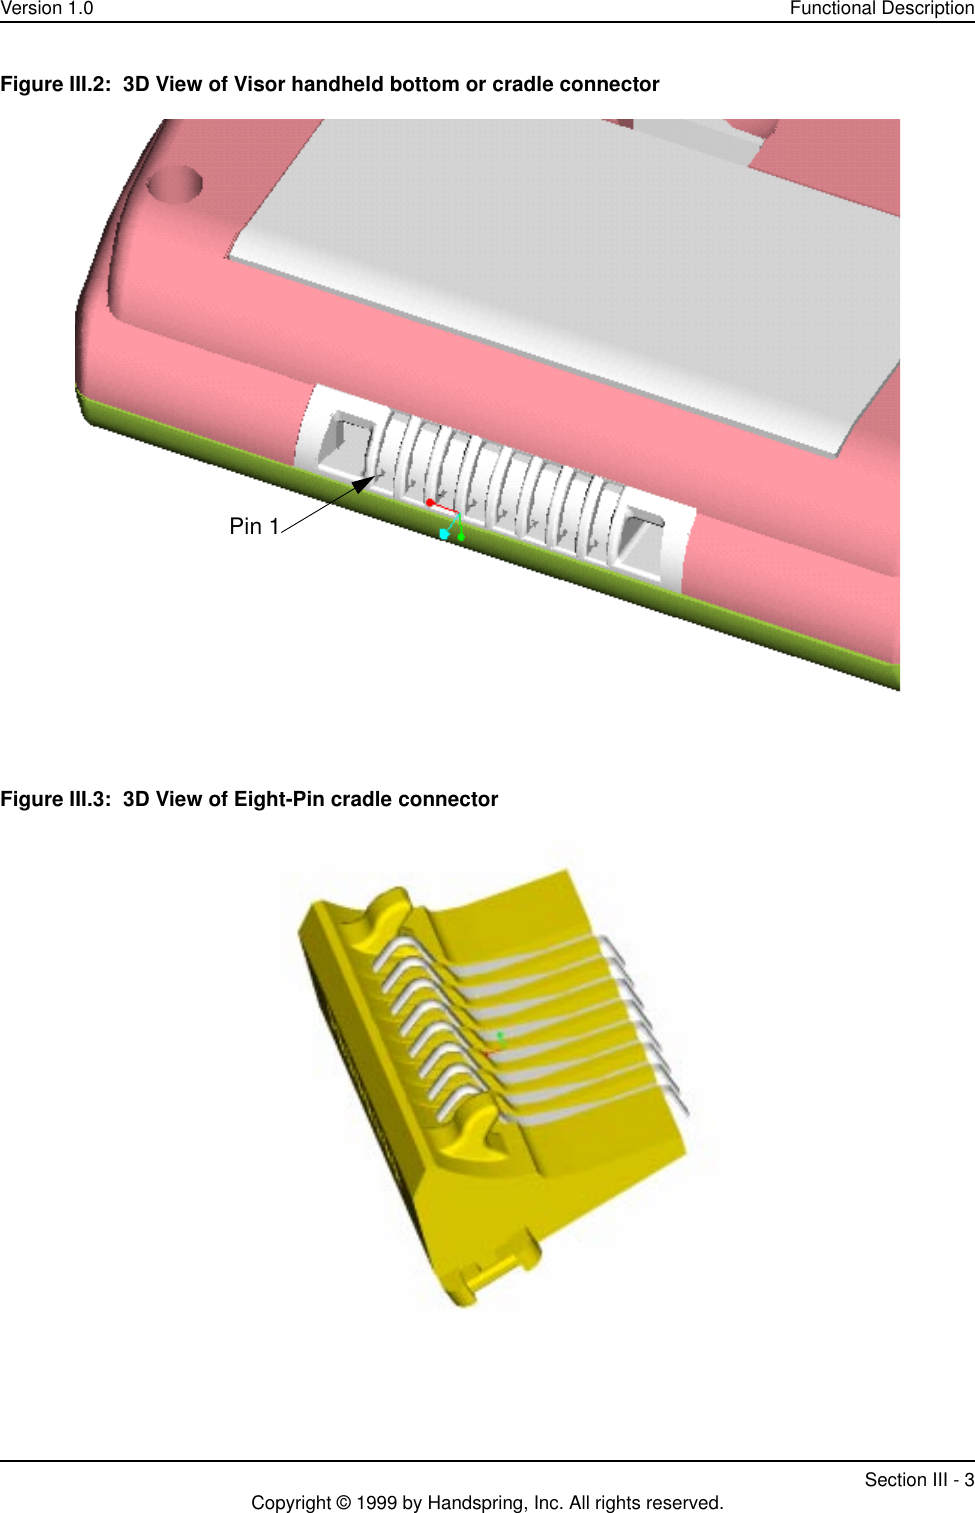
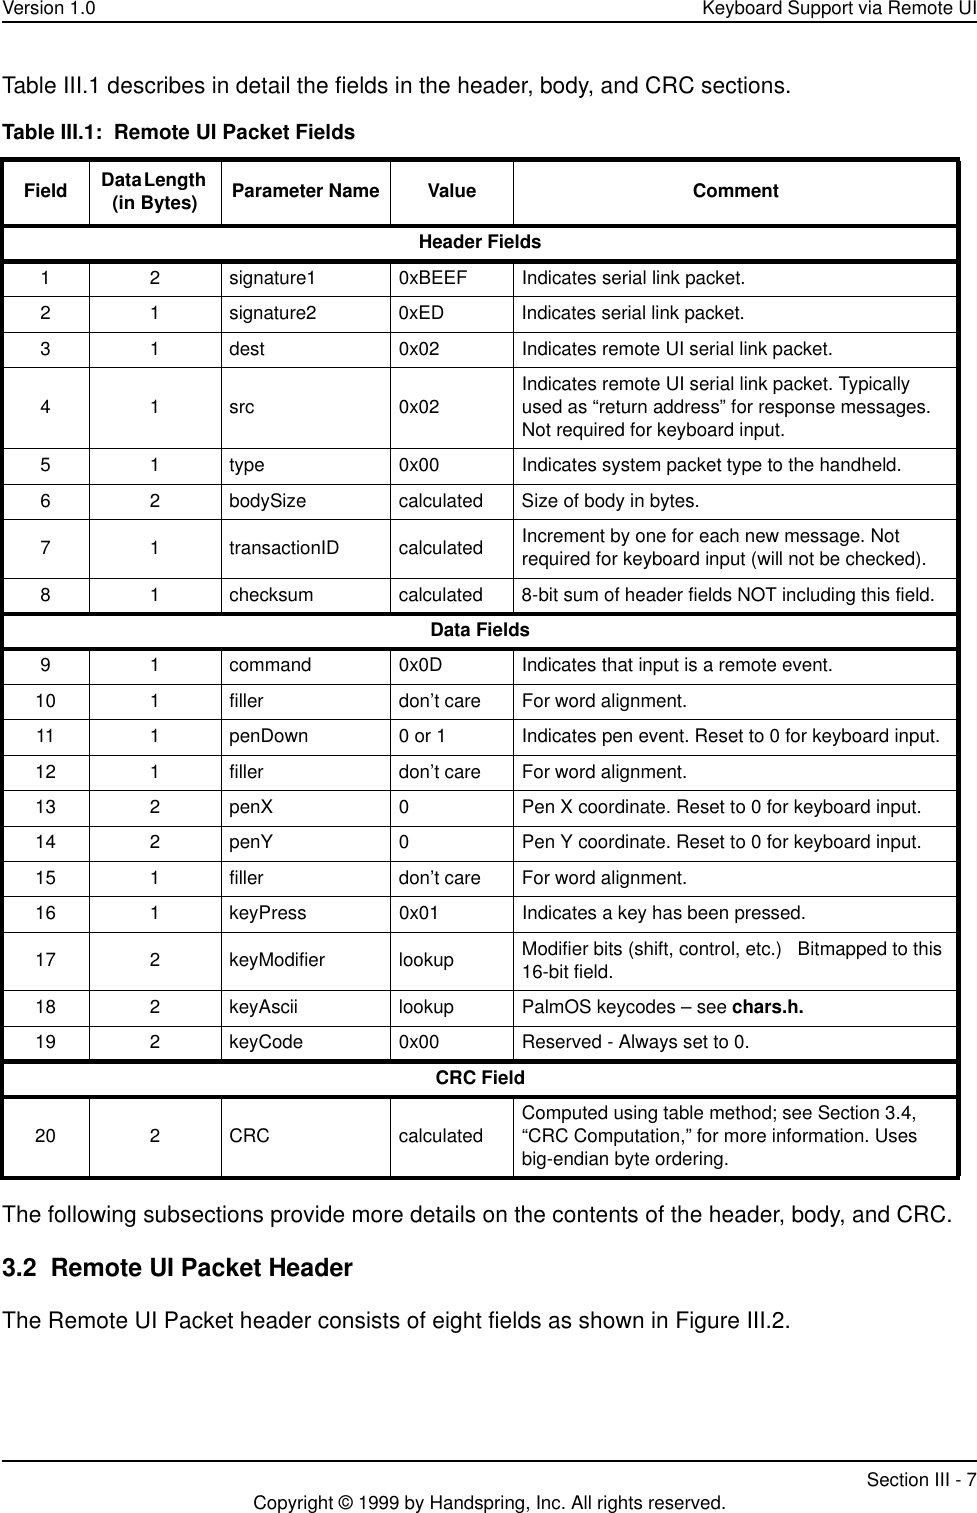
![Section II: Springboard expansion slot Version 1.0Section II - 40 Copyright © 1999 by Handspring, Inc. All rights reserved.5.2 Signal DescriptionsThe signals are described below in alphabetical order. Active-low signals have an asterisk “*” at the end of their names.A[23:0] Address Bus IThe 24-bit address bus provides addressing for up to 32 MB. Each of the two chip selects (CS0 and CS1) has direct access of up to 16 MB. Address line A23 is the most significant address bit, and A0 is the least significant address bit. The default size of each region is 16 MB and is software programmable. This bus is an input to the expansion slot; it is always driven during normal and sleep mode. The address bus is valid throughout the entire bus cycle.Note: In Visor, Handspring’s first generation of handheld computer, A0 is not used. So in this implementation of the Springboard expansion slot, the bus is 16-bit only.CD1*, CD2* Module Detects OCD1* and CD2* are active-low module detect signals that indicate to the handheld when the expansion module has been firmly seated into the Springboard expansion slot. The two Module Detect pins are physically shorter than all other pins on the expansion connector. On the host side, the signals perform two functions: 1) they interrupt the handheld to alert the CPU that a module has been inserted or removed, and 2) they begin turning on the VCC power supply. Depending on the electrical load on the module, VCC is valid within 5 ms. Both signals should be tied directly to GND on the expansion module.CS0*, CS1* Chip Selects IThese two active-low chip select signals control access to the two addressable regions on the module. The address space for CS0* is referred to as csSlot0; the address space for CS1* is referred to as csSlot1. In order for the PalmOS to recognize the module and its contents, use CS0* to access ROM or FLASH. CS1* is optional and can be used to interface with additional ROM, FLASH, UARTs, or other peripheral devices. Both chip select signals are asserted for the duration of the memory cycle. Only one of the two chip selects is valid for each module access. The address bus is guaranteed to be valid before and during the assertion of the chip select signal. Refer to Section 2.1, “Memory Space,” for more information on the chip selects and their corresponding address spaces.D[15:0] Data Bus I/OThe data bus consists of 16 data lines, D[15:0]. D15 is the most significant data bit, and D0 is the least significant data bit. Only 16-bit operations are performed on the data bus.](https://usermanual.wiki/Palm/HVP-1H.Visor-User-Manual/User-Guide-118400-Page-50.png)

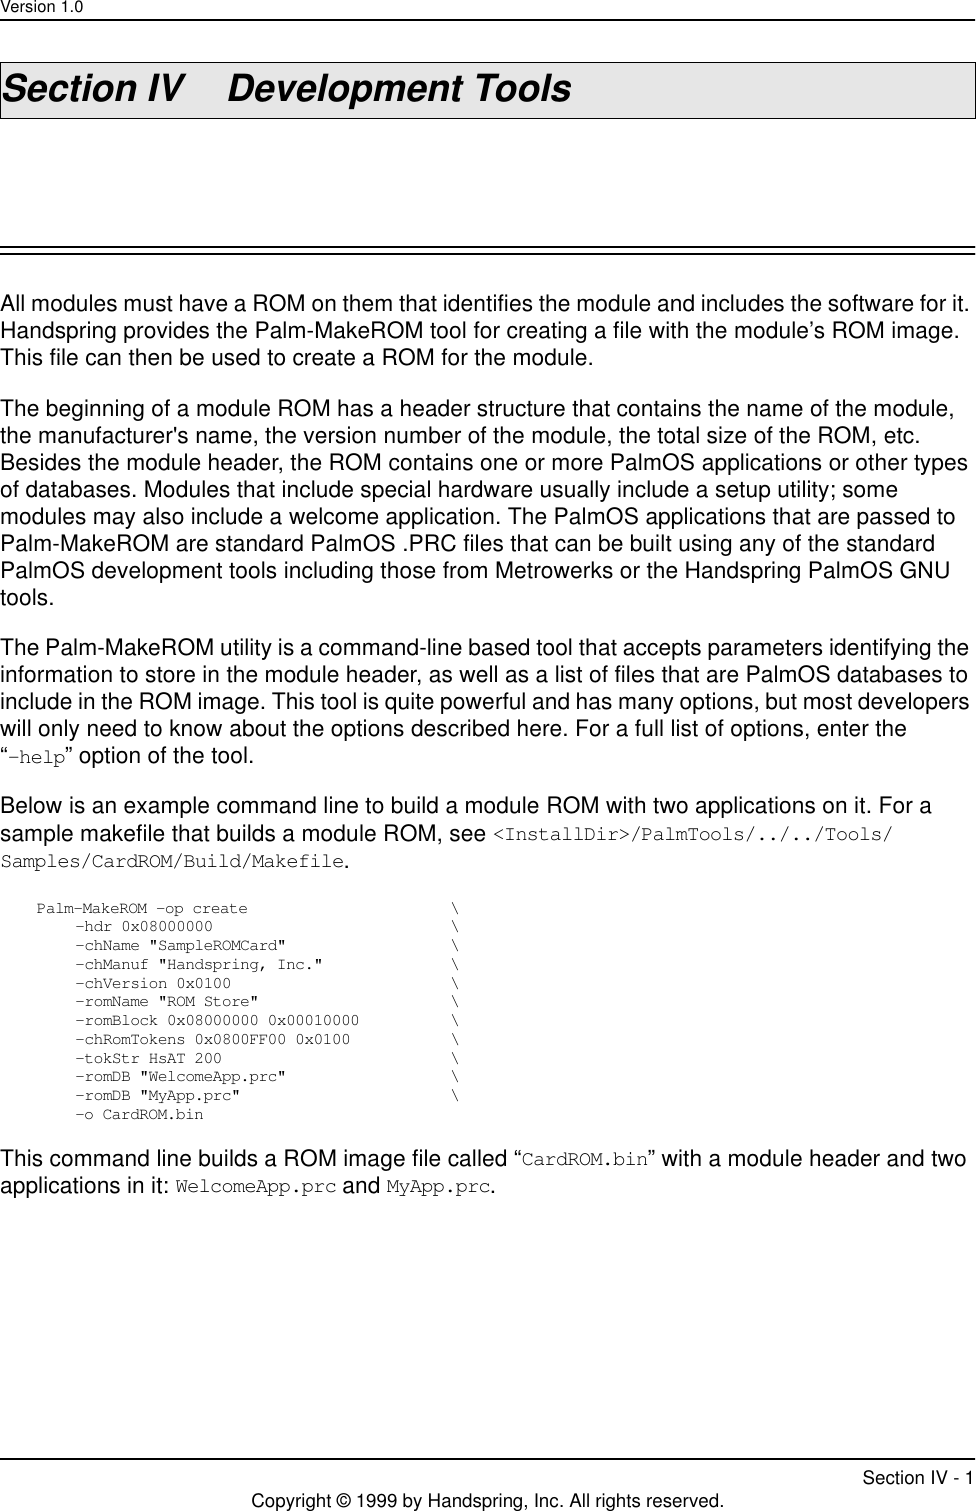
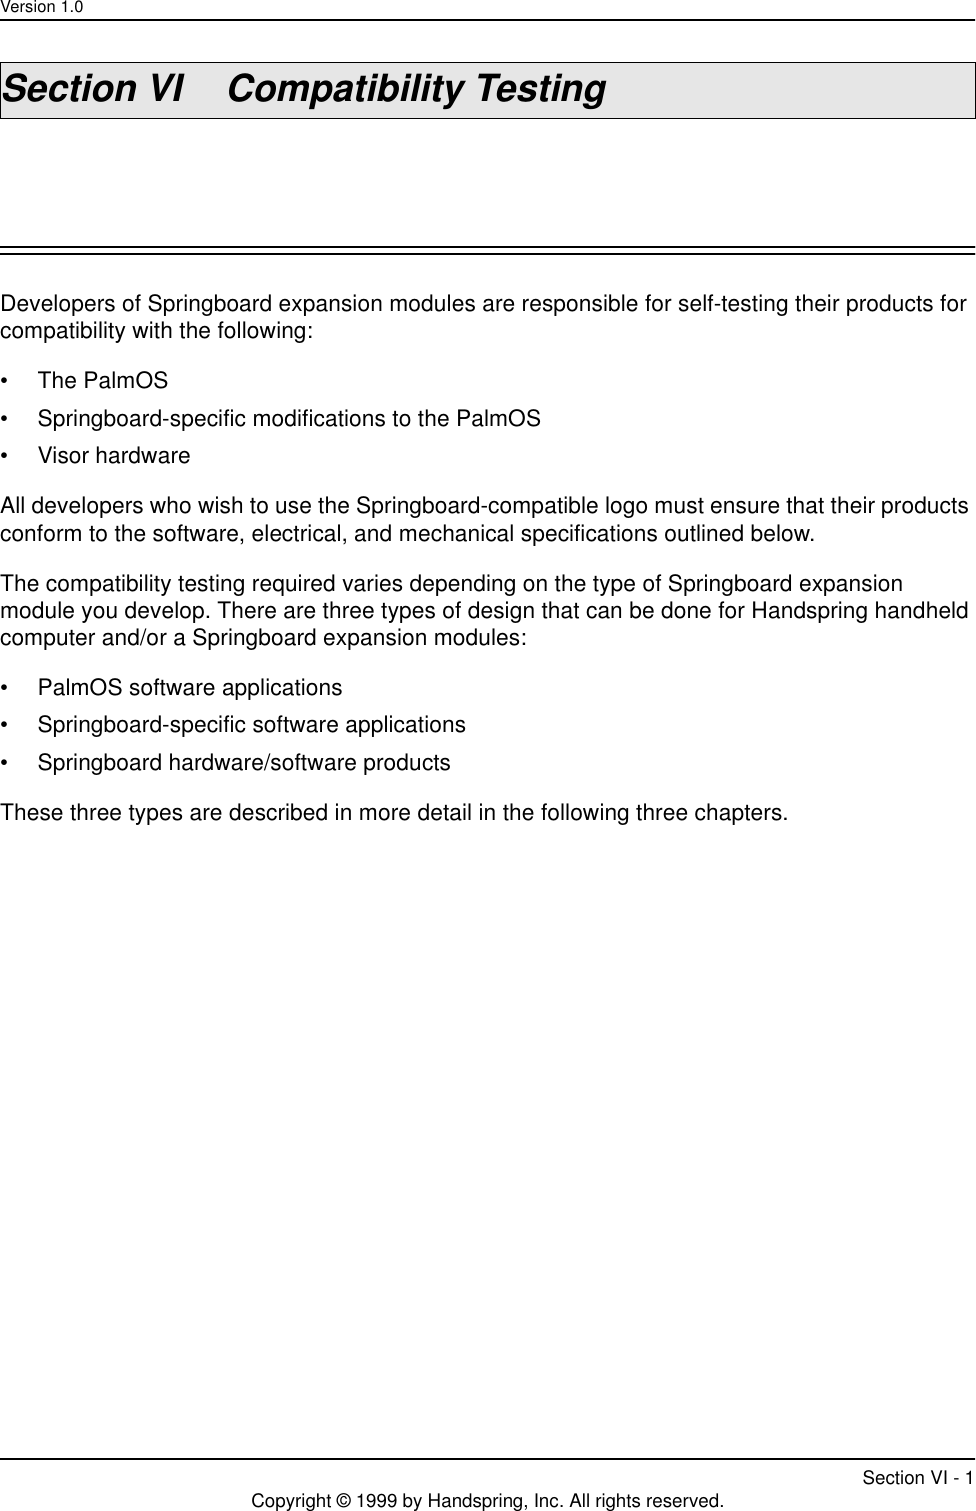
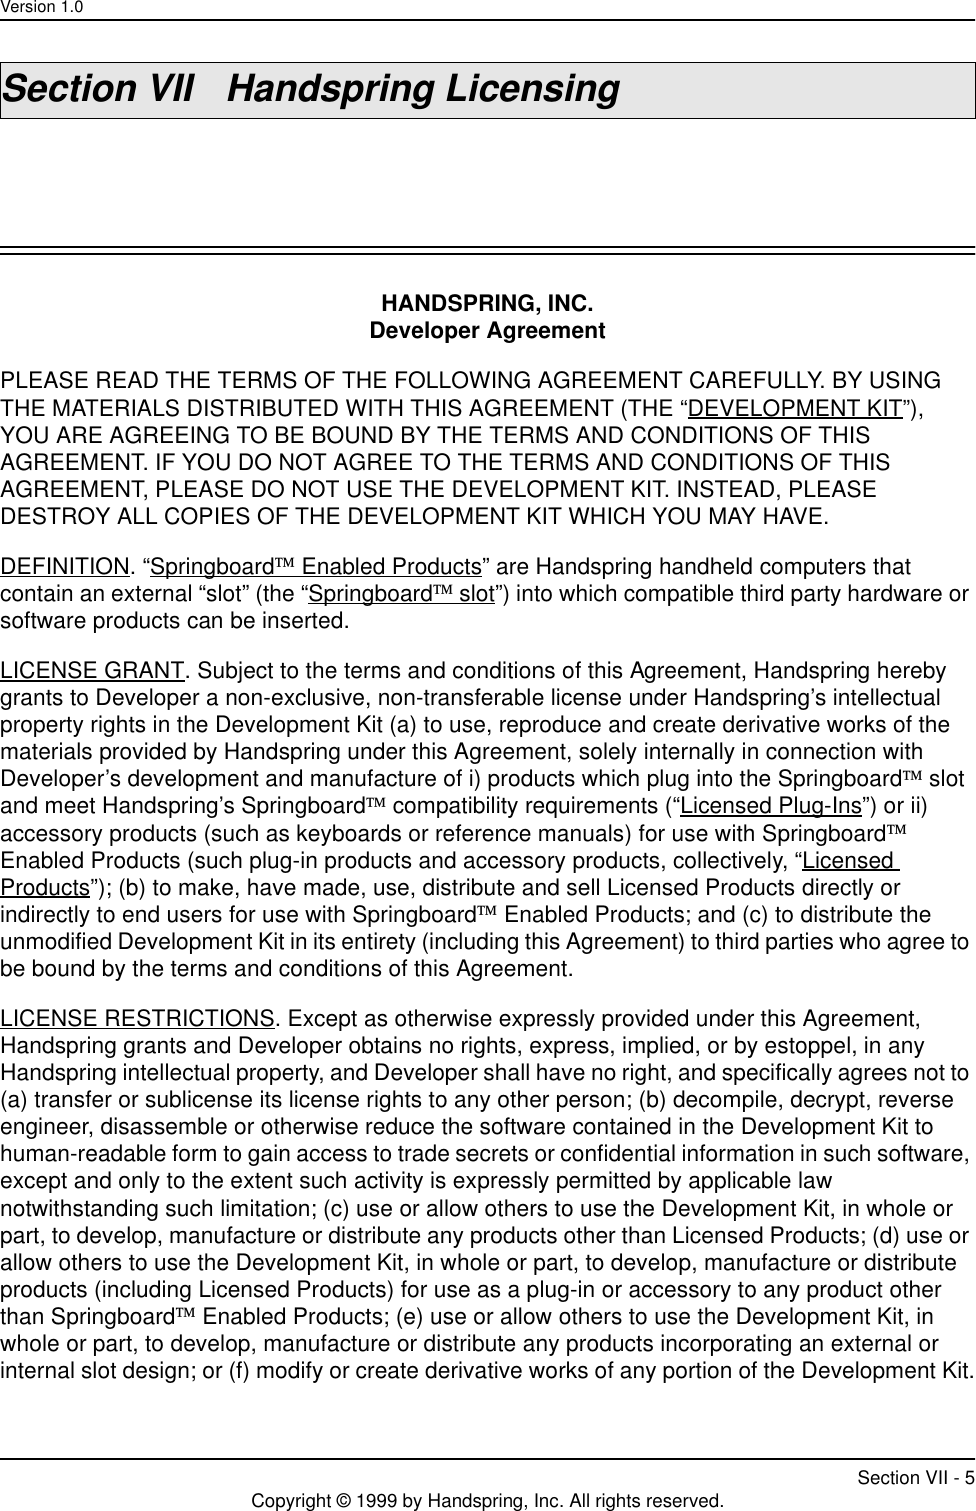
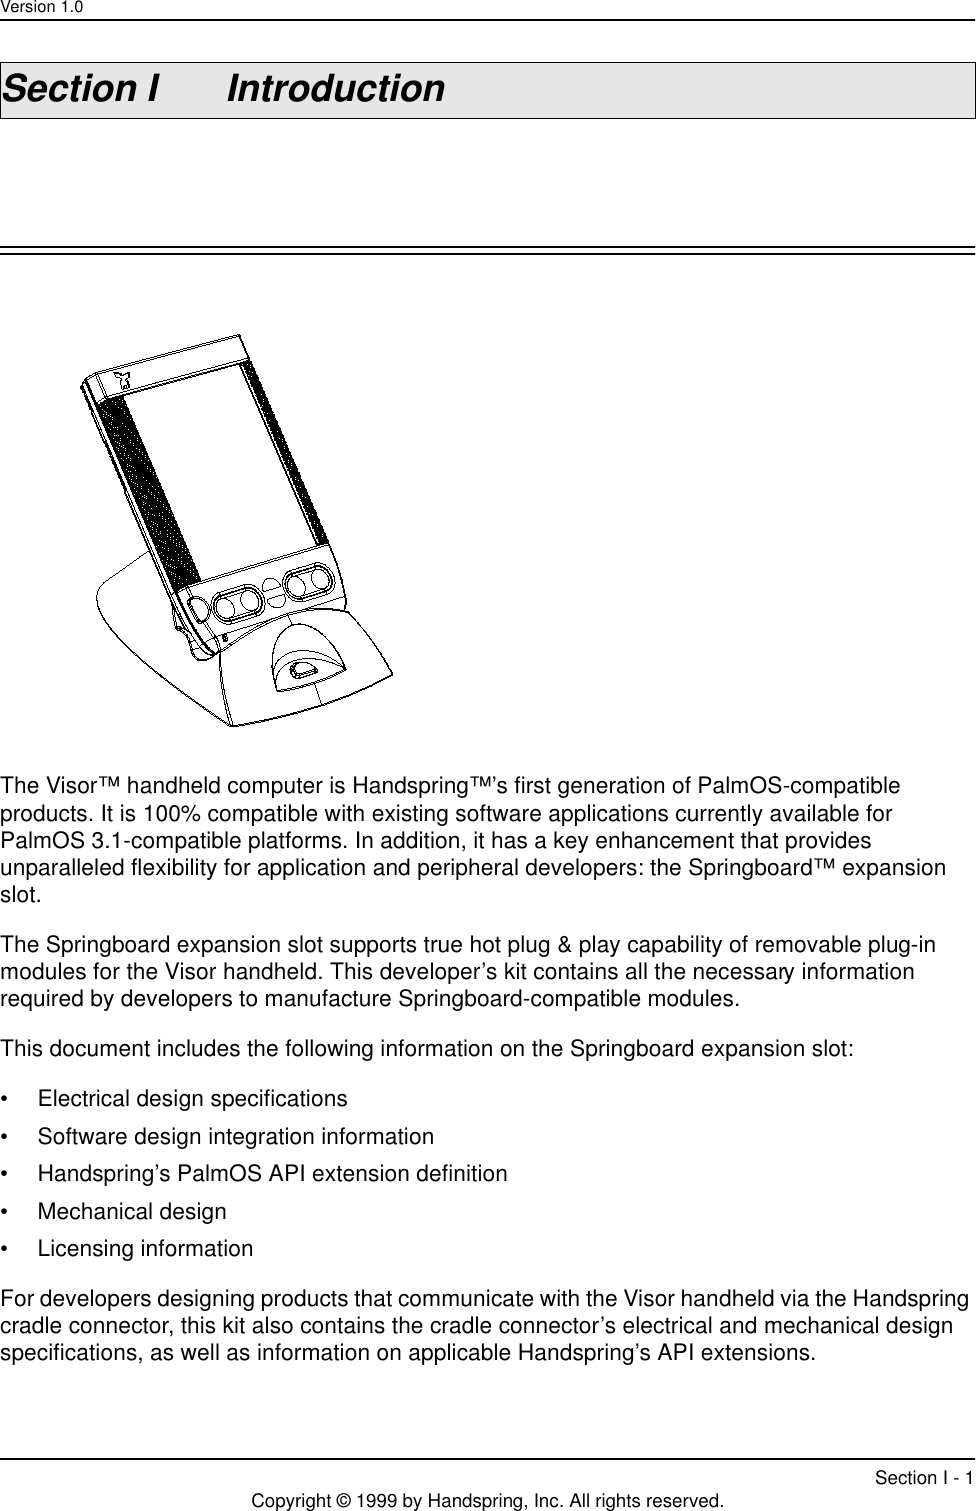
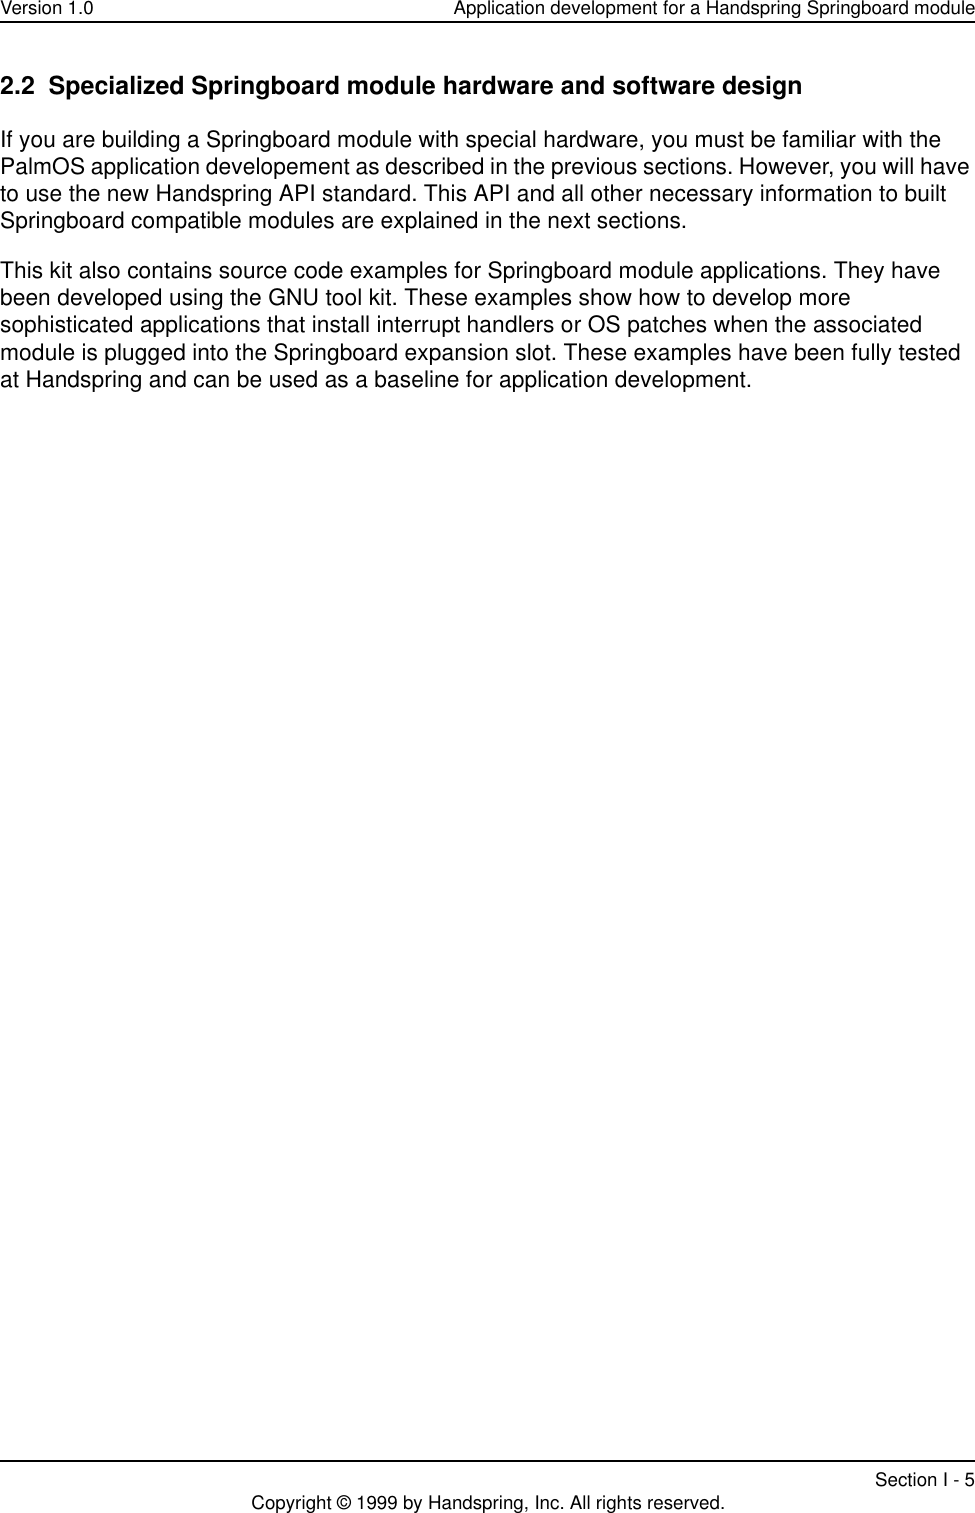
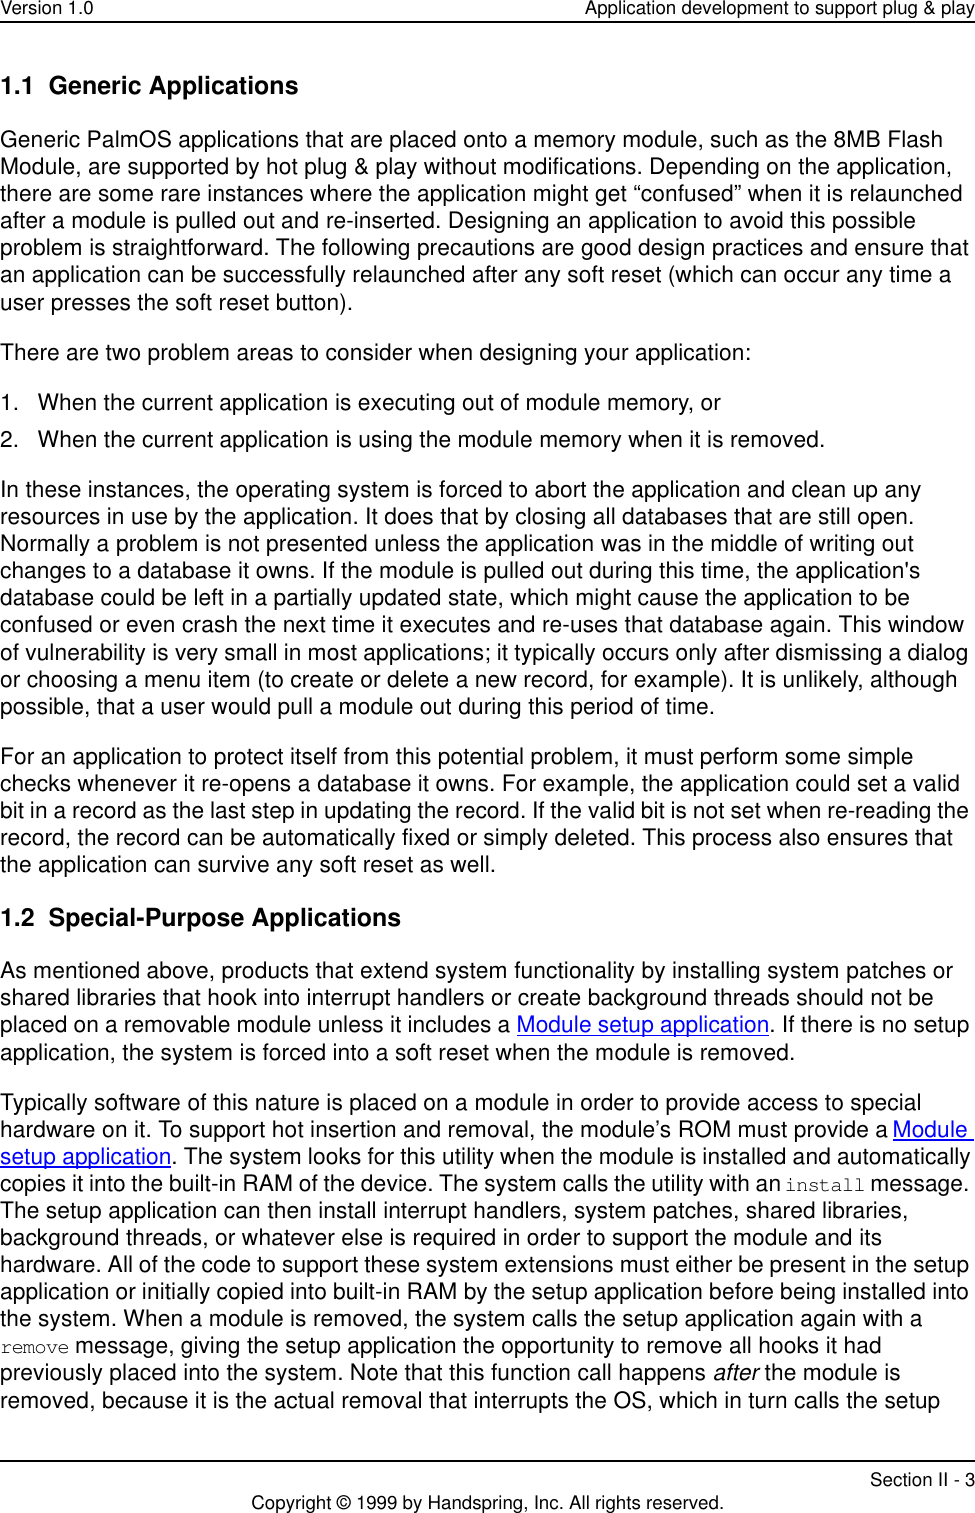
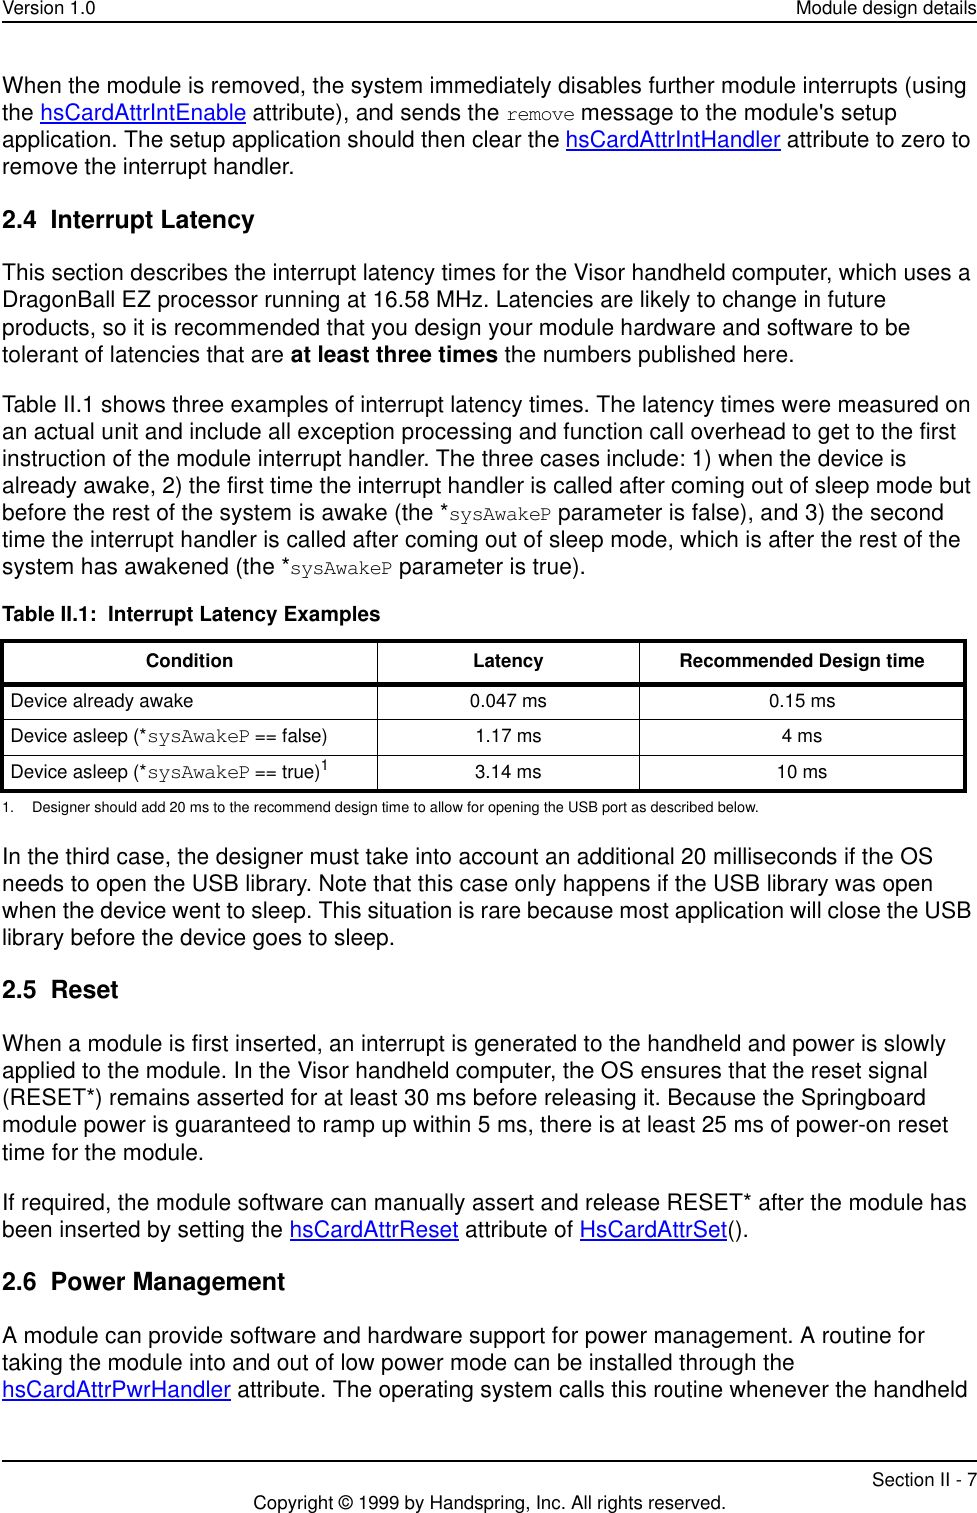
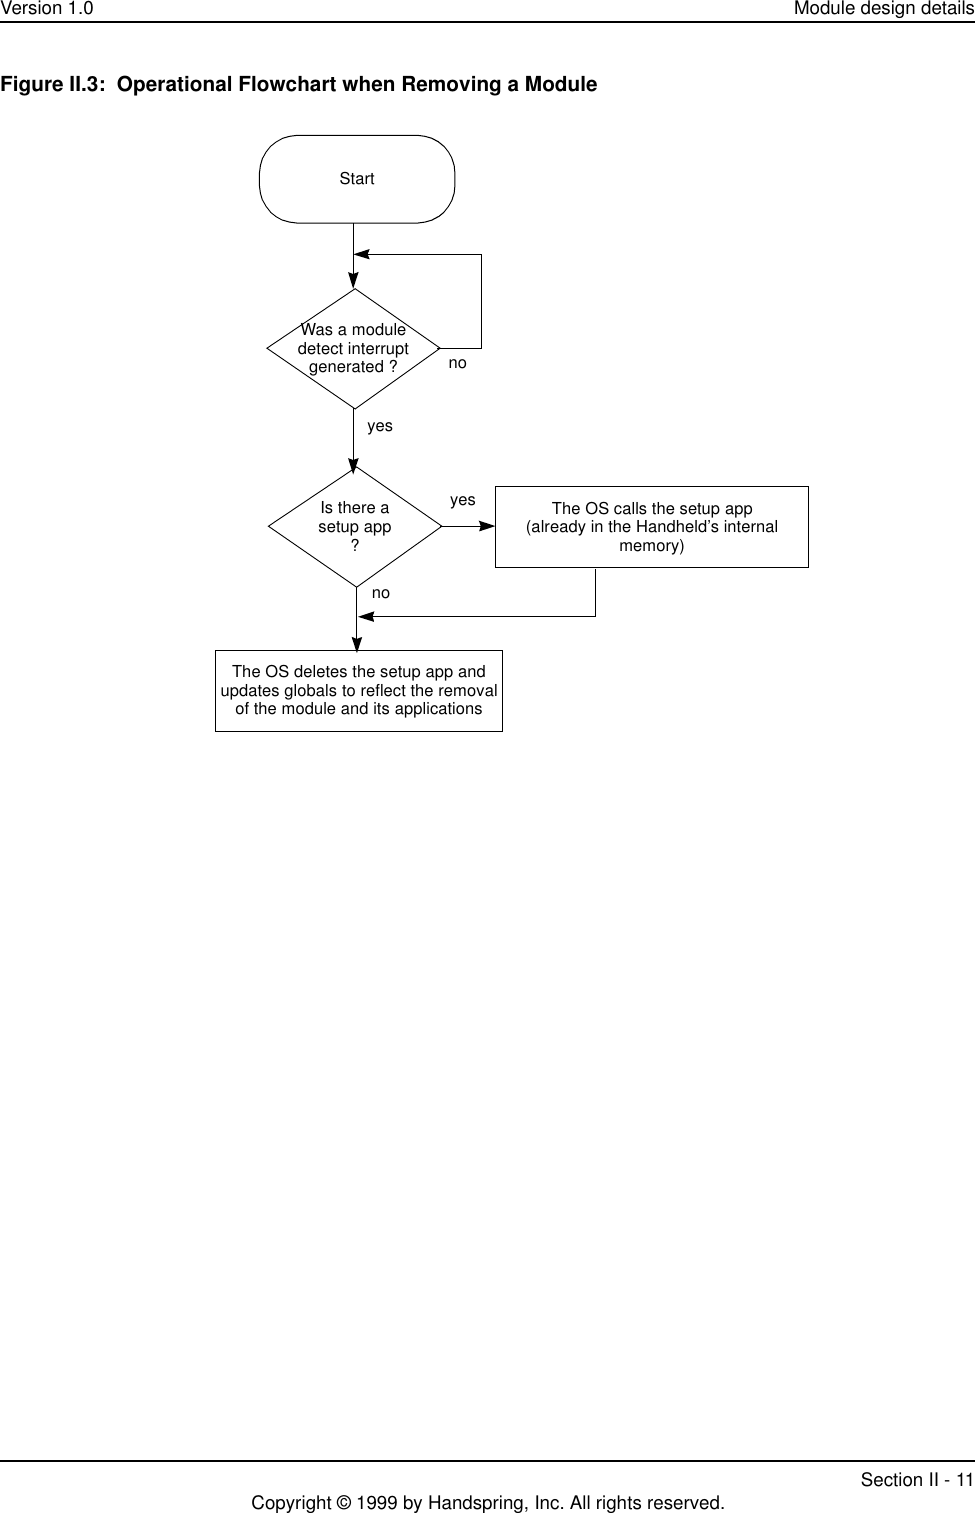
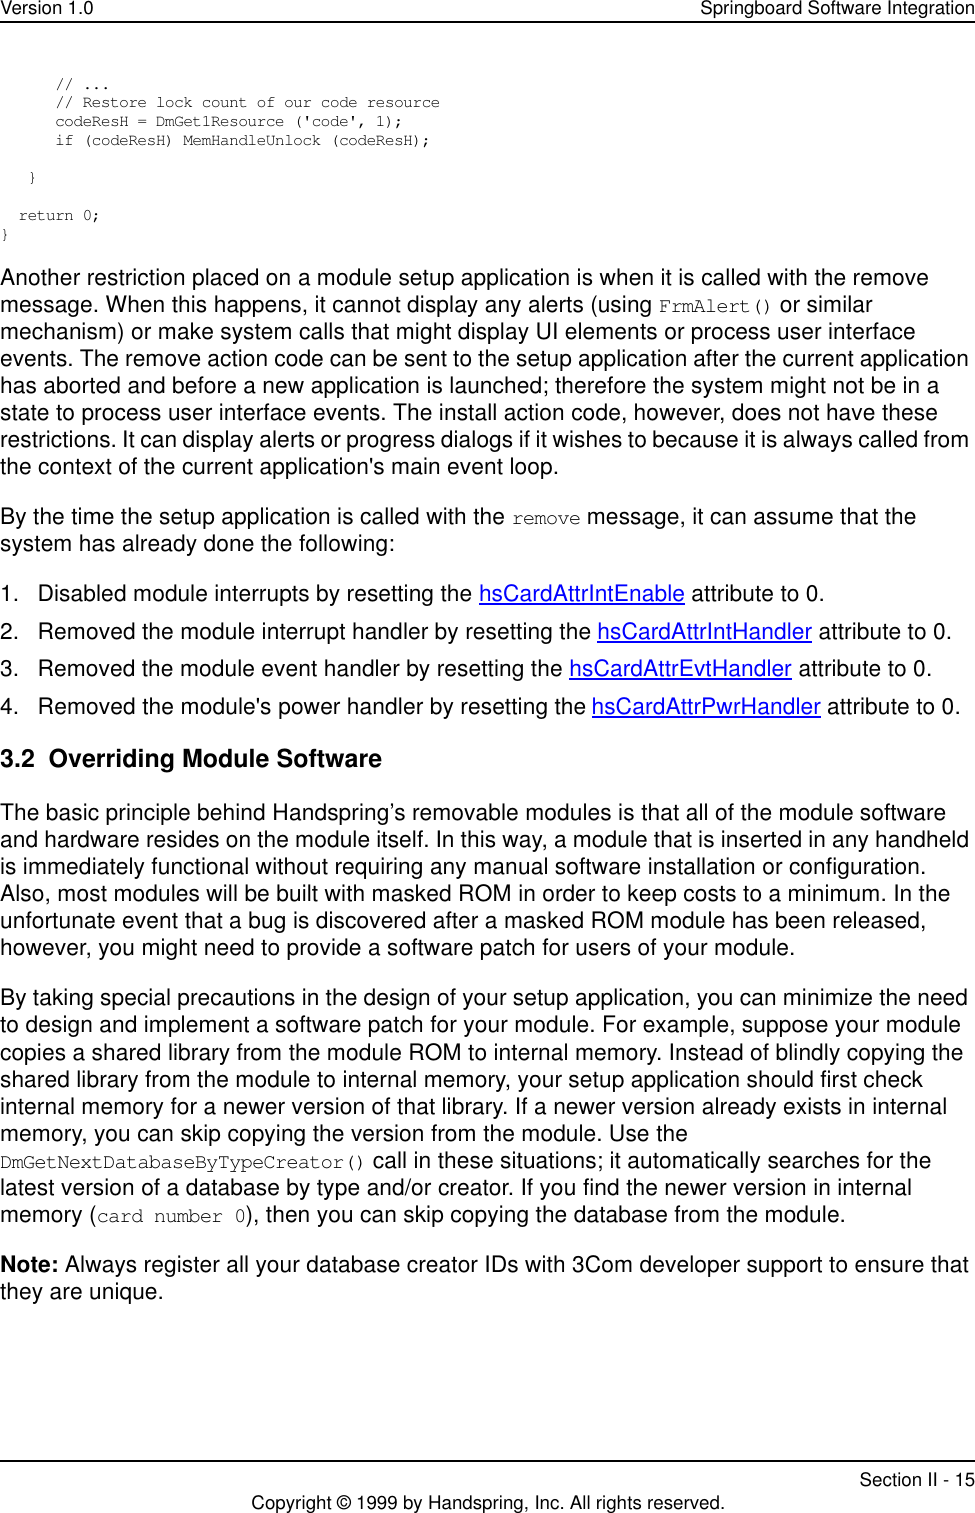
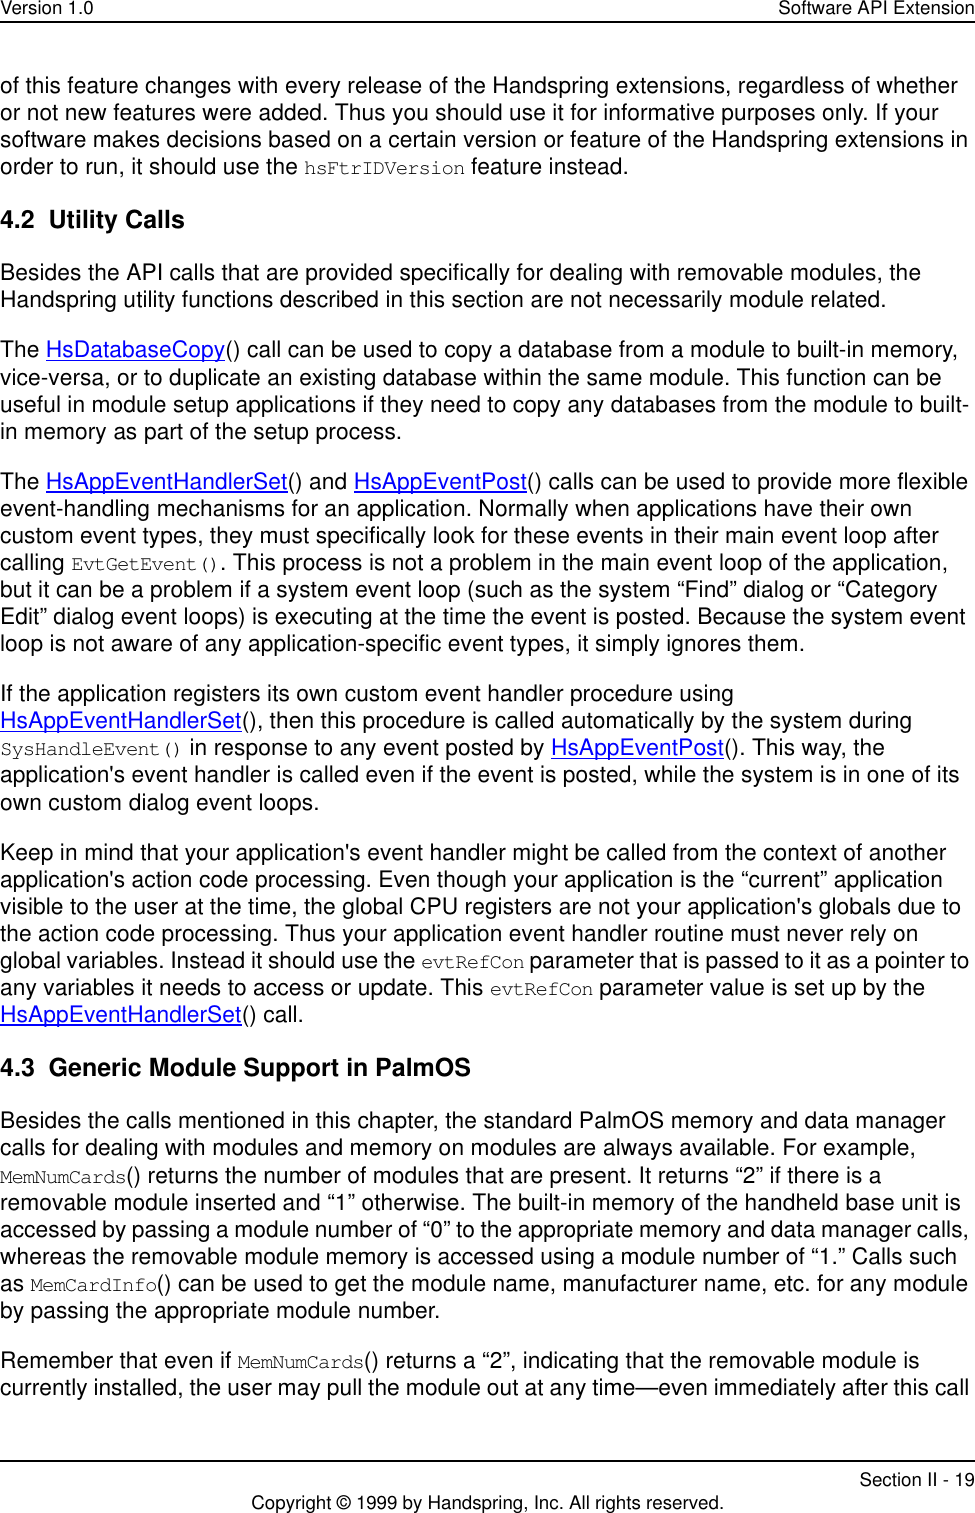
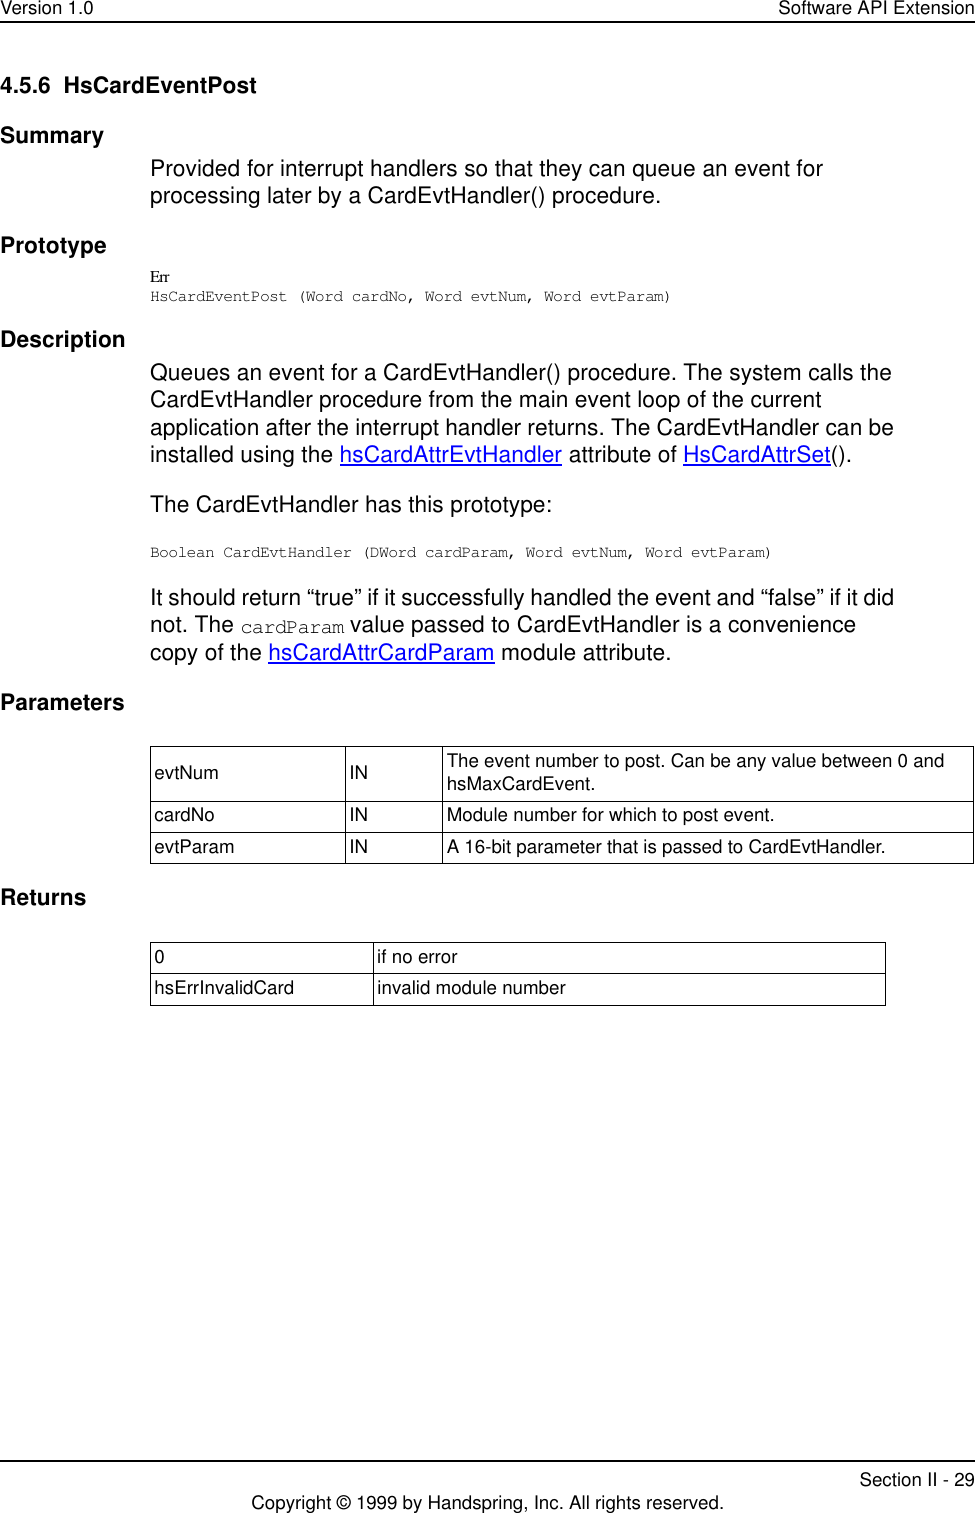
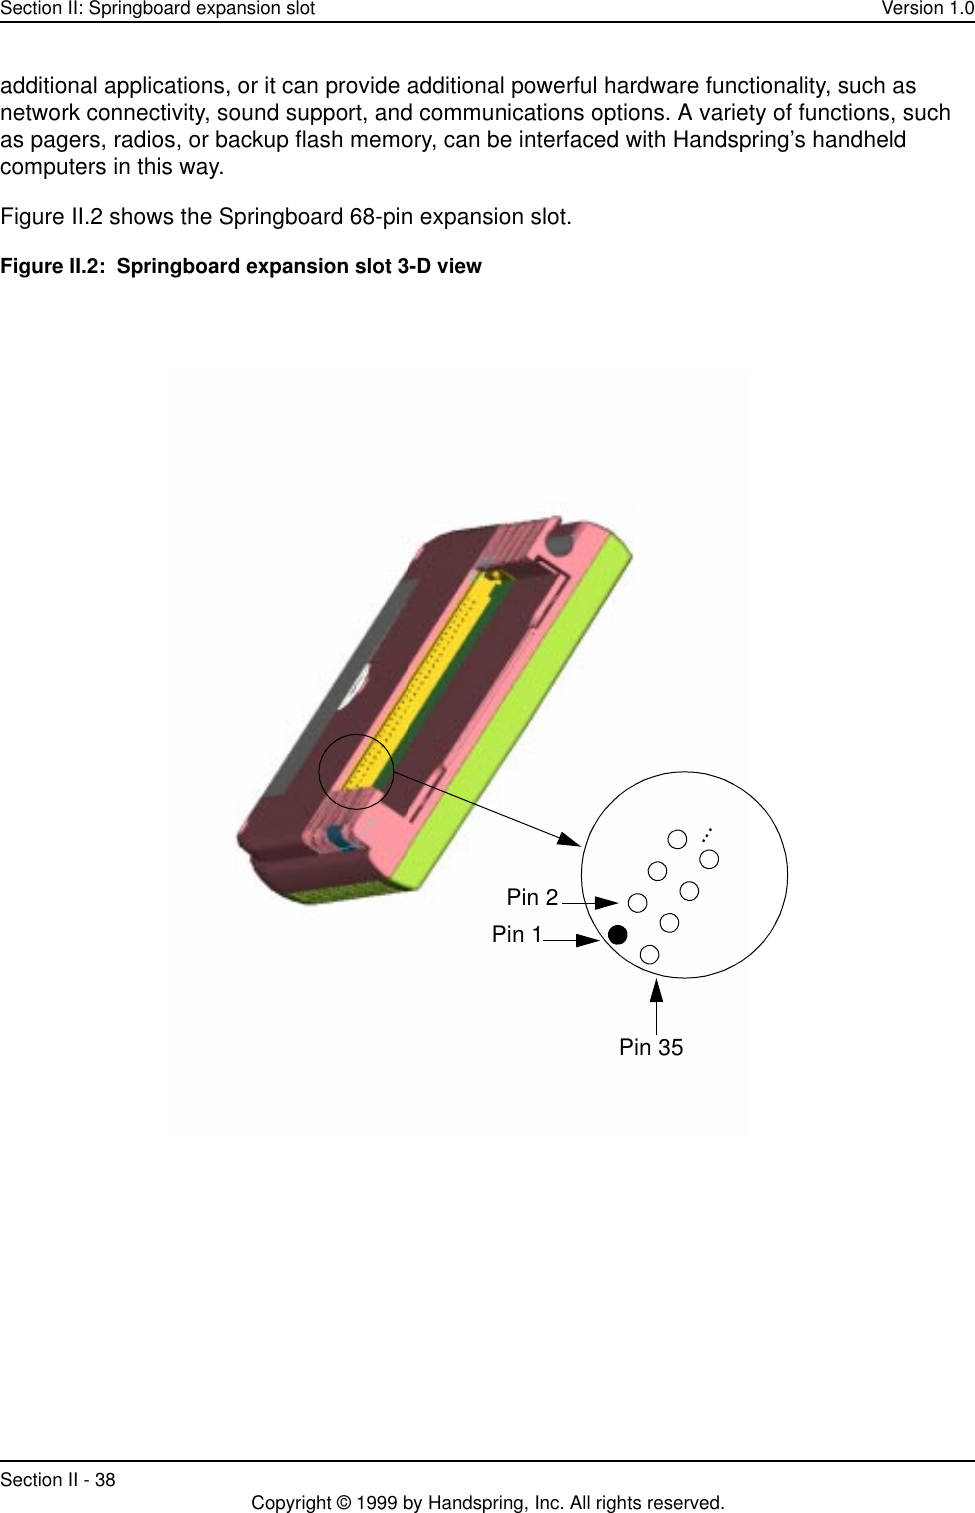
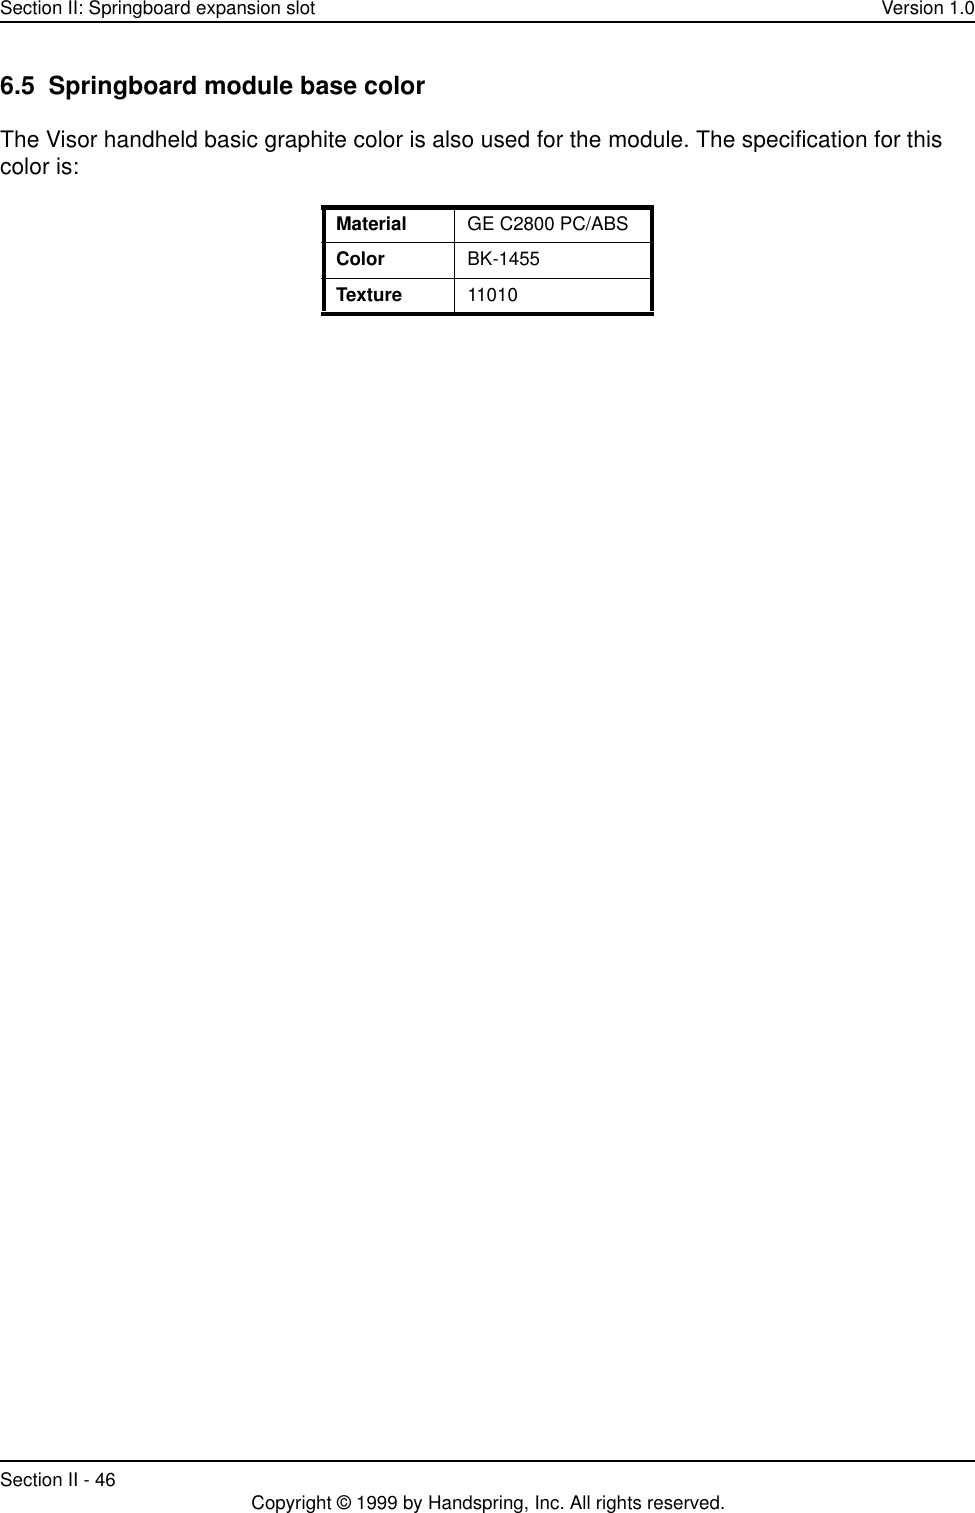
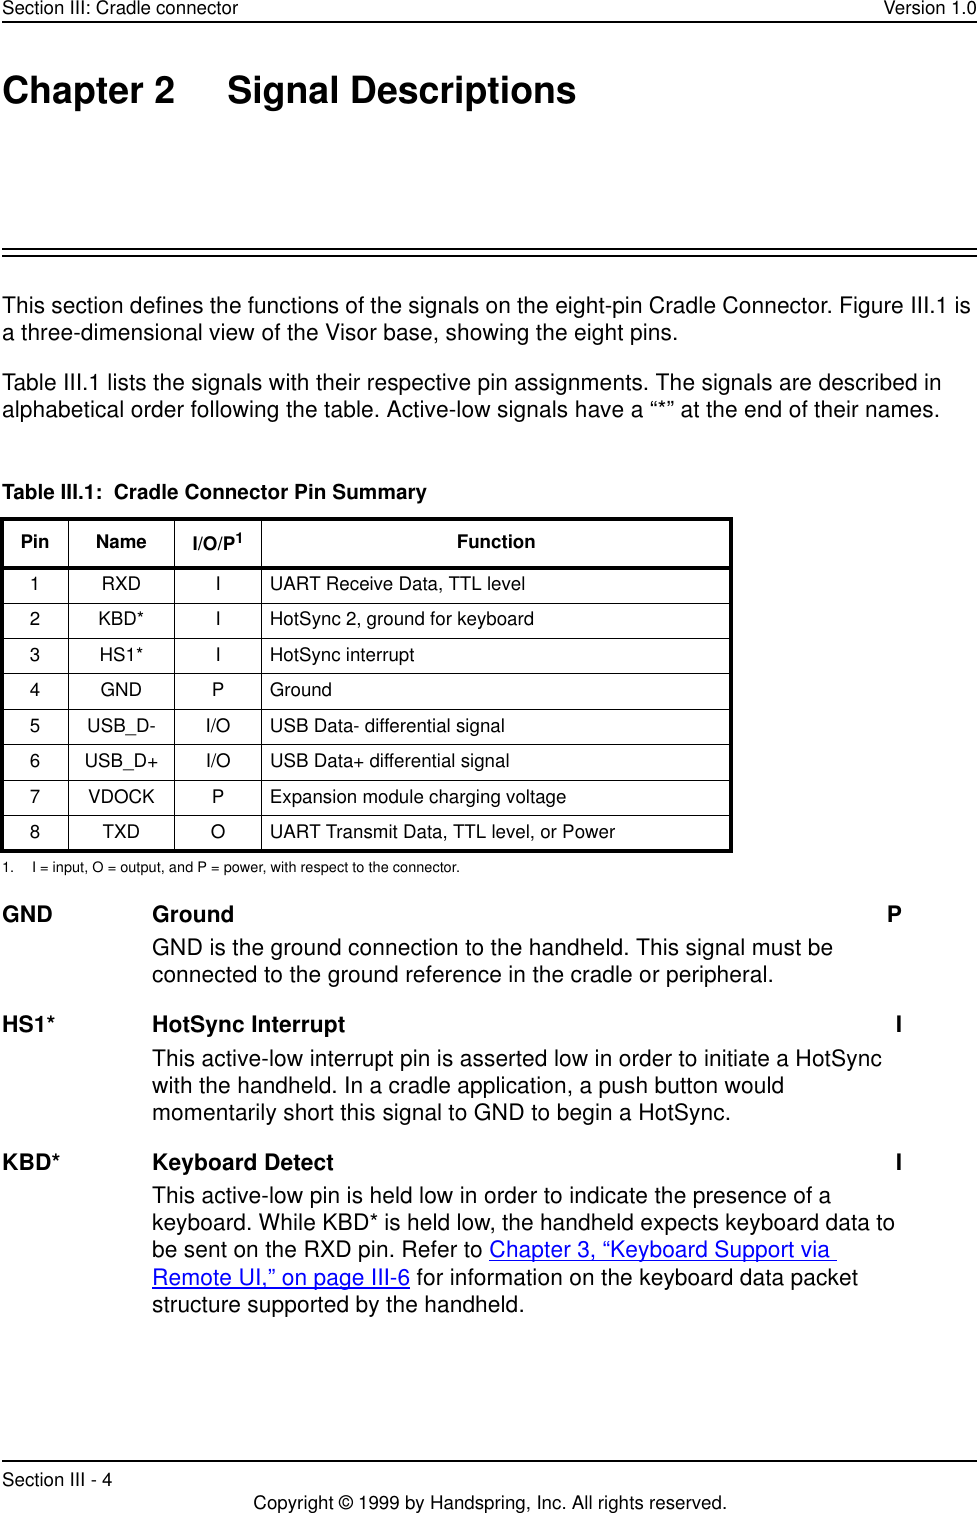
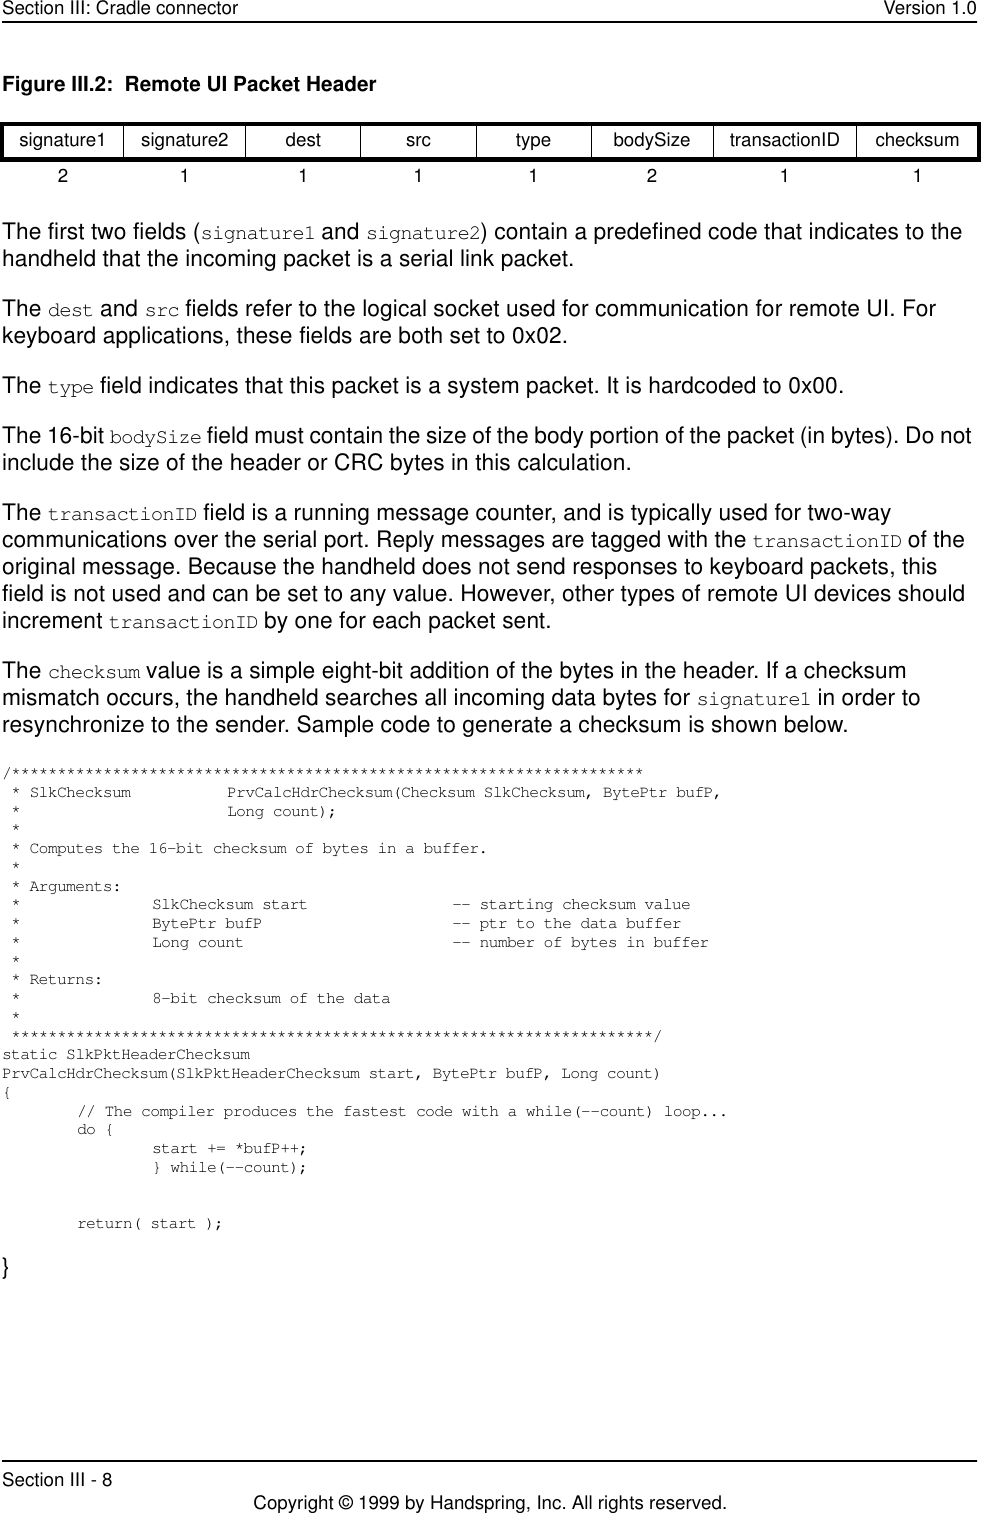
![Section II: Springboard expansion slot Version 1.0Section II - 44 Copyright © 1999 by Handspring, Inc. All rights reserved.6.3 AC CharacteristicsThis section lists the AC timing parameters for Springboard modules. Unless otherwise specified, all parameters are specified at VCC = 3.3V, 25 °C.Figure II.1: Read Cycle TimingTable II.3: Read Cycle Timing ParametersNum Parameter Min Max Unit1 Address valid to CSx* asserted 55 – ns2 WE* negated before address valid -5 – ns3 CSx* asserted to OE* asserted11. The chip selects are not guaranteed to be asserted prior to the assertion of OE*. Also the cycle is ended when either a chip select or OE* is deasserted.–5ns4 Data valid from CSx* asserted – 95 + nT22. n is the number of wait states. T is the system clock period.ns 5 CSx* pulse width 125 + nT 425 ns 6 Data in hold after CSx* negated 5 – ns 7 OE* negated after CSx* negated 3 26 ns A[23:0]CSx*OE*WE*D[15:0]2431567](https://usermanual.wiki/Palm/HVP-1H.Visor-User-Manual/User-Guide-118400-Page-54.png)
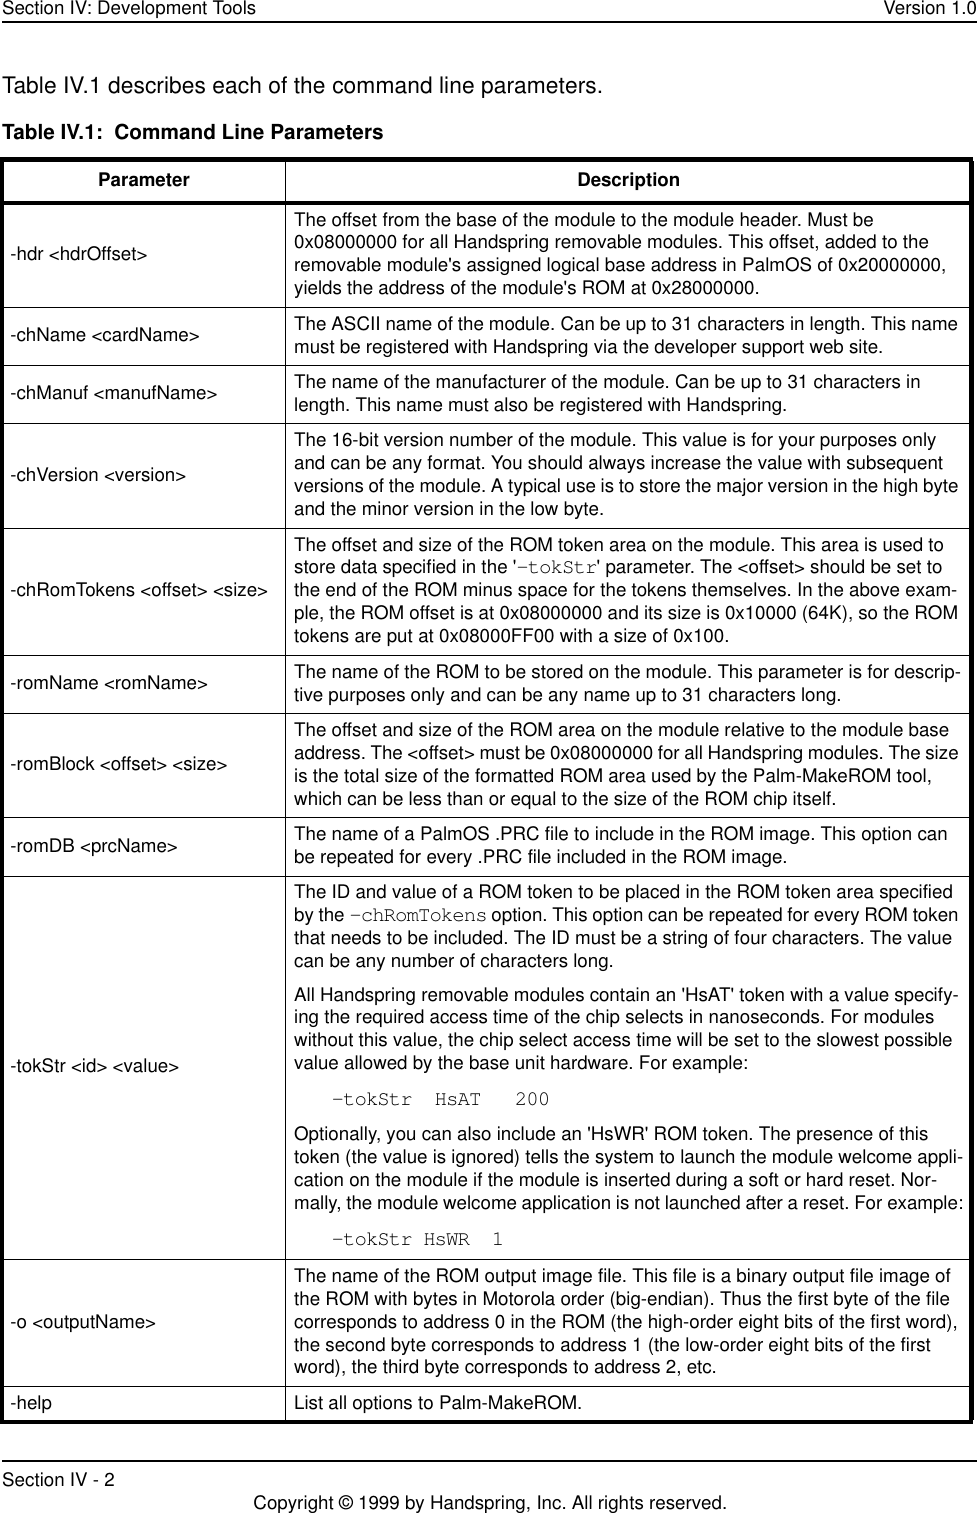
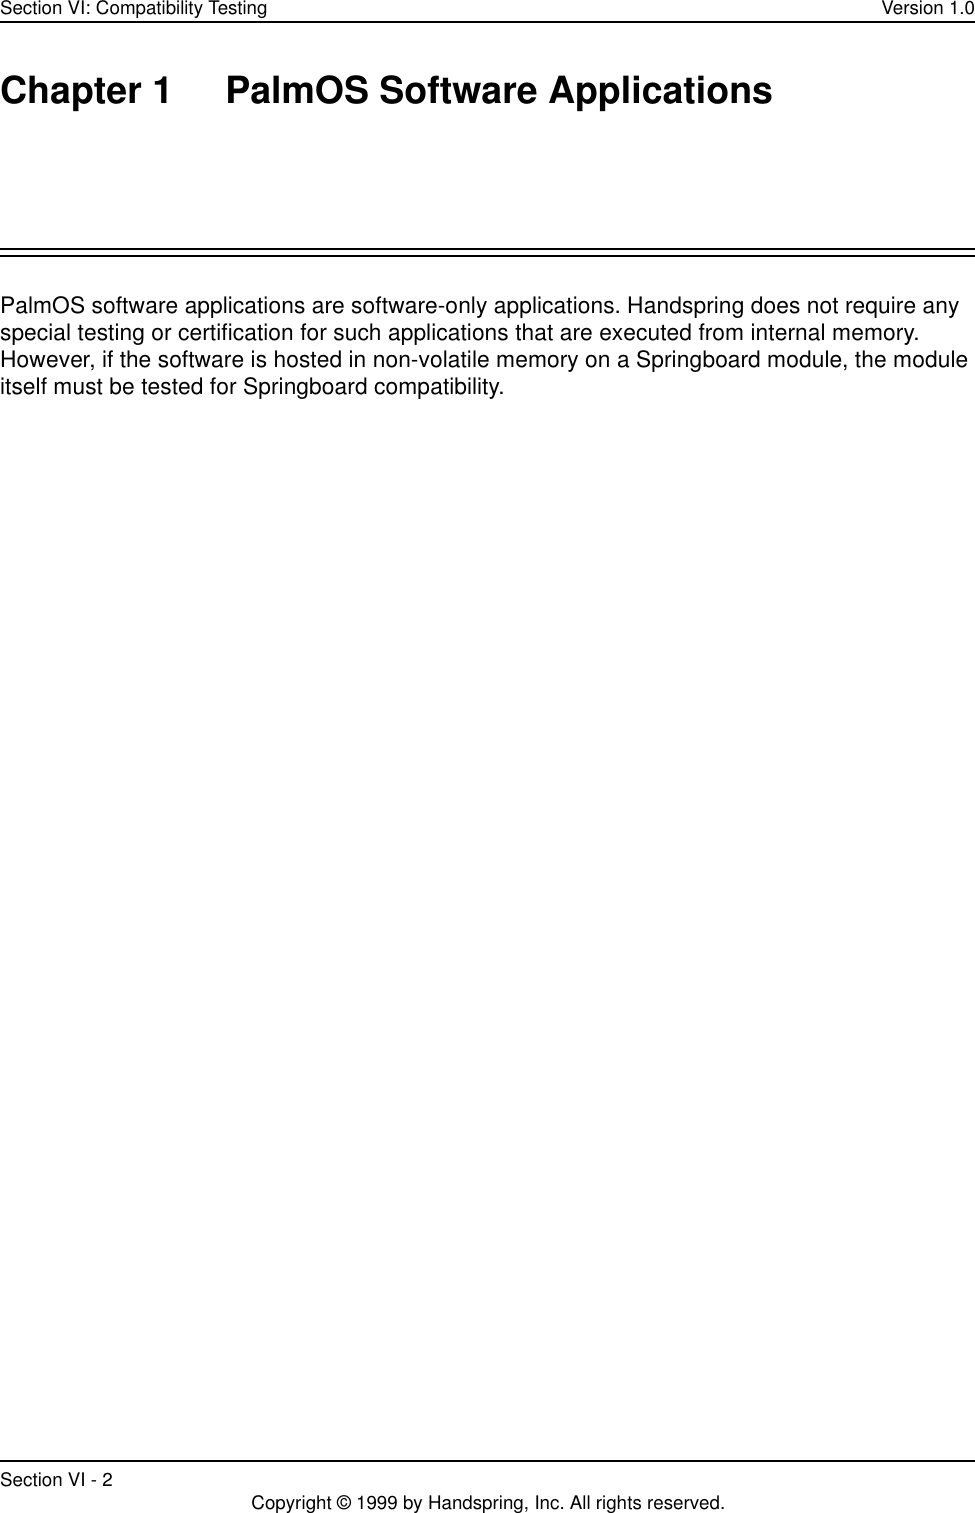
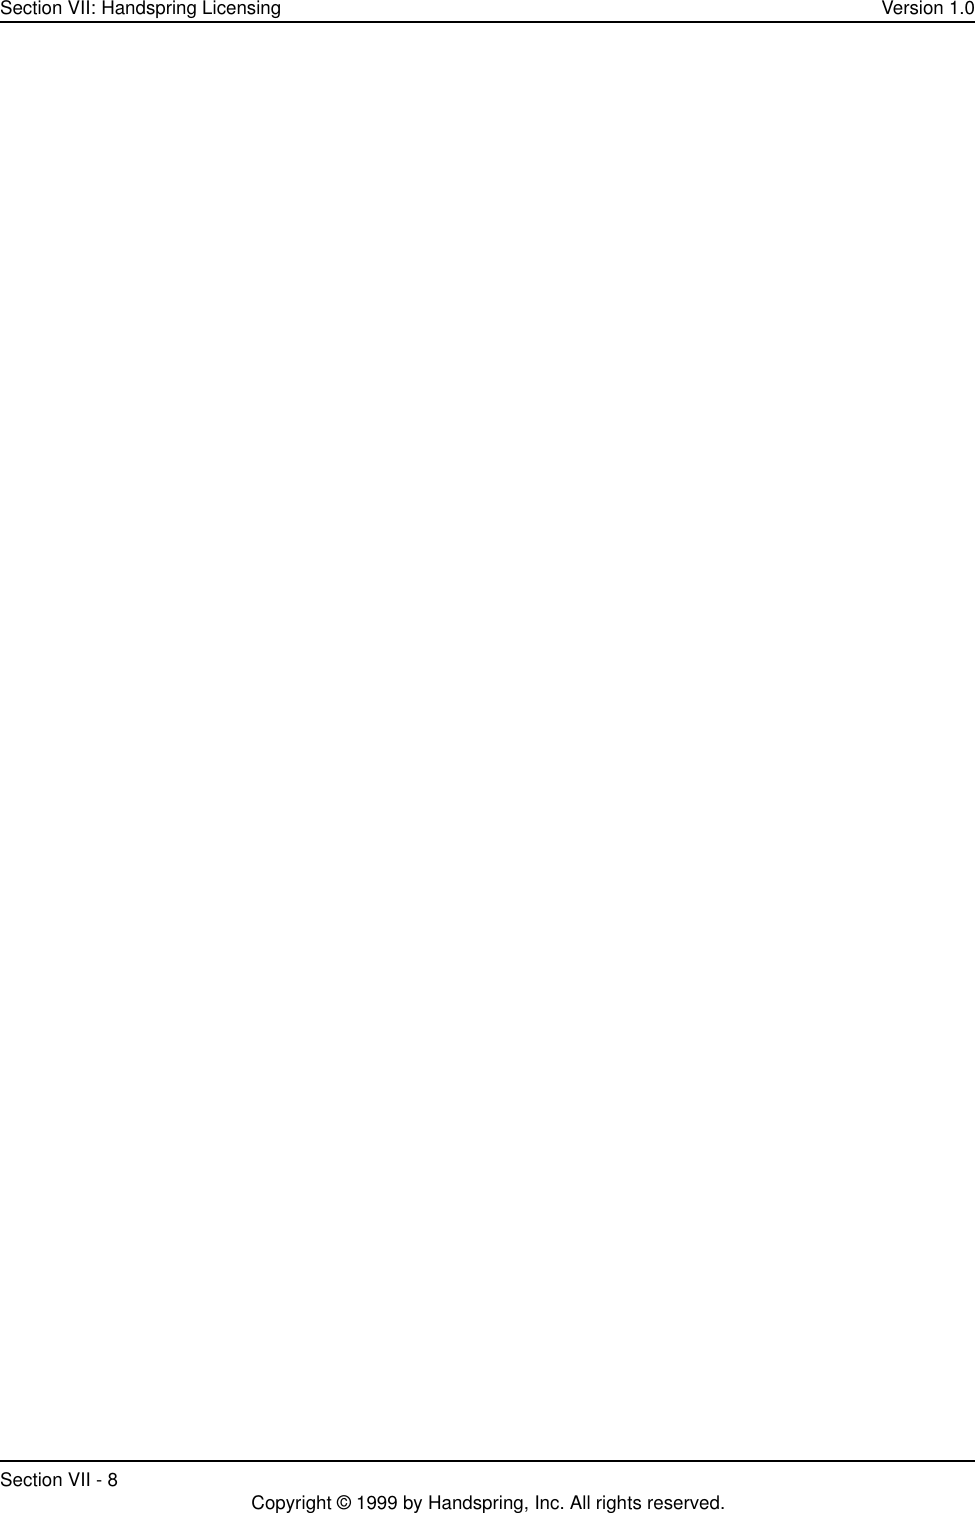
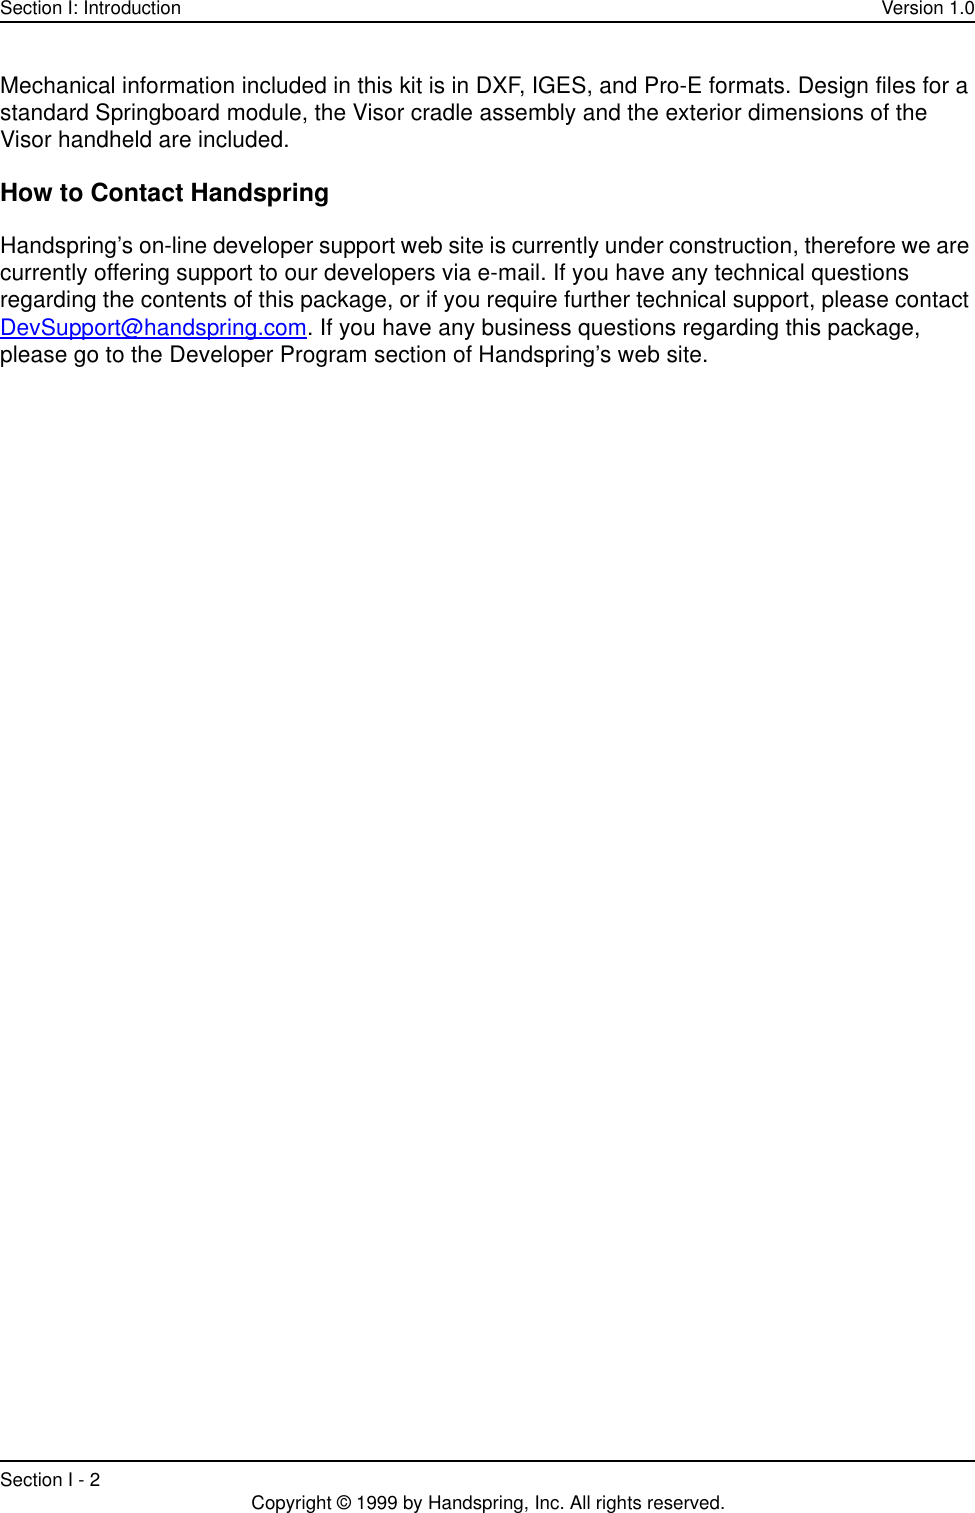
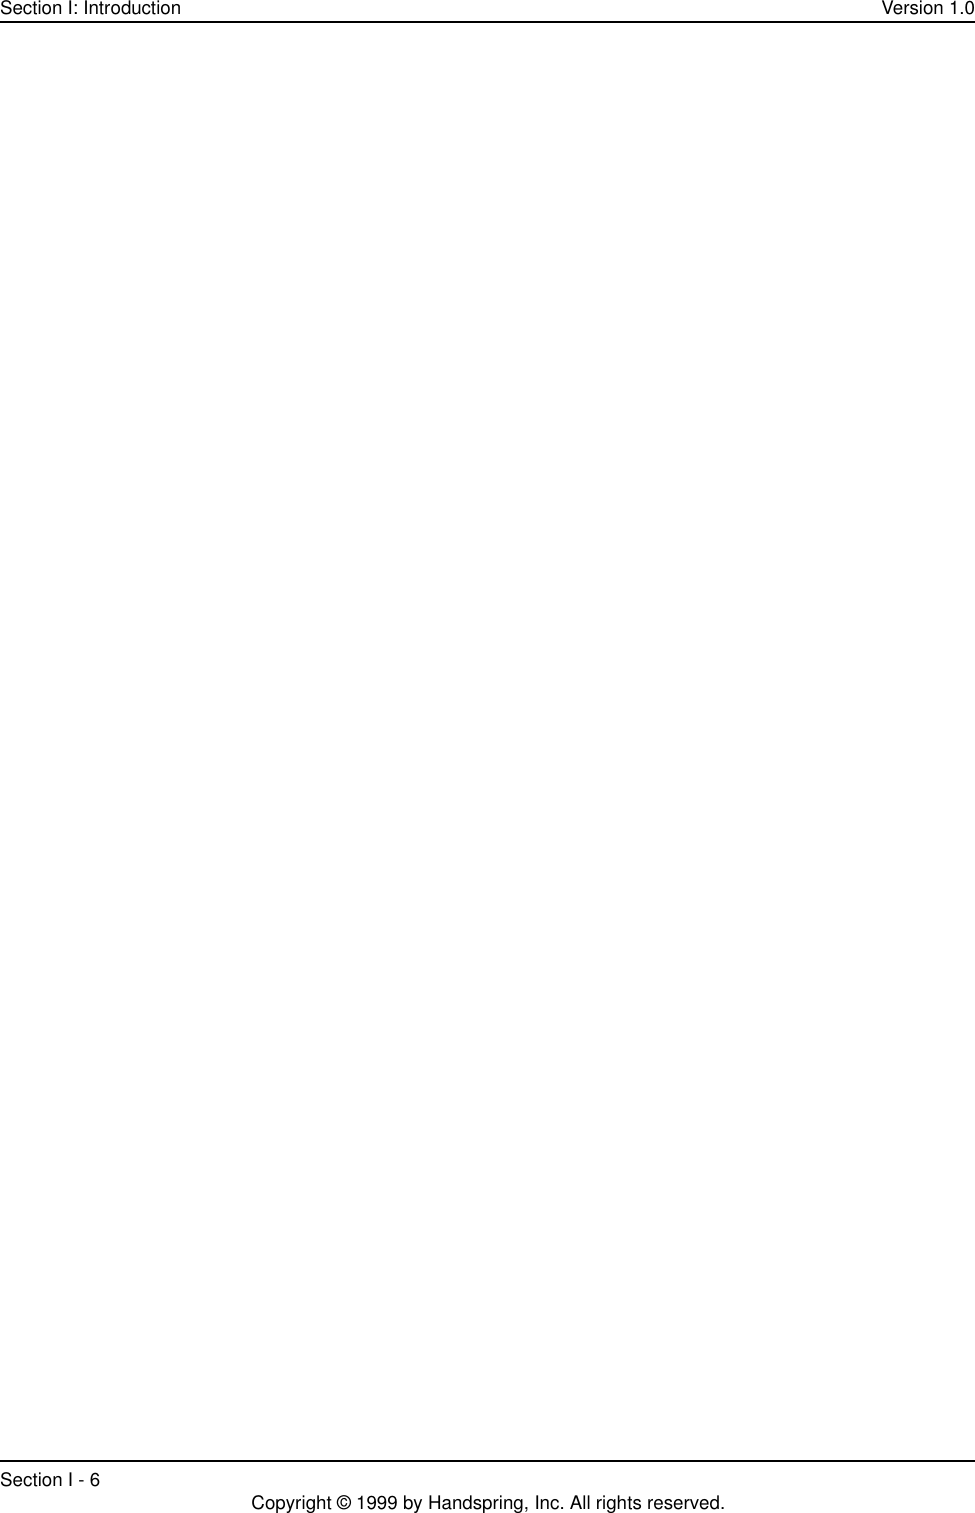
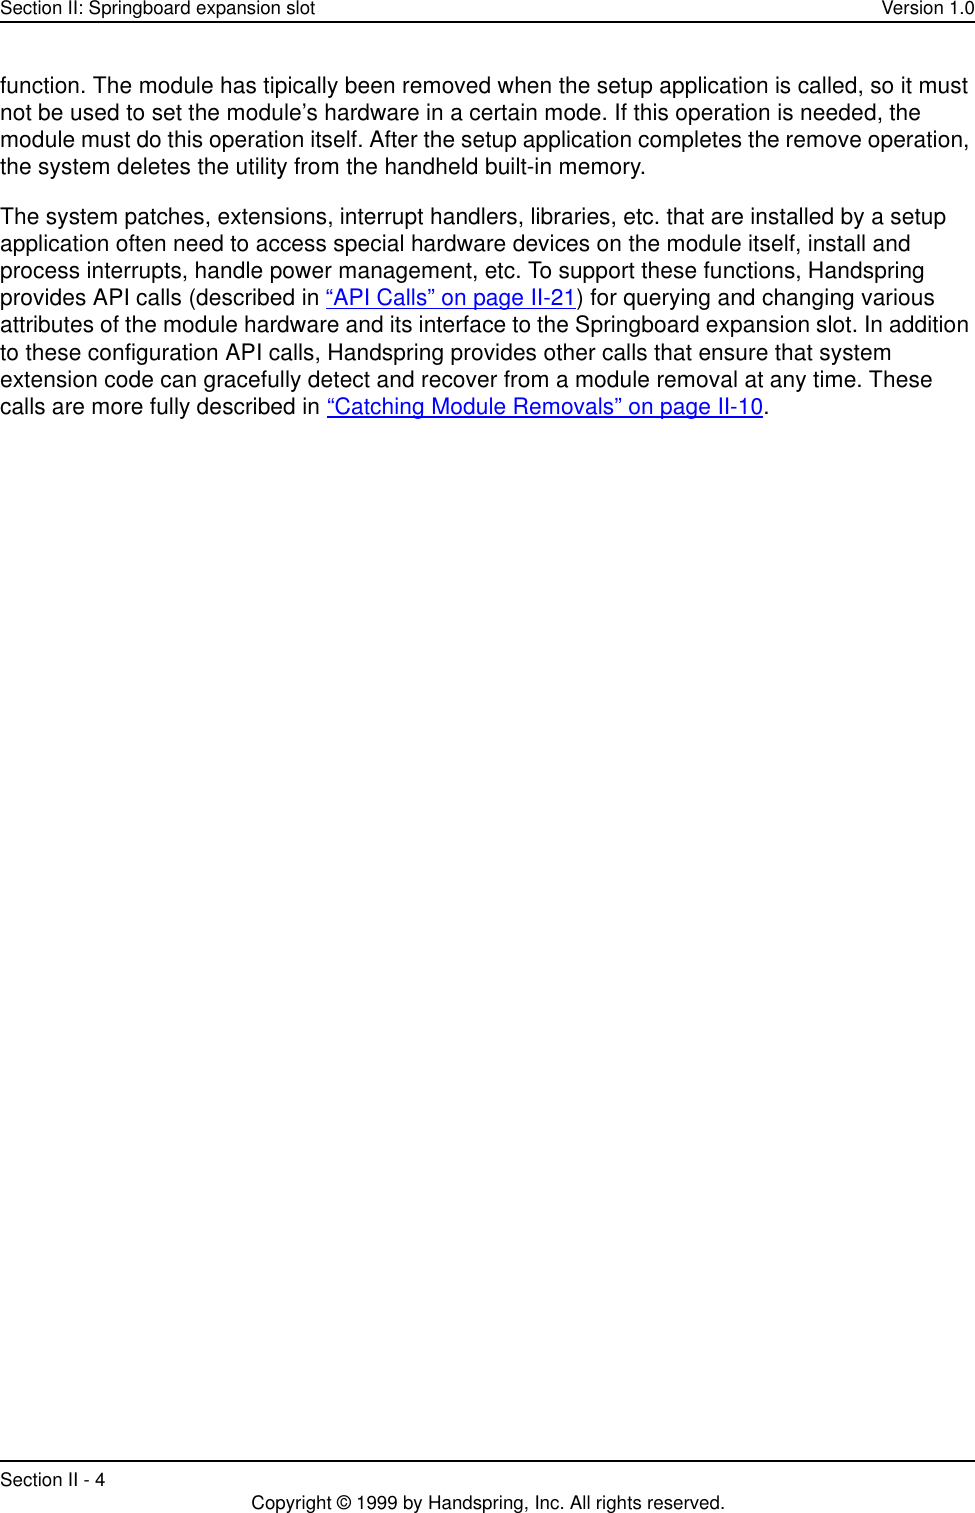
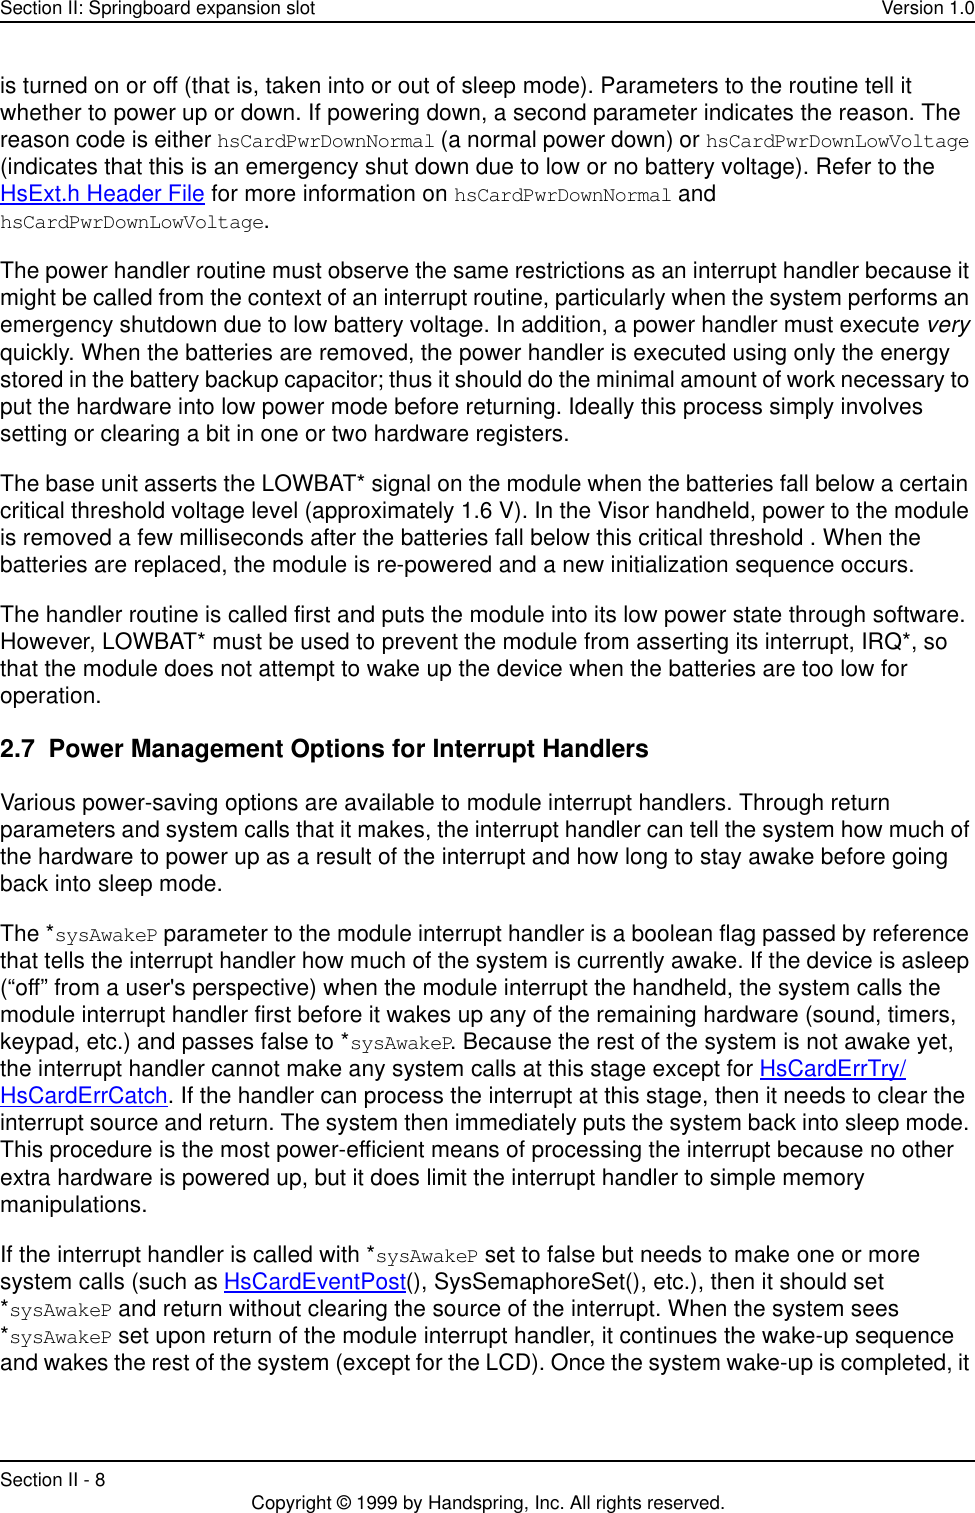
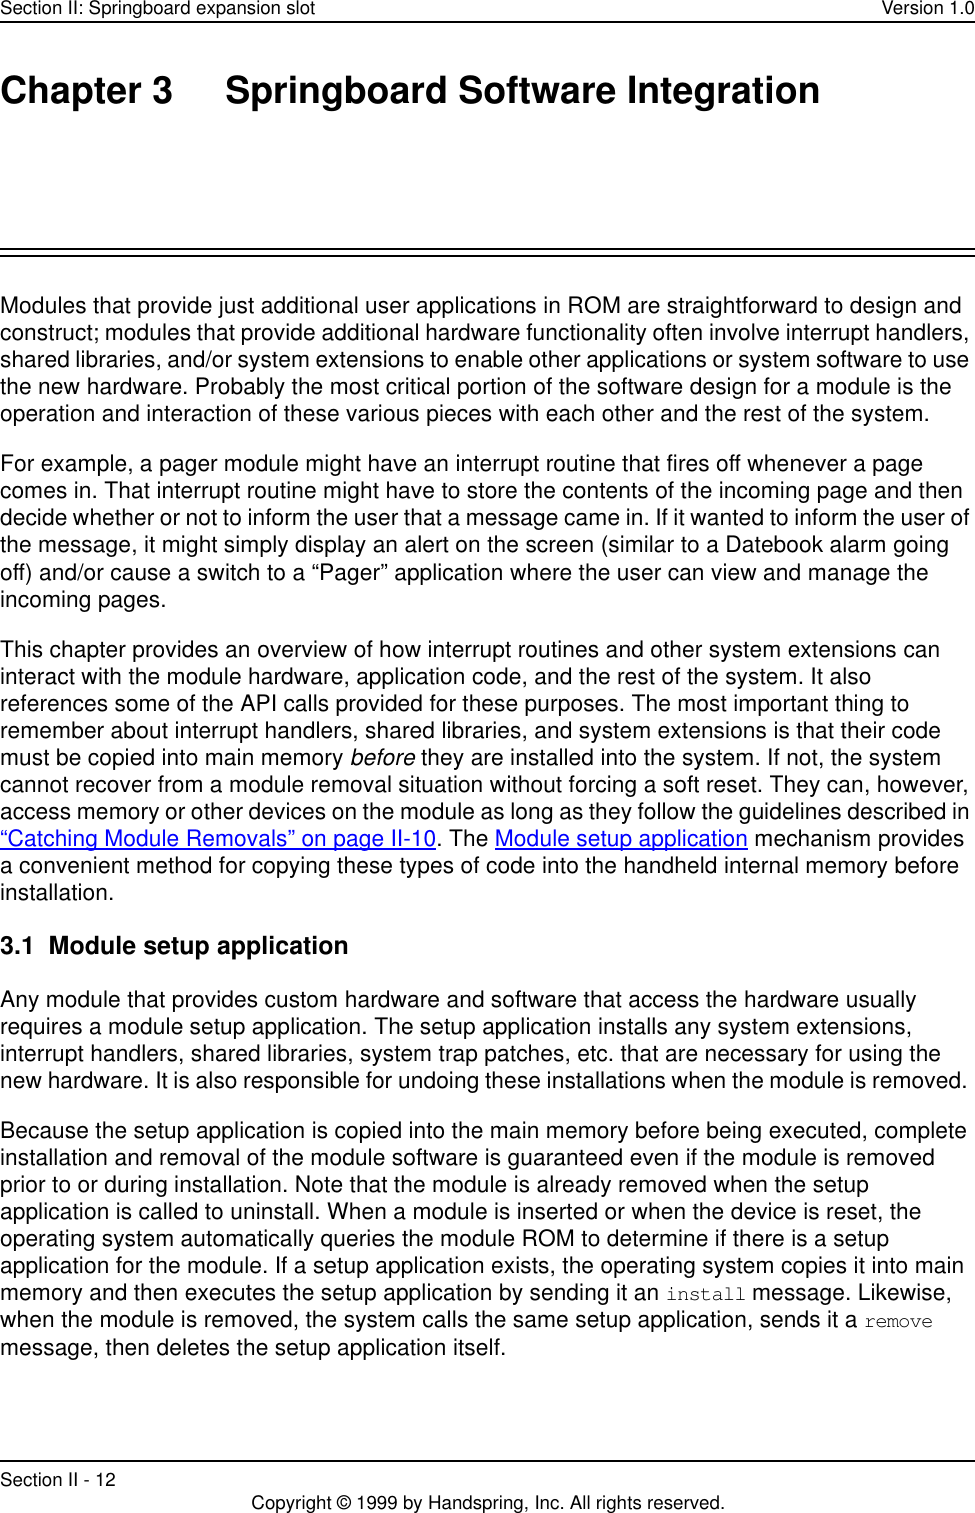
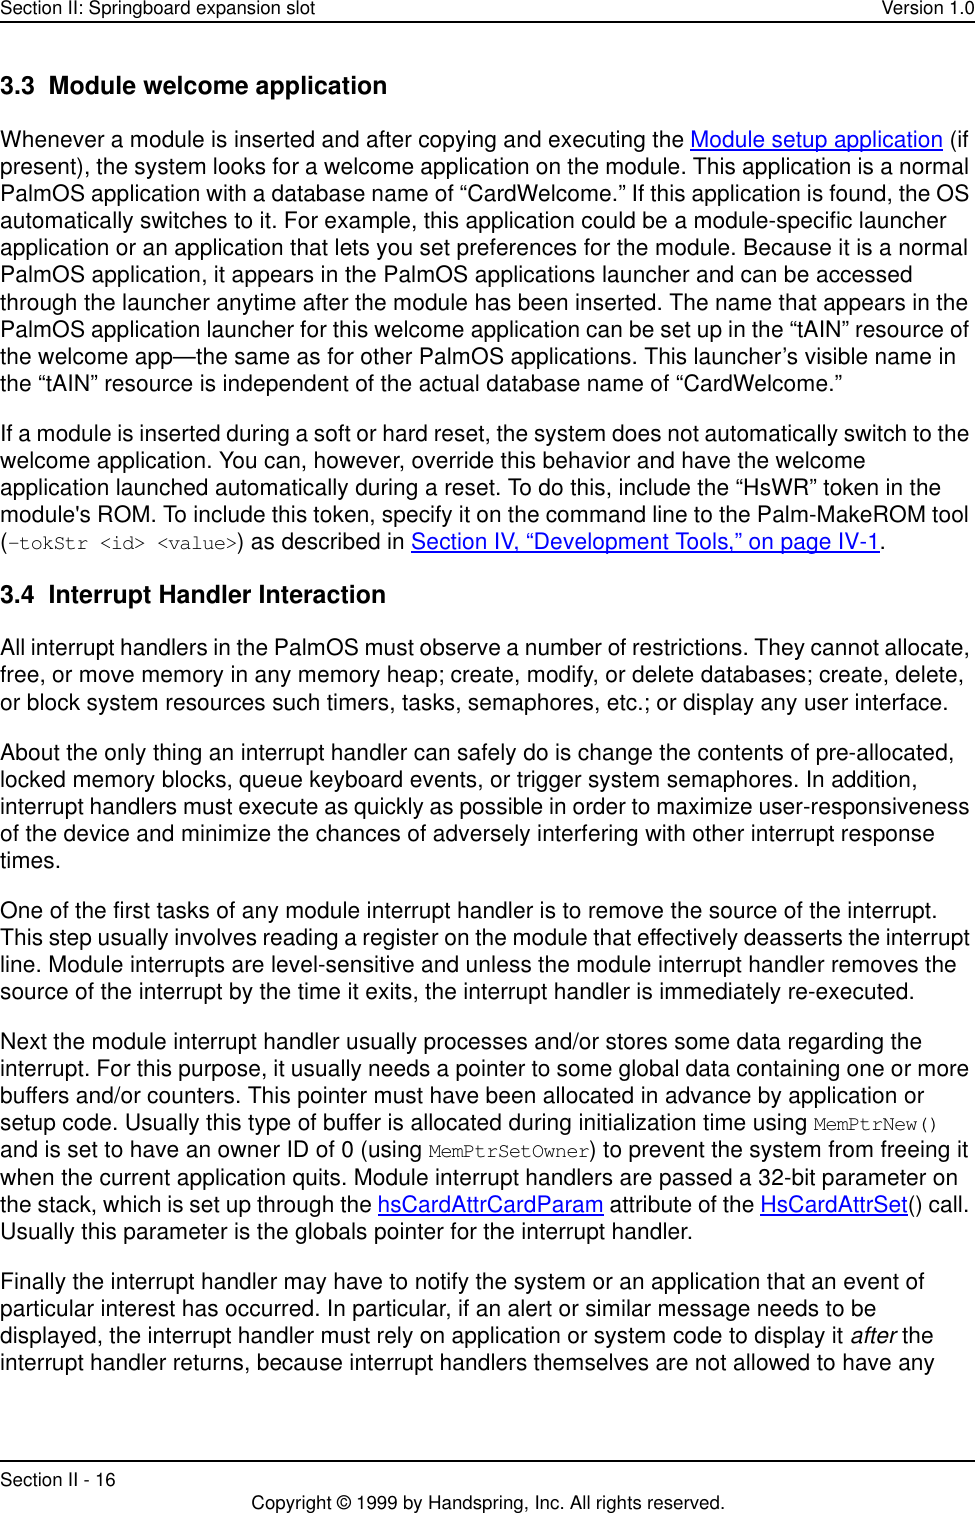
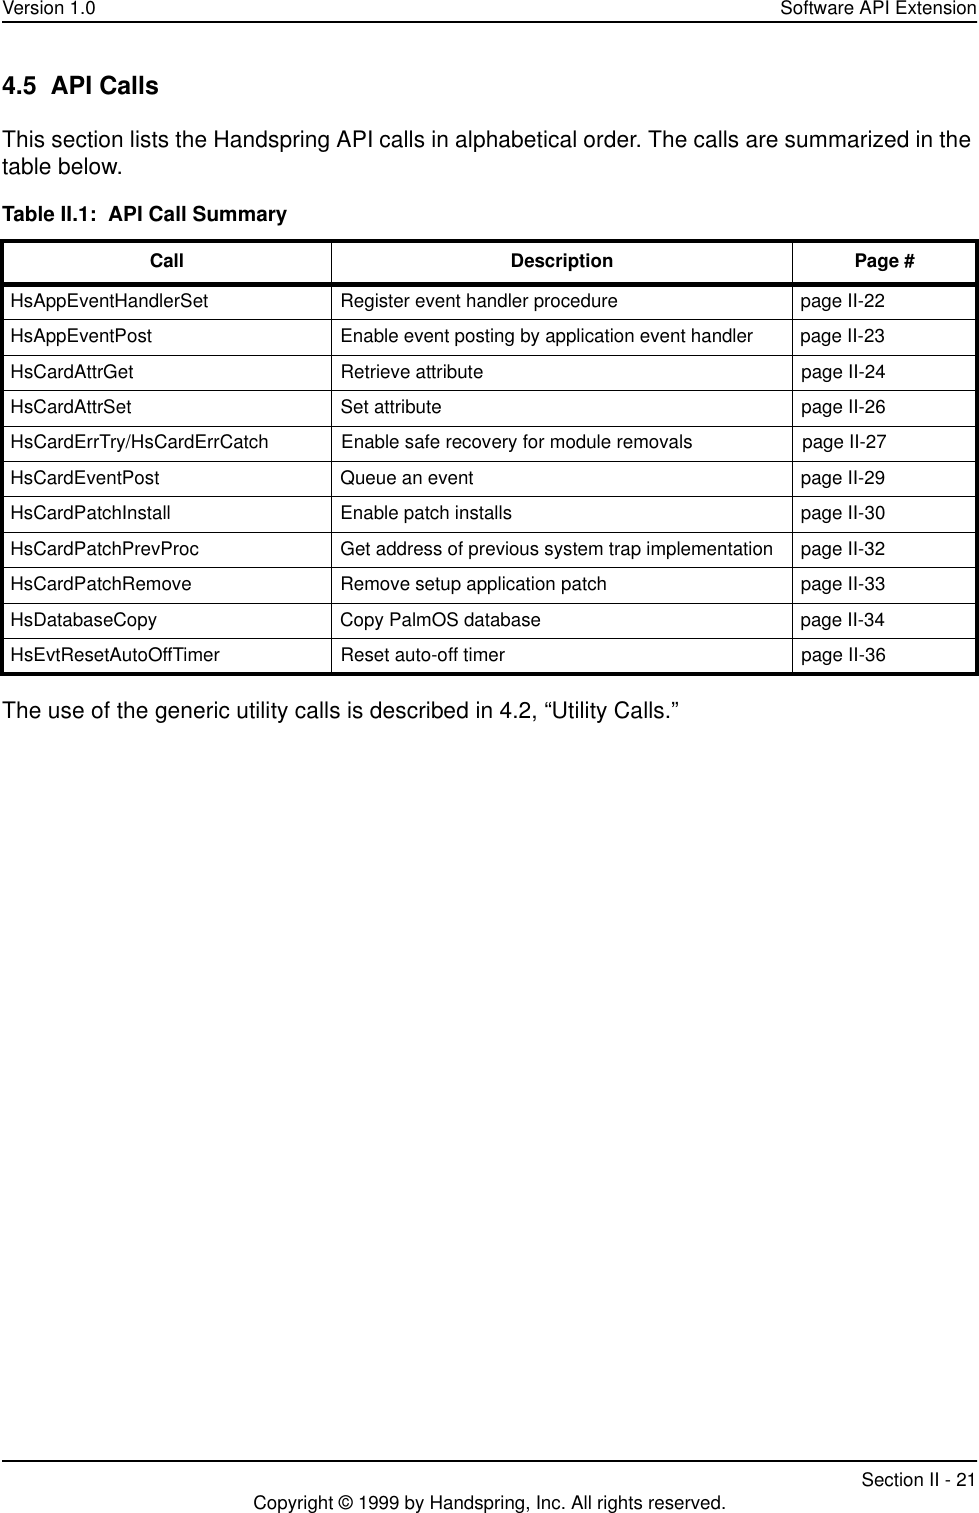
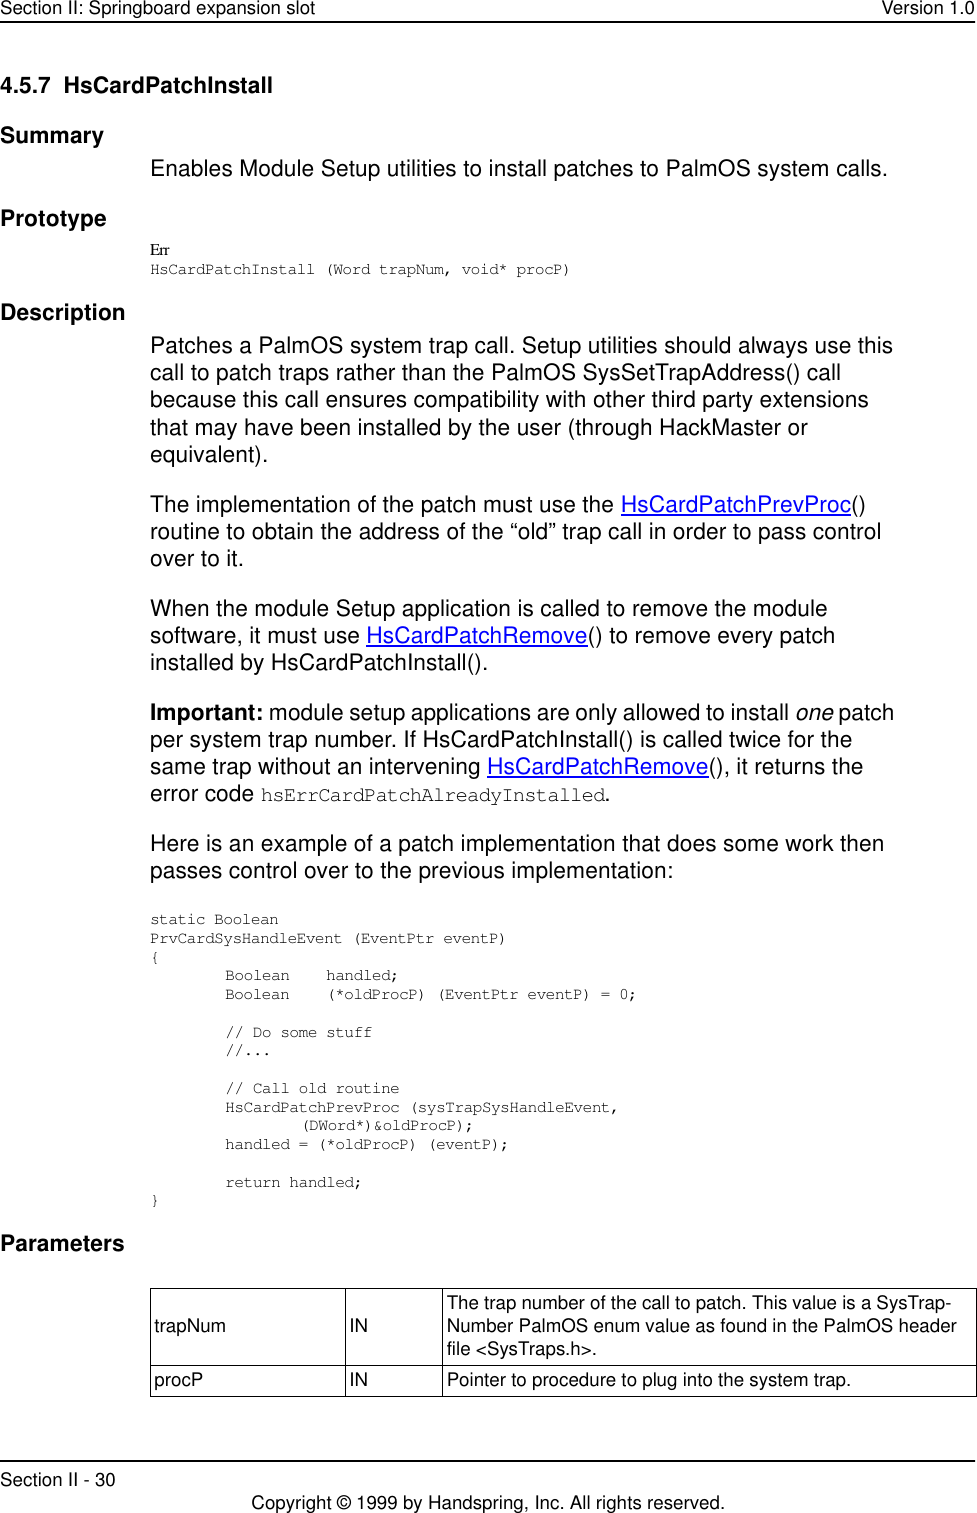
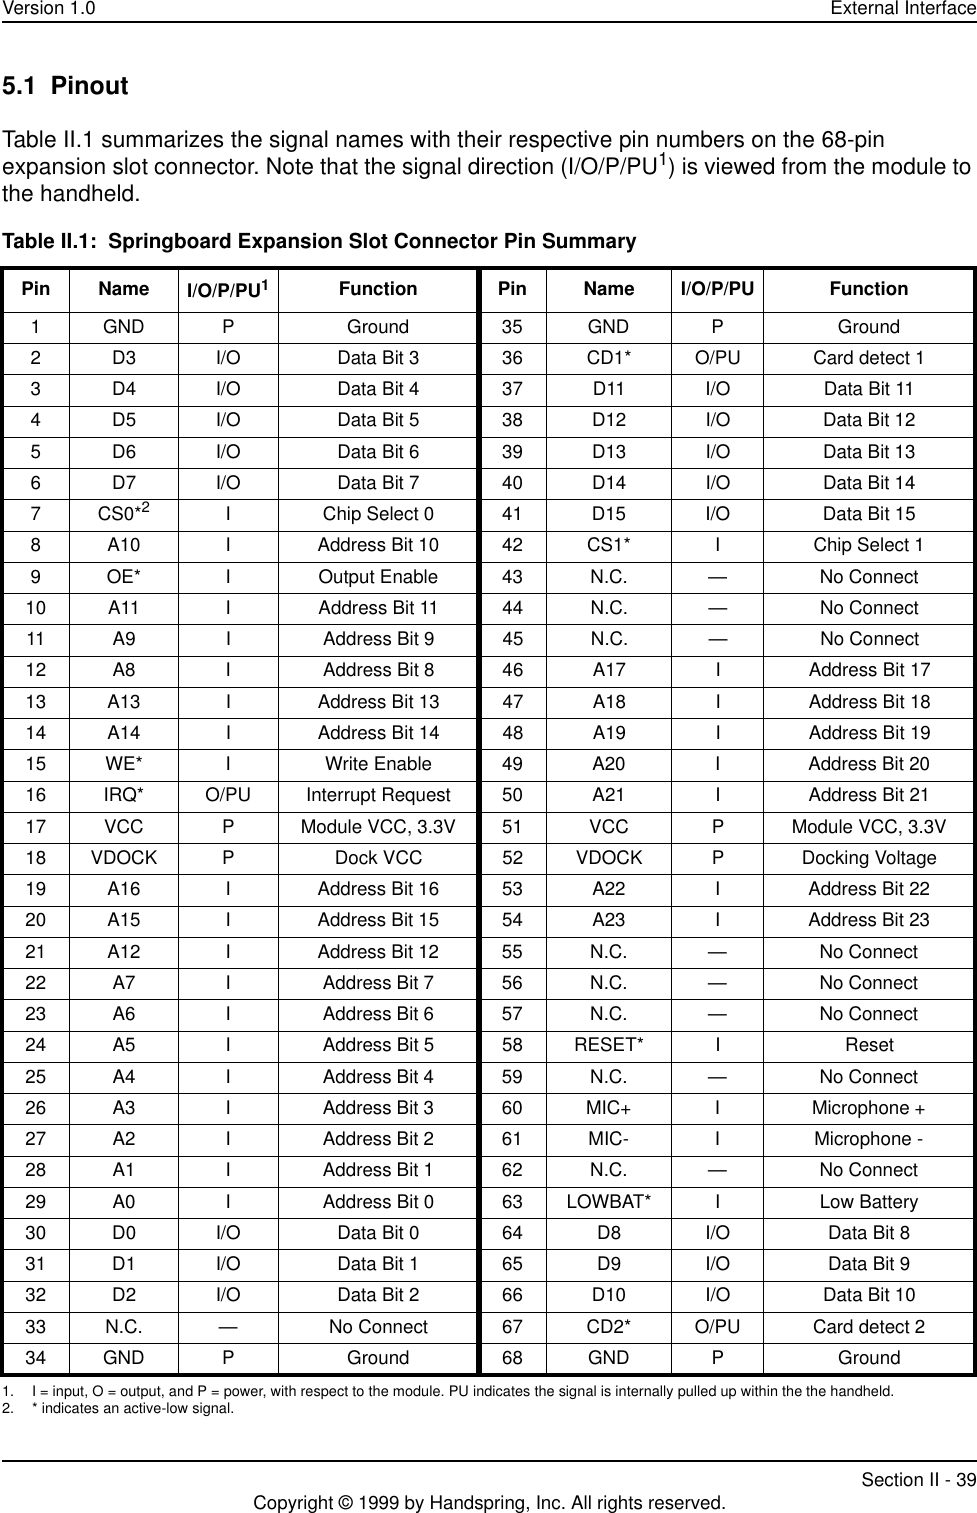
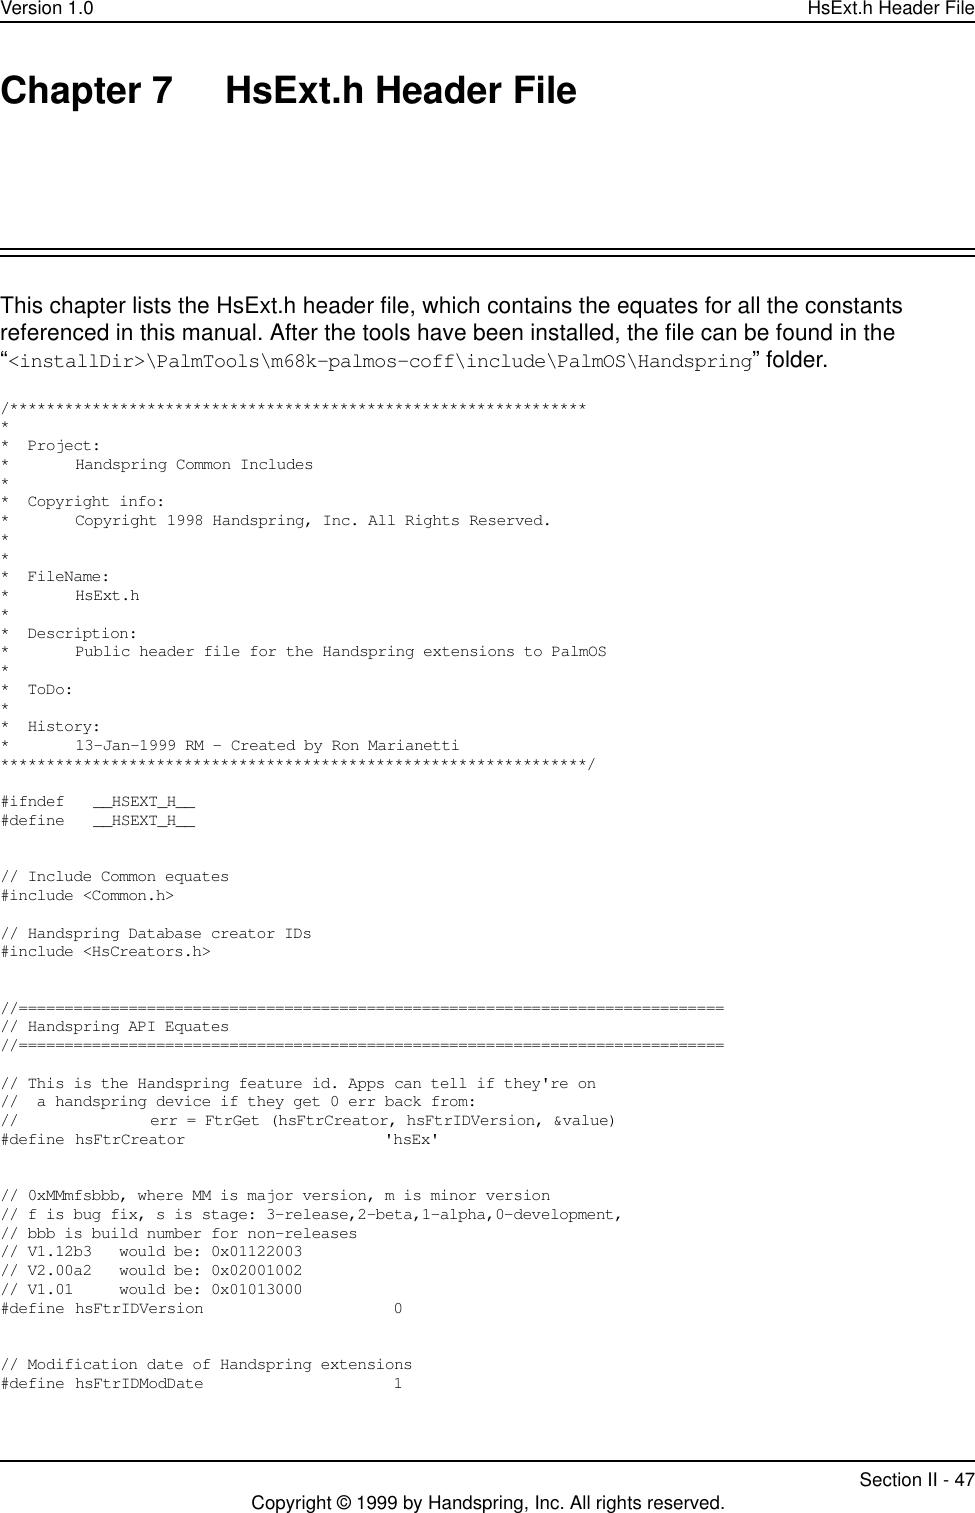
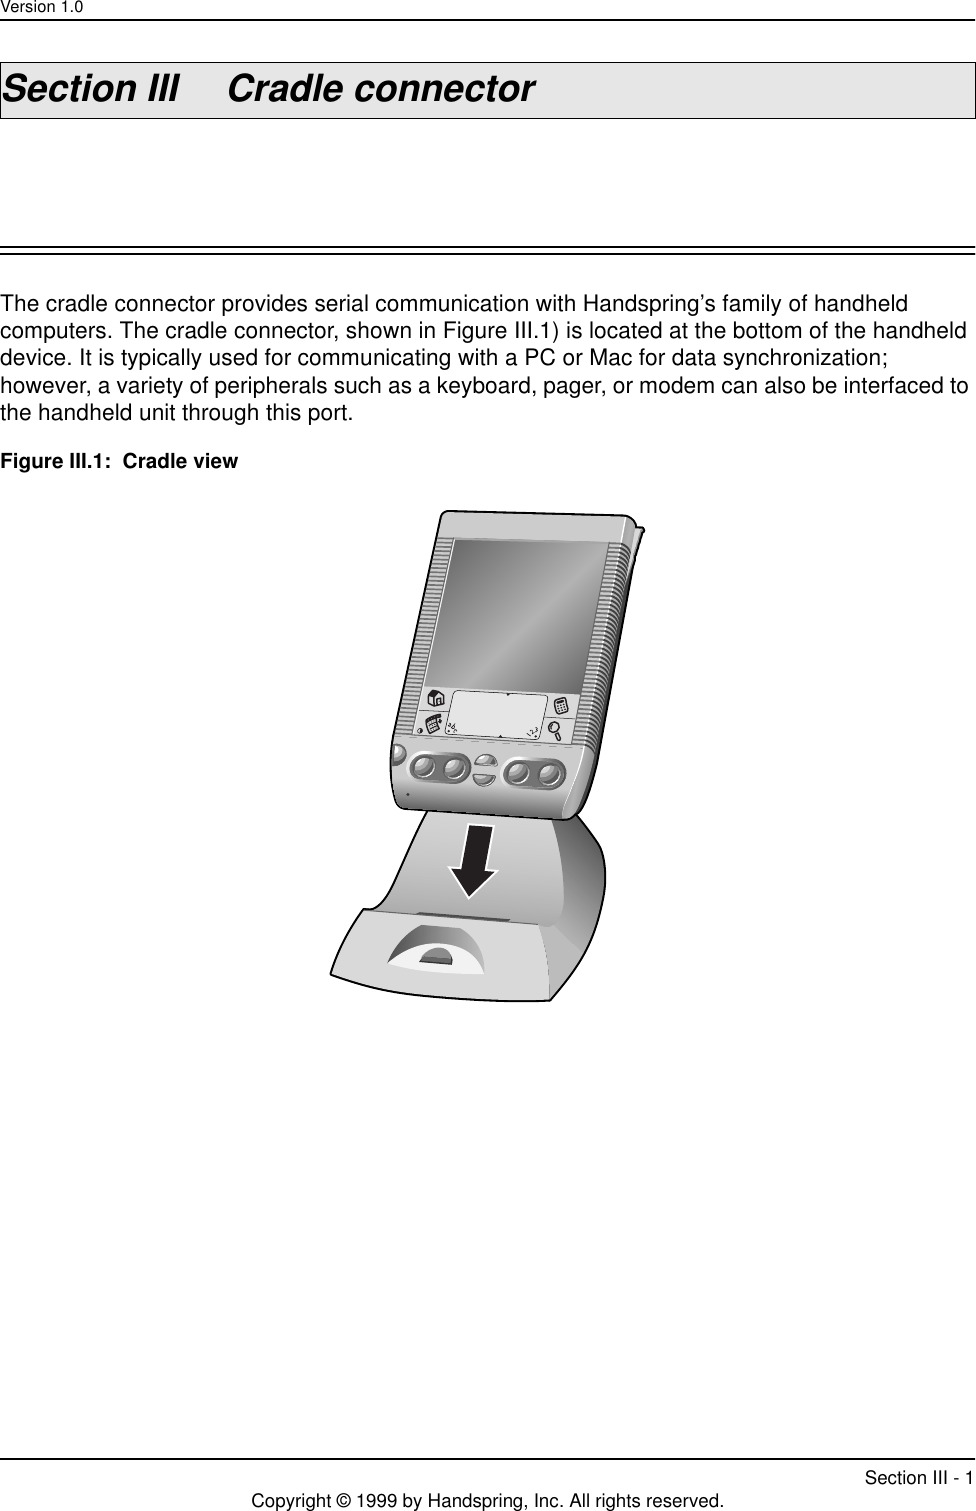
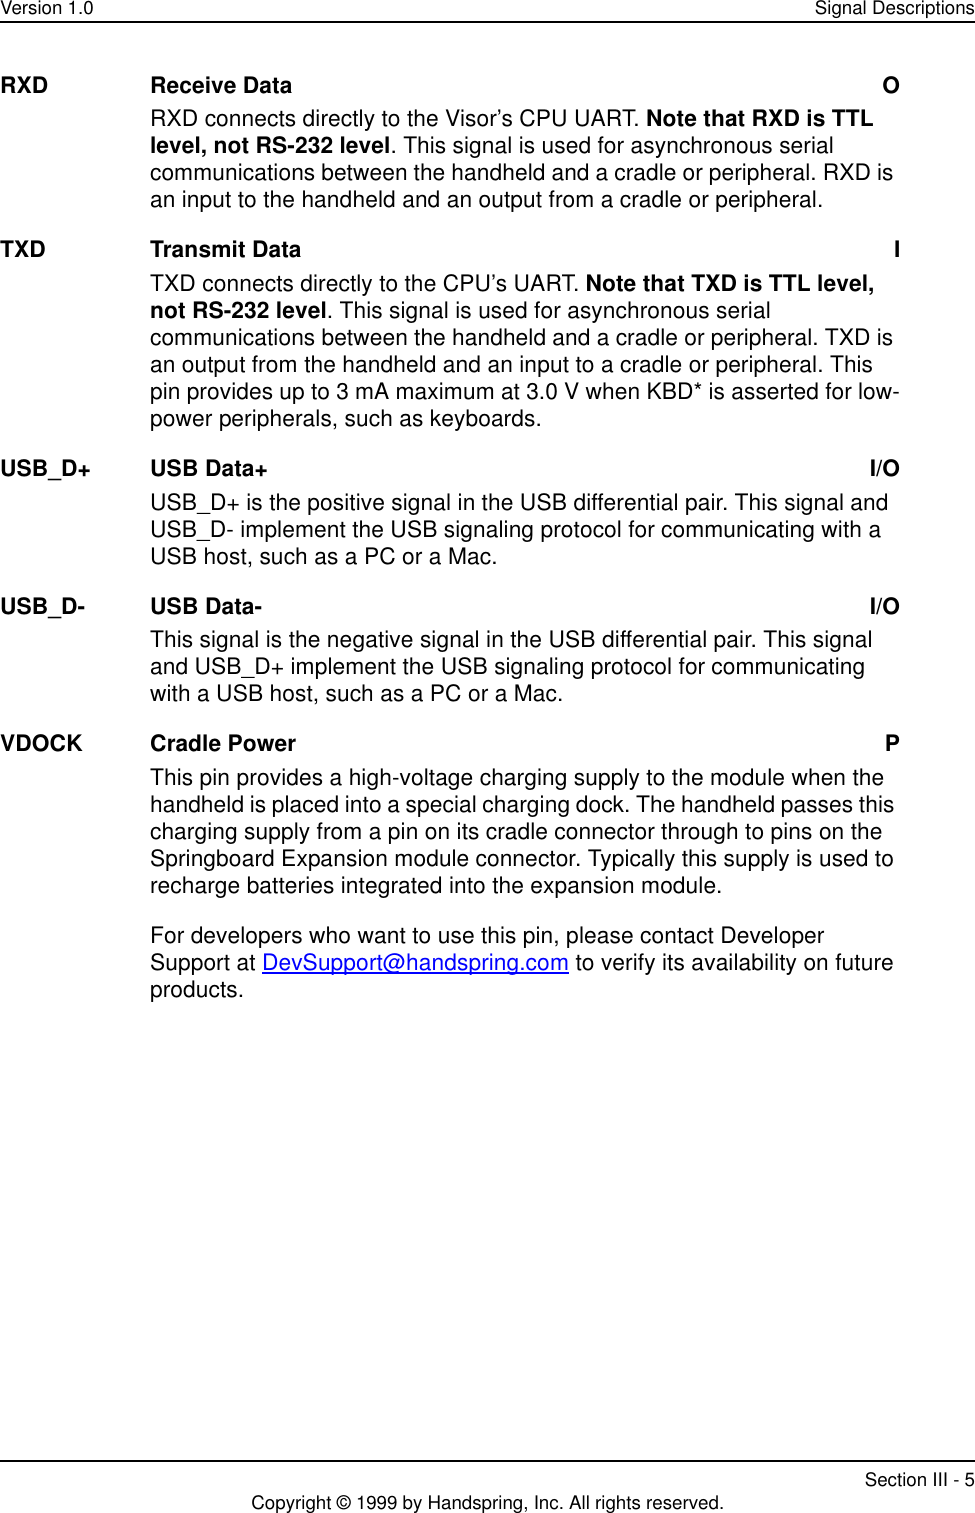
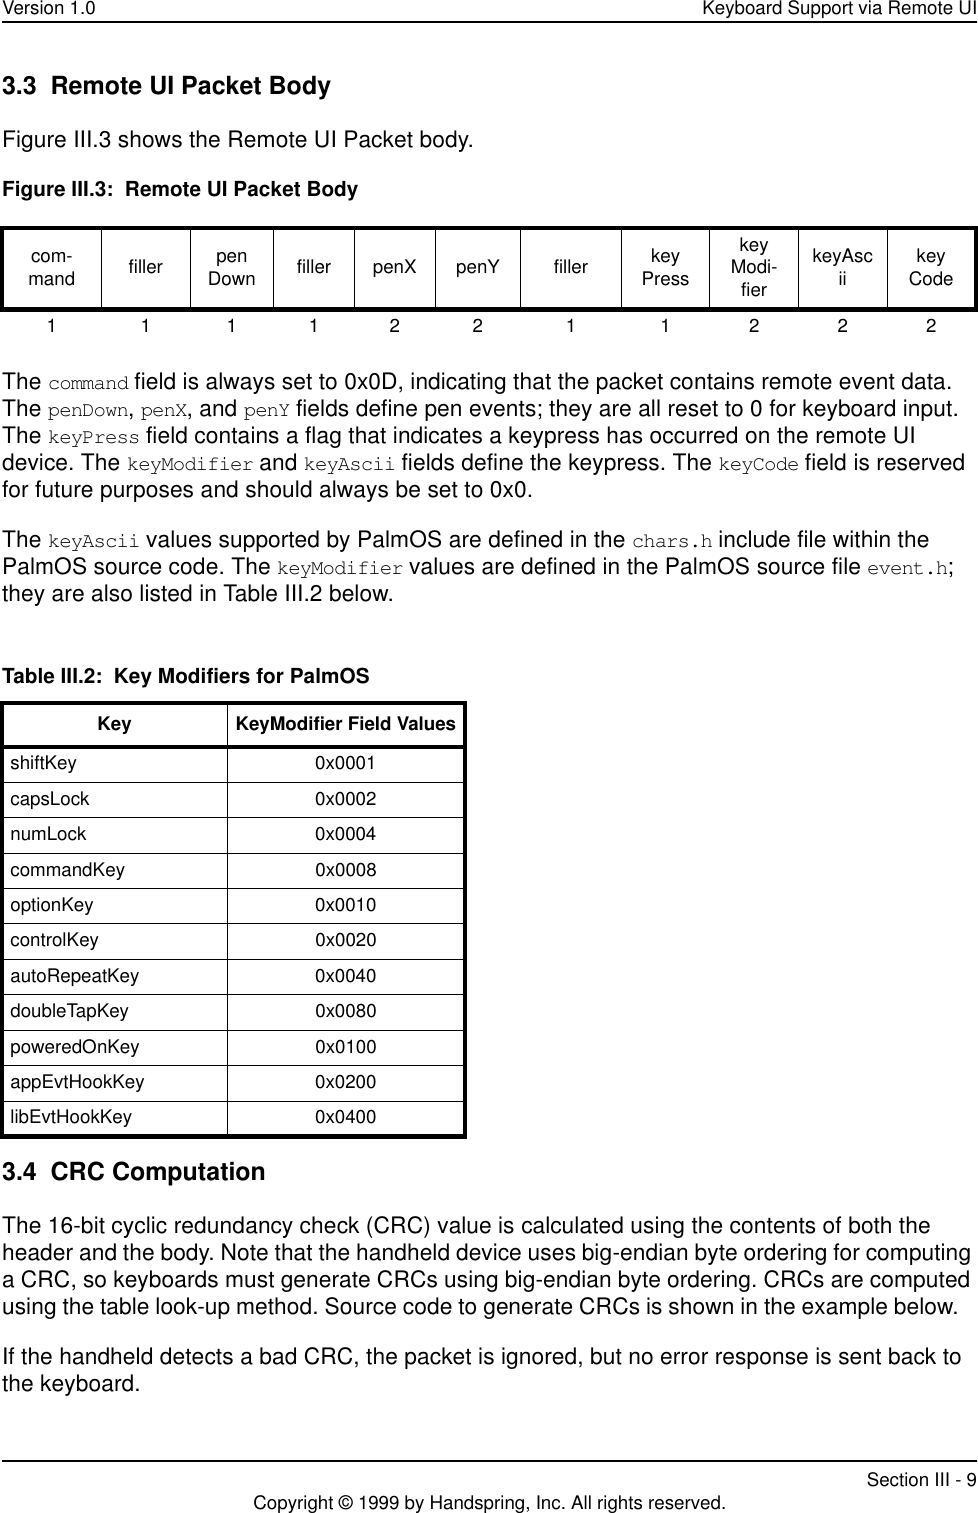
![Version 1.0 Electrical and mechanical specificationsSection II - 45Copyright © 1999 by Handspring, Inc. All rights reserved.Figure II.2: Write Cycle Timing6.4 Springboard connector insertion/extraction force ratingsTable II.5 lists the mechanical insertion/extraction force ratings for the Springboard expansion slot connector.Table II.4: Write Cycle TimingNum Parameter Min Max Unit1 Address valid to CSx* asserted 55 – ns2 CSx* asserted to WE* asserted -5 13 ns3 CSx* asserted to data valid – 45 ns4 CSx* pulse width 125 + nT1425 ns 5 WE* negated before CSx* negated 25 40 ns 6 Data hold after CSx* negated 35 – ns 7 CSx* negated to data in, Hi-Z – 55 ns 1. n is the number of wait states. T is the system clock period.Table II.5: Insertion/extraction force for the Springboard expansion slot connectorRating Value UnitInsertion force1 (PRELIMINARY)1. These rating were verified up to 3000 insertion/extraction of the module.1.5 - 6 poundsExtraction force (PRELIMINARY) 1.5 - 5 poundsA[23:0]CSx*OE*WE*D[15:0]3214675](https://usermanual.wiki/Palm/HVP-1H.Visor-User-Manual/User-Guide-118400-Page-55.png)
![Version 1.0 HsExt.h Header FileSection II - 51Copyright © 1999 by Handspring, Inc. All rights reserved.hsCardAttrEvtHandler,// HsCardEvtHandlerPtr// : RW : card event handlerhsCardAttrLogicalBase,// DWord : R : logical base address of cardhsCardAttrLogicalSize,// DWord : R : total reserved address space for cardhsCardAttrHdrOffset,// DWord : R : offset from halCardAttrLogicalBase to// card header// Leave this one at end!!!hsCardAttrLast } HsCardAttrEnum;// ------------------------------------------------------------------------------// Equates for the HsPrefGet/Set calls// ------------------------------------------------------------------------------// The prefstypedef enum { // Type : Description // ---------------------------------// The following are used by SysLibFind() to resolve a virtual library// name to an actual one. hsPrefSerialLibDef, // Char[] : Name of serial library // to substitute for hsLibAliasDefaulthsPrefSerialLibHotSyncLocal, // Char[] : Name of serial library // to substitute for hsLibAliasHotSyncLocalhsPrefSerialLibHotSyncModem, // Char[] : Name of serial library // to substitute for hsLibAliasHotSyncModemhsPrefSerialLibIrda, // Char[] : Name of serial library // to substitute for hsLibAliasIrdahsPrefSerialLibConsole, // Char[] : Name of serial library // to substitute for hsLibAliasConsole// Leave this one at end!!!hsPrefLast } HsPrefEnum;// ------------------------------------------------------------------------------// Prototype of the App Event Handler that can be setup using// HsAppEventHandlerSet() and triggered using HsAppEventPost(). The// evtRefCon is a copy of evtRefCon passed to HsAppEventHandlerSet()//// This routine should not rely on globals since it may be called// while in the context of another app's action code. // ------------------------------------------------------------------------------typedef Boolean (*HsAppEvtHandlerPtr) (DWord evtRefcon, Word evtNum, Word evtParam);//=============================================================================// Handspring selectors for the Handspring system trap // // NOTE: If you add traps here, you must://// 1.) Add a prototype to the Prototypes section of this header or// to the prototype section of HsExtPrv.h if it's private call// // 2.) Modify the PrvHsSelector routine in HsExtensions.c to recognize](https://usermanual.wiki/Palm/HVP-1H.Visor-User-Manual/User-Guide-118400-Page-61.png)
![Version 1.0 HsExt.h Header FileSection II - 53Copyright © 1999 by Handspring, Inc. All rights reserved.FOURWORD_INLINE(0x3f3c, selector, m68kTrapInstr+sysDispatchTrapNum,trapNum)#endif//=============================================================================// HsCardErrTry / Catch / support//// ---------------------------------------------------------------------// // Typical Use:// x = 0;// HsCardErrTry // {// // access card in some manner that may fail// value = cardBaseP[0]// // // do other stuff too// x = 1; // Set local variable in Try// // // access card again// value = cardBaseP[1] //// }//// HsCardErrCatch // {// // Recover or cleanup after a failure in above Try block// // The code in this block does NOT execute if the above// // try block completes without a card removal// if (x > 1) // SysBeep(1);// // } HsCardErrEnd// //=============================================================================// Try & Catch macros#define HsCardErrTry \{\ ErrExceptionType_tryObject; \ Ptr* _listP;\ _listP = HsPrvErrCatchListP(); \ _tryObject.err = 0; \ _tryObject.nextP = (ErrExceptionPtr)*_listP;\ *_listP = (Ptr)&_tryObject; \ if (ErrSetJump(_tryObject.state) == 0) \ {// NOTE: All variables referenced in and after the ErrCatch must // be declared volatile. Here's how for variables and pointers:// volatile Word oldMode;// ShlDBHdrTablePtr volatile hdrTabP = nil;// // If you have many local variables after the ErrCatch you may// opt to put the ErrTry and ErrCatch in a separate enclosing function.#define HsCardErrCatch \ *_listP = (Ptr)_tryObject.nextP; \} \ else\ {\ *_listP = (Ptr)_tryObject.nextP;](https://usermanual.wiki/Palm/HVP-1H.Visor-User-Manual/User-Guide-118400-Page-63.png)
![Section III: Cradle connector Version 1.0Section III - 10 Copyright © 1999 by Handspring, Inc. All rights reserved./************************************************************** FUNCTION: Crc16CalcBlock** DESCRIPTION: Calculate the 16-bit CRC of a data block using the table lookup method.** PARAMETERS:* bufP -- pointer to the data buffer;* count -- the number of bytes in the buffer;* crc -- the seed crc value; pass 0 the first time * function is called, pass in new crc result * as more data is added to packet and crc is updated.* RETURNS:* A 16-bit CRC for the data buffer.**************************************************************/Word Crc16Calc (VoidPtr bufP, Word count, Word crc){registerBytePtr byteP = (BytePtr)bufP;WordPtr crctt = (WordPtr)crctt_16; // CRC translation table//// Calculate the 16 bit CRC using the table lookup method.//if ( count ) {do {crc = (crc << 8) ^ crctt[ (Byte)((crc >> 8) ^ *byteP++) ];} while ( --count );}return( crc & 0xffff );}// This is the lookup table used when performing the 16-bit CRC calculation. //static Word crctt_16[ 256 ] ={0x0000, 0x1021, 0x2042, 0x3063, 0x4084, 0x50A5, 0x60C6, 0x70E7,0x8108, 0x9129, 0xA14A, 0xB16B, 0xC18C, 0xD1AD, 0xE1CE, 0xF1EF,0x1231, 0x0210, 0x3273, 0x2252, 0x52B5, 0x4294, 0x72F7, 0x62D6,0x9339, 0x8318, 0xB37B, 0xA35A, 0xD3BD, 0xC39C, 0xF3FF, 0xE3DE,0x2462, 0x3443, 0x0420, 0x1401, 0x64E6, 0x74C7, 0x44A4, 0x5485,0xA56A, 0xB54B, 0x8528, 0x9509, 0xE5EE, 0xF5CF, 0xC5AC, 0xD58D,0x3653, 0x2672, 0x1611, 0x0630, 0x76D7, 0x66F6, 0x5695, 0x46B4,0xB75B, 0xA77A, 0x9719, 0x8738, 0xF7DF, 0xE7FE, 0xD79D, 0xC7BC,0x48C4, 0x58E5, 0x6886, 0x78A7, 0x0840, 0x1861, 0x2802, 0x3823,0xC9CC, 0xD9ED, 0xE98E, 0xF9AF, 0x8948, 0x9969, 0xA90A, 0xB92B,0x5AF5, 0x4AD4, 0x7AB7, 0x6A96, 0x1A71, 0x0A50, 0x3A33, 0x2A12,0xDBFD, 0xCBDC, 0xFBBF, 0xEB9E, 0x9B79, 0x8B58, 0xBB3B, 0xAB1A,0x6CA6, 0x7C87, 0x4CE4, 0x5CC5, 0x2C22, 0x3C03, 0x0C60, 0x1C41,0xEDAE, 0xFD8F, 0xCDEC, 0xDDCD, 0xAD2A, 0xBD0B, 0x8D68, 0x9D49,0x7E97, 0x6EB6, 0x5ED5, 0x4EF4, 0x3E13, 0x2E32, 0x1E51, 0x0E70,0xFF9F, 0xEFBE, 0xDFDD, 0xCFFC, 0xBF1B, 0xAF3A, 0x9F59, 0x8F78,0x9188, 0x81A9, 0xB1CA, 0xA1EB, 0xD10C, 0xC12D, 0xF14E, 0xE16F,0x1080, 0x00A1, 0x30C2, 0x20E3, 0x5004, 0x4025, 0x7046, 0x6067,0x83B9, 0x9398, 0xA3FB, 0xB3DA, 0xC33D, 0xD31C, 0xE37F, 0xF35E,0x02B1, 0x1290, 0x22F3, 0x32D2, 0x4235, 0x5214, 0x6277, 0x7256,0xB5EA, 0xA5CB, 0x95A8, 0x8589, 0xF56E, 0xE54F, 0xD52C, 0xC50D,0x34E2, 0x24C3, 0x14A0, 0x0481, 0x7466, 0x6447, 0x5424, 0x4405,0xA7DB, 0xB7FA, 0x8799, 0x97B8, 0xE75F, 0xF77E, 0xC71D, 0xD73C,0x26D3, 0x36F2, 0x0691, 0x16B0, 0x6657, 0x7676, 0x4615, 0x5634,0xD94C, 0xC96D, 0xF90E, 0xE92F, 0x99C8, 0x89E9, 0xB98A, 0xA9AB,0x5844, 0x4865, 0x7806, 0x6827, 0x18C0, 0x08E1, 0x3882, 0x28A3,0xCB7D, 0xDB5C, 0xEB3F, 0xFB1E, 0x8BF9, 0x9BD8, 0xABBB, 0xBB9A,0x4A75, 0x5A54, 0x6A37, 0x7A16, 0x0AF1, 0x1AD0, 0x2AB3, 0x3A92,0xFD2E, 0xED0F, 0xDD6C, 0xCD4D, 0xBDAA, 0xAD8B, 0x9DE8, 0x8DC9,0x7C26, 0x6C07, 0x5C64, 0x4C45, 0x3CA2, 0x2C83, 0x1CE0, 0x0CC1,0xEF1F, 0xFF3E, 0xCF5D, 0xDF7C, 0xAF9B, 0xBFBA, 0x8FD9, 0x9FF8,0x6E17, 0x7E36, 0x4E55, 0x5E74, 0x2E93, 0x3EB2, 0x0ED1, 0x1EF0};](https://usermanual.wiki/Palm/HVP-1H.Visor-User-Manual/User-Guide-118400-Page-76.png)