Contents
- 1. Module User Manual
- 2. Visor User Manual
- 3. Revised user manual statement
- 4. Revised RF Exposure stmt
- 5. user manual with SAR stmt at end
user manual with SAR stmt at end

VisorPhone™ Module
User Guide

ii
Copyright
Copyright © 2000 - 2001 Handspring, Inc. All rights reserved. Handspring, Springboard,
Visor, VisorPhone, the Handspring logo, and the Springboard logo are trademarks of Hand-
spring, Inc., and may be registered in some jurisdictions. Graffiti, HotSync, and Palm OS are
registered trademarks of Palm, Inc. or its subsidiaries. All other trademarks are the property of
their respective owners.
Disclaimer and limitation of liability
Handspring, Inc. and its suppliers assume no responsibility for any damage or loss resulting
from the use of this guide.
Handspring, Inc. and its suppliers assume no responsibility for any loss or claims by third parties
which may arise through the use of this software and hardware. Handspring, Inc. and its suppli-
ers assume no responsibility for any damage or loss caused by deletion of data as a result of mal-
function, dead battery, or repairs. Be sure to make backup copies of all important data on other
media to protect against data loss.
Important: Please read the Handspring End User Software License Agreement in the back of
this guide before using the accompanying software program(s). Using any part of the software
indicates that you accept the terms of the Handspring End User Software License Agreement.
Part #: 50-0227-01

Contents iii
Contents
Getting Started.................................................................................1
Step 1: Set up your handheld computer.............................................2
Step 2: Insert your SIM card into your VisorPhone .........................3
Step 3: Insert your battery into your VisorPhone .............................4
Step 4: Get to know your phone........................................................5
Step 5: Connect the phone to your handheld....................................7
Step 6: Charge the battery..................................................................8
Step 7: Turn on your phone...............................................................9
Step 8: Activate your account...........................................................10
Congratulations................................................................................11
Making Voice Calls ........................................................................13
Calling a speed dial number.............................................................14
Dialing a number with the Dialpad .................................................15
Redialing the last number ................................................................16
Redialing previous numbers.............................................................16
Calling a number in your Address Book..........................................17
Dialing a number from other applications.......................................18
Returning a missed call.....................................................................19
Calling an emergency number.........................................................20
Receiving Calls...............................................................................21
Answering the phone........................................................................22
Responding to call waiting ...............................................................23
Forwarding calls ...............................................................................24

iv Contents
Handling Multiple Calls...................................................................25
Placing a call on hold .......................................................................26
Dialing another number while a call is on hold ..............................27
Switching between two calls ............................................................28
Using 3-way calling..........................................................................29
Checking Messages ........................................................................31
Reviewing missed calls .....................................................................32
Checking voicemail ..........................................................................33
Checking text messages....................................................................34
Displaying call history......................................................................35
Purging call history ..........................................................................36
Managing Your Speed Dial List .......................................................37
Defining speed dial buttons .............................................................38
Adding an Address Book entry to your speed dial list.....................39
Changing a speed dial entry.............................................................40
Deleting speed dial entries...............................................................41
Arranging the speed dial list.............................................................42
Using Your SIM Phonebook ............................................................43
Copying entries from your speed dial list to your SIM card...........44
Copying entries from your SIM card to your speed dial list...........45
Deleting entries from your SIM card ..............................................46
Dialing entries on your SIM card....................................................47

Contents v
Working With SMS Text Messages..................................................49
Enabling SMS and SMS Email........................................................50
Viewing messages .............................................................................51
Replying to messages........................................................................52
Creating messages ............................................................................53
Creating message greetings and signatures .....................................56
Saving incoming messages................................................................57
Copying incoming messages ............................................................57
Forwarding incoming messages .......................................................58
Modifying messages..........................................................................58
Sorting messages...............................................................................59
Deleting messages ............................................................................60
Using VisorPhone as a Wireless Modem..........................................61
Setting up VisorPhone as a wireless modem ...................................62
Using third-party data applications with VisorPhone.....................63
Preparing for a direct wireless HotSync operation .........................64
Preparing for a network wireless HotSync operation .....................65
Performing a wireless HotSync operation.......................................66
Customizing Your Phone.................................................................67
Setting dialing prefixes for use in North America...........................68
Assigning dialing applications ..........................................................69
Changing the phone display.............................................................70
Selecting the ringer settings.............................................................71
Preventing unauthorized use of your phone....................................72
Unlocking your phone......................................................................73

vi Contents
Disabling call waiting.......................................................................74
Blocking your phone number for outgoing calls.............................75
Selecting a service provider network ...............................................76
Connecting a headset.......................................................................77
Using the Menus.............................................................................79
Phone application Edit menus.........................................................79
Phone application Record menu......................................................79
Phone application Options menus...................................................80
SIM Phonebook application Edit menu..........................................81
SIM Phonebook application Options menu....................................81
SMS Message Manager application Message menus ......................82
SMS Message Manager application Edit menu...............................83
SMS Message Manager application Options menu ........................84
Troubleshooting and Maintenance...................................................85
Caring for your VisorPhone module...............................................91
Caring for the battery ......................................................................92
How do I dispose of the battery?.....................................................93
Warranty and Other Product Information ........................................95
Index ...........................................................................................115

Getting Started 1
Getting Started
Congratulations on the purchase of your new VisorPhone™ module. Your
VisorPhone module integrates the power of a state-of-the-art digital mobile
phone with the simplicity of your Handspring handheld computer.
To use your VisorPhone, you must first activate your account with your
mobile phone service provider.
Your account information is located on your SIM (Subscriber Identity
Module) card. If a SIM card did not come with your VisorPhone, your
service provider will provide one when you subscribe to their service. Your
SIM card must be inserted into your VisorPhone before you can use it.
Just follow the eight easy steps in this chapter to get up and running quickly.
2 Getting Started
Step 1: Set up your handheld computer
1. If you haven’t already set up your handheld, follow the steps that came
with your handheld to set it up.
2. (Recommended) Synchronize your handheld with your computer.
Tip: If you need additional information about synchronizing, refer to the
Quick Reference Guide and Visor Handheld User Guide that came with
your handheld.
Place your handheld
in the cradle and
press the HotSync
button
Getting Started 3
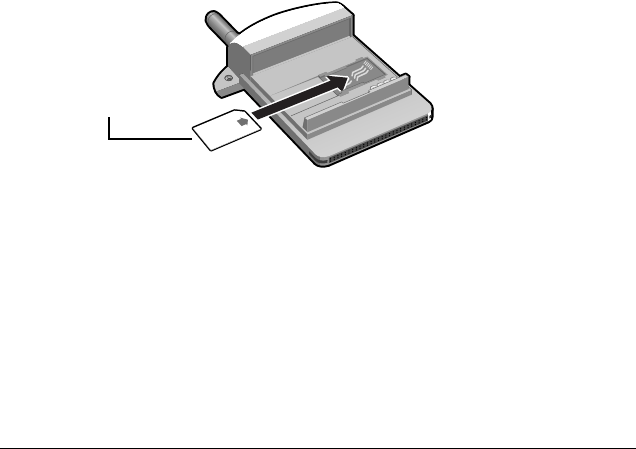
Step 2: Insert your SIM card into your VisorPhone
The SIM (Subscriber Identity Module) card is a small rectangular plastic
piece. The SIM card is included with your service provider’s documentation
and is often referred to as a “smartcard.”
Note: If your SIM card is already inserted in your phone, skip to Step 3.
■Insert the SIM card into the slot.
Tip: Since calls are billed to your telephone number, you can move your
SIM card to any mobile phone that uses a SIM card, and the calls
will be billed to your account.
Slide the SIM
card into the slot
4 Getting Started
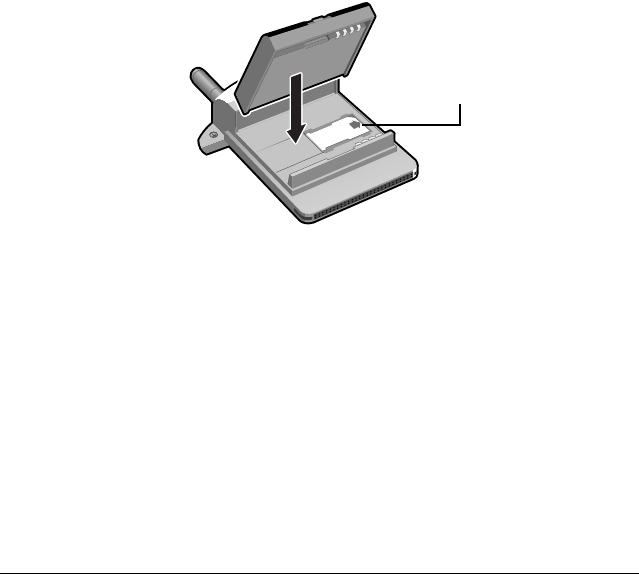
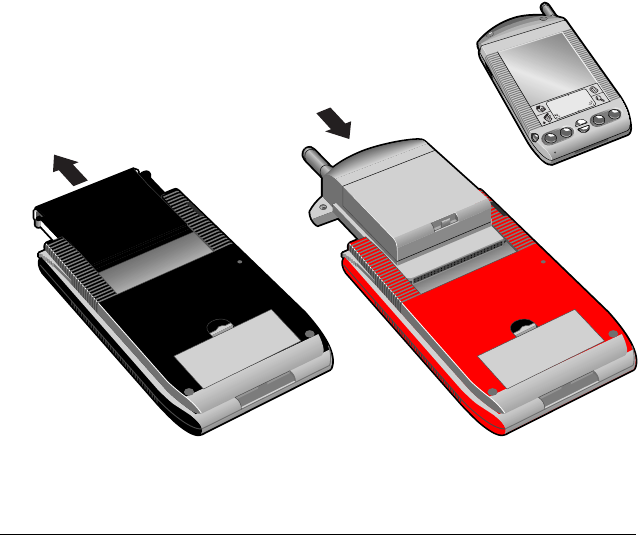
Step 3: Insert your battery into your VisorPhone
■Insert the battery into your VisorPhone and secure the latch.
SIM card
Getting Started 5
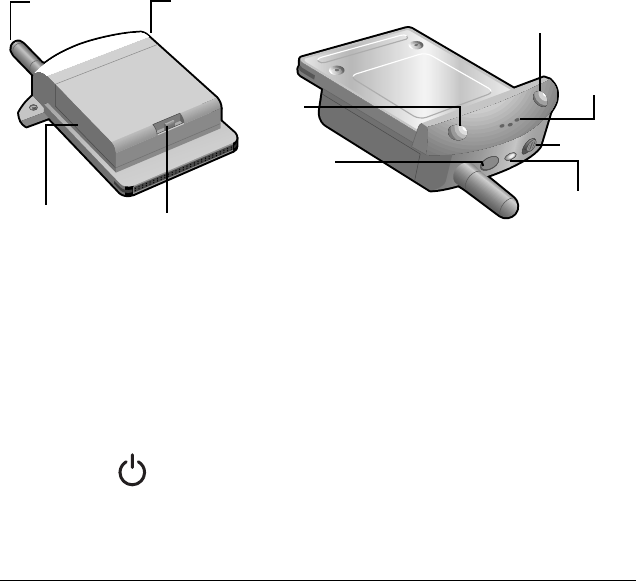
Step 4: Get to know your phone
Antenna Receives and sends signals on your VisorPhone. The
antenna does not telescope out of the phone.
Headset jack Enables you to connect a headset so you can view your
handheld screen while talking on the phone.
Battery Powers your VisorPhone.
Battery latch Secures the battery to your VisorPhone.
Power
button
Turns on your VisorPhone and activates the signal.
Your phone stays on until you remove it from your
handheld or press the power button to turn it off.
Antenna Hea
d
set jac
k
Battery latch
Power
button
Speaker
Phone
button
SMS Message
Manager button
LED
Slider
Battery
6 Getting Started
Speaker Functions as the earpiece on your VisorPhone.
Tip: To adjust the volume during a call, press the
scroll buttons on the front of your handheld.
Phone
button
Turns on your handheld and starts the Phone
application. If another application is running, press this
button to switch to the Phone application. If the phone
is ringing, press this button to answer calls.
SMS
Message
Manager button
Turns on your handheld and starts the SMS Message
Manager application so you can view, send, and receive
text messages.
Slider Controls the ringer setting. See “Selecting the ringer
settings” on page 71 for details on changing the settings.
LED Provides status information for your VisorPhone. The
color of the light and the blink state indicate the status
as follows:
No light = Phone off
Red/solid = Charger on; battery charging
Green/solid = Charger on; battery fully charged
Red/slow blink = Phone on; no network service
Green/slow blink = Phone on; in service
Red/fast blink = Battery low
Green/fast blink = Data call active
Getting Started 7
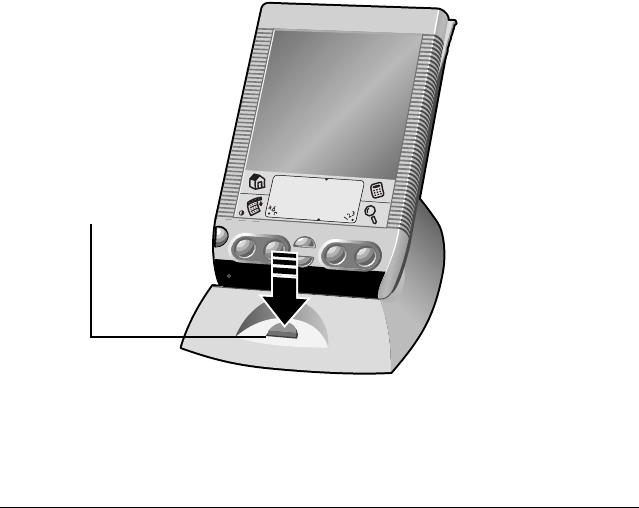
Step 5: Connect the phone to your handheld
1. Remove the slot protector from your handheld.
2. Insert your VisorPhone module into the Springboard™ expansion slot.
Tip: To remove your VisorPhone from your handheld, simply slide it
out from the Springboard expansion slot.
Slide the slot
protector away
from your
handheld
Slide the module into
the Springboard
expansion slot

8 Getting Started
Step 6: Charge the battery
1. Plug the travel charger into a wall outlet.
2. Insert the travel charger cable into the connector on your handheld.
Tip: When your phone is on, the charge icon appears in the Phone
application while your VisorPhone charges. Note that your
VisorPhone must be in your handheld while charging, and that it
takes about 1.5 hours to fully charge the battery. It’s time to recharge
the battery when you observe one of the following:
■the LED turns red and blinks quickly
■the LED does not turn on when you turn on your phone
■the battery gauge in the top-right corner of the Phone
application appears empty when your VisorPhone is on and the
Phone application is on the screen
LED turns so
l
i
d
re
d
when charging
and solid green
when charged
Getting Started 9
Step 7: Turn on your phone
After the battery is charged, you can begin using your phone.
1. Press the Power button on your VisorPhone for two seconds until you
hear a beep.
Note: If the Unlock Phone dialog appears, see “Unlocking your
phone” on page 73 for instructions.
2. Wait up to two minutes for your VisorPhone to locate your service
provider’s network. Do not tap OK.
Tip: When your VisorPhone locates the network, the Network Search
dialog displays a Welcome message and your service provider’s
name appears in the upper-left corner of the Phone application. If
you are in an area without coverage, the Network Search dialog
displays an “Unable to register to the network” message and “No
Service” appears in the upper-left corner of the Phone application.
10 Getting Started
Step 8: Activate your account
If you received a new SIM card with your phone, you need to call your
service provider to activate your account (unless it was activated upon
purchase at a retail location). Your service provider’s phone number is
located on the materials that came with your VisorPhone module.
Once you receive your phone number, it may take a few hours to become
fully active. Some service providers send a special message with your phone
number. Follow these steps to check the phone number:
1. Make sure your phone is on for at least 30 seconds.
2. Press the Phone button on your VisorPhone to access the Phone
application.
3. Tap the Menu icon .
4. Under Options, tap Phone Info.
5. Tap OK.
Your VisorPhone number (if available)
Your equipment ID number

Getting Started 11
Congratulations
You’re ready to use your VisorPhone module. Keep these things in mind as
you use your new phone:
■If you travel outside a coverage area, your phone remains on but you
can’t make or receive calls. If this occurs, the LED blinks red slowly and
the phone periodically tries to register to the network. When you return
to a coverage area, the LED blinks green.
■Although VisorPhone supports many calling features, such as call
waiting, call hold, call forwarding, 3-way calling, voicemail, SMS, and
SMS Email, check with your service provider to confirm that these
services are available and active on your mobile calling plan.
■If you travel outside a coverage area, you can’t receive SMS text
messages. However, the messages are stored by the network and you
will receive them when you return to a coverage area.
■Your account includes a voicemail feature so people can always leave
you a message even when your phone is off.
■Always use care when operating a mobile phone. If you plan to use your
VisorPhone module while driving a car, we recommend that you
become familiar with local laws concerning use of a mobile phone while
driving, and that you use a headset for hands-free operation. See
“Connecting a headset” on page 77 to learn how to connect a headset to
your VisorPhone.

12 Getting Started
Making Voice Calls 13
Making Voice Calls
There are several ways to make voice calls with your VisorPhone. This
chapter describes how to dial a number by:
■Selecting it from your speed dial list
■Entering it on the Dialpad
■Selecting it from your Call History list
■Selecting it from your Address Book
■Dialing from another application
■Returning a missed call
■Dialing an emergency number
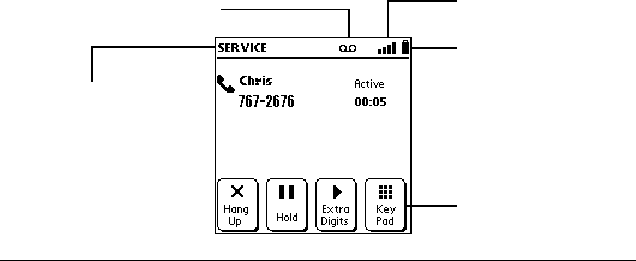
After you dial and establish a connection, the Active Call screen appears:
Tap Key Pad to enter
extra numbers such
as a PIN code or an
extension
Network name
Voicemail notification icon
(not used by all networks) Signal strength icon
Battery gauge
14 Making Voice Calls
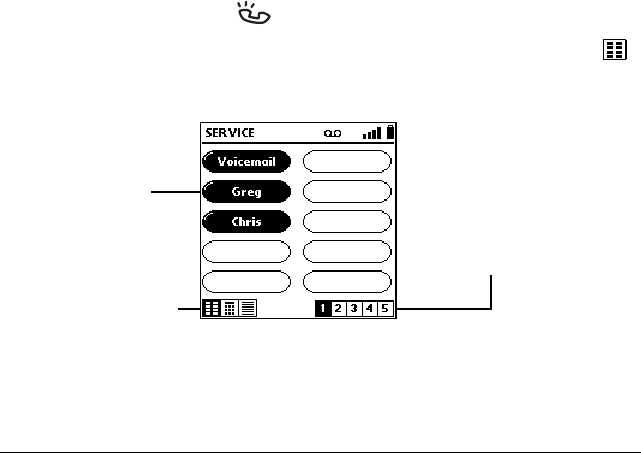
Calling a speed dial number
Speed dialing enables you to quickly place a call without entering the
number. This is particularly useful for numbers you call often, such as your
home or office.
Note: This section assumes you’ve already created a speed dial list. To
learn how to add numbers to your speed dial list see “Defining speed
dial buttons” on page 38.
1. Press the Phone button on your VisorPhone.
Tip: If the screen below doesn’t appear, tap the Speed Dial icon .
2. Select the number you want to call.
Tip: After you make the connection the Active Call screen appears.
If prompted to enter a menu selection, tap Key Pad. If you
defined any Extra Digits, such as an extension, tap Extra Digits.
3. Tap Hang Up to end the call.
Tap a button to
dial a number
Tap a Page icon
to view other
speed dial pages
Speed Dial, Dialpad,
and Call History icons
Making Voice Calls 15
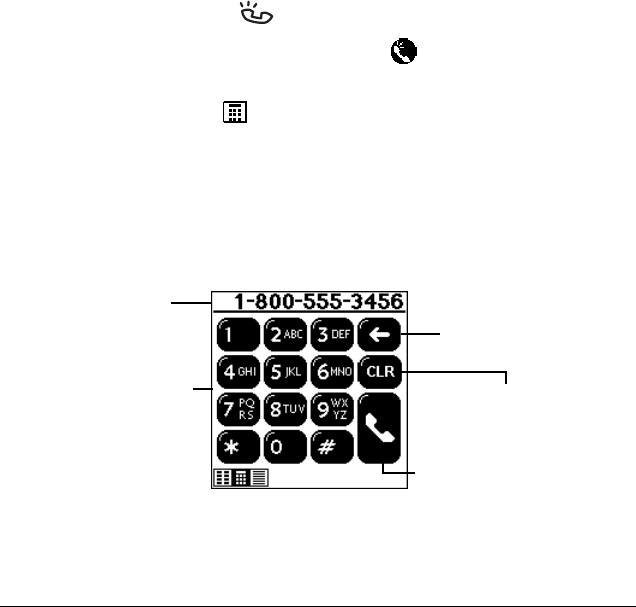
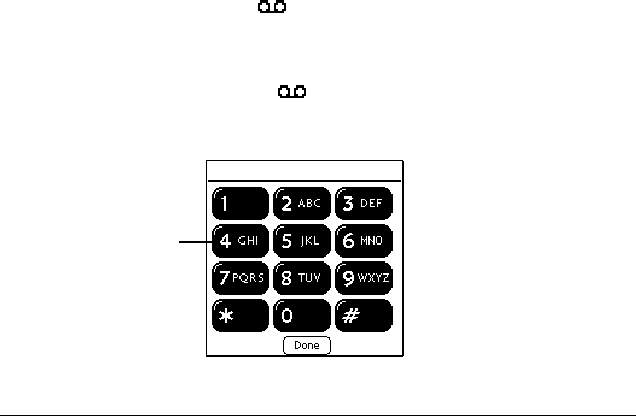
Dialing a number with the Dialpad
1. Press the Phone button on your VisorPhone.
Tip: You can also tap the Phone icon in the Applications
Launcher to start the Phone application.
2. Tap the Dialpad icon .
3. Dial the number. If you are dialing an international number, tap the +
key before entering the number to automatically insert the international
access code upon dialing.
Tip: To display the last ten numbers dialed, press the scroll buttons
on the front of your handheld.
Tip: To edit the phone number, tap the Dial box and then use the
keypad, Graffiti® writing, or the onscreen keyboard.
4. Tap Hang Up to end the call.
Tap CLR to delete
the entire entry
Tap Backspace to
erase the last digit
Tap a digit to enter
it in the dial box
Tap Send to dial the
number in the dial box
Dial box
16 Making Voice Calls
Redialing the last number
■Hold down the Phone button for two seconds to redial the last number
you called.
Redialing previous numbers
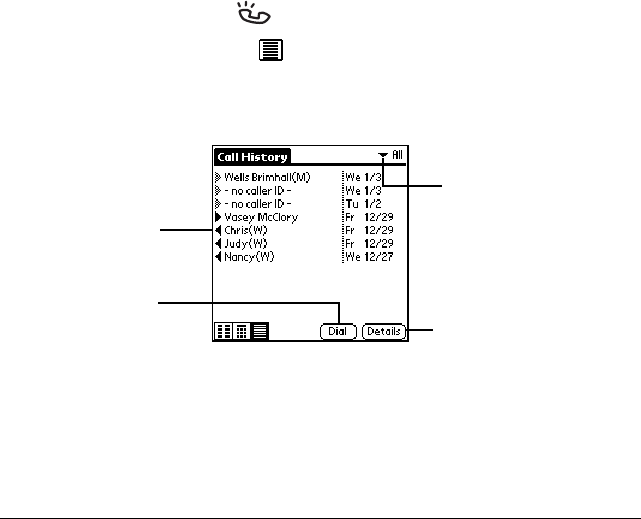
1. Press the Phone button on your VisorPhone.
2. Tap the Call History icon to view a list of previous incoming and
outgoing calls.
3. Select the number you want to call.
4. Tap Dial.
Tip: To add a number to your Address Book or Speed Dial list, tap
Details, tap Copy Phone #, then in Address Book or Speed Dial Edit
view, tap the line where you want to add the number, and select
Paste from the Edit menu to insert the number.
Tap
h
ere to se
l
ect
the call category:
All, Incoming, Out-
going, or Missed
Tap the entry you
want to dial
Tap Dial to call
selected number Tap Details to view
call information
Making Voice Calls 17
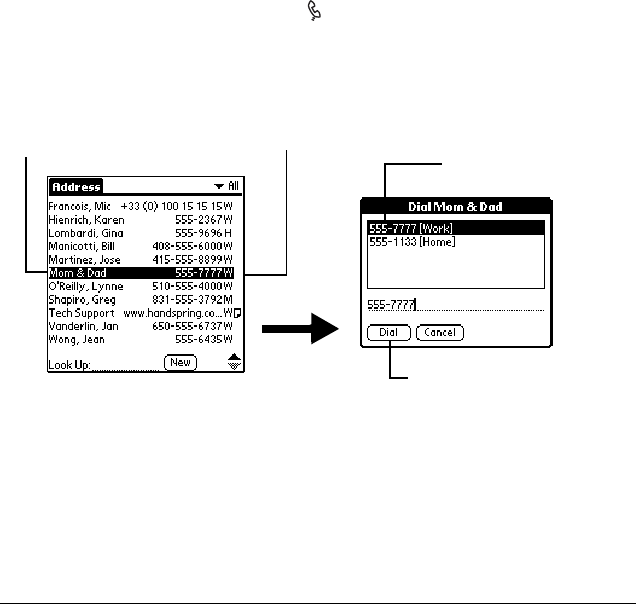
Calling a number in your Address Book
1. Press the Address Book button on the front of your handheld.
2. Select the number you want to call.
Tip: If you install a third-party email or SMS application, the Dial
button changes to an Email button when you select an email
address, or to an SMS button when you select a mobile phone
number. See “Assigning dialing applications” on page 69 for
details on assigning compatible third-party SMS and Email
applications to these buttons.
3. Tap Hang Up to end the call.
T
ap a name
to view or
edit contact
information
Tap a number
to select a
number to dial Tap a number
to select it
Tap Dial to call the number
18 Making Voice Calls
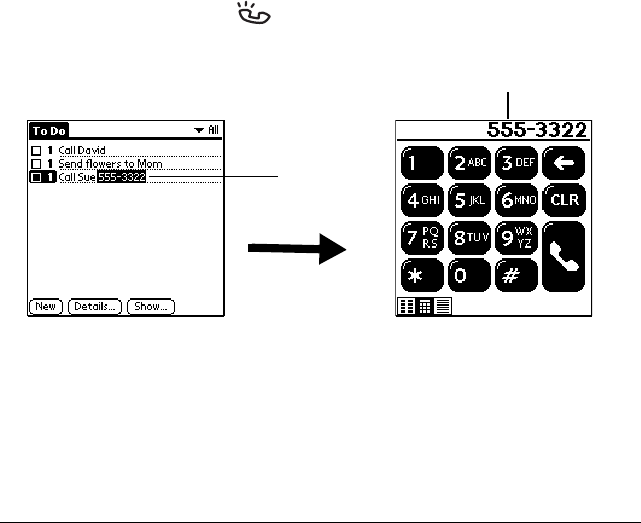
Dialing a number from other applications
You can also dial numbers from other applications such as Memo Pad or To
Do List.
1. Highlight the number you want to dial.
2. Press the Phone button on your VisorPhone.
Tip: The number automatically appears in the Dial box on the Dialpad
screen so you can edit the number if needed.
Select a
number
to dial
Tap
h
ere to a
dd
an area co
d
e
or change the number
Making Voice Calls 19
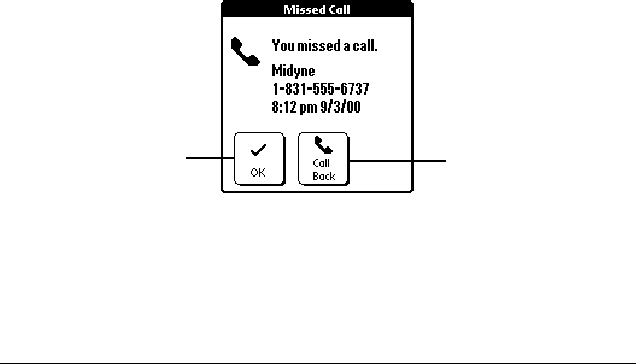
Returning a missed call
When your VisorPhone is on and you remain in a coverage area, any calls
you miss appear in the Call History list and you receive a missed call alert
message. When your phone is off or you travel outside a coverage area, your
calls are forwarded to voicemail and they do not appear in the Call History
list.
■If you miss multiple calls, a message appears indicating the number of
calls you missed. Follow the steps in “Reviewing missed calls" on page
32 to return the calls.
■If you miss a single call, the following screen appears:
Tip: If the caller’s phone number is not available, the Call Back button
does not appear on the Missed Call screen.
Tap Call Back to
dial the number
Tap OK to dismiss
the call without
calling back
20 Making Voice Calls
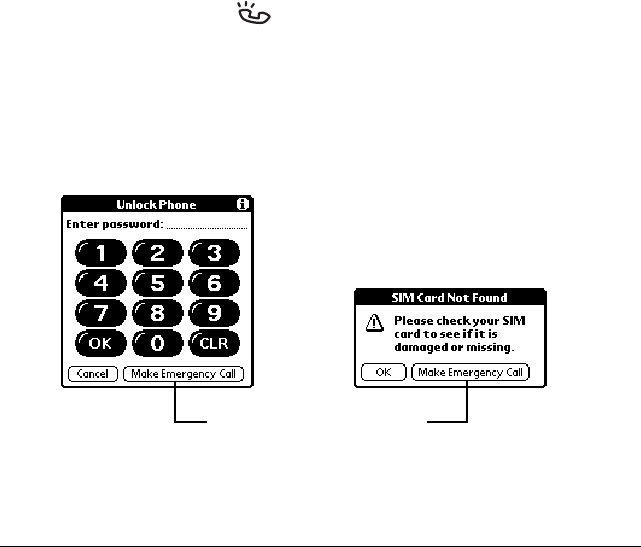
Calling an emergency number
Your VisorPhone provides easy access to emergency numbers such as
112 or 911.
1. Press the Phone button on your VisorPhone.
2. Do one of the following:
■If your phone is unlocked, dial 112 or 911 from the Dialpad screen.
■If your phone is locked or your SIM card is missing, tap Make
Emergency Call from the Unlock Phone or SIM Card Not Found
screen.
Tip: You don’t need to unlock your phone or even have the SIM card
installed to call an emergency number.
Tap Make Emergency Call

Receiving Calls 21
Receiving Calls
Whenever your phone is on and you are within a coverage area, you can
receive incoming calls. In addition to answering calls, you can also choose
several incoming call options. This chapter describes how to:
■Answer the phone (or reject a call)
■Respond to a call waiting prompt
■Forward your calls
22 Receiving Calls
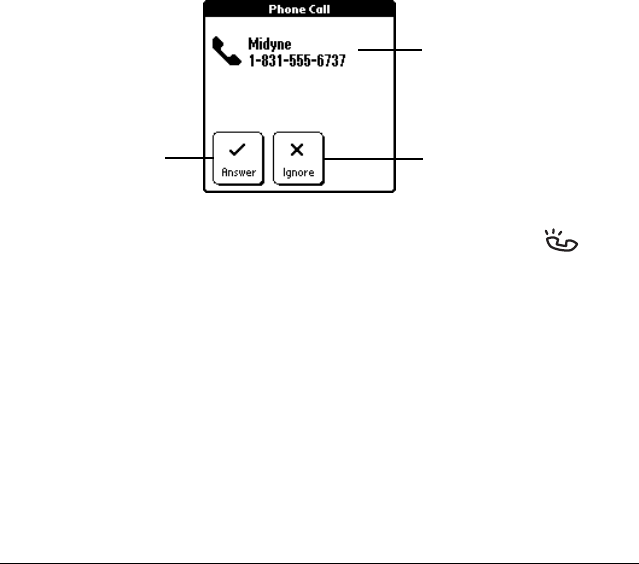
Answering the phone
An incoming call turns on your handheld if it is off.
Tip: You can also answer a call by pressing the Phone button while
your VisorPhone is ringing.
Caller’s name and
phone number if
available
Tap Answer to
accept the call
Tap Ignore to
send the call
to voicemail
Receiving Calls 23
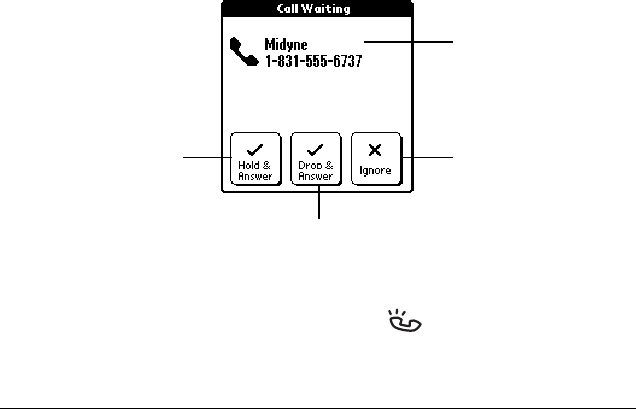
Responding to call waiting
When you are on the phone and receive a second call, the Phone application
updates the Active call screen and emits a Call Waiting “beep” tone.
Tip: Make sure the Disable Call Waiting option on the Call Preferences
screen is off. When this option is off the Disable Call Waiting check
box is empty. For more information on enabling and disabling call
waiting, see “Disabling call waiting” on page 74.
■When the Call Waiting dialog appears, tap the appropriate button.
Tip: You can also press the Phone button to place the first call on
hold and answer the incoming call.
Caller’s name and
phone number if
available
Tap Hold & Answer
to place 1st call on
hold and answer
incoming call
Tap Drop & Answer
to end1st call and
answer incoming call
Tap Ignore to
send the call
to voicemail
24 Receiving Calls
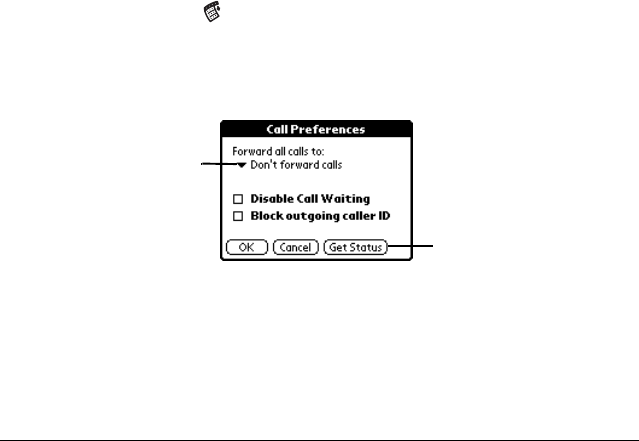
Forwarding calls
If you need to turn off your phone or know you will be traveling outside a
coverage area, you can forward your calls to another number. Keep in mind
that your service provider will still charge you for your forwarded calls.
Note: Because call forwarding information is stored by the network, it’s a
good idea to check the current network settings both before and
after you change the call forwarding option.
1. Tap the Menu icon .
2. Under Options, tap Call Preferences.
3. Select the call forwarding option you want to use.
Tip: You can define multiple forwarding numbers. Select Edit numbers
from the list to add, change, or delete a number.
4. Tap OK.
Tap here to forward
all calls to the selected
number
Tap here to display
current network settings

Handling Multiple Calls 25
Handling Multiple Calls
You can use the Hold button in the Phone application to handle a variety of
situations that involve multiple calls. During an active call, you can receive
or place another call, switch between two active calls, and create a 3-way
conference call. For example, when you’re talking to a friend, you can put
them on hold, call a restaurant to make dinner reservations, and return to
your friend to confirm the time and place. These features also enable you to
receive an important incoming call while you’re already on the phone, and
to facilitate conference calls when you’re on the go.
This chapter describes how to:
■Place a call on hold
■Dial another number while a call is on hold
■Switch between two calls
■Use 3-way calling
26 Handling Multiple Calls
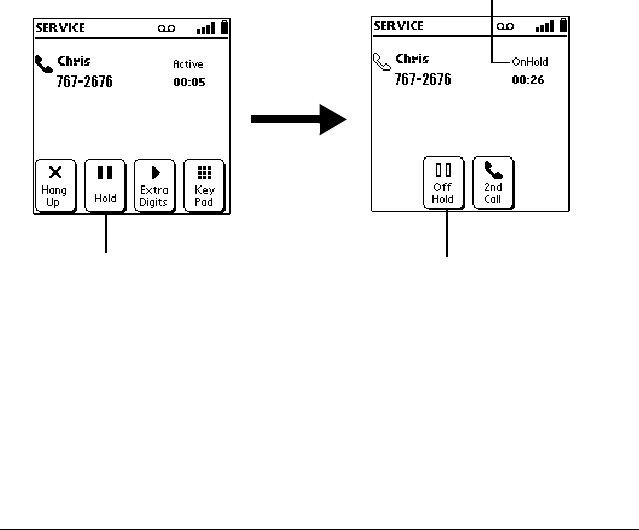
Placing a call on hold
1. Place or answer a call.
2. Tap Hang Up to end the call.
Tap Off Hold to return
to the call
Call status
indicator
Tap Hold to put the
call on hold
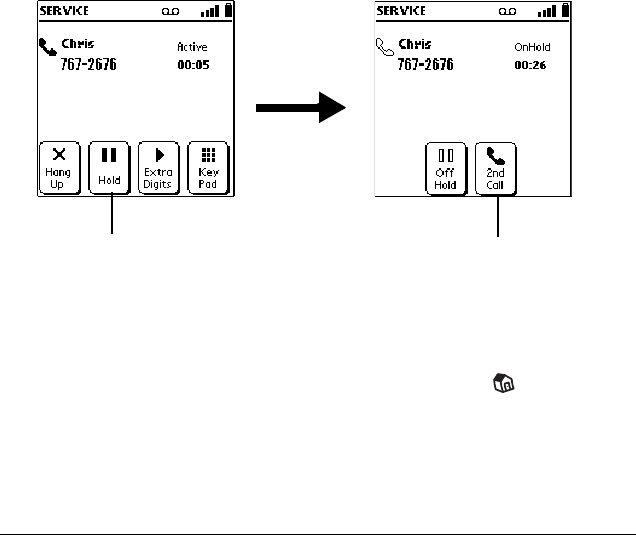
Handling Multiple Calls 27
Dialing another number while a call is on hold
1. Place or answer a call.
2. Put the call on hold.
3. Tap 2nd Call.
4. Dial the number.
Tip: You can tap the Applications Launcher icon to open
another application that has the number you want to dial.
Tap 2nd Call to access
dial functions
Tap Hold to put the
call on hold
28 Handling Multiple Calls
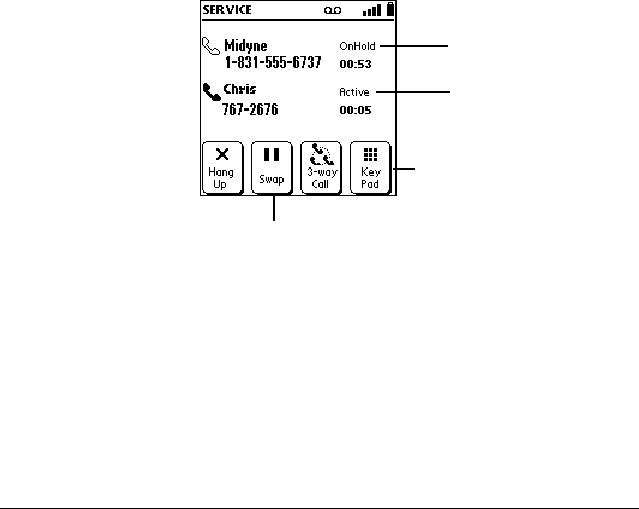
Switching between two calls
1. Answer or place two calls. See “Dialing another number while a call is on
hold” on page 27.
2. Tap Swap, or tap the call status line to switch between calls.
Tip: If you called an automated phone system that prompts you to
enter a menu selection or phone extension, tap KeyPad to
respond to the voice prompts.
3. Tap Hang Up to end the active call.
Tap Swap to
change calls
Tap KeyPad to access a
voice prompt system
1st call status
2nd call status
Handling Multiple Calls 29
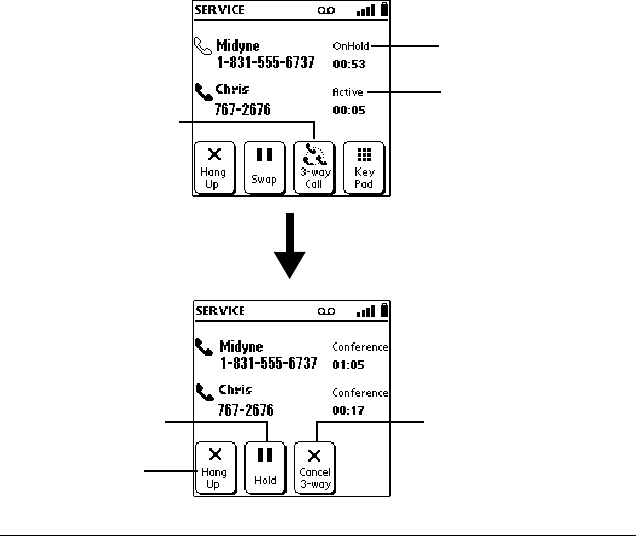
Using 3-way calling
1. Answer or place two calls.
2. Join the two calls.
Tap 3-way Call to
speak with both calls
at the same time
1st call status
2nd call status
Tap Hang Up to
end both calls
Tap Hold to place
both calls on hold
Tap Cancel 3-way to
return to the previous
active call and to
place the other call
on hold

30 Handling Multiple Calls

Checking Messages 31
Checking Messages
Your VisorPhone is capable of receiving voicemail and text messages and
generating missed call messages.
If you miss a call when your VisorPhone is on and you remain in a coverage
area, your missed calls appear in the Call History list and you receive a
missed call alert message. When your phone is off or you travel outside a
coverage area, your missed calls are forwarded to voicemail and they do not
appear in the Call History list. Similarly, when your phone is off or you
travel outside a coverage area, your service provider stores your text
messages until you turn on your phone or return to a coverage area.
Note: You may need to contact your service provider to add the text
messaging feature to your rate plan. This feature is sometimes
referred to as SMS, or Short Message Service.
This chapter describes how to:
■Review missed calls
■Check voicemail
■Check text messages
■Display call history
■Purge call history
32 Checking Messages
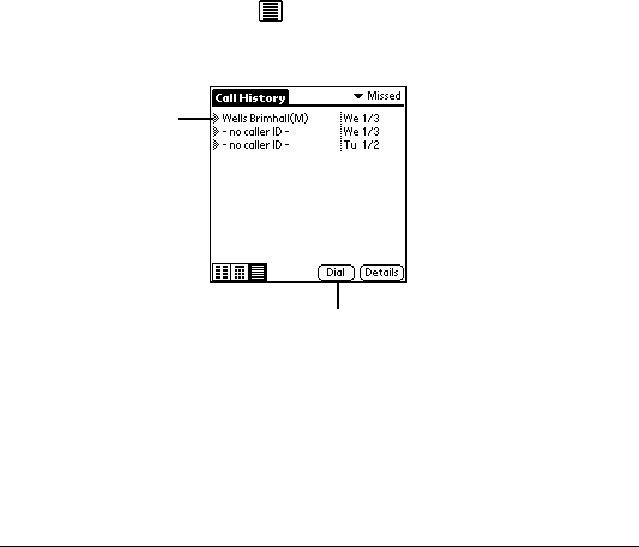
Reviewing missed calls
When you don’t answer an incoming call, it appears under Missed calls in
your Call History list.
1. Tap the Call History icon .
2. Tap Missed in the pick list in the upper-right corner.
Tap caller’s name
or phone number
Tap Dial to return the call
Checking Messages 33
Checking voicemail
When your phone is off, you travel outside a service area, or you miss or
choose to ignore a call, the caller may leave a voicemail message. When you
connect to the network, the phone application notifies you that you received
voicemail messages.
1. Dial your voicemail service using one of these methods:
■Tap the Voicemail button in the Speed Dial view.
■Tap Listen in the Voicemail alert dialog.
■Tap the Voicemail icon in the upper-right part of the Speed Dial
view or the Dialpad view.
Tip: Some service providers do not support the Listen button and
the Voicemail icon .
2. Tap Key Pad on the Active Call screen.
3. Tap Done.
Tap buttons to dial
access codes and
review messages
34 Checking Messages
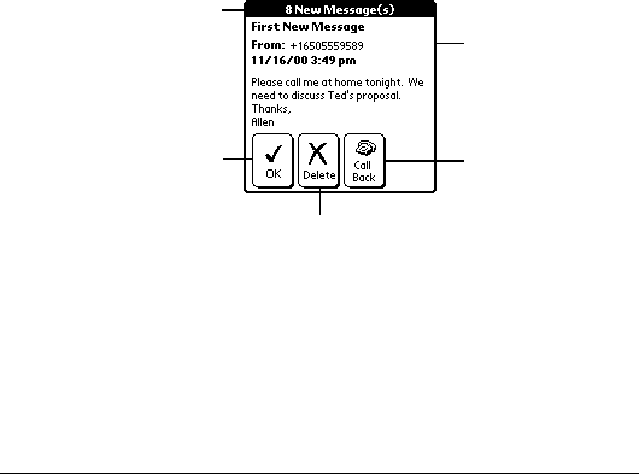
Checking text messages
When your phone is off or you travel outside a service area, other people can
still send you text messages. Your service provider stores the messages for
you until you turn on your phone or return to a service area. When you
connect to the network, the SMS Message Manager displays the first
message in a screen similar to the following:
Caller’s name and
phone number if
available
Tap OK to review
messages later
Tap Delete to delete
the message
Num
b
er o
f
new messages
Tap Call Back to
dial the sender
Checking Messages 35
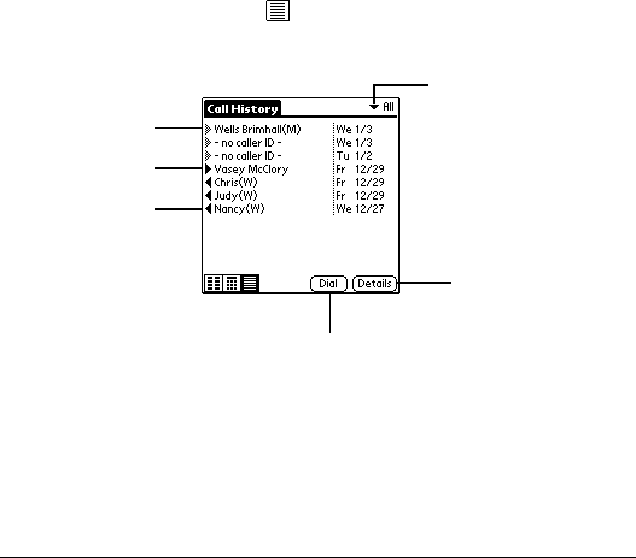
Displaying call history
The Call History view provides quick access to the previous 1,000 incoming
and outgoing calls.
■Tap the Call History icon .
Tip: To temporarily store a number in your handheld’s memory,
tap Details, tap Copy Phone #, and then tap Done. You can
now Paste this number into any application on your handheld.
Outgoing call
Tap arrow to se
l
ect
the call category: All,
Incoming, Outgoing,
or Missed
Incoming call
Missed call
Tap Dial to call the
selected number
Tap Details to
view time and
duration
36 Checking Messages
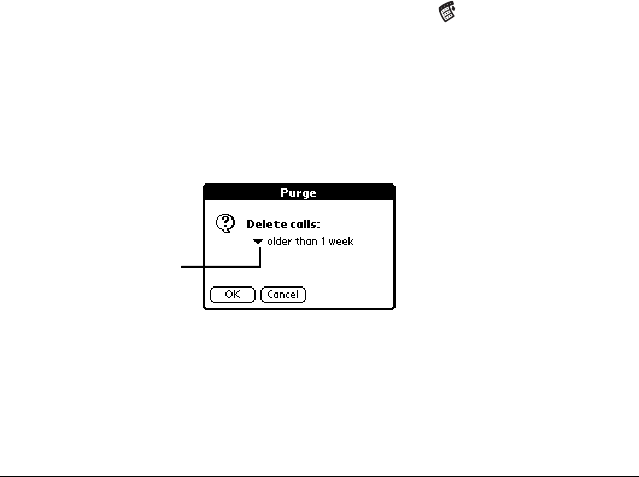
Purging call history
Your VisorPhone continues accumulating call history information for up to
1,000 calls until you purge the call history list. To conserve storage space, we
recommend that you purge this list periodically.
Note: Using the Purge function permanently removes the calls from your
handheld. You cannot undo this process to restore the information.
1. From the Call History view, tap the Menu icon .
2. Under Record, tap Purge.
Tip: To delete a specific item, select the item from the Call History
view and tap Delete Item instead of Purge.
3. Select the purge option you want to use.
4. Tap OK.
Tap the pick list to
choose which calls
to purge

Managing Your Speed Dial List 37
Managing Your Speed Dial List
You can store up to 50 phone numbers in the speed dial list. There are five
pages of numbers that hold ten numbers per page.
Tip: Keep your speed dial list organized by storing different types of
numbers on different pages. For example, create separate pages for
family, business, friends, and emergency numbers.
This chapter describes how to:
■Assign phone numbers to speed dial buttons
■Add Address Book entries to your speed dial list
■Change speed dial entries
■Delete speed dial entries
■Arrange the speed dial list
38 Managing Your Speed Dial List
Defining speed dial buttons
1. Tap the Speed Dial icon .
2. Tap a blank speed dial button.
Note: The first slot on the first Speed Dial page is reserved for your
service provider’s voicemail service number.
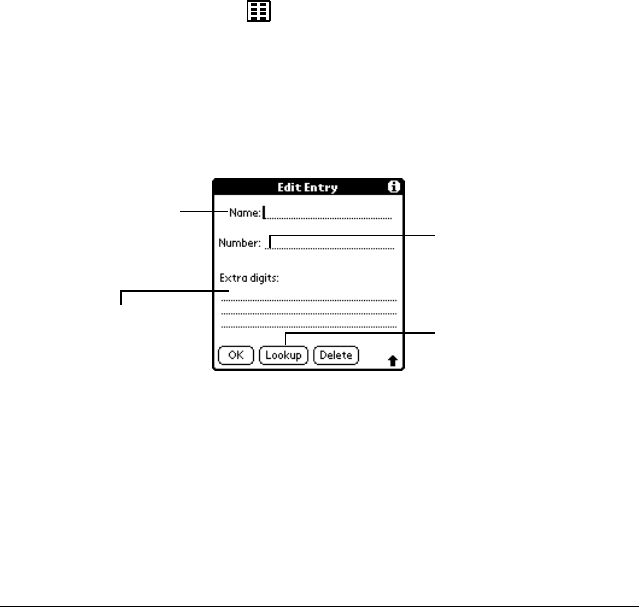
3. In the Edit Entry dialog, enter the Name, Number, and any Extra digits.
Tip: To insert a pause between Extra digits when dialing, enter a
comma (,). Each comma represents a one second pause.
4. Tap OK.
Enter a
name for
the button
Tap Lookup to find
a number in your
Address Book
Enter the phone
number
Enter digits to dial
after placing the call
(such as an extension
or access code)
Managing Your Speed Dial List 39
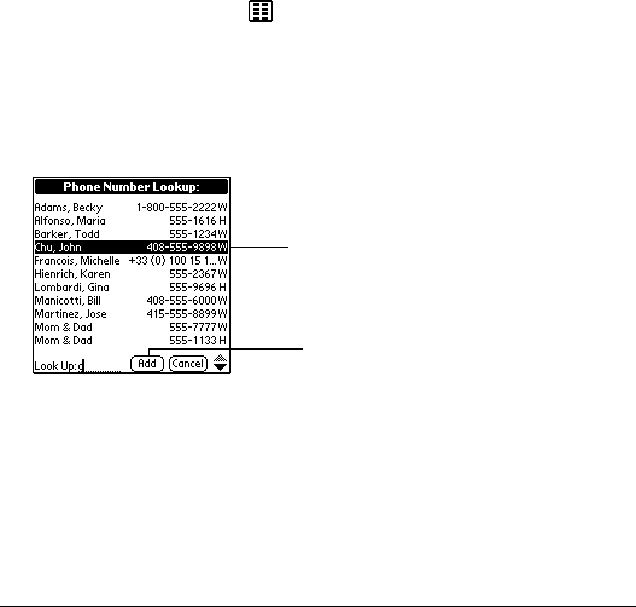
Adding an Address Book entry to your speed dial list
1. Tap the Speed Dial icon .
2. Tap a blank speed dial button.
3. Tap Lookup.
4. In the Phone Number Lookup dialog, use the scroll arrows or begin
writing the person’s last name to find the number you want.
5. Tap Add.
Tip: You can edit the number or name by tapping it in the Edit
Entry dialog.
6. From the Edit Entry dialog, tap OK.
Tap a number to select it
Tap Add to insert
the number in the
speed dial entry
40 Managing Your Speed Dial List
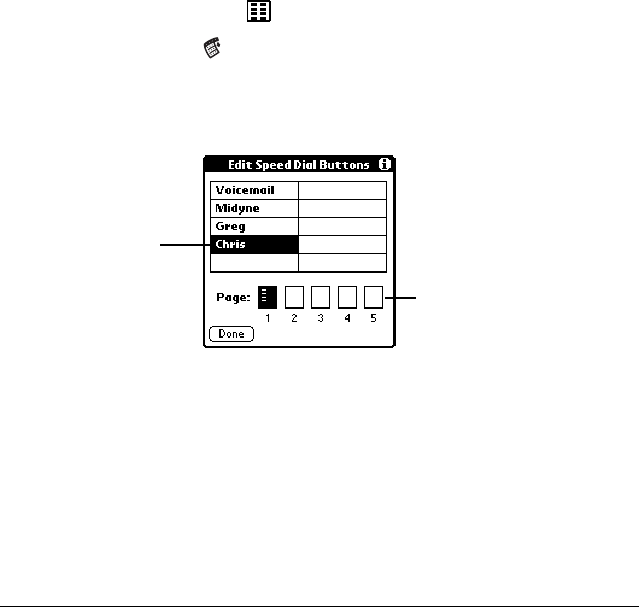
Changing a speed dial entry
1. Tap the Speed Dial icon .
2. Tap the Menu icon .
3. Under Edit, tap Edit Speed Dial.
4. Select the entry you want to change.
5. In the Edit Entry dialog, enter the new information.
6. Tap OK to save the new information.
7. Tap Done.
Tap an entry
to select it
Tap pages to view
more entries

Managing Your Speed Dial List 41
Deleting speed dial entries
1. Tap the Speed Dial icon .
2. Tap the Menu icon .
3. Under Edit, tap Edit Speed Dial.
4. Select the entry you want to delete.
5. In the Edit Entry dialog, tap Delete.
6. Tap OK to confirm deletion.
7. Tap Done.
Tap an entry
to select it
Tap pages to view
more entries
42 Managing Your Speed Dial List
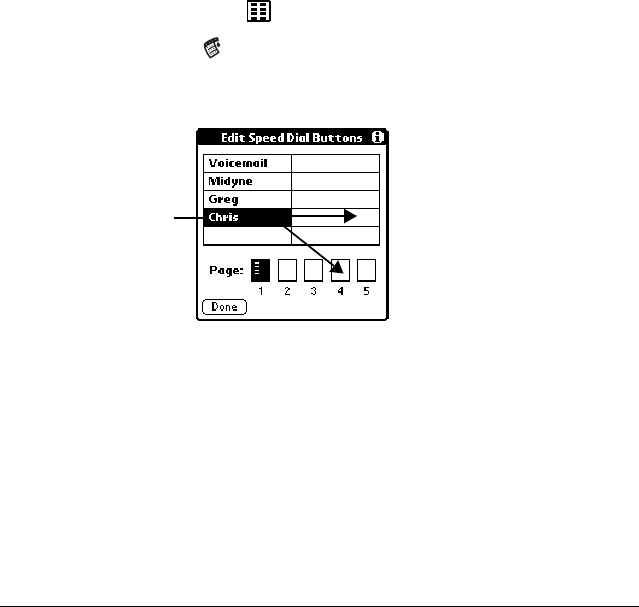
Arranging the speed dial list
1. Tap the Speed Dial icon .
2. Tap the Menu icon .
3. Under Edit, tap Edit Speed Dial.
Tip: If the new slot is full, the other entries move over one slot as the
rows fill from top to bottom. If you drag an entry to a page icon,
the entry moves to the first available slot on that page.
4. Tap Done.
Drag an entry
to another slot
or page

Using Your SIM Phonebook 43
Using Your SIM Phonebook
In addition to storing your phone number and billing information, your
SIM card also contains a phone list that is separate from your Address Book
and speed dial list. Most SIM cards enable you to store more than 50 names
and numbers. By storing a phone list on your SIM card, you have immediate
access to your phone list when you move your SIM card to another phone.
The SIM Phonebook application is a utility that enables you to view and
manage the phone list on your SIM card.
This chapter describes how to:
■Copy entries from your speed dial list to your SIM card
■Copy entries from your SIM card to your speed dial list
■Delete entries from your SIM card
■Dial entries on your SIM card
44 Using Your SIM Phonebook
Copying entries from your speed dial list to your SIM card
1. Tap the Applications Launcher icon on the front of your handheld.
2. Tap the SIM Phonebook icon .
3. Tap Speed Dial in the pick list in the upper-right corner.
4. Tap the entry you want to copy.
Tip: To copy all the numbers in your speed dial list, select Copy All
from the Edit menu.
Tip: A check mark indicates that the entry is already on both your
speed dial list and your SIM list.
5. Tap Copy.
Tap a name or number to select it
Tap Copy to add the entry
to your SIM card
Tap Speed Dial
Using Your SIM Phonebook 45
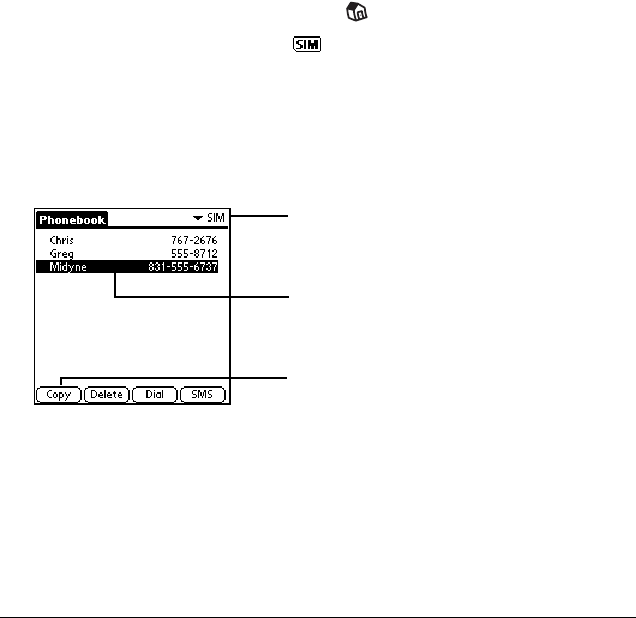
Copying entries from your SIM card to your speed dial list
1. Tap the Applications Launcher icon on the front of your handheld.
2. Tap the SIM Phonebook icon .
3. Tap SIM in the pick list in the upper-right corner.
4. Tap the entry you want to copy.
Tip: To copy all the numbers in your speed dial list, select Copy All
from the Edit menu.
Tip: A check mark indicates that the entry is already on both your
speed dial list and your SIM list.
5. Tap Copy.
Tap a name or number to select it
Tap Copy to add the entry
to your speed dial list
Tap
S
I
M
46 Using Your SIM Phonebook
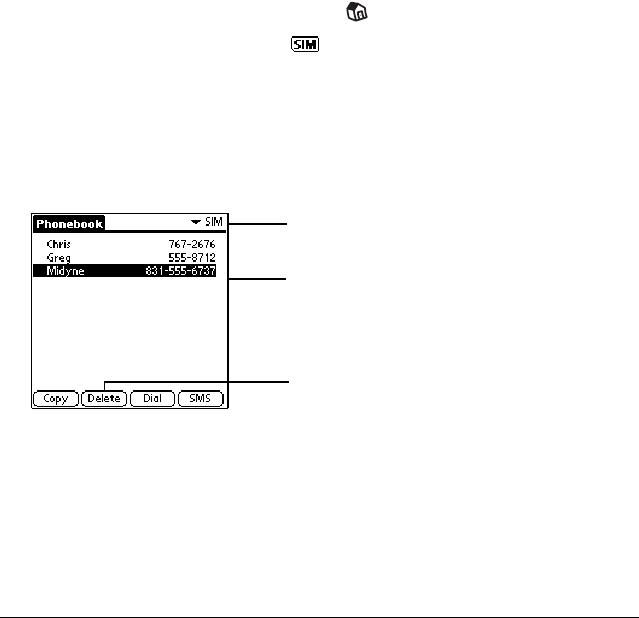
Deleting entries from your SIM card
1. Tap the Applications Launcher icon on the front of your handheld.
2. Tap the SIM Phonebook icon .
3. Tap SIM in the pick list in the upper-right corner.
Tip: To delete entries from your speed dial list, tap Speed Dial
instead.
4. Select the entry you want to delete.
5. Tap Delete.
6. Tap OK to confirm deletion.
Tap a name or number to select it
Tap Delete to remove
the entry
Tap to select SIM or Speed Dial
Using Your SIM Phonebook 47
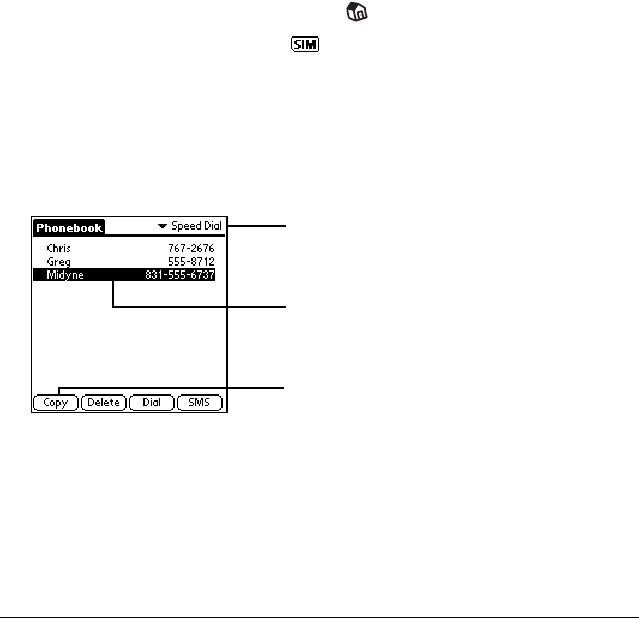
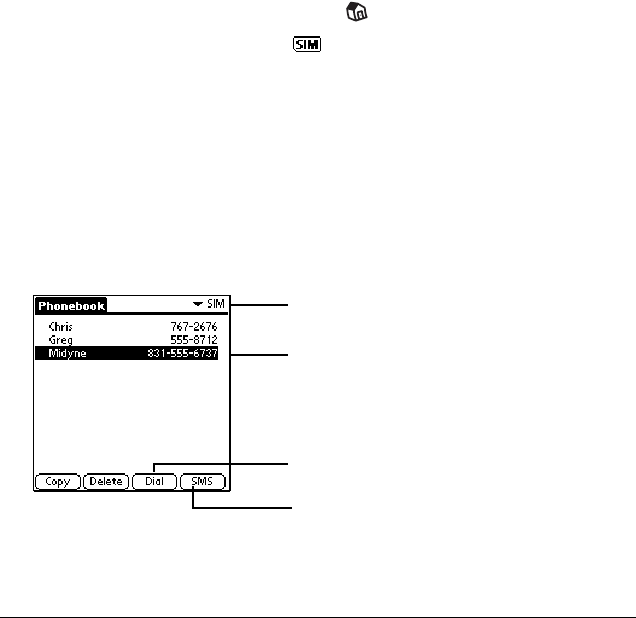
Dialing entries on your SIM card
1. Tap the Applications Launcher icon on the front of your handheld.
2. Tap the SIM Phonebook icon .
3. Tap SIM in the pick list in the upper-right corner.
Tip: You can also dial entries from your speed dial list by tapping
Speed Dial instead.
4. Select the entry you want to dial.
Tip: You can also send a text message to an SMS-enabled mobile
phone by tapping a mobile phone number and then tapping
SMS instead of Dial.
5. Tap Dial.
Tap a name or number to select it
Tap Dial to call the number
Tap to select SIM or Speed Dial
Tap SMS to send a text message

48 Using Your SIM Phonebook

Working With SMS Text Messages 49
Working With SMS Text Messages
In addition to dialing and receiving calls, you can use your VisorPhone to
send and receive short text messages. These text messages, also called SMS
(Short Message Service) messages, are similar to email messages that you
send and receive from your computer, but are limited to a few sentences in
length. The person receiving your message must also have a GSM mobile
phone and a service provider that supports text messages. Some service
providers also allow you to use your mobile phone to send text messages to
an email address and to receive text messages from a computer. Talk to your
service provider for details about their SMS and SMS Email features. This
chapter describes how to:
■Enable SMS and SMS Email
■View messages
■Reply to messages
■Create messages
■Create message greetings and signatures
■Set message options
■Save messages
■Forward messages
■Copy message text to the clipboard
■Modify outgoing messages
■Sort messages
■Delete messages
50 Working With SMS Text Messages
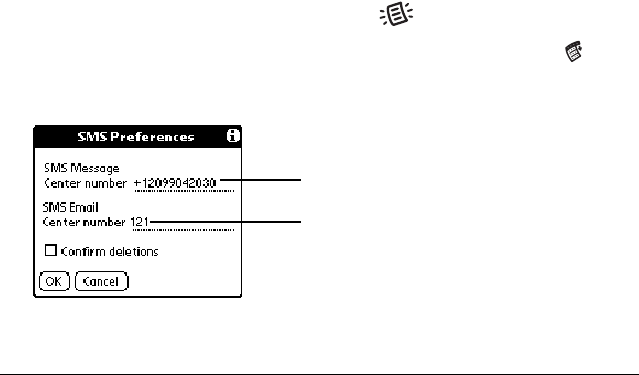
Enabling SMS and SMS Email
To send and reply to SMS messages, you must subscribe to your service
provider’s SMS service. If you subscribe to this service, your service provider
supplies an SMS Message Center number which appears in the SMS
Preferences dialog.
To use SMS Email, you must subscribe to your service provider’s SMS
Email service and enter their SMS Email Center number in the SMS
Preferences dialog. The SMS Email Center forwards the SMS messages to
the recipient’s email address. Contact your service provider to obtain their
SMS Email Center number.
1. Press the SMS Message Manager button on your VisorPhone.
2. From any SMS Message Manager list view, tap the Menu icon .
3. Under Options, tap Preferences.
4. Tap OK.
Enter SMS Email Center number
Confirm SMS Message Center number
Working With SMS Text Messages 51
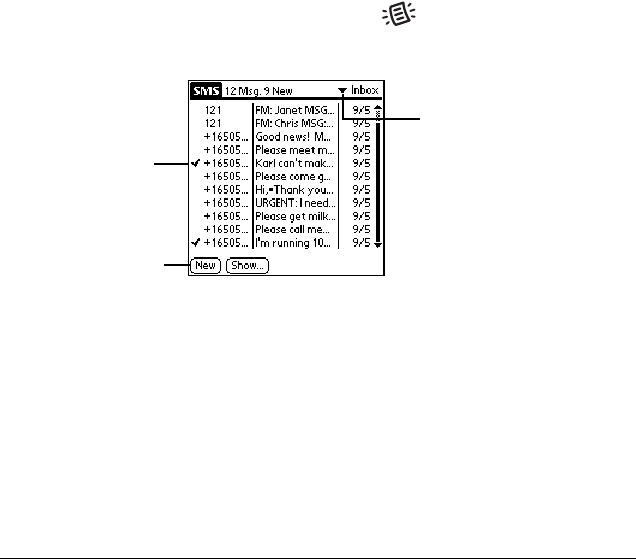
Viewing messages
You can view SMS messages even if you don’t subscribe to your service
provider’s SMS service.
1. Press the SMS Message Manager button on your VisorPhone to
open the SMS Message Manager Inbox.
Tip: When viewing Saved messages, the arrows indicate whether a
message was incoming or outgoing.
2. Tap the message you want to view.
3. Press the scroll buttons on your handheld to scroll through a message.
At the start or end of a message, it displays the next message.
4. Tap Done.
Tap New to create
a message
Tap arrow to select
the message category:
Inbox, Saved, Pending,
or Sent
Message read
52 Working With SMS Text Messages
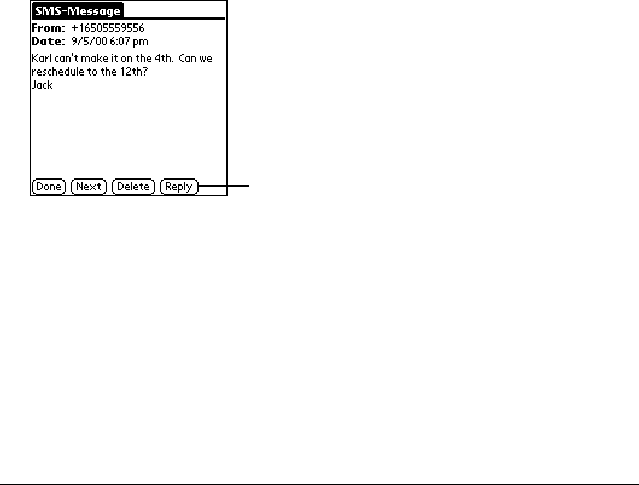
Replying to messages
To reply to SMS messages, you must subscribe to your service provider’s
SMS service. See “Enabling SMS and SMS Email” on page 50 to determine
if you subscribed to your service provider’s SMS service.
1. Tap the incoming message to which you want to reply.
2. Tap Reply.
3. Enter the message text.
Tip: When you reply to an SMS message, the SMS Message
Manager fills in the To field for you. When you reply to an
email message, you must enter the email address on the first
line of the message. See “Creating an SMS Email message” on
page 55 for more information.
4. Tap Send.
Tap Reply to respond to the message

Working With SMS Text Messages 53
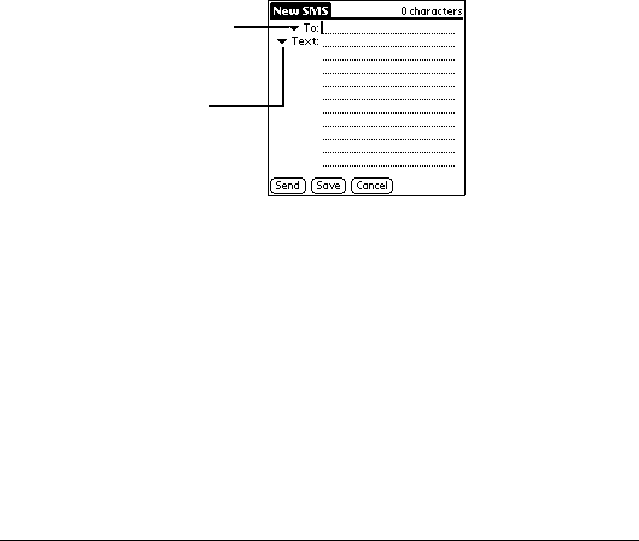
Creating messages
SMS Message Manager enables you to create short text messages and send
them to a GSM mobile phone number or an email address. If a message
exceeds 160 characters, SMS Message Manager divides the text into
multiple messages. As you create a message, the status bar indicates how
many messages will be sent and the total number of characters in all the
messages.
To save time while creating messages, you can insert predefined text from
a template. Some templates ask you to enter information such as a meeting
time or place. Using a template is similar to filling in the blanks on a form
letter instead of writing a letter from scratch. Fortunately, in SMS Message
Manager you can easily combine the template text with your own text to
personalize your message.
You can create a message at any time, but if you send a message when you
are outside a coverage area, your VisorPhone places the message in the
Pending category and sends it automatically when you return to a coverage
area. While a message is in the Pending category, you cannot edit it, but you
can delete it before it is sent.
54 Working With SMS Text Messages
Creating an SMS text message
1. From any SMS Message Manager list view, tap New.
2. Address the message to a mobile phone number.
3. Enter text using Graffiti, the onscreen keyboard, or the Text and
Greetings pick lists.
4. Tap Send. (The message goes into the Pending category until your
phone transmits the message.)
Tip: To store a draft message and send it later, tap Save instead.
After your message transmits, your VisorPhone places a copy in the Sent
category. If an error occurs while sending the message, an exclamation point
(!) appears next to the message in the Sent category.
Note: Some service providers may restrict you from sending SMS
messages to recipients outside your service network.
Tap To to select a number
Tap Text to insert text
from a template
Working With SMS Text Messages 55
Creating an SMS Email message
To send a message to an email address, you must first enter your service
provider’s SMS Email Center number. See “Enabling SMS and SMS
Email” on page 50.
1. From any SMS Message Manager list view, tap New.
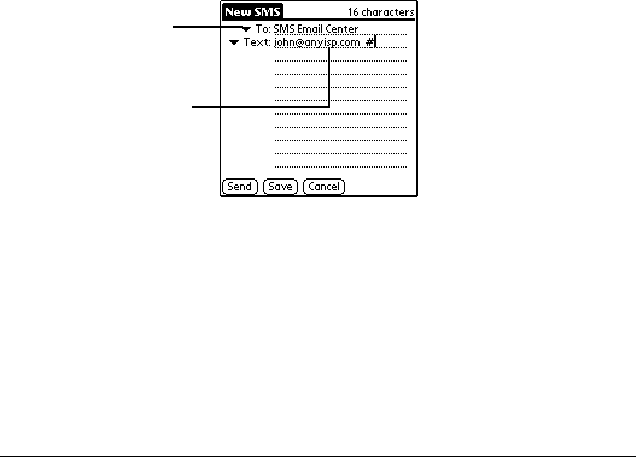
2. Tap the To pick list and select SMS Email Center.
3. On the first Text line, enter the recipient’s email address followed by a
space and a # symbol.
4. Enter the remaining text.
5. Tap Send. (The message goes in the Pending category until it
transmits.)
Tip: To store a draft message and send it later, tap Save instead.
Tap To to select
SMS Email Center
Enter email address
followed by a space
and # symbol
56 Working With SMS Text Messages
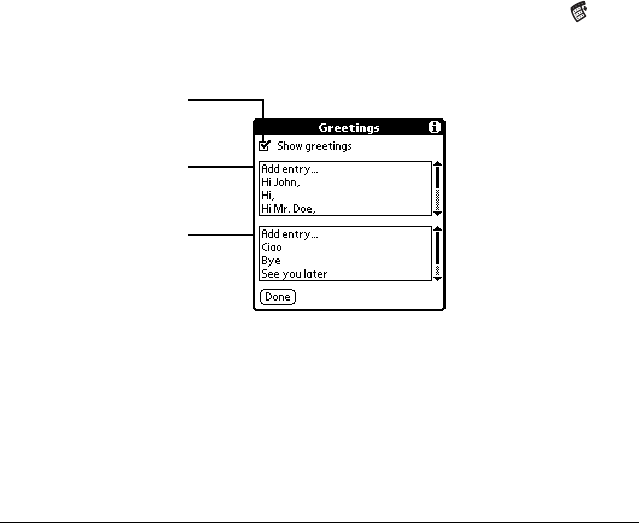
Creating message greetings and signatures
When you create a message you can use the greetings pick lists to insert a
greeting and signature in your message. You can also add items to these lists
or modify the existing items.
1. From any SMS Message Manager list view, tap the Menu icon .
2. Under Options, tap Greetings.
3. Tap Done.
Tap Add entry to
create a new signature
Tap
h
ere to
h
i
d
e t
h
e
greetings pick lists
Tap Add entry to
create a new greeting

Working With SMS Text Messages 57
Saving incoming messages
1. Open the message you want to save.
2. Tap the Menu icon .
3. Under Message, tap Save.
Tip: Saving an incoming message moves the message from your
Inbox to the Saved category.
Copying incoming messages
1. Open the message you want to copy.
2. Tap the Menu icon .
3. Under Message, tap Put Into Clipboard.
Tip: To create a memo with the text, tap Copy to Memo Pad
instead.
4. Open the message or application where you want to insert the message.
5. Tap the Menu icon .
6. Under Edit, tap Paste.

58 Working With SMS Text Messages
Forwarding incoming messages
1. From the Inbox or Saved category, open the incoming message you want
to forward.
2. Tap the Menu icon .
3. Under Message, tap Forward.
Tip: You can edit the forwarded message before sending it.
4. Enter the recipient’s mobile phone number.
Note: The recipient’s phone must be SMS enabled.
5. Tap Send.
Modifying messages
You can modify any outgoing messages in your Saved or Sent categories.
Tip: You can create your own message template by modifying and
resending a Sent message.
1. Open the message you want to change.
2. Tap the message text, or tap Edit.
3. Edit the message.
4. Tap Send.
Tip: When modifying a message, you can keep the revised message
without sending it by tapping Save instead of Send.

Working With SMS Text Messages 59
Sorting messages
1. In the SMS Message Manager, tap Show.
2. Select the sort method you want to use.
3. Tap OK.
Tip: If you sort the list by name, messages from senders that are not in
your Address Book appear at the bottom of the list in numerical
order by phone number.
Tap arrow to select
sort method
60 Working With SMS Text Messages
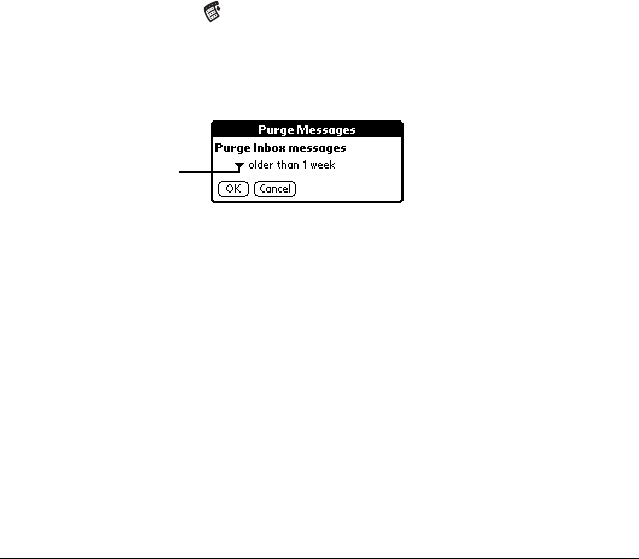
Deleting messages
1. In the SMS Message Manager, tap the pick list in the upper-right corner
to select the category containing the messages you want to delete.
2. Tap the Menu icon .
3. Under Message, tap Purge.
4. Select the deletion method you want to use.
5. Tap OK.
6. If prompted, tap Yes to confirm deletion.
Tip: To delete a single message, open it and tap the Delete button.
Tap arrow to select
deletion method

Using VisorPhone as a Wireless Modem 61
Using VisorPhone
as a Wireless Modem
In addition to using your VisorPhone as a phone, you can also use it as a
modem that operates at 14.4Kbps or 9.6Kbps, depending on the speed of
your service provider network. You can use your VisorPhone’s modem
capabilities with third-party communication software that you download
from the Internet, such as web browsers or email applications, and to
perform wireless HotSync operations when your cradle is not available.
This chapter describes how to:
■Set up your VisorPhone as a wireless modem
■Use third-party data applications with VisorPhone
■Prepare for a direct wireless HotSync operation
■Prepare for a network wireless HotSync operation
■Perform a wireless HotSync operation
62 Using VisorPhone as a Wireless Modem
Setting up VisorPhone as a wireless modem
To use your VisorPhone as a modem, you must subscribe to the data services
feature from your service provider and establish an ISP account or corporate
dial-up account.
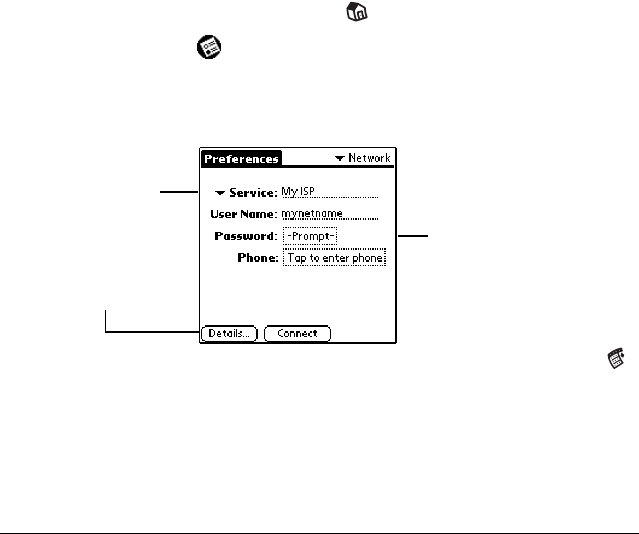
1. Tap the Applications Launcher icon on the front of your handheld.
2. Tap the Prefs icon .
3. Tap Network in the pick list in the upper-right corner.
4. Enter the configuration information for your ISP.
Note: If your ISP is not on the Service pick list, tap the Menu icon ,
tap New on the Service menu, and enter the service name.
5. Check your settings by tapping Connect. When your settings work
properly, the Connect button changes to a Disconnect button.
To learn more about using your handheld with your ISP, see “Network
Preferences and TCP/IP Software” in the Visor Handheld User Guide.
Enter your User Name,
Password, and your
ISP’s phone number
Select your ISP
from the Service
pick list
Tap here to enter
advanced DNS and
IP Address settings

Using VisorPhone as a Wireless Modem 63
Using third-party data applications with VisorPhone
Before using a third-party communication application, verify with the
developer that the application you installed is compatible with VisorPhone.
1. Install the third-party application on your handheld. See “Installing
third-party applications” in the Visor Handheld User Guide for details.
2. Start the third-party application you installed.
Note: Most third-party applications automatically connect you to
your ISP when you start the application. If the application
doesn’t connect you to your ISP, follow these steps to establish
a connection:
a.Tap the Applications Launcher icon on the front of your
handheld.
b.Tap the Prefs icon .
c.Tap Network in the pick list in the upper-right corner.
d.Tap Connect and wait for a connection to establish.
3. Disconnect after you finish using the third-party application.

64 Using VisorPhone as a Wireless Modem
Preparing for a direct wireless HotSync operation
A direct wireless HotSync operation is when you dial a modem attached to
your desktop computer to perform a remote HotSync operation.
1. Tap the Applications Launcher icon on the front of your handheld.
2. Tap the HotSync icon .
3. Tap Enter Phone #.
4. Enter your computer modem number, and then tap OK.
5. Tap the Menu icon .
6. Under Options, tap Modem Sync Prefs.
7. Tap Direct to modem, and then tap OK.
8. On a Windows computer, click the HotSync icon and check Modem
on the HotSync Manager menu. On a Macintosh, open HotSync
Manager and select Modem Setup on the Serial Port Settings tab.
Enter the number
used to call your
computer modem

Using VisorPhone as a Wireless Modem 65
Preparing for a network wireless HotSync operation
A network wireless HotSync operation is when you dial a modem attached
to a network, such as a server on a corporate LAN, to perform a remote
HotSync operation.
Note: This feature is not available for the Macintosh.
1. Tap the Applications Launcher icon on the front of your handheld.
2. Tap the HotSync icon .
3. Tap the Menu icon .
4. Under Options, tap Modem Sync Prefs.
5. Tap Network, and then tap OK.
6. Tap Select Service and configure the Network Preferences panel.
Note: For information on the Network HotSync feature and
configuring the Network Preferences panel, see the Visor
Handheld User Guide.
7. On your desktop computer, click the HotSync icon and check
Network on the HotSync Manager menu.
8. Click the HotSync icon again, select Setup, click the Network tab,
and then select your user name.
9. Perform a HotSync operation.

66 Using VisorPhone as a Wireless Modem
Performing a wireless HotSync operation
Since your VisorPhone operates as a modem at 14.4Kbps or 9.6Kbps, a
wireless HotSync operation takes significantly longer than performing a
HotSync operation with your cradle. Therefore, we recommend performing
a wireless HotSync operation only when your cradle is not available.
Tip: To increase the speed of a wireless HotSync operation, select
Conduit Setup under Options and reduce the number of
applications with which you synchronize.
1. Tap the Applications Launcher icon on the front of your handheld.
2. Tap the HotSync icon .
3. Tap the Modem Sync icon .
4. Wait for your VisorPhone to connect with the modem on the other end
and for the HotSync operation to finish.
Tip: If necessary, you can cancel the procedure at any time by tapping the
Cancel button.

Customizing Your Phone 67
Customizing Your Phone
The Phone application Preference screens enable you to customize many of
the VisorPhone features to meet your individual needs. For example, you
can choose which view appears when you start the Phone application, and
set security options to prevent unauthorized use.
This chapter describes how to:
■Set dialing prefixes
■Reassign the buttons in your Address Book
■Change the phone display
■Select the ringer setting
■Prevent unauthorized use of your phone
■Unlock your phone
■Disable call waiting
■Block your phone number for outgoing calls
■Select a different service provider network
■Connect a headset to your VisorPhone
68 Customizing Your Phone
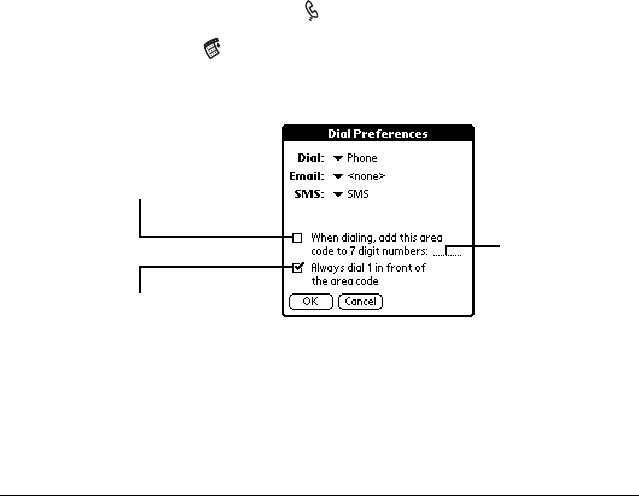
Setting dialing prefixes for use in North America
Some North American service providers require 11-digit dialing. If you
already have 7-digit or 10-digit numbers in your Address Book, you can set
your VisorPhone to automatically use 11-digit dialing by using a default area
code. Using this feature does not change the numbers in your Address Book.
1. Press the Address Book button on the front of your handheld.
2. Tap the Menu icon .
3. Under Options, tap Dial Preferences.
4. Tap OK.
Note: You may be prompted to enter a default area code the first time you
dial a number from your Address Book.
Enter default
area code here
Tap check box to insert an
area code in front of 7-digit
numbers before dialing
Tap check box to insert a 1
in front of 10-digit numbers
before dialing
Customizing Your Phone 69
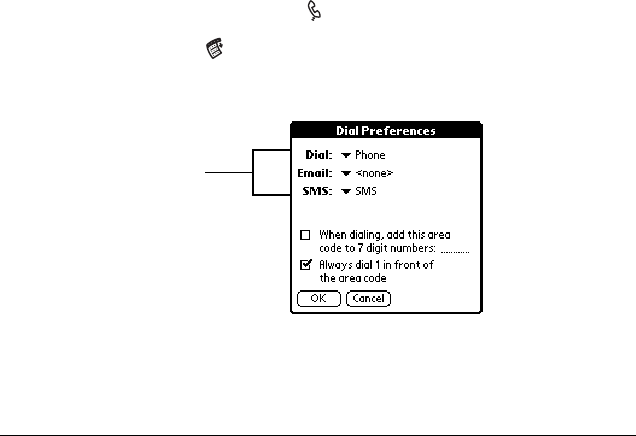
Assigning dialing applications
When you select a phone number or email address in Address Book, you can
tap the Dial, SMS, or Email buttons to direct the selected information to a
specific application. The default applications for these buttons are the
Phone application and the SMS Message Manager. However, if you have
third-party SMS or Email applications installed on your handheld, you can
assign these buttons to any application that is compatible with the dialing-
enabled version of Address Book.
1. Press the Address Book button on the front of your handheld.
2. Tap the Menu icon .
3. Under Options, tap Dial Preferences.
Tip: If no other applications appear in the pick lists, then you don’t
have compatible SMS or Email applications on your handheld.
4. Tap OK.
Tap pick lists to
assign an application
to that button
70 Customizing Your Phone
Changing the phone display
1. Press the Phone button on your VisorPhone.
2. Tap the Menu icon .
3. Under Options, tap Phone Preferences.
4. Select the display options you want to use.
5. Tap OK.
Tap the view you want
to see when you open
the Phone application Tap an icon to skip
that view when
pressing the Phone
button repeatedly
Customizing Your Phone 71
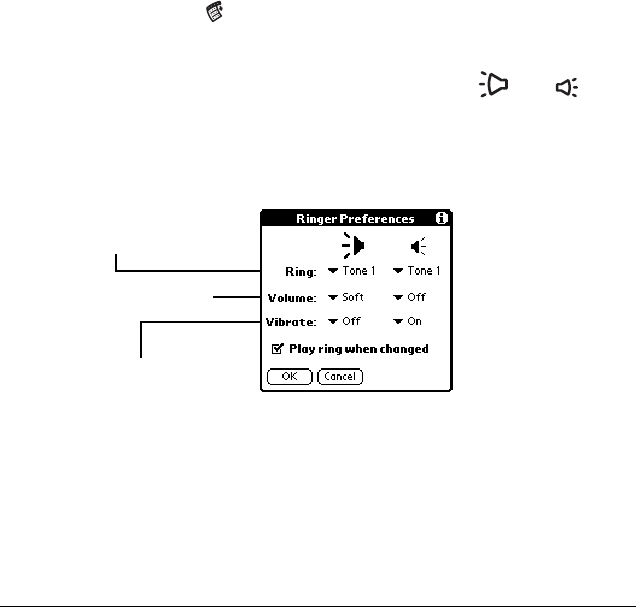
Selecting the ringer settings
1. Tap the Menu icon .
2. Under Options, tap Ringer Preferences.
Tip: The slider on your phone has two positions and . The
two Ringer Preferences columns control the behavior of the
corresponding slider position.
3. Select the ringer settings you want to use.
Tip: You can use both a ring tone and vibrate alert or use them
separately. For example, you can set one position to ring softly
and vibrate, and the other position to vibrate only. To preview
a new sound, select Play ring when changed.
4. Tap OK.
Tap Ring pick lists to
select ring style
Tap Volume pick lists to
select volume level
Tap Vibrate pick lists to turn
vibrate mode on or off
72 Customizing Your Phone
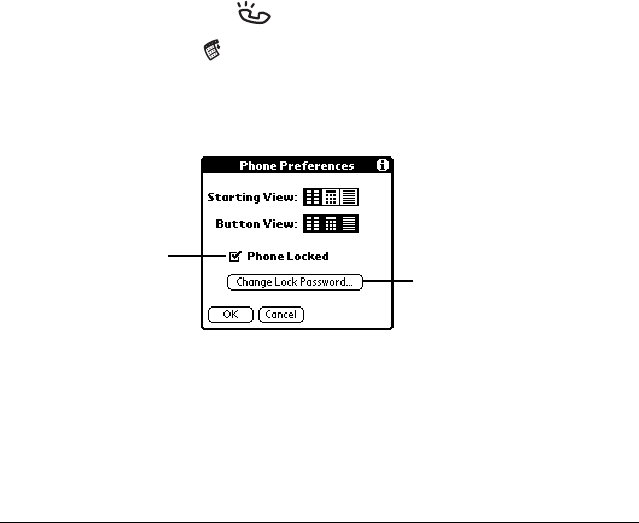
Preventing unauthorized use of your phone
You can protect your phone number from unauthorized use by locking your
SIM card.
1. Turn on your phone.
2. Press the Phone button on your VisorPhone.
3. Tap the Menu icon .
4. Under Options, tap Phone Preferences.
5. Select the Phone Locked check box to lock your SIM card.
6. Enter your password (PIN) and tap OK.
Note: If you haven’t set a password yet, check your service provider’s
documentation for the default password. In North America,
this is usually 1234 or 1111.
7. Tap OK.
Tap here to lock
and unlock the
SIM card Tap here to define a
new password (PIN)

Customizing Your Phone 73
Unlocking your phone
1. Turn on your phone.
2. Press the Phone button on your VisorPhone.
3. Enter your password (PIN).
Note: If you haven’t set your own password, enter the password listed
in your service provider documentation. In North America,
this is usually 1234 or 1111.
If you are using a SIM card from an established account, enter
your existing password.
4. Tap OK.
Tip: See “Preventing unauthorized use of your phone” on the previous
page to learn about setting your own password.
Tap numbers to
enter password
Tap OK to unlock
your phone Tap CLR to erase
the entire entry
74 Customizing Your Phone
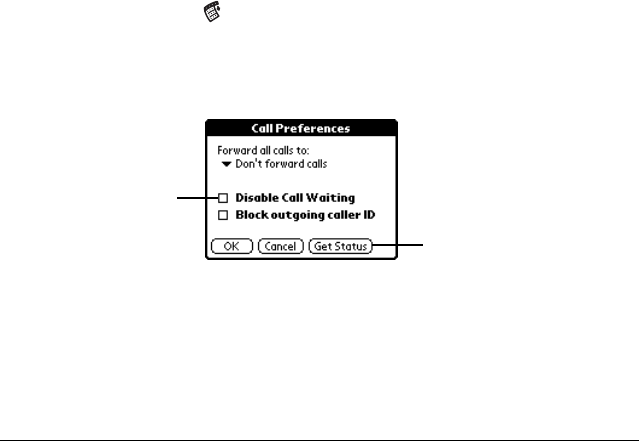
Disabling call waiting
If you receive a call while you are talking on the phone, the Phone
application notifies you about the second call. If you don’t want to be
interrupted by other calls, you can disable call waiting.
Note: Because call waiting information is stored by the network, it’s a good
idea to check the current network settings both before and after you
change the call waiting option.
1. Tap the Menu icon .
2. Under Options, tap Call Preferences.
3. Disable the call waiting option.
4. Tap OK.
Tip: To reactivate Call Waiting, remove the check from the Disable Call
Waiting check box.
Tap here to disable
call waiting
Tap here to display current
network settings
Customizing Your Phone 75
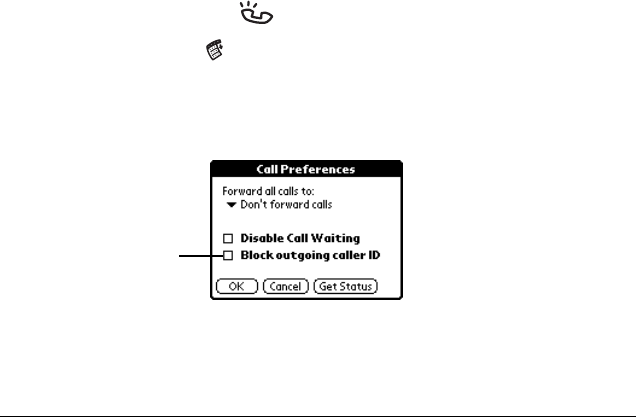
Blocking your phone number for outgoing calls
When you place a call from your VisorPhone, the Phone application reveals
your phone number to the person you’re calling. If your service provider
supports caller ID blocking, you can prevent revealing your phone number
to people you call.
Note: Because caller ID blocking information is stored by the network,
it’s a good idea to check the current network settings both before
and after you change the Block outgoing caller ID option.
1. Press the Phone button on your VisorPhone.
2. Tap the Menu icon .
3. Under Options, tap Call Preferences.
4. Enable the Block outgoing caller ID option.
5. Tap OK.
Tap here to place
anonymous calls
76 Customizing Your Phone
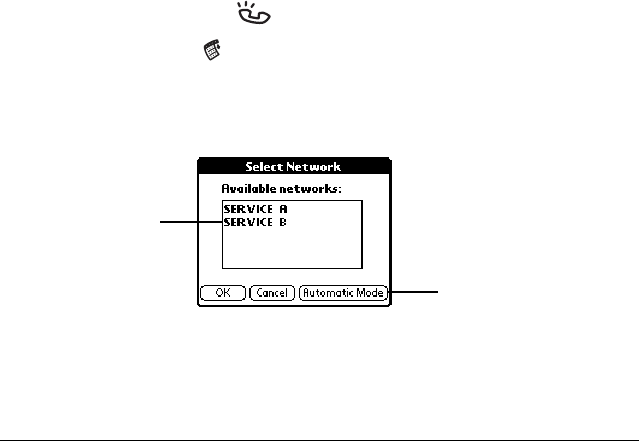
Selecting a service provider network
If you roam to an area where multiple service providers offer coverage, your
VisorPhone automatically selects the provider with the strongest signal.
However, if you prefer, you can manually select a service provider network.
Note: When you manually select a network, your VisorPhone finds only
that network until you either choose another network, or return to
Automatic Mode.
1. Press the Phone button on your VisorPhone.
2. Tap the Menu icon .
3. Under Options, tap Select Network.
4. Select a network.
5. Tap OK.
Note: Selecting a new network may take 30 seconds or more.
Tap a network
to enter manual
mode
Tap Automatic Mode
to return to automatic
search mode
Customizing Your Phone 77
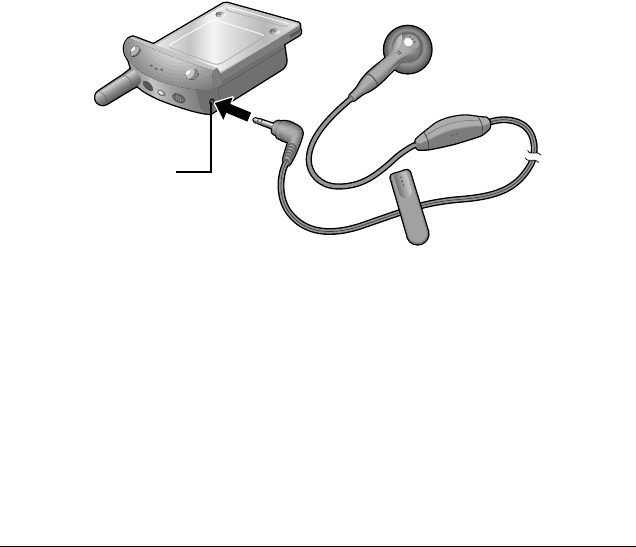
Connecting a headset
Use the built-in speaker and microphone or connect an optional headset for
hands-free operation. For best results, use only headsets from Handspring.
Headset
jack

78 Customizing Your Phone

Using the Menus 79
Using the Menus
This section provides an overview of the menu options available in the
Phone, SIM Phonebook, and SMS Message Manager applications. Some of
the menu options vary based on which screen is active.
Phone application Edit menus
Edit Speed Dial: Opens a dialog where you can define, change, and delete
speed dial buttons. For details, see “Changing a speed dial entry” on page
40.
Paste: Inserts a phone number from the clipboard into the dial box.
Phone application Record menu
Purge: Opens a dialog where you can remove selected records from the Call
History list. For details, see “Purging call history” on page 36.
Delete Item: Removes the selected record from the Call History list.
Speed Dial view Dialpad view
Call History view
80 Using the Menus
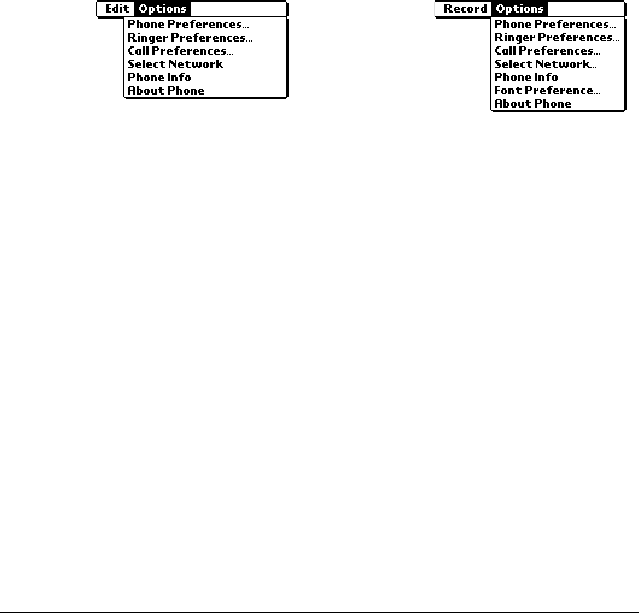
Phone application Options menus
Phone Preferences: Opens a dialog where you can change your phone display
and lock the phone. For details, see “Changing the phone display” on page
70 and see “Preventing unauthorized use of your phone” on page 72.
Ringer Preferences: Opens a dialog where you can choose the ringer settings.
For details, see “Selecting the ringer settings” on page 71.
Call Preferences: Opens a dialog where you can choose call waiting, call
blocking, and call forwarding settings. For details, see “Disabling call
waiting” on page 74, “Blocking your phone number for outgoing calls” on
page 75, and “Forwarding calls” on page 24.
Select Network: Opens a dialog where you can search for and use networks
other than your default network. For details, see “Selecting a service
provider network” on page 76.
Phone Info: Opens a dialog where you can view information about your phone
such as the phone number and the IMEI number that uniquely identifies
your phone to the network.
Font Preference: Opens a dialog where you can choose the font you want.
About Phone: Opens a dialog where you can view version and copyright
information for the Phone application.
Speed Dial
and Dialpad
views
Call History
view
Using the Menus 81
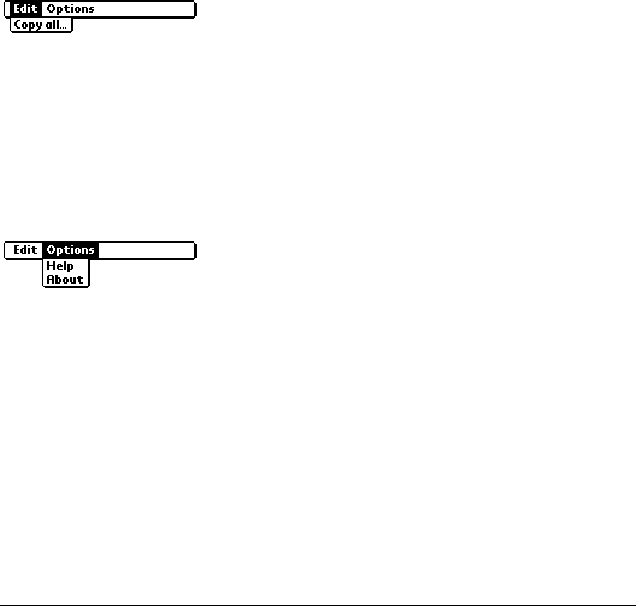
SIM Phonebook application Edit menu
Copy All: Copies all entries that exist in one phone list to the other phone
list. If you are viewing the speed dial list, it copies all new entries to your
SIM card. If you are viewing the SIM card list, it copies all new entries to
the speed dial list.
SIM Phonebook application Options menu
Help: Opens a dialog where you can view tips about using the SIM
Phonebook application.
About: Opens a dialog where you can view version and copyright
information for the SIM Phonebook application.
Speed Dial and SIM views
Speed Dial and SIM views
82 Using the Menus
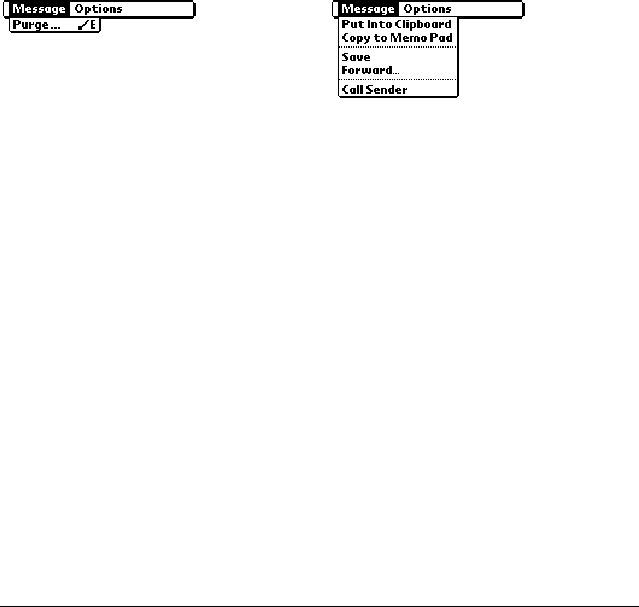
SMS Message Manager application Message menus
Purge: Opens a dialog where you can choose which messages you want to
remove from the Inbox. For details, see “Deleting messages” on page 60.
Put Into Clipboard: Copies the selected message to the clipboard so you can
paste it into another message or application. For details, see “Copying
incoming messages” on page 57.
Copy to Memo Pad: Copies the selected message to a new Memo Pad memo.
For details, see “Copying incoming messages” on page 57.
Save: Stores the selected message in the Saved category.
Forward: Creates a copy of the selected message so you can send it to
someone else. For details, see “Forwarding incoming messages” on page 58.
Call Sender: Dials the person who sent the message.
Inbox view
Message view
Using the Menus 83
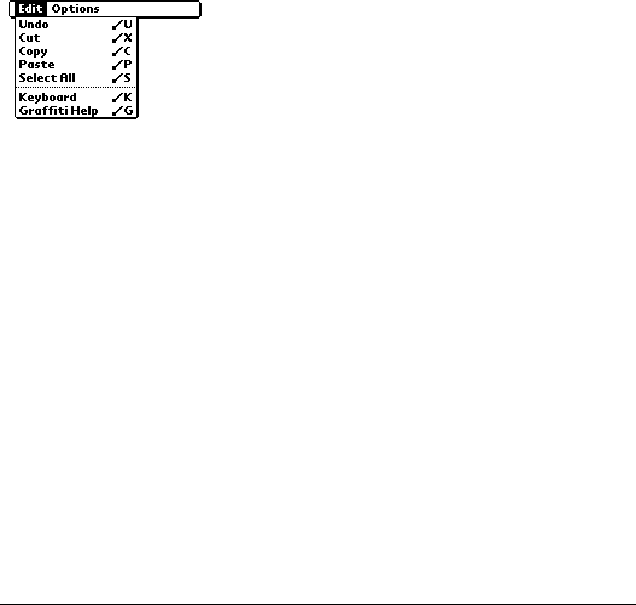
SMS Message Manager application Edit menu
Undo: Clears the last action.
Cut: Removes the selected text and places it on the clipboard.
Copy: Copies the selected text and places it on the clipboard.
Paste: Inserts text stored on the clipboard at the current cursor position.
Select All: Selects all text in the current field.
Keyboard: Opens the onscreen keyboard.
Graffiti Help: Opens screens that show you how to form Graffiti characters.
84 Using the Menus
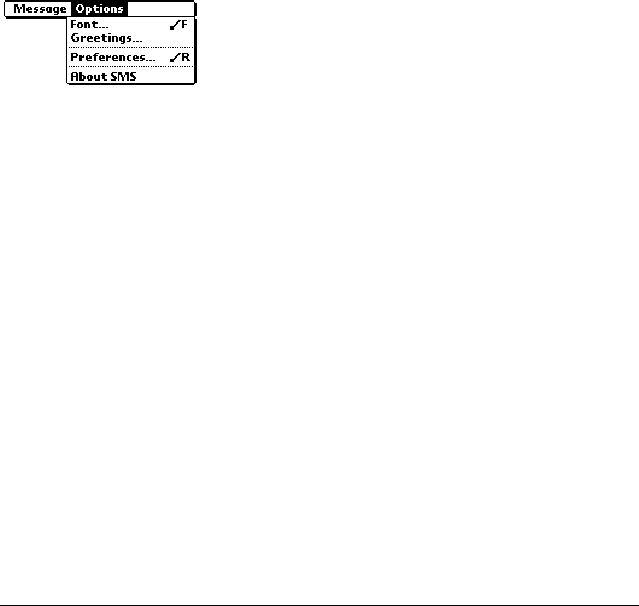
SMS Message Manager application Options menu
Font: Opens a dialog where you can choose the font you want to use.
Greetings: Opens a dialog where you can enter predefined opening and
closing phrases to use in your messages. For details, see “Creating message
greetings and signatures” on page 56.
Preferences: Opens a dialog where you can view the SMS Service Center
number (if this field is blank, contact your service provider for this
information), choose deletion confirmation, and enter your service
provider’s SMS Email Center number. For details, see “Enabling SMS and
SMS Email” on page 50.
About SMS: Opens a dialog where you can view version and copyright
information for the SMS Message Manager application.

Troubleshooting and Maintenance 85
Troubleshooting and Maintenance
If you encounter a problem with your VisorPhone module, check this
section to see if your problem is listed. If your problem isn't listed here, or
the suggestions don't resolve your problem, visit us at www.handspring.com
for technical support contact information.
My VisorPhone
won't turn on
■Make sure your VisorPhone is inserted firmly in the
Springboard expansion slot.
■Make sure your VisorPhone battery isn't drained.
■When you turn on your VisorPhone, hold down the
power button for at least two seconds, until you hear
a beep.
■Turn on your handheld to make sure that the
handheld batteries aren't drained. Low batteries will
prevent your VisorPhone from turning on.
I get a message
that my SIM
card is missing
when I turn on
my VisorPhone
■Make sure your SIM card is properly inserted. The
metal contacts must face down (away from the
battery), and the side with the corner cut must slide
into the SIM slot first. For details, see “Step 2: Insert
your SIM card into your VisorPhone” on page 3.
■Your SIM card may be damaged. Contact your
service provider for a new card.

86 Troubleshooting and Maintenance
My VisorPhone
requires an
unlocking code
(PIN), but I
didn't set one
■Your service provider may have set the locking code
before you received your VisorPhone. Enter the
default unlocking code (PIN) and then tap OK. In
North America, the default unlocking code is usually
1234 or 1111. If this doesn't work, contact your
service provider.
Note: It is actually your SIM card that is locked, not
your VisorPhone.
■If you see the Unblock Phone screen instead of the
Unlock Phone screen, you entered the unlock code
(PIN) incorrectly three times, and your VisorPhone
is now blocked. Contact your service provider to
obtain the unblock code. If you enter the unblock code
(PUK) incorrectly ten times, your SIM is
permanently disabled.
I called my
service provider
to enable my
phone service,
but it still
doesn’t work
Some service providers require 24 hours or more to
activate your phone service. If it has been longer than
your service provider’s activation period, report the
problem to your service provider.

Troubleshooting and Maintenance 87
My phone
number isn't on
the Phone Info
screen
Your service provider may need to install your phone
number onto your SIM card. Contact your service
provider to see if they can send a message to your
VisorPhone that writes your phone number onto your
SIM card.
My VisorPhone
won't register to
the network
■You are probably outside a network coverage area.
Try using another GSM phone to verify whether
coverage is available in your current location.
■If coverage is available in your location, try your SIM
card in another GSM phone. If it still doesn’t, work,
your SIM card may be malfunctioning. Contact your
service provider for another SIM card.
■Turn off your VisorPhone, and then turn it on again.
If a dialog appears asking if you want to search for a
network, tap Yes.
I tried dialing a
phone number,
but my
VisorPhone just
beeps at me
■Make sure you dialed the correct number.
■Wait a few minutes and try again. If the network is
very busy, calls cannot connect.
■Verify that you are in a network coverage area and
then move a few yards away and try the call again. If
you are in a weak coverage area (1 bar of signal
strength or less), you may not be able to complete
calls even though you are registered to the network.

88 Troubleshooting and Maintenance
I can't dial
international
numbers
For security purposes, most service providers require you
to enable international calling on your account. Call your
service provider to enable international calling.
Call waiting
doesn’t work
Enable call waiting in the Call Preferences dialog. For
details, see “Disabling call waiting” on page 74.
Call forwarding
doesn't work
For security purposes, most service providers require you
to enable this feature on your account even though there
is usually no extra charge. Call your service provider to
enable call forwarding.
Caller ID
blocking for my
outgoing calls
doesn't work
Some service providers require you to enable this feature
on your account. Call your service provider to enable
blocking your Caller ID.
Some incoming
caller’s names
don’t appear in
Call History
■Find out if a caller has blocked their Caller ID.
■Call History does not show names for records you
marked hidden in your Address Book.
The SIM
Phonebook
application
won't open
Make sure your SIM card is inserted in your VisorPhone
and that your phone has been on for at least 30 seconds.

Troubleshooting and Maintenance 89
My SIM
Phonebook
doesn’t display
the full name
and number
When a name or number is longer than will fit in the SIM
Phonebook display, three dots appear to indicate that the
entry contains additional information. SIM Phonebook
does not truncate the actual entry, it just does not appear
on the screen.
Some phone
numbers don’t
appear in the
SMS Lookup
Make sure the number you want is identified as a mobile
number in your Address Book. Only mobile phone
numbers appear when you use the SMS Message Manager
Lookup button.
I can’t send SMS
Messages
■Make sure SMS services are enabled on your account
by checking the SMS Preferences dialog to see if the
SMS Message Center number is on this screen. If the
number is missing, contact your service provider for
the SMS Message Center number and enter it in the
SMS Preferences dialog.
Note: Receiving SMS messages does not indicate
that you have a subscription to your service
provider’s SMS service. You must subscribe
to this service to send or reply to messages.
■Verify that you are in a GSM coverage area.
■Make sure the destination number is correct. Some
service providers require 11-digit phone numbers for
SMS messages.

90 Troubleshooting and Maintenance
I get an error
message when I
send an SMS
message to an
email address
Make sure you have subscribed to and enabled the SMS
email feature. You need to get the SMS Email Center
number from your service provider and enter it in the
SMS Preferences dialog. This number is different from
the SMS Message Center number you use to send
messages to other mobile phone numbers. For more
information, see “Enabling SMS and SMS Email” on
page 50.
The applications
I assigned to the
Dial, Email, and
SMS buttons in
the Dialing
Address Book
don’t launch
■Check the Dial Preferences dialog in the Address
Book to confirm the application is assigned to the
Dial, Email, or SMS button. For details, see
“Assigning dialing applications” on page 69.
■Contact the software developer for the application
you want to use when you tap the button, and verify
that the software is compatible with the new Dialing
Address Book and the version of Palm OS your
VisorPhone uses. To take advantage of these buttons,
an application must contain special code that
registers its capabilities to the Dialing Address Book.
I get a “No
Carrier” error
when making
data calls
■Verify that data calls are enabled on your account.
■Verify that you are in a coverage area.

Troubleshooting and Maintenance 91
Caring for your VisorPhone module
■Keep your VisorPhone and its accessories out of the reach of small
children.
■Keep your VisorPhone dry.
■Use your VisorPhone at normal temperatures between -20 degrees and
54.4 degrees Celsius (-4 degrees and 130 degrees Fahrenheit).
Temperatures outside of this range may cause damage to your
VisorPhone.
■Keep your VisorPhone away from dusty or dirty areas.
■Do not disassemble your VisorPhone.
■Do not use harsh detergents to clean your VisorPhone.
■Use only genuine Handspring accessories. Third party accessories are
not guaranteed to function properly with your VisorPhone.
■Do not let the Springboard contacts on your VisorPhone come in direct
contact with conductive or electronic objects.
■Do not short any contacts on your VisorPhone module or the
Springboard connectors.
I can't
synchronize
when my
VisorPhone is
connected to my
handheld
Make sure that there are no active calls on your
VisorPhone before you begin a HotSync operation. You
cannot synchronize while you have an active call, and you
cannot make or receive calls during a HotSync operation.

92 Troubleshooting and Maintenance
Caring for the battery
Your VisorPhone uses a 680mAh Lithium Ion battery. A fully-charged
battery provides approximately 3 hours of talk time and more than 70 hours
of standby time. Follow these guidelines to get the most from your battery:
■Do not disassemble the battery pack.
■If you are not using your VisorPhone for an extended period of time,
disconnect the battery pack from the phone and store it in a cool, dry
place; charge the battery at least once every six months when not in use.
■Never throw the battery pack into fire or expose it to extreme heat.
■If the battery pack ever becomes hot or smells odd, stop using it.
■If the battery pack becomes damaged and leaks liquid, stop using it and
avoid skin contact with the leaking liquid.
■Use only a genuine Handspring battery pack. Third party battery packs
are not guaranteed to function properly with your VisorPhone.
■Always replace the battery pack with the same type of pack. Using
another type of battery pack may cause an explosion.
■Do not short any battery contacts or let the contacts come in direct
contact with conductive or electronic objects.
■Be sure to properly dispose of the battery. For more information, see
“How do I dispose of the battery?” on page 93.
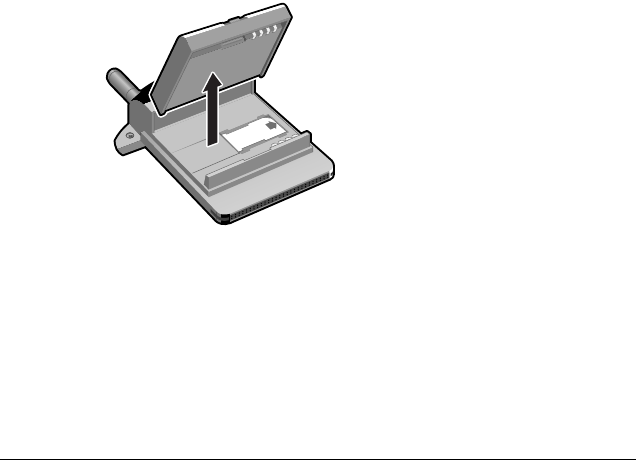
Troubleshooting and Maintenance 93
How do I dispose of the battery?
When your battery fails to hold a charge, you need to replace it.
Caution: It is illegal in many areas to dispose of Lithium Ion batteries in
household or business trash. Call your local recycling center for
instructions on battery recycling, or contact Handspring for safe
disposal options. Do not handle a damaged or leaking battery.

94 Troubleshooting and Maintenance

Warranty and Other Product Information 95
Warranty and
Other Product Information
Handspring, Inc. Springboard Module
End User Software License Agreement
THIS PRODUCT CONTAINS PRE-LOADED SOFTWARE, THE USE OF WHICH IS LI-
CENSED BY HANDSPRING, INC. AND ITS SUPPLIERS (COLLECTIVELY, "HAND-
SPRING"), TO ITS CUSTOMERS FOR THEIR USE ONLY AS SET FORTH BELOW.
SOFTWARE LICENSE: Handspring grants you a nonexclusive license to use the software program(s) (the
"Software") pre-loaded on this Product subject to the terms and restrictions set forth in this VisorPhone End
User Software License Agreement ("License Agreement"). You are not permitted to lease or rent, distribute
or sublicense the Software or to use the Software in a time-sharing arrangement or in any other unautho-
rized manner. Further, no license is granted to you in the human readable code of the Software (source
code). Except as provided below, this License Agreement does not grant you any rights to patents, copy-
rights, trade secrets, trademarks, or any other rights in respect to the Software. The Software is licensed to
be used solely as pre-loaded on the Product and solely in connection with Handspring products. Otherwise,
the Software and supporting documentation may be copied only as essential for backup or archive purposes
in support of your use of the Software as permitted hereunder. You must reproduce and include all copyright
notices and any other proprietary rights notices appearing on the Software on any copies that you make.
PAYMENT OF FEES: The effectiveness of the licenses granted hereunder is conditioned on the receipt
by Handspring of any applicable fees.
NO ASSIGNMENT; NO REVERSE ENGINEERING: You may transfer the Software and this License
Agreement to another party in connection with a transfer of the Product on which the Software is pre-load-
ed, if the other party agrees in writing to accept the terms and conditions of this License Agreement If you
transfer the Software, you must at the same time either transfer all copies of the Software as well as the sup-
porting documentation to the same party or destroy any such materials not transferred. Except as set forth
above, you may not transfer or assign the Software or your rights under this License Agreement. Modifica-
tion, reverse engineering, reverse compiling, disassembly, or removal of the Software from the Product on
which it is pre-loaded is expressly prohibited. However, if you are a European Union ("EU") resident, in-
formation necessary to achieve interoperability of the Software with other programs within the meaning of
the EU Directive on the Legal Protection of Computer Programs is available to you from Handspring upon
written request.
EXPORT RESTRICTIONS: You agree that you will not export or re-export the Software or accompa-
nying documentation (or any copies thereof) or any products utilizing the Software or such documentation

96 Warranty and Other Product Information
in violation of any applicable laws or regulations of the United States or the country in which you obtained
them. The software covered by this License Agreement may contain strong data encryption code which can-
not be exported outside of the U.S. or Canada. You agree that you will not export/re-export, either physically
or electronically, the encryption software or accompanying documentation without obtaining written autho-
rization from the U.S. Department of Commerce.
UNITED STATES GOVERNMENT LEGEND: If you are acquiring the Software on be-half of any unit
or agency of the United States Government, the following provisions apply. The Software constitutes a "com-
mercial item", as that term is defined at Federal Acquisition Regulation (FAR) 2.101 (Oct. 1995), consisting
of "commercial computer software" and "commercial computer software documentation", as such terms are
used in FAR 12.212 (Sept. 1995), and is provided to the U.S. Government only as commercial software (with
"Restricted Rights", if applicable). Use, duplication, or disclosure by the U.S. Government is subject to re-
strictions set forth in this License Agreement and as provided in DFARS 227.7202-1(a) and 227.7202-3(a)
(1995), DFARS 252.227-7013(c)(1)(ii) (OCT 1988), FAR 12.212(a) (1995), FAR 52.227-19, or FAR 52.227-
14 (ALT III), as applicable.
TERM AND TERMINATION: This License Agreement is effective until terminated. You may terminate
it at any time by destroying the Software and documentation together with all copies and merged portions in
any form. It will also terminate immediately if you fail to comply with any term or condition of this License
Agreement. Upon such termination you agree to destroy the Software and documentation, together with all
copies and merged portions in any form.
GOVERNING LAW: This License Agreement shall be governed by the laws of the State of California as
such laws are applied to agreements entered into and to be performed entirely within California between Cal-
ifornia residents and by the laws of the United States. You agree that the conflicts of laws principles of such
laws and the United Nations Convention on Contracts for the International Sale of Goods (1980) are hereby
excluded in its entirety from application to this License Agreement.
LIMITED WARRANTY; LIMITATION OF LIABILITY: All warranties and limitations of liability ap-
plicable to the Software are as stated on the Limited Warranty or in the product manual accompanying the
Software. Such warranties and limitations of liability are incorporated herein in their entirety by this refer-
ence.
SEVERABILITY: In the event any provision of this License Agreement is found to be invalid, illegal or un-
enforceable, the validity, legality and enforceability of any of the remaining provisions shall not in any way be
affected or impaired and a valid, legal and enforceable provision of similar intent and economic impact shall
be substituted therefor.
ENTIRE AGREEMENT: This License Agreement sets forth the entire understanding and agreement be-
tween you and Handspring, supersedes all prior agreements, whether written or oral, with respect to the Soft-
ware, and may be amended only in a writing signed by both parties.

Warranty and Other Product Information 97
Handspring, Inc. Limited Warranty for Accessories
LIMITED WARRANTY: Handspring, Inc. ("Handspring"), warrants to the original end user ("Custom-
er") that under normal intended use (i) Handspring hardware accessories will be free from defects in work-
manship and materials for one year from the date of purchase, and (ii) Handspring software accessories will
substantially conform to their specifications and the media containing the software will be free from defects
in workmanship and materials, for ninety (90) days from the date of purchase. Handspring does not provide
any warranty for any third party software. During the warranty period, Handspring shall either repair, re-
place or refund the purchase price of defective accessories.
Handspring and its suppliers shall not be liable for any losses or damages of any kind resulting from the use
of this accessory or for any of Customer's software or data stored on accessories returned to Handspring for
service.
WARRANTY SERVICE: Customer must obtain warranty service authorization from Handspring within
the applicable warranty period before returning defective accessories to Handspring. Returned accessories
must be shipped prepaid and packaged appropriately, and it is recommended that they be insured or sent by
a method that provides for tracking of the package. If Handspring ships a replacement accessory to Custom-
er before receiving the original accessory and Customer fails to return the original accessory to Handspring
within thirty (30) days from the date the warranty service authorization is issued, Handspring will charge
Customer the then current published catalogue price of such accessory.
LIMITATIONS: THIS LIMITED WARRANTY IS IN LIEU OF ALL OTHER WARRANTIES,
TERMS, OR CONDITIONS; INCLUDING WARRANTIES, TERMS, OR CONDITIONS OF
MERCHANTABILITY, FITNESS FOR A PARTICULAR PURPOSE, SATISFACTORY QUALITY,
CORRESPONDENCE WITH DESCRIPTION, AND NON INFRINGEMENT, ALL OF WHICH
ARE EXPRESSLY DISCLAIMED BY HANDSPRING AND ITS SUPPLIERS. IN NO EVENT WILL
HANDSPRING OR ITS SUPPLIERS BE LIABLE FOR ANY SPECIAL, INCIDENTAL, CONSE-
QUENTIAL, OR INDIRECT DAMAGES RESULTING FROM THE POSSESSION, USE, OR
FAILURE OF THIS ACCESSORY.
Some countries, states, or provinces do not allow the exclusion or limitation of implied warranties or the lim-
itation of incidental or consequential damages or the limitation of liability for personal injury, so the above
limitations and exclusions may be limited in their application to you. When the implied warranties are not
allowed to be excluded in their entirety, they will be limited to the duration of the applicable written war-
ranty. This warranty gives you specific legal rights which may vary depending on local law.

98 Warranty and Other Product Information
Handspring, Inc. Springboard-modul
Endnutzer-softwarelizenzvereinbarung
DIESES PRODUKT ENTHÄLT VORINSTALLIERTE SOFTWARE, DEREN VERWENDUNG
VON HANDSPRING, INC. UND SEINEN LIEFERANTEN (IM FOLGENDEN „HAND-
SPRING" GENANNT) AN SEINE KUNDEN FÜR DEREN PERSÖNLICHEN GEBRAUCH -
AUSSCHLIESSLICH WIE UNTEN AUSGEFÜHRT - LIZENZIERT IST.
SOFTWARELIZENZ: Handspring gewährt Ihnen eine einfache Lizenz für die Verwendung des/der Soft-
wareprogramms/Softwareprogramme (im nachfolgenden „Software" genannt), das/die auf diesem Produkt
vorinstalliert ist/sind, gemäß den Bestimmungen und Beschränkungen dieses VisorPhone Endnutzer-Soft-
warelizenzvertrags (im nachfolgenden „Lizenzvertrag" genannt). Sie sind nicht befugt, die Software zu ver-
leasen oder zu vermieten, zu vertreiben oder Unterlizenzen zu vergeben. Zudem ist es Ihnen nicht gestattet,
die Software im Rahmen einer Timesharing Vereinbarung oder in sonstiger nicht autorisierter Weise zu (be-
)nutzen. Darüber hinaus erhalten Sie keine Lizenz für den Quellcode der Software. Abgesehen von den unten
ausgeführten Bestimmungen werden Ihnen keine Rechte an Patenten, Urheberrechten, Geschäftsgeheimnis-
sen, Warenzeichen oder anderen Rechten bezüglich der Software eingeräumt. Die Software darf nur so wie
auf diesem Produkt vorinstalliert und nur in Verbindung mit Handspring-Produkten verwendet werden. Die
Software und das Begleitmaterial dürfen nur kopiert werden, soweit dies aus Datensicherungs- oder Ar-
chivierungsgründen zur Nutzung der Software gemäß den hier dargelegten Bestimmungen zwingend er-
forderlich ist. Sie müssen alle in der Software enthaltenen Urheberrechtshinweise und alle
Markenrechtshinweise in die von Ihnen erstellten Kopien aufnehmen und die Hinweise auf den Kopien wie-
dergeben.
GEBÜHREN: Die hiermit gewährte Lizenz wird mit Erhalt der Zahlung aller anwendbaren Gebühren
durch Handspring wirksam.
KEINE ABTRETUNG, KEINE RÜCKENTWICKLUNG: Sie dürfen die Software und diesen Lizenz-
vertrag im Rahmen einer Übertragung des Produkts, auf dem die Software vorinstalliert ist, an Dritte über-
tragen, wenn diese sich schriftlich mit den Bestimmungen dieses Lizenzvertrags einverstanden erklären.
Wenn Sie die Software übertragen, müssen Sie gleichzeitig auch entweder alle Kopien sowie das Begleitma-
terial an dieselbe Partei übertragen oder aber das nicht übertragene Material vernichten. Abgesehen von der
obengenannten Regelung dürfen Sie die Software oder Ihre Rechte im Rahmen dieses Lizenzvertrags nicht
abtreten oder übertragen. Jede Veränderung, Rückentwicklung, Dekompilierung, Disassemblierung oder
Entfernung der Software von dem Produkt, auf dem die Software vorinstalliert ist, ist ausdrücklich verboten.
Wenn sich jedoch Ihr Wohnsitz im Gebiet der Europäischen Union („EU") befindet, können Sie Informa-
tionen, die zur Herstellung der Interoperabilität der Software mit anderen Programmen im Sinne der EU-
Richtlinie zum rechtlichen Schutz von Computerprogrammen benötigt werden, auf schriftliche Anfrage von
Handspring erhalten.

Warranty and Other Product Information 99
EXPORTBESCHRÄNKUNGEN: Sie erklären sich damit einverstanden, die Software und das Begleit-
material (oder jegliche Kopien davon) bzw. Produkte, die die Software nutzen, nicht unter Verletzung gel-
tender Gesetze und Bestimmungen der USA oder des Landes, in dem Sie sie erhalten haben, zu exportieren
oder zu reexportieren. Die von diesem Lizenzvertrag betroffene Software enthält eventuell Datenverschlüs-
selungscode, der nicht aus den U.S.A. oder Kanada ausgeführt werden darf. Sie erklären sich damit einver-
standen, die Verschlüsselungssoftware oder das Begleitmaterial ohne schriftliche Genehmigung das U.S.
Department of Commerce weder gegenständlich noch elektronisch zu exportieren oder zu reexportieren.
RECHTLICHE BESCHRÄNKUNGEN FÜR REGIERUNGSBEHÖRDEN DER USA: Wenn Sie
die Software im Auftrag einer Abteilung oder Dienststelle der Regierungsbehörden der USA beschaffen,
gelten die folgenden Bestimmungen. Die Software stellt eine „kommerzielle Ware" gemäß FAR 2.101 (Okt.
1995) dar, bestehend aus „kommerzieller Computer-Software" und „Dokumentation für kommerzielle
Computer-Software" entsprechend FAR 12.212 (Sept. 1995), und wird den Regierungsbehörden der USA
nur als kommerzielle Software (ggf. mit „Eingeschränkten Rechten") zur Verfügung gestellt. Die Verwen-
dung, Vervielfältigung oder Offenlegung durch die Regierungsbehörden der USA unterliegt den Bestim-
mungen dieser Lizenzvereinbarung und den rechtlichen Beschränkungen von DFARS 227.7202-1(a) und
227.7202-3(a) (1995), DFARS 252.227-7013(c)(1)(ii) (Okt. 1988), FAR 12.212(a) (1995), FAR 52.227-19
oder FAR 52.227-14 (ALT III), je nachdem, welche Bestimmungen anwendbar sind.}
GELTUNGSDAUER UND KÜNDIGUNG: Dieser Lizenzvertrag bleibt bis zu seiner Kündigung in
Kraft. Sie können ihn jederzeit kündigen, indem Sie die Software und das Begleitmaterial zusammen mit
allen Kopien und anhängenden Teilen, gleich welcher Form, zerstören. Darüber hinaus endet der Vertrag
umgehend bei Verstoß gegen eine der Bestimmungen dieses Lizenzvertrags. Sie stimmen zu, bei einer
solchen Beendigung die Software und das Begleitmaterial zusammen mit allen Kopien und anhängenden
Teilen, gleich welcher Form, zu zerstören.
GELTENDES RECHT: Dieser Lizenzvertrag unterliegt dem Sachrecht des US-Bundesstaates Kaliforn-
ien und dem Bundesrecht der U.S.A. unter Ausschluß der Regelungen des Interlokalen und Internationalen
Privatrechts sowie des Wiener UN-Kaufrechtsübereinkommens von 1980.
BESCHRÄNKTE GEWÄHRLEISTUNG; HAFTUNGSBESCHRÄNKUNG: Auf die Software sind
die Garantiebestimmungen und Haftungsbeschränkungen, wie sie im Benutzerhandbuch aufgeführt sind,
anwendbar. Diese Garantiebestimmungen und Haftungsbeschränkungen werden hiermit in ihrer Gesa-
mtheit Bestandteil dieses Lizenzvertrags.
UNWIRKSAMKEIT EINZELNER BESTIMMUNGEN: Falls eine Bestimmung dieses Lizenzvertrags
für unwirksam, illegal oder undurchsetzbar befunden wird, ist die Gültigkeit, rechtliche Zulässigkeit und
Durchsetzbarkeit der übrigen Bestimmungen in keiner Weise betroffen oder beeinträchtigt.
GESAMTE VEREINBARUNG: Dieser Lizenzvertrag stellt die gesamte Vereinbarung und den gesamten
Vertrag zwischen Ihnen und Handspring dar und ersetzt alle früheren schriftlichen oder mündlichen Ver-

100 Warranty and Other Product Information
träge, die für diese Software gelten, und kann nur in schriftlicher Form und nach Unterzeichnung durch beide
Parteien abgeändert werden.
Handspring, Inc. Haftungsbeschränkung Und Beschränkte
Gewährleistung Für Zubehör
HAFTUNGSBESCHRÄNKUNG: Handspring Inc. („Handspring") ist gegenüber dem ursprünglichen
Endnutzer („Kunden") zur Einhaltung der zwingenden Bestimmungen des deutschen Gewährleistungsrechts
verpflichtet. Die deutschen Gewährleistungsbestimmungen gelten mit folgenden Abweichungen:
Im Falle der Mangelhaftigkeit des Produkts oder eines Teils im Sinne des Gesetzes ist Handspring nach sein-
er Wahl dazu berechtigt, das Produkt oder Teil zu ersetzen oder zu reparieren. Bei Fehlschlagen der Ersat-
zlieferung oder Nachbesserung stehen dem Kunden weiterhin alle ihm gesetzlich zwingend zukommenden
Rechte zu.
Jegliche Haftung für einen schuldhaft durch Handspring verursachten Schaden wird hiermit ausgeschlossen,
soweit ein solcher Schaden nicht durch Handspring zuzurechnende grobe Fahrlässigkeit oder Vorsatz
verursacht worden ist und soweit es sich bei einem solchen Schaden nicht um Tod oder Körperschaden han-
delt, welcher durch eine Handspring zuzurechnende Handlung oder Unterlassung verursacht wurde.
BESCHRÄNKTE GEWÄHRLEISTUNG FÜR ZUBEHÖR: Zusätzlich zu den zwingenden Bestimmu-
ngen des deutschen Gewährleistungsrechts, die unter den oben aufgeführten Einschränkungen anwendbar
sind, gewährt Handspring die im folgenden dargestellte Garantie:
Handspring übernimmt gegenüber dem Kunden die Garantie, daß bei gewöhnlichem, zweckbezogenen Ge-
brauch (i) Handspring-Hardwarezubehör für den Zeitraum von einem Jahr ab Kaufdatum frei von Verarbe-
itungs- und Materialfehlern ist und daß (ii) Handspring-Softwarezubehör im wesentlichen seiner
Beschreibung entspricht und die Datenträger, auf denen die Software enthalten ist, für einen Zeitraum von
neunzig (90) Tagen ab Kaufdatum frei von Verarbeitungs- und Materialfehlern sind. Handspring übernimmt
keine Garantie für Software von Drittanbietern. Während der Garantiezeit wird defektes Zubehör von
Handspring entweder repariert, ersetzt oder aber der Kaufpreis dafür rückerstattet.
HANDSPRING UND SEINE LIEFERANTEN HAFTEN WEDER FÜR VERLUSTE ODER
SCHÄDEN, GLEICH WELCHER ART, DIE AUS DEM GEBRAUCH DIESES ZUBEHÖRS
ENTSTEHEN, NOCH FÜR KUNDENSOFTWARE ODER -DATEN, DIE AUF ZUBEHÖR EN-
THALTEN SIND, DAS FÜR REPARATUREN AN HANDSPRING GESCHICKT WIRD, SOWEIT
EIN SOLCHER VERLUST ODER SCHADEN NICHT DURCH HANDSPRING ZUZURECH-
NENDE GROBE FAHRLÄSSIGKEIT ODER VORSATZ VERURSACHT WORDEN IST UND SO-
WEIT ES SICH BEI EINEM SOLCHEN SCHADEN NICHT UM TOD ODER KÖRPERSCHADEN
HANDELT, WELCHER DURCH EINE HANDSPRING ZUZURECHNENDE HANDLUNG
ODER UNTERLASSUNG VERURSACHT WURDE.

Warranty and Other Product Information 101
WAHRNEHMUNG VON GARANTIELEISTUNGEN, RÜCKGABE FEHLERHAFTEN ZUBE-
HÖRS UND VERSPÄTETE RÜCKGABE FEHLERHAFTEN ZUBEHÖRS: Der Kunde muß in-
nerhalb der geltenden Garantiezeit eine Garantiezusage von Handspring einholen, bevor defektes Zubehör
an Handspring zurückgeschickt wird. Das eingesandte Material muß mit Rückporto versehen und angemes-
sen verpackt sein. Es wird außerdem empfohlen, das Zubehör zu versichern oder eine Versandart zu wählen,
die die Rückverfolgung des Pakets ermöglicht. Wenn Handspring Ersatzzubehör an den Kunden liefern
läßt, bevor Handspring das Originalzubehör erhalten hat, und der Kunde das Originalzubehör nicht inner-
halb von dreißig (30) Tagen nach Erteilung der Garantiezusage an Handspring zurücksendet, berechnet
Handspring dem Kunden den zu diesem Zeitpunkt gültigen Katalogpreis des entsprechenden Zubehörs.
VERBRAUCHERINFORMATION: In einigen Staaten, Ländern, oder Provinzen ist der Ausschluß oder
die Beschränkung der gesetzlichen Gewährleistungsbestimmungen bzw. die Haftungsbeschränkung hin-
sichtlich zufälliger Schäden oder hinsichtlich Folgeschäden oder hinsichtlich Körperverletzungen nicht zu-
lässig, so daß die oben vorgenommene Haftungs- und Gewährleistungsbeschränkung auf Sie
möglicherweise keine Anwendung findet. Diese Gewährleistungserklärung verleiht Ihnen bestimmte Re-
chte, die je nach anwendbarem Recht verschieden sein können
Handspring, Inc.
Contrat De Licence Utilisateur Final Du Module Springboard
CE PRODUIT CONTIENT UN LOGICIEL PRECHARGE, DONT L'UTILISATION EST
REGIE PAR UNE LICENCE ACCORDEE PAR HANDSPRING, INC. ET SES FOURNISSEURS
(COLLECTIVEMENT, « HANDSPRING ») A SES CLIENTS POUR LEUR SEULE UTILISA-
TION , DANS LES CONDITIONS ENONCEES CI-APRES.
LICENCE DE LOGICIEL : Handspring vous accorde une licence non exclusive d'utilisation du ou des
programme(s) (le « Logiciel ») préchargé(s) sur ce Produit conformément aux termes et restrictions du
présent Contrat de licence de logiciel pour Utilisateur Final de la VisorPhone (le « Contrat de licence »).
Vous n'êtes pas autorisé à donner en location, ni à louer, distribuer ou accorder de sous-licences du Logiciel,
ni à l'utiliser en temps partagé ou de quelque autre façon non autorisée. En outre, aucune licence ne vous est
accordée sur le code source du Logiciel. Sous réserve des droits qui vous sont concédés ci-dessous, le présent
Contrat de Licence ne vous confère aucun droit sur les brevets, droits d'auteur, secrets de fabrique, marques
commerciales, ou autres droits afférents au Logiciel. Vous devez utiliser le Logiciel uniquement avec le Pro-
duit dans lequel il est préchargé et seulement en connexion avec les produits Handspring. D'autre part, le
Logiciel et la documentation qui l'accompagne ne peuvent être copiés qu'à des fins de sauvegarde ou d'ar-
chivage dans le cadre d'une utilisation conforme aux termes du présent Contrat. Vous devez reproduire et
inclure sur toutes les copies que vous effectuez toutes les mentions de droits d'auteur et de droits de propriété
figurant sur le Logiciel.
REDEVANCE DE LICENCE : La prise d'effet des licences accordées en vertu du présent Contrat est
soumise au versement à Handspring des redevances applicables.

102 Warranty and Other Product Information
INTERDICTION DE CESSION ET D'INGENIERIE INVERSE : Vous êtes autorisé à transférer le
Logiciel et le présent Contrat de licence à un tiers avec le Produit sur lequel il est préchargé, à condition que
ledit tiers s'engage par écrit à respecter les termes et conditions du présent Contrat de Licence. Si vous procé-
dez à un tel transfert, vous devez fournir toutes les copies du Logiciel et de la documentation qui l'accompa-
gne au tiers à qui vous transférez le Logiciel ou détruire tout élément non transféré. Sous réserve des
disposition qui précèdent, le présent Contrat ne vous autorise pas à transférer ou céder le Logiciel ou vos
droits résultant du présent Contrat Il vous est expressément interdit de modifier, d'effectuer de l'ingénierie
inverse, de décompiler, de désassembler, ou retirer le Logiciel du Produit sur lequel il est préchargé. Toute-
fois, si vous êtes un résident de l'Union européenne (« UE »), vous pouvez demander par écrit à Handspring
les informations nécessaires à l'interopérabilité du Logiciel avec d'autres programmes au sens de la directive
européenne sur la protection légale des programmes d'ordinateur.
RESTRICTIONS A L'EXPORTATION : Vous vous engagez à ne pas exporter ou réexporter le Logiciel,
ni la documentation qui l'accompagne (ou les copies de ces documents), ni les produits utilisant le Logiciel
ou sa documentation en violation des lois ou réglementations applicables aux Etats-Unis ou dans le pays dans
lequel vous les avez acquis. Le Logiciel régi par le présent Contrat peut contenir de fortes clés de chiffrement
des données ne pouvant pas être exportées des Etats-Unis ou du Canada. Vous vous engagez à ne pas export-
er/réexporter, physiquement ou électroniquement, le logiciel de chiffrement ou la documentation qui l'ac-
compagne sans l'autorisation écrite préalable du U.S. Department of Commerce.
DISPOSITIONS RELATIVES AU GOUVERNEMENT DES ETATS-UNIS : Si vous faites l'acquisi-
tion du Logiciel pour le compte d'une entité du gouvernement des Etats-Unis, les dispositions suivantes s'ap-
pliquent. Le Logiciel est un « article commercial », tel que défini par l'article 2.101 (Oct. 1995) du FAR
(Federal Acquisition Regulation) et se compose du « Logiciel informatique commercial » et de la « Docu-
mentation pour logiciel informatique commercial », telles que ces expressions sont utilisées dans les articles
12.212 (Sept. 1995) du FAR, et est fourni au gouvernement des Etats-Unis uniquement en tant qu'article
commercial (avec des « Droits restreints », le cas échéant). L'utilisation, la reproduction, ou la divulgation par
le gouvernement des Etats-Unis est soumise aux restrictions prévues dans le présent Contrat de licence et les
articles DFARS 227.7202-1 (a) et 227.7202-3 (a) (1995), DFARS 252.227-7013 (c)(1)(ii) (OCT 1988), FAR
12.212 (a) (1995), FAR 52.227-19, ou l'article FAR 52.227-14 (ALT III), selon le cas.
DISPOSITIONS ET RESILIATION : Le présent Contrat de licence demeurera en vigueur jusqu'à sa ré-
siliation. Vous pouvez le résilier à tout moment en détruisant le Logiciel et sa documentation ainsi que toutes
les copies et les éléments qui y sont intégrés. Ce Contrat sera résilié de plein droit si vous ne respectez pas un
de ses termes ou conditions. En cas de résiliation vous vous engagez à détruire le Logiciel et sa documentation
ainsi que toutes les copies et les éléments qui y sont intégrés.
LOI APPLICABLE : Le présent contrat est régi par les lois en vigueur dans l'Etat de Californie. Vous re-
connaissez que sont expressément exclus l'application des règles de conflit de lois mentionnées ci-dessus ainsi
que celle de la Convention des Nations Unies relative aux contrats de vente internationale de marchandises
(1980).

Warranty and Other Product Information 103
LIMITATION DE GARANTIE ; LIMITATION DE RESPONSABILITE : Toutes les garanties et
limitations de responsabilité applicables au Logiciel sont mentionnées dans la Limitation de Garantie ou le
manuel accompagnant le Logiciel. Lesdites garanties et limitations sont incorporées par référence au présent
Contrat. Ces limitations ne s'appliqueront que dans les limites de la loi applicable. En tout état de cause la
garantie légale s'appliquera si le client est un consommateur au sens défini par le code français de la consom-
mation.
NULLITE PARTIELLE : Si une disposition du présent Contrat est jugée non valable, illégale ou inop-
posable, les autres dispositions ne seront pas affectées, et ladite disposition sera remplacée par une disposi-
tion légale et opposable ayant une portée et un impact économique similaires.
INTEGRALITE DU CONTRAT : Le présent Contrat de licence constitue l'intégralité du Contrat vous
liant à Handspring. Il annule et remplace tout accord antérieur, écrit ou oral, relatif au Logiciel, et ne peut
être modifié que par un document écrit signé par les deux parties.
Handspring, Inc.
Limitation De Garantie Concernant Les Accessoires
GARANTIE LIMITEE : Handspring, Inc. (« Handspring »), garantit à l'utilisateur final initial (le « Client
») que, dans des conditions d'utilisation normale, (i) les accessoires des matériels Handspring seront exempts
de défauts matériels et de fabrication pendant une période d'un an à compter de la date d'acquisition, et que
(ii) les accessoires des logiciels Handspring seront pour l'essentiel conformes aux spécifications et que les
supports du Logiciel seront exempts de défauts matériels ou de fabrication, pendant une période de quatre-
vingt-dix (90) jours à compter de la date d'acquisition. Handspring n'accorde aucune garantie en ce qui con-
cerne des logiciels tiers. Pendant la période de garantie, Handspring pourra à son choix réparer, remplacer
ou rembourser le prix d'achat des accessoires défectueux.
Handspring et ses fournisseurs ne pourront être tenus pour responsables des pertes ou dommages d'aucune
sorte résultant de l'utilisation de cet accessoire ou subis par tout logiciel ou données du Client stockés sur
des accessoires retournés à Handspring pour des prestations de service.
GARANTIE DE SERVICES : Le Client doit obtenir pendant la période de garantie applicable une au-
torisation de fourniture de service auprès de Handspring préalablement au retour des accessoires défectueux.
Lesdits accessoires doivent être expédiés port payé et correctement emballés. Il est recommandé de les as-
surer ou de les expédier via un mode de transport permettant le suivi du colis. Si Handspring expédie un ac-
cessoire de remplacement au Client avant de recevoir l'accessoire original et que le Client ne renvoie pas
celui-ci dans les trente (30) jours à compter de la date d'autorisation de fourniture de service dans le cadre
de la garantie, Handspring facturera au Client le prix de l'accessoire mentionné dans le catalogue en vigueur.
LIMITATIONS : LA PRESENTE GARANTIE LIMITEE REMPLACE LES AUTRES GARANTIES,
TERMES OU CONDITIONS ; Y COMPRIS LES GARANTIES, TERMES OU CONDITIONS DE
QUALITE, DE CONVENANCE A UN USAGE PARTICULIER, DE QUALITE SATISFAISANTE,

104 Warranty and Other Product Information
DE CONFORMITE A LA DESCRIPTION ET DE NON CONTREFACON, LESQUELLES SONT
EXPRESSEMENT EXCLUES PAR. HANDSPRING ET SES FOURNISSEURS. HANDSPRING OU
SES FOURNISSEURS NE SAURAIENT EN AUCUN CAS ETRE TENUS POUR RESPONSABLES
DES DOMMAGES SPECIAUX, INCIDENTS, CONSECUTIFS OU INDIRECTS RESULTANT DE
LA POSSESSION, DE L'UTILISATION DE L'ACCESSOIRE, OU D'UNE DEFAILLANCE DE CE-
LUI-CI.
Certains pays, Etats ou provinces ne permettent pas l'exclusion ou la limitation de garanties implicites ou re-
sponsabilité pour dommages consécutifs ou préjudice corporel. Les limitations et exclusions mentionnées ci-
dessus ne vous sont donc peut-être pas applicables. Lorsque les garanties implicites ne peuvent pas être ex-
clues dans leur intégralité, elles ne sont valables que pendant la durée de la garantie écrite applicable. Cette
garantie vous confère des droits légaux spécifiques qui peuvent varier en fonction du droit local applicable.
Handspring, Inc. Contrato De Licencia
Para El Usuario Final Del Software Del Módulo Springboard
ESTE PRODUCTO CONTIENE SOFTWARE PREINSTALADO CUYO USO SE OTORGA
BAJO LICENCIA DE HANDSPRING, INC. Y SUS PROVEEDORES (COLECTIVAMENTE DE-
NOMINADO "HANDSPRING") AL CLIENTE, SEGÚN LAS CONDICIONES QUE SE ES-
TABLECEN A CONTINUACIÓN.
LICENCIA DEL SOFTWARE: Handspring le otorga una licencia no exclusiva para utilizar los programas
de software (el "Software") preinstalados en este producto, sujeta a las condiciones y restricciones establecidas
en este Contrato de licencia para el usuario final de la VisorPhone ("Contrato de licencia"). No se permite el
arrendamiento, subarrendamiento, alquiler, distribución o transferencia de la licencia del Software a terceros,
ni su uso en tiempo compartido o de cualquier modo no autorizado. Además, no se otorga ninguna licencia
sobre el código legible del Software (código fuente). Salvo en las situaciones establecidas a continuación, este
Contrato de licencia no le otorga ningún derecho sobre patentes, derechos de autor, secretos comerciales,
marcas comerciales o cualquier otro tipo de derechos relativos al Software. La licencia del Software se con-
cede sólo para su uso como programa preinstalado en el Producto y en conexión con otros productos de
Handspring. El Software y la documentación adjunta sólo se podrán reproducir como copias de seguridad o
para archivarlos durante las operaciones inherentes al uso del Software según lo establecido en este documen-
to. Cada copia que haga deberá reproducir e incluir todas las notas de derechos de autor, así como cualquier
otra nota de propiedad de derechos que aparezca en el Software.
PAGO DE DERECHOS: La efectividad de la licencia que se otorga por el presente documento está condi-
cionada al pago de los derechos correspondientes a Handspring.
LIMITACIONES DE TRANSFERENCIA E INGENIERÍA INVERSA: Sólo se podrá transferir el
Software y este Contrato de licencia a terceros si transfiere el Producto en el que se encuentre preinstalado el
Software, siempre que la otra parte acepte por escrito los términos y condiciones de este Contrato de licencia.

Warranty and Other Product Information 105
Al transferirse el Software, deberán transferirse al mismo tiempo todas las copias del Software y la documen-
tación adjunta al mismo destinatario o destruir cualquier material no transferido. Salvo en los casos estable-
cidos anteriormente, no se podrá transferir o ceder el Software ni los derechos que otorga este Contrato de
licencia. Están expresamente prohibidas la modificación, utilización de técnicas de ingeniería inversa, de-
compilación, desensamblaje o eliminación del Software del Producto en el que se encuentre preinstalado.
No obstante, si usted es residente en la Unión Europea ("UE"), puede solicitar a Handspring por escrito la
información necesaria para asegurar la interoperabilidad del Software con otros programas según lo descrito
en la Directiva de la UE sobre protección legal de programas informáticos.
LIMITACIONES DE EXPORTACIÓN: Usted se compromete a no exportar o reexportar el Software y
la documentación adjunta (o copias de los mismos) u otros productos que utilicen dicho Software y docu-
mentación si ello va contra las leyes y regulaciones correspondientes de los Estados Unidos o el país en que
los adquirió. El Software cubierto por este Contrato de licencia puede contener códigos de cifrado de datos
de alto nivel, que no se puede exportar fuera de los Estados Unidos o Canadá. Usted se compromete a no
exportar o reexportar, ya sea por medios físicos o electrónicos, el software de cifrado o la documentación ad-
junta sin la autorización expresa y por escrito del Departamento de Comercio de los Estados Unidos (U.S.
Department of Commerce).
DISPOSICIONES RELATIVAS AL GOBIERNO DE LOS ESTADOS UNIDOS: Si adquiere el
Software en nombre de alguna entidad o agencia del gobierno de los Estados Unidos, se aplicarán las dis-
posiciones siguientes. El Software constituye un "artículo comercial" (commercial item), según la definición
del término descrita en la Regulación federal sobre adquisiciones (Federal Acquisition Regulation - FAR)
2.101 (Octubre de 1995), que consta de "programas informáticos comerciales" y "documentación de progra-
mas informáticos comerciales", según el uso de dichos términos en la FAR 12.212 (Septiembre de 1995), y
se le proporciona al gobierno de los Estados Unidos sólo como software comercial (con "derechos limitados"
si así se establece). Su uso, duplicación o divulgación por parte del gobierno de los Estados Unidos está sujeto
a las limitaciones establecidas en este Contrato de licencia, de acuerdo con lo dispuesto en DFARS 227.7202-
1(a) y 227.7202-3(a) (1995), DFARS 252.227-7013(c)(1)(ii) (OCT 1988), FAR 12.212(a) (1995), FAR
52.227-19 o FAR 52.227-14 (ALT III), según corresponda.
DURACIÓN Y FINALIZACIÓN: Este contrato de Licencia estará vigente hasta su finalización. Si se
deseara terminarlo en un momento dado, deberá destruirse el Software y la documentación junto con todas
las copias y partes combinadas por cualquier medio. El Contrato de licencia también finalizará en caso de
incumplimiento de cualquier término o condición del mismo. En tal caso, usted se compromete a destruir el
Software y la documentación, junto con todas las copias y partes combinadas por cualquier medio.
LEGISLACIÓN APLICABLE: Este Contrato de licencia se rige por las leyes del Estado de California tal
como esas leyes se aplican a los contratos celebrados y ejecutados completamente en California por resident-
es de California según la legislación de los Estados Unidos. Usted acepta que queda excluida en su totalidad
la aplicación de las normas sobre conflicto entre dichas leyes, así como la Convención de las Naciones Unidas
sobre Contratos de Compra-Venta Internacional de Mercancías (1980) al presente Contrato de Licencia.

106 Warranty and Other Product Information
GARANTÍA LIMITADA Y LIMITACIONES DE RESPONSABILIDAD: Todas las garantías y limit-
aciones de responsabilidad correspondientes al Software se aplicarán según lo establecido en la Garantía Lim-
itada o en el manual del producto que acompaña al Software. Dichas garantías y limitaciones de
responsabilidad quedan incorporadas en su totalidad al presente Contrato por la referencia que aquí se hace
a ellas.
VALIDEZ DE LAS CLÁUSULAS: : En caso de que alguna disposición de este Contrato de licencia resulte
ser no válida, ilegal o no exigible, ello no afectará a la validez, legalidad y exigibilidad de ninguna de las dis-
posiciones restantes. En tal caso, la disposición afectada se sustituirá por otra disposición válida, legal y exigi-
ble cuyos efectos e impactos económicos sean similares.
INTEGRIDAD DEL CONTRATO: Este Contrato de Licencia constituye el compromiso y acuerdo ínte-
gro entre usted y Handspring, y sustituye y reemplaza cualesquiera acuerdos previos, ya sea oral o escrito, rel-
ativo al Software. Este contrato sólo se podrá modificar mediante un documento escrito firmado por ambas
partes.
Handspring, Inc. Garantía Limitada Para Accesorios
GARANTÍA LIMITADA: Handspring, Inc. ("Handspring"), garantiza al usuario final ("Cliente") que, en
condiciones de uso normales, (i) los accesorios de hardware de Handspring estarán libres de defectos en cuan-
to a materiales y mano de obra durante un año desde la fecha de compra y (ii) los accesorios de software de
Handspring cumplirán sustancialmente las especificaciones indicadas y los soportes físicos del software es-
tarán libres de defectos en cuanto a materiales y fabricación durante noventa (90) días a partir de la fecha de
compra. Handspring no ofrece ninguna garantía para software de terceros. Durante el periodo de garantía,
Handspring reparará, reemplazará o devolverá el importe de la compra de accesorios defectuosos.
Handspring y sus proveedores no son responsables de pérdidas o daños de cualquier tipo causados por el uso
de este accesorio ni de software o datos del Cliente almacenados en los accesorios devueltos a Handspring.
SERVICIO DE GARANTÍA: Antes de devolver accesorios defectuosos a Handspring, el Cliente deberá
obtener autorización del servicio de garantía de Handspring dentro del periodo de garantía correspondiente.
Los accesorios devueltos deberán empaquetarse adecuadamente y su envío será a cargo del Cliente. Se re-
comienda asegurarlos o enviarlos mediante un método que permita su seguimiento. Si Handspring envía un
accesorio de repuesto al Cliente antes de recibir el accesorio original y el Cliente no entrega dicho accesorio
original a Handspring en treinta (30) días desde la fecha en que emitió la autorización de servicio de garantía,
Handspring aplicará al Cliente el precio de dicho accesorio según se indique en el último catálogo publicado.
LIMITACIONES: ESTA GARANTÍA LIMITADA SUSTITUYE A TODAS LAS DEMÁS GA-
RANTÍAS, TÉRMINOS Y CONDICIONES; INCLUYENDO GARANTÍAS, TÉRMINOS Y CONDI-
CIONES DE COMERCIABILIDAD, IDONEIDAD PARA UN PROPÓSITO DETERMINADO,
CALIDAD SATISFACTORIA, CORRESPONDENCIA CON LA DESCRIPCIÓN (EXCEPTO EN LA
MEDIDA EN QUE ASÍ LO PREVEA LA LEGISLACIÓN LOCAL) E IMCUMPLIMIENTOS, RE-

Warranty and Other Product Information 107
NUNCIANDO EXPRESAMENTE HANDSPRING Y SUS PROVEEDORES A OTORGAR NINGU-
NA DE LAS ANTERIORES GARANTÍAS, TÉRMINOS O CONDICIONES. HANDSPRING O SUS
PROVEEDORES NO SERÁN RESPONSABLES EN NINGÚN CASO DE DAÑOS ESPECIALES,
FORTUITOS, EMERGENTES O INDIRECTOS CAUSADOS POR LA POSESIÓN, USO O FAL-
LOS DE ESTE ACCESORIO.
Algunos países, estados o provincias no permiten la exclusión o limitación de las garantías implícitas, la lim-
itación de daños fortuitos y perjuicios derivados o la limitación de responsabilidad por daños personales y,
por lo tanto, la aplicación de algunas de las limitaciones y exclusiones anteriores puede estar restringida. Si
no está permitido excluir limitaciones implícitas en su totalidad, éstas se limitarán a la duración de la garantía
escrita correspondiente. Esta garantía le otorga derechos legales específicos que pueden variar según las leyes
locales.
Handspring, Inc. Springboard Module
Contratto Di Licenza Software Per L'utente Finale
QUESTO PRODOTTO CONTIENE SOFTWARE PRE-CARICATO, L'USO DEL QUALE
CONSENTITO IN BASE ALLA LICENZA DELLA HANDSPRING ED I SUOI FORNITORI
(COMPLESSIVAMENTE,, "HANDSPRING"), AI SUOI CLIENTI ESCLUSIVAMENTE PER
LORO USO ED COME DI SEGUITO PREVISTO
LICENZA SOFTWARE: Handspring concede all'utente una licenza non esclusiva per usare il/i program-
ma/i software [il "Software") pre-caricato in questo Prodotto in base ai termini e alle limitazioni previste nel
presente Contratto di Licenza Software VisorPhone per l'Utente Finale ("Contratto di Licenza"). All'utente
non è consentito concedere in noleggio, distribuire o concedere in sublicenza il Software o usare il Software
in condivisione o in qualsiasi altro modo non autorizzato. Inoltre, all'utente non viene concessa alcuna licen-
za sul codice del Software leggibile da un operatore (codice sorgente). Salvo quanto di seguito previsto, il
presente Contratto di Licenza non concede all'utente alcun diritto su brevetti, diritti d'autore, segreti com-
merciali, marchi commerciali o alcun altro diritto sul Software. Il Software viene concesso in licenza affinché
venga usato esclusivamente come pre-caricato nel Prodotto ed esclusivamente in connessione con prodotti
Handspring. Inoltre, il Software e la documentazione di supporto potranno essere copiati solo in quanto nec-
essario per fini di backup o archivio, a supporto dell'uso del Software da parte dell'utente secondo quanto
previsto. L'utente deve riprodurre e includere tutti gli avvisi sul diritto d'autore e qualsiasi altro diritto di
proprietà che appaiono sul Software su qualsiasi copia che l'utente effettuerà.
PAGAMENTO DI CORRISPETTIVI: L'efficacia della licenza concessa è subordinata alla ricezione da
parte della Handspring di ogni corrispettivo dovuto.
DIVIETO DI CESSIONE; DIVIETO DI REVERSE ENGINEERING: L'utente potrà cedere il Soft-
ware e il presente Contratto di Licenza a terzi in connessione ad un trasferimento del Prodotto sul quale il
Software è pre-caricato, a patto che i terzi si obblighino per iscritto ad accettare i termini e le condizioni del

108 Warranty and Other Product Information
presente Contratto di Licenza. Qualora l'utente trasferisca il Software, dovrà allo stesso tempo trasferire tutte
le copie del Software così come la documentazione di supporto al cessionario o distruggere tale materiale che
non venga trasferito. Salvo quanto sopra previsto, l'utente non potrà trasferire o cedere il Software o i suoi
diritti derivanti dal presente Contratto di Licenza. Sono espressamente proibite la modifica, il reverse engi-
neering, la decompilazione, il disassemblamento, o la rimozione del Software dal Prodotto sul quale lo stesso
è pre-caricato. Tuttavia, qualora l'utente sia residente nell'Unione Europea ("EU"), le informazioni neces-
sarie per ottenere l'interoperabilità del Software con altri programmi, secondo le previsioni della Direttiva
EU sulla Tutela Legale dei Programmi per Computer, saranno rese disponibili all'utente dalla Handspring
in base ad una richiesta scritta.
LIMITI ALL'ESPORTAZIONE: L'utente si obbliga a non esportare o ri-esportare il Software o la doc-
umentazione di accompagnamento (o qualsiasi copia degli stessi) o qualsiasi Prodotto che utilizzi il Software
o tale dumentazione, in violazione di qualsiasi legge o regolamento degli Stati Uniti o della nazione nella
quale l'utente ha ottenuto gli stessi. Il software oggetto del presente Contratto di Licenza può contenere un
particolare codice di crittografia di dati che non può essere esportato al di fuori degli Stati Uniti o del Canada.
L'utente si obbliga a non esportare/ri-esportare, sia materialmente che informaticamente, il software di crit-
tografia o la documentazione di accompagnamento senza aver ottenuto un autorizzazione scritta del Diparti-
mento di Commercio degli Stati Uniti.
AVVISO PER IL GOVERNO DEGLI STATI UNITI: Qualora l'utente stia ottenendo il Software per
conto di qualsiasi ente o istituzione del Governo degli Stati Uniti, si applicheranno le seguenti previsioni. Il
Software costituisce "bene commerciale", come questo termine è definito dal Federal Acquisition Regulation
(FAR) 2.101 (Oct. 1995), ed è costituito dal "software commerciale" e "documentazione su software commer-
ciale", come questi termini vengono definiti nel FAR 12.212 (Sept. 1995), e viene fornito al Governo degli
Stati Uniti solo come software commerciale (con "Limitazione di Diritti", qualora applicabili). L'uso, la du-
plicazione, o la rivelazione da parte del Governo degli Stati uniti è subordinato alle limitazioni stabilite nel
presente Contratto di Licenza e così come previsto nel DFARS 227.7202-1(a) e 227.7202-3(a) (1995),
DFARS 252.227-7013(c)(1)(ii) (OCT 1988), FAR 12.212(a) (1995), FAR 52.227-19, o FAR 52.227-14 (ALT
III), in quanto applicabili.
DURATA, RECESSO E RISOLUZIONE: Il presente Contratto di Licenza è a tempo indeterminato.
L'utente potrà recedere dallo stesso in qualsiasi momento, distruggendo il Software e la documentazione in-
sieme a tutte le copie e le parti unificate delle stesse in qualsiasi forma. Il presente Contratto di Licenza sarà
automaticamente risolto "di diritto e senza necessità di una pronuncia giudiziale" qualora l'utente sia inadem-
piente ai seguenti termini o condizione del presente Contratto di Licenza: In caso di risoluzione, l'utente si
obbliga a distruggere il Software e la documentazione, insieme a tutte le copie le parti unificate delle stesse in
qualsiasi forma.
LEGGE APPLICABILE: Al presente Contratto di Licenza si applicherà la legge dello Stato della Califor-
nia L'utente accetta che i principi sui conflitti di leggi applicabili contenuti in tale legge e la Convenzione

Warranty and Other Product Information 109
delle Nazioni Unite sulla Vendita Internazionale di Beni (1980) sono espressamente ed integralmente es-
cluse dall'applicazione al presente Contratto di Licenza.
LIMITAZIONE DI GARANZIE; LIMITAZIONE DI RESPONSABILITA': Tutte le faranzie e le
limitazioni di responsabilità applicabili al Software sono quelle indicate nella Limitazione di Garanzia o nel
manuale del prodotto che accompagna il Software. Tali garanzie e limitazioni di responsabilità sono inte-
gralmente incorporate nel presente per riferimento. Tale limitazione si applicherà secondo quanto consen-
tito dalla legge. In ogni caso, le garanzie di legge si applicheranno se l'utente è un consumatore, secondo la
definizione del Codice dei Consumatori Francese.
NULLITA' PARZIALE: Nel caso in cui qualsiasi previsione del presente Contratto di Licenza sia ritenuta
non valida, illegale o inefficace, la validità, legalità ed efficacia di ogni altra previsione non sarà in alcun modo
pregiudicata o diminuita e un previsione valida, legale ed efficace con scopo ed impatto economico analogo
dovrà essere inserita al suo posto.
INTERO ACCORDO: Il presente Contratto di Licenza stabilisce l'intero accordo tra l'utente e Hand-
spring, sostituisce tutti i precedenti accordi, sia scritti che orali, relativi al Software, e potrà essere modificato
solo per iscritto con sottoscrizione di entrambe le parti.
Handspring, Inc. Limitazione Di Garanzia Per Gli AccessorI
LIMITAZIONE DI GARANZIE: Handspring garantisce all'originario utente ("Cliente") che in caso di
uso normale e previsto (i) gli accessori hardware Handspring saranno privi di difetti di produzione e nei ma-
teriali per un anno dalla data di acquisto, e (ii) gli accessori software Handspring saranno sostanzialmente
conformi alle loro caratteristiche e che i supporti che contengono il software saranno privi di difetti di
produzione e nei materiali, per novanta (90) giorni dalla data di acquisto. Handspring non fornisce alcuna
garanzia per il software di terzi. Durante il periodo di garanzia, Handspring riparerà, sostituirà o rimborserà
il prezzo di acquisto degli accessori difettosi.
Salvo il caso di dolo o colpa grave, Handspring e i suoi fornitori non saranno responsabili per qualsiasi per-
dita o danni di alcun tipo derivanti dall'uso di questo accessorio o per qualsiasi software del Cliente o dati
registrati su accessori restituiti a Handspring per il servizio di garanzia.
SERVIZIO DI GARANZIA: Il Cliente deve ottenere l'autorizzazione per il servizio di garanzia da Hand-
sping entro il relativo servizio di garanzia prima di restituire gli accessori difettosi ad Handspring. Gli acces-
sori restituiti devono essere inviati con spese di trasporto pre-pagate e opportunamente impacchettati, e si
raccomanda che gli stessi siano assicurati o inviati con un metodo che consenta di rintracciare i pacchi. Qua-
lora Handspring invii un accessorio in sostituzione al Cliente prima di aver ricevuto l'accessorio originale ed
il Cliente non restituisca l'accessorio originale a Handspring entro trenta (30) giorni dalla data in cui l'au-
torizzazione al servizio di garanzia è stata emessa, Handspring addebiterà al Cliente il prezzo di listino in
vigore a tale data per tale accessorio.

110 Warranty and Other Product Information
LIMITAZIONI: LA PRESENTE LIMITAZIONE DI GARANZIA SOSTITUISCE TUTTE LE AL-
TRE GARANZIE, TERMINI, O CONDIZIONI, COMPRESE LE GARANZIE, TERMINI O CON-
DIZIONI DI IDONEITA' AL COMMERCIO, IDONEITA' AD UNO SCOPO PARTICOLARE,
QUALITA', CORRISPONDENZA ALLA DESCRIZIONE, E NON VIOLAZIONE DI DIRITTI AL-
TRUI, LE QUALI VENGONO ESPRESSAMENTE ESCLUSE DA HANDSPRING ED I SUOI FOR-
NITORI. SALVA L'IPOTESI DI DOLO O COLPA GRAVE, IN NESSUN CASO HANDSPRING O I
SUOI FORNITORI SARANNO RESPONSABILI PER QUALSIASI DANNO SPECIALE, INCIDEN-
TALE CONSEGUENZIALE O DIRETTO DERIVANTE DAL POSSESSO, USO, O MANCATO
FUNZIONAMENTO DI QUESTO ACCESSORIO.
Alcuni paesi, stati o province non consentono l'esclusione o la limitazione di garanzie implicite o la limitazi-
one di danni incidentali o conseguenziali o la limitazione di responsabilità per lesioni personali, pertanto le
limitazioni ed esclusioni di cui sopra potranno essere limitate nella loro applicazione all'utente. Nel caso in
cui non sia consentita l'esclusione integrale delle garanzie implicite, le stesse saranno limitate alla durata della
relativa garanzia scritta. La presente garanzia concede all'utente specifici diritti che possono variare in base
alla normativa locale applicabile.

Warranty and Other Product Information 111
Safety and General Information
IMPORTANT INFORMATION ON SAFE AND EFFFICIENT OPERATION. Read this information
before using your integrated multi-service portable radio.
For the Safe and Efficient Operation of Your Radio, Observe These Guidelines:
Your radio product contains a transmitter and a receiver. When it is ON, it receives and transmits radio fre-
quency (RF) energy. The radio operates in the frequency range of 800 MHz to 1990 MHz and employs dig-
ital modulation techniques. When you use your radio, the system handling your call controls the power level
at which your radio transmits. The output power level typically may vary over a range from .001 Watts to 2
Watts.
Exposure to Radio Frequency Energy
Your VisorPhone Radio Product is designed to comply with the following national and international stan-
dards and guidelines regarding exposure of human beings to radio frequency electromagnetic energy:
■United States Federal Communications Commission, Code of Federal Regulations;
47 CFR part 2 sub-part J
■American National Standards Institute (ANSI) IEEE. C95. 1-1992
■National Council on Radiation Protection and Measurements (NCRP). Report 86
■International Commission on Non-Ionizing Radiation Protection (ICNIRP) 1998
■National Radiological Protection Board of the United Kingdom, GS 11, 1988
■Verband Deutscher Elektrotechniker (VDE) DIN-0848
■Department of Health and Welfare Canada. Safety Code 6
To comply with the above FCC Regulations governing human exposure to radio frequency energy, users
MUST adhere to the following procedure:
■To comply with FCC RF exposure guidelines during body-worn operation, use the Handspring Belt
Clip or the Handspring Holster. Use of other body worn accessories that have not been tested with the
VisorPhone for RF exposure compliance may not comply.
To assure optimal radio performance, always adhere to the following procedures:
■When placing or receiving a phone call hold the radio as you would a telephone.
■Speak directly into the microphone and position the antenna up over your shoulder.
■DO NOT hold the antenna when the radio is “IN USE.” Holding the antenna affects call quality and
may cause the radio to operate at a higher power level than needed.

112 Warranty and Other Product Information
Interference to Medical and Personal Electronic Devices
Most electronic equipment is shielded from RF energy. However, certain equipment may not be shielded
against the RF signals from your wireless phone.
Pacemakers
The Health Industry Manufacturers Association recommends that a minimum separation of six inches (6")
be maintained between a handheld wireless phone and a pacemaker to avoid potential interference with the
pacemaker. These recommendations are consistent with the independent research by the recommendations
of Wireless Technology Research.
Persons with pacemakers should:
■ALWAYS keep the phone more than six inches from their pacemaker when the phone is turned ON.
■not carry the phone in a breast pocket.
■use the ear opposite the pacemaker to minimize the potential for interference.
■turn the phone OFF immediately if you have any reason to suspect that interference is taking place.
Hearing Aids
Some digital wireless phones may interfere with some hearing aids. In the event of such interference, you may
want to consult your hearing aid manufacturer to discuss alternatives.
Other Medical Devices
If you use any other personal medical device, consult the manufacturer of your device to determine if it is ad-
equately shielded from external RF energy. Your physician may be able to assist you in obtaining this infor-
mation.
Turn your phone OFF in health care facilities when any regulations posted in these areas instruct you to do
so. Hospitals or health care facilities may be using equipment that could be sensitive to external RF energy.
Interference to Other Electronic Devices
RF energy may affect improperly installed or inadequately shielded electronic operating and entertainment
systems in motor vehicles. Check with the manufacturer or representative to determine if these systems are
adequately shielded from external RF energy. Also check with the manufacturer of any equipment that has
been added to the vehicle.
Turn your radio OFF before boarding any aircraft to prevent possible interference to aircraft systems. Reg-
ulations of the United states Federal Aviation Administration prohibit use when the aircraft is in the air and
require you have permission from a crew member to use your radio while the aircraft is one the ground.

Warranty and Other Product Information 113
Safety and General Use While Driving
Check the laws and regulations on the use of telephones in the area where you drive. Always obey them.
When using the phone while driving, please:
■Give full attention to driving and to the road
■Use hands-free operation, if available
■Pull off the road and park before making or answering a call if driving conditions so require.
International Safety Statements
Aircraft Safety
Switch off your cellular telephone when in an aircraft. The use of cellular telephones in an aircraft may be
dangerous to the operation of the aircraft, disrupt the cellular network and is illegal. Failure to observe this
instruction may lead to suspension or denial of cellular services to the offender, or legal action or both.
Non-ionising Radiation
As with other mobile radio transmitting equipment, users are advised that for satisfactory operation of the
equipment and for the safety of the personnel. it is recommended that no part of the human body be allowed
to come to close to the antenna during operation of the equipment.
FCC Statement
This device complies with part 15 of the FCC rules. Operation is subject to the following two conditions:
(1) This device may not cause harmful interference, and (2) this device must accept any interference received,
including interference that may cause undesired operation.
Note: This equipment has been tested and found to comply with the limits for a Class B digital device,
pursuant to Part 15 of the FCC rules. These limits are designed to provide reasonable protection against
harmful interference in a residential installation. This equipment generates, uses, and can radiate radio fre-
quency energy and, if not installed and used in accordance with the instructions, may cause harmful inter-
ference to radio communications. However, there is no guarantee that interference will not occur in a
particular installation. If this equipment does cause harmful interference to radio or television reception,
which can be determined by turning the equipment off and on, the user is encouraged to try to correct the
interference by one or more of the following measures:
■Reorient or relocate the receiving antenna.
■Increase the separation between the equipment and receiver.
■Connect the equipment into an outlet on a circuit different from that to which the receiver is
connected.
■Consult the dealer or an experienced radio/TV technician for help.

114 Warranty and Other Product Information
The use of shielded I/O cables is required when connecting this equipment to any and all optional peripheral
or host devices. Failure to do so may violate FCC rules.
Caution: Changes or modifications not covered in this manual must be approved in writing by the manufac-
turer's Regulatory Engineering Department. Changes or modifications made without written approval may
void the user's authority to operate this equipment.
Responsible Party:
Handspring, Inc.
189 Bernardo Avenue
Mountain View, California 94043-5203
United States of America
(650) 230-5000
Canadian RFI Statement
This Class B digital apparatus meets all requirements of the Canadian Interference-Causing Equipment Reg-
ulations.
Cet appareil numérique de la classe B respecte toutes les exigences du Réglement sur le matériel brouilleur
du Canada.
Acknowledgments
We would like to thank the following developers whose contributions were an integral part of the Handspring
product:
■OPTION International NV
Kolonel Begaultlaan 45
3012 Leuven
BELGIUM
Tel: +32 16 317 411
info@option.com
www.option.com

Index 115
Index
Numerics
3-way calling 29
A
Active call 13, 25
Address Book
adding from Call History 16
adding to Speed Dial 39
dialing from 17
Dialing Preferences 69
Adjusting volume 6
Answering calls 21–23
Antenna 5
B
Battery
care 92
charging 8
disposal 93
gauge 13
indicators 8
inserting 4
location 5
specifications 92
Beep tone 23
Buttons
Phone 6
power 5
ringer 6
scroll 6, 15, 51
slider 6
SMS Message Manager 6
C
CallPreferences 23, 24, 74, 75, 80
status 26, 28, 29
waiting 23, 74
Call History 19
adding to Address Book 16
adding to Speed Dial list 16
deleting items 36
dialing from 16
displaying 35
icon 16
incoming calls 35
missed calls 19, 31, 32, 35
outgoing calls 35
purging 36
Caller ID 19, 22, 23, 34, 75

116 Index
Calls
3-way 29
active 13, 25
answering 21–23
answering call waiting 23
conference 29
forwarding 24
ignoring 22
incoming 21–24, 35
missed 19, 32, 35
outgoing 13–20, 35, 75
placing a second 27
placing from SIM Phonebook
47
placing on hold 26
switching 28
Conference calls 29
Coverage area 11, 19, 21, 24, 31, 53
D
Deleting
Call History 36
SIM card entries 46
SMS messages 34, 53, 60
Speed Dial entries 41
Dialing
applications 69
emergency numbers 20
from Address Book 17
from Call History 16, 32, 35
from Memo Pad 18
from SIM Phonebook 47
from To Do List 18
last number 16
prefixes 68
previous numbers 15, 16, 35
with Dialpad 15
with Speed Dial 14
Dialpad
dialing numbers 15
icon 15
E
Editcall forwarding number 24
menu 79, 81, 83
phone number 15, 17, 18, 39
SMS messages 58
Speed Dial 40, 42
Email messages 49, 50, 52, 55
Emergency numbers 20

Index 117
F
Forwarding
calls 24
SMS Email 50
SMS messages 58, 82
Frequently asked questions 85–91
G
Greetings 56
H
Headset
connecting 77
jack 5
Hold button 26
HotSync operations 61–66, 91
I
Icons
battery 13
Call History 16, 32
Dialpad 15
Phonebook 44, 45
signal strength 13
Speed Dial 14
Voicemail 13
Ignoring calls 22
Incoming calls 21–24, 35
Indicators
battery 6, 8, 13
Call History 35
call status 26, 28, 29
call waiting 23
missed call 19
network service 6, 11, 13
signal strength 13
voicemail 13
K
Key Pad 13, 14, 33
L
LED 5, 6, 8, 11
Light, see LED 6
Limited warranty 95
Locking phone 72
M
Memo Pad 18
Menus
Phone application 79–80
Phonebook 81
SMS Message Manager 82–84

118 Index
Message
Manager, see SMS
menus 82
Messages
checking 31–35
missed call 19
purging SMS 60
replying 52
sorting SMS 59
text 11, 31, 34, 51
voicemail 11, 33
Missed calls 19, 32, 35
Modem 61–66
Module
inserting 7
removing 7
N
Network
coverage area 11
HotSync operation 65
name 13
selecting 76, 80
status 6, 75
voicemail number 38
Network status 24, 74
O
Options
Call Preferences 74, 75
call waiting 74
menu 80, 81, 84
Phone Preferences 70
Ringer Preferences 71
Outgoing calls 13–20, 35, 47, 75
P
Password 72, 73
Phone application
menus 79–80
starting 15
Phone button 6
Phone number
checking 10
editing 15
Phonebook
menus 81
PIN 72, 73, 86
Power button 5
Preferences
Call 75
call waiting 74
dialing 69

Index 119
Phone 70
ringer 71
Prefixes 68
PUK 86
Purging
Call History 36
SMS messages 60
R
Record menu 79
Redialing a number 16
Ringer
button 6
settings 71
S
Safety 11, 92, 110–112
Scroll buttons 6, 15, 51
Security 72
Setup 2–10
Signal strength 13, 76
Signatures 56
SIM card
defined 1, 3
IMEI 10
inserting 3
locking 72
phone number 10
Phonebook 43–47
SMS Message Center number
50
SIM Phonebook 43–47
Slider 5, 6, 71
SMS
changing messages 58
copying text 57
creating messages 53
email messages 50, 55
forwarding messages 58
greetings 56
Inbox 51
menus 82–84
Message Manager button 6
messages 31, 34
Preferences 50
purging messages 60
replying to messages 52
saving messages 57
signatures 56
sorting messages 59
Sorting messages 59
Speaker 5, 6, 77

120 Index
Speed Dial
adding Address Book entries
39
adding Call History entries 16
changing entries 40
copying entries from SIM card
44, 45
defining buttons 38
deleting entries 41
dialing numbers 14
icon 14
list 37–42
organizing 37, 42
voicemail 33, 38
Support 85
Switching calls 28
T
Text messages, see SMS
To Do List 18
Troubleshooting 85–91
U
Unblock code 86
Unlock code 86
V
Vibrate 71
VisorPhone
inserting 7
parts of 5
removing 7
turning on 9
Voicemail 11, 19, 22, 31, 33, 38
icon 13
Volume 6
W
Warranty 95
Wireless synchronization, see
HotSync operations