Contents
Users Manual Part 1

[cover]
Sprint Start.book Page a Monday, June 17, 2002 8:57 AM

PCS Service
www.sprintpcs.com
Copyright © 2002 Sprint Spectrum L.P. All rights reserved. No reproduction in whole or in part without prior written approval. Sprint, and the diamond logo are
trademarks of Sprint Communications Company L.P. All other trademarks are property of their respective owners. Portions copyright © 2002 Handspring, Inc. All
rights reserved. Handspring, Treo, and the Treo logo are trademarks of Handspring, Inc. and may be registered in some jurisdictions. Blazer and the Handspring
logo are trademarks of Handspring, Inc., are registered trademarks in the U.S.A., and may be registered in other jurisdictions. Palm OS and HotSync are registered
trademarks and Palm and the Palm Powered logo are trademarks of Palm, Inc. and are used by Handspring under license. All other trademarks and trade names
are the property of their respective owners.
Printed in the U.S.A.
50-0926-00
Sprint Start.book Page b Monday, June 17, 2002 8:57 AM

Table of Contents
How to Use This Guide . . . . . . . . . . . . . . . . . . . . . . . . . . . . . . . . . . . . . . . . . . . . . . . . . . . . . . . . . . . . . . i
Getting Extra Phone and Service Information . . . . . . . . . . . . . . . . . . . . . . . . . . . . . . . . . . . . . . . . . ii
Setting Up. . . . . . . . . . . . . . . . . . . . . . . . . . . . . . . . . . . . . . . . . . . . . . . . . . . . . . . . . . . . . . . . . . . . . . . . . iii
Computer system requirements for USB HotSync cable . . . . . . . . . . . . . . . . . . . . . . . . . . . . . . . . . . . . . . . . . . . . . . vii
Computer system requirements for Serial HotSync cable (sold separately) . . . . . . . . . . . . . . . . . . . . . . . . . . . . . . vii
To install the software: . . . . . . . . . . . . . . . . . . . . . . . . . . . . . . . . . . . . . . . . . . . . . . . . . . . . . . . . . . . . . . . . . . . . . . . . vii
Getting Started . . . . . . . . . . . . . . . . . . . . . . . . . . . . . . . . . . . . . . . . . . . . . . . . . . . . . . . . . . . . . . . . . . . . ix
1. Your New PCS Treo 300 . . . . . . . . . . . . . . . . . . . . . . . . . . . . . . . . . . . . . . . . . . . . . . . . . . . . . . . . . 2
Your Phone’s Features . . . . . . . . . . . . . . . . . . . . . . . . . . . . . . . . . . . . . . . . . . . . . . . . . . . . . . . . . . . . . . . . . . . . . . . . . 3
2. Turning Your Phone On and Off . . . . . . . . . . . . . . . . . . . . . . . . . . . . . . . . . . . . . . . . . . . . . . . . . . . 5
Turning Wireless Mode ON . . . . . . . . . . . . . . . . . . . . . . . . . . . . . . . . . . . . . . . . . . . . . . . . . . . . . . . . . . . . . . . . . . . . . 5
Turning Wireless Mode OFF . . . . . . . . . . . . . . . . . . . . . . . . . . . . . . . . . . . . . . . . . . . . . . . . . . . . . . . . . . . . . . . . . . . . . 5
Turning Handheld Mode ON . . . . . . . . . . . . . . . . . . . . . . . . . . . . . . . . . . . . . . . . . . . . . . . . . . . . . . . . . . . . . . . . . . . . 5
Turning Handheld Mode OFF . . . . . . . . . . . . . . . . . . . . . . . . . . . . . . . . . . . . . . . . . . . . . . . . . . . . . . . . . . . . . . . . . . . 5
3. Using the Charger . . . . . . . . . . . . . . . . . . . . . . . . . . . . . . . . . . . . . . . . . . . . . . . . . . . . . . . . . . . . . . . 6
4. Adjusting the Display . . . . . . . . . . . . . . . . . . . . . . . . . . . . . . . . . . . . . . . . . . . . . . . . . . . . . . . . . . . 7
5. Using the Keyboard . . . . . . . . . . . . . . . . . . . . . . . . . . . . . . . . . . . . . . . . . . . . . . . . . . . . . . . . . . . . . 8
Entering Text . . . . . . . . . . . . . . . . . . . . . . . . . . . . . . . . . . . . . . . . . . . . . . . . . . . . . . . . . . . . . . . . . . . . . . . . . . . . . . . . 8
Entering Accented Characters and Symbols . . . . . . . . . . . . . . . . . . . . . . . . . . . . . . . . . . . . . . . . . . . . . . . . . . . . . . . . 9
Using Menus . . . . . . . . . . . . . . . . . . . . . . . . . . . . . . . . . . . . . . . . . . . . . . . . . . . . . . . . . . . . . . . . . . . . . . . . . . . . . . . . . 9
Using the Keyboard Backlight . . . . . . . . . . . . . . . . . . . . . . . . . . . . . . . . . . . . . . . . . . . . . . . . . . . . . . . . . . . . . . . . . . . 9
6. Getting to Know the PhoneBook Screen . . . . . . . . . . . . . . . . . . . . . . . . . . . . . . . . . . . . . . . . . . 10
7. Making and Receiving Calls . . . . . . . . . . . . . . . . . . . . . . . . . . . . . . . . . . . . . . . . . . . . . . . . . . . . 11
Making a Call From the Speed Dial, Contacts, or Call History Views . . . . . . . . . . . . . . . . . . . . . . . . . . . . . . . . . . . 11
Making a Call From the Dial Pad View . . . . . . . . . . . . . . . . . . . . . . . . . . . . . . . . . . . . . . . . . . . . . . . . . . . . . . . . . . . 12
Answering Calls . . . . . . . . . . . . . . . . . . . . . . . . . . . . . . . . . . . . . . . . . . . . . . . . . . . . . . . . . . . . . . . . . . . . . . . . . . . . . . 12
Sending Calls to Voicemail . . . . . . . . . . . . . . . . . . . . . . . . . . . . . . . . . . . . . . . . . . . . . . . . . . . . . . . . . . . . . . . . . . . . 13
Working With Active Calls . . . . . . . . . . . . . . . . . . . . . . . . . . . . . . . . . . . . . . . . . . . . . . . . . . . . . . . . . . . . . . . . . . . . . 13
Ending a Call . . . . . . . . . . . . . . . . . . . . . . . . . . . . . . . . . . . . . . . . . . . . . . . . . . . . . . . . . . . . . . . . . . . . . . . . . . . . . . . 13
Sprint Start.book Page c Monday, June 17, 2002 8:57 AM

8. Internal Phone Book . . . . . . . . . . . . . . . . . . . . . . . . . . . . . . . . . . . . . . . . . . . . . . . . . . . . . . . . . . . 14
Entering and Saving Contact Information . . . . . . . . . . . . . . . . . . . . . . . . . . . . . . . . . . . . . . . . . . . . . . . . . . . . . . . . 14
Finding or Changing Contact Information . . . . . . . . . . . . . . . . . . . . . . . . . . . . . . . . . . . . . . . . . . . . . . . . . . . . . . . 15
Deleting a Contact . . . . . . . . . . . . . . . . . . . . . . . . . . . . . . . . . . . . . . . . . . . . . . . . . . . . . . . . . . . . . . . . . . . . . . . . . . . 15
Defining Speed Dial Buttons . . . . . . . . . . . . . . . . . . . . . . . . . . . . . . . . . . . . . . . . . . . . . . . . . . . . . . . . . . . . . . . . . . . 16
9. Controlling Your Roaming Experience . . . . . . . . . . . . . . . . . . . . . . . . . . . . . . . . . . . . . . . . . . . 17
Setting Your Phone’s Roam Mode . . . . . . . . . . . . . . . . . . . . . . . . . . . . . . . . . . . . . . . . . . . . . . . . . . . . . . . . . . . . . . . 17
10. Changing Your Phone’s Settings . . . . . . . . . . . . . . . . . . . . . . . . . . . . . . . . . . . . . . . . . . . . . . . . . 18
Adjusting Volume During a Conversation . . . . . . . . . . . . . . . . . . . . . . . . . . . . . . . . . . . . . . . . . . . . . . . . . . . . . . . . 18
Selecting the Ringer Settings . . . . . . . . . . . . . . . . . . . . . . . . . . . . . . . . . . . . . . . . . . . . . . . . . . . . . . . . . . . . . . . . . . . 18
Silencing the Ringer . . . . . . . . . . . . . . . . . . . . . . . . . . . . . . . . . . . . . . . . . . . . . . . . . . . . . . . . . . . . . . . . . . . . . . . . . . 19
11. Sending and Receiving Voice Messages . . . . . . . . . . . . . . . . . . . . . . . . . . . . . . . . . . . . . . . . . 20
Setting Up Voicemail . . . . . . . . . . . . . . . . . . . . . . . . . . . . . . . . . . . . . . . . . . . . . . . . . . . . . . . . . . . . . . . . . . . . . . . . . 20
Retrieving Voicemail Messages . . . . . . . . . . . . . . . . . . . . . . . . . . . . . . . . . . . . . . . . . . . . . . . . . . . . . . . . . . . . . . . . . 20
Accessing Voicemail From Another Phone . . . . . . . . . . . . . . . . . . . . . . . . . . . . . . . . . . . . . . . . . . . . . . . . . . . . . . . . 20
12. Receiving SMS Messages . . . . . . . . . . . . . . . . . . . . . . . . . . . . . . . . . . . . . . . . . . . . . . . . . . . . . . 21
Receiving a Message . . . . . . . . . . . . . . . . . . . . . . . . . . . . . . . . . . . . . . . . . . . . . . . . . . . . . . . . . . . . . . . . . . . . . . . . . . 21
Viewing Messages . . . . . . . . . . . . . . . . . . . . . . . . . . . . . . . . . . . . . . . . . . . . . . . . . . . . . . . . . . . . . . . . . . . . . . . . . . . . 21
Responding to Messages . . . . . . . . . . . . . . . . . . . . . . . . . . . . . . . . . . . . . . . . . . . . . . . . . . . . . . . . . . . . . . . . . . . . . . . 22
13. PCS Service Features . . . . . . . . . . . . . . . . . . . . . . . . . . . . . . . . . . . . . . . . . . . . . . . . . . . . . . . . . . 23
Call Waiting . . . . . . . . . . . . . . . . . . . . . . . . . . . . . . . . . . . . . . . . . . . . . . . . . . . . . . . . . . . . . . . . . . . . . . . . . . . . . . . . 23
Call Forwarding . . . . . . . . . . . . . . . . . . . . . . . . . . . . . . . . . . . . . . . . . . . . . . . . . . . . . . . . . . . . . . . . . . . . . . . . . . . . . 23
Three-Way Calling . . . . . . . . . . . . . . . . . . . . . . . . . . . . . . . . . . . . . . . . . . . . . . . . . . . . . . . . . . . . . . . . . . . . . . . . . . . 25
PCS Voice CommandSM . . . . . . . . . . . . . . . . . . . . . . . . . . . . . . . . . . . . . . . . . . . . . . . . . . . . . . . . . . . . . . . . . . . . . . . . 26
14. PCS Vision . . . . . . . . . . . . . . . . . . . . . . . . . . . . . . . . . . . . . . . . . . . . . . . . . . . . . . . . . . . . . . . . . . . . 27
15. Your Phone’s PCS Vision Capabilities . . . . . . . . . . . . . . . . . . . . . . . . . . . . . . . . . . . . . . . . . . . . 28
Accessing PCS Vision Features . . . . . . . . . . . . . . . . . . . . . . . . . . . . . . . . . . . . . . . . . . . . . . . . . . . . . . . . . . . . . . . . . . 28
PCS Vision Services . . . . . . . . . . . . . . . . . . . . . . . . . . . . . . . . . . . . . . . . . . . . . . . . . . . . . . . . . . . . . . . . . . . . . . . . . . . 29
PCS Vision Billing Information . . . . . . . . . . . . . . . . . . . . . . . . . . . . . . . . . . . . . . . . . . . . . . . . . . . . . . . . . . . . . . . . . 29
16. Your Phone’s Special Features . . . . . . . . . . . . . . . . . . . . . . . . . . . . . . . . . . . . . . . . . . . . . . . . . . 30
17. Accessing Other Applications . . . . . . . . . . . . . . . . . . . . . . . . . . . . . . . . . . . . . . . . . . . . . . . . . . . 31
Using the Applications Launcher . . . . . . . . . . . . . . . . . . . . . . . . . . . . . . . . . . . . . . . . . . . . . . . . . . . . . . . . . . . . . . . . 31
Using the Application Buttons . . . . . . . . . . . . . . . . . . . . . . . . . . . . . . . . . . . . . . . . . . . . . . . . . . . . . . . . . . . . . . . . . . 31
Sprint Start.book Page d Monday, June 17, 2002 8:57 AM

18. Date Book Plus . . . . . . . . . . . . . . . . . . . . . . . . . . . . . . . . . . . . . . . . . . . . . . . . . . . . . . . . . . . . . . . . 32
Adding an Event . . . . . . . . . . . . . . . . . . . . . . . . . . . . . . . . . . . . . . . . . . . . . . . . . . . . . . . . . . . . . . . . . . . . . . . . . . . . . 32
Scheduling an Untimed Event . . . . . . . . . . . . . . . . . . . . . . . . . . . . . . . . . . . . . . . . . . . . . . . . . . . . . . . . . . . . . . . . . . 33
Scheduling a Repeating Event . . . . . . . . . . . . . . . . . . . . . . . . . . . . . . . . . . . . . . . . . . . . . . . . . . . . . . . . . . . . . . . . . . 33
Rescheduling an Event . . . . . . . . . . . . . . . . . . . . . . . . . . . . . . . . . . . . . . . . . . . . . . . . . . . . . . . . . . . . . . . . . . . . . . . 33
Displaying Your Calendar . . . . . . . . . . . . . . . . . . . . . . . . . . . . . . . . . . . . . . . . . . . . . . . . . . . . . . . . . . . . . . . . . . . . . 34
Deleting an Event . . . . . . . . . . . . . . . . . . . . . . . . . . . . . . . . . . . . . . . . . . . . . . . . . . . . . . . . . . . . . . . . . . . . . . . . . . . . 34
19. Memo Pad . . . . . . . . . . . . . . . . . . . . . . . . . . . . . . . . . . . . . . . . . . . . . . . . . . . . . . . . . . . . . . . . . . . . 35
Creating a Memo . . . . . . . . . . . . . . . . . . . . . . . . . . . . . . . . . . . . . . . . . . . . . . . . . . . . . . . . . . . . . . . . . . . . . . . . . . . . 35
Reviewing or Editing a Memo . . . . . . . . . . . . . . . . . . . . . . . . . . . . . . . . . . . . . . . . . . . . . . . . . . . . . . . . . . . . . . . . . . 35
Deleting a Memo . . . . . . . . . . . . . . . . . . . . . . . . . . . . . . . . . . . . . . . . . . . . . . . . . . . . . . . . . . . . . . . . . . . . . . . . . . . . 35
20. Preferences and Other Settings . . . . . . . . . . . . . . . . . . . . . . . . . . . . . . . . . . . . . . . . . . . . . . . . . 36
Setting General Preferences . . . . . . . . . . . . . . . . . . . . . . . . . . . . . . . . . . . . . . . . . . . . . . . . . . . . . . . . . . . . . . . . . . . . 36
Reassigning the Buttons on Your PCS Treo 300 . . . . . . . . . . . . . . . . . . . . . . . . . . . . . . . . . . . . . . . . . . . . . . . . . . . . 36
Setting Formats Preferences . . . . . . . . . . . . . . . . . . . . . . . . . . . . . . . . . . . . . . . . . . . . . . . . . . . . . . . . . . . . . . . . . . . . 37
Changing the Screen Fonts . . . . . . . . . . . . . . . . . . . . . . . . . . . . . . . . . . . . . . . . . . . . . . . . . . . . . . . . . . . . . . . . . . . . 37
21. Synchronizing Data . . . . . . . . . . . . . . . . . . . . . . . . . . . . . . . . . . . . . . . . . . . . . . . . . . . . . . . . . . . . 38
22. Beaming Information . . . . . . . . . . . . . . . . . . . . . . . . . . . . . . . . . . . . . . . . . . . . . . . . . . . . . . . . . . . 39
23. Resetting Your Phone . . . . . . . . . . . . . . . . . . . . . . . . . . . . . . . . . . . . . . . . . . . . . . . . . . . . . . . . . . 40
Performing a Soft Reset . . . . . . . . . . . . . . . . . . . . . . . . . . . . . . . . . . . . . . . . . . . . . . . . . . . . . . . . . . . . . . . . . . . . . . . 40
Performing a Hard Reset . . . . . . . . . . . . . . . . . . . . . . . . . . . . . . . . . . . . . . . . . . . . . . . . . . . . . . . . . . . . . . . . . . . . . . 40
24. Accessories for Your Phone . . . . . . . . . . . . . . . . . . . . . . . . . . . . . . . . . . . . . . . . . . . . . . . . . . . . 41
Using a Headset . . . . . . . . . . . . . . . . . . . . . . . . . . . . . . . . . . . . . . . . . . . . . . . . . . . . . . . . . . . . . . . . . . . . . . . . . . . . . 41
Additional Accessories . . . . . . . . . . . . . . . . . . . . . . . . . . . . . . . . . . . . . . . . . . . . . . . . . . . . . . . . . . . . . . . . . . . . . . . . . 42
25. Upgrading From a Palm OS Handheld . . . . . . . . . . . . . . . . . . . . . . . . . . . . . . . . . . . . . . . . . . . . 43
26. Troubleshooting . . . . . . . . . . . . . . . . . . . . . . . . . . . . . . . . . . . . . . . . . . . . . . . . . . . . . . . . . . . . . . . 44
27. Performance and Safety . . . . . . . . . . . . . . . . . . . . . . . . . . . . . . . . . . . . . . . . . . . . . . . . . . . . . . . . 46
Important Information About Your Phone and Service . . . . . . . . . . . . . . . . . . . . . . . . . . . . . . . . . . . . . . . . . . . . . 46
Maintaining Safe Use of and Access to Your Phone . . . . . . . . . . . . . . . . . . . . . . . . . . . . . . . . . . . . . . . . . . . . . . . . . 47
Caring for and Protecting Your Phone Battery . . . . . . . . . . . . . . . . . . . . . . . . . . . . . . . . . . . . . . . . . . . . . . . . . . . . . 49
Acknowledging Special Precautions and the FCC Notice . . . . . . . . . . . . . . . . . . . . . . . . . . . . . . . . . . . . . . . . . . . . . 49
28. Terms and Conditions & Warranty Information . . . . . . . . . . . . . . . . . . . . . . . . . . . . . . . . . . . . 50
Terms and Conditions of Services . . . . . . . . . . . . . . . . . . . . . . . . . . . . . . . . . . . . . . . . . . . . . . . . . . . . . . . . . . . . . . . 50
Handspring Product Warranty . . . . . . . . . . . . . . . . . . . . . . . . . . . . . . . . . . . . . . . . . . . . . . . . . . . . . . . . . . . . . . . . . . 61
Sprint Start.book Page e Monday, June 17, 2002 8:57 AM

Sprint Start.book Page f Monday, June 17, 2002 8:57 AM

i
How to Use This Guide
Welcome — you’ve made the right choice
The advantages of PCS are as clear as each call you make. With PCS, we give you what you really
want from a wireless service provider – clear calls, easy-to-understand service plans and self-
servicing options for managing your account. All this is designed to make your life easier and worry
free.
We know you’re eager to start using your phone right away and this guide is divided into two
sections that are designed to help you do just that.
The first section will guide you through the steps required to set up your PCS Service. It
includes blanks so you can write down important information we’ll share with you that you’ll
want to remember. Things like your new PCS Treo 300 Phone Number, information about
your service plan and your first invoice.
The second section will guide you through the basics of your phone and service, with quick,
easy-to-follow instructions. And if you want to know more, just visit us online at
www.sprintpcs.com and log on. Then click on “Claire's Directory for Service Solutions.”
There you’ll find a complete phone user’s guide that includes a section on learning about all the
advanced features of your phone and service.
1
2
Sprint Start.book Page i Monday, June 17, 2002 8:57 AM
ii
Getting Extra Phone and Service Information
This guide covers the basics, but your phone is capable of performing a variety of advanced
functions. To learn more about the topics in this guide and to find valuable troubleshooting tips,
refer to the electronic User Guide. The electronic User Guide also walks you through using
advanced features and the other applications on your PCS Treo 300:
The electronic User Guide installs automatically when you install the software on the PCS Vision
CD (see page vii). To use the electronic User Guide, you need Adobe Acrobat Reader software. To
install this software, insert the PCS Vision CD in the CD-ROM drive on your computer, select
Acrobat Installer from the menu, and follow the onscreen instructions.
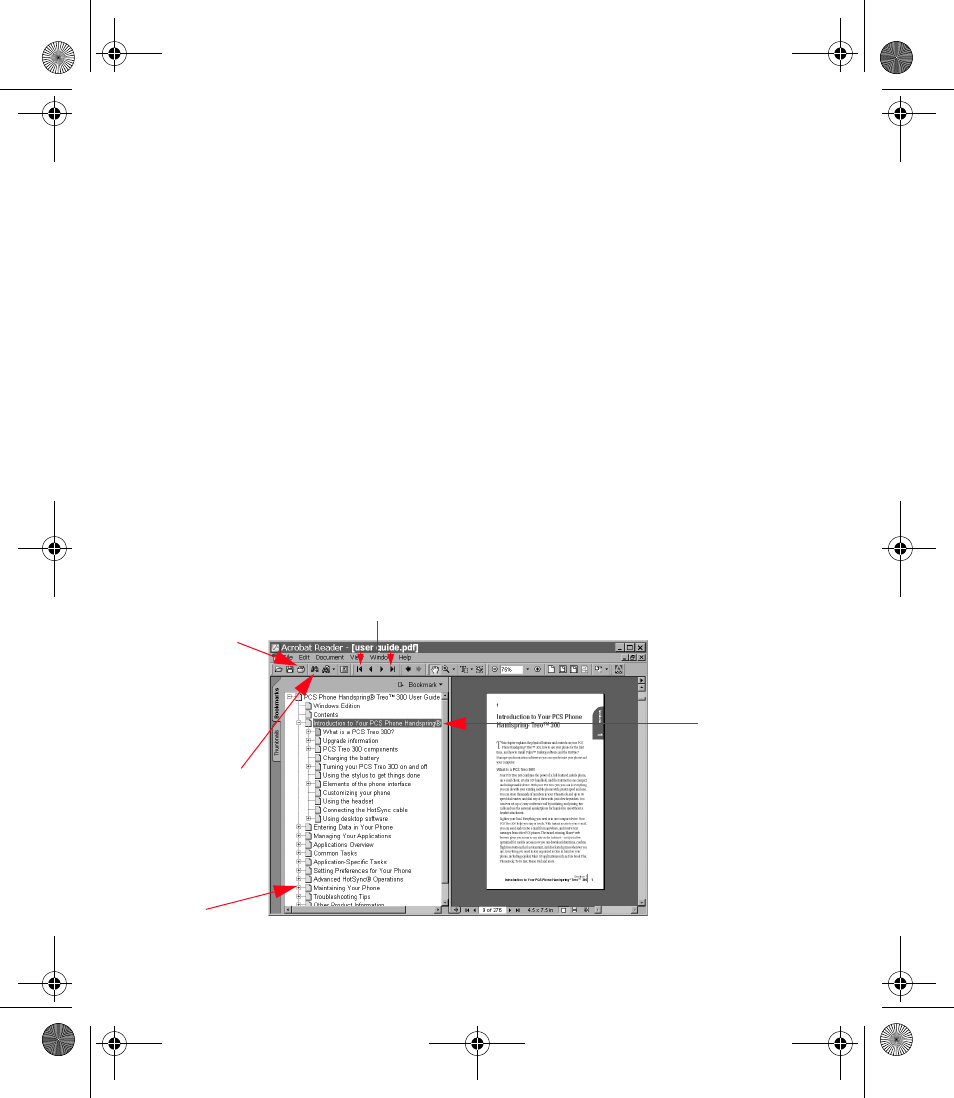
Using the electronic User Guide
•Open the Handspring or Palm folder on your computer.
• Double-click the User Guide.PDF file.
•Calculator
• CityTime
•Expense
• To Do List
Click the
binoculars
t
o search for
s
pecific text
Click the arrows to turn pages
Cli
c
k
t
h
e
printer to
print pages
Click a + or -
to expand or
collapse the
outline
Click a title to
jump to that
section
Sprint Start.book Page ii Monday, June 17, 2002 8:57 AM

iii
Setting Up
Setting Up Your
PCS Phone
Handspring® Treo™ 300
Sprint Start.book Page iii Monday, June 17, 2002 8:57 AM
iv
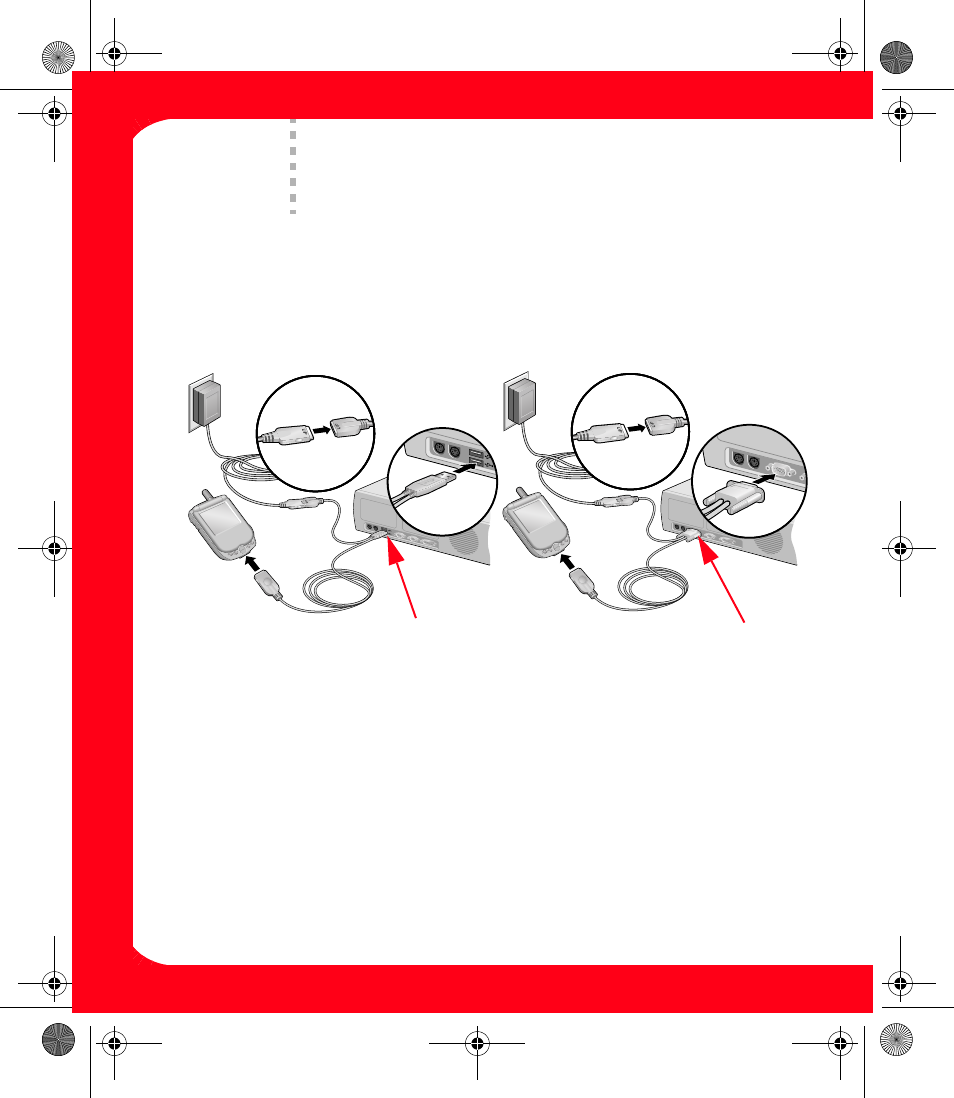
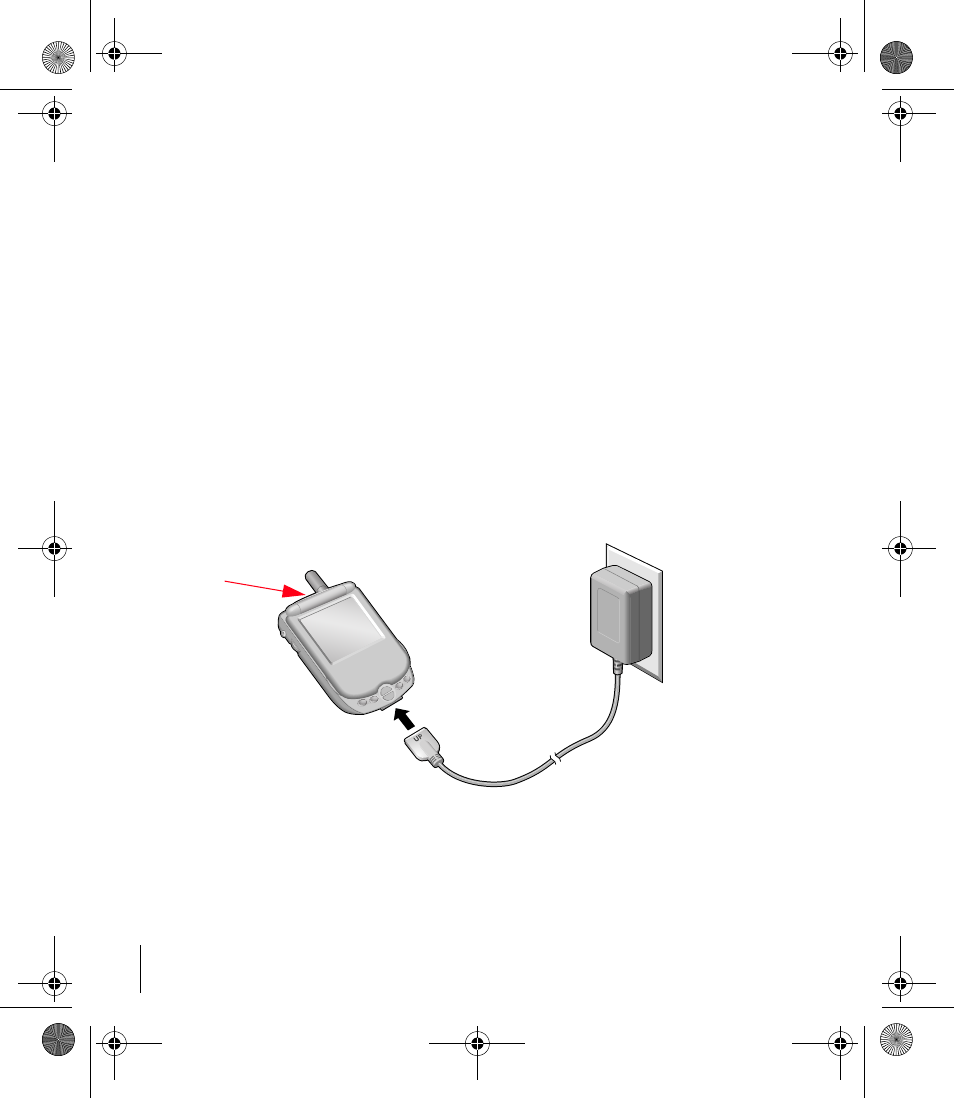
Charge your PCS Treo 300 battery
You can connect the USB cable that comes with your PCS Treo 300, or you can purchase a
serial cable at www.handspring.com.
APlug the Travel Charger into a wall outlet.
BConnect the Travel Charger to the short end of the HotSync® cable. Be sure to match the sides
of the connectors labeled “UP.”
CConnect the long end of the HotSync cable to your PCS Treo 300 with the button facing up.
We recommend 2 hours for the first full charge. To confirm your PCS Treo 300 is charging,
check the LED on top of the unit: red = charging; green = fully charged.
1
AA
BB
CC
USB HotSync
cable Serial HotSync
cable
Sprint Start.book Page iv Monday, June 17, 2002 8:57 AM
v
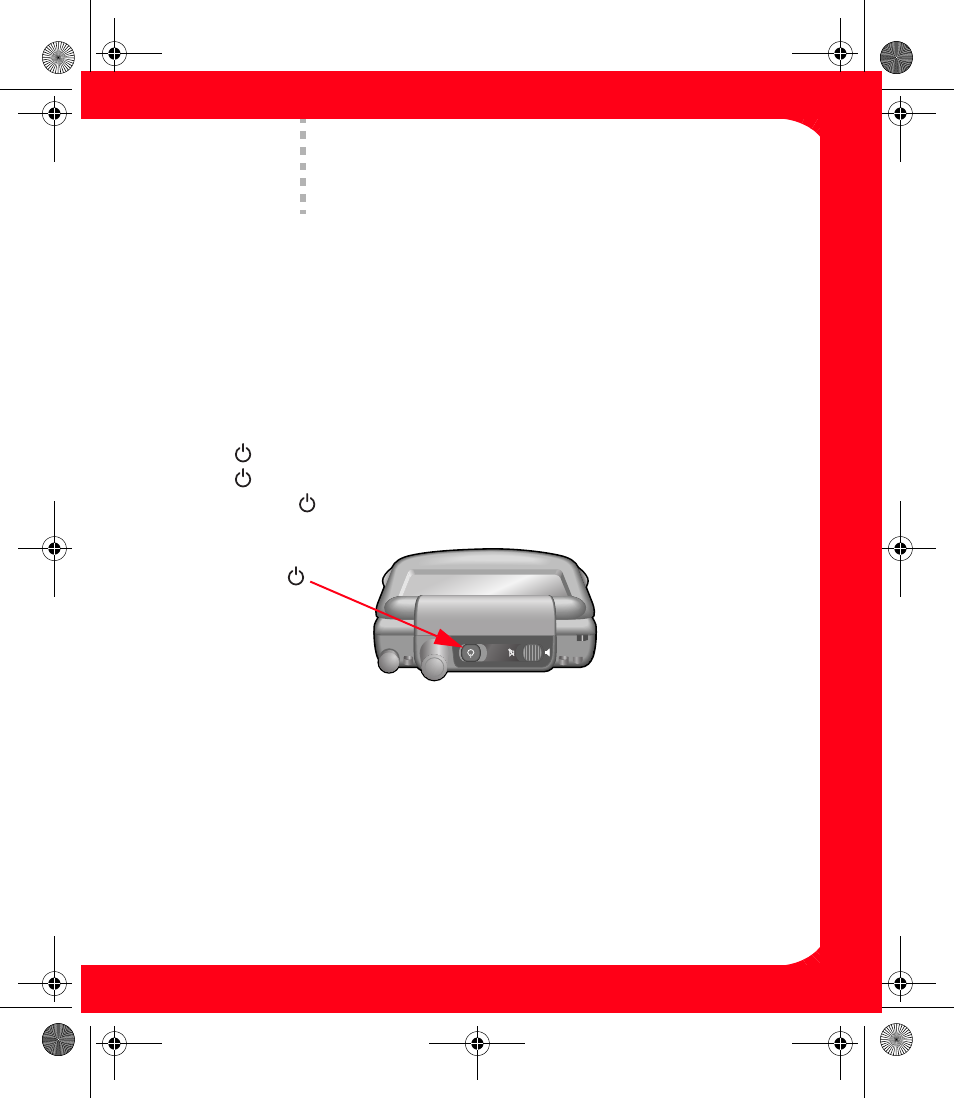
Turn on Your PCS Treo 300
Your PCS Treo 300 has two operating modes: a handheld mode and a wireless mode. You can
turn the two modes on and off independently of each other. In handheld mode, you can use
organizer applications such as Date Book Plus and To Do List. In wireless mode, you can
make or receive calls. You can also turn both modes on at the same time. When both modes
are on, you can use the organizer applications as well as make and receive calls.
• Press once to turn handheld mode on/off.
• Press twice to turn the keyboard backlight on/off.
• Press and hold to turn wireless mode on/off.
When you turn on wireless mode, you will hear a beep tone and see a Welcome graphic.
2
Power Button
Sprint Start.book Page v Monday, June 17, 2002 8:57 AM

vi
Set up your PCS Treo 300
The first time you use your PCS Treo 300, you need to calibrate the screen, select the country,
and set the current time and date.
• Remove the stylus from the slot. Refer to page 3 for details.
• Tap the screen as indicated.
• Follow the onscreen instructions to set the date and time.
3
Sprint Start.book Page vi Monday, June 17, 2002 8:57 AM

vii
Install Synchronization Software
and User Guide
The synchronization features of Palm Desktop software and your HotSync cable enable you
to exchange data between your PCS Treo 300 and your computer. This process is called a
HotSync operation. Each time you perform a HotSync operation, any information you
entered or changed on your PCS Treo 300 is copied to your computer and vice versa. This
backs up your data and is strongly advised. Before you perform a HotSync operation, you
must connect the HotSync cable to your computer (as described in Step 1) and install the
Palm Desktop software from the PCS Vision CD.
Computer system requirements for USB HotSync cable
• Windows 98, Windows Me, Windows 2000, Windows XP
• Available USB port
• CD-ROM drive
• Internet Explorer 5.01 or higher (recommended)
Computer system requirements for Serial HotSync cable (sold separately)
• Windows 95, Windows 98, Windows Me, Windows 2000, Windows NT 4.0, or Windows XP
• Available serial port
• CD-ROM drive
• Internet Explorer 5.01 or higher (recommended)
To install the software:
• If you’re upgrading from another Palm OS device, you must install the synchronization
software included with your phone on your computer. Refer to page 43 for instructions.
• Insert the PCS Vision CD in the CD-ROM drive on your computer and follow the onscreen
instructions to install the synchronization software and the electronic User Guide.
4
Sprint Start.book Page vii Monday, June 17, 2002 8:57 AM

viii
Assign a name to your
PCS Treo 300 and synchronize
During the software installation you will be prompted to synchronize for the first time. The
first time you synchronize, you must assign a user name. Every device needs a unique name.
Never synchronize more than one device to the same user name on your computer.
• Connect your PCS Treo 300 to the HotSync cable.
• Press the HotSync button on the cable.
• Select a user name and click OK.
• Wait for your PCS Treo 300 to display a message indicating the process is done.
• If prompted, tap Reset on your phone.
• Press the release buttons on the sides of the HotSync connector to remove the cable
from your PCS Treo 300.
5
HotSync
Synchronization
Button
Release Buttons
Sprint Start.book Page viii Monday, June 17, 2002 8:57 AM

ix
Getting Started
Activating and Using Your
PCS Service
Sprint Start.book Page ix Monday, June 17, 2002 8:57 AM
x
Have these things ready
before you call to activate
• Your PCS Treo 300 with a fully charged battery
• Your Social Security number or your driver’s license number
• Your Electronic Serial Number (also known as ESN; refer to step 5 to locate the number)
• The city and state where your phone will be primarily based
•A pen
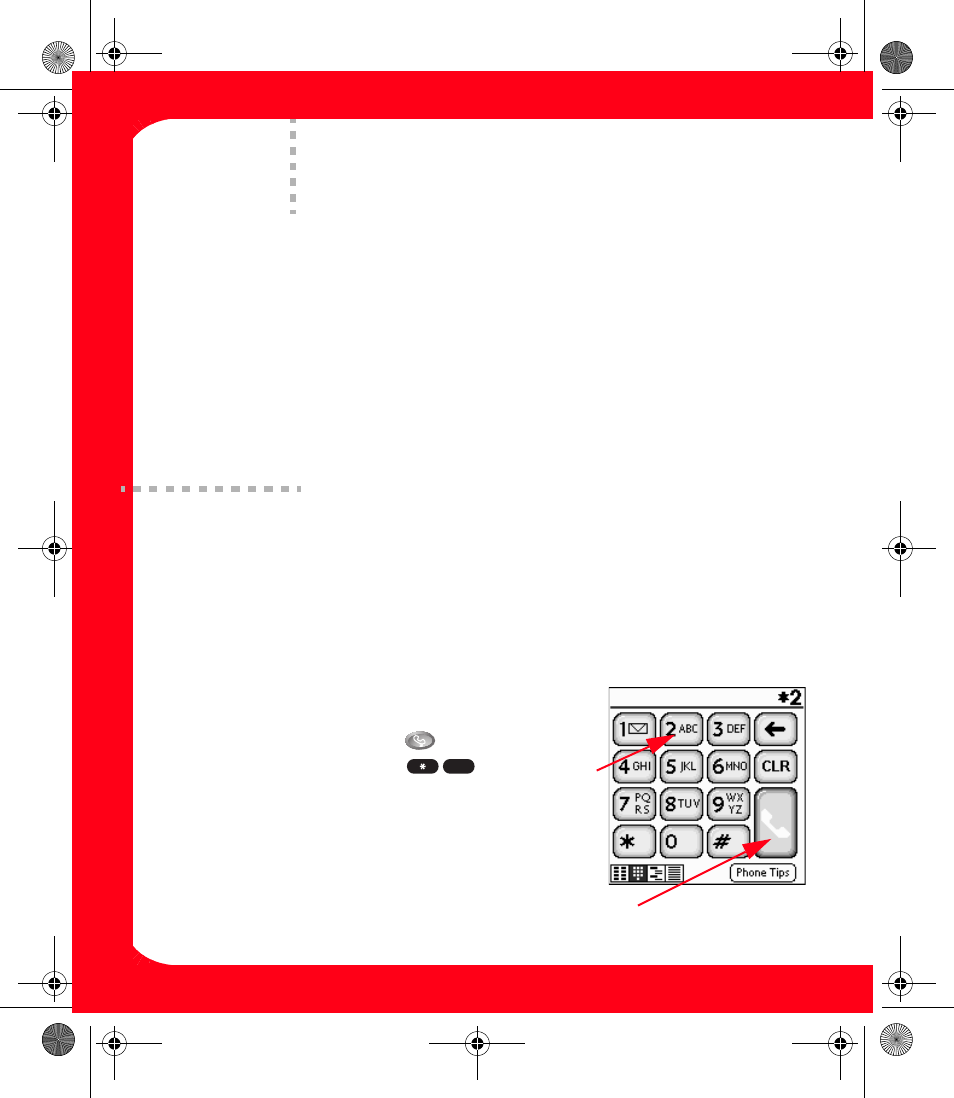
Setting up your service —
You choose the way
The two fastest ways:
• Visit us online at activate.sprintpcs.com.
• From your PCS Treo 300, press , and
then on your phone screen, tap
followed by the handset button.
You can also:
• Use a phone other than your PCS Treo 300
– dial 1-888-715-4588.
1
2
Tap Handset Button
Tap Numbers
2
Sprint Start.book Page x Monday, June 17, 2002 8:57 AM

xi
PCS Service Areas
Interested in where you can use your new phone? Check out the most up-to-date coverage
maps at www.sprintpcs.com.
Your PCS Account Password
You’ll use this number when managing your account on www.sprintpcs.com. Your default
password is the last four digits of your Social Security number.
3
4
My account password is: _________________________
Sprint Start.book Page xi Monday, June 17, 2002 8:57 AM
xii
Finding your phone’s ESN
If you set up service using your PCS Treo 300, the network automatically communicates the
ESN to us. You’ll only need this number when you’re setting up service online at
activate.sprintpcs.com or calling us from a phone other than your new PCS Treo 300. The
ESN, or Electronic Serial Number, is an 11-digit number written on the barcode sticker on
the back of your phone. To find it, look at the first number on the label.
After writing down the ESN, turn on your phone by holding down the Power button for a
few seconds.
PCS Clear PaySM Program
(This section may not apply to you. If not, skip to section 7.)
□You are on the PCS Clear Pay Program.
Easy steps to follow to help keep you enjoying your new PCS Service
• From the Dial Pad view, tap followed by the handset button, or log into
www.sprintpcs.com to find out how many minutes or how much data (if applicable) you
have used within your service plan. If you have exceeded your minutes or data in your plan
or have a past due balance you should make a payment to keep your service turned on.
5
ESN: _____________________________________
6
Sprint Start.book Page xii Monday, June 17, 2002 8:57 AM
xiii
There are two easy payment options:
• Make a payment at any Western Union location using the Swiftpay form. To find the nearest
location, go the Dial Pad view and tap followed by the handset button.
(Transaction fee applies; payment is credited to your account within 12 hours.)
• From the Dial Pad view, followed by the handset button. (posting time is 12
hours)
How we will help you keep your service turned on:
• In the event that your service has been turned off, you will receive a text message stating:
“Your PCS service has been turned off. From the Dial Pad view, followed by the
handset button to make a payment and turn service on.”
• The first time your service has been turned off you will be connected to a live PCS Clear Pay
Program Specialist who will explain why your service has been turned off. You will be asked
to pay your balance to get service turned on (payment will be credited and service turned
back on within 12 hours).
• For any additional times that your service has been turned off, you will be connected to our
automated payment process. You will have to pay your balance to have your service turned
back on (payment will be credited and service turned back on within 12 hours).
8
3
3
*Services fees may apply
Sprint Start.book Page xiii Monday, June 17, 2002 8:57 AM
xiv
Understanding your
PCS Service Plan
7
Voice Usage
Total Voice Minutes in your PCS Service Plan: ___________
• Anytime Minutes: ___________________________
•Night & Weekend Minutes
(M-Th 9pm-7am, F 9pm-M 7am): _____________________
Monthly service charge: $ ________________________
Each additional voice minute: _____________________¢
Long Distance is included in my plan: □ Yes □ No
• If no, long distance is charged at __________ per minute.
Data Usage
Ⅺ Your plan includes data.
Data included in plan: ______ megabyte sent or received
Data overage: ______/ megabyte sent or received
Sprint Start.book Page xiv Monday, June 17, 2002 8:57 AM
xv
Data Usage
Ⅺ Your plan includes data and you have opted to subscribe to an additional data
plan at $______ per month.
This additional plan includes ______ megabytes of data sent or received.
Data overage: ______/ kilobyte sent or received
Ⅺ Your plan does not include data, but you have opted to subscribe to an add-on
data plan in addition to your voice plan.
Additional monthly service charge for data: $______
Data in plan: ______ megabyte sent or received
Data overage: ______/ kilobyte sent or received
Ⅺ All PCS phones with PCS Vision capabilities may access data. If you do not
choose one of the plan options listed above you can access data on a casual basis at
a default rate of ______ per kilobyte.
PCS Advantage Agreement:
Ⅺ I have agreed to a PCS Advantage Agreement.
___ 1 Year
___ 2 Year
Ⅺ I have opted not to sign a PCS Advantage Agreement.
$______ Monthly fee
Sprint Start.book Page xv Monday, June 17, 2002 8:57 AM
xvi
Your new PCS Treo 300
Phone Number and User Name
Additional Options I chose to subscribe to:
Ⅺ PCS Voice Command at $______ per month
Ⅺ PCS Add-a-Phone at $______ per month
Ⅺ PCS to PCS Calling at $______ per month
Ⅺ PCS Equipment Replacement at $______ per month
Ⅺ Roadside Rescue at $___ per month
Ⅺ Sprint Residential Long Distance
Note: Premium Data Services – If your phone is PCS Vision capable, you may
download content on a per event basis. You will be advised of the event charge
prior to downloading. In addition to being charged a download fee, you will also
be charged the kilobytes for the download.
8
PCS Treo 300 Phone Number
_________________________________________
Sprint Start.book Page xvi Monday, June 17, 2002 8:57 AM
xvii
Understanding your PCS Invoice
• Your first invoice will arrive within a few days.
• Your first invoice will reflect the following charges:
Ⅺ Your first full month of service, which is your monthly recurring charge of $______
Ⅺ Additional charges such as taxes, roaming, voice or data overage, or premium data
services
Ⅺ Charges for additional options you opt to subscribe to: $______
Ⅺ Your one-time non-refundable activation fee of $______
• Approximate total of first invoice $______
PCS Treo 300 User Name
_________________________________________
Your user name is automatically assigned to you. Your user name, which resembles
an email address (for example, name@sprintpcs.com), is used with PCS Email
and 2-way messaging services.
9
Sprint Start.book Page xvii Monday, June 17, 2002 8:57 AM
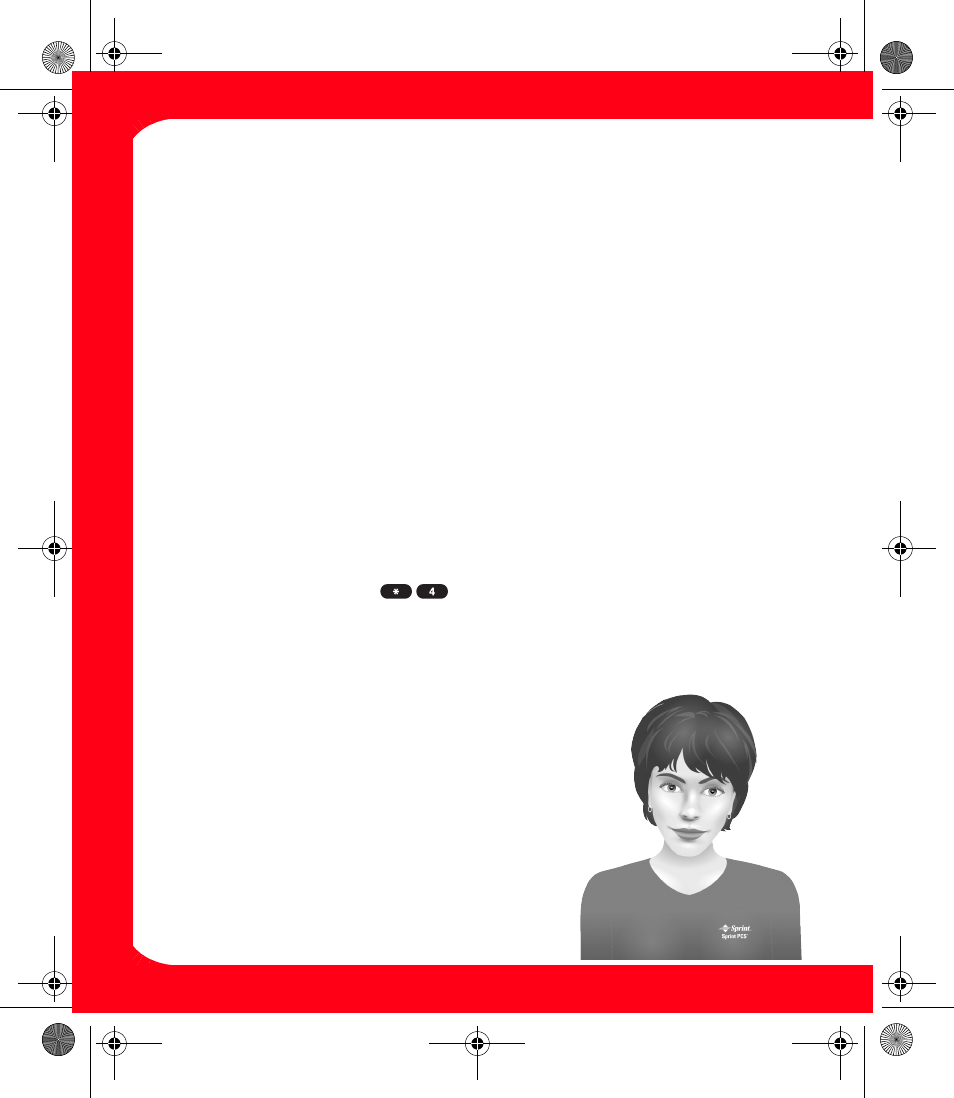
xviii
Quick, easy options
to manage your account
With PCS Customer Service Solutions, you can visit www.sprintpcs.com or use your PCS
Treo 300 to access Claire, your virtual service representative. She'll guide you to the
information you need.
Visit www.sprintpcs.com
Once you log on, you can:
• View the details of your service plan
• Find out how many minutes you’ve used and how many are remaining in your plan
• View your current and previous three months invoices, including the call detail
• Click on “Claire's Directory For Service Solutions” to:
• Make a payment
• Find out about PCS Products and Services
• Learn how to set up your voicemail and more!.
From the Dial Pad view, tap * followed by the handset button and Claire will
respond with the following:
• A summary of your rate plan
• Minutes and/or Data Units remaining in your plan for the current invoice cycle
• Information about your most recent invoice
• When your last payment was received
• The option to make a payment
*Services fees may apply
Welcome and thanks
for choosing
Sprint.
Sprint Start.book Page xviii Monday, June 17, 2002 8:57 AM

Section
1
Basics of Your Phone
Sprint Start.book Page 1 Monday, June 17, 2002 8:57 AM
Section 1
Your New PCS Treo 300
2
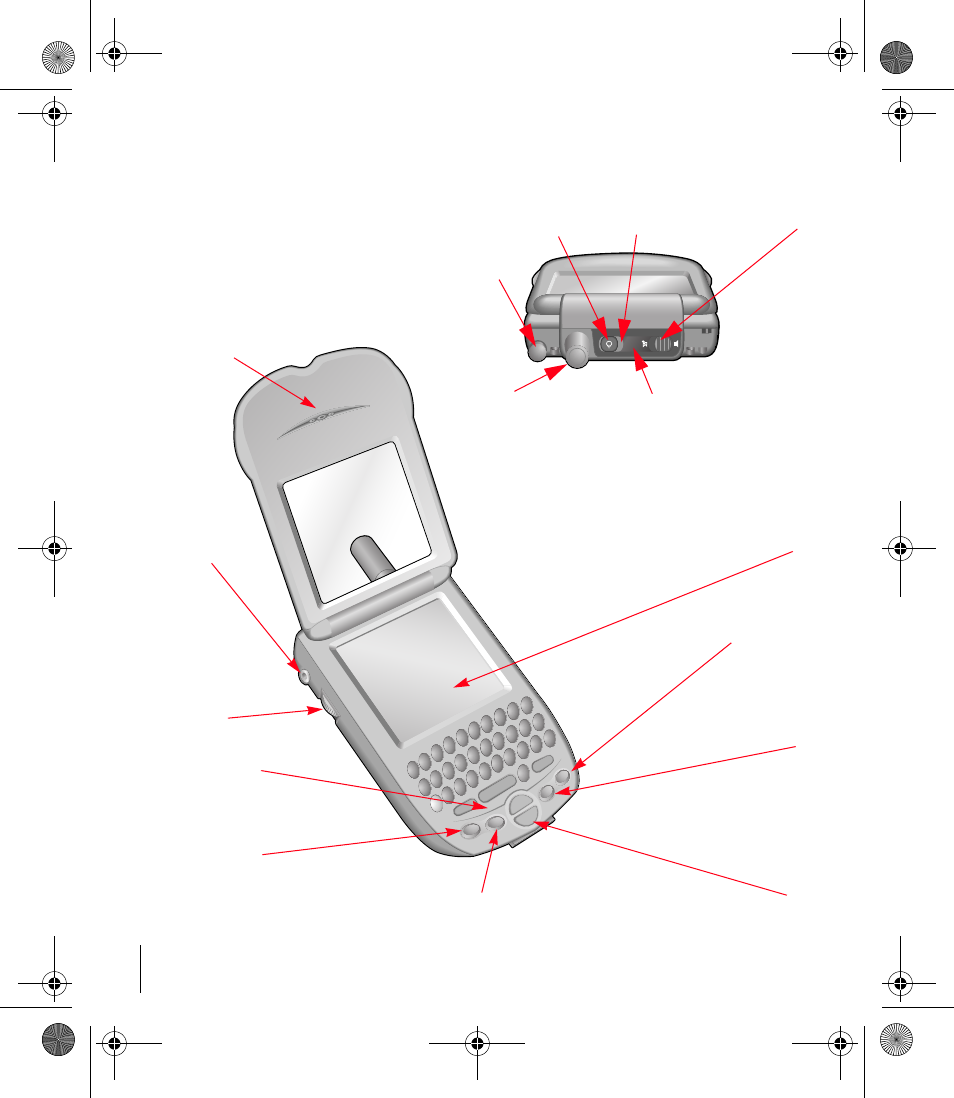
Your New PCS Treo 300
7. Earpiece
13.Display Screen
14.Memo/Calculator
Button
12.Date Book Plus/
To Do List Button 16.Scroll Buttons
15.Blazer®/
CityTime Button
8. Headset
Jack
11.PhoneBook/
SMS Button
10.Microphone
9. Rocker/Volume
Switch
1. Power Button
2. Stylus
3. Antenna
6. Ringer Switch
4. LED
5. IR Port
Sprint Start.book Page 2 Monday, June 17, 2002 8:57 AM

Section 1
Your New PCS Treo 300 3
Your Phone’s Features
1. Power Button: Turns your phone and wireless mode on and off, and controls the keyboard
backlight.
2. Stylus: Serves as the instrument used to tap options on your phone screen. To use the stylus,
slide the stylus out of the slot, and hold it as you would a pen or pencil.
3. Antenna: Receives and sends wireless communication signals. The antenna does not telescope
out of your phone.
4. LED: Provides status information for your PCS Treo 300 based on the color of the light and the
blink state.
ᮣNo light: Wireless mode off
ᮣSolid: Connected to travel charger
Green = Fully charged
Red = Charging
ᮣBlinking: Wireless mode on
Green = In coverage area
Red = Out of coverage area
ᮣDouble-blink red: Low battery
5. IR Port: Uses infrared technology to transmit and receive data from other Palm OS devices. You
can also use the IR port to update the information between your phone and computer using
HotSync technology.
6. Ringer Switch: Controls the ringer setting. Silencing the ringer turns off all system sounds,
including alarms. When you silence the ringer, Date Book Plus alarms vibrate.
7. Earpiece: Functions as the speaker when you use the wireless phone features of your PCS Treo
300.
8. Headset Jack: Enables you to connect a hands-free headset for use with the wireless features.
Use only headsets that are compatible with your PCS Treo 300. See page 41 for additional
information.
Sprint Start.book Page 3 Monday, June 17, 2002 8:57 AM

Section 1
Your New PCS Treo 300
4
9. Rocker/Volume Switch: Enables you to navigate on your phone with just one hand. You can
use the rocker switch as an alternate method to perform a variety of tasks, such as adjusting the
call volume level on your phone. The rocker switch functions change based on whether your
phone’s wireless mode is on or off and which application you are using.
To use the rocker switch, roll the dial up or down, press it in and release it, or press and hold it.
10.Microphone: Functions as the mouthpiece when you use the wireless phone features of your
PCS Treo 300.
11.PhoneBook/SMS Button: Activates the PhoneBook application, and when used in
combination with Option , activates the SMS application.
12.Date Book Plus/To Do List Button: Activates the Date Book Plus application, and when used
in combination with Option , activates the To Do List application.
13.Display Screen: Displays the applications and information stored in your phone. It is touch-
sensitive and responds to the stylus.
14.Memo/Calculator Button: Activates the Memo Pad application, and when used in
combination with Option , activates the Calculator application.
15.Blazer/CityTime Button: Activates the Blazer application, and when used in combination with
Option , activates the CityTime application.
16.Scroll Buttons: Displays text and other information that extends beyond the viewing area of the
screen. Press the bottom scroll button to view information below the viewing area, and press
the top scroll button to view information above the viewing area. The scroll buttons also enable
you to navigate between records in an application and to adjust the volume during a call.
Tip: If your phone screen is off, pressing any application button turns on and opens the corresponding application.
Sprint Start.book Page 4 Monday, June 17, 2002 8:57 AM

Section 2
Turning Your Phone On and Off 5
Turning Your Phone On and Off
Your PCS Treo 300 has two operating modes: a handheld mode and a wireless mode. Refer to page
v to learn more about these two modes.
Turning Wireless Mode ON
ᮣPress the Power button for two seconds. The phone displays “Network Search” until it
locates a signal, then it automatically enters Standby mode — the phone’s idle state. At this
point, you’re ready to begin making and receiving calls.
Turning Wireless Mode OFF
ᮣPress the Power button for two seconds until the screen reads “Goodbye.”
Turning Handheld Mode ON
Do any of the following:
ᮣOpen the lid.
ᮣPress and release the Power button .
ᮣPress and release the rocker switch.
Turning Handheld Mode OFF
Do either of the following:
ᮣClose the lid.
ᮣPress and release the Power button .
Tip:Handheld mode turns off automatically after a period of inactivity based on a setting in your phone’s General
Preferences. See page 36 for details.
Sprint Start.book Page 5 Monday, June 17, 2002 8:57 AM
Section 3
Using the Charger
6
Using the Charger
It is vital that you use only a HotSync Cable and Travel Charger that are approved by either Sprint
or Handspring. Use of unauthorized accessories could damage your phone and invalidate your
warranty.
ᮣA red light on the PCS Treo 300 lets you know the battery is charging.
ᮣA green light lets you know the battery is at least 90 percent charged.
It takes about 2 hours to fully recharge a completely rundown battery. A fully charged battery
provides up to 2.5 hours of continuous talk time, or up to 5 days of continuous standby time.
To use the Travel Charger provided with your phone:
ᮣPlug the flat end of the Travel Charger into your PCS Treo 300 and the other end into an
electrical outlet.
To use the HotSync Cable and Travel Charger provided with your phone:
ᮣConnect the HotSync Cable, Travel Charger, and your PCS Treo 300 to your computer and an
electrical outlet as shown on page iv.
LED
Sprint Start.book Page 6 Monday, June 17, 2002 8:57 AM
Section 4
Adjusting the Display 7
Adjusting the Display
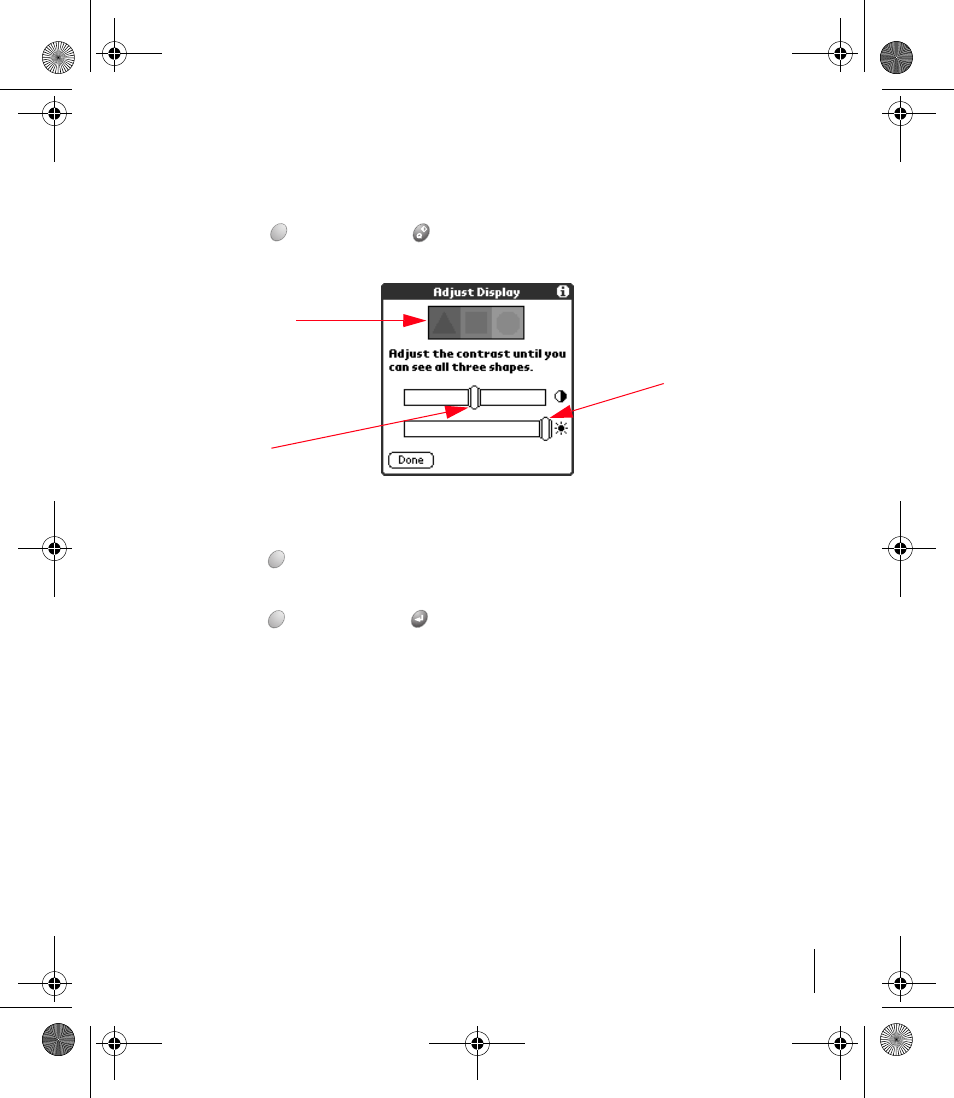
To adjust the color and brightness of the display:
1. Press Option and then press Q .
2. Use the scroll buttons, or drag the top slider, to adjust the color saturation. Move the slider until
you can clearly see the three shapes.
3. Hold Option and use the scroll buttons, or drag the bottom slider, to adjust the screen
brightness.
4. Hold Option and press Return to finish.
Three Shapes
Color
Saturation
Slider
Brightness Slider
Sprint Start.book Page 7 Monday, June 17, 2002 8:57 AM
Section 5
Using the Keyboard
8
Using the Keyboard
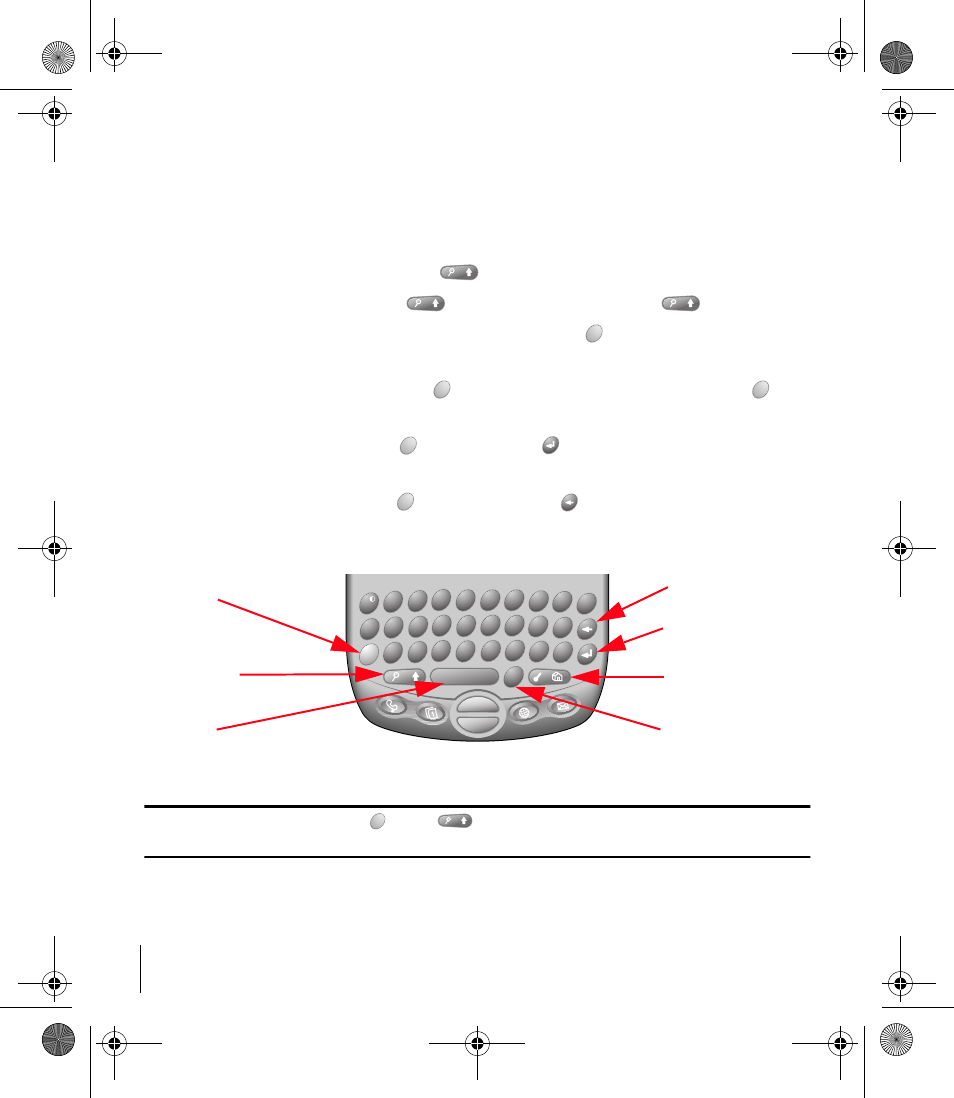
Entering Text
ᮣTo type lowercase letters, use your thumbs to press the keys.
ᮣTo type an uppercase letter, press Shift and then type a letter.
ᮣTo turn Caps Lock on, press Shift twice. To turn it off, press Shift again.
ᮣTo type a number/symbol that appears in blue, press Option and then press the key where
the number/symbol appears in blue.
ᮣTo turn Option Lock on, press Option twice. To turn Option Lock off, press Option
again.
ᮣTo affirm an action hold Option and press Return . Use this key combination instead of
tapping onscreen buttons such as Done or OK.
ᮣTo annul an action hold Option and press Backspace . Use this key combination instead
of tapping onscreen buttons such as Cancel or Delete.
Tip:You don’t need to hold down Option or Shift while pressing a letter or other key. The only exception to
this rule is when you are affirming or annulling an action as described above.
"
P
#
O
3
I
2
U
1
Y
*
T
/
R
$
E
@
W
Q
'
L
6
K
5
J
4
H
9
M
0
...
.
8
N
7
B
+
G
–
F
)
D
(
S
%
A
’
V
?
C
!
X
:
Z
Option
Shift/Find
Space
Backspace
Return
Menu/Applications
Launcher
List Type
Sprint Start.book Page 8 Monday, June 17, 2002 8:57 AM

Section 5
Using the Keyboard 9
Entering Accented Characters and Symbols
1. Type the letter you want to accent.
2. Press ListType .
3. Use the scroll buttons to select the character on the list.
4. Press Space to insert the accented character or symbol.
Tip:You can find more symbols under related characters. For example, the £ symbol is located under the $ key. To view a
list of available accented and symbol characters, press Menu and under Edit select Keyboard Help (/G).
Using Menus
1. Press Menu to display the menus.
2. Press the top scroll button to switch between menus.
3. Press the bottom scroll button to select a command within a menu.
4. Press Space to run the selected command.
You can also do any of the following:
ᮣPress Menu and type a shortcut letter to select a menu command. Shortcut letters
such as “/G” appear next to the command on each menu item on the screen and menu
selection instructions in this guide. For example, in the previous section, (/G) is the shortcut
for the Keyboard Help command.
ᮣPress Menu again to close the menus without running a command.
Using the Keyboard Backlight
ᮣPress the Power button twice to toggle the keyboard backlight on and off.
Note:The keyboard backlight is noticeable only in relatively dark environments, and when it is on, the screen brightness
automatically dims to conserve battery power.
Sprint Start.book Page 9 Monday, June 17, 2002 8:57 AM
Section 6
Getting to Know the PhoneBook Screen
10
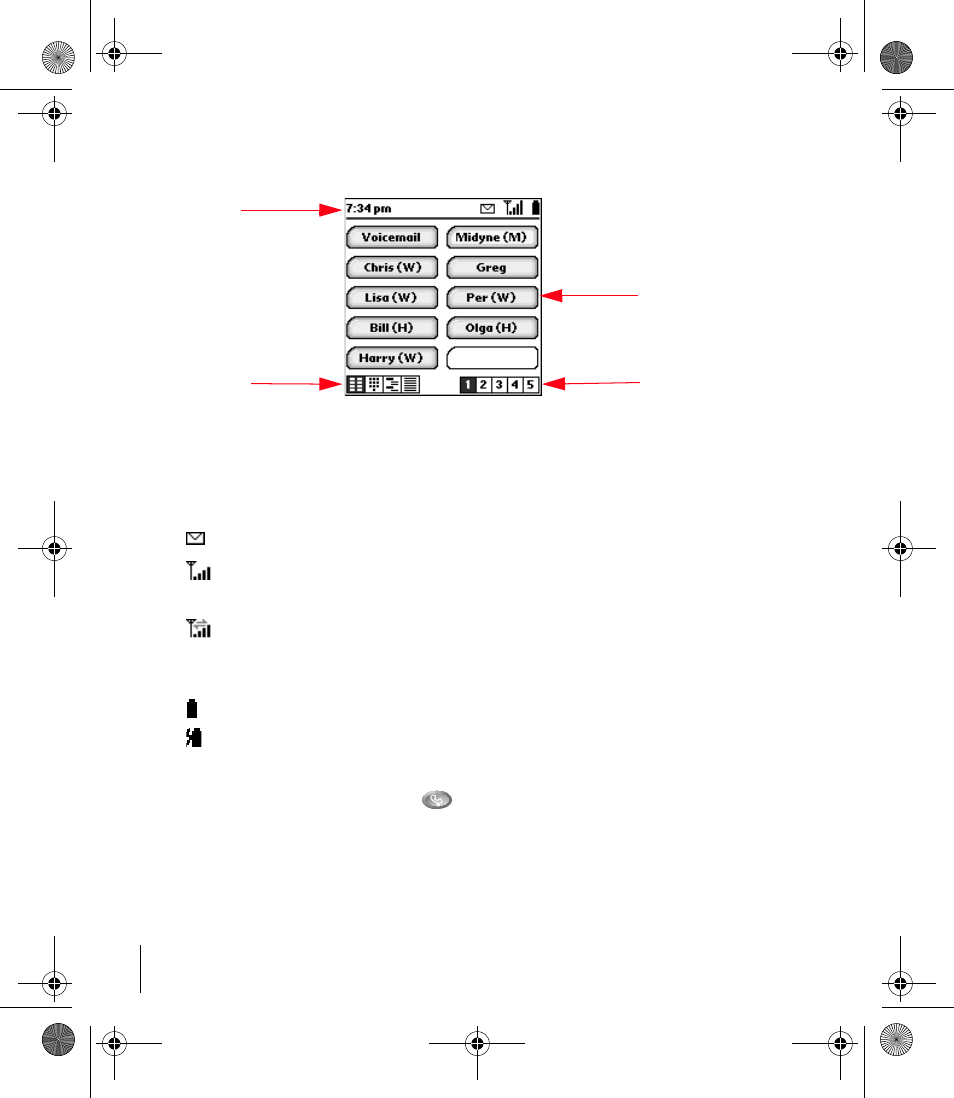
Getting to Know the PhoneBook Screen
1. Status Bar: Provides the following status information about your PCS Treo 300:
2. View Icons: Indicates which view currently appears on the screen. To switch to another view,
tap a view icon or press PhoneBook repeatedly to cycle between the various views.
3. Speed Dial Buttons: Enables you to store and quickly dial a phone number. See page 16 for
information about storing speed dial entries.
4. Page Number Icons: Enables you to access other speed dial pages by tapping one of these icons.
Time Displays the current time when wireless mode is on. If you roam outside the PCS
network, “Roaming” or “No Service” appear instead. When wireless mode is off,
“Wireless Mode is Off” appears in this position.
Appears when you have new voicemail messages.
Displays the signal strength. The stronger the signal, the more bars appear. No bars
= no coverage. Inside a building, moving near a window may improve reception.
Appears as black arrows when your phone is connected to PCS Vision. Appears as
green arrows when you are sending or receiving data. For example, this icon appears
green when you browse the Internet.
Displays the battery status. As the battery drains, the icon changes from full to empty.
Appears when your phone battery is charging.
1. Status Bar
2. View Icons 4. Page Number Icons
3. Speed Dial Buttons
Sprint Start.book Page 10 Monday, June 17, 2002 8:57 AM
Section 7
Making and Receiving Calls 11
Making and Receiving Calls
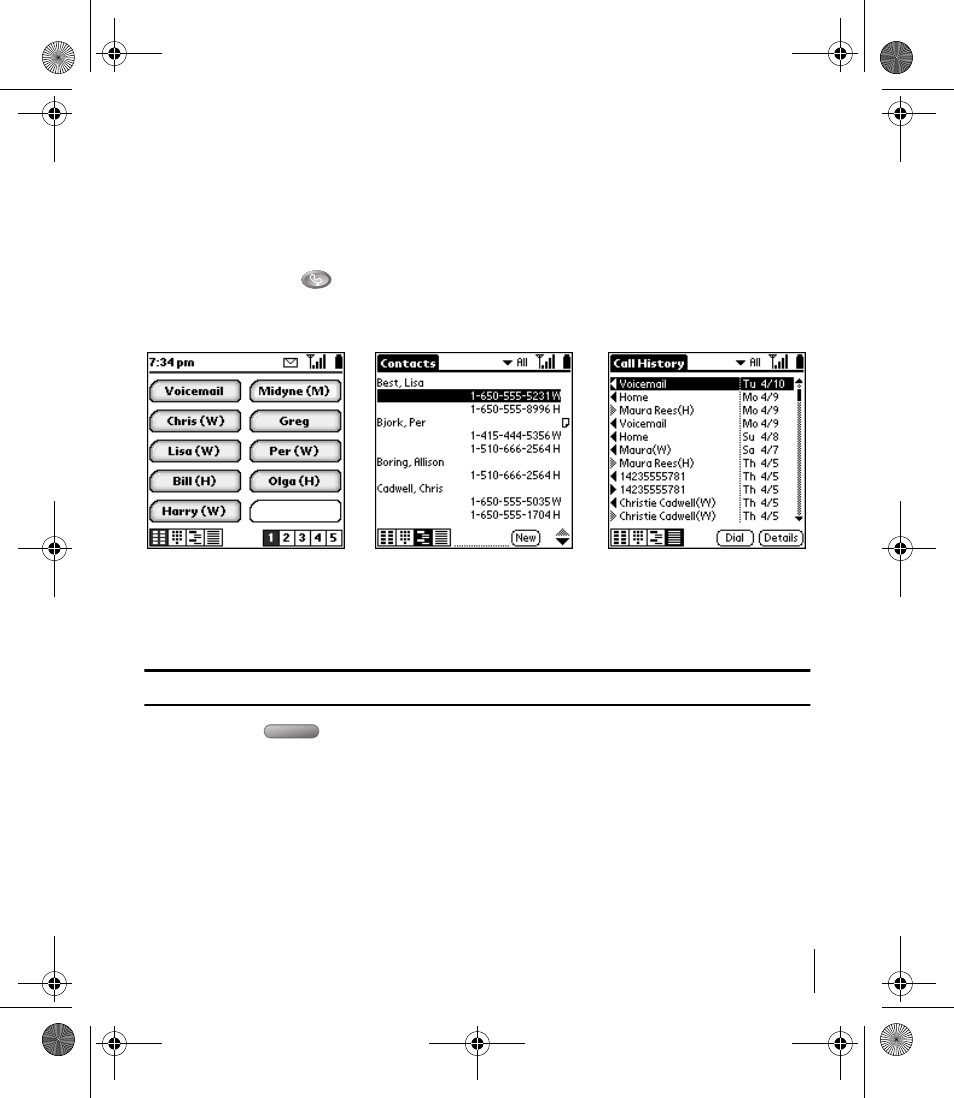
Making a Call From the Speed Dial, Contacts, or Call History Views
1. Make sure wireless mode is on. See page 5 for details.
2. Press PhoneBook repeatedly to display the view you want to use.
3. Begin typing the first initial and last name of the person you want to call. For more search
options, see page 15.
4. Use the scroll buttons to select the number you want to dial.
Tip:You can also select an entry by rolling the rocker switch or tapping the entry on the screen.
5. Press Space to dial.
Speed Dial View Contacts View Call History View
Sprint Start.book Page 11 Monday, June 17, 2002 8:57 AM
Section 7
Making and Receiving Calls
12
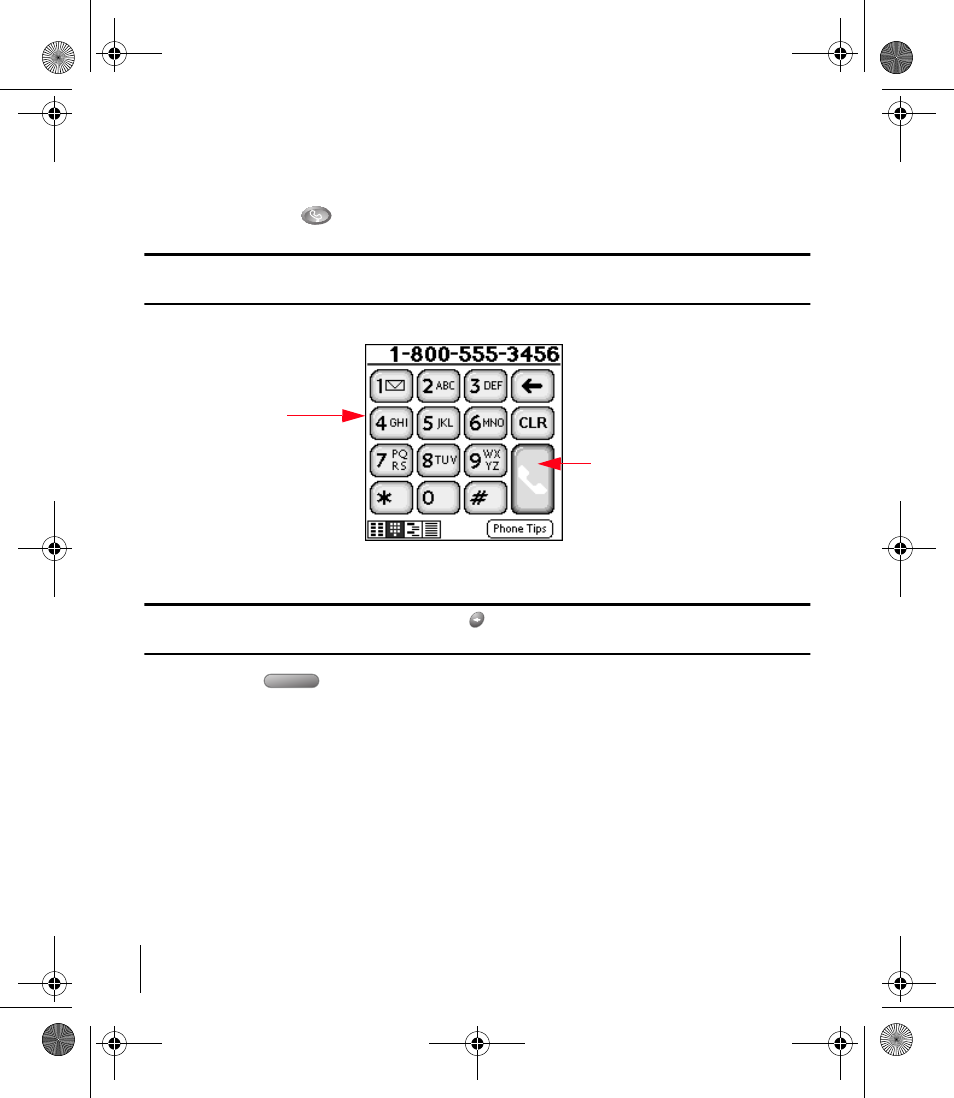
Making a Call From the Dial Pad View
1. Make sure wireless mode is on. See page 5 for details.
2. Press PhoneBook to access the Dial Pad view.
Tip:You can jump to the Dial Pad from the Speed Dial view by simply typing the number you want to call. At first your
phone interprets the numbers as letters, but it quickly figures out you’re typing numbers and jumps to the Dial Pad view.
3. Type the number you want to call on the keyboard number pad, or tap the onscreen numbers.
Tip:If you make a mistake while dialing, press Backspace to erase one digit at a time. Or, tap CLR to erase the entire
number.
4. Press Space or tap the handset button to dial.
Answering Calls
1. Make sure wireless mode is on (see page 5). If it is off, incoming calls go to voicemail.
2. When your phone rings or vibrates, answer the call by doing one of the following:
ᮣOpen the lid if it is closed.
ᮣTap Answer if the lid is open.
ᮣPress the button on the headset (if it is attached).
Handset Button
Dial Pad View
Sprint Start.book Page 12 Monday, June 17, 2002 8:57 AM
Section 7
Making and Receiving Calls 13
Sending Calls to Voicemail
To ignore a call and send it to voicemail do one of the following:
ᮣPress the top scroll button.
ᮣTap Ignore if the lid is open.
ᮣClose the lid if it is open.
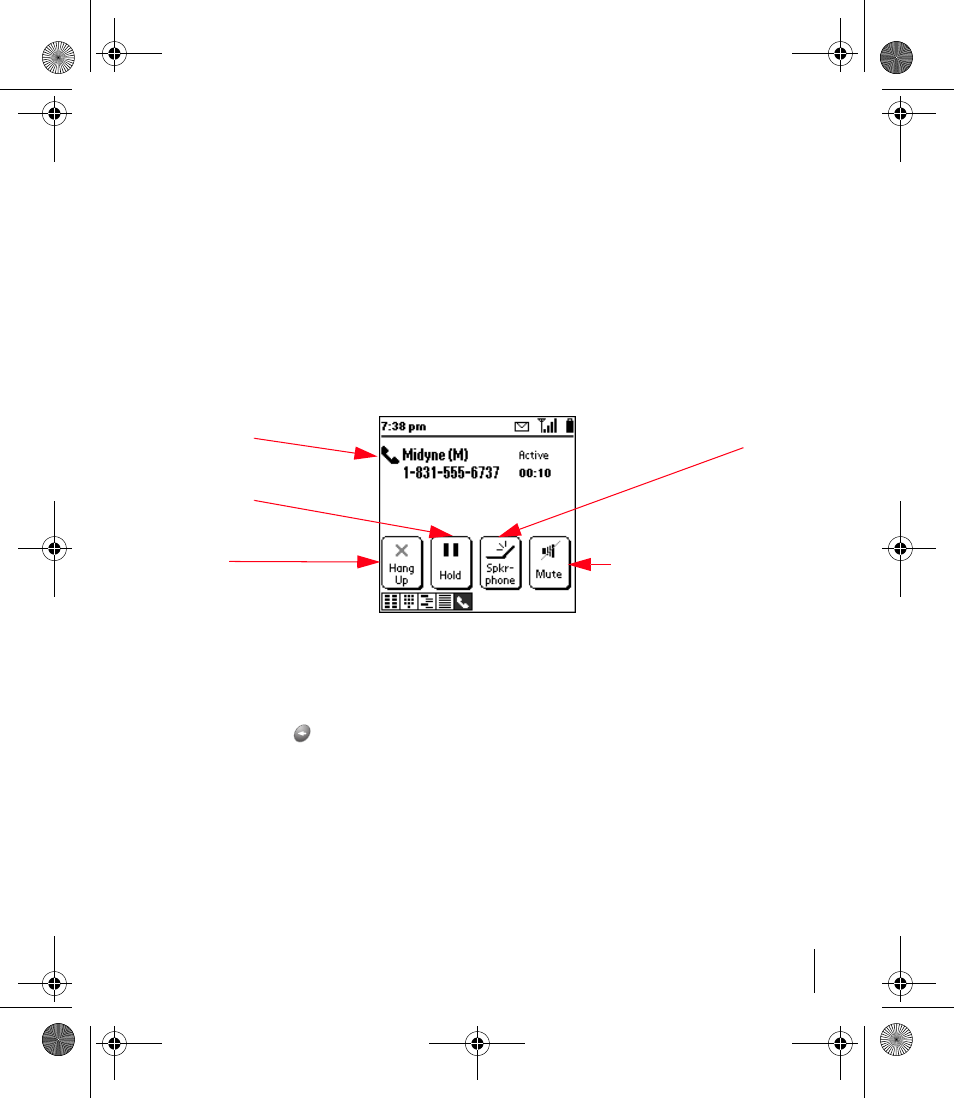
Working With Active Calls
After you make or receive a call, the Active Call view icon appears in the lower left corner of the
PhoneBook screen, and the Active Call view appears:
Ending a Call
To end a call, do one of the following:
ᮣClose the lid.
ᮣPress Backspace .
ᮣPress the button on the headset (if it is attached).
ᮣTap Hang Up.
Tap to mute the
microphone
Tap to end
the call
Tap to place the
call on hold
Tap to use the personal
speakerphone
Caller’s name
and number
Sprint Start.book Page 13 Monday, June 17, 2002 8:57 AM
Section 8
Internal Phone Book
14
Internal Phone Book
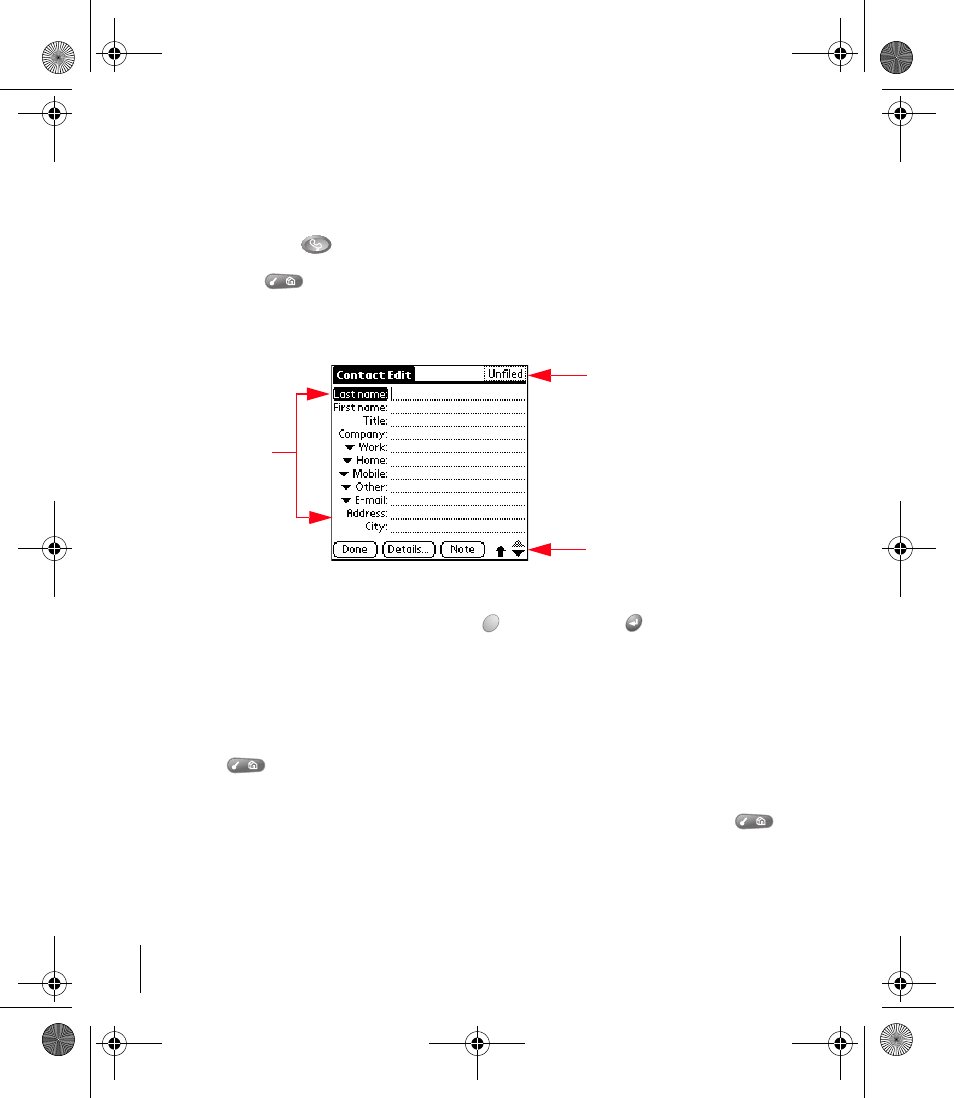
Entering and Saving Contact Information
1. Press PhoneBook repeatedly until you see the Contacts view.
2. Press Menu and select New (/N).
3. Use the scroll buttons to move between fields as you type.
4. After you enter the information, hold Option and press Return to finish.
When entering Contacts, keep the following in mind:
ᮣYou can also import addresses from popular software applications on your computer. See the
electronic User Guide for instructions.
ᮣTo place the entry in a category, mark it private, or add a note, in the Contact Edit screen press
Menu and select Details (/E).
ᮣYou can set the Dial Preferences in your Contacts list to always dial a “1” before the area code
and to add a specific area code to 7-digit numbers. In the Contacts list, press Menu and
under Options select Dial Preferences (/Z). Select United States or Canada as your Home
country and enable the features you need. This feature is particularly useful when you’re
travelling and using the Speed Dial view.
Type the
information
Arrows indicate
more information
Category
Sprint Start.book Page 14 Monday, June 17, 2002 8:57 AM
Section 8
Internal Phone Book 15
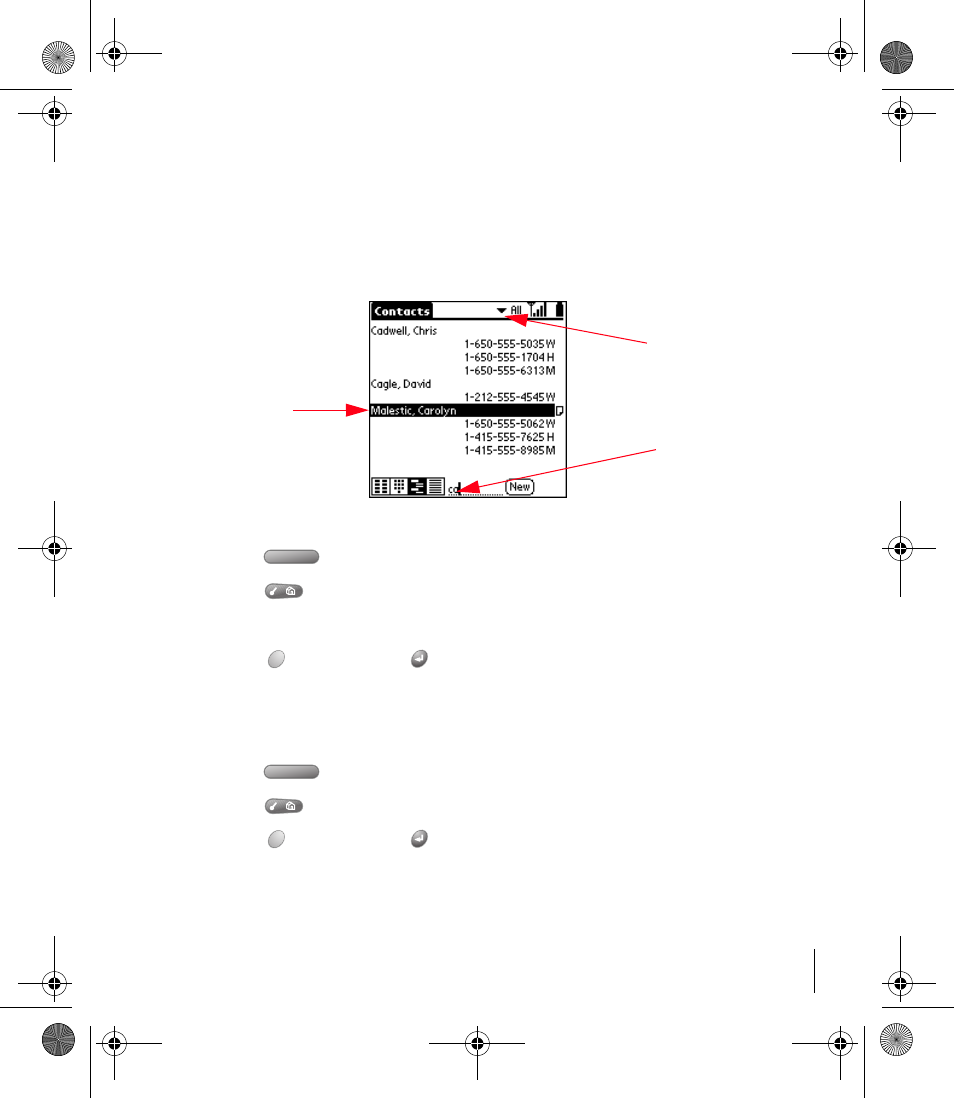
Finding or Changing Contact Information
1. In the Contacts, Speed Dial, or Call History views, begin typing one of the following for the
entry you want to find or edit:
2. Roll the rocker switch or use the scroll buttons to select the name.
3. Press Space to open the entry.
4. Press Menu and select Edit Contact (/E).
5. Make changes to the entry as necessary.
6. Hold Option and press Return to finish.
Deleting a Contact
1. In the Contacts view, select the name you want to delete.
2. Press Space to open the entry.
3. Press Menu and select Delete Contact (/D).
4. Hold Option and press Return to finish.
ᮣFirst initial and last name ᮣFirst name ᮣLast name
Tap the name
you want to
view or edit Letters you type
appear here
Tap to view
another category
Sprint Start.book Page 15 Monday, June 17, 2002 8:57 AM
Section 8
Internal Phone Book
16
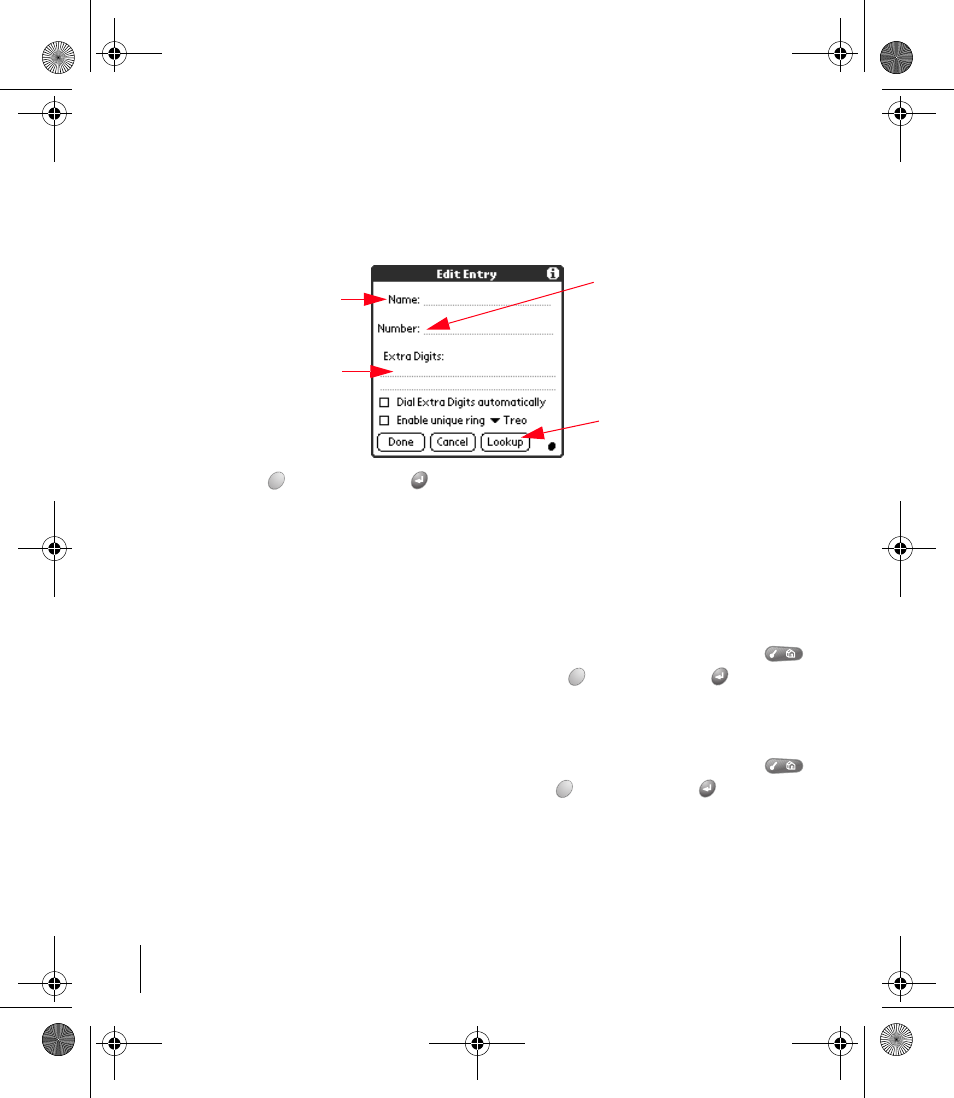
Defining Speed Dial Buttons
1. In the Speed Dial view, tap a blank speed dial button.
2. Use the scroll buttons to move between fields as you type.
3. Hold Option and press Return to finish.
When defining speed dial buttons, keep the following in mind:
ᮣTo automatically dial the Extra Digits you entered after a two second pause, select the Dial
Extra Digits automatically check box.
ᮣTo assign a unique ring to calls from this number, select the Enable unique ring check box and
choose the ring type from the pick list.
ᮣTo edit an existing speed dial entry, highlight the entry you want to change, press Menu
and select Edit Speed Dial (/E). After editing, hold Option and press Return to finish.
ᮣTo insert a pause between Extra Digits when dialing, type a comma (,). Each comma
represents a one second pause.
ᮣTo delete an existing speed dial entry, highlight the entry you want to delete, press Menu
and select Edit Speed Dial (/E), tap Delete, hold Option and press Return to finish.
ᮣYou can set the Dial Preferences in your Contacts list to always dial a “1” before the area code
and to add a specific area code to 7-digit numbers. This feature is particularly useful when
you’re travelling and using the Speed Dial view. See page 14 for details.
Type a name for
the button
Tap Lookup to find a
number in your
Contact list
Type the phone
number
Type digits to dial
after placing the call
(such as an extension
or access code)
Sprint Start.book Page 16 Monday, June 17, 2002 8:57 AM
Section 9
Controlling Your Roaming Experience 17
Controlling Your Roaming Experience
Your phone is single-band, which means you can make and receive calls while on the Nationwide
PCS Network and you can also roam on other digital networks where we’ve implemented
roaming agreements with other carriers. To learn more about roaming, visit www.sprintpcs.com.
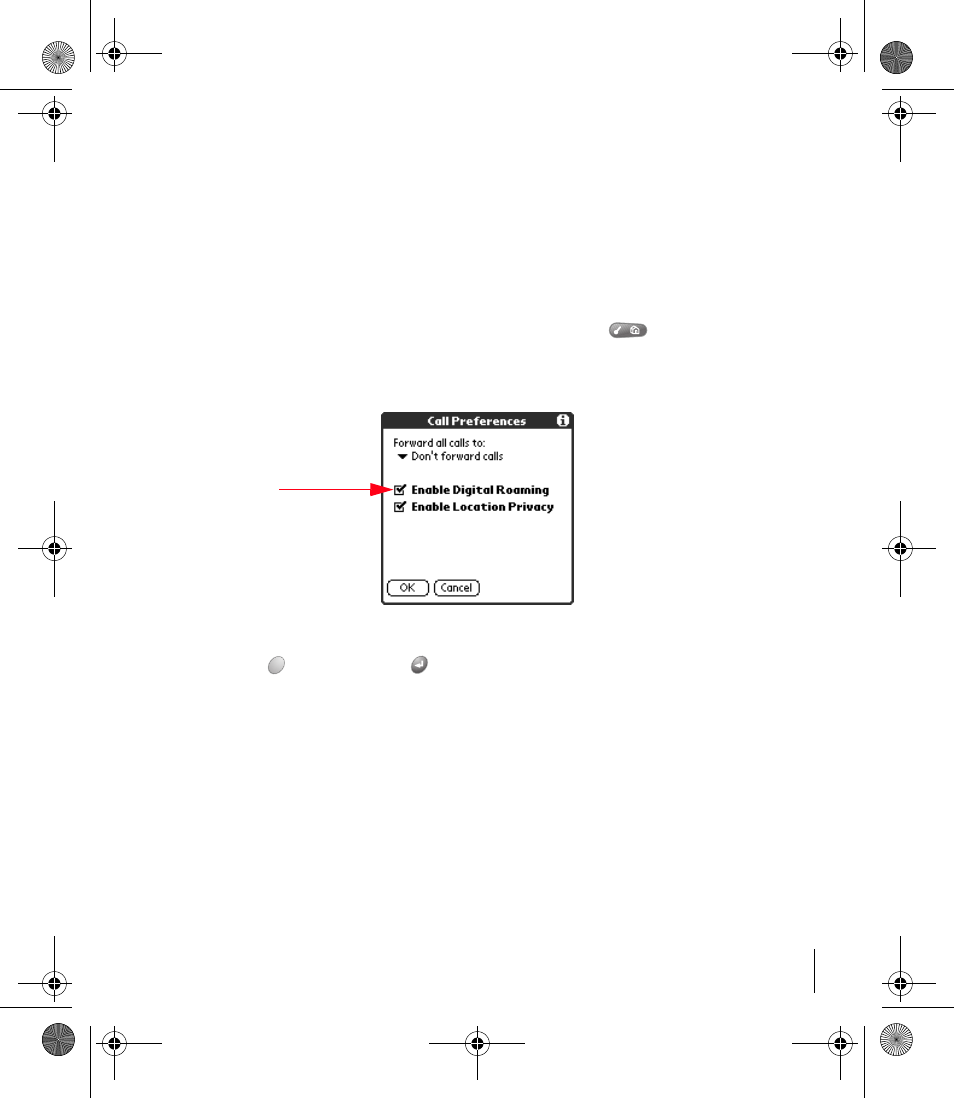
Setting Your Phone’s Roam Mode
1. From the Speed Dial, Dial Pad, or Call History view, press Menu .
2. Under Options, select Call Preferences (/A).
3. Select the Enable Digital Roaming check box.
4. Hold Option and press Return to finish.
Tap to set
roam mode
Sprint Start.book Page 17 Monday, June 17, 2002 8:57 AM
Section 10
Changing Your Phone’s Settings
18
Changing Your Phone’s Settings
Adjusting Volume During a Conversation
ᮣRoll the rocker switch or press the scroll buttons on the front of your phone during the call.
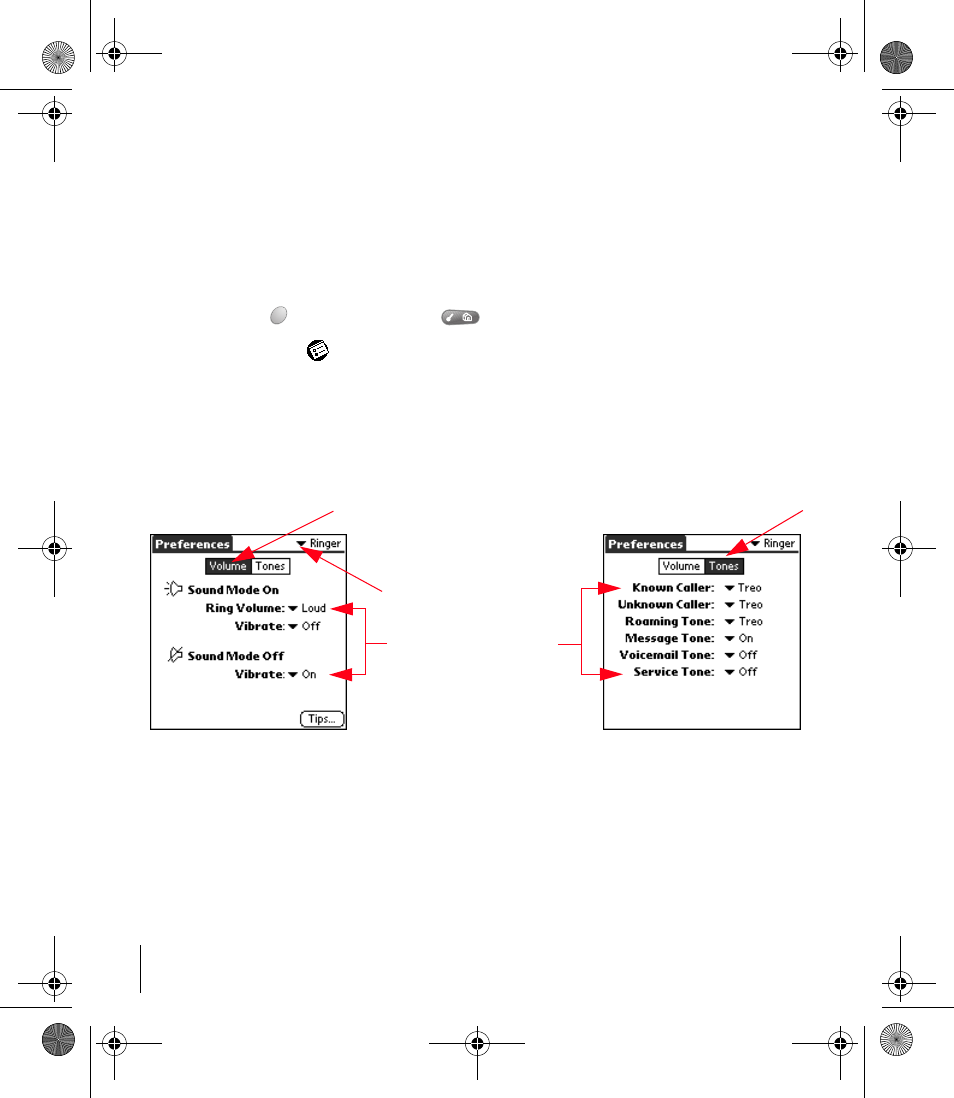
Selecting the Ringer Settings
1. Press Option and then press Menu .
2. Tap the Prefs icon .
3. Tap the pick list in the upper-right corner and select Ringer.
4. Tap Volume to set volume levels.
5. Tap Tones to select ring tones.
When selecting the ringer settings, keep the following in mind:
ᮣThe Vibrate pick lists enable or disable the vibrate option for the corresponding ringer switch
position. See page 2 for ringer switch location.
ᮣIf the Vibrate option under Sound Mode On is on, your phone both rings and vibrates. If the
Vibrate option under Sound Mode Off is on, ring tones and alarms vibrate. If the ringer switch
and the Vibrate option under Sound Mode Off are off, ring tones and alarms flash the LED.
Tap to set volume levels
Tap to change settings
Tap to select Ringer
Tap to set ring tones
Sprint Start.book Page 18 Monday, June 17, 2002 8:57 AM

Section 10
Changing Your Phone’s Settings 19
Silencing the Ringer
When you silence the ringer you can either answer the call or let it ring through to voicemail.
Silencing the ringer also turns off all system sounds, including alarms. When you silence the
ringer, Date Book Plus alarms vibrate or flash the LED (depending on the Ringer Preference
setting). See the previous page for details.
To silence the ringer, do one of the following:
ᮣPress any button on your phone.
ᮣSlide the ringer switch to the silent position .
Sprint Start.book Page 19 Monday, June 17, 2002 8:57 AM

Section 11
Sending and Receiving Voice Messages
20
Sending and Receiving Voice Messages
Setting Up Voicemail
1. Make sure wireless mode is on. See page 5 for details.
2. Do one of the following:
ᮣFrom the Dial Pad view, tap and hold the 1 button for two seconds until the Active Call
screen appears.
ᮣFrom the Dial Pad or Speed Dial view, press and hold the 1 key for two seconds.
ᮣFrom the Speed Dial view, tap the Voicemail button.
3. Follow the system prompts to create your pass code and record your greeting.
Retrieving Voicemail Messages
1. Make sure wireless mode is on. See page 5 for details.
2. Do one of the following:
ᮣFrom the Dial Pad view, tap and hold the 1 button for two seconds until the Active Call
screen appears.
ᮣFrom the Dial Pad or Speed Dial view, press and hold the 1 key for two seconds.
ᮣFrom the Speed Dial view, tap the Voicemail button.
ᮣFrom the Dial Pad or Speed Dial view, tap the voicemail icon in the title bar.
3. Follow the system prompts.
Accessing Voicemail From Another Phone
1. Dial your PCS Treo 300 number.
2. Press when voicemail answers.
3. Enter your pass code.
Sprint Start.book Page 20 Monday, June 17, 2002 8:57 AM
Section 12
Receiving SMS Messages 21
Receiving SMS Messages
To use SMS, you must first subscribe to and activate PCS Vision Services. See page 28.
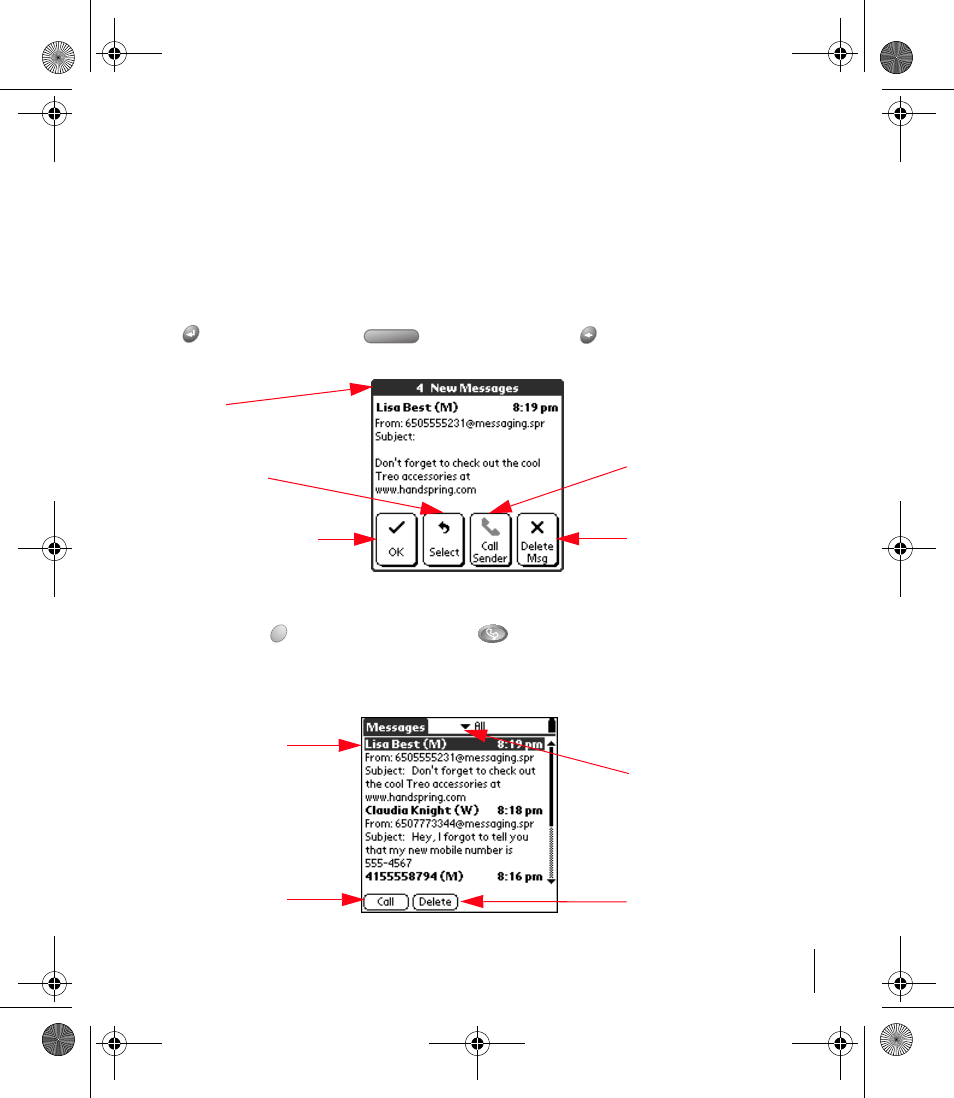
Receiving a Message
When you receive a message, the New Messages alert dialog appears.
ᮣTap the screen as shown below, or use the following keys:
= OK = Select = Delete Msg.
Viewing Messages
1. Press Option and then press PhoneBook to access SMS.
2. Use the scroll buttons to scroll through the messages.
Number of new
messages
Tap to select
how to respond Tap to call sender
Tap to delete message
Tap to save message
Tap to call sender Tap to delete message
Tap to view a
specific category
Selected message
Sprint Start.book Page 21 Monday, June 17, 2002 8:57 AM
Section 12
Receiving SMS Messages
22
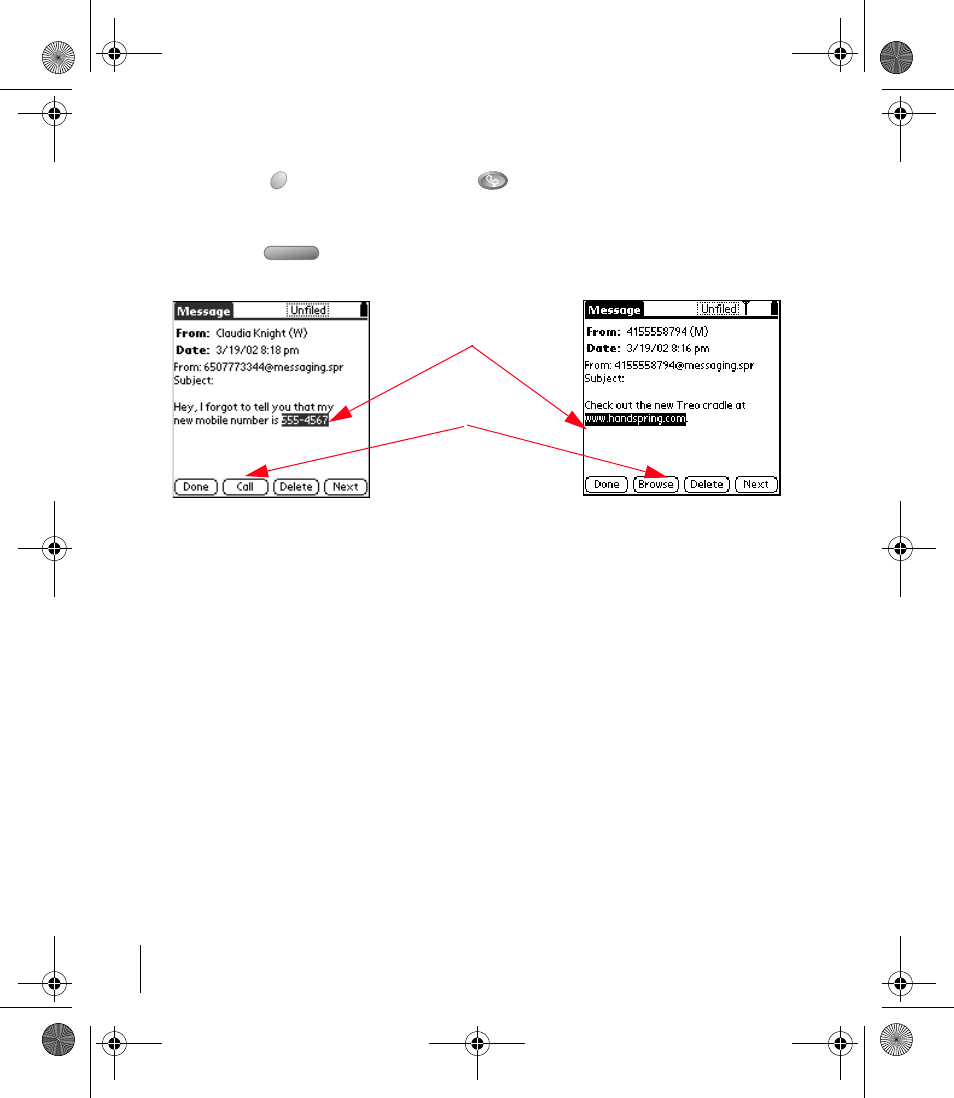
Responding to Messages
1. Press Option and then press PhoneBook to access SMS.
2. Use the scroll buttons to select the message to which you want to respond.
3. Press Space to open the message.
4. Press the scroll buttons to move between selectable items within the message.
5. Tap the action button to respond to the message.
The action button changes based on the type of information that is currently selected. For
example, when you select a web site URL, the action button changes to a Browse button and when
you select a phone number, it changes to a Call button.
Action button
Selected item
Sprint Start.book Page 22 Monday, June 17, 2002 8:57 AM
Section 13
PCS Service Features 23
PCS Service Features
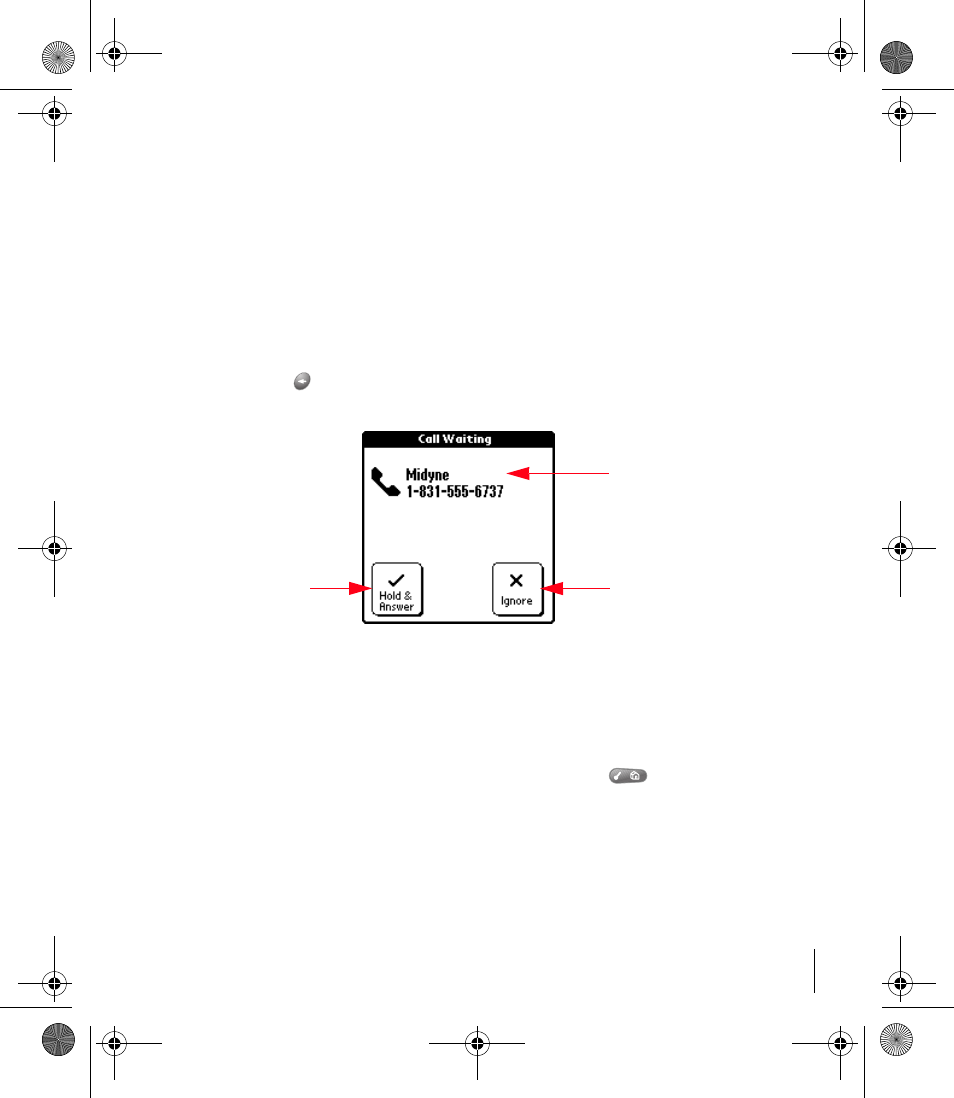
Call Waiting
To respond to an incoming call while you’re on a call, do one of the following:
ᮣTap Hold & Answer on the Call Waiting screen, or press the headset button (if it is attached).
This puts the first caller on hold and lets you answer the second call. To switch between callers,
tap Swap or press the headset button again.
ᮣTap Ignore to send the second call to voicemail.
ᮣPress Backspace to end your first call, and then tap Answer to answer the incoming call.
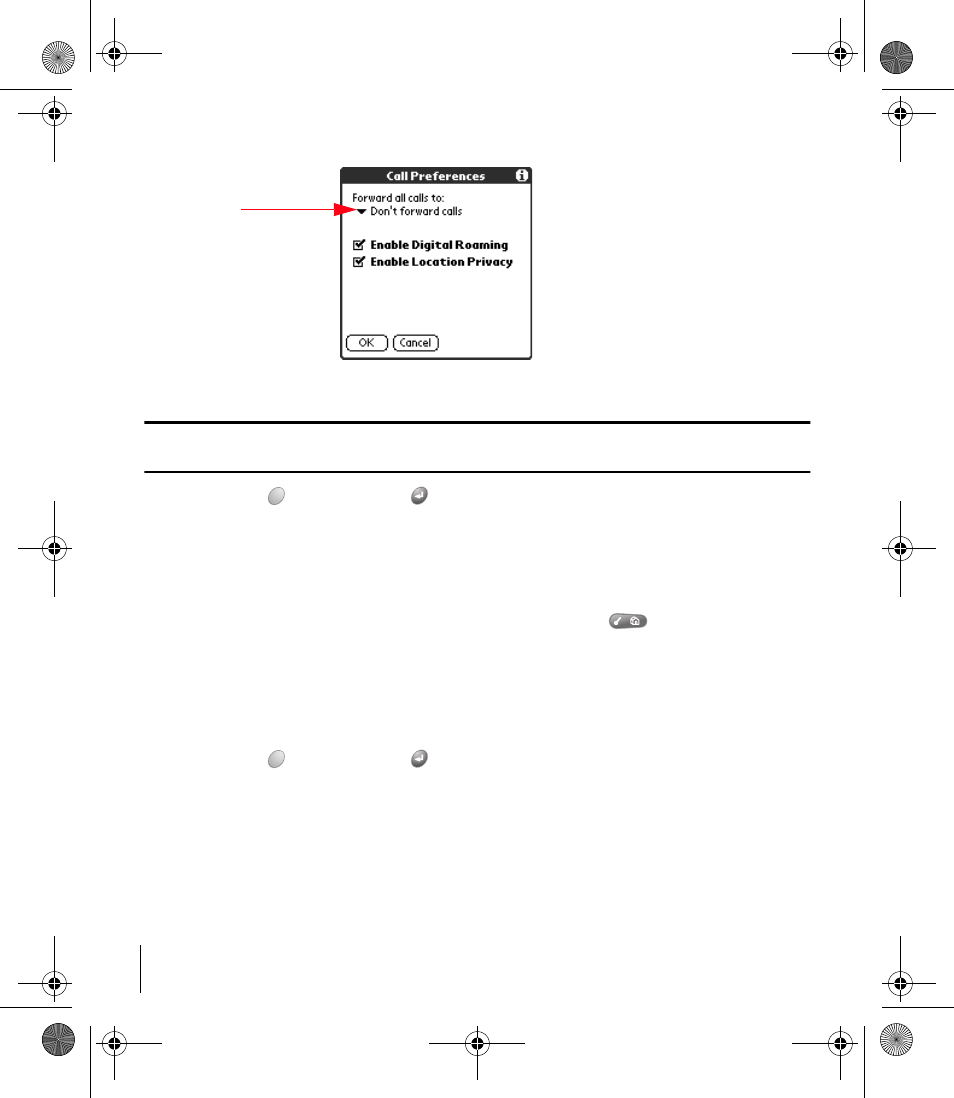
Call Forwarding
Lets you forward your calls to another number. You can still make calls from your phone while
this is activated. There is a per call charge for this service.
To activate
1. From the Speed Dial, Dial Pad, or Call History view, press Menu .
2. Under Options, select Call Preferences (/A).
3. Tap the Forward all calls to pick list.
4. Select the call forwarding option you want to use.
Caller’s name and phone
number if available
Puts 1st call on hold,
and answers 2nd call Sends call to voicemail
Sprint Start.book Page 23 Monday, June 17, 2002 8:57 AM
Section 13
PCS Service Features
24
Tip:You can define multiple forwarding numbers. Select Edit numbers from the list to add, change, or delete a 10-digit
forwarding number.
5. Hold Option and press Return to finish.
6. Listen for a confirmation tone. If you do not hear a tone, try calling yourself to see if the call
forwards to the correct number.
To deactivate
1. From the Speed Dial, Dial Pad, or Call History view, press Menu .
2. Under Options, select Call Preferences (/A).
3. Tap the Forward all calls to pick list.
4. Select Don’t forward calls.
5. Hold Option and press Return to finish.
6. Listen for a confirmation tone.
Pick List
Sprint Start.book Page 24 Monday, June 17, 2002 8:57 AM
Section 13
PCS Service Features 25
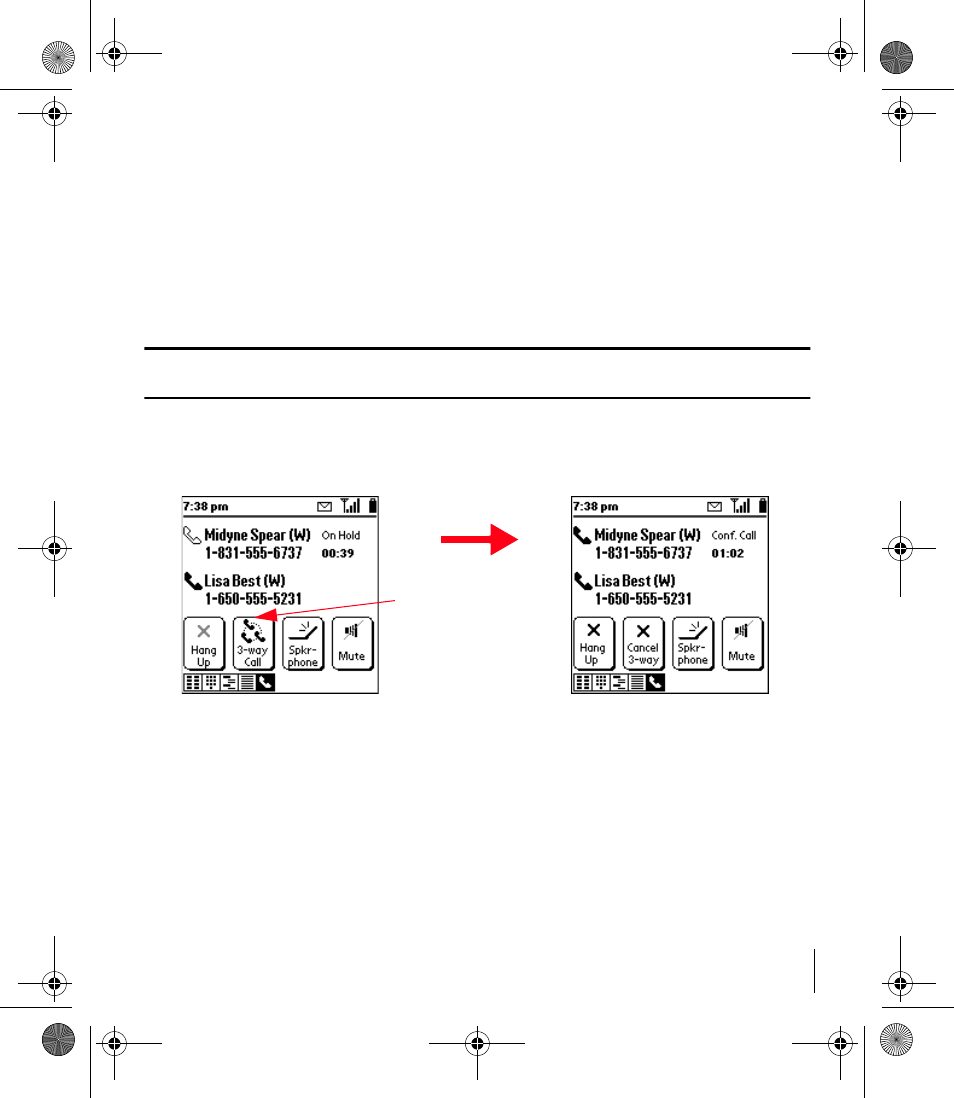
Three-Way Calling
Talk to two different people at the same time. When using this feature, the normal airtime rates
will be charged for each of the two calls.
1. Dial a number you wish to call.
2. Once you have established the connection, tap Hold and to put the first caller on hold.
3. Dial the second number you wish to call.
Note:You cannot initiate a 3-way call if the second call is an incoming call. To use this feature, you must place both of
the calls before joining them.
4. When you’re connected to the second party, tap 3-way Call or press the button on the headset
(if it is attached), to begin your three-way call.
If one of the people you called hangs up, you and the remaining caller stay connected. If you are
the first to hang up, all three callers are disconnected.
5. Tap Cancel 3-way or tap the headset button to end the second call and to return to the first call
you placed, or tap Hang Up to end both calls.
Initiates 3-way Call
Sprint Start.book Page 25 Monday, June 17, 2002 8:57 AM

Section 13
PCS Service Features
26
PCS Voice CommandSM
With PCS Voice CommandSM, you can call a number just by saying a name.
Get started by setting up your Personal Address Book
1. From the Dial Pad view, tap followed by the handset button. The first time you use it, you
will hear a tutorial before moving on to the next step.
2. You’ll hear a tone followed by the prompt “Ready.” Say “Add Name” to begin setting up your
Personal Address Book.
Making a call with PCS Voice Command
1. From the Dial Pad view, tap followed by the handset button.
2. You’ll hear a tone followed by the prompt “Ready.”
3. After the prompt, say “Call” and the name of the person or the number you want called.
4. Your request will be repeated and you will be asked to verify. Say “Yes” to call the number or
person. Say “No” to cancel.
Accessing information using PCS Voice Command
1. From the Dial Pad view, tap followed by the handset button.
2. Say “Call the Web.”
3. Choose from a listing of information categories like email, news, weather, sports and more.
Sprint Start.book Page 26 Monday, June 17, 2002 8:57 AM
Section 14
PCS Vision 27
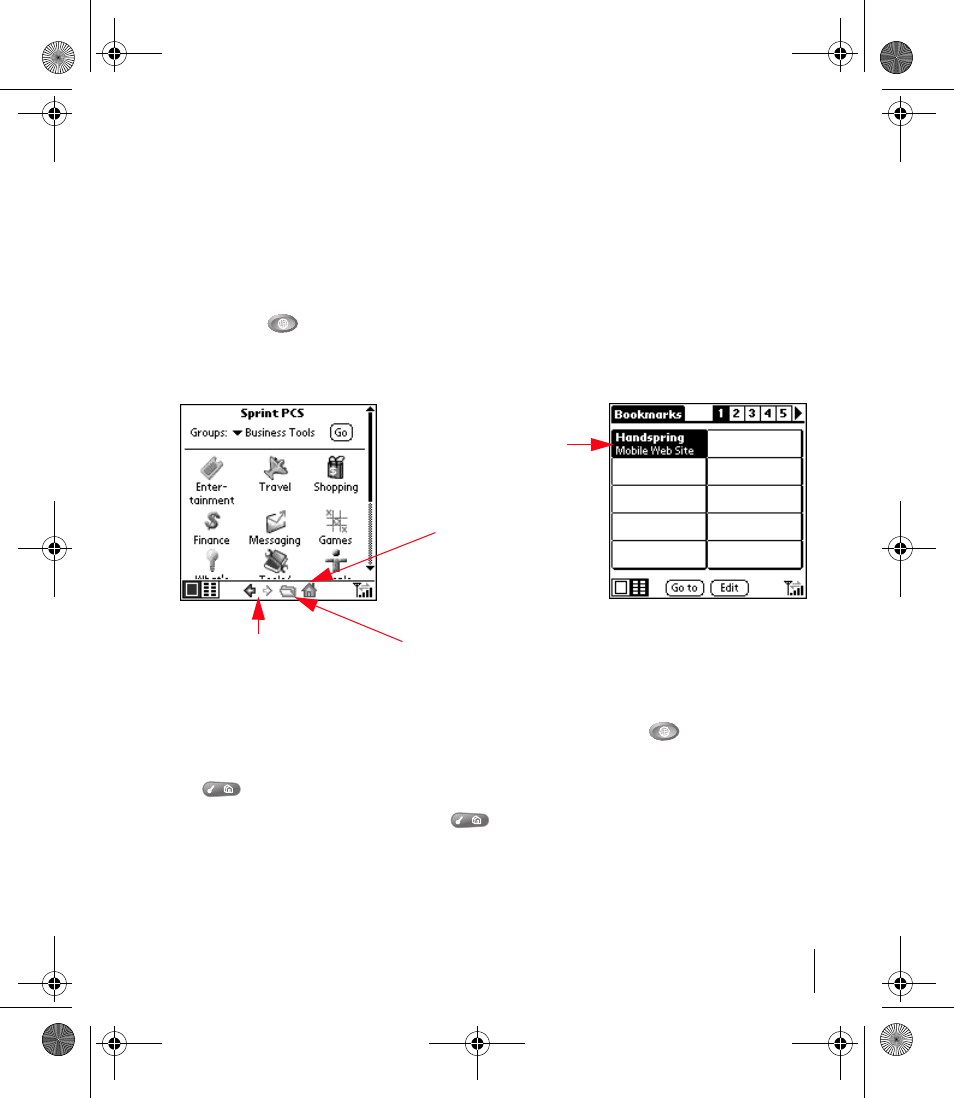
PCS Vision
To sign up for PCS Vision Services or access complete instructions, visit www.sprintpcs.com and
log on. Then click on “Claire's Directory for Service Solutions” where you may view the complete
phone user’s guide or take a tutorial.
1. Make sure wireless mode is on. See page 5 for details.
2. Press Blazer .
3. Do any of the following:
ᮣTo switch between the Web Page and Bookmark views, press Blazer repeatedly.
ᮣTo rearrange the bookmark list or edit a bookmark, go to the Bookmark view, press Menu
and select Edit Bookmarks (/E).
ᮣTo add a new bookmark, press Menu and select Add Bookmark (/A), or go to the
Bookmark view and tap an empty slot.
ᮣTo scroll through a page, roll the rocker switch or use the scroll buttons.
Tap to enter a URL
Tap to view next
and previous pages
Tap to go to
home page
B
oo
k
mar
k
v
i
ew
Web Page view
Tap a bookmark
to view that page
Sprint Start.book Page 27 Monday, June 17, 2002 8:57 AM
Section 15
Your Phone’s PCS Vision Capabilities
28
Your Phone’s PCS Vision Capabilities
The following information will help you understand your phone's exciting third generation
capabilities. To learn how to use all the advanced features of your phone, refer to the electronic
User Guide. For more information about the electronic User Guide, see page ii.
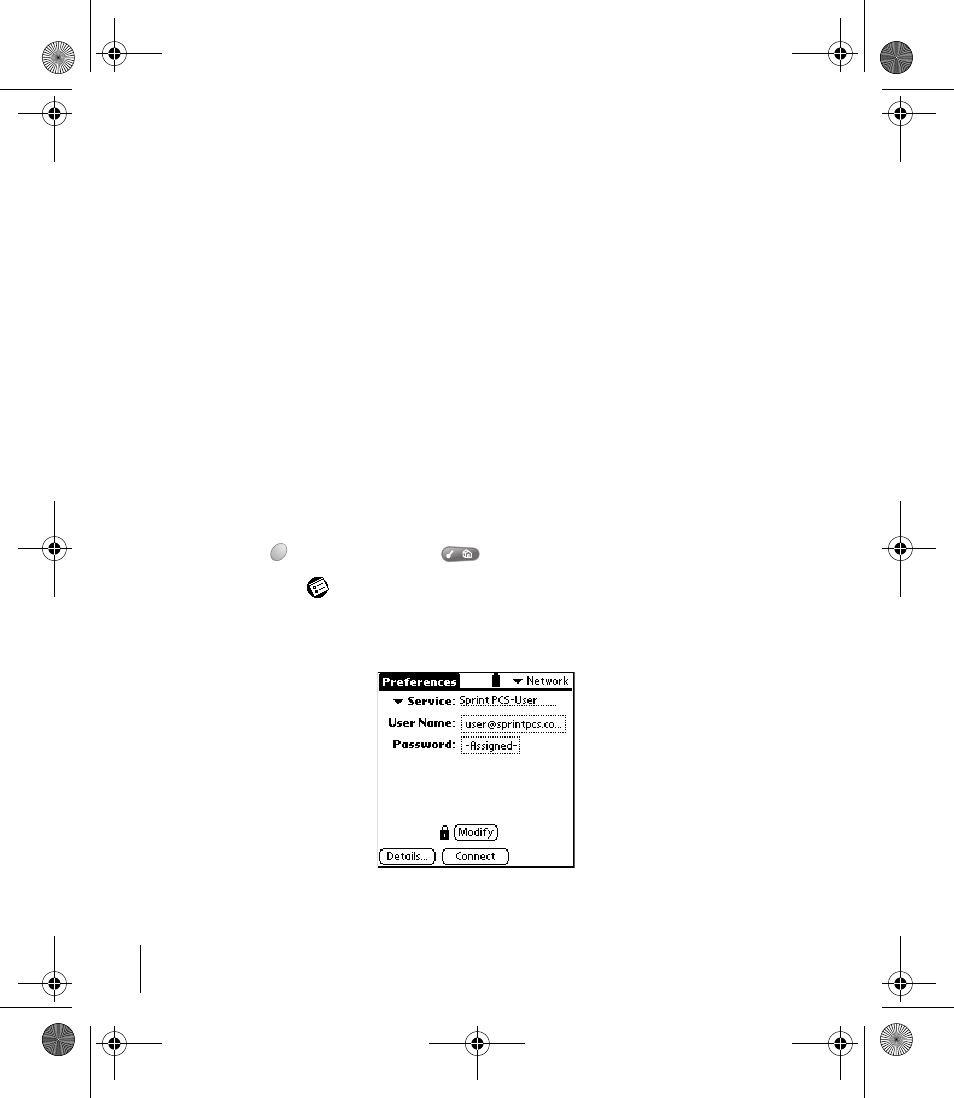
Accessing PCS Vision Features
User Name
Your user name is automatically assigned to you. Your user name, which resembles an email
address (for example, name@sprintpcs.com), is used with PCS Email and 2-way messaging
services.
When your phone is PCS Vision enabled, your user name will automatically appear on your
phone's display screen. Once your phone is activated, you are signed in and ready to connect to
PCS Vision Services at any time. You will only be charged for services when you use them.
To find your user name and options:
1. Press Option and then press Menu .
2. Tap the Prefs icon .
3. Tap the pick list in the upper-right corner and select Network.
Sprint Start.book Page 28 Monday, June 17, 2002 8:57 AM

Section 15
Your Phone’s PCS Vision Capabilities 29
PCS Vision Services
With PCS Vision Services, you will have access to additional features, better performance, faster
Internet connections and a wider variety of online services. Features such as Wireless Web access,
graphically-enriched games and sending/receiving digital images will be available on your
phone through the PCS Vision Services and third-party Palm OS applications.
PCS 2-Way Messaging
Now you can send and receive email and attachments from your phone or laptop computer.
Photos
Send and receive high-quality digital photos to friends and family across the country.
Color Games
Download challenging games onto your PCS Treo 300.
Enhanced Ringers
Enhanced ringers allow you to personalize your phone with downloadable ringers or to create
and share your own custom ring tones. Assign different rings to numbers in your address book,
and you'll know who's calling by the ring.
PCS Vision Billing Information
Your PCS Vision Services are billed according to the amount of data (kilobytes) you send and
receive, not the minutes you use on your phone. You will only be billed if and when you use these
features. Anytime you send or receive data on your phone, you will be billed for the amount of
data transmitted. For more information, visit www.sprintpcs.com or see the FAQ section of your
phone's electronic User Guide.
Sprint Start.book Page 29 Monday, June 17, 2002 8:57 AM

Section 16
Your Phone’s Special Features
30
Your Phone’s Special Features
Your PCS Treo 300 is one of the smallest, lightest, color Palm OS® phones available. With your
new phone, you will no longer have trouble getting to meetings and appointments on time,
remembering people’s names and personal details, or keeping track of all the items on your to do
list. Your phone can help you improve your track record in all these areas.
In addition to keeping all your contact names, addresses, phone numbers, and other details in
PhoneBook, you can enter all your schedule details in Date Book Plus and view them in day,
week, month, year, or list format. You can even set alarms to remind you of important meetings.
Add your tasks to To Do list, prioritize them so you don’t overlook them, and assign them a due
date. When you are out of the office, track your expenses for your expense reports; then transfer
the data to your computer to print it out.
To make sure you don’t lose any of this important information, you can synchronize your data
with Palm Desktop software on your computer so you always have a backup copy. You can set
different levels of security for your handheld so unauthorized eyes cannot view your data.
Use the IR port to exchange data and applications with other Palm OS devices. Or download any
of the thousands of third-party applications available for Palm OS devices. Using your handheld
doesn’t always have to be serious either. With the bright color screen you can use third-party
software to enjoy viewing photos and playing games.
Sprint Start.book Page 30 Monday, June 17, 2002 8:57 AM