Panasonic Connect 209023A UMTS/ GSM Cellular Mobile with Bluetooth®, WLAN and RFID User Manual BEGIN E OI 091214
Panasonic Mobile Communications Development of Europe Ltd UMTS/ GSM Cellular Mobile with Bluetooth®, WLAN and RFID BEGIN E OI 091214
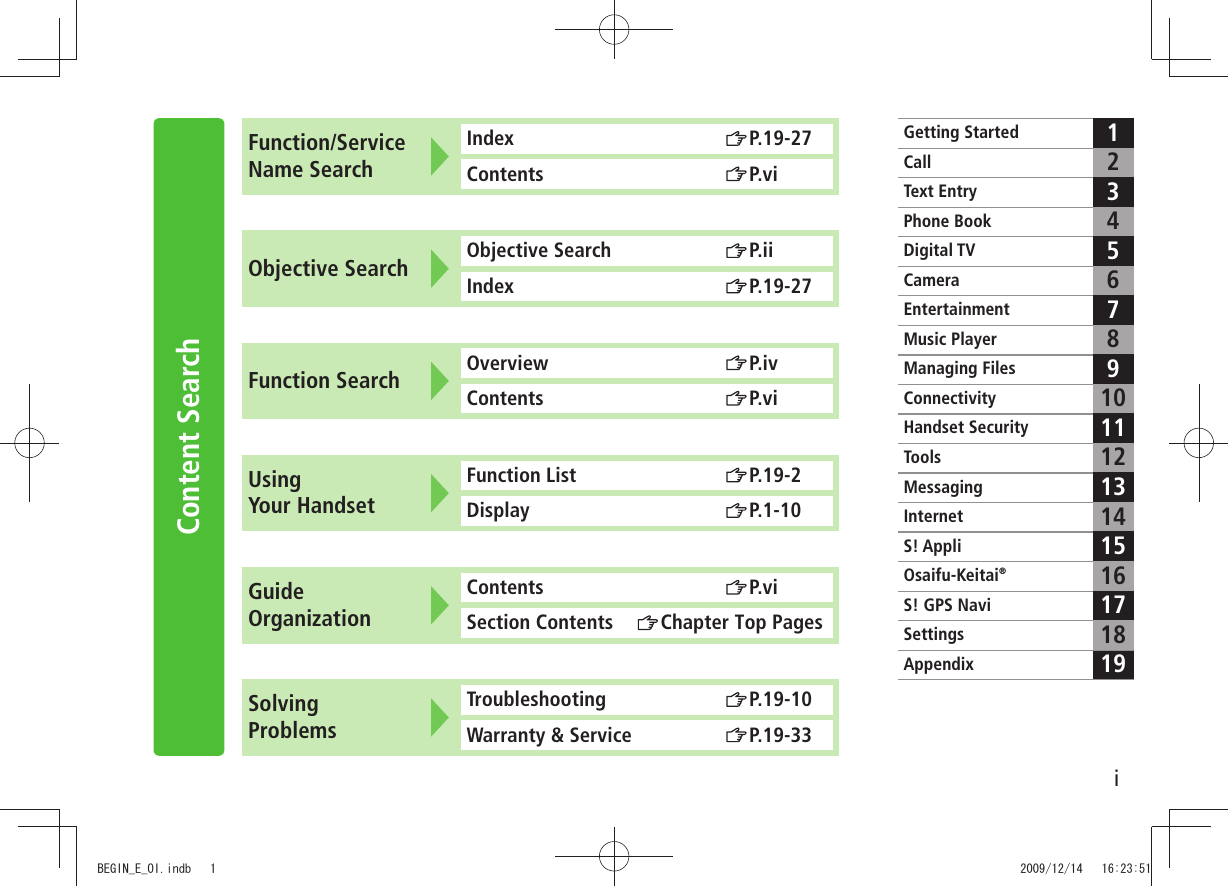
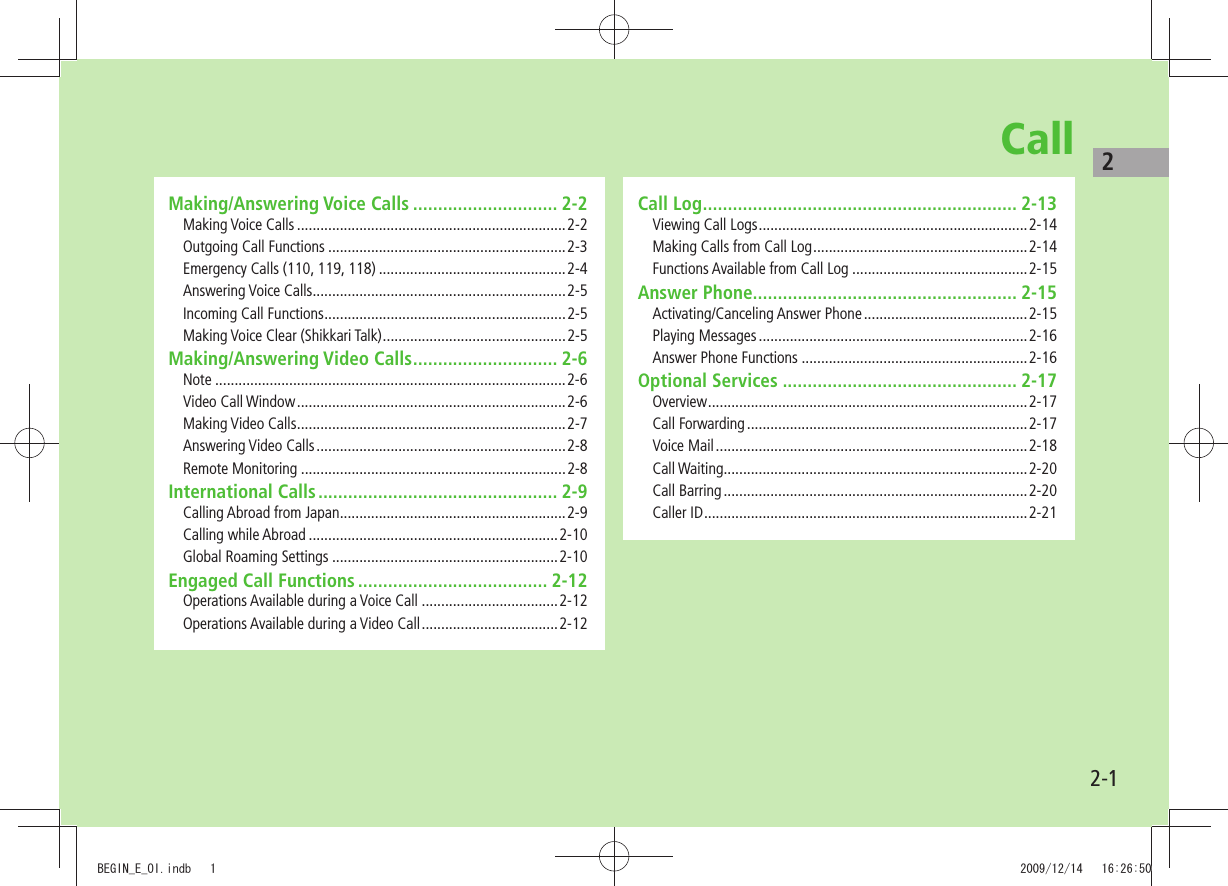
Contents
User Manual 1 of 7


![ixGuide SymbolsPress the corresponding key to execute the function or operation indicated at the bottom of Display.Example (Normal Position):Example(Horizontal Open Position):❶❸❺❹❷❶❸❺❹Multi Selector Operations (❶)OperationsSoftkey Label*Normal Position Horizontal Open PositionPress to select an itemPress * Softkey labels vary by menu.Multi Selector (❶)Use Multi Selector to select items, navigate menus, etc. In this guide, Multi Selector operations are indicated as shown below.Softkeys (❷❸❹❺)In this guide, Softkey operations are indicated as shown below.Example ❷❸: [Finish], [Menu][Finish] and [Menu] are Softkey label examples; Softkey labels vary by menu.❷ differs between Normal Position and Horizontal Open Position. This guide uses for operation descriptions.Up Up/Down Up/Down/Left/RightDownLeft Left/Right CenterRightLeft RightUpDown CenterBEGIN_E_OI.indb 2 2009/12/14 16:24:28](https://usermanual.wiki/Panasonic-Connect/209023A.User-Manual-1-of-7/User-Guide-1221763-Page-11.png)
![xJapanese Functions & ServicesWhen "(Japanese)" appears in a title, Japanese ability is required to use full range of the function or service.Operation DescriptionsFollowing are examples of operation descriptions. Please note, actual operations may differ.Basic OperationsOperations are expressed as shown here.Example: Menu Selection❶ Press in Standby to open Main Menu.❷ Use to highlight Phone Book; then press [Select].❸ Use to highlight Group; then press [Select]. Steps❶ Use to highlight a group; then press [Edit].❷ Use to highlight an item; then press [Select].❸ Set respective items.Menu Selection StepsMain Menu Phone Book Group appears for USIM Card Group.1 Highlight a group, and press [Edit] Select an item Set itemAdvanced OperationsFor advanced features and settings, go to pages indicated under Tip.Example:Tip●Operations Available during a Voice Call ( P.2-12) ●Making Calls from Call Log ( P.2-14) ●Saving Entered Numbers to Phone Book ( P.4-5) Settings ●Set Handset Response when Closed during Call ( P.18-9)Settings Refer to Chapter 18 "Settings."BEGIN_E_OI.indb 3 2009/12/14 16:24:29](https://usermanual.wiki/Panasonic-Connect/209023A.User-Manual-1-of-7/User-Guide-1221763-Page-12.png)
![xiAbbreviated DescriptionsFor advanced settings (Chapter 18), initial operations may be abbreviated or omitted.Example: StepsFollow these steps after Abbreviated Steps. Abbreviated StepsInitial steps are abbreviated.From Main Menu Tools CalendarFunctions Available in Calendar Window ■Highlight a date > [Menu] Select an item (See below)Item Operation/DescriptionNew Create a new entry ( P.12-2, P.12-3)Weekly display/ 1 MonthToggle Monthly/Weekly viewIcon display Entries in category of selected icon appearSelect an icon > Omitted StepsInitial steps are omitted. Start operations from specified window.Use Other Graphic Mail Settings ■In S! Mail text entry window, Select an arrange itemBEGIN_E_OI.indb 4 2009/12/14 16:24:31](https://usermanual.wiki/Panasonic-Connect/209023A.User-Manual-1-of-7/User-Guide-1221763-Page-13.png)


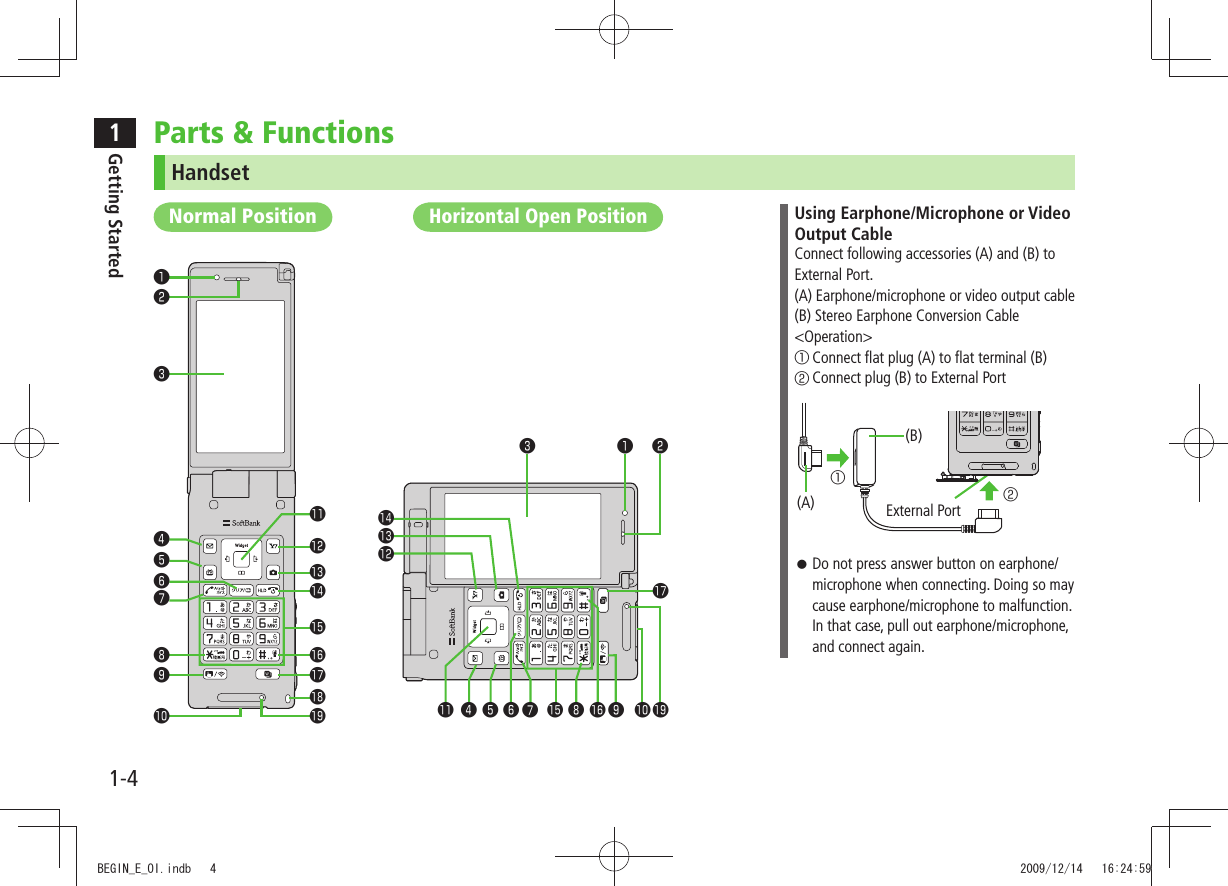
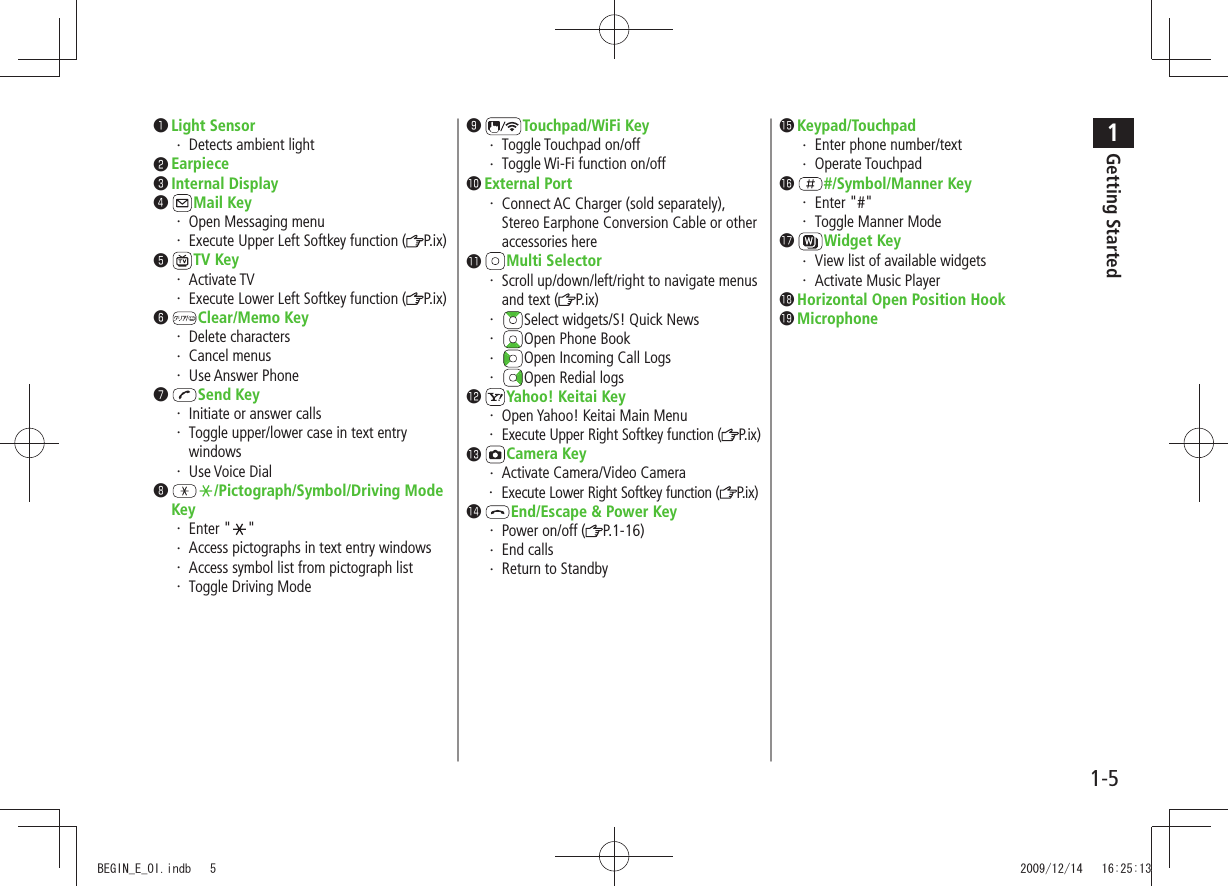
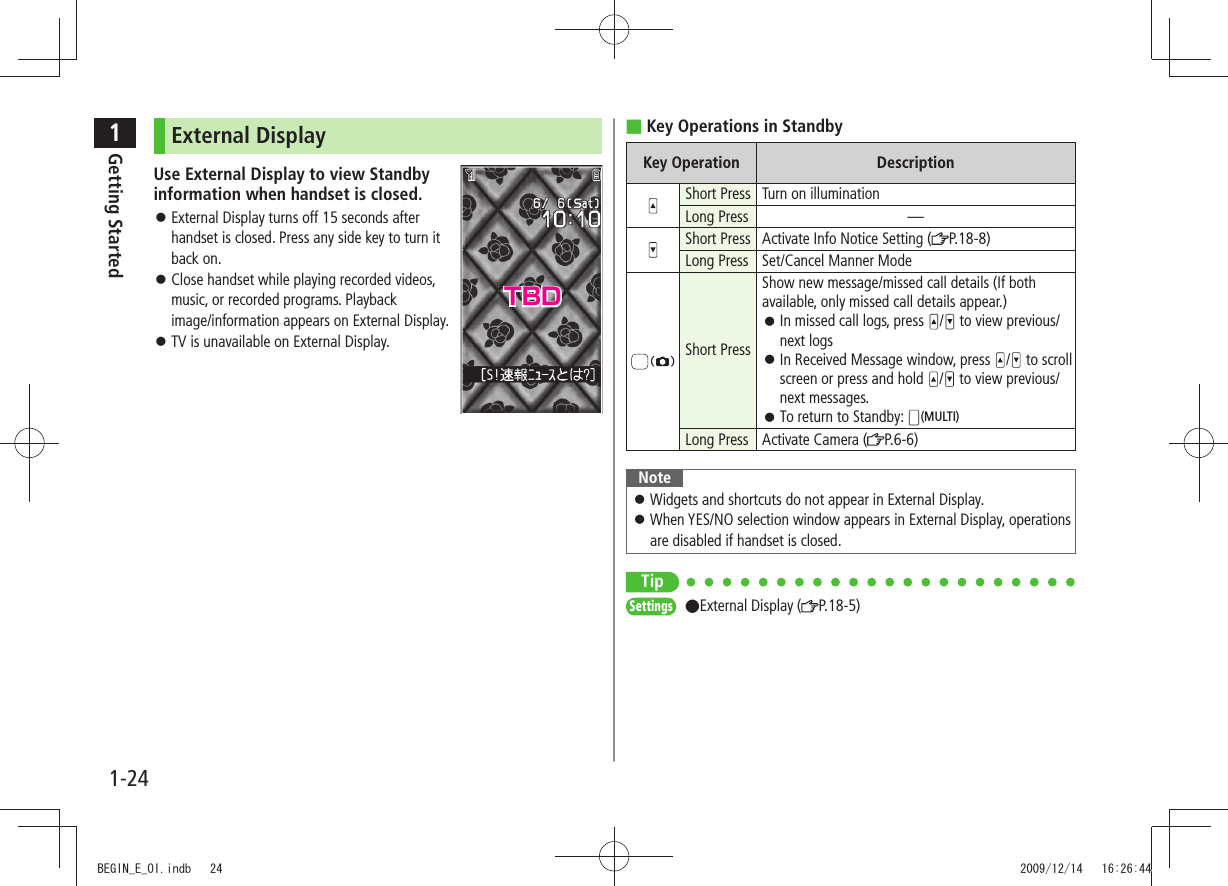
![1Getting Started1-6 Antenna External Display ( P.1-23) Notification Light/Charging IndicatorFlashes for incoming transmissions・ Lights in red for charging・ Hinge/Antenna Infrared PortTransfer data via Infrared・ Camera LogoPlace Logo over a reader/writer when using ・ Osaifu-Keitai® ( P.16-4) Battery Cover Charging Terminals Strap Eyelet Flash/Photo lightLights/flashes during Camera use・ Use when shooting in dark places・ Speaker One-push Open Button ( P.1-7) TV Antenna Upper Side KeyIncrease earpiece/TV volume・ [Closed Position]View Incoming Call Logs on External Display・ Toggle External Display・ Turn on illumination・ Lower Side KeyDecrease earpiece/TV volume・ [Closed Position]Set/cancel Manner Mode・ Check missed calls/new messages・ (MULTI) MULTI Key Open TASK MENU/Pictures Folder・ Shutter KeyActivate Camera/capture images・ BEGIN_E_OI.indb 6 2009/12/14 16:25:21](https://usermanual.wiki/Panasonic-Connect/209023A.User-Manual-1-of-7/User-Guide-1221763-Page-34.png)

![1Getting Started1-19Activating Emission OFF ModeTemporarily suspend all handset transmissions; when active, all calls/messages and incoming information are blocked.When Emission OFF Mode is active, appears.Main Menu Settings Call Settings Emission OFF Mode1 YESTo cancel: Follow the same steps. NoteEmission OFF Mode disables Bluetooth ®/Infrared/IC transmissions. Bluetooth® handsfree devices cannot be used either.Activating Driving ModeHandset does not ring for incoming calls. Voice guidance informs the caller you are unavailable and Answer Phone activates.When Driving Mode is active, appears.1 In Standby, press and hold To cancel: Press and hold againNoteWhen Answer Phone memory is full, incoming calls are rejected. Check ringtone when earphone/microphone is connected. Handset MenusMain Menu1 In Standby, Main Menu appears.To change Main Menu theme: [Set Menu] Select a pattern2 to highlight an icon Selected function menu appears.To return to Standby: NoteStandby window returns after 15 seconds of inactivity in Main Menu. Main MenuStandbyTBD TBDBEGIN_E_OI.indb 19 2009/12/14 16:26:31](https://usermanual.wiki/Panasonic-Connect/209023A.User-Manual-1-of-7/User-Guide-1221763-Page-47.png)
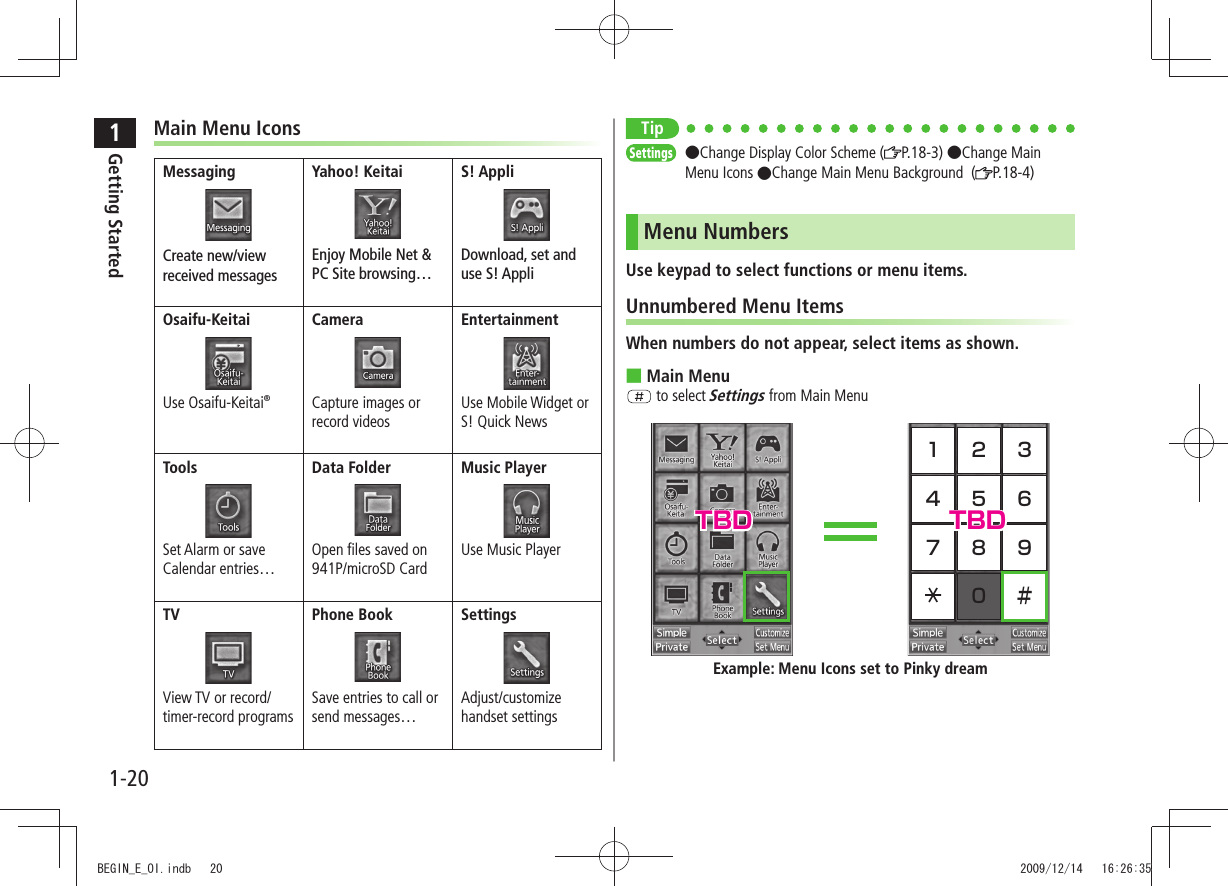
![1Getting Started1-21When Menu Icons is Set to Standard or CustomizeMenus cannot be selected from Main Menu by keypad.Open menu items by entering specific number in Main Menu (Quick Open Menu: P.19-14).Top Menu Opened from Main Menu ■ to select Display SettingsNumbered Menu ItemsPress key corresponding to menu number to select a menu.In Display Settings (from Settings Top Menu), to select Menu Icons1234567890Example: Settings Top MenuAccessing Functions/Info from StandbySelect indicators/ticker in Standby to access functions and information.Available Items ■Event Indicator ( P.1-21) Mobile Widget ( P.7-2)S! Quick News ( P.7-4) S! Information Channel/Weather ( P.7-6)Shortcuts ( P.1-22) Status Indicators ( P.1-10)1 In Standby, Pointer ( ) appears.Press or to return to Standby (Pointer disappears).2 Use to move pointer ( ) to an indicator, icon or ticker [Select]Indicator, icon or ticker is selected. Function name appears.Press and hold to move pointer ( ) continuouslyTo cancel selection: or 3 [Select]Function or information appears.When Widgets Do Not AppearPointer ( ) does not appear. After Step 1, use to highlight an item [Select] to show function or information To show/hide widgets: TBDTBDTBDBEGIN_E_OI.indb 21 2009/12/14 16:26:37](https://usermanual.wiki/Panasonic-Connect/209023A.User-Manual-1-of-7/User-Guide-1221763-Page-49.png)
![1Getting Started1-22Standby Options & Event IndicatorsCheck various indicators and information in Standby.To access functions/information from indicators: P.1-20Event IndicatorsEvent Indicators appear for missed calls, messages, etc.Events ■Missed Calls Missed calls ( P.2-13)New MessagesNew messages ( P.13-10)Answer PhoneRecorded caller messages ( P.2-16)Voice Mail New Voice Mail ( P. 2 - 1 9 )Missed Call NotificationIf Missed Call Notification is active, indicator appears for calls missed while handset is off, out-of-range, engaged, etc. ( P.2-19)S! Information Channel InfoS! Information Channel (received/failed updates) ( P. 7 - 6 )Weather Info Weather Indicator (received/failed updates) ( P.7-7)Other Information ■Missed alarm ( P.12-6) S! Appli startup notice ( P.15-3)USB Mode setting ( P.10-11) Missed location information requestAuto location information notice ( P.17-3) Timer ( P.5-14)Content Key ( P.9-5) Software Update result ( P.19-13)Using Pointer ( ■) In Standby, > [Menu] Select an item (See below)Item Operation/Descriptionto widgets listOpen Widget ListYahoo!JAPAN LoginOpen Yahoo! JAPAN log in windowStand-by DisplayChange Standby wallpaperSelect a folder > Select an imageMobile Widget?View Mobile Widget overview (Japanese)Horizontal Open MenuIn Horizontal Open Position, press in Standby to access Horizontal Open Menu. From Horizontal Open Menu, access functions available in Horizontal Open Position.Default Horizontal Open Menu varies by handset color ( P.18-23).Press to go from Horizontal Open Menu to Standby.Set handset to open to Horizontal Open Menu, Digital TV or Camera for Horizontal Open Position (Horizontal View: P.18-13).Some operations and menu items in Horizontal Open Menu differ from those that appear in this guide.TBDTBDBEGIN_E_OI.indb 22 2009/12/14 16:26:41](https://usermanual.wiki/Panasonic-Connect/209023A.User-Manual-1-of-7/User-Guide-1221763-Page-50.png)
![1Getting Started1-23Mobile Widget (Japanese)Paste various widgets to Standby to access information or tools from Standby.Mobile Widget: P.7-2To show/hide widgets: S! Quick News (Japanese)By default, S! Quick News appears at bottom of Display.S! Quick News: P.7-4Show/hide S! Quick News: P.18-16S! Information Channel/Weather (Japanese)Subscribe to content and periodically receive updates. Set Weather Indicator to appear on Standby.S! Information Channel/Weather: P.7-6ShortcutsAccess frequently used functions from Standby. Following shortcuts are set by default (Services available only in Japanese): S-1 battle, Content Value Package and Simple Select VideoAdding ShortcutsSome functions are not available for shortcuts. 1 Open a function, [Menu] Add shortcut icon YESEditing/Deleting Shortcuts1 In Standby, to move pointer Highlight a shortcut2 [Menu] Select an item (See below)Item Operation/DescriptionEdit title Edit title >Sort Select an item > Select a target [Finish] YESDelete thisYES >Delete allYES >ShortcutsTBDTBDTBDTBDBEGIN_E_OI.indb 23 2009/12/14 16:26:42](https://usermanual.wiki/Panasonic-Connect/209023A.User-Manual-1-of-7/User-Guide-1221763-Page-51.png)
![1Getting Started1-25Customizing User InterfaceCustomized Screen/Familiar UsabilityCustomized ScreenDownload and set Customized Screen to personalize user interface, ringtone, etc., to a selected theme.Familiar UsabilityDownload Familiar Usability applications that mimic the interface design of other handsets.Downloading Customized Screen/Familiar UsabilityDownload characters or applications from websites.Main Menu Data Folder Customized Screen1 Customized Screen or Familiar Usability YESWebsite providing characters or applications appears.Follow onscreen instructions.To manage Customized Screen applications in Data Folder: P.9-11Setting Customized Screen/Familiar Usability1 In Standby, 2 [Customize] Customized Screen or Familiar Usability3 Highlight a theme [Set]To toggle thumbnail and list: [Change]4 YESNoteCustomized Screen or Familiar Usability cannot be set when battery is low.Other functions are not available while switching. For some seconds after switching is complete, all calls/messages may be blocked.Familiar Usability does not completely remake handset. Alternatively, Main Menu Settings Customized Screen To cancel, select Release Settings.When Simple menu is active, Customized Screen and Familiar Usability settings are not reflected. To reflect settings, cancel Simple menu.BEGIN_E_OI.indb 25 2009/12/14 16:26:44](https://usermanual.wiki/Panasonic-Connect/209023A.User-Manual-1-of-7/User-Guide-1221763-Page-53.png)
![1Getting Started1-26Changing Display FontChange Display font. Fonts can also be downloaded.Downloading FontsMain Menu Settings Display Settings Font1 Download Font YESFollow onscreen instructions.For details on Font folder (Data Folder): P.9-11NoteWhile Personal Data Lock is set, fonts cannot be downloaded. Changing FontMain Menu Settings Display Settings Font1 Select a folder Highlight a font [Set]Private MenuSave frequently used functions in Private Menu.Up to 12 items can be saved. Change preset functions as needed. Opening Private Menu1 In Standby, [Private]Private Menu appears.To return to Main Menu: [Normal]2 Select a menuChange Private Menu Background ■After Step1, >[Set] [Menu] Change BG image Select a folder Select an imagePrivate Menu WindowTBDBEGIN_E_OI.indb 26 2009/12/14 16:26:45](https://usermanual.wiki/Panasonic-Connect/209023A.User-Manual-1-of-7/User-Guide-1221763-Page-54.png)
![1Getting Started1-27Customizing Private Menu 1 In Standby, [Private] [Set]2 Highlight a target [Menu] Add to menu3 Select an itemCancel Functions ■In Step 2, (highlight a function >) [Menu] Release this or Release all YESReset Private Menu ■In Step 2, >[Menu] Reset menu YESAdding Shortcuts1 In Standby, [Private] [Set]2 [Menu] Add shortcut icon YESNoteAlternatively, open Private Menu setting window from Main Menu Settings Display Settings Private MenuPrivate Menu Setting WindowSimple MenuActivate Simple menu to limit menu options to basic ones.Handset is limited to basic operations ( P.1-27).Normal Mode WindowSimple Menu WindowTBDTBD TBDBEGIN_E_OI.indb 27 2009/12/14 16:26:47](https://usermanual.wiki/Panasonic-Connect/209023A.User-Manual-1-of-7/User-Guide-1221763-Page-55.png)
![1Getting Started1-28Activating Simple Menu1 In Standby, [Simple] YES2 YES or NOSelect YES to set all items in Font Size ( P.18-6) to Large.To open Simple menu: in Standby.Cancel Simple Menu ■In Standby, > [Normal] YESNoteTurning off the power does not cancel Simple menu. Widgets (in Standby) and S! Quick News do not appear in Simple menu. Customized Screen or Familiar Usability setting is canceled.Simple MenuSimple Menu PageVoice CallOutgoing Log 2-13Incoming Log 2-13Phone Book 4-6Create New Phone Book 4-3Answer Phone 2-15Account Details 1-30MessagingIncoming Mail 13-15Create New 13-4Retrieve New 13-15Drafts 13-15Sent Messages 13-15Create New SMS 13-7Yahoo! KeitaiYahoo! Keitai 14-2Bookmarks 14-8Saved Pages 14-8Enter URL 14-4CameraTake Pictures 6-6See Pictures 6-14Shoot Videos 6-8Watch Videos 6-14Simple Menu PageTVWatch TV 5-5Timer Recording 5-14Channel Setting 5-4ToolsData Folder 9-2Alarms 12-6Calendar 12-2Calculator 12-8Notepad 12-8Receive via Infrared 10-3SettingsRingtones/Volume 1-1718-2Screen/Fonts18-3to18-6Call Time & Cost 18-9Date & Time 18-8Security11-216-519-12Call Settings2-17to2-21BEGIN_E_OI.indb 28 2009/12/14 16:26:47](https://usermanual.wiki/Panasonic-Connect/209023A.User-Manual-1-of-7/User-Guide-1221763-Page-56.png)
![1Getting Started1-30Multi TaskActivate up to three functions from four different groups at the same time.Group Function❶ Messaging Group Messaging❷ Yahoo! Keitai/ S! Appli GroupYahoo! Keitai/S! Appli/Entertainment (except for Mobile Widget)/Osaifu-Keitai (Lifestyle-Appli)❸ Tools GroupMusic Player*/Camera/Tools/Data Folder/TV/Phone Book/Entertainment (Mobile Widget)❹ Settings Group Settings/Osaifu-Keitai (IC Card Settings)* Functions other than Tools Group may be included.[ ▼] appears above the icons of an active group. appears for single function in use; for multiple functions in use.Tip●Other Functions while Watching TV ( P.5-8)●Using Other Functions while Listening to Music (Play Background) ( P.8-7)❶❸❷❹Activating Another FunctionActivate another function from a different group. Multi Task is unavailable when Simple menu is active.1 (MULTI) Open Menu Select a functionNoteIf another function is selected from same group, confirmation appears. Select YES to cancel current function and start a new function.Ending Current Functions1 End All Active Functions ■ >(MULTI) [ ] YESTASK MENU WindowTBDTBDBEGIN_E_OI.indb 30 2009/12/14 16:26:49](https://usermanual.wiki/Panasonic-Connect/209023A.User-Manual-1-of-7/User-Guide-1221763-Page-58.png)
![Call22-3Outgoing Call FunctionsShowing/Hiding Caller IDEnter number > [Menu] Notify caller ID OFF or ONTo cancel setting: [Menu] Notify caller ID Cancel prefixSetting Caller ID on/off (Caller ID: P.2-21)Adding Prefix to Phone NumberSave Prefix ■Main Menu > Settings Call Settings Prefix Highlight <Not Recorded> [Edit] Enter a name Enter a prefix numberUp to seven entries can be saved. To check entries: Select a saved prefix. To delete entries: Highlight a prefix [Menu] Delete this or Delete all ( For Delete all, enter Phone Password) YESMake Calls Using Prefix ■Enter a number > [Menu] Prefix numbers Select an entry Voice Calls: / Video Calls: [V. Call]Alternatively, in detail window of Phone Book, Redial, Outgoing Call Logs or Incoming Call Logs, [Menu] Prefix numbers Select an entry Voice Calls: / Video Calls: [V. Call]Example: Save "186" and "184" as prefixes, and add them to phone numbers to show/hide your caller ID when making calls.Sending Touch-tone SignalsSend touch-tone signals for services such as reserving tickets, checking bank balance, etc. Save number strings to be sent as a touch-tone signal. Use P (pause) to separate numbers when saving.Save Pause Dial ■Main Menu > Settings Phone Settings Pause Dial [Edit] Enter a number stringTo enter a pause (p): Press and hold To delete: In Pause Dial window, [Menu] Delete YESSend Pause Dial ■Main Menu > Settings Phone Settings Pause Dial [Send] Enter a phone number Once line is connected, press [Send]Number string is sent each time [Send] is pressed.To send all number strings at one time: Once line is connected, press and hold Send at one timeBEGIN_E_OI.indb 3 2009/12/14 16:27:04](https://usermanual.wiki/Panasonic-Connect/209023A.User-Manual-1-of-7/User-Guide-1221763-Page-63.png)
![Call22-5Answering Voice CallsWhen a Call Arrives…941P rings; Notification Light flashes.If Caller ID is sent, number appears in Internal Display and External Display; if saved in Phone Book, caller's name appears.When an International call arrives, appears at upper left of caller's phone number.1 to talk To adjust volume: or 2 to end callCall Time appears.Adjust Ringer Volume ■While 941P is ringing, >Volume adjustment is disabled in following cases: During Manner Mode (・ P.1-17)While ・ Ringer Volume is set to Escalating Tone ( P.18-2)NoteWhen Caller ID is not sent, Withheld appears.Calls cannot be received in Horizontal Open Position except when earphone/microphone is connected.Tip●Operations Available during a Voice Call ( P.2-12)●Rejecting Unknown Callers ●Rejecting Calls without Caller ID (P.11-11)Settings ●Change Answer Setting ●Answer Calls by Opening Handset (P.18-7)Incoming Call FunctionsFollowing operations are available for incoming calls.Place Calls on Hold >Answer Phone > / Call Rejection >[Menu] Call RejectionRejecting Unknown Callers/Rejecting Calls without Caller ID ( P.11-11)Call Forwarding >[Menu] Call ForwardingActivate Call Forwarding ( P.2-17) beforehand to forward incoming calls to a preset number. If Call Forwarding is not active, call is rejected.Making Voice Clear (Shikkari Talk)<Default> ONMake other party's voice clear according to surrounding noise.Main Menu Settings Call Settings Shikkari Talk1 ON or OFFBEGIN_E_OI.indb 5 2009/12/14 16:27:07](https://usermanual.wiki/Panasonic-Connect/209023A.User-Manual-1-of-7/User-Guide-1221763-Page-65.png)
![Call22-7Making Video CallsBefore CallingConfirm signal strength ( P.1-10)If any of these indicators appear: Video Calls cannot be made ( P.1-10, P.1-11, P.19-12)1 Enter a phone number2 Confirm the number, then [V. Call]When answered, outgoing and incoming images appear; other party's voice sounds via Speaker. To adjust volume: or 3 to end callNoteOther party's voice sounds via Earpiece in Manner Mode; activate Speaker ( P.2-12).Tip●Outgoing Call Functions ( P.2-3)●Operations Available during a Video Call ( P.2-12)●Making Calls from Call Log ( P.2-14) ●Other Ways to Add New Entries ( P.4-5) ●Making Calls from Phone Book ( P.4-6)Settings ●Change Outgoing Image ●Switch to Voice Call when Video Call Fails ( P.18-12)TBDBEGIN_E_OI.indb 7 2009/12/14 16:27:11](https://usermanual.wiki/Panasonic-Connect/209023A.User-Manual-1-of-7/User-Guide-1221763-Page-67.png)
![Call22-8Answering Video CallsWhen a Video Call Arrives…941P rings; Notification Light flashes.If Caller ID is sent, number appears in Internal Display and External Display; if saved in Phone Book, caller's name appears.When an International call arrives, appears at upper left of caller's phone number.1 Inside Camera Image is sent.To send Alternative Image: [Subst.]2 to end callNoteOther party's voice sounds via Earpiece in Manner Mode; activate Speaker ( P.2-12).Tip●Adjust Ringer Volume ●Incoming Call Functions ( P.2-5) ●Operations Available during a Video Call ( P.2-12)Remote MonitoringUse 941P as a monitoring camera to observe a remote place from a phone with 3G-324M compliant Video Call functions. Remote Monitoring starts when 941P receives a Video Call from preset phone number.Saving Numbers to Activate Remote MonitoringMain Menu Settings Video Call Remote Monitoring 1 Enter Phone Password Other ID2 <Not Recorded> Enter a phone number 3 Ring Tone Duration Enter time (sec)4 Setting ONSetting cannot be set to ON in Manner Mode.TBDTBDBEGIN_E_OI.indb 8 2009/12/14 16:27:13](https://usermanual.wiki/Panasonic-Connect/209023A.User-Manual-1-of-7/User-Guide-1221763-Page-68.png)
![Call22-9Select Numbers from Phone Book/Call Log ■In Step 2, highlight ><Not Recorded> [Menu] Refer to Select an item Select a numberDelete Numbers ■After Step 1, (highlight a number >) [Menu] Delete this or Delete all YESUsing Remote Monitoring1 Make a Video Call to 941P from a preset phone numberAfter ring time elapses, Remote Monitoring starts.A Video Call starts if 941P answers before auto answer activates. 2 To quit Remote Monitoring, (caller or recipient side)International CallsCalling Abroad from JapanApplication not required. For details, go to: http://mb.softbank.jp/en/global_services/call/1 Enter a phone number2 [Menu] Int'l dial assistCountry/region code list appears.3 Select a country/region4 Voice Calls Video Calls[V. Call]Enter Country/Region Code Directly ■ > Press and hold to display + (IDD Prefix) Enter a country/region code Enter a number (omit first 0) Voice Calls: / Video Calls: [V. Call]Do not omit leading 0 to call Italy (country code: 39).BEGIN_E_OI.indb 9 2009/12/14 16:27:15](https://usermanual.wiki/Panasonic-Connect/209023A.User-Manual-1-of-7/User-Guide-1221763-Page-69.png)
![Call22-10Calling while AbroadMay require application to Global Roaming Service. Download and take Global Roaming Guide when traveling abroad. For details, go to: http://mb.softbank.jp/en/global_services/global_roamingExample: Calling Japan from Another Country/RegionAuto Assist ( Right) is set to ON and Japan by default.Only number starting with 0 is valid.1 Voice CallsEnter a phone number Video CallsEnter a phone number [V. Call]2 DialFirst 0 is replaced by +81.To call a number just as saved in Phone Book: Dial with orig.No.Calling Other Countries/Regions Using Country/Region CodeFollow the same steps as calling abroad from Japan ( P.2-9).Calling within the Same Country/RegionFollow the same steps as making a Voice Call/Video Call within Japan (P.2-2, P.2-7).Global Roaming SettingsFrom Main Menu Settings International Call ■International Call SettingsInt'l Dial Assist > Select an item (See below)Item Operation/DescriptionAuto Assist Replace IDD Prefix with +ON > or OFF ( For ON, select a country/region)Country/ Area CodeSave up to 27 country/region codesHighlight ><Not Recorded> [Edit] Enter a country/region name Enter a country/region codeTo view an entry: Select a saved country/region name To delete: Highlight a country/region name [Menu] Delete this or Delete all ( For Delete all, enter Phone Password) YESIDD Prefix Edit IDD Prefix. IDD Prefix is set to 0046010 by default >[Menu] Edit Edit IDD Prefix BEGIN_E_OI.indb 10 2009/12/14 16:27:16](https://usermanual.wiki/Panasonic-Connect/209023A.User-Manual-1-of-7/User-Guide-1221763-Page-70.png)
![Call22-11Network Mode ■<Default> AutomaticallySelect Network > Select an item (See below)Item Operation/DescriptionAutomatically3G/GSM service area in Japan or abroad.941P selects 3G network in Japan or an available network automatically using area (network condition) abroad.Manually Select an item >3G/GSM・ : 3G/GSM service area in Japan or abroad. 941P selects an available network using area (network condition).3G・ : 3G service area in Japan or abroadGSM・ : GSM service area abroad. Unavailable in JapanAutomatically is recommended.Select Operator ■<Default> AutoSelect Operator > Select an item (See below)Item Operation/DescriptionAuto Select an operator automaticallyManual Select an operator manuallySelect an operator >Operators with X are not available.To show operator list: [Update]Network Re-searchSearch available networksWhen Auto is set, 941P selects an available operator automatically. When Manual is set, operator list appears.Operator Priority for Automatic Search ■PLMN Setting > [Menu] Select an item (See below)Item Operation/DescriptionAdd your networkSave currently connected operator >[Finish] YESAdd from list Select an operator > [Set] Select a network type [Finish] YESTo search operators by country/region: [Search] Select a country/region (To search again in country/region list: [Search] Enter a country/region name)Direct input Save unlisted operators by entering country/region code and operator codeEnter country/region code (3 digits) and operator code >(2 to 3 digits) Select a network type [Finish] YESChange prioritySelect a priority > [Finish] YESDelete this/Delete allYES > [Finish] YESView ■Operator Name in Standby<Default> OFFOperator Name > ON or OFFWhen ON is set, Clock Position is set to Pattern 1 even when Pattern 2 - Pattern 12 is set ( P.18-4).BEGIN_E_OI.indb 11 2009/12/14 16:27:17](https://usermanual.wiki/Panasonic-Connect/209023A.User-Manual-1-of-7/User-Guide-1221763-Page-71.png)
![Call22-12Engaged Call FunctionsOperations Available during a Voice CallAdjust Volume > / Adjust volume within two seconds. Adjusted volume is retained even after calls end or handset is turned off.Place Call on Hold >[Hold]To resume call: 2Speaker ON/OFF 1Toggle Speaker or Earpiece >Record ConversationRecord for about three minutes per callPress and hold > or [Rec]To end recording: [Stop], or press and hold To play back recorded data: P.2-16Toggle Manner ModePress and hold >Toggle Handset/Bluetooth®Toggle handset or Bluetooth® devicePress and hold > 21 Normal Position only2 Function may not be available or call may be placed on hold in Horizontal Open Position.Operations Available during a Video CallAdjust Volume > / Adjust volume within two seconds. Adjusted volume is retained even after calls end or handset is turned off.Place Call on Hold >[Hold]To resume call: 2To send Alternative Image: [Subst.] Speaker ON/OFF 1Toggle Speaker or Earpiece >Record ConversationRecord up to five calls for about 20 seconds eachPress and hold >To end recording: [Stop] or press and hold To play back recorded data: P.2-16Inside Camera/Outside Camera >[In cam/Out cam]Camera/Alternative ImageToggle Camera Image and Alternative Image >[Image/Subst.]Incoming/Outgoing ImageToggle Incoming Image and Outgoing Image >[Change]Zoom > (zoom in) or (zoom out)Toggle Manner ModePress and hold >BEGIN_E_OI.indb 12 2009/12/14 16:27:20](https://usermanual.wiki/Panasonic-Connect/209023A.User-Manual-1-of-7/User-Guide-1221763-Page-72.png)
![Call22-13Toggle Handset/ Bluetooth®Toggle handset or Bluetooth® device >[Menu] Talk on BT/Phone Bluetooth or PhoneBacklightSetting >[Menu] Back light Constant light or 15 seconds lightVideo CallSetting >[Menu] V. Call settings Follow the steps for selected item ( P.18-12)LCD AI Activate/deactivate auto image compensation >[Menu] LCD AI ON or OFFAccount Details >[Menu] Account detailsKey Guide >[Menu] Key guide1 Normal Position only2 Function may not be available or call may be placed on hold in Horizontal Open Position.Call LogIncoming and outgoing call records appear here. Use these records to call back.Redial Up to 30 outgoing call records (Voice and Video) are saved. Older records of same number are deleted.Outgoing Call LogsUp to 30 outgoing call records (Voice and Video) and up to 30 outgoing transmission records (64K data and packet transmission) are saved. Older records of same number are also retained.Incoming Call LogsUp to 30 incoming call records (Voice and Video) and up to 30 incoming transmission records (64K data transmission) are saved. Older records of same number are also retained.Indicators for Redial/Outgoing Call Logs/Incoming Call Logs Dialed/received Voice Calls* Missed Voice Calls Dialed/received Video Calls* Missed Video Calls New messages recorded on Answer Phone Dialed/received international Voice Calls* Missed international Voice Calls Dialed/received international Video Calls* Missed international Video Calls* Calls received while handset is off, out-of-range, engaged, etc. ( P.2-19) Received Remote Monitoring calls Dialed calls of 64K data transmission Received calls of 64K data transmission* Missed calls of 64K data transmission Dialed calls of packet transmission Received calls of 64K data/packet transmission when no external device is connected* Unchecked calls are highlighted.BEGIN_E_OI.indb 13 2009/12/14 16:27:24](https://usermanual.wiki/Panasonic-Connect/209023A.User-Manual-1-of-7/User-Guide-1221763-Page-73.png)