Panasonic Connect 209023A UMTS/ GSM Cellular Mobile with Bluetooth®, WLAN and RFID User Manual BEGIN E OI 091214
Panasonic Mobile Communications Development of Europe Ltd UMTS/ GSM Cellular Mobile with Bluetooth®, WLAN and RFID BEGIN E OI 091214
Contents
User Manual 4 of 7
![Messaging13-713Sending SMS MessagesExample: Select a Phone Book entry to send SMS.1 Create New SMS2 Select Address field Phone Book3 Select a Phone Book entry Select a SoftBank handset numberAddress fieldText fieldComposition Window4 Select Text field5 Enter textWhen number of entered character exceeds limit, S! Mail conversion option message appears.6 [Send]Manual Mail Conversion In SMS Composition window, >[Menu] Change mail typeNoteWhen a single-byte text message including | { } [ ] ^ is sent or a draft including such text is edited, some characters may be cut out of text field.Tip Addresses Functions Available while Creating Messages ( P.13-8)Settings Confirm Message Delivery ( P.18-18) Change SMS Center Number Set Input Character to English ( P.18-19)Text Entry WindowTBDTBDTBDTBDBEGIN_E_OI.indb 7 2009/12/14 16:34:05](https://usermanual.wiki/Panasonic-Connect/209023A.User-Manual-4-of-7/User-Guide-1221766-Page-1.png)
![Messaging13-813Creating MessagesAddressesFrom S! Mail: Press and hold Select Address fieldSMS: Create New SMS Select Address fieldEnter Address Directly S! Mail: >Address Input or Phone Number Input Enter a mail address/SoftBank handset numberSMS: >Direct Entry Enter a SoftBank handset numberSelect Address from Sent Address/Received Address Logs Sent Address > or Received Address Select a logSelect S! Mail Address from Mail Group Mail Group > Select a Mail Group Add/Edit/Delete AddressFollow the steps (See below) >Item Operation/DescriptionAdd recipients*<Not entered> > Select an address selection method Select an address or enter directlyEdit Select an address > Edit (For SMS: Direct Entry) Edit addressDelete*Highlight an address > [Menu] Delete receiver YES* S! Mail onlyChange To/Cc/Bcc (S! Mail only) Highlight an address > [Menu] Destination types Select a typeAttachmentsFrom After attaching a file, select Attachment fieldOpen/Play Attached Files Select a file > Add Attachments >[Menu] Add Attached Files ( Select a folder Select a file)* [Finish]* To capture still images or videos: Activate Camera Photo mode or Video mode Frame subject [Record], or ( For video, [Stop], or ) [Save], or Delete AttachmentsHighlight a file > [Menu] Del Attached Files YESOther FunctionsFunctions Available while Creating Messages S! Mail: Press and hold > [Menu] Select an item (See below) >SMS: Create New SMS [Menu] Select an item (See below)Item Operation/DescriptionSend Send messagePreview Preview message while creatingSave as DraftsSave message to Drafts box without sendingAttached files 1View attached file listLoad Template 1Select a template >Save Template 1Save edited templateYES >BEGIN_E_OI.indb 8 2009/12/14 16:34:06](https://usermanual.wiki/Panasonic-Connect/209023A.User-Manual-4-of-7/User-Guide-1221766-Page-2.png)
![Messaging13-913Item Operation/DescriptionAdd Signature 1Add signatureCreate and save signature beforehand ( Below).Send Settings: Priority 1Notify recipient of message priority levelSelect a level >Send Settings: Confirm Delivery 1Check whether S! Mail is sent to recipientON >Send Settings: Set Reply Address 1Set reply-to addressON >Specify reply-to address beforehand ( Below).Confirm Delivery 2Check whether SMS is sent to recipientON >Input character 2Select character input modeJapanese > or EnglishChange mail type 2Switch SMS to S! Mail while creating1 S! Mail only2 SMS onlySending OptionsFrom Settings S! Mail Settings Sending OptionsSet Reply-to Address Set Reply-To > ON Select reply-to address entry field Select a reply-to address or enter directly [Finish]Set Signature Set Signature > Select an item ( ON or ON When New Select signature entry field Enter signature [Finish])Graphic Mail FunctionsUse Other Graphic Mail Settings In S! Mail text entry window, > Select an arrange item (See below)Item Operation/DescriptionInsert files: File SelectInsert still images, Flash® or music filesSend inserted music files as BGMSelect a folder > Select a fileInsert files: CameraActivate camera to insert picturesCapture a sill image >Insert files: Delete BGMDelete inserted music fileYES >Font Color Change font color >Background colorChange background color >Insert Lines Insert separator lineMy PictogramsInsert My Pictograms ( P.13-6)Graphic all resetCancel all Graphic Mail SettingsYES > YESSelect area Specify text to be arrangedPlace cursor before text > [Start] Specify area [End] Select other items Follow the steps for selected itemsTo cancel selection: [End] Font Size Change font size >Select BlinkingFlash textSet Scrolling Scroll textSet Swinging Swing textNext PageBEGIN_E_OI.indb 9 2009/12/14 16:34:07](https://usermanual.wiki/Panasonic-Connect/209023A.User-Manual-4-of-7/User-Guide-1221766-Page-3.png)
![Messaging13-1013Item Operation/DescriptionAlignment Select a type >One file of BGM or Flash ®, and up to 40 types of My Pictograms or images can be inserted per Graphic Mail.To delete inserted images, lines, My Pictograms, etc.: Close Graphic Palette Move cursor before images, etc. Ring Songs&Tones or Music files cannot be inserted directly from microSD Card. Move files to handset beforehand. Download Templates via Internet > Templates Download Templates YES941P connects to Internet, and a website appears. Follow onscreen instructions.Sending MessagesFrom S! Mail: Press and hold [Menu]SMS: Create New SMS [Menu] Confirm Delivery (For S! Mail, >Send Settings ) Confirm Delivery ONConfirm Message Delivery ( P.18-18)Save to Drafts Save as Drafts >Messages are saved to Drafts ( P.13-15).Receiving & Viewing MessagesOpening New MessagesWhen a new message is received, and Event Indicator appear in Standby.By default, the complete message and any attachments are automatically downloaded. This setting also applies while abroad. Transmission fees are incurred; adjust to use (To change auto download settings: P.18-19).1 Select indicatorLatest message appears. to show previous/next message.Message WindowTBDTBDBEGIN_E_OI.indb 10 2009/12/14 16:34:08](https://usermanual.wiki/Panasonic-Connect/209023A.User-Manual-4-of-7/User-Guide-1221766-Page-4.png)
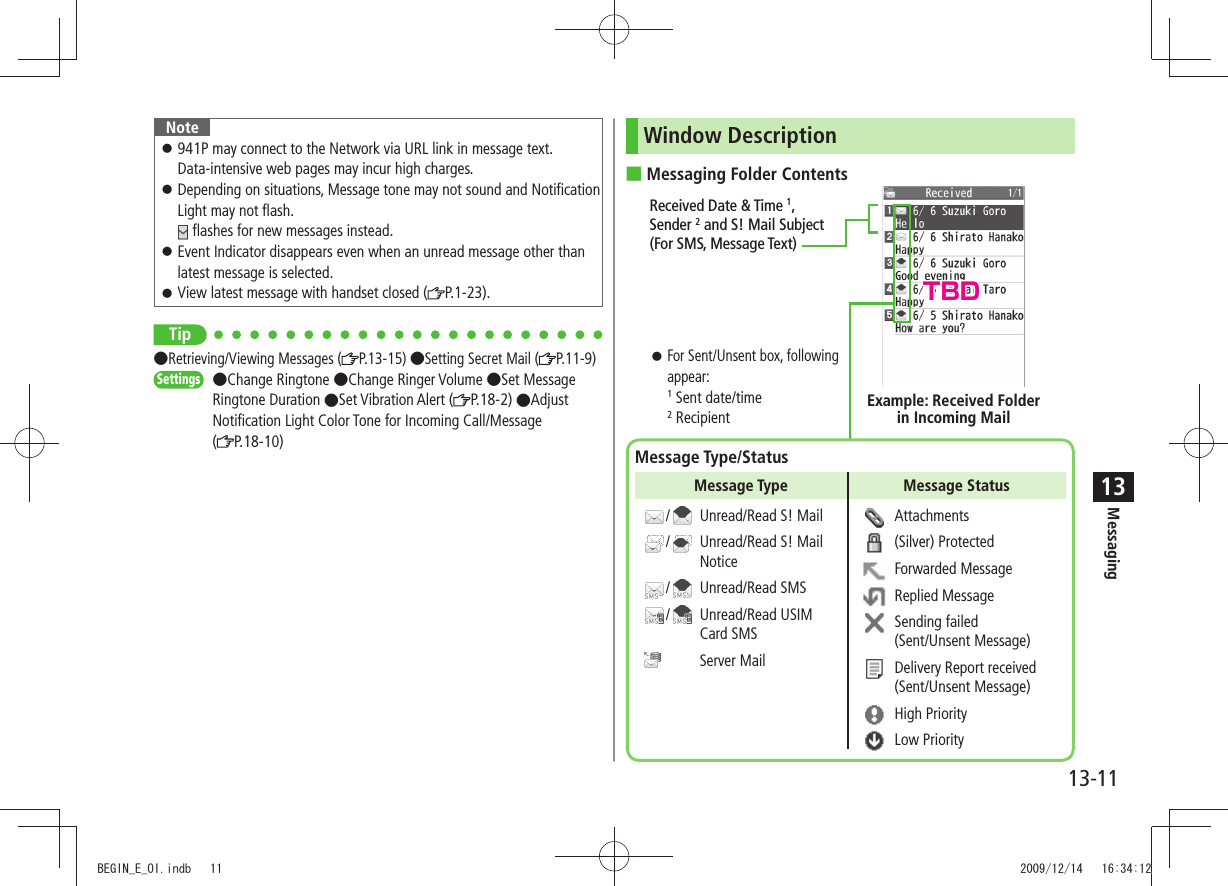
![Messaging13-1213Message Contents For a sent message, the following appear: 1 Sent date/time2 Recipient3 Number/all sent messagesNoteStatus indicators for forwarded/replied SMS messages (saved in USIM Card) do not appear.After retrieving complete messages, S! Mail Notice icons with (Forwarded) or (Replied) change to / (S! Mail).Messages remain protected after complete messages are retrieved via protected S! Mail Notices.If messages on microSD Card do not appear correctly, copy messages to handset ( P.9-19) and execute Charset Conversion ( P.13-22).Tip Functions Available for Received/Sent/Draft Message List ( P.13-20) Functions Available in Received/Sent Message Window ( P.13-22)Settings Change Font Size ( P.18-18)Sender 2SubjectNumber of AttachmentsMessage TextThe number of files (images, sounds, videos, text, etc.) appears.Example: Received MessageReceived Date/Time 1Number/All Received Messages 3Retrieving Complete S! MailDuring Video Calls or outgoing mail, complete S! Mail is not downloaded. When notification arrives, retrieve complete message. Note: Depending on download setting, complete message is not downloaded.1 At the end of message text, highlight ContinueRetrieve from Message List In received message list, >[Menu] Retrieve This oneRetrieve Multiple Messages In received message list, >[Menu] Retrieve Selected Repeat: Select a message* [Finish] YES* To cancel selection, press again.TBDTBDBEGIN_E_OI.indb 12 2009/12/14 16:34:14](https://usermanual.wiki/Panasonic-Connect/209023A.User-Manual-4-of-7/User-Guide-1221766-Page-6.png)
![Messaging13-1313Opening & Saving Attachments1 In Message window, [Menu] Attached files2 Select a file 3 To save the file, highlight the file [Save] YES4 Select a folderNoteWhen messages are opened, attached image files appear/play automatically. (Silver) appears with file requiring a Content Key. If Content Key has expired, warning appears when opening a file. Acquire new Content Key ( P.9-5).Incompatible files are saved to Other Documents in Data Folder. Some files may not be saved to 941P.File Formats Supported by Auto PlaybackImage files (JPEG, GIF, PNG) Music files (SMAF, AMR, SMF, SP-MIDI) TipSettings Play Attached Music Files Automatically ( P.18-19)Showing Sent/Received Mail Address1 Sent AddressPress and hold Received AddressPress and hold : SMS (successfully sent) : S! Mail (successfully sent)To show Redial/Incoming Call Logs: [Change]2 Select a log to showTo send S! Mail/SMS to addresses shown: Mail composition operation (S! Mail: From Step 4 on P.13-4 or SMS: From Step 4 on P.13-7)To save to Phone Book: [Store] Operation for saving to Phone Book ( From Step 2 on P.4-5)Tip Sent/Received Address ( P.13-19)TBDBEGIN_E_OI.indb 13 2009/12/14 16:34:16](https://usermanual.wiki/Panasonic-Connect/209023A.User-Manual-4-of-7/User-Guide-1221766-Page-7.png)
![Messaging13-1413Using Server MailRetrieve mail list stored at the Center to view Server Mail.Viewing Server Mail1 Server Mail2 Retrieve Mail List YESUpdate Server Mail List After Step1, >Retrieve Mail List [Update] YESRetrieving Server Mail1 Server Mail Retrieve Mail ListIf no Server Mail is in the list, YES Back2 Retrieve a New MessageSelect S! Mail Retrieve Multiple Messages[Menu] Retrieve Retrieve Selected Select S! Mail* [Finish] YES* To clear, repeat same operation.Retrieve All Messages > Server Mail Retrieve AllTipMail Security ( P.11-10)Server Mail Functions ( P.13-15)BEGIN_E_OI.indb 14 2009/12/14 16:34:16](https://usermanual.wiki/Panasonic-Connect/209023A.User-Manual-4-of-7/User-Guide-1221766-Page-8.png)
![Messaging13-1513Retrieving/Viewing MessagesManually Retrieving New MessagesRetrieve S! Mail messages saved on Server while handset is off/out-of-range. > Retrieve NewServer Mail functionsFrom Server MailDelete One/Selected Server Mail >Retrieve Mail List Highlight a message [Menu] Del Server Mail Delete This or Delete Selected ( For Delete This, select messages* [Finish]) YES* To clear, repeat same operation.Delete All Server Mail Delete All > Enter Phone Password YESForward Server Mail Retrieve Mail List > Highlight a message [Menu] Fwd Server Mail Compose S! Mail [Send]Sort Server Mail Retrieve Mail List > [Menu] Sort Select a conditionView Server Mail Information Retrieve Mail List > Highlight a message [Menu] Mail InformationView Server Mail Memory Server Mail Memory >Organizing/Using MessagesChecking Messages in Messaging Folders1 Incoming Mail, Drafts, Sent/UnsentIn Incoming Mail folder, select a folder then message. Messaging Folders: P.13-32 Select a messageIn Received/Sent Message window, toggle to view previous/next messages.Tip Functions Available in Incoming Mail Box Functions Available for Received/Sent/Draft Message List ( P.13-20)BEGIN_E_OI.indb 15 2009/12/14 16:34:17](https://usermanual.wiki/Panasonic-Connect/209023A.User-Manual-4-of-7/User-Guide-1221766-Page-9.png)
![Messaging13-1613Auto-sortPreviously received messages are not sorted. Incoming messages are sorted by subject if both address and subject match sort condition applied to specific folder. Messages with no subject are sorted by address.Either address or mail subject can be specified per folder. 1 Incoming Mail2 Highlight ユーザーフォルダ 1-3 [Menu] Auto-sort Setting3 [Menu] Select an item (See below)Item Operation/DescriptionAdd Address Sort received messages by sender’s addressSelect an address selection method > Select/enter an addressSave up to 10 addresses per folder. Add Subject Sort received messages by mail subjectEnter a subject >Save one subject per folder. SMS cannot be sorted by mail subject. Add Group Sort received messages by Group in Phone BookSelect a group >Save up to 10 groups per folder. Add Mail groupSort received messages by Mail GroupSelect a Mail Group >Save up to 10 Mail Groups per folder. Edit Sort Conditions After Step 2, highlight an item > [Edit] Edit address, subject or mail groupChange Auto-sort List View Switch Name view or Address view for Auto-sort.After Step 2, >[Menu] Display the List Name or AddressTBDBEGIN_E_OI.indb 16 2009/12/14 16:34:18](https://usermanual.wiki/Panasonic-Connect/209023A.User-Manual-4-of-7/User-Guide-1221766-Page-10.png)
![Messaging13-1713Delete Auto-sort Settings After Step 2, (highlight an item >) [Menu] Delete or Delete All ( For Delete All, enter Phone Password) YESFilter SpamSort messages from unidentifiable handsets into Spam Folder without incoming notification.NoteSome messages from addresses saved in Phone Book as secret data may be sorted into Spam Folder. Be careful when deleting messages from Spam Folder.Setting Spam Folder<Default> OFF1 Settings Universal Settings Anti-Spam Measures2 Spam Filter Enter Phone Password3 ON YESSafe ListSpecify up to 20 addresses and domains (for example, @softbank.ne.jp) to receive messages from without sorting into Spam Folder.1 Settings Universal Settings Anti-Spam Measures Safe List2 Add Addresses[Menu] Add Address Received Address or Direct Entry Select or enter an address Add Domains[Menu] Add Domain Enter a domain (character string after @)3 [Finish]Edit Saved Addresses After Step 1, highlight an address > [Edit] Edit addressDelete Addresses After Step 1, (highlight an address >) [Menu] Delete or Delete All ( For Delete All, enter Phone Password) YESTip Report Spam ( P.13-23)BEGIN_E_OI.indb 17 2009/12/14 16:34:18](https://usermanual.wiki/Panasonic-Connect/209023A.User-Manual-4-of-7/User-Guide-1221766-Page-11.png)
![Messaging13-1813Replying to Messages1 In Message window, [Reply]Re : appears before Subject when replying to S! Mail. Received message text is quoted.2 Complete message [Send]Reply without Quoting/Replying to All In Step 1, >[Menu] Reply Reply to Sender or Reply to All Compose S! Mail or Compose SMSSelectable items differ by mail type. NoteAlternatively, reply from Message List window without opening messages ( P.13-20)Tip Change Message Quote Setting when Replying ( P.18-18)Using Mail GroupsSave mail addresses by group. Messages can be sent to specified group of recipients.Save up to 20 recipients per group. Create up to 20 groups. Creating Mail GroupsMain Menu Phone Book Settings Mail Group1 Select a group to save2 Enter Mail Address DirectlyHighlight <Not stored> [Edit] Enter mail address Select Mail Address from Phone Book or Sent/Received Address LogsHighlight <Not stored> [Menu] Look-up address Select an item Select an entryRepeat Step 2 to save mail addresses. Mail Group ListTBDTBDBEGIN_E_OI.indb 18 2009/12/14 16:34:19](https://usermanual.wiki/Panasonic-Connect/209023A.User-Manual-4-of-7/User-Guide-1221766-Page-12.png)
![Messaging13-1913Change Group Names In Step 1, highlight a mail group > [Menu] Edit group name Edit nameReset Group Names In Step 1, highlight a mail group > [Menu] Reset group name YESEdit Mail Addresses After Step 1, highlight a mail address > [Edit] EditDelete Saved Mail Addresses >After Step 1, (highlight a mail address ) [Menu] Delete this or Delete all ( For Delete all, enter Phone Password) YESSending a Message to All Group MembersMain Menu Phone Book Settings Mail Group1 Highlight a group [ ]2 Compose a message ( From Step 4 on P.13-4)Sent/Received AddressSent address logs: Press and hold > Highlight an address [Menu] Select an item (See below)Received address logs: Press and hold > Highlight an address [Menu] Select an item (See below)Item Operation/DescriptionCharacter sizeToggle character sizeAdd to Phone BookSave selected mail address/number to Phone Book (From Step 2 on P.4-5)Add shortcut iconCreate a shortcut ( P.1-22) Select a shortcut in Standby to open composition window with selected mail address/number in Address fieldCompose S! MailCreate S! Mail to selected address/phone number (From Step 4 on P.13-4)Compose SMSCreate SMS to selected phone number ( From Step 4 on P.13-7)Dialing Select a dialing method > DialDialed calls 1Show Redial logsReceived calls 2Show Incoming Call LogsDelete thisYES >Delete selectedCheck logs to be deleted > [Finish] YESDelete all Enter Phone Password > YES1 Sent address logs only2 Received address logs onlyBEGIN_E_OI.indb 19 2009/12/14 16:34:20](https://usermanual.wiki/Panasonic-Connect/209023A.User-Manual-4-of-7/User-Guide-1221766-Page-13.png)
![Messaging13-2013Organizing MessagesFunctions Available in Incoming Mail Box > Incoming Mail (Highlight a folder) [Menu] Select an item (See below)Item Operation/DescriptionAdd folder Enter folder name >Edit folder name*Edit folder name >Auto-sort Setting*Sort received messages (Auto-sort: >From Step 3 on P.13-16)Re-sort in ThisRe-sort messages in selected folderYES >Sort in AllRe-sort messages in all foldersYES >Mail SecuritySet to require Phone Password for opening a folderEnter Phone Password >To cancel: repeat the step Delete folder* Enter Phone Password > YES* onlyFunctions Available for Received/Sent/Draft Message List > Incoming Mail, Drafts or Sent/Unsent ( For Incoming Mail, select a folder) Highlight a message [Menu] Select an item (See below)Item Operation/DescriptionEdit 1 2Edit message to send(S! Mail: From Step 2 on P.13-4/SMS: From Step 2 on P.13-7)Send 2Send DraftsItem Operation/DescriptionRetrieve 3Retrieve complete S! MailThis one > or Selected ( For Selected, select multiple messages* [Finish] YES)* To cancel: press againReply 3Reply without quoting messageReply to Sender > or Reply to All Compose S! Mail or Compose SMS Compose a message (S! Mail: From Step 4 on P.13-4/SMS: From Step 4 on P.13-7)Selectable items differ by mail type. Reply with Quote 3Quote received message to replyReply to Sender > or Reply to All Compose S! Mail or Compose SMS Compose a message (S! Mail: From Step 4 on P.13-4/SMS: From Step 4 on P.13-7)Selectable items differ by mail type. Forward 3Forward >/Fwd Server Mail Select Address field Select an item Select/enter an address [Send]Forward Server Mail ( P.13-15)When forwarding S! Mail, Fw: appears before Subject. Dotted line appears in the first line of Text field.Attachments are also forwarded (Messages with copy protected attachments may not be forwardable.).Dial Select an item > Make a call/compose a message/add to Phone BookAdd Address 1 3Save addresses to Phone BookSelect phone number or mail address > YES (From Step 2 on P.4-5)BEGIN_E_OI.indb 20 2009/12/14 16:34:21](https://usermanual.wiki/Panasonic-Connect/209023A.User-Manual-4-of-7/User-Guide-1221766-Page-14.png)
![Messaging13-2113Item Operation/DescriptionProtect/Unprotect 1 3Protect received/sent messagesThis one > or Selected ( For Selected, select multiple messages* [Finish])* To cancel: press againTo unprotect, repeat the step. Unread/ Read 3Switch status to Unread/ReadMove 3Move messages to specific foldersMove This > or Move Selected ( For Move Selected, select multiple messages* [Finish] YES) Select a folder* To cancel: press againDelete Select an item > Operate selected itemIf messages are received while selecting multiple messages, message deletion may fail.ConfirmDelivery 1View Delivery reportSend Ir data (P.10-3)IC Transmission(P.10-5)Copy to microSDCopy messages to microSD CardYES >Copy to USIM/Copy to Phone 3Copy SMS to USIM Card/handsetYES >Move to USIM/Move to Phone 3Move SMS to USIM Card/handsetYES >Sort Change display orderSelect a display order >Item Operation/DescriptionMail InformationView detailed information (Subject, From, To, etc.)Mail history 1 3Show up to 1000 sent/received mail recordsSelect a sender/recipient address > or appears.Select a record to show Message Window. to return to previous window.1 Sent messages only2 Drafts only3 Received messages onlyBEGIN_E_OI.indb 21 2009/12/14 16:34:22](https://usermanual.wiki/Panasonic-Connect/209023A.User-Manual-4-of-7/User-Guide-1221766-Page-15.png)
![Messaging13-2213Using MessagesFunctions Available in Received/Sent Message Window In Message Window, >[Menu] Select an item (See below)Item Operation/DescriptionRetrieve 1Retrieve complete S! MailEdit 2Edit message to send(S! Mail: From Step 2 on P.13-4/SMS: From Step 2 on P.13-7)Reply 1Reply without quoting messageReply to Sender > or Reply to All Compose S! Mail or Compose SMS Compose a message (S! Mail: From Step 4 on P.13-4/SMS: From Step 4 on P.13-7)Selectable items differ by mail type. Reply with Quote 1Quote received message to replyReply to Sender > or Reply to All Compose a message (S! Mail: From Step 4 on P.13-4/SMS: From Step 4 on P.13-7)Selectable items differ by mail type. Forward 1Forward > or Fwd Server MailForward Server Mail ( P.13-15)Dial Select an item > Make a call/compose a message/add to Phone BookAdd Address Save addresses to Phone BookSelect phone number or mail address > YES( From Step 2 on P.4-5)Add to Phone BookSave highlighted phone number/mail address to Phone BookYES >(From Step 2 on P.4-5)Item Operation/DescriptionAttached files Show attached filesSave TemplatesSave templatesYES >Add Shortcut IconCreate a shortcut ( P.1-22) Select a shortcut in Standby to open composition window with selected mail address/number in Address fieldFont Size Select a size >Scroll Unit Change scroll unitHalf Screen > or Whole ScreenCharset Conversion 1Convert characters when not properly shownSelect an item >Delete Select an item > Operate selected itemConfirm Delivery 2View Delivery reportMail InformationView detailed information (Subject, From, To, etc.)Send Ir data (P.10-3)IC Transmission(P.10-5)Copy to microSDCopy messages to microSD CardYES >Copy to USIM or Copy to Phone 1Copy SMS to USIM Card/handsetYES >Move to USIM or Move to Phone 1Move SMS to USIM Card/handsetYES >BEGIN_E_OI.indb 22 2009/12/14 16:34:22](https://usermanual.wiki/Panasonic-Connect/209023A.User-Manual-4-of-7/User-Guide-1221766-Page-16.png)
![Messaging13-2313Item Operation/DescriptionReport Spam 1Report received mail as Spam Mail >[Send]Change destination to report to ( P.18-18).Mail history Show up to 1000 sent/received mail recordsSelect a sender/recipient address > or appears.Select a record to show Message Window. to return to previous window.1 Received Message Window only2 Sent Message Window onlyBEGIN_E_OI.indb 23 2009/12/14 16:34:23](https://usermanual.wiki/Panasonic-Connect/209023A.User-Manual-4-of-7/User-Guide-1221766-Page-17.png)

![Internet14-414Entering URLEnter URLs (addresses beginning with "http://" or "https://") directly to access websites, or open previously viewed pages using URL histories.Up to 20 URL histories are stored. Main Menu Yahoo! Keitai Enter URL1 Enter URL DirectlyDirect Entry Enter URL Use URL HistoryURL History List Select a URLDelete URL Histories In Step1, >URL History List (Highlight a URL ) [Menu] Delete or Delete All YESURL History List WindowUsing Access HistoriesOpen previously viewed pages using access histories.Up to 100 access histories are stored (The number of savable histories varies depending on data amount.).Main Menu Yahoo! Keitai History1 Select a historyDelete Access Histories In Step 1, (highlight a history >) [Menu] Delete or Delete All YES ( For Delete All, enter Phone Password)Show Access History URLs In Step 1, highlight a history > [Menu] Display URLExiting Mobile Internet1 YESNoteClosing handset does not affect active browser. History WindowTBDTBDBEGIN_E_OI.indb 4 2009/12/14 16:34:28](https://usermanual.wiki/Panasonic-Connect/209023A.User-Manual-4-of-7/User-Guide-1221766-Page-22.png)
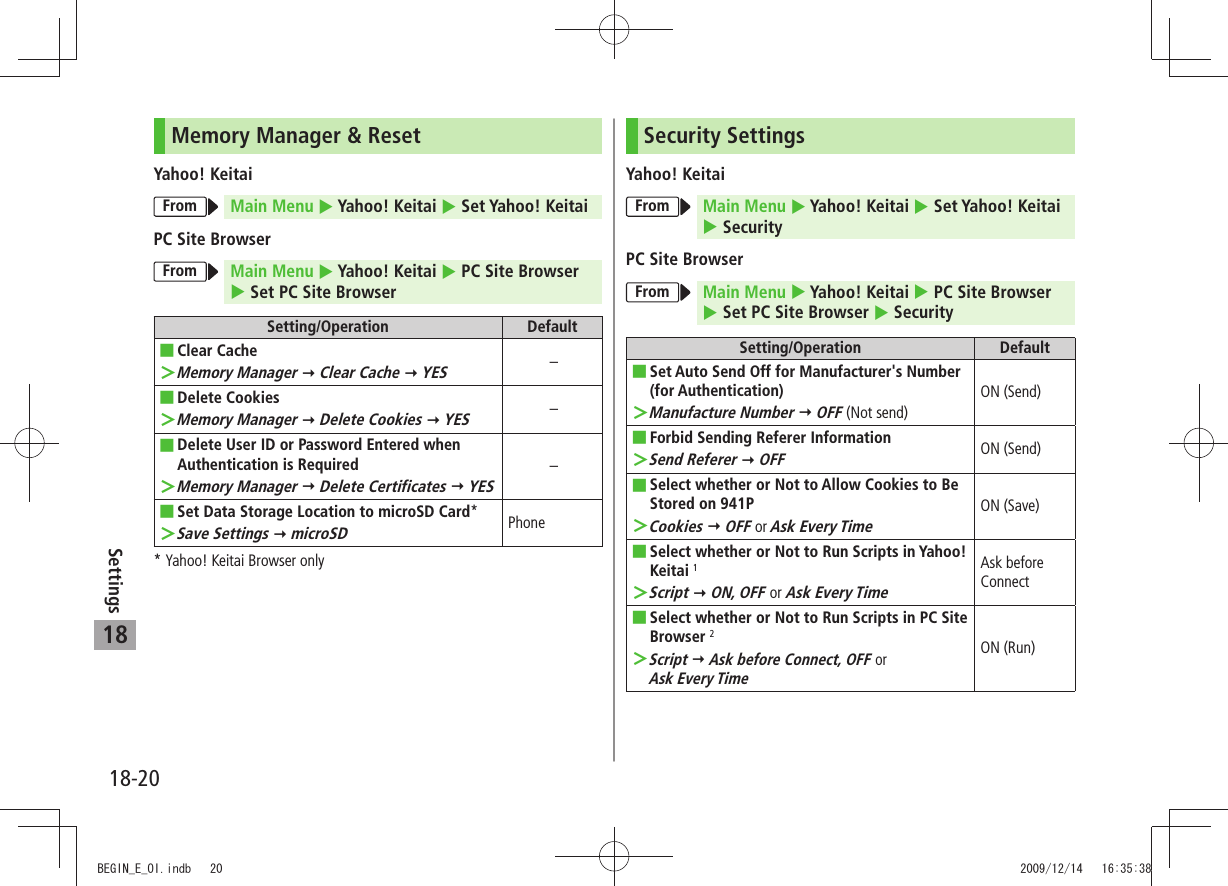
![Internet14-614Basic OperationsUsing CursorMove CursorUse cursor to select underlined menu items. to move right to move left to move to previous line to move to next lineScroll PagesScroll bar appears on right side or at bottom of Display when page content continues beyond view. scroll up/down scroll left/right scroll page up by a screenful scroll page down by a screenfulMove to previous page/ next pagePreviously viewed pages are temporarily saved in Cache Memory ( P.14-2).[Back]: Return to previous page[Menu] Forward: View next pageSome web pages may not appear after performing the steps above.When Authentication is RequiredSome pages require user authentication for access.If required, enter user ID or password.NoteWhile page is open, press and hold to switch to TV.TipSettings Font Size Scroll Unit Images Off Sound Off ( P.18-19) Delete User ID or Password Entered when Authentication is Required ( P.18-20)BEGIN_E_OI.indb 6 2009/12/14 16:34:38](https://usermanual.wiki/Panasonic-Connect/209023A.User-Manual-4-of-7/User-Guide-1221766-Page-24.png)
![Internet14-814Using InformationBookmarks & Saved PagesBookmark websites or save page content to Saved Pages.Some copy protected materials cannot be saved. Bookmarks Save links to websites. 941P connects to the Network to open the link.Saved Pages Save page content. 941P opens saved pages without connecting to the Network.Saving Web Pages1 Open a web page [Menu] Bookmarks or Saved Pages Add2 Select title Edit title3 OK OKSaved Bookmarks/Saved Pages are saved to Bookmarks List/Saved Pages List ( Right)Open Bookmarks/Saved Pages in Web Page Open a web page > [Menu] Bookmarks or Saved Pages View ListViewing Bookmarks & Saved PagesMain Menu Yahoo! Keitai ( PC Site Browser)1 Bookmarks or Saved Pages Select an itemExample: Yahoo! Keitai BrowserNoteCreate folders in Bookmarks/Saved Pages List to organize Bookmarks/ Saved Pages ( P.14-9).TipSend Bookmarks via Infrared ( P.10-3) Send Bookmarks via IC Transmission ( P.10-5) Add Bookmark Shortcuts to Standby Save URLs to Bookmarks Send Bookmark URLs ( P.14-10)Saved Pages List WindowBookmarks List WindowTBD TBDBEGIN_E_OI.indb 8 2009/12/14 16:34:42](https://usermanual.wiki/Panasonic-Connect/209023A.User-Manual-4-of-7/User-Guide-1221766-Page-26.png)
![Internet14-914Managing Bookmarks & Saved PagesFollow the steps below to open Bookmarks or Saved Pages list:Yahoo! Keitai Main Menu Yahoo! Keitai Bookmarks or Saved PagesPC Site Browser Main Menu Yahoo! Keitai PC Site Browser Bookmarks or Saved PagesNoteWhen a different USIM Card is inserted, Saved Pages do not appear or title name cannot be changed.Creating New Bookmarks/Saved Pages FoldersFolders cannot be created within existing folders. 1 BookmarksIn Bookmarks list window, [Menu] Create New Folders Enter title Saved PagesIn Saved Pages list window, [Menu] New Folder Enter titleMove Bookmarks/Saved Pages to Folder Before moving to folders, set Sort to Saved/Moved Order (P.14-10)In Bookmarks/Saved Pages list window ( P.14-8), highlight a bookmark/saved page [Menu] Move to Select a folder Select a destinationEdit Folder Title In Bookmarks/Saved Pages list window ( >P.14-8), highlight a folder [Menu] Edit Edit folder titleEditing Bookmark Titles/URLs1 In Bookmarks list window, highlight a bookmark [Menu] Edit2 Edit title/URLRenaming Saved Pages1 In Saved Pages list window, highlight a saved page [Menu] Edit2 Edit titleTip Delete Bookmarks/Saved Pages/Folders Display Bookmark/Saved Page URLs Change Bookmarks/Saved Pages/Folders Display Order Sort Bookmarks/Saved Pages/Folders ( P.14-10)BEGIN_E_OI.indb 9 2009/12/14 16:34:42](https://usermanual.wiki/Panasonic-Connect/209023A.User-Manual-4-of-7/User-Guide-1221766-Page-27.png)
![Internet14-1014Bookmarks/Saved Pages FunctionsFrom Main Menu Yahoo! Keitai ( PC Site Browser) Bookmarks or Saved PagesAdd Bookmark Shortcuts to Standby Highlight a bookmark > [Menu] Add shortcut icon YESSave URLs to Bookmarks >[Menu] Create New Bookmarks Enter a title/URL OKDelete Bookmarks/Saved Pages/Folders Follow the steps below >Item Operation/DescriptionDelete Highlight a bookmark, saved page or folder > [Menu] Delete YESDelete Selected Items Select items to delete >[Menu] Delete selected Check items to delete [Delete] YESDelete All >[Menu] Delete All YES Enter Phone PasswordDisplay Bookmark/Saved Page URLs Highlight a bookmark/saved page > [Menu] Display URLChange Bookmarks/Saved Pages/Folders Display Order Highlight a bookmark/saved page/folder > [Menu] Move to to select a positionBefore changing order, set Sort ( Right) to Saved/Moved Order.Sort Bookmarks/Saved Pages/Folders >[Menu] Sort Select a conditionSend Bookmark URLs Highlight a bookmark > [Menu] Send URL S! Mail or SMS Create a message (S! Mail: From Step 2 on P.13-4/SMS: From Step 2 on P.13-7)BEGIN_E_OI.indb 10 2009/12/14 16:34:43](https://usermanual.wiki/Panasonic-Connect/209023A.User-Manual-4-of-7/User-Guide-1221766-Page-28.png)
![Internet14-1114Downloading Image/Sound FilesSave images, sounds, etc. to Data Folder or microSD Card.For PC Site Browser, only still images can be saved. 1 Open a web page [Menu] Select File2 Select a file3 Save YESAvailable menu items vary by saved content.Save location is determined by Save Settings ( P.18-20). However, save location may change depending on situations. Check confirmation when download is complete.Confirmation appears when downloading images or sound files. Select YES for image/sound setting.NoteDo not remove/install microSD Card while saving files to it. Do not turn 941P power off while downloading or saving files. Files may be damaged.Some copy protected files may not be saved. Videos selected from web pages play while being downloaded. Using Number, Address or URLUse linked numbers, addresses or URLs to make calls, send messages, access websites, or save directly to Phone Book.1 Open a web page containing phone numbers, mail addresses or URLs2 Phone NumberSelect a phone number Select an item (See below)Item Operation/DescriptionVoice call Make a Voice CallVideo call Make a Video CallSelect image Select outgoing imageAdd to Phone BookSave a number to Phone Book ( From Step 2 on P.4-5) E-mail AddressSelect an address Select an item (See below)Item Operation/DescriptionCompose S! MailCreate S! Mail ( From Step 4 on P.13-4)Compose SMS Create SMS ( From Step 4 on P.13-7)Add to Phone BookSave mail address to Phone Book ( From Step 2 on P.4-5) URLSelect URL941P connects to the Network.BEGIN_E_OI.indb 11 2009/12/14 16:34:44](https://usermanual.wiki/Panasonic-Connect/209023A.User-Manual-4-of-7/User-Guide-1221766-Page-29.png)
![Internet14-1214StreamingEnjoy video/sound clips while they download.Supported by compatible files on Yahoo! Keitai sites only. Streaming files cannot be saved. Main Menu Yahoo! Keitai Yahoo! Keitai1 Open a web page Select a file Streaming starts.2 or to exitEngaged Streaming Operations Mute/Release Mute [ /]Pause/Resume*[/]Volume /Set Playback Position* to start playback from specified pointToggle Display Position Toggle Portrait/Landscape view. * Not available during playback for live events such as live sports programs.NoteStreaming requires a continuous Network connection. Network remains connected even during a pause (Transmission fees apply).Paused streams may stop after three minutes of inactivity. When roaming abroad, streaming may be unavailable or not be performed properly.Incoming Voice Calls while StreamingIncoming call pauses an active stream.Video Calls cannot be received while streaming. BEGIN_E_OI.indb 12 2009/12/14 16:34:48](https://usermanual.wiki/Panasonic-Connect/209023A.User-Manual-4-of-7/User-Guide-1221766-Page-30.png)
![Internet14-1314Option Menu ItemsIn Yahoo! Keitai, press [Menu] for following operations.Some functions may not be available depending on web pages. Item Operation/DescriptionForward Go to next page ( P.14-6)Bookmarks View Bookmarks list, add bookmarks, or add bookmark shortcuts to StandbySaved Pages View Saved Pages list or save page content to Saved PagesText Copy Copy page textReload Page Refresh page informationEnter URL Enter URL directly or use URL History to access pagesSelect File View, play or save file to Data Folder (Downloading Image/Sound Files: From Step 2 on P.14-11)Item Operation/DescriptionHandy FunctionsSwitch PC Browser 1/Switch Browser 2: Toggle Yahoo! Keitai/PC siteInternet Search: Search text in InternetSearch In Page: Search text within pageJump in this page: Jump to top/end of pageSend URL: Send URL via S! Mail/SMSHistory: Open previously viewed pagesExpand/Shrink 2: Zoom page in/outSet Display Range 2: Specify displayed area of pageFlash(R) Menu: Playback/pause Flash® filesProperties: View page details or server certificates for secure pagesYahoo! Keitai 1/Home Page 2View top menuSettingsFont Size: Change character sizeEncoding: Change encoding typePointer: Set Pointer 2Switch screen 2Toggle between Small Screen and PC ScreenExit Browser Exit Browser1 Yahoo! Keitai only2 PC Site Browser onlyBEGIN_E_OI.indb 13 2009/12/14 16:34:48](https://usermanual.wiki/Panasonic-Connect/209023A.User-Manual-4-of-7/User-Guide-1221766-Page-31.png)
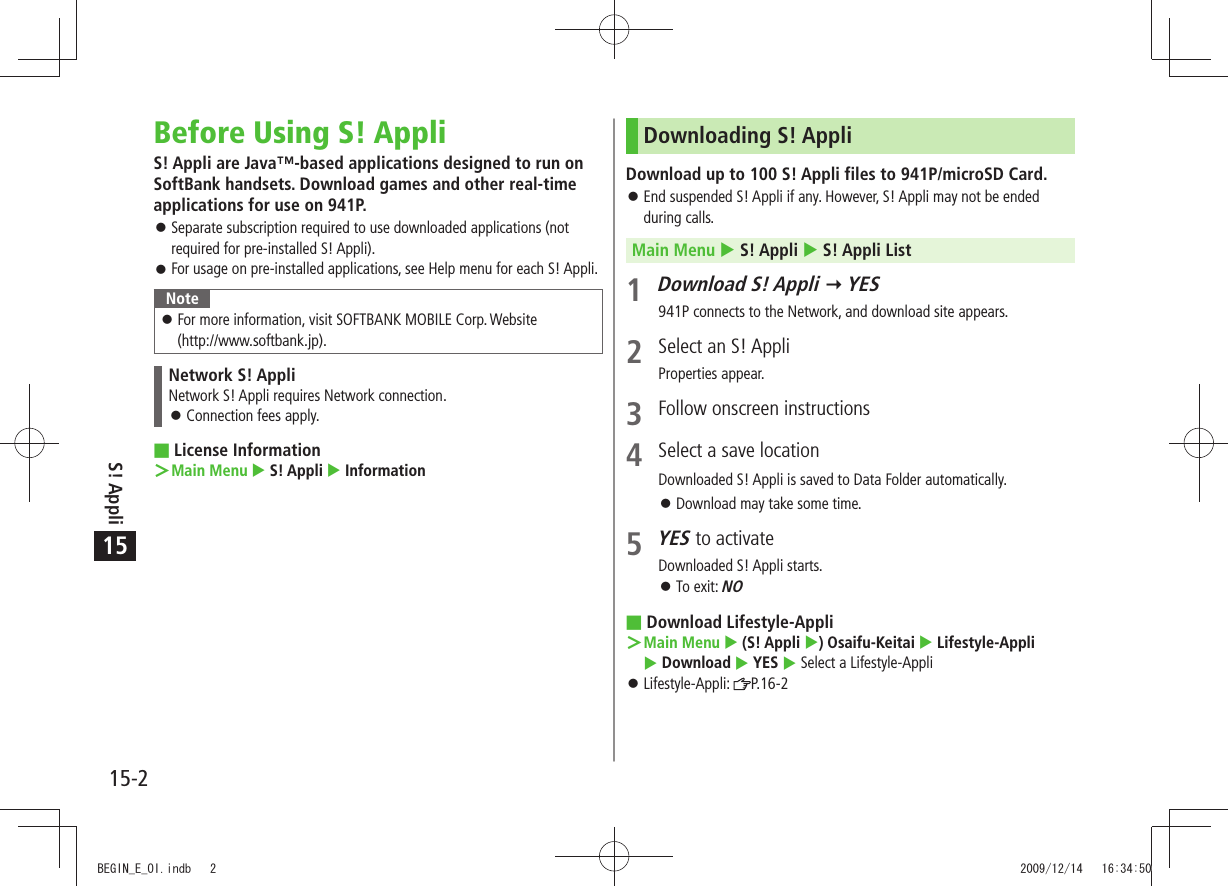
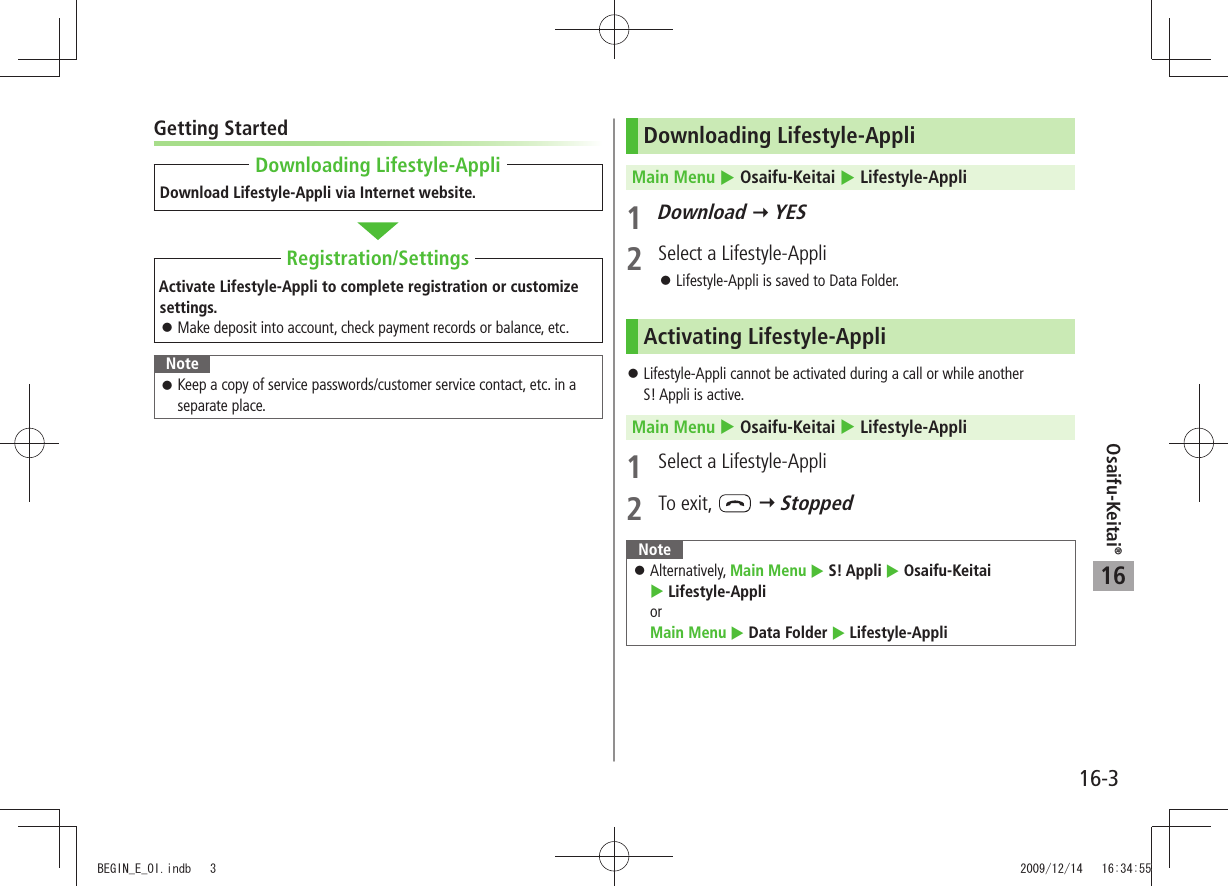
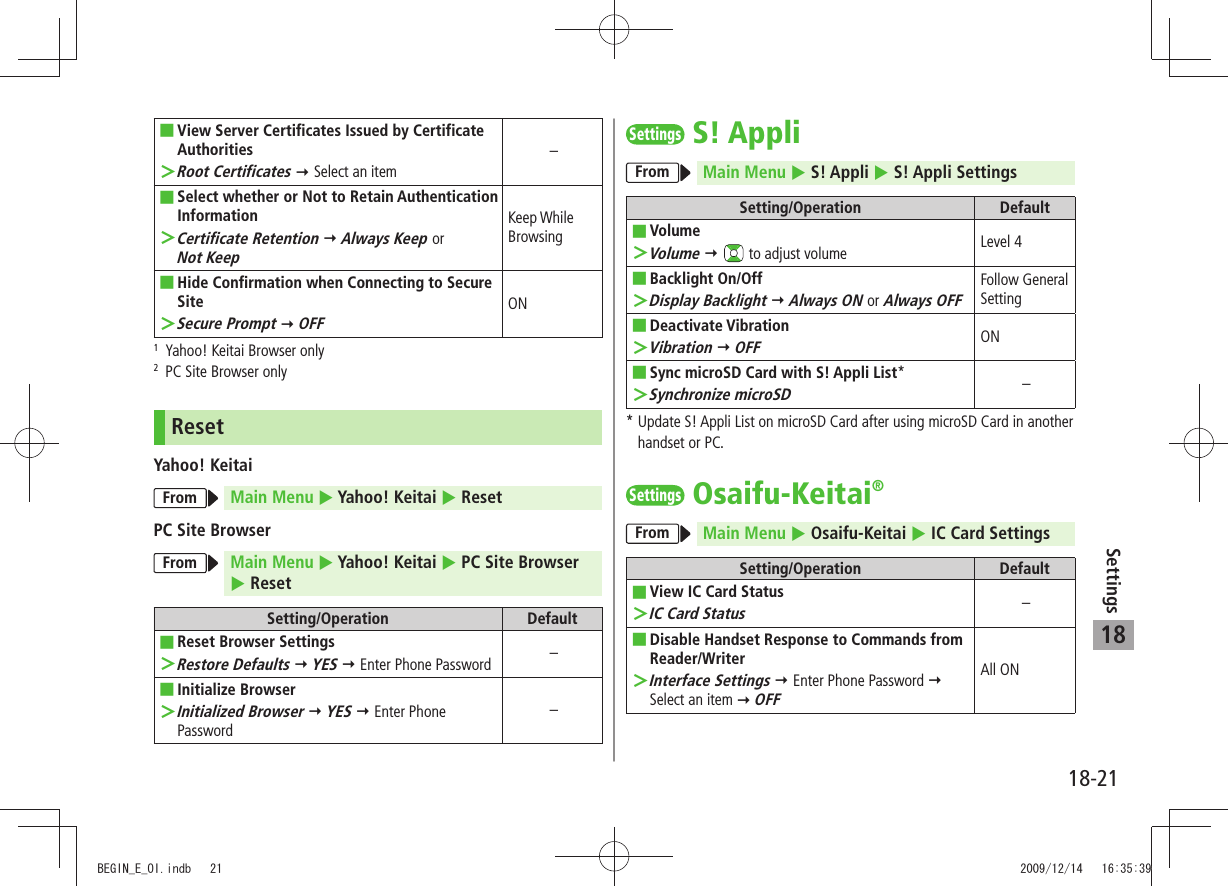
![S! Appli15-315Using S! AppliActivating S! AppliMain Menu S! Appli S! Appli List1 Select an S! AppliApplication starts and appears.See application Help menu for usage information. Confirmation appears when selecting Network S! Appli. For a microSD Card S! Appli, press [microSD] before Step 1.NoteActivate an S! Appli; Main Menu Data Folder S! Appli Select an S! AppliApplications with in S! Appli List are intended for Landscape View.Incoming transmissions pause S! Appli. If handset is closed while S! Appli is active, S! Appli pauses. AV output compatible applications may be viewed on a TV set ( P.10-13).TipSettings Volume Backlight On/Off Deactivate Vibration Sync microSD Card with S! Appli List ( P. 1 8 - 2 1)Terminate/Suspend & ResumeTerminating/Pausing S! Appli1 While running an S! Appli, 2 Suspended or Stopped appears for a suspended application.Resuming/Terminating Paused S! AppliMain Menu S! Appli S! Appli List1 Replayed or StoppedResumed application starts from paused point.Using S! Appli Startup HistoryMain Menu S! Appli S! Appli History1 Highlight a record [Menu] Start, S! Appli info or DeleteBEGIN_E_OI.indb 3 2009/12/14 16:34:53](https://usermanual.wiki/Panasonic-Connect/209023A.User-Manual-4-of-7/User-Guide-1221766-Page-35.png)
![S! Appli15-415Managing ApplicationsMoving S! Appli between 941P and microSD Card Main Menu S! Appli S! Appli List1 Highlight an S! Appli [Menu] Move to microSD or Move to phoneSome S! Appli may not be moved to microSD Card. Deleting S! AppliMain Menu S! Appli S! Appli List1 Highlight an S! Appli [Menu] Delete YESSome pre-installed S! Appli may not be deleted. Viewing S! Appli PropertiesMain Menu S! Appli S! Appli List1 Highlight an S! Appli [Menu] S! Appli infoSetting Security Level while Running S! AppliSecurity Level cannot be set for some applications. Main Menu S! Appli S! Appli List1 Highlight an S! Appli [Menu] Security level2 Select an item (See below)Item Operation/DescriptionNetwork Access Connect to the NetworkAuto Invocation Activate S! AppliMultimedia Recording Record multimedia dataData Reading Access Read Phone Book, Calendar events, etc.Data Rewrtng Accss Write/delete Phone Book, Calendarevents, etc.Location Access Retrieve Location information3 Always Allowed, Ask First Time*, Ask Every Time or Not Allowed * Confirmation appears the first time application is activated.Reset Security Level Settings Reset security level settings to default or condition when downloading.In Step 2, >Reset Sec. Setting YESBEGIN_E_OI.indb 4 2009/12/14 16:34:53](https://usermanual.wiki/Panasonic-Connect/209023A.User-Manual-4-of-7/User-Guide-1221766-Page-36.png)
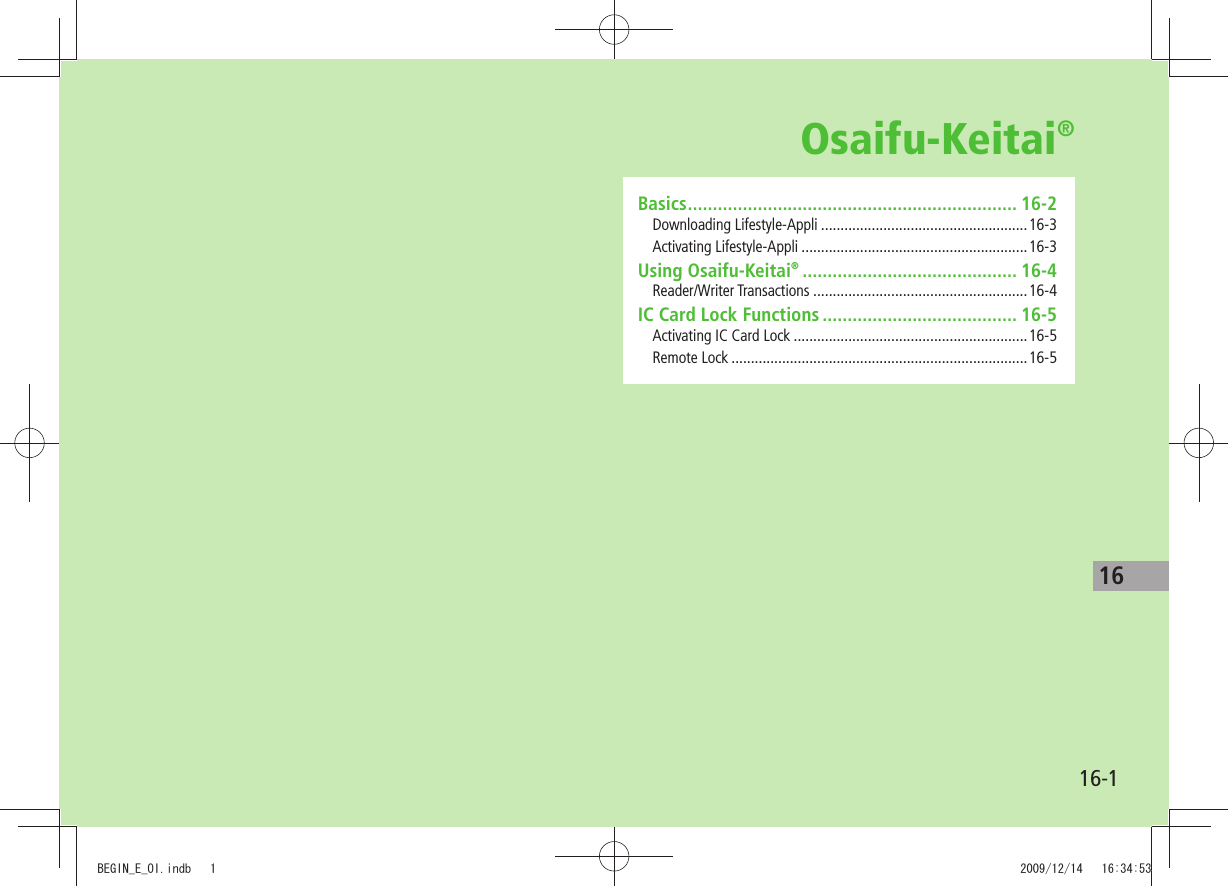
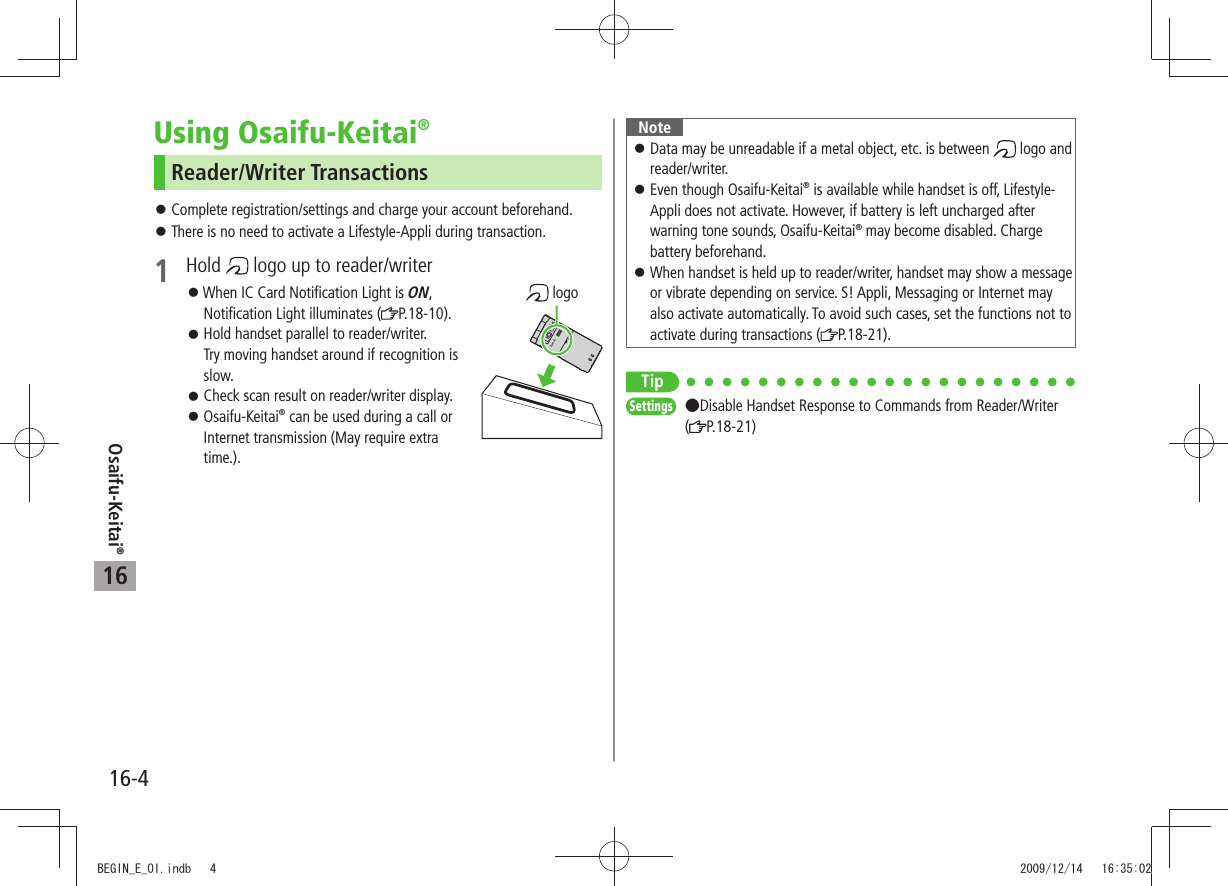
![Osaifu-Keitai®16-516IC Card Lock FunctionsActivating IC Card Lock<Default> OFF1 Press and hold Enter Phone Password appears in Standby.Repeat the step as required to unlock. NoteAlternatively, Main Menu Osaifu-Keitai IC Card Settings IC Card Lock or Main Menu Settings Security IC Card LockRemote Lock<Default> OFFSaving Numbers to Activate Remote LockSave up to three phone numbers to enable Remote Lock. Main Menu Osaifu-Keitai IC Card Settings Remote Lock1 Enter Phone Password ON Numbers to Permit2 <Not Recorded> Enter phone numbersTo save numbers from Phone Book/Incoming Call Logs or to use a payphone number: [Menu] Refer to or Payphone3 [Return] [Set]BEGIN_E_OI.indb 5 2009/12/14 16:35:07](https://usermanual.wiki/Panasonic-Connect/209023A.User-Manual-4-of-7/User-Guide-1221766-Page-41.png)
![Osaifu-Keitai®16-616Number of Calls to Activate Remote Lock<Default> Three timesSpecify the number of incoming calls for activating IC Card Lock. Main Menu Osaifu-Keitai IC Card Settings Remote Lock1 Enter Phone Password ON2 # of Incoming Call Enter a number (03-10) [Set]Activating Remote Lock1 Call 941P from one of the specified numbers (Send Caller ID)2 Hang up after 941P receives the call3 Repeat Steps 1-2 until specified number of incoming calls is reached (within three minutes)After specified number of incoming calls, IC Card Lock is set and a message informs you IC Card Lock is activated.NoteWhen setting IC Card Lock, call 941P from the same specified phone number. Incoming calls from different phone numbers cannot be counted. Specified incoming calls may not be counted when Call Forwarding is active.Remote Lock is not available when ring time for Answer Phone is set to 0 or Driving Mode is active.BEGIN_E_OI.indb 6 2009/12/14 16:35:07](https://usermanual.wiki/Panasonic-Connect/209023A.User-Manual-4-of-7/User-Guide-1221766-Page-42.png)
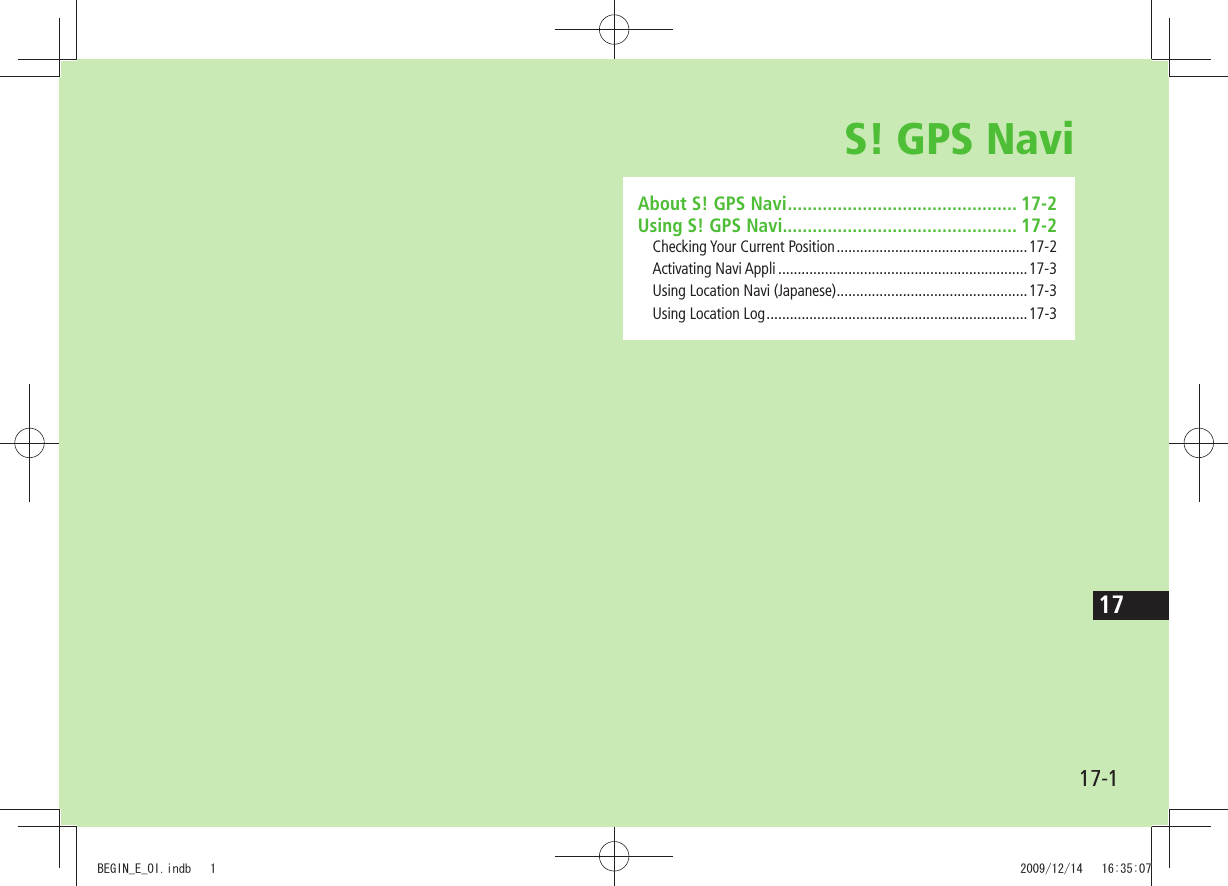
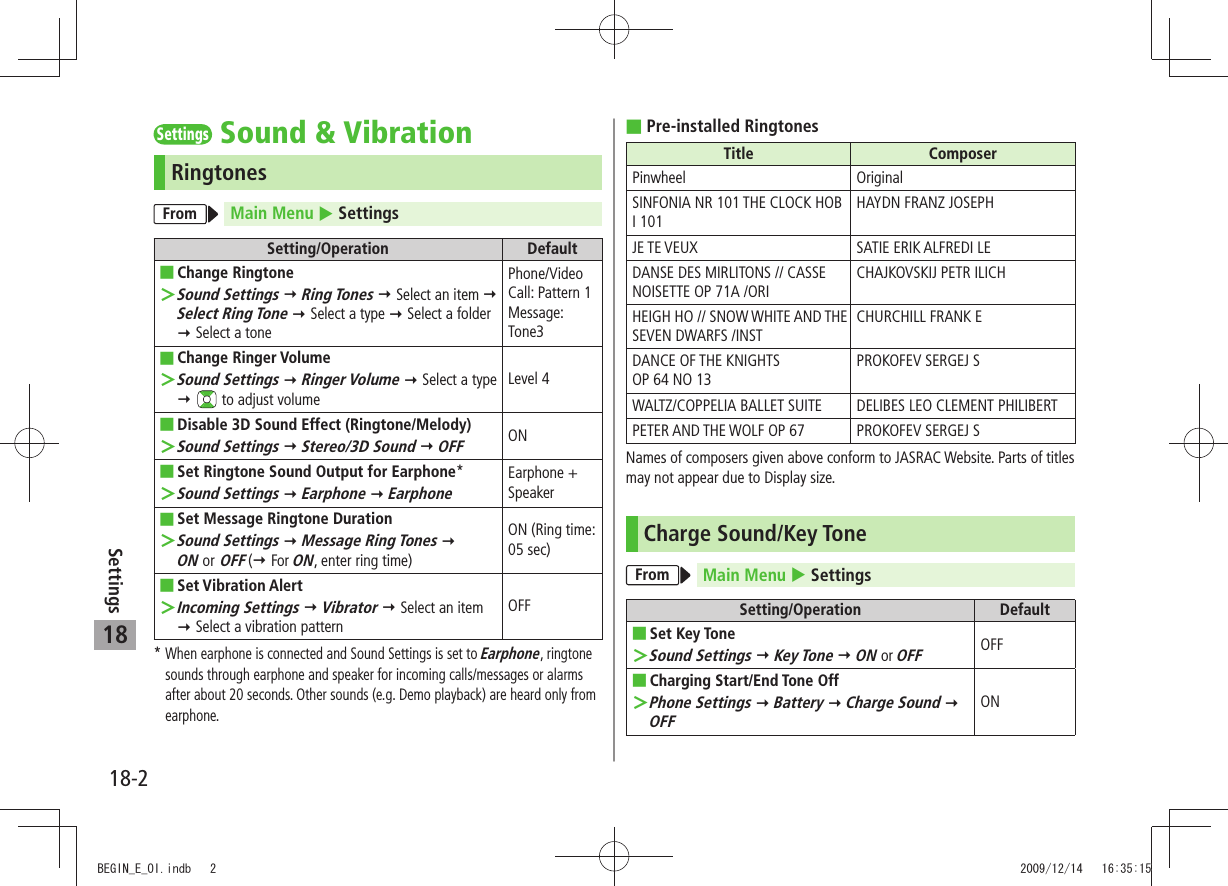
![17-2S! GPS Navi17About S! GPS NaviS! GPS Navi provides location information by communicating with base stations and by GPS satellite. Check your position on map, area information or route to your destination using a Navi Appli.NoteLocation information may be inaccurate due to location or signal conditions.SoftBank is not liable for any resulting damages. Position cannot be determined while Positioning Lock is active ( P.18-22).For more information, visit SOFTBANK MOBILE Corp. Website (http://www.softbank.jp).Using S! GPS NaviChecking Your Current PositionActivate Navi Appli to check your position.Main Menu Tools S! GPS Navi1 Current Location YESPositioning starts.To check your current position during positioning: When [Use] appears at lower right, OK2 When positioning is complete, [Map] YES941P connects to the Network and web page opens.To reposition: [Retry]Save to Phone Book Save obtained location information to Phone Book.Positioning is complete > [Menu] Add to Phone Book YES Follow the steps for saving to Phone Book ( From Step 2 on P.4-5)Indicating Positioning Accuracy LevelAccuracy Level ... Fairly accurateAccuracy Level ... Relatively accurateAccuracy Level ... No accurate location information retrieved Retrieve location information again.BEGIN_E_OI.indb 2 2009/12/14 16:35:12](https://usermanual.wiki/Panasonic-Connect/209023A.User-Manual-4-of-7/User-Guide-1221766-Page-44.png)
![17-3S! GPS Navi17Activating Navi AppliSearch for current area information or route to your destination.End all applications including suspended applications. Main Menu Tools S! GPS Navi Navi AppliUsing Location Navi (Japanese)Use Location Navi to locate a person via a SoftBank 3G handset or PC. For more information, visit SOFTBANK MOBILE Corp. Website (http://www.softbank.jp).Main Menu Tools S! GPS Navi Location NaviNoteEvent Indicator appears when location information is automatically provided or location information request is rejected. Select indicator to show location log.Using Location LogUp to 50 latest location info are saved. Delete as required.Main Menu Tools S! GPS Navi Location Logs 1 Show DetailsSelect a record to view details appears if positioning fails. Delete a RecordHighlight a record [Menu] Delete Delete this YES Delete All[Menu] Delete Delete all Enter Phone Password YESNoteWhen 50 records are saved, oldest is deleted first. When positioning is requested while viewing a record, a message appears and log window returns.TipSettings S! GPS Navi Settings ( P.18-22)BEGIN_E_OI.indb 3 2009/12/14 16:35:13](https://usermanual.wiki/Panasonic-Connect/209023A.User-Manual-4-of-7/User-Guide-1221766-Page-45.png)
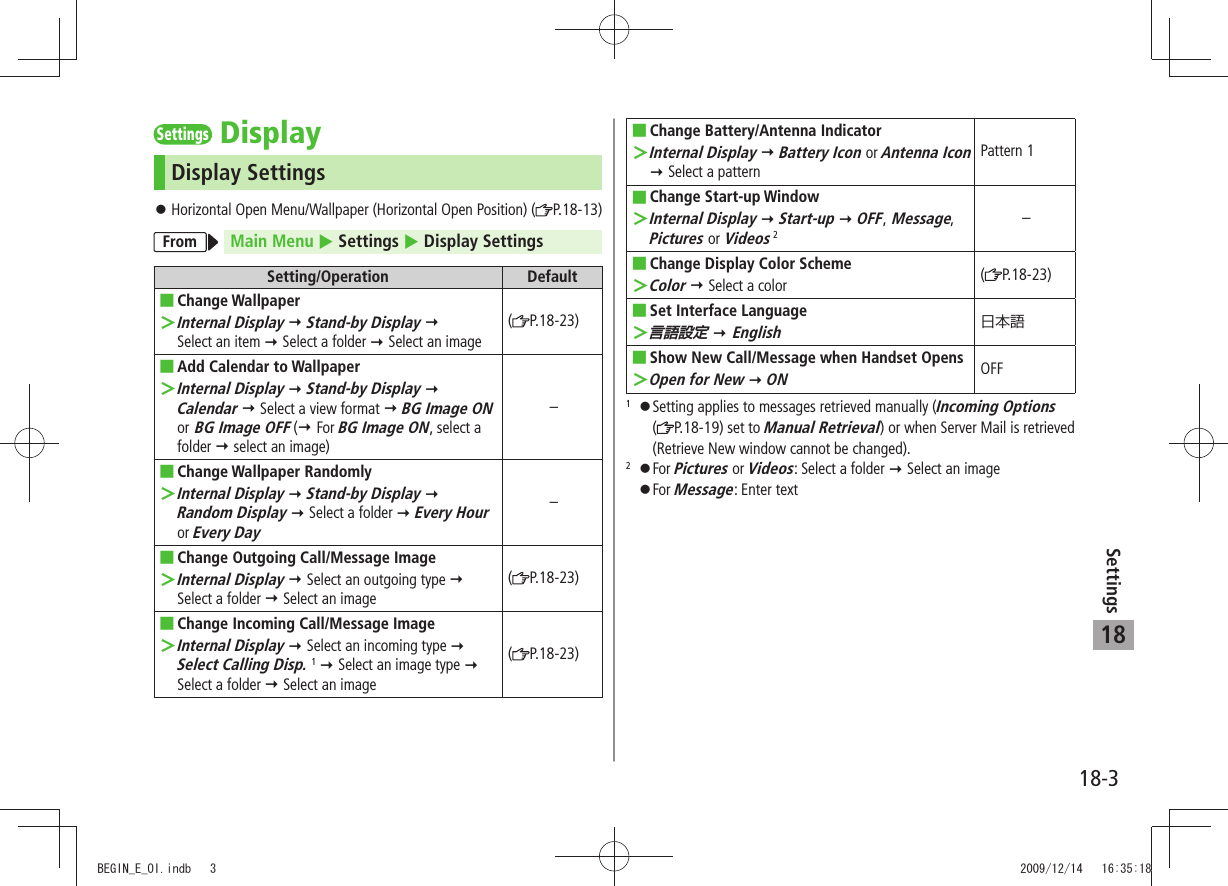
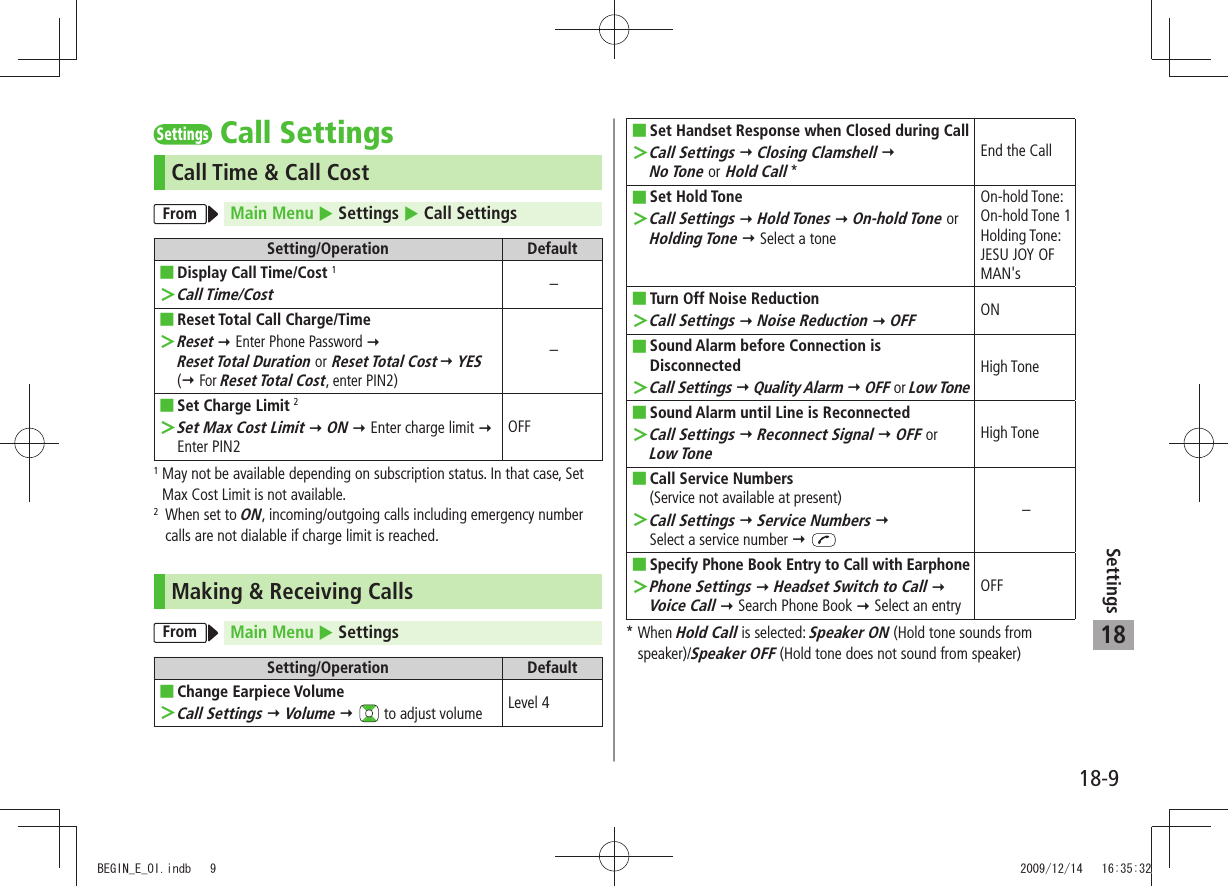
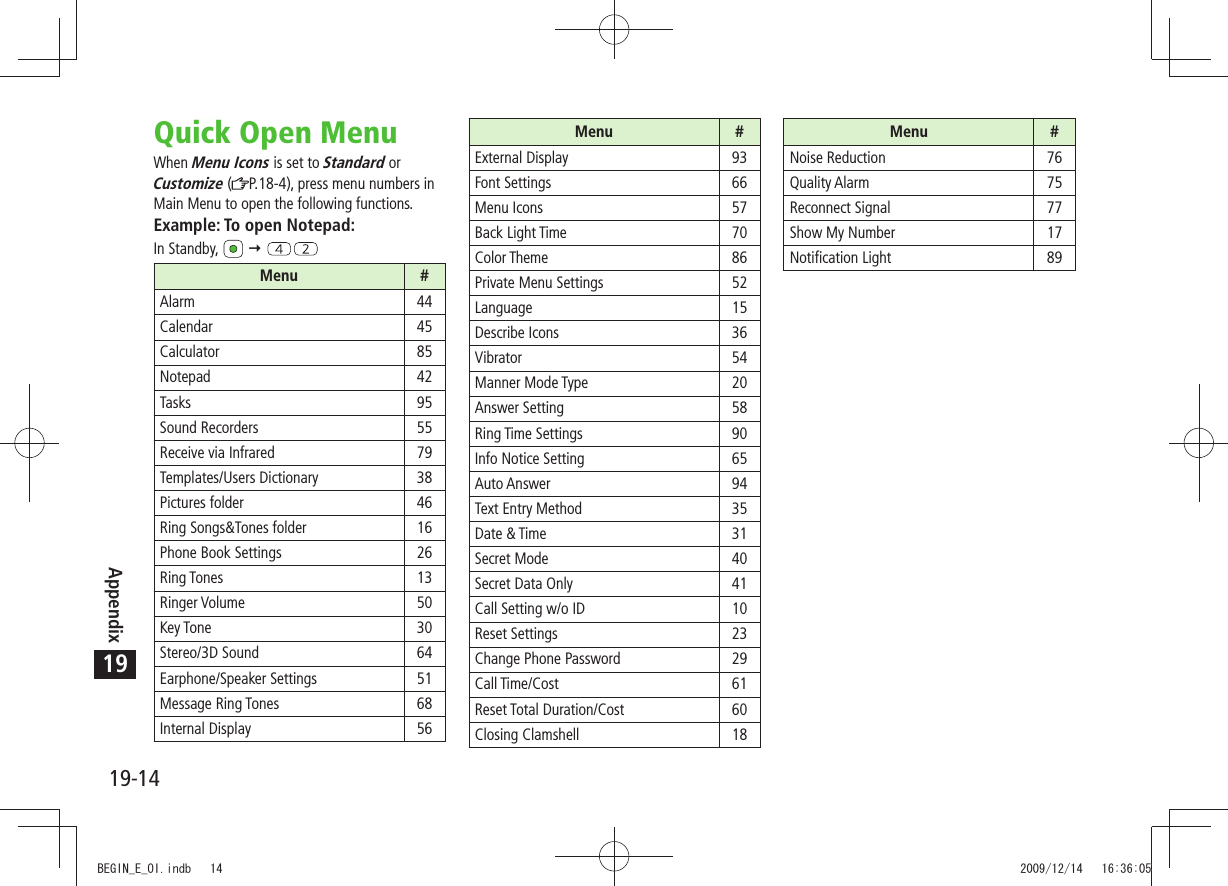
![18-4Settings18Main MenuFrom Main Menu Settings Display Settings Menu IconsSetting/Operation DefaultChange Main Menu Theme ■Select a pattern >(P.18-23)Change Main Menu Icons ■Customize > Select a menu Select a folder Select an image–Change Main Menu Background ■Customize > Background Image Select a folder Select an image–ClockStandby Clock (Horizontal Open Position) ( P.18-13)External Display Clock ( P.18-5)From Main Menu Settings Display Settings Internal Display ClockSetting/Operation DefaultChange Standby Clock Pattern ■ 1Stand-by Clock > [Pattern] Select a pattern [Set](P.18-23)Change Standby Clock Position ■ 1 2Stand-by Clock > [Position] Select a position [Set]Pattern 1Change Standby Clock Size ■ 1Stand-by Clock > [Size] Large [Set] SmallChange Standby Clock at Upper Right (lower ■right in Landscape View)Icon Clock > Select a pattern(P.18-23)1 Highlight Stand-by Clock [Play] to view Standby Clock.2 Even if clock position is set to Pattern 2 - Pattern 12, clock appears in Pattern 1 when:Calendar, World Clock or Operator Name is set to appear in Standby Time zone is set to other than GMT+9 Privacy Key Lock is active BEGIN_E_OI.indb 4 2009/12/14 16:35:22](https://usermanual.wiki/Panasonic-Connect/209023A.User-Manual-4-of-7/User-Guide-1221766-Page-50.png)
![18-5Settings18Back LightFrom Main Menu Settings Display SettingsSetting/Operation DefaultTurn Back Light On/Off; Set Power Saver Mode ■1Back Light Time > Lighting ON or OFF Select ON (Power Saver Mode) or OFF (Constant Light) ( For ON, Enter Light time)ON+SaverIlluminate Back Light while Charging ■Back Light Time > Charging Constant LightStandard 2Limit Back Light to Display Only ■Back Light Time > Area LCDLCD + KeysAdjust Brightness ■ >Back Light Time Brightness Select a brightness levelAuto 3Set Back Light to Turn On Softly ■Back Light Time > Soft Light ONOFFDisable Auto Image Compensation ■LCD AI > OFFON1 During operation (except when in Standby or S! Appli is active), press and hold to toggle ON/OFF.2 When set to Standard, Back Light illuminates with the same setting as Lighting setting.3 When set to Auto, Back Light is automatically adjusted according to ambient light.External DisplayFrom Main Menu Settings Display Settings External DisplaySetting/Operation DefaultTurn Off External Display ■OFF >ONAdjust ■BrightnessON > Brightness Select a brightness level Level 3Change ■WallpaperON > Stand-by Display Select an item Select a folder Select an image(P.18-23)Add Calendar to Wallpaper ■ON > Stand-by Display Calendar BG Image ON or BG Image OFF ( For BG Image ON, select a folder Select an image)–Change Stand-by ■Clock Display 1ON > Clock Stand-by Clock [Pattern] Select a clock pattern [Set](P.18-23)Change Stand-by Clock Position ■1 2ON > Clock Stand-by Clock [Position] Select a pattern [Set]Pattern 10Change Stand-by Clock Size ■1ON > Clock Stand-by Clock [Size] Small [Set]LargeBEGIN_E_OI.indb 5 2009/12/14 16:35:23](https://usermanual.wiki/Panasonic-Connect/209023A.User-Manual-4-of-7/User-Guide-1221766-Page-51.png)
![18-6Settings18Change Icon Clock Pattern ■ON > Clock Icon Clock Select a pattern (P.18-23)Set Caller ID Off ■ON > Incoming Calls OFFONForbid Opening New Message by Pressing ■ON > Message OFFON (Open)Turn Back Light Off after All S! Quick News ■ViewedON > S! Quick News All ONOFF (Turn off in 15 seconds)Turn Back Light Off while Playing Videos ■ON > Movie Display Time Display Always15 seconds1 Highlight Stand-by Clock [Play] to view Standby Clock.2 Even if clock position is set to Pattern 2 - Pattern 12, clock appears in Pattern 1 when:Calendar, World Clock or Operator Name is set to appear in Standby Time zone is set to other than GMT+9 Privacy Key Lock is active FontFrom Main Menu Settings Display SettingsSetting/Operation DefaultChange Font Size by Function ■Font Size > Select an item Select a size Standard ■Set Menu Font Sizes CollectivelyFont Size > Collective Setting Large or Small *StandardChange Font Style (Incoming/Outgoing Call Window) ■Disp. Call/Recv # > Pattern 2Pattern 1* When set to Small, font size for Phone Book and Incoming/Outgoing Call Logs is set to Standard.BEGIN_E_OI.indb 6 2009/12/14 16:35:24](https://usermanual.wiki/Panasonic-Connect/209023A.User-Manual-4-of-7/User-Guide-1221766-Page-52.png)
![18-7Settings18SettingsManner ModeFrom Main Menu Settings Incoming Settings Manner Mode TypeSetting/Operation DefaultSet Manner Mode Type ■Manner Mode, Super Silent >or User Mode ( For User Mode, set individual items [Finish])Manner ModeDefault Settings by Mode ■Manner Mode Super Silent Driving Mode User ModeAnswer PhoneValue set for Answer PhoneValue set for Answer Phone ON OFFVibratorON ON OFF ONIn. CallsSilent Silent Silent SilentMsg Ring T.Silent Silent Silent SilentAlarmSilent Silent Silent SilentRec. Check ToneON OFF ON ONKey ToneOFF OFF * OFFMic Sensitiv.Up Up Up UpLVA Tone (Low battery alarm)OFF OFF OFF OFF* Based on Key Tone setting ( P.18-2)SettingsIncoming SettingsFrom Main Menu Settings Incoming SettingsSetting/Operation DefaultChange Answer Setting ■ ( P.18-8)Answer Setting > Quick Silent or OFF Any Key AnswerAnswer Calls by Opening Handset ■ >Open-to-Ans. Call Phone or Video Call AnswerKeep RingingHide Caller Image Saved in Phone Book ■Phone Book Image > OFFONSet ■ Response ( P.18-8) for Missed Call/New Message NotificationInfo Notice Setting > ON or OFFONActivate Auto Answer with Earphone ■ >Auto Answer ON Enter ring time OFFSet Call Waiting Response ■In-call Management > Call Forwarding or Call RejectionAnswerBEGIN_E_OI.indb 7 2009/12/14 16:35:25](https://usermanual.wiki/Panasonic-Connect/209023A.User-Manual-4-of-7/User-Guide-1221766-Page-53.png)
![18-8Settings18Answer Setting Key Operations Any Key AnswerTo answer a call, press any of the following keys:Voice Call: , , - , , , , , , , , , Video Call: , , Quick SilentTo cancel ringtone/vibration, press any of the following keys:Voice Call: - , , , , , , , , , Video Call: - , , , , , , , , OFF To answer a call, press any of the following keys:Voice Call: , Video Call: , , When [Voice Mail] is assigned to indicated at the bottom of Display, press to start voice or video recording.Info Notice Setting Response ON No Missed Calls/No Received Messages: Triple-beep soundsMissed Calls/Received Messages: Double-beep sounds twiceボイス (Voice)*No Missed Calls/No Received Messages: Triple-beep soundsMissed Calls: Double-beep sounds; voice message announces that you have a missed callReceived Messages: Double-beep sounds; voice message announces that you have a new messageWhen Vibrator is set for Incoming Settings, vibration activates with beeps. In Manner Mode, only vibration activates.Set Side-keys Guard to OFF beforehand ( P.11-8).* Japanese onlySettingsDate & TimeFrom Main Menu Settings Date & TimeSetting/Operation DefaultChange Date and Time ■Date & Time > Enter year, date, time and time zone –Display World Clock ■ >World Clock ON to select an area OFFActivate Daylight Savings Time ■Daylight Savings > ONOFFDeactivate Alarm while Operating Other ■FunctionsAlarm Tone > Operation PreferredAlarm PreferredDeactivate Automatic Time Correction via ■Yahoo! Keitai >Time Correction OFFONBEGIN_E_OI.indb 8 2009/12/14 16:35:32](https://usermanual.wiki/Panasonic-Connect/209023A.User-Manual-4-of-7/User-Guide-1221766-Page-54.png)
![18-10Settings18SettingsNotification LightFrom Main Menu Settings Notification LightSetting/Operation DefaultSet Notification Light by Incoming Type ■(Voice/Video Calls or Messages)Incoming > Select Color Select a type to select a color(P.18-23)Change Notification Light Color Name for ■Incoming Call/MessageIncoming > Color Edit Color Name Select a color Edit color name–Adjust Notification Light Color Tone for ■Incoming Call/MessageIncoming > Color Adjust Color Tone Select a color Adjust color tone–Set Notification Light for Missed Calls/New ■MessagesMissed Call/Unread > OFF When Checked or OFFOFF after 24hoursSet Notification Light for Other Functions ■Select a function > ON or OFF, or to select a color–View Notification Light Status ■*Confirm Status >–* View Notification Light settings for incoming calls/messages, engaged calls or upper Side Key commands.SettingsText EntryFrom Main Menu Settings Phone Settings Text Entry MethodSetting/Operation DefaultSet Input Mode ■Input Mode > Check input mode(s) to use [Finish] Select a input mode to prioritizeInput mode: All Prioritized mode: Mode 1 (5-touch)Hide Predictive Candidates/Context Forecast ■ListPredict > OFFONSet Learning Feature Off for Secret Mode/ ■Secret Data OnlyLearn in Secret Mode > Enter Phone Password OFFONDelete All Learned Words ■Reset Learned Words > Enter Phone Password YES–BEGIN_E_OI.indb 10 2009/12/14 16:35:33](https://usermanual.wiki/Panasonic-Connect/209023A.User-Manual-4-of-7/User-Guide-1221766-Page-56.png)
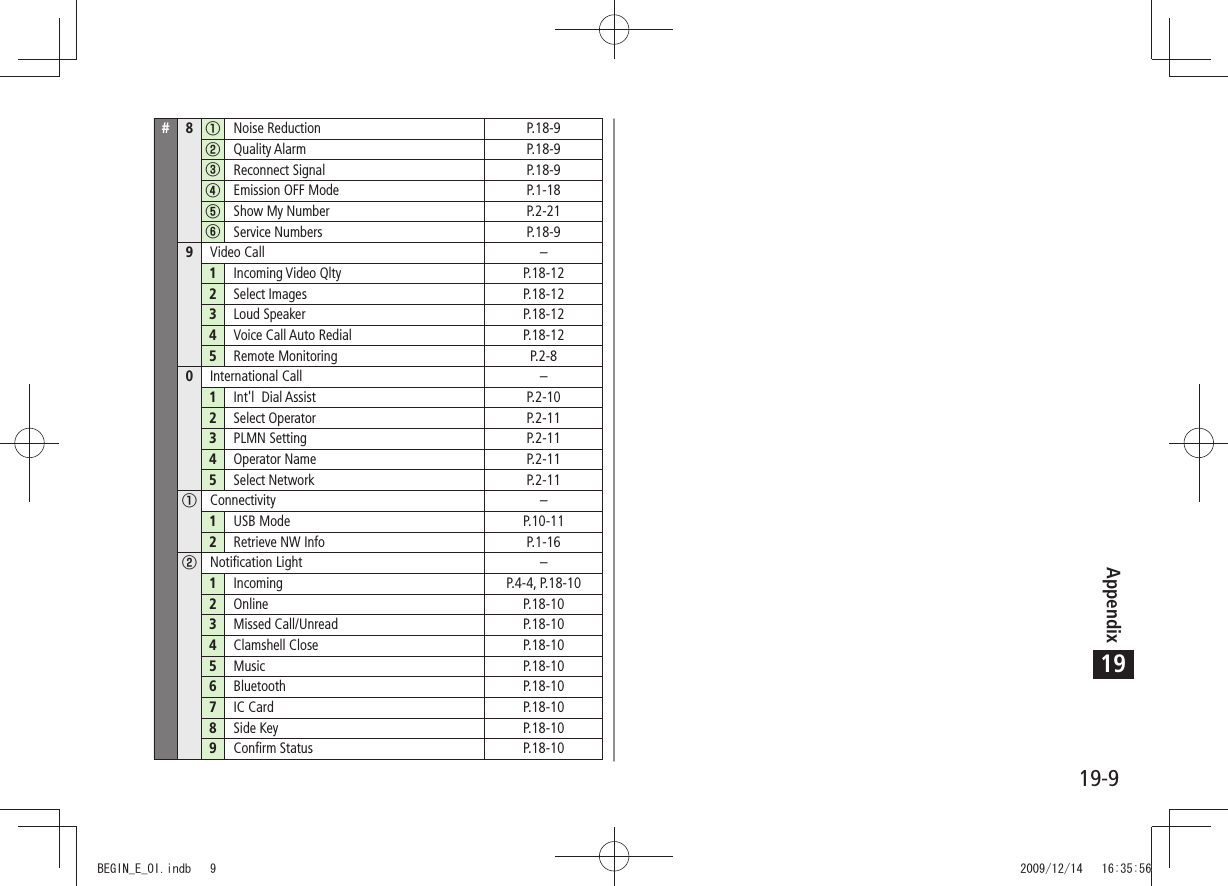
![18-12Settings18SettingsVideo CallFunction MenusFrom Main Menu Settings Video CallSetting/Operation DefaultChange Incoming Image Quality ■Incoming Video Qlty > Quality Prioritized or Motion PrioritizedStandardChange Outgoing Image ■Select Images > Select a category Highlight Original [Menu] Change setting Select a folder Select a file [Play] to view imagePre-installedSwitch Earpiece On ■Loud Speaker > OFFONSwitch to Voice Call when Video Call Fails ■Voice Call Auto Redial > ONOFFMonitor Room Remotely ■Remote Monitoring > ( P.2-8) –Engaged Video Call SettingsFrom During a Video Call, [Menu] V. Call settingsSetting/Operation DefaultChange Incoming Image Quality ■IncomingVideo Qlty > Qlty Prioritized or Motion PrioritizedStandardChange Brightness ■Brightness > Select a brightness level 0Adjust Color Tone to Lighting Conditions ■White balance > Select an environment AutomaticChange Color Tone ■Color mode set > Select a color tone Normal ■Enhance Image Quality in Low Light ConditionsNight mode > ONOFFSet Focus ■*Focus > Select a focus type Landscape* Outside Camera onlyBEGIN_E_OI.indb 12 2009/12/14 16:35:34](https://usermanual.wiki/Panasonic-Connect/209023A.User-Manual-4-of-7/User-Guide-1221766-Page-58.png)
![18-13Settings18SettingsHorizontal Open PositionHorizontal Open Menu/WallpaperFrom Main Menu SettingsSetting/Operation DefaultSet Which Operation to Start when Opening ■Handset to Horizontal Open PositionPhone Settings > Horizontal View TV, Camera or Horizontal Open MenuOFFChange Menu Theme in Horizontal Open ■PositionDisplay Settings > Hor. Open Menu Select a pattern(P.18-23)Change Wallpaper in Standby ■Display Settings > Internal Display Stand-by Display Wide Select a folder Select an image(P.18-23)Add Calendar to ■Wallpaper in StandbyDisplay Settings > Internal Display Stand-by Display Wide Calendar BG Image ON or BG Image OFF ( For BG Image ON, select a folder Select an image)–Change Wallpaper Randomly ■Display Settings > Internal Display Stand-by Display Wide Random Display Select a folder Every Hour or Every Day–Standby ClockFromMain Menu Settings Display Settings Internal Display Clock Stand-by Clock WideSetting/Operation DefaultChange Standby ■Clock Display 1 >[Pattern] Select a pattern [Set] (P.18-23)Change Standby Clock Position ■ 1 2 >[Position] Select a pattern [Set] Pattern 3Change Standby Clock Size ■ 1 >[Size] Small [Set] Large1 Highlight Stand-by Clock Wide [Play] to view clock.2 Even if clock position is set to Pattern 2 - Pattern 7, clock appears in Pattern 1 when:Calendar, World Clock or Operator Name is set to appear in StandbyTime zone is set to other than GMT+9Privacy Key Lock is activeBEGIN_E_OI.indb 13 2009/12/14 16:35:35](https://usermanual.wiki/Panasonic-Connect/209023A.User-Manual-4-of-7/User-Guide-1221766-Page-59.png)
![18-14Settings18SettingsDigital TVFrom Main Menu TV User SettingsSetting/Operation DefaultHide Caption ■Display > Caption OFFONChange Caption Position in Landscape View ■Display > Caption Posit. In W-scr UpperLowerHide Guide in Landscape View ■Display > Icons OFFONForbid Enhancing Frame Rate Automatically ■Video > Mobile W-Speed OFFONChange Image Quality ■Video > Image Quality Select an item DynamicSet Back Light Duration while Watching TV ■Display Light > Lighting Duration Enter duration (min.)Constant LightDeactivate Auto Volume ■Sound > Sound Effect Auto Volume OFFONRemaster Sounds from Earphone or Bluetooth ■® DeviceSound > Sound Effect Remaster 1 ONOFFAdd Listening Effect to Sound from Earphone ■or Bluetooth® DeviceSound > Sound Effect Listening 1 Select an itemOFFChange Quality of Sound from Earphone or ■Bluetooth® DeviceSound > Sound Effect Equalizer 1 Select an itemNormalTurn Off Speaker by Closing 941P while ■Watching TVSound > TV Sound While Closed OFFONEnd Recording when Battery Runs Low ■Recording > Rec. When Low Battery Stop RecordingContinue RecordingStart Recording TV Automatically when a Call ■Comes in while Watching TVRecording > Rec. Program When Call ONOFFHide Images on Data Broadcast Sites ■Data Broadcasting > Images OFFONTurn Off Sounds from Data Broadcast/Sites ■Data Broadcasting > Sound Effect OFFONShow Confirmation on Data Broadcast ■Data Broadcasting > Reset Settings YES–Set Power Saving Mode ■ 2ECO Mode > YESOFFReset Channel List ■Reset Channel Setting > Enter Phone Password YES–Delete Information in Broadcasting Storage ■AreaReset Storage Area > (Highlight an affiliated channel ) [Menu] Delete this or Delete all ( For Delete all, enter Phone Password) YES–BEGIN_E_OI.indb 14 2009/12/14 16:35:35](https://usermanual.wiki/Panasonic-Connect/209023A.User-Manual-4-of-7/User-Guide-1221766-Page-60.png)
![18-17Settings18SettingsBluetooth®From Main Menu Tools Bluetooth My Devices SettingsSetting/Operation DefaultSet Authentication/Encryption to Send Phone ■Book EntriesSet Authentications > ON ONOFF/OFFEnter Password when Sending All Phone Book ■EntriesSession Number Setting > ONOFFSet Duration to Search for Bluetooth ■® DevicesTime-out to Search > Enter duration (sec.) 05 secStop Ringtone Output to Headset/Handsfree ■DeviceForward Ring Tone > OFFONContinue Calls on Handset when Bluetooth ■® is Disconnected from Headset/Handsfree DeviceDisconnection Settings > Continue on the PhoneEnd the CallAlways Make Calls from 941P even when ■Headset Device is ConnectedDial from Headset > DeactivateActivateAlways Use Handsfree Device to Make/Receive ■CallsHandsfree Setting > Handsfree ModePrivate Mode 1View Bluetooth ■® PropertiesDevice Properties > 2–1 In Private Mode, device that makes/answers call takes priority.2 Device name, address, class and supported services appear. To change device name: [Edit]BEGIN_E_OI.indb 17 2009/12/14 16:35:37](https://usermanual.wiki/Panasonic-Connect/209023A.User-Manual-4-of-7/User-Guide-1221766-Page-63.png)
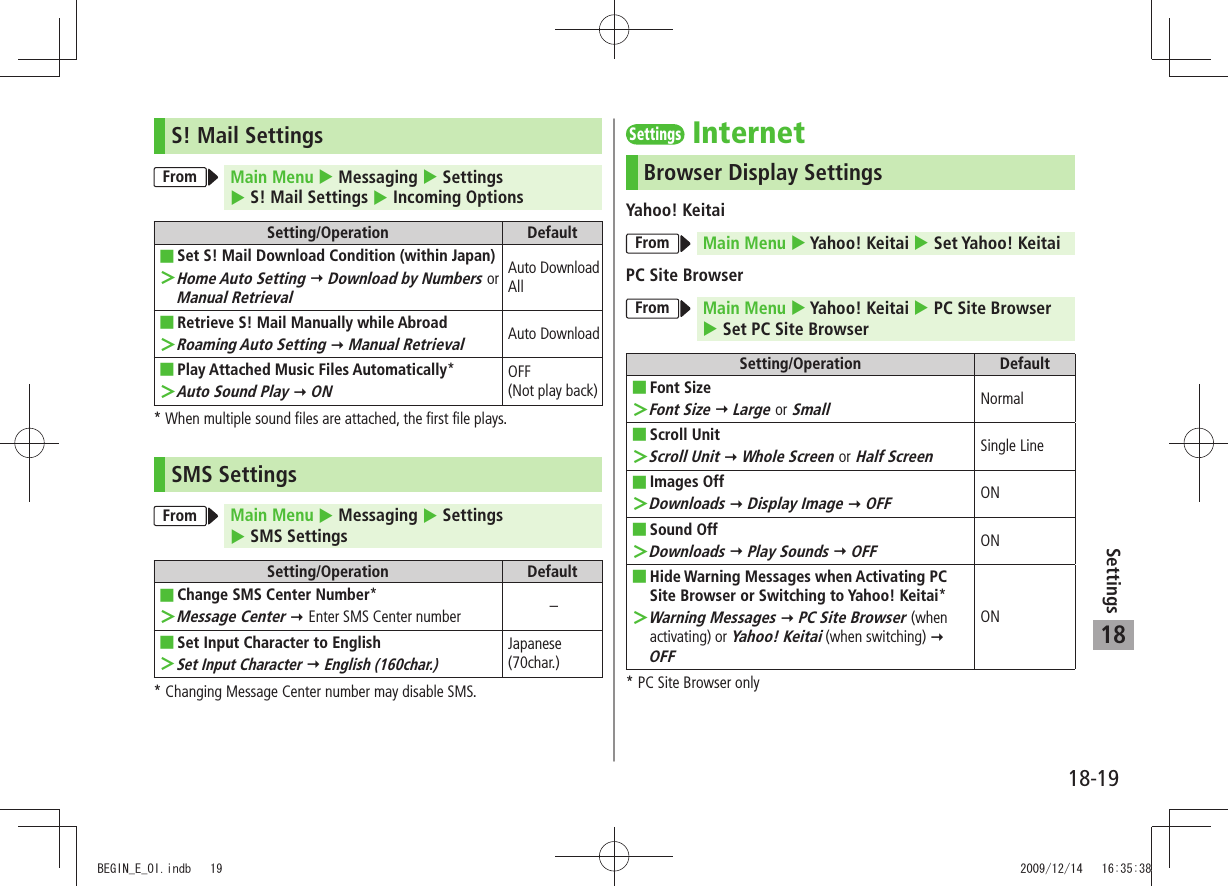
![18-18Settings18SettingsMessagingUniversal SettingsFrom Main Menu Messaging Settings Universal SettingsSetting/Operation DefaultChange Font Size ■*Font Size > Small or LargeNormalSet Scroll Unit in Text Entry/Preview Window ■Scroll Unit > Half Screen or Whole ScreenSingle LineChange Message Quote Setting when Replying ■Quote Message > ON (S! Mail/SMS) or OFFON (S! Mail)Confirm Message Delivery (Available when ■messaging to SoftBank handset numbers)Delivery Report > ONOFF (Not confirm)Change Anti-Spam Measures Setting ■Anti-Spam Measures > Report Spam [Edit] Edit recipient address [Finish] YESstop@meiwaku.softbankmobile.co.jpReset Anti-Spam Measures Setting ■Anti-Spam Measures > Report Spam [Menu] Reset Address [Finish] YES–Set Auto Delete Off (For Sent/Unsent) ■Auto Sent Msg Del > OFFONSet Auto Delete Off (For Incoming Mail) ■Auto Received Msg Del > ON (Read Msg Only) or OFFON (All Msg)* Character size in SMS or S! Mail subject field does not change. Check preview to see actual size.BEGIN_E_OI.indb 18 2009/12/14 16:35:37](https://usermanual.wiki/Panasonic-Connect/209023A.User-Manual-4-of-7/User-Guide-1221766-Page-64.png)
![18-22Settings18SettingsS! GPS Navi SettingsFromMain Menu Tools S! GPS Navi NAVI SettingsSetting/Operation DefaultSelect Navi Appli to Activate ■Select Navi Appli > Select a Navi Appli –Save Current Map URL ■Map URL Settings > Highlight <Not Recorded> [Edit] URL Name Enter a name Map URL Enter a URL ("http://" or "https://") [Finish]–Select Map URL ■Map URL Settings > Select a name NAVITIMEEdit/Delete Map URL ■*Map URL Settings > Highlight a name [Menu] Edit or Delete–Activate to Lock Positioning Function ■Positioning Lock > Enter Phone Password ONOFFHide Confirmation when Sending Location ■InformationSend Location Info > Enter Phone Password Send without Check (Send location information without showing confirmation)Send with Check (Show confirmation every time)Hide Notification of Incoming Location ■Provision RequestNotification Setting > Enter Phone Password OFFONSet Positioning Ringtone/Vibrator/Ringtone ■DurationRecv Location Request > Ringtone, Vibration Alert or Ringtone Duration Set individual itemRingtone: Pattern 2 Vibrator Alert: Pattern 1 Ringtone Duration: 05 seconds* Pre-installed NAVITIME cannot be edited or deleted.BEGIN_E_OI.indb 22 2009/12/14 16:35:39](https://usermanual.wiki/Panasonic-Connect/209023A.User-Manual-4-of-7/User-Guide-1221766-Page-68.png)

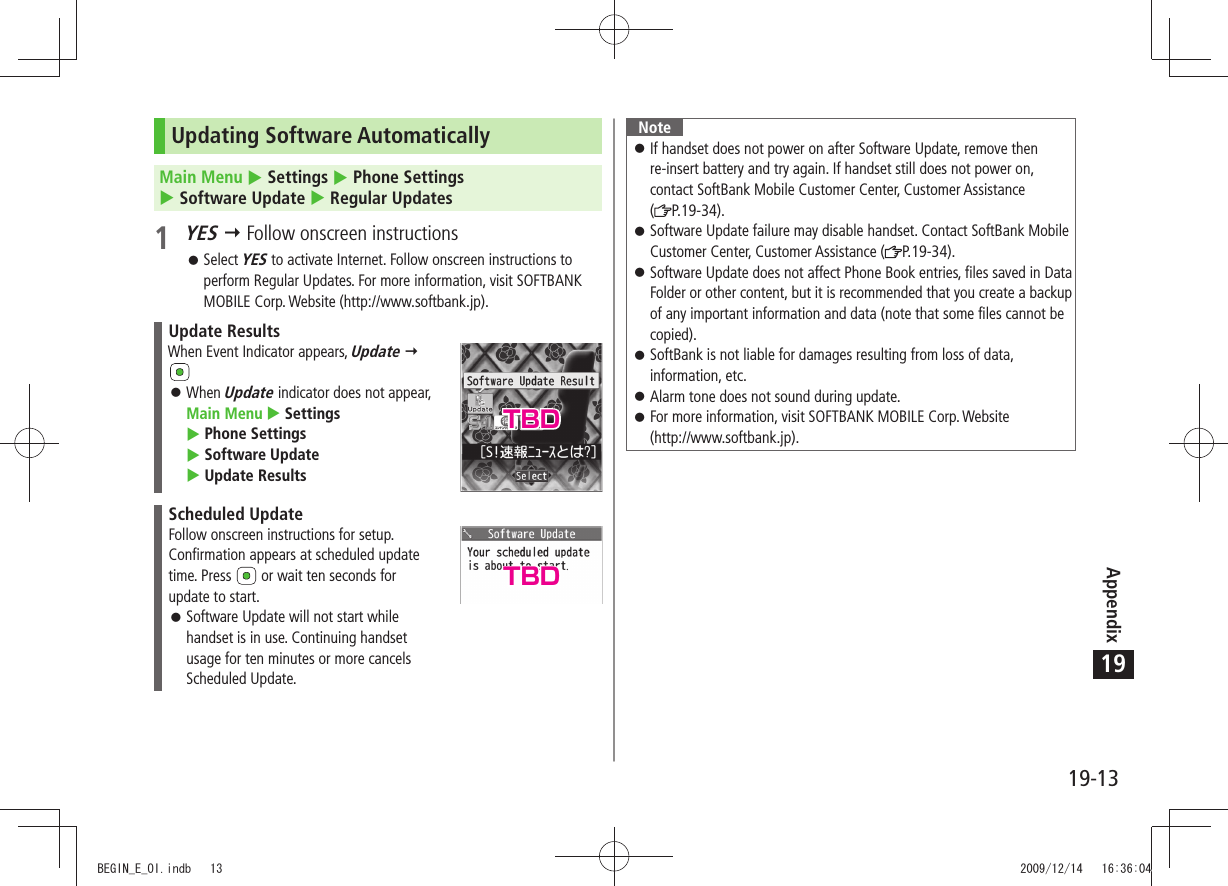
![Appendix19-1219Warning SignsProblem Causes and Remedies appears Handset is out-of-range.Move to a location where signal is strong. appearsSide-keys Guard is ON ( P.11-8).To activate Side Keys while handset is closed, set Side-keys Guard OFF. or appearsKeyguard ( P.11-3) or Privacy Key Lock (P.11-4) is active. Cancel it to use handset. Answer calls even if Keyguard or Privacy Key Lock is active.Low battery message appears and battery alarm tone soundsBattery is low.Charge ( P.1-15) or replace battery ( P.1-14).Software UpdateCheck for handset software updates and download as required. Choose to begin update or schedule update.Connection fees do not apply to updates (including checking for updates, downloading and rewriting).Fully charge battery beforehand. Even if appears, low battery message may appear. In this case, charge battery until Charging Indicator goes out.Select a place where signal is strong and stable. Do not remove battery during the update. Update will fail. Other functions are not available during Software Update. The update may take some time. Updating Software ManuallyMain Menu Settings Phone Settings Software Update Software Update1 [YES] Follow onscreen instructionsAfter download is complete, handset automatically turns off and restarts before Software Update begins.After Software Update is complete, handset automatically turns off and restarts before information appears for successful update (This process takes approximately 60 seconds.).TBDBEGIN_E_OI.indb 12 2009/12/14 16:36:01](https://usermanual.wiki/Panasonic-Connect/209023A.User-Manual-4-of-7/User-Guide-1221766-Page-82.png)
![19-15Appendix19Key Assignments (5-touch Mode)DisplayKey 漢カナabc 123 1 2_ 2 3 3Pictograms [Press and hold] TemplatesSpaceSpaceSpace[Press and hold] Symbols 41 Appears when entering single-byte character.2 Appears when entering double-byte character.3 Added to highlighted character. Press to display pictographs after determining character.4 In number mode, symbol list may not be displayed.While entering character, press to toggle characters at cursor in reverse order.After entering hiragana, katakana or alphanumerics, press to toggle upper/lower case.In number mode, press and hold to enter "+" (not available in S! Mail text field).In alphanumerics mode, characters entered after an upper-case character appear in order of: upper case lower case.BEGIN_E_OI.indb 15 2009/12/14 16:36:14](https://usermanual.wiki/Panasonic-Connect/209023A.User-Manual-4-of-7/User-Guide-1221766-Page-85.png)
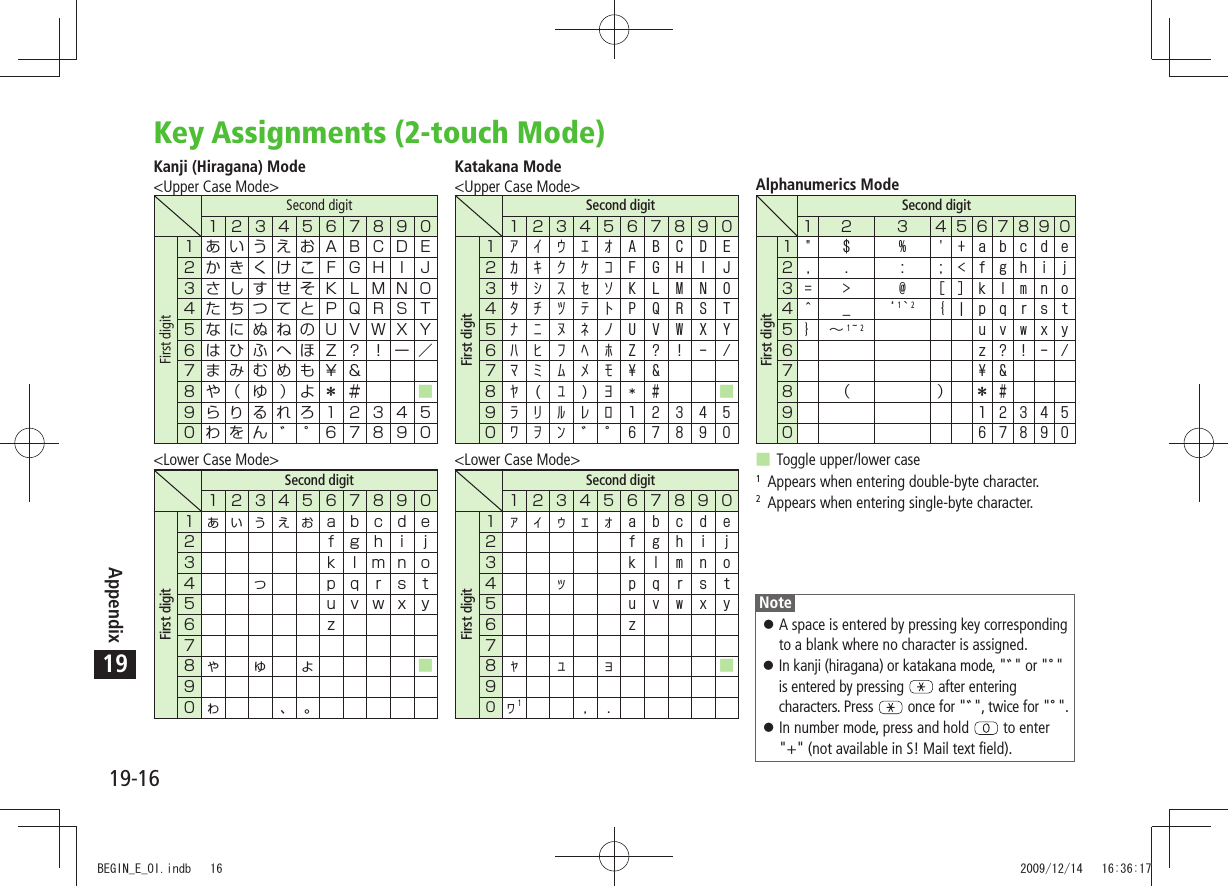
![19-17Appendix19Key Assignments (NIKO-touch Mode)Kanji (Hiragana) ModeSecond digitFirst digit Second digitFirst digit Katakana ModeNotePress [Mode] to toggle kanji (hiragana) and single-byte number modes.To switch to katakana mode: In kanji (hiragana) mode, [Menu] 1 byte characterTo toggle lower/upper case: Enter a character A space is entered by pressing key corresponding to a blank where no character is assigned.Press once for "", twice for "". In kanji (hiragana) mode, enter characters before pressing .In number mode, press and hold to enter "+" (not available in S! Mail text field).BEGIN_E_OI.indb 17 2009/12/14 16:36:20](https://usermanual.wiki/Panasonic-Connect/209023A.User-Manual-4-of-7/User-Guide-1221766-Page-87.png)