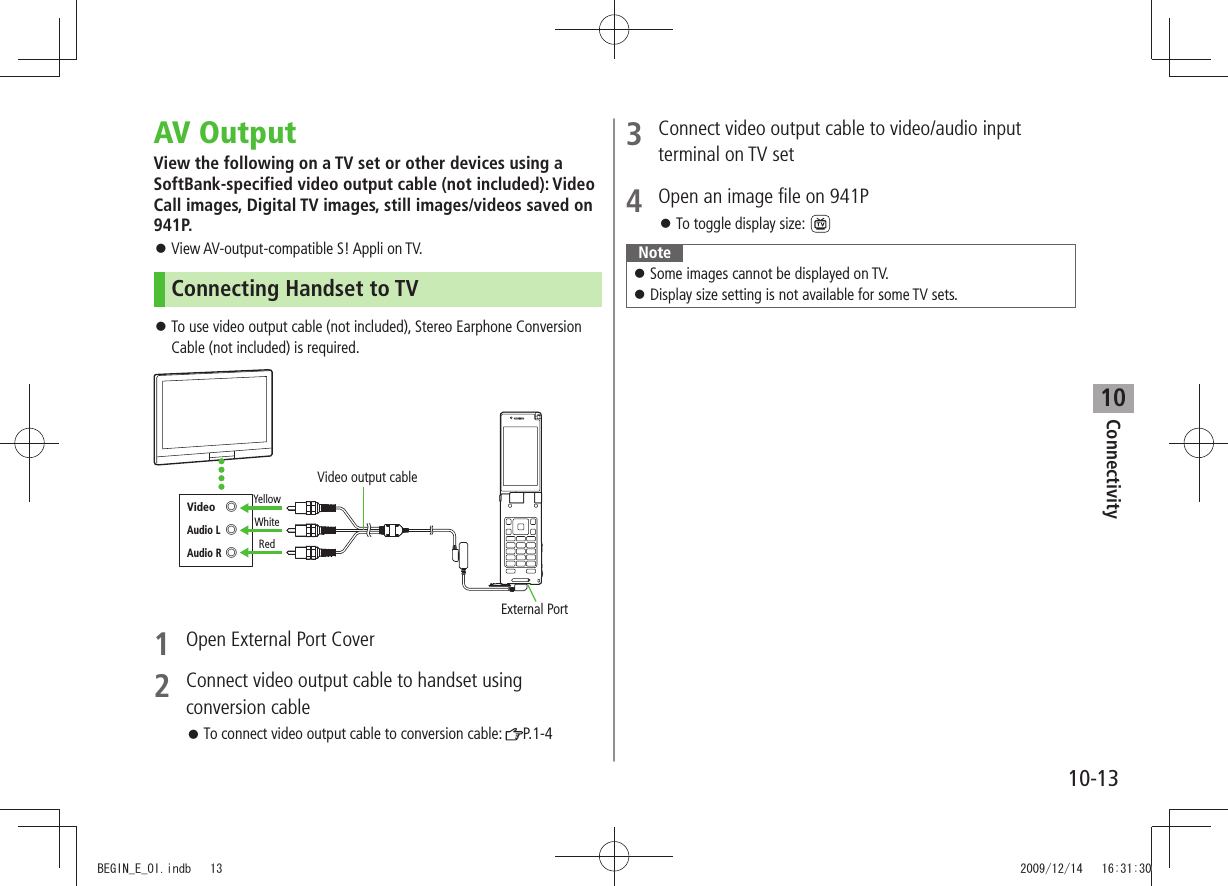
Panasonic Connect 209023A UMTS/ GSM Cellular Mobile with Bluetooth®, WLAN and RFID User Manual BEGIN E OI 091214
Panasonic Mobile Communications Development of Europe Ltd UMTS/ GSM Cellular Mobile with Bluetooth®, WLAN and RFID BEGIN E OI 091214
Contents
User Manual 3 of 7
![Entertainment7-47S! Quick News (Japanese)Add news headlines, weather forecasts, etc. via S! Quick News List to scroll across Standby Window.Registering or viewing S! Quick News incurs transmission fees. No fees apply for viewing ticker information. For more information, visit SOFTBANK MOBILE Corp. Website (http://www.softbank.jp).Registering S! Quick News ItemsRegister one Quick news, up to four General news and one Special news.Main Menu Entertainment S! Quick News S! Quick News List1 Add News YESYahoo! Keitai connects and contents list appears.2 Select an itemFollow onscreen instructions.Opening New InformationViewing New Information in StandbyWhen new information is received, appears in Standby.1 In Standby, to move pointer Select ticker2 [Select]Content list appears.3 Select informationDetails appear.TipSettings ●Turn Back Light Off after All S! Quick News Viewed ( P.18-6) ●Show Only Unread Items in Standby ●Change Marquee Speed ●Hide S! Quick News ●Show Image Data ( P.18-16)BEGIN_E_OI.indb 4 2009/12/14 16:30:20](https://usermanual.wiki/Panasonic-Connect/209023A.User-Manual-3-of-7/User-Guide-1221765-Page-1.png)
![Entertainment7-57Opening S! Quick News ListMain Menu Entertainment S! Quick News S! Quick News List1 Select an itemContent list appears.2 Select informationDetailed information appears.3 To connect to the Network, select a title YESUpdate Manually ■In Step1, >[Menu] Update or All Update YESView Summary ■In Step 1, highlight information > [Menu] Summary DisplayIconsUnread Quick newsRead Quick newsAuto Refresh disabledUnread General newsRead General newsUnread Special newsRead Special newsDelete Registered Items ■In Step 1, (highlight information >) [Menu] Delete or All Delete YES ( For All Delete, enter Phone Password)NoteAlternatively, Main Menu Entertainment S! Quick News Settings Del S! Quick News List YES to delete all informationTipSettings ●Automatically Update S! Quick News List ●Delete S! Quick News Information ( P.18-16)BEGIN_E_OI.indb 5 2009/12/14 16:30:21](https://usermanual.wiki/Panasonic-Connect/209023A.User-Manual-3-of-7/User-Guide-1221765-Page-2.png)
![Entertainment7-67S! Information Channel/Weather (Japanese)Subscribe to content and periodically receive updates. Set Weather Indicator to appear on Standby.Transmission fees apply for updates. Registering/CancelingMain Menu Entertainment S! Info Ch./Weather1 Register/Cancel YES941P connects to the Network.Follow onscreen instructions.Using S! Information ChannelUp to seven updates are saved. Viewing New InformationWhen information arrives, and Event Indicator appear in Standby.1 In Standby, to move pointer Select Event Indicator2 [Select]Follow onscreen instructions.Option Menu Items ( P.7-8)Manually Retrieve Information ■Select Event Indicator "Failed to download"Alternatively, Main Menu Entertainment S! Info Ch./Weather Get Latest Contents YESDelete Information ■Main Menu > Entertainment S! Info Ch./Weather Highlight What's New? [Menu] Delete YESNoteAlternatively, Main Menu Entertainment S! Info Ch./Weather What's New? to retrieve informationIf there is unread information in both S! Quick News and S! Information Channel, does not appear. Only Event Indicator appears.Viewing Previously Received InformationMain Menu Entertainment S! Info Ch./Weather1 History Select a date for unread news and for read news appear.Delete History ■Main Menu > Entertainment S! Info Ch./Weather History (Highlight a History) [Menu] Delete or Delete all YES ( For Delete all, enter Phone Password)TBDBEGIN_E_OI.indb 6 2009/12/14 16:30:23](https://usermanual.wiki/Panasonic-Connect/209023A.User-Manual-3-of-7/User-Guide-1221765-Page-3.png)
![Entertainment7-77Using Weather IndicatorWeather Indicator for current forecast area appears in Standby.Viewing New InformationEvent Indicator and Weather Indicator appear for weather updates.1 In Standby, to move pointer Select Event Indicator or Weather Indicator2 [Select]Information appears.Follow onscreen instructions.Option Menu Items ( P.7-8)Weather IndicatorIndicators are updated periodically.Example: Clear, Rain later thunderstorm, Cloudy with occasional snow, etc.See Weather Indicator List ( P.19-24) for a complete list of indicators.Manually Update Weather Indicator ■Select Event Indicator "Failed to download"Alternatively, Main Menu Entertainment S! Info Ch./Weather Weather Indicator Manual Update YESHide Event Indicator ■Main Menu > Entertainment S! Info Ch./Weather Weather Indicator Missed Event Settings OFFNoteAlternatively, view forecast details from Main Menu Entertainment S! Info Ch./Weather Weather Indicator WeatherHiding Weather IndicatorMain Menu Entertainment S! Info Ch./Weather Weather Indicator Display Settings1 OFFWhen Display Settings is set to OFF, update is also deactivated.BEGIN_E_OI.indb 7 2009/12/14 16:30:24](https://usermanual.wiki/Panasonic-Connect/209023A.User-Manual-3-of-7/User-Guide-1221765-Page-4.png)
![Entertainment7-87Option Menu ItemsWhile viewing a content, press [Menu] for these options.Item Operation/DescriptionForward Go to next pageText Copy Copy page textSelect File View, play or save file to Data Folder (From Step 2 in Downloading Image/Sound Files: P.14-11)Jump in this pageJump to top/end of pageYahoo! Keitai View top menuFont Size Change character size* or character conversion methodExit viewing thisExit content* Linked with Font Size setting in Internet option menu.E-Books (Japanese)Use BookSurfing® to acquire/view e-books, comics, photo books, etc. or e-Book Viewer to view XMDF files on 941P.BookSurfing ® and e-Book Viewer are S! Appli.Download Content Keys ( P.9-5) to read CCF/XMDF files.Some copy protected files have extensions different from the ones below. Application File FormatBookSurfing®CCF (.ccf)e-Book Viewer XMDF (.zbf, .zbk, .zbs)Some PC content may not be viewable via e-Book Viewer. Main Menu Entertainment1 BookSurfing or e-Book ViewerSee application Help menu for usage information. NoteLaunch BookSurfing ®/e-Book Viewer via S! Appli, or select a file from Books in Data Folder.BEGIN_E_OI.indb 8 2009/12/14 16:30:25](https://usermanual.wiki/Panasonic-Connect/209023A.User-Manual-3-of-7/User-Guide-1221765-Page-5.png)

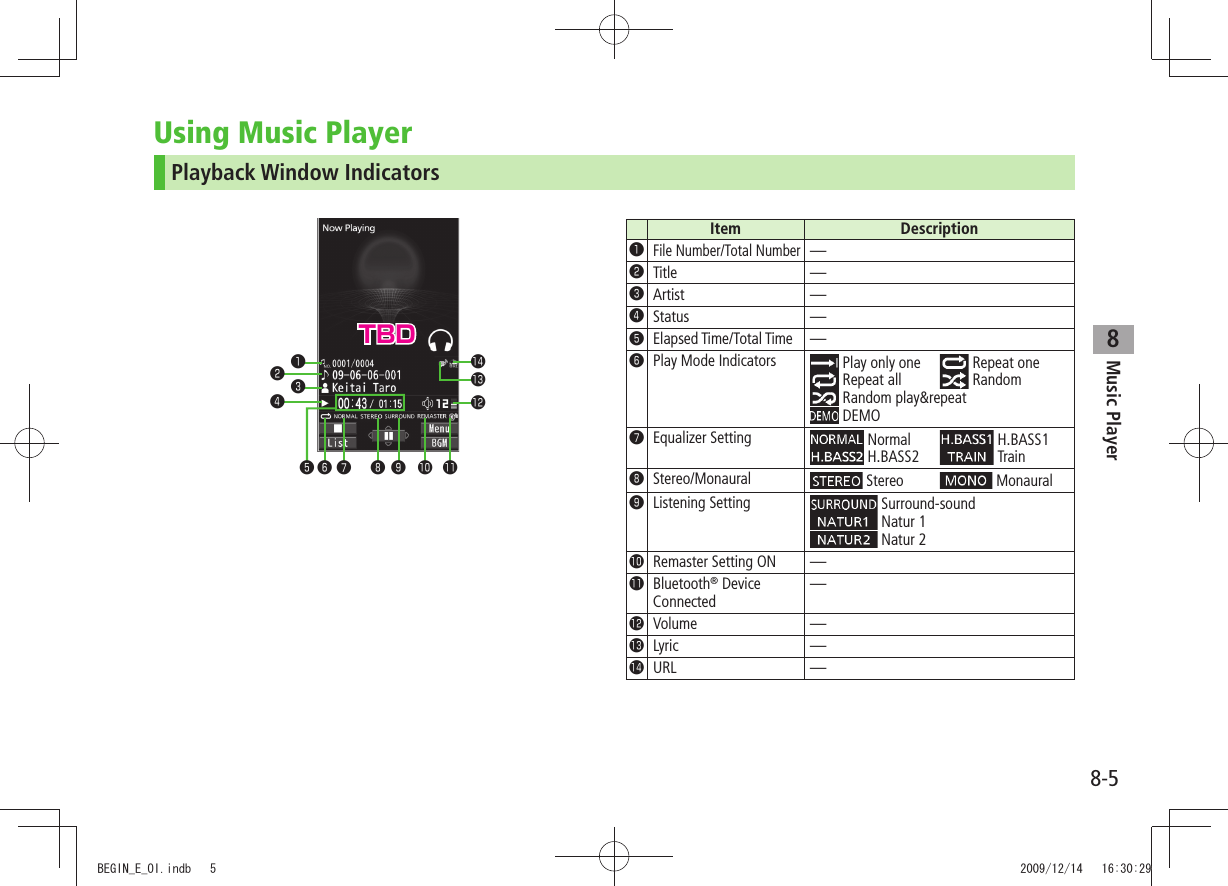
![Music Player8-68Playing Music1 Press and hold Player Menu window appears.Last playback window appears. To open Player menu: twice. 2 Select a category (See below)Item Operation/DescriptionAll Tracks Select files from 941P & microSD CardArtist Select files from Artist folderAlbum Select files from Album folderGenre Select files from Genre folderPlay List Select group of files saved to Play List★ appears for currently/previously played Play List.3 Select a fileSelected file plays.★ appears for currently/previously played file.Playback Window Operations: P.8-7To end playback, [ ]Player Menu WindowNoteAlternatively, follow these steps to play back music files: Main Menu Music Player Playermp4/3gp files in Ring Songs&Tones folder can also be played in Music Player.When playing back files with handset closed, missed calls or new messages cannot be checked by even if Info Notice Setting ( P.18-7) is ON.Changing Play Mode1 Press and hold Player Menu window appears.Last playback window appears. To open Player menu: twice.2 [Menu] Play mode setting3 Select an item (See below)Item Operation/DescriptionNormal Play all files in selected category/Play ListPlay only one Play selected fileRepeat one Repeat selected fileRepeat all Repeat all files in selected category/Play ListRandom Play selected category/Play List files randomlyRandom play&repeatRepeat selected category/Play List files randomlyTBDBEGIN_E_OI.indb 6 2009/12/14 16:30:33](https://usermanual.wiki/Panasonic-Connect/209023A.User-Manual-3-of-7/User-Guide-1221765-Page-11.png)
![Music Player8-78Using Other Functions while Listening to Music (Play Background)Use Phone Book, Messaging, Internet, etc. while listening to music.1 While playing file, [BGM]2 To end, in Standby End playerNoteSome functions cannot operate simultaneously. Volume or play mode change is not available during Play Background. Playing Chaku-Uta Full®/WMA Files as DemoMain Menu Music Player Data Manager1 Select an item (See below)Item Operation/DescriptionMain Folder View Chaku-Uta Full® listSelect a folder >To view file list in handset/microSD Card: [Phone/microSD] WMA View WMA list [Change] to toggle display view in Chaku-Uta Full® and WMA list.2 Select a Chaku-Uta Full® or WMA fileDemonstration playback starts.Playback Window OperationsAdjust Volume or Play Previous* or press and hold When playback time is over three seconds, previous file plays from beginning.Play Next* or press and hold Rewind Press and hold Forward Press and hold Pause/Resume [ / ]Stop [ ]View Next Jacket/LyricView Previous Jacket/LyricSwitch Jacket/Lyric DisplaySwitch Playlist/Playback Window*[List/Player]Play Background*[BGM]Switch Remaster ( P.8-8)Switch Listening ( P.8-8)Switch Equalizer ( P.8-8)* Not available for playback as a demoBEGIN_E_OI.indb 7 2009/12/14 16:30:42](https://usermanual.wiki/Panasonic-Connect/209023A.User-Manual-3-of-7/User-Guide-1221765-Page-12.png)
![Music Player8-88Functions while Playing FilesSet Sound Effect ■While playing file, >[Menu] Sound effect Select an item (See below)Item Operation/DescriptionRemaster Complement sound from earphone or Bluetooth® device to bring close to original soundON > or OFFListening Add listening effect to sound from earphone or Bluetooth® deviceSelect an item >Surround-sound・ : Reproduce natural and stereophonic soundNatur 1 or Natur 2・ : Complement sound specific to earphone to reproduce natural soundOFF・ : Turn off Listening settingEqualizer Change quality of sound from earphone or Bluetooth® deviceSelect an item >Normal・ : Reproduce normal soundH. BASS1・ : Enhance low-pitched sound H. BASS2・ : Enhance low-pitched sound even moreTrain・ : Minimize sound leakageFunctions Available in Playback Window ■While playing file, >[Menu] Select an item (See below)Item Operation/DescriptionPlayer menu Show Player menuPlay mode settingChange play mode ( P.8-6)Sound effect (Left)Music info Show song title, artist and playback timeConnect to WebsiteOpen site linkYES >Display ImageShow jacketDisplay lyricShow lyricPrevious image/Previous lyricShow previous jacket or lyricNext image/Next lyricShow next jacket or lyricBEGIN_E_OI.indb 8 2009/12/14 16:30:42](https://usermanual.wiki/Panasonic-Connect/209023A.User-Manual-3-of-7/User-Guide-1221765-Page-13.png)
![Music Player8-98Chaku-Uta Full®/WMA ListFrom Main Menu Music Player Data ManagerConfirm Memory Status ■ >[Menu] Memory StatusFunctions Available in Chaku-Uta Full ■® Folder ListMain Folder > Highlight a folder [Menu] Select an item (See below)Item Operation/DescriptionAdd folder Enter folder name >Edit folder nameEnter folder name >Delete folder Enter Phone Password > YESMemory StatusConfirm memory status/total files >Functions Available in Chaku-Uta Full ■®/WMA File ListMain Folder >or WMA ( Select a folder) Highlight a file [Menu] Select an item (See below)Item Operation/DescriptionSet as ring tone (Fullsong ring tone) 1Set Chaku-Uta Full® as ringtoneFullsong ring tone > Select an itemSet as ring tone (Point ring tone) 1Set a segment of Chaku-Uta Full® as ringtonePoint ring tone > Select a segment Select an itemTo confirm segment: [Play]Music info Show song title, artist and playback timeMove 1Select a storage >Item Operation/DescriptionMove to microSD 1 Move a Chaku-Uta Full® to microSD CardAdd folder 1Enter folder name >Multiple-choice 1Select multiple Chaku-Uta Full® filesCheck Chaku-Uta Full >® files [Menu] Delete, Move or Send Ir data Operate selected itemConnect to Website 1Open site linkYES >Display imageShow jacketMemory StatusMemory status/total number of files appearsDEL all licenses 2Delete all WMA licensesEnter Phone Password > YESDelete thisYES >Delete all Delete all files in folderEnter Phone Password > YESAttach to S! Mail 1Send a file via S! Mail ( From Step 2 on P.13-4)Send Ir data 1( P.10-3)IC transmission 1( P.10-5)Take contents key 1( P.9-5)1 Chaku-Uta Full® files only2 WMA files onlyBEGIN_E_OI.indb 9 2009/12/14 16:30:43](https://usermanual.wiki/Panasonic-Connect/209023A.User-Manual-3-of-7/User-Guide-1221765-Page-14.png)
![Music Player8-108Using Play ListUse Play List to organize Data Folder music files. Select Music folder files to create Play List links to each file in its original folder.Creating New Play ListsSave up to 30 Play Lists with up to 100 songs per list. Music files saved on microSD Card are also savable. 1 Press and hold Player menu appears.Last playback window appears. To open Player menu: twice 2 Play List [Menu] Create play list Select a category and show file list Check files to save to Play List [Finish]3 Enter a Play List namePlay List WindowNoteCreate WMA Play Lists (using Windows Media ® Player) or SD Audio Play Lists (using SD-Juke Box) on PC. Maximum number of Play Lists to create and songs to save is as follows: WMA Play Lists: 100 Play Lists; 250 songs per list SD Audio Play Lists: 99 Play Lists; 99 songs per listPlaying Songs from Play List1 Press and hold Player menu appears.Last playback window appears. To open Player menu: twice2 Play List Select a Play ListTo play back selected Play List from the beginning: [Play]3 Select a fileSelected file plays back. Notemp4/3gp files in Ring Songs&Tones folder can also be added to Play List.Play List Contents WindowTBDTBDBEGIN_E_OI.indb 10 2009/12/14 16:30:45](https://usermanual.wiki/Panasonic-Connect/209023A.User-Manual-3-of-7/User-Guide-1221765-Page-15.png)
![Music Player8-118Play ListPress and hold Play ListFunctions Available in Play List Window ■(Highlight a Play List) >[Menu] Select an item (See below)Item Operation/DescriptionPlayer menu Open Player menuPlay mode settingChange play mode ( P.8-6)Create play listCreate a new Play List ( P.8-10)Copy play list Copy Play ListEnter a Play List name >Edit pl. list nameEdit Play List nameEdit Play List name >Add Add files to Play ListSelect a category, and open a Play List > Check files to add [Finish]Delete play listSelect an item > Operate selected itemFunctions Available in Play List Contents Window ■Select a Play List > (Highlight a file) [Menu] Select an item (See below)Item Operation/DescriptionPlayer menu Open Player menuPlay mode settingChange play mode ( P.8-6)Music info Show song title, artist and playback timeItem Operation/DescriptionAdd Add files to Play ListSelect a category, and show contents window > Check files to add [Finish]DEL from play listDelete files from Play ListSelect an item > Operate selected itemOrder to play Select a file from Play List to change playing order > to change order [Select]Repeat steps above to change order [Set]Add to play listAdd files to another Play ListAdd one > or Add some ( For Add some, check files [Finish]) Select a Play ListDisplay image Show jacketBEGIN_E_OI.indb 11 2009/12/14 16:30:45](https://usermanual.wiki/Panasonic-Connect/209023A.User-Manual-3-of-7/User-Guide-1221765-Page-16.png)
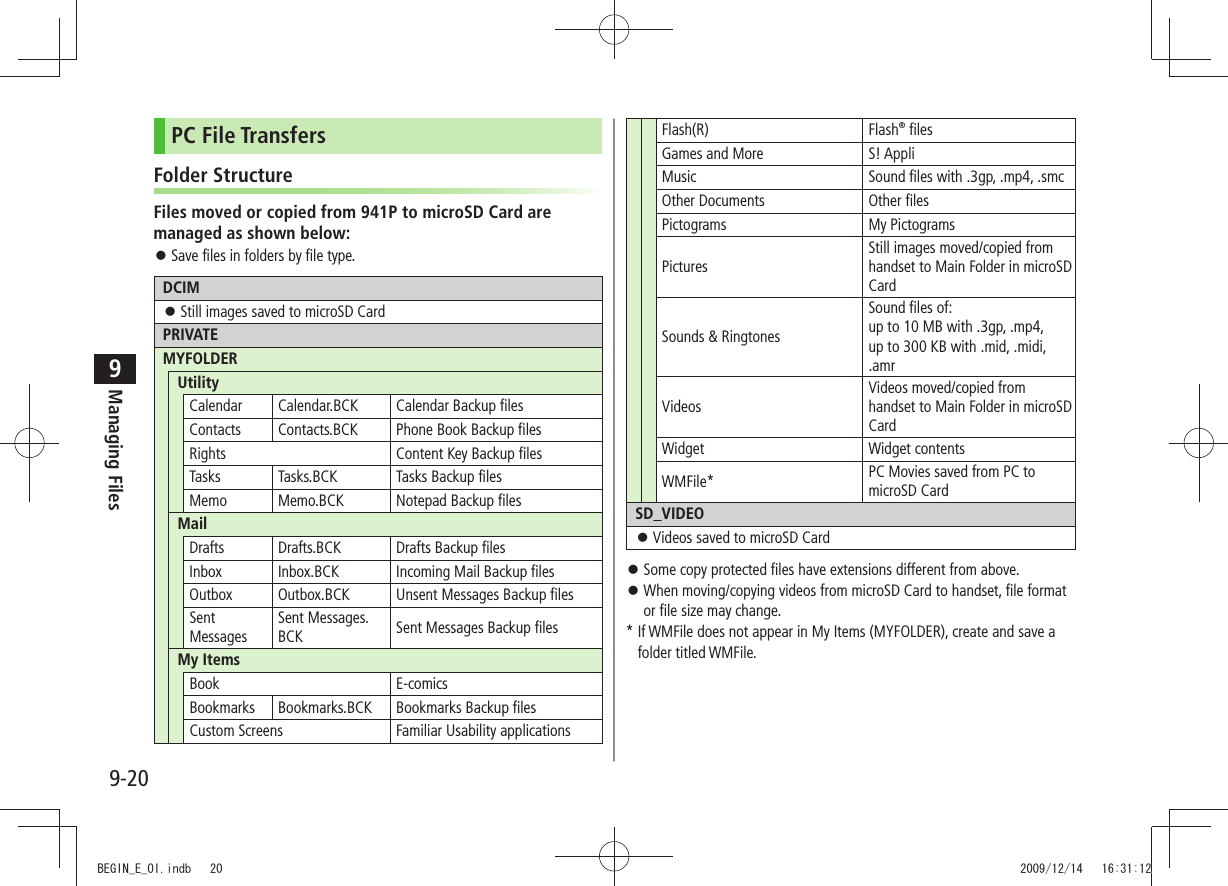
![9-3Managing Files9Folder Function/Saved Data File Format 1Videos 2Download Videos Connect to download site MP4 (including .mp4, .3gp, SDV), ASF (.asf)Main Folder Downloaded video files, etc.Camera Video files recorded by CameraPre-installed Preinstalled video filesPlay List Play back Play ListPosition Memory Play back video files from saved resume positionPC Movies microSD 3PC movies saved using PC WMA (.wma), WMV (.wmv), ASF (.asf)Position Memory Play back PC movies from saved resume positionPlay History Playback records of PC moviesTV Image Still images recorded by Digital TV JPEG (.jpg)Video 3Copy-protected video files (One-Seg compatible) TOD (.tod), MOI (.moi), MAI (.mai), PGI (.pgi)Position Memory Play back video files from saved resume positionLifestyle-Appli Download Connect to download site (Osaifu-Keitai®: P.16-2) –Books 2Download Books Connect to download site CCF (.ccf), XMDF (.zbf, .zbk, .zbs)Customized Screen 2Customized Screen Connect to download site CUSR (.xcsf)Familiar Usability UIE (.uie)Templates Download Templates Connect to download site –Font Download Font Connect to download site MTF (.mtf)Main Folder Downloaded fontsPre-installed Pre-installed fontsOther Documents 2Main Folder Incompatible files attached to mail 4–1 Some copy protected files have extensions different from above.2 When microSD Card is installed, press [microSD] in Folder list to view data saved in microSD Card.3 Available only when microSD Card is installed.4 Some attachment files cannot be saved in Other Documents.BEGIN_E_OI.indb 3 2009/12/14 16:30:47](https://usermanual.wiki/Panasonic-Connect/209023A.User-Manual-3-of-7/User-Guide-1221765-Page-20.png)
![Managing Files9-49Using Copy Protected FilesPlaying/forwarding/saving may be restricted and Content Key ( P.9-5) may be required for usage. See file information to confirm restrictions such as expiry term or usage limitation (Respective file information in "Options": P.9-7). or (Silver) appears for copy protected files requiring Content Keys. files are inaccessible.Files downloaded on 941P cannot be used on PCs. Network setting may be required for usage. File usage may require insertion of USIM Card in use at time of download.941P holds up to 1000 Content Keys. Multiple Keys may be required to use a file. Expired Keys are deleted automatically.Interrupted playback (by incoming calls or Alarm) of copy protected WMA files with limited usage in Data Folder is also counted as one usage. Opening FilesViewing & Playing FilesMain Menu Data Folder1 Select a folderIn Folder List, press to toggle handset folder and microSD Card folder. 2 Select a folder Select a fileFile appears/plays.To toggle file list view: [Change]When Shortcut to a Download Site is SelectedHandset connects to a download site on Internet.Operations while Playing Back Ring Songs&Tones ■Stop [Stop]Volume /Attach files (during playback) to S! Mail [ ]Pictures FolderStill Image List WindowTBDTBDBEGIN_E_OI.indb 4 2009/12/14 16:30:54](https://usermanual.wiki/Panasonic-Connect/209023A.User-Manual-3-of-7/User-Guide-1221765-Page-21.png)
![Managing Files9-59Videos/PC Movies Playback Operation ■Some operations are not available depending on files. Adjust Volume or Play Previous Starts from beginning when playback time is over three seconds.Play NextRewind 1Press and hold Forward 1Press and hold Select Position 2 repeatedlyChange Speed [ / 1/ ]Mute/Resume [ / ]Pause/Resume [ / ]Play Frame by Frame 1While pausing, [Frame]Play back frame by frame Switch Portrait/Landscape View (Full Screen)Remaster ( P.8-8)Listening ( P.8-8)Equalizer ( P.8-8)1 Videos only2 PC Movies onlyonly Tip ●File Display/Playback Functions ( P.9-6)Content KeyIf Content Key is expired, a message appears when the file is opened. To obtain a new Key, select YES. 941P connects to Content Key site.Copy Protected Files: P.9-4 or (Silver) appears for files requiring Content Keys. files are inaccessible. appears on images in Thumbnail view of expired files (Original icon appears for Books folder.).NoteAlternatively, obtain Content Key as follows: Highlight a file [Menu] Take contents keyDepending on contents, some Content Keys may not be obtained from websites even when warning for expired contents appears.When 1000 Content Keys have been saved, a message appears. Delete old Keys; otherwise downloads may fail (Connection fees apply).BEGIN_E_OI.indb 5 2009/12/14 16:31:00](https://usermanual.wiki/Panasonic-Connect/209023A.User-Manual-3-of-7/User-Guide-1221765-Page-22.png)
![Managing Files9-69File Display/Playback FunctionsEnlarge Still Images ■Main Menu > Data Folder Pictures Select a folder Select a file [Menu] Display size Fit in displayPlay Back from a Resume Position ■Resume playback (videos/PC Movies) from a saved position.Main Menu > Data Folder Videos or PC Movies Position Memory Select an itemSave a resume position: RightMarker to resume is a resume position automatically saved when a call comes in, alarm goes off, battery runs low, or playback is terminated.Functions Available in Video/PC Movie Playback Window ■Some operations are not available depending on files. While playback is paused, >[Menu] Select an item (See below)Item Operation/DescriptionNormal play 1Play at normal speedSlow 1Play at slow speedQuick View (1.25x) 1Play 1.25 times faster than normalQuick View(2x) 1Play at double speedFast 2ForwardRewind 2RewindStop Return to Videos/PC Movies List windowPosition to playStart playback from specified point > to highlight a play point [Set]Connect to Website 1Open site linkYES >Item Operation/DescriptionSound effectRemaster, Listening or Equalizer ( P.8-8)Contents info 2Show title, file name, etc.Position memorySave resume positionSelect a resume position >To play back from a saved position: LeftAttach to S! Mail 1Send file via S! Mail(From Step 2 on P.13-4)Register (Ringtones) 1Set as ringtoneRingtones > Select a type★ appears for item set as ringtone.Register (Stand-by Display/Start-up Window) 1Save a file as Standby Display or Start-up WindowSelect an item > YESVideo info 1Show title, file name, etc.Send Ir data 1Send file via Infrared ( P.10-3)IC transmission 1Send file via IC transmission ( P.10-5)Add shortcut icon 1Create a shortcut ( P.1-22)Description 2Show file informationThe words view > or Description viewCopy URL 2Copy URLDisplay size Select a display sizeActual size > or Fit in displayChange to full 1Switch to Landscape View. Full screen playback starts.To toggle views: 1 Video files only2 PC movies onlyBEGIN_E_OI.indb 6 2009/12/14 16:31:00](https://usermanual.wiki/Panasonic-Connect/209023A.User-Manual-3-of-7/User-Guide-1221765-Page-23.png)
![Managing Files9-79OptionsCopy Protected FilesWhen set as wallpaper or ringtone, settings may return to defaults if license has expired or different USIM Card is inserted.Limited use files cannot be set as wallpaper or ringtone. Highlight a file in Data Folder [Menu] for the following operations.Some functions may not be available depending on files. Pictures ■Item Operation/DescriptionEdit picture Edit files ( P.9-12)Display pictureOpen filesSet display* Set as wallpaper, Phone Book image, Menu Icons, etc.Select an item >★ appears for item.Picture info Show file name, file size, etc.Attach to S! MailSend files via S! Mail ( From Step 2 on P.13-4)Graphic mail Add selected files to Graphic Mail ( P.13-9) Send Ir data Send files via Infrared ( P.10-3)IC transmissionSend files via IC transmission ( P.10-5)Add shortcut iconCreate shortcuts ( P.1-22)Copy to microSDCopy files to microSD CardMove to microSDMove files to microSD CardPositioning Set where to paste files in StandbySelect a position >Item Operation/DescriptionEdit file name Edit file namesMove Move files to other foldersSlideshow Show files in a folder continuously. Select display speedNormal > or SlowDelete this Delete a fileYES >Delete all Delete all filesEnter Phone Password > YESMultiple-choiceSelect multiple files to useCheck files to use > [Menu] Select an itemMemory StatusShow memory informationSort Change display order of filesSelect an order >Pictures/ File namesToggle list viewAlternatively, [Change] to toggleTake contents keyConnect to site for Content Key* Before setting a file as Video Call related item (except for Incoming/Outgoing Video Calls), set Select Images to Original (Change Outgoing Image: P.18-12). To set a file as Menu Icon related item, set Menu Icons to Customize (P.18-4).If incoming calls arrive or handset is turned off while My Pictograms package file (.gpk) is being uncompressed, some pictograms in package file may not open. Retry uncompressing.BEGIN_E_OI.indb 7 2009/12/14 16:31:01](https://usermanual.wiki/Panasonic-Connect/209023A.User-Manual-3-of-7/User-Guide-1221765-Page-24.png)
![Managing Files9-89Tip ●Enlarge Still Images ( P.9-6)●Editing Still Images ( P.9-12)●Creating Animations ( P.9-13)●Saving Still Images to Phone Book ( P.9-14)Ring Songs&Tones ■Item Operation/DescriptionEdit file name Edit file namesPlay melody Play back filesSet as ring toneSet as >ringtone★ appears for item.Add shortcut iconCreate shortcuts ( P.1-22)Attach to S! MailSend files via S! Mail ( From Step 2 on P.13-4)Send Ir data Send files via Infrared ( P.10-3)IC transmissionSend files via IC transmission ( P.10-5)Copy to microSDCopy files to microSD CardSong·Tone infoShow titles, file names, etc.Memory StatusShow memory informationDelete Select a type >Delete this・ YESDelete select・ Check files to delete [Finish] YESDelete all・ Enter Phone Password YESItem Operation/DescriptionSort Change display order of filesSelect an order >Move Move files to other foldersMove to microSDMove files to microSD CardTake contents keyConnect to site for Content KeyWidget ■Item Operation/DescriptionPaste on Stand-by(P.7-2)Widget InformationShow file names, sizes, etc.Attach to S! MailSend files via S! Mail ( From Step 2 on P.13-4)Send Ir data Send files via Infrared ( P.10-3)IC transmissionSend files via IC transmission ( P.10-5)Move to microSDMove files to microSD CardDelete this Delete a fileYES >Delete all Delete all filesEnter Phone Password > YESMultiple-choiceSelect multiple files to useCheck files to use > [Menu] Select an itemBEGIN_E_OI.indb 8 2009/12/14 16:31:02](https://usermanual.wiki/Panasonic-Connect/209023A.User-Manual-3-of-7/User-Guide-1221765-Page-25.png)
![Managing Files9-99S! Appli/Lifestyle-Appli ■Item Operation/DescriptionStart Activate S! Appli or Lifestyle-AppliSecurity level Set security level ( P.15-4)S! Appli info Show file names, file sizes, etc.Add shortcut iconCreate shortcuts ( P.1-22)Move to microSDMove files to microSD Card (Lifestyle-Appli cannot be moved)Delete Delete filesYES >Music ■See "Functions Available in Chaku-Uta Full ®/WMA File List" ( P.8-9)Videos ■Item Operation/DescriptionRegister Set as ringtones, Standby Display or Start-up displayVideo info Show titles, file names, etc.Attach to S! MailSend files via S! Mail ( From Step 2 on P.13-4)Send Ir data Send files via Infrared ( P.10-3)IC transmission Send files via IC transmission ( P.10-5)Copy to microSDCopy files to microSD CardMove to microSDMove files to microSD CardMove Move files to other foldersAdd shortcut iconCreate shortcuts ( P.1-22)Edit file nameEdit file namesDelete this Delete a fileYES >Delete all Delete all filesEnter Phone Password > YESMultiple-choiceSelect multiple files to useCheck files to use > [Menu] Select an itemMemory StatusShow memory informationSort Change display order of filesSelect an order >Listing Change list view [Change] to toggle viewsTake contents keyConnect to site for Content KeyBEGIN_E_OI.indb 9 2009/12/14 16:31:02](https://usermanual.wiki/Panasonic-Connect/209023A.User-Manual-3-of-7/User-Guide-1221765-Page-26.png)
![Managing Files9-109PC Movies ■Item Operation/DescriptionContents info Show titles, file names, etc.Move Move files to other foldersCopy Copy files to other foldersMultiple-choiceSelect multiple files to useCheck files to use > [Menu] Select an itemComment viewShow descriptionsMemory StatusShow memory informationDelete this Delete a fileYES >Delete all Delete all filesEnter Phone Password > YESTV ■See Pictures folder for still images. Item Operation/DescriptionEdit title Enter titles >Video info Show titles, channel names, etc.Add shortcut iconCreate shortcuts ( P.1-22)Delete Select an item >Delete this・ YESDelete selected・ Check files to delete [Finish] YESDelete all・ Enter Phone Password YESMemory StatusShow memory informationListing Change list view [Change] to toggle viewsBooks ■Item Operation/DescriptionPlay Play back filesConnect to WebsiteOpen site linkBook info Show file names, file sizes, etc.Copy to microSDCopy files to microSD CardMove to microSDMove files to microSD CardAdd folder Add foldersEdit file nameEdit file namesMove Move files to other foldersTake contents keyConnect to site for Content KeyDelete Delete filesYES >BEGIN_E_OI.indb 10 2009/12/14 16:31:03](https://usermanual.wiki/Panasonic-Connect/209023A.User-Manual-3-of-7/User-Guide-1221765-Page-27.png)
![Managing Files9-119Customized Screen ■Item Operation/DescriptionPreview Preview filesCollective SettingSet Customized Screen all at onceFile info Show titles, file names, etc.Copy to microSDCopy files to microSD CardMove to microSDMove files to microSD CardEdit file name Edit file namesDelete this Delete a fileYES >Delete all Delete all filesEnter Phone Password > YESMultiple-choiceSelect multiple files to useCheck files to use > [Menu] Select an itemMemory StatusShow memory informationSort Change display order of filesSelect an order >Listing Change list view [Change] to toggle viewsTake contents keyConnect to site for Content KeyConnect to WebsiteOpen site linkTemplates ■Item Operation/DescriptionCompose S! MailSend files via S! Mail ( P.13-5)Edit title Edit titlesTemplate Info Show title and file sizeDelete thisYES >Delete selectedCheck files to delete > [Finish] YESDelete All Enter Phone Password > YESFont ■Item Operation/DescriptionSet Apply selected fontFile info Show file names, file sizes, etc.Edit title Edit titlesDelete this Delete a fileYES >Delete all Delete all filesEnter Phone Password > YESMultiple-choiceSelect multiple files to useCheck files to use > [Menu] Select an itemMemory StatusShow memory informationSort Change display order of filesSelect an order >Listing Change list view [Change] to toggle viewsBEGIN_E_OI.indb 11 2009/12/14 16:31:03](https://usermanual.wiki/Panasonic-Connect/209023A.User-Manual-3-of-7/User-Guide-1221765-Page-28.png)
![Managing Files9-129Other Documents ■Item Operation/DescriptionFile info Show file names, file sizes, etc.Attach to S! MailSend files via S! Mail ( From Step 2 on P.13-4)Copy to microSDCopy files to microSD CardEdit file name Edit file namesMove Move files to other foldersDelete this Delete a fileYES >Delete all Delete all filesEnter Phone Password > YESMultiple-choiceSelect multiple files to useCheck files to use > [Menu] Select an itemMemory StatusShow memory informationSort Change display order of filesSelect an order >NoteTitles of mp4/3gp Ring Songs&Tones files and Videos/Music/Customized Screen files appear in respective lists. Files without titles appear with file names (created when files are saved to handset). Titles cannot be changed; edited file names may not appear in lists.Using/Editing Still ImagesEditing Still ImagesEdit features are not available for all file types. Main Menu Data Folder Pictures1 Select a folder Select a file [Menu] Edit picture2 [Menu] Select an item (See below)Item Operation/DescriptionMarker stamp Select a stamp > to move stamp [Put]Following options are available when positioning a stamp:To rotate or scale up/down: ・ [Menu] Select an itemTo start over: ・ [Cancel]To add: [Add]Frame Select a frame >To rotate 180 degrees: ・ [Menu] 180° rotationTo change frame: ・ To return to frame list: ・ [Cancel]Character stampEnter text > to move text [Put]To change content/color/font/size: When positioning stamp, [Menu] Operate selected itemTo start over: [Cancel] after positioningBEGIN_E_OI.indb 12 2009/12/14 16:31:04](https://usermanual.wiki/Panasonic-Connect/209023A.User-Manual-3-of-7/User-Guide-1221765-Page-29.png)
![Managing Files9-139Item Operation/DescriptionFit in screen Change image size to Standby (480 x 854)YES >Change size Select a size >To start over: [Cancel]Trim away Specify a size > to specify area [Set]To start over: After specifying area, [Cancel]Retouch Select an item >To start over: [Cancel]Rotate90° to right >, 90° to left or 180°To start over: [Cancel]Brightness > to adjust brightnessAttach to S! Mail*Create S! Mail with edited still images >[Set] Create S! Mail ( From Step 2 on P.13-4)Edited files are automatically saved. Alternatively, [ ] to attach pictures to S! MailSave* Overwrite/rename to save edited files* Available after other editing operations.3 [Set] [Save]4 YES (Overwrite) or NO (Save as)Creating AnimationsSaving Original AnimationMain Menu Data Folder Pictures Original Animation1 <New> <1st> - <20th>2 Select a folder Select a fileRepeat Step 2. 3 [Finish]Functions Available in Original Animation ListIn Original Animation list, press [Menu] for following operations.Item Operation/DescriptionEdit title Enter title >Org. animation Add more files to an Original Animation ( Above)Display picturePlay back an Original AnimationAlternatively, select an Original Animation from list to play back.Set display Set an Original Animation as Standby display, etc.Select item to set Original Animation as >Picture info View item set for Set displayRelease animationCancel a saved Original AnimationYES >BEGIN_E_OI.indb 13 2009/12/14 16:31:05](https://usermanual.wiki/Panasonic-Connect/209023A.User-Manual-3-of-7/User-Guide-1221765-Page-30.png)
![Managing Files9-149Saving Still Images to Phone BookSavable sizes: ・ Standby (480 x 854) or smaller in JPEG or GIF format (up to 300 Kbytes)VGA (640 x 480) or smaller in PNG format・ Save images to up to 100 Phone Book entries. Still images cannot be saved to USIM Card Phone Book entries. Main Menu Data Folder Pictures1 Select a folder Select a file [Menu] Set display Phone Book2 New EntryNew Enter details ( From Step 3 on P.4-4) [Finish] Add to Existing EntryAdd Select entry [Finish] YESManaging Folders/FilesManaging FoldersThe following operations are available in Pictures, Music, Books, Videos, Ring Songs&Tones and Other Documents.Main Menu Data Folder1 Select a folder [Menu] Select an item (See below)Item Operation/DescriptionAdd folder Create user foldersEdit folder nameEdit user folder namesDelete folder Delete a user folderEnter Phone Password > YES YESFolder security 1Hide files in folder unless Phone Password is enteredEnter Phone Password > YES appears for folder.To cancel: Repeat the step Delete all image 2Enter Phone Password > YES YESEdit Play List 3Edit Play ListsRelease Play List 3Cancel edited Play ListsYES >BEGIN_E_OI.indb 14 2009/12/14 16:31:06](https://usermanual.wiki/Panasonic-Connect/209023A.User-Manual-3-of-7/User-Guide-1221765-Page-31.png)
![Managing Files9-159Item Operation/DescriptionSelect storage 4Specify folders on microSD Card to save files toYES >Folders cannot be specified when saving Books files. Memory Status 5View memory capacity/number of saved files1 Pictures/Videos folders only2 Pictures folder only3 Play List folder in Ring Songs&Tones folder only4 microSD Card only5 Music folder onlyUsing Play ListUse Play List to organize Data Folder Ring Songs&Tones/Videos files.Select Ring Songs&Tones, Music or Videos folder files to create Play List links to each file in its original folder.Creating Ring Songs&Tones Play ListsMain Menu Data Folder Ring Songs&Tones1 Highlight Play List [Menu] Edit Play List2 Select a number Select a folder Select a fileRepeat Step 2. 3 [Finish]Play Back Play List ■Main Menu > Data Folder Ring Songs&Tones Play ListFiles are played back in the saved order. Delete a File ■After Step 1, select a file > Release thisDelete All Files ■In Step 1, >[Menu] Release Play List YESNotemp4/3gp files cannot be added to Play List except in Music Player Play List.BEGIN_E_OI.indb 15 2009/12/14 16:31:06](https://usermanual.wiki/Panasonic-Connect/209023A.User-Manual-3-of-7/User-Guide-1221765-Page-32.png)
![Managing Files9-169Creating Video Play ListsMain Menu Data Folder Videos Play List1 Select a Play List2 Select a number Select a folder Select a fileRepeat Step 2. 3 [Finish]Play Back Play Lists ■Main Menu > Data Folder Videos Play List Highlight a Play List [Play]Files are played back in the saved order. Delete a File ■After Step 1, (highlight a file >) [Menu] Delete this or DEL all from list YESChange Order ■After Step 1, >[Menu] Oder to play Select a file Select a target [Finish] [Finish]microSD Card941P is compatible with up to 2 GB commercial microSD Cards and up to 16 GB commercial microSDHC Cards (as of May 2009). For information on memory card compatibility, visit the website below (Japanese). Note that microSD Cards not listed on the website may not function properly.From Yahoo! Keitai ・ P-egg (as of May 2009) Yahoo! Keitai top page メニューリスト 辞書・ツール→ ケータイメーカー P-eggFrom PC ・ http://panasonic.jp/mobile/ Not all operations are guaranteed by the microSD/microSDHC Cards listed.Format new microSD/microSDHC Cards for use with 941P ( P.9-18).NoteSoftBank is not liable for damages from accidental loss/alteration of microSD Card information. Keep a copy of Phone Book entries, etc. in a separate place.microSD Card has no write protect feature; there is a risk of accidental erasure/overwriting of files.BEGIN_E_OI.indb 16 2009/12/14 16:31:06](https://usermanual.wiki/Panasonic-Connect/209023A.User-Manual-3-of-7/User-Guide-1221765-Page-33.png)
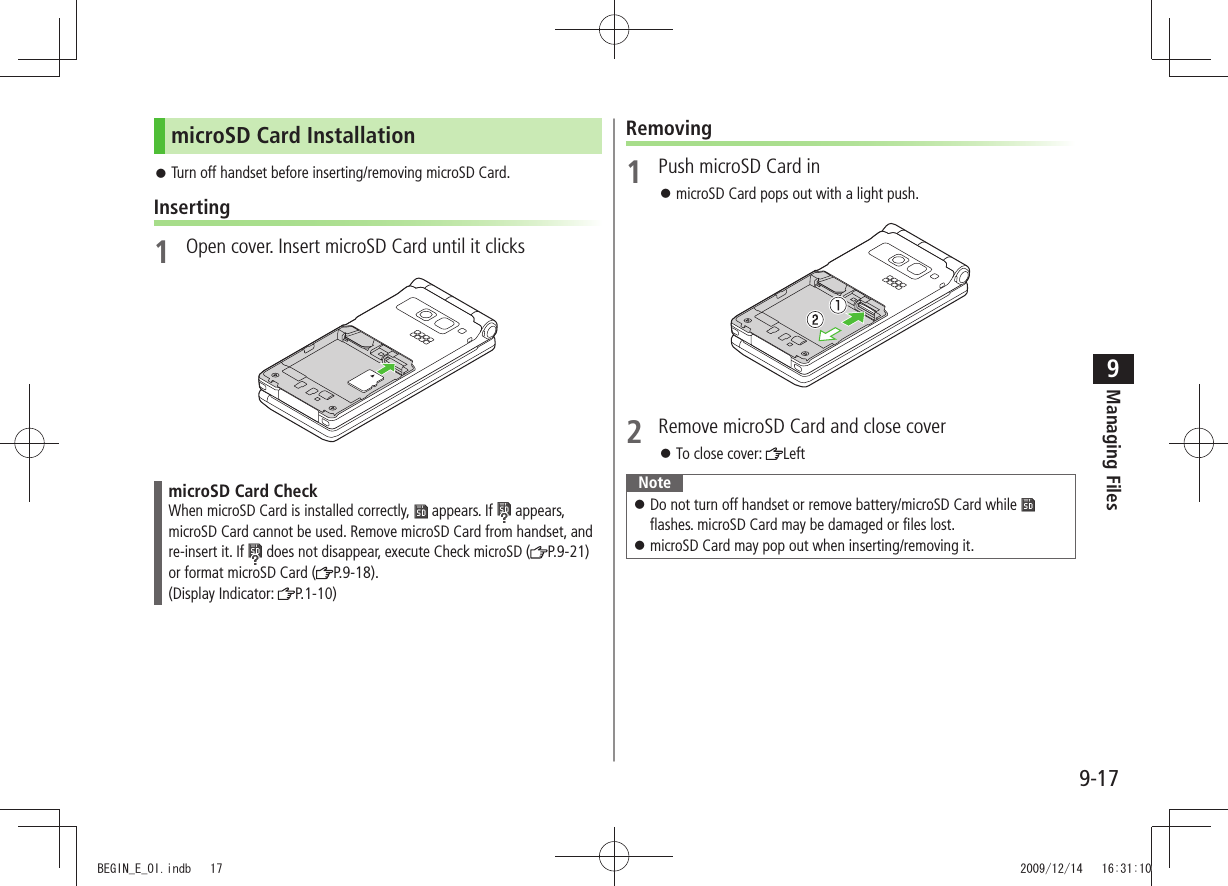
![Managing Files9-189Format microSD CardFormatting microSD Card deletes all saved files/data. Main Menu Tools microSD Backup1 [Menu] microSD format2 Enter Phone Password YESNoteDo not turn handset power off or remove microSD Card or battery while formatting; may damage handset or microSD Card.microSD Cards formatted on other devices may not be used. Format microSD Card on 941P before use.941P cannot format incompatible microSD Cards. If format fails, turn power off and remove microSD Card from 941P. Reinsert microSD Card and format it again.Viewing microSD Card FilesView Phone Book entries, Calendar events, Tasks, mail messages, Notepads and Bookmarks backed up on microSD Card.Main Menu Tools microSD Backup1 Select a category2 Select a fileBackup date appears as file name.3 Select a dataNoteIf messages on microSD Card do not appear correctly, copy messages to handset ( P.9-19) and execute Charset Conversion ( P.13-22).Category ListFile ListDetailed DataData ListTBDTBDTBDTBDBEGIN_E_OI.indb 18 2009/12/14 16:31:11](https://usermanual.wiki/Panasonic-Connect/209023A.User-Manual-3-of-7/User-Guide-1221765-Page-35.png)
![Managing Files9-199Handset Data BackupBack up handset data (Phone Book, Calendar, Tasks, Messages, Notepad, Bookmarks, Content Keys) to microSD Card; restore handset data after accidental loss/alteration.Back up Content Key: P.9-22Backing up to microSD CardMain Menu Tools microSD Backup1 Highlight a category [Menu] Copy to microSD ( For Bookmarks, select an item)2 Enter Phone Password YESAll files of selected category are backed up to microSD Card.One File Backup ■Open a file > [Menu] Copy to microSD YESRestoring from microSD CardMain Menu Tools microSD Backup1 Select a category2 Restore One ItemSelect a file Highlight an item [Menu] Add to phone Restore One FileHighlight a file [Menu] Add to phone or Overwrite to phone Enter Phone Password Restore All Files[Menu] Add all to phone or Overwr. all to ph. Enter Phone Password3 YESNoteNote that Overwrite to phone or Overwr. all to ph. erases all files of same category on handset.Files of 10 MB or larger cannot be moved/copied from microSD Card to handset.Data backed up in other SoftBank handsets may not be restored in 941P depending on type and size.Tip ●Delete Items from microSD Card ●View microSD Card Memory Capacity (P.9-21)BEGIN_E_OI.indb 19 2009/12/14 16:31:12](https://usermanual.wiki/Panasonic-Connect/209023A.User-Manual-3-of-7/User-Guide-1221765-Page-36.png)
![Managing Files9-219Using Data on microSD CardWith a microSD Card inserted, connect handset with a PC via USB cable (not included) to read/write data from/onto microSD Card. Following equipment is required:Connector Cable: USB cable PC: PC with USB port (Universal Serial Bus Specification Rev 1.1 compliant)Compatible Operating Systems: Windows ® XP, Windows Vista® (Japanese version in each)Main Menu Settings Connectivity USB Mode microSD Mode1 Connect handset to PC via USB cable while 941P is onPC recognizes microSD Card. appears in Standby (handset).NoteEven if incoming call arrives, reading/writing data continues during calls. After calls, check indicators on PC to see if reading/writing is complete.File names saved in microSD Card may not properly appear if changed on PC.microSD Card FunctionsRestore microSD Card items (Check microSD) ■Main Menu > Tools microSD Backup [Menu] Check microSD YESDo not turn handset power off or remove microSD Card or battery while formatting; may damage handset or microSD Card.It may take 30 seconds or longer to complete Check microSD depending on data volume on microSD Card.941P cannot check incompatible or unformatted microSD Cards. 941P may delete files and folders that fail to be restored. Delete Items from microSD Card ■Main Menu > Tools microSD Backup Select a category (Highlight a file ) [Menu] Delete this or Delete all ( For Delete all, enter Phone Password) YESContent Key cannot be deleted. View microSD Card Memory Capacity ■Main Menu > Tools microSD Backup [Menu] microSD infoBEGIN_E_OI.indb 21 2009/12/14 16:31:13](https://usermanual.wiki/Panasonic-Connect/209023A.User-Manual-3-of-7/User-Guide-1221765-Page-38.png)
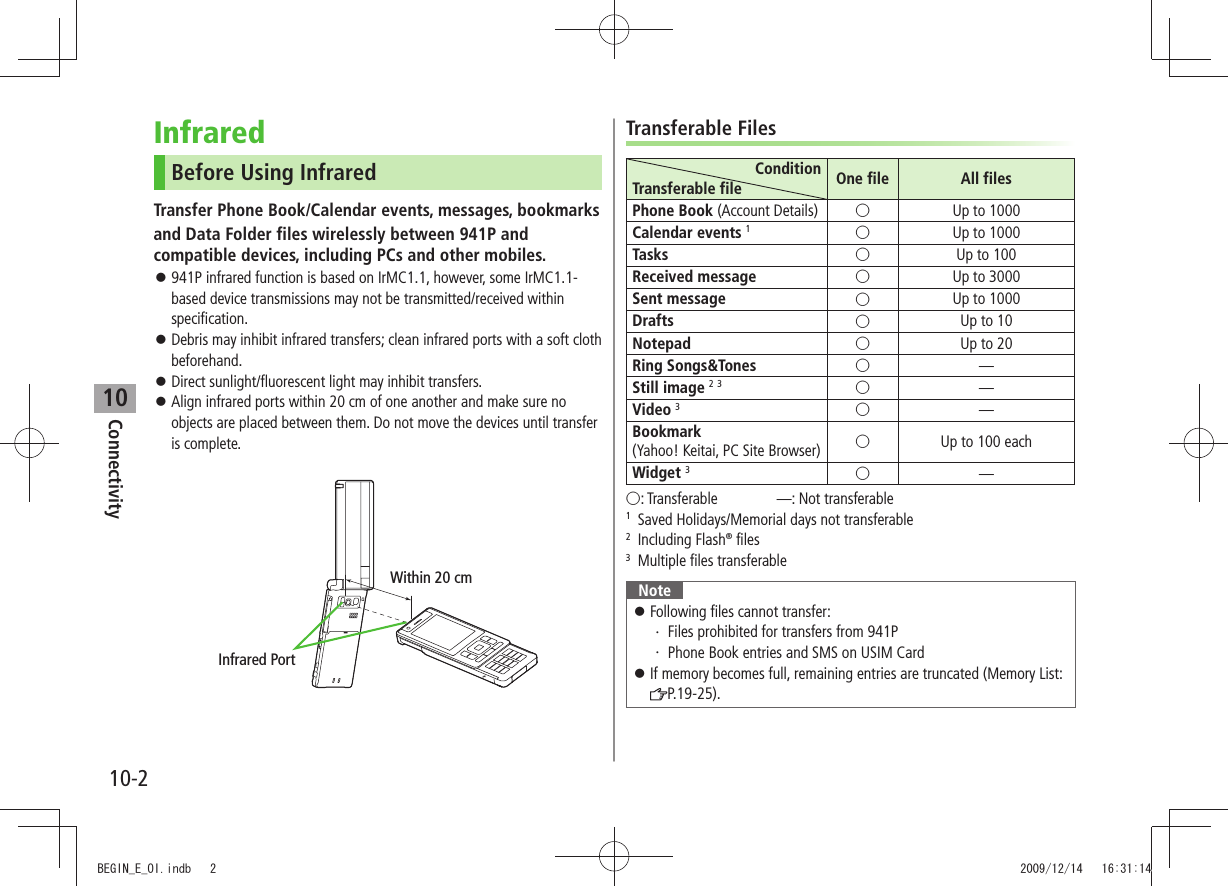
![Connectivity10-310One/Multiple File TransferTransferable Files: P.10-2Sending1 Highlight a file, and follow the steps belowFiles to Send Operation/DescriptionPhone Book >[Menu] Send Ir data Send phonebookAccount Details >[Ir]Messages >[Menu] Send Ir data Send ThisBookmarks >[Menu] Send to ExtrnlDvcs Send Ir data Send ThisStill Images/ Videos/Widgets >[Menu] Send Ir dataTo send multiple files: [Menu] Multiple-choice Select files to send [Menu] Send Ir data Other Files >[Menu] Send Ir data2 YESReceivingMain Menu Tools Receive via Infrared Receive1 When a file is received, YESSend files from sender side within 30 seconds.To receive subsequent files, select YES.All File TransfersPrecautionReceiving all files overwrites all saved files including secret/protected files. Files saved in Secret Mode are also deleted.Sending all Phone Book entries sends Account Details as well. User-edited information is overwritten (handset number remains). Session NumberSession number (4 digits) is required for all file transfers via Infrared and IC transmission. Sender and recipient must enter same Session number to complete transfers.Sending1 Highlight a file, and follow the steps belowFiles to Send Operation/DescriptionPhone Book [Menu] Send Ir data Send all phonebookMessages [Menu] Send Ir data Send AllBookmarks [Menu] Send to ExtrnlDvcs Send Ir data Send AllOther Files [Menu] Send all Ir data2 Enter Phone Password Enter Session number YESRecipient must enter the same Session number to start transfers.BEGIN_E_OI.indb 3 2009/12/14 16:31:16](https://usermanual.wiki/Panasonic-Connect/209023A.User-Manual-3-of-7/User-Guide-1221765-Page-42.png)
![Connectivity10-510One File TransferBefore Receiving a FileReceive IC Datum is set to ON by default. When Receive IC Datum is OFF, One File Transfer is unavailable.To set Receive IC Datum on:Main Menu Osaifu-Keitai IC Card Settings Receive IC Datum ONSending1 Highlight a file, and follow the steps belowFiles to Send Operation/DescriptionPhone Book >[Menu] IC transmission Send phonebookAccount Details >[ICtrans]Messages >[Menu] IC Transmission Send ThisBookmarks >[Menu] Send to ExtrnlDvcs IC transmission Send ThisOther Files >[Menu] IC transmission2 YESReceiving1 Align logo on sender side with 941P (recipient) YESAll File TransfersPrecautions/Session number ( P.10-3)Sending1 Highlight a file, and follow the steps belowFiles to Send Operation/DescriptionPhone Book >[Menu] IC transmission Send all phonebookMessages >[Menu] IC Transmission Send AllBookmarks >[Menu] Send to ExtrnlDvcs IC transmission Send AllOther Files >[Menu] AllIC transmission2 Enter Phone Password Enter Session number YESRecipient must enter the same Session number to start transfers.Receiving1 Align logo on sender side with 941P (recipient)2 YES Enter Phone Password Enter same Session number as sender'sSaved files are deleted. Transfer starts.BEGIN_E_OI.indb 5 2009/12/14 16:31:19](https://usermanual.wiki/Panasonic-Connect/209023A.User-Manual-3-of-7/User-Guide-1221765-Page-44.png)
![Connectivity10-710Notes 941P may not be able to establish a Bluetooth ® connection with some Bluetooth® devices. Establish connections with certified Bluetooth ® devices that meet the specification standards developed by Bluetooth® SIG. Due to the unique characteristics/specifications of a certified Bluetooth ® device, connections or transfers may fail; procedures, displayed results or operations may vary from those described in the manual. When data transfer is interrupted, it may take some time for process to complete. Noise may interfere with wireless or handsfree conversations depending on the status of connected devices or signal conditions. For details about headset/handsfree devices, see the device manuals. Using Bluetooth®Pair Bluetooth® devices with 941P beforehand to establish connections for different Bluetooth® functions.Searching & Pairing DevicesSearch other Bluetooth® devices. Paired devices appear in Search&Paired Device list. Bluetooth ® Passkey is not necessary for paired devices.Search up to 20 Bluetooth ® devices at one time; pair with up to ten Bluetooth® devices.Place Bluetooth ® devices on standby for connection.Main Menu Tools Bluetooth Search&Paired Device1 YES*Device search starts and names of found devices appear.To search again: [Search]* If there are already paired devices in list, select a device Select a function2 Select a device YES Enter Phone Password3 Select text entry field Enter Bluetooth® Passkey 4 Select a Bluetooth® function Next PageBEGIN_E_OI.indb 7 2009/12/14 16:31:21](https://usermanual.wiki/Panasonic-Connect/209023A.User-Manual-3-of-7/User-Guide-1221765-Page-46.png)
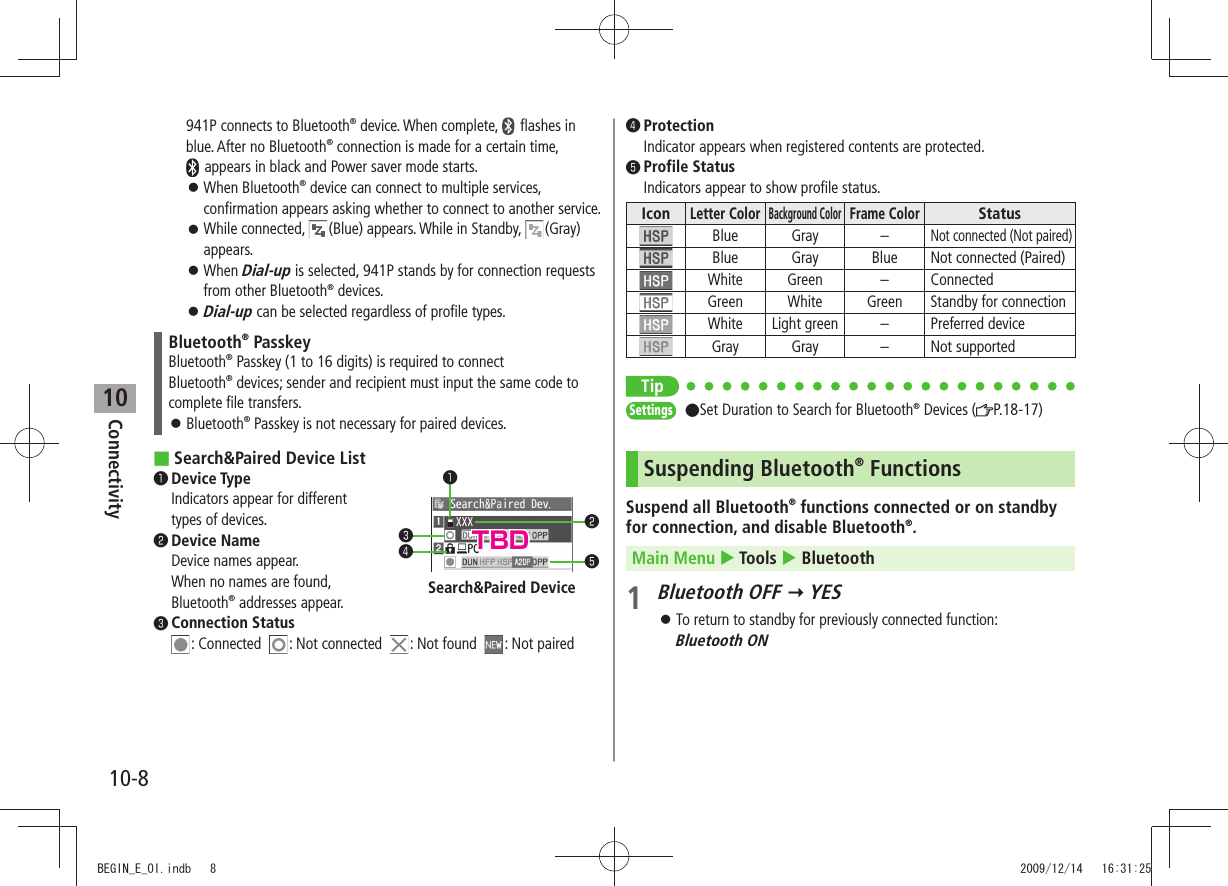
![Connectivity10-910Placing Bluetooth® Devices on Standby for ConnectionMain Menu Tools Bluetooth Accept Registered1 Check functions to be on standby for connection [Finish]To uncheck, select functions to remove check marks. Sending/Receiving Phone BookSending1 Open Phone Book [Menu] Send to Bluetooth2 One File TransferSend phonebook Select a recipient device All File TransferSend all phonebook Select a recipient device Enter Phone Password3 YESReceivingMain Menu Tools Bluetooth Receive via Bluetooth1 One File TransferReceive YES All File TransferReceive All Enter Phone Password YES YESIf memory becomes full, remaining entries are truncated (Memory List: P.19-25).TipSettings ●Set Authentication/Encryption to Send Phone Book Entries ●Enter Password when Sending All Phone Book Entries (P.18-17)BEGIN_E_OI.indb 9 2009/12/14 16:31:27](https://usermanual.wiki/Panasonic-Connect/209023A.User-Manual-3-of-7/User-Guide-1221765-Page-48.png)
![Connectivity10-1010Bluetooth® FunctionsFrom Main Menu Tools BluetoothFunctions Available in Search&Paired Device Window ■Search&Paired Device > [Menu] Select an item (See below)Item Operation/DescriptionRegister devicesEnter Phone Password > Pair devices (From Step 3 on P.10-7)Preferred deviceSet a preferred Bluetooth® device for incoming callsAvailable only for headset function compatible Bluetooth® devices.To cancel, perform same operation. Protect/releaseProtect/cancel devices. Protection prevents devices from being deleted or overwrittenChange device nameEnter a device name >DeleteYES >Description Show device name, Bluetooth® address, device class and supported profileAdd shortcut iconCreate shortcuts ( P.1-22)Make/Receive Calls via Bluetooth ■®Search&Paired Device > Select a device Headset or Hands-free YES Make/receive a call using Bluetooth® deviceUse Bluetooth ■® Device for Wireless PlaybackSearch&Paired Device > Select a device Audio Watch Digital TV or play back videos or musicDigital TV/Video sounds are played only by A2DP profile compatible Bluetooth® devices compliant with SCMS-T copyright protection standard.Connect to Internet Using Bluetooth ■® DeviceSearch&Paired Device > Select a device Dial-up941P waits for dial-up connection. Refer to a manual for Bluetooth ® device for details. Download utility software (941P) "Modem Wizard" from website below to PC and install software. http://panasonic.jp/mobile/support/download/941p/index.htmlTo establish a dial-up connection, see Help on "Modem Wizard." Connecting handset to a PC or PDA for Internet access may incur high packet transmission charges.Place Bluetooth ■® Device on Standby for Dial-upDialup Rgstry Standby > Enter Phone Password YES Select Bluetooth® Passkey text box Enter Bluetooth® PasskeyBEGIN_E_OI.indb 10 2009/12/14 16:31:27](https://usermanual.wiki/Panasonic-Connect/209023A.User-Manual-3-of-7/User-Guide-1221765-Page-49.png)


![Handset Security11-911Secret Mode/Secret Data Only<Default> DeactivatePhone Book entries and calendar events saved as secret data appear only when 941P is in Secret Mode/Secret Data Only.Set Phone Book or Calendar events as secret data (Phone Book: P.4-7, 4-8 / Calendar events: P.12-5)Main Menu Settings Security1 Select an item (See below)Item Operation/DescriptionSecret Mode View all data including secret dataSecret Data OnlyView only secret data2 Enter Phone PasswordFor Secret Data Only, number of saved secret data appears.When Secret Mode/Secret Data Only is set, appears (For Secret Data Only, indicator flashes.).Cancel Secret Mode/Secret Data Only ■In Standby, > or follow Step 1 aboveCancel Secret Mode/Secret Setting ■In Phone Book/Calendar event window, >[Menu] Release secretNoteSelect whether to save data edited/saved in Secret Mode as secret data. Data saved/edited in Secret Data Only are saved as secret data.only TipSettings ●Set Learning Feature Off for Secret Mode/Secret Data Only (P.18-10)Setting Secret Mail<Default> ONSet messages from secret Phone Book entries to appear only when handset is set to Secret Mode or Secret Data Only.1 Settings2 Universal Settings Secret Mail Display3 Enter Phone Password4 OFFNoteWhen both Spam Filter and Secret Mail Display are set, messages from Phone Book entries saved as secret mode are sorted into Spam Folder (Safe List: P.13-17).BEGIN_E_OI.indb 9 2009/12/14 16:31:55](https://usermanual.wiki/Panasonic-Connect/209023A.User-Manual-3-of-7/User-Guide-1221765-Page-62.png)
![11-10Handset Security11Mail SecuritySet handset to require Phone Password for opening mail boxes or operating Server Mail.1 Settings2 Universal Settings Mail Security3 Enter Phone Password Select items* [Finish]* To cancel: press again. appears for set mail boxes and menus.Set/Cancel Mail Security by Incoming Mail Folder ■ > Incoming Mail Highlight a folder [Menu] Mail Security Enter Phone Password appears for set mail boxes and menus.Call RestrictionsReject/accept/forward calls from specified phone numbers, or restrict calling unspecified phone numbers.1 Search Phone Book2 Select an entry [Menu] Restrictions3 Enter Phone Password4 Select an item (See below)Item Operation/DescriptionRestrict DialingAllow calls only to specified numbersCall Rejection Reject specified numbersCall AcceptanceAccept from specified numbers onlyCall ForwardingAutomatically forward specified numbersSet destination numbers (Call Forwarding: P.2-17)To cancel, repeat operation. View/Cancel Phone Book Restrictions ■ >Main Menu Phone Book Restrictions Enter Phone Password Select an item* Select a Phone Book entry Select a number YES* ★ appears for set item.Highlight an item, [Menu] Release Settings YES to cancel restriction on all specified numbers.BEGIN_E_OI.indb 10 2009/12/14 16:31:56](https://usermanual.wiki/Panasonic-Connect/209023A.User-Manual-3-of-7/User-Guide-1221765-Page-63.png)
![Tools12-212CalendarView by day, week or month; set Alarms for events.Opening CalendarMain Menu Tools CalendarCurrent month appears.When a date with Calendar events is selected, number of AM and PM events and up to three contents appear. [Prev.] or [Next] to show previous/next month calendar.To switch Monthly/Weekly view: P.12-4Monthly ViewCreating Calendar EventsSave up to 1000 entries.Main Menu Tools Calendar1 to highlight a date [New] Schedule2 Select an item (See below)Item Operation/DescriptionSelect icon/ Edit summarySelect an icon > Edit subjectWhole day settingOFF > or ONWhen ON is set, Alarm goes off at 0:00 a.m.Date (from) Enter start date and time >Date (to) Enter end date and time >Repeat Select a repetition > (For Select day, check days [Finish])Alarm Select an Alarm type ( > For ON/Set time, enter time)Alarm Tone: P.12-6Alarm tone Select an Alarm tone type > Select a folder Select an Alarm toneContents Enter event description >TBDTBDBEGIN_E_OI.indb 2 2009/12/14 16:32:20](https://usermanual.wiki/Panasonic-Connect/209023A.User-Manual-3-of-7/User-Guide-1221765-Page-67.png)
![Tools12-3123 [Finish]NoteCalendar events between 00:00 on 2000/01/01 and 23:59 on 2037/12/31 can be saved on 941P.Alarm tone does not sound when Privacy Key Lock or Personal Data Lock is set. However, settings can be changed even while Personal Data Lock is set ( P.11-5).Calendar Event IndicatorsFollowing indicators appear in Calendar Window. (Blue): Morning event (Orange): Afternoon event _ (Underscore): Event that lasts for two days or longerFollowing indicators appear on Display. : Alarm : Monthly : Daily : Yearly : WeeklySaving Holidays/Memorial DaysSave up to 100 entries (one entry a day) each for Holidays or Memorial days.Main Menu Tools Calendar1 Highlight a date [New] Holidays or Memorial days2 Select an item (See below)Item Operation/DescriptionDate setting Enter a date >Repeat Select a repetition type >1 time does not repeat Holidays/Memorial days events.Edit holiday/anniversaryEnter description >3 [Finish]IndicatorsHolidays appear in red.Memorial days are marked with a red circle.Following indicators appear in Calendar/Calendar Event List Window: : Holidays : Memorial days : Yearly repeatBEGIN_E_OI.indb 3 2009/12/14 16:32:25](https://usermanual.wiki/Panasonic-Connect/209023A.User-Manual-3-of-7/User-Guide-1221765-Page-68.png)
![Tools12-412Viewing/Editing Calendar Event DetailsMain Menu Tools Calendar1 to select a date2 Select an eventTo edit: [Edit] Edit selected item (Schedule: From Step 2 on P.12-2/Holiday, Anniversary: From Step 2 on P.12-3)Calendar FunctionsFrom Main Menu Tools CalendarFunctions Available in Calendar Window ■Highlight a date > [Menu] Select an item (See below)Item Operation/DescriptionNew Create a new entry ( P.12-2, P.12-3)Calendar Event ListCalendar Event DetailsItem Operation/DescriptionWeekly display/ 1 MonthToggle Monthly/Weekly viewIcon display Entries in category of selected icon appearSelect an icon >No. of schedulesDisplay number of saved Schedule, Holiday or Anniversary entriesAdd shortcut iconCreate a shortcut ( P.1-22)Send all Ir data(P.10-3)AllIC transmission(P.10-5)Delete past Delete past entries/items, prior to highlighted dateSelect a category to delete > YESDelete all Enter Phone Password > Select an item YESReset holidaysRestore deleted HolidaysYES >Functions Available in Calendar Events List/Details ■Select a date ( > Select a Schedule, Holiday or Anniversary) [Menu] Select an item (See below)Item Operation/DescriptionNew Create a new entry ( P.12-2, P.12-3)Edit Edit selected item ( Left)Copy Copy an entry to another dayEnter date and time to copy an entry to >Calendar displaySwitch from Icon display to Calendar displayTBDTBDBEGIN_E_OI.indb 4 2009/12/14 16:32:32](https://usermanual.wiki/Panasonic-Connect/209023A.User-Manual-3-of-7/User-Guide-1221765-Page-69.png)
![Tools12-512Item Operation/DescriptionIcon display Entries in category of selected icon appearSelect an icon >Set secret mode/Release secretActivate/deactivate Secret ModeYES >( For Set secret mode, enter Phone Password)Secret entries appear only in Secret Mode or Secret Data Only ( P.11-9).Compose S! MailCreate S! Mail by copying event date and content to message text ( From Step 2 on P.13-4)Send Ir data (P.10-3)Send all Ir data(P.10-3)IC transmission(P.10-5)AllIC transmission(P.10-5)Copy to microSDCopy an entry to microSD CardYES >To display data on microSD Card: P.9-18Delete thisYES >Delete past Delete past entries/items, prior to highlighted dateSelect a category to delete > YESDelete select Check entries to delete > [Finish] YESTasksMake quick notes of task to manage in Task list.Saving a TaskMain Menu Tools Tasks 1 [New] Select an item (See below)To check saved Tasks, select a Task. To edit, press [Edit] in detail window.Item Operation/DescriptionEdit Tasks Enter content >Due date Select how to enter due date > Enter due dateSelect No date to enter none.Priority Select a priority level >Category Select a category >Alarm Select an Alarm type ( > For ON/Set time, enter time)Alarm Tone: P.12-6Alarm tone Select an Alarm tone type > Select a folder Select an Alarm tone2 [Finish]When content is not entered, Tasks cannot be saved. NoteAlarm tone does not sound when Privacy Key Lock or Personal Data Lock is set. However, settings can be changed even while Personal Data Lock is set ( P.11-5).BEGIN_E_OI.indb 5 2009/12/14 16:32:33](https://usermanual.wiki/Panasonic-Connect/209023A.User-Manual-3-of-7/User-Guide-1221765-Page-70.png)
![Tools12-612Using TasksIn Tasks window, press [Menu] for following operations.Item Operation/DescriptionNew Create a new entry ( P.12-5)Edit Edit an entry ( P.12-5)Change statusChange status indicator shown in Tasks listSelect a status ( > For Completion, select an item Enter Completion date)Overdue status indicator turns red. Show by categorySelect a category >Sort/Filter Sort list by due date, entry order, status, etc.Select a condition >Add shortcut iconCreate a shortcut ( P.1-22)Send Ir data (P.10-3)Send all Ir data(P.10-3)IC transmission( P.10-5)AllIC transmission(P.10-5)Copy to microSDCopy a Task to microSD CardYES >To display data on microSD Card: P.9-18Delete thisYES >Delete select Check entries > [Finish] YESDelete completedDelete an entry in Completion statusYES >Delete all Enter Phone Password > YESAlarmsAlarm ToneWhen scheduled time arrives, alarm tone sounds and Notification Light illuminates.For Calendar events and Tasks, alarm message and animation corresponding to selected icon appear on Display.To Stop Alarm Tone for Calendar Events, Tasks or AlarmPress any key.Missed Alarm"Missed Alarm" Event Indicator appears in Standby for alarms missed during Privacy Key Lock, Personal Data Lock or Infrared transmission once locks are canceled or transmission ends. Select indicator to view content.NoteWhen one or more Alarms are set to the same time, alarm sounds in the order of : "Alarm" "Timer Recording" "Tasks" "Calendar" "Timer Watching" For Tasks, "Missed Alarm" indicator appears.BEGIN_E_OI.indb 6 2009/12/14 16:32:34](https://usermanual.wiki/Panasonic-Connect/209023A.User-Manual-3-of-7/User-Guide-1221765-Page-71.png)
![Tools12-712Setting AlarmSet up to 12 alarms. Alarm tone sounds at the specified time once, everyday or weekly as set.Main Menu Tools Alarms1 Highlight an Alarm [Edit]2 Select an item (See below)Item Operation/DescriptionAlarm (Alarm on/off)Activate or cancel AlarmON > or OFFTime setting Set Alarm time >Repeat Select a repetition >( For Select day, check days [Finish])Alarm tone Select an Alarm tone type > Select a folder Select an Alarm toneAlarms (Alarm volume) > to set Alarm tone volumeSnooze settingON > or OFF ( For OFF, enter time)When Snooze is set to ON, Alarm tone sounds for 60 seconds, repeating up to six times at five minute intervals.Prefer manner modeON > or OFFSet Manner Mode or Alarm priority. 3 [Finish] appears.Cancel & Reactivate Alarm ■In Alarms list, press >[Menu] Select set this or Release this YESCancel or reactivate an alarm entry as required. Highlight an entry to reactivate/cancel Alarm.Cancel Snooze ■Press any key > NoteCopy protected files may not be set as Alarm tone. Alarm tone does not sound when Privacy Key Lock or Personal Data Lock is set. However, settings can be changed even while Personal Data Lock is set ( P.11-5).Alarm IndicatorsFollowing indicators appear: : Repeats daily : Repeats weeklyTBDBEGIN_E_OI.indb 7 2009/12/14 16:32:51](https://usermanual.wiki/Panasonic-Connect/209023A.User-Manual-3-of-7/User-Guide-1221765-Page-72.png)
![Tools12-812CalculatorMain Menu Tools CalculatorOperation Assigned keyNumber (0 - 9) - +–x÷=Decimal point%ClearExample:-17+28.5=11.5 NotepadSave up to 20 notes.Saving a NoteMain Menu Tools Notepad1 <Not Recorded>Select a saved note to view content. [Edit] to edit.2 Enter textUp to 256 double-byte or 512 single-byte characters can be entered.Notepads WindowTBDTBDBEGIN_E_OI.indb 8 2009/12/14 16:33:19](https://usermanual.wiki/Panasonic-Connect/209023A.User-Manual-3-of-7/User-Guide-1221765-Page-73.png)
![Tools12-912Notepad FunctionsIn Notepad list window, press [Menu] for following operations.Item Operation/DescriptionEdit Edit a saved noteCompose S! MailCreate S! Mail by copying content to message text (From Step 2 on P.13-4)Edit schedule Copy a note to Schedule to create a Calendar eventSchedule > Save a new note ( From Step 2 on P.12-2)Add shortcut iconCreate a shortcut ( P.1-22)Send Ir data (P.10-3)Send all Ir data(P.10-3)IC transmission(P.10-5)AllIC transmission(P.10-5)Copy to microSDCopy a note to microSD CardYES >To display data on microSD Card: P.9-18Notepad Info Display entry date, latest modified date and category of noteCategory Select a category >When no category applies, select None.Delete thisYES >Delete selectedCheck notes > [Finish] YESDelete all Enter Phone Password > YESDictionary (Japanese)Use ケータイTOOL<辞書> to access dictionaries (学研 辞スパ英和・和英辞書 and 学研 国語辞書).ケータイTOOL<辞書> is an S! Appli.Main Menu Tools Dictionary1 Read 免責 (disclaimer) OKケータイTOOL<辞書> activates.To disable 免責: Uncheck アプリ起動時に常に表示する。(Always show disclaimer when accessing dictionaries)2 Enter a wordSearch results appear.To scroll pages: /To switch dictionaries: /To search again: [再検索]3 Select a wordDetails appear.4 To end, StoppedNote While Dictionary application is active, press [メニュー] for useful functions.BEGIN_E_OI.indb 9 2009/12/14 16:33:21](https://usermanual.wiki/Panasonic-Connect/209023A.User-Manual-3-of-7/User-Guide-1221765-Page-74.png)
![Tools12-1012Sound RecordersVoice RecorderSet recorded sounds for ringtones.Record for about 60 seconds each. Main Menu Tools Sound Recorders Voice Recorder1 YES2 [Stop]/ / ( OK) to stop recordingRecorded sounds are saved in Ring Songs&Tones folder.Voice AnnounceSet recorded sound for on hold tone/holding tone, Alarm, Calendar event alarm, Tasks alarm, ringtones, Answer Phone message, Timer Watching (Digital TV), Ring Songs&Tones Play List.Record only one item for about 15 seconds. Select Voice Announce in individual window to set Voice Announce as specific tone.Main Menu Tools Sound Recorders Voice Announce1 RecordRecording starts.Tone beeps five seconds before recording ends.2 [Stop] to end recordingTone beeps twice and previous screen returns.To play back: PlayTo delete: Erase YESBEGIN_E_OI.indb 10 2009/12/14 16:33:22](https://usermanual.wiki/Panasonic-Connect/209023A.User-Manual-3-of-7/User-Guide-1221765-Page-75.png)
![Tools12-1112Bar Code ReaderScan barcodes (JAN) or QR Codes with built-in camera. Access websites, send messages, etc. from QR Codes.JAN CodesJAN Code is a one-dimensional bar code denoting numerals with bars and spaces of different widths.QR CodesQR Code is a two-dimensional bar code containing information.Scanning BarcodesUp to five items can be saved. For split data, scan up to 16 divided QR Codes.Main Menu Tools Bar Code Reader Scan Barcodes1 Frame barcode in the center of DisplayTo adjust Display brightness: [Menu] Brightness Adjust to -3 (dark) - +3 (light)To zoom: To use Focus Lock: 2 [Start]Scanning starts, and scanned results appear when completed.For split data, OK Repeat Step 1 and 2To use scanned data: Step 2 on P.12-123 [Menu] Save result OKNote 941P cannot read barcodes or two-dimensional codes other than JAN/ QR Codes.Some barcodes cannot be read depending on code type or size. Barcode recognition may be slow. Hold handset steady while scanning. Barcodes may not be correctly read owing to scratch, dirt, damage, quality of printed material, light reflection, or QR code version.Example: Scanned Results Window (QR Code: Left)TBDBEGIN_E_OI.indb 11 2009/12/14 16:33:25](https://usermanual.wiki/Panasonic-Connect/209023A.User-Manual-3-of-7/User-Guide-1221765-Page-76.png)
![Tools12-1212Viewing/Editing Scanned DataMain Menu Tools Bar Code Reader Saved Data List1 ViewSelect an item Edit TitleHighlight an item [Menu] Edit title EditDelete Saved Data ■In Step 1, (highlight an item >) [Menu] Delete Delete this or Delete all ( For Delete all, enter Phone Password) YESUsing Scanned DataMain Menu Tools Bar Code Reader Saved Data List1 Select an item2 [Menu] Select an item (See below)Item Operation/DescriptionSave result Save scanned resultsDisplay list Display Saved Data ListInternet Connect to URLYahoo! Keitai > or PC Site Browser YESAlternatively, select URL to connect to Internet. Compose S! MailCreate S! Mail to selected address ( From Step 4 on P.13-4)Alternatively, select address to create S! Mail. Dialing Call selected phone numberSelect a dialing method > DialAlternatively, select phone number to dial. Add to Phone BookSave scanned results to Phone Book ( From Step 2 on P. 4-5)Add bookmarkSave URL to BookmarkYES > [OK]Copy Copy selected characters to another place ( From Step 2 on P.3-9)BEGIN_E_OI.indb 12 2009/12/14 16:33:26](https://usermanual.wiki/Panasonic-Connect/209023A.User-Manual-3-of-7/User-Guide-1221765-Page-77.png)
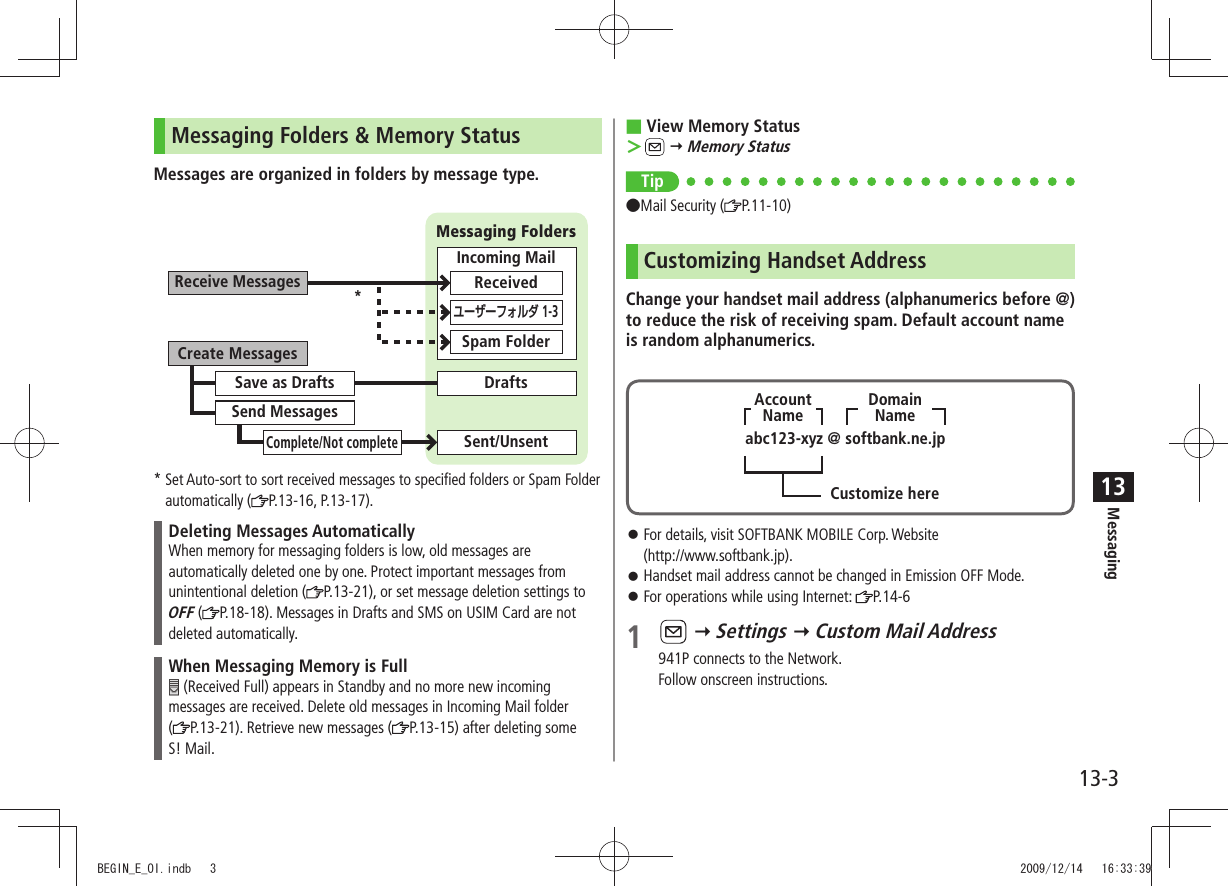
![Messaging13-213BasicsSend messages via S! Mail or SMS.S! Mail[Separate subscription required]Exchange text messages with SoftBank or e-mail compatible handsets, PCs, etc.; attach image or sound files etc.941P is compatible with Graphic Mail ( P.13-5)SMS Exchange short text messages with SoftBank handsets.For more information, visit SOFTBANK MOBILE Corp. Website (http://www.softbank.jp).NoteMessaging functions are also available in Horizontal Open Position. Switching Normal Position to Horizontal Open Position may end active screen.Available Entry Items & Character Entry LimitsItem S! Mail SMSAddressE-mailaddress ○Up to 246 single-byte alphanumerics/ Up to 20 recipients––Phone number 1○○Up to 21 single-byte alphanumerics/Up to 1 recipientSubject ○Up to 256 double-byte/ Up to 512 single-byte alphanumerics––Text ○30 KB ○Up to 70 double-/single-byte alphanumerics 2Attachment ○3––1 SoftBank handset numbers only2 When text entry mode is set to English (160char.) ( P.18-19), up to 160 single-byte alphanumerics can be entered.3 Up to 300 KB including subject, message text and attachment can be sent.NoteS! Mail text character limit differs by attachment size. When number of entered characters exceeds limit in SMS, S! Mail conversion option message appears.S! Mail cannot be converted to SMS. BEGIN_E_OI.indb 2 2009/12/14 16:33:29](https://usermanual.wiki/Panasonic-Connect/209023A.User-Manual-3-of-7/User-Guide-1221765-Page-79.png)
![Messaging13-413Sending S! Mail & SMSSending S! MailExample: Select a Phone Book entry to send S! Mail.1 Press and hold 2 Select Address field Phone Book3 Select a Phone Book entry Select a SoftBank handset number or mail addressPress to toggle tabs if both mail addresses and phone numbers are saved.Composition WindowAddress fieldSubject fieldAttachment fieldText field4 Select Subject field Enter subject5 Select Text field6 Enter text7 [Send]Tip ●Addresses ●Functions Available while Creating Messages ( P.13-8) ●Sending Options ( P.13-9) ●Sending Messages ( P.13-10)Settings ●Confirm Message Delivery ( P.18-18)Text Entry WindowTBDTBDTBDTBDTBDTBDBEGIN_E_OI.indb 4 2009/12/14 16:33:45](https://usermanual.wiki/Panasonic-Connect/209023A.User-Manual-3-of-7/User-Guide-1221765-Page-81.png)
![Messaging13-513Next PageAdding Attachments1 After Step 6 on P.13-4, select Attachment field2 Select a folder in Data Folder Select a file3 [Send]Attach Captured Pictures/Videos ■After Step1, >Activate Camera Photo mode or Video mode Frame subject [Record], or ( For video, [Stop], or ) [Save], or NoteSome files can not be attached depending on the file format or size. Some copy protected files can not be sent. Ring Songs&Tones, Music and Videos files cannot be attached directly from microSD Card. Move files to handset before attaching to messages.Tip●Attachments ( P.13-8)Graphic MailCreate HTML messages; select font color/size, background color, or insert images, etc.Example: Use various Templates to create Graphic Mail.Change font size Scroll text 1 After Step 4 on P.13-4, press [Menu] Load Template Select a templateTo view template: Highlight template [View]2 Select Text field Delete "ココに文字をいれてネ"3 Font SizeAlternatively, [Menu] Set Graphic Mail to open Graphic PaletteGraphic PaletteTBDTBDTBDBEGIN_E_OI.indb 5 2009/12/14 16:33:58](https://usermanual.wiki/Panasonic-Connect/209023A.User-Manual-3-of-7/User-Guide-1221765-Page-82.png)
![Messaging13-6134 Select a font size Enter text5 Select area6 Place cursor before a sentence to scroll [Start] Move cursor to end of sentence [End]7 Set Scrolling [Exit]8 to preview Alternatively, [Menu] Preview to view text field9 [Send]Reset Operations ■To cancel previous operation: Close Graphic Palette > [Menu] UndoTo reset all Graphic Mail operations: > Graphic all reset YES YESUsing My Pictograms1 After Step 5 on P.13-4, in text entry window, [My Pict.]My Pictogram list appears.Previously used pictogram list appears first. Functions in pictogram list ( P.3-4)2 Select a My PictogramMy Pictogram is entered.3 Enter text [Send]Use My Pictograms from Graphic Palette ■In text entry window, > My Pictograms [My Pict.] Select a My Pictogram [Exit]Use My Pictograms Saved in microSD ■In text entry window, > Insert files File Select Pictures [microSD] My Pictograms Select a folder Select a My PictogramTip ●Use Other Graphic Mail Settings ( P.13-9) ●Download Templates via Internet ( P.13-10)TBDTBDTBDBEGIN_E_OI.indb 6 2009/12/14 16:34:04](https://usermanual.wiki/Panasonic-Connect/209023A.User-Manual-3-of-7/User-Guide-1221765-Page-83.png)