Panasonic Connect 210035A UMTS/ GSM Cellular Mobile with Bluetooth®, WLAN and RFID User Manual Part 1 of 3
Panasonic Mobile Communications Development of Europe Ltd UMTS/ GSM Cellular Mobile with Bluetooth®, WLAN and RFID Part 1 of 3
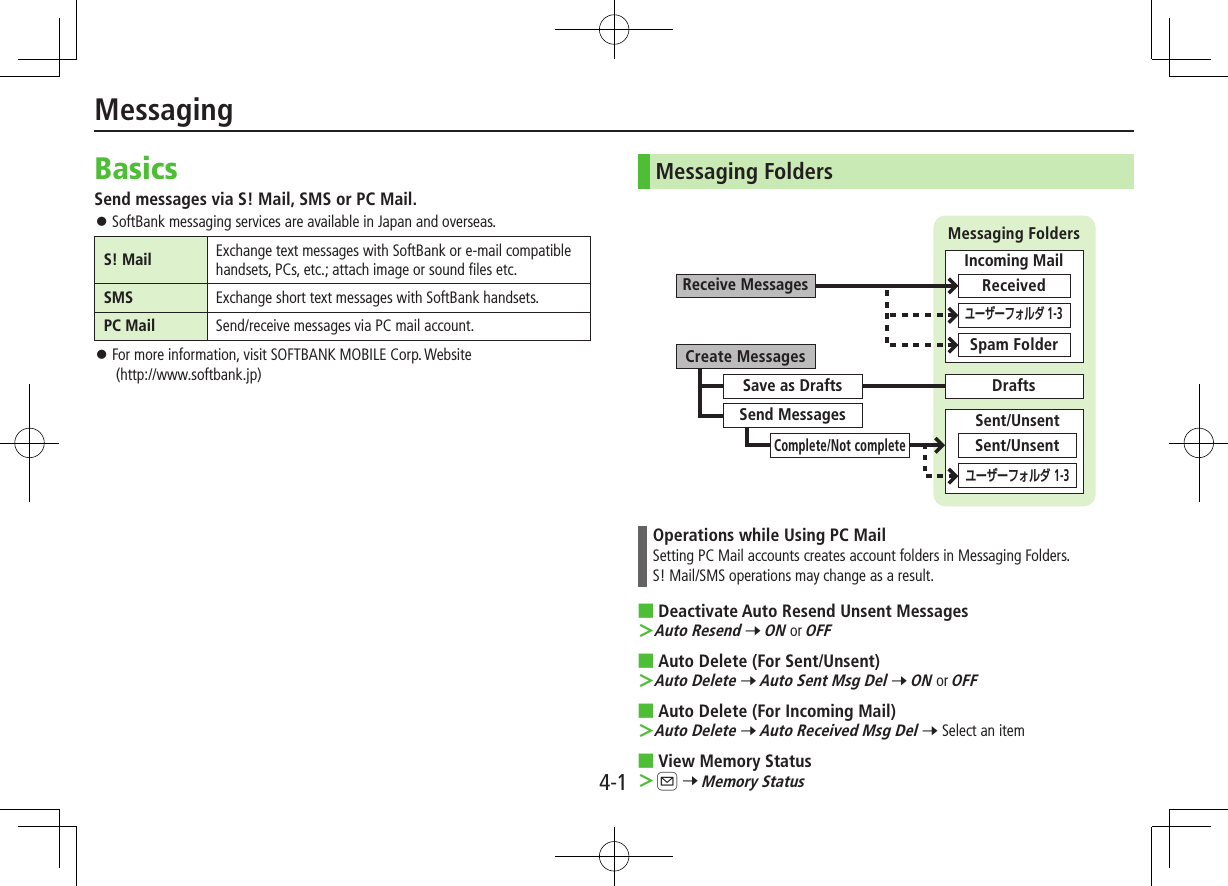
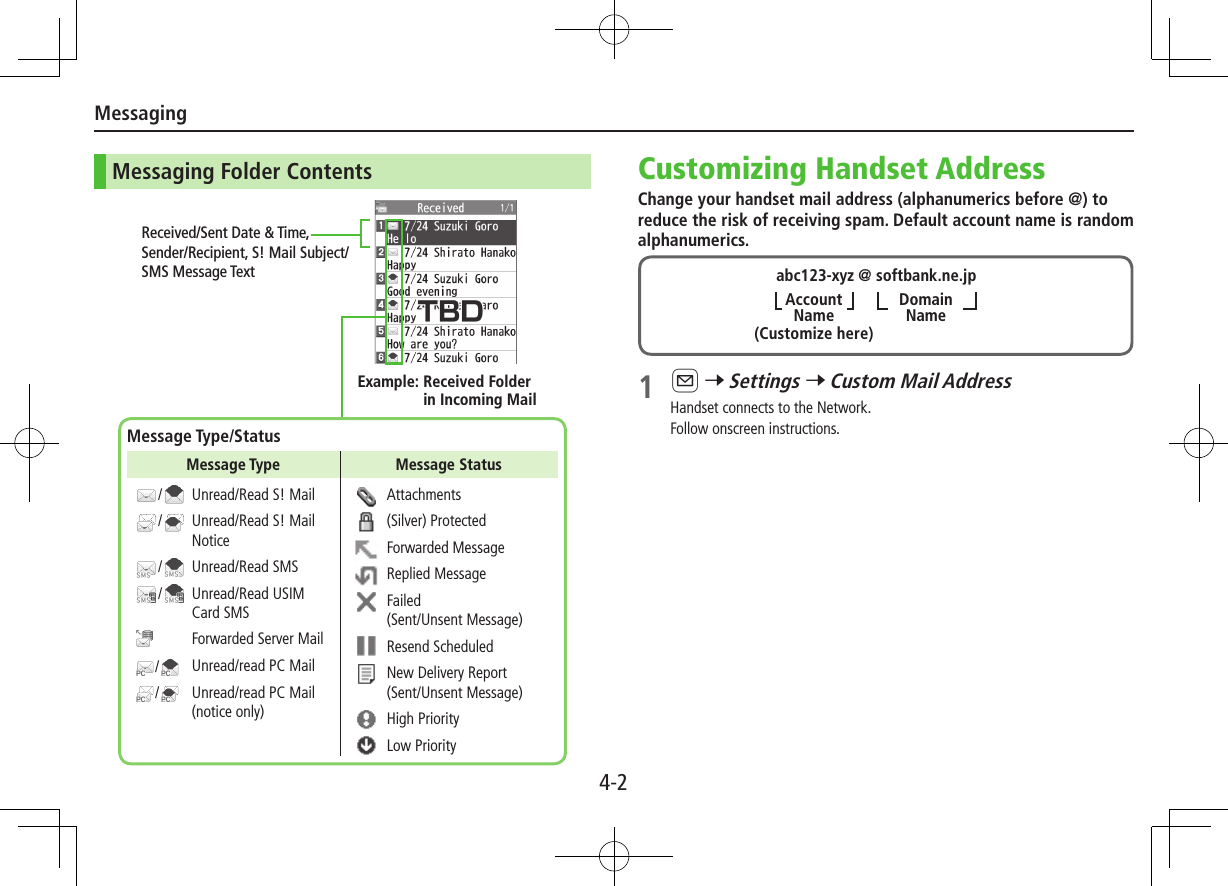
Contents
- 1. User Manual Part 1 of 3
- 2. User Manual Part 2 of 3
- 3. User Manual Part 3 of 3
- 4. User MAnual Part 2 of 3
User Manual Part 1 of 3
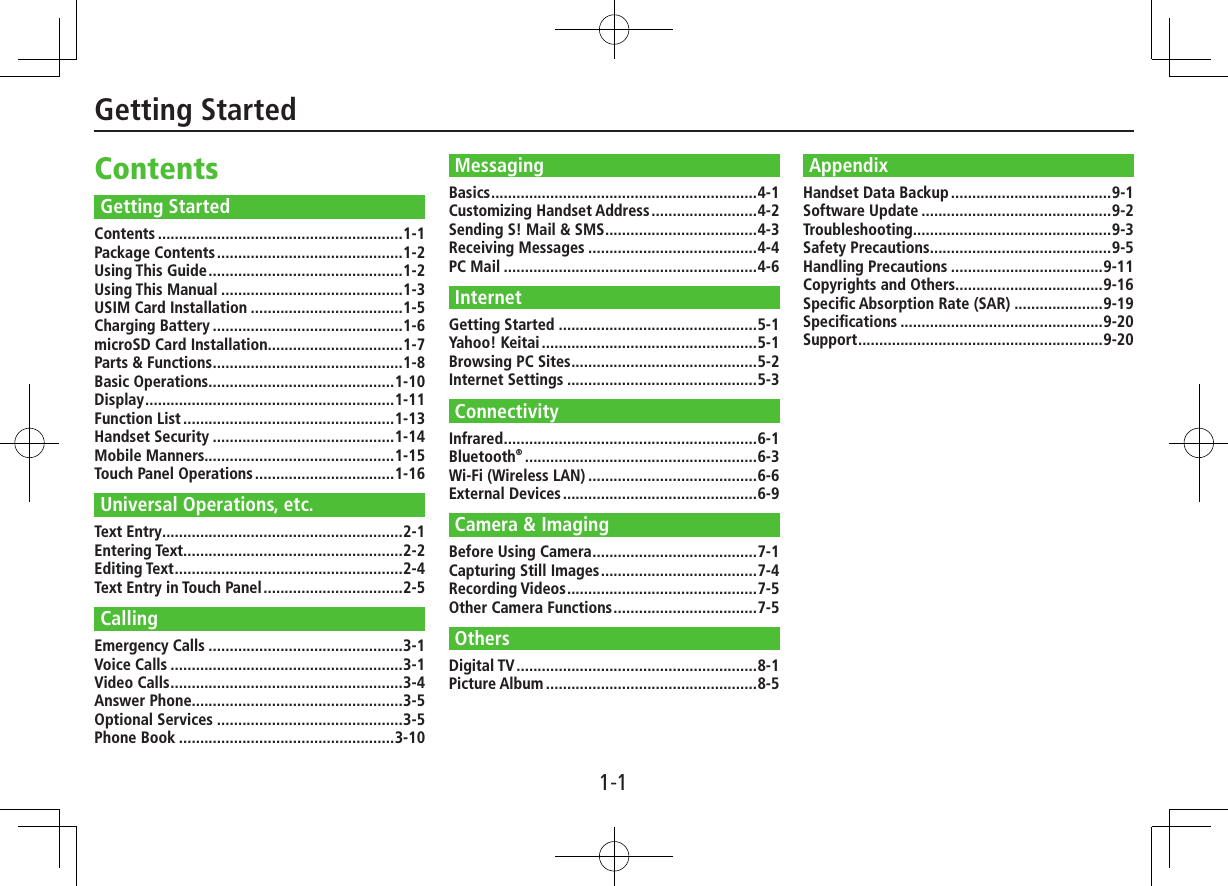
![1-4Getting StartedOperation Descriptions The following examples are for reference only and may differ from actual operations.Basic OperationsOperations are expressed as shown here.Example 1:Menu SelectionPress *z in Standby to open Main Menu.Use Xz to highlight Phone; then press *z[Select].Use ?z to highlight Group; then press *z[Select].StepsUse ?z to highlight a group; then press A[Edit].Use ?z to highlight an item; then press *z[Select].Set respective items.Menu Selection StepsMain Menu 4 Phone 4 Group appears for USIM Card Group.1 Highlight a group 7 A[Edit] 7 Select an item 7 Set itemExample 2:Check Box SelectionUse ?z to highlight an item; then press *z.Check Box changes to .Repeat to select multiple items.To deselect an item, use ?z to highlight item; then press *z.Check mark disappears.1 A 7 Settings2 Universal Settings 7 Mail Security3 Enter Phone Password 7 Check items7 A[Finish]Check Box Selection](https://usermanual.wiki/Panasonic-Connect/210035A.User-Manual-Part-1-of-3/User-Guide-1391716-Page-6.png)
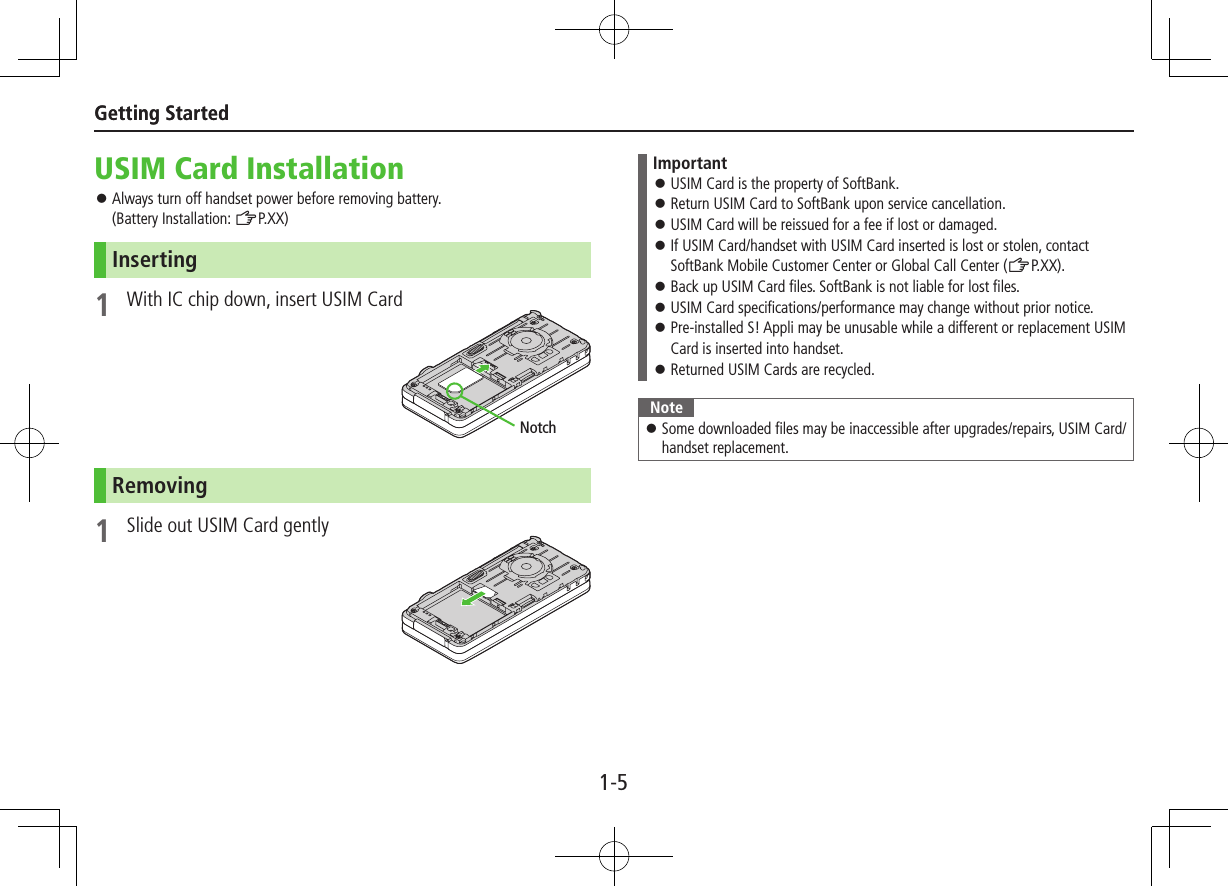
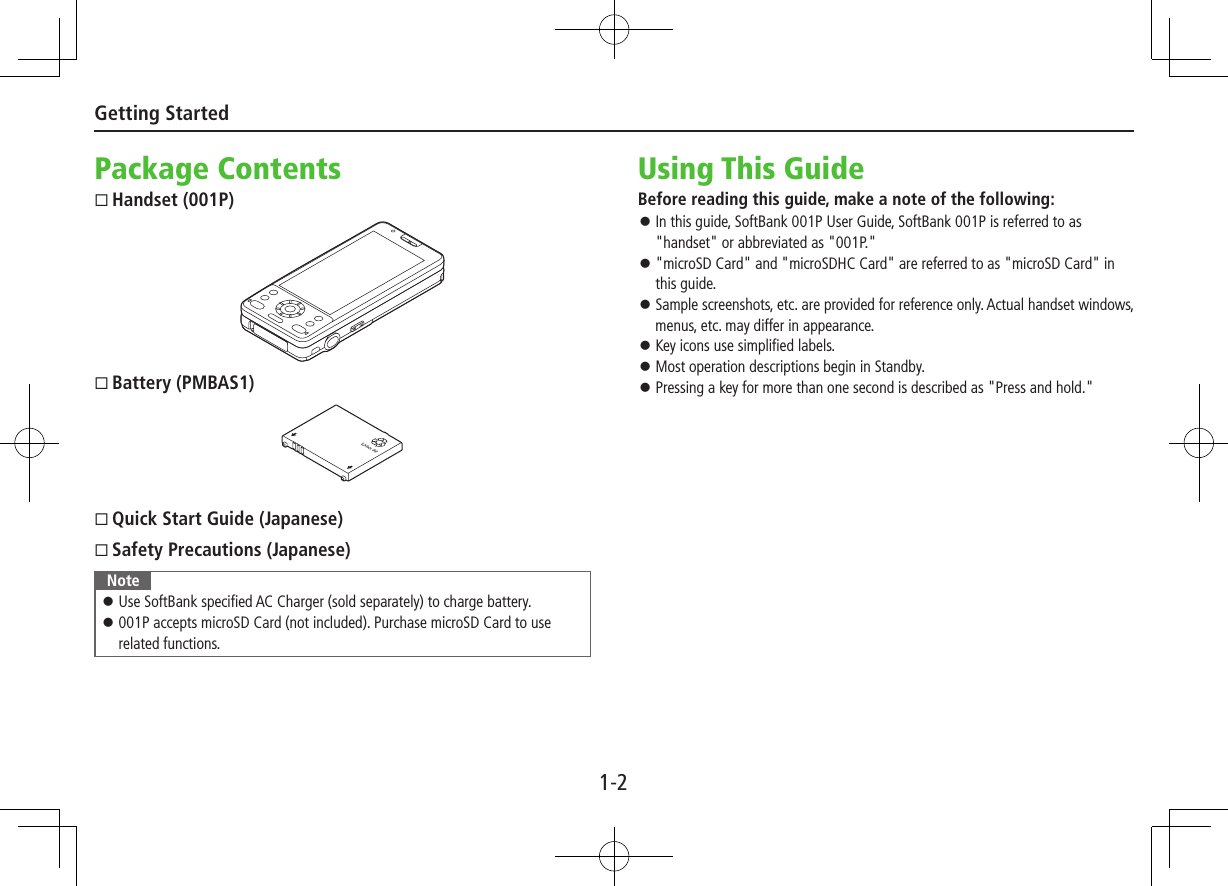
![1-7Getting StartedCharging BatteryUse only specified AC Charger (sold separately).1 Connect AC Charger to Handset2 Extend Charger Blades, and plug AC Charger into AC OutletCharging Indicator illuminates and charging starts.When charging is complete, Charging Indicator goes out.3 When charging is complete, unplug AC Charger from AC Outlet, then disconnect handsetSqueeze Release Tabs and pull straight out to remove Charger Connector.Port CoverCharging IndicatorConnection PortArrows upRelease TabsCharger ConnectorAC ChargerCharger BladesAC Outlet321microSD Card Installation001P is compatible with up to 2 GB commercial microSD Cards and up to 16 GB commercial microSDHC Cards (as of December 2010). Turn off handset before inserting/removing microSD Card. (Battery Installation: ZP.XX)Inserting1 Insert microSD Card until it clicks ■Format microSD Card Main Menu 4 Tools 4 microSD Backup 4 S[Menu] 4 microSD format 4 Enter Phone Password 4 YESRemoving1 Push microSD Card in microSD Card pops out with a light push.](https://usermanual.wiki/Panasonic-Connect/210035A.User-Manual-Part-1-of-3/User-Guide-1391716-Page-9.png)
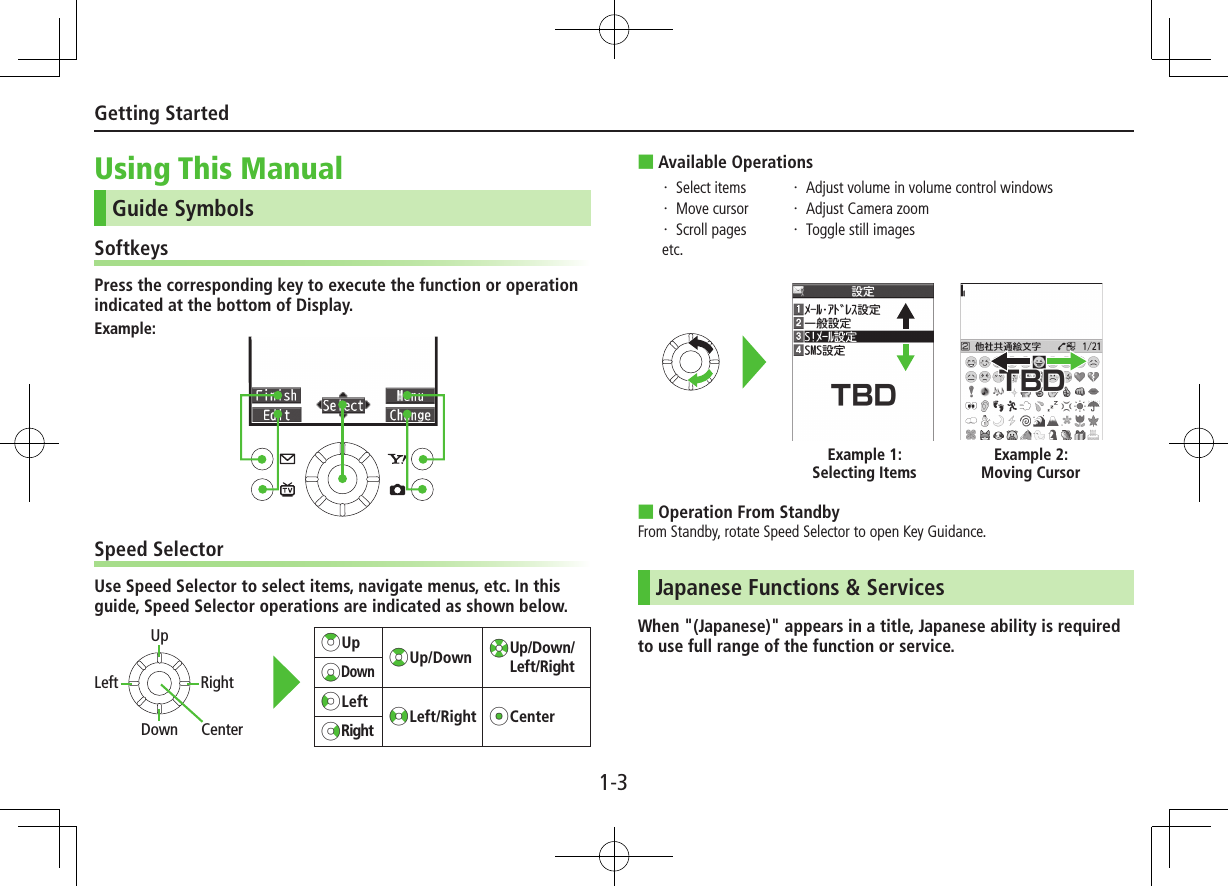
![Getting Started1-9 Infrared Port・ Transfer data via Infrared Light Sensor・ Detects ambient light Display/Touch Panel AMail Key・ Open Messaging menu・ Execute Upper Left Softkey function 1TV Key・ Activate TV・ Execute Lower Left Softkey function JSend Key・ Initiate or answer calls・ Toggle upper/lower case in text entry windows KClear/Memo Key・ Delete characters・ Cancel menus・ Use Answer Phone G/Pictograph/Symbol/Driving Mode Key・ Enter " "・ Access pictographs/symbols/smileys/URLs in text entry windows・ Toggle Driving Mode On/Off Microphone Earpiece zSpeed Selector・ Move cursor or select menus Notification Light/Charging Indicator・ Flashes for incoming transmissions・ Lights in red for charging SYahoo! Keitai Key・ Open Yahoo! Keitai top menu・ Execute Upper Right Softkey function FCamera Key・ Activate Camera・ Execute Lower Right Softkey function LEnd/Escape & Power Key・ Power on/off (ZP.XX)・ End calls・ Return to Standby Keypad・ Enter phone number/text H#/Manner Key・ Enter "#"・ Toggle Manner Mode External Port・ Connect AC Charger, Stereo Earphone Conversion Cable or other accessories here Battery Cover Flash・ Lights/flashes during Camera use・ Use when shooting in dark places Logo・ Place Logo over a reader/writer when using Osaifu-Keitai® Camera Antenna TV Antenna 5Upper Side Key・ Increase earpiece/TV volume・ Activate Slideshow 6Lower Side Key・ Decrease earpiece/TV volume [Closed Position]・ Set/cancel Manner Mode 8Shutter Key・ Activate Camera・ Capture still images/videos gMULTI/Wi-Fi Key・ Open TASK MENU・ Toggle Wi-Fi function On/Off Speaker Strap Eyelet Charging Terminals](https://usermanual.wiki/Panasonic-Connect/210035A.User-Manual-Part-1-of-3/User-Guide-1391716-Page-11.png)
![1-12Getting StartedInformation WindowIn Standby, Information window opens to notify of missed events. Select a notification to view/access information.1 Highlight an item 7 *z[Select]Follow onscreen instructions. Widgets and shortcuts re-appear when all items have been viewed. ■Close Information Window S[Exit] / K / L 7 OK (Select Confirm once to show confirmation only once) ■Open Information Window LMotion ControlChange handset orientation to switch Portrait/Landscape View.TBDTBDTBDTBDHandset Menus1 In Standby, *zMain Menu appears.2 Xz to highlight an icon 7 *z[Select]Selected function menu appears. To return to Standby: LNote Standby window returns after 15 seconds of inactivity in Main Menu.Main MenuStandbyL*z](https://usermanual.wiki/Panasonic-Connect/210035A.User-Manual-Part-1-of-3/User-Guide-1391716-Page-14.png)
![2-1Text EntryEnter alphanumerics, hiragana, kanji, katakana, symbols and pictographs. Two types of character input methods are available: 5-touch and 2-touch In this guide, examples are described in 5-touch.2-touchPress two numeric keys to enter a character. ■Text Entry Window Character Input Methods Operations5-touch/2-touch Press and hold A[Mode] Input Modes (Double-byte/Single-byte) Operations5-touch1/1: Kanji (hiragana) (double-byte)1/11/2: Katakana1/11/2: Upper case alphanumericsabc1/1Smabc1/2Sm: Lower case alphanumerics1/11/2: NumbersA[Mode] 7 Select a character type2-touch1/1 1/2: Upper case alphanumerics/Regular kana1/1Sm 1/2Sm: Lower case alphanumerics/Small kana To toggle double-/single-byte: A[Mode] To toggle Small kana/Regular kana: IP Remaining Bytes Universal Operations, etc.](https://usermanual.wiki/Panasonic-Connect/210035A.User-Manual-Part-1-of-3/User-Guide-1391716-Page-21.png)
![2-2Universal Operations, etc.Entering TextEntering CharactersExample: Enter 1 In alphanumerics mode, A[Mode] 7 す: E three timesず: Nz* 7 E three times 7 Gき: W twice* When the next character is on the same key, press Nz first to move cursor.2 Cz to enter Suggestion List To exit List, press K. Available suggestion lists: Predictive Candidates Conversion Candidates Context Forecast abc/123/Kana Candidates (ZP.3-6)3 Xz to select 鈴木 ■Other Input FunctionsEnter katakana/alphanumericsA[Mode] 7 Select input mode (character type) 7 Enter charactersEnter small kana (, , etc.)Enter a character 7 J to convert to small character Alternatively, press a key repeatedly to enter an assigned small kana.Enter upper case charactersEnter a character 7 J Alternatively, press a key repeatedly to enter an assigned upper case character.Add or Enter a character to add ゛or ゜ 7 G for ゛or G twice for ゜ In single-byte katakana mode, ゛and ゜ are entered as a single-byte character.Insert line feed F[Line FD] to insert line feeds in textInsert space at end of text NzInsert space within text H repeatedly until single-byte space appears*, or S[Menu] 7 Input Space (Double-byte (single-byte) space is entered in 2 bytes (1 byte) input mode.)Toggle characters in reverse orderF[Rev.]Example: From c, press to toggle as follows: c 7 b 7 a 7 2…Move cursor to beginning/end of sentenceS[Menu] 7 Jump 7 To beginning or To endUndo 1[Undo]* Space cannot be entered in number mode. Use symbol list.](https://usermanual.wiki/Panasonic-Connect/210035A.User-Manual-Part-1-of-3/User-Guide-1391716-Page-22.png)
![2-3Universal Operations, etc.Pictographs/Symbols/Smileys/URL Pictographs do not appear in messages sent to incompatible SoftBank handsets or e-mail addresses.1 In text entry window, GList Log may appear first.1 Only in S! Mail text entry window2 Only for S! Mail2 To toggle tabs: A[]/S[ ]3 Xz to select a pictograph/symbol/smiley/URL To close list: KMy Pict.1: My Pictograms tabUnivrsl.2: Universal (cross-carrier) pictographs tabFull: All pictographs tabSymbol: Symbols tabSmiley: Smileys tabURL: URLs tabTemplatesInsert templates (greetings, URLs, emoticons) or edit preinstalled templates.Inserting Templates1 In text entry window, press and hold G Not available in number mode.2 Select a category 7 Select a templateEditing TemplatesMain Menu 4 Tools 4 Templates/Users Dic. 4 Templates1 Select a category2 Highlight a template 7 A[Edit] 7 Edit template ■Reset Edited Templates After Step 1, (highlight a template 7) S[Menu] 7 Reset this or Reset all (7 For Reset all, enter Phone Password) 7 YES ■Manage Template Folders In Step 1, highlight a category 7 S[Menu] 7 Edit folder name 7 Edit folder name To reset folder name, S[Menu] 7 Reset name 7 YES](https://usermanual.wiki/Panasonic-Connect/210035A.User-Manual-Part-1-of-3/User-Guide-1391716-Page-23.png)
![2-4Universal Operations, etc.Editing TextDeleting & Replacing1 Delete Characters within LinesPlace cursor before a character 7 KA character after cursor is deleted. Press and hold K to delete all characters after cursor. Delete Characters from the End of TextPlace cursor at the end of text 7 KA character before cursor is deleted. Press and hold K to delete all characters before cursor.2 Enter another characterCopy/Cut & Paste1 In text entry window, S[Menu] 7 Copy or Cut2 Select Text to Copy/CutPlace cursor before (or after) text to select 7 *z[Start] 7 Place cursor after (or before) text 7 *z[End] Select All (In S! Mail Message Text Entry Window Only)S[All] 7 *z[End]3 Place cursor at target location 7 S[Menu] 7Paste](https://usermanual.wiki/Panasonic-Connect/210035A.User-Manual-Part-1-of-3/User-Guide-1391716-Page-24.png)

![3-1Emergency CallsCall 110 (Police), 119 (Fire & Ambulance) or 118 (Coast Guard) even when some handset restrictions are active.Calls Cannot be Made in Following Cases: When Set Max Cost Limit is ON and charge limit is reached In PIN/PIN2, PUK/PUK2 entry windowEmergency Positioning RequestWhen an emergency call is made from a mobile phone, location is reported to first response agencies such as the police. Location information may be inaccurate due to location or signal conditions. Describe location or nearby landmarks. Base Station Positioning System is accurate within 100 meters to 10 kilometers. Location information from distant base stations may be inaccurate. Function available where first response agencies have completed system installation. Dialing 184 before 110, 119 or 118, cancels location report. However, first responders may obtain location information for immediate and serious threats to life. Not available for international roaming. Requires no separate subscription or transmission fees.Voice CallsMaking Voice Calls1 Enter number with area code 7 J To adjust volume:?z2 L to end call ■Calling from Redial Log Nz 7 Select an entry 7 J ■Making Calls from Phone Book Cz 7 <z to select a page of the required reading 7Select an entry 7 Nz 7 Select a phone number 7 *z ■Showing/Hiding Caller ID Enter number 7 S[Menu] 7 Notify caller ID 7 OFF or ON To cancel setting: S[Menu] 7 Notify caller ID 7 Cancel prefixAnswering Voice Calls1 When a call is received, J to talk2 L to end callCalling](https://usermanual.wiki/Panasonic-Connect/210035A.User-Manual-Part-1-of-3/User-Guide-1391716-Page-26.png)
![3-2CallingInternational Call Application not required. For details, go to: http://mb.softbank.jp/en/global_services/call/1 Enter a phone number2 S[Menu] 7 Int’l dial assistCountry/region code list appears.3 Select a country/region4 Voice CallsJ Video CallsA[V. Call] ■Enter Country/Region Code Directly P 7 Press and hold P to display + (IDD Prefix) 7 Enter a country/region code 7 Enter a number (omit first 0) 7 Voice Calls: J / Video Calls: A[V. Call] Do not omit leading 0 to call Italy (country code: 39).Global Roaming May require application to Global Roaming Service. For details, go to:http://mb.softbank.jp/en/global_services/global_roaming/Example: When Roaming Dial Assistant is ON Roaming Dial Assistant (ZP.2-10) is set to ON and Japan by default.1 Voice CallsEnter a phone number 7 J Video CallsEnter a phone number 7 A[V. Call]2 Select an item (See below)Item Operation/DescriptionCall to Japan* Call Japan Call to set code* Call a country/region set for Roaming Dial AssistantAs is Call Manually enter number to callSelect when calling within the country/region* First 0 is replaced by IDD Prefix and country/region code (e.g. +81). (When calling Italy, +39 is added before first 0.) Confirmation window appears for the first time. Select NO to set Roaming Dial Assistant to OFF.Note IDD Prefix and country/region code can be manually entered in Step 1. Alternatively, save IDD Prefix and country/region code in Phone Book entries.](https://usermanual.wiki/Panasonic-Connect/210035A.User-Manual-Part-1-of-3/User-Guide-1391716-Page-27.png)
![3-3CallingGlobal Roaming SettingsFrom Main Menu 4 Settings 4 International Call ■International Call Settings Int’l Dial Assist 7 Select an item (See below)Item Operation/DescriptionRoaming Dial AssistantAutomatically inserts prefixes (IDD Prefix and country code) ON or OFF (7 For ON, select a country/region)Country/Area CodeSave up to 27 country/region codes Highlight <Not Recorded> 7 A[Edit] 7 Enter a country/region name 7 Enter a country/region code To view an entry: Select a saved country/region To delete: Highlight a country/region 7 S[Menu] 7 Delete this or Delete all (7 For Delete all, enter Phone Password) 7 YESIDD Prefix Edit IDD Prefix. IDD Prefix is set to 0046010 by default S[Menu] 7 Edit 7 Edit IDD Prefix ■Network Mode<Default> Automatically Select Network 7 Select an item (See below)Item Operation/DescriptionAutomatically Handset automatically selects 3G network in Japan, and available network (3G or GSM) when abroad.Manually Select an item・ 3G/GSM: 3G/GSM service area in Japan or abroad.Handset selects an available network automatically.・ 3G: 3G service area in Japan or abroad.・ GSM: GSM service area abroad. Unavailable in Japan. Automatically is recommended. ■Select Operator<Default> Auto Select Operator 7 Select an item (See below)Item Operation/DescriptionAuto Select an operator automaticallyManual Select an operator manually Select an operator Operators with X are not available. To show operator list: A[Update]Network Re-searchSearch available networks When Auto is set, handset selects an available operator automatically. When Manual is set, operator list appears.](https://usermanual.wiki/Panasonic-Connect/210035A.User-Manual-Part-1-of-3/User-Guide-1391716-Page-28.png)
![3-4CallingVideo Calls ■Video Call Window Display appearance may vary by settings/conditions.Call TimeVideo Call IndicatorIncoming ImageOutgoing Image (Alternative Image/Video Image)Indicators : Incoming/Outgoing Sound OK (Gray): Incoming/Outgoing Sound NA : Incoming/Outgoing Image OK (Gray): Incoming/Outgoing Image NA : Video ON : Alternative Image ON : Speaker ON : AV output : During Bluetooth® handsfree call : Close-up : Landscape : Night modeMaking Video Calls1 Enter number with area code 7 A[V.Call] To adjust volume:?z2 L to end callAnswering Video Calls1 When a video call is received, J To send Video Image: 1[image]2 L to end call](https://usermanual.wiki/Panasonic-Connect/210035A.User-Manual-Part-1-of-3/User-Guide-1391716-Page-29.png)
![3-6Calling ■Check Call Forwarding Status Main Menu 4 Settings 4 Call Settings 4 Voice Mail/Call Fwding 4 Get Status ■Cancel Call Forwarding Main Menu 4 Settings 4 Call Settings 4 Voice Mail/Call Fwding 4 Deactivate All 4 YESNote Toll free numbers and international call numbers cannot be saved as a destination number. When using Call Forwarding together with Answer Phone, the function with shorter ring time takes priority (Priority may change due to signal condition). When Ringer ON is set, following operations are available while handset is ringing (within ring time):・ To answer call: J・ To forward call: S[Menu] 7 Call ForwardingVoice MailUnanswered calls are forwarded to Voice Mail Center as set or when handset is off, out-of-range, engaged, etc. Calls are forwarded to Voice Mail Center via Call Forwarding function; Call Forwarding and Voice Mail cannot be set simultaneously. Voice Mail is not available for Video Calls.Activating Voice MailMain Menu 4 Settings 4 Call Settings 4 Voice Mail/Call Fwding 4 Voice Mail ON1 Select an item (See below)Item Operation/DescriptionRinger ON Forward missed calls Select a ring time 7 YESRinger OFF Forward all calls without ringing/vibrating YESNote When using Voice Mail together with Answer Phone, the function with shorter ring time takes priority (Priority may change due to signal condition). When Ringer ON is set, following operations are available while handset is ringing (within ring time):・ To answer call: J・ To forward call: S[Menu] 7 Call Forwarding](https://usermanual.wiki/Panasonic-Connect/210035A.User-Manual-Part-1-of-3/User-Guide-1391716-Page-31.png)
![3-7CallingChecking Voice Mail MessagesInformation window (ZP.1-20) and appear in Standby when new messages are recorded.1 Select an item 7 YESFollow voice guidance.Information window and disappear after messages are checked. ■View DetailsView callers’ phone numbers and date/time Voice Mail messages were left before playing messages. Activate Missed Call Notification beforehand (ZPXX-XX). Vz 7 Voice Mail Notif. 7 F[]Missed Call NotificationWhen Missed Call Notification function is active, Information window appears for calls missed while handset was off, out-of range, engaged etc. Available only when Voice Mail is active.Main Menu 4 Settings 4 Call Settings 4 Missed Call Notifi.1 YESHandset connects to the Network.Follow voice guidance.When Calls are Received while Missed Call Notification is Active…Information window appears for missed calls when handset is turned on or comes into range. Select information to view Missed Calls. Had incoming call(s) appears when Voice Mail messages are recorded (ZLeft).](https://usermanual.wiki/Panasonic-Connect/210035A.User-Manual-Part-1-of-3/User-Guide-1391716-Page-32.png)
![3-8CallingCall WaitingPlace the current call on hold and answer a second, or alternate between calls.Activating/Canceling Call WaitingMain Menu 4 Settings 4 Call Settings 4 Call Waiting1 Activate or Deactivate 7 YESAnswering Second Call1 When tone sounds, J Press J to alternate between calls. Press L to disconnect active call. When the party hangs up, active call ends. Press J to re-engage the party on hold. When a second call comes in while first call is on hold, hold status is canceled and first call resumes. ■Reject Second Call When tone sounds, S[Menu] 7 Call RejectionNote When Voice Mail or Call Forwarding is set to Ringer ON while Call Waiting is active, unanswered calls are transferred to Voice Mail Center or the forwarding number. When Voice Mail or Call Forwarding is set to Ringer OFF, Call Waiting is disabled.Call BarringRestrict incoming/outgoing Voice Calls/Video Calls and SMS messages. Bar All Outgoing and Bar All Incoming are not available when Call Forwarding or Voice Mail is active (Call Forwarding or Voice Mail takes priority). Security Code is required (ZP.1-28).Activating/Deactivating Call BarringMain Menu 4 Settings 4 Call Settings 4 Call Barring1 Select an item (See below)Item Operation/DescriptionBar All Outgoing Restrict all non-emergency callsBar All Int'l Allow only domestic callsBar Int'l Restrict all international calls except to JapanBar All Incoming Reject all callsBar All Roaming Reject calls when outside Japan2 Activate or Deactivate 7 YES3 Enter Security Code](https://usermanual.wiki/Panasonic-Connect/210035A.User-Manual-Part-1-of-3/User-Guide-1391716-Page-33.png)
![3-10CallingPhone BookPhone Book Entry ItemsSave up to 1000 entries in handset Phone Book; 50 entries to USIM Card Phone Book.Phone Book Entry Items Handset USIM CardBasic itemName (Reading) Available AvailableGroup 19 10Phone number 5 2Mail address 5 1Address Available N/ALocation information Available N/ABirthday Available N/AMemo Available N/AImage 100 N/AMemory number 000 - 999 N/AIncoming SettingsRingtoneAvailable N/AVibratorNotification LightScreenMsg RingtoneMsg VibratorMsg Notif. LightAnswer messageSaving to Phone Book1 Press and hold Cz 7 Enter Last name 7 Enter First name 7 An item 7 Enter information 7 A ■Save Settings Main Menu 4 Phone Book 4 Settings 4 Save Settings 4 Phone, USIM or Ask Every Time Select Ask Every Time to select target each time you save an entry. ■Edit Phone Book Entries Cz 7 Select an entry 7 1[Edit] 7 Edit (ZFrom Step 3 on P.4-3) 7 YES](https://usermanual.wiki/Panasonic-Connect/210035A.User-Manual-Part-1-of-3/User-Guide-1391716-Page-35.png)
![Messaging4-3Sending S! Mail & SMSSending S! Mail1 Press and hold A2 Select Address field3 Select from Phone BookPhone Book 7 Select a SoftBank handset number or mail address Enter DirectlyEnter Mail Address or Enter Phone Number 7 Enter a mail address/SoftBank handset number Select from Sent/Received LogsSent Address or Received Address 7 Select a log 7 *z[Select]Composition WindowAddress fieldMail sizeSubject fieldAttachment fieldText field4 Select Subject field 7 Enter subject5 Select Text field 7 Enter text6 A[Send]Additional Functions ■Add Attachments Select Attachment field 7 Select a folder in Data Folder 7 Select a file 7 A[Send] ■Add Address Select Address field 7 < Not entered> 7 Search/enter address 7 Select an address or enter directly 7 A[Finish] ■Use Templates S[Menu] 7 Load Template 7 Highlight a template 7 A[View] 7 *z[Select] ■Use My Pictograms In text entry window, G[My Pict.] 7 Select a My Pictogram](https://usermanual.wiki/Panasonic-Connect/210035A.User-Manual-Part-1-of-3/User-Guide-1391716-Page-38.png)
![Messaging4-4Sending SMS Messages1 A 7 Create New SMS2 Select Address field3 Select from Phone BookPhone Book 7 Select a SoftBank handset number Enter DirectlyDirect Entry 7 Enter a SoftBank handset number Select from Sent/Received LogsSent Address or Received Address 7 Select a log 7 *z[Select]4 Select Text field 7 Enter text When number of entered character exceeds limit, S! Mail conversion option message appears.5 A[Send] ■Manual Mail Conversion In SMS Composition window, A[Menu] 7 Change mail type 7 Select an itemAddress fieldText fieldComposition WindowReceiving MessagesRetrieving S! Mail AutomaticallyAuto Download retrieves up to 1 MB messages. Transmission fees are incurred; adjust to use. (To disable Auto Download/limit message size for Auto Download: ZP.XX)When a new message is received, appears and Information window opens in Standby.1 In Information window, New message When Information window does not appear, A 4 Incoming Mail 4 select a folder 4 Select a message.](https://usermanual.wiki/Panasonic-Connect/210035A.User-Manual-Part-1-of-3/User-Guide-1391716-Page-39.png)
![Messaging4-5Retrieve Complete S! MailWhen Center sends initial portion of message (S! Mail Notice), retrieve the complete message manually.1 Select a message with or 7 Select continue (xxxKB ) at the end of message textIncoming Options (S! Mail Only)From Main Menu 4 Messaging 4 Settings 4 S! Mail Settings 4 Incoming Options1 Select an item (See below)Item Operation/DescriptionDownload Size LimitLimit maximum incoming message size 300KB or 2MBAuto Retrieve SizeDeactivate/limit Auto retrieval Auto Retrieve Size 7 Select an itemAuto Retrieve forLimit Auto-retrieval by Message Type Selected Messages 7 Address Stored in PB or SoftBank Domain Only 7 A[Finish]](https://usermanual.wiki/Panasonic-Connect/210035A.User-Manual-Part-1-of-3/User-Guide-1391716-Page-40.png)
![Messaging4-6PC MailPC Mail Account Setup Check ISP information in advance. PC Mail services may not be available depending on services, settings, contract details for PC mail account. Quick Yahoo! Mail Address Setup is available for setting your Yahoo! account.1 A 7 Settings 7 PC Mail Settings 7 Account Settings2 <Not Recorded> 7 Select an item (See below)Item Operation/DescriptionAccount Name Enter an account nameIncoming Options Select an item 7 Enter/select an item 7 K User Name, Password and Receiving Server are required.Sending Options Select an item 7 Enter/select an item 7 K Mail Address and Sender Server are required. 3 A[Finish] 7 OK ■Set Default Account After Step 1, highlight an account 7 S[Menu] 7 Default account ★ appears for selected account. ■Delete Account After Step 1, highlight an account 7 S[Menu] 7 Delete account 7 Enter Phone Password 7 YES Sending PC Mail1 Press and hold A 7 PC Mail2 Compose a message and send(ZFrom Step 2 on P.XX) ■Change Account After Step 1, select Account field 7 Select an account ■Attach Image/Music Files Highlight a file 7 S[Menu] 7 Attach to message 7 PC Mail 7 Compose a message and send (ZFrom Step 2 on P.XX)PC Mail SettingsFrom Main Menu 4 Messaging 4 Settings 4 PC Mail Settings 4 Check New Mail ■Auto-retrieve for New Messages Auto Check 7 Select an account (*z to toggle ON/OFF) 7 A[Finish] ■Set Auto-retrieve Interval/Condition Check Interval 7 Select an item ■Auto-retrieve (while Abroad) Auto Check in Roaming 7 ON or OFFAccount fieldPC Mail Composition Window](https://usermanual.wiki/Panasonic-Connect/210035A.User-Manual-Part-1-of-3/User-Guide-1391716-Page-41.png)
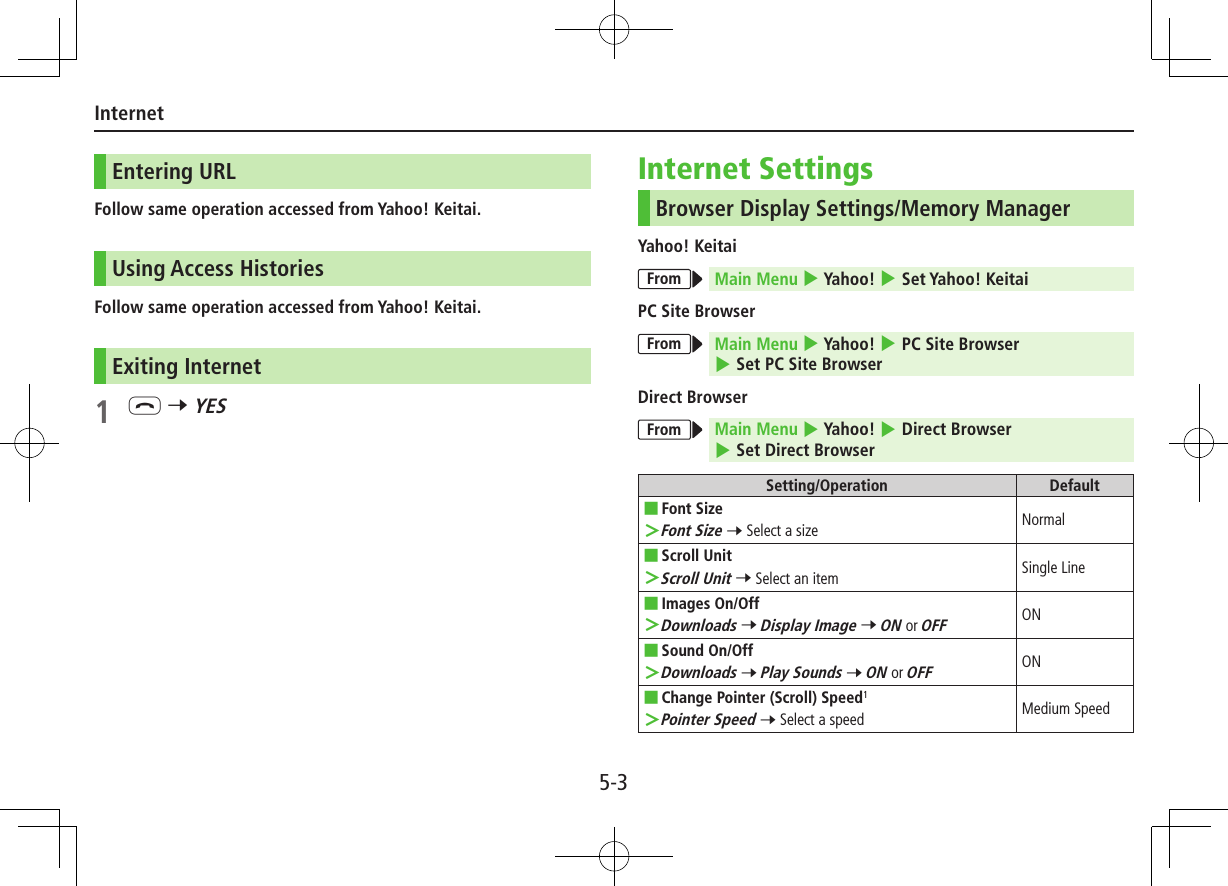
![5-1Getting StartedAccess Yahoo! Keitai Mobile Internet and PC sites.InternetYahoo! Keitai View Mobile Internet Websites Download image/sound files, etc. Movies/Music StreamingPC Site Browser/Direct Browser View PC Sites Download still images Separate subscription is required for Network access. For more information, visit SOFTBANK MOBILE Corp. Website (http://www.softbank.jp).Connecting Via Wi-FiOnce connection setup is complete, handset automatically connects to that Wi-Fi network when within range. Wi-Fi: ZP.XX-XX Switch to 3G from Wi-Fi: ZP.XX-XXYahoo! KeitaiFrom Main Menu 4 Yahoo!Opening Yahoo! Keitai Menu1 Open Top MenuYahoo! Keitai Open Menu ListMenu List2 Select a menu item Repeat Step 2 as required.Web Search1 Web Search 7 Enter text 7 S[OK]Internet](https://usermanual.wiki/Panasonic-Connect/210035A.User-Manual-Part-1-of-3/User-Guide-1391716-Page-43.png)