Panasonic Connect 210035A UMTS/ GSM Cellular Mobile with Bluetooth®, WLAN and RFID User Manual Part 3 of 3
Panasonic Mobile Communications Development of Europe Ltd UMTS/ GSM Cellular Mobile with Bluetooth®, WLAN and RFID Part 3 of 3
Contents
- 1. User Manual Part 1 of 3
- 2. User Manual Part 2 of 3
- 3. User Manual Part 3 of 3
- 4. User MAnual Part 2 of 3
User Manual Part 3 of 3
![8-1Digital TVInitial SetupSet channels for your area.Main Menu 4 TV 4 Channel Setting 4 Select Area1 Select a region 7 Select a prefecture 7 YESAutomatic Channel SetupIf manual setup fails, try automatic channel setup.Main Menu 4 TV 4 Channel Setting 4 Automatic1 YES 7 After channel search, YES 7 Enter titleWatching TV1 12 Select a channelDirect Channel Access Q – OG(Channel 10)P(Channel 11)H(Channel 12)Previous/Next Channel <zChannel Search Press and hold <z To stop: A[Cancel]/K3 To end TV, L 7 End TVViewerOthers](https://usermanual.wiki/Panasonic-Connect/210035A.User-Manual-Part-3-of-3/User-Guide-1391718-Page-1.png)
![8-2OthersIndicators❶❷❸❺❻❼ ❽ ❾❹❶Indicator Display❷ ❺❻ ❽❼ ❾Item Description Operation (Normal Position)●❶Image — —●❷Captions — —●❸Data Broadcast (ZP.5-7) —●❹Data Broadcast Mode Data Broadcast Mode offData Broadcast Mode on1[To TV]/[To DBC]2●❺Off timer (ZP.5-9) —●❻ECO Mode (ZP.18-14) —●❼Channel (ZP.5-4) When multiple programs are available in the same broadcasting station, "service number/total numbers" appears.—●❽Signal Strength Level Strong←――→Weak Out of range —●❾Receiving Captions — —●Volume — Adjust volume: ?z1 Mute/Resume: K1●Program Title —J/A3●Recorder Status1 Recording Timer Set (ZP.5-11, P.5-13)●Display/Caption2Display: ON/OFF/LargeCaption: ON/OFFJ Each key press toggles settings.●Indicator/Caption3 Indicators: ON/OFFCaption: Upper position/Lower position/OFFJ Each key press toggles settings.1 Only when Data Broadcast Mode is off 2 Only in Portrait View 3 Only in Landscape View](https://usermanual.wiki/Panasonic-Connect/210035A.User-Manual-Part-3-of-3/User-Guide-1391718-Page-2.png)
![8-3OthersRecording/Playing ProgramsRecording Current ProgramRecordings are saved to microSD Card.1 Activate TV 7 *z[Record]2 *z[Stop] to stop recording ■Capture Screenshots >Activate TV (Data Broadcast Mode off) 7 press and hold FPlaying Recorded ProgramsMain Menu 4 Data Folder 4 TV 4 Video1 Select a videoPlayback starts.2 K to stop playback ■Playback OperationsVolume ?zMute/Cancel Mute S[/ ]Fast-forward Nz (Press once: 10x; Press twice: 30x)Fast-rewind Vz (Press once: 10x; Press twice: 30x)Pause/Resume *z[/ ]Play Frame by FramePause playback 7 A[Frame]Skip Rewind1Press and hold Vz/GSkip Forward2Press and hold Nz/HToggle Playback SpeedA[///(Summary View)]View Title JToggle Data View Display title 7 J In Landscape View, each key press toggles indicators (icons) and captions on/off. (Each key press also switches time bar position regardless of whether caption is shown.)Toggle Display View/Data ViewF When Data Broadcast Mode is off, each key press toggles views. When Data Broadcast Mode is on, each key press toggles Data View.Data Broadcast Mode On/Off1 In Landscape View, turn program title on.1 Unavailable if file is under 12 seconds long.2 Unavailable if file is under 28 seconds long.](https://usermanual.wiki/Panasonic-Connect/210035A.User-Manual-Part-3-of-3/User-Guide-1391718-Page-3.png)
![8-4OthersTimerMain Menu 4 TV1 Timer Watching or Timer Recording2 A[New] 7 Select an itemSet a channel, date and time to start and end viewing/recording a program, etc.3 A[Finish] 7 For Timer Recording, select YES or YES (confirm once)](https://usermanual.wiki/Panasonic-Connect/210035A.User-Manual-Part-3-of-3/User-Guide-1391718-Page-4.png)
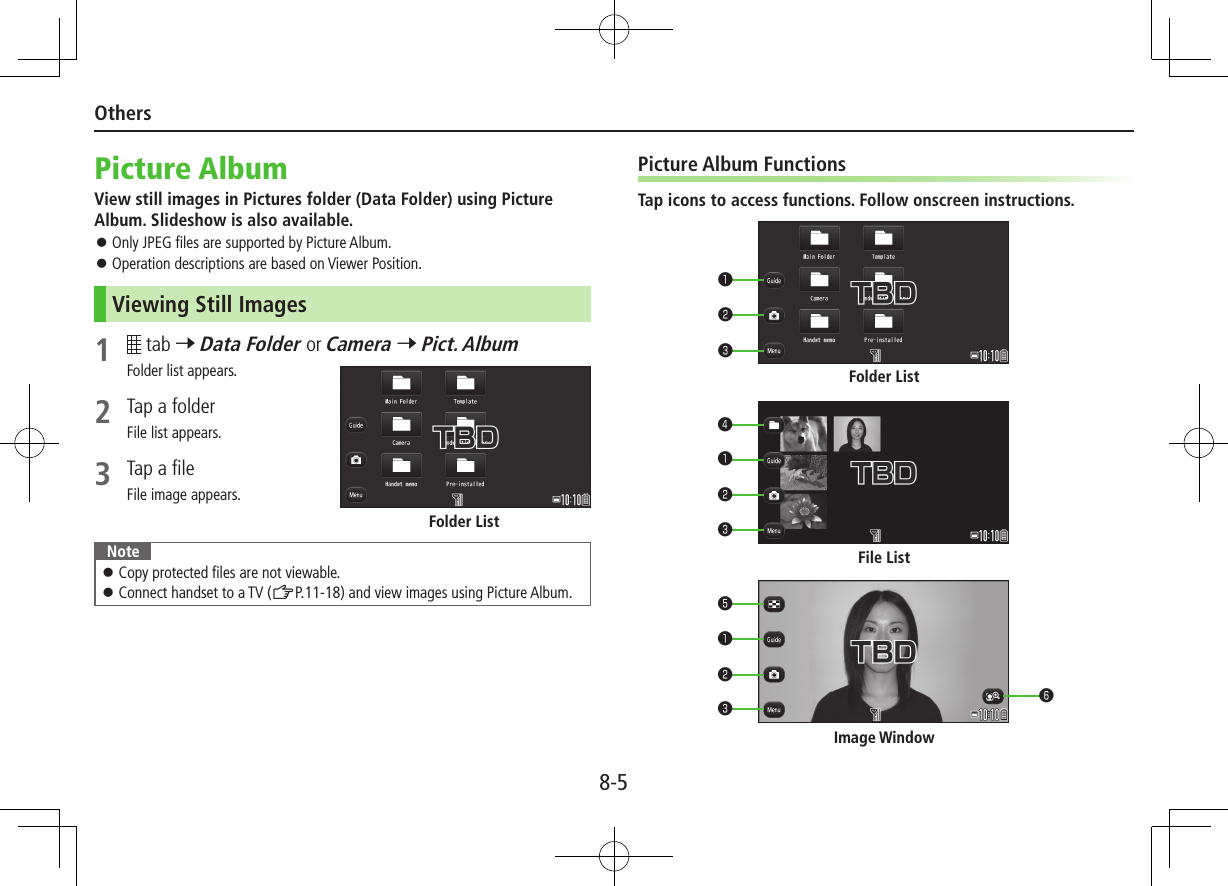
![8-6OthersItem Description❶Guide View operating instructions❷Activate Camera-Touch1Activate Camera in Digicam mode❸Menu View function menu❹Folder List View folder list❺File List View file list❻Face Zoom2Zoom in on faces When more than one face is detected, tap icon to zoom in on another face.1 Available only when Picture Album is activated by in Digicam mode.2 Available only when faces are detectedNote Each tap in Image window toggles indicators on/off. (In Normal Position, press F[].) Face Zoom may not be available depending on still image. Faces detected by Beauty plus (ZP.10-29) may not correspond with those detected by Face zoom. ■Scroll Page/Screen Slide left/right to scroll files in file list. Slide left/right to scroll images in Image window. ■Zoom >In Image window, Menu 7 Zoom 7 Adjust Slide Lever To cancel: CLRNote In Normal Position, press *z[Zoom] 7 H/G to zoom in/out Image window. To undo, press *z[Return].](https://usermanual.wiki/Panasonic-Connect/210035A.User-Manual-Part-3-of-3/User-Guide-1391718-Page-6.png)
![9-1Handset Data BackupBack up handset data (Phone Book, Calendar, Tasks, Messages, Notepad, Bookmarks, Content Keys) to microSD Card; restore handset data after accidental loss/alteration.Backing up to microSD CardMain Menu 4 Tools 4 microSD Backup1 Highlight a category 7 S[Menu] 7 Copy to microSD (7 For Bookmarks, select an item)2 Enter Phone Password 7 YESAll files of selected category are backed up to microSD Card. ■One File Backup >Open a file 7 S[Menu] 7 Copy to microSD 7 YESRestoring from microSD CardMain Menu 4 Tools 4 microSD Backup1 Select a category2 Restore One ItemSelect a file 7 Highlight an item 7 S[Menu] 7 Add to phone Restore One FileHighlight a file 7 S[Menu] 7 Add to phone or Overwrite to phone 7 Enter Phone Password Restore All FilesS[Menu] 7 Add all to phone or Overwr. all to ph. 7 Enter Phone Password3 YESNote Note that Overwrite to phone or Overwr. all to ph. erases all files of same category on handset. Video files of 100 MB or larger cannot be moved from microSD Card to handset. Files of 10 MB or larger except for Videos/Books files (.bmo) cannot be moved/copied from microSD Card to handset. Data backed up in other SoftBank handsets may not be restored in 001P depending on type and size.Appendix](https://usermanual.wiki/Panasonic-Connect/210035A.User-Manual-Part-3-of-3/User-Guide-1391718-Page-8.png)
![Appendix9-2Software UpdateCheck for 001P software updates and download as required. Transmission fees do not apply to updates (including checking for updates, downloading and rewriting). Software Update may take approximately 30 minutes. Fully charge battery beforehand. Even if appears, low battery message may appear. In this case, charge battery until Notification Light/Charging Indicator goes out. Select a place where signal is strong and stable. Other functions are unavailable during update. Software Update does not affect Phone Book entries, files saved in Data Folder or other content, but it is recommended that you create a backup of any important information and data (note that some files cannot be copied). SoftBank is not liable for damages resulting from loss of data, information, etc. Do not remove battery during the update. Update will fail. Software Update failure may disable handset. Contact SoftBank Mobile Customer Center, Customer Assistance (ZP.XX).Main Menu 4 Settings 4 Phone Settings 4 Software Update 4 Software Update1 A[YES] 7 Follow onscreen instructionsAfter download is complete, handset automatically restarts and update begins.When update is complete, Software has been successfully updated. appears. Handset restarts then Information appears. Entire process takes approximately 60 seconds.Update ResultsWhen Information window appears, Software Updt. Result 7 *z When Information does not appear, Main Menu 4 Settings 4 Phone Settings 4 Software Update 4 Update ResultsScheduled UpdateConfirmation appears at scheduled update time. Press *z or wait ten seconds for update to start.Note If handset does not power on after Software Update, remove then re-insert battery and try again. If handset still does not power on, contact SoftBank Mobile Customer Center, Customer Assistance (ZP.XX). SoftBank is not liable for damages resulting from loss of data, information, etc. Alarm tone does not sound during update. For more information, visit SOFTBANK MOBILE Corp. Website (http://www.softbank.jp).](https://usermanual.wiki/Panasonic-Connect/210035A.User-Manual-Part-3-of-3/User-Guide-1391718-Page-9.png)