Panasonic Mobile Communications 210035A UMTS/ GSM Cellular Mobile with Bluetooth®, WLAN and RFID User Manual User MAnual Part 2 of 3
Panasonic Mobile Communications Development of Europe Ltd UMTS/ GSM Cellular Mobile with Bluetooth®, WLAN and RFID User MAnual Part 2 of 3
Contents
- 1. User Manual Part 1 of 3
- 2. User Manual Part 2 of 3
- 3. User Manual Part 3 of 3
- 4. User MAnual Part 2 of 3
User MAnual Part 2 of 3
6-1
Infrared
Before Using Infrared
Transfer Phone Book/Calendar events, messages, bookmarks
and Data Folder files wirelessly between handset and compatible
devices, including PCs and other mobiles.
001P infrared function is based on IrMC1.1, however, some
IrMC1.1-based device transmissions may not be transmitted/received within
specification.
Debris may inhibit infrared transfers; clean infrared ports with a soft cloth
beforehand.
Direct sunlight/fluorescent light may inhibit transfers.
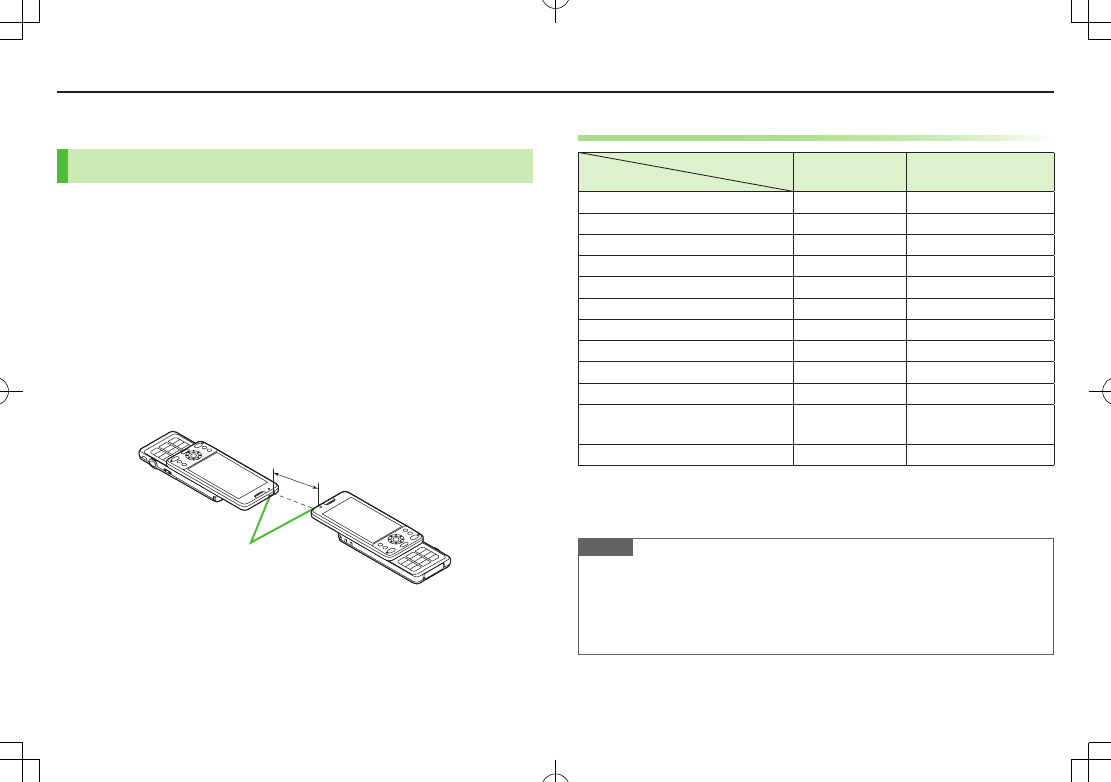
Align infrared ports within 20 cm of one another and make sure no objects are
placed between them. Do not move the devices until transfer is complete.
Infrared Port
Within 20 cm
Transferable Files
File One file All files
Phone Book (Account Details) Available Up to 1000
Calendar events1Available Up to 1000
Tasks Available Up to 100
Received message Available Up to 3000
Sent message Available Up to 1000
Drafts Available Up to 10
Notepad Available Up to 20
Ring Songs&Tones Available N/A
Still image2 3Available N/A
Video3Available N/A
Bookmark
(Yahoo! Keitai, PC Site Browser) Available Up to 100 each
Widget3Available N/A
1 Saved Holidays/Memorial days and Handwriting Diary not transferable
2 Including Flash® files
3 Multiple files transferable
Note
Following files cannot transfer:
・ Files prohibited for transfers from 001P
・ Phone Book entries and SMS on USIM Card
If memory becomes full, remaining entries are truncated
Connectivity

6-2
Connectivity
Sending
One/Multiple File Transfer
1 Highlight a file, and follow the steps below
Files to Send Operation/Description
Phone Book
>S[Menu] 7
Send Ir data
7
Send phonebook
Account Details
>F[Ir]
Messages
>S[Menu] 7
Send Ir data
7
Send This
Bookmarks
>S[Menu] 7
Send to ExtrnlDvcs
7
Send Ir data
7
Send This
Still Images/
Videos/Widgets
>S[Menu] 7
Send Ir data
To send multiple files:
S
[Menu]
7
Multiple-choice
7
Check files to send
7
S
[Menu]
7
Send Ir data
Other Files
>S[Menu] 7
Send Ir data
2
YES
All File Transfers
Precaution
Receiving all files overwrites all saved files including secret/protected files.
Sending all Phone Book entries transfers Account Details as well. User-saved
Account Details is overwritten on receiving handset (handset number remains).
Session Number
Session number (4 digits) is required for all file transfers via Infrared and
IC transmission. Sender and recipient must enter same Session number to
complete transfers.
1 Highlight a file 7 S[Menu] 7 follow the steps below
Files to Send Operation/Description
Phone Book
Send Ir data
7
Send all phonebook
Messages
Send Ir data
7
Send All
Bookmarks
Send to ExtrnlDvcs
7
Send Ir data
7
Send All
Other Files
Send all Ir data
2 Enter Phone Password 7 Enter Session number 7
YES
Receiving
Main Menu 4 Tools 4 Receive via Infrared
1 One/Multiple File Transfer
Receive
7 When a file is received,
YES
Send files from sender side within 30 seconds.
All File Transfers
Receive All
7 Enter Phone Password 7 Enter same Session
number as sender's 7
YES
7
YES
Saved files are deleted, and transfer starts.

6-3
Connectivity
Bluetooth®
Notes
Bluetooth® connection is not guaranteed with all Bluetooth® devices.
Establish connections with certified Bluetooth® devices that meet the
specification standards developed by Bluetooth® SIG.
Due to the unique characteristics/specifications of a certified Bluetooth® device,
connections or transfers may fail; procedures, displayed results or operations may
vary from those described in the manual.
When data transfer is interrupted, it may take some time for process to complete.
Noise may interfere with wireless or handsfree conversations depending on the
status of connected devices or signal conditions.
For details about headset/handsfree devices, see the device manuals.
Bluetooth® and Wi-Fi are not simultaneously available.
Radio Wave Interference with Wi-Fi Devices
Bluetooth® and Wi-Fi devices (IEEE802.11b/g) share the same frequency band
(2.4 GHz). Use of both devices in close proximity may cause interference, affecting
transmission speed, clarity or connection quality. If interference occurs:
Maintain at least 10 m between Bluetooth® and Wi-Fi devices.
Turn off Wi-Fi device when using Bluetooth® device within a 10 m radius.
Searching & Pairing Devices
Main Menu 4 Tools 4 Bluetooth 4 Search&Paired Device
1
YES
*
Device search starts and names of found devices appear.
To search again: A[Search]
* If there are already paired devices in list, select a device 7 Select a function
2 Select a device 7
YES
7 Enter Phone Password
3 Select text entry field 7 Enter Bluetooth® Passkey
4 Select a Bluetooth® function
Handset connects to Bluetooth® device. When complete, flashes in blue.
After no Bluetooth® connection is made for a certain time, appears in black
and Power saver mode starts.
When Bluetooth® device can connect to multiple services, confirmation
appears asking whether to connect to another service.
While connected, (Blue) appears. While in Standby, (Gray) appears.
When
Dial-up
is selected, handset stands by for connection requests from
other Bluetooth® devices.
Dial-up
can be selected regardless of profile types.
Bluetooth® Passkey
Bluetooth® Passkey (1 to 16 digits) is required to connect Bluetooth® devices;
sender and recipient must input the same code to complete file transfers.
Bluetooth® Passkey is not necessary for paired devices.
6-4
Connectivity
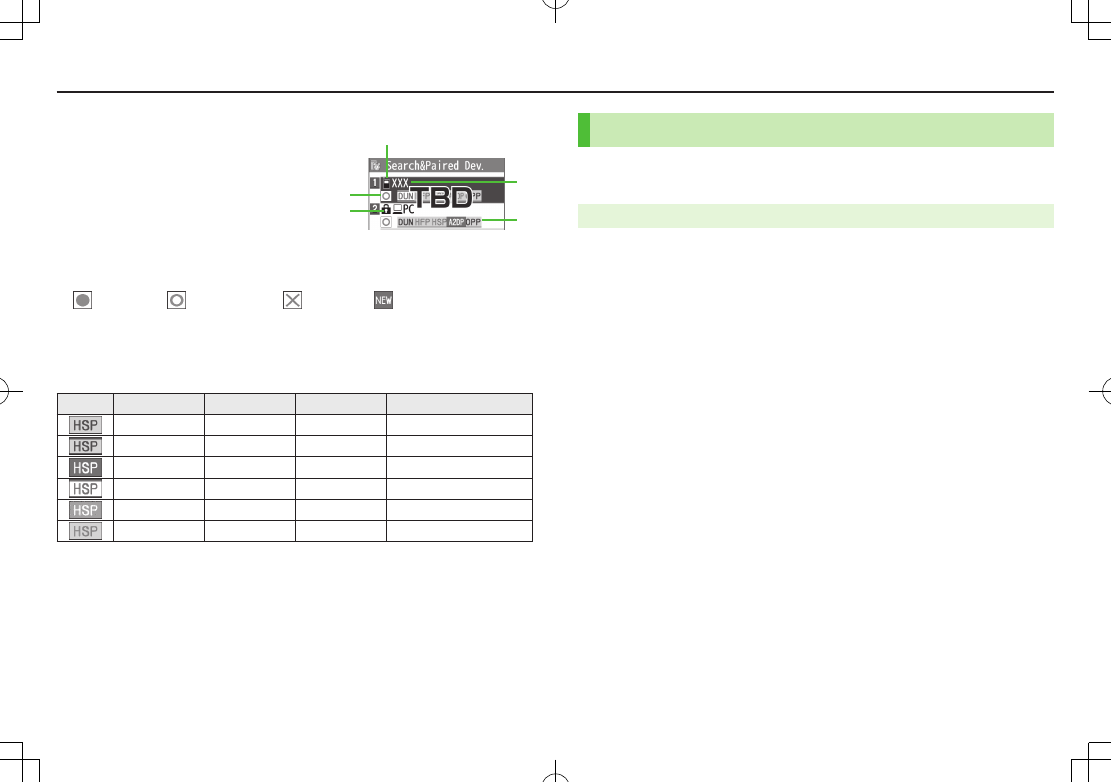
■Search&Paired Device List
❶ Device Type
Indicators appear for different
types of devices.
❷ Device Name
Device names appear.
When no names are found,
Bluetooth® addresses appear.
❸ Connection Status
: Connected : Not connected : Not found : Not paired
❹ Protection
Indicator appears when registered contents are protected.
❺ Profile Status
Indicators appear to show profile status.
Icon
Letter Color
Background Color
Frame Color
Status
Blue Gray —
Not connected (Not paired)
Blue Gray Blue Not connected (Paired)
White Green —Connected
Green White Green Standby for connection
White Light green —Preferred device
Gray Gray —Not supported
Search&Paired Device
❷
❺
❸
❹
❶Suspending Bluetooth® Functions
Suspend all Bluetooth® functions connected or on standby for
connection, and disable Bluetooth®.
Main Menu 4 Tools 4 Bluetooth
1
Bluetooth OFF
7
YES
To return to standby for previously connected function:
Bluetooth ON

6-5
Connectivity
Placing Bluetooth® Devices on Standby for
Connection
Main Menu 4 Tools 4 Bluetooth 4 Accept Registered
1 Check functions to be on standby for connection 7
A[Finish]
To uncheck, select functions to remove check marks.
Sending/Receiving Phone Book
Sending
1 Open Phone Book 7 S[Menu] 7
Send to Bluetooth
2 One File Transfer
Send phonebook
7 Select a recipient device
All File Transfer
Send all phonebook
7 Select a recipient device 7 Enter
Phone Password
3
YES
Receiving
Main Menu 4 Tools 4 Bluetooth 4 Receive via Bluetooth
1 One File Transfer
Receive
7
YES
All File Transfer
Receive All
7 Enter Phone Password 7
YES
7
YES

6-6
Connectivity
Wi-Fi (Wireless LAN)
Use wireless LAN (Wi-Fi) for Internet connection via home/public
Wi-Fi networks enabling high-speed internet access.
001P Wi-Fi function supports IEEE802.11b/g.
Subscription to Keitai Wi-Fi is required to access Internet over Wi-Fi.
Direct Access
Use Direct Browser to view PC sites via Wi-Fi connection.
Before Using Wi-Fi
Notes
Wi-Fi connection may automatically switch to 3G depending on signal condition.
Bluetooth® and Wi-Fi are not simultaneously available.
Wi-Fi is not available while abroad.
Radio Wave Interference with Bluetooth® Devices
Bluetooth® and Wi-Fi devices (IEEE802.11b/g) share the same frequency band
(2.4 GHz). Radio wave interference occurs if Bluetooth® and Wi-Fi devices are
used in close proximity, causing low transmission speed, noise or poor connection.
If interference occurs, take the following measures:
Keep 10 m or more between Bluetooth® and Wi-Fi devices.
Turn off Bluetooth® device when using Wi-Fi device within a radius of less than
10 m.
Registering/Connecting to Access Points
Following methods are available for registering/connecting to
access points.
Search/Setting Search access points for registration/connection.
Manual Setting Manually register/connect to access points.
AOSS
Use AOSSTM (AirStationTM One-Touch Secure System) for
registration/connection. For AOSSTM-compatible access points,
press AOSS button on access point device for automatic setup.
BB mobilepoint
Register to BB mobilepoint and set as access point.
The BB mobilepoint profile is saved to handset by default.
For details on BB mobilepoint, visit
http://tm.softbank.jp/english/consumer/wlan/index.html
Register up to 10 access points.
User ID and password is required for connecting to pre-registered access points
(Public Wi-Fi Setting: ZP.11-14).
For setting/operating access point devices, refer to device manual.
Wi-Fi connection is not available when access point channel is set to
12-14 ch and stealth mode.

6-7
Connectivity
Access Point Search
Main Menu 4 Tools 4 Wi-Fi 4 Profile Lists/Settings
1 S[Menu] 7
New Profile
7
Search&Setting
Select
YES
when prompted to turn Wi-Fi
ON
.
To search again: A[Search]
2 Select an access point 7 *z[Store] 7
YES
7 *z[CNCT]
7
YES
■Access Point List
❶..
Access Point Name
Detected SSID (ESSID) appears. Access
point name appears for a registered
access point.
❷..
Registered Networks
: Registered (not connected)
: Registered (connected)
❸..
Signal Strength
Signal status appears.
❹..
Security Status
Security status appears.
❶
❷
❸
❹
Wi-Fi Status Indicators
Wi-Fi ON (out of range)
/ Keitai Wi-Fi/Direct Access Available (In-Range/Transmitting)
/ Direct Access Available (In-Range/Transmitting)
Number of blue arches indicates signal strength.
Access Point List

6-8
Connectivity
Manual Registration/Connection
Main Menu 4 Tools 4 Wi-Fi 4 Profile Lists/Settings
1 S[Menu] 7
New Profile
7
Manual Setting
2 Highlight an item (See below) 7 *z[Edit]
Item Operation/Description
Profile Name
>Enter an access point name
SSID
>Enter the same SSID (ESSID) as access point
IP Setting Set IP address and DNS server
>Highlight
IP Address Setting
or
DNS Server Setting
7
*z[Edit] 7
Automatically
or
Manually
(7 For
Manually
, edit respective items)
Security Setting Set security/encryption method according to access point
>Select a security type
・
WEP
7 Enter WEP key 7 Enter encryption key
・
WPA/WPA2-PSK
7 Enter encryption key
To cancel security setting:
Non
Yahoo! Keitai
Setting
Select whether to use Keitai Wi-Fi
>
Accept
or
Not Accept
When using Direct Browser only, select
Not Accept
.
Public W-Fi
Setting
Set public wireless LAN on/off
>
ON
or
OFF
(7 For
ON
, select
ID
or
Password
7
*z[Edit] 7 Enter ID or password)
Connection with all public wireless LAN services is not
guaranteed.
Proxy Setting Select whether to use HTTP proxy for Direct Access
>
YES
or
NO
(7 For
YES
, highlight an item 7 *z[Edit] 7
Edit)
3 A[Store] 7
YES
7 A[CNCT] 7
YES
Registration/Connection Using AOSSTM
Main Menu 4 Tools 4 Wi-Fi 4 Profile Lists/Settings
1 1[AOSS]
Select
YES
to register/connect to an access point after disconnecting from
registered access point.
2 Press AOSS button at access point
Press within 120 seconds.
3 A[Store] 7
YES
7 A[CNCT] 7
YES
Enabling/Disabling Wi-Fi
1 Press and hold w
Wi-Fi status indicator appears (ZP.XX-XX).

6-9
Connectivity
Functions Available for Wi-Fi
■Functions Available in Profile List/Setting Window
>Main Menu 4 Tools 4 Wi-Fi 4 Profile Lists/Settings 4 S[Menu]
4 Select an item (See below)
Item Operation/Description
Connect Connect to a registered access point
>
YES
Change Priority Change priority for registered access points
>Select an access point 7 ?z to move to target 7 *z 7
A[Finish]
New Profile
>Select an item
・
AOSS
(ZFrom Step 2 (Left))
・
Search&Setting
(ZFrom Step 2 on P.11-13)
・
Manual Setting
(ZFrom Step 2 on P.11-14)
New BB
mobilepoint
Enter user ID/password to register BB mobilepoint
>Highlight an item 7 *z[Edit] 7 Enter user ID/password
7 A[Set]
Edit
>Edit items
Copy Copy registered access point
Delete
>Select an item
・
Delete this
7
YES
・
Delete selected
7 Check access points 7 A[Finish]
7
YES
・
Delete all
7 Enter Phone Password
■View Connection Status
>Main Menu 4 Tools 4 Wi-Fi 4 Connection Status
To update status: A[Update]
External Devices
SoftBank Utility Software (Japanese)
Phone Book, Calendar, Tasks, messages, Bookmarks, Notepads and
Data Folder can be transferred to a PC, edited or managed by
using SoftBank Utility Software.
USB cable (not included) is necessary for using SoftBank Utility Software.
Set USB Mode to
Communication Mode
.
For details on and downloading SoftBank Utility Software, visit
http://www.softbank.jp/mb/r/sbu/ (Japanese)

6-10
Connectivity
USB (Japanese)
Connect handset to a PC via USB cable (not included) specified by
SoftBank for data transfer or data communication.
Transfer data using SoftBank Utility Software.
Setting USB Mode
<Default> Communication Mode
Main Menu 4 Settings 4 Connectivity 4 USB Mode
1 Select an item (See below)
Item Operation/Description
Communication
Mode
Packet transmission, 64K data transmission, data transfer and
calls with USB handsfree compatible devices are available
microSD Mode Read/write data on microSD Card
MTP Mode Transfer/delete music data via Windows Media® Player on PC
Data Communication via USB Cable
Use handset as a modem for Internet access by connecting
handset with a PC.
Download utility software from URL below and install on PC.
http://panasonic.jp/mobile/support/download/001p/index.html
1 Install "USBドライバ (USB Driver)" and "Modem Wizard"
from Utility Software (001P) to a PC
2 Set handset to
Communication Mode
, and connect
handset to PC via USB cable
Power up handset before connecting to PC via USB cable.
3 Start up "Modem Wizard," and operate communication setup
"Modem Wizard" enables you to set up APN and dial-up easily.
For setup/starting procedures, see "Modem Wizard" Help.
Note
Connecting handset to a PC or PDA for Internet access may incur high packet
transmission fees.

6-11
Connectivity
Connecting Handset to TV
View the following on a TV set or other devices: Video Call images,
Digital TV images, still images/videos saved on 001P.
To use Video Output Cable (not included), Stereo Earphone Conversion Cable (not
included) is required.
1 Open External Port Cover
2 Connect Video Output Cable to handset using Stereo
Earphone Conversion Cable
3 Connect Video Output Cable to video/audio input terminal on
TV set
4 Open an image file on handset
External Port
Yellow
White
Red
Video Output Cable
Video ◎
Audio L ◎
Audio R ◎

7-1
Before Using Camera
001P features approximately 13.2 Mega Pixel CMOS Auto-focus
Camera capable of capturing still images and videos.
Notes
Remove dust/debris from lens cover with a soft cloth.
Handset movement may blur images especially in dark places; hold handset
firmly.
Capturing/saving images immediately after handset has been left in a hot place
may affect image quality.
Exposing lens to direct sunlight may affect image quality.
Photo Light illuminates or flashes while Camera is active. Photo light cannot be
turned off.
Shutter click sounds at fixed volume even in Manner Mode.
Note
Camera is not available when battery is low.
Incoming calls, Alarm and low battery cancel Camera. Captured images/
recorded videos are retained. Save data when Camera restarts.
When left in Viewfinder for three minutes, Camera is canceled.
File Formats & Save Location
Still images/videos are saved to Data Folder.
Image Type File Format Save Location
Still images JPEG (.jpg) Data Folder (Pictures)
Videos MPEG-4 (.3gp), ASF (.asf) Data Folder (Videos)
■Change Save Location
>(
Storage setting
7)
Store in
7
Phone
or
microSD
Note
When recording time (File size setting: ZP.XX-XX) is set to
Long time
,
videos are saved to microSD Card.
Camera Modes & Positions
Camera Mode Still Image Video
Digicam mode Available Available
Photo mode Available N/A
Video Camera mode N/A Available
Camera & Imaging

Camera & Imaging
7-2
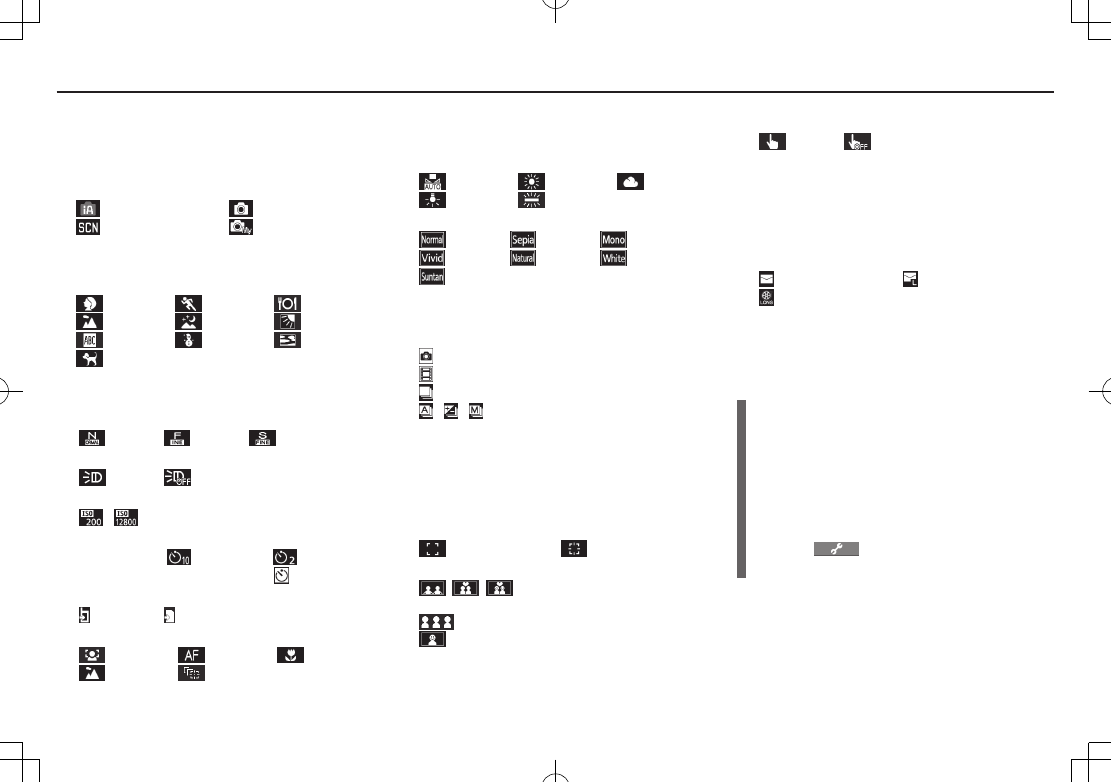
Camera Display Indicators
Images shown below are for reference only.
■Video Camera Mode
❻ ❽ ❺❸❹❷
❶
❾
❼
■Photo Mode
■Digicam Mode
❶
❺
❸ ❹ ❷
❽
❾
❼
❹ ❷ ❾
❽
❼
❺
❸
❶
Camera & Imaging
7-3
Most icons and operation descriptions are based on
Digicam mode. Actual screenshots and operations
may differ from actual icons/operations.
❶
Photo mode
iA (Intelligent Auto) Normal
Scene MyOriginal
(For Scene/MyOriginal, indicators may vary
depending on setting.)
◦❷
Scene
Portrait
Sports
Food
Scenery
Night mode
Backlight
Character
Snow
Sunset
Pet
❸Image size
Show image size
❹Image QLTY
Normal Fine Super fine
❺Photo light
ON OFF
❻ISO setting
- 200 auto to 12800 auto
❼Auto timer
Digicam mode: 10 seconds 2 seconds
Photo mode/Video Camera mode:
❽Store in
Phone microSD
❾Focus
FaceDetect Auto Close-up
Landscape AF tracking
Brightness
Adjust brightness (Level -3 to +3)
White BAL
Auto Fine Cloudy
Bulb Light
Color mode
Normal Sepia Monochrome
Vivid Natural Whitening
Suntan
No. of frames
Show number of remaining frames
Camera-mode
Digicam mode/Photo mode
Video camera mode
Con.set. (Action mode in Digicam mode)
/ / Action mode in Photo mode (Auto/Auto
bracket/Manual)
Img. stabilizer
Correct camera shake
Top indicator
Indicate vertical direction
Focus Guide
Auto focus guide AF tracking guide
AutoShutter
/ / Love shutter (Friends/Lovers/
Lovers+Smile)
Group shutter (One to Five)
Smile shutter
Zoom bar
Indicate zoom level
TouchAF/AE
Valid Invalid
Key Guidance
Show key operation guidance
Memory capacity bar
Indicate memory status (appears in red when
memory is full)
File size setting
Mail restrict'n(S) Mail restrict'n(L)
Long time
Movie type set
Record video without audio
Recordable time
Indicate recordable time
Key Guidance
Press A[Guide] in Digicam mode to view Key
operation guidance (Normal Position).
For Photo mode/Video Camera mode, follow the
steps below to change settings:
・ Press keys indicated by .(7 ?z to select an
item)
・ A[] 7 <z to select a setting 7
?z to select an item
7-4
Camera & Imaging
Capturing Still Images
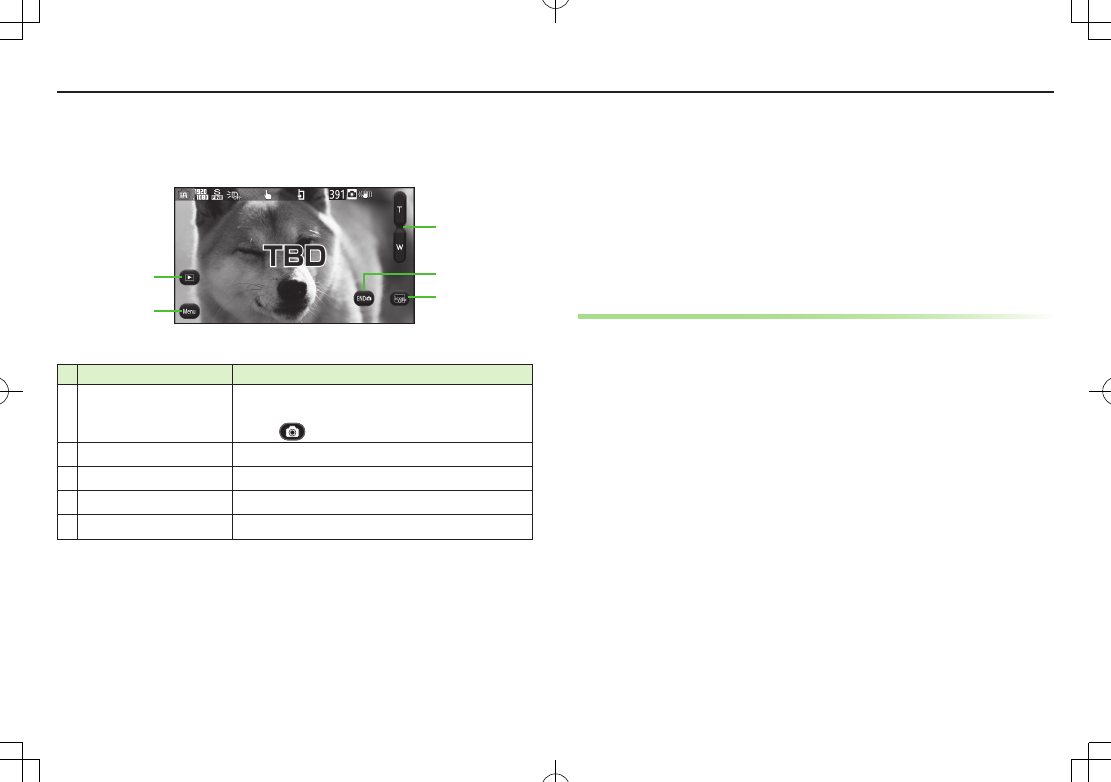
■Functions Available in Viewfinder
Item Description
❶Activate Picture Album Activate Picture Album to view captured images
Use as a slideshow (ZP.XX-XX)
Tap to return to Viewfinder
❷Menu View function menu
❸Zoom Adjust zoom level
❹Cancel Camera Cancel Camera
❺Show Indicator Show/hide indicators
Picture Viewfinder (Digicam Mode)
❶
❸
❺
❹
❷
1 8 or F
2 Frame subject 7 8 or *z
Shutter click sounds at fixed volume, then captured image appears for two
seconds.
Image is automatically saved.
3 L to exit
Continuous Shooting
Capture a succession of six or eight still images. Number of
captured images varies by image size.
1 In Viewfinder, S[Menu] 7
Con. set.
7
Continuous
2 Frame subject 7 8 or *z
Continuous shooting starts.
Postview window appears.
3 Save One
Highlight a image 7 *z[Save]
To view full-size image: Highlight an image 7 F[Scale up]
(7 <z to toggle full-size images) 7 To save the image, *z[Save]
Save All
A[STO all]
To return to Viewfinder without saving images: K
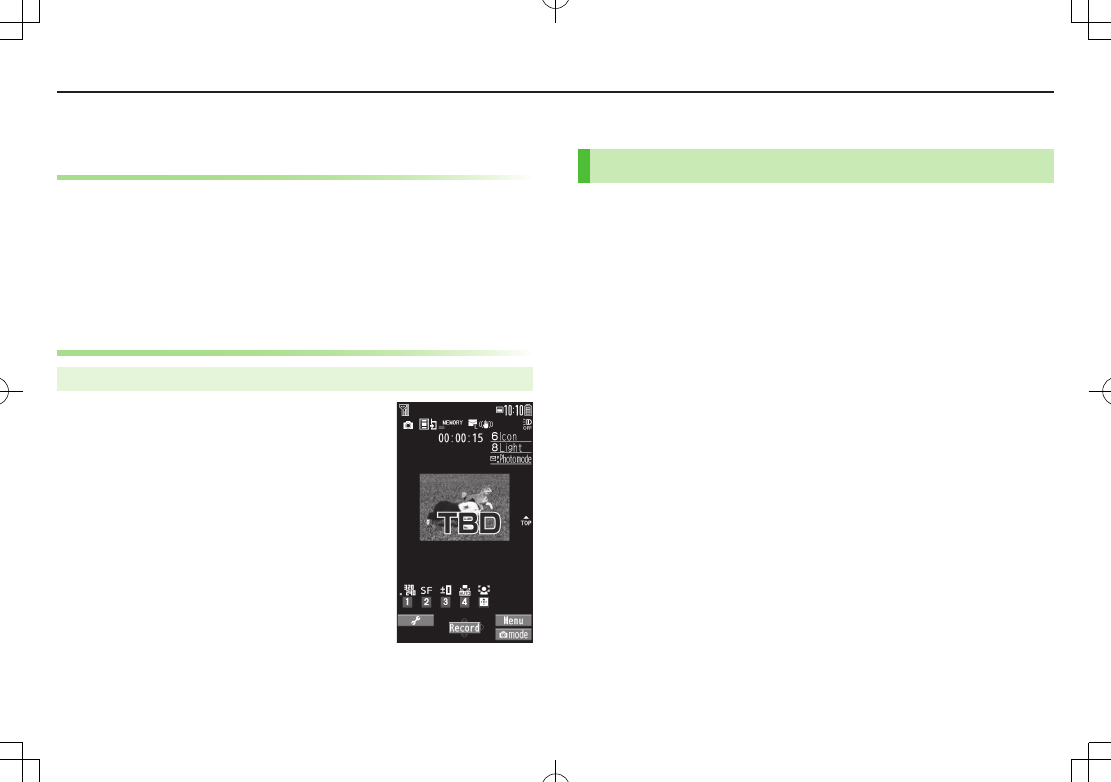
7-5
Camera & Imaging
Recording Videos
In Digicam Mode
1 8 or F
2 Frame subject 7 (TBD)
3 (TBD) to exit
Video is automatically saved.
In Video Camera Mode
Main Menu 4 Camera
1
Video Camera
2 Frame subject 7 *z[Record],
P or 8 to start recording
3 *z[Stop], P or 8 to end
recording
Video is automatically saved.
4 L to exit
Video Viewfinder
Other Camera Functions
Auto Focus Lock
Bring focus on subject at center of display automatically.
Lock focus on subject, and recompose your picture.
1 In Viewfinder, 8 halfway or Cz
When in focus, handset sounds. Focus Guide turns green, and focus is locked.
When out of focus, Focus Guide turns red.
To cancel focus locked by Cz or G: K
To cancel focus locked by 8: Release finger from 8
2 Determine composition
3
Capture image in selected camera mode
In Step 1, press 8 halfway to lock focus, then press 8 firmly
to shoot.

7-6
Camera & Imaging
AF Tracking
Position AF tracking guide on subject. AF tracking guide appears
and tracks moving subject while adjusting focus and exposure for
subject.
Note
When Camera is unable to track subject (e.g. when subject is out of Viewfinder),
AF tracking is canceled.
Depending on situation, AF tracking may track unintended subject.
AF tracking is not available when Auto shutter is in use or certain image size is
set.
1 Tap subject in Viewfiner
When subject is recognized,
AF tracking guide turns yellow and
begins tracking subject.
To cancel:
CLR
2 8 or F to capture the image
Auto Timer
1 In Viewfinder, S[Menu] 7
Auto timer
7
10 seconds
or
2 seconds
In Photo/Video Camera/Action modes: S[Menu] 7
Auto timer
7
ON
7 Enter time (seconds)
2 8 or *z
Auto timer tone sounds. After set period of time, shutter is released and
recording starts.
While Auto timer is active, press A[Quit] or K to return to Viewfinder
without canceling Auto timer.
Note
Auto timer is not available when Action mode is set to
Manual
.
Auto Timer is set to
OFF
after capturing.

7-7
Camera & Imaging
Auto Shutter (Digicam Mode Only)
Shutter automatically releases when camera detects certain
conditions. Select an Auto Shutter type to specify condition (When
Photo mode is set to
Intelligent Auto
or Focus is set to
FaceDetect
).
1 In Viewfinder, S[Menu] 7
AutoShutter
7 Select an
item (See below)
Item Operation/Description
OFF Cancel Auto shutter setting
Love shutter Shutter releases when two faces move close together
>
Friends
,
Lovers
or
Lovers+Smile
When
Lovers
is set, distance between two faces is closer
than
Friends
.
Group shutter Camera detects up to five faces. When more people are in frame,
Auto timer activates and shutter releases in three seconds
>Select number of people
Smile shutter Shutter releases when Camera detects a smiling face. If
multiple faces are detected, shutter releases when camera
detects a smile in yellow focus guide