Panasonic of North America 927150TX Hearing Aid User Manual WH 17C 15C 13C indd
Panasonic Corporation of North America Hearing Aid WH 17C 15C 13C indd
Revised User Manual
Operating Instructions
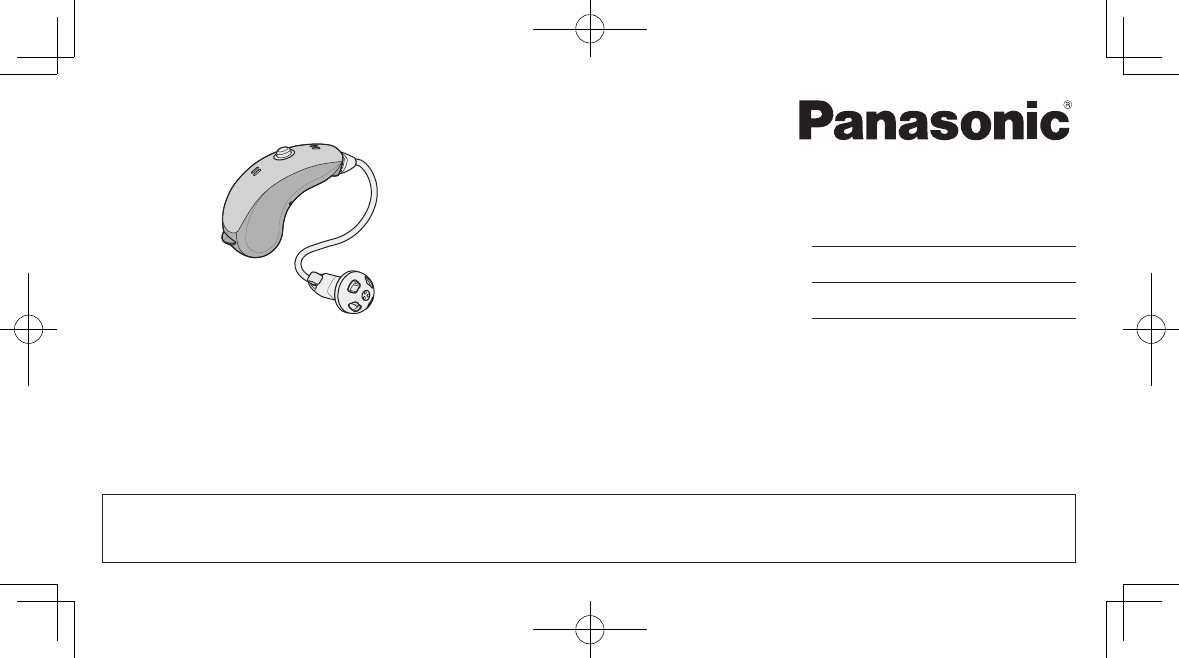
Hearing Instrument R1-W Model No. WH-R17C
Model No. WH-R15C
Model No.
W
H-R13C
Before using the Panasonic Hearing Instrument R1-W series, please be aware of the following restrictions:
· R1-W series cannot be used outside the United States.
The information contained in this manual is important for safe and reliable operation. Anyone who will handle, maintain,
store, or dispose of your hearing instrument should read this document. Carefully read and thoroughly understand this
entire document before attempting to set up and operate the hearing aid. Failure to follow the operating instructions may
result in poor performance of the hearing aid or even can result in serious and sometimes permanent bodily injury.
Keep this document for future reference. If you have any questions, consult the dispenser where you purchased your hearing aid.
The Limited Warranty document is enclosed together in the package. Keep it in a secure place. Make sure that it is
properly completed, signed with the authorized dispenser’s name, and filled in with date of original purchase, name of
dispenser and other important information.
2
Before Use
Introduction
We would like to thank you for purchasing the
Panasonic Hearing Instrument.
The Panasonic Digital Hearing Instrument helps
optimize both intelligibility and comprehension for the
hearing impaired.
The type of hearing aid that will work best for you
depends on the type and severity of your hearing loss
and usage conditions. You will need to get a thorough
hearing evaluation and have your ears examined by
an ear specialist or an audiologist. They will suggest
the most appropriate type of hearing aid for you
depending on the type and degree of hearing loss. In
order to get the right hearing aid that will be tailored
to meet your individual needs and lifestyle, be sure to
have your hearing aid properly fitted and fine-tuned
to your ears, as an improper fit can cause comfort and
flexibility issues, and even further damage to the ear.
It is important to keep in mind that hearing aids will
not restore normal hearing, nor will they halt the
progression of hearing loss. They are intended to
compensate for impaired hearing. They should be used
only for the purpose they are designed and directed.
Carefully read the instructions and make sure you fully
understand the operation of the hearing aid before
using it.
Continuously operating equipment
3
Before Use
Before UseOperationsReference
Contents
Before Use
Package contents ........................................................... 4
Warning to hearing aid dispensers .................................. 6
Important notice for prospective hearing aid users
............
7
Children with hearing loss ................................... 8
Safety precautions .............................................. 9
Usage instructions ............................................ 16
Operations
Component description ................................................ 20
Basic operational flow .................................................. 20
i-i. Battery insert/removal with Battery Easy Care Tool
........
21
i-ii. Manual battery insert/removal ................................. 24
ii. Wearing the hearing instrument ................................ 25
iii. Turning on the hearing instrument
................
26
iv. Adjusting the memory switch ....................... 27
v. Adjusting the volume control......................... 28
vi. Turning off the hearing instrument ............... 29
vii. Removing the hearing instrument ................ 29
Use with telephone .......................................... 30
Reference
Carrying case ............................................................... 30
Hearing instrument dryer .............................................. 31
Setting the hearing instrument in the hearing instrument dryer
.32
Wax guard replacement ............................................... 34
Removing the eartip ..................................................... 35
Attaching the eartip ..................................................... 36
Retention loop setup .................................................... 38
Receiver unit replacement ............................................. 40
Top cover replacement ................................................. 41
Cleaning and maintenance ............................... 42
For first-time users ............................................ 43
Troubleshooting guide ...................................... 44
How family and friends can help ....................... 46
Performance .................................................... 47
Specifications ................................................... 55
Information ...................................................... 56
FCC compliance ................................................ 59
Warranty and customer service .............Back cover
4
Before Use
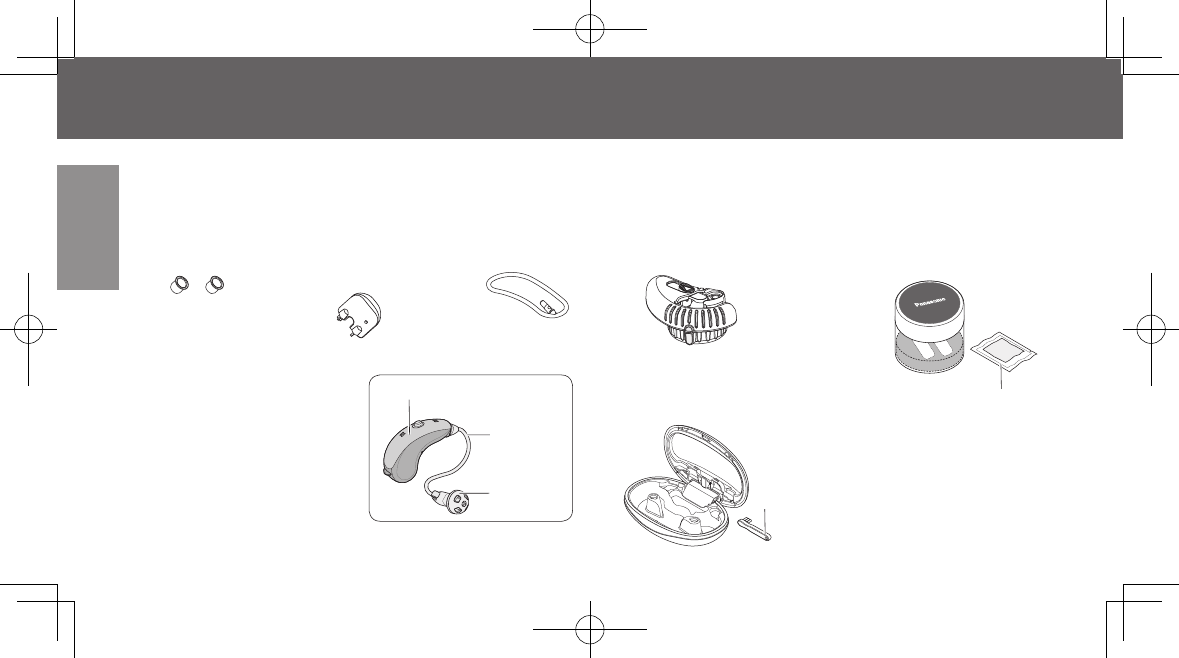
Package contents
The Panasonic hearing instrument R1-W series comes with the following items.
If there are any missing or defective items, please inform your dispenser.
Components
· Battery Easy Care Tool
QTY: 1
· Wax guard
QTY: 2
· Replacement tool
for wax guard
QTY: 1
· Retention loop
QTY: 1
· Main unit
QTY: 1
(Receiver unit and eartip
are integrated with the
main unit by dispenser.)
· Carrying Case
QTY: 1
· Hearing instrument dryer
QTY: 1
Cleaning
brush
Main unit
Receiver
unit
Eartip
Plastic bag
containing
desiccant

5
Before Use
VOL
MEMORY
Documentation set
· Operating Instructions
· Quick Tips
· Limited Warranty
Optional Accessories (sold-separately)
· Consult your dispenser.
Remote Control
(WH-0M1201A)
Hearing Hub
(WH-0M1101A)
Battery
(sold-separately)
· Zinc air battery
(size 13)

6
Before Use
Warning to hearing aid dispensers
A hearing aid dispenser should advise a prospective
hearing aid user to consult a physician if it is
determined through inquiry, actual observation,
or review of any other available information, that
the prospective user has any of the following
conditions:
· Visible congenital or traumatic deformity of the
ear.
· History of active drainage from the ear within the
previous 90 days.
· History of sudden or rapidly progressive hearing
loss within the previous 90 days.
· Acute or chronic dizziness.
· Unilateral hearing loss of sudden or recent onset
within the previous 90 days.
· Audiometric air-bone gap equal to or greater than 15
decibels at 500 hertz (Hz), 1 000 Hz, and 2 000 Hz.
· Visible evidence of significant cerumen
accumulation or a foreign body in the ear canal.
· Pain or discomfort in the ear.
A hearing aid must be programmed and adjusted by
the dispenser on an individual basis. Inappropriate
hearing aid setting may cause damage to the ears
of your customers. If you have any questions about
fitting, contact the Panasonic sales division below.
Company name:
Panasonic Corporation of North America
Healthcare Group
Address:
One Panasonic Way, 1H-6, Secaucus, NJ 07094
Telephone No.:
1-888-422-6309
7
Before Use
Important notice for prospective hearing aid users
Good health practice requires that a person with a
hearing loss have a medical evaluation by a licensed
physician (preferably a physician who specializes in
diseases of the ear) before purchasing a hearing aid.
Licensed physicians who specialize in diseases of the ear
are often referred to as otolaryngologists, otologists
or otorhinolaryngologists. The purpose of medical
evaluation is to assure that all medically treatable
conditions that may affect hearing are identified and
treated before the hearing aid is purchased.
Following the medical evaluation, the physician will
give you a written statement that states that your
hearing loss has been medically evaluated and that you
may be considered a candidate for an audiologist or a
hearing aid dispenser, as appropriate, for a hearing aid
evaluation.
The audiologist or hearing aid dispenser will conduct
a hearing evaluation to assess your ability to hear
with and without a hearing aid. The evaluation will
enable the audiologist or dispenser to select and fit
a hearing aid to your individual needs.
If you have reservations about your ability to
adapt to amplification, you should inquire about
the availability of a trial-rental or purchase-option
program. Many hearing aid dispensers now offer
programs that permit you to wear a hearing aid for
a period of time for a nominal fee after which you
may decide if you want to purchase the hearing aid.
Federal law restricts the sale of hearing aids to those
individuals who have obtained a medical evaluation
from a licensed physician. Federal law permits a fully
informed adult to sign a waiver statement declining
the medical evaluation for religious or personal
beliefs that preclude consultation with a physician.
The exercise of such a waiver is not in your best
health interest and its use is strongly discouraged.

8
Before Use
Children with hearing loss
In addition to seeing a physician for a medical
evaluation, a child with a hearing loss should
be directed to an audiologist for evaluation and
rehabilitation since hearing loss may cause problem
in language development and the educational and
social growth of a child.
An audiologist is qualified by training and
experience to assist in the evaluation and
rehabilitation of a child with a hearing loss.
9
Before Use
Safety precautions
Follow the instructions below to reduce the risk of personal injury or damage to the hearing instrument.
The following symbols are used throughout this document, and contain important differences
regarding the probability of serious injury. These definitions are as follows:
WARNING
CAUTION
Indicates a potentially hazardous situation that could result in death or
serious injury.
Indicates a possible hazard which if not avoided
may result in
minor to
moderate injury. It is also used to alert against unsafe
practices that can
result in property damage.
The following symbols specify behavior or actions which are not allowed and an instruction that
must be carried out.
Do Not
(Not Allowed) Mandatory Attention, consult
ACCOMPANYING DOCUMENT
10
Before Use
Safety precautions (Continued)
Keep out of reach of children and pets.
A hearing instrument and its
components can be a choking
hazard
and cause possible internal injury if
swallowed. To prevent accidental
ingestion of hearing instrument or its
components and/or accessories, secure them
in a safe place where they are not accessed
by infants, small children, pets, or others who
might accidentally swallow them.
Keep batteries away from children and pets.
Hearing instrument batteries can be easily
swallowed and pose a choking hazard
and possible internal injury. To prevent
accidental ingestion, secure batteries in a
safe place where they are not accessed by
infants, small children, and pets. Dispose of
used batteries immediately.
WARNING
· If swallowed, obtain immediate medical
attention.
·If swallowed, call the 24-hour National Button
Battery Ingestion Hotline collect at
1-(202)-625-3333. Seek medical attention.
11
Before Use
Do not let others use your hearing instrument.
Inappropriate use of a hearing instrument
can cause severe damage to the ear. Do not
let children play with the hearing instrument.
Keep the hearing instrument out of reach of
children.
Do not disassemble, short-circuit, or expose
the zinc air battery to water or fire.
Failure to heed this warning may result in
leakage or explosion, which can lead to
injury or contamination of surrounding
factors.
WARNING
12
Before Use
CAUTION
Safety precautions (Continued)
Do not use the hearing instrument near any device that emits high frequency radio waves or
generates a strong magnetic field.
The hearing instrument may emit acoustic feedback which can result in hearing damage.
•Remove your hearing aid while undergoing any kind of electromagnetic treatment such as X-Rays,
Magnetic Resonance Imaging (MRI), Computerized Axial Tomography (CAT), Electroencephalogram
(EEG), Electrocardiogram (ECG), Short-Wave Diathermy, or other electrical or magnetic treatment.
•Other types of radiation such as burglary alarms, room surveillance systems, radio equipment, and
mobile phone will not damage the hearing aid. They could, however, affect the sound quality or
produce unusual sounds in the hearing aids.
13
Before Use
Do not modify or disassemble the hearing
instrument.
Failure to heed this warning may
result in damage to the ear.
Do not immerse the hearing aid in water,
and do not allow it to get wet.
It may short-circuit and become damaged.
· Contact your dispenser if you need to have
your hearing instrument adjusted, or if
you encounter unexpected behavior of the
hearing instrument.
Do not use any other receiver unit.
Use of another type of receiver unit that is
not provided by your dispenser may generate
loud sound, which can damage hearing.
CAUTION
Make sure that the battery is fresh and
installed correctly.
Pay attention to the polarity. Inserting
the battery incorrectly can result in a
burst, leak, or damage to the unit.
14
Before Use
Safety precautions (Continued)
Before wearing a hearing aid, have your ear
examined by a licensed physician, or get a
hearing evaluation from a hearing instrument
specialist or an audiologist.
If the wrong type of a hearing aid is
selected, or a hearing aid is used in an
improper manner, it can cause ear or
hearing damage.
CAUTION
Ask the dispenser for a proper fit.
Inappropriate fitting may result in damage to
your hearing. Have your hearing aid fitted to
your individual needs.
Confirm that the hearing instrument is
completely free of burrs and cracks.
Rugged projection like sharp edges and
rough burrs protruding from the surface
of the hearing instrument can cause cuts
and nicks to the skin.
· When cleaning your hearing aid, wipe it gently
with a soft cloth. Never use organic solvents such
as alcohol, paint thinner, or benzene. Failure to
heed this caution may result in deformation of the
hearing instrument or cracking on the surface.
15
Before Use
CAUTION
Before wearing the hearing instrument,
make sure that the eartip fits into place.
If the eartip is not securely attached, it
may come off and remain in the ear.
Never attempt to remove the eartip
with use of any device. Attempting
to remove it on your own may cause
damage to the ear. Consult your
physician immediately.
· Do not use eartip if damaged.
Stop using the hearing instrument if you
experience any physical discomfort.
If you keep using the hearing instrument
when you suffer from headache, dizziness,
pain in the ear or skin abnormality at the ear
such as swelling and rash, your condition
may become worse.
· Stop using the hearing aid immediately and consult
your physician.
16
Before Use
Stop using the hearing instrument if you notice
draining fluid from your ears.
Do not use the hearing instrument without resolving
any problems that may cause drainage from the ear.
Discharge from the ear adhering to the receiver may
obstruct the sound, affect the hearing quality, or
damage the hearing instrument Consult your physician
to resolve the draining condition.
Clean the ear canal before each use of the hearing
instrument.
Eartips can collect cerumen (earwax), which can clog
the earphone and lower the sound quality. Safely
clean earwax out of your ear.
Usage instructions
Do not drop, hit or shake the hearing instrument. Do not
subject it to high impact, vibration, or impact. Drops and
impacts will cause scratches, cracks and damage.
Do not forcefully bend or pull on the receiver.
The receiver can get deformed.
The hearing instrument and its remote control and
Hearing Hub are designed to comply with the United States
regulations and are intended for use in the United States.
If you experience some physical discomfort such as pain
in the ear or skin abnormality, stop using the hearing
instrument, seek immediate medical treatment then
contact your dispenser.
Take off the hearing instrument before you go to sleep.
After using hair styling products and skin care products,
do not touch the hearing instrument without first washing
your hands. Do not put sunscreen or tanning lotion
around the area where your skin comes in direct contact
with the hearing instrument.
Care and handling instructions
For proper care and handling of your hearing instrument,
be sure to read and follow the instructions below.
Preventive maintenance can help extend the life span of
your hearing instrument.
17
Before Use
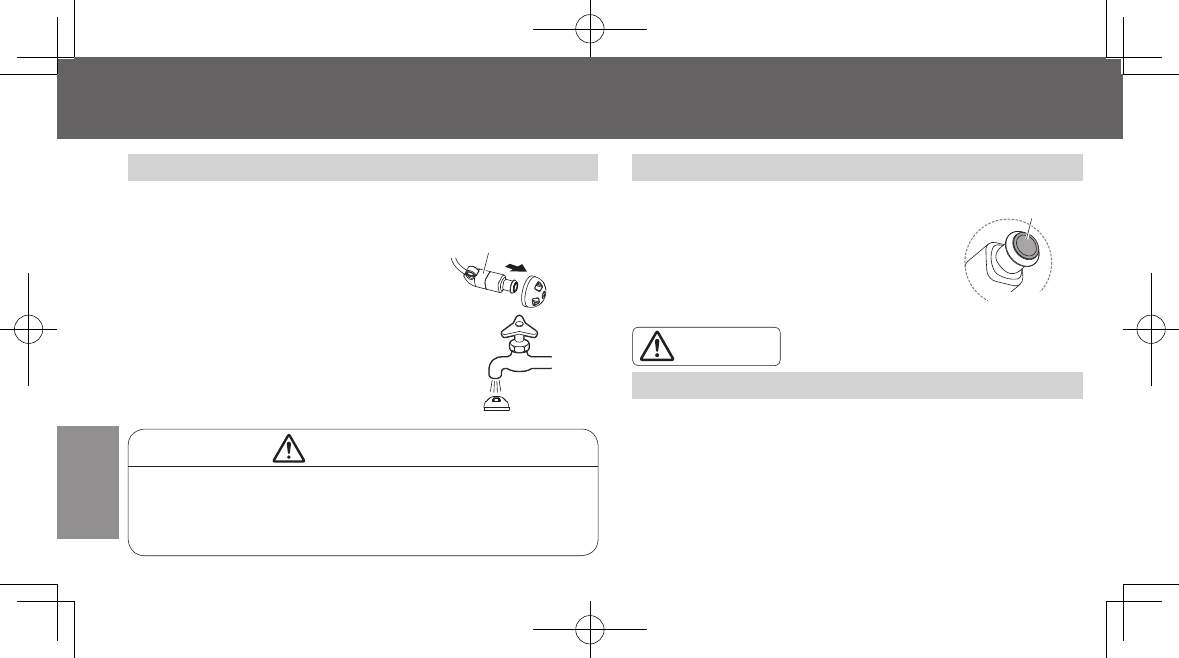
Avoid high temperatures, moisture, humidity and dust.
· Do not use the hearing instrument in the shower or
while swimming.
· Do not touch the hearing instrument with wet hands.
· Remove the hearing instrument before applying hair
spray.
· Do not use the hearing instrument with wet hair.
Dry your hair as leaving it soaking wet will wet your
hearing instrument.
· Do not leave or store the hearing instrument in a
damp location (bathroom), dusty environment or in
direct sunlight, high temperature or humidity (such as
in an automobile).
The hearing instrument has no special protection
against ingress of water.
· Equipment not suitable for use in the
presence of flammable anesthetic agents
mixed with air, oxygen, or nitrous oxide.
CAUTION
18
Before Use
Usage instructions (Continued)
Proper battery handling and maintenance
Individual zinc air cells are stored with an adhesive
tab. The factory seal must not be peeled off until the
battery is required for use.
The tab seals the air hole on the battery. Once the tab is
removed, it takes approximately 30 seconds before the
battery is activated. Wait until the battery is ready.
If you do not use the hearing
instrument for a week or longer,
remove the battery and put the tab
back on its plus (+) end. Place the
battery with the plus (+) sign facing
down and store the battery in an
area that sustains approximately
60 percent moisture. If you fail to
do this, the battery will deteriorate
quickly and will be completely
exhausted in about a month.
If the battery is running low, the hearing instrument will
make an alert or warning chime.
If the battery has not been used for a long period of time,
it may swell. A weak or dead battery can severely affect
the functioning of your hearing instrument. Replace it
with a new one immediately.
The amount of battery life varies depending on the type
and amplification of your hearing instruments and the
number of hours of use.
Moisture accumulation in the hearing instrument causes
not to function correctly. Wipe clean with a dry cloth.
With or without an adhesive tab, do not stack more than
three batteries on top of each other or let them come in
contact with each other.
Adhesive tab
Zinc air battery
19
Before Use
Do not store or carry the battery with metal jewelry
or objects such as coins, nails, screws, hair pins or
the like. Never carry loose batteries. If they come
in contact with each other or other metal objects,
they will short out.
Do not expose the battery to moisture or rain.
The battery absorbs carbon dioxide from the
atmosphere, resulting in its short life span. Do not
use near a heat source.
Hearing instrument maintenance
Before putting your hearing instrument in the hearing
instrument dryer, wipe off any dirt, dust, oil or sweat
that is left on the hearing instrument and battery
with a clean soft cloth. Do not leave the hearing
instrument exposed to direct sunlight, extremely high
temperatures and humidity.
When not wearing your hearing instrument, store it in
its carrying case.
To prevent accidental ingestion of hearing instrument,
components and accessories, secure them in the
carrying case.
20
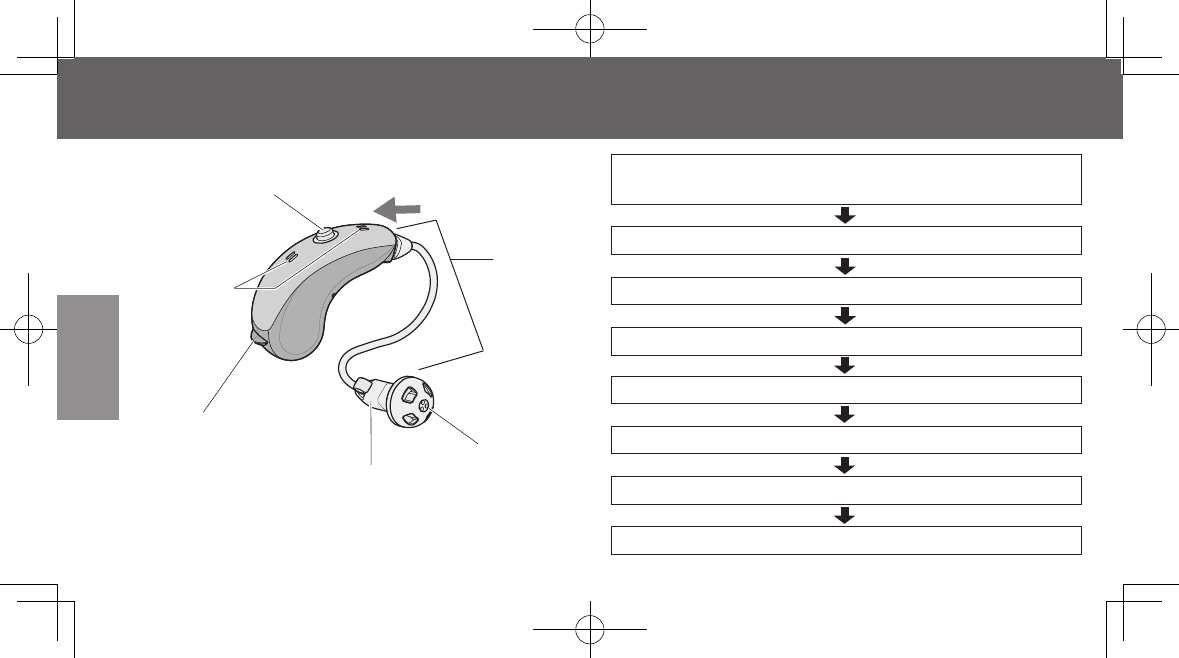
Operations
Input sound direction
Battery compartment with
ON/OFF switch
Receiver
unit
Microphone
(sound inlet)
Receiver
Eartip
Component description
Memory switch
Basic operational flow
i-i. Battery insert/removal
with Battery Easy Care Tool ...............Pages 21-23
i-ii. Manual battery insert/removal .................Page 24
ii. Wearing the hearing instrument ..............Page 25
iii. Turning on the hearing instrument ...........Page 26
iv. Adjusting the memory switch ..................Page 27
v. Adjusting the volume control ...................Page 28
vi. Turning off the hearing instrument ..........Page 29
vii. Removing the hearing instrument ............Page 29
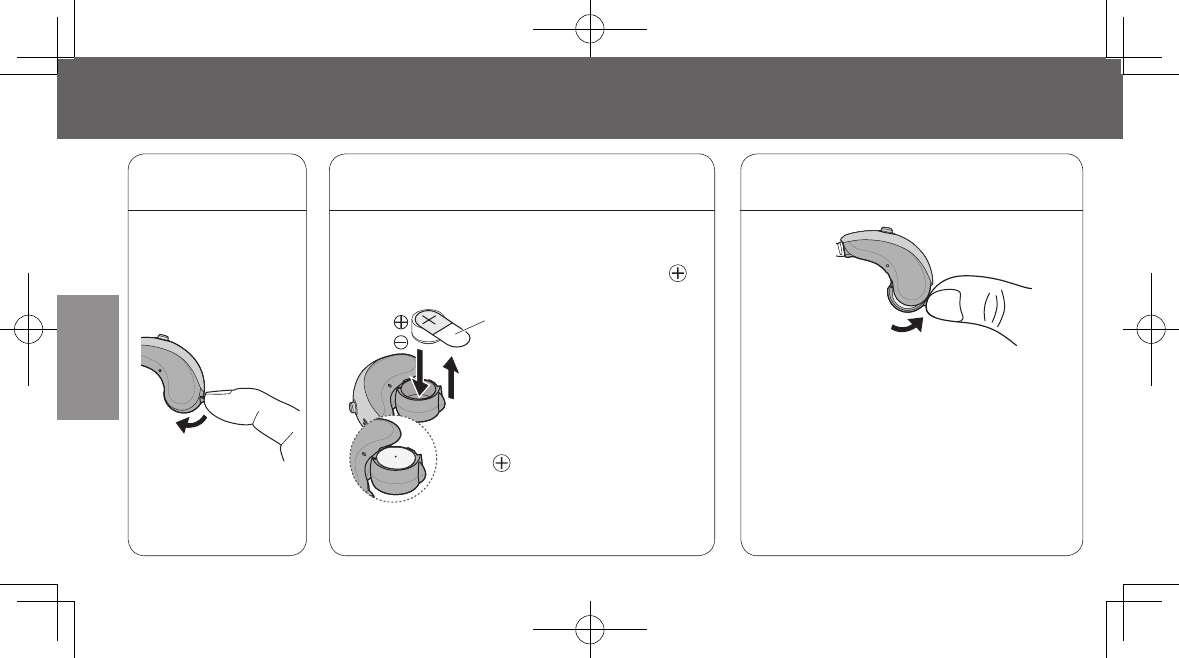
21
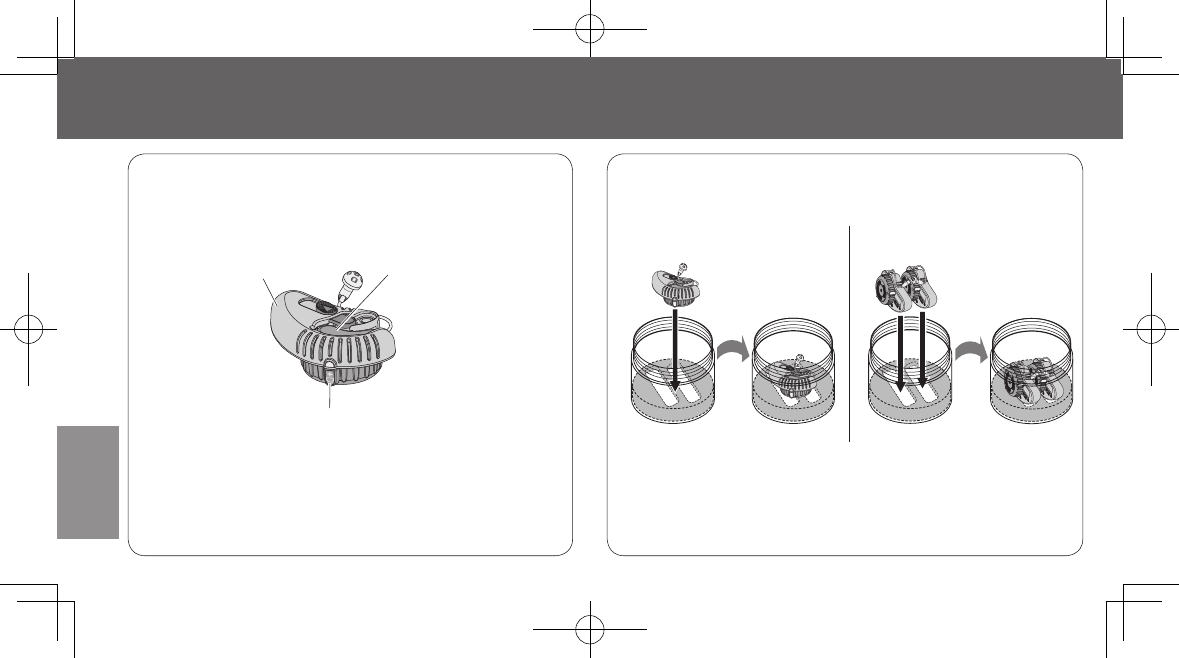
Operations
Set the hearing instrument in the battery easy care tool.
1
i-i
.
Battery insert/removal with Battery Easy Care Tool
Adjust the dial to the white indicator then set your
hearing instrument into the hearing instrument holder.
Dial
White indicator
Battery Easy Care Tool
Instrument
holder
Rotate the dial on the back of the tool clockwise until
it snaps into the “Battery” position.
Dial
Battery symbol
See the back of the tool.
The dial points to the
“CHANGE BATTERY”.
22
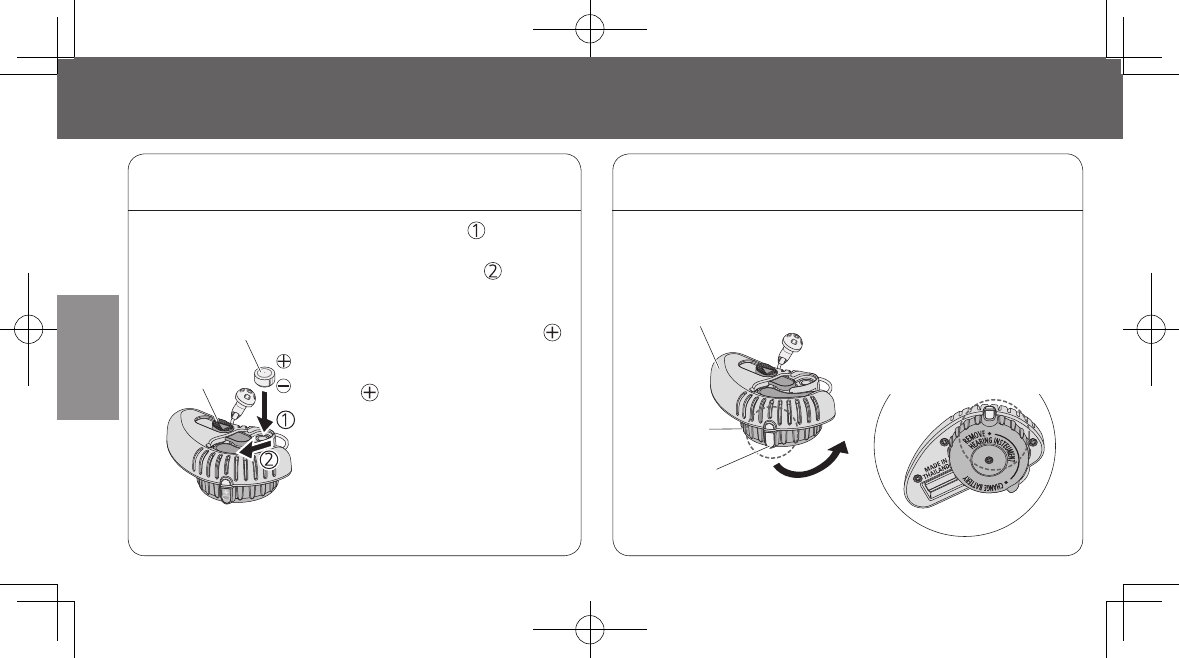
Operations
Install a zinc air battery.
2Close the battery compartment cover.
3
i-i
.
Battery
insert/removal
with
Battery
Easy
Care
Tool
(Continued)
Put a zinc air battery in the battery holder
,
as shown
in the figure below. Slightly press and slide the
battery
into the direction, as indicated by the arrow
.
Zinc air battery
· Use a zinc air battery (size 13).
Peel off the tab on the plus
side then place the battery in
the battery holder, with the
plus sign facing up.
· Slide the battery, so the battery
will push the lock slider down,
and automatically be installed in
the hearing instrument. Release
the lock slider when the battery
pops in.
Lock slider
Rotate the dial on the back of the tool counterclockwise
until it snaps into the white indicator.
Battery Easy
Care Tool
White indicator
Dial
See the back of the tool.
The dial points to the
“REMOVE HEARING
INSTRUMENT”.
23
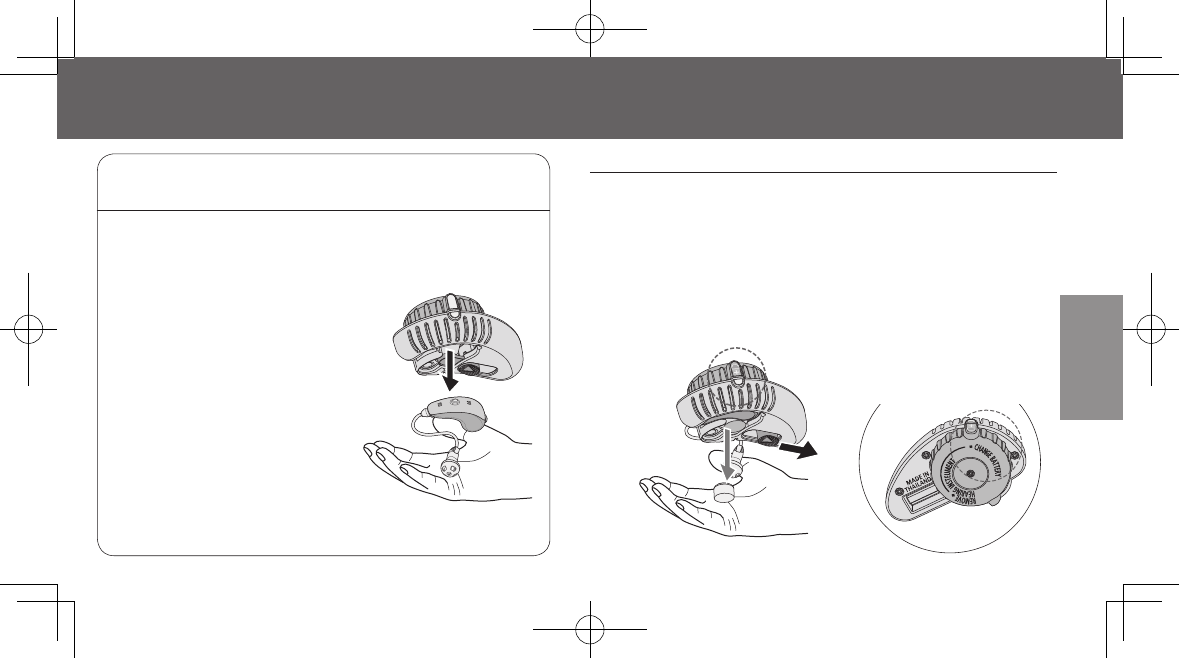
Operations
Remove the hearing instrument.
4
Turn the battery easy care tool upside down so
the hearing instrument will pop out. Hold out
your hand and catch it when it falls.
· Do not pull the tube section
of the receiver unit, which
will cause damage to the
receiver unit.
Remove a battery with Battery Easy Care Tool
1.
Set the hearing instrument in the battery easy care tool in
the same manner as you insert the battery into the tool.
2. Press and pull the lock slider into the direction, as
indicated by the arrow. Holding the slider, turn the
battery easy care tool upside down, so the battery will
pop out. Hold out your hand and catch it.
See the back of the tool.
The dial points to the
“CHANGE BATTERY”.
24
Operations
For removal,
turn the main unit upside
down and pull out the battery.
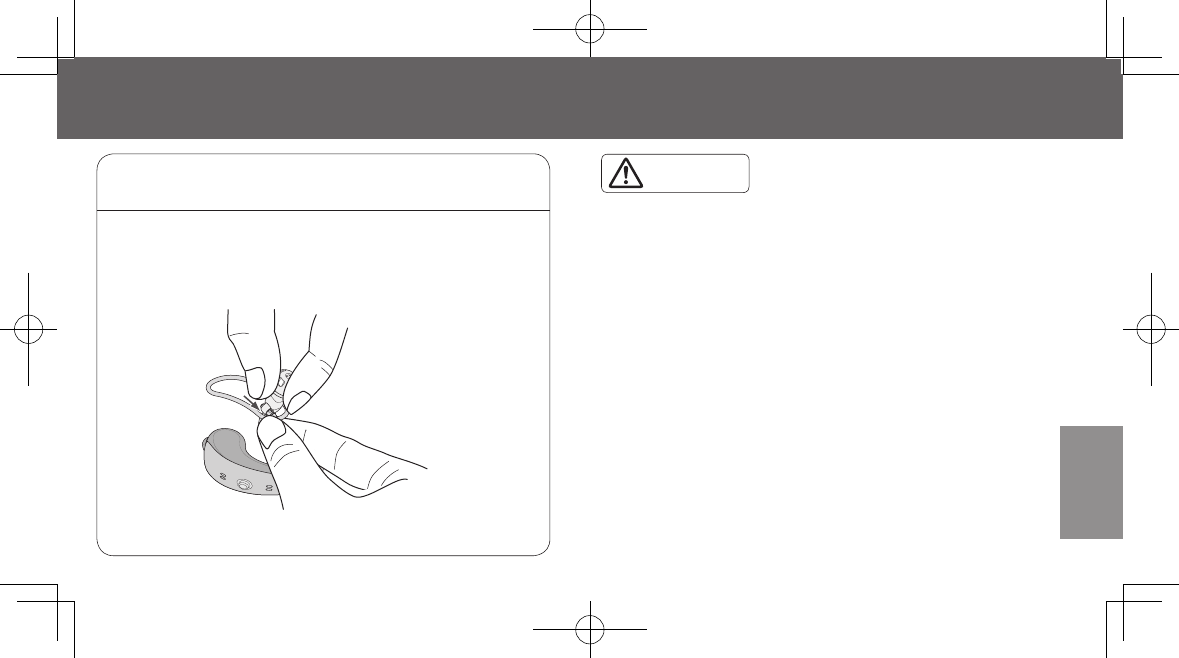
i-ii. Manual battery insert/removal
Insert the zinc air battery.
2Close the battery door.
3
Adhesive peel tab
When inserting a new battery (size 13), pay
attention to the battery terminal. Place a new
battery in the compartment with the plus
sign facing up.
· If you keep the battery door shut, the
switch remains turned on, and acoustic
feedback or whistle sound may be
produced. Be sure to turn off before
wearing the hearing instrument.
· You can set the power on delay (the
amount of time until audio output gets
fully activated after closing the battery
door). Consult your dispenser for details.
· Keep the tab for future use to prevent
battery drain when not in use.
Open the
battery door.
1
Place a tip of your
forefinger under the
edge of the swing-
out door and gently
pull outward.
· Do not open the
battery door too
far, or damage is
likely to occur.
· Peel off the tab placed on the
plus sign after the battery is
securely in place.
25
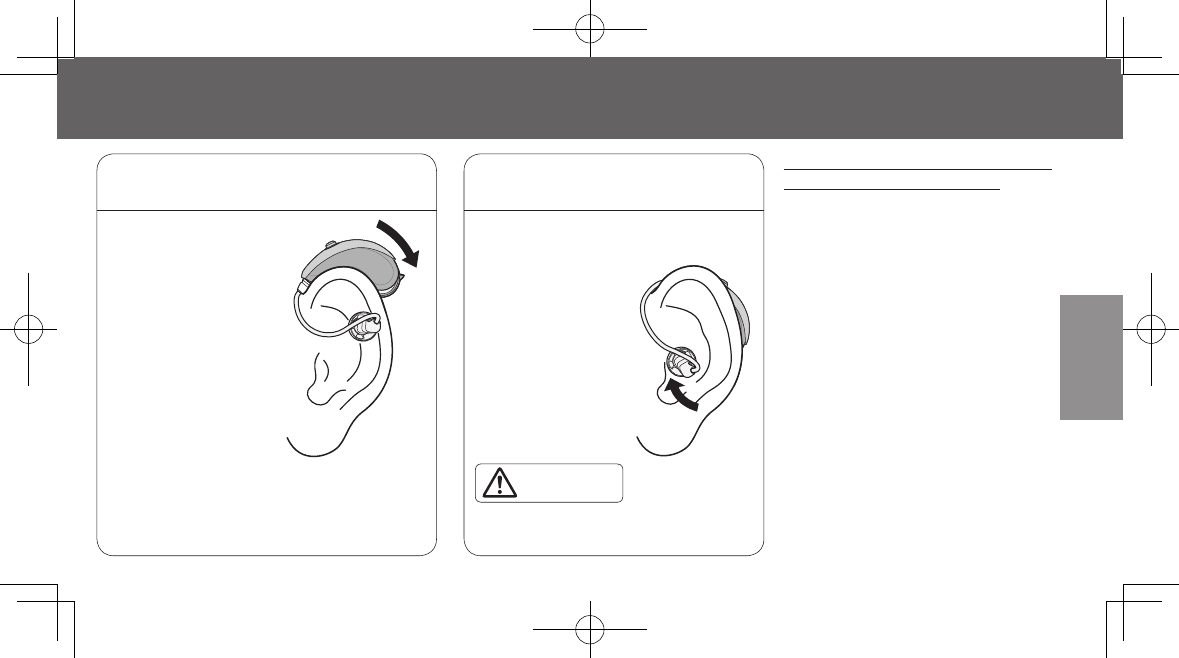
Operations
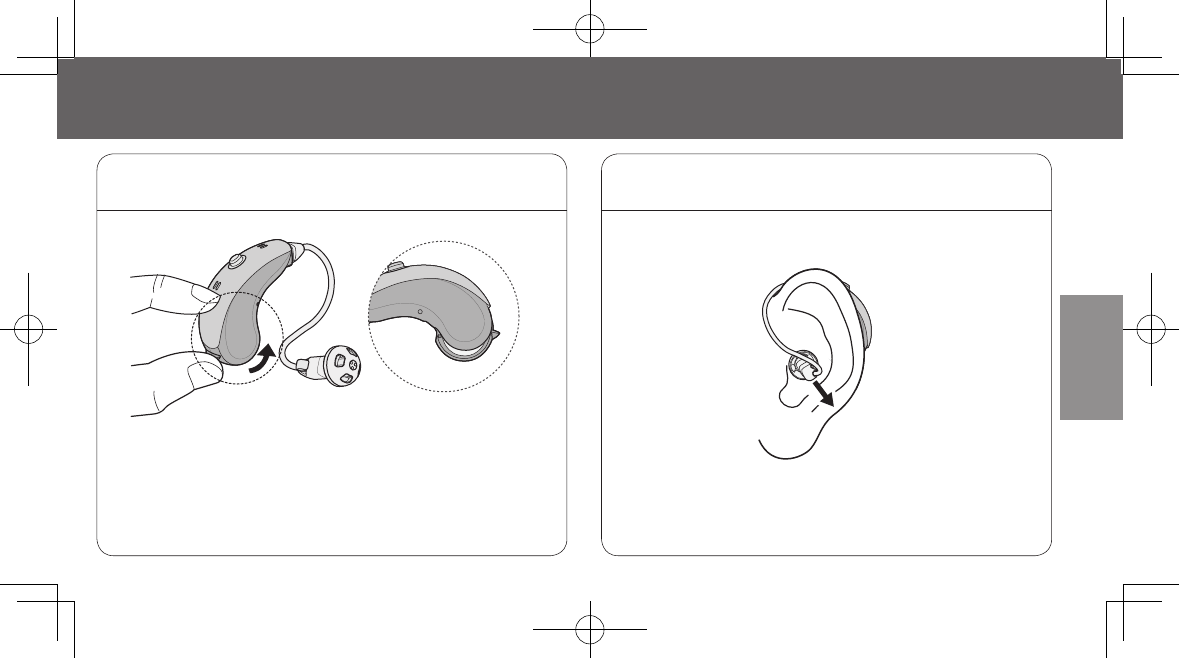
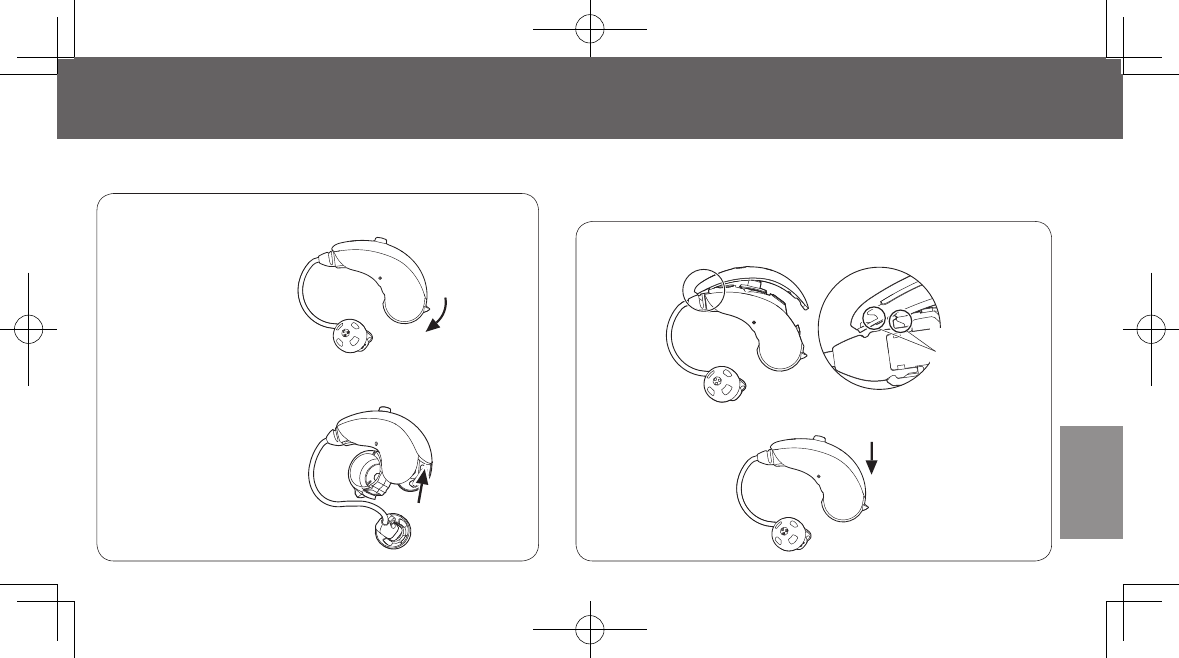
ii. Wearing the hearing instrument
Position the hearing
instrument behind the ear.
1
Hold the main unit
and carefully place the
hearing instrument
behind your ear
wrapping it over the
top of your ear.
· Make sure that the hearing
instrument is powered off.
Insert the eartip in
the ear.
2
Gently insert the eartip
into your ear canal by
pressing the receiver
with your fingertip.
· Pushing the eartip far inside the
ear can hurt your eardrum.
Eartips are available in different
types and sizes as follows:
·Closed type (S/M /L)
·Open type (S/M/L)
·Double dome type (M/L)
CAUTION
26
Operations
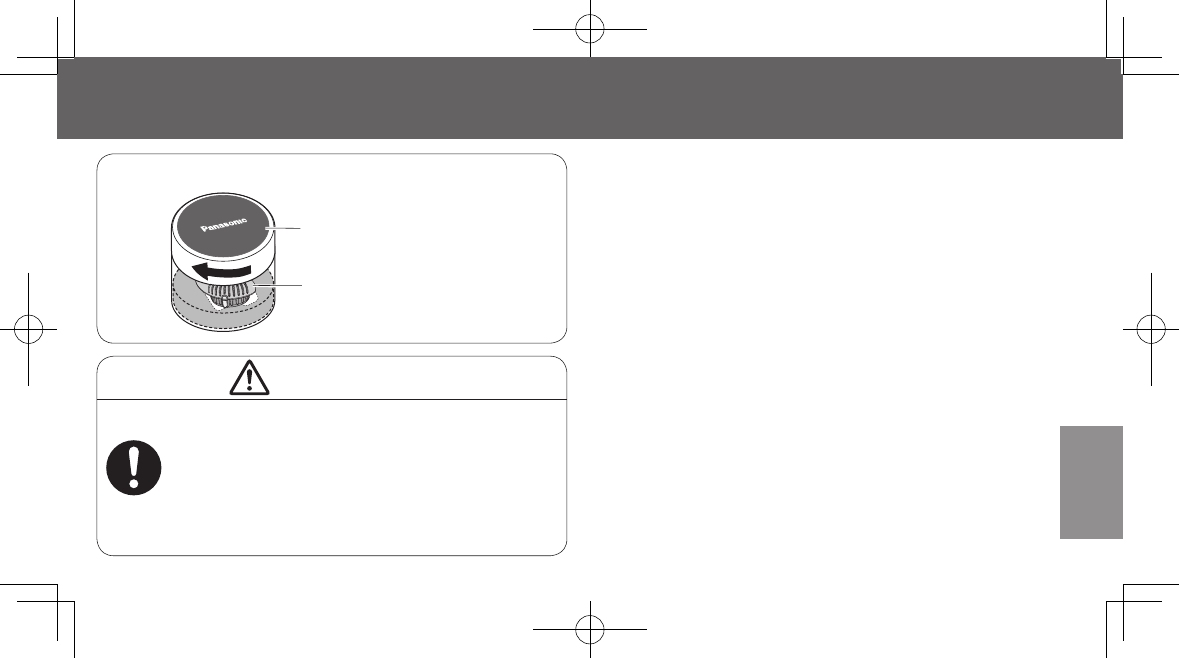
iii. Turning on the hearing instrument
Holding the main unit, close the
battery door completely.
1
27
Operations
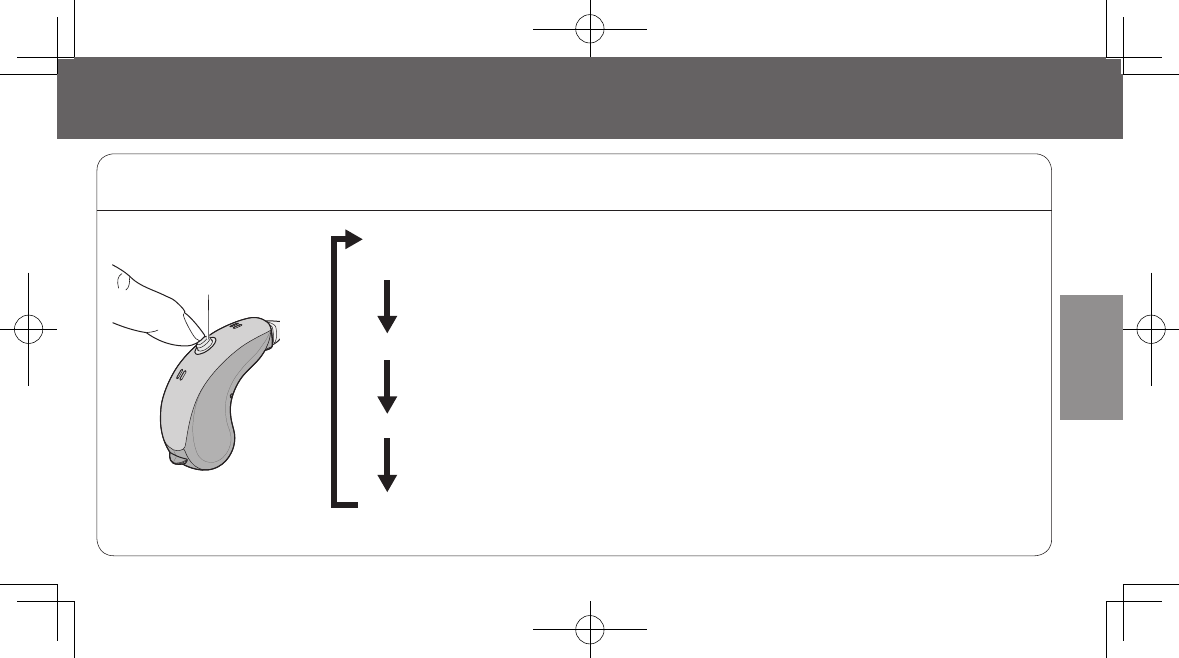
iv. Adjusting the memory switch
Adjusting the memory switch.
1
Memory
switch
WH-R17C/WH-R15C :Up to 4 programs
WH-R13C :Up to 3 programs
· By pressing the memory switch button, you can
change listening modes (memory programs)
depending on the environmental conditions.
Press the memory switch while the hearing
instrument is on, so you can change the setting.
· If the instrument is turned off then back on again,
the mode will be returned to Memory 1.
· The memory programs can be customized according
to your needs and preferences.
Consult your dispenser for details.
Memory 1 (the hearing
instrument is turned on)
Memory 2
Memory 3
Memory 4
(Chimes twice)
(Chimes three times)
(Chimes four times)
(Chimes
once)
28
Operations
v. Adjusting the volume control
Adjust the volume by pressing the
volume control key.
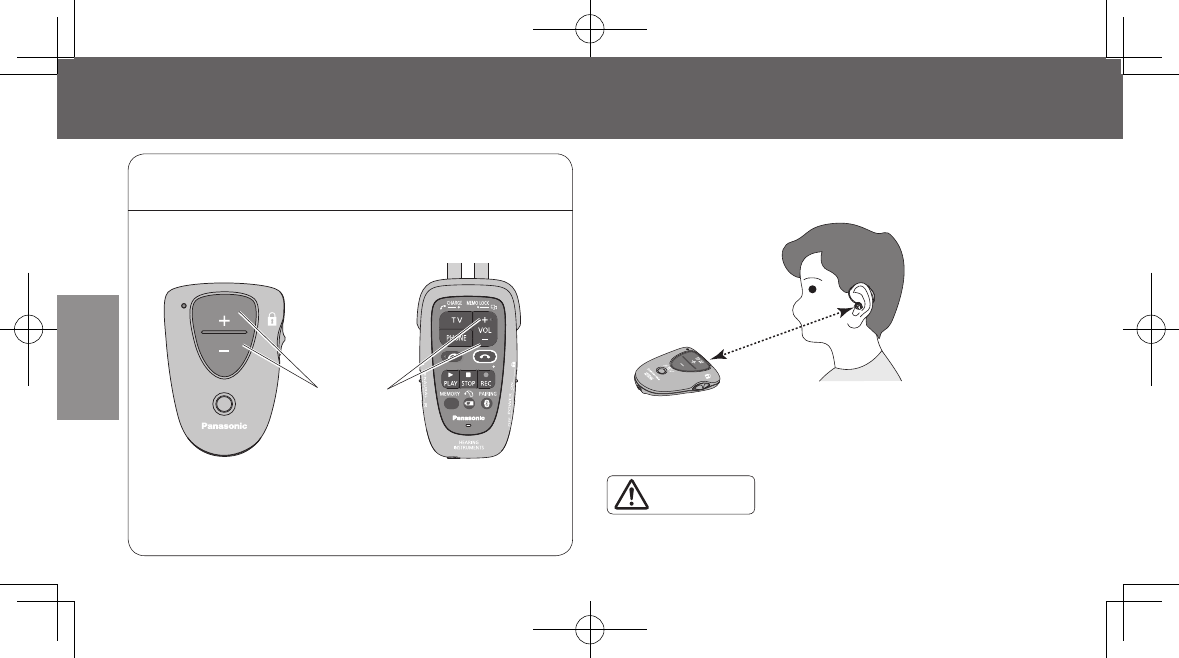
1· The available communication distance between your
hearing instrument and Remote Control or Hearing Hub
is up to approximately 15.7 inches (40 cm).
· Do not use the Remote Control and Hearing Hub
if you are fitted with a cardiac pacemaker.
Within approx.
15.7 inches
VOL
MEMORY
Volume control
Remote Control
WH-0M1201A
· Optional Remote Control and Hearing Hub are
sold separately.
Hearing Hub
WH-0M1101A
· The communication range varies depending on which
direction you point your Remote Control or Hearing Hub.
See the manual of the Remote Control for details.
CAUTION
The illustration shows
the Remote Control.
29
Operations
vi.
Turning
off
the
hearing
instrument
vii.
Removing
the
hearing
instrument
Open the battery door completely
until it clicks.
1
· Open the battery door until the stopper is kept in a
locked position, as indicated in the figure above.
If it is not open enough, the hearing instrument may
remain powered on.
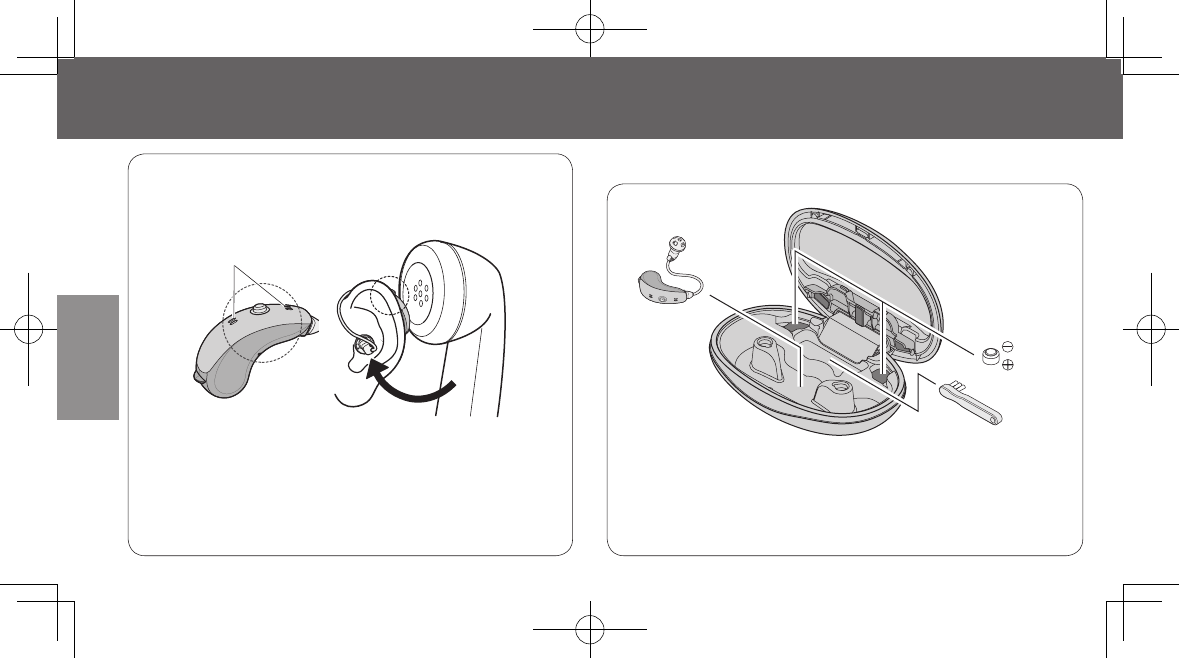
Remove the eartip in your ear.
1
· Make sure that the hearing instrument is powered off.
Hold the receiver and pull it straight out.
30
Operations
Use with telephone
· If it is too close to the microphone, acoustic
feedback or whistle can be caused. To avoid this,
keep some distance between the telephone (both
landline and mobile) and the microphone.
Hold the handset near the hearing instrument and
move it to find the best position to listen to the voice.
Carrying case
Carrying case
Zinc air
battery
Cleaning
brush
Hearing
instrument
· Remove the battery from your hearing instrument to
prevent power from accidentally being turned on.
· Handle the receiver unit with care. It is subject to
accidental damage and breakage.
Microphone
See the attached guidelines for complete details.
31
Reference
Hearing instrument dryer
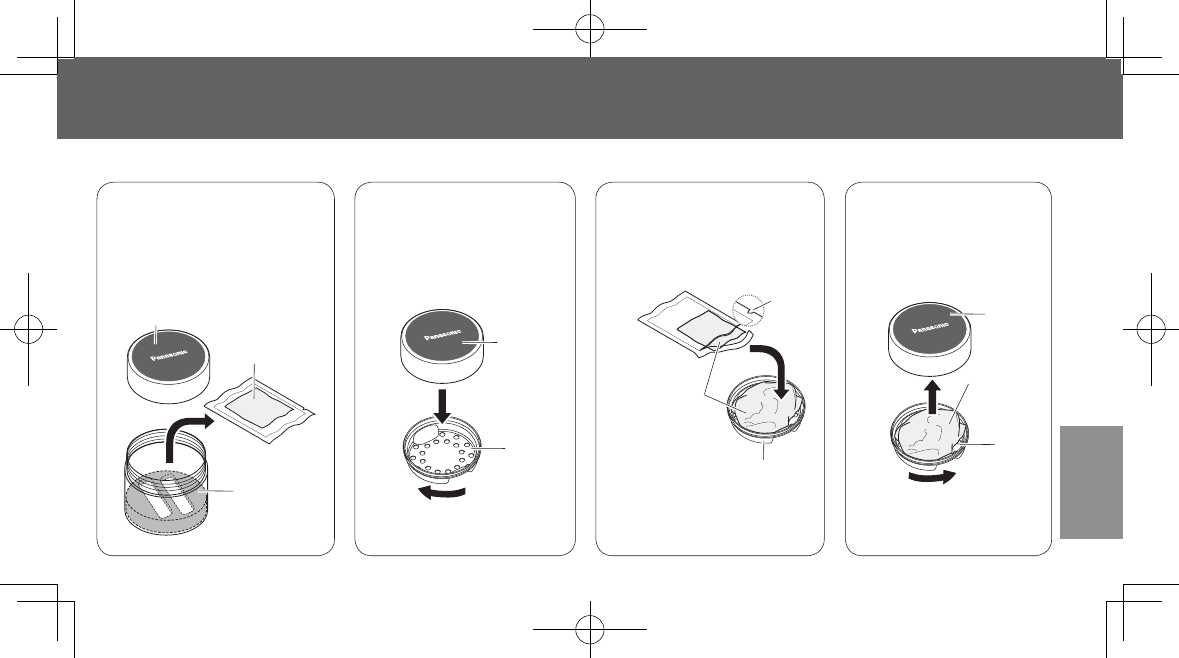
1
Unscrew the lid and
take the plastic bag
containing desiccant
out of the hearing
instrument dryer.
2
· Turn the inner cap to the
left until it comes off.
Plastic bag
containing
desiccant
Lid
Case
Twist the inner
cap clockwise
and detach it
from the lid.
Lid
Inner
cap
3Take the desiccant
pack out of the
plastic bag and put
it on the inner cap.
Inner cap
Desiccant
pack
4Screw the
inner cap back
on the lid.
Open
· Turn the inner cap
counterclockwise to
tighten it.
Inner
cap
Desiccant
pack
See the attached guidelines for complete details.
Lid
· When you open the plastic
bag, be careful not to tear
the desiccant pack.
32
Reference
Setting the hearing instrument in the hearing instrument dryer
1
Set your hearing instrument in the
Battery Easy Care Tool.
2
· Do not remove the battery from your hearing instrument.
Hearing
instrument
Battery Easy
Care Tool
Set the battery easy care tool in the hearing
instrument dryer.
“Battery” symbol
· Make sure that the dial snaps into the “Battery”
symbol; air exposure to the battery will decrease
the service life time.
[Monaural] [Binaural]
33
Reference
Battery Easy Care Tool
containing the hearing
instrument
3Screw the lid until tightly closed.
Lid
· The hearing instrument dryer removes accumulation
of moisture in the hearing instrument. Moisture can
damage the internal, electronic components. For
optimum hearing instrument care, it is recommended
to use a hearing instrument dryer before retiring for
the night so it will take away moisture overnight.
· Before using the hearing instrument dryer, wipe off
any dirt, dust, oil or sweat that is left on the hearing
instrument and battery with a clean soft cloth.
· A tiny packet of silica gel is included in the hearing
instrument dryer. Make sure that the lid is on tight.
If the lid is loose or off the case, the silica gel will
absorb moisture from the outside air.
· Blue silica will slowly change its color as it absorbs
moisture. When it reaches its saturation point and
turns pink, replace it with a new one. Silica gel
packets are available at your dispenser.
CAUTION
· Desiccants are not edible. Keep them away
from children and pets.
· Do not place the battery directly in a hearing
instrument dryer. Once activated, the battery
will be consumed quickly as its chemicals tend
to dry out. This will significantly shorten the
battery service lifetime.
34
Reference
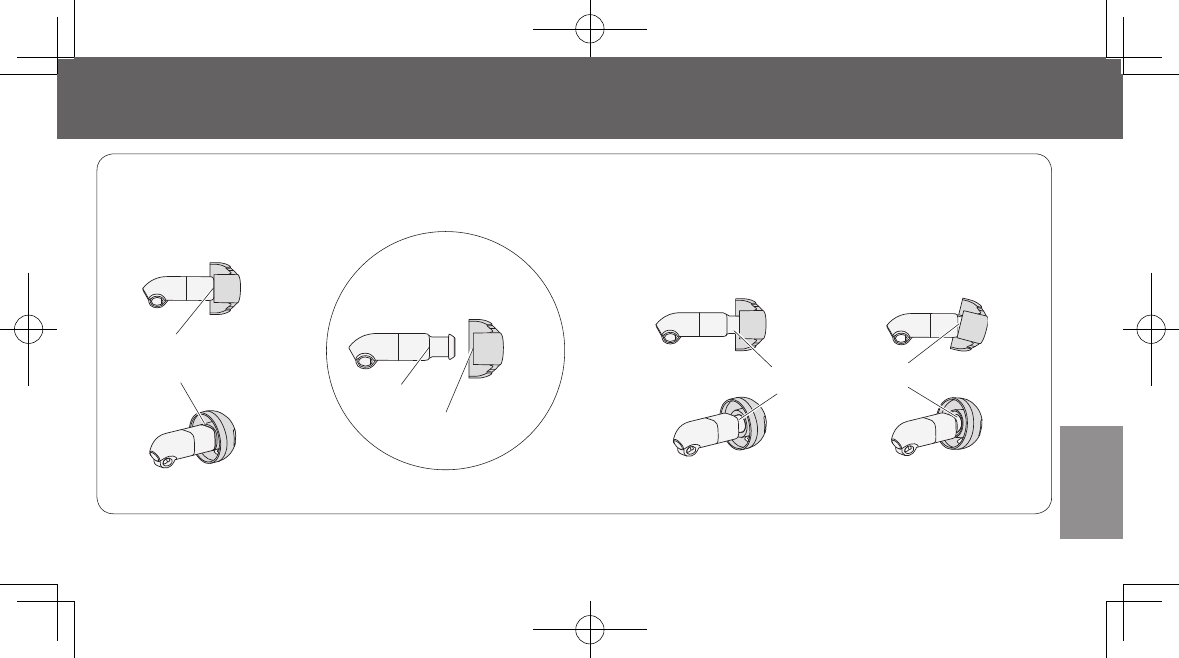
Wax guard replacement (Consult your dispenser)
A wax guard is attached to the head of the receiver. If you feel that sounds are too muffled, or you have experienced a
clogged feeling in your ears, you may have dirt, dust and wax build up in the wax guard. Replace a dirty wax guard with
a new one. It can affect the performance of your hearing instrument.
1
Replacement
tool
A
For removal (+)
B For insertion (-)
Insert a new
wax guard into
the “B” side of
the tool.
Insert the wax
guard that is
currently being
used into the “A”
side of the tool.
Pull out the tool,
as indicated by
the arrow in the
illustration. The
wax guard will
come off.
Push a new wax
guard (Step 1)
down into the
head of the
receiver in place.
Pull out the tool, as
indicated by the arrow
in the illustration. The
wax guard is securely
held in place.
2345
Wax guard Receiver
· Use only the supplied wax guard.
35
Reference
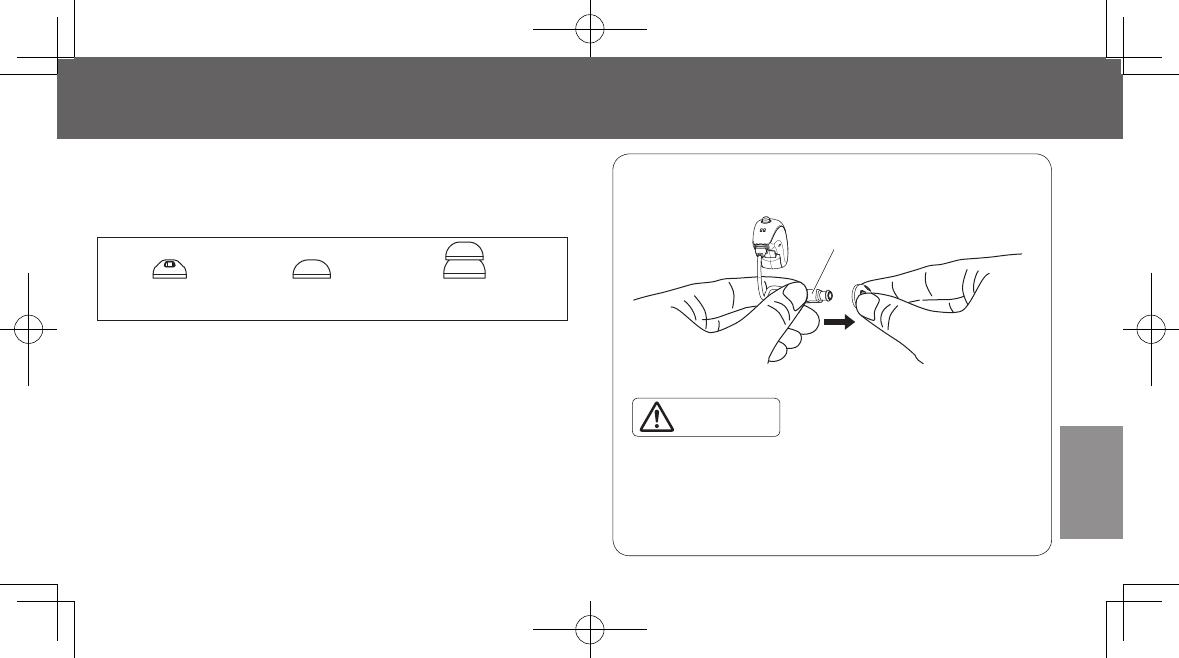
Removing the eartip (Consult your dispenser)
Choosing the right receiver unit and eartip is essential
to comfort, a secure fit, and an appropriate directional
response from the hearing instrument. Panasonic’s eartips
are available in different sizes and types.
Open
(S/M/L)
Closed
(S/M/L)
Double dome
(M/L)
· The double-dome eartip supports the increased power
receiver only.
· An open fitting is non-occluding, comfortable fit with
a natural sound. A closed fitting has the advantage of
increased gain, minimizing problems with feedback.
A double-dome fitting is more stable ensuring less sound
leakage out of the ear canal. Comfort may be an issue
for those who wear them for long periods of time. Your
dispenser will select the most suitable eartip. If you want
to try on different sizes or types, contact your dispenser
for assistance and replacement eartip.
Receiver
Holding the receiver, remove the eartip.
· If the eartip comes off and sticks in your ear,
never attempt to remove it with use of any
device. Consult your physician immediately.
· Never use a damaged eartip.
CAUTION

36
Reference
Attaching the eartip (Consult your dispenser)
1
Attach the eartip to the receiver.
2Squeeze the eartip attached to the receiver
down into the drilling hole until it is securely
in place.
Drilling hole
Receiver
· Holding the receiver with your thumb and
forefinger, gently push the eartip into the receiver.
Carrying
case
· Do not hold the tube with excessive force.
37
Reference
3Make sure that the eartip is securely attached to the receiver.
· The eartip must be securely attached, as indicated in the illustration below.
[Correct]
The head of the
receiver is not visible.
Viewed
from
the side
Head of
the receiverEdge of
the eartip
· The above illustration shows an eartip in size M.
[Incorrect]
The head of the
receiver is visible.
The head of the receiver is loose, not firmly fastened or
securely attached.
· Be sure to bridge a gap by squeezing the eartip
down into the receiver.
· If the eartip is not securely attached, it may come off and remain in the ear. Make sure that the receiver fits snugly in
the eartip, otherwise squeeze the eartip all the way down into the receiver.

38
Reference
Retention loop setup (Consult your dispenser)
1
Get the retention loop in
the right direction, and pass
the receiver unit through
the loop. Insert the hook of
the retention loop into the
slot of the receiver unit.
2Pull the loop, as indicated
by the arrow in the figure
below. Make sure the
receiver unit is held steadily
in the retention loop.
3Position the retention
loop in the concha of
the ear after inserting
the eartip into the
ear.
Retention loop
If your eartip easily slips out of the ear, you can try the supplied retention loop for better hearing.
Retention
loop
Concha
39
Reference
Removing the retention loop
· Use only the supplied retention loop.
Use of other retainers may cause hearing damage.
· Make sure that both the eartip and retention loop
are securely attached to the receiver, respectively.
Holding the receiver with your fingers, twist and
pull the retention loop off, as indicated by the
arrow in the figure.
CAUTION
40
Reference
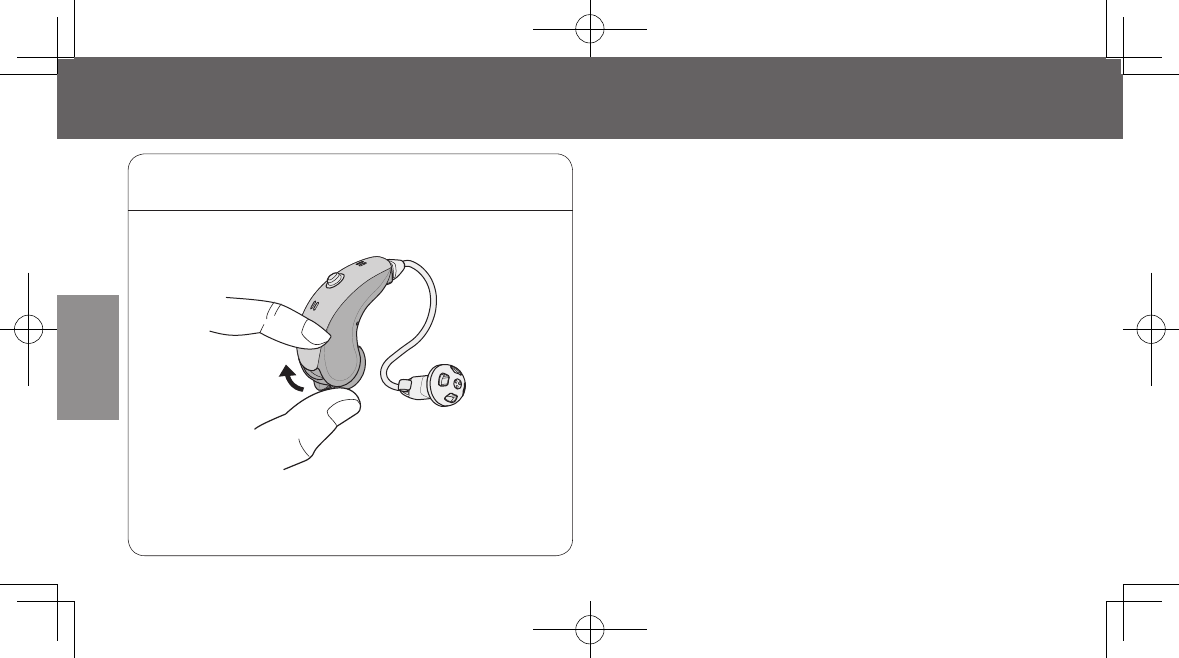
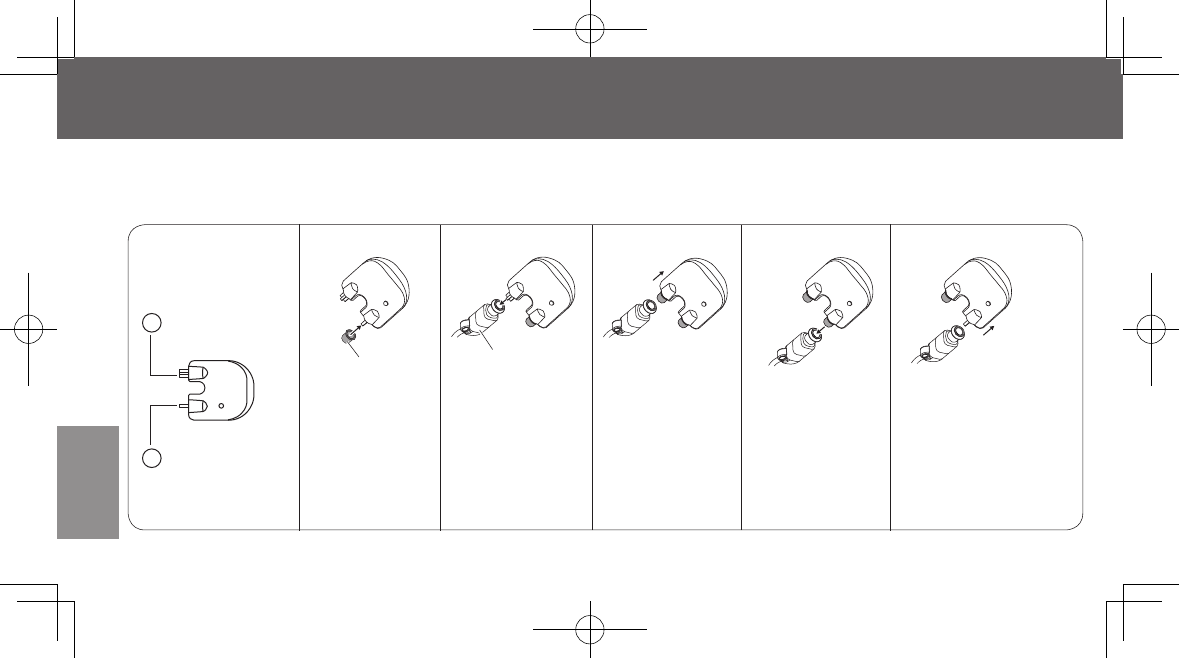
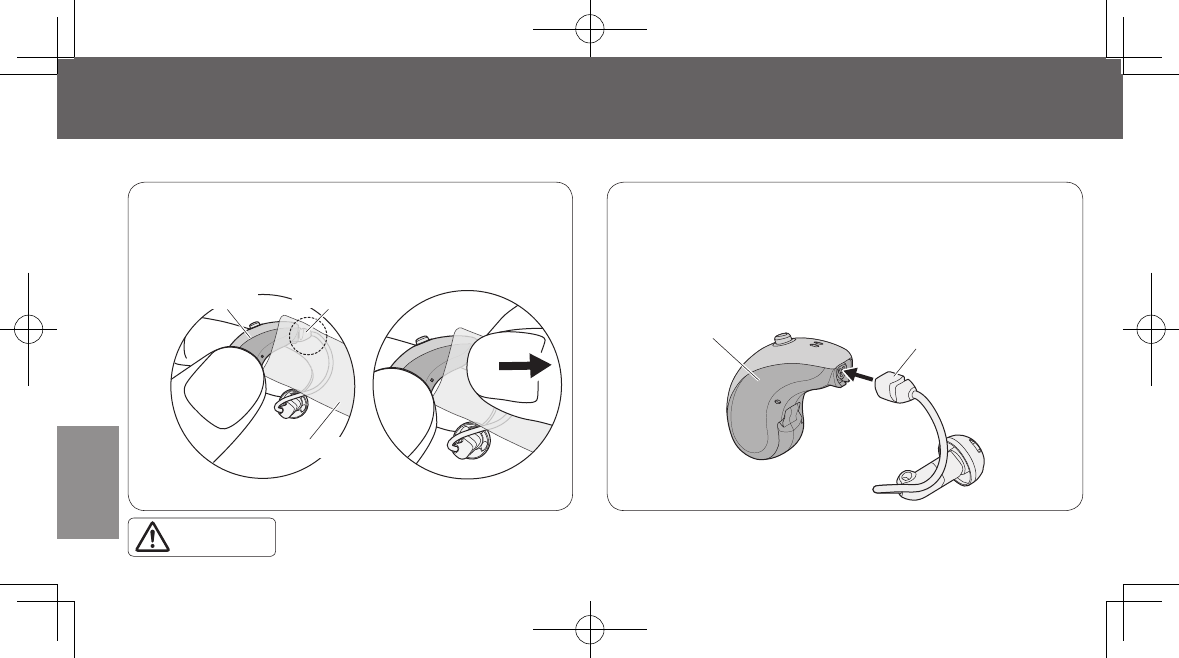
Receiver unit replacement (Consult your dispenser)
1Holding the main unit, pinch the plug of
the receiver unit with an anti-skid pad*
to detach the receiver unit from the main
unit. Do not twist or pull too hard.
2Insert the plug of the receiver securely into
the main unit as indicated in the figure
below. Make sure that the receiver unit is
facing in the right direction.
Receiver units are available in sizes 0, 1, 2 and 3. If your receiver does not fit properly, then consult your dispenser.
Receiver unit
Anti-skid pad
Main unit
* Anti-skid pads are not included in the package.
Plug of the
receiver unit
Main unit
· Use only the supplied receiver unit. Use of other receivers may cause hearing damage.
· Make sure that the battery has been removed when inserting or removing the receiver unit.
CAUTION
41
Reference
Top cover replacement (Consult your dispenser)
· The tabs are
held securely
in place.
Be sure to follow the instructions below. An attempt the
other way may crack or break the top cover.
Removing the top cover
1Open the battery compartment door.
2Lift the area indicated by the arrow in
the figure at right.
Installing the top cover
1Insert the top edge to bottom edge of the
cover.
2Make sure that the cover fits snugly.
42
Reference
Cleaning and maintenance (Consult your dispenser)
Before cleaning, remove the eartip
from the receiver.
If it is heavily soiled, wash it off with
lukewarm water and mild soap.
Allow it to air dry completely in a
well-ventilated place. Make sure that
it is completely dry before attaching
it back to the receiver.
Cleaning the eartip
Clogged eartips can affect your hearing. To optimize the
performance of your hearing instrument, clean out your eartip.
Receiver
CAUTION
· If the eartip comes off and remains in the ear, never
attempt to remove it with use of any device. Attempting
to remove it on your own may cause damage to the ear.
Consult your physician immediately.
Wax guard replacement
Remove the eartip. The wax guard is
fixed in the head of the receiver.
If the wax guard is clogged, it has to
be replaced with a new one.
A dedicated replacement tool needs
to be used, so contact your dispenser. Receiver
Wax guard
Cleaning the hearing instrument
Wipe it gently with a soft cloth. Never use organic
solvents such as alcohol, paint thinner, or benzene.
Failure to heed this caution may result in deformation
of the hearing instrument or cracking on the surface.
Wipe off any sweat, dirt, dust or oil that is left on the
hearing instrument with a clean soft cloth and avoid
exposure to direct sunlight or high temperatures and
humidity.
CAUTION
43
Reference
When you start using your hearing instrument for the first time, you may need time to adjust to the amplified sound.
Gradually increase the time and occasion of use to enhance your awareness of sounds and their sources as described
in the illustration below. With practice, you should become accustomed to the amplified sound and want to wear your
hearing instrument regularly.
Listen to your own
voice in a quiet
environment
1Talk with your family
or friends in a quiet
environment
2Listen to TV sound
at the same volume
as others
3Talk with several
people (4-5) in a
quiet environment
4
· Do not increase the volume of the hearing instrument from the beginning. High volume can cause fatigue.
For first-time users
44
Reference
Troubleshooting guide
This section discusses a general approach to solving problems related to design and operation of the hearing instrument.
Narrow down the problem area, identify the source of the issue, and provide workarounds.
If the problem still remains unresolved, write down any error conditions encountered error codes and problem description
then contact the dispenser you purchased your hearing instrument from. Your dispenser is indicated on the back page of
this document.
Symptom Probable cause Corrective action / Workaround Page
Acoustic feedback
or whistle sound is
produced.
The eartip does not fit your ear. Insert the eartip into the ear properly. If you do
not feel the eartip fits, consult your dispenser.
Comfort may be an issue for those who wear
for long periods of time. Your dispenser will
select the most suitable by effectively minimizing
uneasiness and feedback.
25
35-37
The sound is too low
or quiet.
The remaining battery power is low. Replace the old battery with a new one. 21-24
The eartip is plugged up with earwax,
dirt, or other foreign particles.
Consult your dispenser for cleaning. 41
The wax guard is completely clogged. Consult your dispenser for replacement. 34
45
Reference
Symptom Probable cause Corrective action / Workaround Page
A loud noise is
frequently generated.
(Alarming chime,
beeping sound)
The remaining battery power is low. Replace the old battery with a new one. If it does
not work, open the battery cover, wait for 30
seconds then close back again. 18
21-24
The hearing instrument is turned on
as soon as a battery is inserted.
Turn off the hearing instrument, wait for about
30 seconds, and turn it back on again. If it does
not work, replace the battery with a new one.
No sound is
produced.
The hearing instrument is powered
off.
Close the battery door completely then turn on
the hearing instrument. 26
The remaining battery power is low. Replace the old battery with a new one. 18
21-24
The battery is installed improperly. Insert the battery correctly.
Be sure to use a correct zinc air battery.

46
Reference
How family and friends can help
Be sure to look directly at
the person when speaking.
Use facial expressions,
gestures and body
language to give clues.
Speak at a reasonable
speed to allow the
listener time to fully
comprehend the
conversation.
Avoid loud speech because
the hearing instrument
turns the sound up and the
words are much harder to
understand.
If the person’s reply
doesn’t make sense,
repeat what you said
with different words.
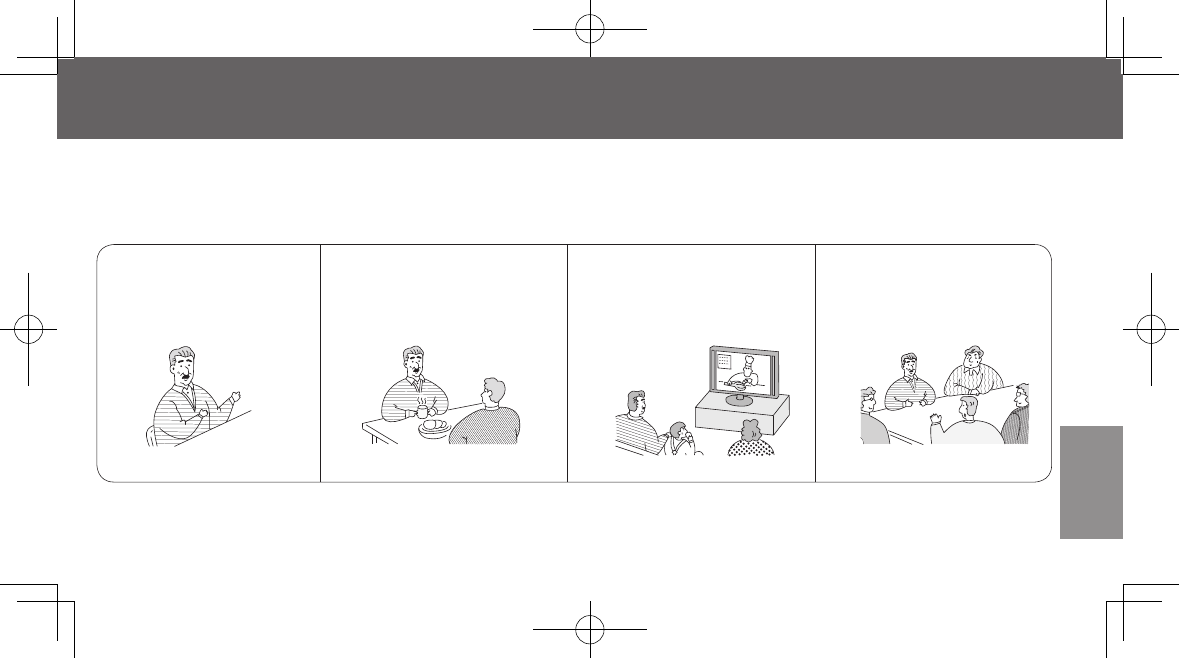
Family members and friends can play a major supportive role in the life of hearing-impaired people. They may feel
helpless, not being able to communicate effectively. Be supportive of any emotions the hearing-impaired person may
be experiencing and help prevent them from being socially isolated. The more practice and experience they have in
various listening situations, the more accustomed they will be to the hearing aid. The following strategies can help when
communicating with a person with hearing loss.
Reduce the distance
between you and the
listener
1Speak slowly and
clearly
2Speak naturally
3Repeat yourself
if necessary, using
different words
4
47
Reference
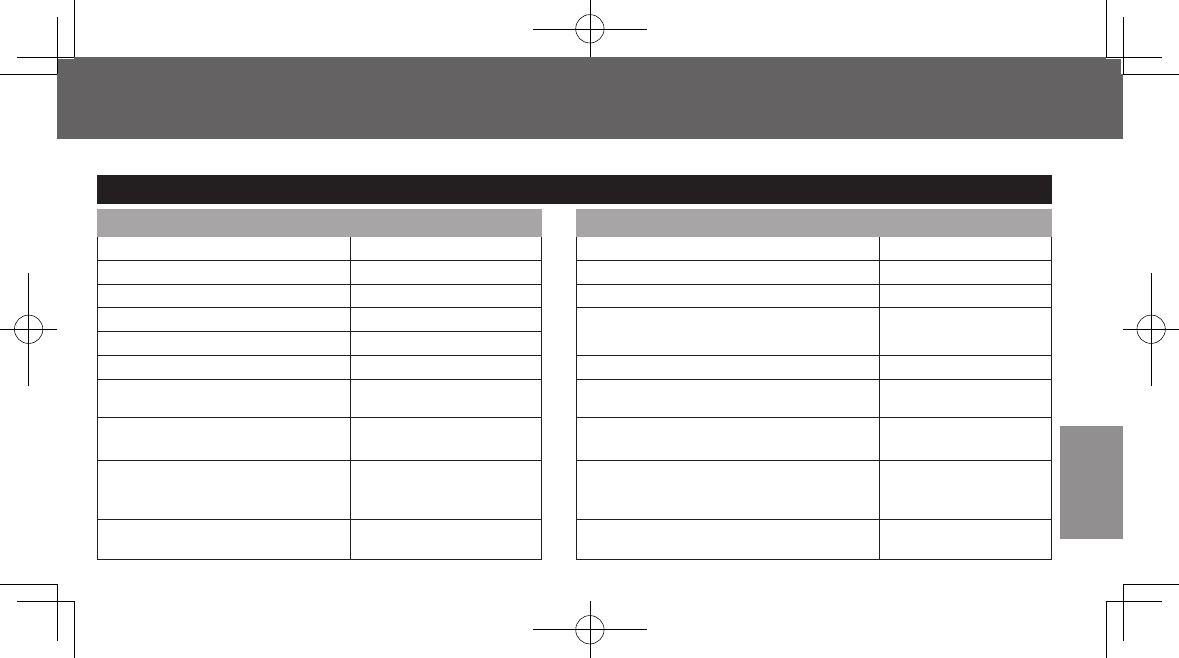
The performance is as follows when the zinc air battery PR48/13 1.3 V is used;
Performance
According to IEC 60118-7: 2005
Battery current 0.9 mA
Maximum OSPL90 114 dB SPL
HFA OSPL90 107 dB SPL
Maximum full-on gain 49 dB
HFA full-on gain 42 dB
Reference test gain 30 dB
Bandwidth Less than
200 Hz - 9 770 Hz
Equivalent input noise level 25 dB
Total harmonic distortion
500 Hz: 5 %
800 Hz: 5 %
1 600 Hz: 5 %
Dynamic AGC characteristics Attack Time: 1 ms
Release Time: 700 ms
According to ANSI S3.22-2003
(Includes April 2007 Erratum)
Battery current (Battery current drain) 0.9 mA
Maximum OSPL90 114 dB SPL
HFA OSPL90 (Average saturation output)
107 dB SPL
HFA full-on gain (Average full-on gain) 42 dB
Reference test gain 30 dB
Frequency range Less than
200 Hz - 9 770 Hz
Equivalent input noise level
(Equivalent input noise) 25 dB
Total harmonic distortion
500 Hz: 5 %
800 Hz: 5 %
1 600 Hz: 5 %
Dynamic AGC characteristics Attack Time: 1 ms
Release Time: 700 ms
Standard type
48
Reference
Performance (Continued)
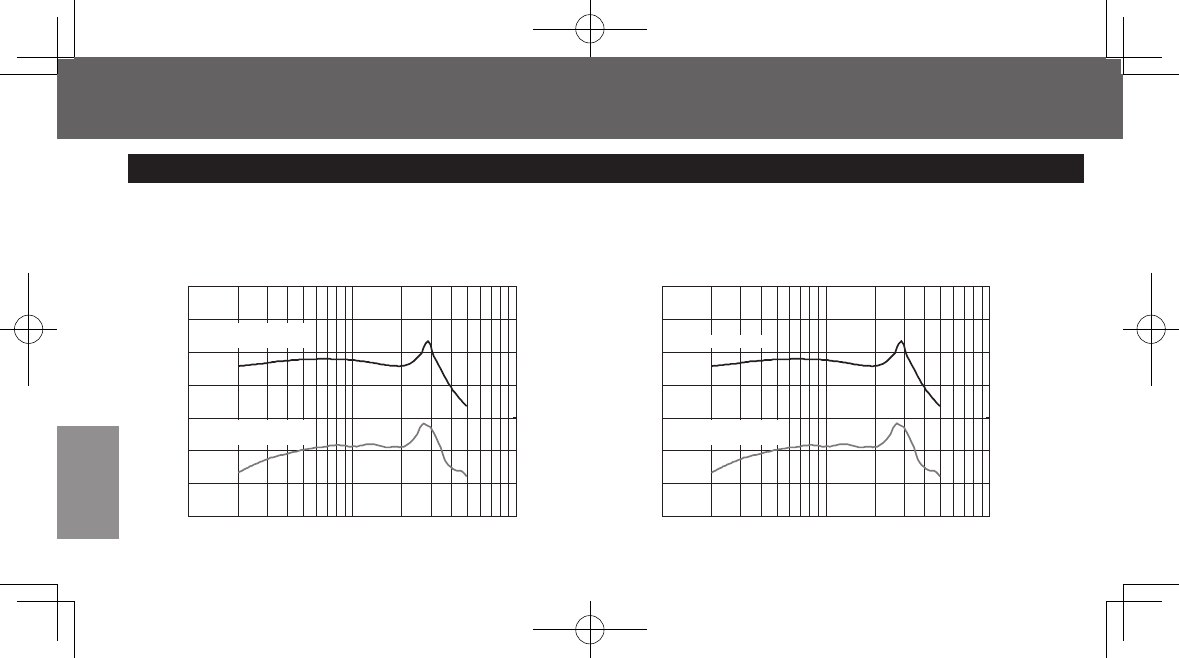
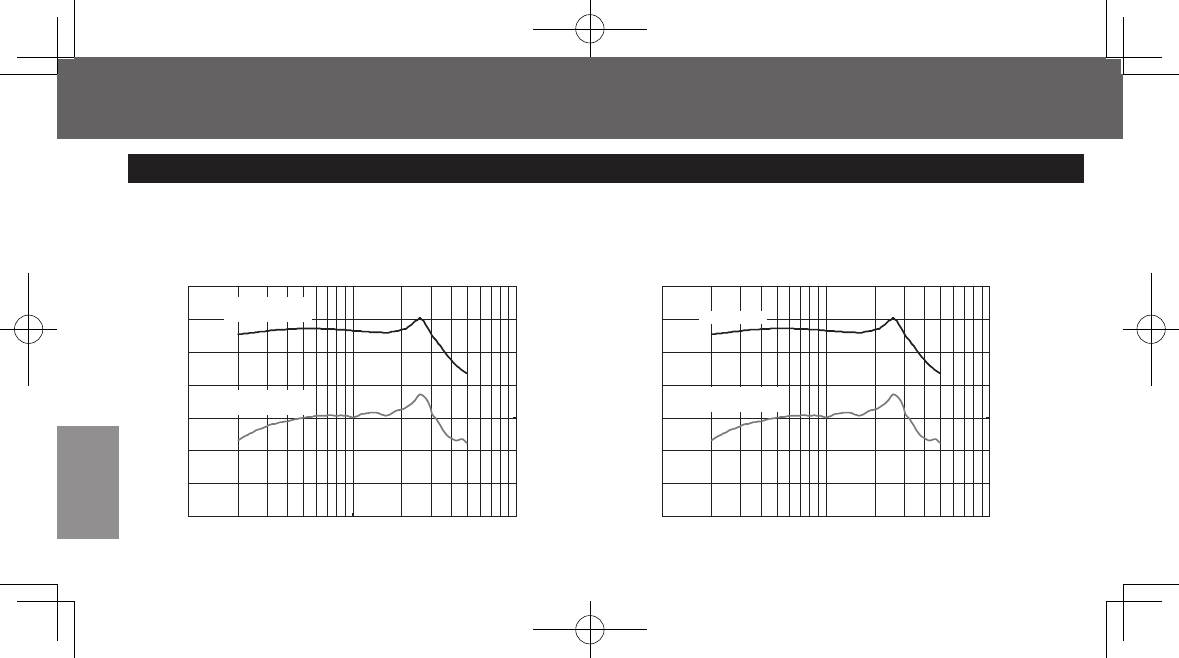
According to IEC 60118-7:2005 According to ANSI S3.22-2003 (Includes April 2007 Erratum)
OSPL90 frequency response curve and
Full on acoustic gain response curve
OSPL90 curve (Saturation output curve)
and Full on gain response curve
Output sound pressure level [dB SPL]
130
120
110
100
90
80
70
60
90
80
70
60
50
40
30
20
Full on acoustic gain [dB]
100 1k 10k
Fre
q
uenc
y
[
Hz
]
OSPL90 frequency
response curve
Full on acoustic gain
response curve
Output sound pressure level [dB SPL]
130
120
110
100
90
80
70
60
90
80
70
60
50
40
30
20
Full on gain [dB]
100 1k 10k
Fre
q
uenc
y
[
Hz
]
OSPL90 curve
Full on acoustic gain
response curve
Standard type

49
Reference
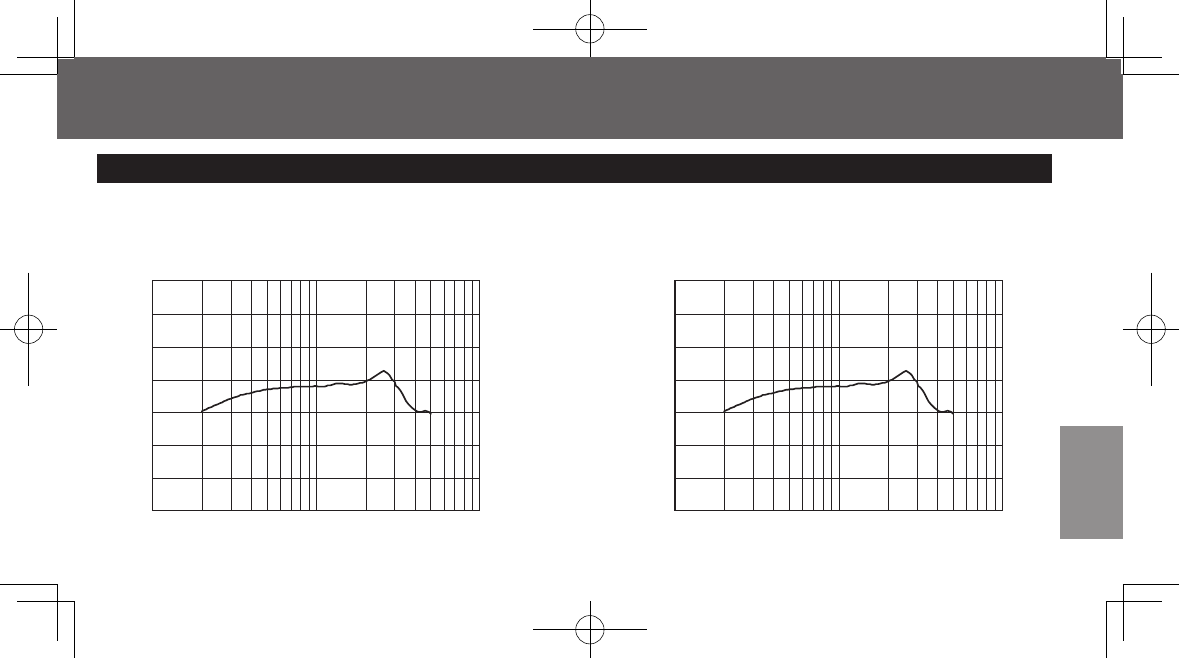
According to IEC 60118-7:2005 According to ANSI S3.22-2003 (Includes April 2007 Erratum)
Basic frequency response curve
Frequency response curve
Output sound pressure level [dB SPL]
120
110
100
90
80
70
60
50
100 1k 10k
Fre
q
uenc
y
[
Hz
]
Output sound pressure level [dB SPL]
120
110
100
90
80
70
60
50
100 1k 10k
Fre
q
uenc
y
[
Hz
]
Standard type
50
Reference
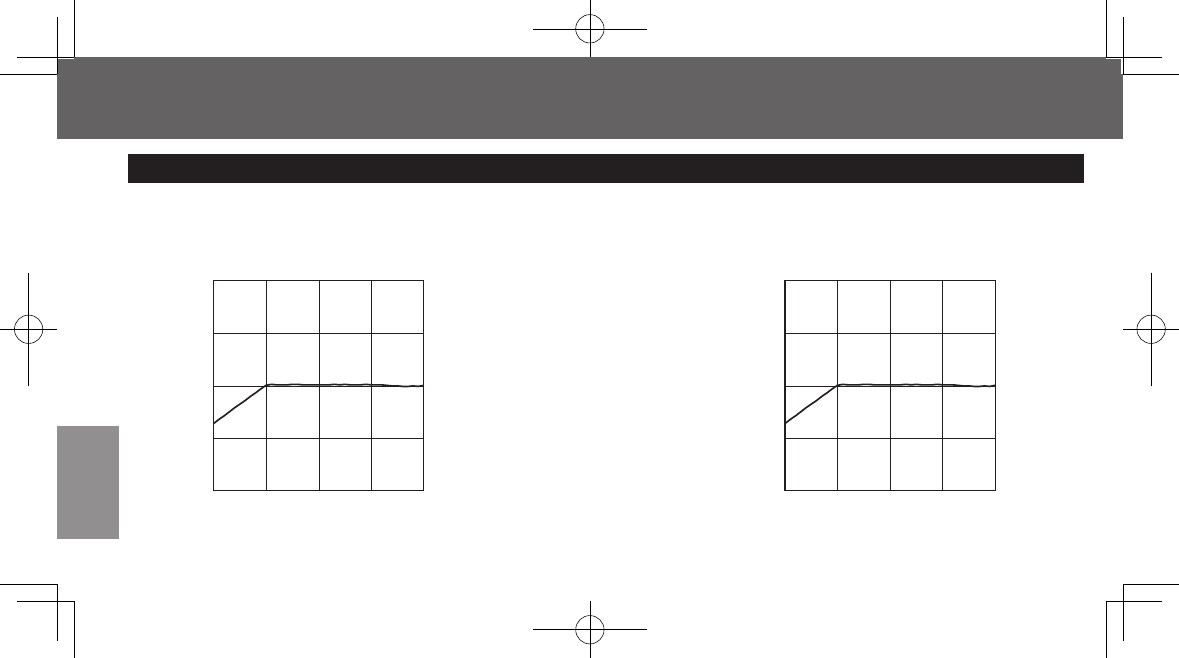
Performance (Continued)
According to IEC 60118-7:2005 According to ANSI S3.22-2003 (Includes April 2007 Erratum)
AGC Steady state input-output
characteristics
AGC input-output characteristics (input-
output curve)
70
80
90
100
110
50 60 70 80 90
In
p
ut Level
[
dB SPL
]
Output Level [dB SPL]
70
80
90
100
110
50 60 70 80 90
In
p
ut Level
[
dB SPL
]
Output Level [dB SPL]
Standard type
51
Reference
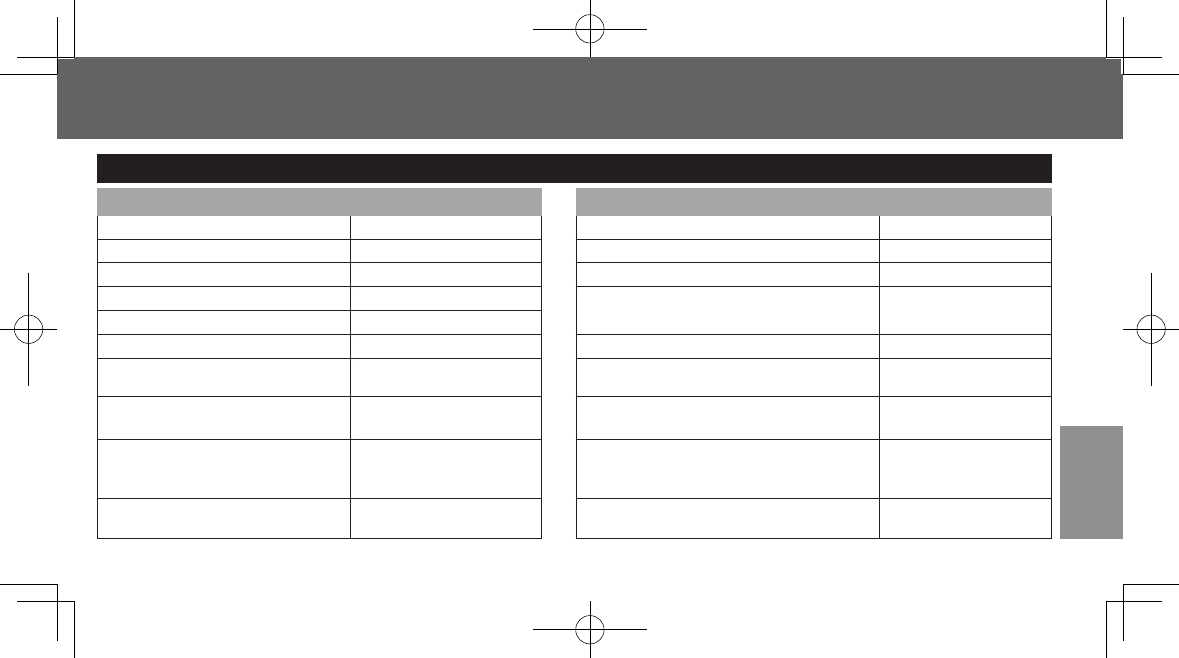
According to IEC 60118-7: 2005
Battery current 1.0 mA
Maximum OSPL90 121 dB SPL
HFA OSPL90 117 dB SPL
Maximum full-on gain 58 dB
HFA full-on gain 52 dB
Reference test gain 40 dB
Bandwidth Less than
200 Hz - 8 000 Hz
Equivalent input noise level 25 dB
Total harmonic distortion
500 Hz: 5 %
800 Hz: 5 %
1 600 Hz: 5 %
Dynamic AGC characteristics Attack Time: 1 ms
Release Time: 700 ms
According to ANSI S3.22-2003
(Includes April 2007 Erratum)
Battery current (Battery current drain) 1.0 mA
Maximum OSPL90 121 dB SPL
HFA OSPL90 (Average saturation output)
117 dB SPL
HFA full-on gain (Average full-on gain) 52 dB
Reference test gain 40 dB
Frequency range Less than
200 Hz - 8 000 Hz
Equivalent input noise level
(Equivalent input noise) 25 dB
Total harmonic distortion
500 Hz: 5 %
800 Hz: 5 %
1 600 Hz: 5 %
Dynamic AGC characteristics Attack Time: 1 ms
Release Time: 700 ms
Power type
52
Reference
Performance (Continued)
According to IEC 60118-7:2005 According to ANSI S3.22-2003 (Includes April 2007 Erratum)
OSPL90 frequency response curve and
Full on acoustic gain response curve
OSPL90 curve (Saturation output curve)
and Full on gain response curve
Output sound pressure level [dB SPL]
130
120
110
100
90
80
70
60
90
80
70
60
50
40
30
20
Full on acoustic gain [dB]
100 1k 10k
Fre
q
uenc
y
[
Hz
]
OSPL90 frequency
response curve
Full on acoustic gain
response curve
Output sound pressure level [dB SPL]
130
120
110
100
90
80
70
60
90
80
70
60
50
40
30
20
Full on gain [dB]
100 1k 10k
Fre
q
uenc
y
[
Hz
]
OSPL90 curve
Full on acoustic gain
response curve
Power type
53
Reference
According to IEC 60118-7:2005 According to ANSI S3.22-2003 (Includes April 2007 Erratum)
Basic frequency response curve
Frequency response curve
Output sound pressure level [dB SPL]
130
120
110
100
90
80
70
60
100 1k 10k
Fre
q
uenc
y
[
Hz
]
Output sound pressure level [dB SPL]
130
120
110
100
90
80
70
60
100 1k 10k
Fre
q
uenc
y
[
Hz
]
Power type

54
Reference
Performance (Continued)
According to IEC 60118-7:2005 According to ANSI S3.22-2003 (Includes April 2007 Erratum)
AGC Steady state input-output
characteristics
AGC input-output characteristics (input-
output curve)
80
90
100
110
120
50 60 70 80 90
In
p
ut Level
[
dB SPL
]
Output Level [dB SPL]
80
90
100
110
120
50 60 70 80 90
In
p
ut Level
[
dB SPL
]
Output Level [dB SPL]
Power type
55
Reference
According to UL 60601-1:2003 R6.03
Transport/Storage temperature –10 °C to 50 °C [14 °F to 122 °F]
Transport/Storage relative humidity 20 % to 85 %
Additional installed circuit Adjustment through the dedicated controller unit.
WH-R17C: Gain for 16-channel model
WH-R15C: Gain for 12-channel model
WH-R13C: Gain for 9-channel model
Mass Approx. 2.1 g [Approx. 0.07 oz] (with the zinc air battery)
Dimensions 32.5 mm (W) × 19.1 mm (H) × 8.5 mm (D)
[1.28” (W) × 0.75” (H) × 0.33”(D)]
Classification Internally powered equipment
BF type applied part
Specifications
56
Reference
Information
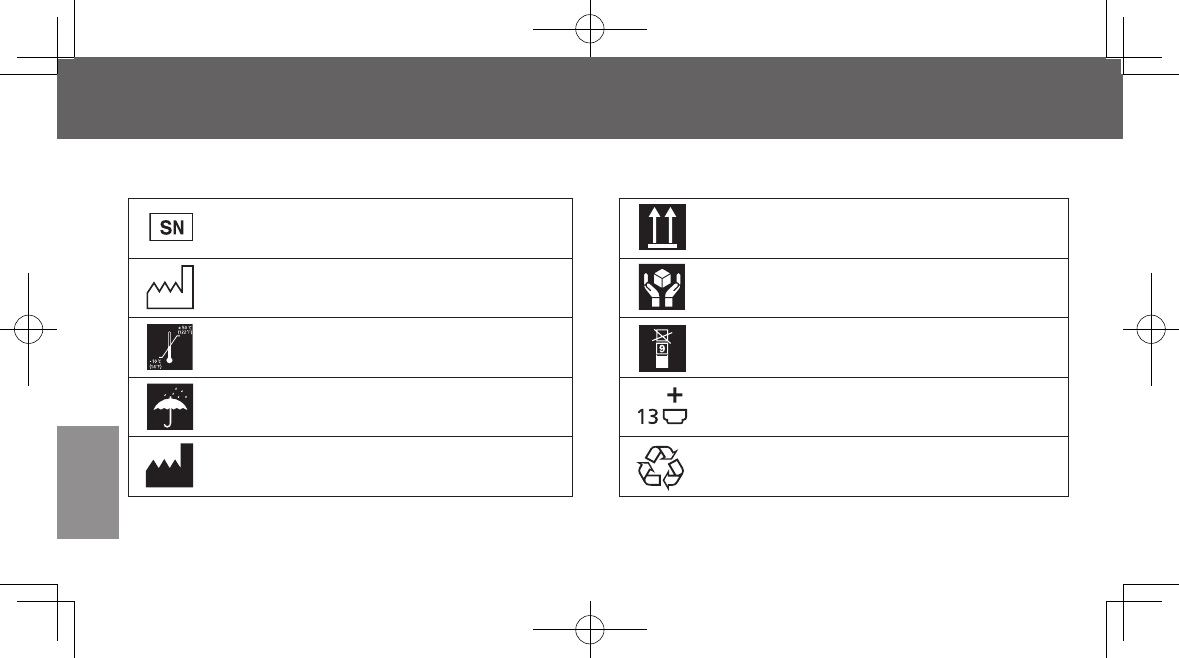
Symbol Indications
Symbol for “SERIAL NUMBER”
Symbol for “DATE OF MANUFACTURE”
Symbol for “TEMPERATURE LIMITATION”
Symbol for “KEEP DRY”
Symbol for “MANUFACTURER”
Symbol for “THIS WAY UP”
Symbol for “HANDLE WITH CARE”
Symbol for “STACKING LIMIT BY NUMBER”
Symbol for “Zinc air battery”
General symbol for recovery/recyclable

57
Reference
Hearing instrument
· Consult your dispenser where you
purchased your hearing aid for advice on
how to dispose of your hearing instrument.
Make sure that the hearing instrument
is disposed of properly, so the waste will
undergo necessary treatment, recovery
and recycling and thus prevent potential
negative effects on the environment and
human health.
Disposal Guidelines
Battery disposal
· For battery disposal, follow the battery
disposal guidance based on the current
United States federal laws and regulations.
Many states have regulations in place
requiring some form of battery recycling.
The regulations of some states may require
recycling for certain types of batteries
different than other states. If you are
using batteries outside the United States,
other nations may regulate waste based
on different criteria. Confirm the status of
batteries in the nation where disposal occurs.
58
Reference
For your reference (Fill out when you purchase your hearing aid)
*The serial number is printed on the package label.
Name of owner:
Hearing instrument dispenser:
Dispenser address:
Dispenser phone:
Purchase date:
Hearing instrument model number:
Hearing instrument serial number*:
Receiver model number:
Receiver serial number*:
Information (Continued)
59
Reference
FCC compliance
FCC ID : ACJ927150TX
This device complies with Part 15 of the FCC Rules.
Operation is subject to the following two conditions:
(1) This device may not cause harmful interference, and
(2) this device must accept any interference received, including interference that may cause undesired operation.
Changes or modifications not expressly approved by the party responsible for compliance could void the user’s authority
to operate the equipment.
NOTE: This equipment has been tested and found to comply with the limits for a Class B digital device, pursuant to
part 15 of the FCC Rules. These limits are designed to provide reasonable protection against harmful interference in a
residential installation. This equipment generates, uses and can radiate radio frequency energy and, if not installed and
used in accordance with the instructions, may cause harmful interference to radio communications. However, there is no
guarantee that interference will not occur in a particular installation. If this equipment does cause harmful interference to
radio or television reception, which can be determined by turning the equipment off and on, the user is encouraged to try
to correct the interference by one or more of the following measures:
- Reorient or relocate the receiving antenna.
- Increase the separation between the equipment and receiver.
- Connect the equipment into an outlet on a circuit different from that to which the receiver is connected.
- Consult the dealer or an experienced radio/TV technician for help.
Printed in Japan
YAHR17CA-1
F0911-1101
2011-10-20
© Panasonic Healthcare Co., Ltd. 2011
[Distributor]
Panasonic Corporation of North America
Healthcare Group
One Panasonic Way, 1H-6, Secaucus, NJ 07094
Telephone No. 1-888-422-6309
[Manufacturer]
247 Fukutake-ko, Saijo, Ehime 793-8510, Japan
Warranty
The Limited Warranty document is enclosed together in the package.
Make sure that it is filled in with date of original purchase, name of dispenser, and other important information.
Keep it in a secure place.
Customer Services Directory (United States)
Obtain product information and operating assistance and locate the nearest dispenser by visiting our website
at: http://www.panasonic.com/hearing
You may also contact us directly at: 1-888-422-6309
Warranty and customer service