Panasonic of North America 96NKX-HDV330 SID Phone with Bluetooth Transceiver User Manual Operating Instructions English
Panasonic Corporation of North America SID Phone with Bluetooth Transceiver Operating Instructions English
Users Manual

Operating Instructions
SIP Phone
KX-HDV330
Model No.
Thank you for purchasing this Panasonic product.
Please read this manual carefully before using this product and save this manual for future
use.
Note
RIn this manual, the suffix of each model number is omitted unless necessary.
RThe illustrations such as some keys may differ from the appearance of the actual product.
RCertain products and features described in this document may not be available in your
country or area. Contact your phone system dealer/service provider.
RThe contents and design of the software are subject to change without notice.
Document Version: 2015-10

Outline
This manual describes information about the installation and operation of KX-HDV330.
Related Documentation
RQuick Start Guide
Describes basic information about the installation and safety precautions to prevent personal injury
and/or damage to property.
RAdministrator Guide
Describes detailed information about the configuration and management of this unit.
Manuals and supporting information are provided on the Panasonic Web site at:
http://www.panasonic.net/pcc/support/sipphone/
For Future Reference
Record the information in the space below for future reference.
Note
RThe serial number and MAC address of this product may be found on the label affixed to the bottom of
the unit. You should note the serial number and MAC address of this unit in the space provided and
retain this manual as a permanent record of your purchase to aid in identification in the event of theft.
MODEL NO.
MAC ADDRESS
DATE OF PURCHASE
NAME OF DEALER
DEALER’S ADDRESS
DEALER’S TEL. NO.
SERIAL NO.
Other Information
Trademarks
RThe Bluetooth® word mark and logos are owned by the Bluetooth SIG, Inc. and any use of such marks
by Panasonic Corporation is under license.
RAll other trademarks identified herein are the property of their respective owners.
2
Introduction

Important Information
Important Information ..........................................4
For Users in European Countries .......................5
For Users in the United Kingdom ........................5
For Users in Australia .........................................5
For Users in Australia and the United
Kingdom ..............................................................6
For Users in New Zealand ..................................6
For Users in the United States ............................6
For Users in Canada ...........................................8
For Best Performance .........................................9
Before Operating the Telephones
Accessory Information ......................................10
Location of Controls ..........................................12
The Display and Icons ......................................19
Adjusting the Volume ........................................26
Incoming/Outgoing Call Log .............................26
Setting the Password ........................................27
Selecting the Display Language .......................27
Entering Characters ..........................................27
Bluetooth Headset ............................................28
Basic Operation ................................................29
Making Calls
Making Calls .....................................................30
Basic Calling .....................................................30
Easy Dialing ......................................................30
Making a Multicast Voice Paging call ...............32
Receiving Calls
Receiving Calls .................................................33
Answering Calls ................................................33
Hands-free Mode ..............................................34
Training Mode ...................................................34
During a Conversation
During a Conversation ......................................35
Before Leaving Your Desk
Call Forwarding/Do Not Disturb ........................38
Listening to Voice Mail Messages ....................38
Xsi Visual Voice Mail ........................................38
Using the Phonebook
Using the Phonebook .......................................40
Using the Personal Phonebook ........................41
Using the Shared Phonebook ...........................47
ECO Mode ........................................................47
Checking the Line Status ..................................48
Customizing the Telephone
Customizing the Telephone ..............................50
Installation and Setup
Installation and Setup .......................................57
Updating the software .......................................64
Appendix
Appendix ...........................................................65
3
Table of Contents
Important Information
Data Security
We cannot be responsible for damages resulting from the misuse of this product.
RKeep a copy of all important data (such as the phonebook list) in case the machine malfunctions and
data cannot be recovered.
RThis product can store your private/confidential information. To protect your privacy/confidentiality, we
recommend that you erase the information such as the phonebook or call log from the memory before
you dispose of, transfer or return the product, or have the product repaired.
RTo avoid unauthorized access to this product:
– Keep the password secret.
– Change the default password.
– Set a password that is random and cannot be easily guessed.
– Change the password regularly.
RSecurity settings, such as passwords, cannot be undone at Panasonic service centers. Take
measures to prevent passwords from being lost or forgotten.
RIf a password is forgotten, initialize the unit and configure the settings again. For details, consult your
administrator or dealer.
RIt is recommended that you lock the phonebook to prevent stored information from being leaked.
Disposal of Old Equipment and Batteries
Only for European Union and countries with recycling systems
These symbols on the products, packaging, and/or accompanying documents mean
that used electrical and electronic products and batteries must not be mixed with
general household waste.
For proper treatment, recovery and recycling of old products and batteries, please take
them to applicable collection points in accordance with your national legislation.
By disposing of them correctly, you will help to save valuable resources and prevent
any potential negative effects on human health and the environment.
For more information about collection and recycling, please contact your local
municipality.
Penalties may be applicable for incorrect disposal of this waste, in accordance with
national legislation.
Note for the battery symbol (bottom symbol)
This symbol might be used in combination with a chemical symbol. In this case it
complies with the requirement set by the Directive for the chemical involved.
4
Important Information

For Users in European Countries
The following declaration is applicable to KX-HDV330NE/KX-HDV330X only
Panasonic System Networks Co., Ltd. declares that this equipment is in compliance with the essential
requirements and other relevant provisions of Radio & Telecommunications Terminal Equipment
(R&TTE) Directive 1999/5/EC.
Declarations of Conformity for the relevant Panasonic products described in this manual are available for
download by visiting:
http://www.ptc.panasonic.eu
Contact to Authorized Representative:
Panasonic Testing Center
Panasonic Marketing Europe GmbH
Winsbergring 15, 22525 Hamburg, Germany
Ecodesign information
Ecodesign information under EU Regulation (EC) No.1275/2008 amended by (EU) Regulation No.
801/2013.
=======================================
Please visit here: www.ptc.panasonic.eu
click [Downloads]
® Energy related products information (Public)
=======================================
Power consumption in networked standby and guidance are mentioned in the web site above.
For Users in the United Kingdom
RThis unit is designed to be installed under controlled conditions of ambient temperature and a relative
humidity.
RAvoid installing the unit in damp or humid environments, such as bathrooms or swimming pools.
R999 and 112 can be dialed on the product after accessing the outside line for the purpose of making
outgoing calls to the BT emergency (999) and (112) services.
The method for accessing an outside line differs depending on the SIP server. For details, confirm the
features of the SIP server.
For Users in Australia
WARNING
RPlease ensure that a separate telephone, not dependent on local power, is available for emergency
use.
RThis equipment will be inoperable when mains power fails.
RNo “000” or other calls can be made from this device during a mains power failure.
5
Important Information

For Users in Australia and the United Kingdom
RThis unit is capable of being used in conjunction with hearing aids fitted with inductive
coil pick-ups. The handset should be held as for normal conversation. For operation,
the hearing aid should be set to its "T" position or as directed in the operating
instructions for the hearing aid.
RThis unit is designed to aid the visually handicapped to locate dial keys and buttons.
For Users in New Zealand
RThis equipment shall not be set to make automatic calls to the Telecom ‘111’ Emergency Service.
PTC General Warning
RThe grant of a Telepermit for any item of terminal equipment indicates only that Telecom has accepted
that the item complies with minimum conditions for connection to its network. It indicates no
endorsement of the product by Telecom, nor does it provide any sort of warranty. Above all, it provides
no assurance that any item will work correctly in all respects with another item of Telepermitted
equipment of a different make or model, nor does it imply that any product is compatible with all of
Telecom’s network services.
The Use of IP Networks through the PSTN
RInternet Protocol (IP) by its nature introduces delay into speech signals as each data packet is
formulated and addressed. Telecom Access Standards recommends that suppliers, designers and
installers using this technology for calls to or from the PSTN refer to ITU E Model requirements in the
design of their networks. The overall aim is to minimize delay, distortion and other transmission
impairments, particularly for those calls involving cellular and international networks, which already
suffer extensive delay.
Echo cancellation
REcho cancelers are not normally required in the Telecom PSTN because geographic delays are
acceptable where CPE return loss is maintained within Telepermit limits. However, those private
networks making use of Voice over IP technology are required to provide echo cancellation for all
voice calls. The combined effect of audio/VoIP conversion delay and IP routing delay can cause the
echo cancellation time of ³ 64 ms to be required.
Important Notice
RUnder power failure conditions this appliance may not operate. Please ensure that a separate
telephone, not dependent on local power, is available for emergency use.
RNo “111” or other calls can be made from this device during a mains power failure.
For Users in the United States
Note
RThis equipment has been tested and found to comply with the limits for a Class B digital device,
pursuant to Part 15 of the FCC Rules. These limits are designed to provide reasonable protection
against harmful interference in a residential installation. This equipment generates, uses, and can
radiate radio frequency energy and, if not installed and used in accordance with the instructions, may
cause harmful interference to radio communications. However, there is no guarantee that interference
will not occur in a particular installation. If this equipment does cause harmful interference to radio or
6
Important Information

television reception, which can be determined by turning the equipment off and on, the user is
encouraged to try to correct the interference by one or more of the following measures:
– Reorient or relocate the receiving antenna.
– Increase the separation between the equipment and receiver.
– Connect the equipment to an outlet on a circuit different from that to which the receiver is connected.
– Consult the dealer or an experienced radio/TV technician for help.
This device complies with Part 15 of the FCC Rules. Operation is subject to the following two
conditions:
(1) this device may not cause harmful interference, and (2) this device must accept any interference
received, including interference that may cause undesired operation.
WHEN PROGRAMMING EMERGENCY NUMBERS AND/OR MAKING TEST CALLS TO EMERGENCY
NUMBERS:
1. Remain on the line and briefly explain to the dispatcher the reason for the call before hanging up.
2. Perform such activities during off-peak hours, such as early morning or late evening.
CAUTION
Any changes or modifications not expressly approved by the party responsible for compliance could void
the user’s authority to operate this product.
FCC RF Exposure Warning:
RThis product complies with FCC radiation exposure limits set forth for an uncontrolled environment.
RTo comply with FCC RF exposure requirements, this product must be installed and operated 20 cm
(8 inches) or more between the product and all person’s body.
RThis product may not be collocated or operated in conjunction with any other antenna or transmitter.
FCC ID can be found on the bottom of the units.
Privacy of communications may not be ensured when using this phone.
Hearing Aid Compatibility
This telephone provides magnetic coupling for hearing aids as defined by the FCC in 47 CFR Section
68.316. Use only handsets or other acoustic devices with this equipment that are compliant with the
hearing aid compatibility requirements of FCC Part 68.
When you hold the phone to your ear, noise might be heard in your Hearing Aid. Some Hearing Aids are
not adequately shielded from external RF (radio frequency) energy. If noise occurs, use an optional
headset accessory or the speakerphone option (if applicable) when using this phone. Consult your
audiologist or Hearing Aid manufacturer about the availability of Hearing Aids which provide adequate
shielding to RF energy commonly emitted by digital devices.
Compliance with TIA-1083 standard:
T
Compatible with
Hearing Aid T-Coil
TIA-1083
Telephone handsets identified with
this logo have reduced noise and
interference when used with T-Coil
equipped hearing aids and cochlear
implants.
7
Important Information

Responsible Party
Panasonic Corporation of North America
Two Riverfront Plaza, Newark, NJ 07102-5490
Technical Support
Panasonic Corporation of North America
Two Riverfront Plaza, Newark, NJ 07102-5490
Telephone: 1 (800) 528-6747 Option 1
For Users in Canada
Industry Canada Notices and Other Information
This product meets the applicable Industry Canada technical specifications.
Note
RThis Class B digital apparatus complies with Canadian ICES-003.
CAUTION
Any changes or modifications not expressly approved by the party responsible for compliance could void
the user’s authority to operate this product.
Compliance with TIA-1083 standard:
T
Compatible with
Hearing Aid T-Coil
TIA-1083
Telephone handsets identified with
this logo have reduced noise and
interference when used with T-Coil
equipped hearing aids and cochlear
implants.
RF Exposure Warning:
RThis product complies with IC radiation exposure limits set forth for an uncontrolled environment.
RTo comply with IC RF exposure requirements, this product must be installed and operated 20 cm
(8 inches) or more between the product and all person’s body.
RThis product may not be collocated or operated in conjunction with any other antenna or transmitter.
Privacy of communications may not be ensured when using this phone.
8
Important Information

For Best Performance
Environment
RKeep the product away from heating appliances and devices that generate electrical noise, such as
fluorescent lamps, motors and televisions. These noise sources can interfere with the performance of
the product.
RDo not place the product in rooms where the temperature is less than 0 °C (32 °F) or greater than
40 °C (104 °F).
RAllow 10 cm (3–15/16 in) clearance around the product for proper ventilation.
RAvoid environments with excessive smoke, dust, moisture, mechanical vibration, shock, or direct
sunlight.
RThe apparatus is designed to be installed and operated under controlled conditions of ambient
temperature and a relative humidity.
Routine Care
RUnplug the AC adaptor from the AC outlet and disconnect the Ethernet cable before cleaning.
RWipe the product with a soft cloth.
RDo not clean the product with abrasive powder or with chemical agents such as benzine or thinner.
RDo not use liquid cleaners or aerosol cleaners.
Touch Display
RTouch the display only with the end of your finger. Do not touch the display with sharp objects, such as
a pen or your fingernails.
RUse only one finger. Touching the display with more than one finger can result in unexpected behavior.
Placement
RDo not place heavy objects on top of the product.
RCare should be taken so that objects do not fall onto, and liquids are not spilled into, the product.
Optional Equipment
RA KX-HDV20 (20 Key Expansion Module) can be used with the product.
RThe KX-HDV20 can be used only when the product receives power from the optional AC adaptor; it
cannot be used when the product receives power via Power-over-Ethernet (PoE).
RUp to 5 KX-HDV20 units can be connected to the product.
However, if you mount the product on a wall, mount in with only one KX-HDV20 unit attached to the
KX-HDV330. To mount a second KX-HDV20 unit or more, mount each in turn, unattached to the main
unit.
9
Important Information
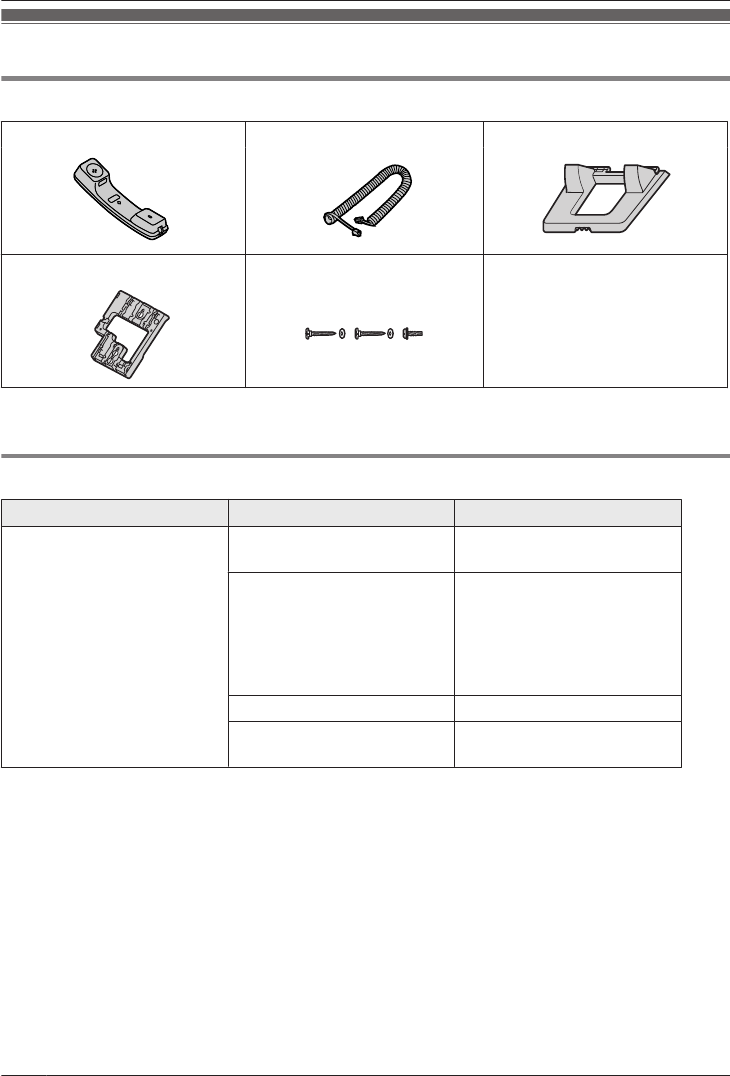
Accessory Information
Included Accessories
Handset: 1 Handset Cord: 1 Stand: 1
Wall Mounting Adaptor: 1 Screws for wall mounting: 3*1
*1 The two large screws are for mounting the unit on the wall. The small screw is for attaching the wall
mounting adaptor to the unit.
Optional Accessories
Item Model AC Adaptor Model No.*2
AC Adaptor*1 KX-HDV330NE/
KX-HDV330RU
KX-A422CE (PNLV228)
KX-HDV330X KX-A422AG (PNLV228)/
KX-A422AL (PNLV228)/
KX-A422BR (PNLV228)/
KX-A422CE (PNLV228)/
KX-A422UK (PNLV228)/
KX-A422X (PNLV228)
KX-HDV330SX KX-A422SX (PNLV228)
KX-HDV330/
KX-HDV330C
KX-A422 (PNLV228)
*1 This unit complies with the IEEE 802.3af Power-over-Ethernet (PoE) standard. If PoE is available on
your network, this unit can receive the necessary power from the network through the Ethernet cable.
In this case, no AC adaptor is needed. However, if PoE is not available or if you will use a KX-HDV20
(20 Key Expansion Module), you will need to connect an AC adaptor to the unit.
*2 To order an optional AC adaptor, please order using the "KX-A422xx" model number.
For details about which AC adaptor model number you should order, consult your dealer.
10
Before Operating the Telephones
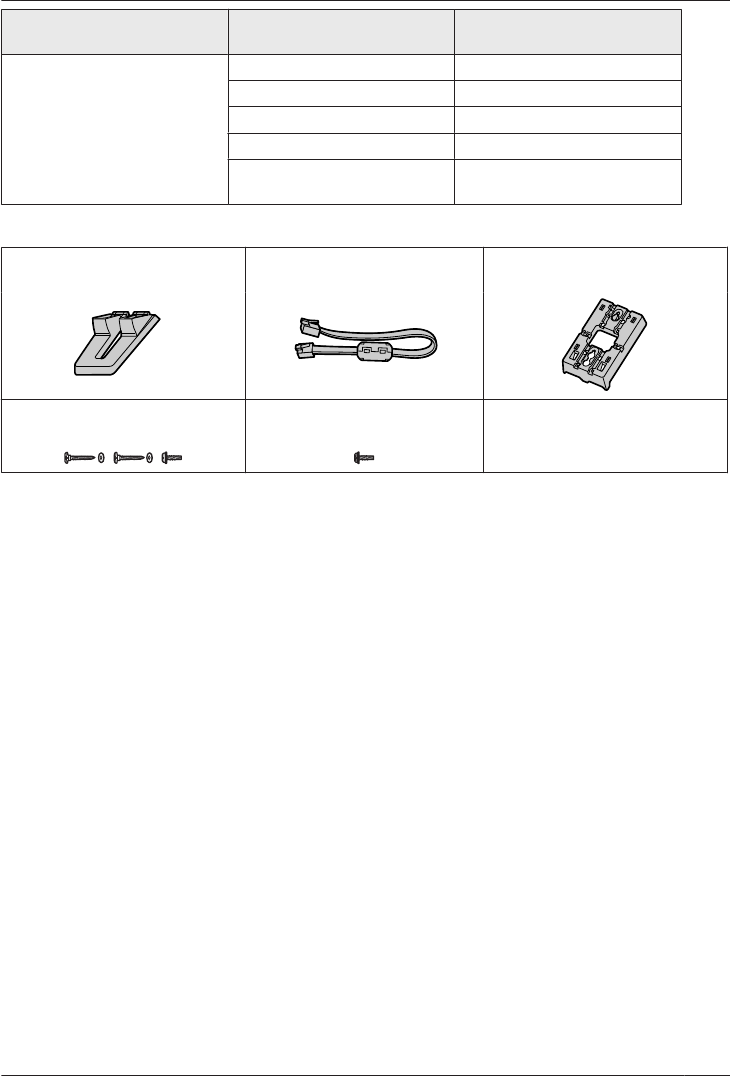
Item Model 20 Key Expansion Module
Model No.
20 Key Expansion Module KX-HDV330NE KX-HDV20NE
KX-HDV330RU KX-HDV20RU
KX-HDV330X KX-HDV20X
KX-HDV330SX KX-HDV20SX
KX-HDV330/
KX-HDV330C
KX-HDV20
KX-HDV20 Included Accessories
Stand: 1 Connection cable: 1 Wall mount adaptor for
KX-HDV20: 1
Screws for wall mounting: 3*1 Screw for attaching the
KX-HDV20 to the unit: 1
*1 The two large screws are for mounting the unit on the wall. The small screw is for attaching the wall
mounting adaptor to the unit.
Note
For users in the United States only
To order accessories, call toll-free 1-800-332-5368.
11
Before Operating the Telephones
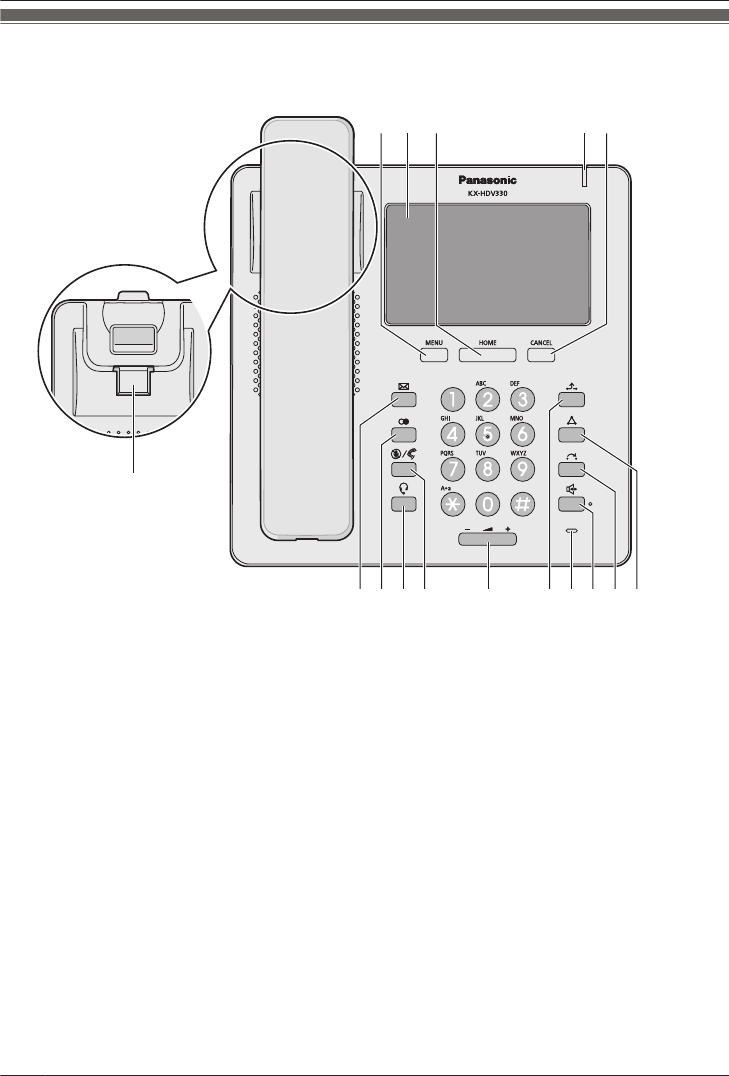
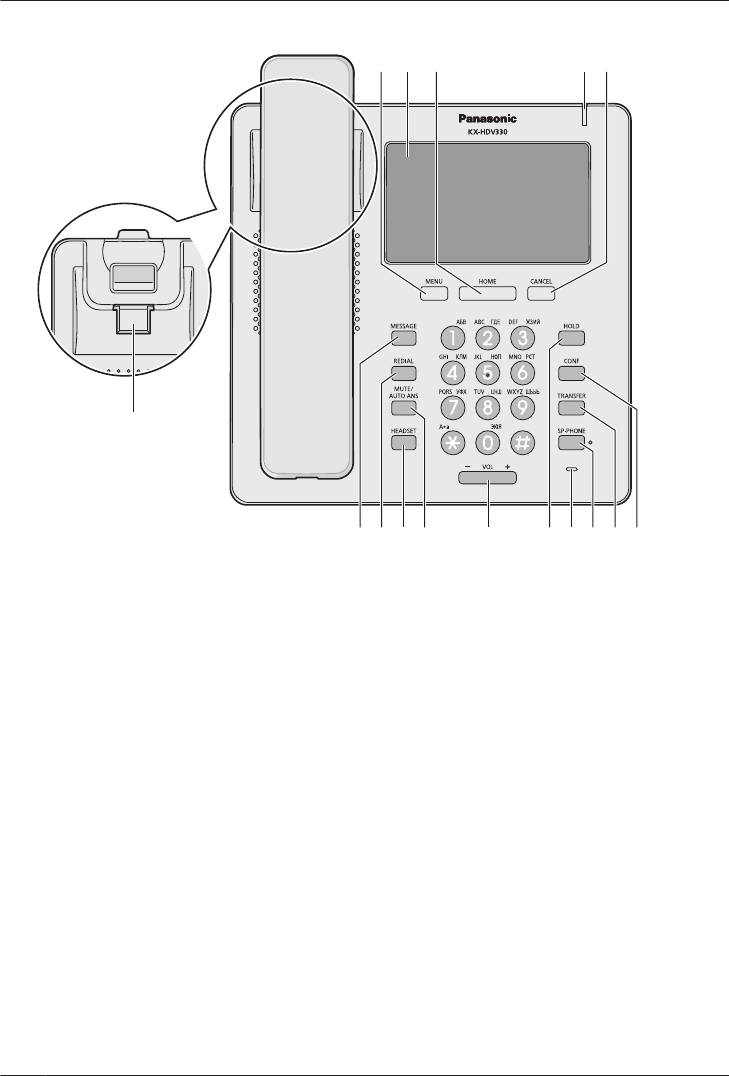
Location of Controls
KX-HDV330NE
LIJ KH ON P
B D
A C E
F
GM
12
Before Operating the Telephones

KX-HDV330X/KX-HDV330SX
LIJ KH ON P
B D
A C E
F
GM
13
Before Operating the Telephones
KX-HDV330RU
LIJ KH ON P
B D
A C E
F
GM
14
Before Operating the Telephones
KX-HDV330
LIJ KH ON P
B D
A C E
F
GM
15
Before Operating the Telephones

KX-HDV330C
LIJ KH ON P
B D
A C E
F
GM
16
Before Operating the Telephones
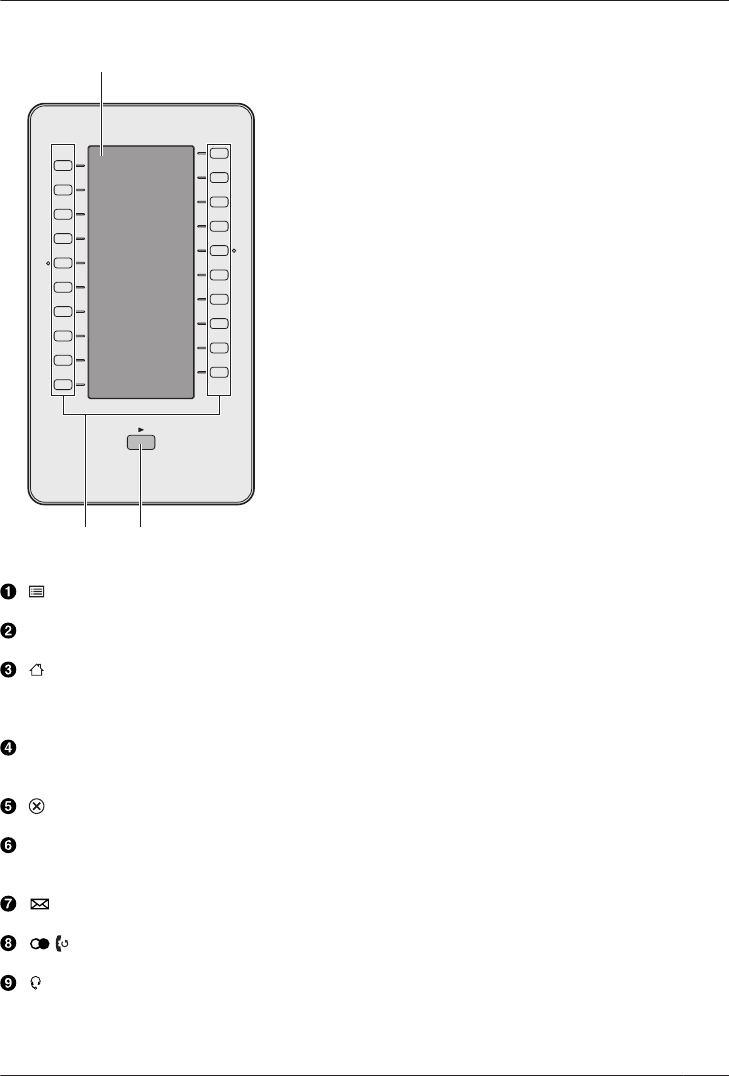
KX-HDV20NE/KX-HDV20X/KX-HDV20SX/KX-HDV20RU/KX-HDV20
S
R
Q
/MENU
Display the menu. The contents of the menu differ depending on the settings and mode.
Touch display
For details about the display, see “Display”, Page 19.
/HOME
Return to the Home screen.
Depending on the mode, the screen you return to and other operations differ. Pressing this key in
standby mode displays function keys 1 to 4.
Ringer/Message Waiting/Missed Call Indicator
The lamp flashes when you are receiving a call, or when you have an unread message or missed
call notification.
/CANCEL
Used to cancel the selected item.
Handset Hook
Keeps the handset stable when the unit is mounted on a wall. For details, see “Hooking the
Handset”, Page 64.
/MESSAGE
Used to access your voice mailbox.
/ /REDIAL
Used to redial the last dialed number.
/HEADSET
Used for performing headset operations.
17
Before Operating the Telephones

/MUTE/AUTO ANS
Used to receive an incoming call in hands-free mode or mute the microphone/handset during a
conversation.
/VOL
Used to adjust the ringer/receiver volume.
/ /HOLD
During talking, used to place a call on Hold. In standby mode, used to retrieve a call on hold if there
is one.
Microphone
Used for hands-free conversation.
/SP-PHONE
Used for performing hands-free operations.
/ /TRANSFER
Used to transfer a call to another party.
/CONF
Used to establish a multiple-party conversation.
Self-labeling LCD
For details about the self-labeling LCD, see “KX-HDV20 Self-labeling LCD”, Page 23.
DSS Keys [01–20]*1
Used to perform the assigned function. When a key is assigned as a Line key, it can be used to
confirm the status of the line. The key name that you assigned is displayed on the KX-HDV20’s
self-labeling LCD. For details about changing the DSS keys, see “Changing the Function Keys
(Program Keys and DSS Keys)”, Page 51.
DSS Page Key*1
Used to switch the page of DSS keys displayed on the KX-HDV20 self-labeling LCD. There are two
pages of 20 DSS keys.
*1 These keys can be used when you connect a KX-HDV20 to the unit.
Note
R"DSS" stands for "Direct Station Selection".
18
Before Operating the Telephones
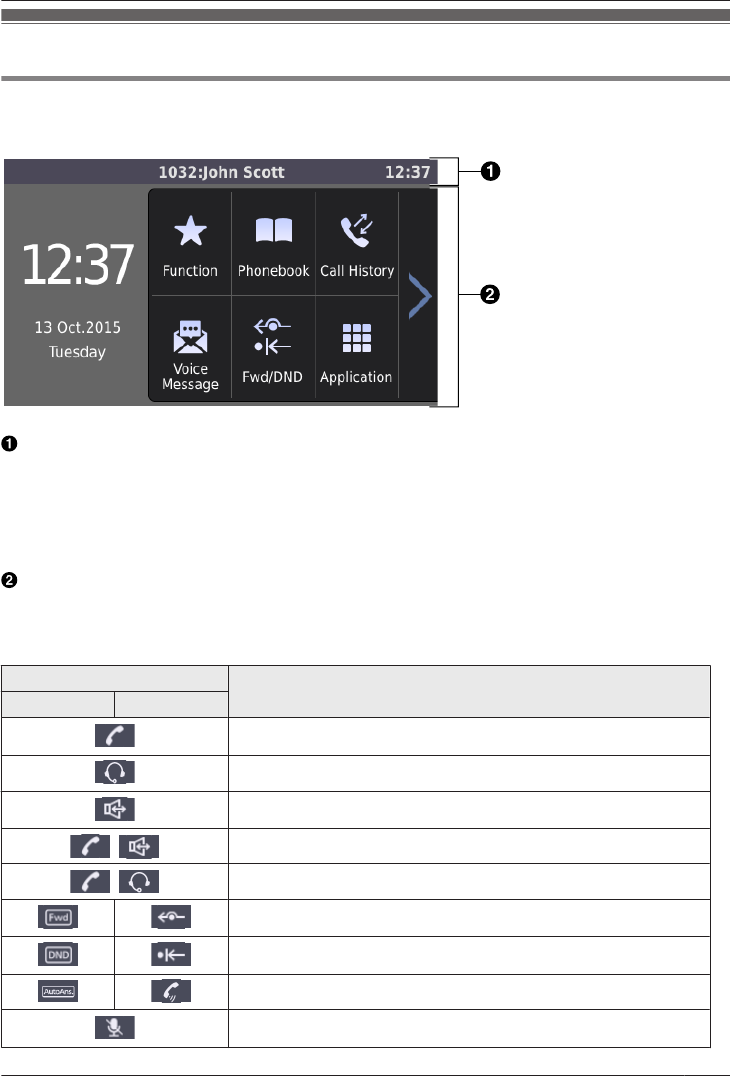
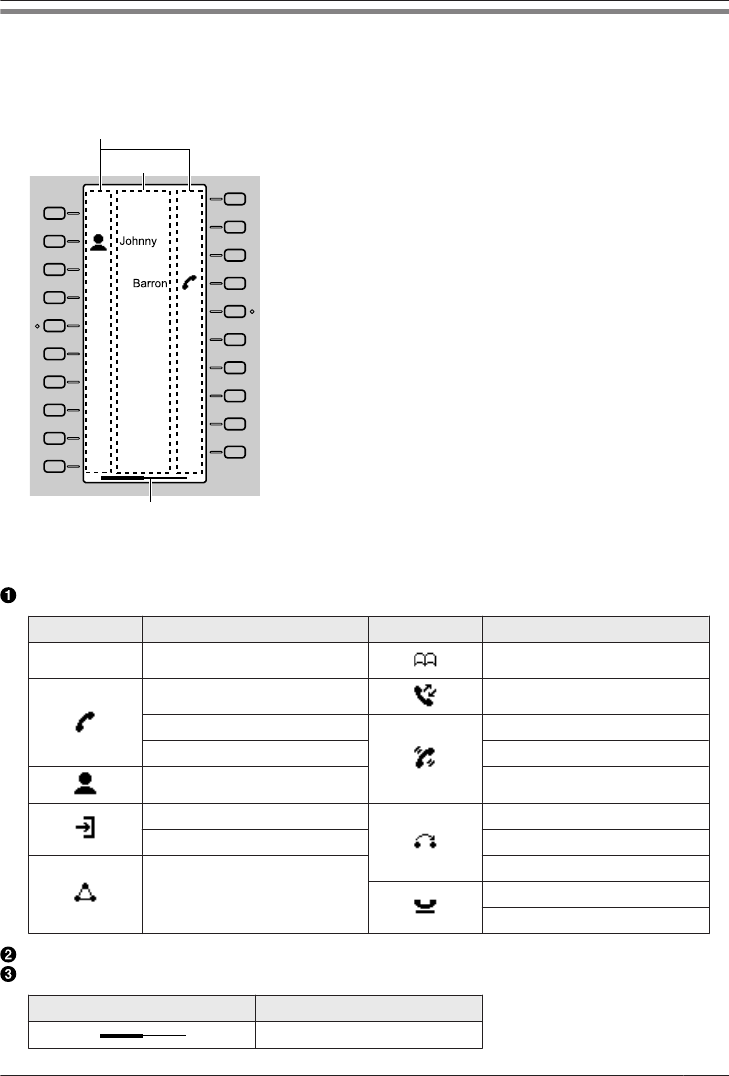
The Display and Icons
Display
[Example]
Status bar
There are 2 display patterns for the status bar, which alternate back and forth. Tapping this area has
no effects.
Pattern A: Status icons (settings, hold, incoming call, etc.) and time
Pattern B: Number and name of the telephone line, communication method icons (handset, headset,
speakerphone, etc.), mute icon, and time
While configuring settings, the screen title is displayed.
Operation area
Displays the screens for all functions. Tapping here operates the telephone.
The icons for the top screen change depending on the phone’s status.
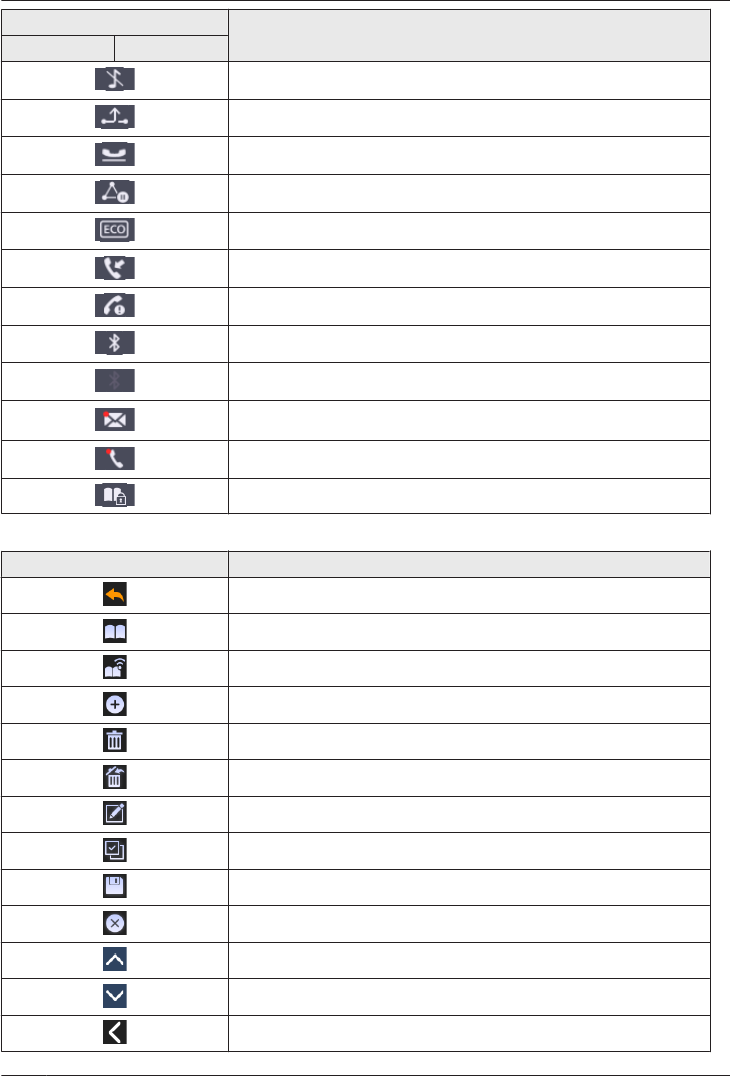
Icons displayed in the status bar
Suffix Meaning
(none)/C NE/RU/SX/X
Handset in use
Headset in use
Using speakerphone
Off-hook monitor
Training mode
Fwd enabled
DND enabled
Auto answer enabled
Mute
19
Before Operating the Telephones
Suffix Meaning
(none)/C NE/RU/SX/X
Ringer off
Call on hold
Call on hold in a Call Park zone
Conference hold
ECO mode enabled
Receiving an incoming call
Network error
Bluetooth® connection established
Bluetooth connection not established
New message
Missed call
Phonebook lock
Operation icons displayed in the operation area
Icon Meaning
Back
Personal Phonebook
Shared Phonebook
Add contact
Enter delete mode
Execute delete
Enter edit mode
Select all items
Save
Cancel
Scroll up
Scroll down
Scroll left
20
Before Operating the Telephones
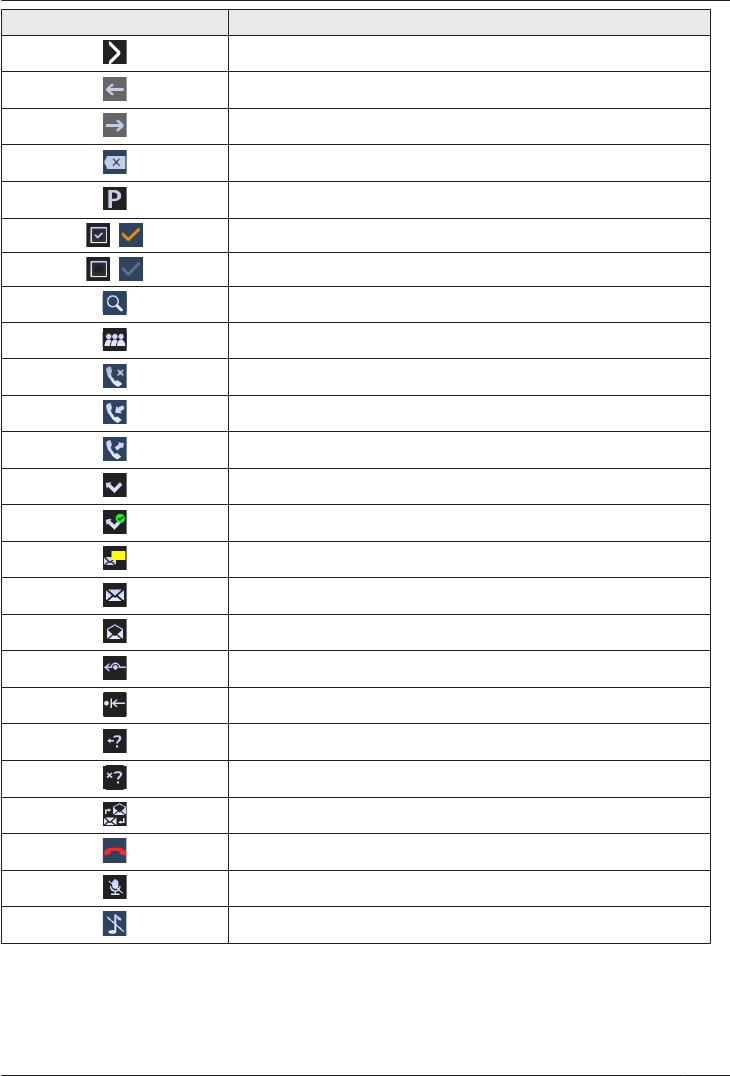
Icon Meaning
Scroll right
Move the cursor left
Move the cursor right
Backspace
Pause
, Selected
, Unselected
Search
Category
Missed calls
Incoming calls
Outgoing calls
New missed call
Confirmed missed call
Number of unread voice mails
Unread voice mail
Read voice mail
Call Forwarding
Do Not Disturb
Anonymous call
Anonymous call rejection
Change a message between read and unread
Go on-hook
Mute
Ringer off
21
Before Operating the Telephones

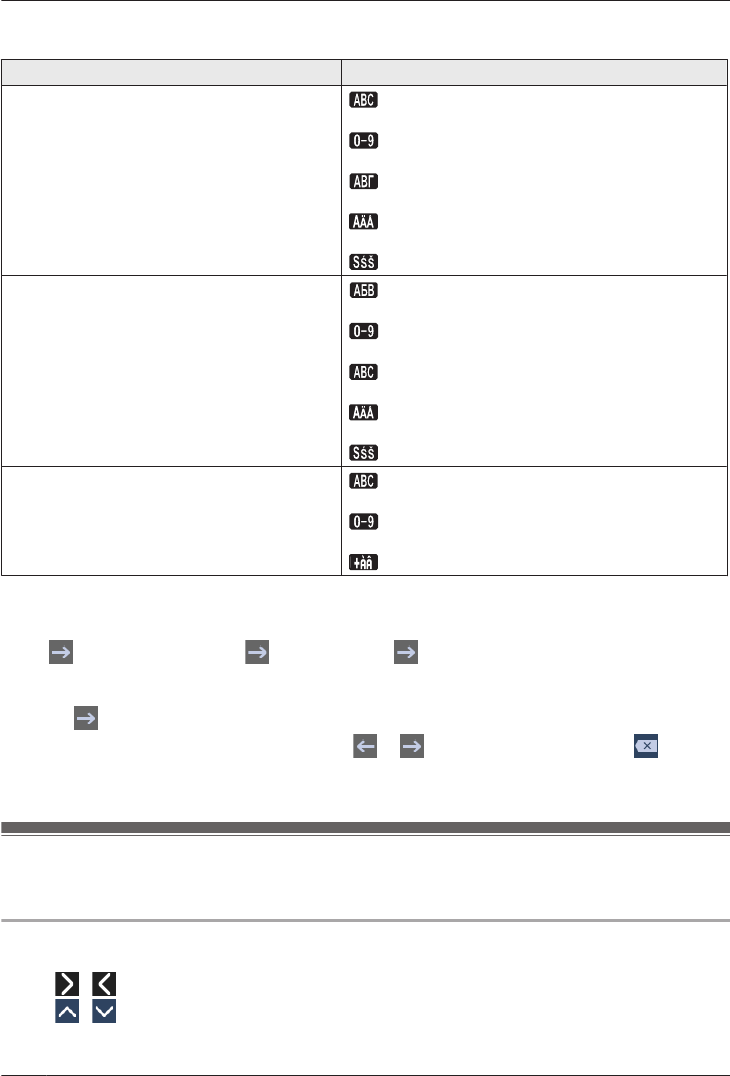
Character input icons
Suffix Meaning
(none)/C NE/RU/SX/X
ABC
Latin character entry mode
0 - 9
Numeric character entry mode
Special character (Extended 1) entry mode
Special character (Extended 2) entry mode
Greek character entry mode
Cyrillic character entry mode
Note
RExample images of the display in this manual are samples only, and the actual screen on your phone
may vary in color and/or appearance.
RDescriptions of icons displayed with text are not included.
22
Before Operating the Telephones
KX-HDV20 Self-labeling LCD
[Example]
KX-HDV20 (Optional model)*1
020
019
018
016
015
014
013
012
011
010
008
007
006
005
004
003
002
001
A
B
C
*1 Up to 40 keys (20 keys ´ 2 pages) can be registered.
Pictographs
Pictograph Meaning Pictograph Meaning
(Number) No function is assigned. Phonebook
One Touch Dial Call History
Line Simultaneous Ring
Line Status Wrap Up
BLF Directed Call Pickup
ACD (Login/Logout) Call Forward
Hoteling/Hospitality Transfer
Conference Blind Transfer
Park
Park Retrieve
Function Label Name
Page Information
Indication Meaning
Displaying page 1
23
Before Operating the Telephones

Indication Meaning
Displaying page 2
Note
RImages of the display in this manual are samples only. The actual screen on your phone may vary in
color and/or appearance.
24
Before Operating the Telephones

Main Menu
The following menu items are displayed in standby mode.
Function
Displays the function keys.
See “Changing the Function Keys (Program Keys and DSS Keys)”, Page 51.
Voice Message
Used to access your voice mailbox.
See “Listening to Voice Mail Messages”, Page 38.
Fwd/DND*1
Sets the Call Forwarding or Do Not Disturb features.
See “Call Forwarding/Do Not Disturb”, Page 38.
Paging*1
Makes a Multicast Voice Paging call.
See “Making a Multicast Voice Paging call”, Page 32.
Call History
Used to display the call log.
See “Incoming/Outgoing Call Log”, Page 26.
Phonebook
Used to access the Personal or Shared Phonebook.
See “Using the Phonebook”, Page 40.
Line Status
Used to display the status of each line on the LCD.
See “Checking the Line Status”, Page 48.
Basic Settings
Used to access the basic settings menu.
See “Changing the Basic Settings”, Page 55.
System Settings
Used to access the system settings menu.
See “Changing the System Settings”, Page 55.
Advanced Settings
Used to access the advanced settings menu.
See “Changing the Advanced Settings”, Page 55.
Call Center/Call Centre*1
Used to access the Call Center feature.
Presence*1
Used to access the Presence feature.
Application*1
Used to access the Application feature.
*1 This item is displayed only when the feature is enabled. Contact your administrator for further
information.
25
Before Operating the Telephones
Adjusting the Volume
Adjusting the Receiver/Speaker/Headset Volume
1. Press [k]/[j] volume key: Adjust the volume during a conversation.
Note
RBoth receiver volume and headset volume are adjusted in training mode. See “Training Mode”,
Page 34.
Adjusting the Ringer Volume or Turning the Ringer Off
[In standby mode]
1. Press [k]/[j] volume key: Adjust the ringer volume.
2. Tap "OK".
Note
RFor details about setting the ringer pattern, see “Incoming Option”, Page 67.
Adjusting the Ringer Volume or Turning the Ringer Off while Ringing
While receiving a call, do the following to adjust the ringer volume or turn the ringer off:
Note
RIf you attach a headset while receiving an incoming call, ringing will be heard from the speaker.
To adjust the ringer volume
1. Press [k]/[j] volume key: Adjust the ringer volume.
Note
RThe adjusted volume level will also be used for subsequent calls.
RThe volume can also be adjusted in the pop-up window.
To turn the ringer off
1. Tap .
Incoming/Outgoing Call Log
Displaying the Incoming/Outgoing Call Log
[In standby mode]
1. Tap / a "Call History"
2. Missed Call Log: Tap .
Incoming Call Log: Tap .
Outgoing Call Log: Tap .
Making a call using the Incoming/Outgoing Call Log
See “Using the Incoming/Outgoing Call Log”, Page 31.
Storing an item using the Incoming/Outgoing Call Log
See “Storing an Item Using the Incoming or Outgoing Call Log”, Page 42.
26
Before Operating the Telephones

Deleting Items in the Incoming/Outgoing Call Log
[When the Incoming or Outgoing Call Log is displayed]
1. Tap .
2. Tap / : Tap the check boxes of the items you want to delete.
3. Tap . a "OK"
Note
RYou can select all items in the list by tapping .
Setting the Password
The telephone password is not set by default. You must register a password (4 digits) before use. You
cannot use the following features without setting a password:
RPhonebook lock (See “Locking the Phonebook”, Page 46).
Note
RTo avoid unauthorized access to this product:
– Set a password that is random and cannot be easily guessed.
– Change the password regularly.
RMake a note of the password so that you will not forget it.
To set
[In standby mode]
1. Tap / a "Basic Settings"
2. Tap / a "Other Option"
3. Tap "Change Password".
4. Enter a new password (4 digits [0–9]).*1 a "OK"
5. Verify the password by entering it again as in step 4.
*1 If a password is already set, you will need to enter the old password first.
Selecting the Display Language
You can select the language displayed on your LCD.
[In standby mode]
1. Tap / a "Basic Settings"
2. Tap / a "Display Option"
3. Tap / a "Language"
4. Tap / : Select a language. a "OK"
RFor a list of the languages that can be selected, see “Display Option”, Page 69.
Entering Characters
You can enter characters and digits using the dialing keys.
You can select one of the character modes by tapping the desired character mode while entering a name.
27
Before Operating the Telephones
For available characters, see “Character Mode Table”, Page 65.
To change the character mode while editing a name in the phonebook, tap the desired character mode.
Model No. Character Mode
KX-HDV330NE, KX-HDV330X, KX-HDV330SX (Latin)
(Numeric)
(Greek)
(Extended 1)
(Extended 2)
KX-HDV330RU (Cyrillic)
(Numeric)
(Latin)
(Extended 1)
(Extended 2)
KX-HDV330, KX-HDV330C (Latin)
(Numeric)
(Extended 1)
Example: To enter "Anne" in Latin Mode.
2 a a * a 6 a 6 a a 6 a 6 a a 3 a 3
RTo switch between uppercase and lowercase, press *.
RTo enter a character located on the same dialing key as the previous character, move the cursor by
tapping , then enter the desired character.
RIf you enter a different character by mistake, tap or to highlight the character, tap to delete
it, then enter the correct character.
RTo clear an entire line, tap "Delete".
Bluetooth Headset
Before using a Bluetooth headset, you need to register it to the unit.
Registering a Bluetooth headset
Set the headset to pairing mode by following the instructions in the headset’s documentation.
1. Tap / a "Basic Settings"
2. Tap / a "Bluetooth Headset"
3. Tap "Add New Device".
4. Enter the PIN.*1 a "OK"
28
Before Operating the Telephones
*1 For more information regarding the PIN, see the documentation for your headset.
Deregistering a Bluetooth headset
1. Tap / a "Basic Settings"
2. Tap / a "Bluetooth Headset"
3. Tap "Registration". a "Yes"
Connecting a Bluetooth headset
1. Tap / a "Basic Settings"
2. Tap / a "Bluetooth Headset"
3. Tap "Connection". a "On" a "OK"
Disconnecting a Bluetooth headset
1. Tap / a "Basic Settings"
2. Tap / a "Bluetooth Headset"
3. Tap "Connection". a "Off" a "OK"
Note
RDuring a conversation using a Bluetooth headset, the receiver volume can be adjusted using the
volume key on either the headset or the main unit.
RThe connection status can be viewed on the status bar.
RSignals are transmitted between the unit and the Bluetooth headset using radio waves. For maximum
distance and noise free operation, it is recommended that the unit be situated away from electrical
appliances such as faxes, radios, personal computers, and microwaves.
RPrivacy of communications may not be ensured when using the unit.
Basic Operation
Going off-hook
In this manual, when you see the phrase "off-hook", you can do any of the following:
RLift the corded handset off its cradle.
RPress /[SP-PHONE] while the corded handset is on its cradle. This enables hands-free mode.
RPress /[HEADSET] when using a headset.
RTap the corresponding function key to select a line.*1
*1 When a function key is assigned as a Line key or Line Status key, this feature is available.
Going on-hook
In this manual, when you see the phrase "on-hook", you can do any of the following:
RReplace the corded handset on its cradle.
RPress /[SP-PHONE] when you are in hands-free mode.
RPress /[HEADSET] when using a headset.
RPress /[CANCEL].
RTap "Off".
29
Before Operating the Telephones
Making Calls
RYou can confirm that the number was dialed correctly before calling (Predialing) by entering the
number, then going off-hook.
RIf an outside call is received from a phone number stored in the phonebook, the number and name of
the caller will be displayed in the call log.
RTo cancel dialing, press /[CANCEL].
RTo insert a 3 second pause between phone numbers, tap "Pause".*1
It is useful when you want to operate voice mail service without listening to pre-recorded
announcement, for example. Repeat as needed to create longer pauses.
RThe "+" symbol (international dialing code) can be entered by pressing and holding the "B" key.
*1 This icon is displayed only when configured on the telephone. Contact your administrator for further
information.
Basic Calling
Calling by Dialing
1. In standby mode, go off-hook.
2. Dial the outside party’s number.
3. Tap "Voice Call".
4. Go on-hook to end the call.
Note
RYou can use a specific line by pressing a function key assigned to a line (see “Changing the Function
Keys (Program Keys and DSS Keys)”, Page 51) or by using the Line Status screen (see “Checking
the Line Status”, Page 48).
RTo dial a new number without going on-hook, follow the procedure below.
[During a Conversation]
1. Press /[MENU].
2. Tap "Flash"/"Recall".
Predialing
In standby mode, you can start dialing while still on-hook. After dialing the number, go off-hook to begin
the call.
Easy Dialing
Making a call using the redial list
The last phone number dialed is stored in the redial list (32 digits max.).
[In standby mode]
1. Press / /[REDIAL].
2. Go off-hook.
Note
RIf this procedure is performed during a conversation, the conversation will end, and then redialing is
performed.
30
Making Calls
Hot Key Dialing
You can assign a phone number to each number key and then access the desired phone number by
simply pressing and holding the assigned number key.
1. Press and hold the dialing key (0–9) assigned as a Hot Key for more than 1 second.
2. Go off-hook.
Note
RWhile the Hot Key’s information is displayed, you can tap or to select another Hot Key number.
RIf Hot Key dialing is set to "Auto", a Hot Key number can also be dialed by pressing and holding the
assigned dialing key for a specified number of seconds. For details, see “Selecting the Type of Hot
Key Dialing”, Page 51.
RFor details about assigning Hot Keys, see “Assigning Hot Keys From Phonebook”, Page 50.
Using the Hot Line
If your administrator has configured this function, you can make a call to a registered phone number
automatically. Contact your administrator for further information.
[In standby mode]
1. Go off-hook.
Using the Incoming/Outgoing Call Log
Using the Incoming Call Log
[In standby mode]
1. Tap / a "Call History"
2. Missed Call Log: Tap .
Incoming Call Log: Tap .
3. Tap / : Select an incoming call log.
4. Go off-hook.
Using the Outgoing Call Log
[In standby mode]
1. Tap / a "Call History"
2. Tap .
3. Tap / : Select an outgoing call log.
4. Go off-hook.
Using the Phonebook
Using the Personal Phonebook
[In standby mode]
1. Tap / a "Phonebook"
2. If "Shared Phonebook" is displayed as the title, tap .*1
3. Search for the desired item.*2
4. Tap / : Select the desired item.
5. Select the desired phone number.
31
Making Calls
6. Go off-hook.
*1 If only Personal Phonebook is permitted, this step is skipped.
*2 For details, see “Searching for an Item in the Personal Phonebook”, Page 45.
Note
RIf the Personal Phonebook is not permitted, this feature cannot be used. Contact your administrator for
further information.
Using the Shared Phonebook
[In standby mode]
1. Tap / a "Phonebook"
2. If "Phonebook" is displayed as the title, tap .*1
3. Search for the desired item.*2
4. Tap / : Select the desired item.
5. Select the desired phone number.
6. Go off-hook.
*1 If only Shared Phonebook is permitted, this step is skipped.
*2 For details, see “Searching for an Item in the Shared Phonebook”, Page 47.
Note
RIf the Shared Phonebook is not permitted, this feature cannot be used. Contact your administrator for
further information.
Making a Multicast Voice Paging call
When you make a paging call, the voice will be heard through the speaker phone of the other telephones.
[In standby mode]
1. Tap / a "Paging"*1
2. Select a desired channel group.*2
3. Go off-hook, or tap "Call".
*1 Paging is available only when the feature is enabled. Contact your administrator for further
information.
*2 If there is only 1 channel group, paging will start immediately.
32
Making Calls

Receiving Calls
RYou can select the ringer for each type of incoming call. See “Incoming Option”, Page 67.
RYou can also use Auto Answer to answer a call. See “Answer Option”, Page 68.
RThe volume of the ringer can be adjusted, or turned off. See “Adjusting the Ringer Volume or Turning
the Ringer Off”, Page 26.
RIf you attach a headset while receiving an incoming call, ringing will be heard from the speaker.
Depending on the headset, ringing may be heard through the headset.
RUp to 24 calls can be received at the same time. The 25th caller will hear a busy tone.
Caller ID
If an outside call that contains Caller ID information (a caller’s name and telephone number) is received,
this information will be logged in the Incoming Call Log and displayed on the LCD.
If a call from a number matching a number entered in the phonebook is received, the name registered in
the phonebook for that number will be displayed along with the number.
If caller information is sent by the phone system and there is also information stored in the phonebook for
the same number, the information stored in the phonebook will be displayed.
Answering Calls
To answer an incoming call
1. Go off-hook.*1
*1 When the handset is already off-hook, press and release the hook switch.
Note
RWhen a call is received while another call is on hold, pressing and releasing the hook switch will
answer the call.
To answer an incoming call on a specific line
1. Press the corresponding function key.
Note
RWhen a function key is assigned as a Line key or Line Status key, this feature is available.
RLine keys with incoming calls will be flashing blue rapidly.
RYou can select the ringer pattern for each type of incoming call. For details, see “Incoming Option”,
Page 67.
To answer an incoming call when receiving multiple incoming calls
1. Tap "Line".
2. Tap / : Select an incoming call.
3. Go off-hook.
To reject an incoming call
1. While an incoming call is ringing, tap "Reject".
2. The call will be rejected, and the telephone will return to standby mode.
Note
RCalls from specific numbers can be automatically rejected. For details, see “Incoming call barring
(Caller ID service users only)”, Page 53.
33
Receiving Calls
Hands-free Mode
In hands-free mode, you can talk and hear the other party in a conversation without using the handset.
This mode is useful for performing other tasks during a conversation, such as writing.
Enabling hands-free mode
If you press /[SP-PHONE] in standby mode, you can enable hands-free mode.
During a conversation using a headset, you can enable hands-free mode by pressing /[SP-PHONE].
Canceling hands-free mode
You can cancel hands-free mode in one of the following ways:
RDuring a conversation in hands-free mode, go off-hook.
RWhile you are talking in hands-free mode and a headset is attached to the unit, press /[HEADSET] to
continue the conversation using the headset.
Training Mode
In training mode, you can hear the other party in a conversation from both a headset and the handset.
This mode is useful for training an operator. While the operator talks to the other party on the headset, a
trainer also can listen to the other party on the handset and teach the operator how to respond to the
caller.
Starting training mode
[During a conversation using a headset]
1. Go off-hook by lifting the handset off its cradle.
2. Press /[HEADSET] to start training mode.
Ending training mode
1. Replace the handset on its cradle.
The conversation will continue using the headset.
34
Receiving Calls
During a Conversation
Transferring a Call (Call Transfer)
You can transfer a call to another destination (extension or outside party).
Note
ROperation for this feature may differ depending on the telephone’s configuration. If the following
procedure does not work, contact your administrator for further information.
To transfer
1. Press / /[TRANSFER] during a conversation.
2. Dial the party you want to transfer to. a Tap "Voice Call".
3. Wait until the other party answers to announce the transfer.
4. Go on-hook.
Note
RTo return to the call before the transfer destination answers, press /[CANCEL].
To do a blind transfer
1. Tap "Blind"*1 during a conversation.
2. Dial the party you want to transfer to. a Tap "Voice Call".
*1 If blind transfers are not permitted, this icon is not displayed. Contact your administrator for further
information.
Holding a Call
You can put a call on hold by holding the call at your extension.
Note
ROperation for this feature may differ depending on the telephone’s configuration. If the following
procedure does not work, contact your administrator for further information.
Holding
To hold the current call
1. Press / /[HOLD].
Note
RWhen a function key is assigned as a Line key, if you press a Line key other than the one for the
current call, the call is put on hold or is disconnected depending on the Automatic Call Hold settings.
For details, contact your phone system dealer/service provider.
To retrieve a call on hold at your line
[When one line is on hold]
1. Press / /[HOLD].
[When two or more lines are on hold]
1. Press / /[HOLD].
2. Tap / : Select a line on hold.
35
During a Conversation
Note
RWhen a call is received while another call is on hold, pressing and releasing the hook switch will
answer the call.
RIf a function key is assigned as a Line key, and a call is on hold on that line, you can retrieve the call on
hold by following the step below.
1. Press the corresponding function key.
Holding in a System Parking Zone (Call Park)
You can use this feature as a transferring feature.
When Call Park is permitted, the "Park" icon is displayed. However, the Call Park feature number must
be set beforehand. Also, depending on your phone system, you may need to enter a parking zone
number to retrieve a parked call. The feature depends on your phone system. Contact your administrator
for further information.
To set
1. Press /[MENU] during a conversation.
2. Tap "Park".
To retrieve (Call Park Retrieve)
[In standby mode]
1. Enter the Call Park Retrieve feature number.
2. Go off-hook.
Note
RDepending on the telephone system, may be displayed in the status bar. In this case, you can
retrieve the call by pressing /[MENU] and then tapping "Park". However, to retrieve a parked call
using the icon, the Call Park Retrieve feature number must be set beforehand. Contact your
administrator for further information.
Talking to Two Parties Alternately (Call Splitting)
When talking to one party while the other party is on hold, you can swap the calls back and forth
(alternately).
To alternate between the parties leaving one party on hold temporarily
1. Press / /[HOLD] during a conversation.
2. Dial the other party’s extension number.
3. After talking to the other party, tap "Line Status".
4. Tap / : Select the original party.
5. Talk to the party.
Three-party Conference
During a conversation, you can add an additional party to your call and establish a conference call.
Note
RYour phone system may support advanced conference features, such as conference calls with four or
more parties. In this case, the procedures for handling a conference call may be different from those
explained in this section. For details, contact your phone system dealer/service provider.
Making a Conference Call
1. Press /[CONF] during a conversation.
2. Dial the party you want to add to the conversation. a Tap "Voice Call".
3. Press /[CONF] after the other party has answered.
36
During a Conversation
Removing a Party from the Conference
During a conference, you can remove other parties from the conference. However, this operation is
available only during conference calls you initiate.
1. During a conference call, press / /[HOLD].
2. Press / /[HOLD] again to show the conference parties on hold.
3. Tap / : Select the party to remove.
4. Talk to the party and go on-hook to end the call.
5. Go off-hook and talk to the remaining party.
Ending a Conference Call
To end the conference call, go on-hook.
Mute
You can disable the microphone or the handset to consult privately with others in the room while listening
to the other party on the phone through the speaker or the handset.
To set/cancel
1. Press /[MUTE/AUTO ANS].
Note
RWhen the icon is displayed in the status bar, Mute is on.
RDuring Mute, even if you switch from/to speakerphone, Mute will continue.
RDuring Mute, even if you connect/disconnect a headset, Mute will continue.
Call Waiting
During a conversation, if a second call arrives, you will hear a call waiting tone. You can answer the
second call by disconnecting or holding the current call.
This is an optional telephone company service. You can receive a call waiting tone and the caller’s
information. For details, contact your phone system dealer/service provider.
To disconnect the current call and then talk to the new party
1. Go on-hook.
2. Go off-hook.
To hold the current call and then talk to the new party
1. Tap "Voice Call".
Off-hook Monitor
During a two-party conversation with the corded handset, you can allow other people to listen to the
conversation through the speaker while you continue the conversation using the corded handset.
To start/To cancel
1. Press /[SP-PHONE] during a conversation.
Note
RWhen off-hook monitor is active, replacing the corded handset to its cradle enables hands-free mode.
37
During a Conversation
Call Forwarding/Do Not Disturb
You can have incoming calls automatically forwarded to another destination. You can also have incoming
calls rejected (Do Not Disturb).
To access the FWD/DND settings
[In standby mode]
1. Tap / a "Fwd/DND"
2. If the unit has multiple lines, tap / to select the desired line.
3. Tap / : Select the type of FWD or DND setting to apply.
The settings are as follows:
RDND: Enable Do Not Disturb
(All incoming calls are automatically rejected.)
RFwd(All): Enable Forward All Calls
(All incoming calls are forwarded.)
RFwd(Busy): Enable Forward Busy
(Incoming calls are forwarded only when your extension is in use.)
RFwd(NA): Enable Forward No answer*1
(An incoming call is forwarded if you do not answer the call within a certain amount of time.)
4. (Fwd) Tap "On/Off": Select On or Off. a "Next" or "OK"
(DND) Tap "On/Off": Select On or Off. a "OK"
5. If a Forward setting is selected, enter a new forward phone number, or confirm and modify a
previously set forward phone number. a "OK"
*1 Tap "Ring Count" to specify the number of rings before the call is forwarded.
Note
RWhen Call Forwarding and/or Do Not Disturb is enabled, / and/or / appears in
the status bar in standby mode.
RThis feature is only available when enabled. Contact your administrator for further information.
Listening to Voice Mail Messages
When you receive a voice message, is displayed, or the Message Waiting indicator flashes slowly.
You can check your new messages by accessing your mailbox.
[In standby mode]
1. Press /[MESSAGE] or tap "Voice Message".
2. Tap / : Select the line on which is displayed.
Xsi Visual Voice Mail
With the Voice Messaging service of Broadsoft-Xsi, you can receive detailed information about
messages from the Xsi server. The following operations are available:
RDownload messages
RMark messages as read or unread
RDelete messages
For details, contact your phone system dealer/service provider.
38
Before Leaving Your Desk

The following limitations apply:
RVideo messages are not supported.
RVoice message format: WAV only (MP3 is unavailable)
RVoice message recording time: Maximum 5 minutes
39
Before Leaving Your Desk
Using the Phonebook
The KX-HDV330 has 2 types of phonebook.
1. Personal Phonebook
This phonebook is stored in the telephone.
2. Shared Phonebook
If your telephone company provides a shared phonebook service, you can use it. For details, contact
your phone system dealer/service provider.
Personal
Phonebook
Shared
Phonebook
Storing new items ü—
Editing stored items ü—
Deleting store items ü—
Searching the phonebook by name ü ü
Searching the phonebook by category ü—
Phone numbers for each item Up to 5 Up to 5*1
Private Ring ü—
Locking the phonebook ü—
*1 This number depends on the service being used.
40
Using the Phonebook
Using the Personal Phonebook
You can store up to 500 items (5 phone numbers per item, max. 2500 phone numbers) in the telephone
along with names for easy access. You can also set unique ringer patterns for different categories to
identify incoming calls. All phonebook items are stored in alphabetical order. For security purposes, you
can lock the phonebook.
RTo search for an item in the phonebook, see “Searching for an Item in the Personal Phonebook”,
Page 45.
RTo refer to another phonebook that can contain more than 500 items via the network, see “Using the
Shared Phonebook”, Page 47.
Note
RWe recommend that backups are made of the phonebook data, in case the data becomes
unrecoverable due to product malfunction.
RYou can store information for a maximum of 500 contacts.
RPhonebook data can be imported and exported. Contact your administrator for further information.
A name can have up to 24 characters. A telephone number can have up to 32 digits.
Private Ring
You can organize entries in the phonebook into one of 9 Private Ring Categories. It is possible to set a
different ringer pattern*1 for each category. When the displayed Caller ID*2 matches a phone number or
name stored in the phonebook, the telephone rings according to the Private Ring Category settings.
*1 For Ringer patterns, see “Incoming Option”, Page 67.
*2 For Caller ID information, see “Caller ID”, Page 33.
Storing an Item in the Personal Phonebook
Storing a New Item
[In standby mode]
1. Tap / a "Phonebook"
2. Tap . a The number of remaining entries is displayed. a "OK"
3. Tap "<Enter Name>".
4. Enter a name (max. 24 characters). a "OK"
5. Tap "<Enter Phone No>".
6. Enter the phone number (max. 32 digits). a "OK"
7. Repeat steps 5 and 6 to add additional phone number types.
8. Tap "Category Off".
9. Tap / : Select a category.
10.Tap of the phone number you want to use as the entry’s default number.
The color of the icon for the selected item changes to .
11.Tap .
Note
RSteps 8 and 9 can be omitted if you do not want to assign a category.
RStep 10 can be omitted if you do not want to assign a default number. (The first number entered for an
entry will automatically be assigned as the default number.)
RThe valid digits are "0" through "9", "G", "B", "J", "P".
RIf an item with the same name and number exists, the new information added will be merged with the
existing item.
41
Using the Phonebook
RTo enter characters, see “Entering Characters”, Page 27.
Storing an Item Using the Dialing
You can dial a number first and then add it as a phonebook entry.
To add a new entry:
[In standby mode]
1. Dial a number.
2. Tap "Phonebook".
3. Tap "Create New Item". a "OK"
4. The number of remaining entries is displayed. a "OK"
5. Tap "<Enter Name>".
6. Enter a name (max. 24 characters). a "OK"
7. Tap "Category Off".
8. Tap / : Select a category.
9. Tap of the phone number you want to use as the entry’s default number.
The color of the icon for the selected item changes to .
10.Tap .
Note
RSteps 7 and 8 can be omitted if you do not want to assign a category.
RStep 9 can be omitted if you do not want to assign a default number. (The first number entered for an
entry will automatically be assigned as the default number.)
RThe valid digits are "0" through "9", "G", "B", "J", "P".
RIf an item with the same name and number exists, the new information added will be merged with the
existing item.
RTo enter characters, see “Entering Characters”, Page 27.
To add the phone number to an existing entry:
[In standby mode]
1. Dial a number.
2. Tap "Phonebook".
3. Tap "Add Number". a "OK"
4. Tap .
5. Enter the name or the first character(s) of the desired name. a "OK"
6. Tap / : Select the desired name.
7. Tap of the phone number you want to use as the entry’s default number.
The color of the icon for the selected item changes to .
8. Tap .
Note
RStep 7 can be omitted if you do not want to assign a default number. (The first number entered for an
entry will automatically be assigned as the default number.)
RThe valid digits are "0" through "9", "G", "B", "J", "P".
RIf an item with the same name and number exists, the new information added will be merged with the
existing item.
RTo enter characters, see “Entering Characters”, Page 27.
Storing an Item Using the Incoming or Outgoing Call Log
You can add a number listed in the Incoming or Outgoing Call Log to the Personal Phonebook.
42
Using the Phonebook

To add a new entry:
[In standby mode]
1. Display the Incoming or Outgoing Call Log. For details, see “Incoming/Outgoing Call Log”, Page 26.
2. Tap / : Select the desired item.
3. Tap "Save Phonebook".
4. Tap "Create New Item". a "OK"
5. The number of remaining entries is displayed. a "OK"
6. Tap "<Enter Name>".
7. Enter a name (max. 24 characters). a "OK"
8. Tap "Category Off".
9. Tap / : Select a category.
10.Tap of the phone number you want to use as the entry’s default number.
The color of the icon for the selected item changes to .
11.Tap .
Note
RSteps 8 and 9 can be omitted if you do not want to assign a category.
RStep 10 can be omitted if you do not want to assign a default number. (The first number entered for an
entry will automatically be assigned as the default number.)
RThe valid digits are "0" through "9", "G", "B", "J", "P".
RIf an item with the same name and number exists, the new information added will be merged with the
existing item.
RTo enter characters, see “Entering Characters”, Page 27.
To add the phone number to an existing entry:
[In standby mode]
1. Display the Incoming or Outgoing Call Log. For details, see “Incoming/Outgoing Call Log”, Page 26.
2. Tap / : Select the desired item.
3. Tap "Save Phonebook".
4. Tap "Add Number". a "OK"
5. Tap .
6. Enter the name or the first character(s) of the desired name. a "OK"
7. Tap / : Select the desired name.
8. Tap of the phone number you want to use as the entry’s default number.
The color of the icon for the selected item changes to .
9. Tap .
Note
RStep 8 can be omitted if you do not want to assign a default number. (The first number entered for an
entry will automatically be assigned as the default number.)
RThe valid digits are "0" through "9", "G", "B", "J", "P".
RIf an item with the same name and number exists, the new information added will be merged with the
existing item.
RTo enter characters, see “Entering Characters”, Page 27.
43
Using the Phonebook
Editing a stored item in the Personal Phonebook
Editing a Stored Item
[In standby mode]
1. Tap / a "Phonebook"
2. Tap .
3. Enter the name or the first character(s) of the desired name. a "OK"
4. Tap / : Select the desired name.
5. Tap .*1
6. Tap the desired name, phone number, category or default telephone number.
7. Edit the data as necessary.
8. Repeat steps 5 to 7 and edit the items you want to change.
9. Tap .
*1 If this icon is not displayed, you are currently viewing the Shared Phonebook. You must be viewing
the Personal Phonebook to edit items. Contact your administrator for further information.
Note
RTo change a character or digit, tap or to highlight it, tap to delete it, and then enter the new
character or digit.
RTo clear an entire line, tap "Delete".
RTo move the cursor to the left or right, tap or respectively.
RFor details about entering characters, see “Entering Characters”, Page 27.
Editing Category Names
You can edit the names of the categories in the phonebook.
[In standby mode]
1. Tap / a "Basic Settings"
2. Tap / a "Display Option"
3. Tap / a "Category Name"
4. Tap / : Select the desired category number (1–9).
5. Enter a name for the category (max. 13 characters). a "OK"
6. Repeat steps 4 and 5 for each category name to edit.
Note
For details about entering characters, see “Entering Characters”, Page 27.
Deleting a Stored Item in the Personal Phonebook
Deleting a Stored Item
[In standby mode]
1. Tap / a "Phonebook"
2. Tap .
3. Enter the name or the first character(s) of the desired name. a "OK"
4. Tap / : Select the desired name.
5. Tap .*1
44
Using the Phonebook
6. Tap / : Tap the check boxes of the items you want to delete.*2
7. Tap a "OK"
*1 If this icon is not displayed, you are currently viewing the Shared Phonebook. You must be viewing
the Personal Phonebook to edit items. Contact your administrator for further information.
*2 You can select all items in the list by tapping .
Searching for an Item in the Personal Phonebook
You can search for an item in the phonebook by following the steps below.
Searching by Name
You can also search for an item in the phonebook by entering a name:
[In standby mode]
1. Tap / a "Phonebook"
2. If "Shared Phonebook" is displayed as the title, tap .*1
3. Tap .
4. Enter the name or the first character(s) of the desired name. a "OK"
5. Tap / : Select the desired name.
6. Select the desired phone number.
7. To make a call, go off-hook.
*1 If only Personal Phonebook is permitted, this step is skipped.
Searching by Category
If items in the phonebook have been assigned categories, you can search by category.
[In standby mode]
1. Tap / a "Phonebook"
2. If "Shared Phonebook" is displayed as the title, tap .*1
3. Tap .
4. Tap / : Select a category.
5. Tap .
6. Enter the name or the first character(s) of the desired name. a "OK"
7. Tap / : Select the desired name.
8. Select the desired phone number.
9. To make a call, go off-hook.
*1 If only Personal Phonebook is permitted, this step is skipped.
Searching by pressing Dial Keys
You can also search for an item in the phonebook by pressing multiple dial keys when the phonebook list
is displayed:
[When the phonebook is displayed]
1. Press the dial keys to enter the first character(s) of the desired name in accordance with the character
tables.*1
*1 For details about the characters assigned to the dial keys, see the following table.
45
Using the Phonebook
Suffix NE/X/SX/C/(none) NE/X/SX RU
Keys ABC (Latin) ΑΒΓ (Greek) АБВ (Cyrillic)
1B®G®1B®G®1 А®Б®В®B®G®1
2A®B®C®2 Α®Β®Γ®2 Г®Д®Е®Ё®2®A®B®C®2
3D®E®F®3 Δ®Ε®Ζ®3 Ж®З®И®Й®3®D®E®F®3
4G®H®I®4 Η®Θ®Ι®4 К®Л®М®4®G®H®I®4
5J®K®L®5 Κ®Λ®Μ®5 Н®О®П®5®J®K®L®5
6M®N®O®6Ν® ®Ο®6ЮѮҮ6®M®N®O®6
7P®Q®R®S®7 Π®Ρ®Σ®7 У®Ф®Х®7®P®Q®R®S®7
8T®U®V®8 Τ®Υ®Φ®8 Ц®Ч®Ш®8®T®U®V®8
9W®X®Y®Z®9 Χ®Ψ®Ω®9 Щ®Ъ®Ы®Ь®9®W®X®Y®Z®9
00®Space 0®Space Э®Ю®Я®0®Space
RPressing a key repeatedly will cycle through the characters associated with that key. For example, to
enter the letter "C" in Latin Mode, press 2 3 times.
RThe illustrations of the keys in the table may differ in appearance from the actual keys on the
telephone.
Example: To enter "ANNE" in Latin Mode.
2 a 6 a 6 a a 6 a 6 a 3 a 3
Note
RAvailability depends on your phone system. Contact your administrator for further information.
Locking the Phonebook
You can lock/unlock the phonebook while in standby mode. If no password has been set, you cannot lock
the phonebook. For details about setting the password, see “Setting the Password”, Page 27.
Note
RIf you lock either the Personal Phonebook or the Shared Phonebook, the other one is also locked. If
you unlock the phonebook, both phonebooks are unlocked.
Locking/Unlocking the Phonebook
[In standby mode]
To lock
1. Tap / a "Phonebook"
2. Press /[MENU].
3. Tap "Lock Phonebook". a "OK"*1
To unlock
1. Tap / a "Phonebook"
2. Enter your password.*2 a "OK"
3. Press /[MENU].
4. Tap "Unlock Phonebook". a "OK"
5. Enter your password.*2 a "OK"
Unlocking the Phonebook Temporarily
1. Tap / a "Phonebook"
46
Using the Phonebook
2. Enter your password.*2 a "OK"
*1 The call log is also locked.
*2 If you enter an incorrect password 3 times, you cannot enter another password for approximately 30
seconds.
Using the Shared Phonebook
You can refer to the Shared Phonebook in addition to the Personal Phonebook, if the Shared Phonebook
is available.
Note
We recommend setting this feature with your administrator. Contact your administrator for further
information.
Searching for an Item in the Shared Phonebook
Searching by Name
[In standby mode]
1. Tap / a "Phonebook"
2. If "Phonebook" is displayed as the title, tap .*1
3. Tap .
4. Enter the name or the first character(s) of the desired name. a "OK"
5. Tap / : Select the desired name.
6. Select the desired phone number.
7. To make a call, go off-hook.
*1 If only Personal Phonebook is permitted, this step is skipped.
ECO Mode
Enabling this mode reduces the amount of electricity consumed by the unit.
Note
RWhen ECO mode is enabled, the "Link Speed" setting (Page 73) changes as follows:
– Link Speed: "10M/Full"
– PC port cannot be used
RWhen the ECO mode setting is changed, the unit will restart.
RWhen ECO mode is enabled, is displayed in the status bar.
Setting ECO Mode
[In standby mode]
1. Tap / a "System Settings"
2. Tap "System Settings".
3. Tap / a "ECO Mode"
4. Tap "On".*1 a "OK"
*1 To disable ECO mode, select "Off" (default).
47
Using the Phonebook
Checking the Line Status
You can check the status of each line (up to 12 lines) on the display.
Checking the Line Status
[In standby mode]
1. Tap / a "Line Status"
2. Tap / : Select the line whose status you want to check.
3. Press /[CANCEL] to end checking the line status or tap the line to perform an action. See "Line
status indication" below for details.
[During a conversation]
1. Tap / a "Line Status"
2. Tap / : Select the line whose status you want to check.
3. Press /[CANCEL] to end checking the line status or tap the line to perform an action. See "Line
status indication" below for details.
Note
RWhen a function key is assigned as a Line Status key, you can press that function key to display the
line status screen. See "Line status indication" below for details.
Line status indication
Status Display Meaning
Free*1 The line is idle.
Action: seize the line for dialing.
In Use The line is on a call.
Action: none.
Line On Hold*2 The line is on hold.
Action: retrieve the call on hold.
Incoming Call*2 The line is receiving a call.
Action: answer the call.
Recall*2 The line is receiving a Hold Recall signal.
Action: answer the call.
<x> In Use*3 A shared line is in use at another unit.
Action: join the call.
<x> Line On Hold*3 A shared line is on hold at another unit.
Action: retrieve the call on hold.
*1 The following icons are also displayed if the corresponding feature is enabled.
Icon Meaning
Call Forwarding
Do Not Disturb
Making an anonymous call
Block anonymous calls
48
Using the Phonebook

*2 When the line is in this state, call information is also displayed.
*3 If the shared line is set, <x> (index number) is also displayed. We recommend setting this with your
administrator. Contact your administrator for further information.
49
Using the Phonebook
Customizing the Telephone
Changing the Telephone’s LCD Display
You can change what is displayed on the telephone’s LCD while the telephone is in standby mode.
1. Tap / a "Basic Settings"
2. Tap / a "Display Option"
3. Tap / a "Standby Display"
4. Select the desired item. a "OK"
Hot Keys
By assigning phone numbers to dial keys, you can make a call by pressing and holding a dial key.
R“Hot Key Dialing”, Page 31
Assigning Hot Keys From Phonebook
You can assign a phone number stored in the Personal Phonebook to a key to be used as a Hot Key.
1. In standby mode, press and hold a dial key (0–9) for more than 1 second.
2. Tap .
3. Tap .
4. Enter the desired name.
5. Tap / : Select the desired name.
6. Select a desired phone number.
7. Tap .
Note
RFor details about searching for an item in the phonebook, see “Searching for an Item in the Personal
Phonebook”, Page 45.
Editing Hot Keys
1. In standby mode, press and hold a dial key (0–9) for more than 1 second.
2. Tap .
3. Tap "Name", if necessary.
4. Edit the name. a "OK"
5. Tap "Phone Number", if necessary.
6. Edit the phone number. a "OK"
7. Tap .
Deleting a Hot Key
1. In standby mode, press and hold the dialing key assigned as a Hot Key for more than 1 second.*1
2. Tap .
3. Tap the check boxes of the items you want to delete.*2
4. Tap . a "OK"
*1 While the Hot Key’s information is displayed, you can tap or to select another Hot Key
number.
*2 You can select all items in the list by tapping .
50
Customizing the Telephone
Selecting the Type of Hot Key Dialing
You can select one of 2 types of Hot Key Dialing for each assigned Hot Key.
1. In standby mode, press and hold a dial key (0–9) for more than 1 second.
2. Tap .
3. Tap "Automatic Call".
4. Select "Manual" or "Auto". a "OK"
RManual:
Press and hold the dialing key (0–9) assigned as a Hot Key for more than 1 second, and then go
off-hook. For details, see “Hot Key Dialing”, Page 31.
RAuto:
Pressing and holding an assigned Hot Key for the set number of seconds will dial that Hot Key’s
assigned number immediately.
Note
RTo select the number of seconds before the call is automatically made, see "Hot Key Time" in “Key
Option”, Page 68.
Changing the Function Keys (Program Keys and DSS Keys)
[In standby mode]
1. Tap / a "Basic Settings"
2. Tap / a "Key Option"
3. Tap "Program Key".*1
4. Tap / : Select the key to change.
5. Tap "Function".
6. Tap / : Select the new item to assign. a "OK"
7. Specify additional settings, such as "Line", "Label" and "Phone Number" as necessary.
8. Tap .
*1 To assign functions to the DSS keys on a KX-HDV20, tap "DSS Key". You can also assign a function
by pressing the desired DSS key for 3 or more seconds.
Note
RIn addition to the Line function, other functions can be assigned to individual lines. However, only lines
that have been set up in advance can be selected.
Each of the function keys can be assigned one of the following functions.
ROne Touch Dial
Used to dial a previously set phone number with one touch.
RBLF (Busy Lamp Field)
Used to transfer calls to the extension assigned to the key while receiving an incoming call or during a
conversation. The indicator of a BLF key also shows the current status of the extension assigned to
the key.
Status Meaning
Color Light pattern
Red Off Available
On Unavailable
Quick Flashing Ringing
51
Customizing the Telephone
Status Meaning
Color Light pattern
Blue On Call Park
Note
RMore than 48 BLF keys can be programmed, but status indication is available only up to 48 keys.
RLine
Used to seize a line in order to make or receive a call. The color of each key’s indicator shows the
status of the line.
Status Meaning
Color Light pattern
Blue On In Use
RYou are on a call.
Slow Flashing "Line On Hold"
RA call is on hold.
Quick Flashing "Incoming Call" or "Recall"
RA call (including Hold Recall) is being received.
Name or number of caller
RA call to a shared line is being received.
Red On In Use
RA shared line is in use or a call is on private hold at
another unit.
Slow Flashing "Line On Hold"
RA shared line is on hold at another unit.
Off — Free
RThe line is idle.
RACD[Login]/ACD[Wrap Up]*1
ACD[Login]: Used to log in/log out of an Automatic Call Distribution Group.
ACD[Wrap Up]: Used to change the phone’s status from unavailable a wrap up a available.
The color of each key’s indicator shows the status of the key.
Status Meaning
Color Light pattern ACD[Login] ACD[Wrap Up]
Red Off Logged In Available
On Logged Out Unavailable
Slow Flashing — Wrap Up
RLine Status
Used to confirm the status of each line. This allows the function key to work as a Line key such as
seizing a line in order to make or receive a call.
RCall Forward
Used to forward incoming calls to the extension assigned to the key.
RPhonebook*2
Used to open the phonebook.
RCall History*2
Used to open the Incoming/Outgoing Call Log.
52
Customizing the Telephone
RSimultaneous Ring*1
Enables parallel ringing. Up to 10 locations can be specified to ring simultaneously when you receive a
call.
Status Meaning
Color Light pattern
Blue On Simultaneous Ring feature: On
Off Simultaneous Ring feature: Off
RHoteling/Hospitality*1
Used to log in/log out of the Call Center Hoteling Event.
RTransfer*1
Used to transfer a call to the extension assigned to the key with confirmation during a conversation.
RBlind Transfer*1
Used to transfer a call to the extension assigned to the key without confirmation during a conversation.
RConference
Used to establish a multiple-party conversation (conference).
RDirected Call Pickup*1
Used to answer an incoming call arriving at the specified telephone number.
RCall Park/Park Retrieve*1
Used to park a call or to retrieve a parked call (Call Parking).
*1 This item can be used only when the feature is enabled. Contact your administrator for further
information.
*2 This item can be selected when the list is registered on the telephone. Contact your administrator for
further information.
Block anonymous calls
This feature allows the unit to reject calls when the unit receives a call without phone number. The default
setting is "Off".
IMPORTANT
RA password may be required for these settings. We recommend setting with your administrator.
Contact your administrator for further information.
RThis feature is not available on shared lines.
[In standby mode]
1. Tap / a "Advanced Settings"
2. Tap / a "Call Settings"
3. Tap / a "Block Anonymous"
4. Tap / : Select a desired line.
5. Select "On" or "Off". a "OK"
Incoming call barring (Caller ID service users only)
This feature allows the unit to reject calls from specified phone numbers that you do not want to answer
such as junk calls.
When a call is received, the unit does not ring while the caller is being identified. If the phone number
matches an entry in the call barred list, the unit rejects the call.
53
Customizing the Telephone
IMPORTANT
RA password may be required for these settings. We recommend setting with your administrator.
Contact your administrator for further information.
Storing unwanted callers
You can store up to 30 phone numbers in the call barred list by using the caller list or by entering the
numbers directly.
[In standby mode]
1. Tap / a "Advanced Settings"
2. Tap / a "Call Settings"
3. Tap / a "Block Caller ID"
4. Tap / : Select a blank line.
5. Enter the phone number (32 digits max.). a "OK"
Editing the phone numbers to reject
[In standby mode]
1. Tap / a "Advanced Settings"
2. Tap / a "Call Settings"
3. Tap / a "Block Caller ID"
4. Tap / : Select a desired phone number.
5. Edit the phone number. a "OK"
Deleting the phone numbers to reject
[In standby mode]
1. Tap / a "Advanced Settings"
2. Tap / a "Call Settings"
3. Tap / a "Block Caller ID"
4. Tap .
5. Tap / : Tap the check boxes of the items you want to delete.*1
6. Tap . a "OK"
*1 You can select all items in the list by tapping .
Making an anonymous call
Before making a call, specify the following:
IMPORTANT
RA password may be required for these settings. We recommend setting with your administrator.
Contact your administrator for further information.
[In standby mode]
1. Tap / a "Advanced Settings"
2. Tap / a "Call Settings"
3. Tap / a "Anonymous Call"
54
Customizing the Telephone
4. Tap / : Select a line.
5. Select "On" or "Off". a "OK"
Changing the Basic Settings
To select the main item in standby mode
1. Tap / a "Basic Settings"
2. Tap / : Select the main item.
Main Item Sub Item Page
Incoming Option Ringer Volume Ringer Type Page 67
Talk Option Speaker Volume Handset Volume Headset Volume Page 68
Answer Option Auto Ans Device Auto Ans Delay Page 68
Key Option Program Key DSS Key Hot Key Time Page 68
Display Option Language Backlight Standby Display Page 69
Category Name Date Format Time Format
Screen Saver DSS Control
Key Tone — Page 70
Bluetooth
Headset
Connection Registration Page 70
Other Option Change Password Embedded Web Page 70
Changing the System Settings
IMPORTANT
RThe feature depends on your phone system. Contact your administrator for further information.
To select the main item in standby mode
1. Tap / a "System Settings"
2. Tap / : Select the main item.
Main Item Sub Item Page
Status Line Status Firmware Version IP Mode Page 71
IPv4 Settings IPv6 Settings MAC Address
LLDP VLAN
Network Settings IP Mode Select IPv4 Settings IPv6 Settings Page 71
LLDP VLAN Link Speed
System Settings Set Time & Date*1 Authentication Access Code Page 73
ECO Mode Restart DSS Restart
*1 Availability depends on your phone system. Contact your administrator for further information.
Changing the Advanced Settings
To select the main item in standby mode
1. Tap / a "Advanced Settings"
55
Customizing the Telephone

2. Select the main item.
Main Item Sub Item Page
Xsi Setting*1 — Page 73
UC Setting*1 — Page 74
Call Settings*2 Block Anonymous Anonymous Call Block Caller ID Page 74
Anywhere*1 Remote Office*1 SimultaneousRing*1
System Lock
Executive
Filtering*1
— Page 75
Assistant
Settings*1
Assistant Filtering Divert Setting Page 75
*1 This item is displayed only when the feature is enabled. Contact your administrator for further
information.
*2 A password may be required for these settings.
Web User Interface Programming
The product provides a Web-based interface for configuring various settings and features, including
some that are not programmable directly. The following list contains some useful features that are
programmable through the Web user interface.
Contact your administrator for further information.
RLanguage Settings (IP Phone/Web)
RUser Password (for access to Web user interface)
RDefault Line for Outgoing
RCall Rejection Phone Numbers
RCall Features
– Enable Anonymous Call
– Enable Block Anonymous Call
– Enable Do Not Disturb
– Enable Call Forwarding Always
– Forwarding Number (Always)
– Enable Call Forwarding Busy
– Forwarding Number (Busy)
– Enable Call Forwarding No Answer
– Forwarding Number (No Answer)
– Ring Counts (No Answer)
RHotline Number
RFlexible Key Setting
RPhonebook Import and Export
RDSS Console
Note
REach time you want to access the Web user interface, you must enable Web programming
(Embedded Web). See “Other Option”, Page 70.
56
Customizing the Telephone
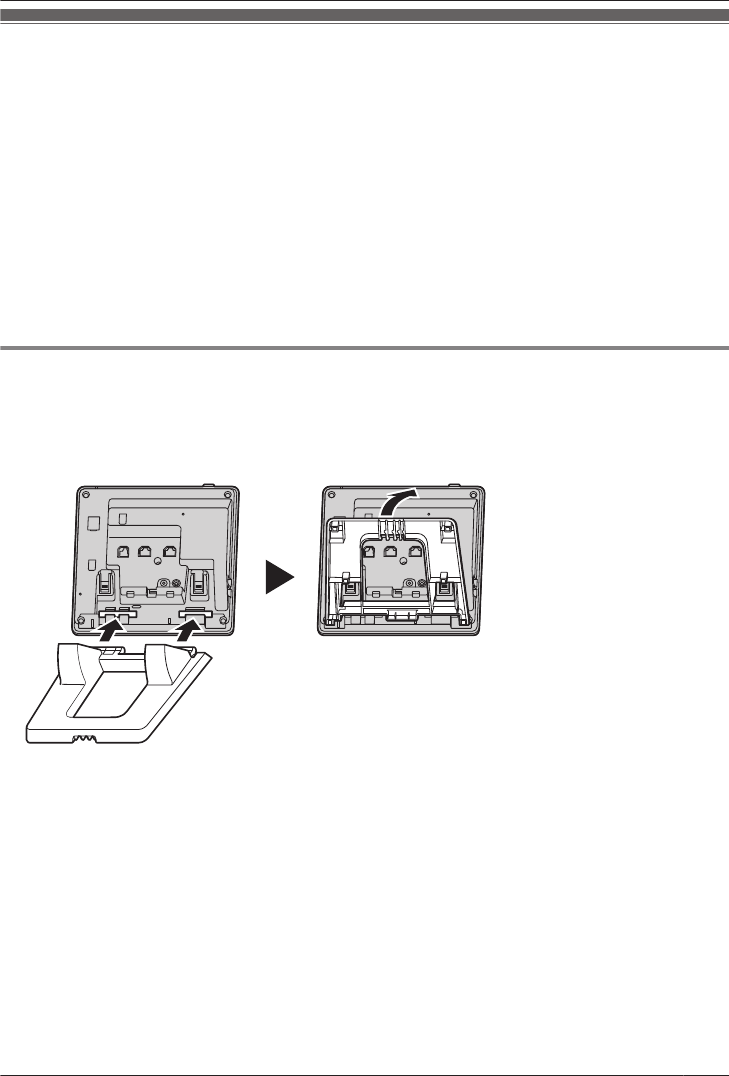
Installation and Setup
Note
RPanasonic assumes no responsibility for injuries or property damage resulting from failures arising out
of improper installation or operation inconsistent with this documentation.
WARNING
RTo reduce the risk of fire or electric shock, do not overload AC outlets and extension cords.
RCompletely insert the AC adaptor/power plug into the AC outlet. Failure to do so may cause electric
shock and/or excessive heat resulting in a fire.
RRegularly remove any dust, etc. from the AC adaptor/power plug by pulling it from the power outlet,
then wiping with a dry cloth. Accumulated dust may cause an insulation defect from moisture, etc.
resulting in a fire.
Attaching the Stand
Attach the stand to the desk phone.
1. Insert the stand into the slots located in the unit.
2. Gently rotate the stand in the direction indicated until it is fixed.
KX-HDV330 stand
57
Installation and Setup
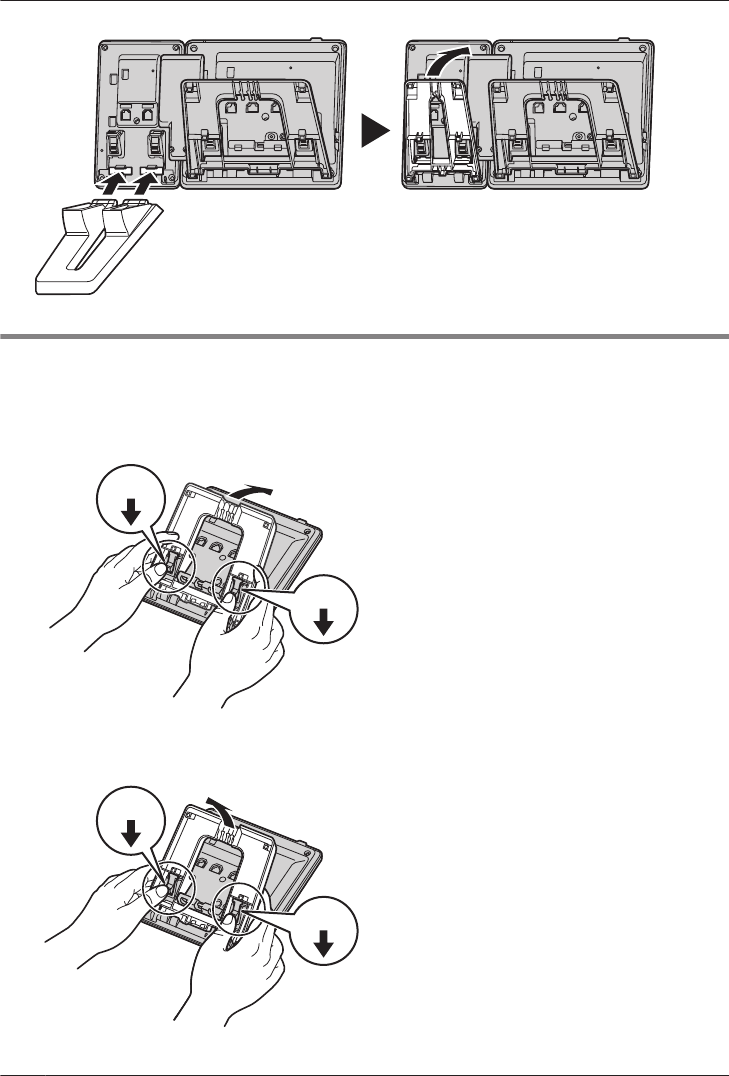
KX-HDV20 (option) stand
Adjusting the Stand Position
Push the PUSH marks in the direction indicated, with both hands, and tilt and slide the stand until it
becomes fixed in the desired position.
RLowering the stand
PUSH
PUSH
RRaising the stand
PUSH
PUSH
58
Installation and Setup
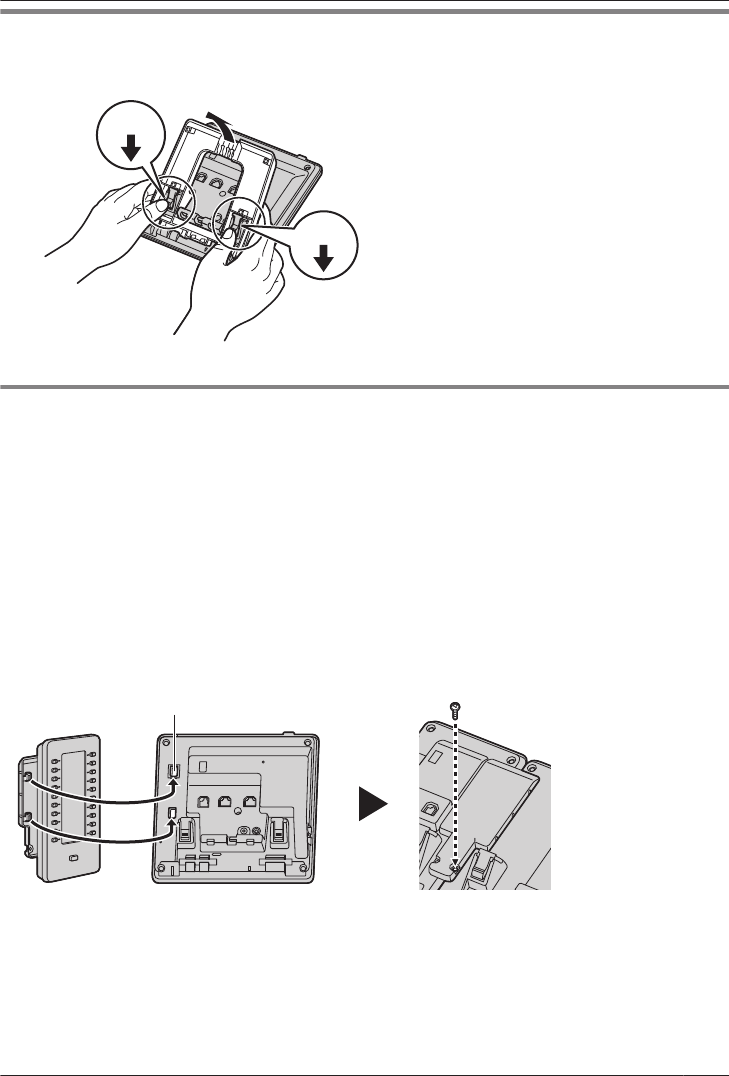
Removing the Stand
Tilt the stand in the direction indicated while pushing the PUSH marks with both hands.
PUSH
PUSH
Attaching the Optional KX-HDV20 to the Unit
The optional KX-HDV20 has 20 DSS keys, and it adds 40 function keys (20 keys ´ 2 pages) to the unit.
These keys can be used to seize a line to make or receive a call or to perform a feature that has been
assigned to the key.
1. Remove the stand from both the KX-HDV330 and KX-HDV20. See “Removing the Stand”, Page 59.
2. Insert the tabs of the KX-HDV20 into the designated openings in the base, and then slide the
KX-HDV20 in the direction of the arrow.
3. Fasten the KX-HDV20 to the unit with the included screw.
4. Attach the stand to both the KX-HDV330 and the KX-HDV20. See “Attaching the Stand”, Page 57.
Or, if the unit will be mounted on a wall, perform wall mounting. See “Wall Mounting”, Page 62.
5. Connect the KX-HDV20 to the unit with the included cable. See “Connections (including optional
KX-HDV20)”, Page 60.
6. Turn on the KX-HDV330.
23
*1
*1 Remove the hole cover.
59
Installation and Setup
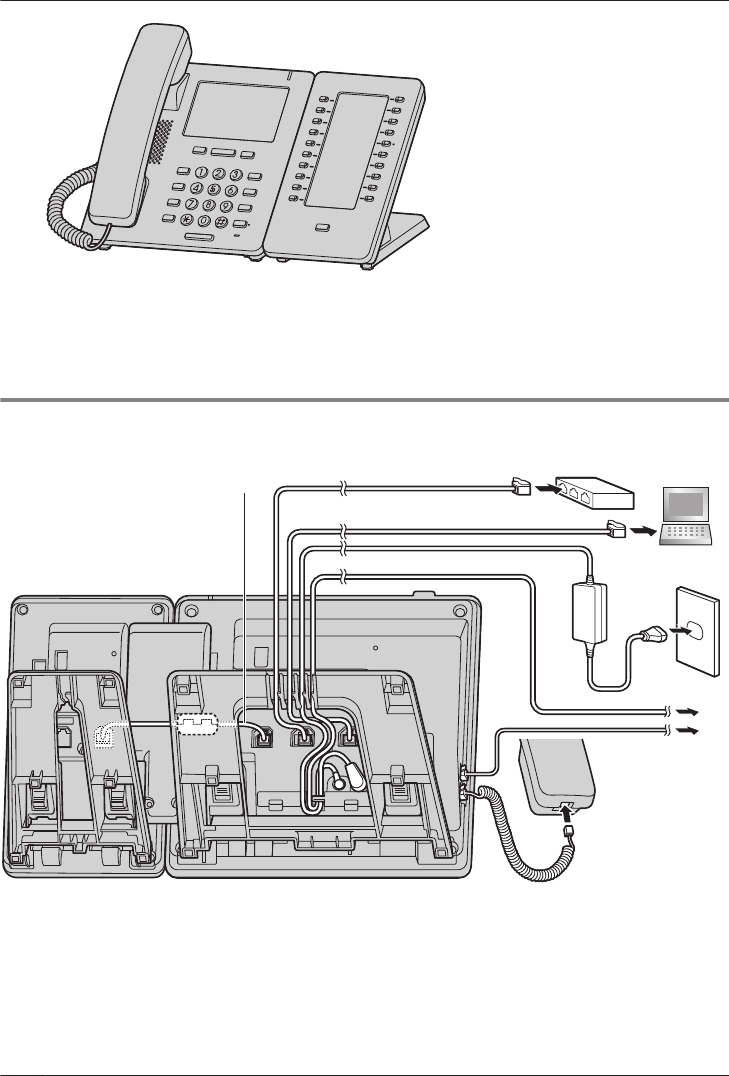
Note
RUp to 5 KX-HDV20 units can be connected to the product. However, if you mount the product on a
wall, only one KX-HDV20 unit can be used.
Connections (including optional KX-HDV20)
Connect the Ethernet cable, the Handset Cord and the AC adaptor (Option) to the unit.
*2
*5
*4
*1
*3
*3
*1 Connection cable
Connect the connection cable as shown in the illustration.
*2 PoE HUB
*3 Optional AC adaptor
*4 Optional EHS headset
For up-to-date information about EHS headsets that have been tested with this unit, refer to the
following web site:
http://www.panasonic.net/pcc/support/sipphone/
60
Installation and Setup
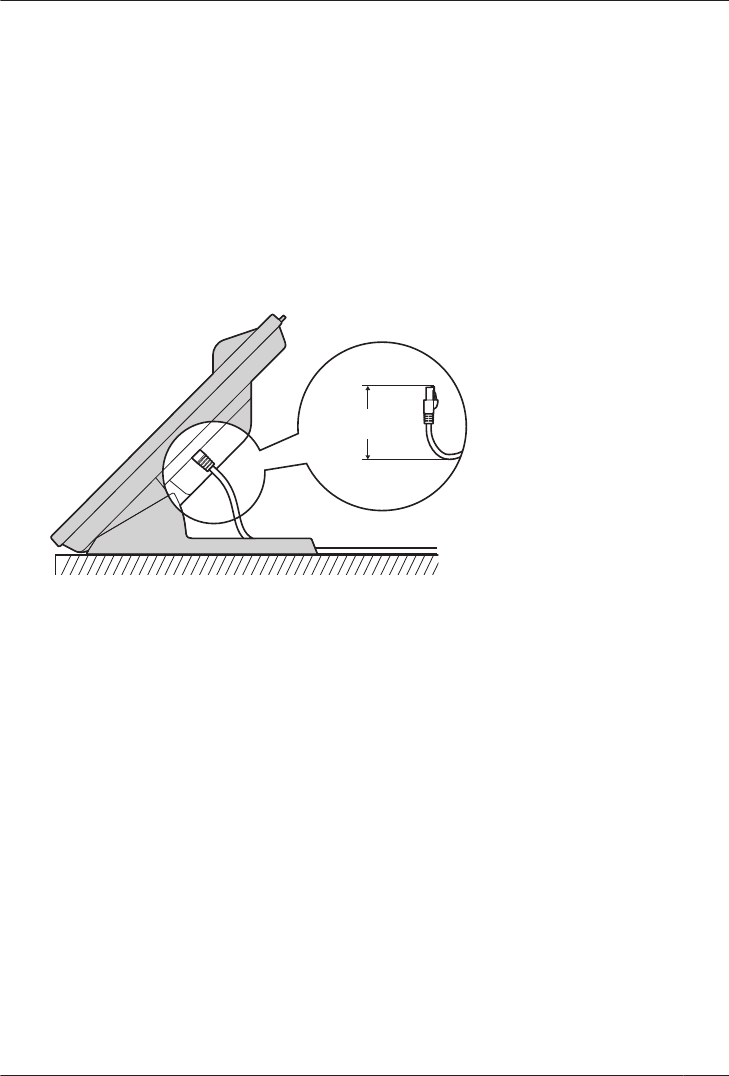
*5 Optional headset
For up-to-date information about headsets that have been tested with this unit, refer to the following
web site:
http://www.panasonic.net/pcc/support/sipphone/
RThe initial setting for the IP address is "DHCP—Auto". For information about your network
environment, contact your administrator. For details, see “Network Settings”, Page 71.
When selecting Ethernet cables (not included)
RUse flexible cables without jack covers. Do not use cables with a hard coating that may tear or crack
when bent.
To prevent damage to the cables, use cables that do not protrude from the bottom of the base.
Connect the cables as shown in the following illustration.
*1
*1 60 mm (2 3/8 in) or less
RUse a straight CAT 5e (or higher) Ethernet cable (not included) that is 6.5 mm (1/4 in) in diameter or
less.
When connecting to a switching hub
RIf PoE is available, an AC adaptor is not needed.
RThis unit complies with the PoE Class 2 standard.
When connecting a PC
RThe PC port does not support PoE for connected devices.
When connecting cables and the AC adaptor
RPass the Ethernet cable and the AC adaptor cord under the stand.
61
Installation and Setup
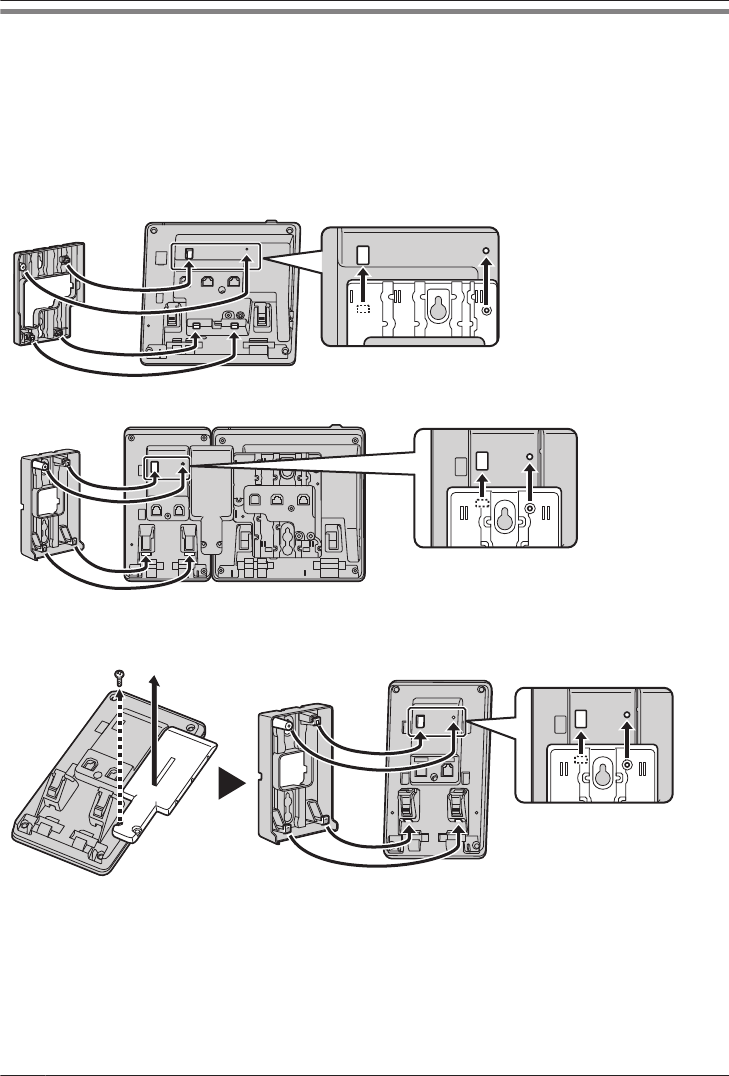
Wall Mounting
The KX-HDV330 and up to 5 optional KX-HDV20 units can be mounted on a wall.
IMPORTANT
RMake sure that the wall and the fixing method are strong enough to support the weight of the unit. (See
“Specifications”, Page 76.)
1. Insert the tabs of the wall mounting adaptor into the designated openings in the base, and then slide
the wall mounting adaptor in the direction of the arrow until it clicks.
KX-HDV330
With optional KX-HDV20
For 2nd to 5th KX-HDV20
Remove the screw from the DSS cover of the KX-HDV20, and then slide the cover up to remove it.
2. Fasten the wall mounting adaptor to the base with the included small screw.
(Recommended torque: 0.4 N·m [4.08 kgf·cm/3.54 lbf·in] to 0.6 N·m [6.12 kgf·cm/5.31 lbf·in])
3. Connect the AC adaptor, handset cord, Ethernet cables, and connection cable as necessary.
4. Drive the large screws into the wall either 83 mm (3 1/4 in) or 100 mm (3 15/16 in) apart, and mount
the unit on the wall.
62
Installation and Setup
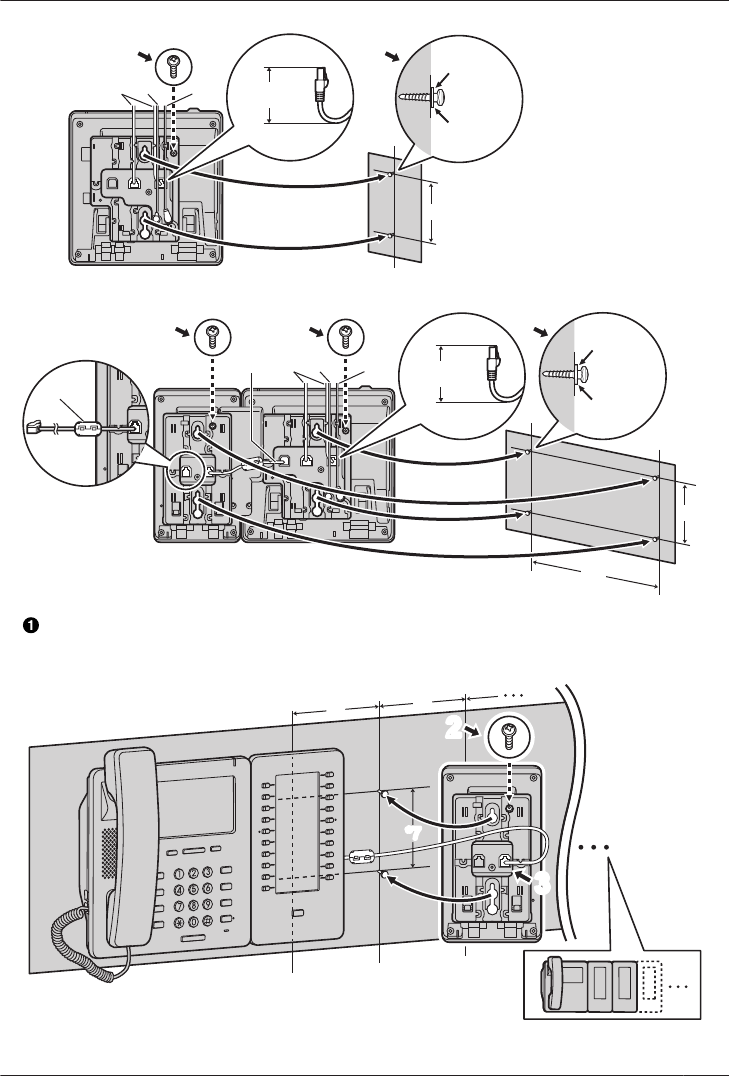
KX-HDV330
*4
*5
*6
*1
*7
*2 *3
2 4
With optional KX-HDV20
*5
*6
*8
*4
*7
242
*8
*9
A*1 *2 *3
If you will mount additional KX-HDV20 units, connect the connection cable for the next unit to the
unit you are attaching.
For 2nd to 5th KX-HDV20
*7*7
33
*10 *10
22
*1 Ethernet cables
63
Installation and Setup
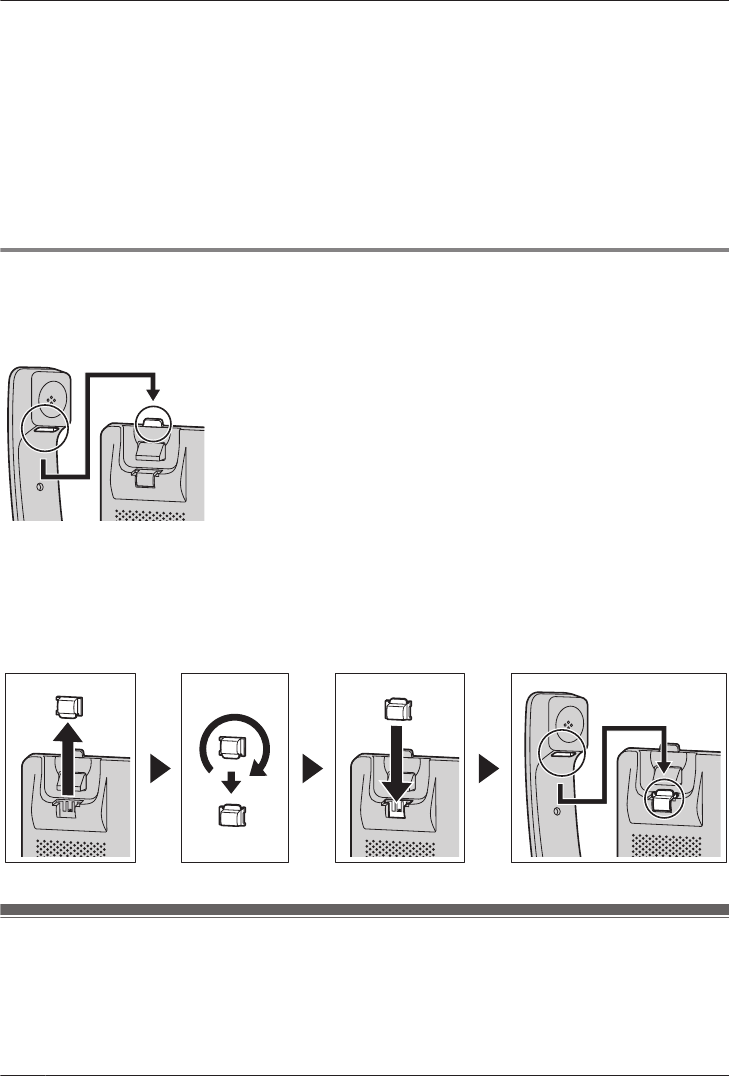
*2 EHS headset cable
*3 AC adaptor
*4 40 mm (1 37/64 in) or less
*5 Washer
*6 Drive the screw to this point
*7 83 mm (3 1/4 in) or 100 mm (3 15/16 in)
*8 Connection cable
Connect the connection cable as shown in the illustration.
*9 152 mm (6 in)
*10 111 mm (4 3/8 in)
RYou can find a wall mounting template at the end of this manual.
Hooking the Handset
To Hook the Handset During a Conversation
1. Hook the handset over the top edge of the unit.
To Lock the Handset Hook when the Unit is Wall Mounted
1. Remove the handset hook from the slot.
2. Turn it up-side-down.
3. Slide the handset hook back into the slot until it locks.
4. Handset is safely hooked when it is in the cradle.
Updating the software
Your phone system dealer may offer new features and improve its software version from time to time.
Contact your administrator for further information.
64
Installation and Setup
Appendix
Character Mode Table
KX-HDV330 (Suffix: NE/X/SX)
Keys ABC
(Latin)
0–9
(Numeric)
ΑΒΓ
(Greek) (Extended 1)
SŚŠ
(Extended 2)
1Space B & ’
( ) G , – . / 1 1Space B & ’ ( ) G , – . / 1
2
A B C 2
2
Α Β Γ 2
a b c 2 α β γ 2
3D E F 3 3Δ Ε Ζ 3
d e f 3 δ ε ζ 3
4G H I 4 4Η Θ Ι 4
g h i 4 η θ ι 4
5J K L 5 5Κ Λ Μ 5 J K L 5
j k l 5 κ λ μ 5 j k l 5
6
M N O 6
6
m n o 6 ν ξ ο 6
7P Q R S 7 7Π Ρ Σ 7
p q r s 7 π ρ σ 7
8T U V 8 8Τ Υ Φ 8
t u v 8 τ υ φ 8
9W X Y Z 9 9
w x y z 9
0Space ! ? " : ;
+ = < > 0 0Space ! ? " : ; + = < > 0
##
RPress * before or after entering a character to change between uppercase and lowercase.
RPressing a key repeatedly will cycle through the characters associated with that key. For example, to
enter the letter "C" in Latin Mode, press 2 3 times.
RCharacters that are entered using the # key (for example, "$") cannot be entered when searching the
phonebook. See “Searching for an Item in the Personal Phonebook”, Page 45.
65
Appendix
RThe illustrations of the keys in the table may differ in appearance from the actual keys on the
telephone.
KX-HDV330 (Suffix: RU)
Keys АБВ
(Cyrillic)
0–9
(Numeric)
ABC
(Latin) (Extended 1)
SŚŠ
(Extended 2)
1
А Б В Space
G + - / = < > 1 1Space B & ’ ( ) G, – . / 1
а б в Space
G + - / = < > 1
2
Г Д Е Ё 2
2
A B C 2
г д е ё 2 a b c 2
3Ж З И Й 3 3D E F 3
ж з и й 3 d e f 3
4К Л M 4 4G H I 4
к л м 4 g h i 4
5H О П 5 5J K L 5 J K L 5
н о п 5 j k l 5 j k l 5
6
Р С Т 6
6
M N O 6
р с т 6 m n o 6
7У Ф Х 7 7P Q R S 7
у ф х 7 p q r s 7
8Ц Ч Ш 8 8T U V 8
ц ч ш 8 t u v 8
9
Щ Ъ Ы Ь
Space ! ? " 9 9
W X Y Z 9
щ ъ ы ь
Space ! ? " 9 w x y z 9
0
Э Ю Я
Space . , ’ : ;
( ) 0 0Space ! ? " : ; + = < > 0
э ю я Space .
, ’ : ; ( ) 0
#
Ґ Є І Ї Ў # #
ґ є і ї ў #
66
Appendix
RPress * before or after entering a character to change between uppercase and lowercase.
RPressing a key repeatedly will cycle through the characters associated with that key. For example, to
enter the letter "C" in Latin Mode, press 2 3 times.
RPressing a key repeatedly will cycle through the characters associated with that key. For example, to
enter the letter "E" in Cyrillic Mode, press 2 3 times.
RCharacters that are entered using the # key (for example, "$") cannot be entered when searching the
phonebook. See “Searching for an Item in the Personal Phonebook”, Page 45.
RThe illustrations of the keys in the table may differ in appearance from the actual keys on the
telephone.
KX-HDV330 (Suffix: [none]/C)
Keys ABC (Latin) 0–9
(Numeric)
+ÀÂ (Extended 1)
Upper Lower Upper Lower
1Space B & ’ ( ) G , – . / 1 1Space B & ’ ( ) G , – . / 1
2A B C 2 a b c 2 2
3D E F 3 d e f 3 3
4G H I 4 g h i 4 4
5J K L 5 j k l 5 5JKL5 jkl5
6M N O 6 m n o 6 6
7P Q R S 7 p q r s 7 7
8T U V 8 t u v 8 8
9W X Y Z 9 w x y z 9 9
0Space ! ? " : ; + = < > 0 0Space ! ? " : ; + = < > 0
##
RPress * before or after entering a character to change between uppercase and lowercase.
RPressing a key repeatedly will cycle through the characters associated with that key. For example, to
enter the letter "C" in Latin Mode, press 2 3 times.
RCharacters that are entered using the # key (for example, "$") cannot be entered when searching the
phonebook. See “Searching for an Item in the Personal Phonebook”, Page 45.
RThe illustrations of the keys in the table may differ in appearance from the actual keys on the
telephone.
Basic Settings Menu Layout
Incoming Option
Sub Item Description Setting Default
Ringer Volume Adjusts the ringer volume Level 1–8
Off
Level 5
Ringer Type
RLine 1–12
RPrivate Ring
(Category 1–9)
Ringer Pattern
Selects the ringtone for each
type of call.*1
Ringtone 1–32 Ringtone 1*2
67
Appendix
*1 The preset melodies in this product are used with permission of © 2010 Copyrights Vision Inc.
*2 The default ringtone is different depending on the line number.
Talk Option
Sub Item Description Setting Default
Speaker Volume Adjusts the speaker volume. Level 1–8 Level 5
Handset Volume Adjusts the handset volume. Level 1–8 Level 5
Headset Volume Adjusts the headset speaker
volume.
Level 1–8 Level 5
Answer Option
Sub Item Description Setting Default
Auto Ans Device Selects the types of devices
that can be answered by Auto
Answer.
Speaker Phone
Headset
Speaker Phone
Auto Ans Delay Selects the number of seconds
before a call is automatically
answered when Auto Answer is
turned on.
0s–20s 6s
Key Option
Sub Item Description Setting Default
RProgram Key
RDSS Key
Assigns a function to each
program key or DSS key.
One Touch Dial
BLF
Line
ACD[Login]*1
ACD[Wrap Up]*1
Line Status
Call Forward
Phonebook
Call History
Simultaneous Ring*1
Hoteling/Hospitality*1
Transfer*1
Blind Transfer*1
Conference
Directed Call Pickup*1
Call Park*1
Park Retrieve*1
Not stored
Hot Key Time Selects the number of seconds
before a call is automatically
made when a Hot Key
assigned to "Auto" is pressed
and held.
1s–20s 2s
*1 Displayed only when configured on the telephone.
68
Appendix
Display Option
Sub Item Description Setting Default
Language Selects the display language.
Up to 10 languages can be
downloaded from the server or
Web as necessary. Contact
your administrator for further
information.
Suffix: NE/X/SX
Auto
English
Deutsch
Español
FRANÇAIS
Italiano
Svenska
Nederlands
Português
Čeština
Auto
Suffix: (none)/C
Auto
English
Español
FRANÇAIS
Auto
Suffix: RU
Auto
English
РУССКИЙ
Українська
Auto
Backlight Selects the length of time
before the backlight turns off
after returning to the standby
display, the level of the
backlight when it’s active, and
the level of the backlight when
it’s inactive.
Screen Timeout
30 sec.
1 min.
5 min.
10 min.
30 min.
60 min.
120 min.
180 min.
300 min.
Always On
Active Level
Level 1–8
Inactive Level
Low
Off
Screen Timeout:
1 min.
Active Level:
Level 8
Inactive Level:
Off
Standby Display Selects what is shown on the
display while in standby mode.
Phone Number
Phone No&Name
Off
Phone Number
Category Name Edits the names of the
categories.
Max. 13 characters x
Category (1–9)
Not stored
69
Appendix
Sub Item Description Setting Default
Date Format Selects the format for the date
shown on the display in
standby mode.
DD-MM-YYYY
MM-DD-YYYY
Suffix: NE/X/
SX/RU
DD-MM-YYYY
Suffix: (none)/C
MM-DD-YYYY
Time Format Selects the format for the time
shown on the display in
standby mode.
12H
24H
Suffix: NE/X/
SX/RU
24H
Suffix: (none)/C
12H
Screen Saver Selects the length of time
before the screen saver
activates.
Off
10 sec.
30 sec.
1 min.
3 min.
5 min.
Off
DSS Control Adjusts the backlight and LCD
contrast of connected
KX-HDV20 units.
Backlight
Auto
On
Level 1–6
Off
LCD Contrast
Level 1–6
Backlight:
Auto
Level 6
LCD Contrast:
Level 3
Key Tone
Sub Item Description Setting Default
Key Tone Turns the key tone on or off. On
Off
On
Bluetooth Headset
Sub Item Description Setting Default
Bluetooth Headset Registers and deregisters a
Bluetooth headset.
Refer to “Bluetooth
Headset”, Page 28.
Not registered
Other Option
Sub Item Description Setting Default
Change
Password*1*2
Changes the telephone
password (4 digits) used for
unlocking the phonebook.
Enter Old Password.*3*4
¯
Enter New Password.
¯
Verify New Password.
Not registered
Embedded Web Selects whether the web
function and the logging
function are available or not.
On
Off
Off
*1 To avoid unauthorized access to this product:
70
Appendix
RSet a password that is random and cannot be easily guessed.
RChange the password regularly.
*2 Make a note of the password so that you will not forget it.
*3 If a password has not already been set, you can skip the first step.
*4 For details about setting the password, see “Setting the Password”, Page 27.
System Settings Menu Layout
Status
Sub Item Description Status
Line Status Displays the line status. Line 1–12
Registered/Registering/(NULL)
Firmware Version Displays the firmware version of the
telephone.
—
IP Mode Displays the IP network mode. IPv4/IPv6/IPv4&IPv6
IPv4 Settings Displays information about IPv4 settings. –IP Address*1
–Subnet Mask*1
–Default Gateway*1
–DNS 1*1
–DNS 2*1
IPv6 Settings Displays information about IPv6 settings. –IP Address*2
–Prefix*2
–Default Gateway*2
–DNS 1*2
–DNS 2*2
MAC Address Displays the MAC address of the
telephone.
—
LLDP Displays the LLDP status. On/Off
VLAN Displays the VLAN ID and priority. —
*1 If this item is not set, “0.0.0.0” is displayed. If the telephone is not connected to the network, “…” is
displayed.
*2 If this item is not set, “0::0” is displayed. If the telephone is not connected to the network, “::” is
displayed.
Network Settings
Sub Item Description Setting Default
IP Mode Select Changes the network settings
of the telephone. Current
settings are displayed as a
highlight.
IPv4
IPv6
IPv4&IPv6
IPv4
71
Appendix
Sub Item Description Setting Default
IPv4 Settings Specifies the IPv4 settings. Connection Mode
DHCP
DNS
Auto
Manual
–DNS 1
–DNS 2
Static
–IP Address
–Subnet Mask
–Default Gateway
–DNS 1
–DNS 2
Connection
Mode: DHCP
DNS: Auto
IPv6 Settings Specifies the IPv6 settings. Connection Mode
DHCP
DNS
Auto
Manual
–DNS 1
–DNS 2
RA
–DNS 1
–DNS 2
Static
–IP Address
–Prefix
–Default Gateway
–DNS 1
–DNS 2
Connection
Mode: DHCP
DNS: Auto
LLDP Specifies the LLDP settings. PC Port
–VLAN ID
–Priority
On/Off
On
Off
PC Port:
VLAN ID: 0
Priority: 0
LLDP: On
VLAN Specifies the VLAN settings. Enable VLAN
Yes
No
IP Phone
–VLAN ID
–Priority
PC
–VLAN ID
–Priority
Enable VLAN:
No
IP Phone:
VLAN ID: 2
Priority: 7
PC:
VLAN ID: 1
Priority: 0
72
Appendix
Sub Item Description Setting Default
Link Speed Specifies the Ethernet PHY
mode settings.
IP Phone
Auto
100M/Full
100M/Half
10M/Full
10M/Half
PC
Auto
100M/Full
100M/Half
10M/Full
10M/Half
Auto
System Settings
Sub Item Description Setting Default
Set Time & Date*1 Specifies the time and date of
the telephone.
–Date
–Time
—
Authentication Specifies the ID and password
for HTTP authentication.
–ID*2
–Password*2
Not stored
Access Code*3 Specifies the access code to
access the redirect server.
Max. 16 characters Not stored
ECO Mode Selects whether to enable ECO
mode.
On
Off
Off
Restart*4 Restart the unit. — —
DSS Restart*4 Restart any connected DSS
units.
— —
*1 Availability depends on your phone system. Contact your administrator for further information.
*2 Max. 128 characters
*3 This item is displayed only during initial setup.
*4 The unit will restart even if it is being accessed through the Web user interface or on a call.
Advanced Settings Menu Layout
Xsi Setting
Sub Item Description Setting Default
Xsi Setting*1 Specifies the ID and password
for the Xsi service.
Line 1–12
–ID*2
–Password*2
Not stored
*1 This item is displayed only when the feature is enabled. Contact your administrator for further
information.
*2 Max. 128 characters
73
Appendix
UC Setting
Sub Item Description Setting Default
UC Setting*1 Specifies the ID and password
for the Broadsoft UC service
(IM&P).
–ID*2
–Password*2
Not stored
*1 This item is displayed only when the feature is enabled. Contact your administrator for further
information.
*2 Max. 128 characters
Call Settings
Sub Item Description Setting Default
Block Anonymous Specifies whether or not to
block incoming anonymous
calls.
Line 1–12
On
Off
Off
Anonymous Call Specifies whether or not to
make outgoing anonymous
calls.
Line 1–12
On
Off
Off
Block Caller ID Edits/deletes the phone
numbers to reject incoming
calls.
Enter Number*2, edit
number*2, delete number,
delete all numbers
Not stored
Anywhere*1 Specifies/edits the Xsi’s
Anywhere settings.
Line 1–12
Registration:
–Name
–Phone Number*2
Edit:
–Status
On
Off
–Name
–Phone Number*2
–Alt. Number*2
—
Remote Office*1 Specifies the Xsi’s Remote
Office setting.
Line 1–12
–Status
On
Off
–Phone Number*2
—
SimultaneousRing*1 Specifies the Xsi’s
Simultaneous Ring setting.
Line 1–12
–Status
On
Off
–Phone Number*2
—
System Lock Selects whether to lock the Call
Settings menu.
On*3
Off
Off
*1 If the Xsi’s service is available, you can select this item. Contact your administrator for further
information.
*2 In a phone number that exceeds 32 digits, the exceeding digits will not be displayed.
74
Appendix
*3 Password is required (4 digits).
Executive Filtering
Sub Item Description Setting Default
Executive Filtering*1 Sets whether to filter calls to an
executive terminal using the
Broadsoft Executive-Assistant
feature.
Line 1–12
On
Off
Off
*1 This item is displayed only when the feature is enabled. Contact your administrator for further
information.
Assistant Settings
Sub Item Description Setting Default
Assistant Filtering*1 Sets whether to filter calls to an
assistant terminal using the
Broadsoft Executive-Assistant
feature.
Line 1–12
Specify a line as
"Executive".
On
Off
Off
Divert Setting*1 Sets the transfer feature for an
executive terminal using the
Broadsoft Executive-Assistant
feature.
On
Phone Number
Off
Off
*1 This item is displayed only when the feature is enabled. Contact your administrator for further
information.
75
Appendix

Specifications
KX-HDV330
Item Specifications
Power Supply AC adaptor / PoE (IEEE 802.3af)
Power Consumption PoE
Stand-by: approx. 2.7 W (ECO mode off), approx. 2.2 W (ECO
mode on)
Talking: approx. 3.5 W (ECO mode off), approx. 2.8 W (ECO mode
on)
AC Adaptor
Stand-by: approx. 2.6 W (ECO mode off), approx. 1.9 W (ECO
mode on)
Talking: approx. 3.4 W (ECO mode off), approx. 2.7 W (ECO mode
on)
Maximum Power Consumption Approx. 4.4 W
Operating Environment 0 °C (32 °F) to 40 °C (104 °F)
Ethernet Port LAN: 1 (RJ45), PC: 1 (RJ45)
Ethernet Interface 10Base-T/100Base-TX/1000Base-T
(Auto / 100MB-FULL / 100MB-HALF / 10MB-FULL / 10MB-HALF)
Auto MDI / MDIX
Wideband Codec G.722
Narrowband Codec G.711a-law / G.711µ-law / G.729a
Multiple Line 12
LCD Display 4.3-inch color TFT with touch panel
16,772,216 colors (Full color)
LCD Size 480 ´ 272 pixels
LCD Backlight 8 levels
VoIP Connection Method SIP
Speaker 1
Microphone 1
Headset Jack 1 (RJ9)
EHS Jack 1 (ø3.5 mm [1/8 in], for EHS only)
Bluetooth 1 (Class 1)
Dimensions
(Width ´ Depth ´ Height;
stand attached)
"High" position:
195 mm ´ 175 mm ´ 177 mm
(7.7 in ´ 6.9 in ´ 7.0 in)
"Low" position:
195 mm ´ 176 mm ´ 154 mm
(7.7 in ´ 6.9 in ´ 6.1 in)
Weight (with handset, handset
cord and stand)
850 g (1.87 lb)
76
Appendix

KX-HDV20
Item Specifications
Power Supply*1 Power is supplied from the KX-HDV330.
Power Consumption Stand-by: approx. 0.5 W
Maximum Power Consumption Approx. 1.5 W
Operating Environment 0 °C (32 °F) to 40 °C (104 °F)
LCD Display Monochrome graphical
LCD Size 160 ´ 384 pixels, 12 lines
LCD Backlight 6 levels (Always On/Automatic/Always Off)
Dimensions
(Width ´ Depth ´ Height;
stand attached)
"High" position:
110 mm ´ 176 mm ´ 178 mm
(4.3 in ´ 6.9 in ´ 7.0 in)
"Middle" position:
110 mm ´ 176 mm ´ 154 mm
(4.3 in ´ 6.9 in ´ 6.1 in)
"Low" position:
110 mm ´ 175 mm ´ 121 mm
(4.3 in ´ 6.9 in ´ 4.8 in)
Weight (with stand) 430 g (0.95 lb)
*1 The KX-HDV20 can be used only when the KX-HDV330 is receiving power from the optional AC
adaptor.
77
Appendix
Troubleshooting
Common Issues and Solutions
General Use
Issue Possible Cause Solution
The display is blank. The unit is not receiving power. The unit is not designed to function
when there is a power failure. Make
sure that the device supplying PoE
is receiving power and that the
Ethernet cable is properly
connected. If an AC adaptor is
connected, confirm that the AC
adaptor is connected and receiving
power.
The unit is not
performing properly.
Cables or cords are not
connected properly.
Check all connections.
Your connection settings are
incorrect.
RConsult your administrator to
confirm that your settings are
correct.
RIf the problem persists, consult
your dealer.
An error has occurred. Restart the unit.
I cannot hear a dial
tone.
—Confirm that the LAN cable is
properly connected.
I cannot cancel the
phonebook lock.
The password you entered was
incorrect.
Enter the correct password.
I forgot my password. — Consult your administrator or dealer.
The date and time are
not correct.
—Adjust the date and time of the unit.
The Message/Ringer
lamp is lit.
You received a voice message
while you were on the phone or
away from your desk.
Check the voice message.
The KX-HDV20 will
not turn on.
The KX-HDV330 is receiving
power via Power-over-Ethernet
(PoE).
Connect the KX-HDV330 to an AC
power outlet using the optional AC
adaptor.
Making and Receiving Calls
Issue Possible Cause Solution
I cannot make calls. The phone number was entered
incorrectly.
RConfirm that you have entered
the phone number of the other
party correctly.
RConsult your administrator or
dealer.
The phonebook list is being
imported or exported.
RWait a few minutes for the
operation to complete.
RConfirm with your administrator or
dealer.
78
Appendix
Issue Possible Cause Solution
I cannot make long
distance calls.
Your telephone service does not
allow you to make long distance
calls.
Make sure that you have subscribed
to your telephone company’s long
distance service.
The unit does not ring
when a call is
received.
The ringer is turned off. Press the [j] volume key while a
call is being received, or change the
ringer volume setting.
While talking to an
outside party, the line
is disconnected.
Your phone system/service may
impose a time limit on outside
calls.
Consult your dealer to extend the
time limit, if necessary.
Sound Quality
Issue Possible Cause Solution
The other party
cannot hear my voice.
The unit is muted. Press /[MUTE/AUTO ANS] to
turn off the mute feature.
If you are using the
speakerphone, objects may be
obstructing the microphone.
Do not obstruct the unit’s
microphone during calls. Keep your
hands, as well as common objects
such as folders, cups, and coffee
pots away from the unit during calls.
Sound cuts out; I can
hear myself through
the speaker.
You are too far away from the
microphone.
Try speaking closer to the
microphone.
The environment is not suited to
speakerphone calls.
RDo not use the unit within 2 m
(6 ft 7 in) of projectors, air
conditioning devices, fans, or
other audible or electrical noise
emitting devices.
RIf using the unit in a room with
windows, close the curtains or
blinds to prevent echoes.
RUse the unit in a quiet
environment.
The unit was moved during a call. Do not move the unit while on a call.
Objects are obstructing the
microphone.
Do not obstruct the unit during calls.
Keep your hands, as well as
common objects such as folders,
cups, and coffee pots away from the
unit during calls.
The other party is using a
half-duplex speakerphone.
If the other party is using a
half-duplex speakerphone, sound
may cut out occasionally during
calls. For best performance, the
other party should use a full-duplex
speakerphone.
79
Appendix

Phonebook List
Issue Possible Cause Solution
I cannot add or edit
entries to the
phonebook list.
The phonebook list is full. Delete any unnecessary entries.
The maximum number of entries in
the phonebook list is 2500.
Bluetooth Headset
Issue Possible Cause Solution
I cannot have a
conversation using
the Bluetooth headset.
The headset is not registered. Make sure that the headset is
properly registered to the unit.
An EHS headset is connected. Remove the EHS headset from the
headset jack. Priority is given to the
EHS headset when both are
connected.
The headset is not charged. Make sure that the headset is
properly charged by following the
instructions in the headset’s
documentation.
80
Appendix

Error Messages
During operation, error messages might appear on the unit. The following table lists these messages and
possible causes and solutions.
Error Message Possible Cause Solution
Error:001
Check LAN cable.
The LAN cable is not connected. Check all connections.
Error:002
IP Address
Collision
The unit’s network settings are
incorrect.
Consult your system administrator
or dealer.
Error:002
IP Address
Error:003
Not Registered
Failed to register to SIP server. Consult your system administrator
or dealer.
Memory Full The phonebook is full and cannot
store the new item.
Remove unnecessary data in the
phonebook and try again.
No Entries When trying to view the
phonebook: No items have been
stored. See “Storing an Item in
the Personal Phonebook”,
Page 41.
When trying to view the Incoming
or Outgoing Call Log: No logs
have been stored.
Need Repair Device fault. Contact your phone system dealer/
service provider.
Phonebook Error The memory became full during a
phonebook download.
RRemove unnecessary data in the
phonebook, or consult your
administrator regarding the
number of items being
downloaded.
RThis message disappears if you
access the phonebook.
81
Appendix

WALL MOUNTING TEMPLATE 1
(KX-HDV330, optionally with 1 attached KX-HDV20)
1. Drive the screws into the wall as indicated.
2. Hook the unit onto the screw heads.
Note:
Make sure to set the print size to correspond with the
size of this page. If the dimensions of the paper
output still deviate slightly from the measurements
indicated here, use the measurements indicated here.
83 mm (3 ¼ in)
100 mm (3 15⁄16 in)
One screw here
One screw here
One screw at either point
One screw at either point
152 mm (6 in)
For KX-HDV330
For KX-HDV20

83 mm (3 ¼ in)
100 mm (3 15⁄16 in)
One screw here
One screw here
One screw at either point
One screw at either point
WALL MOUNTING TEMPLATE 2
(For mounting 2 or more KX-HDV20 units)
1. Drive the screws into the wall as indicated.
2. Hook the unit onto the screw heads.
Note:
Make sure to set the print size to correspond with the
size of this page. If the dimensions of the paper
output still deviate slightly from the measurements
indicated here, use the measurements indicated here.
111 mm (4 ⅜ in)
Previously mounted KX-HDV20
(for reference)
For KX-HDV20 to mount

1-62, 4-chome, Minoshima, Hakata-ku, Fukuoka 812-8531, Japan
Web Site: http://www.panasonic.net/pcc/support/sipphone/
Two Riverfront Plaza, Newark, NJ 07102-5490
Web Site:
http://www.panasonic.net/pcc/support/sipphone/
5770 Ambler Drive, Mississauga, Ontario, L4W 2T3
Web Site:
http://www.panasonic.com/ca/
Copyright:
This material is copyrighted by Panasonic System Networks Co., Ltd., and may be reproduced for
internal use only. All other reproduction, in whole or in part, is prohibited without the written consent of
Panasonic System Networks Co., Ltd.
© Panasonic System Networks Co., Ltd. 2015 PNQX7593ZA PD1015SM0