Panasonic of North America 96NKX-HNC700 HomeHawk Front Door User Manual Installation Manual English
Panasonic Corporation of North America HomeHawk Front Door Installation Manual English
UserManual.wiki
>
Panasonic of North America
>
96NKX HNC700 User Manual
User Manual
Navigation menu
Upload a User Manual
Namespaces
Wiki Guide
HTML
PDF
Info
Views
User Manual
Discussion / Help
Navigation
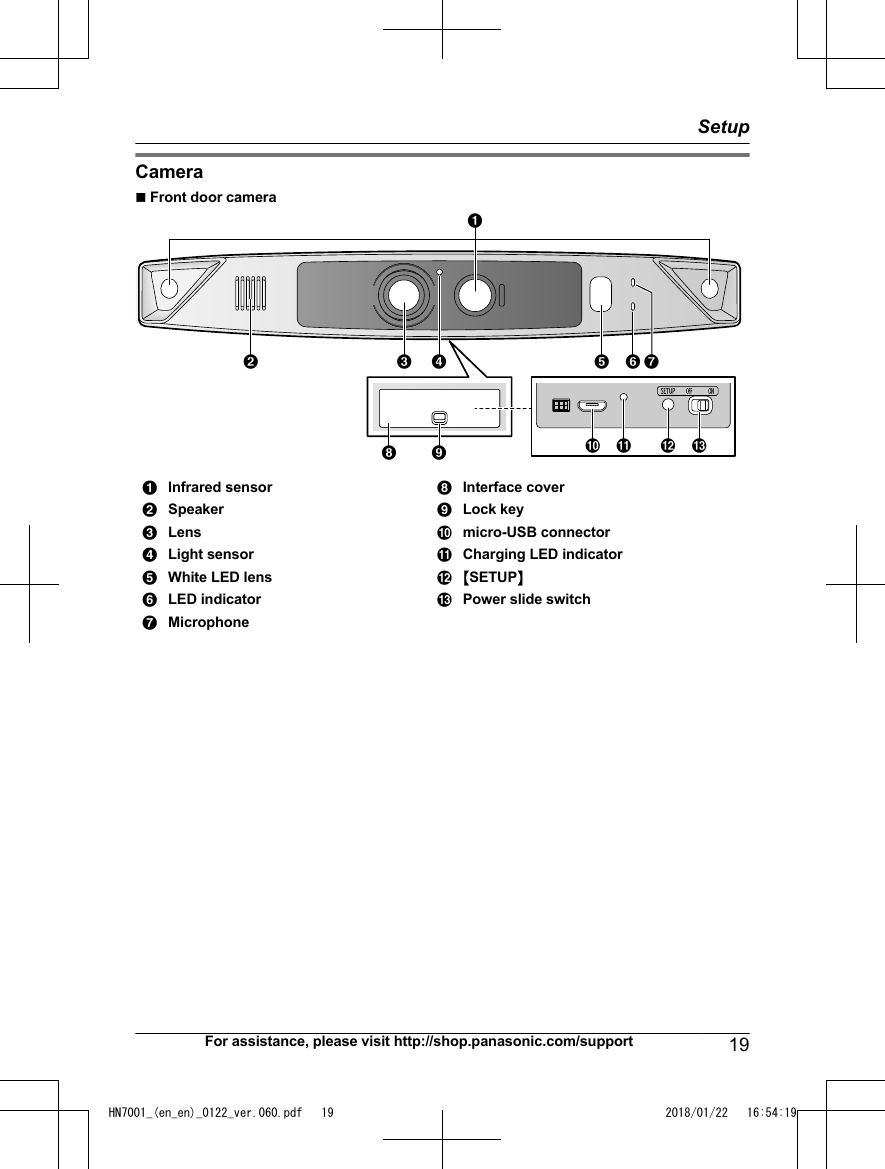
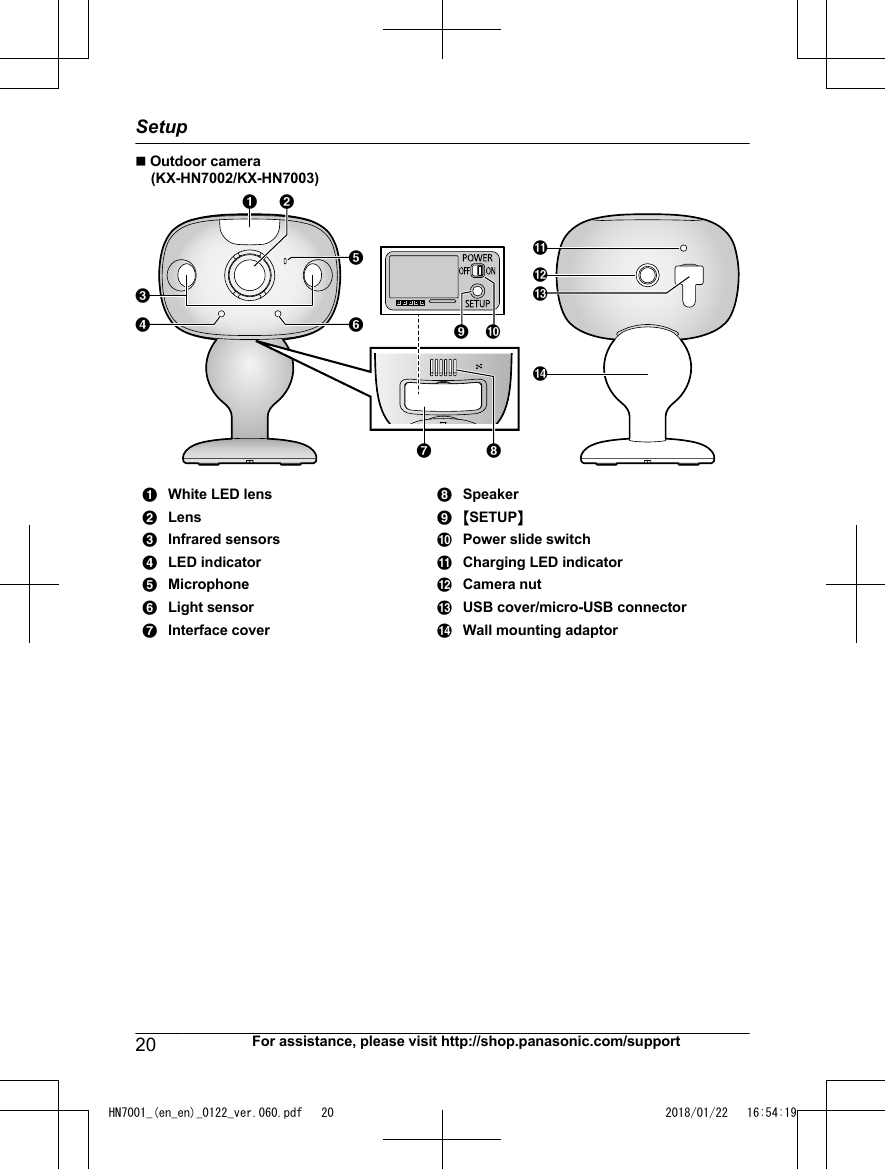
![IntroductionModel composition .......................................3Accessory information ..................................3Expanding your camera ...............................4Important InformationGraphical symbols for use on equipment andtheir descriptions ..........................................5About this system .........................................5For your safety .............................................5Important safety instructions ........................7Security cautions ..........................................7For best performance ...................................8Privacy and rights of portrait ........................8Other information .........................................8Installation LocationWireless communication range ..................12Information about sensor features .............12Information about night vision mode ..........13Installation location examples ....................14Do not install in these locations ..................17SetupPart names and functions ..........................18Setup overview ...........................................22Charging the cameras ................................22Turning the power on for the cameras .......23Downloading the [HomeHawk] app ............23Connections for access point .....................24Initial setup .................................................24Registering the cameras ............................25Confirming the camera installation area .....25Camera installation ....................................25Testing the motion detection range ............30Registering another mobile device .............31AppendixFeatures available when using the[HomeHawk] app ........................................32Accessing the User’s Guide .......................32Specifications .............................................32Open source software notice for accesspoint ...........................................................33Software information for access point ........33FCC and other information .........................34Customer services .....................................35Limited Warranty (ONLY FOR U.S.A.) .......362Table of ContentsHN7001_(en_en)_0122_ver.060.pdf 2 2018/01/22 16:54:18](https://usermanual.wiki/Panasonic-of-North-America/96NKX-HNC700/User-Guide-3732436-Page-2.png)
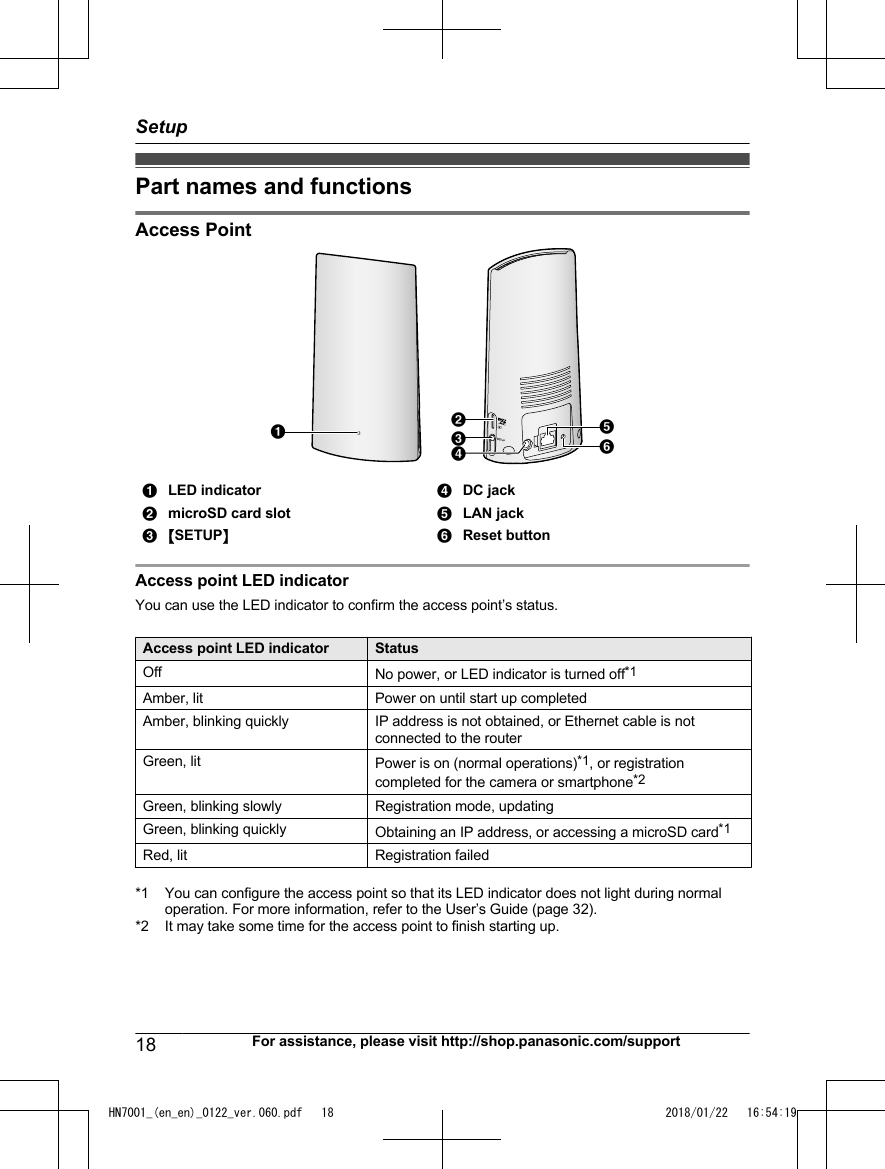
![Wireless communication rangeThe wireless communication range of each device in the system from the access point isapproximately 100 m (up to 328 feet 1 inch). Wireless communication may be unreliable whenthe following obstacles are located between the access point and other devices.RMetal doors or screensRWalls containing aluminum-sheet insulationRWalls made of concrete or corrugated ironRDouble-pane glass windowsRMultiple wallsRWhen using each device on separate floors or in different buildingsNote:RThe access point cannot connect wirelessly to devices other than the front door camera oroutdoor camera.RThe camera’s LED indicator blinks slowly in red if it is out of range of the access point. In thiscase, confirm all connections, including those of the access point.RThe signal strength can be checked with the [HomeHawk] app. For more information, refer tothe User’s Guide (page 32).Information about sensor featuresThe cameras have 2 sensor features that are used for motion detection: a visual sensor and aninfrared sensor (i.e., heat sensor).Please read the following information before deciding where to install the camera.Note:RThe camera’s sensor features are not designed to be used in situations that require highreliability. We do not recommend use of the sensor features in these situations.RPanasonic takes no responsibility for any injury or damage caused by the use of the camera’ssensor features.Detection methodVisual sensor Infrared sensorThe camera detects changes in the imagesbeing displayed.RThe camera detects changes in thebrightness levels of moving objects.The camera detects temperature differencesof objects in the images being displayed.RThe infrared sensor uses infrared rays todetect temperature differences within itsrange that are emitted naturally by people,animals, etc.12 For assistance, please visit http://shop.panasonic.com/supportInstallation LocationHN7001_(en_en)_0122_ver.060.pdf 12 2018/01/22 16:54:19](https://usermanual.wiki/Panasonic-of-North-America/96NKX-HNC700/User-Guide-3732436-Page-12.png)
![Detection rangeVisual sensorCan detect motion anywhere in the visible image.RYou can adjust the area detectable by the visual sensor. For more information, refer to theUser’s Guide (page 32).Main characteristicsVisual sensor Infrared sensorEasily detects movement in the daytime orwhen it is bright. Through the use of whiteLEDs or IR-LEDs, movement can also bedetected when it is dark.RMovement may be incorrectly detectedwhen the moving object and thebackground have a similar color.RMovement may be incorrectly detectedwhen there are sudden changes to theoverall brightness levels such as whenexternal lights are used.Easily detects when there is a big differencebetween the temperatures of objects and thesurrounding environment, such as in winter orlate at night.RThe sensor cannot easily detect whenthere is no difference between thetemperatures of objects and thesurrounding environment.RIf the camera is mounted facing a road, thesensor may detect incorrectly due tointerference caused by the heat frompassing cars.Information about night vision modeThe cameras feature color night vision mode, which allows camera images to be viewable evenwhen the surrounding area is dark.Note:RWhen [Color] is selected for the night vision mode, the white LEDs are lit enabling images tobe displayed in color.RWhen [Monochrome] is selected for the night vision mode, the array of infrared LEDs thatsurround the camera’s lens light up in a faint red color that can be seen in the dark.The visibility range for [Monochrome] in dark conditions is longer than for [Color].RIf the camera is installed in front of a window and points directly at the window, images may bepoor when night vision mode is active.For assistance, please visit http://shop.panasonic.com/support 13Installation LocationHN7001_(en_en)_0122_ver.060.pdf 13 2018/01/22 16:54:19](https://usermanual.wiki/Panasonic-of-North-America/96NKX-HNC700/User-Guide-3732436-Page-13.png)
![Setup overview1Charging the camerasMake sure the battery is fully chargedbefore you setup the cameras.2Turning the power on for the camerasTurn the power on.3Downloading the applicationDownload the [HomeHawk] app to yourmobile device.4Connection for access pointConnect the AC adaptor and Ethernetcable to the access point.5Initial setupMake sure you can access the systemusing your mobile device.6RegistrationRequired only if the camera waspurchased separately (i.e., not as part ofa bundle).7Confirm the installation areaRead the information in this document toconfirm that the desired installation areais suitable to proper operation.8InstallationInstall the camera in the desired location.Charging the camerasRThis camera has an internal rechargeablebattery.RRemove the camera from the wall beforecharging (page 28).RMake sure to charge the camera indoorsand in a dry location.RCharge the camera in a location with atemperature between 5 °C and 40 °C (41°F and 104 °F). The camera cannot chargein locations outside of these temperatures.Charging the front door cameraCharge for about 7 hours.RTurn the camera off before charging thebattery. If the camera is turned on whilecharging, it may take longer to charge.1Slide the lock key (A).2Open the interface cover (B).3Insert the USB cable into the micro-USBconnector (C).1233211 Power off2 5.0 V, 1.0 A or higher power sourceWe recommend using the supplied USB cable.3 Charging LED indicator22 For assistance, please visit http://shop.panasonic.com/supportSetupHN7001_(en_en)_0122_ver.060.pdf 22 2018/01/22 16:54:19](https://usermanual.wiki/Panasonic-of-North-America/96NKX-HNC700/User-Guide-3732436-Page-22.png)
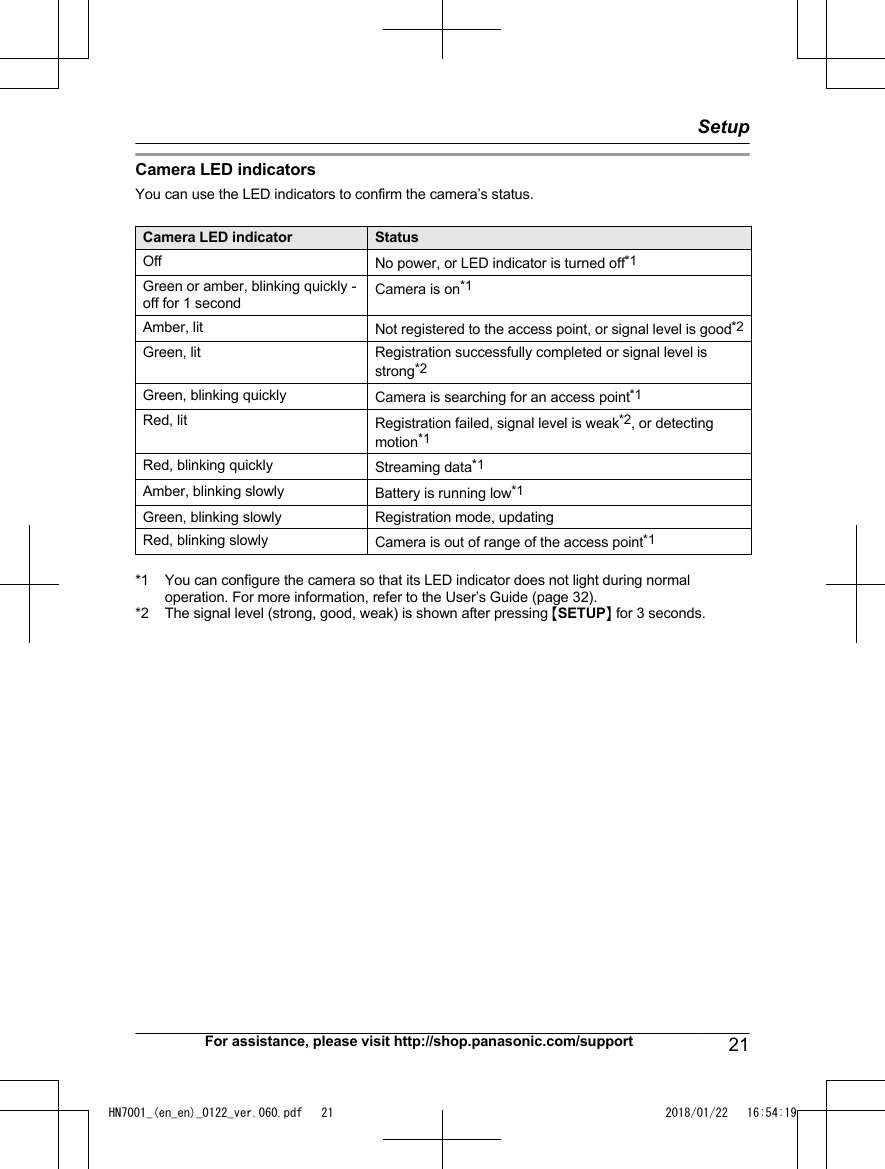
![Charging the outdoor cameraCharge for about 7 hours.RTurn the camera off before charging thebattery. If the camera is turned on whilecharging, it may take longer to charge.1Open the USB cover (A).2Insert the USB cable into the micro-USBconnector (B).212311 Power off2 5.0 V, 1.0 A or higher power sourceWe recommend using the supplied USB cable.3 Charging LED indicatorCamera charging LED indicatorsYou can use the charging LED indicators toconfirm the charging status of the cameras.Camera indicator StatusRed, lit Charging iscompletedRed, blinking slowly ChargingRed, blinking quickly Charging failureTurning the power on forthe camerasOpen the cover of the cameras, and then slidethe power slide switch to ON. (page 19, nFront door camera M, page 20, n Outdoorcamera J)Downloading the[HomeHawk] appDownload information is available at the webpage listed below.https://panasonic.net/cns/pcc/support/homehawkUsing your device’s app storeiPhone, iPad usersSearch for “Panasonic HomeHawk”. iPadusers should search in the “iPhone only”category.Android™ device usersSearch for “Panasonic HomeHawk”.Compatible mobile devicesPlease check the latest information at thefollowing supported page.https://panasonic.net/cns/pcc/support/homehawkRiPhone® and iPad® (iOS 10.0 and later) orAndroid™ devices (Android 4.1 and later)(As of October 2017)Note:RThe [HomeHawk] app may not functionproperly depending on the systemenvironment, such as the model of yourmobile device, peripherals connected toyour mobile device, and the apps installedon your mobile device.For assistance, please visit http://shop.panasonic.com/support 23SetupHN7001_(en_en)_0122_ver.060.pdf 23 2018/01/22 16:54:19](https://usermanual.wiki/Panasonic-of-North-America/96NKX-HNC700/User-Guide-3732436-Page-23.png)
![RThe following Android devices are notcompatible with the [HomeHawk] app.– Android devices that are not supportedby Google Play™– Android devices with limited hardwarefeatures (Bluetooth, wireless LAN, andmicrophone support are required.)Connections for accesspointNote:RUse only the supplied AC adaptor.1Insert the AC adaptor DC plug into theDC jack (A), then connect the ACadaptor to the power outlet (1).2Insert the Ethernet cable into the LANjack (B), then connect the Ethernet cableto your router (2).3Insert a microSD card (not supplied) intothe unit’s microSD card slot (C).13221Note about power connectionsAC adaptor connectionRThe AC adaptor must remain connected atall times. (It is normal for the adaptor to feelwarm during use.)RThe AC adaptor should be connected to avertically oriented or floor-mounted ACoutlet. Do not connect the AC adaptor to aceiling-mounted AC outlet, as the weight ofthe adaptor may cause it to becomedisconnected.Power failureRThe access point will not work during apower failure.Initial setupConfirm the following before you begin.– Make sure you have installed the[HomeHawk] app on your mobile device– Make sure the access point and yourwireless router are turned on and theaccess point’s LED indicator is blinkingquickly in amber or lit in green– Make sure your access point and mobiledevice are connected to your wireless router– Make sure your mobile device can connectto the Internet1Start the [HomeHawk] app.RThe end-user license agreement isdisplayed the first time you start theapp.2Follow the on-screen instructions.3Tap [Access Point], wait for a while, andthen follow the on-screen instructions.RPerform the following according to thestatus of the access point’s LEDindicator.– Lights in green: Tap the green litbutton, and then go to step 4.– Blinks in amber quickly: Tap theamber blinking button, and thenconnect the Ethernet cable to theaccess point and router. Next,follow the on-screen instructions.After waiting for a while, check thecolor of the LED indicator again.– Blinks in green quickly: Tap thegreen blinking button, check ifDHCP (Dynamic Host ConfigurationProtocol) is operating for the router,and then tap [OK].4When prompted, press MSETUPN on theaccess point.24 For assistance, please visit http://shop.panasonic.com/supportSetupHN7001_(en_en)_0122_ver.060.pdf 24 2018/01/22 16:54:19](https://usermanual.wiki/Panasonic-of-North-America/96NKX-HNC700/User-Guide-3732436-Page-24.png)
![5When prompted, set the password thatwill be used to log in to the access pointwhile away from home and then tap [OK].6When prompted, enter a name for theaccess point (if necessary) and for yourmobile device and then tap [OK].RThe app’s home screen is displayedwhen initial setup is completed.Registering the camerasThe access point and cameras arepre-registered. If for some reason the camerasare not registered to the access point, thecamera’s LED indicator lights in amber.You can register each camera by using theregistration buttons or the [HomeHawk] app.Note:RIf you purchased cameras separately (i.e.,not as part of a bundle), you must registereach camera to the access point.RBefore registering the camera, make surethe camera is turned on, and that the ACadaptor of the access point is connectedand the access point is powered.Using registration buttons1Access point:Press and hold MSETUPN until the LEDindicator (page 18, Access Point A)blinks slowly in green.2Front door camera/outdoor camera*1:Press and hold MSETUPN until the LEDindicator (page 19, n Front door cameraF, page 20, n Outdoor camera D) blinksslowly in green.RWhen registration is completed, thecamera sounds one long beep.*1 KX-HN7002/KX-HN7003 (page 3)Note:RIf registration fails, the camera soundsseveral short beeps.Using the appYou can change the name of the camerausing the [HomeHawk] app. For moreinformation, refer to the User’s Guide(page 32).Confirming the camerainstallation areaBefore deciding where to install the camera,carefully read the chapter “InstallationLocation”, beginning on page 12, to confirmthe installation location and direction.Camera installationInstallation precautionsRDo not use an impact driver. (This may leadto damaged screws or over-tightening.)For assistance, please visit http://shop.panasonic.com/support 25SetupHN7001_(en_en)_0122_ver.060.pdf 25 2018/01/22 16:54:19](https://usermanual.wiki/Panasonic-of-North-America/96NKX-HNC700/User-Guide-3732436-Page-25.png)
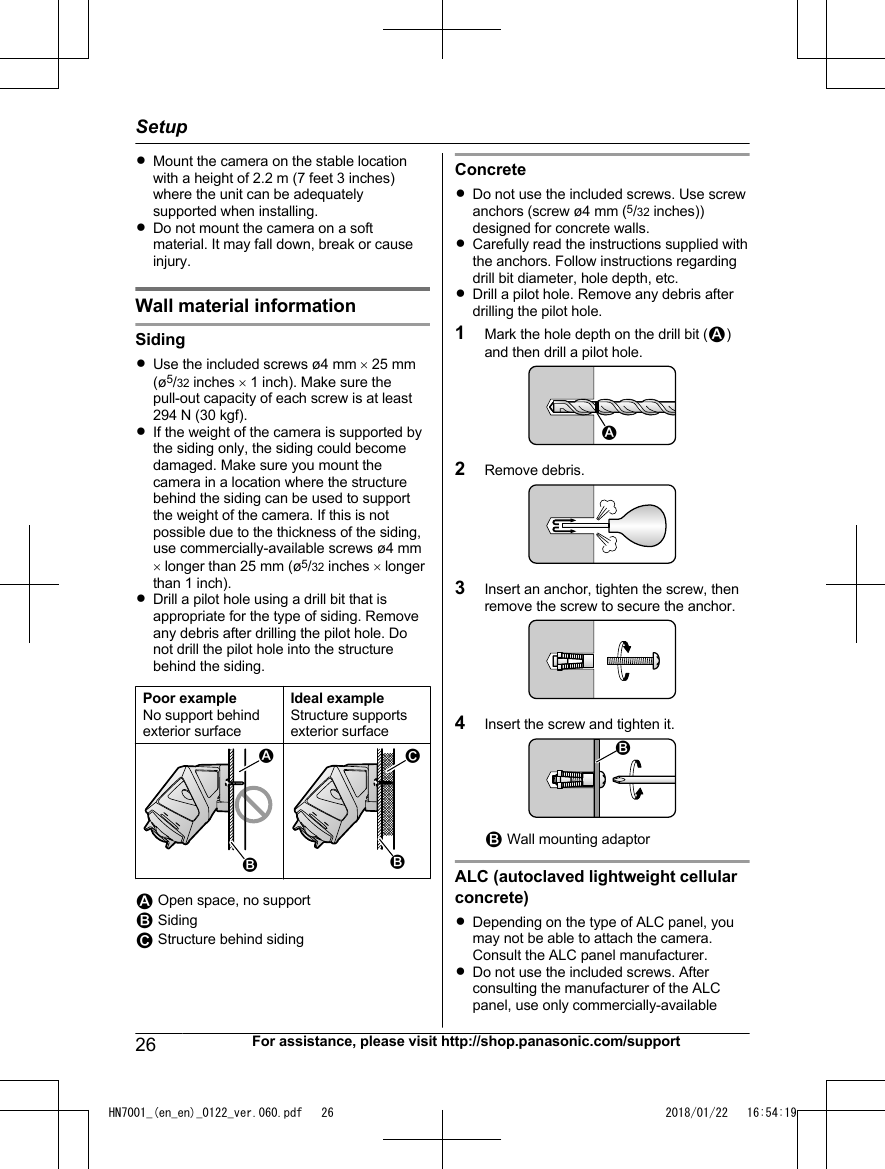
![5Mount the wall mounting adaptor to thewall. Next, attach the safety wire to thewall, and then attach the camera to thewall mounting adaptor.1 Wall mounting screws2 25.4 mm (1 inch)3 HoleYou can prevent the camera from fallingby passing a string through the hole in thestand.3123216Adjust the camera angle.Note:RAttach the safety wire while it is bent.RAttach the safety wire high on the wall sothat the camera does not strike anyone inthe event the camera detaches from thewall.RDo not hang from the camera or wallmounting adaptor.Testing the motiondetection rangeAfter you have installed the [HomeHawk] appon your mobile device, you can use yourmobile device to test the performance of thecamera’s motion detection features.For details about these operations, refer to theUser’s Guide (page 32).1Start the [HomeHawk] app and then tap.2Tap [Settings].3Tap [Camera settings] and select thecamera to be tested.4Tap [Detection] ® [Detection Test].5Move to an area within the camera’sviewable area.6While moving near the camera, use yourmobile device to observe where you arein the viewable area when the camera’smotion detection features are triggered.7Note the areas of the viewable areawhere movement is detected, and makeadjustments as necessary.Note:RYou can adjust the area detectable by thevisual sensor. For more information, refer tothe User’s Guide (page 32).Testing the microphoneTo test the microphone, speak loudly andclearly into the microphone while a mobiledevice user is viewing live images from thecamera.30 For assistance, please visit http://shop.panasonic.com/supportSetupHN7001_(en_en)_0122_ver.060.pdf 30 2018/01/22 16:54:20](https://usermanual.wiki/Panasonic-of-North-America/96NKX-HNC700/User-Guide-3732436-Page-30.png)
![Registering another mobiledeviceIn order to access the system from a mobiledevice, you must first register the mobiledevice to the access point. You can registerup to 8 mobile devices to an access point.Confirm the following before you begin.– Make sure you have completed the initialsetup procedure– Make sure your mobile device can connectto the Internet– Make sure your wireless router and theaccess point are turned on– Make sure your mobile device and theaccess point are connected to the samewireless router1Using the mobile device that you want toregister, download the [HomeHawk] appand then start the app.2Follow the on-screen instructions.3When prompted, press MSETUPN on theaccess point.RYour mobile device will be registeredto the access point.4When prompted, enter the password thatwill be used to log in to the access point,then tap [OK].5When prompted, enter a name for yourmobile device and then tap [OK].RThe app’s home screen is displayedwhen initial setup is completed.For assistance, please visit http://shop.panasonic.com/support 31SetupHN7001_(en_en)_0122_ver.060.pdf 31 2018/01/22 16:54:20](https://usermanual.wiki/Panasonic-of-North-America/96NKX-HNC700/User-Guide-3732436-Page-31.png)
![Features available whenusing the [HomeHawk] appSome of the camera’s features that areavailable when using the [HomeHawk] appare listed below. For more information, refer tothe User’s Guide (page 32).–Live camera monitoringYou can view live images from the camera,even while away from home.–Listen and talkYou can use your mobile device to talk andlisten to anyone within range of thecamera’s microphone and speaker.–Sensor adjustmentYou can adjust the camera’s motiondetection features, such as detectionsensitivity and detection area.–NotificationYou can configure the camera to send anotification to the [HomeHawk] app whenthe camera detects motion.Accessing the User’s GuideThe User’s Guide is a collection of onlinedocumentation that helps you get the most outof the [HomeHawk] app.1Tap in the app’s home screen.2Tap [User’s Guide].Note:RMicrosoft® Windows® Internet Explorer® 8and earlier versions are not supported.RAndroid 4.1 or later versions arerecommended.RYou can also access the User’s Guide atthe web page listed below.https://panasonic.net/cns/pcc/support/homehawk/manual/SpecificationsRFrequency rangeWireless LAN:2.412 GHz – 2.462 GHz (channels 1 – 11)RRF transmission powerWireless LAN:Access point:200 mW (peak transmission power)Front door camera/Outdoor camera:100 mW (peak transmission power)RPower sourceAccess point:120 V AC, 60 HzFront door camera/Outdoor camera:5.0 V, 1.0 A*1RPower consumptionAccess point:Standby: 1.2 WMaximum: 6 WRBattery performanceFront door camera/Outdoor camera:Operating time: 7 hoursApprox. 3 months (when used 5 minutes aday)*2ROperating conditionsAccess point:0 °C – 40 °C (32 °F – 104 °F)20 % – 80 % relative air humidity (dry)Front door camera/Outdoor camera:-20 °C – 50 °C (-4 °F – 122 °F)up to 90 % relative air humidity(non-condensing)RImage sensorFront door camera/Outdoor camera:1.0 megapixel CMOSRMinimum illuminance required*3Front door camera/Outdoor camera:IR-LED: 0 lx*3White LED: 1 lx*3RFocal lengthFront door camera/Outdoor camera:Fixed 0.2 m (0.7 feet – infinity)RAngular field of view (camera angle)Front door camera/Outdoor camera:172°RMotion detection methodPyroelectric infrared sensor (PIR sensor)and visual sensor32 For assistance, please visit http://shop.panasonic.com/supportAppendixHN7001_(en_en)_0122_ver.060.pdf 32 2018/01/22 16:54:20](https://usermanual.wiki/Panasonic-of-North-America/96NKX-HNC700/User-Guide-3732436-Page-32.png)