Panasonic of North America 96NKX-TG9581 DECT 6.0 Base with BT User Manual Operating Instructions English
Panasonic Corporation of North America DECT 6.0 Base with BT Operating Instructions English
UserManual.wiki
>
Panasonic of North America
>
96NKX-TG9581 User Manual
>
Users Manual
Contents
1.
Users Manual
2.
User Manual
Users Manual
Navigation menu
Upload a User Manual
Namespaces
Wiki Guide
HTML
PDF
Info
Views
User Manual
Discussion / Help
Navigation

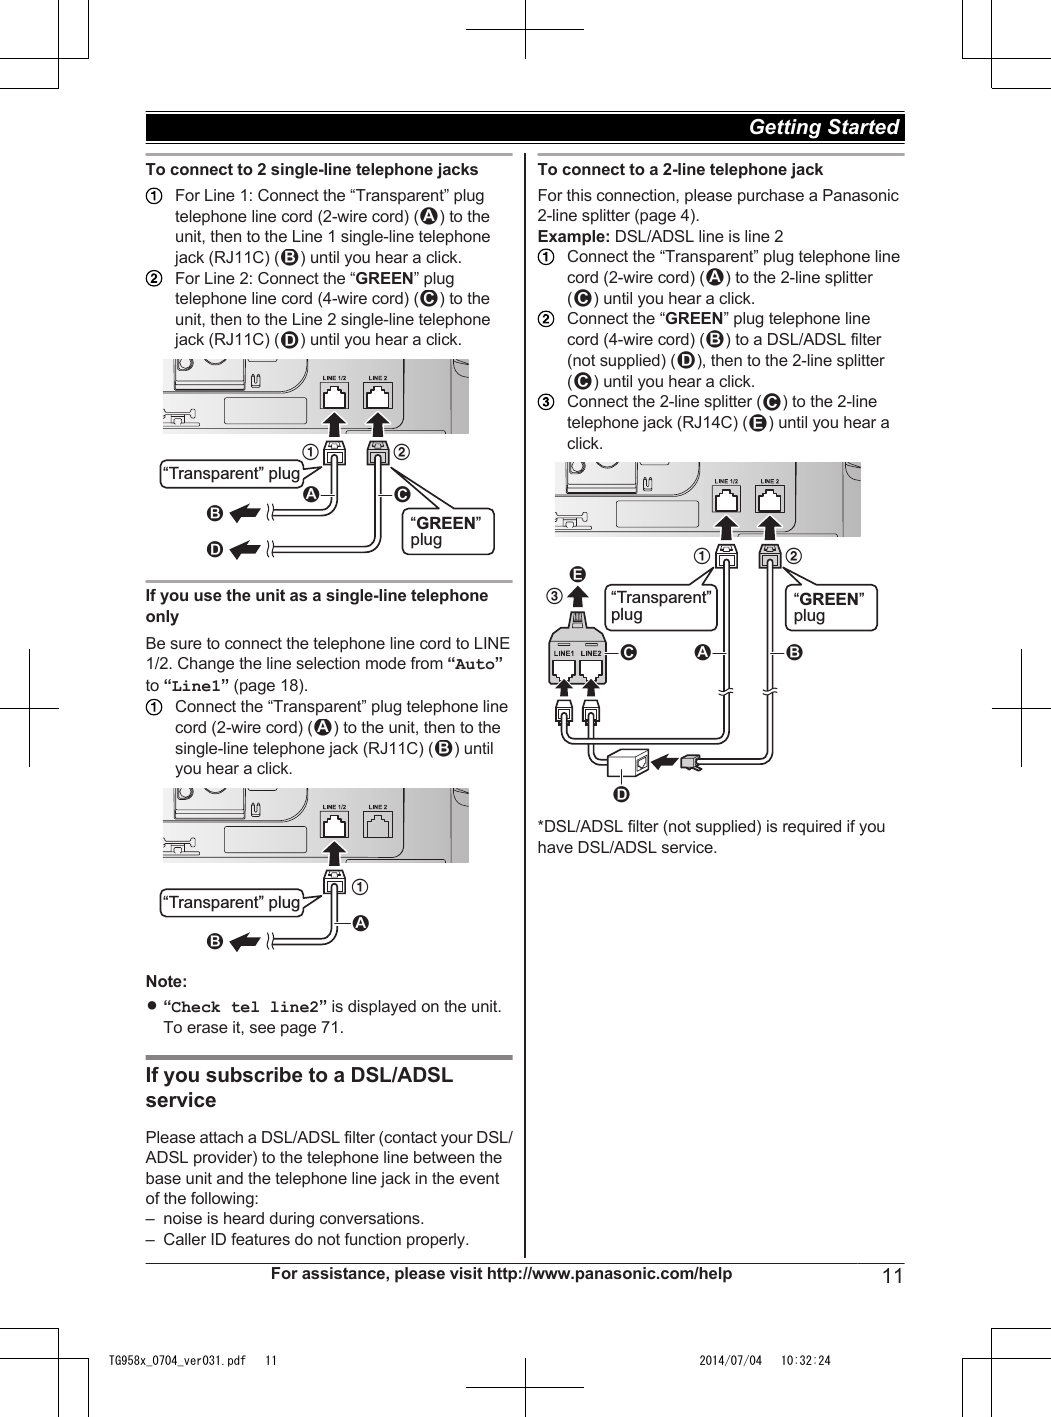
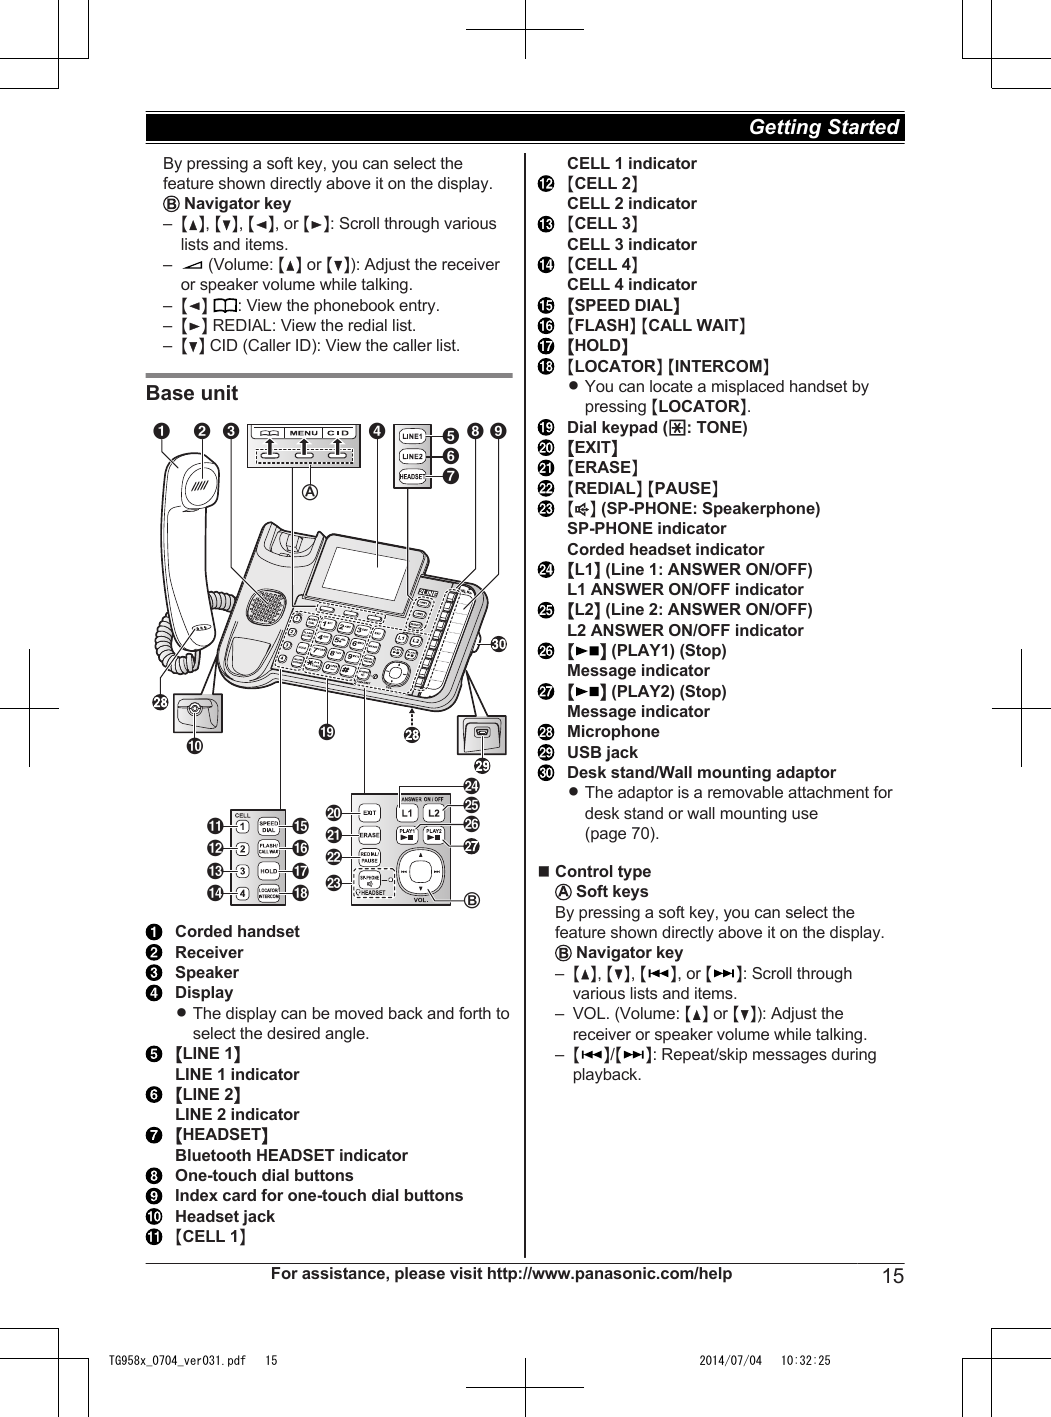


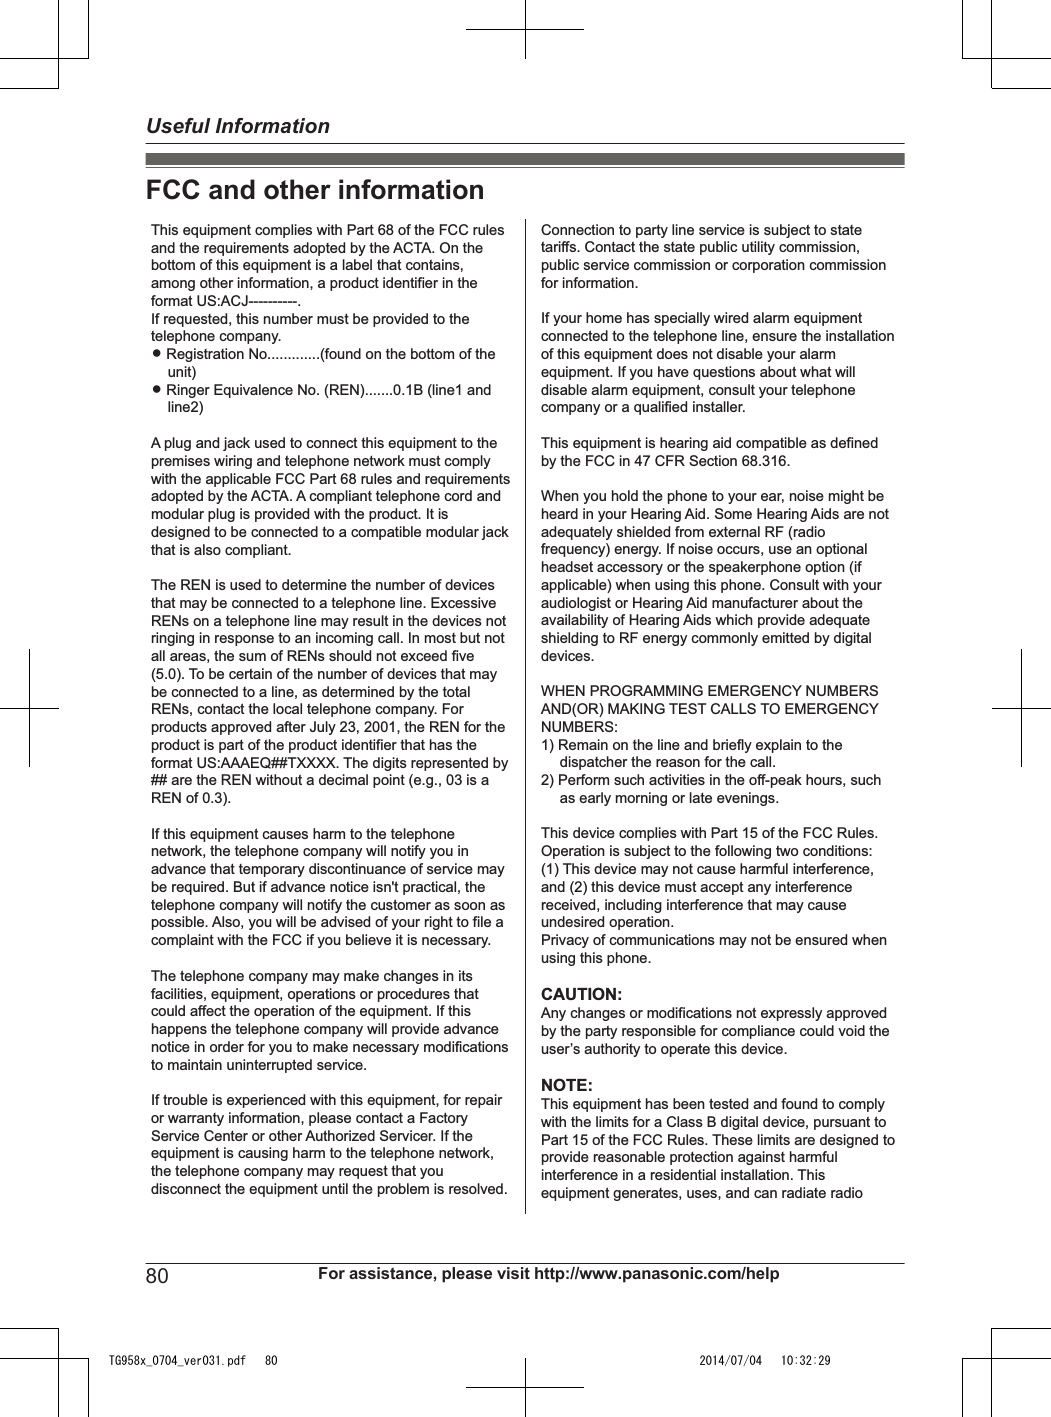
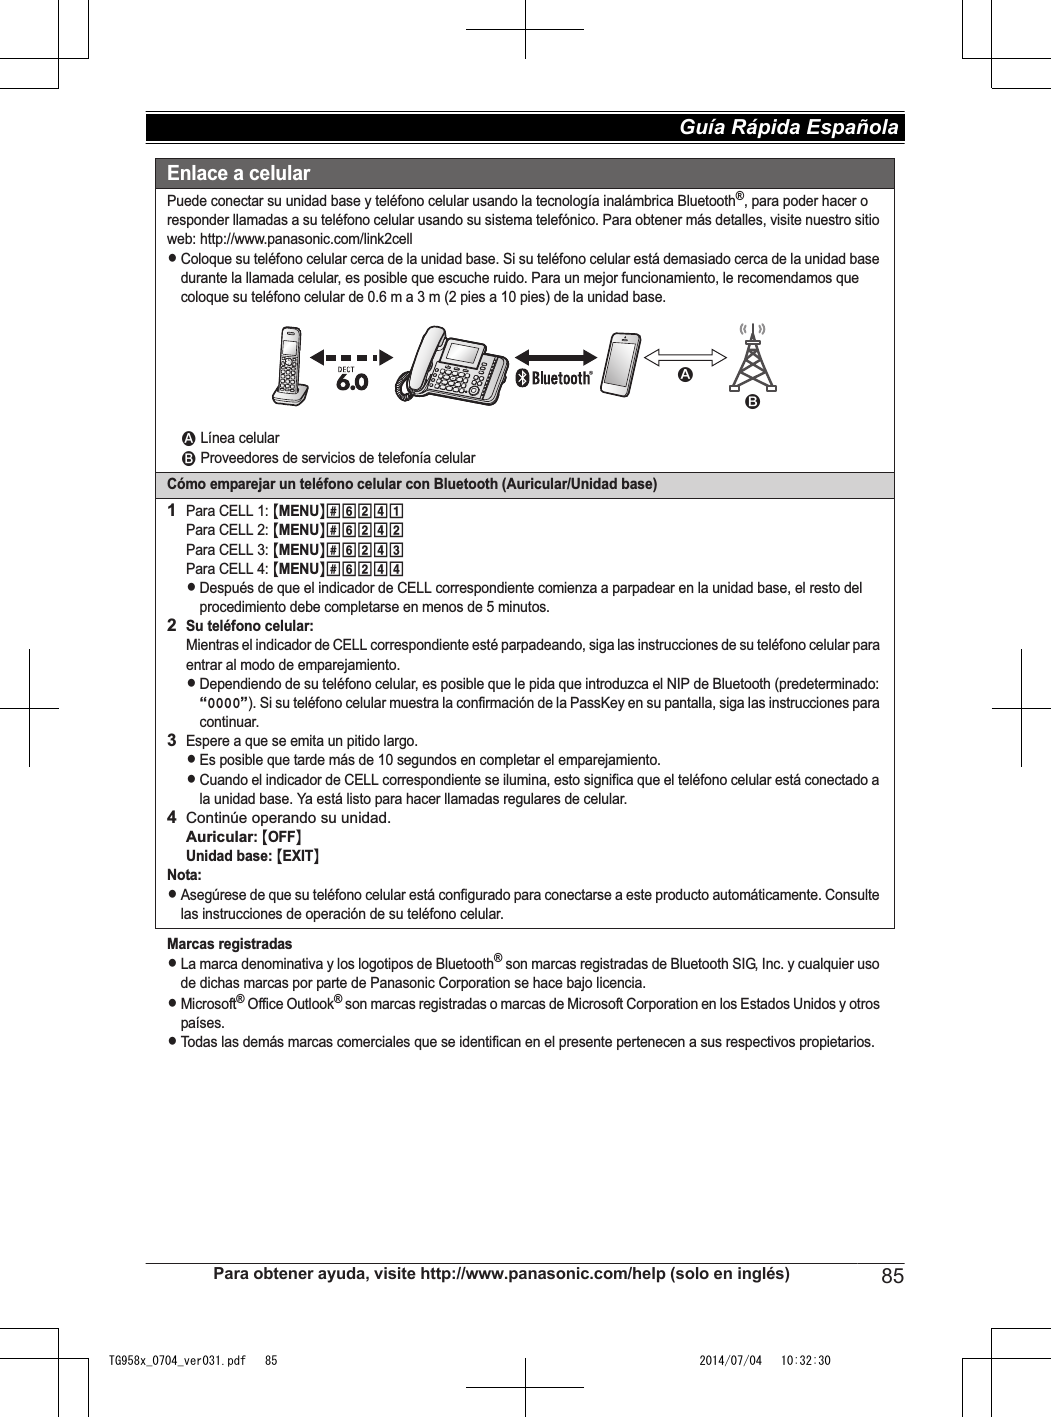
![“Telephone Plug-in” settingsBy installing the “Telephone Plug-in” software forMicrosoft® Office Outlook® found on the suppliedCD-ROM and connecting the base unit and yourcomputer with the mini USB cable, the followingfeatures are available:– You can make/answer landline or cellular callsfrom the “Telephone Plug-in” of Microsoft OfficeOutlook through the base unit.– Caller information is shown in a pop-up windowon your computer display when a call isreceived.System requirementsItem SpecificationsCPU 1.0 GHz Intel® Pentium®/Celeron®processor or comparable CPU orhigher processorRAM 512 MB or moreOS RMicrosoft® Windows Vista® orlaterRMicrosoft® Windows® 7 or laterRMicrosoft® Windows® 8 or laterMicrosoft®OfficeOutlook®RMicrosoft® Office Outlook® 2007or laterRMicrosoft® Office Outlook® 2010or laterRMicrosoft® Office Outlook® 2013or laterHard disk 20 MB or moreVideoresolution1,024 x 768 or higherOthers RCD-ROM driveRUSB 2.0Note:RThe screen shot shown is for Microsoft OfficeOutlook 2013.RThe screen shots shown in these instructionsmay differ slightly from those of the actualproduct.RSoftware features and appearance are subjectto change without notice.Installing the “Telephone Plug-in”Before installing “Telephone Plug-in”, make sure ofthe following:– Microsoft Office Outlook is installed on yourcomputer.– The base unit is not connected to your computerwith the mini USB cable (until instructed to doso).1Start Windows and exit all other applications.RYou must be logged in as an administratorin order to install “Telephone Plug-in”.2Insert the included CD-ROM into yourCD-ROM drive.RClick [Setup.exe] when prompted. If theinstallation does not start, see page 77.3When the language selection window isdisplayed, select the desired language andclick [Next].4When the “Telephone Plug-in” window isdisplayed, click [Next].5Read the license agreement carefully.If you accept the terms of the licenseagreement, check the box and click [Next].6When the “Telephone Plug-in” install shieldwizard is displayed, click [Install].7When installation is finished, click [Finish] tocomplete the installation. Then remove theCD-ROM from your CD-ROM drive.Uninstalling the “Telephone Plug-in”1Exit all applications and disconnect the miniUSB cable from your computer.2To uninstall “Telephone Plug-in”, perform thefollowing procedure:From the Start menu:32 For assistance, please visit http://www.panasonic.com/helpCall from Outlook® (Telephone Plug-in)TG958x_0704_ver031.pdf 32 2014/07/04 10:32:26](https://usermanual.wiki/Panasonic-of-North-America/96NKX-TG9581.Users-Manual/User-Guide-2334562-Page-32.png)
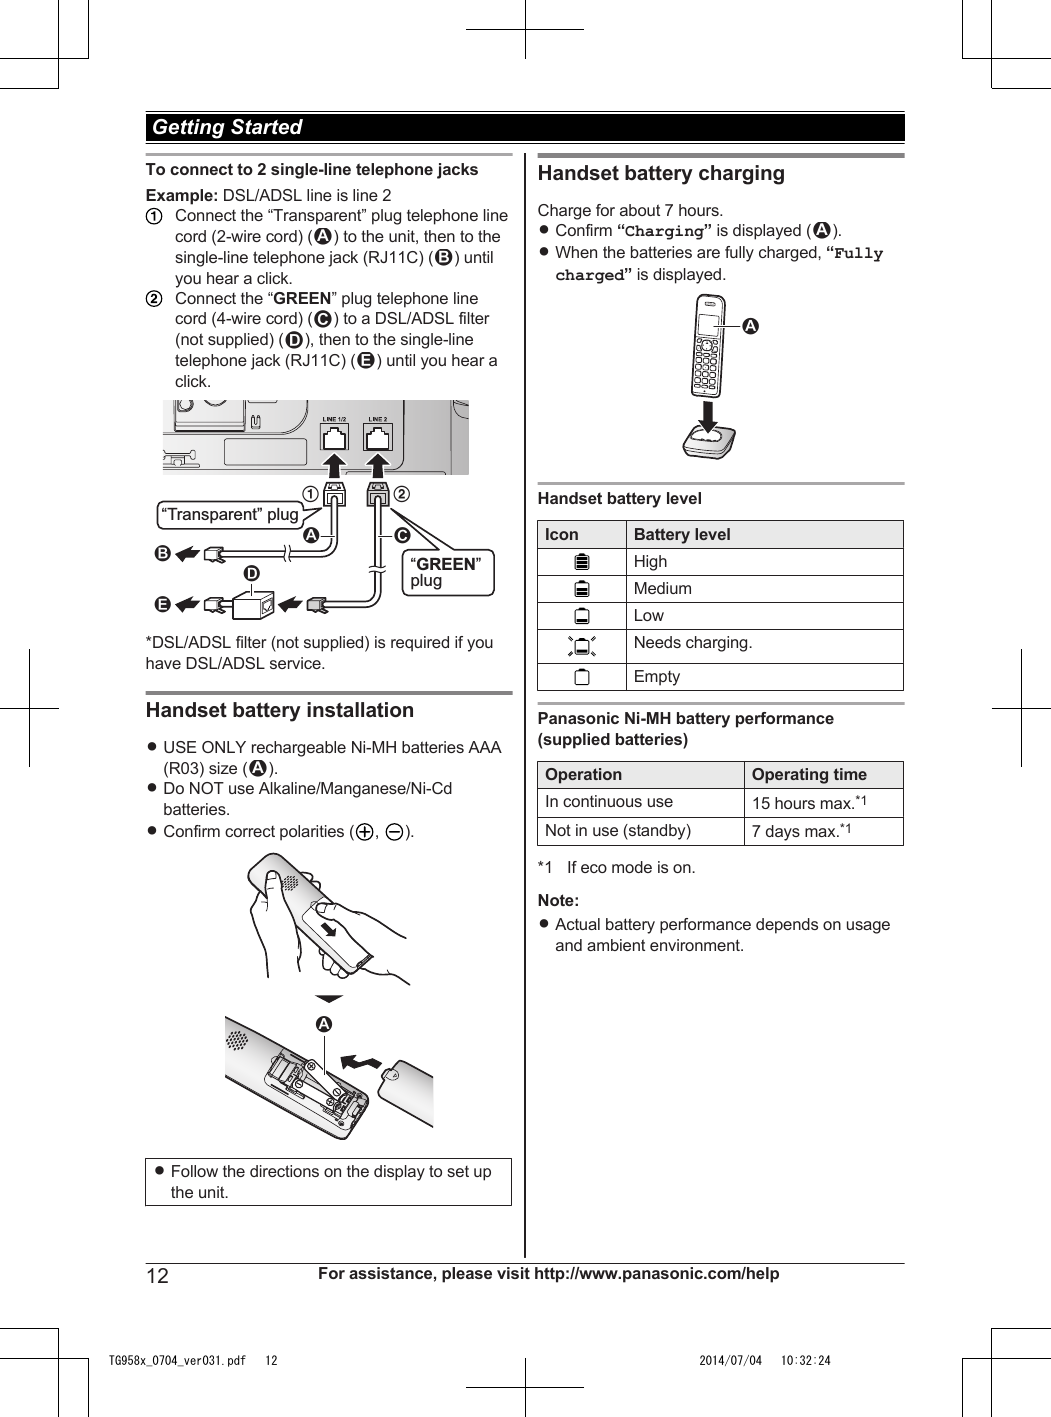
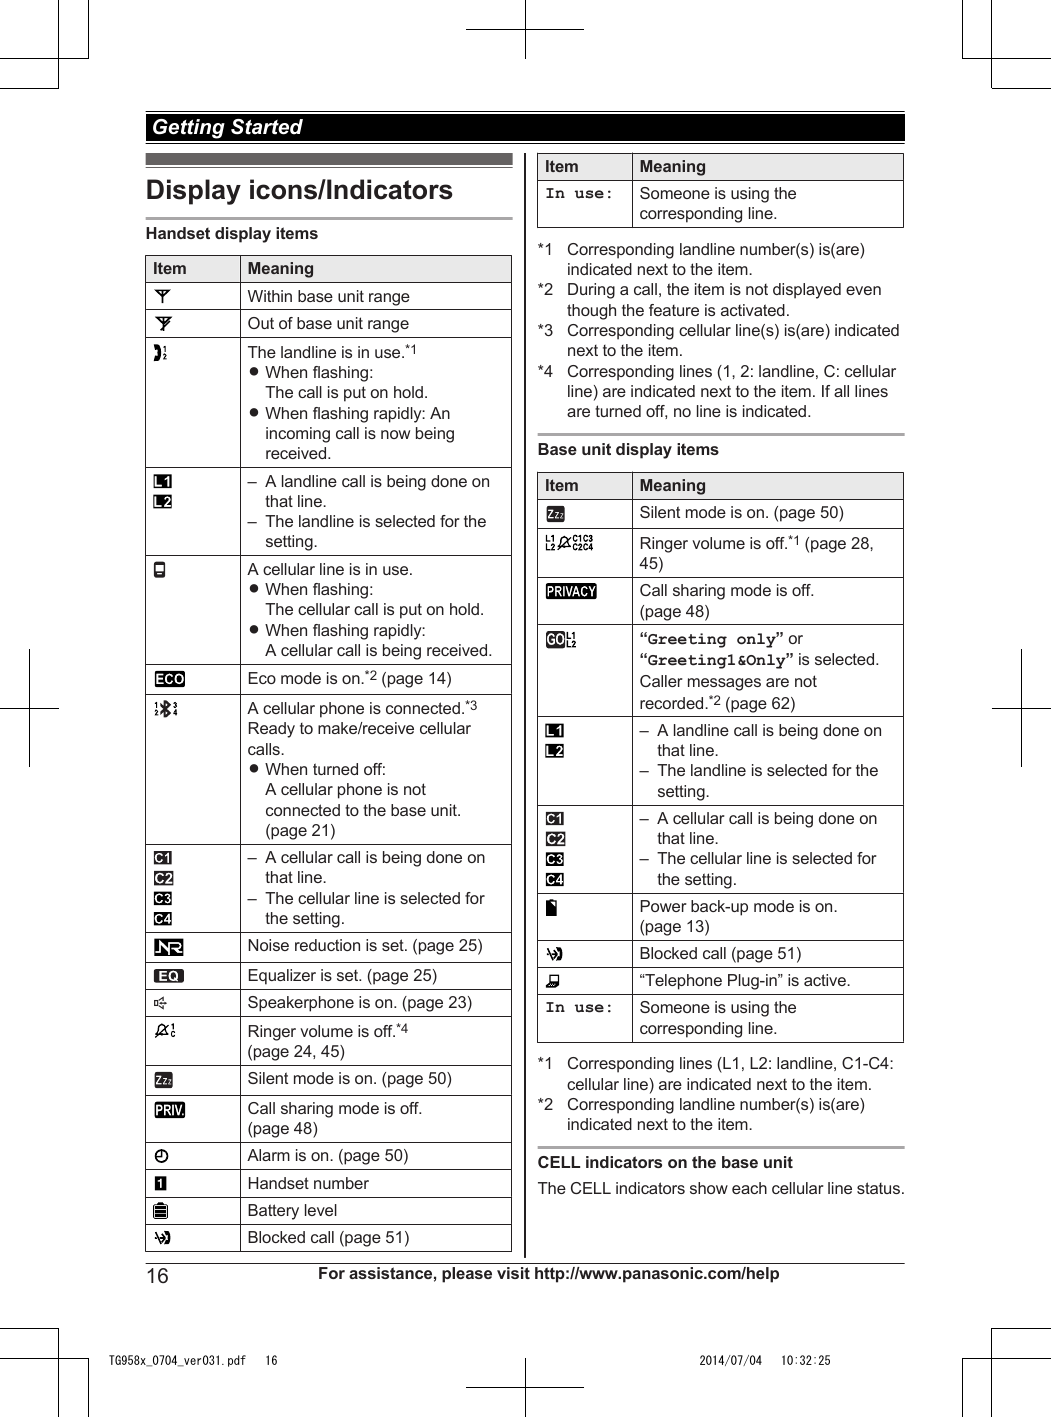
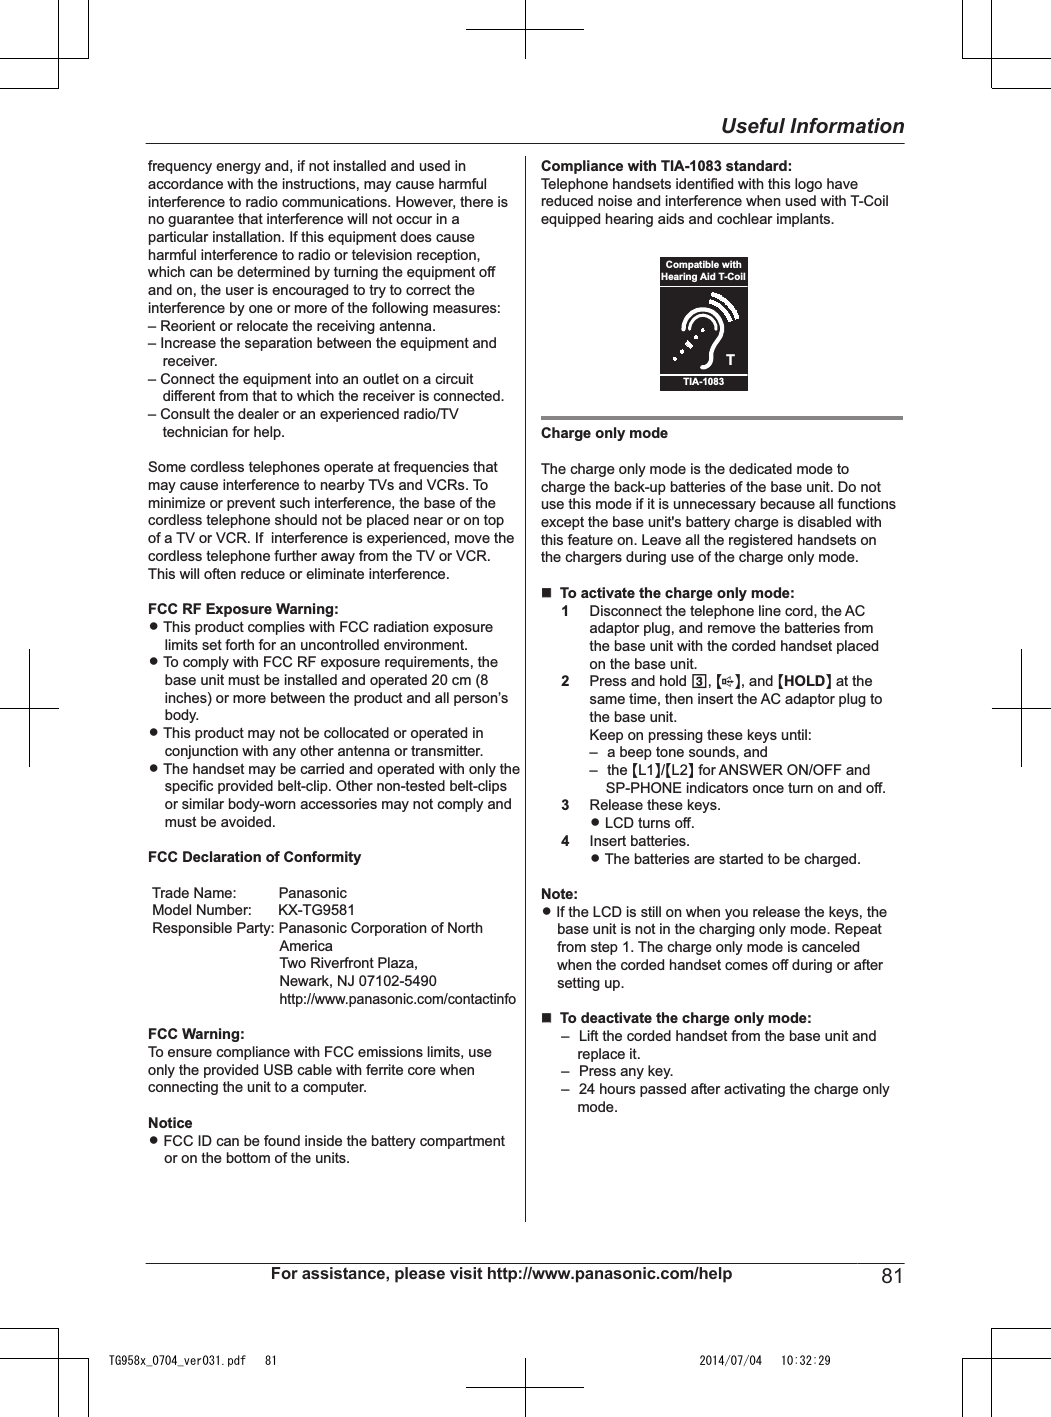
![Point to [All Programs] a [Panasonic] a[Telephone Plug-in], and click [Uninstall].3When the uninstall confirmation window isdisplayed, click [Yes] to start uninstallation.4When uninstallation is finished, click [Finish]to exit the uninstallation.Connecting a computer to the baseunit with mini USB cable“Telephone Plug-in” must be installed beforeconnecting the base unit to your computer.Note:RWhen a call is made or received on a landline orcellular line by “Telephone Plug-in” of Outlook inyour computer, the base unit speakerphone isactivated. You may lift the corded handset toswitch from the speakerphone to the cordedhandset.Making calls from OutlookWhen “Telephone Plug-in” is installed correctly, atoolbar appears in the Microsoft Office Outlookdisplay. You can use the following lists of thetoolbar.– Contact list for Microsoft Outlook– Caller list– Redial list– Speed dial listYou can also make calls by entering a phonenumber in the toolbar.Note:RMake sure that the corded handset is placed onthe cradle of base unit before making calls fromOutlook. When the base unit is in use, youcannot use the feature of “Call from Outlook(Telephone Plug-in)”.Making a call from the MicrosoftOutlook contact listn Microsoft Office Outlook 2013 users1332n Microsoft Office Outlook 2007/2010/2013users1233Microsoft Office Outlook 2010/2013 users1Find and open the desired contact.2Click [Phone numbersC]. ----(A)3Click the phone number you want to call.----(B)4Using a landline:Click [Call from line1] or [Call from line2] toselect the desired line. ----(C)Using a cellular line:Click [Call from cellC], and click the desiredcellular line list ([Cell1]*1 to [Cell4]*1). ----(C)*1 After the Bluetooth device is paired, thedevice name is displayed.RThe base unit automatically dials thenumber with the speakerphone.Microsoft Office Outlook 2007 users1Find and double click the desired contact.For assistance, please visit http://www.panasonic.com/help 33Call from Outlook® (Telephone Plug-in)TG958x_0704_ver031.pdf 33 2014/07/04 10:32:26](https://usermanual.wiki/Panasonic-of-North-America/96NKX-TG9581.Users-Manual/User-Guide-2334562-Page-33.png)
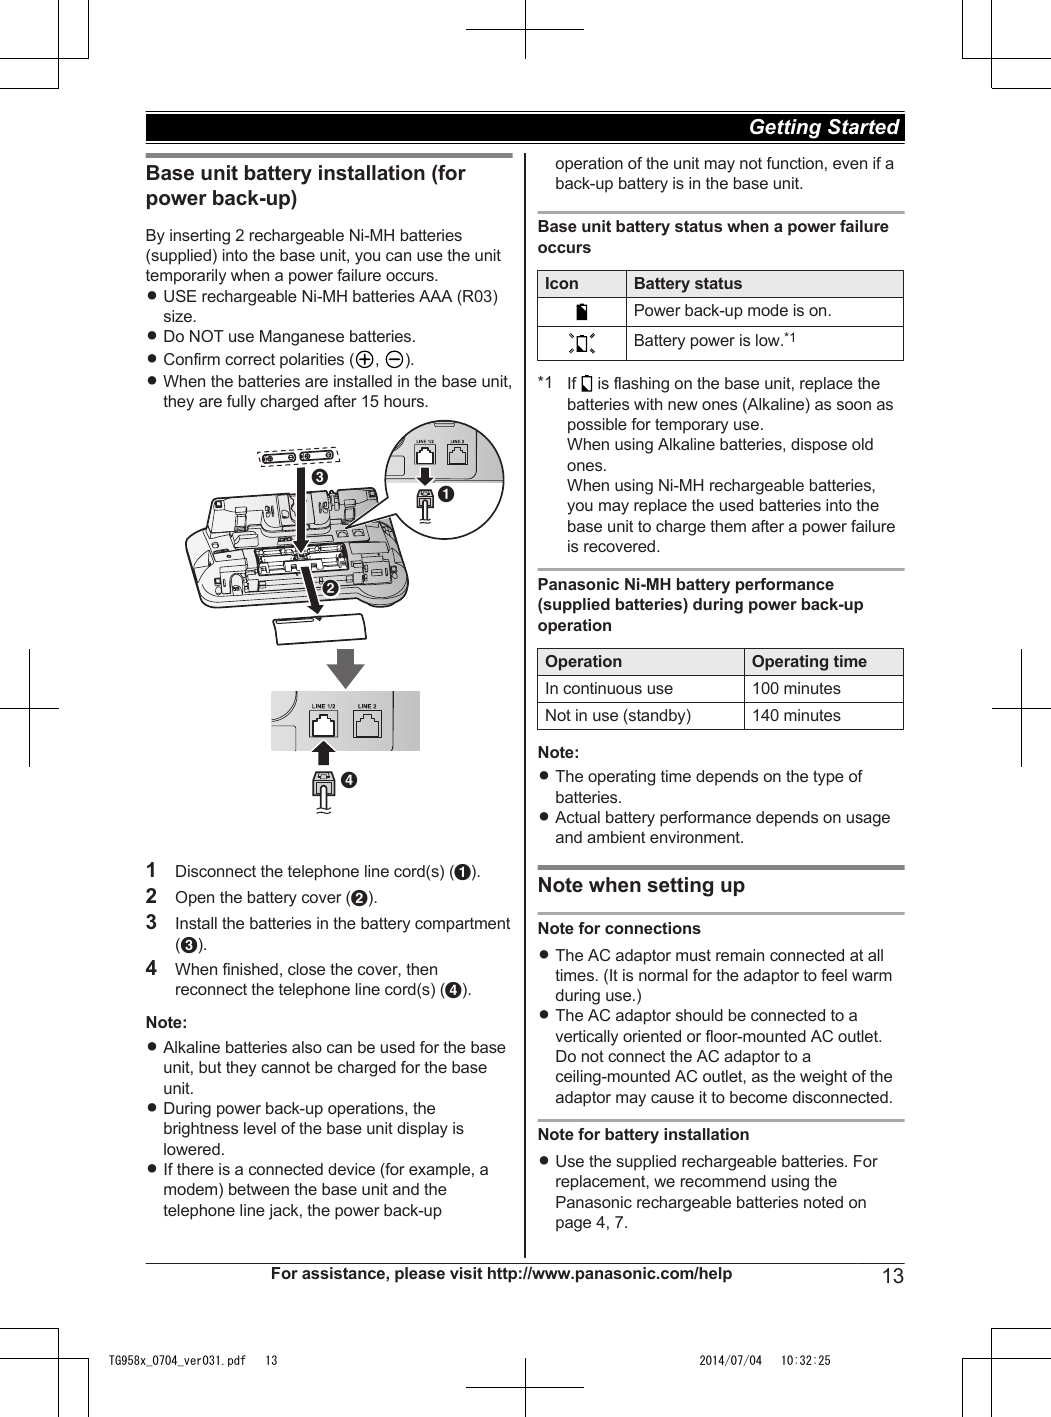
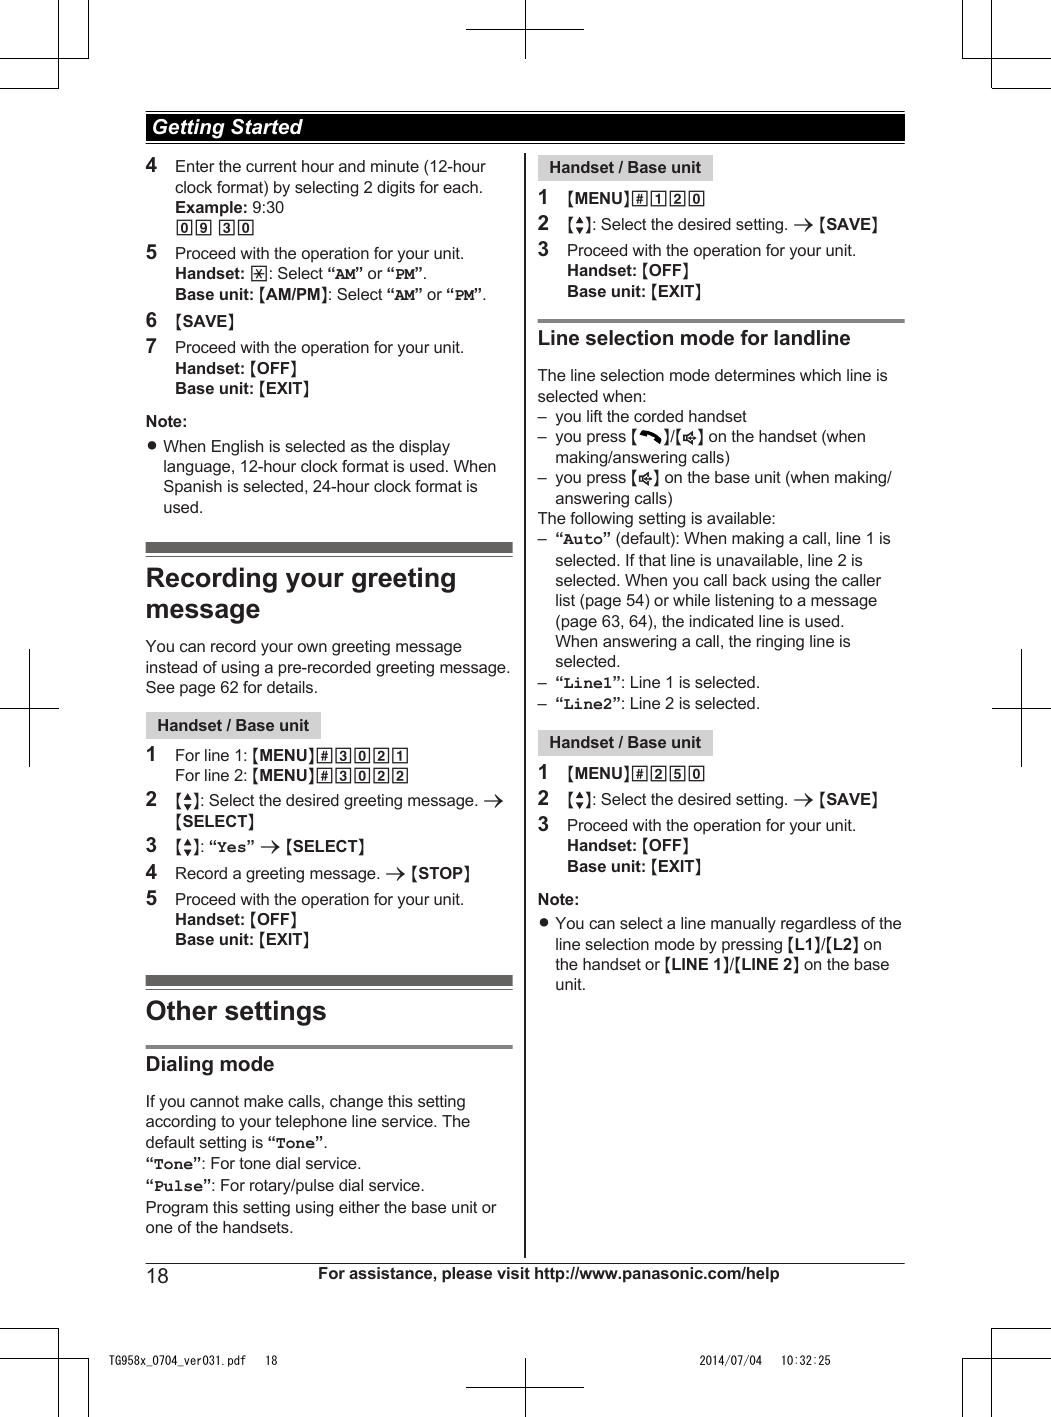
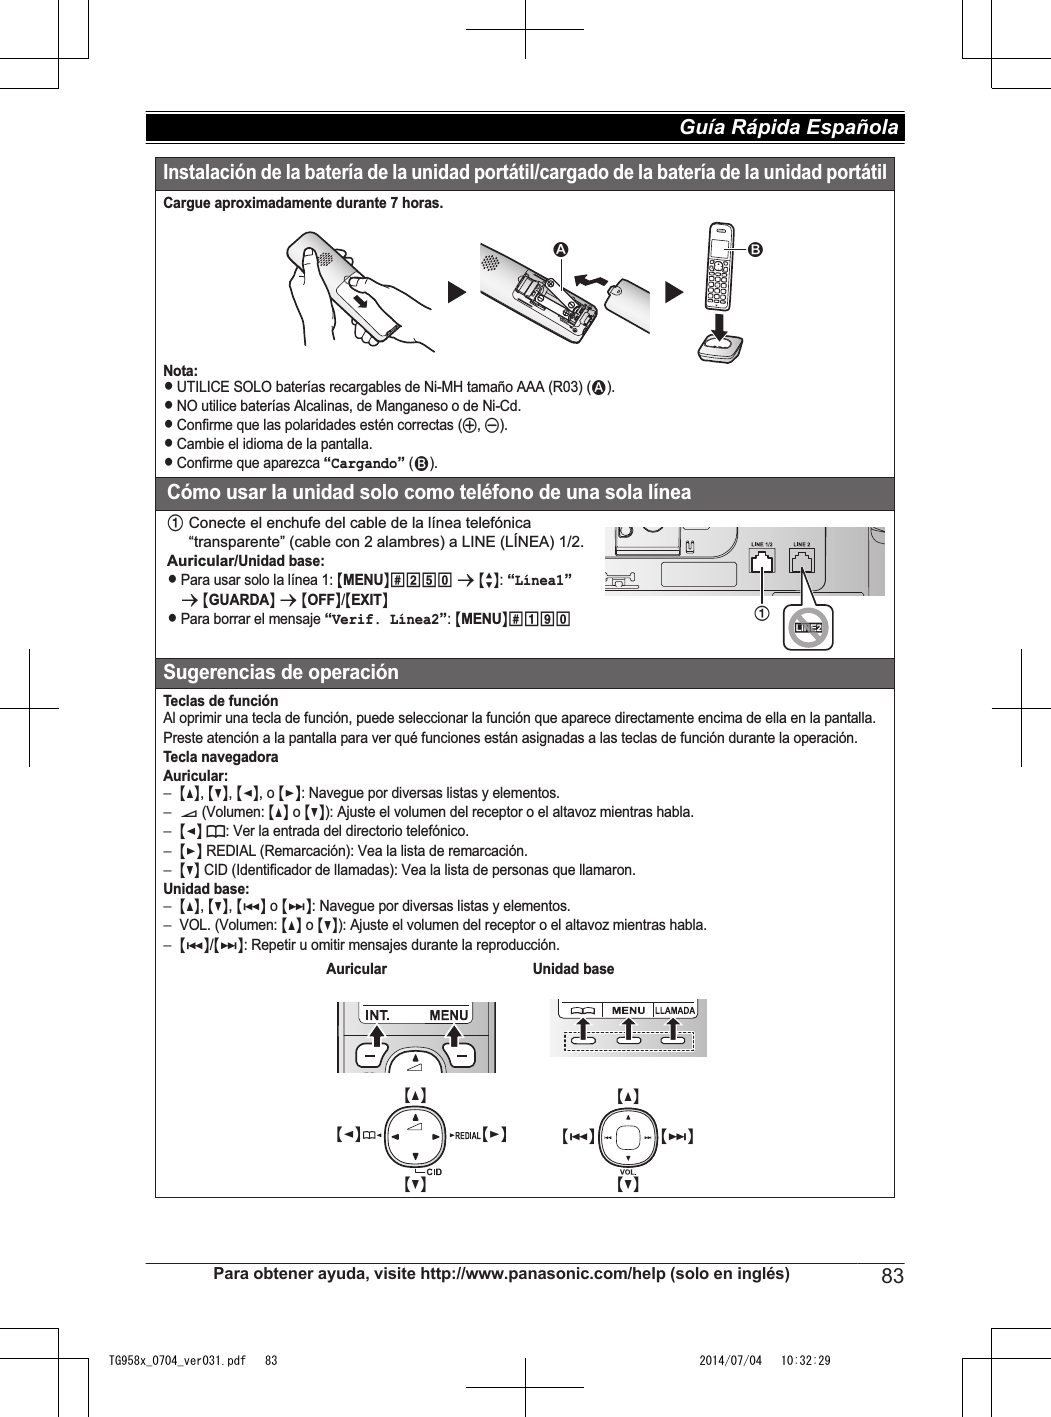
![2Using a landline:Click [Call from line1] or [Call from line2] toselect the desired line. ----(C)Using a cellular line:Click [Call from cellC], and click the desiredcellular line list ([Cell1]*1 to [Cell4]*1). ----(C)*1 After the Bluetooth device is paired, thedevice name is displayed.3Click [Phone numbersC]. ----(A)4Click the phone number you want to call.----(B)RThe base unit automatically dials thenumber with the speakerphone.Making a call from the caller listThe last 10 caller information is stored in the callerlist.1332Microsoft Office Outlook 2010/2013 users1Click [Caller listC]. ----(A)2Click the phone number you want to call.----(B)3Using a landline:Click [Call from line1] or [Call from line2] toselect the desired line. ----(C)Using a cellular line:Click [Call from cellC], and click the desiredcellular line list ([Cell1]*1 to [Cell4]*1). ----(C)*1 After the Bluetooth device is paired, thedevice name is displayed.Microsoft Office Outlook 2007 users1Using a landline:Click [Call from line1] or [Call from line2] toselect the desired line. ----(C)Using a cellular line:Click [Call from cellC], and click the desiredcellular line list ([Cell1]*1 to [Cell4]*1). ----(C)*1 After the Bluetooth device is paired, thedevice name is displayed.2Click [Caller listC]. ----(A)3Click the phone number you want to call.----(B)Making a call from the redial listWhen you are using functions other than thecontact list, you can make a call from the rediallist. Confirm [Dial number] is displayed in thetoolbar. The last 20 phone numbers dialed arestored in the redial list (each 24 digits max.).Microsoft Office Outlook 2010/2013 users1Click [C] displayed to the right of [Dialnumber].2Click the phone number you want to call.3Using a landline:Click [Call from line1] or [Call from line2] toselect the desired line.Using a cellular line:Click [Call from cellC], and click the desiredcellular line list ([Cell1]*1 to [Cell4]*1).*1 After the Bluetooth device is paired, thedevice name is displayed.Microsoft Office Outlook 2007 users1Using a landline:Click [Call from line1] or [Call from line2] toselect the desired line.Using a cellular line:Click [Call from cellC], and click the desiredcellular line list ([Cell1]*1 to [Cell4]*1).*1 After the Bluetooth device is paired, thedevice name is displayed.2Click [C] displayed to the right of [Dialnumber].3Click the phone number you want to call.Making a call by entering a phonenumber in the toolbar12234 For assistance, please visit http://www.panasonic.com/helpCall from Outlook® (Telephone Plug-in)TG958x_0704_ver031.pdf 34 2014/07/04 10:32:26](https://usermanual.wiki/Panasonic-of-North-America/96NKX-TG9581.Users-Manual/User-Guide-2334562-Page-34.png)
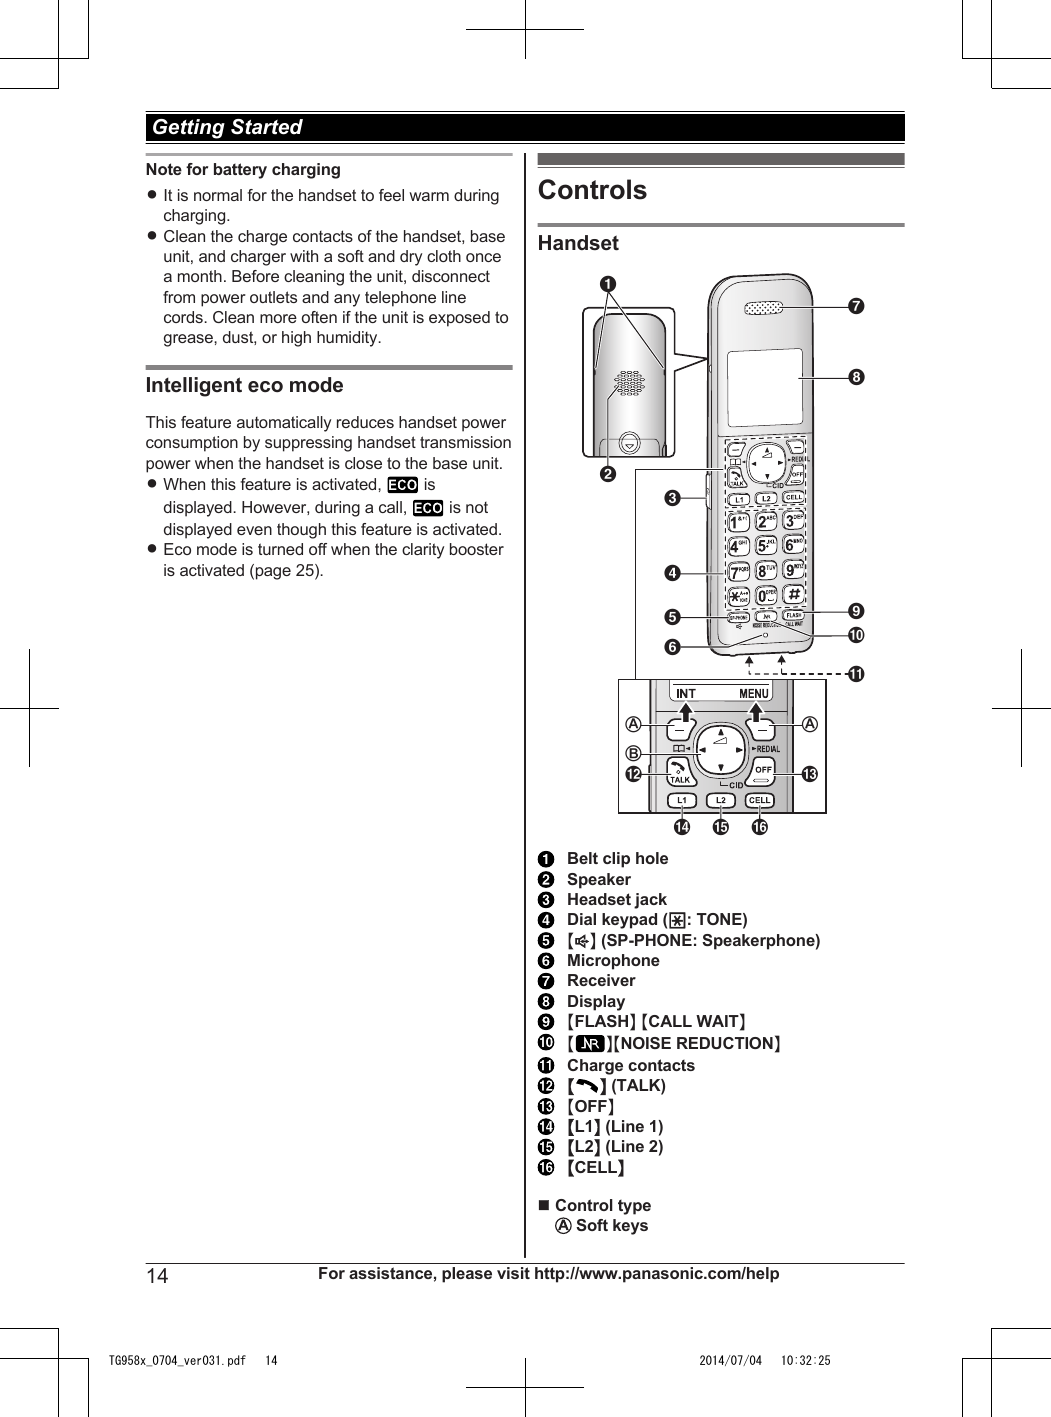
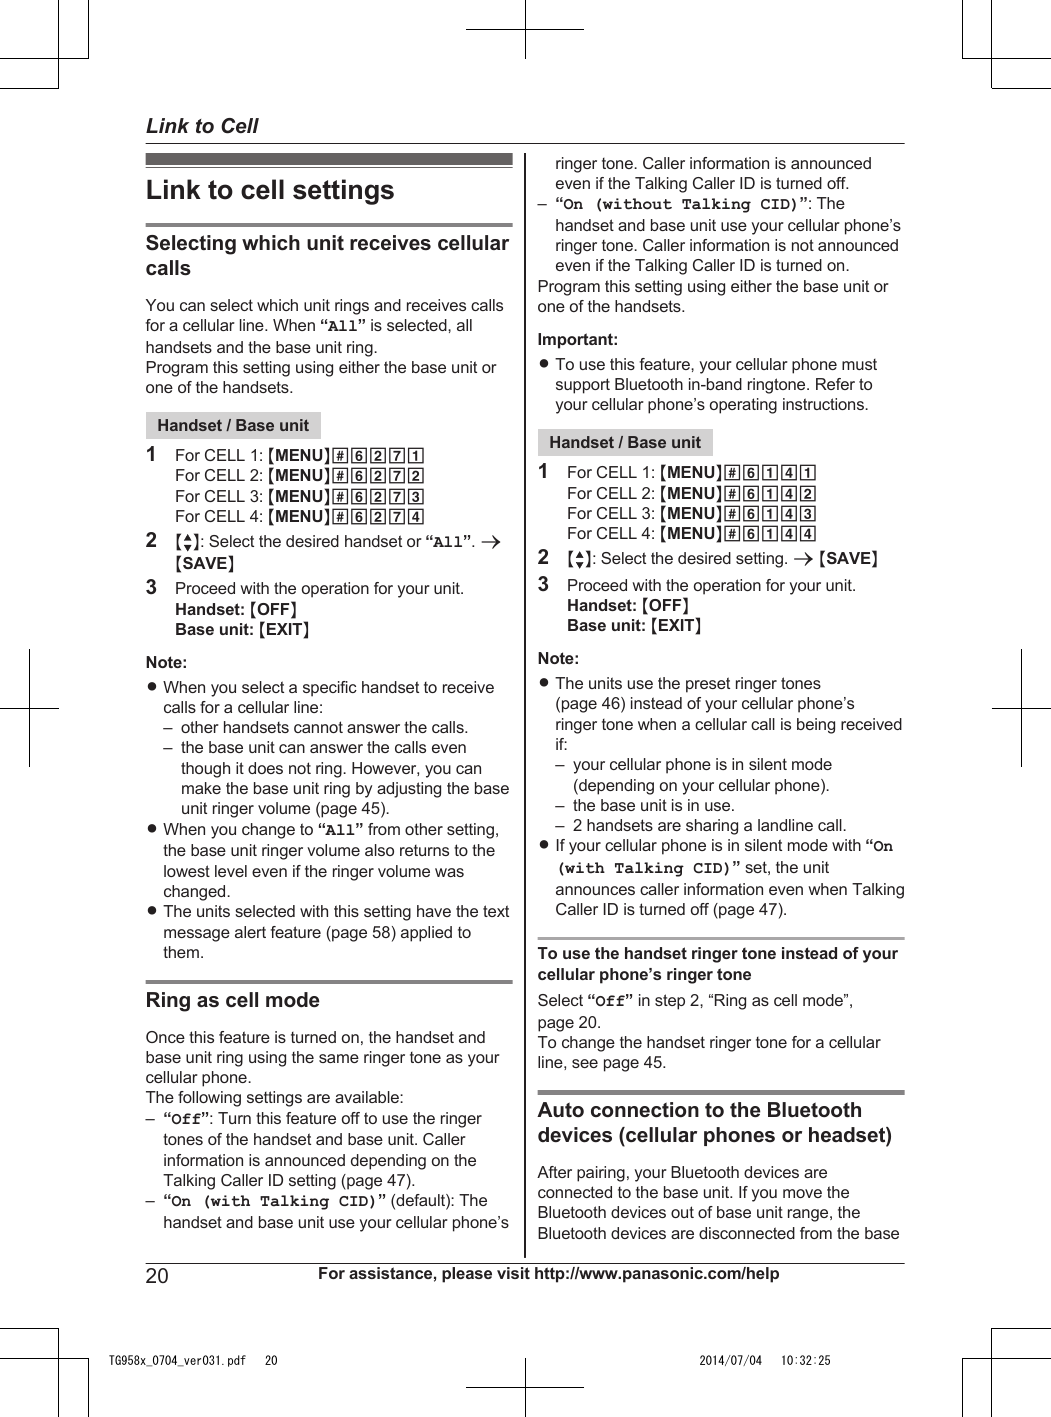
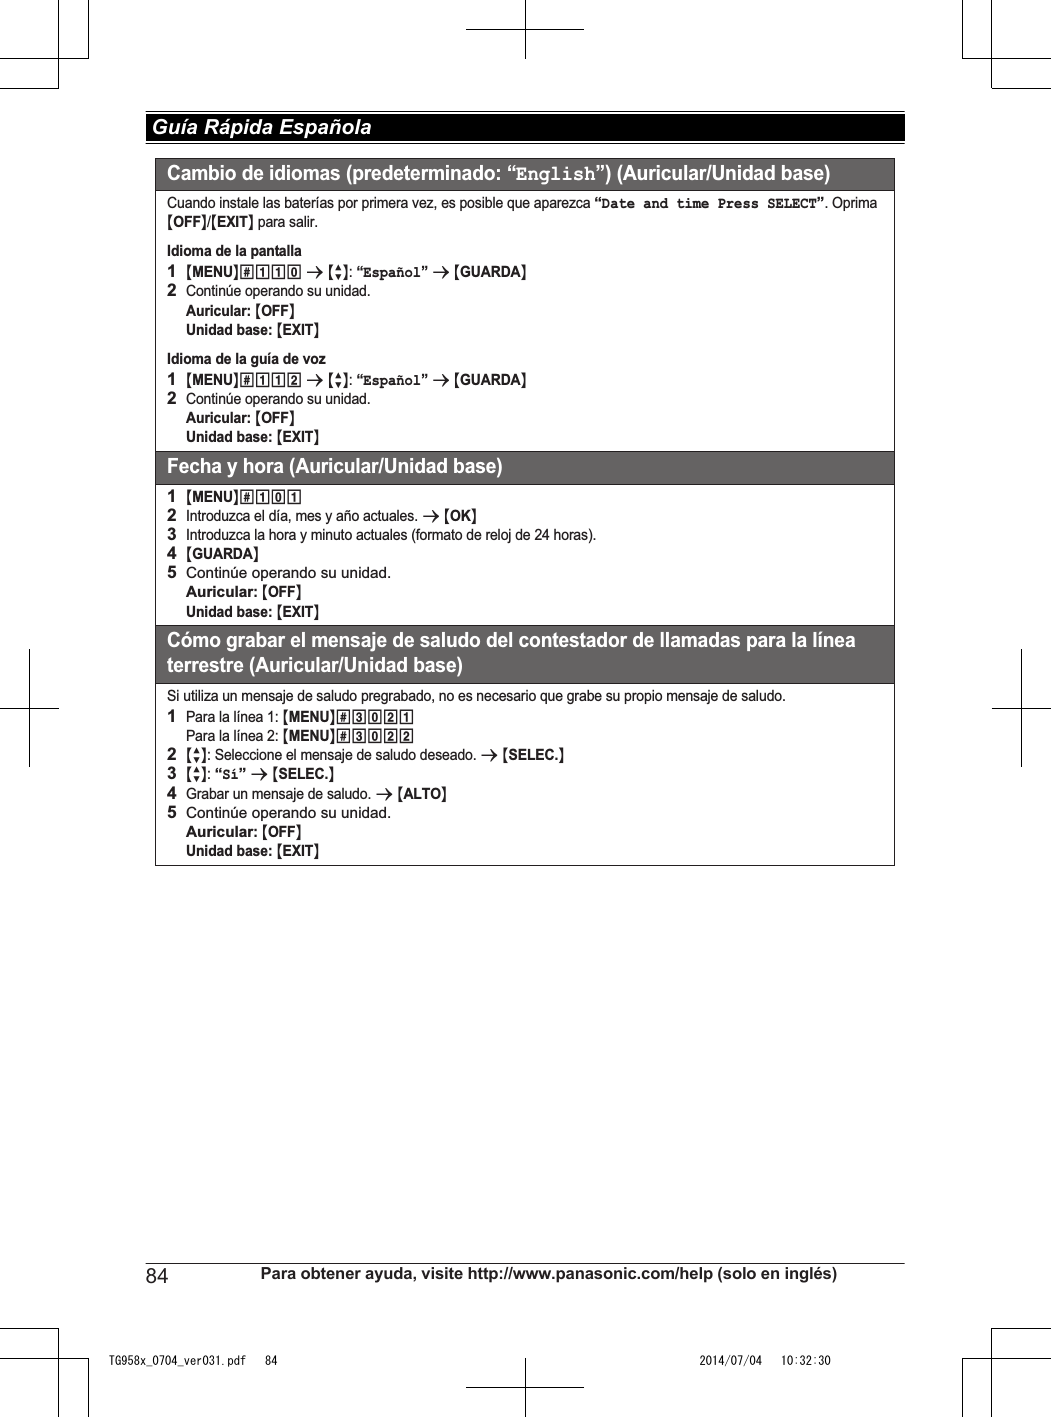
![122Microsoft Office Outlook 2010/2013 users1Enter the phone number in the toolbar. ----(A)ROnly the following keys are accepted (max.24 digits):0 to 9, H, #, p (Pause), and f (Flash)2Using a landline:Click [Call from line1] or [Call from line2] toselect the desired line. ----(B)Using a cellular line:Click [Call from cellC], and click the desiredcellular line list ([Cell1]*1 to [Cell4]*1). ----(B)*1 After the Bluetooth device is paired, thedevice name is displayed.Microsoft Office Outlook 2007 users1Using a landline:Click [Call from line1] or [Call from line2] toselect the desired line. ----(B)Using a cellular line:Click [Call from cellC], and click the desiredcellular line list ([Cell1]*1 to [Cell4]*1). ----(B)*1 After the Bluetooth device is paired, thedevice name is displayed.2Enter the phone number in the toolbar. ----(A)ROnly the following keys are accepted (max.24 digits):0 to 9, H, #, p (Pause), and f (Flash)3Press the Enter key on your computer to dialthe number.Hanging up a callWhen you finish a call, press MN on the base unit.orUsing a landline:Click [Disconnect line1] or [Disconnect line2] inthe toolbar.Using a cellular line:Click [Disconnect cellC] in the toolbar, and clickthe desired cellular line list ([Cell1]*1 to [Cell4]*1).*1 After the Bluetooth device is paired, the devicename is displayed.Speed dial from OutlookYou can add 10 names (32 characters max.) andphone numbers (24 digits max.) to the speed diallist.Adding phone numbers to the speeddial123Microsoft Office Outlook 2007/2010/2013 users1Click [Speed dialC] ----(A)2Select the number that has no entry. ----(B)3Click [Add] to entry the name/telephonenumber. ----(C)4Enter the party’s name and phone number.5Click [Save].Editing an entryMicrosoft Office Outlook 2007/2010/2013 users1Click [Speed dialC].2Select the desired speed dial.3Click [Edit].4Edit the name and phone number if necessary.5Click [Save].Erasing an entryMicrosoft Office Outlook 2007/2010/2013 users1Click [Speed dialC].2Select the desired speed dial.3Click [Erase].4Click [Yes].For assistance, please visit http://www.panasonic.com/help 35Call from Outlook® (Telephone Plug-in)TG958x_0704_ver031.pdf 35 2014/07/04 10:32:26](https://usermanual.wiki/Panasonic-of-North-America/96NKX-TG9581.Users-Manual/User-Guide-2334562-Page-35.png)
![Making a callMicrosoft Office Outlook 2010/2013 users1Click [Speed dialC].2Select the phone number you want to call.3Click [Call].4Using a landline:Click [Call from line1] or [Call from line2] toselect the desired line.Using a cellular line:Click [Call from cellC], and click the desiredcellular line list ([Cell1]*1 to [Cell4]*1).*1 After the Bluetooth device is paired, thedevice name is displayed.Microsoft Office Outlook 2007 users1Using a landline:Click [Call from line1] or [Call from line2] toselect the desired line.Using a cellular line:Click [Call from cellC], and click the desiredcellular line list ([Cell1]*1 to [Cell4]*1).*1 After the Bluetooth device is paired, thedevice name is displayed.2Click [Speed dialC].3Select the phone number you want to call.4Click [Call].Answering calls fromOutlookWhen a call is received on “Telephone Plug-in” ofOutlook, caller information is displayed on apop-up window of your computer.To answer the call from Outlook, perform thefollowing operation depending on your selectedpop-up window (page 36).–“Contact list” (default):Using a landline:Click [Answer to line1] or [Answer to line2] inthe toolbar.Using a cellular line:Click [Answer to cellC] in the toolbar, and clickthe desired cellular line list ([Cell1]*1 to[Cell4]*1).*1 After the Bluetooth device is paired, thedevice name is displayed.–“Simple window”: Click [Answer].After an answer key is clicked, the base unitautomatically turns on the speakerphone andanswers via the speakerphone.RWhen you receive a call from the phone numberstored in the call block list, “Telephone Plug-in”does not display a pop-up window.RIf the caller’s phone number does not match acontact in the Microsoft Office Outlook contactlist, a new contact window is displayed with theCaller ID information for the caller (if the CallerID information contains the name and phonenumber). You can edit the contact information inthe window and store it as a new contact.Important:RTo use “Telephone Plug-in” features, you mustsubscribe to a Caller ID service. Contact yourservice provider/telephone company for details.“Telephone Plug-in” toolbarsettings121Click [Options] in the toolbar.2Change the following settings as necessary.n Plug-in language ----(A)You can select “English”, “Français”, or“Español”.n Caller Information ----(B)You can select a desired setting for the pop-upwindow by each line.Landline: “Line1”/“Line2”Cellular line: “Cell1” to “Cell4”–“Contact list” (default): Displays aMicrosoft Office Outlook contact window.–“Simple window”: Displays a simplewindow showing used line, caller’s nameand phone number.–“Off”: Does not display a pop-up window.3Click [OK] to complete the changes.36 For assistance, please visit http://www.panasonic.com/helpCall from Outlook® (Telephone Plug-in)TG958x_0704_ver031.pdf 36 2014/07/04 10:32:26](https://usermanual.wiki/Panasonic-of-North-America/96NKX-TG9581.Users-Manual/User-Guide-2334562-Page-36.png)

![Answering systemProblem Cause/solutionThe unit does not record newmessages.RThe answering system is turned off. Turn it on (page 61).RThe answering system does not answer or record calls fromcellular lines.RThe message memory is full. Erase unnecessary messages(page 63, 64).RThe greeting setting is set to “Greeting only” or“Greeting1&Only”. Change the setting (page 61).RYour service provider/telephone company’s voice mail servicemay be answering your calls before the unit’s answering systemcan answer your calls. Change the unit’s number of rings setting(page 67) to a lower value, or contact your service provider/telephone company.RThe answering system can only record calls from 1 line at atime.I cannot operate the answeringsystem remotely.RThe remote access code is not set. Set the remote access code(page 66).RYou are entering the wrong remote access code. If you haveforgotten your remote access code, enter the remote accesscode setting to check your current code (page 66).RThe answering system is turned off. Turn it on (page 67).RYou cannot operate the answering system when calling acellular phone paired to the base unit.The unit does not emit thespecified number of rings.RIf the first ring is turned off, the number of rings decreases by 1from the specified number of rings.Call from Outlook (Telephone Plug-in)Problem Cause/solutionIf the installer program does notstart automatically.RDouble click [Setup.exe] in your CD-ROM drive folder to startinstalling.A pop-up window (MicrosoftOffice Outlook contact list) is notdisplayed when a call is received.RCaller information indication in the “Telephone Plug-in” setting isset to “Off”. Set it to “Contact list” or “Simple window”(page 36).RIf more than 5,000 entries are stored in the contact list, pop-upwindows may not be displayed. Erase entries from the contactlist so that the number of stored entries is 5,000 or less.RThe base unit is in use.“Invalid phone number” isdisplayed and I cannot make acall from the Microsoft Outlookcontact list.RIf you entered 25 or more digits for the phone number in thetoolbar, “Telephone Plug-in” cannot dial the phone number.Enter up to 24 digits for the phone number in the toolbar.REntries other than 0 to 9, H, #, p (Pause), f (Flash) are invalid.Enter only valid digits or characters.I want to update “TelephonePlug-in”.ROnce uninstall “Telephone Plug-in”, and then re-install the latestversion of “Telephone Plug-in” (page 32). Visit our Web sitebelow to download the latest version of “Telephone Plug-in”.http://www.panasonic.com/supportFor assistance, please visit http://www.panasonic.com/help 77Useful InformationTG958x_0704_ver031.pdf 77 2014/07/04 10:32:29](https://usermanual.wiki/Panasonic-of-North-America/96NKX-TG9581.Users-Manual/User-Guide-2334562-Page-77.png)

![Llamadas desde Outlook® (Interconexión del teléfono)Si instala el “Interconexión del teléfono” software para Microsoft® Office Outlook® que viene en el CD-ROM suministrado y conecta la unidad base y su computadora con el cable USB mini, las siguientes funciones estarán disponibles:−Puede hacer o recibir llamadas de línea o celular desde la “Interconexión del teléfono” de Microsoft Office Outlook mediante la unidad base.−La información del que llama se muestra en una ventana desplegable que aparece en su computadora al recibir una llamada.Puede hacer llamadas desde OutlookN Para usuarios de Microsoft Office Outlook 2010/2013Cómo hacer llamadas desde la lista de contactos de Microsoft Outlook 2010/20131Encuentre y abra el contacto deseado.2Haga clic en [Núm. teléf.V].3Haga clic en el número telefónico al que desea llamar.4Usando una línea fija:Haga clic [Llamar línea 1] o [Llamar línea 2] para seleccionar la línea deseada.Usando una línea de celular:Haga clic en [Llamar cel.V] y haga clic en la lista de líneas de celular deseada ([Cel.1]*1 de [Cel.4]*1).*1 Cuando el dispositivo con Bluetooth está vinculado, se muestra su nombre.Cómo hacer llamadas desde la lista de llamadas1Haga clic en [Lista LlamadaV].2Haga clic en el número telefónico al que desea llamar.3Usando una línea fija:Haga clic [Llamar línea 1] o [Llamar línea 2] para seleccionar la línea deseada.Usando una línea de celular:Haga clic en [Llamar cel.V] y haga clic en la lista de líneas de celular deseada ([Cel.1]*1 de [Cel.4]*1).*1 Cuando el dispositivo con Bluetooth está vinculado, se muestra su nombre.Cómo hacer una llamada usando la lista de remarcación1Haga clic en [V] que está a la derecha de [Marcar núm.].2Haga clic en el número telefónico al que desea llamar.3Usando una línea fija:Haga clic [Llamar línea 1] o [Llamar línea 2] para seleccionar la línea deseada.Usando una línea de celular:Haga clic en [Llamar cel.V] y haga clic en la lista de líneas de celular deseada ([Cel.1]*1 de [Cel.4]*1).*1 Cuando el dispositivo con Bluetooth está vinculado, se muestra su nombre.Cómo hacer llamadas al introducir un número telefónico en la barra de herramientas1Introduzca el número telefónico en la barra de herramientas.2Usando una línea fija:Haga clic [Llamar línea 1] o [Llamar línea 2] para seleccionar la línea deseada.Usando una línea de celular:Haga clic en [Llamar cel.V] y haga clic en la lista de líneas de celular deseada ([Cel.1]*1 de [Cel.4]*1).*1 Cuando el dispositivo con Bluetooth está vinculado, se muestra su nombre.Para obtener ayuda, visite http://www.panasonic.com/help (solo en inglés) 89Guía Rápida Española TG958x_0704_ver031.pdf 89 2014/07/04 10:32:30](https://usermanual.wiki/Panasonic-of-North-America/96NKX-TG9581.Users-Manual/User-Guide-2334562-Page-89.png)
![N Para usuarios de Microsoft Office Outlook 2007Cómo hacer llamadas desde la lista de contactos de Microsoft Outlook 20071Encuentre y haga doble clic en el contacto deseado.2Usando una línea fija:Haga clic [Llamar línea 1] o [Llamar línea 2] para seleccionar la línea deseada.Usando una línea de celular:Haga clic en [Llamar cel.V] y haga clic en la lista de líneas de celular deseada ([Cel.1]*1 de [Cel.4]*1).*1 Cuando el dispositivo con Bluetooth está vinculado, se muestra su nombre.3Haga clic en [Núm. teléf.V].4Haga clic en el número telefónico al que desea llamar.Cómo hacer llamadas desde la lista de llamadas1Usando una línea fija:Haga clic [Llamar línea 1] o [Llamar línea 2] para seleccionar la línea deseada.Usando una línea de celular:Haga clic en [Llamar cel.V] y haga clic en la lista de líneas de celular deseada ([Cel.1]*1 de [Cel.4]*1).*1 Cuando el dispositivo con Bluetooth está vinculado, se muestra su nombre.2Haga clic en [Lista LlamadaV].3Haga clic en el número telefónico al que desea llamar.Cómo hacer una llamada usando la lista de remarcación1Usando una línea fija:Haga clic [Llamar línea 1] o [Llamar línea 2] para seleccionar la línea deseada.Usando una línea de celular:Haga clic en [Llamar cel.V] y haga clic en la lista de líneas de celular deseada ([Cel.1]*1 de [Cel.4]*1).*1 Cuando el dispositivo con Bluetooth está vinculado, se muestra su nombre.2Haga clic en [V] que está a la derecha de [Marcar núm.].3Haga clic en el número telefónico al que desea llamar.Cómo hacer llamadas al introducir un número telefónico en la barra de herramientas1Usando una línea fija:Haga clic [Llamar línea 1] o [Llamar línea 2] para seleccionar la línea deseada.Usando una línea de celular:Haga clic en [Llamar cel.V] y haga clic en la lista de líneas de celular deseada ([Cel.1]*1 de [Cel.4]*1).*1 Cuando el dispositivo con Bluetooth está vinculado, se muestra su nombre.2Introduzca el número telefónico en la barra de herramientas.3Pulse la tecla Intro de su computadora para marcar el número.Cómo colgar una llamadaCuando termine una llamada, presione {s} en la unidad base, o bien,Usando una línea fija:Haga clic en [Descon. línea 1] o [Descon. línea 2] en la barra de herramientas.Usando una línea de celular:Haga clic en [Descon. cel.V] en la barra de herramientas y haga clic en la lista de líneas de celular desea ([Cel.1]*1 de [Cel.4]*1).*1 Cuando el dispositivo con Bluetooth está vinculado, se muestra su nombre.Llamadas desde Outlook® (Interconexión del teléfono)90 Para obtener ayuda, visite http://www.panasonic.com/help (solo en inglés) Guía Rápida EspañolaTG958x_0704_ver031.pdf 90 2014/07/04 10:32:30](https://usermanual.wiki/Panasonic-of-North-America/96NKX-TG9581.Users-Manual/User-Guide-2334562-Page-90.png)
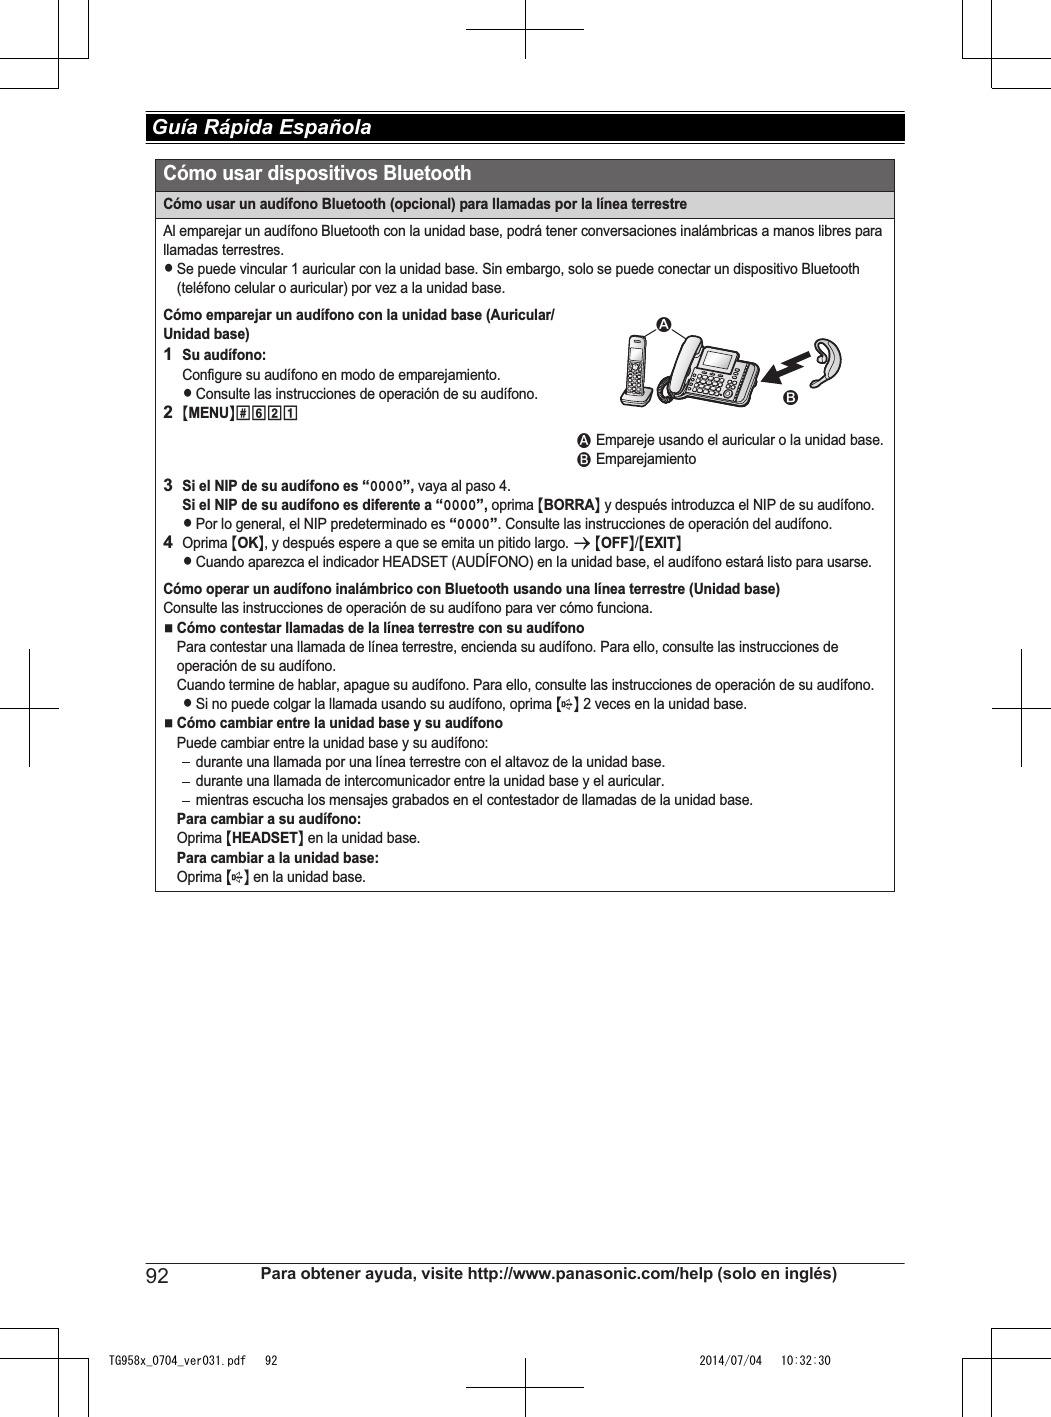
![Respuesta a llamadas de OutlookCuando se recibe una llamada en “Interconexión del teléfono” de Outlook, la información de quien llama se muestra en una ventaba emergente en su computadora.Para responder la llamada desde Outlook, realice los siguientes pasos según la ventana emergente seleccionada.−“Lista de contactos” (predeterminado): Usando una línea fija:Haga clic en [Contestar línea 1] o [Contestar línea 2] en la barra de herramientas.Usando una línea de celular:Haga clic en [Contestar cel.V] en la barra de herramientas y haga clic en la lista de líneas de celular desea ([Cel.1]*1 de [Cel.4]*1).*1 Cuando el dispositivo con Bluetooth está vinculado, se muestra su nombre.−“Ventana simple”: Presione [Contestar].Cuando se presiona una tecla de respuesta, la unidad base enciende automáticamente el altavoz y responde mediante este.Cómo usar dispositivos BluetoothCopiado de entradas del directorio telefónico desde un teléfono celular con Bluetooth (transferencia del directorio telefónico) (Auricular/Unidad base)Puede copiar entradas del directorio telefónico desde los teléfonos celulares emparejados o desde otros teléfonos celulares (no emparejados) al directorio telefónico de la unidad.1{MENU}(6182Para copiar desde teléfonos celulares emparejados: {r}: Seleccione el teléfono celular deseado. s {SELEC.}LLos elementos copiados se almacenan en el grupo (“Cel. 1” a “Cel. 4”) en el que está emparejado el teléfono celular. Para copiar desde otros teléfonos celulares (no emparejados): {r}: “Otro celular” s {SELEC.} s {r}: Seleccione el grupo al que desea copiar. s {SELEC.}3Cuando aparezca “Transf. datos del directorio del celular” : Vaya al paso 4.Cuando aparezca el menú “Selec. modo” : {r}: Seleccione “Auto” o “Manual”. s {SELEC.}“Auto”: Descargue todas las entradas del teléfono celular automáticamente. Vaya al paso 5.“Manual”: Copie las entradas que seleccionó.LEl menú “Selec. modo” aparece solo cuando el teléfono celular soporta PBAP (Perfil de Acceso a Directorio Telefónico) para la conexión Bluetooth.LAlgunos teléfonos celulares quizás requieran que realice una operación en el mismo incluso si selecciona “Auto”.4Teléfono celular:Siga las instrucciones de su teléfono celular para copiar las entradas del directorio telefónico. LPara otros teléfonos celulares (no emparejados), necesita buscar y seleccionar la unidad base. Quizás requiera el NIP de Bluetooth (predeterminado: “0000”). Si su teléfono celular muestra la confirmación de la PassKey en su pantalla, siga las instrucciones para continuar.LLas entradas que se están copiando aparecen en la unidad. 5Espere a que aparezca “Completo”.6Continúe operando su unidad.Auricular: {OFF}Unidad base: {EXIT}Llamadas desde Outlook® (Interconexión del teléfono)Para obtener ayuda, visite http://www.panasonic.com/help (solo en inglés) 91Guía Rápida Española TG958x_0704_ver031.pdf 91 2014/07/04 10:32:30](https://usermanual.wiki/Panasonic-of-North-America/96NKX-TG9581.Users-Manual/User-Guide-2334562-Page-91.png)