Panasonic of North America 96NKX-WT126 DECT 6.0 Cordless Telephone Handset for PBX User Manual
Panasonic Corporation of North America DECT 6.0 Cordless Telephone Handset for PBX
UserManual.wiki
>
Panasonic of North America
>
96NKX WT126 User Manual
User Manual
Navigation menu
Upload a User Manual
Namespaces
Wiki Guide
HTML
PDF
Info
Views
User Manual
Discussion / Help
Navigation
![Please read "Important Information" on page 71 before using. Read and understandall instructions.Accessories (included)AC adaptor: 1[Part No.]PQLV219Charger: 1 Battery: 2 Belt Clip: 1[Part No.] [Part No.] [Part No.]HHR-65AAABBelt Clip Holder: 1 Battery Cover: 1 Screws and Washers: 2[Part No.] [Part No.] [Part No.]• To order accessories, call toll free 1-800-332-5368.4Before Initial UseBefore Initial Use](https://usermanual.wiki/Panasonic-of-North-America/96NKX-WT126/User-Guide-1348775-Page-4.png)
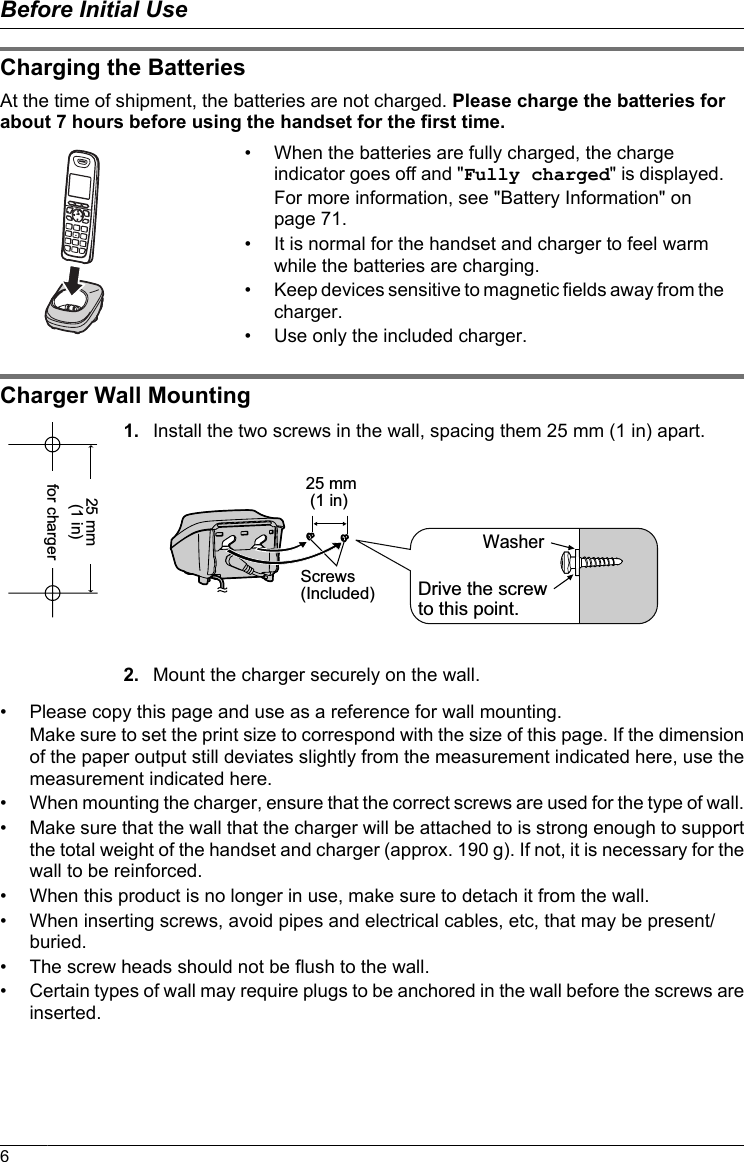
![Attaching the Belt ClipYou can attach the handset to your belt by following the steps below.[To attach]1Insert the clip into the designated notches inthe handset.2Slide the clip into the holder until it clicks.[To remove]1Make sure to turn the handset 180° when youtake it off.2Remove the belt clip.7Before Initial Use](https://usermanual.wiki/Panasonic-of-North-America/96NKX-WT126/User-Guide-1348775-Page-7.png)
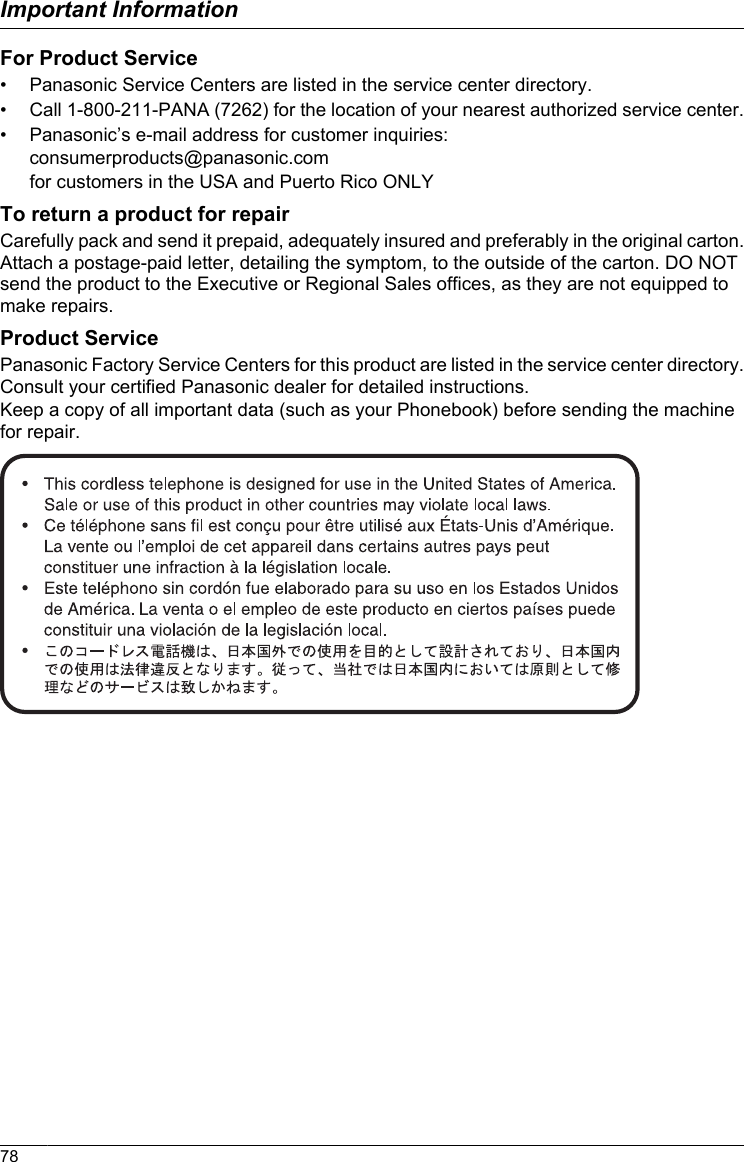
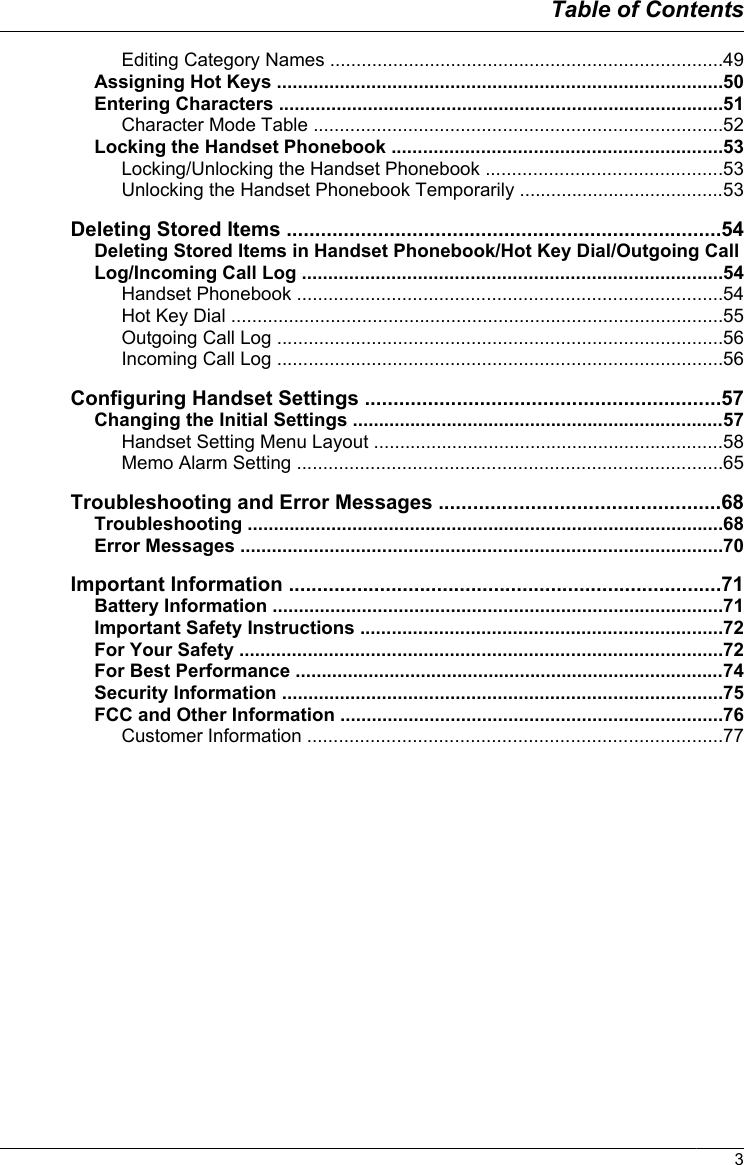
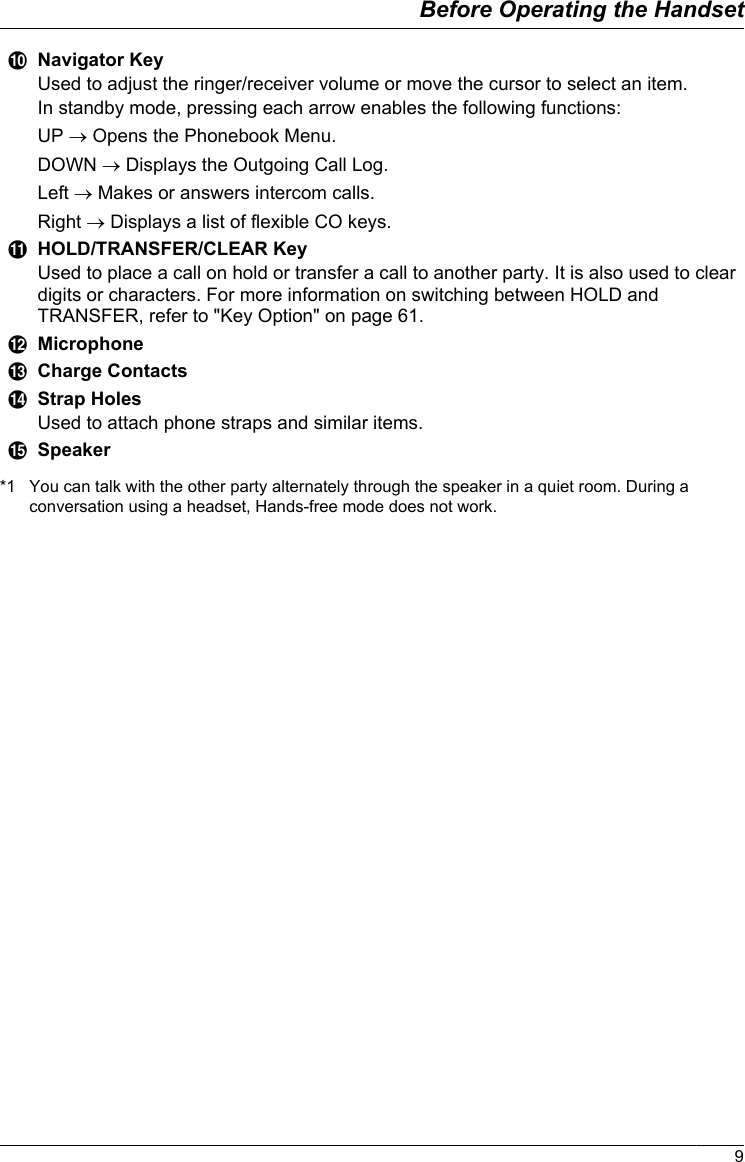
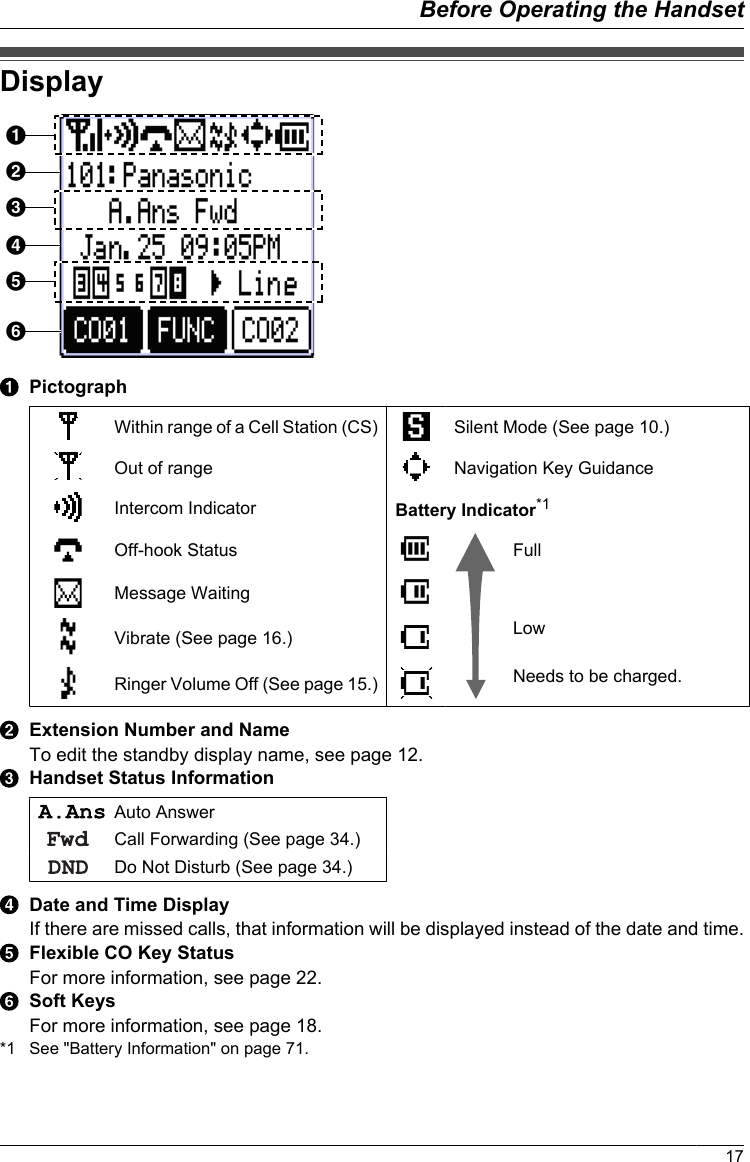
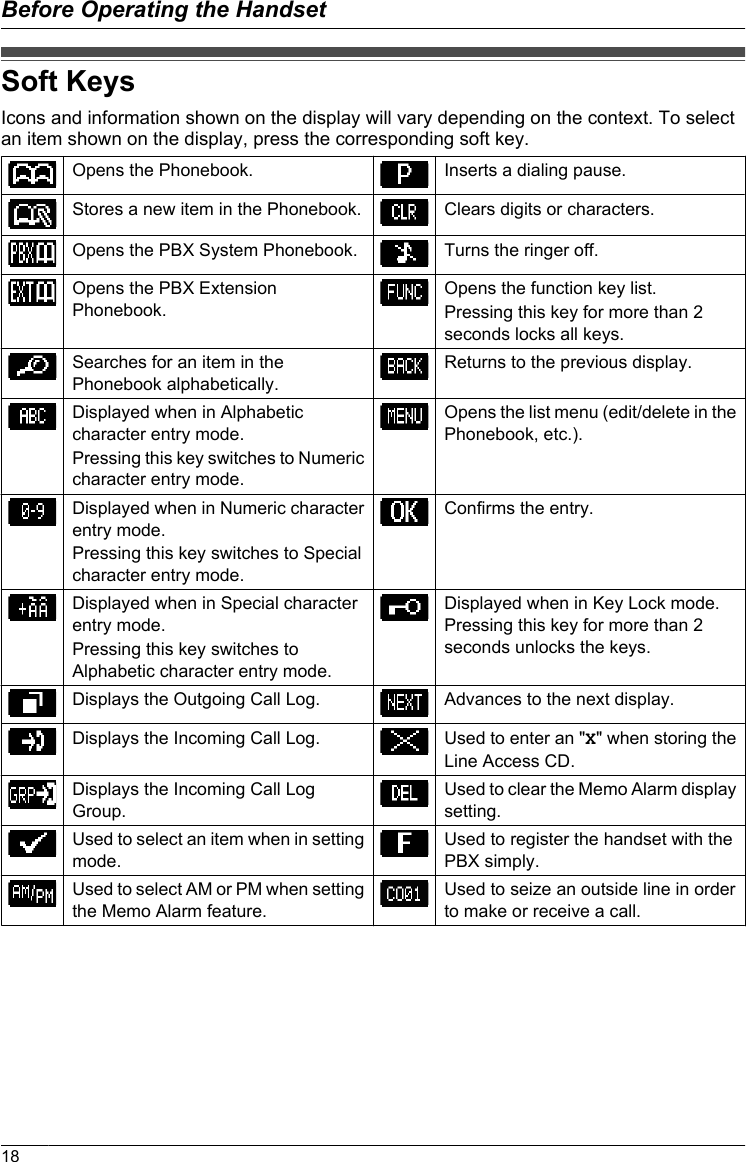
![Location of ControlsThe headset is an optionalaccessory.Please use only aPanasonic headset below.KX-TCA93/KX-TCA94/KX-TCA95/KX-TCA400/KX-TCA430 [Back View]Open the cover.ARinger/Charge IndicatorBTALK/SP-PHONE (Speakerphone) KeyUsed to make or answer calls, or toggle between the Receiver/Hands-free*1 modeduring a conversation.CFLASH KeyUsed to disconnect the current call and make another call without hanging up.DHeadset JackESilent Mode KeyUsed to turn Silent Mode on or off when pressed for more than 2 seconds in standbymode. For more information, refer to "Silent Mode" on page 10.FReceiverGDisplayRefer to "Display" on page 17.HSoft KeysThe handset features 3 soft keys. By pressing a soft key, you can select the featureshown directly above it on the display.ICANCEL KeyUsed to end calls or exit Function mode.8Before Operating the HandsetBefore Operating the Handset](https://usermanual.wiki/Panasonic-of-North-America/96NKX-WT126/User-Guide-1348775-Page-8.png)
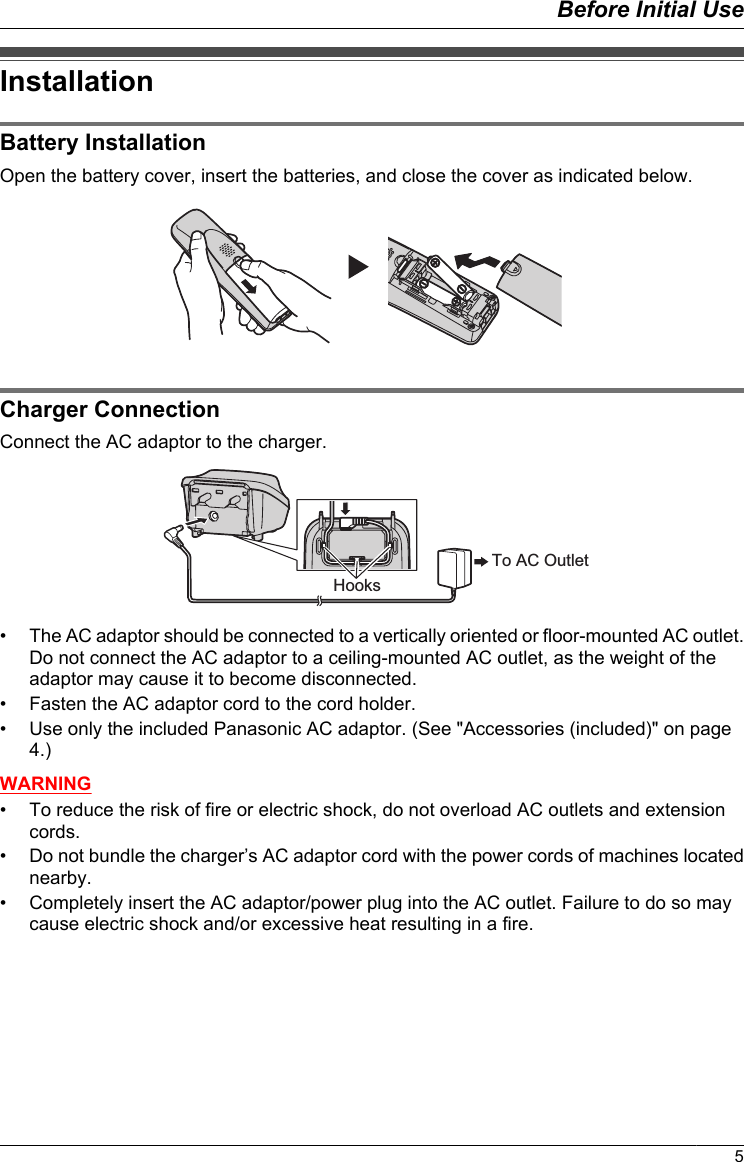
![Key LockYou can lock all keys while the handset is in standby mode.[Display Icon]Unlocked LockedPress the center soft key for more than 2seconds to lock/unlock.Silent ModeSilent Mode turns off the ringer and sets the handset to vibrate*1 when calls are received.This can be useful in situations where you do not want to be disturbed, such as during ameeting.Press for more than 2 seconds to set/cancel the Silent Mode.[Display Icon]Silent ModeWhen Silent Mode is active, the microphone’s sensitivity is increased, and the followingfeatures are turned off automatically, regardless of their settings.– Ringer Volume– Ring On Charger– Auto Answer– Key Tone– Range Alarm– Low Battery Alarm• If you set the handset on the charger during Silent Mode, the handset will not vibrate.*2*1 The vibrate feature is available only for the KX-WT126.*2 Please note that if you set the handset on the charger while receiving an incoming call, vibrationwill stop. Once the vibration stops, the handset will not vibrate again for that call, even if the handsetis lifted up again. (If Quick Answer is set, lifting up the handset will answer the call.)Advanced Voice ClarityWhen this feature is enabled, clear conversation is provided on both the sending side andthe receiving side. It is useful in noisy environments such as warehouses, manufacturingplants, restaurants, and garages.Select "1:Voice Clarity".Press the center soft key.Press the center soft key.Select "On".10Before Operating the Handset](https://usermanual.wiki/Panasonic-of-North-America/96NKX-WT126/User-Guide-1348775-Page-10.png)

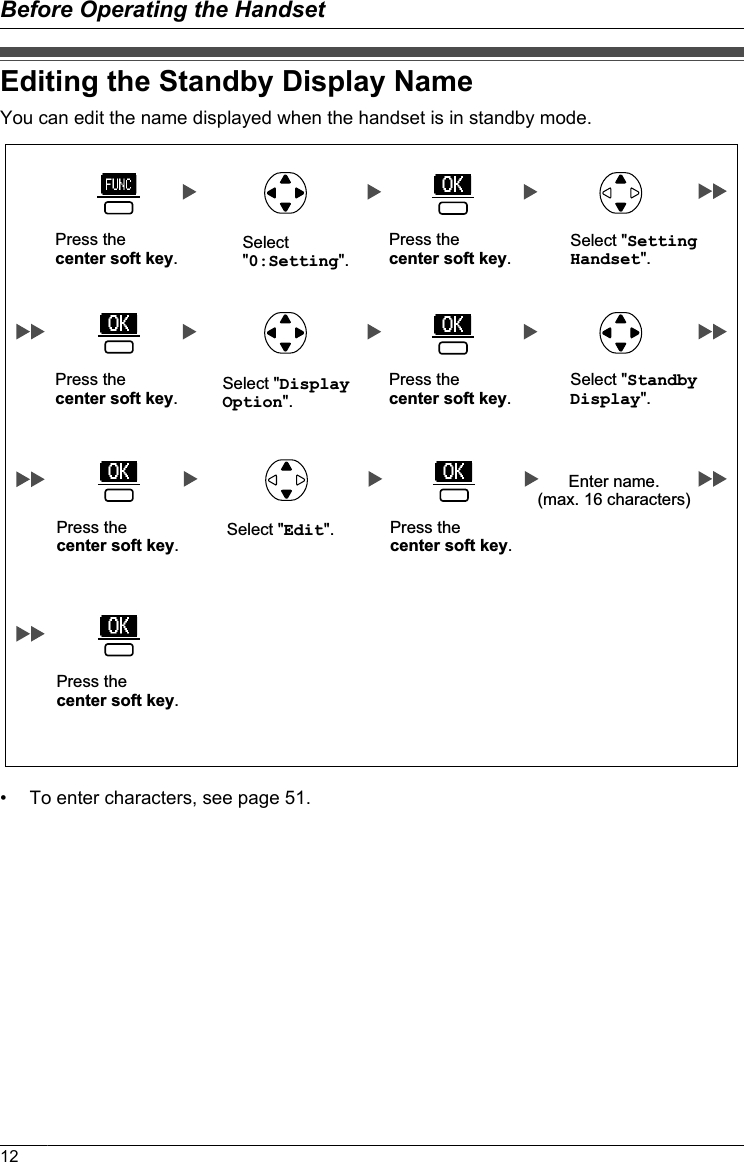
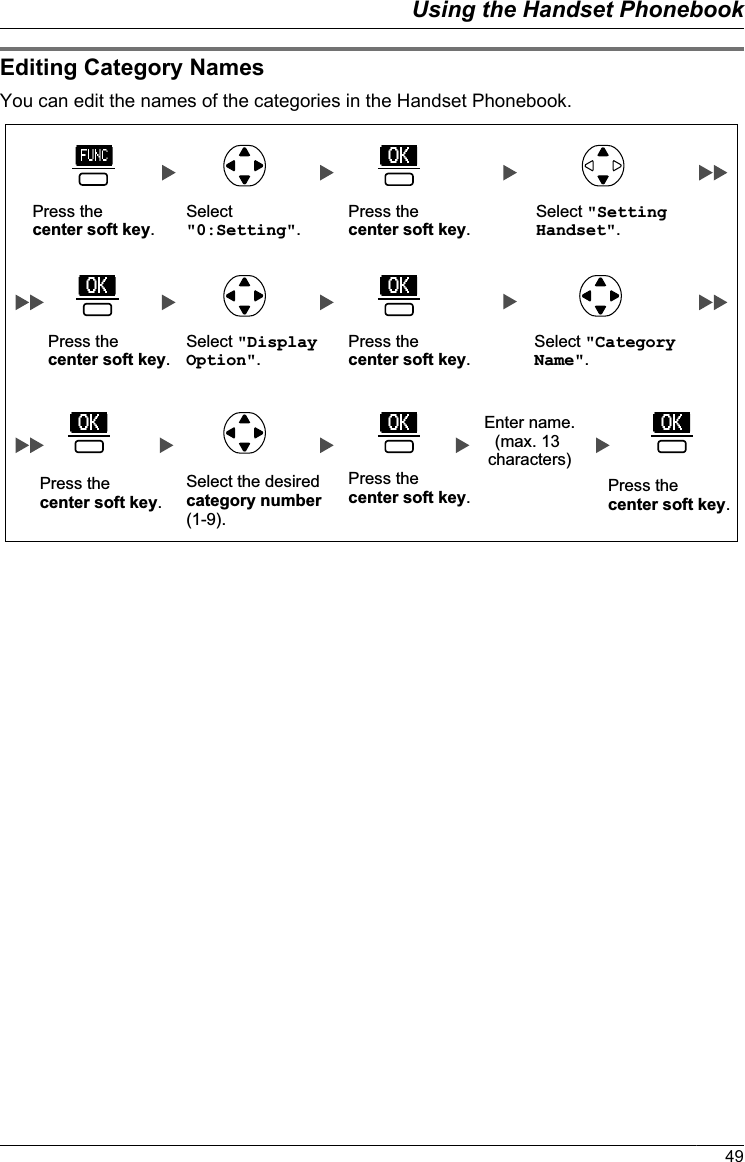
![Editing the Names of the Flexible CO KeysYou can edit a name for each Flexible CO Key of the handset.Select "0:Setting".Press the center soft key.Press the center soft key.Select "Setting Handset".Press the center soft key.Press the center soft key.Select "F-CO Key Name".Select the desired base. (Base 1-4)Press the center soft key.Press the center soft key.Enter name.(max. 12 characters)Select "Key Option".Press the center soft key.Select "Text".Select the desired CO Key No. [0-9, , #].Press the center soft key.Press the center soft key.• To enter characters, see page 51.13Before Operating the Handset](https://usermanual.wiki/Panasonic-of-North-America/96NKX-WT126/User-Guide-1348775-Page-13.png)
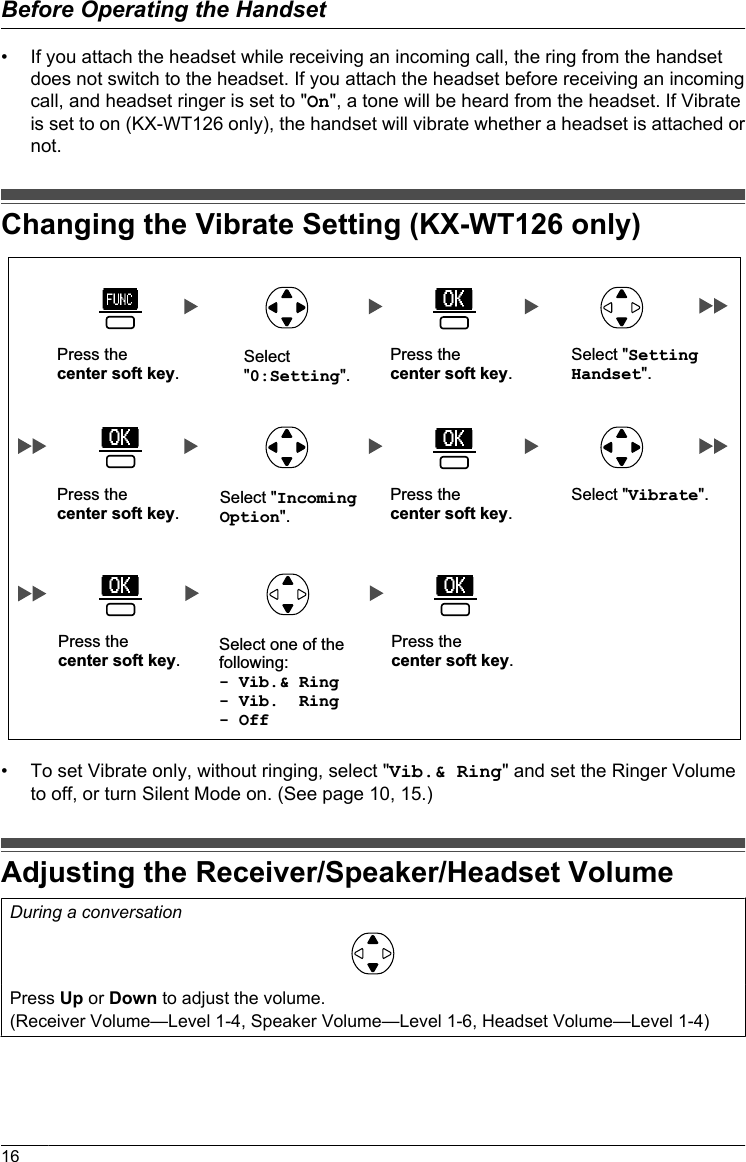
![Editing the Names of the Soft Keys for the Flexible COKeysYou can edit the name of the Soft Key for each Flexible CO Key of the handset.Select "0:Setting".Press the center soft key.Press the center soft key.Select "Setting Handset".Press the center soft key.Press the center soft key.Select "F-CO Key Name".Select the desired base. (Base 1-4)Press the center soft key.Press the center soft key.Enter name.(max. 5 characters)Select "Key Option".Press the center soft key.Select "Soft Key".Select the desired CO Key No. [1, 2].Press the center soft key.Press the center soft key.• To enter characters, see page 51.14Before Operating the Handset](https://usermanual.wiki/Panasonic-of-North-America/96NKX-WT126/User-Guide-1348775-Page-14.png)
![Adjusting the Ringer VolumeSelect "0:Setting".Press the center soft key.Press the center soft key.Select "Setting Handset".Press the center soft key.Press the center soft key.Select "Ringer Volume".Select "Incoming Option".Press the center soft key.Press the center soft key.Select the desired setting. (Step Up/Step Down/Level 1-6/Off)• To set the ringer pattern, see "Incoming Option" on page 60.Adjusting the Ringer Volume or Turning the Ringer offwhile RingingWhile receiving a call[To adjust the ringer volume]Press Up or Down to adjust the volume.*1[To turn the ringer off]ORPress the center soft key.Press CANCEL.*1 The adjusted volume level will also be used for subsequent calls.15Before Operating the Handset](https://usermanual.wiki/Panasonic-of-North-America/96NKX-WT126/User-Guide-1348775-Page-15.png)
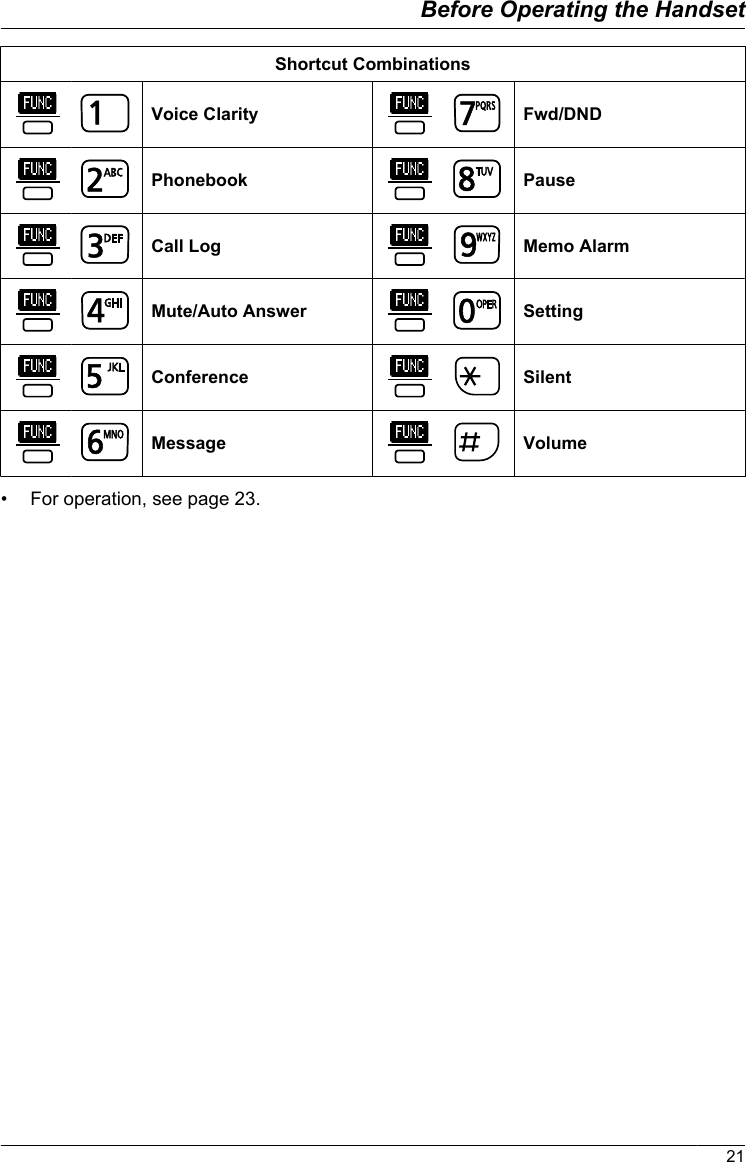
![Operation OutlineHandset functions are accessed through the display menu and selected with the NavigatorKey and soft keys.[Function Keys]*2 [Outgoing Log][Intercom] [In standby mode] [Flexible CO Keys][Phonebook]*1[Incoming Log][Group Log]*1 For more information, see page 41.*2 For more information, see page 20.19Before Operating the Handset](https://usermanual.wiki/Panasonic-of-North-America/96NKX-WT126/User-Guide-1348775-Page-19.png)

![Flexible CO KeysA Flexible CO Key can be used either to seize a line in order to make or receive an outsidecall (F-CO key), or used as a function key. Press the Navigator Key to display the FlexibleCO Key list. Here you can access the 12 Flexible CO Keys. The key numbers displayed onthe 5th line of the screen indicate the lines’ statuses, similar to the LED indicators on aProprietary Telephone.[Example]Understanding the Flexible CO Keys*1Key number square's color Line statusBlackon You are currently using this line.flashing rapidly You have an incoming call on this line.(An outside call is coming in on a single extension.)flashing slowly You have a call on hold on this line.Whiteon This line is in use by someone else.flashing rapidlyYou have an incoming call on this line.(An outside call is coming in on multiple extensionssimultaneously.)flashing slowly Someone has a call on hold on this line.No color This line is idle.*1 The meanings of these colors of key numbers vary depending on the status of the outside line.• To select a key, press its key number, or press the Navigator Key or to select thedesired key and press (the center soft key).• To edit the names of Flexible Keys, see page 13.• For more information, refer to the feature documentation for your PBX.22Before Operating the Handset](https://usermanual.wiki/Panasonic-of-North-America/96NKX-WT126/User-Guide-1348775-Page-22.png)
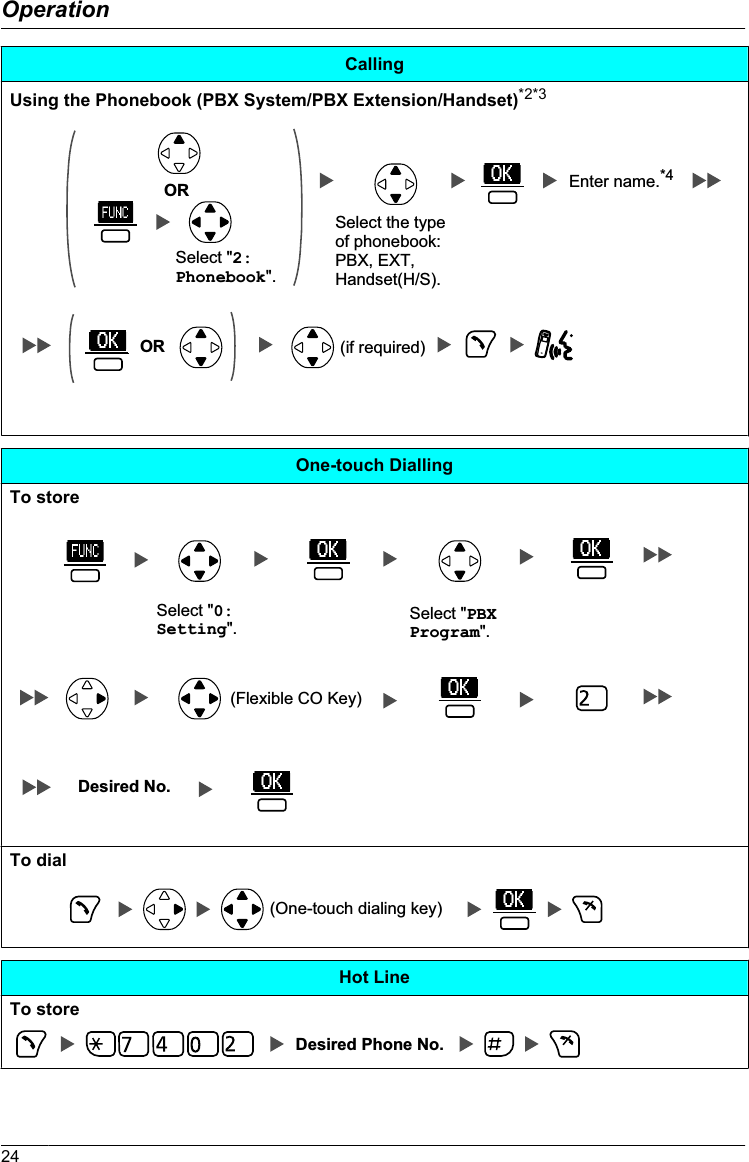
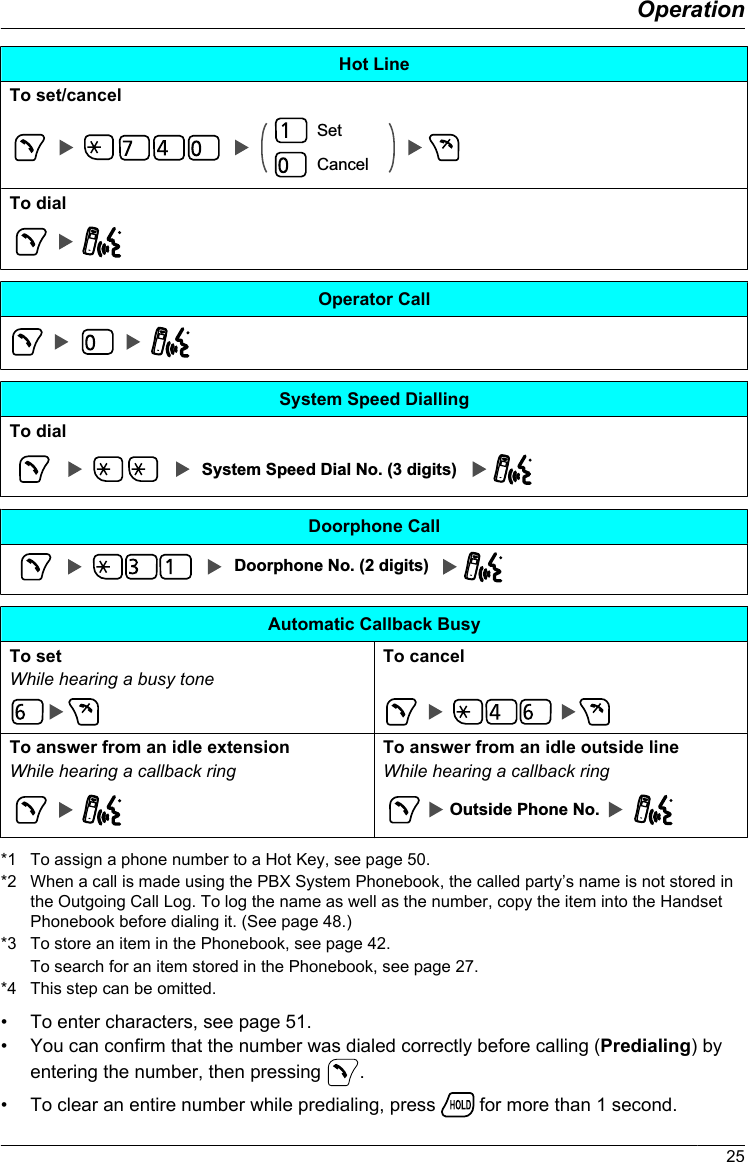
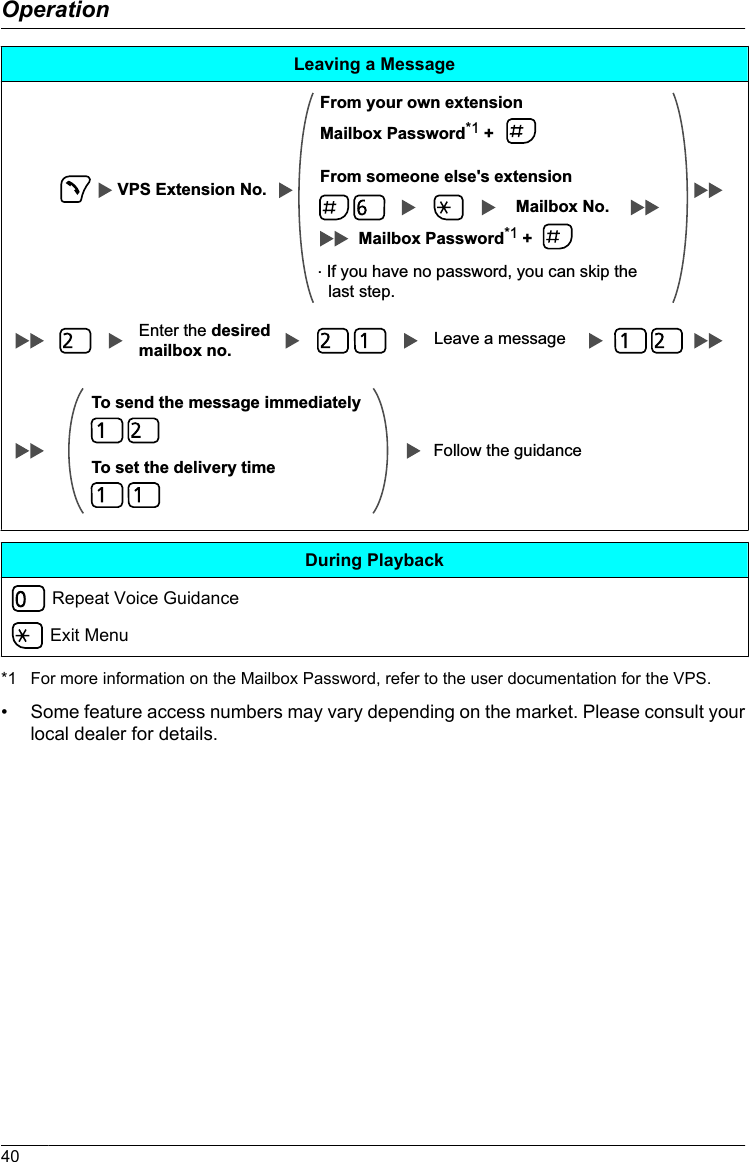
Outside Phone No.–Using Soft KeysOutside Phone No. XXUsing Hot Key Dial*1Press the dialing key assigned as a Hot Key for more than 1 second. (if required)Using the Outgoing Call Log*2Using the Incoming Call LogUsing the Incoming Call Log GroupIncoming Call Log Group No.23OperationOperation](https://usermanual.wiki/Panasonic-of-North-America/96NKX-WT126/User-Guide-1348775-Page-23.png)
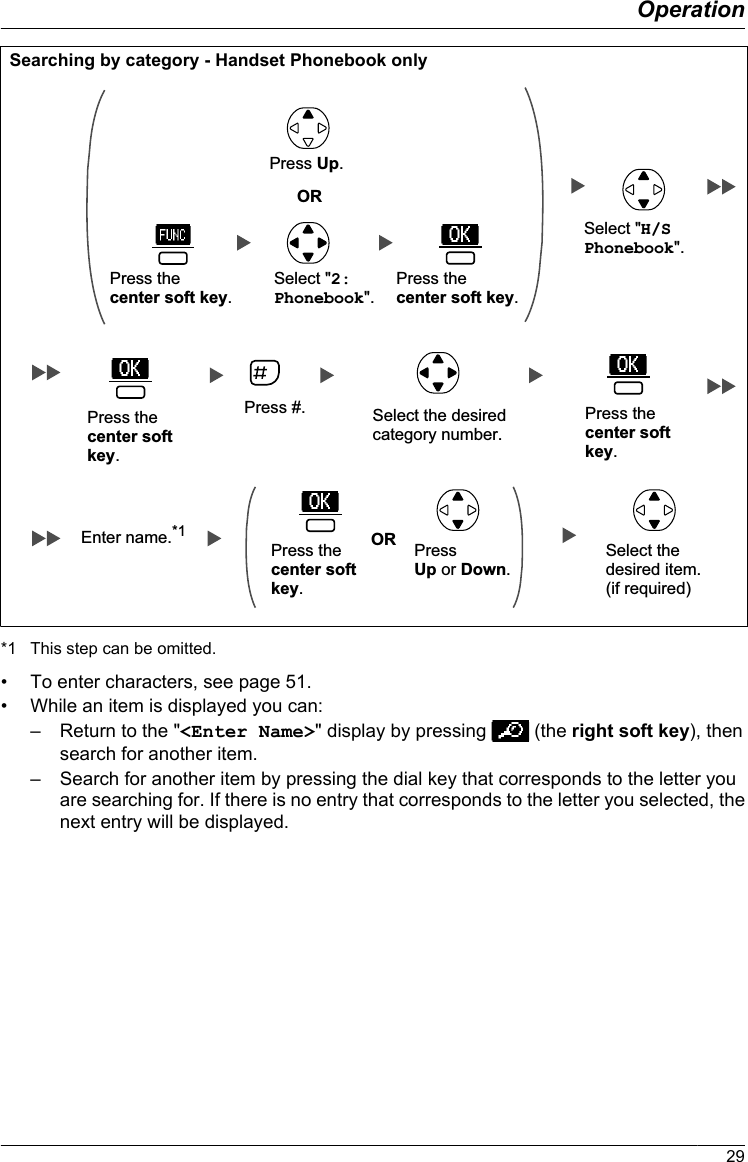
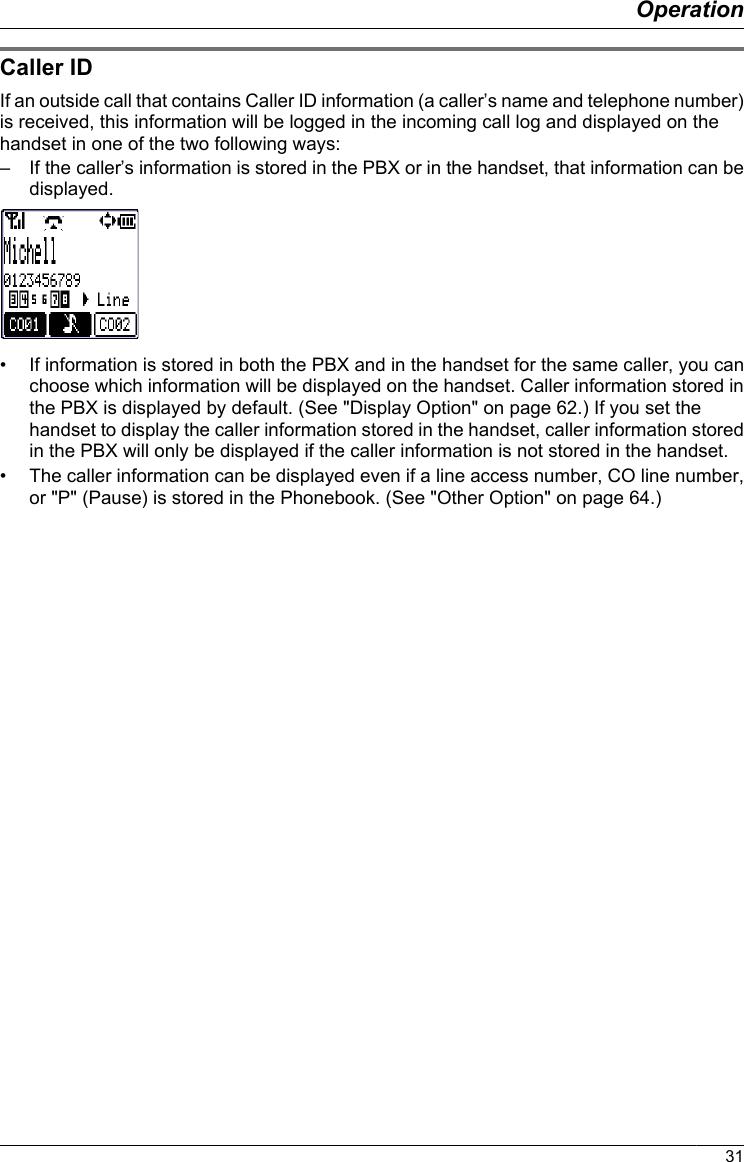
![Receiving CallsReceivingAn Intercom CallAn Outside Call/A Group CallAn Outside Call on a specific line(rapidly flashing Flexible CO Key)ORrapidly flashing Flexible CO Key [0-9, , #]Call PickupDirectedGroupExtension No.Group No. (2 digits)• You can also answer a call using the following features:– Any Key Answer (See "Answer Option" on page 61.)– Quick Answer (See "Answer Option" on page 61.)– Auto Answer (See "Answer Option" on page 61.)Note• Please consider the following when "Quick Answer" is set to "On".If a brief power failure occurs when the handset is receiving a call on the charger,– if "Talk On Charger" is set to "Off" (default), the call may be disconnectedafter being answered.– if "Talk On Charger" is set to "On", the call may be answered automatically.In this case, please note that privacy rights may be violated or sensitiveinformation may be transmitted to unauthorized parties.• You can select the ringer and vibrate pattern for each type of incoming call. (See"Incoming Option" on page 60.)• For more information, refer to the user documentation for your PBX.30Operation](https://usermanual.wiki/Panasonic-of-North-America/96NKX-WT126/User-Guide-1348775-Page-30.png)
![During a ConversationTransferring a CallTo an extensionExtension No.*1To an outside partyOutside Phone No. ORCO Line Group No.*1HoldingTo hold (Regular Hold)To hold (Exclusive Call Hold)To retrieve a call–An Intercom Call–An Outside Call(slowly flashing Flexible CO Key)ORslowly flashing Flexible CO Key [0-9, , #]32Operation](https://usermanual.wiki/Panasonic-of-North-America/96NKX-WT126/User-Guide-1348775-Page-32.png)
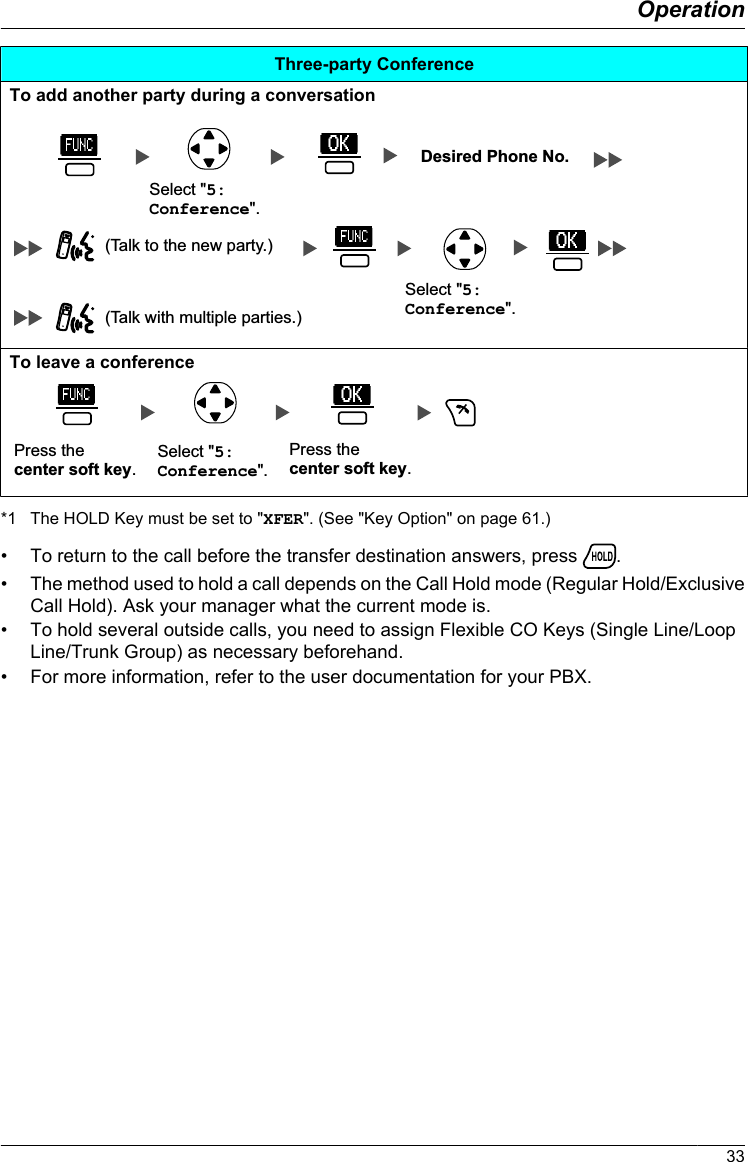
ORORDisregard this step if both parties are extensions.PagingTo pagePaging Group No. (2 digits) (Announce)Wait for an answer. To answer35Operation](https://usermanual.wiki/Panasonic-of-North-America/96NKX-WT126/User-Guide-1348775-Page-35.png)


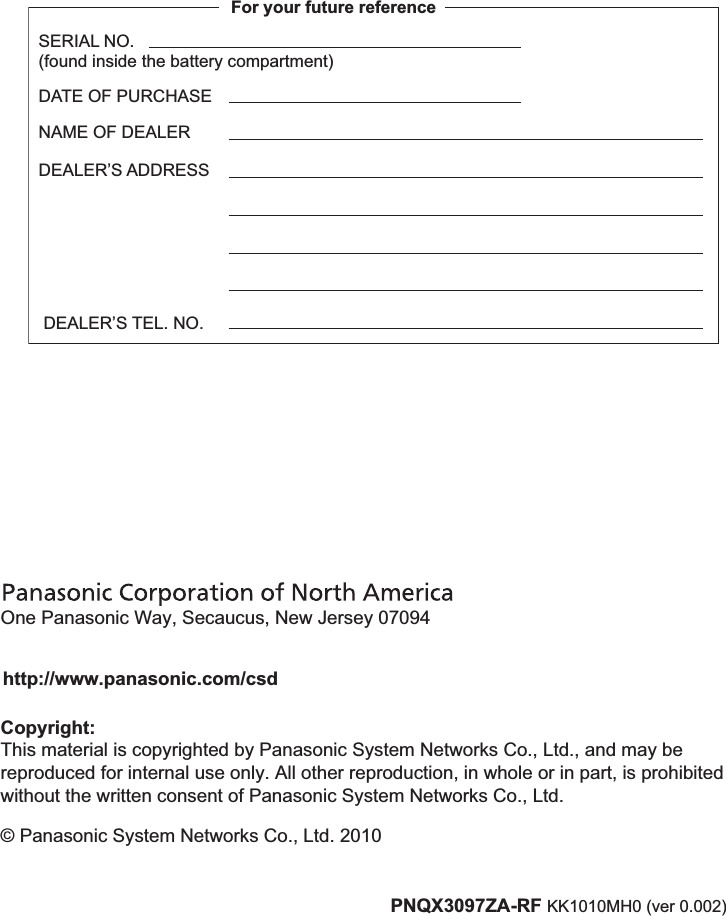
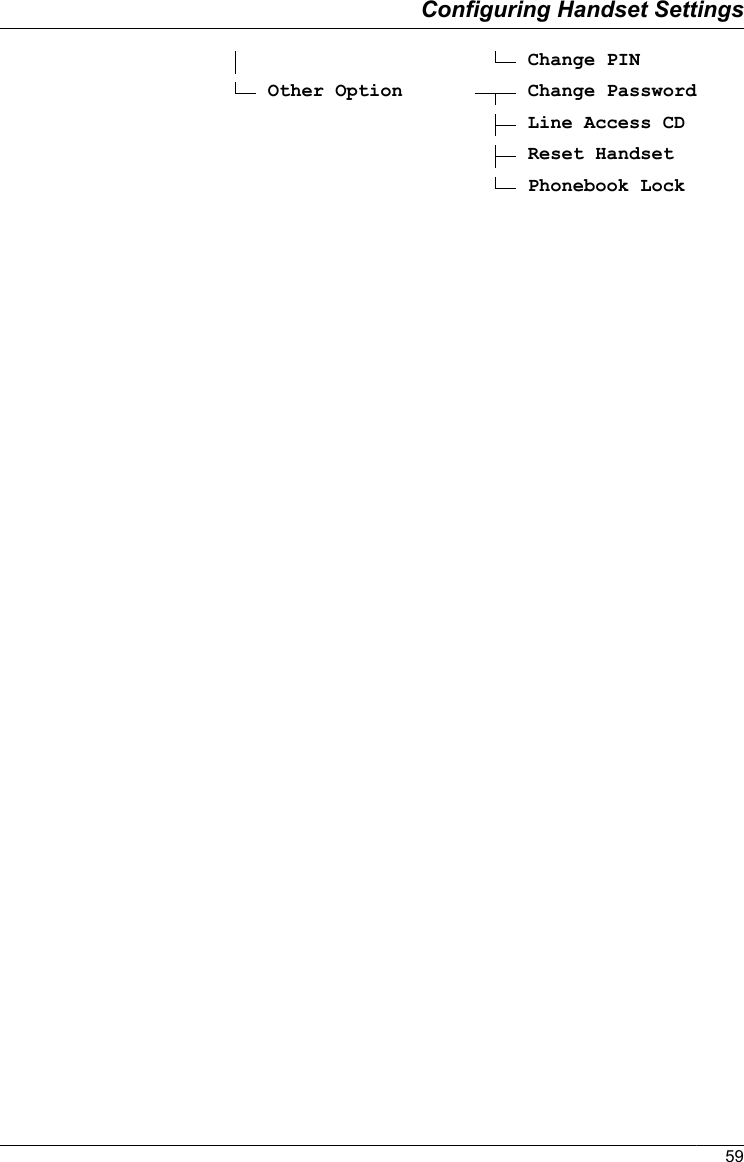
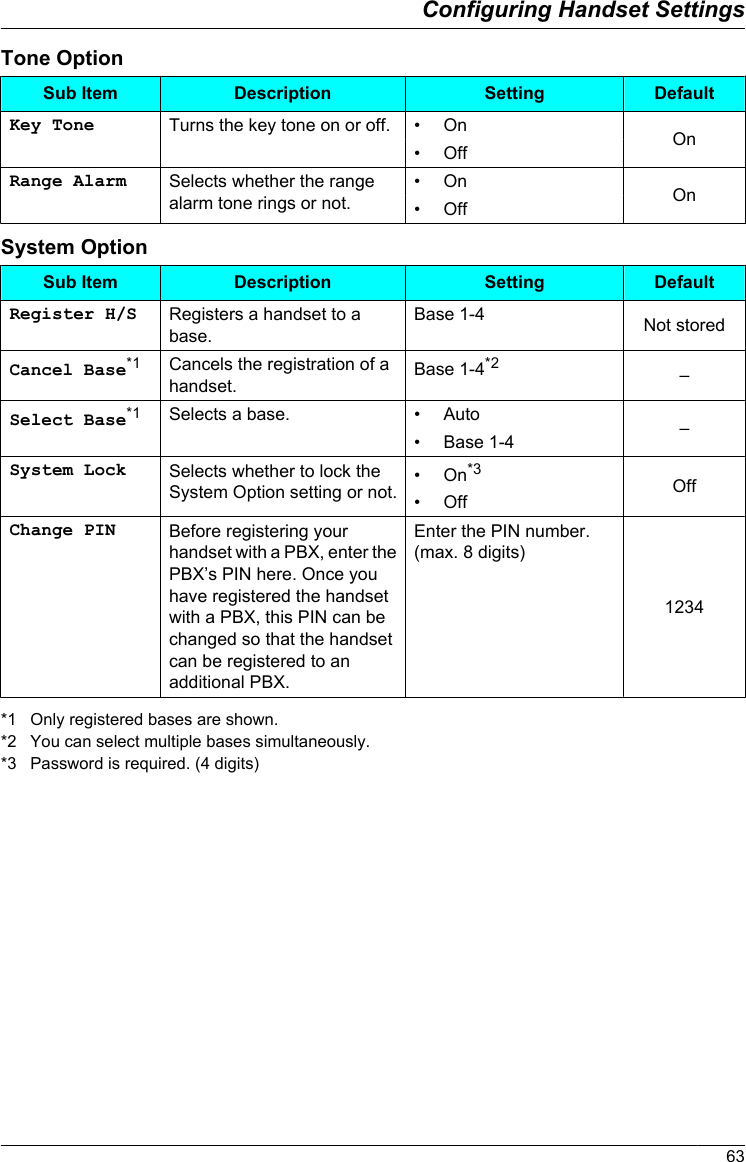
![Handset Setting Menu Layout[Main Item] [Sub Item]Setting Handset Incoming Option Ringer VolumeRinger TypeVibrate (KX-WT126only)Ring On ChargerMemo AlarmHeadset RingerTalk Option Speaker VolumeReceiver VolumeHeadset VolumeHeadset Mic VolTalk On ChargerAnswer Option Any Key AnswerQuick AnswerAuto AnswerAuto Ans DelayKey Option F-CO Key NameHOLD/XFER KeyDisplay Option LanguageBacklightLCD ContrastStandby DisplayCategory NameDate&Time FormCaller ID DispCO Status DispTone Option Key ToneRange AlarmSystem Option Register H/SCancel BaseSelect BaseSystem Lock58Configuring Handset Settings](https://usermanual.wiki/Panasonic-of-North-America/96NKX-WT126/User-Guide-1348775-Page-58.png)
![Memo Alarm SettingAn alarm will sound at the set time. A memo can also be displayed. Memo Alarm is availableonly when the handset is within range of a CS.To setSelect "9:Memo Alarm".Press the center soft key.Select the alarm mode. (Once/Daily/Weekly/Off) Press the center soft key.Press the center soft key.Press the center soft key.Select the alarm number. (1-3)[Select the alarm mode-Once/Daily]Enter memo.[Once]Enter date and time.*1[Daily]Enter time.Press the center soft key.Press the center soft key.Press the center soft key for "Save".65Configuring Handset Settings](https://usermanual.wiki/Panasonic-of-North-America/96NKX-WT126/User-Guide-1348775-Page-65.png)
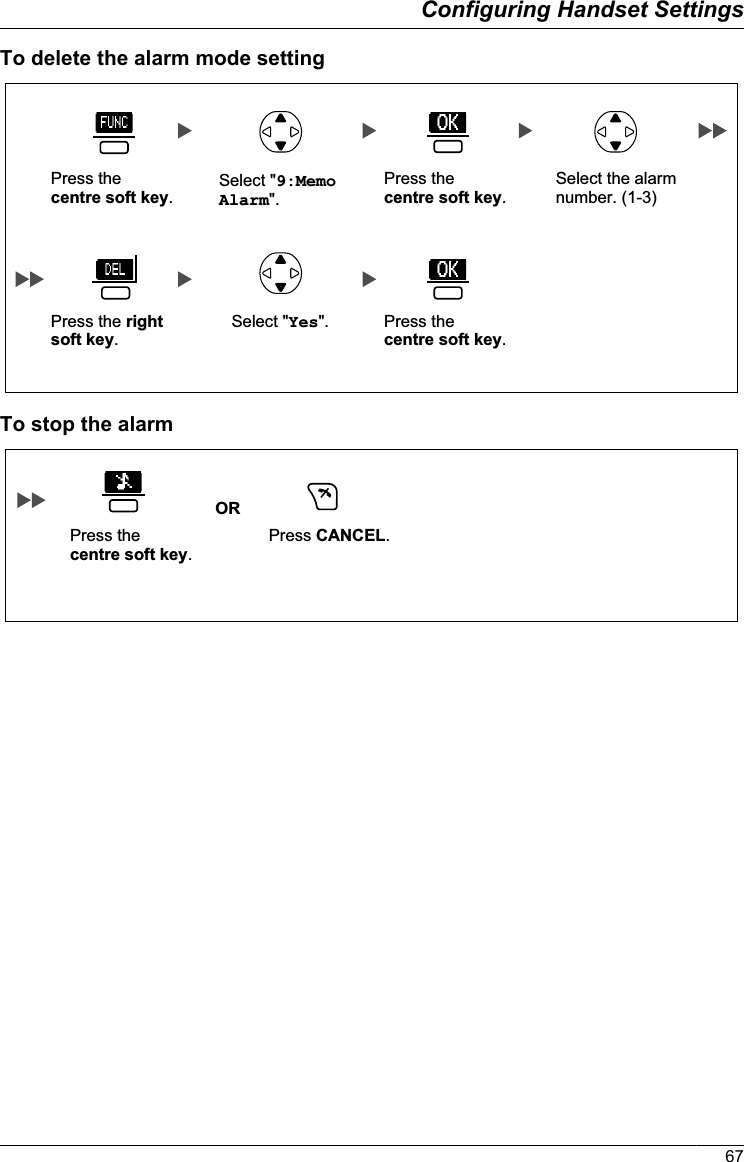
![[Select the alarm mode-Weekly]Select the desired day of the week.Enter memo.Enter time.Press the right soft key.*2 Press the center soft key.Press the center soft key.Press the center soft key.Press the center soft key for "Save".[Select the alarm mode-Off]Press the center soft key for "Save".*1 You can select the format for the date and time. (See "Display Option" on page 62.)*2 A " " will be displayed next to the day of the week that has been set.• You can select the ring or vibrate (KX-WT126 only) pattern for each Memo Alarm. (See"Incoming Option" on page 60.)• If you are on a call at the time that the alarm is set to sound, it will sound after you haveended the call.66Configuring Handset Settings](https://usermanual.wiki/Panasonic-of-North-America/96NKX-WT126/User-Guide-1348775-Page-66.png)
![Battery InformationAfter your Panasonic batteries are fully charged (at 25 °C [77 °F]):Operation Operating TimeWhile in use (Talk) Up to about 8 h (Voice Clarity: OFF)Up to about 7 h (Voice Clarity: ON)While not in use (Standby) Up to about 168 h• Operating time may be shorter than listed above depending on usage conditions andambient temperature.• The handset can receive calls while charging.• Battery consumption increases when the handset is used out of range (" " is displayed).•Clean the handset and the charger contacts with a soft, dry cloth once a month.Clean more often if the unit is subject to grease, dust or high humidity. Otherwisethe batteries may not charge properly.Low Battery WarningThe batteries need to be charged in the following situations:• " " flashes, and the alarm sounds*1.• "Charge Battery" is displayed. In this situation, the handset cannot be operated.*1 If the low battery warning occurs during a conversation, the call will be automatically disconnectedone minute after the alarm sounds.Replacing the BatteriesIf " " flashes after using the phone for a short time, even when the batteries have beenfully charged, the batteries should be replaced.If you replace the batteries before the low battery warnings appears, the battery strengthicon may display an incorrect reading. In this case, use the handset as normal with the newbatteries installed. To install the batteries, see "Battery Installation" on page 5. When thelow battery warning is displayed, charge the batteries for about 7 hours. The battery strengthicon will then display the correct reading.• Please use Panasonic batteries with the service part number HHR-65AAAB only.• There is a danger of explosion if the battery is incorrectly replaced.A nickel metal hydride battery that is recyclable powers the product you havepurchased.Please call 1-800-8-BATTERY for information on how to recycle this battery.71Important InformationImportant Information](https://usermanual.wiki/Panasonic-of-North-America/96NKX-WT126/User-Guide-1348775-Page-71.png)