Panasonic of North America 9TGCF-P12 CF-P1 Personal Computer with WLAN+BT+GPRS User Manual USer Manual for GPRS
Panasonic Corporation of North America CF-P1 Personal Computer with WLAN+BT+GPRS USer Manual for GPRS
Contents
- 1. User Manual Bluetooth
- 2. User Manual for CF P1
- 3. User Manual for WLAN
- 4. USer Manual for GPRS
USer Manual for GPRS

Supplementary Instructions
for GSM/GPRS
®
Contents
This manual contains supplementary instructions regarding the use of the
computer. It explains the cases where the operation of the computer differs
from that in the Operating Instructions.
Your computer is equipped with GSM/GPRS enabling you to communicate
using radio frequencies.
About the abbreviations in this manual, refer to the table on page 5.
Precautions
Safety Precautions ............................................. 2
For U.S.A............................................................ 3
Names and Functions of Parts
LED Description.................................................. 5
Abbreviations...................................................... 5
Using GSM/GPRS
Installing/Removing a SIM Card ......................... 6
Setting Up the Remote Network for GPRS ........ 7
Using CheckNet
Running ............................................................ 11
Using CheckNet ............................................... 12
Specifications.................................................... 20
2
Precautions
When in a hospital or other health care facility, observe the restrictions on the use of
mobiles. Switch Personal Computer or Handheld Computer incorporating GSM/GPRS
modem off, if instructed to do so by the guidelines posted in sensitive areas. Medical
equipment may be sensitive to RF energy.
The operation of cardiac pacemakers, other implanted medical equipment and hear-
ing aids can be affected by interference from Personal Computer or Handheld Com-
puter incorporating GSM/GPRS modem placed close to the device. If in doubt about
potential danger, contact the physician or the manufacturer of the device to verify
that the equipment is properly shielded. Pacemaker patients are advised to keep their
Personal Computer or Handheld Computer incorporating GSM/GPRS modem away
from the pacemaker, while it is on.
Switch off Personal Computer or Handheld Computer incorporating GSM/GPRS
modem before boarding an aircraft. Make sure it cannot be switched on inadvert-
ently. The operation of wireless appliances in an aircraft is forbidden to prevent
interference with communications systems. Failure to observe these instructions may
lead to the suspension or denial of cellular services to the offender, legal action, or
both.
Do not operate Personal Computer or Handheld Computer incorporating GSM/GPRS
modem in the presence of flammable gases or fumes. Switch off the cellular terminal
when you are near petrol stations, fuel depots, chemical plants or where blasting
operations are in progress. Operation of any electrical equipment in potentially ex-
plosive atmospheres can constitute a safety hazard.
Your Personal Computer or Handheld Computer incorporating GSM/GPRS modem
receives and transmits radio frequency energy while switched on. Remember that
interference can occur if it is used close to TV sets, radios, computers or inadequately
shielded equipment. Follow any special regulations and always switch off Personal
Computer or Handheld Computer incorporating GSM/GPRS modem wherever for-
bidden, or when you suspect that it may cause interference or danger.
Road safety comes first! Do not use a Personal Computer or Handheld Computer
incorporating GSM/GPRS modem while driving a vehicle. Do not place the com-
puter with GSM/GPRS modem in an area where it could cause personal injury to the
driver or passengers. It is recommended to stow the unit in the boot or secure stow-
age area while driving.
Safety Precautions
The following safety precautions must be observed during all phases of the operation, usage,
service or repair of any Personal Computer or Handheld Computer incorporating GSM/GPRS
modem. Manufacturers of the cellular terminal are advised to convey the following safety
information to users and operating personnel and to incorporate these guidelines into all manuals
supplied with the product. Failure to comply with these precautions violates safety standards
of design, manufacture and intended use of the product. Panasonic assumes no liability for
customer failure to comply with these precautions.

3
Do not place the computer with GSM/GPRS modem in an area over an air bag or in
the vicinity where an air bag may deploy.
Air bags inflate with great force and if the computer with GSM/GPRS modem is
placed in the air bag deployment area may be propelled with great force and cause
serious injury to occupants of the vehicle.
IMPORTANT!
Personal Computer or Handheld Computer incorporating GSM/GPRS modem oper-
ate using radio signals and cellular networks cannot be guaranteed to connect in all
conditions. Therefore, you should never rely solely upon any wireless device for
essential communications, for example emergency calls.
Remember, in order to make or receive calls, Personal Computer or Handheld Com-
puter incorporating GSM/GPRS modem must be switched on and in a service area
with adequate cellular signal strength.
Some networks do not allow for emergency calls if certain network services or phone
features are in use (e.g. lock functions, fixed dialing etc.). You may need to deacti-
vate those features before you can make an emergency call.
Some networks require that a valid SIM card be properly inserted in Personal Com-
puter or Handheld Computer incorporating GSM/GPRS modem.
For U.S.A.
Federal Communications Commission Radio Frequency Interference Statement
Note: This equipment has been tested and found to comply with the limits for a Class B digital
device, pursuant to Part 15 of the FCC Rules. These limits are designed to provide reasonable
protection against harmful interference in a residential installation. This equipment generates,
uses and can radiate radio frequency energy and, if not installed and used in accordance with the
instructions, may cause harmful interference to radio communications. However, there is no
guarantee that interference will not occur in a particular installation. If this equipment does cause
harmful interference to radio or television reception, which can be determined by turning the
equipment off and on, the user is encouraged to try to correct the interference by one or more of
the following measures:
Reorient or relocate the receiving antenna.
Increase the separation between the equipment and receiver.
Connect the equipment into an outlet on a circuit different from that to which the receiver is
connected.
Consult the Panasonic Service Center or an experienced radio/TV technician for help.
Safety Notice
Do not touch or move antenna while the unit is transmitting or receiving.
Do not hold any component containing the radio such that the antenna is very close or touching
any exposed parts of the body, especially the face or eyes, while transmitting.
Do not operate a portable transmitter near unshielded blasting caps or in an explosive environ-
ment unless it is type especially qualified for such use.

4
Precautions
Warning
To assure continued compliance, use only shielded interface cables when connecting to a com-
puter or peripheral. Also, any changes or modifications not expressly approved by the party
responsible for compliance could void the user’s authority to operate this equipment.
FCC Radiation Exposure Statement:
• This equipment complies with FCC radiation exposure limits set forth for an uncontrolled envi-
ronment.
• This equipment must be installed and operated in accordance with provided instructions and
minimum 1inch (2.5 cm) spacing must be maintained between the equipment and your face
during your GSM voice call.
• This equipment may use multiple installed transmitters, which may be capable of simultaneous
transmission.
This device complies with Part 15 of the FCC Rules. Operation is subject to the following two
conditions:
(1)This device may not cause harmful interference, and
(2)This device must accept any interference received, including interference that may cause un-
desired operation.
Responsible Party: Matsushita Electric Corporation of America
One Panasonic Way
Secaucus, NJ 07094
Tel No:1-800-LAPTOP-5 (1-800-527-8675)
5
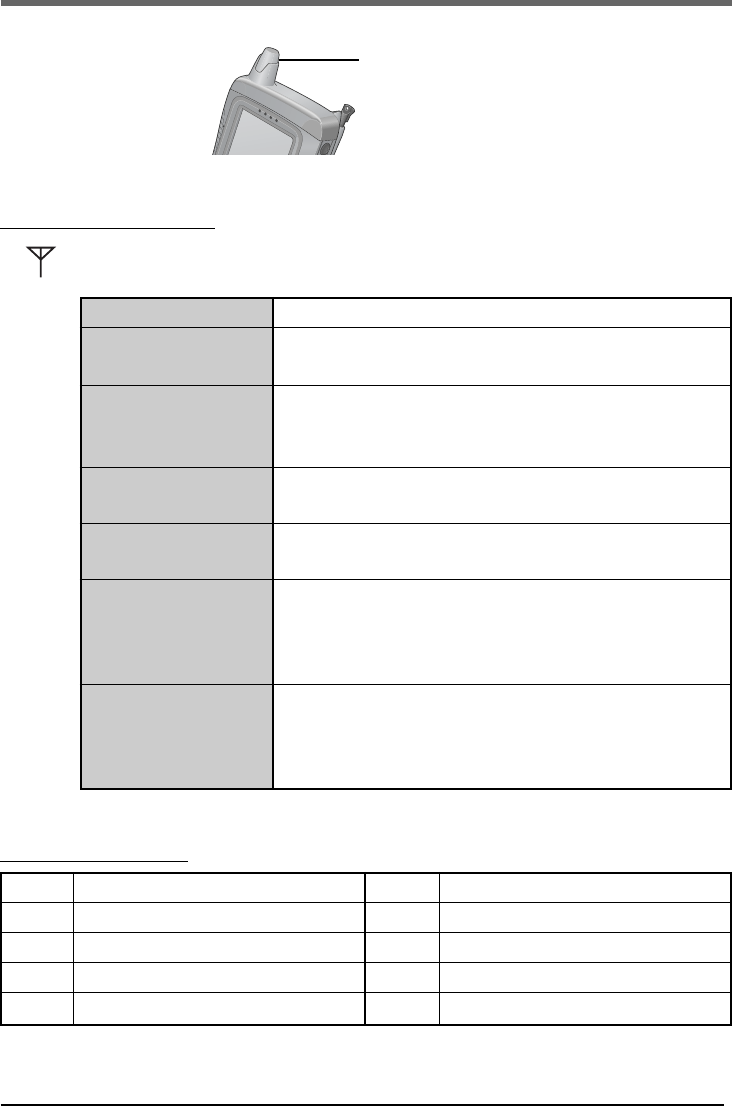
Names and Functions of Parts
Except the followings, refer to the Operating Instructions.
Antenna
LED Description
Status Indicator:
A green LED will light while communicating.
Mode
Off
600 ms On/
600 ms Off
75 ms On/3 s Off
75 ms On/75 ms Off/
75 ms On/3 s Off
Flashing
On
Function
GSM/GPRS modem is off or running in SLEEP or
Alarm.
No SIM card inserted or no PIN entered, or network
search in progress, or ongoing user authentication, or
network login in progress.
Logged to network (monitoring control channels and user
interactions). No call in progress.
One or more GSM/GPRS contexts activated.
Indicates GSM/GPRS data transfer: When a GSM/GPRS
transfer is in progress, the LED goes on within 1 second
after data packets were exchanged. Flash duration is
approximately 0.5 s.
Depending on type of call:
Voice call: Connected to remote party.
Data call: Connected to remote party or exchange of
parameters while setting up or disconnecting a call.
Abbreviations
APN
Access Point Name
PIN
Personal Identification Number
CID
Context Identity
PLMN
Public Land Mobile Network
GPRS
General Packet Radio Service
QOS
Quality of Service
GSM
Global System of Mobile Communication
SIM
Subscriber Identity Module
IP
Internet Protocol
TCP
Transmission Control Protocol
6
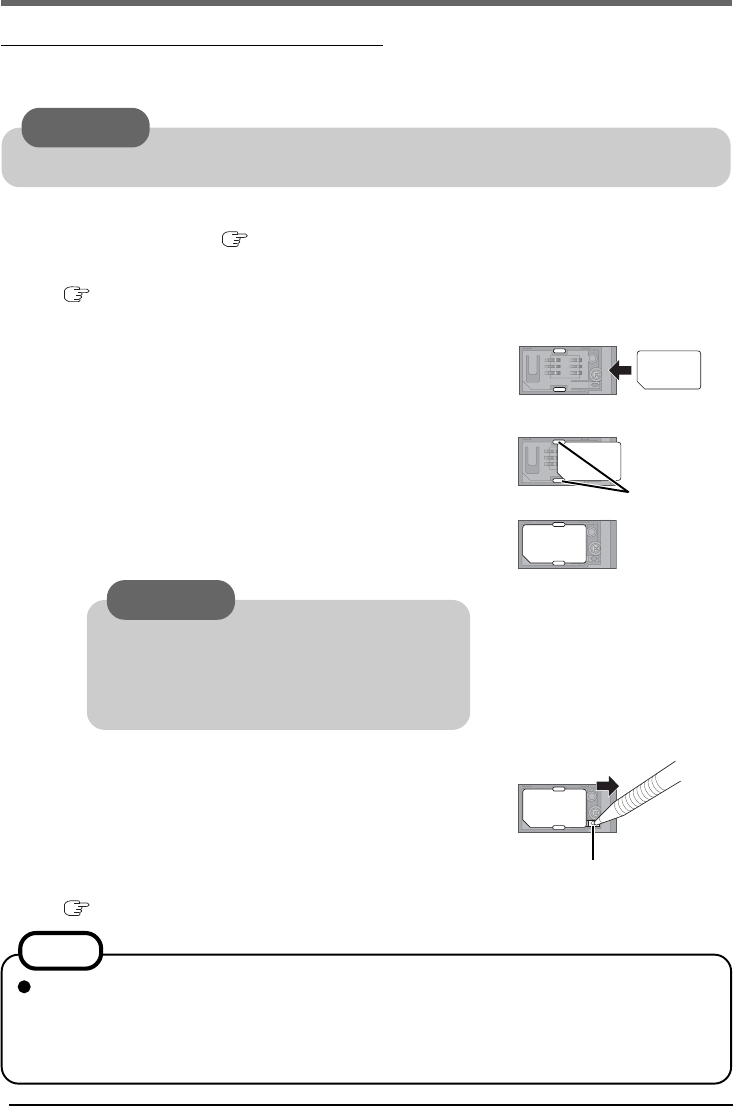
Inserting/Removing a SIM Card
A SIM card has been installed into the back of the CF-P1 underneath the battery. When
replacing the SIM card, follow the instruction below.
CAUTION
Do not insert/remove the SIM card when the GSM/GPRS power is on.
1Power off the GSM/GPRS modem using the
CheckNet Window ( page13).
2Power off the CF-P1 and remove the battery pack.
( Operating Instructions “First-time Operation”)
3Inserting a SIM Card
(1) Hold the CF-P1 in a vertical position where the
antenna is on your right hand side. Slide the SIM
card into the slot, with the metal connectors facing
down.
Make sure the SIM card goes under A.
(2) Insert the card all the way into the slot as shown
in the illustration. Ensure that the beveled corner
is positioned in the bottom left corner.
Removing a SIM Card
Slide the SIM card out in the direction of the arrow
while pushing B with the provided stylus or a finger.
B
Using GSM/GPRS
A
NOTE
If the card is inserted and removed repeatedly, the printing on the card surface may rub
off and create a powder residue. This powder may become affixed to the terminals
causing poor contact. If you notice that the terminals have become soiled due to
repeated insertion and removal, wipe the terminals lightly with a clean cloth.
CAUTION
Insert with care, because if the SIM card
is not inserted correctly, the computer will
not operate, and the SIM card may be dam-
aged by contact with the battery.
4Insert the battery pack and set the cover.
( Operating Instructions “First-time Operation”).

7
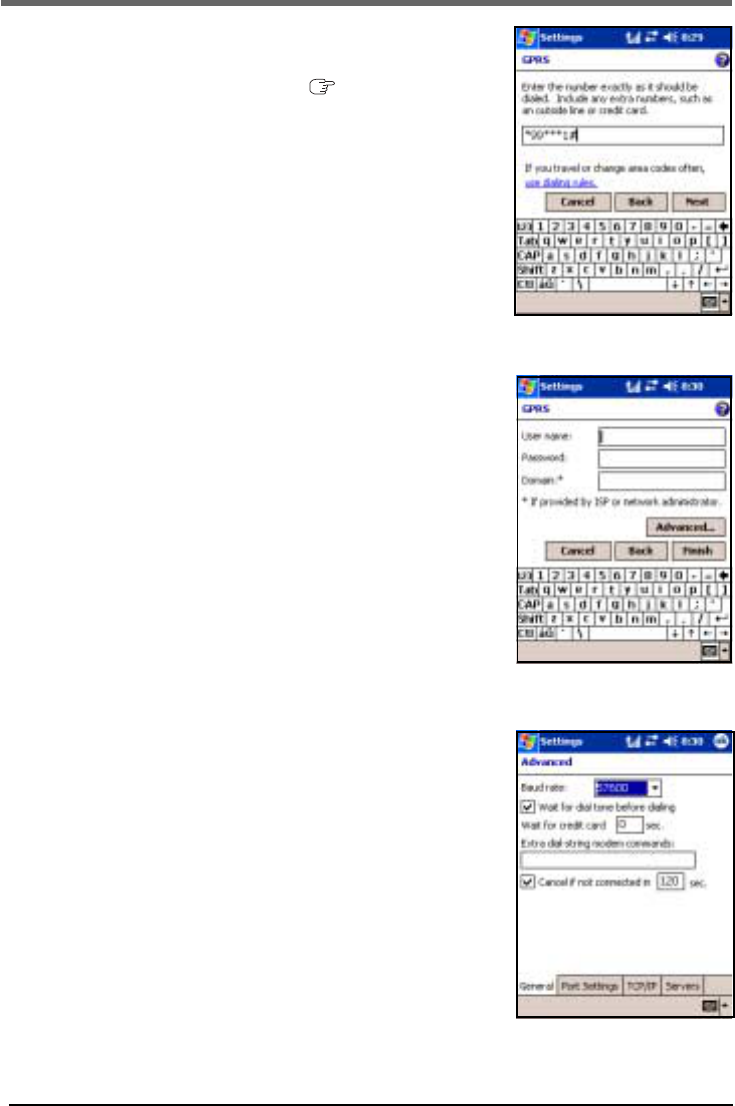
(3) Enter the suitable connection name and then select
[Panasonic RF Modem] at [Select a modem:], then tap
[Next].
The settings may vary with the local service provider. This information has to be requested
from the local provider. (The following sample screenshots illustrate the setup procedure.)
1Turn on your computer. ( Operating Instructions)
2Set up the Remote Network.
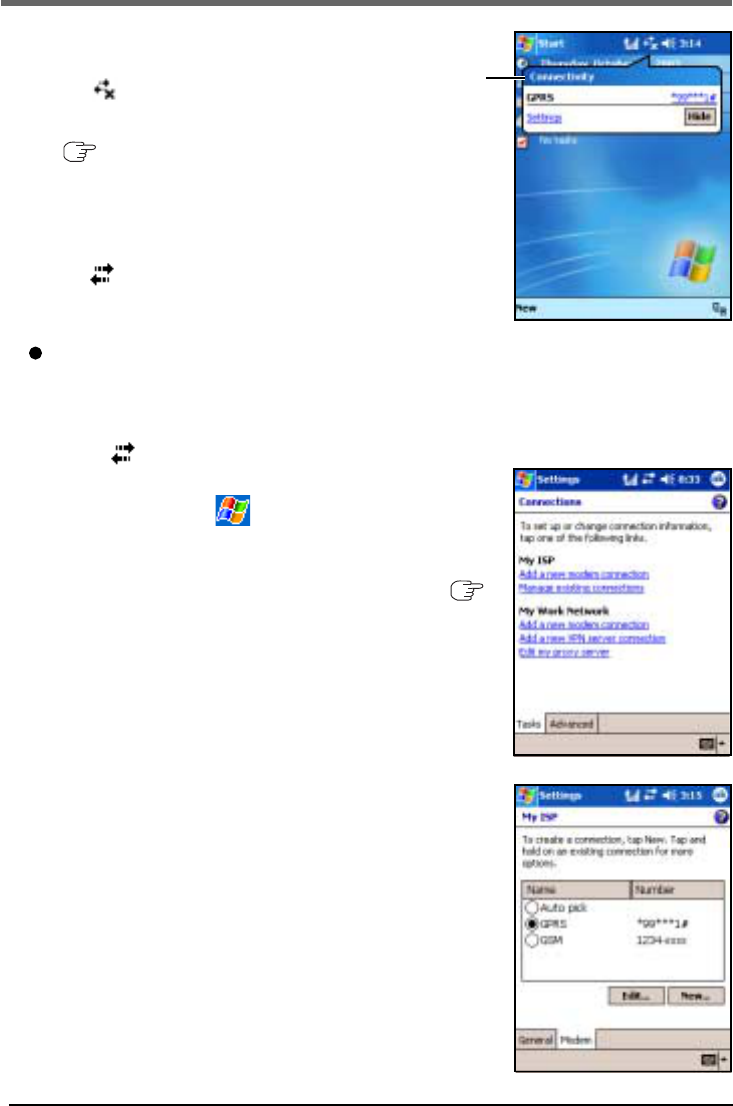
(1) Tap, in order, - [Settings] - [Connections] tab - [Connections].
(2) Tap [Add a new modem connection] at [My ISP].
Setting Up the Remote Network for GPRS
8
Using GSM/GPRS
(6) Enter the user name and password, and enter domain if
provided by ISPor network administrator.
(Check with your network manager or the operator for
the SIM you are using to confirm the information to be
requested).
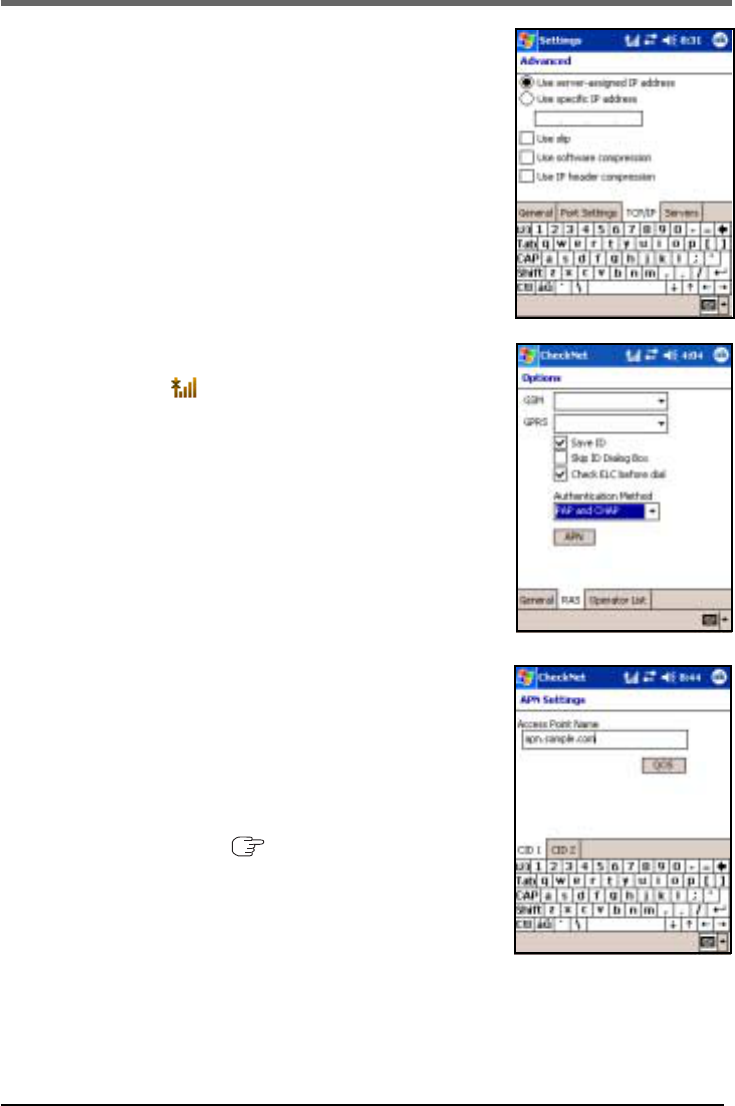
(7) Tap [Advanced...].
(8) Select [57600]at [Baud rate], and then tap [TCP/IP]tab.
(4) Enter [*99***1#] for telephone number in the box.
The 1 before the # corresponds to the CID number of
the APN setting for step 3 (3) ( page9). When set-
ting the connection to CID2, the telephone number is
[*99***2#].
(5) Tap [Next].
9
(3) Enter the access point name that connects to the GPRS
network.
(Check with your network manager or the operator for
the SIM you are using to confirm the setting informa-
tion.)
(4) Tap [ok].
(9) Remove check marks for [Use software compression]
and [Use IP header compression], then tap [ok].
3Set up the access point name.
(1) Tap and hold on the navigation bar and tap [Op-
tions] - [RAS] tab.
(2) Select RAS authentication method if necessary for a
different authentication method other than the [RAP and
CHAP], and tap [APN].
The settings for the GSM are the same as the GPRS, except
for the following:
• No need to set the access point name
• Set the number, user name, password, and the domain for the requested ISP.
When selecting the CID tab number here, select the same
number as the number before the # in the telephone
number in step 2 (4) ( page 8).
(10)Tap [Finish].
10
4Connect /Disconnect to GPRS network
(1) Connecting
Tap to display the connectivity bubble (A).
Make sure that the name of the setting in step 2(3)
( page 7) is displayed and tap the telephone num-
ber.
The connection will start.
Disconnecting
Tap to display the connectivity bubble and tap [Dis-
connect].
When multiple connection settings have been created,
the desired setting may not be selected using only the
operations described above. In this case, use the fol-
lowing settings.
(1) Tap on the navigation bar then tap [Settings] to
display [Connections] screen*1.
*1You can also tap - [Settings] - [Connections]tab
- [Connections].
(2) Tap [Manage existing connections] at [My ISP]*2.
*2This appears after setting the remote network (
page 7-9).
(3) Change the setting from [Auto pick] to a desired
setting (in this case, select GPRS).
(4) Tap [ok].
(A)
Using GSM/GPRS

11
CheckNet is software that is used during voice calls or data communications via a GSM/
GPRS modem installed in the CF-P1. To conduct communications using this product, a SIM
card (sold separately) is required. GPRS communications can only be conducted when using
a SIM card for an operator that supports GPRS communications.
Using the CheckNet utility, you can use the following functions.
Network information indication
RF signal level indication
GSM/GPRS modem power control
RAS (Dial-up network) control
SMS (Short Message Service)
Voice call
Running
When the power is switched on, will be displayed on the navigation bar. The follow-
ings show the variation of the icon and its meanings.
These icons flash during initialization or when the battery power is low.
Navigation bar icon
: Initializing the GSM/GPRS modem
GSM/GPRS modem is powered off.
: GPRS modem error
: SIM card error
: Unread message
: Out of coverage
: GSM service is available (the number of bars indicates the signal
strength) ( page 13)
: GSM/GPRS service is available (the number of bars indicates the signal
strength) ( page 13)
Tap the icon to display text information indicating the modem or network status.
Tap and hold the icon to display the pop-up menu.
If - [Programs] - [CheckNet] is tapped when CheckNet has already been started
up, the [Voice] screen will be displayed.
NOTE
Using CheckNet
CAUTION
Do not turn off the CF-P1 by the power switch while is displayed on the navigation
bar.
12
Using CheckNet
You can select the menu from the CheckNet window. With the CheckNet window, detailed
information can be seen graphically.
To open the CheckNet window
Tap and hold on the navigation bar and tap [Open] from the popup menu (shown
below).
To close the CheckNet window
Tap the button on the navigation bar. (You cannot exit the CheckNet.)
ASignal Strength Value: This indicates the
signal strength by value.
BSignal Strength Meter: This indicates the
signal strength by the bar graph. (
page 13)
CCommunication Mode: Display available
network service.
GSM: Only GSM is available
GSM + GPRS: GSM and GPRS are
available
DAn operator name with which GSM/
GPRS modem is currently registered
ECell information which GPRS modem is
currently using
PLMN: Public Land Mobile Network
ID Code
LAC: Location Area Code [Hex]
CELL ID: Cell ID [Hex]
CH: ARFCN (Absolute Fre-
quency Channel Number) of
the BCCH carrier
FStatus of the CheckNet
GNumber of unread SMS ( page 14)
H
<CheckNet window>
K
Using CheckNet
A
B
C
F
G
I
K
D
L
M
HJ
J
ML
N
<Popup menu>
E
I
13
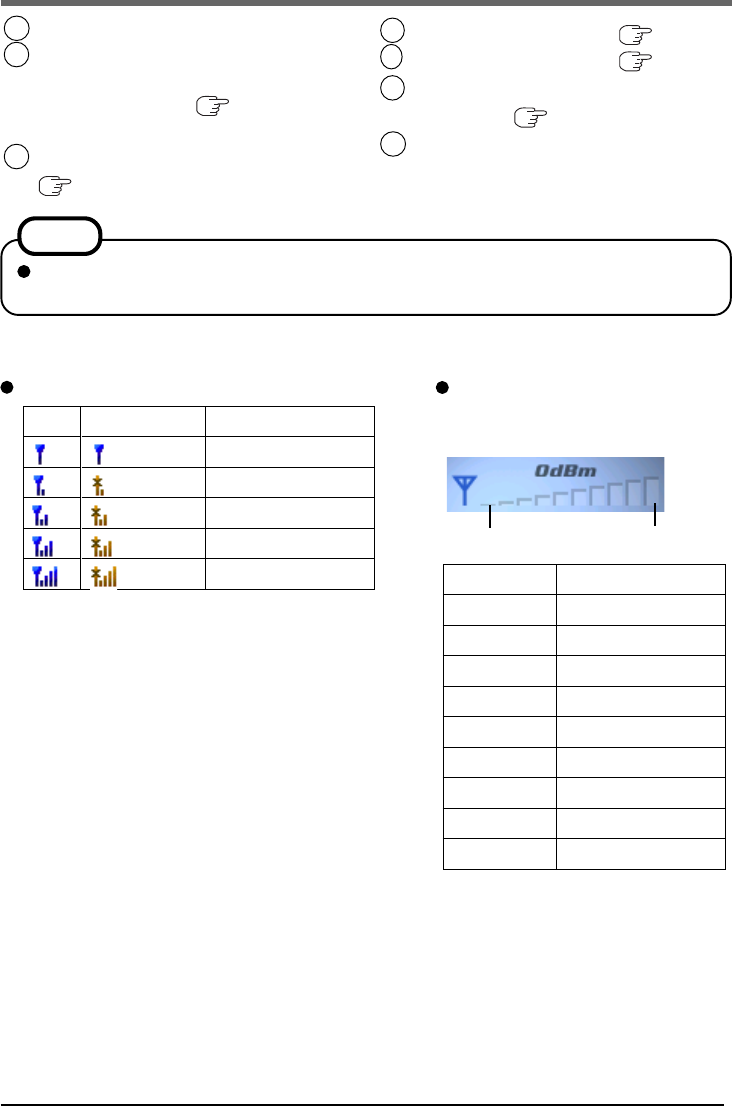
RF signal level indication
Level-1
Level-2
Level-3
Level-4
Level-5
Level-6
Level-7
Level-8
Level-9
Level-10
– -100 dBm
-99 dBm – -95 dBm
-94 dBm – -90 dBm
-89 dBm – -85 dBm
-84dBm – -80 dBm
-79 dBm – -75 dBm
-74 dBm – -70 dBm
-69 dBm – -65 dBm
-64 dBm – -60 dBm
-59 dBm –
Signal Strength Value and Sig-
nal Strength Meter on the
CheckNet window
GSM
Signal level
Out of coverage
– -96 dBm
-95dBm – -84 dBm
-85 dBm – -74 dBm
-75 dBm –
Navigation bar icon
GSM+GPRS
Level 1 Level 10
HPower on/off the GSM/GPRS modem
Start RAS (Dial-up network) from
CheckNet (available only when in area
of signal coverage, page 18), and
stop if connected.
Display [SMS] screen
( page 14)
KDisplay [Voice] screen ( page 15)
LDisplay [Options] screen ( page 17)
M
Display GSM/GPRS modem / SIM card
information ( page 19)
NOpen the CheckNet window
I
J
NOTE
When tapped the [Power] or [About], functions may not work properly. In this case,
reset the computer.
14
Using CheckNet
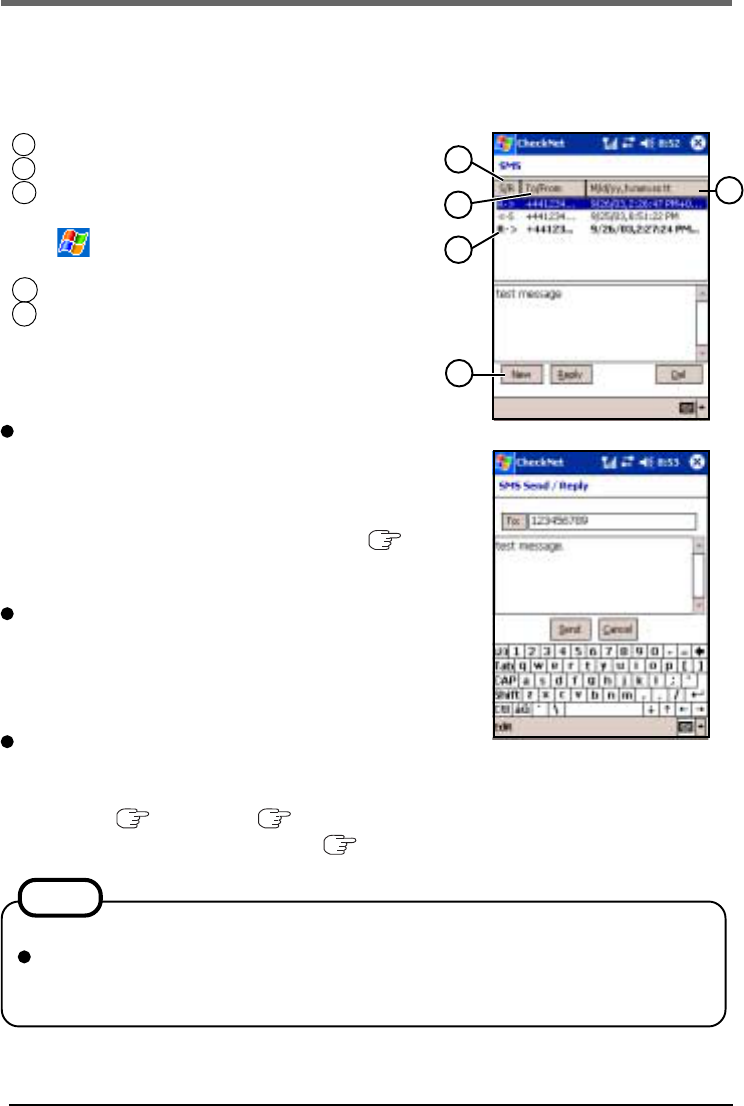
SMS
SMS messages can be sent or read with the CheckNet. SMS links to the Contacts; therefore,
you can input the phone number from the Contacts.
Tap [SMS] from the CheckNet window to display the [SMS] screen.
NOTE
About the characters used in SMS
Up to 160 characters can be received or sent.
Note, however, that since some characters are treated as 2-byte characters, the num-
ber that can be received or sent becomes less than 160 if these characters are used.
To send new SMS
1In the [SMS] screen, tap [New].
[SMS Send/Reply] screen is displayed.
2Write destination phone number or tap [To] to show
the Contacts and select the destination ( page 16).
3 Write a message and tap [Send].
To reply to SMS
1In the [SMS] screen, select the message and tap [Re-
ply].
2Write a message and tap [Send].
To receive SMS
SMS messages sent to this computer are automatically received and displayed on this
screen. When an SMS message is received, the user is notified by an icon and a Notifica-
tion LED ( page 11 and “Operating Instructions”). This function can be dis-
abled using the appropriate settings ( page 17 [General] tab).
ADisplay S(Send) or R(Receive)
BReceiver’s / Sender’s number
CDate of Sending or Receiving
Set the display format using by following
- [Settings] - [System] tab- [Regional
Settings] - [Date]
DUnread messages are displayed in bold characters.
EIf you close the screen before sending a message,
this will change to [Restore] when the next SMS
screen is opened.
A
D
BC
E
15
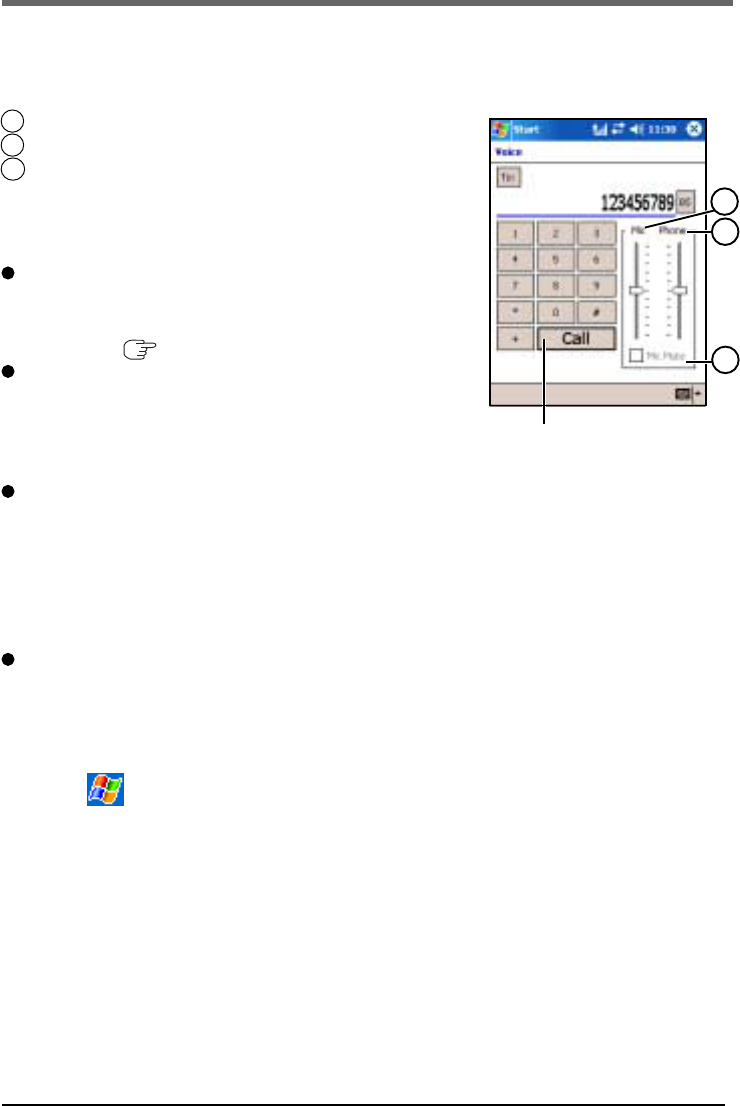
To make a voice call
Input the destination phone number and select [Call].
You can also tap [To] to display the Contacts to select the
destination ( page 16).
When you receive a telephone call
The [Voice] screen will be displayed.
Answer the phone using the one of the following.
• Tap [Answer]*1on the [Voice] screen.
• Press the headset’s answer switch*2 when a headset.
To end the telephone call
Hang up the phone using the one of the following.
• Tap [Hang up]*1on the [Voice] screen.
• Press the headset’s answer switch*2 to hang up when a
headset.
*2Press for one second. Function will not operate if the switch
is not pressed long enough.
To receive voice calls and messages when the computer
is powered off
Even when the computer’s power is off, it is possible to
start up the computer and receive voice calls using the fol-
lowing settings.
1Tap - [Settings] - [System]tab - [Option Devices]
- [RF serial]tab.
2Add a checkmark at the [Supply power to the RF mod-
ule when the unit is suspended] and at the [Enable re-
sume when RI signal is detected].
3Tap [ok].
*1 This button will change to
[Answer] or [Hang up].
Voice
You can make a voice call.
Tap [Voice] from the CheckNet window to display [Voice] screen.
C
A [Mic] :To adjust the microphone volume
B[Phone] :To adjust the speaker volume
C[Mic Mute] :If you add the check mark after connecting,
the sound from the microphone will not be transmitted to
the person you are speaking to. A
B
16
Using CheckNet
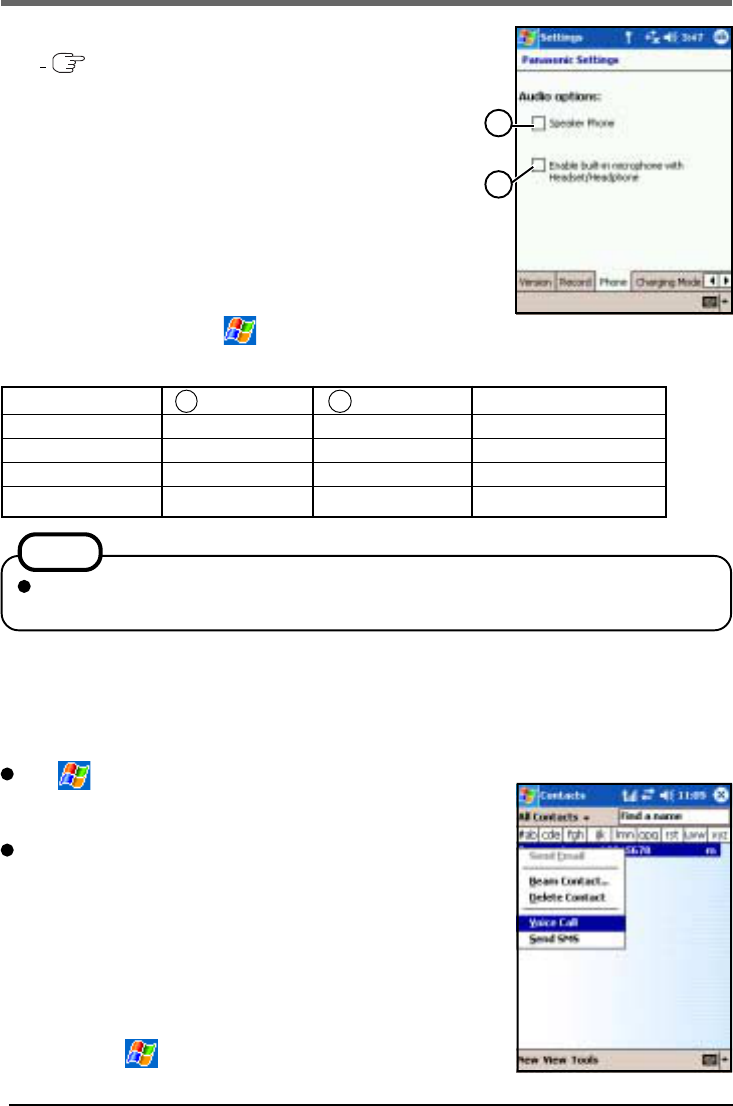
Contacts
Contacts maintains a list of friends, colleagues and customers
so that you can easily find the information you are looking
for.
Tap - [Contacts].
You can create or change a contact, or add a note to a con-
tact.
You can send messages or make a voice call by specifying
a receiver from Contacts.
Tap and hold the desired receiver, and tap [Voice Call] or
[Send SMS].
If there is more than one phone numbers for the desired
receiver, a screen will appear for selecting the appropriate
number.
For details, tap - [Help] - [Contacts].
NOTE
If you try to initiate a dial-up using the GSM/GPRS modem during a voice call, the
voice call will be terminated.
A telephone function can be used by using one of the follow-
ings. ( Operating Instructions “Names and Functions of
Parts”)
• Handset
- The internal microphone with the receiver
• Speaker phone
- The internal microphone with the speaker
• Headset
- The headset (model No. CF-VHSP11W)
• Headphone
- The internal microphone with stereo headphones (the adap-
tor included with CF-VHSP11W is required).
To change this setting, tap - [Settings] - [System] tab-
[Panasonic Settings] - [Phone] tab.
A
B
Handset
Speaker phone
Headset
Headphone
A
Uncheck
Check
Uncheck
Uncheck
B
Uncheck
Uncheck
Uncheck
Check
Headset/Headphone
No use
No use
Use headset
Use headphone

17
Options
Tap [Options...] from the CheckNet window to display the [Options] screen.
[General] tab
AIf checked, the main window is shown when this ap-
plication is started.
BIf checked, the power is suppressed when this appli-
cation is started.
CIf checked, notification LED does not light even when
there is an unread message or while a message is be-
ing received.
DIf checked, sound is not generated when the first un-
read message is received.
EIf checked, ringer sound is not generated when a voice
phone call is received.
FSelect the Navigation Bar icon. When the [Network]
is selected, the mail icon is displayed only for a few
seconds after the unread SMS is received. When the
[SMS] is selected, the mail icon will be displayed while
there is an unread SMS.
To enable PIN lock
Tap [Lock PIN] and enter the PIN code (4digits), then
tap [OK].
([Lock PIN] will change to [Unlock PIN].)
Next time when GPRS modem is turned on, the PIN
code will be requested.
To disable PIN lock
Tap [Unlock PIN] and enter PIN code (4digits), then
tap [OK].
([Unlock PIN] will change to [Lock PIN].)
CAUTION
A
C
B
D
E
F
If an incorrect PIN code is input repeatedly (number
of times depends on SIM), the PUK screen on the right
will be displayed. If an incorrect PUK code is input
repeatedly in this screen as well, the SIM will be
locked, and can no longer be used.
18
Using CheckNet
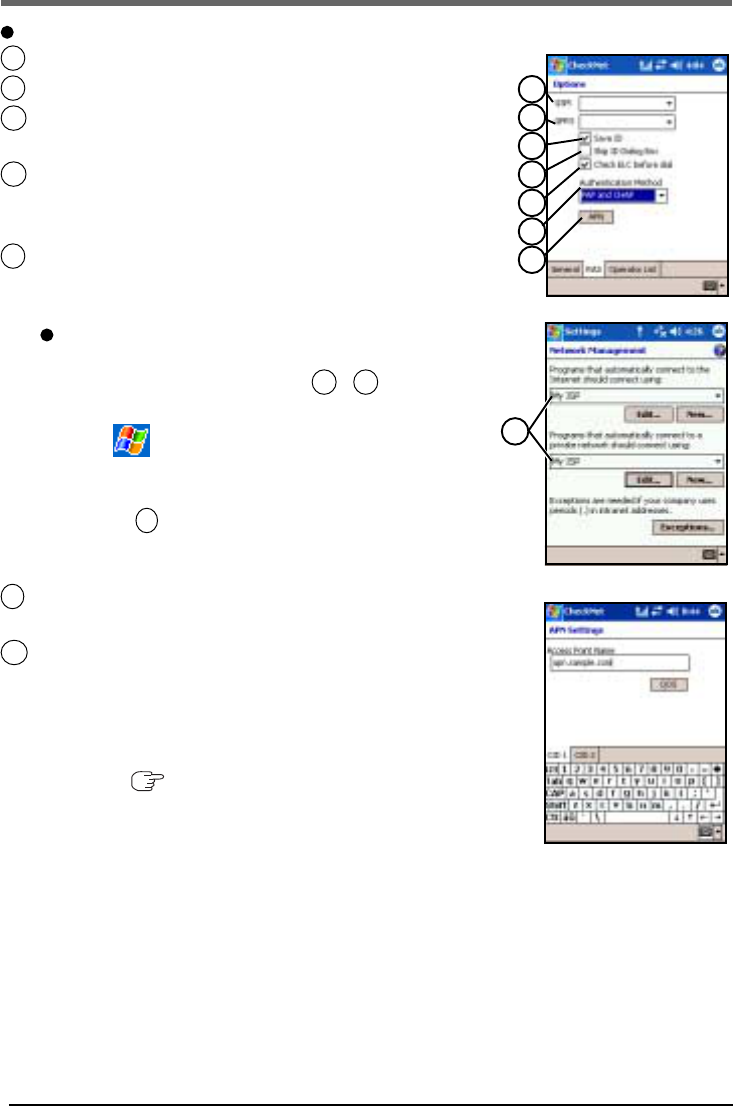
[RAS] tab
A[GSM]: Select dial-up network setting for GSM.
B[GPRS]: Select dial-up network setting for GPRS.
C[Save ID]: If checked, the last valid user ID and password
are used as default user ID and password.
D[Skip ID Dialog Box]: If checked, skip to show the dialog
box to enter user ID and password if valid ID/password
are saved.
E[Check ELC before dial]: If checked, the signal strength
is checked before the dial-up network connection is
started.
Since the network connection can be established
using the operation method explained in step 4 on page
9, there is no need for settings A - E . If CheckNet
settings are required, use the following settings.
1Tap - [Settings] - [Connections] - [Connections]
- [Advanced]tab - [Select Networks].
2Select the same setting in the [Network Management]
screen a .
In this case, the [Network Card] will be displayed in
the connectivity bubble.
F[Authentication Method]: Select RAS authentication
method.
G[APN]: If tapped, the [APN Settings] screen is displayed.
Input the name of the access point that mediates commu-
nications between the GPRS network and the Internet.
There are two APN settings (CID1and CID2). The APN
used corresponds to the “n” in the dialup phone number
*99***n# ( page 8).
[Access Point Name]: Specify the access point
name(APN).
Check with your network manager or the operator for the
SIM you are using to confirm the name of the access point
to be set. As a rule, there is no need to change the QOS
(Quality of Service) setting. Change this only if you are
instructed to do so by your network manager.
A
B
C
D
E
F
G
a
19
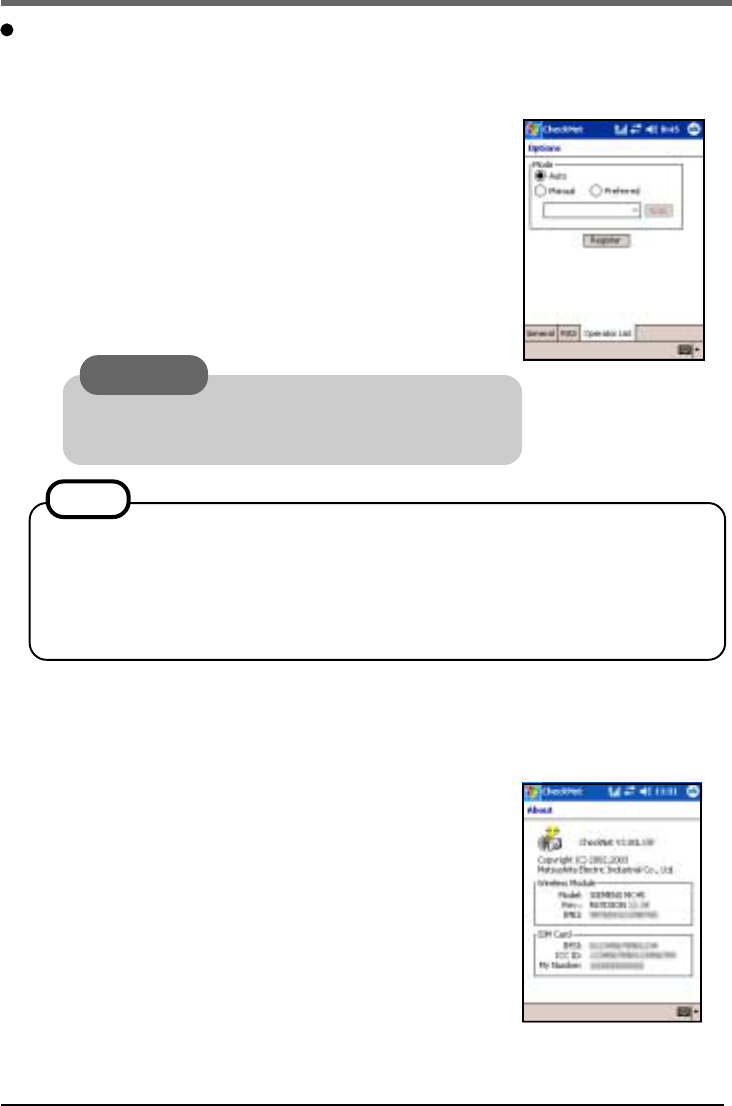
About
Select [About] to confirm GPRS modem / SIM card information.
The information is displayed only when the GSM/GPRS modem’s power is on.
[Wireless Module]
Model: Module name
Rev: Firmware version number
IMEI: International Mobile station Equipment Identity
[SIM card information]
IMSI: International Mobile subscriber Identity
ICC ID: Card identification number
My number: Display the telephone number if it is stored
in the SIM.
[Operator List] tab
Since the operator is usually selected automatically, it is not necessary to change it.
To change the settings manually, perform the following procedures.
1Make the settings at [Mode].
Auto: The operator is selected automatically
Manual: Keep trying to connect the operator se-
lected manually
Preferred: Try to connect the operator selected manu-
ally. If it fails, try to connect automatically.
2When you tap [Manual] or [Preferred], tap [Scan] and
select operator from the scanned list, then tap [Regis-
ter].
Since these settings are saved even after the GSM/GPRS modem is turned off, the
next time the power is turned on the GSM/GPRS modem will try to connect using the
previous settings.
We recommend that you change the mode to [Auto] when moving out the selected
operator’s range.
NOTE
CAUTION
Do not turn off the computer while this function is run-
ning.

20
Specifications
All items other than the following specifications are the same as the CF-P1P series.
( Operating Instructions)
Printed in Japan