Panasonic of North America 9TGCF-P12 CF-P1 Personal Computer with WLAN+BT+GPRS User Manual USer Manual for GPRS
Panasonic Corporation of North America CF-P1 Personal Computer with WLAN+BT+GPRS USer Manual for GPRS
Contents
- 1. User Manual Bluetooth
- 2. User Manual for CF P1
- 3. User Manual for WLAN
- 4. USer Manual for GPRS
USer Manual for GPRS


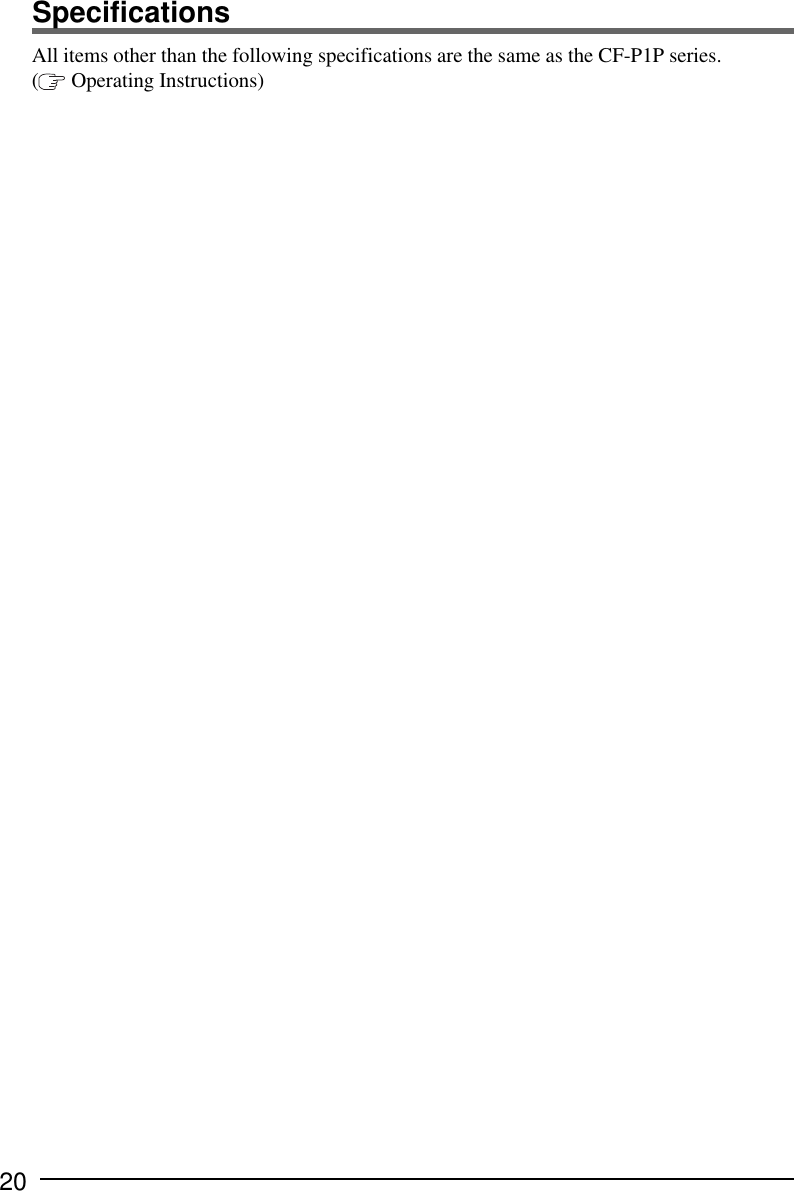
![7(3) Enter the suitable connection name and then select[Panasonic RF Modem] at [Select a modem:], then tap[Next].The settings may vary with the local service provider. This information has to be requestedfrom the local provider. (The following sample screenshots illustrate the setup procedure.)1Turn on your computer. ( Operating Instructions)2Set up the Remote Network.(1) Tap, in order, - [Settings] - [Connections] tab - [Connections].(2) Tap [Add a new modem connection] at [My ISP].Setting Up the Remote Network for GPRS](https://usermanual.wiki/Panasonic-of-North-America/9TGCF-P12.USer-Manual-for-GPRS/User-Guide-401483-Page-7.png)
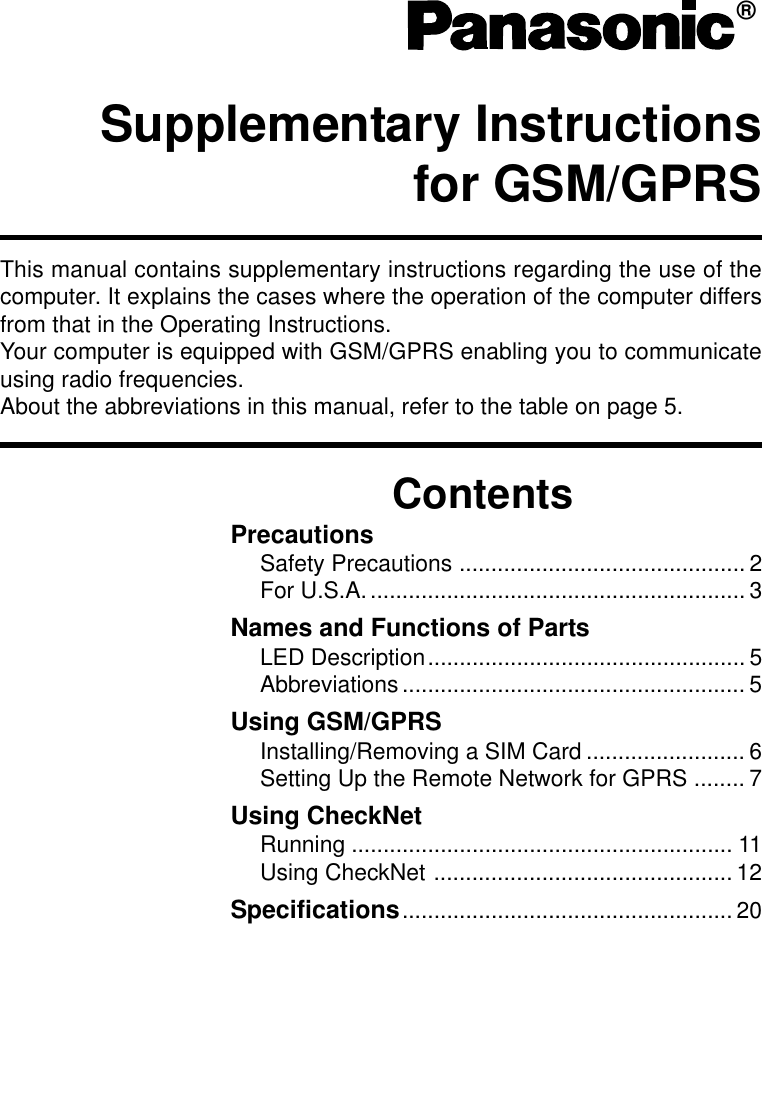
![8Using GSM/GPRS(6) Enter the user name and password, and enter domain ifprovided by ISPor network administrator.(Check with your network manager or the operator forthe SIM you are using to confirm the information to berequested).(7) Tap [Advanced...].(8) Select [57600]at [Baud rate], and then tap [TCP/IP]tab.(4) Enter [*99***1#] for telephone number in the box.The 1 before the # corresponds to the CID number ofthe APN setting for step 3 (3) ( page9). When set-ting the connection to CID2, the telephone number is[*99***2#].(5) Tap [Next].](https://usermanual.wiki/Panasonic-of-North-America/9TGCF-P12.USer-Manual-for-GPRS/User-Guide-401483-Page-8.png)
![9(3) Enter the access point name that connects to the GPRSnetwork.(Check with your network manager or the operator forthe SIM you are using to confirm the setting informa-tion.)(4) Tap [ok].(9) Remove check marks for [Use software compression]and [Use IP header compression], then tap [ok].3Set up the access point name.(1) Tap and hold on the navigation bar and tap [Op-tions] - [RAS] tab.(2) Select RAS authentication method if necessary for adifferent authentication method other than the [RAP andCHAP], and tap [APN].The settings for the GSM are the same as the GPRS, exceptfor the following:• No need to set the access point name• Set the number, user name, password, and the domain for the requested ISP.When selecting the CID tab number here, select the samenumber as the number before the # in the telephonenumber in step 2 (4) ( page 8).(10)Tap [Finish].](https://usermanual.wiki/Panasonic-of-North-America/9TGCF-P12.USer-Manual-for-GPRS/User-Guide-401483-Page-9.png)
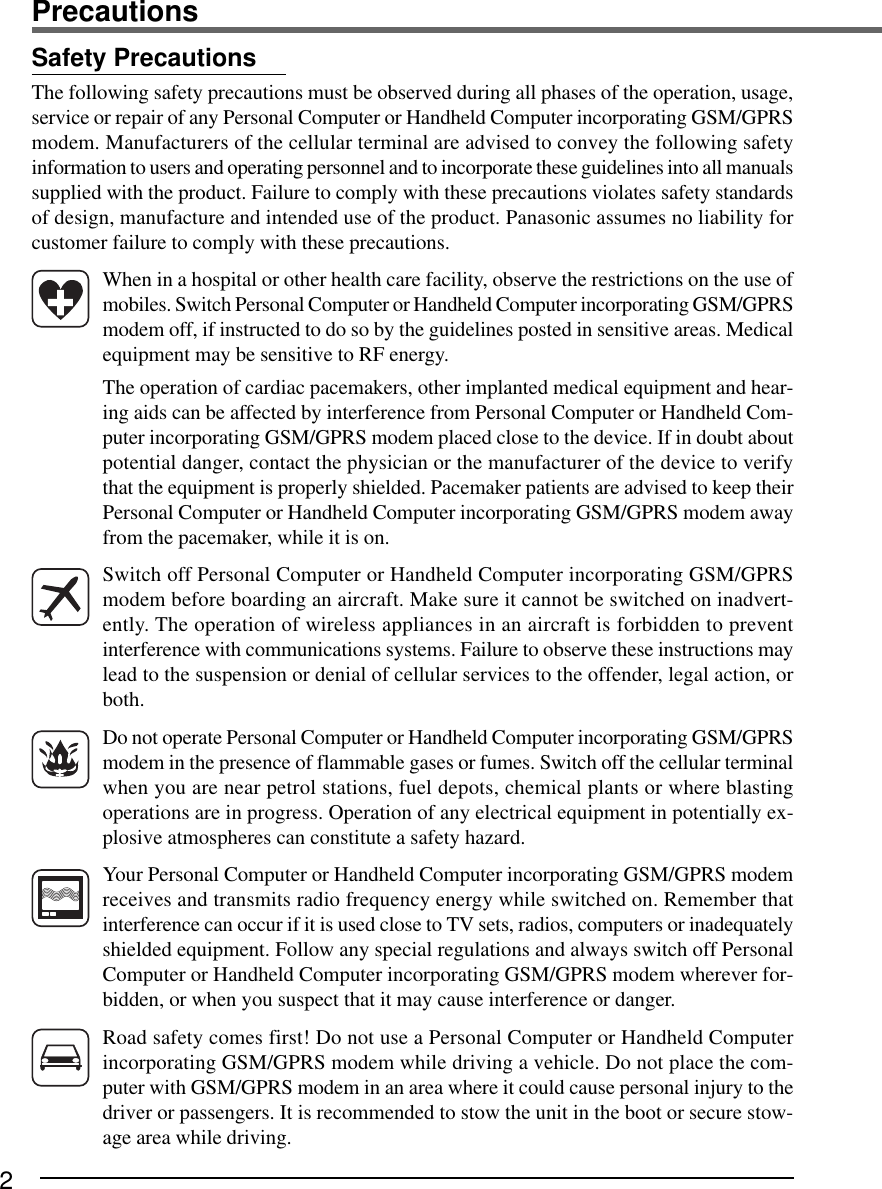
![104Connect /Disconnect to GPRS network(1) ConnectingTap to display the connectivity bubble (A).Make sure that the name of the setting in step 2(3)( page 7) is displayed and tap the telephone num-ber.The connection will start.DisconnectingTap to display the connectivity bubble and tap [Dis-connect]. When multiple connection settings have been created,the desired setting may not be selected using only theoperations described above. In this case, use the fol-lowing settings.(1) Tap on the navigation bar then tap [Settings] todisplay [Connections] screen*1.*1You can also tap - [Settings] - [Connections]tab- [Connections].(2) Tap [Manage existing connections] at [My ISP]*2.*2This appears after setting the remote network (page 7-9).(3) Change the setting from [Auto pick] to a desiredsetting (in this case, select GPRS).(4) Tap [ok].(A)Using GSM/GPRS](https://usermanual.wiki/Panasonic-of-North-America/9TGCF-P12.USer-Manual-for-GPRS/User-Guide-401483-Page-10.png)
![11CheckNet is software that is used during voice calls or data communications via a GSM/GPRS modem installed in the CF-P1. To conduct communications using this product, a SIMcard (sold separately) is required. GPRS communications can only be conducted when usinga SIM card for an operator that supports GPRS communications.Using the CheckNet utility, you can use the following functions.Network information indicationRF signal level indicationGSM/GPRS modem power controlRAS (Dial-up network) controlSMS (Short Message Service)Voice callRunningWhen the power is switched on, will be displayed on the navigation bar. The follow-ings show the variation of the icon and its meanings.These icons flash during initialization or when the battery power is low.Navigation bar icon: Initializing the GSM/GPRS modemGSM/GPRS modem is powered off.: GPRS modem error: SIM card error: Unread message: Out of coverage: GSM service is available (the number of bars indicates the signalstrength) ( page 13): GSM/GPRS service is available (the number of bars indicates the signalstrength) ( page 13) Tap the icon to display text information indicating the modem or network status. Tap and hold the icon to display the pop-up menu. If - [Programs] - [CheckNet] is tapped when CheckNet has already been started up, the [Voice] screen will be displayed.NOTEUsing CheckNetCAUTIONDo not turn off the CF-P1 by the power switch while is displayed on the navigationbar.](https://usermanual.wiki/Panasonic-of-North-America/9TGCF-P12.USer-Manual-for-GPRS/User-Guide-401483-Page-11.png)
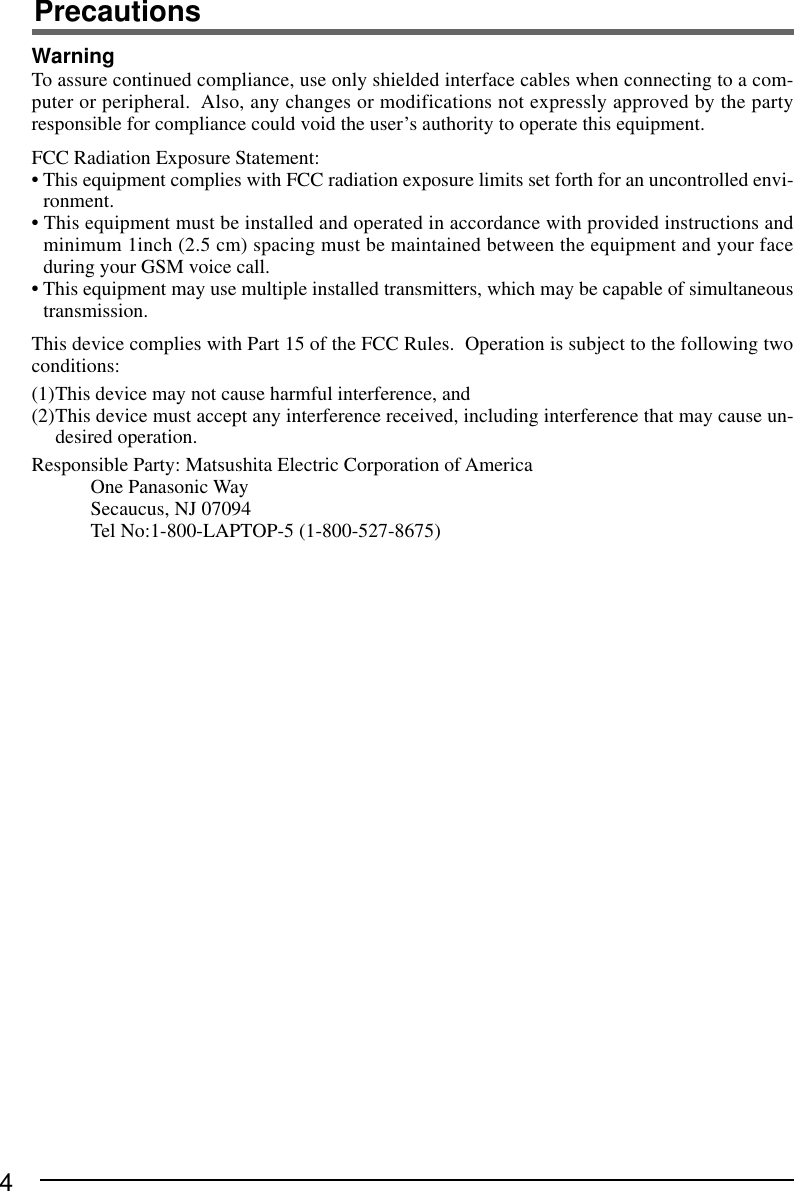
![12Using CheckNetYou can select the menu from the CheckNet window. With the CheckNet window, detailedinformation can be seen graphically.To open the CheckNet windowTap and hold on the navigation bar and tap [Open] from the popup menu (shownbelow).To close the CheckNet windowTap the button on the navigation bar. (You cannot exit the CheckNet.)ASignal Strength Value: This indicates thesignal strength by value.BSignal Strength Meter: This indicates thesignal strength by the bar graph. (page 13)CCommunication Mode: Display availablenetwork service.GSM: Only GSM is availableGSM + GPRS: GSM and GPRS areavailableDAn operator name with which GSM/GPRS modem is currently registeredECell information which GPRS modem iscurrently usingPLMN: Public Land Mobile NetworkID CodeLAC: Location Area Code [Hex]CELL ID: Cell ID [Hex]CH: ARFCN (Absolute Fre-quency Channel Number) ofthe BCCH carrierFStatus of the CheckNetGNumber of unread SMS ( page 14)H<CheckNet window>KUsing CheckNetABCFGIKDLMHJJMLN<Popup menu>EI](https://usermanual.wiki/Panasonic-of-North-America/9TGCF-P12.USer-Manual-for-GPRS/User-Guide-401483-Page-12.png)
![13RF signal level indicationLevel-1Level-2Level-3Level-4Level-5Level-6Level-7Level-8Level-9Level-10– -100 dBm-99 dBm – -95 dBm-94 dBm – -90 dBm-89 dBm – -85 dBm-84dBm – -80 dBm-79 dBm – -75 dBm-74 dBm – -70 dBm-69 dBm – -65 dBm-64 dBm – -60 dBm-59 dBm –Signal Strength Value and Sig-nal Strength Meter on theCheckNet windowGSMSignal levelOut of coverage– -96 dBm-95dBm – -84 dBm-85 dBm – -74 dBm-75 dBm –Navigation bar iconGSM+GPRSLevel 1 Level 10HPower on/off the GSM/GPRS modemStart RAS (Dial-up network) fromCheckNet (available only when in areaof signal coverage, page 18), andstop if connected.Display [SMS] screen( page 14)KDisplay [Voice] screen ( page 15)LDisplay [Options] screen ( page 17)MDisplay GSM/GPRS modem / SIM cardinformation ( page 19)NOpen the CheckNet windowIJNOTEWhen tapped the [Power] or [About], functions may not work properly. In this case,reset the computer.](https://usermanual.wiki/Panasonic-of-North-America/9TGCF-P12.USer-Manual-for-GPRS/User-Guide-401483-Page-13.png)
![14Using CheckNetSMSSMS messages can be sent or read with the CheckNet. SMS links to the Contacts; therefore,you can input the phone number from the Contacts.Tap [SMS] from the CheckNet window to display the [SMS] screen.NOTEAbout the characters used in SMSUp to 160 characters can be received or sent.Note, however, that since some characters are treated as 2-byte characters, the num-ber that can be received or sent becomes less than 160 if these characters are used.To send new SMS1In the [SMS] screen, tap [New].[SMS Send/Reply] screen is displayed.2Write destination phone number or tap [To] to showthe Contacts and select the destination ( page 16).3 Write a message and tap [Send].To reply to SMS1In the [SMS] screen, select the message and tap [Re-ply].2Write a message and tap [Send].To receive SMSSMS messages sent to this computer are automatically received and displayed on thisscreen. When an SMS message is received, the user is notified by an icon and a Notifica-tion LED ( page 11 and “Operating Instructions”). This function can be dis-abled using the appropriate settings ( page 17 [General] tab).ADisplay S(Send) or R(Receive)BReceiver’s / Sender’s numberCDate of Sending or ReceivingSet the display format using by following - [Settings] - [System] tab- [RegionalSettings] - [Date]DUnread messages are displayed in bold characters.EIf you close the screen before sending a message,this will change to [Restore] when the next SMSscreen is opened.ADBCE](https://usermanual.wiki/Panasonic-of-North-America/9TGCF-P12.USer-Manual-for-GPRS/User-Guide-401483-Page-14.png)
![15To make a voice callInput the destination phone number and select [Call].You can also tap [To] to display the Contacts to select thedestination ( page 16).When you receive a telephone callThe [Voice] screen will be displayed.Answer the phone using the one of the following.• Tap [Answer]*1on the [Voice] screen.• Press the headset’s answer switch*2 when a headset.To end the telephone callHang up the phone using the one of the following.• Tap [Hang up]*1on the [Voice] screen.• Press the headset’s answer switch*2 to hang up when aheadset.*2Press for one second. Function will not operate if the switchis not pressed long enough.To receive voice calls and messages when the computeris powered offEven when the computer’s power is off, it is possible tostart up the computer and receive voice calls using the fol-lowing settings.1Tap - [Settings] - [System]tab - [Option Devices]- [RF serial]tab.2Add a checkmark at the [Supply power to the RF mod-ule when the unit is suspended] and at the [Enable re-sume when RI signal is detected].3Tap [ok].*1 This button will change to [Answer] or [Hang up].VoiceYou can make a voice call.Tap [Voice] from the CheckNet window to display [Voice] screen.C A [Mic] :To adjust the microphone volume B[Phone] :To adjust the speaker volume C[Mic Mute] :If you add the check mark after connecting,the sound from the microphone will not be transmitted tothe person you are speaking to. AB](https://usermanual.wiki/Panasonic-of-North-America/9TGCF-P12.USer-Manual-for-GPRS/User-Guide-401483-Page-15.png)
![16Using CheckNetContactsContacts maintains a list of friends, colleagues and customersso that you can easily find the information you are lookingfor.Tap - [Contacts].You can create or change a contact, or add a note to a con-tact.You can send messages or make a voice call by specifyinga receiver from Contacts.Tap and hold the desired receiver, and tap [Voice Call] or[Send SMS].If there is more than one phone numbers for the desiredreceiver, a screen will appear for selecting the appropriatenumber.For details, tap - [Help] - [Contacts].NOTEIf you try to initiate a dial-up using the GSM/GPRS modem during a voice call, thevoice call will be terminated.A telephone function can be used by using one of the follow-ings. ( Operating Instructions “Names and Functions ofParts”)• Handset- The internal microphone with the receiver• Speaker phone- The internal microphone with the speaker• Headset- The headset (model No. CF-VHSP11W)• Headphone- The internal microphone with stereo headphones (the adap-tor included with CF-VHSP11W is required).To change this setting, tap - [Settings] - [System] tab-[Panasonic Settings] - [Phone] tab.ABHandsetSpeaker phoneHeadsetHeadphone AUncheckCheckUncheckUncheck BUncheckUncheckUncheckCheckHeadset/HeadphoneNo useNo useUse headsetUse headphone](https://usermanual.wiki/Panasonic-of-North-America/9TGCF-P12.USer-Manual-for-GPRS/User-Guide-401483-Page-16.png)
![17OptionsTap [Options...] from the CheckNet window to display the [Options] screen.[General] tabAIf checked, the main window is shown when this ap-plication is started.BIf checked, the power is suppressed when this appli-cation is started.CIf checked, notification LED does not light even whenthere is an unread message or while a message is be-ing received.DIf checked, sound is not generated when the first un-read message is received.EIf checked, ringer sound is not generated when a voicephone call is received.FSelect the Navigation Bar icon. When the [Network]is selected, the mail icon is displayed only for a fewseconds after the unread SMS is received. When the[SMS] is selected, the mail icon will be displayed whilethere is an unread SMS.To enable PIN lockTap [Lock PIN] and enter the PIN code (4digits), thentap [OK].([Lock PIN] will change to [Unlock PIN].)Next time when GPRS modem is turned on, the PINcode will be requested.To disable PIN lockTap [Unlock PIN] and enter PIN code (4digits), thentap [OK].([Unlock PIN] will change to [Lock PIN].)CAUTIONACBDEFIf an incorrect PIN code is input repeatedly (numberof times depends on SIM), the PUK screen on the rightwill be displayed. If an incorrect PUK code is inputrepeatedly in this screen as well, the SIM will belocked, and can no longer be used.](https://usermanual.wiki/Panasonic-of-North-America/9TGCF-P12.USer-Manual-for-GPRS/User-Guide-401483-Page-17.png)
![18Using CheckNet[RAS] tabA[GSM]: Select dial-up network setting for GSM.B[GPRS]: Select dial-up network setting for GPRS.C[Save ID]: If checked, the last valid user ID and passwordare used as default user ID and password.D[Skip ID Dialog Box]: If checked, skip to show the dialogbox to enter user ID and password if valid ID/passwordare saved.E[Check ELC before dial]: If checked, the signal strengthis checked before the dial-up network connection isstarted. Since the network connection can be establishedusing the operation method explained in step 4 on page9, there is no need for settings A - E . If CheckNetsettings are required, use the following settings.1Tap - [Settings] - [Connections] - [Connections]- [Advanced]tab - [Select Networks].2Select the same setting in the [Network Management]screen a .In this case, the [Network Card] will be displayed inthe connectivity bubble.F[Authentication Method]: Select RAS authenticationmethod.G[APN]: If tapped, the [APN Settings] screen is displayed.Input the name of the access point that mediates commu-nications between the GPRS network and the Internet.There are two APN settings (CID1and CID2). The APNused corresponds to the “n” in the dialup phone number*99***n# ( page 8).[Access Point Name]: Specify the access pointname(APN).Check with your network manager or the operator for theSIM you are using to confirm the name of the access pointto be set. As a rule, there is no need to change the QOS(Quality of Service) setting. Change this only if you areinstructed to do so by your network manager.ABCDEFGa](https://usermanual.wiki/Panasonic-of-North-America/9TGCF-P12.USer-Manual-for-GPRS/User-Guide-401483-Page-18.png)
![19AboutSelect [About] to confirm GPRS modem / SIM card information.The information is displayed only when the GSM/GPRS modem’s power is on.[Wireless Module]Model: Module nameRev: Firmware version numberIMEI: International Mobile station Equipment Identity[SIM card information]IMSI: International Mobile subscriber IdentityICC ID: Card identification numberMy number: Display the telephone number if it is storedin the SIM.[Operator List] tabSince the operator is usually selected automatically, it is not necessary to change it.To change the settings manually, perform the following procedures.1Make the settings at [Mode].Auto: The operator is selected automaticallyManual: Keep trying to connect the operator se-lected manuallyPreferred: Try to connect the operator selected manu-ally. If it fails, try to connect automatically.2When you tap [Manual] or [Preferred], tap [Scan] andselect operator from the scanned list, then tap [Regis-ter].Since these settings are saved even after the GSM/GPRS modem is turned off, thenext time the power is turned on the GSM/GPRS modem will try to connect using theprevious settings.We recommend that you change the mode to [Auto] when moving out the selectedoperator’s range.NOTECAUTIONDo not turn off the computer while this function is run-ning.](https://usermanual.wiki/Panasonic-of-North-America/9TGCF-P12.USer-Manual-for-GPRS/User-Guide-401483-Page-19.png)