Panasonic of North America 9TGCF-P12 CF-P1 Personal Computer with WLAN+BT+GPRS User Manual Operating Instructions
Panasonic Corporation of North America CF-P1 Personal Computer with WLAN+BT+GPRS Operating Instructions
Contents
- 1. User Manual Bluetooth
- 2. User Manual for CF P1
- 3. User Manual for WLAN
- 4. USer Manual for GPRS
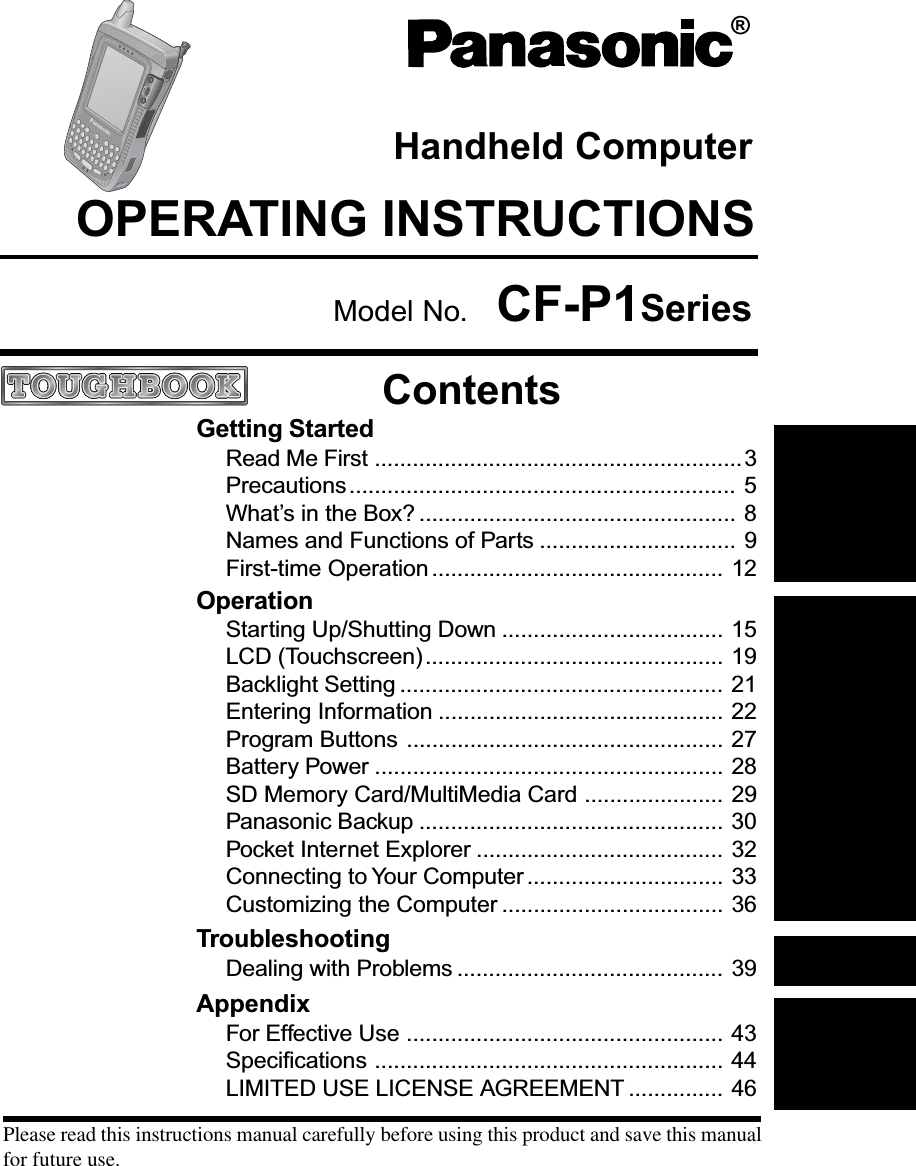
User Manual for CF P1
![2Customer's RecordSerial No.orModel No.*Code No.Dealer's NameDealer's AddressDate of Purchase*For the Model No., insert the 12 digit number (for example, CF-P1P3CZF6E) located on the back ofthe computer.CF-P1P3 series(QWERTY keytype keyboard)CF-P1P1 series(numeric keypadtype keyboard)NOTE:NOTE provides a useful fact or helpful information.CAUTION:CAUTION indicates a condition that may result in minor or moder-ate injury. - [Programs]: This illustration means to tap at the top of the screen, then totap [Programs].< For the CF-P1P3 series >: This illustration means to press the [A] key.Mode key + NUM key: This illustration means to press and hold the [ ] key (Mode key),then press the [NUM ] key.< For the CF-P1P1 series >: This illustration means to press the [1] key. : Where to go for referred information.Some of the illustrations in this manual may differ slightly in shape from the actual items inorder to make the explanation easier to understand.This operating instructions describes the models below.Note however that the illustrations mainly show the CF-P1P3 series.IntroductionThank you for purchasing the Panasonic Handheld Computer. Read the operating instruc-tions thoroughly for proper operation of your new computer.Illustrations and Terminology in this Manual](https://usermanual.wiki/Panasonic-of-North-America/9TGCF-P12.User-Manual-for-CF-P1/User-Guide-401471-Page-2.png)
![6Stop UsingShould the battery emit an ab-normal odor, become hot to thetouch, become discolored,change shape, or become in anyway different from normal, re-move it from the computer andstop using it.If the battery pack will not be used for along period of time (a month or more),charge or discharge (use) the battery packuntil the remaining battery level becomes30 % to 40 % and store it in a cool, dryplace.The battery pack is not charged when thecomputer is first purchased. Be sure tocharge it before using it for the first time.When the AC adaptor is connected to thecomputer, charging begins automatically.If the battery leaks and the fluid gets intoyour eyes, do not rub your eyes. Immedi-ately flush your eyes with clear water andsee a doctor for medical treatment as soonas possible.About High Temperature ModeThis computer has a high temperature modefunction that prevents the degradation ofthe battery in high temperature environ-ments. We recommend setting the hightemperature mode function when install-ing the computer in a car, etc. To do this,set [Charging mode] in - [Settings] -[System] tab - [Panasonic Settings] to [HighTemperature]. In the high temperaturemode, the full charge capacity of batterybecomes approximately 80 %.Battery PackCare should be exercised with regard to thefollowing in order to avoid the possibilityof over-heating, fire, or damage.Do Not DisassembleDo not insert sharp objects intothe battery pack, expose it tobumps or shocks, or deform, dis-assemble, or modify it.Do Not ShortDo not short the positive (+) andnegative (-) contacts.Do Not Put Into a MicrowaveDo not put the battery pack intoa microwave oven or a pressur-ized chamber.Avoid Extreme Heat, Cold andDirect SunlightDo not charge, use or leave thebattery pack for extended peri-ods where it will be exposed todirect sunlight, in a hot place (inan automobile on a sunny day,for example), or in a cold place.Avoid HeatDo not throw the battery packinto a fire or expose it to exces-sive heat.Keep Articles AwayDo not place the battery pack to-gether with articles such as neck-laces or hairpins when carryingor storing.Do Not Use With Any OtherDeviceThe battery pack is rechargeableand was intended for the speci-fied computer. Do not use it witha device other than the one forwhich it was designed.Precautions](https://usermanual.wiki/Panasonic-of-North-America/9TGCF-P12.User-Manual-for-CF-P1/User-Guide-401471-Page-6.png)
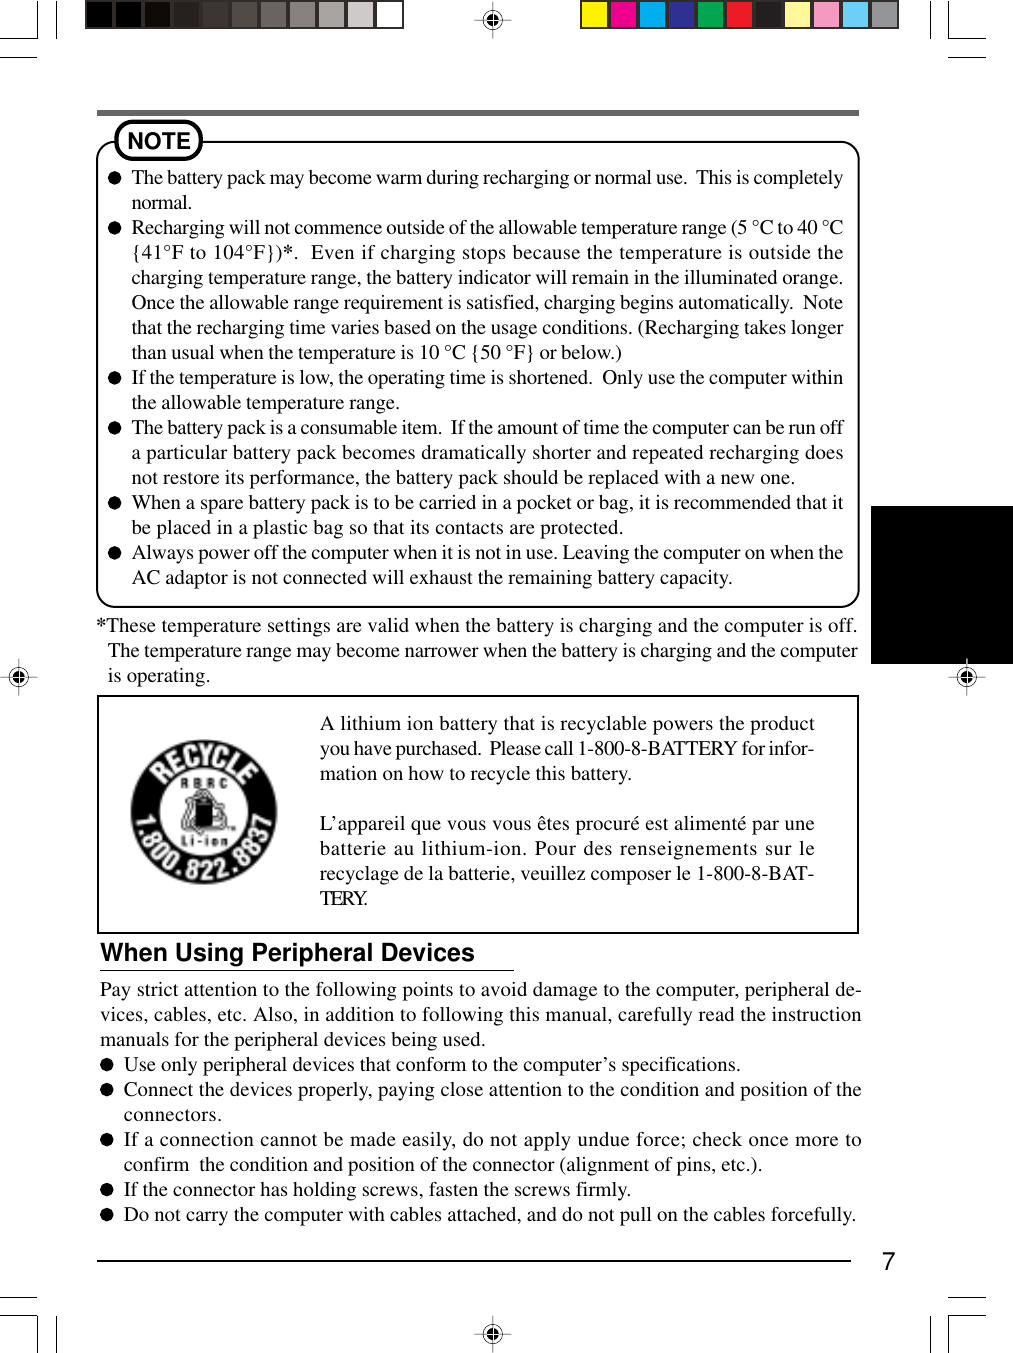
![9*1*2 ( “Supplementary Instructions”)*1*2 RF Module PowerNotification/*1 Message-In IndicatorBattery IndicatorGreen: Fully-chargedOrange: Charging in progressNot lit: Charging not being performedor AC adaptor not connectedNames and Functions of PartsProgram ButtonsCursor Control ( page 23)By pressing a programbutton (F1, F2, F3 andF4), the program as-signed to the button isstarted up. ( page 27) ( page 10)The illustrations shown may differ from the actual physical appearances. ( page 19) ( page 35)Depending on built-in cardor modules, some modelshave a different shape (e.g.,barcode scanner). For de-tails, refer to the attachedSupplementary Instructions.(These cards and modulecannot be changed.)LED IndicatorsLED Indicators *1 Available on specific models.*2 Can be set to not light up( page 37).Keyboard(numerickeypad type)< For the CF-P1P1 series >The keyboard is of the numeric keypadtype. There are no LED indicators ( Numeric key lock and CapsLock).( page 25 ) ( page 20)LCD (Touchscreen)StylusKeyboard(QWERTY key type) Numeric key lockCaps lockFor detailed settings, tap - [Set-tings] - [System] tab - [Panasonic Set-tings]. ( page 37)Infrared Communication PortReceiverPower SwitchInternal Microphone ( page 29)SD Memory Card/MultiMedia Card Slot](https://usermanual.wiki/Panasonic-of-North-America/9TGCF-P12.User-Manual-for-CF-P1/User-Guide-401471-Page-9.png)
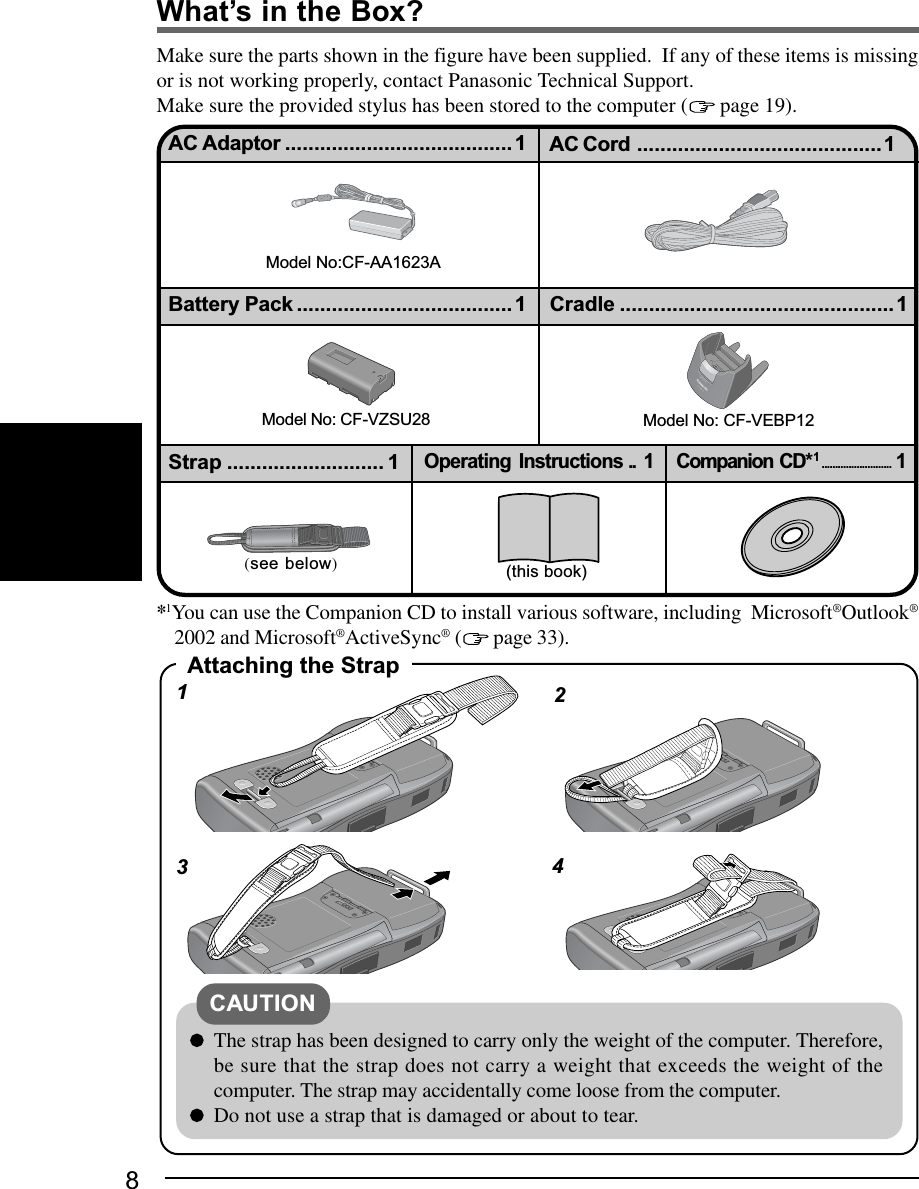
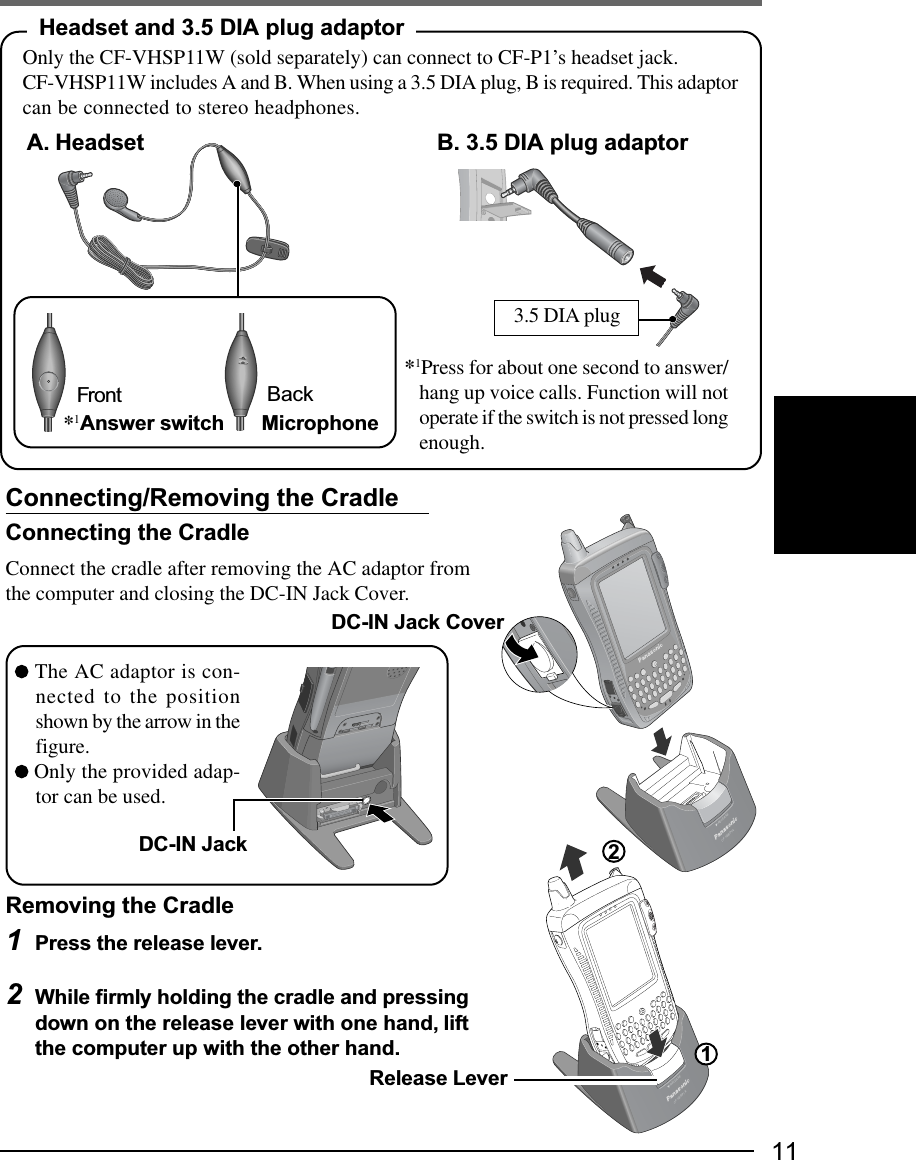
![10Names and Functions of PartsTo adjust the volume, tap - [Settings] - [Per-sonal] tab - [Sounds & Notifications] - [Volume]tab.Use this connector to connect a headset or a 3.5DIA plug adaptor ( pages 11). Audio outputfrom the internal speaker is disabled when theheadset or the 3.5 DIA plug adaptor is con-nected.( pages 12 and 28)Set the computer into the cradle (included)( next page). Or, you can connect the com-puter directly to the computer using the propercable ( page 34).Cursor ControlUsing the cursor control, the following operations can be performed.“Push” Operation:Executes a selected item from a menu, or a selected icon.For example, after an item within a menu is selected, thecursor control can be pushed to execute this selected item.“Move Up/Down Right/Left” Operations:Performs the same function as the up/down left/right cur-sor keys. For example, the “Move Up” operation can beperformed to select an item towards the top within a menu.Changing the Cursor Control SettingsThe cursor control settings allow you to adjust the interval between the waiting timeuntil the repetition of an input begins (from the first input to the second input) if thecursor control is held down, and the repeat of the input (from the second input and on).1Tap - [Settings] - [Personal] tab - [Buttons] - [Up/Down Control] tab.2Customize the way your cursor control repeats.3Tap [ok].Strap Attachments ( page 8)( page 39)Battery PackSpeakerHeadset JackExpansion ConnectorReset SwitchDC-IN Jack](https://usermanual.wiki/Panasonic-of-North-America/9TGCF-P12.User-Manual-for-CF-P1/User-Guide-401471-Page-10.png)
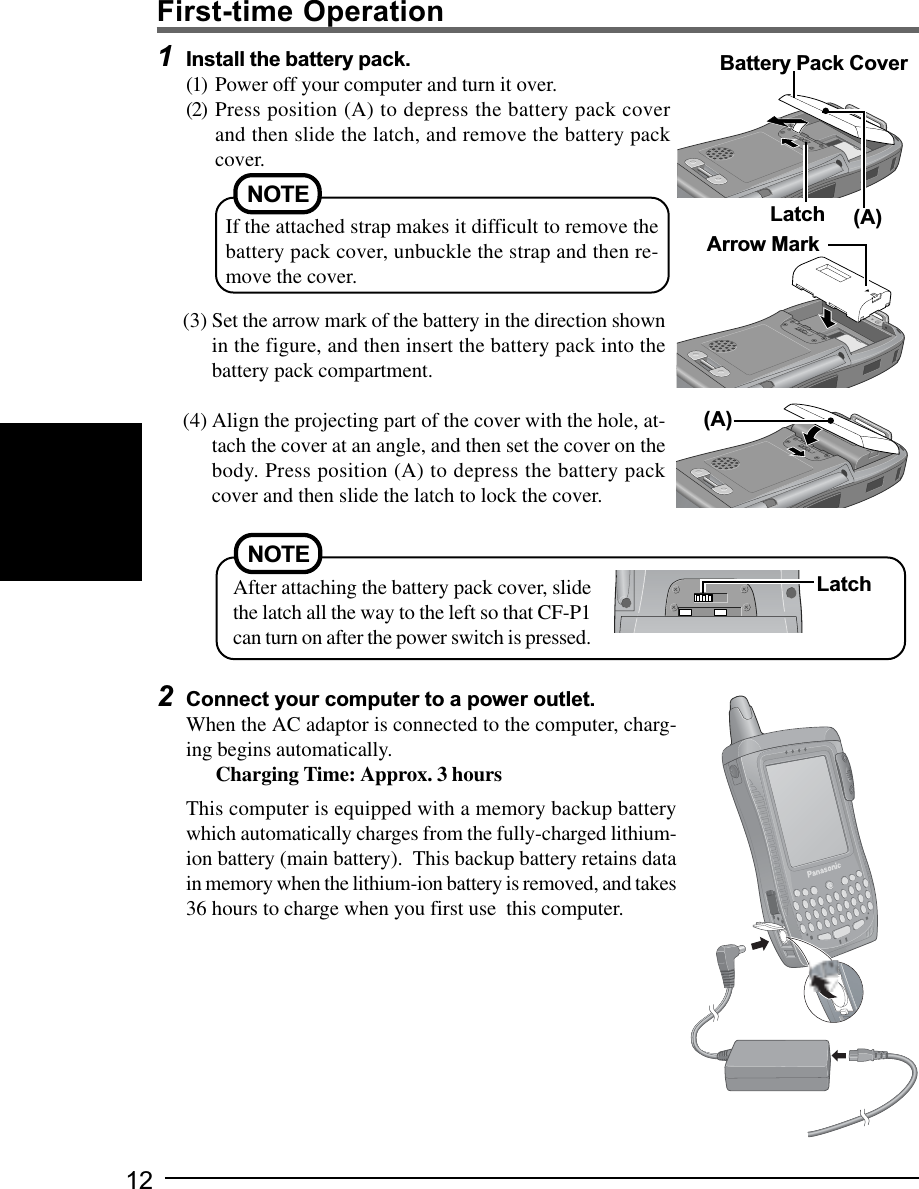
![143Turn your computer on(1) Using the provided stylus, push the center of the reset switch straightin for 1 second. If the DC-IN Jack's cover makes it difficult topush the reset switch, push the cover in a little as you push theswitch.(2) Tap the screen to set up your Pocket PC.The Windows*1 alignment screen is displayed.*1 This computer uses Microsoft® Windows® MobileTM 2003 software for Pocket PC.(3) Align the touchscreen.(For alignment, tapping operations are required. For informationon tapping, refer to page 20.)"+" is displayed in the center, upper left, lower left, lower right,and upper right portions of the screen, in that order. Each time the"+" mark is displayed, tap the center of the "+" mark with thestylus.(4) At [complete], tap the screen to begin using CF-P1.4Set the time and date(1) Tap - [Settings] - [System] tab - [Clock].(2) Set the time and date.(3) Tap [ok].Reset SwitchThis concludes the first-time use operation guidelines.NOTEYou can also set the time and date by tapping on [Today] screen.Use only the stylus provided to push the reset switch.Do not push the reset switch with any other sharp-pointedobjects, i.e. pencils, and ball point pens. The reset switch orother parts may become damaged.CAUTIONFirst-time Operation](https://usermanual.wiki/Panasonic-of-North-America/9TGCF-P12.User-Manual-for-CF-P1/User-Guide-401471-Page-14.png)
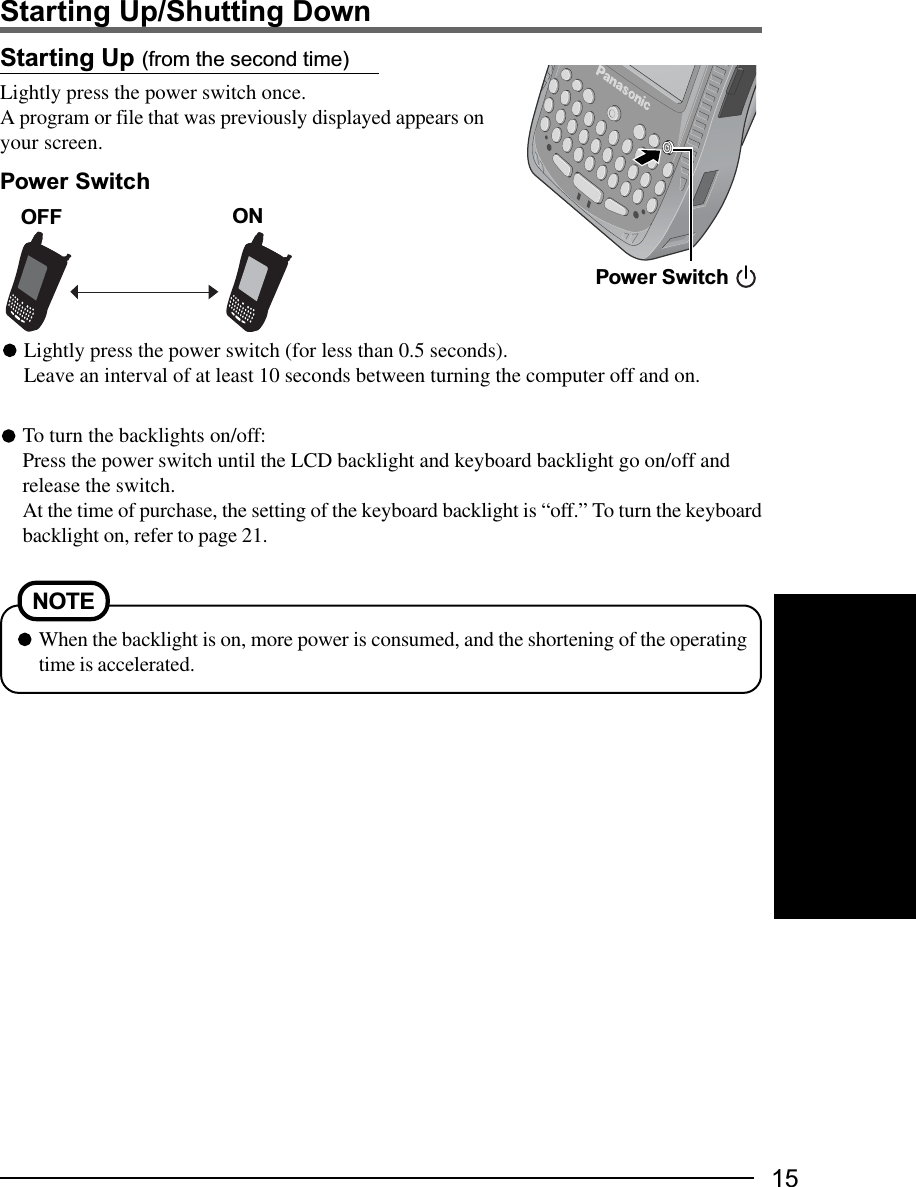
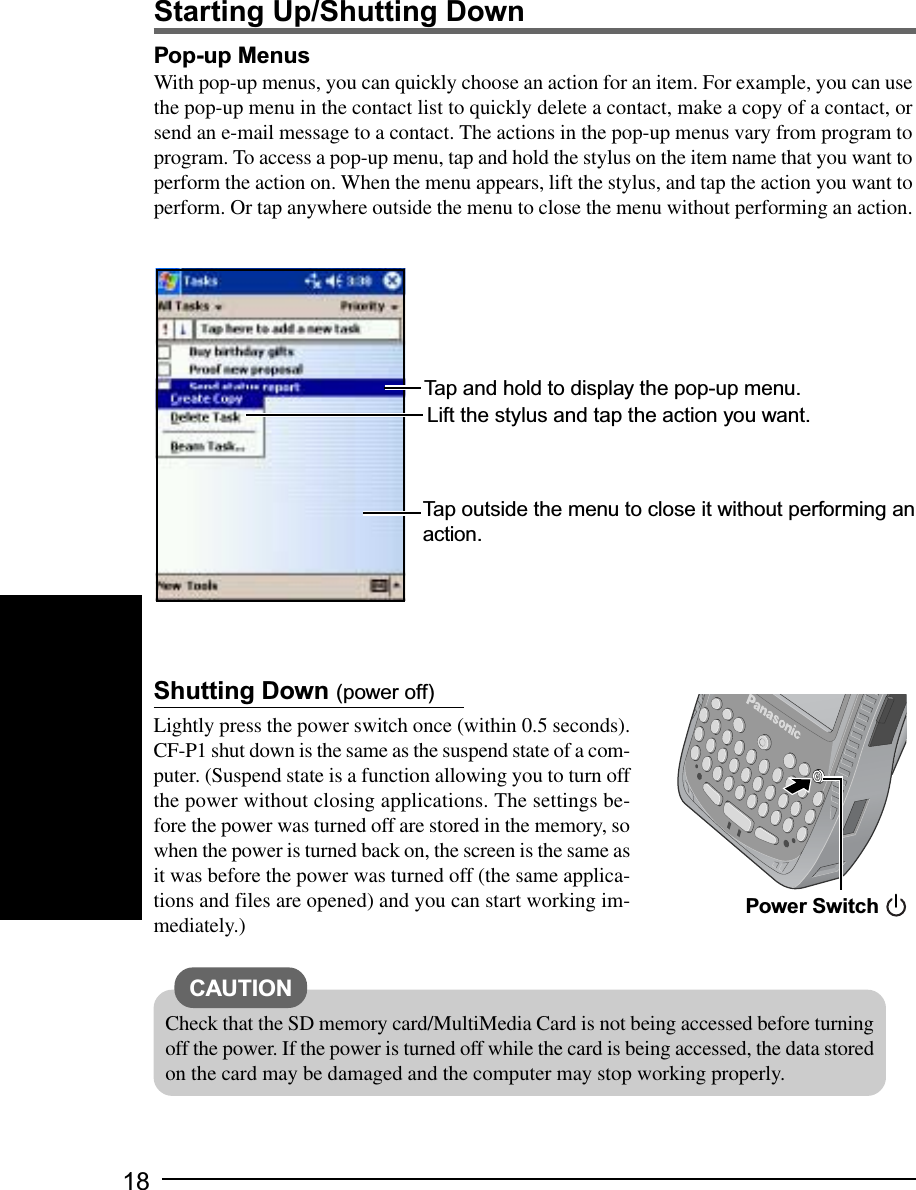
![16Starting Up/Shutting DownThe Navigation Bar and Command BarThe navigation bar is located at the top of the screen. It displays the active program andcurrent time, and allows you to switch to programs and close screens.Use the command bar at the bottom of the screen to perform tasks in programs. The com-mand bar includes menu names, buttons, and the input panel button. or may be displayed dependingon the program that is running.Status Icon ( below)New ButtonMenu Names ButtonsInput Panel Button(Example for [Notes])Tap to quickly select a program you have recentlyused.Tap to select a program.Tap to see additional programs.Tap to customize CF-P1 ( page 36-38).Following are some of the status icons you may see.Turn all sounds on and offBackup battery is very lowMain battery is chargingMain battery is very lowMain battery is lowMain battery is fullStatus Icon & MeaningConnection is activeSynchronization is occurringNotification that one or more instantmessages were receivedNotification that one or more e-mailmessages were receivedMore Notification icons need to bedisplayed. Tap the icon to view all.Connection is not active*1*1This icon differs depending on model.](https://usermanual.wiki/Panasonic-of-North-America/9TGCF-P12.User-Manual-for-CF-P1/User-Guide-401471-Page-16.png)
![17Today ScreenYou’ll see the Today screen when you turn on the computer for the first time each day (orafter 4 hours of inactivity*1). You can also display it by tapping - [Today]. On the Todayscreen, you can see at a glance important information for the day.*1To change the setting, tap - [Settings] - [Personal] tab - [Today] - [Items] tab.Tap to switch to a program.Tap to create a new item.Tap to change date and time.Tap to open an item.Your day at a glance.Tap to view connection status.](https://usermanual.wiki/Panasonic-of-North-America/9TGCF-P12.User-Manual-for-CF-P1/User-Guide-401471-Page-17.png)
![20Align the screen if the cursor does not correctly move to the position where the stylus touchesthe screen of the computer.1Tap - [Settings] - [System] tab - [Screen].2Tap [Align Screen].3"+" is displayed in the center, upper left, lowerleft, lower right, and upper right portions ofthe screen, in that order.Each time the "+" mark is displayed, tap the center ofthe "+" mark with the stylus.The alignment procedure is executed after the five“+” marks are touched.Handling the TouchscreenUse the provided stylus with CF-P1. Do not use an implement other than the stylus thatcomes with the computer.Do not place any object on the surface or press down forcefully with sharp-pointed objects(e.g., nails), or hard objects that can leave marks (e.g., pencils and ball point pens).Do not operate the computer when such things as dust are on the LCD. Do not allowsubstances such as oil to contact the LCD. The cursor may not work properly in suchcases.Aligning the ScreenNOTE<For the CF-P1P3 series>You can also display the alignment screen when (Mode key) + the cursor control arepushed.<For the CF-P1P1 series>You can also display the alignment screen when PF (PF key) + the cursor control arepushed.LCD (Touchscreen)](https://usermanual.wiki/Panasonic-of-North-America/9TGCF-P12.User-Manual-for-CF-P1/User-Guide-401471-Page-20.png)
![21LCD Backlight ON/OFFPress the power switch until the LCD backlight goes on/off after the computer is turned onand release the switch.Setting of the LCD Backlight and Keyboard BacklightThe LCD backlight and keyboard backlight can be set to switch off automatically (e.g., forconserve power) by setting the timeout function. Individual settings can be made for batteryuse and AC adaptor use.1Tap - [Settings] - [System] tab - [Backlight].2Battery use setting: Tap the [Battery Power] tab.AC adaptor use setting: Tap the [External Power] tab.Adjust the LCD BrightnessScreen brightness can be adjusted in accordance with the usage conditions.1Tap - [Settings] - [System] tab - [Backlight].2Tap the [Brightness] tab and adjust the brightness with the slider.3Tap [ok].Backlight Setting3Tap [ok].Add a check mark so that when the device is not oper-ated, the LCD backlight switches off automaticallywhen the timeout expires.Add a check mark so that tapping the screen turns theLCD backlight on.(Example for [Battery Power])TimeoutAdd a check mark to turn the keyboard backlight onwhen the LCD backlight turns on.](https://usermanual.wiki/Panasonic-of-North-America/9TGCF-P12.User-Manual-for-CF-P1/User-Guide-401471-Page-21.png)
![22Entering InformationYou can use the following options to enter information:Use the keyboard to input the number, character*1 or symbol*1 shown on the key top.Use the input panel to input typed text, either by using the soft keyboard or other inputmethod.Write directly on the screen.*2Draw pictures on the screen.*2Speak into the internal microphone to record a message.*2Use Microsoft® ActiveSync® to synchronize or copy information from a host computer toCF-P1. For more information on Microsoft®ActiveSync®, see ActiveSync Help on thehost computer ( page 33).*1 Only for the CF-P1P3 series.*2 For more information, tap - [Help] - [Settings] - [Input].To type with the soft keyboard:(1) Tap the arrow next to the input panelbutton and then [Keyboard].(2) On the soft keyboard that is displayed,tap the keys with your stylus.Select an input methodInput Panel ButtonTap to see your choiceUse the input panel to enter information in any program on CF-P1. You can either type usingthe soft keyboard or write using Letter Recognizer, Block Recognizer, or Transcriber. Ineither case, the characters appear as typed text on the screen.To show or hide the input panel, tap the input panel button. Tap the arrow next to the inputpanel button to see your choices.Using the Input PanelTap [123] to allow the keyboard to input $,{}, %, etc.NOTEIf the keyboard is used while the soft keyboard is open, the soft keyboard will close.](https://usermanual.wiki/Panasonic-of-North-America/9TGCF-P12.User-Manual-for-CF-P1/User-Guide-401471-Page-22.png)
![23QWERTYUIOPLJKHGFDSZXCVBNMáüSPACENUMCAP1234567890/+=?$!,.)(:'"@-Mode KeyA symbol or number on the key top is input by pressing the Mode key (the numeric keylock indicator goes on) followed by the corresponding alphabet key. Each Mode key pressworks for the input of only one symbol or number. This is convenient when using one handto input sentences including symbols/numbers.Example: To input “abc.def.”, press the keys in the following order. A B C M D E F MTo input only symbols or numbers on the key top, keep holding down this key whileinputting symbols or numbers.This key is also for inputting accented letters, using [ESC]key and [DEL]key. For moredetails, see the explanation of each keys.NUM KeyEach time the Mode key + NUM key are pressed, the mode changes from the alphabetinput mode (default) to the symbol/number input mode, and vice versa. In the symbol/number input mode (numeric key lock indicator on), the symbols and numbers on the keytop can be inputted continuously.To exit the symbol/number input mode, you can also choose to press only the NUM key.Pressing this key once and pressing an alphabet key can be input the capital letter.áü/SPACE KeyPressing this key inserts a space.Pressing the Mode key + áü/SPACE key input accented letters after inputting the corre-sponding alphabet key.Example: To input “à” or “â”, press the keys in the following order.OK Key CAP KeyMode KeyNUM KeyDEL(Delete)/Backspace KeyEnter Keyáü/SPACE KeyAlphabet KeysTAB Key“.” “.”Using the QWERTY Keypad Type Keyboard <For the CF-P1P3 series>ESC Key“à”: áüSPACE A“â”: áüSPACEáüSPACE A áüSPACEHold down the Mode key and press the áü/SPACE key repeatedly if necessary, until the desiredcharacter appears.](https://usermanual.wiki/Panasonic-of-North-America/9TGCF-P12.User-Manual-for-CF-P1/User-Guide-401471-Page-23.png)
![24Entering Information CAP KeyThis key is used for inputting capital letters.Each time the Mode key + CAP key are pressed, the mode changes from the standard(non-caps) input mode to the caps lock mode, and vice versa. In the caps lock mode (capslock indicator goes on), capital letters can be inputted continuously.(When both the numeric key lock indicator and caps lock indicator are on, priority is givento the symbol/number input mode.)Inputting non-capital characters in the caps lock mode:Press an alphabet while also holding down on the NUM key.Pressing this key once and pressing an alphabet key can be input the capital letter (like theNUM key).Enter KeyThis key works the same as the Enter key of a computer, e.g., line feed in a document, and toselect icons and items from menus, etc.DEL (Delete) /Backspace KeyThis key works the same as the Backspace key of a computer.If pressed the Mode key + DEL/Backspace key, this key works the same as the Delete key ofa computer.TAB KeyThis key works the same as the Tab key of a computer.OK KeyThis key works the same as the tapping [ok] on the screen.ESC KeyIf pressed with Mode key, this key works the same as the Esc key on a computer.](https://usermanual.wiki/Panasonic-of-North-America/9TGCF-P12.User-Manual-for-CF-P1/User-Guide-401471-Page-24.png)
![25Using the Numeric Keypad Type Keyboard <For the CF-P1P1 series>Press a key to input the number shown on the key top.The keys can also be used as function keys. (See "PF key" below.)PF Key: When is pressed and the PF key indicator is turned on (functionkey mode), the functions assigned to the each number key are activatedwhen the corresponding keys are pressed.(The functions assigned to the number keys differently dependingon the application.)- To use the function key mode only once:Press once, then press a number key.(You can also press the number key while pressing .)Once the number key is pressed, indicator turns off. To turn itoff without pressing a number key, press twice.- To use the function key mode continuously:Press twice to lock the function key mode, then press the numberkeys. Press once to unlock the function key mode.You can also assign these keys to the program. For detailed set-tings, see the next page.OK KeyBS (Backspace) KeyMinus KeyA KeyPF KeyB KeyENT (Enter) KeyNumber KeysPF Key indicatorCLR (Clear) KeyPeriod KeyMinus Key: Press this to input a "-".CLR (Clear) Key: The function differently depending on the application.Period Key: When pressed, a period (".") is input.ENT (Enter) Key: This key works the same as the Enter key of a computer, e.g., linefeed in a document, etc.BS (Backspace) Key: This key works the same as the Backspace key of a computer.A/BKey: These operate as function keys.You can also assign these keys to the program. For detailed set-tings, see the next page.OK Key: This key works the same as the tapping [ok] on the screen.2147.580963ABBSPFCLRENT-](https://usermanual.wiki/Panasonic-of-North-America/9TGCF-P12.User-Manual-for-CF-P1/User-Guide-401471-Page-25.png)
![26Assigning of Programs <Only for the CF-P1P1 series>Customize the keys to open your most used programs.1Tap - [Settings] - [System] tab - [Panasonic Settings] - [Buttons] tab.2Choose each setting.3Tap [ok].(2)Tap under [Button assignment] and select a pro-gram from the list.When selecting [None], the button assignment inthe list shown above will be none.When selecting [(...Free command)], [Open] willbe displayed (See below).(3)Tap and select a folder and type of files.The following functions are assigned to the keys atthe time of purchase:PF+6 - Volume up, PF+7- Volume downThe assignment of those keys can be changed.Entering Information(1)Tap one item.](https://usermanual.wiki/Panasonic-of-North-America/9TGCF-P12.User-Manual-for-CF-P1/User-Guide-401471-Page-26.png)
![27Program ButtonsQWERTYUIOP1234567890/@The F1, F2, F3 and F4 buttons are called pro-gram buttons. If either of the program but-tons is pressed after the computer has startedup, the program assigned for that button isstarted up.Changing the Assignment of a Program ButtonPrograms are assigned to the program buttons at the time of purchase.F3 - Start Menu, F4 - Context MenuYou can change the assignment of the program buttons following the procedure.1Tap - [Settings] - [Personal] tab - [Buttons].2Choose each setting.Program ButtonsResuming with a Program ButtonYou can resume the computer with one of the F1, F2, F3 and F4 buttons.1Tap - [Settings] - [System] tab - [Panasonic Settings] - [Wakeup]*1 tab.*1 To display the hidden tab, tap the on the right edge of the tab.2Add a check mark to resume when the program button is pressed.Start Menu3Tap [ok].3Tap [ok].(1)Tap one button.If the [Restore Defaults] is tapped, the assignmentswill return to the default settings.(2)Tap under [Button assignment] and select a pro-gram from the list.Context Menu](https://usermanual.wiki/Panasonic-of-North-America/9TGCF-P12.User-Manual-for-CF-P1/User-Guide-401471-Page-27.png)
![28Battery PowerRemaining BatteryTap - [Settings] - [System] tab - [Power].The remaining battery charge is displayed.When the Remaining Battery Charge Becomes LowPlug in the AC adaptor, and fully charge your battery.Use a spare battery if you have one.If you have neither the AC adaptor nor a spare battery, power off your computer.CAUTIONReplacing the Battery PackWhen the charge provided by your battery pack is supplied for only a short period of time,even after full charging according to the instructions, it may be time to replace your batterypack. The battery pack is a consumable item and therefore requires replacement (CF-VZSU28W).Ensure that the backup battery is fully charged before replacing the battery pack andreplace the battery pack within 5 hours; otherwise the data in RAM will be lost.Do not touch the terminals of the battery pack. The battery pack may no longer functionproperly if the contacts are dirty or damaged.Do not expose the battery pack to water, or allow it to become wet.The battery pack is not charged when CF-P1 is first purchased. Be sure to charge itbefore using it for the first time. When the AC adaptor is connected to CF-P1, chargingbegins automatically.Use only the specified battery pack (CF-VZSU28W) with CF-P1.Do not install or remove the battery pack while CF-P1 is on.Remove the battery pack(1) Turn off your computer and wait for 30 seconds.(2) Turn your computer over.(3) Press position (A) to depress the battery pack cover andthen slide the latch, and remove the battery pack cover.(4) Remove the battery in the direction shown in the figure.LatchBattery Pack Cover(A)NOTEIf the attached strap makes it difficult to remove thebattery pack cover, unbuckle the strap and then re-move the cover.Install the battery pack(1) Refer to page 12 about installing the battery pack.(2) Turn your computer on.(3) Save the unsaved data and push the reset switch.](https://usermanual.wiki/Panasonic-of-North-America/9TGCF-P12.User-Manual-for-CF-P1/User-Guide-401471-Page-28.png)
![30Using the backup function, you can back up data from the CF-P1 RAM to an SD memorycard, MultiMedia card, CF card or ROM option area, or restore data backed up on thosestorage area to the CF-P1 RAM.Panasonic Backup1Reset CF-P1 ( page 39).2When backing up to an SD memory card, insertthe SD memory card.3Tap - [Programs] - [Panasonic Backup] -[Backup] tab.4Tap to select the storage area to back up thedata.5Tap [Backup Start].6Input the Backup file name.Add a check mark for [Set Password] and set a pass-word if required.7Tap [OK].Follow the on-screen instructions.The progress screen will be displayed. To stop the op-eration, tap [Abort].“Backup successful” will be displayed when the backupis complete. Tap [ok].Manual BackupCAUTION Do not do the following during the procedure:• Touching the power switch • Performing any keyboard and touchscreen. Disable the connection with the host computer, for example by disconnecting the cable. Confirm that battery remaining is at least 50%, disable all power management, andstop any other programs that may be running. The data in [Inbox] cannot be backed up. If necessary, Use Microsoft®ActiveSync® tobackup.NOTEBackup processing cannot be executed manually during Auto Backup or AutoRestore.We recommend that each media be formatted as shown below when backing up.SD SD Format (use SD Formatter)MMC FAT16CF/ROM option area not required.](https://usermanual.wiki/Panasonic-of-North-America/9TGCF-P12.User-Manual-for-CF-P1/User-Guide-401471-Page-30.png)
![31Auto Restore1Full reset CF-P1( page 39 step (1) - (4)).[Panasonic Backup] screen will be displayed.2Select a file for restore, and tap [OK].If a password has been set, a message will be displayed.Enter the password and press [OK]. Restore will start.The progress screen will be displayed. When the re-store is complete, CF-P1 resets automatically.1Tap - [Programs] - [Panasonic Backup].2Tap [Tools] on the command bar and select [Auto Backup Settings].3Tap [File] tab.(1) Tap to choose the storage area for auto backup.(2) Change the settings in [Settings].If the ROM option area is chosen, some settings cannot be changed.4Tap [Schedule] tab.(1) Add a check mark for [Scheduling backup].(2) Set the time and day to back up at [Backup Schedule].Tap [Battery] tab if required.Add a check mark for [Backup when battery is low.] and set the threshold.Tap [Password] tab if required.Set password for backup files.5Tap [ok].Auto BackupNOTE If power is off, the amount of battery power remaining cannot be checked sothat this function cannot work.CAUTIONIf there is a check mark in [Stop other application before backup], some appli-cations currently being executed may not be shut down properly.CAUTIONIf you want to make settings immediately after copying a file of 10 MB or moreand then turn off the computer soon after that, wait for about one minutebefore turning off the computer.](https://usermanual.wiki/Panasonic-of-North-America/9TGCF-P12.User-Manual-for-CF-P1/User-Guide-401471-Page-31.png)
![32You can connect to Internet service provider (ISP), and use the connection to send and re-ceive e-mail messages and view Web or WAP pages.Getting ConnectedThe settings will vary for different network environments. Ask your system administrator orthe person in charge of the network and make settings using the followings.(1)Tap - [Settings] - [Connections] tab - [Connections] in order.(2)Set up or change connection information On the [Tasks] tab:(1) Tap one of the followings:Add a new modem connection (My ISP)Add a new modem connection (My Work Network)Add a new VPN server connection (My Work Network)Set up my proxy server (My Work Network)(2) Enter the necessary information. On the [Advanced] tab:Tap [Select Networks], [Select Location] or [Network Card] and set up if required.For details, tap - [Help].To run Pocket Internet ExplorerTap - [Internet Explorer].Pocket Internet ExplorerFavorites ButtonHome ButtonRefresh Button](https://usermanual.wiki/Panasonic-of-North-America/9TGCF-P12.User-Manual-for-CF-P1/User-Guide-401471-Page-32.png)
![33Connecting to Your ComputerUse Microsoft®ActiveSync® to synchronize a host computer and CF-P1 information, to trans-fer files between a host computer and CF-P1, or to backup and restore data.The following methods can be used to connect the CF-P1 with a host computer.The use of a Serial Cable or USB Cable.The use of the infrared communication port.Use an RS-232C Cable or a USB Adaptor Cable to connect CF-P1 with a peripheral.Installing ActiveSync®1Set the Companion CD into the host computer.The opening screen is displayed automatically.• When the opening screen is not automatically displayed In [Start] - [Run], input [x:\setup] and select [OK].(“x” is the drive letter. You can change the letter to suit your preference.)2Select button.3Select [Start Here].4Select [Install ActiveSync x.x*1] and read the on-screen instructions andselect [Install].5At [Installation Message], select [OK].[File Download] will be displayed. This screen varies depending on the hostcomputer’s software (e.g. Internet Explorer version). • If [Open] is displayed on [File Download], select [Open].• If [Run this program from its current location] is displayed on [File Download],select it and then select [OK].6At [Microsoft ActiveSync], select [Next].7At [Select Installation Folder], select [Next].8At [Get Connected], read the on-screen instructions and connect the CF-P1 with a host computer.(Refer to page 34 to connect the CF-P1 with a host computer.) • For details, select [Microsoft ActiveSync x.x*1 Help] during the installation.CAUTIONTo ensure that synchronization functions properly, install Microsoft®ActiveSync® 3.7before connecting CF-P1 and the host computer for the first time.*1 The version is shown.](https://usermanual.wiki/Panasonic-of-North-America/9TGCF-P12.User-Manual-for-CF-P1/User-Guide-401471-Page-33.png)
![34Connecting to Your ComputerTo change the synchronization settings, tap, in order, - [ActiveSync] - [Tools] -[Options...]. Be sure to disconnect the cable when changing the synchronization set-tings.Disconnect and connect the cable again if communications do not start.For information about the Microsoft®ActiveSync®, refer to the Microsoft®ActiveSync®Help.NOTECAUTIONWhile performing communications, avoid the following:• Connect/disconnect the cable.• Remove the computer from the cradle.• Turn on/off the computer.9At [Set up a Partnership], select the partnership and select [Next].When Connecting the CF-P1 Directly with a ComputerUse a Connector Protector (optional: CF-VCCP11U) toconnect CF-P1 with an external device firmly.USB Autosync CableSerial Autosync CableExpansion Connector of the CF-P1orRemoving](https://usermanual.wiki/Panasonic-of-North-America/9TGCF-P12.User-Manual-for-CF-P1/User-Guide-401471-Page-34.png)

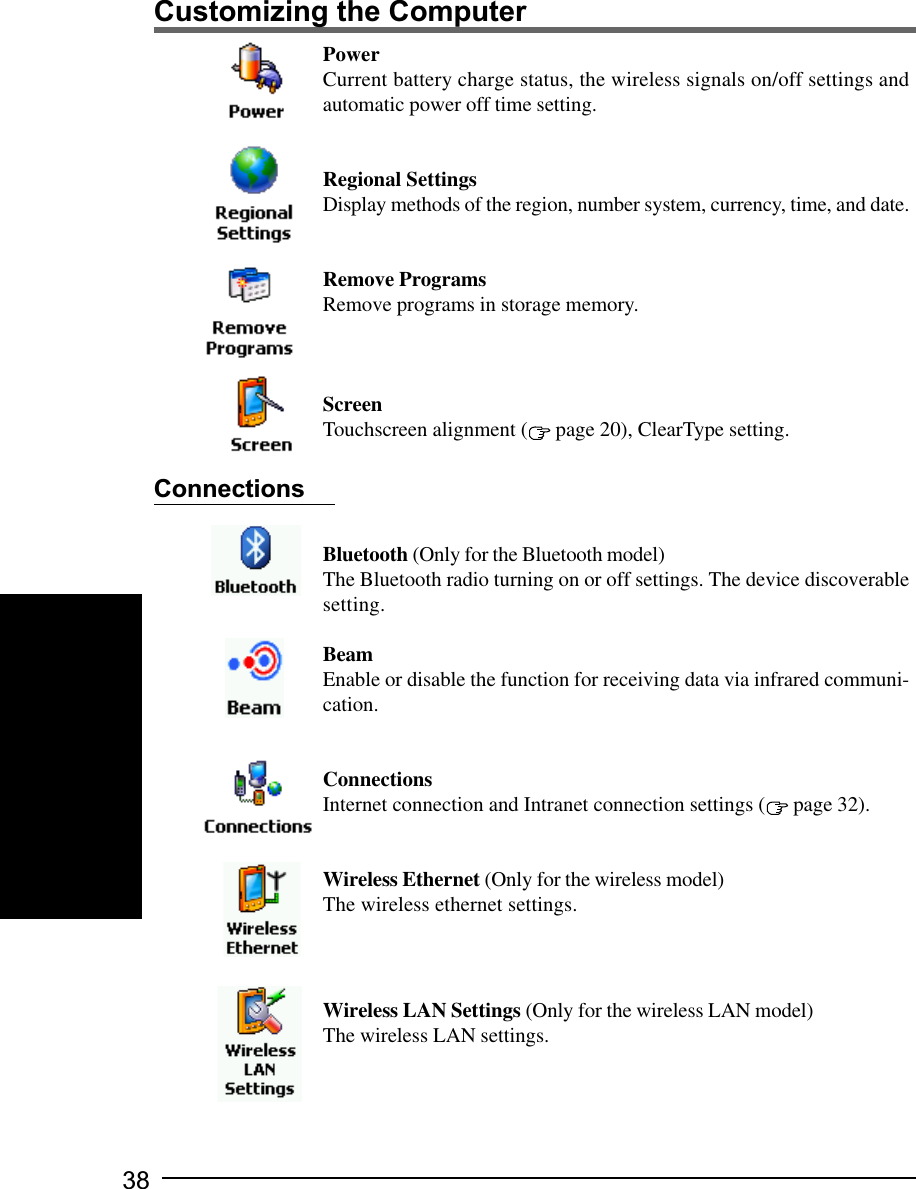
![36Customizing the ComputerIf you want information on the various individual settings of the computer, tap - [Set-tings] and then tap the item (icon) you want to check.(For details, tap - [Help] - [Settings].)ButtonsProgram buttons and the cursor control settings.InputInput panel (soft keyboard or letter recognizer, etc.) settings.MenusSelect programs to be displayed in , or items to be displayed in [New]in the Today screen.Owner InformationRegistration (or changing) of the user’s (owner’s) personal information.You can choose to display the registered owner information on the screenwhen CF-P1 is turned on.PasswordPassword enable/disable, and a password hint setting.If a password is set, it has to be inputted in order to open the passwordscreen. When the wrong password is inputted four times, the set hint isdisplayed. At times certain characters, such as á and ü, cannot be inputfrom the keyboard. Use the soft keyboard.Sounds & NotificationsVolume setting and operation sound setting.Specific sound settings to be generated in a wide range of situations.TodayDesktop display setting.AboutDisplay of release version and copyrights, and device ID setting.BacklightLCD backlight timeout function, tap-induced backlight on and keyboardbacklight setting, and LCD brightness adjustment.PersonalSystem](https://usermanual.wiki/Panasonic-of-North-America/9TGCF-P12.User-Manual-for-CF-P1/User-Guide-401471-Page-36.png)
![37CertificatesAdd and delete personal certificates and root certificates.Clear Type TunerMake a text clear by moving the slider.ClockTime/date settings and alarm settings.CPU ClockChange the operating speed of the processor.MemoryComputer memory assignment possible (assignment of memory for datamemory and memory for program execution). Display of total storagecard memory if it is installed. Activate or stop the running programs.Option DevicesAdd a check mark in a box to activate CF card and RF module when thepower is off*1, and make Wireless LAN card*1 on/off setting.To set to not light up LED indicators*1, remove the check mark at the [UseLED to indicate RF module status].*1 Available on specific models.Panasonic Settings [Version] tab: Display of ROM release version, the size of ROMoption area, UUID and available devices*2.*2 Available on specific models. [Record] tab: When a check mark is added at [Mix playsound], bothplay sound and microphone sound can be recorded. When the checkmark is removed, only microphone sound can be recorded. (When us-ing the telephone, both play sound and microphone sound will berecorded regardless of whether or not this check mark is turned on.)Select either [Use ALC (Automatic Level Control)] or [Manual] andmove the slider to adjust the record gain level. [Phone] tab: Add a check mark for [Speaker phone] to use with thespeaker phone when using the telephone.Add a check mark for [Enable built-in microphone with Headset/Head-phone] to use Headset/Headphone, using built-in microphone. [Charging Mode] tab ( page 6) [Wakeup] tab ( page 27) [Buttons] tab (only for CF-P1P1 series) : Change the assignment of aprogram keys.( page 26)](https://usermanual.wiki/Panasonic-of-North-America/9TGCF-P12.User-Manual-for-CF-P1/User-Guide-401471-Page-37.png)
![39Resetting Your ComputerWhen the computer fails to respond to an operation, reset your computer. There are twomethods for resetting the computer.Performing a ResetThis selection saves all stored records and entries and then restartsthe computer.Unsaved data in open windows may be lost.If possible, turn off the computer and push the center of the resetswitch straight in.Push the reset switch within 1 second using the stylus.Resetting the computer may cause the clock to malfunction.After resetting the computer, check the time and correct the clocksettings if necessary.Performing a Full ResetThis selection erases all stored records and entries and then restarts the computer.Therefore, never perform a full reset unless a reset does not solve your problem.(1) Using the provided stylus, push the center of the reset switch straight in for 1second while holding down on the power switch.(2) Tap the screen to set up your Pocket PC.The Windows alignment screen is displayed.(3) Align the touchscreen ( page 20 step 3).(4) At [complete], tap the screen to begin using CF-P1.(5) Set the time and date.Tap - [Settings] - [System] tab - [Clock] to set the time and date, and tap [ok].Dealing with ProblemsUse only the provided stylus to push in the reset switch.Do not push the reset switch with any other sharp-pointed objects, i.e. pencils, and ballpoint pens. The reset switch or other parts may become damaged.CAUTIONReset Switch](https://usermanual.wiki/Panasonic-of-North-America/9TGCF-P12.User-Manual-for-CF-P1/User-Guide-401471-Page-39.png)
![40Dealing with ProblemsTroubleshootingStarting UpCheck to see if a fully charged battery pack is properlyinstalled.The power does not go on unless the AC adaptor is con-nected:The battery level is too low. Charge the battery with theAC adaptor. (Make sure that the battery never dischargescompletely and that it is charged periodically.)Push the reset switch to restart CF-P1.Slide the latch to lock thebattery pack cover all theway to the left.If the power does not turn on when the above operationsare performed, the battery pack must be replaced.You can set the date and time through [Clock] in- [Settings] - [System] tab.If you continue to experience problems, the backupbattery maintaining the clock may need to be replaced.Contact Panasonic Technical Support.This computer will not correctly recognize the date andtime starting from the year 2085 A.D.The battery level may be too low. If the battery levelgoes below a certain threshold, CF-P1 automatically shutsdown. In such cases, connect the AC adaptor and chargethe battery.The computer may have entered a locked state. If this isthe case, connect the AC adaptor and push the resetswitch. Check the remaining battery level and make surethat multiple applications are not running simultaneously.Close all applications that are not being used.The computer may be turned off automatically while thedata is being copied by beams or when using File Ex-plorer. To prevent this, change the time setting to a longertime in - [Settings] - [System]tab - [Power] -[Advanced]tab.It is possible that settings were made immediately after afile of 10 MB or more was copied, and that the power wasturned off soon after that. In this case, the power shouldbe turned off after waiting for about one minute.CF-P1 does not turn on.Or, there is no displaywhen CF-P1 is turned on.The date and time are in-correct.CF-P1 shuts down automati-cally.The data cannot be copied.Alarm and Auto backup donot operate according to set-tings.Latch](https://usermanual.wiki/Panasonic-of-North-America/9TGCF-P12.User-Manual-for-CF-P1/User-Guide-401471-Page-40.png)
![41DisplayThe LCD backlight may have automatically turned offdue to the power-saving function. Turn on the LCD back-light by holding down the power switch until the back-light goes on.Adjust the backlight brightness.1Tap - [Settings] - [System] tab - [Backlight].2Tap the [Brightness] tab and adjust the brightness withthe slider.Push the reset switch to restart.Align the screen ( page 20).It is hard to view the LCD.The cursor cannot be con-trolled.The cursor does not prop-erly correspond to a stylustap.A host computer does notrecognize CF-P1. Confirm that Microsoft®ActiveSync® 3.7 (or a later ver-sion) has been installed in the host computer.Check to see if a fully charged battery pack is properlyinstalled to CF-P1.If a modem card has been inserted, disconnect these de-vices and check the communication status again.Confirm that CF-P1’s power is on.Push the reset switch to restart.If a cable or cradle is being used for the connection,recheck the connection to the host computer.Peripheral is not recog-nized even after driver isinstalled.Connecting a Host PCConnecting PeripheralsRemove cards or other peripherals, and push thereset switch.Application SoftwareConnect the AC adaptor and push the reset switch. Checkthe remaining battery level and make sure that multipleapplications are not running simultaneously. Close allapplications that are not being used.The computer locks up dur-ing the execution of an ap-plication, or the executionspeed becomes noticeablyslower.Cannot connect to the net-work. Check the server information and network settings.Network](https://usermanual.wiki/Panasonic-of-North-America/9TGCF-P12.User-Manual-for-CF-P1/User-Guide-401471-Page-41.png)
![42Quality of recorded sound ispoor.Play sound is recorded eventhough the Mix playsoundcheckmark is off.Noise in recording or play-back sound. Tap - [Settings] - [Personal] tab - [Input] - [Options] tab- [Voice recording format], and select a higher frequency.Playsound (sound from the speaker) is being picked upand recorded by the microphone. If you want to avoidplaysound recording completely, connect the headsetor the headphone.If a load is applied during recording or playback, forexample when the SD memory card is disconnected orconnected, then noise in the recording or playback willresult. In this event, stop the recording or playback, andrestart after closing other applications.SoundsCharacter Input < Only for CF-P1P1 series >Characters can be input using the input panel.( page 22)Entering charactersDealing with Problems](https://usermanual.wiki/Panasonic-of-North-America/9TGCF-P12.User-Manual-for-CF-P1/User-Guide-401471-Page-42.png)