Panasonic of North America 9TGWL16A Wireless Network Adapter User Manual
Panasonic Corporation of North America Wireless Network Adapter
Contents
- 1. (shortterm confidential) Host User manual_R1
- 2. User Manual_20170227_v1 - Host User manual of wireless communication
- 3. Host User Manual for external antenna r1
- 4. User Manual_WL16A
- 5. User manual
- 6. User Manual_20171002_v1 - Host CF-20_User Manual_Wireless
- 7. Host CF-20_User Manual_rev
- 8. User Manual_20180301_v1 - Host User Manual_FZ-G1.pdf
- 9. User Manual_20180301_v1 - Host User Manual_FZ-G1_Wireless.pdf
- 10. User Manual
User Manual_20171002_v1 - Host CF-20_User Manual_Wireless
![1. Touch and hold the task bar.2. Select the item to display.Screen MessagesScreen messages are explained in [English (United States)].(Depending on the language preference, some screen messages in these instructions are different from the actual screen messages. For example,[Flight mode] may be displayed instead of [Airplane mode] in some language preference)Opening the Control Panel1. Click (Start) - [Windows System] - [Control Panel].Opening the Settings1. Click (Start) - (Settings).Alternatively, click (Settings) in the tablet mode.Latest Information on Windows 10When Microsoft®Windows®10 is updated, the screen display or operation procedures may be changed.For the latest information on Windows 10, see the following web page.http://pc-dl.panasonic.co.jp/itn/addendum/](https://usermanual.wiki/Panasonic-of-North-America/9TGWL16A.User-Manual-20171002-v1-Host-CF-20-User-Manual-Wireless/User-Guide-3592941-Page-3.png)
![Setup1. Right-click (Start) - [Device Manager].2. Double-click the Ethernet device under “Network adapters”, and then click [Power Management].3. Add a checkmark to [Allow this device to wake the computer].4. Click [OK].N O T EnThe setting made is enabled after restarting the computer.nThe LAN port of keyboard base does not support the Wake Up from wired LAN function.](https://usermanual.wiki/Panasonic-of-North-America/9TGWL16A.User-Manual-20171002-v1-Host-CF-20-User-Manual-Wireless/User-Guide-3592941-Page-5.png)
![Disabling/Enabling Wireless Communication<Only for model with wireless LAN>There are several ways of disabling and enabling wireless communication.Using airplane modeSetting [Wireless Configuration] in the [Advanced] menu of the Setup UtilitySettings in the Network and Sharing Center ( Using the Wireless LAN Function)N O T EnFor further information about Wireless LAN.Using airplane mode*1(For wireless LAN)1. Click (Start) - (Settings) - [Network & Internet] - [Airplane mode] *1.Alternatively click (Settings) - [Network & Internet] - [Airplane mode]*1 in the tablet mode.2. To disable wireless communications, set [Airplane mode]*1 to [On].To enable wireless communications, set [Airplane mode]*1 to [Off], and then;set [Wi-Fi]*1 to [On] (for wireless LAN).*1 : Screen messages are explained in [English (United States)].(Depending on the language preference, some screen messages in these instructions are different from the actual screen messages. For example,[Flight mode]/[WiFi] may be displayed instead of [Airplane mode]/[Wi-Fi] in some language preference.)](https://usermanual.wiki/Panasonic-of-North-America/9TGWL16A.User-Manual-20171002-v1-Host-CF-20-User-Manual-Wireless/User-Guide-3592941-Page-6.png)
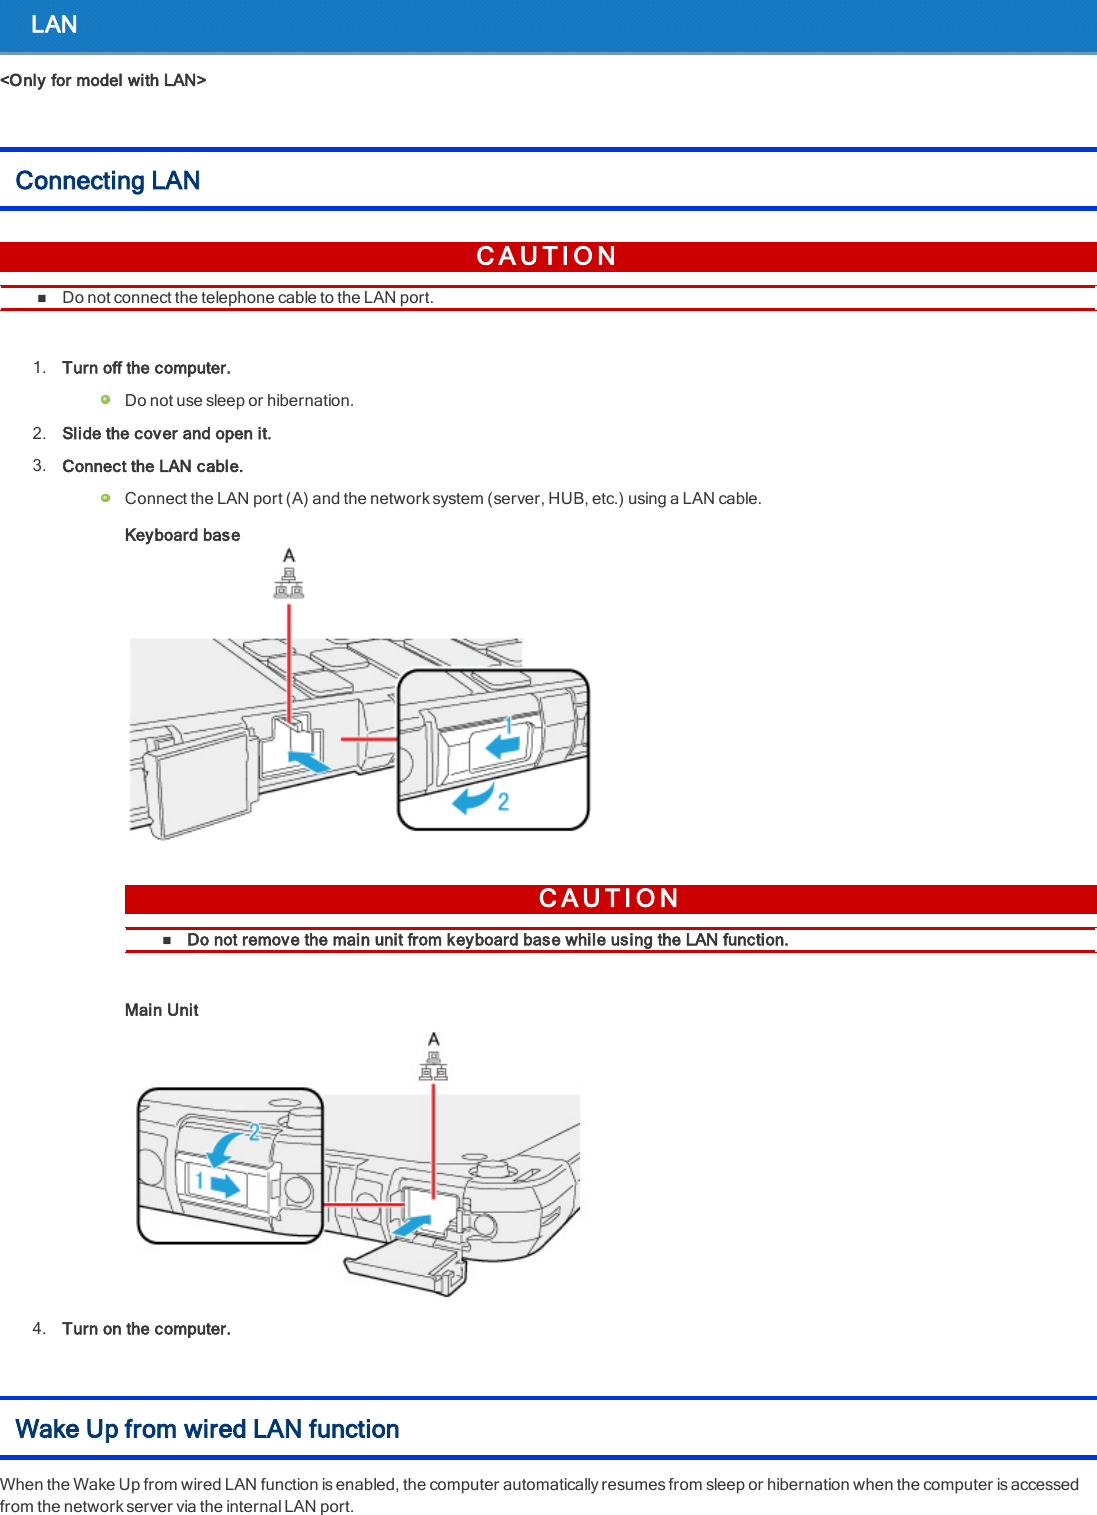
![Wireless LAN<Only for model with wireless LAN>C A U T I O NnDo not use wireless LAN on airplanes, in hospitals, or in other locations where wireless LAN signals may affect devices.Follow the instructions of airline companies and hospitals. If you use the computer in these locations, turn off the wireless LAN.nTo avoid unauthorized access to the computer through wireless LANWe recommend you to make security settings such as encryption before using wireless LAN.Otherwise the hard disk data such as the shared files can be exposed to the risk of unauthorized access.N O T EnCommunication is established through the wireless LAN antenna (A). Do not block the antenna area with your hand or body.nThe transmission rate will be lower when a microwave oven is used near by.nTo use wireless LAN, set [Wireless LAN] of [Wireless Configuration] to [Enabled] (default) in the [Advanced] menu of the Setup Utility.Using the Wireless LAN FunctionBefore using a wireless LAN, turn the wireless LAN communication on.Turning on/off the wireless LAN communication1. To enable the wireless communication ( Disabling/Enabling Wireless Communication).Setting the wireless LAN access pointPreparationFollow the instruction manual of the wireless LAN access point to make settings for the access point to recognize the computer.1. Turn the wireless LAN on.2. Click or on the task tray.3. Select an access point, and click [Connect].4. Input the key you set for the access point to recognize the computer, and click [Next].Wait for the computer to connect to the wireless LAN access point.When the icon on the task tray is changed to , the wireless LAN setting is complete.](https://usermanual.wiki/Panasonic-of-North-America/9TGWL16A.User-Manual-20171002-v1-Host-CF-20-User-Manual-Wireless/User-Guide-3592941-Page-7.png)
![N O T EnThe settings depend on the network environment. For further information, ask the system administrator or the person in charge of thenetwork.nIf you use the stealth type wireless LAN access point which restricts automatic detection of the wireless LAN access point, take the fol-lowing procedure.If you do not perform the procedure below, you may not be able to access the wireless LAN access point automatically or the wirelessLAN access point may not be displayed.1. Click on the task tray, and then click [Hidden network].2. Click [Connect], enter the necessary information such as the network name (SSID), and click [Next].For further information, ask the system administrator or the person in charge of the network.Enabling/Disabling the Wireless LAN Standard IEEE802.11a (802.11a)1. Click (Start) - [Panasonic] - [Panasonic PC Settings Utility], and click (Settings) - (Network).Alternatively click (All apps) - [Panasonic] - [Panasonic PC Settings Utility], and click (Settings) - (Network) in the tablet mode.2. Click [Enabled] or [Disabled] for the wireless LAN IEEE802.11a.N O T EnIn some countries, communication using IEEE802.11a (5 GHz wireless LAN) standard is restricted by law.nIf IEEE802.11a is enabled or disabled while the computer is connected to an IEEE802.11b/g access point, the connection will be temporarily inter-rupted.](https://usermanual.wiki/Panasonic-of-North-America/9TGWL16A.User-Manual-20171002-v1-Host-CF-20-User-Manual-Wireless/User-Guide-3592941-Page-8.png)
![Troubleshooting (Advanced)Refer to the following instructions when a problem occurs. If the remedies indicated in the chart do not solve the problem, contact Panasonic TechnicalSupport.For a software problem, refer to the instruction manual of the software.NetworkCannot connect to a network. Set the device ([Tablet LAN]/[Wireless LAN]) to [Enabled] in the [Advanced] menu of the SetupUtility.Cannot check the computer's MACaddress.Follow the steps below.1. Right-click (Start) - [Windows Power-Shell].2. Input "getmac /fo list /v", and press ≪Enter≫.Insert a space between "fo" and "list", and between "list" and "/v".3. Wireless LAN's MAC address:Make a note of the 12-digit string of alphanumeric displayed on "Physical Address" lineof "Wi-Fi".Wired LAN's MAC address:Make a note of the 12-digit string of alphanumeric displayed on "Physical Address" lineof "Ethernet".4. Input "exit", and press ≪Enter≫.Wireless Communication (only for model with wireless LAN)Cannot connect to a network. Confirm the airplane mode is Off.To turn off the airplane mode, follow the steps below.1. Click (Start) - (Settings) - [Network & Internet] - [Airplane mode]*1.Alternatively click (Settings) - [Network & Internet] - [Airplane mode]*1 in the tab-let mode.2. Click [Airplane mode]*1 to [Off], and then;set [Wi-Fi]*1 to [On] (for wireless LAN).Restart the computer.Access point is not detected. Shorten the distance between the computer and the access point, and try the detection again.Confirm the following settings:[Wireless LAN] in the [Advanced] menu of the Setup UtilityConfirm that [Wireless LAN] of [Wireless Configuration] is set to [Enabled].Airplane modeConfirm that Wireless LAN (Wi-Fi) is ON.This computer uses channels 1 through 11*2 when using IEEE802.11b/g/n. Check the channelbeing used by the access point.*1 : Screen messages are explained in [English (United States)].(Depending on the language preference, some screen messages in these instructions are different from the actual screen messages. For example,[Flight mode] / [WiFi] may be displayed instead of [Airplane mode] / [Wi-Fi] in some language preference.)*2 : In the case of wireless communications, the frequency band being used can be divided into segments, so that different communications can be con-ducted on each band segment. A "Channel" refers to the individual frequency bandwidth divisions.](https://usermanual.wiki/Panasonic-of-North-America/9TGWL16A.User-Manual-20171002-v1-Host-CF-20-User-Manual-Wireless/User-Guide-3592941-Page-9.png)
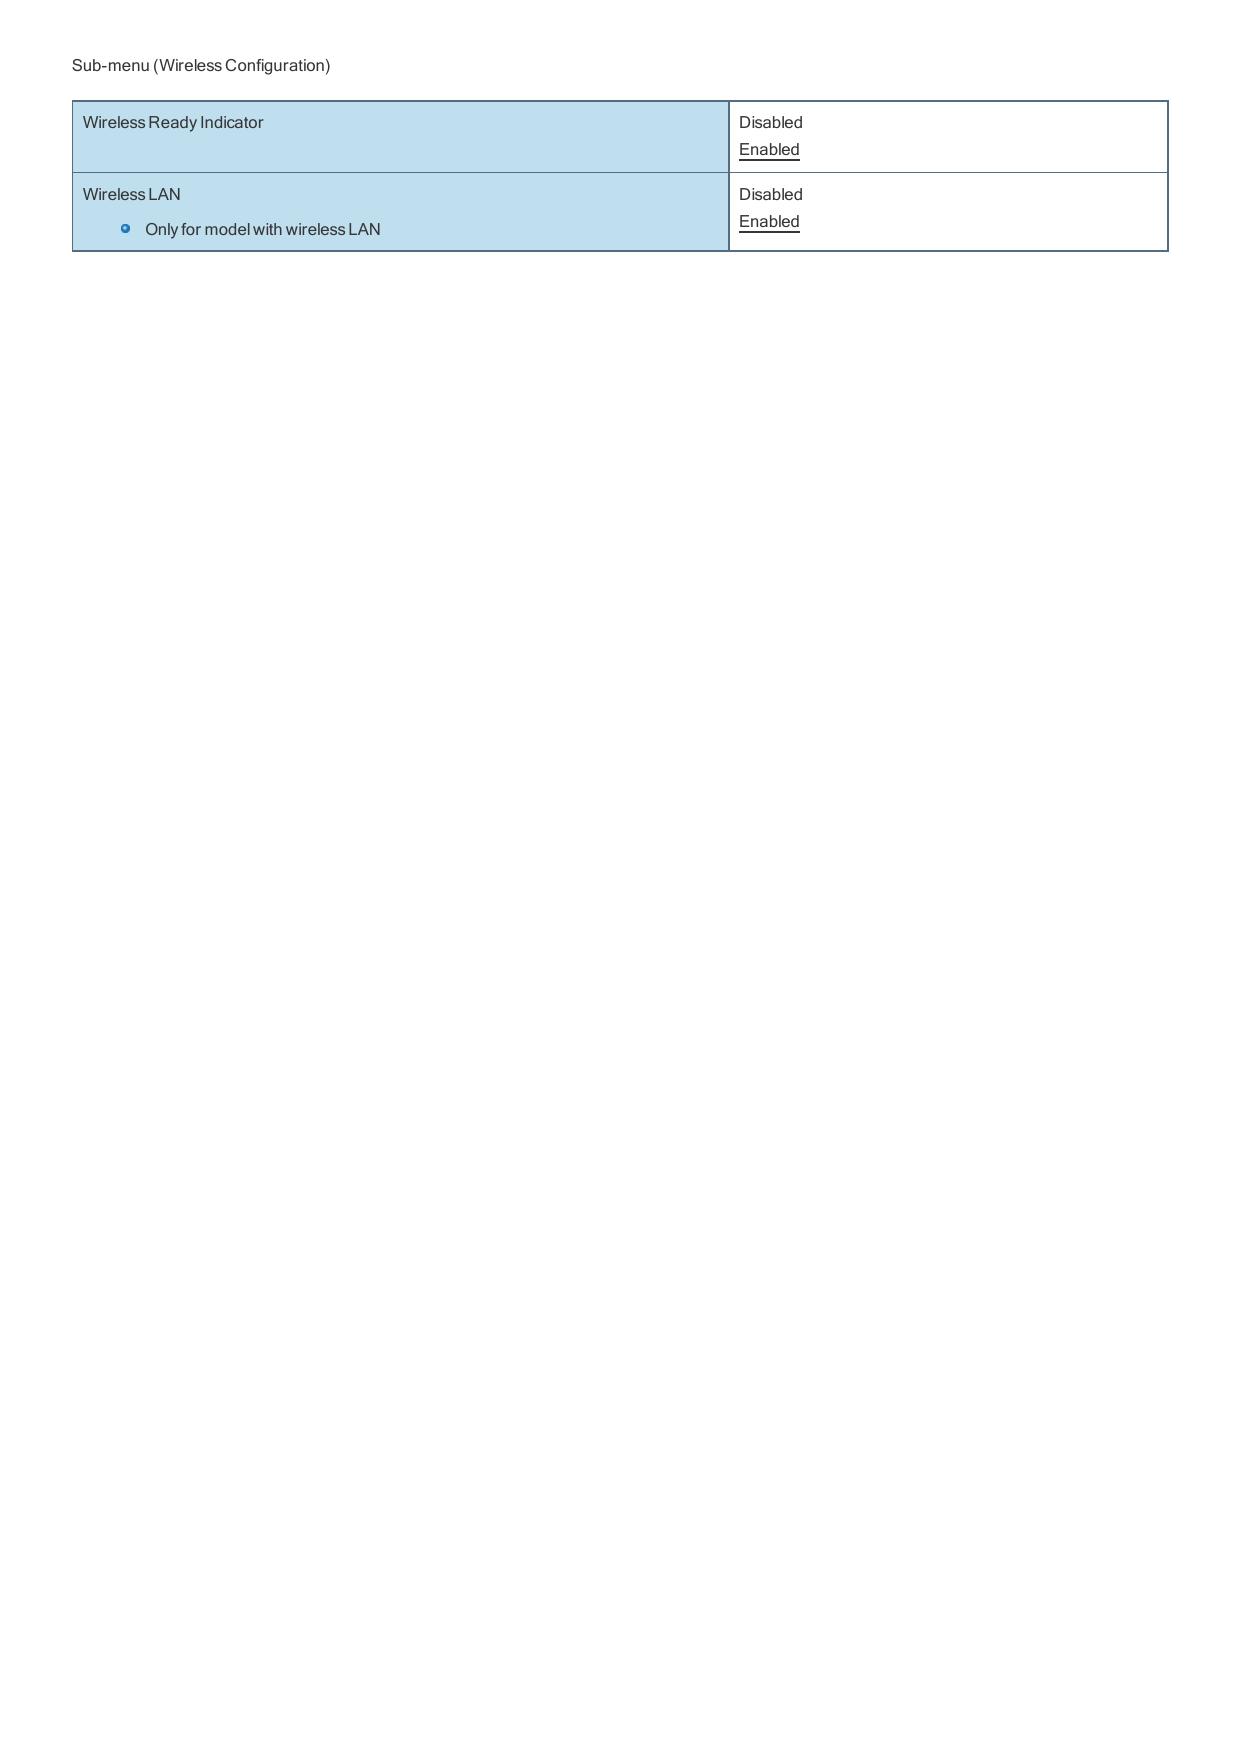
![Setup UtilityYou can make the settings of the computer's operating environment (password settings, startup drive selection, etc.)Starting the Setup Utility1. Click (Start) - (Settings) - [Update & security] - [Recovery].2. Click [Restart now] under “Advanced startup”*1.*1: Screen messages are explained in [English (United States)].(Depending on the language preference, some screen messages in these instructions are different from the actual screen messages. Forexample, [Advanced start-up] may be displayed instead of [Advanced startup] in some language preference.)3. Click [Troubleshoot] - [Advanced options] - [UEFI Firmware Settings] - [Restart].The computer restarts, and the Setup Utility screen appears.N O T EnWhen the fast startup is enabled, Setup Utility cannot be started by pressing ≪F2≫or ≪Del≫during the startup procedure.When [Enter Password] is displayed, enter your password.When you start the Setup Utility with Supervisor PasswordYou can make the settings of all items of the Setup Utility.When you start the Setup Utility with User PasswordNote the following:In the [Advanced] and [Boot] menus, you cannot make the settings of all items.In the [Security] menu, you can change only the User Password when [User Password Protection] is set to [No Protection]. You cannotdelete the User Password.In the [Exit] menu, you cannot make the setting of [Load Default Values] and [Boot Override].≪F9≫(Setup Defaults) does not function.N O T EnSetup Utility screen is displayed on the internal LCD even when an external display is connected to the computer as the factory default. However,if the LID (display) is closed, it will come to be displayed on an external display.nWindows 10 supports UEFI boot.nThe [Panasonic] boot screen may not appear when only the external display is being used. In this case, as soon as the computer starts up, press≪F2≫or ≪Del≫several times and start the Setup Utility.Advanced MenuUnderlined items are the factory presets.Peripheral ConfigurationTablet LANOnly for Main UnitDisabledEnabledPower On by LANCan be changed only when [LAN] is set to [Enabled].DenyAllowWireless ConfigurationThe submenu appears when this item is selected.Enters the sub-menu.](https://usermanual.wiki/Panasonic-of-North-America/9TGWL16A.User-Manual-20171002-v1-Host-CF-20-User-Manual-Wireless/User-Guide-3592941-Page-10.png)