Panasonic of North America 9TGWL16A Wireless Network Adapter User Manual 20180301 v1 Host FZ G1 Wireless
Panasonic Corporation of North America Wireless Network Adapter 20180301 v1 Host FZ G1 Wireless
Contents
- 1. (shortterm confidential) Host User manual_R1
- 2. User Manual_20170227_v1 - Host User manual of wireless communication
- 3. Host User Manual for external antenna r1
- 4. User Manual_WL16A
- 5. User manual
- 6. User Manual_20171002_v1 - Host CF-20_User Manual_Wireless
- 7. Host CF-20_User Manual_rev
- 8. User Manual_20180301_v1 - Host User Manual_FZ-G1.pdf
- 9. User Manual_20180301_v1 - Host User Manual_FZ-G1_Wireless.pdf
- 10. User Manual
User Manual_20180301_v1 - Host User Manual_FZ-G1_Wireless.pdf
![This manual explains using the default setting.Illustrations and Terminology in this manual“Windows 10 Pro” as “Windows” or “Windows 10”For Windows 10:Screen messages are explained in [English (United States)].(Depending on the language preference, some screen messages in these instructions are different from the actual screen messages. For example, [Flight mode] may be displayed instead of [Airplane mode] in some languagepreference) Terms and illustrations in these instructions.<Only when connected to the external keyboard>≪Enter≫: This means to press the Enter key.≪Ctrl≫ + ≪F7≫: This means to press and hold ≪Ctrl≫ key, and then press ≪F7≫ key. The display of the key may be different from this manual according to the keyboard used. (e.g. “Delete” instead of“Del”) -:Touch (Start) and then touch (Power).Some illustrations and display examples may look different from the actual product. Some types of software are automatically updated, and differences may occur from descriptions in this manual. Desktop mode and Tablet modeWindows 10 offers the desktop mode in which operation is performed using the keyboard or mouse, and also the tablet mode optimized for the touch panel operation. The mode can be switched by touching (Notification), and then touching (Tablet mode) tile.If some icons do not appears on the task bar, perform the following operations.1. Touch and hold the task bar.2. Select the item to display.Sound and VideoSound (e.g. MP3, WMA) and video (e.g. MPG, WMV) recorded in microSD Memory Card may be interrupted during playback. If this happens, copy them to the flash memory drive and play back.Depending on the processing status on Windows, sound may be interrupted at Windows startup. You can mute the sound at startup.The startup sound is muted as the factory default.1. Touch and hold the desktop and touch [Personalize] - [Sounds].2. Remove the check mark from [Play Windows Startup sound], and touch [OK].About the Ambient Light SensorThe ambient light sensor is used to adjust the display screen brightness automatically. To configure the automatic adjustment function, proceed as follows. 1. Touch (Start) - (Settings) - [System] - [Display].IntroductionNOTE](https://usermanual.wiki/Panasonic-of-North-America/9TGWL16A.User-Manual-20180301-v1-Host-User-Manual-FZ-G1-Wireless-pdf/User-Guide-3769630-Page-2.png)
![2. Touch[Change brightness automatically when lighting changes] and select [On].Windows UpdateYou can update to the latest patches and service packs for Windows with the following menus.1. Touch (Start) - (Settings) - [Update & Security] - [Windows Update].2. Touch [Check for updates].Do not apply "Driver Updates" even if a message to update a driver appears. If a driver update is required, contact yourtechnical support office.Regarding Windows 10Displaying All appsOn the Start screen, proceed as follows.1. Touch (Start) at the bottom left corner, and then touch (All apps).Opening the Control Panel1. Touch and hold (Start) at the bottom left corner, and then touch [Control Panel].Opening the Settings1. Touch (Start) at the bottom left corner, and then touch (Settings).Changing the desktop mode and tablet mode1. Touch (Notification) at the task tray - [Tablet mode].[Tablet mode] tile is blue : Tablet mode[Tablet mode] tile is gray : Desktop mode](https://usermanual.wiki/Panasonic-of-North-America/9TGWL16A.User-Manual-20180301-v1-Host-User-Manual-FZ-G1-Wireless-pdf/User-Guide-3769630-Page-3.png)
![<Only for model with Bluetooth>You can access internet and other Bluetooth devices without connecting cables.Communication is established through the Bluetooth antenna (A). Do not block the antenna area with your hand orbody.To use Bluetooth, set [Bluetooth] of [Wireless Configuration] to [Enabled] (default) in the [Advanced] menu of theSetup Utility.The transmission rate will be lower when a microwave oven is used near by.When you uninstall the Bluetooth Driver, turn Bluetooth off.Using the Bluetooth FunctionBefore using a Bluetooth, turn the Bluetooth communication on.Turning on/off the Bluetooth communication1. Touch (Start) - (Settings) - [Network & Internet] - [Airplane mode] , and set [Airplane mode] to [Off].Alternativelytouch (Notifications) - (All settings) - [Network & Internet] - [Airplane mode] , and set[Airplane mode] to [Off].To turn off the Bluetooth communication, set [Bluetooth] to [Off].To turn on the Bluetooth communication, set [Bluetooth] to [On].*1 : Screen messages are explained in [English (United States)].(Depending on the language preference, some screen messages in these instructions are different from the actual screen messages. For example, [Flight mode] may be displayed instead of [Airplane mode] in some language preference.)To check the Bluetooth communication status1. Touch (Start) - (Settings) - [Devices] - [Bluetooth].Alternatively, touch (Notifications) on the task tray, and then touch (Bluetooth).BluetoothNOTE*1*1*1*1](https://usermanual.wiki/Panasonic-of-North-America/9TGWL16A.User-Manual-20180301-v1-Host-User-Manual-FZ-G1-Wireless-pdf/User-Guide-3769630-Page-4.png)
![<Only for model with wireless WAN >This computer is equipped with the Wireless WAN enabling you to communicate using radio frequencies.nCommunication is established through the Wireless WAN antenna (A). Do not block the antenna area with your hand or body. nTo use wireless WAN, set [Wireless WAN] of [Wireless Configuration] to [Enabled] (default) in the [Advanced] menu of the Setup Utility.nBefore the computer enters sleep or hibernation, cut the Wireless WAN communication. Entering sleep orhibernation without cutting the connection may disable communication after resuming. In this case, restart the computer.nIf "Device driver software was not installed correctly." (or a similar message) appears when starting the computer or resuming from sleep or hibernation.When communication works normally, Wireless WAN is operating correctly. If communication fails, the device may not be recognized correctly. In this case, restart the computer.Inserting/Removing a SIM CardBefore using the Wireless WAN, set a SIM card to the SIM card slot.nBe sure to turn off the computer before inserting or removing the SIM card.To insert a SIM card1. Turn off the computer.2. Disconnect the AC adaptor, remove the battery pack. ( Replacing the Battery Pack)3. <Only for model with Built-in Bridge Battery>Wait for about 3 minutes.4. Remove the screws (A) and the SIM card slot cover (B).Wireless WANN O T EC A U T I O N](https://usermanual.wiki/Panasonic-of-North-America/9TGWL16A.User-Manual-20180301-v1-Host-User-Manual-FZ-G1-Wireless-pdf/User-Guide-3769630-Page-5.png)
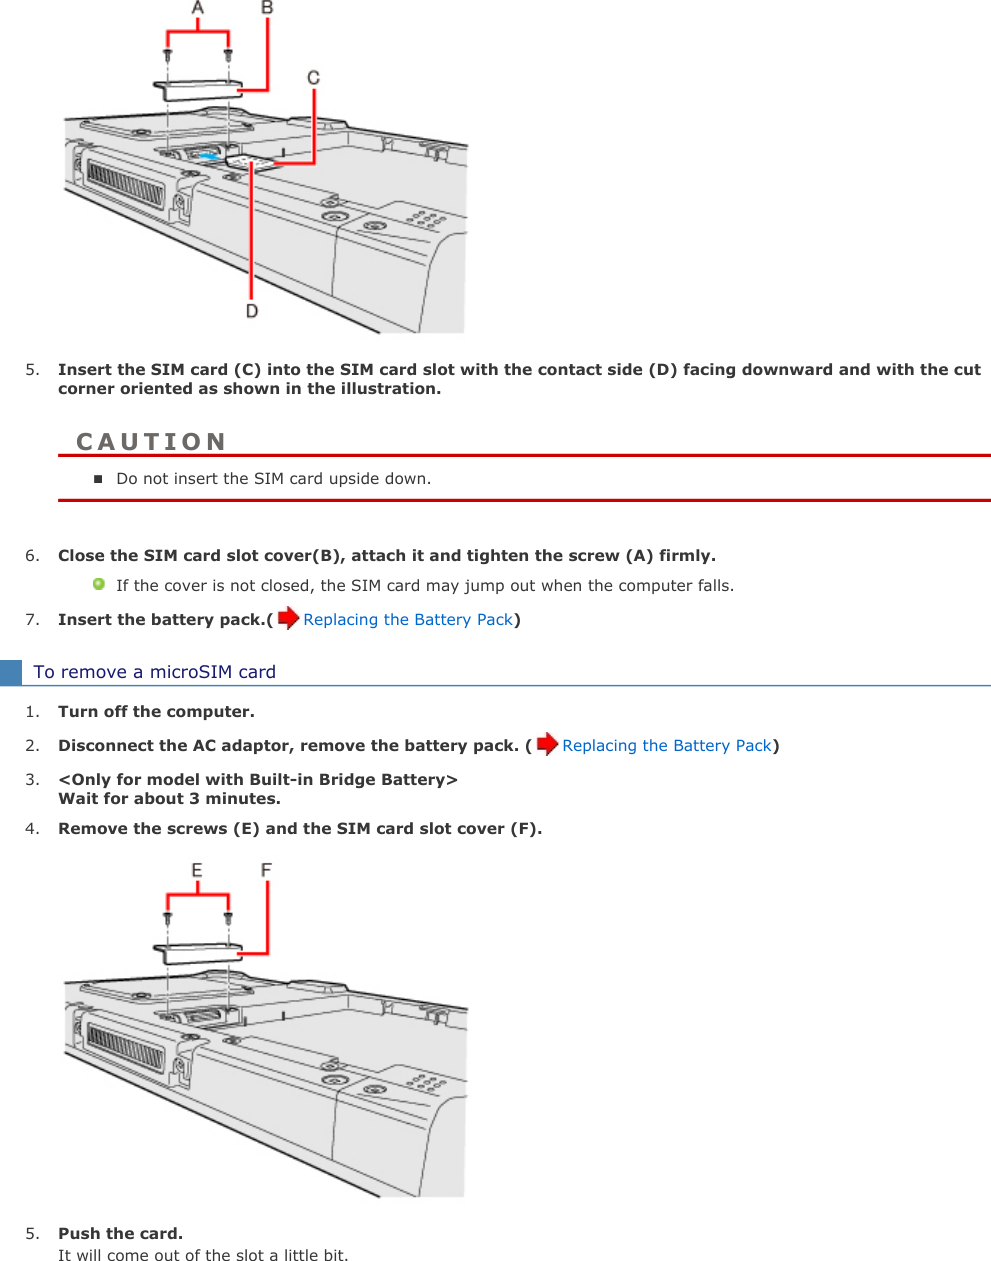
![6. Pull the card all the way out.7. Close the SIM card slot cover(F), attach it and tighten the screw (E) firmly.8. Insert the battery pack.( Replacing the Battery Pack)Connecting to a network1. Touch (Start) - (Settings) - [Network & Internet] - [Cellular].2. Touch ISP under "Cellular".](https://usermanual.wiki/Panasonic-of-North-America/9TGWL16A.User-Manual-20180301-v1-Host-User-Manual-FZ-G1-Wireless-pdf/User-Guide-3769630-Page-7.png)
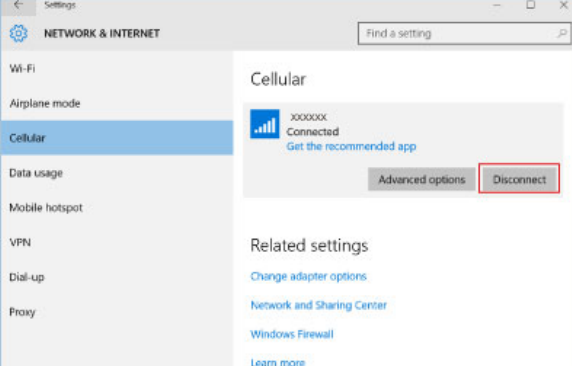
![3. Touch [Advanced options], add an APN.If an APN is not displayed under "Internet APN":1. Touch [Add an Internet APN]. 2. Input detailed information such as APN, and then touch [Save].4. Touch arrow upper left(return to previous page).5. Select created APN profile, and then touch [Apply].Disconnecting to a network1. Touch , and then touch ISP.2. Touch (Start) - (Settings) - [Network & Internet] - [Cellular], and then touch ISP.3. Touch [Disconnect].](https://usermanual.wiki/Panasonic-of-North-America/9TGWL16A.User-Manual-20180301-v1-Host-User-Manual-FZ-G1-Wireless-pdf/User-Guide-3769630-Page-8.png)