Panasonic of North America AP3G81 Commercial High Speed Oven User Manual
Panasonic Appliance Company of America Commercial High Speed Oven
UserManual.wiki
>
Panasonic of North America
>
AP3G81 User Manual
User Manual
Navigation menu
Upload a User Manual
Namespaces
Wiki Guide
HTML
PDF
Info
Views
User Manual
Discussion / Help
Navigation
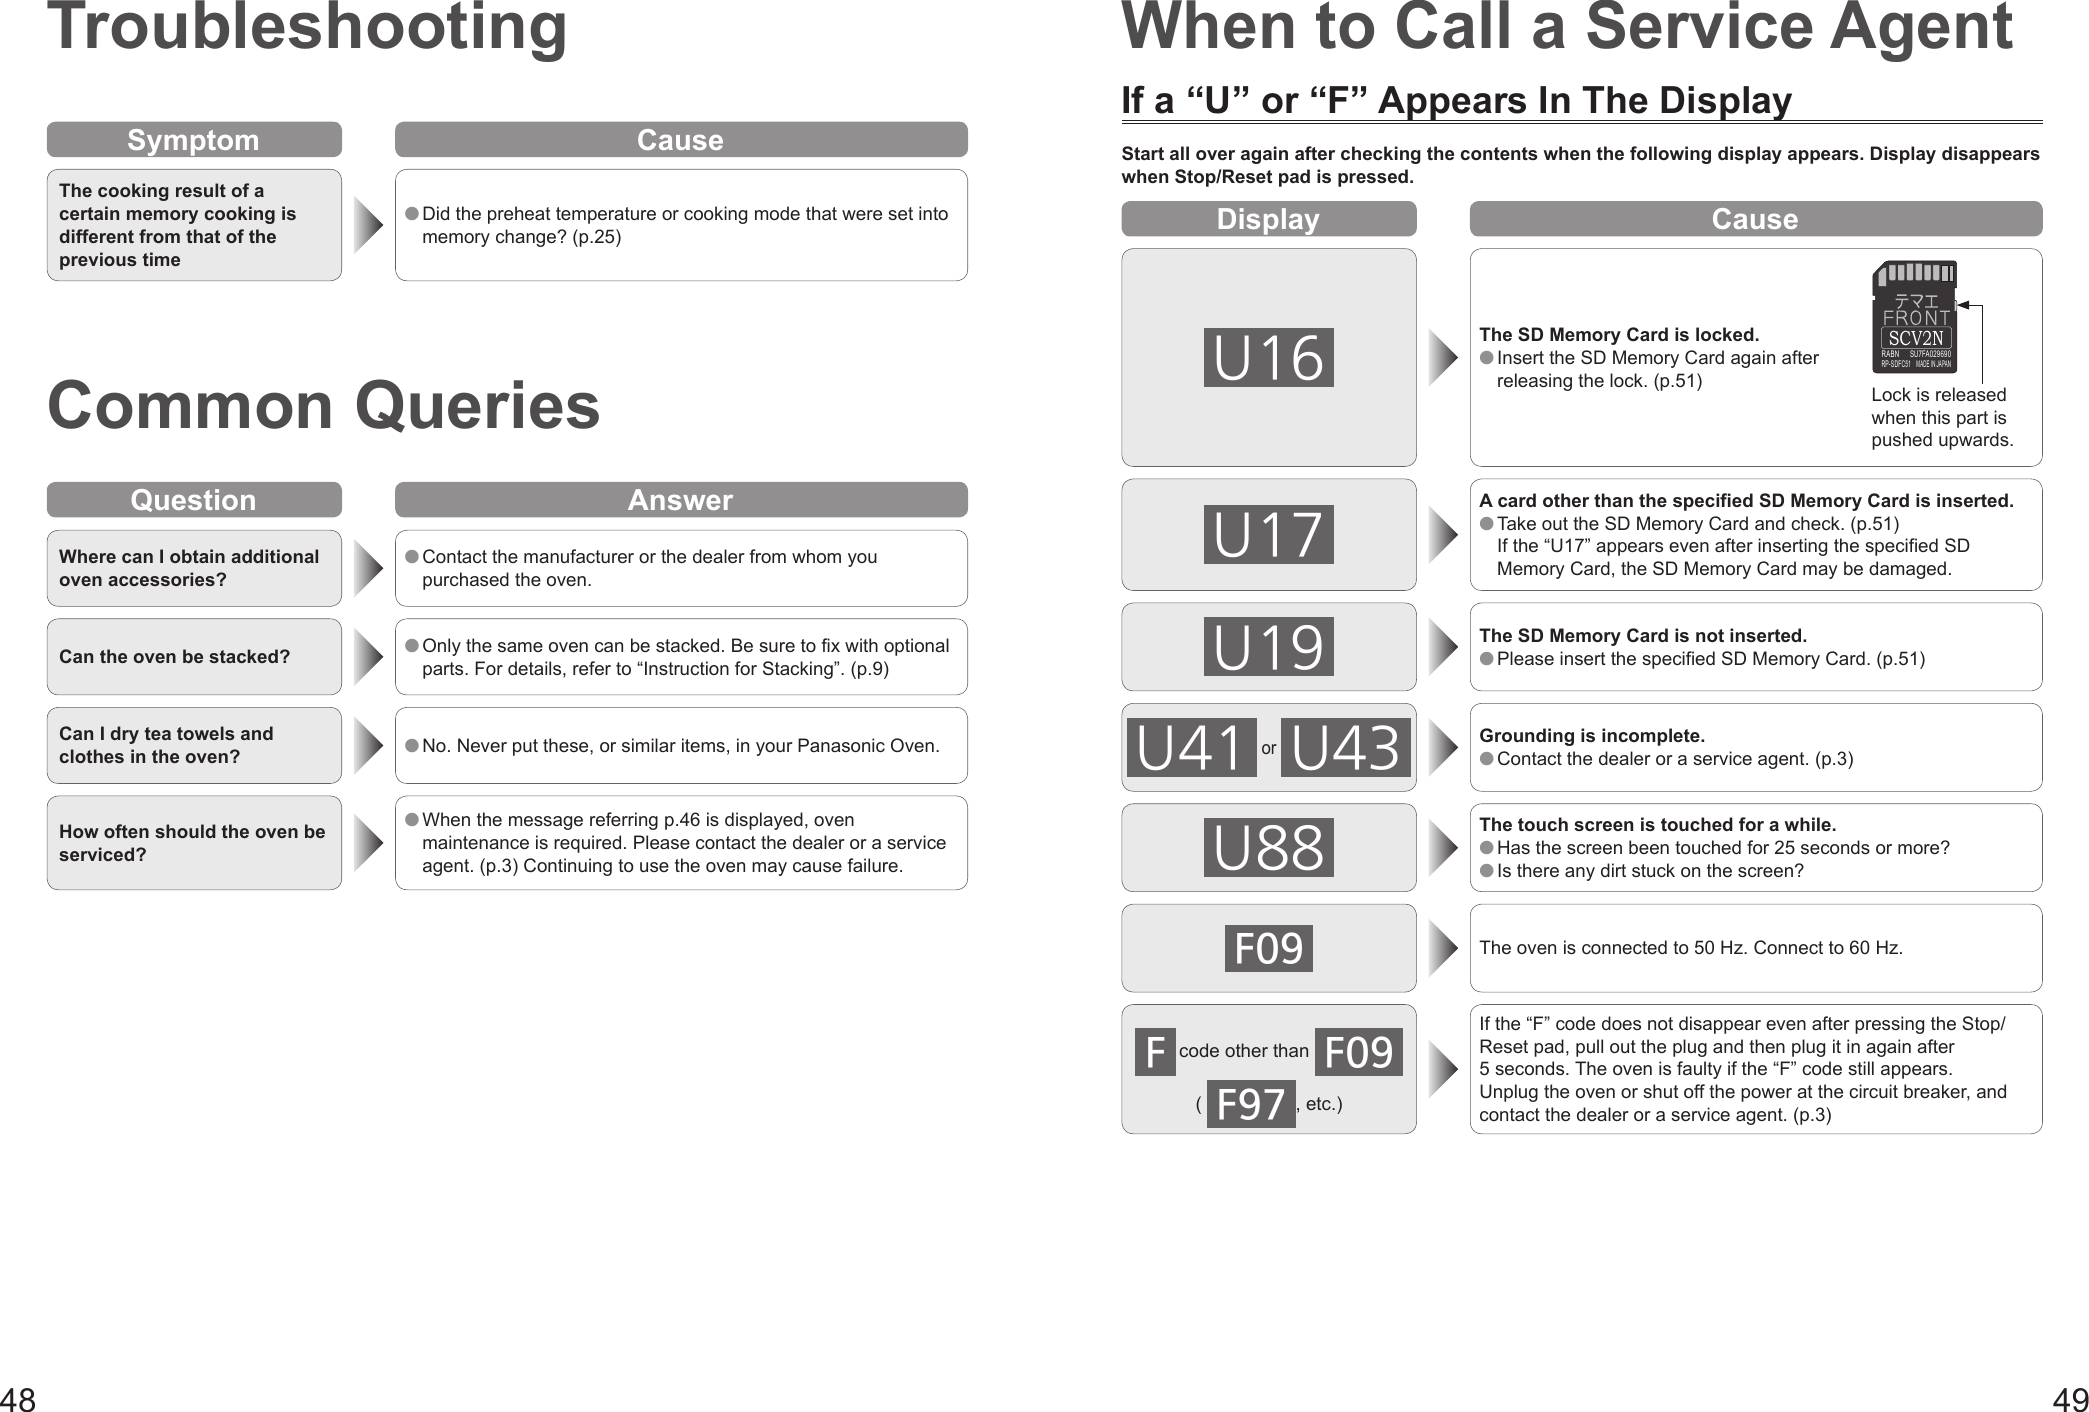
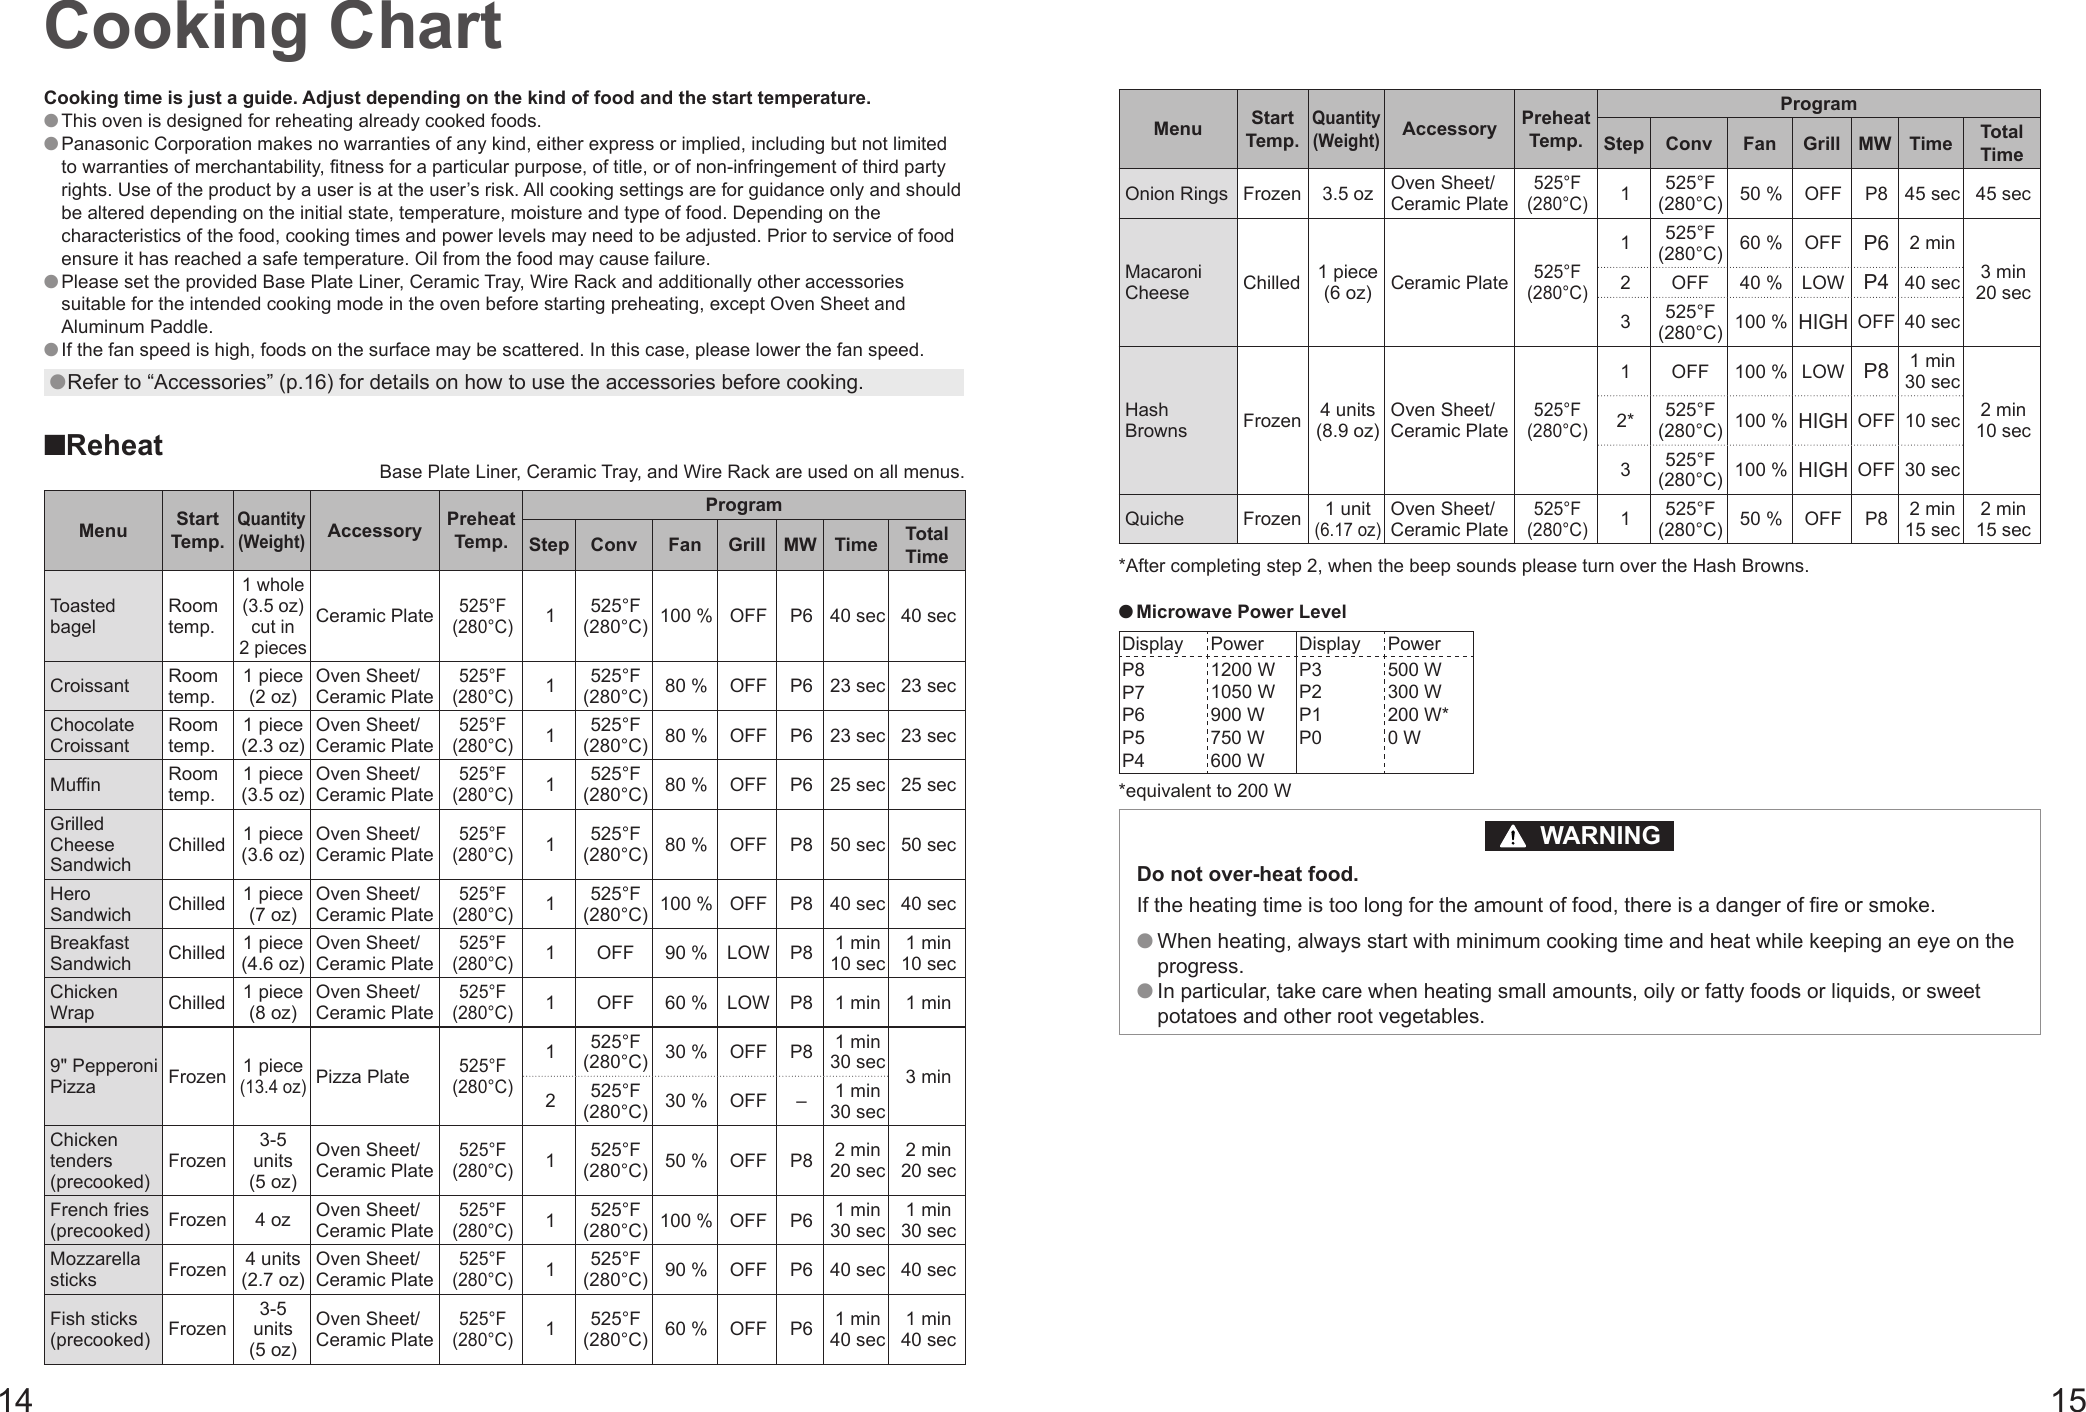
![12 13Basic UsageYou can cook in a cooking mode suitable for the application.Manual cookingSelect Memory or Manual Step 1 only cookingConvection Heater(p.29)GrillHeater(p.30)Convection-and-GrillHeater(p.31)Convection-and-MicrowaveHeater+Microwave(p.32)Grill-and-MicrowaveHeater+Microwave(p.33) Microwave only cooking is not possible in Step 1. Illustrations are images. The accessories to be used differ depending on the cooking mode.Fan Speed The fan circulates the heat of the heater throughout the entire oven to brown food and give a crisp finish to the surface. The fan speed can be set from 30 % to 100 % when cooking other than the microwave. Adjust it depending on the food. Fan speed guide30 % 40 % 50 % 60 % 70 % 90 %80 % 100 %Dries the food quickly and makes the surface crispy Gives the surface a crispy finishBake gentlyCooking in steps6 types* of cooking modes can be combined up to 3 continuous steps. *Step 1: 5 typesStep 1 e.g.: Convection 525°F (280°C), Fan speed 100 %, Microwave P5, 1 minStep 2 e.g.: Microwave P4, 50 secStep 3 e.g.: Grill High, Fan speed 30 %, 30 sec Maximum power and cooking time for Convection-and-Microwave/Grill-and-Microwave cooking (p.34)Memory cookingSaving a cooking program to the memoryUp to 1000 programs of cooking programs can be saved to the memory. [You can also set 10 programs, and default setting is 100 programs. (p.40)]The saved cooking program can be used to achieve the same cooking. (p.41)Cooking ModesHow to Cooking Cooking ModesConvection HeaterA convection heater (circulation fan heater) circulates heat throughout the oven cavity and cooks food fully while controlling the set temperature. (p.29)GrillHeaterA grill heater provides heat and a circulation fan operates to distribute the heat throughout the oven cavity. Every surface of the food is well-cooked. (p.30)Convection-and-GrillHeaterBoth convection heater (circulation fan heater) and grill heater circulate heat in the oven cavity while controlling the temperature.Cooks the food throughout while browning on the surface. (p.31)MicrowaveMicrowave You can use microwave only cooking at Step 2 and Step 3 in Cooking in Steps. (pp.34–35)Applies microwaves to the food causing the molecules in the food to strongly collide and give rise to heating by friction.As a result, the food is heated about the same on the surface and inside.Convection-and-MicrowaveHeater+MicrowaveCombined cooking with convection heater (circulation fan heater) and microwave.A convection heater circulates heat throughout the oven cavity with controlling the set temperature while the microwave heats the food fully. The cooking time is reduced. (p.32)Grill-and-MicrowaveHeater+MicrowaveCombined cooking with grill heater and microwave.A grill heater adds heat while a microwave heats the food, and additionally a circulation fan operates to give the entire surface a crisp finish.The cooking time is reduced. (p.33) Illustrations are images. The accessories to be used differ depending on the cooking mode.About the arrows in the illustrationConvection Heater Grill Heater Fan only Microwave](https://usermanual.wiki/Panasonic-of-North-America/AP3G81/User-Guide-4063785-Page-7.png)
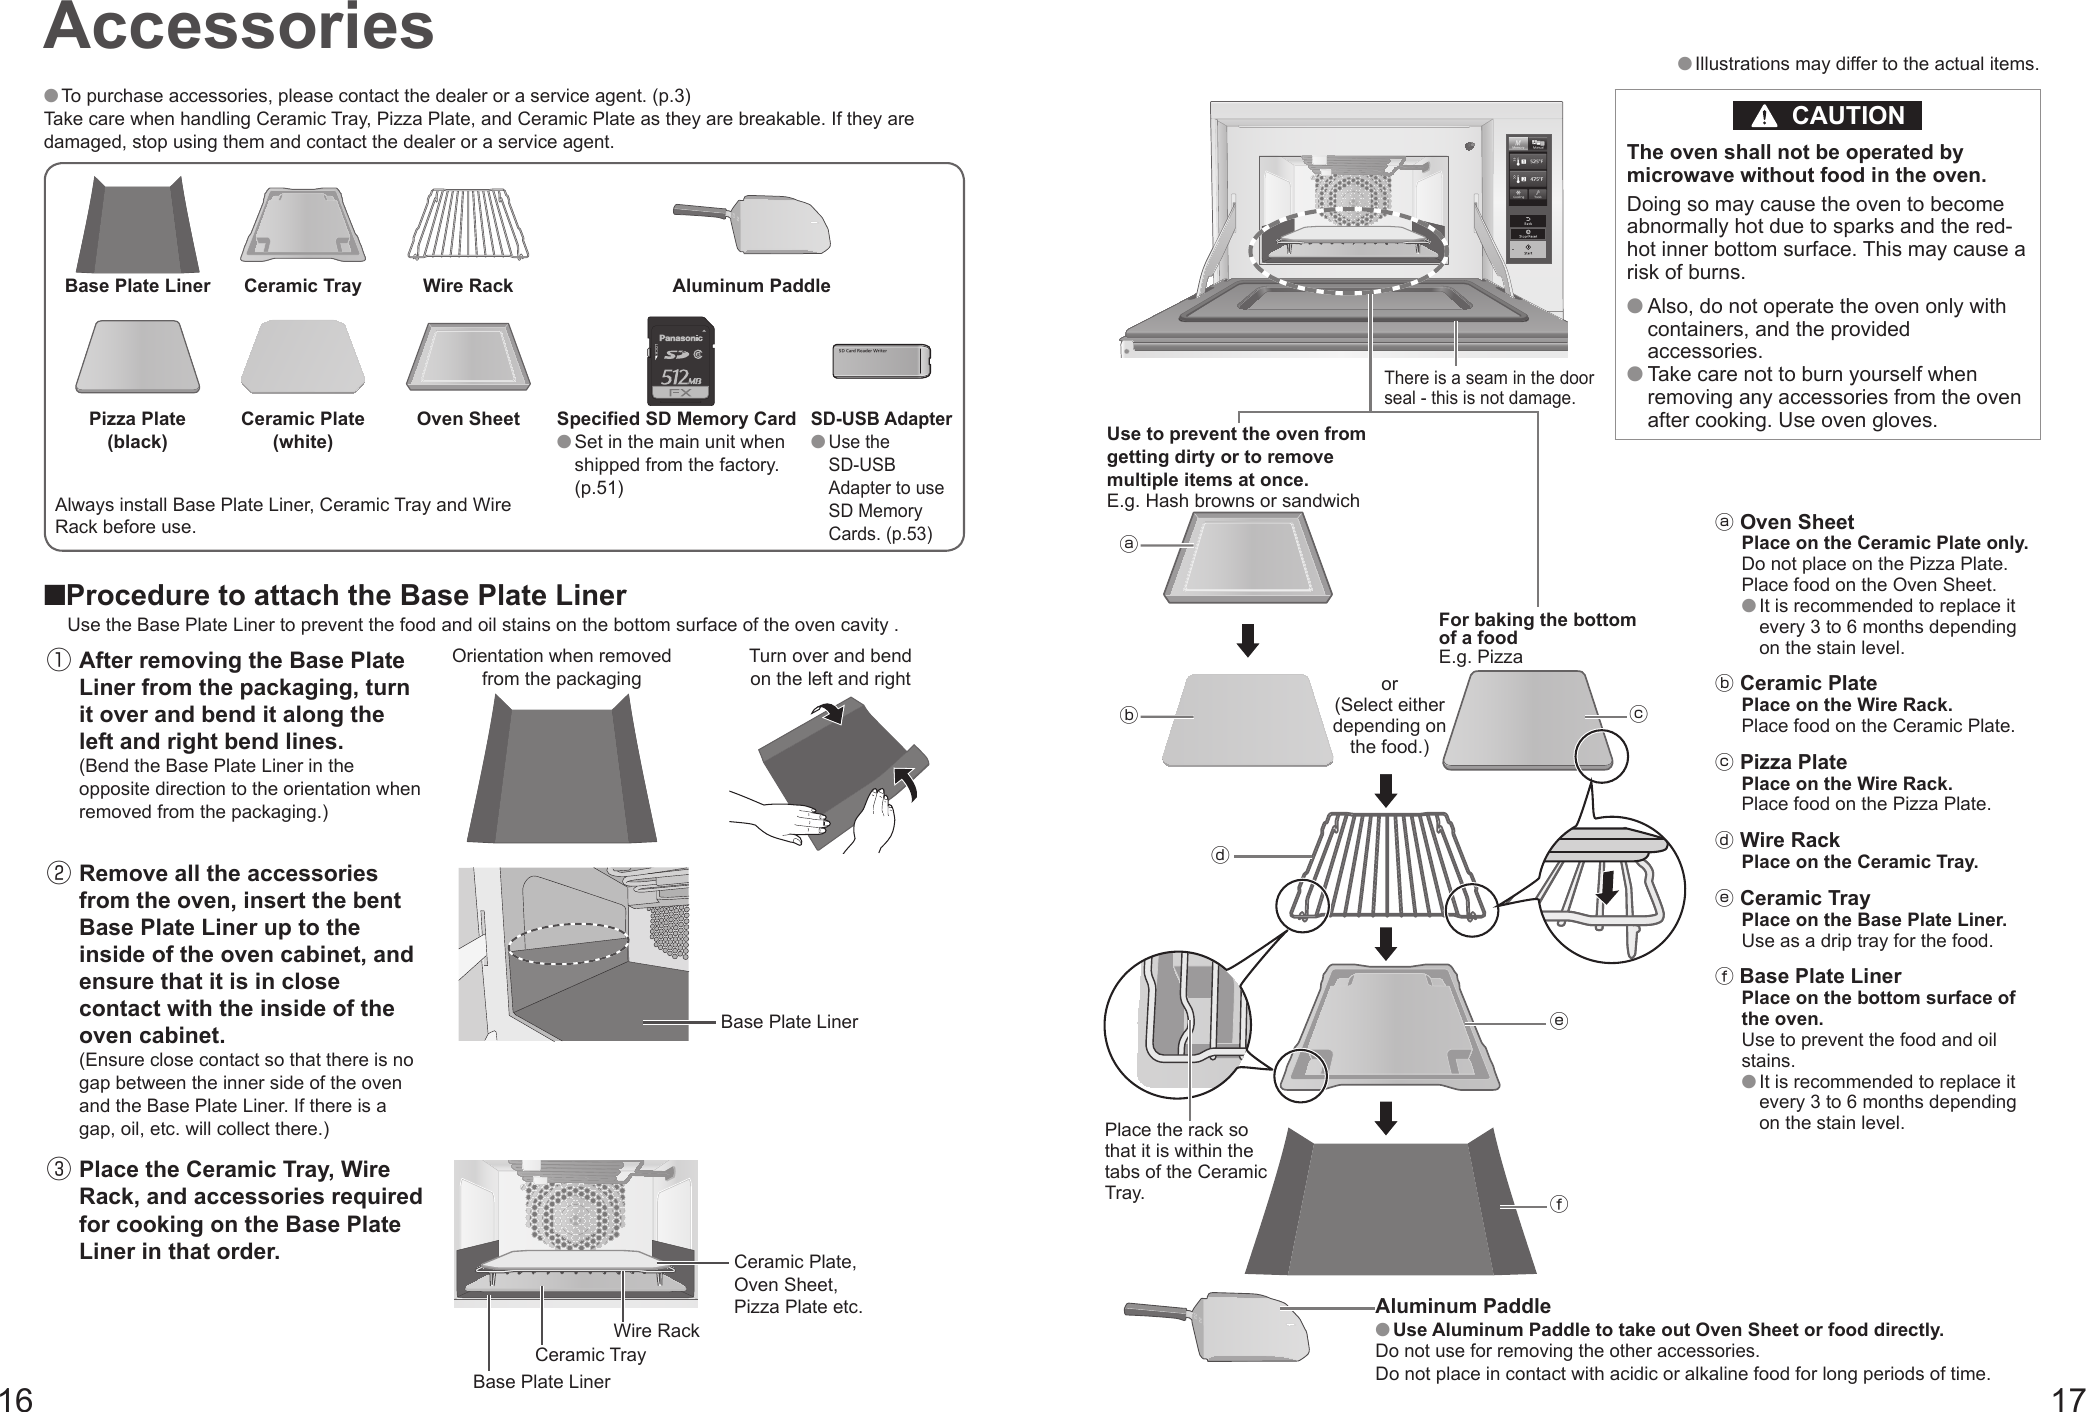
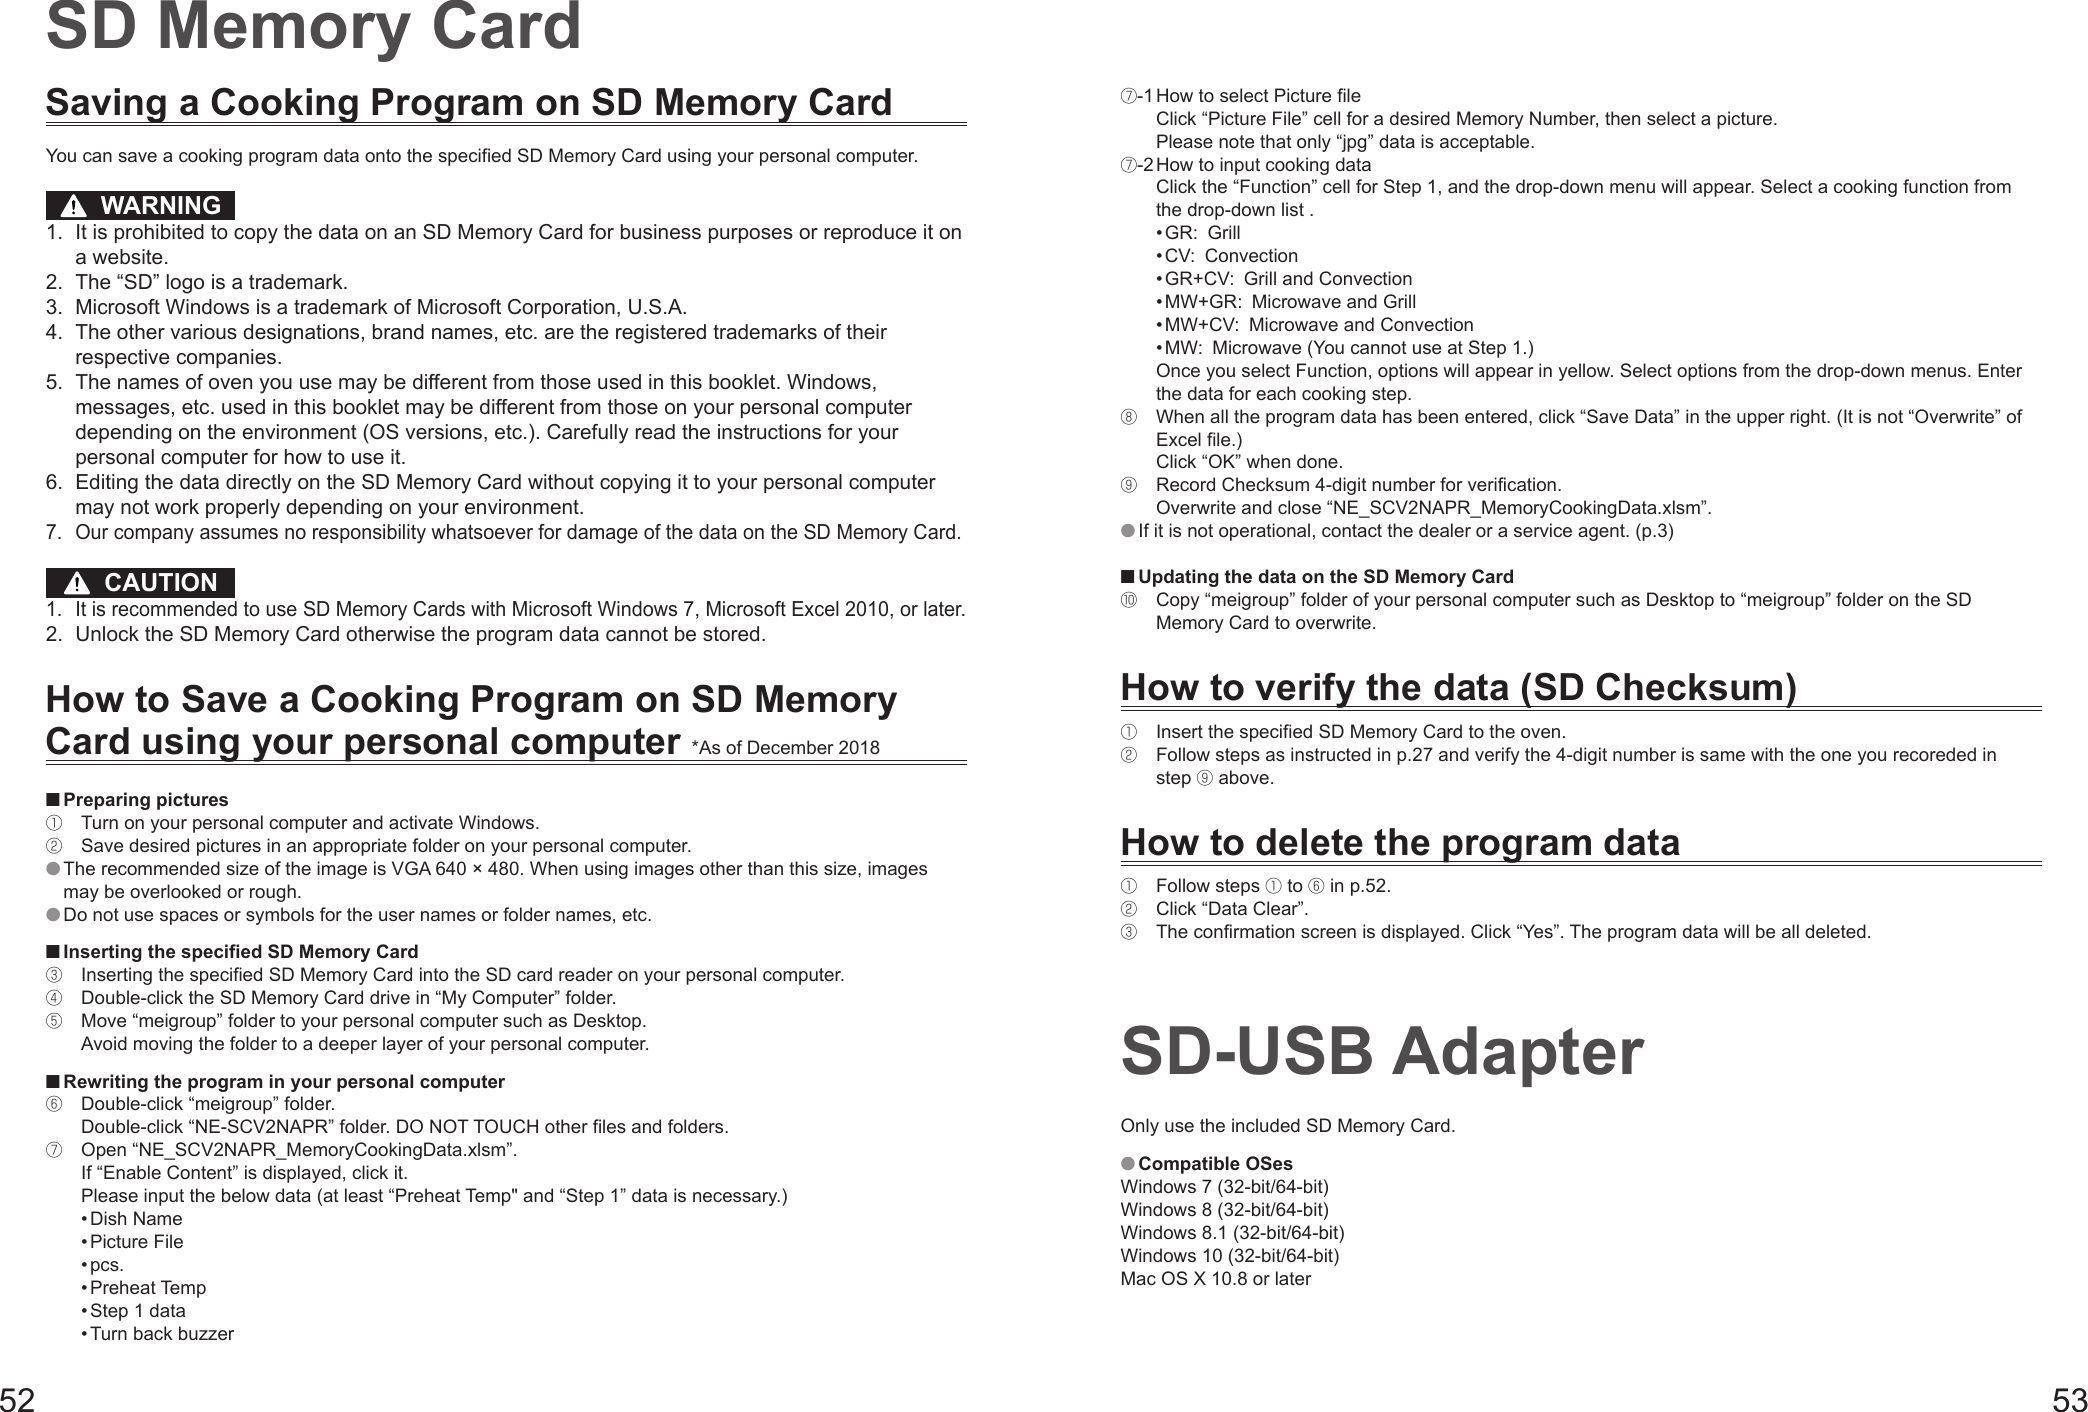
![18 19Auto Power OFF FunctionThe initial screen of the display turns off automatically if it is not used for 5 minutes.To turn the power ONIn Auto Power OFF mode, opening the door turns the power ON.LampBack Pad Returns to the previous control screen so that settings can be changed. Unavailable after cooking has started.Stop/Reset Pad Press once to temporarily stop the cooking process. To resume cooking, press the Start pad. Press twice to clear your instructions (returns to the initial screen) or cancel cooking. Press once to cancel cooking of a stored program when the memory lock is turned on.Tools (pp.23–27) Cooling (p.22) Please contact a service agent to change the temperature display from Fahrenheit to Celsius.Start Pad After setting preheating or cooling, press this pad. After preheating, setting memory cooking or manual cooking and press this pad to start cooking. The lamp will flash to encourage you to press the pad.Touch Screen (display) (p.20) Tap on the screen directly to use the controls. Shows details such as the cooking temperature, cooking time, stored cooking program, beep information, and so on. Do not touch the screen with a sharp object. Doing so will cause damage.Exhaust VentCatalystThe oil smoke that circulates inside the oven cavity is decomposed and purified by going through the catalyst converter. The catalyst reaction will lower when the cooking temperature is low [approximately 475°F (250°C) or lower].Door HandleIntake VentPower Supply CordPower Supply PlugPlease only plug in to outlets compatible with 20 Amp Plug to NEMA #6-20P. Equipment is dedicated to single phase power supply. Illustrations may differ to the actual items. Caution labels are affixed to the actual oven.Oil TrayCollects oil from inside the oven.A specified SD Memory Card is set inside. (p.51) How to remove the front cover, drip tray, air filter, and oil tray. (p.44)Air FilterUnder the Drip TrayFront CoverDrip TrayCollects food residue and water.DoorOpening this while cooking will stop the operation.FrontBackNoteAlways install the air filter, drip tray, and front cover before using the oven. Continuous use of the oven without these parts will result in malfunction.Parts of your OvenGROUNDINGIMPORTANT: FOR PERSONAL SAFETY, THIS OVEN MUST BE PROPERLY GROUNED.When an outlet is not grounded, it is personal responsibility and obligation of the customer to have it replaced with a properly grounded outlet.An external equipotential bonding conductor is provided at the back side of the oven and it is marked by this symbol.Control Panel (initial screen)](https://usermanual.wiki/Panasonic-of-North-America/AP3G81/User-Guide-4063785-Page-10.png)

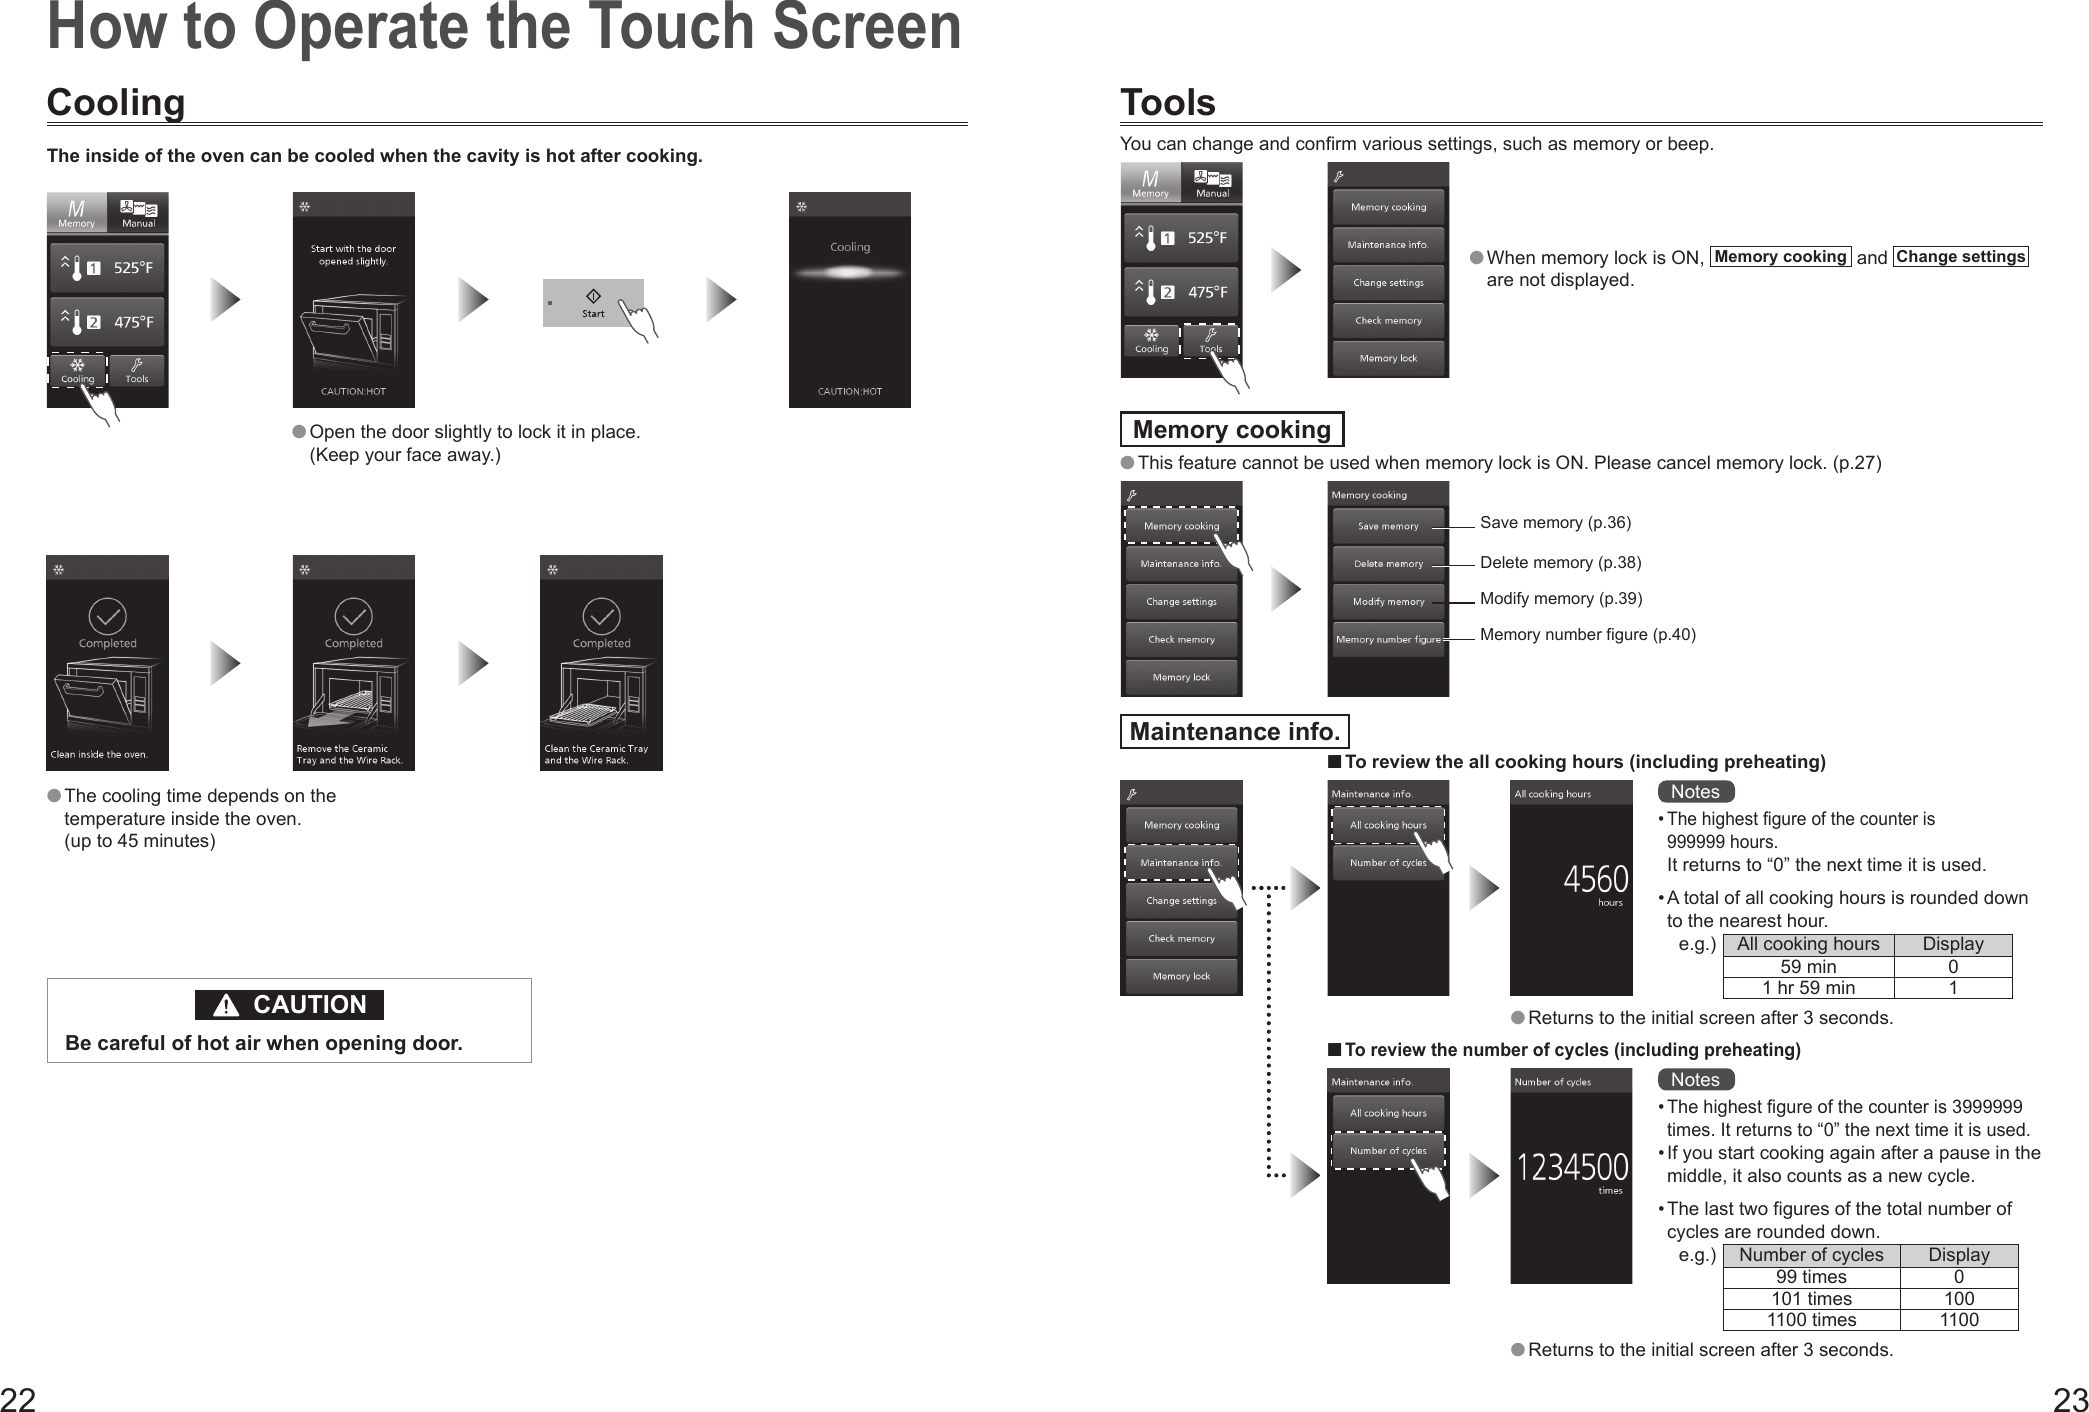
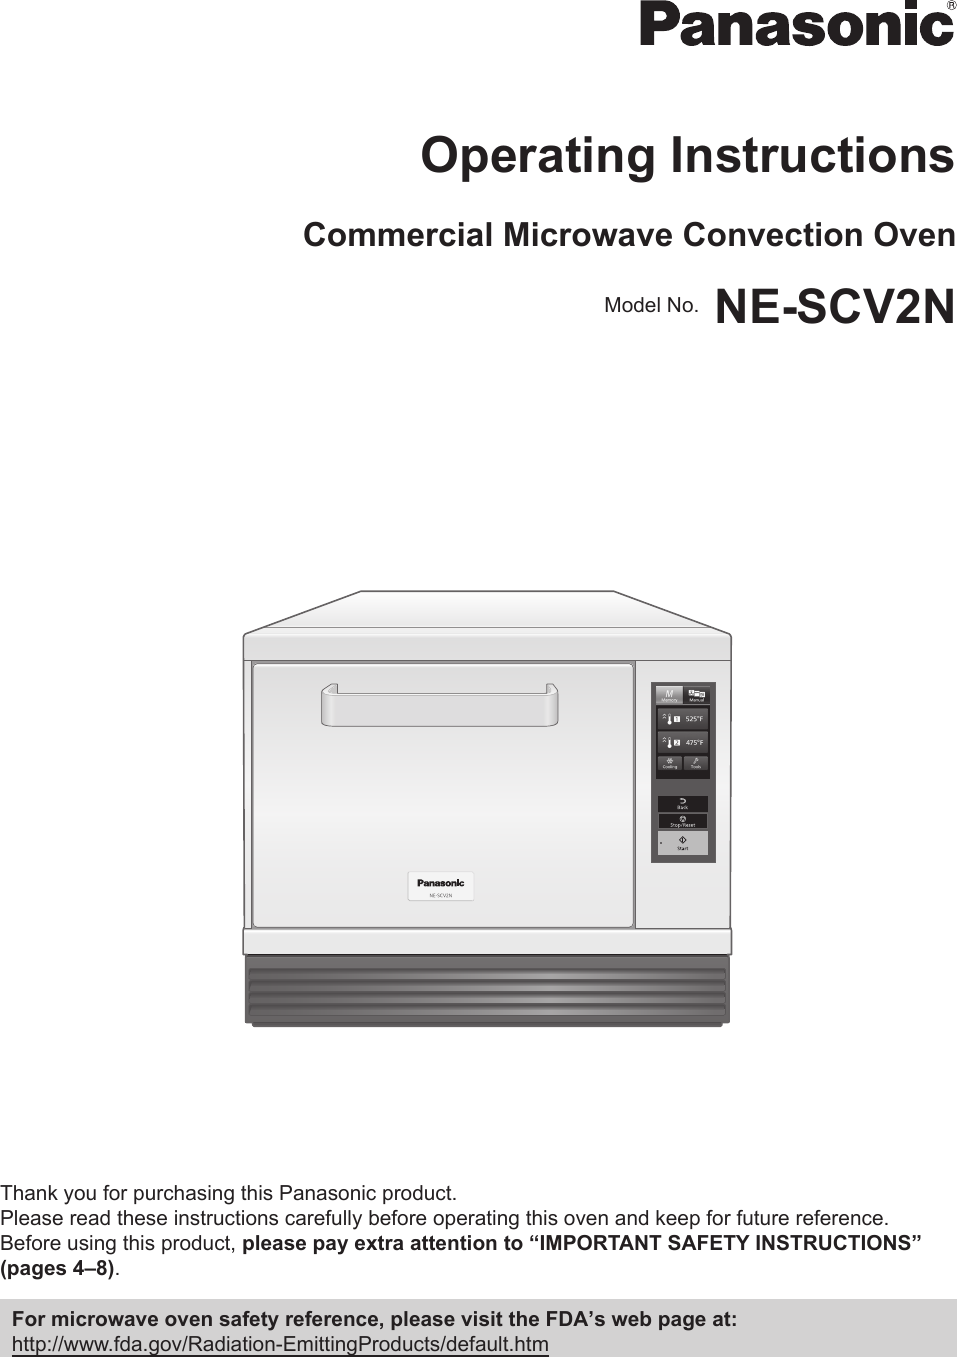
![24 25ToolsChange settings This feature cannot be used when memory lock is ON. Please cancel memory lock. (p.27)Beep To change the loudness of the beep(Default setting: Level3) Depending on the setting, Pitch of beep clean may be displayed. Select the loudness with + or – , and tap OK . To change the length of beep at the end of programBeeps in three short pulses every 15 secondsBeeps in longer pulses continuouslyBeeps in one long pulse then beeps in three longer pulses every 30 seconds The beep stops when you open the door.(Default setting: Type1) Select the length of beep and tap OK . To change the tone pitch of the beep at the end of program(Default setting: Normal) Select the tone pitch and tap OK . To select ON or OFF for the preheated beep (Default setting: ON) To select ON or OFF for the door alarm (Default setting: ON) Select Preheated beep or Door alarm . Select ON or OFF , and tap OK . The oven returns to the initial screen after displaying the settings for 3 seconds.How to Operate the Touch ScreenPreheat temperature You can change the preheat temperature displayed on the initial screen.[Default setting: Preheat 1 → 525°F (280°C), Preheat 2 → 475°F (250°C)] Please note that the preheat temperature previously saved for the memory cooking (p.36) will also be changed if you change the setting here. Select Preheat1 or Preheat2 . Set Required temp. From 350°F (180°C) to 525°F (280°C) in 25°F increments. Set Cook available temp. From 350°F (180°C) to 525°F (280°C) in 25°F increments. Returns to the initial screen after 3 seconds.LCD brightness You can choose the brightness of the touch screen.BrightDark(Default setting: Level3) The oven returns to the initial screen after displaying the settings for 3 seconds. Select the brightness with + or – , and tap OK .](https://usermanual.wiki/Panasonic-of-North-America/AP3G81/User-Guide-4063785-Page-13.png)
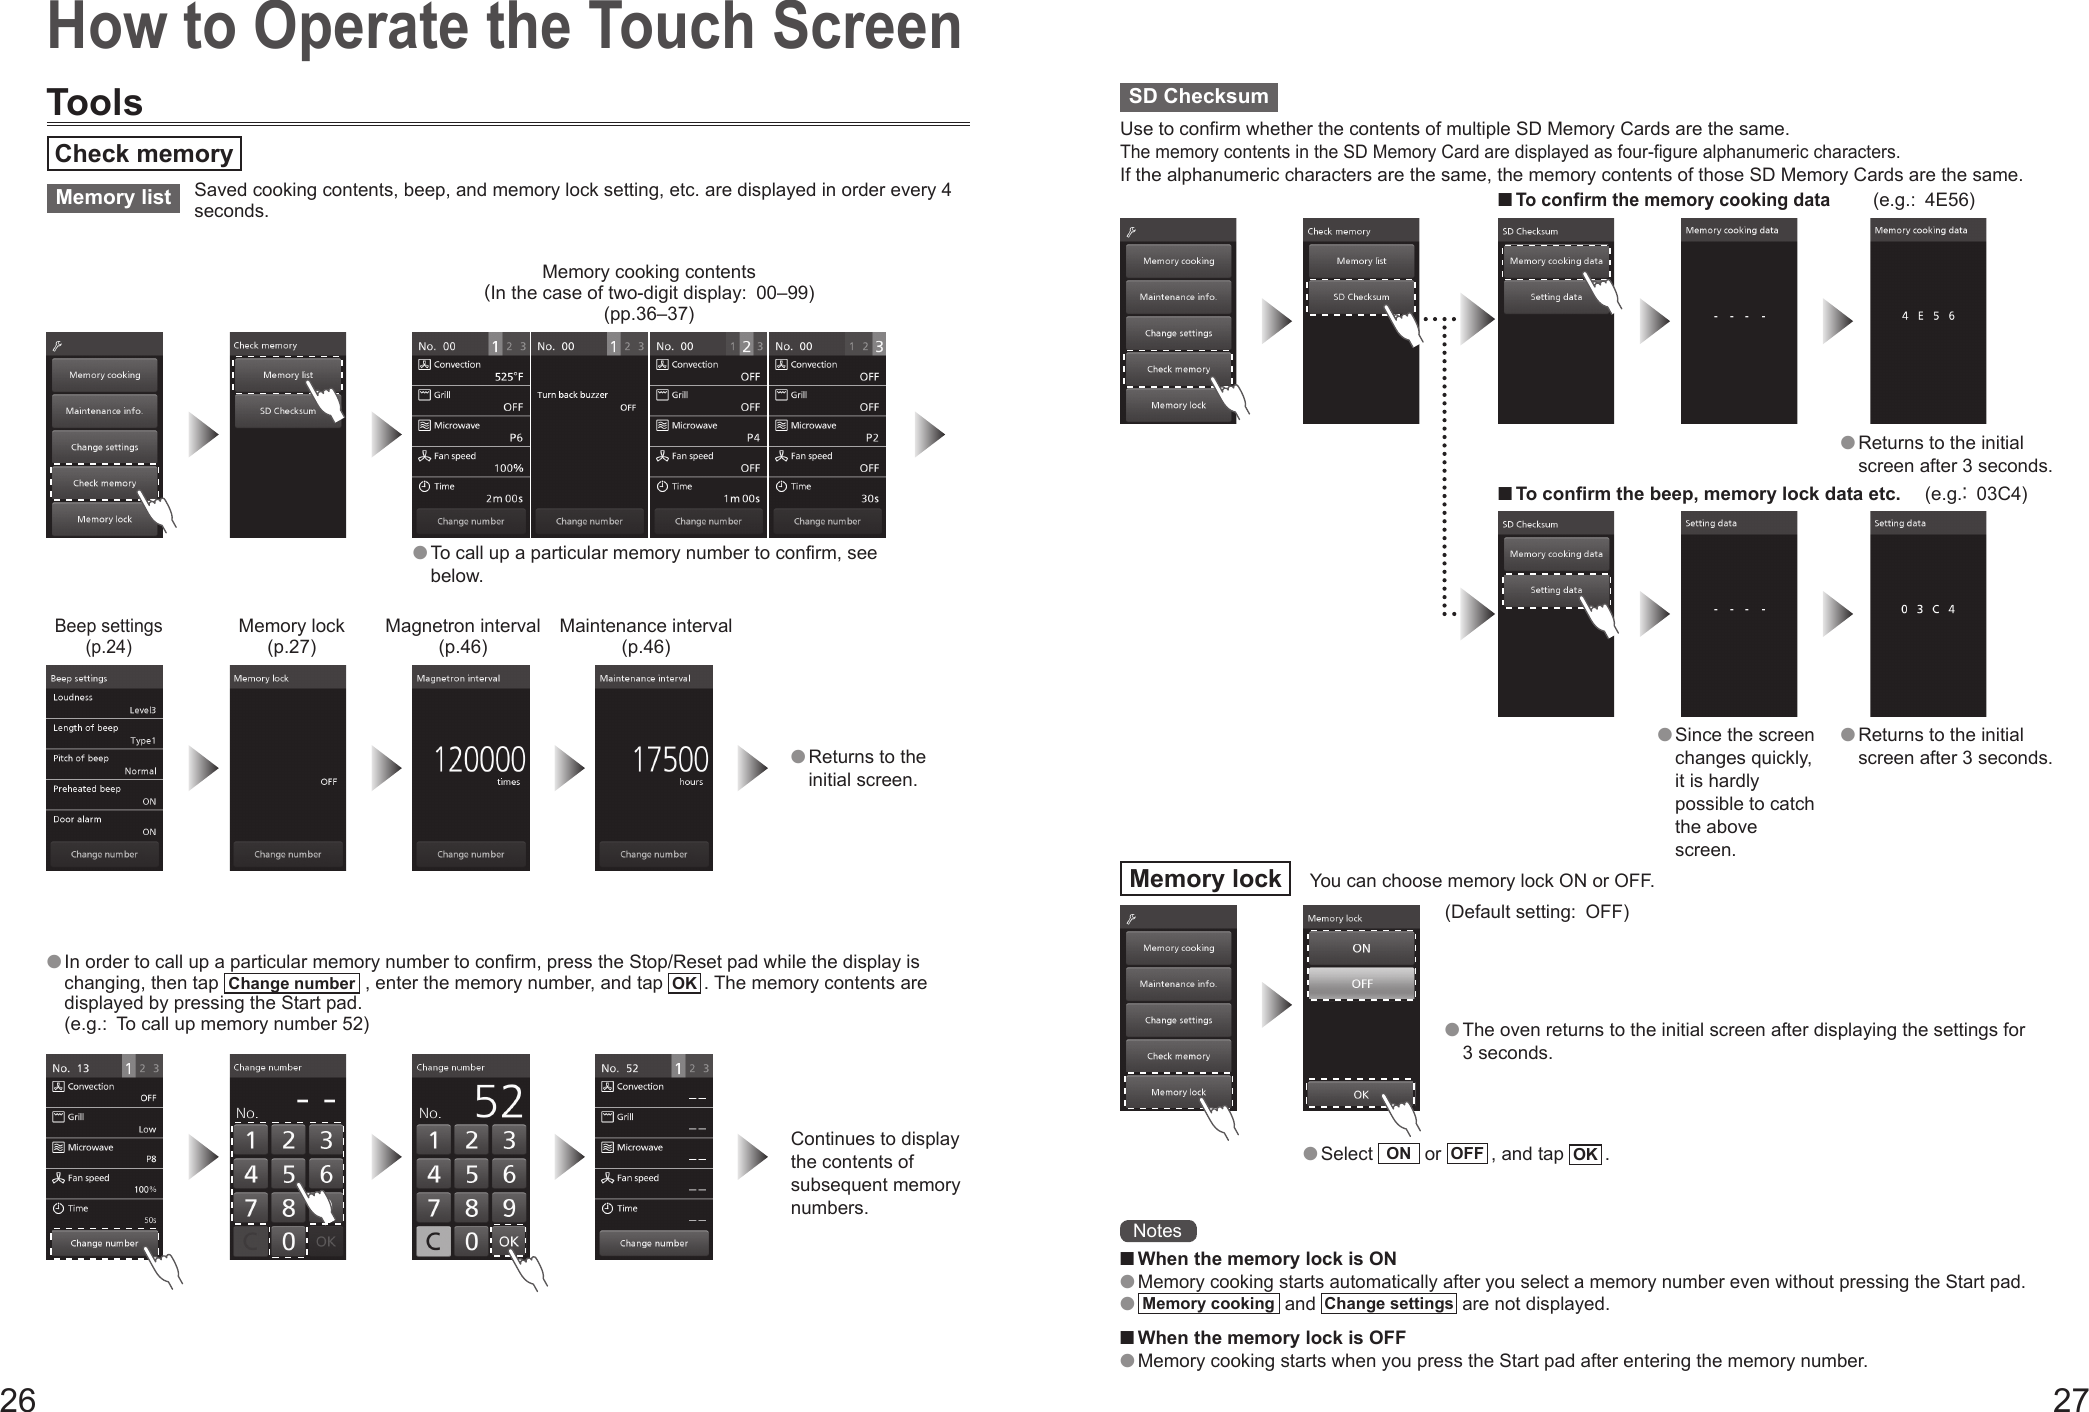
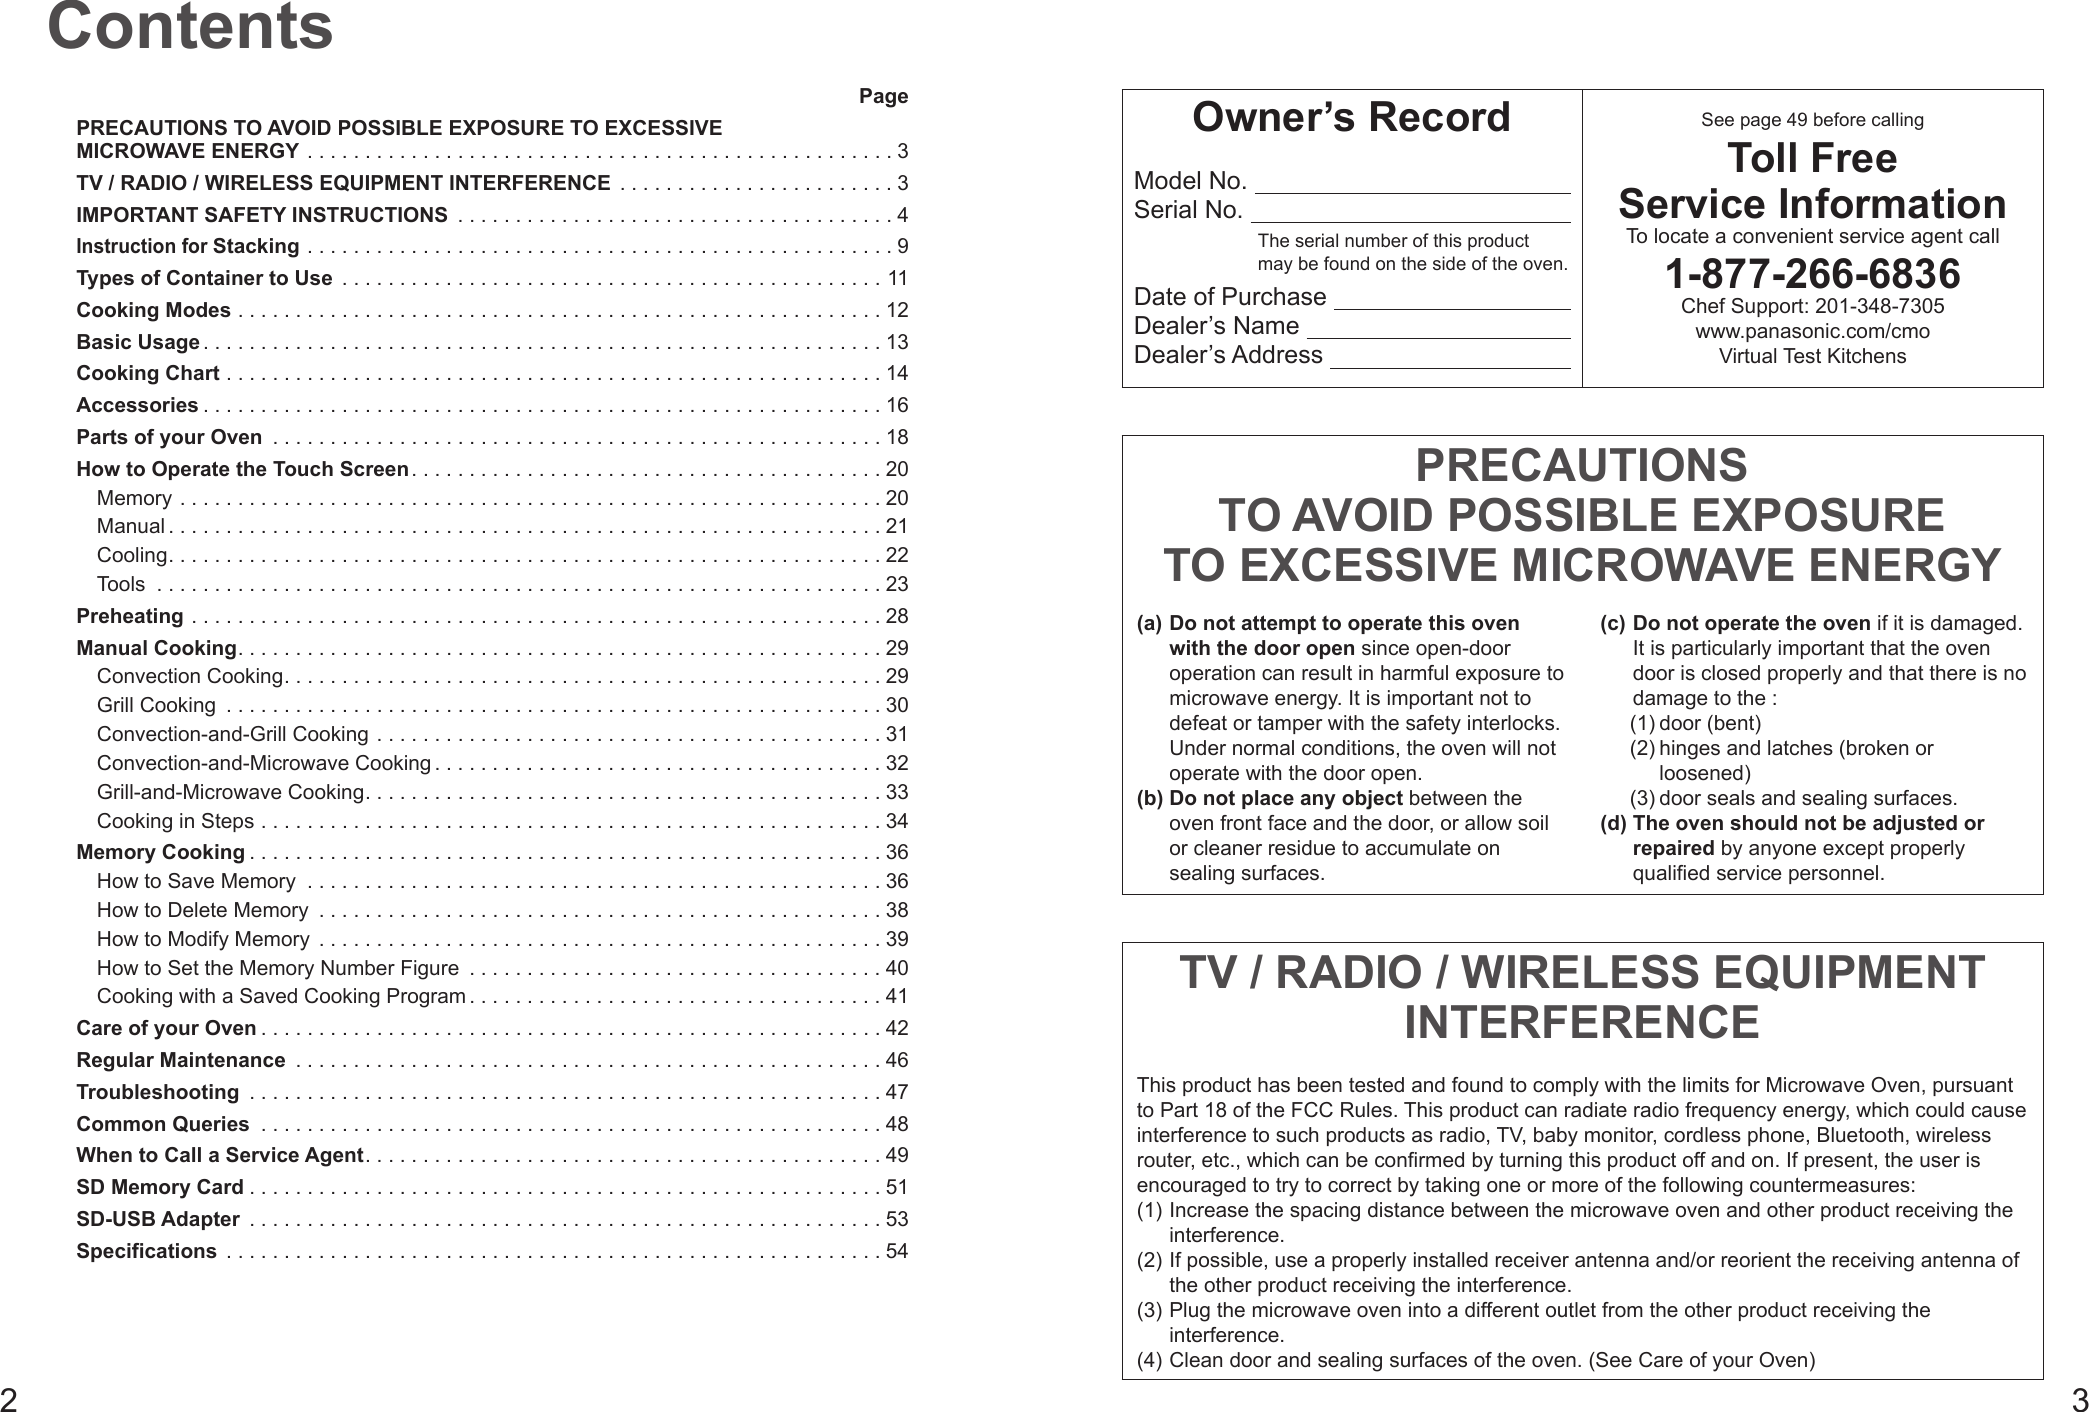
![36 37Memory Cookinge.g.: Memory , Preheating 525°F (280°C) → Step 1 Convection 525°F (280°C), Fan speed 100 %, Microwave P6, 1 min → Step 2 Convection 525°F (280°C), Fan speed 60 %, 50 sec → Step 3 Grill High, Fan speed 30 %, 30 secMemory number: 37How to Save MemoryThere are two methods to save memory cooking – saving a cooking program after manual cooking and saving a cooking program in advance.Up to 1000 programs of cooking programs can be saved to the memory.[You can also set 10 programs, and default setting is 100 programs. (p.40)] The default menu is registered in No. 00–No. 18.It is useful to cook everyday menus.You can also overwrite, change or erase previously saved contents. This feature cannot be used when memory lock is ON. Please cancel memory lock. (p.27)Save the program after manual cooking1 After cooking is complete, take the food out After taking out the food, you can save the cooking program.2 Tap Memory Tap Cancel to return to the initial screen.3 Enter the desired memory number When the memory number is empty When the memory number is already used Tap Overwrite and this screen appears.Save successfulReturns to the initial screen after 3 seconds.Save successfulReturns to the initial screen after 3 seconds.Save a program in advance1 Select Tools 2 Select Memory cooking 3 Select Save memory 4 Enter the desired memory number and tap OK 5 Select preheatingCarry out procedures 1 to 6 of Step 1 of “Cooking in Steps” (p.34)6 Set the cooking time, and tap Next Tap Memory here to display the confirmation screen and complete.Carry out procedures 1 to 4 of Step 2 of “Cooking in Steps” (p.35)7 Set the cooking time, and tap Next Tap Memory here to display the confirmation screen and complete.Carry out procedures 1 to 4 of Step 3 of “Cooking in Steps” (p.35)8 Set the cooking time, and tap Memory The oven returns to the initial screen after displaying the confirmation screen for 3 seconds.Please note that the preheat temperature saved for the memory cooking will be changed if you change the setting of Preheat temperature. (p.25)](https://usermanual.wiki/Panasonic-of-North-America/AP3G81/User-Guide-4063785-Page-19.png)